Panasonic of North America 96NKX-PRX120 96NKX-PRX120 User Manual
Panasonic Corporation of North America 96NKX-PRX120 Users Manual
UserManual.wiki
>
Panasonic of North America
>
96NKX PRX120 User Manual
Users Manual
Navigation menu
Upload a User Manual
Namespaces
Wiki Guide
HTML
PDF
Info
Views
User Manual
Discussion / Help
Navigation
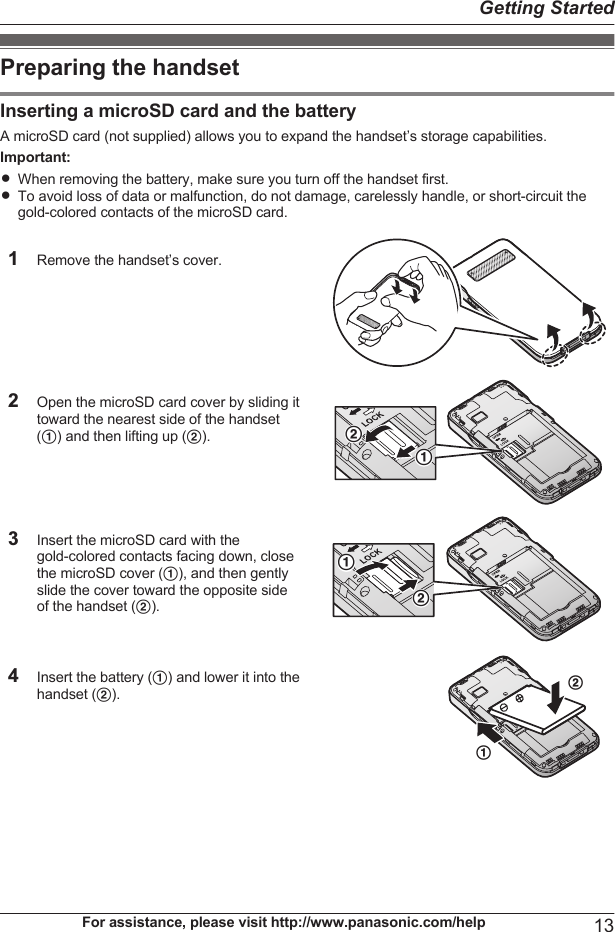
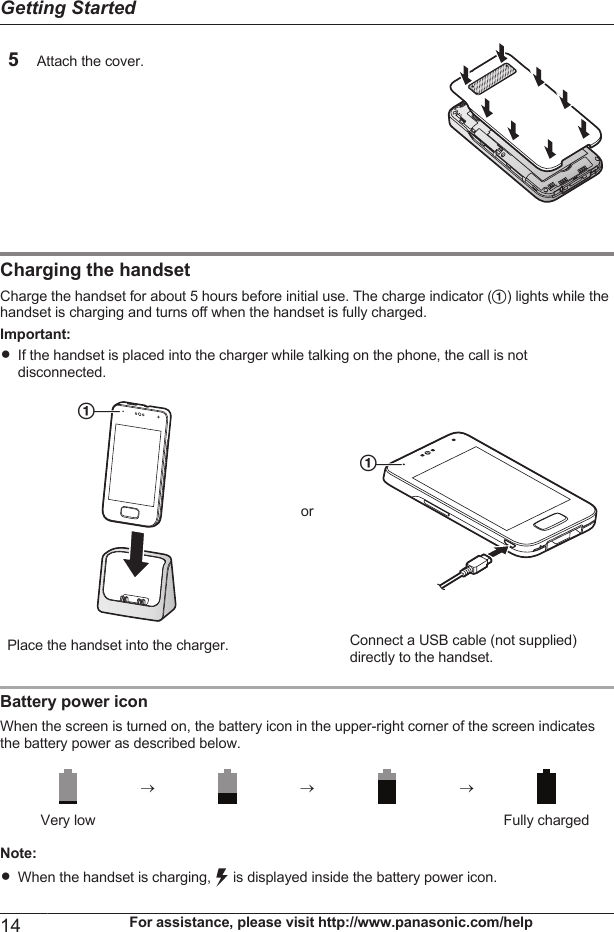
![RYou can also check the percentage of battery power remaining. From the home screen, tap ® [System settings] ® [Battery].Information about power and chargingAC adaptor connectionRThe AC adaptor must remain connected at all times. (It is normal for the adaptor to feel warmduring use.)RThe AC adaptor should be connected to a vertically oriented or floor-mounted AC outlet. Donot connect the AC adaptor to a ceiling-mounted AC outlet, as the weight of the adaptor maycause it to become disconnected.Power failureRThe unit will not work during a power failure. We recommend connecting a corded-typetelephone (without AC adaptor) to the same telephone line or to the same telephone line jackusing a Panasonic T-adaptor (page 3).Battery use and replacementRUse only the supplied battery. For replacement, use only the Panasonic rechargeable batterynoted on page 3.RThe battery might swell when its life is close to an end. This is dependent on the usageconditions and is not a problem.Battery chargingRIt is normal for the handset to feel warm during charging.RClean the charge contacts of the handset, base unit, and charger with a soft and dry clothonce a month. Before cleaning the unit, disconnect from power outlets and any telephone linecords. Clean more often if the unit is exposed to grease, dust, or high humidity.Saving battery powerRThe amount of time you can use the handset before the battery needs to be charged variesdepending on how you are using it. Each of the following can help you save battery power.– Turn off the screen when you are not using the handset (page 17).– Use the control panel (page 20) to turn off the handset’s Wi-Fi, GPS, and Bluetoothfeatures.– When you are away from home, use the control panel (page 20) to turn off the handset’sDECT connection to the base unit. Note that if you do not turn the connection back on whenyou return home, you will not be able to make or receive calls using the handset.For assistance, please visit http://www.panasonic.com/help 15Getting Started](https://usermanual.wiki/Panasonic-of-North-America/96NKX-PRX120/User-Guide-2146824-Page-15.png)
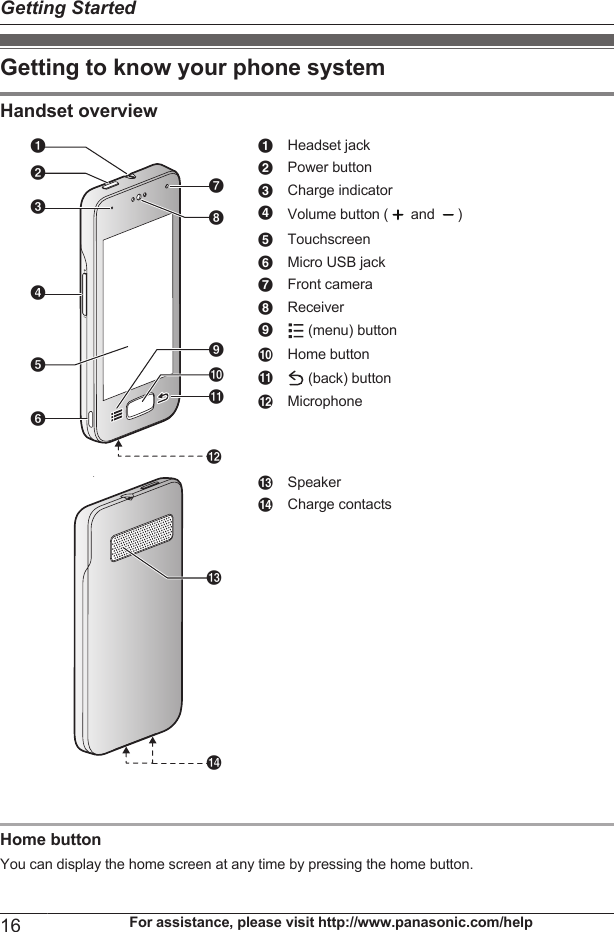
![Navigation buttons (menu) button: Displays a list of options available in the current screen. (back) button: Returns to the previous screen or closes the current dialog box, menu,on-screen keyboard, etc.Note:RThe and buttons are displayed in most screens. They appear at the bottom of thehandset next to the home button, and turn off if you do not use them for a while. To display the and buttons after they have turned off, simply touch the area of the handset where theywould normally be displayed.Base unit overviewAAM N (locator) buttonHandsets registered to the base unit willring when you press this button. This canbe useful when you want to locate amisplaced handset.Turning the handset on and offTo turn the handset on, press and hold the power button on the top of the handset. If the lockscreen appears, unlock the screen (page 17).To turn the handset off, press and hold the power button on the top of the handset, and then tap[Power off] ® [OK].Note:RThe first time you turn on the handset, the setup wizard is displayed (page 18).Turning the screen on and offYou can turn the screen off to save battery power and prevent accidental operation. While thescreen is turned off, you can still receive calls, messages, etc. Any apps that were in use whenthe screen was turned off continue to run.To turn the screen on and off, press the power button on the top of the handset. You can alsoturn the screen on by pressing the home button.Unlocking the screenWhen you turn the screen on, the lock screen may be displayed. This screen prevents you fromaccidentally tapping the handset and operating it unintentionally. When the default lock screen isdisplayed, you can unlock the screen by dragging the lock icon toward the unlock icon or towardthe icon of the desired action.For assistance, please visit http://www.panasonic.com/help 17Getting Started](https://usermanual.wiki/Panasonic-of-North-America/96NKX-PRX120/User-Guide-2146824-Page-17.png)
![Setup wizardThe first time you turn on the handset, the setup wizard prompts you to configure the followingsettings. Follow the on-screen instructions and configure each item as needed.1Select the language.2Configure date and time settings.3Select the desired automatic time adjustment setting.RIf you select [Use network provided time], an Internet connection is needed for thehandset to adjust its date and time setting automatically.4Add or create a Google account.5Configure Wi-Fi settings (displayed only if you choose to configure a Google account).Note:RSome items may be displayed in English regardless of the display language setting.Setting up a Google accountConfiguring your handset to synchronize with your Google account is an easy way to synchronizecontacts and other information between different devices, such as computers or smartphones,and your phone system’s handset. For example, you can use your computer to add your contactsto your Google account, and then configure the handset to synchronize with your Googleaccount. Your contacts will be automatically downloaded to your handset.The setup wizard will prompt you to either add your existing Google account information to thehandset or create a new account. You can skip this step if desired. To configure Google accountsettings later, see page 44.Note:RAn Internet connection is required to configure a Google account. If you choose to use orcreate a Google account during the setup wizard, you will be prompted to enter Wi-Fiinformation so that the handset can connect to the Internet.Wi-Fi settingsIf you have a wireless router and an Internet connection, you can configure the handset toconnect to your Wi-Fi network and access the Internet for synchronizing your handset with yourGoogle account, using the [Browser] app to view web pages, etc. If the setup wizard promptsyou to enter Wi-Fi information, use the following procedure. To configure these settings later, seepage 44.1Select a Wi-Fi network.RIf the desired Wi-Fi network is not displayed, you may need to enter the network name(also called the “SSID”) manually. See page 44 for more information.2Enter the password if you are connecting to a secure Wi-Fi network.3Tap [Connect].18 For assistance, please visit http://www.panasonic.com/helpGetting Started](https://usermanual.wiki/Panasonic-of-North-America/96NKX-PRX120/User-Guide-2146824-Page-18.png)
![Home screenThe home screen is the main screen from which you can launch apps, such as the phone,camera, and web browser, and check widgets. It’s available any time by simply pressing thehome button. You can customize the home screen to suit your needs, and add, move, andremove items as desired.Browsing the home screenThe home screen contains multiple pages of app icons and widgets. Flick the screen left andright to view other pages. To open an app, tap the app’s icon.Moving an item on the home screen1Tap and hold the item.2Drag the item to the new location.RYou can move the item to another page by dragging the item to the left or right edge ofthe screen.Using the app listThe app list gives you access to all the apps and widgets stored on the handset. You can viewthe app list by tapping in the home screen. Similar to the home screen, the app list alsocontains multiple pages that you can view by flicking the screen left and right.Use the following procedure to add an item in the app list to the home screen.1Browse to the page of the home screen where you want to add an app or widget, and thentap .2Browse to the page of the app list that contains the desired item.3Tap and hold the item.RThe screen switches to the home screen.4Drag the item and drop it on the home screen.Erasing an item from the home screen1Tap and hold the item.2Drag the item and drop it on [Remove] at the top of the screen.For assistance, please visit http://www.panasonic.com/help 19Getting Started](https://usermanual.wiki/Panasonic-of-North-America/96NKX-PRX120/User-Guide-2146824-Page-19.png)
![Status and notificationsStatus barThe status bar is displayed at the top of the handset’s screen when using most apps. It displaysthe time and provides icons and other indicators that let you know the status of the handset’sbattery, network signal strength, and certain features of the handset.See page 56 for a list of commonly used status icons and their meanings.Notifications panelThe notifications panel provides detailed information about incoming email messages, missedcalls, calendar events, etc. You can open the notifications panel by sliding your finger down fromthe top to the bottom of the screen. To close the notifications panel, slide your finger up from thebottom to the top of the screen. While the notifications panel is open, you can tap a notificationand open the corresponding app, and some notifications can be removed by flicking them left orright.See page 57 for a list of commonly used notification icons and their meanings.Control panelThe control panel is displayed at the top of the notifications panel and allows you to changesettings for certain features quickly without switching to another screen. Simply tap the featureicons that are displayed in the control panel to toggle through the available settings. You can seemore settings by flicking the control panel left and right.See page 58 for a list of the settings available in the control panel.Landline appThe [Landline] app is displayed by default on the handset’s home screen, and allows you toaccess commonly used features of your phone system.20 For assistance, please visit http://www.panasonic.com/helpGetting Started](https://usermanual.wiki/Panasonic-of-North-America/96NKX-PRX120/User-Guide-2146824-Page-20.png)
![Allows you to make intercom callsAllows you to change certain features of your phone systemAllows you to use the phone system’s answering system (KX-PRX120 only)Allows you to access the base unit’s call logAllows you to use the base unit’s key detector featureStarting the [Landline] appTap [Landline] in the home screen or app list.For assistance, please visit http://www.panasonic.com/help 21Getting Started](https://usermanual.wiki/Panasonic-of-North-America/96NKX-PRX120/User-Guide-2146824-Page-21.png)
![Making callsYou can use the [Phone] app to make and receive calls, check your call logs, and use servicesprovided by your phone service provider.The [Phone] app consists of the following tabs.Used to dial manually, make intercom calls, etc.Used to check the call log (page 25).Used to quickly browse for a person stored in your contacts (page 28).Important:RWhen the handset is connected to the base unit, is displayed in the status bar. If this icon isnot displayed, the handset cannot make or receive calls.RIf the handset is placed into the charger while talking on the phone, the call is notdisconnected.Dialing manually1Tap [Phone] in the home screen or app list.2Select the tab at the top of the screen.3Enter the phone number and then tap at the bottom of the screen.RTo erase a number, tap .RTo enter a dialing pause, tap and hold .4When finished, tap to end the call.Searching while dialing manuallyAs you enter digits on the keypad, the handset searches for items in the handset call log andphonebook that match the entered digits. You can display the matched items by tapping , andyou can call an item by tapping next to it.Calling a contactYou can add contacts to the handset by adding them manually (see page 28) or bysynchronizing the handset with your Google account (see page 44).1Tap [Phone] in the home screen or app list.2Select the tab at the top of the screen.3Tap the desired contact.4When finished, tap to end the call.22 For assistance, please visit http://www.panasonic.com/helpPhone Features](https://usermanual.wiki/Panasonic-of-North-America/96NKX-PRX120/User-Guide-2146824-Page-22.png)
![Adding a phone number to your contacts while dialing1After dialing a number manually, tap .2To add the number to an existing contact:→ Tap the desired contact.To add the number to a new contact:→ Tap [CREATE NEW CONTACT].3If prompted, follow the on-screen instructions to determine where the contact will be saved.RContacts can be stored in the handset’s memory or synchronized with your Googleaccount.RTap [Add new account] (if displayed) if you want to register a Google account to thehandset. You can also register an account later (page 44).4Enter or edit the information as needed and tap [DONE].Using other features during a callSpeakerphoneTap to turn on the speakerphone during a call. Tap again to switch back to the receiver.Receiver or speaker volumePress the volume button up ( ) and down ( ) repeatedly during a call.MuteTap during a call to mute the handset’s microphone so that the other party cannot hear you.Tap again to turn the mute off.HoldTap during a call to place the call on hold so that you and the other party cannot hear eachother. Tap again to return to the call.RThe handset sounds an alarm if a call is held for 9 minutes. If the call remains on hold, thealarm sounds again 30 seconds later (i.e., after 9 minutes and 30 seconds of being on hold).The call is disconnected 30 seconds later if it continues to be on hold (i.e., after 10 minutes ofbeing on hold).FlashTap [FLASH] to use call waiting and answer a second call or switch between calls (page 25).You can change the flash time if necessary (page 42).Temporary tone dialing (for rotary/pulse phone service users)Press to switch to tone dialing mode and then dial the numbers as desired.For assistance, please visit http://www.panasonic.com/help 23Phone Features](https://usermanual.wiki/Panasonic-of-North-America/96NKX-PRX120/User-Guide-2146824-Page-23.png)
![Activating the screen during a callThe handset’s proximity sensor detects when you raise the phone to your ear and automaticallyturns off the screen. This not only saves battery power, but also prevents you from inadvertentlyoperating the screen while talking. The screen turns on again when you move the handset awayfrom your ear.You can also turn the screen off and on manually when on a call by pressing the power button onthe top of the handset.Note:RIf you turn off the screen while on a call, the call will continue.KeypadTap during a call if you need to enter numbers, such as when navigating a call center’s voiceguided menu system. Tap to hide the keypad.Answering callsAnswering a call1When a call is being received, tap and drag it to .2Tap to end the call.Choosing not to answer a callWhen a call is being received, tap and drag it to . The handset stops ringing.Ringer volumePress the volume button up ( ) and down ( ) repeatedly to adjust the ringer volume. While thehandset is ringing, press the button up or down to turn the ringer off temporarily.Changing ringtone and audio settings quickly1Press and hold the power button on the top of the handset.2Select the desired audio profile.Selects the [Silent] audio profile. The ringer is turned off. Selects the [General] audio profile. Your customized ringtone and audiosettings are used (page 39).Note:RFor details about ringtones and audio settings, see page 39.24 For assistance, please visit http://www.panasonic.com/helpPhone Features](https://usermanual.wiki/Panasonic-of-North-America/96NKX-PRX120/User-Guide-2146824-Page-24.png)
![Answering a second call (call waiting)If you receive a second call while you are talking on the phone, the handset will let you know bysounding a call waiting tone. If caller information is also received, you can confirm the informationon the screen and answer the second call if desired.Important:RYou may need to subscribe to your phone service provider’s call waiting service in order toanswer a second call. Consult your phone service provider for information about this feature.1When you hear the call waiting tone, tap [FLASH].2To switch between calls, tap [FLASH] again.Using the call logsThe handset and base unit each log your calls, allowing you to check a record of your calls. Thefollowing symbols are used to indicate each type of call stored in the call logs.Important:RCaller ID is required to log missed and answered calls (page 44).Call log Icon MeaningHandset calllog*1 (blue) Missed callAnswered call (green) Outgoing callBase unit calllog (red) Missed call (blue) Answered call or missedcall that has been confirmed*1 The handset call log can only log calls that are received while the handset is connected tothe base unit.Checking your missed callsWhen you have a missed call, is displayed in the status bar and notifications panel. To viewthe missed call, open the notifications panel (page 20) and tap the missed call notification.Using the handset call logMaking a call from the handset call log1Tap [Phone] in the home screen or app list.2Select the tab at the top of the screen.3Select the type of calls you want to view by tapping the desired tab.4Tap next to the phone number or person you want to call.5When finished, tap to end the call.For assistance, please visit http://www.panasonic.com/help 25Phone Features](https://usermanual.wiki/Panasonic-of-North-America/96NKX-PRX120/User-Guide-2146824-Page-25.png)
![Adding information from the handset call log to your contacts1Tap [Phone] in the home screen or app list.2Select the tab at the top of the screen.3Select the type of calls you want to view by tapping the desired tab.4Tap the desired name or phone number and then tap [Add to contacts].R[Add to contacts] is not displayed if the selected call log entry has already been addedto your contacts.5To add the number to an existing contact:→ Tap the desired contact.To add the number to a new contact:→ Tap [CREATE NEW CONTACT].6If prompted, follow the on-screen instructions to determine where the contact will be saved.RContacts can be stored in the handset’s memory or synchronized with your Googleaccount.RTap [Add new account] (if displayed) if you want to register a Google account to thehandset. You can also register an account later (page 44).7Enter or edit the information as needed and tap [DONE].Erasing the handset call log1Tap [Phone] in the home screen or app list.2Select the tab at the top of the screen.3Select the type of calls you want to view by tapping the desired tab.4Tap ® [Delete].5Select the desired entries.RTap to select all entries. Tap to deselect all entries.6Tap ® [OK].Using the base unit call logMaking a call from the base unit call log1Tap [Landline] in the home screen or app list.2Tap [Call log list].RThe handset connects to the base unit.3Tap next to the phone number or person you want to call.4When finished, tap to end the call.Erasing the base unit call log1Tap [Landline] in the home screen or app list.2Tap [Call log list].RThe handset connects to the base unit.26 For assistance, please visit http://www.panasonic.com/helpPhone Features](https://usermanual.wiki/Panasonic-of-North-America/96NKX-PRX120/User-Guide-2146824-Page-26.png)
![3To erase information for one call:→ Select the desired call and then tap ® [Delete from call log].To erase information for all calls:→ Tap ® [Delete all calls] ® [OK].Editing a caller’s phone number before callingYou can edit a phone number in the base unit call log by removing its area code and/or the longdistance code “1”.1Tap [Landline] in the home screen or app list.2Tap [Call log list].RThe handset connects to the base unit.3Tap the desired name or phone number and then tap ® [Edit number before call].4Tap [Edit] repeatedly until the phone number is displayed in the desired format.Automatically editing caller phone numbersThe base unit can automatically edit the phone numbers of incoming calls by removing their areacodes and/or the long distance code “1”. Phone numbers are edited automatically based on theirarea codes.Important:RCaller ID is required to use this feature (page 44).Turning this feature on or off1Tap [Landline] in the home screen or app list.2Tap [Landline settings] ® [Initial settings].RThe handset connects to the base unit.3Tap [Caller ID edit].4Select the desired setting.Selecting the phone numbers to be automatically editedMake sure this feature is turned on, and then edit and call back a phone number in the base unitcall log that contains the desired area code (page 27).Note:RPhone numbers from the 4 most recently edited area codes are automatically edited.For assistance, please visit http://www.panasonic.com/help 27Phone Features](https://usermanual.wiki/Panasonic-of-North-America/96NKX-PRX120/User-Guide-2146824-Page-27.png)
![Adding contactsYou can use the [People] app to store all your contact information in the handset. Entries (alsocalled “contacts”) contain information about your friends, family, and colleagues, such as theiraddresses, phone numbers, and email addresses.Note:RIf you have a Google account and an Internet connection, you can synchronize your contactswith the handset automatically (page 44).Adding a contact manually1Tap [People] in the home screen or app list.2Tap .3If prompted, follow the on-screen instructions to determine where the contact will be saved.RContacts can be stored in the handset’s memory or synchronized with your Googleaccount.RTap [Add new account] (if displayed) if you want to register a Google account to thehandset. You can also register an account later (page 44).4Enter the information as needed.RTo add an image, tap the image icon.RTo undo the changes you have made, tap ® [Discard] ® [OK]. Note that if you tap, the changes will be saved.RTo add the new contact information to an existing contact, tap ® [Join].5Tap [DONE].Note:RIf you store domestic and/or international phone numbers in your contacts using “+” and thecountry code, store the phone number conversion codes in the base unit so that phonenumbers will be dialed correctly (page 42).Adding yourself to your contacts1Tap [People] in the home screen or app list.2Tap [Set up my profile].RIf [Set up my profile] is not displayed, tap the content displayed under [ME], and thentap ® [Edit].3Enter the information as needed.4Tap [DONE].Calling contactsSearching for a contact1Tap [People] in the home screen or app list.28 For assistance, please visit http://www.panasonic.com/helpPhonebook Features](https://usermanual.wiki/Panasonic-of-North-America/96NKX-PRX120/User-Guide-2146824-Page-28.png)
![2Tap and then enter the search text.RYou can also scroll using the slider on the right side of the screen to search for a contactby first letter.Calling or emailing a contact1Tap [People] in the home screen or app list.2Tap the contact and then select the desired method of communication.Managing contactsEditing a contact1Tap [People] in the home screen or app list.2Select the desired contact and then tap ® [Edit].3Edit the information as needed.4Tap [DONE].Erasing a contact1Tap [People] in the home screen or app list.2Select the desired contact and then tap ® [Delete] ® [OK].Speed dialingYou can assign phone numbers stored in your contacts to the dial keys 2 to 9, and then dialthose phone numbers by pressing and holding the dial keys in the [Phone] app.1Tap [Phone] in the home screen or app list.2Tap ® [Speed dial].3Select an unused speed dial location.RTo erase a speed dial assignment, tap ® [Remove].4Select the desired contact.For assistance, please visit http://www.panasonic.com/help 29Phonebook Features](https://usermanual.wiki/Panasonic-of-North-America/96NKX-PRX120/User-Guide-2146824-Page-29.png)
![Message recording featuresThe following features can record your missed calls for you.– The base unit’s answering system (KX-PRX120 only; described in this section)– Your phone service provider’s voicemail service (page 45)Answering systemThe base unit’s answering system can answer calls after a certain number of rings. When itanswers a call, it plays a greeting message and can then record caller messages. Messages arestored in the base unit, and you can play them using a handset when at home or remotely byusing an outside telephone. The answering system cannot answer calls if you are talking on thephone.Recording capacityThe total recording capacity is about 38 minutes. A maximum of 64 messages can be recorded.Note:RThe following occur if the recording memory becomes full.–[Memory full] will be displayed when the answering system is turned on or off.– A beep will sound.– A memory full announcement will be heard.– If you use a pre-recorded greeting message, the base unit will answer calls with a differentpre-recorded message that asks callers to call again later. (If you have recorded your owngreeting message, it will continue to be played for callers.) No new messages will berecorded.Turning the answering system on and offThe answering system is already turned on at the time of purchase.1Tap [Landline] in the home screen or app list.2Tap [Answering system].RThe handset connects to the base unit.3Turn the [Answer] switch on or off.R is displayed in the status bar while the answering system is turned on.Greeting messagesRecording a greeting messageBy default, the answering system uses a pre-recorded greeting message. You can record yourown greeting message if you prefer.1Tap [Landline] in the home screen or app list.30 For assistance, please visit http://www.panasonic.com/helpAnswering System Features (KX-PRX120 only)](https://usermanual.wiki/Panasonic-of-North-America/96NKX-PRX120/User-Guide-2146824-Page-30.png)
![2Tap [Answering system].RThe handset connects to the base unit.3Tap [Greeting] ® [Record greeting].4Tap [OK] and speak your message after the beep.5Tap to stop recording and save your new greeting message.RYour new greeting message is played back for confirmation.Playing your greeting message1Tap [Landline] in the home screen or app list.2Tap [Answering system].RThe handset connects to the base unit.3Tap [Greeting] ® [Play greeting].Erasing your greeting message1Tap [Landline] in the home screen or app list.2Tap [Answering system].RThe handset connects to the base unit.3Tap [Greeting] ® [Reset to default greeting] ® [OK].RA pre-recorded greeting message will be used until you record a new greeting.Playing your messages is displayed in the status bar and notifications panel when the answering system has recordednew messages. You can access the answering system by tapping this icon in the notificationspanel.Playing messages1Tap [Landline] in the home screen or app list.2Tap [Answering system].RThe handset connects to the base unit.RThe number of messages is displayed at the top of the screen.3To play all new messages:→ Tap [Play new message].To play all messages:→ Tap [Play all messages].To play a specific message:→ Tap [Message list] and then tap next to the desired message.Note:RMessages that have been played have a checkmark next to them in the message list.For assistance, please visit http://www.panasonic.com/help 31Answering System Features (KX-PRX120 only)](https://usermanual.wiki/Panasonic-of-North-America/96NKX-PRX120/User-Guide-2146824-Page-31.png)
![Using message playback controlsThe following controls are available when playing messages.Tap to stop playback.Tap to skip to the previous message (if tapped within the first 5 seconds ofplayback) or to repeat the current message from the beginning.Tap to skip to the next message.Tap to erase the current message.Tap to switch between speaker and receiver.Tap to call the caller back. (Caller ID required; see page 44)Editing a phone number when calling backThis feature is not available when playing back a message that does not have a phone numberassociated with it.1Play the desired message.2Tap ® [Edit & call].RThe [Phone] app starts.3Edit the number as desired and then tap .Erasing messagesTo erase a message, tap while playing the message.Erasing all messages1Tap [Landline] in the home screen or app list.2Tap [Answering system].RThe handset connects to the base unit.3Tap [Delete all messages] ® [OK].32 For assistance, please visit http://www.panasonic.com/helpAnswering System Features (KX-PRX120 only)](https://usermanual.wiki/Panasonic-of-North-America/96NKX-PRX120/User-Guide-2146824-Page-32.png)
![Remote operation featuresWhile away from home, you can use a touch-tone phone to access the base unit and listen toanswering system messages or change answering system settings. The base unit’s voiceguidance prompts you to press certain dial keys to perform different operations.You can access the answering system remotely using the following methods.–New message notification: The base unit calls you at an outside phone number.–Standard remote access: You call the base unit while away from home.Remote operation settings overviewSettings Remote operation methodNew message notification Standard remote accessFirst time setup page 33 –Turn feature on page 34 –Change notificationdestination phone numberpage 34 –Making remote code requiredor not requiredpage 34 –Set remote code page 37(optional)page 37Remote operation overviewNew message notification Standard remote access1While away from home, the base unitcalls you when new message is recorded.2Answer call.3Enter remote code (if required).4Operate answering system (page 35).1While away from home, call your phonenumber.2When answering system answers yourcall, enter remote code.3Operate answering system (page 35).New message notificationAfter the answering system records a caller message, the base unit can call a phone number ofyour choosing and then play the new message back when you answer the phone. You canassign a remote code to maintain the privacy of your messages; if the remote code is assigned,the base unit will not play new messages unless the code is entered.Important:RWhen this feature is enabled, the base unit will call the specified phone number when itrecords a caller message. Make sure you carefully check the phone number assigned to thisfeature.First time setup1Tap [Landline] in the home screen or app list.For assistance, please visit http://www.panasonic.com/help 33Answering System Features (KX-PRX120 only)](https://usermanual.wiki/Panasonic-of-North-America/96NKX-PRX120/User-Guide-2146824-Page-33.png)
![2Tap [Answering system].RThe handset connects to the base unit.3Turn on the [New message alert] switch.4Tap [Notification to] ® [(No entry)].5To select a person and phone number from your contacts:→ Tap [Phonebook] and then select the desired contact and phone number.To enter a name and phone number manually:→ Tap [Keypad], enter a name and phone number, and then tap [Done].Making remote code entry required or not requiredIf this setting is set to [Active], you must enter the remote code (page 37) in order to accessthe answering system remotely via the new message notification feature.1Tap [Landline] in the home screen or app list.2Tap [Answering system].RThe handset connects to the base unit.3Tap [New message alert] ® [Remote code].4To make remote code entry required:→ Tap [Active]. If you are prompted to enter the remote code, enter the desired code andthen tap [Done].To make remote code entry not required:→ Tap [Inactive].Turning new message notification on or off1Tap [Landline] in the home screen or app list.2Tap [Answering system].RThe handset connects to the base unit.3Turn the [New message alert] switch on or off.Note:RWhile operating the answering system remotely, you can turn off the new message notificationfeature by pressing #9.Changing the phone number for new message notification1Tap [Landline] in the home screen or app list.2Tap [Answering system].RThe handset connects to the base unit.3Tap [New message alert] ® [Notification to].4To edit the name and phone number assigned to this feature:→ Tap [Edit], edit the information, and then tap [Done].To erase the name and phone number assigned to this feature:→ Tap [Delete] ® [OK].34 For assistance, please visit http://www.panasonic.com/helpAnswering System Features (KX-PRX120 only)](https://usermanual.wiki/Panasonic-of-North-America/96NKX-PRX120/User-Guide-2146824-Page-34.png)
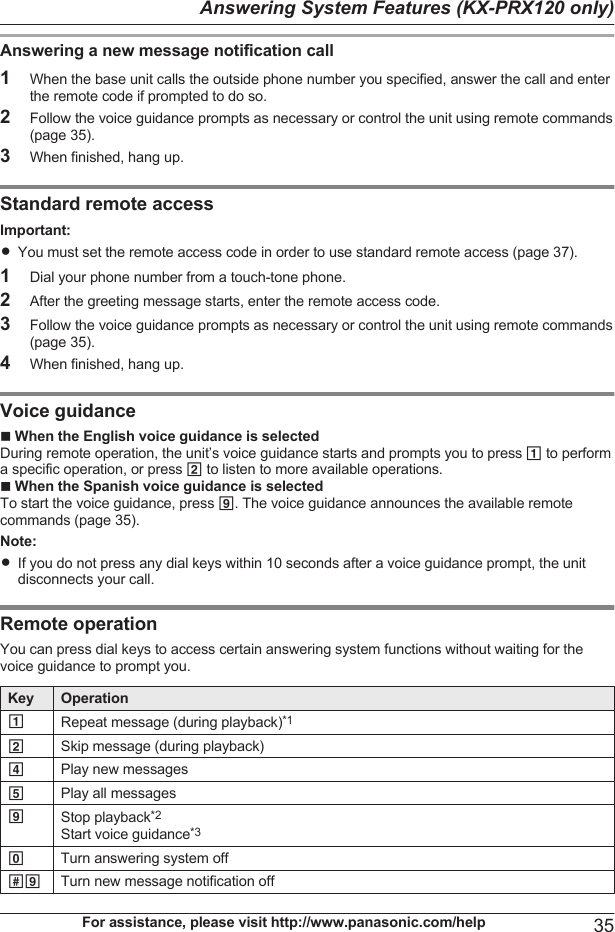
![Key Operation*4 Erase currently playing message*5 Erase all messages*# End remote operation and end call*1 If pressed within the first 5 seconds of playback, the previous message is played.*2 For English voice guidance only*3 For Spanish voice guidance onlyTurning on the answering system remotely1Dial your phone number from a touch-tone phone.2Let the phone ring 15 times.RA long beep is heard.3Enter your remote access code within 10 seconds after the long beep.RThe greeting message is played back.RYou can either hang up, or enter your remote access code again and begin remoteoperation.Answering system settingsVoice guidance languageYou can change the language used for the answering system’s voice guidance.1Tap [Landline] in the home screen or app list.2Tap [Landline settings] ® [Initial settings].RThe handset connects to the base unit.3Tap [Voice prompt].4Select the desired language.Number of ringsYou can change the number of times the phone rings before the unit answers a call.1Tap [Landline] in the home screen or app list.2Tap [Answering system].RThe handset connects to the base unit.3Tap [Settings] ® [Number of rings].4Select the desired setting.RIf you select [Auto], the answering system answers at the end of the 2nd ring when newmessages have been recorded, or at the end of the 5th ring when there are no newmessages. If you call your home phone from outside to listen to new messages usingremote operation (page 33), you will know that there are no new messages when thephone rings for the 3rd time. You can then hang up without being charged for the call.36 For assistance, please visit http://www.panasonic.com/helpAnswering System Features (KX-PRX120 only)](https://usermanual.wiki/Panasonic-of-North-America/96NKX-PRX120/User-Guide-2146824-Page-36.png)
![For voicemail service subscribersTo receive voicemail and use the answering system properly, please note the following:RTo use your phone service provider’s voicemail service (page 45) rather than the unit’sanswering system, turn off the answering system (page 30).RTo use the base unit’s answering system rather than your phone service provider’s voicemailservice, please ask the service provider to deactivate your voicemail service.If your phone service provider cannot do this:– Set the answering system’s [Number of rings] setting (page 36) so that it answers callsbefore your voicemail service does. It is necessary to check the number of rings required toactivate your voicemail service before changing this setting.– Increase the number of rings required for your phone service provider’s voicemail service,so that the base unit’s answering system can answer calls before your voicemail servicedoes. Contact your phone service provider as necessary.Recording timeThis setting determines the maximum recording time allowed for each caller.1Tap [Landline] in the home screen or app list.2Tap [Answering system].RThe handset connects to the base unit.3Tap [Settings] ® [Recording time].4Select the desired setting.RIf you select [Greeting only], the answering system does not record caller messages.Tap [OK] to save the setting.RIf you do not record your own greeting message and [Greeting only] is selected, theanswering system will play the pre-recorded greeting-only message asking callers to callagain later. If you record your own greeting message (page 30), ask callers to call againlater.Remote codeThe remote access code is a 3-digit code that must be entered in order to access the answeringsystem remotely using standard remote access. This code prevents unauthorized parties fromlistening to your messages remotely. The default setting is [111].1Tap [Landline] in the home screen or app list.2Tap [Answering system].RThe handset connects to the base unit.3Tap [Settings] ® [Remote code].4Enter the desired code and then tap [Done].Call screeningThis setting determines whether the handset can screen calls while a caller is leaving a message.When screening a call, you can adjust the speaker volume by pressing the volume button up() and down ( ) repeatedly, and you can answer the call by tapping and dragging it to.1Tap [Landline] in the home screen or app list.For assistance, please visit http://www.panasonic.com/help 37Answering System Features (KX-PRX120 only)](https://usermanual.wiki/Panasonic-of-North-America/96NKX-PRX120/User-Guide-2146824-Page-37.png)
![2Tap [Answering system].RThe handset connects to the base unit.3Tap [Settings] ® [Call screening].4Select the desired setting.38 For assistance, please visit http://www.panasonic.com/helpAnswering System Features (KX-PRX120 only)](https://usermanual.wiki/Panasonic-of-North-America/96NKX-PRX120/User-Guide-2146824-Page-38.png)
![Ringtones and audio settingsYou can adjust the handset’s ringtone, ringer volume, and other audio settings, and save thesettings as an audio profile. Audio profiles allow you to change multiple ringtone and audiosettings easily.Selecting an audio profile1From the home screen, tap ® [System settings] ® [Audio profiles].2Tap next to the desired audio profile.Preset audio profiles–[General]: You can select the desired ringtone, ringer volume, etc.–[Silent]: The ringer is turned off.–[Outdoor]: The settings of the [General] profile are used. The ringer volume is set to themaximum level.Changing audio settings1From the home screen, tap ® [System settings] ® [Audio profiles].2Tap the name of the desired audio profile.RYou can change the settings of the [General] audio profile, but the other default audioprofiles cannot be changed.3Change the settings as desired.4When finished, tap the home button.Frequently used settings–[Volumes]: Allows you to adjust the volume for ringtones and other alerts.–[Landline call ringtone]: Allows you to select the ringtone used for incoming calls.–[Dial pad touch tones]: Determines whether touch tones are heard when you dial using thekeypad.Note:RThe ringtone heard for intercom calls cannot be changed.Creating an audio profile1From the home screen, tap ® [System settings] ® [Audio profiles] ® .2Enter a name for the audio profile and then tap [OK].3Select the new audio profile and then change the settings as desired.4When finished, tap the home button.Resetting audio profile settingsFrom the home screen, tap ® [System settings] ® [Audio profiles] ® ® [OK].For assistance, please visit http://www.panasonic.com/help 39Other Features and Settings](https://usermanual.wiki/Panasonic-of-North-America/96NKX-PRX120/User-Guide-2146824-Page-39.png)
![Silent modeSilent mode allows you to select a period of time during which the handset will not ring for calls.This feature is useful for time periods when you do not want to be disturbed, for example, whilesleeping.Important:RMake sure the unit’s date and time setting is correct (page 43).Turning silent mode on and off1From the home screen, tap ® [System settings] ® [Audio profiles].2Turn the [Silent mode] switch on or off.Changing the start and end timeYou can set the start and end times.1From the home screen, tap ® [System settings] ® [Audio profiles].2Turn on the [Silent mode] switch, and then tap [Silent mode] ® [Start/end].3Select the desired settings and then tap [Set].Auto talkWhen this feature is enabled, you can answer an incoming call simply by lifting the handset offthe charger or by unplugging the USB cable.1Tap [Phone] in the home screen or app list.2Tap ® [Settings].3Turn the [Auto talk] checkbox on or off.Blocking incoming calls (call block)You can use the call block feature to block junk calls, calls from certain people, or calls that haveno caller information (i.e., anonymous calls). If a call is received that meets the call block criteria,the base unit disconnects the call.Important:RCaller ID is required to use this feature (page 44).ROnce phone numbers have been added to the blocked caller list, the handset does not ringwhen a call is received until it has received the Caller ID and can confirm that the phonenumber is not stored in the blocked caller list.Adding a phone number manuallyYou can store 100 phone numbers.40 For assistance, please visit http://www.panasonic.com/helpOther Features and Settings](https://usermanual.wiki/Panasonic-of-North-America/96NKX-PRX120/User-Guide-2146824-Page-40.png)
![Important:RYou must store the full phone number, including the area code, in order to block calls from thatnumber.1Tap [Landline] in the home screen or app list.2Tap [Landline settings] ® [Caller blocked].RThe handset connects to the base unit.3Tap ® [Add to blocked list].4Enter the desired phone number and then tap [Done].Adding a phone number from the base unit call log1Tap [Landline] in the home screen or app list.2Tap [Call log list].RThe handset connects to the base unit.3Tap the desired information.4Tap ® [Add to blocked list] ® [OK].Editing or erasing a phone number1Tap [Landline] in the home screen or app list.2Tap [Landline settings] ® [Caller blocked].RThe handset connects to the base unit.3Select the desired phone number.4To edit the phone number:→ Tap [Edit], edit the phone number, and then tap [Done].To erase the phone number:→ Tap [Delete] ® [OK].Blocking anonymous callsYou can use this feature to block calls that do not have caller information, including calls fromcallers who have blocked their caller identification.1Tap [Landline] in the home screen or app list.2Tap [Landline settings] ® [Caller blocked].RThe handset connects to the base unit.3Turn the [Block withheld number] checkbox on or off.Sounding or muting the first ringThis setting determines whether the first ring is heard when a call is received. If your phone linehas Caller ID service and you do not want your phone system to ring before caller information isreceived, turn this setting off.1Tap [Landline] in the home screen or app list.2Tap [Landline settings] ® [Caller blocked].RThe handset connects to the base unit.3Turn the [First ring] checkbox on or off.For assistance, please visit http://www.panasonic.com/help 41Other Features and Settings](https://usermanual.wiki/Panasonic-of-North-America/96NKX-PRX120/User-Guide-2146824-Page-41.png)
![Phone number conversion codesIf you store phone numbers in your contacts using “+” and the country code, store the followingcodes in the base unit so that phone numbers will be dialed correctly.1Tap [Landline] in the home screen or app list.2Tap [Landline settings] ® [Initial settings].RThe handset connects to the base unit.3Tap [Phone number conversion].4Select a code to edit, enter the code (4 digits max.) and then tap [OK].–[International code]: This is the international dialing prefix that you need to dial whendialing international phone numbers manually.–[Country code]: This is the country code required when calling your country fromoverseas.–[National access code]: If you store domestic phone numbers in your handset using “+”and the country code, this is the number that should replace the country code whencalling domestically.Flash time1Tap [Landline] in the home screen or app list.2Tap [Landline settings] ® [Initial settings].RThe handset connects to the base unit.3Tap [Set flash time].4Select the desired setting.Important:RThe setting should stay at [700 ms] unless tapping [FLASH] fails to pick up the waiting call.Line modeGenerally this setting should not be changed. This setting automatically maintains receivervolume at the proper level depending on the current telephone line condition. Set the line modeto [A] if the telephone line condition is not good.1Tap [Landline] in the home screen or app list.2Tap [Landline settings] ® [Initial settings].RThe handset connects to the base unit.3Tap [Set line mode].4Select the desired setting.42 For assistance, please visit http://www.panasonic.com/helpOther Features and Settings](https://usermanual.wiki/Panasonic-of-North-America/96NKX-PRX120/User-Guide-2146824-Page-42.png)
![Tone/pulse settingThis setting must be set to match the dialing mode of your phone service, otherwise you will notbe able to make calls. (The default setting is [Tone].)1Tap [Landline] in the home screen or app list.2Tap [Landline settings] ® [Initial settings].RThe handset connects to the base unit.3Tap [Tone/pulse setting].4Select the desired setting.–[Pulse]: Select if your phone service uses pulse (rotary) dialing mode.–[Tone]: Select if your phone service uses tone dialing mode.Display language1From the home screen, tap ® [System settings] ® [Language & input] ®[Language].2Select the desired language.Note:RSome items may be displayed in English regardless of the display language setting.Date and timeSelecting automatic or manual date and time setting1From the home screen, tap ® [System settings] ® [Date & time] ® [Automatic date& time].2To set the date and time automatically:→ Select the desired method.RIf you select [Use network provided time], an Internet connection is needed for thehandset to adjust its date and time setting automatically.To set the date and time manually:→ Select [Off].Setting the date and time manually1From the home screen, tap ® [System settings] ® [Date & time].2Make sure that [Automatic date & time] is set to [Off].3To set the date:→ Tap [Set date], select the desired date, and then tap [Set].To set the time:→ Tap [Set time], select the desired time, and then tap [Set].For assistance, please visit http://www.panasonic.com/help 43Other Features and Settings](https://usermanual.wiki/Panasonic-of-North-America/96NKX-PRX120/User-Guide-2146824-Page-43.png)
![Wi-Fi settingsIf you have a wireless router and an Internet connection, you can configure the handset toconnect to your Wi-Fi network and access the Internet for synchronizing your handset with yourGoogle account, using the [Browser] app to view web pages, etc.1From the home screen, tap ® [System settings].2Turn on the [Wi-Fi] switch.3Tap [Wi-Fi].4Select a Wi-Fi network.RIf the desired Wi-Fi network is not displayed, you may need to enter the network name(also called the “SSID”) manually. See page 44 for more information.5Enter the password if you are connecting to a secure Wi-Fi network.6Tap [Connect].Adding a Wi-Fi network manuallySome wireless routers do not broadcast their availability. In this case you need to enter thenetwork name (SSID) as well as the network’s password.1From the home screen, tap ® [System settings].2Tap [Wi-Fi] ® [ADD NETWORK].3Enter the Wi-Fi network’s SSID.4Select the network’s security type and enter its password, if required.5Tap [Save].Google™ accountIf you have a Google account and an Internet connection, you can register your accountinformation in the handset and synchronize your contacts, Gmail™ messages, calendar, anddata for other Google services with the data stored in your handset. This is a convenient way totransfer your contacts to the handset.Use the following procedure to enter your Google account information.1From the home screen, tap ® [System settings] ® [Accounts & sync] ® [ADDACCOUNT] ® [Google].2Follow the on-screen instructions.Caller ID supportThe base unit is Caller ID compatible. Caller ID is a service provided by your phone serviceprovider which may require a subscription. Contact your phone service provider for details andavailability.44 For assistance, please visit http://www.panasonic.com/helpOther Features and Settings](https://usermanual.wiki/Panasonic-of-North-America/96NKX-PRX120/User-Guide-2146824-Page-44.png)
![Caller ID featuresWhen you receive a call, Caller ID allows the base unit to receive caller information provided fromyour phone service provider. The base unit automatically logs caller information for the last 50callers and stores this information in the base unit call log. The handset also logs information forcalls that are received while the handset is connected to the base unit.Caller information displayIf a caller’s phone number matches the phone number stored in the handset contacts (page 28),the stored name is displayed and logged in the call log.VoicemailVoicemail is an automatic answering service that may be offered by your phone service provider.After you subscribe to this service, your service provider’s voicemail system answers calls for youwhen you are unavailable to answer the phone or when your line is busy. Messages are recordedby your service provider, not by your telephone.When you have new messages, is displayed in the status bar and notifications panel if yourservice provider supports message indication service. Please contact your service provider fordetails.Important:RMake sure you read the information for voicemail service subscribers on page 37.RKX-PRX120 only: To use your phone service provider’s voicemail service rather than the unit’sanswering system, turn off the answering system (page 30).Setting the voicemail access number1Tap [Landline] in the home screen or app list.2Tap [Landline settings] ® [Voicemail].RThe handset connects to the base unit.3Tap [Voicemail number].4Enter the access number and then tap [OK] ® [OK].Voicemail tone detectionThis feature allows the base unit to detect voicemail tones sent by your phone service provider sothat is displayed properly when new voicemail messages have been recorded.Turn this feature off in the following situations:RYou do not subscribe to your phone service provider’s voicemail service.RYour phone service provider does not send voicemail tones.RYour phone is connected to a PBX.If you are not sure which setting is required, contact your phone service provider.1Tap [Landline] in the home screen or app list.2Tap [Landline settings] ® [Voicemail].RThe handset connects to the base unit.3Tap [Voicemail tone detect].For assistance, please visit http://www.panasonic.com/help 45Other Features and Settings](https://usermanual.wiki/Panasonic-of-North-America/96NKX-PRX120/User-Guide-2146824-Page-45.png)
![4Select the desired setting.Listening to voicemail1Tap [Phone] in the home screen or app list.2Select the tab at the top of the screen.3Tap and hold 1.4Operate your service provider’s voicemail service.RContact your service provider for details.46 For assistance, please visit http://www.panasonic.com/helpOther Features and Settings](https://usermanual.wiki/Panasonic-of-North-America/96NKX-PRX120/User-Guide-2146824-Page-46.png)
![Adding handsetsIn order to use a handset and base unit together, the handset must be registered to the base unit.You can register additional handsets to the base unit for a total of 6 handsets.Important:RSee page 4 for information about recommended handsets. Certain features may not beavailable if a different handset model is used.Registering an additional handset to your base unitThe supplied handset is pre-registered to the base unit.1Tap [Landline] in the home screen or app list.2Tap [Landline settings] ® [Initial settings].3If a dialog is displayed prompting you to press M N on the base unit:→ Follow the on-screen instructions. You do not need to follow the steps below.If the [Initial settings] screen is displayed:→ Tap [Registration] ® [Register handset].or→ Tap [Register handset].4Press and hold M N on the base unit for about 5 seconds, and then tap [OK].RIf all registered handsets start ringing, press M N again to stop, then repeat this step.RThe handset beeps when registration is complete.Changing the handset nameYou can customize the name of your handset. This can help you easily identify handsets whenmaking intercom calls, transferring calls to other handsets, etc.1Tap [Landline] in the home screen or app list.2Tap [Landline settings] ® [Initial settings].RThe handset connects to the base unit.3Tap [Handset name].4Edit the name and then tap [OK].Deregistering a handsetThis procedure erases registration information for the selected handset from both the handsetand its base unit.1Tap [Landline] in the home screen or app list.2Tap [Landline settings] ® [Initial settings].RThe handset connects to the base unit.3Tap [Registration] ® [Cancel registration].4Select the desired handset and then tap [OK].For assistance, please visit http://www.panasonic.com/help 47Expanding Your Phone System](https://usermanual.wiki/Panasonic-of-North-America/96NKX-PRX120/User-Guide-2146824-Page-47.png)
![Intercom featuresMaking an intercom callYou can call another handset that is connected to the same base unit.1Tap [Phone] in the home screen or app list.2Tap and then select the desired handset.RYou can customize the handset name (page 47).3When finished, tap to end the call.Answering an intercom call1When a call is being received, tap and drag it to .RTo reject an intercom call, tap and drag it to .2When finished, tap to end the call.Transferring and sharing a callYou can transfer and share calls between two handsets that are connected to the same base unit.1While talking on a call, tap .RThe call is put on hold.2Select the desired handset.3Wait for the other handset user to answer the call.RThe other handset rings for 1 minute.RTo cancel and return to the call, tap .4TransferringAfter the other handset user answers the call, tap to end the intercom call.RThe other handset user may continue to talk on the call.SharingAfter the other handset user answers the call, tap to talk on the call together with theother handset user.RThe other handset user may continue to talk on the call.5When finished, tap to leave the call.RWhen both handset users have left the call, the call is disconnected.Joining a callIf another handset user is talking on a call, you can use your handset to join the call and talk onthe call with the handset user.1While another handset user is talking on a call, tap [Phone] in the home screen or app list.2Select the tab at the top of the screen.3Tap at the bottom of the screen.48 For assistance, please visit http://www.panasonic.com/helpExpanding Your Phone System](https://usermanual.wiki/Panasonic-of-North-America/96NKX-PRX120/User-Guide-2146824-Page-48.png)
![Note:RYou can prevent other handset users from joining your calls by enabling call sharing(page 49).Call sharingIf a handset user is talking on a call, this feature prevents other handset users from joining thecall (page 48).1Tap [Landline] in the home screen or app list.2Tap [Landline settings] ® [Initial settings].RThe handset connects to the base unit.3Turn the [Call sharing] checkbox on or off.Using key detectorsYou can register up to 4 optional key detectors to your phone system (page 3). By registering akey detector to the base unit and then attaching the key detector to an easily misplaced item,such as your house or car keys, you can use your handset to find the item. When you use thehandset’s key detector search mode, the key detector will emit a sound that changes as thehandset moves closer to the item.For more information, refer to the documentation supplied with your key detector or visit thefollowing web site.http://panasonic.net/pcc/products/telephone/p/tga20/Registering a key detector1Tap [Landline] in the home screen or app list.2Tap [Key detector] ® [Settings].RThe handset connects to the base unit.3Tap [Add new device] for an available key detector location number (1–4).4Using the key detector:With the tab pushed to the right (A), pull out the battery holder (B). Insert the battery withthe positive terminal ( ) facing up (C), then close the battery holder (D).RConfirm that the battery’s terminals ( , ) are facing the correct directions.For assistance, please visit http://www.panasonic.com/help 49Expanding Your Phone System](https://usermanual.wiki/Panasonic-of-North-America/96NKX-PRX120/User-Guide-2146824-Page-49.png)
![RThe key detector will enter registration mode automatically and will sound its registrationtones.CDBA5Wait until a long beep sounds.Note:RIf the registration tones do not sound or registration fails, remove the battery from the keydetector for at least 2 minutes before attempting registration again.Changing a key detector’s name1Tap [Landline] in the home screen or app list.2Tap [Key detector] ® [Settings].RThe handset connects to the base unit.3Select the desired key detector and then tap [Change name].4Edit the name as desired and then tap .Deregistering a key detector1Tap [Landline] in the home screen or app list.2Tap [Key detector] ® [Settings].RThe handset connects to the base unit.3Select the desired key detector and then tap [Deregistration] ® [OK].Searching for a key detector1Tap [Landline] in the home screen or app list.2Tap [Key detector] ® [Search].RThe handset connects to the base unit.3Select the desired key detector.4Try to locate the key detector.RWhile searching for the key detector, the handset beeps and displays the key detector’ssignal strength (1–5) and level (1–100). The key detector beeps in response.RSearching stops automatically after 3 minutes. To continue searching for the key detector,repeat step 3.5To stop searching, tap .50 For assistance, please visit http://www.panasonic.com/helpExpanding Your Phone System](https://usermanual.wiki/Panasonic-of-North-America/96NKX-PRX120/User-Guide-2146824-Page-50.png)
![Checking key detector battery level1Tap [Landline] in the home screen or app list.2Tap [Key detector] ® [Battery check].RThe handset connects to the base unit.3Select the desired key detector.RIf the battery is good, the key detector beeps and [OK] is displayed.RIf the battery is dead, the key detector does not beep and [Battery dead] is displayed.R[Battery dead] may be displayed if there is radio interference or if the key detector is outof range of the handset.For assistance, please visit http://www.panasonic.com/help 51Expanding Your Phone System](https://usermanual.wiki/Panasonic-of-North-America/96NKX-PRX120/User-Guide-2146824-Page-51.png)
![Phone settings overviewYou can customize general phone settings to suit your needs using the [Settings] app. Settingsare grouped into the categories explained below.To open the [Settings] app, tap [Settings] in the home screen or app list.Settings category Description[Phone management] Contains settings related to the handset’s DECTfeatures.[Wi-Fi] Contains wireless network settings.[Landline settings] Contains various base unit features and settings.[Bluetooth] Contains Bluetooth wireless technology settings.[More...] Contains settings related to wireless networks, such asairplane mode and Wi-Fi Direct.[Audio profiles] Contains settings related to silent mode, ringer volume,and ringtones.[Display] Contains settings such as brightness and screentimeout.[Storage] Allows you to confirm the available space in yourphone.[Battery] Allows you to confirm and manage battery performance.[Apps] Allows you to manage and remove the apps installedon your phone.[Accounts & sync] Allows you to add and remove new accounts, as wellas manage how your phone synchronizes to servers tokeep its data up-to-date.[Location services] Contains settings related to how your phone useslocation information.[Security] Contains settings that control security-related featuressuch as screen lock.[Language & input] Contains settings related to display language, inputlanguage, the keyboard, speech, and the userdictionary.[Backup & reset] Contains data backup and deletion related settings thathelp you manage and back up your personalinformation to Google servers. You can also reset yourphone and its information using settings found here.[Date & time] Contains settings that determine your phone’s date,time, time zone, and time format.[Schedule power on/off] Allows you to set the handset to turn on and off andscheduled times.[Accessibility] Contains settings that can make the phone easier tointeract with.52 For assistance, please visit http://www.panasonic.com/helpOther Information](https://usermanual.wiki/Panasonic-of-North-America/96NKX-PRX120/User-Guide-2146824-Page-52.png)
![Settings category Description[Developer options] Contains advanced settings that are not required fortypical use.[About phone] Allows you to confirm general phone information suchas battery level, network status, and installed softwareversions.For assistance, please visit http://www.panasonic.com/help 53Other Information](https://usermanual.wiki/Panasonic-of-North-America/96NKX-PRX120/User-Guide-2146824-Page-53.png)
![Status iconsIcons that appear in the status bar vary depending on the apps that are installed in the handset.Some common icons are described below.Connection to base unit is availableNo connection to base unitAirplane mode is onConnected to Wi-Fi networkBluetooth feature is onBluetooth device is connectedBattery is chargingSpeakerphone is onMicrophone is muted[Silent] audio profile is selectedSilent mode is onCall sharing is offAnswering system is on*1Answering system is set to “greeting only” mode*1*1 KX-PRX120 only56 For assistance, please visit http://www.panasonic.com/helpOther Information](https://usermanual.wiki/Panasonic-of-North-America/96NKX-PRX120/User-Guide-2146824-Page-56.png)
![Control panel settingsChanges the handset’s screen brightness (auto, dim, half, full).Changes the amount of time before the handset’s screen dims (15 seconds, 30seconds, 1 minute).Turns the handset’s auto screen rotation feature on and off.Turns the handset’s airplane mode feature on and off.Turns the handset’s Wi-Fi feature on and off.Turns the handset’s DECT connection to the base unit on and off.Turns the handset’s Bluetooth feature on and off.Turns the handset’s GPS feature on and off.Selects the [General] audio profile.Selects the [Silent] audio profile.Selects the [Outdoor] audio profile.58 For assistance, please visit http://www.panasonic.com/helpOther Information](https://usermanual.wiki/Panasonic-of-North-America/96NKX-PRX120/User-Guide-2146824-Page-58.png)
![Problem Cause and/or solutionI cannot make longdistance calls.RMake sure that you have long distance service.Caller IDProblem Cause and/or solutionCaller information is notdisplayed.RYou may need to subscribe to your phone service provider’sCaller ID service. Contact your phone service provider fordetails.RIf your unit is connected to any additional telephoneequipment, remove the additional equipment and plug the unitdirectly into the wall jack.RIf you use a DSL/ADSL service, we recommend connecting aDSL/ADSL filter between the base unit and the telephone linejack. Contact your DSL/ADSL service provider for details.RThe name display service may not be available in some areas.Contact your phone service provider for details.ROther telephone equipment may be interfering with this unit.Disconnect the other equipment and try again.The 2nd caller’sinformation is notdisplayed during anoutside call.RIn order to use Caller ID, call waiting, or Call Waiting Caller ID(CWID), you must first contact your phone service providerand subscribe to the desired service.After subscribing, you may need to contact your phone serviceprovider again to activate this specific service, even if youalready subscribed to both Caller ID and Call Waiting withCaller ID services (CWID).Caller information isdisplayed late.RDepending on your phone service provider, the unit maydisplay the caller’s information at the 2nd ring or later. Turn[First ring] off (page 41).RMove closer to the base unit.The call log/incomingphone numbers are notedited automatically.RThe Caller ID number auto edit feature is turned off. Turn it onand try again (page 27).RYou need to call back the edited number to activate Caller IDnumber auto edit.I cannot dial the phonenumber edited in the calllog.RThe phone number you dialed might have been editedincorrectly (for example, the long distance “1” or the area codeis missing). Edit the phone number with another pattern(page 27).For assistance, please visit http://www.panasonic.com/help 61Other Information](https://usermanual.wiki/Panasonic-of-North-America/96NKX-PRX120/User-Guide-2146824-Page-61.png)
![Answering system (KX-PRX120 only)Problem Cause and/or solutionThe answering systemdoes not record messages.RThe answering system is turned off. Turn it on (page 30).RThe message memory is full. Erase unwanted messages(page 32).RThe recording time is set to [Greeting only]. Change thesetting (page 37).RIf you subscribe to a voicemail service, messages arerecorded by your service provider, not your telephone. Changethe unit’s number of rings setting (page 36) or contact yourphone service provider.I cannot operate theanswering systemremotely.RThe remote access code is not set, or you are entering thewrong remote code. Set the remote access code (page 37).RThe answering system is turned off. Turn it on (page 30).The unit does not ring thespecified number of times.RIf [First ring] is turned off (page 41), the number of ringsdecreases by 1 from the specified number of rings.Liquid damageProblem Cause/solutionLiquid or other form ofmoisture has entered thehandset or charger.RDisconnect the AC adaptor from the charger, and remove themicroSD card and battery from the handset. Allow the unitexposed to liquid to dry for at least 3 days. After the exposedunit is completely dry, reconnect the AC adaptor, insert themicroSD card and battery into the handset, and charge thebattery fully before use. If the exposed unit does not workproperly, contact your place of purchase or nearest Panasonicservice center.Caution:RTo avoid permanent damage, do not use a microwave ovento speed up the drying process.62 For assistance, please visit http://www.panasonic.com/helpOther Information](https://usermanual.wiki/Panasonic-of-North-America/96NKX-PRX120/User-Guide-2146824-Page-62.png)
![Updating the softwareIf a system update is available, you can update the system software contained in the handset. AmicroSD card must be installed in the handset in order to update the system software.Important:RFor best performance, we recommend using a computer to download the software update file,and then using a USB connection to copy the file to the microSD card installed in the handset.RConnect the handset to your computer using a USB cable (not supplied) with a Micro-B plugfor connecting to the handset. Refer to the following illustration for plug shape and pin layout.1Use a computer to access the support page for this product at the address below and checkwhether there is a software update available for the handset.http://www.panasonic.net/pcc/support/tel/sdectRIf a software update is available, continue to the next step, otherwise there is no need tocontinue with this procedure.2Connect the handset to your computer using a USB cable.3When the [USB connected] screen is displayed on the handset, tap [Turn on USBstorage].4Using your computer, download the software update file and save it to the root directory ofthe handset’s microSD card.RSave the file as is (i.e., as a “.zip” file). Do not change the file extension.RWhen you connect the handset to your computer, the handset’s internal memory and itsmicroSD card are mounted on your computer as removable disks. If you do not knowwhich removable disk corresponds to the microSD card, remove the card from thehandset and observe the name of the handset’s internal memory when it is mounted, andthen insert the microSD card into the handset again.5After the file has been saved, tap [Turn off USB storage] on the handset.6Disconnect the handset from your computer.7Using the handset, go to the home screen and then tap ® [System settings] ® [Aboutphone] ® [Software update].8Follow the on-screen instructions.RThe software update file is automatically erased from the microSD card after the update iscomplete.For assistance, please visit http://www.panasonic.com/help 63Other Information](https://usermanual.wiki/Panasonic-of-North-America/96NKX-PRX120/User-Guide-2146824-Page-63.png)