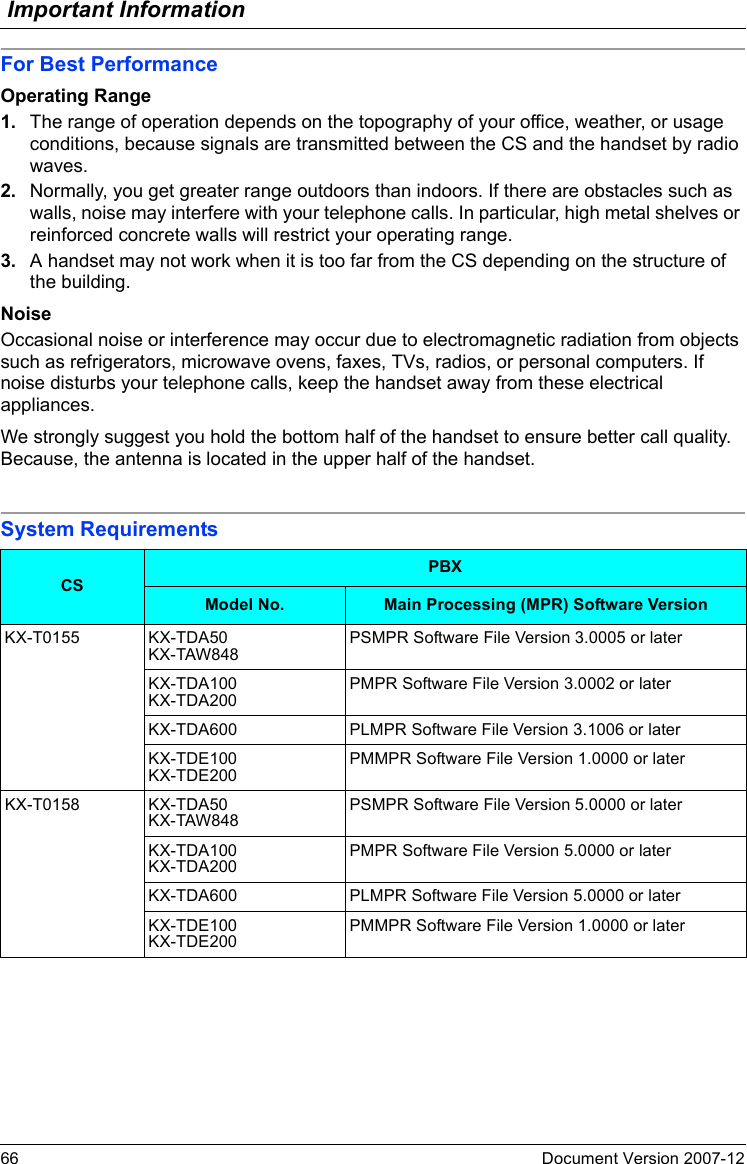
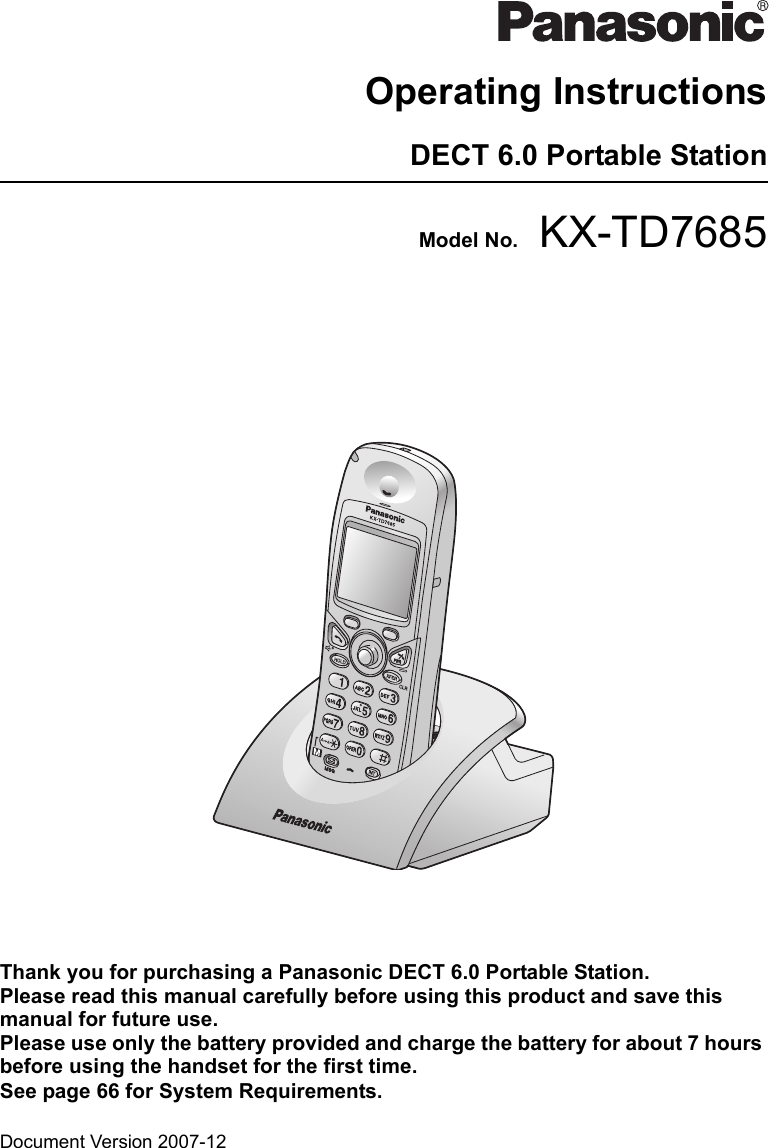
Panasonic of North America 96NKX-TD7685 Isochronous UPCS Portable Station (Handset) User Manual 1
Panasonic Corporation of North America Isochronous UPCS Portable Station (Handset) 1
UserManual.wiki
>
Panasonic of North America
>
96NKX-TD7685 User Manual
>
User Manual 1
Contents
1.
User Manual 1
2.
User Manual 2
User Manual 1
Navigation menu
Upload a User Manual
Namespaces
Wiki Guide
HTML
PDF
Info
Views
User Manual
Discussion / Help
Navigation

![Before Initial Use4Document Version 2007-12 Please read “Important Information” on page 60 before using. Read and understand all instructions.Accessories (included)• To order accessories, call toll free 1-800-332-5368.Accessories (included)AC adaptor ....................... One Charger ............................ One Battery .............................. One[Part No.] [Part No.] [Part No.]PQLV207 PSWETD7684M N4HHGMB00005 or HHR-P103Belt Clip ............................ One Belt Clip Holder ............... One Battery Cover ................... One[Part No.] [Part No.] [Part No.]PSKE1084Z5 PSKE1040Z3 PSYNTD7684MRScrews and Washers ...... Two[Part No.]Screws: PQHE5004YWashers: XWG35FJ](https://usermanual.wiki/Panasonic-of-North-America/96NKX-TD7685.User-Manual-1/User-Guide-891648-Page-5.png)

![Before Initial Use6Document Version 2007-12 Charger Wall MountingAttaching the Belt Clip and Belt Clip HolderYou can attach the handset to your belt by following the steps below.Charger Wall Mounting1. Install the two included screws in the wall, spacing them 28 mm (1-1/8 in) apart.2. Mount the charger securely on the wall.• Make sure that the wall that the charger will be attached to is strong enough to sup-port the weight of the handset and charger (270 g [0.6 lb]). If not, it is necessary for the wall to be reinforced.• When this product is no longer in use, make sure to detach it from the wall.Attaching the Belt Clip and Belt Clip Holder28 mm(1-1/8 in)for chargerWasherDrive the screw to this point.28 mm(1-1/8 in)Screws[To attach] Allows phone straps and similar objects to be connected.Slide the clip into the holder until it clicks.[To remove]Make sure to turn the handset 180° when you take it off.Remove the belt clip.](https://usermanual.wiki/Panasonic-of-North-America/96NKX-TD7685.User-Manual-1/User-Guide-891648-Page-7.png)
![Before Operating the HandsetDocument Version 2007-12 7Location of ControlsLocation of Controls[Back View]SpeakerThe headset is an option. Please use only a Panasonic headset below.KX-TCA86/KX-TCA91/KX-TCA92Open the cover.Press POWER for more than 2 seconds.[Power On]Standby mode[Power Off]Blank displayUpDownLeft RightYou can use the Joy-stick to move the cursor in the desired direction. Press the center button to confirm a selection.1324680795BCDEFGHJKLNOMIALM](https://usermanual.wiki/Panasonic-of-North-America/96NKX-TD7685.User-Manual-1/User-Guide-891648-Page-8.png)
![Before Operating the Handset8Document Version 2007-12 *1 You can talk with the other party alternately through the speaker in a quiet room.During a conversation using a headset, Hands-free mode does not work.Key LockYou can lock all keys other than the Joystick while the handset is in standby mode. Ringer/Charger Indicator Display Headset Jack Refer to “Display” on page 14. TALK/SP-PHONE (Speakerphone) Key Left/Right Soft KeyUsed to make or answer calls, or toggle between the Receiver/Hands-free*1 mode during a conversation.Used to select the function displayed directly above each key. Functions are displayed based on the current context. HOLD Key POWER/CANCEL KeyUsed to place a call on Hold. Used to end calls, exit the Phonebook or Function mode, or turn the handset on or off. Meeting Mode KeyUsed to turn Meeting Mode on or off when pressed for more than 2 seconds in standby mode.For more information, refer to “Meeting Mode” on page 9. JoystickUsed to adjust the ringer/receiver vol-ume, select Function menus and the function displayed directly above it, and to move the cursor to select a desired item. Message Key TRANSFER/CLEAR KeyUsed to leave a message waiting indica-tion, or to call back the party who left a message waiting indication.Used to transfer a call to another party, or to clear digits or characters. Charge Contact INTERCOM Key Microphone Used to make or answer intercom calls. ReceiverKey LockAJBCKDLEMFNGOHI[Display Icon]Unlocked LockedPress the Joystick for more than 2 seconds to lock/unlock.](https://usermanual.wiki/Panasonic-of-North-America/96NKX-TD7685.User-Manual-1/User-Guide-891648-Page-9.png)
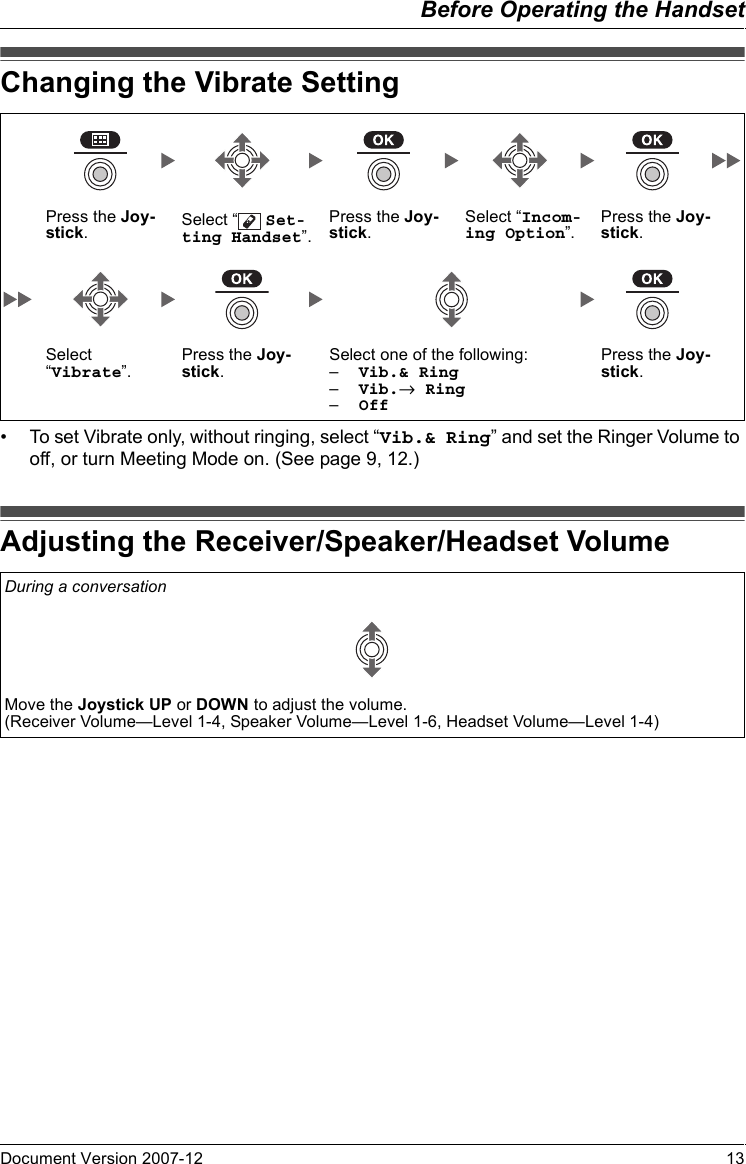
![Before Operating the Handset12 Document Version 2007-12 Adjusting the Ri nger Volume• To set the ringer pattern, see page 49.Adjusting the Ri nger Volume or Turning the R inger off while Ringing*1 The adjusted volume level will also be used for subsequent calls.• If you attach the headset while receiving an incoming call, the ring from the handset does not switch to the headset. If you attach the headset before receiving an incoming call, and headset tone is set to on, a tone will be heard from the headset. If Vibrate is set to on, the handset will vibrate whether a headset is attached or not.Adjusting the Ringer VolumePress the Joystick.Select “ Ringer Volume”.Press the Joystick. Select the desired set-ting. (Step Up/Step Down/Level 1-6/Off)Press the Joystick.Adjusting the Ringer Volume or Turning the Ringer off while RingingWhile receiving a call[To adjust the ringer volume]Move the Joystick UP or DOWN to adjust the volume.*1[To turn the ringer off]ORPress the Joystick. Press CANCEL.](https://usermanual.wiki/Panasonic-of-North-America/96NKX-TD7685.User-Manual-1/User-Guide-891648-Page-13.png)

![Before Operating the HandsetDocument Version 2007-12 17Operation OutlineHandset functions are accessed through the display menu and selected with the Joystick and soft keys. The guidance display is shown in standby mode for easy operation.*1 You can select whether the guidance display is shown or not. (See page 52.)*2 Moving the Joystick displays the phone number.• To enter characters, see page 42. To search for an item stored in the Phonebook, see page 24.Operation Outline[Main Menu][Handset Phonebook] [Incoming Call Log] *2 [Outgoing Call Log][PBX System Phonebook] [PBX Extension Phonebook] [Incoming Call Log Group][Function Keys] [In standby mode] *1 [Flexible CO Keys]](https://usermanual.wiki/Panasonic-of-North-America/96NKX-TD7685.User-Manual-1/User-Guide-891648-Page-18.png)
![Before Operating the Handset20 Document Version 2007-12 Flexible CO KeysA flexible CO key can be used either to seize a line in order to make or receive an outside call (F-CO key), or used as a function key. Move the Joystick to display the flexible CO key list. Here you can access the 12 flexible CO keys. The icon shown beside each F-CO key indicates line status similarly to the LED indicators on a Proprietary Telephone; is the same as a green LED, and is the same as a red LED.[Example]Understanding the F-CO Key Icons*1*1 The meanings of these icons vary depending on the status of the CO line.• To select a key, press its key number, or move the Joystick to select the desired key and press .• To edit the names of flexible CO keys, see page 11.• For more information, refer to the feature documentation for your PBX.Flexible CO Keys(on): You are currently using this line.(flashing rapidly): You have an incoming call on this line.(An outside call is coming in on a single extension.)(flashing slowly): You have a call on hold on this line.(on): This line is in use by someone else.(flashing rapidly): You have an incoming call on this line.(An outside call is coming in on multiple extensions simultaneously.)(flashing slowly): Someone has a call on hold on this line.(no icon) This line is idle.](https://usermanual.wiki/Panasonic-of-North-America/96NKX-TD7685.User-Manual-1/User-Guide-891648-Page-21.png)
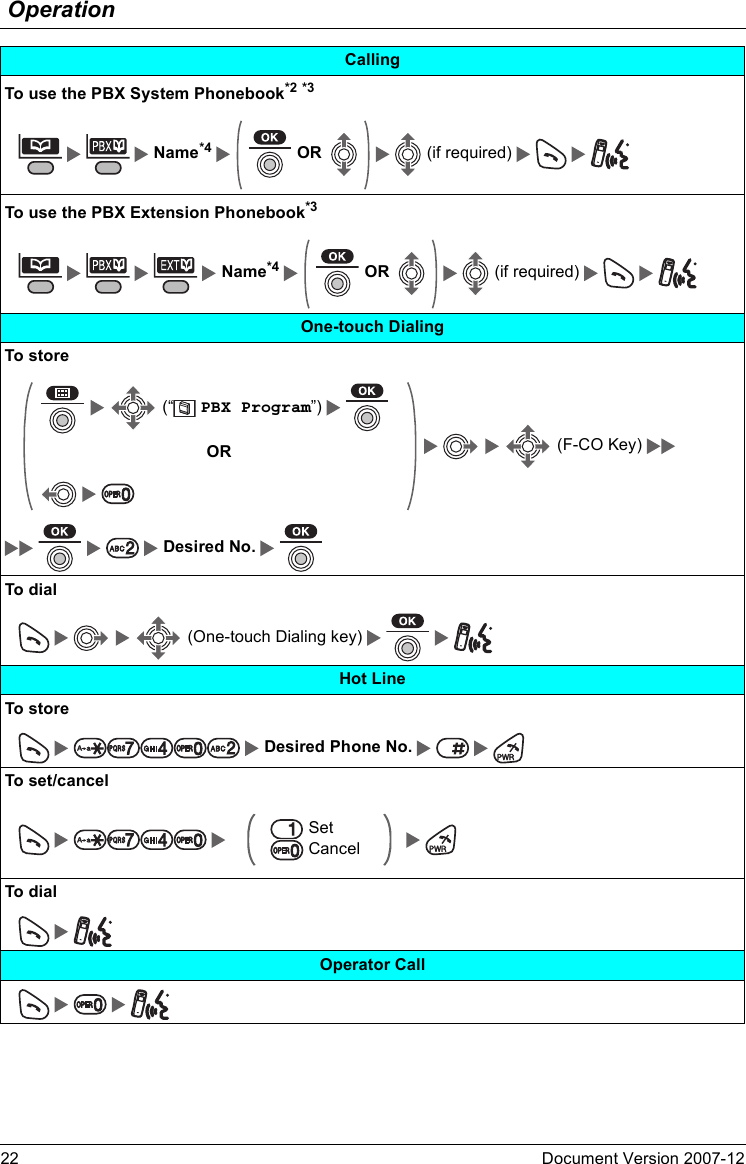
![OperationDocument Version 2007-12 21Making CallsMaking CallsCallingTo an extension Extension No. To an outside partyTo use the Line Access Numbers Outside Phone No. OR CO Line Group No.To use Flexible CO Keys (idle CO key no. [0-9, , #]) Outside Phone No. OR (idle CO key) To use Hot Key Dial*1 (Press the dialing key assigned as a Hot Key for more than 1 second.) To use the Outgoing Call Log*2 To use the Incoming Call Log To use the Incoming Call Log Group Incoming Call Log Group No. To use the Handset Phonebook*3 Name*4 OR (if required)](https://usermanual.wiki/Panasonic-of-North-America/96NKX-TD7685.User-Manual-1/User-Guide-891648-Page-22.png)
![OperationDocument Version 2007-12 27Receiving Calls• You can also answer a call with the following features:– Any Key Answer (See page 51.)– Quick Answer (See page 51.)– Auto Answer (See page 51.)• You can select the ringer, LED, and vibrate pattern for each type of incoming call. (See page 49.)• For more information, refer to the user documentation for your PBX.Receiving CallsReceivingAn Intercom Call/An Outside Call/An Group Call An Intercom Call An Outside Call on a specific line (rapidly flashing F-CO key [0-9, , #]) OR (rapidly flashing F-CO key) Call Pickup Directed Extension No.Group Group No. (2 digits)](https://usermanual.wiki/Panasonic-of-North-America/96NKX-TD7685.User-Manual-1/User-Guide-891648-Page-28.png)
![OperationDocument Version 2007-12 29During a Conv ersation• To return to the call before the transfer destination answers, press .• The method used to hold a call depends on the Call Hold mode (Regular Hold/Exclusive Call Hold). Ask your manager what the current mode is.During a ConversationTransferring a CallTo an extension Extension No. To an outside party Outside Phone No. OR CO Line Group No.HoldingTo hold (Regular Hold) To hold (Exclusive Call Hold) To retrieve a callAn Intercom Call An Outside Call (slowly flashing F-CO key [0-9, , #]) OR (slowly flashing F-CO key) Three-party ConferenceTo add another party during a conversation Desired Phone No. (Talk to the new party.) (Talk with multiple parties.)To leave a conference](https://usermanual.wiki/Panasonic-of-North-America/96NKX-TD7685.User-Manual-1/User-Guide-891648-Page-30.png)
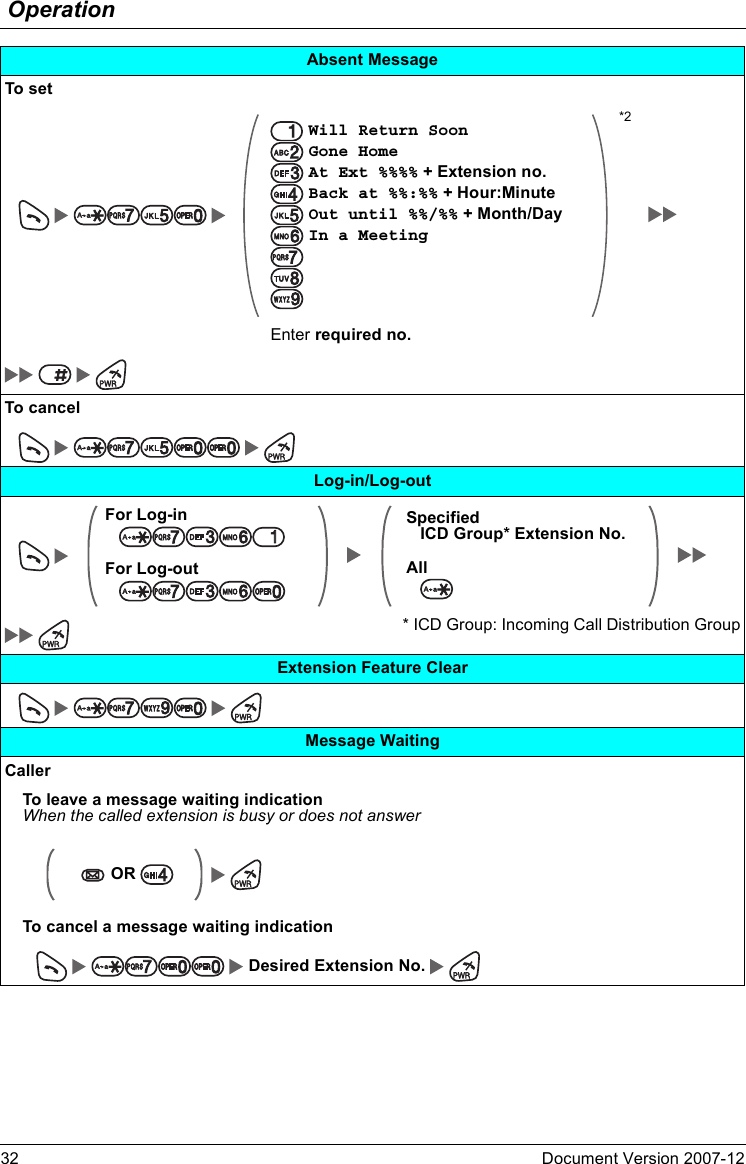
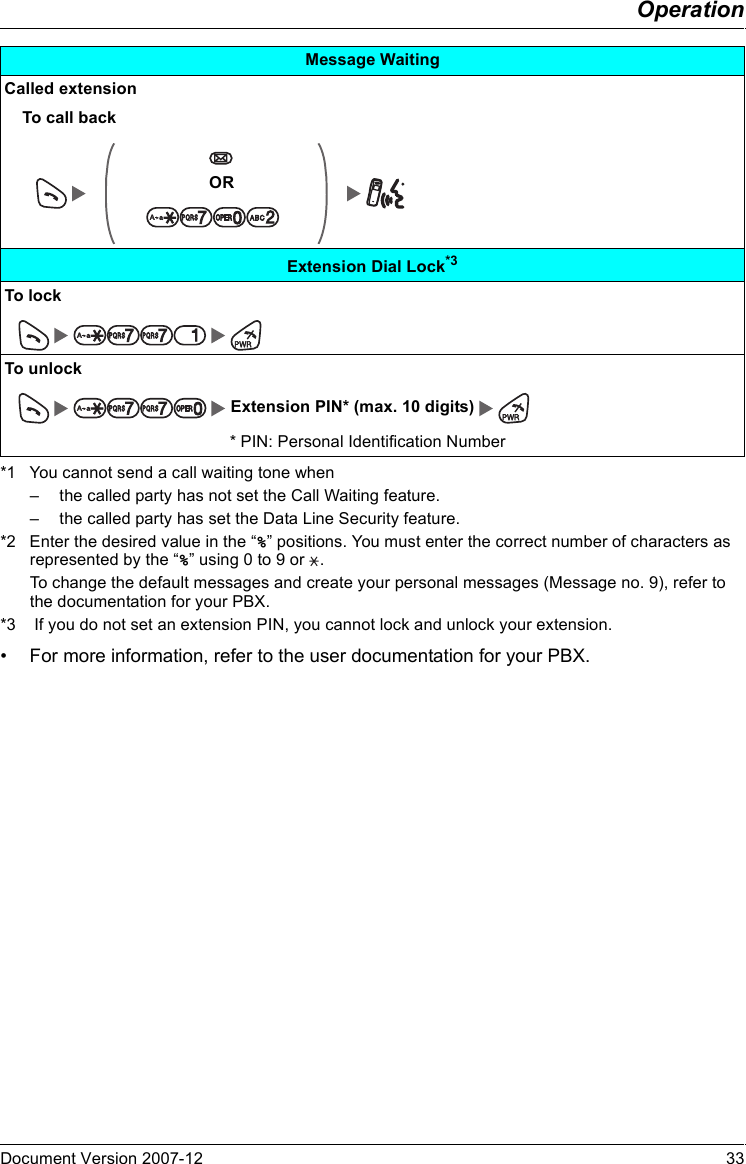
![OperationDocument Version 2007-12 31Call WaitingTo set/cancel for intercom calls No call ToneTo set/cancel for outside calls No tone ToneTo talk to the new party (While hearing the Call Waiting tone)To terminate a current status To hold and then talk to the new party (rapidly flashing F-CO Key [0-9, , #])OR (rapidly flashing F-CO Key) ORDisregard this step if both parties are extensions.PagingTo page Paging Group No. (2 digits) (Announce) Wait for an answer. To answer](https://usermanual.wiki/Panasonic-of-North-America/96NKX-TD7685.User-Manual-1/User-Guide-891648-Page-32.png)

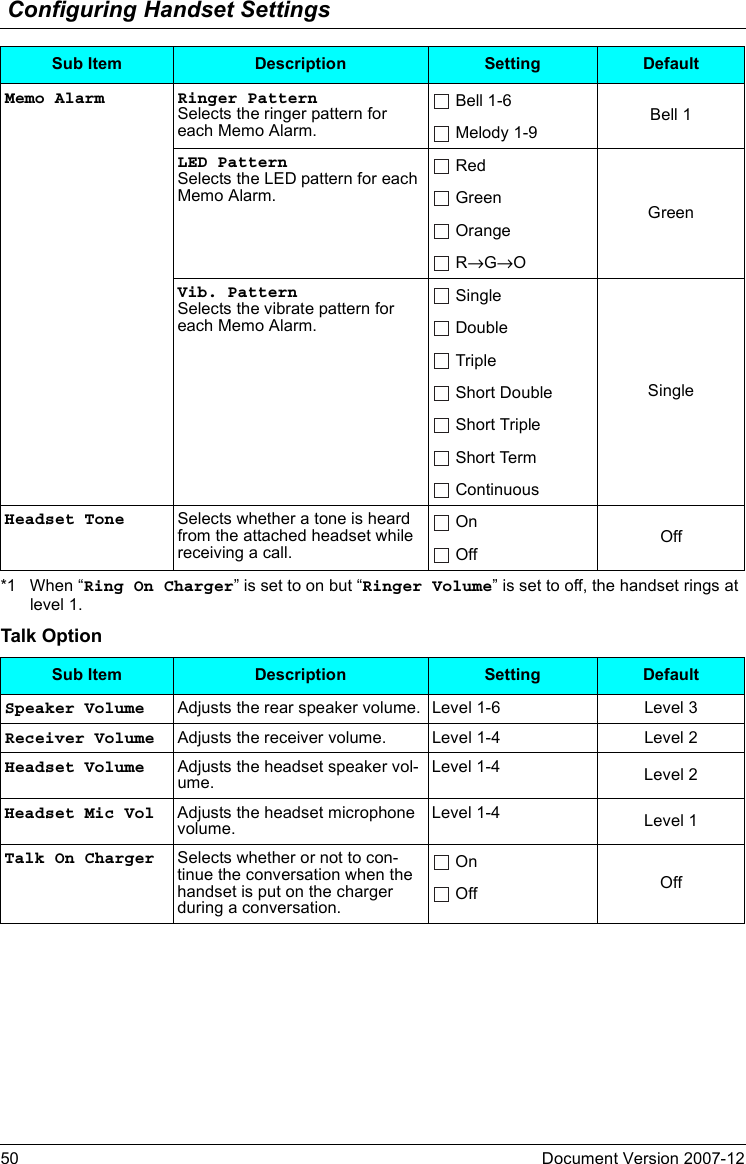
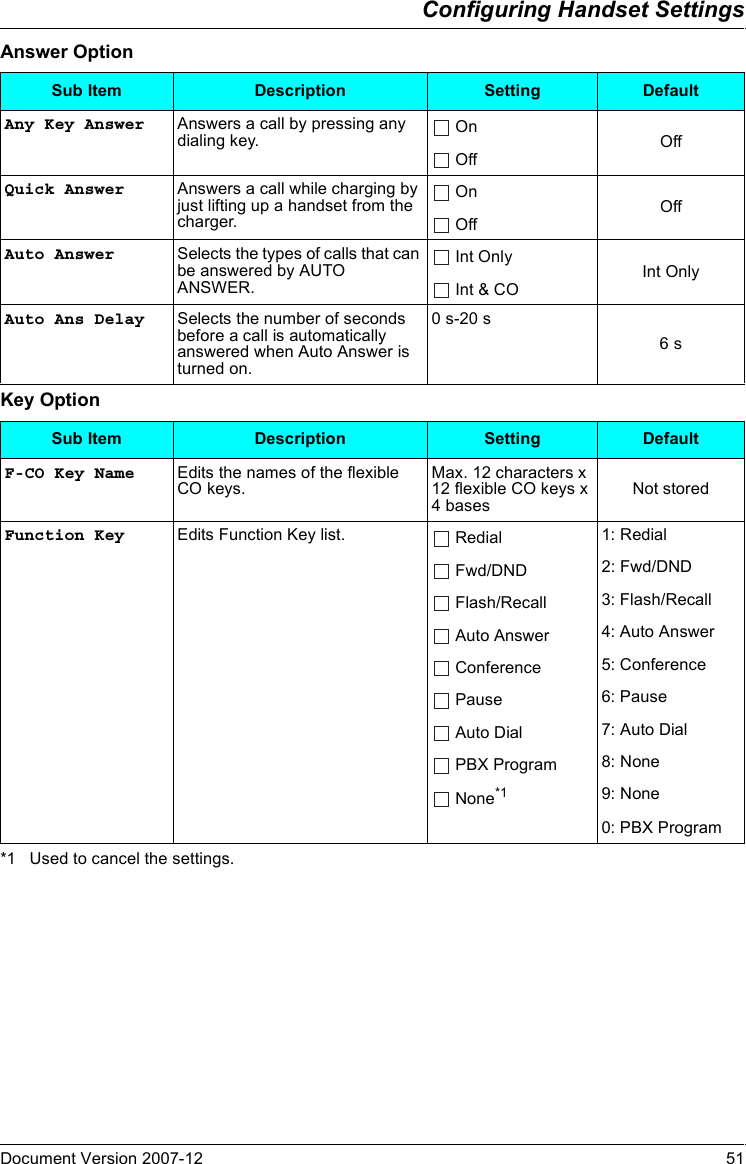
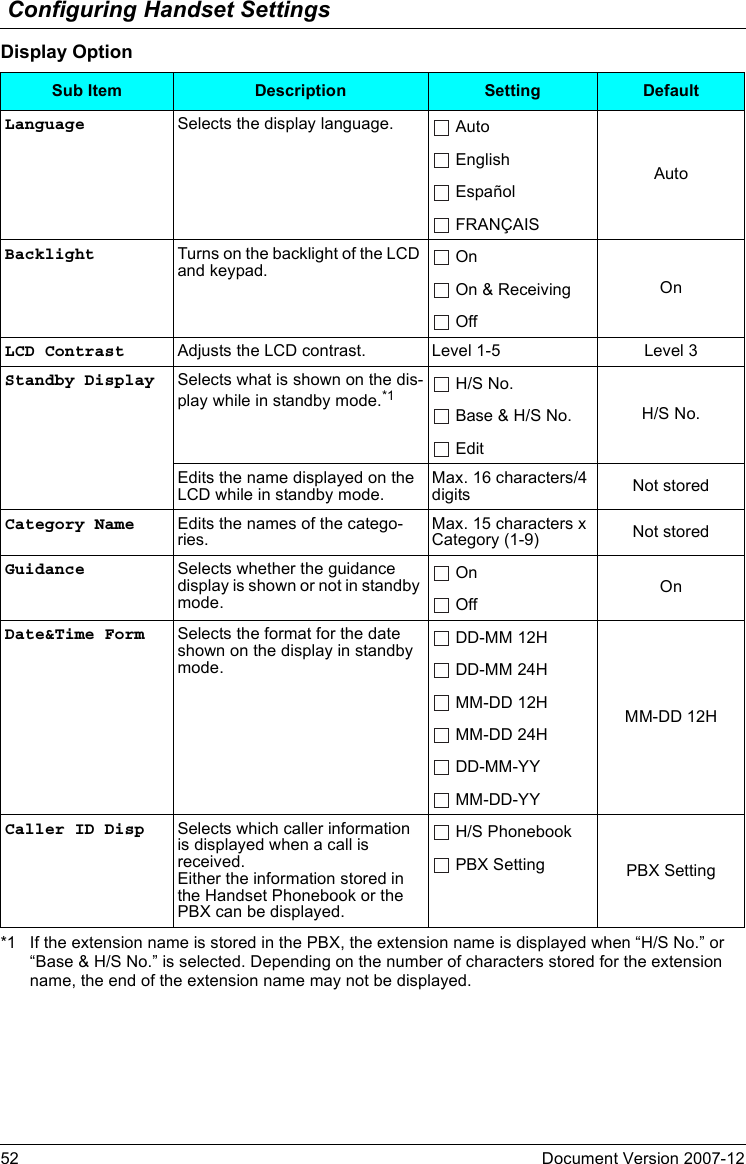
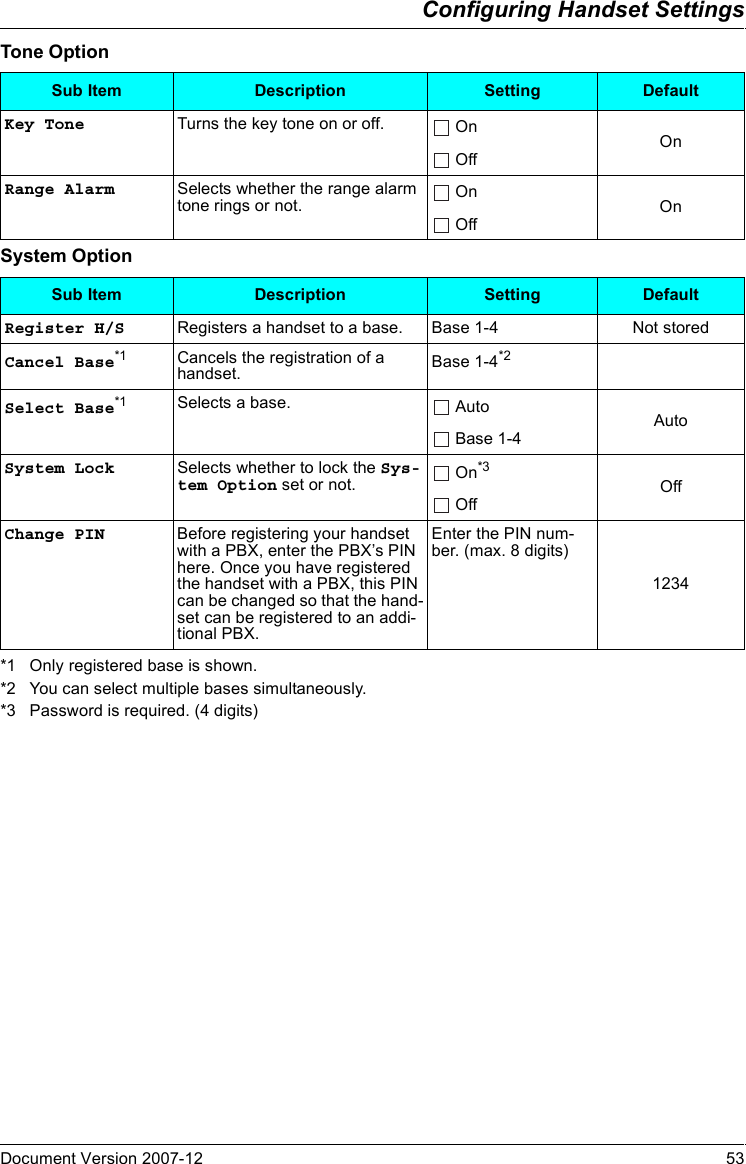
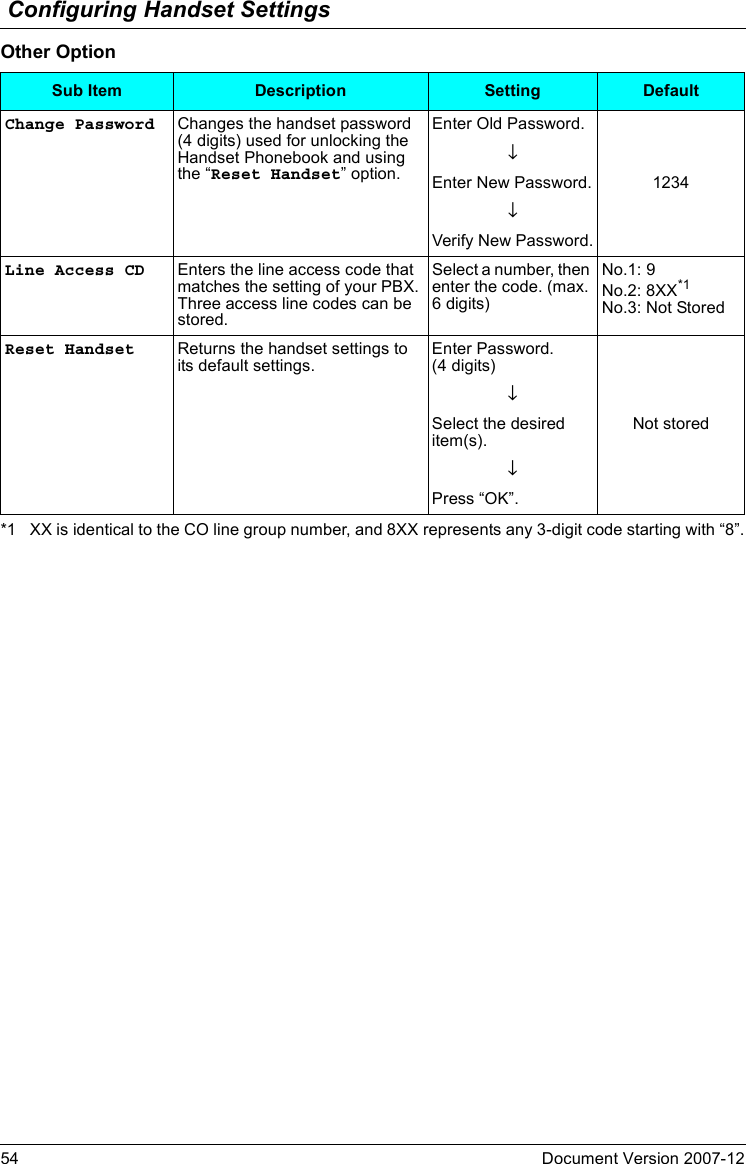
![Configuring Handset Settings48 Document Version 2007-12 Handset Setting Menu LayoutHandset Setting Menu Layout[Main Item] [Sub Item] Setting Handset Incoming Option Ringer VolumeRinger TypeVibrateRing On ChargerMemo AlarmHeadset ToneTalk Option Speaker VolumeReceiver VolumeHeadset VolumeHeadset Mic VolTalk On ChargerAnswer Option Any Key AnswerQuick AnswerAuto AnswerAuto Ans DelayKey Option F-CO Key NameFunction KeyDisplay Option LanguageBacklightLCD ContrastStandby DisplayCategory NameGuidanceDate&Time FormCaller ID DispTone Option Key ToneRange AlarmSystem Option Register H/SCancel BaseSelect BaseSystem LockChange PINOther Option Change PasswordLine Access CDReset Handset](https://usermanual.wiki/Panasonic-of-North-America/96NKX-TD7685.User-Manual-1/User-Guide-891648-Page-49.png)
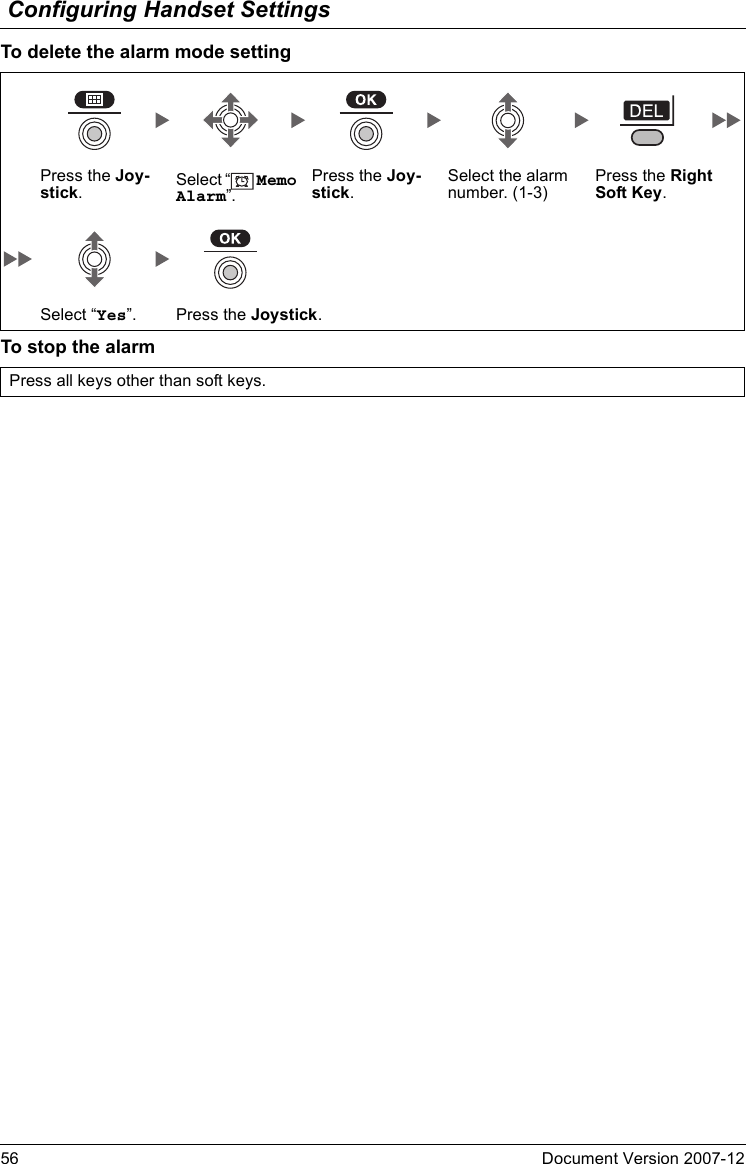
![Configuring Handset SettingsDocument Version 2007-12 55Memo Alarm SettingAn alarm will sound at the set time. A memo can also be displayed. Memo Alarm is available only when handset is within range of a CS.To set*1 You can select the format for the date and time. (See page 52.)*2 A “ ” will be displayed next to a day of the week that have been set.• You can select the ringer/LED/vibrate pattern for each Memo Alarm. (See page 50.)• If you are on a call at the time that the alarm is set to sound, it will sound after you have ended the call.Memo Alarm SettingPress the Joy-stick.Select “ Memo Alarm”.Press the Joy-stick.Select the alarm number. (1-3)Press the Joy-stick.[Select the Alarm mode—Once/Daily][Once]Enter date and time.*1[Daily]Enter the time.Enter memo.Press the Joy-stick.Press the Joy-stick.Press the Joystick for “Save”.[Select the Alarm mode—Weekly]*2Enter time.Select the desired day of the week.Press the Right Soft Key.Press the Joy-stick.Press the Joy-stick.Enter memo.Press the Joy-stick.Press the Joy-stick for “Save”.[Select the Alarm mode—Off]Press the Joy-stick.Press the Joystick for “Save”.](https://usermanual.wiki/Panasonic-of-North-America/96NKX-TD7685.User-Manual-1/User-Guide-891648-Page-56.png)

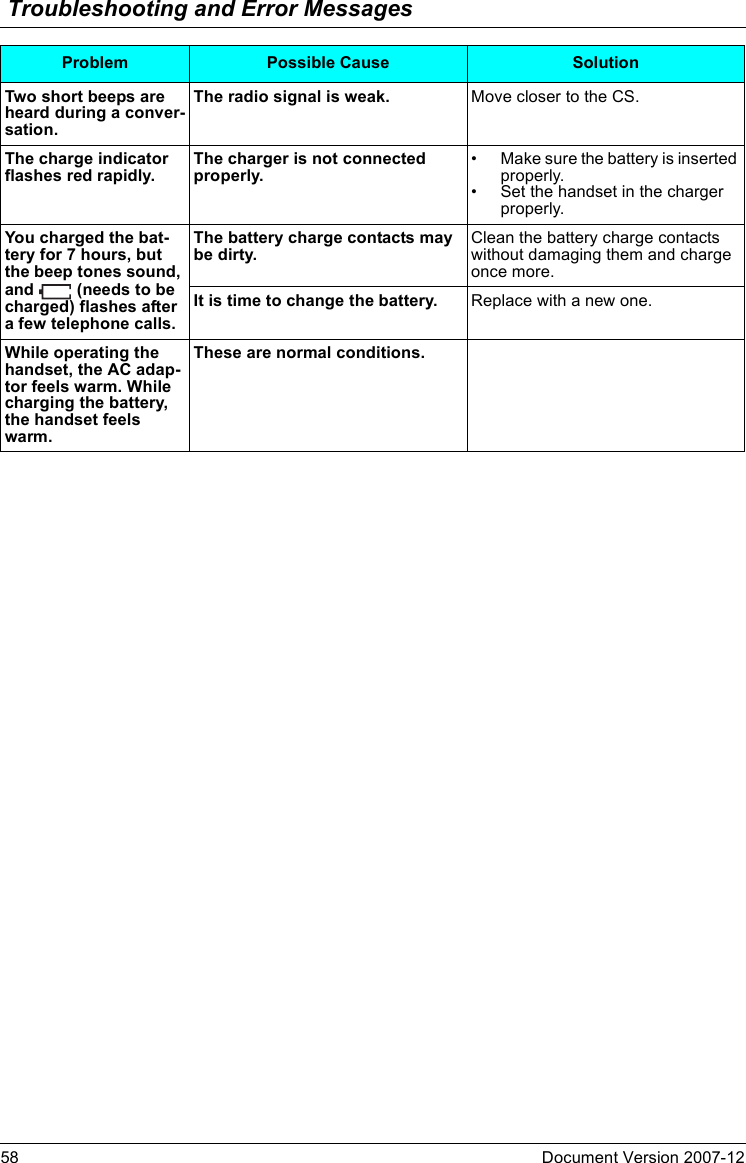
![Important Information60 Document Version 2007-12 Battery InformationAfter your Panasonic battery is fully charged (at 25 °C [77 °F]):• Operating time may be shorter than listed above depending on usage conditions and ambient temperature.• The battery will drain slowly even while the handset is turned off.• The handset can receive calls while charging.• Battery consumption increases when the handset is used out of range. If “ ” flashes, power off the handset.Low Battery WarningThe battery needs to be charged in the following situations:• “ ” flashes, and the alarm sounds*1.•“Charge Battery” is displayed. In this situation, the handset cannot be operated.*1 If the low battery warning occurs during a conversation, the call will be automatically disconnected one minute after the alarm sounds.Replacing the BatteryIf “ ” flashes after using the phone for a short time, even when the battery has been fully charged, the battery should be replaced.Before replacing the battery, make sure the low battery warning is displayed, then turn off the power to prevent memory loss. Replace the battery and charge the new battery for about 7 hours.If you replace the battery before the low battery warnings appears, the battery strength icon may display an incorrect reading. In this case, use the handset as normal with the new battery installed. When the low battery warning is displayed, charge the battery for about 7 hours. The battery strength icon will then display the correct reading.• Please use a Panasonic battery with the service part number N4HHGMB00005 or HHR-P103.Battery InformationOperation Operating TimeWhile in use (Talk) Up to about 10 hWhile not in use (Standby) Up to about 168 h1. Turn the power off to prevent memory loss.2. Press the notch on the cover firmly and slide it as indicated by the arrow.3. Open the cover and replace the battery.4. Close the cover and charge the handset.This product is powered by a recyclable nickel-metal hydride battery.Please call 1-800-8-BATTERY for information on how to recycle this battery.There is a danger of explosion if the battery is incorrectly replaced.](https://usermanual.wiki/Panasonic-of-North-America/96NKX-TD7685.User-Manual-1/User-Guide-891648-Page-61.png)