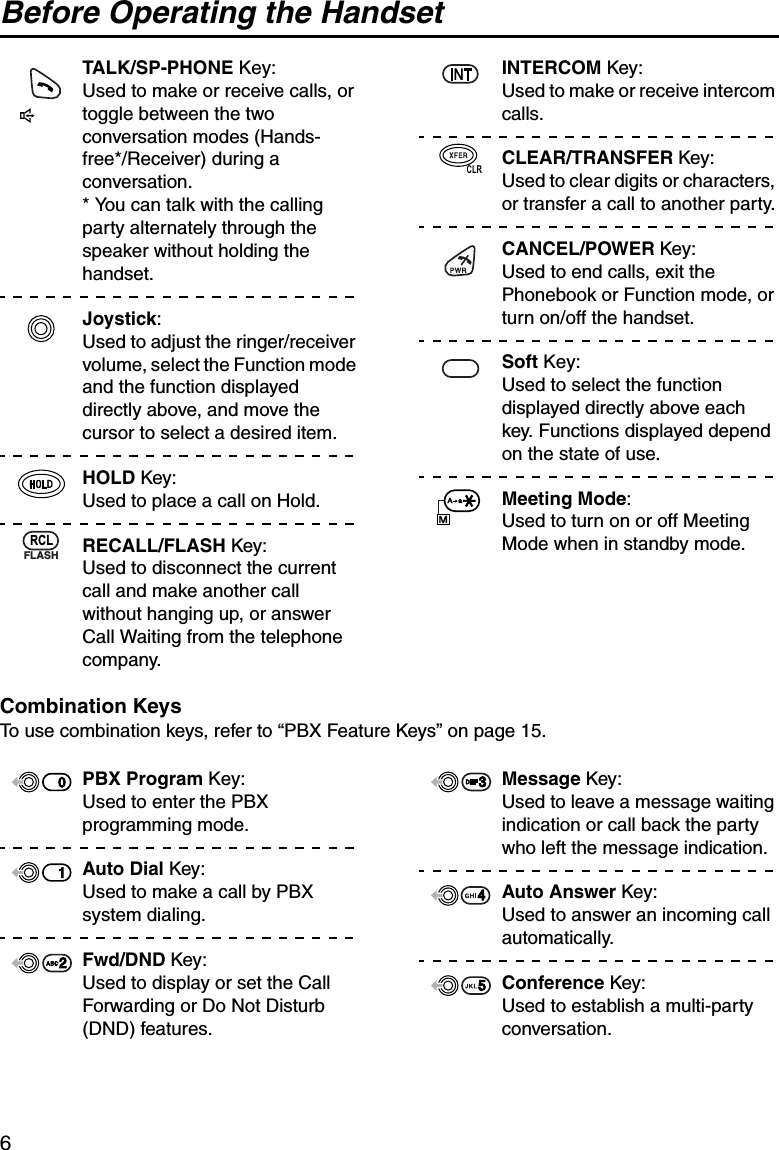
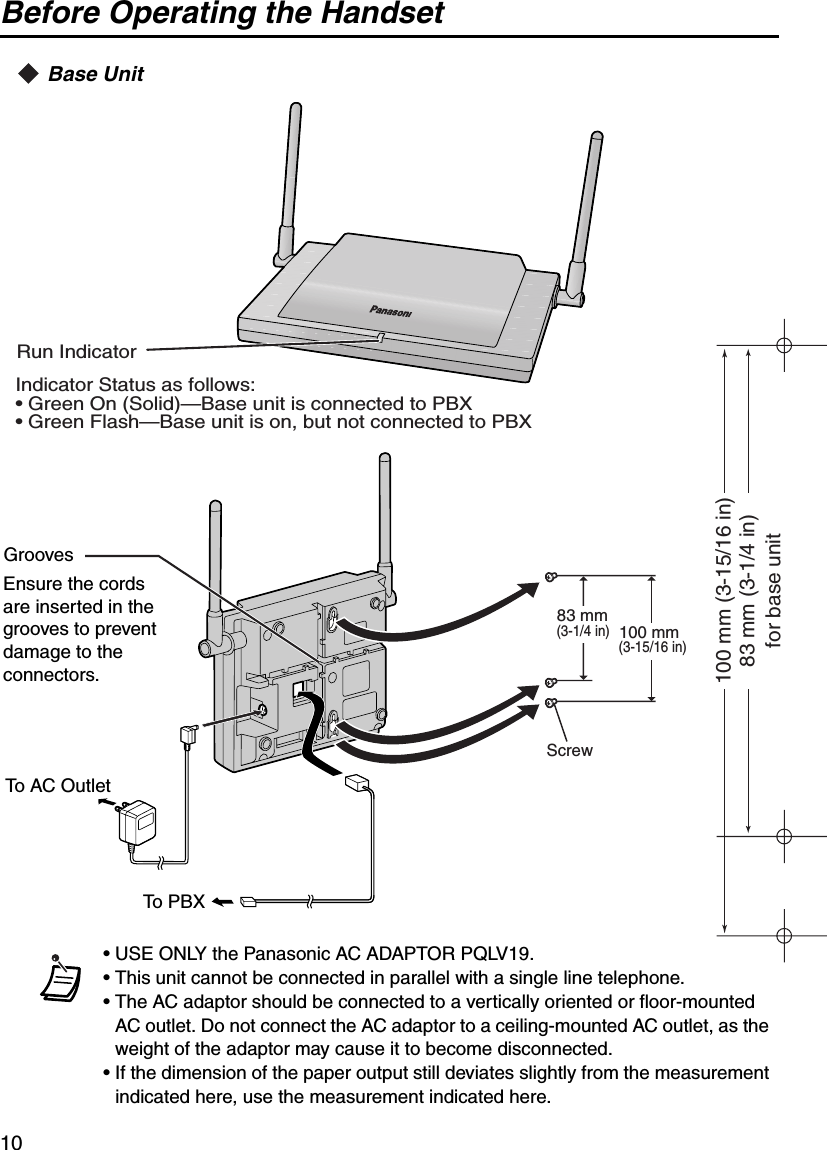
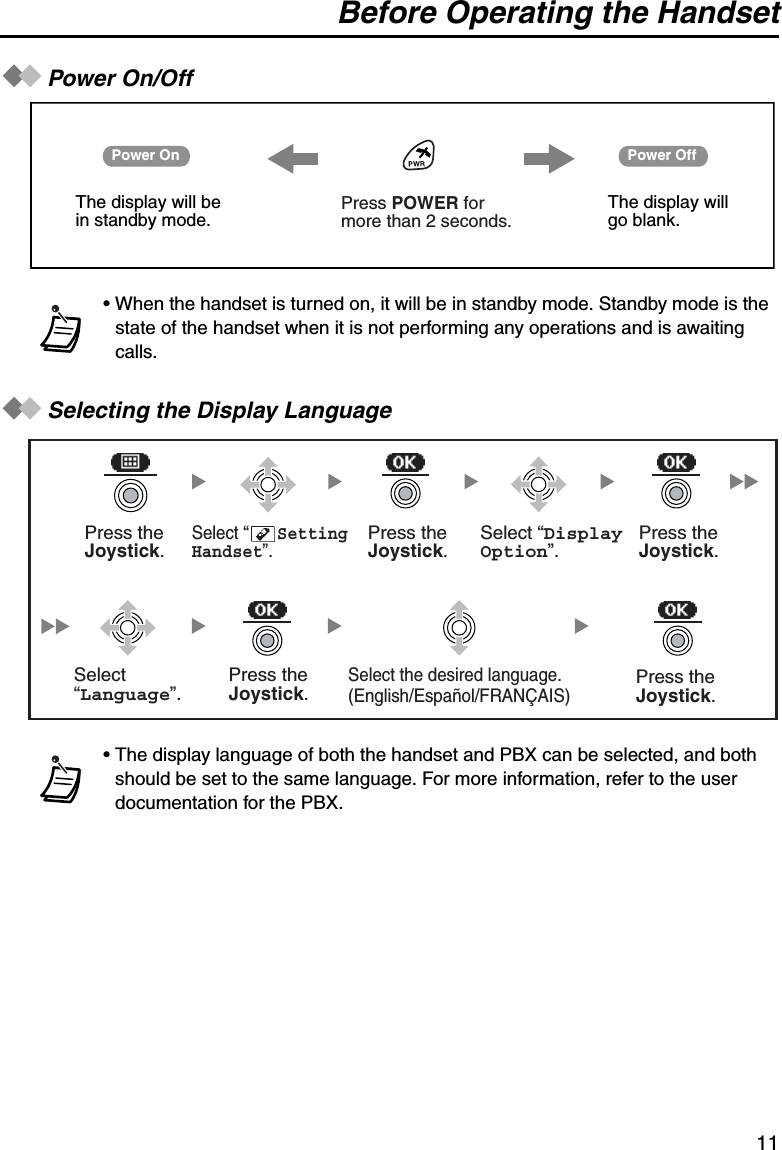
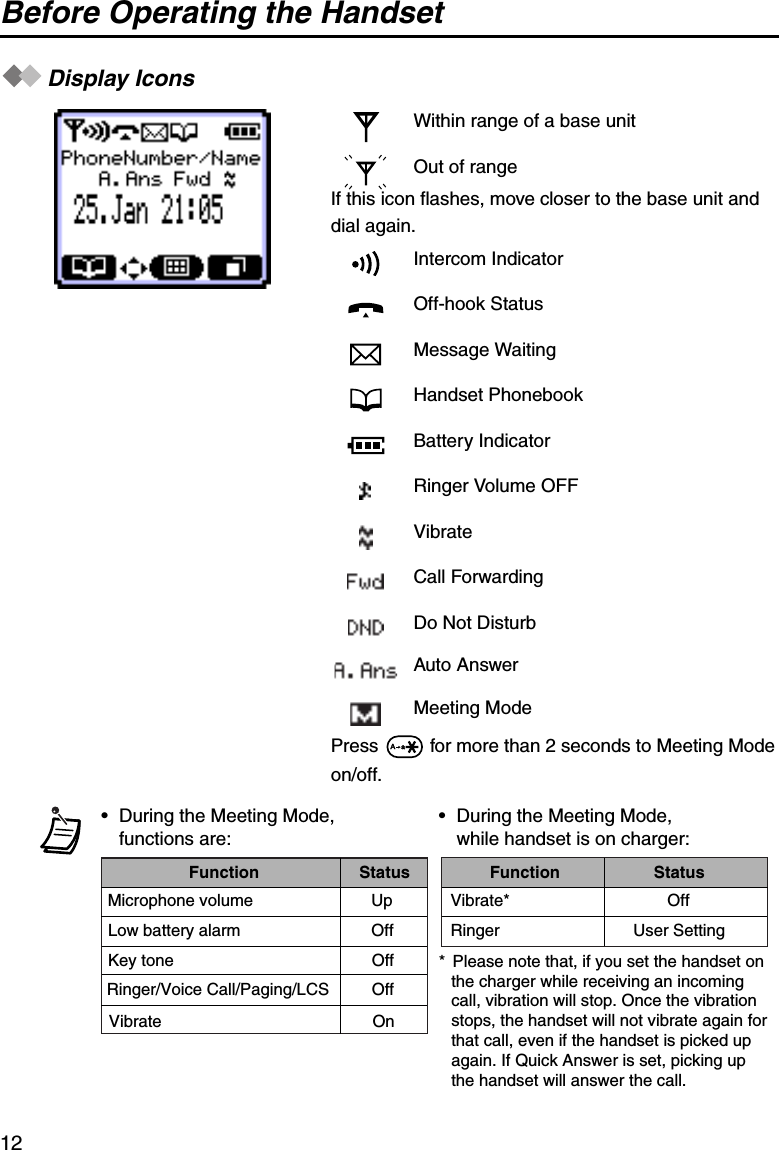
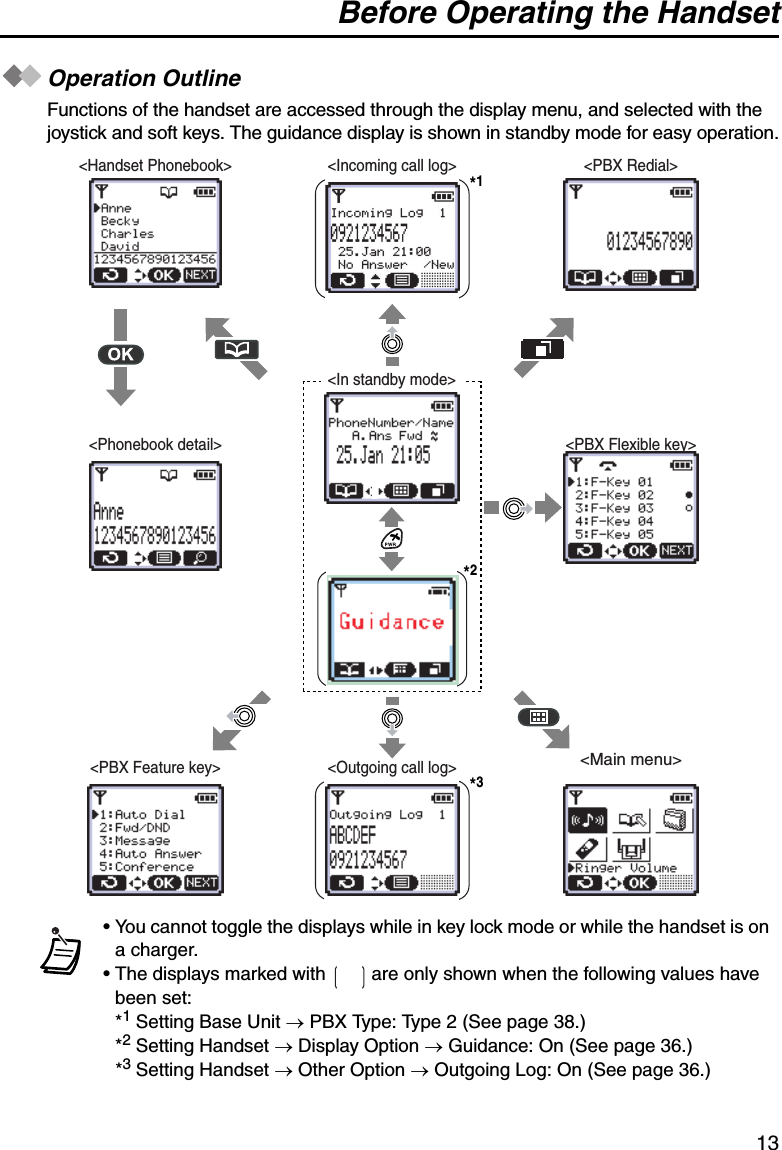
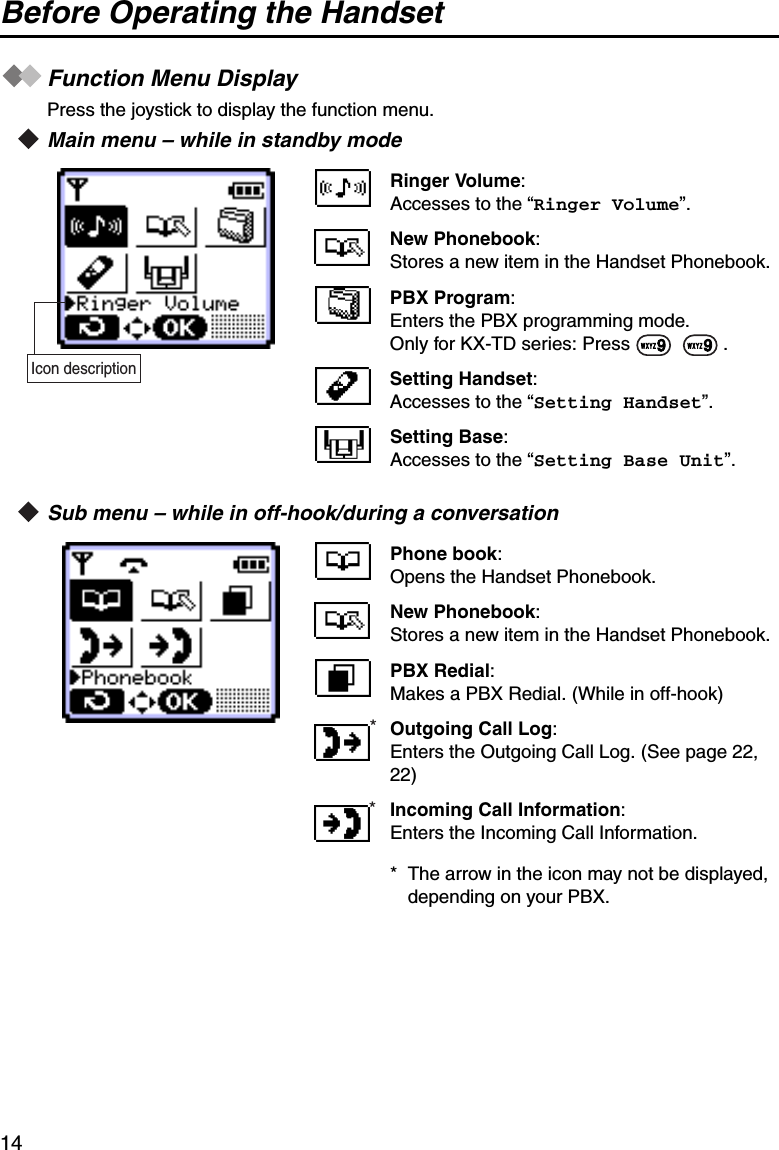
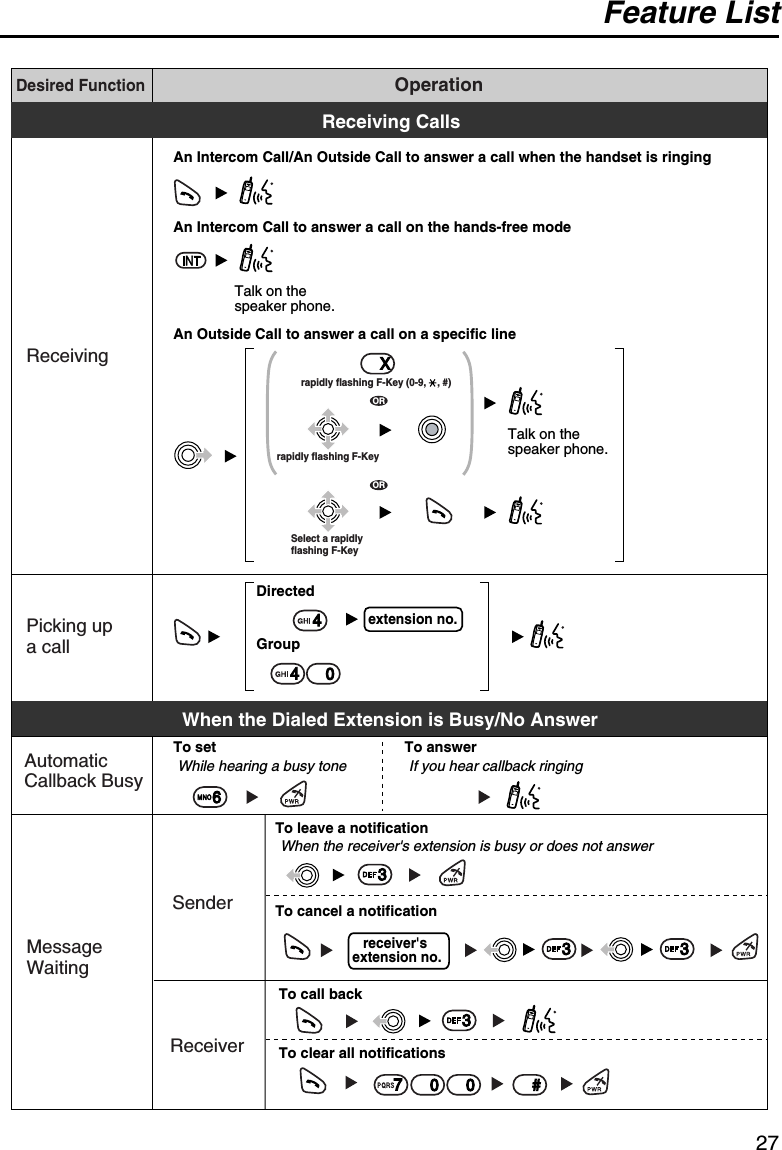
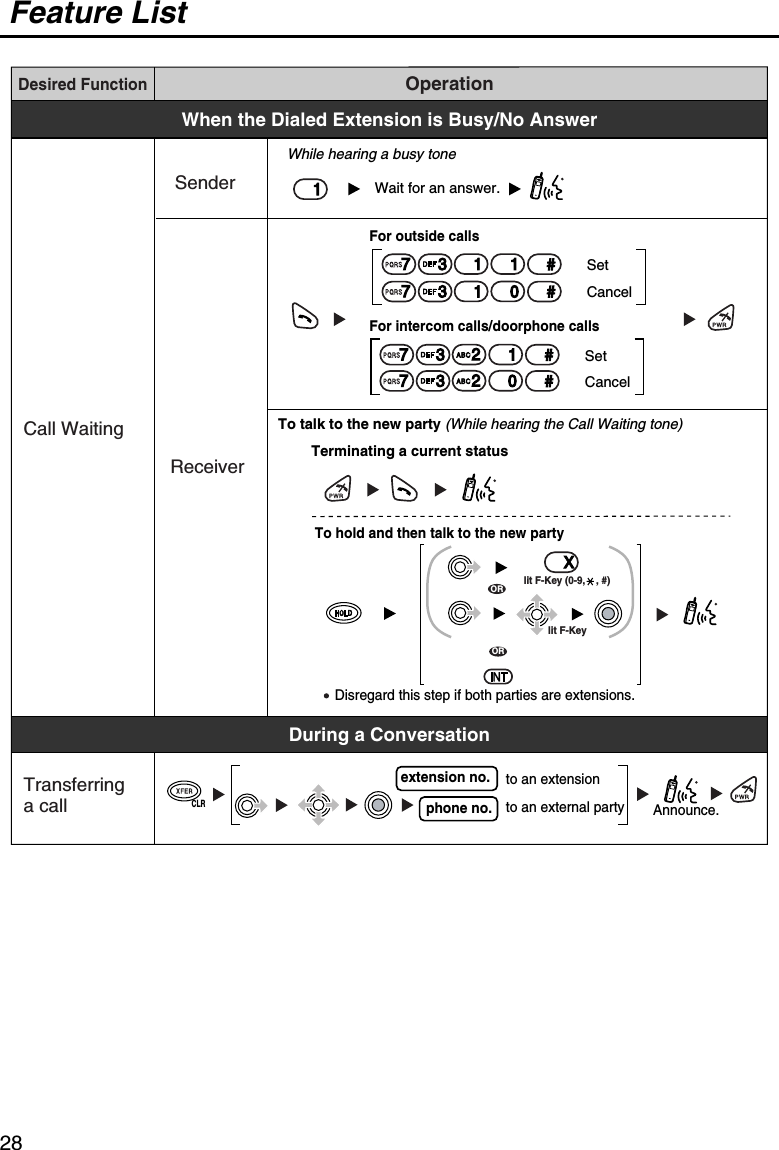
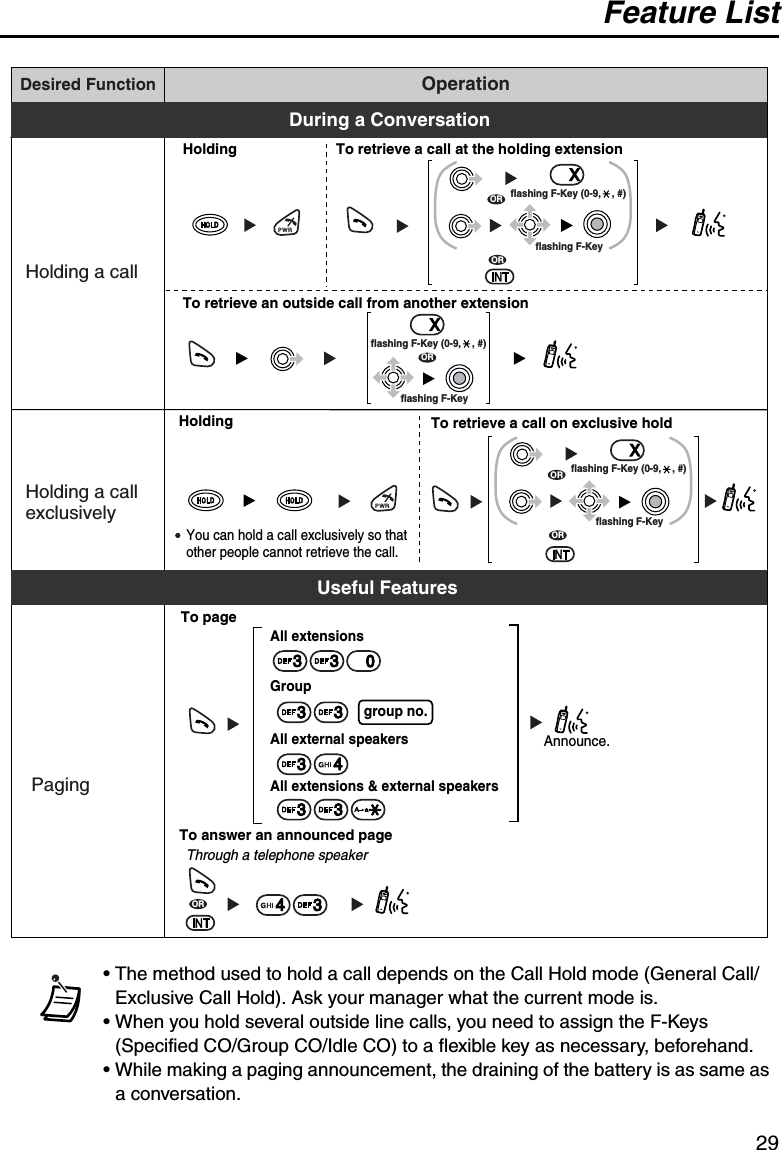
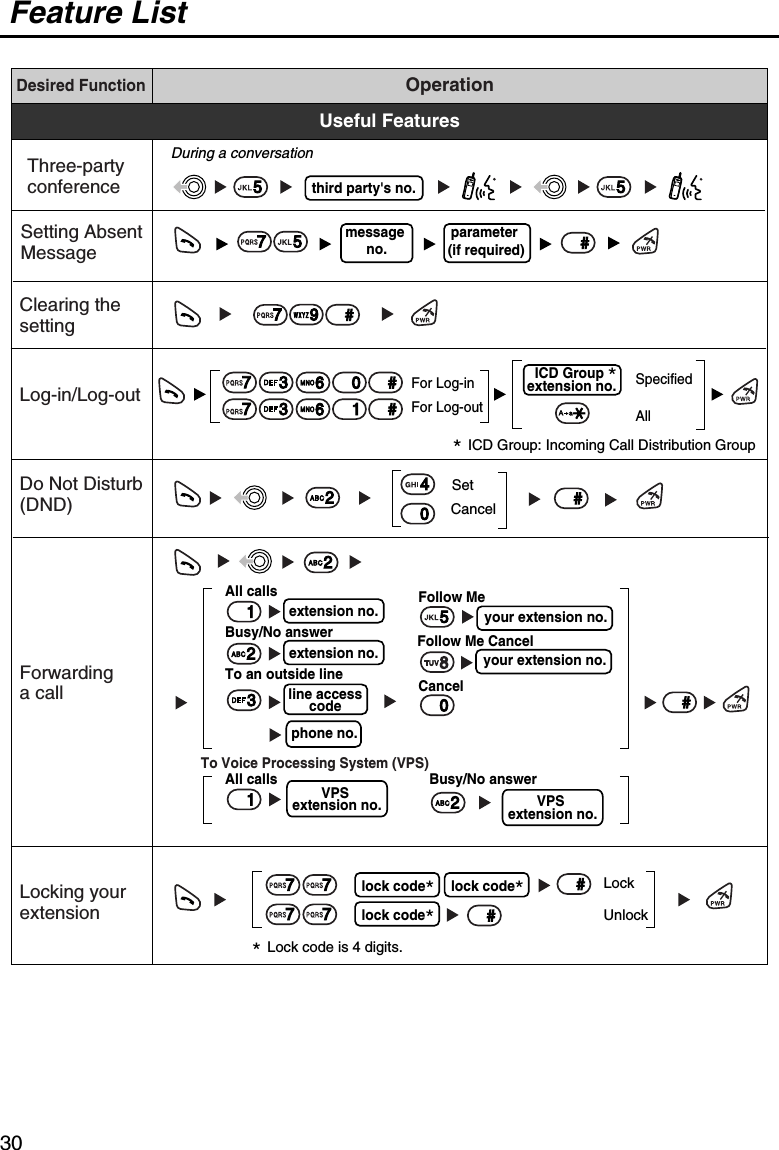
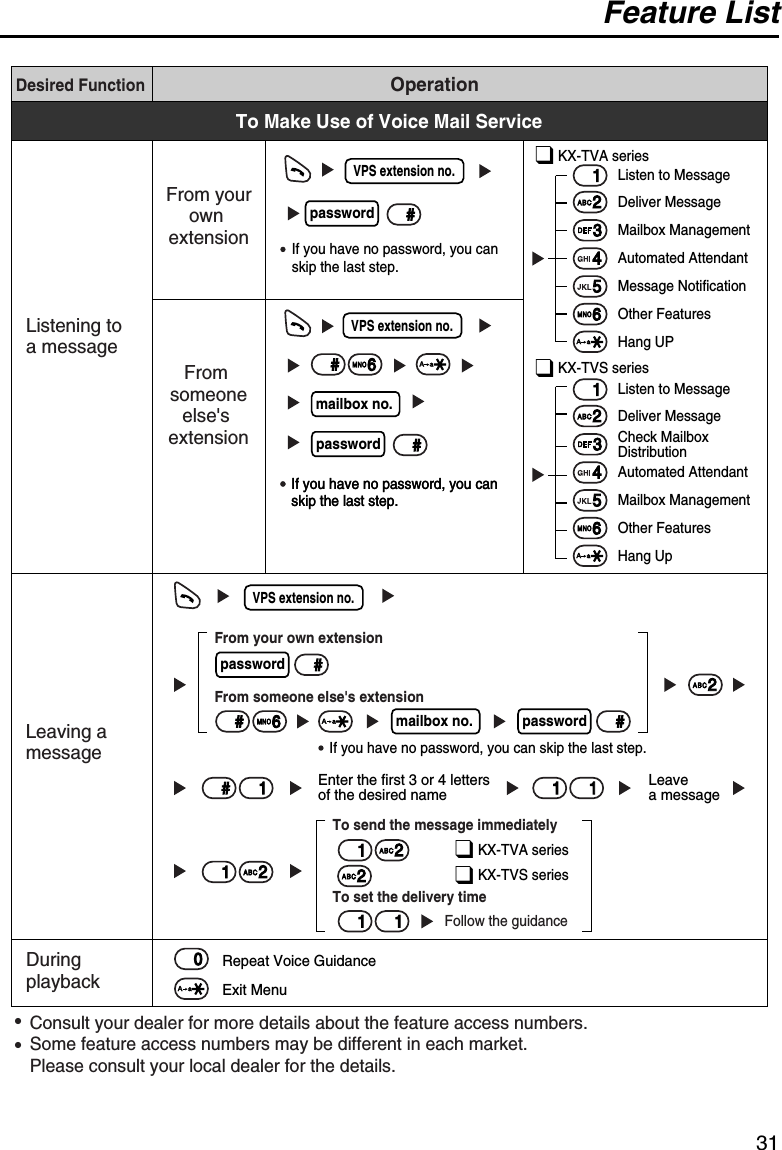
Panasonic of North America 96NKX-TD7896 2.4 GHz WIRELESS PROPRIETARY CORDLESS TELEPHONE User Manual KX TD7896
Panasonic Corporation of North America 2.4 GHz WIRELESS PROPRIETARY CORDLESS TELEPHONE KX TD7896
Contents
- 1. STATEMENT OF DIGITAL CODE SECURITY
- 2. USER MANUAL
USER MANUAL

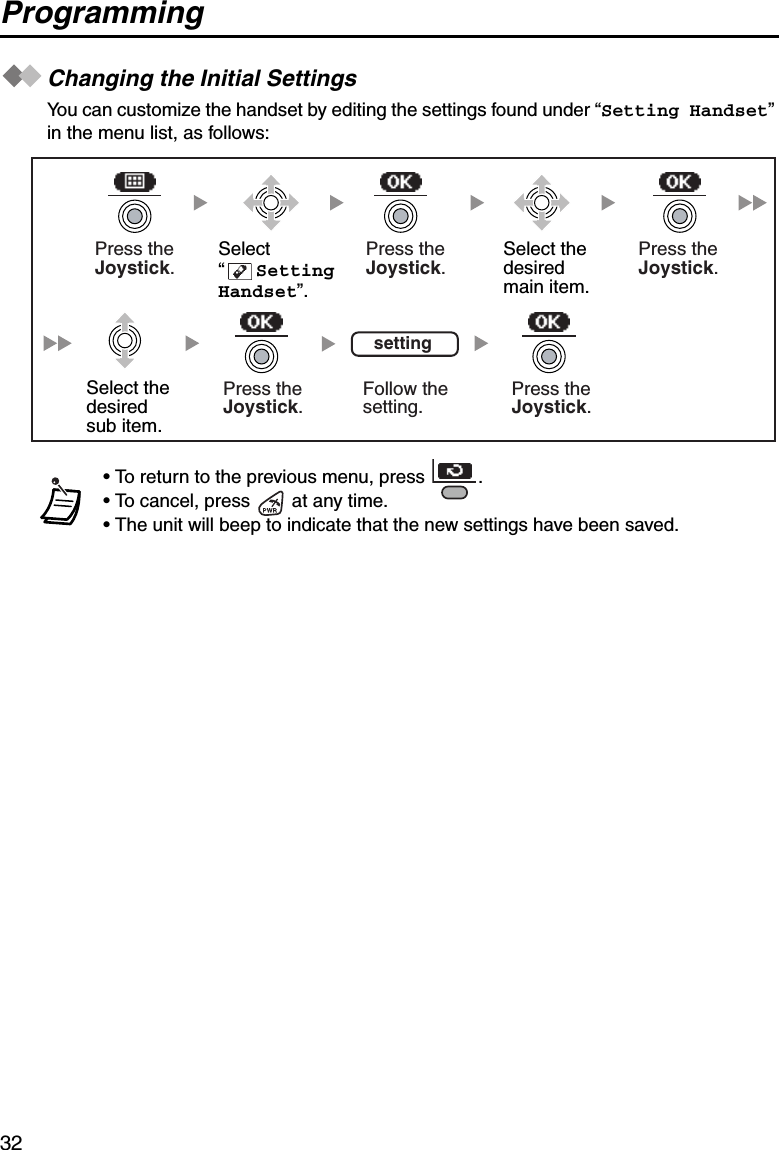
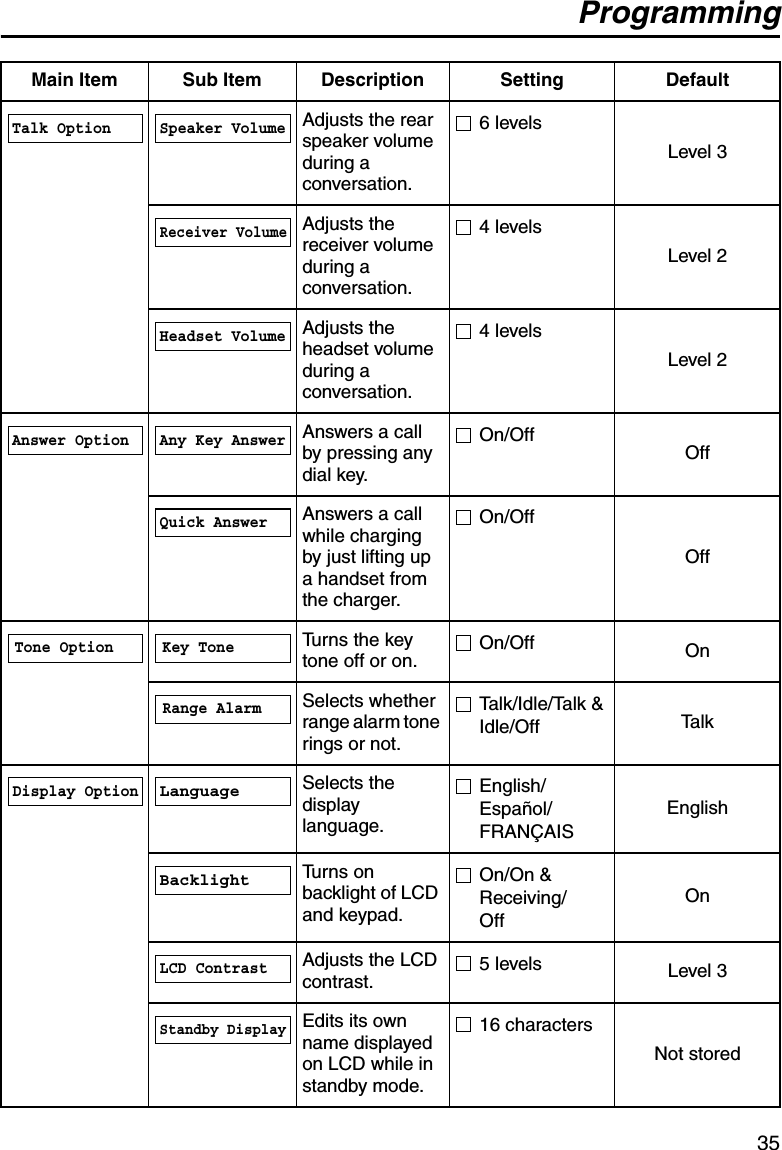
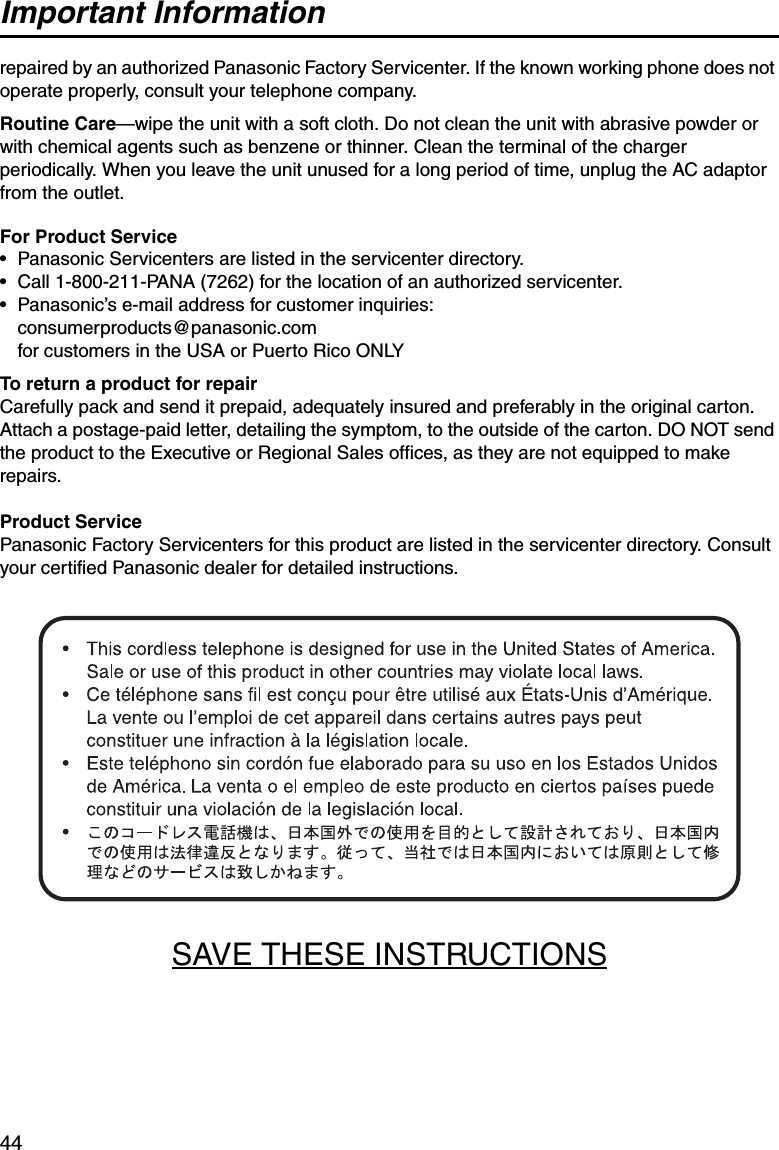
![Programming38Base unit setting menu layoutCommon Settings*1 After you set the PBX type, disconnect and reconnect the telephone cord.*2 For KX-TDA series, default may vary by country/area.The following settings vary depending on the PBX type.For “PBX Type-Type 1” only [KX-TA624/KX-TA824/KX-TAW848/KX-TDA series]Main Item Description Setting DefaultSelects the type of PBX that the base unit is connected to.*1Type 1/Type 2Ty p e 1Mode 1/Mode 2 Mode 1*2Main Item Description Setting DefaultSelects which line of the display Caller ID is shown from.1st Line/2nd Line/3rd Line1st LinePBX TypeSetting BaseFwd/DND DisplayCaller ID LineDate&TimeCaller ID Line(For “PBX Type-Type 2” only)(For “PBX Type-Type 1” only) (For “PBX Type-Type 2” only)PBX TypeFwd/DND DisplayCaller ID Line](https://usermanual.wiki/Panasonic-of-North-America/96NKX-TD7896.USER-MANUAL/User-Guide-553465-Page-38.png)
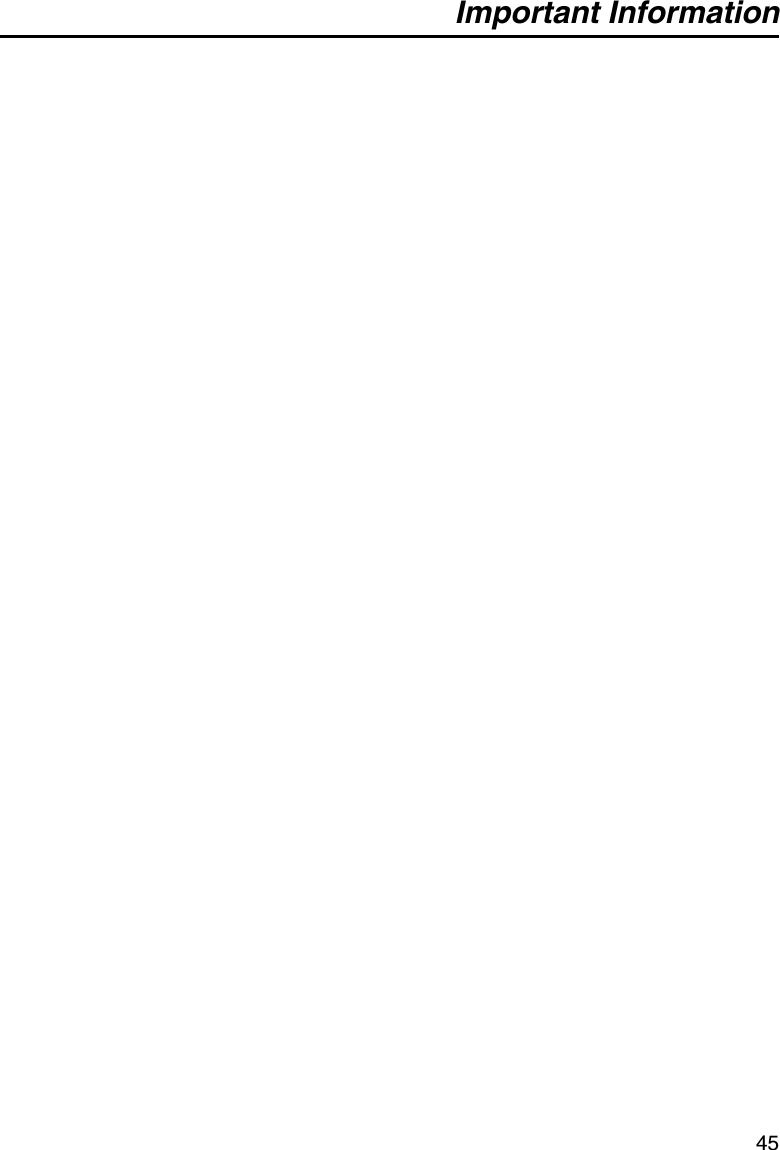
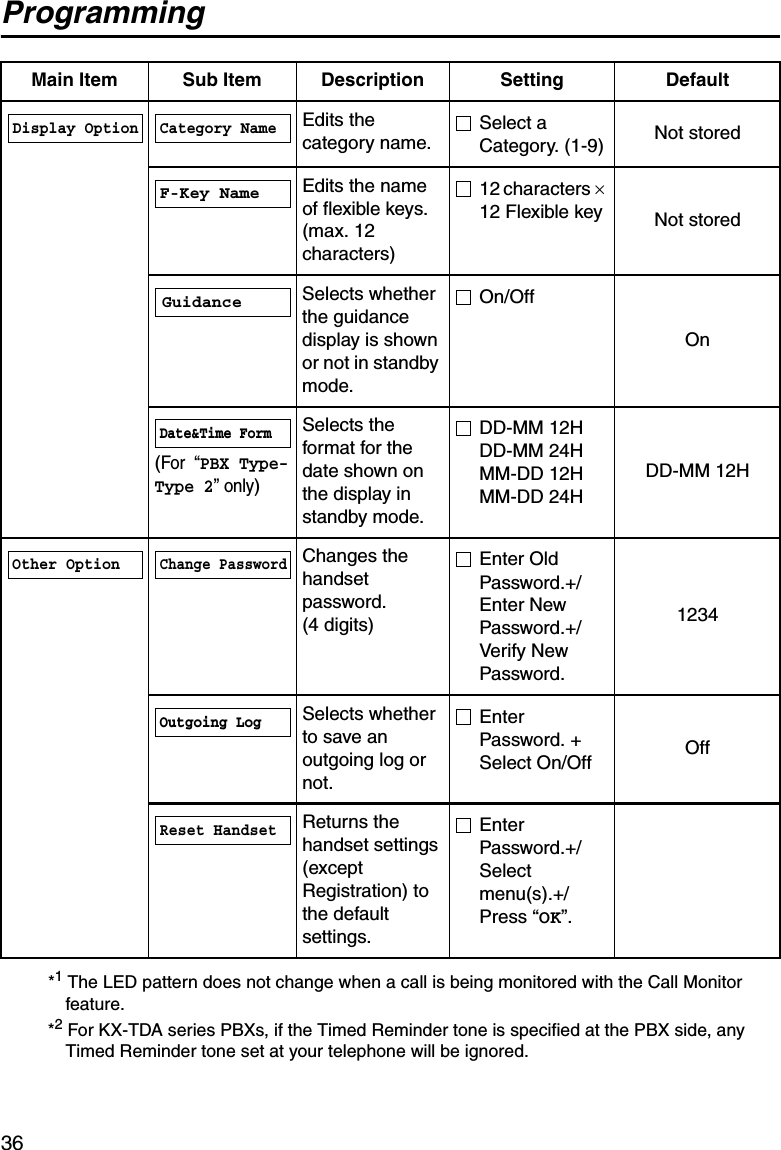
![Programming39For “PBX Type-Type 2” only [KX-TA308/KX-TA1232/KX-TD series]Setting Base UnitMain Item Description Setting DefaultSets the date and time for the base unit.DateTime01-01-05(D-M-Y)12:00 AM(H:M)Sets each type of Incoming Log either on or off.*Single ToneOn/OffDouble ToneOn/OffTriple ToneOn/OffSingle Tone: OffDouble Tone: OffTriple Tone: Off• * When a check mark is displayed beside a tone type, incoming call information for that tone type will be logged.• These settings are only applied to your telephone, not the PBX itself.• Set the current date and time to the base unit. If you do not do so, the date and time of incoming and outgoing calls will not be displayed correctly.Date&TimeIncoming LogPress theJoystick.Select the desired setting.Press theJoystick.Press theJoystick.Press the Joystick.Select “ Setting Base”. Follow thesetting.setting](https://usermanual.wiki/Panasonic-of-North-America/96NKX-TD7896.USER-MANUAL/User-Guide-553465-Page-39.png)
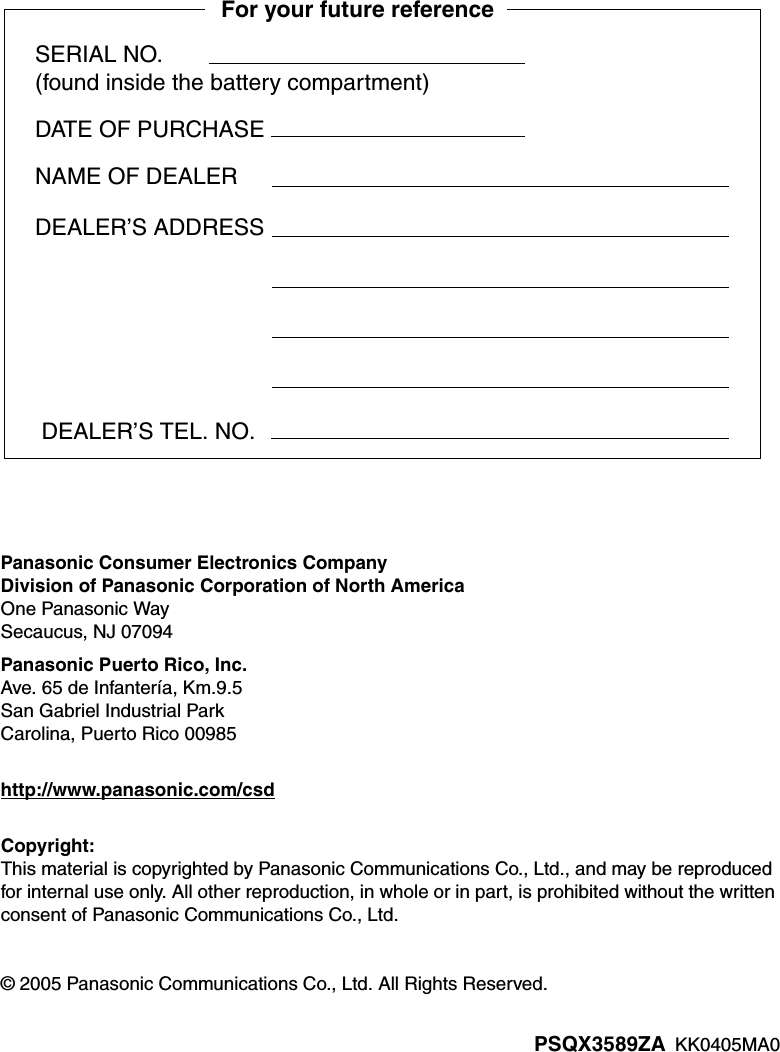
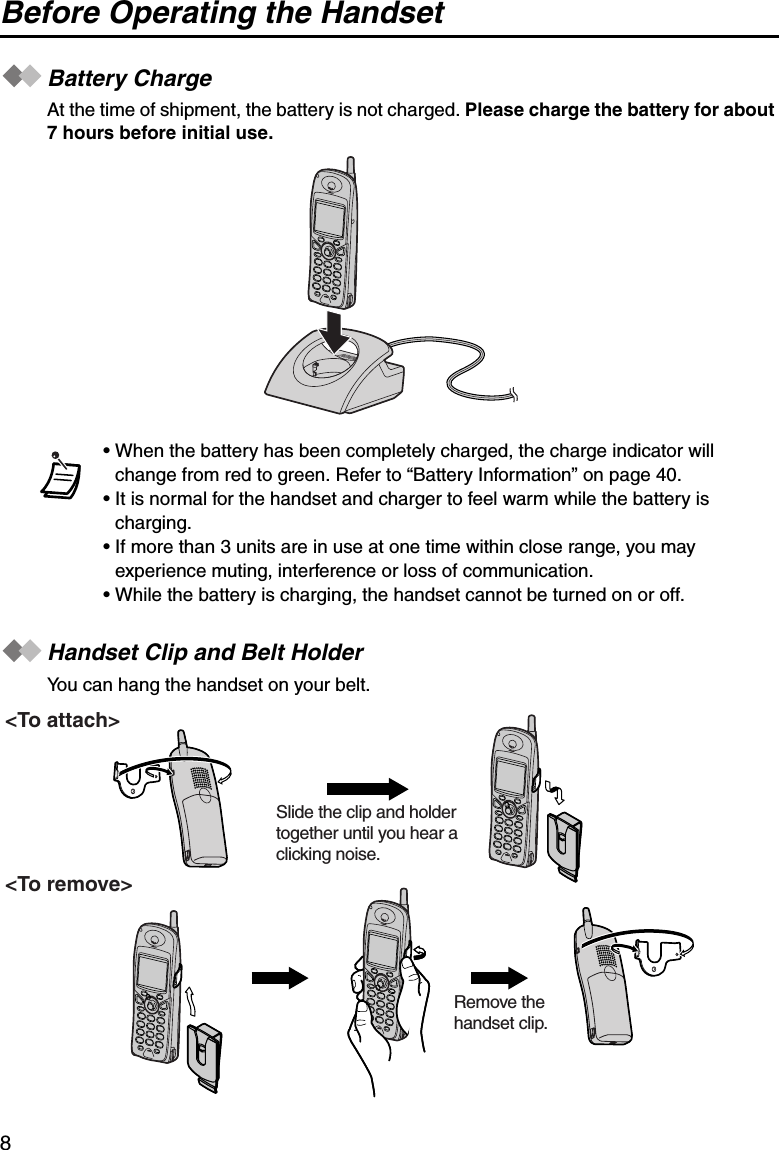
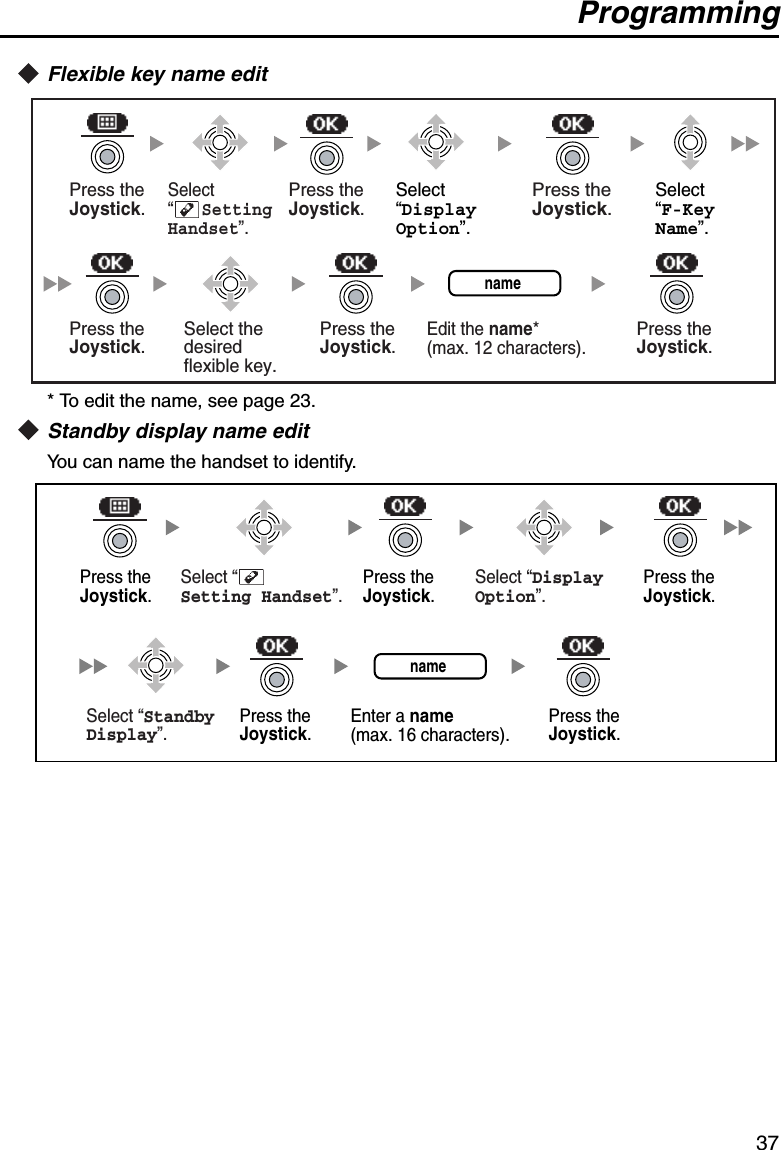
![Important Information40Importan t Information BATTERY INFORMATIONAfter your Panasonic battery is fully charged [at 25 °C (77 °F)]:• Operating time may be shortened depending on usage conditions and ambient temperature.• The battery will drain slowly even while the unit is turned off.• The handset can receive calls while charging.• Battery consumption increases when the handset is used out of range. If “ ” flashes, power off the handset.Low Battery WarningThe battery needs to be charged in the following situations:• “ ” flashes or the alarm sounds every 5 seconds.*•“Charge Battery” is displayed. In this situation, the handset cannot be operated.* If the low battery warning occurs during a conversation, the call will be disconnected automatically one minute later.Replacing the BatteryIf “ ” flashes after using the phone for a short time, even when the battery has been fully charged, the battery should be replaced.Before replacing the battery, make sure the low battery warning is displayed, then turn off the power to prevent memory loss. Replace the battery, and charge the new battery for at least 7 hours. If you replace the battery before the low battery warning appears, the battery strength icon may display an incorrect reading. In this case, use the handset as normal with the new battery installed. When the low battery warning is displayed, charge the battery for about 7 hours. The battery strength icon will then display the correct reading.• Please use Panasonic battery with service part number N4HHGMB00005 or HHR-P103.A nickel metal hydride battery that is recyclable powers the product you have purchased.Please call 1-800-8-BATTERY for information on how to recycle this battery.There is a danger of explosion if the battery is incorrectly replaced.OperationWhile in use (Talk)While not in use (Stand-by)Operating TimeUp to about 7 hUp to about 168 h](https://usermanual.wiki/Panasonic-of-North-America/96NKX-TD7896.USER-MANUAL/User-Guide-553465-Page-40.png)
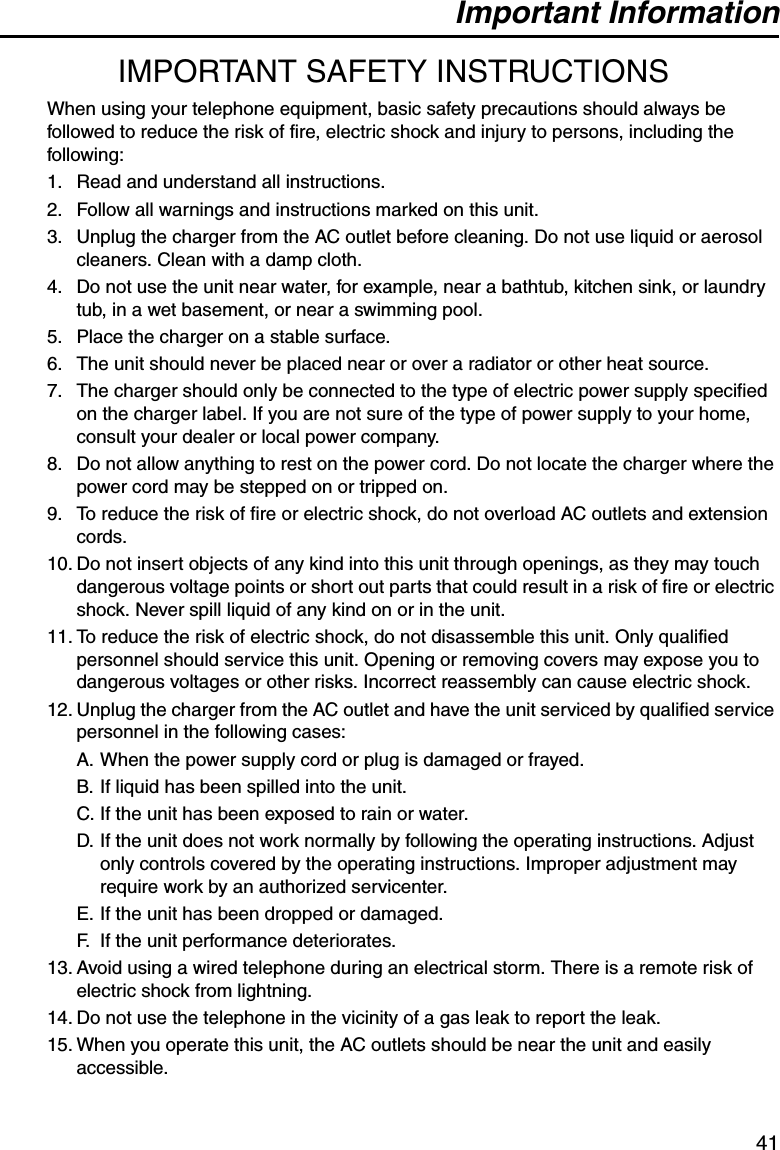
![Important Information43NOTE:This equipment has been tested and found to comply with the limits for a Class B digital device, pursuant to Part 15 of the FCC Rules. These limits are designed to provide reasonable protection against harmful interference in a residential installation. This equipment generates, uses, and can radiate radio frequency energy and, if not installed and used in accordance with the instructions, may cause harmful interference to radio communications. However, there is no guarantee that interference will not occur in a particular installation. If this equipment does cause harmful interference to radio or television reception, which can be determined by turning the equipment off and on, the user is encouraged to try to correct the interference by one or more of the following measures:—Reorient or relocate the receiving antenna.—Increase the separation between the equipment and receiver.—Connect the equipment to an outlet on a circuit different from that to which the receiver is connected.—Consult the dealer or an experienced radio/TV technician for help.Using this telephone near 2.4 GHz electrical appliances may cause interference to one or both devices. Move away from the electrical appliances.Hearing Aid CompatibilityThis telephone provides magnetic coupling for hearing aids as defined by the FCC in 47 CFR Section 68.316. When you hold the phone to your ear, noise might be heard in your Hearing Aid. Some Hearing Aids are not adequately shielded from external RF (radio frequency) energy. If noise occurs, use an optional headset accessory or the speakerphone option (if applicable) when using this phone. Consult your audiologist or Hearing Aid manufacturer about the availability of Hearing Aids which provide adequate shielding to RF energy commonly emitted by digital devices.OTHER IMPORTANT INFORMATIONEnvironment—do not place the unit in rooms where the temperature is less than 5 °C (41 °F) or greater than 40 °C (104 °F). Allow 10 cm (3-15/16 in) clearance around the unit for proper ventilation.Avoid excessive smoke, dust, mechanical vibration, shock, or direct sunlight.Medical—consult the manufacturer of any personal medical devices, such as pacemakers, to determine if they are adequately shielded from external RF (radio frequency) energy. (The unit operates in the frequency range of 2,401 MHz to 2,480 MHz and emits 0.40 watts of RF [radio frequency] power.) Do not use the unit in health care facilities if any regulations posted in the area instruct you not to do so. Hospitals or health care facilities may be using devices sensitive to external RF (radio frequency) energy.If you are having problems making calls disconnect the unit from the telephone line and connect a known working phone. If the known working phone operates properly, have your unit](https://usermanual.wiki/Panasonic-of-North-America/96NKX-TD7896.USER-MANUAL/User-Guide-553465-Page-43.png)