Panasonic of North America 96NKX-TPA65 DECT 6.0 Cordless Desktop VoIP Phone User Manual Operating Instructions English
Panasonic Corporation of North America DECT 6.0 Cordless Desktop VoIP Phone Operating Instructions English
UserManual.wiki
>
Panasonic of North America
>
96NKX TPA65 User Manual
Users Manual
Navigation menu
Upload a User Manual
Namespaces
Wiki Guide
HTML
PDF
Info
Views
User Manual
Discussion / Help
Navigation
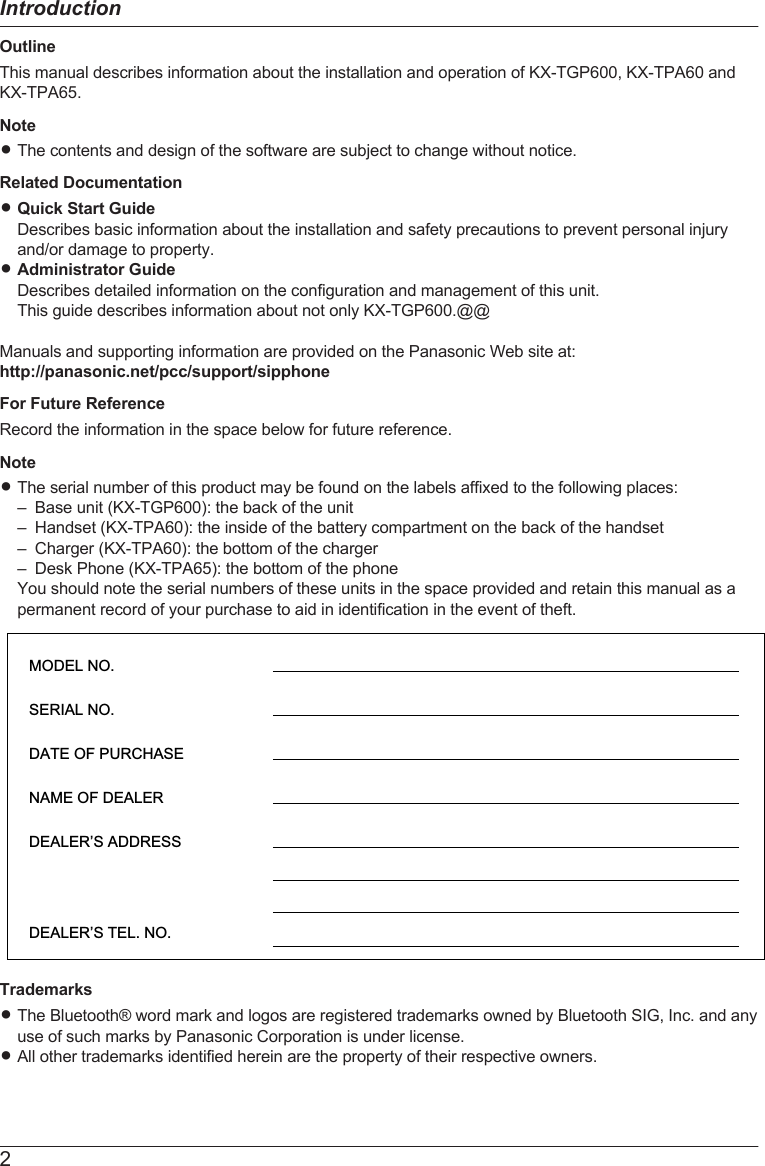

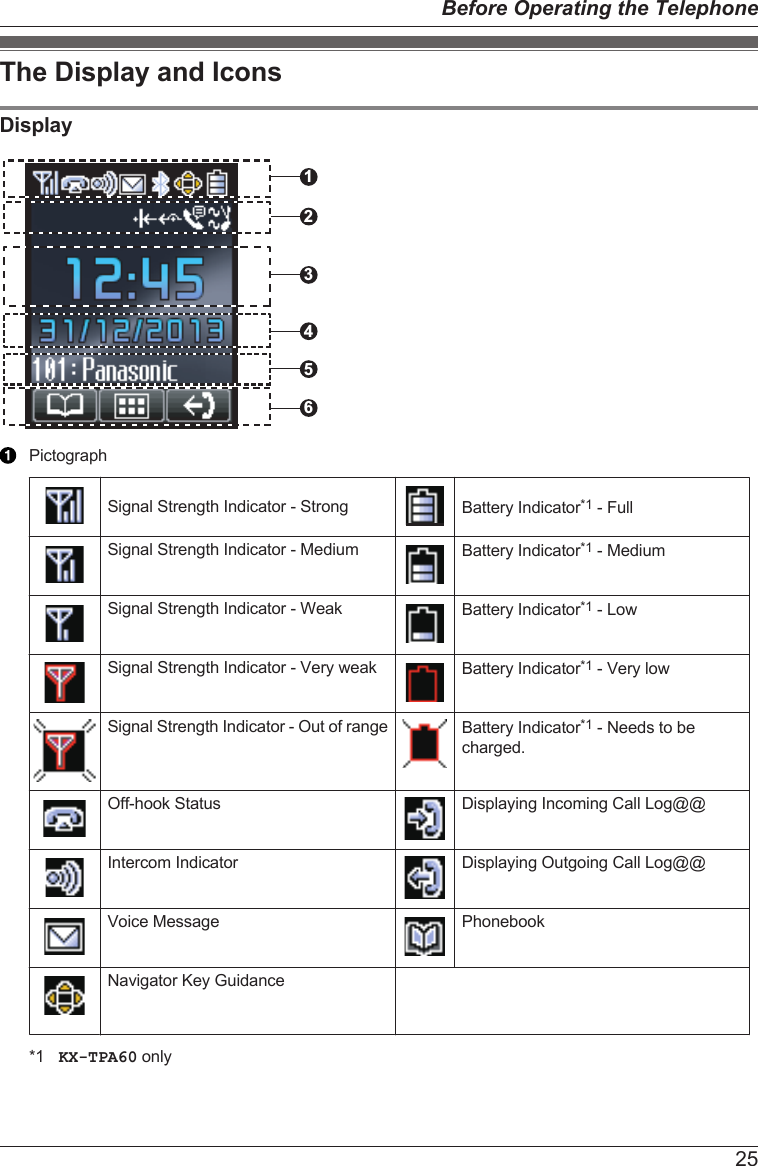
![Battery Information (KX-TPA60 only)After batteries are fully charged (at 25 °C [77 °F]):Operation Operating TimeWhile Talking(Backlight off ) Up to about 10 HWhile not in use (Standby) Up to about 168 HROperating time may be shorter than listed above depending on usage conditions and ambienttemperature.RBatteries will drain slowly even while the handset is turned off.RThe handset can receive calls while charging.RBattery consumption increases when the handset is out of range (if " " flashes, turn the handset off).RClean the handset and the charger contacts with a soft, dry cloth once a month. Clean moreoften if the unit is subject to grease, dust or high humidity. Otherwise batteries may not chargeproperly.Low Battery WarningBatteries needs to be charged in the following situations:RThe battery level indicator displays as empty (" ") and the alarm sounds*1.R"Charge Battery" is displayed. In this situation, the handset cannot be operated.*1 If the low battery warning occurs during a conversation, the handset will turn off in one minute.Replacing the BatteriesIf the battery level indicator displays as empty (" ") after using the phone for a short time, even whenthe batteries have been fully charged, the batteries should be replaced.Before replacing the batteries, make sure the low battery warning is displayed, then turn off the power toprevent memory loss. Replace the batteries and charge the new batteries for about 6 hours.If you replace the batteries before the low battery warning appears, the battery strength icon may displayan incorrect reading. In this case, use the handset as normal with the new batteries installed.When the low battery warning is displayed, charge the batteries for about 6 hours. The battery strengthicon will then display the correct reading.RPlease use AAA Ni-MH 1.2 V, 630 mAh batteries only. (Contact your phone system dealer/serviceprovider.)RThere is a danger of explosion if the batteries are incorrectly replaced.Nickel metal hydride batteries thatare recyclable power the product youhave purchased. Please call1-800-8-BATTERY for information onhow to recycle these batteries.Important Notice Concerning the Correct Use and Charging of Ni-MH BatteriesBatteries, due to their construction, undergo some wear and tear. The lifetime of batteries also dependson correct maintenance. Charging and discharging are the most important factors. You should takenotice of the following to maintain the life of the batteries as long as possible.Ni-MH batteries have a kind of memory, the "memory effect". If fully charged batteries are used severaltimes only for 15 minutes in the handset and then recharged, the capacity of the batteries will be reduced11Important Information](https://usermanual.wiki/Panasonic-of-North-America/96NKX-TPA65/User-Guide-2502961-Page-11.png)
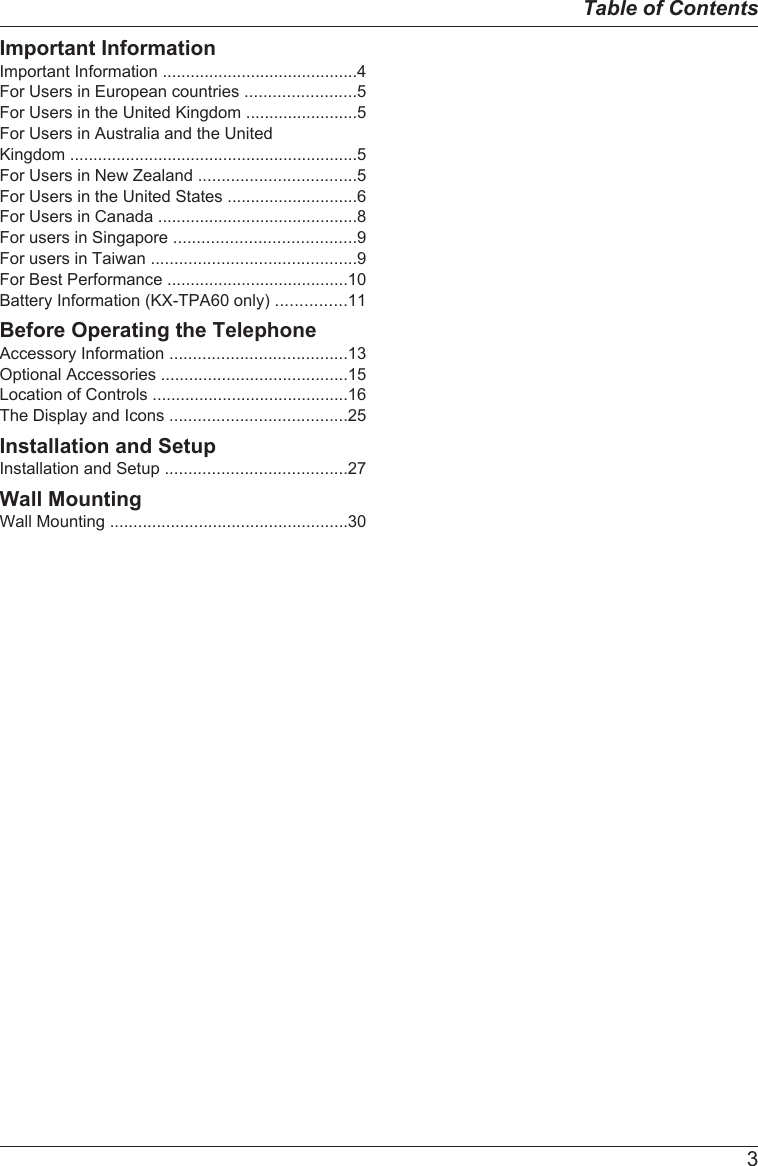
![Location of ControlsKX-TGP600 (Base unit)Status IndicatorStatusMeaningsColor LightpatternGreen On [In Service]RThe base unit is connected to the Internet. The startup process iscomplete and you may now make and receive internet calls.SlowFlashing[In Service]RThe base unit is in talking.@@RThe base unit is downloading data. Do not disconnect theEthernet cable or AC adaptor from the base unit until theSTATUS indicator stops flashing and lights in steady green.ModerateFlashing[In Service]RTalk session is busy.@@RThe handset is downloading data.Red On [Working]RWhen the base unit is turned on, the STATUS indicator lights inred for about 10 seconds.SlowFlashing[Working]RThe base unit is registering a handset.ModerateFlashing[Working]RThe base unit is paging handsets.16Before Operating the Telephone](https://usermanual.wiki/Panasonic-of-North-America/96NKX-TPA65/User-Guide-2502961-Page-16.png)
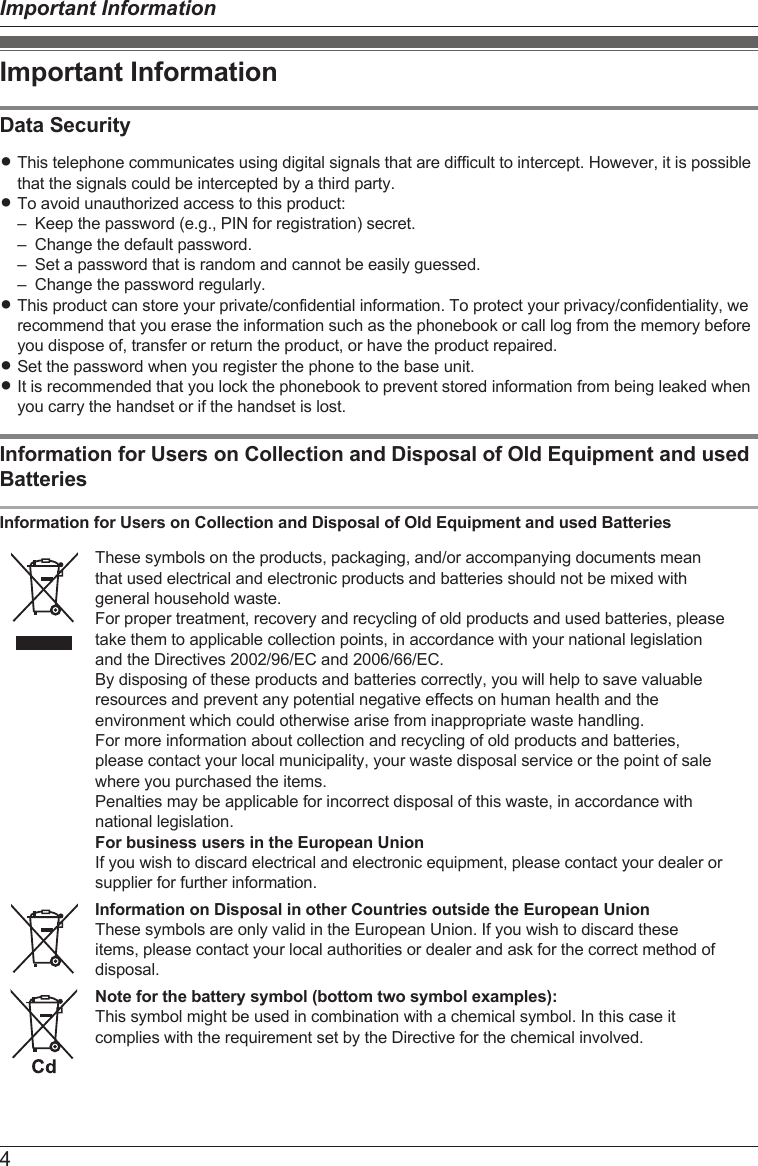
![Amber On [Failure]RThe base unit’s IP address may conflict with the IP addresses ofother devices on your local network. Contact your administratorfor further information.SlowFlashing[Working]RThe base unit is obtaining an IP address or is obtainingconfigurations. Please wait.RThe base unit is registering with your phone system. Please waitRIf the STATUS indicator continues flashing, check the following:– Network settings may not be correct. Contact youradministrator.– Many installation issues can be resolved by resetting all theequipment. First, shut down your modem, router, hub, baseunit, and computer. Then turn the devices back on one at atime in this order: modem, router, hub, base unit, computer.– If you cannot access Internet Web pages using your computer,check to see if your phone system is having connection issuesin your area.– For more troubleshooting help, contact your administrator.ModerateFlashing[Failure]RUnplug the base unit’s AC adaptor to reset the unit, thenreconnect the AC adaptor. If the STATUS indicator is still flashingrapidly, there may be a problem with the base unit hardware.Contact your phone system dealer/service provider.Off — RThe base unit power is off.RThe Ethernet cable is not connected properly. Connect it.RYour network devices (hub, router, etc.) are turned off. Check theLEDs for the link status of the devices.RThe base unit power is booting up.NoteRLED flashing patterns are as follows:– Slow Flashing: 60 times per minute– Moderate Flashing: 120 times per minuteHandset locator buttonYou can locate a misplaced handset by paging it.If you pressing it again or after the lapse 60 seconds, the calls to the handsets will be stopped.@@17Before Operating the Telephone](https://usermanual.wiki/Panasonic-of-North-America/96NKX-TPA65/User-Guide-2502961-Page-17.png)
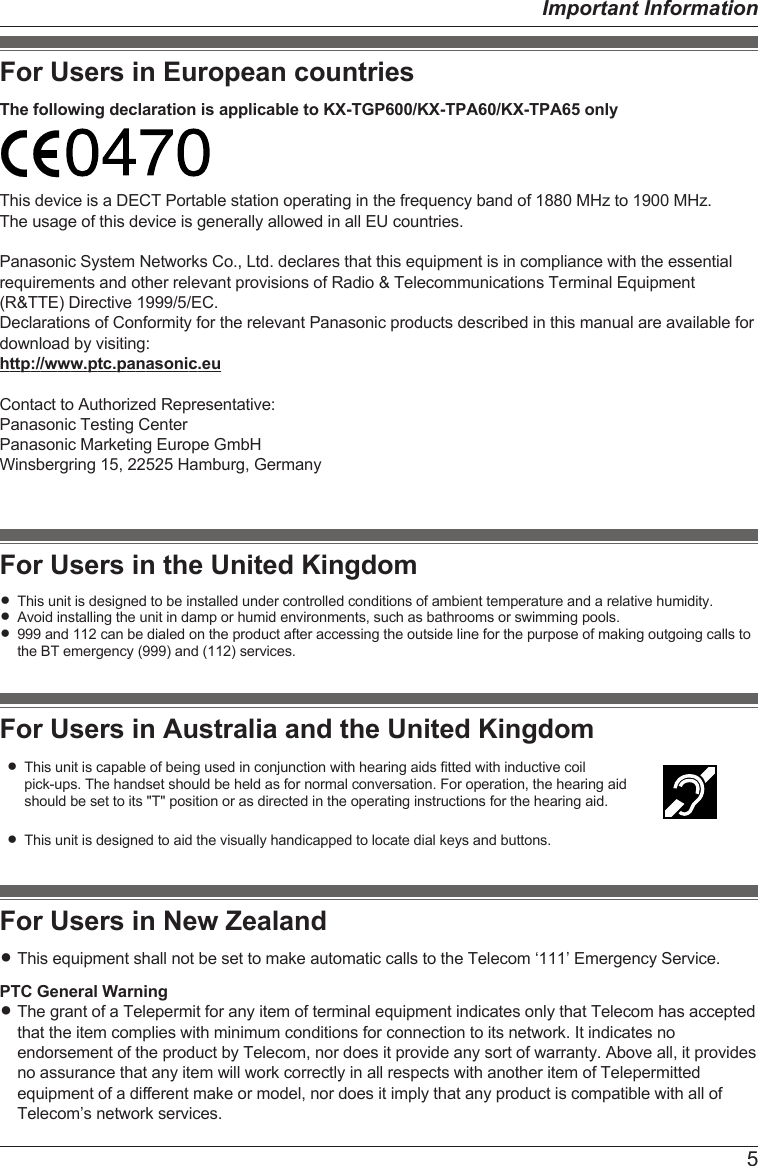
![HandsetNoteRThe characters printed on the keypad may differ depending on the destination.@@KX-TPA60[Back View]KX-TPA60ALKX-TPA60CEKX-TPA60UKKX-TPA60CKX-TPA60LAKX-TPA60LCKX-TPA60 KX-TPA60RURinger/Charge IndicatorIn standby mode, the indicator shows the charging status. If an incoming call arrives, the indicatorblinks in accordance with the LED pattern setting.@@Status MeaningsColor Light patternRed On Charging@@Moderate Flashing Charging Error@@18Before Operating the Telephone](https://usermanual.wiki/Panasonic-of-North-America/96NKX-TPA65/User-Guide-2502961-Page-18.png)
![Off — Full charge, or out of handest@@Headset JackThe following optional headsets can be used with this unit. (Not all operations with the headsets canbe guaranteed.)RFor KX-TPA60CE/KX-TPA60UK/KX-TPA60AL/KX-TPA60RU:Panasonic RP-TCA400 and RP-TCA430RFor KX-TPA60/KX-TPA65:Panasonic KX-TCA400 and KX-TCA430RFor KX-TPA60LA/KX-TPA65LC:Panasonic RP-TCA400, RP-TCA430, KX-TCA400 and KX-TCA430For up-to-date information about headsets that have been tested with this unit, refer to the followingweb sites:RFor users in the United Stateshttp://www.panasonic.com/sipRFor all users except the United Stateshttp://panasonic.net/pcc/support/sipphone[TALK]/[SP-PHONE] KeyUsed to make or answer calls, or toggle between Receiver mode and Hands-free mode during aconversation. During a conversation using a headset, Hands-free mode does not work.Navigator KeyThe Navigator Key includes four arrow keys and a center key. The arrow keys are used to adjust theringer/receiver volume or move the cursor to select an item. The center key is used to confirm aselection. If in standby mode, pressing the keys perform the following functions:ALEFT ® Used to display the Incoming call log.BUP ® Used to adjust the ringer volume.CRIGHT ® Used to open the phonebook.DDOWN ® Used to display the Outgoing call log.ECENTER ® Used to display the Menu.[HOLD]/[MESSAGE] KeyDuring talking, used to place a call on Hold. In standby mode, pressing this key plays your voicemessages.Silent Mode KeyUsed to turn Silent Mode on or off when pressed for more than 2 seconds in standby mode. Fordetails, see "Silent Mode".[LINE] KeyUsed to confirm the line status of VoIP server.ReceiverDisplayFor details, see “Display”, Page 25.19Before Operating the Telephone](https://usermanual.wiki/Panasonic-of-North-America/96NKX-TPA65/User-Guide-2502961-Page-19.png)
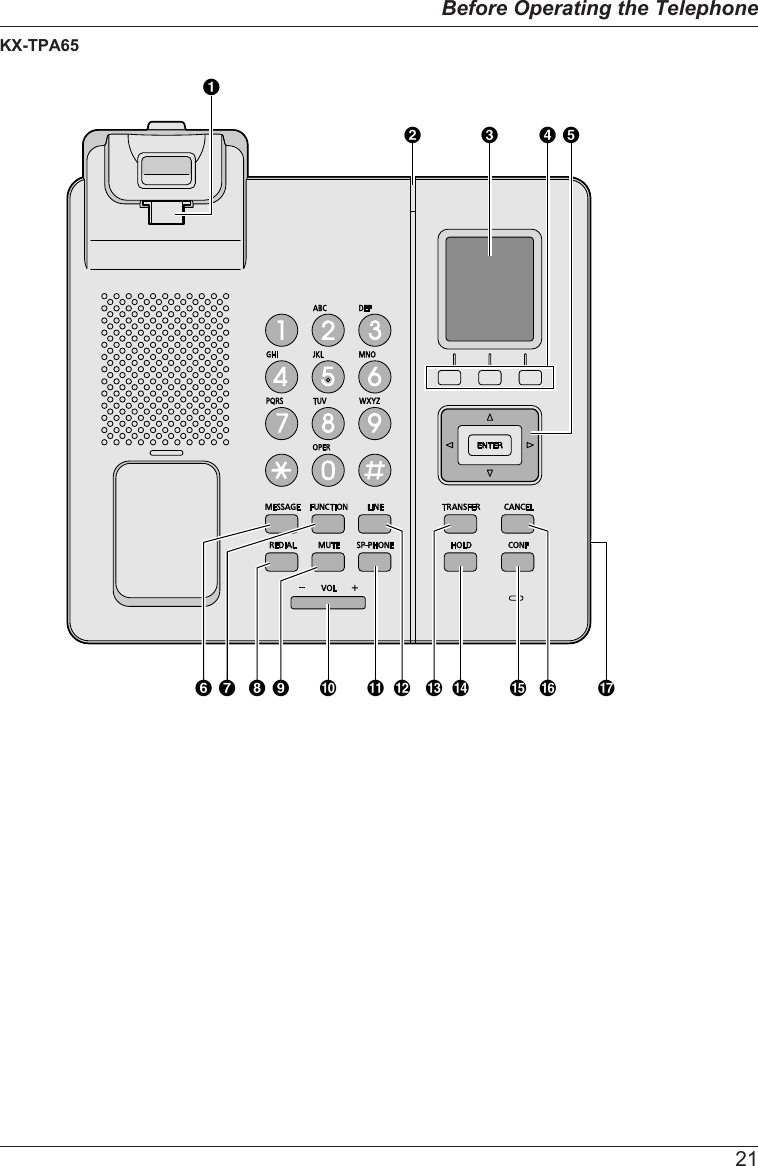
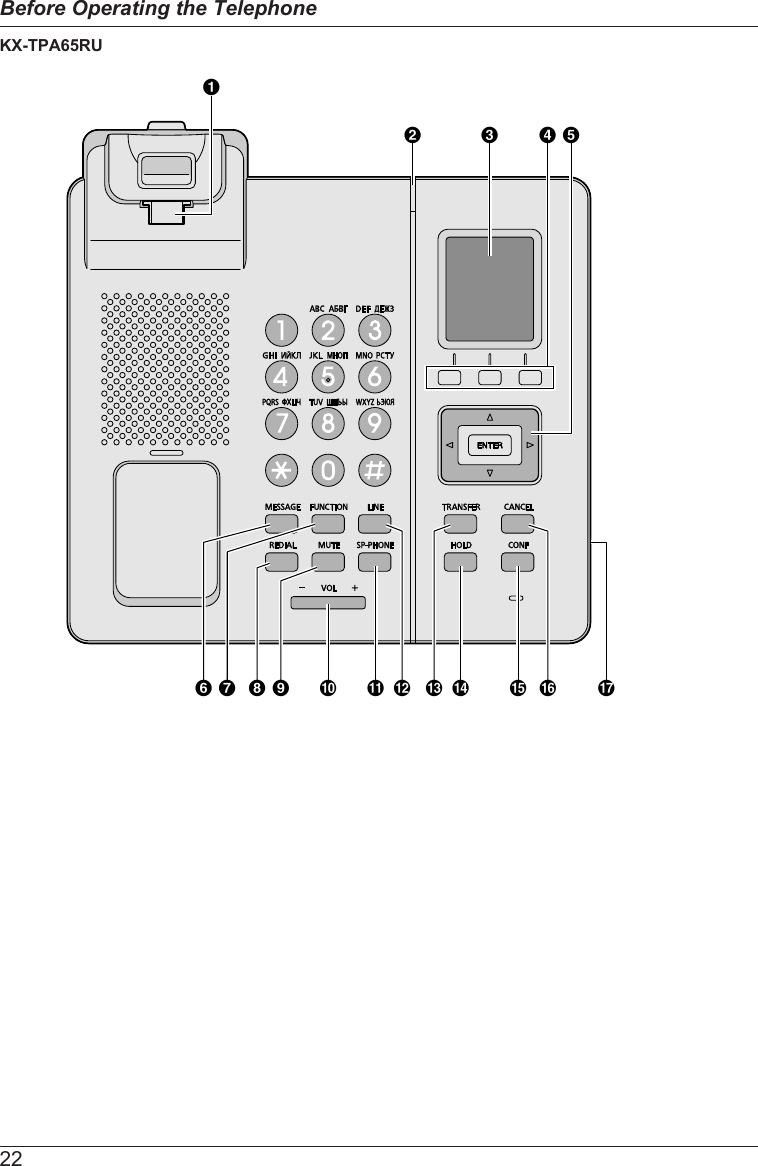
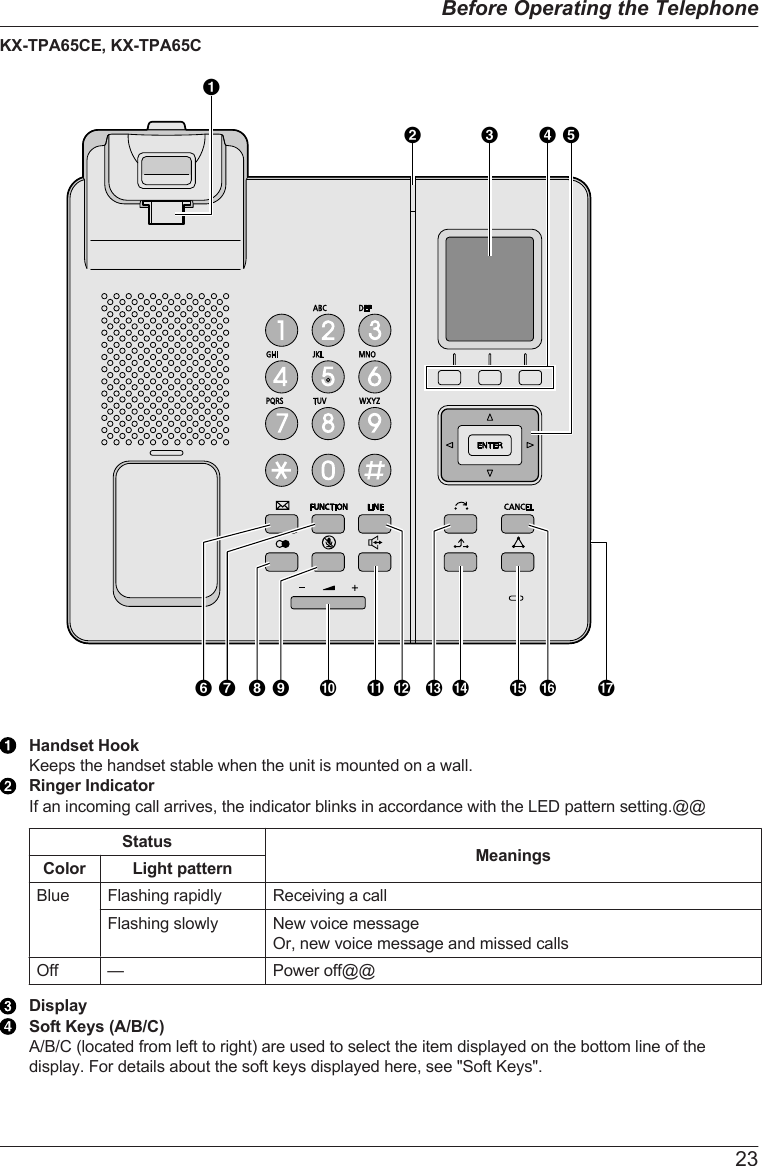
![Soft Keys (A/B/C)A/B/C (located from left to right) are used to select the item displayed on the bottom line of thedisplay. For details about the soft keys displayed here, see "Soft Keys".[POWER]/[CANCEL] KeyUsed to end calls, exit the phonebook or Function mode. Press and hold this key to turn the handseton or off.[TRANSFER/CLEAR] KeyUsed to transfer a call to another party, or to clear digits or characters.[FUNCTION] KeyPressing this key followed by a keypad number (0–9) allows you to perform various commonfunctions quickly. For details, see "Function Keys".MicrophoneCharge ContactsStrap HolesUsed to attach phone straps and similar items.SpeakerDesk PhoneKX-TPA65AL, KX-TPA65LA, KX-TPA65LC, KX-TPA60UK, KX-TPA60XACB D EQK M OF G H I J L N P20Before Operating the Telephone](https://usermanual.wiki/Panasonic-of-North-America/96NKX-TPA65/User-Guide-2502961-Page-20.png)