Panasonic of North America 96NKX-UDT121 DECT 6.0 Cordless Telephone Handset with Bluetooth Transceiver for SIP server or PBX User Manual KX UDT121 Operating Instructions English
Panasonic Corporation of North America DECT 6.0 Cordless Telephone Handset with Bluetooth Transceiver for SIP server or PBX KX UDT121 Operating Instructions English
User Manual
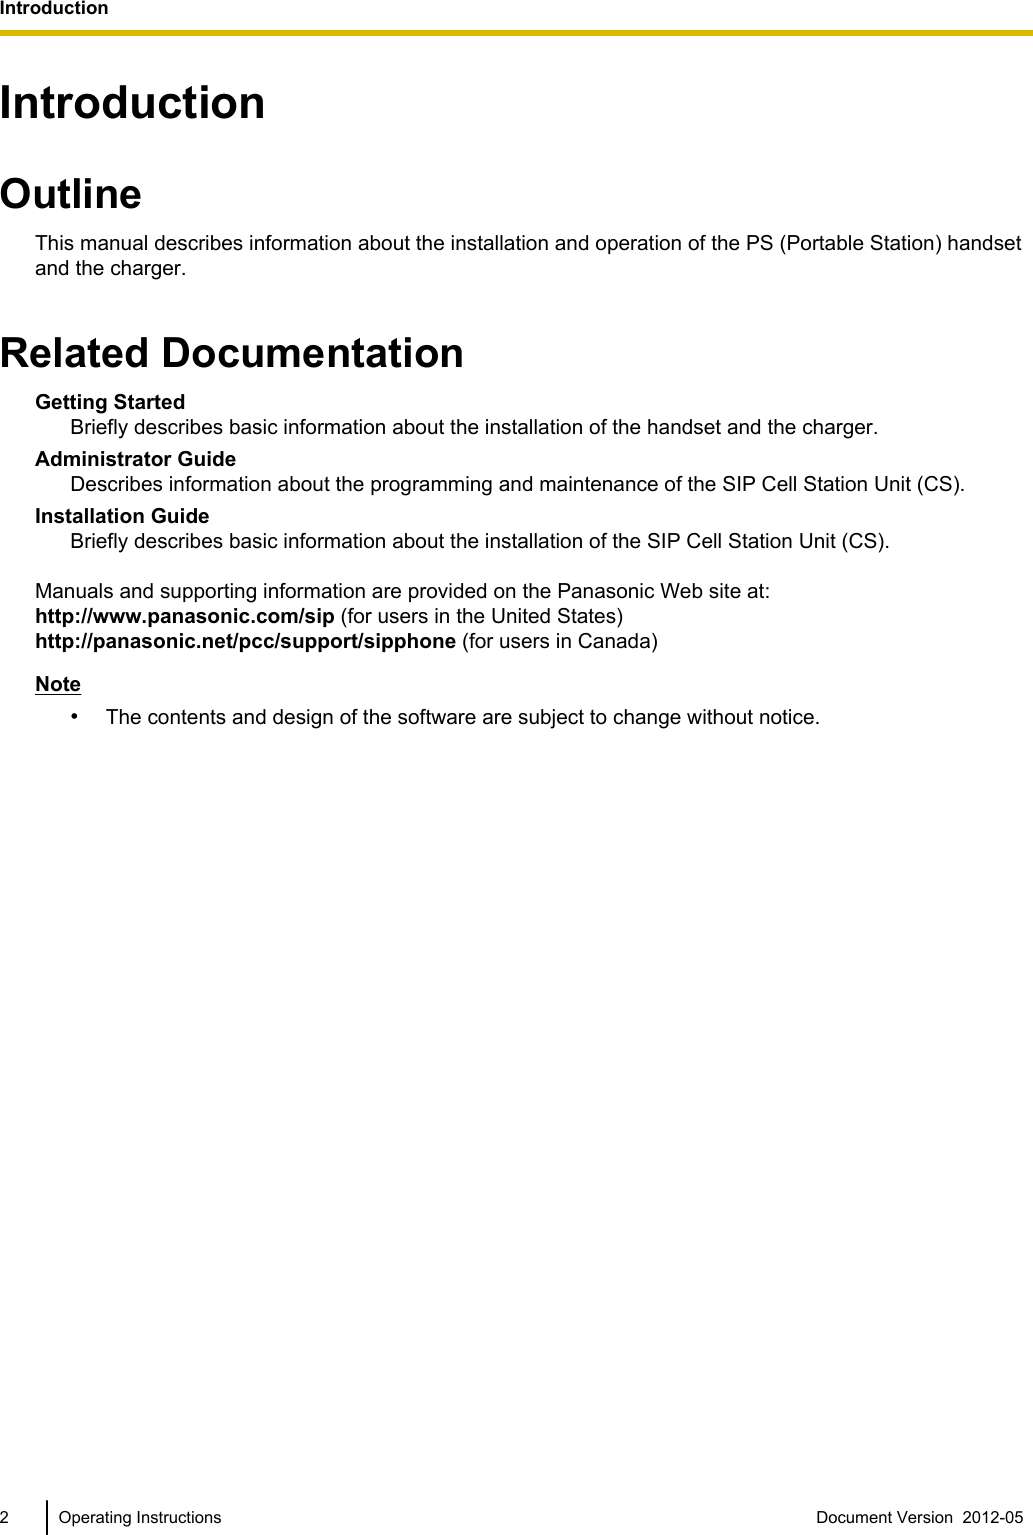

![For Best PerformanceOperating Range•The range of operation depends on the topographyof your office, weather, or usage conditions,because signals are transmitted between the CSand the handset by radio waves.•Normally, you get greater range outdoors thanindoors. If there are obstacles such as walls, noisemay interfere with your telephone calls. Inparticular, high metal shelves or reinforced concretewalls will restrict your operating range.•A handset may not work when it is too far from theCS depending on the structure of the building.•We strongly suggest you hold the bottom half of thehandset to ensure better call quality. Because, theantenna is located in the upper half of the handset.NoiseOccasional noise or interference may occur due toelectromagnetic radiation from objects such asrefrigerators, microwave ovens, faxes, TVs, radios, orpersonal computers. If noise disturbs your telephonecalls, keep the handset away from these electricalappliances.Environment•Keep the product away from heating appliancesand devices that generate electrical noise, such asfluorescent lamps and motors. These noise sourcescan interfere with performance of the product.•Do not place the product in rooms where thetemperature is less than 0 °C (32 °F) or greater than40 °C (104 °F).•To avoid damage, charge the battery only intemperatures ranging from 5 °C (41 °F) to 40 °C(104 °F).•Allow 10 cm (3-15/16 in) clearance around theproduct for proper ventilation.•Avoid environments with excessive smoke, dust,moisture, mechanical vibration, shock, or directsunlight.•The apparatus is designed to be installed andoperated under controlled conditions of ambienttemperature and a relative humidity.Routine Care•Unplug the charger from the AC outlet beforecleaning.•Wipe the product with a soft cloth.•Do not clean the product with abrasive powder orwith chemical agents such as benzine or thinner.•Do not use liquid cleaners or aerosol cleaners.•Clean the terminal of the charger periodically.Placement•Do not place heavy objects on top of the handsetand charger.•Care should be taken so that objects do not fall onto,and liquids are not spilled into, the product.•Place the charger on a flat surface. If the charger ismounted on the wall, install it straight.Bluetooth•A Bluetooth headset can communicate with thehandset within a range of approximately 10 m(32.8 ft). The connection may be subject tointerference from obstructions such as walls orelectronic devices. For best performance, werecommend using a Bluetooth headset within 1 m(3.28 ft) of the handset.•This unit complies with the Bluetooth wirelesstechnology 2.0 specification.Battery InformationAfter your Panasonic battery is fully charged (at 25 °C[77 °F]):Operation Operating TimeWhile Talking(Backlight off*1, Bluetoothoff, Narrowband Mode)Up to about 13 hWhile Talking(Backlight on*2, Bluetoothon, Wideband Mode)Up to about 7 hWhile not in use(Standby) Up to about 200 h*1 When the "Talking" setting of "Backlight" is set to "Off". Fordetails, see "Display Option (Page 48)".*2 When the "Talking" setting of "Backlight" is set to "On". Fordetails, see "Display Option (Page 48)".•Operating time may be shorter than listed abovedepending on usage conditions and ambienttemperature.•The battery will drain slowly even while the handsetis turned off.•The handset can receive calls while charging.•Battery consumption increases when the handset isout of range (if " " flashes, turn the handset off).•Clean the handset and the charger contactswith a soft, dry cloth once a month. Clean moreoften if the unit is subject to grease, dust or highDocument Version 2012-05 Operating Instructions 11Important Information](https://usermanual.wiki/Panasonic-of-North-America/96NKX-UDT121/User-Guide-1708561-Page-11.png)

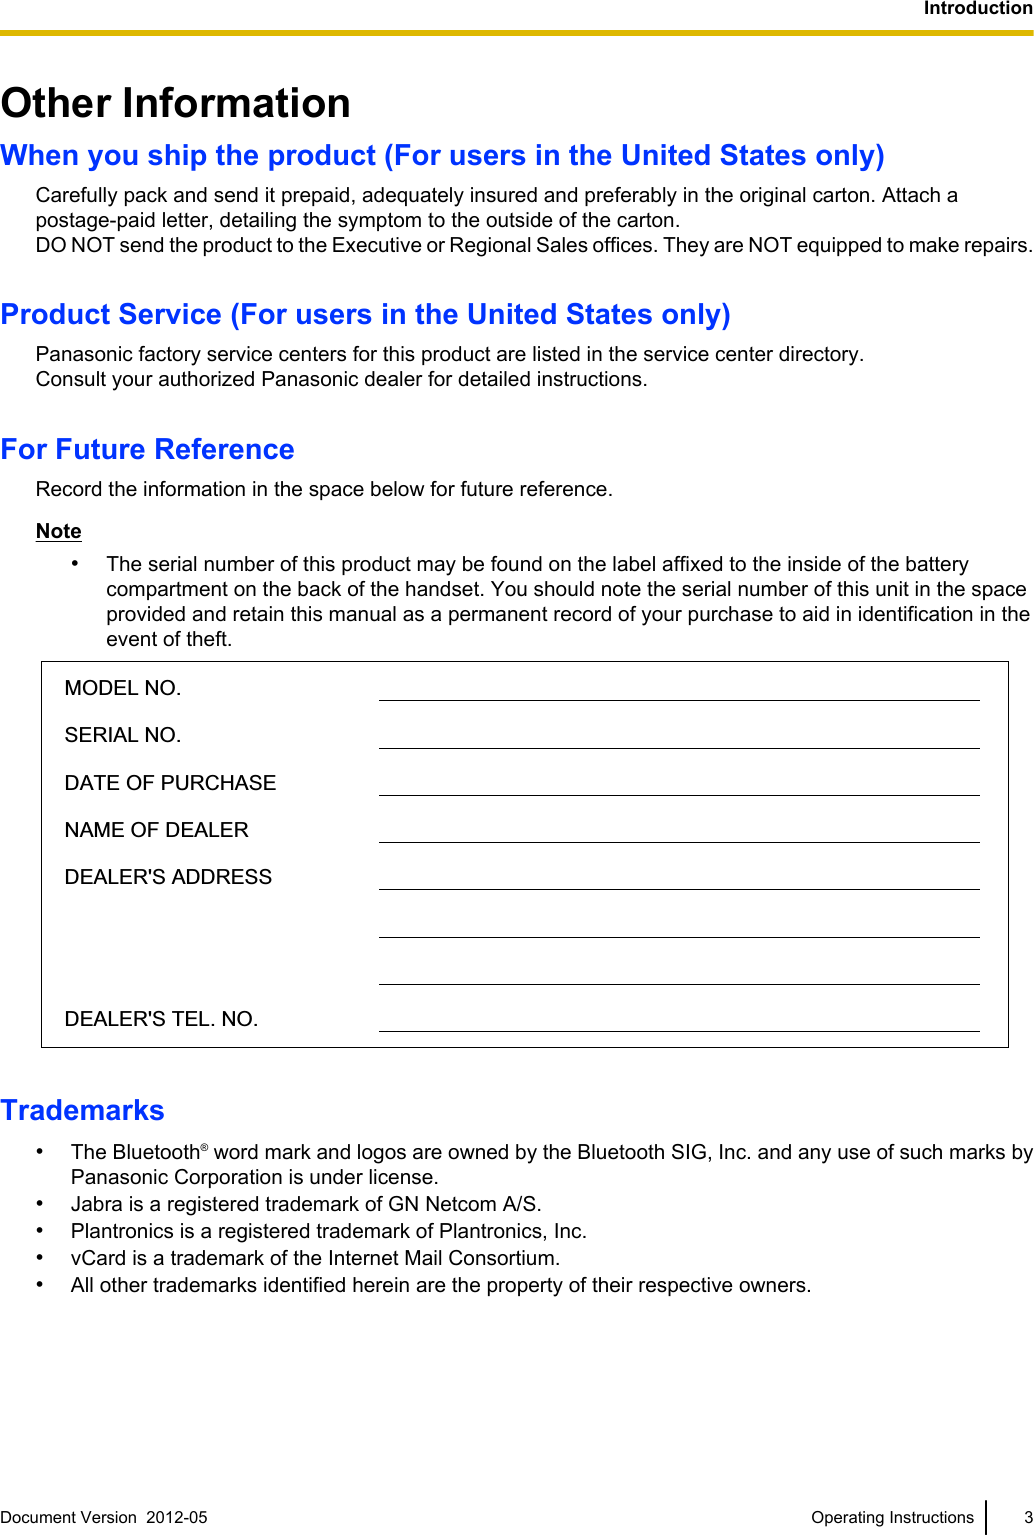
![Before Operating the TelephoneAccessory InformationIncluded AccessoriesAC adaptor: 1 Charger: 1 Battery*1: 1[Part No.] [Part No.]PNLV226 PNWEUDT121MBelt Clip: 1 Belt Clip Holder: 1 Battery Cover*2: 1[Part No.] [Part No.]PNKE1142Z1 PSKE1040Z4*1 For details, consult your administrator or dealer.*2 The battery cover comes attached to the handset.•To order accessories, call toll-free 1-800-332-5368. (For users in the United States only)Note•The illustrations may differ from the appearance of the actual product.Document Version 2012-05 Operating Instructions 13Before Operating the Telephone](https://usermanual.wiki/Panasonic-of-North-America/96NKX-UDT121/User-Guide-1708561-Page-13.png)
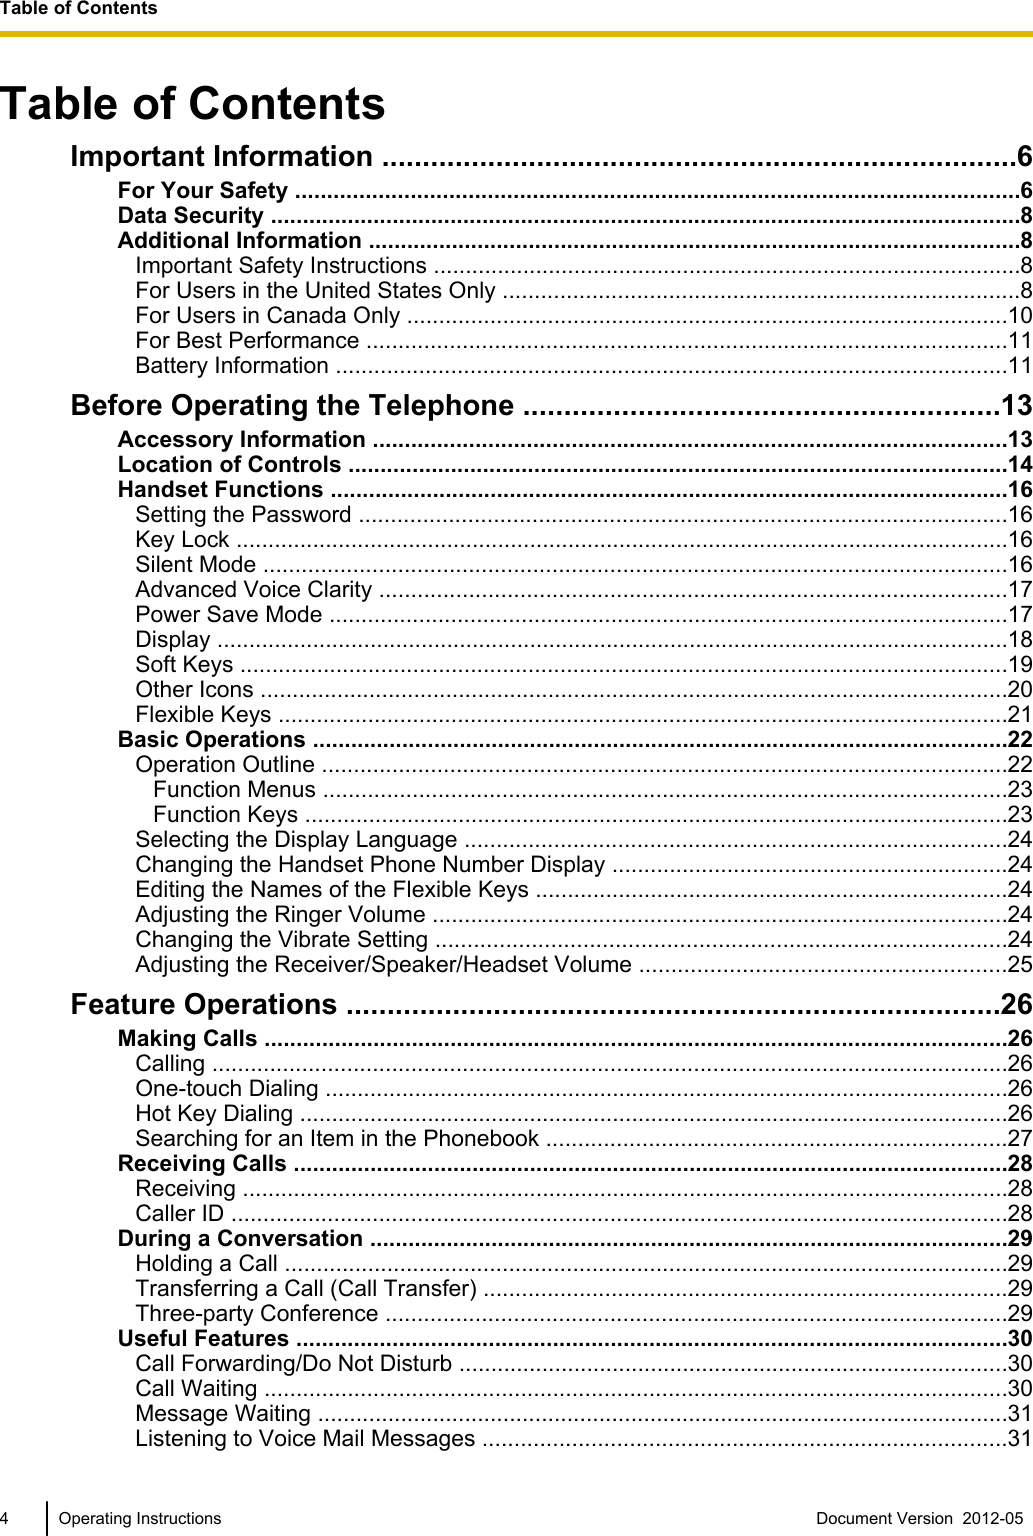
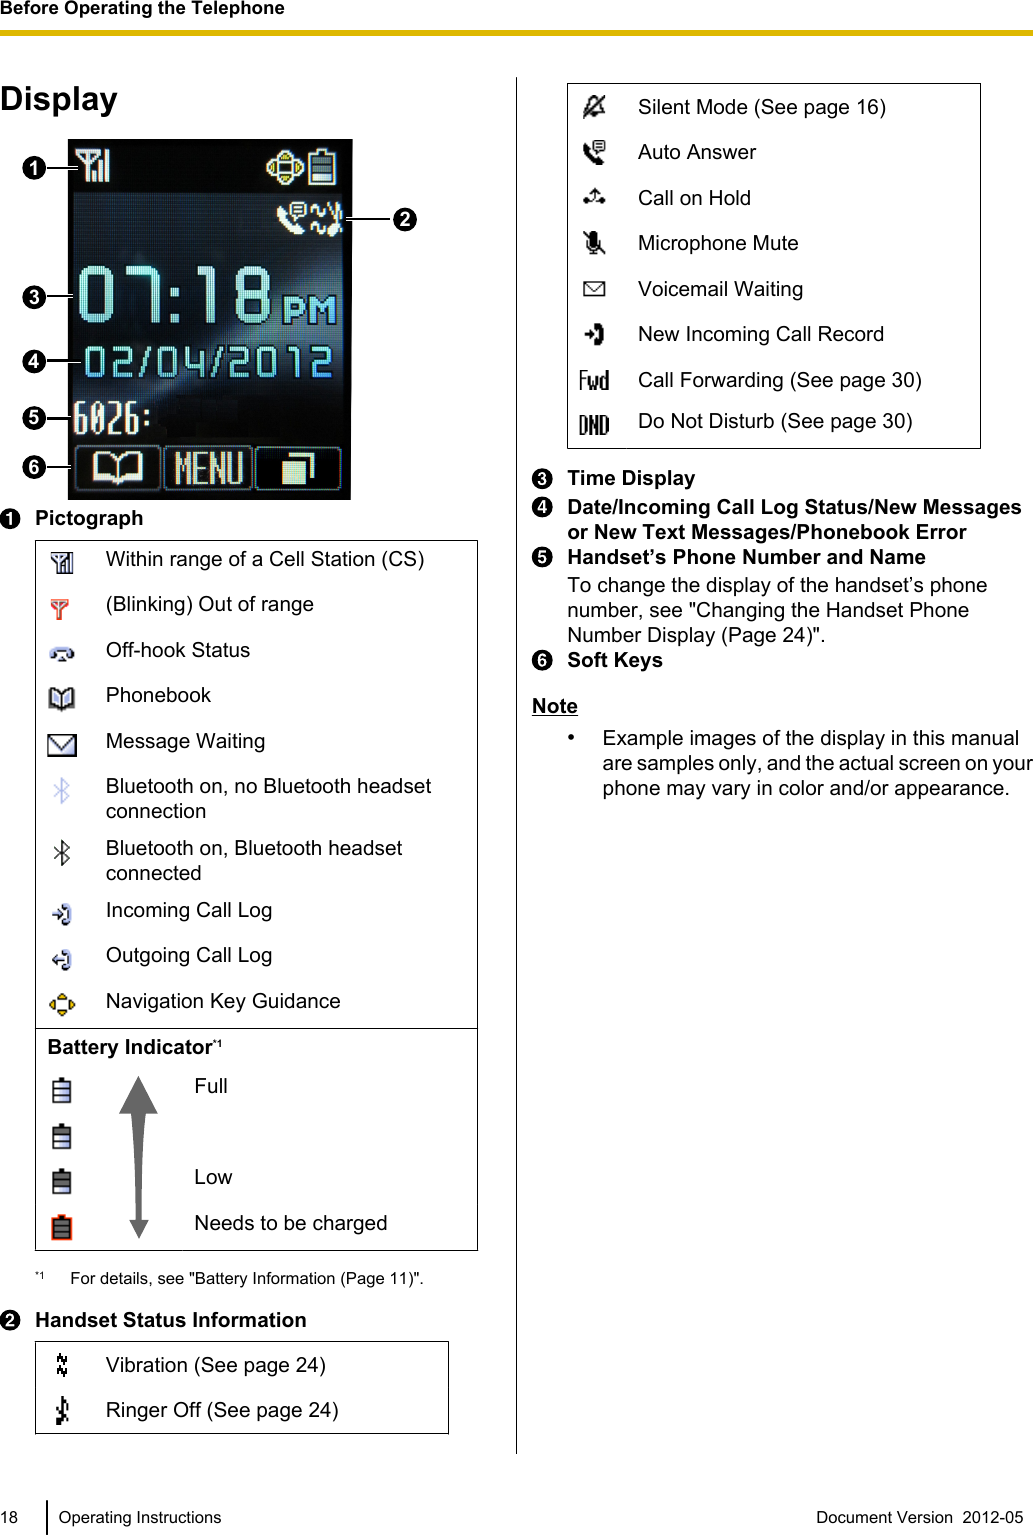
![Location of ControlsThe headset is an optionalaccessory.Open the cover.[Back View]ARinger/Charge IndicatorBHeadset JackThe following headsets can be used with this unit. (Not all operations with the headsets can beguaranteed.)–Wired headsetsPanasonic KX-TCA400 and KX-TCA430–Bluetooth headsetsSelected Plantronics®-brand headsetsSelected GN Netcom Jabra®-brand headsetsFor up-to-date information about headsets that have been tested with this unit, refer to the following websites:http://www.panasonic.com/sip (for users in the United States)http://panasonic.net/pcc/support/sipphone (for users in Canada)CTALK/SP-PHONE (Speakerphone) KeyUsed to make or answer calls, or toggle between Receiver mode and Hands-free*1 mode during aconversation.DNavigator KeyThe Navigator Key includes four arrow keys and a center key. The arrow keys are used to adjust theringer/receiver volume or move the cursor to select an item. The center key is used to confirm a selection.If in standby mode, pressing the keys perform the following functions:ALEFT ( ) ® Used to display the Incoming call log.14 Operating Instructions Document Version 2012-05 Before Operating the Telephone](https://usermanual.wiki/Panasonic-of-North-America/96NKX-UDT121/User-Guide-1708561-Page-14.png)
![BUP ( ) ® Used to adjust the ringer volume.CRIGHT ( ) ® Used to open the phonebook.DDOWN ( ) ® Used to display the Outgoing call log.ECENTER ® Used to display the Menu.In this manual, when a procedure instructs you to "press ", you can also press the[CENTER] key to confirm the selection.EHOLD/Voice Message KeyDuring talking, used to place a call on Hold. In standby mode, pressing this key plays your voicemessages.FSilent Mode KeyUsed to turn Silent Mode on or off when pressed for more than 2 seconds in standby mode. For details,see "Silent Mode (Page 16)".GFlexible KeyPressing the FLEX key displays a menu with functions that have been assigned to each dial key (0–9,, and #). The functions can be selected from the menu, or accessed quickly by pressing FLEX, thenthe assigned key.HReceiverIDisplayFor details, see "Display (Page 18)".JSoft KeysThe handset features 3 soft keys. By pressing a soft key, you can select the feature shown directly aboveit on the display. For details about the soft keys displayed here, see "Soft Keys (Page 19)".KPOWER/CANCEL KeyUsed to end calls, exit the phonebook or Function mode. Press and hold this key to turn the handset onor off.LTRANSFER/CLEAR KeyUsed to transfer a call to another party, or to clear digits or characters.MFunction KeyPressing the FUNC key followed by a keypad number (0–9) allows you to perform various commonfunctions quickly. For details, see "Function Keys (Page 23)".NMicrophoneOCharge ContactsPStrap HolesUsed to attach phone straps and similar items.QSpeaker*1 You can talk with the other party alternately through the speaker in a quiet room. During a conversation using a headset, Hands-freemode does not work.Document Version 2012-05 Operating Instructions 15Before Operating the Telephone](https://usermanual.wiki/Panasonic-of-North-America/96NKX-UDT121/User-Guide-1708561-Page-15.png)
![Handset FunctionsSetting the PasswordThe handset password is not set by default. You mustregister a handset password (4 digits) before use. Youcannot use the following features without setting apassword:–Phonebook lock (See "Locking the HandsetPhonebook (Page 42)".)–"Manual&Password" or "Auto&Password" forKey Lock Type (See "Key Option (Page 47)".)–Reset Handset (See "Other Option (Page 50)".)To set1. Press or the [CENTER] navigation key.2. Select " Setting Handset" by pressing thearrow keys, and then press .3. Press [] or [ ] to select "Other Option", andthen press .4. Press [] or [ ] to select "Change Password",and then press .5. Enter a new password (4 digits [0–9]).6. Verify the password by entering it again as in step5.Note•To avoid unauthorized access to this product:–Set a password that is random and cannotbe easily guessed.–Change the password regularly.•Make a note of the password so that you will notforget it.Key LockYou can lock all keys other than the Navigator Key whilethe handset is in standby mode. One of 4 key lock typescan be selected. For details, see "Key Option(Page 47)".To lockPress and hold or the [CENTER] navigation keyfor more than 2 seconds to lock the handset keys.The icon will be displayed to indicate that thekeys are locked.To unlockTo unlock the handset keys, press and hold orthe [CENTER] navigation key for more than 2 seconds.The icon will change to to indicate the keyshave been unlocked.Note•If you select "Manual&Password" or"Auto&Password" for Key lock type, you needto enter the password to unlock the handset.•If no password has been set, you cannot select"Manual&Password" or "Auto&Password"for Key lock type. To set the password, see"Setting the Password (Page 16)".Silent ModeSilent Mode turns off the ringer and sets the handset tovibrate when calls are received. This can be useful insituations where you do not want to be disturbed, suchas during a meeting.When Silent Mode is active, the following features areturned off or set as specified automatically, regardlessof their settings.–Ringer Volume–Ring On Charger–Auto Answer–Key Tone–Vibrate (Vib.& Ring)To set or cancelTo set or cancel Silent Mode, press and hold formore than 2 seconds.Note•If you set the handset on the charger duringSilent Mode, the handset will not vibrate.*1•When Silent Mode is set, the Low Battery Alarmwill not be heard in standby mode.•When Silent Mode is set, confirmation soundsfor setting the ring pattern or ring volume will notplay.*1 Please note that if you set the handset on the charger whilereceiving an incoming call, vibration will stop. Once the vibrationstops, the handset will not vibrate again for that call, even if thehandset is lifted up again. (If Quick Answer is set, lifting up thehandset will answer the call.)16 Operating Instructions Document Version 2012-05 Before Operating the Telephone](https://usermanual.wiki/Panasonic-of-North-America/96NKX-UDT121/User-Guide-1708561-Page-16.png)
![Advanced Voice ClarityWhen Advanced Voice Clarity is enabled,environmental noise is reduced to improve andmaintain sound quality for the other party in theconversation. Receiver volume is also increasedaccording to the level of environmental noise. It is usefulin noisy environments such as warehouses,manufacturing plants, restaurants, and garages.Advanced Voice Clarity can be enabled by default forregular use, or toggled on/off during a call.Enabling or disabling Advanced Voice Clarity1. Press FUNC.2. Press [ ] or [ ] to select "Voice Clarity", andthen press .3. Press [ ] or [ ] to select "On" or "Off", and thenpress .Temporarily enabling or disabling AdvancedVoice Clarity during a callYou can enable or disable Advanced Voice Clarityduring a call by doing either of the following:a. Press FUNC, then press [ ] or [] to select "VoiceClarity", and then press .orb. Press . To display the soft key, edit thedisplayed soft keys. See "Key Option (Page 47)".Note•Advanced Voice Clarity can be used only inReceiver mode or with a headset. It cannot beused in Hands-free mode. If Hands-free modeis enabled during a call while Advanced VoiceClarity is enabled, Advanced Voice Clarity willbe temporarily disabled.Power Save ModePower Save Mode turns off the ringer, LCD backlight,and/or key backlight automatically after a set number ofseconds have passed while receiving a call. For detailsabout adjusting power save mode settings, see"Incoming Option (Page 45)".Document Version 2012-05 Operating Instructions 17Before Operating the Telephone](https://usermanual.wiki/Panasonic-of-North-America/96NKX-UDT121/User-Guide-1708561-Page-17.png)
![Flexible KeysA Flexible Key can be used either to seize a line in orderto make or receive a call, or used as a function key.Press FLEX to display the Flexible Key list. Here youcan access the 12 Flexible Keys. The color of each keynumber indicates the status of the line or the status ofthe function assigned to the key.[Example]Key numbers•To select a key, press [ ] or [ ] to select thedesired key, and then press .•To edit the names of Flexible Keys, see page 24.The following types of flexible keys are available:DN (Directory Number)Seizes the line assigned to the DN key. When a callarrives at the DN key, pressing the key answers the call.LED Indication•Off: Idle•Green on: You are on a call using the DN key.•Flashing green rapidly: A call is being received.•Flashing green slowly: A call is on hold.•Red on: A shared line is in use or on private hold atanother unit.•Flashing red slowly: A shared line is on hold atanother unit.Note•A shared line is a line that can be used bymultiple units. This is an optional feature andmay not be supported on your phone system.•If a call is on private hold (red, steady on), thecall cannot be retrieved except from the unit thatput the call on hold.One-TouchCalls the party or accesses a feature assigned to thekey. For details, see "One-touch Dialing (Page 26)".Document Version 2012-05 Operating Instructions 21Before Operating the Telephone](https://usermanual.wiki/Panasonic-of-North-America/96NKX-UDT121/User-Guide-1708561-Page-21.png)
![Basic OperationsOperation OutlineHandset functions are accessed through the display menu and selected with the Navigator Key and soft keys.FUNCFLEX[Main Menu][Handset Phonebook][Incoming Call Log] [Ringer Volume][Outgoing Call Log][Function Keys][In standby mode]*1[Flexible Keys]Press the Navigator KeyPress the Navigator Keyor press the Navigator Keyor press the Navigator Key*1 If soft key display settings are changed, the soft keys shown here may not be displayed.•The selected item will be highlighted.•For details about entering characters, see "Entering Characters (Page 40)". For details about searchingfor an item in the phonebook, see "Searching for an Item in the Phonebook (Page 27)".22 Operating Instructions Document Version 2012-05 Before Operating the Telephone](https://usermanual.wiki/Panasonic-of-North-America/96NKX-UDT121/User-Guide-1708561-Page-22.png)
![Function MenusPress or the [CENTER] navigation key to displaythe main and sub menus.Main Menu—While in Standby ModeIncoming LogEnters the Incoming CallLog.Ringer VolumeAccesses the "RingerVolume" setting.New PhonebookStores a new item in thephonebook.Setting HandsetAccesses the "SettingHandset" settings.Memo AlarmAccesses the "MemoAlarm" settings.Sub Menu—While Off-hook/During a ConversationPhonebookOpens the phonebook.New PhonebookStores a new item in thephonebook.Outgoing LogEnters the Outgoing CallLog.Incoming LogEnters the Incoming CallLog.MuteTurns the microphonemute feature on or offduring a conversation.Function KeysHandset functions can be activated through the displaykey list.1. Press FUNC to display the function key list.2. Press [ ] or [ ] to select the desired function, andthen press .You can also press the number key correspondingto a function number to select it directly.1: Mute/A.AnsAutomatically answers incomingcalls in hands-free mode. " " isdisplayed in standby mode.2: ConferenceEstablishes a multiple-partyconversation.3: Fwd/DNDDisplays and/or sets CallForwarding and Do Not Disturb.4: Voice ClaritySets Advanced Voice Clarity.5: Last No RedialCall the last number that wasdialed.6: PhonebookMakes a call using thephonebook.7: Incoming LogMakes a call using the IncomingCall Log.8: Redial ListList numbers that were recentlydialed.9: Flash/RecallDisconnects the current call andallows you to make another callwithout hanging up.0: AlarmSets a memo alarm.Document Version 2012-05 Operating Instructions 23Before Operating the Telephone](https://usermanual.wiki/Panasonic-of-North-America/96NKX-UDT121/User-Guide-1708561-Page-23.png)
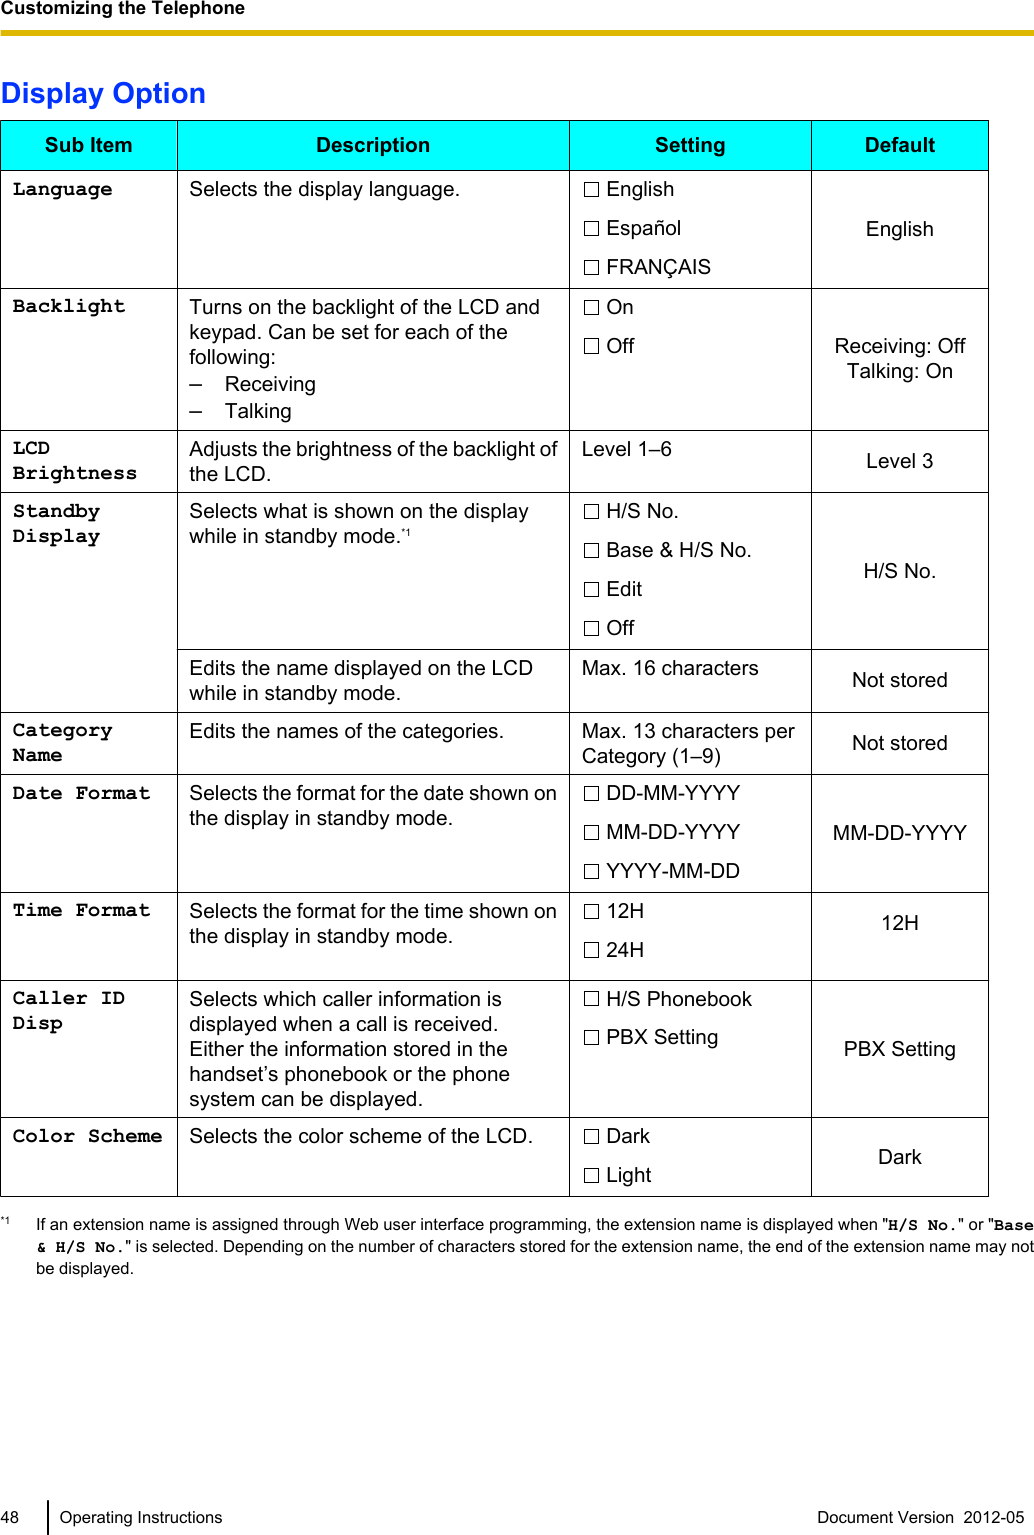
![Selecting the Display LanguageYou can select the language displayed on your handset.1. Press or the [CENTER] navigation key.2. Select " Setting Handset" by pressing thearrow keys, and then press .3. Press [] or [] to select "Display Option", andthen press .4. Press [] or [ ] to select "Language", and thenpress .5. Press [ ] or [ ] to select a language*1, and thenpress .*1 You can select one of the following 3 languages: English,Español, FRANÇAIS.Changing the Handset PhoneNumber DisplayYou can change the display of the handset’s phonenumber when the handset is in standby mode.1. Press or the [CENTER] navigation key.2. Select " Setting Handset" by pressing thearrow keys, and then press .3. Press [] or [] to select "Display Option", andthen press .4. Press [] or [ ] to select "Standby Display",and then press .5. Press [] or [] to select the desired item, and thenpress .Note•By default, "H/S No." is selected.•For details about standby display settings, see"Display Option (Page 48)".Editing the Names of theFlexible KeysWeb user interface programming is required to changethe names of the Flexible Keys used for the handset.For details, consult your administrator or dealer.Adjusting the Ringer VolumeThe volume of the ringer can be adjusted, or turned off.Adjusting the Ringer Volume orTurning the Ringer Off1. Press or the [CENTER] navigation key.2. Select " Ringer Volume" by pressing thearrow keys, and then press .3. Press [] or [] to select the desired setting (StepUp, Step Down, Level 1–6, Off), and then press.Note•You can press the [] key instead of performingsteps 1 and 2.•For details about setting the ringer pattern, see"Incoming Option (Page 45)".Adjusting the Ringer Volume orTurning the Ringer Off while RingingWhile receiving a call, do the following to adjust theringer volume or turn the ringer off:To adjust the ringer volumePress [] or [ ] to adjust the volume*1.To turn the ringer offPress or .*1 The adjusted volume level will also be used for subsequent calls.Note•If you attach a headset while receiving anincoming call, the ring from the handset doesnot switch to the headset. If you attach aheadset before receiving an incoming call, andheadset ringer is set to "On", ringing will beheard from the headset.Changing the Vibrate Setting1. Press or the [CENTER] navigation key.2. Select " Setting Handset" by pressing thearrow keys, and then press .3. Press [ ] or [ ] to select "Incoming Option",and then press .4. Press [ ] or [ ] to select "Vibrate", and thenpress .24 Operating Instructions Document Version 2012-05 Before Operating the Telephone](https://usermanual.wiki/Panasonic-of-North-America/96NKX-UDT121/User-Guide-1708561-Page-24.png)
![5. Press [ ] or [ ] to select the desired setting(Vib.& Ring, Vib.® Ring, Off), and thenpress .Note•To set Vibrate only, without ringing, select"Vib.& Ring" and set the Ringer Volume to"Off", or turn Silent Mode on. For details, see"Location of Controls (Page 14)" and "Adjustingthe Ringer Volume (Page 24)".Adjusting the Receiver/Speaker/Headset VolumeDuring a conversation, press [] or [ ] to adjust thevolume (Level 1–6).Note•If you are using a Bluetooth headset, you canalso adjust the receiver volume by using thevolume key on the Bluetooth headset. Fordetails about using a Bluetooth headset, see"Bluetooth (Page 31)".Document Version 2012-05 Operating Instructions 25Before Operating the Telephone](https://usermanual.wiki/Panasonic-of-North-America/96NKX-UDT121/User-Guide-1708561-Page-25.png)
![Feature OperationsMaking CallsCallingCalling by Dialing1. Press .2. Dial the outside party’s number.3. Press .4. To end the call, press .PredialingIn standby mode, you can start dialing while stillon-hook. After dialing the number, press to gooff-hook and begin the call.Note•Alternatively, you can seize a specific line formaking the call by pressing FLEX and selectingan idle DN key.•To clear an entire number while predialing,press for more than 1 second.•To cancel dialing, press .•If " " flashes, move closer to the CS and dialagain.•If you are using a Bluetooth headset, see "CallHandling with a Bluetooth Headset(Page 33)".Using the Outgoing Call LogIf a call is received from a phone number stored in thephonebook, the number and name of the caller will bedisplayed in the call log.1. While in standby mode, press [] or .2. Press [ ] or [ ] to select an outgoing call record,and then press .3. To end the call, press .Using the Incoming Call Log1. While in standby mode, press [ ].2. Press [ ] or [ ] to select an incoming call record,and then press .3. To end the call, press .Using the Phonebook1. Press [ ] or .2. Select an item stored in the phonebook, and thenpress .3. To end the call, press .Note•For details about searching for an item in thephonebook, see "Searching for an Item in thePhonebook (Page 27)".•For details about entering characters, see"Entering Characters (Page 40)".•For details about storing an item in thephonebook, see "Storing an Item in the HandsetPhonebook (Page 35)".One-touch DialingYou can make a call with a One-touch operation if aOne-touch Dialing key has been created for the desiredparty. One-touch Dialing keys can also be configured toaccess features of your phone system, if available.1. Press FLEX, and then press the One-touch Dialingkey (flexible key).2. To end the call, press .Note•For details about Flexible Keys, see "FlexibleKeys (Page 21)".Hot Key DialingYou can assign a phone number to each number keyand then access the desired phone number by simplypressing and holding the assigned number key.1. Press and hold the dialing key (0–9) assigned as aHot Key for more than 1 second.2. Press .Note•While the Hot Key’s information is displayed,you can press [] or [ ] to select another HotKey number.•If Hot Key dialing is set to "Auto", a Hot Keynumber can also be dialed by pressing andholding the assigned dialing key for a specified26 Operating Instructions Document Version 2012-05 Feature Operations](https://usermanual.wiki/Panasonic-of-North-America/96NKX-UDT121/User-Guide-1708561-Page-26.png)
![number of seconds. For details, see "Selectingthe Type of Hot Key Dialing (Page 38)".•For details about assigning Hot Keys, see"Assigning Hot Keys (Page 38)".Searching for an Item in thePhonebookYou can search for an item in the phonebook, and thenmake a call.1. While in standby mode, press [] or .2. Press [ ] or [ ] to select the desired item.3. Press .Searching by NameYou can also search for an item in the phonebook byentering a name:1. While in standby mode, press [] or .2. Press .3. Enter the name or the first character(s) of thedesired name, and then press .4. Press [] or [ ] to select the desired item.5. Press .Searching by CategoryIf items in the phonebook have been assignedcategories, you can search by category.1. While in standby mode, press [ ] or .2. Press , and then press #.3. Press [] or [ ] to select a category, and thenpress .4. Enter the name or the first character(s) of thedesired name of the item in the category, and thenpress .5. Press [] or [ ] to select the desired item.6. Press .Note•If one item has multiple phone numbers stored,you can press the [CENTER] navigation key,and then press [] or [ ] to select the desiredphone number for that item.•For details about entering characters, see"Entering Characters (Page 40)".•While an item is displayed you can press to return to the "<Enter Name>" display,and then search for another item.Document Version 2012-05 Operating Instructions 27Feature Operations](https://usermanual.wiki/Panasonic-of-North-America/96NKX-UDT121/User-Guide-1708561-Page-27.png)
![Receiving CallsReceivingTo answer an incoming call, press .Note•If you are using a Bluetooth headset, see "CallHandling with a Bluetooth Headset(Page 33)".To answer an incoming call on aspecific line1. Press FLEX to display the flexible keys.2. Press the flexible key number, or press [ ] or [ ]to select the desired key, and then press .You can also answer a call using the following features:–Any Key Answer–Quick Answer–Auto AnswerFor details about setting these features, see "AnswerOption (Page 46)".Note•Flexible keys with incoming calls will be flashinggreen rapidly.•If "Quick Answer" is set to "On" and a briefpower failure occurs while the handset isreceiving a call on the charger, the followingmay occur:If a brief power failure occurs when the handsetis receiving a call on the charger,–If "Talk On Charger" is set to"Off" (default), the call may bedisconnected after being answered.–If "Talk On Charger" is set to "On", thecall may be answered automatically. In thiscase, please note that privacy rights may beviolated or sensitive information may betransmitted to unauthorized parties.•You can select the ringer pattern and LEDpattern for each type of incoming call. Fordetails, see "Incoming Option (Page 45)".Rejecting an incoming callYou can reject an incoming call from your handset.1. While an incoming call is ringing, press .2. The call will be rejected, and the handset will returnto standby mode.Rejecting calls from specific numbersCalls from specific numbers can be automaticallyrejected. This feature can be enabled through Web userinterface programming. For details, contact youradministrator or dealer.Caller IDIf an outside call that contains Caller ID information (acaller’s name and telephone number) is received, thisinformation will be logged in the incoming call log anddisplayed on the handset.If a call from a number matching a number entered inthe phonebook is received, the name registered in thephonebook for that number will be displayed along withthe number.[Example]If caller information is sent by the phone system andthere is also information stored in the phonebook for thesame number, you can choose which information willbe displayed on the handset. Caller information sent bythe phone system is displayed by default. For details,see "Display Option (Page 48)".If you set the handset to display the caller informationstored in the phonebook, caller information sent by thephone system will only be displayed if the number of thecaller is not stored in the phonebook.28 Operating Instructions Document Version 2012-05 Feature Operations](https://usermanual.wiki/Panasonic-of-North-America/96NKX-UDT121/User-Guide-1708561-Page-28.png)
![During a ConversationHolding a CallYou can put a call on hold by holding the call at yourextension.To hold the current callPress , and then press .Note•If Automatic Call Hold is enabled on yourhandset, the call will also be put on hold if youselect a DN key other than the one for thecurrent call. For details, consult youradministrator or dealer.To retrieve a call on hold at your extension1. Press FLEX.2. Press the dial key corresponding to the slowlyflashing green DN key, or press [] or [ ] to selecta slowly flashing green DN key, and then press.Transferring a Call (CallTransfer)You can transfer a call to another destination (extensionor outside party).To transfer1. Press during a conversation.2. Dial the party you want to transfer to, and then press.3. Wait until the other party answers to announce thetransfer.4. Press .Note•To return to the call before the transferdestination answers, press .•If unscreened transfers are supported on yourphone system, step 3 can be omitted. Fordetails, consult your administrator or dealer.To do a blind transfer1. Press during a conversation.2. Dial the party you want to transfer to, and then press.3. Press .Three-party ConferenceDuring a conversation, you can add an additional partyto your call and establish a conference call.Notice•Your phone system may support advancedconference features, such as conference callswith four or more parties. In this case, theprocedures for handling a conference call maybe different from those explained in this section.For details about your phone system, consultyour administrator or dealer.Making a Conference Call1. Press FUNC, and then press 2 ("Conference").2. Dial the party you want to add to the conversation,and then press .3. After the called party answers, press FUNC, andthen press 2 ("Conference").Note•The soft key can also be used to accessthe Conference function directly. To display thiskey, edit the displayed soft keys. For details,see "Key Option (Page 47)".Removing a Party from the ConferenceDuring a conference, you can remove other parties fromthe conference. However, this operation is availableonly during conference calls you initiate.1. During a conference call, press .2. Press FLEX.3. Press the dial key, or press [ ] or [ ], and thenpress to select the DN key (flexible key) thatcorresponds to the party you want to disconnect.4. Press .5. Press FLEX.6. Press the dial key, or press [ ] or [ ], and thenpress to select the DN key (flexible key) thatcorresponds to the remaining party.Document Version 2012-05 Operating Instructions 29Feature Operations](https://usermanual.wiki/Panasonic-of-North-America/96NKX-UDT121/User-Guide-1708561-Page-29.png)
![Note•To reestablish the conference without removingeither party, press FUNC, and then 2("Conference") after step 3.Ending a Conference CallTo go on-hook and end the conference call, press.Useful FeaturesCall Forwarding/Do Not DisturbYou can have incoming calls automatically forwardedto another destination. You can also have incomingcalls rejected (Do Not Disturb).To access the FWD/DND settings1. In standby mode, press FUNC, and then 3 ("Fwd/DND").2. If the unit has multiple lines, press [ ] or [ ] toselect the desired line, and then press .3. Press [ ] or [ ] to select the type of FWD or DNDsetting to apply, and then press .The settings are as follows:–DND: Enable Do Not Disturb(All incoming calls are automatically rejected.)–Fwd(All): Enable Forward All Calls(All incoming calls are forwarded.)–Fwd(Busy): Enable Forward Busy(Incoming calls are forwarded only when yourextension is in use.)–Fwd(NA): Enable Forward No answer(An incoming call is forwarded if you do notanswer the call within a certain amount of time.)4. If a Forward setting is selected, enter a new forwarddestination number, or confirm and modify apreviously set forward destination number, and thenpress .Note•When Call Forwarding and/or Do Not Disturb isenabled, and/or appears on the displayin standby mode.•FWD settings cannot be used on a shared line.Call WaitingDuring a conversation, if a second call arrives, you willhear a call waiting tone. You can answer the second callby disconnecting or holding the current call.To disconnect the current call and then talk tothe new party1. Press while hearing the call waiting tone.2. Press .30 Operating Instructions Document Version 2012-05 Feature Operations](https://usermanual.wiki/Panasonic-of-North-America/96NKX-UDT121/User-Guide-1708561-Page-30.png)
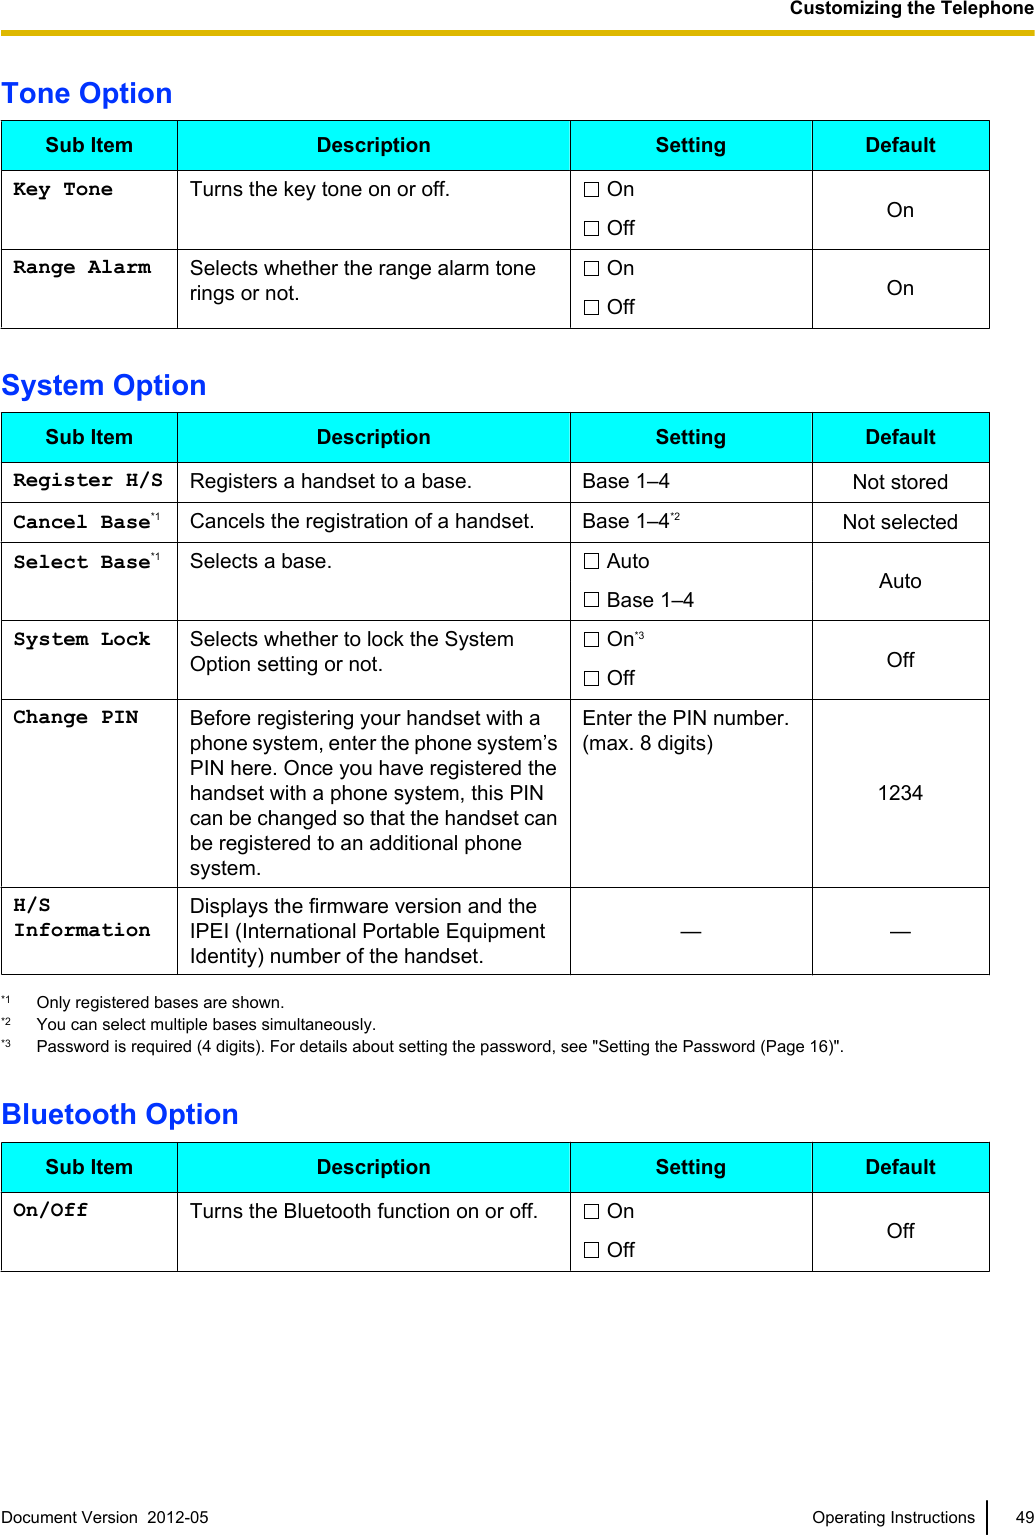
![To hold the current call and then talk to the newparty1. Press while hearing the call waiting tone.2. Press FLEX.3. Press the dial key corresponding to the flashinggreen DN key, or press [ ] or [ ] to select aflashing green DN key, and then press .Message WaitingIf another extension has left a message waitingindication for your extension, you can call back the otherextension directly. When your extension has a messagewaiting indication set, "Message" is displayed, and will appear.To call back an extension that has left amessage waiting indication1. In standby mode, press .2. Press [ ] or [ ] to select the line on which isdisplayed, and then press .Listening to Voice MailMessagesWhen you receive a voice message, "Voice Msg" isdisplayed, and will appear.You can check your new messages by accessing yourmailbox.1. In standby mode, press and hold .2. Press [ ] or [ ] to select the line on which isdisplayed, and then press .Note•Step 2 is not necessary if only one line isconfigured on the handset.BluetoothYou can use Bluetooth to connect to a Bluetoothwireless headset and transfer phonebook data from acell phone.Turning Bluetooth On or OffBefore using Bluetooth to connect to a wirelessBluetooth headset or to a cell phone, Bluetooth must beset to "On" in the handset settings.1. Press or the [CENTER] navigation key.2. Select " Setting Handset" by pressing thearrow keys, and then press .3. Press [] or [ ] to select "Bluetooth Option",and then press .4. Press [ ] or [] to select "On/Off", and then press.5. Press [ ] or [ ] to select "On" or "Off", and thenpress .Setting and Changing theBluetooth PIN NumberBefore using Bluetooth to connect to a cell phone, youmust set the Bluetooth PIN number in the handsetsettings.1. Press or the [CENTER] navigation key.2. Select " Setting Handset" by pressing thearrow keys, and then press .3. Press [] or [ ] to select "Bluetooth Option",and then press .4. Press [] or [] to select "Cell Phone", and thenpress .5. Press [] or [ ] to select "Change BT PIN", andthen press .6. Enter the old PIN number, and then press .*17. Enter a PIN number (4 digits), and then press.8. Re-enter the same PIN number as in step 7, andthen press .*1 If a PIN number has not been set previously, skip this step andcontinue to step 7.Note•The valid digits are 0–9.Document Version 2012-05 Operating Instructions 31Feature Operations](https://usermanual.wiki/Panasonic-of-North-America/96NKX-UDT121/User-Guide-1708561-Page-31.png)
![Registering and Deregistering theBluetooth HeadsetYou can use a wireless Bluetooth headset with ahandset. Before using a Bluetooth headset, you mustregister it to a handset.Registering a Bluetooth HeadsetNotice•Perform any procedures on the headsetnecessary for registering it before configuringthe settings on the handset. Otherwise, theBluetooth headset may not be registered.1. Press or the [CENTER] navigation key.2. Select " Setting Handset" by pressing thearrow keys, and then press .3. Press [ ] or [ ] to select "Bluetooth Option",and then press .4. Press [ ] or [] to select "BT Headset", and thenpress .5. Press [ ] or [ ] to select "Registration", andthen press .6. Press [ ] or [ ] to select "Register", and thenpress .7. Enter the headset’s Bluetooth PIN number, andthen press .Note•After pressing in step 4, if no Bluetoothheadset is registered, skip to step 7.•Only one Bluetooth headset can be registeredto the handset. If a different Bluetooth headsethas already been registered, registering a newBluetooth headset will overwrite the currentregistration.•Up to 4 digits can be entered for the Bluetoothheadset’s PIN number.Deregistering the Bluetooth Headset1. Press or the [CENTER] navigation key.2. Select " Setting Handset" by pressing thearrow keys, and then press .3. Press [ ] or [ ] to select "Bluetooth Option",and then press .4. Press [ ] or [] to select "BT Headset", and thenpress .5. Press [] or [ ] to select "Registration", andthen press .6. Press [] or [] to select "Deregister", and thenpress .7. Press [] or [ ] to select "Yes", and then press.Connecting and Disconnecting aBluetooth HeadsetYou can connect a registered Bluetooth headset with ahandset.Connecting a Bluetooth Headset1. Press or the [CENTER] navigation key.2. Select " Setting Handset" by pressing thearrow keys, and then press .3. Press [ ] or [ ] to select "Bluetooth Option",and then press .4. Press [ ] or [] to select "BT Headset", and thenpress .5. Press [ ] or [] to select "Connection", and thenpress .6. Press [ ] or [ ] to select "On", and then press.Note•The default setting is "On".Disconnecting the BluetoothHeadset1. Press or the [CENTER] navigation key.2. Select " Setting Handset" by pressing thearrow keys, and then press .3. Press [] or [ ] to select "Bluetooth Option",and then press .4. Press [] or [] to select "BT Headset", and thenpress .5. Press [] or [] to select "Connection", and thenpress .32 Operating Instructions Document Version 2012-05 Feature Operations](https://usermanual.wiki/Panasonic-of-North-America/96NKX-UDT121/User-Guide-1708561-Page-32.png)
![6. Press [ ] or [ ] to select "Off", and then press.Call Handling with a BluetoothHeadsetYou can make or answer a call using the Bluetoothheadset.Note•In this manual, the names of buttons andfeatures described for Bluetooth headsets areexamples only. Your Bluetooth headset’sbutton names or features may differ. Consultthe documentation for your Bluetooth headsetfor operation and feature information.Making a Call with the BluetoothHeadset1. Dial the outside party’s number.2. Press the [TALK] button or [REDIAL] button on theBluetooth headset.3. To end a call, press the [TALK] button on theBluetooth headset.Answering a Call Using a BluetoothHeadset1. Press the [TALK] button on the Bluetooth headset.2. To end a call, press the [TALK] button on theBluetooth headset.Note•When a call is received, if the headset ringer ison, the Bluetooth headset will ring even if thehandset is set to Silent Mode, or if "Vibrate"or "Ring On Charger" is enabled.Switching a Conversation betweenthe Handset and a BluetoothHeadsetTo switch a conversation from the handset tothe Bluetooth headset•Press twice.To switch a conversation from the Bluetoothheadset to the handset•Press .Adjusting the Microphone Volume ofa Bluetooth Headset1. Press or the [CENTER] navigation key.2. Select " Setting Handset" by pressing thearrow keys, and then press .3. Press [] or [ ] to select "Bluetooth Option",and then press .4. Press [] or [] to select "BT Headset", and thenpress .5. Press [] or [ ] to select "Headset Mic Vol",and then press .6. Press [] or [ ] to adjust the volume (Level 1–6),and then press .Note•The microphone volume for the Bluetoothheadset can only be adjusted when the handsetis in standby mode.Registering and Deregistering aCell Phone for PhonebookTransferYou can transfer the phonebook data of a cell phone tothe handset. Before performing the transfer, you mustregister the cell phone to the handset. For details abouttransferring a phonebook, see "Phonebook and vCardTransfer by Bluetooth (Page 37)".Registering a Cell Phone1. Press or the [CENTER] navigation key.2. Select " Setting Handset" by pressing thearrow keys, and then press .3. Press [] or [ ] to select "Bluetooth Option",and then press .4. Press [] or [] to select "Cell Phone", and thenpress .5. Press [] or [ ] to select "Registration", andthen press .Document Version 2012-05 Operating Instructions 33Feature Operations](https://usermanual.wiki/Panasonic-of-North-America/96NKX-UDT121/User-Guide-1708561-Page-33.png)
![6. If the "Register/Deregister" menu is displayed,press [] or [ ] to select "Register", and thenpress . Otherwise, proceed to step 7.7. Complete the registration by operating the cellphone.Note•Follow the procedure above before doing anyoperations on the cell phone. Otherwise, the cellphone may not be registered.•When you operate the cell phone, thehandset’s Bluetooth PIN number is required.For details, see "Setting and Changing theBluetooth PIN Number (Page 31)".Deregistering a Cell Phone1. Press or the [CENTER] navigation key.2. Select " Setting Handset" by pressing thearrow keys, and then press .3. Press [] or [ ] to select "Bluetooth Option",and then press .4. Press [] or [] to select "Cell Phone", and thenpress .5. Press [] or [ ] to select "Registration", andthen press .6. Press [] or [] to select "Deregister", and thenpress .7. Press [] or [ ] to select "Yes", and then press.34 Operating Instructions Document Version 2012-05 Feature Operations](https://usermanual.wiki/Panasonic-of-North-America/96NKX-UDT121/User-Guide-1708561-Page-34.png)
![Customizing theTelephoneUsing the HandsetPhonebookYou can store up to 500 phone numbers in the handsetalong with names for easy access. You can also setunique ringer patterns and LED patterns for differentcategories to identify incoming calls. All phonebookitems are stored in alphabetical order.For security purposes, you can lock the phonebook. Fordetails about making calls from the phonebook, see"Using the Phonebook (Page 26)".Note•A single entry (i.e., name) can have multiplephone numbers. Since the phonebook capacityis limited by the number of stored phonenumbers, storing multiple phone numbers in anentry decreases the maximum number ofentries.•We recommend that backups are made of thehandset’s phonebook data, in case the databecomes unrecoverable due to productmalfunction. For details, consult youradministrator or dealer.Private RingYou can organize entries in the phonebook into one of9 Private Ring Categories. It is possible to set a differentringer pattern and LED pattern, vibration pattern, andcolor pattern*1 for each category. When the displayedCaller ID*2 matches a phone number or name stored inthe phonebook, the handset rings according to thePrivate Ring Category settings.*1 For details about ringer patterns, LED patterns, vibrationpatterns, and color patterns, see "Incoming Option(Page 45)".*2 For details about Caller ID information, see "Caller ID(Page 28)".Storing an Item in the HandsetPhonebookStoring a New Item1. Press or the [CENTER] navigation key.2. Select " New Phonebook" by pressing thearrow keys, and then press .3. Enter a name (max. 24 characters), and then press.4. Press [ ] or [ ] to select a phone number type(A to E), and then press .5. Enter the phone number (max. 32 digits), and thenpress .6. Repeat steps 4 and 5 to add additional phonenumber types.7. Press [ ] or [ ] to select "Category Off", andthen press .8. Select a category, and then press .9. To select a default number for the entry, press []or [ ] to select "Default Tel No", and then press.10. Press [] or [] to select the number to use as thedefault number, and then press .11. Press .Note•Steps 7 and 8 can be omitted if you do not wantto assign a category.•Steps 9 and 10 can be omitted if you do not wantto assign a default number. (The first numberentered for an entry will automatically beassigned as the default number.)•The valid digits are "0" through "9", " ", "#", and"+".•For details about entering characters, see"Entering Characters (Page 40)".•If an item with the same name and numberexists, the new information added will bemerged with the existing item.Editing a Stored ItemYou can edit the information stored in phonebookentries.1. Press .2. Press [ ] or [ ] to display the desired entry, orpress and search for the desired entry.Document Version 2012-05 Operating Instructions 35Customizing the Telephone](https://usermanual.wiki/Panasonic-of-North-America/96NKX-UDT121/User-Guide-1708561-Page-35.png)
![3. Press to open the phonebook sub-menu.4. Press [ ] or [ ] to select "Edit", and then press.5. Edit the name, phone number, category, anddefault number setting as necessary.6. Press .Note•To change a character or digit, press [] or[ ] to highlight it, press to delete it, andthen enter the new character or digit.•To clear an entire line, press and hold formore than 1 second.•To move the cursor to the left or right, press[] or [ ], respectively.•For details about searching for an item in thephonebook, see "Searching for an Item in thePhonebook (Page 27)".•For details about entering characters, see"Entering Characters (Page 40)".Storing an Item Using PredialingYou can dial a number first and then add it as aphonebook entry.1. In standby mode, dial a number.2. Press .3. Enter a name (max. 24 characters), and then press.4. Press [] or [ ] to select a phone number type(A to E), and then press .5. Enter the phone number (max. 32 digits), and thenpress .6. Repeat steps 4 and 5 to add additional phonenumber types.7. Press [ ] or [ ] to select "Category Off", andthen press .8. Select a category, and then press .9. To select a default number for the entry, press [ ]or [ ] to select "Default Tel No", and then press.10. Press [ ] or [] to select the number to use as thedefault number, and then press .11. Press .Note•Steps 7 and 8 can be omitted if you do not wantto assign a category.•Steps 9 and 10 can be omitted if you do not wantto assign a default number. (The first numberentered for an entry will automatically beassigned as the default number.)•For details about entering characters, see"Entering Characters (Page 40)".Storing an Item Using the Incomingor Outgoing Call LogYou can add a number listed in the incoming or outgoingcall log to the phonebook.1. In standby mode, press [] to open the IncomingCall Log or press [] to open the Outgoing Call Log.2. Press [ ] or [ ] to select a record in the log.3. Press to open the phonebook sub-menu.4. Press [ ] or [ ] to select "Save Phonebook", andthen press .5. Edit the name if desired, and then press .6. Press [] or [ ] to select a phone number type(A to E), and then press .7. Edit the phone number if desired, and then press.8. Repeat steps 6 and 7 to add additional phonenumber types.9. Press [ ] or [ ] to select "Category Off", andthen press .10. Select a category, and then press .11. To select a default number for the entry, press [ ]or [ ] to select "Default Tel No", and then press.12. Press [ ] or [] to select the number to use as thedefault number, and then press .13. Press .Note•Steps 9 and 10 can be omitted if you do not wantto assign a category.•Steps 11 and 12 can be omitted if you do notwant to assign a default number. (The firstnumber entered for an entry will automaticallybe assigned as the default number.)•For details about entering characters, see"Entering Characters (Page 40)".36 Operating Instructions Document Version 2012-05 Customizing the Telephone](https://usermanual.wiki/Panasonic-of-North-America/96NKX-UDT121/User-Guide-1708561-Page-36.png)
![Editing Category NamesYou can edit the names of the categories in thephonebook.1. Press or the [CENTER] navigation key.2. Select " Setting Handset" by pressing thearrow keys, and then press .3. Press [] or [] to select "Display Option", andthen press .4. Press [] or [ ] to select "Category Name", andthen press .5. Press [ ] or [ ] to select the desired categorynumber (1–9), and then press .6. Enter a name for the category (max. 13 characters),and then press .7. Repeat steps 5 and 6 for each category name toedit.Note•For details about entering characters, see"Entering Characters (Page 40)".Phonebook and vCard Transferby BluetoothTransferring Phonebook Data from aCell Phone using BluetoothYou can transfer the phonebook data of a cell phone tothe handset using Bluetooth wireless transmission. Fordetails about Bluetooth, see "Bluetooth (Page 31)".Notice•The cell phone must support PBAP (PhoneBook Access Profile) to use this function.To transfer the phonebook data of a registeredcell phone to the handset1. Press or the [CENTER] navigation key.2. Select " Setting Handset" by pressing thearrow keys, and then press .3. Press [ ] or [ ] to select "Bluetooth Option",and then press .4. Press [ ] or [] to select "Cell Phone", and thenpress .5. Press [ ] or [ ] to select "Phonebook", and thenpress .6. Press .7. Press [] or [] to select "1:(your cell phonename)", and then press .8. Press [] or [] to select "Auto" or "Manual", andthen press .•If you select "Auto", the download will startedautomatically.•If you select "Manual", operate the transferfrom the cell phone to start the download.To transfer the phonebook data of anunregistered cell phone to the handset1. Press or the [CENTER] navigation key.2. Select " Setting Handset" by pressing thearrow keys, and then press .3. Press [ ] or [ ] to select "Bluetooth Option",and then press .4. Press [ ] or [] to select "Cell Phone", and thenpress .5. Press [ ] or [ ] to select "Phonebook", and thenpress .6. Press .7. Press [ ] or [ ] to select "2:Other Cell", andthen press .8. When "Transfer Phonebook From CellPhone" is displayed, start the transfer by operatingthe cell phone.Note•For details about registering a cell phone, see"Registering and Deregistering a Cell Phone forPhonebook Transfer (Page 33)".•Phonebook transfer and the Bluetooth headsetfunctions cannot be operated at the same time.•If a call is received during a transfer, only thephonebook data transferred before the call wasreceived is saved to the handset phonebook.•If the transfer was not fully completed,"Completed" is displayed, and details of whatwas not transferred will be shown.•If the phonebook is locked, the temporaryunlocking screen will be displayed, and you willneed to temporarily unlock to continue. Fordetails, see "Unlocking the PhonebookTemporarily (Page 42)".•While transferring phonebook data from a cellphone using Bluetooth, the Bluetoothpictograph will not be displayed on the screenof the handset (see "Display (Page 18)").Document Version 2012-05 Operating Instructions 37Customizing the Telephone](https://usermanual.wiki/Panasonic-of-North-America/96NKX-UDT121/User-Guide-1708561-Page-37.png)
![Transferring vCard Data usingBluetoothvCard™ is a standard file format for an electronicbusiness card. A vCard can include a name and phonenumbers. You can save this vCard data to the handsetusing Bluetooth wireless transmission.Note•Only version 2.1 of vCard is supported.•If both the name and phone number of aphonebook item being transferred correspondswith existing data in the handset, thephonebook item will not be transferred. Also,phonebook entries without any phone numbersentered will not be transferred to the handset.•If multiple phone numbers exist for one nameitem, only the first 6 phone numbers receivedwill be saved. Any numbers beyond the first 6received will not be saved to the handset.•Phone numbers that contain more than 32 digitswill not be saved to the handset.•Phonebook names can contain up to 24characters. Names over 24 characters in lengthwill be shortened to 24 characters whentransferred. Note that if extended charactersare used, the length of the name transferredmay be further reduced.Assigning Hot KeysYou can assign a phone number stored in thephonebook to a key to be used as a Hot Key.1. In standby mode, press and hold a dial key (0–9) formore than 1 second.2. Press .3. Press [ ] or [ ] to select "Copy from P.book",and then press .4. Press [ ] or [ ] to select an entry, or press to search for an entry, and then press .5. Press [] or [] to select a number, and then press.6. Press .Note•For details about searching for an item in thephonebook, see "Searching for an Item in thePhonebook (Page 27)".Selecting the Type of Hot Key DialingYou can select one of 2 types of Hot Key Dialing foreach assigned Hot Key.If "Manual" is selected, pressing and holding anassigned Hot Key for the set number of seconds willdisplay the Hot Key’s information. Then, pressing dials the Hot Key’s assigned number.If "Auto" is selected, pressing and holding an assignedHot Key for the set number of seconds will dial that HotKey’s assigned number immediately.1. In standby mode, press and hold a dial key (0–9) formore than 1 second.2. Press .3. Press [ ] or [] to select "Automatic Call", andthen press .4. Select "Manual" or "Auto", and then press .Note•To select the number of seconds before the callis automatically made, see "Key Option(Page 47)".38 Operating Instructions Document Version 2012-05 Customizing the Telephone](https://usermanual.wiki/Panasonic-of-North-America/96NKX-UDT121/User-Guide-1708561-Page-38.png)
![Memo Alarm SettingAn alarm will sound at the set time. A memo can alsobe displayed. Memo Alarm is available only when thehandset is within range of a CS.Note•You can select the ringer pattern and LEDpattern for each Memo Alarm. For details, see"Incoming Option (Page 45)".•If you are on a call at the time that the alarm isset to sound, it will sound after you have endedthe call.Setting a Memo Alarm1. Press or the [CENTER] navigation key.2. Select " Memo Alarm" by pressing the arrowkeys, and then press .3. Press [ ] or [ ] to select an alarm number (1–3),and then press .4. Press [ ] or [] to select an alarm mode, and thenpress .The alarm modes are as follows:–Off: Disables the selected Memo Alarm.–Once: The selected Memo Alarm will occur onlyonce.–Daily: The selected Memo Alarm will occur atthe same time every day.–Weekly: The selected Memo Alarm will occurat the same time on selected days of the week.5. Set the time and date for the Memo Alarm.The information to enter depends on the alarmmode.–Once: Enter the date and time, using theNavigator Keys and/or dial keys, and then press.–Daily: Enter the daily time, using the NavigatorKeys and/or dial keys, and then press .–Weekly:a. Press [ ] or [] to select a day of the week,and then press . A mark will bedisplayed next to each day of the week thathas been selected. In this way, you canselect multiple days of the week.b. After selecting 1 or more days of the week,press .c. Enter a time of day using the NavigatorKeys and/or dial keys, and then press.6. Enter a text message to be displayed when theMemo Alarm occurs, and then press .7. Press .Note•For details about entering characters, see"Entering Characters (Page 40)".•When entering a time of day, press totoggle between AM or PM. will not bedisplayed if 24-hour-time display is set.Deleting a Memo Alarm1. Press or the [CENTER] navigation key.2. Select " Memo Alarm" by pressing the arrowkeys, and then press .3. Press [] or [ ] to select an alarm number (1–3),and then press .4. Press [ ] or [ ] to select "Yes", and then press.Stopping a Memo Alarm•While the alarm is ringing, press , , ,or set the handset on the charger.Document Version 2012-05 Operating Instructions 39Customizing the Telephone](https://usermanual.wiki/Panasonic-of-North-America/96NKX-UDT121/User-Guide-1708561-Page-39.png)
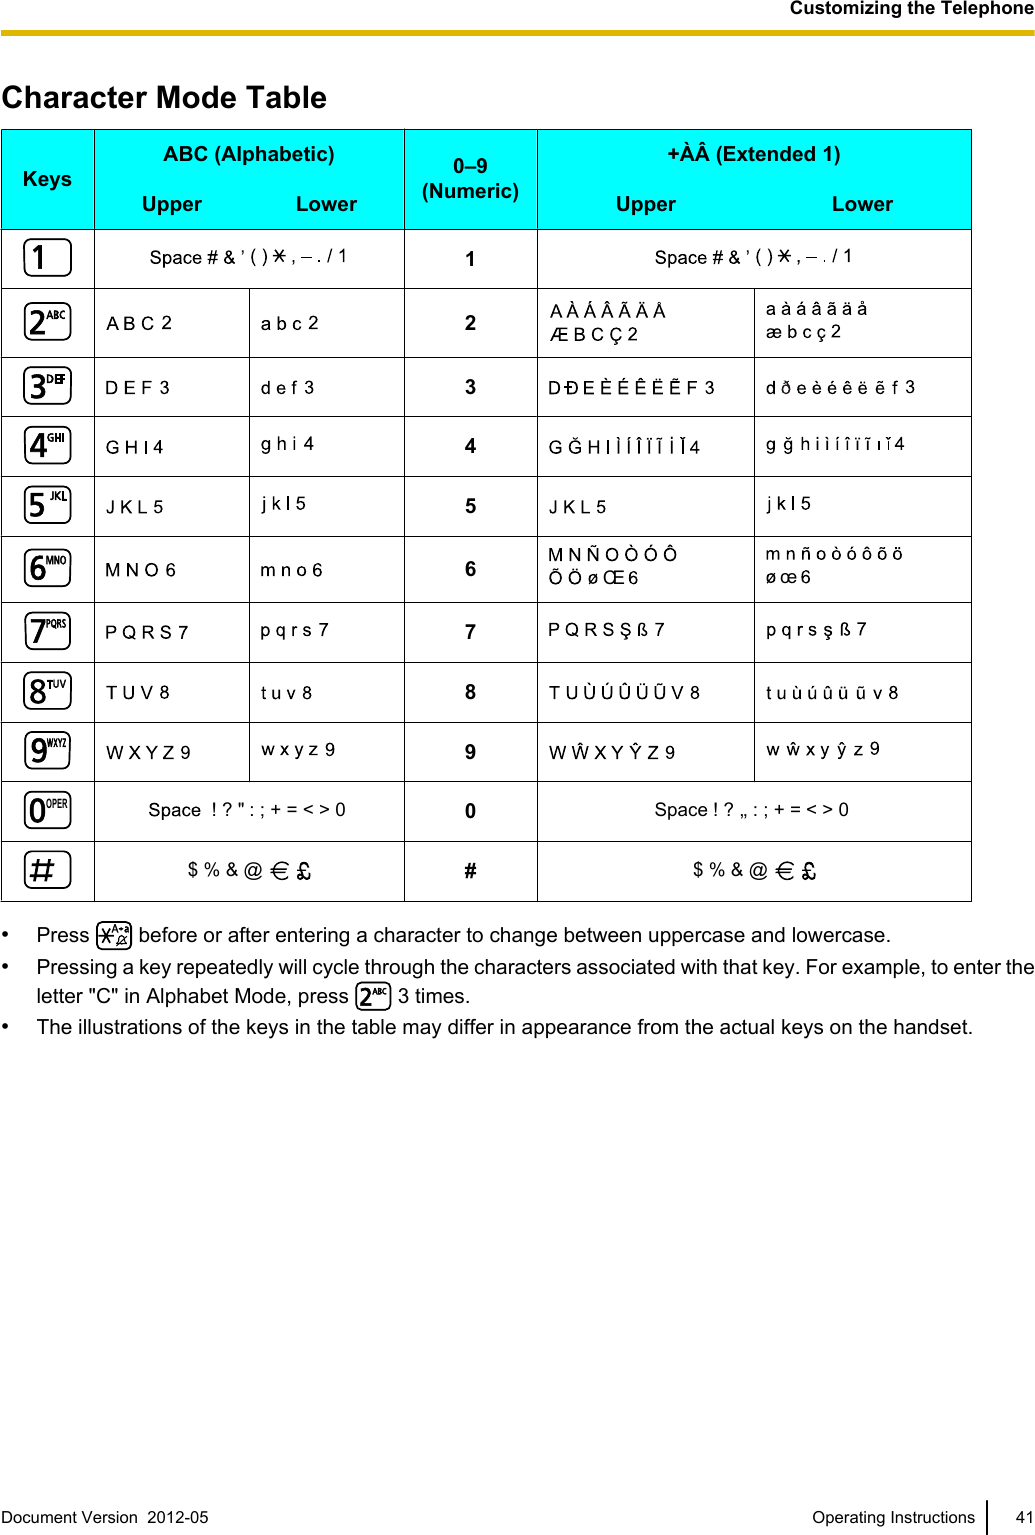
![Entering CharactersYou can enter characters and digits using the dial keys.You can select one of 3 character modes by pressing the Right Soft Key while enteringa name. The function icon above the soft key displays the current character mode.For a list of available characters, see "Character Mode Table (Page 41)".A, aB, bC, cTo change the character mode while editing a name in the phonebook, press theright soft key.Alphabetic Numeric Extended 1Example: To enter "Anne" in Alphabetic Mode.(RIGHT) (RIGHT) (RIGHT)•To switch between uppercase and lowercase, press .•To enter a character located on the same dialing key as the previous character, move the cursor by pressingthe Navigator Key [], then enter the desired character.•If you enter a different character by mistake, press the Navigator Key [] or [] to highlight the character,press to delete it, and then enter the correct character.•To clear an entire line, press for more than 1 second.•To move the cursor, press the Navigator Key [ ], [ ], [ ] or [ ].40 Operating Instructions Document Version 2012-05 Customizing the Telephone](https://usermanual.wiki/Panasonic-of-North-America/96NKX-UDT121/User-Guide-1708561-Page-40.png)
![Locking the HandsetPhonebookYou can lock/unlock the phonebook while the handsetis in standby mode. If no password has been set, youcannot lock the phonebook. For details about setting thepassword, see "Setting the Password (Page 16)".Locking/Unlocking the PhonebookTo lock•Press and hold for more than 2 seconds. will be displayed.To unlock1. Press and hold for more than 2 seconds.2. Enter your password.3. Press to return to standby mode.Unlocking the PhonebookTemporarily1. Press .2. Enter your password.Deleting Stored ItemsPhonebook1. Press [ ] or to display the phonebook.2. Press [ ] or [ ] to select an item, or press to search for an item.3. Press .4. Press [ ] or [ ] to select "Delete", and then press.5. Press [ ] or [ ] to select "Yes", and then press.Note•In step 4, you can select "Delete All" insteadto delete all items.•For details about searching for an item in thephonebook, see "Searching for an Item in thePhonebook (Page 27)".Hot Key Dial1. Press and hold the dialing key assigned as a HotKey for more than 1 second.2. Press .3. Press [ ] or [] to select "Delete", and then press.4. Press [] or [ ] to select "Yes", and then press.Note•In step 1 while the Hot Key’s information isdisplayed, you can press [ ] or [ ] to selectanother Hot Key number.•In step 3, you can select "Delete All" insteadto delete all items.Incoming/Outgoing Call Log1. In standby mode, press [] to open the IncomingCall Log or press [] to open the Outgoing Call Log.2. Select an item stored in the call log, and then press.3. Press [ ] or [] to select "Delete", and then press.4. Press [] or [ ] to select "Yes", and then press.Note•In step 3, you can select "Delete All" insteadto delete all items.42 Operating Instructions Document Version 2012-05 Customizing the Telephone](https://usermanual.wiki/Panasonic-of-North-America/96NKX-UDT121/User-Guide-1708561-Page-42.png)
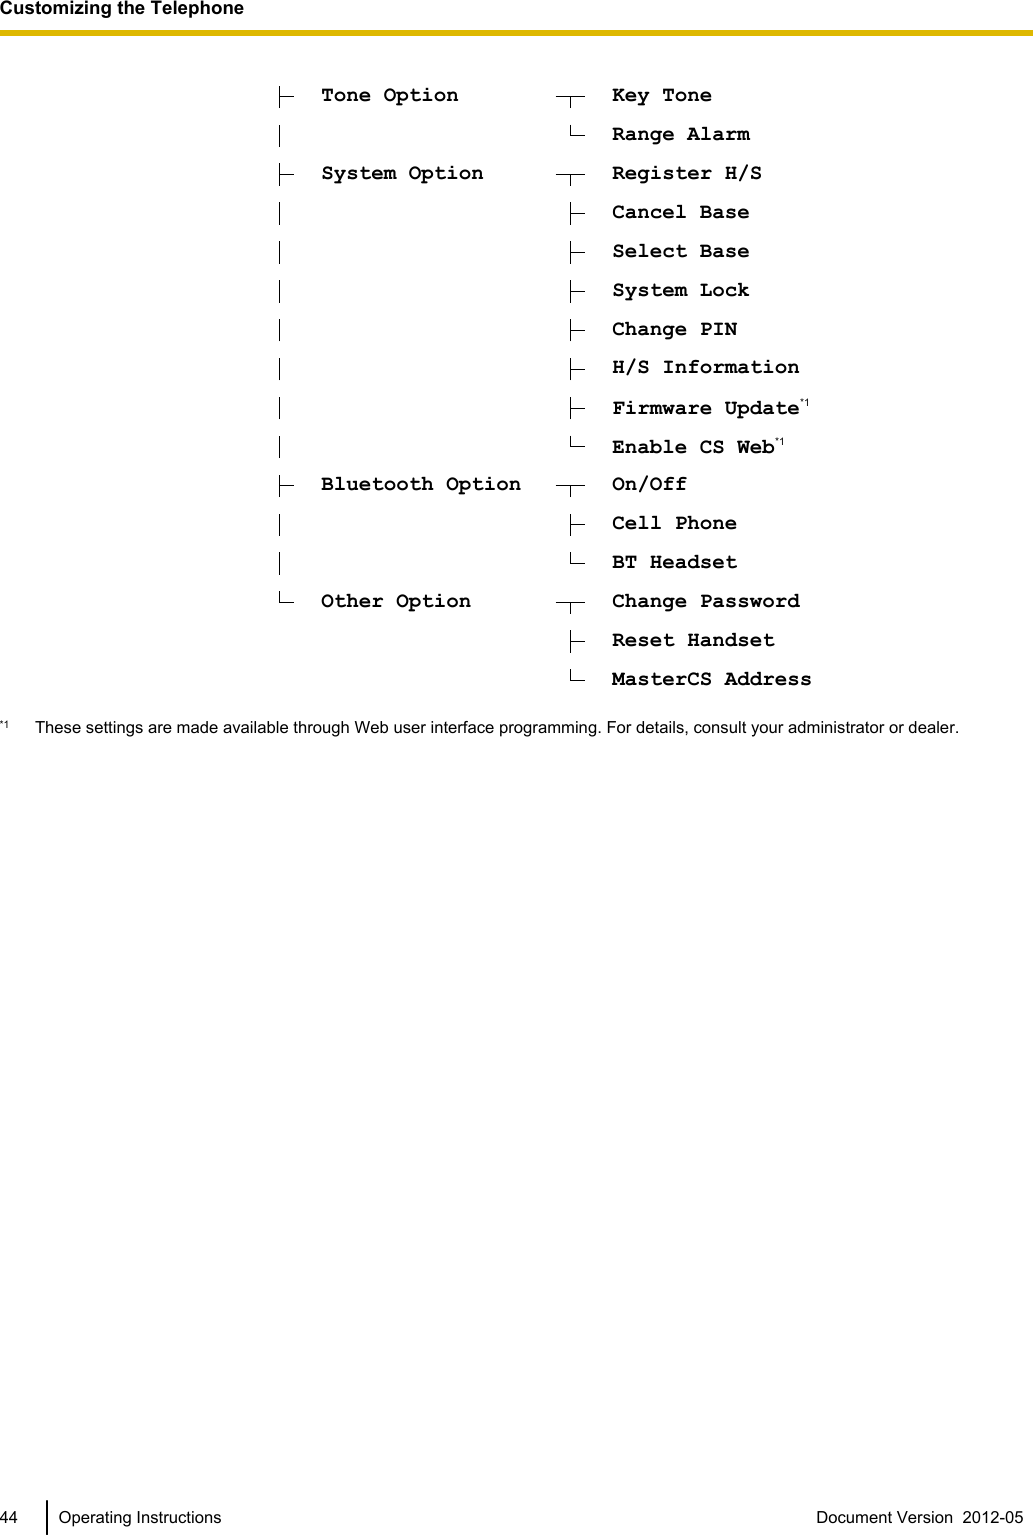
![Changing Handset SettingsHandset Setting Menu Layout[Main Item] [Sub Item]Setting Handset Incoming Option Ringer VolumeRinger TypeVibrateRing On ChargerMemo AlarmPower SaveHeadset RingerTalk Option Speaker VolumeReceiver VolumeHeadset VolumeHeadset Mic VolTalk On ChargerAnswer Option Any Key AnswerQuick AnswerAuto Ans DelayKey Option Soft Key EditSoft Key NameKey Lock TypeAuto Lock TimeHot Key TimeDisplay Option LanguageBacklightLCD BrightnessStandby DisplayCategory NameDate FormatTime FormatCaller ID DispColor SchemeDocument Version 2012-05 Operating Instructions 43Customizing the Telephone](https://usermanual.wiki/Panasonic-of-North-America/96NKX-UDT121/User-Guide-1708561-Page-43.png)


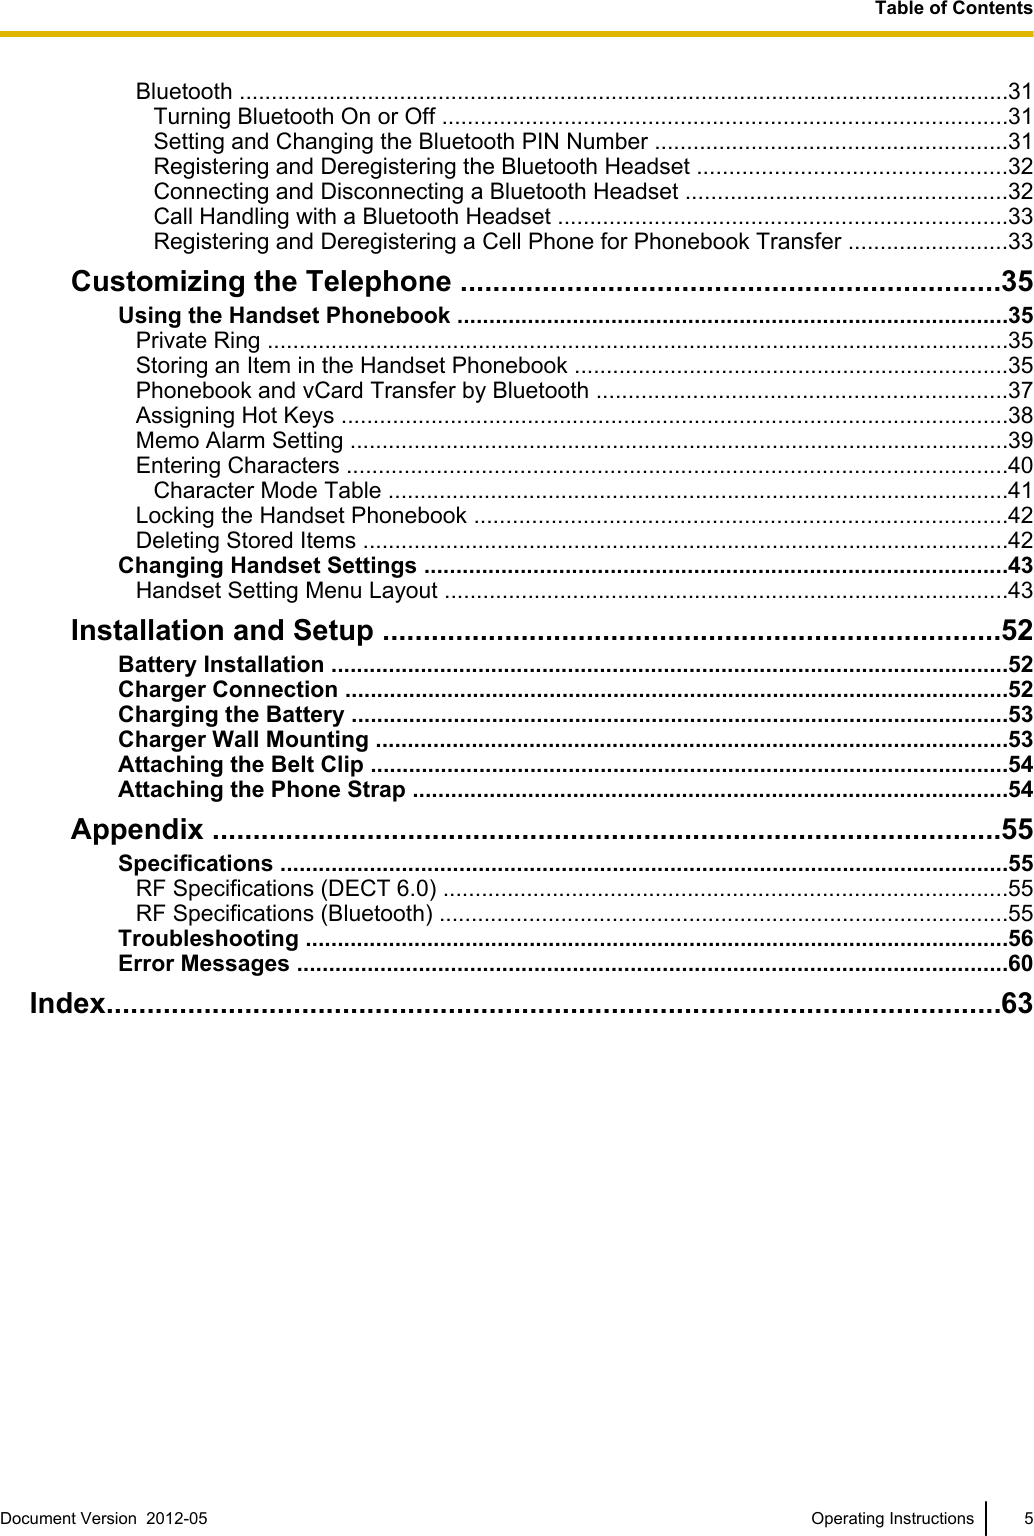
![Charging the BatteryAt the time of shipment, the battery is not charged. Please charge the battery for about 3 hours beforeusing the handset for the first time.•The charge indicator will turn off when the battery is fully charged. Formore information about charging the battery, see "Battery Information(Page 11)".•It is normal for the handset and charger to feel warm while the batteryis charging.•Keep devices sensitive to magnetic fields away from the charger.•Use only the included charger.Charger Wall Mounting25 mm(1 in)for charger1. Install the two screws in the wall, spacing them 25 mm (1 in) apart.20 mm (3/4 in) or longerSpace2 mm (1/16 in)• Recommended screw size is M4 x 20.25 mm(1 in)Screws(Not supplied)2. Mount the charger securely on the wall.•Please copy this page and use as a reference for wall mounting.Make sure to set the print size to correspond with the size of this page. If the dimension of the paper outputstill deviates slightly from the measurement indicated here, use the measurement indicated here.•When mounting the charger, ensure that the correct screws are used for the type of wall.•Make sure that the wall that the charger will be attached to is strong enough to support the total weight ofthe handset and charger (approx. 135 g [0.30 lb]). If not, it is necessary for the wall to be reinforced.•When this product is no longer in use, make sure to detach it from the wall.•When inserting screws, avoid pipes and electrical cables, etc, that may be present/buried.•The screw heads should not be flush to the wall.•Certain types of wall may require plugs to be anchored in the wall before the screws are inserted.Document Version 2012-05 Operating Instructions 53Installation and Setup](https://usermanual.wiki/Panasonic-of-North-America/96NKX-UDT121/User-Guide-1708561-Page-53.png)
![Attaching the Belt ClipYou can attach the handset to your belt by following the steps below.[To attach]1. Insert the clip into the designated notches in the handset.2. Slide the clip into the holder until it clicks.[To remove]1. Make sure to turn the handset 180° when you take it off.2. Remove the belt clip.Attaching the Phone StrapOpen the battery cover, run the strap through the strap hole, and then loop it around the hook.54 Operating Instructions Document Version 2012-05 Installation and Setup](https://usermanual.wiki/Panasonic-of-North-America/96NKX-UDT121/User-Guide-1708561-Page-54.png)
![AppendixSpecificationsItem SpecificationsDisplay 1.8-inch TFT Backlight LCD, 65,000 colorsHeadset Jack 1 (ø 2.5 mm [3/32 in])Battery Li-Ion 3.7 V (700 mAh)Maximum Power Consumption(Charger)Standby: 0.3 WMaximum: 4.0 WBattery Performance Talk: up to 13 hoursStandby: up to 200 hoursCharging Time 3 hoursDimensions(Width ´ Depth ´ Height)Handset only:48.5 mm ´ 17.9 mm ´ 127.5 mm(1.91 in ´ 0.70 in ´ 5.02 in)Handset on charger:63.0 mm ´ 78.0 mm ´ 140.0 mm(2.48 in ´ 3.07 in ´ 5.51 in)WeightHandset (including battery): 88 g (0.19 lb)Handset (including battery) and charger: 135 g (0.30 lb)Operating Environment 0 °C to 40 °C (32 °F to 104 °F)5 °C to 40 °C (41 °F to 104 °F) (When charging)RF Specifications (DECT 6.0)Item SpecificationsFrequency Band 1920 MHz to 1930 MHzNumber of Carriers 5Transmission Output Peak 115 mWRF Specifications (Bluetooth)Item SpecificationsFrequency Band 2.4000 GHz to 2.4835 GHzClass Class 2Document Version 2012-05 Operating Instructions 55Appendix](https://usermanual.wiki/Panasonic-of-North-America/96NKX-UDT121/User-Guide-1708561-Page-55.png)