Panasonic of North America 9TAK-STD14 1.9 GHz Wireless Pendant Microphone User Manual
Panasonic Corporation of North America 1.9 GHz Wireless Pendant Microphone Users Manual
Users Manual
1
Rev.1.0
1.9GHz Wireless Pendant Microphone
K-STD14

2
Rev.1.0
FCC CAUTION
Changes or modifications not expressly approved by the party responsible for compliance could
void the user’s authority to operate the equipment.
This device complies with part 15 of the FCC Rules. Operation is subject to the following two
conditions: (1) This device may not cause harmful interference, and (2) this device must accept
any interference received, including interference that may cause undesired operation.
Compliance with FCC requirement 15.407(c)
Data transmission is always initiated by software, which is the passed down through the MAC,
through the digital and analog baseband, and finally to the RF chip. Several special packets are
initiated by the MAC. These are the only ways the digital baseband portion will turn on the RF
transmitter, which it then turns off at the end of the packet. Therefore, the transmitter will be on
only while one of the aforementioned packets is being transmitted. In other words, this device
automatically discontinue transmission in case of either absence of information to transmit or
operational failure.
Radio Frequency (RF) Exposure Warning
The available scientific evidence does not show that any health problems are associated with
using low power wireless devices. There is no proof, however, that these low power wireless
devices are absolutely safe. Low power Wireless devices emit low levels of radio frequency
energy (RF) in the microwave range while being used. Whereas high levels of RF can produce
health effects (by heating tissue), exposure of low-level RF that does not produce heating effects
causes no known adverse health effects. Many studies of low-level RF exposures have not found
any biological effects. Some studies have suggested that some biological effects might occur, but
such findings have not been confirmed by additional research. 1.9GHz Wireless Pendant
Microphone, model K-STD14 has been tested and found to comply with FCC radiation exposure
limits set forth for an uncontrolled environment and meets the FCC radio frequency (RF)
Exposure Guidelines.
Notice
FCC ID can be found on the battery compartment of the units.

3
Rev.1.0
WARNING:
1) To prevent fire or electric shock hazard, do not expose this apparatus to rain or moisture.
2) The apparatus should not be exposed to dripping or splashing and no objects filled with
liquids, such as vases, should be placed on the apparatus.
3) Batteries shall not be exposed to excessive heat such as sunshine, fire or the like
The model number and serial number of this product may be found on the surface of the unit.
You should note the model number and serial number of this unit in the space provided and
retain this book as a permanent record of your purchase to aid identification in the event of
theft.
Model No.
Serial No.
A lithium ion/polymer battery that is recyclable powers the product you have purchased.
Please call 1-800-8-BATTERY for information on how to recycle this battery.
MEDICAL:
Consult the manufacturer of any personal medical devices, such as pacemakers, to determine if
they are adequately shielded from external RF (radio frequency) energy. The unit operates in the
frequency range of 1.92 GHz to 1.93 GHz.
Do not use the unit in health care facilities if any regulations posted in the area instruct you not to
do so. Hospitals or health care facilities may be using equipment that could be sensitive to
external RF (radio frequency) energy.

4
Rev.1.0
Important Safety Instructions
1) Read these instructions.
2) Keep these instructions.
3) Heed all warnings.
4) Follow all instructions.
5) Do not use this apparatus near water.
6) Clean only with dry cloth.
7) Do not block any ventilation openings. Install in accordance with the manufacturer's
instructions.
8) Do not install near any heat sources such as radiators, heat registers, stoves, or other
apparatus (including amplifiers) that produce heat.
9) Only use attachments/accessories specified by the manufacturer.

5
Rev.1.0
Precautions
Turn off the power supply when inside an aircraft.
The product might interfere with operational safety of the aircraft.
Do not attempt to disassemble or shortcircuit rechargeable batteries.
An exploding battery or leaking battery fluid may result in fire, injury and burns.
Avoid placing the product in unstable conditions.
Failure to do so may cause injury.
Stop operation immediately when something is wrong with the product.
When smoke goes up from the product or the smell of smoke comes from the product,
continued use will result in fire. Immediately remove the battery and the battery charger, and
contact your dealer.
Do not swing the product around on its strap.
The strap might come off, resulting in personal injury or damage to the product.
6
Rev.1.0
[Precautions for use]
• Operating temperature:
5 °C - 35 °C {41 °F - 95 °F}
When calculating the battery life, note that temperatures below 10 °C {50 °F} shorten the
battery duration.
• Do not disassemble the product or touch internal parts.
• Battery power is slightly consumed even when the power of this product is OFF. If the
battery is left unused, that may result in liquid leakage. To prevent this, remove the battery
from the product when unused for a long time.
• Exercise care when using the product in high places. If it falls down, it may cause personal
injury or suffer damage.
• Do not use or leave the battery in places where it will be exposed to high temperatures,
such as in strong direct sunlight, in a sun-heated car, by the fire, or in front of a stove.
• Do not touch the battery poles or contacts inside the battery cover with dirty hands.
Otherwise poor contact or noise may result. If dirty, wipe off with a dry soft cloth.
The contacts inside the battery cover tend to get dirty. Clean them regularly (about once a
month) with ethyl alcohol. Do not use solvents, such as benzine or thinner, or a metal polish.
Otherwise the contacts may become deformed or discolored, or the brass plating may come
off.
• Do not use a deteriorated or short-circuited battery. A battery in this condition may leak
fluid, overheat and cause damage.
• The product is not made to drip-proof specification. Do not use the product with the wet
hands in a place where it is directly exposed to water.
• Do not swing the product around on the neck strap. To prevent strangling, the closure of
the strap provided for hanging the product around the neck is designed to give way under
pressure. If swung around on the neck strap, the closure will open and the product will fly
away, resulting in personal injury or damage to the product.
• The product is designed for indoor use.
• Use the product in a location where it is relatively shielded from noise produced by rotating
machinery, transformers or the ignition system or automobiles.
• Do not place the product on top of heatgenerating equipment, such as powered amplifiers,
video monitors or measuring instruments, and do not leave it in a closed car in hot summer.
When storing the product, do so in a dry place.
• The product is high-precision adjusted; exposing it to strong impact or dropping it on the
floor may change its characteristics. Handle the product with due care. Do not expose the
product to shock or impact as this will cause the audio output of the receiver to give off noise
on impact.
Product care
• Clean the power source with a dry cloth.
• Do not clean with volatile liquids such as benzine and thinner.
• When using a chemical cloth for cleaning, observe the cautions provided with that product.
Useful hints
• Noise prevention
Turn off the power of this product, and turn down the volume of a powered amplifier, mixer,
etc. before replacing, removing or inserting the battery, as this might produce a large noise
from these devices.
• Volume control
When the volume control from this product goes wrong, move closer to the receiver and
then try again to adjust the volume.
7
Rev.1.0
CONTENTS
Important Safety Instructions
Precautions
Major operating controls and their functions
Channel setting
Inserting a battery
Fitting the microphone
Using the microphone
Adjusting the volume
Muting
Connecting an external microphone
Connecting an external device
Replacing a battery
Charging a rechargeable battery
Replacing the neck strap
Troubleshooting
8
Rev.1.0
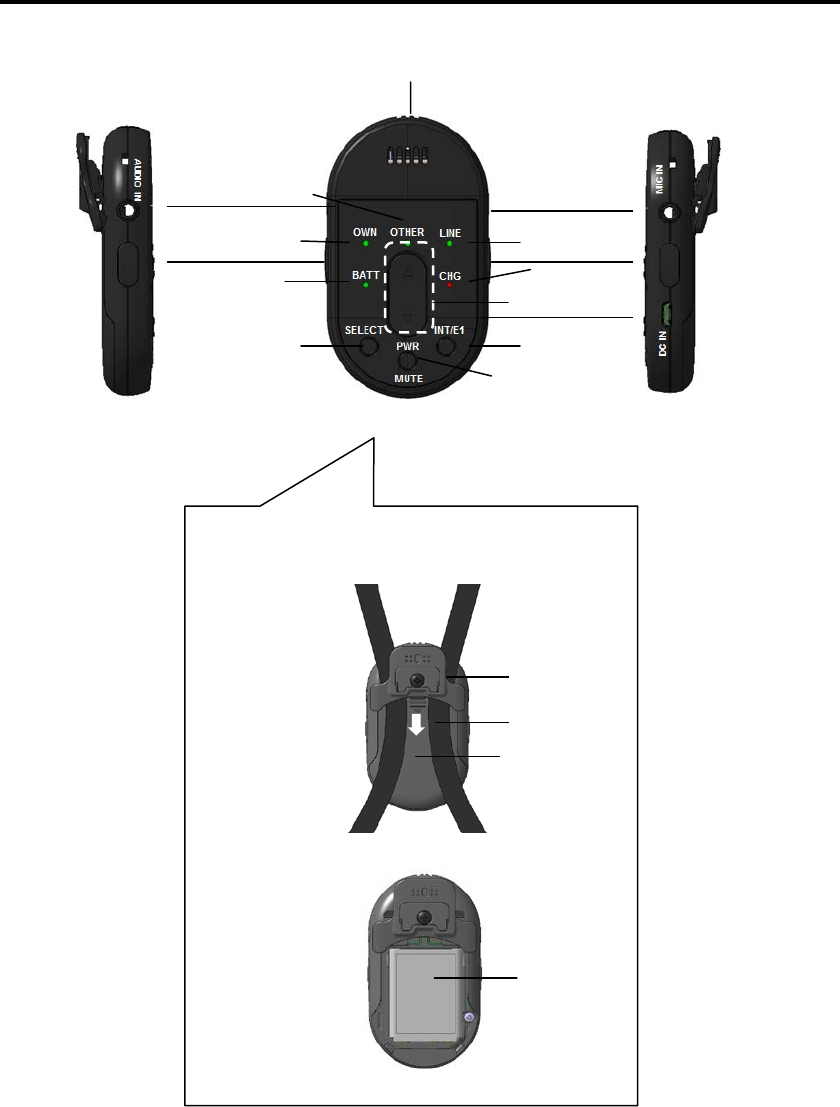
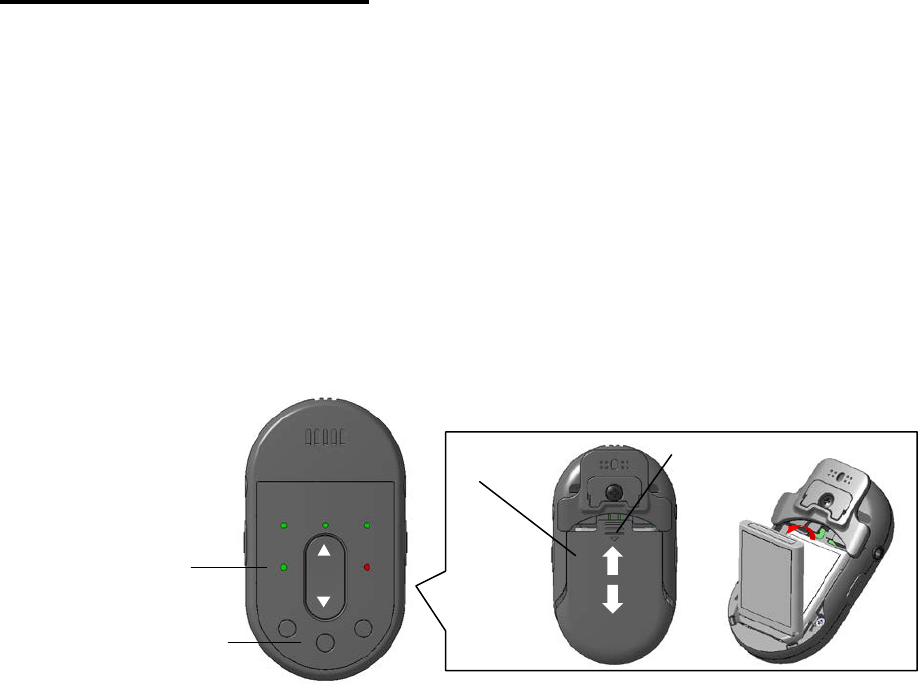
Major operating controls and their functions
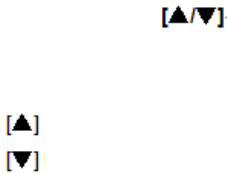
14 14
1
2
3
4
5
6
8
13
9
10
12
11
7
Rear View
Battery cover remove
(inside the battery cover )
18
15
16
17
9
Rev.1.0
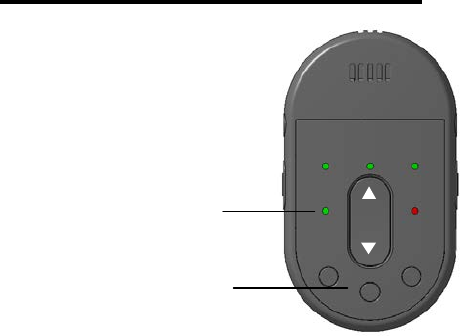
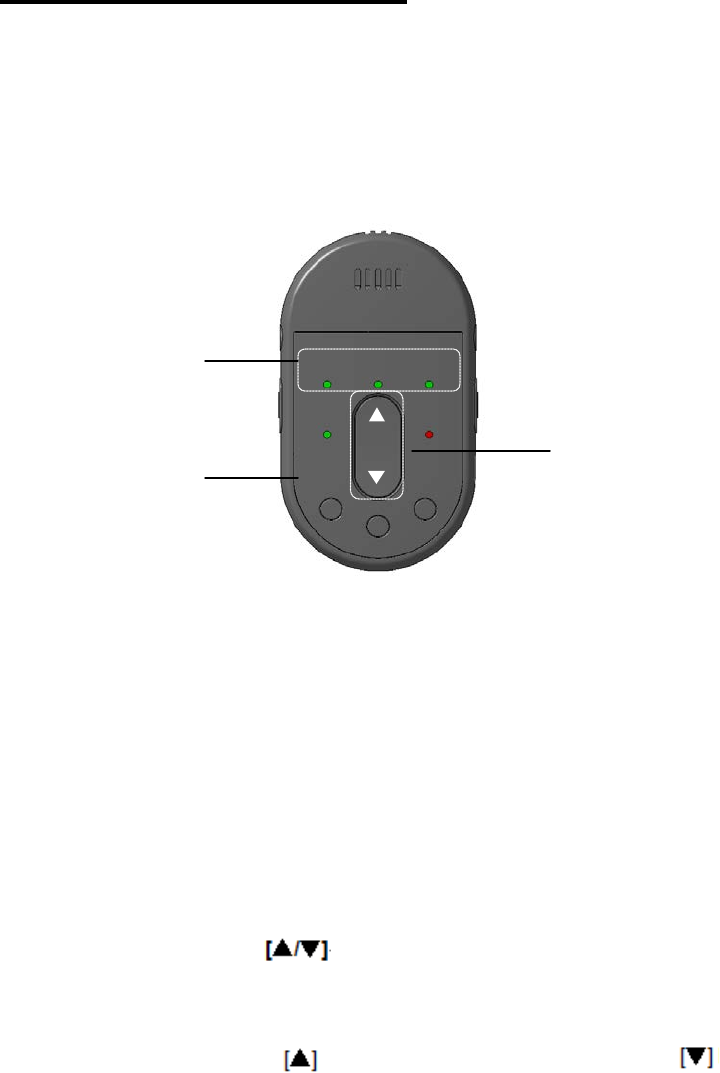
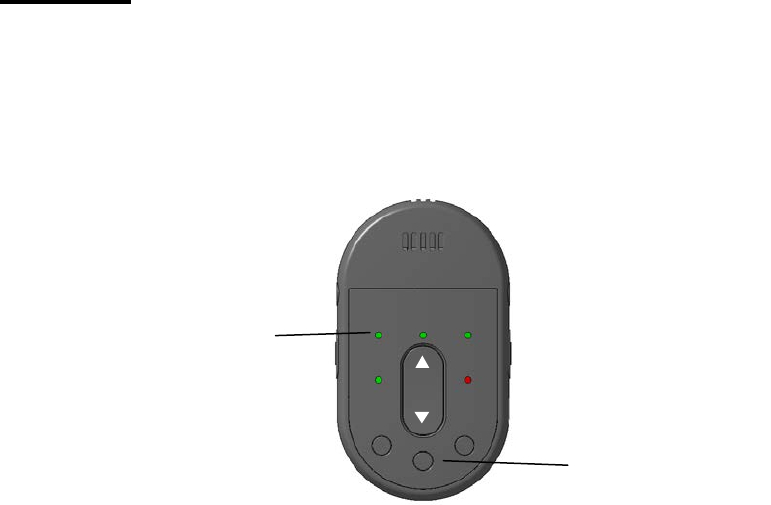
[1] Microphone opening
This opening picks up the speaker’s voice.
[2] Microphone selection indicator (green) [OWN]
Lights when [OWN] (audio from [1], [8], or [13]) is selected for adjusting the volume.
Blinking indicates that the microphone is muted.
[3] Microphone selection indicator (green) [OTHER]
[OTHER] microphone refers to other microphone receiving audio at the same receiver.
Lights when the [OTHER] microphone is selected for adjusting the volume.
[4] Line selection indicator (green) [LINE]
[LINE] refers to external devices connected to the line input terminal of the receiver. Lights
when [LINE] is selected for adjusting the volume.
[5] Volume control buttons
Adjust the volume of [OWN], [OTHER] and [LINE]. (Adjustment step range: refer to
Receiver[K-SRC14] manual ) Adjust when any one of the indicators in [2] to [4] is on.
Pressing the button will increase the volume.
Pressing the button will decrease the volume.
Keeping the buttons pressed will continuous increase/decrease the volume.
[6] Microphone input terminal [MIC IN] (side)
Transmits the audio from a connected external microphone to the receiver.
When an external microphone is connected to this terminal, the audio from the [1]
Microphone opening is muted.
[7] Charge indicator (red) [CHG]
Indicates the charging status.
ON: Charging completed .
OFF:, No connected a charge connector or no battery installed.
Blinking ( 2 seconds ) : Charging
* In the case of a complete discharge state, the first about 1 minute red LED lights RED.
Blinking( 1 second ) : Charge Error
10
Rev.1.0
[8] DC input terminal [DC IN] (side)
Used to connect the charger for charging the battery installed in the microphone.
[9] [INT/E1] button
Pressing this button will activate E1 output and an Intercom call ( or a response ).
(Explanation of the intercom is referring to the DECT AP[K-SAP14] manual..)
[10] [PWR/MUTE] button
Pressing this button will turn the microphone power [ON/OFF]. To turn "ON", press it for 1
second or more, to turn "OFF", press it for 2 seconds or more.
While the power is on, pressing this button short once will mute the microphone, and
pressing this button again will cancel muting.
[11] [SELECT] button
Selects the target for volume control.
Each time the button is pressed, the selection indicator changes as follows:
[OWN] -> [OTHER] -> [LINE] -> [OWN].
[12] Battery indicator [BATT]
Indicates the status of the microphone power supply and the battery condition as follows:
Green light: Power is turned "ON".
Yellow light: Power is turned “ON”, but battery is nearing its end.
Red light: Battery is depleted. Charge the battery or E2 state.
Light off: Power is turned "OFF".
Blinking ( green ): Standby state.( A microphone is ready )
Blinking ( yellow ): Out of Range.
[13] External input terminal [AUDIO IN] (side)
Transmits the audio from a connected external device to the receiver.
When an external device is connected to this terminal, audio from the [1] Microphone
opening and [6] Microphone input terminal is muted.
[14] E2 Button (side)
Pressing simultaneously both side E2 button or more will be an activate E2 output.
( E2 release : Press [PWR/MUTE] button 2 seconds or more. )
11
Rev.1.0
[15] Neck strap
For hanging the microphone around the neck.
[16] Clip (rear)
For adjusting the neck strap to an appropriate length. The clip can be attached to the
speaker’s clothes.
[17] Battery cover (rear)
The battery cover can be removed by pulling in the direction of the arrow.
[18] Battery slot (inside the battery cover)
Install one lithium-ion rechargeable battery, paying attention to the charging terminal inside
the battery cover.
12
Rev.1.0
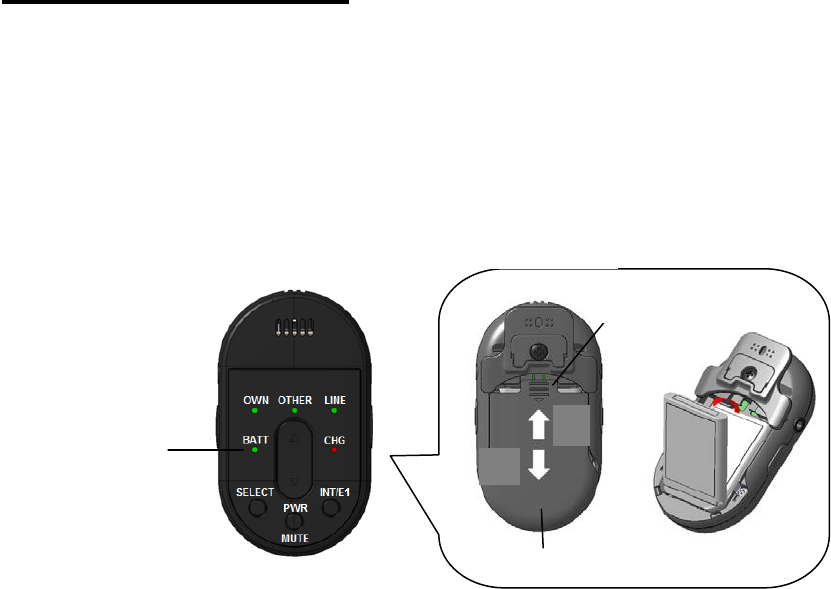
Inserting a battery
• To insert a battery, turn off the power of the microphone, and make sure that the
microphone is not connected to the charger.
• To replace a battery, refer to "Replacing a battery".
Note:
• Do not touch the battery poles with hands. Otherwise poor contact or noise may result. If
dirty, wipe off with a dry soft cloth.
1 Confirm that the battery indicator is off.
2 Remove the battery cover.
Pull the battery cover in the arrow direction while pressing the A position with both right and
left thumb to remove cover.
3 Install a battery.
Insert the battery and card, making sure that their orientation is correct.
About batteries that you can use with this unit
The 1U583136R-B006A (Lithium Ion Battery) is the only battery that can be used in this
microphone.
4 Attach the battery cover.
Push up the battery cover to the direction of the arrow in the figure, and fit it to its original
position
1
Battery indicator
3
2
4
A
Battery cover
Rear view
13
Rev.1.0
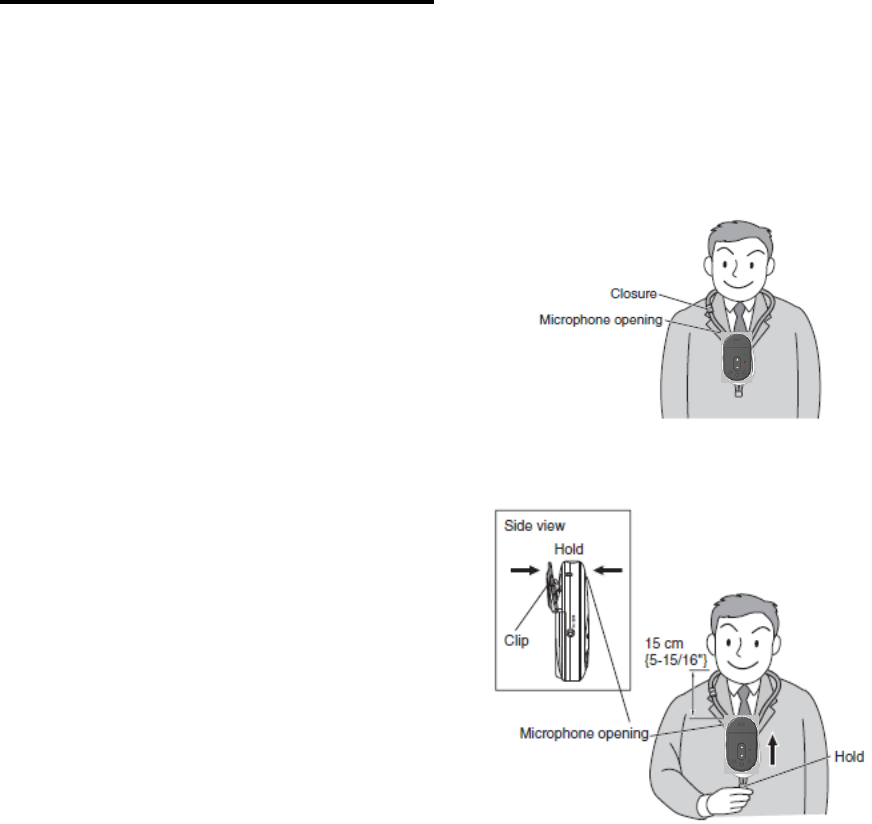
Fitting the microphone
When fitting, removing, or adjusting the position of the microphone, turn off the power of the
microphone, and make sure that the microphone is not connected to the charger.
1 Hang the microphone around the neck of the speaker.
Widen the looped part of the strap above
the microphone and hang it around the
speaker’s neck, with the front of the
microphone facing outward as shown in
the illustration at right.
2 Adjust the position of the microphone.
While holding the lower end of the neck
strap with one hand and opening the clip
at the rear of the microphone with the
other, pull up the microphone to the level
of the speaker’s chest.
Adjust so that the distance between the
speaker’s mouth and the microphone
opening is approx. 15 cm {5-15/16"} as
shown in the illustration at right.
Let go of the clip in the desired position.
If bothered by the sound of the microphone rubbing against your clothes, fix the clip at the
rear of the microphone to your shirt pocket or placket.
Note:
• The neck strap is provided with a safety closure to prevent strangling. It is not meant to fit
the microphone.
• To remove, reverse the above procedure.
14
Rev.1.0
Using the microphone
1To turn on the microphone, press its [PWR/MUTE] button for 1 second or more.
The battery indicator of the microphone lights. To turn off the power, press the button for
2 seconds or more. The battery indicator of the microphone turns off.
Memo:
When [BAT] indicator RED Blink, the registration to a receiver is required.
After turn on receiver’s [LINK] button,
turn on Microphone simultaneously [PWR/MUTE] button and [INT/E1] button.
( microphone power OFF state)
Important:
• While using the microphone, do not take the microphone close to the speaker.
Loud noises such as feedback may damage your hearing.
Note:
• Also read the operating instructions of the receiver (K-SRC14), and the Access point
(K-SAP14).
BATT CHG
OWN
OTHER
LINE
PWR
MUTE
SELECT INT/E1
Battery indicator
1
[PWR/MUTE] button
15
Rev.1.0
Adjusting the volume
The microphone can control the volume of audio signals that are output from the receiver
(K-SRC14).
After adjusting the volume level at the receiver and any connected external devices, the
speaker can make fine adjustments, such as level differences, by performing the following
operations on the microphone.
1 Press the selector button
When the selector button is pressed for the first time after turning on the power, the [OWN]
selection indicator lights, and after that the selection indicator for the preceding selection
([OWN], [OTHER], [LINE]) will light. Then press the selector button repeatedly to select the
desired selection. The selection indicators light in the following order:
[OWN] -> [OTHER] -> [LINE] -> [OWN].
* The selection indicator lights for 5 seconds. If no operation takes place within this period,
the indicator turns off automatically.
2 Press the volume button
While the selection indicator for the selection made in 1 is lit, either press the volume button
or keep it pressed.
will increase the volume, pressing will decrease Pressing the volume button
it. Refer to the receiver manual for an adjustment range. The selection indicator goes off 5
seconds after the volume button was pressed for the last time.
• When [OWN] is lit
Adjust the audio volume of this microphone (input from the microphone opening, external
BATT CHG
OWN OTHER LINE
PWR
MUTE
SELECT INT/E1
Selection indicator
1
Selector button
2
Volume button
16
Rev.1.0
input and microphone input).
* Adjustment is not possible while muted ([OWN] selection indicator is blinking)
• When [OTHER] is lit
Adjust the volume of another microphone (Refer to the table in this page.)
• When [LINE] is lit
Adjust the volume of the external device (CD player or MD player) that is connected to the
line input connector of the receiver that receives the audio from the microphone.
Note:
• The adjusted volume can be reset by turning off the power switch of the receiver.
It is not reset by turning off the power of the microphone.
• While the microphone is muted, volume control of the [OWN] microphone is disabled but
enabled for [OTHER] and [LINE].
17
Rev.1.0
Muting
If you want to temporarily stop the audio transmitted from this microphone to the receiver for
one reason or another, without turning off the microphone, you can temporarily mute the
audio signals.
1 Press the [PWR/MUTE] button.
When pressing the [PWR/MUTE] button once, the [OWN] selection indicator starts blinking
and the audio transmitted from the microphone to the receiver is muted. While muting is
activated, audio input of the [OWN] microphone (audio input from microphone opening,
external input and microphone input terminal) is muted. To cancel muting, press the
[PWR/MUTE] button again.
Note:
• After muting is maintained for approx. 5 minutes, the microphone is turned off
automatically.
• In the muted state, volume control of the [OWN] microphone is disabled, but [OTHER] and
[LINE] are enabled.
• The muting operation may become disabled under certain circumstances.
BATT CHG
OWN
OTHER
LINE
PWR
MUTE
SELECT INT/E1
[PWR/MUTE] button
[OWN] selection indicator
18
Rev.1.0
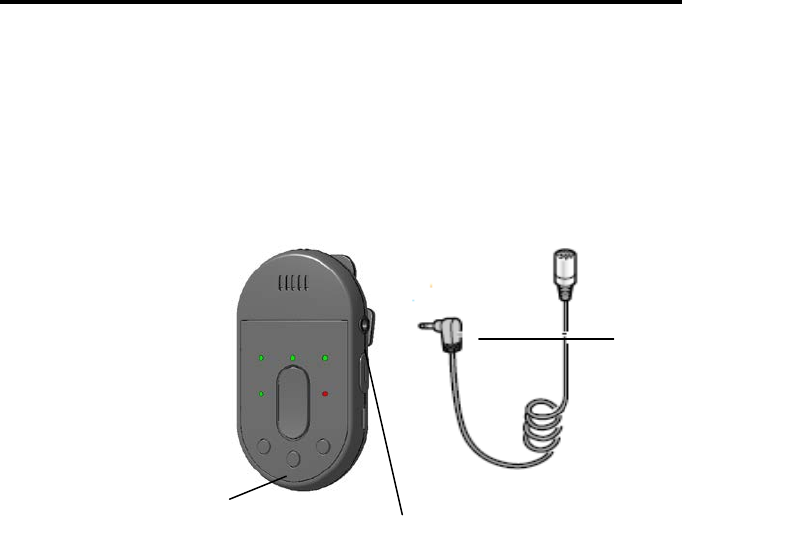
Connecting an external microphone
This function allows you to use an external microphone instead of the microphone opening
of this microphone. Connect an external microphone (for example, an electret condenser
microphone) to the microphone input terminal of the microphone, and transmit the audio to
the receiver.
1 Turn off the power of the microphone.
2 Using the ø3.5 mini-plug, connect the external microphone (for example, a
commercially available electret condenser microphone) to the microphone input
terminal.
3 Turn on the power of the microphone.
Important:
• Do not connect external devices (CD players or MD players) to the microphone input
terminal.
Loud noises may damage your hearing. When an external device is mistakenly connected,
turn off the power of the microphone and the external device, disconnect the plug, and
connect the device to external input terminal.
Note:
• Once the ø3.5 mini-plug is plugged into the microphone input terminal, priority is given to
this audio transmission from an external microphone and the audio from the microphone
opening will not be transmitted.
1,3 [PWR/MUTE] button
Microphone input terminal
Electret condenser microphone
(commercially available)
φ
3.5 mini-plug
19
Rev.1.0
• The microphone input terminal of the microphone is a monaural terminal. If a stereo
external microphone is plugged into the microphone input terminal, either the right or the left
channel audio will be transmitted.
• When fine-tuning the volume of external microphone using this microphone, select [OWN]
by pressing the selector button. For fine tuning, refer to "Adjusting the volume.
• Use a unidirectional microphone. The use of an omnidirectional microphone may cause
feedback.
• In addition to this manual, refer to the operating instructions of the external microphone to
be connected.
20
Rev.1.0
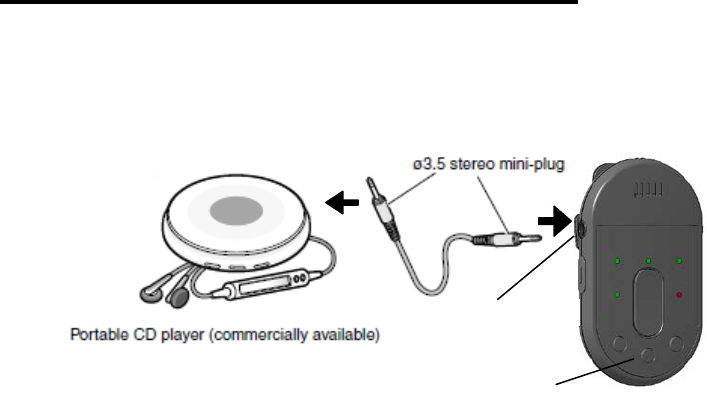
Connecting an external device
You can connect an external device (for example, a portable CD player) to the external input
terminal and transmit the audio to the receiver.
1 Turn off the power of the microphone and the external device.
2 Connect an external device.
Use a ø3.5 stereo mini-plug to connect the external device (for example, a portable CD
player) to the external input terminal.
3 Turn on the power of the external device (for example, a portable CD player).
4 Turn on the power of the microphone.
5 Adjust the volume.
Adjust the audio volume of the external device.
Note:
• Once a ø3.5mm stereo mini-plug is plugged into the external input terminal, priority is
given to this input and the audio from the microphone opening and the microphone input
terminal will not be transmitted.
• If an external microphone is mistakenly connected to the external input terminal, the audio
of the external microphone will not be transmitted. Turn off the power of the microphone,
disconnect the plug, and connect the external microphone to microphone input terminal.
• If the audio of the external device is stereo, stereo signals will be mixed.
• When fine-tuning the volume of external device using this microphone, select [OWN] by
pressing the selector button. For fine tuning, refer to "Adjusting the volume"
External input terminal
1,4
[PWR/MUTE] button
21
Rev.1.0
• In addition to this manual, refer to the operating instructions of the device to be connected.
22
Rev.1.0
Replacing a battery
• Carefully read the "Precautions" and proceed accordingly.
• To replace the battery, turn off the power of the microphone, and make sure that the
microphone is not connected to the charger.
Note:
• Do not touch the battery poles with hands. Otherwise poor contact or noise may result. If
dirty, wipe off with a dry soft cloth.
• Battery power is slightly consumed even when the power of this product is OFF. If the
battery is left unused, that may result in liquid leakage. To prevent this, remove the battery
from the product when unused for a long time.
1 Turn off the power by pressing the [PWR/MUTE] button for 2 seconds or more.
Confirm that the battery indicator is off.
2 Remove the battery cover.
Pull the battery cover in the arrow direction while pressing the A portion with both right and
left thumbs to remove the cover.
3 Install a new battery.
Insert the battery and card, making sure that their orientation is correct.
About batteries that you can use with this unit
The 1U583136R-B006A (Lithium Ion Battery) is the only battery that can be used in this
microphone.
4 Attach the battery cover.
Push up the battery cover to the direction of the arrow in the figure, and fit it to its original
position.
5 Confirm that the battery indicator lights.
BAT
CH
OW
OTHER
LIN
PW
MUT
SELEC
INT/E
1,5
[PWR/MUTE] button
1,5
Battery indicator
2
4
3
Battery cover A
Rear view
23
Rev.1.0
Press the [PWR/MUTE] button for 1 second or more, turn on the power of the microphone,
and confirm that the battery indicator lights green or yellow
24
Rev.1.0
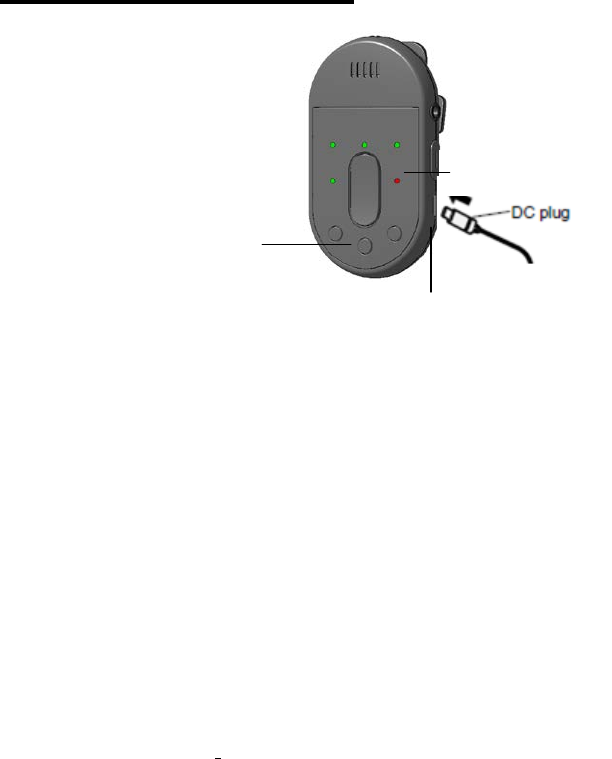
Charging a battery
1 Turn off all microphones.
2 Connect the micro-USB plug of the charger to the DC input terminal of the
microphone.
After connecting the microphone to the charger, the charge indicator (red) indicates the
charging status as follows:
ON: Charging completed .
OFF:, No connected a charge connector or no battery installed.
Blinking ( 2 seconds ) : Charging
* In the case of a complete discharge state, the first about 1minute red LED lights RED.
Blinking( 1 second ) : Charge Error. Indicates one of the following conditions.
• The temperature of the battery may be out of the acceptable range. Confirm that the
temperature is within the acceptable range.
Important:
• If the microphone is connected to the charger with the power turned on, the microphone
will be powered off and charging will start.
Only E2 button operates during charge connector connection.
Note:
• If the charger remains connected after charging is completed, it will not restart charging to
make up for any amount lost due to self-discharge.
• If the microphone is turned off and the charger is connected, but the charge indicator does
not light, check to see that the micro-USB plug of the charger is properly plugged into the
DC input terminal, the power cable of the charger into the charger.
• Charging takes up to 4 hours, but the charging time varies depending on status of use.
• Charging at a temperature outside the normal range may result in significantly longer
charging times.
Note, however, that charging times may become longer even within the operating
temperature range, if the temperature of the microphone is higher or lower than the normal
condition.
• The charger and the microphone may get hot slightly during charging.
• Do not charge a rechargeable battery that has just been fully charged. Otherwise you will
shorten the life of the battery.
• Also read the operating instructions of the charger.
1.
[PWR/MUTE] button
Charge indicator
DC input terminal
2
25
Rev.1.0
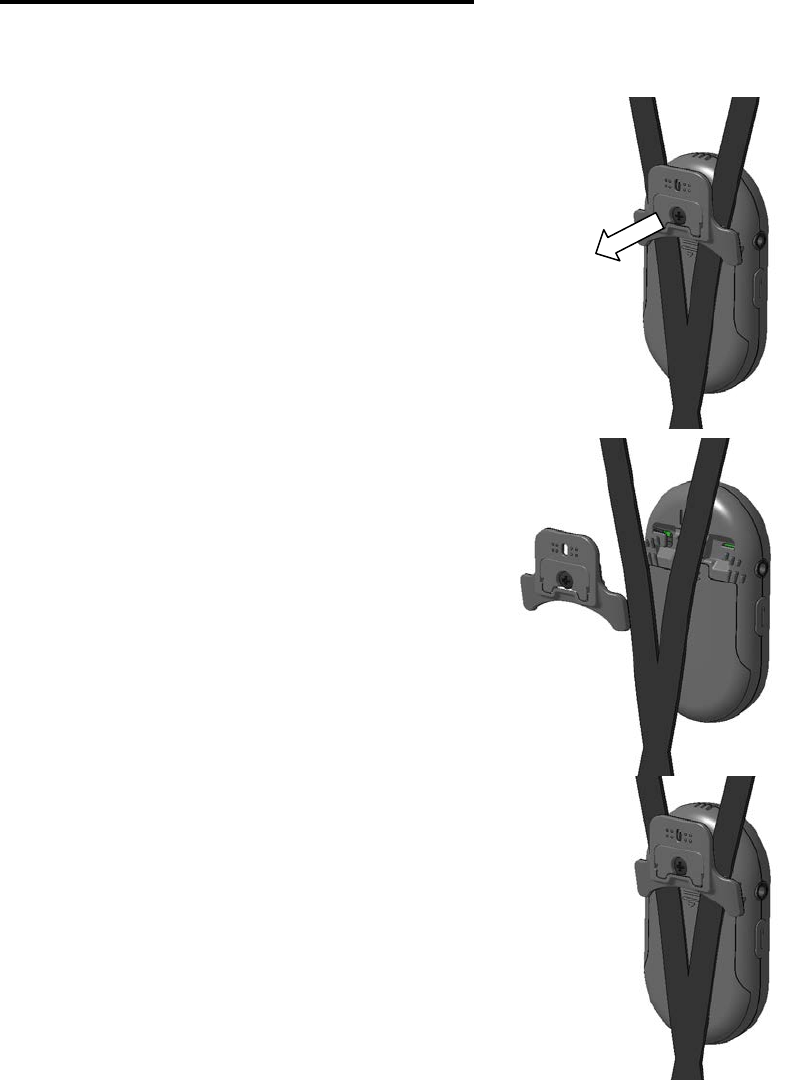
Replacing the neck strap
• When replacing the neck strap, turn off the power of the microphone, and make sure that
the microphone is not connected to the charger.
Remove the screw from the microphone.
1 The screw of a pendant microphone is removed
with a driver.
2 Remove the other side of the neck strap in the
same way.
When attaching a neck strap to the
microphone, hook each side of the
strap to each claw, and reverse the
above procedure.
After the neck strap is attached to the microphone,
make sure both sides of neck strap are hooked to
the claws.
Important:
• Use only the neck strap that is intended for this microphone.
(This neck strap is provided with a safety closure to prevent strangling.)
Otherwise, that may result in accidental injury.

26
Rev.1.0
Trouble shooting
Before asking for repairs, check the symptoms with the following table.
Contact a dealer if the suggested remedies do not correct the problem or if the problem is
not described below.
Symptom Cause/solution
The power cannot be turned on.
• Is the battery charger connected to the
microphone (with no battery)?
>> Connect the charger to the microphone.
Is microphone charging?
(CHG indication RED or RED brink)
>>Please extract a charge cable.
• Is the battery depleted?
>> Charge the battery.
Does not use
(at the time of Power ON,CHG LED is RED)
Pairing registration with a receiver has not been
performed.
>>
(1) Press a receiver's [LINK] button, and
a receiver is
made into register mode.
(2)Press simultaneously [PWR/MUTE] button and [INT/E1]
button will register for receiver. ( microphone power OFF
state)
Volume too low
(No sound)
Is the volume of the [OWN] microphone
turned down?
>> With the [OWN] selection indicator lit, press the
volume button to increase the volume.
Is the receiver set up correctly?
>> Check the settings.
No sound from the microphone opening
Is any external device connected to the external
input terminal or microphone input terminal?
>> Connection of an external device or external
microphone, even if not powered up, disables sound
transmission from the microphone opening of the
microphone.
Unplug the connected devices
No sound Does the [OWN] selection indicator blink?
>> Press the [PWR/MUTE] button to cancel muting.

27
Rev.1.0
No sound from an external microphone
Is the external microphone connected to the
external input terminal?
>> Connect the external microphone to the
microphone input terminal.
Loud noise
Is an external device (for example, a portable CD
player) connected to the microphone input terminal?
>> Connect the external device (for example, a
portable CD player) to the external input terminal.
No operation possible
(muting, volume adjustment, etc.)
Are the [OWN], [OTHER] and [LINE] selection
indicators all lit?
>> Press the [PWR/MUTE] button for 2 seconds or
more to turn off the microphone, and then turn the
power on again
Does not charge
(charge indicator is off)
• Is a battery installed?
>> Install a battery.
• Is the micro-USB plug of the charger inserted
all the way into the DC input terminal?
>> Confirm the connection.
Does not charge
(The charge indicator blinking, but goes
lights after a few minutes)
Are you trying to charge a battery that has just been
charged?
>> The battery is already fully charged. Remove the
charger from the microphone, and use the
microphone with the battery
Does not charge
(charge indicator is blinking)
Is the battery extremely hot?
>> Disconnect the charger once and allow the
battery to cool off before reconnecting.
Has the battery deteriorated?
>> Deteriorated rechargeable battery will shorten
the battery duration or cannot turn on the
microphone. Replace the deteriorated battery with a
new rechargeable one.
Does not use(CHG LED is Yellow blinking) Microphone is out of range.
Please use in the range

28
Rev.1.0
Specifications
Radio Standard DECT
Frequency Range: 1,920.0~1,930.0MHz
Coverage 20m (NORMAL)
30m (Hi POWER)
Microphone type Unidirectional electret condenser microphone
Audio Frequency Response 100Hz to 8 kHz (From Microphone to receiver)
External input level –55 dBV ø3.5 mini jack (plug-in power compatible)
External input –14 dBV ø3.5 stereo mini jack (monaural mix)
Battery Lithium Ion Battery (Chargeable)
Battery life about 2years
(Battery needs to be replaced every 2 years)
Talk time Around 8 hours
Charge Time Around 4 hours
Charging method Powe
r Supply with micro USB Port
Dimensions 3.31"(H) x 1.89"(W) x 0.63"(D)
84 W x 48 H x 16 D [mm], excluding projections.
Weight 50g (not including Batteries and Strap)
Temperature Range 5°C ~ +35°C {41 °F - 95 °F}
Humidity Range ~90%
The Condition of Installation Indoor use
Weights and dimensions indicated are approximate.
Specifications are subject to change without notice.