Panasonic of North America 9TAWX-CH450 DECT 6.0 All-In-One Headset User Manual
Panasonic Corporation of North America DECT 6.0 All-In-One Headset Users Manual
UserManual.wiki
>
Panasonic of North America
>
9TAWX CH450 User Manual
Users Manual
Navigation menu
Upload a User Manual
Namespaces
Wiki Guide
HTML
PDF
Info
Views
User Manual
Discussion / Help
Navigation
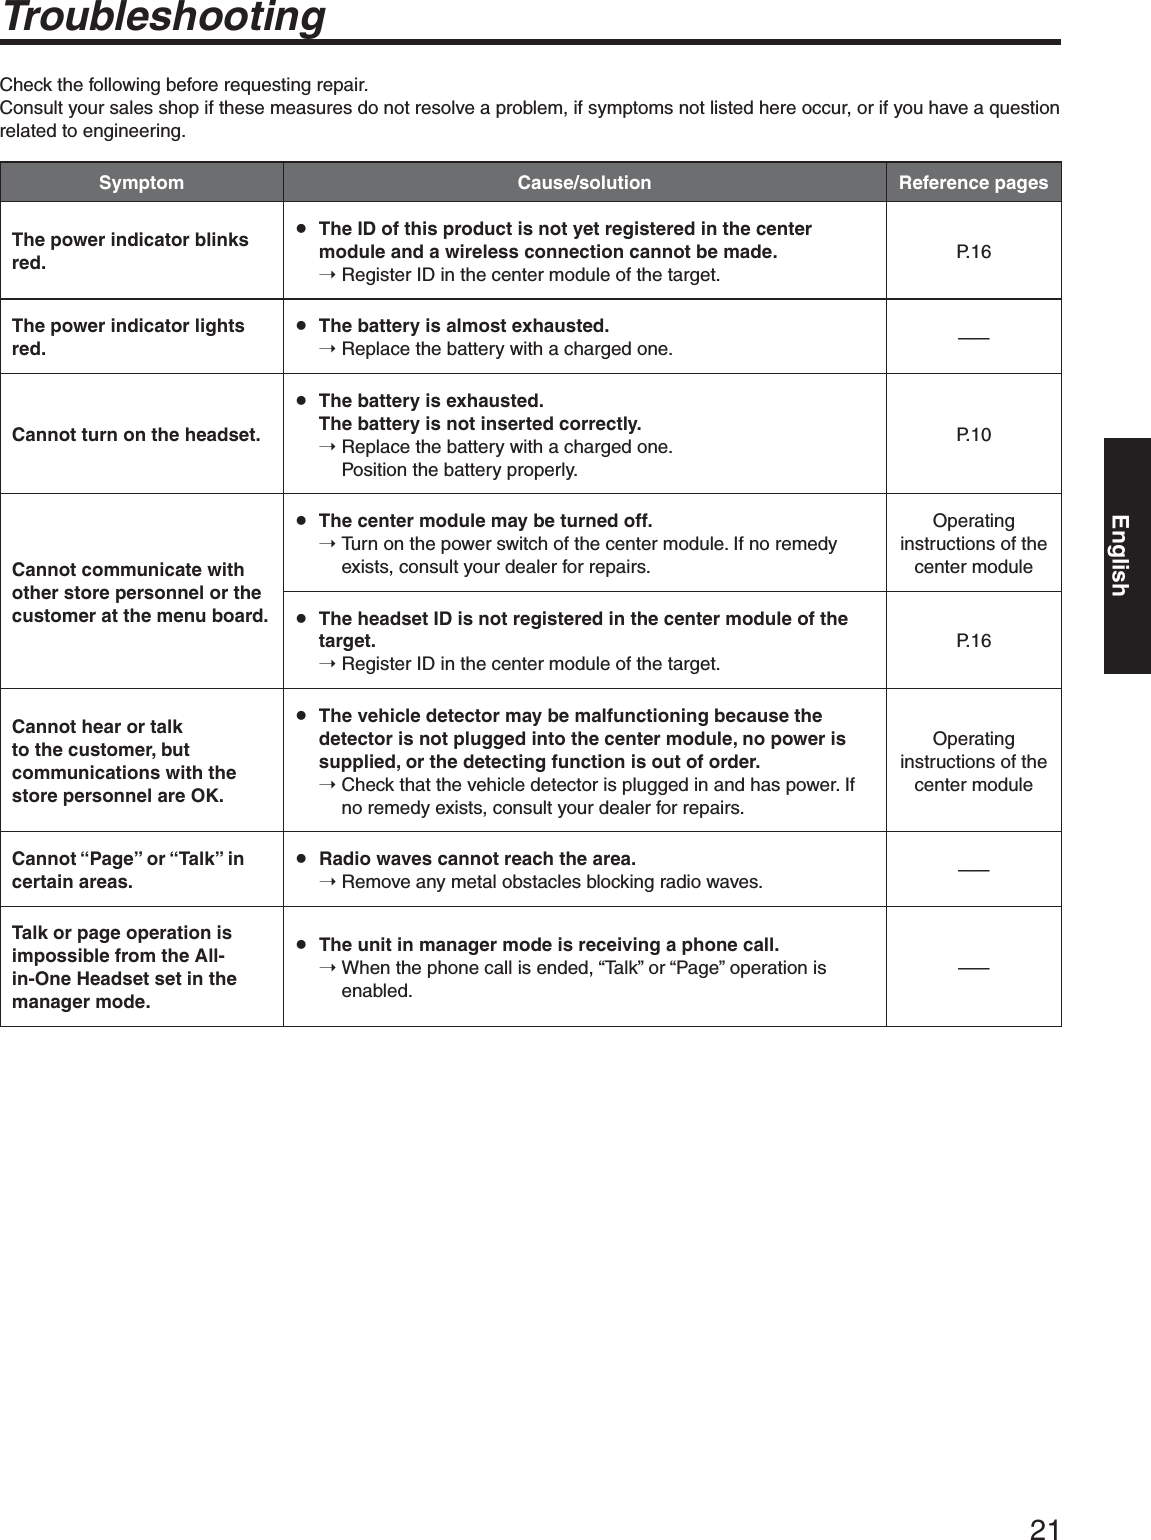
![8Major Operating Controls and Their Functions Head Band and Head PadAdjustable to your head by sliding the head pad. Battery Lock [EJECT]When removing the battery, slide out the lock.When loading a battery, insert the battery until the lock clicks. Battery Case / Battery (Optional accessory)Place the battery in the battery case, and then attach it to this product. (Refer to p. 10 “Battery Loading & Replacement”.) Head Pad Cushion Switch CompartmentDo not open the cover of this compartment. It should be opened only by qualified service personnel or system installers. Power Button [POWER] Pressing the button will turn the headset on.Pressing the button again for 2 seconds or more will turn the headset off. Earphone Pad Microphone BoomAdjust the microphone position to your mouth by rotating and bending the boom. Microphone Lane IndicatorLights orange or green to indicate which lane is in operation.Orange: Lane A is selected.Green: Lane B is selected.Orange blinking: Lane A is being selected, and either the Talk or Page mode is activated.Green blinking: Lane B is being selected, and either the Talk or Page mode is activated.](https://usermanual.wiki/Panasonic-of-North-America/9TAWX-CH450/User-Guide-2130355-Page-8.png)
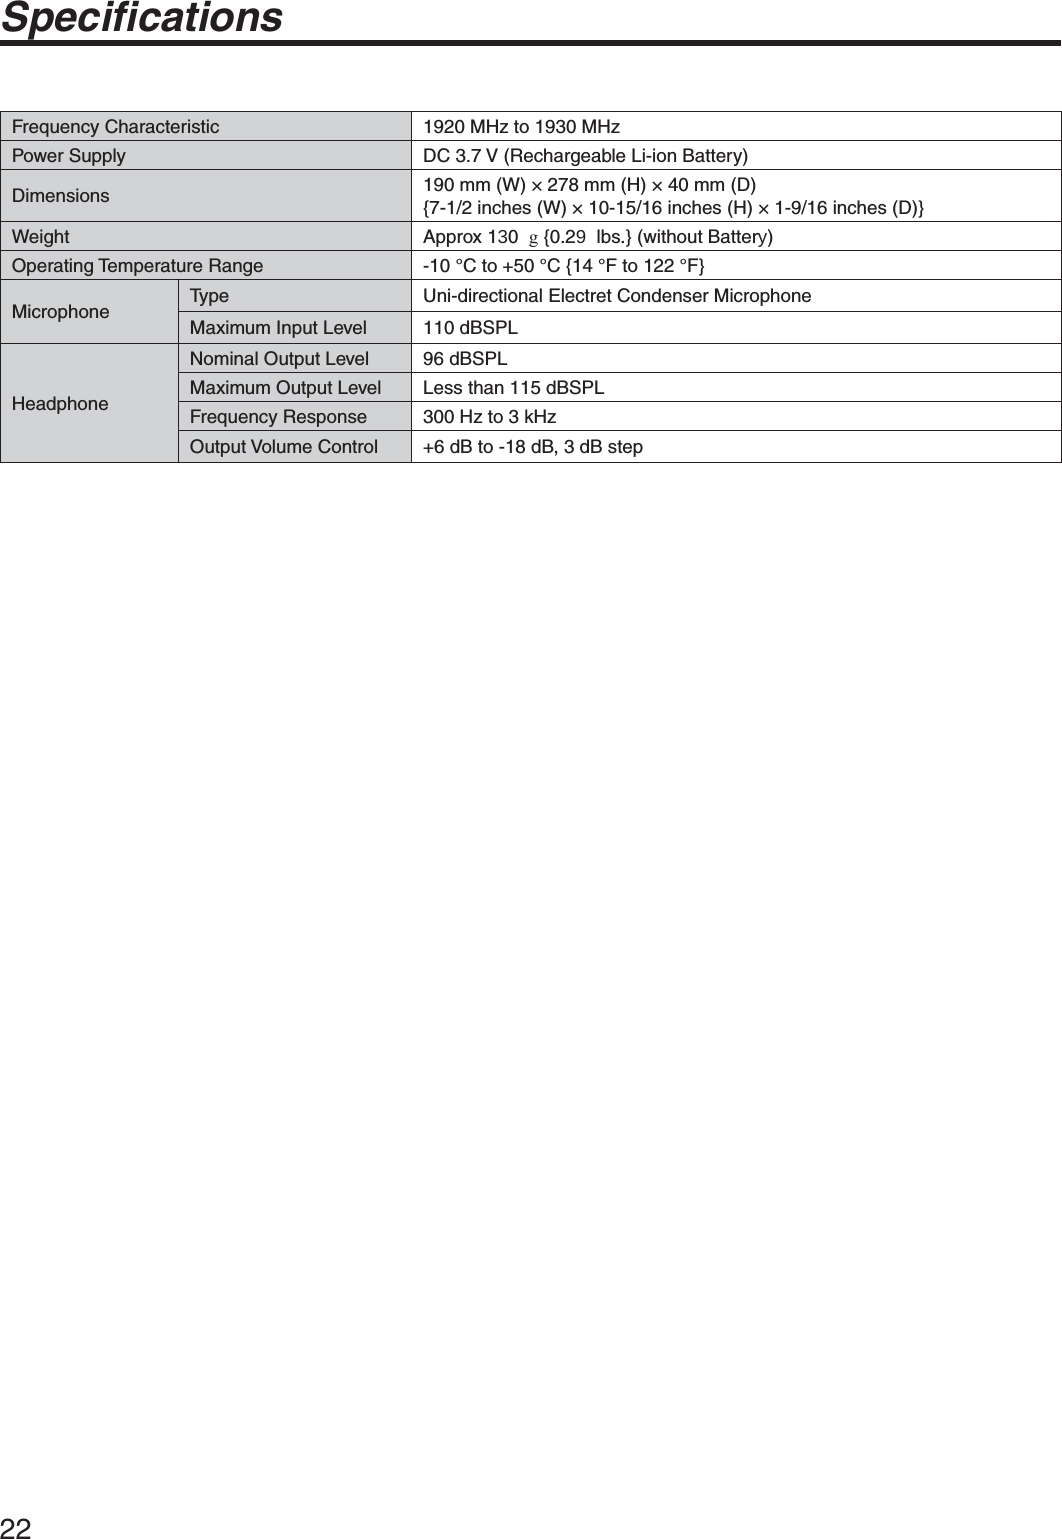
![9 Power IndicatorThe indicator shows the status as follows.Green: Power is supplied and the unit is operating.Green blinking: Power is supplied and Manager mode is activated.Red: The battery is almost exhausted. Replace the battery with a charged one.Red blinking: An error has occurred. Phone Button [R] This function is activated only when this product is set to manager mode.You can place phone calls via the center module. Alert Button [F] Functions vary depending on the center module to which the user is connected.<When connected to WX-CC411, WX-CC412>Hold down this button for 2 seconds or more to send a Security Alert to the center module.The action taken when an Alert is sent depends on the center module setting, and can include TALK & PAGE Recording, Send E-mail, etc.<When connected to WX-C3010>The [F] button functions as the External Device Control Button. While it is pressed, an External Device is kept ON. Volume Control Buttons [VOL + – ] Pressing the buttons will increase or decrease the sound level.Press the [+] button to increase the sound level. Each time the button is pressed, a beep notifies the user that the volume is being increased. If you try to increase the volume over the upper limit, two beeps notify the user of a prohibited action.Press the [–] button to reduce the sound level. Each time the button is pressed, a beep notifies the user that the volume is being reduced. If you try to reduce the volume below the lower limit, two beeps notify the user of a prohibited action. Talk 1 Button [T1] This button controls communications with the customer.The function of this button changes depending on the DIP switch setting. (Refer to p. 20 “DIP Switch Setup”.))RU'LUHFW/DQH6HOHFWVHWXSLQ3UHVV7R7DON377PRGH!While the [T1] button is being pressed, you can talk with a customer at the Lane A menu board.)RU1RUPDOVHWXSLQ3UHVV7R7DON377PRGH!While the [T1] button is being pressed, you can talk with a customer at the menu board of the connected lane.)RU'LUHFW/DQH6HOHFWVHWXSLQ7DON/RFNPRGH!When you press the [T1] button once, you can talk with a customer at the Lane A menu board. Press the button again to end the call.)RU1RUPDOVHWXSLQ7DON/RFNPRGH!When you press the [T1] button once, you can talk with a customer at the menu board of the connected lane. Press the button again to end the call. Talk 2 / A/B Lane Selection Button [T2, A/B] This button can be set to two functions by the DIP switch setting. (Refer to p. 20 “DIP Switch Setup”.)[T2]This button controls communications with the customer.<)RU'LUHFW/DQH6HOHFWVHWXSLQ3UHVV7R7DON377PRGH>While the [T2] button is being pressed, you can talk with a customer at the Lane B menu board.<)RU1RUPDOVHWXSLQ3UHVV7R7DON377PRGH>While holding down the [T2] button, you can talk with a customer at the menu board of another lane.<)RU'LUHVW/DQH6HOHFWVHWXSLQ7DON/RFNPRGH>When you press the [T2] button once, you can talk with a customer at the Lane B menu board. Press the button again to end the call.<)RU1RUPDOVHWXSLQ7DON/RFNPRGH>When you press the [T2] button once, you can talk with a customer at the menu board of another lane. Press the button again to end the call.[A/B]When WX-CC412 is used as the center module, this button switches the connection from Lane A to Lane B (or vice versa) of the dual lane. Page Button [P] This button controls communications with store personnel.<When the Press-To-Page (PTP) mode is preset>While the [P] button is held down, you can speak to store personnel.<When the Page-Lock mode is preset>When the [P] button is pressed, you can speak to the store personnel until you press the button a second time.English](https://usermanual.wiki/Panasonic-of-North-America/9TAWX-CH450/User-Guide-2130355-Page-9.png)
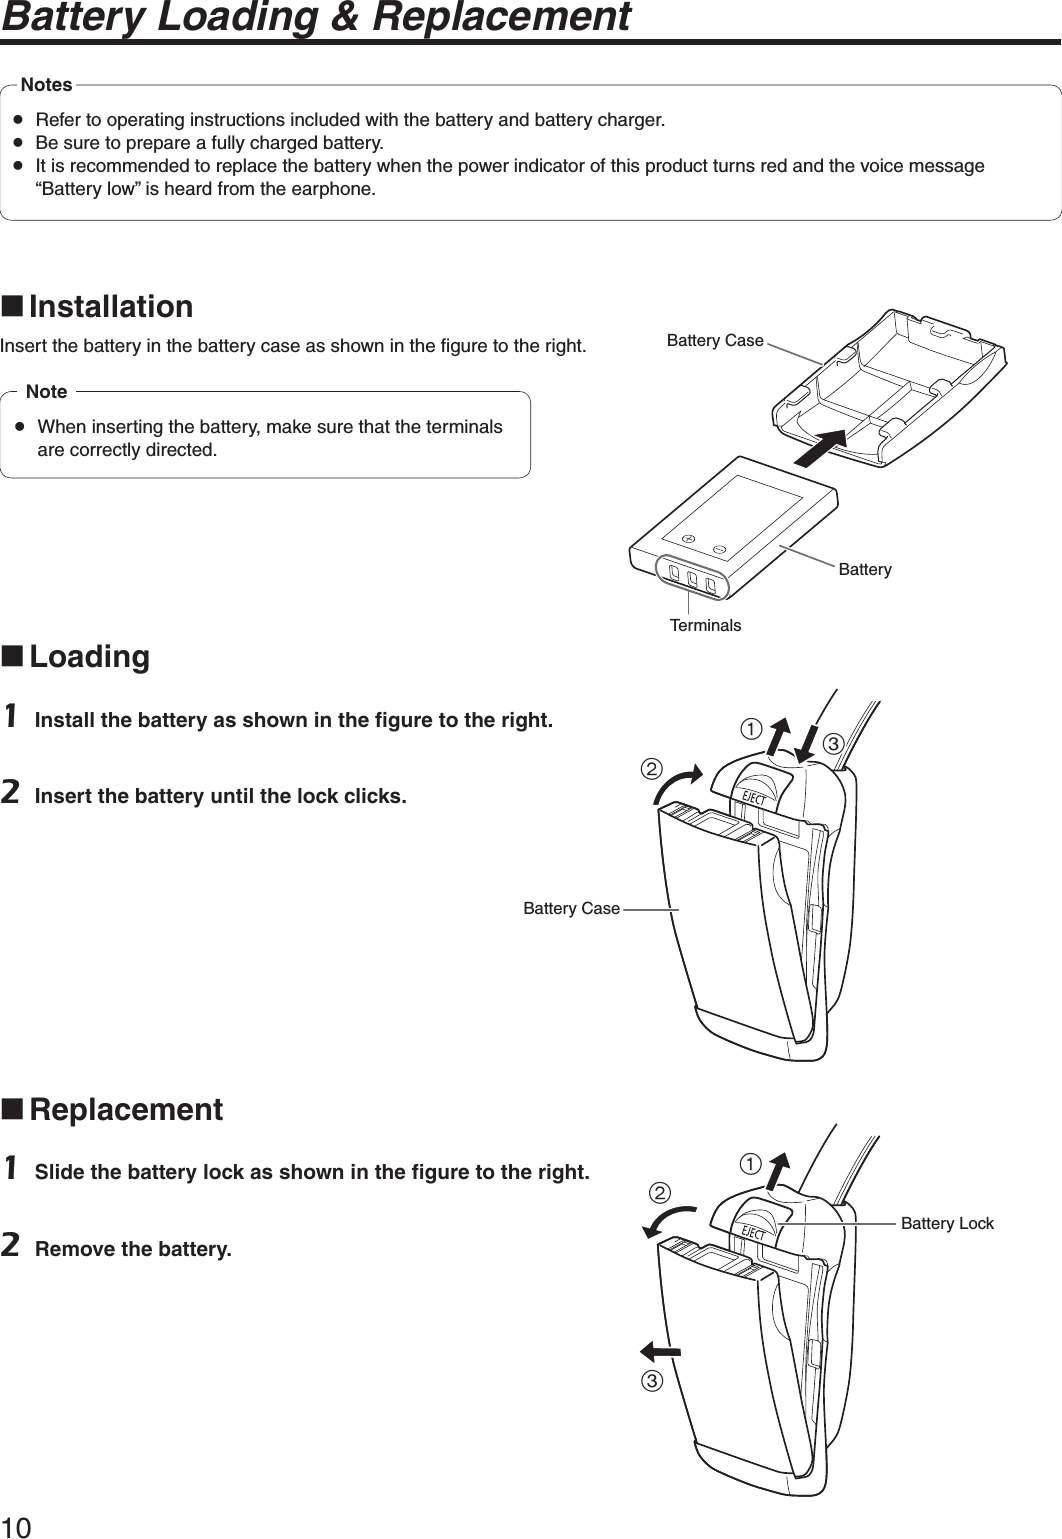
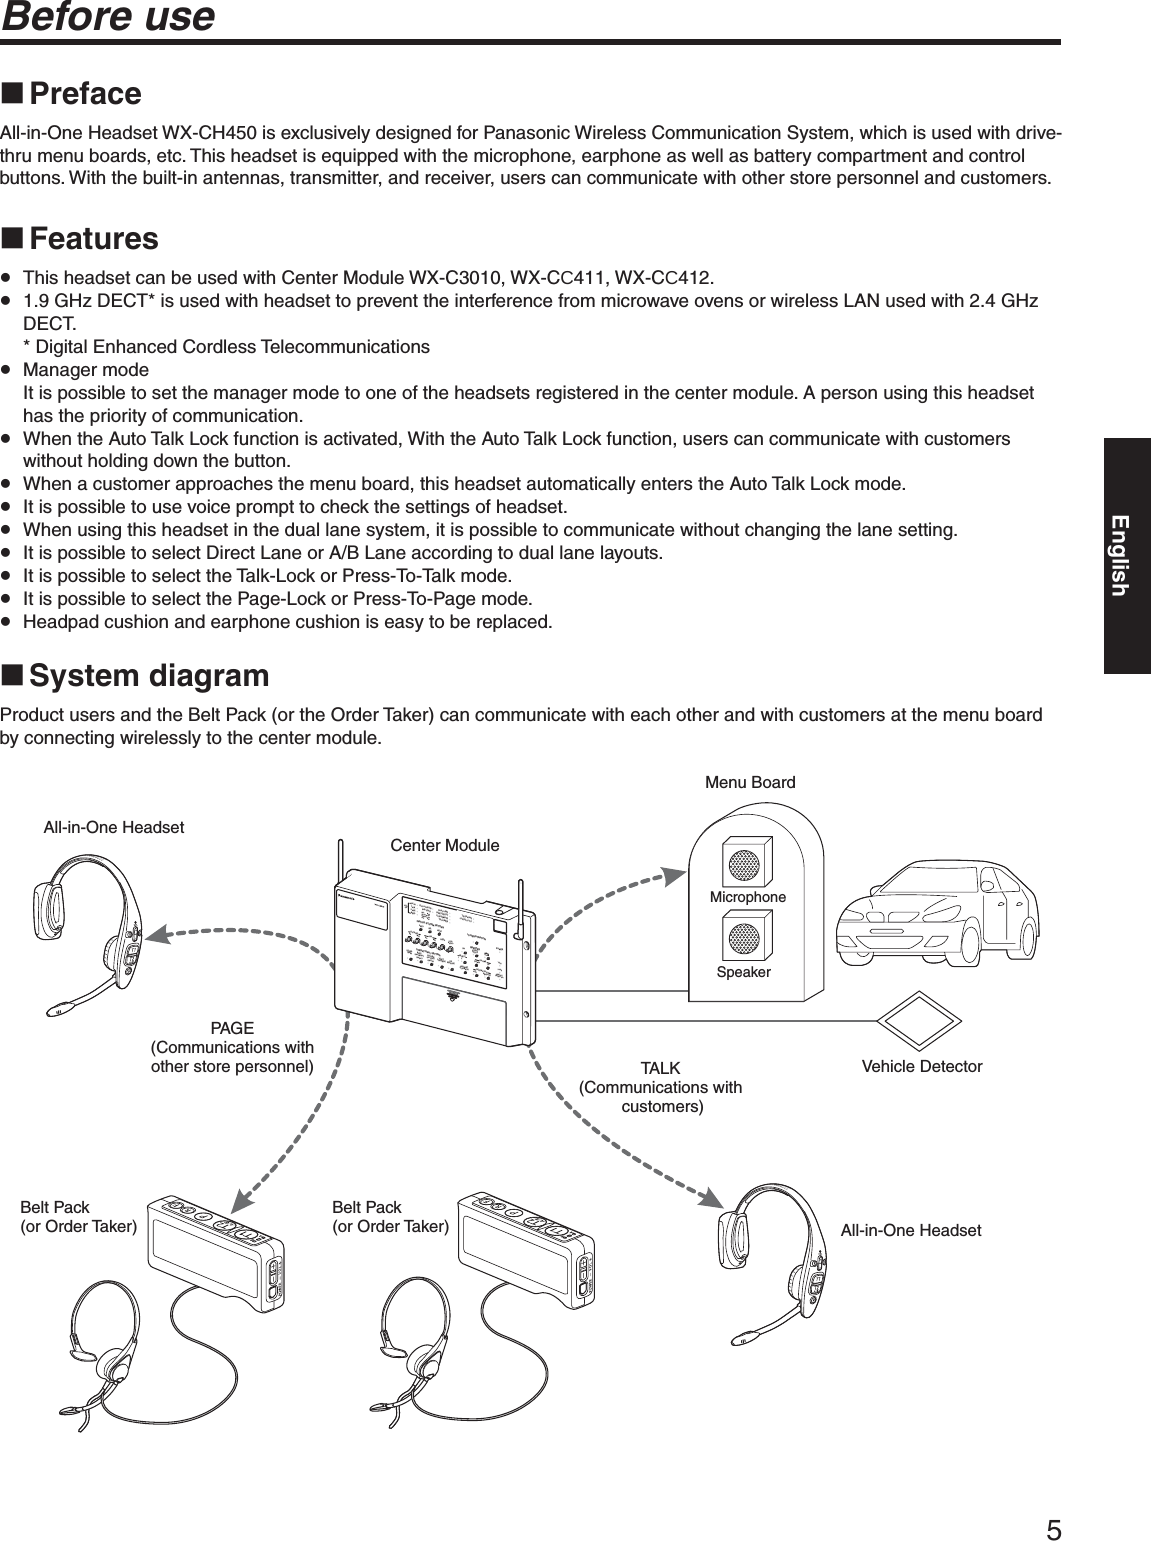
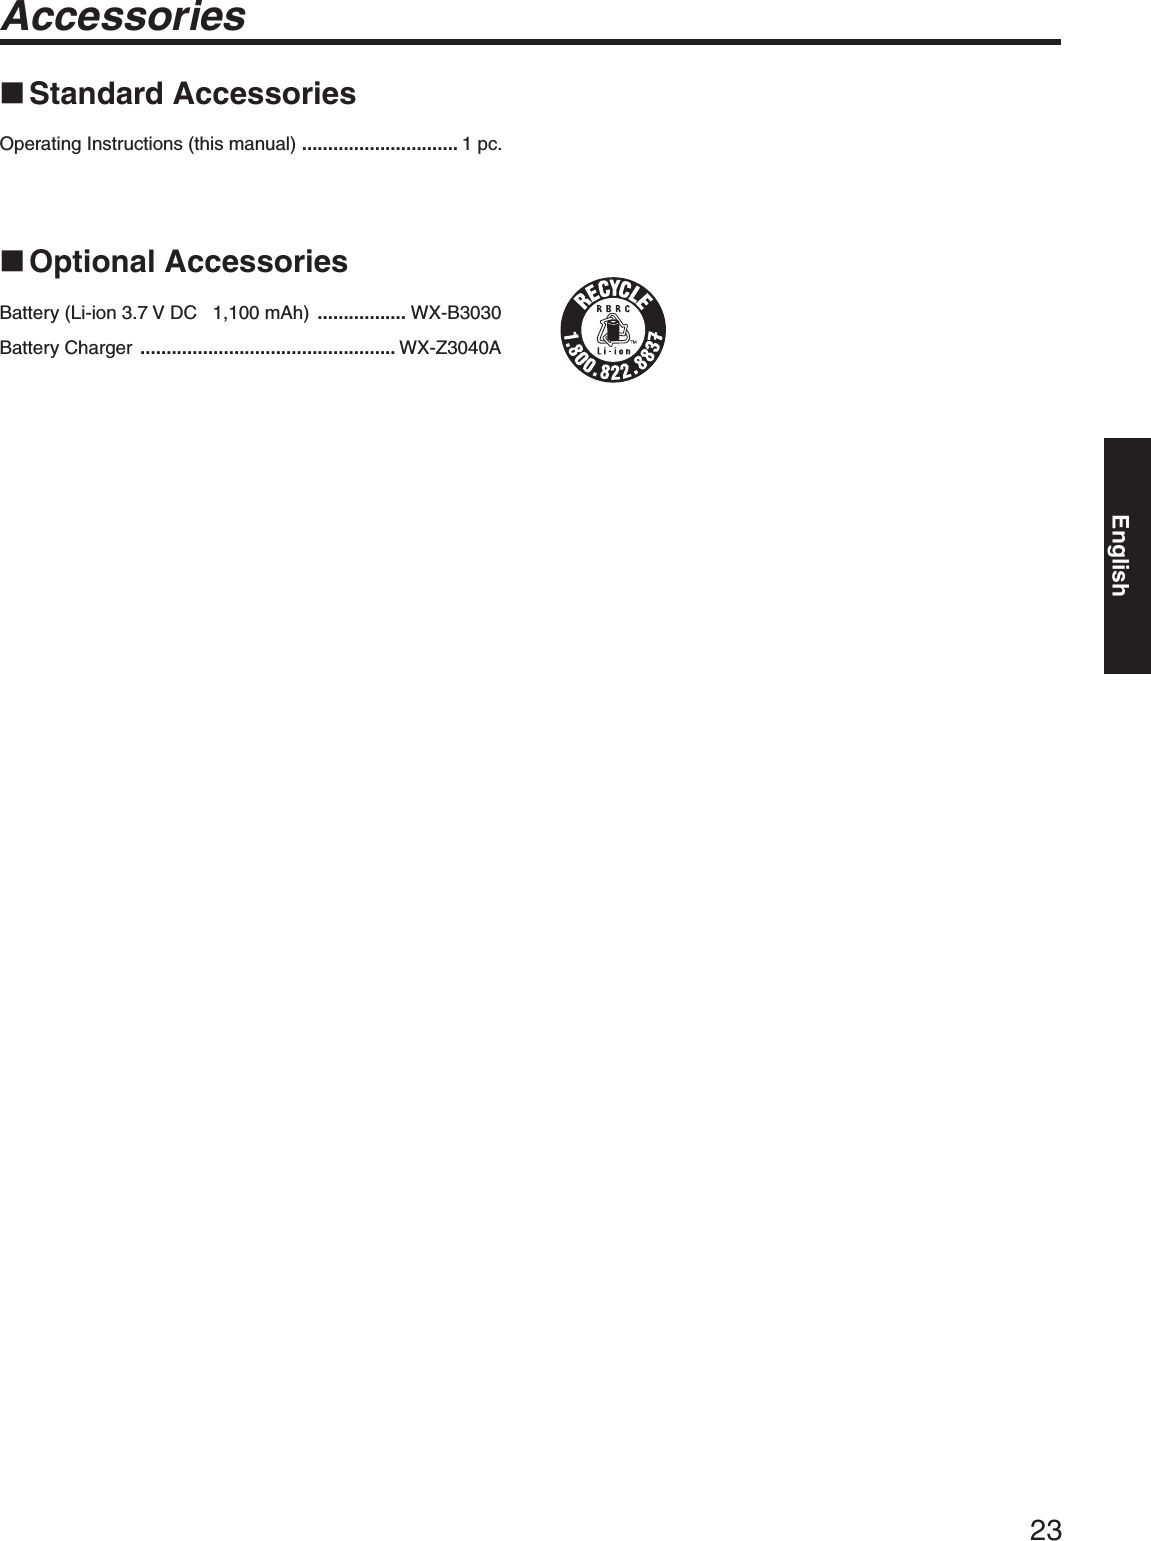
![11Operating Proceduresw PreparationsPrior to operating the headset, confirm that the system setup for the headset, center module, and other devices has been completed. Install a battery in the battery compartment.(Refer to p. 10 “Battery Loading & Replacement”.) Press the [POWER] button to turn on thepower.p When the power is turned on, the voice messages “Hello”, “Headset xx” (xx: ID number registered in the center module) and “Lane x” (x: Connected Lane number) are heard from the earphone. Wear the headset. Adjust the head pad so that the earphone isplaced on your ear. Rotate and bend the microphone boom so thatthe microphone is placed near your mouth. Attach a strap if necessary.Strap English](https://usermanual.wiki/Panasonic-of-North-America/9TAWX-CH450/User-Guide-2130355-Page-11.png)
![12Operating Proceduresw Volume adjustmentSelect a proper sound level by pressing the [+] or [–] button.w Communications with Customers (TALK)Any store personnel wearing the headset can communicate bidirectionally with any customer who is at the menu board.p You will hear a beep in the headset when a vehicle arrives at the menu board.When the Press-To-Talk (PTT) mode is preset Hold down the [T1] button.p A beep is heard from the earphone to confirm that communication has been established. In this state, you can talk with a customer at the menu board by speaking into the microphone of this product. Release the [T1] button.p Communication is interrupted and the conversation is ended.When the Talk-Lock mode is preset Press the [T1] button.p A beep is heard from the earphone to confirm that communication has been established. In this state, you can talk with a customer at the menu board by speaking into the microphone of this product. Press the [T1] button again.p Communication is interrupted and the conversation is ended.w Communications with Other Store Personnel (PAGE)Store personnel wearing the headset can communicate with each other without being heard by customers.When the Press-To-Page (PTP) mode is preset Hold down the [P] button.p A beep is heard from the earphone to confirm that communication has been established. In this state, you can talk with a store personnel by speaking into the microphone of this product. Release the [P] button.p Communication is interrupted and the conversation is ended.When the Page-Lock mode is preset Press the [P] button.p A beep is heard from the earphone to confirm that communication has been established. In this state, you can talk with a store personnel by speaking into the microphone of this product. Press the [P] button again.p Communication is interrupted and the conversation is ended.](https://usermanual.wiki/Panasonic-of-North-America/9TAWX-CH450/User-Guide-2130355-Page-12.png)
![13w Alert notificationWhen the center module is WX-CC411 or WX-CC412, store personnel wearing this product can send a Security Alert to the center module. Hold down the [F] button for 2 seconds or more.p A beep is heard from the earphone, indicating that the transmission is complete, and a Security Alert is sent to the center module. When the center module receives a Security Alert from this product, it performs the preset operations (TALK & PAGE Recording, Send E-Mail, alert message play back, Camera monitoring, etc.). w External Device ControlWhen the center module is WX-C3010, you can control the External Device Control terminal of the center module using this product. Hold down the [F] button.p A short beep is heard from the earphone and the External Device Control terminal of the center module enters the ON state. Release the [F] button.p 2 short beeps are heard from the earphone and the External Device Control terminal of the center module enters the OFF state.w Dual lane operationIn dual lane operation, this product must select a lane for communication.For Normal setupSwitching to Lane BWhen a connection is made to Lane A, the lane indicator is lit in orange. Press the [T2] button.p A voice of “Lane B” is heard from the earphone and the lane indicator is lit in green. The connection is changed to Lane B.Switching to Lane AWhen a connection is made to Lane B, the lane indicator is lit in green. Press the [T2] button.p A voice of “Lane A” is heard from the earphone and the lane indicator is lit in orange. The connection is changed to Lane A.For Direct Lane Select setupSwitching to Lane BWhen a connection is made to Lane A, the lane indicator is lit in orange. Press the [T2] button.p A voice of “Lane B” is heard from the earphone and the lane indicator blinks green. The connection is changed to Lane B. You can talk with a customer at the menu board of Lane B.Switching to Lane AWhen a connection is made to Lane B, the lane indicator is lit in green. Press the [T1] button.p A voice of “Lane A” is heard from the earphone and the lane indicator blinks orange. The connection is changed to Lane A. You can talk with a customer at the menu board of Lane A.English](https://usermanual.wiki/Panasonic-of-North-America/9TAWX-CH450/User-Guide-2130355-Page-13.png)
![14Operating Proceduresw Internet Telephone Service (Only when this product is set to manager mode)This product can receive calls from on-line communication software such as Skype. Press the [R] button while a call tone is heard from the earphone of this product.p The Internet Telephone Service is connected and you can make a call. Press the [R] button while the Internet Telephone Service is connected.p The service is disconnected and the call is ended.p When you hold down the [R] button for 2 seconds or more while the Internet Telephone Service is disconnected, you can make a call through the Internet Telephone Service.p Software must be installed in the center module in order to use the Internet Telephone Service. For details, contact a sales shop. Notew Communication limitationsUp to 4 units of this product or the Belt Pack (or the Order Taker) can be used per lane. If a 5th unit tries to talk or page, an error beep and the voice message “Cannot connect” are heard from the earphone, and access is rejected. However, the 5th and subsequent units can hear talk or page communications.w Out of communication rangeWhen a store personnel wearing this product moves out of communication range, an error beep and the voice message “Out of range” are heard from the earphone and communication is disconnected.When returning to communication range, a beep is heard and communication becomes possible.w BatteryWhen the battery charge becomes low, an error beep and the voice message “Battery Low” are heard from the earphone, and the power indicator blinks red at the same time. When this occurs, immediately replace the battery with a fully charged one.w Turning off the power Hold down the [POWER] button for 2 seconds or more.p The voice message “Goodbye” is heard from the earphone, the power is turned off, and the power indicator goes off.](https://usermanual.wiki/Panasonic-of-North-America/9TAWX-CH450/User-Guide-2130355-Page-14.png)
![15Setting the Unitw Manager Modep The manager can interrupt store personnel’s TALK or PAGE at any time by monopolizing one channel by priority.p Only 1 unit of this product or the Belt Pack (or the Order Taker) can be set to manager mode. Complete ID Registration, to do this setting. Hold down the [POWER] button for 2 seconds or more to turn off the headset. Press the [POWER] button for 1 second or more while holding down the [R] and [T1] buttons to turn on the power.p You can hear “Connecting center module A” and power indicator blinks red and green alternately. Also the Lane indicator blinks orange.In dual lane operationSettings for Lane B must also be performed.Press the [POWER] button for 1 second or more while holding down the [R] and [T2] buttons to turn on the power.p You can hear “Connecting center module B” and power indicator blinks red and green alternately. Also the Lane indicator blinks green. If manager mode setting is successful, you can hear “Manager” and the power indicator blinks green.p If there is a problem setting the manager mode settings, an error beep and the voice message “Failed” are heard from the earphone, and the power indicator blinks red to alert the user the abnormal state. If that happens, retry from STEP 1.p Only 1 unit of this product or the Belt Pack (or the Order Taker) can be set to manager mode per center module. If a second unit is set to manager mode, the manager mode setting on the first unit is automatically cancelled.Notew Canceling the Manager Mode Turn off the headset that has been set for the manager mode. Press the [POWER] button for 1 second or more while holding down the [R] and [T1] buttons to turn on the power.p You can hear “Connecting center module A” and power indicator blinks red and green alternately. Also the Lane indicator A blinks orange.In dual lane operationCanceling of the manager mode should be performed.Press the [POWER] button for 1 second or more while holding down the [R] and [T2] buttons to turn on the power.p You can hear “Connecting center module B” and power indicator blinks red and green alternately. Also the Lane indicator blinks green. When manager mode is cancelled, the unit returns to the normal condition, and the power indicator turns green.p If there is a problem canceling the manager mode settings, an error beep and the voice message “Failed” are heard from the earphone, and the power indicator blinks red to alert the user the abnormal state. If that happens, retry from STEP 1.English](https://usermanual.wiki/Panasonic-of-North-America/9TAWX-CH450/User-Guide-2130355-Page-15.png)
![16Settingw Auto-Talk-Lock setupFor a headset where Auto-Talk-Lock is set up, it has a function to select “Talk” automatically when the vehicle detector has become active, and you can talk with the customer at the menu board. One unit of this product or the Belt Pack (or the Order Taker) can be set to Auto-Talk-Lock setup per lane.p Complete ID Registration, to do this setting.p You can set only the unit with its DIP switch #1 in the ON position. (Refer to p. 20 “DIP Switch Setup”.) Press the [POWER] button to turn on the power.p When the power is turned on, the voice messages “Hello”, “Headset xx” (xx: ID number registered in the center module) and “Lane x” (x: Connected Lane number) are heard from the earphone. Press the [T1] button* while the power indicator blinks green and red alternately for 3 seconds.p Auto-Talk-Lock registration is performed to Lane A. When registration is complete, the voice message “Auto Talk ON” is heard from the earphone, and the power indicator stops blinking alternately.p When the [T1] button of this product is not pressed within 3 seconds after the power is turned on, the voice message “Auto Talk OFF” is heard from the earphone, and the unit starts as usual.* Use the [T2] button to register Auto-Talk-Lock for Lane B.p If there is a problem registering Auto-Talk-Lock, an error beep and the voice message “Failed” are heard from the earphone, and the power indicator blinks red to alert the user the abnormal state. If that happens, retry from STEP 2.p If the power of the headset is turned OFF, all the setting conditions for Auto-Talk-Lock will be canceled. This setting should be carried out without fail when the power supply is started up.Notew ID RegistrationBefore using this product, the unit ID must be registered in the center module. After the ID is registered in the center module, wireless communication between this product and the center module is enabled. Set the center module to “ID Registration” mode.(Refer to the operating instructions of the center module.) Hold down the power button for 2 seconds or more to turn off the headset. Press the [POWER] button for 1 second or more while holding down the [T1] and [T2] buttons to turn on the power.p The headset enters the ID Registration setting mode. You will hear “Registration Mode” and the power indicator will blink orange. Press the [T1] button.p You can hear “Connecting center module A” and the lane Indicator will blink orange.p When the center module is WX-CC412, ID registration for Lane B is automatically started, the voice message “Connecting Center module B” is heard from the earphone, and the lane indicator blinks orange.p When the ID Registration succeeds, you will hear “Registration complete”, “Headset xx” (xx: ID number registered in the center module), and the power indicator stops blinking and stays on.p If ID registration fails, an error beep and the voice message “Failed” are heard from the earphone, and the power indicator blinks red to indicate an abnormal state. If that happens, retry from STEP 2. When the ID registration is complete, cancel “ID Registration” of the center module.p When this is done, “ID Registration” of this product is cancelled and the power indicator turns green.](https://usermanual.wiki/Panasonic-of-North-America/9TAWX-CH450/User-Guide-2130355-Page-16.png)
![17w Deletion of IDWhen the center module is WX-C3010, delete the ID of this product according to the following procedure. Hold down the [POWER] button for 2 seconds or more to turn off the headset.For deleting an ID registered in the center module of Lane APress the [POWER] button for 1 second or more while holding down the [F] and [T1] buttons to turn on the power.p The unit starts in “Delete ID mode”. The power indicator blinks orange.For deleting an ID registered in the center module of Lane BPress the [POWER] button for 1 second or more while holding down the [F] and [T2] buttons to turn on the power.p The unit starts in “Delete ID mode”. The power indicator blinks orange. Press the [P] button.p The ID is deleted instantly, the voice message “ID not registered” is heard from the earphone, and the power indicator blinks red to indicate an abnormal state.p If Deletion of ID fails, an error beep and the voice message “Failed” are heard from the earphone, and the power indicator blinks red to indicate an abnormal state. If that happens, retry from STEP 1.p When the number of ID registrations of this product or the Belt Pack (or the Order Taker) exceeds the center module’s upper limit, the center module deletes some IDs automatically. If a unit of this product or the Belt Pack (or the Order Taker) is not used for an extended time after being registered, its ID may be deleted.Importantw Voice Prompt language switchoverYou can change the language used for Voice Prompt. You can select one from English, French, Spanish, and No Voice Prompt as the language for Voice Prompt. Hold down the [POWER] button for 2 seconds or more to turn off the headset. Press the [POWER] button for 1 second or more while holding down the [P] button to turn on the power.p The power indicator blinks orange and the lane indicator remains off. Press the [T1] button to change the language. When the [T2] button is pressed, the Voice Prompt message starts in the language selected after a beep.English: “Hello”French: “Bonjour”Spanish: “Buenos Dias”No Voice Prompt: – Press the [P] button.p The currently selected language is set, and this product restarts automatically.English](https://usermanual.wiki/Panasonic-of-North-America/9TAWX-CH450/User-Guide-2130355-Page-17.png)
![18Settingw Searching for the center moduleThis product searches for an accessible center module via the center module in which the ID is already registered. When an accessible center module is found, this product is connected to that center module.p To use this function, it is necessary to register the ID in multiple center modules in advance. Hold down the [POWER] button for 2 seconds or more to turn off the headset. Press the [POWER] button for 1 second or more while holding down the [R] and [+] buttons to turn on the power.p The power indicator blinks red and green alternately and the lane indicator blinks orange. When an accessible center module is found, the power indicator blinks red and green alternately, and the lane indicator blinks orange.p After 5 seconds, this product restarts automatically and accesses the center module searched for.p The ID of 1 unit of this product can be registered in up to 30 center modules. The center module not accessed for the longest time is overwritten when the ID is registered in the 31st center module.Notew InitializationYou can initialize this product to the factory settings. Hold down the [POWER] button for 2 seconds or more to turn off the headset. Press the [POWER] button for 1 second or more while holding down the [+] and [–] buttons to turn on the power.p The power indicator lights up in green and the lane indicator remains off. When the [POWER] button is released, initialization starts.p When initialization is finished, this product restarts automatically.p When initialization is finished, the ID is not registered, the power indicator blinks red, and the lane indicator turns orange.Note](https://usermanual.wiki/Panasonic-of-North-America/9TAWX-CH450/User-Guide-2130355-Page-18.png)
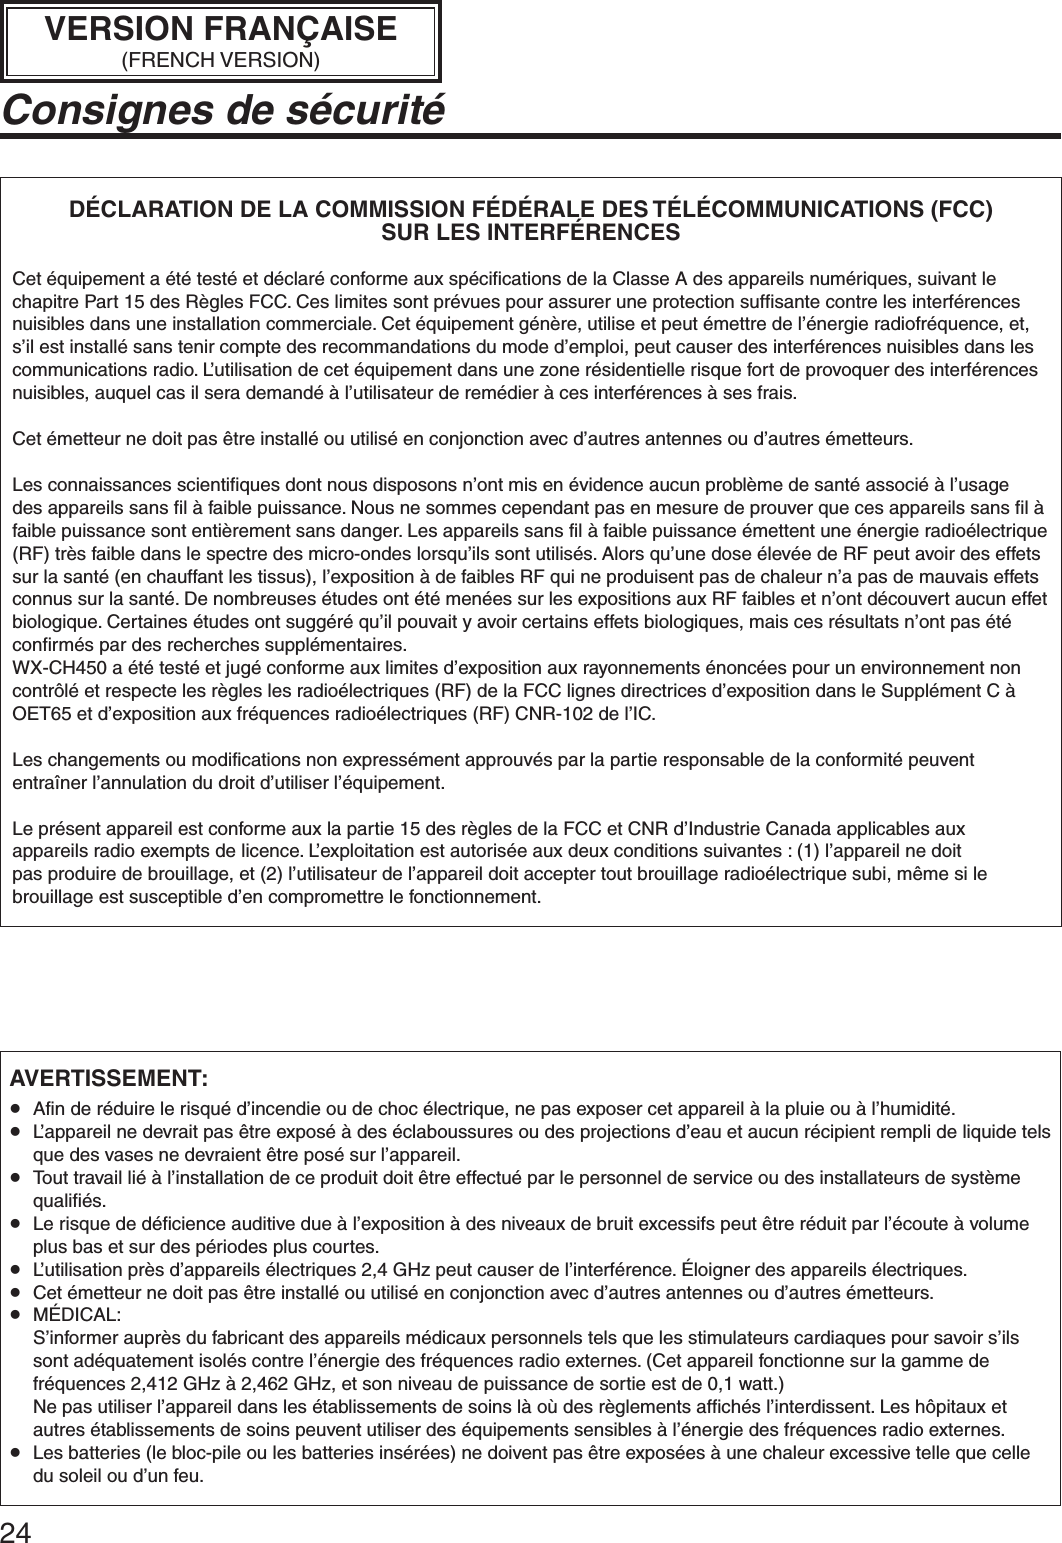
![20Setup ProceduresSetup of this product should only be performed by qualified service personnel or system installers.w Switch compartment Unscrew the screw and open the switch compartment when the power of the headset is OFF.Cover Set the switches as described below. After finishing the setup, replace the cover.w DIP Switch SetupRemove the switch cover and you will see a 4-bit DIP switch and a 1-bit DIP switch.Initial Setting1345p Be sure to turn off the headset. Otherwise, the DIP Switch will not be activated until you turn the power off and on again.NoteSW# Function ON OFF1Auto TALK Lock ON/OFF ON OFF2 T2 Button Setting Direct Lane Select Normal3Talk/Page Button SettingTALK LockPAGE LockPTTPTP4Center module model selection WX-C3010 WX-CC411WX-CC4125 Unused – Normal operationSW#1 Auto TALK Lock ON/OFFON: Auto Talk Lock ONOFF: Auto Talk Lock OFFSW#2 T2 Button SettingSet the lane selection method for the dual lane operation.ON: Direct Lane Select ModeThe T1 button is for lane A, the T2 button is for lane B.OFF: NormalPress the [T2] button to select lane A or B.SW#3 Setting button operations for talkingON: Talk for Talk-Lock, Page for Page-LockOFF: Talk for PTT, Page for PTPSW#4 Center module model selectionON: WX-C3010OFF: WX-CC411, WX-CC412SW#5 UnusedAlways set to OFF.](https://usermanual.wiki/Panasonic-of-North-America/9TAWX-CH450/User-Guide-2130355-Page-20.png)
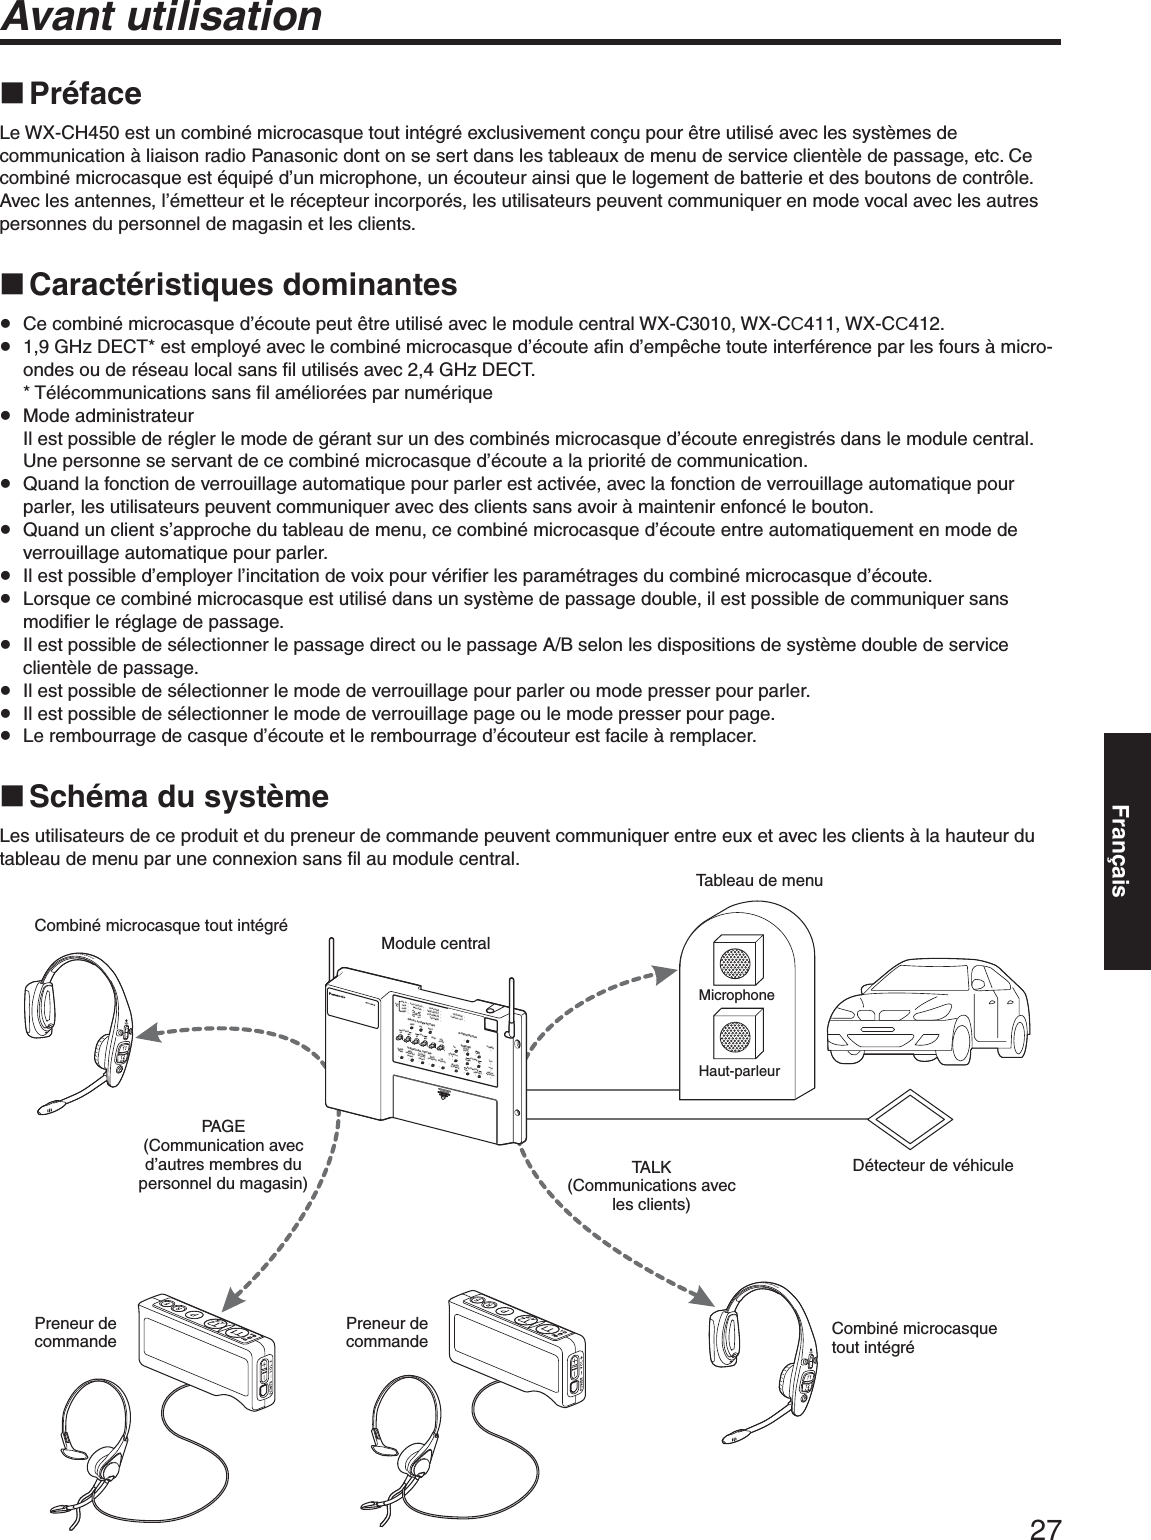
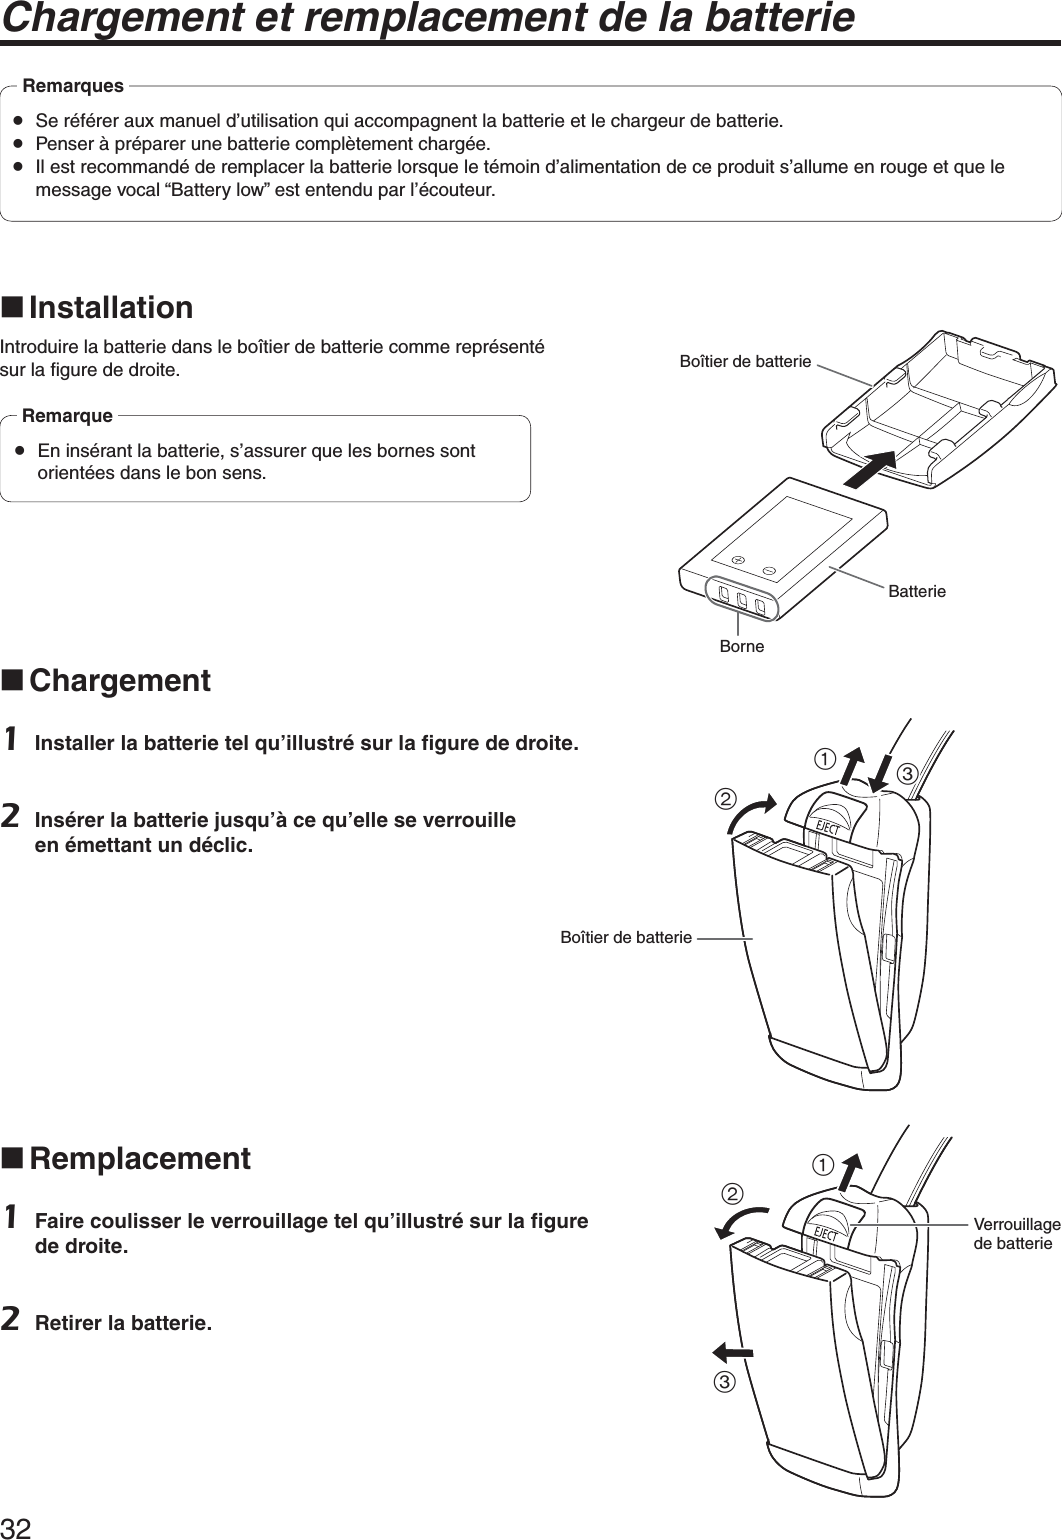
![30Principaux organes de commande et fonctions Bande de casque d’écoute et rembourrage de casqueS’ajuste à la taille de la tête par coulissement du rembourrage de casque. Verrouillage de batterie [EJECT]Faire coulisser le verrouillage pour retirer la batterie.Lors du chargement d’une batterie, introduire la batterie jusqu’à ce que le verrouillage émette un déclic. Boîtier de batterie / Batterie (accessoire optionnel)Mettre la batterie dans le boîtier de batterie, puis fixer ce dernier au produit. (Se référer à p.32 à “Chargement et remplacement de la batterie”.) Rembourrage de casque d’écoute Logement d’interrupteurNe pas ouvrir le couvercle de ce logement. Ne doit être ouvert que par un technicien professionnel ou des installateurs de système qualifiés. Bouton d’alimentation [POWER] Le fait d’appuyer sur le bouton met le combiné microcasque en marche.Une autre pression du bouton pendant au moins 2 secondes permet d’arrêter le combiné microcasque d’écoute. Rembourrage d’écouteur Perche de microphoneAjuster la position du microphone par rapport à la bouche en faisant tourner et en pliant la perche. Microphone Indicateur de passageS’allume en orange ou en vert pour indiquer le passage en service.Orange : Le passage A est sélectionné.Vert : Le passage B est sélectionné.Clignotement orange : Le passage A est sélectionné, et le mode Parler ou Page est activé.Clignotement vert : Le passage B est sélectionné, et le mode Parler ou Page est activé.](https://usermanual.wiki/Panasonic-of-North-America/9TAWX-CH450/User-Guide-2130355-Page-30.png)
![31 Indicateur d’alimentationL’indicateur montre l’état actuel comme suit.Vert : L’alimentation est appliquée et l’appareil est en fonction.Clignotement vert : L’alimentation est appliquée et le mode de gérant est activé.Rouge : La batterie est presque épuisée. Remplacer la batterie par une batterie chargée.Clignotement rouge : Une erreur s’est produite. Bouton Téléphone [R] Cette fonction n’est activée que lorsque ce produit est réglé sur le mode de gérant.Il est possible de faire des appels téléphoniques via le module central. Bouton d’alerte [F] Les fonctions varient suivant le module central auquel l’utilisateur est connecté.<Lorsque connecté au WX-CC411, WX-CC412>Maintenir ce bouton enfoncé pendant 2 secondes ou plus pour envoyer une alerte de sécurité au module central.L’action prise lorsqu’une alerte est envoyée dépend du réglage du module central, et peut comprendre Enregistrement TALK et PAGE, Envoyer courriel, etc.<Lorsque connecté au WX-C3010>Le bouton [F] fonctionne en tant que le bouton de commande de périphérique externe. Le périphérique externe demeure activé tant que ce bouton est enfoncé. Boutons de réglage de volume [VOL + – ] Une pression des boutons a pour effet d’augmenter oude diminuer le niveau de sortie son.Appuyer sur le bouton [+] pour augmenter le niveau du son. À chaque pression sur le bouton, une tonalité informe l’utilisateur que le volume est augmenté. Si l’utilisateur essaie d’augmenter le volume au-delà de la limite supérieure, deux tonalités l’informent que cette action est interdite.Appuyer sur le bouton [–] pour réduire le niveau du son. À chaque pression sur le bouton, une tonalité informe l’utilisateur que le volume est réduit. Si l’utilisateur essaie de réduire le volume en deçà de la limite inférieure, deux tonalités l’informent que cette action est interdite. Bouton Parler 1 [T1] Ce bouton contrôle les communications avec le client.La fonction de ce bouton change suivant le réglage de l’interrupteur DIP. (Se référer à p.42 à “Configuration d’interrupteur DIP”.)3RXUXQHFRQILJXUDWLRQGHVpOHFWLRQGLUHFWHGHSDVVDJHHQPRGH3UHVVHUSRXUSDUOHU377!Pendant que le bouton [T1] est enfoncé, il est possible de parler à un client à la hauteur du tableau de menu du passage A.3RXUXQHFRQILJXUDWLRQQRUPDOHHQPRGH3UHVVHUSRXUSDUOHU377!Pendant que le bouton [T1] est enfoncé, il est possible de parler à un client à la hauteur du tableau de menu du passage connecté.3RXUXQHFRQILJXUDWLRQGHVpOHFWLRQGLUHFWHGHSDVVDJHHQPRGHGHYHUURXLOODJHSRXUSDUOHU!En appuyant une fois sur le bouton [T1], il est possible de parler à un client à la hauteur du tableau de menu du passage A. Appuyer de nouveau sur le bouton pour terminer l’appel.3RXUXQHFRQILJXUDWLRQQRUPDOHHQPRGHGHYHUURXLOODJHSRXUSDUOHU!En appuyant une fois sur le bouton [T1], il est possible de parler à un client à la hauteur du tableau de menu du passage connecté. Appuyer de nouveau sur le bouton pour terminer l’appel. Bouton de sélection Parler 2 / Passage A/B [T2, A/B] Ce bouton peut être réglé sur deux fonctions suivant leréglage de l’interrupteur à positions multiples. (Se référer à p.42 à “Configuration d’interrupteur DIP”.)[T2]Ce bouton contrôle les communications avec le client.<3RXUXQHFRQILJXUDWLRQGHVpOHFWLRQGLUHFWHGHSDVVDJHHQPRGH3UHVVHUSRXUSDUOHU377>Pendant que le bouton [T2] est enfoncé, il est possible de parler à un client à la hauteur du tableau de menu du passage B.<3RXUXQHFRQILJXUDWLRQQRUPDOHHQPRGH3UHVVHUSRXUSDUOHU377>Pendant que le bouton [T2] est enfoncé, il est possible de parler à un client à la hauteur du tableau de menu d’un autre passage.<3RXUXQHFRQILJXUDWLRQGHVpOHFWLRQGLUHFWHGHSDVVDJHHQPRGHGHYHUURXLOODJHSRXUSDUOHU>En appuyant une fois sur le bouton [T2], il est possible de parler à un client à la hauteur du tableau de menu du passage B. Appuyer de nouveau sur le bouton pour terminer l’appel.<3RXUXQHFRQILJXUDWLRQQRUPDOHHQPRGHGHYHUURXLOODJHSRXUSDUOHU>En appuyant une fois sur le bouton [T2], il est possible de parler à un client à la hauteur du tableau de menu d’un autre passage. Appuyer de nouveau sur le bouton pour terminer l’appel.[A/B]Lorsque le WX-CC412 est utilisé comme module central, ce bouton commute la connexion du passage A au passage B (ou vice-versa) des passages doubles. Bouton Page [P] Ce bouton contrôle les communications avec le personnel du magasin.<Lorsque le mode presser pour page (PTP) est préréglé>Alors que le bouton [P] est maintenu pressé, il est possible de parler au personnel du magasin.<Lorsque le mode de verrouillage page est préréglé>Alors que le bouton [P] est maintenu pressé, il est possible de parler au personnel du magasin jusqu’à ce que le bouton soit pressé une seconde fois.Français](https://usermanual.wiki/Panasonic-of-North-America/9TAWX-CH450/User-Guide-2130355-Page-31.png)
![33Modes d’utilisationw PréparatifsAvant d’utiliser le combiné microcasque, confirmer que laconfiguration du système pour le combiné microcasque, lemodule central et d’autres périphériques est complètementterminée. Installer une batterie dans le logement debatterie.(Se référer à p.32 à “Chargement et remplacement de la batterie”.) Appuyer sur le bouton [POWER] pour mettrel’appareil en marche.p Au moment de la mise en marche, les messages vocaux “Hello”, “Headset xx” (xx : le numéro d’identification enregistré dans le module central) et “Lane x” (x : numéro du passage connecté) seront entendus par l’écouteur. Porter le combiné microcasque d’écoute. Ajuster le rembourrage de casque pour quel’écouteur soit placé sur l’oreille. Faire pivoter et replier la perche demicrophone pour que le microphone soit placé près de la bouche. Fixer la courroie selon les besoins.CourroieFrançais](https://usermanual.wiki/Panasonic-of-North-America/9TAWX-CH450/User-Guide-2130355-Page-33.png)
![34Modes d’utilisationw Réglage du volumeSélectionner un niveau sonore approprié en appuyantsur le bouton [+] ou [–].w Communications avec les clients (TALK)Tout membre du personnel portant un combiné microcasque peut communiquer en mode bidirectionnel avec n’importe quel client qui se trouve à la hauteur du tableau de menu.p Une tonalité est entendue dans le combiné microcasque quand un véhicule arrive à la hauteur du tableau de menu.Lorsque le mode presser pour parler (PTT) est préréglé Presser et immobiliser le bouton [T1].p Une tonalité est entendue par l’écouteur pour confirmer que la communication est établie. Dans cet état, il est possible de communiquer avec un client à la hauteur du tableau de menu en parlant dans le microphone de ce produit. Libérer le bouton [T1].p La communication est coupée et la conversation prend fin.Lorsque le mode de verrouillage pour parler est préréglé Presser le bouton [T1].p Une tonalité est entendue par l’écouteur pour confirmer que la communication est établie. Dans cet état, il est possible de communiquer avec un client à la hauteur du tableau de menu en parlant dans le microphone de ce produit. Presser le bouton [T1] encore une fois. p La communication est coupée et la conversation prend fin.w Communication avec d’autres membres du personnel du magasin (PAGE)Tous les membres du personnel portant un combiné microcasque peuvent communiquer entre eux sans être des clients.Lorsque le mode presser pour page (PTP) est préréglé Presser et immobiliser le bouton [P].p Une tonalité est entendue par l’écouteur pour confirmer que la communication est établie. Dans cet état, il est possible de communiquer avec un membre du personnel en parlant dans le microphone de ce produit. Libérer le bouton [P].p La communication est coupée et la conversation prend fin.Lorsque le mode de verrouillage page est préréglé Presser le bouton [P].p Une tonalité est entendue par l’écouteur pour confirmer que la communication est établie. Dans cet état, il est possible de communiquer avec un membre du personnel en parlant dans le microphone de ce produit. Presser le bouton [P] encore une fois.p La communication est coupée et la conversation prend fin.](https://usermanual.wiki/Panasonic-of-North-America/9TAWX-CH450/User-Guide-2130355-Page-34.png)
![35w Notification d’alerteLorsque le module central est le WX-CC411 ou le WX-CC412, les membres du personnel qui portent ce produit peuvent envoyer une alerte de sécurité au module central. Presser et immobiliser le bouton [F] pendant au moins 2 secondes.p Une tonalité est entendue par l’écouteur pour indiquer que la transmission est achevée, et une alerte de sécurité est envoyée au module central. Lorsque le module central reçoit une alerte de sécurité de ce produit, il effectue les opérations prédéfinies (Enregistrement TALK et PAGE, Envoyer courriel, lecture de message d’alerte, Surveillance par caméra, etc.).w Commande de périphérique externeLorsque le module central est le WX-C3010, il est possible de commander la borne de commande de périphérique externe à l’aide de ce produit. Presser et immobiliser le bouton [F].p Une courte tonalité est entendue par l’écouteur, et la borne de commande de périphérique externe passe en mode actif. Libérer le bouton [F].p 2 courtes tonalités sont entendues par l’écouteur, et la borne de commande de périphérique externe passe en mode d’arrêt.w Mode double passageEn mode double passage, ce produit doit sélectionner un passage pour la communication.Pour une configuration normaleCommutation sur le passage BQuand une connexion est établie au passage A, l’indicateur de passage s’allume en orange. Presser le bouton [T2].p Une voix “Lane B” est entendue par l’écouteur et l’indicateur de passage s’allume en vert. La connexion passe au passage B.Commutation sur le passage AQuand une connexion est établie au passage B, l’indicateur de passage s’allume en vert. Presser le bouton [T2].p Une voix “Lane A” est entendue par l’écouteur et l’indicateur de passage s’allume en orange. La connexion passe au passage A.Pour une configuration de sélection directe de passageCommutation sur le passage BQuand une connexion est établie au passage A, l’indicateur de passage s’allume en orange. Presser le bouton [T2].p Une voix “Lane B” est entendue par l’écouteur et l’indicateur de passage clignote en vert. La connexion passe au passage B. Il est possible de parler à un client à la hauteur du tableau de menu du passage B.Commutation sur le passage AQuand une connexion est établie au passage B, l’indicateur de passage s’allume en vert. Presser le bouton [T1].p Une voix “Lane A” est entendue par l’écouteur et l’indicateur de passage clignote en orange. La connexion passe au passage A. Il est possible de parler à un client à la hauteur du tableau de menu du passage A.Français](https://usermanual.wiki/Panasonic-of-North-America/9TAWX-CH450/User-Guide-2130355-Page-35.png)
![36Modes d’utilisationw Service de téléphonie Internet (Seul ce produit est réglé sur le mode de gérant)Ce produit peut recevoir les appels d’un logiciel de communication en ligne tel que Skype. Appuyer sur le bouton [R] pendant qu’une tonalité d’appel est entendue par l’écouteur de ce produit.p Le service de téléphonie Internet est alors connecté et il est possible de faire un appel. Appuyer sur le bouton [R] pendant que le service de téléphonie Internet est connecté.p Le service se déconnecte et l’appel prend fin.p Lorsque le bouton [R] est maintenu enfoncé pendant 2 secondes ou plus pendant que le service de téléphonie Internet est déconnecté, il est possible de faire un appel par le service de téléphonie Internet.p Le logiciel doit être installé dans le module central pour pouvoir utiliser le service de téléphonie Internet. Pour plus de détails, contacter un revendeur.Remarquew Limitations de communicationJusqu’à 4 appareils de ce produit ou du preneur de commande peuvent être utilisés par passage.Si un cinquième appareil essaie de parler à un client ou de communiquer avec un membre du personnel, une tonalité d’erreur et le message vocal “Cannot connect” sont entendus par l’écouteur et l’accès est refusé.Par contre, le cinquième appareil et les suivants peuvent entendre les conversations avec les clients ou les communications avec les membres du personnel.wHors de portée de communicationLorsqu’un membre du personnel qui porte ce produit n’est plus à portée de communication, une tonalité d’erreur et le message vocal “Out of range” sont entendus par l’écouteur et la communication est déconnectée.Lorsqu’il revient à portée de communication, une tonalité est entendue et la communication devient possible.w BatterieLorsque la batterie devient faible, une tonalité d’erreur et le message vocal “Battery Low” sont entendus par l’écouteur, et le témoin d’alimentation clignote en rouge en même temps. Lorsque cela se produit, remplacer immédiatement la batterie par une batterie complètement chargée.w Éteindre l’appareil Presser et immobiliser le bouton [POWER] pendant au moins 2 secondes.p Le message vocal “Goodbye” est entendu par l’écouteur, l’appareil s’éteint et le témoin d’alimentation s’éteint.](https://usermanual.wiki/Panasonic-of-North-America/9TAWX-CH450/User-Guide-2130355-Page-36.png)
![37Configuration de l’appareilw Mode de gérantp Le gérant peut interrompre le mode TALK ou PAGE de tout membre du personnel à tout moment en monopolisant un canal par priorité.p Seulement 1 appareil de ce produit ou de preneur de commande peut être réglé sur le mode de gérant. Effectuer l’enregistrement d’identification, pour faire ce réglage. Appuyer et immobiliser le bouton [POWER] pendant au moins 2 secondes pour arrêter le combiné microcasque. Appuyer sur le bouton [POWER] pendant 1 seconde ou plus tout en maintenant enfoncés les boutons [R] et [T1] pour mettre l’appareil en marche.p Il est possible d’entendre “Connecting center module A” et le témoin d’alimentation clignote alternativement du rouge au vert. En outre, l’indicateur de passage clignote en orange.En mode de passage doubleLes réglages du passage B doivent aussi être effectués.Appuyer sur le bouton [POWER] pendant 1 seconde ou plus tout en maintenant enfoncés les boutons [R] et [T2] pour mettre l’appareil en marche.p Il est possible d’entendre “Connecting center module B” et le témoin d’alimentation clignote alternativement du rouge au vert. En outre, l’indicateur de passage clignote en vert. Si le réglage de mode de gérant se déroule avec succès, il est possible d’entendre “Manager” et le témoin d’alimentation clignote en vert.p S’il y a un problème lors de la configuration des réglages de mode de gérant, une tonalité d’erreur et le message vocal “Failed” sont entendus par l’écouteur, et le témoin d’alimentation clignote en rouge pour alerter l’utilisateur de l’état anormal. Si cela se produit, réessayer depuis l’ÉTAPE 1.p Seulement 1 appareil de ce produit ou de preneur de commande peut être réglé sur le mode de gérant pour chaque module central. Si un deuxième appareil est réglé sur le mode de gérant, cela annule automatiquement le réglage du mode de gérant sur le premier appareil.Remarquew Annulation du mode gérant Couper l’alimentation du combiné microcasque qui a été réglé pour le mode de gérant. Appuyer sur le bouton [POWER] pendant 1 seconde ou plus tout en maintenant enfoncés les boutons [R] et [T1] pour mettre l’appareil en marche.p Il est possible d’entendre “Connecting center module A” et le témoin d’alimentation clignote alternativement du rouge au vert. En outre, l’indicateur de passage clignote en orange.En mode de passage doubleL’annulation du mode de gérant doit être effectuée.Appuyer sur le bouton [POWER] pendant 1 seconde ou plus tout en maintenant enfoncés les boutons [R] et [T2] pour mettre l’appareil en marche.p Il est possible d’entendre “Connecting center module B” et le témoin d’alimentation clignote alternativement du rouge au vert. En outre, l’indicateur de passage clignote en vert. Lorsque le mode de gérant est annulé, l’appareil revient en condition normale et le témoin d’alimentation s’allume en vert.p S’il y a un problème lors de l’annulation des réglages de mode de gérant, une tonalité d’erreur et le message vocal “Failed” sont entendus par l’écouteur, et le témoin d’alimentation clignote en rouge pour alerter l’utilisateur de l’état anormal. Si cela se produit, réessayer depuis l’ÉTAPE 1.Français](https://usermanual.wiki/Panasonic-of-North-America/9TAWX-CH450/User-Guide-2130355-Page-37.png)
![38Configuration de l’appareilw Configuration de la fonction de verrouillage automatique pour parlerPour un combiné microcasque d’écoute où la fonction de verrouillage automatique pour parler est configurée, il a une fonction pour sélectionner “Talk” automatiquement quand le détecteur de véhicule est devenu actif, et si l’on parle avec le client au tableau de menu. Pour chaque passage, il est possible de régler 1 appareil de ce produit ou le preneur de commande sur la configuration de la fonction de verrouillage automatique pour parler.p Effectuer l’enregistrement d’identification, pour faire ce réglage.p Il n’est possible de régler que l’appareil dont l’interrupteur DIP N° 1 est sur la position ON.(Se référer à p.42 à “Configuration d’interrupteur DIP”.) Appuyer sur le bouton [POWER] pour mettre l’appareil en marche.p Au moment de la mise en marche, les messages vocaux “Hello”, “Headset xx” (xx : le numéro d’identification enregistré dans le module central) et “Lane x” (x : numéro du passage connecté) seront entendus par l’écouteur. Appuyer sur le bouton [T1]* pendant que le témoin d’alimentation clignote alternativement en vert et en rouge pendant 3 secondes.p L’enregistrement de la fonction de verrouillage automatique pour parler est effectué sur le passage A. Une fois l’enregistrement terminé, le message vocal “Auto Talk ON” est entendu par l’écouteur, et le témoin d’alimentation cesse de clignoter de manière alternée.p Si l’on n’appuie pas sur le bouton [T1] de ce produit dans les 3 secondes qui suivent sa mise en marche, le message vocal “Auto Talk OFF” est entendu par l’écouteur, et l’appareil démarre comme d’ordinaire.* Utiliser le bouton [T2] pour enregistrer la fonction de verrouillage automatique pour parler sur le passage B.p S’il y a un problème lors de l’enregistrement de la fonction de verrouillage automatique pour parler, une tonalité d’erreur et le message vocal “Failed” sont entendus par l’écouteur, et le témoin d’alimentation clignote en rouge pour alerter l’utilisateur de l’état anormal. Si cela se produit, réessayer depuis l’ÉTAPE 2.p Si le courant d’alimentation du combiné microcasque d’écoute est coupé, toutes les conditions de réglage pour la fonction de verrouillage automatique pour parler seront annulées. Ce réglage devrait être effectué sans faute quand l’alimentation électrique est appliquée.Remarquew Enregistrement d’identificationAvant d’utiliser ce produit, l’ID d’appareil doit être enregistré dans le module central. Une fois l’ID enregistré dans le module central, la communication sans fil entre ce produit et le module central est activée. Régler le module central sur le mode “Enregistrement ID”.(Se reporter au manuel d’instructions du module central.) Appuyer et immobiliser le bouton [POWER] pendant au moins 2 secondes pour arrêter le combiné microcasque. Appuyer sur le bouton [POWER] pendant 1 seconde ou plus tout en maintenant enfoncés les boutons [T1] et [T2] pour mettre l’appareil en marche.p Le combiné microcasque passe en mode de paramétrage d’enregistrement d’identification. On entend alors “Registration Mode” et le témoin d’alimentation clignote en orange. Presser le bouton [T1].p On entend alors “Connecting center module A” et l’indicateur de passage clignote en orange.p Lorsque le module central est le WX-CC412, l’enregistrement ID pour le passage B est automatiquement lancé, le message vocal “Connecting Center module B” est entendu par l’écouteur, et l’indicateur de passage clignote en orange.p Quand l’enregistrement d’identification a réussi avec succès, on entend alors “Registration complete”, “Headset xx” (xx : le numéro d’identification enregistré dans le module central), et le témoin d’alimentation cessent de clignoter et restent allumés.p Si l’enregistrement ID échoue, une tonalité d’erreur et le message vocal “Failed” sont entendus par l’écouteur, et le témoin d’alimentation clignote en rouge pour indiquer un état anormal. Si cela se produit, réessayer depuis l’ÉTAPE 2. Une fois l’enregistrement ID terminé, annuler “Enregistrement ID” du module central.p Lorsque cela est fait, “Enregistrement ID” de ce produit est annulé et le témoin d’alimentation s’allume en vert.](https://usermanual.wiki/Panasonic-of-North-America/9TAWX-CH450/User-Guide-2130355-Page-38.png)
![39w Suppression d’une identificationSi le module central est le WX-C3010, supprimer l’ID de ce produit en procédant comme suit. Appuyer et immobiliser le bouton [POWER] pendant au moins 2 secondes pour arrêter le combiné microcasque.Pour supprimer un ID enregistré dans le module central du passage AMaintenir enfoncés simultanément les boutons [F], [T1] et [POWER] pendant 1 seconde ou plus.p L’appareil démarre en “Mode suppression ID”. Le témoin d’alimentation clignote en orange.Pour supprimer un ID enregistré dans le module central du passage BMaintenir enfoncés simultanément les boutons [F], [T2] et [POWER] pendant 1 seconde ou plus.p L’appareil démarre en “Mode suppression ID”. Le témoin d’alimentation clignote en orange. Presser le bouton [P].p Cet identifiant est supprimé instantanément, le message vocal “ID not registered” est entendu par l’écouteur, et le témoin d’alimentation clignote en rouge pour indiquer un état anormal.p Si la suppression de l’ID échoue, une tonalité d’erreur et le message vocal “Failed” sont entendus par l’écouteur, et le témoin d’alimentation clignote en rouge pour indiquer un état anormal. Si cela se produit, réessayer depuis l’ÉTAPE 1.p Lorsque le nombre d’Enregistrements ID de ce produit ou du preneur de commande dépasse la limite supérieure du module central, celui-ci supprime automatiquement certains ID. Si un appareil de ce produit ou un preneur de commande demeure inutilisé pour une période prolongée après avoir été enregistré, il se peut que son ID soit supprimé.Importantw Basculement de langue de message vocalIl est possible de changer la langue utilisée pour le message vocal. Il est possible de sélectionner Anglais, Français, Espagnol ou Pas de message vocal comme langue de message vocal. Appuyer et immobiliser le bouton [POWER] pendant au moins 2 secondes pour arrêter le combiné microcasque. Appuyer sur le bouton [POWER] pendant 1 seconde ou plus tout en maintenant enfoncé le bouton [P] pour mettre l’appareil en marche.p Le témoin d’alimentation clignote en orange et l’indicateur de passage reste éteint. Appuyer sur le bouton [T1] pour changer la langue. Lorsque le bouton [T2] est enfoncé, le message vocal commence dans la langue sélectionnée après une tonalité.Anglais: “Hello”Français: “Bonjour”Espagnol: “Buenos Dias”Pas de message vocal: – Presser le bouton [P].p La langue actuellement sélectionnée est paramétrée, et ce produit redémarre automatiquement.Français](https://usermanual.wiki/Panasonic-of-North-America/9TAWX-CH450/User-Guide-2130355-Page-39.png)
![40Configuration de l’appareilw Recherche du module centralCe produit cherche un module central accessible via le module central sur lequel l’ID est déjà enregistré. Lorsqu’il trouve un module central accessible, ce produit s’y connecte.p Pour utiliser cette fonction, il est nécessaire d’enregistrer à l’avance l’ID sur plusieurs modules centraux. Appuyer et immobiliser le bouton [POWER] pendant au moins 2 secondes pour arrêter le combiné microcasque. Appuyer sur le bouton [POWER] pendant 1 seconde ou plus tout en maintenant enfoncés les boutons [R] et [+] pour mettre l’appareil en marche.p Le témoin d’alimentation clignote alternativement du rouge au vert et l’indicateur de passage clignote en orange. Lorsqu’un module central accessible est trouvé, le témoin d’alimentation clignote alternativement en rouge et en vert, et l’indicateur de passage clignote en orange.p Au bout de 5 secondes, ce produit redémarre automatiquement et accède au module central trouvé.p L’ID de 1 appareil de ce produit peut être enregistré sur jusqu’à 30 modules centraux. Le module central resté le plus longtemps sans accès est remplacé lorsque l’ID est enregistré sur le 31e module central.Remarquew RéinitialisationIl est possible de réinitialiser ce produit pour rétablir les réglages d’usine. Appuyer et immobiliser le bouton [POWER] pendant au moins 2 secondes pour arrêter le combiné microcasque. Appuyer sur le bouton [POWER] pendant 1 seconde ou plus tout en maintenant enfoncés les boutons [+] et [–] pour mettre l’appareil en marche.p Le témoin d’alimentation s’allume en vert et l’indicateur de passage reste éteint. Lorsque le bouton [POWER] est libéré, la réinitialisation commence.p Une fois la réinitialisation terminée, ce produit redémarre automatiquement.p Une fois la réinitialisation terminée, l’ID n’est pas enregistré, le témoin d’alimentation clignote en rouge et l’indicateur de passage s’allume en orange.Remarque](https://usermanual.wiki/Panasonic-of-North-America/9TAWX-CH450/User-Guide-2130355-Page-40.png)
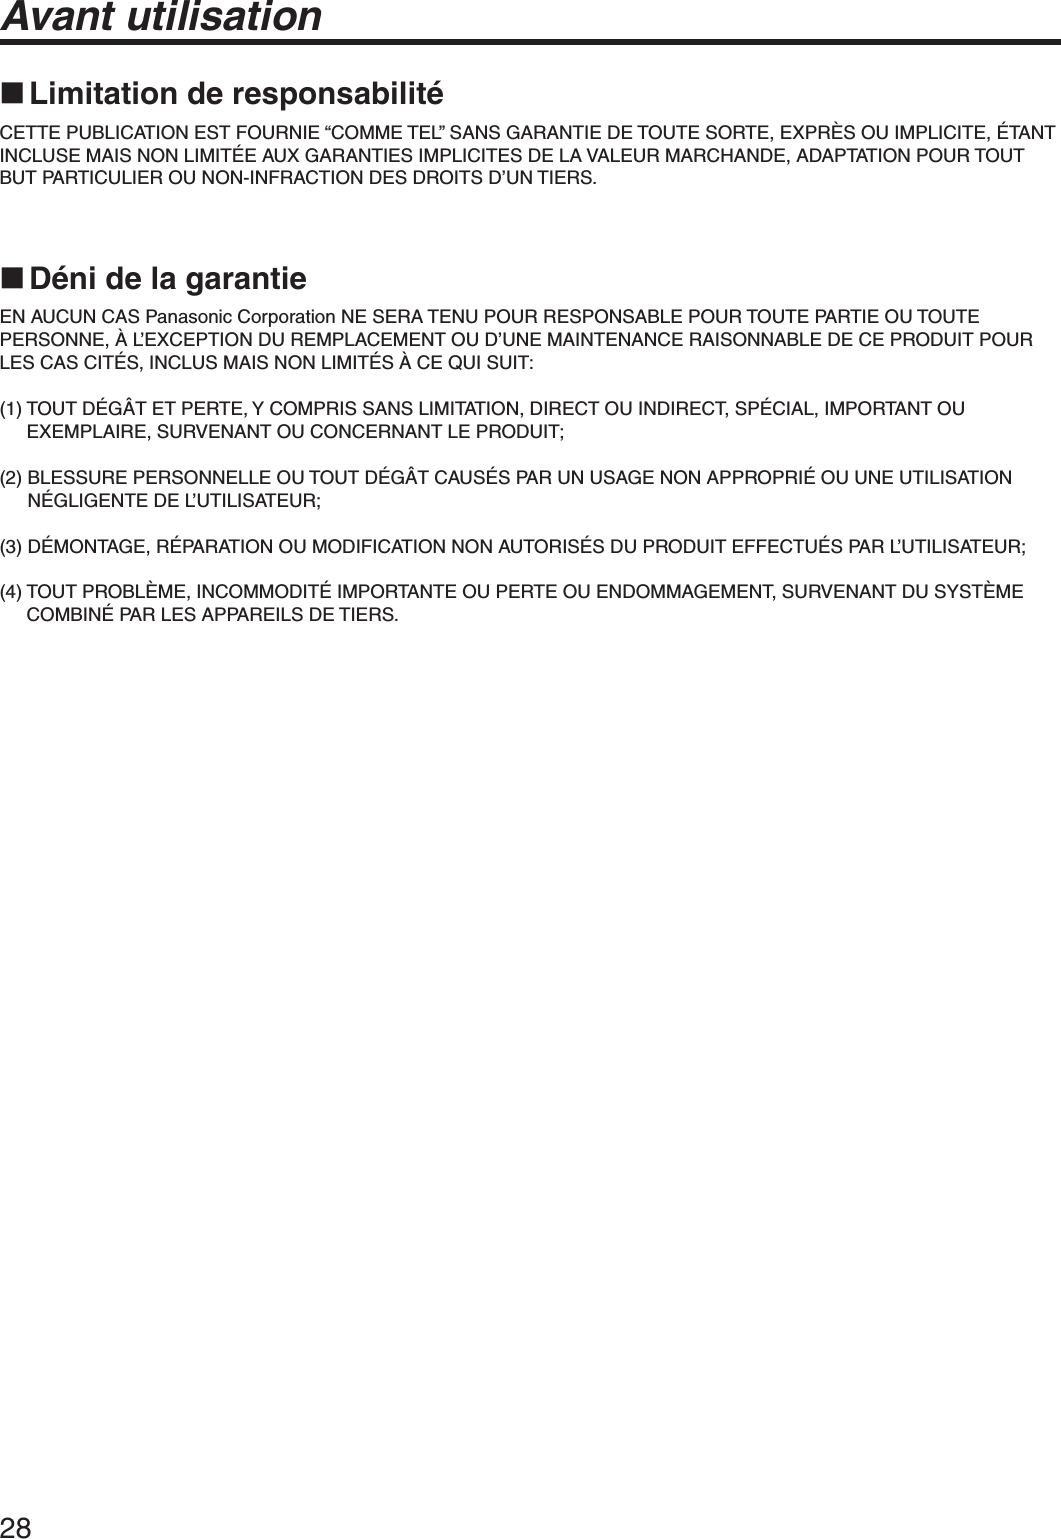
![42Procédures de configurationLa configuration de ce produit doit être exécutée par un personnel de dépannage qualifié ou des installateurs professionnels.w Logement d’interrupteur Dévisser la vis et ouvrir le logement d’interrupteur lorsque le combiné microcasque est éteint.Couvercle Régler les commutateurs comme indiqué ci-dessous. Après avoir positionné l’interrupteur, remonter le couvercle.wConfiguration d’interrupteur DIPLe retrait du couvercle d’interrupteurs rendra visibles un interrupteur DIP 4 bits et un interrupteur DIP 1 bit.Paramétrage initial1345p Ne pas oublier de couper l’alimentation du combiné microcasque d’écoute. En ne procédant pas ainsi, l’interrupteur à positions multiples ne sera pas activé tant que l’alimentation ne sera pas coupée puis rétablie.RemarqueSW# Fonction ON OFF1Verrouillage automatique pour parler activée/désactivéeON OFF2Paramétrage de bouton T2Sélection directede passageNormal3Réglage du bouton Parler/PageVerrouillage pour parlerVerrouillage pagePTTPTP4Sélection du modèle de module centralWX-C3010 WX-CC411WX-CC4125 Non utilisé –Fonctionnement normalSW#1 Verrouillage automatique pour parler activée/désactivéeON: Fonction de verrouillage automatique pourparler activéeOFF: Fonction de verrouillage automatique pourparler désactivéeSW#2 Paramétrage de bouton T2Paramétrer la méthode de sélection de passage pour le fonctionnement en passage double.ON: Mode de sélection directe de passageLe bouton [T1] est pour le passage A, le bouton [T2] est pour le passage B.OFF: NormalAppuyer sur le bouton [T2] pour sélectionner le passage A ou B.SW#3 Paramétrage des commandes de bouton pour parlerON: Parler pour Mode de verrouillage pour parler, Page pour mode de verrouillage pageOFF: Parler pour PTT, Page pour PTPSW#4 Sélection du modèle de module centralON: WX-C3010OFF: WX-CC411, WX-CC412SW#5 Non utiliséToujours régler sur OFF.](https://usermanual.wiki/Panasonic-of-North-America/9TAWX-CH450/User-Guide-2130355-Page-42.png)