Panasonic of North America 9TGCF-199 Portable Laptop PC with WWAN, WLAN and Bluetooth User Manual CF 19CTQZZBM indb
Panasonic Corporation of North America Portable Laptop PC with WWAN, WLAN and Bluetooth CF 19CTQZZBM indb
Contents
- 1. Users Manual
- 2. Supplemental Users Manual
Users Manual
![2Getting StartedIntroductionThank you for purchasing this Panasonic computer. For optimum performance and safety, please read these instruc-tions carefully. Terms and illustrations in these instructionsCAUTION : Conditions that may result in minor or moderate injury.NOTE : Useful and helpful information.Enter : Press [Enter] key.Fn + F5 : Press and hold [Fn] key, and then press [F5] key.[start] - [Run] : Click [start], and then click [Run]. You may need to double-click in some cases. : Page in these Operating Instructions or in the Reference Manual. : Reference to the on-screen manuals. Some illustrations are simplifi ed to help your understanding and may look different from the actual unit. If you do not log on as an administrator, you cannot use some functions or cannot display some screens. Refer for the latest information about optional products to the catalogs, etc. In these instructions, the names and terms are referred as follows. “Microsoft® Windows® XP Professional Service Pack 2 with Advanced Security Technologies” as “Windows”, “Win-dows XP” or “Windows XP Professional” “Microsoft® Windows® XP Tablet PC Edition 2005” as “Windows”, “Windows XP” or “Windows XP Tablet PC Edi-tion” DVD-ROM & CD-R/RW drive, and DVD MULTI drive as “CD/DVD drive” Circular media including DVD-ROM and CD-ROM as “discs” The display modes are referred as follows. ( ) indicates the terms in [Intel® Graphics Media Accelerator Driver for Mobile] screen. To display the screen, click [start] - [Control Panel] - [Other Control Panel Options] - [Intel(R) GMA Driver for Mobile]. Internal LCD (Notebook): The computer’s display External display (Monitor): External display Simultaneous display (Intel® Dual Display Clone): The same screen is displayed on the internal LCD and the ex-ternal display. Extended desktop: The extended working area across the internal LCD and the external display. CopyrightThis manual is copyrighted by Matsushita Electric Industrial Co., Ltd. with all rights reserved. No part of this manual may be reproduced in any form without the prior written permission of Matsushita Electric Industrial Co., Ltd.No patent liability is assumed with respect to the use of the information contained herein.© 2007 Matsushita Electric Industrial Co., Ltd. All Rights Reserved. DisclaimerComputer specifi cations and manuals are subject to change without notice. Matsushita Electric Industrial Co., Ltd. as-sumes no liability for damage incurred directly or indirectly from errors, omissions or discrepancies between the com-puter and the manuals. TrademarksMicrosoft®, Windows®, the Windows logo and IntelliMouse are registered trademarks of Microsoft Corporation of the United States and/or other countries.Intel, Core, Centrino and PROSet are either registered trademarks or trademarks of Intel Corporation.SD Logo is a trademark. Adobe, the Adobe logo and Adobe Reader are either registered trademarks or trademarks of Adobe Systems Incorpo-rated in the United States and/or other countries.PhoenixBIOS, Phoenix Always and Recover Pro are trademarks and/or registered trademarks of Phoenix Technolo-gies Ltd.Bluetooth™ is a trademark owned by Bluetooth SIG, Inc., U.S.A. and licensed to Matsushita Electric Industrial Co., Ltd.Panasonic® is a registered trademark of Matsushita Electric Industrial Co., Ltd.Names of products, brands, etc., appearing in this manual are trademarks or registered trademarks of their respective own companies.](https://usermanual.wiki/Panasonic-of-North-America/9TGCF-199.Users-Manual/User-Guide-957303-Page-2.png)
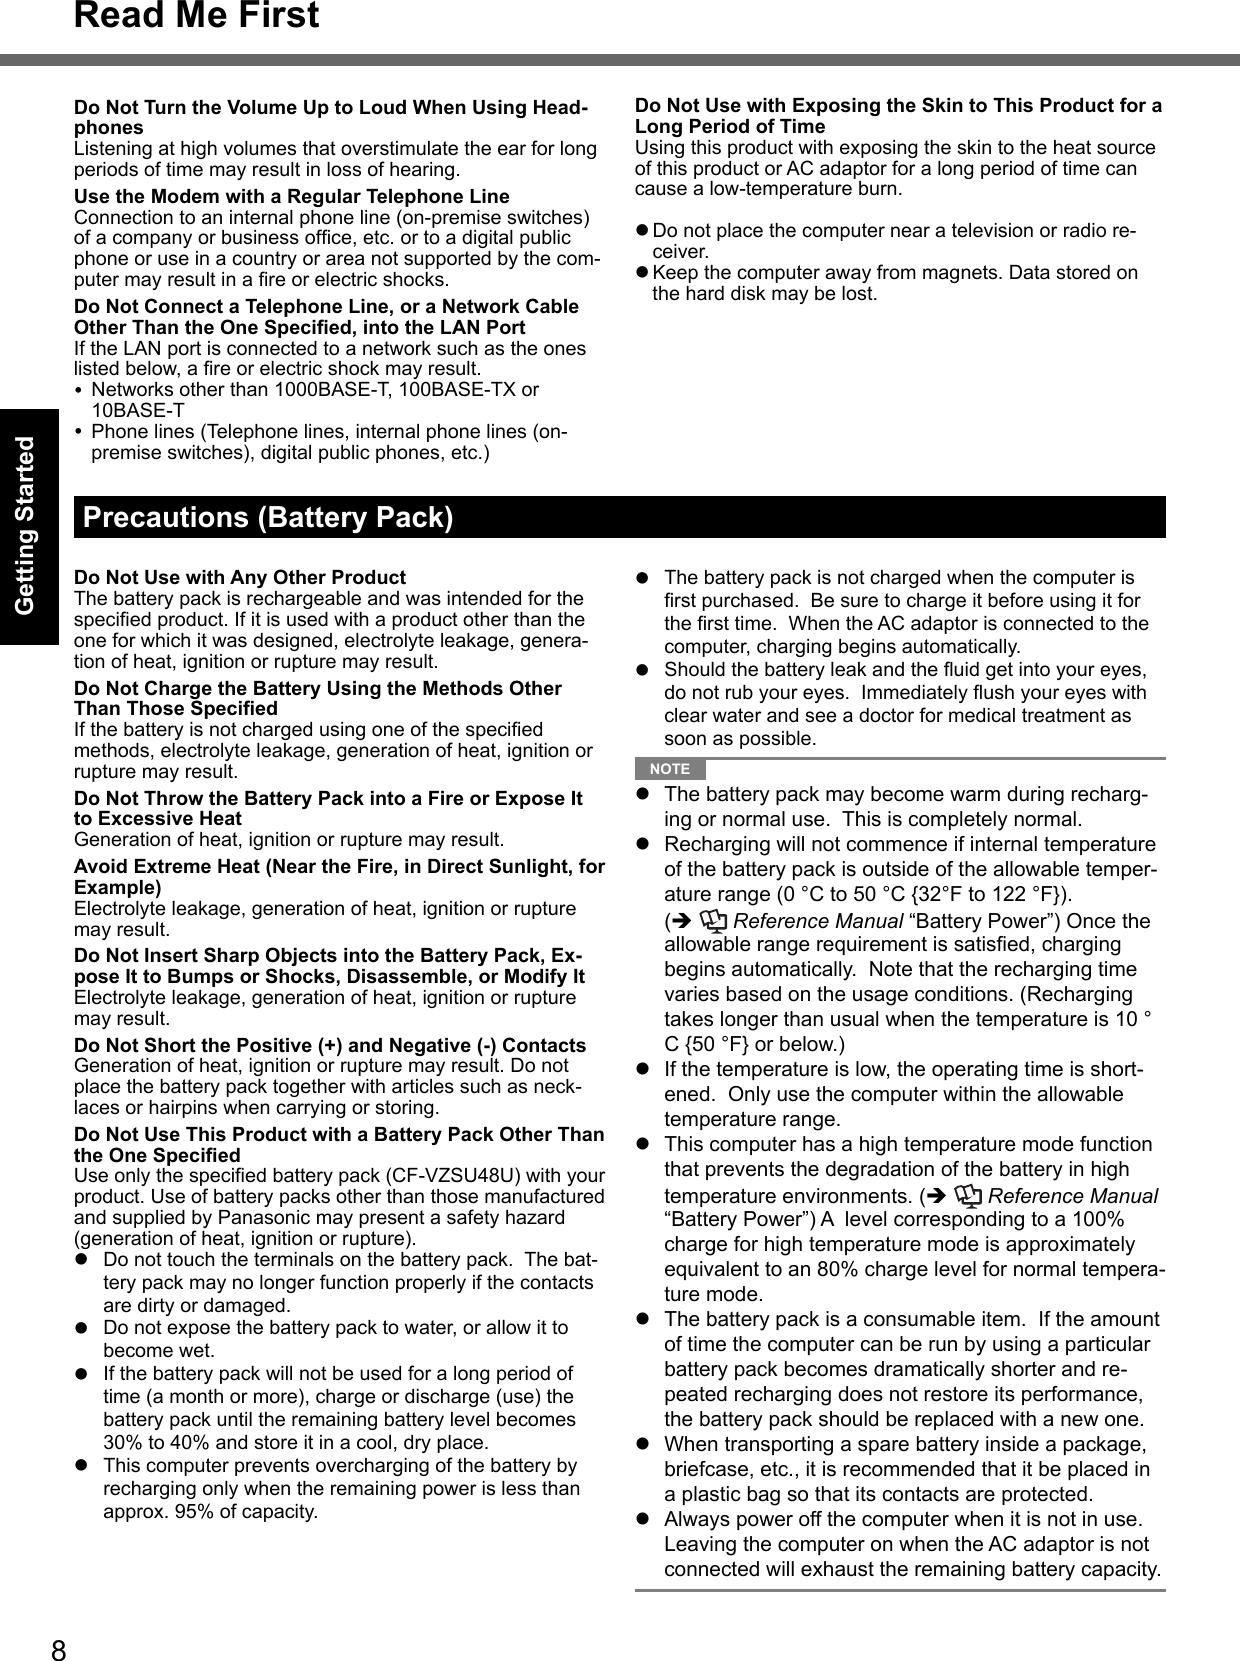
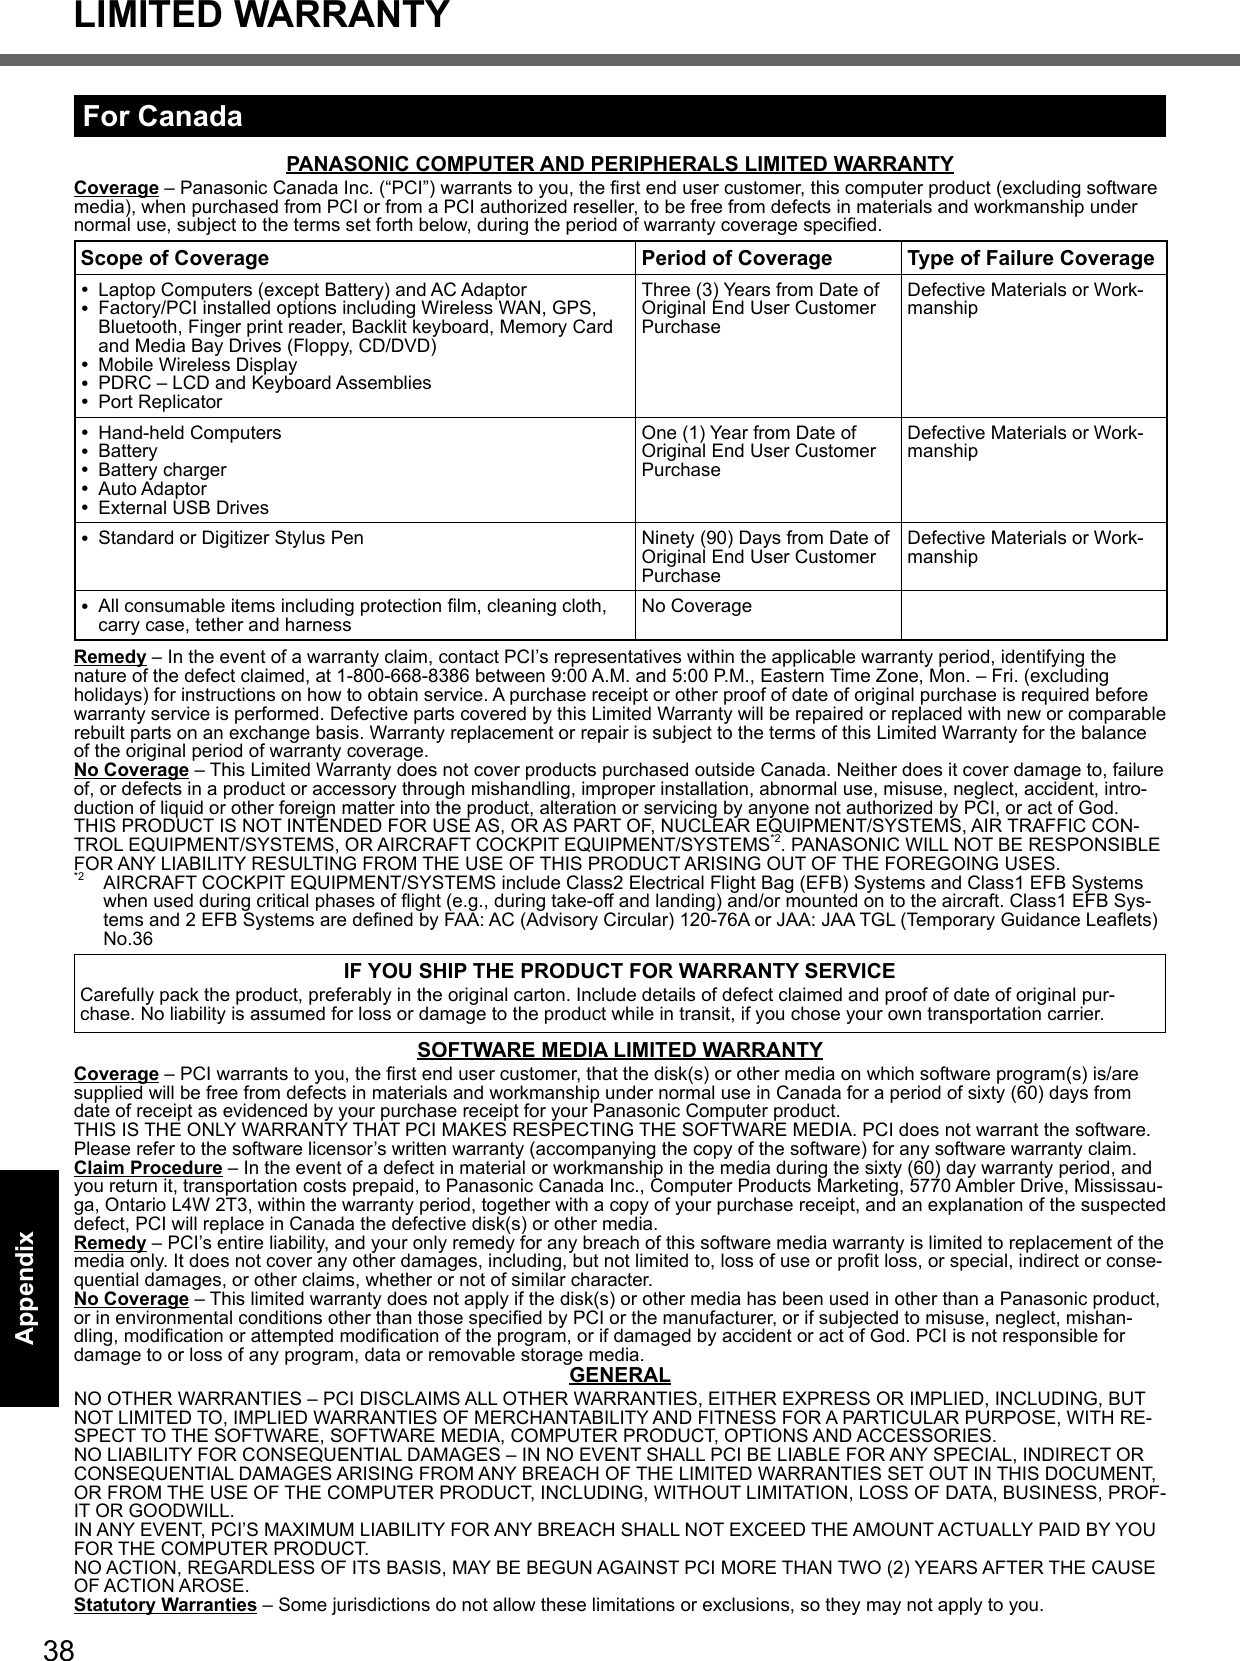
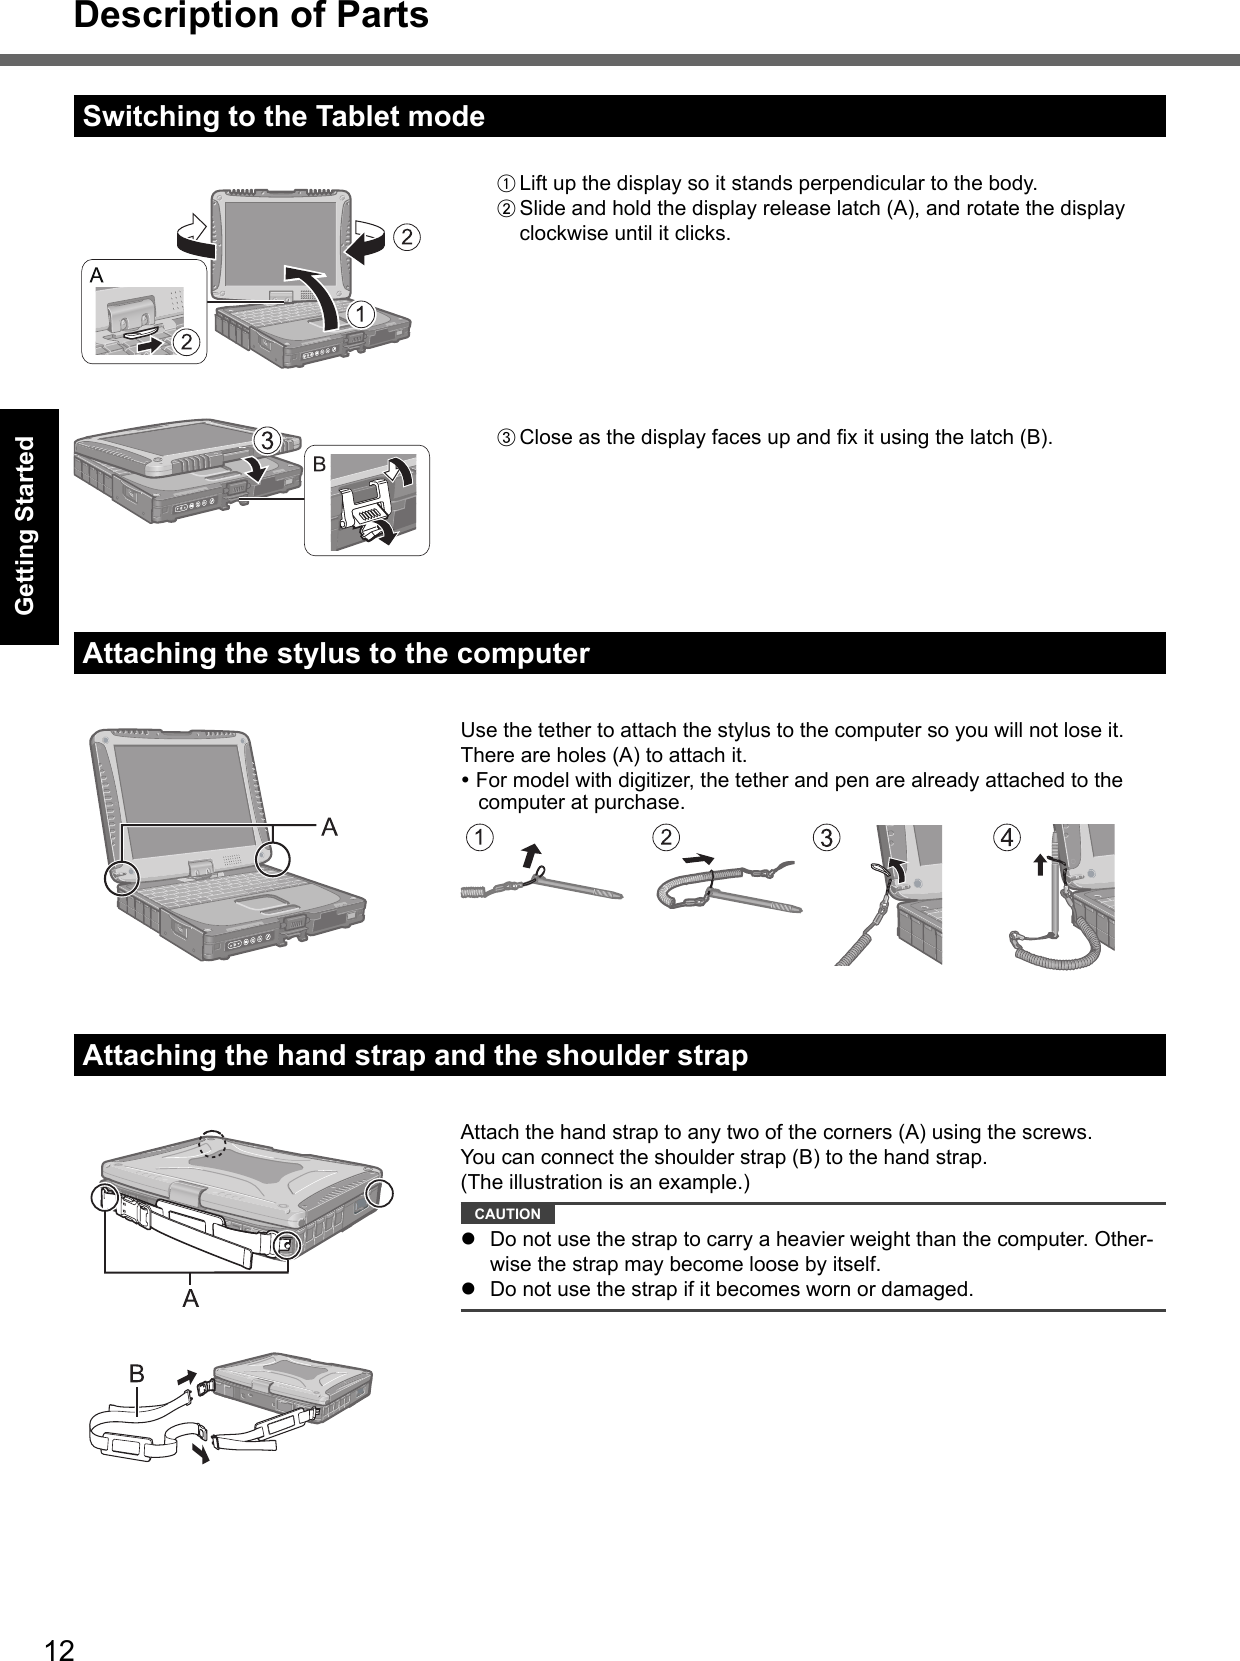
![11Getting StartedLeft sideRear side BottomA: DC-IN JackB: USB Port Reference Manual “USB Devices”C: IEEE 1394 Interface Connector Reference Manual “IEEE 1394 Devices”D: Modem Port Reference Manual “Modem”E: LAN Port Reference Manual “LAN”F: SD Memory Card Indicator(Blinking: During access) Reference Manual “SD Memory Card”G: SD Memory Card Slot Reference Manual “SD Memory Card”H: Wireless Switch Reference Manual “Disabling / Enabling Wireless Communication”I: <for model without Smart Card Slot> PC Card Slot Reference Manual “PC Card / ExpressCard” <for model with Smart Card Slot> Smart Card Slot Reference Manual “Smart Card”J: <for model without Smart Card Slot> ExpressCard Slot Reference Manual “PC Card / ExpressCard” <for model with Smart Card Slot> PC Card Slot Reference Manual “PC Card / ExpressCard”K: Headphone Jack You can connect headphones or amplifi ed speakers. When they are connected, audio from the internal speakers is not heard.L: Microphone Jack A condenser microphone can be used. If other types of microphones are used, audio input may not be pos-sible, or malfunctions may occur as a result. When recording in stereo using a stereo micro-phone:Double-click in the notifi cation area, click [Op-tions] - [Properties], and add a check mark for [Re-cording], click [OK] - [Options] - [Advanced Controls] - [Advanced], remove a check mark for [Mono Micro-phone], and then click [Close]. When using a monaural microphone with a 2-termi-nal plug:With the settings outlined above, only audio on the left track will be recorded.When monitoring the microphone audio using head-phones, sounds on the left track cannot be heard, regardless of the above settings. This is a result of the computer’s specifi cations, and is not a malfunction.M: Security Lock A Kensington cable can be connected. For further information, read the manual that comes with the cable.N: External Display Port Reference Manual “External Display”O: Serial PortP: RAM Module Slot Reference Manual “RAM Module”Q: Expansion Bus Connector Reference Manual “Port Replicator / Car Mounter”R: External Antenna Connector](https://usermanual.wiki/Panasonic-of-North-America/9TGCF-199.Users-Manual/User-Guide-957303-Page-11.png)
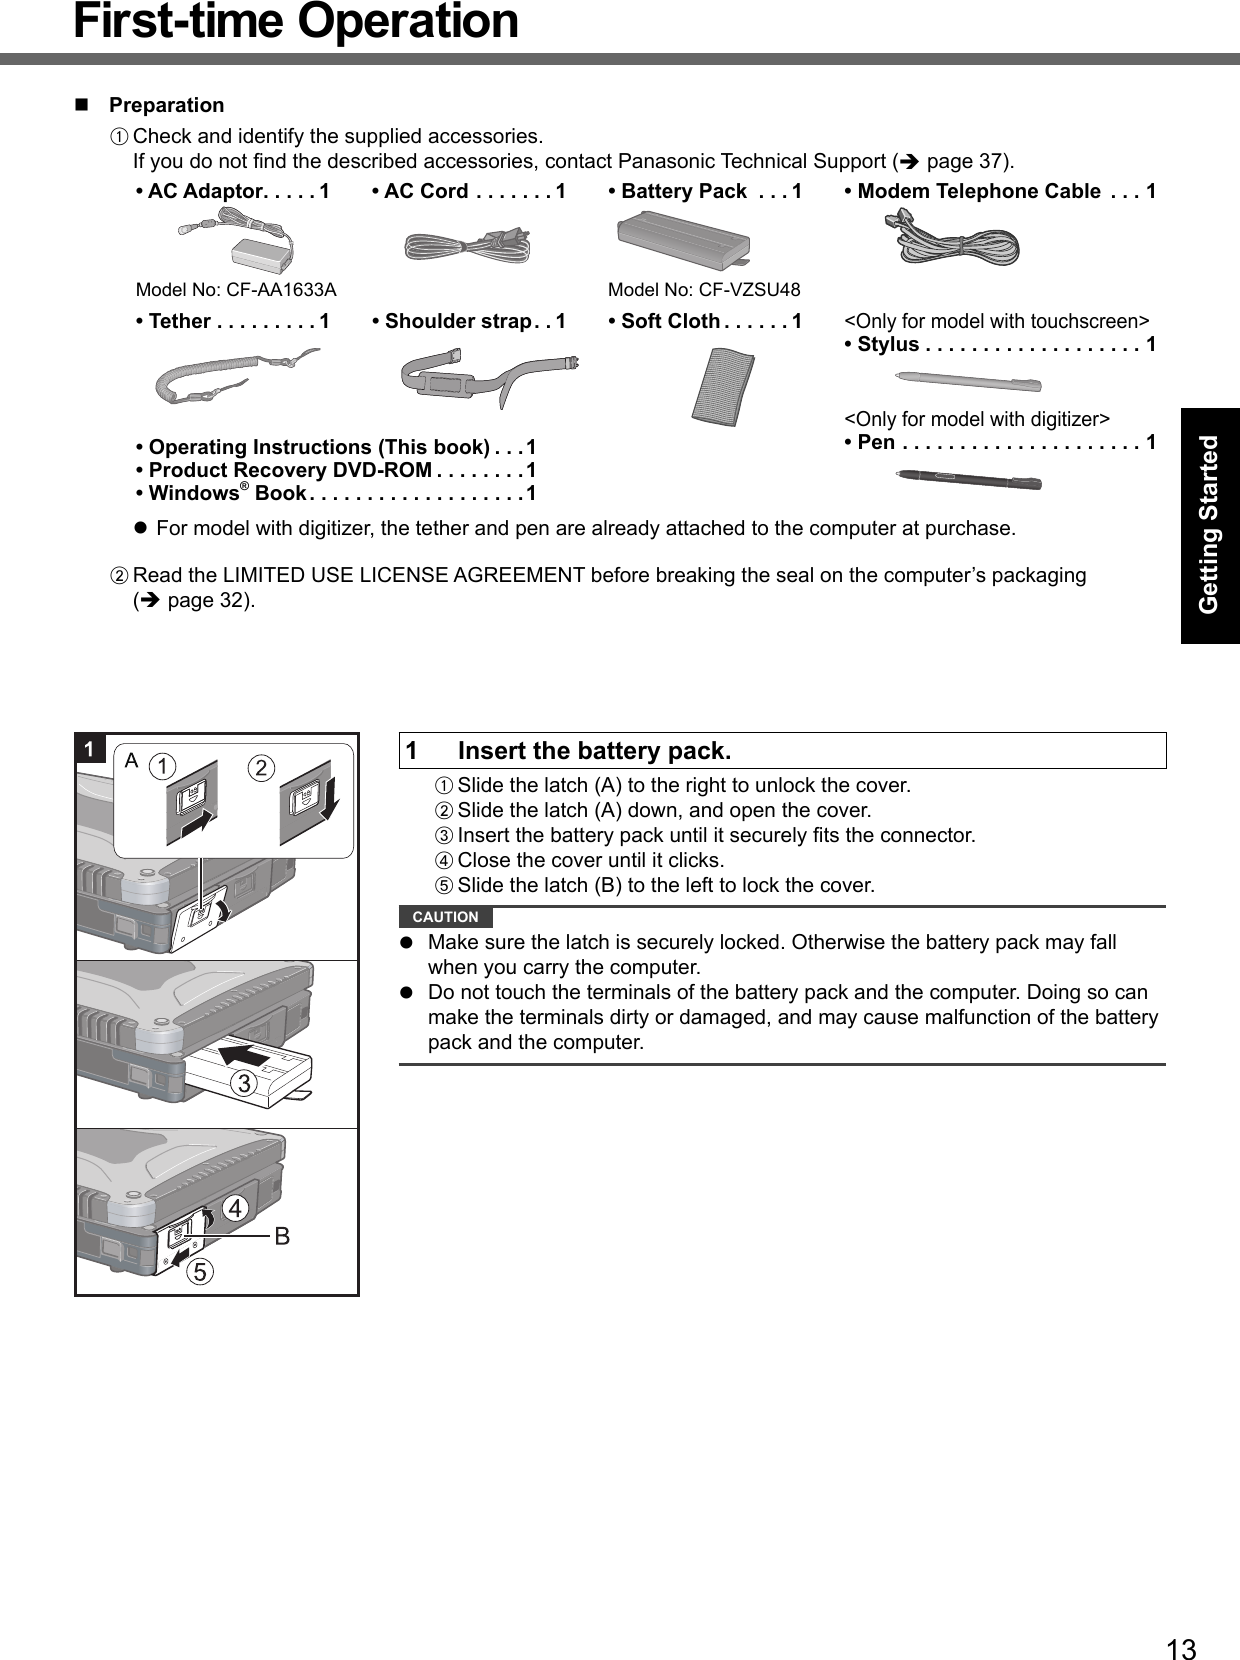
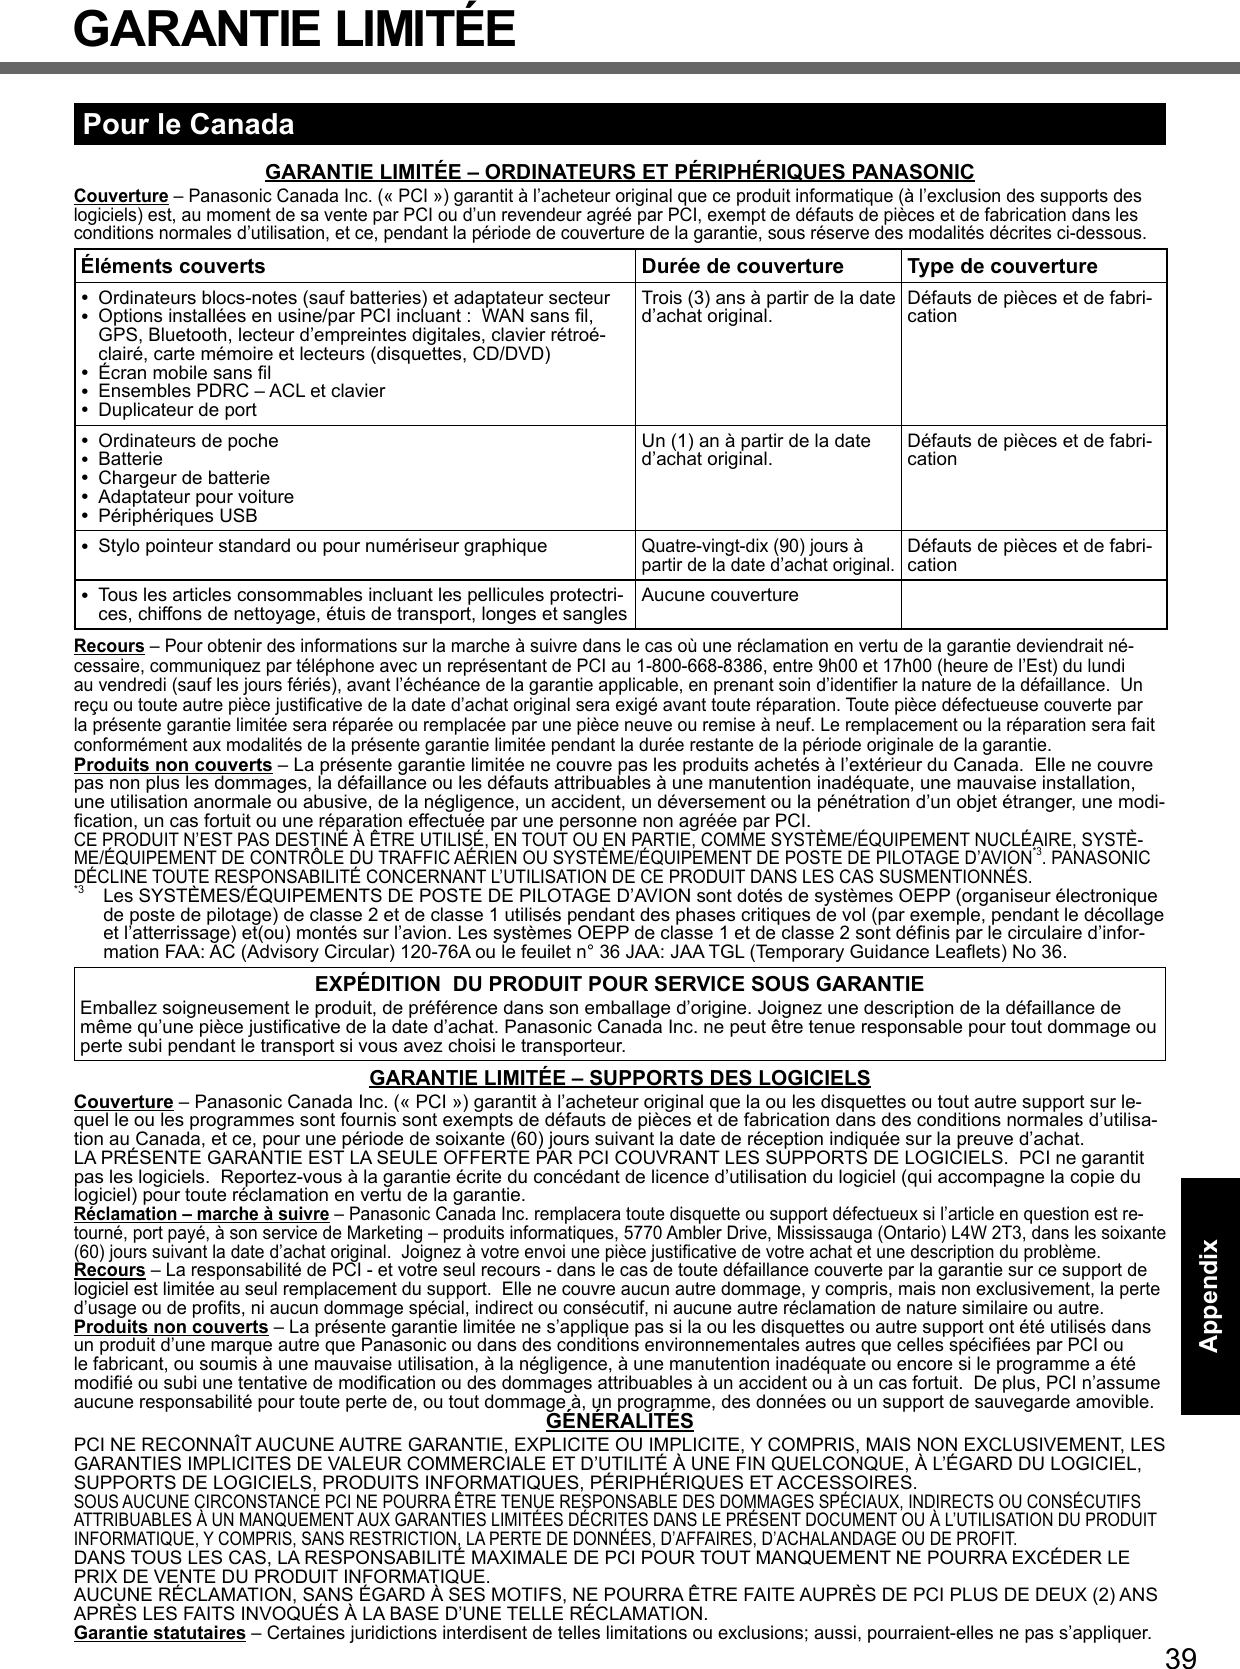
![14Getting StartedFirst-time Operation2 Connect your computer to a power outlet. The battery charging starts automatically. CAUTION Do not disconnect the AC adaptor and do not switch the wireless switch to on until the fi rst-time operation procedure is completed. When using the computer for the fi rst time, do not connect any peripheral device except the battery pack and AC adaptor. Handling the AC adaptor Problems such as sudden voltage drops may arise during periods of thunder and lightning. Since this could adversely affect your computer, an uninter-ruptible power source (UPS) is highly recommended unless running from the battery pack alone.3 Turn on the computer.A Pull up the part (A) and release the latch.B Lift open the display.C Slide and hold the power switch (B) for approximately one second until the power indicator lights. CAUTION Do not slide the power switch repeatedly. The computer will forcibly be turned off if you slide and hold the power switch for four seconds or longer. Once you turn off the computer, wait for ten seconds or more before you turn on the computer again. Do not perform the following operation until the hard disk drive indicator turns off. Connecting or disconnecting the AC adaptor Sliding the power switch Touching the keyboard, touch pad, tablet buttons, touchscreen (only for model with touchscreen), digitizer (only for model with digitizer) or external mouse Closing the display When the CPU temperature is high, the computer may not start up to prevent overheating of the CPU. Wait until the computer cools down, and then turn the power on again. If the computer does not power on even after cooling down, contact Panasonic Technical Support ( page 37).4 Setup Windows.A Follow the on-screen instructions. CAUTION When you set date/time/time zone and click [Next], the screen may not go to the next step for a few minutes. Do not touch the keyboard or touch pad, and wait until the screen changes. If “An unexpected error has occurred…” (or a similar message) is displayed, click [OK]. This is not a malfunction. Wait until the hard disk drive indicator has turned off. This computer periodically records the management information including the hard disk information such as number of hours powered-on, number of times powered-on, internal temperature, replacement sector. The maximum data vol-ume for each record is 750 byte. These information are only used for estimating the cause when the hard disk goes down by any possibility. They are never sent to outside via network nor used for any other purpose except for the purpose described the above. To disable the function, add the check mark for [Disable the automatic save function for management information history] in [Hard Disk Status] of PC Infor-mation Viewer, and click [OK].](https://usermanual.wiki/Panasonic-of-North-America/9TGCF-199.Users-Manual/User-Guide-957303-Page-14.png)
![15Getting Started5 Create a new account.A Click [start] - [Control Panel] - [User Accounts] - [Create a new account]. CAUTION Remember your password. If you forget the password, you cannot use the Windows operation system. Creating a password reset disk beforehand is recommended.6 <Only for model with touchscreen> Perform the touchscreen calibration.A Click [start] - [All Programs] - [Fujitsu Touch Panel (USB)] - [Touch Screen Calibration Utility].B Using the stylus, touch each of the 12 “+” target marks one by one until it blinks, and then press Enter.C Press Enter. NOTE Regarding Windows XP You can select the Classic view of Control Panel or the Classic Start menu. You can also change the way a user logs on or off. This manual explains using the Windows XP default setting (not Classic view or Classic Start menu etc.). Windows Update You can update to the latest patches and service packs for Windows with the following menus. [start] - [All Programs] - [Windows Update] Do not apply “Driver Updates” even if a message to update a driver appears. If a driver update is required, contact Panasonic Technical Support ( page 37). If the message “Your computer might be at risk” is displayed Select on the notifi cation area and make the appropriate settings. The Windows Security Center regularly gives you notice so that you can make the optimum settings. This is not an error message and you can use the computer. However, making appropriate measures is recommended to reduce the risk of virus and other attacks. To conserve power, the following power saving methods are set at the time of purchase. The screen automatically turns off after 15 minutes of inactivity. The computer automatically enters standly*1 after 20 minutes of inactivity.*1: Refer to Reference Manual “Standby and Hibernation Functions” about resuming from standby. Power consumption in each mode is as follows. (When AC adaptor is connected)When the screen is off Approx. ●●● WIn standby Approx. ●●● WThe battery pack is fully charged (or not being charged) and the computer is off*2 Approx. ●●● W*2: Measured based on guidelines of the ENERGY STAR® program. Power consumption might differ from value described in the Operating Instructions. Note that the computer consumes electricity even when the computer power is off. If the battery pack is fully charged, the battery will be fully discharged in the following period of time:Status of “Wake Up from wired LAN” functionStatus of “Wake Up from wireless LAN” functionEnabled Disabled Enabled DisabledWhen power is off Approx. ●● days Approx. ● weeks Approx. ●● days Approx. ● weeksIn standby Approx. ●● days Approx. ● weeks Approx. ●● days Approx. ● weeksIn hibernation Approx. ●● days Approx. ● weeks Approx. ●● days Approx. ● weeks](https://usermanual.wiki/Panasonic-of-North-America/9TGCF-199.Users-Manual/User-Guide-957303-Page-15.png)
![16Useful InformationOn-screen ManualYou can access the Reference Manual and the Important Tips on the computer screen.When you access the Reference Manual and the Important Tips for the fi rst time, the License Agreement of the Adobe Reader may be displayed. Read it carefully and select [Accept] to proceed. Reference Manual The Reference Manual contains the practical information to help you fully enjoy the computer’s performance.To access the Reference Manual:A Click [start] - [Reference Manual].Contents Key Combinations Tablet Buttons Touchscreen Digitizer Software Keyboard Panasonic Hand Writing Display Rotation Standby and Hibernation Functions Saving Power Security Measures Battery Power PC Card / ExpressCard SD Memory Card SD Security Smart Card RAM Module Port Replicator / Car Mounter External Display USB Devices IEEE 1394 Devices Modem LAN Disabling / Enabling Wireless Communication Wireless LAN Bluetooth Hard Disk Drive Setup Utility Icon Enlarger Loupe Utility DMI Viewer Recover Pro Technical Information Troubleshooting (Advanced)Some contents only apply to some limited models. Important Tips The Important Tips will provide you with the helpful information about the battery and touchscreen. Read to use the battery pack in the optimum condition to obtain longer operation time.To access the Important Tips:A Double-click on the desktop. Alternatively click [start] - [All Programs] - [Panasonic] - [Battery] - [Important Tips] or click [start] - [All Programs] - [Panasonic] - [On-Line Manuals] - [Important Tips]. NOTE When Adobe Reader update notice is displayed, we recommend you follow the on-screen procedure to update. See http://www.adobe.com/ for the latest version of Adobe Reader.](https://usermanual.wiki/Panasonic-of-North-America/9TGCF-199.Users-Manual/User-Guide-957303-Page-16.png)
![18Useful Information Preventing your computer from unauthorized use via wireless LAN<Only for model with wireless LAN> Before using wireless LAN, make the appropriate security settings such as data encryption. Computrace® SoftwareComputrace® software tracks your stolen computer.Perform the following steps before installing Computrace® software. Computrace® software is not included or installed in this computer. CAUTION You will be unable to set [Computrace (R) BIOS Module] to [Disable] once you have set to [Enable]. Do not change the setting when not used. Even if you have set [Computrace (R) BIOS Module] to [Enable], this setting may return to [Disable] after repairs to the motherboard, etc. have been made. NOTE Consult Absolute Software Corp. before disposal. Refer to the following URL for Computrace® software for installation and available service regions. Note that this service is only available in certain regions. http://www.absolute.com1 Turn on or restart the computer, and press F2 while [Panasonic] boot screen is dis-played.The Setup Utility starts up. If the password is requested, enter the Supervisor Password.2 Select the [Security] menu, then select [Computrace (R) Sub-Menu] and press Enter.3 Select [Computrace (R) BIOS Module], and set to [Enable].4 At the confi rmation message, select [Execute] and press Enter.5 At the reconfi rmation message, select [Execute] and press Enter.6 Press F10.At the confi rmation message, select [Yes] and press Enter.The computer restarts.MaintenanceTo clean the LCD panelUse the soft cloth included with the computer. (For further information, refer to “Suggestions About Cleaning the LCD Surface” that comes with the soft cloth.)To clean areas other than the LCD panelWipe with a soft dry cloth such as gauze. When using detergent, dip a soft cloth in water-diluted detergent and wring it thoroughly. CAUTION Do not use benzene, thinner, or rubbing alcohol since it may adversely affect the surface causing discoloration, etc. Do not use commercially-available household cleaners and cosmetics, as they may contain components harmful to the surface. Do not apply water or detergent directly to the computer, since liquid may enter inside of the computer and cause malfunction or damage.Handling and Maintenance](https://usermanual.wiki/Panasonic-of-North-America/9TGCF-199.Users-Manual/User-Guide-957303-Page-18.png)
![19Useful InformationHard Disk Backup Function (Recover Pro)The Recover Pro creates a backup area (storage area) on the hard disk to back up (store) the hard disk data, and re-stores the backup data to its original location when it is lost or corrupted by operational errors or other factors. You do not need external media or peripheral devices to back up or restore hard disk data on this computer. At purchase, the Recover Pro is not installed. Install using the instructions below.The Recover Pro cannot back up or restore data correctly if a hard disk problem occurs during data backup or re-storing. If an error occurs due to an unexpected malfunction, incorrect operation, or other reason while data is being restored, the hard disk data (data before restoration) may be lost.Matsushita Electric Industrial Co., Ltd. will bear no responsibility for any damage suffered (including loss of data) as a result of the use of this function.The Recover Pro provides 3 types of backup as follows: Quick Backup: Scheduled backup of the updated data File Backup: File backup at fi le save and change Complete Backup: Backup of the entire data on the internal hard diskHere, we will explain the procedures for installation, complete backup (backing up hard disk contents in case Windows can-not be booted), and complete restore (recovering the hard disk data to its condition at the time of the complete backup).For further information, refer to the software’s online manual ( page 20). CAUTION All operations should be executed with the AC adaptor connected. Do not turn the power off while operations are in progress. If the power is turned off while installation, backup, or restore operations are in progress, these opera-tions may not function properly, and it may be impossible to start Windows. Also, do not press any keys or slide any switches, including hot keys. When restarting the computer, the message “Check fi le system on C:” may appear. Follow the on-screen instruc-tions. Do not skip the check process. Make sure you allow enough space on the hard disk when choosing settings during installation. To change these settings you must reinstall Recover Pro. To execute Complete Backup reliably, we recommend performing [Typical] installation in the following cases. Hard disk with a single partition Immediately after reinstalling software (when more than half of the entire space of the hard disk is available) ( page 22) Be sure to use the internal hard disk drive to create the backup area. Never use disk or device other than the inter-nal hard disk drive. Some software (security software, backup software, encryption software, or hard disc accessible specifi c software, etc.) may be incompatible with Recover Pro.For further information, refer to: http://www.phoenix.com/en/Customer+Services/White+Papers-Specs/Recover+Pro/default.htm When using Personal Secure Drive ( Installation Manual of “Trusted Platform Module (TPM)”), do not execute File Backup for Personal Secure Drive. The “Create recovery CD-DVD” function in Recover Pro is designed to help you save complete backup data to CD or DVD. When using the “Create recovery CD-DVD”, you can view the complete backup data on the hard disk, but take care to avoid accidentally deleting this data. After installing the Recover Pro, do not use the IEEE1394 network connection. If any problem occurred, stop the IEEE1394 network connection and restart the computer.InstallationPreparation Connect the AC adaptor.1 Log on to Windows as an administrator.2 Close all programs.3 Disable anti-virus software.4 Click [start] - [Run], enter [c:\util\rcvpro\setup.exe], and click [OK].The InstallShield Wizard screen appears.5 Click [Next].Follow the on-screen instructions.Carefully read the License Agreement, and click [I accept the agreement.] The computer restarts several times to complete installation. appears in the notifi cation area.](https://usermanual.wiki/Panasonic-of-North-America/9TGCF-199.Users-Manual/User-Guide-957303-Page-19.png)
![20Useful Information CAUTION During the installation, the screen may become black (no display) momentarily. This is not a malfunction. If you select [Typical] in installation, approximately 40% (max.) of the hard disk drive space is allocated as the back-up area. You cannot change the size of backup area after creation.Complete BackupBacks up all data on the hard disk.Preparation Connect the AC adaptor.1 Log on to Windows as an administrator.2 Close all programs.3 Click [start] - [All Programs] - [Phoenix Applications] - [Phoenix Recover Pro 6].“Recover Pro 6” screen appears.4 Click [Complete Backup], and click [Yes]. The computer restarts, and “Recover Pro 6” screen appears.Follow the on-screen instructions. NOTE You can completely backup only one hard disk’s worth of data to the backup area. Do not touch the power switch while using the Recover Pro.Complete RestoreThis function uses the data created during complete backup. It restores the hard disk data to the condition when you performed the complete backup. Files created and changes made to settings after the latest complete backup is made will be deleted.Preparation Connect the AC adaptor.1 Click [start] - [All Programs] - [Phoenix Applications] - [Phoenix Always Launcher], and click [Run]. The computer restarts, and “Phoenix Always” screen appears.Alternatively turn on or restart the computer, and hold down F4 while [Panasonic] boot screen is displayed until “Phoenix Always” screen appears.2 Click [Protect / Recover], and click [Phoenix Recover Pro 6]. “Recover Pro 6” screen appears.3 Click [Complete Restore].Follow the on-screen instructions. NOTE Do not touch the power switch while using the Recover Pro. To access the online manualA Click [start] - [All Programs] - [Phoenix Applications] - [Docs], and double-click [UserGuides].B Double-click the fi le of Recover Pro user’s guide or Phoenix Always user’s guide.Hard Disk Backup Function (Recover Pro)](https://usermanual.wiki/Panasonic-of-North-America/9TGCF-199.Users-Manual/User-Guide-957303-Page-20.png)
![21Useful InformationHard Disk Data Erase UtilityWhen disposing the computer or transferring the ownership, erase all hard disk data in order to avoid data leakage. Even if you erase the data or initialize the hard disk using normal Windows commands, the data can be read with some special software. Use the hard disk data erase utility to erase the data completely.Note that transferring of the ownership without uninstalling the commercial software will be a violation of the software’s license agreement.The hard disk data erase utility erases data using an overwriting method, but there is a possibility that due to mal-functions or other operational errors, data may not be completely erased. There are also specialized devices that may be able to read data that has been erased using this method. If you need to erase highly confi dential data, we recommend that you contact a company that specializes in this process. Matsushita Electric Industrial Co., Ltd. will bear no responsibility for losses or damages suffered as a result of the use of this utility. CAUTION When the hard disk contains the Recover Pro backup data, the Recover Pro backup area is lost as well. NOTE This utility cannot erase data for specifi c partitions.Preparation Prepare the following items: The Product Recovery DVD-ROM (included) Panasonic USB CD/DVD drive (optional) (refer to recent catalogs and other sources for information about the products available) Remove all peripherals (except for the CD/DVD drive). Connect the AC adaptor and do not remove it until hard disk data erase is complete.1 Turn off the computer and connect the CD/DVD drive to the USB port ( page 11).2 Turn on the computer, and press F2 several times while [Panasonic] boot screen is dis-played. The Setup Utility starts up. If the password is requested, enter the Supervisor Password.3 Select the [Boot] menu, then select [USB CDD] and press F6 until [USB CDD] is at the top of the boot priority order.4 Set the Product Recovery DVD-ROM into the CD/DVD drive.5 Press F10.At the confi rmation message, select [Yes] and press Enter.The computer restarts.6 Press 2 to execute [2. [Erase HDD]]. To cancel this operation, press 0.7 At the confi rmation message, press Y.8 When [<<< Start Menu >>>] is displayed, press Enter.The approximate time required for erasing data will be displayed.9 Press Space.At the confi rmation message, press Enter. The hard disk erase process starts. When the operation is completed, the [Hard disk data has been deleted.] message will appear. If a problem has occurred during the operation, an error message will appear. To cancel partway, press Ctrl + C. The data erasure will be up to that point.10 Remove the Product Recovery DVD-ROM, and then press any key to turn off the com-puter.11 Remove the CD/DVD drive.](https://usermanual.wiki/Panasonic-of-North-America/9TGCF-199.Users-Manual/User-Guide-957303-Page-21.png)
![22Useful InformationReinstalling SoftwareReinstalling software will return the computer to the default condition. When you reinstall the software, the hard disk data including the backup data of the Recover Pro will be erased.Back up important data to other media or an external hard disk before reinstallation.Preparation Prepare the following items: The Product Recovery DVD-ROM (included) Panasonic USB CD/DVD drive (optional) (refer to recent catalogs and other sources for information about the products available) Remove all peripherals (except for the CD/DVD drive). Connect the AC adaptor and do not remove it until reinstallation is complete. NOTE If you have installed the Recover Pro ( page 19), Select [1] or [2] in the step 9 below. If you select [3], the Recover Pro will no longer function properly. Only when you want to save the data which you stored in the separate partitions other than the fi rst partition and the Recover Pro backup area, select [3] in the step 9 below and perform the following steps.A After reinstallation, backup the data to external media (e.g., removable disk).B Perform the reinstallation procedure again, and select [1] or [2] in the step 9.C Return the data backed up in external media to the internal hard disk.1 Turn off the computer and connect the CD/DVD drive to the USB port ( page 11).2 Turn on the computer, and press F2 several times while [Panasonic] boot screen is dis-played.The Setup Utility starts up. If the password is requested, enter the Supervisor Password.3 Write down all of the contents of the Setup Utility and press F9.At the confi rmation message, select [Yes] and press Enter.4 Select the [Boot] menu, then select [USB CDD] and press F6 until [USB CDD] is at the top of the boot priority order.5 Set the Product Recovery DVD-ROM into the CD/DVD drive.6 Press F10.At the confi rmation message, select [Yes] and press Enter.The computer will restart.7 Press 1 to execute [1. [Recovery]].The License Agreement screen appears. To cancel partway, press 0.8 Press 1 to select [1. Yes, I agree to the provisions above and wish to continue!].9 Select the settings. [2]: Enter the size of operating system partition and press Enter.(The size of data partition will be determined by subtracting the operating system partition size from the maximum size.) [3]: Windows will be installed in the fi rst partition. (The size of the fi rst partition must be 20 GB or more. If smaller, installation will not be possible.)At the confi rmation message, press Y.Reinstallation starts automatically. (It will take approximately 20 minutes.) Do not interrupt reinstallation, for example by turning off the computer or pressing Ctrl + Alt + Del. Oth-erwise reinstallation may become unavailable as Windows may not start up or the data may be corrupted.10 Remove the Product Recovery DVD-ROM, and then press any key to turn off the com-puter.11 Remove the CD/DVD drive.](https://usermanual.wiki/Panasonic-of-North-America/9TGCF-199.Users-Manual/User-Guide-957303-Page-22.png)
![23Useful Information12 Turn on the computer, and press F2 several times while [Panasonic] boot screen is dis-played.The Setup Utility starts up. If the password is requested, enter the Supervisor Password.13 Press F9.At the confi rmation message, select [Yes] and then press Enter.The Setup Utility settings excluding the password(s) will return to the default values.14 Select the [Exit] menu and then select [Save Current Values], then press Enter.At the confi rmation message, select [Yes] and press Enter.15 Turn the computer off by using the power switch. If additional instructions are included with the computer, be sure to read them. It may be necessary to per-form additional operations during the following procedure.16 Perform the fi rst-time operation ( page 13).17 Start the Setup Utility and change the settings as necessary.](https://usermanual.wiki/Panasonic-of-North-America/9TGCF-199.Users-Manual/User-Guide-957303-Page-23.png)
![24TroubleshootingError Code/MessageFollow the instructions below when an error message or code appears. If the problem persists or if the error code/mes-sage is not shown here, contact Panasonic Technical Support ( page 37).Error Code/Message Solution0211 Keyboard error Disconnect external keyboard or mouse.0251 System CMOS checksum bad - Default confi guration usedAn error has occurred in the memory of Setup Utility settings. This occurs when the memory content is changed by an unexpected program operation, etc. Start the Setup Utility and return the settings to the default values, and then change the settings as necessary. If the problem persists, the internal clock battery may need to be replaced. Contact Panasonic Technical Support ( page 37).0271 Check date and time settings The date and time settings are not correct. Start the Setup Utility and set the correct date and time. If the problem persists, the internal clock battery may need to be replaced. Contact Panasonic Technical Support ( page 37).0280 Previous boot incomplete - Default confi guration usedStartup has failed repeatedly, so the Setup Utility settings have been returned to the default values to startup the computer. Start the Setup Utility and return the settings to the default values, and then change the settings as necessary.Press <F2> to Setup Write down the error details and press F2 to start the Setup Utility. Change the settings if necessary.0613: Serial Port*1 con-fi guration changed0614: Serial Port*1 confi g. error - device disabled*1 “A” or “B” appears here to indicate the name of the confl ict-ing port.The I/O and IRQ settings of the serial ports are in confl ict. Run the Setup Utility and in the [Advanced] menu, change the port’s settings so there is no confl ict.Operating System not foundThe operating system is not installed in the fl oppy disk or the hard disk that you are going to boot from. If using a fl oppy disk, change the disk to the one you can use for boot. If using the hard disk, check if the hard disk is recognized in [Information] menu of the Setup Utility. If the hard disk is recognized, perform the reinstallation ( page 22). If not, contact Panasonic Technical Support ( page 37). If a device is connected to the USB port, disconnect the device, or set [USB Port] or [Legacy USB Support] to [Disable] in the [Advanced] menu of the Setup Utility. If a device is connected to the ExpressCard slot, disconnect the device, or set [ExpressCard slot] to [Disable] in the [Advanced] menu of the Setup Utility.RAM Module Failed When the RAM module is not inserted correctly or the RAM module is not conforming to the computer’s specifi cations, a beep will sound and the “RAM Module Failed” message will be displayed when you turn the power on. Slide the power switch for four seconds or longer to turn off the computer, confi rm that the RAM module conforms to the specifi cations, and reinsert it. To start the Setup UtilityA Restart the computer.B Press F2 several times while [Panasonic] boot screen is displayed.](https://usermanual.wiki/Panasonic-of-North-America/9TGCF-199.Users-Manual/User-Guide-957303-Page-24.png)
![25TroubleshootingTroubleshooting (Basic)Follow the instructions below when a problem has occurred. There is also an advanced troubleshooting guide in the “Reference Manual”. For a software problem, refer to the software’s instruction manual. If the problem persists, contact Panasonic Technical Support ( page 37). You can also check the computer’s status in the PC Information Viewer ( Reference Manual “Troubleshooting (Advanced)”). Starting UpCannot start up.The power indicator or bat-tery indicator is not lit. Connect the AC adaptor. Insert a fully charged battery. Remove the battery pack and the AC adaptor, then connect them again. If a device is connected to the USB port, disconnect the device, or set [USB Port] or [Legacy USB Support] to [Disable] in the [Advanced] menu of the Setup Utility. If a device is connected to the ExpressCard slot, disconnect the device, or set [ExpressCard slot] to [Disable] in the [Advanced] menu of the Setup Utility.The power is turned on but “Warming up the system (up to 32 minutes)” appears. The computer is warming up before start up. Wait for the computer to start up (takes up to 32 minutes). If, “Cannot warm up the system” is displayed, the computer failed to warm up and does not start. In this case, turn off the computer, leave it in an envi-ronment of 5 °C {41 °F} or higher temperature for about an hour, and then turn on the power again.Cannot turn on the computer.The computer does not re-sume from standby.(The power indicator blinks quickly in green.) Leave it in an environment of 5 °C {41 °F} or higher temperature for about an hour, then turn on the power again.You have forgotten the pass-word. Supervisor Password or User Password: Contact Panasonic Technical Support ( page 37). Administrator password: If you have a password reset disk, you can reset the administrator password. Set the disk and enter any wrong password, then follow the on-screen instructions and set a new password. If you do not have a password reset disk, reinstall ( page 22) and set up Windows, and then set a new password.“Remove disks or other media. Press any key to restart” or a similar message appears. A fl oppy disk is in the drive and it does not contain system startup information. Remove the fl oppy disk and press any key. If a device is connected to the USB port, disconnect the device, or set [USB Port] or [Legacy USB Support] to [Disable] in the [Advanced] menu of the Setup Utility. If a device is connected to the ExpressCard slot, disconnect the device, or set [ExpressCard slot] to [Disable] in the [Advanced] menu of the Setup Utility. If the problem persists after removing the disk, it may be a hard disk failure. Contact Panasonic Technical Support ( page 37).Windows startup and opera-tion is slow. Press F9 in the Setup Utility ( page 24 “To start the Setup Utility”) to return the Setup Utility settings (excluding the passwords) to the default values. Start the Setup Utility and make the settings again. (Note that the processing speed depends on the applica-tion software, so this procedure may not make Windows faster.) If you installed a resident software after purchase, turn off the residence. Disable Indexing Service in the following menu.Click [start] - [Search] - [Change preferences] - [Without Indexing Service]The date and time are incor-rect. Make the correct settings. Click [start] - [Control Panel] - [Date, Time, Language, and Regional Options] - [Date and Time]. If the problem persists, the internal clock battery may need to be replaced. Contact Panasonic Technical Support ( page 37). When the computer is connected to LAN, check the date and time of the server. The 2100 A.D. or later year will not be correctly recognized on this computer.[Executing Battery Recali-bration] screen appears. The Battery Recalibration was canceled before Windows was shut down last time. To start up Windows, turn off the computer by the power switch, and then turn on.[Enter Password] does not appear when resuming from standby/hibernation. To display [Enter Password] at resuming, set the Windows password. The password you have set in the Setup Utility is not requested at resuming.A Click [start] - [Control Panel] - [User Accounts] and select the account, and set the password.B Click [start] - [Control Panel] - [Performance and Maintenance] - [Power Options] - [Advanced] and add a check mark for [Prompt for password when computer resumes from standby].](https://usermanual.wiki/Panasonic-of-North-America/9TGCF-199.Users-Manual/User-Guide-957303-Page-25.png)
![26Troubleshooting Starting UpCannot resume. An error may occur when the computer automatically enters the standby or hibernation mode while the screensaver is active. In this case, turn off the screensaver or change the pattern of the screensaver.Other startup problems. Press F9 in the Setup Utility ( page 24 “To start the Setup Utility”) to return the Setup Utility settings (excluding the passwords) to the default values. Start the Setup Utility and make the settings again. Remove all peripheral devices. Check to see if there was a disk error.A Click [start] - [My Computer] and right-click [Local Disk(C:)], and click [Properties].B Click [Tools] - [Check Now].C Select the option in [Check disk options] and click [Start]. Start the computer in Safe Mode and check the error details. When the [Panasonic] boot screen disappears*1 at startup, press and hold F8 until the Windows Advanced Options Menu is displayed.*1 When [Password on boot] is set to [Enable] in the [Security] menu of the Setup Utility, [Enter Password] appears after the [Panasonic] boot screen disappears. As soon as you enter the password and press Enter, press and hold F8. Entering PasswordOn the [Enter Password] screen, a beep sounds and the password cannot be entered. The computer may be in ten-key mode. If the NumLk indicator lights, press NumLk to disable the ten-key mode, and then input.Even after entering the pass-word, [Type your password] is displayed again. The computer may be in ten-key mode.If the NumLk indicator lights, press NumLk to disable the ten-key mode, and then input. The computer may be in Caps Lock mode.If the Caps Lock indicator lights, press Caps Lock to disable the Caps Lock mode, and then input. Shutting downWindows does not shut down. Remove the USB device and the ExpressCard. Wait one or two minutes. It is not a malfunction. DisplayNo display. The external display is selected. Press Fn + F3 to switch the display. Wait until the display has been switched completely before pressing Fn + F3 again. When using an external display, Check the cable connection. Turn on the display. Check the settings of external display. The display is turned off by the power-saving function. To resume, do not press the direct selection keys, but press any other key like Ctrl. The computer entered standby or hibernation by the power-saving function. To resume, slide the power switch. The screen may not be displayed even after the computer resumed from standby or hi-bernation. In this case, press Fn+ F7 to enter standby and resume the computer again.The screen is dark. The screen is darker when the AC adapter is not connected. Press Fn + F2 and adjust the brightness. As you increase the brightness, battery consumption increases. You can separately set the brightness for when the AC adaptor is connected and when not connected.The LCD brightness chang-es a number of times when the AC adaptor is discon-nected. Intel(R) Display Power Saving Technology is active and automatically changes the LCD brightness. This is not a malfunction.Troubleshooting (Basic)](https://usermanual.wiki/Panasonic-of-North-America/9TGCF-199.Users-Manual/User-Guide-957303-Page-26.png)
![27Troubleshooting DisplayImage colors are not repro-duced as expected when displaying photographs or other images. Remove the check mark of [Intel(R) Display Power Saving Technology].A Click [start] - [Control Panel] - [Other Control Panel Options] - [Intel(R) GMA Driver for Mobile].B Click [Display Settings] - [Power Settings].The screen is disordered. Changing the number of display colors and resolution may affect the screen. Restart the computer. Connecting/disconnecting an external display may affect the screen. Restart the com-puter.During Simultaneous display, one of the screens becomes disordered. When using the Extended Desktop, use the same display colors for the external display as those used by the LCD. If you continue to experience problems, try changing the display by clicking [start] - [Control Panel] - [Other Control Panel Options] - [Intel(R) GMA Driver for Mobile] - [Dis-play Devices]. When the [Command Prompt] is set to “Full Screen” by pressing Alt + Enter, the picture is displayed on one of the screens only. When the window display is restored by pressing Alt + Enter, the picture is displayed on both screens. Simultaneous display cannot be used until Windows startup is complete (during Setup Utility, etc.).The external display does not work normally. If the external display does not support the power saving function, it may not work nor-mally when the computer enters the power saving mode. Turn off the external display. Touch Pad / Touchscreen (only for model with touchscreen)/Digitizer (only for model with digitizer)The cursor does not work. When using the external mouse, connect it correctly. Restart the computer using the keyboard. (Press , U, and R to select [Restart].) If the computer does not respond to keyboard commands, read “No response” ( page 28).Cannot input using the touch pad. Set [Touch Pad] to [Enable] in the [Main] menu of the Setup Utility. The drivers for some mice may disable the touch pad. Check your mouse’s operating instructions.Cannot point the correct position using the included stylus/pen.<Only for model with touchscreen> Perform the touchscreen calibration ( page 15).<Only for model with digitizer> Perform the digitizer calibration. Use the included pen. On the Windows logon screen or the Welcome screen, you may not be able to point the correct position using the included pen. Use the keyboard or the touch pad to log on. Reference ManualThe Reference Manual is not displayed. Install Adobe Reader.A Log on to Windows as an administrator.B Click [start] - [Run], input [c:\util\reader\AdbeRdr70_enu_full.exe], then click [OK].Follow the on-screen instructions.C Update Adobe Reader to its latest version.If your computer is connected to the internet, start up Adobe Reader and click [Help] - [Check for updates now].](https://usermanual.wiki/Panasonic-of-North-America/9TGCF-199.Users-Manual/User-Guide-957303-Page-27.png)
![28Troubleshooting Recover ProCannot install Recover Pro Recover Pro cannot be installed when four primary partitions exist. Reduce the number of primary partitions to three or less before installation. You can check the number of the primary partitions in the order of [start] - [Control Panel] - [Performance and Mainte-nance] - [Administrative Tools] - [Computer Management] - [Disk Management]. Recover Pro cannot be installed when a backup area is remaining on the hard disk. Try one of the following methods: If the backup area has complete backup data and you want to restore that data:Follow the “Complete Restore” instructions in “Hard Disk Backup Function (Recover Pro)” ( page 20) to restore the data. To return the computer to its condition at the time of shipment:Reinstall the software ( page 22). In step 9, do not select “3. Reinstall Windows to the fi rst partition.” If you do not need the data in the backup area, or if it is corrupted, or if does not in-clude complete backup data: A Access [http://www.phoenix.com/en/Customer+Services/Utilities/Recover+Pro+6.htm#Where], and download/install “Cleanup Utility for Recover Pro 6”. B Delete the backup area using “Cleanup Utility for Recover Pro 6”.C Reinstall Recover Pro.In this case, all data in the backup area will be lost. An unnecessary backup area is present (is left) when Recover Pro is not installed.A Access [http://www.phoenix.com/en/Customer+Services/Utilities/Recover+Pro+6.htm#Where], and download/install “Cleanup Utility for Recover Pro 6”. B Delete the backup region using “Cleanup Utility for Recover Pro 6”.Some parts of the hard disk cannot be File Backed up. The hard disk area encrypted by security software may not be backed up. Exclude the area from the File Backup object. OthersNo response. Press Ctrl+Shift+Esc to open Task Manager and close the software application that is not responding. An input screen (e.g., password input screen at startup) may be hidden behind another window. Press Alt+Tab to check. Slide the power switch for four seconds or longer to shut down the computer, and then slide the power switch to turn it on. If the application program does not work normally, uninstall and reinstall the program. To uninstall, click [start] - [Control Panel] - [Add or Remove Programs].Troubleshooting (Basic)](https://usermanual.wiki/Panasonic-of-North-America/9TGCF-199.Users-Manual/User-Guide-957303-Page-28.png)
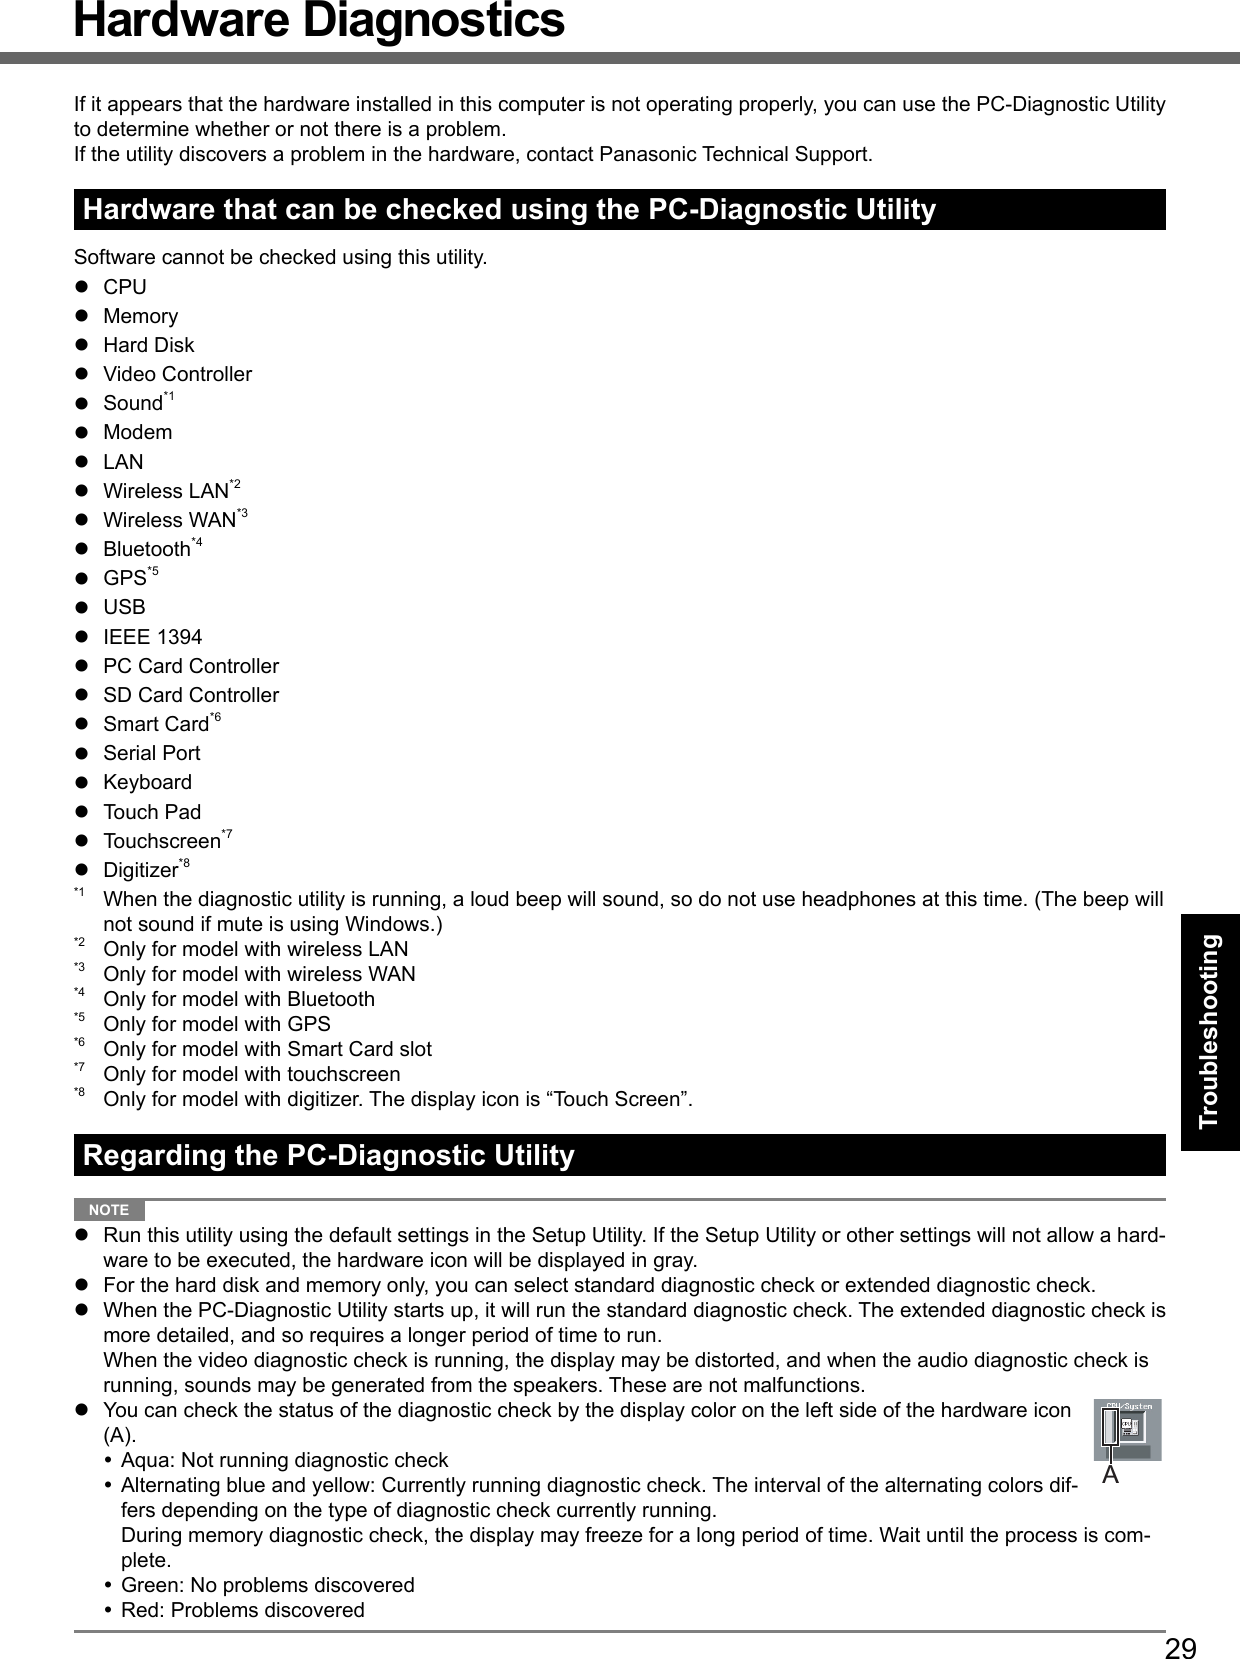
![30Troubleshooting We recommend that you use the touch pad for operations. When not using the touch pad, you can operate using the internal keyboard instead. Do not use the touchscreen or the digitizer.Operations Touch pad operations Internal keyboard operationsSelect icon Place the cursor above the icon Press Space. and then press ( (close) cannot be selected)Click the icon Tap or click (right click cannot be used) Press Space above the iconComplete the PC-Diagnos-tics Utility and then restart the computerClick (close) Press Ctrl+Alt+Del. By clicking the icon, you can execute the following operations: : Start the diagnostic check from the beginning : Stop the diagnostic check (You cannot restart the check partway through by clicking ) : Display help (click the screen or press Space to return to the original diagnostic check screen)Running the Diagnostic CheckDisconnect any peripheral devices (e.g., storage device) before running the diagnostic check. 1 Connect the AC adaptor and turn on the wireless switch ( page 11).During the diagnostic check, do not remove the AC adaptor, or attach any peripheral devices.2 Turn on or restart the computer, and press F2 while [Panasonic] boot screen is dis-played.The Setup Utility starts up. If the password is requested, enter the Supervisor Password. If you are using the computer after changing the settings from the status at the time of purchase, we recom-mend that you make a note of the settings that are changed.3 Press F9.At the confi rmation message, select [Yes] and press Enter.4 Press F10.At the confi rmation message, select [Yes] and press Enter.The computer will restart.5 Press Ctrl+ F7 while [Panasonic] boot screen is displayed.When the PC-Diagnostic Utility starts up, it will automatically begin the diagnostic check for all hardware compo-nents. If the password is requested, enter the password. The touch pad and the internal keyboard cannot be used until alternating blue and yellow colors are dis-played on the left side of the hardware icon ( page 29). If the touch pad does not operate properly, press Ctrl+Alt+Del to restart the computer, or slide the power switch to turn the power off, and then restart the PC-Diagnostic Utility. NOTE Using the following procedure, you can run a diagnostic check on a specifi ed hardware component, or run an extended diagnostic check on the hard disk.A Click to stop the diagnostic check.B Click the icon for the hardware that is not to be checked, so that the icon is displayed in gray (B).When running a check on the hard disk, clicking the icon once will turn on the extended diagnostic check (“FULL” (C) will be displayed below the icon); click again, and the icon will be displayed in gray. C Click to start the diagnostic check. CHardware Diagnostics](https://usermanual.wiki/Panasonic-of-North-America/9TGCF-199.Users-Manual/User-Guide-957303-Page-30.png)
![34AppendixSpecifi cationsThis page provides the specifi cations for the basic model CF-19FHGAXBM/CF-19FDGAXVM. The model number is different according to the unit confi guration. To check the model number:Check the bottom of the computer or the box the computer came in at the time of purchase. To check CPU speed, memory size and the hard disk drive (HDD) size:Run the Setup Utility ( Reference Manual “Setup Utility”) and select [Information] menu.[CPU Speed]: CPU speed, [System Memory]: Memory size, [Hard Disk]: Hard disk drive size Main Specifi cationsModel No. CF-19FHGAXBM CF-19FDGAXVMCPU Intel® Core™ 2 Duo Processor U7500 (1.06 GHz, 2 MB*1 L2 cache, 533 MHz FSB)Chipset Intel® GM965Memory*1*2 1 GB (4 GB Max.)Video Memory*1*3 UMA (384 MB Max.)Hard Disk Drive*4 80 GBDisplay Method 10.4 XGA type (TFT)Internal LCD*5 65,536/16,777,216 colors (800 × 600 dots/1024 × 768 dots)External Display*6 65,536/16,777,216 colors (800 × 600 dots/1024 × 768 dots/1280 × 768 dots/1280 × 1024 dots)Wireless LAN*7 page 35BluetoothTM *8 page 35LAN IEEE 802.3 10BASE-T, IEEE 802.3u 100BASE-TX, IEEE 802.3ab 1000BASE-TModem Data: 56 kbps (V.92) FAX: 14.4 kbpsSound WAVE and MIDI playback, Intel® High Defi nition Audio subsystem support, Monaural speakerSecurity Chip TPM (TCG V1.2 compliant)*9Card Slot PC Card Type I or Type II x 1 (3.3 V: 400 mA, 5 V: 400 mA)ExpressCard*10 ExpressCard/34*11 or ExpressCard/54 x 1Smart Card*12 ISO7816 x 1SD Memory Card*13 x 1, Data transfer rate = 8 MB per second*14RAM Module Slot 200-pin, 1.8 V, SO-DIMM, DDR2 SDRAM, PC2-4200 CompliantInterface USB port (4-pin, USB 2.0) x 2, Serial Port (Dsub 9-pin male), Modem port (RJ-11), LAN port (RJ-45), External display port (Mini Dsub 15-pin female), Expansion Bus Connector (Dedicated 100-pin female), External Antenna Connector (Dedicated 50 Ω coaxial connector) x 2, IEEE 1394a Interface Connector (4-pin x 1), Microphone Jack (Miniature jack, 3.5 DIA, Stereo), Headphone Jack (Miniature jack, 3.5 DIA, Impedance 32 Ω, Output Power 4 mW × 2)Keyboard / Pointing Device 82 keys / Touch Pad / Touchscreen (Anti-Refl ection, Stylus (included) touch capable) 82 keys / Touch Pad / Digitizer (Anti-Refl ec-tion)Power Supply AC adaptor or Battery packAC Adaptor*15 Input: 100 V to 240 V AC, 50 Hz/60 Hz, Output: 16.0 V DC, 3.75 ABattery Pack Li-ion 10.65 V, 5.7 AhOperating Time*16 Approx. 4.5 hours to 8 hours*17 (Approx. 7 hours*18)Charging Time*16Power on Approx. 7.5 hoursPower off Approx. 4.5 hoursClock Battery Coin type lithium battery 3.0 VPower Consumption*19 Approx. ●● W*20 / Approx. ●● W (Maximum when recharging in the ON state)Physical Dimensions (W × H × D)(excluding the hand strap/shoul-der strap)271 mm × 49 mm × 216 mm {10.7" × 1.93" × 8.5"}Weight (excluding the hand strap/shoul-der strap)Approx. 2.30 kg {Approx. 5.06 lb.} Approx. 2.35 kg {Approx. 5.17 lb.}Operation Environment Temperature: 5 °C to 35 °C {41 °F to 95 °F}Humidity: 30% to 80% RH (No condensation)Storage Environment Temperature: -20 °C to 60 °C {-4 °F to 140 °F}Humidity: 30% to 90% RH (No condensation)](https://usermanual.wiki/Panasonic-of-North-America/9TGCF-199.Users-Manual/User-Guide-957303-Page-34.png)
![35Appendix Main Specifi cationsOperating System Microsoft® Windows® XP Professional Service Pack 2 with Advanced Security Technologies (NTFS File System)Microsoft® Windows® XP Tablet PC Edition 2005(NTFS File System)Utility Programs DMI Viewer, Microsoft® Windows® Media Player 10, Adobe Reader, PC Information Viewer, SD Utility, Icon Enlarger, Loupe Utility, Intel® Matrix Storage Manager, Intel® PROSet/Wireless Software*7, Bluetooth™ Stack for Windows® by TOSHIBA*8 , Wireless Switch Utility, Hotkey Settings, Battery Recalibration Utility, Panasonic Hand Writing*21, Software Keyboard*21, Dis-play Rotation Tool, Infi neon TPM Professional Package*22, Recover ProTM 6*22 or Recover ProTM VX*22 , Tablet Buttons Settings*21, Power Saving Utility, Wireless Connection Disable UtilitySetup Utility, Hard Disk Data Erase Utility*23, PC-Diagnostic Utility Wireless LAN <Only for model with wireless LAN>Intel WiFi Link 4965AG (802.11 a + b + g)Data Transfer Rates*24 IEEE802.11a: 54/48/36/24/18/12/9/6 Mbps (automatically switched)IEEE802.11b: 11/5.5/2/1 Mbps (automatically switched)IEEE802.11g: 54/48/36/24/18/12/9/6 Mbps (automatically switched)Standards Supported IEEE802.11a/IEEE802.11b/IEEE802.11gTransmission method OFDM system, DSSS systemWireless Channels Used IEEE802.11a: Channels 36/40/44/48/52/56/60/64/149/153/157/161/165IEEE802.11b/IEEE802.11g: Channels 1 to 11RF Frequency Band IEEE802.11a: 5.18-5.32 GHz, 5.745-5.825 GHzIEEE802.11b/IEEE802.11g: 2.412-2.462 GHz BluetoothTM <Only for model with Bluetooth>Bluetooth Version 2.0 + EDRTransmission method FHSS systemWireless Channels Used Channels 1 to 79RF Frequency Band 2.402-2.48 GHz*1 1 MB = 1,048,576 bytes*2 You can physically expand the memory upto 4 GB, but the total amount of usable memory available will be less depending on the actual system confi guration. *3 A segment of the main memory is allotted automatically depending on the computer’s operating status. The size of the Video Memory cannot be set by the user.*4 1 GB = 1,000,000,000 bytes. Your operating system or some application software will report as fewer GB.*5 A 16,777,216 color display is achieved by using the dithering function.*6 Maximum resolution depends on the specifi cations of the external display.*7 Only for model with wireless LAN*8 Only for model with Bluetooth*9 For information on TPM, click [start] - [Run] and input “c:\util\drivers\tpm\README.pdf”, and refer to the Installation Manual of “Trusted Platform Module (TPM)”.*10 Only for model with ExpressCard slot*11 When using ExpressCard/34, the card slot cover cannot be closed.*12 Only for model with Smart Card slot*13 Operation has been tested and confi rmed using Panasonic SD Memory Cards with a capacity of up to 2 GB. The transfer rate using the SD Memory Card slot on this computer is 8 MB per second. (This is a theoretical value, and differs from actual speeds.) The transfer rate is 8 MB per second even if you use an SD Memory Card that supports high-speed transfer rates. Operation on other SD equipment is not guaranteed. This computer supports SDHC Memory Cards (SD Memory Cards with a capacity of 4 GB or more). This computer is not compatible with MultiMediaCards. Do not insert this kind of cards.*14 Theoretical value and not the actual speed. The transfer rate does not become higher even if you use a card that supports the higher transfer rate.*15 The AC adaptor is compatible with power sources up to 240 V AC adaptor. The computer is supplied with a 125 V AC compat-ible AC cord. 20-M-2-1*16 Varies depending on the usage conditions.*17 Measured using BatteryMark™ Version 4.0.1 (LCD brightness: Maximum - Minimum)*18 Measured using MobileMark™ 2005 (LCD brightness: 60 cd/m2)*19 page 15 *20 Rated power consumption 23-E-1*21 Only for model with Windows XP Professional*22 You need to install to use the feature.*23 The Product Recovery DVD-ROM is required.*24 These are speeds specifi ed in IEEE802.11a+b+g standards. Actual speeds may differ.](https://usermanual.wiki/Panasonic-of-North-America/9TGCF-199.Users-Manual/User-Guide-957303-Page-35.png)