Panasonic of North America 9TGCF-19C Toughbook CF-19 PC with WWAN, WLAN and Bluetooth User Manual CF 19CTQZZBM indb
Panasonic Corporation of North America Toughbook CF-19 PC with WWAN, WLAN and Bluetooth CF 19CTQZZBM indb
Contents
- 1. Users Manual
- 2. Users Manual Insert
Users Manual
![2Getting StartedIntroductionThank you for purchasing this Panasonic computer. For optimum performance and safety, please read these instruc-tions carefully. Terms and illustrations in these instructionsCAUTION : Conditions that may result in minor or moderate injury.NOTE : Useful and helpful information.Enter : Press [Enter] key.Fn + F5 : Press and hold [Fn] key, and then press [F5] key. (Start) - [All Programs] : Click (Start), and then click [All Programs].[start] - [Run] : Click [start], and then click [Run]. You may need to double-click in some cases. : Page in these Operating Instructions or in the Reference Manual. : Reference to the on-screen manuals. indicates Windows Vista® Business Operating System. indicates Microsoft® Windows® XP Professional Operating System or indicates Microsoft® Windows® XP Tablet Operating System. Some illustrations are simplifi ed to help your understanding and may look different from the actual unit. If you do not log on as an administrator, you cannot use some functions or cannot display some screens. Refer for the latest information about optional products to the catalogs, etc. In these instructions, the names and terms are referred as follows. “Windows Vista® Business” as “Windows” or “Windows Vista” “Microsoft® Windows® XP Professional Service Pack 2 with Advanced Security Technologies” as “Windows”, “Win-dows XP” or “Windows XP Professional” “Microsoft® Windows® XP Tablet PC Edition 2005” as “Windows”, “Windows XP” or “Windows XP Tablet PC Edi-tion” DVD-ROM & CD-R/RW drive and DVD MULTI drive as “CD/DVD drive” Circular media including DVD-ROM and CD-ROM as “discs” DisclaimerComputer specifi cations and manuals are subject to change without notice. Panasonic Corporation assumes no li-ability for damage incurred directly or indirectly from errors, omissions or discrepancies between the computer and the manuals. TrademarksMicrosoft®, Windows®, Windows Vista, and the Windows logo are registered trademarks of Microsoft Corporation of the United States and/or other countries.Intel, Core, Centrino and PROSet are either registered trademarks or trademarks of Intel Corporation.SDHC Logo is a trademark. Adobe, the Adobe logo and Adobe Reader are either registered trademarks or trademarks of Adobe Systems Incorpo-rated in the United States and/or other countries.Computrace® is a registered trademark of Absolute® Software Corp.Bluetooth™ is a trademark owned by Bluetooth SIG, Inc., U.S.A. and licensed to Panasonic Corporation.Panasonic® is a registered trademark of Panasonic Corporation.Names of products, brands, etc., appearing in this manual are trademarks or registered trademarks of their respective own companies.CF-19CTQZZBM.indb 2 2008/11/10 10:16:13](https://usermanual.wiki/Panasonic-of-North-America/9TGCF-19C.Users-Manual/User-Guide-1074046-Page-2.png)
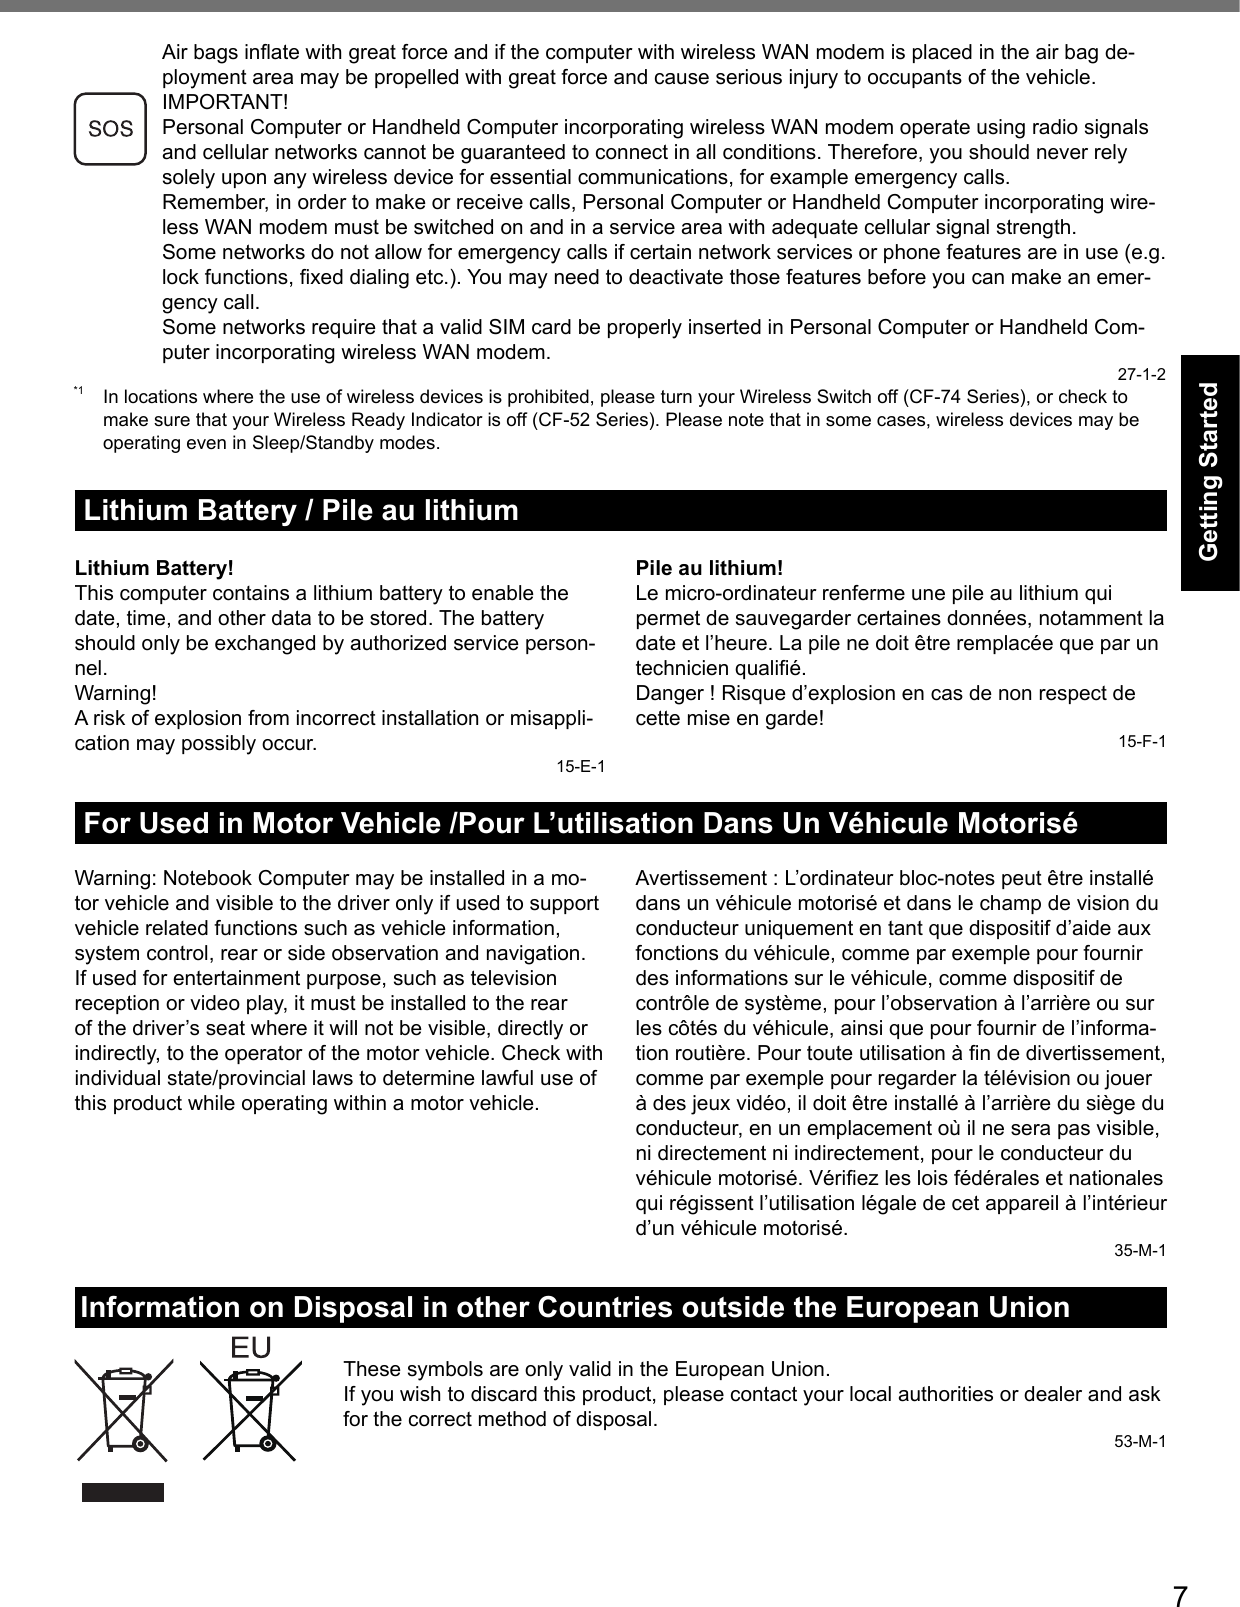
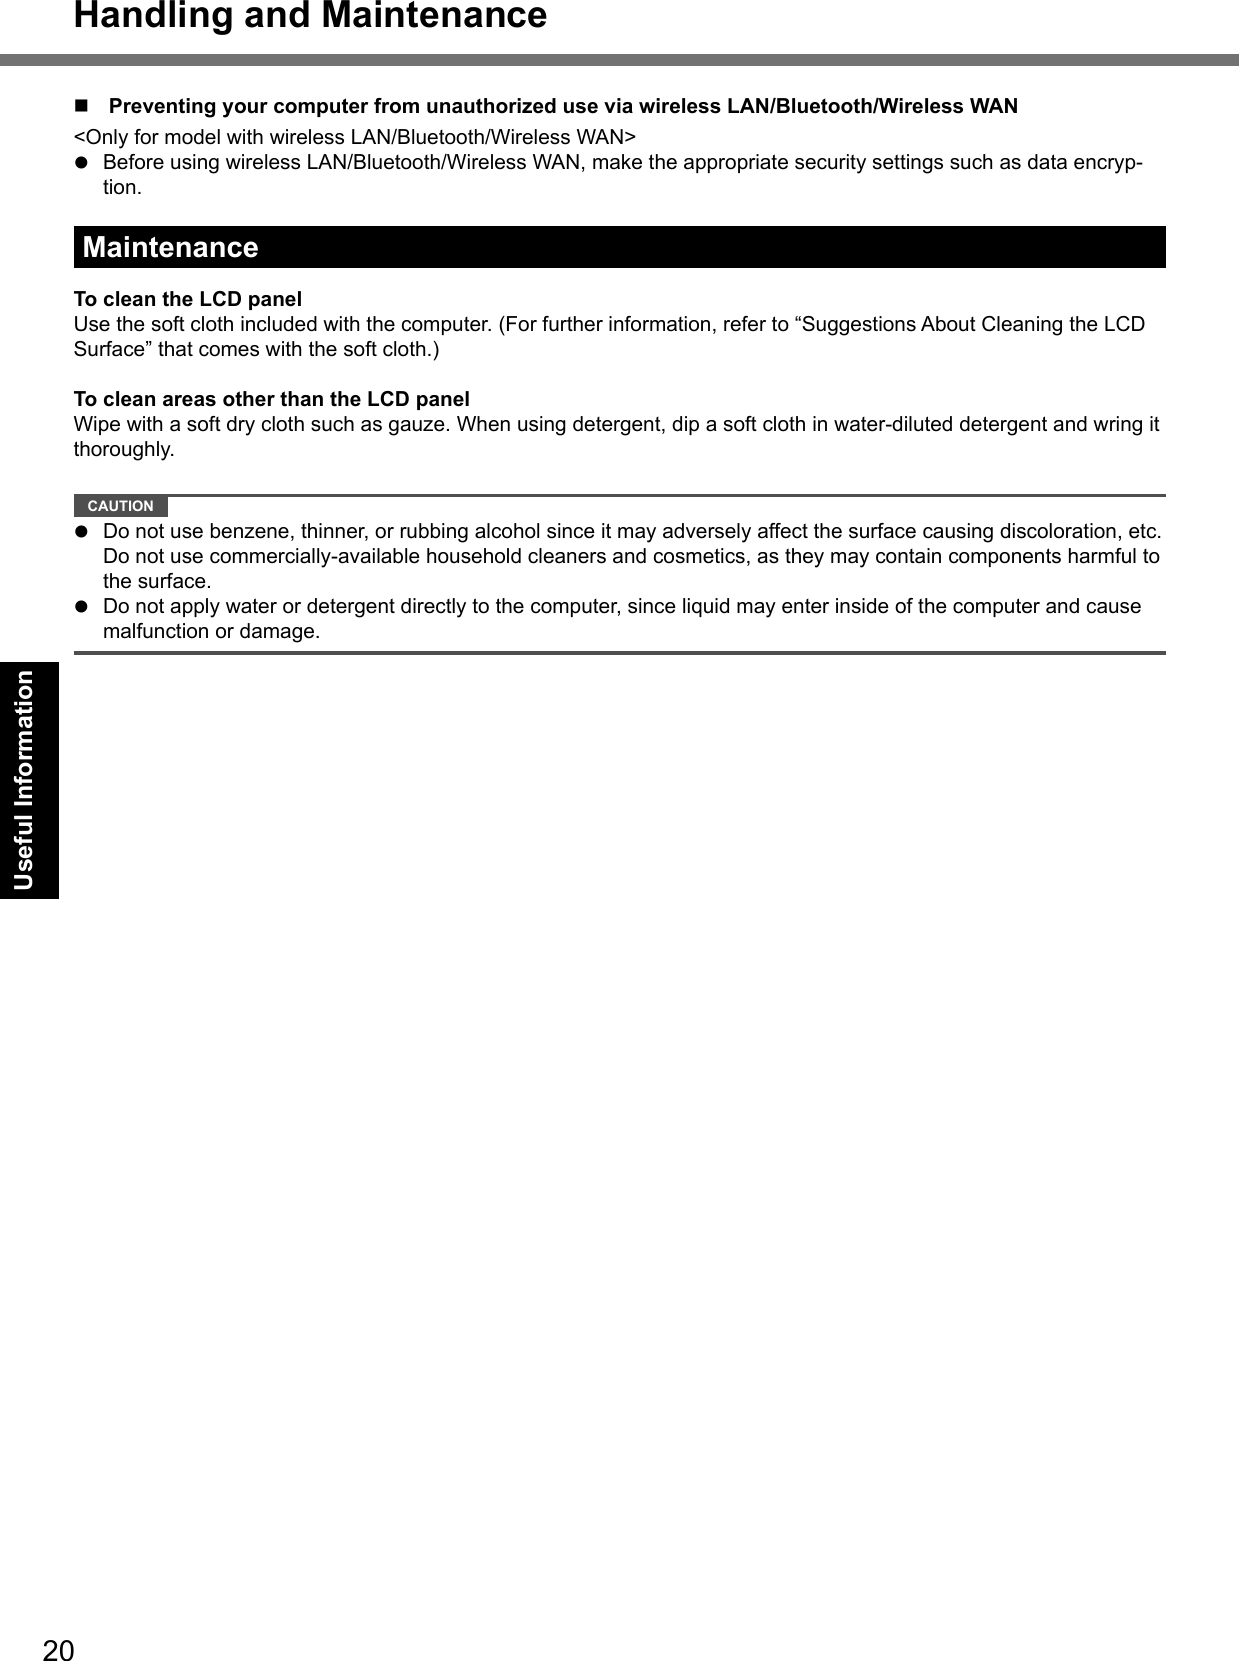
![11Getting StartedLeft sideRear side BottomA: DC-IN JackB: USB Port Reference Manual “USB Devices”C: IEEE 1394 Interface Connector Reference Manual “IEEE 1394 Devices”D: Modem Port Reference Manual “Modem”E: LAN Port Reference Manual “LAN”F: SD Memory Card Indicator(Blinking: During access) Reference Manual “SD Memory Card”G: SD Memory Card Slot Reference Manual “SD Memory Card”H: Wireless Switch Reference Manual “Disabling/Enabling Wireless Communication”I: <For model without Smart Card Slot> PC Card Slot (PC) Reference Manual “PC Card / ExpressCard” <For model with Smart Card Slot> Smart Card Slot (SCR) Reference Manual “Smart Card”J: <For model without Smart Card Slot> ExpressCard Slot (EX) Reference Manual “PC Card / ExpressCard” <For model with Smart Card Slot> PC Card Slot (PC) Reference Manual “PC Card / ExpressCard”K: Headphone Jack You can connect headphones or amplifi ed speakers. When they are connected, audio from the internal speakers is not heard.L: Microphone Jack A condenser microphone can be used. If other types of microphones are used, audio input may not be pos-sible, or malfunctions may occur as a result. When recording in stereo using a stereo microphone:Click (Start) - [Control Panel] - [Hardware and Sound] - [Sound] - [Recording] - [Microphone] - [Properties], and then add a check mark for [No Au-dio Enhancements] in [Microphone Enhancements].Click [start] - [All Programs] - [SoundMAX] - [Control Panel] and select [Microphone], and then add a check mark for [No Filtering] in [Microphone Enhancements]. When using a monaural microphone with a 2-terminal plug:Click (Start) - [Control Panel] - [Hardware and Sound] - [Sound] - [Recording] - [Microphone] - [Properties], and then add a check mark for [Voice Enhancements] in [Microphone Enhancements].Otherwise, only audio on the left track will be recorded.Click [start] - [All Programs] - [SoundMAX] - [Control Pan-el] and select [Microphone], and then add a check mark for [Voice Recording] in [Microphone Enhancements].Otherwise, only audio on the left track will be recorded.M: Security Lock A Kensington cable can be connected. For further information, read the manual that comes with the cable.N: External Display Port Reference Manual “External Display”O: Serial PortP: RAM Module Slot Reference Manual “RAM Module”Q: External Antenna ConnectorR: Expansion Bus Connector Reference Manual “Port Replicator / Car Mounter”CF-19CTQZZBM.indb 11 2008/11/10 10:16:14](https://usermanual.wiki/Panasonic-of-North-America/9TGCF-19C.Users-Manual/User-Guide-1074046-Page-11.png)
![15Getting Started CAUTION You cannot choose the following words for user name and password: CON, PRN, AUX, CLOCK$, NUL, COM1 to COM9, LPT1 to LPT9. You can change the user name, password, image and security setting after setup of Windows. Remember your password. If you forget the password, you cannot use the Win-dows. Creating a password reset disk beforehand is recommended. The wallpaper for the fi rst logon user has already been set on “4 Setup Windows.” .When using this computer under the Sun, the screen becomes easily viewable by changing the wallpaper to the white wallpaper.A Right-click on the desktop, and click [Personalize] - [Desktop Background].B Select [Solid Colors] at [Picture Location].C Select the white wallpaper and click [OK]. When you set date/time/time zone and click [Next], the screen may not go to the next step for a few minutes. Do not touch the keyboard or touch pad, and wait until the screen changes. If “An unexpected error has occurred ...” (or a similar message) is displayed, click [OK]. This is not a malfunction. Wait until the hard disk drive indicator has turned off.6 Perform the touchscreen calibration.<Only for model with touchscreen> NOTE At fi rst, log on to Windows as an administrator, and perform this calibration. Return the rotated display to [Primary Landscape] before the touchscreen cali-bration.A Click (Start) - [Control Panel] - [Additional Options] - [Tablet Calibration].B Using the stylus, touch each of the 9 “+” target marks one by one. NOTE Perform the following calibration for each user.A Click (Start) - [Control Panel] - [Mobile PC] - [Tablet PC Settings].B Click [Calibrate].C Using the stylus, touch each of the 4 “+” target marks one by one, and then click [OK]. Perform the calibration for the orientation to be used.A Click [start] - [All Programs] - [Fujitsu Touch Panel (USB)] - [Touch Screen Calibration Utility].B Using the stylus, touch each of the 12 “+” target marks one by one until it blinks, and then press Enter.C Press Enter.<Only for model with Dual Touch> NOTE Perform these calibration for each user. If you cannot touch the desired position, perform Digitizer Calibration again and restart the computer.A Run [Tablet PC Settings]. Click (Start) - [Control Panel] - [Mobile PC] - [Tablet PC Settings].B Click [Calibrate].C Using the digitizer pen, touch each of the 4 “+” target marks one by one, and then click [OK]. Perform the calibration for the orientation to be used.CF-19CTQZZBM.indb 15 2008/11/10 10:16:14](https://usermanual.wiki/Panasonic-of-North-America/9TGCF-19C.Users-Manual/User-Guide-1074046-Page-15.png)
![16Getting Started NOTE PC Information Viewer This computer periodically records the management information including the hard disk information. The maximum data volume for each record is 1024 bytes. These information are only used for estimating the cause when the hard disk goes down by any possibility. They are never sent to outside via network nor used for any other purpose except for the purpose described the above. To disable the function, add the check mark for [Disable the automatic save function for management information history] in [Hard Disk Status] of PC Information Viewer, and click [OK]. ( Reference Manual “Checking the Computer’s Usage Status”) Precaution against Starting Up/Shutting Down Do not do the following Connecting or disconnecting the AC adaptor Sliding the power switch Touching the keyboard, touch pad, touchscreen, dual touch or external mouse Closing the display Turn on/off the wireless switch NOTE To conserve power, the following power saving methods are set at the time of purchase. The screen automatically turns off after 15 minutes of inactivity. The computer automatically enters sleep*3( )/standby*3( ) after 20 minutes of inactiv-ity.*3 Refer to Reference Manual “Sleep or Hibernation Functions” ( )/”Standby or Hibernation Func-tions” ( ) about resuming from sleep/standby.A Run [Tablet and Pen Settings]. Double-click or click [start] - [Control Panel] - [Printers and Other Hard-ware] - [Tablet and Pen Settings].B Click [Settings] - [Calibrate].C Using the digitizer pen, touch each of the 4 “+” target marks one by one, and then click [OK]. Perform the calibration for both [Landscape] and [Portrait].7 Create a new account.Click [start] - [Control Panel] - [User Accounts] - [Create a new account]. CAUTION Remember your password. If you forget the password, you cannot use the Win-dows operation system. Creating a password reset disk beforehand is recom-mended.First-time OperationCF-19CTQZZBM.indb 16 2008/11/10 10:16:15](https://usermanual.wiki/Panasonic-of-North-America/9TGCF-19C.Users-Manual/User-Guide-1074046-Page-16.png)
![17Getting Started To change the partition structureYou can shrink a part of an existing partition to create unallocated disk space, from which you can create a new parti-tion. This computer has a single partition in the default setting.A Click (Start) and right-click [Computer], then click [Manage]. A standard user needs to enter an administrator password.B Click [Disk Management].C Right-click the partition for Windows (“c” drive in the default setting), and click [Shrink Volume]. The partition size depends on the computer specifi cations.D Input the size in [Enter the amount of space to shrink in MB] and click [Shrink]. You cannot input a larger number than the displayed size.E Right-click [Unallocated] (the shrunk space in the step D) and click [New Simple Volume].F Follow the on-screen instructions to make the settings, and click [Finish].Wait until formatting is completed. NOTE You can create an additional partition using remaining unallocated space or newly creating unallocated space. To delete a partition, right-click the partition and click [Delete Volume] in the step C.CF-19CTQZZBM.indb 17 2008/11/10 10:16:15](https://usermanual.wiki/Panasonic-of-North-America/9TGCF-19C.Users-Manual/User-Guide-1074046-Page-17.png)
![18Useful InformationOn-screen ManualYou can access the Reference Manual and the Important Tips on the computer screen.When you access the Reference Manual and the Important Tips for the fi rst time, the License Agreement of the Adobe Reader may be displayed. Read it carefully and select [Accept] to proceed. Reference Manual The Reference Manual contains the practical information to help you fully enjoy the computer’s performance.To access the Reference Manual: Double-click on the desktop. Alternatively click (Start) - [All Programs] - [Panasonic] - [On-Line Manuals] - [Reference Manual]. Click [start] - [Reference Manual]. Important Tips The Important Tips will provide you with the battery information so that you can use the battery pack in the optimum condition to obtain longer operation time.To access the Important Tips: Double-click on the desktop. Alternatively click (Start) - [All Programs] - [Panasonic] - [On-Line Manuals] - [Important Tips]. Double-click on the desktop. Alternatively click [start] - [All Programs] - [Panasonic] - [On-Line Manuals] - [Important Tips]. NOTE When Adobe Reader update notice is displayed, we recommend you follow the on-screen procedure and update.See http://www.adobe.com/ for the latest version of Adobe Reader.CF-19CTQZZBM.indb 18 2008/11/10 10:16:15](https://usermanual.wiki/Panasonic-of-North-America/9TGCF-19C.Users-Manual/User-Guide-1074046-Page-18.png)
![21Useful InformationReinstalling SoftwareReinstalling software will return the computer to the default condition. When you reinstall the software, the hard disk data will be erased.Back up important data to other media or an external hard disk before reinstallation. CAUTION Do not delete the partition with recovery tools on the hard disk.The disk space in the partition is not available to store data.Preparation Prepare the following items: The Product Recovery DVD-ROM (included) Panasonic CD/DVD drive Remove all peripherals (except for the CD/DVD drive). Connect the AC adaptor and do not remove it until reinstallation is complete.1 Turn off the computer and connect the CD/DVD drive to the USB port ( page 11).2 Turn on the computer, and press F2 or Del while [Panasonic] boot screen is displayed.The Setup Utility starts up. If the password is requested, enter the Supervisor Password.3 Write down all of the contents of the Setup Utility and press F9.At the confi rmation message, select [Yes] and press Enter.4 Press F10.At the confi rmation message, select [Yes] and press Enter.Computer will restart.5 Press F2 or Del while [Panasonic] boot screen is displayed.The Setup Utility starts up. If the password is requested, enter the Supervisor Password.6 Set the Product Recovery DVD-ROM ( ) into the CD/DVD drive.7 Select the [Exit] menu, then select your CD/DVD drive in [Boot Override].8 Press Enter.The computer will restart. 9 Click [Reinstall Windows] and click [Next].The License Agreement screen appears.10 Click [Yes, I agree to the provisions above and wish to continue!] and click [Next].11 Select the settings and click [Next]. [Reinstall Windows to the whole Hard Disk to factory default.]You will have a single partition. [Reinstall Windows to the operating system partition.]You can keep the partition structure.12 At the confi rmation message, click [YES].Reinstallation starts automatically. (It will take approximately 30 - 60 minutes.) Do not interrupt reinstallation, for example by turning off the computer. Otherwise reinstallation may become unavailable as Windows may not start up or the data may be corrupted.13 Remove the Product Recovery DVD-ROM, and then click [OK] to turn off the computer.14 Turn on the computer. If the password is requested, enter the Supervisor Password.15 Perform the “First-time Operation” ( page 14).16 Start the Setup Utility and change the settings as necessary.17 Perform Windows Update.Area usable by WindowsHard disk Partition with recovery tools(approximately 2 GB)CF-19CTQZZBM.indb 21 2008/11/10 10:16:15](https://usermanual.wiki/Panasonic-of-North-America/9TGCF-19C.Users-Manual/User-Guide-1074046-Page-21.png)
![22Useful Information9 Press 1 to execute [1. [Recovery]].The License Agreement screen appears. To cancel partway, press 0.10 Press 1 to select [1. Yes, I agree to the provisions above and wish to continue!].11 Select the settings. [2]: Enter the size of operating system partition and press Enter.(The size of data partition will be determined by subtracting the operating system partition size from the maximum size.) [3]: Windows will be installed in the fi rst partition.(The size of the fi rst partition must be 30 GB or more. If smaller, installation will not be possible.)At the confi rmation message, press Y.Reinstallation starts automatically. (It will take approximately 30 - 75 minutes.) Do not interrupt reinstallation, for example by turning off the computer or pressing Ctrl + Alt + Del. Oth-erwise reinstallation may become unavailable as Windows may not start up or the data may be corrupted.12 Remove the Product Recovery DVD-ROM, and then press any key to turn off the com-puter. If additional instructions are included with the computer, be sure to read them. It may be necessary to perform additional operations during the following procedure.13 Turn on the computer. If the password is requested, enter the Supervisor Password.14 Perform the “First-time Operation” ( page 14).15 Start the Setup Utility and change the settings as necessary.Reinstalling SoftwareCF-19CTQZZBM.indb 22 2008/11/10 10:16:15](https://usermanual.wiki/Panasonic-of-North-America/9TGCF-19C.Users-Manual/User-Guide-1074046-Page-22.png)
![23TroubleshootingTroubleshooting (Basic)Follow the instructions below when a problem has occurred. There is also an advanced troubleshooting guide in the “Reference Manual”. For a software problem, refer to the software’s instruction manual. If the problem persists, contact Panasonic Technical Support ( page 33). You can also check the computer’s status in the PC Information Viewer ( Reference Manual “Troubleshooting (Advanced)”). Starting UpCannot start up.The power indicator or bat-tery indicator is not lit. Connect the AC adaptor. Insert a fully charged battery. Remove the battery pack and the AC adaptor, then connect them again. If a device is connected to the USB port, disconnect the device, or set [USB Port] or [Legacy USB Support] to [Disable] in the [Advanced] menu of the Setup Utility. If a device is connected to the ExpressCard slot, disconnect the device, or set [ExpressCard Slot] to [Disable] in the [Advanced] menu of the Setup Utility. Press Fn + F8 to turn off the concealed mode.The power is turned on but “Warming up the system (up to 30 minutes)” appears. The computer is warming up before start up. Wait for the computer to start up (takes up to 30 minutes). If, “Cannot warm up the system” is displayed, the computer failed to warm up and does not start. In this case, turn off the computer, leave it in an environment of 5 °C {41 °F} or higher temperature for about an hour, and then turn on the power again.Cannot turn on the computer.The computer does not re-sume from sleep( )/standby ( ).(The power indicator blinks quickly in green.) Leave it in an environment of 5 °C {41 °F} or higher temperature for about an hour, then turn on the power again.You have forgotten the pass-word. Supervisor Password or User Password: Contact Panasonic Technical Support ( page 33). Administrator password: If you have a password reset disk, you can reset the administrator password. Set the disk and enter any wrong password, then follow the on-screen instructions and set a new password. If you do not have a password reset disk, reinstall ( page 21) and set up Windows, and then set a new password.“Remove disks or other media. Press any key to restart” or a similar message appears. A fl oppy disk is in the drive and it does not contain system startup information. Remove the fl oppy disk and press any key. If a device is connected to the USB port, disconnect the device, or set [USB Port] or [Legacy USB Support] to [Disable] in the [Advanced] menu of the Setup Utility. If a device is connected to the ExpressCard slot, disconnect the device, or set [ExpressCard Slot] to [Disable] in the [Advanced] menu of the Setup Utility. If the problem persists after removing the disk, it may be a hard disk failure. Contact Panasonic Technical Support ( page 33).Windows startup and opera-tion is slow. Press F9 in the Setup Utility ( Reference Manual “Setup Utility”) to return the Setup Utility settings (excluding the passwords) to the default values. Start the Setup Utility and make the settings again. (Note that the processing speed depends on the ap-plication software, so this procedure may not make Windows faster.) If you installed a resident software after purchase, turn off the residence. Disable Indexing Service in the following menu.Click [start] - [Search] - [Change preferences] - [With Indexing Service (for faster local service)].The date and time are incor-rect. Make the correct settings. Click (Start) - [Control Panel] - [Clock, Language, and Region] - [Date and Time]. Click [start] - [Control Panel] - [Date, Time, Language, and Regional Options] - [Date and Time]. If the problem persists, the internal clock battery may need to be replaced. Contact Panasonic Technical Support ( page 33). When the computer is connected to LAN, check the date and time of the server. The 2100 A.D. or later year will not be correctly recognized on this computer.[Executing Battery Recali-bration] screen appears. The Battery Recalibration was canceled before Windows was shut down last time. To start up Windows, turn off the computer by the power switch, and then turn on.CF-19CTQZZBM.indb 23 2008/11/10 10:16:15](https://usermanual.wiki/Panasonic-of-North-America/9TGCF-19C.Users-Manual/User-Guide-1074046-Page-23.png)
![24Troubleshooting Starting Up[Enter Password] does not appear when resuming from sleep ( )/standby ( )/hibernation. The password you have set in the Setup Utility is not requested at resuming. To use the password security at resuming, set the Windows password.A Click (Start) - [Control Panel] - [Add or remove user accounts] and select the ac-count, and set the password.B Click (Start) - [Control Panel] - [System and Maintenance] - [Require a password when the computer wakes] and add a check mark for [Require a password].A Click [start] - [Control Panel] - [User Accounts] and select the account, and set the password.B Click [start] - [Control Panel] - [Performance and Maintenance] - [Power Options] - [Advanced] and add a check mark for [Prompt for password when computer resumes from standby].Cannot resume. An error may occur when the computer automatically enters the sleep or hibernation mode while the screensaver is active. In this case, turn off the screensaver or change the pattern of the screensaver.Other startup problems. Press F9 in the Setup Utility ( Reference Manual “Setup Utility”) to return the Setup Utility settings (excluding the passwords) to the default values. Start the Setup Utility and make the settings again. Remove all peripheral devices. Check to see if there was a disk error.A Remove all peripheral devices including an external display.B Click (Start) - [Computer] and right-click [Local Disk (C:)], and click [Properties].C Click [Tools] - [Check Now...]. A standard user needs to enter an administrator password.D Select the option in [Check disk options] and click [Start].E Click [Schedule disk check] and restart the computer.A Click [start] - [My Computer] and right-click [Local Disk(C:)], and click [Properties].B Click [Tools] - [Check Now].C Select the option in [Check disk options] and click [Start]. Start the computer in Safe Mode and check the error details. When the [Panasonic] boot screen disappears*1 at startup, press and hold F8 until the Windows Advanced Options Menu is displayed.*1 When [Password on boot] is set to [Enabled] in the [Security] menu of the Setup Utility, [Enter Password] appears after the [Panasonic] boot screen disappears. As soon as you enter the password and press Enter, press and hold F8. Entering PasswordOn the [Enter Password] screen, the password cannot be entered. The computer may be in ten-key mode. If the NumLk indicator lights, press NumLk to disable the ten-key mode, and then input.Even after entering the pass-word ( )/ Locked ( )/Type your password, is displayed again. The computer may be in ten-key mode.If the NumLk indicator lights, press NumLk to disable the ten-key mode, and then input. The computer may be in Caps Lock mode.If the Caps Lock indicator lights, press Caps Lock to disable the Caps Lock mode, and then input. Shutting downWindows does not shut down. Remove the USB device and the ExpressCard. Wait one or two minutes. It is not a malfunction.Troubleshooting (Basic)CF-19CTQZZBM.indb 24 2008/11/10 10:16:15](https://usermanual.wiki/Panasonic-of-North-America/9TGCF-19C.Users-Manual/User-Guide-1074046-Page-24.png)
![25Troubleshooting DisplayNo display. The external display is selected. Press Fn + F3 to switch the display. Wait until the display has been switched completely before pressing Fn + F3 again. When using an external display, Check the cable connection. Turn on the display. Check the settings of external display. The display is turned off by the power-saving function. To resume, do not press the direct selection keys, but press any other key like Ctrl. The computer entered sleep ( ) /standby ( ) or hiberna-tion by the power-saving function. To resume, press the power switch.The screen is dark. The screen is darker when the AC adaptor is not connected. Press Fn + F2 and adjust the brightness. As you increase the brightness, battery consumption increases. You can separately set the brightness for when the AC adaptor is connected and when not connected. Press Fn + F8 to turn off the concealed mode.The screen is disordered. Changing the number of display colors and resolution may affect the screen. Restart the computer. Connecting/disconnecting an external display may affect the screen. Restart the com-puter.During Simultaneous display, one of the screens becomes disordered. When using the Extended Desktop, use the same display colors for the external display as those used by the LCD. If you continue to experience problems, try changing the display.Right-click on the desktop, and click [Graphics Properties] - [Display Devices].Clicking [start] - [Control Panel] - [Other Control Panel Options] - [Intel(R) GMA Driver for Mobile] - [Display Devices]. When the [Command Prompt] is set to “Full Screen” by pressing Alt+Enter, the picture is displayed on one of the screens only. When the window display is restored by pressing Alt+Enter, the picture is displayed on both screens. Simultaneous display cannot be used until Windows startup is complete (during Setup Utility, etc.).The external display does not work normally. If the external display does not support the power saving function, it may not work nor-mally when the computer enters the power saving mode. Turn off the external display.<Only for model with GPS>The cursor cannot be con-trolled properly. Operate the following steps.A Set [GPS] to [Disable] in the [Advanced] - [Serial Port Settings] of the Setup Utility.B Press F10 and select [Yes] at the confi rmation message, and press Enter.The computer will restart.C Log on to Windows as an administrator.D Click (Start) and input “c:\util\drivers\gps\GPSVista.reg” in [Start Search], and press Enter.E Click [Yes] and click [OK].The computer will restart.F Press F2 while [Panasonic] boot screen is displayed.G Set [GPS] to [Enable] in the [Advanced] - [Serial Port Settings].H Press F10 and select [Yes] at the confi rmation message, and press Enter.CF-19CTQZZBM.indb 25 2008/11/10 10:16:16](https://usermanual.wiki/Panasonic-of-North-America/9TGCF-19C.Users-Manual/User-Guide-1074046-Page-25.png)
![26Troubleshooting Touch Pad / Touchscreen (only for model with touchscreen)/Dual Touch (only for model with dual touch)The cursor does not work. When using the external mouse, connect it correctly. Restart the computer using the keyboard. Press and press three times, and press to select [Restart] and press Enter. Press , U, and R to select [Restart]. If the computer does not respond to keyboard commands, read “No response”( below).Cannot input using the touch pad. Set [Touch Pad] to [Enable] in the [Main] menu of the Setup Utility. The drivers for some mice may disable the touch pad. Check your mouse’s operating instructions.<Only for model with touch-screen>Cannot input using the touchscreen. Set [Touchscreen Mode] to [Auto] or [Tablet] in the [Main] menu of the Setup Utility. Set [Touchscreen Mode] to [Auto] or [Touchscreen Mode] in the [Main] menu of the Setup Utility.Cannot point the correct position using the included stylus/digitizer pen.<Only for model with touchscreen> Perform the touchscreen calibration ( page 15).<Only for model with dual touch> Perform the digitizer calibration and Touchscreen calibration ( page 15). Use the included digitizer pen. On the Windows logon screen or the Welcome screen, you may not be able to point the correct position using the included digitizer pen. Use the keyboard or the touch pad to log on. Reference ManualThe Reference Manual is not displayed. Install Adobe Reader.A Log on to Windows as an administrator. B Click (Start) and input “c:\util\reader\Setup.exe” in [Start Search] then press Enter.C Update Adobe Reader to its latest version.If your computer is connected to the internet, start up Adobe Reader and click Help] - [Check for Updates...]. B Click [start] - [Run], input [c:\util\reader\Setup.exe], then click [OK].C Update Adobe Reader to its latest version.If your computer is connected to the internet, start up Adobe Reader and click [Help] - [Check for updates now]. OthersNo response. Press Ctrl+Shift+Esc to open Task Manager and close the software application that is not responding. An input screen (e.g., password input screen at startup) may be hidden behind another window. Press Alt+Tab to check. Slide the power switch for four seconds or longer to shut down the computer, and then slide the power switch to turn it on. If the application program does not work normally, uninstall and reinstall the program. To uninstall, click (Start) - [Control Panel] - [Uninstall a program]. click [start] - [Control Panel] - [Add or Remove Programs].Troubleshooting (Basic)CF-19CTQZZBM.indb 26 2008/11/10 10:16:16](https://usermanual.wiki/Panasonic-of-North-America/9TGCF-19C.Users-Manual/User-Guide-1074046-Page-26.png)
![29AppendixSpecifi cationsThis page provides the specifi cations for the basic model. The model number is different according to the unit confi guration. To check the model number:Check the bottom of the computer or the box the computer came in at the time of purchase. To check CPU speed, memory size and the hard disk drive (HDD) size:Run the Setup Utility ( Reference Manual “Setup Utility”) and select [Information] menu.[CPU Speed]: CPU speed, [System Memory]: Memory size, [Hard Disk]: Hard disk drive size Main Specifi cationsModel No. CF-19KHRAXJM CF-19KHRAXAM CF-19KDRAXJM CF-19KDRAXCMCPU Intel® Core™ 2 Duo Processor U9300 (1.20 GHz, 3 MB*1 L2 cache, 800 MHz FSB)Chipset Mobile Intel® GS45 Express ChipsetMemory*1*2 2048 MB (4096 MB Max.)Video Memory*1*3*4UMA 797 MB Max. (When Memory is 2 GB) / UMA 1551 MB Max. (When Memory is 4 GB)UMA 1024 MB Max.Hard Disk Drive*4 160 GBDisplay Method 10.4 XGA type (TFT)Internal LCD*5 65,536/16,777,216 colors (800 × 600 dots/1024 × 768 dots)External Display*6 65,536/16,777,216 colors (800 × 600 dots/1024 × 768 dots/1280 × 768 dots/1280 × 1024 dots)Wireless LAN*7 page 30BluetoothTM *8 page 30LAN IEEE 802.3 10Base-T, IEEE 802.3u 100Base-TX, IEEE 802.3ab 1000Base-TModem Data: 56 kbps (V.92) FAX: 14.4 kbpsSound WAVE and MIDI playback, Intel® High Defi nition Audio subsystem support, Monaural speakerSecurity Chip TPM (TCG V1.2 compliant)*9Card Slot PC Card Type I or Type II x 1 (3.3 V: 400 mA, 5 V: 400 mA)ExpressCard*10 ExpressCard/34*11 or ExpressCard/54 x 1Smart Card*12 ISO7816 x 1SD Memory Card*13 x 1, Data transfer rate = 8 MB per second*14RAM Module Slot 200-pin, 1.8 V, SO-DIMM, DDR2 SDRAM, PC2-5300 CompliantInterface USB port (4-pin, USB 2.0) x 2, Serial Port (Dsub 9-pin male), Modem port (RJ-11), LAN port (RJ-45), External display port (Mini Dsub 15-pin female), Expansion Bus Connector (Dedicated 100-pin female), External Antenna Connector (Dedicated 50 Ω coaxial connector) x 2, IEEE 1394a Interface Connector (4-pin x 1), Microphone Jack (Miniature jack, 3.5 DIA, Stereo), Headphone Jack (Miniature jack, 3.5 DIA, Impedance 32 Ω, Output Power 4 mW x 2)Keyboard / Pointing Device 82 keys / Touch Pad / Touchscreen (Anti-Refl ection, Stylus (included) touch capable) 82 keys / Touch Pad / Dual Touch (Anti-Re-fl ection, Stylus (included) touch capable)Power Supply AC adaptor or Battery packAC Adaptor*23 Input: 100 V to 240 V AC, 50 Hz/60 Hz, Output: 16.0 V DC, 3.75 ABattery Pack Li-ion 10.65 V, 5.7 AhOperating Time*15 9 hours/ 10.0 hours*16Charging Time*15Power on Approx. 6.5 hoursPower off Approx. 4.5 hoursClock Battery Coin type lithium battery 3.0 VPower Consumption*17 Approx. 30 W*18 / Approx. 60 W (maximum when recharging in the ON state)Physical Dimensions (W × H × D)(excluding the hand strap/shoul-der strap)271 mm × 49 mm × 216 mm {10.7" × 1.93" × 8.5"}Weight (excluding the hand strap/shoul-der strap)Approx. 2.30 kg {Approx. 5.06 lb.} Approx. 2.30 kg {Approx. 5.06 lb.}CF-19CTQZZBM.indb 29 2008/11/10 10:16:16](https://usermanual.wiki/Panasonic-of-North-America/9TGCF-19C.Users-Manual/User-Guide-1074046-Page-29.png)
![30Appendix Main Specifi cationsOperation Environment Temperature: 5 °C to 35 °C {41 °F to 95 °F}Humidity: 30% to 80% RH (No condensation)Storage Environment Temperature: -20 °C to 60 °C {-4 °F to 140 °F}Humidity: 30% to 90% RH (No condensation)Operating SystemWindows Vista® Business Service Pack 1Microsoft® Windows® XP Professional Service Pack 2 with Advanced Security Technologies (NTFS File System)Microsoft® Windows® XP Tablet PC Edition 2005 (NTFS File System)Utility Programs Adobe Reader, PC Information Viewer, Loupe Utility, Intel® PROSet/Wireless Software*7, Blue-tooth™ Stack for Windows® by TOSHIBA*8, Wireless Switch Utility, Hotkey Settings, Battery Recalibration Utility, Panasonic Hand Writing, Display Rotation Tool, Infi neon TPM Profession-al Package*19, Power Saving Utility, Wireless Connection Disable Utility*19, Concealed Mode Utility*21Setup Utility, Hard Disk Data Erase Utility*20, PC-Diagnostic Utility Wireless LAN <Only for model with wireless LAN>Data Transfer Rates IEEE802.11a : 54/48/36/24/18/12/9/6 Mbps (automatically switched)*22IEEE802.11b : 11/5.5/2/1 Mbps (automatically switched)*22IEEE802.11g : 54/48/36/24/18/12/9/6 Mbps (automatically switched)*22IEEE802.11n : (HT20) 144.4/130/117/115.6/104/86.7/78/65/58.5/57.8/52/43.3/39/28.926/19.5/14.4/13/6.5 Mbps (automatically switched)*22(HT40) 300/270/243/240/216/180/162/130/120/117/108/104/90/81/78/60/54/52/39/30/27/26/13 Mbps (automatically switched)*22Standards Supported IEEE802.11a / IEEE802.11b / IEEE802.11g / IEEE802.11n(Draft 2.0)Transmission method OFDM system, DSSS systemWireless Channels Used IEEE802.11a : Channels 36/40/44/48/52/56/60/64/100/104/108/112/116/132/136/140/149/153/157/161/165IEEE802.11b/IEEE802.11g : Channels 1 to 11IEEE802.11n : Channels 1-11/36/40/44/48/52/56/60/64/100/104/108/112/116/132/136/140/149/153/157/161/165RF Frequency Band IEEE802.11a : 5.18 GHz - 5.32 GHz, 5.5 GHz - 5.58 GHz, 5.66 GHz - 5.7 GHz, 5.745 GHz -5.825 GHzIEEE802.11b/IEEE802.11g : 2.412 GHz - 2.462 GHzIEEE802.11n : 2.412 GHz - 2.462 GHz, 5.15 GHz - 5.35 GHz, 5.5 GHz - 5.58 GHz, 5.66 GHz -5.7 GHz, 5.745 GHz - 5.85 GHz BluetoothTM <Only for model with Bluetooth>Bluetooth Version 2.0 + EDRTransmission method FHSS systemWireless Channels Used Channels 1 to 79RF Frequency Band 2.402-2.48 GHz*1 1 MB = 1,048,576 bytes*2 You can physically expand the memory up to 4096 MB, but the total amount of usable memory available will be less depending on the actual system confi guration. *3 A segment of the main memory is allotted automatically depending on the computer’s operating status. The size of the Video Memory cannot be set by the user.*4 1 GB = 1,000,000,000 bytes. Your operating system or some application software will report as fewer GB.*5 A 16,777,216 color display is achieved by using the dithering function.*6 Maximum resolution depends on the specifi cations of the external display. Display may be impossible using some connected external displays.*7 Only for model with wireless LAN*8 Only for model with Bluetooth*9 For information on TPM, click (Start) and input “c:\util\drivers\tpm\README.pdf” in [Start Search] and press Enter, and refer to the Installation Manual of “Trusted Platform Module (TPM)”. click [start] - [Run] and input “c:\util\drivers\tpm\README.pdf”, and refer to the Installation Manual of “Trusted Platform Module (TPM)”.*10 Only for model with ExpressCard slot*11 When using ExpressCard/34, the card slot cover cannot be closed.*12 Only for model with Smart Card slotSpecifi cationsCF-19CTQZZBM.indb 30 2008/11/10 10:16:16](https://usermanual.wiki/Panasonic-of-North-America/9TGCF-19C.Users-Manual/User-Guide-1074046-Page-30.png)