Panasonic of North America 9TGCF-28WLAN1 Notebook Computer with Built-In Wireless LAN User Manual ORiNOCO PC Card User s Guide
Panasonic Corporation of North America Notebook Computer with Built-In Wireless LAN ORiNOCO PC Card User s Guide
Contents
Manual

ORINOCO PC Card - User’s Guide
3-5
Using ORiNOCO and Windows - View Other Computers
View Other Computers 3
When multiple ORiNOCO stations are up-and-running in your wireless
network, you can use the procedure described below to display the other
computers:
1. Start Windows Explorer.
2. Scroll down the list of files and folders to look for the item Network
Neighborhood.
3. Double-click the Network Neighborhood item to display all stations in
your Microsoft Networking Group.
4. To display other workgroups in the network environment, double-click the
Entire Network icon.
If you cannot find other (ORiNOCO) networked computers, verify whether
the other ORiNOCO computers are:
■Powered up and logged on to the network.
■Configured to operate with identical Microsoft Network settings
concerning:
— Networking Protocol.
— Wireless Network Name
— Workgroup Name

3-6
ORINOCO PC Card - User’s Guide
Using ORiNOCO and Windows - View Other Computers
To view or modify the Station Name or Workgroup of your computer, proceed
as follows:
1. Click the button from the Windows task bar.
2. Click on Settings, and then on Control Panel.
3. In the Control Panel window, double-click the Network icon.
4. In the Network Settings window, select the Identification tab.
You can verify and change the Station Name or Workgroup parameters.
NOTE:
You have to restart your computer before changes to the Network
Settings will be effected.
To verify the radio connection with other stations refer to “View Wireless Link
Quality” on page 3-7.

ORINOCO PC Card - User’s Guide
3-7
Using ORiNOCO and Windows - Using the Client Manager
Using the Client Manager 3
If you installed the ORiNOCO Client Manager as described in “Installing the
Client Manager Software” on page 2-3, you can use the Client Manager to:
■Verify the quality of your wireless connection to the network.
■View/Modify the configuration settings of your wireless PC Card.
The Client Manager will start automatically every time you power up your
computer.
The Client Manager icon is displayed in the “System Tray” of your
Windows task bar at the right-side on the bottom of your screen,
indicating that the Client Manager program is running.
■Click the icon once with your left mouse button to retrieve a more
detailed status overview.
■Click the icon once with your right mouse button to display a menu with
more options.
View Wireless Link Quality 3
You can use the Client Manager icon on the Windows task bar to verify the
link quality of your network connection.
An overview of all possible icons is given in Table 3-1. When the
Client Manager icon is not indicating excellent or good radio connection, act
as described below.

3-8
ORINOCO PC Card - User’s Guide
Using ORiNOCO and Windows - Using the Client Manager
Table 3-1 Client Manager Icon
Icon Description Color
Excellent radio connection Green
Good radio connection Green
Marginal radio connection:
The radio signal is weak. Move closer to the:
■ORiNOCO AP-1000, or
■ORiNOCO Base Station
Yellow
Poor radio connection:
The radio signal is very weak. Save your files and move
closer to the:
■ORiNOCO AP-1000, or
■ORiNOCO Base Station
Red
No radio connection because:
■Looking for initial connection, or
■You have moved out of range of the network.
Red
Peer-to-Peer network connection Blank
ORINOCO PC Card - User’s Guide
3-9
Using ORiNOCO and Windows - Using the Client Manager
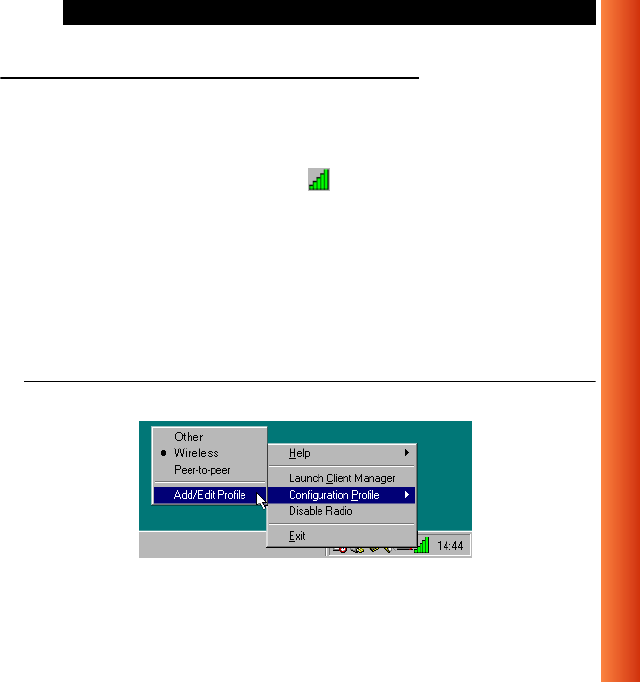
View/Modify PC Card Settings 3
If you would like to view or modify ORiNOCO parameters, for example
because you would like to connect to another network or type of network,
proceed as follows:
1. Right-click on the Client Manager icon on the Windows task bar.
2. From the menu, select Configuration Profile (see Figure 3-2) and select:
■Add/Edit Profile to add a new profile or to modify an existing profile.
■One of the existing profiles (if present) to select a profile without
viewing or modifying the settings.
After selecting and another profile, the PC Card will use the selected profile
to connect to the wireless network.
Figure 3-2 Edit Wireless Configuration Settings

3-10
ORINOCO PC Card - User’s Guide
Using ORiNOCO and Windows - Using the Client Manager
If your Client Manager icon is not visible, you have to start the
Client Manager program again:
1. Click the button from the Windows task bar.
2. Select Programs, and then select the ORiNOCO workgroup.
3. Next select Client Manager to start the Client Manager program.
Alternatively you can to change the PC Card configuration via the Control
Panel:
1. Click the button from the Windows task bar.
2. Click on Settings, and then on Control Panel.
3. In the Control Panel window, double-click the Wireless Network icon.
4. (Optional) Change the parameters you would like to modify, and click
■the OK button to confirm your changes, or
■the Cancel button to ignore your modifications.

ORINOCO PC Card - User’s Guide
3-11
Using ORiNOCO and Windows - Finding More Information
Finding More Information 3
If you are looking for more information than contained in this manual, please
consult one of the following options:
■The online “ORINOCO PC Card - User’s Guide” - for more information
about the Client Manager program and for information about installing
the ORiNOCO PC Card in other operating systems, such as:
—MS Windows NT
—MS Windows CE
—MS DOS
— Apple Macintosh
The online “ORINOCO PC Card - User’s Guide” can be found on the
ORiNOCO Software CD-ROM that came with your PC Card kit.
■The on-line help system of your ORiNOCO wireless system - for
information about software and driver functionality.
To view the on-line help system click the Help button or press the
function key on your keyboard in any ORiNOCO window, or
■The “ORiNOCO Manager Suite User’s Guide” - a reference guide for
LAN Administrators that need to setup, monitor and manage corporate
LANs.
F1


ORINOCO PC Card - User’s Guide
4-1
4
Advanced Configurations
Introduction 4
Although your ORiNOCO PC Card will work fine in most network
environment with the Basic Parameters as described on page 2-11, you may
wish to explore the advanced parameters options as displayed on the
ORiNOCO PC Card’s Edit Configuration windows.
Only if connected to an existing network advanced parameters can be
specified for an ORiNOCO PC Card. Consult your LAN Administrator for
information about whether these parameters apply to your situation.
Encryption Parameters Tab 4
The encryption tab enables you to define the encryption keys that your
ORiNOCO PC Card should use to:
■Decrypt wireless messages received via its wireless interface.
■Encrypt data that will be transmitted via the wireless interface.
!CAUTION:
Encryption needs to be the same for all ORiNOCO stations.

Advanced Configurations - Introduction
4-2
ORINOCO PC Card - User’s Guide
Figure 4-1 Setup ORiNOCO Encryption Parameters
You can identify up to 4 different key values to decrypt wireless data, and
select one of these keys to encrypt wireless data transmissions.
For more information consult your LAN Administrator. You can also refer to
the helpfile and the “ORiNOCO Manager Suite User’s guide”.
Advanced Configurations - Introduction
ORINOCO PC Card - User’s Guide
4-3
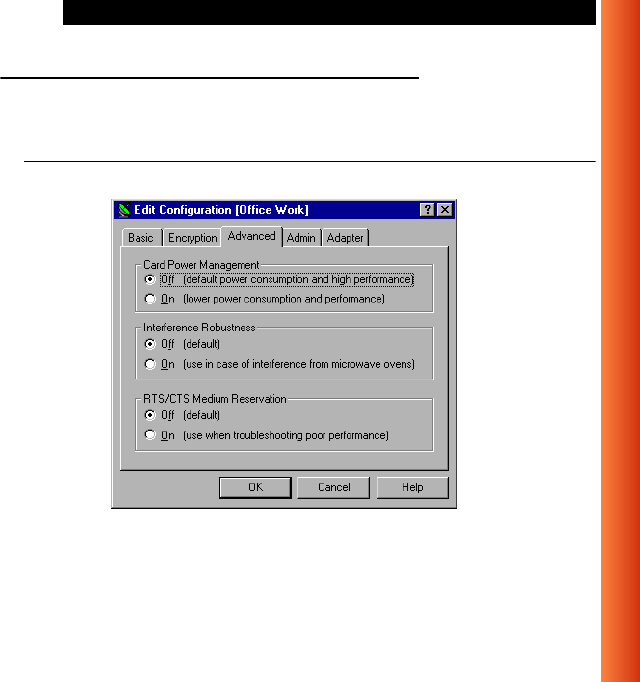
Advanced Parameters Tab 4
On the Advanced parameters tab of the Edit Configuration window you can
adjust a number of parameters.
Figure 4-2 Setup ORiNOCO Advanced Parameters

Advanced Configurations - Introduction
4-4
ORINOCO PC Card - User’s Guide
For more information consult your LAN Administrator. You can also refer to
the helpfile and the “ORiNOCO Manager Suite User’s guide”.
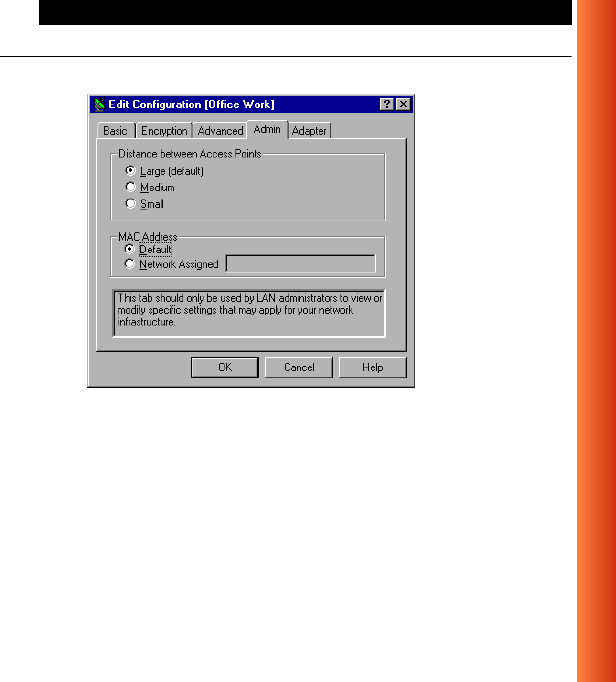
Admin Parameters Tab 4
On the Admin parameters tab of the Edit Configuration window the following
parameters can be specified.
■Card Power
Management
To extend the battery life of (mobile) wireless
devices.
■Interference
Robustness
Can be activated in exceptional cases when
troubleshooting slow performance of the ORiNOCO
network that could be related to in-band interference
from e.g. microwave ovens.
■RTS/CTS
Medium
Reservation
This parameter can be activated:
— if density of ORiNOCO stations and access
points is very low
— as a result of poor network performance due to
excessive frame collisions at the access points.
Advanced Configurations - Introduction
ORINOCO PC Card - User’s Guide
4-5
Figure 4-3 Setup ORiNOCO Admin Parameters
For more information consult your LAN Administrator. You can also refer to
the helpfile and the “ORiNOCO Manager Suite User’s guide”.
■Distance between
Access Points
Depending on the number of access points in a
ORiNOCO network this parameter controls the
network performance.
■MAC Address Can be activated in exceptional cases when
troubleshooting slow performance of the
ORiNOCO network that could be related to in-
band interference from e.g. microwave ovens.
