Panasonic of North America 9TGCF-501 Wireless LAN built in Notebook Personal Computer User Manual Manual
Panasonic Corporation of North America Wireless LAN built in Notebook Personal Computer Manual
Contents
- 1. Manual
- 2. Corrected manual insert
Manual
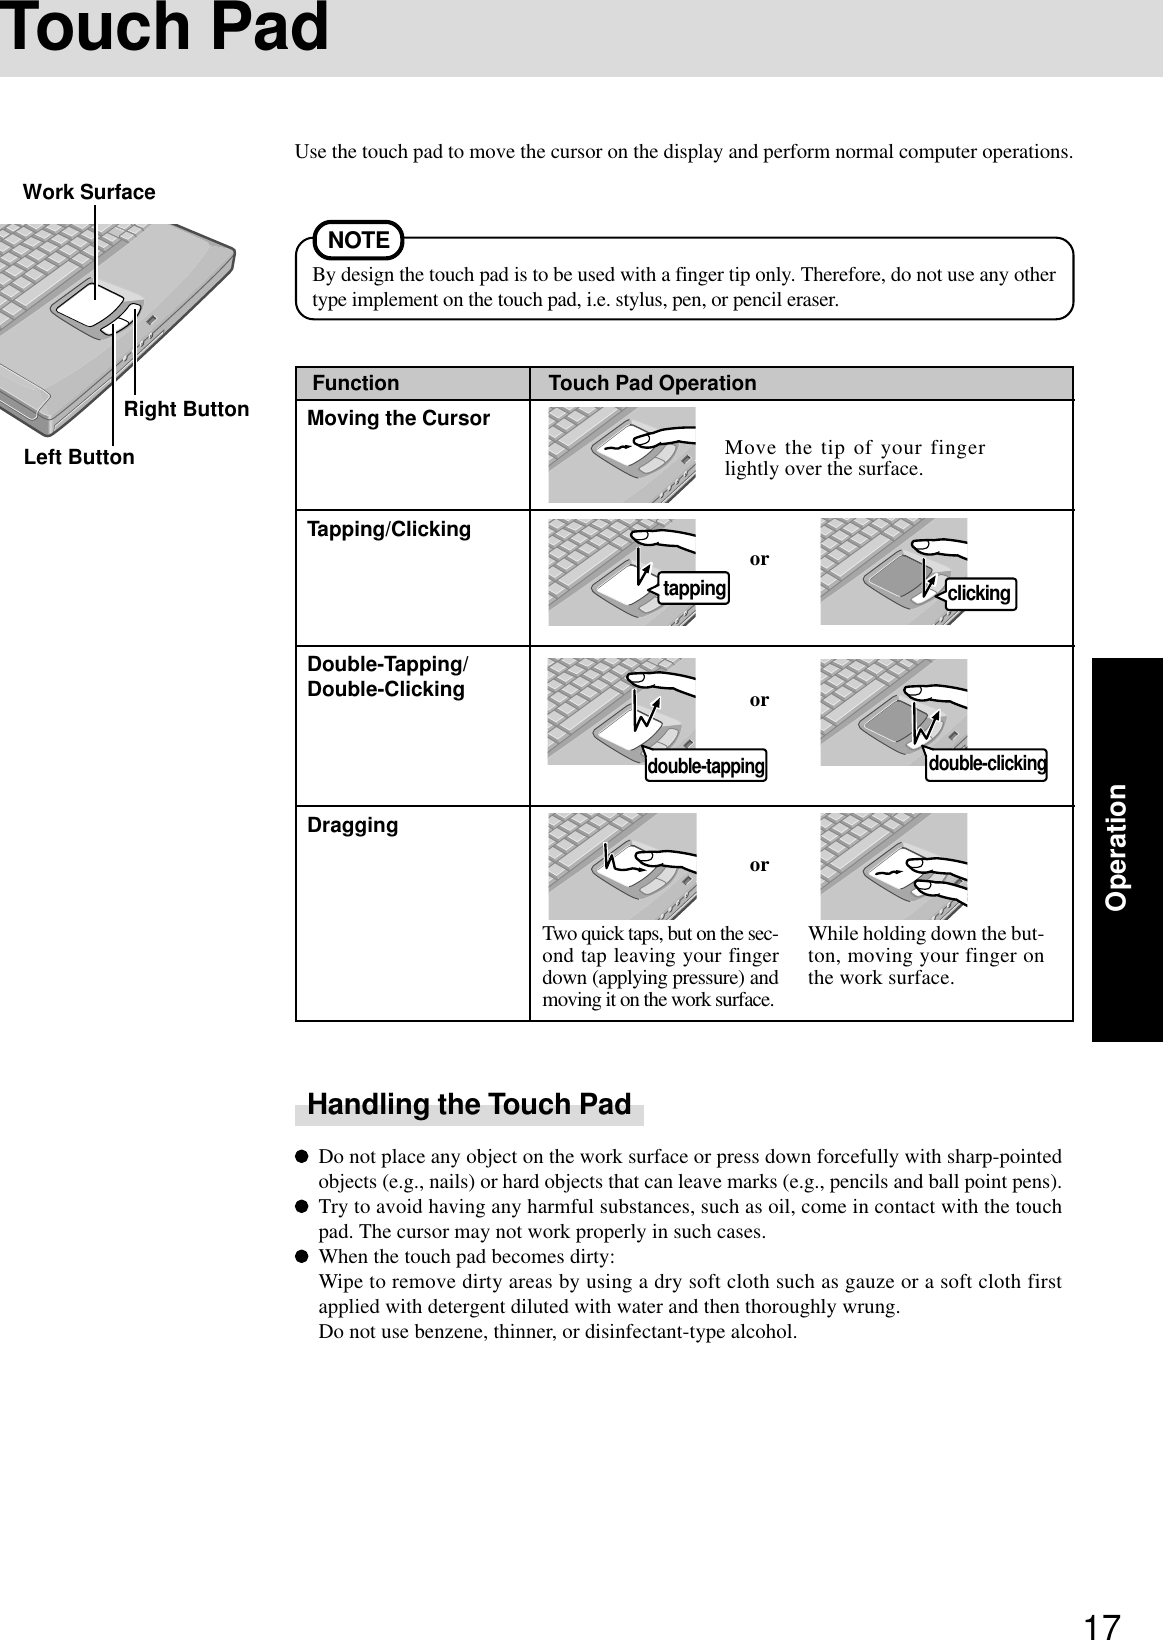
![OPERATING INSTRUCTIONSPersonal Computer®AppendixLIMITED USE LICENSE AGREEMENT.........26Hard Disk Data Erase Utility...........................28Easy CD Creator™ 5 .....................................29WinDVD™ ......................................................31Names and Functions of Parts .......................33Specifications .................................................35LIMITED WARRANTY ....................................37TroubleshootingList of Error Codes .........................................19Dealing with Problems (Summary).................21Reinstalling Software .....................................24OperationStarting Up/Shutting Down ............................ 14Touch Pad ..................................................... 17Reference Manual ......................................... 18Getting StartedRead Me First.................................................. 3First-time Operation ........................................ 9Contents[Additional Manual]Reference ManualThis manual can be accessed on your computer.Refer to page 18 on how to access the Reference Manual.Reference Manual•Read Me First•Key CombinationsReference Manual•Touch Pad (Advanced)•Standby/HibernationFunctions•Security Measures•Computing on theRoad•Battery Power•CD Drive•PC Cards•RAM Module•Port Replicator•Printer•External Display•USB Devices•IEEE 1394 Devices•Modem•LAN•Hard Disk Drive•Setup Utility•LED IndicatorsReference Manual•Technical Information•DMI Viewer •List of Error Codes•Dealing with Problems(Advanced)Appendix Getting StartedOperationTroubleshootingModel No. CF-50 Series2000Please read these instructions carefully before using this product and save this manual for future use.XP](https://usermanual.wiki/Panasonic-of-North-America/9TGCF-501.Manual/User-Guide-286711-Page-1.png)
![2IntroductionThank you for purchasing the Panasonic computer. Read the operating instructions thoroughly for proper operation of your newcomputer.Illustrations and Terminology in this ManualCopyrightThis manual is copyrighted by Matsushita Electric Industrial Co., Ltd. with all rights reserved. No part of this manual may bereproduced in any form without the prior written permission of Matsushita Electric Industrial Co., Ltd.No patent liability is assumed with respect to the use of the information contained herein.©2002 Matsushita Electric Industrial Co., Ltd. All Rights Reserved.DisclaimerComputer specifications and manuals are subject to change without notice. Matsushita Electric Industrial Co., Ltd. assumes noliability for damage incurred directly or indirectly from errors, omissions or discrepancies between the computer and the manuals.TrademarksMicrosoft, Windows and the Windows logo are registered trademarks of Microsoft Corporation of the United States and/or othercountries.PS/2® is a registered trademark of International Business Machines Corporation.Intel, Pentium and SpeedStep are either registered trademarks or trademarks of Intel Corporation.Adobe® and Acrobat® are either registered trademarks or trademarks of Adobe Systems Incorporated in the United States and/orother countries.Roxio, the Roxio logo, Easy CD Creator and DirectCD are trademarks of Roxio, Inc. which may be registered in some jurisdictions.WinDVD™ is a trademark of InterVideo, Inc.Panasonic is a registered trademark of Matsushita Electric Industrial Co., Ltd.* For the Model No., insert the 12 digit number (for example, CF-50Y5KNUDM) located on thebottom of the computer.NOTE:NOTE provides a useful fact or helpful information.CAUTION:CAUTION indicates a condition that may result in minor or moderate injury.WARNING:WARNING indicates a hazard that may result in moderate or serious injury. Windows 2000 : Information for Microsoft® Windows® 2000 Professional users. Windows XP : Information for Microsoft® Windows® XP Professional users.Enter : This illustration means to press the [Enter] key.Fn + F5 : This illustration means to press and hold the [Fn] key, then press the [F5] key.[Start]* - [Run]: This illustration means to click [Start]*, then to click [Run]. For some applications, you may need to double-click.* Windows XP : [start]: Where to go for referred information. : This illustration means to refer to the Reference Manual, which is available on your computer.Refer to page 18 on how to access this manual.Windows 2000 screens are used in this manual when no specific OS notes are required.Some of the illustrations in this manual may differ slightly in shape from the actual items in order to make the explanationeasier to understand.Circular media such as CD-ROM and DVD-ROM are described as “discs”.The following drives are described as “CD drive”.CD-ROM drive, DVD-ROM drive, CD-R/RW drive, DVD-ROM & CD-R/RW drive.If the user has logged on without the administrator authority, some functions may not be executable, and some screens maynot be displayed as shown in this manual. If this happens, log on with the administrator authority to enable these functions.Customer's RecordSerial No.orDate of PurchaseModel No.*Code No.Dealer's NameDealer's Address](https://usermanual.wiki/Panasonic-of-North-America/9TGCF-501.Manual/User-Guide-286711-Page-2.png)

![7Getting StartedDo not power down your computer or press the floppy disk drive eject button while the floppy diskdrive indicator ( ) is on.Doing so may damage the data on the floppy disk and render the floppy disk useless.Use care when handling floppy disks.To protect the data on your floppy disks or to prevent a floppy disk from becoming stuck in your com-puter, avoid the following:• Sliding the shutter on the floppy disk manually.• Exposing the floppy disk to a magnetic field.• Storing the floppy disk in locations prone to high temperatures, low pitched noise, dampness, or dust.• Applying more than one label on the floppy disk.Confirm the contents of a floppy disk before formatting it.Confirm that no important data is on the floppy disk, because all data on the floppy disk will be erased.Use the write-protect tab.This is a must for preserving important data.This prevents your data from being erased or over-written.Saving Data on the Hard DiskWrite Enable Write DisableWrite-protect TabSaving Data on Floppy DisksUsers are advised to purchase the latest versions of virus protection software and use them regularly.We recommend you run the software:• When booting your computer.• After receiving data.We recommend that you check data received on disks or from external sources, such as data downloadedfrom the Internet, e-mail, etc. (For compressed files, uncompress them before running a check).Computer VirusesDo not expose your computer to shock.Use care when handling your computer, shock may damage your hard disk or make your software appli-cations and data unusable.Do not power down your computer while software applications are running or hard disk drive indicator ( )is on.Properly shut Windows* down to avoid problems.Save all valuable data to disks.Backing up data to disks will limit damage should trouble occur to your computer or should you inad-vertently change or erase data.Use the security function for all important data. ( “Security Measures”)*Windows 2000 : This computer uses Microsoft® Windows® 2000 Professional.Windows XP : This computer uses Microsoft® Windows® XP Professional.Hard Disk LockWhen the Hard Disk Lock is set to [Enable], it is impossible to read/write data from/to the hard disk when thehard disk is installed in a different computer, since a password is also set for the hard disk. When the hard diskis returned to the original computer, you can read/write data as before. In this case, however, make the settingsin the Setup Utility exactly the same as they were before the hard disk was removed. (Note that this Hard DiskLock does not guarantee the complete protection of data.) ( “Security Measures”)When Disposing of or Transferring Ownership of This DeviceWhen disposing of or transferring ownership of this device, completely erase all data on the hard disk in orderto prevent the theft of hard disk data. Even if you delete data or initialize the hard disk through normal Win-dows commands, data can still be read using special software. In order to erase all data, either have the dataerased by a specialist (at a charge) or use the hard disk data erase utility (included) ( Page 28). (Note thatthis hard disk data erase utility does not guarantee that data will be completely erased.)Also note that transferring ownership of this device without deleting software from the hard disk mayviolate software user’s licenses.](https://usermanual.wiki/Panasonic-of-North-America/9TGCF-501.Manual/User-Guide-286711-Page-7.png)
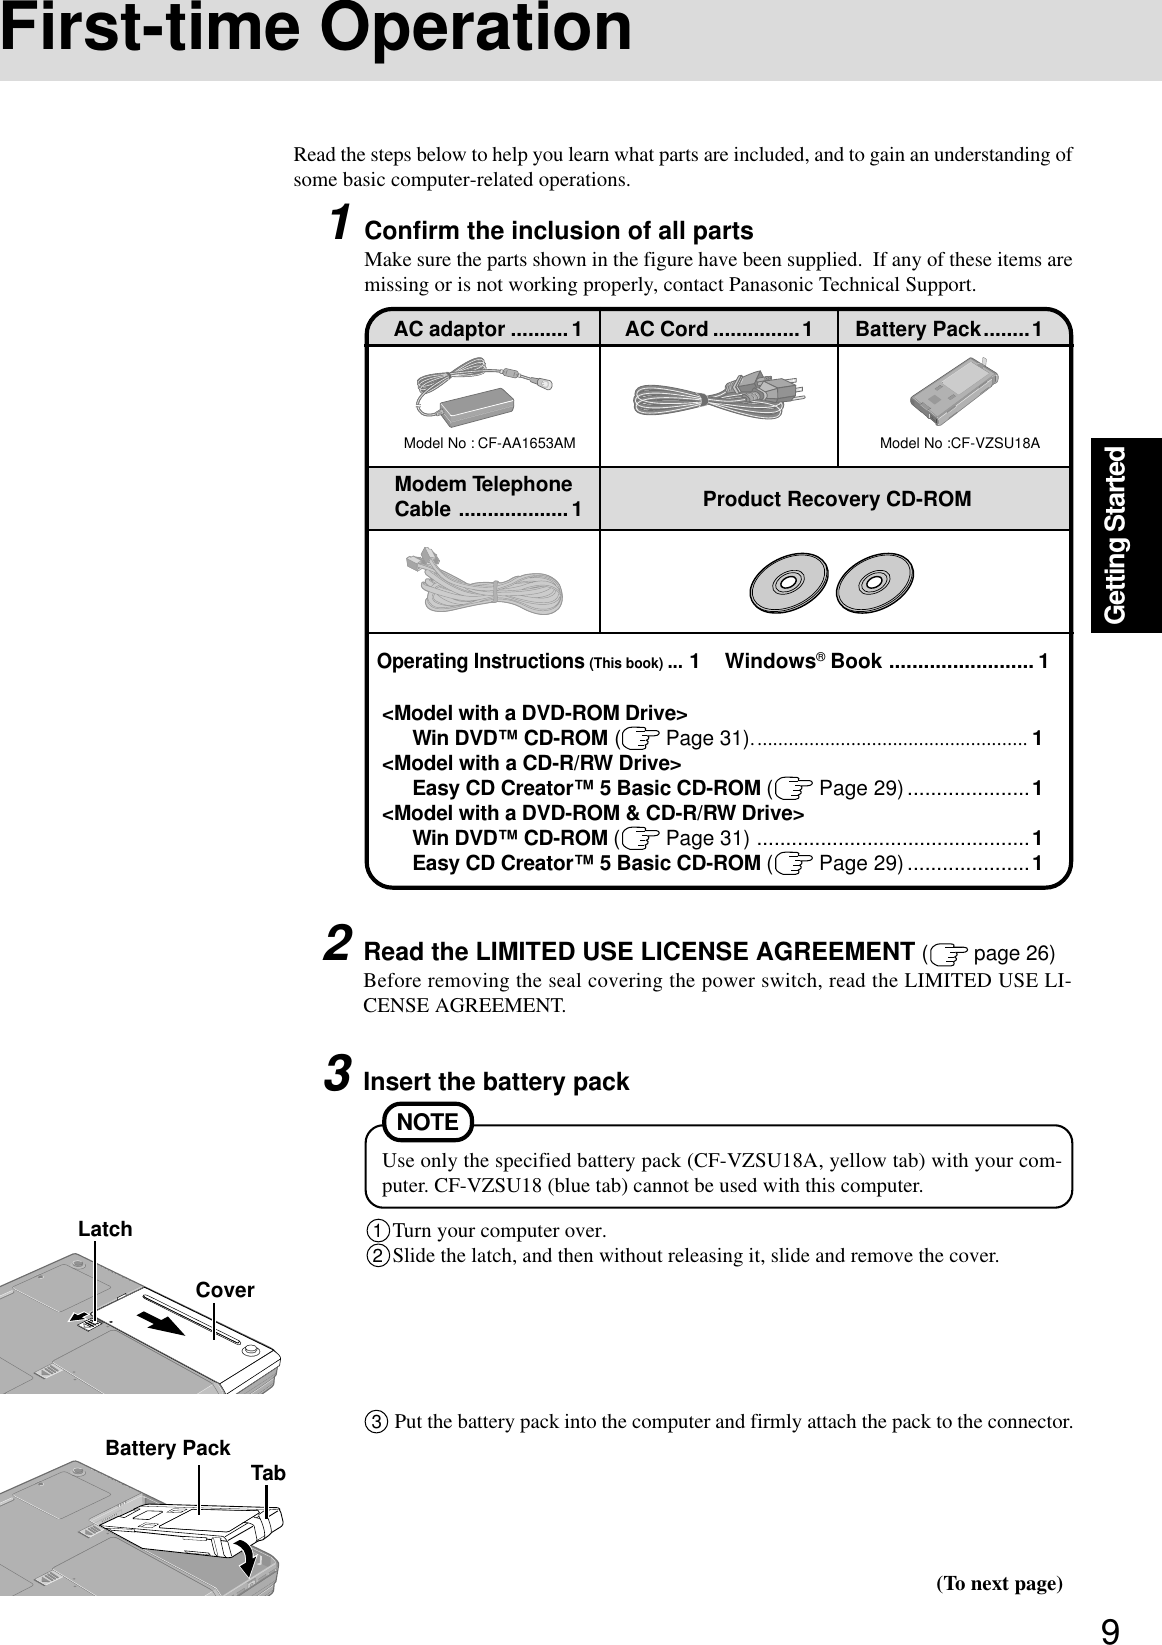

![11Getting Started7Setup WindowsMoving the cursor ( ) or clicking buttons can be performed with the touch pad (page 17).1At the [Welcome to the Windows 2000 Setup Wizard], select [Next].2After reading the agreement, select [I accept this agreement] or [I don’t accept thisagreement], then select [Next].3Select settings for your region, then select [Next].4Enter your name and organization and then select [Next].5Enter your computer name and administrator password and then select [Next].Windows 2000NOTE If [I don’t accept this agreement] is selected, the Windows setup will be aborted.Do not press any key or move the touch pad until [Windows 2000 Professional Setup]is displayed.CAUTIONCAUTIONRemember this password! If the password is forgotten, Windows 2000 cannot beoperated.6Enter the correct date, time and the time zone, then select [Next].You can also complete these settings at a later time.7At the [Networking Settings], select [Typical settings], then select [Next].8At the [Workgroup or Computer Domain], select [No, this computer is not on a net-work, or is on a network without a domain], then select [Next].The computer will restart.9At the [Welcome to the Network Identification Wizard], select [Next].10At the [Users of This Computer], select [Users must enter a user name and password touse this computer], then select [Next].11Select [Finish].12Enter your administrator password and select [OK].Windows XPNOTE If [I don’t accept this agreement] is selected, the Windows setup will be aborted.Do not press any key or move the touch pad until [Windows XP Professional Setup] isdisplayed.CAUTION1At the [Welcome to the Windows XP Setup Wizard], select [Next].2After reading the agreement, select [I accept this agreement] or [I don’t accept thisagreement], then select [Next].3Select settings for your region, then select [Next].4Enter your name and organization and then select [Next].(To next page)](https://usermanual.wiki/Panasonic-of-North-America/9TGCF-501.Manual/User-Guide-286711-Page-11.png)
![12Getting StartedFirst-time Operation8Create Backup Disks for reinstallation1Prepare 2HD floppy disks and make sure they are not in the write-protected state, andthen set it.2Windows 2000Select [Start] - [Programs] - [Panasonic] - [Create Backup Disk] and follow the on-screen instructions.Windows XPSelect [start] - [All Programs] - [Panasonic] - [Create Backup Disk] and follow the on-screen instructions.When [You do not need to make “BACKUP DISK”] is displayed, there is no need tocreate a Backup Disk.3Place a label identifying the contents on each disk.Name of created backup diskFIRSTAID FD (When the display for creating the UPDATE FD is shown, create thedisk by following the on-screen instructions.)Label on the top surface, andinsert the shutter-side headfirst.5Enter your computer name and administrator password and then select [Next].6Enter the correct date, time and the time zone, then select [Next].You can also complete these settings at a later time.7At the [Networking Settings], select [Typical settings], then select [Next].8At the [Workgroup or Computer Domain], select [No, this computer is not on a net-work, or is on a network without a domain], then select [Next].The computer will restart.9Enter your administrator password and select .Eject ButtonCAUTIONRemember this password! If the password is forgotten, Windows XP cannot beoperated. ( Page 13)CAUTIONStore the floppy disks in a safe place. They will enable you to return your computerto close to the condition at the time of purchase should any problems occur.When creating backup disks, do not run any other application program.When creating backup disks and the message [Insufficient files to copy] is dis-played, select [OK] and then contact Panasonic Technical Support.While the floppy disk drive indicator is on, do not remove the floppy disk, poweroff your computer or use the standby or hibernation function ( “Standby/Hibernation Functions”).Be sure to create the backup disk.If a backup disk is not created, it will be impossible to return the computer to itsoriginal state. In this case, contact Panasonic Technical Support.This concludes the first-time use operation guidelines.<Information for the CD-R/RW drive and DVD-ROM & CD-R/RW drive>Before using the CD-R/RW drive or DVD-ROM & CD-R/RW drive for the first time,remove the protective sheet from the lens area. The protective sheet inside the drive delaysthe opening of the drive by about ten seconds. This delay is not a problem.NOTE](https://usermanual.wiki/Panasonic-of-North-America/9TGCF-501.Manual/User-Guide-286711-Page-12.png)
![13Getting StartedYou can select Classic view for the Control Panel or select the Classic Start menu. Youcan also change the way a user logs on or off.The procedure in this manual uses the method or view of the Windows XP defaultsetting (not Classic view or Classic Start menu etc.).Resetting the passwordWindows XP has a function to reset a forgotten password.To use this function, you need to create a password reset disk beforehand following thesteps below.1Select [start] - [Control Panel] - [User Accounts] and select the account you used tologon.2Select [Prevent a forgotten password] from the [Related Tasks] menu and create apassword reset disk following the on-screen instructions.Store the password reset disk in a safe place.Depending on the Windows settings, installed applications, and drivers, menus andother displays may differ, or some functions (such as use of the password reset disk)may be inoperable. Check with your system administrator for details.NOTEOnly the logon password for each account can be reset.The password set in the Setup Utility cannot be reset.Information for Windows XP](https://usermanual.wiki/Panasonic-of-North-America/9TGCF-501.Manual/User-Guide-286711-Page-13.png)
![14Operation1Open the displaySlide the latch as shown and lift open the display.Starting Up/Shutting DownStarting Up2Turn your computer onPress the power switch and hold it for approximately one second until the power indicatorturns on before releasing it.After confirming that the power indicator has turned on, avoid the following untilWindows has completed loading.• Connecting or disconnecting the AC adaptor.• Touching the power switch.• Performing any keyboard or touch pad (or external mouse) operations.• Closing the display.Once the computer is powered off, you must wait at least ten seconds before pow-ering it on again.When the CPU temperature rises, the computer may not power on to prevent theCPU from overheating. Should this happen, allow the computer to cool down thenswitch the power on again.If the computer still does not power on, contact Panasonic Technical Support.When an application or file that was previously displayed ap-pears on your screen,the standby or hibernation mode ( “Standby/Hibernation Functions”) hasbeen set.CAUTION Enter your password* and press Enter .( “Security Measures”)Will Start Will Not Start(Power off)If [Enter Password] is displayed,*Supervisor Password or User Password set in the Setup Utility (notthe Windows password).Three incorrect attemptsorNo password for about a minuteThe correct passwordEnter Password [ ]You may encounter the following situations when the computer is turned on at verylow temperatures. These functions are designed to prevent hard disk drive malfunc-tions that may occur at low temperatures.The message “Warming up the system” is displayed, and start-up takes longer thanusual (a few minutes or more).In this case, wait for the computer to start up.The power indicator will blink quickly (in green); in this case, the power does notturn on, or the computer does not resume from standby or hibernation mode.To restart the computer, leave it in an environment with a temperature of 5°C (41°F)or more for about an hour, and try turning the power on once more.PowerSwitch Power Indicator NOTE](https://usermanual.wiki/Panasonic-of-North-America/9TGCF-501.Manual/User-Guide-286711-Page-14.png)
![15Operation3Log on to WindowsWindows 2000Wait for 10 seconds after confirming that the hard disk drive access has been completed,input the user name and password, then select [OK]. Until the correct user name andpassword are entered, the computer will not operate.Windows XPWait for 10 seconds after confirming that the hard disk access has been completed, selectthe user and input the password, then select . Until the correct password is entered, thecomputer will not operate.4Select your applicationYou are able to start working on your computer.The power saving function is factory set, so if there is no input from a key, the touch pador an external mouse (when one is connected) for a certain interval of time, the power tothe LCD and hard disk may be turned off. The LCD will resume operation when thetouch pad or an external mouse (when one is connected) is used or a key is pressed.The power to the LCD may be turned off even when an application software is beinginstalled. In this case, because it is conceivable that a selection dialog box will beshown, do not press Space or Enter to attempt to resume from this condition asdoing so may trigger a selection, but instead, press a key unrelated to the direct trigger-ing of a selection, like Ctrl .In addition, when the computer is left alone, it automatically enters the standby or hiber-nation mode ( “Standby/Hibernation Functions”). The computer will resumeby pressing the power switch.Windows XPWhen you create the first new account, you can only select [Computer administrator].Only the added user account will be displayed in the Welcome screen. The account forthe administrator created during Windows setup (when the computer is started up forthe first time) will not be displayed.When switching to a different user with the Fast User Switching function, it may not bepossible to set the settings of the display. In this case, log on with the administratorauthority again, not using the Fast User Switching function, and try the operation oncemore.NOTE](https://usermanual.wiki/Panasonic-of-North-America/9TGCF-501.Manual/User-Guide-286711-Page-15.png)
![16OperationShutting Down (power off your computer)From the keyboard,You may choose to press , and then select the menu with or .Restarting your computer (without shutting down)Windows 2000Select [Restart], then select [OK].Windows XPSelect [Restart].3Confirm shut downWindows 2000Select [Shut down], then select [OK].Windows XPSelect [Turn Off].Your computer will power off automatically.To quickly resume computer operation after shutting down,The standby or hibernation function is available. ( “Standby/Hiberna-tion Functions”)NOTENOTEStarting Up/Shutting DownThis procedure is for shutting down the computer without using the standby or hibernationfunction.( “Standby/Hibernation Functions”)1Save important data and close each application2Display the shut down screenWindows 2000Select [Start] - [Shut Down].Windows XPSelect [start] - [Turn Off Computer].CAUTIONDo not do the following during the shutdown/restart procedure.• Connecting or disconnecting the AC adaptor.• Touching the power switch.• Performing any keyboard, touch pad (or external mouse) operations.• Closing the display.](https://usermanual.wiki/Panasonic-of-North-America/9TGCF-501.Manual/User-Guide-286711-Page-16.png)
![18OperationTable of Contents(Items)By clicking an item, the cor-responding page will be dis-played at 100%.Reference Manual1Turn your computer on2Windows 2000Select [Reference Manual] in [Start] - [Programs] - [Panasonic] - [On-Line Manuals]Windows XPSelect [Reference Manual] in [start]When the Reference Manual is started up for the first time, the License Agreement of the Acrobat Reader will be displayed. Afterreading the agreement, select [Accept] to access the Reference Manual.The Reference Manual can be accessed on your computer. When a printer is connected, the Reference Manual can also be printed.This manual explains functions for you to make greater use of the computer, such as how to add peripheral devices, how the SetupUtility works and other useful information.Run the Reference ManualPage indicatorA desired page can be displayed by inputting the page number after clicking here.(The display may be changed without notification.)Display the pageGo forward or backward a page, or tothe beginning or end of a document.Display ofthe manualMovable splitter barThis bar can be dragged, forexample, to the right to en-large the display of the Tableof Contents.Change the display sizeYou can select to magnify/de-magnify the display.ExitPerform a “Find” operationIllustrations may be difficult to view depending on the magnification. If this is the case, we recommend that the display bemagnified.The characters in PDF files (such as the Reference Manual) may be difficult to read depending on the Acrobat Readersettings and the Windows Desktop settings. In such cases, change the Acrobat Reader settings with the following procedure.1Start up Acrobat Reader.2Select [Edit] - [Preferences] - [Accessibility], and then set [Color Scheme] to [Use colors specified in document].When the taskbar is hidden at the bottom portion of Acrobat Reader, set the maximum display window size.If a printer is connected, we recommend printing pages. The illustrations and display samples may not print with a highquality.Windows XPWhen switching to a different user with the Fast User Switching function, PDF files may not be printed properly. In this case,log on with the administrator authority again, not using the Fast User Switching function, and try the operation once more.NOTECancel or correct an operationZoom-inHand toolTo move around the current page.](https://usermanual.wiki/Panasonic-of-North-America/9TGCF-501.Manual/User-Guide-286711-Page-18.png)
![21TroubleshootingThe power indicator or bat-tery indicator is not lit[Enter Password] is displayedPOST Startup Error(s) isdisplayedWindows startup, or an op-eration is extremely slowThe date and time are incor-rectWhen resuming from thestandby or hibernationmode, [Enter Password]does not appear even if apassword has been set in theSetup UtilityWhen the administratorpassword is forgottenWhen the previous item isnot the causeCheck the cable connection for the AC adaptor.Check to see if a fully charged battery is properly installed.Remove the battery pack and disconnect the AC adaptor, then connect them again.Input your password. If you have forgotten it, contact Panasonic Technical Support. page 19Press F9 in the Setup Utility ( “Setup Utility”). This will restore the SetupUtility’s settings to their default values (except the password settings). Then, the SetupUtility must be run once again for you to input the appropriate operating environment set-tings. (The processing speed depends on the application software used, so this operationmay not cause the processing speed to increase.)You can set the date and time using the following menu.Windows 2000 : [Control Panel] - [Date/Time]Windows XP : [Control Panel] - [Date, Time, Language, and Regional Options] -[Date and Time] When the computer is connected to a LAN, confirm the date and time of the server.If you continue to experience problems, the internal battery maintaining the clock mayneed to be replaced. Contact Panasonic Technical Support. This computer will not correctly recognize the date and time starting from the year 2100A.D.Use the Windows password as follows:Windows 2000Set the password in [Control Panel] - [Users and Passwords], then add the check mark for[Prompt for password when computer goes off standby] in [Control Panel] - [Power Op-tions] - [Advanced].Windows XPSelect the account to change in [Control Panel] - [User Accounts] and set the password, thenadd the check mark for [Prompt for password when computer resumes from standby] in[Control Panel] - [Performance and Maintenance] - [Power Options] - [Advanced].Windows 2000After reinstalling, setup Windows and then set the password again.Windows XPIf you have created a password reset disk ( page 13), a message is displayed when youfail to correctly enter the password. Follow the message’s instructions and set the passwordagain by using the password reset disk.If you have not created a password reset disk, after reinstalling, setup Windows and then setthe password again.Press F9 in the Setup Utility ( “Setup Utility”). This will restore the SetupUtility’s settings to their default values (except the password settings).Try removing all peripheral devices.Windows 2000Click [Local Disk(C:)] with the right button in [My Computer], select [Properties], thenselect [Tools] - [Check Now].Windows XPClick [Local Disk(C:)] with the right button in [start] - [My Computer], select [Proper-ties], then select [Tools] - [Check Now].At start-up, press F8 to operate the computer in the Safe mode.When a problem occurs, refer to this page. The “Reference Manual” also contains detailed information. If a problem appears to berelated to a software application, read the software related manual. If you still cannot troubleshoot the problem, contact PanasonicTechnical Support.Dealing with Problems (Summary) Starting Up](https://usermanual.wiki/Panasonic-of-North-America/9TGCF-501.Manual/User-Guide-286711-Page-21.png)
![22TroubleshootingNo display after powering onThe power has not beenturned off, but after a cer-tain period of time, there isno displayThe cursor cannot be con-trolledAn afterimage appears (e.g.,green, red, and blue dotsremain on the display) orthere are dots not display-ing the correct colors.The external display nolonger displays properlyThe screen becomes disor-deredWhen you want to displaythe fonts or icons at a largersizeWindows XPAn error occurs or the com-puter freezes while usingDualview.Dealing with Problems (Summary)When there is no display to an external display,• Check your cable connection to the external display.• Confirm your display is powered on.• Check the settings for your external display.Try changing the display by pressing Fn + F3 .When displaying only through an external display, if the computer is shut down by usingthe standby or hibernation function, there will be no display on the LCD unless the exter-nal display is connected when operations are resumed. In this case, connect the externaldisplay or press Fn + F3 .Has the computer been set to the power-saving mode? To resume operation of your computer from the condition the power of the display is off(for energy conservation purposes), press any key unrelated to the direct triggering of aselection, like Shift .To save power, your computer may have automatically entered the standby or hiberna-tion mode. ( “Computing On the Road”) Press the power switch.Restart the computer by using the keyboard (e.g., ).If an image is displayed for a prolonged period of time, an afterimage may appear. Thisis not a malfunction. The afterimage will disappear when a different screen is displayed.High-precision and advanced technologies are necessary in the production of color liquidcrystal displays (color LCDs). Therefore, if 0.002% or less of the picture elements eitherfail to light or remain constantly lit (that is, more than 99.998% of elements are function-ing properly), no defect is considered to exist.When an external display not compatible with the power saving mode is used with thecomputer, the external display may no longer display properly when the computer enters thecondition the power of the display is OFF (for energy conservation purposes). In suchcases, turn off the power to the external display.Changing the number of colors of the display may affect the screen. Restart the computer.Windows XPWhen using Dualview, use the same display colors for the external display as those usedby the LCD.Change the settings as follows (for more details, refer to the Windows Help).Windows 20001Select [Start] - [Settings] - [Control Panel] - [Display] - [Appearance].2Select the scheme labeled “large” or “extra large” in [Scheme] to change the font size,and select [Icon] in [Item] to change the icon size.Windows XP1Select [start] - [Control Panel] - [Appearance and Themes] - [Display] - [Appearance].2Select the font size in [Font size], and select [Effects] and then add the check mark for[Use large icons] to increase the icon size.If you use a 3D screen saver while in Dualview mode at a high resolution, an error mayoccur or the computer may freeze. Under these conditions, do not use a 3D screen saver. DisplaySome applications do notwork properly When switching to a different user with the Fast User Switching function, the followingproblems may occur.• Some applications may not work properly (for example, PDF files may not be printedproperly).• It may not be possible to set the settings of the display.• A serial mouse may not work.If any of the above occur, log on with the administrator authority again, not using the FastUser Switching function, and try the operation once more. Fast User Switching function Windows XP](https://usermanual.wiki/Panasonic-of-North-America/9TGCF-501.Manual/User-Guide-286711-Page-22.png)
![23TroubleshootingThe red indicator lights.The red indicator blinksThe orange indicator blinksWindows cannot be shutdown or restarted Shutting downDo not shut down Windows during music playback.If a USB device is connected, try removing it.Is Acrobat Reader installed?If Acrobat Reader is not installed, run [c:\util\reader\ar505enu.exe] in [Start]* - [Run] toreinstall the program. When installing the program, do not change the installation destina-tion folder. If the destination folder is changed, the Reference Manual cannot be openedfrom the [Start]* menu.Windows XP : [start] Reference ManualThe Reference Manual isnot displayedThe battery level is low. Save your data and power off your computer.After connecting the AC adaptor or replacing the battery pack with a fully charged one, turnyour computer on.The battery pack or recharging function may be defective. Quickly remove the batterypack and disconnect the AC adaptor, then connect them again.Check the model number of the battery pack. CF-VZSU18 (blue tab) cannot be used withthis computer. Use only the specified battery pack (CF-VZSU18A, yellow tab).If the problem persists, contact Panasonic Technical Support.Unable to charge because of an improper temperature range. ( page 6) Battery Indicator OthersPress Ctrl + Shift + Esc to open Task Manager and close the software applicationwhich is not responding.After shutting down by pressing the power switch for more than four seconds, press thepower switch to power on and open the application again.If the program no longer works normally, delete the program using the following menu.Then reinstall the program.Windows 2000 : [Control Panel] - [Add/Remove Programs]Windows XP : [Control Panel] - [Add or Remove Programs]Computer hangs](https://usermanual.wiki/Panasonic-of-North-America/9TGCF-501.Manual/User-Guide-286711-Page-23.png)
![24TroubleshootingReinstalling SoftwareBefore Reinstallation PreparingYou will need the Product Recovery CD-ROM and the Backup Disk (e.g., FIRSTAID FD) you made earlier. ( page 12)Reinstalling1Turn the computer on.2When the message [Press F2 to enter SETUP] is displayed,press F2 and then run the Setup Utility.If the password has been set, enter the Supervisor Pass-word.3Write down all of the contents of the Setup Utility andthen press F9 .At the confirmation message, select [Yes] and press Enter .4Select [Boot] menu, then select [CD Drive] and press F6until [CD Drive] is at the top of the [Boot] menu.5Place the disc one of the recovery CDs into the CD drive.6Press F10 .At the confirmation message, select [Yes] and press Enter .The computer will reboot, and this screen should appear.Select [1. Start restoring the operating system.].7The License Agreement screen should appear.Select [1. Yes, I agree to the provisions above and wish tocontinue!].If data on your hard disk is compressed, the data shouldbe uncompressed. ImportantSave all important data. If reinstallation is carried out, all data existing prior to the installation will be lost. The reinstal-lation will return the computer to close to the conditions at time of purchase.Before the reinstallation procedure, remove all peripherals.Be sure the AC adaptor is connected until the reinstallation procedure is completed.If you have not created the FIRSTAID FD, you can create by using the following menu.Windows 2000 : [Create Backup Disk] in [Start] - [Programs] - [Panasonic].Windows XP : [Create Backup Disk] in [start] - [All Programs] - [Panasonic].If you can not create this disk, contact Panasonic Technical Support.NOTECAUTION---------------------------------------------------------------------Select a number---------------------------------------------------------------------1. Start restoring the operating system.2. Erase the whole data on HDD for security.3. End---------------------------------------------------------------------9Make a selection from the menu.When selecting [2], enter the basic partition size for OSinstallation and press Enter .(The data partition size is the remainder after subtract-ing the basic partition size.)To select [3], the initial partition size must be 6 GB ormore of the hard disk size. Reinstallation cannot be per-formed with a small partition size.Windows XP8This screen should appear.Windows 2000---------------------------------------------------------------------Select a number---------------------------------------------------------------------1. Restore Windows(R) 2000 Professional to the whole HDD.2. Make two partitions, for the operating system and data. And restoreWindows(R) 2000 Professional to the operating system partition.(All existing partitions on HDD will be lost.)3. Restore Windows(R) 2000 Professional to the first partition4. End------------------------------------------------------------------------------------------------------------------------------------------Select a number---------------------------------------------------------------------1. Restore Windows(R) XP Professional to the whole HDD.2. Make two partitions, for the operating system and data. And restoreWindows(R) XP Professional to the operating system partition.(All existing partitions on HDD will be lost.)3. Restore Windows(R) XP Professional to the first partition4. End---------------------------------------------------------------------](https://usermanual.wiki/Panasonic-of-North-America/9TGCF-501.Manual/User-Guide-286711-Page-24.png)
![25Troubleshooting11 After the reinstallation procedure completes, the follow-ing message will appear on the display.Windows(R) 2000 Professional install wizard will start after reboot.Remove the Product Recovery CD-ROM, then restart the computer by pressingCtrl + Alt + Del (Delete).Windows 200010 At the confirmation message, select [Y].The operations of reinstallation for the hard disk start au-tomatically. (The operations take about 15 minutes.)When the message “insert the next CD” is displayed, in-sert the Product Recovery CD-ROM showing the nextnumber in the sequence, and then select [OK].If the message “The media does not contain the cor-rect file” appears, select [OK]. The message “insertthe next CD” will be displayed again.Confirm that the proper Product Recovery CD-ROMhas been inserted by opening the tray of the CD driveand then close the tray, then select [OK].NOTEWindows(R) XP Professional install wizard will start after reboot.Remove the Product Recovery CD-ROM, then restart the computer by pressingCtrl + Alt + Del (Delete).Windows XPRemove the Product Recovery CD-ROM, then restart thecomputer by pressing Ctrl + Alt + Del .12 When the message [Press F2 to enter SETUP] is displayed,press F2 and then run the Setup Utility.If the password has been set, enter the Supervisor Pass-word.13 Press F9 .At the confirmation message, select [Yes] and press Enter . (The Setup Utility settings will return to theirdefault values. Even the security settings with the excep-tion of the password(s) will return to their default values.)Change the settings where necessary.14 Press F10 .At the confirmation message, select [Yes] and press Enter .15 Perform the setup procedure for Windows by followingthe instructions on the screen. ( page 11)NOTEWhen the FIRSTAID FD is to be created, follow the stepsin the readme.txt on the disk. ( page 12)<Changing the drive letter>You can change the drive letter for the CD drive or hard diskdrive by the following steps.Drive letters can only be changed when two or more parti-tions have been created on the hard disk drive. The nameof the C: drive cannot be changed.We recommend that you make these changes before in-stalling applications.Windows 20001Select [Start] - [Settings] - [Control Panel] - [Administra-tive Tools] - [Computer Management].2Select [Disk Management] from [Storage].3Right click on the partition of the hard disk or the name ofthe CD drive and select [Change Drive Letter and Path].4Select [Edit].5Select [Assign a drive letter] and the new drive letter, andthen select [OK].6At the confirmation message, select [Yes].Windows XP1Select [start] - [Control Panel] - [Performance and Main-tenance] - [Administrative Tools] - [Computer Manage-ment].2Select [Disk Management] from [Storage].3Right click on the partition of the hard disk or the name ofthe CD drive and select [Change Drive Letter and Paths].4Select [Change].5Select [Assign the following drive letter] and the new driveletter, and then select [OK].6At the confirmation message, select [Yes].](https://usermanual.wiki/Panasonic-of-North-America/9TGCF-501.Manual/User-Guide-286711-Page-25.png)
![28Appendix1Turn the computer on.2When the message [Press F2 to enter SETUP] is displayed, press F2 and then run the Setup Utility.If the password has been set, enter the Supervisor Password.3Select [Boot] menu, then select [CD Drive] and press F6 until [CD Drive] is at the top of the [Boot] menu.4Place the disc one of the recovery CDs into the CD drive.5Press F10 .At the confirmation message, select [Yes] and press Enter .The computer will reboot, and this screen should appear.6Select [2. Erase the whole data on HDD for security.].7At the confirmation message, press Y .8At the start menu, press Enter .9The time required for erasing data will be displayed.Press Space .10 At the confirmation message, press Enter .The operation of erasing the hard disk starts.11 After the operation is complete:Under normal conditions, the message [Hard disk data has been deleted.] will be displayed.If a problem occurred during the operation, an error message will be displayed.12 Remove the Product Recovery CD-ROM, then turn off the computer by pressing the power switch.This computer is equipped with a utility for completely erasing hard disk data.When disposing of or transferring ownership of this device, erase all data on the hard disk in order to prevent the theft of hard diskdata following the steps below.The hard disk data erase utility erases data using an “overwriting” method, but there is a possibility that due to malfunctions orother operational errors, data may not be completely erased. There are also specialized devices that may be able to read datathat has been erased using this method. If you need to erase highly confidential data, we recommend that you contact acompany that specializes in this process. Matsushita Electric Industrial Co., Ltd. will bear no responsibility for losses ordamages suffered as a result of the use of this utility.PreparingYou will need the Product Recovery CD-ROM.---------------------------------------------------------------------Select a number---------------------------------------------------------------------1. Start restoring the operating system.2. Erase the whole data on HDD for security.3. End---------------------------------------------------------------------NOTEBe sure the AC adaptor is connected until the procedure is completed.This utility can only be used for internal hard disk. It cannot be used to erase data from external hard disks.This utility cannot erase data from damaged disk.This utility cannot erase data for specific partitions.After executing this utility, the computer cannot be booted from the hard disk.Hard Disk Data Erase UtilityProcedure](https://usermanual.wiki/Panasonic-of-North-America/9TGCF-501.Manual/User-Guide-286711-Page-28.png)
![29AppendixEasy CD Creator TM 5<Model with a CD-R/RW drive / Model with a DVD-ROM & CD-R/RW drive>“Easy CD CreatorTM 5”(hereafter, Easy CD Creator) is CD writing software application developed by Roxio, Inc.Here, explanations are given on general information about Easy CD Creator, the installation procedure, and how to access theonline manual. Refer to the online manual concerning the detailed use of the software application.What you can do with this software applicationCreation of music CDsCreation of data CDs (CD-ROMs)Creation of data CDs (writing files to CD-R and CD-RW discs like writing to floppy disks, etc. To do this, use DirectCDUtility.)Applicable CD MediaCD-R (CD-Recordable: one-time writable CD media)Once data is written, it cannot be changed.CD-RW (CD-ReWritable: rewritable CD media)Written data can be deleted and new information can be added.General InformationNOTEFor details on the functions of the software application and CD media, refer to the online manual of the application as well.Close all other software application before running the Setup program for Easy CD Creator for added safety.1Set the Easy CD Creator CD-ROM in the CD-R/RW drive.2Select [Yes] at [Roxio Easy CD Creator 5].<When the [Roxio Easy CD Creator 5] is not automatically displayed>In [Start]* - [Run], input [x:\SETUP] and select [OK].(“x” is the drive letter. You can change the letter to suit your preference.)*Windows XP :[start]3Select your language at [Choose Setup Language], then select [OK].Follow the on-screen instructions.When the installation completes, remove the CD-ROM from the drive.(First time only)Easy CD Creator is not pre-installed in the computer. To install the software application, follow the procedure below.If you accidentally delete Easy CD Creator, or if you use the product recovery CD-ROMs and completely return the computerto factory condition, follow the procedure below to re-install the software application.Installing Easy CD CreatorCAUTIONNOTEWhen the Easy CD Creator is started up for the first time, the License Agreement is displayed. After reading the agreement,select [I accept the terms in the license agreement], then select [OK].](https://usermanual.wiki/Panasonic-of-North-America/9TGCF-501.Manual/User-Guide-286711-Page-29.png)
![30AppendixHow to access the Online ManualRefer to the following menu for information on the functions of each application.Windows 2000 : Select [Start] - [Programs] - [Roxio Easy CD Creator 5] - [Project Selector], then select [help].Windows XP : Select [start] - [All Programs] - [Roxio Easy CD Creator 5] - [Project Selector], then select [help].Refer to the Help menu of each application for information about specific operations.Running Easy CD CreatorRefer to the online manual ( described above) for information on the operation and useof each function.When is displayed on the taskbar, the [Auto Disconnect] screen of Dial Up may not be displayed and the computer willcontinue to be connected when Internet Explorer is closed. In such cases, double-click the Dial Up icon on the taskbarand disconnect the line.When a new CD-R disc is inserted, Project Selector is typically displayed. If there is no display, try setting the CD-R discagain. If there is still no display, open Project Selector from the start menu.When selecting names for external CD drives or drives created using “virtual CD” software, use letters that come later in thealphabet than the drive letter for the internal CD drive.When writing data using DirectCD, remove the CD-R/RW disk, and complete the writing process before doing any of thefollowing:• Shutting down or restarting Windows• Logging off Windows or using the fast user switching function• Entering standby or hibernation modeDo not use the emergency hole of the CD drive when removing the disc.NOTEWhen reading data of a CD formatted with DirectCD on another computer:• The UDF Reader installation screen is displayed.Install the UDF Reader. Although the message on the screen indicates that the reader is for use with Windows 95 orWindows NT, it can be installed on other operating systems as well.• The UDF Reader installation screen is not displayed and the data cannot be read.CDs formatted with DirectCD cannot be used with this computer. Use a data CD that was not written by DirectCDformat.When a CD cannot be formatted with DirectCD, try formatting it by the Administrator.Cautions on UseInformationIf Easy CD Creator does not operate properly, we recommend carefully reading the online help file first for problems withthe operating environment or operations.If you still cannot troubleshoot the problem, contact Panasonic Technical Support.About CopiesWhen writing to CD-R/RW, make sure that you are not infringing any copyrights.It is illegal to copy audio CDs for non-personal use.When backing up software, make sure that you are not infringing any software copyrights for that product.Easy CD Creator TM 5](https://usermanual.wiki/Panasonic-of-North-America/9TGCF-501.Manual/User-Guide-286711-Page-30.png)
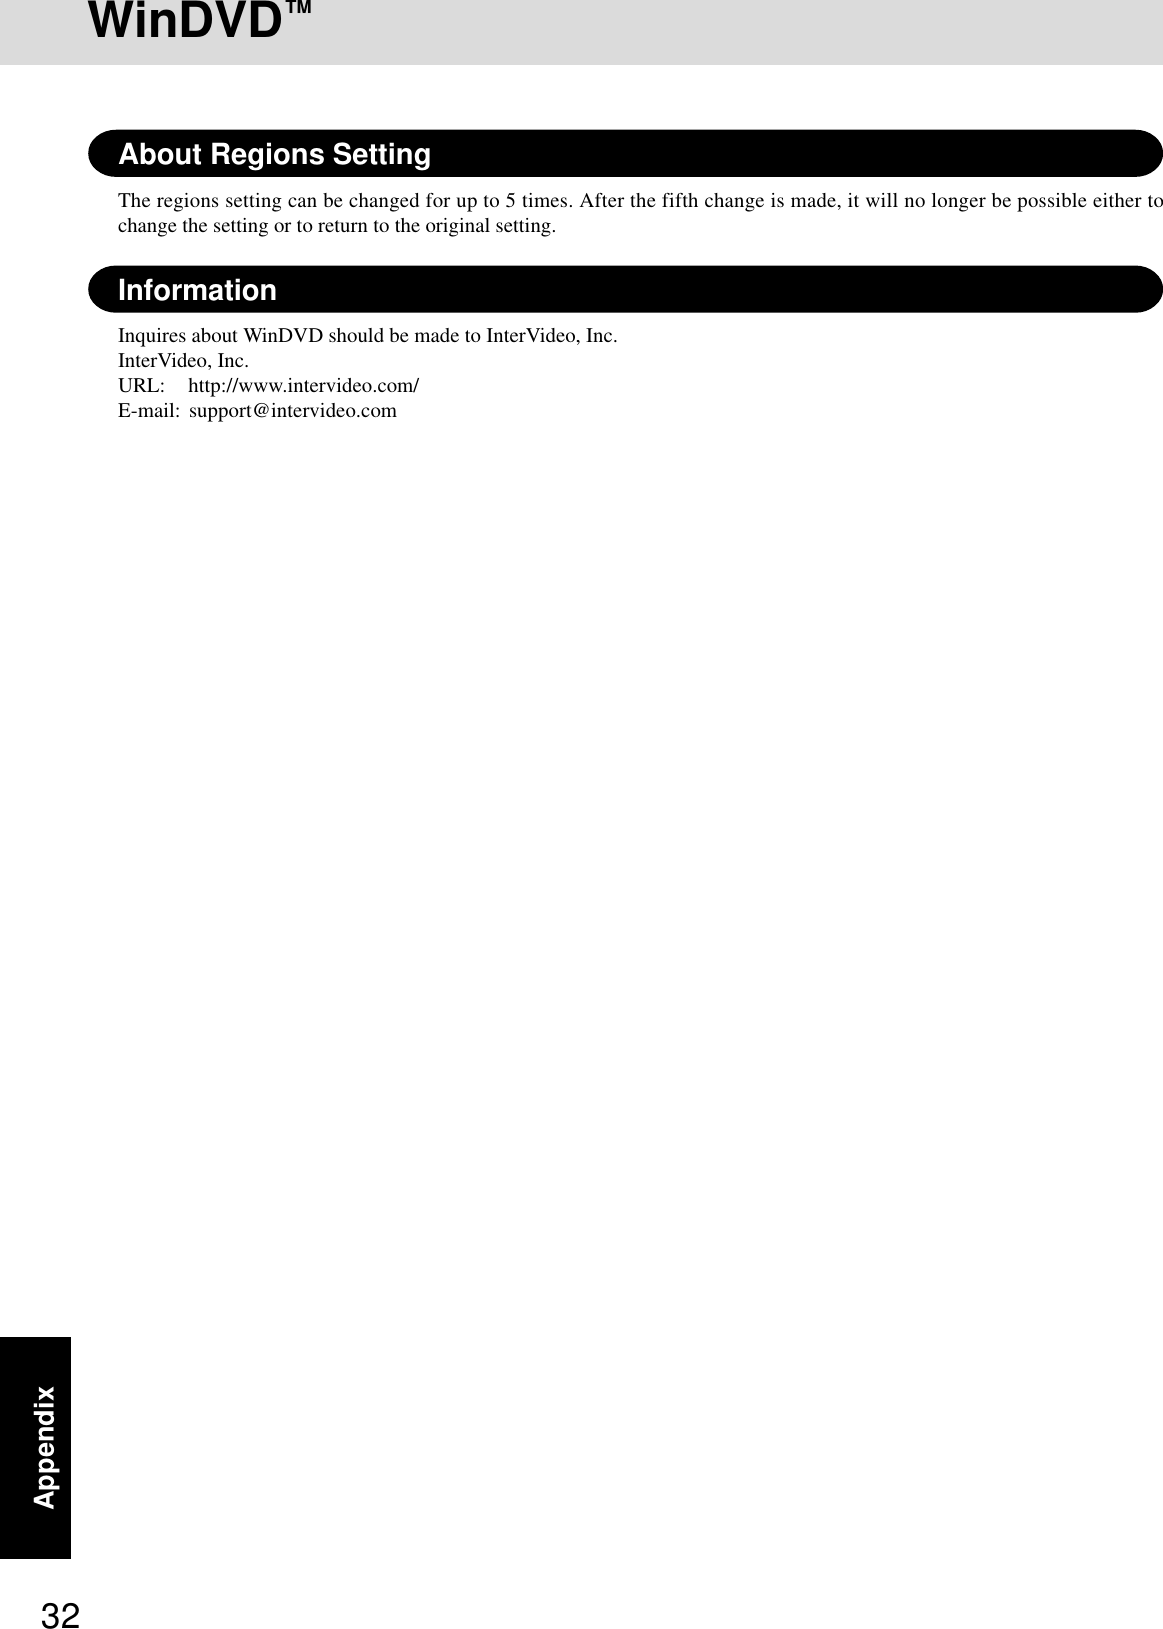
![31Appendix<Model with a DVD-ROM drive / Model with a DVD-ROM & CD-R/RW drive>WinDVD™ (hereafter, WinDVD) is a software application for DVD playback.Here, you will find explanations and general information on the installation procedure and how to access the online manual.WinDVD™Installing WinDVDCAUTIONClose all other software application before running the Setup program for WinDVD for added safety.Log on as the administrator.1Set the WinDVD CD-ROM in the drive.The WinDVD setup program will run automatically (allow some time for disc recognition). When the setup program willnot run automatically, input [x:\setup] in [Start]* - [Run] and select [OK]. (“x”is the drive letter. You can change the letterto suit your preference.)*Windows XP :[start]2Select [Next] at the Welcome Message.3After reading the “License Agreement”*, select [Yes] if you agree to the terms.* Refer to the “LIMITED USE LICENSE AGREEMENT” on the Operating Instructions of the computer.4Follow the on-screen instructions and install WinDVD.<Confirmation of the DVD-ROM drive settings>To run WinDVD, it is necessary to make the following settings.1Windows 2000 Select [Start] - [Settings] - [Control Panel] - [System] - [Hardware] - [Device Manager].Windows XP Select [start] - [Control Panel] - [Performance and Maintenance] - [System] - [Hardware] - [Device Man-ager].2Double-click [Primary IDE Channel] for [IDE ATA/ATAPI controllers].3Select [Advanced Settings], and confirm that [Transfer Mode] is set to [DMA if available] for [Device 0] and [Device 1].4Double-click [Secondary IDE Channel] for [IDE ATA/ATAPI controllers] and perform as the step .Do not enter the standby or hibernation mode while WinDVD is running.Do not start WinDVD while the hard disk drive’s access lamp is blinking immediately after the computer was started up.If you maximize the video display window, you can return to the original window size by double-clicking over theimages.During video playback (while the access lamp is on), do not eject the disc.Do not use other applications or the Command Prompt, and do not change the settings of the screen properties.In some cases, when the number of colors for the display is increased, a message appears and the DVD cannot be played.If this happens, reduce the number of display colors.Immediately after resuming from a pause, frame dropping may occur depending on the operating environment or DVDvideo (images or sounds are disrupted).In the DualView (Dual-Display mode) or simultaneous (internal/external) display mode, there are times when images orvideo are not displayed correctly.During a prolonged period of rapid advance, the pause mode may be established at some point. If this happens, exitWinDVD, and restart.NOTERunning WinDVDWindows 2000Select [Start] - [Programs] - [InterVideo WinDVD] - [InterVideo WinDVD] or double-click on the desktop.Windows XPSelect [start] - [All Programs] - [InterVideo WinDVD] - [InterVideo WinDVD] or double-click on the desktop.<How to access the online manual>Select “?” of the WinDVD control panel.](https://usermanual.wiki/Panasonic-of-North-America/9TGCF-501.Manual/User-Guide-286711-Page-31.png)
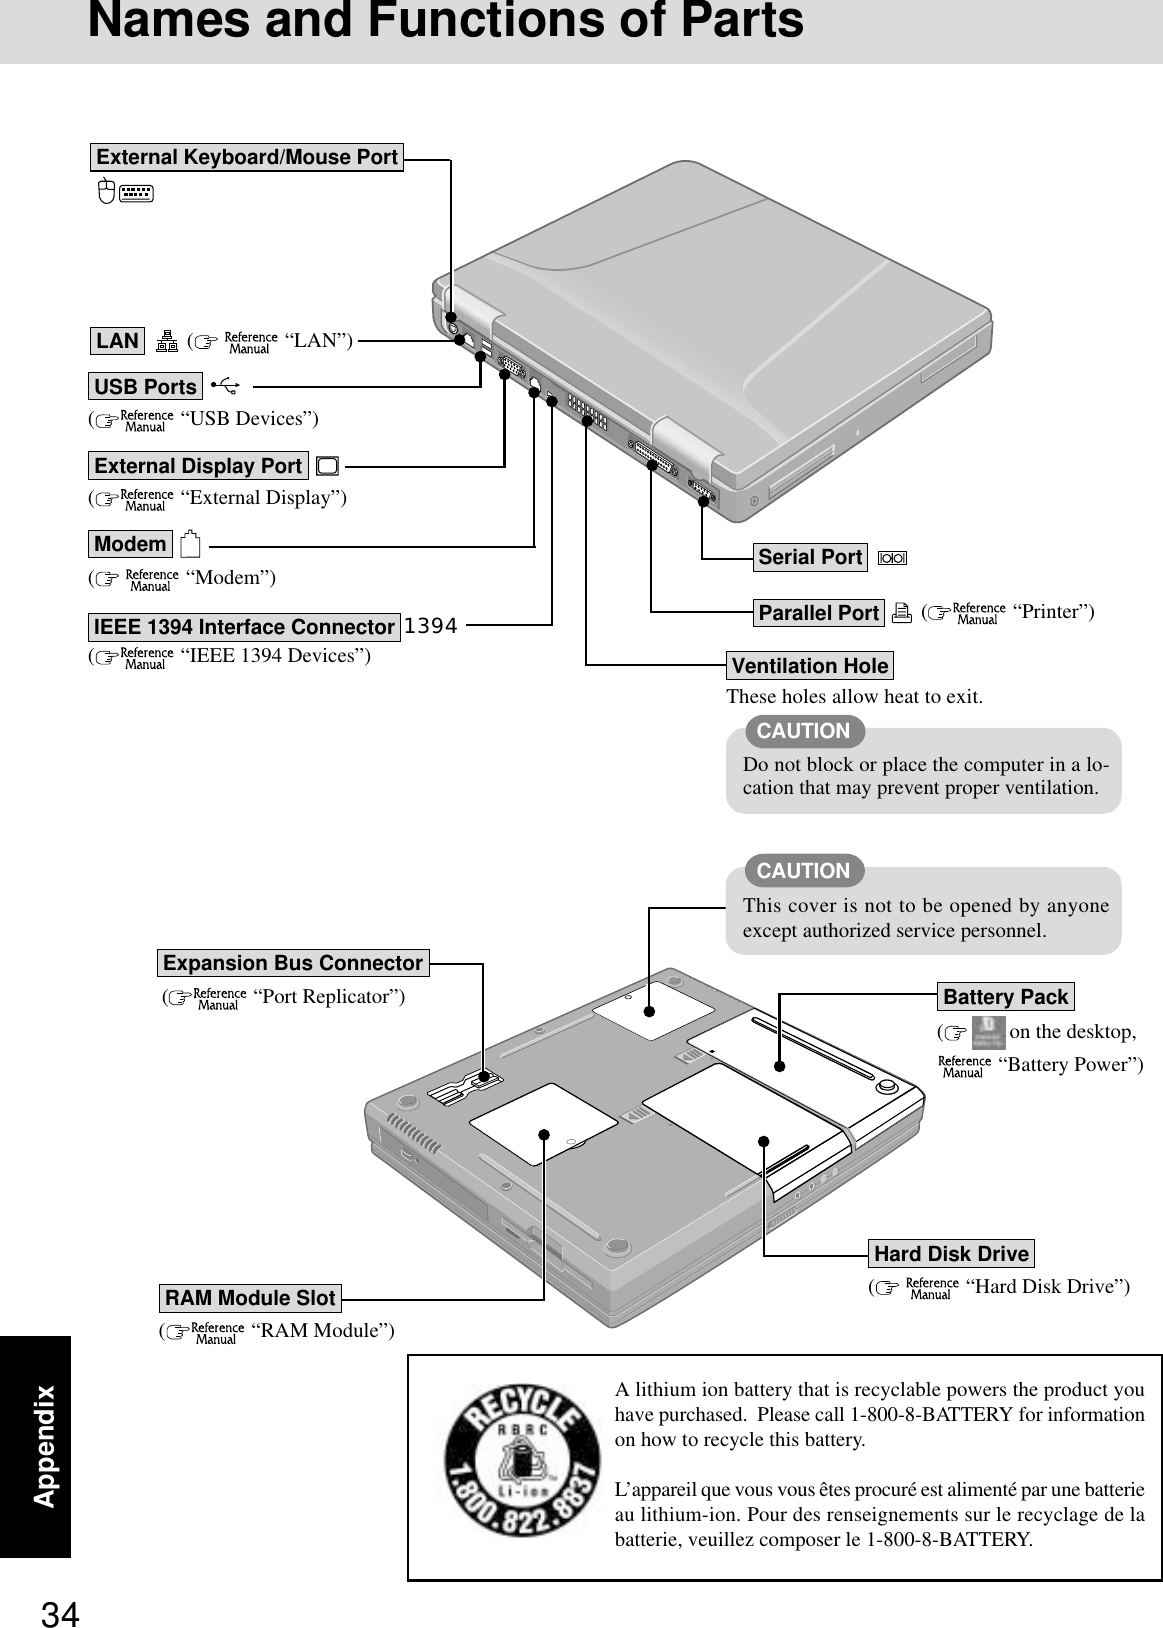
![33AppendixNames and Functions of PartsFor information on the key combi-nations available. ( “Key Combinations”).There are dots near function keysto enable you to locate the key’sposition by touch.( “LED Indicators”)LED IndicatorsBefore using the computer for the first time,carefully read the [Limited Use LicenseAgreement]. If you agree to the conditions,remove the seal.To adjust the volume: Fn + F5 or F6Speaker on/off: Fn + F4Speakers( page 17)Touch PadLED Indicators( “LED Indicators”)Power statusBattery pack statusUse this connector to connectheadphones or amplifier-equippedspeakers. Audio output from theinternal speaker is disabled whenheadphones or external speakersare connected.Use only a monaural condenser microphone.Using an input source other than a monauralcondenser microphone may not allow audio tobe input or may damage the equipment.The illustrations shown may differ from the actual physical appearances.( “PC Cards”)PC Card SlotsCaps LockNumeric key (NumLk)Scroll lock (ScrLk)CD drive statusFloppy disk drive statusHard disk drive statusPower statusFunction KeysLCDFloppy Disk DrivePower SwitchMicrophone JackHeadphone JackCD Drive ( “CD Drive”)Security LockA Kensington cable can be connectedto prevent theft of your computer. Formore information, please read themanual that comes with the cable.LOCKDC-IN JackKeyboardThere is a small bar on F , J , and to enable you to locate the key’sposition by touch.](https://usermanual.wiki/Panasonic-of-North-America/9TGCF-501.Manual/User-Guide-286711-Page-33.png)
![35AppendixSpecifications Main Specifications*1A 16 M color display is achieved by using the dithering function.Windows XP : 256 color depth and the resolution of 640x480 are not supported.Windows 2000 : Setting 256 color depth or the resolution of 640 x 480 is not recommended.*2Maximum resolution depends on the specifications of the external display.Windows XP : 256 color depth and the resolution of 640x480 are not supported.Windows 2000 : Setting 256 color depth or the resolution of 640 x 480 is not recommended.*31GB = 109 bytesThis page provides the specifications for the basic model CF-50Y5KNUDM/CF-50Y5KNUKM. The model number will changedepending on the configuration of the unit, such as, CPU speed, memory size, HDD size, Operating System, LCD type, andwhether a CD-ROM drive, a DVD-ROM drive, a CD-R/RW drive, or a DVD-ROM&CD-R/RW drive is included or not.To check the model number:Check the bottom of the computer or the box the computer came in at the time of purchase.CF-50Y5KNUDM CF-50Y5KNUKMMobile Intel® Pentium® 4 Processor 1.9 GHz-ML2 (Second) Cache Memory: 512 KB256 MB (768 MB Max. )32 MB15.0 type (TFT)256/65536/16M colors (640 x 480 dots/800 x 600 dots/1024x768 dots/1280 x 1024 dots/1600 x 1200 dots)256/65536/16M colors (640 x 480 dots/800 x 600 dots/1024x768 dots/1280 x 1024 dots/1600 x 1200 dots/2048x1536 dots)*240 GB*3Microsoft® Windows® 2000 professional Microsoft® Windows® XP professionalwith Service Pack 2Model No.CPUMemory (Expandable to)Video MemoryLCD TypeDisplayed Colors*1External DisplayHard Disk DriveOperating SystemTo check CPU speed, memory size and the hard disk drive (HDD) size:Run the Setup Utility ( “Setup Utility”) and select [Information] menu.Confirm the required information by checking the following items.CPU speed: [CPU Speed]Memory size: [System Memory]Hard disk drive size: [Primary Master]](https://usermanual.wiki/Panasonic-of-North-America/9TGCF-501.Manual/User-Guide-286711-Page-35.png)