Panasonic of North America 9TGCF-513 CF-51mk3 with BT and WLAN(a+b+g) User Manual Operating Instructions
Panasonic Corporation of North America CF-51mk3 with BT and WLAN(a+b+g) Operating Instructions
Contents
- 1. BT User Manual
- 2. CF51 User Manual
- 3. CF 51 User Manual
- 4. WLAN User Manual
CF51 User Manual
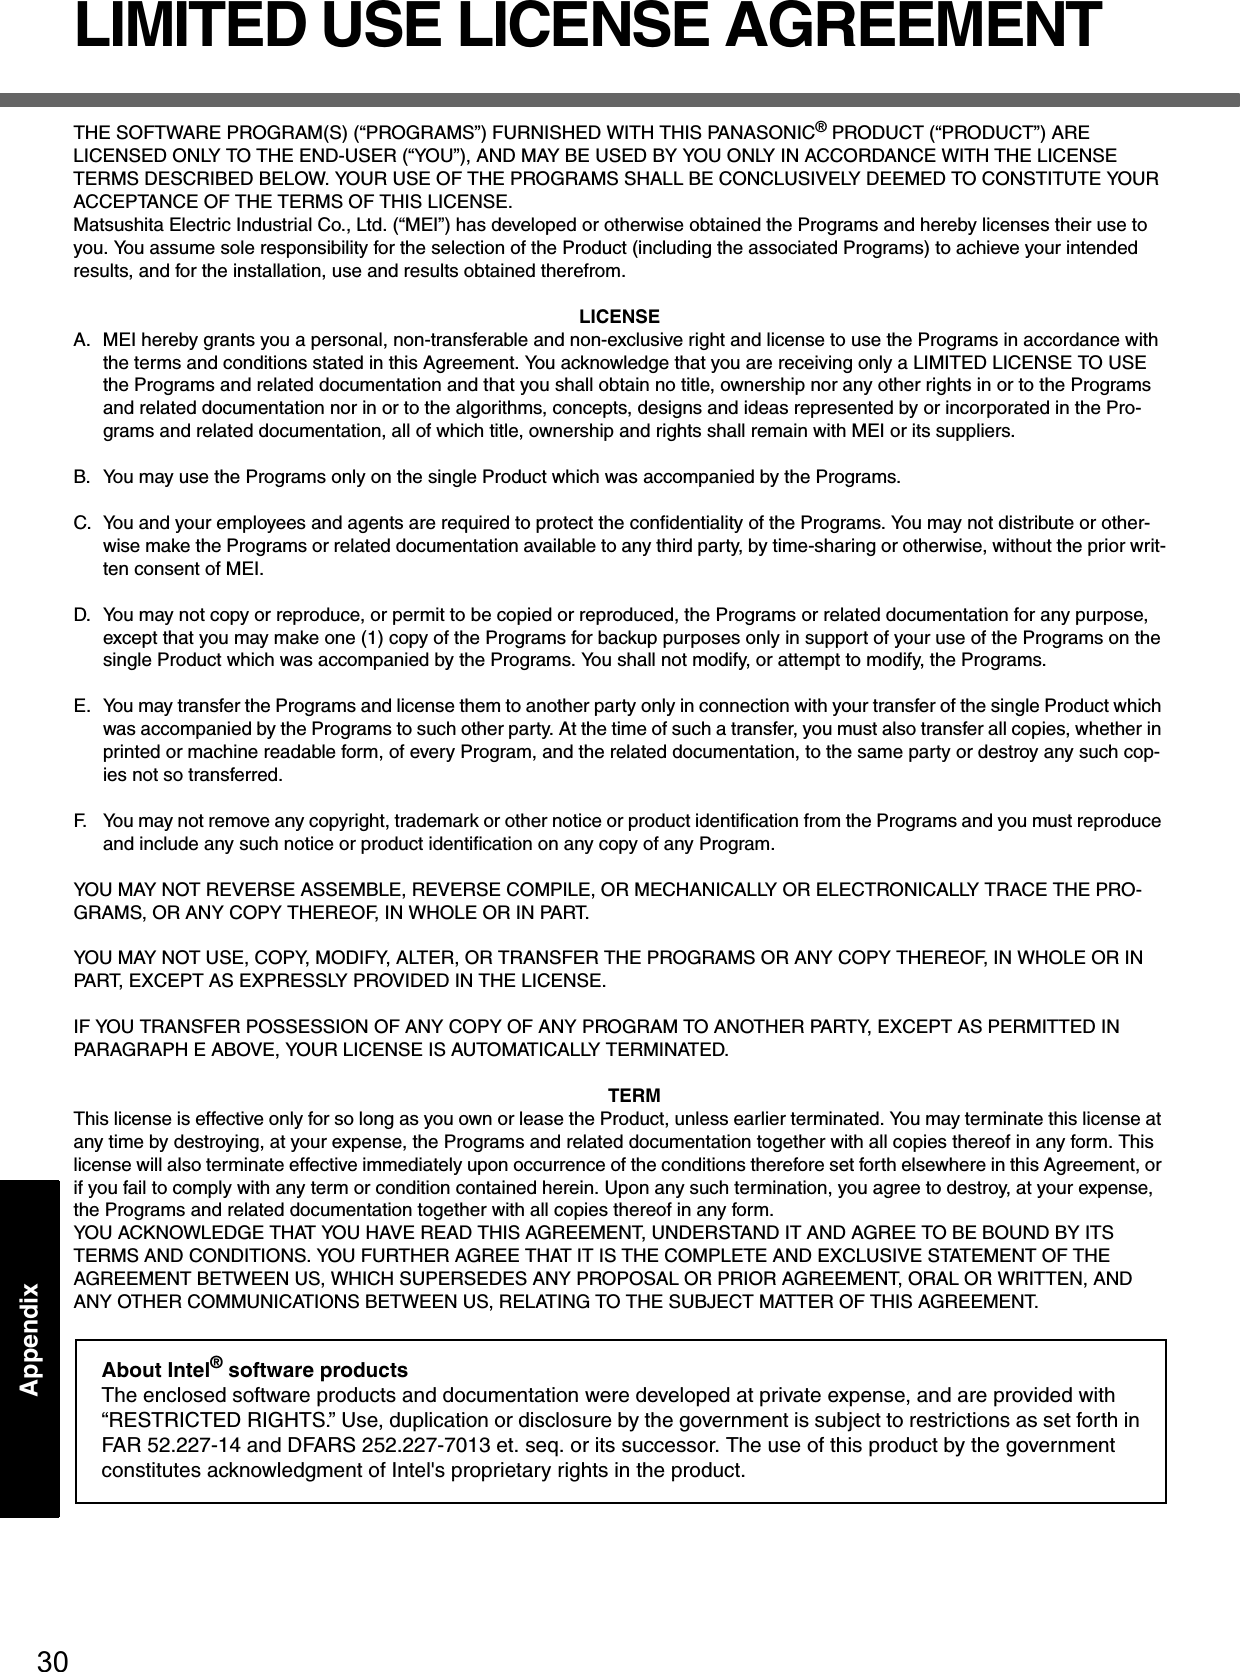
![Please read these instructions carefully before using this product and save this manual for future use.ContentsGetting StartedOperationTroubleshootingGetting StartedOperationTroubleshootingAppendixAppendixXPRead Me First ........................................................3Names and Functions of Parts ..............................7First-time Operation ...............................................9Starting Up/Shutting Down ..................................13Touch Pad ...........................................................16Reference Manual ...............................................17Useful Information................................................18List of Error Codes...............................................23Dealing with Problems (Summary) ......................24Reinstalling Software ...........................................28LIMITED USE LICENSE AGREEMENT ..............30Hard Disk Data Erase Utility ................................31Specifications.......................................................32LIMITED WARRANTY .........................................35OPERATING INSTRUCTIONSPersonal ComputerModel No. CF-51 series[Additional Manual]Reference ManualThis manual can be accessed on your computer.Refer to “Reference Manual” on how to access the Reference Manual. (Îpage 17)](https://usermanual.wiki/Panasonic-of-North-America/9TGCF-513.CF51-User-Manual/User-Guide-606203-Page-1.png)
![2*1 For the Model No., insert the 12 digit number (for example, CF-51LCMDDBM) located on the bottom of the computer.IntroductionThank you for purchasing the Panasonic computer. Read the operating instructions thoroughly for proper operation of your new computer.Illustrations and Terminology in this ManualzSome of the illustrations in this manual may differ slightly in shape from the actual items in order to make the explanation easier to understand.zIf the user has logged on without the administrator authority, some functions may not be executable, and some screens may be not displayed as shown in this manual.If this happens, log on with the administrator authority to enable these functions.zConfirm the latest information on optional products in catalogs, etc.zIn this manual, “Microsoft® Windows® XP Professional Service Pack 2 with Advanced Security Technologies” is indicated as “Windows” or “Windows XP”.zIn this manual, the following software packages are described as follows:“WinDVD™ 5 (OEM Version)” as “WinDVD”“B’s Recorder GOLD7 BASIC” as “B’s Recorder”“B’s CLiP 6” as “B’s CLiP”zThe following drives may be described as “CD/DVD drive”.DVD-ROM & CD-R/RW drive, DVD MULTI drivezCircular media such as DVD-ROM and CD-ROM are described as “discs”.CopyrightThis manual is copyrighted by Matsushita Electric Industrial Co., Ltd. with all rights reserved. No part of this manual may be repro-duced in any form without the prior written permission of Matsushita Electric Industrial Co., Ltd.No patent liability is assumed with respect to the use of the information contained herein.© 2005 Matsushita Electric Industrial Co., Ltd. All Rights Reserved.DisclaimerComputer specifications and manuals are subject to change without notice. Matsushita Electric Industrial Co., Ltd. assumes no liability for damage incurred directly or indirectly from errors, omissions or discrepancies between the computer and the manuals.TrademarksMicrosoft®, Windows® and the Windows logo are registered trademarks of Microsoft Corporation of the United States and/or other countries.PS/2® is a registered trademark of International Business Machines Corporation.Intel, Pentium and PROSet are either registered trademarks or trademarks of Intel Corporation.Adobe, the Adobe logo and Adobe Reader are either registered trademarks or trademarks of Adobe Systems Incorporated in the United States and/or other countries.WinDVD™ is a trademark of InterVideo, Inc.Panasonic is a registered trademark of Matsushita Electric Industrial Co., Ltd.Names of products, brands, etc., appearing in this manual are trademarks or registered trademarks of their respective own compa-nies.NOTE NOTE provides a useful fact or helpful information.CAUTION CAUTION indicates a condition that may result in minor or moderate injury.EnterThis illustration means to press the [Enter] key.Fn + F5This illustration means to press and hold the [Fn] key, then press the [F5] key.[start] - [Run] This illustration means to click [start], then to click [Run]. For some applications, you may need to double-click.Î or ⇒These symbols indicated related pages.Î : Refer to the page in this Operating Instructions⇒ : Refer to the Reference ManualCustomer’s RecordModel No.*1Serial No.orCode No.Date of PurchaseDealer’s NameDealer’s Address](https://usermanual.wiki/Panasonic-of-North-America/9TGCF-513.CF51-User-Manual/User-Guide-606203-Page-2.png)


![First-time Operation10Getting StartedCAUTIONzBe sure the AC adaptor is connected until completing the first-time use opera-tion. zWhen using the computer for the first time, do not connect any peripheral device except the battery pack and AC adaptor to the computer.Handling the AC adaptorzDo not twist or pull the AC power cord forcefully. Doing so may damage the con-nections.zUse only the specified AC adaptor with your computer. Using an AC adaptor other than the one supplied might damage the battery and/or the computer.zWhen the DC plug is not connected to the computer, disconnect the AC cord from your AC wall outlet.zProblems such as sudden voltage drops may arise during periods of thunder and lightning. Since this could adversely affect your computer, an uninterrupt-ible power source (UPS) is highly recommended unless running from the battery pack alone.5Open the display.ASlide the latch located at the front.BLift open the display. 6Turn your computer on.Press the power switch and hold it for approximately one second until the power indicator turns on before releasing it.zDo not press the power switch repeatedly.zOnce the computer is powered off, you must wait at least ten seconds before powering it on again.7Setup Windows.Moving the cursor or clicking buttons can be performed with the touch pad. (Îpage 16)zDo not press any key or move the touch pad until [Windows XP Profes-sional Setup] is displayed.AAt [Welcome to the Windows XP Setup Wizard], select [Next].BAfter reading the agreement, select [I accept this agreement] or [I don’t accept this agreement], then select [Next].zIf [I don’t accept this agreement] is selected, the Windows setup will be aborted.CSelect settings for your region, then select [Next]. DEnter your name and organization and then select [Next]. EEnter your computer name and administrator password and then select [Next]. zRemember this password! If the password is forgotten, Windows can-not be operated.FEnter the correct date, time and the time zone, then select [Next]. The computer will restart.zIt may take some time before the computer restarts and the screen of step i is displayed. Wait, and do not press any keys, or touch the touch pad, etc.GEnter your administrator password and select .zWhen Windows setup is completed, the following message will be displayed at the bottom right of the screen: “Your computer might be at risk.” Continue to the next step.The message is generated by the [Security Center] function in [Control](https://usermanual.wiki/Panasonic-of-North-America/9TGCF-513.CF51-User-Manual/User-Guide-606203-Page-10.png)
![11Getting StartedPanel], and does not indicate an error or malfunction. For more information about [Security Center]: Îpage 19.8Create a new account.ASelect [start] - [Control Panel] - [User Accounts] - [Create a new account].BEnter a new name for the new account, then select [Next].CSelect [Computer administrator], then select [Create Account]. D<When you want to create a password for the new account>Select the new account you have created and select [Create a password].Follow the instructions on the screen to create a password.ESelect [start] - [Turn Off Computer] - [Restart] to restart the computer.CAUTIONzRemember this password! If the password is forgotten, Windows cannot be operated. You can create a password reset disk beforehand (Îpage 12).NOTEzWhen creating a new user account:• If you make mail settings, create password reset disks (Îpage 12), or con-duct other related operations before creating the user account, you will be unable to use any previous mail history or settings.• When you create the first new account, you can only select [Computer admin-istrator].Once a “Computer Administrator” account has been created, you can create additional limited user accounts. Note also that only the added user account will be displayed in the Welcome screen. The account for the administrator created during Windows setup will not be displayed.zThe message “Your computer might be at risk,” which is displayed at the bottom right of the screen, is generated by the “Security Center” function in Windows XP, and does not indicate an error or malfunction.To prevent this message from being displayed, refer to “Security of the Com-puter” (Îpage 19). zAbout the Icon Enlarger:• If the characters or icons on the screen are too small and difficult to see, after completing step 8, select [start] - [All Programs] - [Panasonic] - [Icon Enlarger]. This will allow you to magnify the display of characters and icons on the screen. • The [Icon Enlarger] can be set separately for each account.zYou can also use [Loupe Utility], which enlarges a part of the screen. (⇒ Refer-ence Manual “Loupe Utility”)z<Only for models with wireless LAN>If you use the wireless LAN, be sure to refer to the Reference Manual’s “Wire-less LAN”.This concludes the first-time use operation guidelines.](https://usermanual.wiki/Panasonic-of-North-America/9TGCF-513.CF51-User-Manual/User-Guide-606203-Page-11.png)
![First-time Operation12Getting StartedzDepending on the Windows settings, installed applications, and drivers, menus and other displays may differ, or some functions (such as use of the password reset disk) may be inoperable. Check with your system administrator for details.zYou can select Classic View for the Control Panel or select the Classic Start menu. You can also change the way a user logs on or off.The procedure in this manual uses the method or view of the Windows XP default setting (not Classic view or Classic Start menu etc.).Resetting the passwordWindows XP has a function to reset a forgotten password. To use this function, you need to create a password reset disk beforehand following the steps below.AInsert the floppy disk drive into the multimedia pocket, or connect the USB floppy disk drive (optional: CF-VFDU03) to your computer.BSelect [start] - [Control Panel] - [User Accounts].CSelect the account you used to log on and select [Prevent a forgotten password] from [Related Tasks] menu.Create a password reset disk following the on-screen instructions.Store the password reset disk in a safe place.zOnly the logon password for each account can be reset.The password set in the Setup Utility (⇒ Reference Manual “Setup Util-ity”) cannot be reset.Information for Windows XP](https://usermanual.wiki/Panasonic-of-North-America/9TGCF-513.CF51-User-Manual/User-Guide-606203-Page-12.png)


![15Operation1Save important data and close each application.2Select [start] - [Turn Off Computer].3Select [Turn Off].Your computer will power off automatically.zRestarting your computer (without shutting down):Select [Restart].To shut down using the keyboard:Press , U , and select [Turn Off] with U.CAUTIONzDo not do the following during the shutdown/restart procedure.• Connecting or disconnecting the AC adaptor.• Touching the power switch.• Performing any keyboard, touch pad or external mouse operations.• Closing the display.NOTEzTo quickly resume computer operation after shutting down, The standby or hibernation function is available ( ⇒Reference Manual “Standby/Hibernation Functions”).When you leave the computer or interrupt your work...If you use the "Standby" or "Hibernation" function, then when you turn on the power next time, the application software and files you were using before will be displayed, and you can restart the same operations immediately. ( ⇒Reference Manual “Standby/Hibernation Functions”)Shutting Down (power off your computer)](https://usermanual.wiki/Panasonic-of-North-America/9TGCF-513.CF51-User-Manual/User-Guide-606203-Page-15.png)
![16OperationTouch PadUse the touch pad to move the cursor on the screen and perform computer operations.A. Work Surface (Touch Pad)B. Left ButtonC. Right ButtonNOTEzBesides the above operations, operations such as Zoom and Pan are possible by allocating these functions to the buttons and/or pad. For more details, refer to [Mouse Properties]*1.*1 Select [start] - [Control Panel] - [Printers and Other Hardware] - [Mouse].zThe operations of Scroll, Pan or Zoom will differ depending on the application. There are cases the touch pad will not support these operations even with an application that supports the functions.zWhen using the touch pad, keep the following in mind.• By design the touch pad is to be used with a finger tip only. Do not place any object on the work surface or press down forcefully with sharp-pointed objects (e.g., nails) or hard objects that can leave marks (e.g., pencils and ball point pens).• Try to avoid having any harmful substances, such as oil, come in contact with the touch pad. The cursor may not work properly in such cases.Function OperationMoving the Cursor Move the tip of your finger lightly over the surface.Tapping/ClickingTapping or ClickingDouble-Tapping/Double-ClickingDouble-Tapping or Double-ClickingDraggingTwo quick taps, but on the second tap leaving your finger down (applying pressure) and moving it on the work sur-face.orWhile holding down the button, moving your finger on the work surface.Scroll ⇒ Reference Manual “Touch Pad”](https://usermanual.wiki/Panasonic-of-North-America/9TGCF-513.CF51-User-Manual/User-Guide-606203-Page-16.png)
![17OperationReference ManualReference Manual / Important TipsThe Reference Manual and the Important Tips can be accessed on your computer. When a printer is connected, the Reference Manual can also be printed.Reference ManualThe Reference Manual explains functions for you to make greater use of the com-puter, such as how to add peripheral devices, how the Setup Utility works, and other useful information.zHow to access the Reference ManualSelect [Reference Manual] in [start].Important TipsImportant Tips provides information on how to maximize use of the battery pack, which is necessary for computing away from your home or office.zHow to access the Important TipsSelect on the desktop.Important Tips can also be accessed from the following menu.Select [Important Tips] in [start] - [All Programs] - [Panasonic] - [On-Line Manu-als].When the Reference Manual or Important Tips is accessed for the first time, the License Agreement of the Adobe Reader may be displayed. If it is displayed, after read-ing the agreement, select [Accept] to access the Reference Manual or Important Tips.NOTEzIllustrations may be difficult to view depending on the magnification. If the illus-tration is too small, magnify the display.zIf a printer is connected, we recommend printing the pages required. Depend-ing on the printer, the illustrations and display samples may not be printed with a high quality.Contents•Read Me First •Key Combinations•LED Indicators•Touch Pad•Standby/Hibernation Functions•Security Measures•Computing on the Road•Battery Power•Multimedia Pocket•CD/DVD Drive•WinDVD•B’s Recorder/B’s CLiP•PC Cards•RAM Module•Port Replicator•External Display•Printer•USB Devices•IEEE 1394 Devices•Modem•LAN•Wireless LAN•Hard Disk Drive•Setup Utility•Technical Information•DMI Viewer•Icon Enlarger•Loupe Utility•List of Error Codes•Dealing with Problems (Advanced)](https://usermanual.wiki/Panasonic-of-North-America/9TGCF-513.CF51-User-Manual/User-Guide-606203-Page-17.png)

![19OperationDisplayAvoid using water when cleaning the panel. Ingredients included in water may leave scratches and reduce readability of the screen.<When cleaning dust/dirt>zAvoid rubbing off dust/dirt with cloth since it may leave scratch on the screen. Sweep dust/dirt with fine brush, then wipe it with a dry soft cloth used for cleaning glasses.<When cleaning oily surface>zApply camera lens cleaner on a soft gauze and clean it with gentle force. Then, wipe with a dry soft cloth used for cleaning glasses. Areas excluding the displayWipe these areas with a soft cloth, after applying water or detergent diluted with water to the soft cloth and firmly wringing out excess water.Touch Pad (Îpage 16)CAUTIONzDo not use benzene, thinner, or rubbing alcohol. Doing so may adversely affect the surface, e.g., discoloration. In addition, do not use commercially-available household cleaners and cosmetics, as they may contain components harmful to the surface.zDo not directly add or spray water or detergent. If liquid enters the inside of the computer, it may cause it to work improperly or be damaged.Use the Windows Security Center function to protect Windows from damage by com-puter viruses, etc.Windows Security CenterzWhat is Windows Security Center?The Windows Security Center allows centralized management of Windows security information, and monitors antivirus measures and other Windows security settings to ensure optimum safety.Use the Windows Security Center function to protect your computer from damage by viruses, etc.Select [start] - [Control Panel] - [Security Center] to display the current settings for the following security functions.• Windows FirewallA security system for protecting the computer from unauthorized access via the Internet or other external networks.The firewall regulates the data exchanged between the computer and the external network, so that only approved data can pass through.At the time of purchase, the Windows Firewall is set to be enabled.• Automatic UpdatesIf your computer is connected to the Internet, this function regularly checks whether security updates and other important updates have been made available, and automatically installs these updates in their latest conditions.• Virus ProtectionThis function regularly checks whether antivirus software has been installed in the computer, and whether the version of that software is the latest version available.MaintenanceSecurity of the Computer](https://usermanual.wiki/Panasonic-of-North-America/9TGCF-513.CF51-User-Manual/User-Guide-606203-Page-19.png)
![Useful Information20OperationIf the message “Your computer might be at risk” is displayedRead the message, select (red icon) on the taskbar, and make the appropriate settings.This message, which the Windows Security Center (Îpage 19) displays to confirm the security-related settings regularly, will be displayed until the settings are made more properly.NOTEzThis message does not indicate an error. You can use the computer while the message is displayed. However, in order to operate the computer more safely, we recommend making the appropriate measures to reduce damage from virus and other attacks, thus avoiding the appearance of this message.The Pop-up BlockerIn Windows XP, security functions have been strengthened with regard to Web con-tents.One of these is the “Pop-up Blocker,” which may prevent some Web pages from being displayed.Users are advised to purchase the latest versions of virus protection software and use them regularly.We recommend you run the software:zWhen booting your computer.zAfter receiving data.We recommend that you check data received on disks or from external sources, such as data downloaded from the Internet, e-mail, etc. (For compressed files, uncompress them before running a check).For Data Execution Prevention (DEP), you can make one of the settings in the following menu.[start] - [Control Panel] - [Performance and Maintenance] - [System] - [Advanced] - [Settings] (in [Performance]) - [Data Execution Prevention]For more information, refer to Windows help.You can use the latest patches and service packs for Windows with the following menus. Do not apply “Driver Updates” even if a message to update a driver appears. If a driver update is required, contact Panasonic Technical Support. (Îpage 35)[start] - [All Programs] - [Windows Update]Pay strict attention to the following points to avoid damage to the computer, peripheral devices, cables, etc. Also, in addition to following this manual and the Reference Man-ual, carefully read the instruction manuals for the peripheral devices being used.zUse only peripheral devices that conform to the computer’s specifications.zConnect the devices properly, paying close attention to the condition and position of the connectors.zIf a connection cannot be made easily, do not apply undue force; check once more to confirm the condition and position of the connector (alignment of pins, etc.) .zIf the connector has holding screws, fasten the screws firmly.Computer VirusesWindows UpdateWhen Using Peripheral Devices](https://usermanual.wiki/Panasonic-of-North-America/9TGCF-513.CF51-User-Manual/User-Guide-606203-Page-20.png)
![21OperationzDo not carry the computer with cables attached, and do not pull on the cables force-fully.zDo not expose your computer to shock.Use care when handling your computer, shock may damage your hard disk or make your software applications and data unusable.zDo not power down your computer while software applications are running or hard disk drive indicator is on. Properly shut Windows down to avoid problems.zSave all valuable data to disks.Backing up data to disks will limit damage should trouble occur to your computer or should you inadvertently change or erase data.zUse the security function for all important data. (⇒ Reference Manual “Security Measures”)Hard Disk LockWhen the Hard Disk Lock is set to [Enable], it is impossible to read/write data from/to the hard disk when the hard disk is installed in a different computer. When the hard disk is returned to the original computer, you can read/write data as before. In this case, however, make the settings in the Setup Utility exactly the same as they were before the hard disk was removed. (Note that this Hard Disk Lock does not guarantee the complete protection of data.) (⇒ Reference Manual “Security Measures”)zDo not power down your computer or press the floppy disk drive eject button while the MP indicator is on.Doing so may damage the data on the floppy disk and render the floppy disk use-less.zUse care when handling floppy disks.To protect the data on your floppy disks or to prevent a floppy disk from becoming stuck in your computer, avoid the following:• Sliding the shutter on the floppy disk manually. • Exposing the floppy disk to a magnetic field.• Storing the floppy disk in locations prone to high temperatures, low pitched noise, dampness, or dust.• Applying more than one label on the floppy disk.zConfirm the contents of a floppy disk before formatting it.Confirm that no important data is on the floppy disk, because all data on the floppy disk will be erased.zUse the write-protect tab (A).This is a must for preserving important data.This prevents your data from being erased or overwritten.zWhen disposing of or transferring ownership of this device, erase all data on the hard disk in order to prevent the theft of hard disk data. Even if you delete data or initialize the hard disk through normal Windows commands, data can still be read using special software. In order to erase all data, either have the data erased by a specialist (at a charge) or use the hard disk data erase utility (included) ( Îpage 31). (Note that this hard disk data erase utility does not guarantee that data will be completely erased.)Also, note that if you transfer ownership of this device without deleting commercial software that you have installed to the hard disk, you may be in violation of the licensing agreement for that software.Saving Data on the Hard DiskSaving Data on Floppy DisksWhen Disposing of or Transferring Ownership of This Device](https://usermanual.wiki/Panasonic-of-North-America/9TGCF-513.CF51-User-Manual/User-Guide-606203-Page-21.png)

![23TroubleshootingList of Error CodesWhen turning on the computer, if one of the following error codes or messages is displayed, follow the instructions shown below.If the problem persists, or if the error code or message displayed is not shown here, contact Panasonic Technical Sup-port. ( Îpage 35)How to run the Setup Utility1Restart the computer.2Press F2 while [Panasonic] boot screen is displayed soon after the computer begins the startup procedure.Error Code/Message Action0211: Keyboard error zIf an external keyboard or mouse is connected, disconnect these devices.0251: System CMOS checksum bad - Default configuration usedAn error has occurred in the memory that stores the Setup Utility settings. This error occurs when the memory content is changed through some inad-vertent operation by a program or other function. zRun the Setup Utility and load the default values, then change the set-tings to the appropriate values as needed. zIf the problem persists, the internal clock battery may need to be replaced. Contact Panasonic Technical Support.0271: Check date and time settings The date and time setting are incorrect.zRun the Setup Utility and set the date and time correctly.zIf the problem persists, the internal clock battery may need to be replaced. Contact Panasonic Technical Support.0280: Previous boot incomplete - Default configuration usedStartup has failed repeatedly, so the Setup Utility settings have been returned to their default values, and the computer has been booted.zRun the Setup Utility and load the default values, then change the set-tings to the appropriate values as needed. Press <F2> to Setup zWrite down the error details and press F2 to run the Setup Utility. Con-firm the settings, and change the settings to the appropriate values as needed.Operating System not found The OS is not properly installed on the floppy disk or the hard disk that you are trying to boot from.zIf the computer cannot be booted from the floppy disk, check the floppy disk drive to ensure that the disk is in fact bootable, and change it to another if not.zIf the computer cannot be booted from the hard disk, confirm whether the hard disk is properly recognized in [Information] menu of the Setup Utility.If the hard disk is recognized, perform the reinstallation procedure. If not, contact Panasonic Technical Support.zIf a device is connected to the USB port, disconnect the device, or run the Setup Utility and set [Legacy USB Support] in [Security] menu to [Disable].RAM Module Failed zIf the RAM module has not been inserted properly, or if a RAM module other than one matching the specifications has been inserted, a beep will sound and the message “RAM Module Failed” will be displayed when turning the power on. In this case, press the power switch for four seconds or more to turn off the computer, confirm that the RAM module meets the specifications, and reinsert it.](https://usermanual.wiki/Panasonic-of-North-America/9TGCF-513.CF51-User-Manual/User-Guide-606203-Page-23.png)
![24TroubleshootingDealing with Problems (Summary)When a problem occurs, refer to this page. The “Reference Manual” also contains detailed information. If a problem appears to be related to a software application, read the software related manual. If you still cannot troubleshoot the problem, contact Panasonic Technical Support ( Îpage 35). You can use the PC Information Viewer to check the computer’s usage status. (⇒Reference Manual “Dealing with Problems (Advanced)”)Starting UpThe power indicator is not lit zCheck the cable connection for the AC adaptor. zCheck to see if a fully charged battery is properly installed.zRemove the battery pack and disconnect the AC adaptor, then connect them again. The computer does not operate when a USB device is connectedzThe computer may not operate when certain USB devices are connected. Disconnect the USB device, or set [Legacy USB Support] to [Disable] in [Security] menu of the Setup Utility.[Enter Password] is dis-playedzInput your Supervisor Password or User Password. If you have forgotten it, contact Panasonic Technical Support (Îpage 35).POST Startup Error(s) is displayedÎpage 23Windows startup, or an operation is extremely slowzPress F9 in the Setup Utility (⇒Reference Manual “Setup Utility”). This will restore the Setup Utility’s settings to their default values (except the password settings). Then, the Setup Utility must be run once again for you to input the appropriate oper-ating environment settings. (The processing speed depends on the application soft-ware used, so this operation may not cause the processing speed to increase.)zIf you install resident software after purchasing this computer, disable the resident software.The date and time are incor-rectzYou can set the date and time using the following menu.[start] - [Control Panel] - [Date, Time, Language, and Regional Options] - [Date and Time]zIf you continue to experience problems, the internal battery maintaining the clock may need to be replaced. Contact Panasonic Technical Support.zWhen the computer is connected to a LAN, confirm the date and time of the server.zThis computer will not correctly recognize the date and time starting from the year 2100 A.D.When resuming from the standby or hibernation mode, [Enter Password] does not appear even if a password has been set in the Setup UtilityzEven when a password has been set in the [Security] menu of the Setup Utility, [Enter Password] does not appear when the computer resumes from the standby or hibernation mode.If you want to use the security function when using the standby or hibernation mode, use the Windows password as follows:ASelect the account to change in [start] - [Control Panel] - [User Accounts] and set the password.BAdd the check mark for [Prompt for password when computer resumes from standby] in [Control Panel] - [Performance and Maintenance] - [Power Options] - [Advanced].When “Remove disks or other media. Press any key to restart” (or a similar mes-sage) is displayedzThis means a floppy disk that does not contain system startup information has been left in the floppy disk drive. Remove the floppy disk, and press any key.zIf the message still appears even after trying the above measure, this may be an indication that some type of hard disk failure has occurred. Contact Panasonic Technical Support.[Executing Battery Recali-bration] screen is displayedzThis screen appears because the Battery Recalibration was canceled before Windows was shut down last. To start up Windows, turn off the computer by using the power switch, and then turn it back on again.When the administrator password is forgottenzIf you have created a password reset disk (Îpage 12), a message is displayed when you fail to correctly enter the password. Follow the message’s instructions and set the password again by using the password reset disk.If you have not created a password reset disk, after reinstalling, setup Windows and then set the password again.](https://usermanual.wiki/Panasonic-of-North-America/9TGCF-513.CF51-User-Manual/User-Guide-606203-Page-24.png)
![25TroubleshootingWhen the previous item is not the causezPress F9 in the Setup Utility (⇒Reference Manual “Setup Utility”). This will restore the Setup Utility’s settings to their default values (except the password settings).zTry removing all peripheral devices.zCheck a disk error using the following procedure.ADisplay [Local Disk (C:) Properties].Right-click [Local Disk(C:)] in [start] - [My Computer], and select [Proper-ties].BSelect [Tools] - [Check Now].CSelect [Start] after selecting required items in [Check disk options].zAt startup, hold down F8 when [Panasonic] boot screen disappears*1, and release your finger when the Windows Advanced Option Menu is displayed. Start the com-puter in Safe Mode, and confirm the details of the error.*1 When [Password on boot] is set to [Enable], [Enter Password] appears after the [Panasonic] boot screen disappears. Hold down F8 soon after inputting the password and pressing Enter.DisplayNo display after powering on zWhen there is no display to an external display,• Check your cable connection to the external display.• Confirm your display is powered on.• Check the settings for your external display.zThe display destination may be set to the external display.Try changing the display by pressing Fn + F3.If you want to switch the display destination repeatedly by pressing Fn + F3, make sure that the display destination has switched completely each time before pressing Fn + F3 again.zPress Fn+F2 and adjust the brightness. The power has not been turned off, but after a certain period of time, there is no displayzHas the computer been set to the power-saving mode?To resume operation of your computer from the condition the power of the display is off (for energy conservation purposes), press any key unrelated to the direct trigger-ing of a selection, like Ctrl.zTo save power, your computer may have automatically entered the standby mode (power indicator blinks green) or hibernation mode (power indicator turns off). In such cases, press the power switch.When the battery pack is used, the screen is darker than when the AC adaptor is connectedzPress Fn + F2 and adjust the brightness. Note, however, that when the brightness is increased, the battery running time will become shorter.Brightness can be set to separate levels for when the AC adaptor is connected and when it is disconnected.An afterimage appears (e.g., green, red, and blue dots remain on the display) or there are dots not dis-playing the correct colorszIf an image is displayed for a prolonged period of time, an afterimage may appear. This is not a malfunction. The afterimage will disappear when a different screen is displayed.zHigh-precision and advanced technologies are necessary in the production of color liquid crystal displays (color LCDs). Therefore, if 0.002% or less of the picture ele-ments either fail to light or remain constantly lit (that is, more than 99.998% of ele-ments are functioning properly), no defect is considered to exist.The screen becomes disor-deredzThe screen display may become distorted if the resolution or number of colors is changed, or if an external display is connected or disconnected while the computer is operating. Restart the computer.The external display no longer displays properlyzWhen an external display not compatible with the power saving mode is used with the computer, the display may not function correctly when the computer enters the power saving mode. In such cases, turn off the power to the external display.Starting Up](https://usermanual.wiki/Panasonic-of-North-America/9TGCF-513.CF51-User-Manual/User-Guide-606203-Page-25.png)
![Dealing with Problems (Summary)26TroubleshootingWhen you want to display the fonts or icons at a larger sizezChange the size of the icons, etc. using “Icon Enlarger” (⇒Reference Manual “Icon Enlarger”).zYou can also change the settings as follows (for more details, refer to the Windows Help).ASelect [start] - [Control Panel] - [Appearance and Themes] - [Display] - [Appearance].BSelect the font size in [Font size], and select [Effects] and then add the check mark for [Use large icons] to increase the icon size.CSelect [OK], then select [OK].zTo enlarge a part of the screen, use Loupe Utility (⇒Reference Manual “Loupe Util-ity”).During simultaneous display, one of the screens becomes disorderedzTry changing the display by pressing Fn+F3.zIf you continue to experience problems, try changing the display destination in the following menu.[start] - [Control Panel] - [Other Control Panel Options] - [Intel(R) GMA Driver for Mobile] - [Devices]zWhen the [Command Prompt] is set to "Full Screen" by pressing Alt + Enter, the picture is displayed on one of the screens only. When the window display is restored by pressing Alt + Enter, the picture is displayed on both screens.zSimultaneous display cannot be used until Windows startup is complete (during Setup Utility, etc.). When the Fn+F3 key is pressed, the screen is displayed on the external display or internal LCD.When a video such as an MPEG file and a DVD video is being played with WinDVD or Windows® Media Player, the display destination cannot be switched using Fn+F3zThe display destination cannot be switched while a video such as an MPEG file and a DVD video is playing.Stop playing the video before switching the display destination.When the screensaver is set, an error will occur dur-ing a resume operationzWhen the computer automatically enters the standby or hibernation mode while the screensaver is running, an error may occur during a resume operation. In such cases, turn off the screensaver or try changing the pattern of the screensaver.Shutting downWindows cannot be shut down or restartedzIf a USB device is connected, try removing it.zIt may take one or two minutes to shut down.Battery IndicatorThe red indicator lights zThe battery level is very low (the charge is approx. 9% or less). Connect the AC adaptor. You can use the computer when the indicator light is orange. If you do not have an AC adaptor, save your data and power off your computer. After replacing the battery pack with a fully charged one, turn your computer on.The red indicator blinks zQuickly save your data and power off your computer. Remove the battery pack and disconnect the AC adaptor, then connect them again.If the problem persists, contact Panasonic Technical Support. The battery pack or charging circuit may be defective. The green indicator blinks*1 zIn high temperature mode, the battery pack is discharging to a level of 80%*2 in nor-mal temperature mode.(⇒Reference Manual “Battery Power”) Do not remove the battery pack while the battery indicator is blinking green, or the power will be turned off forcibly.*1 Only for the main battery pack.*2 A level of 80% in normal temperature mode is displayed as [100%] in high temperature mode.Display](https://usermanual.wiki/Panasonic-of-North-America/9TGCF-513.CF51-User-Manual/User-Guide-606203-Page-26.png)
![27TroubleshootingThe orange indicator blinks zBattery cannot be recharged temporarily because the internal temperature of the battery pack is outside of the acceptable temperature range for recharging. Once the allowable range requirement is satisfied, charging begins automatically. Your computer can be used normally in this state.zWhen using the application, power consumption is high; therefore there is insufficient power to recharge the battery.Reference ManualThe Reference Manual is not displayedzIs Adobe Reader installed?If you have uninstalled Adobe Reader, install using the following procedures.ASelect [start] - [Run], input [c:\util\reader\AdbeRdr60_enu_full.exe], then select [OK].Install Adobe Reader by following the instructions on the screen.BUpdate Adobe Reader to its latest version.If your computer is connected to the Internet, start up Adobe Reader and select [Help] - [Updates].If your computer is not connected to the Internet, select [start] - [Run], input [c:\util\reader\Acro-Reader_6.0.2_Update.exe], then select [OK].Fast User Switching functionSome applications do not work properlyzWhen switching to a different user with the Fast User Switching function, the follow-ing problems may occur.• Some applications may not work properly. • Key combination with Fn may not work.• It may not be possible to set the settings of the display.• A serial mouse may not work.• The B's CLiP icon will no longer be shown on the taskbar and CD-RW disc (<Only for DVD MULTI drive> CD-RW, DVD-RW and +RW discs) cannot be written.• <Only for models with wireless LAN>The wireless LAN cannot be used.In this case, log off all users without using Fast User Switching function, and try the operation once more. If the problem persists, restart the computer.OthersNo response zPress Ctrl+Shift+Esc to open Task Manager and close the software application which is not responding.zIs there an input screen (e.g., password input screen at startup) hidden behind another window? Use Alt+Tab to check for other windows being displayed.zAfter shutting down by pressing the power switch for more than four seconds, press the power switch to power on and open the application again.If the program no longer works normally, delete the program using the following procedure. Then reinstall the program.[start] - [Control Panel] - [Add or Remove Programs]Battery Indicator](https://usermanual.wiki/Panasonic-of-North-America/9TGCF-513.CF51-User-Manual/User-Guide-606203-Page-27.png)
![28TroubleshootingReinstalling SoftwarePreparingzThe Product Recovery DVD-ROM (included)zPanasonic CD/DVD driveImportantzBefore the reinstallation procedure, remove all peripherals (except for the CD/DVD drive).zBe sure the AC adaptor is connected until the reinstallation procedure is completed.zEven if reinstallation is executed, the number of times that the DVD video region code can be set will not be returned to the state set at the time of factory shipment.ATurn off the computer and insert the CD/DVD drive into the multimedia pocket. (⇒ Reference Manual “Multimedia Pocket”)BTurn on the computer, and press F2 while [Panasonic] boot screen is dis-played.The Setup Utility will start up. If the password has been set, enter the Supervisor Password.CWrite down all of the contents of the Setup Utility and then press F9.At the confirmation message, select [Yes] and press Enter.DSelect [Boot] menu, then select [IDE MP] and press F6 until [IDE MP] is at the top of [Boot] menu.EPlace the Product Recovery DVD-ROM into the CD/DVD drive.FPress F10.At the confirmation message, select [Yes] and press Enter. The com-puter will restart.GPress 1 to execute [1. [Recovery]].(You can cancel this operation by pressing 0.)The License Agreement screen should appear.HPress 1 to select [1. Yes, I agree to the provisions above and wish to con-tinue!].This screen should appear.IMake a selection from the menu.zWhen selecting [2], enter the basic partition size for the operating sys-tem installation and press Enter.(The data partition size is the remainder after subtracting the basic par-tition size.)When reinstallation procedure is performed, the contents of the hard disk will be erased. Be sure to back up any criti-cal data that is on your hard disk before running the reinstallation procedure.The reinstallation procedure will return the computer to its original condition.zIf you have created partitions for data, the data may be erased or become corrupt as a result of the reinstallation procedure.Before ReinstallationReinstalling](https://usermanual.wiki/Panasonic-of-North-America/9TGCF-513.CF51-User-Manual/User-Guide-606203-Page-28.png)
![29TroubleshootingzTo select [3], the first partition size must be 6 GB or more of the hard disk size. Reinstallation cannot be performed with a small partition size.JAt the confirmation message, press Y.The operation of reinstallation for the hard disk starts automatically. (The operations take about 15 minutes.)zDo not interrupt the reinstallation procedure before completion, for example by turning off the computer or pressing Ctrl + Alt + Del, as this may prevent Windows from starting up, or may cause data to be lost so that the reinstallation procedure cannot be executed.KAfter the reinstallation procedure completes, the screen should appear.Remove the Product Recovery DVD-ROM, and then press any key.The computer will be shut down.LTurn on the computer, and press F2 while [Panasonic] boot screen is dis-played.The Setup Utility will start up.If the password has been set, enter the Supervisor Password.MPress F9.At the confirmation message, select [Yes] and then press Enter. (The Setup Utility settings will return to their default values. Even the security settings with the exception of the password(s) will return to their default values.)NSelect [Exit] and then select [Save Current Values], then press Enter.At the confirmation messages, select [Yes] and press Enter.OTurn the computer off by using the power switch.zIf additional instructions are included with the computer, be sure to read them. It may be necessary to perform additional operations during the following procedures.PPerform the first-time use operation. (Îpage 10)QRun the Setup Utility and change the settings where necessary. Changing the drive letterYou can change the drive letter for the CD/DVD drive or hard disk drive by the following steps.zDrive letters can only be changed when two or more partitions have been created on the hard disk drive. The name of the C: drive cannot be changed.zWe recommend that you make these changes before installing applica-tions.ASelect [start] - [Control Panel] - [Performance and Maintenance] - [Administrative Tools] - [Computer Management].BSelect [Disk Management] from [Storage].CRight click on the partition of the hard disk or the name of the CD/DVD drive and select [Change Drive Letter and Paths...].DSelect [Change].ESelect [Assign the following drive letter] and the new drive letter, and then select [OK].FAt the confirmation message, select [Yes].](https://usermanual.wiki/Panasonic-of-North-America/9TGCF-513.CF51-User-Manual/User-Guide-606203-Page-29.png)
![31AppendixAppendixHard Disk Data Erase UtilityThis computer is equipped with a utility for completely erasing hard disk data.When disposing of or transferring ownership of this device, erase all data on the hard disk in order to prevent the theft of hard disk data by following the steps below.zYou will need the Product Recovery DVD-ROM (included) and Panasonic CD/DVD drive. zBe sure the AC adaptor is connected until the procedure is completed.zThis utility can only be used for internal hard disk. It cannot be used to erase data from external hard disks.zThis utility cannot erase data from damaged disk.zThis utility cannot erase data for specific partitions.zAfter executing this utility, the computer cannot be booted from the hard disk.ATurn off the computer and insert the CD/DVD drive into the multimedia pocket. (⇒ Reference Manual “Multimedia Pocket”)BTurn on the computer, and press F2 while [Panasonic] boot screen is dis-played. The Setup Utility will start up.If the password has been set, enter the Supervisor Password.CSelect [Boot] menu, then select [IDE MP] and press F6 until [IDE MP] is at the top of [Boot] menu.DPlace the Product Recovery DVD-ROM into the CD/DVD drive.EPress F10.At the confirmation message, select [Yes] and press Enter.The computer will restart.FPress 2 to execute [2. [Erase HDD]].(You can cancel this operation by pressing 0.)GAt the confirmation message, press Y.HWhen [<<< Start menu >>>] is displayed, press Enter.IThe approximate time required for erasing data will be displayed.Press Space.JAt the confirmation message, press Enter. The operation of erasing the hard disk will start.If necessary, the “hard disk data erase” operation can be cancelled after it has begun by pressing Ctrl + C.(If the operation is cancelled before being completed, a part of the data will not be erased.)KAfter the operation is complete:Under normal conditions, the message [Hard disk data has been deleted.] will be displayed.If a problem occurred during the operation, an error message will be dis-played.LRemove the Product Recovery DVD-ROM, and then press any key to turn off the computer.The hard disk data erase utility erases data using an overwriting method, but there is a possibility that due to malfunc-tions or other operational errors, data may not be completely erased. There are also specialized devices that may be able to read data that has been erased using this method. If you need to erase highly confidential data, we recom-mend that you contact a company that specializes in this process. Matsushita Electric Industrial Co., Ltd. will bear no responsibility for losses or damages suffered as a result of the use of this utility.PreparingProcedure](https://usermanual.wiki/Panasonic-of-North-America/9TGCF-513.CF51-User-Manual/User-Guide-606203-Page-31.png)
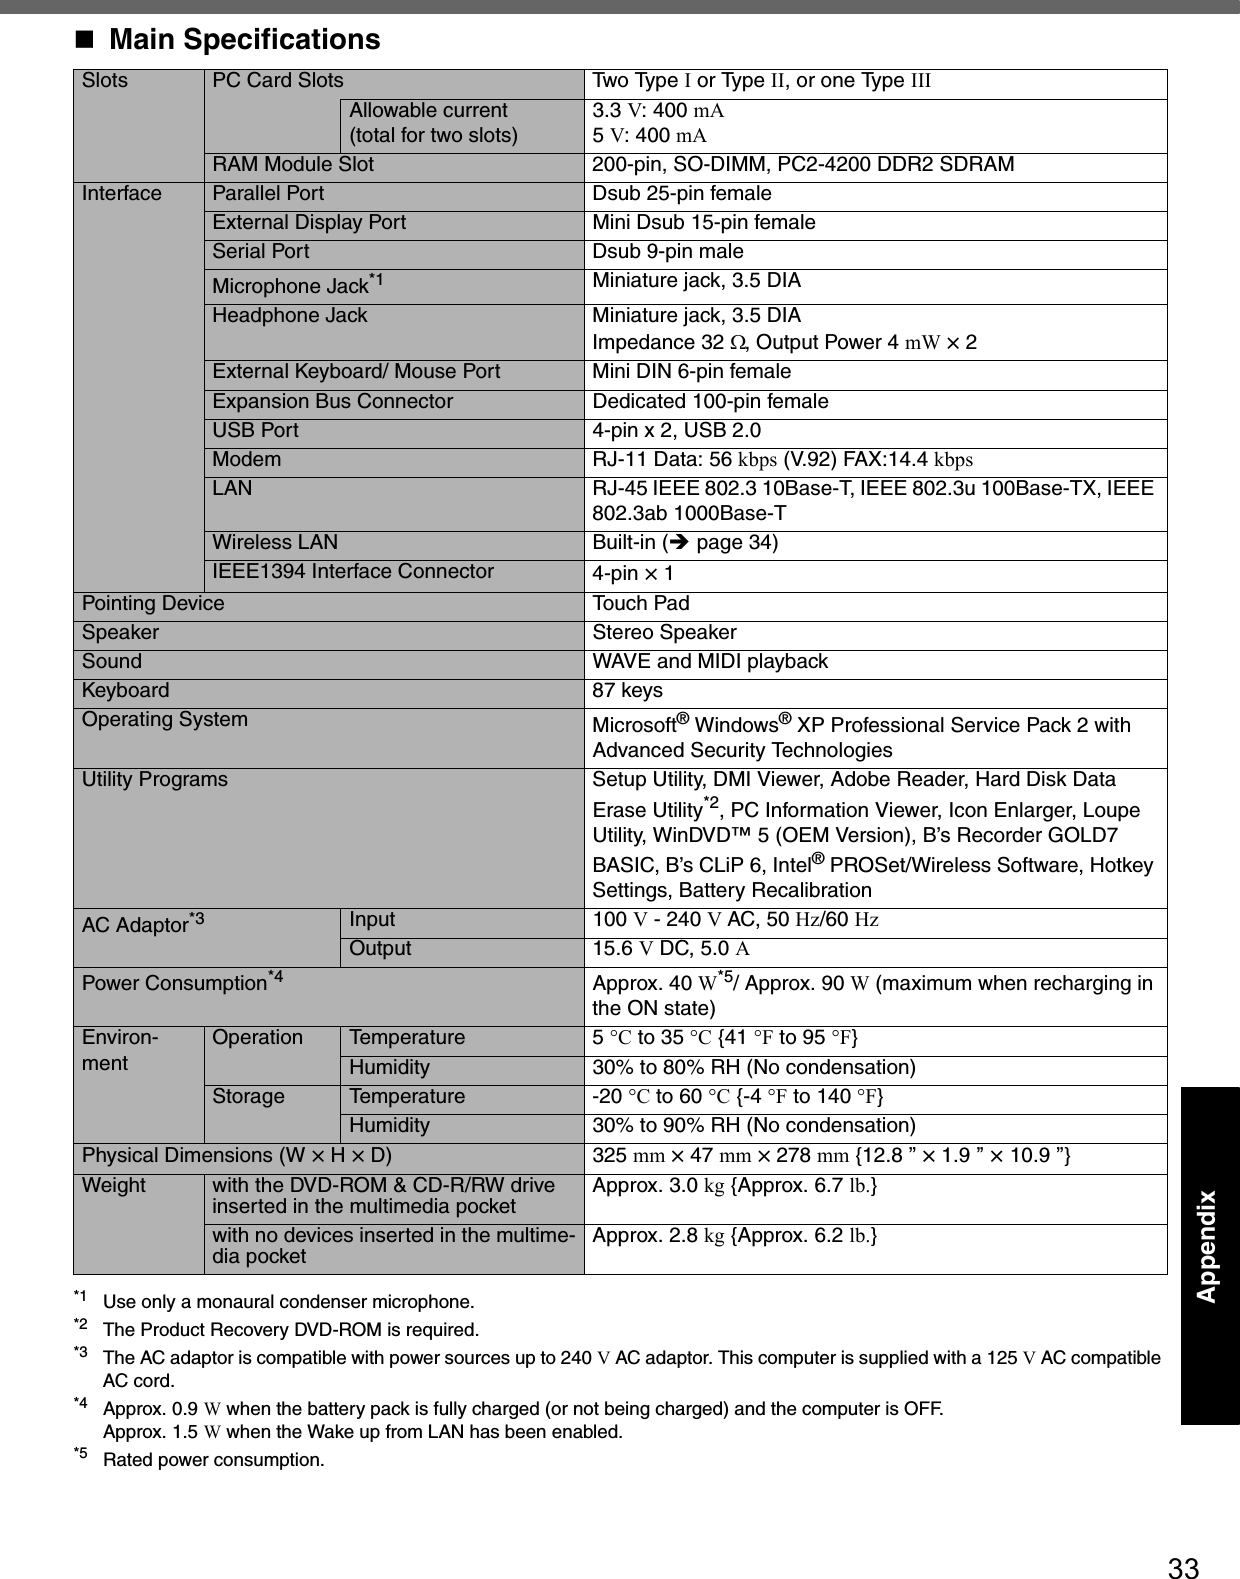
![32AppendixSpecificationsThis page provides the specifications for the basic model CF-51LCMDDBM/CF-51LCCDDBM. The model number will change depending on the configuration of the unit, such as, CPU speed, memory size, HDD size, Operating System, LCD type, and whether a DVD-ROM drive, a DVD-ROM & CD-R/RW drive or a DVD MULTI drive or a floppy disk drive is included or not.To check the model number:Check the bottom of the computer or the box the computer came in at the time of purchase.To check CPU speed, memory size and the hard disk drive (HDD) size:Run the Setup Utility (⇒ Reference Manual “Setup Utility”) and select [Information] menu.Confirm the required information by checking the following items.CPU speed:[CPU Speed]Memory size:[System Memory]Hard disk drive size:[Primary Master]Main Specifications*1 1MB = 1,048,576 bytes*2 When expanding memory, remove the RAM module that was inserted at the time of factory shipment, and insert two 1024 MB-RAM modules.*3 A segment of the main memory is allotted automatically depending on the computer’s operating status. The size of the Video Memory cannot be set by the user.*4 A 16,777,216 color display is achieved by using the dithering function.*5 Maximum resolution depends on the specifications of the external display.*6 1GB = 1,000,000,000 bytes. Your operating system or some application software will report as fewer GB.*7 Varies depending on the usage conditions.*8 Measured using BatteryMark™ Version 4.0.1 (LCD brightness: Maximum - Minimum)*9 Measured using MobileMark™ 2002 (LCD brightness: 60 cd/m2)Model No. CF-51LCMDDBM/CF-51LCCDDBMCPU Intel® Pentium® M Processor (2.0 GHz DVAL CORE, 2 MB*1 L2cache, 533 MHz FSB)Memory 256 MB*1 (2048 MB*1 *2 Max.)Video Memory UMA (128 MB*1 Max.)*3LCD Type 15.0 XGA type (TFT)Displayed Colors*4 65,536/16,777,216 colors (800 × 600 dots/1024 × 768 dots)External Display 65,536/16,777,216 colors (800 × 600 dots/1024 × 768 dots/1280 × 768 dots/1280 × 1024 dots/1400 × 1050 dots/1600 × 1200 dots/2048 × 1536 dots)*5Hard Disk Drive Approx. 40 GB*6Battery Pack Li-ion 11.1 V, 6.6 AhOperating Time*7Main Battery Approx. 2 hours - 5 hours*8 (Approx. 4.5 hours*9)Main Battery + Second Battery Approx. 3.5 hours - 8 hours*8 (Approx. 7.5 hours*9)Charging Time*7Power On Main Battery Approx. 4 hoursMain Battery + Second BatteryApprox. 6.5 hoursPower Off Main Battery Approx. 4 hoursMain Battery + Second BatteryApprox. 6.5 hoursClock Battery Coin type lithium battery 3.0 V](https://usermanual.wiki/Panasonic-of-North-America/9TGCF-513.CF51-User-Manual/User-Guide-606203-Page-32.png)


CF 51 User Manual
![Please read these instructions carefully before using this product and save this manual for future use.ContentsGetting StartedOperationTroubleshootingGetting StartedOperationTroubleshootingAppendixAppendixXPRead Me First ........................................................3Names and Functions of Parts ..............................7First-time Operation ...............................................9Starting Up/Shutting Down ..................................13Touch Pad ...........................................................16Reference Manual ...............................................17Useful Information................................................18List of Error Codes...............................................23Dealing with Problems (Summary) ......................24Reinstalling Software ...........................................28LIMITED USE LICENSE AGREEMENT ..............30Hard Disk Data Erase Utility ................................31Specifications.......................................................32LIMITED WARRANTY .........................................35OPERATING INSTRUCTIONSPersonal ComputerModel No. CF-51 series[Additional Manual]Reference ManualThis manual can be accessed on your computer.Refer to “Reference Manual” on how to access the Reference Manual. (Îpage 17)](https://usermanual.wiki/Panasonic-of-North-America/9TGCF-513.CF-51-User-Manual/User-Guide-606225-Page-1.png)
![2*1 For the Model No., insert the 12 digit number (for example, CF-51LCMDDBM) located on the bottom of the computer.IntroductionThank you for purchasing the Panasonic computer. Read the operating instructions thoroughly for proper operation of your new computer.Illustrations and Terminology in this ManualzSome of the illustrations in this manual may differ slightly in shape from the actual items in order to make the explanation easier to understand.zIf the user has logged on without the administrator authority, some functions may not be executable, and some screens may be not displayed as shown in this manual.If this happens, log on with the administrator authority to enable these functions.zConfirm the latest information on optional products in catalogs, etc.zIn this manual, “Microsoft® Windows® XP Professional Service Pack 2 with Advanced Security Technologies” is indicated as “Windows” or “Windows XP”.zIn this manual, the following software packages are described as follows:“WinDVD™ 5 (OEM Version)” as “WinDVD”“B’s Recorder GOLD7 BASIC” as “B’s Recorder”“B’s CLiP 6” as “B’s CLiP”zThe following drives may be described as “CD/DVD drive”.DVD-ROM & CD-R/RW drive, DVD MULTI drivezCircular media such as DVD-ROM and CD-ROM are described as “discs”.CopyrightThis manual is copyrighted by Matsushita Electric Industrial Co., Ltd. with all rights reserved. No part of this manual may be repro-duced in any form without the prior written permission of Matsushita Electric Industrial Co., Ltd.No patent liability is assumed with respect to the use of the information contained herein.© 2005 Matsushita Electric Industrial Co., Ltd. All Rights Reserved.DisclaimerComputer specifications and manuals are subject to change without notice. Matsushita Electric Industrial Co., Ltd. assumes no liability for damage incurred directly or indirectly from errors, omissions or discrepancies between the computer and the manuals.TrademarksMicrosoft®, Windows® and the Windows logo are registered trademarks of Microsoft Corporation of the United States and/or other countries.PS/2® is a registered trademark of International Business Machines Corporation.Intel, Pentium and PROSet are either registered trademarks or trademarks of Intel Corporation.Adobe, the Adobe logo and Adobe Reader are either registered trademarks or trademarks of Adobe Systems Incorporated in the United States and/or other countries.WinDVD™ is a trademark of InterVideo, Inc.Panasonic is a registered trademark of Matsushita Electric Industrial Co., Ltd.Names of products, brands, etc., appearing in this manual are trademarks or registered trademarks of their respective own compa-nies.NOTE NOTE provides a useful fact or helpful information.CAUTION CAUTION indicates a condition that may result in minor or moderate injury.EnterThis illustration means to press the [Enter] key.Fn + F5This illustration means to press and hold the [Fn] key, then press the [F5] key.[start] - [Run] This illustration means to click [start], then to click [Run]. For some applications, you may need to double-click.Î or ⇒These symbols indicated related pages.Î : Refer to the page in this Operating Instructions⇒ : Refer to the Reference ManualCustomer’s RecordModel No.*1Serial No.orCode No.Date of PurchaseDealer’s NameDealer’s Address](https://usermanual.wiki/Panasonic-of-North-America/9TGCF-513.CF-51-User-Manual/User-Guide-606225-Page-2.png)


![First-time Operation10Getting StartedCAUTIONzBe sure the AC adaptor is connected until completing the first-time use opera-tion. zWhen using the computer for the first time, do not connect any peripheral device except the battery pack and AC adaptor to the computer.Handling the AC adaptorzDo not twist or pull the AC power cord forcefully. Doing so may damage the con-nections.zUse only the specified AC adaptor with your computer. Using an AC adaptor other than the one supplied might damage the battery and/or the computer.zWhen the DC plug is not connected to the computer, disconnect the AC cord from your AC wall outlet.zProblems such as sudden voltage drops may arise during periods of thunder and lightning. Since this could adversely affect your computer, an uninterrupt-ible power source (UPS) is highly recommended unless running from the battery pack alone.5Open the display.ASlide the latch located at the front.BLift open the display. 6Turn your computer on.Press the power switch and hold it for approximately one second until the power indicator turns on before releasing it.zDo not press the power switch repeatedly.zOnce the computer is powered off, you must wait at least ten seconds before powering it on again.7Setup Windows.Moving the cursor or clicking buttons can be performed with the touch pad. (Îpage 16)zDo not press any key or move the touch pad until [Windows XP Profes-sional Setup] is displayed.AAt [Welcome to the Windows XP Setup Wizard], select [Next].BAfter reading the agreement, select [I accept this agreement] or [I don’t accept this agreement], then select [Next].zIf [I don’t accept this agreement] is selected, the Windows setup will be aborted.CSelect settings for your region, then select [Next]. DEnter your name and organization and then select [Next]. EEnter your computer name and administrator password and then select [Next]. zRemember this password! If the password is forgotten, Windows can-not be operated.FEnter the correct date, time and the time zone, then select [Next]. The computer will restart.zIt may take some time before the computer restarts and the screen of step i is displayed. Wait, and do not press any keys, or touch the touch pad, etc.GEnter your administrator password and select .zWhen Windows setup is completed, the following message will be displayed at the bottom right of the screen: “Your computer might be at risk.” Continue to the next step.The message is generated by the [Security Center] function in [Control](https://usermanual.wiki/Panasonic-of-North-America/9TGCF-513.CF-51-User-Manual/User-Guide-606225-Page-10.png)
![11Getting StartedPanel], and does not indicate an error or malfunction. For more information about [Security Center]: Îpage 19.8Create a new account.ASelect [start] - [Control Panel] - [User Accounts] - [Create a new account].BEnter a new name for the new account, then select [Next].CSelect [Computer administrator], then select [Create Account]. D<When you want to create a password for the new account>Select the new account you have created and select [Create a password].Follow the instructions on the screen to create a password.ESelect [start] - [Turn Off Computer] - [Restart] to restart the computer.CAUTIONzRemember this password! If the password is forgotten, Windows cannot be operated. You can create a password reset disk beforehand (Îpage 12).NOTEzWhen creating a new user account:• If you make mail settings, create password reset disks (Îpage 12), or con-duct other related operations before creating the user account, you will be unable to use any previous mail history or settings.• When you create the first new account, you can only select [Computer admin-istrator].Once a “Computer Administrator” account has been created, you can create additional limited user accounts. Note also that only the added user account will be displayed in the Welcome screen. The account for the administrator created during Windows setup will not be displayed.zThe message “Your computer might be at risk,” which is displayed at the bottom right of the screen, is generated by the “Security Center” function in Windows XP, and does not indicate an error or malfunction.To prevent this message from being displayed, refer to “Security of the Com-puter” (Îpage 19). zAbout the Icon Enlarger:• If the characters or icons on the screen are too small and difficult to see, after completing step 8, select [start] - [All Programs] - [Panasonic] - [Icon Enlarger]. This will allow you to magnify the display of characters and icons on the screen. • The [Icon Enlarger] can be set separately for each account.zYou can also use [Loupe Utility], which enlarges a part of the screen. (⇒ Refer-ence Manual “Loupe Utility”)z<Only for models with wireless LAN>If you use the wireless LAN, be sure to refer to the Reference Manual’s “Wire-less LAN”.This concludes the first-time use operation guidelines.](https://usermanual.wiki/Panasonic-of-North-America/9TGCF-513.CF-51-User-Manual/User-Guide-606225-Page-11.png)
![First-time Operation12Getting StartedzDepending on the Windows settings, installed applications, and drivers, menus and other displays may differ, or some functions (such as use of the password reset disk) may be inoperable. Check with your system administrator for details.zYou can select Classic View for the Control Panel or select the Classic Start menu. You can also change the way a user logs on or off.The procedure in this manual uses the method or view of the Windows XP default setting (not Classic view or Classic Start menu etc.).Resetting the passwordWindows XP has a function to reset a forgotten password. To use this function, you need to create a password reset disk beforehand following the steps below.AInsert the floppy disk drive into the multimedia pocket, or connect the USB floppy disk drive (optional: CF-VFDU03) to your computer.BSelect [start] - [Control Panel] - [User Accounts].CSelect the account you used to log on and select [Prevent a forgotten password] from [Related Tasks] menu.Create a password reset disk following the on-screen instructions.Store the password reset disk in a safe place.zOnly the logon password for each account can be reset.The password set in the Setup Utility (⇒ Reference Manual “Setup Util-ity”) cannot be reset.Information for Windows XP](https://usermanual.wiki/Panasonic-of-North-America/9TGCF-513.CF-51-User-Manual/User-Guide-606225-Page-12.png)
![15Operation1Save important data and close each application.2Select [start] - [Turn Off Computer].3Select [Turn Off].Your computer will power off automatically.zRestarting your computer (without shutting down):Select [Restart].To shut down using the keyboard:Press , U , and select [Turn Off] with U.CAUTIONzDo not do the following during the shutdown/restart procedure.• Connecting or disconnecting the AC adaptor.• Touching the power switch.• Performing any keyboard, touch pad or external mouse operations.• Closing the display.NOTEzTo quickly resume computer operation after shutting down, The standby or hibernation function is available ( ⇒Reference Manual “Standby/Hibernation Functions”).When you leave the computer or interrupt your work...If you use the "Standby" or "Hibernation" function, then when you turn on the power next time, the application software and files you were using before will be displayed, and you can restart the same operations immediately. ( ⇒Reference Manual “Standby/Hibernation Functions”)Shutting Down (power off your computer)](https://usermanual.wiki/Panasonic-of-North-America/9TGCF-513.CF-51-User-Manual/User-Guide-606225-Page-15.png)
![16OperationTouch PadUse the touch pad to move the cursor on the screen and perform computer operations.A. Work Surface (Touch Pad)B. Left ButtonC. Right ButtonNOTEzBesides the above operations, operations such as Zoom and Pan are possible by allocating these functions to the buttons and/or pad. For more details, refer to [Mouse Properties]*1.*1 Select [start] - [Control Panel] - [Printers and Other Hardware] - [Mouse].zThe operations of Scroll, Pan or Zoom will differ depending on the application. There are cases the touch pad will not support these operations even with an application that supports the functions.zWhen using the touch pad, keep the following in mind.• By design the touch pad is to be used with a finger tip only. Do not place any object on the work surface or press down forcefully with sharp-pointed objects (e.g., nails) or hard objects that can leave marks (e.g., pencils and ball point pens).• Try to avoid having any harmful substances, such as oil, come in contact with the touch pad. The cursor may not work properly in such cases.Function OperationMoving the Cursor Move the tip of your finger lightly over the surface.Tapping/ClickingTapping or ClickingDouble-Tapping/Double-ClickingDouble-Tapping or Double-ClickingDraggingTwo quick taps, but on the second tap leaving your finger down (applying pressure) and moving it on the work sur-face.orWhile holding down the button, moving your finger on the work surface.Scroll ⇒ Reference Manual “Touch Pad”](https://usermanual.wiki/Panasonic-of-North-America/9TGCF-513.CF-51-User-Manual/User-Guide-606225-Page-16.png)
![17OperationReference ManualReference Manual / Important TipsThe Reference Manual and the Important Tips can be accessed on your computer. When a printer is connected, the Reference Manual can also be printed.Reference ManualThe Reference Manual explains functions for you to make greater use of the com-puter, such as how to add peripheral devices, how the Setup Utility works, and other useful information.zHow to access the Reference ManualSelect [Reference Manual] in [start].Important TipsImportant Tips provides information on how to maximize use of the battery pack, which is necessary for computing away from your home or office.zHow to access the Important TipsSelect on the desktop.Important Tips can also be accessed from the following menu.Select [Important Tips] in [start] - [All Programs] - [Panasonic] - [On-Line Manu-als].When the Reference Manual or Important Tips is accessed for the first time, the License Agreement of the Adobe Reader may be displayed. If it is displayed, after read-ing the agreement, select [Accept] to access the Reference Manual or Important Tips.NOTEzIllustrations may be difficult to view depending on the magnification. If the illus-tration is too small, magnify the display.zIf a printer is connected, we recommend printing the pages required. Depend-ing on the printer, the illustrations and display samples may not be printed with a high quality.Contents•Read Me First •Key Combinations•LED Indicators•Touch Pad•Standby/Hibernation Functions•Security Measures•Computing on the Road•Battery Power•Multimedia Pocket•CD/DVD Drive•WinDVD•B’s Recorder/B’s CLiP•PC Cards•RAM Module•Port Replicator•External Display•Printer•USB Devices•IEEE 1394 Devices•Modem•LAN•Wireless LAN•Hard Disk Drive•Setup Utility•Technical Information•DMI Viewer•Icon Enlarger•Loupe Utility•List of Error Codes•Dealing with Problems (Advanced)](https://usermanual.wiki/Panasonic-of-North-America/9TGCF-513.CF-51-User-Manual/User-Guide-606225-Page-17.png)
![19OperationDisplayAvoid using water when cleaning the panel. Ingredients included in water may leave scratches and reduce readability of the screen.<When cleaning dust/dirt>zAvoid rubbing off dust/dirt with cloth since it may leave scratch on the screen. Sweep dust/dirt with fine brush, then wipe it with a dry soft cloth used for cleaning glasses.<When cleaning oily surface>zApply camera lens cleaner on a soft gauze and clean it with gentle force. Then, wipe with a dry soft cloth used for cleaning glasses. Areas excluding the displayWipe these areas with a soft cloth, after applying water or detergent diluted with water to the soft cloth and firmly wringing out excess water.Touch Pad (Îpage 16)CAUTIONzDo not use benzene, thinner, or rubbing alcohol. Doing so may adversely affect the surface, e.g., discoloration. In addition, do not use commercially-available household cleaners and cosmetics, as they may contain components harmful to the surface.zDo not directly add or spray water or detergent. If liquid enters the inside of the computer, it may cause it to work improperly or be damaged.Use the Windows Security Center function to protect Windows from damage by com-puter viruses, etc.Windows Security CenterzWhat is Windows Security Center?The Windows Security Center allows centralized management of Windows security information, and monitors antivirus measures and other Windows security settings to ensure optimum safety.Use the Windows Security Center function to protect your computer from damage by viruses, etc.Select [start] - [Control Panel] - [Security Center] to display the current settings for the following security functions.• Windows FirewallA security system for protecting the computer from unauthorized access via the Internet or other external networks.The firewall regulates the data exchanged between the computer and the external network, so that only approved data can pass through.At the time of purchase, the Windows Firewall is set to be enabled.• Automatic UpdatesIf your computer is connected to the Internet, this function regularly checks whether security updates and other important updates have been made available, and automatically installs these updates in their latest conditions.• Virus ProtectionThis function regularly checks whether antivirus software has been installed in the computer, and whether the version of that software is the latest version available.MaintenanceSecurity of the Computer](https://usermanual.wiki/Panasonic-of-North-America/9TGCF-513.CF-51-User-Manual/User-Guide-606225-Page-19.png)
![Useful Information20OperationIf the message “Your computer might be at risk” is displayedRead the message, select (red icon) on the taskbar, and make the appropriate settings.This message, which the Windows Security Center (Îpage 19) displays to confirm the security-related settings regularly, will be displayed until the settings are made more properly.NOTEzThis message does not indicate an error. You can use the computer while the message is displayed. However, in order to operate the computer more safely, we recommend making the appropriate measures to reduce damage from virus and other attacks, thus avoiding the appearance of this message.The Pop-up BlockerIn Windows XP, security functions have been strengthened with regard to Web con-tents.One of these is the “Pop-up Blocker,” which may prevent some Web pages from being displayed.Users are advised to purchase the latest versions of virus protection software and use them regularly.We recommend you run the software:zWhen booting your computer.zAfter receiving data.We recommend that you check data received on disks or from external sources, such as data downloaded from the Internet, e-mail, etc. (For compressed files, uncompress them before running a check).For Data Execution Prevention (DEP), you can make one of the settings in the following menu.[start] - [Control Panel] - [Performance and Maintenance] - [System] - [Advanced] - [Settings] (in [Performance]) - [Data Execution Prevention]For more information, refer to Windows help.You can use the latest patches and service packs for Windows with the following menus. Do not apply “Driver Updates” even if a message to update a driver appears. If a driver update is required, contact Panasonic Technical Support. (Îpage 35)[start] - [All Programs] - [Windows Update]Pay strict attention to the following points to avoid damage to the computer, peripheral devices, cables, etc. Also, in addition to following this manual and the Reference Man-ual, carefully read the instruction manuals for the peripheral devices being used.zUse only peripheral devices that conform to the computer’s specifications.zConnect the devices properly, paying close attention to the condition and position of the connectors.zIf a connection cannot be made easily, do not apply undue force; check once more to confirm the condition and position of the connector (alignment of pins, etc.) .zIf the connector has holding screws, fasten the screws firmly.Computer VirusesWindows UpdateWhen Using Peripheral Devices](https://usermanual.wiki/Panasonic-of-North-America/9TGCF-513.CF-51-User-Manual/User-Guide-606225-Page-20.png)
![21OperationzDo not carry the computer with cables attached, and do not pull on the cables force-fully.zDo not expose your computer to shock.Use care when handling your computer, shock may damage your hard disk or make your software applications and data unusable.zDo not power down your computer while software applications are running or hard disk drive indicator is on. Properly shut Windows down to avoid problems.zSave all valuable data to disks.Backing up data to disks will limit damage should trouble occur to your computer or should you inadvertently change or erase data.zUse the security function for all important data. (⇒ Reference Manual “Security Measures”)Hard Disk LockWhen the Hard Disk Lock is set to [Enable], it is impossible to read/write data from/to the hard disk when the hard disk is installed in a different computer. When the hard disk is returned to the original computer, you can read/write data as before. In this case, however, make the settings in the Setup Utility exactly the same as they were before the hard disk was removed. (Note that this Hard Disk Lock does not guarantee the complete protection of data.) (⇒ Reference Manual “Security Measures”)zDo not power down your computer or press the floppy disk drive eject button while the MP indicator is on.Doing so may damage the data on the floppy disk and render the floppy disk use-less.zUse care when handling floppy disks.To protect the data on your floppy disks or to prevent a floppy disk from becoming stuck in your computer, avoid the following:• Sliding the shutter on the floppy disk manually. • Exposing the floppy disk to a magnetic field.• Storing the floppy disk in locations prone to high temperatures, low pitched noise, dampness, or dust.• Applying more than one label on the floppy disk.zConfirm the contents of a floppy disk before formatting it.Confirm that no important data is on the floppy disk, because all data on the floppy disk will be erased.zUse the write-protect tab (A).This is a must for preserving important data.This prevents your data from being erased or overwritten.zWhen disposing of or transferring ownership of this device, erase all data on the hard disk in order to prevent the theft of hard disk data. Even if you delete data or initialize the hard disk through normal Windows commands, data can still be read using special software. In order to erase all data, either have the data erased by a specialist (at a charge) or use the hard disk data erase utility (included) ( Îpage 31). (Note that this hard disk data erase utility does not guarantee that data will be completely erased.)Also, note that if you transfer ownership of this device without deleting commercial software that you have installed to the hard disk, you may be in violation of the licensing agreement for that software.Saving Data on the Hard DiskSaving Data on Floppy DisksWhen Disposing of or Transferring Ownership of This Device](https://usermanual.wiki/Panasonic-of-North-America/9TGCF-513.CF-51-User-Manual/User-Guide-606225-Page-21.png)
![23TroubleshootingList of Error CodesWhen turning on the computer, if one of the following error codes or messages is displayed, follow the instructions shown below.If the problem persists, or if the error code or message displayed is not shown here, contact Panasonic Technical Sup-port. ( Îpage 35)How to run the Setup Utility1Restart the computer.2Press F2 while [Panasonic] boot screen is displayed soon after the computer begins the startup procedure.Error Code/Message Action0211: Keyboard error zIf an external keyboard or mouse is connected, disconnect these devices.0251: System CMOS checksum bad - Default configuration usedAn error has occurred in the memory that stores the Setup Utility settings. This error occurs when the memory content is changed through some inad-vertent operation by a program or other function. zRun the Setup Utility and load the default values, then change the set-tings to the appropriate values as needed. zIf the problem persists, the internal clock battery may need to be replaced. Contact Panasonic Technical Support.0271: Check date and time settings The date and time setting are incorrect.zRun the Setup Utility and set the date and time correctly.zIf the problem persists, the internal clock battery may need to be replaced. Contact Panasonic Technical Support.0280: Previous boot incomplete - Default configuration usedStartup has failed repeatedly, so the Setup Utility settings have been returned to their default values, and the computer has been booted.zRun the Setup Utility and load the default values, then change the set-tings to the appropriate values as needed. Press <F2> to Setup zWrite down the error details and press F2 to run the Setup Utility. Con-firm the settings, and change the settings to the appropriate values as needed.Operating System not found The OS is not properly installed on the floppy disk or the hard disk that you are trying to boot from.zIf the computer cannot be booted from the floppy disk, check the floppy disk drive to ensure that the disk is in fact bootable, and change it to another if not.zIf the computer cannot be booted from the hard disk, confirm whether the hard disk is properly recognized in [Information] menu of the Setup Utility.If the hard disk is recognized, perform the reinstallation procedure. If not, contact Panasonic Technical Support.zIf a device is connected to the USB port, disconnect the device, or run the Setup Utility and set [Legacy USB Support] in [Security] menu to [Disable].RAM Module Failed zIf the RAM module has not been inserted properly, or if a RAM module other than one matching the specifications has been inserted, a beep will sound and the message “RAM Module Failed” will be displayed when turning the power on. In this case, press the power switch for four seconds or more to turn off the computer, confirm that the RAM module meets the specifications, and reinsert it.](https://usermanual.wiki/Panasonic-of-North-America/9TGCF-513.CF-51-User-Manual/User-Guide-606225-Page-23.png)
![24TroubleshootingDealing with Problems (Summary)When a problem occurs, refer to this page. The “Reference Manual” also contains detailed information. If a problem appears to be related to a software application, read the software related manual. If you still cannot troubleshoot the problem, contact Panasonic Technical Support ( Îpage 35). You can use the PC Information Viewer to check the computer’s usage status. (⇒Reference Manual “Dealing with Problems (Advanced)”)Starting UpThe power indicator is not lit zCheck the cable connection for the AC adaptor. zCheck to see if a fully charged battery is properly installed.zRemove the battery pack and disconnect the AC adaptor, then connect them again. The computer does not operate when a USB device is connectedzThe computer may not operate when certain USB devices are connected. Disconnect the USB device, or set [Legacy USB Support] to [Disable] in [Security] menu of the Setup Utility.[Enter Password] is dis-playedzInput your Supervisor Password or User Password. If you have forgotten it, contact Panasonic Technical Support (Îpage 35).POST Startup Error(s) is displayedÎpage 23Windows startup, or an operation is extremely slowzPress F9 in the Setup Utility (⇒Reference Manual “Setup Utility”). This will restore the Setup Utility’s settings to their default values (except the password settings). Then, the Setup Utility must be run once again for you to input the appropriate oper-ating environment settings. (The processing speed depends on the application soft-ware used, so this operation may not cause the processing speed to increase.)zIf you install resident software after purchasing this computer, disable the resident software.The date and time are incor-rectzYou can set the date and time using the following menu.[start] - [Control Panel] - [Date, Time, Language, and Regional Options] - [Date and Time]zIf you continue to experience problems, the internal battery maintaining the clock may need to be replaced. Contact Panasonic Technical Support.zWhen the computer is connected to a LAN, confirm the date and time of the server.zThis computer will not correctly recognize the date and time starting from the year 2100 A.D.When resuming from the standby or hibernation mode, [Enter Password] does not appear even if a password has been set in the Setup UtilityzEven when a password has been set in the [Security] menu of the Setup Utility, [Enter Password] does not appear when the computer resumes from the standby or hibernation mode.If you want to use the security function when using the standby or hibernation mode, use the Windows password as follows:ASelect the account to change in [start] - [Control Panel] - [User Accounts] and set the password.BAdd the check mark for [Prompt for password when computer resumes from standby] in [Control Panel] - [Performance and Maintenance] - [Power Options] - [Advanced].When “Remove disks or other media. Press any key to restart” (or a similar mes-sage) is displayedzThis means a floppy disk that does not contain system startup information has been left in the floppy disk drive. Remove the floppy disk, and press any key.zIf the message still appears even after trying the above measure, this may be an indication that some type of hard disk failure has occurred. Contact Panasonic Technical Support.[Executing Battery Recali-bration] screen is displayedzThis screen appears because the Battery Recalibration was canceled before Windows was shut down last. To start up Windows, turn off the computer by using the power switch, and then turn it back on again.When the administrator password is forgottenzIf you have created a password reset disk (Îpage 12), a message is displayed when you fail to correctly enter the password. Follow the message’s instructions and set the password again by using the password reset disk.If you have not created a password reset disk, after reinstalling, setup Windows and then set the password again.](https://usermanual.wiki/Panasonic-of-North-America/9TGCF-513.CF-51-User-Manual/User-Guide-606225-Page-24.png)
![25TroubleshootingWhen the previous item is not the causezPress F9 in the Setup Utility (⇒Reference Manual “Setup Utility”). This will restore the Setup Utility’s settings to their default values (except the password settings).zTry removing all peripheral devices.zCheck a disk error using the following procedure.ADisplay [Local Disk (C:) Properties].Right-click [Local Disk(C:)] in [start] - [My Computer], and select [Proper-ties].BSelect [Tools] - [Check Now].CSelect [Start] after selecting required items in [Check disk options].zAt startup, hold down F8 when [Panasonic] boot screen disappears*1, and release your finger when the Windows Advanced Option Menu is displayed. Start the com-puter in Safe Mode, and confirm the details of the error.*1 When [Password on boot] is set to [Enable], [Enter Password] appears after the [Panasonic] boot screen disappears. Hold down F8 soon after inputting the password and pressing Enter.DisplayNo display after powering on zWhen there is no display to an external display,• Check your cable connection to the external display.• Confirm your display is powered on.• Check the settings for your external display.zThe display destination may be set to the external display.Try changing the display by pressing Fn + F3.If you want to switch the display destination repeatedly by pressing Fn + F3, make sure that the display destination has switched completely each time before pressing Fn + F3 again.zPress Fn+F2 and adjust the brightness. The power has not been turned off, but after a certain period of time, there is no displayzHas the computer been set to the power-saving mode?To resume operation of your computer from the condition the power of the display is off (for energy conservation purposes), press any key unrelated to the direct trigger-ing of a selection, like Ctrl.zTo save power, your computer may have automatically entered the standby mode (power indicator blinks green) or hibernation mode (power indicator turns off). In such cases, press the power switch.When the battery pack is used, the screen is darker than when the AC adaptor is connectedzPress Fn + F2 and adjust the brightness. Note, however, that when the brightness is increased, the battery running time will become shorter.Brightness can be set to separate levels for when the AC adaptor is connected and when it is disconnected.An afterimage appears (e.g., green, red, and blue dots remain on the display) or there are dots not dis-playing the correct colorszIf an image is displayed for a prolonged period of time, an afterimage may appear. This is not a malfunction. The afterimage will disappear when a different screen is displayed.zHigh-precision and advanced technologies are necessary in the production of color liquid crystal displays (color LCDs). Therefore, if 0.002% or less of the picture ele-ments either fail to light or remain constantly lit (that is, more than 99.998% of ele-ments are functioning properly), no defect is considered to exist.The screen becomes disor-deredzThe screen display may become distorted if the resolution or number of colors is changed, or if an external display is connected or disconnected while the computer is operating. Restart the computer.The external display no longer displays properlyzWhen an external display not compatible with the power saving mode is used with the computer, the display may not function correctly when the computer enters the power saving mode. In such cases, turn off the power to the external display.Starting Up](https://usermanual.wiki/Panasonic-of-North-America/9TGCF-513.CF-51-User-Manual/User-Guide-606225-Page-25.png)
![Dealing with Problems (Summary)26TroubleshootingWhen you want to display the fonts or icons at a larger sizezChange the size of the icons, etc. using “Icon Enlarger” (⇒Reference Manual “Icon Enlarger”).zYou can also change the settings as follows (for more details, refer to the Windows Help).ASelect [start] - [Control Panel] - [Appearance and Themes] - [Display] - [Appearance].BSelect the font size in [Font size], and select [Effects] and then add the check mark for [Use large icons] to increase the icon size.CSelect [OK], then select [OK].zTo enlarge a part of the screen, use Loupe Utility (⇒Reference Manual “Loupe Util-ity”).During simultaneous display, one of the screens becomes disorderedzTry changing the display by pressing Fn+F3.zIf you continue to experience problems, try changing the display destination in the following menu.[start] - [Control Panel] - [Other Control Panel Options] - [Intel(R) GMA Driver for Mobile] - [Devices]zWhen the [Command Prompt] is set to "Full Screen" by pressing Alt + Enter, the picture is displayed on one of the screens only. When the window display is restored by pressing Alt + Enter, the picture is displayed on both screens.zSimultaneous display cannot be used until Windows startup is complete (during Setup Utility, etc.). When the Fn+F3 key is pressed, the screen is displayed on the external display or internal LCD.When a video such as an MPEG file and a DVD video is being played with WinDVD or Windows® Media Player, the display destination cannot be switched using Fn+F3zThe display destination cannot be switched while a video such as an MPEG file and a DVD video is playing.Stop playing the video before switching the display destination.When the screensaver is set, an error will occur dur-ing a resume operationzWhen the computer automatically enters the standby or hibernation mode while the screensaver is running, an error may occur during a resume operation. In such cases, turn off the screensaver or try changing the pattern of the screensaver.Shutting downWindows cannot be shut down or restartedzIf a USB device is connected, try removing it.zIt may take one or two minutes to shut down.Battery IndicatorThe red indicator lights zThe battery level is very low (the charge is approx. 9% or less). Connect the AC adaptor. You can use the computer when the indicator light is orange. If you do not have an AC adaptor, save your data and power off your computer. After replacing the battery pack with a fully charged one, turn your computer on.The red indicator blinks zQuickly save your data and power off your computer. Remove the battery pack and disconnect the AC adaptor, then connect them again.If the problem persists, contact Panasonic Technical Support. The battery pack or charging circuit may be defective. The green indicator blinks*1 zIn high temperature mode, the battery pack is discharging to a level of 80%*2 in nor-mal temperature mode.(⇒Reference Manual “Battery Power”) Do not remove the battery pack while the battery indicator is blinking green, or the power will be turned off forcibly.*1 Only for the main battery pack.*2 A level of 80% in normal temperature mode is displayed as [100%] in high temperature mode.Display](https://usermanual.wiki/Panasonic-of-North-America/9TGCF-513.CF-51-User-Manual/User-Guide-606225-Page-26.png)
![27TroubleshootingThe orange indicator blinks zBattery cannot be recharged temporarily because the internal temperature of the battery pack is outside of the acceptable temperature range for recharging. Once the allowable range requirement is satisfied, charging begins automatically. Your computer can be used normally in this state.zWhen using the application, power consumption is high; therefore there is insufficient power to recharge the battery.Reference ManualThe Reference Manual is not displayedzIs Adobe Reader installed?If you have uninstalled Adobe Reader, install using the following procedures.ASelect [start] - [Run], input [c:\util\reader\AdbeRdr60_enu_full.exe], then select [OK].Install Adobe Reader by following the instructions on the screen.BUpdate Adobe Reader to its latest version.If your computer is connected to the Internet, start up Adobe Reader and select [Help] - [Updates].If your computer is not connected to the Internet, select [start] - [Run], input [c:\util\reader\Acro-Reader_6.0.2_Update.exe], then select [OK].Fast User Switching functionSome applications do not work properlyzWhen switching to a different user with the Fast User Switching function, the follow-ing problems may occur.• Some applications may not work properly. • Key combination with Fn may not work.• It may not be possible to set the settings of the display.• A serial mouse may not work.• The B's CLiP icon will no longer be shown on the taskbar and CD-RW disc (<Only for DVD MULTI drive> CD-RW, DVD-RW and +RW discs) cannot be written.• <Only for models with wireless LAN>The wireless LAN cannot be used.In this case, log off all users without using Fast User Switching function, and try the operation once more. If the problem persists, restart the computer.OthersNo response zPress Ctrl+Shift+Esc to open Task Manager and close the software application which is not responding.zIs there an input screen (e.g., password input screen at startup) hidden behind another window? Use Alt+Tab to check for other windows being displayed.zAfter shutting down by pressing the power switch for more than four seconds, press the power switch to power on and open the application again.If the program no longer works normally, delete the program using the following procedure. Then reinstall the program.[start] - [Control Panel] - [Add or Remove Programs]Battery Indicator](https://usermanual.wiki/Panasonic-of-North-America/9TGCF-513.CF-51-User-Manual/User-Guide-606225-Page-27.png)
![28TroubleshootingReinstalling SoftwarePreparingzThe Product Recovery DVD-ROM (included)zPanasonic CD/DVD driveImportantzBefore the reinstallation procedure, remove all peripherals (except for the CD/DVD drive).zBe sure the AC adaptor is connected until the reinstallation procedure is completed.zEven if reinstallation is executed, the number of times that the DVD video region code can be set will not be returned to the state set at the time of factory shipment.ATurn off the computer and insert the CD/DVD drive into the multimedia pocket. (⇒ Reference Manual “Multimedia Pocket”)BTurn on the computer, and press F2 while [Panasonic] boot screen is dis-played.The Setup Utility will start up. If the password has been set, enter the Supervisor Password.CWrite down all of the contents of the Setup Utility and then press F9.At the confirmation message, select [Yes] and press Enter.DSelect [Boot] menu, then select [IDE MP] and press F6 until [IDE MP] is at the top of [Boot] menu.EPlace the Product Recovery DVD-ROM into the CD/DVD drive.FPress F10.At the confirmation message, select [Yes] and press Enter. The com-puter will restart.GPress 1 to execute [1. [Recovery]].(You can cancel this operation by pressing 0.)The License Agreement screen should appear.HPress 1 to select [1. Yes, I agree to the provisions above and wish to con-tinue!].This screen should appear.IMake a selection from the menu.zWhen selecting [2], enter the basic partition size for the operating sys-tem installation and press Enter.(The data partition size is the remainder after subtracting the basic par-tition size.)When reinstallation procedure is performed, the contents of the hard disk will be erased. Be sure to back up any criti-cal data that is on your hard disk before running the reinstallation procedure.The reinstallation procedure will return the computer to its original condition.zIf you have created partitions for data, the data may be erased or become corrupt as a result of the reinstallation procedure.Before ReinstallationReinstalling](https://usermanual.wiki/Panasonic-of-North-America/9TGCF-513.CF-51-User-Manual/User-Guide-606225-Page-28.png)
![29TroubleshootingzTo select [3], the first partition size must be 6 GB or more of the hard disk size. Reinstallation cannot be performed with a small partition size.JAt the confirmation message, press Y.The operation of reinstallation for the hard disk starts automatically. (The operations take about 15 minutes.)zDo not interrupt the reinstallation procedure before completion, for example by turning off the computer or pressing Ctrl + Alt + Del, as this may prevent Windows from starting up, or may cause data to be lost so that the reinstallation procedure cannot be executed.KAfter the reinstallation procedure completes, the screen should appear.Remove the Product Recovery DVD-ROM, and then press any key.The computer will be shut down.LTurn on the computer, and press F2 while [Panasonic] boot screen is dis-played.The Setup Utility will start up.If the password has been set, enter the Supervisor Password.MPress F9.At the confirmation message, select [Yes] and then press Enter. (The Setup Utility settings will return to their default values. Even the security settings with the exception of the password(s) will return to their default values.)NSelect [Exit] and then select [Save Current Values], then press Enter.At the confirmation messages, select [Yes] and press Enter.OTurn the computer off by using the power switch.zIf additional instructions are included with the computer, be sure to read them. It may be necessary to perform additional operations during the following procedures.PPerform the first-time use operation. (Îpage 10)QRun the Setup Utility and change the settings where necessary. Changing the drive letterYou can change the drive letter for the CD/DVD drive or hard disk drive by the following steps.zDrive letters can only be changed when two or more partitions have been created on the hard disk drive. The name of the C: drive cannot be changed.zWe recommend that you make these changes before installing applica-tions.ASelect [start] - [Control Panel] - [Performance and Maintenance] - [Administrative Tools] - [Computer Management].BSelect [Disk Management] from [Storage].CRight click on the partition of the hard disk or the name of the CD/DVD drive and select [Change Drive Letter and Paths...].DSelect [Change].ESelect [Assign the following drive letter] and the new drive letter, and then select [OK].FAt the confirmation message, select [Yes].](https://usermanual.wiki/Panasonic-of-North-America/9TGCF-513.CF-51-User-Manual/User-Guide-606225-Page-29.png)

![31AppendixAppendixHard Disk Data Erase UtilityThis computer is equipped with a utility for completely erasing hard disk data.When disposing of or transferring ownership of this device, erase all data on the hard disk in order to prevent the theft of hard disk data by following the steps below.zYou will need the Product Recovery DVD-ROM (included) and Panasonic CD/DVD drive. zBe sure the AC adaptor is connected until the procedure is completed.zThis utility can only be used for internal hard disk. It cannot be used to erase data from external hard disks.zThis utility cannot erase data from damaged disk.zThis utility cannot erase data for specific partitions.zAfter executing this utility, the computer cannot be booted from the hard disk.ATurn off the computer and insert the CD/DVD drive into the multimedia pocket. (⇒ Reference Manual “Multimedia Pocket”)BTurn on the computer, and press F2 while [Panasonic] boot screen is dis-played. The Setup Utility will start up.If the password has been set, enter the Supervisor Password.CSelect [Boot] menu, then select [IDE MP] and press F6 until [IDE MP] is at the top of [Boot] menu.DPlace the Product Recovery DVD-ROM into the CD/DVD drive.EPress F10.At the confirmation message, select [Yes] and press Enter.The computer will restart.FPress 2 to execute [2. [Erase HDD]].(You can cancel this operation by pressing 0.)GAt the confirmation message, press Y.HWhen [<<< Start menu >>>] is displayed, press Enter.IThe approximate time required for erasing data will be displayed.Press Space.JAt the confirmation message, press Enter. The operation of erasing the hard disk will start.If necessary, the “hard disk data erase” operation can be cancelled after it has begun by pressing Ctrl + C.(If the operation is cancelled before being completed, a part of the data will not be erased.)KAfter the operation is complete:Under normal conditions, the message [Hard disk data has been deleted.] will be displayed.If a problem occurred during the operation, an error message will be dis-played.LRemove the Product Recovery DVD-ROM, and then press any key to turn off the computer.The hard disk data erase utility erases data using an overwriting method, but there is a possibility that due to malfunc-tions or other operational errors, data may not be completely erased. There are also specialized devices that may be able to read data that has been erased using this method. If you need to erase highly confidential data, we recom-mend that you contact a company that specializes in this process. Matsushita Electric Industrial Co., Ltd. will bear no responsibility for losses or damages suffered as a result of the use of this utility.PreparingProcedure](https://usermanual.wiki/Panasonic-of-North-America/9TGCF-513.CF-51-User-Manual/User-Guide-606225-Page-31.png)
![32AppendixSpecificationsThis page provides the specifications for the basic model CF-51LCMDDBM/CF-51LCCDDBM. The model number will change depending on the configuration of the unit, such as, CPU speed, memory size, HDD size, Operating System, LCD type, and whether a DVD-ROM drive, a DVD-ROM & CD-R/RW drive or a DVD MULTI drive or a floppy disk drive is included or not.To check the model number:Check the bottom of the computer or the box the computer came in at the time of purchase.To check CPU speed, memory size and the hard disk drive (HDD) size:Run the Setup Utility (⇒ Reference Manual “Setup Utility”) and select [Information] menu.Confirm the required information by checking the following items.CPU speed:[CPU Speed]Memory size:[System Memory]Hard disk drive size:[Primary Master]Main Specifications*1 1MB = 1,048,576 bytes*2 When expanding memory, remove the RAM module that was inserted at the time of factory shipment, and insert two 1024 MB-RAM modules.*3 A segment of the main memory is allotted automatically depending on the computer’s operating status. The size of the Video Memory cannot be set by the user.*4 A 16,777,216 color display is achieved by using the dithering function.*5 Maximum resolution depends on the specifications of the external display.*6 1GB = 1,000,000,000 bytes. Your operating system or some application software will report as fewer GB.*7 Varies depending on the usage conditions.*8 Measured using BatteryMark™ Version 4.0.1 (LCD brightness: Maximum - Minimum)*9 Measured using MobileMark™ 2002 (LCD brightness: 60 cd/m2)Model No. CF-51LCMDDBM/CF-51LCCDDBMCPU Intel® Pentium® M Processor (2.0 GHz DVAL CORE, 2 MB*1 L2cache, 533 MHz FSB)Memory 256 MB*1 (2048 MB*1 *2 Max.)Video Memory UMA (128 MB*1 Max.)*3LCD Type 15.0 XGA type (TFT)Displayed Colors*4 65,536/16,777,216 colors (800 × 600 dots/1024 × 768 dots)External Display 65,536/16,777,216 colors (800 × 600 dots/1024 × 768 dots/1280 × 768 dots/1280 × 1024 dots/1400 × 1050 dots/1600 × 1200 dots/2048 × 1536 dots)*5Hard Disk Drive Approx. 40 GB*6Battery Pack Li-ion 11.1 V, 6.6 AhOperating Time*7Main Battery Approx. 2 hours - 5 hours*8 (Approx. 4.5 hours*9)Main Battery + Second Battery Approx. 3.5 hours - 8 hours*8 (Approx. 7.5 hours*9)Charging Time*7Power On Main Battery Approx. 4 hoursMain Battery + Second BatteryApprox. 6.5 hoursPower Off Main Battery Approx. 4 hoursMain Battery + Second BatteryApprox. 6.5 hoursClock Battery Coin type lithium battery 3.0 V](https://usermanual.wiki/Panasonic-of-North-America/9TGCF-513.CF-51-User-Manual/User-Guide-606225-Page-32.png)