Panasonic of North America 9TGCF-731A Panasonic Toughbook with WLANa/b/g User Manual 73MK4 X E OI P01 pm6
Panasonic Corporation of North America Panasonic Toughbook with WLANa/b/g 73MK4 X E OI P01 pm6
UserManual.wiki
>
Panasonic of North America
>
9TGCF 731A User Manual
Users Manual
Navigation menu
Upload a User Manual
Namespaces
Wiki Guide
HTML
PDF
Info
Views
User Manual
Discussion / Help
Navigation
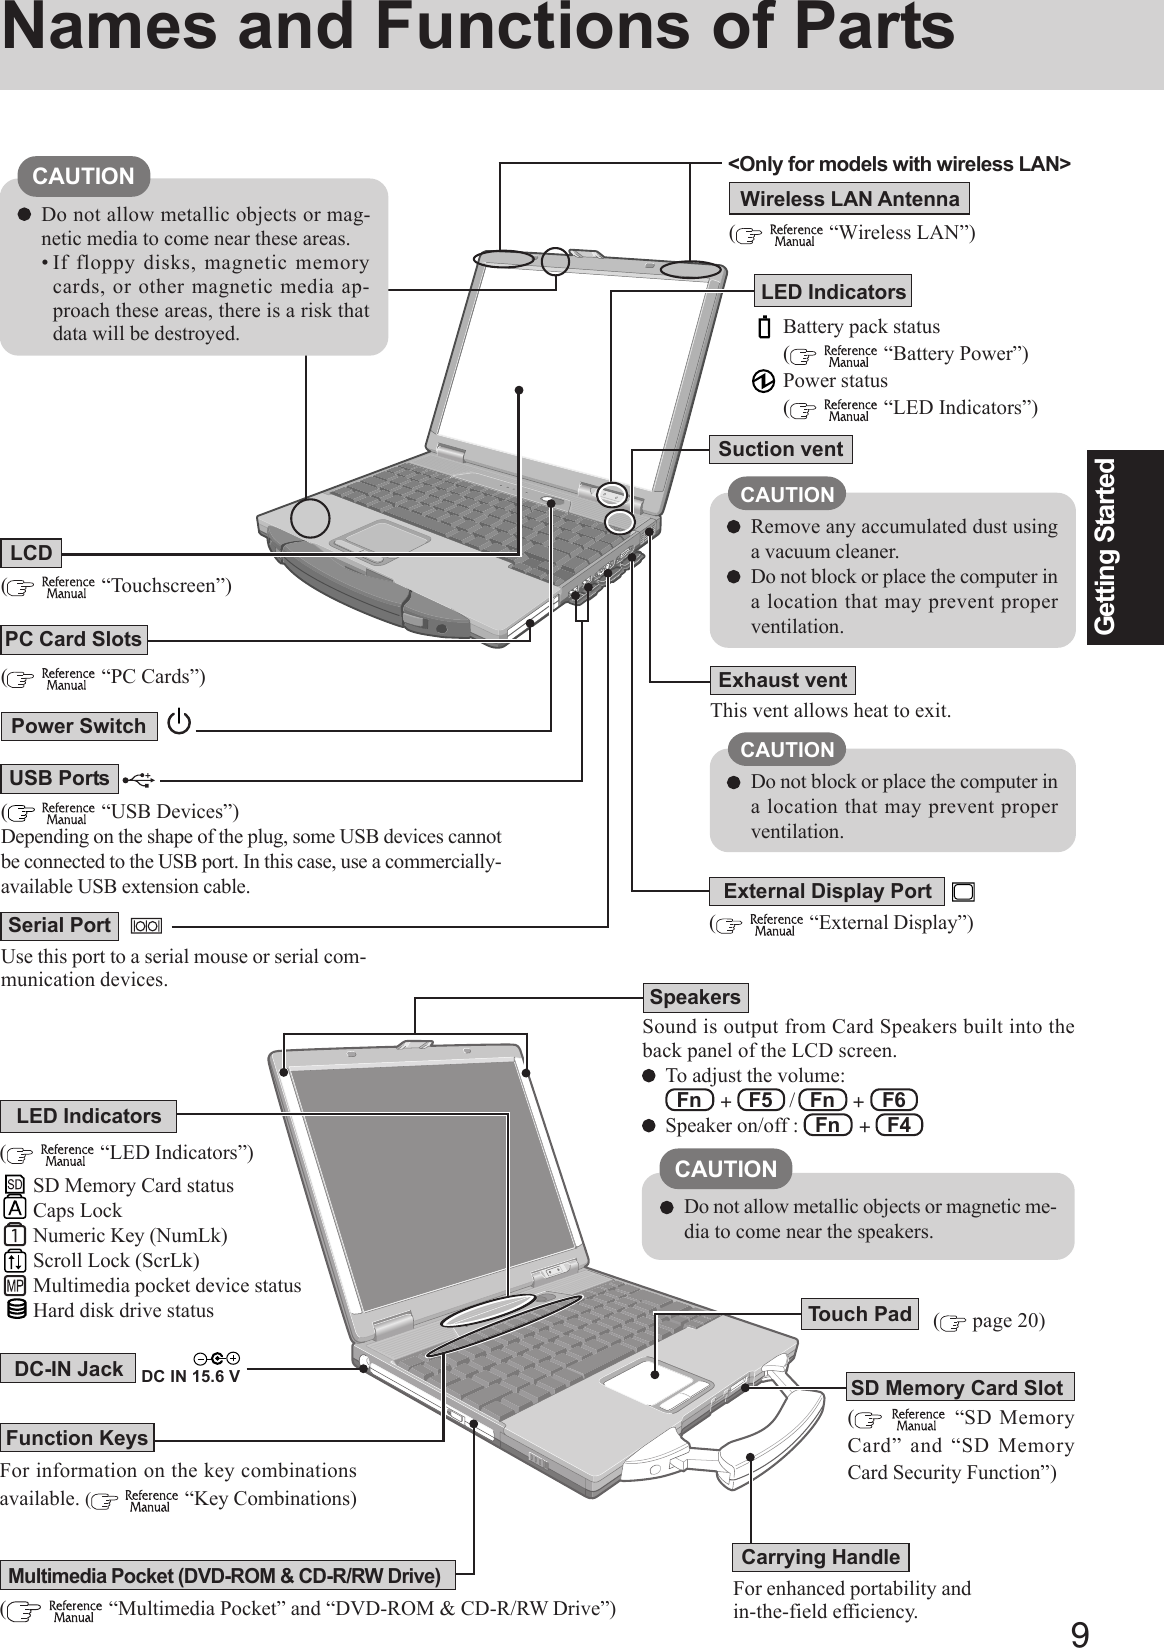
![Personal ComputerOPERATING INSTRUCTIONSAppendixLIMITED USE LICENSE AGREEMENT ........33Hard Disk Backup Function............................35Hard Disk Data Erase Utility...........................39Specifications .................................................40LIMITED WARRANTY....................................42TroubleshootingList of Error Codes ......................................... 23Dealing with Problems (Summary)....................... 24Reinstalling Software .................................... 31OperationStarting Up/Shutting Down............................ 15Touch Pad ..................................................... 18Reference Manual ......................................... 19Useful Information ......................................... 20Getting StartedRead Me First.................................................. 3Names and Functions of Parts ........................ 9First-time Operation ......................................11Contents[Additional Manual]Reference ManualThis manual can be accessed on your computer. Referto page 19 on how to access the Reference Manual.Reference ManualReference Manual•Touch Pad•Touchscreen•Standby/HibernationFunctions•Security Measures•Computing on the Road•Battery Power•Multimedia Pocket•DVD-ROM & CD-R/RW Drive• WinDVD• B’s Recorder/B’s CLiP•PC Cards• SD Memory Card•SD Memory Card SecurityFunction•RAM Module•Port Replicator / I/O Box•External Display•Printer•USB Devices•Modem•LAN•Wireless LAN•Hard Disk Drive•Setup Utility• Icon Enlarger• Loupe UtilityReference Manual•Technical Information•DMI Viewer•List of Error Codes•Dealing with Problems(Advanced)Model No. CF-73 SeriesXPPlease read these instructions carefully before using this product and save this manual for future use.Getting StartedAppendix OperationTroubleshooting•Read Me First•Key Combinations•LED Indicators](https://usermanual.wiki/Panasonic-of-North-America/9TGCF-731A/User-Guide-518856-Page-1.png)
![2Getting StartedIntroductionThank you for purchasing the Panasonic computer. Read the operating instructions thoroughly for proper operation of your newcomputer.Customer’s RecordSerial No.orDate of PurchaseModel No. *Code No.Dealer’s NameDealer’s Address* For the Model No., insert the 12 digit number (for example, CF-73SCVTSBM) located onthe bottom of the computer.Illustrations and Terminology in this ManualCopyrightThis manual is copyrighted by Matsushita Electric Industrial Co., Ltd. with all rights reserved. No part of this manual may bereproduced in any form without the prior written permission of Matsushita Electric Industrial Co., Ltd.No patent liability is assumed with respect to the use of the information contained herein.©2005 Matsushita Electric Industrial Co., Ltd. All Rights Reserved.DisclaimerComputer specifications and manuals are subject to change without notice. Matsushita Electric Industrial Co., Ltd. assumes noliability for damage incurred directly or indirectly from errors, omissions or discrepancies between the computer and the manuals.TrademarksMicrosoft, Windows and the Windows logo are registered trademarks of Microsoft Corporation of the United States and/or othercountries.Intel, Pentium and PROSet are either registered trademarks or trademarks of Intel Corporation.Adobe, the Adobe logo and Adobe Reader are either registered trademarks or trademarks of Adobe Systems Incorporated in the UnitedStates and/or other countries.Panasonic is a registered trademark of Matsushita Electric Industrial Co., Ltd.Names of products, brands, etc., appearing in this manual are trademarks or registered trademarks of their respective owner compa-nies.NOTE:NOTE provides a useful fact or helpful information.CAUTION:CAUTION indicates a condition that may result in minor or moderate injury.Enter : This illustration means to press the [Enter] key.Fn + F5 : This illustration means to press and hold the [Fn] key, then press the [F5] key.[start] - [Run]: This illustration means to click [start], then to click [Run]. For some applications, you may need todouble-click. :Where to go for referred information. : This illustration means to refer to the Reference Manual, which is available on your computer.Refer to page 19 on how to access this manual.Some of the illustrations in this manual may differ slightly in shape from the actual items in order to make the explanationeasier to understand.If the user has logged on without the administrator authority, some functions may not be executable, and some screens may notbe displayed as shown in this manual. If this happens, log on with the administrator authority to enable these functions.Confirm the latest information on optional products in catalogs, etc.In this manual, “Microsoft® Windows® XP Professional Service Pack 2 with Advanced Security Technologies” is indicatedas “Windows” or “Windows XP”.In this manual, the following software packages are described as follows:“B’s Recorder GOLD7 BASIC” as “B’s Recorder”“B’s CLiP 6” as “B’s CLiP”Circular media such as DVD-ROM and CD-ROM are described as “discs”.The following drives may be described as “CD/DVD drive”.DVD-ROM & CD-R/RW drive, DVD MULTI drive](https://usermanual.wiki/Panasonic-of-North-America/9TGCF-731A/User-Guide-518856-Page-2.png)
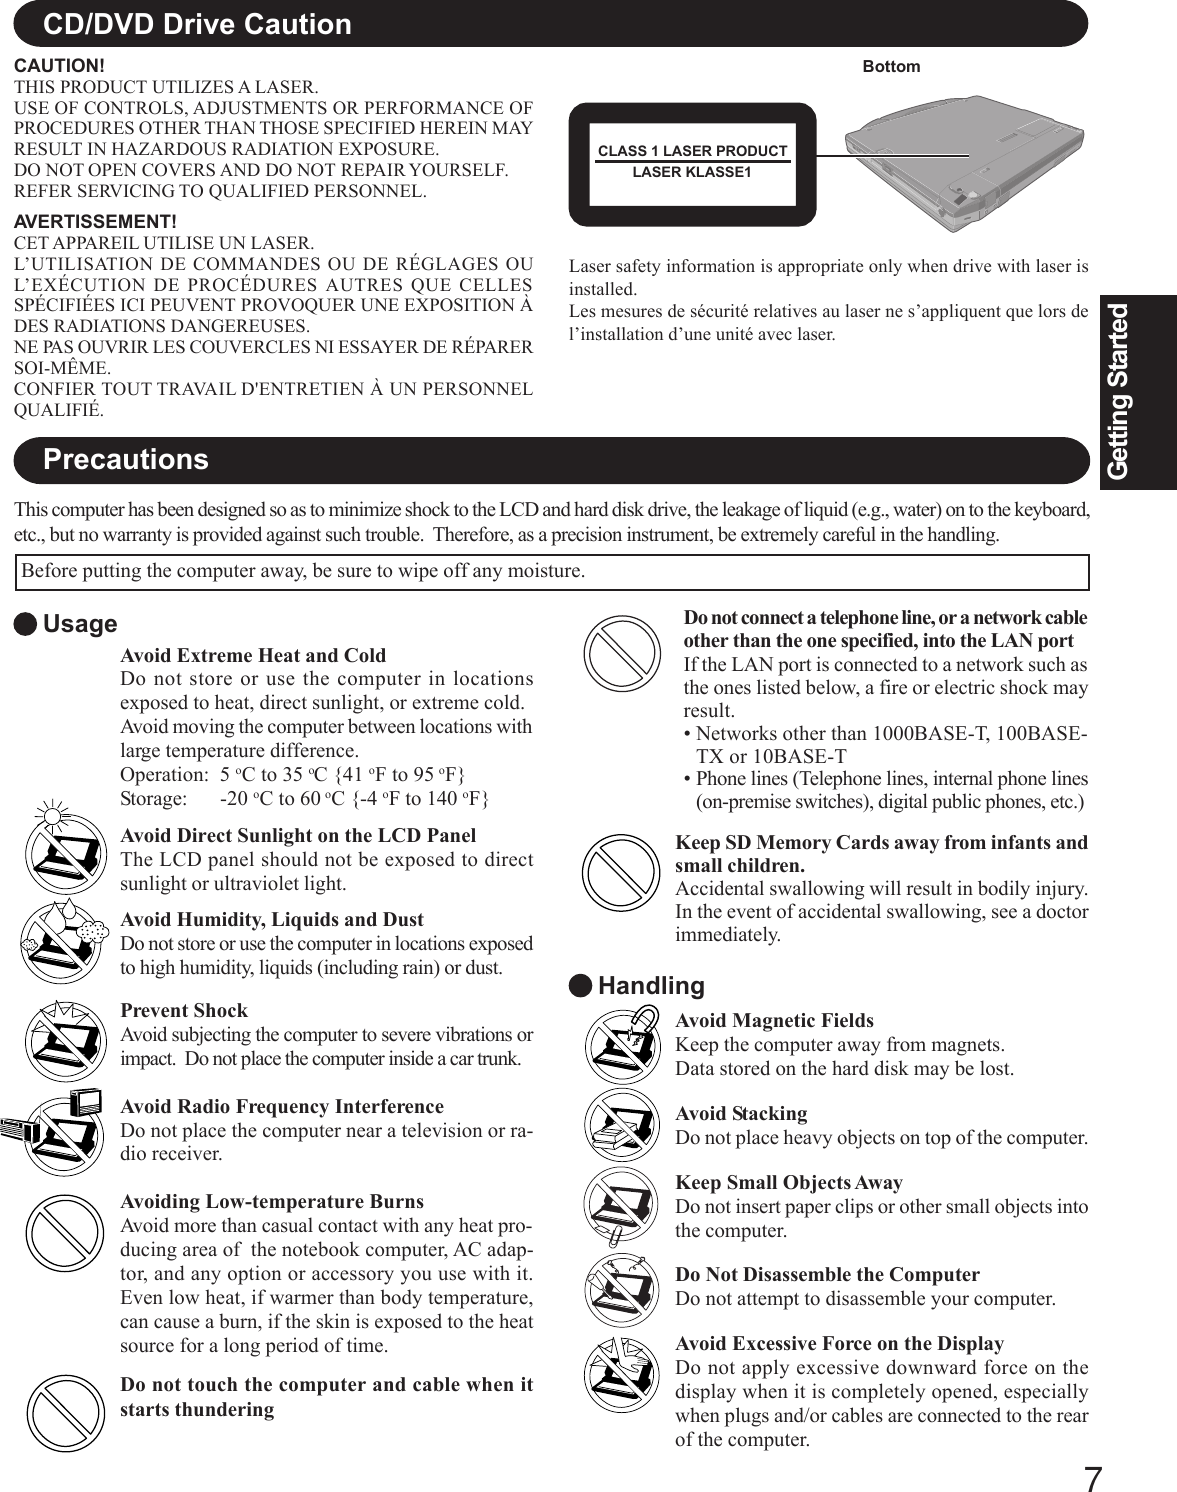
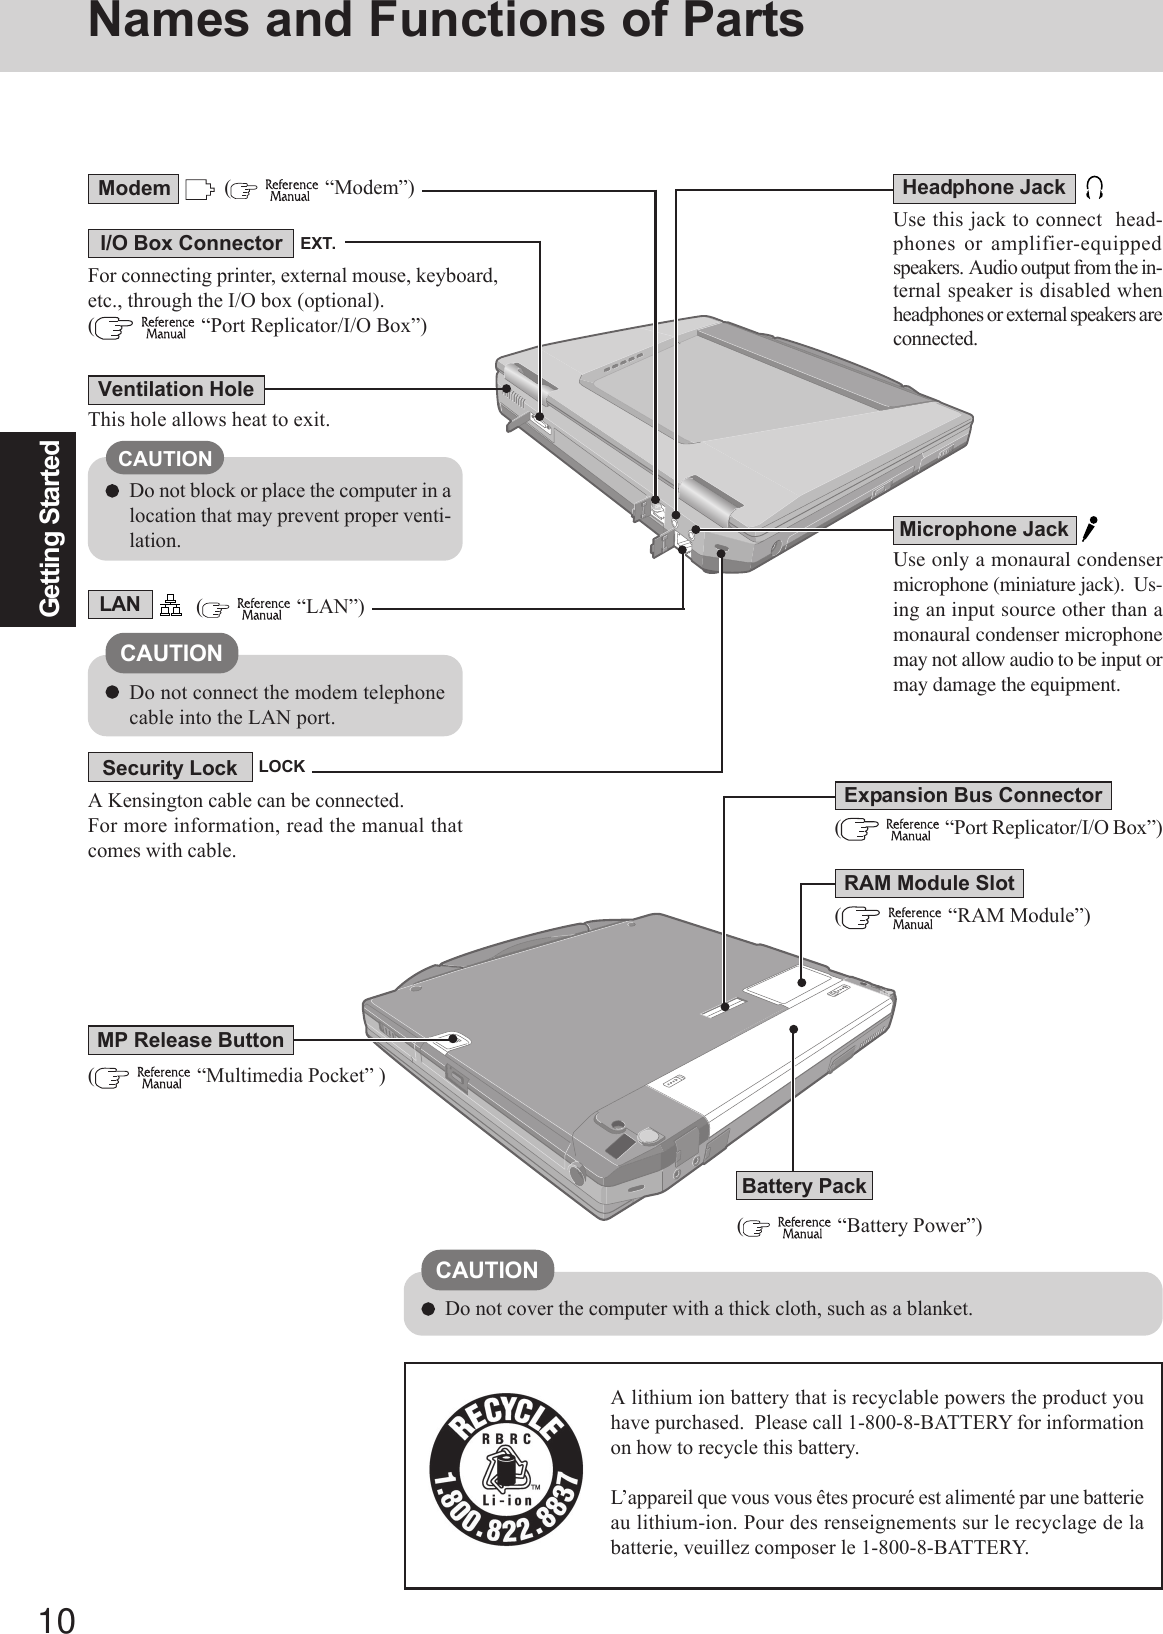
![12Getting StartedFirst-time OperationConnect your computer to a power outlet.CAUTIONBe sure the AC adaptor is connected until completing the first-time use operation.When using the computer for the first time, do not connect any peripheral de-vice except the battery pack and AC adaptor to the computer.Handling the AC adaptorDo not twist or pull the AC power cord forcefully. Doing so may damage theconnections.Use only the specified AC adaptor with your computer. Using an AC adaptorother than the one supplied might damage the battery and/or the computer.When the DC plug is not connected to the computer, disconnect the AC cordfrom your AC wall outlet.Problems such as sudden voltage drops may arise during periods of thunder andlightning. Since this could adversely affect your computer, an uninterruptiblepower source (UPS) is highly recommended unless running from the batterypack alone.45Open the display.1Pull the carrying handle forward.2Lift up the latch.3Lift open the display.CAUTION6Turn your computer on.Press the power switch and hold it for approximately one second until the power indi-cator turns on before releasing it.Do not press the power switch and hold it for more than four seconds; this willcause the power to be turned off forcibly.Do not press the power switch repeatedly.Once the computer is powered off, you must wait at least ten seconds beforepowering it on again.7Setup Windows.Moving the cursor ( ) or clicking buttons can be performed with the touch pad( page 18).The battery pack will be charged automatically.Charging Time: Approx. 3 hours(Varies depending on the usage conditions.)321LatchPowerSwitch PowerIndicator DC-IN JackDC IN 15.6 VCAUTION1At [Welcome to the Windows XP Setup Wizard], select [Next].2After reading the agreement, select [I accept this agreement] or [I don’t accept thisagreement], then select [Next].NOTEDC PlugDo not press any keys or touch the touch pad until [Windows XP ProfessionalSetup] is displayed.Do not use the touchscreen during the Windows setup.If [I don’t accept this agreement] is selected, the Windows setup will be aborted.](https://usermanual.wiki/Panasonic-of-North-America/9TGCF-731A/User-Guide-518856-Page-12.png)
![13Getting StartedCAUTIONRemember this password! If the password is forgotten, Windows cannotbe operated.3Select settings for your region, then select [Next].4Enter your name and organization and then select [Next].5Enter your computer name and administrator password and then select [Next].6Enter the correct date, time and time zone, then select [Next].7Enter your administrator password and select .The computer will restart.NOTEIt may take some time before the computer restarts and the screen of step7 is displayed. Wait, and do not press any keys, touch the touch pad, etc.When creating a new user account:• If you make mail settings, create password reset disks ( page 14), orconduct other related operations before creating the user account, you willbe unable to use any previous mail history or settings.• When you create the first new account, you can only select [Computeradministrator].Once a “Computer Administrator” account has been created, you can cre-ate additional limited user accounts.Note also that only the added user account will be displayed in the Wel-come screen. The account for the administrator created during Windowssetup will not be displayed.NOTECAUTIONRemember this password! If the password is forgotten, Windows cannot beoperated. You can create a password reset disk beforehand ( page 14).8Create a new account.1Select [start] - [Control Panel] - [User Accounts] - [Create a new account].2Enter a name for the new account, then select [Next].3Select [Computer administrator], then select [Create Account].4<When you want to create a password for the new account>Select the new account you have created and select [Create a password].Follow the instructions on the screen to create a password.5Select [start] - [Turn Off Computer] - [Restart] to restart the computer.NOTEWhen Windows setup is completed, the following message will be displayedat the bottom right of the screen: “Your computer might be at risk.” Con-tinue to the next step.The message is generated by the [Security Center] function in [Control Panel],and does not indicate an error or malfunction. For more information about[Security Center]: page 21.](https://usermanual.wiki/Panasonic-of-North-America/9TGCF-731A/User-Guide-518856-Page-13.png)
![14Getting StartedDepending on the Windows settings, installed applications, and drivers, menus andother displays may differ, or some functions (such as use of the password reset disk)may be inoperable. Check with your system administrator for details.You can select Classic view for the Control Panel or select the Classic Start menu.You can also change the way a user logs on or off.The procedure in this manual uses the method or view of the Windows XP defaultsetting (not Classic view or Classic Start menu etc.).Resetting the passwordWindows XP has a function to reset a forgotten password.To use this function, you need to create a password reset disk beforehand followingthe steps below.1Connect the USB floppy disk drive (optional: CF-VFDU03) to your computer.2Select [start] - [Control Panel] - [User Accounts].3Select [Prevent a forgotten password] from the [Related Tasks] menu of the ac-count you have logged on to and create a password reset disk following the on-screen instructions.Store the password reset disk in a safe place.• Only the logon password for each account can be reset.The password set in the Setup Utility ( “Setup Utility”) cannot be reset.Information for Windows XPThis concludes the first-time use operation guidelines.First-time Operation9Calibrate the touchscreen.1Log on to Windows.2Select [start] - [All programs] - [Fujitsu Touch Panel (USB)] - [Touch Screen Cali-bration Utility].3Touch the 12 “+” target marks sequentially with the stylus, and then select [Cali-bration].Keep touching each “+” mark until it blinks.4Select [Save & Exit].NOTECalibrate the touchscreen for each account created.About the Icon Enlarger:• If the characters or icons on the screen are too small and difficult to see,after completing step 9, select [start] - [All Programs] - [Panasonic] - [IconEnlarger]. This will allow you to magnify the display of characters andicons on the screen. ( “Icon Enlarger”)• The [Icon Enlarger] can be set separately for each account.You can also use [Loupe Utility], which enlarges a part of the screen. ( “Loupe Utility”)<Only for models with wireless LAN>If you use the wireless LAN, be sure to refer to the Reference Manual’s“Wireless LAN”.NOTE](https://usermanual.wiki/Panasonic-of-North-America/9TGCF-731A/User-Guide-518856-Page-14.png)

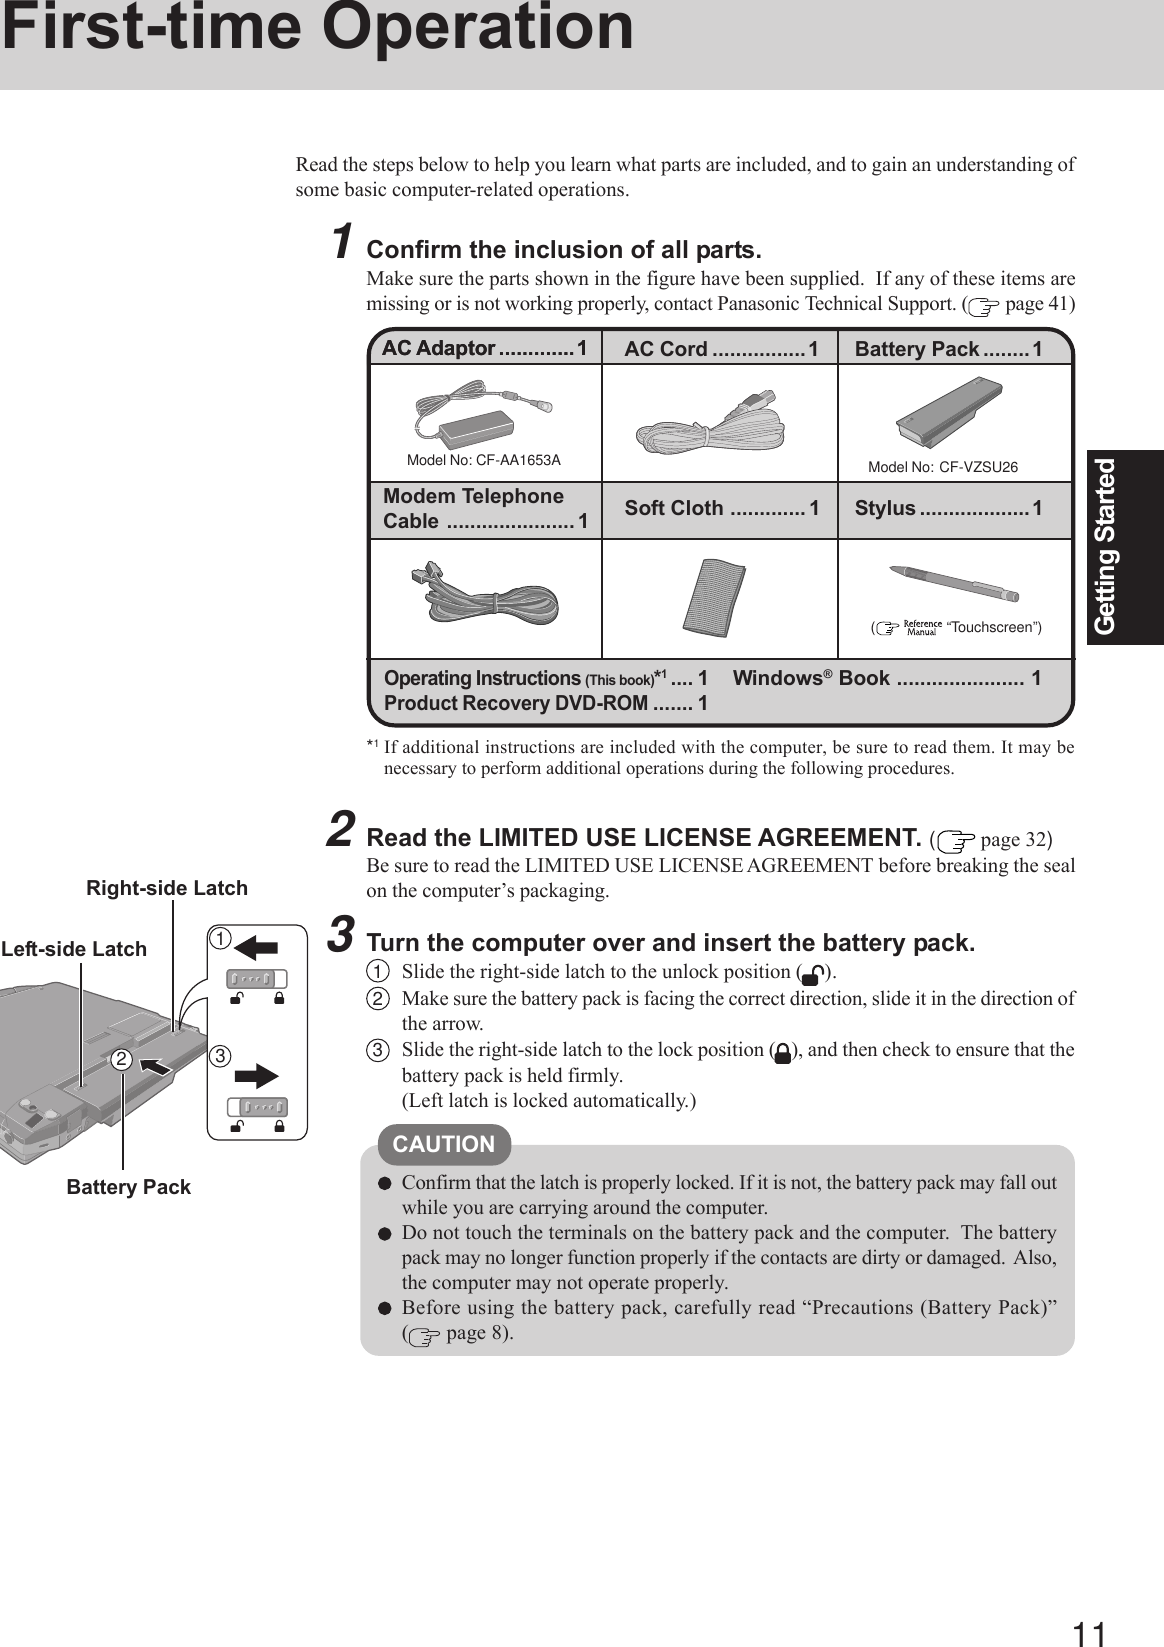
![16OperationStarting Up/Shutting Down3Log on to Windows.After confirming that the hard disk drive indicator has turned off, select the user andinput the password, then select . Until the correct password is entered, the computerwill not operate.4Select your application.You are able to start working on your computer.The power saving function is factory set, so if there is no input from a key, the touchpad, the touchscreen or an external mouse (when one is connected) for a certaininterval of time, the power to the LCD and hard disk may be turned off. The LCDwill resume operation when the touch pad, the touchscreen or an external mouse(when one is connected) is used or a key is pressed.The power to the LCD may be turned off even when an application software is beinginstalled. In this case, because it is conceivable that a selection dialog box will beshown, do not press Space or Enter to attempt to resume from this conditionas doing so may trigger a selection, but instead, press a key unrelated to the directtriggering of a selection, like Ctrl .In addition, when the computer is left alone, it automatically enters the standby orhibernation mode. The computer will resume by pressing the power switch. ( “Standby/Hibernation Functions”)NOTEIf the screen on the left is displayed immediately after you turnon the power...A password has been set to ensure the computer’s security.Enter your password*1 and press Enter . ( “Security Measures”)When the correct password is input, the computer will start.When three incorrect password attempts or nothing is input for one minute, the com-puter will power off.*1Supervisor Password or User Password set in the Setup Utility (not the Windows password).Enter Password [ ]](https://usermanual.wiki/Panasonic-of-North-America/9TGCF-731A/User-Guide-518856-Page-16.png)
![17OperationShutting Down (power off your computer)1Save important data and close each application.2Select [start] - [Turn Off Computer].3Select [Turn Off].Your computer will power off automatically.Restarting your computer (without shutting down):Select [Restart].To shut down using the keyboard;Press , U , and select [Turn Off] with U .CAUTIONDo not do the following during the shutdown/restart procedure.• Connecting or disconnecting the AC adaptor.• Touching the power switch.• Performing any keyboard, touch pad, touchscreen or external mouse operations.• Closing the display.When you leave the computer or interrupt your work...If you use the “Standby” or “Hibernation” function, then when you turn on the power nexttime, the application software and files you were using before will be displayed, and youcan restart the same operations immediately ( “Standby/Hibernation Functions”).To quickly resume computer operation after shutting down,The standby or hibernation function is available ( “Standby/HibernationFunctions”).NOTE](https://usermanual.wiki/Panasonic-of-North-America/9TGCF-731A/User-Guide-518856-Page-17.png)
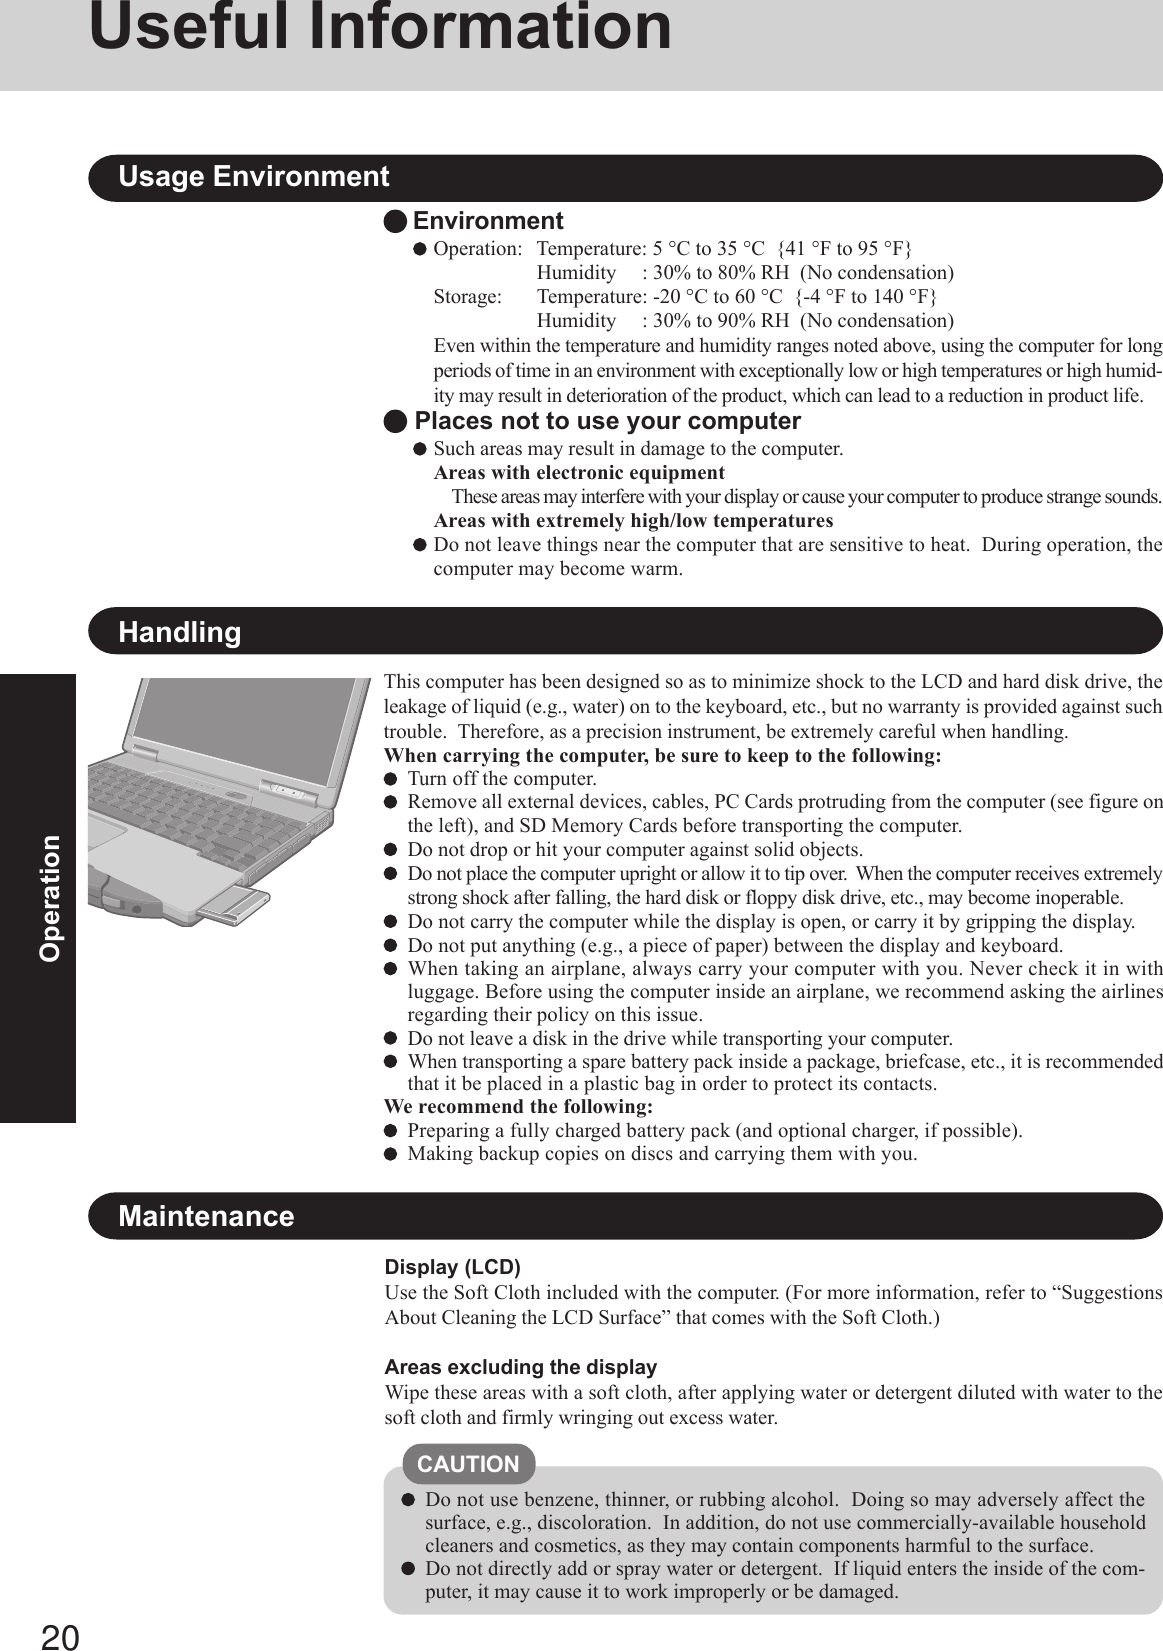
![18OperationTouch PadUse the touch pad to move the cursor on the screen and perform normal computer operations.Left ButtonWork SurfaceRefer to [Mouse Properties] for information on basic operations other than the above.To display [Mouse Properties]:Select [start] - [Control Panel] - [Printers and Other Hardware] - [Mouse].The operations of Scroll, Pan or Zoom will differ depending on the application. Thereare cases the touch pad will not support these operations even with an application thatsupports the functions.Right ButtonHandling the Touch PadBy design the touch pad is to be used with a finger tip only. Do not place any object on thework surface or press down forcefully with sharp-pointed objects (e.g., nails) or hard ob-jects that can leave marks (e.g., pencils and ball point pens).Try to avoid having any harmful substances such as oil, come in contact with the touch pad.The cursor may not work properly in such cases.When the touch pad becomes dirty:Wipe to remove dirt by using a dry soft cloth such as gauze or a soft cloth first applied withdetergent diluted with water and then thoroughly wrung.Do not use benzene, thinner, rubbing alcohol. Doing so may adversely affect the surface,e.g., discoloration. In addition, do not use commercially-available household cleaners andcosmetics, as they may contain components harmful to the surface.orTwo quick taps, but on thesecond tap leaving your fin-ger down (applying pres-sure) and moving it on thework surface.While holding down the but-ton, moving your finger onthe work surface.orFunction OperationMoving the CursorTapping/ClickingDouble-Tapping/Double-ClickingDraggingScroll*1Scroll a document(The movements will dif-fer depending on the ap-plication.)orMove the tip of your fingerlightly over the work surface.tapping clickingdouble-clickingdouble-tappingNOTETo right-click: click with the right button.*1 The movements will differ depending on the application.](https://usermanual.wiki/Panasonic-of-North-America/9TGCF-731A/User-Guide-518856-Page-18.png)
![19OperationReference ManualThe Reference Manual and the Important Tips can be accessed on your computer. When aprinter is connected, these manuals can also be printed.Illustrations may be difficult to view depending on the magnification. If the illustration istoo small, magnify the display.If a printer is connected, we recommend printing the pages required. Depending on theprinter, the illustrations and display samples may not be printed with a high quality.NOTEReference ManualThe Reference Manual explains functions for you to make greater use of the computer,such as how to add peripheral devices, how the Setup Utility works, and other useful infor-mation. (Refer to the cover of this manual for a list of the main contents included.)How to access the Reference ManualSelect [Reference Manual] in [start].Important TipsImportant Tips provides information on how to maximize use of the battery pack, which isnecessary for computing away from your home or office.It also offers helpful explanations on how to use the touchscreen more effectively.How to access the Important TipsSelect on the desktop.Important Tips can also be accessed from [start] - [All Programs] - [Panasonic] - [On-Line Manuals] - [Important Tips].When the Reference Manual or Important Tips is accessed for the first time, the License Agree-ment of the Adobe Reader may be displayed. If it is displayed, after reading the agreement, select[Accept] to access the Reference Manual or Important Tips.Refer to Adobe Reader Help to use the Adobe Reader.Reference Manual / Important Tips](https://usermanual.wiki/Panasonic-of-North-America/9TGCF-731A/User-Guide-518856-Page-19.png)
![21OperationSecurity Center/Antivirus ProtectionUse the Windows Security Center function to protect Windows from damage by computerviruses, etc.Windows Security CenterWhat is Windows Security Center?The Windows Security Center allows centralized management of Windows security infor-mation, and monitors antivirus measures and other Windows security settings to ensureoptimum safety.Use the Windows Security Center function to protect your computer from damage by vi-ruses, etc.Select [start] - [Control Panel] - [Security Center] to display the current settings for thefollowing security functions.• Windows FirewallA security system for protecting the computer from unauthorized access via the Internetor other external networks.The firewall regulates the data exchanged between the computer and the external net-work, so that only approved data can pass through.At the time of purchase, the Windows Firewall is set to be enabled.• Automatic UpdatesIf your computer is connected to the Internet, this function regularly checks whether secu-rity updates and other important updates have been made available, and automaticallyinstalls these updates in their latest conditions.• Virus ProtectionThis function regularly checks whether antivirus software has been installed in the com-puter, and whether the version of that software is the latest version available.Read the message, select (red icon) on the taskbar, and make the appropriate settings.This message, which the Windows Security Center displays to confirm the security-related settingsregularly, will be displayed until the settings are made more properly.If the message “Your computer might be at risk” is displayedNOTEThis message does not indicate an error. You can use the computer while the message isdisplayed. However, in order to operate the computer more safely, we recommend mak-ing the appropriate measures to reduce damage from virus and other attacks, thus avoid-ing the appearance of this message.Some network-related software and some online network games do not operate normallyif the Windows Firewall is enabled. Ask the software manufacturer about the WindowsFirewall in the case of using such software.For further details on the Windows Firewall, see the help displayed by the followingmethods:1Select [start] - [Help and Support] and input [Windows Firewall] into [Search].2Select [Windows Firewall overview].NOTEThe Pop-up BlockerIn Windows XP, security functions have been strengthened with regard to Web contents.One of these is the “Pop-up Blocker,” which may prevent some Web pages from being dis-played.](https://usermanual.wiki/Panasonic-of-North-America/9TGCF-731A/User-Guide-518856-Page-21.png)
![22OperationUseful InformationSaving Data on the Hard DiskHard Disk LockWhen the Hard Disk Lock is set to [Enable], it is impossible to read/write data from/to the harddisk when the hard disk is installed in a different computer, since a password is also set for thehard disk. When the hard disk is returned to the original computer, you can read and write data asbefore. In this case, however, make the settings in the Setup Utility exactly the same as they werebefore the hard disk was removed. (Note that this Hard Disk Lock does not guarantee the com-plete protection of data.) ( “Security Measures”)Do not expose your computer to shock.Use care when handling your computer, shock may damage your hard disk or make yoursoftware applications and data unusable.Do not power off your computer while software applications are running or hard diskdrive indicator is on.Properly shut Windows down to avoid problems.Save all valuable data to disks, etc.Backing up data to disks, etc. will limit damage should trouble occur to your computer orshould you inadvertently change or erase data.Use the security function for all important data. ( “Security Measures” and“SD Memory Card Security Function”)When Using Peripheral DevicesPay strict attention to the following points to avoid damage to the computer, peripheral devices,cables, etc. Also, in addition to following this manual and the Reference Manual, carefully readthe instruction manuals for the peripheral devices being used.Use only peripheral devices that conform to the computer’s specifications.Connect the devices properly, paying close attention to the condition and position of theconnectors.If a connection cannot be made easily, do not apply undue force; check once more to con-firm the condition and position of the connector (alignment of pins, etc.).If the connector has holding screws, fasten the screws firmly.Do not carry the computer with cables attached, and do not pull on the cables forcefully.Users are advised to purchase the latest versions of virus protection software and usethem regularly.We recommend you run the software:• When booting your computer.• After receiving data.We recommend that you check data received on disks or from external sources, such as datadownloaded from the Internet, e-mail, etc. (For compressed files, uncompress them beforerunning a check).For Data Execution Prevention (DEP), you can make one of the settings in the following menu.[start] - [Control panel] - [Performance and Maintenance] - [System] - [Advanced] - [Settings](in [Performance]) - [Data Execution Prevention].For more information, refer to Windows help.Computer VirusesWindows UpdateYou can use the latest patches and service packs for Windows with the following menus.Do not apply “Driver Updates” even if a message to update a driver appears. If a driverupdate is required, contact to Panasonic Technical Support. ( page 42)[start] - [All programs] - [Windows Update]](https://usermanual.wiki/Panasonic-of-North-America/9TGCF-731A/User-Guide-518856-Page-22.png)
![24TroubleshootingList of Error CodesWhen turning on the computer, if one of the following error codes or messages is displayed, follow the instructions shown below.If the problem persists, or if the error code or message displayed is not shown here, contact Panasonic Technical Support. ( page 41)Error Code/Message0211: Keyboard error0251: System CMOS checksumbad - Default configurationused0271: Check date and time set-tings0280: Previous boot incomplete- Default configuration used0613: Serial Port*1 configura-tion changed0614: Serial Port*1 config. error- device disabled*1The port name, such as A or B,is displayed, indicating the con-flicting ports.Press <F2> to SetupOperating System not foundExtended RAM Module FailedActionIf an external keyboard is connected, disconnect these devices.An error has occurred in the memory that stores the Setup Utility settings. This error occurswhen the memory content is changed through some inadvertent operation by a program orother function.Run the Setup Utility and load the default values, then change the settings to the appro-priate values as needed.If the problem persists, the internal clock battery may need to be replaced. Contact Pana-sonic Technical Support.The data and time setting are incorrect.Run the Setup Utility and set the date and time correctly.If the problem persists, the internal clock battery may need to be replaced. Contact Pana-sonic Technical Support.Startup has failed repeatedly, so the Setup Utility settings have been returned to their defaultvalues, and the computer has been restarted. Run the Setup Utility and load the default values, then change the settings to the appropri-ate values as needed.I/O address and IRQ settings are in conflict.Run the Setup Utility and change the settings in [Advanced] menu so there is no portconflicts.Write down the error details and press F2 to run the Setup Utility. Confirm thesettings, and change the settings to the appropriate values as needed.The OS is not properly installed on the floppy disk or the hard disk that you are trying toboot from.If the computer cannot be booted from the floppy disk, check the floppy disk drive toensure that the disk is in fact bootable, and change it to another if not.If the computer cannot be booted from the hard disk, confirm whether the hard disk isproperly recognized in [Information] menu of the Setup Utility.• If the hard disk is recognized, perform the reinstallation procedure.• If not, contact Panasonic Technical Support. If a device is connected to the USB port, disconnect the device, or run the Setup Utilityand set [Legacy USB Support] in [Advanced] menu to [Disable].If the extended RAM module has not been inserted properly, or if an extended RAMmodule other than one matching the specifications has been inserted, a beep will soundand the message “Extended RAM Module Failed” will be displayed when turning thepower on. In this case, turn the power off, confirm that the extended RAM module meetsthe specifications, and reinsert it. To run the Setup Utility1Restart the computer.2Press F2 while [Panasonic] boot screen is displayed soon after the computer begins the startup procedure.](https://usermanual.wiki/Panasonic-of-North-America/9TGCF-731A/User-Guide-518856-Page-24.png)
![25TroubleshootingDealing with Problems (Summary)The power indicator or bat-tery indicator is not litThe computer does not op-erate when a USB device isconnected[Enter Password] is displayedPOST Startup Error(s) isdisplayedWindows startup, or an op-eration is extremely slowThe date and time are incor-rectWhen resuming from thestandby or hibernationmode, [Enter Password]does not appear even if apassword has been set in theSetup UtilityWhen the administratorpassword is forgottenWhen “Remove disks orother media. Press any key[Executing BatteryRecalibration] screen is dis-playedCheck the cable connection for the AC adaptor.Check to see if a charged battery is properly inserted.Remove the battery pack and disconnect the AC adaptor, then connect them again.The computer may not operate when certain USB devices are connected.Disconnect the USB device, or set [Legacy USB Support] to [Disable] in [Advanced]menu of the Setup Utility.Input your Supervisor Password or User Password. If you have forgotten it, contactPanasonic Technical Support. page 24Press F9 in the Setup Utility ( “Setup Utility”). This will restore the SetupUtility’s settings to their default values (except the password settings). Then, the SetupUtility must be run once again for you to input the appropriate operating environmentsettings. (The processing speed depends on the application software used, so this opera-tion may not cause the processing speed to increase.)If you install resident software after purchasing this computer, disable the resident software.When Indexing Service is enabled, Windows operation becomes slower.Disable Indexing Service in the following menu.[start] - [Search] - [Change preferences] - [Without Indexing Service]You can set the date and time using the following menu:[start] - [Control Panel] - [Date, Time, Language, and Regional Options] - [Date and Time] When the computer is connected to a LAN, confirm the date and time of the server.If you continue to experience problems, the internal battery maintaining the clock mayneed to be replaced. Contact Panasonic Technical Support. This computer will not correctly recognize the date and time starting from the year 2100 A.D. Even when a password has been set in the Setup Utility, [Enter Password] does not appearwhen the computer resumes from the standby or hibernation mode. If you want to use thesecurity function when using the standby or hibernation mode, use the Windows pass-word as follows:1Select [start] - [Control Panel] - [User Accounts], and select the account for which thepassword will be set.2Select [Create a password], input the password, and then [Create Password].3Add the check mark for [Prompt for password when computer resumes from standby]in [Control Panel] - [Performance and Maintenance] - [Power Options] - [Advanced].If you have created a password reset disk ( page 14), a message is displayed when youfail to correctly enter the password. Follow the message’s instructions and set the pass-word again by using the password reset disk.If you have not created a password reset disk, after reinstalling, setup Windows and thenset the password again.This means a floppy disk that does not contain system startup information has been left inthe floppy disk drive. Remove the floppy disk, and press any key.This message may appear when certain USB devices are connected. Remove the USBdevice, or set [Legacy USB Support] in [Advanced] menu of the Setup Utility to [Disable].If the message still appears even after trying the above measures, this may be an indicationthat some type of hard disk failure has occurred. Contact Panasonic Technical Support.This screen appears because the Battery Recalibration was canceled before Windows wasshut down last. To start up Windows, turn off the computer by sliding the power switch,and then turn it back on again.When a problem occurs, refer to this page. The “Reference Manual” also contains detailed information. If a problem appears to berelated to a software application, read the software related manual. If you still cannot troubleshoot the problem, contact PanasonicTechnical Support. ( page 41)You can use the PC Information Viewer to check the computer’s usage status. ( “Deal-ing with Problems (Advanced)”) Starting Up](https://usermanual.wiki/Panasonic-of-North-America/9TGCF-731A/User-Guide-518856-Page-25.png)
![26TroubleshootingDealing with Problems (Summary)No display after powering onThe power has not beenturned off, but after a cer-tain period of time, there isno displayWhen the battery pack isused, the screen is darkerthan when the AC adaptoris connectedThe LCD brightness changesa number of times when theAC adaptor is disconnectedImage colors are not repro-duced as expected when dis-playing photographs orother imagesAn afterimage appears (e.g.,green, red, and blue dots re-main on the display) or thereare dots not displaying thecorrect colorsWhen there is no display to an external display,• Check your cable connection to the external display.• Confirm your display is powered on.• Check the settings for your external display.The display destination may be set to the external display.Try changing the display destination by pressing Fn + F3 .If you want to switch the display destination repeatedly by pressing Fn + F3 , makesure that the display destination has switched completely each time before pressing Fn + F3 again.Press Fn + F2 and adjust the brightness.Has the computer been set to the power-saving mode? To resume operation of your computer from the condition the power of the display is off(for energy conservation purposes), press any key unrelated to the direct triggering of aselection, like Ctrl .To save power, your computer may have automatically entered the standby mode (powerindicator blinks green) or hibernation mode (power indicator turns off). In such cases,press the power switch.Press Fn + F2 and adjust the brightness. Note, however, that when the brightness isincreased, the battery running time will become shorter.Brightness can be set to separate levels for when the AC adaptor is connected and whenit is disconnected.Intel(R) Display Power Saving Technology ( “Computing on the Road”) isactive and automatically changes the LCD brightness.We recommend removing the check mark from [Intel(R) Display Power Saving Technol-ogy]. ( “Computing on the Road”)If an image is displayed for a prolonged period of time, an afterimage may appear. This isnot a malfunction. The afterimage will disappear when a different screen is displayed.High-precision and advanced technologies are necessary in the production of color liquidcrystal displays (color LCDs). Therefore, if 0.002% or less of the picture elements eitherfail to light or remain constantly lit (that is, more than 99.998% of elements are function-ing properly), no defect is considered to exist. DisplayWhen the previous item isnot the causePress F9 in the Setup Utility ( “Setup Utility”). This will restore the SetupUtility’s settings to their default values (except the password settings).Try removing all peripheral devices.Check a disk error using the following procedure.1Display [Local Disk(C:) Properties].Select [Local Disk(C:)] with the right button in [start] - [My Computer], and select[Properties].2Select [Tools] - [Check Now].3Select [Start] after selecting required items in [Check disk options].At startup, hold down F8 when [Panasonic] boot screen disappears*1, and releaseyour finger when the Windows Advanced Options Menu is displayed. Start the computerin Safe Mode, and confirm the details of the error.*1 When [Password on boot] is set to [Enable], [Enter Password] appears after the [Panasonic] bootscreen disappears. Hold down F8 soon after inputting the password and pressing Enter . Starting Up (continued)](https://usermanual.wiki/Panasonic-of-North-America/9TGCF-731A/User-Guide-518856-Page-26.png)
![27TroubleshootingWindows cannot be shutdown or restarted Shutting downIf a USB device is connected, try removing it.It may take one or two minutes to shut down.The screen becomes disor-deredThe external display nolonger displays properlyWhen you want to displaythe fonts or icons at a largersizeDuring simultaneous dis-play, one of the screens be-comes disorderedWhen a video such as anMPEG file or a DVD videois being played withWinDVD or Windows? Me-dia Player, the display des-tination cannot be switchedusing Fn + F3When the screen saver is set,an error will occur during aresume operationThe screen display may become distorted if the resolution or number of colors is changed,or if an external display is connected or disconnected while the computer is operating.Restart the computer.When an external display not compatible with the power saving mode is used with thecomputer, the display may not function correctly when the computer enters the powersaving mode. In such cases, turn off the power to the external display.Change the size of the icons, etc. using “Icon Enlarger” ( “Icon Enlarger”).To enlarge a part of the screen, use Loupe Utility ( “Loupe Utility”).Try changing the display by pressing Fn + F3 .If you continue to experience problems, try changing the display destination in the follow-ing menu.[start] - [Control Panel] - [Other Control Panel Options] - [Intel(R) GMA Driver] - [De-vices]When the [Command Prompt] is set to “Full Screen” by pressing Alt + Enter , thepicture is displayed on one of the screens only. When the window display is restored bypressing Alt + Enter , the picture is displayed on both screens.The display destination cannot be switched while a video such as an MPEG file and aDVD video is playing. Stop playing the video before switching the display destination.When the computer automatically enters the standby or hibernation mode while the screensaver is running, an error may occur during a resume operation. In such cases, turn off thescreen saver or try changing the pattern of the screensaver. Display (continued) Battery IndicatorThe red indicator lightsThe red indicator blinksThe green indicator blinks*2The orange indicator blinksThe battery level is very low (the charge is approx. 9% or less).Connect the AC adaptor. You can use the computer when the battery indicator light isorange. If you do not have an AC adaptor, save your data and power off your computer.After replacing the battery pack with a fully charged one, turn your computer on.Quickly save your data and power off your computer. Remove the battery pack and dis-connect the AC adaptor, then connect them again.If the problem persists, contact Panasonic Technical Support. The battery pack or charg-ing circuit may be defective.In high temperature mode, the battery is discharging to the level that corresponds to an80%*1 charge for normal temperature mode. ( “Battery Power”) Do not re-move the battery pack while the battery indicator is blinking green, or the power will beturned off forcibly.*1In high temperature mode, the level that corresponds to an 80% charge for normal tem-perature mode is displayed as [100%].*2Only for the main battery pack.Battery cannot be recharged temporarily because the internal temperature of the batterypack is outside of the acceptable temperature range for recharging. Once the allowablerange requirement is satisfied, charging begins automatically. Your computer can be usednormally in this state.](https://usermanual.wiki/Panasonic-of-North-America/9TGCF-731A/User-Guide-518856-Page-27.png)
![28TroubleshootingDealing with Problems (Summary) Touch Pad / TouchscreenIf you are using an external mouse, ensure that the external mouse has been connectedcorrectly.Restart the computer by using the keyboard.(Press , U , and select [Restart] with R )If the computer does not respond to keyboard commands, read “No response”( page 28).Has the Setup Utility been used to set [Touch Pad] to [Enable]?When external mouse drivers are installed (e.g., Intellimouse), the touch pad may not beused.Has the touch pad driver been properly installed?As a result of the physical characteristics of the touchscreen, sometimes the position ofthe stylus does not match the position of the cursor on the screen. This is not a malfunc-tion. Perform [Calibration]. ( page 14)When mouse drivers are installed (i.e. IntelliMouse), the touchscreen is unable to be used.Reinstall the touchscreen driver.Has the touchscreen driver been properly installed?The cursor cannot be con-trolled properlyUnable to input using thetouch padUnable to point correctlywith the stylus includedwith the computerUnable to input by touchingthe displayIs Adobe Reader installed?If you have uninstalled Adobe Reader, install using the following procedures.1Log on to Windows with the administrator authority.2Select [start] - [Run], input [c:\util\reader\AdbeRdr60_enu_full.exe], then select [OK].Install Adobe Reader by following the instructions on the screen.3Update Adobe Reader to its latest version.If your computer is connected to the Internet, start up Adobe Reader and select [Help]- [Update].If your computer is not connected to the Internet, select [start] - [Run], input[c:\util\reader\Acro-Reader_6.0.2_Update.exe], then select [OK]. Reference ManualThe Reference Manual isnot displayed Reinstalling B’s Recorder/B’s CLiPWhen reinstalling, the inputof a serial number has beenaskedInput the following serial numberB’s Recorder: GK5PAA-AAAQ-1756-2885B’s CLiP: HG5PAA-AAAC-2804-1478 SD Memory CardCannot log on with the SDMemory CardWindows logon user name and password are not set in the SD Memory Card correctly.Enter the Windows user name and password without using the SD Memory Card.After logging on, set the same user name and the password on the SD Memory Card andWindows, using one of the following operations.• Change the setting of the SD Memory Card side by [SD Card Setup].• Change the setting of the Windows side by [Control Panel].](https://usermanual.wiki/Panasonic-of-North-America/9TGCF-731A/User-Guide-518856-Page-28.png)
![29TroubleshootingSome applications do notwork properly Fast User Switching FunctionWhen switching to a different user with the Fast User Switching function, the followingproblems may occur.• Some applications may not work properly.• Key combinations with the Fn key may not work.• It may not be possible to set the settings of the display.• A serial mouse may not work.• The B’s CLiP icon will no longer be shown on the taskbar and CD-RW disc cannot bewritten using B’s CLiP.• Wireless LAN may not work (only for models with wireless LAN).In this case, log off all users without using Fast User Switching function, and try theoperation once more. If the problem persists, restart the computer.Press Ctrl + Shift + Esc to open Task Manager and close the software applicationwhich is not responding.Is there an input screen (e.g., password input screen at startup) hidden behind anotherwindow? Use Alt + Tab to check for other windows being displayed.After shutting down by sliding the power switch for more than four seconds, slide thepower switch to power on and open the application again.If the program no longer works normally, delete the program using the following menu.Then reinstall the program.[start] - [Control Panel] - [Add or Remove Programs]Some video files use a Codec that is not installed as a standard. In these cases, if you playback the video file after connecting to the Internet, the Codec may be downloaded auto-matically, allowing you to play back the file. OthersNo responseWhen trying to play backvideo files using Windows®Media Player, the message[Codec required] appears, andthe file cannot be played back](https://usermanual.wiki/Panasonic-of-North-America/9TGCF-731A/User-Guide-518856-Page-29.png)
![30TroubleshootingReinstalling SoftwareBefore Reinstallation1Turn off the computer and insert the CD/DVD drive intothe multimedia pocket. ( “Multimedia Pocket”)2Turn on the computer, and press F2 while [Panasonic]boot screen is displayed.The Setup Utility will start up.If the password has been set, enter the Supervisor Pass-word.3Write down all of the contents of the Setup Utility andthen press F9 .At the confirmation message, select [Yes] and then press Enter .4Select [Boot] menu, then select [IDE MP: xxxxxxxxxx]and press F6 until [IDE MP: xxxxxxxxxx] is at the topof the [Boot] menu.5Place the Product Recovery DVD-ROM into the CD/DVDdrive.6Press F10 .At the confirmation message, select [Yes] and press Enter .The computer will restart, and this screen should appear.Reinstalling8Press 1 to select [1. Yes, I agree to the provisions aboveand wish to continue!].This screen should appear.PreparingYou will need the Product Recovery DVD-ROM and CD/DVD drive (included).ImportantBefore the reinstallation procedure, remove all peripherals (except for the CD/DVD drive).Be sure the AC adaptor is connected until the reinstallation procedure is completed.Even if reinstallation is executed, the number of times that the DVD video region code can be set will not be returned tothe state set at the time of factory shipment. ( “DVD-ROM & CD-R/RW Drive”)9Make a selection from the menu.---------------------------------------------------------------------Select a number---------------------------------------------------------------------Reinstalling : Windows(R) XP Professional1. Reinstall Windows to the whole HDD to factory default.2. Make two partitions, for the operating system and data. And reinstallWindows to the operating system partition.(All existing partitions on HDD will be lost.)3. Reinstall Windows to the first partition.0. Cancel---------------------------------------------------------------------When reinstallation procedure is performed, the contents of the hard disk will be erased. Be sure to back up any critical data onyour hard disk to another media or to an external hard disk before running the reinstallation procedure.The reinstallation procedure will return the computer to its original condition.Even if a hard disk backup area has been created, this backup area will be erased, and all the backed up data will be lost.(This is not the case when Windows is reinstalled in the first partition.)• If you have created partitions for data, the data may be erased or become corrupt as a result of the reinstallation procedure.---------------------------------------------------------------------Select a number---------------------------------------------------------------------1. [ Recovery ] Reinstall Windows.2. [ Erase HDD ] Erase the whole data on HDD for security.3. [ Backup ] Enable the Backup function.0. [ Cancel ] Cancel.---------------------------------------------------------------------<When the hard disk backup function has been enabled>When the message [The Backup function has been en-abled. If [Recovery] or [Erase HDD] is executed, theBackup function will be disabled, and your Backup datawill be lost.] appears, press Y .7Press 1 to execute [1.[Recovery]].(You can cancel this operation by pressing 0 .)The License Agreement screen should appear.When selecting [2], enter the basic partition size forthe operating system installation and press Enter .(The data partition size is the remainder after subtract-ing the basic partition size.)To select [3], the initial partition size must be 6 GB ormore of the hard disk size. Reinstallation cannot be per-formed with a small partition size.<When the hard disk backup function has been enabled>If you select [1] or [2], the message [The Backup functionhas been enabled. If [Recovery] is executed, the Backupfunction will be disabled, and your Backup data will belost.] appears. In this case, press Y .If the message [Computer must be rebooted in order toexecute [Recovery.]] appears, press R .When [2] is selected, the hard disk backup func-tion cannot be enabled because the hard disk hasbeen divided into partitions.NOTE](https://usermanual.wiki/Panasonic-of-North-America/9TGCF-731A/User-Guide-518856-Page-30.png)
![31TroubleshootingDo not interrupt the reinstallation procedure be-fore completion, for example by turning off thecomputer or pressing Ctrl + Alt + Del , asthis may prevent Windows from starting up, or maycause data to be lost so that the reinstallation pro-cedure cannot be executed.11 Remove the Product Recovery DVD-ROM, and then pressany key.The computer will be shut down.12 Turn on the computer, and press F2 while [Panasonic]boot screen is displayed.The Setup Utility will start up.If the password has been set, enter the Supervisor Pass-word.13 Press F9 .At the confirmation message, select [Yes] and press Enter . (The Setup Utility settings will return to theirdefault values. Even the security settings with the excep-tion of the password(s) will return to their default values.)14 Select [Exit] and then select [Save Current Values], thenpress Enter .At the confirmation message, select [Yes] and pressEnter .15 Turn off the computer by pressing the power switch.10 At the confirmation message, press Y .The operation of reinstallation for the hard disk starts au-tomatically. (The operations take about 15 minutes.)<Changing the drive letter>You can change the drive letter for the CD/DVD drive or harddisk drive by the following steps.Drive letters can only be changed when two or more parti-tions have been created on the hard disk drive. The nameof the C: drive cannot be changed.We recommend that you make these changes before in-stalling applications.1Select [start] - [Control Panel] - [Performance and Mainte-nance] - [Administrative Tools] - [Computer Management].2Select [Disk Management] from [Storage].3Right click on the partition of the hard disk or the name ofthe CD/DVD drive and select [Change Drive Letter andPaths...].4Select [Change].5Select [Assign the following drive letter] and select thenew drive letter, and then select [OK].6At the confirmation message, select [Yes].CAUTIONAfter the reinstallation procedure completes, this screenshould appear.-----------------------------------------------------------------------[Recovery] is complete.Windows(R) XP Professional install wizard will start after reboot.Please remove the Product Recovery DVD-ROM, and turn off the computer.------------------------------------------------------------------------16 Perform the first-time use operation ( page 12 step 6- page 14 step 9 ).17 Run the Setup Utility and change the settings where nec-essary.If additional instructions are included with the com-puter, be sure to read them. It may be necessary toperform additional operations during the followingprocedures.NOTE](https://usermanual.wiki/Panasonic-of-North-America/9TGCF-731A/User-Guide-518856-Page-31.png)
![34AppendixHard Disk Backup FunctionThe hard disk backup function creates a backup area (storage area) on the hard disk. This area is to back up (store) hard diskcontents or restore backed up contents to their original locations.By backing up the data on your hard disk to a backup area, you can protect your data from loss or damage resulting from opera-tional errors or other factors. Also, you can back up or restore hard disk contents using this computer alone, without having to useother media or peripheral devices.At the time of purchase, the hard disk backup function is disabled. If you follow the procedure below to create a backup area, thehard disk backup function will be enabled, and you will be able to back up your data. Note, that once the backup function has beenenabled, you will have to perform the reinstallation procedure to disable it again ( page 30).Disconnect or remove all peripheral devices and SD Memory Cards. Take care to disconnect theUSB floppy disk drive, as the backup area may not be created properly while these devices areconnected.Be sure the AC adaptor is connected to the computer.A backup area cannot be created if the hard disk is already divided into several partitions. Returnthe computer to its condition at the time of purchase (one partition only), and create the backuparea.To divide the partition, make the selection when the backup area is created ( page 35 step 8).If the partition configuration is changed (partitions created, size changed, etc.) after the backuparea has been created, it will no longer be possible to execute the backup function. To change theconfiguration, it is necessary to return the computer to its condition at the time of purchase, andthen create the backup area again.The hard disk backup function will only work for the internal hard disk. This function does notwork with an external hard disk.Backup and restore functions will not operate if the hard disk has been damaged.Do not use the NTFS file system compression function, as this may result in insufficient capacityof the backup area.If the hard disk malfunctions, it will be impossible to read the data stored on it. We recommendthat you also back up important data to a location other than the hard disk (an external hard diskor other media).Execute a disk error check using the following procedure.1Display the [Local Disk(C:) properties].Select [start] - [My Computer], right-click [Local Disk(C:)], and then select [Properties].2Select [Check Now] from [Tools].3In [Check Disk], select [Start] without adding a check mark beside any of the items.If a message is displayed indicating that there is an error in the disk, display [Check Disk], andadd a check mark for [Automatically fix file system errors] and [Scan for and attempt recoveryof bad sectors], select [Start], and check for disk errors again.The hard disk backup function does not accommodate dynamic disks. Do not convert the harddisk to a dynamic disk.The hard disk backup function cannot back up or restore data properly if there is a problem with the hard disk when the data isbacked up or restored. Note that if an error occurs while data is being restored, whether as a result of an unexpected malfunc-tion, incorrect operation, or other reason, the data in the hard disk (data before restoration) may be lost.Matsushita Electric Industrial Co., Ltd. will bear no responsibility for any damages suffered by the user (including loss of data)as a result of the use of this function.Before Using a Hard Disk Backup FunctionPreparingYou will need the Product Recovery DVD-ROM and CD/DVD drive (included).](https://usermanual.wiki/Panasonic-of-North-America/9TGCF-731A/User-Guide-518856-Page-34.png)
![35Appendix1Turn off the computer and insert the CD/DVD drive into the multimedia pocket. ( “Multimedia Pocket”)2Turn on the computer, and press F2 while [Panasonic] boot screen is displayed.The Setup Utility will start up.If a password has been set, enter the Supervisor Password. You cannot register [Boot] menuwith a User Password.3Select [Boot] menu, then select [IDE MP: xxxxxxxxxx] and press F6 until [IDE MP: xxxxxxxxxx] isat the top of the [Boot] menu.4Place the Product Recovery DVD-ROM into the CD/DVD drive.5Press F10 .At the confirmation message, select [Yes] and press Enter .The computer will restart. If [Enter Password] is displayed during the following procedures, inputthe Supervisor Password or the User Password.This screen should appear.Regarding backup area• Requires availability of at least half of the entire hard disk. Without sufficient spaceavailable, the backup area cannot be created.• When the backup area is created, the usable hard disk capacity will be reduced to lessthan half.• The backup area cannot be accessed from Windows. For this reason, backed up datacannot be copied to CD-R or other removable disk media.• When the hard disk backup function is executed, data in the backup area will beoverwritten. If newly created or edited data is backed up later, data stored previouslyin the backup area will be lost.NOTECreate a Backup AreaThe usable hard disk area[At the time of purchase] [After the backup area is created]The backup areaCannot be accessedfrom Windows.Can be accessed fromWindows (One partition).When dividing the hard disk into partitionsDo not execute [1. [Recovery]] to divide the hard disk into partitions. The hard disk backupfunction cannot be enabled after the hard disk has been partitioned. Use procedure 8 todivide the hard disk.CAUTION---------------------------------------------------------------------Select a number---------------------------------------------------------------------1. [ Recovery ] Reinstall Windows.2. [ Erase HDD ] Erase the whole data on HDD for security.3. [ Backup ] Enable the Backup function.0. [ Cancel ] Cancel.---------------------------------------------------------------------7At the confirmation message, press Y .8Select how to divide the hard disk from the menu.<To create a backup area and enable the backup function without dividing the hard disk>Select [1].6Press 3 to execute [3. [Backup]].](https://usermanual.wiki/Panasonic-of-North-America/9TGCF-731A/User-Guide-518856-Page-35.png)
![36AppendixHard Disk Backup Function<To create a backup area and divide hard disk into two partitions, for OS and data>Select [2], enter the partition size (GB), and press Enter .• You can cancel this operation by pressing 0 .• The data partition size will be the maximum settable size less the number entered above.The maximum settable size will differ depending on models.9At the confirmation message, press Y .The backup area is then created.10 When the message [You must reboot in order to enable the Backup function.] appears, removethe Product Recovery DVD-ROM, and press any key to restart the computer. The computer isrestarted, then the backup process will begin.11 When the message [[Backup] is complete] appears, press Ctrl + Alt + Del to restart thecomputer.12 After logging on to Windows, a message will appear advising that a new device has beeninstalled and that the computer must be restarted to enable the settings. Select [Yes] to restartthe computer.The [Boot] menu in the Setup Utility is set to start up from the CD/DVD drive. Change thissetting if necessary.The next time the backup or restore functions are executed, follow the procedure for “Back-ing Up and Restoring Data” ( below).NOTE1Turn the computer on, and press F2 while [Panasonic] boot screen is displayed.The Setup Utility will start up.If a password has been set, enter the Supervisor Password or the User Password.2Select [Exit] menu, then select [Hard Disk Backup / Restore] and press Enter .At the confirmation message, select [Yes], and press Enter .Backing Up and Restoring DataBefore executing the backup function, execute a disk error check ( page 34).Do not interrupt the backup or restore functions before completion, for example by turningoff the power or pressing Ctrl + Alt + Del , as this may prevent Windows fromstarting up, or may cause data to be lost so that the backup and restore functions cannot beexecuted.CAUTIONThe usable hard disk area[At the time of purchase] [After the backup area is created]The backup areaCannot be accessedfrom Windows.Do not press Ctrl + Alt + Del until the message is displayed.CAUTIONCan be accessed fromWindows (Two partitions).](https://usermanual.wiki/Panasonic-of-North-America/9TGCF-731A/User-Guide-518856-Page-36.png)
![37AppendixTo disable the hard disk backup functionPerform the reinstallation procedure. All data in the backup area and the hard disk will beerased.Conduct steps 1-8 for “Reinstalling Software” ( page 30). Select [1] or [2] to execute thereinstallation at the screen for executing the reinstallation.• When [1] is selected, the hard disk backup function can be disabled.• When [2] is selected, the hard disk backup function can be disabled, but in this case, becausethe hard disk has been divided into partitions, the hard disk backup function cannot be re-enabled ( page 23).• When [3] is selected, the hard disk backup function cannot be disabled.CAUTIONWhen the hard disk backup function has been enabled, the backed up data will not be erasedeven if a commercial data erasing utility or similar software is used to erase all data from user-accessible area. You can use the hard disk data erase utility included in this computer (page 38) to erase all data on the hard disk, including backed up data. Use this hard disk dataerase utility before disposing of or transferring ownership of this computer.Occasionally, the message [#1805 cannot write image file] will be displayed, and the backupfunction will be interrupted. If this error occurs, execute the backup function again. Afterthis, if the backup function is completed properly, then there is no problem in the hard disk.3Select the operation to be executed from the menu.<To back up hard disk contents to the backup area>1Press 1 to execute [1. [Backup]].(When dividing the hard disk into two partitions, select the backup method at next screen.)2At the confirmation message, press Y .The backup process will begin.<To restore backed up contents to the hard disk>1Press 2 to execute [2. [Restore]].(When data is backed up in two partitions, select the restore method at next screen.)2At the confirmation message, press Y .The restore process will begin.4When the message [[Backup] is complete] or [[Restore] is complete] is displayed, press Ctrl + Alt + Del to restart the computer.• If the backup or restore process was interrupted before completion, for example if the powerwas turned off, execute the process again.• After logging on to Windows, when a new device is installed and a message appears advisingthat the computer must be restarted to enable the settings, select [Yes] to restart the computer.The time required to complete the backup or restore process differs depending on thedata volume.NOTE](https://usermanual.wiki/Panasonic-of-North-America/9TGCF-731A/User-Guide-518856-Page-37.png)
![38AppendixThis computer is equipped with a utility for erasing hard disk data.When disposing of or transferring ownership of this device, erase all data on the hard disk in order to prevent the theft of hard diskdata by following the steps below.The hard disk data erase utility erases data using an “overwriting” method, but there is a possibility that due to malfunctions orother operational errors, data may not be completely erased. There are also specialized devices that may be able to read datathat has been erased using this method. If you need to erase highly confidential data, we recommend that you contact acompany that specializes in this process. Matsushita Electric Industrial Co., Ltd. will bear no responsibility for losses ordamages suffered as a result of the use of this utility.Hard Disk Data Erase UtilityNOTEBe sure the AC adaptor is connected until the procedure is completed.This utility can only be used for internal hard disk. It cannot be used to erase data from external hard disks.This utility cannot erase data from damaged disk.This utility cannot erase data for specific partitions.After executing this utility, the computer cannot be booted from the hard disk.The backup area and the data in the backup area will be erased.You will need the Product Recovery DVD-ROM and CD/DVD drive (included).1Turn off the computer.2Insert the CD/DVD drive into the multimedia pocket.( “Multimedia Pocket”)3Turn on the computer, and press F2 while [Panasonic]boot screen is displayed.The Setup Utility will start up.If the password has been set, enter the Supervisor Password.4Select [Boot] menu, then select [IDE MP: xxxxxxxxxx] andpress F6 until [IDE MP: xxxxxxxxxx] is at the top of the[Boot] menu.5Place the Product Recovery DVD-ROM into the CD/DVDdrive.6Press F10 .At the confirmation message, select [Yes] and press Enter .The computer will restart, and this screen should appear.---------------------------------------------------------------------Select a number---------------------------------------------------------------------1. [ Recovery ] Reinstall Windows.2. [ Erase HDD ] Erase the whole data on HDD for security.3. [ Backup ] Enable the Backup function.0. [ Cancel ] Cancel.---------------------------------------------------------------------<When the hard disk backup function has been enabled>When the message [The Backup function has been en-abled. If [Recovery] or [Erase HDD] is executed, theBackup function will be disabled, and your Backup datawill be lost.] appears, press Y .7Press 2 to execute [2. [Erase HDD]].(You can cancel this operation by pressing 0 .)<When the hard disk backup function has been enabled>When the message [The Backup function has been en-abled. If [Erase HDD] is executed, the Backup func-tion will be disabled, and your Backup data will be lost.]appears, press Y .When the message [Computer must be rebooted in or-der to execute [Erase HDD.]] appears, press R .8At the confirmation message, press Y .9When [<<<Start Menu>>>] is displayed, press Enter .10 The approximate time required for erasing data will be dis-played.Press Space .11 At the confirmation message, press Enter .The operation of erasing the hard disk will start.(If necessary, the “hard disk data erase” operation can becancelled after it has begun by pressing Ctrl + C .If the operation is cancelled before being completed, a partof the data will not be erased.)12 After the operation is complete:Under normal conditions, the message [Hard disk data hasbeen deleted.] will be displayed.If a problem occurred during the operation, an error mes-sage will be displayed.13 Remove the Product Recovery DVD-ROM, and then pressany key to turn off the computer.PreparingProcedure](https://usermanual.wiki/Panasonic-of-North-America/9TGCF-731A/User-Guide-518856-Page-38.png)

![40AppendixBattery PackMain batteryMain battery +Second batteryMain batteryMain battery +Second batteryClock BatteryAC Adaptor*4InputOutputPower Consumption*5Operation TemperatureHumidityStorage TemperatureHumidityPhysical Dimensions (W x H x D)(excluding the carrying handle)Weight (including the carrying handle)Li-ion 11.1 V, 3.8 Ah3 hours - 4 hours*2 (Approx. 3.5 hours*3)Approx. 6 hours - 8 hours*2 (Approx. 7 hours*3)Approx. 3 hoursApprox. 6 hoursCoin type lithium battery 3.0 V100 V - 240 V AC, 50 Hz/60 Hz15.6 V DC, 5.0 AApprox. 35 W*6 / Approx. 80 W (maximum when recharging in the ON state)5 °C to 35°C {41 °F to 95 °F}30% to 80% RH (No condensation)-20 °C to 60 °C {-4 °F to 140 °F}30% to 90% RH (No condensation)297 mm x 35.5 - 46 mm x 254 mm{11.7 " X 1.4 - 1.8 " X 10 "}Approx. 2.6 kg {Approx. 5.7 lb.}Main Specifications*1Varies depending on the usage conditions ([Audio Power Management] in the Setup Utility: [Enable], etc).*2Measured using BatteryMark™ Version 4.0.1 (LCD brightness: Maximum - Minimum)*3Measured using MobileMark™ 2002 (LCD brightness: 60 cd/m2)*4<Only for North America>The AC adaptor is compatible with power sources up to 240 V AC adaptor. This computer is supplied with a 125 V AC compatible AC cord.*5Approx. 0.9 W when the battery pack is fully charged (or not being charged) and the computer is off.Approx. 2.0 W when the Wake up from LAN function has been enabled.*6Rated power consumption. SoftwareMicrosoft® Windows® XP Professional Service Pack 2 with Advanced Security Technologies(NTFS File System)Setup UtilityDMI ViewerAdobe ReaderIntel® PROSet/Wireless Software*7PC Information ViewerHard Disk Backup Utility*8Hard Disk Data Erase Utility*8SD UtilityIcon EnlargerLoupe UtilityHotkey SettingsBattery Recalibration UtilityWinDVD™5B’s Recorder GOLD7 BASICB’s CLiP 6Operating SystemUtility ProgramsOperatingTime*1ChargingTime*1Envi-ron-ment*7Only for models with wireless LAN.*8The Product Recovery DVD-ROM is required.Data transfer ratesStandards supportedTransmission methodWireless channels usedRF frequency bandIEEE802.11a: 54/48/36/24/18/12/9/6 Mbps (automatically switched)IEEE802.11b: 11/5.5/2/1 Mbps (automatically switched)IEEE802.11g: 54/48/36/24/18/12/9/6 Mbps (automatically switched)IEEE802.11a/IEEE802.11b/IEEE802.11gOFDM system, DSSS systemIEEE802.11a: Channels 36 to 64, 149 to 165IEEE802.11b/IEEE802.11g: Channels 1 to 11IEEE802.11a: 5.18~5.32 GHz, 5.745~5.825 GHzIEEE802.11b/IEEE802.11g: 2412~2462 MHzWireless LAN (only for models with wireless LAN)Specifications](https://usermanual.wiki/Panasonic-of-North-America/9TGCF-731A/User-Guide-518856-Page-40.png)