Panasonic of North America 9TGCF-M342 Notebook Computer with Wireless LAN User Manual Operating Instructions
Panasonic Corporation of North America Notebook Computer with Wireless LAN Operating Instructions
Contents
- 1. Manual
- 2. Revised Manual Statement
Manual
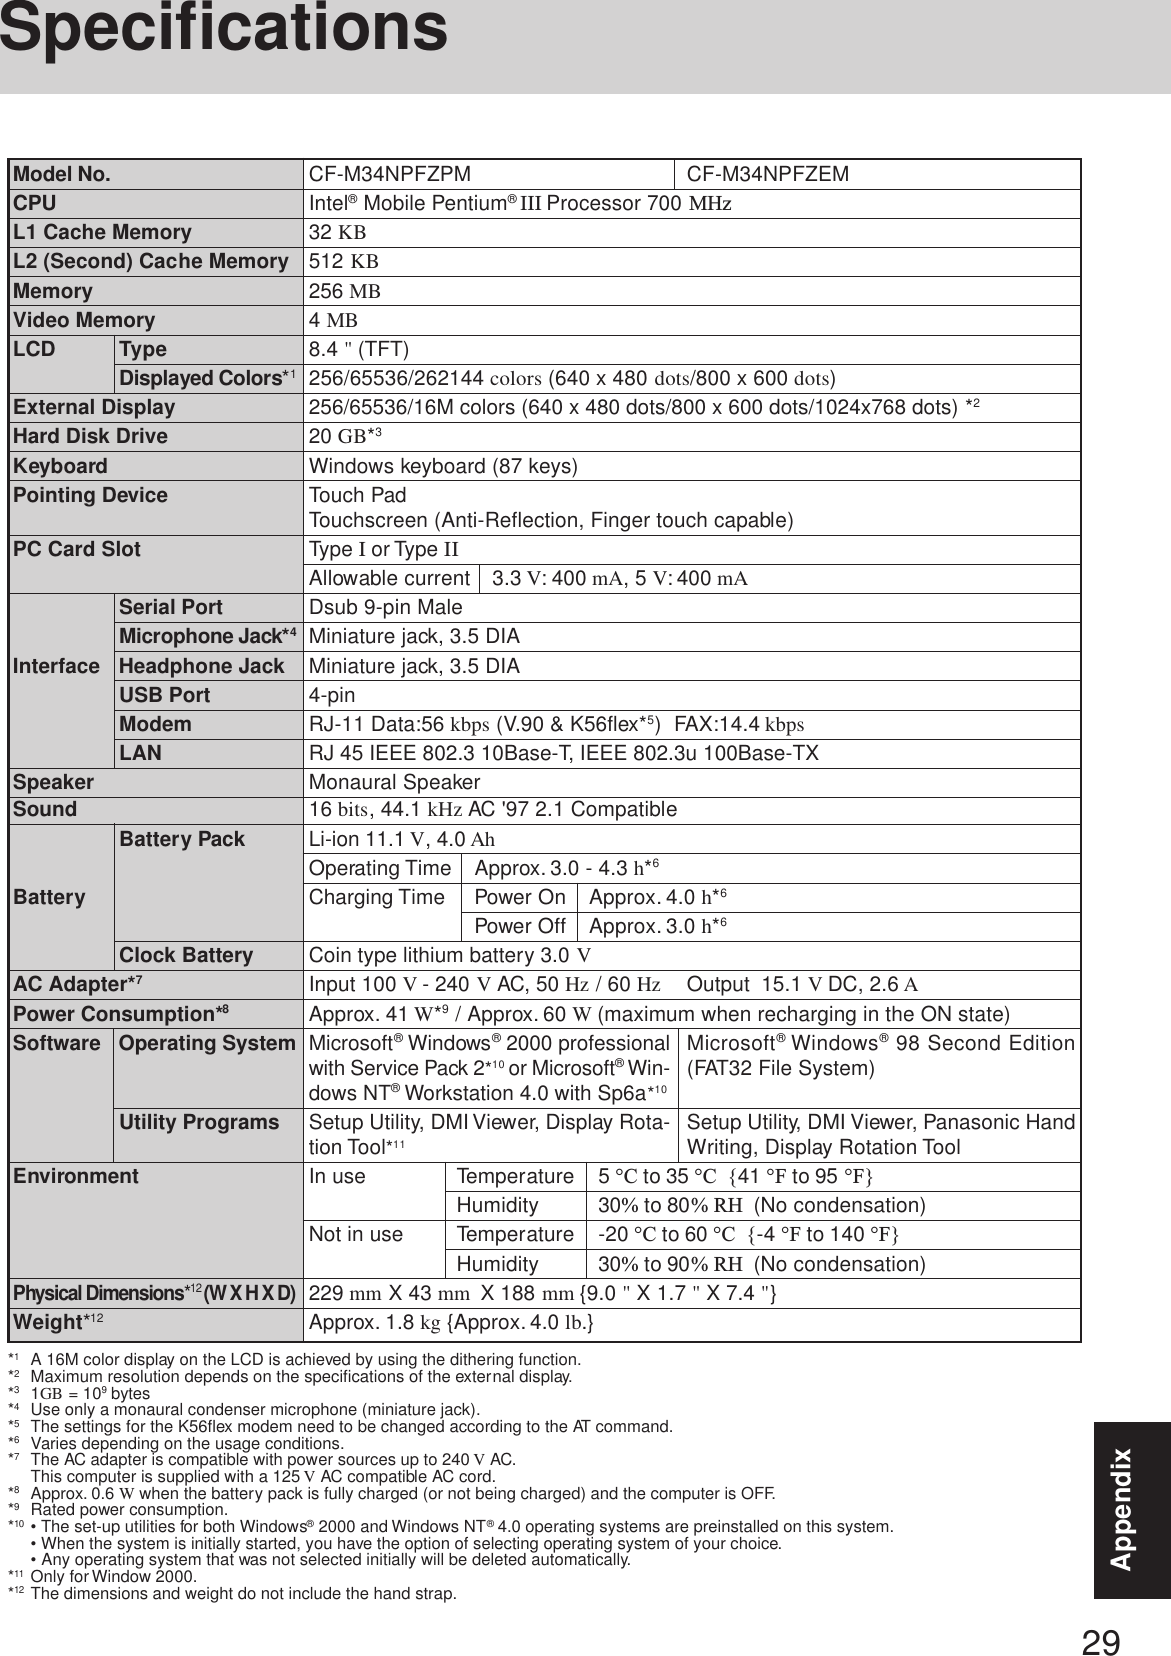
![OPERATING INSTRUCTIONSPersonal Computer®AppendixLIMITED USE LICENSE AGREEMENT........ 26Names and Functions of Parts ...................... 28Specifications ................................................ 29LIMITED WARRANTY................................... 30TroubleshootingList of Error Codes ......................................... 19Dealing with Problems (Summary).......................21Reinstalling Software .................................... 24OperationStarting Up/Shutting Down............................ 14Touch Pad (Basic Operation) ................................... 17Reference Manual ......................................... 18Getting StartedRead Me First.................................................. 3First-time Operation ........................................ 9Contents[Additional Manual]Reference ManualThis manual can be accessed on your computer. Referto page 18 on how to access the Reference Manual.Reference Manual•Key CombinationsReference Manual•Touch Pad (Advanced)•Touchscreen•Panasonic Hand Writ-ing•Display Rotation Tool•Standby/HibernationFunctions•Security Measures•Computing on theRoad•Battery Power•PC Cards•External Display•USB Devices•Modem•LAN•Port Replicator•Accessories•Hard Disk Drive•Setup Utility•LED IndicatorsReference Manual•Technical Information•DMI Viewer •List of Error Codes•Dealing with Problems(Advanced)Appendix Getting StartedOperationTroubleshootingModel No. CF-M34 Series2000 NT98Please read these instructions carefully before using this product and save this manual for future use.In this manual, descriptions are given us-ing illustrations not featuring the handstrap for convenience of explanation.](https://usermanual.wiki/Panasonic-of-North-America/9TGCF-M342.Manual/User-Guide-225408-Page-1.png)
![2Getting StartedIntroductionThank you for purchasing the Panasonic computer. Read the operating instructions thoroughly for proper operation of your newcomputer.Illustrations in this ManualCopyrightThis manual is copyrighted by Matsushita Electric Industrial Co., Ltd. with all rights reserved. No part of this manual may bereproduced in any form without the prior written permission of Matsushita Electric Industrial Co., Ltd.No patent liability is assumed with respect to the use of the information contained herein.©2001 Matsushita Electric Industrial Co., Ltd. All Rights Reserved.DisclaimerComputer specifications and manuals are subject to change without notice. Matsushita Electric Industrial Co., Ltd. assumes noliability for damage incurred directly or indirectly from errors, omissions or discrepancies between the computer and the manuals.TrademarksPS/2™ is a trademark of International Business Machines Corporation.Microsoft®, MS-DOS® and Windows® are registered trademarks of Microsoft Corporation of the United States and/or other coun-tries.Intel, Pentium and SpeedStep are registered trademarks of Intel Corporation.Adobe® and Acrobat® are either registered trademarks or trademarks of Adobe Systems Incorporated in the United States and/orother countries.Panasonic® is a registered trademark of Matsushita Electric Industrial Co., Ltd.NOTE:NOTE provides a useful fact or helpful information.CAUTION:CAUTION indicates a condition that may result in minor or moderate injury.WARNING:WARNING indicates a hazard that may result in moderate or serious injury.[Start]-[Shut Down]:This illustration means to click [Start], then to click [Shut Down].(For some applications, you may need to double-click.)Enter : This illustration means to press the [Enter] key. Fn + F5 : This illustration means to press and hold the [Fn] key, then press the [F5] key. Windows 98 : Information for Microsoft® Windows® 98 Second Edition users.Windows 2000 : Information for Microsoft® Windows® 2000 Professional users. Windows NT : Information for Microsoft® Windows NT® Workstation Version 4.0 users.:Where to go for referred information. : This illustration means to refer to the Reference Manual, which is available on your computer.Refer to page 18 on how to access this manual.*1For the Model No., insert the 12 digit number (for example, CF-M34NPFZPM) located onthe bottom of the computer.*2For Product Key, write down the Product Key shown on the “Certificate of Authenticity”located on the bottom of the computer.Customer's RecordSerial No.orDate of PurchaseModel No.*1Code No.Dealer's NameDealer's AddressProduct Key *2](https://usermanual.wiki/Panasonic-of-North-America/9TGCF-M342.Manual/User-Guide-225408-Page-2.png)

![7Getting StartedDo not power off your computer or press the floppy disk drive eject button while the floppy diskdrive being accessed.Doing so may damage the data on the floppy disk and render the floppy disk useless.Use care when handling floppy disks.To protect the data on your floppy disks or to prevent a floppy disk from becoming stuck in your com-puter, avoid the following:• Sliding the shutter on the floppy disk manually.• Exposing the disk to a magnetic field.• Storing the disk in locations prone to high temperatures, low pitched noise, dampness, or dust.• Applying more than one label on the disk.Confirm the contents of a floppy disk before formatting it.Confirm that no important data is on the floppy disk, because all data on the floppy disk will be erased.Use the write-protect tab.This is a must for preserving important data. Thisprevents your data from being erased or overwritten.Write Enable Write DisableWrite-protect TabSaving Data on DisksUsers are advised to purchase the latest versions of virus protection software and use them regularly.Computer VirusesWe recommend you run the software:• When booting your computer.• After receiving data.We recommend that you check data received on disks or from external sources, such as data downloaded from theInternet, e-mail, etc. (For compressed files, uncompress them before running a check).System File CheckerMicrosoft Corporation has announced that, with a computer in which Internet Explorer 5.01 is installed, if the [SystemFile Checker] in [System Information] is executed, the following may occur. • The message [System File Checker identified that the following file may be corrupted] may appear for a normal file. • In such cases, there is the possibility that the system will become unstable if the file is repaired with theSystem File Checker.In this computer, since Internet Explorer 5.01 is the default browser, do not use the System File Checker.Saving Data on the Hard DiskDo not expose your computer to shock.Use care when handling your computer, shock may damage your hard disk or make your software appli-cations and data unusable.Do not power down your computer while software applications are running or hard disk drive indicator ( )is on.Properly shut Windows* down to avoid problems ([Start] - [Shut Down] ).Save all valuable data to disks.Backing up data to disks will limit damage should trouble occur to your computer or should you inad-vertently change or erase data.Use the security function for all important data. ( “Security Measures”)*Windows 98 : This computer uses Microsoft® Windows® 98 Second Edition.Windows NT : This computer uses Microsoft® Windows NT®.Windows 2000 : This computer uses Microsoft® Windows® 2000 Professional.Hard Disk LockWhen the Hard Disk Lock is set to [Enable], it is impossible to read/write data from/to the hard disk when thehard disk is installed in a different computer, since a password is also set for the hard disk. When the hard diskis returned to the original computer, you can read/write data as before. In this case, however, make the settingsin the Setup Utility exactly the same as they were before the hard disk was removed. (Note that this Hard DiskLock does not guarantee the complete protection of data.) ( “Security Measures”)Windows 98](https://usermanual.wiki/Panasonic-of-North-America/9TGCF-M342.Manual/User-Guide-225408-Page-7.png)

![11Getting StartedSelect the Operating SystemWindows 2000 and Windows NT are preinstalled on this computer. After one of themis selected with the following procedure, only that Operating System can be used.1At the screen for the agreement of the selection of the Operating System , select[Y].2With the number keys, select either Windows 2000 or Windows NT.(The selection of the Operating System is only performed the first time the com-puter is started up. A change cannot be made after the selection.)3At the confirmation message, select [Y]. The Operating System preparation willstart, during which the computer will restart several times.Windows 2000 Windows NT89Setup WindowsMoving the cursor ( ) or clicking buttons can be performed with the touch pad.Windows 981Select settings for your region and your keyboard layout, then select [Next].(for U.S.A.: United States 101)2Enter your name and select [Next].3Select [Skip] at the [Using Your Modem to Connect].4Select [Yes] at the [Cancel Dialing], then select [Next].The License Agreement will be displayed.5After reading the agreement, select [I accept this agreement] or [I do not acceptthe agreement], then select [Next].4When the screen indicating the completion of the Operating System preparationis displayed, press any key.The computer will restart.CAUTIONDo not touch the keyboard. If you accidentally touch the keyboard and thecancel confirmation menu is displayed, do not cancel.6Select [Finish].7Input the correct date, time and time zone and select [Close]. You can also com-plete these settings at a later time.If [I do not accept the agreement] is selected, the Windows setup will beaborted.NOTECAUTIONAfter confirming that the power indicator has turned on, do not touch thepower switch until Windows setup has started.](https://usermanual.wiki/Panasonic-of-North-America/9TGCF-M342.Manual/User-Guide-225408-Page-11.png)
![12Getting StartedWindows NT1The License Agreement will be displayed. After reading the agreement, select [Iaccept this Agreement].2Select [Next].3Input your name and organization, then select [Next]. (It is possible to omit theorganization item.)4Input your computer name and select [Next].5Input an Administrator password and select [Next].6Select [Finish]. Windows will restart.7Following the display, press Ctrl + Alt + Del . Input the password set instep 5 and select [OK], then select [Close] at the [Welcome] display.As the computer starts up, it will be necessary to input the password set in step 8 .8Set the correct settings for all items in [Control Panel]-[Regional Settings] and[Date/Time] etc.If [I don’t accept this Agreement] is selected, the Windows setup will beaborted.NOTECAUTIONRemember this password! If the password is forgotten, Windows NT cannotbe operated.1At the [Welcome to the Windows 2000 Setup Wizard], select [Next].2After reading the agreement, select [I accept this agreement] or [I don't acceptthis agreement], then select [Next].Windows 2000Do not press any key or move the touch pad until [Windows 2000 Profes-sional Setup] is displayed.CAUTIONFirst-time OperationNOTEIf [I don’t accept this agreement] is selected, the Windows setup will beaborted.CAUTION3Select settings for your region, then select [Next].4Enter your name and organization and select [Next].5Enter your computer name and administrator password and select [Next].Remember this password! If the password is forgotten, Windows 2000 can-not be operated.NOTEAt the [Getting started with Windows 2000], select [Exit] to close.6Input the correct date, time and time zone and select [Next].You can also complete these settings at a later time.7At the [Networking Settings], select [Typical settings], then select [Next].8At the [Workgroup or Computer Domain], select [No, this computer is not on anetwork, or is on a network without a domain], then select [Next].The computer will restart.9At the [Network Identification Wizard], select [Next].10At the [Users of This Computer], select [Users must enter a user name and pass-word to use this computer], then select [Next].11Select [Finish].12Enter your administrator password and select [OK].](https://usermanual.wiki/Panasonic-of-North-America/9TGCF-M342.Manual/User-Guide-225408-Page-12.png)
![13Getting StartedCAUTION10 Create Backup Disks for ReinstallationPrepare 2HD floppy disks and make sure they are not in the write-protected state, thenselect [Start] - [Programs] - [Panasonic] - [Create BACKUP DISK] and follow the on-screen instructions. Place a label identifying the contents on each disk.Name of created backup diskFIRSTAID FD (When the display for creating the UPDATE FD is shown, create thedisk by following the on-screen instructions.)Store the floppy disks in a safe place. They will enable you to return yourcomputer to close to the condition at the time of purchase should any problemsoccur.When creating backup disks, do not run any other application program.When creating backup disks and the message [Insufficient files to copy] is dis-played, select [OK] and then contact Panasonic Technical Support.While the floppy disk drive indicator is on, do not remove the floppy disk,power down your computer or use the standby or hibernation function ( “Standby/Hibernation Functions”).Be sure to create the backup disk.If a backup disk is not created, it will be impossible to return the computer to itsoriginal state. In this case, contact Panasonic Technical Support.Label on the top surface,and insert the shutter-side headfirst.The floppy disk drive must be the A drive.1Power off your computer ( "Starting Up/Shutting Down")Do not shut down using the standby or hibernation mode.2Connect the external floppy disk drive to your computer.NOTE3Turn on your computer.4Set a floppy disk and make sure it is not in the write-protected state.5Select [Start] - [Programs] - [Panasonic] - [Create BACKUP DISK].Follow the on-screen instructions. Place a label identifying the contents on eachdisk.Windows 2000When a new device has been installed or a new Windows Component has been added in[Start] - [Settings] - [Control Panel] - [Add/Remove Programs], [Insert Disk] may appear.Select [OK] and specify [c:\winnt\cdimage] in place of [c:\sysprep\i386] or [D:], thenselect [OK].e.g. [c:\winnt\cdimage\i386] in place of [D:\i386]Windows NTThe library able to be used with the retail version of Windows NT 4.0 for ServicePack6 is in the following folder on the hard disk drive.c:\winnt\i386\drvlibThe partition showing [Unknown xxxMB] (in [Start] - [Programs] - [AdministrativeTools (Common)] - [Disk Administrator]) is an important partition. Therefore, do notdelete this partition.NOTEUSB FloppyDisk Drive](https://usermanual.wiki/Panasonic-of-North-America/9TGCF-M342.Manual/User-Guide-225408-Page-13.png)
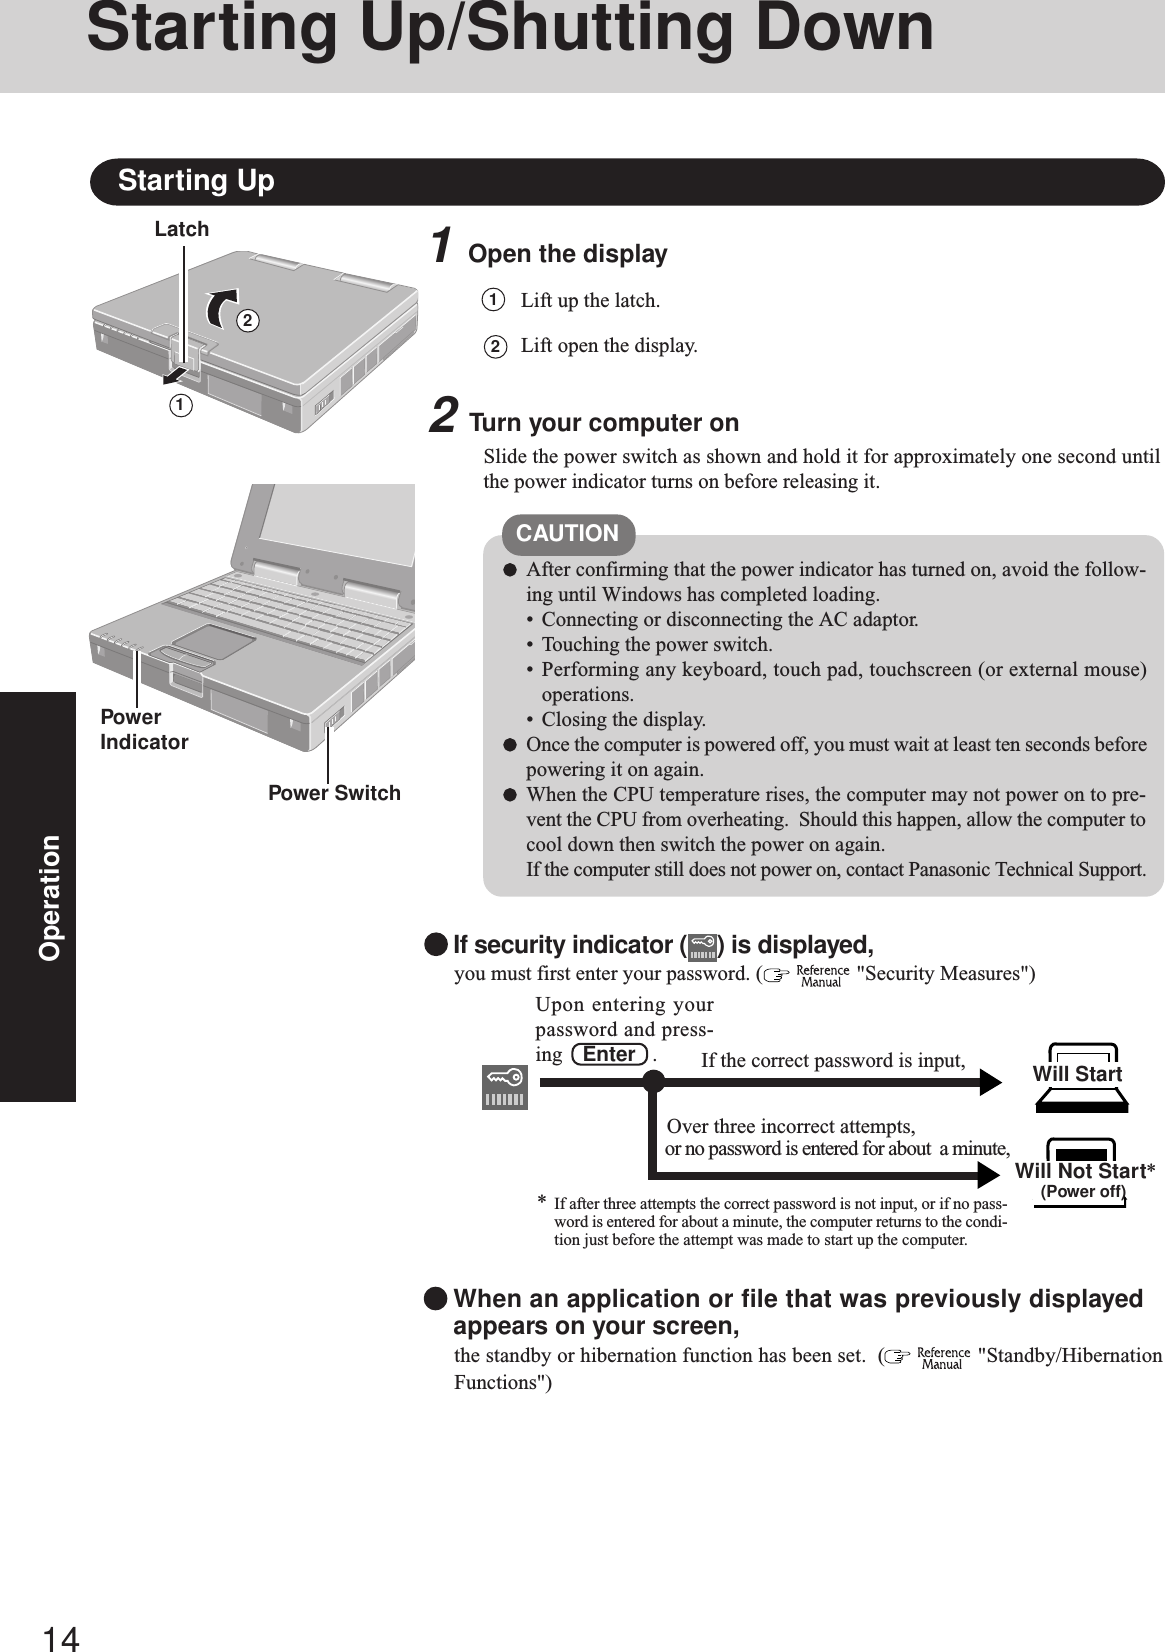
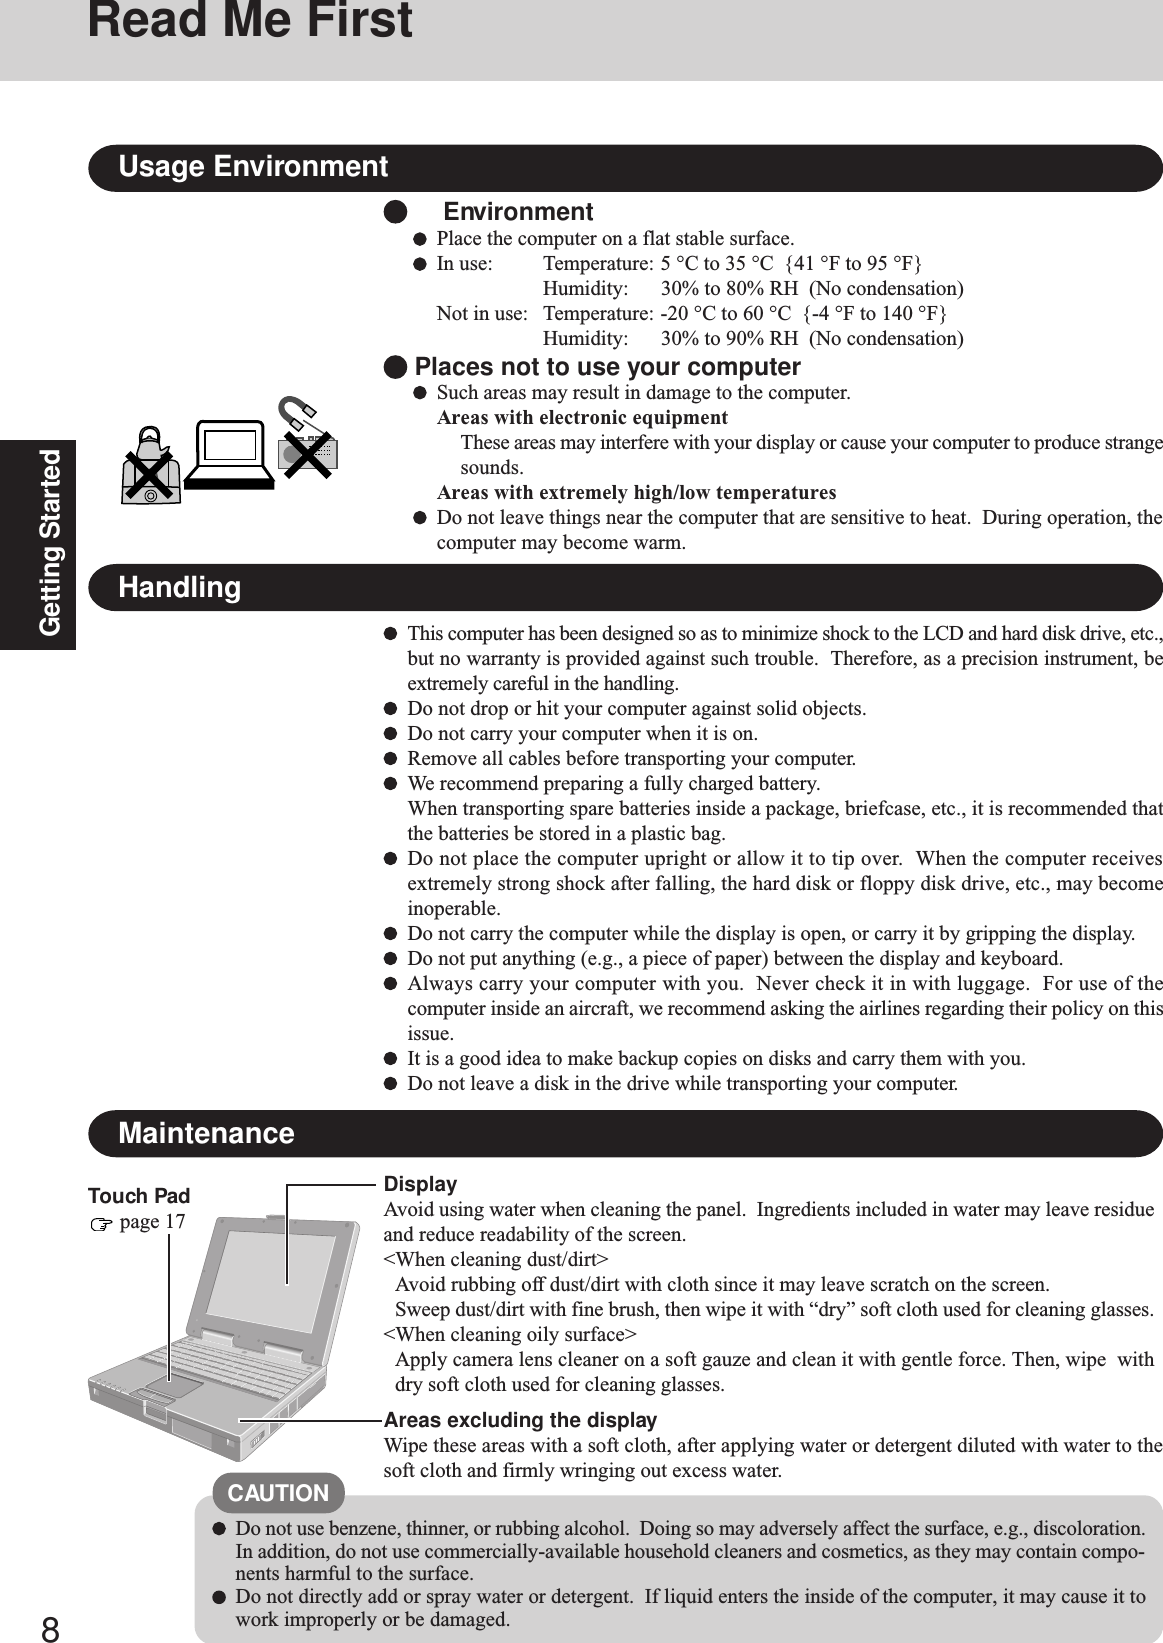
![15OperationOperationStarting Up/Shutting DownUsage ExampleThe hand strap is convenient for computing while standing.Adjust the length of the belt so that the computer does not fall by mistake, and firmly hold thecomputer when using it.CAUTIONDo not add a lot of weight to the hand strap.The hand strap may accidentally come loose from the computer.3Windows NTSelect your operating systemSelect “Windows NT Workstation Version 4.00” and press Enter .4Windows NTLogonPress Ctrl + Alt + Del .5Windows 2000 Windows NTInput your passwordWait for 10 seconds after confirming that the HDD access has been completed, inputthe user name and password, then select [OK]. Until the correct user name and pass-word are entered, the computer will not operate.Windows NTIf [Cancel] is selected, the computer will return to the initial [Begin Logon] display.6Select your applicationYou are able to start working on your computer.The power saving function is factory set, so if there is no input from a key, the touchpad, touchscreen or an external mouse (when one is connected) for a certain intervalof time, the power to the LCD and hard disk may be turned off. The LCD willresume operation when the touch pad, touchscreen or an external mouse (when oneis connected) is used or a key is pressed.The power to the LCD may be turned off while Windows is setting up or even whenan application software is being installed. In this case, because it is conceivable thata selection dialog box will be shown, do not press Space or Enter to attemptto resume from this condition as doing so may trigger a selection, but instead, pressa key unrelated to the direct triggering of a selection, like Ctrl .In addition, when the computer is left alone, it automatically enters the standby*mode ( “Standby/Hibernation Functions”). The computer will resume bysliding the power switch.*Windows 2000 : standby or hibernationNOTE](https://usermanual.wiki/Panasonic-of-North-America/9TGCF-M342.Manual/User-Guide-225408-Page-15.png)
![16OperationShutting Down (power off your computer)2Confirm shut downWindows 98 Windows 2000Select [OK] after selecting [Shut down].Windows NTSelect [Yes] after selecting [Shut down the computer?].Your computer will power off automatically.Windows NTFor the computer to automatically shut down after [Shut down the computer?] isselected, Phoenix APM 2.0 for Windows NT® has to be installed. When or isdisplayed on the task tray, this indicates that the program is installed.NOTERestarting your computer (without shutting down)Windows 98 Windows 2000Select [OK] after selecting [Restart].Windows NTSelect [Yes] after selecting [Restart the computer?].To quickly resume computer operation after shutting down,The standby or hibernation function is available. ( “Standby/Hiberna-tion Functions”)Windows 98If you have selected “Restart in MS-DOS mode”, press Ctrl + Alt + Del tostartup Windows from the MS-DOS mode.NOTEThis procedure is shutting down without using the standby or hibernation function.( “Standby/Hibernation Functions”)1Display the shut down screenAfter saving important data and closing each application, select [Shut Down] from the[Start] menu.From the keyboard,You may choose to press down on , then select the menu with or .NOTE](https://usermanual.wiki/Panasonic-of-North-America/9TGCF-M342.Manual/User-Guide-225408-Page-16.png)

![18Operation1Turn your computer on2Select [Reference Manual] in [Start] - [Programs] - [Panasonic] - [On-Line Manuals]When the Reference Manual is started up for the first time, the License Agreement will be displayed. After reading the agreement,select [Accept] to access the Reference Manual.The Reference Manual can be accessed on your computer. When a printer is connected, the Reference Manual can also be printed.This manual explains functions for you to make greater use of the computer, such as how to add peripheral devices, how the SetupUtility works and other useful information.Run the Reference ManualIllustrations may be difficult to view depending on the magnification. If this is the case, we recommend that the display bemagnified.When the taskbar is hidden at the bottom portion of Acrobat Reader, set the maximum display window size.If a printer is connected, we recommend printing pages. The illustrations and display samples may not print with a highquality.NOTEReference ManualTable of content (Items)By clicking an item, the cor-responding page will be dis-played at 100%.Page indicatorA desired page can be displayed by inputting the pagenumber after clicking here.(The display may be changed without notification.)Display the pageGo forward or backward a page, or tothe beginning or end of a document.Display ofthe manualMovable splitter barThis bar can be dragged, forexample, to the right to en-large the display of the tableof contents.Change the display sizeYou can select to magnify/de-magnify the display.ExitPerform a “Find” operationCancel or correct an operationZoom-inHand toolTo move around the current page.](https://usermanual.wiki/Panasonic-of-North-America/9TGCF-M342.Manual/User-Guide-225408-Page-18.png)
![21TroubleshootingDealing with Problems (Summary)The power indicator or bat-tery indicator is not lit is displayedPOST Startup Error(s) isdisplayedWindows startup, or an op-eration is extremely slowThe date and time are incor-rectWhen the previous item isnot the causeWhen resuming from thestandby or hibernationmode, does not appeareven if a password has beenset in the Setup UtilityWindows 98When starting up in theMS-DOS mode, the USBfloppy disk drive can not beusedWindows 2000The password of the admin-istrator was forgottenCheck the cable connection for the AC adaptor.Check to see if a fully charged battery is properly installed.Remove the battery pack and disconnect the AC adaptor, then connect them again.Input your password. If you have forgotten it, contact Panasonic Technical Support. page 19Press F9 in the Setup Utility ( “Setup Utility”). This will restore the SetupUtility’s settings to their default values (except the password settings). Then, the SetupUtility must be run once again for you to input the appropriate operating environment set-tings. (The processing speed depends on the application software used, so this operationmay not cause the processing speed to increase.)You can set the date and time through [Date/Time] in [Start] - [Settings] - [Control Panel]. When the computer is connected to a Local Area Network (LAN), confirm the date andtime of the server.If you continue to experience problems, the internal battery maintaining the clock mayneed to be replaced. Contact Panasonic Technical Support. This computer will not correctly recognize the date and time starting from the year 2100A.D.Windows NTWhen [APM 2.0 for NT] is not displayed in [Control Panel], this indicates that PhoenixAPM 2.0 for Windows NT® is not installed. When the standby or hibernation function isused under this condition, the date and time may be incorrectly displayed. Correct thedate and time, and then install Phoenix APM 2.0 for Windows NT®.When the standby or hibernation function is used frequently, discrepancies may occur inthe display of the date and time even if APM 2.0 for Windows NT is installed. You can setthe date and time through [Date/Time] in [Start] - [Settings] - [Control Panel].Press F9 in the Setup Utility ( “Setup Utility”). This will restore the SetupUtility’s settings to their default values (except the password settings).Try removing all peripheral devices.Windows 98Run SCANDISK to check the hard disk.At start-up, press Ctrl to operate the computer in the Safe mode.Windows 2000Click [Local Disk(C:)] in [My Computer] with the right button, select [Properties], thenselect [Tools] - [Check Now].At start-up, press F8 to operate the computer in the Safe mode.Use the Windows password as the following.Select [Start] - [Settings] - [Control Panel] - [Power Management]* - [Advanced], then addthe check mark for [Prompt for password when computer goes off standby].* Windows 2000 : [Power Options]After powering off the computer, connect the USB floppy disk drive and restart the com-puter.After reinstalling, setup Windows, then set the password again.When a problem occurs, refer to this page. The “Reference Manual” also contains detailed information. If a problem appears to berelated to a software application, read the software related manual. If you still cannot troubleshoot the problem, contact PanasonicTechnical Support. Starting UpWindows 98 Windows 2000](https://usermanual.wiki/Panasonic-of-North-America/9TGCF-M342.Manual/User-Guide-225408-Page-21.png)
![22TroubleshootingNo display after powering onThe power has not beenturned off, but after a cer-tain period of time, there isno displayThe cursor does not move inscrolling area of the touchpadThe cursor cannot be con-trolledAn afterimage appears (e.g.,green, red, and blue dotsremain on the display) orthere are dots not display-ing the correct colors.The external display nolonger displays properlyThe screen becomes disor-deredThe display destination ofthe screen cannot bechanged with the Fn + F3 keysWhen there is no display to an external display,• Check your cable connection to the external display.• Confirm your display is powered on.• Check the settings for your external display.Try changing the display by pressing Fn + F3 .Windows 98 This combination does not work when the computer is in the Dual-Display Mode.When displaying only through an external display, if the computer is shut down by usingthe standby or hibernation function, there will be no display on the LCD unless the exter-nal display is connected when operations are resumed. In this case, connect the externaldisplay or press Fn + F3 .Windows 98 This combination does not work when the computer is in the Dual-Display Mode.Has the computer been set to the power-saving mode? To resume operation of your computer from the condition the power of the display is off(for energy conservation purposes), press any key unrelated to the direct triggering of aselection, like Ctrl .To save power, your computer may have automatically entered the standby or hiberna-tion mode. ( “Computing On the Road”) Press the power switch.When the Microsoft® IntelliMouseTM Wheel mode or the original mode is set for the touchpad, only scroll operations are possible for the right part or bottom part of the touch pad. Inthis case, cursor operations are possible by using the work surface excluding the right part orbottom part. When no mode is set, the entire surface of the touch pad can be used for cursoroperations.Restart the computer by using the keyboard (e.g., ).If an image is displayed for a prolonged period of time, an afterimage may appear. Thisis not a malfunction. The afterimage will disappear when a different screen is displayed.High-precision and advanced technologies are necessary in the production of color liquidcrystal displays (color LCDs). Therefore, if 0.002% or less of the picture elements eitherfail to light or remain constantly lit (that is, more than 99.998% of elements are function-ing properly), no defect is considered to exist.When an external display not compatible with the power saving mode is used with thecomputer, the external display may no longer display properly when the computer enters thecondition the power of the display is OFF (for energy conservation purposes). In suchcases, turn off the power to the external display.Changing the number of colors of the display may affect the screen. Restart the computer.Windows 98When using Dual-Display mode, use the same display colors for the external display asthose used by the LCD.In the following cases, the setting cannot be changed with the Fn + F3 keys.•When either the internal LCD or external display is set to [Secondary] in [Displays] ofDisplay Properties.•Windows 98 When the computer is in the Dual-Display mode. DisplayWindows NTNT does not start up Starting UpTry the steps listed below.1Power off the computer, and then power it on again.2When [Press spacebar NOW to ...] is displayed, press the space key.3When [Hardware Profile/Configuration Recover Menu] is displayed, follow the on-screeninstructions.](https://usermanual.wiki/Panasonic-of-North-America/9TGCF-M342.Manual/User-Guide-225408-Page-22.png)
![23TroubleshootingPress Ctrl + Alt + Del and select [Shut Down].After cutting the power by sliding the power switch for more than four seconds, slide thepower switch to power on and open the application again.If the program no longer works normally, go to [Start] - [Settings] - [Control Panel] -[Add/Remove Programs] to delete the program. Then reintsall the program.Computer hangs Application SoftwareDealing with Problems (Summary)Is Acrobat Reader installed?If Acrobat Reader is not installed, run [c:\util\reader\ar500enu.exe] in [Start] - [Run] toreinstall the program. When installing the program, do not change the installation destina-tion folder. If the destination folder is changed, the Reference Manual cannot be openedfrom the [Start] menu. Reference ManualThe Reference Manual isnot displayedAfter the display destinationof the screen is switchedwith Fn + F3 , the dis-play destination returns toboth the internal LCD andexternal display upon op-eration DisplayUnder the condition that the [MS-DOS Prompt]* screen is set to “Full Screen”, the displaydestination returns to both the internal LCD and external display if “EXIT” is input and the[MS-DOS Prompt]* screen is closed, or “Full Screen” is canceled (e.g., Alt + Enter ),when the display destination of the screen is switched with Fn + F3 .Press Fn + F3 again.*Windows 2000 Windows NT : [Command Prompt]The red indicator lights.Repeated beeping soundwhile the computer is in use.The red indicator blinksThe orange indicator blinksThe battery level is low. Save your data and power off your computer.After connecting the AC adapter or replacing the battery pack with a fully charged one, turnyour computer on.The battery pack or recharging function may be defective. Quickly remove the batterypack and disconnect the AC adapter, then connect them again.If the problem persists, contact Panasonic Technical Support.Unable to charge because of an improper temperature range. ( page 6) Battery IndicatorUnable to shut down Win-dows Shutting downIf a USB device is connected, try removing it.](https://usermanual.wiki/Panasonic-of-North-America/9TGCF-M342.Manual/User-Guide-225408-Page-23.png)
![24TroubleshootingReinstalling SoftwareBefore Reinstallation PreparingReinstallingCAUTIONIf data on your hard disk is compressed, the data shouldbe uncompressed. Important1Turn off the computer.2Connect the floppy disk drive to the USB port of main unitand CD-ROM drive.3Set the FIRSTAID FD in the floppy disk drive.4Turn the computer on.5When the message [Press <F2> to enter SETUP] is dis-played, press F2 and then run the Setup Utility.If the password has been set, enter the supervisor pass-word.6Write down all of the contents of the Setup Utility and thenpress F9 .At the confirmation message, select [Yes] and press Enter .7<Only when using the CD-ROM drive Panasonic KXL-RW21A>Select [Boot] menu, press F5 / F6 and / until[CD Drive] is at the top of the [Boot] menu.8Windows 98Set the Product Recovery CD-ROM.Windows 2000 Windows NTSet the Product Recovery CD-ROM1.9Press F10 .At the confirmation message, select [Yes] and press Enter . The computer will reboot, and the LicenseAgreement screen should appear. Select [1. Yes, I agree tothe provision above and wish to continue!].10 Windows 2000 Windows NTAt the screen for the selection of the OS, select either Win-dows 2000 or Windows NT.You can reinstall only the initially selected OS. Save all important data. If reinstallation is carried out, all data existing prior to the installation will be lost. The reinstal-lation will return the computer to the conditions at time of purchase. Before the reinstallation procedure, remove all peripherals (except for the CD-ROM and floppy disk drive). Be sure the AC adapter is connected until the reinstallation procedure is completed. When using the Panasonic KXL-RW10A CD-ROM drive, set the switch of the PC Card to 16-bit.•BACKUP DISK(s) created in advance ( page 13)•Product Recovery CD-ROM (included)•External floppy disk drive (optional CF-VFDU03)•CD-ROM drive Panasonic KXL-RW10A (PC Card-compatible) or KXL-RW21A (USB)When using a CD-ROM drive other than the Panasonic KXL-RW10A or KXL-RW21A CD-ROM drive: ( page 25)-------------------------------------------------Select the number-------------------------------------------------1. Restore the whole HDD to factory default2. Restore the drive C to factory default3. End------------------------------------------------- Windows NTWindows 98-------------------------------------------------Select the number-------------------------------------------------1. Restore the whole HDD to factory default2. Restore Windows NT4.0 to the first partition3. End-------------------------------------------------11 This screen should appear.12 Make a selection from the menu.To restore all contents of the hard disk to factorydefault, including the partition setting(s):Select [1. Restore the whole HDD to factory default].Windows 98To restore the hard disk (C drive) to factory default,excluding the partition setting(s):Select [2. Restore the drive C to factory default].Windows 2000 Windows NTTo reinstall Windows NT/Windows 2000 to the firstpartition to factory default:Select [2. Restore Windows NT4.0 (or Windows 2000)to the first partition].(To next page)In such cases, the initial partition size must be 4GB or more of the hard disk size. Reinstallationcannot be performed with a small partition size.If “The program has detected an error 110 on thepartition starting at sector xxxxxxxx on disk1.” isdisplayed, select [Yes].NOTE Windows 2000-------------------------------------------------Select the number-------------------------------------------------1. Restore the whole HDD to factory default2. Restore Windows 2000 to the first partition3. End-------------------------------------------------](https://usermanual.wiki/Panasonic-of-North-America/9TGCF-M342.Manual/User-Guide-225408-Page-24.png)
![25Troubleshooting14 After the reinstallation procedure completes, the follow-ing message will appear on the display.Windows 98All data on the whole HDD has been restored to the factory default.After shutdown, remove the Firstaid FD and CD-ROM Drive,and then restart the computer.Press any key to shutdown.Press Enter . The computer will be shut down.Remove the FIRSTAID FD and the CD-ROM drive, andthen turn the computer on.Windows2000 install wizard will start after reboot.Restore process will execute more after Windows2000 install wizard.After shutdown, remove the Firstaid FD and CD-ROM Drive,and then restart the computer.Press any key to shutdown.Windows 2000Press Enter . The computer will be shut down.Remove the FIRSTAID FD and the CD-ROM drive, andthen turn the computer on.13 At the confirmation message , press Y .The computer will reboot, and the operations of reinstal-lation for the hard disk start automatically. (The opera-tions take about 15 minutes.)Windows 2000 Windows NTWhen “Insert media 2” is displayed, insert Product Re-covery CD-ROM 2, or when “Insert media 3” is displayed,insert Product Recovery CD-ROM 3 into the CD driveand immediately select [OK].(In the case of Windows NT, only Product Recovery CD-ROMs 1 and 2 can be used.)If [OK] is not immediately selected:The message “The media does not contain the correctfile” may appear. In such cases, the message “Insertmedia 2...” is displayed again when [OK] is selected.Confirm that Product Recovery CD-ROM 2 has beeninserted by opening the tray of the CD drive, then closethe tray and immediately select [OK].NOTE15 When the message [Press <F2> to enter SETUP] is dis-played, press F2 and then run the Setup Utility.If the password has been set, enter the Supervisor Pass-word.NOTEWhen an UPDATE FD is to be created, follow the stepsin the readme.txt on the disk. ( page 13)16 Press F9 .At the confirmation message, select [Yes] and press Enter . (The Setup Utility settings will return to theirdefault values. Even the security settings with the ex-ception of the password(s) will return to their default val-ues.)Change the settings where necessary.17 Press F10 .At the confirmation message, select [Yes] and press Enter .18 Perform the setup procedure for Windows by followingthe instructions on the screen. page 11Reinstalling Software<When using a CD-ROM drive other than the PanasonicKXL-RW10A or KXL-RW21A CD-ROM drive>Copy the necessary drivers, from the floppy disk includedwith your CD-ROM drive, to the FIRSTAID FD with themethod below. It will be necessary to edit theCONFIG.SYS file and AUTOEXEC.BAT file on theFIRSTAID FD. When editing the AUTOEXEC.BAT file.Some CD-ROM drives require card managers (card andsocket service). See the manual included with your CD-ROM drive for further details.1Start Windows and insert the FIRSTAID FD2Select [Start]-[Programs]-[Accessories]-[NotePad] andopen [a:\config.sys]3Rewrite the following line and saveDelete the following four lines.;KXL-RW10A DRIVERDEVICE=A:\TOOLS\KMASMGRA.SYSDEVICE=A:\TOOLS\KMASASPA.SYSDEVICE=A:\TOOLS\KMASCDA.SYS /D:MSCD000Add the driver of your CD-ROM drive.Device=A:\DRIVER1.SYS /D:MSCD000Rewrite this driver for the driver of yourCD-ROM drive. The driver for the PCCard will also be necessary. Refer to theoperation manual that accompanies theCD-ROM drive.4Copy the CD-ROM driver file (i.e., the driver file re-written in step 3 ) of the CD-ROM drive below [a:\]of the FIRSTAID FD5Set the floppy disk to the write-protect stateWindows NT4.0 install wizard will start after reboot.Restore process will execute more after Windows NT4.0 install wizard.After shutdown, remove the Firstaid FD and CD-ROM Drive,and then restart the computer.Press any key to shutdown.Windows NTPress Enter . The computer will be shut down.Remove the FIRSTAID FD and the CD-ROM drive, andthen turn the computer on.](https://usermanual.wiki/Panasonic-of-North-America/9TGCF-M342.Manual/User-Guide-225408-Page-25.png)
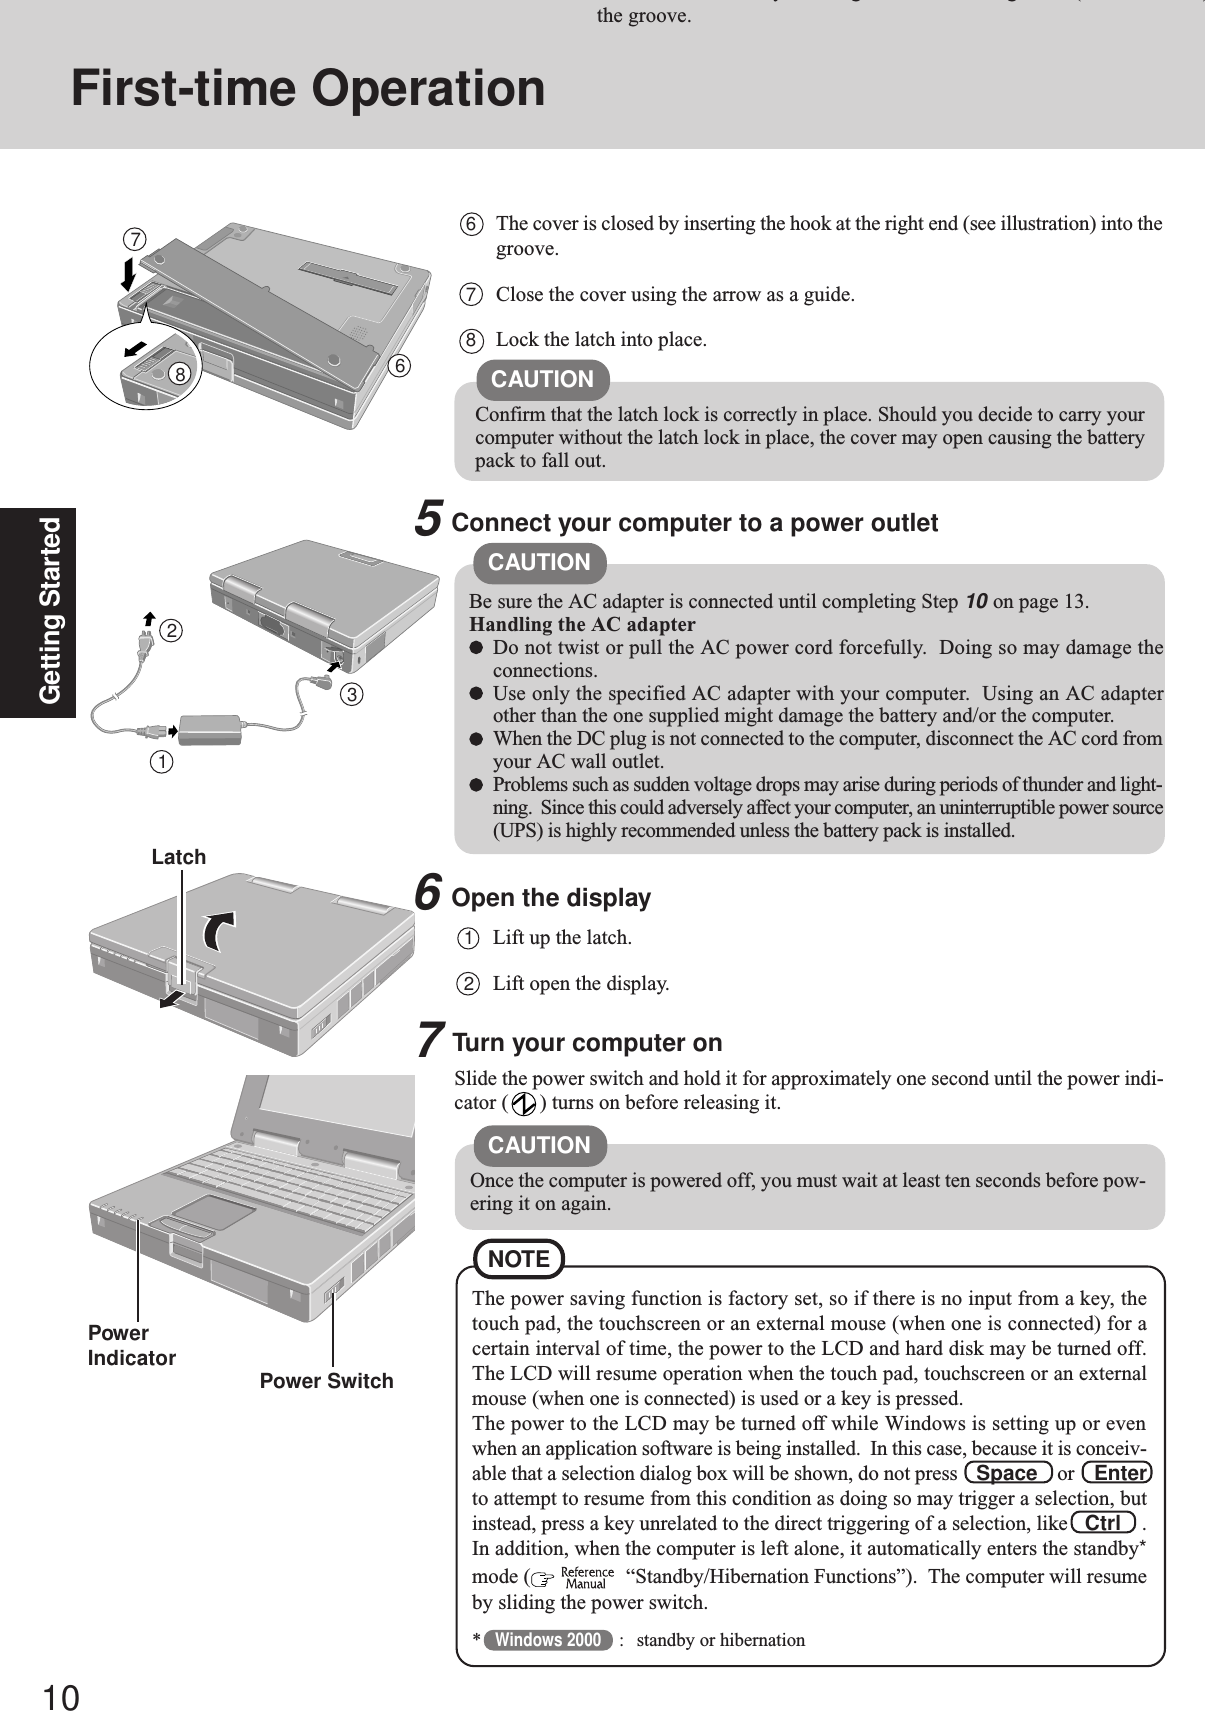
![28AppendixNames and Functions of Parts( "USB Devices")( "Touch Pad (Advanced)", "Touchscreen")( "Modem")DC-IN JackUse only a monaural condenser mi-crophone (miniature jack). Using aninput source other than a monauralcondenser microphone may not al-low audio to be input or may dam-age the equipment.Use this jack to connect head-phones or amplifier-equippedspeakers. Audio output from theinternal speaker is disabled whenheadphones or external speakersare connected.page 17( "LED Indicators")Touch PadLED IndicatorsLCD USB PortModem( "PC Cards")Before using the computer for the first time,carefully read the [LIMITED USE LICENSEAGREEMENT]. If you agree to the condi-tions, remove the seal.POWER Headphone JackRAM Module( "Port Replicator")Expansion Bus ConnectorHard Disk Drive( "Hard DiskDrive")To adjust the volume, select the onthe task bar, then [Volume Control].You may also use the function keys to performthis operation ( Fn + F5 or F6 ).Speaker on/off : Fn + F4SpeakerMicrophone JackA cable can be connected to prevent theft of your computer. Formore information, read the manual provided with the cable.LOCKSerial PortUse this port to a serial mouse orserial communication devices.PC Card SlotsWhen resetting your computer, use adull pointed object. Do not use apencil. Pencil lead can break offinside the computer and damage thecomputer.Power statusBattery pack statusHard disk drive statusScroll Lock (ScrLk)Numeric Key (NumLk)Caps LockReset ButtonPower SwitchHand Strap( "Battery Power")A lithium ion battery that is recyclable powers the product you have purchased. Please call 1-800-8-BATTERY for information on how to recycle this battery.L’appareil que vous vous êtes procuré est alimenté par une batterie au lithium-ion. Pour desrenseignements sur le recyclage de la batterie, veuillez composer le 1-800-8-BATTERY.Battery PackSecurity Lock( "LAN")LAN](https://usermanual.wiki/Panasonic-of-North-America/9TGCF-M342.Manual/User-Guide-225408-Page-28.png)