Panasonic of North America 9TGCF-TW72 Personal Computer Models CF-T72 and CF-W72 User Manual CF T5mk3 Vista DFQW5064ZA en
Panasonic Corporation of North America Personal Computer Models CF-T72 and CF-W72 CF T5mk3 Vista DFQW5064ZA en
Contents
- 1. Final User Manual for CF T7
- 2. Final User Manual for CF W7
Final User Manual for CF T7
![2Getting StartedUseful InformationTroubleshootingAppendixIntroductionThank you for purchasing this Panasonic computer. For optimum performance and safety, please read these instruc-tions carefully.Terms and illustrations in these instructionsSome illustrations are simplified to help your understanding and may look different from the actual unit.If you do not log on as an administrator, you cannot use some functions or cannot display some screens.Refer for the latest information about optional products to the catalogs, etc.In these instructions, the names and terms are referred as follows.• “Windows Vista™ Business” as “Windows” or “Windows Vista”The display modes are referred as follows. ( ) indicates the terms in [Intel® Graphics Media Accelerator Driver for mobile] screen. To display the screen, right-click the desktop and click [Graphics Properties].• Internal LCD (Notebook): The computer’s display• External display (Monitor): External display• Simultaneous display (Intel (R) Dual Display Clone): The same screen is displayed on the internal LCD and the external display.• Extended Desktop: The extended working area across the internal LCD and the external display.CopyrightThis manual is copyrighted by Matsushita Electric Industrial Co., Ltd. with all rights reserved. No part of this manual may be reproduced in any form without the prior written permission of Matsushita Electric Industrial Co., Ltd.No patent liability is assumed with respect to the use of the information contained herein.© 2007 Matsushita Electric Industrial Co., Ltd. All Rights Reserved.DisclaimerComputer specifications and manuals are subject to change without notice. Matsushita Electric Industrial Co., Ltd. assumes no liability for damage incurred directly or indirectly from errors, omissions or discrepancies between the com-puter and the manuals.TrademarksMicrosoft®, Windows®, Windows Vista, IntelliMouse and the Windows logo are registered trademarks or trademarks of Microsoft Corporation of the United States and/or other countries.Intel, Core and Centrino are either registered trademarks or trademarks of Intel Corporation.SD Logo is a trademark. Adobe, the Adobe logo and Adobe Reader are either registered trademarks or trademarks of Adobe Systems Incorpo-rated in the United States and/or other countries.Computrace® is a registered trademark of Absolute® Software Corp.Bluetooth™ is a trademark owned by Bluetooth SIG, Inc., U.S.A. and licensed to Matsushita Electric Industrial Co., Ltd.Panasonic® is a registered trademark of Matsushita Electric Industrial Co., Ltd.Names of products, brands, etc., appearing in this manual are trademarks or registered trademarks of their respective own companies. : Conditions that may result in minor or moderate injury. : Useful and helpful information.Enter : Press [Enter] key.Fn + F5 : Press and hold [Fn] key, and then press [F5] key. (Start) - [All Programs] : Click (Start), and then click [All Programs]. : Page in these Operating Instructions. : Reference to the on-screen manuals.CAUTIONNOTE](https://usermanual.wiki/Panasonic-of-North-America/9TGCF-TW72.Final-User-Manual-for-CF-T7/User-Guide-864362-Page-2.png)
![15Getting StartedUseful InformationTroubleshootingAppendixAClick (Start) - [Control Panel] - [Additional Options] - [Tablet Calibration].BIf [User Account Control] is displayed, click [Continue], or input password and click [OK].CTouch each “+” using the stylus.“+” is displayed in order at 9 locations.NOTEPC Information ViewerThis computer periodically records the management information including the hard disk information such as number of hours powered-on, number of times powered-on, internal temperature, replacement sector. The maximum data volume for each record is 750 byte. These information are only used for estimating the cause when the hard disk goes down by any possibility. They are never sent to outside via network nor used for any other purpose except for the purpose described the above.To disable the function, add the check mark for [Disable the automatic save function for management information history] in [Hard Disk Status] of PC Information Viewer, and click [OK]. ( Reference Manual “Check the Computer’s Usage Status”)When Starting Up/Shutting DownCAUTIONDo not do the following• Connecting or disconnecting the AC adaptor• Sliding the power switch• Touching the keyboard, touch pad, touchscreen or external mouse• Closing the displayNOTEWhen the DC plug is not connected to the computer, disconnect the AC cord from your AC wall outlet. About 1.5 W of power is consumed simply by having the AC adaptor plugged into an electrical outlet.Note that the computer consumes electricity even when the computer power is off. If the battery pack is fully charged, the battery will fully discharge in the following period of time:• When power is off: Approx. 3 months• In sleep: Approx. 8 days• In hibernation: Approx. 15 daysIf “Wake up from LAN” is disabled, the period of time in sleep will become slightly longer, and the period of time in hibernation will become about the same as that in power-off.To change the partition structureYou can shrink a part of an existing partition to create unallocated disk space, from which you can create a new parti-tion. This computer has a single partition in the default setting.AClick (Start) and right-click [Computer], then click [Manage].A standard user needs to enter an administrator password.BClick [Disk Management].CRight-click the partition for Windows (“c” drive in the default setting), and click [Shrink Volume].The partition size depends on the computer specifications.DInput the size in [Enter the amount of space to shrink in MB] and click [Shrink].You cannot input a larger number than the displayed size.ERight-click [Unallocated] (the shrunk space in the step D) and click [New Simple Volume].FFollow the on-screen instructions to make the settings, and click [Finish].Wait until formatting is completed.NOTEYou can create an additional partition using remaining unallocated space or newly creating unallocated space.To delete a partition, right-click the partition and click [Delete Volume] in the step C.6 Perform the touchscreen calibration.](https://usermanual.wiki/Panasonic-of-North-America/9TGCF-TW72.Final-User-Manual-for-CF-T7/User-Guide-864362-Page-15.png)
![16First-time OperationGetting StartedUseful InformationTroubleshootingAppendixYou can select the Classic view of Control Panel or the Classic Start menu. You can also change the way a user logs on or off. This manual explains using the Windows Vista default setting (not Classic view or Classic Start menu etc.).User Account ControlUser Account Control is a new security component of Windows Vista to stop unauthorized changes to your computer.The User Account Control message will pop up every time you try making an important change to your computer.Windows SidebarThe Windows Sidebar does not appear in the default setting. To display it, click (Start) - [All Programs] - [Acces-sories] - [Windows Sidebar].To always display the sidebar:ARight-click the sidebar icon on the notification area, and click [Properties].BAdd a check mark for [Start Sidebar when Windows starts] and click [OK].When Using Wireless LAN <Only for model with wireless LAN>If you cannot communicate with the access point or if the access point is not detected, right-click on the notifica-tion area and click [Connect to a network], and then click in the [Connect to a network] screen.Sound and Video• Sound (e.g. MP3, WMA) and video (e.g. MPG, WMV) recorded in PC Cards and SD Memory Cards may be inter-rupted during playback. If this happens, copy them to the hard disk drive and play back.• Sound and video in AVI files may be interrupted or produce a time-lag during playback. If this happens, click or on the notification area, and click [High performance]. This may remedy the problem.• Depending on the processing status on Windows, sound may be interrupted at Windows startup. You can mute the sound at startup.ARight-click the desktop and click [Personalize] - [Sounds].BRemove the check mark from [Play Windows Startup sound], and click [OK].• If you create WMA files from an audio CD using Windows Media Player and add them to a Windows Media Player’s playlist and play them back, the sound may be cut approximately 20 seconds before the end of the track. If this occurs, make the following settings.AClick (Start) - [Control Panel] - [Hardware and Sound] - [Sound].BClick [Speakers] - [Properties].CIn [Speakers Properties] screen, click [Effects].DAdd a check mark for [Disable System Effects] and click [OK].• The thermal control may set the computer to hibernation if you use the computer in a high ambient temperature and use an application that uses a lot of CPU power (for example, playing DVD-Video over an extended period).Wait a few minutes (at least 5) before turning the computer on again if this occurs.You can change settings to make it less likely that the thermal control will switch the computer to hibernation, even though this will slow down application processing speed, and may result in less smooth video. Go to the Setup Utility [Main] menu and change the setting for [Thermal Control] to [Extended].About Windows® Anytime Upgrade supplied•Windows® Anytime Upgrade is necessary for upgrading Windows Vista™ Business to Windows Vista™ Ultimate. To upgrade the operating system to Windows Vista™ Ultimate using the Windows® Anytime Upgrade disc, you need to purchase the license key on the web site of Microsoft Windows® Anytime Upgrade. For further informa-tion, refer to the instruction manual of Windows® Anytime Upgrade. This disc cannot be used to reinstall Windows. • When you have upgraded the preinstalled “Windows Vista™ Business” to “Windows Vista™ Ultimate” using Win-dows® Anytime Upgrade, you may have the problem that audio does not sound. To remedy it, reinstall the sound driver in the following procedure.AClick (Start) - [Control Panel] - [Uninstall a program].BClick [SigmaTel Audio] and click [Uninstall].A standard user needs to enter an administrator password.Follow the on-screen instructions to remove the sound driver.CClick (Start) and input [c:\util\drivers\sound] in [Start Search], and press Enter.DRight-click [setup] in [sound] folder and click [Run as administrator].If there are two or more “setup” files, right-click the file whose [Type] is [Application].A standard user needs to enter an administrator password.Follow the on-screen instructions and install the sound driver.Regarding Windows Vista](https://usermanual.wiki/Panasonic-of-North-America/9TGCF-TW72.Final-User-Manual-for-CF-T7/User-Guide-864362-Page-16.png)
![17Getting StartedUseful InformationTroubleshootingAppendixIf high-frequency sound occurs around keyboard while using the computerThis symptom is mitigated by changing the settings for the USB power saving function.A standard user needs to enter an administrator password and click [OK].• Set [USB selective suspend setting] to [Enable].AClick (Start) - [Control Panel] - [System and Maintenance] - [Power Options].BClick [Change plan settings] of the current power plan. CIn [Change settings for the plan:], click [Change advanced power settings].DIn [Advanced settings], double-click [USB settings]. EDouble-click the displayed [USB selective suspend setting]. FChange settings of [On battery:] and [Plugged in:] to [Enabled]. GClick [OK] and exit the [Advanced settings] screen.• Set the USB power saving function to [Disable]. AClick (Start) - [All Programs] - [Panasonic] - [USB Power Save Mode Switching Utility].BClick [Disable], and click [OK]. CClick [OK].DRestart the computer.Windows UpdateYou can update to the latest patches and service packs for Windows with the following menus. (Start) - [All Programs] - [Windows Update]Do not apply “Driver Updates” even if a message to update a driver appears. If a driver update is required, contact your technical support office.If the message “Check your computer security” is displayedSelect (red icon) on the notification area and make the appropriate settings. The Windows Security Center reg-ularly gives you notice so that you can make the optimum settings. This is not an error message and you can use the computer. However, making appropriate measures is recommended to reduce the risk of virus and other attacks.](https://usermanual.wiki/Panasonic-of-North-America/9TGCF-TW72.Final-User-Manual-for-CF-T7/User-Guide-864362-Page-17.png)
![20Getting StartedUseful InformationTroubleshootingAppendixOn-screen ManualYou can access the Reference Manual and the Important Tips on the computer screen after completing the “First-time Operation”.When you access the Reference Manual and the Important Tips for the first time, the License Agreement of the Adobe Reader may be displayed. Read it carefully and select [Accept] to proceed.Reference Manual The Reference Manual contains the practical information to help you fully enjoy the computer’s performance.To access the Reference Manual:Double-click on the desktop.Important Tips The Important Tips will provide you with the helpful information about the battery. Read to use the battery pack in the optimum condition to obtain longer operation time.To access the Important Tips:Double-click on the desktop.Alternatively click (Start) - [All Programs] - [Panasonic] - [On-Line Manuals] - [Important Tips].<Only for model with Bluetooth>Supplementary Instructions of “Bluetooth” To access the Supplementary Instructions of “Bluetooth”:Click (Start) - [All Programs] - [Panasonic] - [On-Line Manuals] - [Bluetooth Manual].NOTEWhen Adobe Reader update notice is displayed, we recommend you follow the on-screen procedure and update.See http://www.adobe.com/ for the latest version of Adobe Reader.ContentsRead Me FirstUsing the Touch PadUsing the TouchscreenDisplay RotationKey CombinationsBattery PowerCustomizing the Power SettingComputing on the RoadSleep or Hibernation FunctionsSecurity MeasuresPC CardsSD Memory CardMini Port ReplicatorExternal DisplayUSB DevicesModemLANDisabling/Enabling Wireless Com-municationWireless LANSetup UtilityLoupe UtilityDMI ViewerTroubleshooting (Advanced)Check the Computer’s Usage Sta-tusProtecting Your Computer from VirusesUpdate Windows to its Latest Ver-sionTechnical Information](https://usermanual.wiki/Panasonic-of-North-America/9TGCF-TW72.Final-User-Manual-for-CF-T7/User-Guide-864362-Page-20.png)
![22Handling and MaintenanceGetting StartedUseful InformationTroubleshootingAppendixComputrace® SoftwareComputrace® software tracks your stolen computer.Perform the following steps before installing Computrace® software.Computrace® software is not included or installed in this computer.CAUTIONYou will be unable to set [Computrace (R) BIOS Module] to [Disable] once you have set to [Enable]. Do not change the setting when not used.• Even if you have set [Computrace (R) BIOS Module] to [Enable], this setting may return to [Disable] after repairs to the motherboard, etc. have been made. NOTEConsult Absolute Software Corp. before disposal.Refer to the following URL for Computrace® software for installation and available service regions. Note that this service is only available in certain regions. http://www.absolute.com1 Turn on or restart the computer, and press F2 while [Panasonic] boot screen is dis-played.The Setup Utility starts up.If the password is requested, enter the Supervisor Password.2 Select the [Security] menu, then select [Computrace (R) Sub-Menu] and press Enter.3 Select [Computrace (R) BIOS Module], and set to [Enable].4 At the confirmation message, select [Execute] and press Enter.5 At the reconfirmation message, select [Execute] and press Enter.6 Press F10.At the confirmation message, select [Yes] and press Enter.The computer restarts.To clean display (LCD)Use the soft cloth included with the computer (For more information, refer to “Suggestions About Cleaning the LCD Sur-face” that comes with the soft cloth.)Cleaning the display while the power is on may cause the computer to malfunction. Also, dirt on the touchscreen is eas-ier to see when the computer is powered off, and so is easier to clean.To clean the touch padWipe lightly with a gauze or other dry, soft cloth.To clean areas other than the LCD panel and touch padWet a soft cloth with water or a diluted kitchen cleanser (neutral), wring the cloth out thoroughly, and wipe the dirty area gently. Using a detergent other than a neutral kitchen cleanser (e.g., a weak alkali cleanser) may adversely affect painted surfaces.CAUTIONDo not use benzene, thinner, or rubbing alcohol since it may adversely affect the surface causing discoloration, etc. Do not use commercially-available household cleaners and cosmetics, as they may contain components harmful to the surface.Do not apply water or detergent directly to the computer, since liquid may enter inside of the computer and cause malfunction or damage.Maintenance](https://usermanual.wiki/Panasonic-of-North-America/9TGCF-TW72.Final-User-Manual-for-CF-T7/User-Guide-864362-Page-22.png)
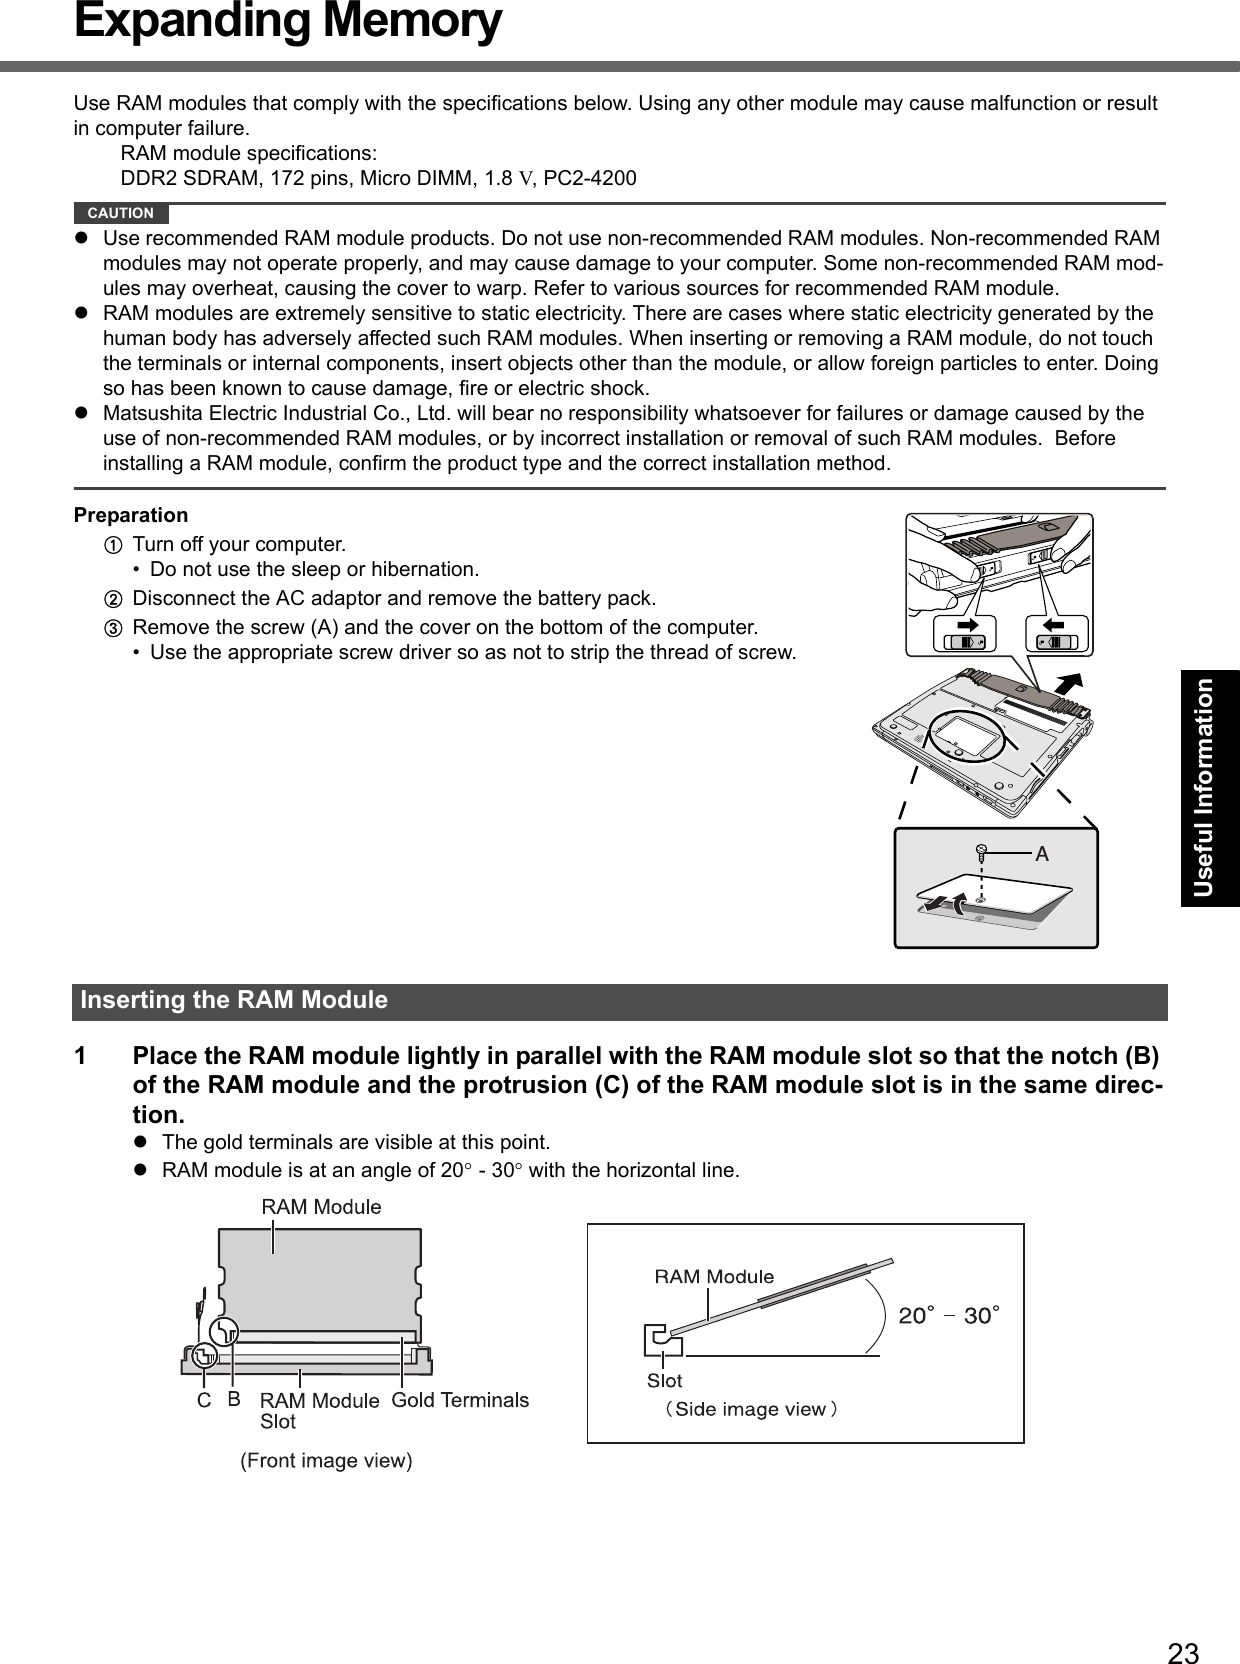
![24Expanding MemoryGetting StartedUseful InformationTroubleshootingAppendix2 Insert the RAM module parallel to the slot firmly until the gold terminals are invisible.If it is hard to insert the RAM module, do not try forcibly but check the module’s direction.3 Press the RAM module down until the right and left hooks (D) lock into place.When pressing down the module, the right and left hooks will open slightly and will return after locking.If it is hard to press down the RAM module, do not try forcibly but check the module’s direction.4 Set the cover and battery pack back.NOTEIf the RAM module is recognized correctly, the total size of this computer’s memory and RAM module memory is dis-played on the [Information] menu of the Setup Utility.If the RAM module is not recognized, turn off the computer and insert it again.1 Carefully open the left and right hooks (E).The RAM module will be raised.2 Carefully remove the RAM module from the slot.3 Set the cover and battery pack back.Removing the RAM Module](https://usermanual.wiki/Panasonic-of-North-America/9TGCF-TW72.Final-User-Manual-for-CF-T7/User-Guide-864362-Page-24.png)
![25Getting StartedUseful InformationTroubleshootingAppendixHard Disk Backup/Restore Function[Backup and Restore Center] and [System Recovery Options] allow you create a backup of the entire hard disk data, which can be used to recover from hardware failure.To create a backup of the entire hard disk to another storage media (e.g., external hard disk): Use [Back up computer].To create a backup of a file or a folder: Use [Back up files].For further information, click (Start) - [Control Panel] - [Back up your computer].NOTEConnect the AC adaptor and do not remove it until backup is complete.NOTEThis function does not work when you turn on the computer for the first time or just after you reinstall Windows. Start and shut down Windows Vista, and then you can use the function.Connect the AC adaptor and do not remove it until restoration is complete.1 Turn on the computer, and when [Panasonic] boot screen disappears, press and hold F8.If [Enter Password] is displayed during the following procedure, input the Supervisor Password or the User Password.2 Release your finger when [Advanced Boot Options] is displayed.3 Press to select [Repair Your Computer] and press Enter.[System Recovery Options] appears.4 Select the keyboard layout and click [Next].5 Select [User name] and input [Password], then click [OK].6 Click [Windows Complete PC Restore] and follow the on-screen instructions.NOTEIf pressing F8 does not display [System Recovery Options], use the Product Recovery DVD-ROM.APerform the steps 1 to 6 of “Reinstalling Software” (page 27).BClick [Run “System Recovery Options”.] and click [Next].CFollow the on-screen instructions.Matsushita Electric Industrial Co., Ltd. will bear no responsibility for any damage suffered (including loss of data) as a result of the use of this function.Creating a backup of the hard disk dataRestoring the hard disk data](https://usermanual.wiki/Panasonic-of-North-America/9TGCF-TW72.Final-User-Manual-for-CF-T7/User-Guide-864362-Page-25.png)
![26Getting StartedUseful InformationTroubleshootingAppendixHard Disk Data Erase UtilityWhen disposing the computer or transferring the ownership, erase all hard disk data in order to avoid data leakage. Even if you erase the data or initialize the hard disk using normal Windows commands, the data can be read with some special software. Use the hard disk data erase utility to erase the data completely.Note that transferring of the ownership without uninstalling the commercial software will be a violation of the software’s license agreement.NOTEThis utility cannot erase data for specific partitions. The entire hard disk data including the data of the recovery parti-tion will be erased.PreparationPrepare the Product Recovery DVD-ROM (included).Prepare the Panasonic CD/DVD drive (optional): CF-VDRRT1M, CF-VDRRT2W, CF-VDRRT3W.Remove all peripherals (except for the CD/DVD drive).Connect the AC adaptor and do not remove it until hard disk data erase is complete.1 Turn off the computer and connect the CD/DVD drive to the computer.2 Turn on the computer, and press F2 while [Panasonic] boot screen is displayed. The Setup Utility starts up.If the password is requested, enter the Supervisor Password.3 Press F9.At the confirmation message, select [Yes] and press Enter.4 Select the [Boot] menu, then select [USB CDD] and press F6 until [USB CDD] is at the top of [Boot priority order].5 Set the Product Recovery DVD-ROM into the CD/DVD drive.6 Press F10.At the confirmation message, select [Yes] and press Enter.The computer will restart.If [Enter Password] is displayed during the following procedures, input the Supervisor Password or the User Password.7 Click [Erase the whole data on the Hard Disk for security] and click [Next].8 At the confirmation message, click [YES].9 Click [Continue].10 Click [Continue] again.11 Click [YES].Erasing the hard disk data starts.12 After erasing is completed, remove the Product Recovery DVD-ROM and click [OK].The hard disk data erase utility erases data using an overwriting method, but there is a possibility that due to malfunc-tions or other operational errors, data may not be completely erased. There are also specialized devices that may be able to read data that has been erased using this method. If you need to erase highly confidential data, we recom-mend that you contact a company that specializes in this process. Matsushita Electric Industrial Co., Ltd. will bear no responsibility for losses or damages suffered as a result of the use of this utility.](https://usermanual.wiki/Panasonic-of-North-America/9TGCF-TW72.Final-User-Manual-for-CF-T7/User-Guide-864362-Page-26.png)
![27Getting StartedUseful InformationTroubleshootingAppendixReinstalling SoftwareCAUTIONDo not delete the recovery partition on the hard disk.This partition contains data to help recover your system.The disk space in the partition is not available to store data.PreparationPrepare the Product Recovery DVD-ROM (included).Prepare the Panasonic CD/DVD drive (optional): CF-VDRRT1M, CF-VDRRT2W, CF-VDRRT3W.Remove all peripherals (except for the CD/DVD drive).Connect the AC adaptor and do not remove it until reinstallation is complete.1 Turn off the computer and connect the CD/DVD drive to the computer.2 Turn on the computer, and press F2 while [Panasonic] boot screen is displayed.The Setup Utility starts up.If the password is requested, enter the Supervisor Password.3 Write down all of the contents of the Setup Utility and press F9.At the confirmation message, select [Yes] and press Enter.4 Select the [Boot] menu, then select [USB CDD] and press F6 until [USB CDD] is at the top of [Boot priority order].5 Set the Product Recovery DVD-ROM into the CD/DVD drive.6 Press F10.At the confirmation message, select [Yes] and press Enter.The computer will restart.7 Click [Reinstall Windows] and click [Next].The License Agreement screen appears.8 Click [Yes, I agree to the provisions above and wish to continue!] and click [Next].9 Select the settings and click [Next].[Reinstall Windows to the whole Hard Disk to factory default.] : You will have a single partition.[Reinstall Windows to the operating system partition.] : You can keep the partition structure.10 At the confirmation message, click [YES].Reinstallation starts automatically. (It will take approximately 30 minutes.)Do not interrupt reinstallation, for example by turning off the computer or pressing Ctrl + Alt + Del. Other-wise reinstallation may become unavailable as Windows may not start up or the data may be corrupted.11 Remove the Product Recovery DVD-ROM, and then click [OK] to turn off the computer, then remove the CD/DVD drive.12 Turn on the computer, and press F2 while [Panasonic] boot screen is displayed.The Setup Utility starts up.If the password is requested, enter the Supervisor Password.13 Press F9.At the confirmation message, select [Yes] and then press Enter.The Setup Utility settings excluding the password(s) will return to the default values.14 Press F10.At the confirmation message, select [Yes] and press Enter.The Setup Utility will close, and the computer will restart.15 Perform the first-time operation (page 14).16 Start the Setup Utility and change the settings as necessary.17 Perform Windows Update.Reinstalling software will return the computer to the default condition. When you reinstall the software, the hard disk data will be erased.Back up important data to other media or an external hard disk before reinstallation.Area usable by WindowsHard disk Recovery partition(approximately 2 GB)](https://usermanual.wiki/Panasonic-of-North-America/9TGCF-TW72.Final-User-Manual-for-CF-T7/User-Guide-864362-Page-27.png)
![28Getting StartedUseful InformationTroubleshootingAppendixTroubleshooting (Basic)/Error Code/MessageFollow the instructions below when a problem has occurred. There is also an advanced troubleshooting guide in the “Reference Manual”. For a software problem, refer to the software’s instruction manual. If the problem persists, contact your technical support office. You can also check the computer’s status in the PC Information Viewer ( Reference Manual “Check the Computer’s Usage Status”).Troubleshooting (Basic)Starting Up and Sleep and Hibernation ModeThe computer does not power on/The power indicator or bat-tery indicator is not lit.Connect the AC adaptor.Insert a fully charged battery.Remove the battery pack and the AC adaptor, then connect them again. If an additional RAM module has been inserted, remove the RAM module and check to see if the RAM module is the recommended one. (page 23)When the CPU temperature is high, the computer may not start up to prevent overheating of the CPU. Wait until the computer cools down, and then turn the power on again. If the com-puter does not power on even after cooling down, contact your technical support office.Windows does not start up. When Windows does not start when resuming from hibernation, set the Product Recov-ery DVD-ROM and display [System Recovery Options] (page 25), and run [Startup Repair]. If the problem persists, perform reinstallation with the Product Recovery DVD-ROM.Remove all peripheral devices.• If a device is connected to the USB port, disconnect the device or set [Legacy USB Support] to [Disable] in the [Advanced] menu of the Setup Utility.If an additional RAM module has been inserted, remove the RAM module and check to see if the RAM module is the recommended one. (page 23)If the power indicator is lit, slide the power switch for four seconds or longer to turn off, then turn on again.Using the following procedure, start up in Safe Mode, and check the error details.ATurn on the computer, and when the [Panasonic] boot screen disappears (after enter-ing the password*1 if one is set) hold down F8.BRelease your finger when [Advanced Boot Options] is displayed, and with or , select [Safe Mode], then press Enter.Follow the on-screen instructions.*1 Supervisor Password or User Password set with the Setup UtilityPress F9 in the Setup Utility (page 31 “To start the Setup Utility”) to return the Setup Utility settings (excluding the passwords) to the default values. Start the Setup Utility and make the settings again.There is a beep sound, and either “Extended RAM Mod-ule Failed” or “Standard RAM Failed” appears.If “Extended RAM Module Failed” appears, the RAM module is not correctly inserted. Turn off the computer, check that the RAM module is a recommended module, then insert it correctly.If “Standard RAM Failed” appears, contact your technical support office.Cannot boot from optional CD/DVD drive.Make sure that the bootable CD/DVD is set properly.Start the Setup Utility, and confirm the following settings.• [USB Port] and [Legacy USB Support] are set to [Enable] in the [Advanced] menu.• [USB CDD] is the first device shown in [Boot priority order] in the [Boot] menu.You have forgotten the password.Supervisor Password or User Password: Contact your technical support office.Administrator password: • If you have another account with Administrator authority, log-on with it, then delete the password for the problem account.• If you have a password reset disk, click [Reset password] displayed after the password input error, then follow the on-screen instructions to set a new password.If you cannot do either of the above, you will need to reinstall (page 27) and setup Windows.“Remove disks or other media. Press any key to restart” or a similar mes-sage appears.A floppy disk is in the floppy disk drive and it does not contain system startup informa-tion. Remove the floppy disk and press any key.This message may appear with some devices connected to the USB port. Remove the device or set [Legacy USB Support] to [Disable] in the [Advanced] menu of the Setup Utility.If the problem persists after removing the disk, it may be a hard disk failure. Perform the rein-stallation and return the hard disk to its condition at the time of purchase. (page 27) If the problem persists even after the reinstallation, contact your technical support office.[Executing Battery Recali-bration] screen appears.The Battery Recalibration was canceled before Windows was shut down last time. To start up Windows, turn off the computer by the power switch, and then turn on.](https://usermanual.wiki/Panasonic-of-North-America/9TGCF-TW72.Final-User-Manual-for-CF-T7/User-Guide-864362-Page-28.png)
![29Getting StartedUseful InformationTroubleshootingAppendixThe computer will not auto-matically enter sleep/hiber-nation.If you connect to a network using wireless LAN function, perform access point settings. ( Reference Manual “Wireless LAN”)If you do not use wireless LAN function, turn off wireless LAN function. ( Refer-ence Manual “Wireless LAN”)Make sure that you are not using any software that regularly accesses the hard disk.When logging on (e.g., resuming the computer), audio is distorted.Perform the following steps to change the audio settings to prevent audio output.ARight-click the desktop and click [Personalize] - [Sounds].BRemove the check mark from [Play Windows Startup sound], and click [OK].Cannot resume. One of the following operations may have been carried out.• In sleep mode, the AC adaptor or battery pack was disconnected, or a peripheral was connected or disconnected.• The power switch was slid for four seconds or longer to forcibly turn off the computer.Slide the power switch to turn on the computer. Data not saved will be lost.Other startup problems. Check to see if there was a disk error.ARemove all peripheral devices including an external display.BClick (Start) - [Computer] and right-click [Local Disk (C:)], and click [Properties].CClick [Tools] - [Check Now].• A standard user needs to enter an administrator password.DSelect the option in [Check disk options] and click [Start].Start the computer in Safe Mode and check the error details. (page 28 “Windows does not start up”)Shutting DownWindows does not shut down.Remove all peripheral devices.Wait one or two minutes. It is not a malfunction.PasswordEven after entering the password, a message appears requesting to type it again.If lights up, press NumLk to disable the ten-key mode, and then input.If lights up, press Caps Lock to disable the Caps Lock mode, and then input.DisplayNo display. The external display is selected. Press Fn + F3 to switch the display. Wait until the dis-play has been switched completely before pressing Fn + F3 again.When using an external display,• Check the cable connection.• Turn on the display.• Check the settings of external display.The display is turned off by the power-saving function. To resume, do not press the direct selection keys, but press any other key like Ctrl.The computer entered sleep or hibernation by the power-saving function. To resume, slide the power switch.The screen may become darker. Press Fn + F2 to make the screen brighter.The screen is disordered. Changing the number of display colors and resolution may affect the screen. Restart the computer.Connecting/disconnecting an external display may affect the screen. Restart the com-puter.The external display does not work normally.If the external display does not support the power saving function, it may not work nor-mally when the computer enters the power saving mode. Turn off the external display.The sidebar gadgets are not correctly displayed.Log off and log on Windows, and display the sidebar again.BatteryThe battery indicator is lights red.The battery level is very low (the charge is approx. 9% or less).Connect the AC adaptor. You can use the computer when the indicator light is orange. If you do not have an AC adaptor, save your data and power off your computer. After replacing the battery pack with a fully charged one, turn your computer on again.Starting Up and Sleep and Hibernation Mode](https://usermanual.wiki/Panasonic-of-North-America/9TGCF-TW72.Final-User-Manual-for-CF-T7/User-Guide-864362-Page-29.png)
![30Troubleshooting (Basic)/Error Code/MessageGetting StartedUseful InformationTroubleshootingAppendixThe battery indicator is blinking.If blinking red:Quickly save your data and power off your computer. Remove the battery pack and dis-connect the AC adaptor, then connect them again. If the problem persists, contact your technical support office. The battery pack or charging circuit may be defective.If blinking orange:• Battery cannot be recharged temporarily because the internal temperature of the bat-tery pack is outside the acceptable temperature range for recharging. Your computer can be used normally in this state. Once the range requirement is satisfied, charging begins automatically.• Software applications and peripheral devices (USB devices, etc.) are consuming too much power. Exit the software applications currently running. Once the range require-ment is satisfied, charging begins automatically.The battery indicator is flashing.The battery is recharging. If [Battery Charging Indicator] in [Main] menu of the Setup Utility is set to [Flashing], the indicator will alternately become lighter and darker.Touch Pad / TouchscreenThe cursor does not work. When using the external mouse, connect it correctly.Restart the computer by using the keyboard. Press and press three times, and press to select [Restart] and press Enter.If the computer does not respond to keyboard commands, read “No response” (below).Cannot input using the touch pad.Set [Touch Pad] to [Enable] in the [Main] menu of the Setup Utility.The drivers for some mice may disable the touch pad. Check your mouse’s operating instructions.Cannot input using the touchscreen.When mouse drivers are installed (i.e. IntelliMouse), the touchscreen does not work. Reinstall the touchscreen driver.Cannot point the correct posi-tion using the included stylus.Perform the touchscreen calibration (page 15).Reference ManualThe Reference Manual is not displayed.Install Adobe Reader. ALog on to Windows as an administrator.BClick (Start) and input “c:\util\reader\AdbeRdr70_enu_full.exe” in [Start Search] then press Enter.CUpdate Adobe Reader to its latest version.If your computer is connected to the internet, start up Adobe Reader and click [Help] - [Check for updates now].Others[System Restore] does not appear by pressing F8.The restoration program does not run after Windows Anytime Upgrade is executed.For further information, access the following web site:https://eww.pavc.panasonic.co.jp/pc/itn/support/vistainfo.htmlNo response. Press Ctrl+Shift+Esc to open Task Manager and close the software application that is not responding.An input screen (e.g., password input screen at startup) may be hidden behind another window. Press Alt+Tab to check.Slide the switch for four seconds or longer to shut down the computer, and then slide the power switch to turn it on. If the application program does not work normally, uninstall and reinstall the program. To uninstall, click (Start) - [Control Panel] - [Uninstall a program].The PC information viewer startup is slow.It may take a minute or longer to start up depending on the network environment.Battery](https://usermanual.wiki/Panasonic-of-North-America/9TGCF-TW72.Final-User-Manual-for-CF-T7/User-Guide-864362-Page-30.png)
![31Getting StartedUseful InformationTroubleshootingAppendixFollow the instructions below when an error code or message appears. If the problem persists or if the error code/mes-sage displayed is not shown here, contact your technical support office.To start the Setup UtilityARestart the computer.BPress F2 while [Panasonic] boot screen is displayed.Error Code/MessageError Code/Message Solution0211 Keyboard error Disconnect external keyboard.0251 System CMOS checksum bad - Default configuration usedAn error has occurred in the memory of Setup Utility settings. This occurs when the memory con-tent is changed by an unexpected program operation, etc. Start the Setup Utility and return the settings to the default values, and then change the set-tings as necessary.If the problem persists, the internal clock battery may need to be replaced. Contact your tech-nical support office.0271 Check date and time settings The date and time settings are not correct.Start the Setup Utility and set the correct date and time.If the problem persists, the internal clock battery may need to be replaced. Contact your tech-nical support office.0280 Previous boot incomplete - Default configuration usedStartup has failed repeatedly, so the Setup Utility settings have been returned to the default val-ues to startup the computer.Start the Setup Utility and return the settings to the default values, and then change the set-tings as necessary.Press <F2> to Setup Write down the error details and press F2 to start the Setup Utility. Change the settings if necessary.Operating System not foundThe operating system is not installed in the floppy disk or the hard disk that you are going to boot from.If using a floppy disk, change the disk to the one you can use for boot.If using the hard disk, check if the hard disk is recognized in [Information] menu of the Setup Utility. If the hard disk is recognized, perform the reinstallation (page 27). If not, contact your technical support office.If a device is connected to the USB port, disconnect the device, or set [Legacy USB Support] to [Disable] in the [Advanced] menu of the Setup Utility.](https://usermanual.wiki/Panasonic-of-North-America/9TGCF-TW72.Final-User-Manual-for-CF-T7/User-Guide-864362-Page-31.png)
![32Getting StartedUseful InformationTroubleshootingAppendixHardware DiagnosticsIf the hardware installed in this computer is not operating properly, you can use the PC-Diagnostic Utility to determine whether or not there is a problem. If the utility discovers a problem in the hardware, contact your technical support office.Hardware below can be checked using this utility. (Software cannot be checked.)CPUMemoryHard DiskVideo ControllerSound*1ModemLANWireless LAN*2Bluetooth*3Wireless WAN*4USBPC Card ControllerSD Card ControllerKeyboardTouch PadTouchscreen*1 When the PC-Diagnostic Utility is running, a loud beep will sound, so do not use headphones at this time. (The beep will not sound if mute is using Windows.)*2 Only for model with wireless LAN*3 Only for model with Bluetooth*4 Only for model with wireless WANWhen the video diagnostic check is running, the display may be distorted, and when the audio diagnostic check is running, sounds may be generated from the speaker. These are not malfunctions. NOTEFor the hard disk only, you can select standard diagnostic check or extended diagnostic check.When the PC-Diagnostic Utility starts up, it will run the standard diagnostic check. We recommend that you use the touch pad for operations. When not using the touch pad, you can operate using the internal keyboard instead. If the touch pad does not operate properly, press Ctrl + Alt + Del to restart the computer, or slide the power switch to turn the power off, and then restart the PC-Diagnostic Utility. Run this utility using the default settings in the Setup Utility. If the Setup Utility or other settings will not allow a hardware to be executed, the hardware icon will be displayed in gray. 1 Connect the AC adaptor, and turn on the wireless switch. During the diagnostic check, do not remove the AC adaptor, or attach any peripheral devices.2Turn on or restart the computer, and press F2 while [Panasonic] boot screen is displayed.The Setup Utility starts up.If the password is requested, enter the Supervisor Password.If you are using the computer after changing the settings from the status at the time of purchase, we recom-mend that you make a note of the settings that are changed.Hardware that can be checked using the PC-Diagnostic UtilityRegarding the PC-Diagnostic UtilityOperations Touch pad operations Internal keyboard operationsSelect icon Place the cursor above the iconPress Space and then press ( (close) cannot be selected)Click the icon Tap or click (right click cannot be used) Press Space above the iconComplete the PC- Diagnos-tic Utility and then restart the computerClick (close) Press Ctrl + Alt + Del.Running the Diagnostic Check](https://usermanual.wiki/Panasonic-of-North-America/9TGCF-TW72.Final-User-Manual-for-CF-T7/User-Guide-864362-Page-32.png)
![33Getting StartedUseful InformationTroubleshootingAppendix3 Press F9.At the confirmation message, select [Yes] and press Enter.4 Press F10.At the confirmation message, select [Yes] and press Enter.The computer will restart.5 Press Ctrl + F7 while [Panasonic] boot screen is displayed.When the PC-Diagnostic Utility starts up, it will automatically begin the diagnostic check for all hardware components. If the password is requested, enter the password.The touch pad and the internal keyboard cannot be used until alternating blue and yellow colors are displayed on the left side of the hardware icon (A). By clicking the icon, you can execute the following operations:• : Start the diagnostic check from the beginning• : Stop the diagnostic check (You cannot restart the check partway through by clicking )• : Display help (click the screen or press Space to return to the original diagnostic check screen)You can check the status of the diagnostic check by the display color on the left side of the hardware icon (A). • Aqua: Not running diagnostic check• Alternating blue and yellow: Currently running diagnostic check. The interval of the alternating colors differs depending on the type of diagnostic check currently running. During memory diagnostic check, the display may freeze for a long period of time. Wait until the process is complete. • Green: No problems discovered• Red: Problems discoveredNOTEUsing the following procedure, you can run a diagnostic check on a specified hardware component, or run an extended diagnostic check on the hard disk (The extended diagnostic check is only for the hard disk). The extended diagnostic check is more detailed, and so requires a longer period of time to run.AClick to stop the diagnostic check.BClick the icon for the hardware that is not to be checked, so that the icon is displayed in gray (B). When running a check on the hard disk, clicking the icon once will turn on the extended diagnostic check (“FULL” (C) will be displayed below the icon); click again, and the icon will be displayed in gray. CClick to start the diagnostic check.6 When all the hardware has been checked, confirm the diagnostic check results. If the display is red and the message “Check Result TEST FAILED” is displayed, you can assume that there is a problem with the computer’s hardware. Confirm which hardware component is displayed as red, and contact your technical support office. If the display is green and the message “Check Result TEST PASSED” is displayed, the computer’s hardware is operating normally. Continue using the computer as it is. If the computer still does not operate properly, reinstall the software. (page 27)NOTEIf you run a memory diagnostic check after installing a new RAM module (sold separately) and the message “Check Result TEST FAILED” is displayed:Remove the additional RAM module and run the diagnostic check again. If the message “Check Result TEST FAILED” is still displayed, you can assume that there is a problem with the internal RAM module. 7 After the diagnostic check is complete, click (close), or press Ctrl + Alt + Del to restart the computer. AC](https://usermanual.wiki/Panasonic-of-North-America/9TGCF-TW72.Final-User-Manual-for-CF-T7/User-Guide-864362-Page-33.png)
![36Getting StartedUseful InformationTroubleshootingAppendixSpecificationsTo check CPU speed, memory size and the hard disk drive (HDD) size:Start the Setup Utility ( Reference Manual “Setup Utility”) and select [Information] menu.[CPU Speed]: CPU speed, [System Memory]: Memory size, [Primary Master]: Hard disk drive sizeMain SpecificationsModel No. CF-T7BWATZJMCPU/Secondary cache memory Intel® Core™ 2 Duo Processor Ultra Low Voltage U7500 (1.06 GHz, 2 MB*1 L2 cache, 533 MHz FSB)Chip Set Mobile Intel® GM 965 Express chip setMain Memory*2 1 GB*1, DDR2 SDRAM (2 GB*1 Max.)Video Memory UMA (251 MB*1 Max.)*3Hard Disk Drive 80 GB*4Approx. 2 GB*4 are used as a recovery partition. (Users cannot use this partition.)Display Method 12.1 XGA type (TFT) (1024 × 768 dots)Internal LCD 65,536/16,777,216 colors (1024 × 768 dots)*5External Display*6 65,536/16,777,216 colors (800 × 600 dots/1024 × 768 dots/1280 × 768 dots/1280 × 1024 dots/1400 × 1050 dots/1440 × 900 dots/1600 × 1200 dots)Simultaneous Display on LCD + Exter-nal Display*6 65,536/16,777,216 colors (800 × 600 dots, 1024 × 768 dots)*5Wireless LAN Intel® Wireless WiFi Link 4965 AGN *7 (page 37)Bluetooth*8 page 37LAN*9 IEEE 802.3 10Base-T, IEEE 802.3u 100Base-TX, IEEE 802.3ab 1000 Base-TModem Data: 56 kbps (V.92) FAX: 14.4 kbpsSound WAVE and MIDI playback, Intel® High Definition Audio subsystem support, Monaural Speaker (built in)Security Chip TPM (TCG V1.2 compliant)*10Card Slots PC Card Slot × 1, Type I or Type II, Allowable current 3.3 V: 400 mA, 5 V: 400 mASD Memory Card Slot*11 × 1RAM Module Slot × 1, DDR2 SDRAM, 200-pin, 1.8 V, SO-DIMM, PC2-4200 Compliant*12Interface USB Ports × 3 (USB2.0 × 3)*13 / Modem Port (RJ-11) / LAN Port (RJ-45) *9 /External Display Port: Mini Dsub 15-pin female / Microphone Jack*14: Miniature jack, 3.5 DIA / Headphone Jack: Miniature jack, 3.5 DIA / Mini Port Replicator connector: Dedicated 50-pin maleKeyboard/Pointing Device 83 keys/Touch Pad/Touchscreen (stylus (included) touch capable)Power Supply AC adaptor or Battery packAC Adaptor*15 Input: 100 V - 240 V AC, 50 Hz/60 Hz Output: 16 V DC, 3.75 ABattery Pack Li-ion 11.1 V, 5.8 AhOperating Time*16 • When using battery pack (CF-VZSU51W)Approx. 7 hours (Economy Mode (ECO) - Disable)• When using battery pack (CF-VZSU52W)Approx. ?? hours (Economy Mode (ECO) - Disable)Charging Time*17 • When using battery pack (CF-VZSU51W)Approx. 5 hours (Power off)/Approx. 6.5 hours (Power on)• When using battery pack (CF-VZSU52W)Approx. 4 hours (Power off)/Approx. 5 hours (Power on)0Power Consumption*18 Approx. 35 W*19 / Approx. 60 W (maximum when recharging in the ON state)Physical Dimensions (W × H × D)(excluding the stylus holder)• Including protrusion of the hand strap268 mm × 33.3 mm (at the front)/71.1 mm (at the rear) × 218 mm {10.6 " × 1.3 " /2.8 " × 8.6 "}• Excluding protrusion of the hand strap268 mm × 33.3 mm (at the front)/50.2 mm (at the rear) × 218 mm {10.6 " × 1.3 " /2.0 " × 8.6 "}Weight*20 Approx. 1465 g {3.3 lb.}](https://usermanual.wiki/Panasonic-of-North-America/9TGCF-TW72.Final-User-Manual-for-CF-T7/User-Guide-864362-Page-36.png)
![37Getting StartedUseful InformationTroubleshootingAppendix *1 1 MB = 1,048,576 bytes / 1 GB = 1,073,741,824 bytes*2 You can physically expand the memory up to 4 GB, but the total amount of usable memory available will be less depend-ing on the actual system configuration.*3 A segment of the main memory is allotted automatically depending on the computer’s operating status. The size of the Video Memory cannot be set by the user.*4 1 GB = 1,000,000,000 bytes. Your operating system or some application software will report as fewer GB.*5A 16,777,216 color display is achieved by using the dithering function. *6Display may be impossible using some connected external displays.*7 Only for model with wireless LAN. It does not correspond to IEEE802.11n.*8 Only for model with Bluetooth.*9 Some devices cannot be used depending on the port type.*10 For information on TPM, click (Start) and input “c:\util\drivers\tpm\README.pdf” in [Start Search], and press Enter, and refer to the Installation Manual of “Trusted Platform Module (TPM)”.*11 This slot is compatible with High-Speed Mode. Operation has been tested and confirmed using Panasonic SD/SDHC Memory Cards with a capacity of up to 8 GB.Operation on other SD equipment is not guaranteed.*12 Only a RAM module designed for DDR2 (PC2-4200) can be added (Panasonic : CF-BAK0512U, CF-BAK1024U).172 pin Micro DIMM used in CF-T5/CF-W5 series cannot be used.*13 Does not guarantee operation of all USB-compatible periph-erals.*14 Use a condenser-stereo microphone.*15 <Only for North America>The AC adaptor is compatible with power sources up to 240 V AC adaptor. This computer is supplied with a 125 V AC compatible AC cord.20-M-2-1*16Measured using MobileMark™ 2007 (LCD brightness : 60 cd/m2).Varies depending on the usage conditions, or when an optional device is attached. When Economy Mode (ECO) is enabled, the operating time becomes approximately 20 % shorter than when it is disabled.*17 Varies depending on the usage conditions, CPU speed, etc.It may take a long time to charge a fully discharged battery.*18 Approx. 0.7 W when the battery pack is fully charged (or not being charged) and the computer is off.*19 Rated power consumption.23-E-1*20 Average value. May differ depending on models.*21 Operations of this computer are not guaranteed except for the pre-installed OS.*22 Must be installed before use. *23 The Product Recovery DVD-ROM is required.*24 For startup methods, refer to “Hardware Diagnostics” (page 32). *25 These are speeds specified in IEEE802.11a+b+g standards. Actual speeds may differ.Environment Operation Temperature 5°C to 35°C {41°F to 95°F}Humidity 30% to 80% RH (No condensation)Storage Temperature -20°C to 60°C {-4°F to 140°F}Humidity 30% to 90% RH (No condensation)OS*21 Windows Vista® Business Doungrade on Windows XP is availablePre-installed Software*21Microsoft® Internet Explorer 7.0 / DirectX 10 /Microsoft® Windows® Media Player 11 / Microsoft® Windows® Movie Maker 6.0 / Microsoft® .NET Framework 3.0 / Adobe Reader / Loupe Utility / Touch Pad Utility / DMI Viewer / PC Information Viewer / PC Information Popup / Display Rotation Tool / Hotkey Settings / Power Saving Utility / Fan Control Utility / LAN Power Saving Utility / Intel® Matrix Storage Manager / Wireless Switch Utility / Wireless Connection Disable Utility*22 / Bluetooth Stack for Windows by TOSHIBA / Economy Mode (ECO) Setting Utility / Battery Recalibration Utility / Infineon TPM Professional Package V3.0*22Setup Utility / Hard Disk Data Erase Utility*23 / PC-Diagnostic Utility*24Wireless LAN <Only for model with wireless LAN>Data Transfer Rates IEEE802.11a: 54/48/36/24/18/12/9/6 Mbps (automatically switched)*25IEEE802.11b: 11/5.5/2/1 Mbps (automatically switched)*25IEEE802.11g: 54/48/36/24/18/12/9/6 Mbps (automatically switched)*25Standard Supported IEEE802.11a/IEEE802.11b/IEEE802.11gTransmission Method OFDM system, DS-SS systemWireless Channels Used IEEE802.11a: Channels 36/40/44/48/52/56/60/64/149/153/157/161/165IEEE802.11b/ IEEE802.11g: Channels 1 to 11RF Frequency Band IEEE802.11a: 5.18 - 5.32 GHz, 5.745 - 5.825 GHzIEEE802.11b/ IEEE802.11g: 2412 - 2462 MHzBluetooth™ <Only for model with Bluetooth>Bluetooth Version 2.0 + EDRTransmission Method FHSS systemWireless Channels Used Channels 1 to 79RF Frequency Band 2.402-2.48 GHz](https://usermanual.wiki/Panasonic-of-North-America/9TGCF-TW72.Final-User-Manual-for-CF-T7/User-Guide-864362-Page-37.png)