Panasonic of North America B21-R10003 Compact Stereo System with Bluetooth Transmitter User Manual
Panasonic Corporation of North America Compact Stereo System with Bluetooth Transmitter
UserManual.wiki
>
Panasonic of North America
>
B21 R10003 User Manual
User manual
Navigation menu
Upload a User Manual
Namespaces
Wiki Guide
HTML
PDF
Info
Views
User Manual
Discussion / Help
Navigation
![3The model number and serial number of this product can be found on eitherthe back or the bottom of the unit.Please note them in the space provided below and keep for future reference.MODEL NUMBERSERIAL NUMBERUser memo:DATE OF PURCHASEDEALER NAMEDEALER ADDRESSTELEPHONE NUMBERListening CautionSelecting fine audio equipment such as the unit youve just purchased isonly the start of your musical enjoyment. Now its time to consider how youcan maximize the fun and excitement your equipment offers. Thismanufacturer and the Electronic Industries Associations ConsumerElectronics Group want you to get the most out of your equipment byplaying it at a safe level. One that lets the sound come through loud andclear without annoying blaring or distortionand, most importantly, withoutaffecting your sensitive hearing.We recommend that you avoid prolonged exposure to excessive noise.Sound can be deceiving. Over time your hearing comfort level adapts tohigher volumes of sound. So what sounds normal can actually be loud andharmful to your hearing.Guard against this by setting your equipment at a safe level BEFORE yourhearing adapts.To establish a safe level:Start your volume control at a low setting.Slowly increase the sound until you can hear it comfortably and clearly,and without distortion.Once you have established a comfortable sound level:Leave it there.Taking a minute to do this now will help to prevent hearing damage or lossin the future. After all, we want you listening for a lifetime. (Inside of product) Product Identification Marking is located on bottom of the unit.Made for iPod and Made for iPhone mean that an electronic accessoryhas been designed to connect specifically to iPod, or iPhone, respectively,and has been certified by the developer to meet Apple performancestandards.Apple is not responsible for the operation of this device or its compliancewith safety and regulatory standards.Please note that the use of this accessory with iPod, or iPhone may affectwireless performance.iPhone, iPod, iPod classic, iPod nano, and iPod touch are trademarks ofApple Inc., registered in the U.S. and other countries.The Bluetooth word mark and logos are owned by the Bluetooth SIG, Inc.and any use of such marks by Panasonic Corporation is under license.Other trademarks and trade names are those of their respective owners.MPEG Layer-3 audio coding technology licensed from Fraunhofer IIS andThomson.-If you see this symbol-Information on Disposal in other Countries outside theEuropean UnionThis symbol is only valid in the European Union.If you wish to discard this product, pleasecontact your local authorities or dealer and askfor the correct method of disposal.About descriptions in this Owners ManualOperations in these instructions are described using remote control, but youcan do the operations with the main unit if the controls are the same.Your unit may not look exactly as illustrated.This Owners Manual is applicable to models SC-HC55 and SC-HC35.Unless otherwise indicated, illustrations in this Owners Manual are ofSC-HC55.[HC55] :indicates features applicable to SC-HC55 only.[HC35] :indicates features applicable to SC-HC35 only.Pages to be referred to are indicated as .[CD] :indicates CD-DA (except MP3).[MP3] :indicates MP3 files.](https://usermanual.wiki/Panasonic-of-North-America/B21-R10003/User-Guide-1407424-Page-3.png)
![4Unit and media carePull out the AC power plug from the outlet before maintenance.Clean this unit with a soft, dry clothNever use alcohol, paint thinner or benzine to clean this unit.Before using chemically treated cloth, carefully read theinstructions that came with the cloth.When dirt is heavy, wring the cloth moistened in water tightly towipe the dirt, and then wipe it with a dried cloth.Do not use tissues or other materials that can fall apart. Smallgrains may get stuck inside the speaker cover.Maintenance of the lensClean discsWipe with a damp cloth and then wipe dry.Disc handling precautionsHandle discs by the edges to avoid inadvertent scratches orfingerprints on the disc.Do not attach labels or stickers to discs.Do not use record cleaning sprays, benzine, thinner, staticelectricity prevention liquids or any other solvent.Do not use the following discs:Discs with exposed adhesive from removed stickers orlabels (rented discs etc.).Discs that are badly warped or cracked.Irregularly shaped discs, such as heart shapes.Accessories Table of contentsCheck the supplied accessories before using this unit. IMPORTANT SAFETY INSTRUCTIONS.................................2Listening Caution...................................................................3Accessories............................................................................4Unit and media care...............................................................4Connections ...........................................................................5Attaching the unit to a wall (optional)..................................6Control reference guide ........................................................8Opening/Closing the sliding door ........................................9Disc operations......................................................................9Sound adjustment................................................................10Radio operations..................................................................11Timer .....................................................................................11Listening to audio from iPod or iPhone.............................12[HC55] Using a Bluetooth compatible device.....................13Others ...................................................................................15Troubleshooting...................................................................15Specifications.......................................................................17Spanish Quick Reference/ Referencia rápida enespañolConexiones...........................................................................18Guía de referencia del mando a distancia .........................19Abrir/Cerrar la puerta deslizante ........................................20Operaciones con discos .....................................................20Operaciones con la radio....................................................21Ajuste de sonido ..................................................................22Sincronizador.......................................................................22Escuchar audio de un iPod o iPhone.................................23[HC55] Uso de un dispositivo compatible con Bluetooth..........24Limited Warranty (ONLY FOR U.S.A. AND PUERTO RICO)........26Limited Warranty (ONLY FOR CANADA)..................................271 Remote control([HC55] N2QAYB000643)([HC35] N2QAYB000641)1 FM indoor antenna(RSAX0002)1 Battery for remotecontrol1 AM loop antenna(N1DYYYY00010)1 AC power supply cord(K2CB2CB00021)Wall mounting accessories2 Safety holder screws(XYN4+8FJK)2 Wall mount brackets(RMQX1082-K)2 Safety holders(RGQ0634-K)2 Rear pads(RKA0252-K)(ONLY FOR CANADA)The enclosed Canadian French label sheet corresponds to theEnglish display on the top of the unit.Product numbers correct as of January 2011. These may be subject tochange.Do not use AC power supply cord with other equipment.Only for U.S.A. and Puerto Rico:To order accessories, refer to Accessory Purchases (United States andPuerto Rico) on page 26.For Canada: To order accessories, call the dealer from whom you madeyour purchase.The remote control informationInsert so the poles ( and ) match those in the remote control.Use alkaline or manganese batteries.Place this side in before the other side.Clean the lens regularly to prevent malfunctions. Use ablower to remove dust and a cotton swab if it is extremelydirty.You cannot use a CD type lens cleaner.Do not leave the sliding door open for prolonged periods oftime. This will cause the lens to get dirty.Be careful not to touch the lens with your fingers.LensDO DO NOT](https://usermanual.wiki/Panasonic-of-North-America/B21-R10003/User-Guide-1407424-Page-4.png)
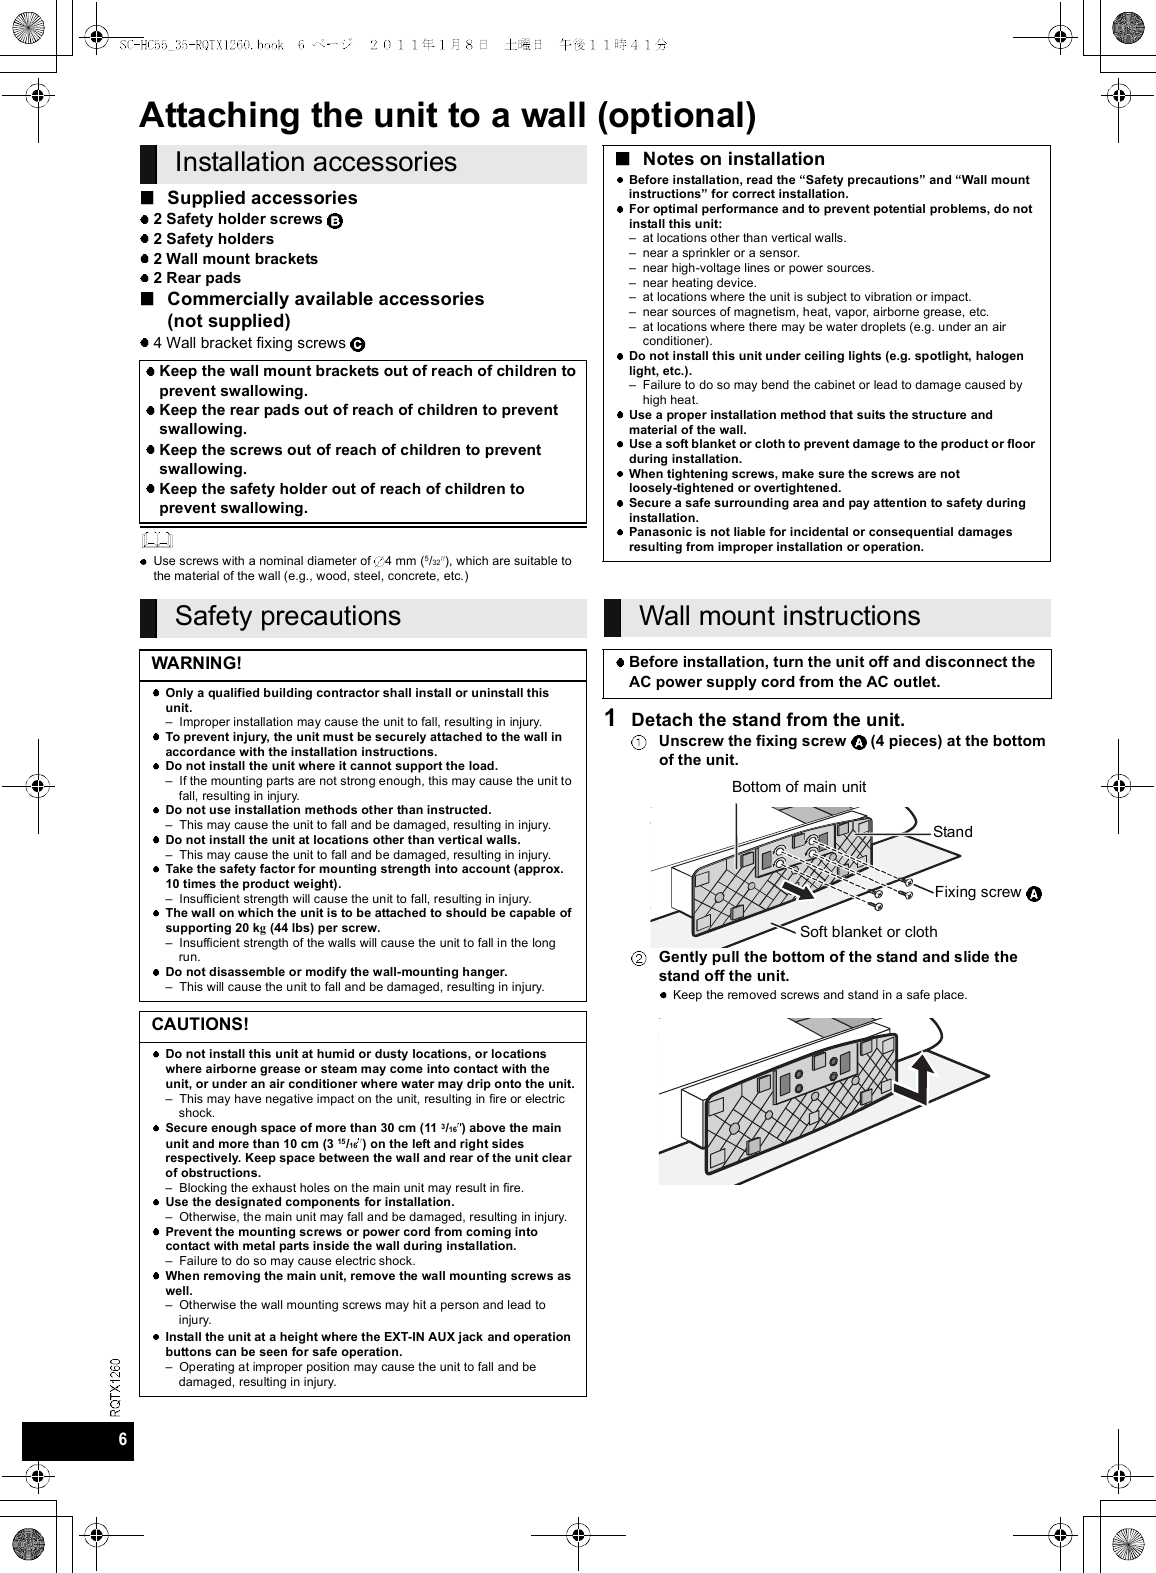
![5ConnectionsConnect the FM indoor antenna.Tape the antenna to a wall or column, in a position with theleast amount of interference.Connect the AM loop antenna.Keep the loop antenna cord away from other wires andcords.Stand the antenna up on its base until it clicks.AM loop antennaConnect the AC power supply cord.Connect the AC power supply cord after all otherconnections are complete.Turn the unit on after a few seconds.Open the EXT-IN AUX/Headphone cover to connectheadphones or external music devices (e.g. MP3 player).Push the projecting part to open the cover .Top ViewConnect the headphones (not supplied)To prevent hearing damage, avoid listening for prolonged periods of time.Excessive sound pressure from earphones and headphones cause hearingloss.Connect an external music device (for AUXmode)You can select the sound input level of the external device.Switch the equalizer off or turn the volume of the external device down toreduce the input signal. High level of input signal will distort the sound.For details, refer to the instruction manual of the other equipment.Cables and devices are not supplied.Notes on speakersThese speakers do not have magnetic shielding. Do not place them near atelevision, personal computer or other devices easily influenced bymagnetism.Basic ConnectionsBack ViewExhaust holesAdhesive tapeFM indoor antennaTo household AC outletPower consumption in standbymode:Approx. 0.05 WAdditional ConnectionsReduce the volume level and connect theheadphones.Plug type: 3.5 mm (1/8) stereoPlug the audio cable (not supplied) intothe EXT-IN AUX jack .Plug type: 3.5 mm (1/8) stereoPress [EXT-IN, RADIO] repeatedly toselect AUX and start playback on theconnected device.[HC55] Press [SOUND] repeatedly to select INPUTLEVEL.Press [ , ] to select HIGH or NORMAL.[HC35] Press [INPUT LEVEL] repeatedly to select HIGH orNORMAL.Projecting partEXT-IN AUX/Headphone cover](https://usermanual.wiki/Panasonic-of-North-America/B21-R10003/User-Guide-1407424-Page-5.png)
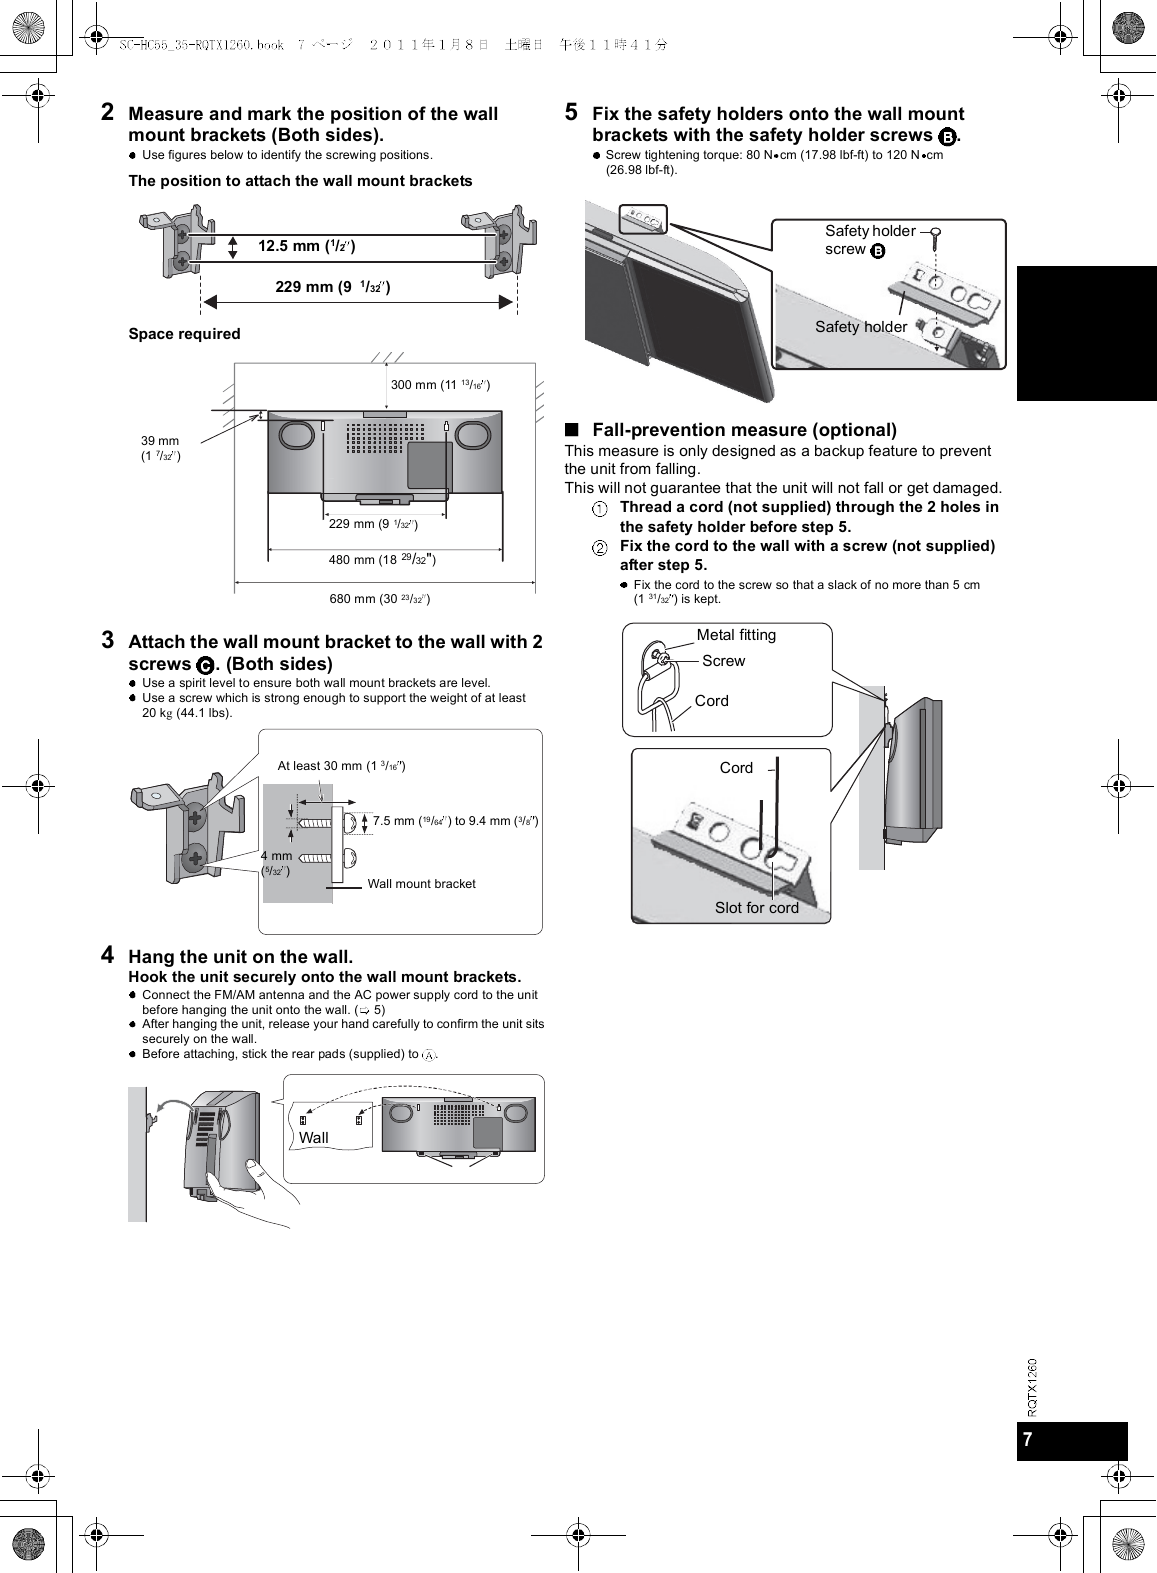
![8Control reference guideButtons such as function the same as the remote control.They can be used interchangeably.Top viewFront viewRemote controlMain unit[SLEEP] ( 11)Standby/on switch [ ],[POWER, /I] ( 9, 11,15)Press to switch the unit from on tostandby mode or vice versa.In standby mode, the unit is stillconsuming a small amount of power.Numeric buttons[1-9, 0, 10] ( 9, 10, 11,15)To select a 2-digitnumbere.g. 16: [ 10] [1] [6]To select a 3-digitnumbere.g. 226: [ 10] [ 10][2] [2] [6][DEL] ( 10)[HC55] [ , iPod] ( 12,13)[HC35] [iPod] ( 12)[CD] ( 9)[], [ ] ( 9, 10,11, 12, 13)[ / ] ( 9, 10, 12, 13)[HC55] [ ] ( 14)[], [ ] ( 9, 11, 12)[SOUND] ( 5, 9, 10)[D.BASS] ( 10)[PLAY MENU] ( 9, 10)[iPod MENU] ( 12)[HC55] [ MENU] ( 14)[ , , , ], [OK] ( 5,9, 10, 11, 12, 14)[DISPLAY] ( 9, 14)[DIMMER]Press and hold to dim the displaypanel. Press and hold again tocancel.[HC55] [OPEN/CLOSESENSOR] ( 9)[HC35] [INPUT LEVEL](5)[iPod ] ( 9)[iPod , OPEN/CLOSE][HC55] Sensor activityindicator*[P L AY, ] ( 11)[CLOCK/TIMER] ( 11)[PROGRAM] ( 10, 11)[+, VOL ,] VOLUME +] ( 14)Adjusts sound volume.[MUTE] ( 14)Mutes the sound. Press again tocancel. MUTE is also canceledwhen the volume is adjusted orthe unit is turned off.[EXT-IN, RADIO][RADIO/EXT-IN] ( 11,15)[] ( 9, 10, 12, 13)[HC55] [ ] ( 14)[PRESET EQ] ( 10)[RADIO MENU] ( 11)[AUTO OFF]This function allows you to turnthe unit off (except in radio mode)after the unit is left unused forabout 30 minutes.When the function is turned on,the A.OFF indicator light.[AUTO PRESET] ( 11)[CD ] ( 9)[CD , OPEN/CLOSE][HC55] Sensor activityindicator*Standby indicator[HC55] Open/Close sensor( 9)SpeakerDisplaySliding door[HC55] Microphone ( 14)[HC55] Bluetooth indicator(13)Remote control signalsensorDistance:Within approx. 7 m (23 ft) directlyin front.* The sensor activity indicator will lightwhen the Open/Close sensor isturned on.One of the indicators will flash whilethe sliding door is opening orclosing. ](https://usermanual.wiki/Panasonic-of-North-America/B21-R10003/User-Guide-1407424-Page-8.png)
![9Opening/Closing thesliding doorPreparationPress [ ] to turn the unit on.For disc operations:While the sliding door is closed, press [CD ]to open the sliding door.For iPod/iPhone operations:While the sliding door is closed, press [iPod ]to open the sliding door.Closing the sliding doorPress [CD ] or [iPod ] again.Keep fingers away from the sliding door when it is closing to avoid possibleminor injuries.Damage may occur if the sliding door is forced closed.Be careful of CD hitting the sliding door while being removed.The sliding door will not close if the docking switch lever is not returned to the original position.With this function the sliding door can be opened withoutpressing a button. The sliding door will open or close by movingyour hand over the sensor.For disc operations:While the sliding door is closed, move your handfrom to .To close the sliding door, move your hand from to .For iPod/iPhone operations:While the sliding door is closed, move your handfrom to .To close the sliding door, move your hand from to .To turn the Open/Close sensor offPress [OPEN/CLOSE SENSOR].Each time the button is pressed, the sensor is turned onON SENSOR) or off (OFF SENSOR).To add a sound effect when the sliding dooropens/closes (when the sensor is used.)Press [SOUND] repeatedly to select BUZZER.Press [ ] or [ ] to select the following setting.The open/close sensor might be unintentionally activated if an object, hand,part of your arm, pets or children move near the sensor.If the open/close sensor does not work or if the sensors reaction rangebecomes smaller, open/close the sliding door using the buttons on the unit orthe remote control.The disc operation side of the sliding door will not open during CD playbackor pause.Disc operations1Press [ ] to turn the unit on.2Open the sliding door. ( left)3With the label of the disc facingtowards you, tilt the disc into thedisc tray under the sliding door.4Place the disc onto the spindle inthe center and then push the discdown until it clicks into place.5Close the sliding door. ( left)Removing a discOpen the sliding door.Hold the center and the top right of the disc and pull the topright of the disc to unlock it from the spindle.Tilt the disc so as not to touch the sliding door or the lens andremove the disc.1Press [ ] to turn the unit on.2Insert the disc to be played ( above).3Press [CD].4Press [ /] to start play.After performing steps 1-3 in Basic play ( above)1Press [PLAY MENU] repeatedly to selectREPEAT.2Press [ , ] to select ON REPEAT and press[OK].3Press [ / ] to start play.To stop repeat play, select OFF REPEAT in step 2.Opening the sliding door[HC55] Open/Close sensorLOW: Set the sound effect level to low.MID: Set the sound effect level to medium.HIGH: Set the sound effect level to high.OFF: Turn the sound effect off.Inserting a discBasic playStop Press [ ].Pause Press [ / ]. Press again to resume play.Skip Press [ ] or [ ] to skip track.Press [ , ] to skip album. (MP3)Search [CD] Press and hold [ ] or [ ].Direct accessplay(Play starts fromthe track youselected.)[CD]:Press the numeric buttons to select thetrack.[MP3]:Press [ , ] to select the album.Press [ ] once and then thenumeric buttons to select the track.This function does not work duringrandom play or program play. (10)View contentsinformationPress [DISPLAY] repeatedly during playor pause.The current tracks information, etc. isdisplayed.Maximum number of displayable characters:approximately 30This unit supports ver. 1.0, 1.1 and 2.3 ID3 tags.Text data that is not supported will not bedisplayed or shown differently.Repeat play](https://usermanual.wiki/Panasonic-of-North-America/B21-R10003/User-Guide-1407424-Page-9.png)
![10Disc operations (Continued)After performing steps 1-3 in Basic play ( 9)1Press [PLAY MENU] repeatedly to select PLAYMODE.2Press [ , ] to select the following mode andpress [OK].3Press [ /] to start play.During random play, you cannot skip to the previous track.The current play mode is cleared when you open the sliding door.To repeat program play or selected play mode, select ON REPEAT in PLAYMENU. ( 9)Enables you to program up to 24 tracks.After performing steps 1-3 in Basic play ( 9)1Press [PROGRAM] during the stop mode.3Press [ /] to start play.The program memory is cleared when you open the sliding door.Sound adjustmentThe following sound effects can be added to the audio output.You may experience a reduction in sound quality when these effects are usedwith some sources. If this occurs, turn the sound effects off.Play mode function1-TRACK 1TR:Plays one selected track on the disc.1-ALBUM 1ALBUM:[MP3]Plays one selected album on the disc.Press [ , ] to select the album.RANDOM RND:Plays a disc randomly.1-ALBUMRANDOM 1ALBUM RND:[MP3]Plays all tracks in one selected albumrandomly.Press [ , ] to select the album.Program play2[CD]:Press the numeric buttons to select the track.To program more tracks, continue by pressing thenumeric buttons.[MP3]:Press [ , ] to select the album.Press [ ] once and then the numeric buttons toselect the track.Press [OK].To program more tracks, repeat steps - .Cancel programmodePress [PROGRAM] in the stop mode toclear PGM indicator from the display.Check programcontentsPress [ ] or [ ] when PGM isdisplayed in the stop mode.Delete lastprogrammed trackPress [DEL] in the stop mode.Clear allprogrammedtracksPress [ ] in the stop mode.Press [ ] again while blinkingCLR ALL.Notes on CD-R/CD-RWThis unit can play CD-R and CD-RW recorded with CD-DA or MP3.Use an audio recording disc for CD-DA and finalize* it when you finishrecording.* A process performed after recording that enables CD-R or CD-RWplayers to play audio CD-R and CD-RW.The unit may not be able to play some discs due to the condition of therecording.Do not use irregularly shaped CDs.Do not attach extra labels and stickers.Do not use CDs with labels and stickers that are coming off or withexcessive adhesive under the labels and stickers.Do not attach scratch-proof covers or any other kind of accessories.Do not write anything on the CDs.Do not clean CDs with liquids (Wipe with a soft and dried cloth).Note about using a DualDiscThe digital audio content side of a DualDisc does not meet the technicalspecifications of the Compact Disc Digital Audio (CD-DA) format so playmay not be possible.Do not use a DualDisc in this unit as it may not be possible to insert itcorrectly and it may get scratched or scraped.Creating MP3 files playable on this unitMaximum number of tracks and albums: 999 tracks and 254 albums(Excluding Root folder).Compatible compression rate: Between 64 kbps and 320 kbps (stereo).128 kbps (stereo) is recommended.Disc formats: ISO9660 level 1 and level 2 (except for extended formats).The time for reading TOC depends on the number of the tracks, foldersor folder structures.Limitations on MP3This unit is compatible with multi-sessions and it takes more time to startplaying.This unit cannot play files recorded using packet write.If the disc includes both MP3 and normal audio data (CD-DA), the unitplays the type recorded in the inner part of the disc. If the disc includesboth MP3 and other types of audio data (e.g. WMA or WAV), the unitplays only the MP3.Depending on how you create the MP3 files, they may not play in theorder you numbered them or may not play at all.Preset EQ Press [PRESET EQ] repeatedly to selectHEAVY, SOFT, CLEAR, VOCAL orFLAT.Bass or Treble Press [SOUND] repeatedly to selectBASS or TREBLE.Press [ , ] to adjust the level (-4 to+4).SurroundSoundPress [SOUND] repeatedly to selectSURROUND.Press [ , ] to selectON SURROUND.To cancel surround sound, selectOFF SURROUND in step .If interference in FM stereo receptionincreases, cancel the surround soundeffect.D.Bass Press [D.BASS] during play to selectON D.BASS or OFF D.BASS.](https://usermanual.wiki/Panasonic-of-North-America/B21-R10003/User-Guide-1407424-Page-10.png)
![11Radio operations1Press [EXT-IN, RADIO] repeatedly to selectFM or AM.2Press [ ] or [ ] to select the frequency ofthe required station.ST is displayed when a stereo FM broadcast is beingreceived.To tune automatically, press and hold [ ] or [ ] untilthe frequency starts changing rapidly.To cancel auto tuning, press [ ] or [ ] once again.Auto tuning may not function when there is excessiveinterference.To improve FM sound qualityPress [RADIO MENU] while receiving FM broadcasts.Press [ , ] to select FM MODE.Press [ , ] to select MONO.Select STEREO in Step to return to stereo broadcasts.MONO is canceled if the frequency is changed.To improve AM sound qualityPress [RADIO MENU] to select B.PROOF while receivingAM broadcasts.Press [ , ] to select the beat proof setting (BP 1 orBP 2) and press [OK].This setting is reset to BP 1 when changes are made (e.g. frequency ischanged).You can preset up to 30 FM channels and 15 AM channels.PreparationPress [EXT-IN, RADIO] repeatedly to select FM or AM.Automatic presettingPress [OK] to switch between the LOWEST andCURRENT frequency.Press [AUTO PRESET].PGM starts to flash and the tuner starts to preset all the stationsit can receive into the channels in ascending order.Manual presettingPress [ ] or [ ] to tune to the required station.Press [PROGRAM].While PGM is flashing, press the numeric buttons to selecta channel.The station occupying a channel is erased if another station is preset in thatchannel.To preset more stations, repeat steps - .Selecting a preset stationPress [ ] or [ ] to select the channel.Alternatively, press the numeric buttons to select the channel.This unit is factory-set to FM 0.2 MHz and AM 10 kHz, but youcan change it to receive broadcasts allocated in FM 0.1 MHz orAM 9 kHz steps.Press [EXT-IN, RADIO] to select FM.Select AM to change the AM frequency stepsPress and hold [RADIO/EXT-IN] on the main unit.After a few seconds the display changes to display currentminimum frequency.Continue to hold down [RADIO/EXT-IN] on the main unit.When the minimum frequency changes, release the button.To return to the original step, repeat steps - .After the setting is changed, any previously preset frequency will be cleared.TimerThis is a 12-hour clock.1Press [CLOCK/TIMER] to select CLOCK.2Within 10 seconds, press [ ,] to set thetime.3Press [OK].To display the clock, press [CLOCK/TIMER].Reset the clock regularly to maintain accuracy.You can set the timer to come on at a certain time to wake you up.This unit offers 3 optional play timers.PreparationTurn the unit on and set the clock ( above).Prepare the music source (disc, radio, iPod/iPhone or AUX)and set the volume.1Press [CLOCK/TIMER] repeatedly to selectPLAY 1, PLAY 2 or PLAY 3.2Within 10 seconds, press [ , ] to set thestarting time.3Press [OK].4Set the finishing time by repeating steps 2 and3.To activate the timer5Press [PLAY, ] repeatedly to set the desiredplay timer on.6Press [ ] to turn the unit off.The timer will start at the preset time, with the volume increasing gradually tothe preset level.The sleep timer can turn the unit off after a set time.Press [SLEEP] to turn the sleep function on or off.30MIN 60MIN 90MIN 120MINOFF (Cancel)Press [SLEEP] once to check the remaining time.The play timer and sleep timer can be used together. The sleep timer alwayshas the priority. Be sure not to overlap the timer settings.When AUTO OFF is ON and the unit is left unused for about 30 minutes,the unit will shut down even if the play time or sleep time has not expired.Manual tuningMemory presetFM/AM frequency stepSetting the clockPlay timerCheck the settings(When the unit ison or in standbymode)Press [CLOCK/TIMER] twice.(The setting is displayed.)Cancel Press [PLAY, ] twice to clear the timerindicator from the display.Sleep timer](https://usermanual.wiki/Panasonic-of-North-America/B21-R10003/User-Guide-1407424-Page-11.png)
![12Listening to audio fromiPod or iPhoneInserting an iPod/iPhone1Open the sliding door. ( 9)2Insert the suitable dock adapter (not supplied)for the iPod/iPhone.Insert the side of the iPod/iPhone dock adapter with theclips facing towards you first and then push the oppositeside until it clicks into place.3Press [ ] to unlock theiPod/iPhone dock and thenpull the docking switchlever to tilt the iPod/iPhonedock.4Connect the iPod/iPhone(not supplied) firmly.Be sure to remove the iPod/iPhone from its case.5Push the docking switchlever back until it clicks intoplace.6Close the sliding door. ( 9)Removing an iPod/iPhoneRepeat step 1 and 3 ( above).To remove, simply pull the iPod/iPhone straight out.Repeat step 5 and 6 ( above).If the iPod/iPhone dock is not tilted when connecting or disconnecting theiPod/iPhone, it may cause damage to the connector.Be sure to use a dock adapter that is compatible with your iPod/iPhone.To purchase a dock adapter, consult your iPod/iPhone dealer.Reduce the volume of the main unit to minimum before connecting ordisconnecting the iPod/iPhone.PreparationPress [iPod] ([HC55]: [ , iPod]) repeatedly to select IPOD.The operations may vary or not work depending on the iPod/iPhone models.Compatible iPod/iPhone (as of January 2011)Compatibility depends on the software version of your iPod/iPhone.Depending on the model, it may be necessary to remove the iPod/iPhone andselect the album, artist, etc. on the iPod/iPhone.Notes on iPhone:All phone features can only be controlled by the iPhones touch screen.The unit does not display incoming calls or the phone status (Connect iPhoneto this unit via Bluetooth to enjoy extended capabilities).The ringtone of incoming call can be heard from the iPhones speaker.When the unit is in iPod/iPhone mode, the ringtone can also be heard fromthe units speakers (Connect iPhone to this unit via Bluetooth to enjoyextended capabilities).Connecting or disconnecting the iPhone from the unit will not cancel a call.There is no Apple Inc. specification that will guarantee the iPhone responsesabove. iPhone responses may vary on new iPhone models or iPhone newsoftware updates.Charging the iPod/iPhoneWhen iPod/iPhone is being charged in standby mode, IPODCHARGING is shown on the main units display.Check iPod/iPhone to see if the battery is fully charged. If youare not using iPod/iPhone for an extended period of time afterrecharging has completed, disconnect it from the main unit asthe battery will be depleted naturally. (Once fully recharged,additional recharging will not occur.)This unit can output internet radio if vTuner for Panasonic isinstalled on your iPhone/iPod touch.Visit the below website for the following information aboutvTuner for Panasonic:http://radio.vtuner.com/panasonic/en/(Compatible iPhone/iPod touch models and software versions,purchasing, installation and operation details.)PreparationInstall vTuner for Panasonic to your iPhone/iPod touch.1Insert the iPhone/iPod touch to this unit.2Press [ , iPod] repeatedly to select INTERNETRADIO.vTuner for Panasonic starts.Inserting/Removing an iPod/iPhoneClipsDock adapteriPod/iPhone dockingswitch leverConnectoriPod operationsPlay Press [ / ].Pause Press [ / ] or [ ]. Press again toresume play.Skip track Press [ ] or [ ].Search the current track Press and hold [ ] or [ ].Display iPod/iPhonemenu/return to previousmenuPress [iPod MENU] in the playmode. (Remote control only)Select contents fromiPod/iPhone menuPress [ , ] and then [OK].(Remote control only)Click!Click!Name Memory sizeiPod touch 4rd generation 8 GB, 32 GB, 64 GBiPod nano 6th generation 8 GB, 16 GBiPod touch 3rd generation 32 GB, 64 GBiPod nano 5th generation (video camera) 8 GB, 16 GBiPod touch 2nd generation 8 GB, 16 GB, 32 GBiPod classic 120 GB, 160 GB (2009)iPod nano 4th generation (video) 8 GB, 16 GBiPod classic 160 GB (2007)iPod touch 1st generation 8 GB, 16 GB, 32 GBiPod nano 3rd generation (video) 4 GB, 8 GBiPod classic 80 GBiPod nano 2nd generation (aluminum) 2 GB, 4 GB, 8 GBiPod 5th generation (video) 60 GB, 80 GBiPod 5th generation (video) 30 GBiPod nano 1st generation 1 GB, 2 GB, 4 GBiPhone 4 16 GB, 32 GBiPhone 3GS 8 GB, 16 GB, 32 GBiPhone 3G 8 GB, 16 GBiPhone 4 GB, 8 GB, 16 GB[HC55]Listening to the Internet Radio](https://usermanual.wiki/Panasonic-of-North-America/B21-R10003/User-Guide-1407424-Page-12.png)
![13[HC55] Using a Bluetoothcompatible deviceFrequency band usedThis unit uses the 2.4 GHz frequency band, however other devices may use thisfrequency as well. To avoid interference with other wireless devices, pleasefollow the cautions listed below.Certification of this deviceThis unit conforms to frequency restrictions and has received certification basedon frequency laws, so a wireless permit is not necessary.However, the following actions are punishable by law in some countries:Taking apart/modifying the unit.Removing specification indications from the rear part of this unit.Usage restrictionsWireless transmission and/or usage with all Bluetooth equipped devices isnot guaranteed.Compatible mobile phones capable of wireless transmission include andcomply to standards set by the Bluetooth SIG, Inc. However, if the mobilephone is optimized to meet standard specifications, some functions maywork. Even so, depending on the specifications and settings of the mobilephone, a connection may not be established, nor are the methods ofoperation, display, or operation guaranteed.This unit supports Bluetooth security features, however depending on theoperating environment and/or settings, this security may not be sufficient.Use caution when transmitting data wirelessly.Please be aware that Panasonic accepts no responsibility for data and/orinformation that may be compromised during a wireless transmission.Range of useUse this device within an unobstructed 10 m (33 ft) range. The range of usageor perimeter may be shortened depending on any obstructions, devices causinginterference, other people in the room, or the construction of the building.Please note that the range mentioned above is not guaranteed.Effects from other devicesIt is possible that this unit may not operate correctly or you may experienceother effects of instability such as broken up audio, etc. when other devicesare placed within close proximity. Therefore, in order to prevent signalinterference, we recommend separating this unit from the following devicesduring use:Microwave oven/Wireless LAN/Electronic devices/Audio & Video devices/OfficeAssistant machines & devices/Digital cordless phones/Fax machines, etc.If you live in close proximity to a broadcasting studio and the signal is toostrong, the unit may not operate correctly.When using a notebook PC with a wireless LAN transmitter, do not use thisunit and the wireless LAN at the same time.If you are still experiencing noise even outside of the 5 m (16.4 ft) range of awireless LAN device, turn the power to the wireless LAN device off.Intended usage limitationsThis unit is intended for normal, general use. This unit is not developed ormanufactured with the intention of use in high safetyor hazardousoccupations. Do not use this unit in these kinds of environments or occupations.The following examples require extreme caution, and can directly result inloss of life, or extreme bodily harm.e.g.)Nuclear Engineering, and control of a nuclear reaction/automated control ofaircraft/air traffic control management/controlling movement of heavy freightsystems/control of life support or extension systems/control of weaponssystems and/or missile launch systems, etc.PreparationPair the Bluetooth device with this unit to create an audioconnection.1Press [ , iPod] repeatedly to selectBLUETOOTH.When using it for the first time, it enters pairing modeautomatically.2While this unit is in pairing mode, access theBluetooth menu of the Bluetooth device andexecute a Bluetooth search to find this unit(SC-HC55).Please refer to the Bluetooth device user manual forfurther instruction on how to connect a Bluetooth device.If prompted for the passkey, enter 0000.3If pairing is successful, the paired devicesname will be displayed for 2 seconds. TheBluetooth indicator lights up. The unit is nowready to be used with the Bluetooth device.Make sure the Bluetooth device supports A2DP (Advance Audio DistributionProfile).This unit supports the A2DP reception which is copyright-protected bySCMS-T method.A2DP enables you to stream stereo sound from an audio source (mobilephone, PC or laptop) to this unit via Bluetooth.Depending on the specification or setting of mobile phones, connection maynot be established, or operation and display may vary.You can register up to 6 devices into this unit. Disconnect the currentBluetooth device and refer to To register more devices ( 14).If you register more than the maximum device number, the oldest device inconnection history will be overwritten.If a registered device is re-registered, it will be overwritten.Pair the Bluetooth device with this unit to create an audioconnection.1Press [ , iPod] repeatedly to selectBLUETOOTH.2On the Bluetooth device:Select this unit (SC-HC55) on the Bluetoothsetup screen to make the connection.3On the Bluetooth device:Start playback of a music source.If the device is connected, the music will be heard on this unit.The Bluetooth indicator lights when there is a connection.Please refer to the Bluetooth device user manual if required.4You can also make the following controls withthe remote control.About using BluetoothWhat is Bluetooth?Bluetooth technology allows you to make a wirelessconnection with another electronic device.Bluetooth pairingBasic playPlay Press [ / ] to start play.Stop Press [ ].Pause Press [ / ]. Press again to resume play.Skip track Press [ ] or [ ].DisplayinformationPress [DISPLAY] repeatedly.](https://usermanual.wiki/Panasonic-of-North-America/B21-R10003/User-Guide-1407424-Page-13.png)
![14[HC55] Using a Bluetooth compatible device(Continued)To utilize these functions, the Bluetooth device must support AVRCP (AudioVideo Remote Control Profile).This unit cannot transmit data to a Bluetooth device.When playing iPod/iPhone by Bluetooth with the main unit, intermittent soundmay be experienced if you leave the iPod/iPhone Bluetooth menu screenactive or when making Bluetooth registration and connection. If this occurs,please exit the iPod/iPhone Bluetooth menu screen.When playing music by iPod/iPhone via Bluetooth connection and the iPod/iPhone is connected into this unit iPod/iPhone dock, the audio will not bere-produced while BLUETOOTH is selected. Select IPOD to continueenjoying the music.You can select the sound input level of the Bluetooth device.1Press [ , iPod] repeatedly to selectBLUETOOTH.2Press [SOUND] repeatedly to select INPUTLEVEL.3Press [ ,] to select , or .Select if the sound is distorted.Press [DISPLAY] repeatedly to view theinformation of the current connected device.BLUETOOTH Connected device nameConnected profilesThis unit works as a Bluetooth hands-free for your mobilephones.This unit does not work with Headset Profile (HSP).When the mobile phone is too close to the microphone of this unit, noise mayoccur. Always keep the mobile phone away from the microphone of this unitwhen making a call.The audio from a disc will be paused while calling in hands-free mode.1Press [ , iPod] repeatedly to selectBLUETOOTH.2Press [ MENU] to display DISCONNECT?and then press [OK].A confirmation message is displayed.3Press [ ,] to select YES and then press[OK].The connection can also be stopped when you disable Bluetoothtransmission on the connected Bluetooth device.PreparationPress [ , iPod] repeatedly to select BLUETOOTH.These functions are unavailable if a device is connected. Disconnect theBluetooth devices to display these functions.To register more devices1Press [ MENU] repeatedly to selectNEW DEV. and then press [OK].The unit enters pairing mode and PAIRING starts blinkingon the display.2While this unit is in pairing mode, access theBluetooth menu of the Bluetooth device andexecute a Bluetooth search to find this unit(SC-HC55).If prompted for the passkey, enter 0000.To select communication quality1Press [ MENU] repeatedly to selectLINK MODE.2Press [ ,] to select the following modes andthen press [OK].To select Auto Link mode1Press [ MENU] repeatedly to selectAUTO LINK.2Press [ ,] to select the following modes andthen press [OK].When LINKING is displayed, pressing [ MENU] is invalid.Auto Link works only if your device supports A2DP.The communication quality settings also depend on the settings on theconnected device. If the communication quality of the connected device is setfor stable communication, the quality of the audio will remain low even if thisunit is set to MODE 2.Input levelDisplay functionHands-Free Profile (HFP)To answer a callIN CALL blinks)Press [ ]. CALLING starts blinking onthe display (Talk into the unitsmicrophone).Press [ ] again to transfer the call to themobile phones (TRANSFER blinks. Youmay now converse using the mobilephone).To cancel a call Press [ ].To adjust thesound volumePress [+, VOL ,] (Adjustable fromTEL VOL 1 to TEL VOL 10).To mute themicrophonePress [MUTE]. Press again to cancel.(During MIC MUTE, the caller is not ableto hear your voice).Disconnecting a BluetoothdeviceAdvanced functionsMODE 1: Connection with emphasis on communicationstabilityMODE 2: Connection with high bit rate for good audio quality(Communication might easily be disconnected inthis mode, select MODE 1 if this occurs).ON: This unit will automatically select BLUETOOTHwhen a Bluetooth device is connected.OFF](https://usermanual.wiki/Panasonic-of-North-America/B21-R10003/User-Guide-1407424-Page-14.png)
![15OthersOther Panasonic audio/video equipment may start functioningwhen you operate the unit using the supplied remote control.You can operate this unit in another mode by setting the remotecontrol operating mode to REMOTE 2.The main unit and remote control must be set to the samemode.1Press [EXT-IN, RADIO] to select AUX.2Press and hold [RADIO/EXT-IN] on the mainunit and [2] on the remote control until the mainunits display shows REMOTE 2.3Press and hold [OK] and [2] on the remotecontrol for at least 4 seconds.To change the mode back to REMOTE 1, repeat the stepsabove by replacing [2] with [1].When the following situations occur, reset the memory:There is no response when buttons are pressed.You want to clear and reset the memory contents.To reset memory1Disconnect the AC power supply cord. (Wait forat least 3 minutes before proceeding to step 2.)2While pressing and holding down [POWER, /I] on the main unit, reconnect the AC powersupply cord.-------- appears on the display.3Release [POWER, /I].All the settings are returned to the factory preset. You willneed to reset the memory items.TroubleshootingBefore requesting service, make the following checks. If you arein doubt about some of the check points, or if the solutionsindicated in the following guide do not solve the problem, refer toCustomer Services Directory (United States and Puerto Rico)on page 26 if you reside in the U.S.A. or Puerto Rico, or refer toLimited Warranty (ONLY FOR CANADA) on page 27 if youreside in Canada.Incorrect display or play will not start.You have not inserted the disc properly. Insert it correctly.The disc is scratched or dirty (Tracks skipped).There is moisture on the lens. Wait for about an hour and thentry again.MP3 cannot be read.You may not be able to play MP3 if you have copied amulti-session disc that has no data between sessions.When creating a multi-session disc, it is necessary to close thesession.The amount of data on the disc is too small. Set the amount ofdata to above 5 MB.Noise is heard or no sound.While playing MP3, noise may occur if the recording is poor.Keep this unit away from mobile phones if the interference isapparent.Turn the volume up.Switch the unit off, check and correct the connection and thenswitch the unit on. Causes include straining of the speakersthrough excessive volume or power and using the unit in a hotenvironment.Humming heard during play.An AC power supply cord or fluorescent light is near the cords.Keep other appliances and cords away from this units cables.A beat sound or noise is heard while receiving radiobroadcast.Switch the television or other audio player off or separate itfrom the unit.Switch the portable audio player off if connected to the EXT-INAUX port.A low hum or noise is heard during AM broadcast.Keep the antenna away from other cables and cords.Keep the AM antenna away from the unit.The picture on the television near the unit disappears orstripes appear on the screen.The location and orientation of the antenna are incorrect.The television antenna wire is too close to the unit. Separatethe antenna wire of the television from the unit.No response when remote control buttons are pressed.Check that the battery is inserted correctly ( 4).The sliding door does not open (or malfunctions).Is the unit turned on?Is the open/close sensor turned off? ( 9)During CD playback or pause, the CD operation side of thesliding door will not open.The open/close sensor may not react to dark objects.Depending on the lighting, the open/close sensor maymalfunction.In this case, try moving the unit to a different place. (Do notplace this unit under strong lighting.)When the open/close sensor is on, the sliding door may open/close while operating the buttons on the top of the unit.In this case, use the remote control.The open/close button lights are flashing.If there is an object close to both open/close sensors, bothopen/close button lights will flash and the open/close sensorwill not function. In this case, move the unit away from theobject, or vice versa. (It will take approx. 10 sec. for the unit tocheck if the clearance is sufficient.)The open/close sensor sound effect cannot be heard whenthe sliding door opens/closes.This is normal while listening to the radio, during playback, etc.or when linked to a Bluetooth device.Changing the main unit andremote control modeMemory reset (Initialization)Common problems[HC55] Open/close sensor](https://usermanual.wiki/Panasonic-of-North-America/B21-R10003/User-Guide-1407424-Page-15.png)
![16Troubleshooting (Continued)iPod/iPhone does not turn on.Cannot operate with [iPod MENU] button.Verify that the iPod/iPhone battery is not depleted beforeconnecting it to the unit.Before inserting the iPod/iPhone into the dock, turn both theunit and the iPod/iPhone off. Turn the power on and select theappropriate source.No sound is heard from the speakers.The iPod/iPhone is not inserted correctly into the dock. Turnthe iPod/iPhone off and remove it from the dock connector.Reinsert it and turn it on again.Make sure that the iPod/iPhone is actually playing something.Adjust the volume.Distorted sound or the sound level is too low.Make sure the equalizer function of the iPod/iPhone is turnedoff.iPod/iPhone cannot be controlled by the remote control ormain unit.Make sure the iPod/iPhone is inserted properly into the dock.Check the dock connection and make sure that iPod/iPhone isselected as the source of music ( 12).iPod/iPhone does not chargeCheck all connections ( 5, 12).The name of the connected device is shown as .Character that cannot be displayed will be replaced by .An unknown device name is detected and displayed as.Noise is heard or broken sound.The Bluetooth communication distance has exceeded 10 m(33 ft). Bring the device closer to the unit.There are obstructions between the device and the unit.Remove or avoid the obstacles.Select MODE 1 to improve connection quality ( 14).Interference from mobile phones.The following messages or service numbers appear on theunits display when something unusual is detected duringstartup and use.--:--You plugged the AC power supply cord in for the first time orthere was a power failure recently. Set the time ( 11).ADJUST CLOCKClock is not set. Adjust the clock accordingly.ADJUST TIMERPlay timer is not set. Adjust the play timer accordingly.PGM FULLThe number of programmed tracks is limited to 24. No furthertracks can be programmed.NO PLAYA CD-ROM disc that is not in CD-DA or MP3 format is inserted.It cannot be played.Check the content. Only MP3 format files can be played.ERRORIncorrect operation is performed. Read the instructions and tryagain.F61 or F76There is a power supply problem. Consult the dealer.AUTO OFFThe unit has been left unused for about 30 minutes and willshut down in a minute. Press any button to cancel it.ILLEGAL OPENSliding door is not in correct position. Turn the unit off and onagain.NODEVICEThe iPod/iPhone device is not inserted correctly. Read theinstructions and try again ( 12).REMOTE 1The main unit is in REMOTE 1 mode. Switch the remotecontrol to REMOTE 1 mode ( 15).REMOTE 2The main unit is in REMOTE 2 mode. Switch the remotecontrol to REMOTE 2 mode ( 15).DIMMERAppears 10 seconds after the volume is turned to .F70There is a Bluetooth module problem. Disconnect the ACpower supply cord and consult your dealer.NO DISCInsert the disc to be played ( 9).NOT SUPPORTEDYou have inserted an iPod/iPhone that cannot be played(12).[HC55]START ERRORCheck the iPhone/iPod touch.Visit the below website for more information:http://radio.vtuner.com/panasonic/en/UNLOCKEDThe iPod/iPhone docking switch lever is not locked in position.Make sure that the iPod/iPhone docking switch lever is properlypushed back into place ( 12).[HC55]CANNOT SETSelect an audio source other than BLUETOOTH orINTERNET RADIO.iPod/iPhone operations[HC55] Bluetooth operationsDisplayed messages](https://usermanual.wiki/Panasonic-of-North-America/B21-R10003/User-Guide-1407424-Page-16.png)
![17SpecificationsMPEG-1 Layer 3, MPEG-2 Layer 3Specifications are subject to change without notice.Mass and dimensions are approximate.Total harmonic distortion is measured by a digital spectrum analyzer.AMPLIFIER SECTIONRMS Output Power Stereo modeFront Ch (both ch driven) 20 W per channel (6 ),1 kHz, 10 % THDTotal RMS Stereo mode power 40WFTC Output Power Stereo modeFront Ch (both ch driven) 15 W per channel (6 ),20 Hz to 20 kHz, 10 % THDTotal FTC Stereo mode power 30WTUNER SECTIONPreset Memory FM 30 stationsAM 15 stationsFrequency Modulation (FM)Frequency range 87.9 MHz to 107.9 MHz(200 kHz step)87.5 MHz to 108.0 MHz(100 kHz step)Antenna terminals 75 (unbalanced)Amplitude Modulation (AM)Frequency range 520 kHz to 1710 kHz(10 kHz step)522 kHz to 1629 kHz(9 kHz step)DISC SECTIONDisc played [8 cm (3") or 12 cm (5")]CD, CD-R/RW(CD-DA, MP3 )Pick upWavelength 790 nmLaser power For U.S.A.CLASS IFor CanadaCLASS 1, CLASS 1MAudio Output (Disc)Number of channels FL, FR, 2 chSPEAKER SECTION[HC55]Type 2 way, 2 speaker system(Passive Radiator)Speaker unit(s)Woofer 6.5 cm (21/2) Cone type 1per channelTweeter 1.5cm(5/8) Piezo type 1 perchannelPassive Radiator 8 cm (31/8)2 per channelImpedance 6[HC35]Type 1 way, 1 speaker system(Passive Radiator)Speaker unit(s)Full range 6.5 cm (21/2) Cone type 1per channelPassive Radiator 8 cm (31/8)2 per channelImpedance 6[HC55] BLUETOOTH SECTIONBluetooth system specification V2.1 + EDRWireless equipmentclassification Class 2 (2.5 mW)Supported profiles A2DP, AVRCP, HFPFrequency band 2402 MHz to 2480 MHz(Adaptive FrequencyHopping)Driving distance 10 m (33 ft) Line of Sight(iPhone 4, at height 1 m(3.3 ft), in MODE 1)TERMINAL SECTIONPhone jackTerminal Stereo, 3.5mm(1/8) jackAUX (Rear)Terminal Stereo, 3.5mm(1/8) jackGENERALPower consumption 25WPower consumption in standby modeApprox. 0.1 WPower supply AC 120 V, 60 HzDimensions (W HD) With stand480 mm 194 mm 84 mm(19" 73/4" 3 1/2")Without stand480 mm 194 mm 69 mm(19" 73/4" 2 3/4")Mass (Weight) Approx. 2.4 kg (5.3 lbs)Operating temperature range 0C to 40 C(32 oF to 104 oF)Operating humidity range 35 % to 80 % RH(no condensation)](https://usermanual.wiki/Panasonic-of-North-America/B21-R10003/User-Guide-1407424-Page-17.png)
![18ConexionesConecte la antena interior FM.Fije con cinta la antena a un muro o columna en un lugarque tenga la menor cantidad de interferencia.Conecte la antena de cuadro AM.Mantenga el cable de la antena suelto alejado de otroscables o hilos.Coloque la antena en forma vertical en su base hasta quequede calzada y haga clic.Antena de cuadro AMConecte el cable de alimentación AC.Conecte el cable de alimentación AC después de quetodas las demás conexiones estén completas.Encienda la unidad después de unos segundos.Abra la tapa EXT-IN AUX/Tapa para conectar los auriculares odispositivos de música externos (por ejemplo, reproductor MP3).Empuje la parte saliente para abrir la tapa .Vista superiorConecte los auriculares (no provistos)Para evitar daños a la audición, evite escuchar durante períodosprolongados.La excesiva presión sonora de audífonos y auriculares puede causar pérdidade la audición.Conectar un dispositivo de música externo(para modo AUX)Usted puede seleccionar el nivel de sonido de entrada deldispositivo externo.Apague el ecualizador o baje el volumen del dispositivo externo para reducirla señal de entrada. El nivel alto de la señal de entrada distorsiona el sonido.Para más detalles, consulte el manual de instrucciones del otro equipo.Los cables y dispositivos no se suministran.Spanish Quick Reference/Referencia rápida en español Conexiones básicasVista posteriorOrificios de ventilaciónCinta adhesivaAntena interior FMHacia el tomacorriente ACConsumo de energía enStandby (modo de espera):Aprox. 0,05 WOtras ConexionesReduzca el volumen y conecte los auriculares.Tipo de enchufe: 3,5 mm (1/8) estéreoEnchufe el cable de audio (no provisto)en el jack EXT-IN AUX .Tipo de enchufe: 3,5 mm (1/8) estéreoPresione [EXT-IN, RADIO] repetidamentepara seleccionar AUX y comience lareproducción en el dispositivoconectado.[HC55] Presione [SOUND] repetidamente paraseleccionar INPUT LEVEL.Presione [ , ] para seleccionar HIGH oNORMAL.[HC35] Presione [INPUT LEVEL] repetidamente paraseleccionar HIGH o NORMAL.Parte salienteTapa EXT-IN AUX/Auriculares](https://usermanual.wiki/Panasonic-of-North-America/B21-R10003/User-Guide-1407424-Page-18.png)
![19Guía de referencia del mando a distanciaLos botones tales como funcionan igual que el mando adistancia. Se pueden usar indistintamente.Vista superiorVista frontalInformación del mando a distanciaInserte de forma tal que los polos ( y ) concuerden con losdel mando a distancia.Use baterías alcalinas o de manganeso.Mando a distanciaUnidad principal[SLEEP] ( 22)Interruptor Standby/On[], [POWER, /I](20, 22)Presione para conmutar launidad desde el modo On aStandby, o viceversa.En el modo Standby, la unidadsigueconsumiendo una pequeñacantidad de energía.Botones numéricos[1-9, 0, 10] ( 20, 21)Para seleccionar unnúmero de 2 dígitosPor ejemplo 16: [ 10][1] [6]Para seleccionar unnúmero de 3 dígitosPor ejemplo 226: [ 10][ 10] [2] [2] [6][DEL] ( 21)[HC55] [ , iPod] ( 23,24)[HC35] [iPod] ( 23)[CD] ( 20)[], [ ] ( 20, 21,22, 23, 24)[ / ] ( 20, 21, 23)[HC55] [ ] ( 24)[], [ ] ( 20, 21,23, 24)[SOUND] ( 18, 20, 22)[D.BASS] ( 22)[PLAY MENU] ( 21)[iPod MENU] ( 23)[HC55] [ MENU][ , , , ], [OK](18, 21, 23, 24)[DISPLAY] ( 20)[DIMMER]Mantenga presionado paraoscurecer el visor. Mantengapresionado nuevamente paracancelar.[HC55] [OPEN/CLOSESENSOR] ( 20)[HC35][INPUT LEVEL] (18)[iPod ] ( 20)[iPod , OPEN/CLOSE][HC55] Indicador de laactividad del sensor[P LAY, ] ( 22)[CLOCK/TIMER] ( 22)[PROGRAM] ( 21)[+, VOL ,] VOLUME +] ( 24)Regula el volumen de sonido.[MUTE] ( 24)Silencia el sonido. Presionenuevamente para cancelar.MUTE también se cancelacuando se regula el volumen ose apaga la unidad.[EXT-IN, RADIO][RADIO/EXT-IN] ( 21)[] ( 20, 21, 23, 24)[HC55] [ ] ( 24)[PRESET EQ] ( 22)[RADIO MENU] ( 21)[AUTO OFF]Esta función le permite apagar launidad (excepto en modo radio)después de que no se usa duranteaproximadamente 30 minutos.[AUTO PRESET] ( 21)[CD ] ( 20)[CD , OPEN/CLOSE][HC55] Indicador de laactividad del sensorIndicador de Standby[HC55] Sensor Abrir/Cerrar ( 20)AltavozVisorPuerta deslizante[HC55] Micrófono ( 24)[HC55] Indicador deBluetooth ( 24)Sensor de señal delmando a distanciaDistancia:Aprox. 7 m (23 pies)directamente en el frente. Coloque primero este lado adentro.](https://usermanual.wiki/Panasonic-of-North-America/B21-R10003/User-Guide-1407424-Page-19.png)
![20Abrir/Cerrar la puertadeslizantePreparaciónPresione [ ] para encender la unidad.Para operaciones con discos:Mientras la puerta deslizante está cerrada,presione [CD ] para abrirla.Para operaciones con iPod/iPhone:Mientras la puerta deslizante está cerrada,presione [iPod ] para abrirla.Cerrar la puerta deslizantePresione [CD ] o [iPod ] nuevamente.Mantenga los dedos alejados de la puerta deslizante cuando se estácerrando para evitar posibles daños menores.Si fuerza la puerta deslizante para cerrarla, se puede dañar.Al extraer el CD, tenga cuidado de no golpear la puerta deslizante.La puerta deslizante no se cerrará si la palanca del interruptor del conectorno se coloca en la posición original.Con esta función, la puerta deslizante se puede abrir sinpresionar un botón. La puerta se abrirá y cerrará cuando muevasu mano sobre el sensor.Para operaciones con discos:Mientras la puerta deslizante está cerrada, muevasu mano de a .Para cerrar la puerta deslizante, mueva su mano de a .Para operaciones con iPod/iPhone:Mientras la puerta deslizante está cerrada, muevasu mano de a .Para cerrar la puerta deslizante, mueva su mano de a .Para deshabilitar el sensor de Apertura/CierrePresione [OPEN/CLOSE SENSOR].Cada vez que pulsa el botón, el sensor se enciendeON SENSOR) o apaga (OFF SENSOR).Para agregar un efecto de sonido cuando la puertadeslizante se abre/cierra (cuando se usa el sensor.)Presione [SOUND] repetidamente para seleccionarBUZZER.Presione [ ] o [ ] para seleccionar el siguiente ajuste.El sensor de apertura/cierre podría activarse accidentalmente si un objeto, lamano, una parte del brazo, animales domésticos o niños se mueven cerca de él.Si el sensor de apertura/cierre no funciona o el rango de reacción disminuye, abra/cierre la puerta deslizante usando los botones de la unidad o el mando a distancia.La puerta deslizante no se abrirá durante la reproducción de CD.Operaciones con discos1Presione [ ] para encender la unidad.2Abra la puerta deslizante. ( izquierda)3Con la etiqueta del disco volteadahacia usted, incline el disco sobrela bandeja ubicada debajo de lapuerta deslizante.4Coloque el disco sobre elsujetador central y luego empujeel disco hacia abajo hasta quequede bien calzado y haga clic.5Cierre la puerta deslizante.(izquierda)Sacar un discoAbra la puerta deslizante.Sostenga el centro y la parte superior derecha del disco, ytire de la parte superior derecha para separarlo del sujetador.Incline el disco para no tocar la puerta deslizante ni laslentes, y sáquelo.1Presione [ ] para encender la unidad.2Inserte el disco que desea reproducir ( arriba).3Presione [CD].4Presione [ /] para comenzar a reproducir.Abrir la puerta deslizante[HC55] Sensor Apertura/CierreLOW: Fije el nivel de sonido bajo.MID: Fije el nivel de sonido medio.HIGH: Fije el nivel de sonido alto.OFF: Apague el efecto de sonido.Insertar un discoReproducción básicaDetención Presione [ ].Pausa Presione [ / ]. Presione nuevamentepara reiniciar la reproducción.Saltear Presione [ ] o [ ] para saltear unapista.Presione [ , ] para saltear el álbum.(MP3)Búsqueda ([CD]solamente)Mantenga presionado [ ] o [ ].Reproducción deacceso directo(La reproduccióninicia en la pistaque seleccionó.)[CD]:Presione los botones numéricos paraseleccionar la pista.[MP3]:Presione [ , ] para seleccionar elálbum.Presione [ ] una vez y luego losbotones numéricos para seleccionarla pista.Esta función no funciona durante lareproducción aleatoria o programada.(21)Ver la informacióndel contenidoPresione [DISPLAY] repetidamentedurante la reproducción o la pausa.Se despliega la información de la pistaactual, etc.Cantidad máxima de caracteres desplegables:aproximadamente 30Esta unidad es compatible con etiquetas de laversión 1.0 y 1.1 ID3. Los datos de texto nosoportados no se desplegarán.](https://usermanual.wiki/Panasonic-of-North-America/B21-R10003/User-Guide-1407424-Page-20.png)
![21Después de realizar los pasos 1-3 de Reproducción básica ( 20)1Presione [PLAY MENU] repetidamente paraseleccionar REPEAT.2Presione [ , ] para seleccionar ON REPEAT ypresione [OK].3Presione [ /] para comenzar a reproducir.Para detener la repetición de la reproducción, seleccione OFFREPEAT en el paso 3.Después de realizar los pasos 1-3 de Reproducción básica ( 20)1Presione [PLAY MENU] repetidamente paraseleccionar PLAY MODE.2Presione [ , ] para seleccionar el modo siguientey presione [OK].3Presione [ /] para comenzar a reproducir.Durante la reproducción aleatoria, no se puede saltar a la pista anterior.El modo de reproducción actual se cancela cuando usted abre la puerta deslizante.Para repetir la reproducción programada o el modo de reproducción seleccionado,seleccione ON REPEAT en PLAY MENU. ( 20)Le permite programar hasta 24 pistas.Después de realizar los pasos 1-3 de Reproducción básica ( 20)1Presione [PROGRAM] durante el modo de detención.3Presione [ /] para comenzar a reproducir.La memoria del programa se borra cuando abre la puerta deslizante.Operaciones con la radio1Presione [EXT-IN, RADIO] repetidamente paraseleccionar FM o AM.2Presione [ ] o [ ] para seleccionar la frecuenciade la estación requerida.ST se visualiza cuando se está recibiendo de una emisora FMestéreo.Para sintonizar automáticamente, mantenga presionado [ ] o[] hasta que la frecuencia comience a cambiar rápidamente.Para cancelar la sintonización automática, presione [ ] o[] nuevamente.La sintonización automática puede no funcionar cuando hayexceso de interferencia.Para mejorar la calidad del sonido FMPresione [RADIO MENU] mientras recibe emisoras FM.Presione [ , ] para seleccionar FM MODE.Presione [ , ] para seleccionar MONO.Seleccione STEREO en el paso para volver a las emisoras estéreo.MONO también se cancela si se cambia la frecuencia.Para mejorar la calidad de sonido AMPresione [RADIO MENU] para seleccionar B.PROOF mientrasrecibe transmisiones AM.Presione [ , ] para seleccionar la prueba beat (BP 1 o BP 2) ypresione [OK].Este ajuste se restaura a BP 1 cuando se realizan cambios (por ejemplo, secambia la frecuencia).Usted puede predefinir hasta 30 canales FM y 15 canales AM.PreparaciónPresione [EXT-IN, RADIO] repetidamente para seleccionar FM o AM.Predefinición automáticaPresione[OK] para conmutar la frecuencia entre LOWESTy CURRENT.Presione [AUTO PRESET].PGM comienza a destellar y la radio comienza a predefinir todas lasestaciones que puede recibir en los canales, en orden ascendente.Predefinición manualPresione [ ] o [ ] para sintonizar la estación requerida.Presione [PROGRAM].Mientras PGM destella, presione los botones numéricos paraseleccionar un canal.La estación que ocupa un canal se borra si otra estación se predefine en ese canal.Para predefinir más estaciones, repita el paso - .Seleccionar una estación predefinidaPresione [ ] o [ ] para seleccionar el canal.Alternativamente, presione los botones numéricos para seleccionar el canal.Esta unidad se define en fábrica como FM 0,2 MHz y AM10 kHz, pero puede cambiar estos ajustes para recibir emisorasasignadas en el paso FM 0,1 MHz o AM 9 kHz.Presione [EXT-IN, RADIO] para seleccionar FM.Seleccione AM para cambiar a los pasos de frecuencia AM.Mantenga presionado [RADIO/EXT-IN] en la unidadprincipal.Después de unos segundos, el visor cambia y muestra la frecuenciamínima actual.Continúe manteniendo pulsando[RADIO/EXT-IN] en la unidadprincipal.Cuando la frecuencia mínima actual cambia, suelte el botón.Para volver al paso original, repita los pasos a .Después de que se cambia la definición, se borrará cualquier frecuenciaprevia.Repetir la reproducciónFunción de modo de reproducción1-TRACK 1TR:Reproduce una pista seleccionada deldisco.1-ALBUM 1ALBUM:([MP3] solamente)Reproduce un álbum seleccionado deldisco.Presione [ , ] para seleccionar elálbum.RANDOM RND:Reproduce un disco en modo aleatorio.1-ALBUM RANDOM1ALBUM RND:([MP3] solamente)Reproduce en modo aleatorio todas laspistas de un álbum seleccionado.Presione [ , ] para seleccionar elálbum.Reproducción programada2[CD]:Presione los botones numéricos para seleccionar la pista.Para programar más pistas, siga pulsando los botonesnuméricos.[MP3]:Presione [ , ] para seleccionar el álbum.Presione [ ] una vez y luego los botones numéricospara seleccionar la pista.Presione [OK].Para programar más pistas, repita los pasos - .Cancelar el modo deprogramaciónPresione [PROGRAM] en el modo dedetención para cancelar el indicador PGM delvisor.Verificar el contenidodel programaPresione [ ] o [ ] cuando PGM sevisualiza en el modo de detención.Borrar la última pistaprogramadaPresione [DEL] en el modo de detención.Borrar todas laspistas programadasPresione [ ] en el modo de detención.Presione [ ] nuevamente mientrasparpadea CLR ALL.Sintonización manualPredefinición de memoriaDefinición de asignación FM/AM](https://usermanual.wiki/Panasonic-of-North-America/B21-R10003/User-Guide-1407424-Page-21.png)
![22Ajuste de sonidoSe pueden agregar los siguientes efectos de sonido a la salidade audio.Puede experimentar una reducción de la calidad del sonido cuando se usanestos efectos con algunas fuentes. Si esto sucede, desactive los efectos desonido.SincronizadorÉste es un reloj de 12 horas.1Presione [CLOCK/TIMER] para seleccionarCLOCK.2En 10 segundos, presione [ ,] para fijar lahora.3Presione [OK].Para visualizar el reloj, presione [CLOCK/TIMER].Vuelva a fijar el reloj regularmente para mantener la precisión.Usted puede fijar el sincronizador para que se active a una horadeterminada para despertarlo.Esta unidad ofrece 3 sincronizadores opcionales de reproducción.PreparaciónEncienda la unidad y fije el reloj ( arriba).Prepare la fuente musical (disco, radio, iPod/iPhone o AUX) yfije el volumen.1Presione [CLOCK/TIMER] repetidamente paraseleccionar PLAY 1, PLAY 2 o PLAY 3.2En 10 segundos, presione [ ,] para fijar lahora de inicio.3Presione [OK].4Fije la hora de finalización repitiendo los pasos2 y 3.Para activar el sincronizador5Presione [PLAY, ] repetidamente para activarel sincronizador de reproducción deseado.6Presione [ ] para apagar la unidad.El sincronizador comenzará a la hora predefinida y el volumen aumentarágradualmente hasta el nivel predefinido.El apagado automático puede apagar la unidad después de unahora predefinida.Presione [SLEEP] para activar o desactivar lafunción de apagado automático.30MIN 60MIN 90MIN 120MINOFF (Cancelar)Presione [SLEEP] una vez para verificar el tiemporestante.El sincronizador de reproducción y el apagado automático se pueden usarjuntos. El apagado automático siempre tiene prioridad. Asegúrese de nosuperponer los ajustes del sincronizador.Cuando AUTO OFF está en ON y la unidad se deja sin usar duranteaproximadamente 30 minutos, la unidad se apagará aun cuando no hayaexpirado el tiempo de reproducción o el de apagado automático.EQpredeterminadoPresione [PRESET EQ] repetidamente paraseleccionar HEAVY, SOFT, CLEAR,VOCAL o FLAT.Bajos o agudos Presione [SOUND] repetidamente paraseleccionar BASS o TREBLE.Presione [ , ] para graduar el nivel (-4a +4).Sonido SurroundPresione [SOUND] repetidamente paraseleccionar SURROUND.Presione [ , ] para seleccionarON SURROUND.Para cancelar el sonido surround, seleccioneOFF SURROUND en el paso .Si la interferencia en la recepción de FMestéreo aumenta, cancele el efecto desonido surround.D.BassPresione [D.BASS] durante la reproducción paraseleccionar ON D.BASS o OFF D.BASS.Ajuste del relojSincronizador de reproducciónVerificar lasdefiniciones(Cuando la unidadestá encendida oen modo standby)Presione [CLOCK/TIMER] dos veces.(Se visualiza la definición.)Cancelar Presione [PLAY, ] dos veces para cancelarel indicador del sincronizador del visor.Apagado automático](https://usermanual.wiki/Panasonic-of-North-America/B21-R10003/User-Guide-1407424-Page-22.png)
![23Escuchar audio de uniPod o iPhoneInsertar un iPod/iPhone1Abra la puerta deslizante. ( 20)2Inserte el adaptador del conector apropiado (noprovisto) para el iPod/iPhone.Inserte el lado del adaptador del conector del iPod/iPhone conlos clips enfrentados hacia usted primero y luego empuje el ladoopuesto hasta que quede bien calzado y haga clic.3Presione [ ] para desbloquear elpuerto de iPodR/iPhone y luegotire de la palanca del interruptordel puerto para inclinar el puertode iPodR/iPhone.4Conecte el iPod/iPhone (noprovisto) firmemente.Asegúrese de sacar el iPod/iPhone del estuche.5Empuje la palanca delinterruptor del puerto hastaque haga clic en su sitio.6Cierre la puerta deslizante.(20)Extraer el iPod/iPhoneRepita los pasos 1 y 3 ( arriba).Para extraer, simplemente tire del iPod/iPhone hacia afuera.Repita los pasos 5 y 6 ( arriba).El conector del iPod/iPhone se puede dañar si no está inclinado cuando seconecta o desconecta el iPod/iPhone.Asegúrese de usar un adaptador del conector que sea compatible con su iPod/iPhone.Para comprar un adaptador del conector, consulte al distribuidor de iPod/iPhone.Reduzca el volumen de la unidad principal al mínimo antes de conectar odesconectar el iPod/iPhone.PreparaciónPresione [iPod] ([HC55]: [ , iPod]) repetidamente paraseleccionar IPOD.iPod/iPhone compatibles (a junio de 2011)La compatibilidad depende de la versión de software de su iPod/iPhone.Según el modelo, puede ser necesario extraer el iPod/iPhone y seleccionarel álbum, artista, etc. en él.Esta unidad puede reproducir radio por Internet si está instaladovTuner for Panasonic en su iPhone/iPod touch.Visite el sitio web que se indica a continuación para obtenermás información sobre vTuner for Panasonic:http://radio.vtuner.com/panasonic/en/(Modelos de iPhone/iPod touch sensibles al tacto y versionesde software compatibles, compra, instalación yfuncionamiento.)PreparaciónInstale vTuner for Panasonic en su iPhone/iPod touch.1Inserte el iPhone/iPod touch en la unidad.2Presione [ , iPod] repetidamente paraseleccionar INTERNET RADIO.Se iniciará vTuner for Panasonic.Insertar/Extraer un iPod/iPhoneClipsAdaptador del conectorPalanca del interruptorde acoplamiento deliPod/iPhoneConectorOperaciones con el iPodReproducir Presione [ / ].Pausa Presione [ / ] o [ ]. Presionenuevamente para reiniciar lareproducción.Saltear pista Presione [ ] o [ ].Buscar la pista actual Mantenga presionado [ ] o[].Visualizar el menú iPod/iPhone/volver al menúanteriorPresione [iPod MENU] en modo dereproducción. (Mando a distanciasolamente)Seleccione loscontenidos en el menúiPod/iPhonePresione [ , ] y luego [OK].(Mando a distancia solamente)¡Clic!¡Clic!Nombre Capacidad de memoriaiPod touch 4ta generación 8 GB, 32 GB, 64 GBiPod nano 6ta generación 8 GB, 16 GBiPod touch 3ra generación 32 GB, 64 GBiPod nano 5ta generación (videocámara) 8 GB, 16 GBiPod touch 2da generación 8 GB, 16 GB, 32 GBiPod classic 120 GB, 160 GB (2009)iPod nano 4ta generación (video) 8 GB, 16 GBiPod classic 160 GB (2007)iPod touch 1ra generación 8 GB, 16 GB, 32 GBiPod nano 3ra generación (video) 4 GB, 8 GBiPod classic 80 GBiPod nano 2da generación (aluminio) 2 GB, 4 GB, 8 GBiPod 5ta generación (video) 60 GB, 80 GBiPod 5ta generación (video) 30 GBiPod nano 1ra generación 1 GB, 2 GB, 4 GBiPhone 4 16 GB, 32 GBiPhone 3GS 8 GB, 16 GB, 32 GBiPhone 3G 8 GB, 16 GBiPhone 4 GB, 8 GB, 16 GB[HC55] Escuchar radio porInternet](https://usermanual.wiki/Panasonic-of-North-America/B21-R10003/User-Guide-1407424-Page-23.png)
![24[HC55] Uso de undispositivo compatiblecon BluetoothPreparaciónSincronice el dispositivo Bluetooth a esta unidad para crear unaconexión de audio.1Presione [ , iPod] repetidamente paraseleccionar BLUETOOTH.Cuando lo usa por primera vez, entra automáticamente en elmodo de sincronización.2Mientras la unidad está en modo desincronización, acceda al menú del dispositivoBluetooth y ejecute la búsqueda de Bluetoothpara encontrar esta unidad (SC-HC55).Consulte el manual del usuario del dispositivo Bluetoothpara conocer más detalles sobre cómo conectar undispositivo Bluetooth.Si se le solicita la clave, ingrese 0000.3Si la sincronización es satisfactoria, sevisualizará el nombre del dispositivosincronizado durante 2 segundos. Se encenderáel indicador de Bluetooth. La unidad ahora estálista para usarse con el dispositivo Bluetooth.Asegúrese de que el dispositivo Bluetooth soporte A2DP (Advance AudioDistribution Profile).Esta unidad soporta la recepción A2DP que está protegida por derechos deautor mediante el método SCMS-T.A2DP le permite reproducir sonido estéreo desde una fuente de audio(teléfono móvil, PC o laptop) en esta unidad a través del Bluetooth.Según la especificación o la configuración del teléfono móvil, la conexiónpuede no establecerse o el funcionamiento y la visualización pueden variar.Si registra más de la cantidad máxima de dispositivos, se sobregrabará eldispositivo más viejo en la historia de conexiones.Si un dispositivo ya registrado se vuelve a registrar, se sobregrabará.Sincronice el dispositivo Bluetooth a esta unidad para crear unaconexión de audio.1Presione [ , iPod] repetidamente paraseleccionar BLUETOOTH.2En el dispositivo Bluetooth:Seleccione esta unidad (SC-HC55) en la pantalla deconfiguración Bluetooth para hacer esta conexión.3En el dispositivo Bluetooth:Comience a reproducir música de una fuenteSi el dispositivo está conectado, la música se escuchará en esta unidad.El indicador de Bluetooth se enciende cuando hay una conexión.Si es necesario, consulte el manual del usuario del dispositivoBluetooth.4También puede realizar los siguientescontroles con el mando a distancia.Para usar estas funciones, el dispositivo Bluetooth debe soportar AVRCP(Audio Video Remote Control Profile).Esta unidad no puede transmitir datos al dispositivo Bluetooth.Cuando reproduce contenido del iPod/iPhone a través del Bluetooth con launidad principal, se puede sentir un sonido intermitente si deja la pantalla delmenú iPod/iPhone Bluetooth activa o cuando registra o conecta el Bluetooth.Si esto ocurre, salga de la pantalla del menú iPod/iPhone Bluetooth.Cuando reproduce música del iPod/iPhone a través de una conexiónBluetooth y el iPod/iPhone está conectado al conector de iPod/iPhone deesta unidad, el audio no será reproducido mientras está seleccionadoBLUETOOTH. Seleccione IPOD para seguir escuchando la música.Esta unidad funciona como un Bluetooth manos libres para suteléfono móvil.Esta unidad no funciona con Headset Profile (HSP).Cuando el teléfono móvil está demasiado cerca del micrófono de estaunidad, se puede escuchar ruido. Cuando hace una llamada mantengasiempre el teléfono alejado del micrófono de esta unidad.El audio de un disco se detendrá cuando llama en modo manos libres.1Presione [ , iPod] repetidamente paraseleccionar BLUETOOTH.2Presione [ MENU] para visualizarDISCONNECT? y luego presione [OK].Se visualizará un mensaje de confirmación.3Presione [ ,] para seleccionar YES yluego presione [OK].La conexión también se puede detener cuando desactiva la transmisiónBluetooth en el dispositivo Bluetooth conectado.Operaciones con BluetoothReproducción básicaReproducir Presione [ / ] para comenzar a reproducir.Detención Presione [ ].Pausa Presione [ / ]. Presione nuevamente parareiniciar la reproducción.Saltear pista Presione [ ] o [ ].VisualizarinformaciónPresione [DISPLAY] repetidamente.Hands-Free Profile (HFP)Para responder unallamada (IN CALLparpadea)Presione [ ]. CALLING comienza aparpadear en el visor (hable en elmicrófono de la unidad).Presione [ ] nuevamente para transferirla llamada al teléfono móvil (TRANSFERparpadea. Ahora puede conversar usandoel teléfono móvil).Para cancelar unallamadaPresione [ ].Para ajustar elvolumen del sonidoPresione [+, VOL ,] (regulable deTEL VOL 1 a TEL VOL 10).Para silenciar elmicrófonoPresione [MUTE]. Presione nuevamentepara cancelar.(Durante MIC MUTE, la persona quellama no puede escuchar su voz).Desconectar el dispositivoBluetooth](https://usermanual.wiki/Panasonic-of-North-America/B21-R10003/User-Guide-1407424-Page-24.png)

![[HC55]THE FOLLOWING APPLIES ONLY IN THE U.S.A.FCC Note:This equipment has been tested and found to comply with the limits for aClass B digital device, pursuant to Part 15 of the FCC Rules.These limits are designed to provide reasonable protection against harmfulinterference in a residential installation. This equipment generates, uses,and can radiate radio frequency energy and, if not installed and used inaccordance with the instructions, may cause harmful interference to radiocommunications.However, there is no guarantee that interference will not occur in aparticular installation. If this equipment does cause harmful interference toradio or television reception, which can be determined by turning theequipment off and on, the user is encouraged to try to correct theinterference by one or more of the following measures:Reorient or relocate the receiving antenna.Increase the separation between the equipment and receiver.Connect the equipment into an outlet on a circuit different from that towhich the receiver is connected.Consult the dealer or an experienced radio/TV technician for help.FCC caution: To maintain compliance with FCC regulations, shieldedinterface cables must be used with this equipment. Operation with non-approved equipment or unshielded cables may result in interference toradio and TV reception. Any changes or modifications not approved by theparty responsible for compliance could void the users authority to operatethis equipment.This device complies with Part 15 of the FCC Rules.Operation is subject to the following two conditions:(1) This device may not cause harmful interference, and(2) this device must accept any interference received, includinginterference that may cause undesired operation.Responsible Party:Panasonic Corporation of North AmericaOne Panasonic WaySecaucus, NJ 07094Support Contact:Panasonic Consumer Electronics CompanyTelephone No.: 1-800-211-PANA (7262)WARNING:To satisfy FCC RF exposure requirements for mobile transmitting devices, aseparation distance of 20 cm (77/8) or more should be maintained betweenthe antenna of this device and persons during device operation. To ensurecompliance, operations at closer than this distance is not recommended.The antenna used for this transmitter must not be co-located in conjunctionwith any other antenna or transmitter.[HC35]THE FOLLOWING APPLIES ONLY IN THE U.S.A.FCC Note:This equipment has been tested and found to comply with the limits for aClass B digital device, pursuant to Part 15 of the FCC Rules.These limits are designed to provide reasonable protection against harmfulinterference in a residential installation. This equipment generates, usesand can radiate radio frequency energy and, if not installed and used inaccordance with the instructions, may cause harmful interference to radiocommunications. However, there is no guarantee that interference will notoccur in a particular installation. If this equipment does cause harmfulinterference to radio or television reception, which can be determined byturning the equipment off and on, the user is encouraged to try to correctthe interference by one or more of the following measures:Reorient or relocate the receiving antenna.Increase the separation between the equipment and receiver.Connect the equipment into an outlet on a circuit different from that towhich the receiver is connected.Consult the dealer or an experienced radio/TV technician for help.Any unauthorized changes or modifications to this equipment would voidthe users authority to operate this device.This device complies with Part 15 of the FCC Rules. Operation is subject tothe following two conditions: (1) This device may not cause harmfulinterference, and (2) this device must accept any interference received,including interference that may cause undesired operation.Responsible Party:Panasonic Corporation of North AmericaOne Panasonic WaySecaucus, NJ 07094Support Contact:Panasonic Consumer Electronics CompanyTelephone No.: 1-800-211-PANA (7262)For U.S.A. and Puerto RicoPanasonic Consumer Electronics Company,Division of Panasonic Corporation of North AmericaOne Panasonic Way, Secaucus,New Jersey 07094http://www.panasonic.com Panasonic Corporation 2011Printed in MalaysiaFor CanadaPanasonic Canada Inc.5770 Ambler DriveMississauga, OntarioL4W 2T3www.panasonic.caRQTX1260-PF0111MT0](https://usermanual.wiki/Panasonic-of-North-America/B21-R10003/User-Guide-1407424-Page-28.png)