Panasonic of North America ST-C700 Network Audio Player User Manual
Panasonic Corporation of North America Network Audio Player
UserManual.wiki
>
Panasonic of North America
>
ST C700 User Manual
Users Manual
Navigation menu
Upload a User Manual
Namespaces
Wiki Guide
HTML
PDF
Info
Views
User Manual
Discussion / Help
Navigation
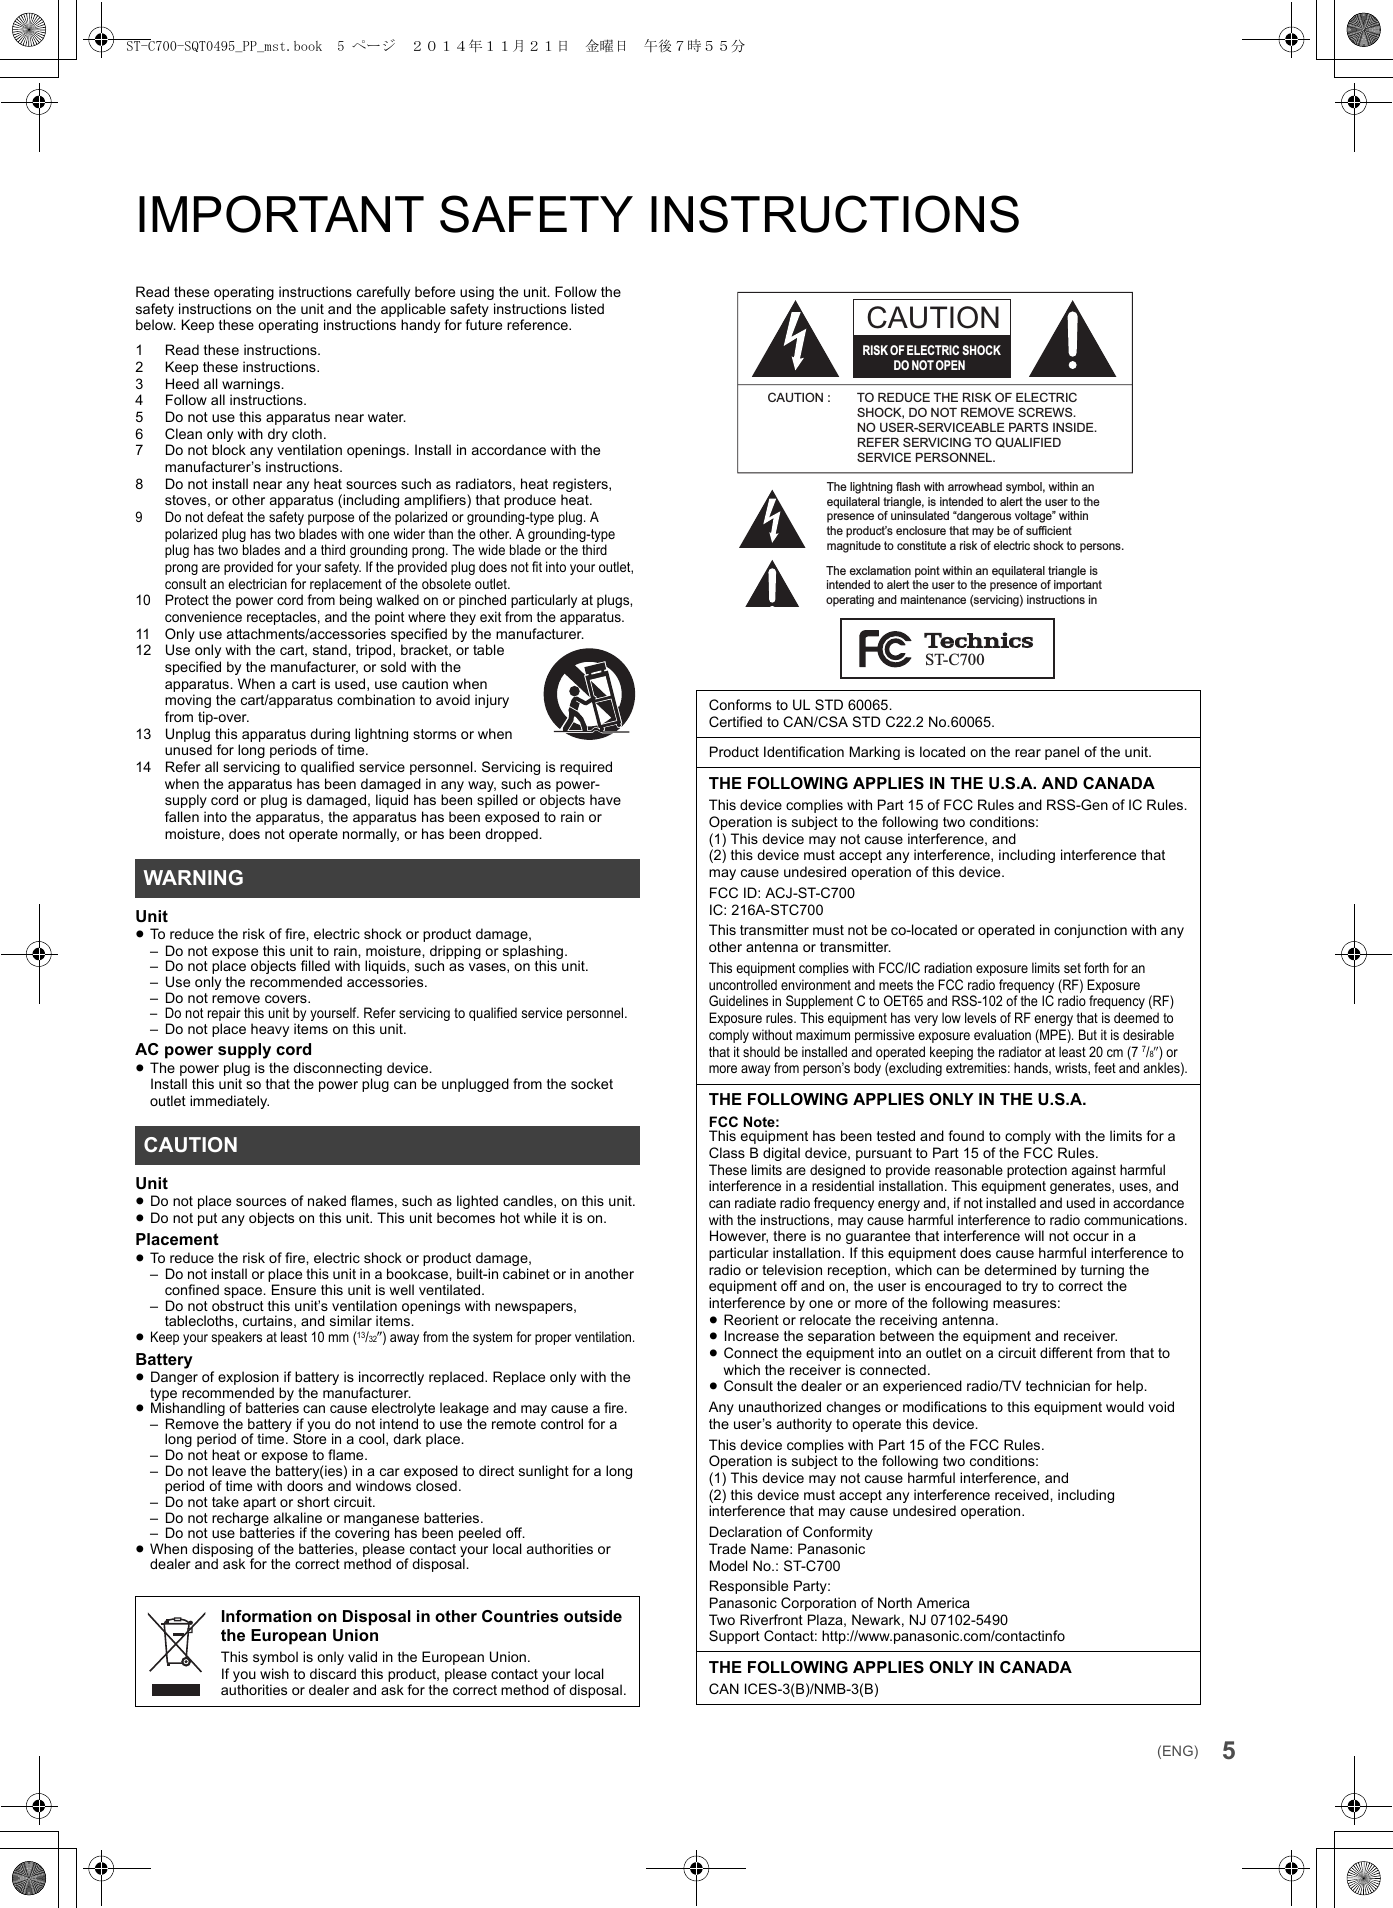
![7(ENG)Control reference guide∫Front1Power switch leverTurn on/off this unit.≥The remote control do not operate when the power switch lever is in the lowered position.2Port for iPhone/iPad/iPod and USB devices (>14, 15)3Remote control signal sensorDistance: Within approx. 7 m directly in frontAngle: Approx. 30o left and right4Display5Basic control switchesThese switches work just by touching the marks. Each time you touch the switch, there will be a beep sound. (>11)≥When playback information is not shown on the display (except in NFC registration standby mode (>18)), you can perform the following operations on the touch panel:6NFC touch area (>18)The NFC touch area sheet is attached to this area at the time of purchase.∫Rear7Product identification markingThe model number is indicated.8Analog audio output terminal [LINE OUT] (>9):Digital audio output terminal [COAX OUT] (>9);Digital audio output terminal [OPT OUT] (>9)<Digital audio input terminal [PC] (>17)For connecting to a PC, etc.=System terminal [CONTROL] (>9)>LAN port [LAN] (>12)?AC IN terminal [AC IN T] (>10)This unit:3 (Up)94 (Down)1/;OK (OK)∫RETURN (Return)HOME (Touch and hold) MENU (Enter menu) ST-C700-SQT0495_PP_mst.book 7 ページ 2014年11月21日 金曜日 午後7時55分](https://usermanual.wiki/Panasonic-of-North-America/ST-C700/User-Guide-2455718-Page-7.png)
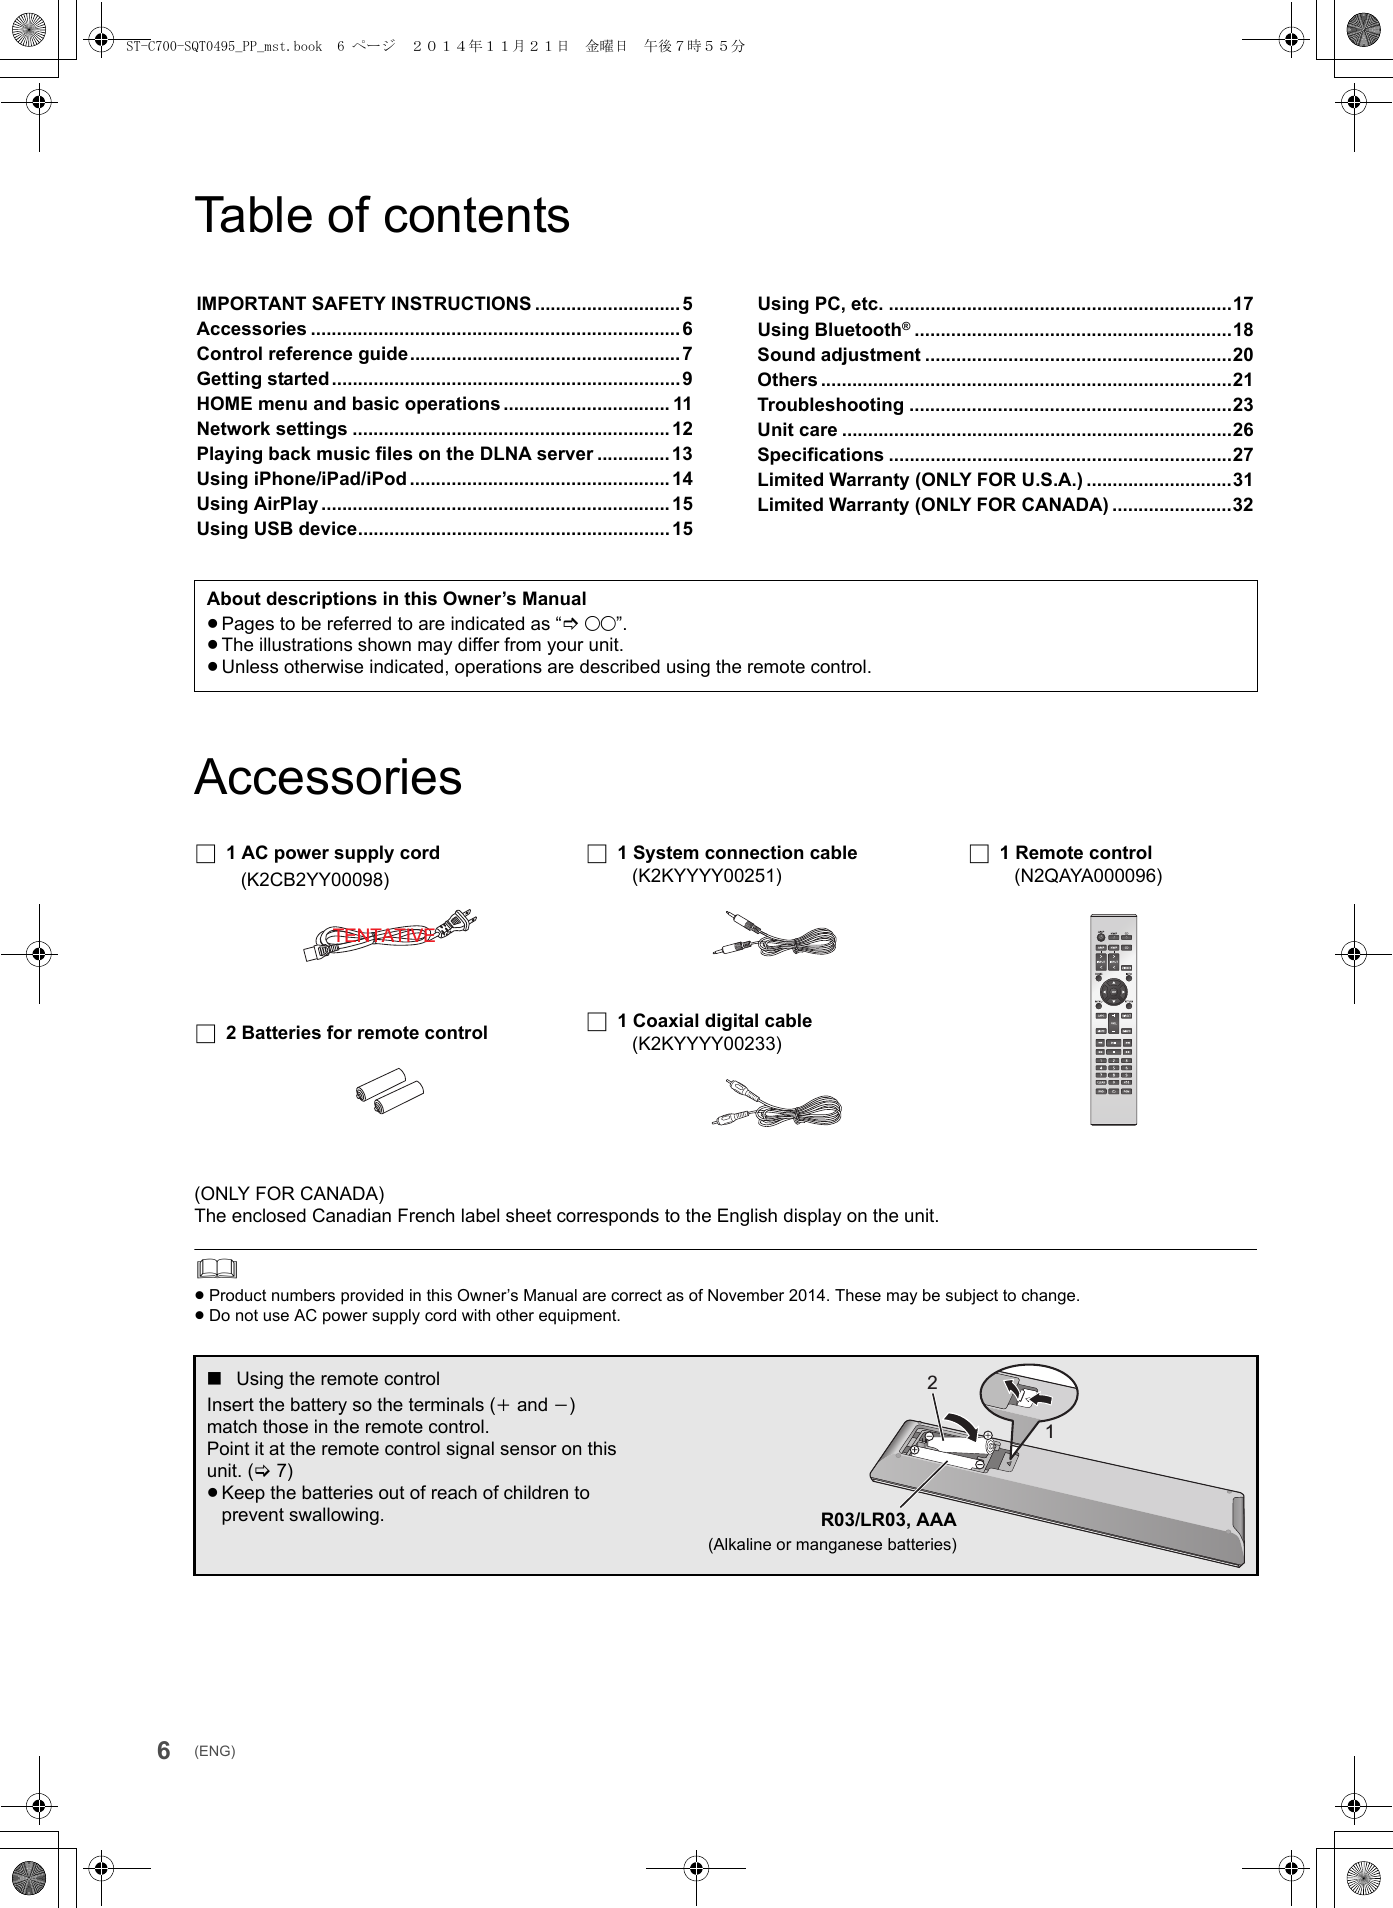
![8(ENG)∫Buttons that work for this unit1[NWP Í]: Standby/on switchPress to switch the unit from on to standby mode or vice versa. In standby mode, the unit is still consuming a small amount of power.≥The remote control do not operate when the power switch lever is in the lowered position.2[AMP]/[NWP]/[CD]: Select the device to be operated3[NINPUT O]: Select the input source4[DIMMER]: Adjust the brightness of the display, etc. (>11)5[HOME]: Display HOME menu (>11)6[INFO]: View content informationPress this button to display the track, artist, and album names, file type, sampling frequency, bit rate, and other information.7[3,4,2,1]/[OK]: Selection/OK8[RETURN]: Return to the previous display9[MENU]: Enter menu:[DIRECT]: Turn on/off Direct mode (>20);[RE-MASTER]: Turn on/off Re-master (>20)<Basic playback control buttons=Numeric buttons, etc.≥To select a 2-digit numberExample: 16: [S10] > [1] > [6]≥To select a 4-digit numberExample: 1234: [S10] > [S10] > [S10] > [1] > [2] > [3] > [4]≥[CLEAR]: Clear the entered value.∫Buttons that work for the SU-C700/SL-C700The remote control of this unit also works for the SU-C700/SL-C700.For information on the operations of the SU-C700/SL-C700, please also refer to their operating instructions.1Standby/on switch for the SU-C7002Standby/on switch for the SL-C7003Select the device to be operated4Select the input source of the SU-C7005Adjust the brightness of the display, etc.6Measure the characteristics of the amplifier and correct its output7Adjust the volume8Mute the soundRemote controlST-C700-SQT0495_PP_mst.book 8 ページ 2014年11月21日 金曜日 午後7時55分](https://usermanual.wiki/Panasonic-of-North-America/ST-C700/User-Guide-2455718-Page-8.png)
![9(ENG)Getting started≥Turn off all equipment before connection and read the appropriate operating instructions.≥Do not connect the AC power supply cord until all other connections are complete.≥Insert the plugs of the cables to be connected all the way in.≥Do not bend cables at sharp angles.≥You can output digital audio signals from this unit and play back music.≥You can operate this unit and the SU-C700 simultaneously with ease on the remote control. (>23)≥Do not use any other system connection cables or coaxial digital cables except the supplied one.≥Connect the system connection cable to the system terminal [CONTROL1] of the SU-C700.≥Connect the coaxial digital cable to the digital audio input terminal [COAX1 IN] of the SU-C700.You can output analog or digital audio signals from this unit and play back music files.System control connection to an SU-C700This unit(rear)SU-C700Coaxial digital cable(supplied)System connection cable(supplied)Connecting to an amplifier and a D/A convertere.g.,This unit(rear)AmplifierOptical digital audio cable(not supplied)D/A converterAudio cable(not supplied)ST-C700-SQT0495_PP_mst.book 9 ページ 2014年11月21日 金曜日 午後7時55分](https://usermanual.wiki/Panasonic-of-North-America/ST-C700/User-Guide-2455718-Page-9.png)
![10 (ENG)Connect only after all other connections are completed.≥This unit consumes a small amount of AC power (>27) even the power switch lever is in the [OFF] position. Remove the plug from the main electrical outlet if you will not be using the unit for an extended period of time. Place the unit so the plug can be easily removed.You can operate using the remote control of this unit.Press and hold [LAPC] until the LAPC indicator on the SU-C700 starts to blink.≥The SU-C700 will start measuring the characteristics of the amplifier if it is connected to the speakers.≥For information on the operations of the SU-C700, please also refer to its operating instructions.AC power supply cord connectionMeasuring the characteristics of the amplifier and correcting its outputAC power supply cord (supplied)To a household AC outletThis unit(rear)Insert the AC power supply cord up to A, a point just before the round hole.ST-C700-SQT0495_PP_mst.book 10 ページ 2014年11月21日 金曜日 午後7時55分](https://usermanual.wiki/Panasonic-of-North-America/ST-C700/User-Guide-2455718-Page-10.png)
![11(ENG)HOME menu and basic operationsMajor functions of this unit can be operated from the HOME menu.Preparation≥Prepare the music that you want to play back.≥Turn on the connected device (amplifier, etc.) and lower its volume.1Raise the power switch lever of this unit to the [Í/I] position.2Press [NWP].3Press [HOME].4Press [3,4] to select an item and then press [OK].≥If there are any other items, repeat this step.5Start play.∫To display HOME menuPress [HOME].Adjust the volume of the connected device (amplifier, etc.).The brightness of this unit’s display and the basic control switches can be changed.Press [DIMMER] repeatedly.≥When the display is turned off, it will light up only when you operate this unit.Before the display turns off again, “Display Off” will be displayed for a few seconds.You can turn the beep sound on/off.≥The factory default is “On”.1Press [NWP].2Press [HOME].3Press [3,4] repeatedly to select “SETUP” and then press [OK].4Press [3,4] repeatedly to select “Beep” and then press [OK].5Press [3,4] to select “On”/“Off” and then press [OK].If you install the dedicated app “Technics Music App” (free of charge) on your tablet/smartphone, you can control this unit and the SU-C700 using a wide variety of functions.For details, visit:www.technics.com/support/USBPlays back music stored on a USB device or an iPhone/iPad/iPod. (>14, 15, 16)PC Plays back music stored on a PC, etc. (>17)LAN ネットワークに接続して音楽を再生します。(>13, 15)Bluetooth Bluetooth®機器に接続して音楽を再生します。(>18, 19)SETUP (>12, 20, 21, 22, 23)ラヰヮユヶヴャヒバヘロモワAdjusting the volumeDisplay brightnessOperation sound settingOperations using the dedicated app “Technics Music App”ST-C700-SQT0495_PP_mst.book 11 ページ 2014年11月21日 金曜日 午後7時55分](https://usermanual.wiki/Panasonic-of-North-America/ST-C700/User-Guide-2455718-Page-11.png)
![12 (ENG)Network settingsYou can stream music from an iOS device (iPhone/iPad/iPod), an Android™ device or a PC (Mac/Windows) to this unit by using the AirPlay or DLNA feature. (>13, 15)To use these features, this unit must join the same network as the AirPlay compatible device or the DLNA compatible device.Normally, just connecting a LAN cable will complete the setup.A: LAN cable (not supplied)1Disconnect the AC power supply cord.2Connect this unit to a broadband router, etc. using a LAN cable.3Connect the AC power supply cord to this unit, and raise the power switch lever to the [Í/I] position. (>10)You can change this unit’s name on the network (Friendly Name), and use specific IP address, subnet mask, default gateway, primary DNS, etc.≥Do not play back music while changing these settings.1Disconnect the AC power supply cord.2Connect this unit to a PC, etc. using a LAN cable.3Connect the AC power supply cord to this unit, and raise the power switch lever to the [Í/I] position.4Press [NWP].5Press [HOME].6Press [3,4] repeatedly to select “SETUP” and then press [OK].7Press [3,4] repeatedly to select “Network” and then press [OK].8Select and input the details.9Press [OK] to apply the settings.10 Press [RETURN] repeatedly to exit the settings.11 Press [NWP Í] to turn the unit to standby mode.≥Wait until “Please Wait” disappears.12 Lower the power switch lever to the [OFF] position and then disconnect the AC power supply cord.13 Perform “Wired LAN connection”. (>left)≥Use category 7 or above straight LAN cables (STP) when connecting to peripheral devices.≥Inserting any cable other than a LAN cable in the LAN port can damage the unit.≥To make network-related settings on the connected device (PC, etc.), start an Internet browser on the device, and enter this unit's IP address checked in step 7 into the address field.≥If you change the network settings immediately after turning on this unit, it may take some time until the changes are applied.Wired LAN connectionBroadband router, etc.This unit(rear)PC, etc.To make network-related settingsST-C700-SQT0495_PP_mst.book 12 ページ 2014年11月21日 金曜日 午後7時55分](https://usermanual.wiki/Panasonic-of-North-America/ST-C700/User-Guide-2455718-Page-12.png)
![13(ENG)Playing back music files on the DLNA serverYou can share music files stored in the DLNA Certified media server (PC, smartphone, etc.) connected to your home network, and enjoy the contents with this unit.≥About supported format, refer to “File format” (>29)Preparation≥Complete the network settings. (>12)≥Connect the device to be used to the same network as this unit.≥Add the contents and folder to the libraries of the Windows Media® player 11 or 12, or a smartphone, etc.– Playlist of Windows Media® player can play back only the contents that are stored in the libraries.– To use Windows Media® Player for streaming, you need to configure it in advance.You can play back music stored on the DLNA server on this unit (DMP—Digital Media Player) by controlling the DLNA server with this unit.1Press [NWP].2Press [NINPUT O] below [NWP] repeatedly to select “LAN”.≥The server selection screen will be displayed.3Press [3,4] to select a DLNA server on the network, and then press [OK].≥The folder/content selection screen will be displayed.≥Folders/content may be displayed in different order from the order on the server, depending on its specifications.4Press [3,4] to select an item and then press [OK].≥If there are any other items, repeat this step.Operations on the remote control∫Random repeat playbackPress [RND].Each time you press the button:∫Repeat playbackPress [`].Each time you press the button:By controlling a DMC (Digital Media Controller) compatible device, you can play back music stored on the DLNA server on this unit (DMR—Digital Media Renderer).1Raise the power switch lever of this unit to the [Í/I] position.2Operate the DMC compatible device and connect to this unit.≥The device name of this unit will be displayed as “Technics ST-C700 _ _ _ _ _ _”*1, 2.≥For details on how to use DMC compatible devices, refer to the operating instructions of the devices or the software.≥You cannot use random repeat playback in combination with other playback modes.≥You can use repeat playback in combination with program playback.≥When you operate DMC, playback of other audio sources will stop and DLNA output will have priority.≥Depending on the contents and the connected equipment, operations or playback may not be possible.*1 “ _ ” stands for a digit that is unique to each set.*2 The device name can be changed from “To make network-related settings”. (>12)Playing back content stored on the DLNA server by controlling it from this unitStop Press [∫].Pause Press [1/;].≥Press again to restart play.Skip Press [:] or [9] to skip track.SearchDuring play or pause, press and hold [6] or [5].≥On the unit: press and hold [:] or [9].OnAll tracks in a folder are repeated randomly.≥“RND `” is displayed.Off Turns off random repeat mode.1-Track Only plays the selected track.≥“1 `” is displayed.All All tracks in a folder are repeated.≥“`” is displayed.Off Turns off repeat mode.Playing back content stored on the DLNA server by controlling it from a DMCST-C700-SQT0495_PP_mst.book 13 ページ 2014年11月21日 金曜日 午後7時55分](https://usermanual.wiki/Panasonic-of-North-America/ST-C700/User-Guide-2455718-Page-13.png)
![14 (ENG)Using iPhone/iPad/iPodConnect your iPhone/iPad/iPod, and you can play back music stored on iPhone/iPad/iPod or charge iPhone/iPad/iPod.∫Compatible iPhone/iPad/iPod(as of September 2014)≥Compatibility depends on the software version. Update your iPhone/iPad/iPod to the latest software before using it with this unit.≥Please be aware that Panasonic accepts no responsibility for the loss of data and/or information.≥Do not connect the following models to the port:– iPod classic, iPod [4th (colour display), and 5th (video) generation], iPod nano (1st generation)Unexpected behaviour may occur.≥Operation results may vary depending on the iPhone/iPad/iPod models.When connecting an iPhone/iPad/iPod, use the dedicated USB cable (not supplied).1Connect iPhone/iPad/iPod to the unit.2Press [NWP].3Press [NINPUT O] below [NWP] repeatedly to select “USB”.4Start play.Operations on the remote control≥It may be necessary to select the album, artist, etc. on the iPhone/iPad/iPod.≥Depending on the iOS version, this function may not be available.During unit on, charging starts when an iPhone/iPad/iPod is connected to this unit.≥Charging is not possible when this unit is turned off.≥Make sure the unit is turned on when you start charging.– When charging an iPhone/iPad/iPod whose battery is depleted, do not turn this unit to standby mode until the iPhone/iPad/iPod becomes operational.≥Check the iPhone/iPad/iPod to see if the battery is fully charged. Once fully charged, remove the iPhone/iPad/iPod.≥Charging stops when the battery is fully charged. The battery will deplete naturally.iPhone 6 Plus / iPhone 6 / iPhone 5s / iPhone 5c / iPhone 5 / iPhone 4s / iPhone 4 / iPhone 3GS / iPhone 3GiPad Air / iPad (3rd and 4th generation) / iPad 2 / iPad / iPad mini with Retina display / iPad miniiPod touch (2nd through 5th generation)iPod nano (3rd through 7th generation)Connecting an iPhone/iPad/iPodUSB cable(not supplied)e.g.,This unit(front)iPhone, etc.Listening to music stored on an iPhone/iPad/iPodStop Press [∫].Pause Press [1/;].≥Press again to restart play.Skip Press [:] or [9] to skip track.SearchDuring play or pause, press and hold [6] or [5].≥On the unit: press and hold [:] or [9].Charging an iPhone/iPad/iPodST-C700-SQT0495_PP_mst.book 14 ページ 2014年11月21日 金曜日 午後7時55分](https://usermanual.wiki/Panasonic-of-North-America/ST-C700/User-Guide-2455718-Page-14.png)
![15(ENG)Using AirPlayAirPlay works with iPhone, iPad, and iPod touch with iOS 4.3.3 or later, Mac with OS X Mountain Lion or later, and PC with iTunes 10.2.2 or later.Preparation≥Complete the network settings. (>12)≥Connect the iOS device or PC to the same network as this unit.1[iOS_device] : Start the “Music” (or iPod) app.[PC] : Start “iTunes”.2Select “Technics ST-C700 _ _ _ _ _ _”*1, 2 from the AirPlay icon.≥Check the volume settings before starting the playback. (When AirPlay is used for the first time, the volume may be output at the maximum setting.)3Start play.≥The playback will start with a slight delay.Operations on the remote control≥Playback of other audio sources will stop and AirPlay output will have priority.≥Volume changes on the iOS device or iTunes will be applied to this unit. (Refer to the iTunes Help for the required settings in iTunes.)≥With some iOS and iTunes versions, it may not be possible to restart the AirPlay playback if the selector is changed or the unit is turned off, during the AirPlay playback.In this case, select a different device from the AirPlay icon of the Music app or iTunes and then re-select this unit as the output speakers.≥AirPlay will not work when playing back videos on iTunes.*1 “ _ ” stands for a digit that is unique to each set.*2 The device name can be changed from “To make network-related settings”. (>12)Using USB deviceYou can play back music stored on a USB device.≥This unit does not guarantee connection with all USB devices.≥FAT16 and FAT32 file systems are supported.≥This unit supports USB 2.0 high speed.≥USB devices may not be recognized by this unit when connected using the following:– a USB hub– a USB extension cable≥It is not possible to use USB card reader/writers.≥This unit cannot record music to a USB device.≥About supported format, refer to “File format” (>29)1Connect a USB device to the unit.2Press [NWP].3Press [NINPUT O] below [NWP] repeatedly to select “USB”.4Press [3,4] to select an item and then press [OK].≥If there are any other items, repeat this step.Operations on the remote controlListening to music with AirPlayStop Press [∫].Pause Press [1/;].≥Press again to restart play.Skip Press [:] or [9] to skip track.Listening to music stored on a USB deviceStop Press [∫].Pause Press [1/;].≥Press again to restart play.Skip Press [:] or [9] to skip track.SearchDuring play or pause, press and hold [6] or [5].≥On the unit: press and hold [:] or [9].≥This operation may not be available for some formats.e.g.,This unit(front)USB deviceST-C700-SQT0495_PP_mst.book 15 ページ 2014年11月21日 金曜日 午後7時55分](https://usermanual.wiki/Panasonic-of-North-America/ST-C700/User-Guide-2455718-Page-15.png)
![16 (ENG)∫Random repeat playbackPress [RND].Each time you press the button:∫Repeat playbackPress [`].Each time you press the button:≥You cannot use random repeat playback in combination with other playback modes.≥You can use repeat playback in combination with program playback.This function allows you to program up to 24 tracks.Preparation≥It is not possible to program tracks by moving folders. Move all the tracks you want to program to a single folder in advance.1Press [PGM] in the stop mode.≥“Program Mode” screen will be displayed.2Press [OK] to display the programming screen.3Press [3,4] to select the desired track.4Press [OK].≥Do steps 3 through 4 again to program other tracks.5Press [1/;] to start playback.≥To return to the “Program Mode” screen, press [∫].Operations on the remote control≥Programmed content is maintained as long as the input source is set to “USB”.≥The program memory will be cleared:– When the USB device is disconnected.– When the unit is turned to standby or off mode.≥You can use program playback in combination with repeat playback.OnAll tracks in a folder are repeated randomly.≥“RND `” is displayed.Off Turns off random repeat mode.1-Track Only plays the selected track.≥“1 `” is displayed.All All tracks in a folder are repeated.≥“`” is displayed.Off Turns off repeat mode.Program playbackStop Press [∫].≥Programmed content is maintained.Check the programmed orderPress [2,1] in the stop mode.≥To return to the “Program Mode” screen, press [RETURN].Add tracks Do steps 3 through 4 in the stop mode.Clear the last trackPress [CLEAR] in the stop mode.≥It is not possible to select and clear the desired programmed track.Cancel program mode1Press [PGM] in the stop mode.≥“Program Clear” is shown.2Press [3,4] to select “Yes” and then press [OK].≥The program memory will be cleared.ST-C700-SQT0495_PP_mst.book 16 ページ 2014年11月21日 金曜日 午後7時55分](https://usermanual.wiki/Panasonic-of-North-America/ST-C700/User-Guide-2455718-Page-16.png)
![17(ENG)Using PC, etc.You can connect the digital audio input terminal [PC] and a PC, etc. with a USB cable and play back music on the PC, etc. with this unit.≥About supported format, refer to “File format” (>29)(as of November 2014)1Disconnect the AC power supply cord.2Connect this unit and a PC, etc.3Connect the AC power supply cord to this unit, and raise the power switch lever to the [Í/I] position. (>10)4Press [NWP].5Press [NINPUT O] below [NWP] repeatedly to select “PC”.6Operate the device to be used for playback.7Press [rVOL s] to adjust the volume.Connecting to a PCBefore connecting to a PC, follow the steps below.≥Refer to the following for the recommend OS versions for your PC:– Windows Vista, Windows 7, Windows 8, Windows 8.1– OS X 10.7, 10.8, 10.91Download and install the dedicated driver to the PC. (Only for Windows OS)Download and install the driver from the website below.www.technics.com/support/2Download and install the dedicated app “Technics Audio Player” (free of charge) on your PC. (Common to both Windows OS and OS X)Download and install the app from the website below.www.technics.com/support/Listening to audio from a PC, etc.USBUSB 2.0 cable(not supplied)This unit(rear)e.g.,PC, etc.Type AType BST-C700-SQT0495_PP_mst.book 17 ページ 2014年11月21日 金曜日 午後7時55分](https://usermanual.wiki/Panasonic-of-North-America/ST-C700/User-Guide-2455718-Page-17.png)
![18 (ENG)Using Bluetooth®You can listen to the sound from the Bluetooth® audio device from this unit wirelessly.≥Refer to the operating instructions of the Bluetooth® device for details.≥If you intend to use an NFC (Near Field Communication)-compatible Bluetooth® device, proceed to “Connecting by NFC”.Preparation≥Turn on the Bluetooth® feature of the device and place the device near this unit.1Press [NWP].2Press [NINPUT O] below [NWP] repeatedly to select “Bluetooth”.3Press [MENU].4Select “Pairing” and then press [OK].5Press [3,4] to select “Yes” and then press [OK].≥“Pairing” is indicated on the display.6Select “ST-C700” from the Bluetooth® device’s Bluetooth® menu.≥The name of the connected device is indicated on the display.≥If prompted for the passkey, input “0000”.≥You can register up to 8 devices with this unit. If a 9th device is paired, the device that has not been used the longest will be replaced.For NFC-compatible Bluetooth® devices (Android™ devices with version 4.1 or later) onlyWith the touch of an NFC (Near Field Communication)-compatible Bluetooth® device to this unit, you can complete a series of steps from registering a Bluetooth® device to connecting it to this unit.Preparation≥Turn on the NFC feature of the device.1Press [NWP].2Press [NINPUT O] below [NWP] repeatedly to select “Bluetooth”.3Press [MENU].4Press [3,4] repeatedly to select “NFC” and then press [OK].5Press [3,4] to select “Yes” and then press [OK].6Touch and hold your device on the NFC touch area of this unit within 20 seconds. (>7)≥Do not move the Bluetooth® device until it displays a message or reacts in some way.Once the Bluetooth® device has reacted, move the device away from this unit.– When the connection of the Bluetooth® device is complete, the name of the connected device is indicated on the display.– The location of the NFC touch area differs depending on the device. When a connection cannot be established even if your Bluetooth® device has touched the NFC touch area of this unit, change the position of the device.≥If you connect another NFC-compatible Bluetooth® device, the previously connected device will be disconnected automatically.≥When the connection is established, playback may start automatically depending on the type of device being used.≥Connecting by NFC may not work properly depending on the type of device being used.≥Do not make an NFC connection in any other way than instructed in the Operating Instructions. Doing so may cause malfunction.Connecting via Bluetooth® menuConnecting by NFCST-C700-SQT0495_PP_mst.book 18 ページ 2014年11月21日 金曜日 午後7時55分](https://usermanual.wiki/Panasonic-of-North-America/ST-C700/User-Guide-2455718-Page-18.png)
![19(ENG)1Press [NWP].2Press [NINPUT O] below [NWP] repeatedly to select “Bluetooth”.≥“Ready” is indicated on the display.≥If you press [1/;], this unit will try and connect to the last connected Bluetooth® device.–“Linking” is indicated on the display.3Select “ST-C700” from the Bluetooth® device’s Bluetooth® menu.≥The name of the connected device is indicated on the display.4Start playback on the Bluetooth® device.Operations on the remote control≥This unit can only be connected to one device at a time.≥To use this unit’s remote control with a Bluetooth® device, the Bluetooth® device must support AVRCP (Audio Video Remote Control Profile).Depending on the status of the device, some controls may not work.You can change the transmission mode to prioritize transmission quality or sound quality.1Press [NWP].2Press [NINPUT O] below [NWP] repeatedly to select “Bluetooth”.≥If a Bluetooth® device is already connected, disconnect it.3Press [MENU].4Press [3,4] repeatedly to select “Link Mode” and then press [OK].5Press [3,4] to select the mode and then press [OK].≥Select “Mode 1” if the sound is interrupted.1Press [NWP].2Press [MENU].3Press [3,4] repeatedly to select “Disconnect?” and then press [OK].4Press [3,4] to select “Yes” and then press [OK].≥The Bluetooth® device will be disconnected if a different audio source is selected.Listening to music stored on a Bluetooth® deviceStop Press [∫].Pause Press [1/;].≥Press again to restart play.Skip Press [:] or [9] to skip track.SearchDuring play or pause, press and hold [6] or [5].≥On the unit: press and hold [:] or [9].Bluetooth® transmission modeMode 1 Emphasis on connectivityMode 2 Emphasis on sound quality (default)Disconnecting a Bluetooth® deviceST-C700-SQT0495_PP_mst.book 19 ページ 2014年11月21日 金曜日 午後7時55分](https://usermanual.wiki/Panasonic-of-North-America/ST-C700/User-Guide-2455718-Page-19.png)
![20 (ENG)Sound adjustmentThe following sound effects can be added to the audio output.Re-mastering expands the playback band and achieves a higher bit depth to reproduce natural and expansive sound close to original music.≥The factory default is “Off”.1Press [NWP].2Press [RE-MASTER] to select “On”/“Off”.This unit can transmit input signals without performing digital signal processing (DSP). This enables faithful and high quality reproduction of original sound.≥The factory default is “Off”.1Press [NWP].2Press [DIRECT] to select “On”/“Off”.You can set an upper limit on the output sampling frequency range. Please note that the range that can be processed differs depending on the amplifier or D/A converter. For details, refer to the operating instructions of the connected device.≥The factory default is “32kHz-192kHz”.Preparation≥Set “Digital Output” to “On”.1Press [NWP].2Press [HOME].3Press [3,4] repeatedly to select “SETUP” and then press [OK].4Press [3,4] repeatedly to select “D.Output fs” and then press [OK].5Press [3,4] to select an item and then press [OK].≥You can select a sampling frequency of 96 kHz or 192 kHz.Disabling the audio output of unused terminals minimizes noise and allows playback in higher audio quality.≥The factory default is “On”.1Press [NWP].2Press [HOME].3Press [3,4] repeatedly to select “SETUP” and then press [OK].To disable the digital audio output:Press [3,4] repeatedly to select “Digital Output” and then press [OK].To disable the analog audio output:Press [3,4] repeatedly to select “Analog Output” and then press [OK].4Press [3,4] to select “Off” and then press [OK].≥To enable the output again, select “On”.≥Depending on the music source that you play back, the applied setting may be less effective.≥Depending on the music source that you play back, it may not be possible to achieve the desired audio quality and sound field effect. In such cases, turn off this function.≥Both Re-master and Direct mode cannot be set to “On”.≥When “Digital Output” or “Analog Output” is set to “Off”, no sound will be output. ≥It may take some time to output audio when you have adjusted the audio quality.Listening to more natural-sounding audio (Re-master)Direct modeSetting the sampling frequencyDisabling audio outputST-C700-SQT0495_PP_mst.book 20 ページ 2014年11月21日 金曜日 午後7時55分](https://usermanual.wiki/Panasonic-of-North-America/ST-C700/User-Guide-2455718-Page-20.png)
![21(ENG)OthersThe sleep timer can turn the unit off after a set time.1Press [NWP].2Press [MENU].3Press [3,4] to select “Sleep” and then press [OK].4Press [3,4] to set the time (in minutes) and then press [OK].“30 minutes” ,. “60 minutes” ,. “90 minutes” ,. “120 minutes” ,. “Off”This unit is designed to conserve its power consumption and save energy. The unit will turn to standby mode automatically if there is no sound and it is not being used for approximately 20 minutes.≥The factory default is “On”.To cancel this function1Press [NWP].2Press [HOME].3Press [3,4] repeatedly to select “SETUP” and then press [OK].4Press [3,4] repeatedly to select “AUTO OFF” and then press [OK].5Press [3,4] to select “Off” and then press [OK].≥To enable the output again, select “On”.≥The auto off function works unless you turn it off, even if you turn off and on this unit.≥If “Network Standby” is set to “On”, this function will also be set to “On”. To change the setting, set “Network Standby” to “Off”. (>21)This unit can turn on automatically from standby mode when this unit is selected as the AirPlay/DLNA player.≥The factory default is “Off”.Preparation≥Connect this unit to the network. (>12)1Press [NWP].2Press [HOME].3Press [3,4] repeatedly to select “SETUP” and then press [OK].4Press [3,4] repeatedly to select “Network Standby” and then press [OK].5Press [3,4] to select “On” and then press [OK].≥If this function is set to “On” the standby power consumption will increase.Sleep timerAuto off functionNetwork standbyST-C700-SQT0495_PP_mst.book 21 ページ 2014年11月21日 金曜日 午後7時55分](https://usermanual.wiki/Panasonic-of-North-America/ST-C700/User-Guide-2455718-Page-21.png)
![22 (ENG)Occasionally, Panasonic may release updated firmware for this unit that may add or improve the way a feature operates. These updates are available free of charge.Preparation≥Connect this unit to the network. (>12)– Make sure that the network is connected to the Internet.1Press [NWP].2Press [HOME].3Press [3,4] repeatedly to select “SETUP” and then press [OK].4Press [3,4] repeatedly to select “F/W Update” and then press [OK].5Press [3,4] to select “Yes” and then press [OK].≥When the update has finished successfully, “Success” is displayed.6Disconnect the AC power supply cord and reconnect it after 3 minutes.≥If there are no updates, “No Need” is displayed after step 5.≥Downloading will require several minutes. It may take longer or may not work properly depending on the connection environment.∫Checking the firmware version1Press [NWP].2Press [HOME].3Press [3,4] repeatedly to select “SETUP” and then press [OK].4Press [3,4] repeatedly to select “F/W Version” and then press [OK].≥Press [OK] to exit.When other equipment responds to the supplied remote control, change the remote control code.≥The factory default is “Mode 1”.Point the remote control at this unit, and press and hold [OK] and the numeric button for at least 4 seconds.≥When the remote control code is changed, the new code will appear on the display for a few seconds.≥When the SU-C700/SL-C700 is connected via the system control function, change its remote control code as well as the remote control code for this unit.日本語や中国語の曲名、アーティスト名などをフォントを切り替えて表示することができます。≥The factory default is “Type1”.1Press [NWP].2Press [HOME].3Press [3,4] repeatedly to select “SETUP” and then press [OK].4Press [3,4] repeatedly to select “Characters” and then press [OK].5Press [3,4] to select “Type1”/“Type2” and then press [OK].Firmware updatesDo not disconnect the AC power supply cord or lower the power switch lever to the [OFF] position while one of the following messages is displayed.“Linking” or “Updating %” (“ ” stands for a number.)≥During the update process, no other operations can be performed.Remote control code[OK] + [1] Set the code to “Mode 1”[OK] + [2] Set the code to “Mode 2”漢字フォントを切り換えるType1 日本語用フォントを使って表示します。Type2 中国語(簡体)用フォントを使って表示します。ST-C700-SQT0495_PP_mst.book 22 ページ 2014年11月21日 金曜日 午後7時55分](https://usermanual.wiki/Panasonic-of-North-America/ST-C700/User-Guide-2455718-Page-22.png)
![23(ENG)You can operate this unit and the SU-C700 simultaneously with ease on the remote control.Preparation1Connect this unit and the SU-C700 with a system connection cable and a coaxial digital cable. (>9)2Set the power switch lever of this unit and the SU-C700 to the [Í/I] position.∫Switching this unit and the SU-C700 to on/standby simultaneously≥If you point the remote control at this unit and press [NWP Í] when this unit and the SU-C700 are in standby mode, this unit and the SU-C700 will be turned on simultaneously.≥本機および SU-C700 の電源が「入」で SU-C700 の入力ソースが “COAX1” のとき、[NWP Í] を本機に向けて押すと、本機および SU-C700 の電源は自動的にスタンバイ状態になります。∫Switching the SU-C700’s input source automaticallyWhen you perform an operation such as playback on this unit, the input source of the SU-C700 will be automatically switched to “COAX1”.∫Adjusting Bass/Middle/TrebleYou can adjust the tone of the SU-C700 with this unit. Each tonal range (Bass/Middle/Treble) can be adjusted.1Press [NWP].2Press [HOME].3Press [3,4] repeatedly to select “SETUP” and then press [OK].4Press [3,4] repeatedly to select “Tone Control” and then press [OK].5Press [3,4] to select “On (adjustment)” and then press [OK].6Press [3,4] to select “BASS” (Bass), “MID” (Middle) or “TREBLE” (Treble).7Press [2,1] to adjust the level and then press [OK].≥Each level can be adjusted between “s10” and “r10”.≥For information on the operations of the SU-C700, please also refer to its operating instructions.TroubleshootingBefore requesting service, make the following checks. If you are uncertain about some of the check points, or if the solutions indicated in the following guide does not resolve the issue, then consult your dealer for instructions.Heat buildup of this unit.≥This unit becomes warm when used for a long time. This is not a malfunction.Do you have the latest firmware installed?≥Panasonic is constantly improving the unit’s firmware to ensure that our customers are enjoying the latest technology. (>22)A “humming” sound can be heard during playback.≥An AC power supply cord or fluorescent light is near the cables. Keep other appliances and cords away from the cables of this unit.No sound.≥Check the volume of the connected device (amplifier, etc.).≥Check to see if the cable connections to the input and output terminals are incorrect. If this is the case, turn off this unit and reconnect the cables correctly.≥Check to see if the correct input source is selected.≥Insert the plugs of the cables to be connected all the way in.≥When “Digital Output” or “Analog Output” is set to “Off”, no sound will be output. Change the setting of the output terminal to be used to “On”. (>20)≥Playback of multi-channel content is not supported.Using the system control functionTo return all settings to the factory defaultsWhen the following situations occur, reset the memory:≥There is no response when buttons are pressed.≥You want to clear and reset the memory contents.1Press [NWP].2Press [HOME].3Press [3,4] repeatedly to select “SETUP” and then press [OK].4Press [3,4] repeatedly to select “Initialization” and then press [OK].5Press [3,4] to select “Yes” and then press [OK].6Press [3,4] to select “Yes” and then press [OK] again.GeneralST-C700-SQT0495_PP_mst.book 23 ページ 2014年11月21日 金曜日 午後7時55分](https://usermanual.wiki/Panasonic-of-North-America/ST-C700/User-Guide-2455718-Page-23.png)
![24 (ENG)The sound is interrupted.≥Depending on your environment, the audio may be interrupted during playback. Check the operating instructions of the connected device and the connection to the device.Playback does not start.≥Depending on your environment or connected devices, it may take some time.The system control function is not working.≥Connect the system connection cable to the system terminal [CONTROL1] of the SU-C700.≥Connect the coaxial digital cable to the digital audio input terminal [COAX1 IN] of the SU-C700.The unit switches to standby mode.≥Is the auto off function turned on? (>21)≥If the SU-C700/SL-C700 is connected to this unit via the system control function, this unit may turn off automatically when you turn off the SU-C700/SL-C700. (>9, 23)Cannot connect to the network.≥Confirm the network connection and settings. (>12)Cannot connect to the unit.≥Make sure that the multicast function on the wireless router is enabled.≥Make sure that the device and the unit are connected to the same network. (>12)≥Reconnect the compatible device to the network and then connect to this unit again.≥Set “Network Standby” to “Off” (>21), turn this unit off and on, and then connect to this unit again.Playback does not start.The sound is interrupted.≥Simultaneous use with other 2.4 GHz devices, such as microwaves, cordless telephones, etc., may result in connection interruptions.Increase the distance between the wireless router and these devices.≥If several wireless devices are simultaneously using the same wireless network as this unit, try turning off the other devices or reducing their wireless network usage.≥Turn off and then on the wireless router.≥Reconnect the devices to the network.≥If the playback stops, check the playback status on the device.Cannot operate.≥Select “USB” as the input source.≥Check that the iPhone/iPad/iPod is connected properly.≥Connect the iPhone/iPad/iPod again or try to restart the iPhone/iPad/iPod.≥The battery of the iPhone/iPad/iPod is depleted. Charge the iPhone/iPad/iPod, and then operate again.iPhone/iPad/iPod does not charge.≥Make sure the unit is turned on when you start charging.– When charging an iPhone/iPad/iPod whose battery is depleted, do not turn this unit to standby mode until the iPhone/iPad/iPod becomes operational.The USB drive or its contents cannot be read.≥The USB drive format or its contents is/are not compatible with the unit. (>29)No response when [1/;] is pressed.≥Disconnect the USB device and then reconnect it. Alternatively, turn the unit off and on again.Slow operation of the USB flash drive.≥Large file size or high memory USB flash drive takes longer time to read.The PC does not recognize this unit.≥Check your operating environment. (>17)≥Restart the PC, turn off and on this unit, and then reconnect the USB cable.≥Use another USB port of the connected PC.≥Install the dedicated driver if using a PC with Windows.Cannot find music files stored on the PC.≥When you play back music files over a network, those that are not registered to its network server are not displayed. For details, refer to the operating instructions for your server.AirPlay/DLNAiPhone/iPad/iPodUSBPCST-C700-SQT0495_PP_mst.book 24 ページ 2014年11月21日 金曜日 午後7時55分](https://usermanual.wiki/Panasonic-of-North-America/ST-C700/User-Guide-2455718-Page-24.png)
![25(ENG)Pairing cannot be completed.≥Check the Bluetooth® device condition.The device cannot be connected.≥The pairing of the device was unsuccessful or the registration has been replaced. Try re-pairing the device.≥This unit might be connected to a different device. Disconnect the other device and try re-pairing the device.The device is connected, but audio cannot be heard through this unit.≥For some built-in Bluetooth® devices, you have to set the audio output to “ST-C700” manually. Read the operating instructions for the device for details.NFC is not working.≥Make sure the NFC feature of the device are turned on.≥Turn on the NFC feature of this unit when you connect a device using NFC. (>18)Reception is poor or a beat sound is heard.≥Keep the antenna away from computers, TVs, other cables and cords.≥Use an outdoor antenna.The remote control does not work properly.≥To avoid interference, please do not put any objects in front of signal sensor. (>7)≥Change the remote control code if other products react to this remote control. (>22)≥操作する機器に SU-C700/SL-C700 が選ばれている場合は、[NWP] を押してから操作をやり直してください。 (>7)Pressing [DIMMER] changes the display, the light and the indicator brightness of the SU-C700/SL-C700.≥[DIMMER] works for the SU-C700/SL-C700 as well as this unit. Turn off the device that you want to maintain the brightness level of, and press [DIMMER].The following messages or service numbers may appear on the unit’s display.“AUTO OFF”≥The unit has been left unused for about 20 minutes and will shut down within a minute. Press any button to cancel it.“Checking Connection”≥The unit is checking the connected iPhone/iPad/iPod or a USB device.“Download Error”≥The firmware download has failed. Press any button to exit. Please try again later.≥The server cannot be found. Press any button to exit. Make sure that the network is connected to the Internet.“Error”≥Incorrect operation is performed. Read the instructions and try again.“Fail”≥The update has been failed. Disconnect the AC power supply cord and reconnect it. Turn the unit on and try again. (>22)“F” (“ ” stands for a number.)≥There is a problem with this unit.– Is the volume extremely high?If so, lower the volume.– Is this unit placed in an extremely hot place?If so, move this unit to a cooler place and wait a few moments and then try to turn it on again.If the problem persists, write down the displayed number, disconnect the AC power supply cord and consult your dealer.“No Network Connection”≥This unit is not connected to the network.Check the network connection. (>12)“No Signal”≥This station cannot be received. Check your antenna.“Not Conditional”≥The function you have tried to use is not available with the current settings. Check the steps and settings.Bluetooth®RadioRemote controlMessagesST-C700-SQT0495_PP_mst.book 25 ページ 2014年11月21日 金曜日 午後7時55分](https://usermanual.wiki/Panasonic-of-North-America/ST-C700/User-Guide-2455718-Page-25.png)
![26 (ENG)“PGM Full”≥The number of programmed tracks is more than 24.“Please Wait”≥This is displayed, for example, when this unit is turned on/off. (For up to 1 minute and 30 seconds)“Remote ” (“ ” stands for a number.)≥The remote control and this unit are using different codes. Change the code on the remote control.– When “Remote 1” is displayed, press and hold [OK] and [1] for at least 4 seconds.– When “Remote 2” is displayed, press and hold [OK] and [2] for at least 4 seconds.“Searching”≥The unit is checking the DLNA server on the network.“Unlock”≥“PC” is selected, but a PC is not connected. Check the connection with the PC. (>17)≥Audio signals, such as sampling frequency components, are not input correctly.“USB Over Current Error”≥The iPhone/iPad/iPod or USB device is drawing too much power. Disconnect the iPhone/iPad/iPod or USB device and turn the unit off and on again.“Hub Device Not Supported”“Unrecognizable Device”“Unsupported”“Unsupported USB Device”≥You have connected an iPhone/iPad/iPod or USB device that is not supported.– If the iPhone/iPad/iPod is compatible, turn it on and connect it correctly.≥The format of the file on the iPhone/iPad/iPod or USB device is not supported.– About supported format, refer to “File format” (>29)Unit carePull out the AC power supply cord from the outlet before maintenance. Clean this unit with a soft cloth.≥When dirt is heavy, wring a wet cloth tightly to wipe the dirt, and then wipe it with a soft cloth.≥Do not use solvents including benzine, thinner, alcohol, kitchen detergent, a chemical wiper, etc. This might cause the exterior case to be deformed or the coating to come off.ST-C700-SQT0495_PP_mst.book 26 ページ 2014年11月21日 金曜日 午後7時55分](https://usermanual.wiki/Panasonic-of-North-America/ST-C700/User-Guide-2455718-Page-26.png)