Panasonic of North America SU-ZT1 Home Theater Audio System User Manual
Panasonic Corporation of North America Home Theater Audio System Users Manual
UserManual.wiki
>
Panasonic of North America
>
SU ZT1 User Manual
Manual
Navigation menu
Upload a User Manual
Namespaces
Wiki Guide
HTML
PDF
Info
Views
User Manual
Discussion / Help
Navigation
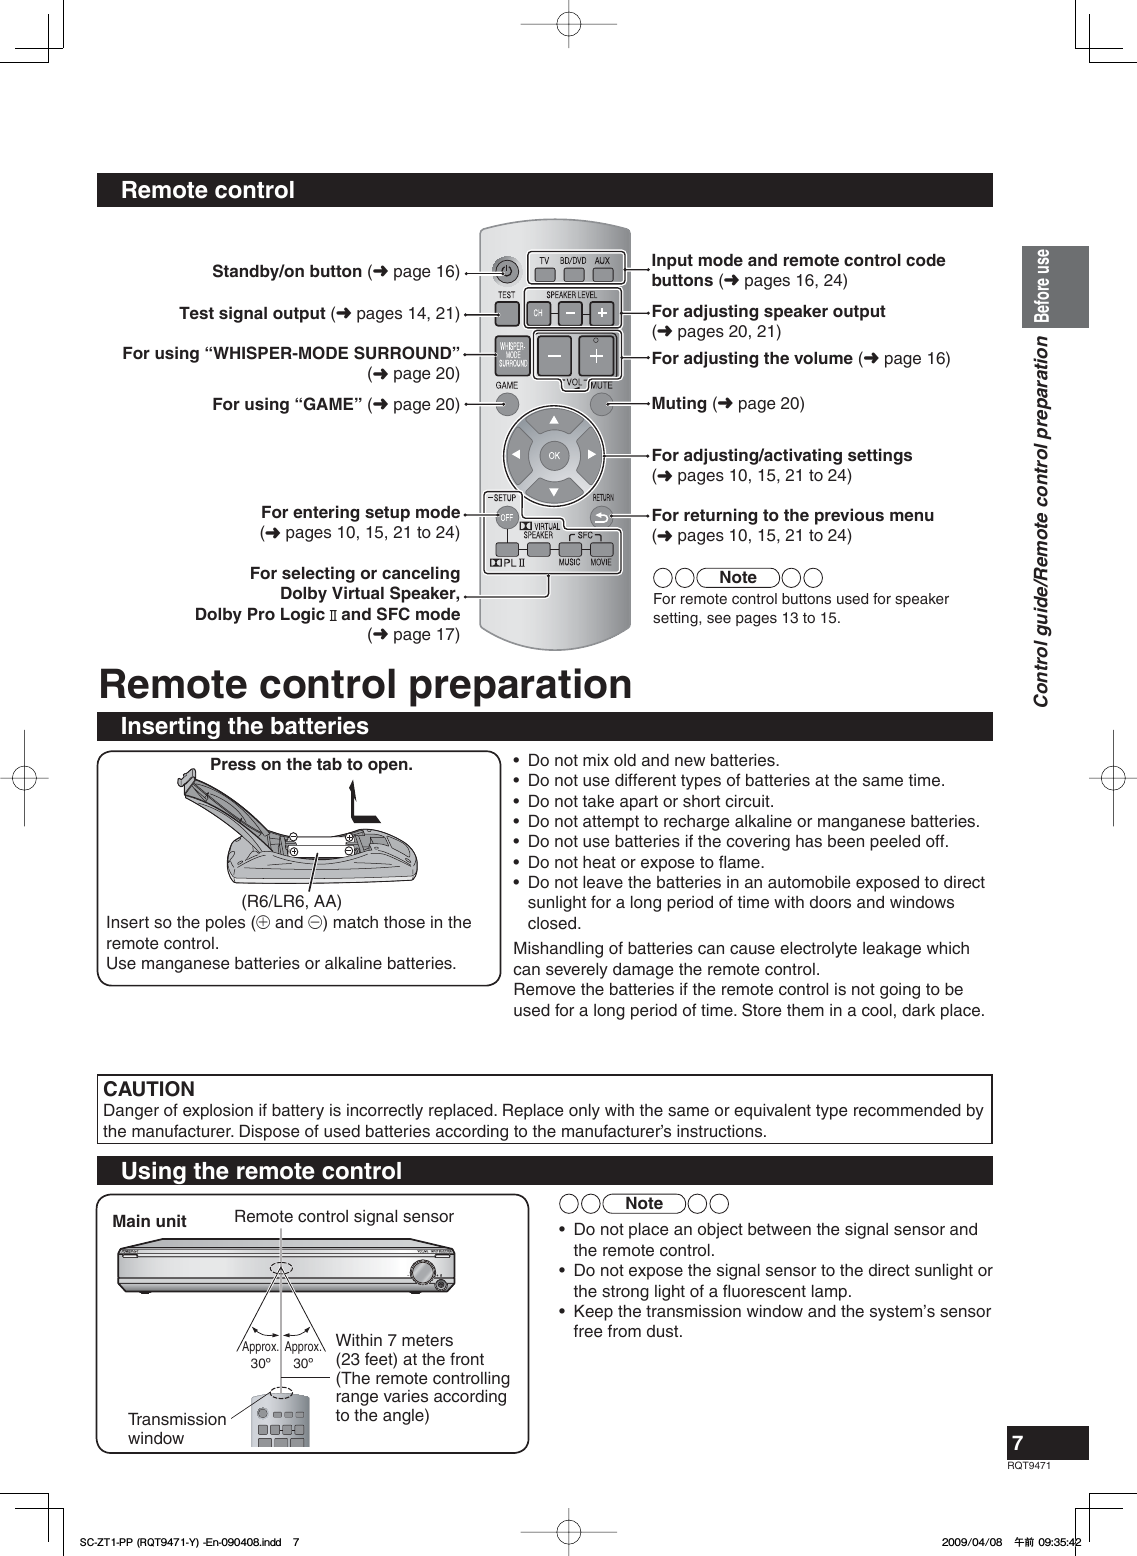
![RQT94715Supplied accessories/Control guideBefore useKeep the Leg cushion out of reach of children to prevent swallowing.Please check and identify the supplied accessories.Use numbers indicated in parentheses when asking for replacement parts.(Product numbers correct as of April 2009. These may be subject to change.)Only for U.S.A. and Puerto Rico: To order accessories, refer to “Accessory Purchases (United States and Puerto Rico)” on page 30.Only for Canada: To order accessories, call the dealer from whom you have made your purchase.Supplied accessoriesMain unit (Control box)Control guideFront viewDisplayPCMWDIGITAL DTSPL SFC MIXVSDIGITAL INPUTftDigital surround signal/Sound fi eld (➜ below, page 17)When input signal is digitalWhen PCM signal is being input or the input signal setting is fi xed to PCM (➜ page 24)General displayWhen the input signal setting is fi xed to DTS (➜ page 24)Wireless Link display(Displayed when wireless speakers are properly operating.) (➜ page 14)When the sound fi eld effect is off by pressing [–SETUP, OFF] (➜ page 17)or when using headphones (➜ page 25)Standby/on switch(➜ pages 13, 16)For adjusting volume(➜ page 16)[INPUT SELECTOR] switch (➜ page 16)For connecting headphones (➜ page 25) DIGITAL : Dolby Digital sourcesDTS : DTS sources VS : When Dolby Virtual Speaker is workingSFC : When SFC mode is being used PL : When Dolby Pro Logic decoder is being used (When using Dolby Virtual Speaker for 2-channel stereo source)• When taking out speakers, hold the pole and base parts (➜ page 6).Packing planSpeakersRemote controlBatteriesMain unitAC power supply cords5 AC power supply cords(K2CB2CB00021)2 Batteries(R6, AA)1 Remote control (N2QAYB000417)Leg cushions (2 sheets: 16 pieces)(RFA3045)Unit of distance: ft (feet), 1 feet=0.3 meter (➜ page 22)5%<622436;'PKPFF5%<622436;'PKPFFඦ೨ඦ೨](https://usermanual.wiki/Panasonic-of-North-America/SU-ZT1/User-Guide-1105012-Page-5.png)
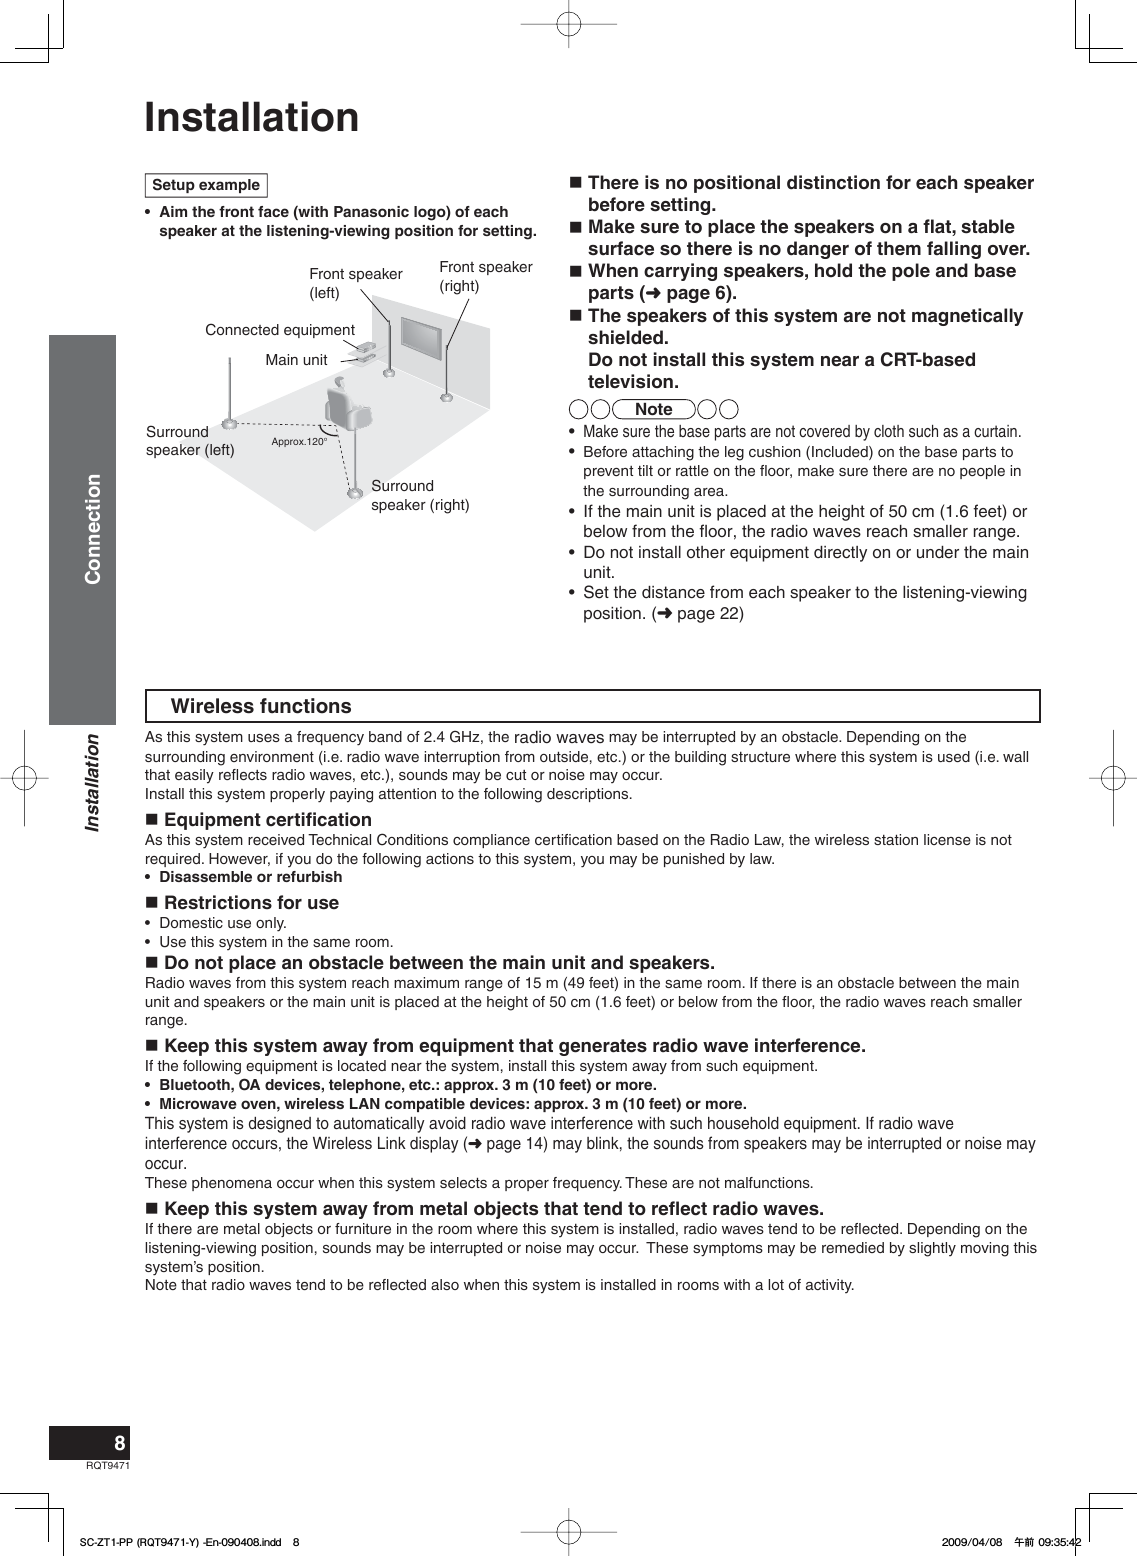
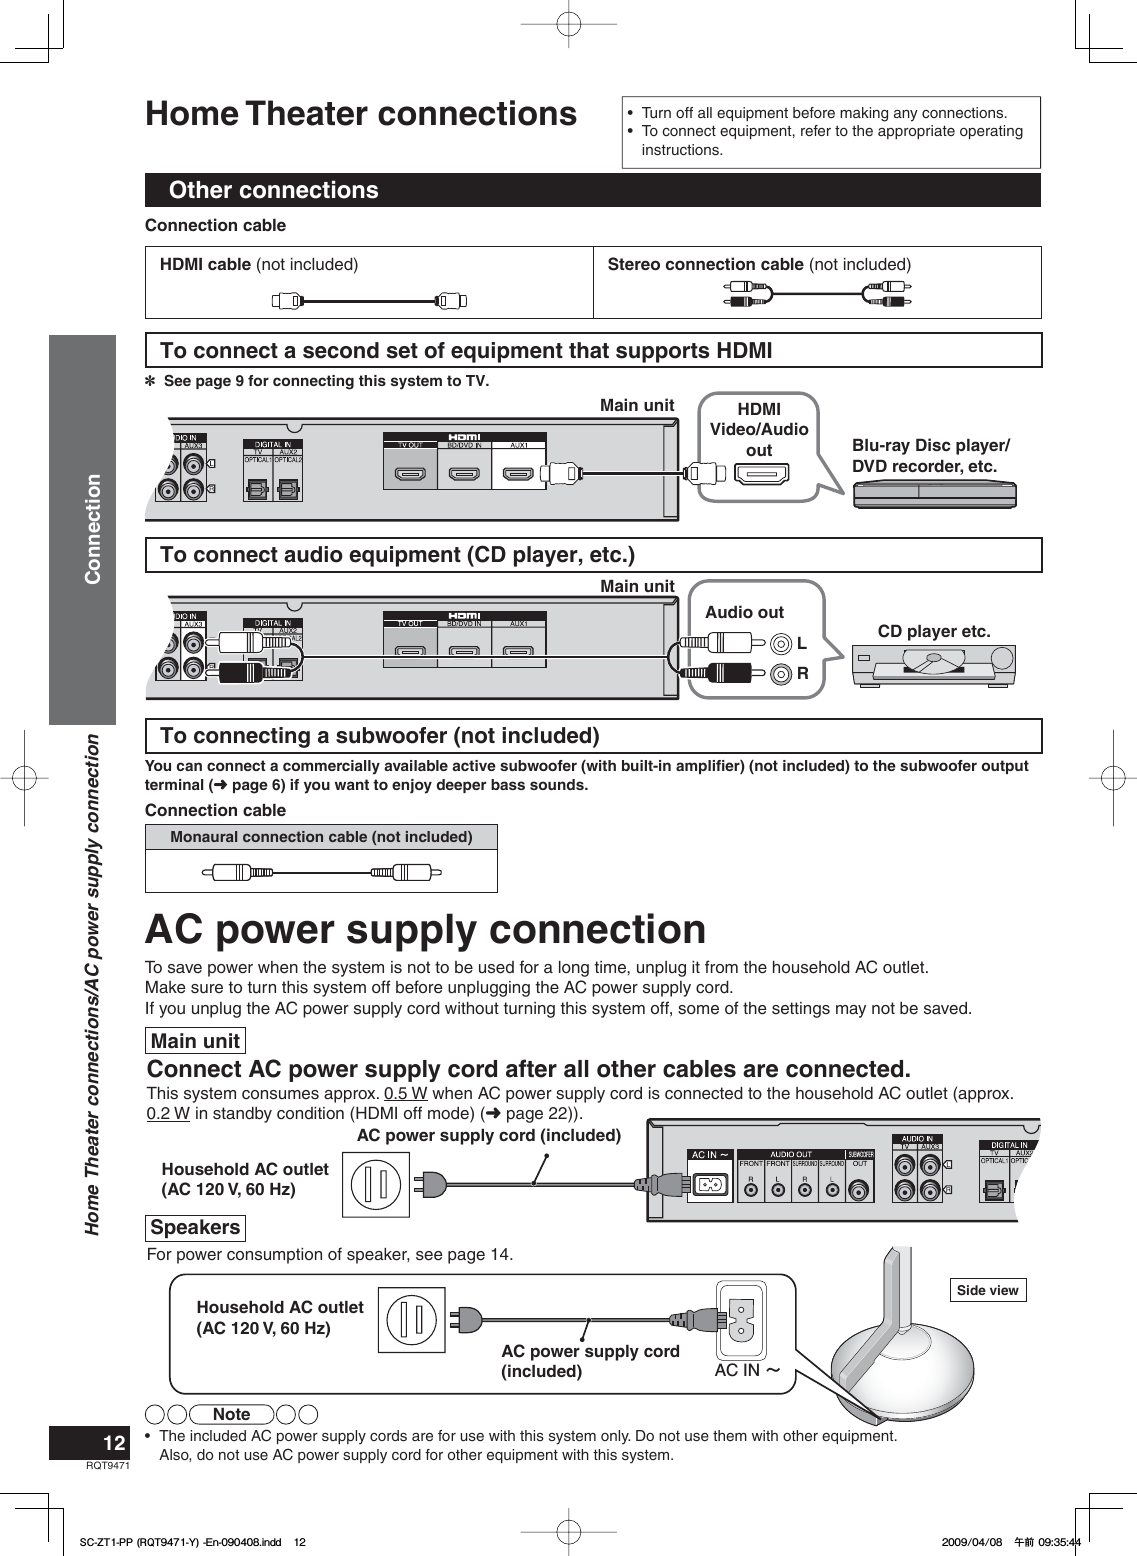
![RQT94716Speaker (with built-in amplifi er)AC IN 㨪TEST IDPole (mid-high part)Base(woofer part)AC inlet(➜ page 12)TESTterminal[WIRELESS LINK] indicator(➜ page 13)ID switchFor switching the speaker “ON/OFF” (➜ page 13)Front view Side viewNoteTEST terminal: This is used to check the product operation status. Only used in factory. Do not insert a foreign object.ID switch: This is used to check the product operation status and not used regularly.Control guideBefore useControl guideNoteThe audio output terminals can be used when you do not use the wireless function and play back on other speakers via an externalamplifi er. Use commercially available monaural audio cables (monaural mini plug/pin plug) to connect to audio input terminals of an external amplifi er channel by channel.Rear viewAC inlet (➜ page 12)Subwoofer output terminal (➜ page 12) Digital input terminal (➜ pages 9 to 11, 19)HDMI terminal (➜ pages 9, 10, 12, 19)Audio input terminal (➜ pages 9 to 12)Audio output terminal(➜ below)5%<622436;'PKPFF5%<622436;'PKPFFඦ೨ඦ೨](https://usermanual.wiki/Panasonic-of-North-America/SU-ZT1/User-Guide-1105012-Page-6.png)

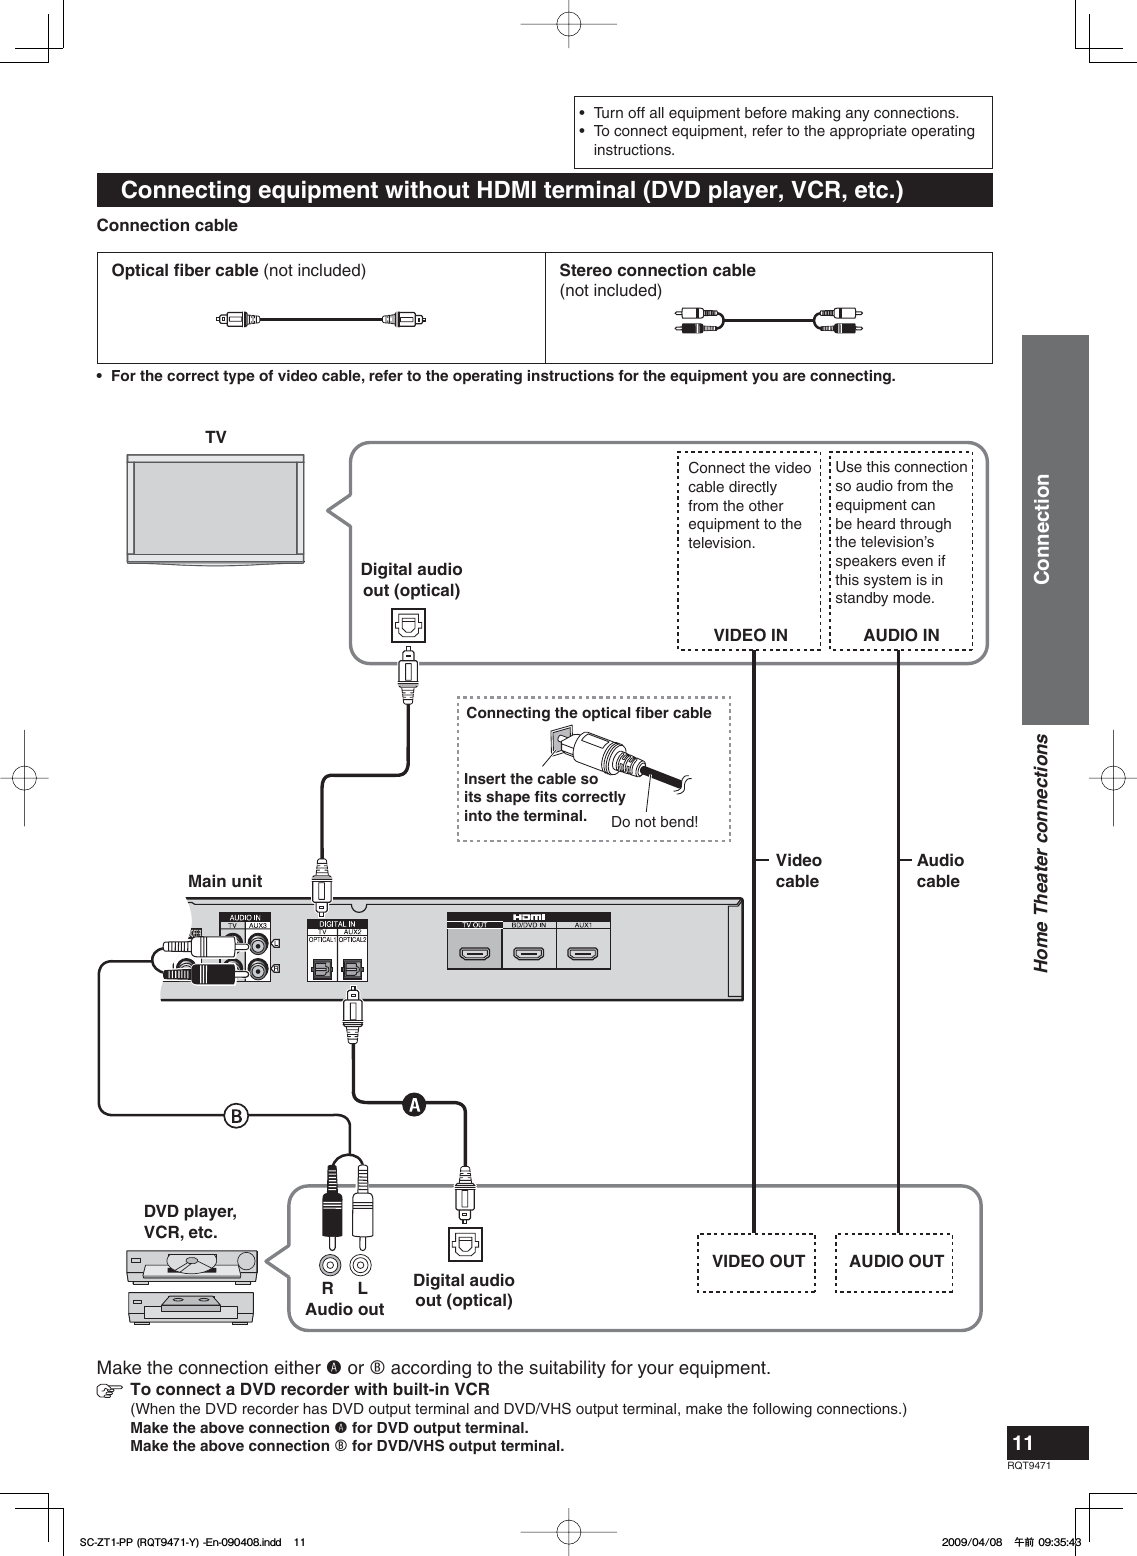
![RQT947110Home Theater connectionsHome Theater connections ConnectionBasic connectionsConnecting STB etc.Use this connection to enjoy STB multi-channel sources on this system.Main unitHDMI input TVHDMI Video/Audio outDigital audio out (optical)Blu-ray Disc player/DVD recorder, etc.Make sure to connect to TV OUT .Digital audio out (optical)STB etc.Setting for automatically switching the input source to STBWhen you make the above connection and you use Panasonic TV (VIERA), you can automatically switch this system’s input by switching the input source of TV (VIERA) to STB in the following procedure.Preparation: Make sure that this system has been turned on. (➜ page 16)1. Switch the input source of TV (VIERA) with the above connection and show STB pictures.2. Press and hold [–SETUP, OFF] for about 2 seconds.The setting items are displayed. (➜ page 21)3. Press [w][q] to select “STB AUDIO ” and press [OK].4. Press [e][r] to select “SET ” and press [OK].SET : The setting is automatically switched to “AUX2 / STB ”.OFF : The setting is not automatically switched to “AUX2 / STB ”. (factory setting)5. Press [ RETURN] several times to select “EXIT ” and press [OK] to fi nish the setting.:Connect the video cable directly from the other equipment to the television. :Use this connection so audio from the equipment can be heard through the television’s speakers even if this system is in standby mode.Reduce the volume on the television and select “TV ” after you have made connections as above if you want to use this system.Connecting cables to audio terminals (DVD player, etc.)TV Audio outVideo cable ()Audio cable ()VIDEO INAUDIO INVIDEO OUTAUDIO OUTLRMain unitDVD player etc.Note• “STB AUDIO ” in step 3 is displayed only when the unit is connected to the Panasonic TV (VIERA). Also, this is not displayed when the step 1 operation is not performed.• If you change the connection after setting, select OFF once and SET again.• When you select “EXIT ” and press [OK], the setting mode finishes in step 3.HDMI INHDMI OUTTo return to the previous display/To cancel during setting operation in steps 2 to 5: Press [ RETURN].HDMI cable• Refer to the operating instructions for the equipment you are connecting for the correct type of video cable.5%<622436;'PKPFF5%<622436;'PKPFFඦ೨ඦ೨](https://usermanual.wiki/Panasonic-of-North-America/SU-ZT1/User-Guide-1105012-Page-10.png)
![RQT9471131. Turn the main unit on.Press • “4CH SEARCH ” appears on the display. (This is displayed only at the first-time setting.)2. Turn 4 speakers on.[WIRELESS LINK] indicatorPressWIRELESS LINKPOWER• The color of [WIRELESS LINK] indicator changes from red to green.• When the [WIRELESS LINK] indicator of each speaker lights green, “4CH SEARCH ” display disappears.3. Press and hold [CH] on the remote control for about 3 seconds until “4 SPKR SET ” is displayed on the main unit’s display.Always aim the remote control at the main unit for operation. Press and hold (about 3 seconds)“4 SPKR SET ”4. Press the remote control button corresponding to the speaker outputting the confi rmation sound.When the sound is output from the surround speaker (right), press [ RETURN].When the sound is output from the surround speaker (left), press [–SETUP, OFF].When the sound is output from the front speaker (left), press [GAME].When the sound is output from the front speaker (right), press [MUTE].Front speaker (left)Front speaker (right)Surroundspeaker (left)Surroundspeaker (right)GAME MUTERETURN–SETUP, OFF • Sound is output from either of the speakers. • When you press the button corresponding to the confi rmation sound of speaker, another speaker outputs confi rmation sound. Press the corresponding button in the same way and complete settings for all 4 speakers. • When “COMPLETE ” disappears on the main unit’s display, the speaker setting is complete.Note• Check if the speakers are properly set after setting the speakers. (➜ page 14)• If the speakers are set incorrectly in step 4, turn the main unit off then on again and perform steps 3 and 4.• If [WIRELESS LINK] indicator does not change from red to green, see page 27 of “Troubleshooting guide”.Speaker setting Make sure that all equipment has been turned off.(When the VIERA Link “HDAVI Control” compatible Panasonic TV (VIERA) and Blu-ray Disc player/DVD recorder (DIGA) are connected, do not turn on TV (VIERA) and Blu-ray Disc player/DVD recorder (DIGA) until the setting is complete.) Connect the AC power supply cords of main unit and 4 speakers to household AC outlets. (➜ page 12) Make sure that the main unit and speakers have been turned off. Prepare the remote control. (➜ page 7)PreparationsMake sure to make this setting when using for the fi rst time after purchase.Setting the speakersSpeaker setting ConnectionWhen installing front speakers only See “Setting front speakers only” (➜ page 15).5%<622436;'PKPFF5%<622436;'PKPFFඦ೨ඦ೨](https://usermanual.wiki/Panasonic-of-North-America/SU-ZT1/User-Guide-1105012-Page-13.png)
![RQT947114When the speakers are detected, the Wireless Link display lights up on the main unit’s display.(Blinks during detecting operation.)While the wireless speakers operate normally, the Wireless Link display lights, but when radio waves are interrupted (When speakers are in standby condition, etc.), it blinks.DisplayWWireless Link displayChecking the speaker setting1. Turn the main unit on.2. Press [TEST] on the remote control to output the test signal.3. Make sure that the display of main unit matches speaker locations.The test signal is output from one speaker at a time for about 2 seconds in the order shown below.“TEST L ”→ “TEST R ”→ “TEST RS ”✽→ “TEST LS ”✽ Confi rm the correct setting locations in the following chart.Display Speaker outputting the test signalTEST L Front leftTEST R Front rightTEST RS ✽Surround right (right back)TEST LS ✽Surround left (left back)NoteIf the speakers are not properly set, do either of the following.• Move the speakers according to the unit’s display.• Perform steps 3 and 4 of “Setting the speakers” (➜ page 13). When using only front speakers, perform steps 4 and 5 of “Setting front speakers only” (➜ page 15).4. Press [TEST] on the remote control to stop the test signal.If the speaker is repaired or replacedPerform the above “Checking the speaker setting” to confi rm that the speaker properly operates. Do the following operations if the sound is not produced normally.1. Press and hold [INPUT SELECTOR] on the main unit about 3 seconds until “4CH SEARCH ” is displayed.2. Perform steps 2 to 4 of “Setting the speakers” (➜ page 13).Speaker setting• When you turn the main unit off with the speakers on, the speakers automatically enter standby (Wireless link standby). The color of [WIRELESS LINK] indicator turns to red.• To reduce more of the power consumption of speakers in standby, turn the speakers off. The speakers enter standby (In standbycondition).<Power consumption of speakers in standby> Wireless link standby: approx. 0.8 W (for 1 speaker) In standby condition: approx. 0.1 W (for 1 speaker)✽ This is not displayed when using the front speakers only.Speaker setting ConnectionPress• To adjust the speaker volume, press [VOL +, –].5%<622436;'PKPFF5%<622436;'PKPFFඦ೨ඦ೨](https://usermanual.wiki/Panasonic-of-North-America/SU-ZT1/User-Guide-1105012-Page-14.png)
![RQT947115Setting front speakers onlyMake this setting after the speaker setting on page 13 is complete.Preparations• Make sure that all equipment has been turned off. (When the VIERA Link “HDAVI Control” compatible Panasonic TV (VIERA) and Blu-ray Disc player/DVD recorder (DIGA) are connected, do not turn on TV (VIERA) and Blu-ray Disc player/DVD recorder (DIGA) until the setting is complete.)• Turn the main unit on. (➜ page 13)• Turn 2 speakers on. (➜ page 13)• Prepare the remote control. (➜ page 7)1. Set “2CH ” at the setting operation of “Changing the number of speakers to 2” below.2. Turn the main unit off once.3. Turn the main unit on again.4. Press and hold [CH] on the remote control for about 3 seconds until “2 SPKR SET ” is displayed on the main unit’s display. • Always aim the remote control at the main unit for operation.5. Press the remote control button corresponding to the speaker outputting the confi rmation sound.When the sound is output from the front speaker (left), press [GAME].When the sound is output from the front speaker (right), press [MUTE].Front speaker (left)Front speaker (right)GAME MUTE • Sound is output from either of the speakers. • When you press the button corresponding to the confi rmation sound of speaker, another speaker outputs confi rmation sound. Press the corresponding button in the same way and complete settings for all 2 speakers. • When “COMPLETE ” disappears on the main unit’s display, the speaker setting is complete.Note• Check if the speakers are properly set after setting the speakers. (➜ page 14)• If the speakers are set incorrectly in step 5, turn the main unit off then on again and perform steps 4 and 5.• If [WIRELESS LINK] indicator does not change from red to green, see page 27 of “Troubleshooting guide”.Changing the number of speakers to 21. Press and hold [–SETUP, OFF] for about 2 seconds.The setting items are displayed. (➜ page 21)2. Press [w][q] to select “SPEAKERS ” and press [OK].3. Press [e][r] to select “2CH ” and press [OK].2CH : When only front speakers are installed4CH : When surround speakers are additionally installed (factory setting)• When changing the number of speakers to 4, select “4CH ” and press [OK].4. Press [e][r] to select “YES ” and press [OK].• To cancel, select “NO ”.5. Press [ RETURN] several times to select “EXIT ” and press [OK] to fi nish the setting.NoteWhen you select “EXIT ” and press [OK], the setting mode fi nishes in step 2.Speaker setting Connection To return to the previous display/To cancel during setting operation: Press [ RETURN].5%<622436;'PKPFF5%<622436;'PKPFFඦ೨ඦ೨](https://usermanual.wiki/Panasonic-of-North-America/SU-ZT1/User-Guide-1105012-Page-15.png)
![RQT947116•Turn on the TV and switch its input to match the connection (HDMI, for example) using the TV’s remote control.•Make sure that the speakers are on. (The following are operations when the power is on in Wireless link standby.)Enjoying movies and musicPressINPUT SELECTOR1Turn on the system.Press(The input source switches each time you press the button.)TV : TV (optical, analog)BD/DVD :Blu-ray Disc player/DVD recorder (HDMI)AUX 1 : AUX1 terminal (HDMI)AUX 2 : AUX2 terminal (optical)AUX 3 : AUX3 terminal (analog)Operation on the main unit2Select the source.3Start play on the connected equipment.4To adjust the volume.TurnNote• See page 27 for digital signals that can be played on this system.• Depending on the playback signal, you may feel the volume of the bass or surround speakers is not balanced with the volume of the front speakers. In this case, you can adjust the speaker volume during playback. (➜ page 20)• Even if you switch input to “TV ”, images (or audio) of the equipment connected to BD/DVD IN terminal or AUX1 terminal are output from TV OUT terminal. When the equipment is connected to both BD/DVD IN terminal and AUX1 terminal, signals of equipment whose input is lastly selected are output.• When using a DVD recorder with built-in VCR (with the DVD output terminal and DVD/VHS output terminal mounted), select the input as follows in step 2 above. To enjoy DVD (when connected to AUX2): select “AUX 2 ”. To enjoy video (when connected to AUX3): select “AUX 3 ”.TV : TV (optical,analog)BD/DVD : Blu-ray Disc player/DVD recorder (HDMI)AUX 1 : AUX1 terminal (HDMI)AUX 2 : AUX2 terminal (optical)AUX 3 : AUX3 terminal (analog)“AUX 1”,“AUX 2”, and “AUX 3” switch every time you press [AUX].Press this button to turn on the system.1234 After playback, reduce the volume level and turn off.To select the source press one of these buttons.Start play on the connected equipment. You can enjoy a variety of surround effects. (➜ page 17)To adjust the volume press these buttons.ororAdjustment range: 0 (Min) to 50 (Max)Aim the remote control toward the signal sensor (➜ page 7) on the main unit of this system.PreparationsPlay Enjoying movies and music5%<622436;'PKPFF5%<622436;'PKPFFඦ೨ඦ೨](https://usermanual.wiki/Panasonic-of-North-America/SU-ZT1/User-Guide-1105012-Page-16.png)
![RQT947117Canceling sound fi eld effectsPress• The surround effects disappear for 2-channel sources such as CD and TV.•When the input signals are multi-channel LPCM or surround digital signals such as Dolby Digital or DTS, the surround playback (➜ left) is achieved. When you use front speakers only, those signals are converged and are output from left and right front speakers.• The condition before the sound field effect is canceled is restored when you turn the unit off/on, switch input sources or plug/unplug the headphones.Enjoying sound fi eld effectsSound fi eld effects differ depending on input sources. Select the mode you prefer after listening to the actual sound.Surround playbackMulti-channel signals are distributed to left and right front speakers, and left and right surround speakers to output.SFC (Sound Field Control)You can enjoy more dynamic and broader surround effects when using SFC with Dolby Digital, DTS and stereo signals (video, CD, etc.). Using SFC (Sound Field Control)Press • The mode switches each time you press the button. (➜ below)To cancel SFC modePressMUSICLIVE Sound refl ection and spread as if you were in a large concert hall.POP/ROCK Best suited for pop and rock music.VOCAL Enhance vocals.JAZZ Sound refl ections as if you were in a small Jazz club.DANCE Sound spread echoing in a large space such as a dance hall.MOVIENEWS Best suited for dialogs in news and drama movies.ACTION Best suited for action movies with impact.STADIUM Enjoy the feeling of being at a live sporting event.MUSICAL Enjoy the feeling of being at a live musical performance.GAME Enjoy games with greater audio impact.MONO Enjoy older monaural audio movies.Dolby Pro Logic You can enjoy 2-channel sources such as CD with the surround effect. Using Dolby Pro Logic PressTo cancel sound fi eld effects Press [–SETUP, OFF]. (➜ right)Note• See page 5 about how to display the surround digital signal/sound field.• If the input signal is 2-channel, Dolby Virtual Speaker also works in conjunction by pressing [ PL ]. (Only when not connecting the surround speakers)• You cannot use Dolby Virtual Speaker, Dolby Pro Logic and SFC when the source contains PCM signals with sampling frequencies of over 48 kHz. They are automatically canceled if those signals are input. To use the effect when playing back other sources, press [ VIRTUAL SPEAKER], [ PL ] or [SFC MUSIC, MOVIE] again to select.• You can also press [GAME] on the remote control to select “GAME ” mode (➜ left) of SFC. (➜ page 20)• When using the surround speakers, Dolby Pro Logic cannot be used for surround signals such as Dolby Digital and DTS, and multi-channel LPCM signals.•When playing back 7.1-channel LPCM signals, you can enjoy wider sound field effects as if another speaker is added.You can make the setting without using this effect. (➜ page 22)Enjoying movies and musicPlayWhen using only front speakersDolby Virtual SpeakerYou can enjoy surround effects as if you were listening to 5.1 channel sources. (Dolby Pro Logic also works for stereo signals of video, CD, etc.) Using Dolby Virtual SpeakerPress • The mode switches each time you press the button. (➜ below)REFERENCE(Standard mode) Standard sound effect.WIDE (Wide mode) Broadens the effect to the left and right.SFC (Sound Field Control) (➜ left) Using SFC (Sound Field Control)You can enjoy by adding your favorite surround effect to the Dolby Virtual Speaker (➜ above) effect.Press • The mode switches each time you press the button. (➜ left)To cancel SFC mode Press [ VIRTUAL SPEAKER].5%<622436;'PKPFF5%<622436;'PKPFFඦ೨ඦ೨](https://usermanual.wiki/Panasonic-of-North-America/SU-ZT1/User-Guide-1105012-Page-17.png)
![RQT947120Functions and settingsUsing “WHISPER-MODE SURROUND”This function is effective during surround playback only. You can enjoy the dynamic effect even if the sound volume level is low during surround playback.Press [WHISPER-MODE SURROUND] to select “W.S. ON ”.• The current setting is displayed first.Each time you press, the setting switches between “W.S. OFF ” and “W.S. ON ”. To cancel Press [WHISPER-MODE SURROUND] to select “W.S. OFF ”.NoteWHISPER-MODE SURROUND is not effective in the following cases. When using the surround speakers: When Dolby Pro Logic and SFC are off with 2-channel signal input When not using the surround speakers: When Dolby Virtual Speaker is offIf the above setting is made when this function is on, this function temporarily becomes off.Using “GAME”Enjoy gaming with more dynamic sound.Press [GAME]. • “GAME ” mode (➜ page 17) in SFC is selected. To cancel Press again. If canceled, SFC’s effect itself is canceled.Muting“MUTE ” blinks on the display while the volume is muted.Press [MUTE]. To cancel Press again.Note• Muting is canceled when you switch the system to standby.• Muting is also canceled when you adjust the volume.Adjusting the bass (woofer part) outputWhen you feel the bass volume is not balanced with the volume of the front speakers, you can adjust the bass during playback.1. Press [CH] to select “WFR ”.(The speaker is switched each time you press the button.)WFR (woofer) → RS (surround right) (when used) → LS (surround left) (when used)2. Press [SPEAKER LEVEL +, –] to adjust the bass volume.Adjustment range: MIN, 1 to 15, MAXAdjusting the surround speaker outputWhen using the surround speakers, you can adjust them, too.1. Press [CH] to select “RS ” or “LS ”.(The speaker is switched each time you press the button.)WFR (woofer) → RS (surround right) (when used) → LS (surround left) (when used)2. Press [SPEAKER LEVEL +, –] to adjust the volume of each speaker.Adjustment range: –10 to +10 Repeat steps 1 and 2 to adjust the level of each speaker.Note•You cannot adjust the front speakers with this operation. To adjust the volume balance of left and right front speakers, see “Adjusting the volume balance of front speakers”. (➜ page 21)• If the sound is distorted, lower the level.• You cannot adjust the output level of speakers if the sound field effect is off and the speaker’s audio output is set to off. (➜ page 17)• You can adjust the speaker’s output level in SFC’s each mode respectively. (➜ page 17)• When a commercially available active subwoofer is connected to the subwoofer output terminal on this unit’s rear panel, the subwoofer is synchronized with the unit and the sound volume is adjusted.To return to the previous display/To cancel during setting operation (➜ page 21): Press [ RETURN].Play Functions and settings5%<622436;'PKPFF5%<622436;'PKPFFඦ೨ඦ೨](https://usermanual.wiki/Panasonic-of-North-America/SU-ZT1/User-Guide-1105012-Page-20.png)
![RQT947121 Setup menu items“REMOTE” “INPUT MODE” “RESET”✽“BASS” ✽“TREBLE” ✽“BALANCE” “SPEAKERS” ✽“DISTANCE”✽“STB AUDIO”“7.1CH VS” “HDMI” “SOUND DLY”“DUAL PRG” “DRCOMP” “ATTENUATOR”“EXIT”•✽ appears only when audio adjustment can be made.• Select “EXIT ” and press [OK] to finish the setup mode.Adjusting sound qualityYou can adjust the level of bass and treble.This setting is effective only when you perform stereo playback of 2-channel analog and PCM signals (during Dolby Virtual Speaker and Dolby Pro Logic is off).This setting is not displayed in other conditions. Be sure to make this setting in the above condition.1. Press and hold [–SETUP, OFF] for about 2 seconds.The setting items are displayed. (➜ above)2. Press [w][q] to select “BASS ” or “TREBLE ” and press [OK].3. Press [e][r] for adjustment, and press [OK].Adjustment range: –6 to +6Factory setting: 04. Press [ RETURN] several times to select “EXIT ” and press [OK] to fi nish the setting.Adjusting the volume balance of front speakersYou can adjust the balance of the front speakers.1. Press and hold [–SETUP, OFF] for about 2 seconds.The setting items are displayed. (➜ above)2. Press [w][q] to select “BALANCE ” and press [OK].3. Press [w][q] for adjustment, and press [OK].L : Front leftR : Front right Move the bar to left and right on the display to adjust.• As the bar gets closer to “L ”, the sound moves to left front.• As the bar gets closer to “R ”, the sound moves to right front.4.Press [ RETURN] several times to select “EXIT ” and press [OK] to fi nish the setting.Note• The bar indication is approximate.• When using headphones, you cannot adjust the volume balance.Adjusting the surround speaker output using the test signalYou can make this setting when using the surround speakers.You can adjust the surround speaker volume by outputting the test signal.1. Press [TEST] to output the test signal.Speaker display L : Front left, R : Front right, RS : Surround right, LS : Surround left• The test signal is output from one speaker at a time for two seconds in the following order.TEST L pTEST R pTEST RS pTEST LS2. Press [VOL +, –] to adjust the volumes of front speakers to the normal listening level. Adjustment range: 0 (Min) to 50 (Max)3. Press [CH] to select surround speakers for adjustment.4. Press [SPEAKER LEVEL +, –] to adjust each speaker’s output level. Adjustment range: RS,LS : –10 to +10• The test signal comes from the speaker being adjusted.• The test signal is output again in the above order 2 seconds after adjustment. Repeat steps 3 and 4 to adjust the level of each speaker.5. Press [TEST] to stop the test signal.Note• You can check the audio output of the front speakers. (➜ page 14) (When the surround speakers are not used, only “TEST L ” and “TEST R ” are displayed and the test signal is output alternately.)• To adjust the volume balance of left and right front speakers, see “Adjusting the volume balance of front speakers” (➜ right).• Even if you adjust each channel level in this adjustment, each channel level setting in each SFC mode (➜ page 17) does not change.• When you make this adjustment while using the front speakers only, Dolby Virtual Speaker functions. When playing 2-channel sources, Dolby Pro Logic also works in conjunction. (➜ page 17)• To adjust the bass volume, do not output the test signal for adjustment. (➜ page 20)Functions and settingsPlay5%<622436;'PKPFF5%<622436;'PKPFFඦ೨ඦ೨](https://usermanual.wiki/Panasonic-of-North-America/SU-ZT1/User-Guide-1105012-Page-21.png)
![RQT947122Setting distancesYou can make this setting when using the surround speakers.This setting is not displayed under different conditions.By setting the distance from front/surround speakers to the listening-viewing position, the sound delay time is automatically calculated and adjusted so that sound reaches the listener at the same time.1. Press and hold [–SETUP, OFF] for about 2 seconds.The setting items are displayed. (➜ page 21)2. Press [w][q] to select “DISTANCE ” and press [OK].3. Press [w][q] to select a speaker to set and press [OK].FRONT : Front speakersSURR : Surround speakers4. Press [e][r] to select the distance and press [OK].Adjustment range: 1.0 to 10.0 meter (3.0 to 30.0 ft (feet))Factory setting : Front 3.0 meter (10.0 ft (feet))Surround 1.5 meter (5.0 ft (feet))5. Press [ RETURN] several times to select “EXIT ” and press [OK] to fi nish the setting.NoteRadio waves from this system reach the maximum range of 15 m (49 feet) within the same room.Setting 7.1-channel virtual surroundWhen playing back 7.1-channel LPCM signals, you can enjoy wider sound fi eld effects as if another speaker is added. Factory setting is “AUTO ”.When you do not want to use 7.1-channel virtual surround effect, select “OFF ” in this setting.1. Press and hold [–SETUP, OFF] for about 2 seconds.The setting items are displayed. (➜ page 21)2. Press [w][q] to select “7.1CH VS ” and press [OK].3. Press [e][r] to select “OFF ” and press [OK].AUTO : The setting is switched between ON and OFF depending on the input signals.Only when 7.1-channel LPCM signals are input, 7.1-channel virtual surround is ON (When other signals are input, this setting is OFF.).OFF : 7.1-channel virtual surround is always OFF.Factory setting : AUTO4. Press [ RETURN] several times to select “EXIT ” and press [OK] to fi nish the setting.Reducing standby power consumption (In standby condition (HDMI off mode))Standby through function (➜ pages 9, 28) does not work in this mode if you have connected through the HDMI terminal.VIERA Link “HDAVI Control” (➜ page 18) will not function when this system is off.1. Press and hold [–SETUP, OFF] for about 2 seconds.The setting items are displayed. (➜ page 21)2. Press [w][q] to select “HDMI ” and press [OK].3. Press [w][q] to select “STNBY ” and press [OK].4. Press [e][r] to select “OFF ” and press [OK].OFF : Standby power consumption reduced (approx. 0.2 W) ON : “Standby through” is activated when this system is turned off. (Normal power consumption)Factory setting: ON5. Press [ RETURN] several times to select “EXIT ” and press [OK] to fi nish the setting.Functions and settingsTo return to the previous display/To cancel during setting operation: Press [ RETURN].Play Functions and settings5%<622436;'PKPFF5%<622436;'PKPFFඦ೨ඦ೨](https://usermanual.wiki/Panasonic-of-North-America/SU-ZT1/User-Guide-1105012-Page-22.png)
![RQT947123Switching between dual soundsYou can switch between dual sounds of Dolby Digital signals.1. Press and hold [–SETUP, OFF] for about 2 seconds.The setting items are displayed. (➜ page 21)2. Press [w][q] to select “DUAL PRG ” and press [OK].3. Press [e][r] to select the audio and press [OK].MAIN : Main audio SAP : Sub channel audio outputM+S : Main + Sub channel audio outputFactory setting : MAIN4. Press [ RETURN] several times to select “EXIT ” and press [OK] to fi nish the setting.Clear audio at low volumeDynamic range compression function for Dolby Digital. It compresses the dynamic range so that you can still hear dialog and leave the sound fi eld unaffected.Use this function when you have to turn the volume down, such as late at night.1. Press and hold [–SETUP,OFF] for about 2 seconds.The setting items are displayed. (➜ page 21)2. Press [w][q] to select “DRCOMP ” and press [OK].3. Press [e][r] to select the setting and press [OK].OFF : Normal playbackSTANDARD : The best suited playback for each audio sourceMAX : Always compressed at the maximum levelFactory setting : OFF4. Press [ RETURN] several times to select “EXIT ” and press [OK] to fi nish the setting.Switching the attenuatorSwitch the attenuator “ON ” when big sounds become distorted while playing an analog input source.1. Press and hold [–SETUP, OFF] for about 2 seconds.The setting items are displayed. (➜ page 21)2. Press [w][q] to select “ATTENUATOR ”and press [OK].3. Press [e][r] to select “ON ” and press [OK].ON, OFFFactory setting : OFF4. Press [ RETURN] several times to select “EXIT ” and press [OK] to fi nish the setting.VIERA Link “HDAVI Control” settingWhen you do not wish to use VIERA Link “HDAVI Control” (➜ page 18), you can set the unlinked operation by selecting “OFF ”.The normal setting is “ON ” (Linked operation).1. Press and hold [–SETUP, OFF] for about 2 seconds.The setting items are displayed. (➜ page 21)2. Press [w][q] to select “HDMI ” and press [OK].3. Press [w][q] to select “CTRL ” and press [OK].4. Press [e][r] to select “ON ” or “OFF ”and press [OK].ON : When the operation is linkedOFF : When the operation is not linkedFactory setting: ON5. Press [ RETURN] several times to select “EXIT ” and press [OK] to fi nish the setting.Adjusting the time lag between audio and video by delaying audio outputYou can reduce audio and video time lag by adjusting sound delay.1. Press and hold [–SETUP, OFF] for about 2 seconds.The setting items are displayed. (➜ page 21)2. Press [w][q] to select “SOUND DLY ” and press [OK].3. Press [e][r] to select the setting and press [OK].AUTO, OFF, 10, 20, 30, 40, 60, 80, 100, 120, 140,160, 180, 200Factory setting: AUTO4. Press [ RETURN] several times to select “EXIT ” and press [OK] to fi nish the setting.Note• If delaying audio output is not necessary, select “OFF ”.• “AUTO ” is effective only when connecting the Panasonic TV (VIERA) supporting HDAVI Control 3 and later versions. (Auto Lip Synchronization Function)• When you connect the Panasonic TV incompatible with HDAVI Control 3 and later versions or non-Panasonic TV, if “AUTO ” is set, “40 ” (msec) is set.Functions and settingsPlay5%<622436;'PKPFF5%<622436;'PKPFFඦ೨ඦ೨](https://usermanual.wiki/Panasonic-of-North-America/SU-ZT1/User-Guide-1105012-Page-23.png)
![RQT947124Functions and settingsSwitching the input signal detection settingMost sources can be played with “AUTO ” (factory setting).However, in the following cases, change the input signal detection setting.• When the beginning of the song is cut during playback of CD, set to “PCM ” (PCM FIX).• When the signal is not detected during playback of DTS sources, set to “DTS ” (DTS FIX).• When noise occurs, return the setting to “AUTO ”.1. Press and hold [–SETUP, OFF] for about 2 seconds.The setting items are displayed. (➜ page 21)2. Press [w][q] to select “INPUT MODE ” and press [OK].3. Press [w][q] to select the input and press [OK].Input: TV,DVD,AUX1,AUX24. Press [e][r] to select the detection method of input signal and press [OK].AUTO : Automatic detectionPCM : PCM (from CDs) digital input fi xedDTS : DTS digital input fi xedFactory setting : AUTORepeat steps 3 and 4 to change setting.5. Press [ RETURN] several times to select “EXIT ” and press [OK] to fi nish the setting.Reset (factory settings)The operation settings for the system will be initialized to the settings made at the time of shipment.1. Press and hold [–SETUP, OFF] for about 2 seconds.The setting items are displayed. (➜ page 21)2. Press [w][q] to select “RESET ” and press [OK].3. Press [e][r] to select “YES ” and press [OK].YES : Choice for resetting NO : Choice against resetting• To cancel, select “NO ”.Note•All the settings are reset when you select “YES ” and the input selector automatically switches to “BD/DVD ”.• If you select “NO ”, you will return to step 2. To exit setup mode, press [ RETURN] a few times to display “EXIT ”, and then press [OK].• The contents of speaker setting are not reset. However, the contents set at “Changing the number of speakers to 2” (➜ page 15) are reset.When other equipment (mini component system, AV amp, etc.) manufactured by Panasonic operates with the remote control operations of this systemWhen using this system’s remote control, other equipment may operate. In this case, switch this system’s remote control code to “REMOTE 1 ”. Do the following to set the same code number for this main unit and remote control.Setting the main unit1. Press and hold [–SETUP, OFF] for about 2 seconds.The setting items are displayed. (➜ page 21)2. Press [w][q] to select “REMOTE ” and press [OK].3. Press [e][r] to select “1” and press [OK].Factory setting : 2•You cannot fi nish the setting mode until the setting on the remote control is changed. Go to step 4.• To set the remote control code to 2, select “2 ” in step 3 and press [OK].Setting the remote control4.Press and hold [OK], and then press [TV] (more than 2 seconds).TV: Remote control code 1BD/DVD: Remote control code 2 (factory setting)• Select the same number as the code number you have selected in step 3.• To set the remote control code to 2, press and hold [OK] in step 4, and then press [BD/DVD] more than 2 seconds.5. Press [ RETURN] several times to select “EXIT ” and press [OK] to fi nish the setting.NoteIf different codes are set between the main unit and remote control, the error message “REMOTE 2 ” or “REMOTE 1 ” is displayed.To return to the previous display/To cancel during setting operation: Press [ RETURN].Play Functions and settings5%<622436;'PKPFF5%<622436;'PKPFFඦ೨ඦ೨](https://usermanual.wiki/Panasonic-of-North-America/SU-ZT1/User-Guide-1105012-Page-24.png)
![RQT947125Troubleshooting and other information Error messages/Using with headphones/Specifi cationsError messagesDisplay Check point/Cause/Countermeasure PagesCANCEL MUTE FUNCTION (Scrolling)• The test signal is not output while muting is on. Cancel muting for operation. 20MUTE (Blinking) • This is always displayed while muting is on. 20NOT POSSIBLE FORTHIS INPUT SOURCE (Scrolling)• You cannot use Dolby Virtual Speaker, SFC and Dolby Pro Logic for dual sounds.—NOT POSSIBLE FORTHIS PCM SOURCE (Scrolling)• You cannot use Dolby Virtual Speaker, SFC and Dolby Pro Logic effect with PCM signals with sampling frequency of over 48 kHz.17NOT POSSIBLE WHEN USING HEADPHONES (Scrolling) • You cannot use the sound field effects when using headphones. 25REMOTE 2REMOTE 1•Set the same remote control code for this main unit and remote control. When “REMOTE 2 ”is displayed, set the code to “2” on the remote control in step 4 of procedure “When other equipment (mini component system, AV amp, etc.) manufactured by Panasonic operates with the remote control operations of this system”. When “REMOTE 1 ” is displayed, set the code to “1” on the remote control in step 4 in the same way.24SWITCH OFF POWER (Scrolling)•While“F70 ” is displayed, all operations but turning ON/OFF operation are not available. Turn off the system, unplug the AC power supply cord, and consult your dealer.—TURN OFF DTS FIX MODE (Scrolling)• When each input is fixed to DTS (DTS FIX), the sound field effects cannot be canceled even if you press [–SETUP, OFF]. Cancel DTS FIX.24U701 •The equipment connected by the HDMI cable is not compatible with this system’s copyright protection technology.—U703• A problem has occurred with the HDMI connection. Try the following to correct the problem. Consult your dealer if the error code remains on the display. – Turn the connected equipment off and on again. – Disconnect the HDMI cable then reconnect it. – Do not connect more than 2 sets of equipment to this system’s output.—U704 • The system received incompatible video signals through HDMI connection. Check the settings of the connected equipment.—Specifi cationsUsing with headphonesNote• Avoid listening for prolonged periods of time to prevent hearing damage.• Multi-channel signals are forcibly converged to 2-channel and output. (2CH MIX) However, for DVD audio, the front left and right signals are output.Turn down the volume as closest as to the minimum value.• Plug type: 3.5 mm (1/8 in.) stereo mini plugg PRE AMPLIFIER SECTIONInput sensitivity / Input impedanceTV, AUX3 600 mV / 47 kΩS/N ratio (IHF A)BD/DVD, TV, AUX1, AUX2 (Digital Input) 80 dB (IHF '66)Tone controlsBASS 50 Hz, + 6 to –6 dBTREBLE 20 kHz, + 6 to – 6 dBInput/Output terminalAudio InputAnalog Input ( TV, AUX3 ) 2Optical Digital Input ( TV, AUX2 ) 2Audio OutputAudio Output ( Front L/R, Surround L/R ) 4Subwoofer Output 1Headphone Output ( 16 to 64 Ω ) 1Video/AudioHDMI Input ( BD/DVD, AUX1 ) 2HDMI Output ( TV ) 1This system supports “HDAVI Control 4” function.g MAIN UNIT GENERALPower supply AC 120 V, 60 HzPower consumption 16 WIn standby condition 0.5 WIn standby condition ( HDMI off mode ) 0.2 WDimensions ( W x H x D ) 430 mm x 59 mm x 262 mm (16-15/16" x 2-5/16" x 10-5/16")Mass [ Weight ] Approx. 2 kg (4.4 lb.)Operating temperature range 0°C to 40 °C (32°F to 104 °F)Operating humidity range 20 % to 80 % RH (no condensation)g WIRELESS SECTIONFrequency of the using band 2.4000 GHz to 2.4835 GHzNumber of using channels 3The reaching distance 15 m (49 ft)∗1∗1 It is under the condition as follows.At same room indoor, there is not an obstacle between the main unit and the speaker.And installing a main unit in the position with equal to or more than 50 cm height.SPEAKERg POWER AMPLIFIER SECTION∗2RMS output power10 % total harmonic distortionWoofer Speaker ch 60 W (100 Hz, 3 Ω)Mid High Speaker ch 20 W (1 kHz, 8 Ω)System Total Power∗3320 W (80 W x 4)FTC output power1.0 % total harmonic distortion50 Hz to 250 Hz Woofer Speaker ch 37 W (3 Ω)250 Hz to 20 kHz Mid High Speaker ch 13 W (8 Ω)System Total Power∗3200 W (50 W x 4)g SPEAKER SECTION∗22 way 5 speakers system (Bass reflex type)Woofer part 12 cm cone type x 1Mid High part 2.4 x 10 cm flat type x 4g SPEAKER GENERAL∗2Power supply AC 120 V, 60 HzPower consumption 20 WWireless link standby 0.8 WIn standby condition 0.1 WDimensions ( W x H x D ) 290 mm x 1231 mm x 290 mm (11-13/32" x 48-15/32" x 11-13/32")Mass [ Weight ] Approx. 3.9 kg (8.6 lb.)Operating temperature range 0°C to 40°C (32°F to 104°F)Operating humidity range 20 % to 80 % RH (no condensation)∗2: per 1 speaker∗3: use 4 speakersNote: 1. Specifications are subject to change without notice. 2. Total harmonic distortion is measured by the digital spectrum analyzer. 3. Total harmonic distortion is measured by using AES17 filter.MAIN UNITW (Headphone) jackHeadphones(not included)5%<622436;'PKPFF5%<622436;'PKPFFඦ೨ඦ೨](https://usermanual.wiki/Panasonic-of-North-America/SU-ZT1/User-Guide-1105012-Page-25.png)
![RQT947126Troubleshooting guideTroubleshooting and other informationBefore requesting service, make the following checks.If you are in doubt about some of the check points, or if the remedies indicated in the chart do not solve the problem, refer to “Customer Services Directory (United States and Puerto Rico)” on page 30 if you reside in the U.S.A. or Puerto Rico, or refer to “Product information” on page 29 if you reside in Canada.Troubleshooting guideProblem Possible solution PagesCommon problemsNo power. • Ensure the AC power supply cord is connected. 12“2CH SEARCH ” or “4CHSEARCH ” does not go off on the display while setting the speakers.• Make sure that the speakers are on.DIf the display does not go off even when the speakers are on, consult your dealer.13,15No sound or image after playback starts.• Select the correct source.• Turn the muting off.• Check that the digital signals can be decoded by this system.With the optical fiber connection, cannot playback PCM signal with sampling frequency of over 96 kHz.• Check connections to other equipment.• Set “AUTO ” in “Switching the input signal detection setting”.• Turn this system off then on again.• Make sure that the speakers are on.• Make sure that the speakers have been properly set.• Adjust the speakers.• If the connections are normal, this may be a cable-related problem. Use other cables and make connections again.1620279 to 1224—13,151420,21—The remote control does not work.• Replace the batteries if they are worn.• Make sure the remote control code has been properly set.724No sound from microphone connected to DVD player (karaoke).•No sound is output from microphone if this system is digitally connected with DVD player. Change to analog connection and input. Make analog connection to AUX3.11,12There is no DTS audio output. There is audio output, but the DTS decoder indicator is not lit.• Set the DTS Digital Audio Output setting on the DVD player, Blu-ray Disc player or DVD recorder to Bitstream.• Set “DTS ” in “Switching the input signal detection setting”.—24Sound is not heard when playing DVD audio.• This may occur due to digital copyright protection of the disc if using optical digital connection. This system may not be able to play sources with sampling frequency of over 48 kHz.—“F70 ” appears on the display.(“DSP ” or “HDMI ” is displayed in .)• Turn off the system, unplug the AC power supply cord, and consult your dealer.—“F76 ” appears on the display.(After displayed, the system turns off.)• Unplug the AC power supply cord, and consult your dealer. —Sound fi eldNo sound in surround mode• Set to Dolby Virtual Speaker, Dolby Pro Logic or SFC.• (When the audio is not heard from TV) Check if this system is connected to TV with the optical fiber cable or the stereo connection cable properly.179 to 11Cannot use Dolby Virtual Speaker, Dolby Pro Logic or SFC.• You cannot use these features with PCM signals with sampling frequency of over 48 kHz. Make analog connection to AUX3.• You cannot use for Dolby Digital dual sounds.11,12—HDMIWhen using an HDMI connection, the fi rst few seconds of sound is cut off.• This may occur if you start play from a chapter on a DVD. The following will correct the problem. Change the audio output setting on the Blu-ray Disc player, DVD recorder or DVD player from Bitstream to PCM.Change input signal setting to “PCM ” in “Switching the input signal detection setting”.—24The system does not work properly.• The system does not work properly if you have connected the HDMI input and output terminals incorrectly. Turn the system off, unplug the AC power supply cord, and make the connection again.9Could watch TV (VIERA) when installed, but now cannot watch TV.• When using this system in combination with TV (VIERA) only, check if HDMI cable is not connected to “BD/DVD IN” of this system. If it is connected to “BD/DVD IN”, connect to “TV OUT”.—The sounds of the fi rst few seconds are cut off when playing back 7.1-channel LPCM signals.• This may occur when playing back 7.1-channel LPCM signals of a Blu-ray disc. Press [u SKIP] on the remote control of recorder or player to play back again from the beginning.—5%<622436;'PKPFF5%<622436;'PKPFFඦ೨ඦ೨](https://usermanual.wiki/Panasonic-of-North-America/SU-ZT1/User-Guide-1105012-Page-26.png)
![RQT947127MaintenanceUnplug the AC power supply cord from the household AC outlet and wipe the system using a soft and dry cloth.• When the system is very dirty, wring the cloth soaked in water thoroughly, wipe the dirt and wipe moisture off with a dry cloth.• Do not use solvents such as benzine, thinner, alcohol, etc. because they may cause casing to deform and coating to come off.• Before using chemically treated cloth, read the instructions that come with the cloth carefully.Digital signals that can be played on this systemNote• With HDMI connection, this system can play back multi-channel LPCM signals with sampling frequencies of over 48 kHz and PCM signals of over 96 kHz in addition to multi-channel LPCM of up to 48 kHz and PCM of up to 96 kHz. (If frequency exceeds these figures, playback equipment performs down-sampling and plays back as 48 kHz signals. However, playback may be impossible depending on the discs. See operating instructions of playback equipment for more information.)•With the optical fiber connection, this system can play multi-channel LPCM signals with sampling frequencies of up to 48 kHz and PCM signals of up to 96 kHz.• See “Glossary” (➜ page 28) for more detailed information on each signal. Dolby Digital Blu-ray disc, DVD etc. DTS Blu-ray disc, DVD etc. PCM (2-channel) CD, DVD audio etc. Multi-channel LPCM (Linear PCM) Blu-ray disc, DVD audio etc. Troubleshooting and other information Troubleshooting guide/Digital signals that can be played on this system/MaintenanceProblem Possible solution PagesHDMIVIERA Link “HDAVI Control” does not function properly.• Confirm “VIERA Link “HDAVI Control” setting” is set to “ON ” (when the operation is linked). When it is “OFF ”, change to “ON ”.•VIERA Link “HDAVI Control” does not function in standby condition (HDMI off mode) when this system is turned off. See “Reducing standby power consumption (In standby condition (HDMI off mode))” and set to “ON ” (normal power consumption).• Check VIERA Link “HDAVI Control” settings of the connected equipment.• VIERA Link “HDAVI Control” may not function when you change the connections for HDMI equipment, insert and remove the outlet, or during blackout. Do the following operations in this case. – Turn on the TV (VIERA) again while all the equipment connected with HDMI cables is on. –Set “VIERA Link “HDAVI Control” (HDMI equipment control)” of TV (VIERA) to “OFF” and then set to “ON” again. (For details, refer to the operating instructions for TV (VIERA).) – Connect this system to TV (VIERA) using the HDMI cable, switch the TV (VIERA) on, unplug this system’s AC power supply cord, and insert it into a household AC outlet again.2322——Even if multi-channel audio sources, such as DVD, Blu-ray disc, are played back, “ DIGITAL” or “DTS” is not displayed.• When using VIERA Link “HDAVI Control” and the speaker is set to “TV”, press VIERA Link button on the remote control of TV (VIERA) and set the speaker to “Home Cinema”.18This system’s input automatically switches to “AUX2 / STB ”, but sound is not heard. Or unexpected sound from other equipment is heard.• After “Setting for automatically switching the input source to STB”, the connection might have been changed. Select OFF once and SET again.10Speakers[WIRELESS LINK] indicator on the speakers does not light green.Sounds are interrupted.• When [WIRELESS LINK] indicator is off, check the connection of AC power supply cord of speaker and check the speaker is “ON”.•If [WIRELESS LINK] indicator does not change from red to green, the main unit and speaker are not linked. Make sure that the main unit is “ON”. Or make the speaker setting again.•You may be using wireless headphones or the wireless LAN may be operating near this system. These symptoms may be remedied by slightly moving this system’s position.12,13,1513,15—Sound stops.(The indicator blinks red and green alternately.)The protection circuit is activated when some abnormality is detected, and turns off the system automatically.• Amplifier output is abnormal.• Straining of the speakers through excessive volume or power.• This may occur if you use the system in an extremely hot environment.DDetermine and correct the cause, then turn the system on.(The protection circuit is reset.)(Consult your dealer if the problem persists.)———5%<622436;'PKPFF5%<622436;'PKPFFඦ೨ඦ೨](https://usermanual.wiki/Panasonic-of-North-America/SU-ZT1/User-Guide-1105012-Page-27.png)