Panasonic of North America VP4RA Radio with Navigation, Tuner, DAB, Class D Amp, Modem, BT, WiFi User Manual Can be modified by macros
Panasonic Corporation of North America Radio with Navigation, Tuner, DAB, Class D Amp, Modem, BT, WiFi Can be modified by macros
Contents
- 1. Users manual
- 2. Users guide
Users guide

TABLE OF CONTENTS
SECTION PAGE
1SAFETYANDGENERALINFORMATION ..............................................3
2INTRODUCTION..................................................................9
3RADIOMODE ...................................................................15
4MEDIAMODE ...................................................................29
5PHONEMODE...................................................................45
6VOICERECOGNITIONQUICKTIPS .................................................63
1
2
3
4
5
6

SAFETY AND GENERAL INFORMATION
CONTENTS
mSAFETY GUIDELINES . . . . . . . . . . . . . . . . . . . . . .4
▫Safe Usage Of The Uconnect System . . . . . . . . . . .4
▫Care And Maintenance . . . . . . . . . . . . . . . . . . . .5
mCYBERSECURITY . . . . . . . . . . . . . . . . . . . . . . . . .5
mSOFTWARE LICENSING INFORMATION . . . . . . . .7
mGENERAL INFORMATION . . . . . . . . . . . . . . . . . .7
▫FCC/ISED Regulatory Notices . . . . . . . . . . . . . . .7
1

SAFETY GUIDELINES
WARNING!
ALWAYS drive safely with your hands on the steer-
ing wheel. You have full responsibility and assume
all risks related to the use of the Uconnect features
and applications in this vehicle. Only use Uconnect
when it is safe to do so. Failure to do so may result
in an accident involving serious injury or death.
Ensure that all persons read this manual carefully before
using the system. It contains instructions on how to use the
system in a safe and effective manner.
Do NOT attach any object to the touchscreen, doing so
can result in damage to the touchscreen.
Please read and follow these safety precautions. Failure to
do so may result in injury or property damage.
•Glance at screen only when safe to do so. If prolonged
viewing of the screen is required, park in a safe location
and set the parking brake
•Stop use immediately if a problem occurs. Failure to do
so may cause injury or damage to the product. Return it
to your authorized dealer to repair.
•Ensure the volume level of the system is set to a level
that still allows you to hear outside traffic and emer-
gency vehicles.
Safe Usage Of The Uconnect System
•Read all instructions in this manual carefully before
using your system to ensure proper usage!
•Your system is a sophisticated electronic device. Do not
let young children use your system.
•Permanent hearing loss may occur if you play your
music or the system at loud volumes. Exercise caution
when setting the volume on your system.
•Keep drinks, rain and other sources of moisture away
from your system. Besides damage to your system,
moisture can cause electric shocks as with any electronic
device.
NOTE: Many features of this system are speed dependent.
For your own safety, it is not possible to use some of the
touchscreen features while the vehicle is in motion.
Exposure To Radio Frequency Radiation
4 SAFETY AND GENERAL INFORMATION

The internal wireless radio operates within guidelines
found in radio frequency safety standards and recommen-
dations, which reflect the consensus of the scientific com-
munity. The radio manufacturer believes the internal wire-
less radio is safe for use by consumers. The level of energy
emitted is far less than the electromagnetic energy emitted
by wireless devices such as mobile phones. However, the
use of wireless radios may be restricted in some situations
or environments, such as aboard airplanes. If you are
unsure of restrictions, you are encouraged to ask for
authorization before turning on the wireless radio.
Care And Maintenance
Touchscreen
•Do not press the touchscreen with any hard or sharp
objects (pen, USB stick, jewelry, etc.) which could scratch
the touchscreen surface!
•Do not spray any liquid or caustic chemicals directly on
the screen! Use a clean and dry micro fiber lens cleaning
cloth in order to clean the touchscreen.
•If necessary, use a lint-free cloth dampened with a
cleaning solution, such as isopropyl alcohol or an iso-
propyl alcohol and water solution ratio of 50:50. Be sure
to follow the solvent manufacturer’s precautions and
directions.
Disc Drive
•Do not insert any damaged, warped, scratched or dirty
Discs into the Disc Player.
•Discs that have been modified with an adhesive label
should not be used in the Disc Player.
•Do not insert more than one Disc at a time into the drive
slot.
CYBERSECURITY
Your vehicle may be a connected vehicle and may be
equipped with both wired and wireless networks. These
networks allow your vehicle to send and receive informa-
tion. This information allows systems and features in your
vehicle to function properly.
Your vehicle may be equipped with certain security fea-
tures to reduce the risk of unauthorized and unlawful
access to vehicle systems and wireless communications.
Vehicle software technology continues to evolve over time
1
SAFETY AND GENERAL INFORMATION 5
and FCA US LLC, working with its suppliers, evaluates
and takes appropriate steps as needed. Similar to a com-
puter or other devices, your vehicle may require software
updates to improve the usability and performance of your
systems or to reduce the potential risk of unauthorized and
unlawful access to your vehicle systems.
The risk of unauthorized and unlawful access to your
vehicle systems may still exist, even if the most recent
version of vehicle software (such as Uconnect software) is
installed.
WARNING!
•It is not possible to know or to predict all of the
possible outcomes if your vehicle’s systems are
breached. It may be possible that vehicle systems,
including safety related systems, could be impaired
or a loss of vehicle control could occur that may
result in an accident involving serious injury or
death.
(Continued)
WARNING! (Continued)
•ONLY insert media (e.g., USB, SD card, or CD) into
your vehicle if it came from a trusted source. Media
of unknown origin could possibly contain malicious
software, and if installed in your vehicle, it may
increase the possibility for vehicle systems to be
breached.
•As always, if you experience unusual vehicle behav-
ior, take your vehicle to your nearest authorized
dealer immediately.
NOTE:
•FCA or your dealer may contact you directly regarding
software updates.
•To help further improve vehicle security and minimize
the potential risk of a security breach, vehicle owners
should:
•Routinely check
www.driveuconnect.com/software-update
to learn
about available Uconnect software updates.
•Only connect and use trusted media devices (e.g.
personal mobile phones, USBs, CDs).
6 SAFETY AND GENERAL INFORMATION

Privacy of any wireless and wired communications cannot
be assured. Third parties may unlawfully intercept infor-
mation and private communications without your consent.
For further information, refer to “Onboard Diagnostic
System (OBD II) Cybersecurity” in your Owner’s Manual.
SOFTWARE LICENSING INFORMATION
For software licensing information, please visit:
us.panasonic.com/automotive-notices
.
GENERAL INFORMATION
FCC/ISED Regulatory Notices
Modification Statement
Changes or modifications not expressly approved by the
party responsible for compliance could void the user’s
authority to operate the equipment.
Interference Statement
This device complies with Part 15 of the FCC Rules and
Industry Canada licence-exempt RSS standard(s). Opera-
tion is subject to the following two conditions: (1) this
device may not cause interference, and (2) this device must
accept any interference, including interference that may
cause undesired operation of the device.
Wireless Notice
This device complies with FCC/ISED radiation exposure
limits set forth for an uncontrolled environment and meets
the FCC radio frequency (RF) Exposure Guidelines and
RSS-102 of the ISED radio frequency (RF) Exposure rules.
This transmitter must not be co-located or operating in
conjunction with any other antenna or transmitter.
FCC Class B Digital Device Notice
This equipment has been tested and found to comply with
the limits for a Class B digital device, pursuant to part 15 of
the FCC Rules. These limits are designed to provide
reasonable protection against harmful interference in a
residential installation. This equipment generates, uses and
can radiate radio frequency energy and, if not installed and
used in accordance with the instructions, may cause harm-
ful interference to radio communications. However, there
is no guarantee that interference will not occur in a
particular installation. If this equipment does cause harm-
ful interference to radio or television reception, which can
be determined by turning the equipment off and on, the
user is encouraged to try to correct the interference by one
or more of the following measures:
•Reorient or relocate the receiving antenna.
1
SAFETY AND GENERAL INFORMATION 7

•Increase the separation between the equipment and
receiver.
•Connect the equipment into an outlet on a circuit
different from that to which the receiver is connected.
•Consult the dealer or an experienced radio/TV techni-
cian for help.
CAN ICES-3 (B) / NMB-3 (B)
This Class B digital apparatus complies with Canadian
ICES-003.
8 SAFETY AND GENERAL INFORMATION
WARNING!! This device must be installed and used at a distance >20 cm from the body.

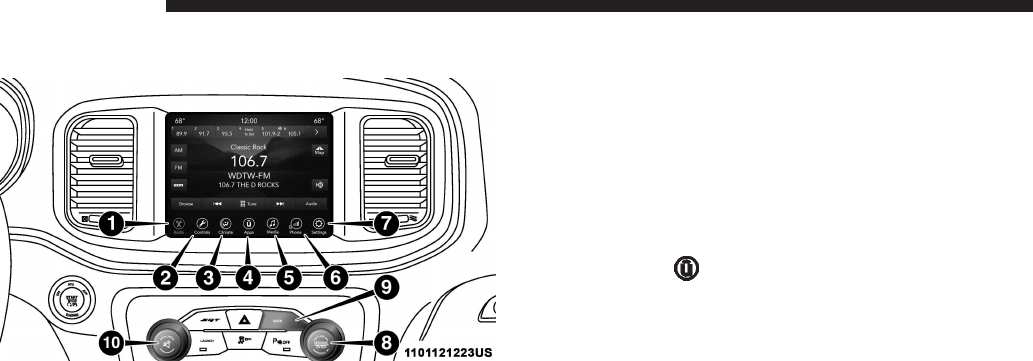
UCONNECT 4 WITH 8.4–INCH DISPLAY
NOTE: Uconnect screen images are for illustration pur-
poses only and may not reflect exact software for your
vehicle.
1. Radio
Press the “Radio” button on the touchscreen to enter Radio
Mode. The different tuner modes; AM, FM and SXM can be
selected by pressing the corresponding buttons on the
touchscreens in Radio Mode.
2. Media
Press the “Media” button on the touchscreen to access
media sources such as: Disc (If Equipped), USB Device,
AUX, Bluetooth, and SD Card (If Equipped) as long as the
requested media is present.
3. Climate
Refer to Climate Controls in your vehicle’s Owner’s
Manual for further details.
4. Apps
Press the “Apps
” button on the touchscreen to access
Smartphone and Connected vehicle options.
5. Controls
Press the 9Controls9button on the touchscreen to adjust the
auto-dimming mirror, heated & vented seats, heated &
vented steering wheel (If Equipped).
6. Phone
Press the “Phone” button on the touchscreen to access the
Uconnect Phone feature.
7. Settings
Press the “Settings” button on the touchscreen to access
vehicle and feature settings.
10 INTRODUCTION
8. Enter/Browse & Tune/Scroll
Push the ENTER/BROWSE button to accept a highlighted
selection on the screen. Rotate the TUNE/SCROLL rotary
knob to scroll through a list or tune a radio station.
9. SCREEN OFF
Push the SCREEN OFF button to turn off the Uconnect
touchscreen.
10. Volume and On/Off Button
Rotate the rotary knob to adjust the Volume. Push the
Volume and On/Off button to turn on and off the system.
NOTE: Interior trims may vary
IDENTIFYING YOUR RADIO
Uconnect 4 With 8.4-Inch Display Key Features
The Uconnect 4 has the following features:
•8.4” Touchscreen
•Hands-free/Bluetooth
•USB ports, and AUX jack — If Equipped
•Touchscreen Climate Controls
2
INTRODUCTION 11
•SiriusXM Satellite Radio with Trial Included — If
Equipped
HD Radio
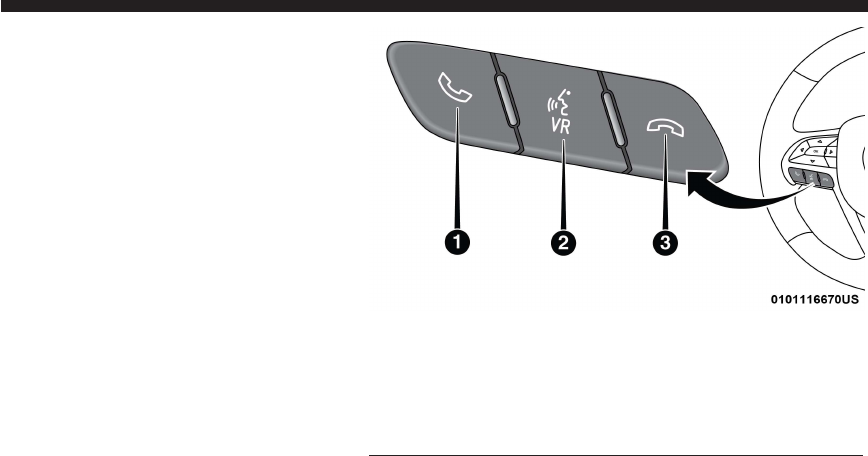
The Uconnect Voice Command And Uconnect Phone
Buttons On Your Steering Wheel
The buttons let you use your voice to give commands, and
make phone calls hands-free, and control your radio and
media devices.
Uconnect Voice Command Buttons
1 — Push To Initiate Or To Answer A Phone Call, Send Or Receive
A Text
2 — For All Radios: Push To Begin Radio, Media Functions, Apps,
And Climate Functions.
3 — Push To End Call
12 INTRODUCTION
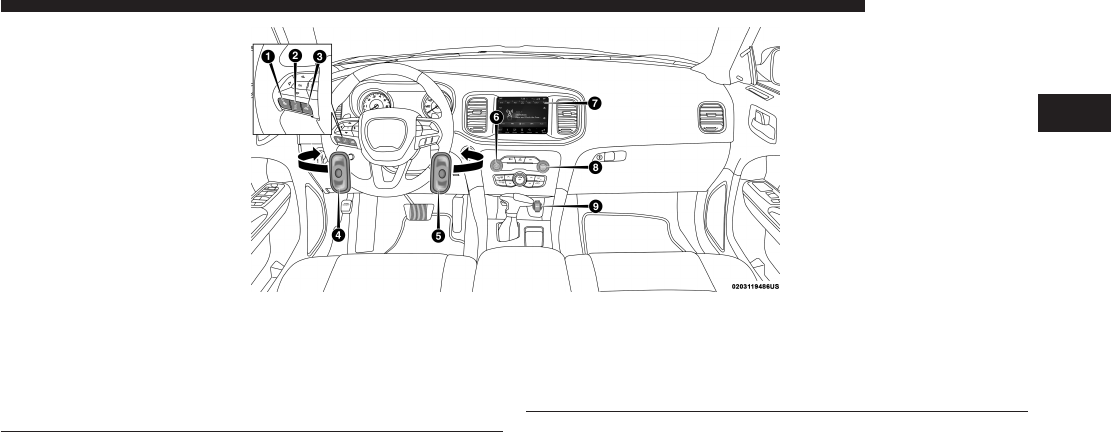
NOTE: Interior trims may vary.
UCONNECT 4C/4C NAV SETTINGS
1 — Uconnect Phone Button
2 — Uconnect Voice Command Button
3 — Phone Hang Up Button
4 — Steering Wheel Audio Controls (Left Rear Surface of Steering
Wheel)
5 — Steering Wheel Audio Controls (Right Rear Surface of Steering
Wheel)
6 — Volume Knob/Mute Button
7 — Uconnect 4 Radio
8 — Tune or Scroll Knob/Browse or Enter Button
9 — Power Outlet
2
INTRODUCTION 13
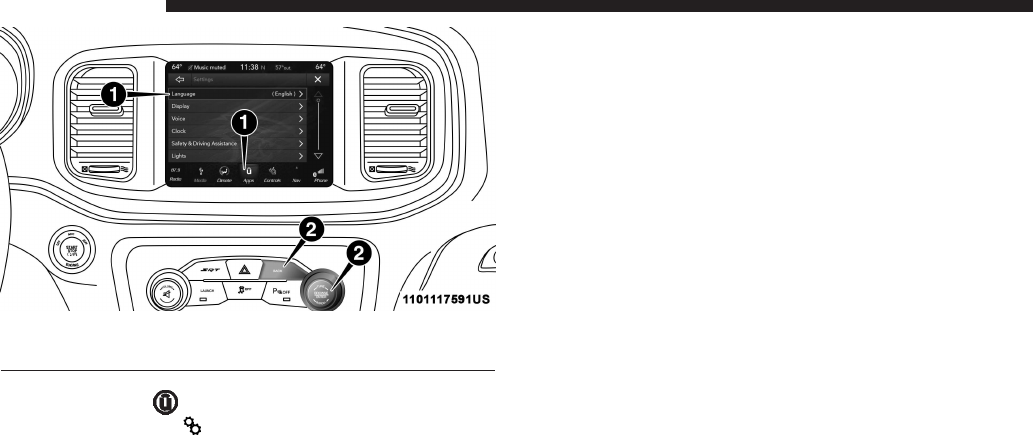
Press the “Apps
” button on the touchscreen, then
press the “Settings ” button on the touchscreen to
display the menu setting screen. In this mode, the
Uconnect system allows you to access all of your
programmable features.
NOTE:
•Only one touchscreen area may be selected at a time.
•Depending on the vehicles options, available feature
settings may vary.
When making a selection, press the button on the touch-
screen to enter the desired mode. Once in the desired
mode, press and release the preferred setting until a
check-mark appears next to the setting, showing that
setting has been selected. Once the setting is complete,
either press the Back Arrow button on the touchscreen to
return to the previous menu, or press the “X” button on the
touchscreen to close out of the settings screen. Pressing the
Up or Down Arrow button on the right side of the screen
will allow you to toggle up or down through the available
settings.
Refer to “Uconnect Settings” in the Owner’s Manual for
further information.
1 — Uconnect Buttons On The Touchscreen
2 — Uconnect Buttons On The Faceplate
14 INTRODUCTION

RADIO MODE
CONTENTS
mRADIO CONTROLS . . . . . . . . . . . . . . . . . . . . . .16
▫Steering Wheel Audio Controls — If Equipped . .18
mSETTING PRESETS . . . . . . . . . . . . . . . . . . . . . . .18
mSIRIUSXM SATELLITE RADIO MODE — IF
EQUIPPED . . . . . . . . . . . . . . . . . . . . . . . . . . . . .19
▫Replay . . . . . . . . . . . . . . . . . . . . . . . . . . . . . . .21
▫Favorites .............................22
▫BrowseInSXM.........................23
mAUDIO................................25
3

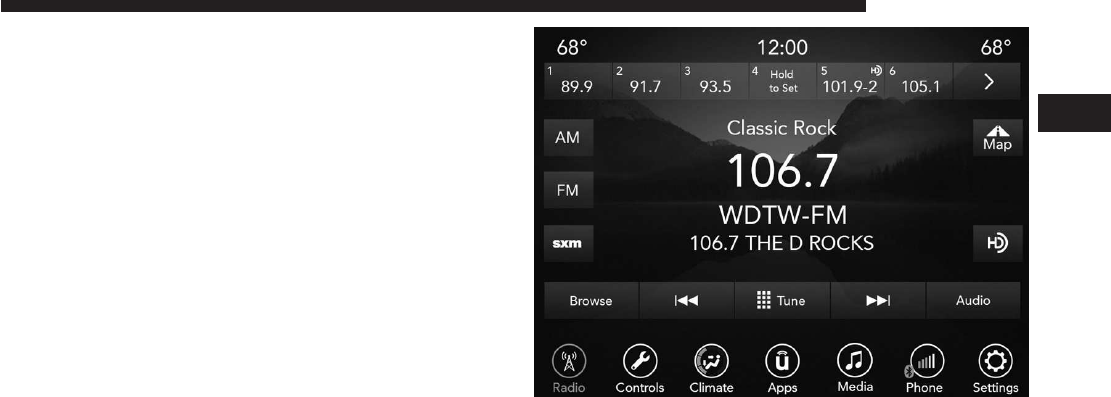
RADIO CONTROLS
The radio is equipped with the following modes:
•AM
•FM
•SiriusXM Satellite Radio (if equipped)
Press the RADIO button on the touchscreen, bottom left
corner, to enter the Radio Mode. The different tuner modes;
AM, FM, and SXM, can then be selected by pressing the
corresponding buttons in the Radio mode.
VOLUME And ON/OFF Control
Push the VOLUME And On/OFF control knob to turn on
and off the Uconnect system.
The electronic volume control turns continuously (360 de-
grees) in either direction, without stopping. Turning the
VOLUME And On/OFF control knob clockwise increases
the volume, and counterclockwise decreases it.
MUTE Button
Push the MUTE button to mute the system. Push the
MUTE button again to unmute the system.
TUNE/SCROLL Control
When the audio system is turned on, the sound will be set
at the same volume level as last played.
Turn the rotary TUNE/SCROLL control knob clockwise to
increase or counterclockwise to decrease the radio station
frequency. Push the ENTER/BROWSE button to choose a
selection.
Screen Close
The X button on the touchscreen at the top right, provides
a means to close the Direct Tune Screen. The Direct Tune
Screen also auto closes if no activity occurs within 20 sec-
onds.
HD Radio
HD Radio technology (available only in the U.S. and
Canadian markets) works similar to conventional radio
except it allows broadcasters to transmit a high-quality
digital signal. With an HD radio receiver, the listener is
provided with a clear sound that enhances the listening
experience. HD radio can also transmit data such as song
title or artist.
Seek And Direct Tune Functions
The Seek Up and Down functions are activated by pressing
the double arrow buttons on the touchscreen to the right
16 RADIO MODE

and left of the radio station display, or by pressing the left
“Steering Wheel Audio Control” (if equipped) up or down.
Seek Up
Press and release the “Seek Up”
button on the touch-
screen to tune the radio to the next listenable station or
channel. During a Seek Up function, if the radio reaches
the starting station after passing through the entire band
two times, the radio will stop at the station where it
began.
Fast Seek Up
Press and hold the “Seek Up”
button on the touch-
screen to advance the radio through the available sta-
tions or channels at a faster rate, the radio stops at the
next available station or channel when the button on the
touchscreen is released.
Seek Down
Press and release the “Seek Down”
button on the
touchscreen to tune the radio to the next listenable
station or channel. During a Seek Down function, if the
radio reaches the starting station after passing through
the entire band two times, the radio will stop at the
station where it began.
Fast Seek Down
Press and hold the “Seek Down”
button on the touch-
screen to advance the radio through the available sta-
tions or channel at a faster rate, the radio stops at the
next available station or channel when the button on the
touchscreen is released.
Direct Tune
Press the “Tune” button on the touchscreen located at the
bottom of the radio screen. The Direct Tune button on the
touchscreen is available in AM, FM and SXM radio modes
and can be used to direct tune the radio to a desired station
or channel.
Press the available number button on the touchscreen to
begin selecting a desired station. Once a number has been
entered, any numbers that are no longer possible (stations
that cannot be reached) will become deactivated/grayed
out.
Undo
You can backspace an entry by pressing the bottom left
“Undo” button or the
button on the touchscreen.
GO
3
RADIO MODE 17

Once the last digit of a station has been entered, the
DIRECT TUNE screen will close and the system will
automatically tune to that station.
The selected Station or Channel number is displayed in the
Direct Tune text box.
Steering Wheel Audio Controls — If Equipped
The remote sound system controls are located on the rear
surface of the steering wheel. Reach behind the wheel to
access the switches.
The right-hand control is a rocker-type switch with a
push-button in the center and controls the volume and
mode of the sound system. Pushing the top of the rocker
switch will increase the volume, and pushing the bottom of
the rocker switch will decrease the volume.
Pushing the center button will make the radio switch
between the various modes available (AM/FM/AUX etc.).
The left-hand control is a rocker-type switch with a push-
button in the center. The function of the left-hand control is
different depending on which mode you are in.
The following describes the left-hand control operation in
each mode.
Radio Operation
Pushing the top of the switch will “Seek” up for the next
listenable station and pushing the bottom of the switch will
“Seek” down for the next listenable station.
The button located in the center of the left-hand control
will tune to the next preset station that you have pro-
grammed in the radio preset button.
Media Mode
Pushing the top of the switch once will go to the next track
on the selected media (AUX, Bluetooth, USB). Pushing the
bottom of the switch once will go to the beginning of the
current track, or to the beginning of the previous track if it
is within eight seconds after the current track begins to
play.
If you push the switch up or down twice, it plays the
second track; three times, it will play the third, etc.
SETTING PRESETS
The Presets are available for all Radio Modes, and are
activated by pressing any of the six “Preset” buttons on the
touchscreen, located at the top of the screen.
18 RADIO MODE

When you are receiving a station that you wish to commit
into memory, press and hold the desired numbered button
on the touchscreen for more than two seconds or until you
hear a confirmation beep.
The Radio stores up to 12 presets in each of the Radio
modes. A set of six presets are visible at the top of the radio
screen.
You can switch between the two radio presets by pressing
the “arrow button” located in the upper right of the radio
touchscreen.
Browse In AM/FM
When in either AM or FM, the Browse Screen provides a
means to edit the Presets List and is entered by pushing the
ENTER/BROWSE button.
Scrolling Preset List
Once in the Browse Presets screen, you can scroll the preset
list by rotation of the TUNE/SCROLL knob, or by pressing
the “Up and Down” arrow keys, located on the right of the
screen.
Preset Selection From List
A Preset can be selected by pressing any of the listed
Presets, or by pushing the ENTER/BROWSE button on the
TUNE/SCROLL knob to select the currently highlighted
Preset.
When selected, the radio tunes to the station stored in the
Preset.
Deleting Presets
A Preset can be deleted in the Presets Browse screen by
pressing the “Trash Can” icon for the corresponding Preset.
Return To Main Radio Screen
You can return to the Main Radio Screen, by pressing the
“X” button, or the back arrow button, on the touchscreen
when in the Browse Presets screen.
SIRIUSXM SATELLITE RADIO MODE — IF
EQUIPPED
SiriusXM Satellite Radio uses direct satellite-to-receiver
broadcasting technology to provide clear, coast to coast
radio content. SiriusXM is a subscription based service.
SiriusXM All Access Package
3
RADIO MODE 19

All satellite radio equipped vehicles come with a trial to the
SiriusXM All Access package, providing over 160 channels
of the best programming for all the places life takes you.
•In your vehicle — You’ll get every channel available on
your radio, including all the premium programming like
Howard Stern, every NFL game, every MLB game, every
NASCAR race, Oprah Radio, and more.
•On the go — With a SiriusXM Internet Radio subscrip-
tion included with the All Access trial, you’ll get
SiriusXM on your computer, smartphone, or tablet.
Including:
•A huge On Demand catalog
•Xtra Channels featuring SiriusXM Latino – a collection
of Spanish-language channels
•MySXM – allowing you to personalize your favorite
music channels
Go to
siriusxm.com/getallaccess
for more information
SiriusXM services require subscriptions, sold separately
after the trial included with the new vehicle purchase. If
you decide to continue your service at the end of your trial
subscription, the plan you choose will automatically renew
and bill at then-current rates until you call SiriusXM at
866-635-2349 to cancel. See SiriusXM Customer Agreement
for complete terms at
www.siriusxm.com
. All fees and
programming subject to change. Our satellite service is
available only to those at least 18 and older in the 48 con-
tiguous USA and D.C. Our SiriusXM satellite service is also
available in PR (with coverage limitations). Our Internet
radio service is available throughout our satellite service
area and in AK. © 2017 SiriusXM Radio Inc. Sirius, XM and
all related marks and logos are trademarks of SiriusXM
Radio Inc. Service available in Canada; see
www.siriusxm.ca
.
This functionality is only available for radios equipped
with a Satellite receiver. In order to receive satellite radio,
the vehicle needs to be outside with a clear view to the sky.
If the screen shows Acquiring Signal, you might have to
change the vehicle’s position in order to receive a signal. In
most cases, the satellite radio does not receive a signal in
underground parking garages or tunnels.
No Subscription
Radios equipped with a Satellite receiver, require a sub-
scription to the SiriusXM Service. When the Radio does not
have the necessary subscription, the Radio is able to receive
the Pre-View channel only.
Acquiring SiriusXM Subscription
20 RADIO MODE

To activate the SiriusXM Satellite Radio subscription, U.S.
residents call:
1-800-643-2112
Canadian residents call:
1-877-438-9677
NOTE: You will need to provide the SiriusXM ID (RID)
located at the bottom of the Channel 0 screen.
The Satellite Mode is activated by a press of the “SXM”
button on the touchscreen.
When in Satellite mode:
•The SXM button on the touchscreen is highlighted.
•The SiriusXM Presets are displayed at the top of the
screen.
•The Genre is displayed below the Presets Bar.
•The SiriusXM Channel Number is displayed in the
center.
•The Program Information is displayed at the bottom of
the Channel Number.
•The SiriusXM function buttons are displayed below the
Program Information.
Tuning is done by operating the Tune Knob or by Direct
Tune, similar to other Radio Bands, see Presets, browse,
Tune Knob, and Direct Tune.
In addition to the tuning Operation functions common to
all Radio modes, the replay, Traffic/Weather Jump, and fav
button functions are available in SiriusXM Mode.
Replay
The replay function provides a means to store and replay
up to 22 minutes of music audio and 48 minutes of talk
radio. Once the channel is switched, content in replay
memory is lost.
Press the “Replay” button on the touchscreen. The play/
pause, rewind/forward and live buttons will display at the
top of the screen, along with the replay time.
You can exit by pressing the “Replay” button on the
touchscreen, any time during the Replay mode.
Play/Pause
3
RADIO MODE 21

Press the “Pause/Play” button on the touchscreen to pause
the playing of live or rewound content at any time. Play
can be resumed again by pressing of the “Pause/Play”
button on the touchscreen.
Rewind
Press the “RW” button on the touchscreen to rewind the
content in steps of five seconds. Pressing the “RW” button
on the touchscreen for more than two seconds rewinds the
content. The Radio begins playing the content at the point
at which the press is released.
Forward
Each press of the “FW” button on the touchscreen forwards
the content in steps of five seconds. Forwarding of the
content can only be done when the content is previously
rewound, and therefore, can not be done for live content. A
continuous press of the “FW” button on the touchscreen
also forwards the content. The Radio begins playing the
content at the point at which the press is release.
Live
Press the “Live” button on the touchscreen to resume
playing of Live content.
Favorites
Press the “fav.” button on the touchscreen to activate the
favorites menu, which will time out within 20 seconds in
absence of user interaction.
You can exit the Favorites Menu by a press of the “X” in the
top right corner.
The favorites feature enables you to set a favorite artist, or
song that is currently playing. The Radio then uses this
information to alert you when either the favorite song, or
favorite artist are being played at any time by any of the
SiriusXM Channels.
The maximum number of favorites that can be stored in the
Radio is 50.
Fav. Artist: While the song is playing to set a Favorite
Artist, press the “fav.” button on the touchscreen and then
the Fav. Artist button on the touchscreen.
Fav. Song: While the song is playing to set a Favorite Song,
press the “fav.” button on the touchscreen and then the Fav
Song button on the touchscreen.
22 RADIO MODE

Browse In SXM
Press the “Browse” button on the touchscreen to edit
Presets, Favorites, Game Zone, and Jump settings, along
with providing the SiriusXM Channel List.
This Screen contains many sub menus. You can exit a sub
menu to return to a parent menu by pressing the “Back
Arrow.”
All
Press the “All” button at the left of the Browse Screen.
Channel List
Press the Channel List, or Genre, to display all the
SiriusXM Channel Numbers. You can scroll the Channel
list by pressing the “Up and Down arrows”, located on the
right side of the screen. Scrolling can also be done by
operating the TUNE/SCROLL knob.
Genre
Press the “Genre” button on the touchscreen to display a
list of Genres. You can select any desired Genre by pressing
the “Genre” list, the Radio tunes to a channel with the
content in the selected Genre.
Presets
Press the “Presets” button located at the left of the Browse
screen.
You can scroll the Presets list pressing the up and down
arrows located at the right side of the screen. Scrolling can
also be done by operating the TUNE/SCROLL knob as
well.
Preset Selection
A Preset can be selected by pressing any of the listed
“Presets”, or by pushing the ENTER/BROWSE button on
the TUNE/SCROLL knob to select the currently high-
lighted Preset. When selected, the Radio tunes to the
station stored in the Preset, and returns to the main Radio
screen.
Deleting A Preset
A Preset can be deleted in the Presets Browse screen by
pressing the “Trash Can” Icon for the corresponding Preset.
Favorites
Press the “Favorites” button located at the left of the
Browse screen.
3
RADIO MODE 23

The Favorites menu provides a means to Edit the Favorites
list and to configure the Alert Settings, along with provid-
ing a list of Channels currently airing any of the items in
the Favorites list.
You can scroll the Favorites list by pressing the “Up and
Down” arrows located at the right side of the screen.
Scrolling can also be done by operating the TUNE/
SCROLL knob as well.
Remove Favorites
Press the “Remove Favorites” tab at the top of the screen.
Press the “Delete All” button on the touchscreen to delete
all of the Favorites or press the “Trash Can” icon next to the
Favorite to be deleted.
Alert Settings
Press the “Alert Setting” tab at the top of the screen. The
Alert Settings menu allows you to choose from a Visual
alert or Audible and Visual alert when one of your favor-
ites is airing on any of the SiriusXM channels.
Tune Start
Tune Start begins playing the current song from the
beginning when you tune to a music channel using one of
the twelve presets, so you can enjoy the complete song.
This feature occurs the first time the preset is selected
during that current song. Tune Start works in the back-
ground, so you will not even realize it’s on, except that you
will miss the experience of joining your favorite song with
only a few seconds left to play. Refer to “Uconnect Set-
tings” in your Owner’s Manual for further information.
Game Zone
Press the “Game Zone” button, located at the left of the
Browse screen. This feature provides you with the ability to
select teams, edit the selection, and set alerts.
On Air
Press the “On-Air” tab at the top of the screen. The On-Air
list provides a list of Channels currently airing any of the
items in the Selections list, and pressing any of the items in
the list tunes the radio to that channel.
Select Teams
Press the “Select Teams” button on the touchscreen to
activate the League Scroll list. Press the chosen league and
a scroll list of all teams within the league will appear, then
you can select a team by pressing the corresponding box. A
check mark appears for all teams that are chosen.
Remove Selection
24 RADIO MODE
Press the “Remove Selection” tab at the top of the screen.
Press the “Delete All” button on the touchscreen to delete
all of the Selections or press the “Trash Can Icon” next to
the Selection to be deleted.
Alert Settings
Press the “Alert Setting” tab at the top of the screen. The
Alert Settings menu allows you to choose from “Alert me
to on-air games upon start” or “Alert upon score update”
or both when one or more of your selections is airing on
any of the SiriusXM channels.
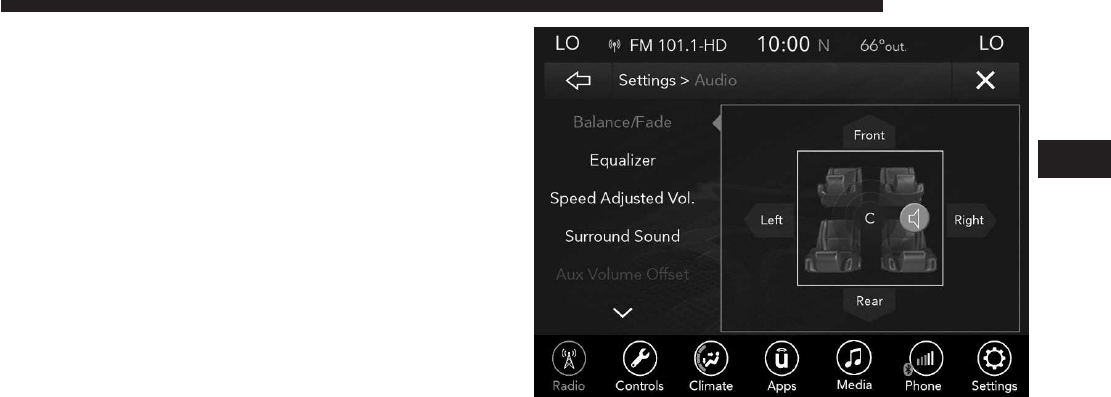
AUDIO
Press the “Audio” button on the touchscreen to activate the
Audio settings screen to adjust Balance/Fade, Equalizer,
Speed Adjusted Volume, Aux volume Offset, and Surround
Sound.
You can return to the Radio screen by pressing the “X”
located at the top right.
Balance/Fade
Press the “Balance/Fade” button on the touchscreen to
Balance audio between the front speakers or fade the audio
between the rear and front speakers.
Pressing the “Front,” “Rear,” “Left,” or “Right” buttons or
press and drag the red Speaker Icon to adjust the Balance/
Fade.
Equalizer
3
RADIO MODE 25
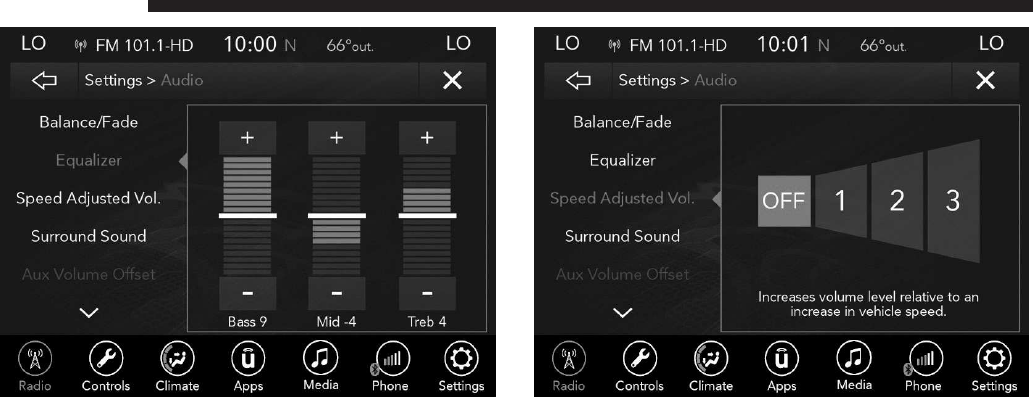
Press the “Equalizer” button on the touchscreen to activate
the Equalizer screen.
Press the “+” or “–” buttons, or by pressing and dragging
over the level bar for each of the equalizer bands. The level
value, which spans between plus or minus nine, is dis-
played at the bottom of each of the Bands.
Speed Adjusted Volume
Press the “Speed Adjusted Volume” button on the touch-
screen to activate the Speed Adjusted Volume screen.
The Speed Adjusted Volume is adjusted by selecting from
“Off,” “1,” “2” or “3.” This alters the automatic adjustment
of the audio volume with variation to vehicle speed.
Volume increases automatically as speed increase to com-
pensate for normal road noise.
Surround Sound
26 RADIO MODE

Press the “On” button on the touchscreen to activate
Surround Sound. Press “Off” to deactivate this feature.
When Surround Sound is On, you can hear audio coming
from every direction as in a movie theatre or home theatre
system.
AUX Volume Offset
Press the “AUX Volume Offset” button on the touchscreen
to activate the AUX Volume Offset screen.
The AUX Volume Offset is adjusted by pressing of the “+”
and “–” buttons. This alters the AUX input audio volume.
The level value, which spans between plus or minus three,
is displayed above the adjustment bar.
Auto Play
Press the “Auto Play” button on the touchscreen to activate
the Auto Play screen.
3
RADIO MODE 27

The Auto Play feature begins playing music as soon as a
USB Media device is connected to one of the vehicle’s
Media USB ports, when it is turned on. Press “Off” to turn
the setting off.
28 RADIO MODE

MEDIA MODE
CONTENTS
mDISC MODE — IF EQUIPPED . . . . . . . . . . . . . . .30
mUSB MODE . . . . . . . . . . . . . . . . . . . . . . . . . . . . .31
mAUX MODE . . . . . . . . . . . . . . . . . . . . . . . . . . . .32
mBLUETOOTH MODE . . . . . . . . . . . . . . . . . . . . . .33
mANDROID AUTO & APPLE CARPLAY . . . . . . . . .34
▫AndroidAuto..........................34
▫Apple CarPlay Integration . . . . . . . . . . . . . . . . .39
▫Android Auto And Apple CarPlay Tips And
Tricks................................42
4

DISC MODE — IF EQUIPPED
Overview
Disc Mode is entered by either inserting a Disc or pressing
the “Disc” button on the left side of the display. Once in
Media Mode, press the “Source” button on the touchscreen
and select “CD.”
A “Insert Disc” message will be displayed on the screen in
the Disc mode when a Disc is not present in the Radio.
Seek Up
/Seek Down
Press and release the Seek Up
button on the touch-
screen for the next selection on the Disc. Press and
release the Seek Down button on the touchscreen to
return to the beginning of the current selection, or to
return to the beginning of the previous selection if the
Disc is within the first three seconds of the current
selection.
Browse
Press the “Browse” button on the touchscreen to display
the browse window. The left side of the browse window
displays a list of ways you can browse through the contents
of the Disc. If supported by the device, you can browse by
Folders, Artists, Playlists, Albums, Songs, etc. Press the
desired button on the touchscreen on the left side of the
screen. The center of the browse window shows items and
it’s sub-functions, which can be scrolled by pressing the
“Up” and “Down” buttons to the right. The TUNE/
SCROLL knob can also be used to scroll.
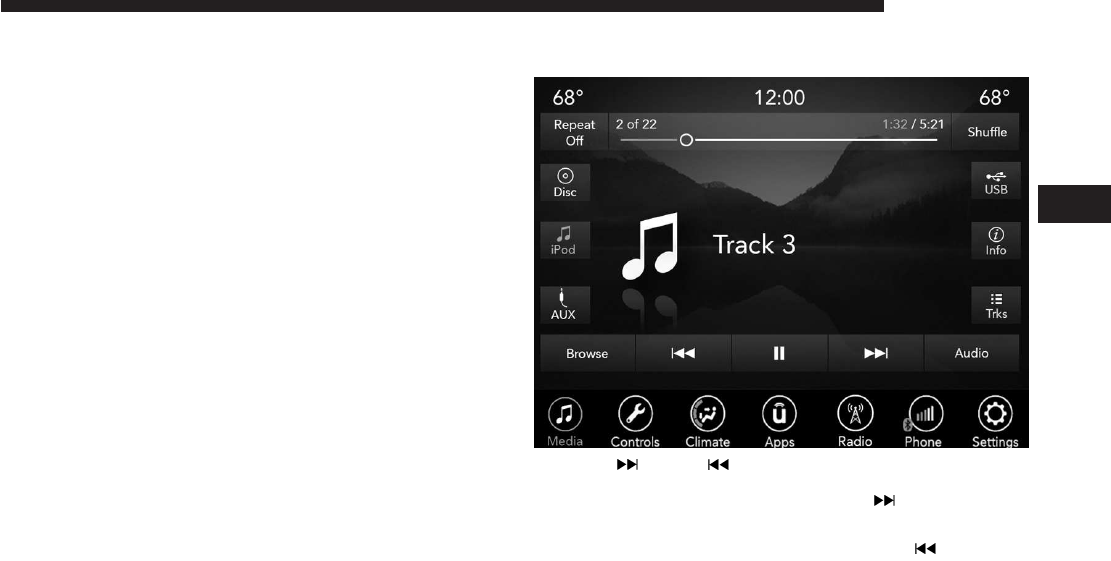
Media Mode
Press the “Media” button on the touchscreen to select the
desired audio source: Disc.
Repeat
Press the “Repeat” button on the touchscreen to toggle the
repeat functionality. The Repeat button on the touchscreen
is highlighted when active. The Radio will continue to play
the current track, repeatedly, as long as the repeat is active.
Shuffle
Press the “Shuffle” button on the touchscreen to play the
selections on the compact disc in random order to provide
an interesting change of pace. Press the button on the
touchscreen a second time to turn this feature off.
Audio
Refer to Radio Mode for adjusting the audio settings.
Info
30 MEDIA MODE
Press the “Info” button on the touchscreen to display the
current track information. Press the “Info” button on the
touchscreen a second time to cancel this feature.
Tracks
Press the “trks” button on the touchscreen to display a pop
up with the Song List. The currently playing song is
indicated by an arrow and lines above and below the song
title. When in the Tracks List screen you can rotate the
TUNE/SCROLL knob to highlight a track (indicated by the
line above and below the track name) and then push the
ENTER/BROWSE knob to start playing that track.
Pressing the “trks” button on the touchscreen while the
pop up is displayed will close the pop up.
USB MODE
Overview
USB/iPod Mode is entered by either inserting a USB device
or iPod and cable into the USB Port or press the “iPod”
button on the left side of the display.
Seek Up
/Seek Down
Press and release the Seek Up
button on the touch-
screen for the next selection on the USB device/iPod.
Press and release the Seek Down button on the
touchscreen to return to the beginning of the current
selection, or to return to the beginning of the previous
selection if the USB device/iPod is within the first three
seconds of the current selection.
Browse
Press the “Browse” button on the touchscreen to display
the browse window. The left side of the browse window
displays a list of ways you can browse through the contents
of the USB device/iPod. If supported by the device, you
can browse by Folders, Artists, Playlists, Albums, Songs,
etc. Press the desired button on the left side of the screen.
The center of the browse window shows items and it’s
sub-functions, which can be scrolled by pressing the “Up”
and “Down” buttons to the right. The TUNE/SCROLL
knob can also be used to scroll.
Media Mode
Press the “Media” button on the touchscreen to select the
desired audio source: USB.
Repeat
Press the “Repeat” button on the touchscreen to toggle the
repeat functionality. The Repeat button on the touchscreen
4
MEDIA MODE 31

is highlighted when active. The Radio will continue to play
the current track, repeatedly, as long as the repeat is active.
Shuffle
Press the “Shuffle” button on the touchscreen to play the
selections on the USB/iPod device in random order to
provide an interesting change of pace. Press the “Shuffle”
button on the touchscreen a second time to turn this feature
off.
Info
Press the “Info” button on the touchscreen to display the
current track information. Press the “Info” button on the
touchscreen a second time to cancel this feature.
Tracks
Press the “trks” button on the touchscreen to display a pop
up with the Song List. The currently playing song is
indicated by an arrow and lines above and below the song
title. When in the “trks” List screen you can rotate the
TUNE/SCROLL knob to highlight a track (indicated by the
line above and below the track name) and then push the
ENTER/BROWSE knob to start playing that track.
Pressing the “trks” button on the touchscreen while the
pop up is displayed will close the pop up.
Audio
Refer to Radio Mode for adjusting the audio settings.
AUX MODE
Overview
AUX (Auxiliary Mode) is entered by inserting an AUX
device using a cable with a 3.5 mm audio jack into the AUX
port or by pressing the AUX button on the left side of the
display.
Inserting Auxiliary Device
Gently insert the Auxiliary device cable into the AUX Port.
If you insert an Auxiliary device with the ignition ON and
the radio ON, the unit will switch to AUX mode and begin
to play when you insert the device cable.
Controlling The Auxiliary Device
The control of the auxiliary device (e.g., selecting playlists,
play, fast forward, etc.) cannot be provided by the radio;
use the device controls instead. Adjust the volume with the
VOLUME And ON/OFF rotary knob, or with the volume
of the attached device.
32 MEDIA MODE
NOTE: The vehicle radio unit is acting as the amplifier for
audio output from the Auxiliary device. Therefore, if the
volume control on the Auxiliary device is set too low, there
will be insufficient audio signal for the radio unit to play
the music on the device.
Media Mode
Press the “Media” button on the touchscreen to select the
desired audio source: AUX.
Audio
Refer to Radio Mode for adjusting the audio settings.
BLUETOOTH MODE
Overview
Bluetooth Streaming Audio (BTSA) or Bluetooth Mode is
entered by pairing a Bluetooth device, containing music, to
the Uconnect System.
Before proceeding, the Bluetooth device must be paired to
the Uconnect Phone to communicate with the Uconnect
System.
NOTE: See the pairing procedure in the Uconnect Phone
section for more details.
To access Bluetooth mode, press the “Bluetooth” button on
the left side of the display.
Seek Up
/Down
Press and release the “Right Arrow”
button on the
touchscreen for the next selection on the Bluetooth
device. Press and release the “Left Arrow” button on
the touchscreen to return to the beginning of the current
4
MEDIA MODE 33

selection, or return to the beginning of the previous
selection if the Bluetooth device is within the first
second of the current selection.
Media Mode
Press the “Media” button on the touchscreen to select the
desired audio source: Bluetooth.
Tracks
If the Bluetooth device supports this feature, press the
“trks” button on the touchscreen to display a pop up with
the Song List. The currently playing song is indicated by a
red arrow and lines above and below the song title.
Pressing the “trks” button on the touchscreen while the
pop up is displayed will close the pop up.
Audio
Refer to Radio Mode for adjusting the audio settings.
ANDROID AUTO & APPLE CARPLAY
Android Auto
Android Auto is a feature of your Uconnect system, and
your Android 5.0 Lollipop, or higher, powered smartphone
with a data plan, that allows you to project your smart-
phone and a number of its apps onto the touchscreen radio
display. Android Auto automatically brings you useful
information, and organizes it into simple cards that appear
just when they are needed. Android Auto can be used with
Google’s best-in-class speech technology, the steering
wheel controls, the knobs and buttons on your radio
faceplate, and the radio display’s touchscreen to control
many of your apps. To use Android Auto follow the
following procedure:
1. Download the Android Auto app from the Google Play
store on your Android-powered smartphone.
2. Connect your Android powered smartphone to one of
the media USB ports in your vehicle. If the Android
Auto app was not downloaded, the first time you plug
your device in, the app will begin to download.
NOTE: Be sure to use the factory-provided USB cable that
came with your phone, as aftermarket cables may not
work.
34 MEDIA MODE
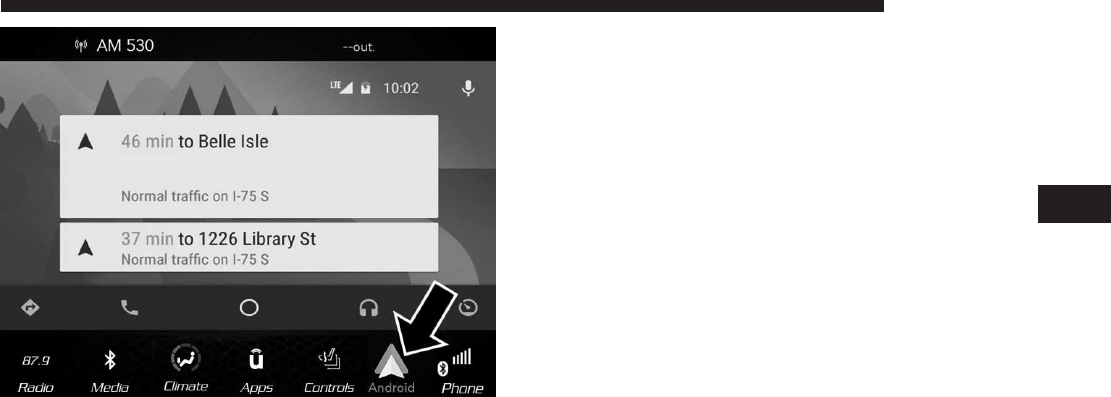
3. Once the device is connected and recognized, the
“Phone” icon on the personalized menu bar will auto-
matically change to the Android Auto Icon. Android
Auto should automatically launch, but if it does not
launch automatically, refer to “Android Auto And
Apple CarPlay Tips And Tricks” in this section for the
procedure to enable the feature “AutoShow”. You can
also launch it by touching the Android Auto icon on the
touchscreen.
Once Android Auto is up and running on your Uconnect
radio, the following features can be utilized using your
smartphone’s data plan:
•Google Maps for navigation
•Google Play Music, Spotify, iHeart Radio, etc. for music
•Handsfree Calling, and Texting for communication
•Hundred of compatible apps
NOTE: To use Android Auto, make sure you are in an area
with cellular coverage. Android Auto may use cellular data
and your cellular coverage is shown in the upper right
corner of the radio screen.
4
MEDIA MODE 35
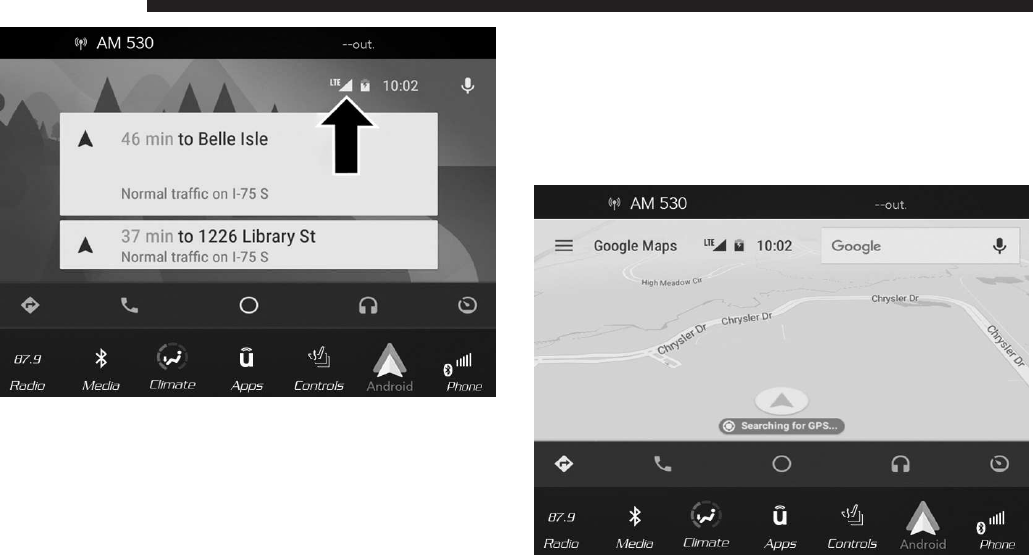
Maps
Push and hold the VR button on the steering wheel or tap
the microphone icon to ask Google to take you to a desired
destination by voice. You can also touch the Navigation
icon in Android Auto to access Google Maps.
NOTE: If the VR button is not held, and is only pushed, the
native Uconnect VR will prompt you and any navigation
command said will launch the native Uconnect navigation
system.
While using Android Auto, Google Maps provides voice-
guided:
•Navigation
•Live traffic information
•Lane guidance
For further information, refer to
www.android.com/auto/
.
36 MEDIA MODE
For further information on the navigation function, please
refer to
https://support.google.com/android
or
https://support.google.com/androidauto/.
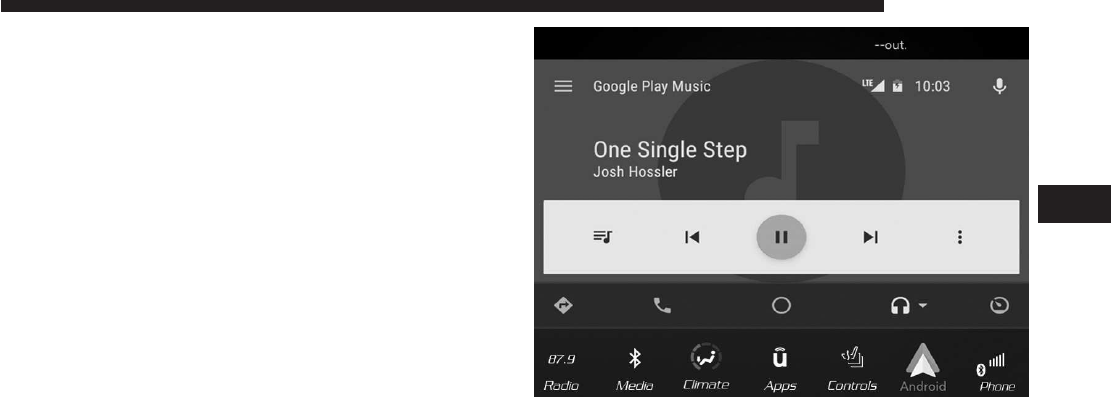
Music
Android Auto allows you to access and stream your
favorite music with apps like Google Play Music,
iHeartRadio, and Spotify. Using your smartphone’s data
plan, you can stream endless music on the road.
NOTE: Music apps, playlists, and stations must be set up
on your smartphone prior to using Android Auto, for them
to work with Android Auto.
NOTE: To see the metadata for the music playing through
Android Auto, select the Uconnect System’s media screen.
For further information refer to
https://support.google.com/androidauto
.
Communication
With Android Auto connected, press and hold the VR
button on the steering wheel to activate voice recognition
specific to the Android Auto. This will allow you to send
4
MEDIA MODE 37
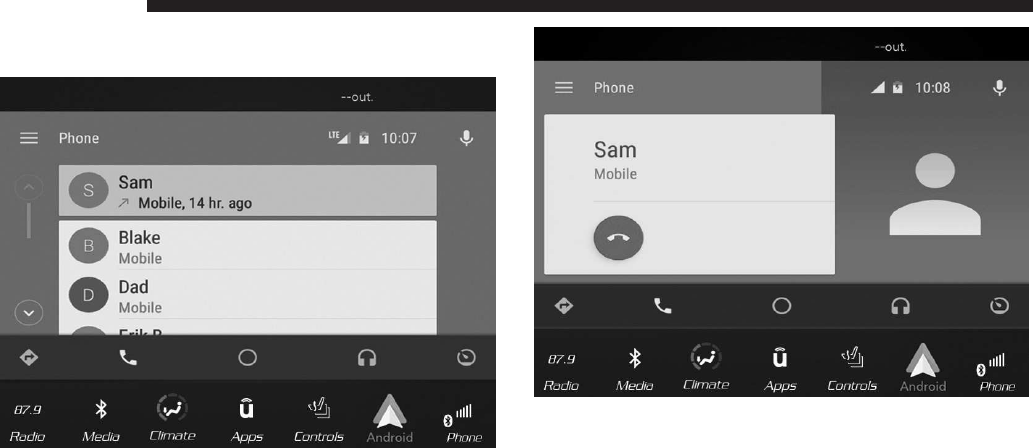
and reply to text messages, have incoming text messages
read out loud, and place and receive hands-free calls.
Apps
The Android Auto App will display all the compatible apps
that are available to use with Android Auto, every time it
is launched. You must have the compatible app down-
loaded, and you must be signed in to the app for it to work
with Android Auto. Refer to
g.co/androidauto
to see the
latest list of available apps for Android Auto.
38 MEDIA MODE
Apple CarPlay Integration
Uconnect works seamlessly with Apple CarPlay, the
smarter, more secure way to use your iPhone in the car, and
stay focused on the road. Use your Uconnect Touchscreen
display, the vehicle’s knobs and controls, and your voice
with Siri to get access to Apple Music, Maps, Messages,
and more.
To use CarPlay, make sure you are using iPhone 5 or later,
have Siri enabled in Settings, ensure your iPhone is un-
locked for the very first connection only, and then use the
following procedure:
1. Connect your iPhone to one of the media USB ports in
your vehicle.
NOTE: Be sure to use the factory-provided Lightning cable
that came with your phone, as aftermarket cables may not
work.
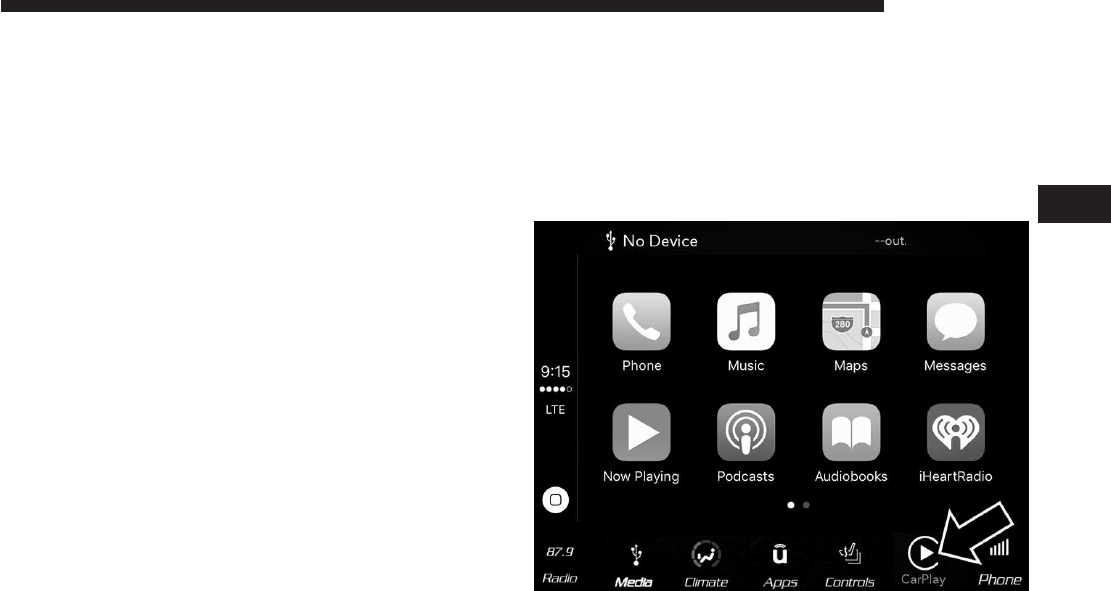
2. Once the device is connected and recognized, the
“Phone” icon on the personalized menu bar will auto-
matically change to the CarPlay Icon. CarPlay should
launch automatically, but if not, refer to “Android Auto
And Apple CarPlay Tips And Tricks” in this section for
the procedure to enable the feature “AutoShow”. You
can also touch the Apple CarPlay icon on the touch-
screen to launch it.
4
MEDIA MODE 39
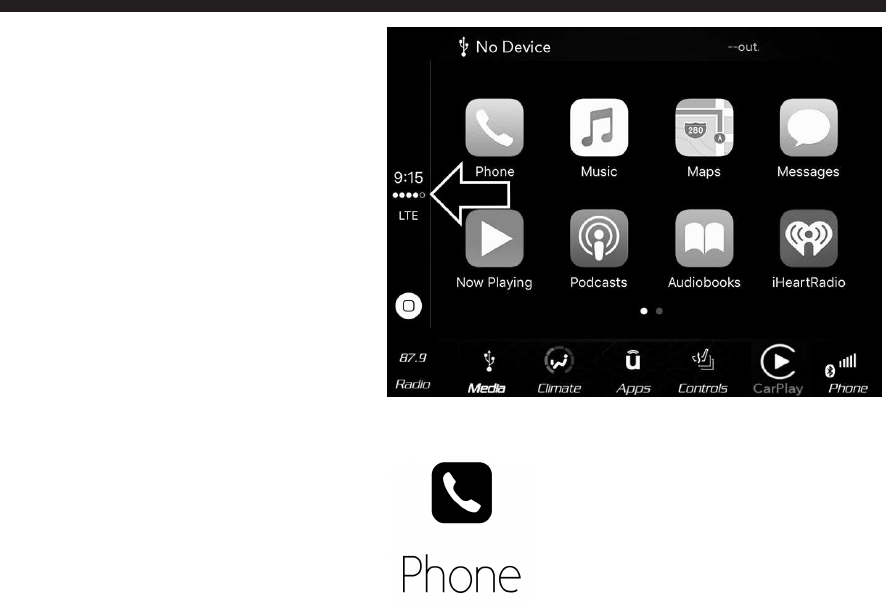
Once CarPlay is up and running on your Uconnect radio,
the following features can be utilized using your iPhone’s
data plan:
•Phone
•Music
•Messages
•Maps
NOTE: To use CarPlay make sure that cellular data is
turned on, and that you are in an area with cellular
coverage. Your data and cellular coverage is shown on the
left side of the radio screen.
Phone
With CarPlay, press and hold the VR
button on the steering wheel to activate
a Siri voice recognition session. You can
also press and hold the Home button
within CarPlay to start talking to Siri.
40 MEDIA MODE
This will allow you to make calls or listen to voice mail as
you normally would using Siri on your iPhone.
NOTE: Only temporarily pushing the VR button on the
steering wheel will launch a native VR session, not a Siri
session, and it will not function with CarPlay.
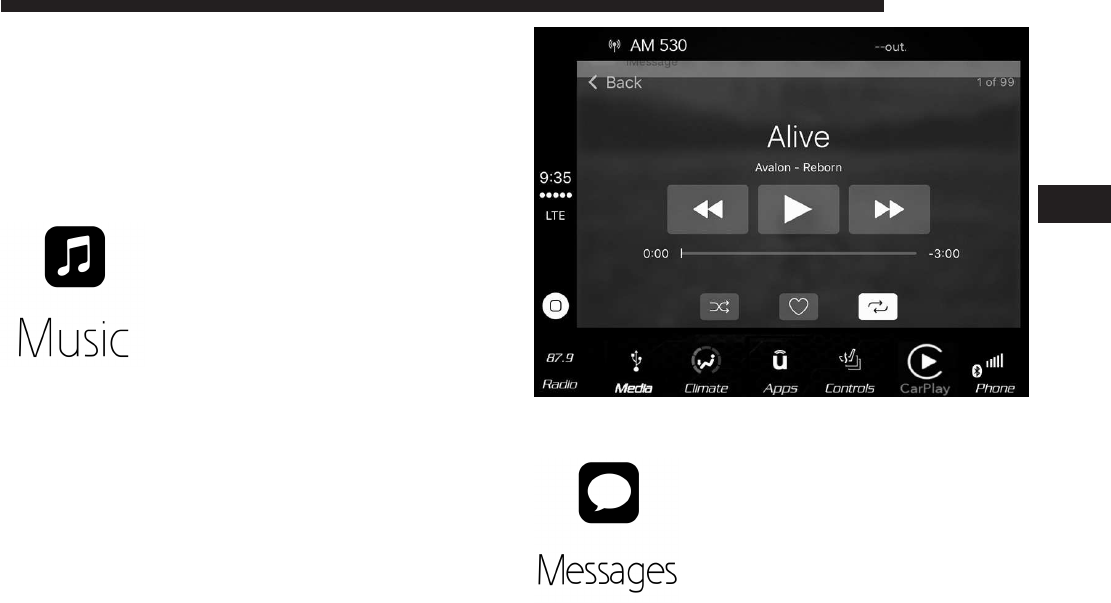
Music
CarPlay allows you to access all your
artists, playlists, and music from iTunes.
Using your iPhone’s data plan, you can
also use select third party audio apps
including music, news, sports, podcasts
and more.
Messages
Just like Phone, CarPlay allows you to
use Siri to send or reply to text mes-
sages. Siri can also read incoming text
messages, but driver’s will not be able to
read messages, as everything is done via
voice.
4
MEDIA MODE 41
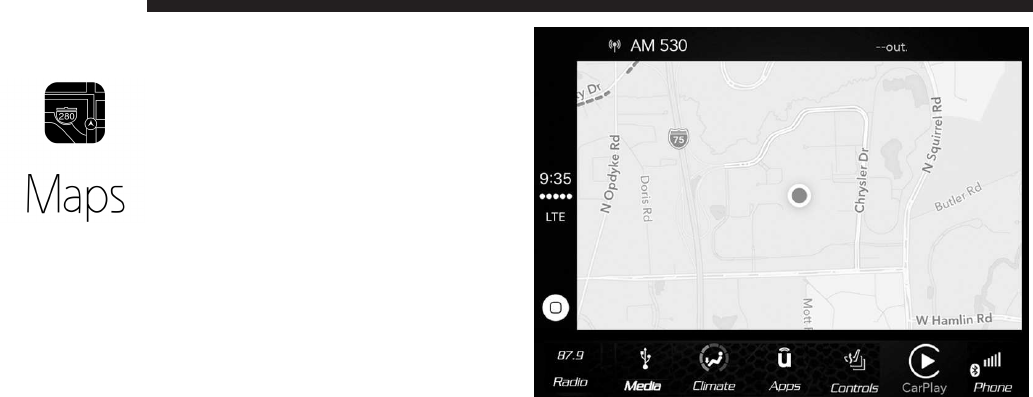
Maps
To use your Apple Maps for navigation
on your Uconnect system, launch Car-
Play, and push and hold the VR button
on the steering wheel to use Siri to set
your desired destination. Alternatively,
choose a Nearby destination by pressing
Destinations and selecting a category, by
launching Siri from the destinations page, or even by
typing in a destination.
Apps
To use a compatible app with CarPlay, you must have the
compatible app downloaded, and you must be signed in to
the app. Refer to
http://www.apple.com/ios/carplay/
to see the latest list of available apps for CarPlay.
Android Auto And Apple CarPlay Tips And Tricks
AutoPlay
42 MEDIA MODE
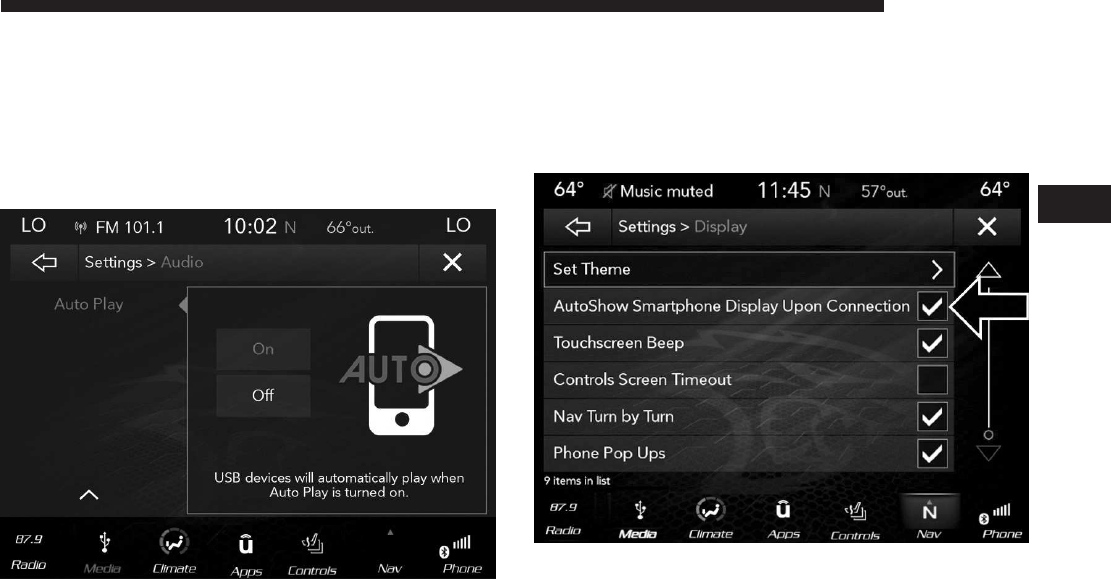
AutoPlay is a feature of the Uconnect system that auto-
matically begins playing music off of the connected device,
as soon as it is connected. This feature can be turned on or
off in the Uconnect Settings, within the Audio Settings
category. It’s default setting is on.
NOTE: AutoPlay is not supported by Android Auto.
AutoShow
AutoShow is a feature of the Uconnect system that auto-
matically launches and displays Android Auto/Apple Car-
Play when the phone is initially connected to the USB
media port. This feature can be turned on and off in the
Uconnect Settings, within the Display Settings category.
The default setting is on.
Android Auto Automatic Bluetooth Pairing
After connecting to Android Auto for the first time and
undergoing the setup procedure, the smartphone will
4
MEDIA MODE 43

automatically pair to the Uconnect system via Bluetooth
without any setup required every time it is within range, if
Bluetooth is turned on.
NOTE: Android Auto features cannot be used with
Bluetooth, a USB connection is required for its use.
Android Auto uses both Bluetooth and USB connections to
function, and the connected device will be unavailable to
other devices when connected using Android Auto.
Multiple Devices Connecting To The Uconnect System
It is possible to have multiple devices connected to the
Uconnect system. For example, if using Android Auto/
Apple CarPlay, the connected device will be the one that
will be used to place hands-free phone calls or send
hands-free text messages. However, another device can
also be paired to the Uconnect system, via Bluetooth, as an
audio source, so the passenger can stream music.
NOTE:
•If using a Samsung device, every time it is connected to
a media USB, and there is another device plugged in,
you will need to manually change the configuration of
the USB connection in order for the Samsung device to
send data.
44 MEDIA MODE

PHONE MODE
CONTENTS
mOVERVIEW . . . . . . . . . . . . . . . . . . . . . . . . . . . .47
mPHONE OPERATION . . . . . . . . . . . . . . . . . . . . .49
▫Operation . . . . . . . . . . . . . . . . . . . . . . . . . . . .49
▫Natural Speech . . . . . . . . . . . . . . . . . . . . . . . . .49
▫Help Command . . . . . . . . . . . . . . . . . . . . . . . .50
▫Cancel Command . . . . . . . . . . . . . . . . . . . . . . .50
▫Pair (Link) Uconnect Phone To A Mobile Phone . .50
▫Pair Additional Mobile Phones . . . . . . . . . . . . . .52
▫Pair A Bluetooth Streaming Audio Device . . . . . .53
▫Connecting To A Particular Mobile Phone Or Audio
Device After Pairing . . . . . . . . . . . . . . . . . . . . .53
▫Disconnecting A Phone Or Audio Device . . . . . .54
▫Deleting A Phone Or Audio Device . . . . . . . . . .54
▫Making A Phone Or Audio Device A Favorite . . .54
▫Phonebook Download (Automatic Phonebook
Transfer From Mobile Phone) — If Equipped . . . .54
▫Managing Your Favorites . . . . . . . . . . . . . . . . . .55
▫To Remove A Favorite . . . . . . . . . . . . . . . . . . . .55
mPHONE CALL FEATURES . . . . . . . . . . . . . . . . . .56
▫Ways To Initiate A Phone Call . . . . . . . . . . . . . .56
▫Dial By Saying A Number . . . . . . . . . . . . . . . . .56
▫Call By Saying A Phonebook Name . . . . . . . . . .56
▫CallControls ..........................56
▫Touch-Tone Number Entry . . . . . . . . . . . . . . . . .57
▫RecentCalls ...........................57
▫Answer Or Ignore An Incoming Call — No Call
Currently In Progress . . . . . . . . . . . . . . . . . . . .57
▫Answer Or Ignore An Incoming Call — Call
Currently In Progress . . . . . . . . . . . . . . . . . . . .58
5

▫Do Not Disturb . . . . . . . . . . . . . . . . . . . . . . . .58
▫Place/Retrieve A Call From Hold . . . . . . . . . . . .58
▫Making A Second Call While Current Call Is In
Progress . . . . . . . . . . . . . . . . . . . . . . . . . . . . . .58
▫Toggling Between Calls . . . . . . . . . . . . . . . . . . .59
▫Join Calls . . . . . . . . . . . . . . . . . . . . . . . . . . . . .59
▫Call Termination . . . . . . . . . . . . . . . . . . . . . . . .59
▫Redial . . . . . . . . . . . . . . . . . . . . . . . . . . . . . . .59
▫Call Continuation . . . . . . . . . . . . . . . . . . . . . . .59
mADVANCED PHONE CONNECTIVITY . . . . . . . . .59
▫Transfer Call To And From Mobile Phone . . . . . .59
▫Connect Or Disconnect Link Between The Uconnect
Phone And Mobile Phone . . . . . . . . . . . . . . . . .60
mTHINGS YOU SHOULD KNOW ABOUT YOUR
UCONNECTPHONE .....................60
▫VoiceCommand ........................60
▫Far End Audio Performance . . . . . . . . . . . . . . .61
▫Bluetooth Communication Link . . . . . . . . . . . . .61
▫Power-Up ............................61
▫General Information . . . . . . . . . . . . . . . . . . . . .61
46 PHONE MODE

OVERVIEW
Uconnect Phone is a voice-activated, hands-free, in-vehicle
communications system. Uconnect Phone allows you to
dial a phone number with your mobile phone.
Uconnect Phone supports the following features:
Voice Activated Features:
•Hands-Free dialing via Voice (“Call John Smith Mobile”
or, “Dial 248-555-1212”).
•Hands-Free text to speech listening of your incoming
SMS messages.
•Hands-free Text Message Reply. (Forward one of 18 pre-
defined SMS messages to incoming calls/text messages).
•Redialing last dialed numbers (“Redial”).
•Calling Back the last incoming call number (“Call
Back”).
•View Call logs on screen (“Show incoming calls,” “Show
Outgoing calls,” “Show missed Calls,” “Show Recent
Calls”).
•Searching Contacts phone number (“Search for John
Smith Mobile”).
Screen Activated Features
•Dialing via Keypad using touchscreen.
•Viewing and Calling contacts from Phonebooks dis-
played on the touchscreen.
•Setting Favorite Contact Phone numbers so they are
easily accessible on the Main Phone screen.
•Viewing and Calling contacts from Recent Call logs.
•Reviewing your recent Incoming SMS.
•Listen to Music on your Bluetooth Device via the
touchscreen.
•Pairing up to ten phones/audio devices for easy access
to connect to them quickly.
NOTE: Your phone must be capable of SMS messaging via
Bluetooth for messaging features to work properly.
Your mobile phone’s audio is transmitted through your
vehicle’s audio system; the system will automatically mute
your radio when using the Uconnect Phone.
For Uconnect customer support:
•U.S. residents - visit
UconnectPhone.com
or call:
5
PHONE MODE 47

877-855-8400
•Canadian residents - (English) call:
800-465-2001
or (French) call:
800-387-9983
Uconnect Phone allows you to transfer calls between the
system and your mobile phone as you enter or exit your
vehicle and enables you to mute the system’s microphone
for private conversation.
WARNING!
ALWAYS drive safely with your hands on the steer-
ing wheel. You have full responsibility and assume
all risks related to the use of the Uconnect features
and applications in this vehicle. Only use Uconnect
when it is safe to do so. Failure to do so may result
in an accident involving serious injury or death.
The Uconnect Phone is driven through your Bluetooth
“Hands-Free Profile” mobile phone. Uconnect features
Bluetooth technology - the global standard that enables
different electronic devices to connect to each other with-
out wires or a docking station, so Uconnect Phone works
no matter where you stow your mobile phone (be it your
purse, pocket, or briefcase), as long as your phone is turned
on and has been paired to the vehicle’s Uconnect Phone.
The Uconnect Phone allows up to ten mobile phones or
audio devices to be linked to the system. Only one linked
(or paired) mobile phone and one audio device can be used
with the system at a time.
Uconnect Phone Button
The Uconnect Phone
button on your steering wheel is
used to get into the phone mode and make calls, show
recent, incoming, outgoing calls, view phonebook etc.,
When you press the button you will hear a BEEP. The
beep is your signal to give a command.
Uconnect Voice Command Button
The Uconnect Voice Command
button on your steer-
ing wheel is only used for “barge in” and when you are
already in a call and you want to send Tones or make
another call.
The
button on your steering wheel is also used to
access the Voice Commands for the Uconnect Voice
48 PHONE MODE

Command features if your vehicle is equipped. Please
see the Uconnect Voice Command section for direction
on how to use the button.
The Uconnect Phone is fully integrated with the vehicle’s
audio system. The volume of the Uconnect Phone can be
adjusted either from the radio volume control knob or from
the steering wheel radio control (right switch), if equipped.
PHONE OPERATION
Operation
Voice commands can be used to operate the Uconnect
Phone and to navigate through the Uconnect Phone menu
structure. Voice commands are required after most
Uconnect Phone prompts. There are two general methods
for how Voice Command works:
1. Say compound commands like “Call John Smith mo-
bile.”
2. Say the individual commands and allow the system to
guide you to complete the task.
You will be prompted for a specific command and then
guided through the available options.
•Prior to giving a voice command, one must wait for the
beep, which follows the “Listen” prompt or another
prompt.
•For certain operations, compound commands can be
used. For example, instead of saying “Call” and then
“John Smith” and then “mobile”, the following com-
pound command can be said: “Call John Smith mobile.”
•For each feature explanation in this section, only the
compound command form of the voice command is
given. You can also break the commands into parts and
say each part of the command when you are asked for it.
For example, you can use the compound command form
voice command “Search for John Smith,” or you can
break the compound command form into two voice
commands: “Search Contact” and when asked “John
Smith.” Please remember, the Uconnect Phone works
best when you talk in a normal conversational tone, as if
speaking to someone sitting a few feet/meters away
from you.
Natural Speech
Your Uconnect Phone Voice system uses a Natural Lan-
guage Voice Recognition (VR) engine.
5
PHONE MODE 49

Natural speech allows the user to speak commands in
phrases or complete sentences. The system filters out
certain non-word utterances and sounds such as “ah” and
“eh.” The system handles fill-in words such as “I would
like to.”
The system handles multiple inputs in the same phrase or
sentence such as “make a phone call” and “to Kelly Smith.”
For multiple inputs in the same phrase or sentence, the
system identifies the topic or context and provides the
associated follow-up prompt such as “Who do you want to
call?” in the case where a phone call was requested but the
specific name was not recognized.
The system utilizes continuous dialog; when the system
requires more information from the user it will ask a
question to which the user can respond without pushing
the “Voice Command”
button on your steering wheel.
Help Command
If you need assistance at any prompt, or if you want to
know your options at any prompt, say “Help” following
the beep.
To activate the Uconnect Phone from idle, simply push the
Phone
button on your steering wheel and say a
command or say “help.” All Uconnect Phone sessions
begin with a push of the Phone button on the radio
control head.
Cancel Command
At any prompt, after the beep, you can say “Cancel” and
you will be returned to the main menu.
You can also push the Phone
or Voice Command
button on your steering wheel when the system is
listening for a command and be returned to the main or
previous menu.
Pair (Link) Uconnect Phone To A Mobile Phone
To begin using your Uconnect Phone, you must pair your
compatible Bluetooth enabled mobile phone. Mobile phone
pairing is the process of establishing a wireless connection
between a cellular phone and the Uconnect system.
To complete the pairing process, you will need to reference
your mobile phone Owner’s Manual. Please visit
UconnectPhone.com
for complete mobile phone compat-
ibility information.
50 PHONE MODE
NOTE:
•You must have Bluetooth enabled on your phone to
complete this procedure.
•The vehicle must be in PARK.
1. Place the ignition in the ACC or ON position.
2. Press the “Phone” button in the Menu Bar on the
touchscreen.
•If there are no phones currently connected with the
system, a pop-up will appear asking if you would like
to pair a mobile phone.
3. Select “Yes” to begin the pairing process.
4. Search for available devices on your Bluetooth enabled
mobile phone.
•Press the Settings button on your mobile phone.
•Select Bluetooth and ensure it is enabled. Once en-
abled, the mobile phone will begin to search for
Bluetooth connections.
5. If No is selected, and you still would like to pair a
mobile phone, press the “Pairing” button from the
Uconnect Phone main screen.
•Select “Paired Phones” then press the “Paired Phones
and Audio Devices” button on the touchscreen, then
press the “Add Device”.
•Search for available devices on your Bluetooth enabled
mobile phone (see below). When prompted on the
phone, select “Uconnect” and accept the connection
request.
6. Uconnect Phone will display an in progress screen while
the system is connecting.
5
PHONE MODE 51

7. When your mobile phone finds the Uconnect system,
select “Uconnect.”
8. When prompted on the mobile phone, accept the con-
nection request from Uconnect Phone.
NOTE: Some mobile phones will require you to enter the
PIN number.
9. When the pairing process has successfully completed,
the system will prompt you to choose whether or not
this is your favorite phone. Selecting “Yes” will make
this phone the highest priority. This phone will take
precedence over other paired phones within range and
will connect to the Uconnect system automatically when
entering the vehicle. Only one mobile phone and/or one
Bluetooth audio device can be connected to the
Uconnect system at a time. If “No” is selected, simply
select “Uconnect” from the mobile phone/audio device
Bluetooth screen, and the Uconnect system will recon-
nect to the Bluetooth device.
Pair Additional Mobile Phones
1. Press the “Pairing” button on the touchscreen from the
Phone main screen.
2. Press the “Paired Phones and Audio Devices” button on
the touchscreen.
3. Press the “Add Device” button on the touchscreen.
4. Search for available devices on your Bluetooth enabled
mobile phone. When prompted on the phone, enter the
name and PIN shown on the Uconnect screen.
5. Uconnect Phone will display an in process screen while
the system is connecting.
6. When the pairing process has successfully completed,
the system will prompt you to choose whether or not
this is your favorite phone. Selecting “Yes” will make
this phone the highest priority. This phone will take
precedence over other paired phones within range.
NOTE: For phones which are not made a favorite, the
phone priority is determined by the order in which it was
paired. The latest phone paired will have the higher
priority.
You can also use the following VR commands to bring up
the Paired Phone screen from any screen on the radio:
•“Show Paired Phones” or
•“Connect My Phone”
52 PHONE MODE

Pair A Bluetooth Streaming Audio Device
1. Press the “Media” button on the touchscreen to begin.
2. Change the Source to Bluetooth.
3. Press the “Bluetooth” button on the touchscreen to
display the Paired Audio Devices screen.
4. Press the “Add Device” button on the touchscreen.
NOTE: If there is no device currently connected with the
system, a pop-up will appear.
5. Search for available devices on your Bluetooth enabled
audio device. When prompted on the device, enter the
PIN shown on the Uconnect screen.
6. Uconnect Phone will display an in process screen while
the system is connecting.
7. When the pairing process has successfully completed,
the system will prompt you to choose whether or not
this is your favorite device. Selecting Yes will make this
device the highest priority. This device will take prece-
dence over other paired devices within range.
NOTE: For devices which are not made a favorite, the
device priority is determined by the order in which it was
paired. The latest device paired will have the higher
priority.
You can also use the following VR command to bring up a
list of paired audio devices.
•“Show Paired Phones” or
•“Connect My Phone”
Connecting To A Particular Mobile Phone Or Audio
Device After Pairing
Uconnect Phone will automatically connect to the highest
priority paired phone and/or Audio Device within range.
If you need to choose a particular phone or Audio Device
follow these steps:
1. Press the “Pairing” button on the touchscreen.
2. Press the “Paired and Audio Devices” button on the
touchscreen.
3. Press to select the particular Phone or the particular
Audio Device. A pop-up menu will appear, press “Con-
nect Phone.”
4. Press the “X” to exit out of the Settings screen.
5
PHONE MODE 53

Disconnecting A Phone Or Audio Device
1. Press the “Pairing” button on the touchscreen.
2. Press the “Paired Phones and Audio Devices” button on
the touchscreen.
3. Press the “Settings” button located to the right of the
device name.
4. The options pop-up will be displayed.
5. Press the “Disconnect Device” button on the touch-
screen.
6. Press the “X” to exit out of the Settings screen.
Deleting A Phone Or Audio Device
1. Press the “Pairing” button on the touchscreen.
2. Press the “Paired Phones and Audio Devices” button on
the touchscreen.
3. Press the “Settings” button located to the right of the
device name for a different Phone or Audio Device than
the currently connected device.
4. The options pop-up will be displayed.
5. Press the “Delete Device” button on the touchscreen.
6. Press the “X” to exit out of the Settings screen.
Making A Phone Or Audio Device A Favorite
1. Press the “Pairing” button on the touchscreen.
2. Press the “Paired Phones and Audio Devices” button on
the touchscreen.
3. Press the “Settings” button located to the right of the
device name.
4. The options pop-up will be displayed.
5. Press the “Make Favorite” button on the touchscreen;
you will see the chosen device move to the top of the list.
6. Press the “X” to exit out of the Settings screen.
Phonebook Download (Automatic Phonebook
Transfer From Mobile Phone) — If Equipped
If equipped and specifically supported by your phone,
Uconnect Phone automatically downloads names (text
names) and number entries from the mobile phone’s
phonebook. Specific Bluetooth Phones with Phone Book
Access Profile may support this feature. See Uconnect
website,
UconnectPhone.com
, for supported phones.
54 PHONE MODE

•To call a name from a downloaded mobile phone book,
follow the procedure in the “Uconnect Voice Recognition
Quick Tips” section.
•Automatic download and update of a phone book, if
supported, begins as soon as the Bluetooth wireless
phone connection is made to the Uconnect Phone, for
example, after you start the vehicle.
•A maximum of 5,000 contact names with four numbers
per contact will be downloaded and updated every time
a phone is connected to the Uconnect Phone.
•Depending on the maximum number of entries down-
loaded, there may be a short delay before the latest
downloaded names can be used. Until then, if available,
the previously downloaded phonebook is available for
use.
•Only the phonebook of the currently connected mobile
phone is accessible.
•This downloaded phonebook cannot be edited or de-
leted on the Uconnect Phone. These can only be edited
on the mobile phone. The changes are transferred and
updated to Uconnect Phone on the next phone connec-
tion.
Managing Your Favorites
There are two ways you can add an entry to your Favorites.
1. After loading the mobile phonebook, press the “Favor-
ites” button on the touchscreen, and then press one of
the “+Add favorite Contact” buttons that appears on the
list.
2. After loading the mobile phonebook, select “Contacts”
from the Phone main screen, then select the appropriate
number. Press the down arrow symbol button next to
the selected number to display the options pop-up. In
the pop-up select “Add to Favorites.”
NOTE: If the Favorites list is full, you will be asked to
remove an existing favorite.
To Remove A Favorite
1. To remove a Favorite, select “Favorites” from the Phone
main screen.
2. Next select the down arrow icon next to the contact you
want to remove from your favorites. This will bring up
the options for that favorite contact.
3. Press “Remove from Favs.”
5
PHONE MODE 55

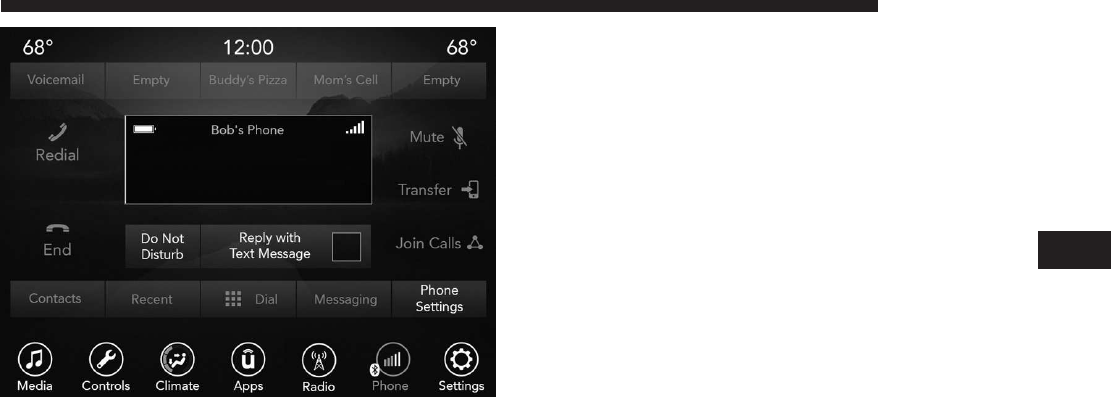
PHONE CALL FEATURES
The following features can be accessed through the
Uconnect Phone if the feature(s) are available and sup-
ported by Bluetooth on your mobile service plan. For
example, if your mobile service plan provides three-way
calling, this feature can be accessed through the Uconnect
Phone. Check with your mobile service provider for the
features that you have.
Ways To Initiate A Phone Call
Listed below are all the ways you can initiate a phone call
with Uconnect Phone.
•Redial
•Dial by pressing in the number
•Voice Commands (Dial by Saying a Name, Call by
Saying a Phonebook Name, Redial or Call Back)
•Favorites
•Mobile Phonebook
•Recent Call Log
•SMS Message Viewer
Dial By Saying A Number
1. Push the “VR” button on your steering wheel to begin.
2. After the “Listening” prompt and the following beep,
say “Dial 151-123-4444.”
3. The Uconnect Phone will dial the number 151-123-4444.
Call By Saying A Phonebook Name
1. Push the “VR” button on your steering wheel to begin.
2. After the “Listening” prompt and the following beep,
say “Call John Doe Mobile.”
3. The Uconnect Phone will dial the number associated
with John Doe, or if there are multiple numbers it will
ask which number you want to call for John Doe.
Call Controls
The touchscreen allows you to control the following call
features:
•Answer
•End
•Ignore
•Hold/unhold
56 PHONE MODE

•Mute/unmute
•Transfer the call to/from the phone
•Swap two active calls
•Join two active calls together
Touch-Tone Number Entry
1. Press the “Phone” button on the touchscreen.
2. Press the “Dial” button on the touchscreen.
3. The Touch-Tone screen will be displayed.
4. Use the numbered buttons on the touchscreens to enter
the number and press “Call.”
If your vehicle has two buttons on the steering wheel (VR
and Phone), press the VR
button on your steering
wheel to send a touch-tone. If your vehicles has three
buttons on the steering wheel (VR, Phone Send, and
Phone End), press the Phone Send button on your
steering wheel to send a touch-tone and say “Send
1234#” or you can say “Send Voicemail Password” if
Voicemail password is stored in your mobile phone-
book.
Recent Calls
You may browse a list of the most recent of each of the
following call types:
•All Calls
•Incoming Calls
•Outgoing Calls
•Missed Calls
These can be accessed by pressing the “recent calls” button
on the Phone main screen.
You can also push the “VR” button on your steering wheel
and say “Show my incoming calls” from any screen and
the Incoming calls will be displayed.
NOTE: Incoming can also be replaced with “Outgoing,”
“Recent” or “Missed.”
Answer Or Ignore An Incoming Call — No Call
Currently In Progress
When you receive a call on your mobile phone, the
Uconnect Phone will interrupt the vehicle audio system.
Push the Phone
button on the steering wheel to accept
the call. You can also press the “answer” button on the
touchscreen or press the caller ID box.
5
PHONE MODE 57

Answer Or Ignore An Incoming Call — Call
Currently In Progress
If a call is currently in progress and you have another
incoming call, you will hear the same network tones for
call waiting that you normally hear when using your
mobile phone. Press the “Uconnect Phone”
button on
the steering wheel, answer button on the touchscreen or
caller ID box to place the current call on hold and
answer the incoming call.
NOTE: The Uconnect Phone compatible phones in the
market today do not support rejecting an incoming call
when another call is in progress. Therefore, the user can
only answer an incoming call or ignore it.
Do Not Disturb
With Do Not Disturb, you can disable notifications from
incoming calls and texts, allowing you to keep your eyes
on the road and hands on the wheel. For your convenience,
there is a counter display to keep track of your missed calls
and text messages while you were using Do Not Disturb.
Do Not Disturb can automatically reply with a text mes-
sage, a call or both, when declining an incoming call and
send it to voicemail.
Automatic reply messages can be:
•“I am driving right now, I will get back to you shortly.”
•Create a custom auto reply message up to 160 characters.
NOTE: Only the first 25 characters can be seen on the
touchscreen while typing a custom message.
While in Do Not Disturb, Conference Call can be selected
so you can still place a second call without being inter-
rupted by incoming calls.
NOTE:
•Reply with text message is not compatible with iPhones.
•Auto reply with text message is only available on
phones that support Bluetooth MAP.
Place/Retrieve A Call From Hold
During an active call, press the “Hold” button on the
Phone main screen.
Making A Second Call While Current Call Is In
Progress
You can place a call on hold by pressing the “Hold” button
on the Phone main screen, then dial a number from the
dialpad, recent calls, SMS Inbox or from the phonebooks.
58 PHONE MODE

To go back to the first call, refer to “Toggling Between
Calls” in this section. To combine two calls, refer to “Join
Calls” in this section.
Toggling Between Calls
If two calls are in progress (one active and one on hold),
press the “Swap” button on the Phone main screen. Only
one call can be placed on hold at a time.
You can also push the Phone
button to toggle between
the active and held phone call.
Join Calls
When two calls are in progress (one active and one on
hold), press the “Join Calls” button on the Phone main
screen to combine all calls into a Conference Call.
Call Termination
To end a call in progress, momentarily press the Phone
“End”
button on the touchscreen or the Phone “End”
button on the steering wheel. Only the active call(s) will
be terminated and if there is a call on hold, it will
become the new active call.
Redial
Press the “Redial” button on the touchscreen, or push the
“VR” button and after the “Listening” prompt and the
following beep, say “Redial.”
The Uconnect Phone will call the last number that was
dialed from your mobile phone.
Call Continuation
Call continuation is the progression of a phone call on the
Uconnect Phone after the vehicle ignition has been
switched to OFF.
NOTE: The call will remain within the vehicle audio
system until the phone becomes out of range for the
Bluetooth connection. It is recommended to press the
“transfer” button on the touchscreen when leaving the
vehicle.
ADVANCED PHONE CONNECTIVITY
Transfer Call To And From Mobile Phone
The Uconnect Phone allows ongoing calls to be transferred
from your mobile phone to the Uconnect Phone without
terminating the call. To transfer an ongoing call from your
5
PHONE MODE 59
connected mobile phone to the Uconnect Phone or vice
versa, press the “Transfer” button on the Phone main
screen.
Connect Or Disconnect Link Between The
Uconnect Phone And Mobile Phone
If you would like to connect or disconnect the Bluetooth
connection between a Uconnect Phone paired mobile
phone and the Uconnect Phone, follow the instructions
described in your mobile phone User’s Manual.
THINGS YOU SHOULD KNOW ABOUT YOUR
UCONNECT PHONE
Voice Command
For the best performance:
•Adjust the rearview mirror to provide at least ½ inch
(1 cm) gap between the overhead console (if equipped)
and the mirror.
•Always wait for the beep before speaking.
•Speak normally, without pausing, just as you would
speak to a person sitting a few feet/meters away from
you.
•Ensure that no one other than you is speaking during a
voice command period.
Performance is maximized under:
•Low-To-Medium Blower Setting
•Low-To-Medium Vehicle Speed
•Low Road Noise
•Smooth Road Surface
•Fully Closed Windows
•Dry Weather Condition
WARNING!
ALWAYS drive safely with your hands on the wheel.
You have full responsibility and assume all risks
related to the use of the Uconnect features and appli-
cations in this vehicle. Only use Uconnect when it is
safe to do so. Failure to do so may result in an accident
involving serious injury or death.
Even though the system is designed for many languages
and accents, the system may not always work for some.
60 PHONE MODE

NOTE: It is recommended that you do not store names in
your favorites phonebook while the vehicle is in motion.
Phonebook (Mobile and Favorites) name recognition rate is
optimized when the entries are not similar. You can say
“O” (letter “O”) for “0” (zero).
Even though international dialing for most number com-
binations is supported, some shortcut dialing number
combinations may not be supported.
Far End Audio Performance
Audio quality is maximized under:
•Low-To-Medium Blower Setting
•Low-To-Medium Vehicle Speed
•Low Road Noise
•Smooth Road Surface
•Fully Closed Windows
•Dry Weather Conditions
•Operation From The Driver’s Seat
Performance such as audio clarity, echo, and loudness to a
large degree rely on the phone and network, and not the
Uconnect Phone.
Echo at the far end can sometimes be reduced by lowering
the in-vehicle audio volume.
In a convertible vehicle, system performance may be
compromised with the convertible top down.
Bluetooth Communication Link
Mobile phones have been found to lose connection to the
Uconnect Phone. When this happens, the connection can
generally be re-established by switching the mobile phone
OFF/ON. Your mobile phone is recommended to remain in
Bluetooth ON mode.
Power-Up
After switching the ignition key from OFF to either the ON
or ACC position, or after a language change, you must wait
at least 15 seconds prior to using the system.
General Information
The following regulatory statement applies to all Radio
Frequency (RF) devices equipped in this vehicle:
This device complies with Part 15 of the FCC Rules and
with Industry Canada license-exempt RSS standard(s).
Operation is subject to the following two conditions:
1. This device may not cause harmful interference, and
5
PHONE MODE 61

2. This device must accept any interference received, in-
cluding interference that may cause undesired opera-
tion.
NOTE: Changes or modifications not expressly approved
by the party responsible for compliance could void the
user’s authority to operate the equipment.
62 PHONE MODE

VOICE RECOGNITION QUICK TIPS
CONTENTS
mINTRODUCING UCONNECT . . . . . . . . . . . . . . . .64
mGET STARTED . . . . . . . . . . . . . . . . . . . . . . . . . . .64
mBASIC VOICE COMMANDS . . . . . . . . . . . . . . . . .65
mRADIO . . . . . . . . . . . . . . . . . . . . . . . . . . . . . . . .65
mMEDIA . . . . . . . . . . . . . . . . . . . . . . . . . . . . . . . .66
mPHONE . . . . . . . . . . . . . . . . . . . . . . . . . . . . . . .67
mCLIMATE ..............................68
mAPPLECARPLAY.........................68
mANDROIDAUTO.........................69
mGENERAL INFORMATION. . . . . . . . . . . . . . . . . .70
mADDITIONAL INFORMATION . . . . . . . . . . . . . . .71
6
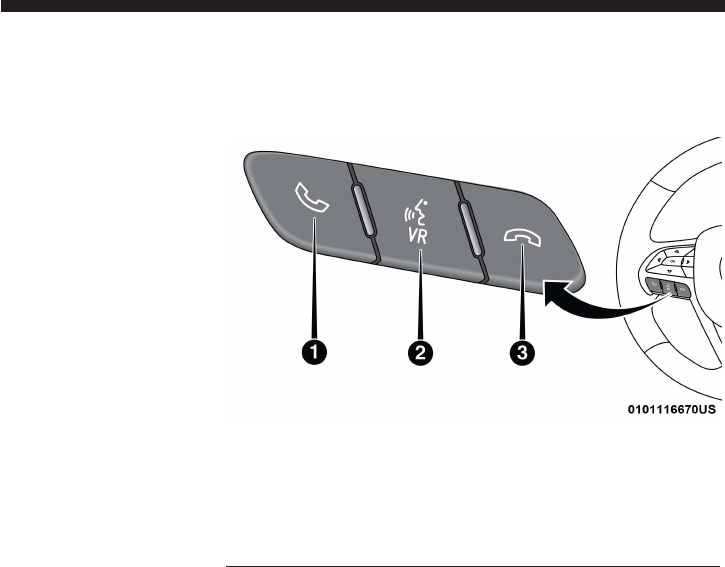
INTRODUCING UCONNECT
Start using Uconnect Voice Recognition with these helpful
quick tips. It provides the key Voice Commands and tips
you need to know to control your Uconnect 4 system.
GET STARTED
All you need to control your Uconnect system with your
voice are the buttons on your steering wheel.
1. Visit
UconnectPhone.com
to check mobile device and
feature compatibility and to find phone pairing instruc-
tions.
2. Reduce background noise. Wind noise and passenger
conversations are examples of noise that may impact
recognition.
3. Speak clearly at a normal pace and volume while facing
straight ahead. The microphone is located in the head-
liner and aimed at the driver.
4. Each time you give a Voice Command, you must first
push either the VR or Phone button, wait until after the
beep, then say your Voice Command.
5. You can interrupt the help message or system prompts
by pushing the VR or Phone button and saying a Voice
Command from current category.
Uconnect Voice Command Buttons
1 — Push To Initiate Or To Answer A Phone Call, Send Or Receive
A Text
2 — For All Radios: Push To Begin Radio, Media Functions, Apps
And Climate Functions.
3 — Push To End Call
64 VOICE RECOGNITION QUICK TIPS
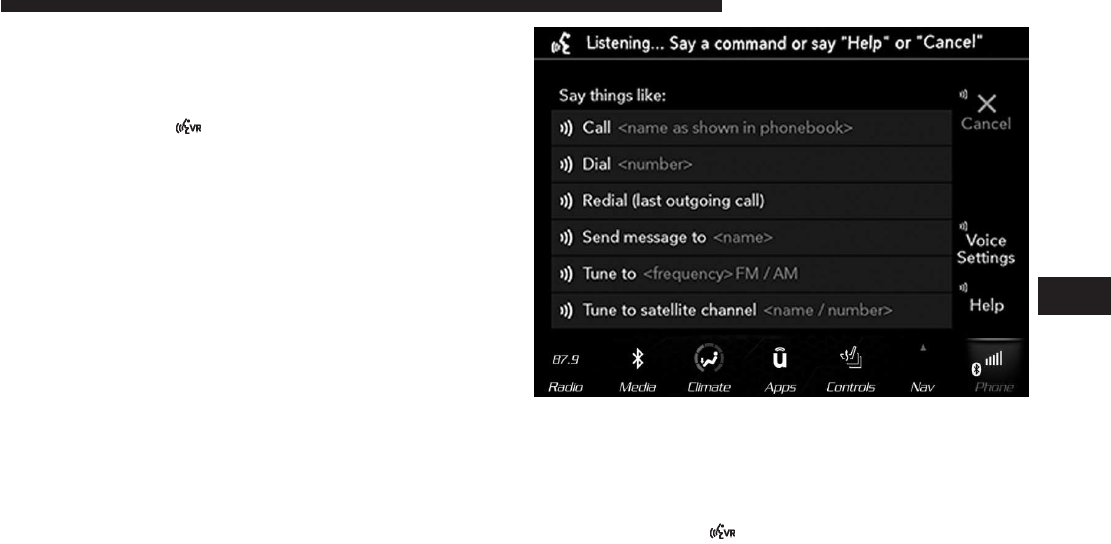
BASIC VOICE COMMANDS
The basic Voice Commands below can be given at any
point while using your Uconnect system.
Push the VR button
. After the beep, say{
•Cancel to stop a current voice session
•Help to hear a list of suggested Voice Commands
•Repeat to listen to the system prompts again
Notice the visual cues that inform you of your voice
recognition system’s status. Cues appear on the top of the
touchscreen.
RADIO
Use your voice to quickly get to the AM, FM or SiriusXM
Satellite Radio stations you would like to hear. (Subscrip-
tion or included SiriusXM Satellite Radio trial required.)
Push the VR button
. After the beep, say{
•Tune to ninety-five-point-five FM
•Tune to Satellite Channel Hits 1
6
VOICE RECOGNITION QUICK TIPS 65
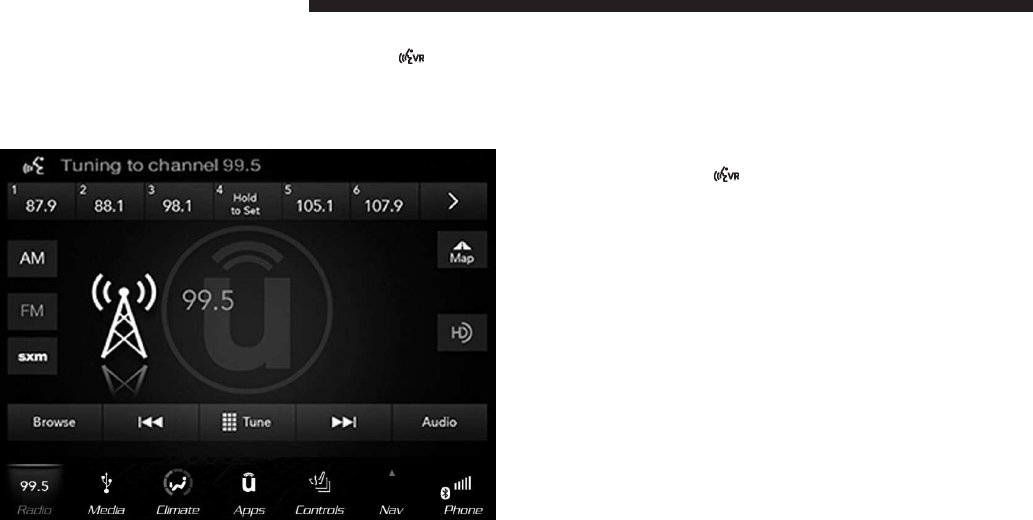
TIP: At any time, if you are not sure of what to say or want
to learn a Voice Command, push the VR button
and say
“Help.” The system will provide you with a list of
commands.
MEDIA
Uconnect offers connections via USB, Bluetooth and auxil-
iary ports (If Equipped). Voice operation is only available
for connected USB and AUX devices. (Remote CD player
optional and not available on all vehicles.)
Push the VR button
. After the beep, say one of the
following commands and follow the prompts to switch
your media source or choose an artist.
•Change source to Bluetooth
•Change source to AUX
•Change source to USB
•Play artist Beethoven; Play album Greatest Hits; Play
song Moonlight Sonata; Play genre Classical
TIP: Press the Browse button on the touchscreen to see all
of the music on your USB device. Your Voice Command
must match exactly how the artist, album, song and genre
information is displayed.
66 VOICE RECOGNITION QUICK TIPS
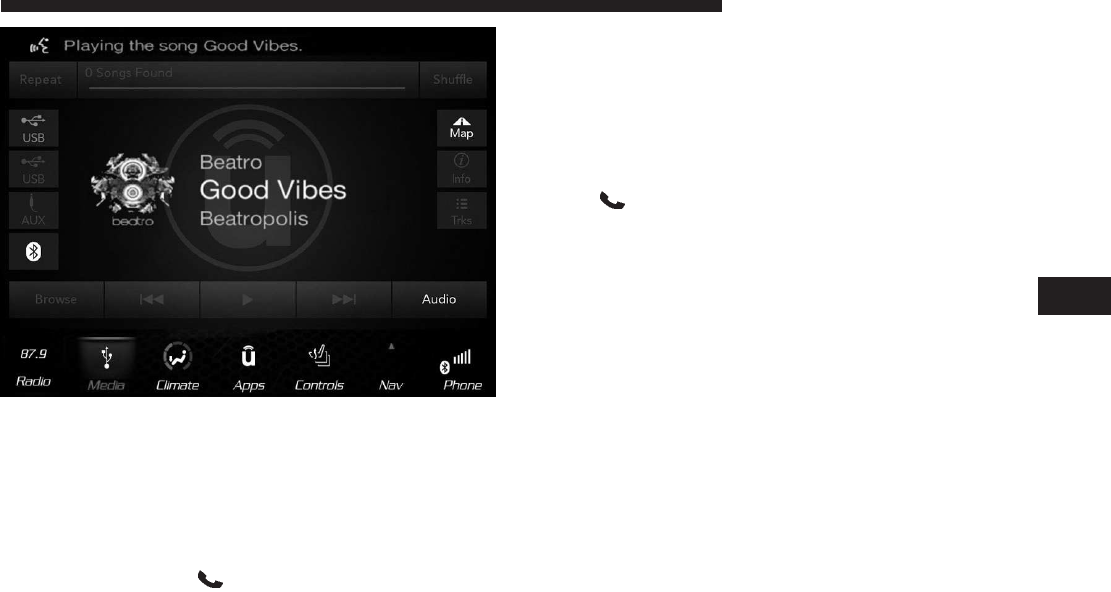
PHONE
Making and answering hands-free phone calls is easy with
Uconnect. When the Phonebook button is illuminated on
your touchscreen, your system is ready. Check
UconnectPhone.com
for mobile phone compatibility and
pairing instructions.
Push the Phone button
. After the beep, say one of the
following commands{
•Call John Smith
•Dial 123-456-7890 and follow the system prompts
•Redial (call previous outgoing phone number)
•Call back (call previous incoming phone number)
TIP: When providing a Voice Command, push the Phone
button
and say “Call,” then pronounce the name
exactly as it appears in your phone book. When a
contact has multiple phone numbers, you can say “Call
John Smith work.” 6
VOICE RECOGNITION QUICK TIPS 67
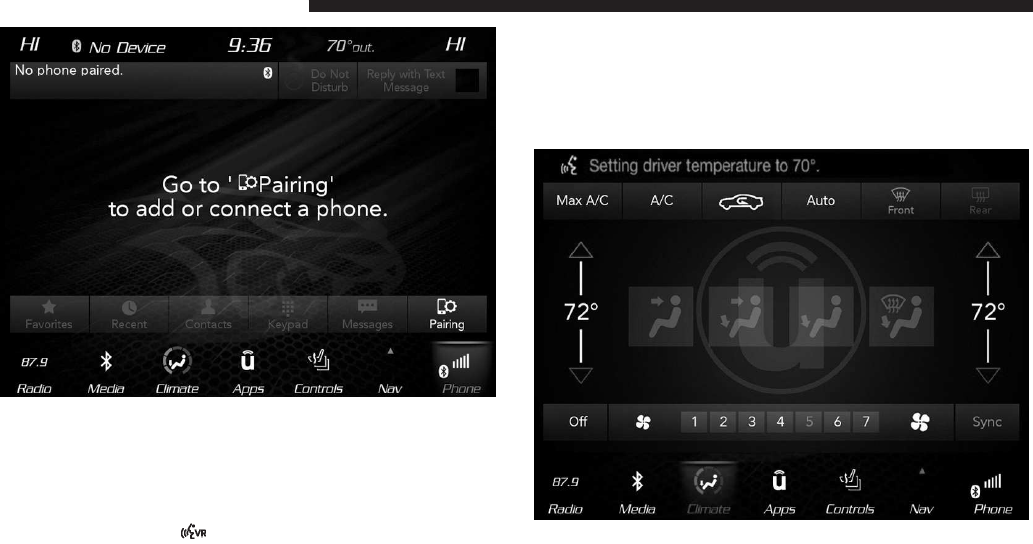
CLIMATE
Too hot? Too cold? Adjust vehicle temperatures hands-free
and keep everyone comfortable while you keep moving
ahead. (If vehicle is equipped with climate control.)
Push the VR button
. After the beep, say one of the
following commands:
•Set driver temperature to 70 degrees
•Set passenger temperature to 70 degrees
TIP: Voice Command for Climate may only be used to
adjust the interior temperature of your vehicle. Voice
Command will not work to adjust the heated seats or
steering wheel if equipped.
APPLE CARPLAY
Apple CarPlay allows you to use your voice to interact
with Siri through your vehicle’s voice recognition system,
and use your smartphone’s data plan to project your
68 VOICE RECOGNITION QUICK TIPS
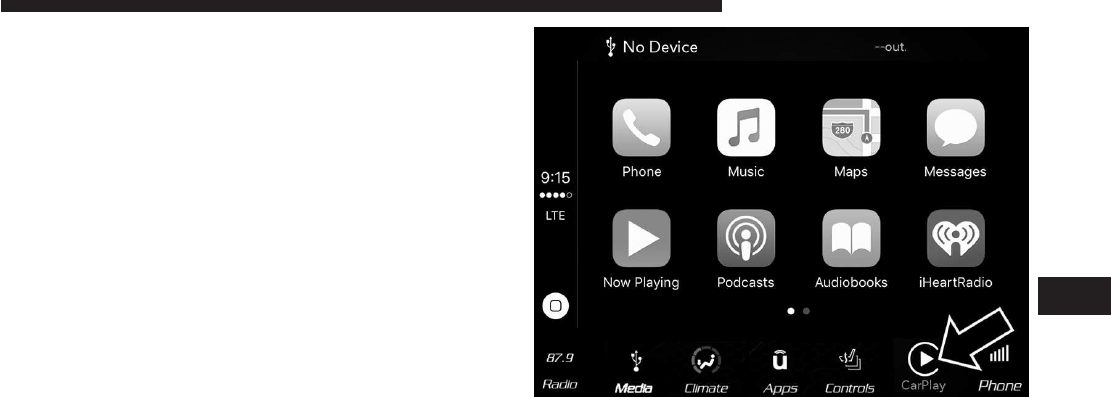
iPhone and a number of its apps onto your Uconnect
touchscreen. Connect your iPhone 5, or higher, to one of
the media USB ports, using the factory-provided Lightning
cable, and press the new CarPlay icon that replaces your
“Phone” icon on the main menu bar to begin Apple
CarPlay. Press and hold the VR button on the steering
wheel, or press and hold the “Home” button within Apple
CarPlay, to activate Siri, which recognizes natural voice
commands to use a list of your iPhone’s features:
•Phone
•Music
•Messages
•Maps
•Additional Apps
ANDROID AUTO
Android Auto allows you to use your voice to interact with
Android’s best-in-class speech technology through your
vehicle’s voice recognition system, and use your smart-
phone’s data plan to project your Android powered smart-
phone and a number of its apps onto your Uconnect
touchscreen. Connect your Android 5.0 (Lollipop), or
higher, to one of the media USB ports, using the factory-
provided USB cable, and press the new Android Auto icon
6
VOICE RECOGNITION QUICK TIPS 69
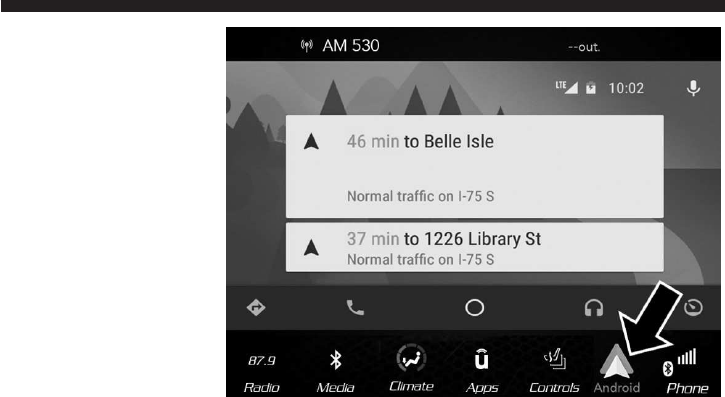
that replaces your “Phone” icon on the main menu bar to
begin Android Auto. Push and hold the VR button on the
steering wheel, or press and hold the “Microphone” icon
within Android Auto, to activate Android’s VR, which
recognizes natural voice commands, to use a list of your
smartphone’s features:
•Maps
•Music
•Phone
•Text Messages
•Additional Apps
GENERAL INFORMATION
The following regulatory statement applies to all Radio
Frequency (RF) devices equipped in this vehicle:
This device complies with Part 15 of the FCC Rules and
with Industry Canada license-exempt RSS standard(s).
Operation is subject to the following two conditions:
1. This device may not cause harmful interference, and
70 VOICE RECOGNITION QUICK TIPS

2. This device must accept any interference received, in-
cluding interference that may cause undesired opera-
tion.
NOTE: Changes or modifications not expressly approved
by the party responsible for compliance could void the
user’s authority to operate the equipment.
ADDITIONAL INFORMATION
© 2017 FCA US LLC. All rights reserved. Mopar and
Uconnect are registered trademarks and Mopar Owner
Connect is a trademark of FCA US LLC. Android is a
trademark of Google Inc. SiriusXM and all related marks
and logos are trademarks of SiriusXM Radio Inc.
Uconnect System Support:
•U.S. residents visit DriveUconnect.com or call:
1-877-855-8400(24 hours a day 7 days a week)
•Canadian residents call: 1-800-465-2001(English) or
1-800-387-9983(French)
6
VOICE RECOGNITION QUICK TIPS 71