Panasonic DMR E80H User Manual DVD Manuals And Guides L0308338
PANASONIC DVD Systems Manual L0308338 PANASONIC DVD Systems Owner's Manual, PANASONIC DVD Systems installation guides
User Manual: Panasonic DMR-E80H DMR-E80H PANASONIC DVD - Manuals and Guides View the owners manual for your PANASONIC DVD #DMRE80H. Home:Electronics Parts:Panasonic Parts:Panasonic DVD Manual
Open the PDF directly: View PDF ![]() .
.
Page Count: 64
PanasoniC °
DVD VIDEO RECORDER
Model No. DMR-E80H
Dear customer
Thank you for purchasing this product. For optimum performance
and safety, please read these instructions carefully.
Before connecting, operating or adjusting this product, please read
these instructions completely. Please keep this manual for future ref-
erence.
Region number supported by this unit
Region numbers are allocated to DVD players and software
according to where they are sold.
•The region number of this unit is "1".
eThe unit will play DVDs marked with labels containing "1" or
"ALL". ,x,m e
P.AM
I[_ [_ RQT6984-P
(5
CAUTION!
THIS PRODUCT UTILIZES A LASER.
USE OF CONTROLS OR ADJUSTMENTS OR PERFORM-
ANCE OF PROCEDURES OTHER THAN THOSE SPECI-
FIED HEREIN MAY RESULT IN HAZARDOUS RADIATION
EXPOSURE.
DO NOT OPEN COVERS AND DO NOT REPAIR YOUR-
SELF. REFER SERVICING TO QUALIFIED PERSONNEL.
WARNING:
TO REDUCE THE RISK OF FIRE, ELECTRIC
SHOCK OR PRODUCT DAMAGE, DO NOT
EXPOSE THIS APPARATUS TO RAIN, MOIS-
TURE, DRIPPING OR SPLASHING AND THAT
NO OBJECTS FILLED WITH LIQUIDS, SUCH
AS VASES, SHALL BE PLACED ON THE
APPARATUS.
CAUTION: TO REDUCE THE RISK OF ELECTRIC
SHOCK, DO NOT REMOVE SCREWS.
NO USER-SERVICEABLE PARTS
INSIDE.
REFER SERVICING TO QUALIFIED
SERVICE PERSONNEL.
The ghtn_ng flash with arrowhead symbol, wlmm
_, an equilateral triangle, is intended to alert the user
A _ to the presence of uninsulated "dangerous voltage"
_IL within the product's enclosure that may be of sum-
,_ cient magnitude to constitute a risk of electric shock
_""_"_"_ to persons.
A The exc_amauor point within an equilateral triangle
A L is intended to alert the user to the presence of
m _ important operating and maintenance (servicing)
,_k instructions n the literature accompanying the ap-
pliance.
CAUTION:
TO PREVENT ELECTRIC SHOCK MATCH
WIDE BLADE OF PLUG TO WIDE SLOT,
FULLY INSERT,
CAUTION!
DO NOT INSTALL OR PLACE THIS UNIT IN A BOOKCASE,
BUILT-IN CABINET OR IN ANOTHER CONFINED SPACE.
ENSURE THE UNIT IS WELL VENTILATED. TO PREVENT
RISK OF ELECTRIC SHOCK OR FIRE HAZARD DUE TO
OVERHEATING, ENSURE THAT CURTAINS AND ANY OTHER
MATERIALS DO NOT OBSTRUCT THE VENTILATION VENTS.
THE FOLLOWING APPLIES ONLY IN THE U.S.A.
FCC Note:
This equipment has been tested and found to comply with the
limits for a Class B digital device, pursuant to Part 15 of the
FCC Rules. These limits are designed to provide reasonable
protection against harmful interference in a residential instal-
lation. This equipment generates, uses, and can radiate radio
frequency energy and, if not installed and used in accor-
dance with the instructions, may cause harmful interference
to radio communications. However, there is no guarantee that
interference will not occur in a particular installation. If this
equipment does cause harmful interference to radio or televi-
sion reception, which can be determined by turning the
equipment off and on, the user is encouraged to try to correct
the interference by one or more of the following measures:
•Reorient or relocate the receiving antenna.
• Increase the separation between the equipment and
receiver.
• Connect the equipment into an outlet on a circuit different
from that to which the receiver is connected.
• Consult the dealer or an experienced radio/TV technician
for help.
FCC Caution: To assure continued compliance, follow the
attached installation instructions and use only shielded inter-
face cables when connecting to peripheral devices.
Any changes or modifications not expressly approved by the
party responsible for compliance could void the user's author-
ity to operate this equipment.
This device complies with Part 15 of the FCC Rules. Opera-
tion is subject to the following two conditions: (1) This device
may not cause harmful interference, and (2) this device must
accept any interference received, including interference that
may cause undesired operation.
THE FOLLOWING APPLIES ONLY IN THE U.S.A.
Note to CA'IV system installer:
This reminder is provided to call the CATV system installer's
attention to Article 820-40 of the NEC that provides guidelines for
proper grounding and, in particular, specifies that the cable
ground shall be connected to the grounding system of the build-
ing, as close to the point of cable entry as practical
(inside of product)
RQT6984
Read these operating instructions carefully before using the unit. Follow the safety instructions on the unit and the applicable safety instructions
listed below. Keep these operating instructions handy for future reference.
1) Read these instructions.
2) Keep these instructions.
3) Heed all warnings.
4) Follow all instructions.
5) Do not use this apparatus near water.
6) Clean only with dry cloth.
7) Do not block any ventilation openings. Install in accordance
with the manufacturer's instructions.
8) Do not install near any heat sources such as radiators, heat
registers, stoves, or other apparatus (including amplifiers) that
produce heat.
9) Do not defeat the safety purpose of the polarized or grounding-
type plug. A polarized plug has two blades with one wider than
the other. A grounding-type plug has two blades and a third
grounding prong. The wide blade or the third prong are provided
for your safety. If the provided plug does not fit into your outlet,
consult an electrician for replacement of the obsolete outlet.
10) Protect the power cord from being walked on or pinched partic-
ularly at plugs, convenience receptacles, and the point where
they exg from the apparatus.
11) Only use attachments/accessories specified by the manufacturer.
12) Use only with the cart, stand, tripod, bracket, or
table specified by the manufacturer, or sold with
the apparatus. When a cart is used, use caution
when moving the cart/apparatus combination to
avoid injury from tip-over.
13) Unplug this apparatus duriog lightniog storms or
when unused for long periods of time.
14) Refer all servicing to qualified service personnel. Servicing is
required when the apparatus has been damaged in any way,
such as power-supply cord or plug is damaged, liquid has been
spilled or objects have fallen into the apparatus, the apparatus
has been exposed to rain or moisture, does not operate nor-
mally, or has been dropped.
@;
(.9
This unit allows recording of high quality video on HDD
and DVD.RAM, the compact and durable digital media
with fast random access. This media also out performs
past tape formats in ease of operation.
•Maximum 106 hours on HDD (Hard Disk Drive)
(-.)page 15)
This model is installed with a high capacity 80 GB hard disk capable of
recording a maximum of 106 hours (6 hours continuously). The same
functions are available with HDD as with DVD-RAM and editing/record-
ing of visual data from hard disk to DVD-RAM/R is easy-to-perform.
•Maximum 12 hours on DVD-RAM
•Using adouble sided, 9.4 GB DVD-RAM allows you to record a
maximum of 12 hours (6 hours continuously).
• You can also use the FR (Flexible Recording) mode to fit record-
ings efficiently onto the available space on the disc.
•Auto Renewal Recording (->page 26)
if yourecorda programontoHDDrepeatedlyeverydayoreveryweekusing
timerrecording,the unitwillrecordthenewprogramovertheold one,
•Relief Recording (->page 25)
When timer recording to DVD-RAM or DVD-R, the unit will compare
the remaining space on the disc and the time necessary for record-
ing. If space is insufficient the unit will record the program to HDD
instead (there is no relief recording function the other way, i.e. from
HDD to DVD-RAM or DVD-R).
• Editing your recording [HOD][RAM]
• Youcan divide programs ('_page 34).
• Use play lists (_page 31) to select your favorite scenes and rear-
range them to play in any order you like.
• Exceptional sound and picture quality when recording
• Audio is recorded using Dolby Digital stereo, enabling high quality
sound recordings.When recording in XP mode it is possible to use
LPCM(2 channel)to achievesoundrecordingsof evenhigherquality.
• The encoder system used for recording is called "Hybrid VBR" and
allows high quality recordings.
•Fast access to the program you want to watch
(->page 19) [H00][RAM][DVO-R]
UsetheDirectNavigatorto finda programyouhaverecordedandstartplay.
•Make your own DVD-Video
•Finalizing a DVD-R that has been recorded on produces an origi-
nal DVD-Video in accordance with DVD-Video standards.
• In addition to DVD-Video movie software, this unit can also play
other types of discs including audio CDs and Video CDs. This
means that this unit has the potential to play a central role in your
home entertainment, from high-end home theater through to CD
playback.
•MP3 disc play (->page 23)
You can also play MP3 files recorded on CD-R and CD-RW,as well
as DVD-RAM,DVD-R, DVD-Audio,DVD-Video,Video CDs and CDs,
•Progressive Scan
By connecting the component videoterminal of this unit to a pro-
gressive scan television, it is possible to enjoy the high quality pic-
ture rendered by the progressive scan function.
•Quick View (->page 21)
You can speed up play to make checking the contents faster. Both
video and sound are played faster.
•The FUNCTIONS window shows you most of the
features you can use (->page 42)
The FUNCTIONS windowhas most of the features and functions
you are likely to use regularly. Just select the icon for the operation
you want to perform.
•Watch a program while you are recording it
(->page 17) [HDD][RAM]
Chasing play
You can watch a program from the start while you are still recording it.
Simultaneous rec and play
You can record a program while watching one you recorded
previously.
Time Slip
You can jump back to review a piece of action you missed while
recording by pressing the time slip button.
• During playback, you can specify a length of time to jump to the
scene you wish to view.
The manufacturer accepts no responsibility and offers no compensation for loss of recorded or edited material due to aproblem with the
unit or recordable media, and accepts no responsibility and offers no compensation for any subsequent damage caused by such loss.
Examples of causes of such losses are
•A disc recorded and edited with this unit is played in a DVD recorder or computer disc drive manufactured by another company.
•A disc used as described above and then played again in this unit.
•A disc recorded and edited with a DVD recorder or computer disc drive manufactured by another company is played in this unit.
RQT6984
(5
IMPORTANT SAFETY INSTRUCTIONS .................... 3
Features ............................................. 3
Accessories .......................................... 4
STEP f Antenna and television connections .............. 5
STEP 2 The remote control ............................. 6
STEP 3 Plug-in Auto Tuning ............................ 6
STEP 4 VCR Plus+ guide channel settings ................ 8
STEP 5 Set up to match your television ................... 9
Disc information ..................................... 10
Control reference guide ............................... 12
Recording television programs ......................... 14
Inserting discs ..................................... 14
Watching the television while recording .................. 15
Recording the best quality pictures in the remaining time
--Flexible Recording .............................. 16
Recording from a video cassette recorder ................ 16
Playing while you are recording ........................ 17
Playing from the beginning of the program you are recording
--Chasing Play .................................. 17
Simultaneous rec and play ............................ 17
Reviewing the recorded images while recording--Time Slip.. 17
Playing discs ........................................ 18
When a menu screen appears on the television ........... 19
Position Memory ................................... 19
Using the Direct Navigator ............................ 19
To erase a program that is being played back ............. 19
Other methods of play ................................ 20
Skipping .......................................... 20
Slow-motion play ................................... 20
Frame-by-frame viewing .............................. 20
Starting play from a selected item ...................... 20
Skipping a minute forward--CM Skip ................... 21
Selecting an amount of time to skit:_-Time Slip ........... 21
Fast forward and rewind--SEARCH .................... 21
Quick View ........................................ 21
Marking places to play again--MARKER ................ 22
Using menus to play MP3 discs ........................ 23
Timer recording ...................................... 24
Specify a time to stop recording ........................ 24
Using VCR Plus+ codes to make timer recordings ......... 24
Manually programming timer recordings ................. 25
Auto Renewal Recording ............................. 26
Check programs .................................... 26
Change or delete the program ......................... 27
Dubbing programs or play list .......................... 28
One Touch Dubbing (HDD _ DUD) ..................... 29
Creating play lists .................................... 30
Playing play fists .................................... 31
Playing play list scenes .............................. 31
To erase a play list or a play list scene during playback ...... 31
Editing play lists ..................................... 32
Editing programs ..................................... 34
HDD, Disc setting .................................... 36
Entering text ........................................ 38
Changing audio ...................................... 39
Using on-screen menus ............................... 40
Common procedures ................................ 40
Disc menu ........................................ 40
Play menu ........................................ 41
Audio menu ....................................... 41
Video menu ....................................... 41
Using the FUNCTIONS window ......................... 42
On-screen displays ................................... 43
Changing the unit's settings ........................... 44
Summary of settings ................................ 44
Common procedures ................................ 46
Changing the remote control code ...................... 46
Clock settings ...................................... 47
Other channel settings ............................... 48
Home Theater ....................................... 49
Connecting a cable TV box/satellite receiver .............. 50
Connecting an amplifier or system component ............ 51
Connecting other video equipment ..................... 52
Other antenna connections ............................ 53
Other antenna connection to the unit .................... 53
Other antenna connection from the unit to the television ..... 53
Glossary ............................................ 54
Disc handling ........................................ 54
Error messages ...................................... 55
Troubleshooting guide ................................ 56
Maintenance ......................................... 58
Specifications ....................................... 59
Product Service ...................................... 59
Limited Warranty (ONLY FOR U.S.A.) .................... 60
Limited Warranty (ONLY FOR CANADA) .................. 61
Guia de referencia r_pida en espafiol
(Spanish Quick Reference) .......................... 62
Index ....................................... Back cover
RQT6984
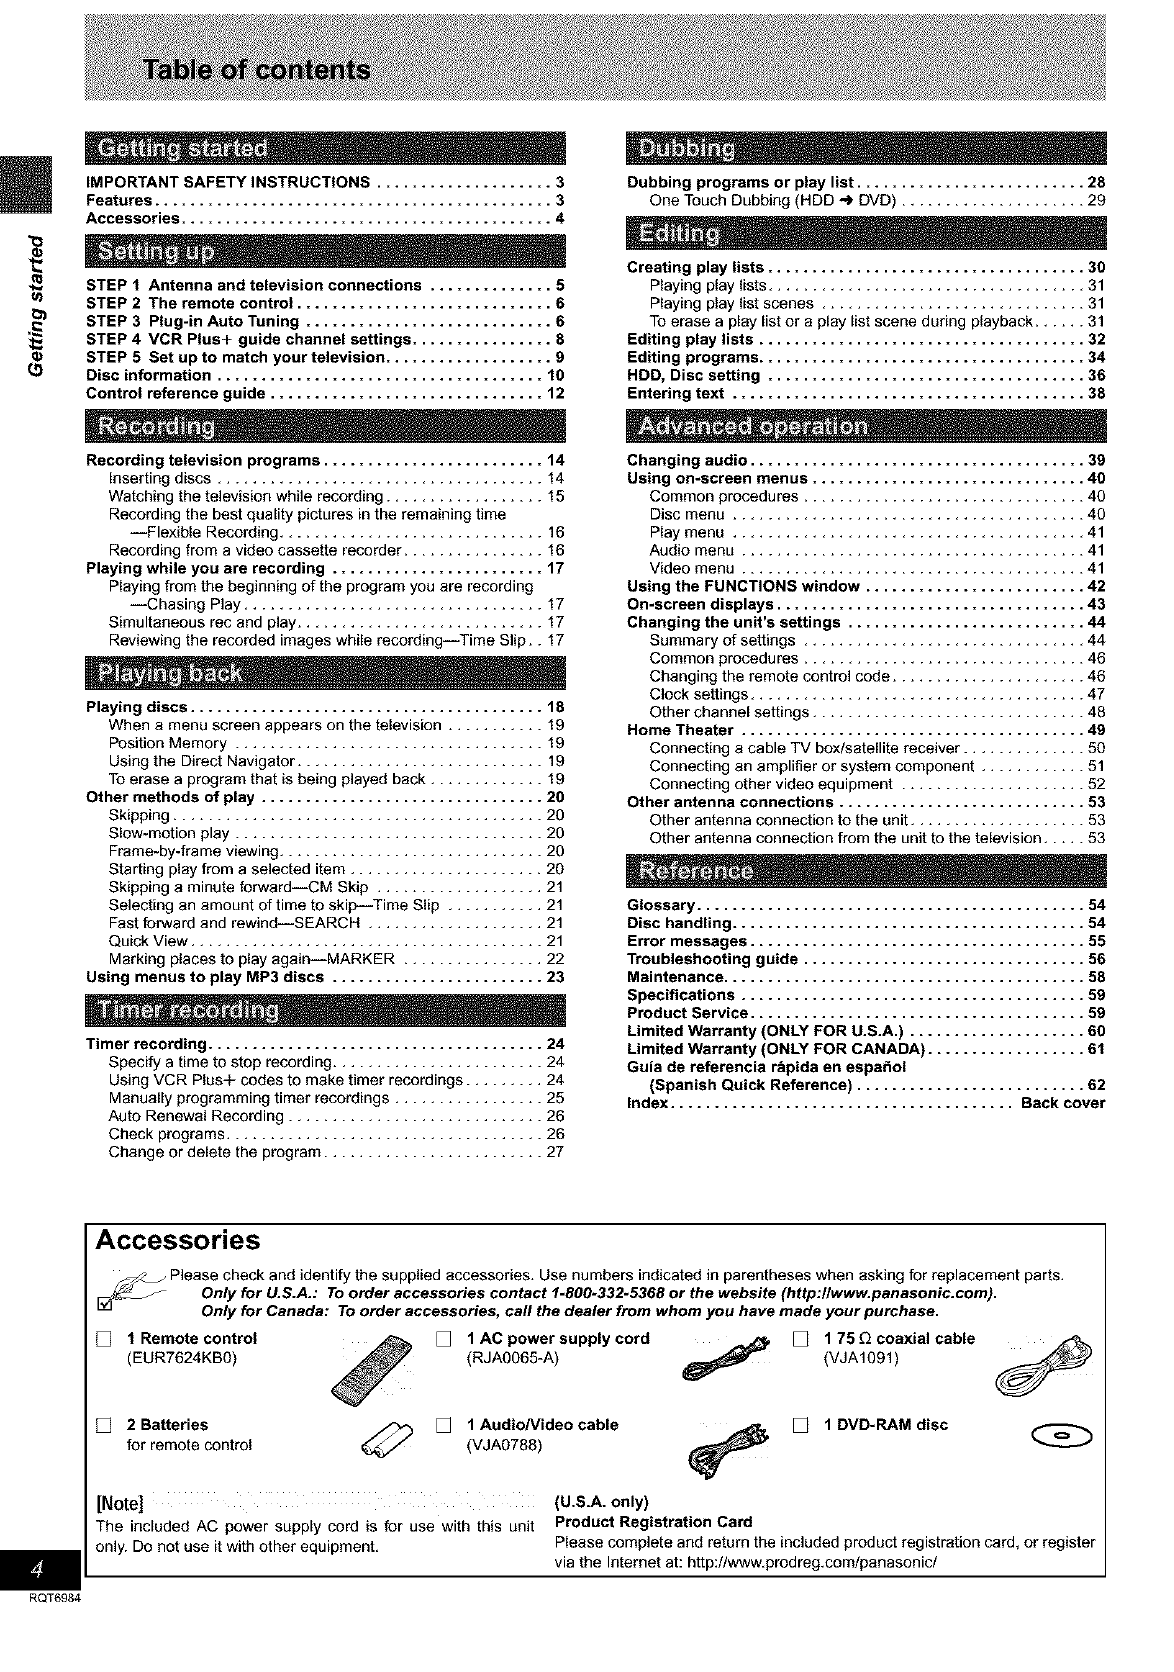
Accessories
_ Please check and identify the supplied accessories. Use numbers indicated in parentheses when asking for replacement parts.
Only for U.S.A.: To order accessories contact 1.800-332.5368 or the website (http:llwww.panaaonic.com).
Only for Canada: To order accessories, call the dealer from whom you have made your purchase.
[] 1 Remote control
(EUR7624KB0)
[] 1AC power supply cord _ [] 175 E2coaxial cable
(RJAOO65-A) (VJA1Ogl)
[] 2 Batteries _ [] 1 AudioNideo cable [] 1 DVD-RAM disc
for remote control (VJAg788)
[Note] (U.S.A. only)
The included AC power supply cord is for use with this unit Product Registration Card
only. Do not use itwith other equipment. Please complete and returnthe includedproductregistration card, or register
via the Intemet at: http://www.prodreg.com/panasonic/

Preparation
•Refer _ the television%operating instructions.
• Turn the television off and disc_aect its AC power supply cord.
To enjoy sound through other audio equipment (,,IPpaga 51)
To enjoy progressive video
Connect to the component video (480P) input t_mlnals on atelevi-
sion compatible with this unit's copy goard sy_em. (V_en will not
be displayed correctly if connected to an Incompatible tslevis_on.)
• All Panasonio televisions that have 480P input terminate are aom-
patible, Consult the manufacturer if you have another brar_d of
telev_lon.
Tetevision To _he antenna
r_- . Cable TV
f
S,VIDEO OUT t_rminal
The S-VIDEO OUT terntlnai achieves a more vivid picture than
the VIDEO OUT terminal b_, separasng the chrbmlnaace [C}
end Iornieance {Y) signals. (Actual results denen_ on the tele-
ws_onj Television
rswDEO1
Svideo cable | IN |
( tiec ed) / /
When makir, g Nia connection, ensure _011connect the audio
cables _o the _respondtr_l audi o input terminals on the televi-
siOrL
75 Gcoaxial cable
aThe signal from the antenna p_es t_rough this unit end along
the 75 _ coaxia_ cable to the television even when this unit is
turned off, Yau don't have to connect the enten_a to tile televi-
sion,
•The picture and sound signal from this unit doea not go through
the 75 G coaxial cable to _he televiaion. Make sure you connect
one of the following terminals on th_ unitto the television: the
AUDIONIDEO terminal, the S-VIDEO OUT ternllhat or the
COMPONENT VIDEO OUT terminal, if the t_evlslon has none
of these terminals, COnsultyour _cel daa_er,
- television COMPONENT VIDEO OUT termin_
[_:f3_#IP_'3NFNT"1These terminals aan be used for either
--_;;6E-6"_i" l imerlece or pr_reas_veoutp_ a_
YPB P_ provide apurer pick}re than the SWID£O
(_ @LC.) IOUTtetmineL
,_ _, ,_ JConnection using these term na_soutputs
l_ _ the color difference signals (P_/P.) and
_ _ luminance signal (Y} _e_arat_y in o_er to
.:_ _t_ _ acMeve hlghfide_ in reproducing colors.
•The descriptionof the compenan v_deo
Video Cable input terrainals depends on the televi-
(net included) sloo or mor_itor (e,g, Y/P_'P_, Y/B-Y/R-Y,
Y/CdC_}. Connect to terminals of the
same Golor,
• After making this connection, change the
b_ack _eve{ for a better picture
(,,_page45, Video-Black Level Control}.
When making thisconnection, ensure you
connect the audio cables to the corra-
spending audio input terminals on the
television,
Conserving power
This unit consumes a _ma_l amount Of powec even when It Ls
turned off (approx. 3.3 W). To save power when the anit is nat to
be used for atang time, unplug It frm'a the household AC outlet.
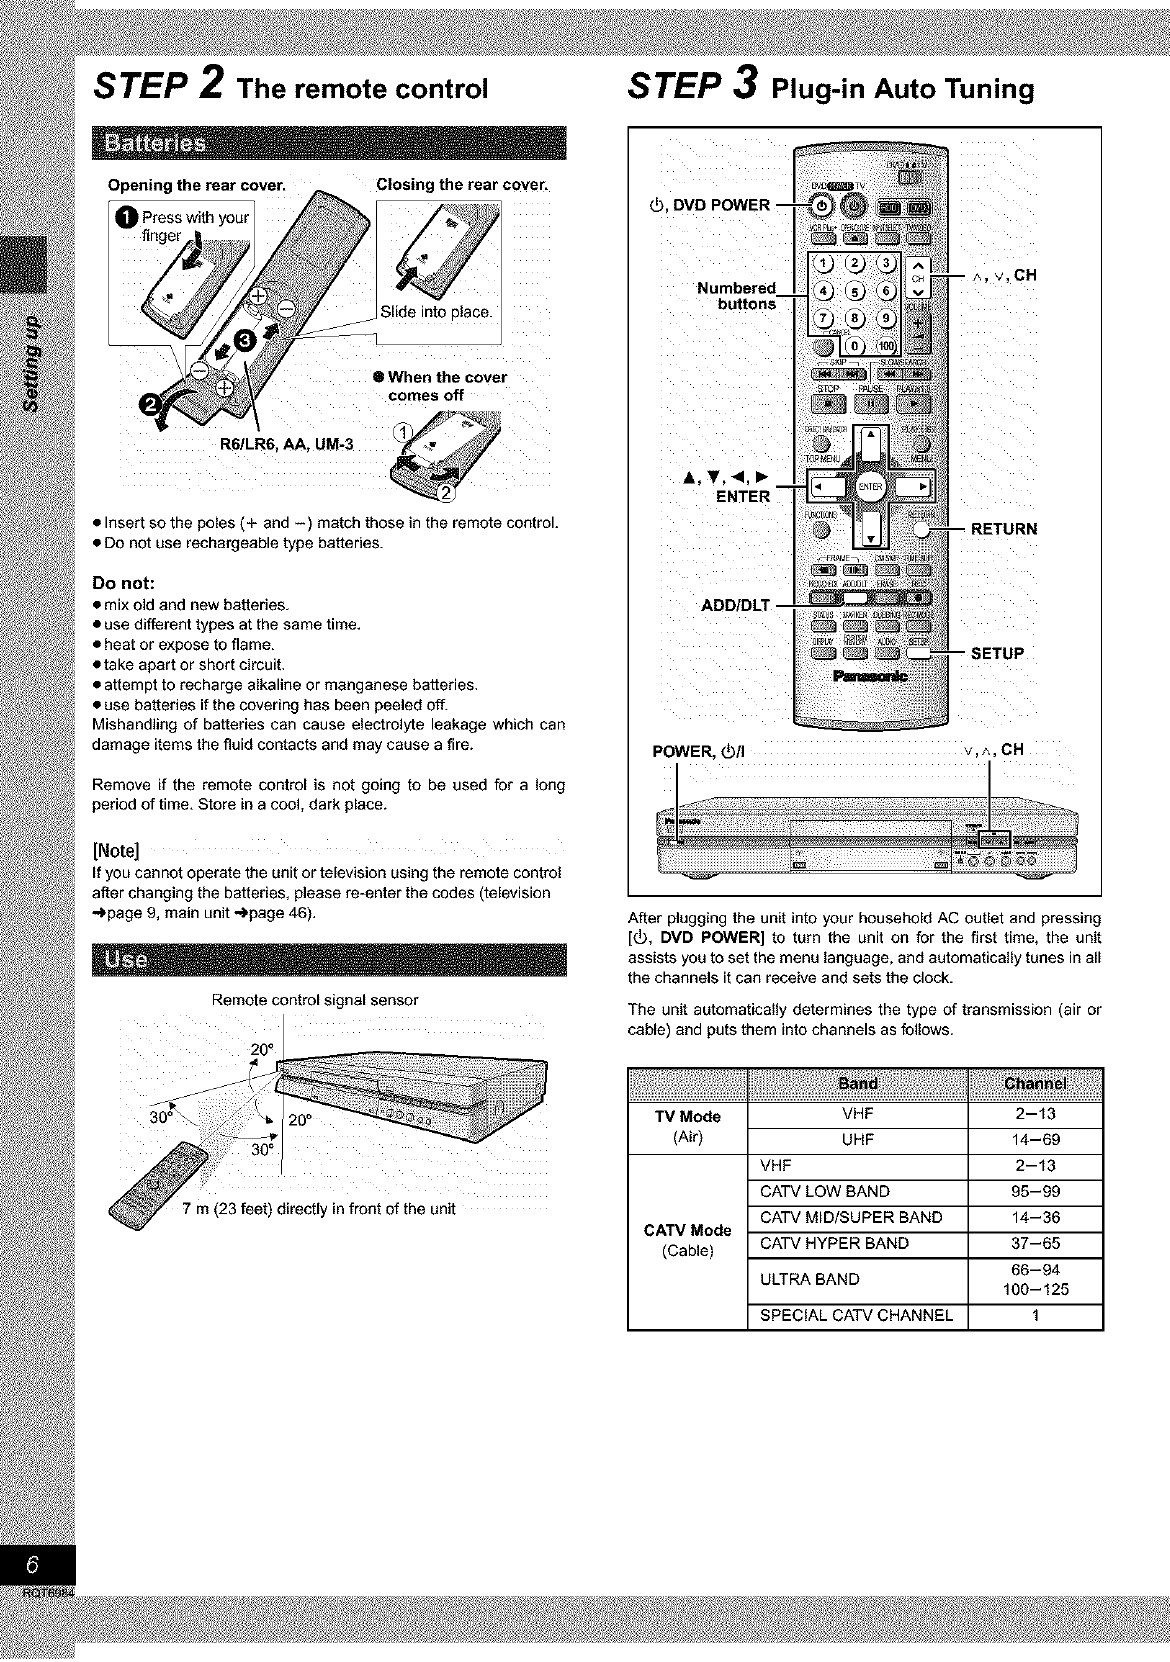
STEP 2The remote control
Opening the rear cover. Closing the rear coven
Press with your
II When the cover
comes off
• Insert so the poles (+ and -) match those in the remote control.
• Do not use rechargeable type batteries.
Do not:
• mix old and new batteries.
• use different types at the same time.
• heat or expose to flame.
• take apart or short circuit.
• attempt to recharge alkaline or manganese batteries.
• use batteries if the covering has been peeled off.
Mishandling of batteries can cause electrolyte leakage which can
damage items the fluid contacts and may cause a fire.
Remove if the remote control is not going to be used for a long
period of time. Store in a cool, dark place.
[Note]
If you cannot operate the unit or television using the remote control
after changing the batteries, please re-enter the codes (television
_page 9, main unit _page 46).
Remote control signal sensor
2 o0
7m (23 feet) directly in front of the unit
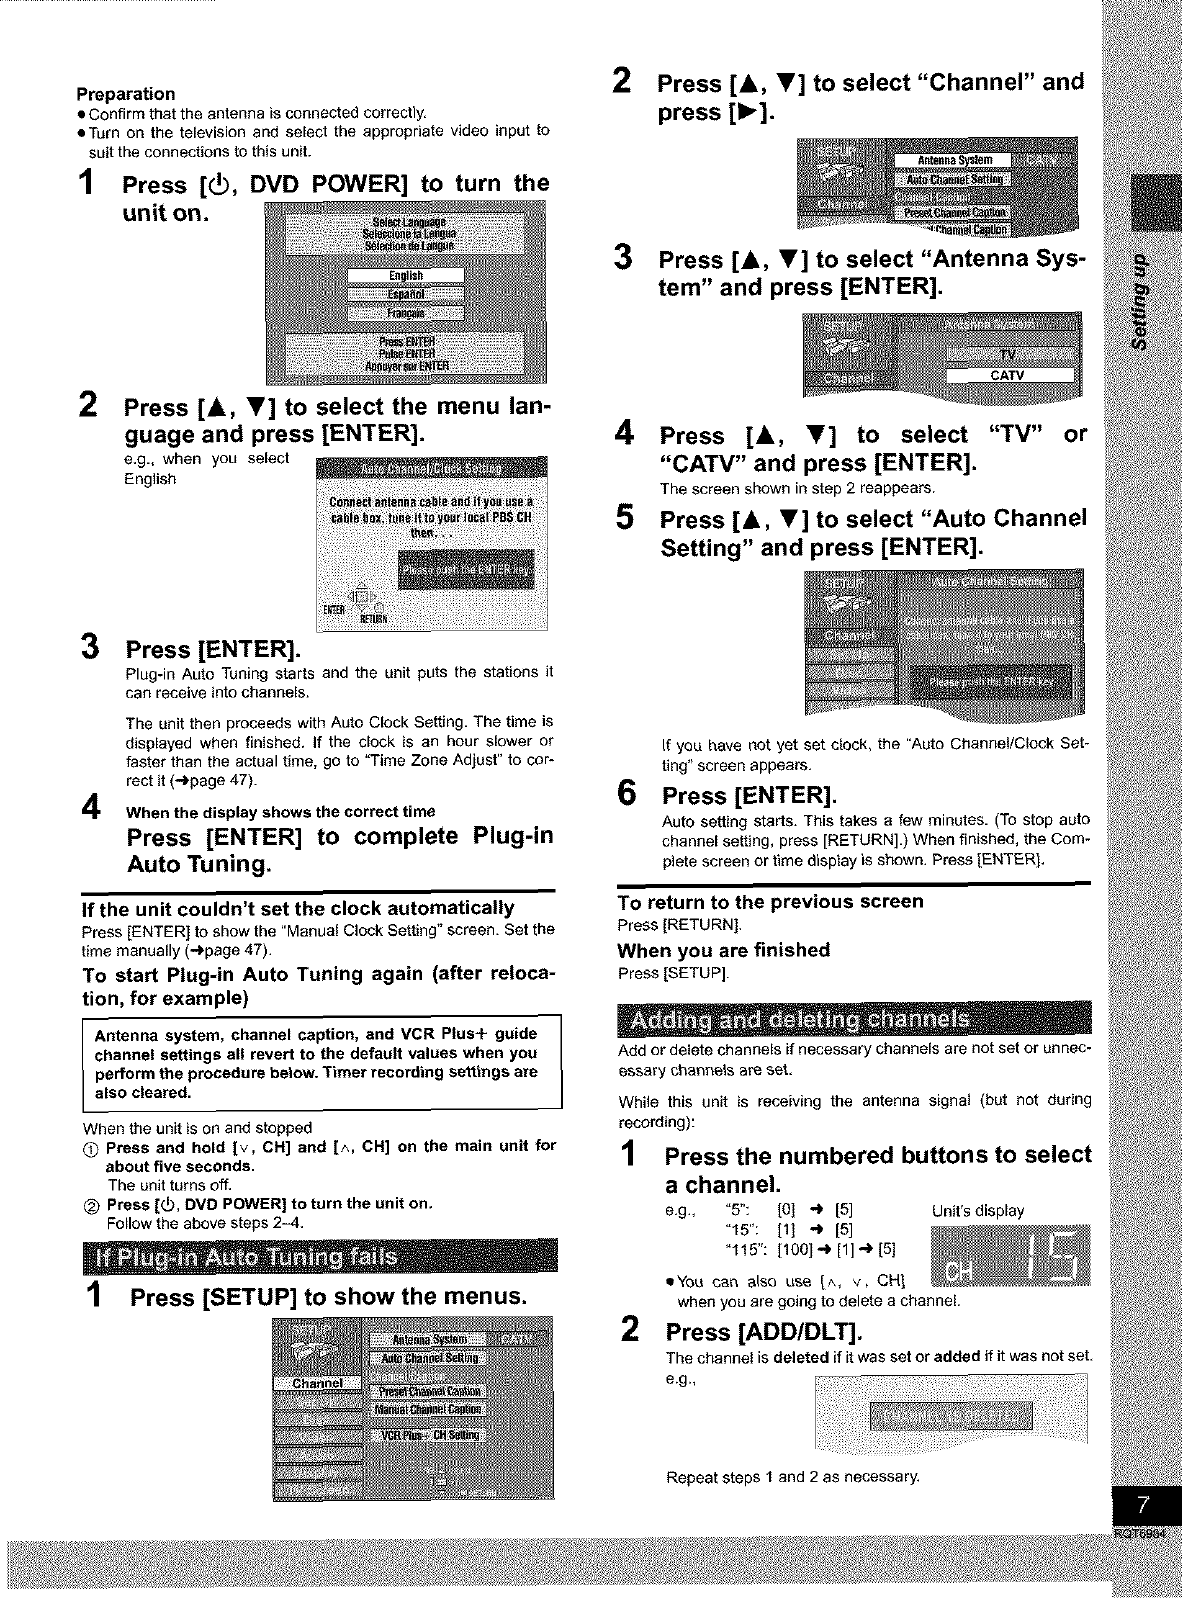
STEP 3Plug-in Auto Tuning
_), DVD POWER.
Numbered
buttons
A,T,<,,
ENTER
POWER, _/I v,^,CH
After plugging the unit into your household AC outlet and pressing
[_), DVD POWER] to turn the unit on for the first time, the unit
assists you to set the menu language, and automatically tunes in all
the channels it can receive and sets the clock.
The unit automatically determines the type of transmission (air or
cable) and puts them into channels as follows.
TV Mode
(Air)
CATV Mode
(Cable)
VHF
UHF
VHF
CATV LOW BAND
CATV MID/SUPER BAND
CATV HYPER BAND
ULTRA BAND
SPECIAL CATV CHANNEL
2-13
14-69
2-13
95-99
14-36
37-65
66-94
100-125
1
Preparation
•Confirm that the antenna is connected correctly.
• Turn on the television and select the appropriate video input to
suit the connections to this unit.
1 Press [_, DVD POWER] to turn the
unit on.
2Press [A, V] to select "Channel" and
press [1_].
3Press [A, V] to select "Antenna Sys-
tem" and press [ENTER].
2Press [_, Y] to select the menu lan-
guage and press [ENTER].
e.g., when you select
English
4
5
Press [A, T] to select "TV" or
"CAW" and press [ENTER].
The screen shown in step 2 reappears.
Press [A, T] to select "Auto Channel
Setting" and press [ENTER].
3
4
Press [ENTER].
Plug-in Auto Tuning starts and the unit puts the stations it
can receive into channels.
The unit then proceeds with Auto Clock Setting. The time is
displayed when finished, if the clock is an hour slower or
faster than the actual time, go to "Time Zone Adjust" to cor-
rect it (..,)page 47).
When the display shows the correct time
Press [ENTER] to complete Plug-in
Auto Tuning.
If the unit couldn't set the clock automatically
Press[ENTER] to show the "Manual Clock Setting" screen. Set the
time manually (,,,)page47).
To start Plug-in Auto Tuning again (after reloca-
tion, for example)
Antenna system, channel caption, and VCR Plus+ guide
channel settings all revert to the default values when you
perform the procedure below. Timer recording settings are
also cleared.
When the unit is on and stopped
OPress and hold [v, CH] and [^, CH] on the main unit for
about five seconds.
The unit turns off.
@ Press [_, DVD POWER] to turn the unit on,
Follow the above steps 2_4.
1Press [SETUP] to showthe menus.
6
If you have not yet set clock, the "Auto Channel/Clock Set-
ting" screen appears.
Press [ENTER].
Auto setting starts. This takes a few minutes. (To stop auto
channel setting, press [RETURN].) When finished, the Com-
plete screen or time display is shown. Press [ENTER].
To return to the previous screen
Press[RETURN],
When you are finished
Press[SETUP].
Add or delete channels if necessary channels are not set or unnec-
essary channels are set.
While this unit is receiving the antenna signal (but not during
recording):
1Press the numbered buttons to select
achannel.
e.g., "5": [0] "_ [5] Unit's display
"f5": [1] _ [5]
"115": [100] -_ [1] -) [5]
='You can etso use [^, v, CH1
when you ere going to delete a channel.
2Press [ADD/DLT].
The channel is deleted if it was set or added if it was not set.
e.g.,
Repeat steps 1 and 2 as necessary.
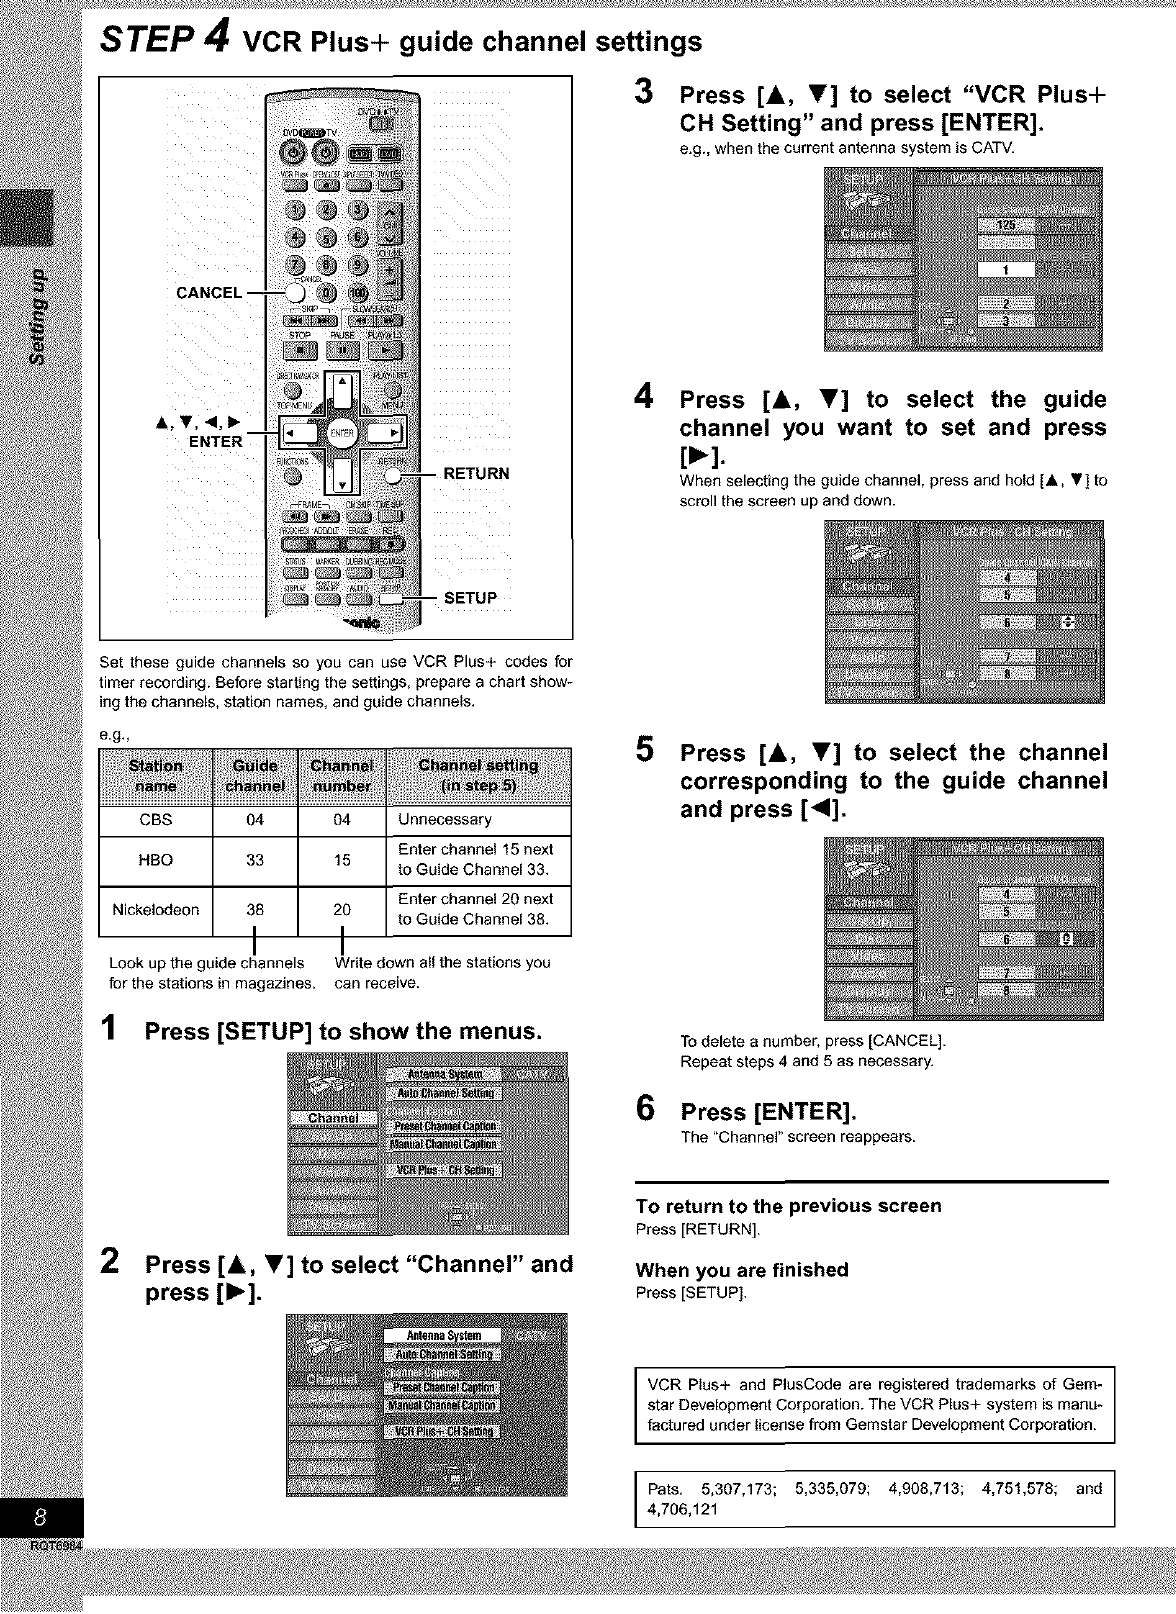
STEP 4VCR Plus+ guide channel settings
SETUP
3Press [A, V] to select "VCR Plus+
CH Setting" and press [ENTER].
e.g., when the current antenna system is CATV.
4Press [A, Y] to select the guide
channel you want to set and press
[_-].
When selecting the guide channel, press and hold [A, .] to
scroll the screen up and down.
Set these guide channels so you can use VCR Plus+ codes for
timer recording. Before starting the settings, prepare a chart show-
ing the channels, station names, and guide channels.
e.g,,
ii i_ !tii¸¸ti_ii_liil
CBS 04
HBO 33
Nickelodeon 38
I
Look up the guide channels
for the stations in magazines.
04 Unnecessary
Enter channel 15 next
15 to Guide Channel 33.
Enter channel 20 next
20 to Guide Channel 38.
I
Write down all the stations you
can receive.
1 Press [SETUP] to showthe menus.
5 Press [A, y] to select the channel
corresponding to the guide channel
and press [41].
6
To delete a number, press [CANCEL].
Repeat steps 4 and 5 as necessary.
Press [ENTER].
The "Channel" screen reappears.
2Press [A, V] to select "Channel" and
press [1_].
To return to the previous screen
Press [RETURN].
When you are finished
Press [SETUP],
VCR Plus+ and PlusCode are registered trademarks of Gem-
star Development Corporation. The VCR Plus+ system is manu-
factured under license from Gemstar Development Corporation.
Pats. 5,307,173; 5,335,079; 4,908,713; 4,751,578; and
4,706,121
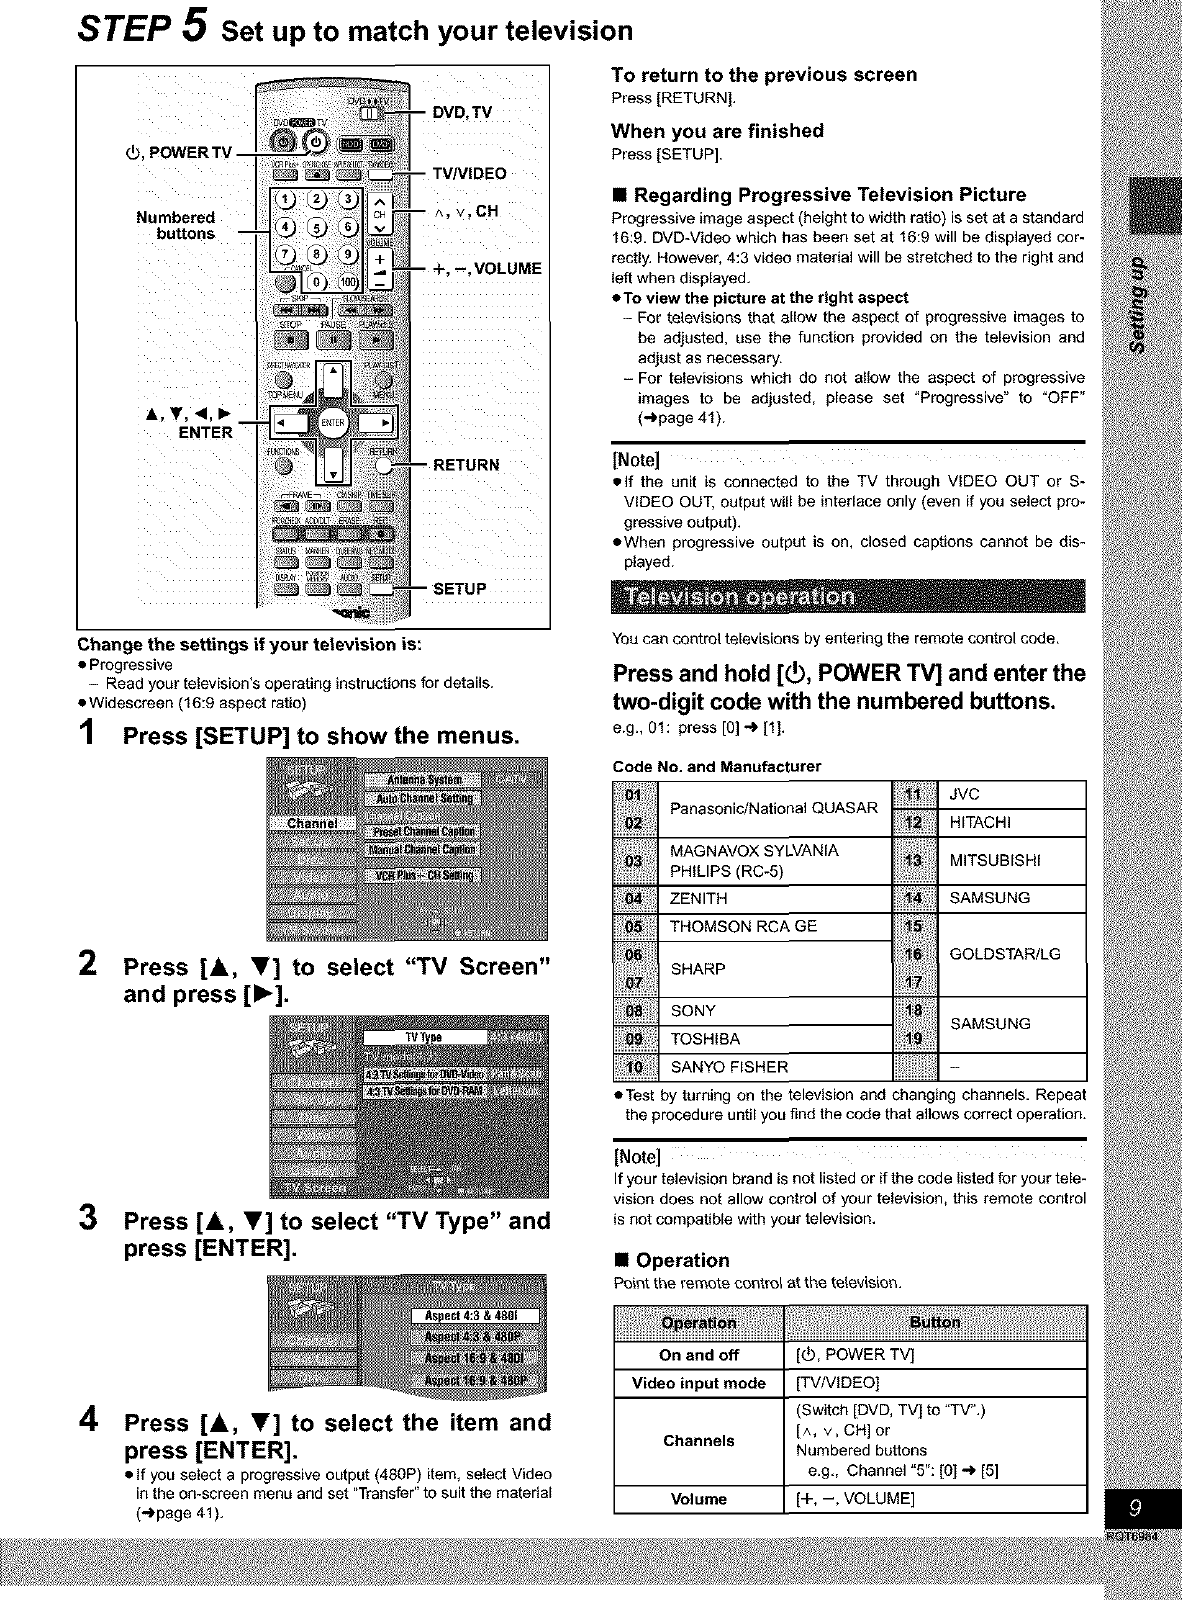
STEP 5 Set up to match your television
_,POWERTV
To return to the previous screen
Press [RETURN],
When you are finished
Press [SETUP].
Numbered
buttons
•Regarding Progressive Television Picture
Progressive image aspect (height to width ratio) is set at a standard
16:9. DVD-Video which has been set at 16:9 will be displayed cor-
rectly. However, 4:3 video material will be stretched to the right and
left when displayed.
• To view the picture at the right aspect
-For televisions that allow the aspect of progressive images to
be adjusted, use the function provided on the television and
adjust as necessary.
- For televisions which do not allow the aspect of progressive
images to be adjusted, please set "Progressive" to "OFF"
(_page 41 ).
[Note]
elf the unit is connected to the TV through VIDEO OUT or S-
VIDEO OUT, output will be interlace only (even if you select pro-
gressive output).
• When progressive output is on, closed captions cannot be dis-
played.
Change the settings if your television is:
•Progressive
- Read your television's operating instructions for details.
• Widescreen (16:9 aspect ratio)
1 Press [SETUP] to showthe menus.
2Press [A, _f] to select "TV Screen"
and press [1_].
TVType
3Press [A, V] to select "TV Type" and
press [ENTER].
You can control televisions by entering the remote control code.
Press and hold [_), POWER TV] and enter the
two-digit code with the numbered buttons.
e.g., 01: press [O] _ [1].
Code No. and Manufacturer
JVC
Panasonic/National QUASAR 1: HITACHI
MAG NAVOX SYLVANIA MITSUB,SH,
............................PHILIPS (RC-5) ........................
ZENITH SAMSUNG
THOMSON RCA GE ' GOLDSTAR/LG
SHARP
SONY
TOSH, A SAMSUN
:, SANYOF_SHER
• Test by turning on the television and changing channels. Repeat
the procedure until you find the code that allows correct operation.
[Note]
If your television brand is not listed or if the code listed for your tele-
vision does not allow control of your television, this remote control
is not compatible with your television.
• Operation
Point the remote oontro_ at the television.
4Press [A, V] to select the item and
press [ENTER].
• If you select a progressive output (480P) item, select Video
in the on-screen menu and set "Transfer" to suit the material
("_page 41).
On and off [_, POWER TV]
Video input mode [TV/VIDEO]
(Switch [DVD, TV] to "TV".)
Channels [^, v, CH] or
Numbered buttons
e.g., Channel "5": [O]_ [5]
Volume [+, --, VOLUME]

u)
RAM R
RAM4.7 R4.7
DVD-RAM DVD-R
4.7 GB/9.4 GB, 12 cm (5") 4.7 GB, 12 cm (5")
2.8 GB, 8 cm (3") 1.4 GB, 8 cm (3")
for General Vet. 2.0
eWe recommend using Panasonic discs as they have been con-
firmed to be compatible with this unit. Other discs may not perform
correctly.
• Do not allow the disc to become dirty or scratched. Fingerprints,
dirt, dust, scratches or deposits of cigarette smoke on the record-
ing surface may make it impossible to use the disc for recording.
• Discs with programs recorded in PAL already cannot be recorded
on using this unit.
I DVD*RAM I
•DVD-RAM recorded on this unit may not be compatible with
other DVD players, including some Panasonic players. Con-
sult the manual for the player to determine compatibility with
these DVD.RAM discs.
• This unit is compatible with both non-cartridge and cartridge
DVD-RAM, but the write-protect tabs on cartridge4ype discs give
better protection to your recordings.
• Picture aspect ratios, regular 4:3 or widescreen 16:9, are recorded
as they are received.
I DVD*R I
•In order to play a DVD-R recorded using this unit on another
playback source, the disc must first be finalized (-)page 36).
• Once a DVD-R is finalized, it becomes DVD-Video.
• You can record onto the available space on the disc and perform
editing functions, such as giving titles to discs and programs and
erasing programs before finalizing.
• When programming is erased from a DVD-R, that space does not
become available. Once an area on a DVD-R is recorded on, that
area is no longer available for recording, whether the recording is
erased or not.
• It takes about 30 seconds for the unit to complete recording man-
agement information after recording finishes.
• This unit optimizes the DVD-R for each recording. Optimizing is
carried out when you start recording after inserting the disc or
turning on the unit. Recording onto the disc may become impossi-
ble if optimizing is carried out too many times.
• Play may be impossible in some cases due the condition of the
recording.
• The video is recorded in a 4:3 aspect irrespective of the video sig-
nal input.
• A DVD-R recorded on this unit may not be recordable on other
Panasonic DVD recorders.
[RAM]
You can protect the contents of your discs in the following ways.
• Cartridge-protect:
With the write-protect tab in the protect posi-
tion, you cannot record to, edit, or erase from
the disc. (Type 1,2, and 4 cartridge discs)
• Program-protect (-)page 34)
• Disc-protect (-)page 36)
AUDIO VIDEO
DVD-Audio ÷1 DVD-Video
_ Ray is in stereo only.
_=Including discs recorded with MP3.
DIGI'_JLAUDIO
Video CD Audio CD ÷2
• The producer of the material can control how DVD-Video and
Video CDs are played. This means that you may not be able to
control play of a disc with some operations described in these
operating instructions. Read the disc's instructions carefully.
• This unit can play CD-R/CD-RW (audio recording disc) recorded
with CD-DA (digital audio), video CD (video CD format 2.0 or
above) or MP3. Finalize" the disc after recording.
Play may be impossible on some CD-R or CD-RW discs due to the
condition of recording.
A process that allows play on compatible equipment.
• This unit cannot record onto CD-R or CD-RW.
I DVD*Video I
•Audio format
Dolby Digital (-)page 45)
D[ 1 _ This unit can play Dolby Digital in stereo (2
one I "r A Lchannels). Connect an amplifier with a built-in
Dolby Digital decoder to enjoy surround sound.
D [ _ n YA L DTS Digital Surround (-)page 45)
Connect this unit to equipment that has a DTS
SU.OUND decoder to enjoy DVDs with this mark.
The features you can use with the different types of discs are indi-
cated as follows.
[HOD] [RAM] [DVD-R] [DVD-A] [gvg-v]
I I I I I
Hard Disk DVD-RAM DVD-R DVD-Audio DVD-Video
[CO] [MP3]
I I I
Video CD AudioCD MP3 discs
• [DVD-R] indicates DVD-R that have not yet been finalized
(-)page 36). DVD-R that have been finalized can use the same
features as DVD-Video. (Refer to features indicated [DVD-V].)
• DVD-Video with a region number other than "1" or "ALU'
• 12-cm (5"), 2.6- and 5.2-GB DVD-RAM
• DVD-RAM not recorded following the Video Recording Standard
• 3.95- and 4.7-G8 DVD-R for Authoring
• Unfinalized DVD-R recorded on other equipment
• PAL discs *DVD-ROM •DVD-RW *+RW
• CD-ROM oCDV •CD-G ePhoto CD
• CVD •SVCD •SACD eMV-Disc
• PD oDivx Video Disc, etc.
RQT6984

Follow the precautions indicated below to prevent damage to
the internal HDD. (Not following precautions may result in a
loss of recording, stop of operation or recording of noise.)
•During setup:
•Do not place in an enclosed area so the rear cooling fan and the
cooling vents on the side are covered up.
• Place the unit on a surface that is flat and not subject to vibration
or impact.
• Place in an area where condensation does not occur.
Condensation is a phenomenon where moisture forms on a cold
surface when there is an extreme change in temperature. Con-
densation may cause internal damage to the unit.
Conditions where condensation may occur
-During the rainy season in tropical and sub tropical areas.
-When there is high humidity or a lot of steam in the room.
-When there is an extreme change in temperature (moving
from a very hot location to a very cold location, or when an
extreme change in air conditioning or cooled air directly
impacts the unit.)
->In the above situation, with the power off, let the unit adjust to
the room temperature and wait 2-3 hours until condensation is
gone.
•While operating
• Do not remove the AC power plug from the AC outlet, or flip the
power breaker switch.
• Do not move the unit or subject to vibration or impact.
_When moving the unit:
Q Turn the power switch off (Wait until "BYE" disappears from the
display)
@ Remove the AC power plug from the AC outlet
_) Wait 2 minutes before moving
While the unit is on, the HDD will be spinning at high speed and it is
normal to hear sounds. These sounds are not problems.
•In the event of a power failure
if a powerfailure occurs, contents in the processof playback!record-
ing may be damaged.
u_
•Safeguards against accidental loss
Data may be lost if the HDD suffersdamage. Any contents you wish
to keep permanently should be dubbed to DVD-RAM or DVD-R.
HDD recording time remaining I
This units records using a VBR (Variable bit recording) data com-
pression system to vary recorded data segments to match video
data segments which may cause differences in the displayed
amount of time and space remaining for recording.
if the remaining amount time is insufficient, erase any unwanted
programs to create enough space before you start recording. (Eras-
ing a playlist will not increase the amount of time.)
RQT6984
u_
®
@
@
@
@
@
@
®
®
@
@
®
®
®
@
@
@
@
@
@
@
@
@
@
@
@
@
@
@
@
@
@
@
@
@
@
@
@
@
@
@
@
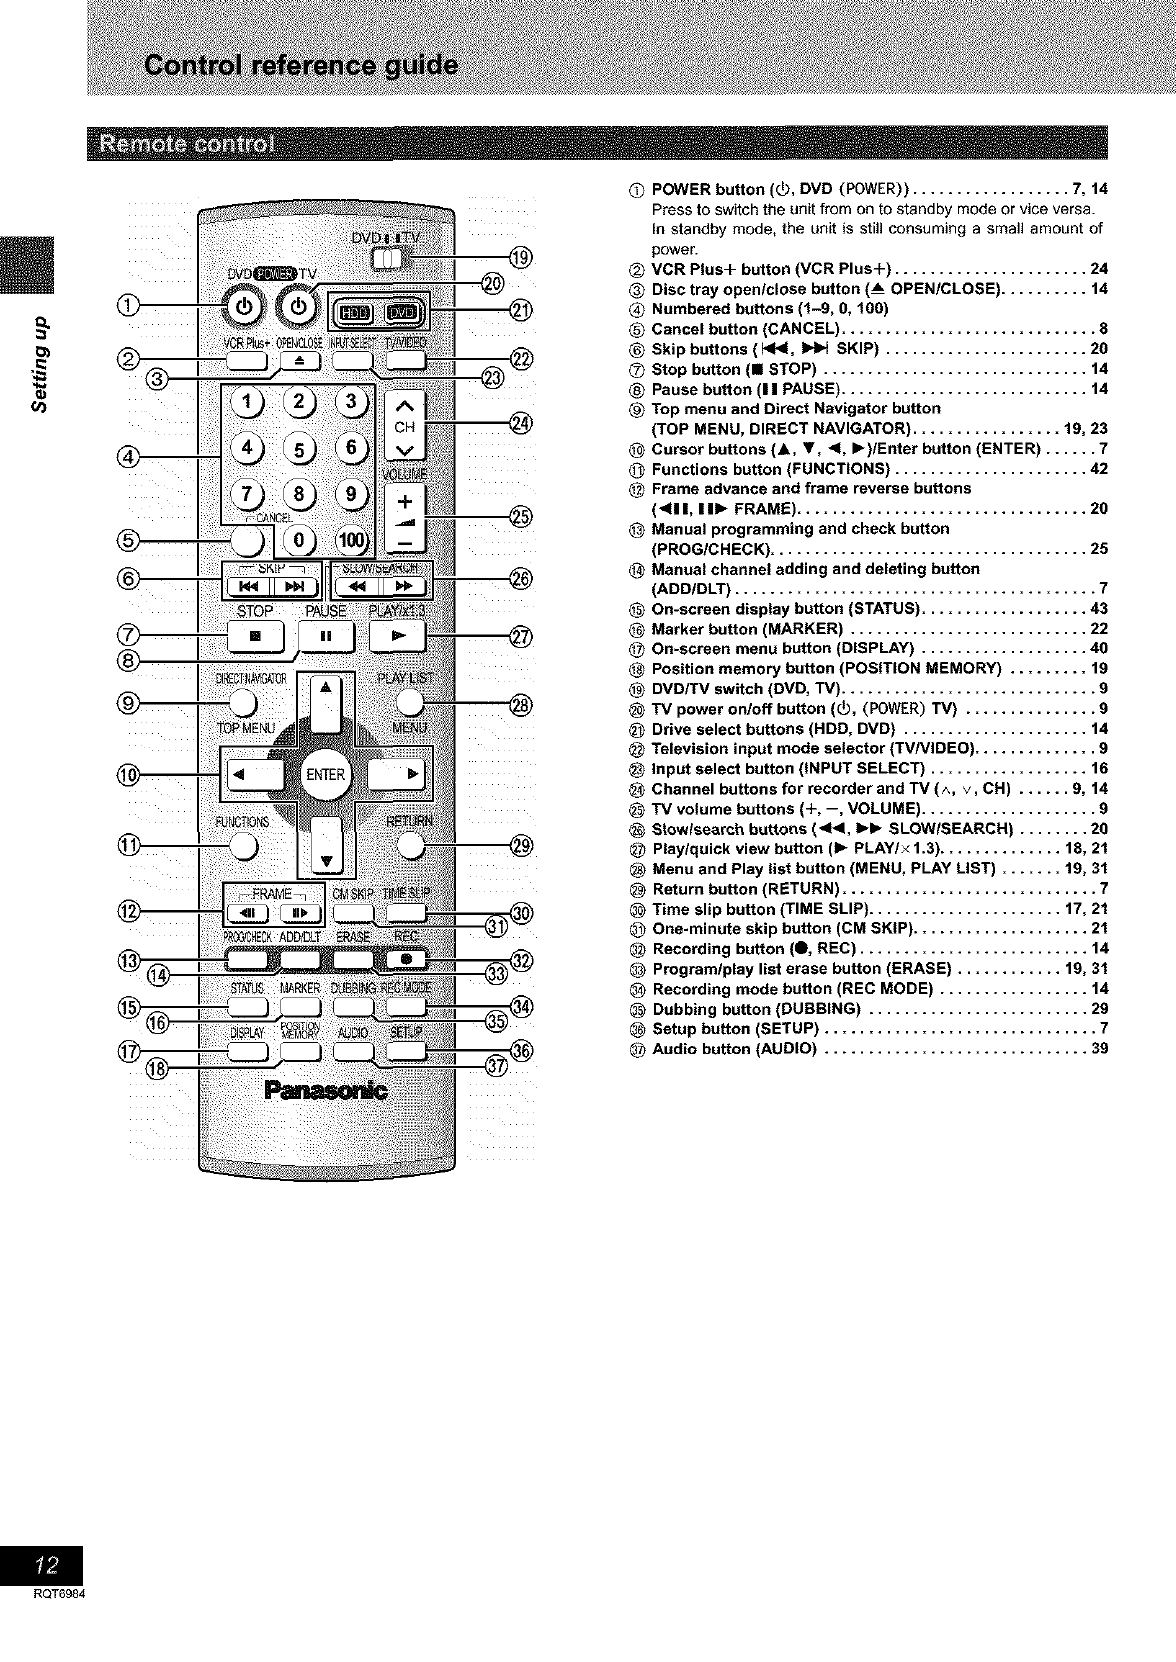
POWER button (_), DVD (POWER)) .................. 7, 14
Press to switch the unit from on to standby mode or vice versa.
In standby mode, the unit is still consuming a small amount of
power.
VCR Plus+ button (VCR Plus+) ...................... 24
Disc tray open/close button (__ OPEN/CLOSE) .......... 14
Numbered buttons (1-9, O, 100)
Cancel button (CANCEL) ............................. 8
Skip buttons ( 1<1<1,_SKIP) ....................... 20
Stop button (i STOP) .............................. 14
Pause button (11 PAUSE) ............................ 14
Top menu and Direct Navigator button
(TOP MENU, DIRECT NAVIGATOR) ................. 19, 23
Cursor buttons (A, 1', 4, I_)/Enter button (ENTER) ...... 7
Functions button (FUNCTIONS) ...................... 42
Frame advance and frame reverse buttons
(<11 I, II1_ FRAME) ................................. 20
Manual programming and check button
(PROG/CHECK) .................................... 25
Manual channel adding and deleting button
(ADD/DLT) ......................................... 7
On-screen display button (STATUS) ................. 43
Marker button (MARKER) ......................... 22
On-screen menu button (DISPLAY) ................. 40
Position memory button (POSITION MEMORY) ....... 19
DVD/TV switch (DVD, TV) ........................... 9
TV power on/off button (_O, (POWER) TV) ............. 9
Drive select buttons (HDD, DVD) ................... 14
Television input mode selector (TV/VIDEO) ............ 9
Input select button (INPUT SELECT) ................ 16
Channel buttons for recorder and TV (A, V, CH) .... 9, 14
TV volume buttons (+, --, VOLUME) .................. 9
Stowlsearch buttons (<_1, I_1_ SLOWISEARCH) ........ 20
Play/quick view button (1_ PLAY/x 1.3) .......
Menu and Play list button (MENU, PLAY LIST)
Return button (RETURN) ..................
Time slip button (TIME SLIP) ...............
One-minute skip button (CM SKIP) ..........
Recording button (0, REC) ................
Program/play list erase button (ERASE) .....
Recording mode button (REC MODE) .......
Dubbing button (DUBBING) ...............
Setup button (SETUP) ....................
Audio button (AUDIO) ....................
..... 18, 21
..... 19,31
......... 7
..... 17, 21
........ 21
........ 14
..... 19, 31
........ 14
........ 29
......... 7
........ 39
RQT6984
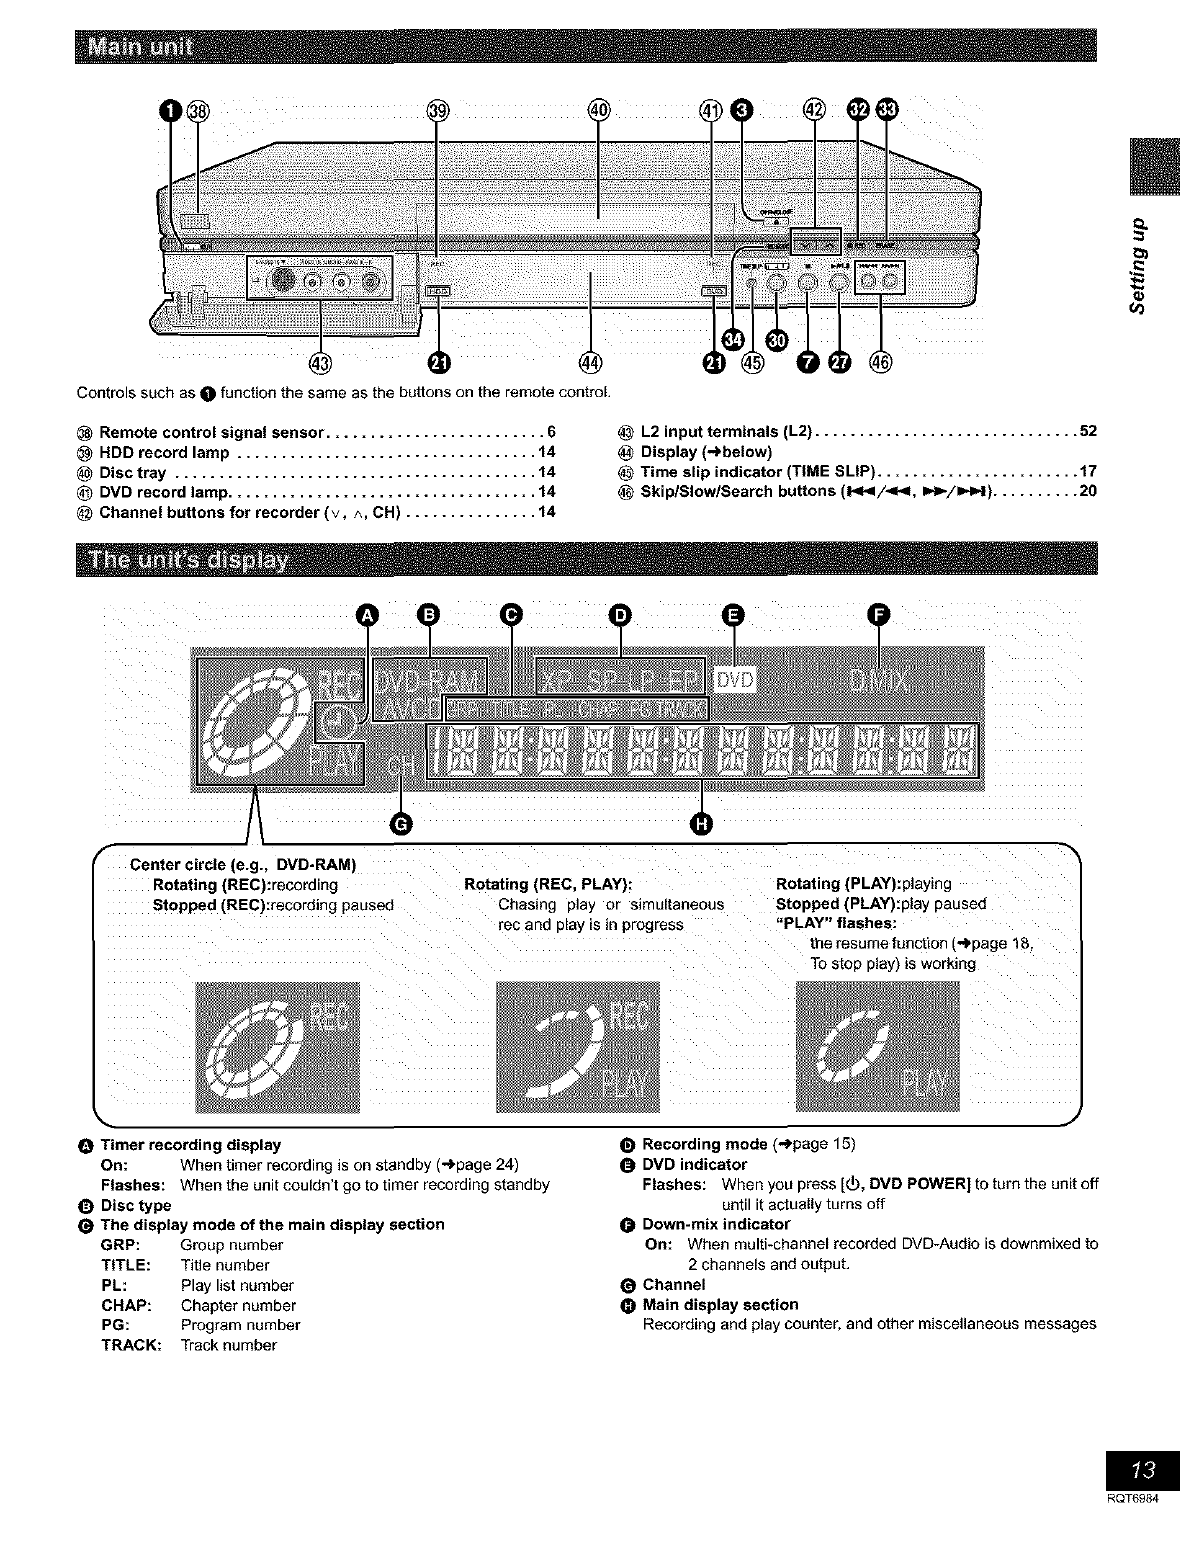
Controls such as O function the same as the buttons on the remote control.
Remote control signal sensor ......................... 6
HDD record lamp .................................. 14
Disc tray ......................................... 14
@DVD record lamp ................................... 14
Channel buttons for recorder (v, ^, CH) ............... 14
L2 input terminals (L2) .............................. 52
Display (-)below)
Time slip indicator (TIME SLIP) ....................... 17
Skip/Slow/Search buttons (1_1_1/_1, I_1_/1=_-I).......... 20
rCenter circle (e.g., DVD-RAM)
Rotating (REC):recording Rotating (REC. PLAY):
Stopped (REC):recording paused Chasing play or simultaneous
rec and p=ay=s=n progress
Rotating (PLAY):playing
Stopped (PLAY):play pausea
"PLAY" hashes:
the resume function (-_page 18
To stop play) is working
OTimer recording display
On: When timer recording is on standby (-_page 24)
Flashes: When the unit couldn't go to timer recording standby
ODisc type
The display mode of the main display section
GRP: Group number
TITLE: Title number
PL: Play list number
CHAP: Chapter number
PG: Program number
TRACK: Track number
J
Recording mode (._page 15)
DVD indicator
Flashes: When you press [(_, DVD POWER] to turn the unit off
until it actually turns off
Down-mix indicator
On: When multi-channel recorded DVD-Audio is downmixed to
2 channels and output.
Channel
Main display section
Recording and play counter, and other miscellaneous messages
RQT6984
8
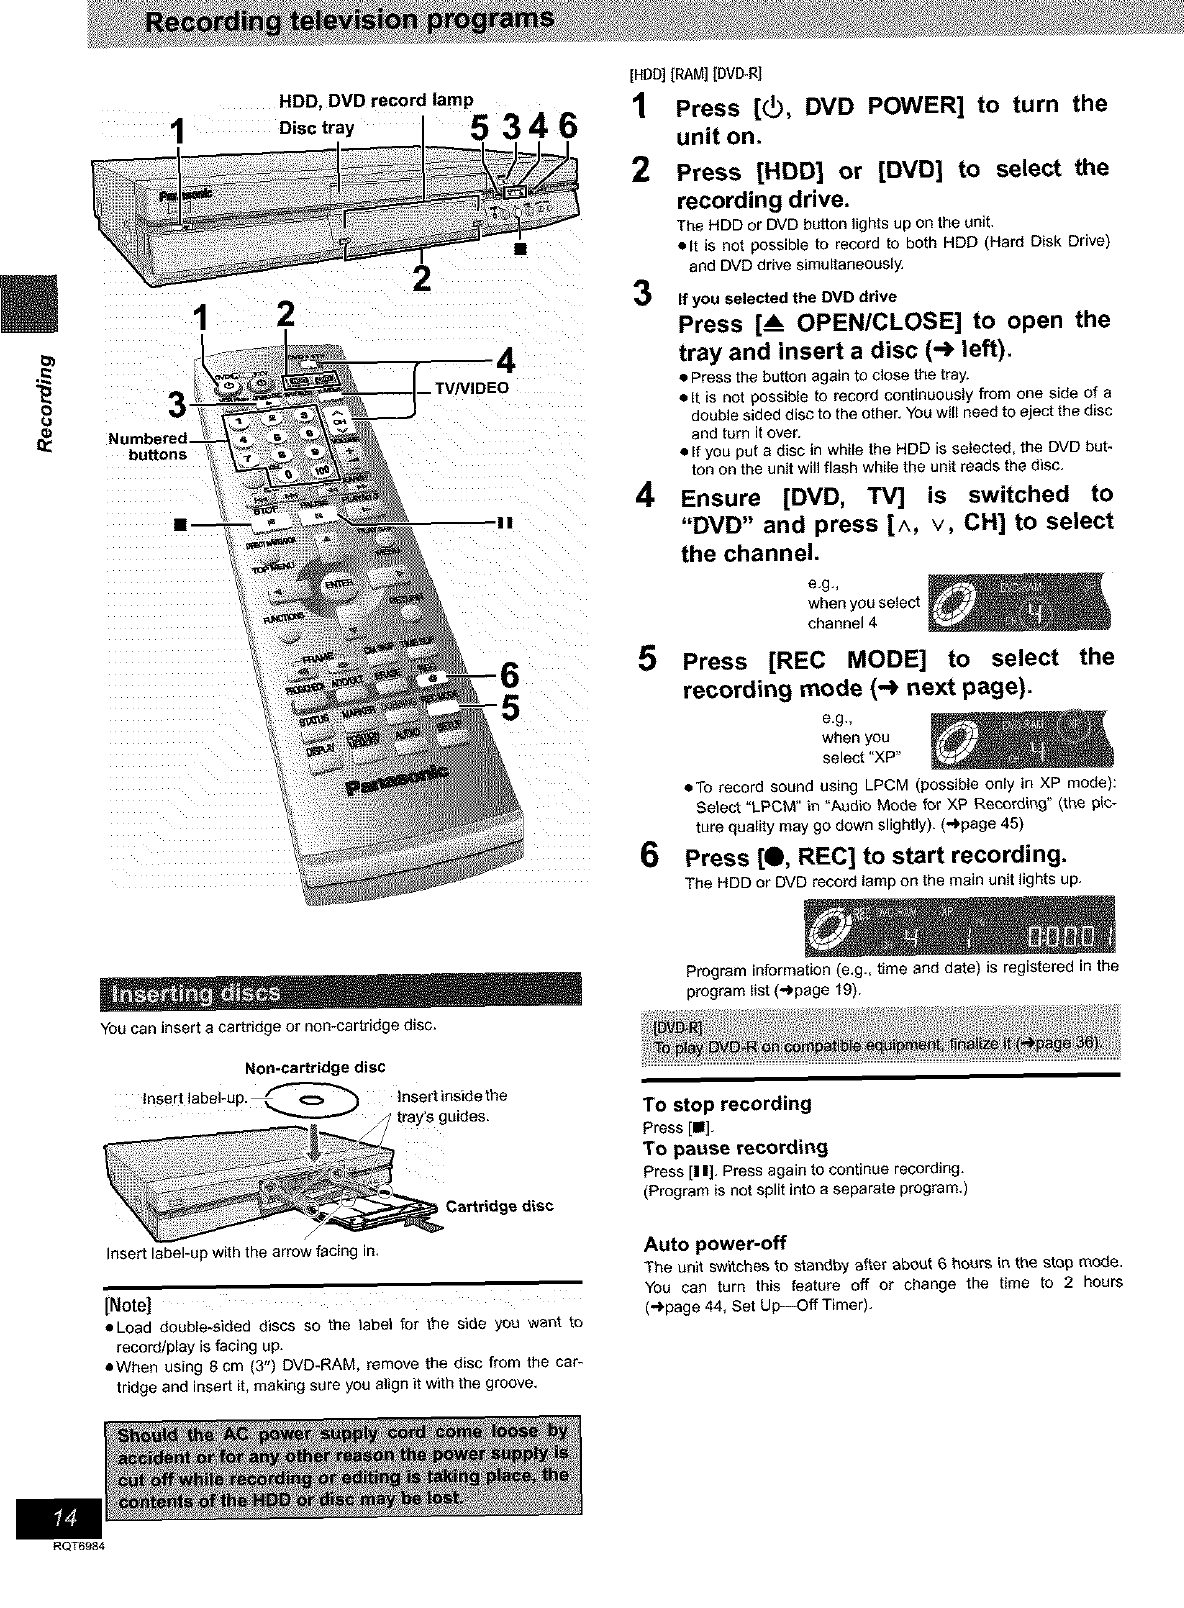
HDD, DVD record lamp
Disctray 5 3 4 6
L
12
bu_ons
You can insert a cartridge or non-cartridge disc.
[HDD][RAM] [DVO_RI
1Press [(_, DVD POWER] to turn the
unit on.
2
3
Press [HDD] or [DVD] to select the
recording drive.
The HDD or DVD button lights up on the unit.
• It is not possible to record to both HDD (Hard Disk Drive)
and DVD drive simultaneously.
If you selected the DVD drive
Press [_ OPEN/CLOSE] to open the
tray and insert a disc (-_ left).
• Press the button again to close the tray.
• It is not possible to record continuously from one side of a
double sided disc to the other. You will need to eject the disc
and turn it over.
• If you put a disc in while the HDD is selected, the DVD but-
ton on the unit will flash while the unit reads the disc.
4Ensure [DVD, TV] is switched to
"DVD" and press [^, v, CH] to select
the channel.
e,g,_
when you select
channel 4
5 Press [REC MODE] to select the
recording mode (-_ next page).
e,g,_
when you
select "XP"
• To record sound using LPCM (possible only in XP mode):
Select "LPCM" in "Audio Mode for XP Recording" (the pic-
ture quality may go down slightly). (-_page 45)
6Press [Q, REC] to start recording.
The HDD or DVD record lamp on the main unit lights up.
Program information is.g., time and date) is registered in the
program list (-')page 19).
Non-cartridge disc
/
insert label.up with the arrow facing in,
[Note]
eLoad double-aided discs so the _abe} for the side you want to
record/play is facing up.
• When using 8 cm (3") DVD-RAM, remove the disc from the car-
tridge and insert it, making sure you align it with the groove.
To stop recording
Press [111],
To pause recording
Press [I I], Press again to continue recording.
(Program is not split into a separate program.)
Auto power-off
The unit switches to standby after about 6 boars in the stop mode.
You can turn this feature off or change the time to 2 hours
(")page 44, Set Up--Off Timer),
RQT6984
[Note|
• You can record while the unit is on standby for timer recording, but
once the time for the timer recording to begin is reached, any
recording taking place will stop and the timer recording will begin.
• You cannot change the channel or recording mode during record-
ing.
• Reiaese protection (cartridge -'_page 10, disc _page 36) when
you record. [RAM]
• When using a DVD-RAM for the first time with this unit, format it to
ensure accurate recording (_page 36, "Format").
• The_e are limitations when recording to DVD-R (.")page 10).
• When recording MT$ sound onto DVD-R or recording using
LPCM, only one of either the main channel or the sub channel can
be recorded. Select at "Select MTS" (_page 45).
For your reference
•You can record up to 250 programs on HDD, 99 programs on one
disc.
•This unit iscompatible with the Content Protection for Record-
able Media (CPRM -I.page 54) system so you can record broad-
casts that allow one oopy, such as some CATV broadcasts, onto
4.7 GB/9.4 GB DVD-RAM {these are CPRM compatible). Jt is not
possible to record ont_ DVD-R or 2,8 GB DVE)-RAM.
• Recording will take place on open space in the HDD or on disc.
Data wilt not be overwritten,
• g is possible to watch playback from one drive while recording
from another (editing _ not possible).
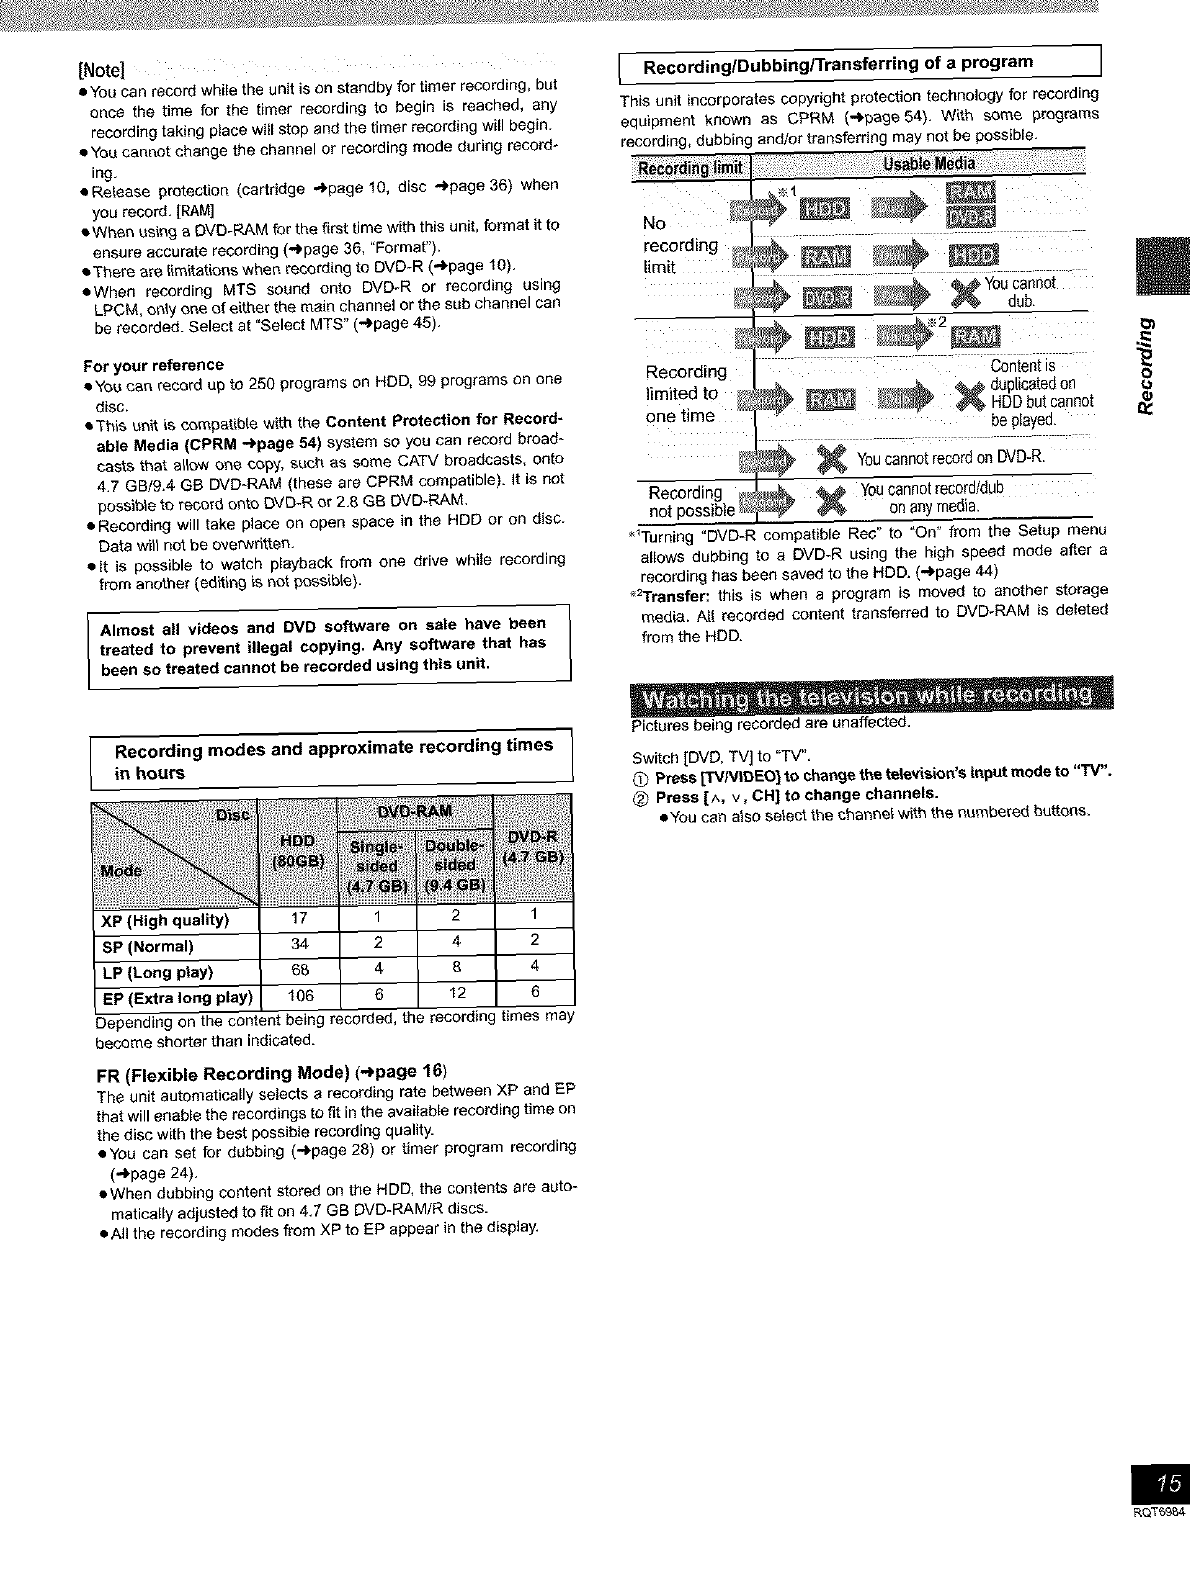
IRecordingJDubbinglTransferring of aprogram I
This unit incorporates copyright protection technology for recording
equipment known as CPRM (,.,bpage54). With some programs
recording, dubbing and/or transferring may net be possible.
NO _
recording _#,_ ............
limit ÷ ÷ i
: _ _ _ YOUcannot
dub,
÷ ÷
Recording ii:; ::;; .... ::: :: i; :ii_ontentis: TT
limited to _ __ _ _ _ duplicated on
_'62_ _ HDD but cannot
One time • be played.
_ You can:;0t record on DVD:R.
Recording _ _L _ You cannot record/dub
not possiblet_ _ _ on any media.
_Turning "DVD-R compatible Rec" to "On" from the Setup menu
allows dubbing to a DVD.R using the high speed mode after a
recording has been saved to the HDD, (-_'page 44)
_>'rrensfer: this is when a program is moved to another storage
media. All recorded content transferred to DVD-RAM is deleted
from the HDD.
8
Dependir_j on the content being recorded, the recording times may
become shorter than indicated.
FR (Flexible Recording Mode) (-_page 16)
The unit automatically selects a recording rate between XP and EP
that will enable the recordings to fit in the available recording time on
the disc with the best possible recording quality.
• You can set for dubbing (..bpage 28) or timer program recording
("_page 24).
• When dubbing content stored on the HDD, the contents are auto-
matically adjusted to fit on 4.7 GB DVD.RAM/R discs.
• All the recording modes from XP to EP appear in the display.
Pictures being recorded are unaffected.
Switch [DVD, TV] to "TV".
0 Press ['_/Ng3EO] to cha_Je the television's input mode to "'IV".
(_) Press [A, v, CH] to change channels.
• You can also select the channel with the numbered buttons.
RQT59B4
oA, V, <1, I_ m
ENTER
FUNCTIONS --
STATUS --
v. CH
REC
[HDD][RAM] [DMITRI
Preparation
Connect a video cassette recorder to this unit's input terminals
(-'>page 52).
While stopped
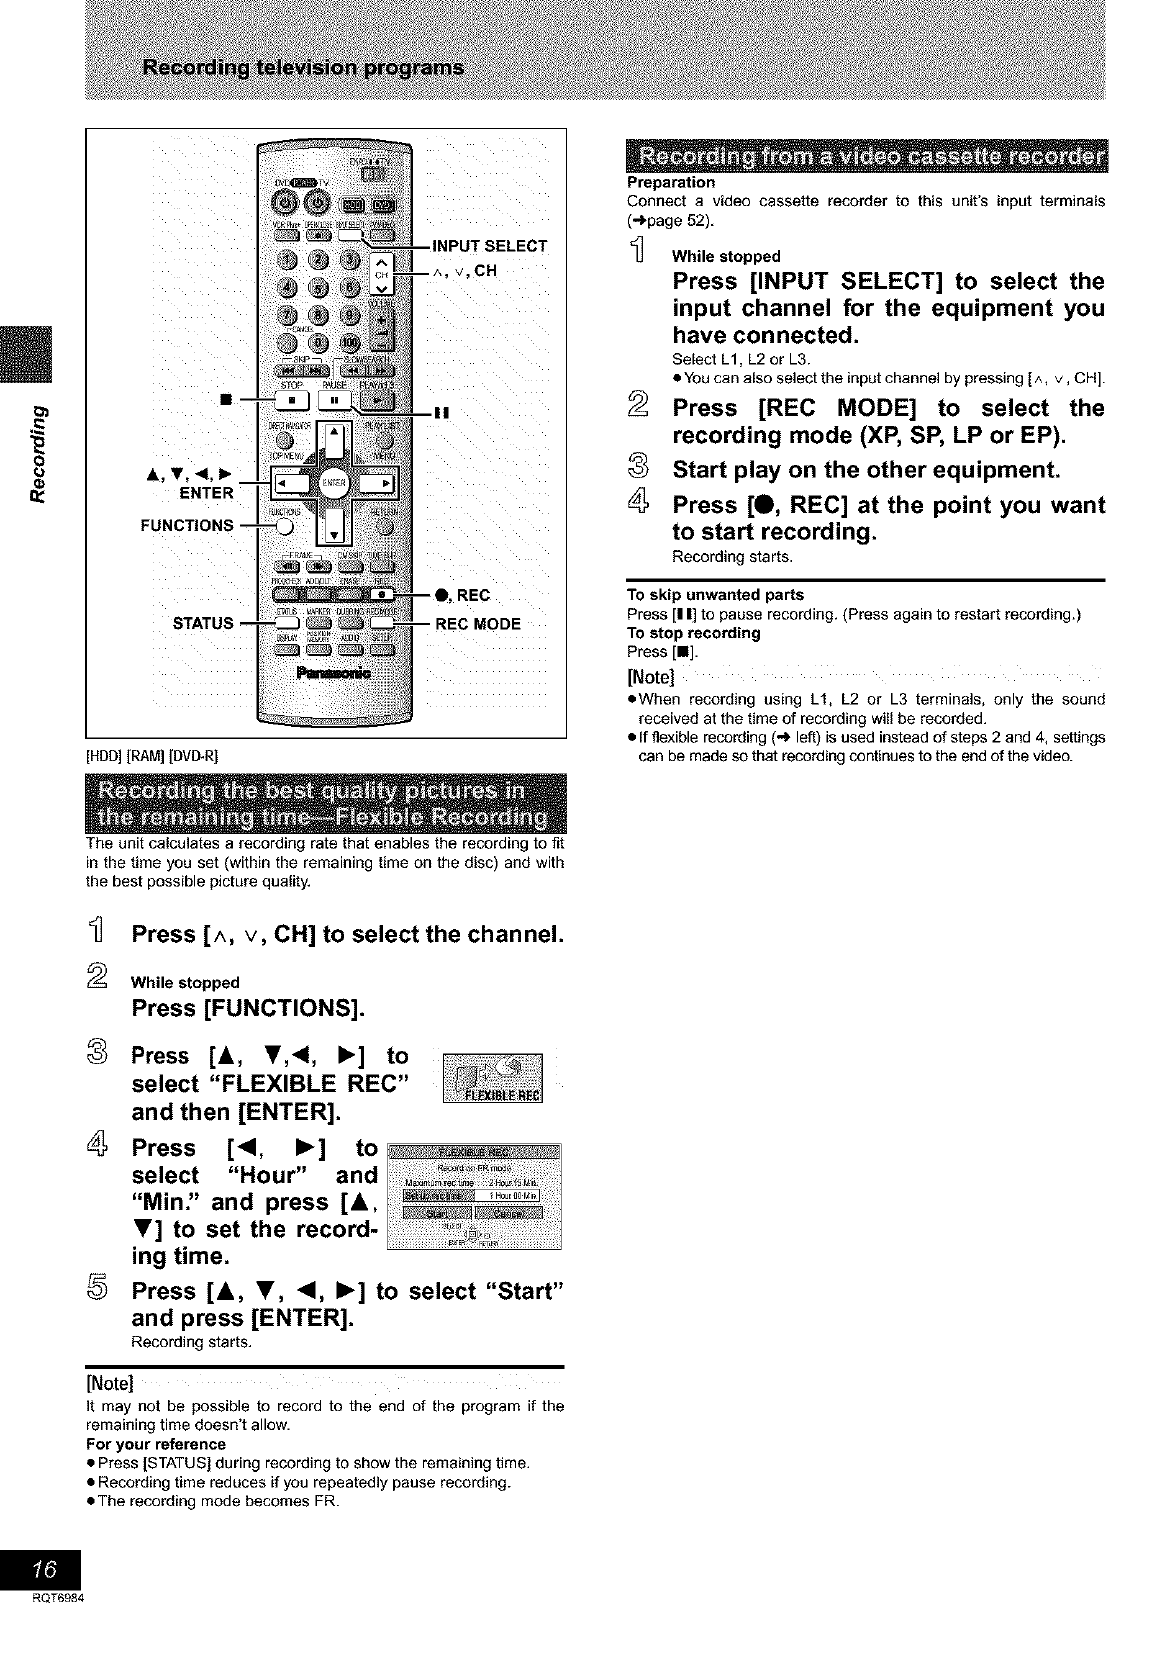
Press [INPUT SELECT] to select the
input channel for the equipment you
have connected.
Select L1, L2 or L3.
• You can also select the inputchannel by pressing [^, v, CH].
2
8
Press [REC MODE] to select the
recording mode (XP, SP, LP or EP).
Start play on the other equipment.
Press [O, REC] at the point you want
to start recording.
Recording starts.
To skip unwanted parts
Press [I I] to pause recording. (Press again to restart recording.)
To stop recording
Press [•].
[Note]
• When recording using L1, L2 or L3 terminals, only the sound
received at the time of recording will be recorded.
• if flexible recording (._ left) is used instead of steps 2 and 4, settings
can be made so that recording continues to the end of the video.
The unit calculates a recording rate that enables the recording to fit
in the time you set (within the remaining time on the disc) and with
the best possible picture quality.
2
8
5
Press [A, V, CH] to select the channel.
While stopped
Press [FUNCTIONS].
Press [A, I!',<, I_] to
select "FLEXIBLE REC"
and then [ENTER].
Press [<1, I_] to
select "Hour" and
"Min" and press [&,
V] to set the record-
ing time.
Press [&, T, <1, I_] to select "Start"
and press [ENTER].
Recording starts.
[Note]
It may not be possible to record to the end of the program if the
remaining time doesn't allow,
For your reference
• Press [STATUS] during recording to show the remaining time.
• Recording time reduces if you repeatedly pause recording.
• The recording mode becomes FR.
RQT6984

DIRECT
NAVIGATOR
A, V, 4,1_ I
ENTER
[HDD][RAM]
You can play a program previously recorded.
During recording
Press [DIRECT NAVIGATOR].
Time slip indicator on the main unit lights.
2Press [&, T] to select a program and
press [ENTER].
e.g._
You want to watch the movie
you recorded yesterday (pro-
gram 1) while recording pro-
gram 2 (sport).
Program 1 is played back
while program 2 (sport) is
being recorded.
I "1 / / / / / /
[Note]
•Sound is not output while fast-forwarding.
• You cannot edit programs during simultaneous rec and play
(_page 34).
8
Press [1_] (PLAY).
Play starts from the beginning of the program being recorded. (Time
slip indicator on the main unit lights.)
e.g._
You are recording a sports
program and you want to
watch it from the beginning.
The same sports program is
played back from the begin-
ning. (Recording continues.)
h_
[Note]
Sound is not output while fast-forwarding.
To stop play and recording
Q Press [•]. (Play stops.)
Wait 2 seconds.
_) Press [•]. (Recording stops.)
=To stop timer recording, press [•], then [ENTER] within 5
seconds,
You can play the program being recorded to check that it is being
recorded correctly. You can also check parts that were recorded pre-
viously.
1Press [TIME SLIP].
Time slip indicator on the
main unit lights.
Play starts from 30 sec-
onds previous. The current
recording images appear
as a picture-in-picture and
you will hear the playback
audio.
• You can select another
program if you press
[DIRECT NAVIGATOR].
2Press [A, T] to enter the time and
press [ENTER].
•Press [,&, Y] to alter in
one-minute units. Press
and hold [.&. ,] to alter
in 10-minute units.
Press [TIME SLIP] to show the play images in full. Press again to
show the play and recording images.
RQT6984

=.
1Disc tray 3 ERASE
2
bu_ons 4
DVD,TV
II
MENU
DIRECT -- A, ¥. 4. I_
NAVIGATOR. ENTER
TOP MENU
--RETURN
POSITION
MEMORY
[HDD][RAM][DMITRI[DVD-A][DVD.'v']IVCr} [CD][MP3]
1
2
3
4
Press [(_, DVD POWER] to turn the
unit on.
Press [HDD] or [DVD] to select the
playback drive.
The HDD or DVD button lights up on the unit.
olt is not possible to playback both HDD (Hard Disk Drive)
and DVD drive simultaneously.
If you selected the DVD drive
Press [_ OPEN/CLOSE] to open the
tray and insert a disc (-_page 14).
•Press the button again to close the tray.
• If cartridge protection is activated (-_page 10), play begins
automatically when you close the tray. [RAM]
• You cannot play continuously from one side of a double-
sided disc to the other. Eject the disc and turn it over.
• If you put a disc in while the HDD is selected, the DVD but-
ton on the unit will flash while the unit reads the disc.
Press [1_] (PLAY).
The unit takes some time to read the disc
before play starts. (When a menu screen
appears on the television ...) next page)
• Play starts from the most recently recorded program.
[HDDI[RAM] [DVD-R]
• Play starts from the beginning of the disc.
[DVI_A] [DVD-V] pJCF}1[CD] [MP3]
To stop play
Press [i].
• When "PLAY" flashes on the display, resume
function is active. Press [_-] (PLAY) to start play
from where you stopped it.
To cancel, press [1] until "PLAY" goes out. (The
position is also cleared when you turn the unit off or open the disc
tray.)
• The screen saver may appear when you
stop play. Press [1] again and you can
use this unit's tuner to watch television.
To pause play
Press [I I]. (Press again to restart play.)
Auto power-off
The unit switches to standby after about 6 hours in the stop mode.
You can turn this feature off or change the time to 2 hours
(")page 44, Set Up--Off Timer).
[Note]
• If you select another drive while playback is in progress, playback
will be stopped. If using DVD-Video, the contents of the menu
screen may be returned to their initial state.
• If a disc is loaded, the unit will come on and play will start when
you press [1_] (PLAY).
• When you play a disc with an audio-only track, the video from the
previous disc may continue to be shown on the television.
• Actual sound levels for DVD-Video are lower compared to televi-
sion broadcast or playback of other discs. To avoid a sudden
increase in volume level when switching from DVD-Video, reduce
the volume setting before playing other sources or switching to
television broadcast.
eWhen using this unit for the first time, the HDD has nothing
recorded on it. You must record a program etc to the HDD before
you can enjoy playback.
RQT6984

Ivcr_l
Switch [DVD. TV] to "DVD" and
Press the numbered buttons (0, 1-9) to select an item.
e.g., "5": [O] '-) [5]
"15": [1] ._ [5]
[DVD_A](DVD-V]
Press [A, V, <1, I_] to select an item and press
[ENTER].
eYou may also be able to use the numbered buttons (O, 1-9) to
select an item.
Other buttons used to operate menus
Read the disc's instructions for further details about operation.
[1_t ][!_1_/1_1_1]: Shows the next menu.
[l<l_][l<</<<]: Shows the previous menu.
(RETURN): Shows the menu screen. [VCD]
[TOP MENU]: Shows the first menu screen. [DVD-A][DVD-VJ
[MENU]: Shows the menu screen. [DVD-V]
[Note]
• Discs continue to rotate while menus are displayed. Press [i]
when you have finished viewing to preserve the unit's motor and
your television screen.
• If "_" appears on the television, the operation is prohibited by
the unit or disc.
• Functions available vary from disc to disc.
[HDD][RAM][DVI3R][DVD-A][DVD-V]IVCP][CD]IMP3]
You can start play from a memorized position even after turning the
unit off.
(When the elapsed play time is displayed)
During play
Press [POSITION MEMORY].
The message "Position Memorized" appears on the televi-
sion.
After switching the unit to standby end back on
Press [_] (PLAY).
Play starts from the memorized position. (The position is
cleared.)
[Note]
[DVD-R][DVI_A] [DVD-VJIVCf._][CD] IMP3]
• The position is cleared when you open the disc tray.
[RAM]
• Positions remain memorized even after the disc tray is opened.
• You cannot mark positions if the disc is write-protected.
(cartridge _page 10, disc _page 36)
For your reference
if you press [hi before switching the unit to standby after pressing
[POSITION MEMORY] to memorize a position, play will resume
from the position you pressed [HI when you press [1_] (PLAY).
[HDD] [RAM] [DVI_R]
A list of programs is created as you record them. You can use this
list to find programs to watch.
_] Press [DIRECT e.g.,DVD-RAM
NAVIGATOR].
The highlighted program
plays in the background.
Press [&, T] to select the program
and press [ENTER]. -_
• You can also select programs with the numbered buttons. ._
e.g., [HDD] [RAM] [DVD-R]
"5": [O]-* [01.._ [5] °5": [O]'_ [5] ._
"15": [O]_ [1] ._ [5] "15": [1] .-) [5]
Play of the images that were playing in the background continues. 8.
To stop play
Press[n].
To clear the program list
Press [DIRECT NAVIGATOR).
About the list
program
Write-protected
Displayed when you have protected
the program.
Copy-protected _
Displayed when you have recorded
a program that has copy protection, I
from CATV broadcasts, for example.
Unable to play
Displayed if you cannot play the program.
Currently recording -
Displayed when the program is being
recorded.
And more...
Programs that have been rerouted to the HDD [HDD]
(_page 25, Relief Recording)
:Programs that allow one copy [HDD]
[HDD][RAM][DMITRI
Since the program, any play lists (_page 31) created from
it ere erased irretrievably by this procedure, you should be
certain you wish to erase before carrying it out.
Press [ERASE].
A confirmation screen will be displayed.
Press [<] to select "Erase" and press
[ENTER].
• On the main unit, press [1<_1/<_1] and [ERASE].
[Note]
• It is not possible to erase the program when you are carrying out
simultaneous rec and play (_page 17). [RAM]
• The amount of space remaining on the disc does not increase
even if you erase programs. [DVD-R]
• If the confirmation screen disappears before you complete the
operation, start from the beginning again.
RQT6984
Numbered
buttons
PLAY/X1.3
A, V, <1.1_
ENTER
[HBD][RAM] [DMITRI[DVD+A][BVD-'v][VCr} [CD][MP3]
During play or while paused
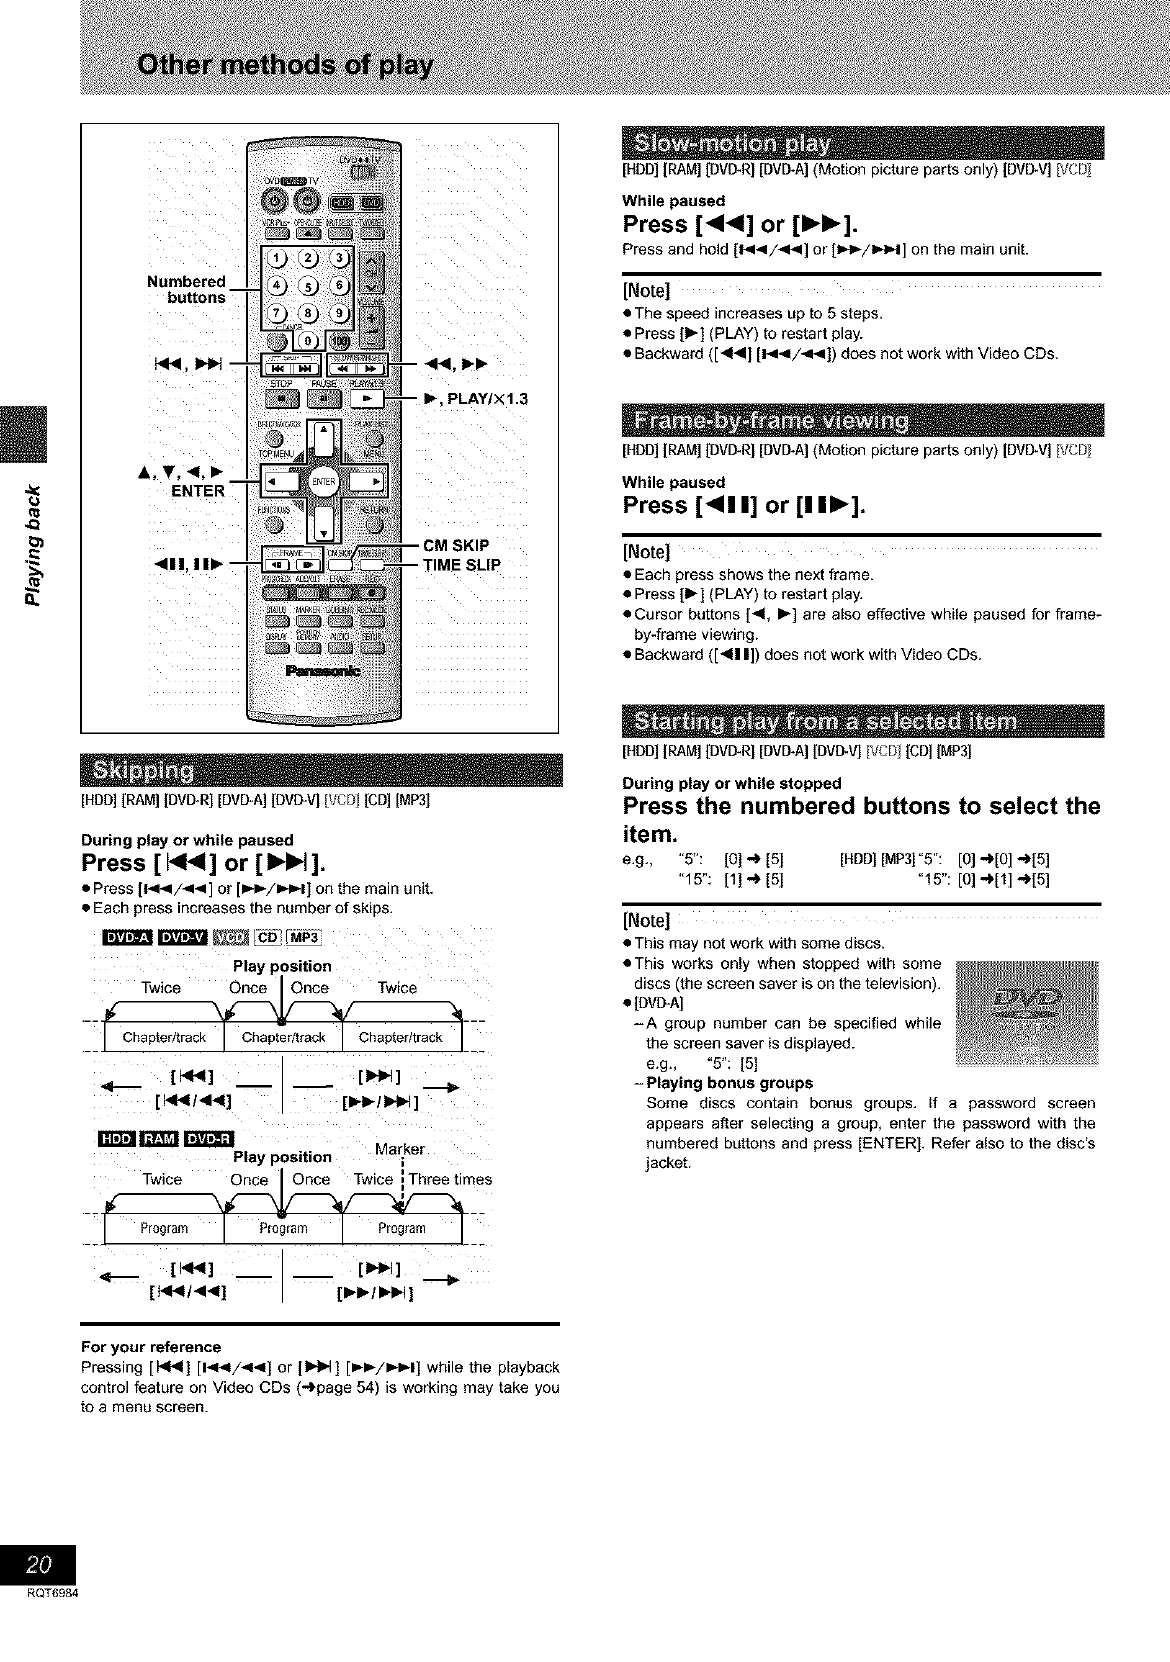
Press [ _1_1] or [1_1].
• Press [1<_1/<4] or [I,_1_/1_1_11on the main unit.
• Each press increases the number of skips.
Play position
_Twice
13rtf_l _ |lay position M arker
Twice Once IOnce Twice iThreetimes
Program Program Program
_1 I Pr0;ramn PriamI--
[HDD][RAM] [DVI_R] [DVD+A](Motion picture parts only) [DVD-V] [VCD
While paused
Press [<<1] or [IH_].
Press and hold [1<_1/<<] or [l_i_/l_l_l] on the main unit.
[Note]
• The speed increases up to 5 steps.
• Press [1_] (PLAY) to restart play.
• Backward ([_14] [14</_1_1]) does not work with Video CDs.
[HDD][RAM] [DVI_R] [DVD+A](Motion picture parts only) [DVD-V] [VCD
While paused
Press [<!1] or [!1_].
[Note]
• Each press shows the next frame.
• Press [1_] (PLAY) to restart play.
• Cursor buttons [<, I_] are also effective while paused for frame-
by-frame viewing.
• Backward ([_1| |]) does not work with Video CDs+
[HBD] [RAM] [DMITRI [DVD+A][BVD.V] [VCr_ [CD] IMP3]
During play or while stopped
Press the numbered buttons to select the
item.
e.g., "5": [O] _ [5] [HDD][MP31"5": [0] _[O] -_[5]
"f5": [f] .+ [5] "f5": [0].+[t] .+[5]
[Note]
• This may not work with some discs.
• This works only when stopped with some
discs (the screen saver is on the television).
• [DVD-AI
-A group number can be specified while
the screen saver is displayed.
e.g., "5": [5]
-Playing bonus groups
Some discs contain bonus groups, if a password screen
appears after selecting a group, enter the password with the
numbered buttons and press [ENTER]. Refer also to the disc's
jacket.
For your reference
Pressing [l<<] [1<</<_1] or [1_1] [_I_/I_IH] while the playback
control feature on Video CDs (-_page 54) is working may take you
to a menu screen.
RQT6984
[HDD][RAM][DMITRI
During play
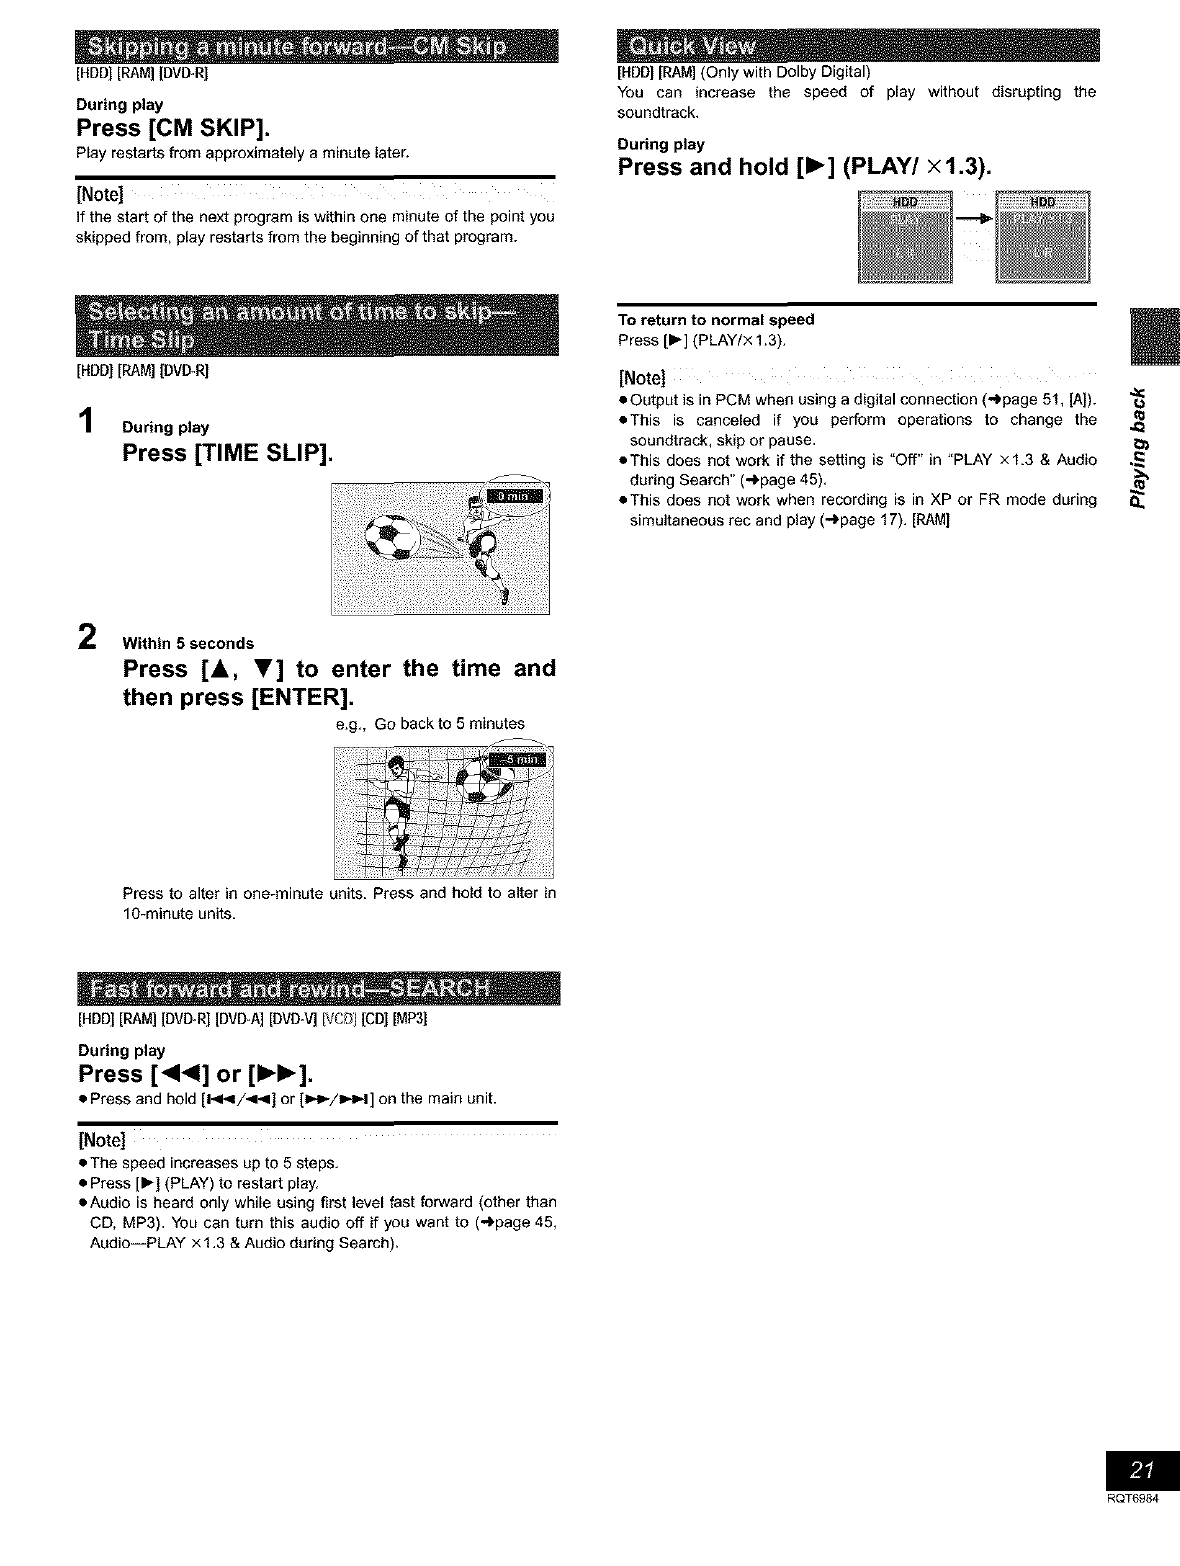
Press [CM SKIP].
Play restarts from approximately aminute later.
[Note]
if the start of the next program is within one minute of the point you
skipped from, play restarts from the beginning of that program.
[HDD][RAM][DMITRI
[HDD] [RAM] (Only with Dolby Digital)
You can increase the speed of play without disrupting the
soundtrack.
During play
Press and hold [_] (PLAY/xl.3).
1During play
Press [TIME SLIP].
To return to normal speed
Press [1_] (PLAY/× 1.3).
[Note]
•Output is in PCM when using a digital connection (,.,_page 51, [A]). "_
• This is canceled if you perform operations to change the ._
soundtrack, skip or pause, ib_
• This does not work if the setting is "Off" in "PLAY ×1.3 & Audio ._
during Search" (,-I_page 45).
• This does not work when recording is in XP or FR mode during (L.
simultaneous rec and play (-I.page 17). [RAM]
2Within 5 seconds
Press [&, T] to enter the time and
then press [ENTER].
e.g., Go back to 5 minutes
Press to alter in one-minute units. Press and hold to alter in
10-minute units.
[HDD][RAM][DVI3R][DVD-A][DVD-V][VC_)][CD][MP3]
During play
Press [_1_1] or [1_1_].
•Press and hold [14-,I/-4-4] or [_/_1] on the main unit.
[Note]
• The speed increases up to 5 steps.
• Press [I,-] (PLAY) to restart play.
• Audio is heard only while using first level fast forward (other than
CD, MP3). You can turn this audio off if you want to (-I.page 45,
Audio--PLAY x 1.3 & Audio during Search).
RQT6984
=.
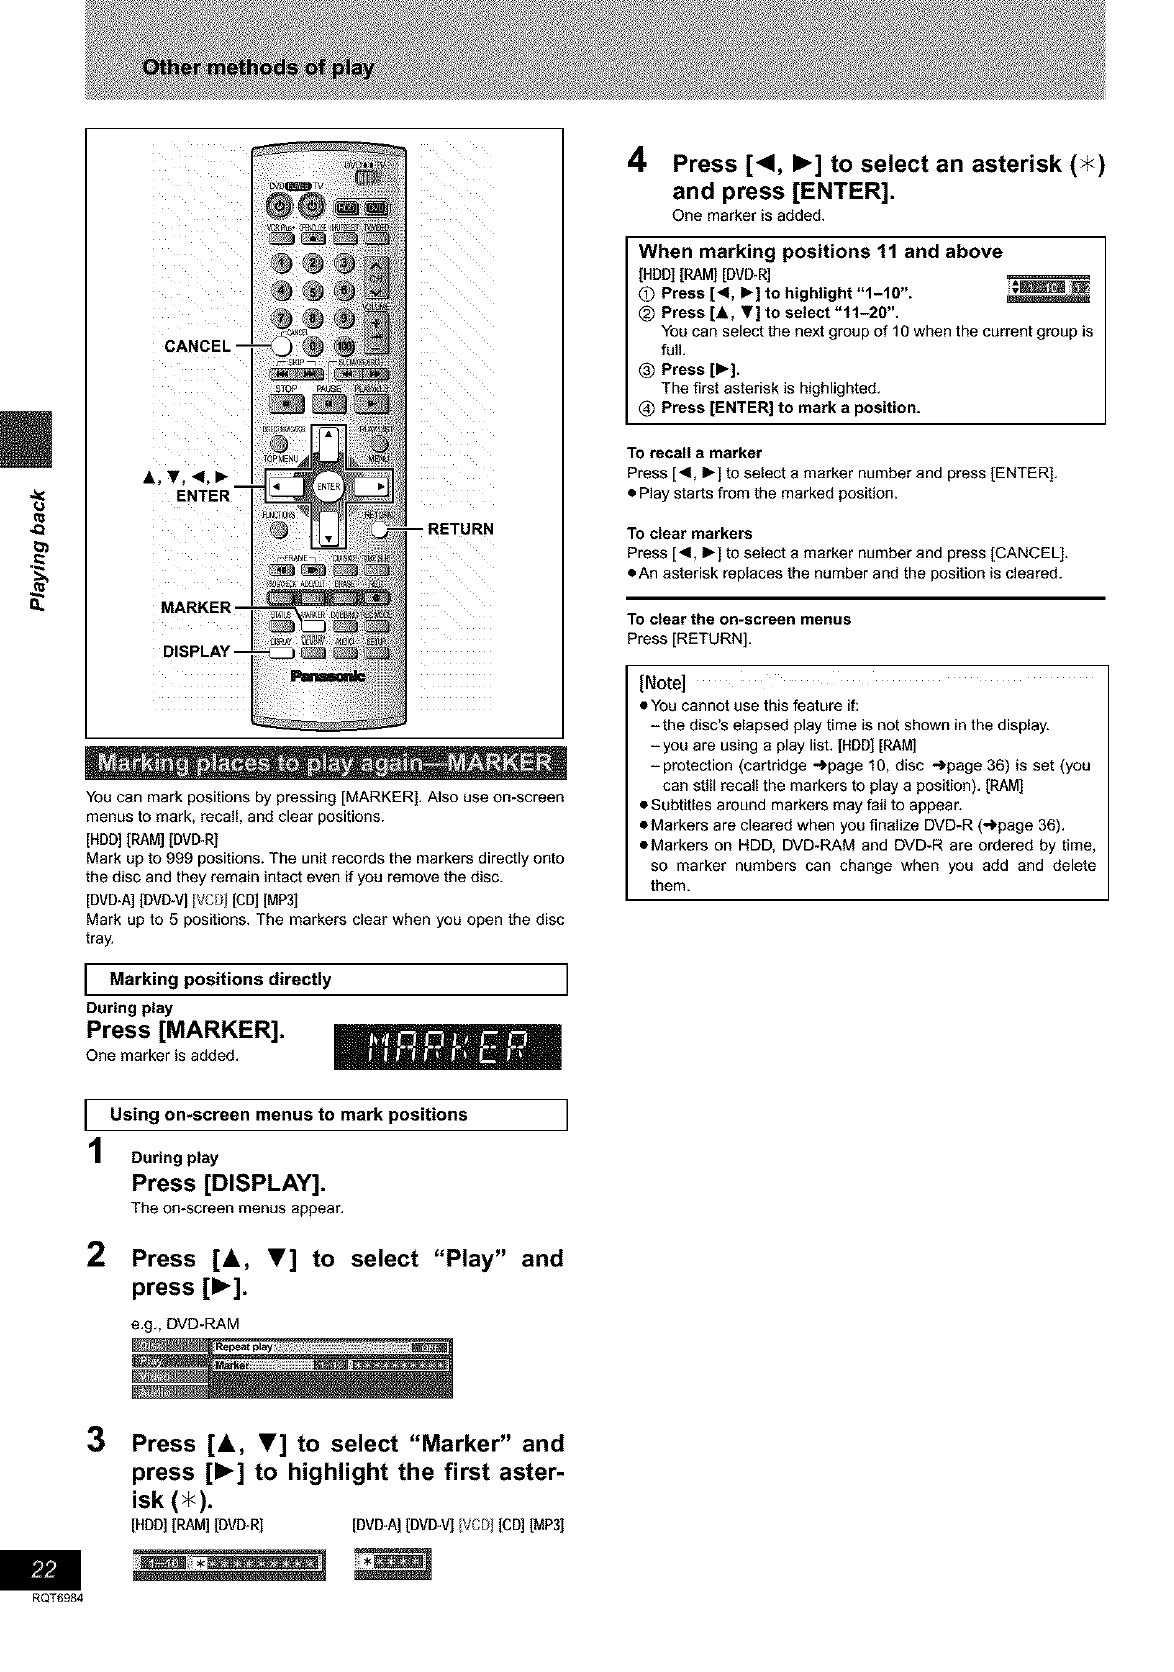
You can mark positions by pressing [MARKER]. Also use on-screen
menus to mark, recall, and clear positions.
[HDD][RAM] [DVI_R]
Mark up to 999 positions. The unit records the markers directly onto
the disc and they remain intact even if you remove the disc.
[DVD*A][DVI_V] IVCF}I[CD]IMP3]
Mark up to 5 positions. The markers clear when you open the disc
tray.
IMarking positions directly ]
During play
Press [MARKER]. _
One marker is added.
IUsing on-screen menus to mark positions ]
During play
Press [DISPLAY].
The on-screen menus appear.
2Press [&, V] to select "Play" and
press [1_].
e.g., DVD-RAM
4Press [<1, I_] to select an asterisk (_<)
and press [ENTER].
One marker is added.
When marking positions 11 and above
[HDD][RAM][DVD-R]
0Press [<1, I_] to highlight "1-10". _'_
_) Press [A, Y] to select "11-20".
You can select the next group of 10 when the current group is
full.
_) Press [1_].
The first asterisk is highlighted.
@ Press [ENTER] to mark aposition.
To recall a marker
Press [4, _-] to select a marker number and press [ENTER].
• Play starts from the marked position.
To clear markers
Press [_1, _-] to select a marker number and press [CANCEL].
• An asterisk replaces the number and the position is cleared.
TO clear the on-scrsen menus
Press [RETURN].
[Note]
eYou cannot use this feature if:
=the disc's elapsed play time is not shown in the display.
=you are using a play list. [HDD][RAM]
=protection (cartridge .,,l.page 10, disc ,,,_page 36) is set (you
can still recall the markers to play a position). [RAM]
•Subtitles around markers may fail to appear.
• Markers are cleared when you finalize DVD-R (,,,_page 36).
eMarkers on HDD, DVD-RAM and DVD-R are ordered by time,
so marker numbers can change when you add and delete
them.
RQT6984
3Press [&, T] to select "Marker" and
press [1_] to highlight the first aster-
isk (_<).
[HDD] [RAM] [DVI_R] [DVD-A] [DVI_V] IVD [CD] IMP3]
Numbered
buttons
ENTER
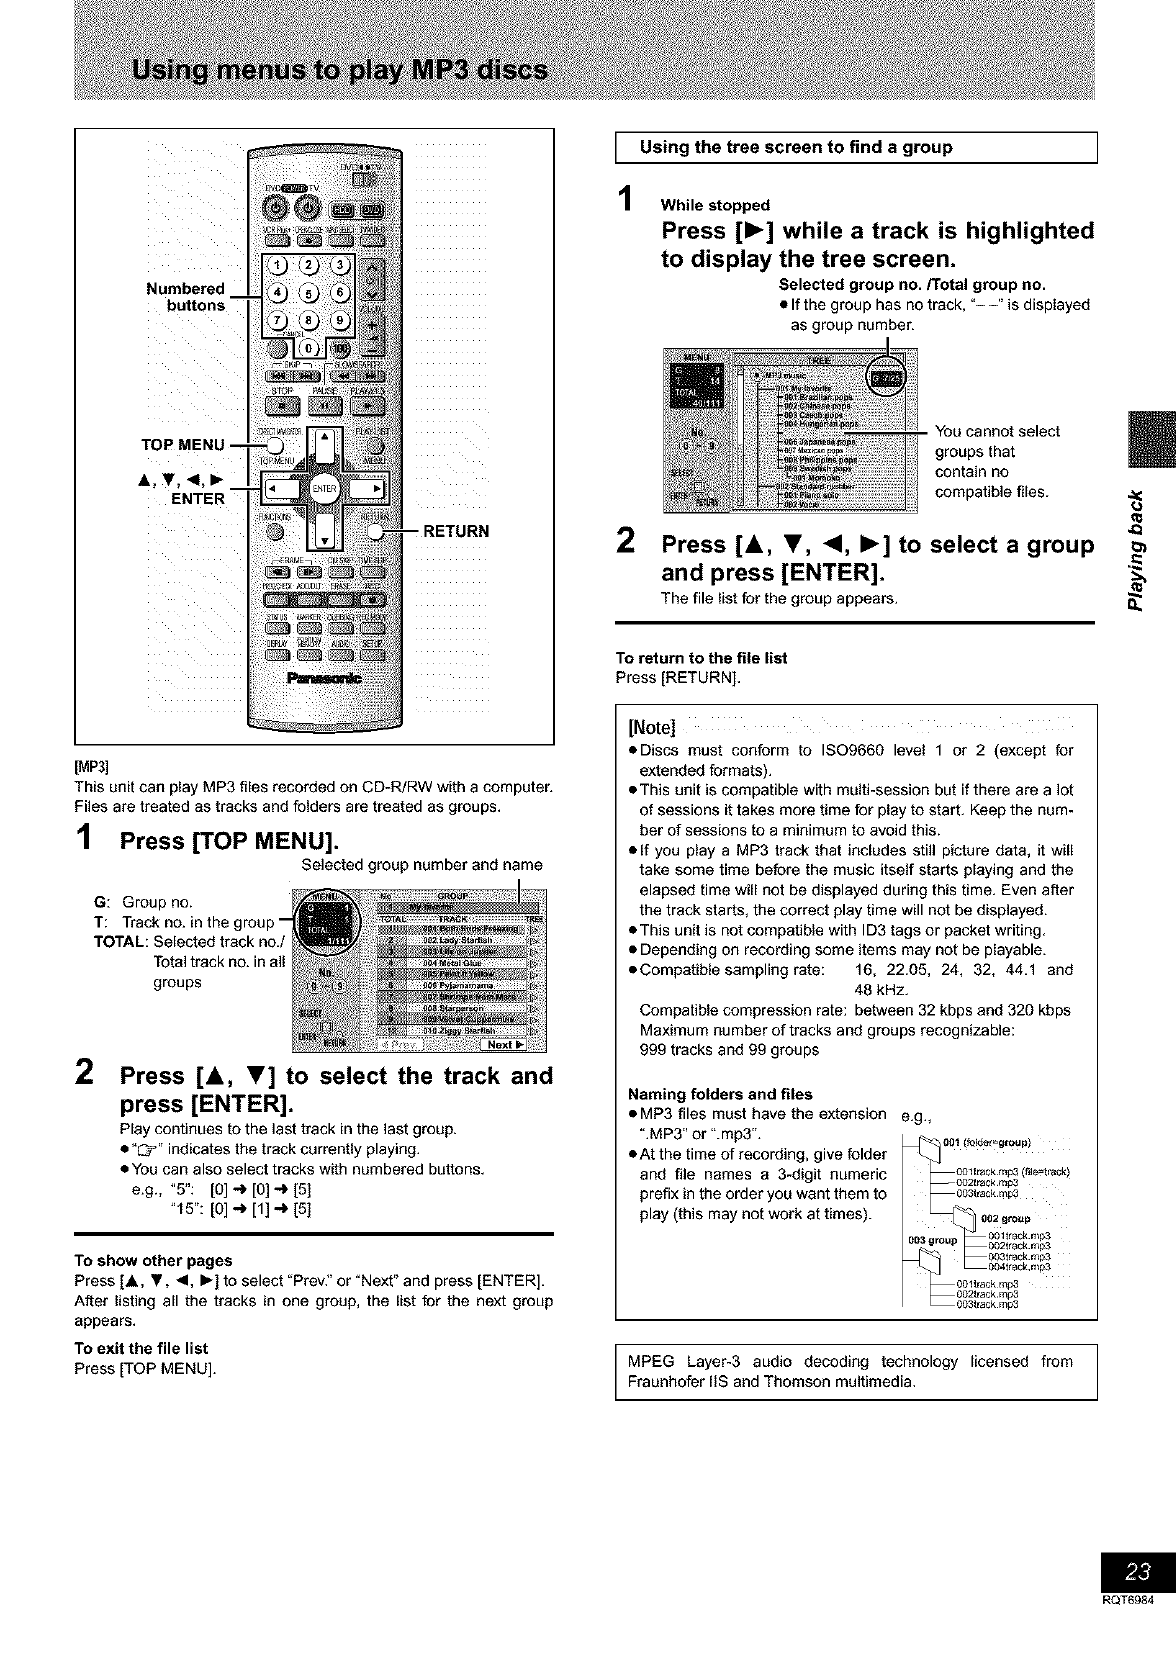
_P3]
This unit can play MP3 files recorded on CD-R/RW with a computer.
Files are treated as tracks and folders are treated as groups.
]Press [TOP MENU].
Selected group number and name
G: Group no.
T: Track no. in the group-
TOTAL: Selected track no./
Total track no. in all
groups
2Press [A, T] to select the track and
press [ENTER].
Play continues to the last track in the last group.
•"I::_'" indicates the track currently playing.
• You can also select tracks with numbered buttons.
e.g., "5": [0] _ [0] _ [5]
"15":[o]-_ [1]_ [5]
To show other pages
Press [.&, Y, _1, I_] to select "Prev:' or "Next" and press [ENTER].
After listing all the tracks in one group, the list for the next group
appears.
To exit the file list
Press [TOP MENU].
1
1
Using the tree screen to find a group ]
While stopped
Press [_] while a track is highlighted
to display the tree screen.
Selected group no./Total group no.
• If the group has no track, "--" is displayed
as group number.
You cannot select
groups that
contain no
compatible files.
2Press [&, T, <, I_] to select a group
and press [ENTER].
The file listfor the group appears. Q,,
To return to the file list
Press [RETURN],
[Note]
eDiscs must conform to ISO9660 level 1 or 2 (except for
extended formats).
• This unit is compatible with multi-session but if there are a lot
of sessions it takes more time for play to start. Keep the num-
ber of sessions to a minimum to avoid this.
elf you play a MP3 track that includes still picture data, it will
take some time before the music itself starts playing and the
elapsed time will not be displayed during this time. Even after
the track starts, the correct play time will not be displayed.
• This unit is not compatible with ID3 tags or packet writing.
• Depending on recording some items may not be playable.
eCompatible sampling rate: 16, 22.05, 24, 32, 44.1 and
48 kHz.
Compatible compression rate: between 32 kbps and 320 kbps
Maximum number of tracks and groups recognizable:
999 tracks and 99 groups
Naming folders and files
• MP3 files must have the extension e.g.,
".MP3" or ".mp3". _00_ (fo_00_(fo_=g,oupl
• At the time of recording, give folder
and file names a 3-digit numeric _0Oltrackmp3(file=track)
002[rack rap3
prefix in the order you want them to 003trackraP3
play (this may not work at times). 002g,o_,p
603 group 0021rackrap3
0 track rap3
004track,r_lp3
oo_t_ack,_3
O02track 1_3
003track 1_3
MPEG Layer-3 audio decoding technology licensed from
Fraunhofer IIS and Thomson multimedia.
RQT6984
8
RQT6984
v(
Numbered
bu_ons
A, T, -<,1_
ENTER
REC
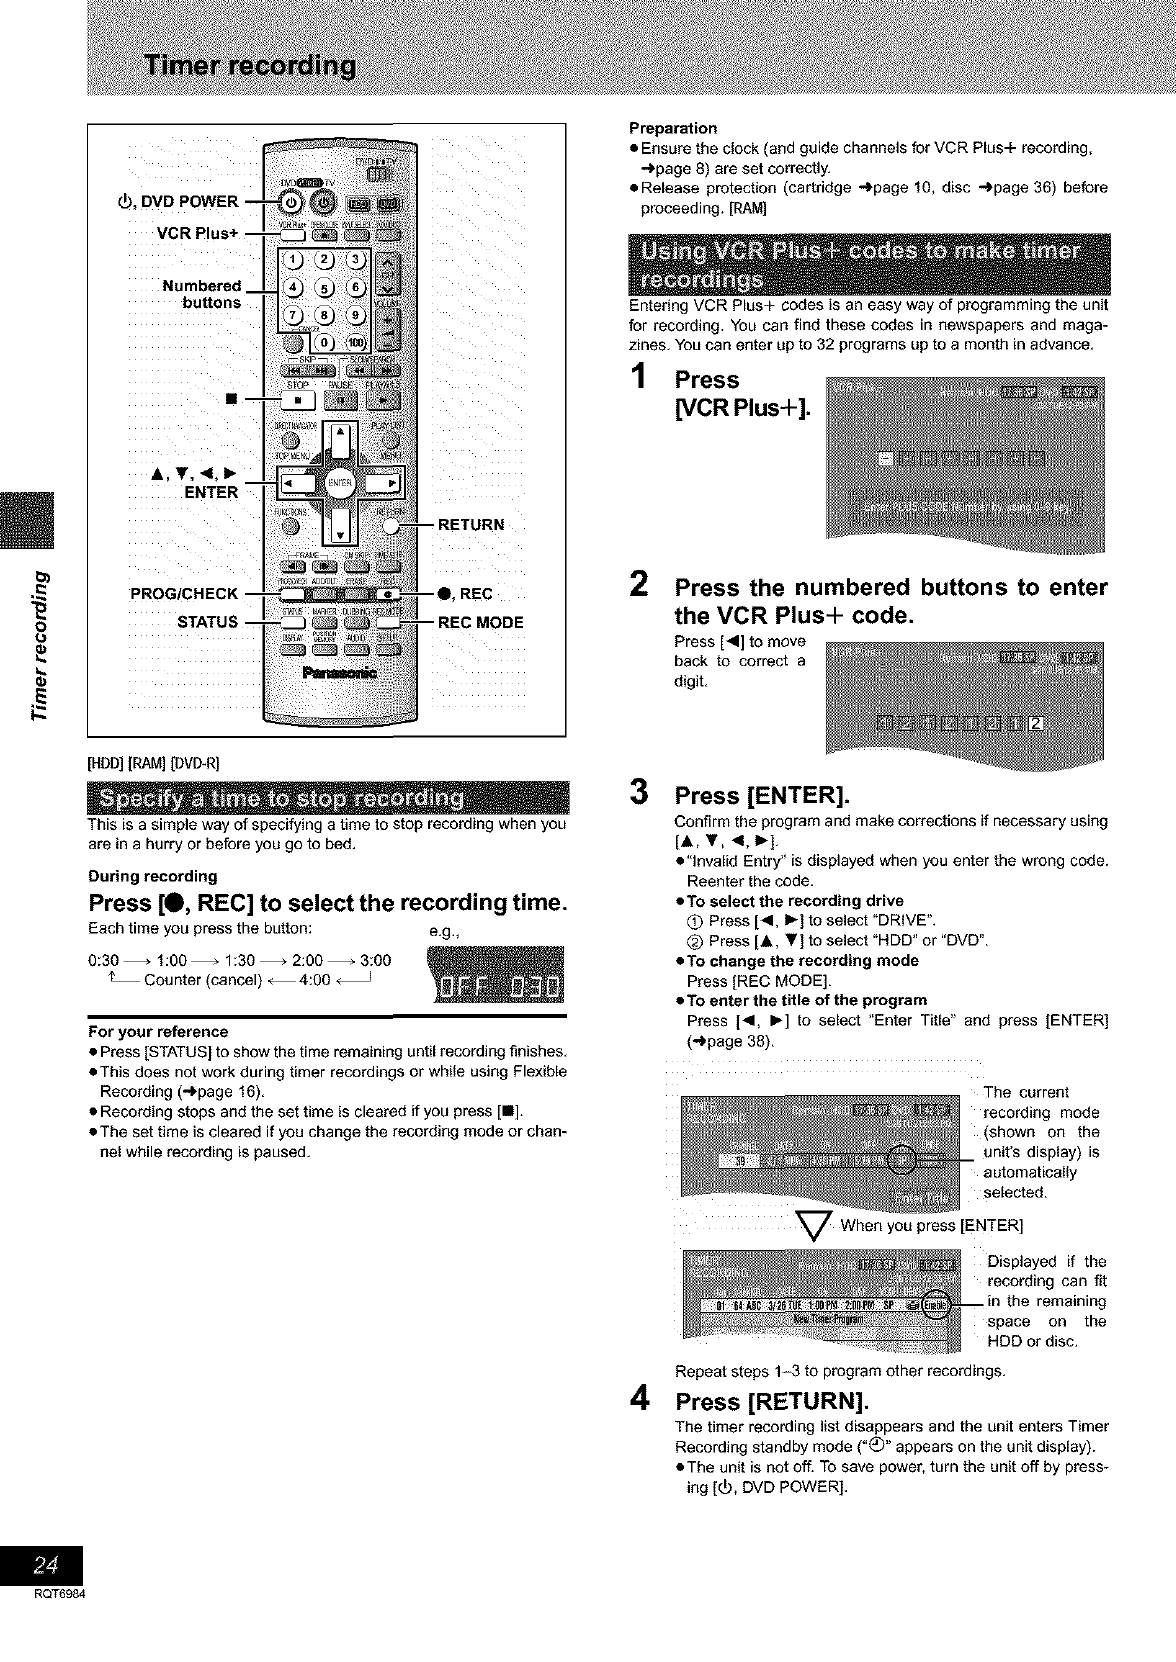
[HDD][RAM][DVD_R]
This is a simple way of specifying a time to stop recording when you
are in a hurry or before you go to bed.
During recording
Press [0, REC] to select the recording time.
Each time you press the button: e,g.,
0:30 _ 1:00 _ 1:30 _ 2:00 _ 3:00
Counter (cancel) _ 4:00
For your reference
•Press [STATUS] to show the time remaining until recording finishes,
• This does not work during timer recordings or while using Flexible
Recording (-_page 16),
• Recording stops and the set time is cleared if you press [111].
• The set time is cleared if you change the recording mode or chan-
nel while recording is paused.
Preparation
• Ensure the clock (and guide channels for VCR Plus+ recording,
-_'page 8) are set correctly.
• Release protection (cartridge _page 10, disc _page 36) before
proceeding. [RAM]
Entering VCR Plus+ codes is an easy way of programming the unit
for recording. You can find these codes in newspapers and maga-
zines. You can enter up to 32 programs up to a month in advance.
1Press
[VCR Plus+].
2Press the numbered buttons to enter
the VCR Plus+ code.
Press [<] to move
back to correct a
digit,
3Press [ENTER].
Confirm the program and make corrections if necessary using
[A, V, <, _].
• "invalid Entry" is displayed when you enter the wrong code.
Reenter the code.
•To select the recording drive
O Press [_1, I_] to select "DRIVE".
_) Press [.&, Y] to select "HDD" or "DVD".
•To change the recording mode
Press [REC MODE].
•To enter the title of the program
Press [_1, I_] to select "Enter Title" and press [ENTER]
(-')page 38).
The current
recording mode
(shown on the
unit's display) is
automatically
selected.
4
Displayed if the
recording can fit
remaining
space on the
HDD or disc.
Repeat steps 1-3 to program other recordings.
Press [RETURN].
The timer recording list disappears and the unit enters Timer
Recording standby mode ("(_)" appears on the unit display).
• The unit is not off. To save power, turn the unit off by press-
ing [_), DVD POWER].

Youcanenterupto32programsuptoamonthinadvance.
Eachdailyorweeklyprogramiscountedasoneprogram.
1Press [PROG/CHECK].
A line that is
ready for
programming
is highlighted.
2Press [ENTER].
3Press [1_] to move through the items
and change the items with [A, T].
• The current settings are shown each time you press [1_].
• You may use the numbered buttons to enter the CHANNEL,
DATE, ON (start Time), and OFF (Finish Time).
•CHANNEL (Channel number and caption)
•DATE
Current date
_ u n da
Next day up to one month later rain a o e y
WJe_y timer: SUN-SAT_MON-SAT_MON-FRI
Djly'timer: WEEKLY SUN ..... WEEKLY SAT
• ON (Start time)/OFF (Finish time)
The time increases or decreases in 30-minute increments if
you hold the button.
•MODE (Recording mode _page 15)
SP_XP_FR_EP_LP (_Return to SP)
•DRIVE
HDD_DVD
•RENEW
(Only when you set daily or weekly recording onto HDD
_page 26, Auto Renewal Recording)
ON--OFF
•Enter Title
Select "Enter Title" using [_1, I_] and press [ENTER]
(")page 38).
4Press [ENTER] when you have
finished programming the timer.
5
Displayed if the
recording can fit
-- in the remaining
space on the
disc,
• Press [A, Y] to select "New Timer Program" and repeat
steps 2- 4 to program other recordings.
Press [PROG/CHECK] or [RETURN].
The timer recording list disappears and the unit enters Timer
Recording standby mode ("_" appears on the unit display),
• The unit is not off. To save power, turn the unit off by press-
ing [_, DVD POWER].
To release the unit from recording standby
Cancel all the timer recording programs using [CANCEL]
(,,_page27),
To stop recording when recording has already
begun
Press [m], then [ENTER] within 5 seconds.
Recording stops.
[Note] ...............................................................................
•When the program timer reaches the set time when in record-
ing standby mode, timer recording will start even if the unit is
playing or recording another program.
• The actual time recorded may be longer than the program itself
when television programs are recorded using VCR Plus+.
• If you don't select a recording mode when using VCR Plus+
codes to make a timer recording, the unit sets the mode
selected on the unit at that time (unless the mode is "XP", in
which case the unit sets "FR" as the mode).
•"All timer programs are occupied:' appears if there are
already 32 programs.
• The remaining time displayed is based on the current record-
ing mode.
•When you program successive timer recordings to start
immediately one after the other, the unit cannot record the
part at the beginning of the later programs (a few seconds
when recording with HDD or DVD-RAM, and approximately
30 seconds when recording with DVD-R).
• If you set DST (Daylight Saving Time) to ON when manually
setting the clock (-I, page 47), timer recording may not work
when summer switches to winter and vice versa.
•"(_" flashes when the unit couldn't go to timer recording
standby.
•When timer recording starts, the record lamp (.._page 13,
Main unit) lights, even if the unit is off.
8
RQT6984

8
Numbered
buttons-
[HDD]
if you record a program onto HDD repeatedly everyday or every
week using timer recording, the unit will record the new program
overthe aidone,
While the timer recording list (->page 25, step 4) is displayed
Press [&, T] to select the program
and then [ENTER].
2Press [<, I_] to select
"RENEW".
3Press [&, T] to select "ON" and then
[ENTER].
The timer recording list reappears.
[Note]
•If a program set for Auto Renewal Recording is protected, the program
will not be overwritten, Instead the program set for recording will be
saved as a separate program, and this program will be the one to be
overwritten when the next Auto Renewal Recording takes place.
• When play back is taking place from the HDD, auto renewal
recording will not be carried out. The program supposed to be auto
renewal recorded will be recorded as a separate program.
• Play list scenes made from programs that were set for Auto
Renewal Recording are erased along with auto renewal.
• When there is not enough space on the HDD, the program may not
be recorded completely (even if repeating a renewal recording).
RQT6984
[HDD][RAM] [DMITRI
1Press [PROG/CHECK].
Icon explanations
The times ovedap those in another program.
Note the following iftimes overlap:
-The program with the earlier start time receives priority.
-Recording of the program with the later start time starts when
the eadier program finishes recording.
-if you make two programs with the same start time, the one
you programmed last receives priority.
@
O
@
o
You stopped recording of a weekly or daily timer recording. The
icon disappears the next time the timer starts recording.
This program is currently recording.
The disc was full or the maximum number of programs or
scenes was reached so the program failed to record,
The material was copy-prohibited so it was not recorded.
The program did not complete recording because the disc is
dirty or some other reason.
• Programs that failed to record are displayed gray, They are a_o-
matically deleted from the timer recording list at 4 a.m. two days
later.
[] Auto Renewal Recording indicator [HDD]
The program will be automatically recorded over in succession.
Relief Recording indicator
Programs that have been rerouted to the HDD because of
insufficient space.
Recording drive indicator
RDD_ DVD_
Message displayed in the CHECK line
Some of the information shown in the CHECK line may not be cor-
rect while you are recording.
Enable: Displayed if the recording can fit in the remaining space
on the disc.
-_ (Date): For recordings made daily or weekly, the display will
show as long as recordings can be made (up to a maxi-
mum of one month from the present time) based on the
time remaining on the disc.
! : it may not be possible to record because of write protec-
tion, because there is no more space left or because the
number of possible programs has reached its maximum.
Please check the HDD and disc.
2Press [PROG/CHECK] or [RETURN].
The timer recording list disappears.
[HDD][RAM][DMITRI
1Press [PROG/CHECK].
The timer recording list appears,
2Press [A, V] to select the program.
oYou may also select programs by inputting a 2-digit number
using the numbered buttons,
e.g., "5": [O] ") [5]
"15": [1] ,-) [5]
ePress [41, I_] to skip down several programs on the list,
3 Press [CANCEL] or [ADD/DLT] to
delete,
You cannot delete programs that are currently recording.
or press [ENTER] to change.
The timer recording setting screen appears.
4
5
If you pressed [ENTER] in step 3,
Move through the items with [<1, I_]
and change the settings with [&, T]
and press [ENTER].
Press [PROG/CHECK] or [RETURN].
The timer recording list disappears.
[Note]
oA Timer recording that is taking place in a recording mode other
than "FR" may have its end time altered,
•Even if the power is off you can still view timer recording informa-
tion by pressing [PROG/CHECK].
8
RQT6984
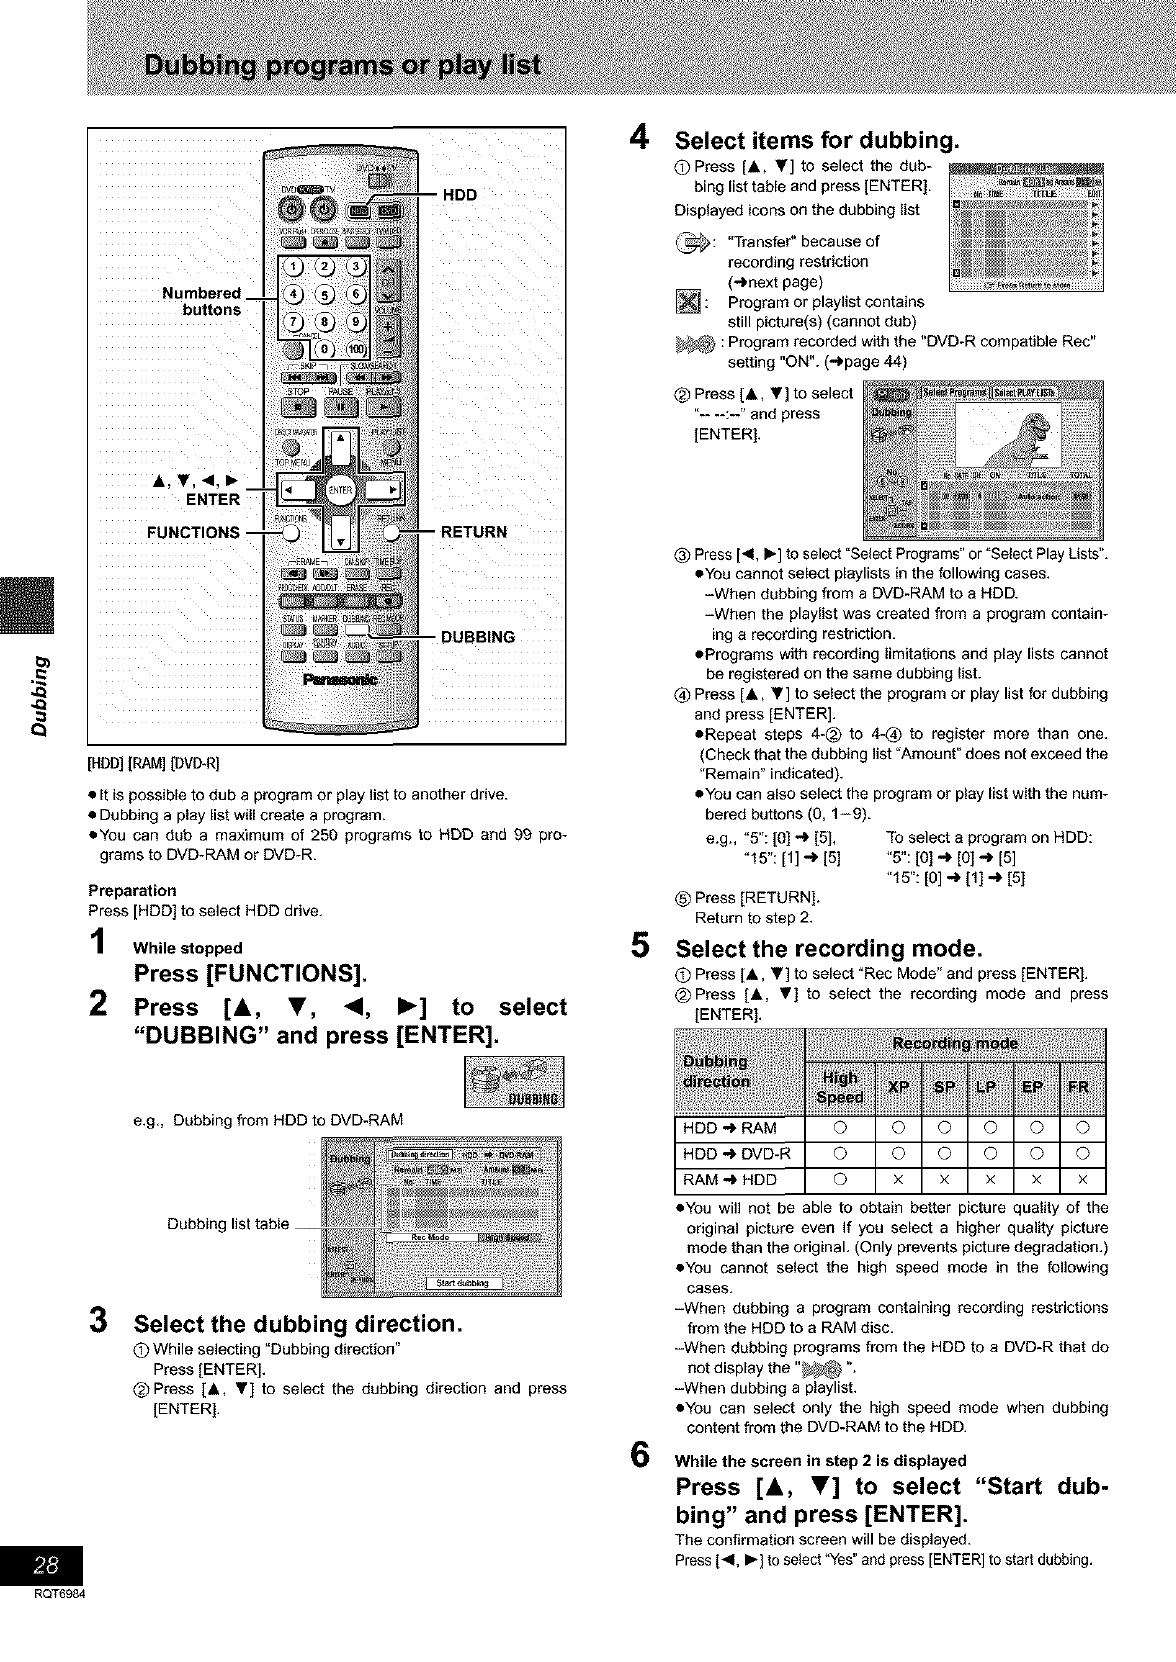
4_
4_
Numbered '
buttons
A, T, <, I_ --
ENTER
FUNCTIONS "
HDD
_BING
[HDD][RAM][DVD-R]
• It is possible to dub a program or play list to another drive.
• Dubbing a play list will create a program.
• You can dub a maximum of 250 programs to HDD and 99 pro-
grams to DVD-RAM or DVD-R.
Preparation
Press [HDD] to select HDD drive,
While stopped
Press [FUNCTIONS].
2Press [&, T, <, I_] to select
"DUBBING" and press [ENTER].
e,g,, Dubbing from HDD to DVD-RAM
Dubbing
3Select the dubbing direction.
O While selecting _Dubbing direction"
Press [ENTER].
@ Press [A, ,] to select the dubbing direction and press
[ENTER],
P_[t!
RQT6984
4
5
6
Select items for dubbing.
O Press [A, Y] to select the dub-
bing list table and press [ENTER].
Displayed icons on the dubbing list
_: "Transfer" because of
recording restriction
(-_next page)
Program or playlist contains
still picture(s) (cannot dub)
_ : Program recorded with the "DVD-R compatible Rec"
setting "ON". (-_page 44)
@ Press [A y] to select
"- -:-" and press
[ENTER],
(_ Press ['4, l_] to select "Select Programs" or "Select Play Lists",
eYou cannot select playlists in the following cases.
-When dubbing from a DVD-RAM to a HDD,
-When the playlist was created from a program contain-
ing a recording restriction,
ePrograms with recording limitations and play lists cannot
be registered on the same dubbing list.
@ Press [A, Y] to select the program or play list for dubbing
and press [ENTER].
eRepeat steps 4-@ to 4-@ to register more than one,
(Check that the dubbing list "Amount" does not exceed the
"Remain" indicated).
eYou can also select the program or play list with the num-
bered buttons (0, 1-9).
e.g., "5": [0] _ [5], To select a program on RDD:
"15": [1] -_ [5] "5": [0] _ [O] ,._ [5]
"15": [O] _ [1] _ [5]
(_ Press [RETURN].
Return to step 2.
Select the recording mode.
O Press [A, T] to select "Rec Mode" and press [ENTER].
@Press [A V] to select the recording mode and press
[ENTER],
.DD-,RAMO 010101010 I
.DD-,DVD-RO O °l°l°l°l
IIII
RAM "_ HDD © x x x x x
• You will not be able to obtain better picture quality of the
original picture even If you select a higher quality picture
mode than the original. (Only prevents picture degradation.)
• You cannot select the high speed mode in the following
cases.
-When dubbing a program containing recording restrictions
from the HDD to a RAM disc.
-When dubbing programs from the HDD to a DVD-R that do
not display the "_ ".
-When dubbing a playlist,
• You can select only the high speed mode when dubbing
content from the DVD-RAM to the HDD.
While the screen in step 2 is displayed
Press [&, T] to select "Start dub-
bing" and press [ENTER].
The confirmation screen will be displayed.
Press [<, I_] to select "Yes"and press [ENTER] to start dubbing,
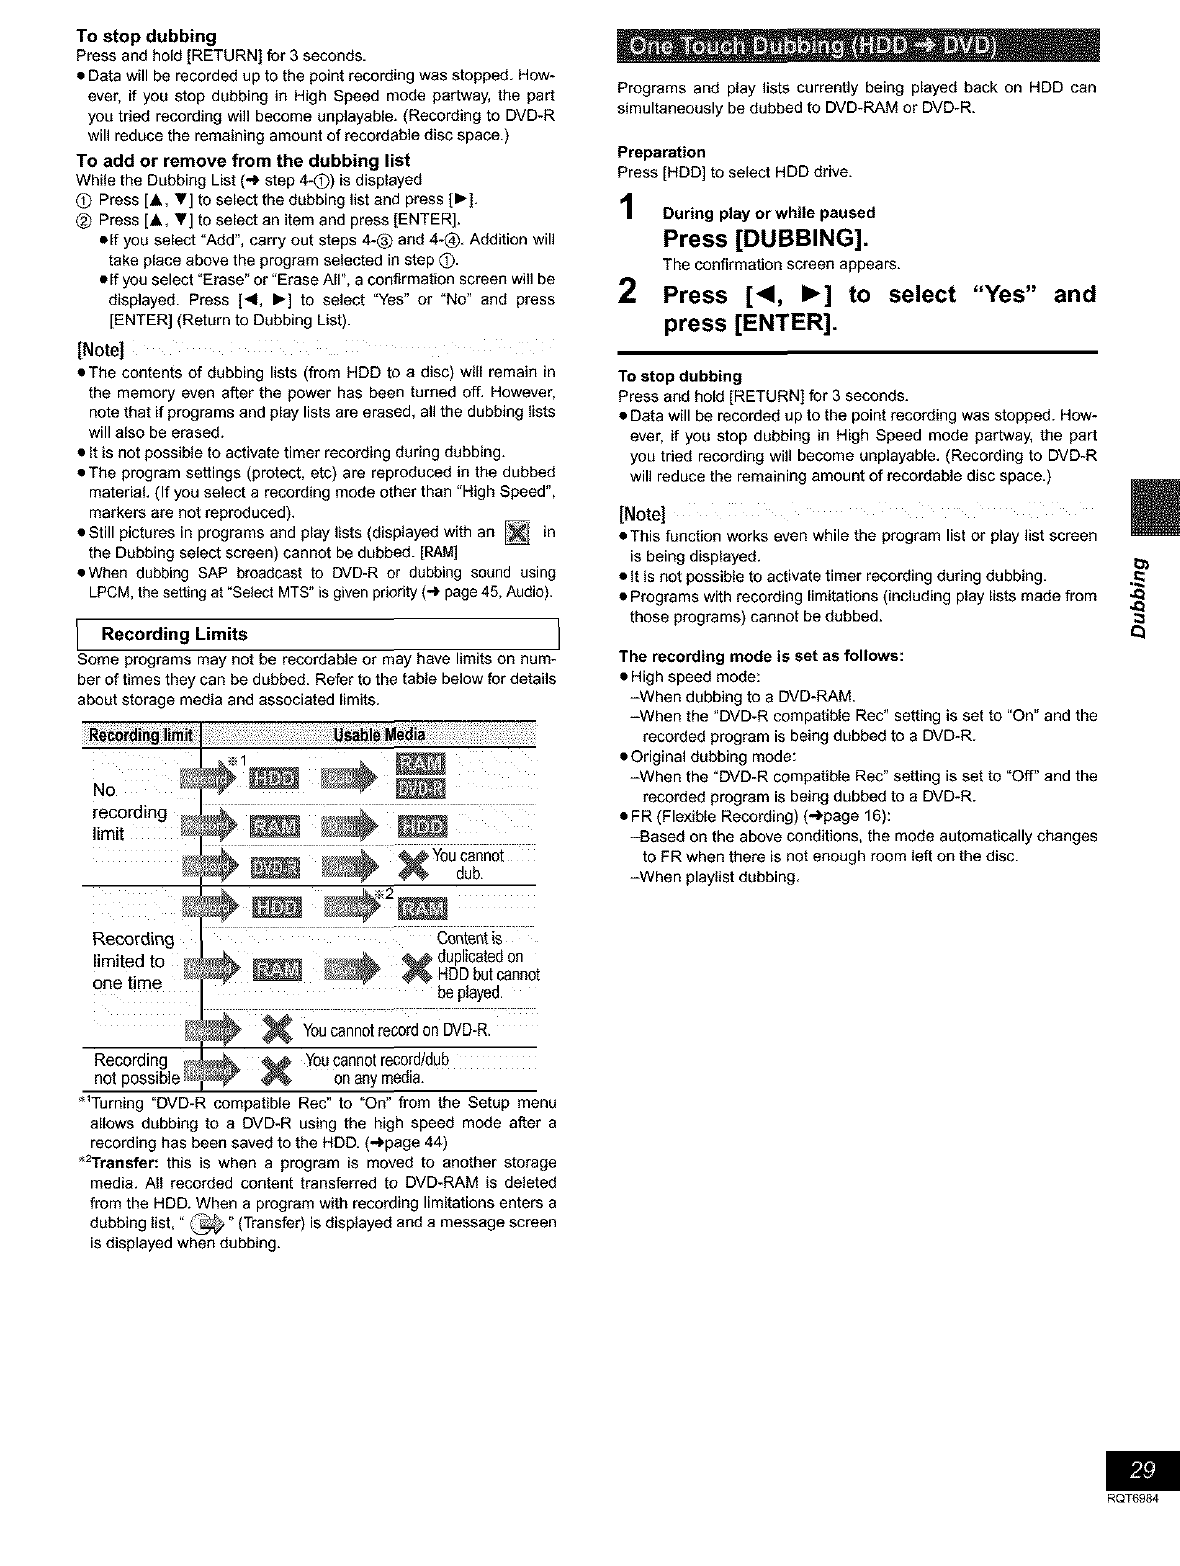
To stop dubbing
Press and hold [RETURN] for 3 seconds.
• Data will be recorded up to the point recording was stopped. How-
ever, if you stop dubbing in High Speed mode partway, the part
you tried recording will become unplayable. (Recording to DVD-R
will reduce the remaining amount of recordable disc space.)
TO add or remove from the dubbing list
While the Dubbing List (_ step 4-O) is displayed
0 Press [A, V] to select the dubbing list and press [1_].
@ Press [A y] to select an item and press [ENTER].
• If you select "Add", carry out steps 4-_) and 4-@. Addition will
take place above the program selected in step O-
olf you select "Erase" or "Erase All", a confirmation screen will be
displayed. Press [4, I_] to select "Yes" or "No" and press
[ENTER] (Return to Dubbing List).
[Note]
• The contents of dubbing lists (from HDD to a disc) will remain in
the memory even after the power has been turned off. However,
note that if programs and play lists are erased, all the dubbing lists
will also be erased.
• It is not possible to activate timer recording during dubbing.
• The program settings (protect, etc) are reproduced in the dubbed
material. (If you select a recording mode other than "High Speed",
markers are not reproduced).
• Still pictures in programs and play lists (displayed with an _ in
the Dubbing select screen) cannot be dubbed. [RAM]
• When dubbing SAP broadcast to DVD-R or dubbing sound using
LPCM, the setting at "Select MTS" is given priority (-) page 45, Audio).
IRecording Limits I
Some programs may not be recordable or may have limits on num-
ber of times they can be dubbed. Refer to the table below for details
about storage media and associated limits.
No
recording
limit _ _
/_ _ _ _Youcannot
dub,
Recording
limited to _
one time be played.
X YOUcannot record on DVD-R.
Recording #_ _ You cannot record/dub
not possible on any media.
_Turning "DVD-R compatible Rec" to "On" from the Setup menu
allows dubbing to a DVD-R using the high speed mode after a
recording has been saved to the HDD. (_page 44)
_rrsnsfer: this is when a program is moved to another storage
media. All recorded content transferred to DVD-RAM is deleted
from the HDD. When a program with recording limitations enters a
dubbing list," _" (Transfer) is displayed and a message screen
is displayed when dubbing.
Programs and play lists currently being played back on HDD can
simultaneously be dubbed to DVD-RAM or DVD-R.
Preparation
Press [HDD] to select HDD drive.
During play or while paused
Press [DUBBING].
The confirmation screen appears.
2Press [<, I_] to select "Yes"
press [ENTER].
and
To stop dubbing
Press and hold [RETURN] for 3 seconds.
• Data will be recorded up to the point recording was stopped. How-
ever, if you stop dubbing in High Speed mode partway, the part
you tried recording will become unplayable. (Recording to DVD-R
will reduce the remaining amount of recordable disc space.)
[Note]
• This function works even while the program list or play list screen
is being displayed.
• It is not possible to activate timer recording during dubbing. ,_
• Programs with recording limitations (including play lists made from _,_
those programs) cannot be dubbed.
The recording mode is set as follows:
•High speed mode:
-When dubbing to a DVD-RAM.
-When the "DVD-R compatible Rec" setting is set to "On" and the
recorded program is being dubbed to a DVD-R.
• Original dubbing mode:
-When the "DVD-R compatible Rec" setting is set to "Off" and the
recorded program is being dubbed to a DVD-R.
• FR (Flexible Recording) (_page 16):
-Based on the above conditions, the mode automatically changes
to FR when there is not enough room left on the disc.
-When playlist dubbing.
RQT6984
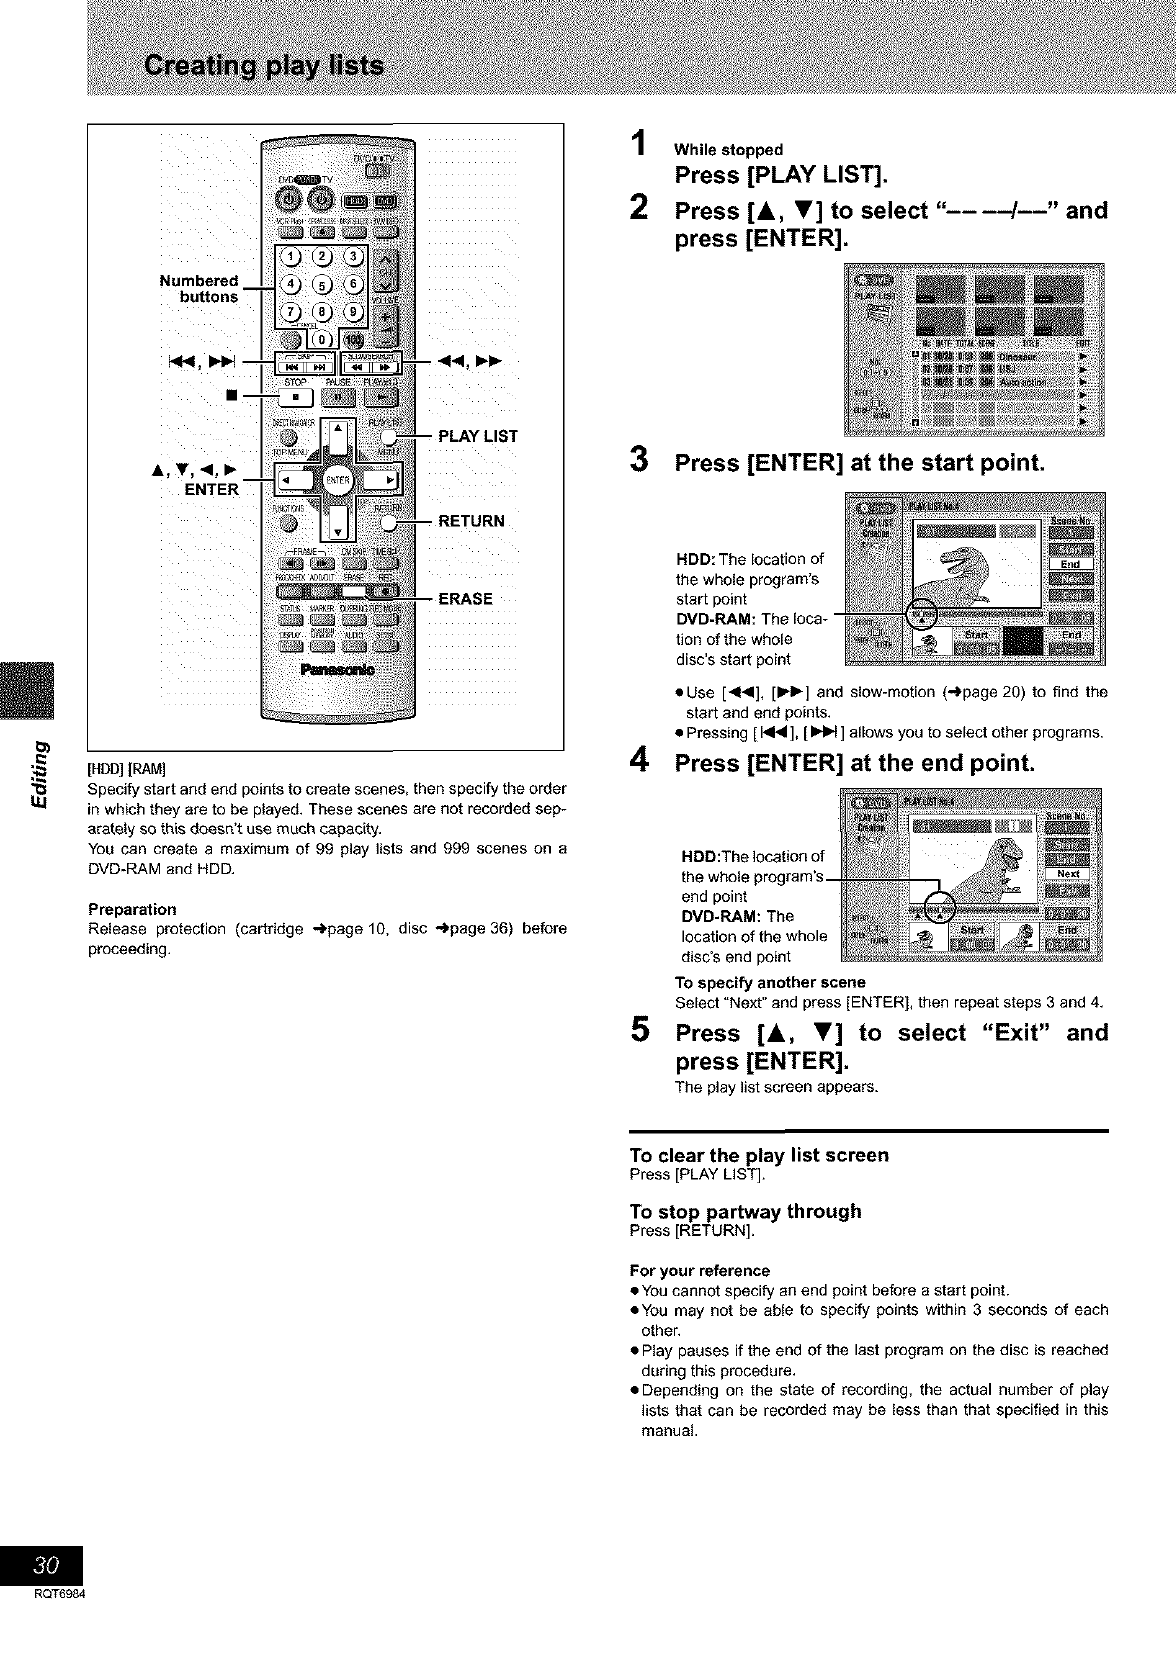
Numbered
buttons _
I<l<, _lb{ m
A,V, 4,_
ENTER
IRN
[HDD][RAM]
Specify start and end points to create scenes, then specify the order
in which they are to be played. These scenes are not recorded sep-
acately so this doesn't use much capacity,
You can create a maximum of 99 play lists and 999 scenes on a
DVD-RAM and HDD.
Preparation
Release protection (cartridge _page 10, disc _page 36) before
proceeding.
While stopped
Press [PLAY LIST].
2Press [A, V] to select"
press [ENTER].
.... 4--" and
3Press [ENTER] at the start point.
HDD: The location of
the whole program's
start point
DMD-RAM: The loca-
tion of the whole
disc's start point
• Use [_14], [IP_-] and slow-motion (")page 20) to find the
start and end points.
• Pressing [ _ ], [ _ ] allows you to select other programs.
4Press [ENTER] at the end point.
5
HOD:The location of
the whole program's
end point
DVD.RAM: The
location of the whole
disc's end point
To specify another scene
Select "Next" and press [ENTER], then repeat steps 3 and 4.
Press [A, V] to select "Exit" and
press [ENTER].
The play list screen appears.
To clear the play list screen
Press [PLAY LIST].
To stop partway through
Press [RETURN].
For your reference
• You cannot specify an end point before a start point.
• You may not be able to specify points within 3 seconds of each
other.
• Play pauses if the end of the last program on the disc is reached
during this procedure.
• Depending on the state of recording, the actual number of play
lists that can be recorded may be less than that specified in this
manual
RQT6984
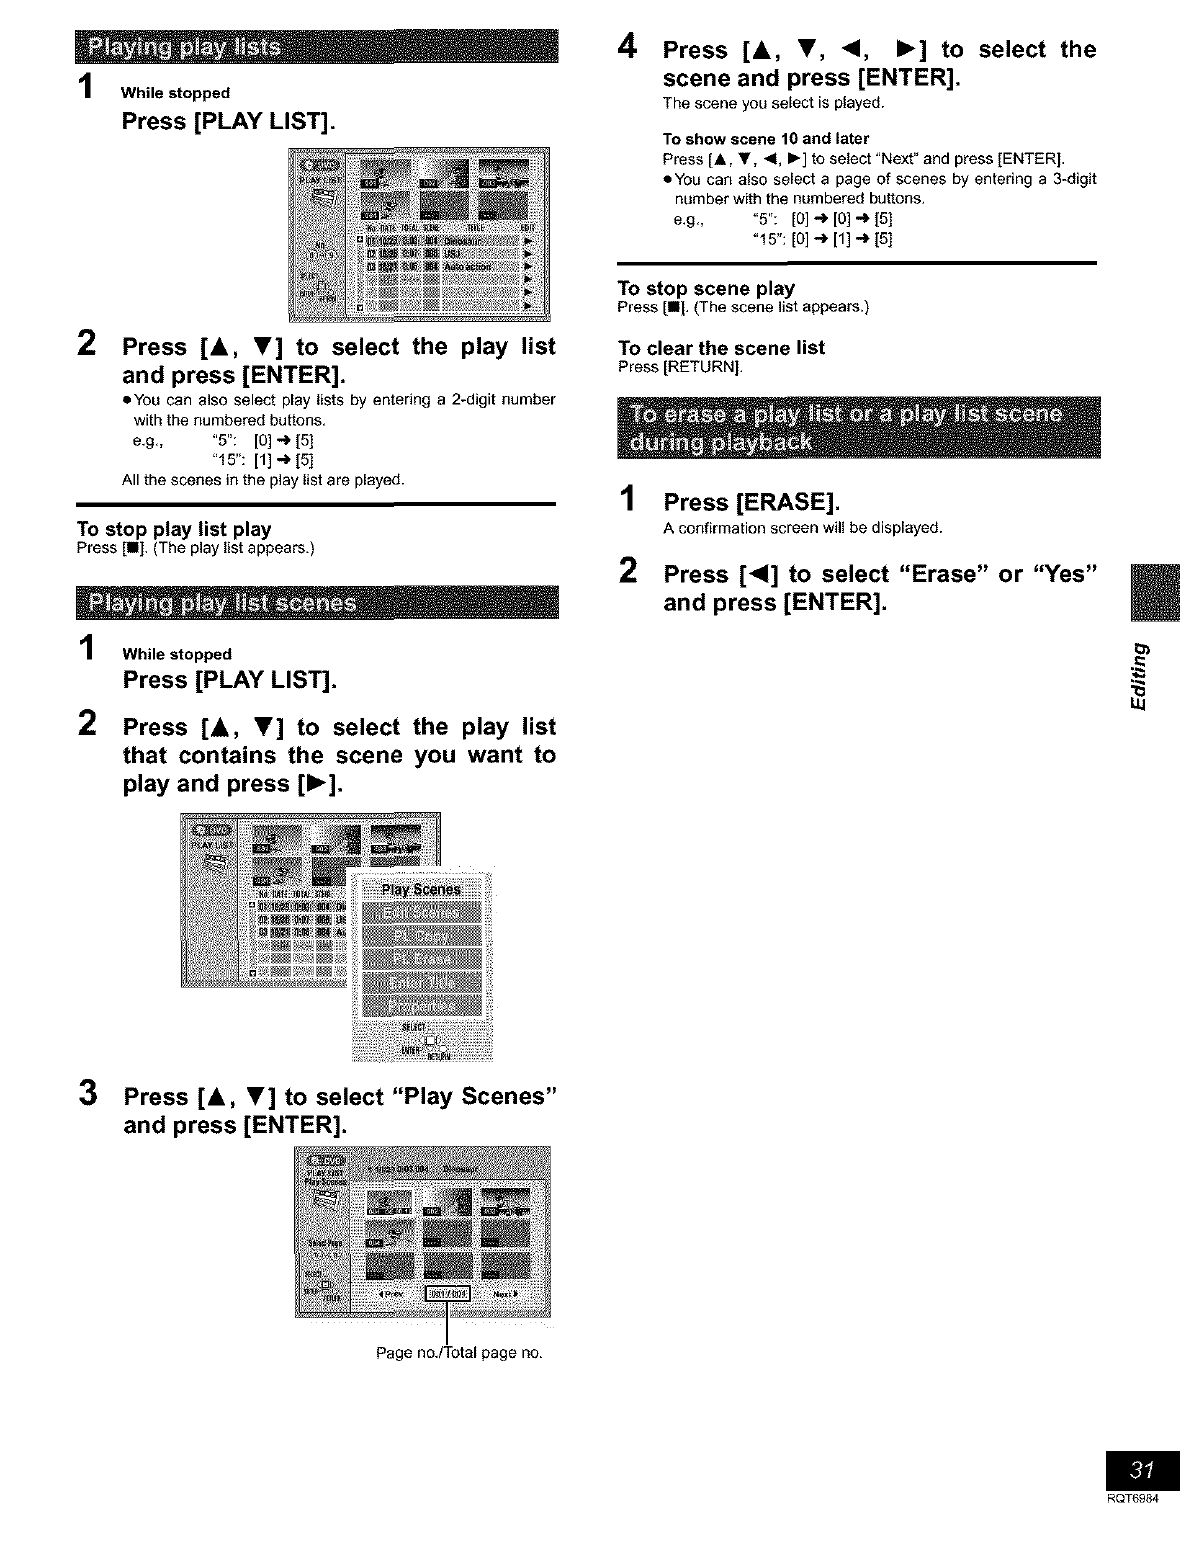
While stopped
Press [PLAY LIST].
2Press [A, V] to select the play list
and press [ENTER].
oYou can also select play lists by entering a 2-digit number
with the numbered buttons,
e,g,, "5": [0] _ [5]
"15": [1] _ [5]
All the scenes in the play list are played.
To stop play list play
PressIn], (The play list appears.)
While stopped
Press [PLAY LIST].
2Press [A, V] to select the play list
that contains the scene you want to
play and press [1_].
4Press [&, T, <1, I_] to select the
scene and press [ENTER].
The scene you select is played.
To show scene 10 and later
Press [A, Y, <1, I_] to select "Next" and press [ENTER],
oYou can also select a page of scenes by entering a 3-digit
number with the numbered buttons.
e,g,, "5": [0] _ [0] _ [5]
"l 5":[o]-_ [1]_ [5]
To stop scene play
Press [11[,(The scene list appears.)
To clear the scene list
Press[RETURN],
1
2
Press [ERASE].
A confirmation screen will be displayed.
Press [<1] to select "Erase" or "Yes"
and press [ENTER].
3Press [&, T] to select "Play Scenes"
and press [ENTER].
Page no,/Total page no.
RQT6984
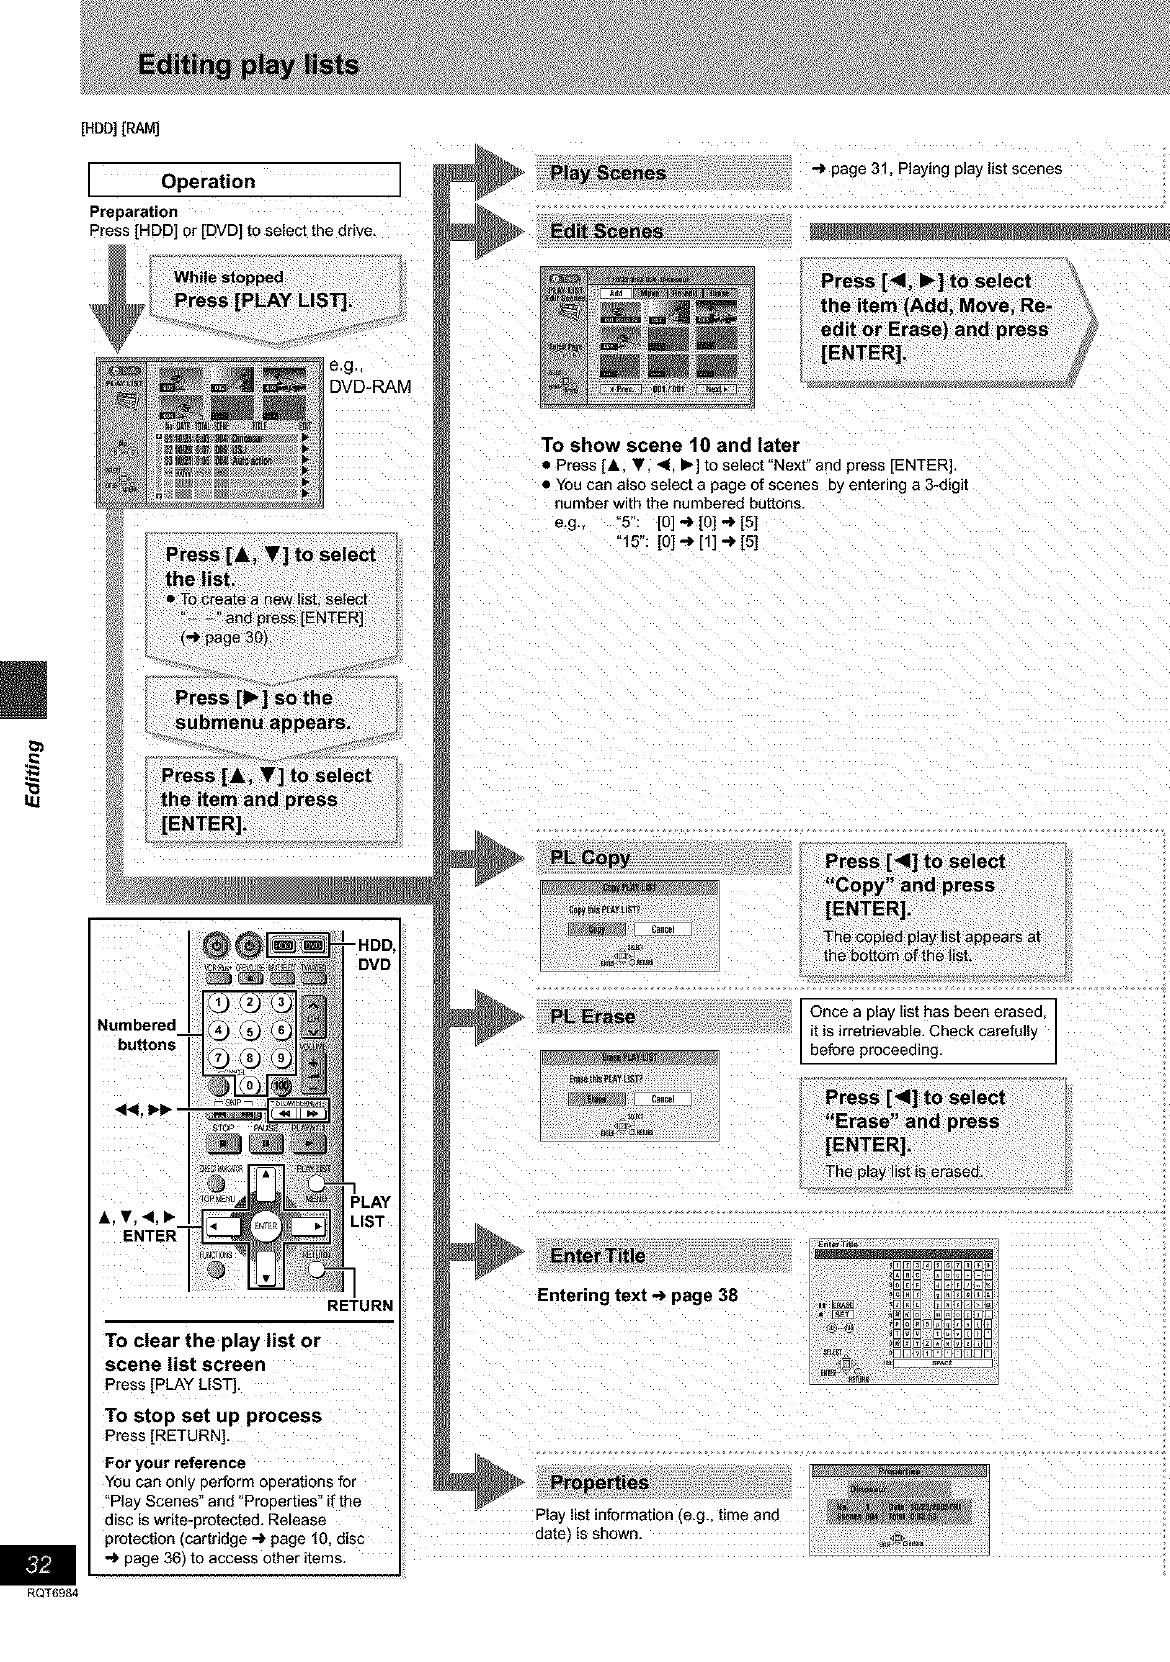
RQT6984
[HOD][RAM]
Operation
Preparation
Press [HDD] or [DVD] to select the drive.
e,g,_
DVD-RAM
Numbered
"HDD,
DVD
&. T. _1. Ib
ENTER
'LAY
.IST
RETURN
To clear the play list or
scene list screen
Press[PLAY LIST].
To stop set up process
Press[RETURN],
For your reference
You can only perform operations for
"Pla) Scenes" and °Prooerties" if the
disc is write-protected. Release
protection (cartridge _ page 10. disc
-') page 36) to access other items, I
R
-> page 31, Playing play list scenes
Edit Scenes
To show scene 10 and later
• Press [A. T. <. _- to select"Next" and press [ENTER].
• You can also select a page of scenes 3y entering a 3-digit
number with the numbered buttons.
e.g., 5": [0] -> [0] -> [5]
"15": [0] -J_[1] _ [5]
Once a play list has been erased
it is irretrievable. Check carefully
before proceeding.
E3m_E_ E]E
_N@@@E]E]E]E]E
Entering text-_ page 38 _NN NNNNm_
,D3_E]53@53mO
NN_NNNN_E]N
_a _OONNOOONO0]
Play list information .,e.g. time and
aate is shown
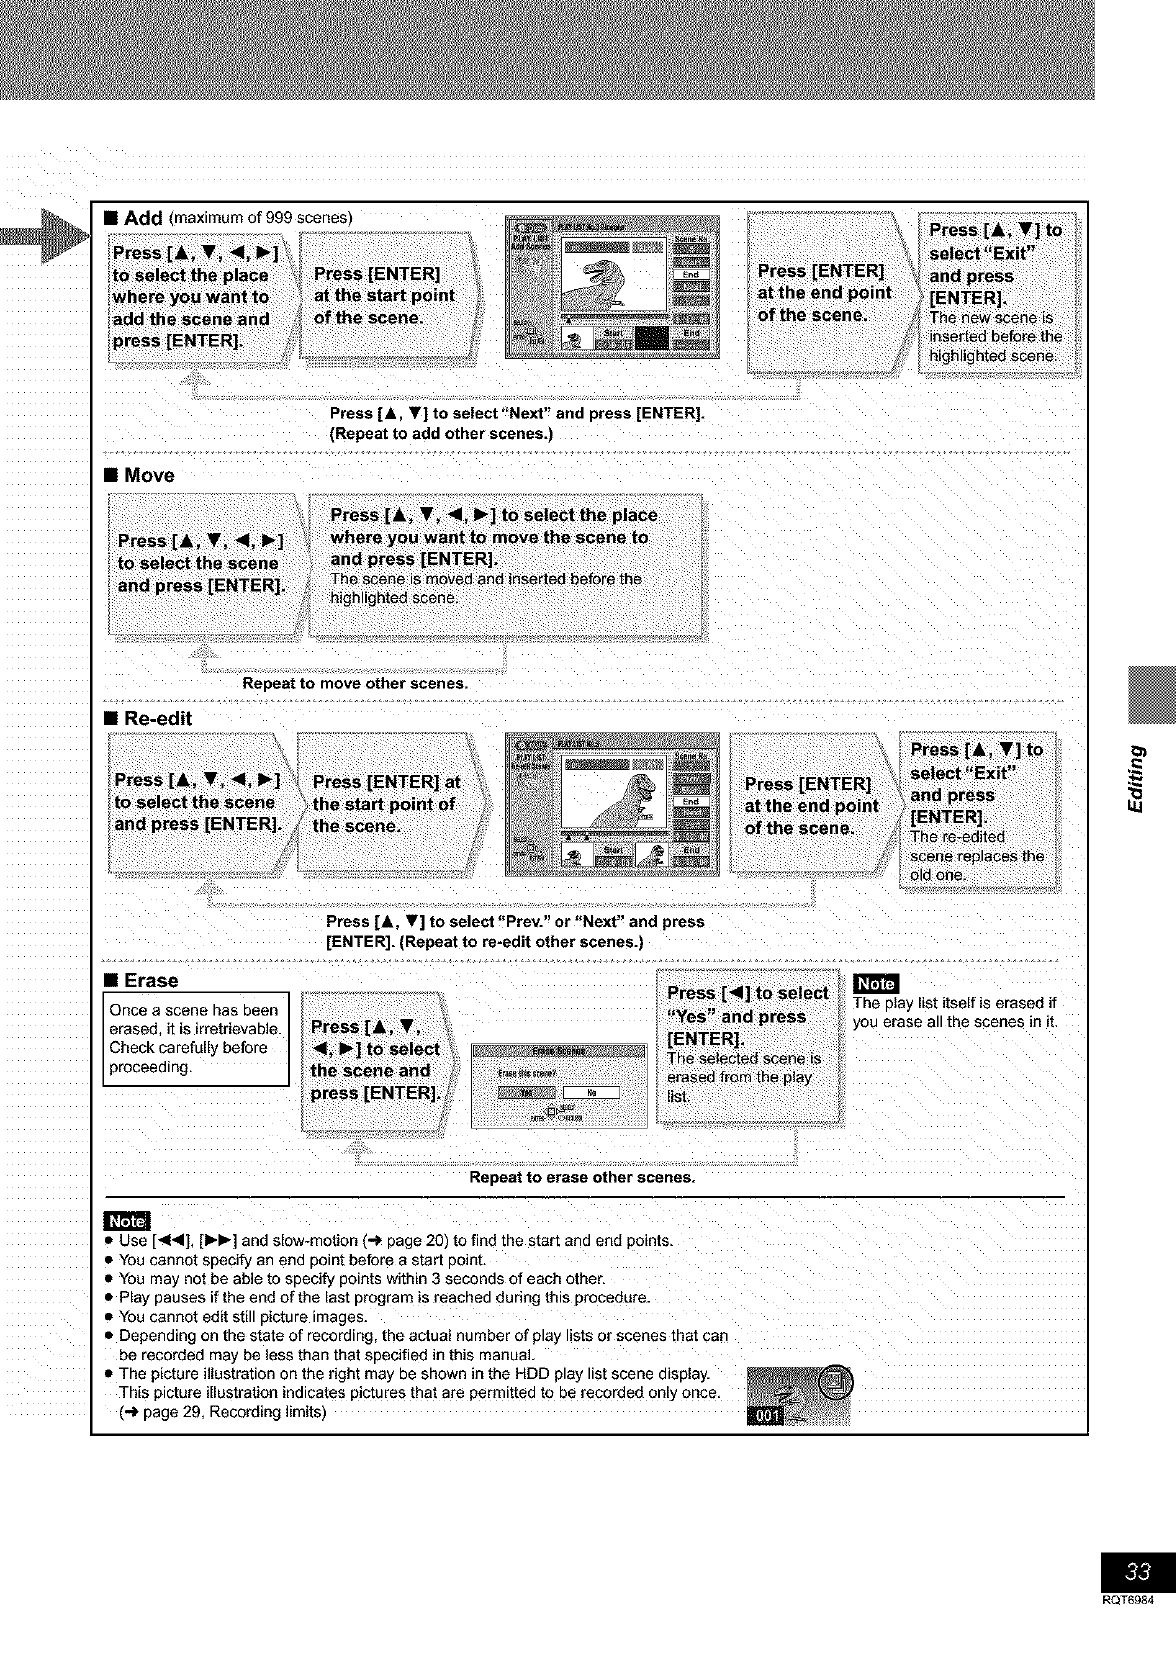
IAdd (maximum of 999 scenes)
Press [& T, <1, I_]
to select the p ace Press [ENTER]
where you want to at the start po nt
add the scene and of the scene,
press [ENTER],
• Move
Press [A, Y] to select "Next" and press [ENTER].
(Repeat to add other scenes.)
......................................",,,4 re;si;:i i,;
_select"Exit '
Press [ENTER] _and press
at the end point [ENTER].
of the scene. The new scene is
inserted before th
highlighted scene
Repeat to move other scenes.
•Re-edit
•Erase
Once a scene has been
erased, it is irretrievable.
Check carefully before
proceeding.
[ENTER]. (Repeat to re-edit other scenes.)
The play list itself is erased if
you erase all the scenes in it.
•0YouUSecannot[41<l]'[1_1_]specifyandanSlOW-motiOnendpoint before(_ pageastart20)point.tofind the start and end points.
0You may net be able to specify points within 3 seconds of each other.
•Play pauses if the end of the last program is reached during this procedure.
•You cannot edit still picture images.
•Depending on the state of recording, the actual number of play lists or scenes that can
be recorded may be less than that specified in this manual,
•The picture illustration on the right may be shown in the HDD play list scene display.
This picture illustration hldicates pictures that are permitted to be recorded only once.
(_ page 29, Recording limits)
RQT6984
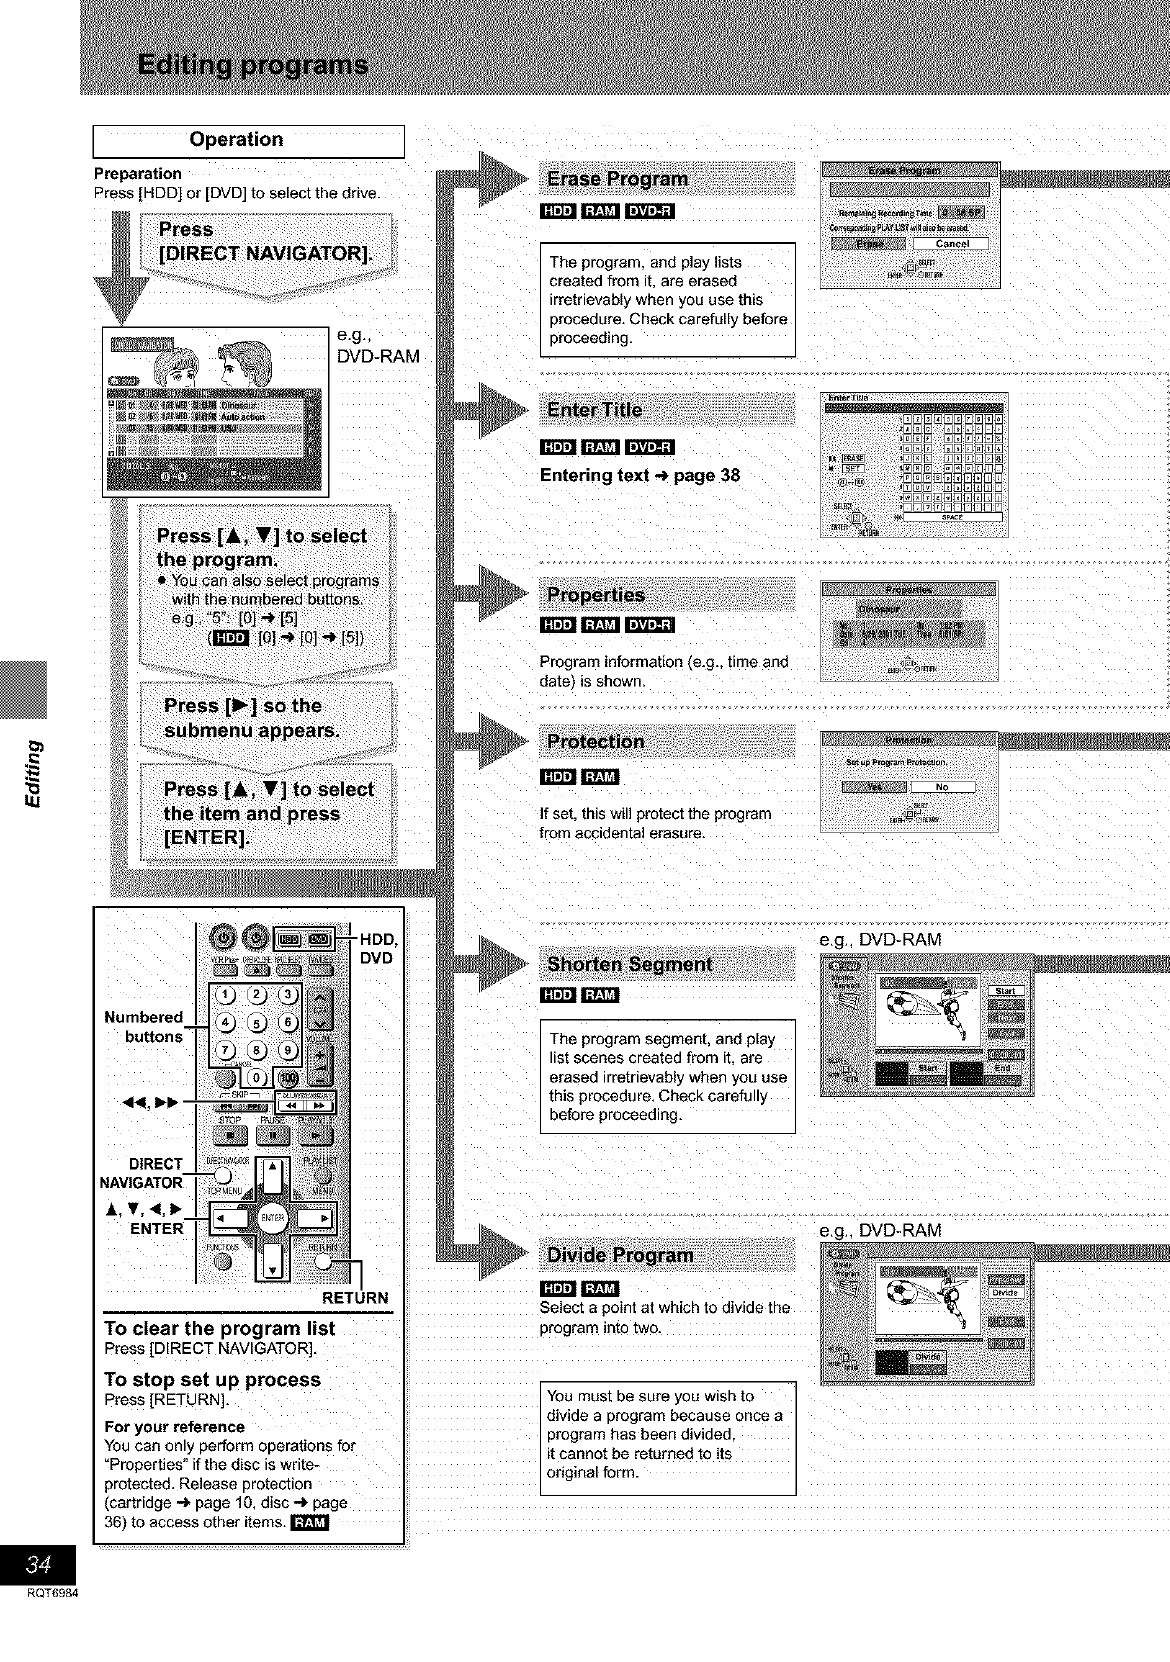
I Operation I
Preparation
Press [HDD] or [DVD] to select the drive. _ Iv_l rmar_
The program, and play lists
created from it, are erased
irretrievably when you use this
procedure. Check carefully before
eg,ovo- M preeeedog
mcart_mrmarcl
Entering text _page 38
Program information (e.g., time and
date) is shown.
Protection
_NNI
f set. this will protect the program
from accidental erasure
4umbered
butt°ns T
_1<, IH_ '
DIRECT
NAVIGATOR
A, T, <,l*
-HDD,
DVD
RETURN
e.g., DVD-RAM
The program segment, and play I
list scenes created from it, are I
erased irretrievably when you use I
this procedure, Check careful y
before proceed rig.
mca IV_I
e.g., DVD-RAM
To clear the program list
Press [DIRECT NAVIGATOR].
To stop set up process
Press [RETURN],
For your reference
You can only perform operations for
"Properties" if the disc is wnte-
_rotected. Release Dro[ecuon
(cartridge _ page f0. disc-_ page
36) to access other items. I_
Select a point at which to divide the
3rogram rote two.
You must be sure you WlS[Ito
divide a program because once a
program has been divided
it cannot be returned to its
original form.
RQT6984
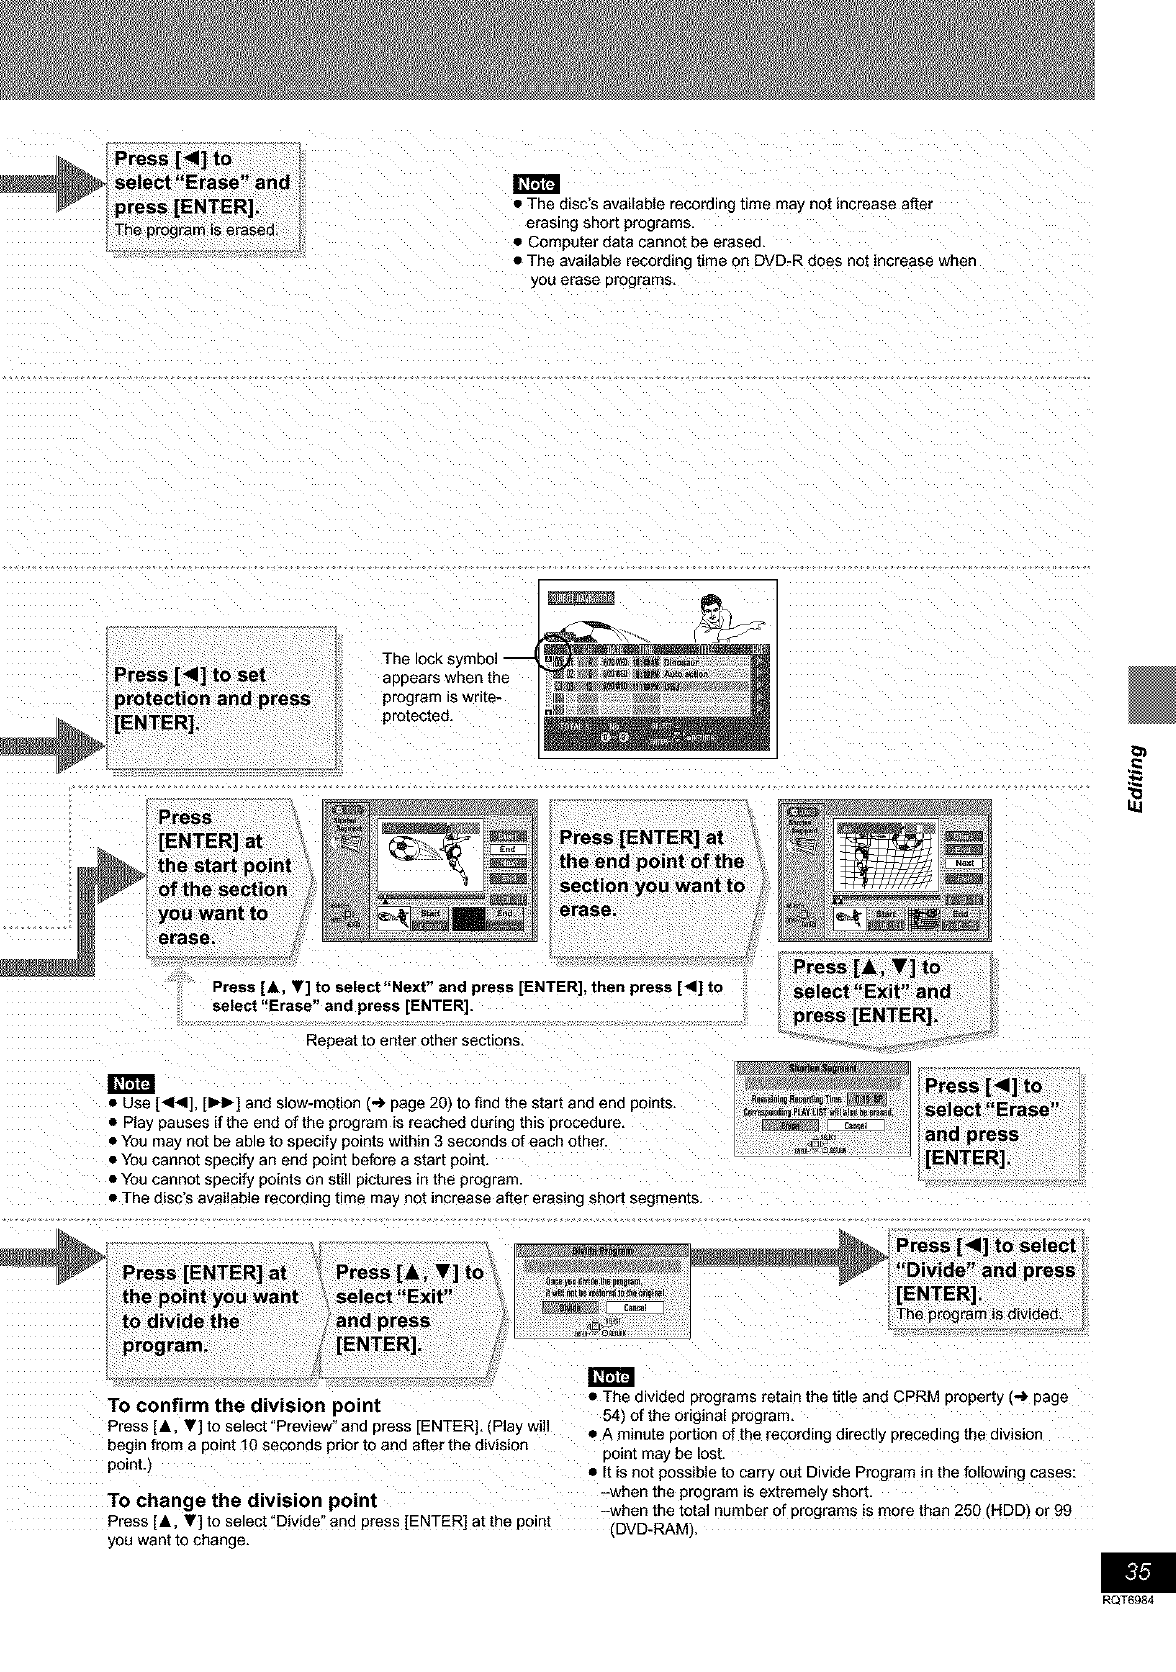
Press [<1] to,
se ect rase and
! i E
press [ENTER].
The prog_m is erased
ilta_,
•The disc's available recording ume may not increase after
erasing snort programs,
• 3omputer data cannot be erased.
• The available recording time on DVD-R does not increase when
you erase programs
_tENTER].
The lock s
appears wrien the
program _swn[e-
protected.
Press
[ENTER] at
jhe sta_ point
of the section
you want to
erase.
Press [A, Y] to select"Next" end press [ENTER], then press [41] to
select "Erase" and press [ENTER],
Repeat to enter Diner sections,
• Use [44], [IH_] and slow-mouon (-,1 page 20) to find the start and ena poims
• Play pauses if the end of the program is reached during this procedure,
• You ma) not be able to specify points within 3 seconds of each other.
• You cannot specify an end point before a start point,
• You cannot specify points on still pictures in the program.
• The disc's available recormng _ "he may not increase after erasing shoe segments,
[ENTER],
7¸
ii_
77
To confirm the division point • The divided programs retain the title and CPRM property (-i page
...... 54) of the original program,
Press [i, 'I] to select Preview' and press [ENTER] (Play will
' " •A minute portion of the recording directly preceding the division
begin from a point 10 seconds prior to and after the division point may be lost.
point.) • It is not possible to carry out Divide Program in the following cases:
TO change the division point -when the program is extremely short,
-when the total number of programs is more than 250 (HDD) or 99
Press [i, T] to select "Divide" and press [ENTER] at the point (DVD-RAM),
you want to change.
RQT6984
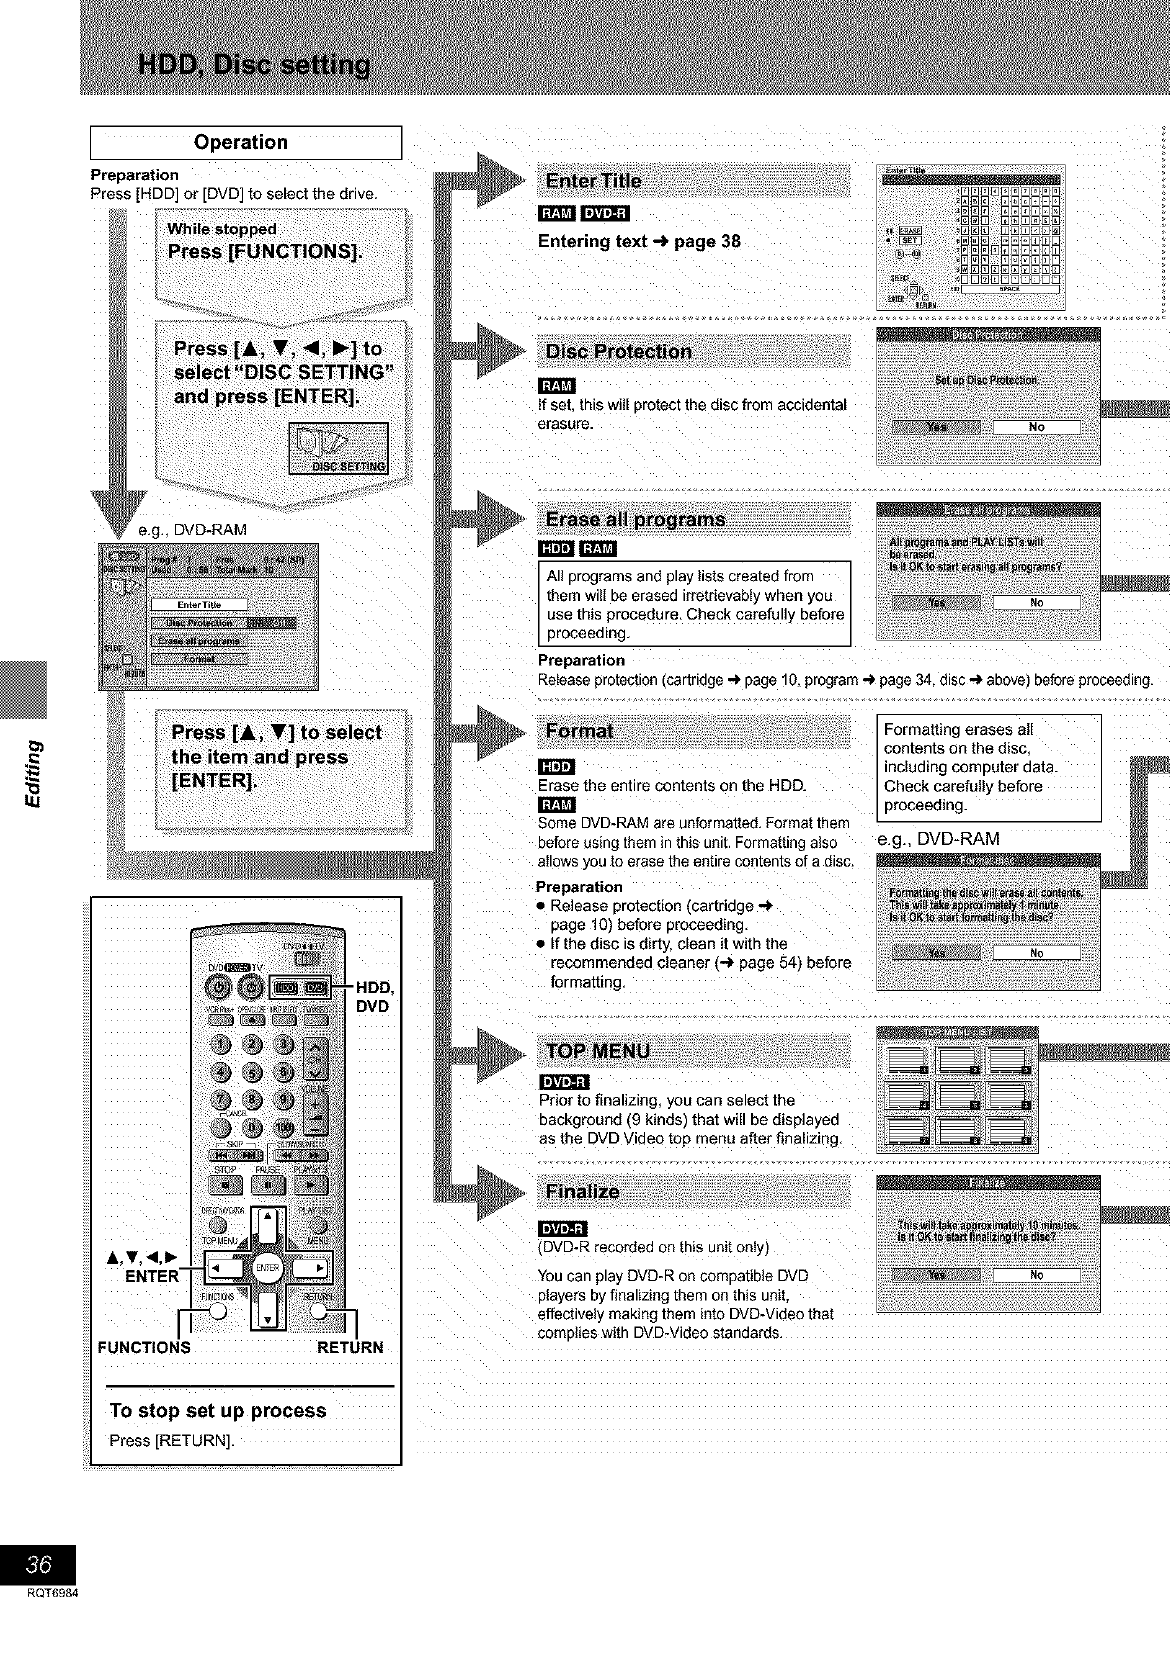
[ _ _]
Operation
Preparation
Press [HDD] or [DVD] to select the drive.
inca
llITAil]_
FUNCTIONS RETURN
To stop set up process
HDD,
DVD
programs
m¢_!Iz_rtl 1
All programs and play listscreated from /
them wilI be erased irretrievably when you /
use this procedure, Check carefullv before _ _o
proceed ng.
Preparation
Release protection[cartridge .-) page 10, program_page 34. disc _ above) before proceeding.
Erase the entire contents on the HDD.
Some DVD-RAM are unformatted, Format theft
before using them in this unit, Formatting also
allows _,outo erase the entire contents of a disc.
Formatting erases all
contents on the disc
ncluding computer aa[a.
Check carefully before
proceeding.
e.g., DVD-RAM
Preparation
• Release protection [cartridge ,._
page 10) before proceeding.
• If the disc is dirty, clean it with the
recommended cleaner (_ page 54) before
tormatting,
TOP MENU
Prior to finalizing, you can select the
background (9 kinds) that will be displayed
as the DVD Video top menu after finalizing,
DVD-R recorded on this unit onl,
You car play DVD-R on comoauDle DVD
players by finalizing them on this unit
effectively making them into DVD-Viaeo mat
complies with DVD-Video standards
Press [RETURN].
RQT6984
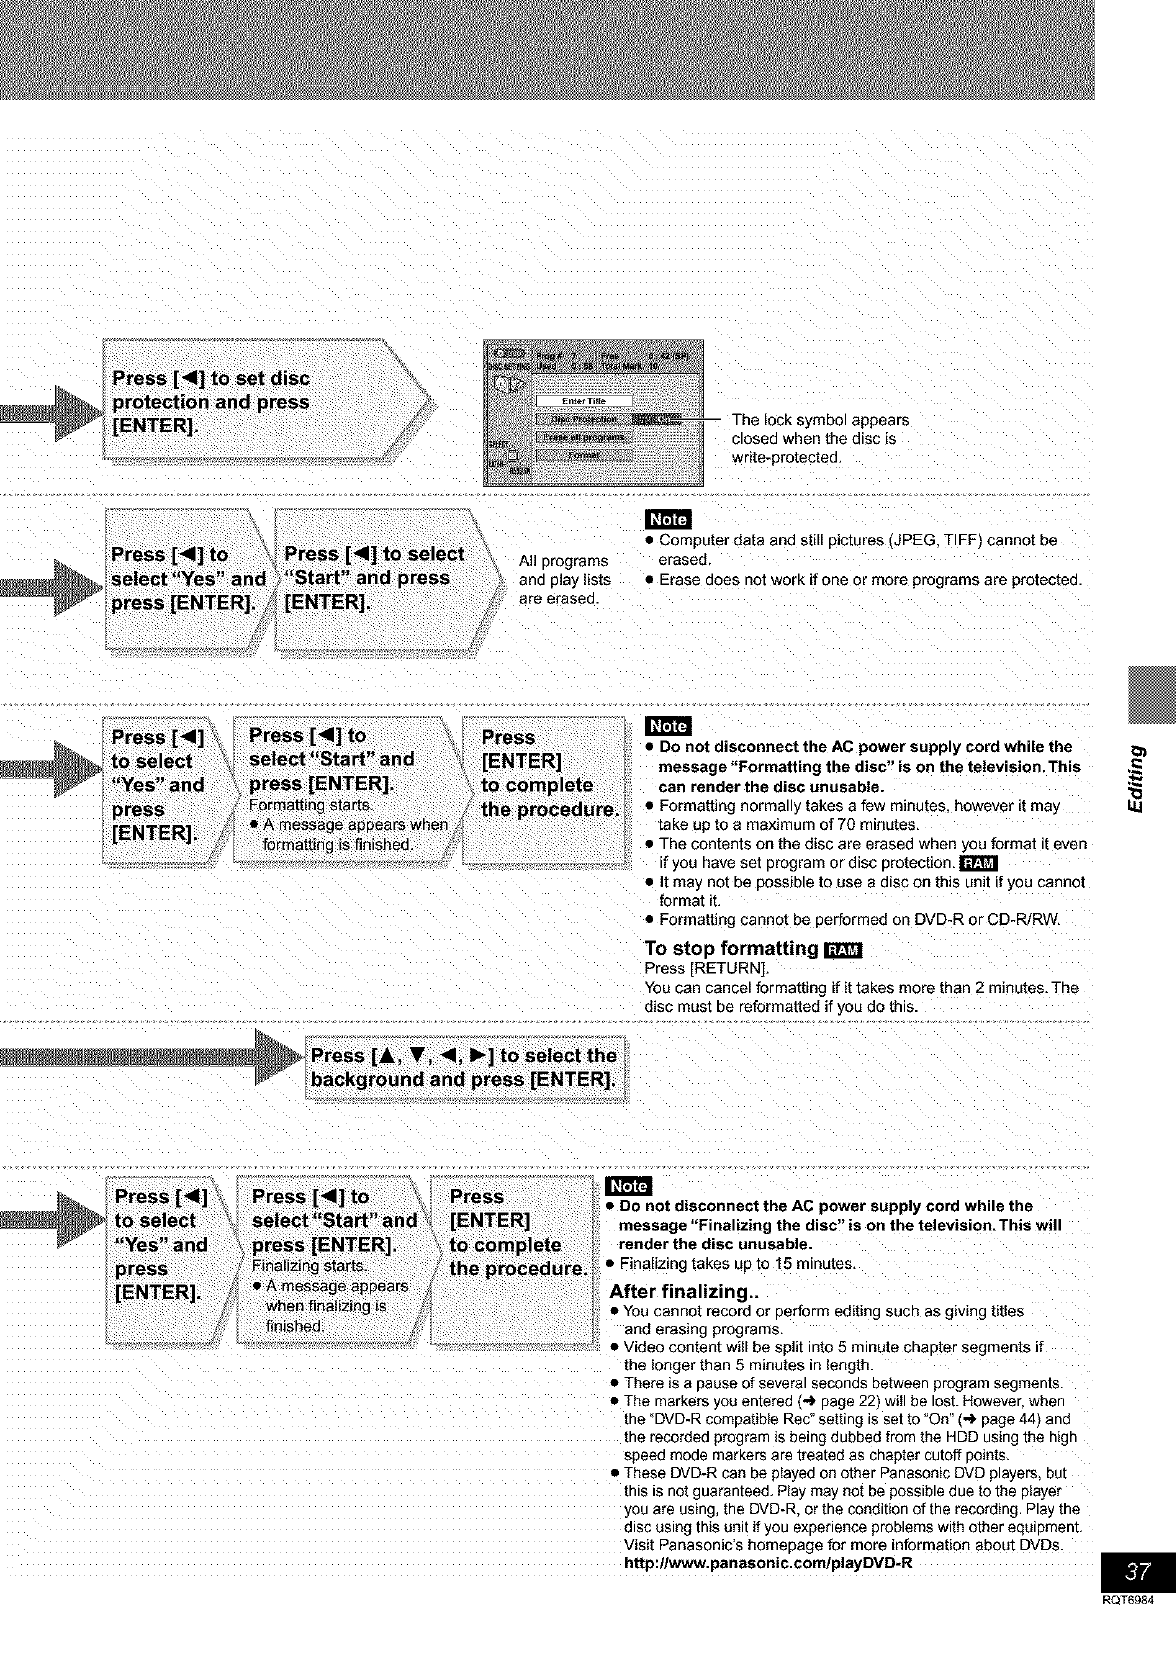
Press [41] to set disc
_protection and press
[ENTER]. ;ymbol appears
closed when the disc is
writs-protected.
Press [_1] to
_select"Yes and
press [ENTER]. f
•Computer data and still pictures JPEG. TIFF_ cannot be
All programs erased.
and play lists • Erase does not work ifone or more programs are protected.
are erased.
Press [<1]
to select
Y d
es an
press
m
•Do not disconnect the AC power supply cord while the
message "Formatting the disc" is on the television. This
can render the disc unusable.
• Formatting normatty takes a few minutes however it may
take up to a maximum of 70 minutes,
• The contents on the disc are erased when you format it even
f you nave set program or disc protection,
• It may not be possible to use a disc on this unit if you cannot
format it.
• Formatting cannot be performed on DVD-R or CD-RiRW,
To stop formatting raer_
Press [RETURN].
Van can cancel formatting if it takes more than 2 minutes, The
disc mast be reformatted if you do this
Press [A, V, 41, I_] to select the
background and press [ENTER]
Press [<1]
to select
"Yes" and
press
m
•Do not disconnect the AC power supply cord while the
message "Finalizing the disc" is on the television.This will
render the disc unusable.
• Finalizing takes up to 15 minutes,
After finalizing..
• You cannot record or oerform editing such as giving titles
and erasing programs,
• Video content will be split into 5 minute chapter segments if
the longer than 5 minutes in length.
• There _sa pause of several seconds between program segments.
• The markers you enterea {,,,l,page 22) will be lost. However when
the "DVD-R comaatib{e Rec" setting is set to "On" (_ page 44) and
tne recoraea program s being dubbed from the HDD using the high
speea moae marKers are treatea as chapter cutoff 3omts.
•These DVD-R can be played on other Panasonic DVD prayers. OUT
this Is not guaranteed. Play may not be possIDte aue to me p)ayer
you are usLng the DVD-R. or the condition of the recording, Play the
alsc using this unit if you experience problems with other eaulDmenl
Visit Panasonic's homepage for more information about DYes.
http:llWWw.panasonic.comlplayDVD-R i
RQT6984
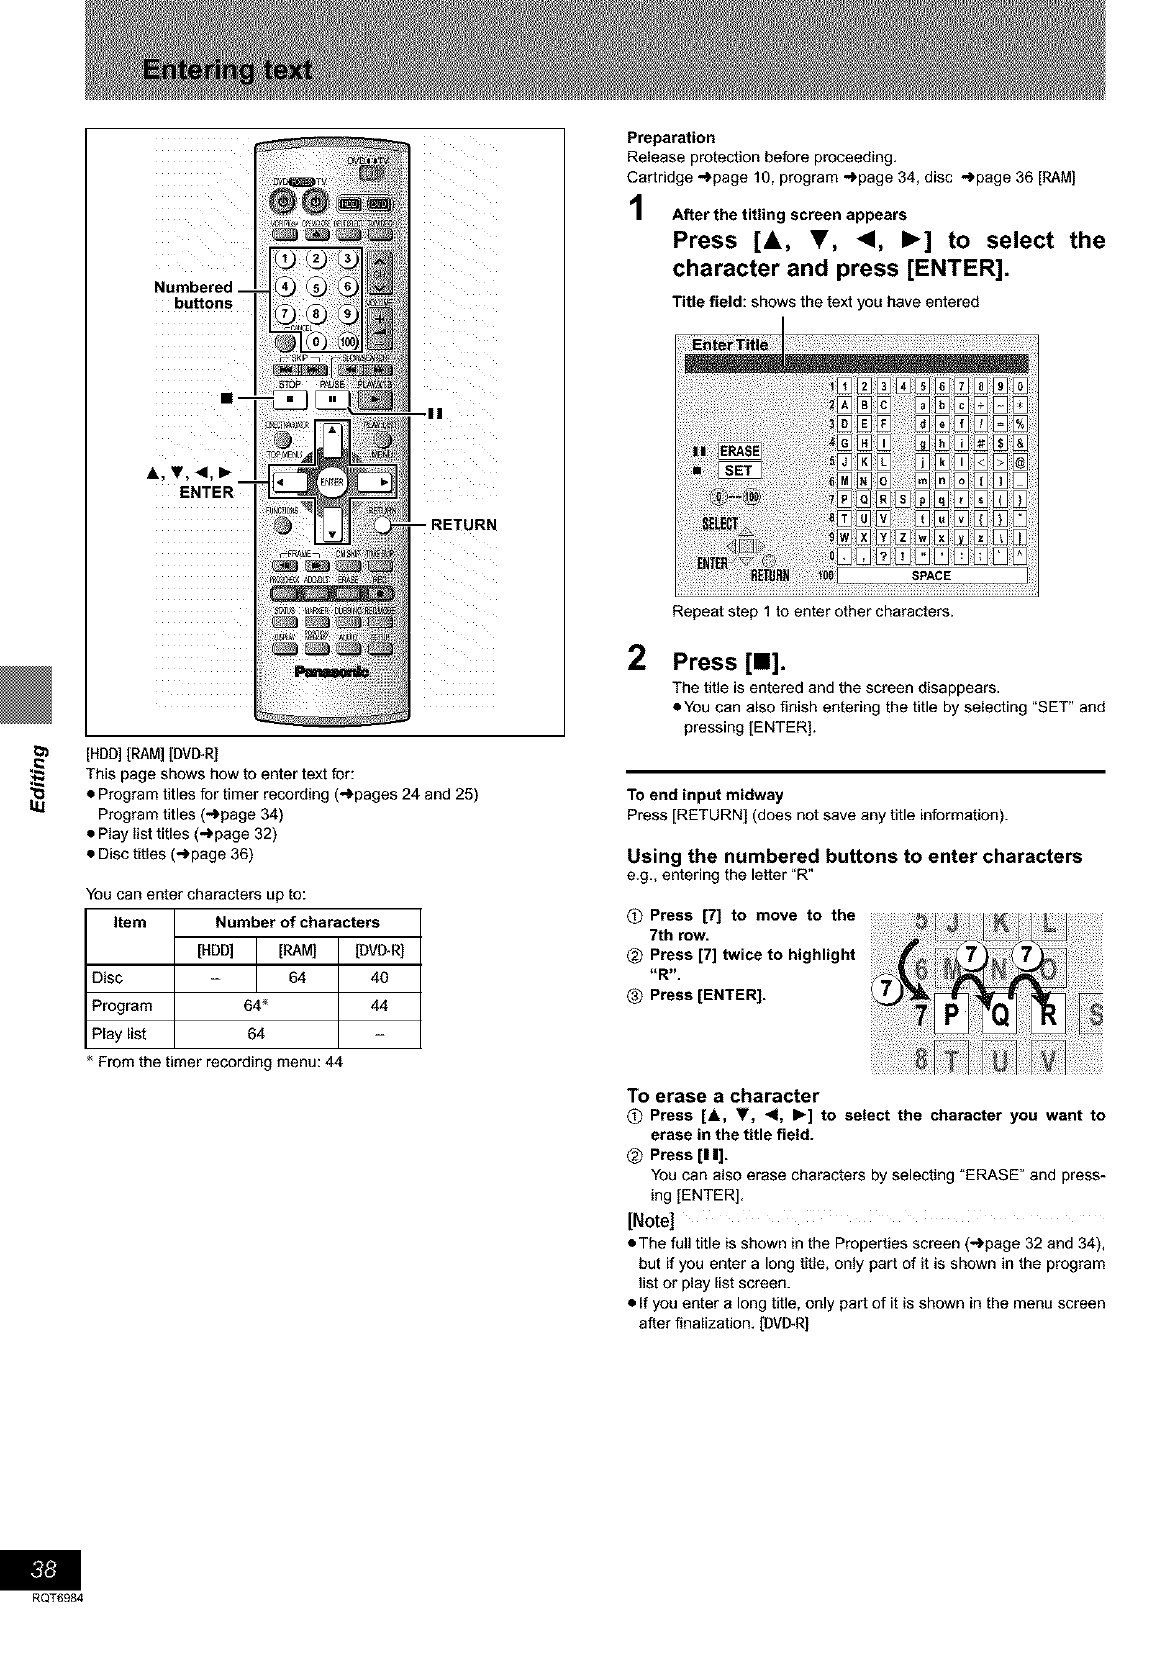
buttons
RETURN
l_ [HDD][RAM] [DVI_R]
This page shows how to enter text for:
_.1 • Program titles for timer recording (_pages 24 and 25)
Program titles (-)page 34)
• Play list titles (-_page 32)
• Disc titles (_page 36)
You can enter characters up to:
Item Number of characters
[HDD] [RAM] [DVD_R]
Disc - 64 40
Program 64 _ 44
Play list 64
From the timer recording menu: 44
Preparation
Release protection before proceeding.
Cartridge _page 10, program -')page 34, disc -_page 36 [RAM]
After the titling screen appears
Press [&, Y, <1, I_] to select the
character and press [ENTER].
Title field: shows the text you have entered
2
Repeat step 1 to enter other characters.
Press [11].
The title is entered and the screen disappears.
• You can also finish entering the title by selecting "SET" and
pressing [ENTER].
To end input midway
Press [RETURN] (does not save any title information).
Using the numbered buttons to enter characters
e.g,, entering the letter "R"
OPress [7] to move to the
7th row.
_) Press [7] twice to highlight
-R-
Press [ENTER].
To erase a character
OPress [A, V, <1, I_] to select the character you want to
erase in the title field.
<_ Press [11].
You can also erase characters by selecting _ERASE" and press-
ing [ENTER].
[Note]
• The full title is shown in the Properties screen (-_page 32 and 34),
but if you enter a long title, only part of it is shown in the program
list or play list screen.
• If you enter a long title, only part of it is shown in the menu screen
after finalization. [DVI_R]
RQT6984
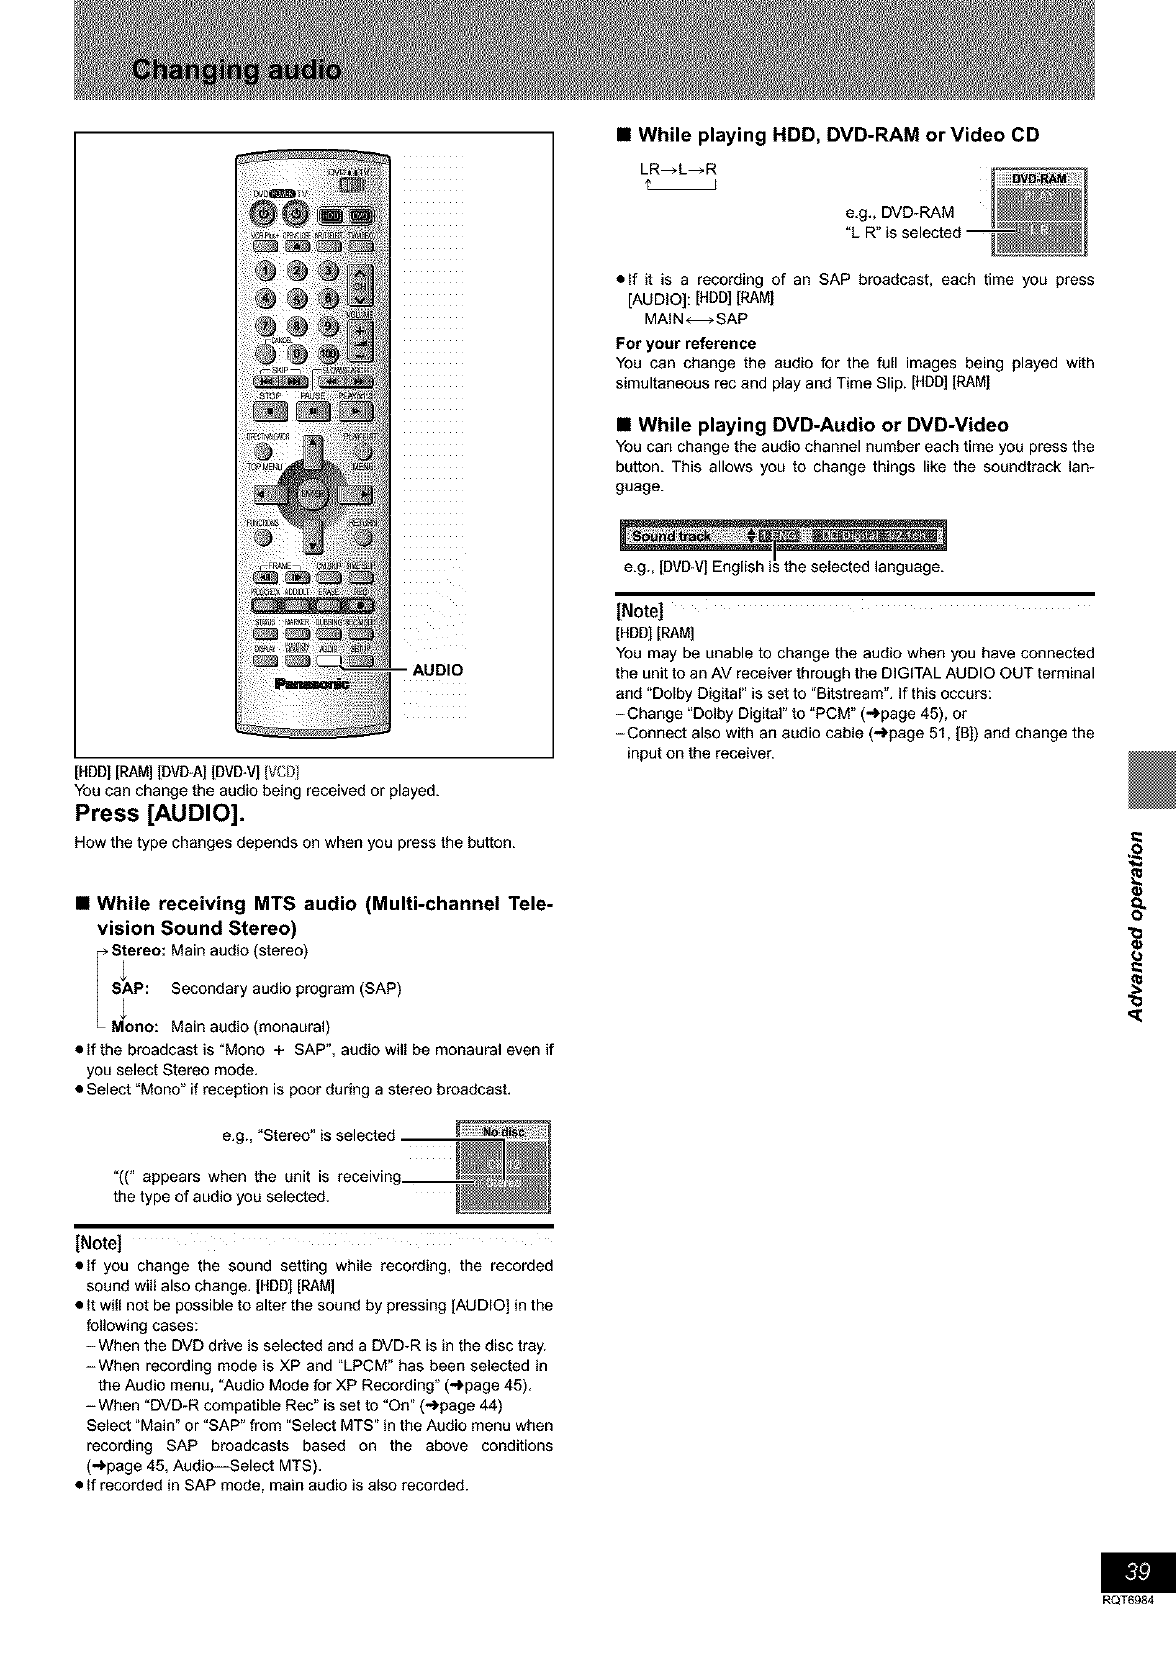
[HDD][RAM][DVI_A][DVD-V][VCDI
You can change the audio being received or played.
Press [AUDIO].
How the type changes depends on when you press the button.
M While receiving MTS audio (Multi-channel Tele-
vision Sound Stereo)
IS_ereo:Main audio (stereo)
SAP: Secondary audio program (SAP)
M_ono: Main audio (monaural)
• If the broadcast is "Mono + SAP", audio will be monaural even if
you select Stereo mode.
• Select "Mono" if reception is poor during a stereo broadcast.
e.g.,"Stereo"is selected
"((" appears when the unit is receivin
the type of audio you selected.
[Note]
• If you change the sound setting while recording, the recorded
sound will also change. [HDD][RAM]
• It will not be possible to alter the sound by pressing [AUDIO] in the
following cases:
-When the DVD drive is selected and a DVD-R is in the disc tray.
-When recording mode is XP and "LPCM" has been selected in
the Audio menu, "Audio Mode for XP Recording" ("_page 45).
-When "DVD-R compatible Rec" is set to "On" (-')page 44)
Select "Main' or "SAP' from "Select MTS" in the Audio menu when
recording SAP broadcasts based on the above conditions
(_page 45, Audio--Select MTS).
• If recorded in SAP mode, main audio is also recorded.
M While playing HDD, DVD-RAM or Video CD
LR_L_R
e.g., DVD-RAM
"L R" is selected --
• If it is a recording of an SAP broadcast, each time you press
[AUDIO]: [HDD][RAM[
MAIN_SAP
For your reference
You can change the audio for the full images being played with
simultaneous rec and play and Time Slip. [HDD] [RAM[
M While playing DVD-Audio or DVD-Video
You can change the audio channel number each time you press the
button. This allows you to change things like the soundtrack lan-
guage.
e.g., [DVD-V] English is the selec ed language.
[Note]
[HDD][RAM]
You may be unable to change the audio when you have connected
the unit to an AV receiver through the DIGITAL AUDIO OUT terminal
and "Dolby Digital" is set to "Bitstream". If this occurs:
-Change "Dolby Digital" to "PCM" ("_page 45), or
-Connect also with an audio cable (-,.)page 51, [BD and change the
input on the receiver.
Bit]
RQT6984
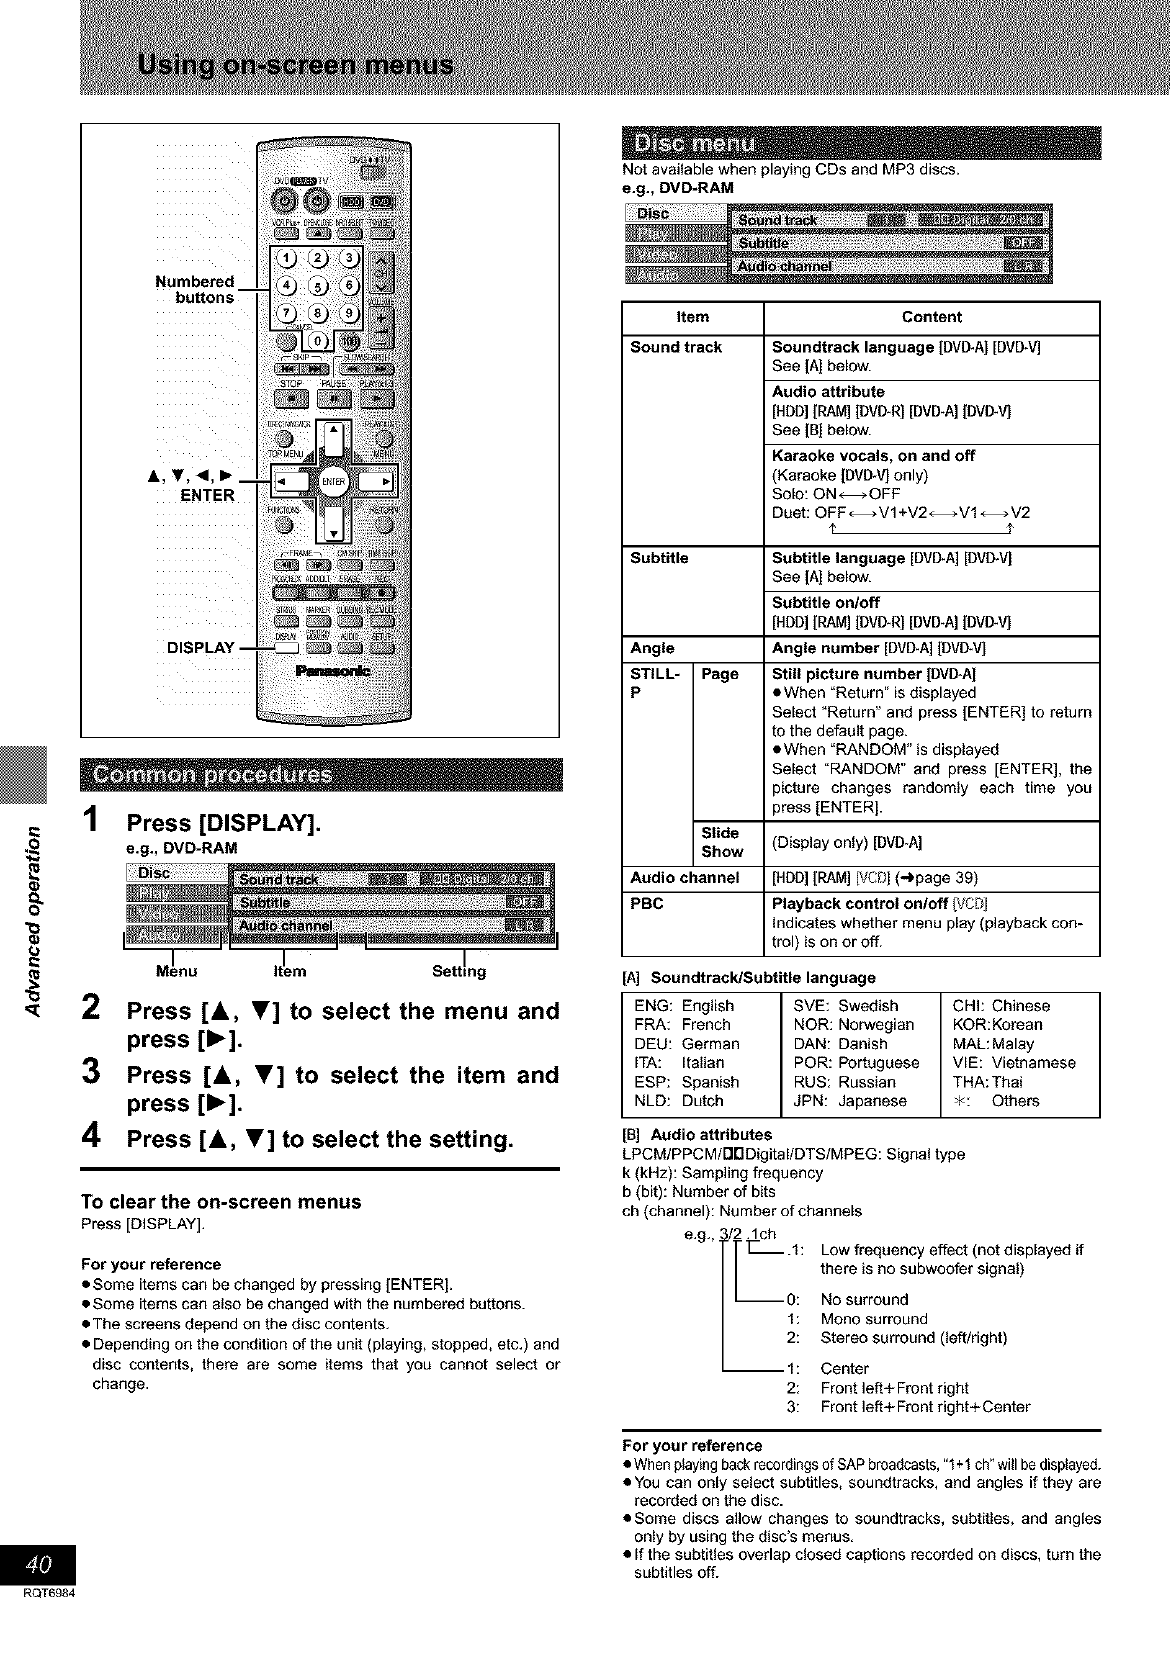
RQT6984
Numbered
&,T,<,
ENTER
1Press [DISPLAY].
e.g., DVD-RAM
Mlenu Itlem Setting
2Press [&, V] to select the menu and
press [1_].
3Press [&, V] to select the item and
press [1_].
4Press [&, T] to select the setting.
To clear the on-screen menus
Press [DISPLAY].
For your reference
•Some items can be changed by pressing [ENTER).
• Some items can also be changed with the numbered buttons.
• The screens depend on the disc contents.
• Depending on the condition of the unit (playing, stopped, etc.) and
disc contents, there are some items that you cannot select or
change.
Not available when playing CDs and MP3 discs.
e.g., DVD-RAM
Item Content
Sound track
Subtitle
Soundtrack language [DVI_A] [DVD_V]
See [A[ below.
Audio attribute
[HDD][RAM][DVI_R][DVD-A][DVI_V]
See [B] below.
Karaoke vocals, on and off
(Karaoke [DVI_V] only)
Solo: ON--OFF
Duet: OFF_-VI+V2_VI_V2
¢ ¢
Subtitle language [DVD-A][DVD_VJ
See [A[ below.
Subtitle on/off
[HDD][RAM][DVI_R][DVD-A][DVI_V]
Angle Angle number [DVD-A][DVD_V]
STILL- Page Still picture number [DVD-A)
P •When "Return" is displayed
Select "Return" and press [ENTER] to return
to the default page.
eWhen "RANDOM" is displayed
Select "RANDOM" and press [ENTER), the
picture changes randomly each time you
press [ENTER).
Slide
Show (Display only) [DVD*A]
Audio channel [HDD][RAM] [VCB](-_page 39)
PBC Playback control on/off [VCB)
indicates whether menu play (playback con-
trol) is on or off.
[A] Soundtrack/Subtitle language
ENG: English SVE: Swedish CHh Chinese
FRA: French NOR: Norwegian KOR:Korean
DEU: German DAN: Danish MAL:Malay
ITA: Italian POR: Portuguese VIE: Vietnamese
ESP: Spanish RUS: Russian THA:Thai
NLD: Dutch JPN: Japanese "4<: Others
[B] Audio attributes
LPCM/PPC M/i'1rlDigital/DTS/MPEG: Signal type
k (kHz): Sampling frequency
b (bit): Number of bits
ch (channel): Number of channels
e.g.,, t_ch
- .1: Low frequency effect (not displayed if
there is no subwoofer signal)
--O: No surround
1: Mono surround
2: Stereo surround (left/right)
--1: Center
2: Front left+ Front right
3: Front left+Front right+Center
For your reference
•When playing back recordings of SAP broadcasts,"1+1 ch°will be displayed.
• You can only select subtitles, soundtracks, and angles if they are
recorded on the disc.
• Some discs allow changes to soundtracks, subtitles, and angles
only by using the disc's menus.
• If the subtitles overlap closed captions recorded on discs, turn the
subtitles off.
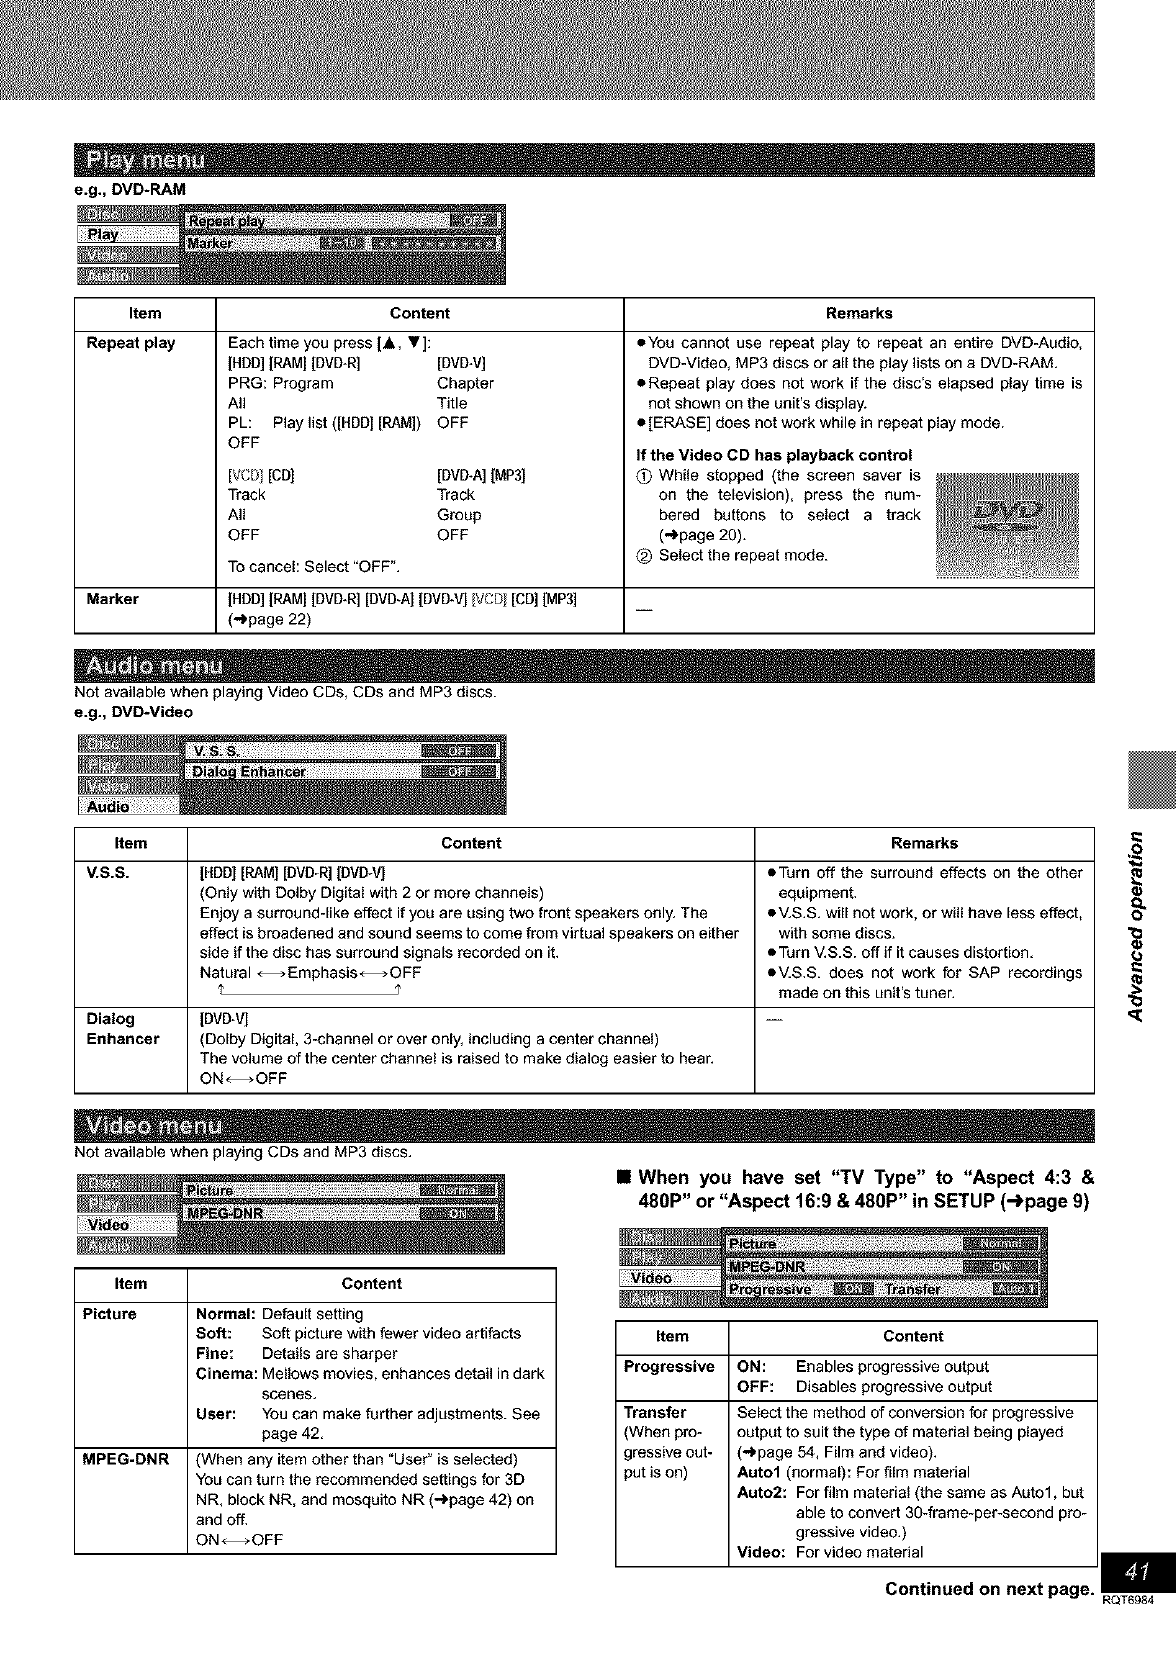
e.g., DVD-RAM
Item Content Remarks
Repeat play Each time you press [&, "V]:
[HDD][RAM] [DVD-R] [DVD-V]
PRG: Program Chapter
All Title
PL: Playlist ([HDD] [RAM]) OFF
OFF
[VCD] [CB] [BVB*A] [MP3]
Track Track
All Group
OFF OFF
oYou cannot use repeat play to repeat an entire DVD-Audio,
DVD-Video, MP3 discs or all the play lists on a DVD-RAM.
oRepeat play does not work if the disc's elapsed play time is
not shown on the unit's display.
• [ERASE] does not work while in repeat play mode.
To cancel: Select "OFF".
Marker [HDD][RAM] [DVD-R] [DVD-A] [DVD-V] IVCDI[CD] [MP3]
(_page 22)
If the Video CD has playback control
(_) While stopped (the screen saver is
on the television), press the num-
bered buttons to select a track
(_page 20).
_) Select the repeat mode.
Not available when playing Video CDs, CDs and MP3 discs.
e.g., DVD-Video
Item Content Remarks
V.S.S. [HDD][RAM][DVD-R][DVD*VJ
(Only with Dolby Digital with 2 or more channels)
Enjoy a surround-like effect if you are using two front speakers only. The
effect is broadened and sound seems to come from virtual speakers on either
side ifthe disc has surround signals recorded on it.
Natural _Emphasis_OFF
•Turn off the surround effects on the other
equipment.
•V.S.S. will not work, or will have less effect,
with some discs.
• Turn MS.S. off if it causes distortion.
•V.S.S. does not work for SAP recordings
made on this unit's tuner.
Dialog [DVD-V]
Enhancer (Dolby Digital, 3-channel or over only, including a center channel)
The volume of the center channel is raised to make dialog easier to hear.
ON--OFF
Not available when playing CDs and MP3 discs.
Item Content
Picture Normal: Default setting
Soft: Soft picture with fewer video artifacts
Fine: Details are sharper
Cinema: Mellows movies, enhances detail in dark
scenes.
User: You can make further adjustments. See
page 42.
MPEG-DNR (When any item other than "User" is selected)
You can turn the recommended settings for 3D
NR. block NR, and mosquito NR (->page 42) on
and off.
ON--OFF
•When you have set "TV Type" to "Aspect 4:3 &
480P" or "Aspect 16:9 & 480P" in SETUP (->page 9)
Item Content
Progressive
Transfer
(When pro-
gressive out-
put is on)
ON: Enables progressive output
OFF: Disables progressive output
Select the method of conversion for progressive
output to suit the type of material being played
(_page 54, Film and video).
Auto1 (normal): For film matedal
Auto2: For film material (the same as Auto1, but
able to convert 30-frame-per-second pro-
gressive video.)
Video: For video matedal U
Continued on next page. RQT6984
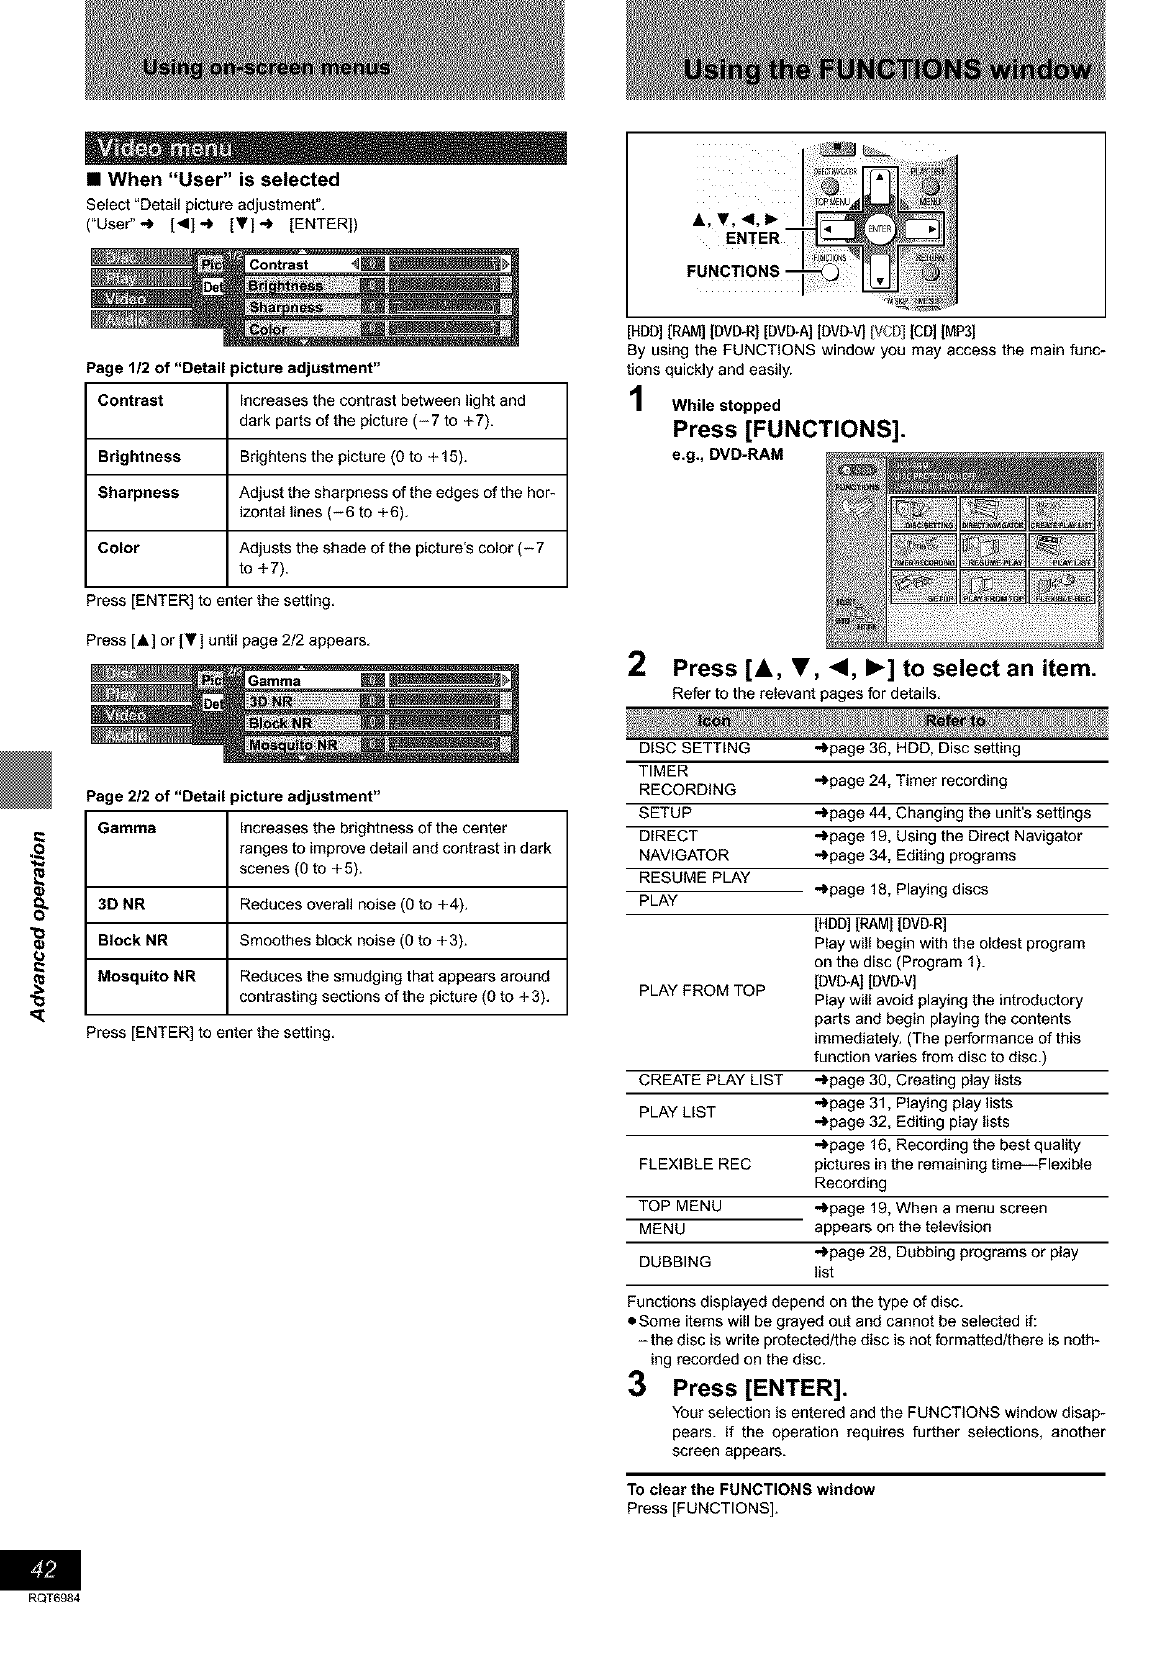
•When "User" is selected
Select _Detailpicture adjustment".
("User"-) [<1]-) [Y]-) [ENTER]) A, Y, <1, I_
ENTER
Page 1/2 of "Detail picture adjustment"
Contrast Increases the contrast between light and
dark parts of the picture (-7 to +7).
Brightness Brightens the picture (0 to + 15).
Sharpness Adjust the sharpness of the edges of the hor-
izontal lines (-6 to +6).
Color Adjusts the shade of the picture's color (-7
to +7).
Press [ENTER] to enter the setting.
Press [A] or IT] until page 2/2 appears.
[HBD] [RAM] [DMITRI [DVD-A][BVD-V] VCD] [CD]IMP3]
By using the FUNCTIONS window you may access the main func-
tions quickly and easily.
While stopped
Press [FUNCTIONS].
e.g., DVD-RAM
2Press [&, T, <1, I_] to select an item.
Refer to the relevant pages for details.
(J
RQT6984
Page 2/2 of "Detail picture adjustment"
Gamma Increases the brightness of the center
ranges to improve detail and contrast in dark
scenes (0 to +5).
3D NR Reduces overall noise (0 to +4).
Block NR Smoothes block noise (O to +3).
Mosquito NR Reduces the smudging that appears around
contrasting sections of the picture (0 to + 3).
Press [ENTER] to enter the setting.
DISC SETTING
TIMER
RECORDING
SETUP
DIRECT
NAVIGATOR
RESUME PLAY
PLAY -)page 18, Playing discs
[HDD] [RAMI [BVB-R]
Play will begin with the oldest program
on the disc (Program 1).
PLAY FROM TOP [BVB*A[ [DVD_V]
Play will avoid playing the introductory
parts and begin playing the contents
immediately. (The performance of this
function varies from disc to disc.)
CREATE PLAY LIST -)page 30, Creating play lists
PLAY LIST -)page 31, Playing play lists
-)page 32, Editing play lists
-)page 16, Recording the best quality
pictures in the remaining time--Flexible
Recording
-)page 19, When a menu screen
appears on the television
-)page 28, Dubbing programs or play
list
FLEXIBLE REC
TOP MENU
MENU
DUBBING
-)page 36, HDD, Disc setting
-)page 24, Timer recording
-)page 44, Changing the unit's settings
-)page 19, Using the Direct Navigator
-)page 34, Editing programs
Functions displayed depend on the type of disc.
• Some items will be grayed out and cannot be selected if:
-the disc is write protected/the disc is not formattedtthere is noth-
ing recorded on the disc.
3Press [ENTER].
Your selection is entered and the FUNCTIONS window disap-
pears, if the operation requires further selections, another
screen appears.
To clear the FUNCTIONS window
Press [FUNCTIONS].
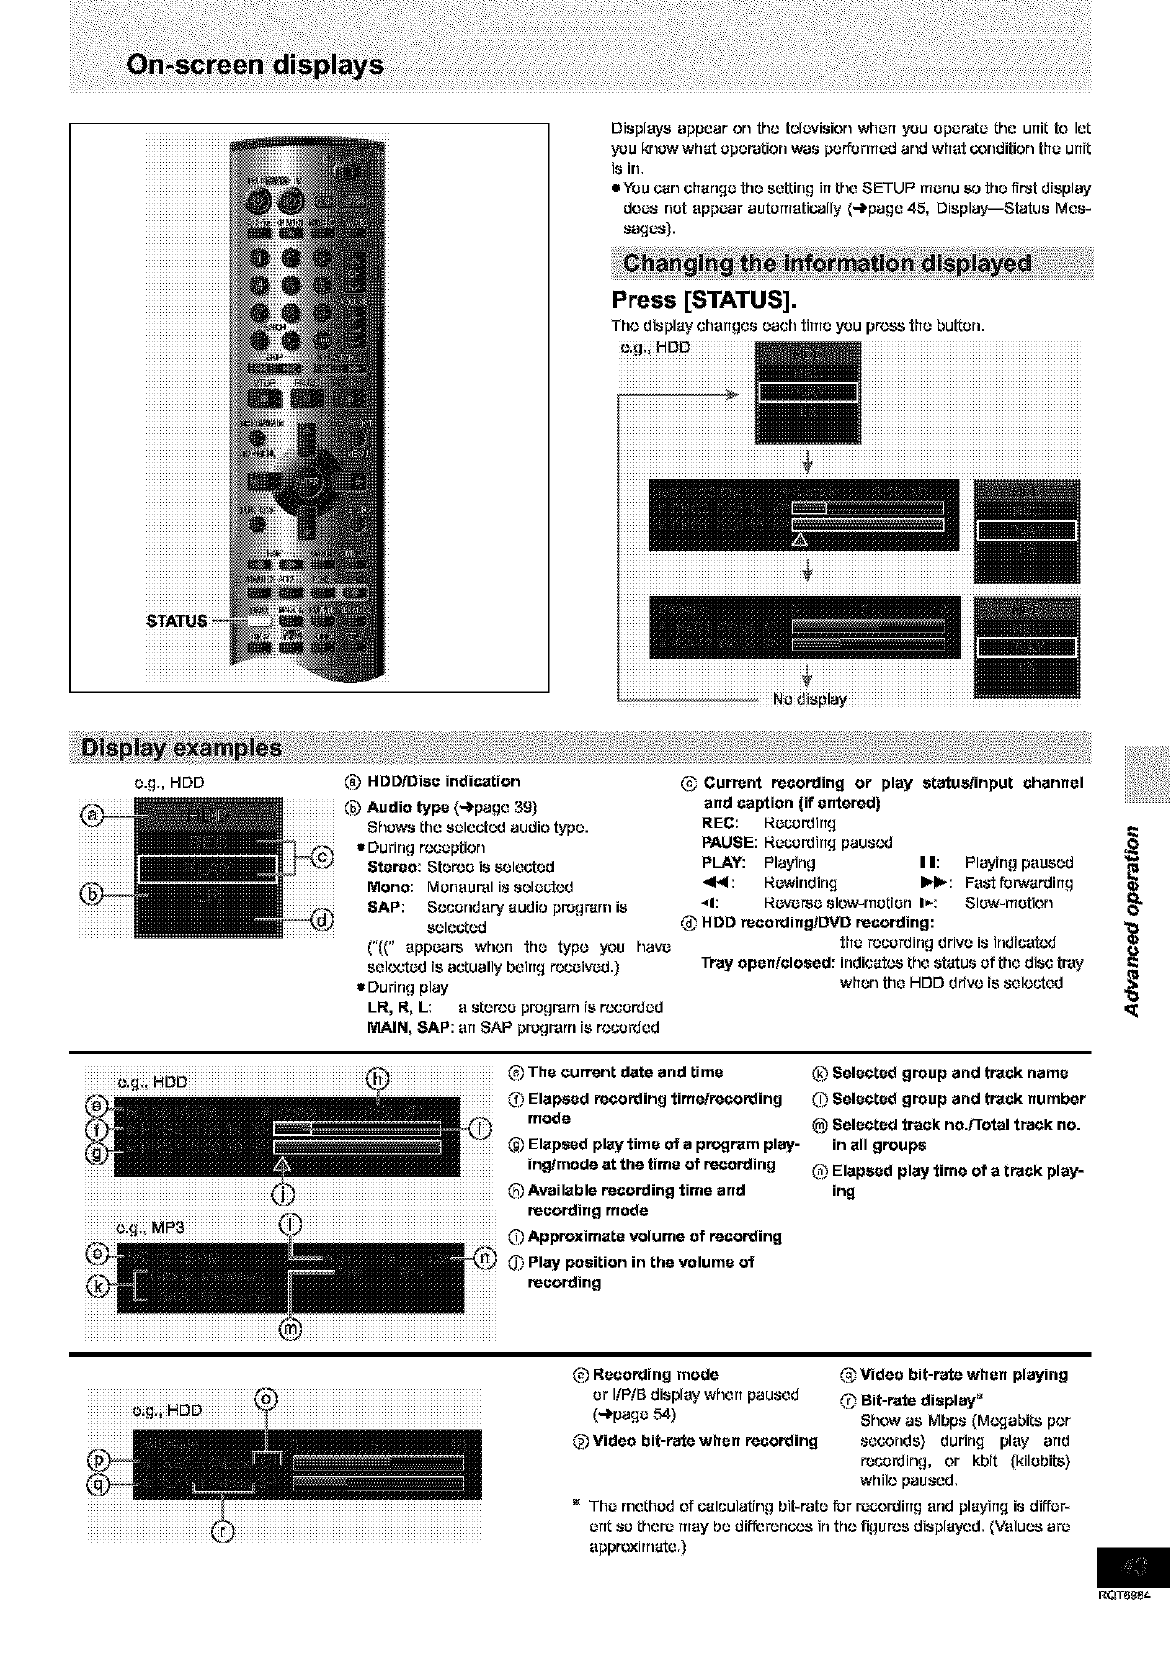
Displeyeappearon _lo telc_/ision when you Operate the unit to let
you krlcw what Operation was performed and what GondiUonthe urfit
is Jr1,
eYeu carl change the setting irtthe SETUI _menu _o the first display
does net appear automatically (-_page 45, Display--Status Mes-
sages).
Ni0i_ii_lay ..................
e.g., HOD @ Currant recording or play atatusiinput channel
and caption (if entered)
REC: I_ec.vrdirtg
PAUSE: I_ecordirt_ paused
PLAY: Playing II: Playing paused
_E<: I_ewfflding I_: Fa_-tfurwardirtg
_1: I_everse slow4nctien I_: Slew4rretion 0_
,_ HDD racording/DVD recording:
the raccrdirlg drive i8 trldicetcd
Tray open/closed: indicates the status of the disc tray
when the HDD drive is selected
O:,_:i HDD (_ The current date and time
(_ Elapsed recording time/recording
mode
@Elapsed play time of aprogram play-
ing/mode at the time of recording
(2 Available recording time and
recording mode
(_ Approximate volume of recording
0_ Play position in the volume of
recording
(.2 L_elected group and track name
(_ Selected group and track number
_) Selected track no.Frotal track no.
in all groups
_Elapsed play time of a track play-
ing
@Reco_ing mode
or I/P/B display whert paused
(-_page 54)
@Video bit-rate when recording
Video bit-rate when playing
,_ Bit-rate display _
Show as Mbps (M¢,v,-labitsper
seconds) during play arid
recording, or kbit (kilebite)
while paused.
The method of calculating bit-rata fur r_c.ording end playing is diffcr-
ertt so there may be difforonc,.,s in th,.,figures displayed. {Values arJ
appmxirnate.)
RQT6_8_
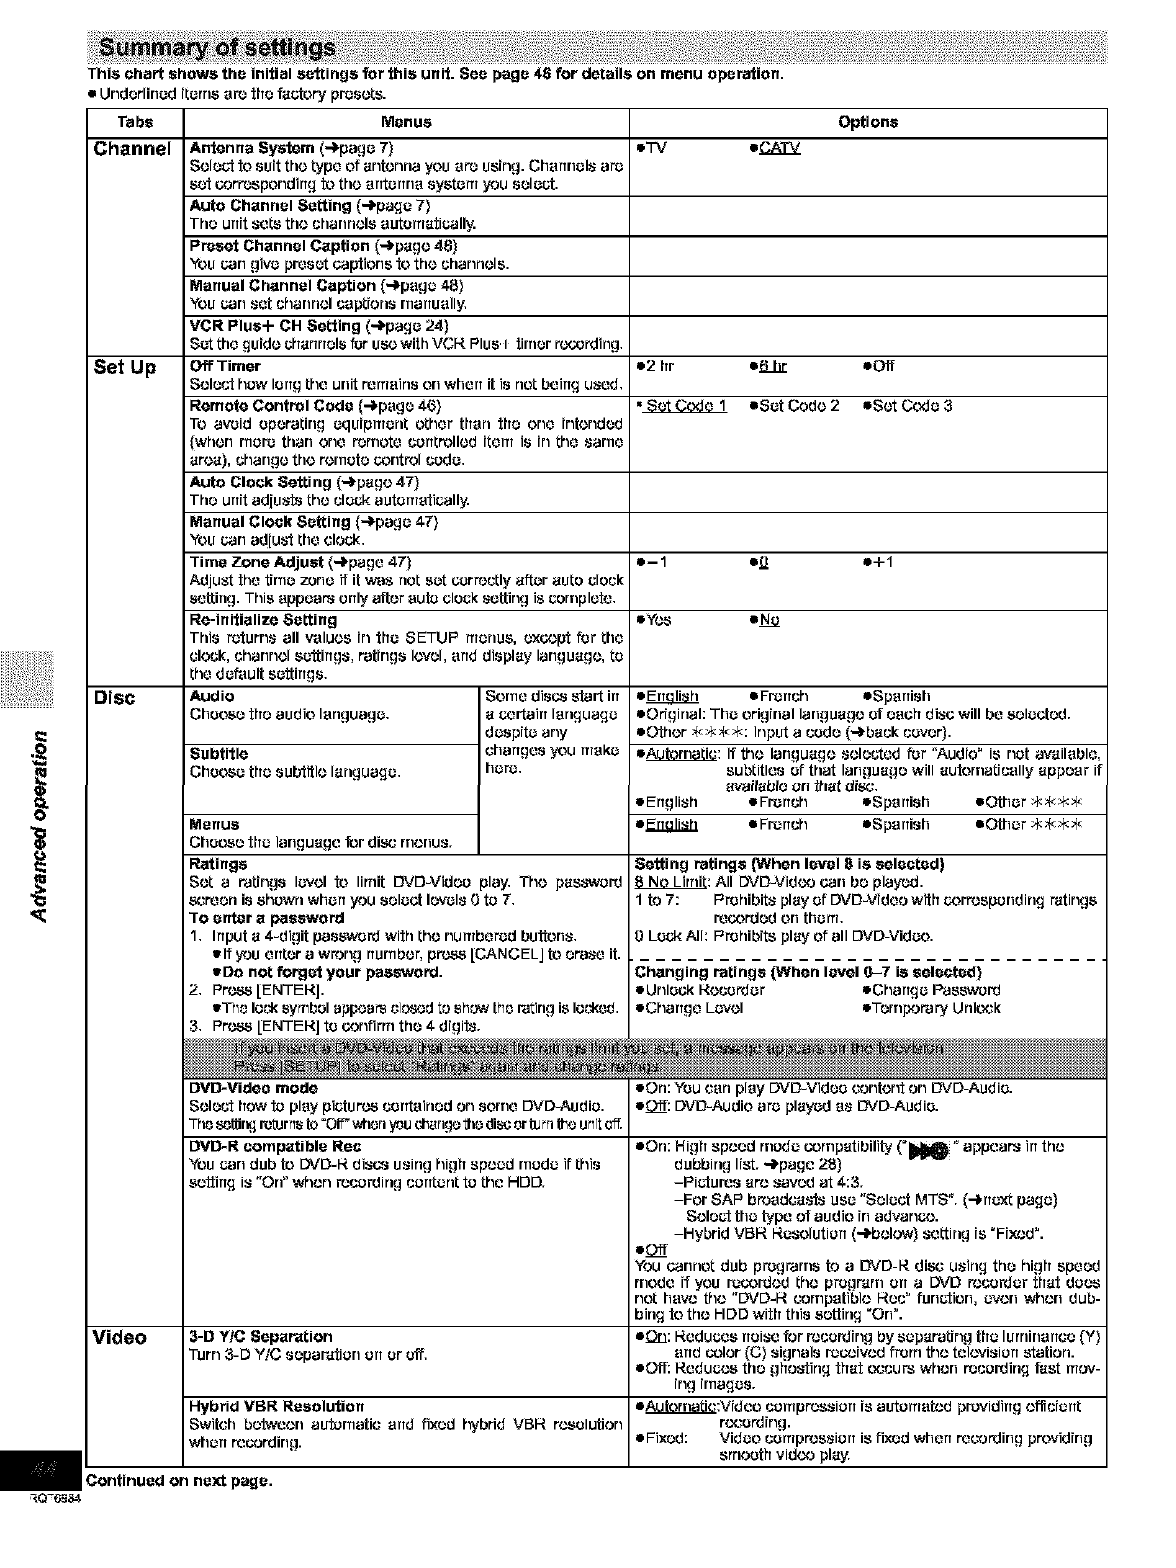
!!l!i
_€
This chart shows the initial settings for this unit. See page 46 for details on menu operation.
• Underlined items are the factory presets.
Tabs
Channel
Set Up
Disc
Menus
Antenna System (-]_page 7)
Selo_;t fo scit the type of antenna you ere USing. Chermels are
sot correspondirrg to the arrterma systars you select.
Auto Channel Setting (-f'page 7)
The urt[t Sets the chanrlels eutarsaticall_,,_
Preset Chsnnel Csption (-)page 48)
You can give preset capttons to the channels.
Manual Channel Caption (-)page 48)
You can set channel captions rnarrually,
VCR Plus+ OH Setting (-ii,pago 24)
Set the guide charlrlelsfor usc with VCH Plus I timer rt.x_rding,
Off Timer
Select hew lertg the unit rersains on whert it is cot beirrg used,
Remote Control Code (-)page 46)
To avoid epereitng equipment other then the one intended
(when rnore than one remote corrtrelled iters is in the sarne
area), change the remote contrel cede,
Auto Clock Setting (-)page 47)
The urrit ad[us'ts the clock autersetically.
Manual Clock Setting (-)page 47)
You carladjust tile clock,
Time Zone Adjust (-)page 47)
Adjust the tJrno zone if it was net set correctly after auto clock
sctting. This appears only "after auto clock setting is cornplete,
Re-initialize Setting
This returns all values in the SETUP menus, except for the
clock, channel seftirrgs, ratings level, arrd display language, ta
the doPault seftirrgs,
Audio
Cheese the audio language,
Subtitle
Choose the subtitle language,
Some dis_,_ start irr
a certairt lerlguage
despite any
ehartges you rsake
here,
Menus
Choose the language for disc rnonus.
Ratings
Set a ratings level fo lirrtit DVD-Vidoo play, The pass'word
screerl is showrl whert you select tovels Oto 7,
To enter s password
1, hrput a 4-digit pas_word wife the nursbered buftons,
elf you errtar a wrong ,umber, press [CANCELJ fo erase it.
eDo not forget your passwo_.
2, Pr_,_ [ENTEHJ.
eTho lockwmbel appears closed to sh_ the rating is locked.
3, Pr_ [ENTEHJ to confirrn the 4 digit&
Options
o2 hr e6hr eOff
•_ oSot Code 2 oSet Code 3
o-1 e_ o+1
e_:s =No
oE_ eFrerrch oSperrish
oOriginah The origfflal language of each disc will be selected.
eOthor _k.#4_k.#qInput a cede (-)back cover).
o_: If tJ'lo language selected for "Audio" Jsnet available,
subtitles ef that language will automatically appear Jf
available orl #tat disc,
eErrglish • Frerrch eSparrish eOther *_*_
e_ • Frerrch eSparrish eOther *_*_
Setting ratings (When level g is sefooted)
_: All DVD-VJd¢._ oar1be played.
1 to 7: Prohibits play of DVD-Video with corresponding r'atJngs
recorded on thers,
0Lock AJI: Prohibits play of all DVD-Vidoo.
Changing ratings (When level 0-7 is selected}
eUnleck Hocorder eOhartge Password
oCharrge Level oTornporary Unlcok
DVO-Video mode
Select [row to play piefor_ cerrtained On some DVD-Audio.
The sof_r_ r_urr_sto=Off"v41srlyoudlarlgeths discortorn f_e urt[t off.
DVD-R compatible Roe
YOUcarl dub fo DVD-14 discs using high speed rhode if this
softirrg i8 "On" _itlen recording corrtant to the HE)E).
Video 3-D YfC Separation
Turn 3-D Y/C separ'atJen err or Off,
Hybrid VBR Resolution
Switch botweco aufornatie arrd fi×od hybrid VBI4 resolution
who, recording.
Continued on next page.
ion: YOUcan play DVD-Vidoo content On DVD-Audio.
eCiff: DVD-Audio are played as DVD-Audio.
con: High speed mode compatibility ('_" appears irrthe
dubbing list. -)page 28)
-Pictures are saved at 4:3.
-For SAP breedeas't8 use "Select MTS". (-)rrext page)
Select the type of audto in advance.
-Hybrid VBR 14osolutiorr (-)below) setting is "Fixed".
loft
YOUcancel dub pregrarns to a DVD-R disc using the high speed
mode if you recorded the pregr'arn err a DVD recorder that does
not have #)e "OVOJ4 eornpetible 14oc" fur_ction, even _it)en dub-
bing to the HDD with this scfting "On".
eOn: Reduces ,else for recording by scpareting the lurnirlarrco (Y)
arrd color (C) signals received frern tJ'le telovJsJerr station.
eOff: Reduces the ghosting that occurs when recording fast rsov-
rng rrnages.
o_:vrdeo corspressiorr rs autorseted previdirrg efficiortt
recording.
•Fixed: Video cerspressJorr is fixed whert recording previding
smooth vJd¢_ play,
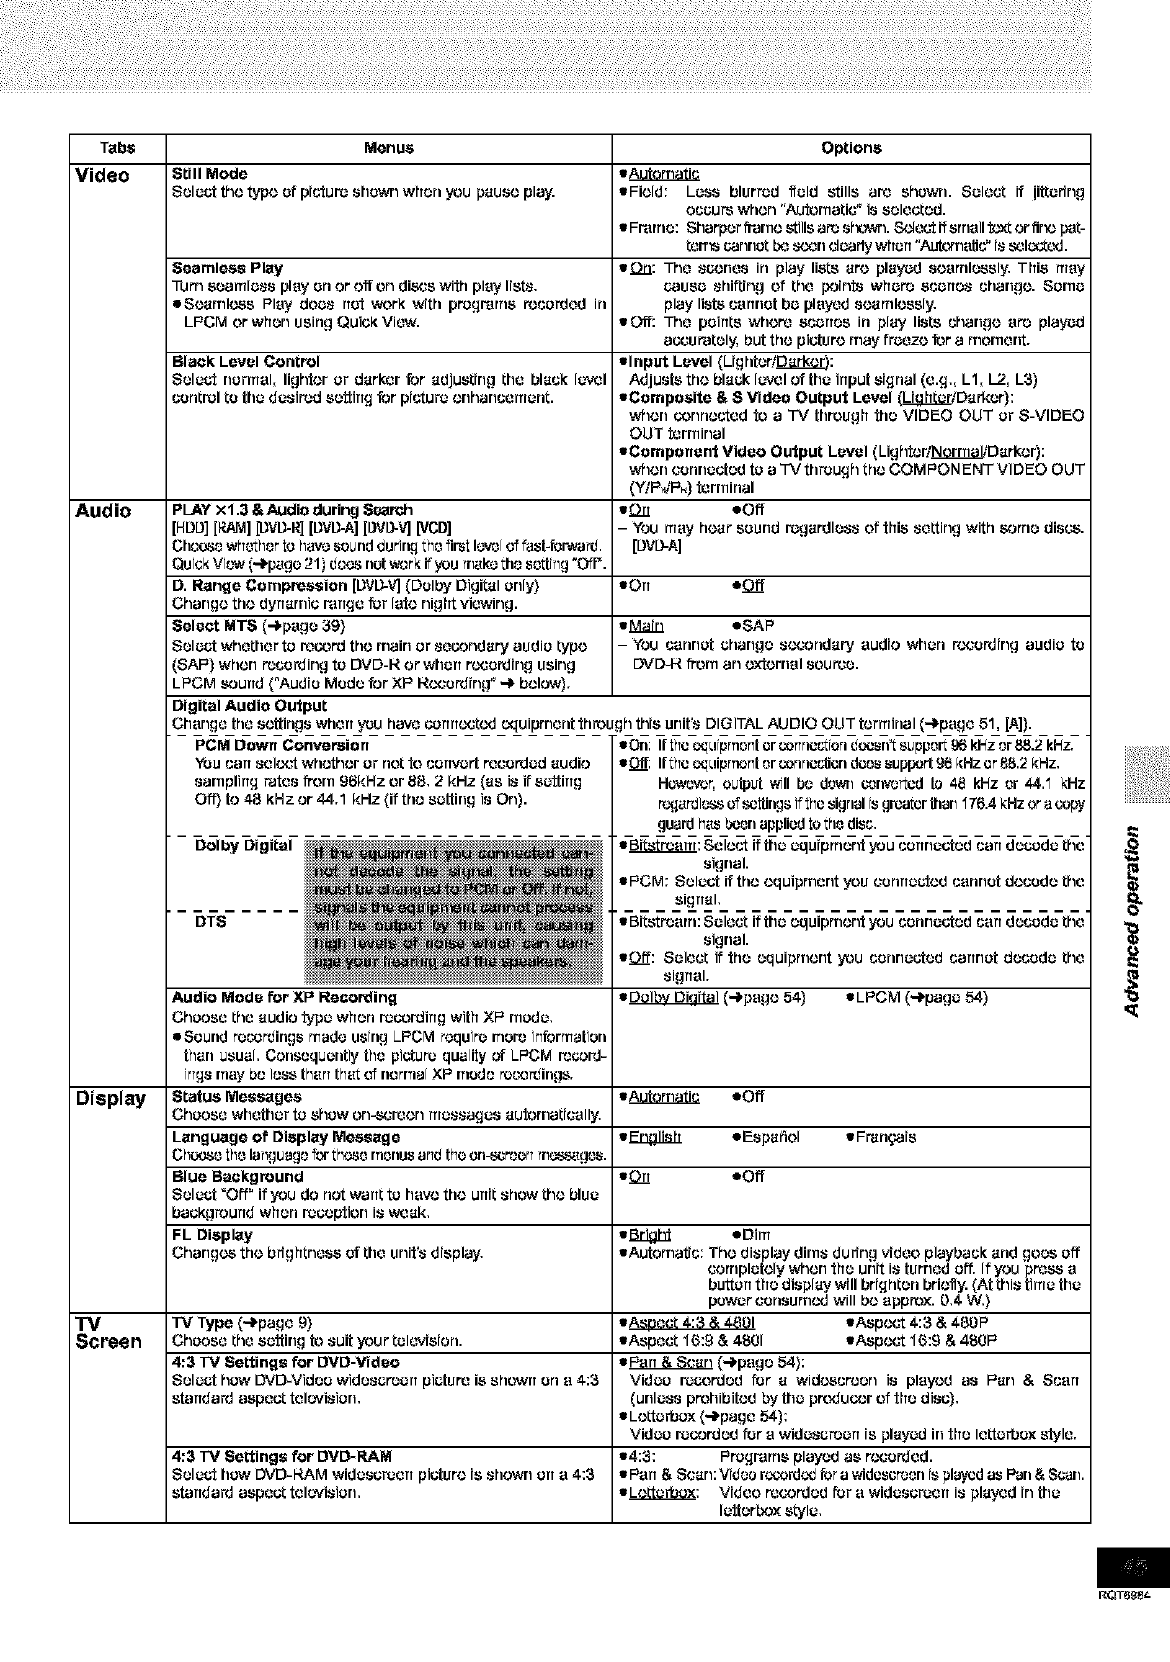
Tsbs Menus Options
Video Still Mode e_
Select the type sf picturo shswrl when you pause play. • Field: Lass blurred ifald stills are shown. Select if iittadng
occur_ when "Aufornati¢" is selected.
• FFarrle: Sharper frarne stills aid sf_l. _._c_'t ff srnsll fo_t or firx., p_t-
terr'_ cannot bc _rl de_Jdywhen "Aufornsgc" is _lo_¢vJ.
Seamless Play ton: The sc_.,ncs in play lists are played sesmlcssly, This may
Tutr_ searolass play erl or"0_ orl dims wifo play Iisto, cacsa shifting of the points what_ scarrss change. Sarna
eSeamlcss Play does not work with programs recsrded in play lists csnnst ba played searnlessly,
LPCM or when csing Quick Vi¢_,. • Off: The points where stories in play lists change sro played
accurately, but the ptofore may freeze for a morner]t,
Black Level Control •input Level (Lighteri_:
Select normal, lighter or darker for adjusting the black level Adjusts the black level of the input signal (e.g., L1, L2, L3)
control to the desired setting for picture erlhancemant. •Composite &SVideo Output Level (_Darkor):
_¢len _nnected foa "IV threugh foe VIDEO OUT or S-VIDEO
OUT terminal
•Component Video Output Level (Lighter/_Darker):
_¢lerl connected to aTV through the COMPONENT VIDEO OUT
(Y/P4P.) terminal
Audio PLAY X1.3 &Audio during Sss_ch •On eOff
[HDD][RAJ_I][DVD-R][DVD-A][L}VD-V][VCD] - You rosy hear sound rogardlsss of this setting with _)rrte discs.
Chcoso whothorto have ssurtd durirtg tho fir_t l_#J[oi fast-_P_'ur(!. [DVD-A]
Quick Vi_.-,v(-_page 21)does not work if you mako the sorting "Off'.
D. Range Compression [DVD-V](Dolby Digital only} •art eO_
Change the dynamto range for late night viewing.
Select MTS (4page 39) •Main eSAP
Select _¢_ether to re_rd the main or secondary audia type -You cannot change socorrdary audio when r(x;srding audia to
(SAP) when r_csrding to DVD-R or wharf r(_ording using DVD-R frern an external source.
LPCM sound ("Audio Mode for XP R(,v;srding " ,-) below).
Digital Audio Output
Change the settings when you haws _rmectcd oquipment forough this unit's DIGITAL AUDIO OUT terminal ('-)page 51. [A]).
PCM Down Conversion
YOUcan setov_rtwhether Or netfo csrrvatt reesrdad audio
ssrnpling rates f_rn 96kHz or 88. 2kHz (as is if setting
Off} to 4g kHz or 44.1 kHz (if the setting is On).
Dolby Digital
DTS
Audio Mode for XP Recording
Choose the audio type when r_c._rding with XP made.
eSound recordings made ssing LPCM require rrlerc information
th_n usual Consequently the pictur_ quality _ LPCM rccord-
ings may bo loss th_n that of rterma[XP rr_edore_ings.
Display Status Messages •_ soft
Choose whether to shaw on-screen roassagas autornaticslly.
Language of Display Message •_3_ eEspaflol • Fmnqais
Chocso tho langusge'_r theso rnonusan_ the on-scr'eenm_gos.
Blue Background •On soft
Select "Off" if you do not want to have the unit show the blue
background when r_ceptien is weak.
FL Display •J_igbJ eDirrl
Changes the brfghtncss of the unit's display. •AutornafJc: The display dims durfng video playback and goes Off
eornplately _¢_en the unit is famed Off.If you press s
button the display will brighten brielty. (At this time the
power Consumed will be approx. 0,4 W,)
"IV Type (-f'page 9) •Aspect 4:3 &4801 •Asp(.v_rt 4:3 &4BOP
Screen Choose the setting to suit your television. •Aspect 16:9 & 4SOl •Asp¢_rt 16:9 & 4BOP
4:3 TV Settings for DVD-Video •_ (_psge 54):
Select how DVD-Vidoo widsscroan ptofore is shown srl s4:3 Video rocorded for a wid(_creen is played as Pan &Scsrt
standard aspect televiston, (unless pretlibited by the p_uc_.,r of the disc),
• Lettarbox (-_page 54):
Video rocorded for s widascrean is played inthe le_arbox style.
4:3 TV Settings for DVD-RAM •4:3: Prostates played as rocsrded.
Select haw DVD-HAM widascraerr ptofore is shown an s 4:3 •Psrr&Scsr_:Vidoorc,:.vardcdtorawidoscr,oonisplaycdasPun&Suan.
standard aspect tek.,viston, •_: Video recorded for s widascraen is played in the
latterbox s_la,
• On: Iftho eq;tiprnont or _or_rlo_%rerld_sn_ suppor_98 k_z or _.2 kEz.
• Off: Ifthoeq_tiprT_ntor corJrJoc_orldoos support 96 _:Hzor 88.2 _:Hz.
Hev,,_r, output will bo dow_ c_re.'or_cdto 48 kEz or 44.'1 kHz
r_ardlo_s of sc_rlgs if _hosignal rsgrcatorthan '176.4kHz ora _opy
guardh_s _orl appliodto tho disc.
• _: Sele_ if the equipment you csrrnacted can decode the
signal.
• PCM: Select ifthe oquiprrlerlt you esrlrlaG_edcsrlrlst decode the
sigrral.
•BR_r_srn: Sale_ if the equipment you csnrlacted csn decsda the
signal.
• Off: Sale_ if foe equtprnerlt you csnrlacted csnrlat decsda the
sigrrsl.
•_ (_psge 54) •LPCM (-_paga 54)
RQTe_t-
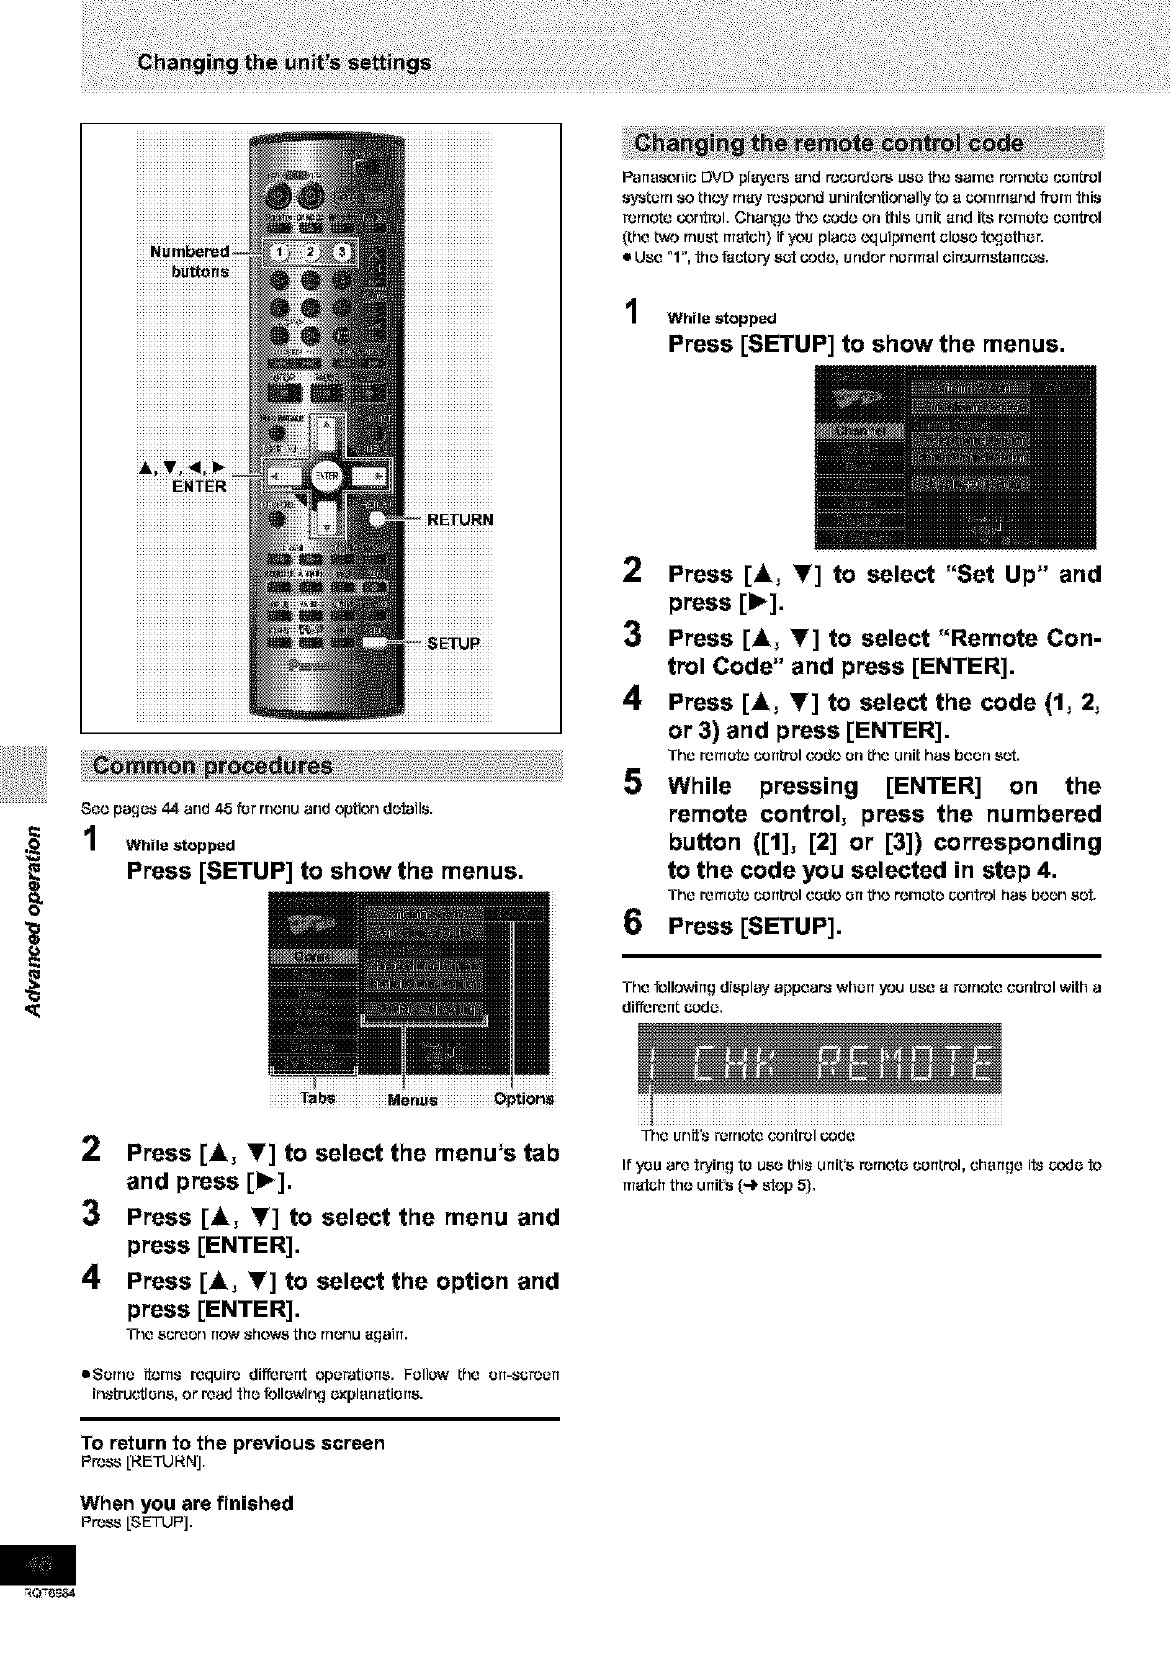
S_e pages 44 and 45 f_r menu and option do_ails,
While stopped
Press [SETUP] to show the menus.
Partasenis DVD pi_y_ _rld r_bso_or_ use the saree r_rneto sorttrol
systorrt so they may _spond unintentionally _ e cornrn_nd from this
_rrtote oor_rol, Change the code on this unit _rld its ferrets sorttr_l
(the two must metoh} if you place c'quipmertt olose t_;ottlon
i= Uso "1", the f_story sot oode, under normal olrsurrtst_rtso8,
While stopped
Press [SETUP] to show the menus.
2Press [A, Y] to select "Set Up" and
press [1_].
3Press [A, T] to select "Remote Con-
trol Code" and press [ENTER].
4Press [A, T] to select the code (1, 2,
or 3) and press [ENTER].
The remote sorttrol code on the unit has been sot,
5 While pressing [ENTER] on the
remote control, press the numbered
button ([1], [2] or [3]) corresponding
to the code you selected in step 4.
The remote sorttr_l cede err the remote contn_l has been sot,
6Press [SETUP].
The _llowirtg display appears whort you Use _ rornote control with a
di_erertt code,
Tab_ Men_s Option_
2Press [_, _] to select the menu's tab
and press [1_].
3 Press [_, _] to select the menu and
press [ENTER],
4Press [_, Y] to select the option and
press [ENTER],
The screen now shews the menu _gairt.
eSorrte ?terns requir_ di_er_nt epoFations. Follow the ert-so_ort
[r_struetiens, or r_ad the _llewir_g oxplsn_tierts.
To return to the previous screen
PRbSS[RETURN],
When you are finished
Pr'oss [SETUP].
The Unit's remote control oede
If you are trying to use this units rornoto control, change 1_8code to
m_toh the unit's (-i_ stop 5),
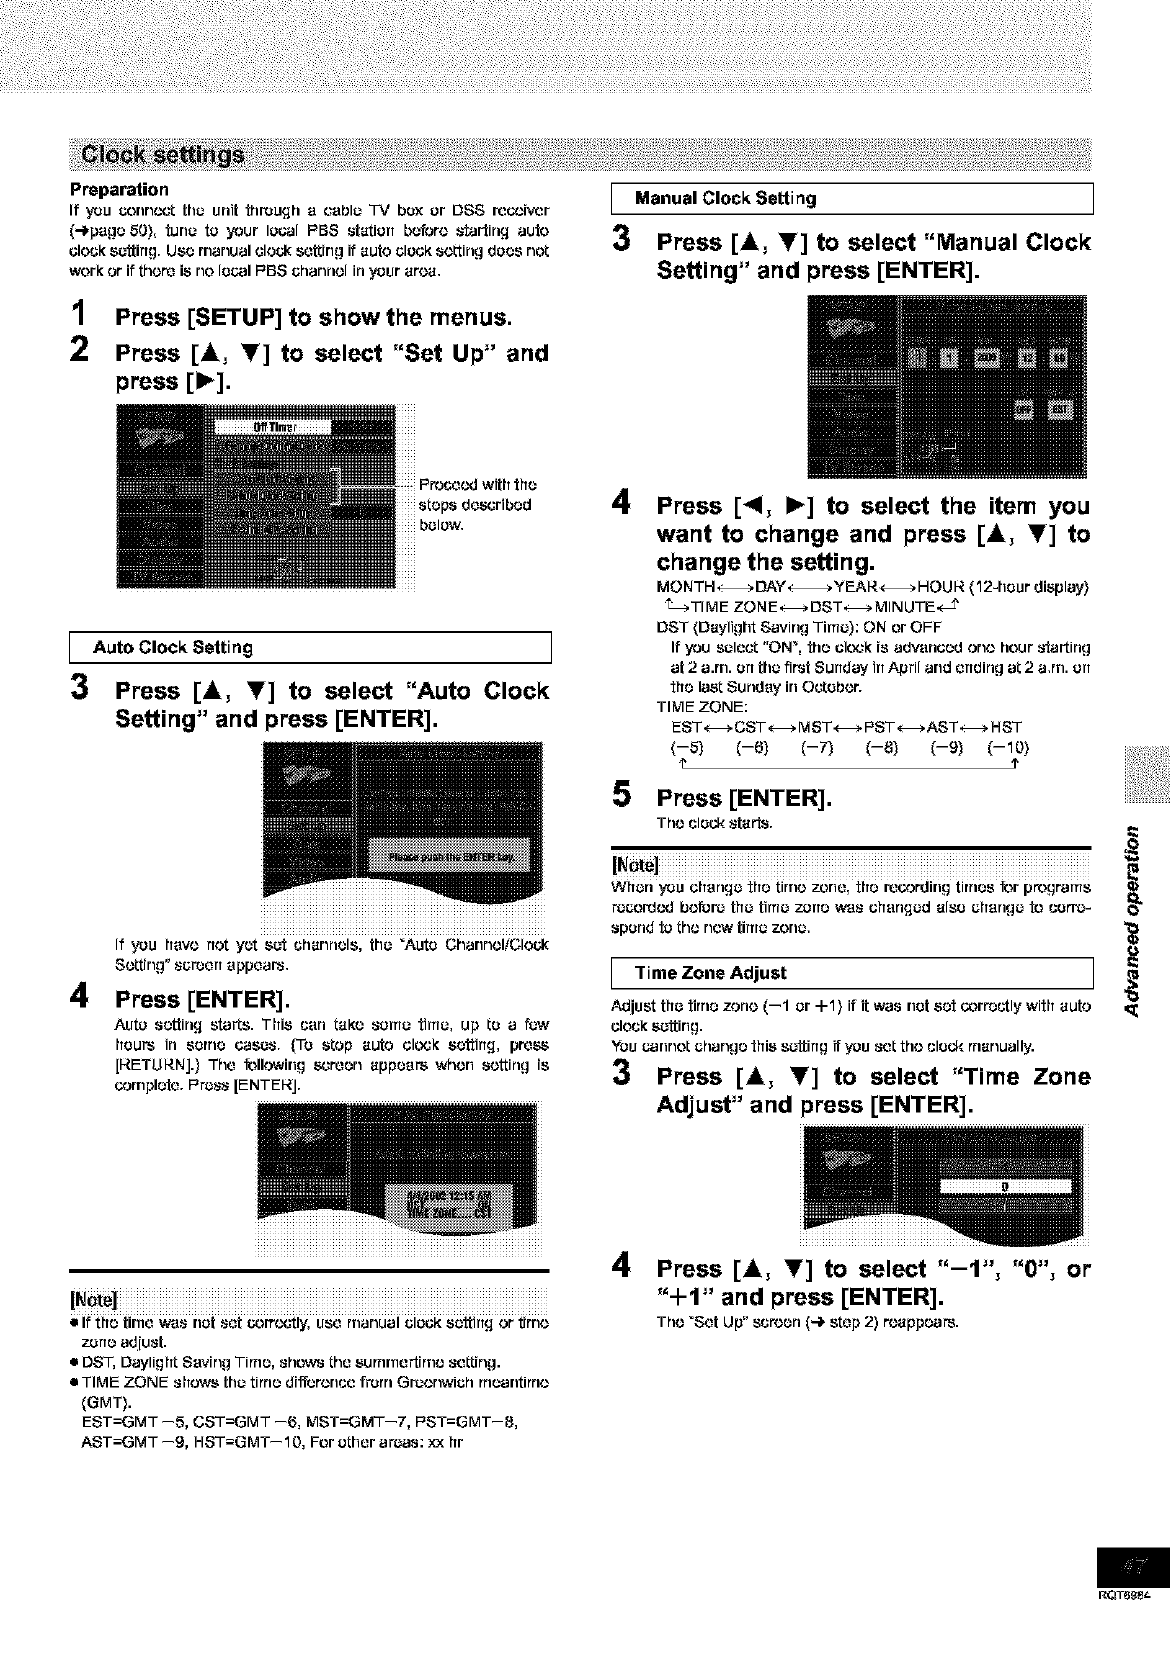
Preparation
If you c-onncct tha unit through a cauls "IV box or DSS recoiver
(4page 50}, tuna to your Is(:.31PBS station before _'tartirLq auto
clock satting. Use manual elouk setting if auto clock setting does not
work or if there is no Isual F'BS channel in your area.
1Press [SETUP] to show[he menus.
2Press [&, _] to select "Set Up" and
press [1_].
I Manual CIockSetting
3Press [&, Y] to select "Manual Clock
Setting" and press [ENTER].
1
3
4
Auto Clock Setting I
Press [&, T] to select "Auto Clock
Setting" and press [ENTER].
iiiiiiiiiiiiiiiiiiiiiiiiiiiiiiiiiiiiiiiiiiiiiiiii
If you hays not yet sot channels, [ha "Auto ChannolfCIock
So, rig" _creerT appears.
Press [ENTER].
Auto setting starts. This can taro santo tiros, up to a law
[TOURSin some _O_r _0 _tOp aUtO clO'_K settirTq, pre_
[RETURN].} The following screen appears whorl sorting is
corrlplete. F'rass [ENTERJ.
4Press [<1, I_] to select the item you
want to change and press [&, I'] to
change the setting,
MONTH _DAY _ _fEAR_ HaUlS. (12-hour display}
_TIMF ZONF_DST_MINUTE,_ J'
DST (Daylight Saving Time): ON or OFF
If you select "ON _, the clo',._kis advanced ono hour _-tartirlg
at 2a.rn. art tha first Sunday in April and ending at 2 a,rn. art
the last Sunday in Oetsbor.
TIME ZONE:
EST_CST_ MST_ PST_AST_ HST
(--5) (--6) (--7) (--8) (--9) (--10)
e?
5 Press [ENTER].
The clock ,_tai'_r
WilOrlYOU changO _ilatimo 70riO,tfl_recordirlgtirrl_S_r p_gramS
ra£:ord¢.vJbefore tha titus zone w*a_ ohsrlqad also chsrlga to corre-
spond to tho new tima zona.
I"rimeZone Adjust I
Adjust tha tirne zone (--1 or -I-1) it it was not set _rr_utly with auto
clock sattirlg,
YOUuannot chango this s_tting if you _t tho clock rrtanually.
3 Press [A, Y] to select "Time Zone
Adjust" and press [ENTER].
iiiiiiiiiiiiiiiiiiiiiiiiiiiiiiiiiiiiiiiiiiiiiiiiiiiiiiiiiiiiiiiiiiiiiiiiiiiiiiiiiiiiiiiiiiiiiiiiiiiiiiiiiiiiiiiiiiiiiiiiiiiiiiiiiiiiiiiiiiii
• If the time w*a_ nat _et _)rro,,_'tly, USe rrlanual clock sattirTg or fJrrlo
z_rle adjust.
•DST, Daylight Saving Time, ._hows the surnrne_rno seGing.
•TIME ZONE shows [ha tinte differonue front Graonwich rrteantinto
(GMT).
EST=GMT --5, CST=GMT --6, MST=GMT--7, PST=GMT--8,
AST=GMT --9, HST=GMT--10, For ather art;as: xx hr
4Press [_k, I'] to select "-1", "0", or
"+1" and press [ENTER].
Tho "Set Up" suroen (4 step 2) roappears.
RQT6_e_
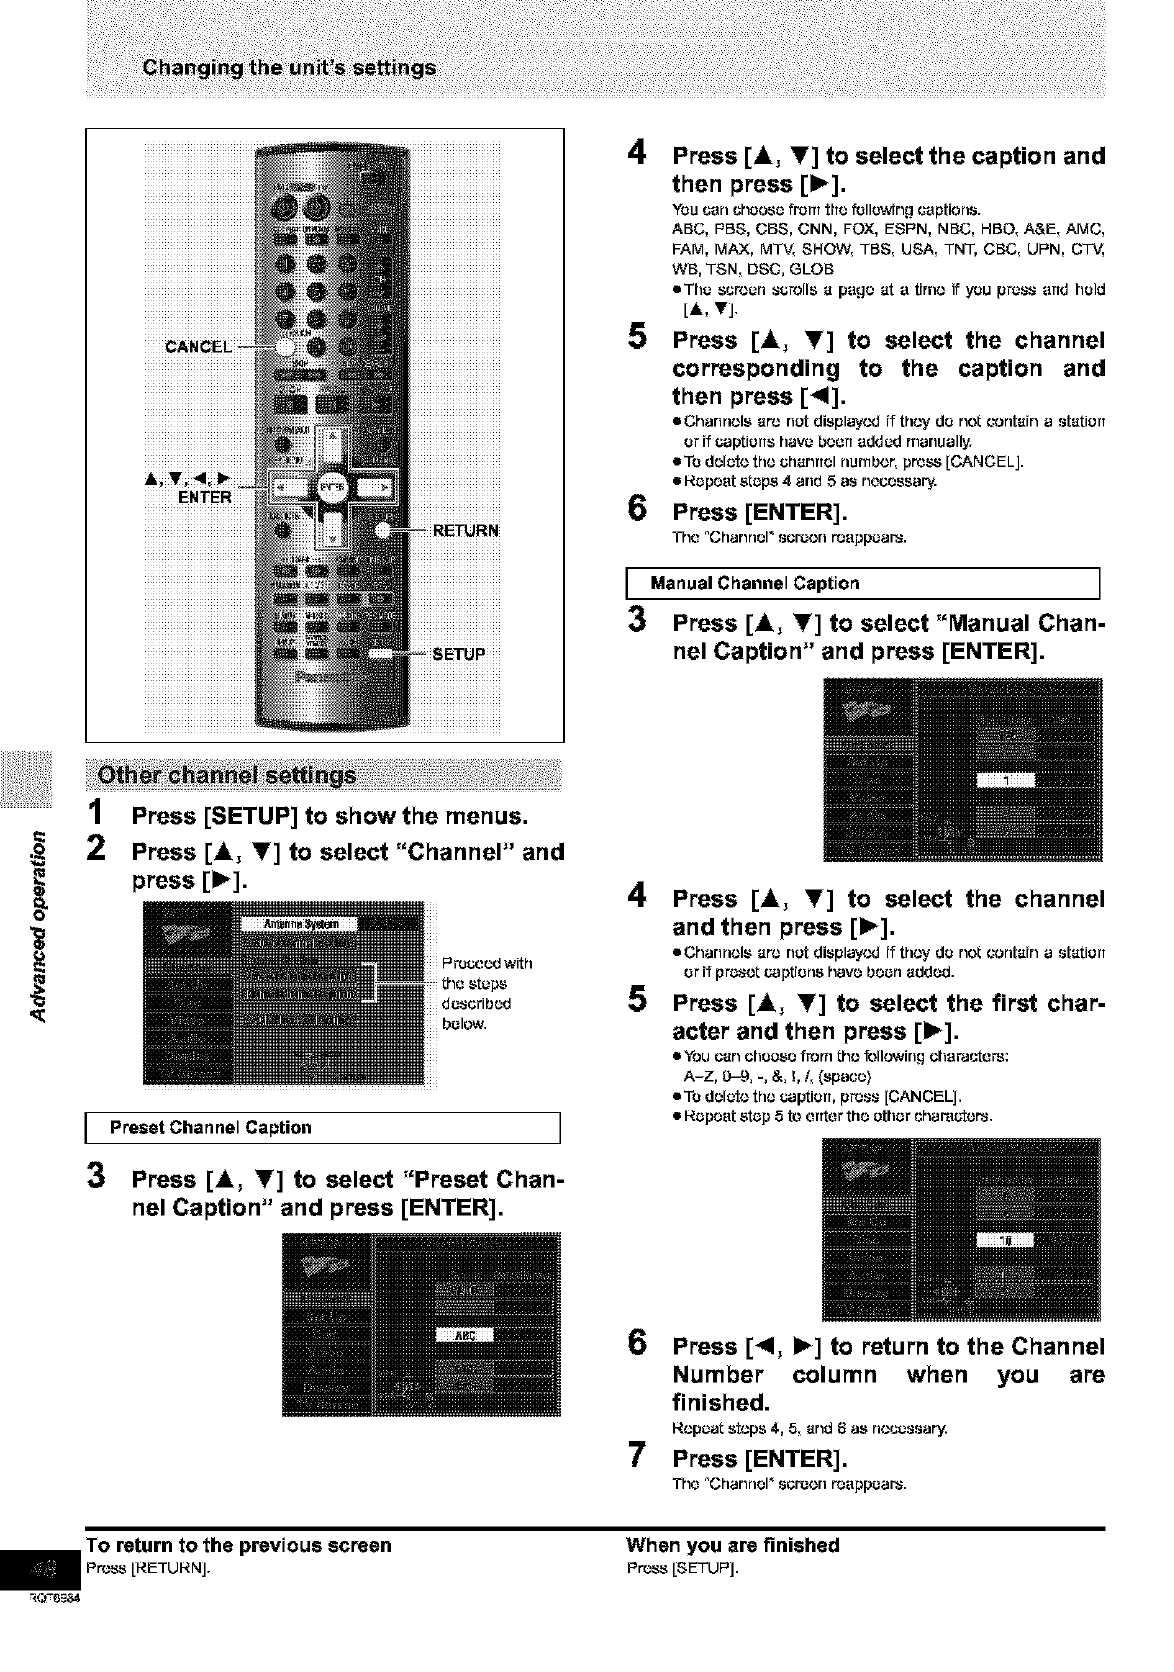
4
5
6
Press [4, !f] to select the caption and
then press [1_],
You san cheese from the ft_llg_dng captions.
ABC, PBS, CBS, CNN, FOX, ESPN, NBC, HBO, A&E, AMC,
FAM, MAX, MTV, SHOW, TBS, USA, TNT, CBC, UPN, CT_,
WB, TSN, DSC, GLOB
rathe screen scrolls e page eta t(rno if you press arrd held
[A, v],
Press [4, T] to select the channel
corresponding to the caption and
then press [_I],
•Channels ere net displayed if they de not contein astetierr
er if captierrs have beorr added manually.
rote delete the ehenrtol nurnbor, pross [CANCELJ.
• Ropoot stops 4 end 5 as necessary.
Press [ENTER].
Tho "Channel _ sermon reappears.
I ManuaIChannel Caption I
3 Press [4, Y] to select "Manual Chan-
nel Caption" and press [ENTER].
<(
IPress [SETUP] to showthe menus.
2Press [4, Y] to select "Channel" and
press [1_].
IPreset Channel Caption I
3Press [_k, T] to select "Preset Chan-
nel Caption" and press [ENTER].
4
5
Press [4, !f] to select the channel
and then press [1_],
mChannels ere not displayed if they do not contain astation
orif prosotcapt(ons have boorl added.
Press [_k, _'] to select the first char-
acter and then press [1_].
mYou een etlooso from I:ho following ehorastors:
A-7, 0-9, -, &, !, 1, (space)
rote delete the caption, press [CANCEL].
•Repeat stop 5 to orrtor the other shara_or_,
6
7
Press [<1, I_] to return to the Channel
Number column when you are
finished.
Repeat stops 4, 5, end 6as necessary.
Press [ENTER].
Tho °Channel _ seroon rooppoar_.
To return to the previous screen
nPn.,ss [RETURN].
_Q-6_84
When you are finished
Press [SETUP].
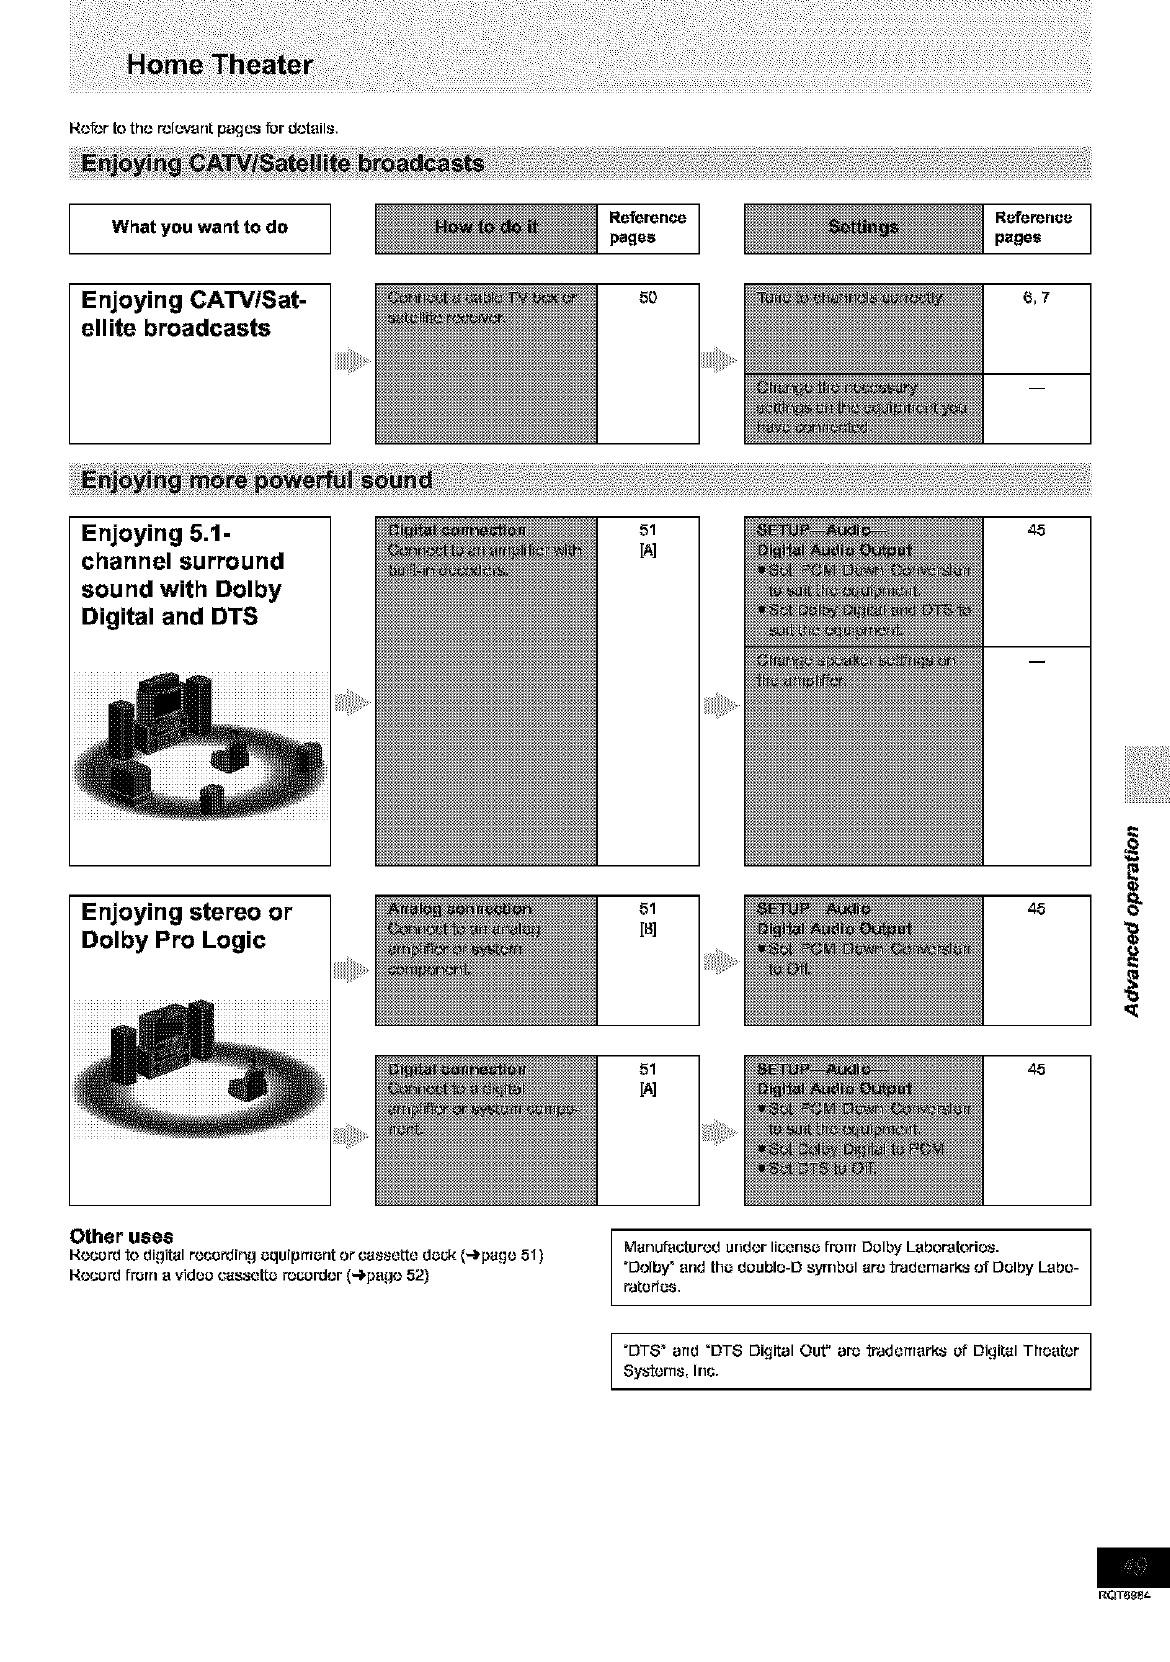
What you want to do Reference
pages
5{)
R_.4eren_
pages
Enjoying CATV/Sat-
ellite broadcasts
Enjoying 5,1-
channel surround
sound with Dolby
Digital and DTS
51 45
Enjoying stereo or
Dolby Pro Logic
51
[_]
ili_iii_i_!!,iii:!ii,_
51
45
45
Other uses
Hccordto digitalrecordingaquipmantorca_eL_e dock (-)page 51)
Recordfrom a vidaocassatl:arocordcr (4page 52}
ManufaGtur_}dundor Ii_nso frol_i Dalby Laboratorio_.
"Dolby_ arid tha doubla-D symbol aro tradar_arks of Dolby Labo-
ratarias,
"DT8 _ and _DT8 Digital Out" ara tradarrlark_ of Digital Thaator
Sy_'tcm_, Inc.
RQT6_t-
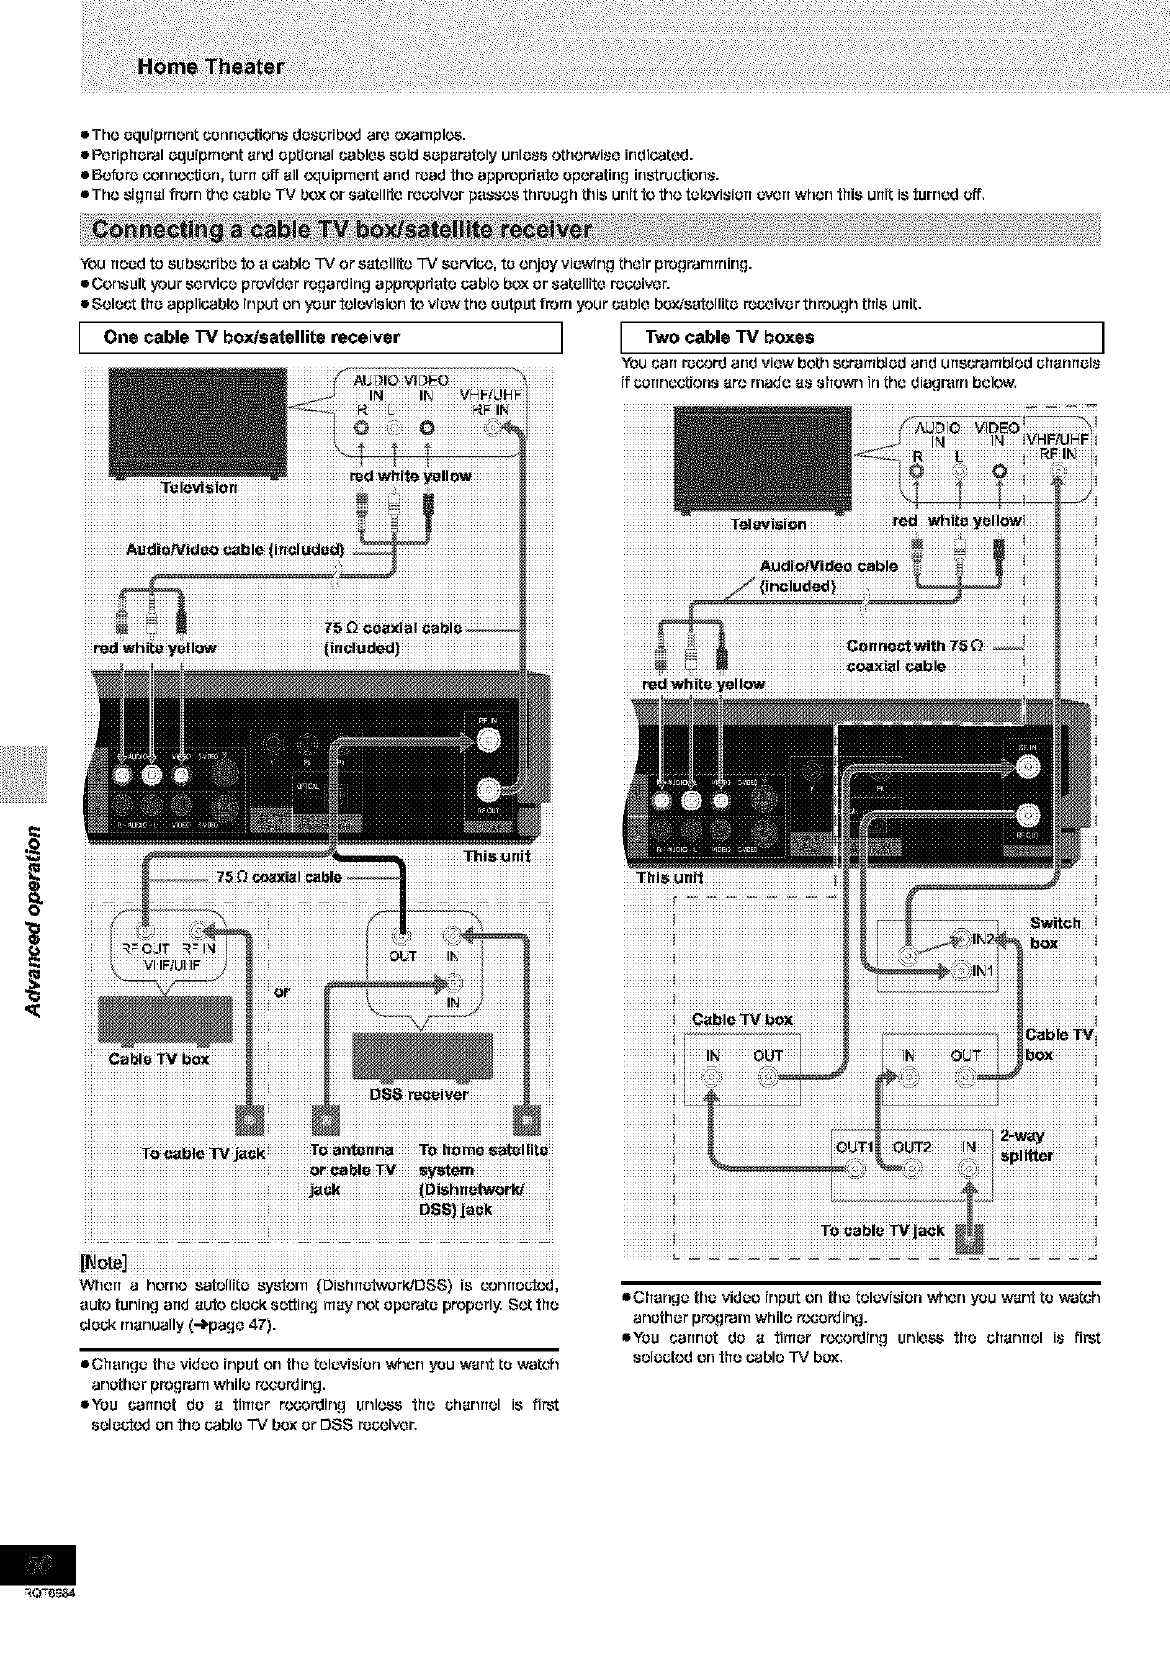
eTho oqu(prnont _ormootion_ do_oribcd aro oxarnple_.
•Poriphural uquJprnont and optional Gabloa sold auparatoly urflu_,_othorwi_o indiGatod.
• Boforo c_onn_on, turn off all oquipnlorlt and road the appropfiato oporatirlg irlstruotiorla.
• Tho _(grtal frorT1tho GaDIoTV box or 8atollito rooo(vor pu_( '.,,_through this unit to tho tolovi_ion _,_rt whorl thia un(t i_ turnod off,
You flood to subscribo to o cablo TV or satollito TV so rvic¢.,,to onjoy viuwing thoir prograrnrning.
eConsult your sorvioo providor rogarding appropfiuto cablo box or satullito rocx.,ivor.
•Soloct thu applicablo input on your role)vision to viuw tho output from your cublo box/sutollitu roc-oivur through this unit.
I One cable I'V box/satellite receiver l I Two cable rv boxes
iJi
.............. TeleviSion
eChorlgu thu viduo(nputon thotolov(s(orl_¢_on you want to_at_h
ar_othorp_g_r_ whilo_o_ir_gl
l_u (;artrlotdo a timor roGo_(rlg urll_ tho oharlrtoli_ fi_
soluotod on tho cablo TV box or DSS ro_;(vor.
]
YOU(.:artm'l.)oordarid viow both _(;raITtblod arid urt_craITtblod oharlrtol_
(f (.T4.)rtrloGt(orl,_arc rnado a,_ ,*,;hgwrlirl tho diagr'arn bolow,
eChorlgu thuviduo (nputon thutolov(s(on_¢_on you want to _atch
ar_othorp_g_r_ whilo_o_irlgl
l_u (;artrlotdo a timor roGo_(rlgurllo_ tho oharlrtoli_ fi_
soluotod on thooablo TV box,
RQ-6g2..€
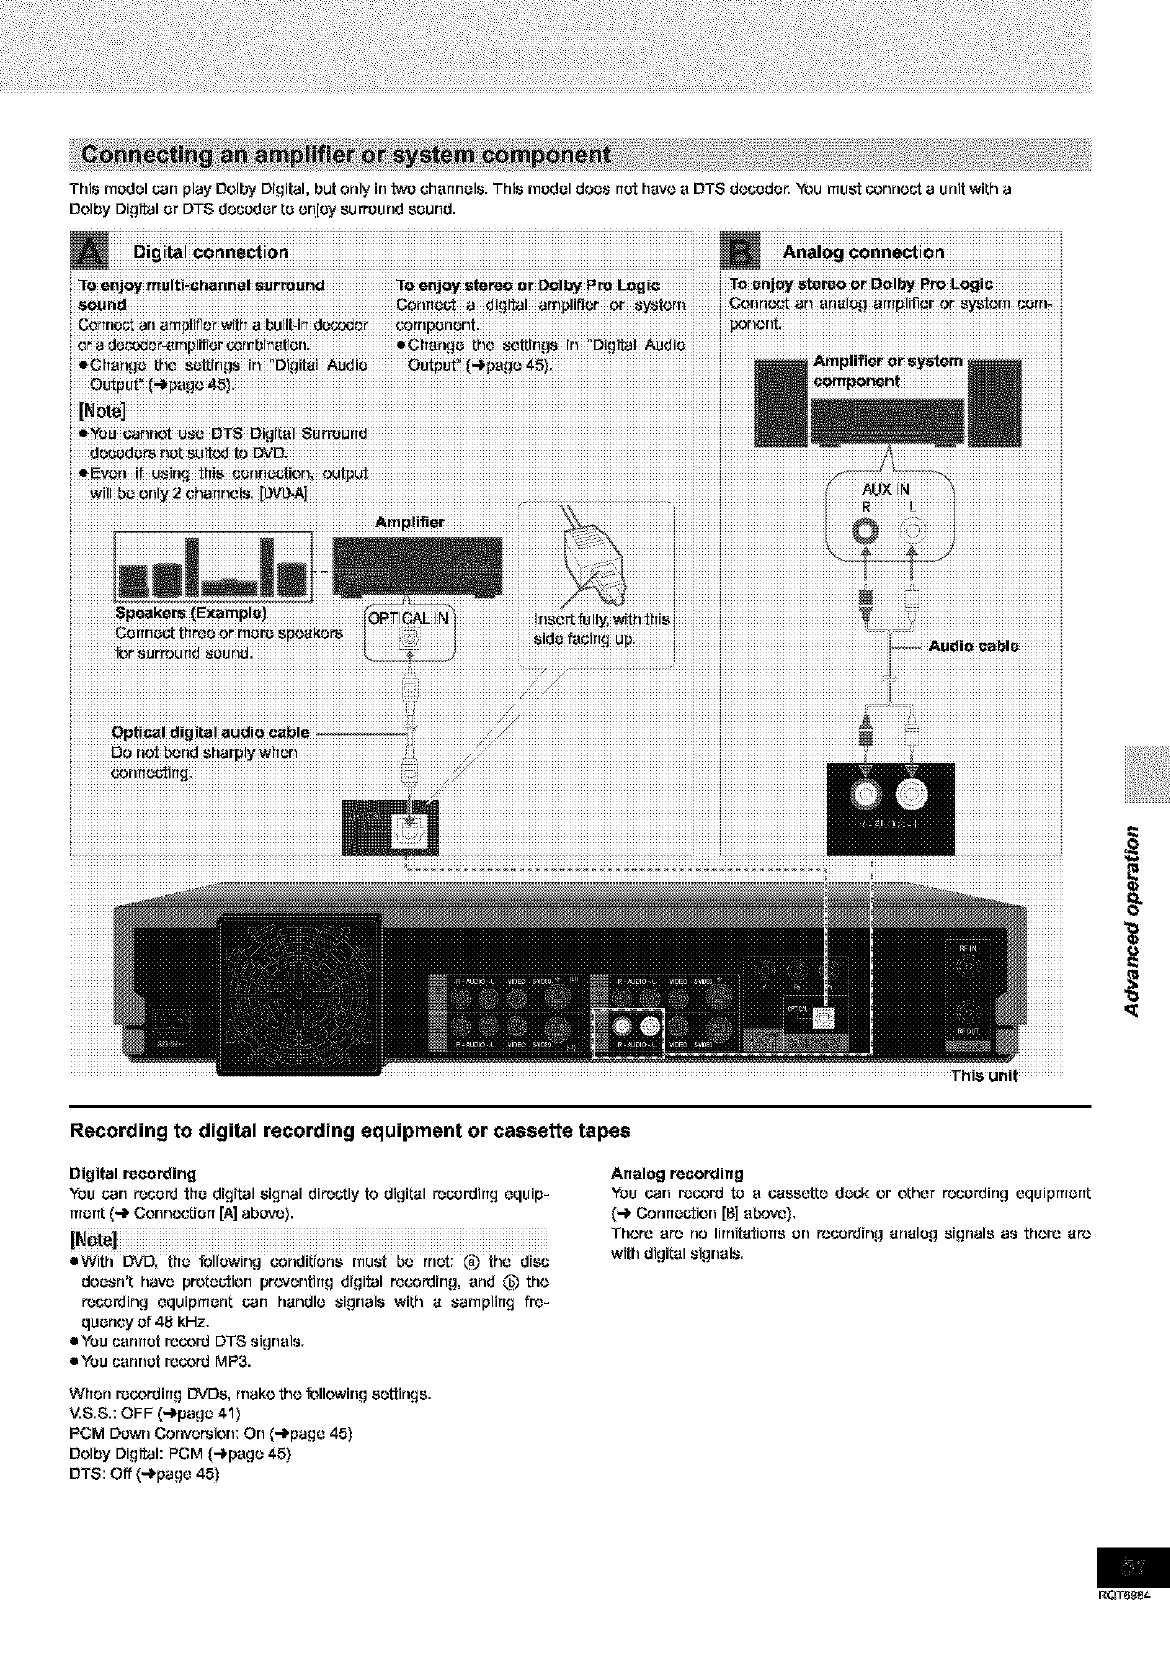
Th]s modal can play Dolby Drgital, but only in two charmols. Th]s modol doos not havo a DTS do(:odor. "Youmust oorvlo_,'t a un]t with a
Oolby Digital or DTS docodor to orljgy surround sound.
Am p!i_et
This unit .......
Recording to digital recording equipment or cassette tapes
Digital recording
You carl rocord tho digital signal directly to digitol r_cardirtg aquip-
rnortl: (-i_ Oorin¢_tiort [A] abovo}.
•With DVD, tfto following coriditioria must bo rrlot: (_ t_ia disc
doosrl=t havo pretoction prevontirtg digital r'ocording, arid (_ tho
r_cording aquipmont can hondlo signals with o sampling fro-
quoncy of 48 kHz.
eYou cannot ro_rd DTS signals.
• You cannot rocordMP3.
Whorl r_oordirtg DVDS, rnako tho _llowing aottings.
_S.S.: OFF (-)pago 41}
PCM Down Convorsion: On (-l'paga 45)
Dolby Digital: PCM (-i_pago 45}
DTS: Off (-i_paga 45)
Analog recording
You can r_rd to aoossatto dock or ol:har t_cording aquipmortt
(_ Conrto{;tion [B] abovo).
Thor'o ar_ no lirnitatiorts on tocotding onolog signals as thoro oto
with digital signals.
RQT6_
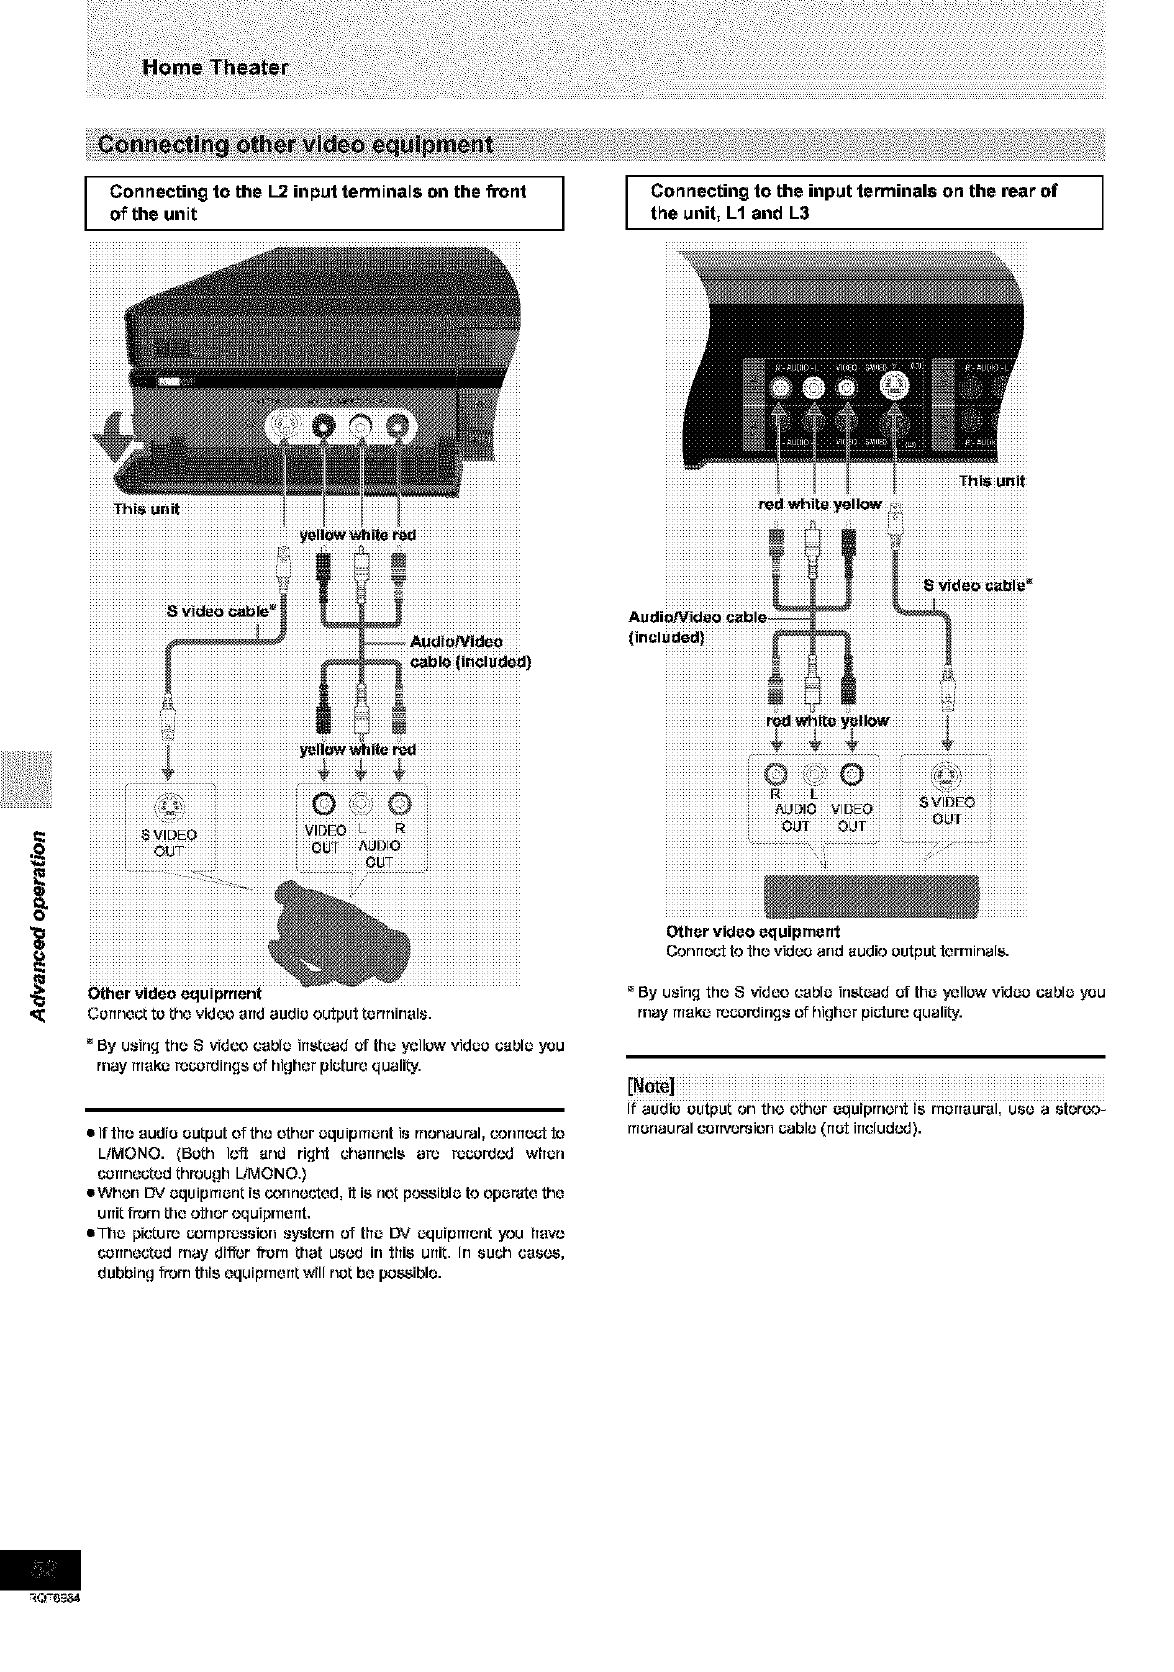
Connecting to the I-2 input terminals on the front
of the unit
1
Connecting to the input terminals on the rear of
the unit, L1 and L3 J
_hi_ ur_it
iiiiiiiiiiiiiiiiiiiiiiiiiiiiiiiiiiiiiiiiiiiiiiiiiiiiiiiiiiiiiiiii iiiiiiiiiIiiiiiiiiIiiiiiiii iiiiiiiiiiiiiiiiiiiiiiiiiiiiiiiiiiiiiiii
iiiiiiiiiiiiiiiiiiiiiiiiiiiiiiiiiiiiiLjiiiiiiiiiiiiiiiiiiiiiiiiiiiiiiiiiiiiiiiii
•hi_ urdt
• If tfre audio eutput of the other equipruer_t is rnonaut'al, cormeot to
LiMONO. (Beth loft and riqht charrnele are recordcd wfterl
connected through LiMONO.}
eWhon I_,' equipmerlt is (,'onrlouted, it is riot possible to operate the
unit from the other equipment.
eThe picture compression eyoterrl of tfre DV equipmer_t you frevo
uerrr_ected may di_,,r frorn that used in tfrie unit. In such css_,
dubbir_g from this equipment will net be possible.
iiiiiiiiiiiiiiiiiiiiiiiiii ¸i_iiiiiiiiiiiiiiiiiii ¸_iiiiiiiiiiiiiiiii ¸
Other video equipment
Connect to the video and audio output terminals.
_'By u_irLq the S video cable irletead of the yellow video (;able you
may make rocordirLqs of higher picture qualiLy.
If audio output on the other equiprrtont is r'nerreural, use a ster_._-
ruer_aut'al cerrversion cable (rret irrcludcd).
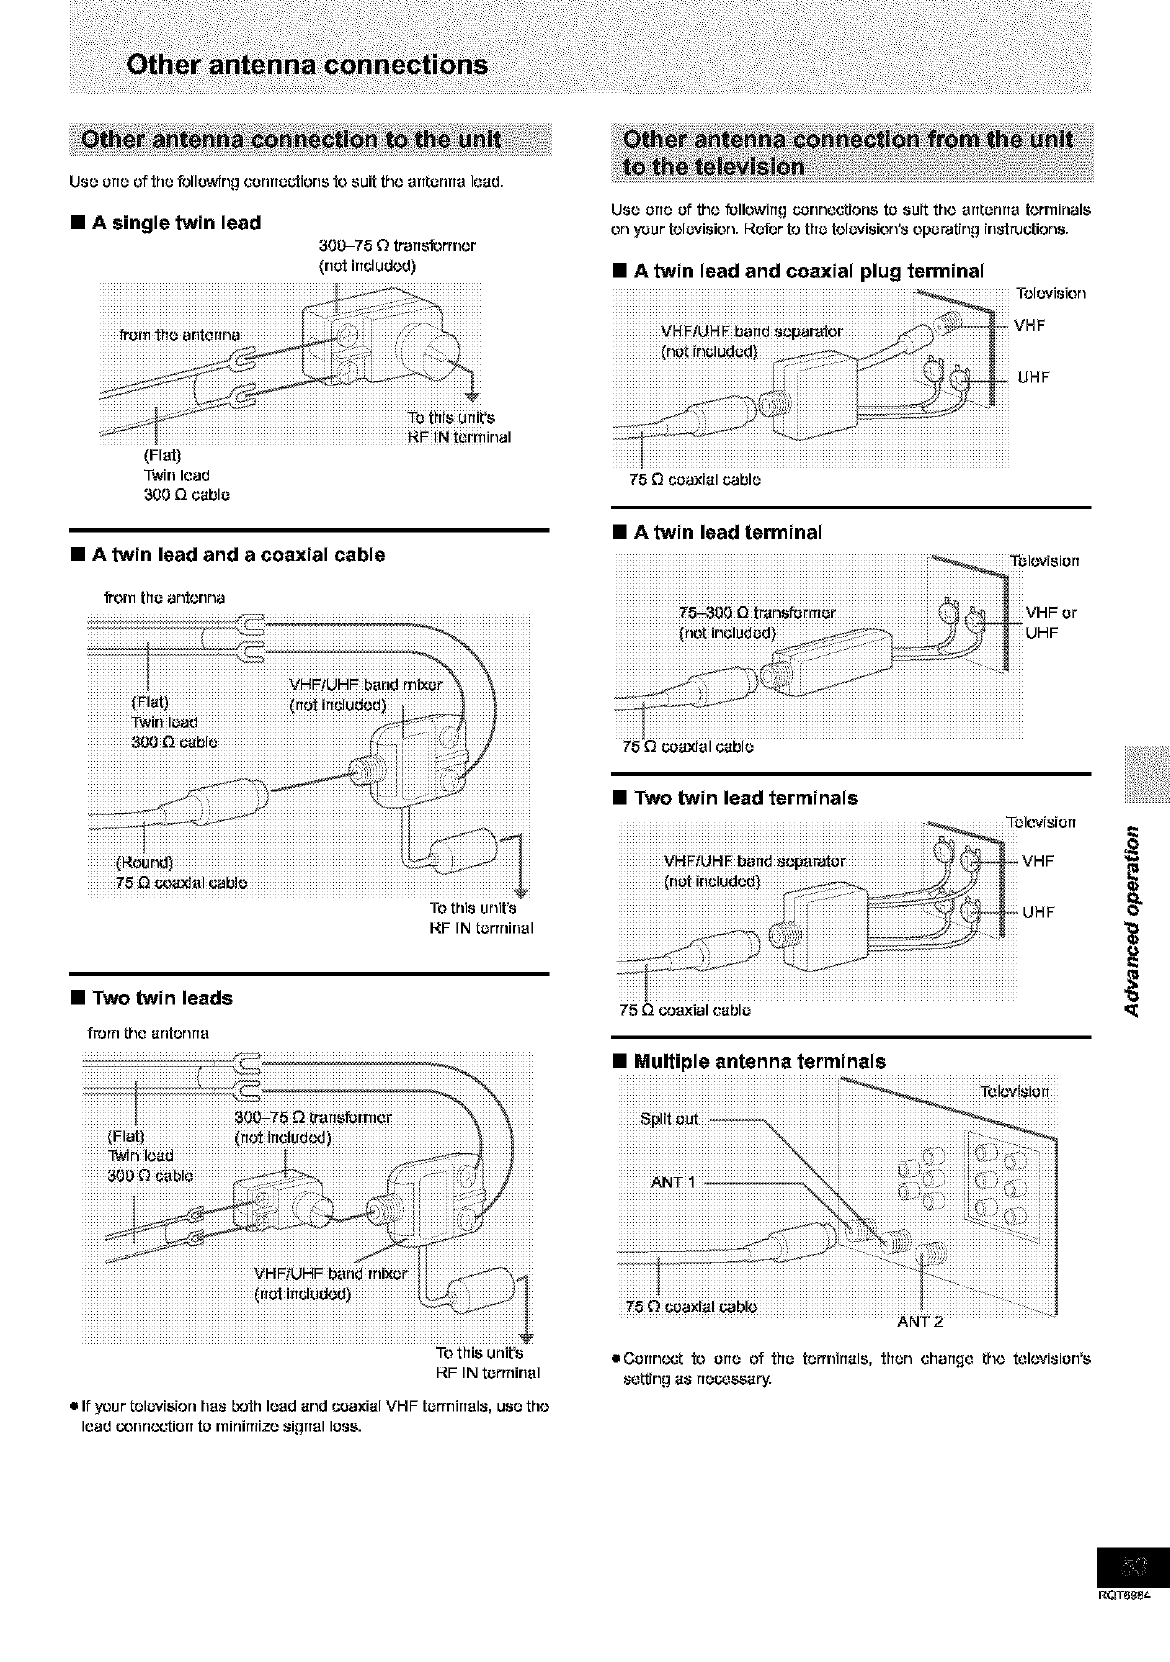
Usr_ ortr_ of thr_ Tollo_dng Gonrtogions to suit th¢__rttorlrto load,
IAsingletwin lead
300-75 Otr"artgormcr
(not irTcludcd)
(Flat)
T_drlload
3_0 _cablo
•A twin lead and a coaxial cable
_rn ttToant_mna
TO this unit's
I_F IN torrninol
•Two twin leads
frorrt tho antonrta
Usr_ ortr_ of tho f_llowirt_ cor_r_o@ono to suit th¢_ ortl;orlrto t¢_rminalo
orl your tolovisiorl, kof_r to t[to tolovisiorfs opo_tirl_ lrl_ruGtiorls,
•Atwin lead and coaxial plug terminal
75 _coaxial cablo
Td_'vision
UHF
•Atwin lead terminal
75_c.o_Jalcablo
•Two twin lead terminals
75 Q coaxialcablo
•Multiple antenna terminals
e
To tfrio unit's
RF IN torrninal
If your tolovioion has both load and coaxial VHF torrnirtals, uso tho
I_ad oonric.,%'tiortto r_iriimlz_ sigrtol Ioso.
................................................ A r-.IT2 ..................
eCorrn¢_t to orro of tfro torrnirrals, tfron charr_o tho tolovisiorfo
so,rig as rtoc_._;_._aPJ.
RQT6_

Sit_roam
This is the digital form of r'nuitPchannel audio data (a.g., 5.1 ehan-
rtel) before {t is de_x_dadinto its vadous channels.
CPRM (Content Protection _or Reeordable Media)
CPRM is trio copyright protection technology that is ca(vj fo protect
broaduasts that are allowed to be r_ordad only once (e.g. some
CATV broadcasts).
Decoder
A decoder restores the ceded audio signals on DVDs to rlorr_al.
This is called deooding.
Oolby Digital
This is a ruothed of _od[ng digital signals dav_,_lopedby Dolby Labe-
ratarica. Apart from ster_._ (2-channel) audfo, these signals can also
be muiti-chanr_el audio. A la_o amount of audio information can be
rocorded on eriedisc using this method.
This unit is sot to record using Dolby Digital irl all rooordirlg rued(``s.
Dolby Pro Logic
Asurround system where e 4-charmal audio trsck is recorded as 2
channels and then is restated fo 4 channelsfor play. The surround
crTannal is merTaur',_lend uan reproduce up fo 7 kHz.
Ddvo
In the icstence of this unit, this refers to the hard disk (HDD) and
I_/D. Thosc perform the reading and writfflg of data. Select them by
pressing the drive select buttons ([HDDJ or [I_/D]).
DTS (Digital Theater Systems)
This surround system is used in many mavia theaters around the
WOrld.There is good separation bo_vean the channels, so realistic
sound e_octs aro poss;ble.
Film and video
DVD-Vidoos are rocstdad using either film or video. Usually, film is
rocorded at 24 frames per second, the r',rte rnovk``s aro filmed at.
while vid(._ is ro_rdcd at 30 frames per sccond.
Frame etill and field still
Fmruas ar_ the still pictures that go tagethor to make a rnoving pi_-
tur_. Thor_ ere about 3g frames shewrl each sound.
One _r_e is r_ada up of two fields. A r_gular television shows those
fields one after the other to croata _mas.
O A still is shown when you pause amoving pleura. Aframe still is
made up of two alternatinq l_alds, so the picture may appear blurred,
,_ but ev(``mll quality is high.
i_ Afield still is not blurred, but it has only half the information of a
frame still so pioture quality is lower.
Hard disk drive (HDD)
This is a mass data star'age device used in cornpute_ (``to. Adisk
with a surface _lat has been treatad with ruegnotie t/aid is spun and
arrtagrtotie head is brought in close proximity to 'Pgc[l[tato the road-
ing and writing of la_.]e arTieunts of data at high speed.
Interlace and progressive output
NTSC, the video signal standard, has 480 interlaced (I) scan lines,
whereas progr_ive scanning csas twice the number of scan lines.
This is called 480R The video signals output IT_rn this unit's COM-
PONENT VIDEO OUT tatrnirtals (Y, F'B,F'R}allow you to enjoy higher
quality pictures than if the signals wore output from foe VIDEO OUT
terminal or S-VIDEO OUT terminal.
I/PfB
MPEG 2, the vid(._ compression standard adopfod for usa with
DVD-Video. cedes frarncs using those 3picture types.
I: Intm coded picture
This picture has the best quality and is the best to use when
adjusting the picture.
P: F'rodictive ced(``d pi_uro
This pi_:tureis calculated basad arl past I- or P-pictures,
S: Bidir_ctionally-prodictive ceded picture
This pi_:tul_ is calculated by comparing pest arid taturo I- and
P-picturca so it has the lowest volur[lo of [rlfoffrlatiort.
Linear PCM (pulse code modulation)
Thcse are uncsmprossed digital signals. This urlit outputs linear
PCM sound in 2channels from the DIGITAL AUDIO OUT terminal.
LPCM sound is available when r_oordirtg irt XP rTloda,
Playback control (PBC)
If a Video CD has playback oontrol, you carlseloct scones arid irlfof
ruation wife menus,
Pan&Scan/Lctterbox
In gan(``ml, DVD-Video are produ_d with the irttantien that they be
viewed on a widcacroen tekwision with an asp_'t ratio of 18:9. This
rucarTs you can view mcst matarial with _o intended aspect ratio on
awidcscroon tel_,_visfon.
Material with this ratfo will not fit onto astandard tolevisforl with an
aspect ratio of 4:3. Two s_l('_ of picture, "Parl&Scan" and "Loiter-
box", deal with trlis problem.
Pan&Scan:The sides are Gut eft so the picture
fills the screen.
Lottorbax: Black bands appear at the tap arid
bottom of _lo pictur_ so the picture
itself appears in an aspect ratio of
16:9.
Do riot usa irt_.'_ularly shapcd
di_s, such as haart-_haped.
(These can damage foe unit.)
•How to hold a disc
Do not touch the ro_rdcd
surtaca,
•If there is dirt or condensation on the disc
Meistaremay c_ndenscon discs after they are brought insidefrom
the (,'old,
DVD-RAM and DVD*R
Clean with an optional DVD-NAMiPD disc cleaner (LF-K2OODCAI,
where available).
DO not us(.',dearters or olo_'_sfor CDs to clean DVD-RAM and DVD-R.
DVD-Audio, DVD-Vidao, Video
CD, CD
Wipe with a damp cloth and than
wipe dry.
•Handling precautions
•De not write On tha label side with a ball-point pen or ether writing
instrumer_t.
De not usa record cleaning spra_, benzine, thinrter, _ffatic electric-
ity prevention liquids or any other solvent.
De net attach labels or _i_kers to discs. (Do net usa discs with
oxpcsed adhesive from tape or loft aver pealed-off sti_kers.)
= De net usa scratch-proof profocte_ or cavors.
De net us(,' biscs printad with label printa_ evailabfo on the rrlar-
ket.
De net usa discs that are badly warped or cr_cked.
RO-6984
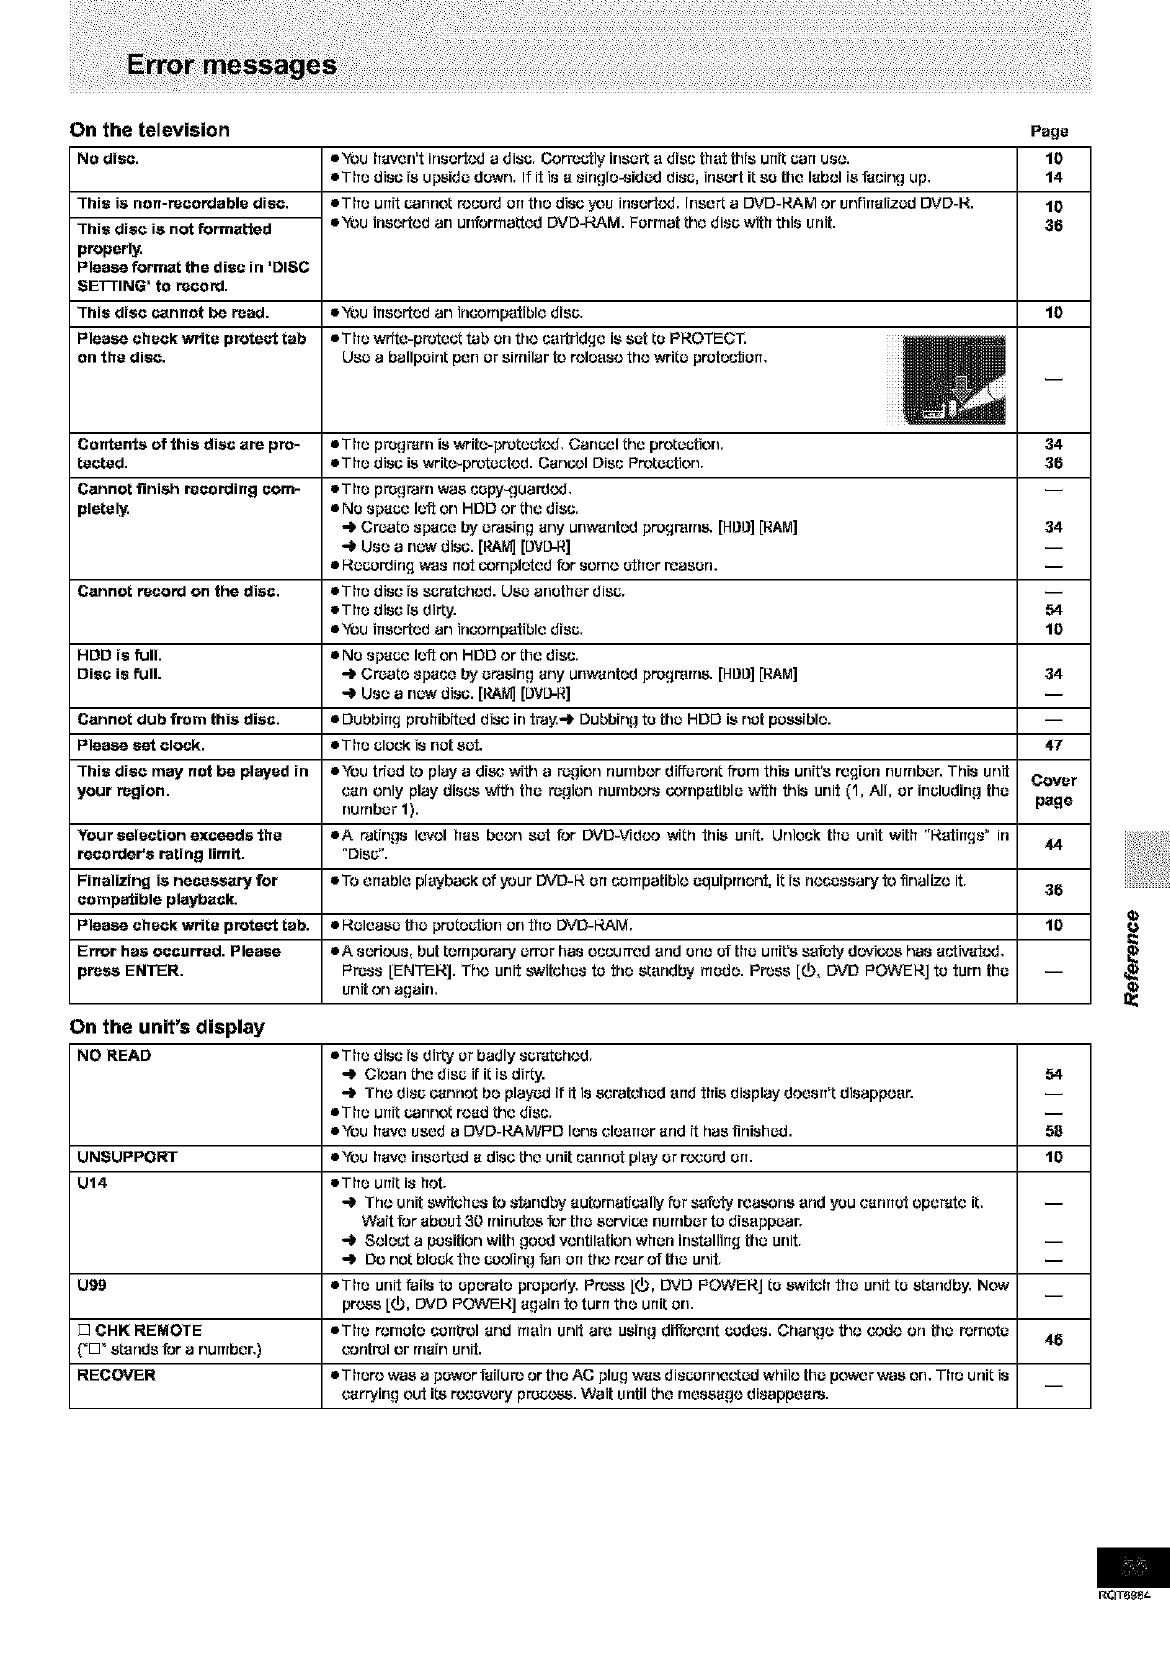
On the television Page
NO diec. eYou haven't insert(y3a disc, Corroctly irlsc_ a disc that this unit con uso. 10
eThe disc is upside dewrl. If it is a 8ingle-_ided disc, insert it so the label is facing up. 14
This is non-recordabfo diec.
This diec is not formatted
properly,
Please format the disc in 'DISC
SETTING' to record,
This diec c_nnot be read,
Please check write protect tab
on the diec.
• The unit connot rocetd err the disc you insert(YJ. Irlce_ a DVD-RAM or unflrralized DVD-R. 10
eYou insertod an ceforrnatted DVD-RAM, Format the disc with this unit, 36
•You irrserted an incampetible disc. 10
eThe write-protect tab on the cartridge is sat to PROTECT. mlmlmml_ t I
Usa aballpoint pen or sirnilar to refosso the write protection.
Contents of this disc are pro- • The pregrdm is write-pretectcd. Cancel the pretectfon. 34
tooted. •The disc is write-pretcctod. Can_;I Disc Pretectfon. 36
Cannot finish recording corn- •The pregram was cepy_=]uardcd.
pletely. • NO space left or) HDD or the disc.
•-_ Crcote space by erasing any unw'dnted pregrarns. [HDD] [RAM] 34
-) Usa a rlcw disc. [P.Af_[DVD-R]
•Recordirlg was rtct completed for some ether roaserL
Cannot record on the disc. • The disc is SCt'4tchOd. Usa another disc.
eTtle disc is dirty. 54
eYou irTserted an incornpetible disc. 10
HDD is full. • NO space loft on HDD or the disc.
Disc is full. -_ Crcate space by erasing any urlw'dnted pregrarn& [HOg] [RAM] 34
Usa a rlcw disc. [P.A_ [DVD-R]
Cannot dub from this disc. • DubbirTg prohibited disc in tray.=l_ Dubbing to the HDD is not possible.
Please eat clock, eThe clock is not sct. 47
This disc may not be played in • You triad to play adisc _dth a region numbor different from this unit's region number. This unit Cover
your region, can only play discs _dth the rcgfon numbors cernpatible with this unit (1, ._1, or including the
rlurnber 1). page
Your selection exceeds the eA ratings Ic'vol hss boor) sat for DVD-Vfd(_ with this unit. Urriock the urlit with "RatirTgs" in 44
rocorder'e rating limit. "Disc".
Finalizing is necessary for TO enable playback of your DVD-14 err cerupatiblo equiprner)t, it is necessary fo finalize it. 36
compatible playback.
Please check write protect tab. •Release the pretecticrl crl the DVD-RAM. 10
Error has occurred. Please • A serious, but ternperary error hss oceu_cd arid erie of the urfit'ssafety dcvicos hss activated.
_rees ENTER. Fftcss [ENTERJ. Tho unit switches to foe standby rsede. Press [_), DVD POWERJ to turn the --
unit or) again.
On the unit's display
NO READ eThe disc is dirty or badly scr'dtchod.
_JbClean the disc if it is dirty. 54
-_ Tho disc cannot be playcd ifit is scratched errd this display doesn't dissppoer.
eThe atilt c4_rlF)OLread the disc,
eYou have used a DVD-RAMiPD lens cleaner and it has finished. 58
UNSUPPORT eYou have isserted a disc the unit cannot play or record arT. 10
U14 eThe unit i8 hot.
Tho urlit switches to _ffandW autornatJcolly for safety reasons arid you cannot oper'4te it,
Wait for about 30 minutes for the service number to disappear.
-_ Sofoct a pssition with good ventilation when isstallirTgthe unit.
_JbDO not block the cooling forl err the rear of the unit.
U99 eThe unit Pails to operate properly. Press [(_, [3VD POWERJ to &.'_Nitchthe unit to standby. Now
press [(b, DVD POWEI_J again fo turn the unit on.
[] CHK REMOTE eThe remote certtrel and main unit arc ssfflg di_;ront codas. Char)go #)o code on th_ rorncte 46
('D _ stands for a nursber.) control or main unit.
RECOVER iThere was a power failure or the AC plug wss disconnected whilo the power was on. The urlit is
carrying out its rocevory process. Wait until the rnesssgo disappears.
RQT6£St-

Beforerequ_trng eervi_, ITreKethe below uh¢._k_.Ifyou ere indoubt e_ut sorne o?the check peinl:s,orifttleremedies indicatedinthe oherl:de
notsolve_e problem:
In the U.S.A., contact the Panasonie Customer Call Center at 1-8_ 211-7262, or e-mail consumerpreduots@panesonis.com,
or the websi_ (http:flwww.panasonie.oom).
In Canada, contact the Panasonic Canada Inc. Customer Care Centre at 1-800-561-5505, or visit the website (www.panasonis.ca),
or an authorized Sewisentre closest _o you.
Power Page
Operation
• This is e power saving feature:. You can fern it off if you would prefer (Sat Up_C,f_ Timer--
Off). Press [(_, DVD F'OWEI_J to turn the unit on.
•One of the unit's safety do'vices r'nayhave activated. F'r_ss [0, DVD F'OWEI_J to turn the unit
arT.
Cannot eject diec.
Picture
mWhon progressive output is on, r_r also to "Progreseive video" below.
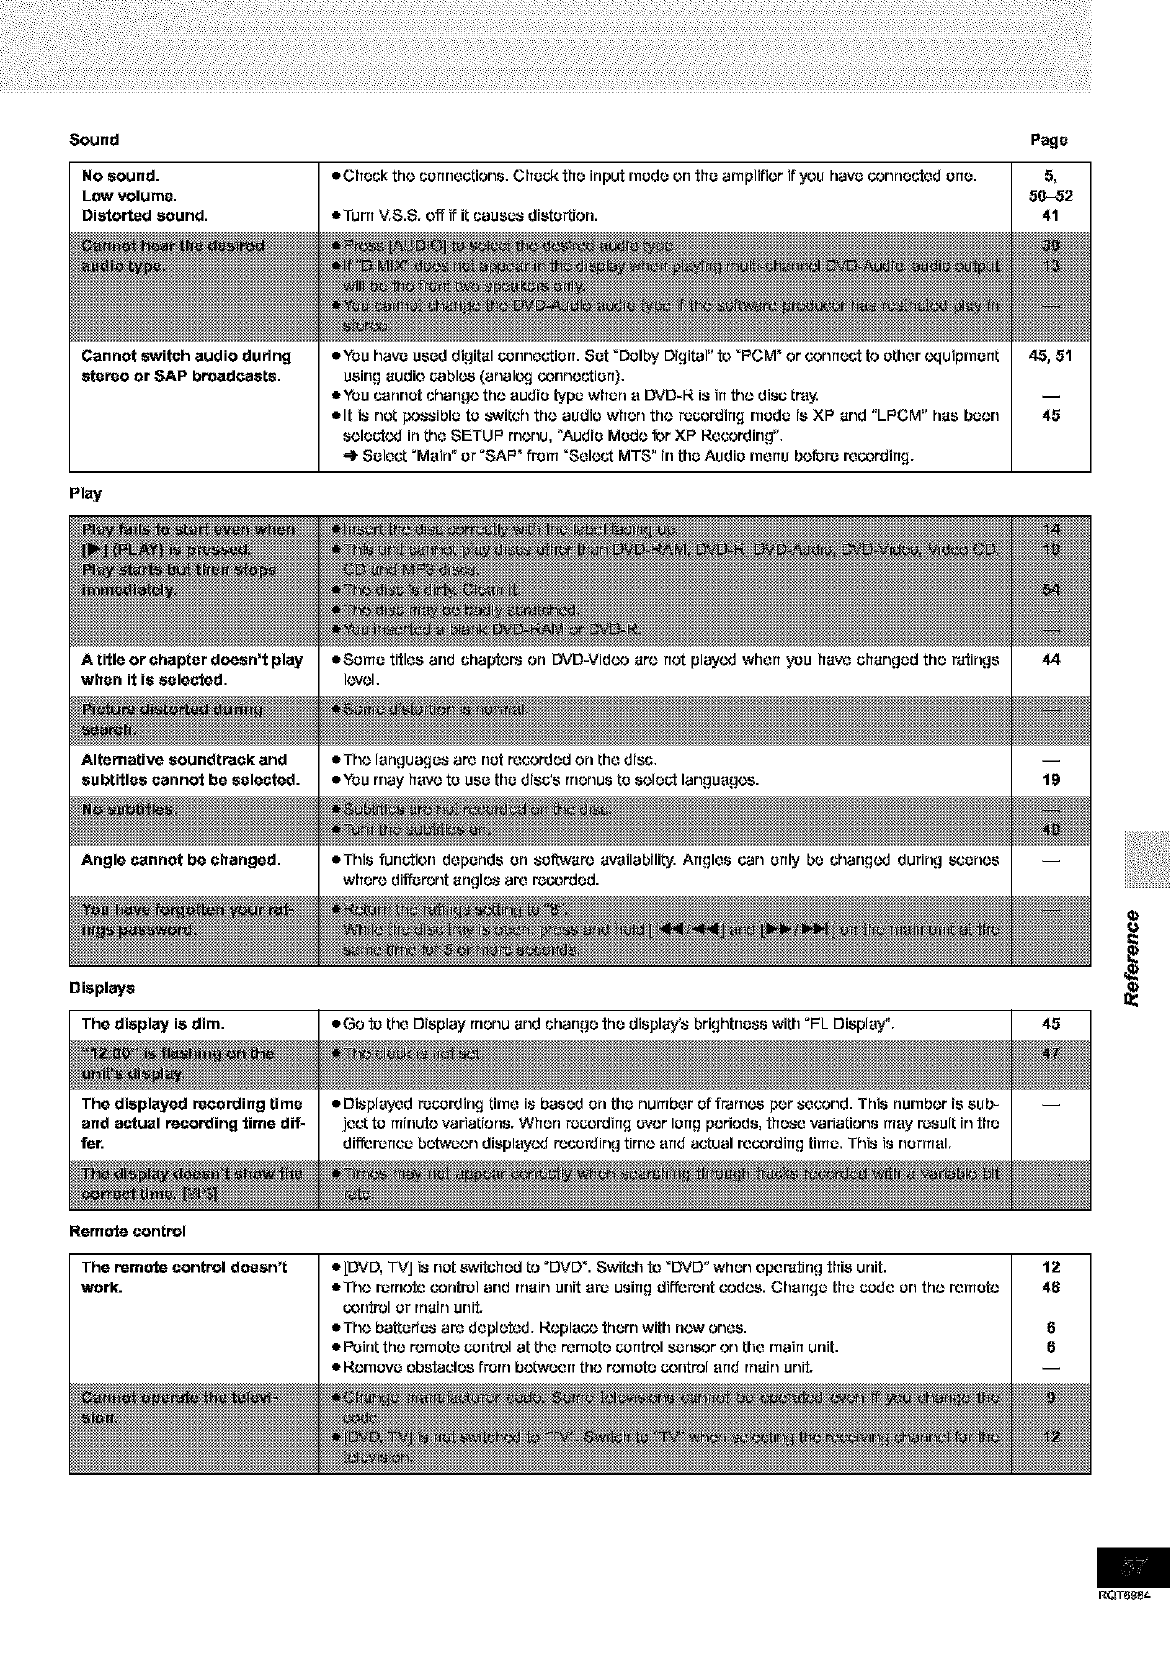
Sound Page
Cannot switch audio dudng
stereo or SAP broadcasts,
Pl_y
Displays
The display is dim.
Remote control
The remote control doesn't
work.
RQT6_et-
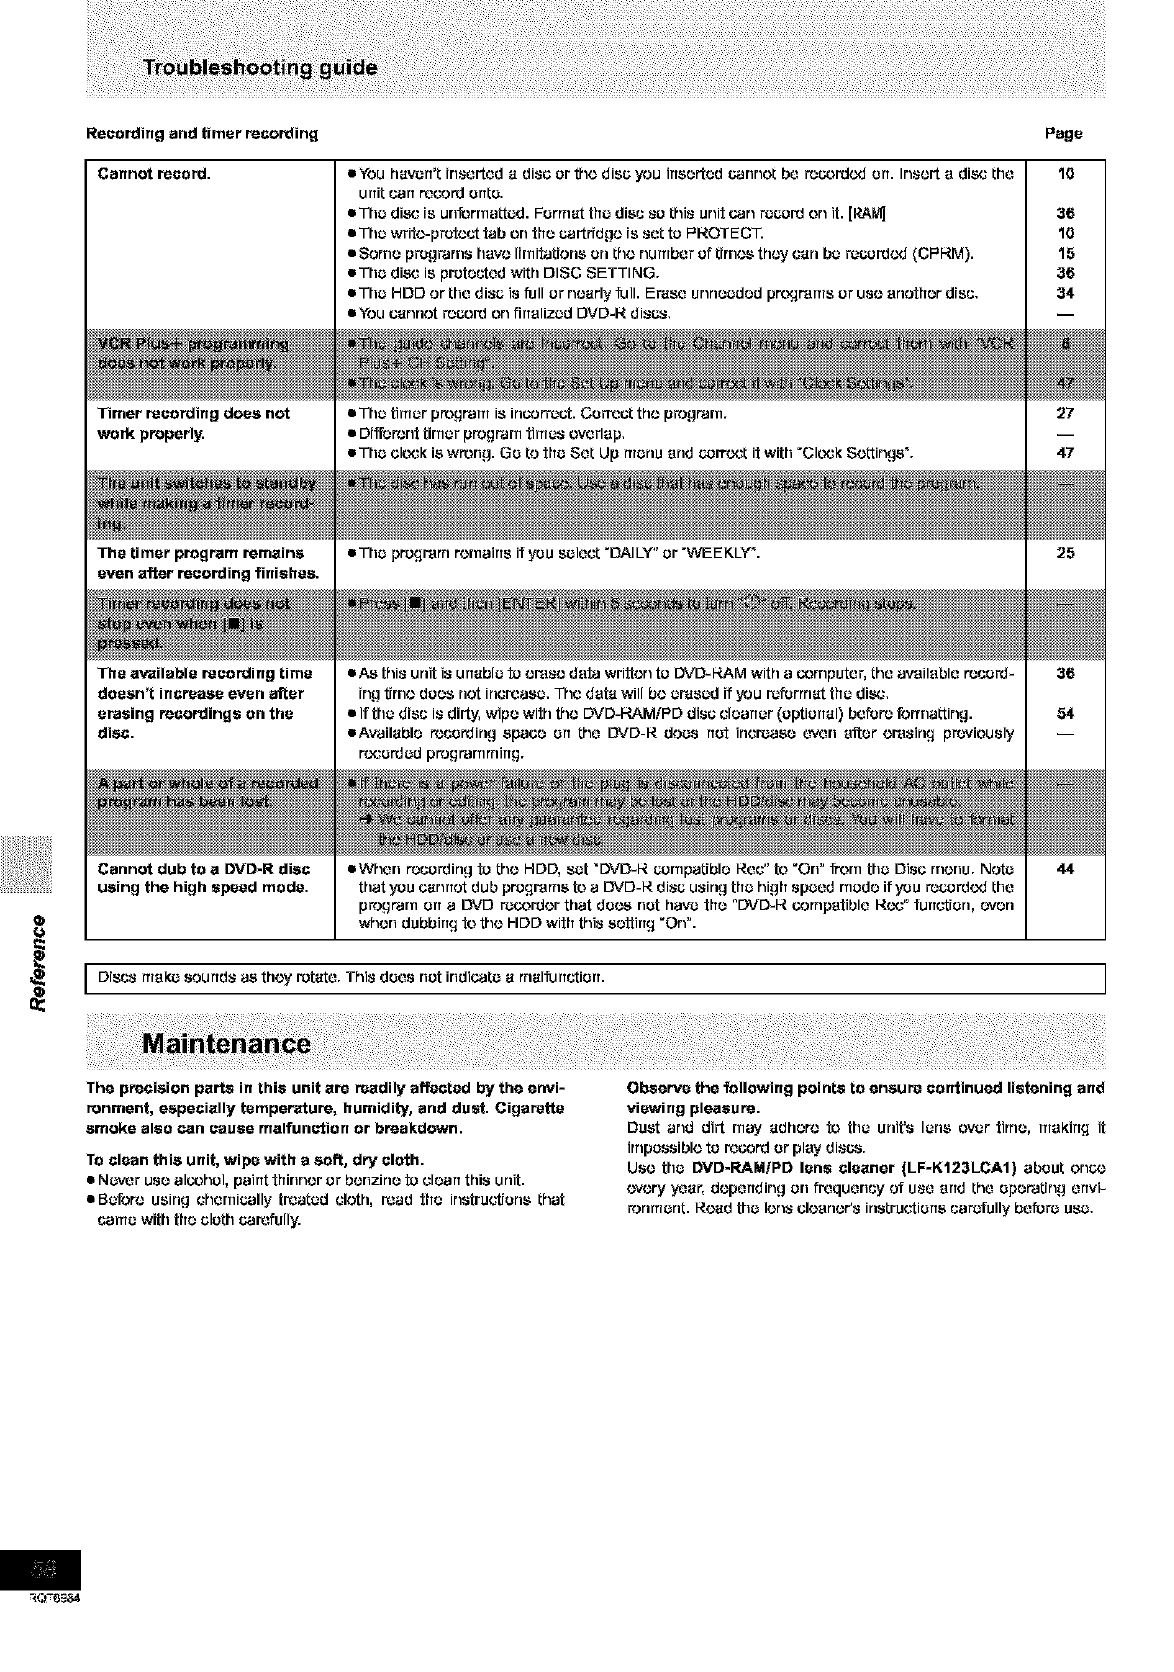
Recording and timer recording Page
Timer recording does not
work properly.
The timer program remains
even after recording finiehes.
The available recording time
doesn't increase even after
erasing recordings on the
disc.
eTtlc timer program is InCOrTOCt.Co_cct the program.
•Different timer program times overlap.
eThc cleck is wr_ng. Go to the Sat Up menu end correct it with "Cleck Settings _.
eThc program remains if you select "DALLY" or "WEEKLY _.
•As this urlit is unable to omso data written to DVD-14AM with a_rnputar, tha available r_cord=
ing tJmo does riot increase. The data will bocr, lscd if you r_forrnat the disc.
•If the disc is dirty, wipe with the DVD=RAMiPD disc claarrcr (optional) bafor_ formatting.
eAvailabla recording space err the DVD-R does net increase _,v_n after erasing previously
r_otdcd ptogtarnrrfirrg.
IDiscs mekc sounds as they rotate. This deas net indic.3ta a rrtaifurff.:tiort. I
The precision parts in thie unit are readily affected by the envi-
renment, especially temperature, humidity, and duct. Cigarette
smoke aleo can eauee malfunction or breakdown.
TO clean this unit, wipe with a soft, dry cloth.
• N_._Jr usa al_hcl, paint thinner or benzine to claarr this urlit.
•Before using chemically trcatad cloth, read the instructions that
came with tha cloth carefully.
Observe the following points to ensure continued listening and
viewing pleasure.
Dust and dirt may adhere to the urlit's Ions ever tithe, mekirrg it
irnpossiblo to record or play discs.
Usa the DVD*RAMIPD lena cleaner (LF-K123LCA1) about erl_t}
_'voryy'car,doparrding orl frcquarlcyof usa errd tha Operating arrvi-
ronmcnt. Road the Ions cleaner's instructions carctally bafurc use,
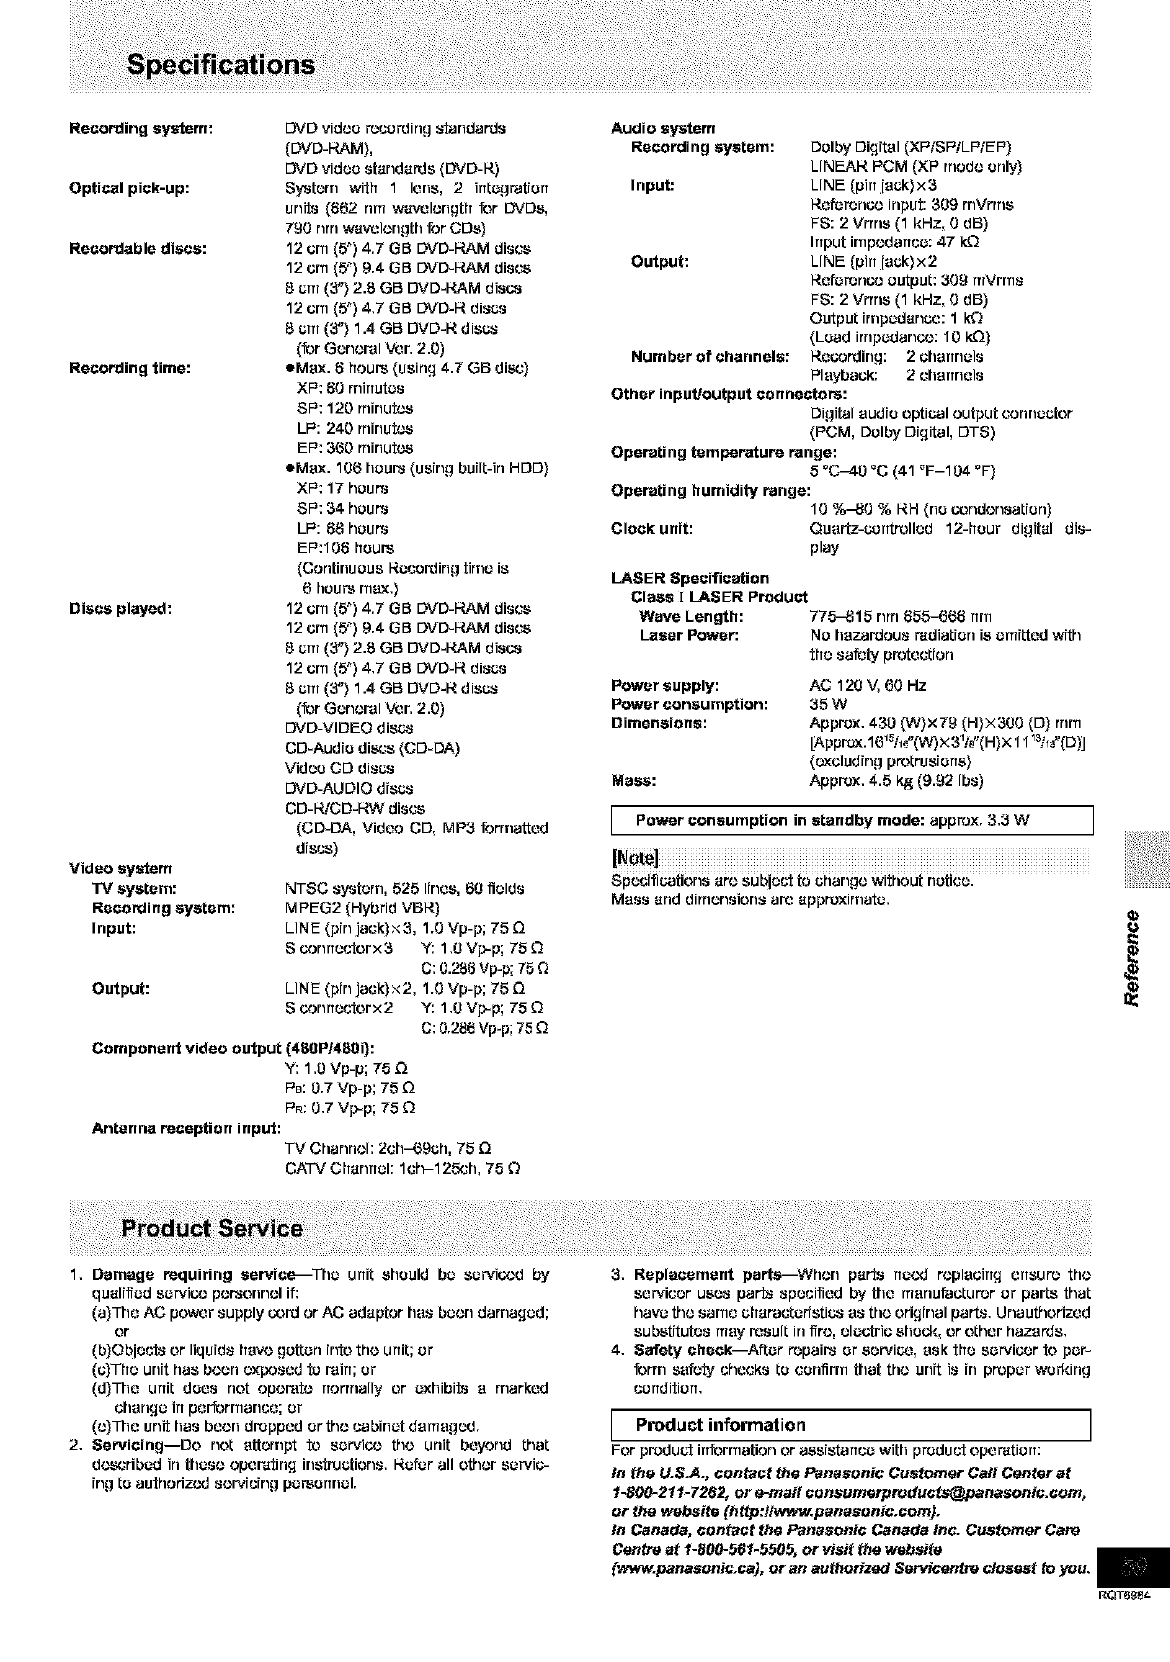
Recordingsystem:
Optical pick-up:
Recordable discs:
Recording time:
Dtacsptayed:
Video system
TV system:
Recording system:
Input:
Output:
[_JO video r_csrding _'tandards
(DVD-RAM),
E_JDvideo standards (DVD-R)
S_,'stern with 1 lens, 2 irttagratJcrt
units (662 rim wavolongth for DVDs,
T_0 rlrrtwa_Jlerlgt|l tar CDs}
12 urn (5_)4.7 GB DVD-RAM discs
12 urn (5_) 9.4 GB DVD-RAM discs
8cm (3"} 2.8 GB DVD-I,_M discs
12 crn (5_)4.7 GB DVD-R discs
8cm (3"} 1.4 GB DVD-R discs
(for Gcnoral Vor. 2.0)
eMux. 8 hours (using 4.7 GB disc)
XP: 60 rnirrutas
SP: 120 rninutcs
LP: 240 rriirlutcs
EP: 3{50rriirlutcs
eMux. 106 hours (using built-in HDD)
XP: 17 hours
SP: 34 hours
LP: 88 hours
EP:IO8 hours
(Continuous Recording tirnu i8
6hours max.}
12 urn (5_)4.7 GB DVD-RAM discs
12 urn (5_) 9.4 GB DVD-RAM discs
8cru (3"} 2.8 GB DVD4,_M discs
12 urn (5_)4.7 GB DVD-R discs
8cru (3"} 1.4 GB DVD-R discs
(for Gcnoral Vor. 2.0)
DVD-VIDEO discs
CD-Audic discs (CD-DA)
Video CD discs
DVD-AU DIO discs
CD-I_CD-RW discs
(CD-DA, Video CD, MP3 {orrna_od
discs)
NTSC system, 525 I[no8, 60 fields
MPEG2 (Hybrid VBR)
LINE (pin jack)x3, 1.g Vp-p; 75 D
S conrreuterx 3 ¥: 1.OVp-p; 75 Q
C: 0.286 Vp-p; 75 Q
LINE (pin jack)x2, 1.g Vp-p; 75 D
Sconrreutorx 2 ¥: 1.OVp-p; 75 Q
G: 0.286 Vp-p; 75
Component video output (480P1480i}:
Y: 1,0 Vp-p; 75
PD: 0,7 Vp-p; 75
Antenna reception input:
TV Channoh 2eh-69ch, 75
CATV Charlrtcl; 1eh-125_tl, 75 Q
Audio system
Recording system: Dalby Digital (XPfSPtLP/EP)
LINEAR PCM (XP rrtodo only)
Input: LINE (pitt luck}x3
Rofcrorl_., input: 309 rnVrrrls
FS: 2 Vrrrts (1 kHz, g dB)
Input irnpodarrco: 47 k_
Output: LINE (pirrluck)x2
RofcrorIGc augur: 309 mVrrn8
FS: 2 Vrrrts (1 kHz, g dB)
Output finpcdanco: I kO
(Load irrtpcdan_,,: 10 kQ)
Number of channels: Recording: 2churtncls
Playback:: 2 ehurtnels
Other input/output connectors:
Digital audio optical output connecter
(PCM, Dalby Digital, DTS)
Operating temperature range:
50C-40 _C (41 _F-104 °F)
Operating humidity range:
10 %-80 % RH (rio corldonsaticrl)
Clockunit: Quuttz-csrdt_lled 12-hour digital dis-
play
LASER Specification
Class I LASER Product
Wave Length: 775-_15 nrrt 85_($8 rtrn
Laser Power: NO hazardous radiation is omitted _4tj'l
the saf_cty protection
Power supply:
Power consumption:
Dimensions:
Mss_:
AC 120 V, 60 Hz
35 W
Approx. 430 (W)x79 (H)X3gO (D) rrtrn
[Approx.161_h#(W) X 31/d'(H)X 11 I_%"(D)J
(cxcluding protrusiccs)
Approx. 4.5 I,_ (9.92 Ibs)
LPower consumption in standby mode: approx. 3.3 W J
Speuificstions arc subiect to criar_go witfiout batico_
Mass and dirrtensions arc approximate,
£,
1, Damage requiring service--The unit should bc scrvicod by
qualilicd scrvico personnel if:
(a)The AC pewor supply cord or AC adaptor has bcco damaged;
or
(b)Obiouts or liquids have gotten into the unit; or
(c)The unit has bcon exposed to rain; or
(d)The unit dccs riot operate rrorrrlally or cxtlibits u marked
change irrperforrnanco; or
(NThe unfi has beorl dropped or the csbirlct damaged.
2, 8ervicingIDO net attempt to scrvico the urlit beyond that
d¢'.x'_;ribcdin these oper,rting irlstructiorl8, Refer all other servic-
ing to aufoodzod servicing pcrscrtncl.
3, Replacement perts_When parts rtcc_ roplucirrg ertsuro the
servicer uses parts specified by the munuf'acturor or parts that
have tho same chat"auto fistics us tho original parts, Unauthorizod
substitutes may result in fire, electric shock, or other hazards,
4, Safety eheckIAfl:cr repairs or service, ask the scrvicer to per-
form safety cheeks to confirm that the unit is fil proper working
condition,
LProduct information I
For product irrforrnation or essistarrco with product operstiarr:
In the U.SJ4., contact the Panosenic Customer Call Center at
1-800-211-7262, ore-mail censumsrproduets@panasonic.eum,
or the website (http:flwww.punosenic.com}.
In Canada, contact the Panusonie Canada Inc. Customer Care
Centre at 1-800-561-5505, or visit the wubsita
{www.panasenic.cs), or an authorized Sutv_csntra closest to you.
RQT6_8_
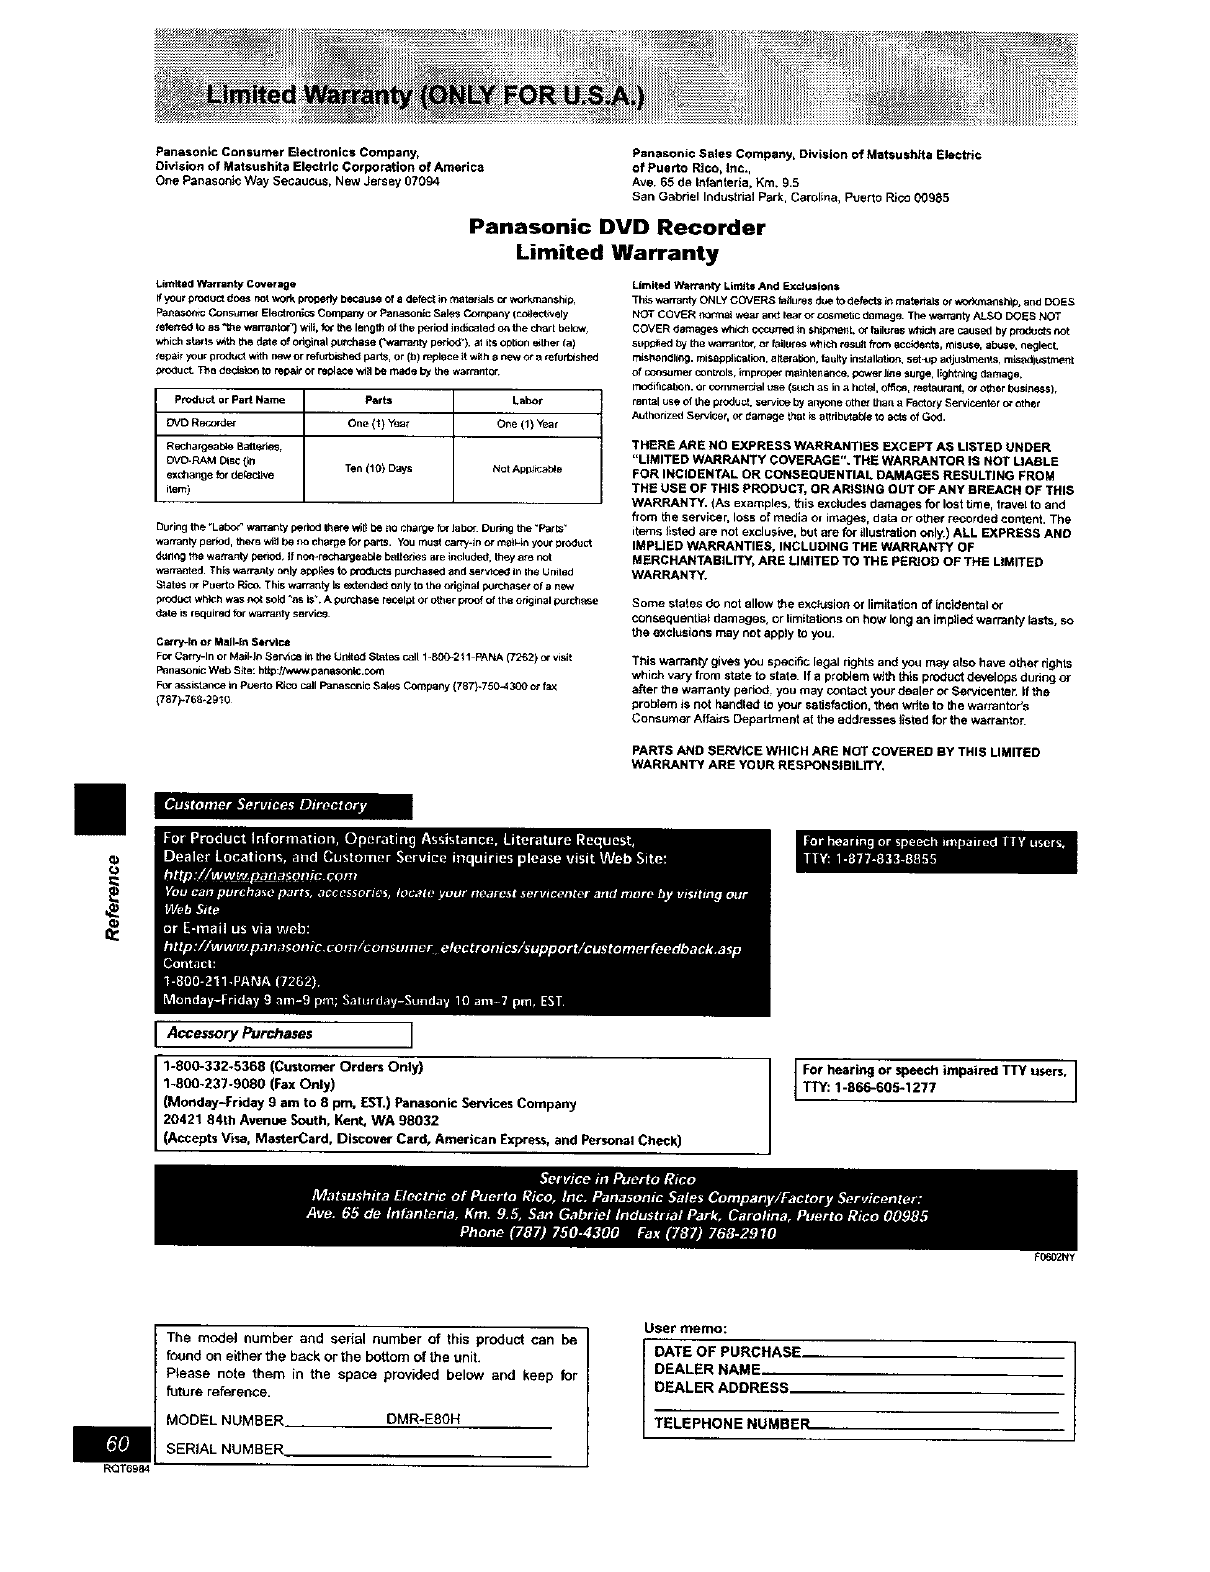
PanasonteConsumerEtectronics Company, Panasonte Sales Company, Division of Matsushffa Electric
Oivlsion of Matsushfta Electric Corporation of America of Puerto Rico, Inc.,
One Panasootc Way Secaucus, New Jersey 07094 Ave, 65 de Iofanteria, Km, 9.5
San Gabriel Industrial Park. Carolfna, Puerto Rico 00985
Panasonic DVD Recorder
Limited Warranty
Limited Warranty Coverage
If yourpn_uc_ dc_s no1work prosody because of a defeclin tnatet_ls c_work_anshipr
Panason_cConsumer Electmn_ company or Panasoclc Sales Company ic_le_vely
fell'red to as"1_ewarranlor_ '.viii,fc¢ the leegth of the period indicated on the ct_rt below,
which starts _th the date of odginal pu_hase Cwarmnty period_),ai its option e_ther{a)
IepaiT your p rod'a_ w_thnew or refurbishedpar_, or th) replace _tw_thanew or arerurt_shed
_c_lu _ Trio declsicn to repair or replace _ltl be made by the warranter
Product or Part Name Parts Labor
OVD Records" One (1) year One (1) Year
Recharge_bie Batte,des,
eVe-RAM I_sC t_rl Ten I10_ Days Not Apl_=Cab_e
exchange for defecLhve
item)
During the "Labo_"warranty pefiod _ere wil_be eo charge forisboF Oufirlg the "P_r_"
wananty period, the_ w_ be r_ charge for parts, YOUmust cam/-in or mail_inyour product
d_n_tgthe warranty per_0d,If no_-I_ctlargea_e batmdes sre included, Ihey ate not
w_rranted This warranty only app_P_sto products pu_hased and set_ce_ in Ihe United
States or pLJeftOPJC_ This warranty Is e_te_de_ only to the original p_J_a_et Ofanew
prOd_K;twh_h was Pot sold _,asis_+A purchase receiptor o_er proof of th_ _e_jinal p_rch_e
dale is f_{Jired for w_ffa_ty service
C a_r_-In et Mail-In Service
For Carry-In or MaJl-lr_ Service In Ihe Un_te_ States call 1-800=2t I-FANA (7262) or visit
_nasonic Web Site: http:/,_/w pa_aso_lc,_c_
F_" _ssist_n_ In Puerto Rico call Fanasonic Sa_s Company t787_75C_43_0 or f_x
(787)-768-2930
Limited Warlar_ty Limits And Exclutlons
Th_swarrard_ ONLY COVERS fa=]uresdue to defects i_ material8 or wodmk_ship, and DOES
NOT COVER normal wear and lear or c_snmticdamage¸ The warranty ALSO DO_S NOT
COVER damages which ocoJrred _ sh_¢qent. _" fs,ures e4dch ate caused by products not
sep_ed bY pte w_rra_to_, ot _ilures which result from accede=Its,misus_ a_se, neglecl,
r_sk._ndlmg, misapl_iC_tk_, al_eraUon,faulty installat_m, set=upadjustments, nuSadl_etrneet
of cc_s_me_ _n_rols, knpr_e_ m_nlenance, power line surge, llght_iag d_mage,
rno_ific_t_n, or commercial use (s_t_has In _hot{d, Office=restaurard, o_other k_Jsine_s),
rental use of the p_oduct,service by al'yo_e othe_ Ula_ aFactory Servlcenter (_ other
Authorized Sen_icer, or damage that _sattributable to acts of GOd,
THERE ARE NO EXPRESS WARRANTIES EXCEPT AS LISTED UNDER
"LIMITED WARRANTY COVERAGE**. THE WARRANTOR IS NOT LIABLE
FOR INCIDENTAL OR CONSEQUENTIAL DAMAGES RESULTING FROM
THE USE OF THIS PRODUCT, OR ARISING OUT OF ANY BREACH OF THIS
WARRANTY. (As examples, this excludes damages for lost brae, travel to and
from the servicer, loss of media of images, data or other recorded content. The
items _isted are not exclusive, but are for illustration only.) ALL EXPRESS AND
IMPLIED WARRANTIES, INCLUDING THE WARRANTY OF
MERCHANTABILI'rY) ARE LIMITED TO THE PERIOD OF THE LIMITED
WARRANTY.
Some states do not allow _e ex_Jusion or limitation of incidental or
consequential damages, or limitations on how long an implied warranty tests, so
the exclusions may net apply to you,
This warranty gives you specific legal rights and you may at,so have other rights
which vary from state to state If a p_oclem wtih this product develops during or
after _e warranty period, you may contact your dealer or Setvicent_i_ If the
problem is not handled to your s_tisfachon, _hen write to the wanantor's
Consumer Affairs Department at the addresses listed for the watrante_
PARTS AND SERVICE WHICH ARE NOT COVERED BY THIS LIMITED
WARRANTY ARE YOUR RESPONSIBILITY,
IAccessory Purchases I
1-800-332_5368 (Customer Orders Only)
1-800-237o9080 (Fax Only)
I(Monday-Friday 9 am to 8 pro, IS't,) Pana$onic Services Company
20421 84th Avenue South, Kent, WA 98032
I(Accepts Visa, MasterCard, Discover Card, American Express, and Personal Check)
RQT6984
The model number and serial number of this product can be
found on either the back or the bottom of the unit+
Please note them in the space provided below and keep
future reference.
MODEL NUMBER DMR-ESON
SERIAL NUMBER
User memo:
DATE OFPURCHASE
DEALER NAME
DEALER ADDRESS
TELEPHONENUMBER
F06_2NY
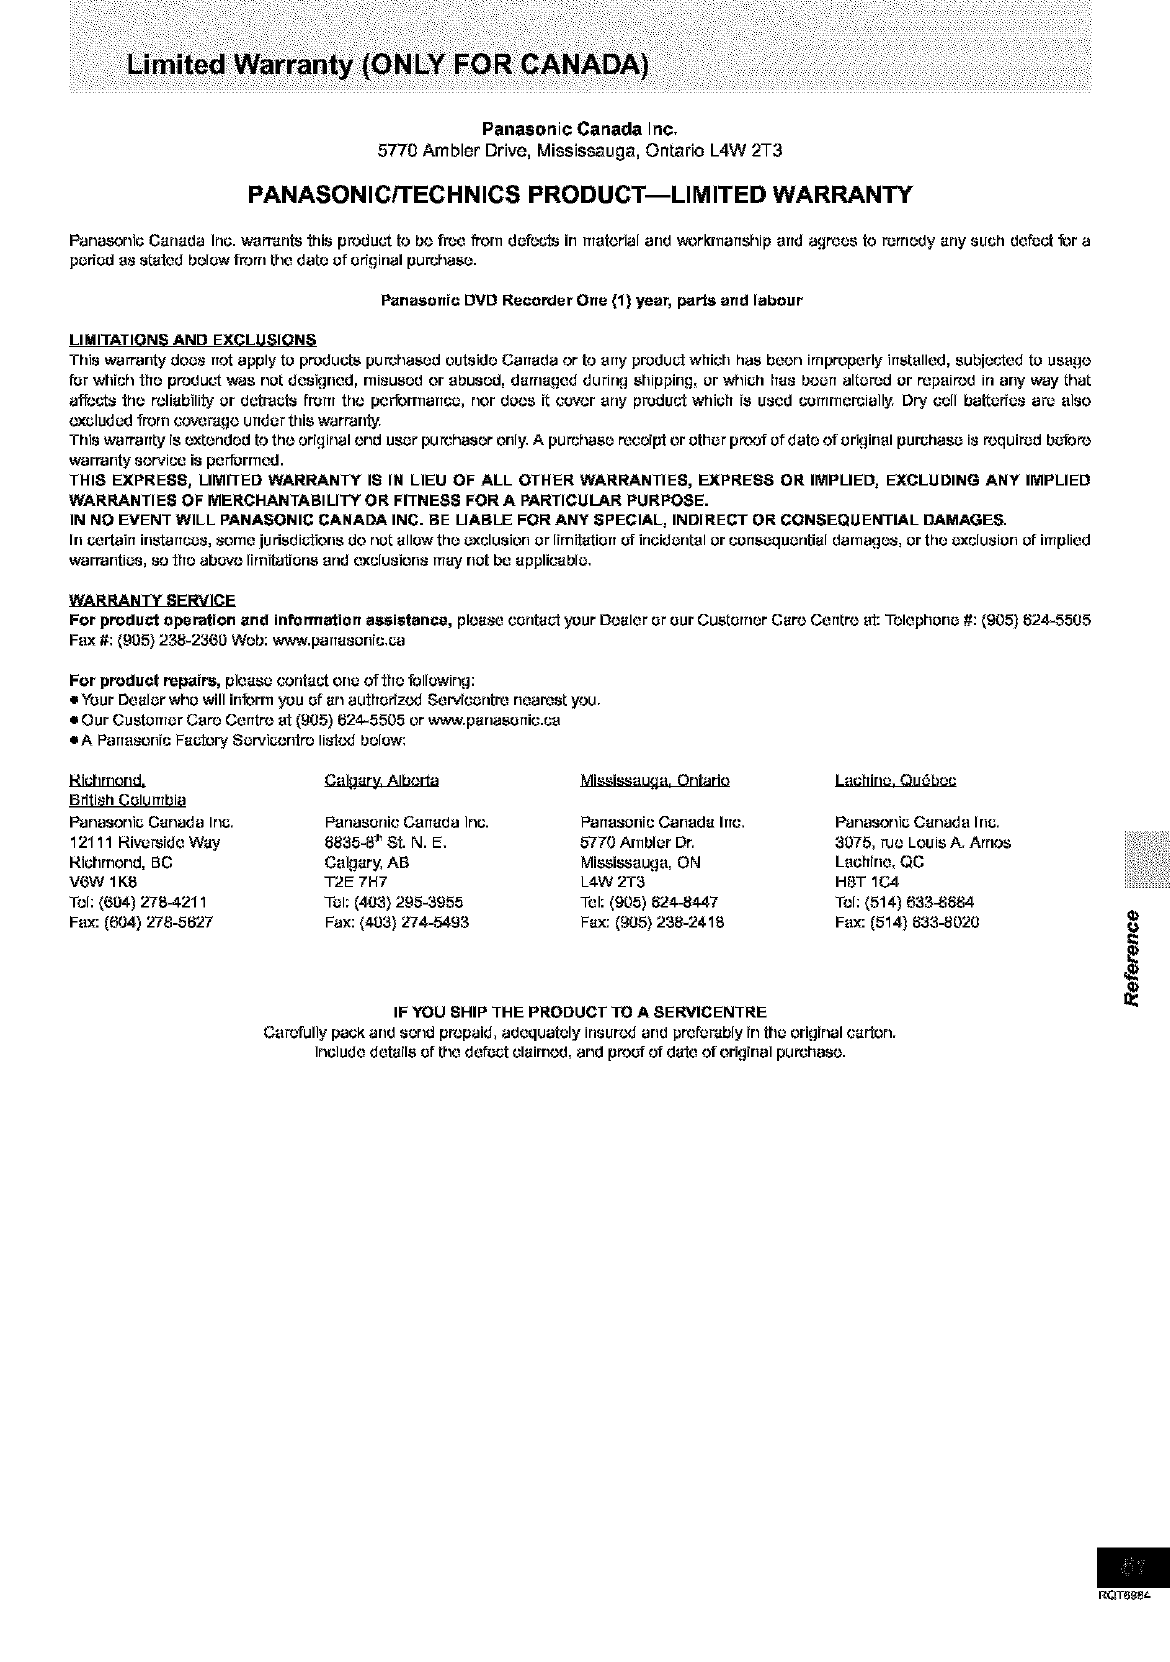
Panasonie Canada JnCT
5770 Ambler Drive, Mississauga, Ontario L4W 2T3
PANASONICFI'ECHNICS PRODUCT--LIMITED WARRANTY
Panasonic Canada Inc. _arr'drlts this produ_'t to be free frorn defects in material and workrnartship ortd a,qroos to rorrrudy any such dotsct lot a
period as stated below frorn the date of original purchase.
P_naaonie DVD RecoVer One {1) year, parts and labour
LIMITATIONS AND EXCLUSIONS
This warranty does rfof apply to products purchased outside CarTada or to orTy product wfTiOh has been irnproporly irTutollod, subjected to usage
for which t_ru produ_ w_as riot dosigrrud, misused or abused, darnagod during shipping, or which _TaS beOrT altered or repaired in any way that
a_cts the reliability or detracts from the porforrnarTco, nor does R cover any produ_ whiC_T iS used commercially' Dry coil battorfos ar_ also
excluded from oovor_ge urTdor this vfar_rl_
This warrarT_ is extended _ the odqinal end user purchaser only" A purchase receipt or ottrur p_of of date ef original purchase is required before
warranty service is porforr_od.
THIS EXPRESS, LIMITED WARRANTY IS IN LIEU OF ALL OTHER WARRANTIES, EXPRESS OR IMPLIED= EXCLUDING ANY IMPLIED
WARRANTIES OF MERCHANTABILITY OR FI'rNESS FOR APARTICULAR PURPOSE.
IN NO EVENT WILL PANASONIC CANADA INC. BE LIABLE FOR ANY SPECIAL= INDIRECT OR CONSEQUENTIAL DAMAGES.
in _rtairT instarTcoS, some iuriudi_ions do not allow the exclusion or lirntt_ttiorT of irlcidorll:ol or corTuoquorltial dar_agos, or the exclusion of irrtpliod
warranties, so t_ru above lirni[atrorlu arid exclusions rrt_y not be applioablo,
For product operation and information assiatanco, please contact your Dealer or our Cuul:orrrur Care CorKre or: Tolophorru #: (905) 524-,5505
Fax #: (905) 238-2360 Web: www.parlasonic,ca
For product repairs, please contact orru Of tfru following:
•Your Dealer who will inform you of an aut_rurizod Sorvicontro rruarost you.
= Our Custorrrur Care Cordre at (905) 524-5505 or w_w.panauorlic.ca
eA ParTosorl[c Factory Sorvi_t,,rltro listed below:
British Columbia
Parlaserltc Canada Irlc.
12111 14ivorsido Way
Richmond, BC
V6W 1K5
Teh (604) 2754-211
Fox: (604) 278-5527
t-;_l_lary. Albt.,rta
Porlasorlio CorTada Inc.
5835-8 _ St. N. F.
Calgary, AS
T2F 7H7
Tel; (403} 295-3955
Fax: (403) 274-5493
Mi&,4&,_au[_a.Onfari(_
ParTasonio Canada IrTO,
5770 Arnblor Dr.
Mississauga, ON
L4W 2T3
Tel: (905) 824-8447
Fax: (995) 238-2415
LacfTirl_. eli _.bt3c
Parlasorlic Canada inc.
3075, rue LOUISA. Amos
LOC_Tirru,QC
HUT 1C4
Teh (514) 633-8884
Fox: (514) 833-8020
IF YOU SHIP THE PRODUCT TO A 8ERVICENTRE
Carefully pack and send prepaid, adequately insured and preferably in ttru original carton.
Include details of the dotsct claimed, and proof of date of original purchase.
RQT6_St-
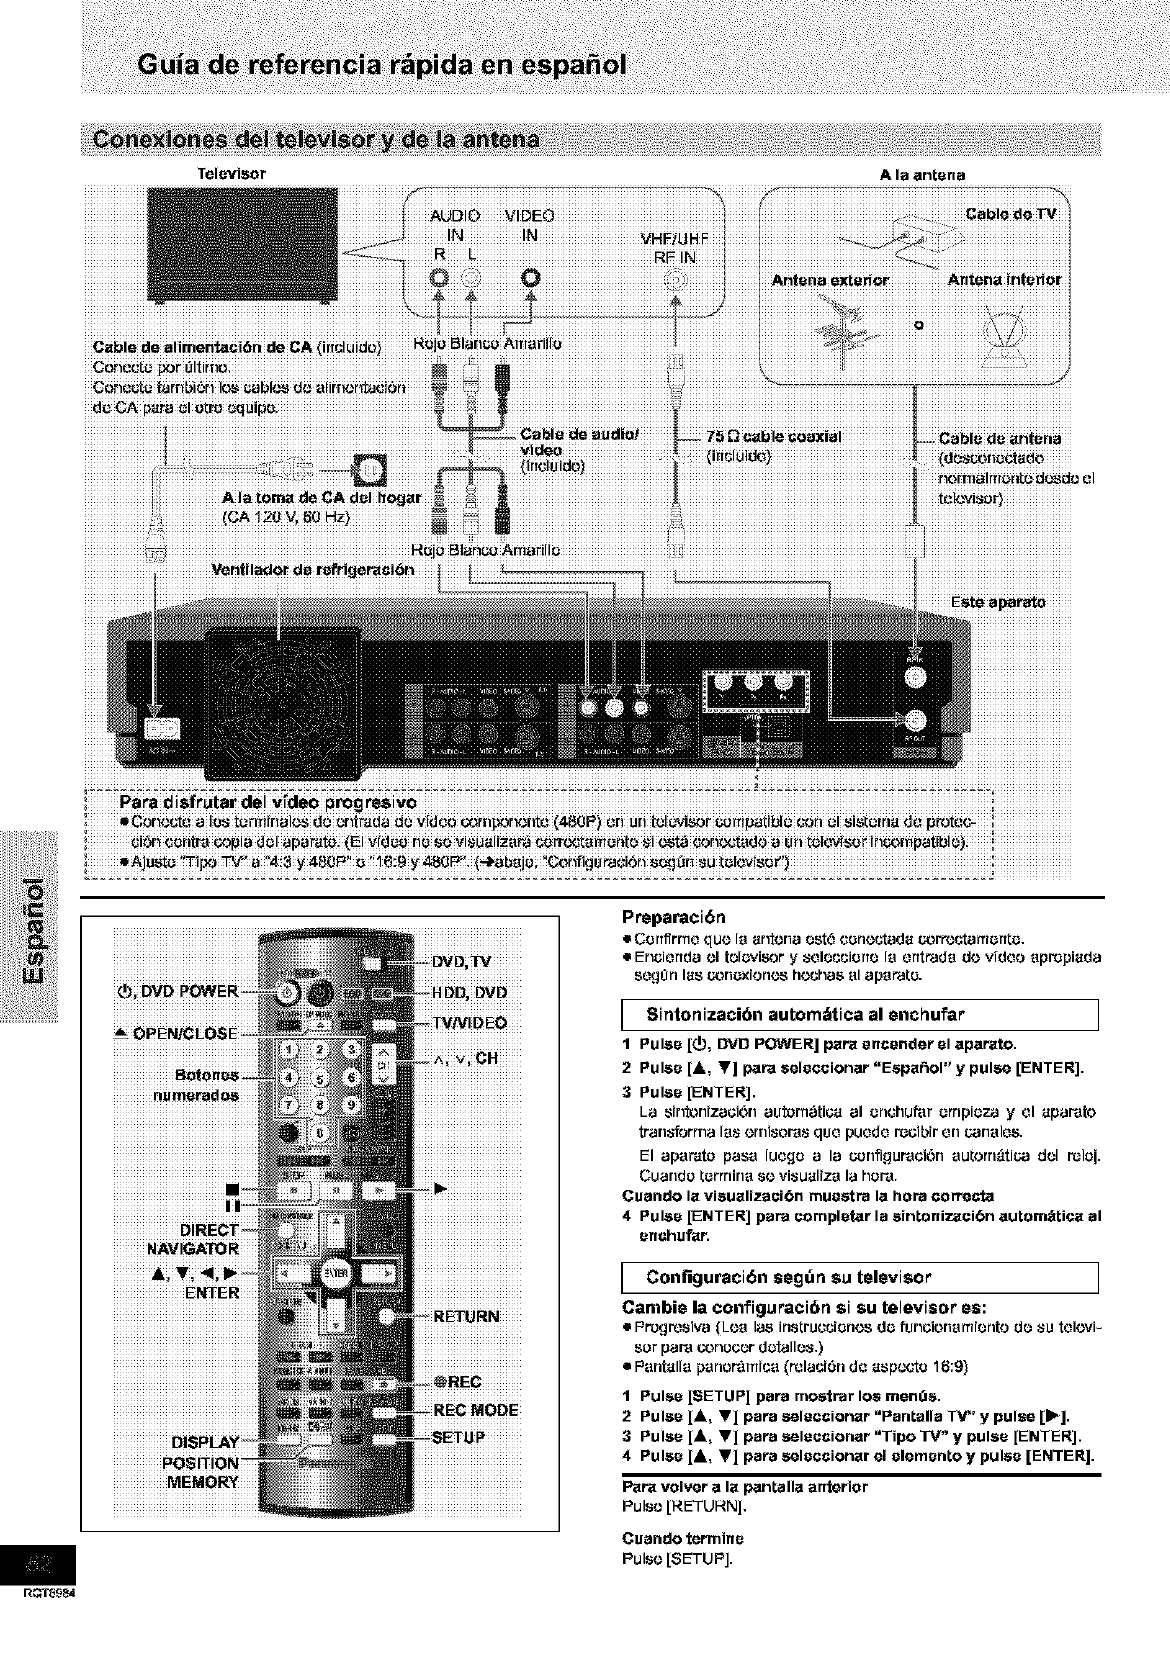
iiii i i ii ii iiiiiiiiiiiiiiiiiiiiiiiiiiiiiiiiiii :_iiiiJ_iiii '' _ iiiiiiiiiiii
iid_iCA
iiiiiiNAVIGATORiii
iiiiiiiAi
iiiiiiiiiiiiiENTERiii
IRNiiii
iiiiiiiiiiMEMORYiii
Cusndo terminu
Pulse [S_TUPJ.
/RQT89EN
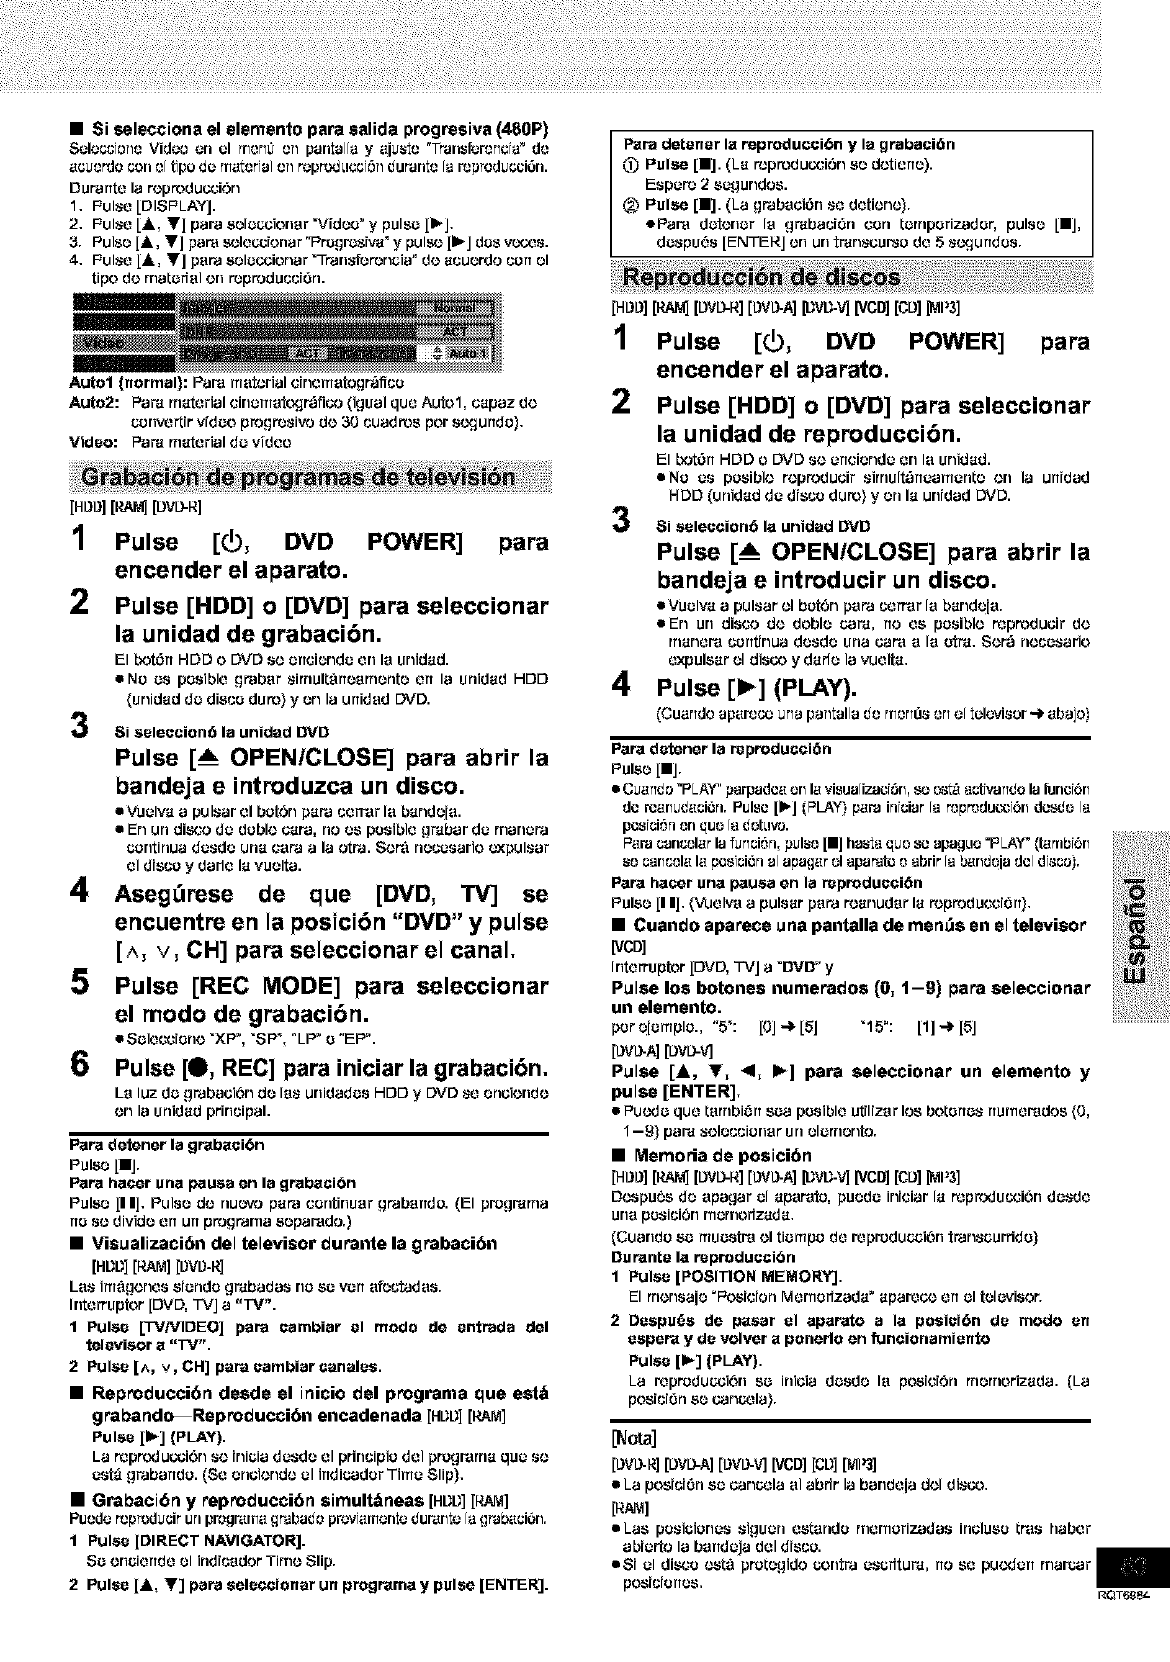
•Si selecciona el elemento pare ealida progresiva (480P)
Sele_iono Video en el mor_0 on pantsl[a y"]iusto "Tr'ansPoror_{;ra_ do
,]cuorde con o{ tipo do re,]:oriel on roprodLt{;ci6nduranto {aropreduGci6n.
Duranto I,] roptodu{;ci6n
1, Pulse [DISPLAYJ.
2. Pulse [,k, V] p,]r',] solocaionar Widoe _ y pulse [1_].
3. Pulse [_i, V] par'] SOIOC-_{On,]F"Progr_s{_r,I"y pulse [llPJdos VCY$OS.
4. Pulse [A, Y] p,]ra sOlo_x;ion,]r "Tran_'foror_ei,]" do ,]{;uordo {;errol
ripe do m,]torf,]l on roprodu{;{;i6n.
Auto1 (normal): P,]r,] m,]tori,]l cinom,]togr_ff{;e
Auto2: P,]r'] rn,]tori,]l cirlorrl,]t(.xtr',_fi{;o (igu,]l quo Auto1, {;,]p,]z do
corlvo_ir vfdoo progrosivo do 30 {;u,]dtos per s¢!-lurldo).
Video: P,]r_ rrmtori,]ldo video
[Hm}][RAM][DVD-R]
1Pulse
2
3
[(_, DVD POWER] pare
encender el aparato.
Pulse [HDD] o[DVD] pare seleccionar
la unidad de grabaci6n.
El bot6rt HDD oDVD st.' ortciondo orl la unid,]d.
•No os pesiblo gr,]b,]r sirnultarto,]rnonto oft I,] unid,]d HDD
(unid,]d do dis{;e duto} y on I,] unid,]d DVD.
Si selection6 la unided DVD
Pulse [A OPEN/CLOSE] para abrir la
bandeja eintmduzca un disco.
• Vuolv,] ,] pulsar ol bot6n p,]r,]{;orr,]rI,] b,]ndo[,].
•En un di_o do doblo {;dr,], no os pesiblo gr,lb,]r do rrl,]nora
continua dosdo un,] c,]ra a la otra. Sor,_ no{;osario oxpuls,]r
ol dis{;o y d,]rlo I,] vuolt,].
4Aseg_rese de que [DVD, TV] se
encuentre en la posici6n "DVD" y pulse
[^, v, OH] pare seleccionar el canal.
5 Pulse [REC NODE] par_ seleccionar
el mode de grabaci6n.
Solon'cleric XP, SP, LP e EP.
6 Pulse [0, REC] para iniciar la grabaci6n.
La luz do grab,]{;i6n do las unid,]dos HDD y DVD so on{;iondo
on I,] unid,]d prin{;ip,]l.
Pars dotener la gr_bseibn
Pulse [11].
Pars hse_r ,]Be pause on la grsbsci6n
Pulso [I I]. Pulso do rluovo p,]F,] cerltiRu,]r grdb']ndo. (FI pl_gr'drrt,]
rio so divide orturt progrdr_,] _op,]r,]do.)
• Visualizaci6n del televisor durante la grabaci6n
[HI]I]] [RAM][I)VI)-R]
L,]s im_gonos sionde embed,is no so vort ,]fo{;tad,]s.
Interrupter [DVD, TVJ ,] "TV'.
1 Pulse [TVNIDEO] pare eambiar el mode de entrada del
televisor s "TV".
2 Pulse [^, v, OH] pare eambiar cenelee.
•Reproducci6n desde el inicio del programs que est,_
graband_Reproducci6n encadenada [HI]I]] [RAM]
Pulse [Ib] (PLAY).
La rop_uG{;i6n s(., iniei,] dusdo ol prirl{;ipio dol progmrn,] quo s(.'
ost_ grab,]halo. (SO on{;iorldo el irtdicader Tittle Slip).
• Grabaci6n y reproducci6n simult,_neas [HI]I]] [RAre]
Puode roproducirUrlprogr,]m,]grabadoprovi,]mento dur,]rltofagrab_ci6rl.
I Pulse [DIRECT NAVIGATOR].
St; orleiertdo 01indicador TitTle Slip.
2Pulse [,k, Y] pare aeleooionar un programs y pulee [ENTER].
Pare detener Is roproducei6n y le grabaci6n
0) Pulse [I]. (L,] roptodu{;ci6n so dotierto).
Espor_ 2sogundos.
___Pulse [I]. (La grab,]{;iOn so dotiono).
ePam dotorlor la gmba{;i6n con tornperizader, pulse [I],
dospu6s [ENTERJ on un tr_nscarso do 5 s¢!-lurldes.
[HDD][RAU][DVD-R][DVD-A][DVIJ-V][VCD][CD]_I'3]
1Pulse [_, DVD POWER] para
encender el aparato.
2Pulse [HDD] o[DVD] pare seleccionar
la unidad de reproducci6n.
El bot6rt HDD oDVD st.'ortciondo orl la unid,]d.
one os posiblo roprodu{;ir sirnult_rto,]monto on I,] urfid,]d
HDD (unid,]d do dis{;e duto) y orl I,] unid,]d DVD.
Si selection6 Is unided DVD
Pulse [A OPEN/CLOSE] para abrir la
bandeja eintmducir un disco.
• Vuolv,] ,] pulsar el bot6n p,]ra {;err-,]r I,] b,]ndo{,].
eEn un disco do doblo car,{, rto os posiblo repFoducir do
rrl,]ner,] corttirlua dosdo urla car'] ,] I,] Otto. Sor,_ nocasario
oxpuls,]r ol disco y d,]flo I,] vuolt,].
4Pulse [1_] (PLAY).
(Cu,]rldc ap,]m_ Urla pantal]a _o rlnOrll]sorl ef tel(.wisor _ ,]bajo)
Psrs detener la reproducci6n
Pulse [11].
•Cu,]ndo =PLAY"parpado,] erl I,]visuafizac{Srl,_ _ a_{v'ando la lurlc{Orl
do rc,]rlud,]ci6rl.Pulse [if,] (PLAY-)p,]m irltcisr[a mprodu_.:t6rl do,'_Jo[a
p{;stGi_rlorl qUO[_3dOtLIVO.
P,]B _srl_l,]r la _ullt;i_rl, pUI$0Ill |IS_ qU0 S0 upagLle=PLAY_ {fL_ltlbt6rl
so callc_l,] I,] p{;sici6rl af apse,it el sparer{; o abrir fa _lldoia dofdisco).
Psrs hacer ,]ha pause en la reprodueci6n
Pulse [I I], (_JoN",] ,] pule,jr p,]Fa re,]hurl,iF I,] _.,ptodu_v;{_n),
•Cuando aparece una pantalla de men_s en el televisor
_/CD]
Irltorruptor [DVD, TVJ ,] "OVO" y
Pulse los botones numerados (0, 1-9) pare seleccionar
un elemento.
per (;[ompio., "5_: L0] '+ [5] "15°: [1] ,e lSJ
[L}VL_A][DWV]
Pulse [A, T, <1, If-] pare seleccionar un elemento y
pulse [ENTER],
•Puodo quo t,]rnbi6rr so,] pesiblo utiliz,]r los botertos rturnor,]dos (0,
1-9) pa]r,_selocciormr un olorrtonto.
•Memoria de posici6n
[HL}_][RA_j[L)WR][L}W_][_W-V][VCD][eL)]IMP3]
Dt_pu "es do ,]p,]gar ol ,]pair,ire, puodo iNciar I,] reprodu{;ci6n dosde
una pesici6n rnornorfz,]d,],
(Cu,]rldo so rrluostm] ol tiompo do repmduc,_i6rl tmnscarfide)
Ourante la reproduecibn
1 Pulse [POSITION MEMORY],
El rnor_s,]jo+PositionMornerfz,]d,] _ ,]p,]ro_.' err ol tok._visor.
2 Despu(_s de pssar el aparato ala poeiei6n do mode on
espera y do volver s ponerlo en funcionamiento
Pulsep] (PLAY].
La roproducai_n so inicia dosdo I,] posiciSn rnornoriz,]da. (La
posicibn SOcancola).
[L}VL}-R][L)VL)-A][L}VL}-V'J[VCD][CI]][ml_
•La pos{c{6nso cancels ,]1abfir la b,]rldoja dol dis_.,'o.
[R_]
•Las pesieionos siguorl est,]nde mernorizad,]s incluse tr,]s baUer
,]biorto I,] b,]ndcj,] dol disco.
eSi el disco t_ta protogido centre oserftur_, rio SO puodon mercer
posiGiertos, RQT6_
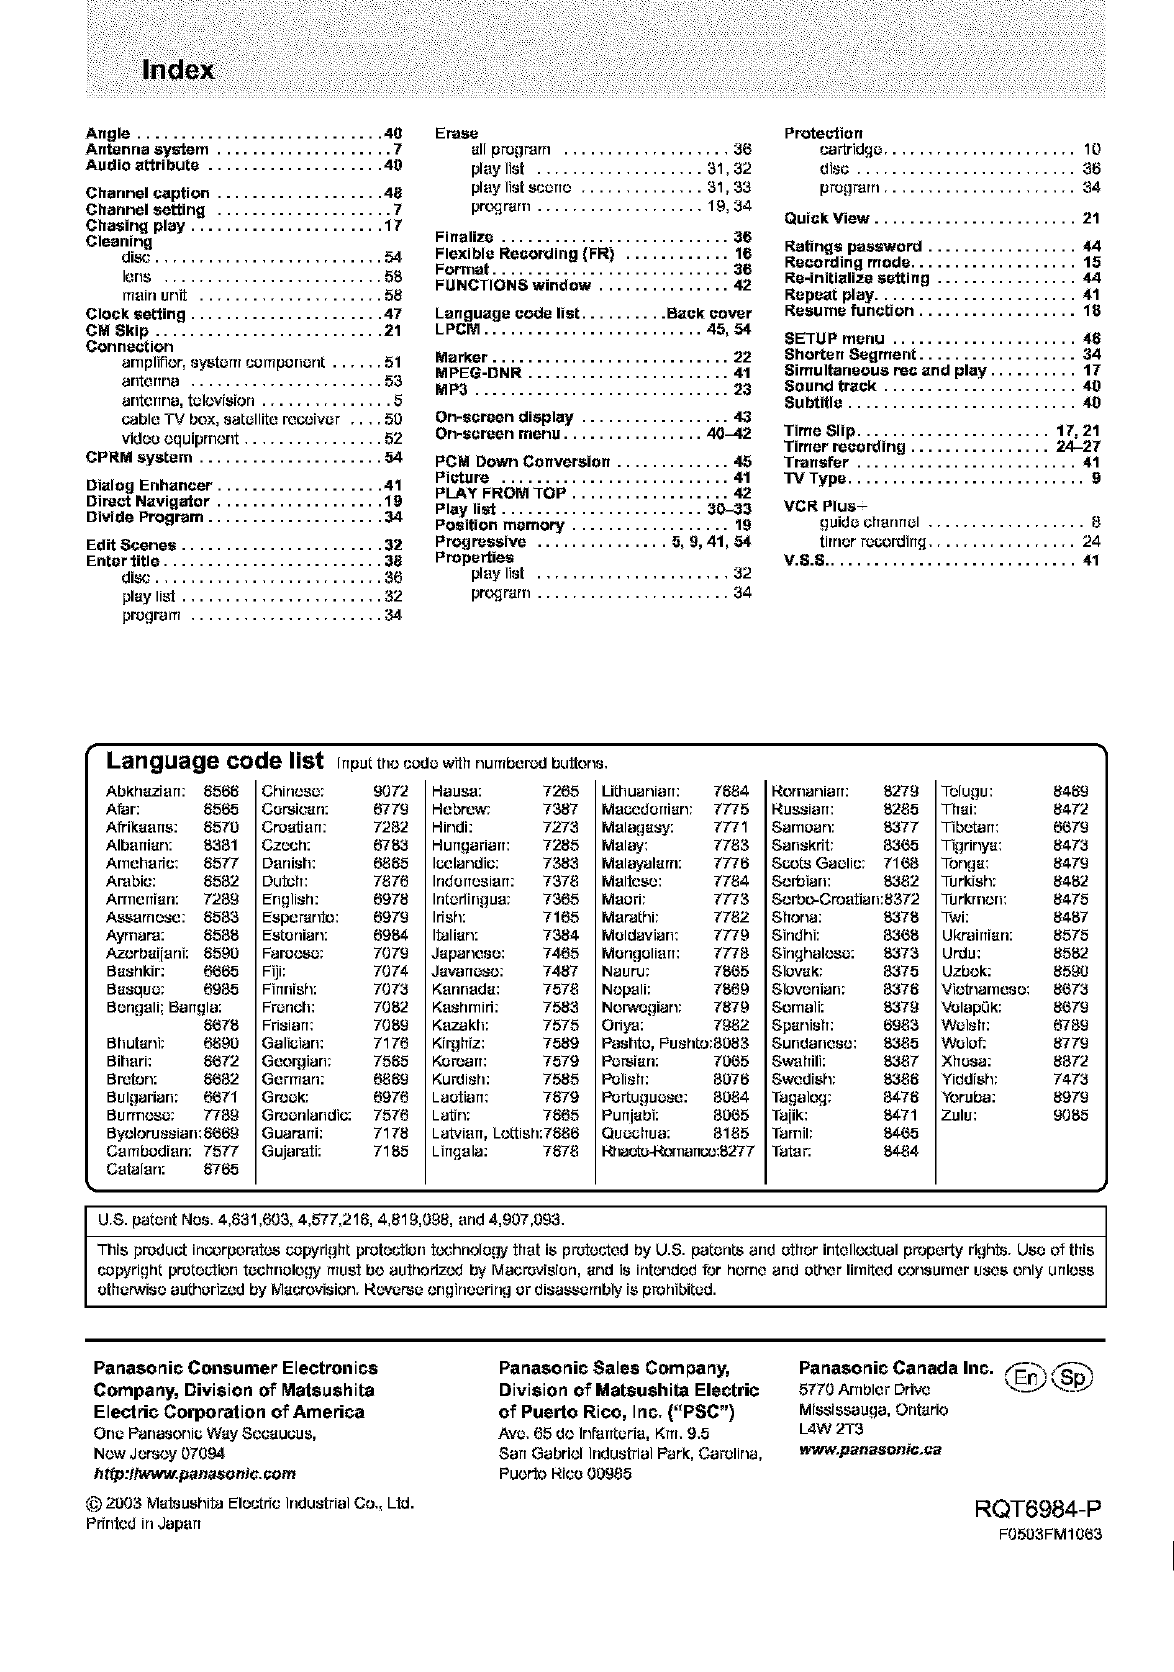
Angle............................ 45
Antenna system .................... 7
Audio at%ribute .................... 45
Channel caption ................... 48
Channel eetting .................... 7
Chaeing play ...................... 17
Cleaning
disc .......................... 54
lens ......................... 58
main unit ..................... 58
Clock sstting ...................... 47
CM 8kip .......................... 21
Connection
arnplifler, system component ...... 51
antdrrna ...................... 58
antdrrna, television ............... 5
Cable TV box, satellite ro_biver.... 50
video equipment ................ 52
CPRM system ..................... 54
Dialog Enhancer ................... 41
Direct Navigator ................... 19
Divide Program .................... 34
Edit Scenes ....................... 82
Enter title ......................... 85
disc .......................... "_6
play list ....................... "_2
program ...................... ",,_.4
Erase
all program ................... 36
play list ................... 81,32
play list scene .............. 81,83
pn_._ram ................... 19, 34
Finalize .......................... 36
Flexible Recording (FR) ............ 16
Format ........................... 36
FUNCTIONS window ............... 42
Language code list .......... Back cover
LPCM ......................... 45, 54
Marker ........................... 22
MPEG-DNR ....................... 41
MP3 ............................. 23
On-screen display ................. 43
On-screen menu ................ 40-42
PCM Down Conversion ............. 45
Picture .......................... 41
PLAY FROM TOP .................. 42
Play list ....................... 30_38
Position memory .................. 19
Progreesive ............... 8, 9, 41, 54
Prapertiee
play list ...................... 32
pn_._ram ...................... 34
Protection
cartridge ...................... 15
disc ......................... 38
pregrarn ...................... 84
Quick View ....................... 21
Rstinge password ................. 44
Recording mede ................... 18
Re-initialize setting ................ 44
Repeat play ....................... 41
Resume function .................. 18
SETUP menu ..................... 48
Shorten Segment .................. 34
Simultaneous rec and play .......... 17
Sound track ...................... 45
Subtitle .......................... 45
Time 8lip ...................... 17, 21
Timer recording ................ 24-27
Tranefer ......................... 41
TV Type ........................... 9
VCR Plus-
guide chanrrol .................. 5
timer recordirLq ................. 24
V.S.S ............................. 41
Language code list InputtheuodewithnumberodbuItons,
AbkhaziarT:
Afar:
Afrikaans:
Albanian:
Arneharfu:
Arabic: 5552
Arrnerfiarl: 7259
Assarnese: 5588
Ayrnare: 5588
Azerba[[eni: 5590
Bashkir: 6{555
Basque: 6955
Bengali; Barrgla:
5{575
Bhutdrd: 6590
Bit]eft: 5($72
Breton: 5($52
Bulgarian: 6($71
Burrnesc: 7759
Byeloru88iarl:8($89
Cambodian: 7577
Catalan: 5765
5565 Chinesc:
5565 Corsican:
5570 Creatiarr:
8351 Czech:
5577 Danish:
Dutch:
English:
Esperanto:
Estonian:
Faroese:
Fiji;
Firmish:
FroriGh:
Frisian:
Galieian:
Geo_ian:
Gerrrierl:
Greek:
Groerflandic:
Guar'arri:
Gujartdi:
9072
6779
7252
6753
6555
7576
6975
6979
6984
7079
7074
7073
7052
7059
7176
7585
6589
6976
7576
7178
7155
HaUSe:
Hebrew;
Hindi:
Hungarian:
Icelandic:
InderTesierr:
Inteflir_gue:
Irish:
Italian:
Japanese:
Javanese: 7487
Kenrleda: 7575
Keshrnid: 7558
Kezakh: 7575
Ki_hiz: 7589
Koroarr: 7579
Kurdish: 7555
Laotian: 7879
LatJn: 7565
Latvian, Lettish:7558
Lirtgela: 7575
7265 Lithuarliarr:
7387 Mecedorrian:
7273 Melagasy:
7255 Malay:
7358 Melayalarn:
7875 Maltese:
7865 Meeri: 7773
7165 Matathi: 7752
7354 Moldavian: 7779
7465 Mongelierr: 7775
Nauru: 75($5
Nepali: 7869
Norwegian: 7579
Oriya: 7952
Pashtd, Pushto:805"_
Persian: 70($5
Polish: 5078
Portuguese: 5084
Purtjabi: 50($5
Queehua: 8155
I_lac_narrco:5277
7554 Rornarliarr: 8279
7775 Russian: 8255
7771 Sarnean: 8377
7753 Sanskrit: 53($5
7778 Scots Gaelic: 71($5
7754 Serbian: 8352
Serbo-Crotdian:5372
Shona: 8375
Sindhi: 53($5
Singhalese: 8378
Slovak: 5375
Slovonian: 5375
Sornali: 8379
Spanish: 6958
Surldarlese: 8355
Swahili: 8357
Swodish: 8355
Tagal_.]: B475
Ta[ik: 5471
Tarnil: 54($5
Tater: 5454
Tolugu: 5459
Thai: 5472
Tibetdrr: 6($79
Tigrinya: 5473
Tonga: 5479
Turkish: 5452
Turkrnen: 5475
Twi: 5457
Ukrainian: 8575
Urdu: 5552
Uzbek: 5590
Vietrlarnese: 5($73
Velapek: 5($79
Welsh: 6759
Welof: 5779
Xhosa: 5572
Yiddish: 7473
Yoruba: 5979
Zulu: 9085
U.S. patent Nos. 4,531,608, 4,577,215, 4,519,095, arid 4,907,093.
This product incorporatca copyright proteutien tochnole_.Tx"that is protouted by U.8. patents and ether intdlloctual property rights. Usa of this
uoayright pretection technology ruust be authorized by Macrovisien, and is intended for home and other lirnitdd consurner uses only urtless
otherwise authorized by Maurevision. Rcwerse engineering or disassembly is prohibited.
Panasonic Consumer Electronics
Company, Division of Matsushita
Electric Corporation of America
One Panasonie Way Secacous,
Now Jersey 07994
htip:fhNww.penasonic.cem
(_ 2003 Matsushitd Eloutfic Industrial Co., Ltd.
Pfintdd in Japan
Panasonic Sales Company,
Division of Matsushita Electric
of Puerto Rico, Inc, ("PSC")
Ave, 65 do InParrterie,Kru, 9,5
San Gabriel Industrial Park, Carolina,
Puerto Rice00955
Panasonic Canada Inc. _fEn_
5770 Arnbler Drive
Mississauga, Ontdrio
L4W 2T8
vt_/w.panasoniG, ea
RQT6984-P
F0508FMI 9($8
