Panasonic DP C106 User Manual To The A2a858e4 2ba3 43c3 82ea 88f574012c1e
User Manual: Panasonic DP-C106 to the manual
Open the PDF directly: View PDF ![]() .
.
Page Count: 1
- TABLE OF CONTENTS
- 1. GETTING TO KNOW THE DP-C106
- 2. BASIC COPYING
- 3. COPY FEATURES
- 4. TOOLS MODE
- 5. PROBLEM SOLVING
- AVOIDING PAPER JAMS
- PRINTER JAM CLEARANCE AREAS
- DOCUMENT FEEDER (ADF) JAM CLEARANCE AREA
- CLEARING A PAPER TRAY JAM
- CLEARING A DUPLEX UNIT/KIT JAM
- CLEARING AREA 1 JAMS
- CLEARING AREA 2 JAMS
- CLEARING AREA 3 JAMS
- CLEARING AREA 4 JAMS
- CLEARING AREA 5 JAMS
- CLEARING AREA 6 JAMS
- CLEARING JAMS IN THE 10 BIN SORTER
- COPY/PRINT QUALITY PROBLEMS
- ADJUSTING THE PRINTER COLOR
- PRINTER ERROR MESSAGES
- PRINTER ERROR CODES
- SCANNER ERROR CODES
- 10 BIN SORTER ERROR MESSAGES
- NETWORK PROBLEM SOLVING
- PRINTING PROBLEMS
- JOB MANAGEMENT PROBLEM SOLVING
- 6. MAINTENANCE
- TYPES OF PAPER
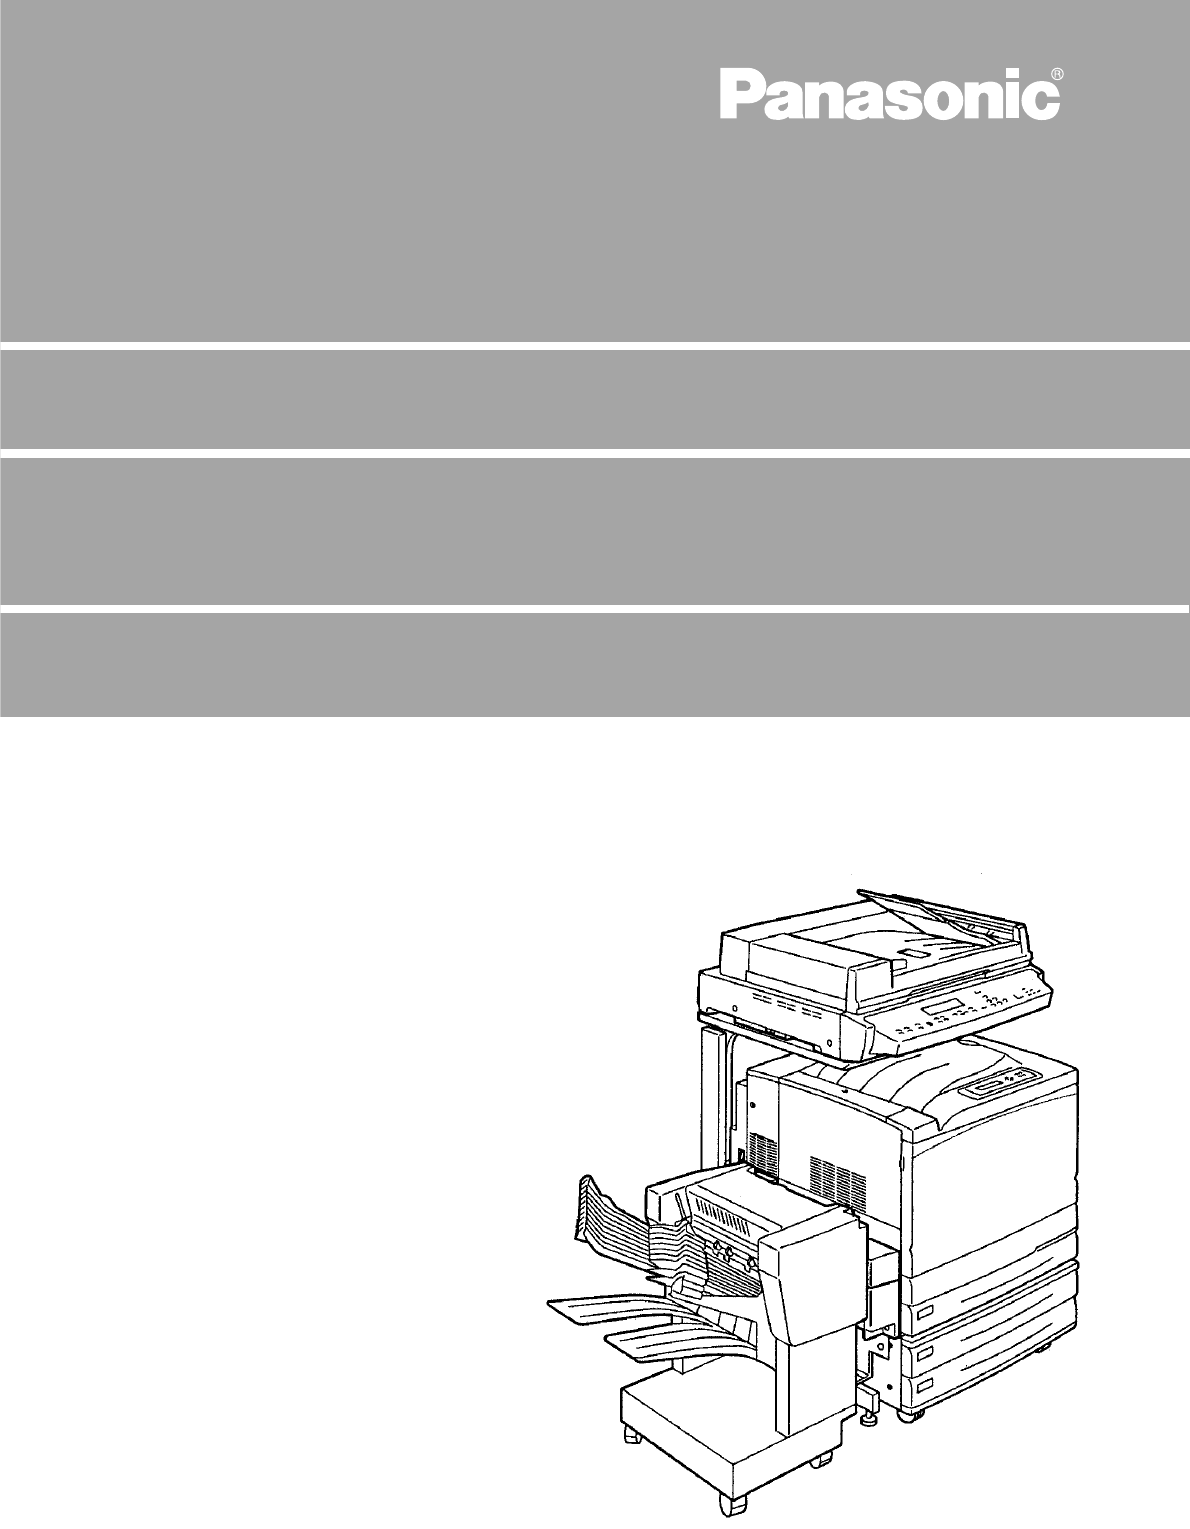
Digital Color Imaging System
Model No.
DP-C106
Operating Instructions
Before operating this machine, please read
these instructions completely and keep these
operating instructions for future reference.
Options
DA-TL28C/TL26C/RM64C/RM128C/DU26C/SM112C/S27C
WARRANTY
U.S.A. only
For Service Call:
Panasonic Document Imaging Company
A Business Unit of Matsushita Electric Corporation of America
Two Panasonic Way
Secaucus, New Jersey 07094
DZSD001526 S0701
July 2001
Printed in Japan
Panasonic Canada Inc.
5770 Ambler Drive
Mississauga, Ontario L4W 2T3
PANASONIC DOCUMENT IMAGING COMPANY MAKES NO WARRANTIES, GUARANTEES OR
REPRESENTATIONS, EXPRESSED OR IMPLIED, TO CUSTOMER WITH RESPECT TO THIS
PANASONIC MACHINE, INCLUDING BUT NOT LIMITED TO, ANY IMPLIED WARRANTY OF
MERCHANTABILITY OR FITNESS FOR A PARTICULAR PURPOSE.
PANASONIC DOCUMENT IMAGING COMPANY ASSUMES NO RISK AND SHALL NOT BE SUBJECT
TO LIABILITY FOR ANY DAMAGE, INCLUDING, BUT NOT LIMITED TO DIRECT, INDIRECT, SPECIAL,
INCIDENTAL OR CONSEQUENTIAL DAMAGES OR LOSS OF PROFITS SUSTAINED BY THE
CUSTOMER IN CONNECTION WITH THE USE OR APPLICATION OF THIS PANASONIC MACHINE.
SEE YOUR DEALER FOR DETAILS OF DEALER’S WARRANTY.
DP-C106
Operating Instructions
English
TRADEMARKS/COPYRIGHTS
The following trademarks and registered trademarks are used throughout this manual.
Microsoft, MS-DOS, Windows, and Windows NT are either registered trademarks or trademarks
of Microsoft Corporation in the United States and/or other countries.
i386, i486, and Pentium are either registered trademarks or trademarks of Intel Corporation.
Adobe, the Adobe logo, Adobe PostScript, Acrobat, Acrobat Reader, and Acrobat logo are either
registered trademarks or trademarks of Adobe Systems Incorporated in the United States and/or
other countries.
Apple, the Apple logo, ColorSync, FireWire, LaserWriter, Mac, Mac logo, Macintosh, Power
Macintosh, and TrueType are either registered trademarks or trademarks of Apple Computer, Inc.
in the United States and/or other countries.
Fiery, the Fiery logo, Fiery Driven, Fiery Link, ColorWise, NetWise, RIP-While-Print, VisualCal,
WebTools, WebSpooler, WebInstaller, and WebStatus are either registered trademarks or
trademarks of Electronics For Imaging, Inc., in the United States and certain other foreign
jurisdictions.
Novell, Novell Client, Novell Directory Services, Novell Distributed Print Services, Netware,
intraNetware, NDPS, NDS, , IPX, IPX/SPX, NDS Admin, NDS Administrator are either registered
trademarks or trademarks of Novell, Inc., in the United States and/or other countries.
Panasonic Document Imaging Company has made every effort to supply trademark information
about company names, products and services mentioned in this documentation. All third party
and/or other trademarks identified herein are the property of their respective owners.
Copyright © 2001 by Matsushita Graphic Communication Systems, Inc.
All rights reserved.
Copyright protection claimed includes all forms and matters of copyrightable material and
information now allowed by statutory or judicial law or hereinafter granted, including without
limitation, material generated from the software programs that are displayed on the screen such
as styles, templates, icons, screen displays, looks, etc.
Contents are subject to change without notice.
Printed in Japan.
iii
Safety Notes, Compliances
Certifications, and Other Notices
Panasonic reserves the right to change this information without notice, and
makes no warranty, express or implied, with respect to this information.
Panasonic shall not be liable for any loss or damage, including consequential
or special damages, resulting from the use of this information, even if loss or
damage is caused by Panasonic's negligence or other fault.
Safety Notes
Your DP-C106 and its supplies have been designed and tested to meet strict
safety requirements. These include safety agency examination and approval,
and compliance with established environmental standards. Please read the
following instructions carefully before operating the DP-C106.
Failure to follow the recommendations in this section may result in personal
injury or rescinding of the Dealer's Warranty/Maintenance Agreement.
WARNING
An improper connection to the DP-C106 grounding conductor can result in
electrical shock. Always connect the copier to a properly grounded wall
outlet. If in doubt, have the outlet checked by a qualified electrician.
Never use an extension cord between the copier power cord and an electrical
outlet.
Do not allow anything to rest on the power cord.
Do not place the DP-C106 where people may step on the power cord.
Follow all warnings and instructions that are marked on or supplied with the
DP-C106.
Never override or "cheat" electrical or mechanical interlock devices.
Always locate the DP-C106 on a solid support surface with adequate
strength for the weight of the copier.
Do not use the DP-C106 near water, wet locations, or outdoors.
Safety Notes, Compliances, Certifications, and Other Notices
iv
Never push objects of any kind into the slots in the covers, as they may touch
dangerous voltage points or short out parts that could result in a risk of fire or
electric shock.
The DP-C106 is designed to prevent user access to unsafe areas and to
ensure that the device will not operate with the covers opened. Never attempt
any maintenance function that is not specified in the DP-C106 Operating
Instructions.
Never remove any covers or guards that require a tool for removal, unless
you are instructed to do so. Ensure that you read all Warnings and Cautions,
and follow each step in the instructions exactly as they are written.
Never attempt any activity that is not specified in the DP-C106 Operating
Instructions, or on the User Interface, or that is not specifically directed by an
authorized Panasonic representative.
Do not look directly at the exposure lamps. The exposure lamps are not
harmful but they are very bright and may cause discomfort. It is
recommended that the Scanner Cover be closed when the DP-C106 is in use.
Never operate the DP-C106 if unusual noises or odors are detected.
Disconnect the power cord from the wall outlet and call your local authorized
Panasonic service representative to correct any problems.
Maintenance Safety
Refer to these instructions as needed in order to ensure the safe operation
of the Copier/Printer.
Always use materials that are supplied or approved by Panasonic. Use of
other materials may result in poor performance and could create a hazardous
situation.
Do not use aerosol cleaners. Follow the instructions in the DP-C106
Operating Instructions for the appropriate cleaning methods.
Never use supplies or cleaning materials for purposes other than what they
were intended. Keep all supplies and cleaning materials out of the reach of
children.
Never place coffee or other liquids on the machine.
Never spill liquid of any kind on the machine.
The DP-C106 is equipped with an energy-saving device to conserve power
when not in use.

Safety Notes, Compliances, Certifications, and Other Notices
v
Unplug the DP-C106 from the wall outlet and refer servicing to qualified
service personnel under the following conditions:
• When the power cord is damaged or frayed
• If liquid has been spilled into the DP-C106
• If the DP-C106 has been exposed to rain or water
• If the DP-C106 is producing unusual noises or odors
If the system does not work or continues to malfunction after following the
Problem Solving procedures in the DP-C106 Operating Instructions, call your
local authorized Panasonic service representative.
Ozone Safety
Make sure that the machine is installed in a spacious or well-ventilated room
so as not to increase the amount of ozone in the air, since ozone is heavier
than air, it is recommended that air at floor level be ventilated.
Laser Safety
Use of controls, adjustments or performance procedures other than those
specified herein, may result in hazardous laser radiation exposure.
This equipment complies with safety standards. With specific regard to laser
safety, the equipment complies with performance standards for laser products
set by government agencies as a Class I laser product and does not emit
hazardous lights, the beam is totally enclosed during all modes of customer
operation and maintenance.
.
Safety Notes, Compliances, Certifications, and Other Notices
vi
Safety Notes
FCC
This equipment has been tested and found to comply with the limits for a
Class A digital device, pursuant to Part 15 of the FCC Rules. These limits
are designed to provide reasonable protection against harmful interference
when the equipment is operated in a commercial environment. This
equipment generates, uses, and can radiate radio frequency energy and, if
not installed and used in accordance with the instruction manual, may cause
harmful interference to radio communications. Operation of this equipment
in a residential area is likely to cause harmful interference in which case the
user will be required to correct the interference at his own expense.
Responsible Party: Matsushita Electric Corporation of America
One Panasonic Way, Secaucus, NJ 07094
Technical Support: Panasonic Document Imaging Company/
Technical Support Department
Two Panasonic Way, Secaucus, NJ 07094
1-800-225-5329
Email: consumerproducts@panasonic.com
The user could lose the authority to operate this equipment if any
unauthorized changes or modifications are made to this equipment.
Shielded cables must be used with this equipment to maintain compliance
with FCC regulations.
European Union
This product complies with the requirements of EC Council Directives
73/23/EEC amended by 93/68/EEC, and 89/336/EEC amended by
92/31/EEC and 93/68/EEC.

Safety Notes, Compliances, Certifications, and Other Notices
vii
WARNING
This product is certified, manufactured and tested in compliance with strict
safety and radio frequency interference regulations. Any unauthorized
alteration, which includes the addition of new functions or the connection of
external devices, may impact this certification. Please contact your local
authorized Panasonic representative for a list of approved accessories.
WARNING
In order to allow this equipment to operate in proximity to Industrial, Scientific
and Medical (ISM) equipment, the external radiation from the ISM equipment
may have to be limited or special mitigation measures taken.
Safety Notes, Compliances, Certifications, and Other Notices
viii
WARNING
This is a Class A product. In a domestic environment this product may
cause radio frequency interference in which case the user may be required
to take adequate measures.
The user could lose the authority to operate this equipment if any
unauthorized changes or modifications are made to this equipment.
Shielded cables must be used with this equipment to maintain compliance
with the Radio Communications Act of 1992.
Documentation Conventions
The following conventions are used throughout the Operating Instructions.
WARNING
Warnings alert you to potential hazard that could result in serious injury or
death.
CAUTION
Cautions alert you to operations that may result in minor injury or damage to
the machine.
Notes contain additional information, explanations, and helpful suggestions.
Keypoints provide techniques or shortcuts.

ix
Table of Contents
1. Getting to Know the DP-C106 ................................................................................. 1
Printer, Front View ....................................................................................................... 1
Printer, Rear View........................................................................................................ 2
Printer, Internal View ................................................................................................... 3
Printer Control Panel ................................................................................................... 4
Scanner and Automatic Document Feeder (ADF) Components .................................. 5
Scanner Control Panel................................................................................................. 7
Options and Supplies................................................................................................... 9
Options..................................................................................................................... 9
Supplies ................................................................................................................. 10
2. Basic Copying ........................................................................................................ 11
The Copier Control Panel .......................................................................................... 11
Copy Mode ................................................................................................................ 13
Auto Start ............................................................................................................... 14
The Copier Main Screen ........................................................................................ 14
Positioning the Originals ............................................................................................ 15
The Document Glass ............................................................................................. 15
The Automatic Document Feeder (ADF)................................................................ 17
Making a Copy........................................................................................................... 20
3. Copy Features ........................................................................................................ 21
Reduce/Enlarge ......................................................................................................... 21
Using the Reduce/Enlarge Feature ........................................................................ 22
Paper Supply ............................................................................................................. 24
Using Paper Trays 1, 2, and 3 ............................................................................... 24
Using the Bypass Tray ........................................................................................... 25
Loading the Bypass Tray.................................................................................... 25

Table of contents Operating Instructions
x
Loading Transparencies into the Bypass Tray.................................................... 28
Loading Postcards into the Bypass Tray ............................................................ 29
Loading Envelopes in the Bypass Tray .............................................................. 30
Making a Copy Using the Bypass Tray............................................................... 31
Color Mode ................................................................................................................ 32
Using the Color Mode Feature ............................................................................... 34
Lighten/Darken .......................................................................................................... 35
Using the Lighten/Darken Feature ......................................................................... 35
Quality Adjustment..................................................................................................... 36
Using the Sharpness Option .................................................................................. 36
Using the Color Level Adjustment .......................................................................... 37
Using the Background Mask Feature ..................................................................... 38
Advanced Features.................................................................................................... 39
Using the Output Feature....................................................................................... 40
Determining the Output with the Optional 10 Bin Sorter......................................... 41
Using the Erase Feature ........................................................................................ 42
Using the 2-Sided Feature ..................................................................................... 43
Using the 2 Up Feature .......................................................................................... 45
4. Tools Mode .............................................................................................................47
Meter Check .............................................................................................................. 47
Administrative Features ............................................................................................. 48
Defaults for Copy ................................................................................................... 50
Color ...................................................................................................................... 53
Auto Color Adjust ................................................................................................... 55
Detect Document Size ........................................................................................... 57
Auto Mode Change ................................................................................................ 58
Limit Copy Set........................................................................................................ 59
Timer Preset .......................................................................................................... 60
Sound Preset ......................................................................................................... 62
User Password....................................................................................................... 63
ADMIN Password................................................................................................... 65
Version Info ............................................................................................................ 66
Self Diagnostics ..................................................................................................... 67

Operating Instructions Table of contents
xi
Transporting the Scanner....................................................................................... 68
5. Problem Solving..................................................................................................... 69
Avoiding Paper Jams................................................................................................. 69
Printer Jam Clearance Areas..................................................................................... 70
Document Feeder (ADF) Jam Clearance Area.......................................................... 71
Clearing a Paper Tray Jam........................................................................................ 73
Clearing a Duplex Unit/Kit Jam .................................................................................. 75
Clearing Area 1 Jams ................................................................................................ 77
Clearing Area 2 Jams ................................................................................................ 81
Clearing Area 3 Jams ................................................................................................ 83
Clearing Area 4 Jams ................................................................................................ 85
Clearing Area 5 Jams ................................................................................................ 87
Clearing the Fuser Area ......................................................................................... 87
Clearing the Upper Inverter .................................................................................... 89
Clearing Area 6 Jams ................................................................................................ 93
Clearing Jams in the 10 Bin Sorter ............................................................................ 94
Copy/Print Quality Problems...................................................................................... 95
Adjusting The Printer Color........................................................................................ 97
VisualCal ................................................................................................................ 97
1. Print Limits Page ........................................................................................... 97
2. Gray Balance Page ....................................................................................... 99
3. Comparison Page........................................................................................ 100
Printer Error Messages............................................................................................ 101
Printer Error Codes.................................................................................................. 105
Scanner Error Codes ............................................................................................... 107
10 Bin Sorter Error Messages ................................................................................. 109
Network Problem Solving ........................................................................................ 111
Troubleshooting During Setup from the Control Panel......................................... 111
Network Protocol Setup Messages ...................................................................... 112
Novell Problems During Network Setup ............................................................... 116
Novell Error Messages ......................................................................................... 117
Runtime Printer Error Messages .......................................................................... 119
Name Table ......................................................................................................... 121

Table of contents Operating Instructions
xii
Printing Problems .................................................................................................... 122
On a Windows Workstation .................................................................................. 122
On a Mac OS Workstation ................................................................................... 123
General Printing Problems ................................................................................... 124
Problems with Print Quality .................................................................................. 127
Job Management Problem Solving .......................................................................... 129
Job Management Error Messages ....................................................................... 129
Unexpected Printing Results ................................................................................ 131
Clearing the Printer .............................................................................................. 132
Users are Unable to Connect to the DP-C106 ..................................................... 132
6. Maintenance ......................................................................................................... 133
Cleaning Procedures ............................................................................................... 133
Cleaning the Printer Covers ................................................................................. 133
Cleaning the Scanner........................................................................................... 134
Document Glass and ADF Cover ..................................................................... 134
Cleaning the Automatic Document Feeder (ADF) ............................................ 135
Replacing the Toner Cartridges ............................................................................... 137
Replacing the Print/Copy Cartridge ......................................................................... 141
Replacing the Toner Waste Container..................................................................... 147
Storing the Supplies................................................................................................. 149
Toner Cartridges .................................................................................................. 149
Handling Precautions ....................................................................................... 149
Print/Copy Cartridge............................................................................................. 150
Handling Precautions ....................................................................................... 150
Types of Paper .......................................................................................................... 151
1
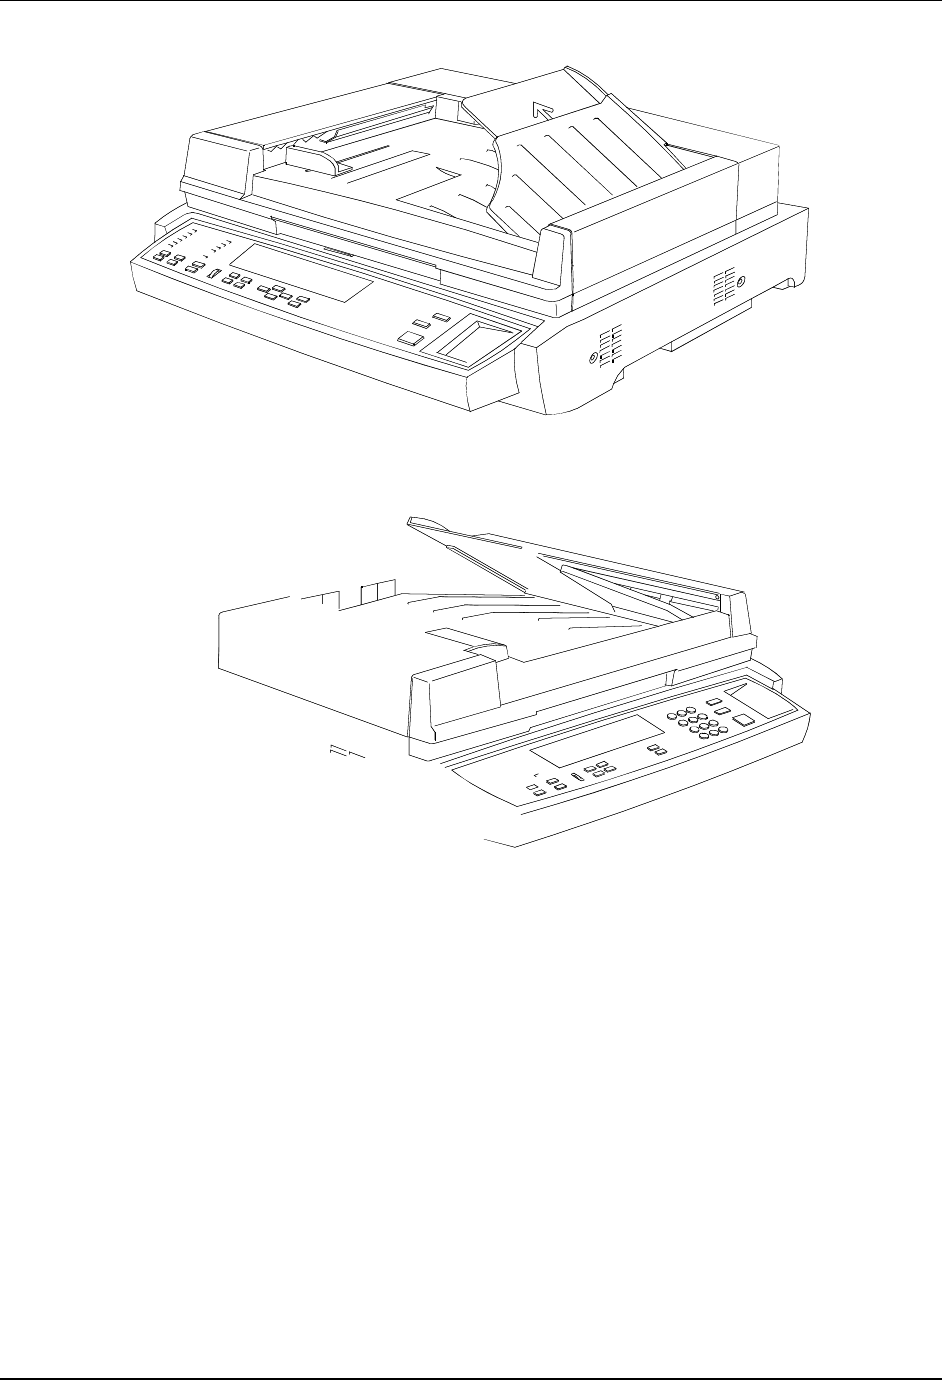
Getting to Know the DP-C106
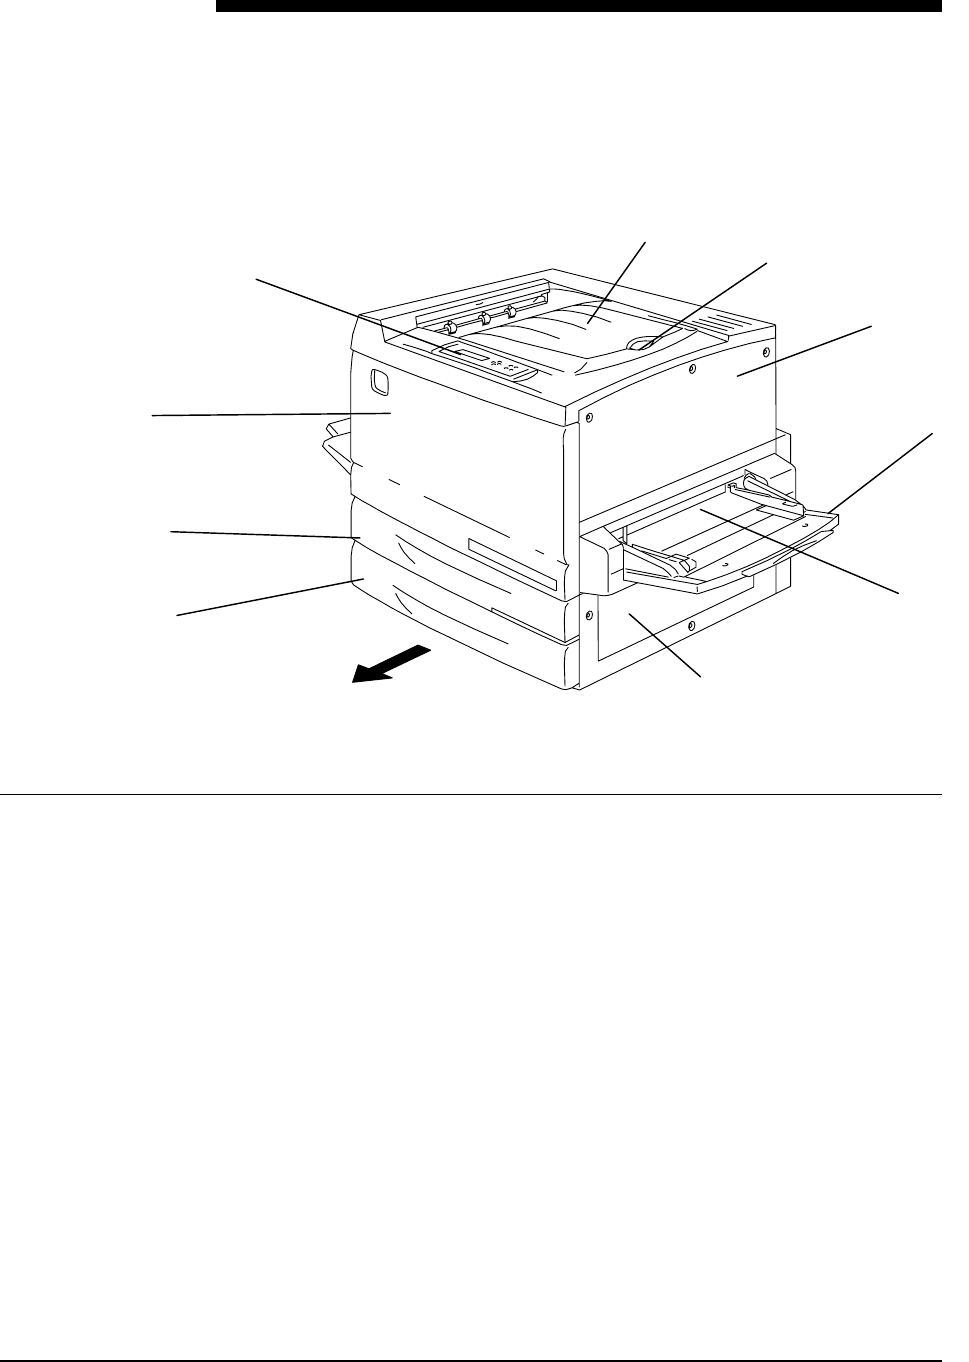
Printer, Front View
1. Paper Tray 1 – place paper supply here
2. Duplex Unit/Kit – option that allows two-sided printing
3. Front Cover – open to access the Toner Cartridges and the Print/Copy
Cartridge
4. Control Panel – use to access the Printer menus and to view messages
5. Printer Output Top Tray – the prints are delivered here
6. Paper Stop – use to stop oversized prints from being pushed out of the
Output Tray. The Paper Stop is adjustable up to 17 x 11 inch (B4) paper
7. Top Right-hand Cover – open to add additional memory
8. Bypass Tray – use for transparencies, envelopes, postcards, or other
stock
9. Bypass Transport – open to access paper jams
10. Paper Feed Area – open to access paper jams
1
3
4
56
7
10
9
8
1
2
Getting to Know the DP-C106 Printer, Rear View
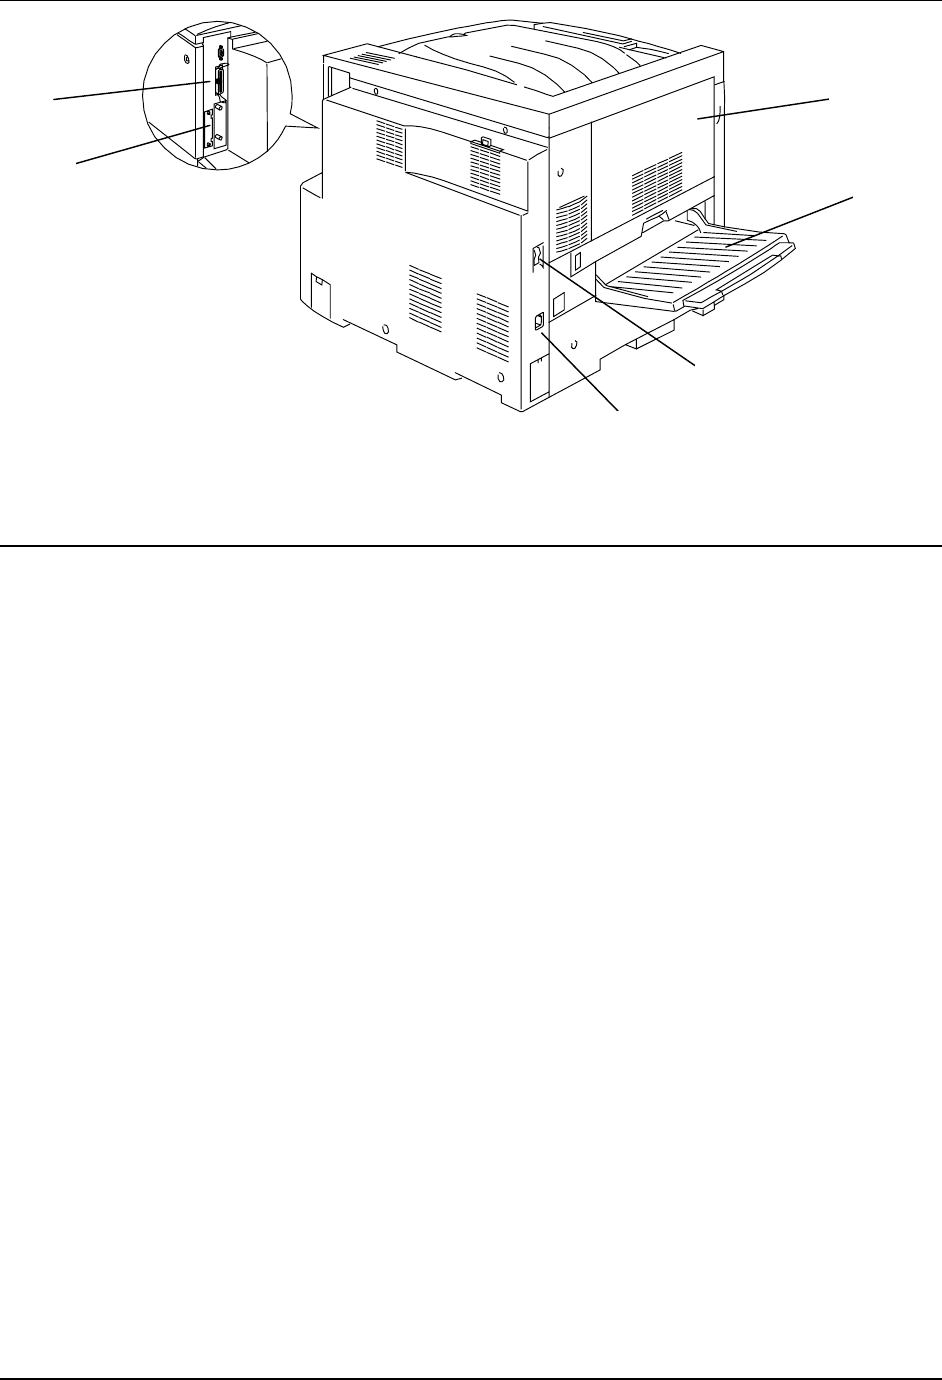
2
Printer, Rear View
11. Scanner Power Connector –provides power to the Scanner
12. Scanner Interface Connector – provides interface to the Scanner
13. Area 4 Access Cover – open to access paper jams
14. Printer Side Output Tray – copies are delivered to this tray
15. Printer Power Switch – use to switch the Printer power Off and On
16. Printer Power Cable Connector – connect the Printer Power Cable
here
12
11
13
15
16
14
Printer, Internal View Getting to Know the DP-C106
3
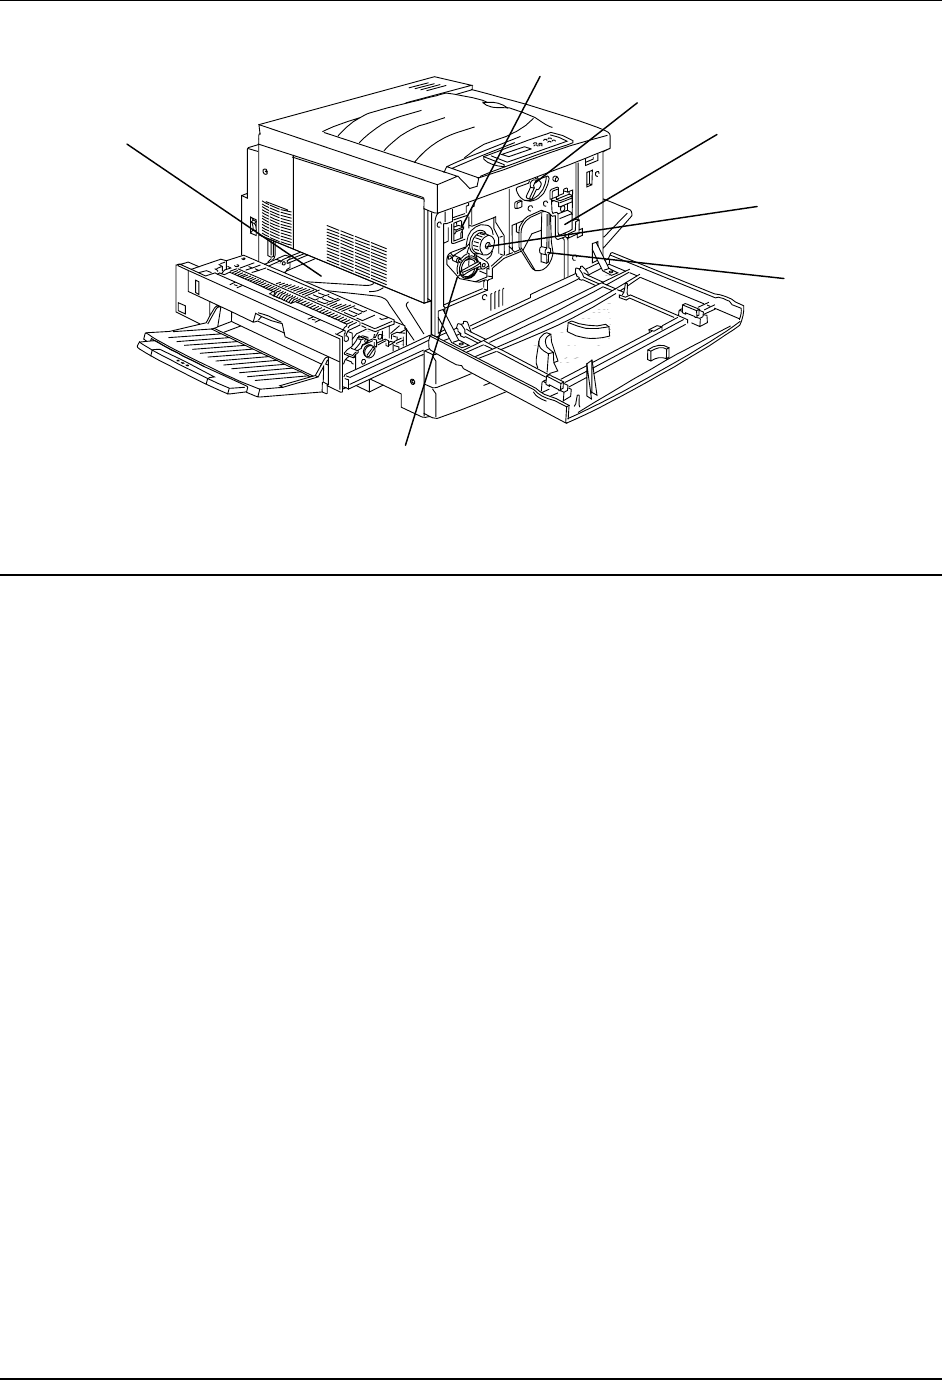
Printer, Internal View
17. Toner Carousel Access – the four Toner Cartridges are installed one at
a time, through this opening
18. Fuser Jam Clearance Area – the Fuser applies heat to the Toner in
order to adhere it to the paper
19. Anti-rotation Lever – use to release the Toner Carousel in order to
remove and replace the Toner Cartridges
20. Lever B – used to lock the Print/Copy cartridge in position
21. Print/Copy Cartridge – use to transfer copy/print image to media
22. Knob – used to manually turn the carousel in order to access the Toner
Cartridges
23. Lever A – the Print/Copy Cartridge is accessed through here
18
17
19 20
21
22
23
Getting to Know the DP-C106 Printer Control Panel
4
C/
1
0
1
0
0
1
0
1
00
1
0
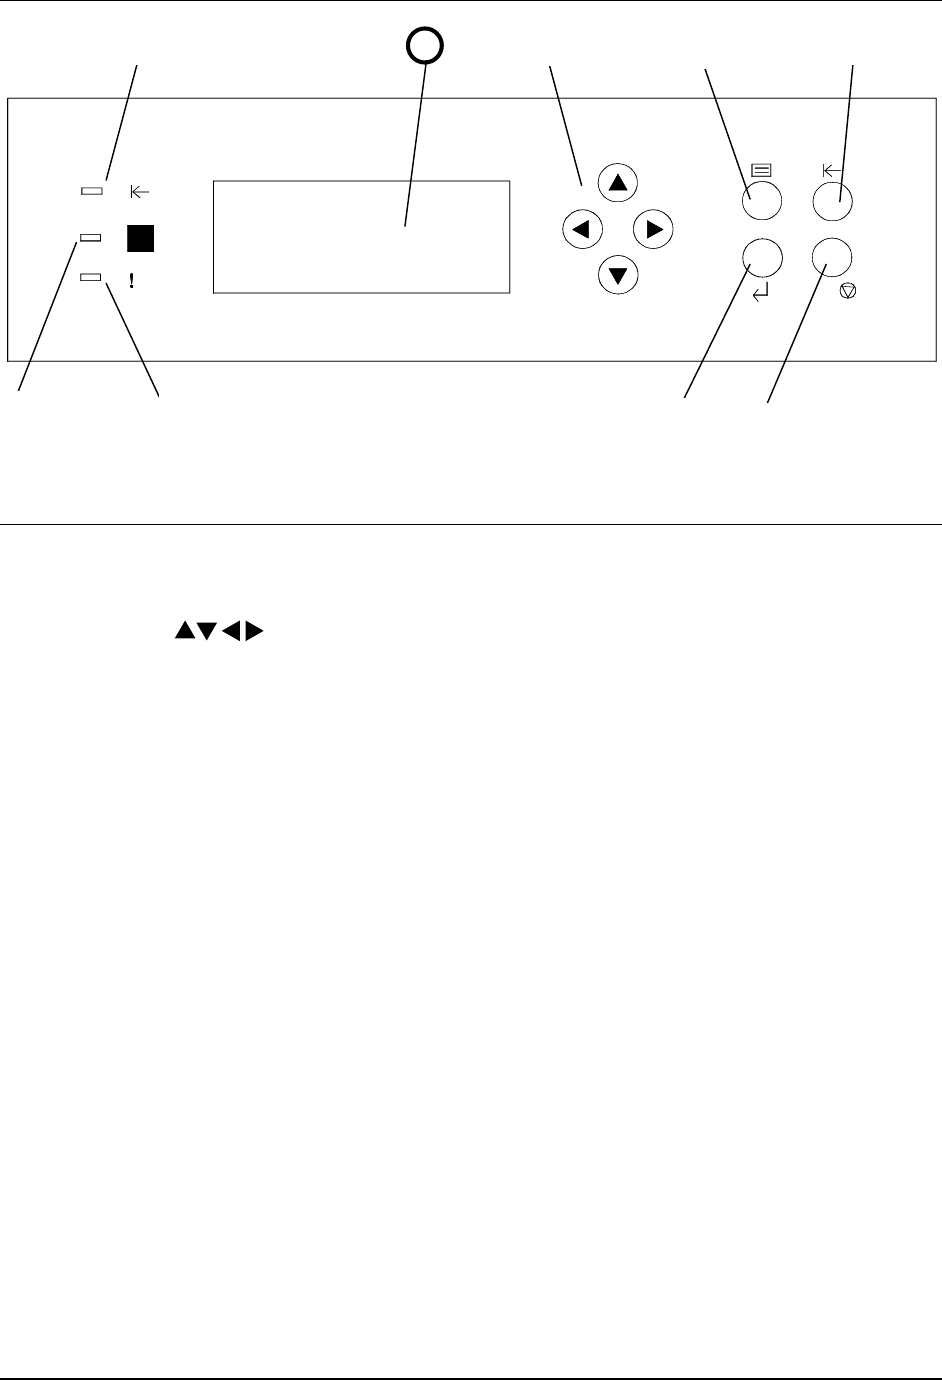
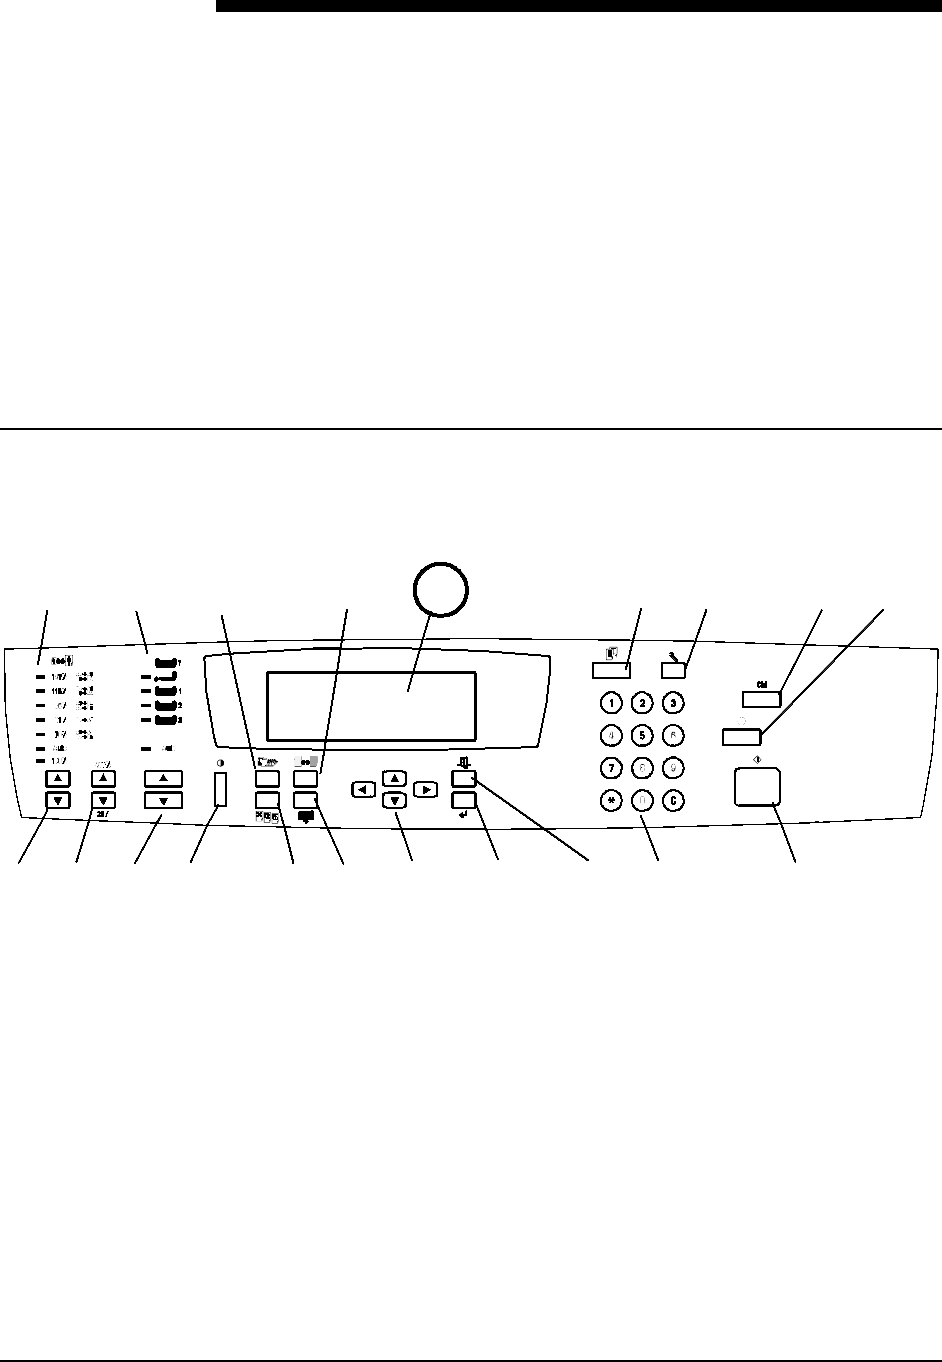
Printer Control Panel
1. Control Panel Screen – use to view the system status, menu options,
problem messages, and fault codes
2. ( ) ARROW buttons – use to view listed options in a menu
3. MENU button – use to step through the Printer menus
4. OFFLINE button– use this button to change the system status from on-
line to off-line and back again
5. CLEAR/STOP button – use this button to Clear an entry, Stop a
procedure or Cancel an operation and to return to the READY menu
6. ITEM/ENTER button– use this button to select options displayed on the
screen
7. ERROR Indicator – this indicator is lit when an error has occurred
8. PROCESSING Indicator – this indicator is lit when Printer is processing
a job
9. ONLINE Indicator – this indicator is lit when the system is on-line
1234
5
6
7
8
9
Scanner and Automatic Document Feeder (ADF) Components Getting to Know the DP-C106
5
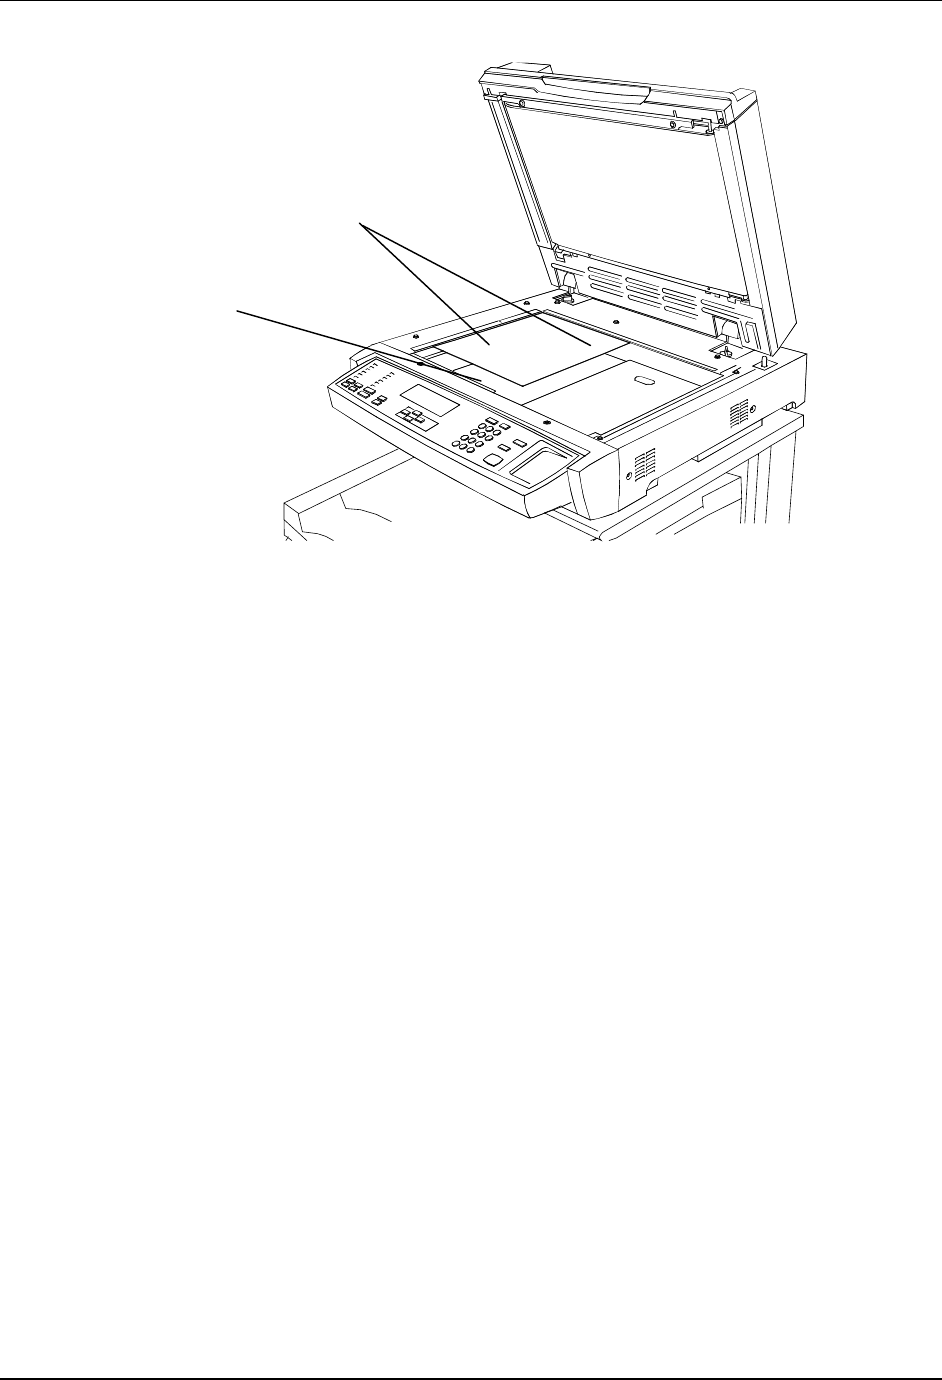
Getting to Know the DP-C106 Scanner and Automatic Document Feeder (ADF) Components
6
7. Registration Guide– align the original with the Registration Guide
8. Document Glass – supports the original for scanning
7
8

Scanner Control Panel Getting to Know the DP-C106
7

Getting to Know the DP-C106 Scanner Control Panel
8
15. Zoom ( ) ARROW buttons – use to select Reduce/Enlarge from 25-
400%
16. Reduce/Enlarge ( ) ARROW buttons – use to select one of the
preset reduction or enlargement settings
17. Reduce/Enlarge indicators – indicates which setting is currently
selected
18. Paper Supply indicators – indicates which paper tray is currently
selected
19. Color Mode button – use to access color mode options
20. Lighten/Darken button – use to lighten or darken the output
Options and Supplies Getting to Know the DP-C106
9
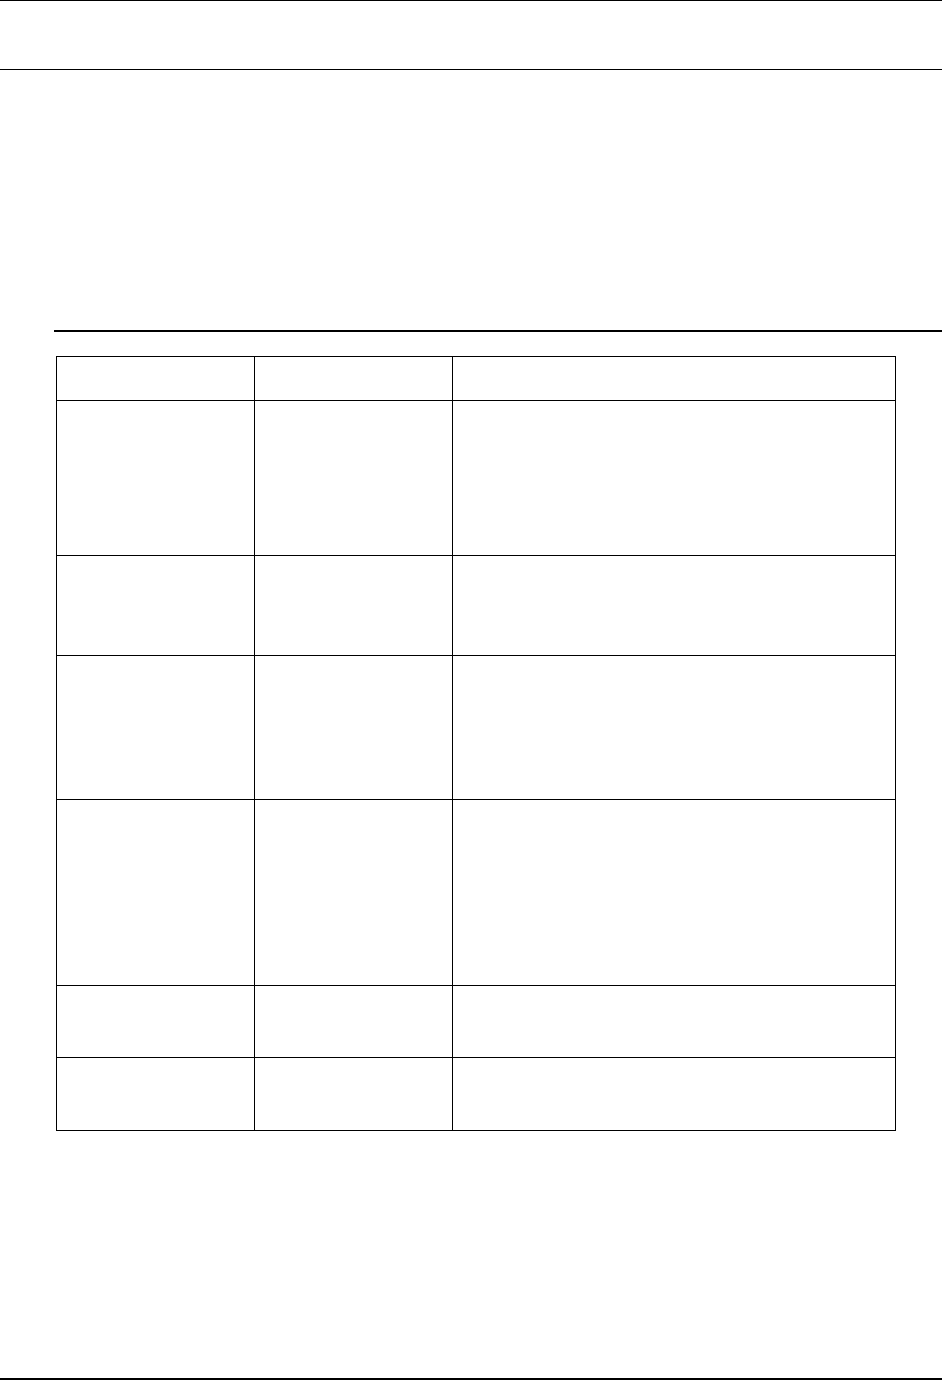
Options and Supplies
The DP-C106 is a digital Color Copier/Printer which can produce images with
great color and clarity. Furthermore, its copying/printing functionality can also
be greatly enhanced by the addition of the following options and supplies.
We hope you find that the wide ranging capabilities will make your office-
place more productive and efficient.
Options
Part Name Part No. Description
10 Bin Sorter DA-S27C The 10 Bin Sorter can sort or stack up
to 10 sets of copies in the bins. It can
also be used to stack up to 500 sheets
in the high capacity bin. The ADF is
required for full functionality.
112MB Image
Memory
Upgrade
DA-SM112C Add 112MB of memory to scanner for 2
sided copying.
64MB Memory
Upgrade
128MB Memory
Upgrade
DA-RM64C
DA-RM128C
Up to 256MB capacity of memory for
the Printer.
(Except Europe)
Duplex Unit
(Except North
America: Duplex
Kit )
DA-DU26C
(For North
America)
DA-DU27C
(Except North
America)
Enables 2-Sided printing.
Oversize Paper
Tray
DA-TL28C This tray handles paper stock up to
12 x 18 inches in size.
Transparency
Tray
DA-TL26C This tray can handle up to 100
transparencies. (8.5 x 11" only)

Getting to Know the DP-C106 Options and Supplies
10
Supplies
Part Name Part No.
1 Black Toner Cartridge DQ-UR26K
1 Cyan Toner Cartridge DQ-UR26C
1 Magenta Toner Cartridge DQ-UR26M
1 Yellow Toner Cartridge DQ-UR26Y
1 Print/Copy Cartridge DQ-UH26X
1 Toner Waste Container DQ-BF28X
11
Basic Copying
This chapter contains the elements and basic function descriptions of the DP-
C106 Copier Control Panel. Also included are guidelines for placing the DP-
C106 in copier mode, positioning the originals on the Document Glass and in
the ADF, and a procedure for making a basic copy using the Copier/Printer
default settings.
The Copier Control Panel
Use the Copier Control Panel to program the DP-C106 for your copy jobs.
The following is a list of the various components on the Copier Control Panel
and their functions.
1. Copier Screen – use to displays programmable features, available
options, and the current settings.
2. Copy – use to change the DP-C106 Copier/Printer from the On-Line
mode to the copy mode.
3. Tools – use to access the Administration features.
4. Clear All – use to reset the selected options to the default settings.
5. Stop – use to stop the copy operation. You can not restart a job after
you press the
Basic Copying
12
7. Numeric Keypad
• Use buttons 0-9 to select the copy quantity, enter personal
passwords, and specify particular feature settings.
• Use the Clear button to reset copy quantity back to 1 or to clear an
incorrect numeric setting.
8. Exit – use to return to the previous screen.
9. Select – use to save copy settings other than the default settings.
10. ( ) ARROW buttons – use to highlight a specific setting on the
Copier Screen for a feature.
11. Advanced Features – use to access the advanced features screen in
order to specify the Output location, the Erase, the 2-Sided, and the 2
Up options.
12. Quality Adjustment – use to access the quality adjustment screen in
order to change the Sharpness and the Color Level of the copies.
13. Contrast Dial – use to lighten or darken the Copier Screen.
14. Paper Supply ( ) ARROW buttons – use to select the desired paper
tray.
15. Zoom ( ) ARROW buttons – use to select a desired percentage for
a reduction or enlargement setting.
16. Reduce/Enlarge ( ) ARROW buttons – use to specify a preset
reduction or enlargement setting.
17. Reduce/Enlarge Indicators – The green light next to each option is lit
when it is selected.
18. Paper Supply Indicators – The green light next to a tray is lit when it is
selected.
19. Color Mode button – use to access the color mode screen.
20. Lighten/Darken button – use to access the copy density screen and
adjust the saturation levels of the copies.
For more information on the copy features introduced above, go to the Copy
Features. For more information on the Tools Option, go to the Tools Mode.
Basic Copying
13
Copy Mode
The default setting for the DP-C106 is the printer mode. To make a copy you
must change the Copier/Printer to the copier mode.
When the DP-C106 Copier/Printer is in the printer mode, a message displays
in the Copier Screen that says
To Enter Copy Mode Press Copy Button
This message is referring to the Copy button on the Copier Control Panel.
After you press the Copy button, one of the following occurs:
• The Ready to Copy message appears on the Copier Control Panel
indicating that you have successfully entered copy mode. The copier is
ready to begin processing jobs.
• If the User Password option is enabled, the Copier Control Panel
prompts you to enter your user password.
Enter your password using the Numeric Keypad. If you enter the wrong
number, press the Clear button.
If your password is correct, the Ready to Copy message automatically
appears on the Copier Screen. This indicates that you have
successfully entered copy mode. The copier is ready to begin
processing jobs.
If you entered an incorrect password, the Incorrect Password message
appears and the copier prompts you to enter your password again.
For information on Setting Up or Changing the User Password, see the
Tools Mode.
Using the Auto Mode Change feature enables the DP-C106 Copier/Printer to
automatically enter the copy mode when originals are loaded in the ADF.
For more information on the Auto Mode Change feature, go to the Tools
Mode.
Basic Copying
14
Auto Start
While the Please Wait message appears on the Copier Screen, you cannot
start copy operations. You may, however, program your copy job. Once the
Copier/Printer has successfully entered copy mode, your copy job will
automatically begin to print.
While the Please Wait message is displayed, position your originals, select
the desired options and press the Start button. The Copier/Printer continues
to show the Please Wait message until it enters the copy mode.
Once the DP-C106 enters the copy mode, the copy job begins to print.
If you wish to cancel the copy job before it begins, press the Stop button.
The Copier Main Screen
Once the DP-C106 enters the copy mode, the Copier Screen displays the
Main Screen. The message Ready to Copy appears on the Main Screen.
The Main Screen also displays the copy quantity and the settings for the
following features:
• Reduce/Enlarge
• Paper Supply
• Color Mode
When you first enter copy mode, each of these features is programmed at the
factory default setting. Should you make any changes to these settings, the
Main Screen will reflect these changes.
For information on the Reduce/Enlarge feature, the Paper Supply feature
and the Color Mode feature, go to the Copy Features. For information on
changing the default settings for each of these features, go to the Tools
Mode.
To view any changes made to the other features available through the DP-
C106 Copier/Printer, access the corresponding feature screen. For
information on the available features and for directions on accessing feature
screens, go to the Copy Features screen.
Basic Copying
15
Positioning the Originals
There are two ways to position originals on the DP-C106: on the Document
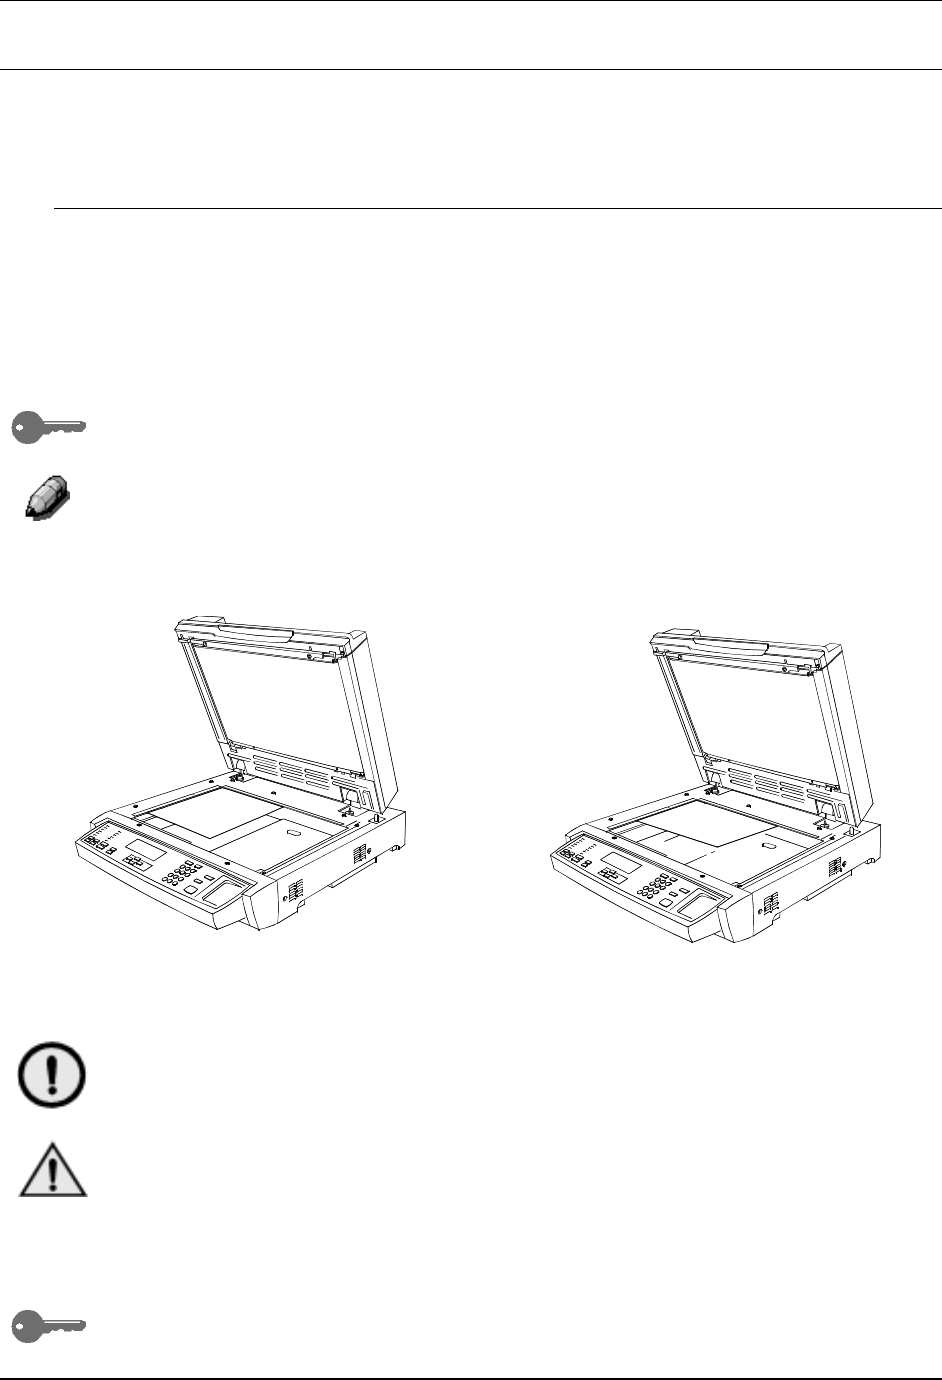
Glass or in the ADF.
The Document Glass
Perform the following steps to use the Document Glass:
1. Raise the ADF.
2. Align the original into the rear, left-hand corner of the Document Glass
face down. Place your original in the same orientation that the paper is
loaded in your selected Paper Tray.
For transparency sheets, tracing paper or other types of thin paper, place a
blank, white sheet over the original on the Document Glass.
For information on the Paper Supply button, see Chapter 3, “Copy
Features”. For information on loading paper into a Paper Tray, see "Setting
Up the DP-C106" in Installation Instructions.
3. Close the ADF.
CAUTION
When copying a thick document, do not force the ADF down. The Document
Glass may break if under too much pressure.
WARNING
If you must perform a copy operation with the ADF open, do not look at the
scanner light.
The maximum original size that the Document Glass can scan is 11 inch x 17
inch or A3 (297 mm x 420 mm).
If you should try to register an original document larger than the maximum
size on the ADF, the image will be cut off on your copy output.
Long Edge Feed (LEF) Short Edge Feed (SEF)
Basic Copying
16
The DP-C106 detects original sizes in either inches or millimeters. The table
below lists the various paper sizes that the DP-C106 can automatically detect
when configured to inches and to millimeters.
For information on changing the copier configuration between inches and
millimeters, go to the Tools Mode.
LEF = Long Edge Feed; SEF = Short Edge Feed
Inch Configuration Metric Configuration
8.5 x 11 in. (SEF/LEF) B5 (SEF/LEF)
8.5 x 14 in (SEF) A4 (SEF/LEF)
11 x 17 in. (SEF) B4 (LEF)
A3 (SEF)
A5 (LEF, EU only)
You must manually select the Paper Supply for documents that do not fall
within the sizes listed in the table and for documents that are difficult to detect,
such as transparencies and tracing paper. If the copier cannot detect the size
of your original, an error message appears on the Copier Screen. The error
message appears each time you attempt to copy the original until you
manually select the appropriate Paper Supply.
For directions on using the Paper Supply button, go to the Copy Features.

Basic Copying
17
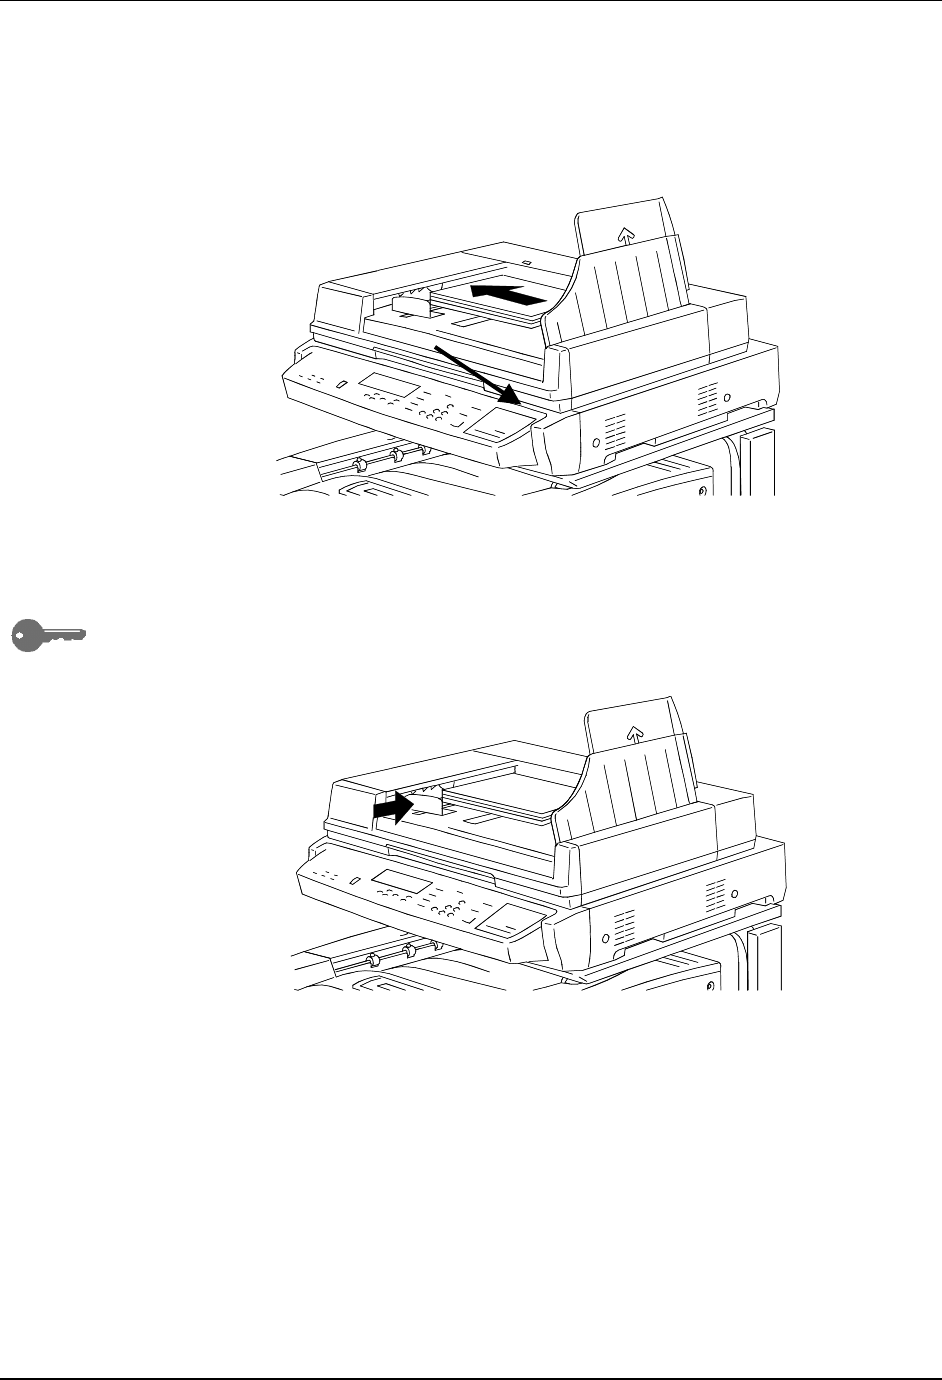
The Automatic Document Feeder (ADF)
The ADF allows you to load up to 30 originals into the DP-C106 for continuous
scanning. Each original is scanned individually, beginning with the bottom sheet.
To use the ADF perform the following steps:
1. Raise the document handler to the right.
2. Place the originals into the ADF face up and in the same orientation as
the paper in the Paper Tray.
Basic Copying
18
3. Gently push the originals into the ADF, as shown below, until the ADF
Light illuminates.
To prevent paper jams, ensure that the original documents rest against the
rear edge of the ADF. Make sure that the ADF Light illuminates.
4. Adjust the Document Guide to gently touch the edges of the originals, as
shown below.
Pushing the Document Guide too tightly against the originals may cause a
ADF jam.
0302512A-WOL
ADF Light
Basic Copying
19
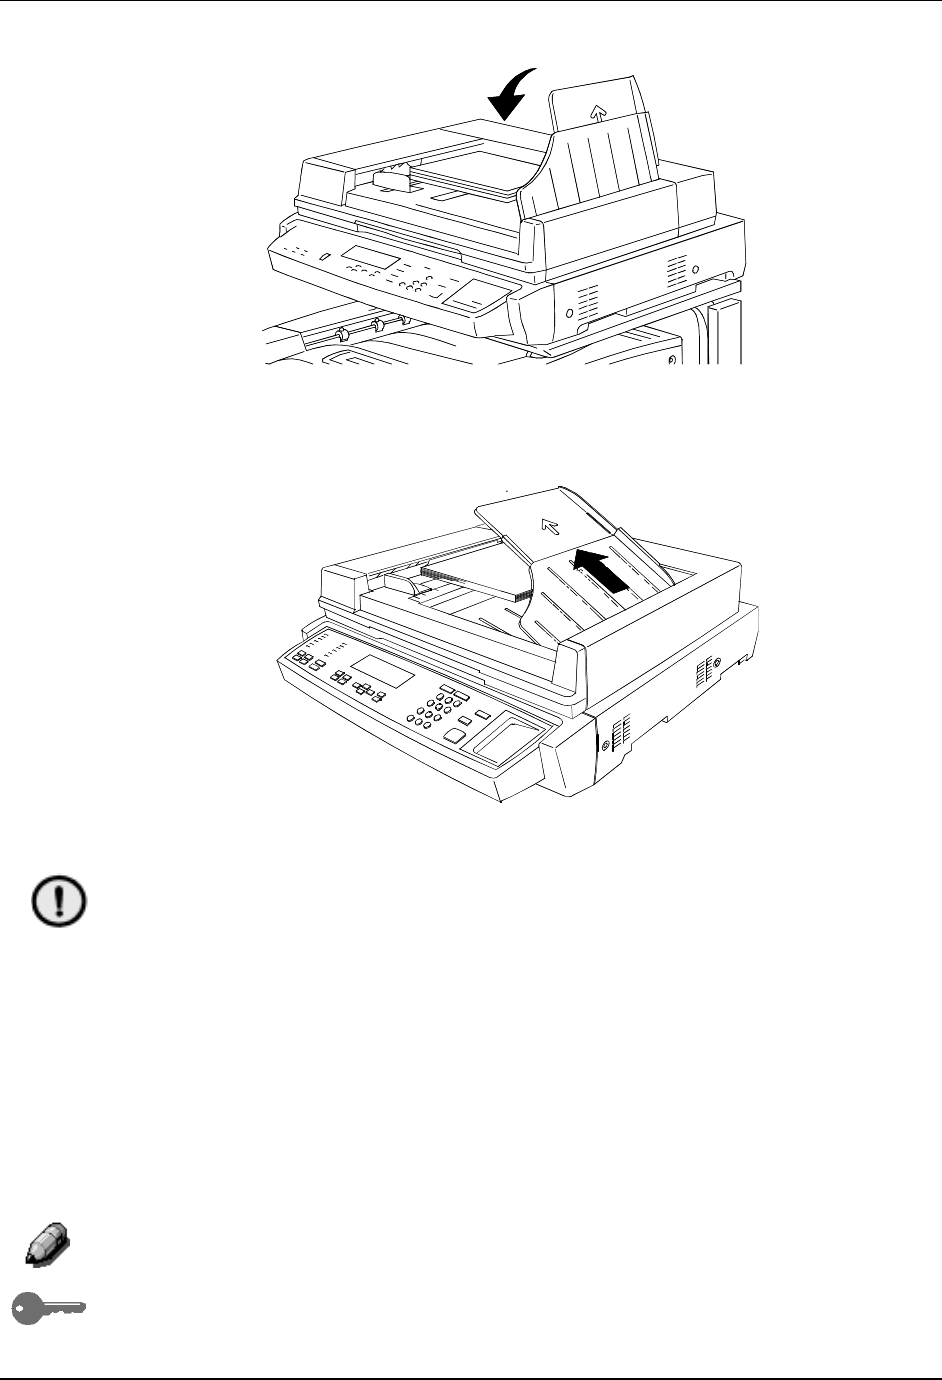
5. Return the Document Tray to the original position.
6. If you are loading large size originals into the ADF, pull out the Exit Tray
Extension of the Document Exit Tray.
CAUTION
Pay attention to the following cautions when using the ADF:
• Do not press on the originals while using the ADF; this could cause a
paper jam.
• Do not let more than 30 sheets stack on the Document Exit Tray. Do not
place any objects on the Document Exit Tray. Both actions could cause
a paper jam.
The ADF accepts all paper sizes between 8.5 x 11 inch or B5 (182 x 257 mm)
and 11 x 17 inch and A3 (297 x 420 mm). The ADF accepts all paper weights
between 38 and 128 gsm or between 10 and 34 lb. To copy an original that is
not within these specifications, you must use the Document Glass.
For specific information on media regulations for the ADF, go to the
"Technical Data" in CD's Operating Instructions.
The ADF does not accept jobs with mixed size originals.
0302513A-W O L
0302516A-W O L
Basic Copying
20
Making a Copy
Perform the following steps to make a copy on the DP-C106:
1. If the Copier/Printer is in printer mode, press the Copy button.
2. Press the Clear All button to reset all default settings.
The settings for all of the copy features are not displayed on the Main
Screen. Feature settings may be altered from a previous copy job. Press
the Clear All button to ensure that all copy features are on the default
settings.
3. Position the originals on the Document Glass or in the ADF.
4. Select the desired number of copies using the Numeric Keypad. If you
enter the wrong number, press the Clear button.
5. Press the Start button.
For directions on applying additional copy features, go to the Copy Features.

21
Copy Features
The following copy features are available on the DP-C106 Copier/Printer:
• Reduce/Enlarge Options
• Paper Supply Selection
• Original Type Selection
• Lighten/Darken Adjustment
• Quality Adjustment
• Advanced Features
This chapter provides detailed information about using each of these features.
Reduce/Enlarge
The Reduce/Enlarge button allows you to increase or decrease the size of the
original image onto your copy output. Selecting a Reduce/Enlarge percentage
on the Copier Control Panel specifies a desired change in the original image
size.
The following Reduce/Enlarge options are available on your DP-C106
Copier/Printer:
• 100 % - The copy image will be the same size as the original image.
• Auto % - The DP-C106 Copier/Printer automatically detects original
document size. After you select your desired paper output size, the
Copier/Printer reduces or enlarges the image to fit onto the output paper.
3
Copy Features
22
• Preset % - The Preset % settings are shown on the Copier Control
Panel. The Copier/Printer automatically determines output size based on
the selected reduction or enlargement percentage.
The following tables list the Preset % selections available on the DP-
C106 and how each percentage affects certain paper sizes.
• Manual % selections - The Zoom ( ) ARROW buttons allow you to
set a manual zoom percentage between 25% and 400%. The manual
zoom percentage displays on the Copier Screen.
Using the Reduce/Enlarge Feature
Follow these steps to make a copy using the Reduce/Enlarge feature:
1. If the DP-C106 is in printer mode, press the Copy button to enter copy
mode.
2. Press the Clear All button to restore default settings.
3. Position the original on the Document Glass or in the ADF.
For information on positioning documents on the Document Glass or using
the ADF, go to the Basic Copying.
Percentage Paper Sizes
64% 11 x 17 in → 8.5 x 11 in
78% 8.5 x 14 in → 8.5 x 11 in
129% 8.5 x 11 in → 11 x 17 in
154% 5.5 x 8.5 in → 8.5 x 14 in
200% 5.5 x 8.5 in → 11 x 17 in
Percentage Paper Sizes
70 % A3 → A4
81% B4 → A4
86% A3 → B4; A4 → B5
115% B4 → A3; B5 → A4
141% B5 → B4
U.S. Preset % selections International Preset % selections
Copy Features
23
4. Perform one of the following:
• Use the Reduce/Enlarge ( ) ARROW buttons to select 100 %
to produce a copy that is the same size as the original document.
• Use the Reduce/Enlarge ( ) ARROW buttons to select Auto%.
• Use the Reduce/Enlarge ( ) ARROW buttons to select a
Preset % reduction/enlargement setting.
• Use the Zoom ( ) ARROW buttons to select a Manual %
reduction or enlargement percentage.
You can enter any percent between 25 % and 400 %.
5. If you selected Auto %, select a desired Paper Supply.
You cannot use the Auto Paper Supply selection with the Auto %
Reduce/Enlarge option. You must select a specific Paper Supply when using
the Auto % Reduce/Enlarge option. Information on the Paper Supply feature
is provided in the next section.
You cannot select an Enlarge value greater than 100% when Auto Paper
Supply is selected. You must manually select the appropriate Paper Supply.
6. Select the desired number of copies using the Numeric Keypad.
7. Press the Start button.
Copy Features
24
Paper Supply
The Paper Supply feature allows you to select the desired paper for your
copies.
The following Paper Supply selections are available on the DP-C106:
• Auto – The Copier/Printer automatically determines original size and the
appropriate paper supply. The Copier/Printer then pulls the appropriate
copy stock from Paper Tray 1, 2, or 3.
• Paper Trays 1, 2, and 3 – This Paper Supply option allows you to
manually select a Paper Tray loaded with the desired output size.
Selecting Paper Tray 1, 2, or 3 along with the Auto % reduce/enlarge option
prompts the DP-C106 to fit the original image on the desired output paper
size. More information on using the Reduce/Enlarge feature is provided at
the beginning of this chapter.
• Bypass Tray – This option allows you load your desired output paper
into the Bypass Tray. Use this method when copying original documents
onto transparencies, labels, envelopes, postcards and other
unconventional paper stocks.
More information on using the Bypass Tray is provided later in this chapter.
Using Paper Trays 1, 2, and 3
Use the following procedure to make a copy using the Paper Trays 1, 2, or 3:
For instructions on loading Paper Trays 1, 2, or 3, go to the “Setting Up the
DP-C106" in Intallation Instructions.
1. If the DP-C106 is in printer mode, press the Copy button to enter copy
mode.
2. Press the Clear All button to restore all default settings.
3. Position the original on the Document Glass or in the ADF.
For more information on positioning original documents, go to the “Basic
Copying”.
Copy Features
25
4. Use the Paper Supply ARROW buttons to select one of the following:
• Auto
You cannot use the Auto Paper Supply feature with the Auto %
Reduce/Enlarge option. You must select a specific reduce/enlarge
percentage. Information on the Reduce/Enlarge feature is provided at the
beginning of this chapter.
• Tray 1
• Tray 2
• Tray 3
If paper is not loaded in the Paper Tray, the message “ADD PAPER TO
TRAY X” is displayed on the Copier Screen, where “X” is the selected tray.
For information on loading the paper tray, go to the “Loading Paper In the
Paper Trays” procedure in the “Setting Up the DP-C106" in Installation
Instructions.
5. Select your desired number of copies using the Numeric Keypad.
6. Press the Start button.
Using the Bypass Tray
Use the Bypass Tray to copy onto unconventional paper sizes or weights,
such as postcards, transparencies or envelopes.
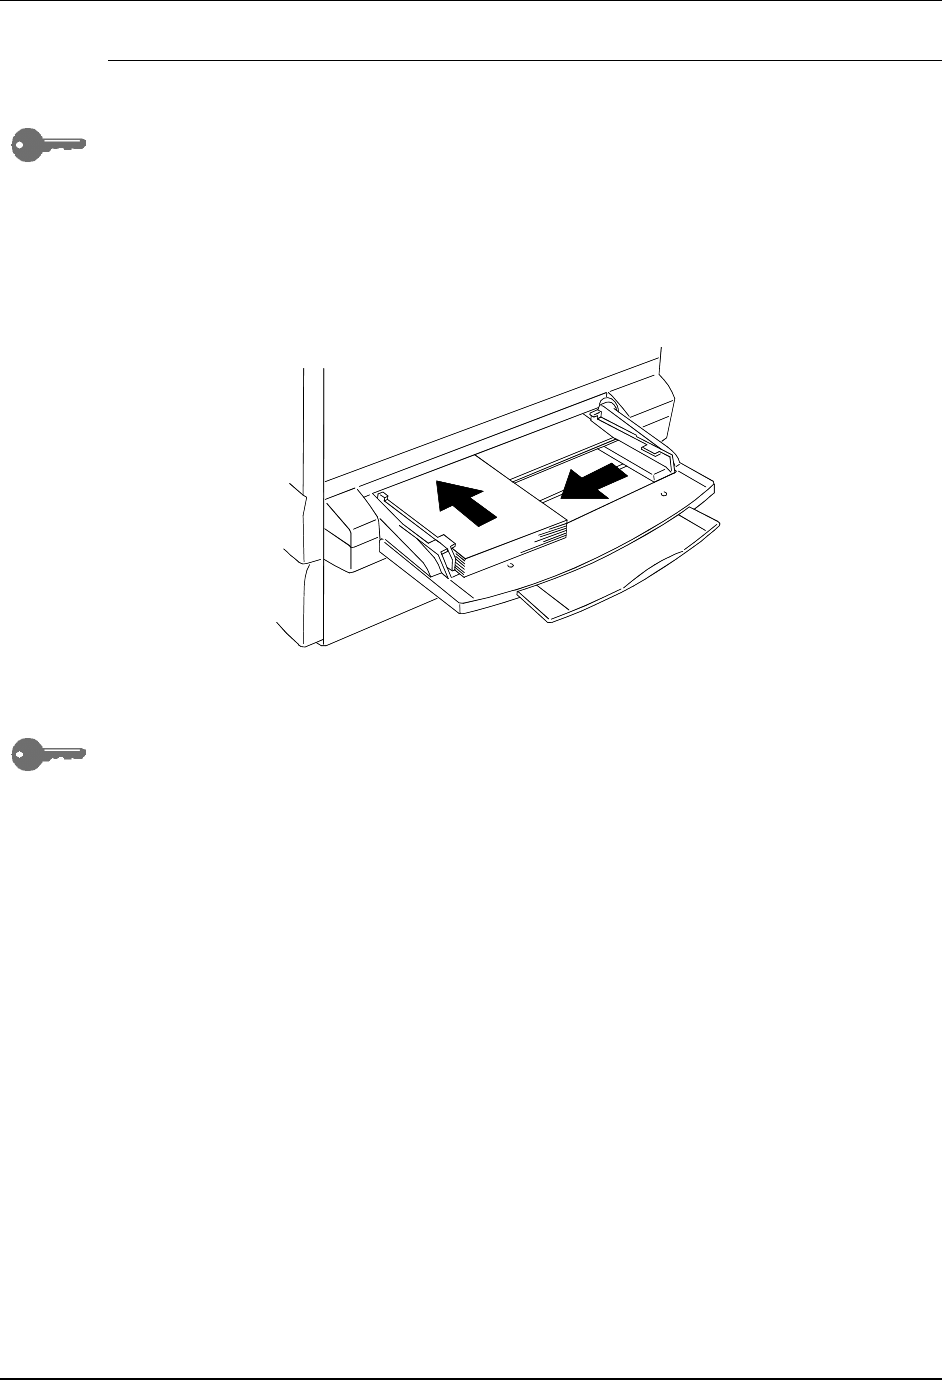
Loading the Bypass Tray
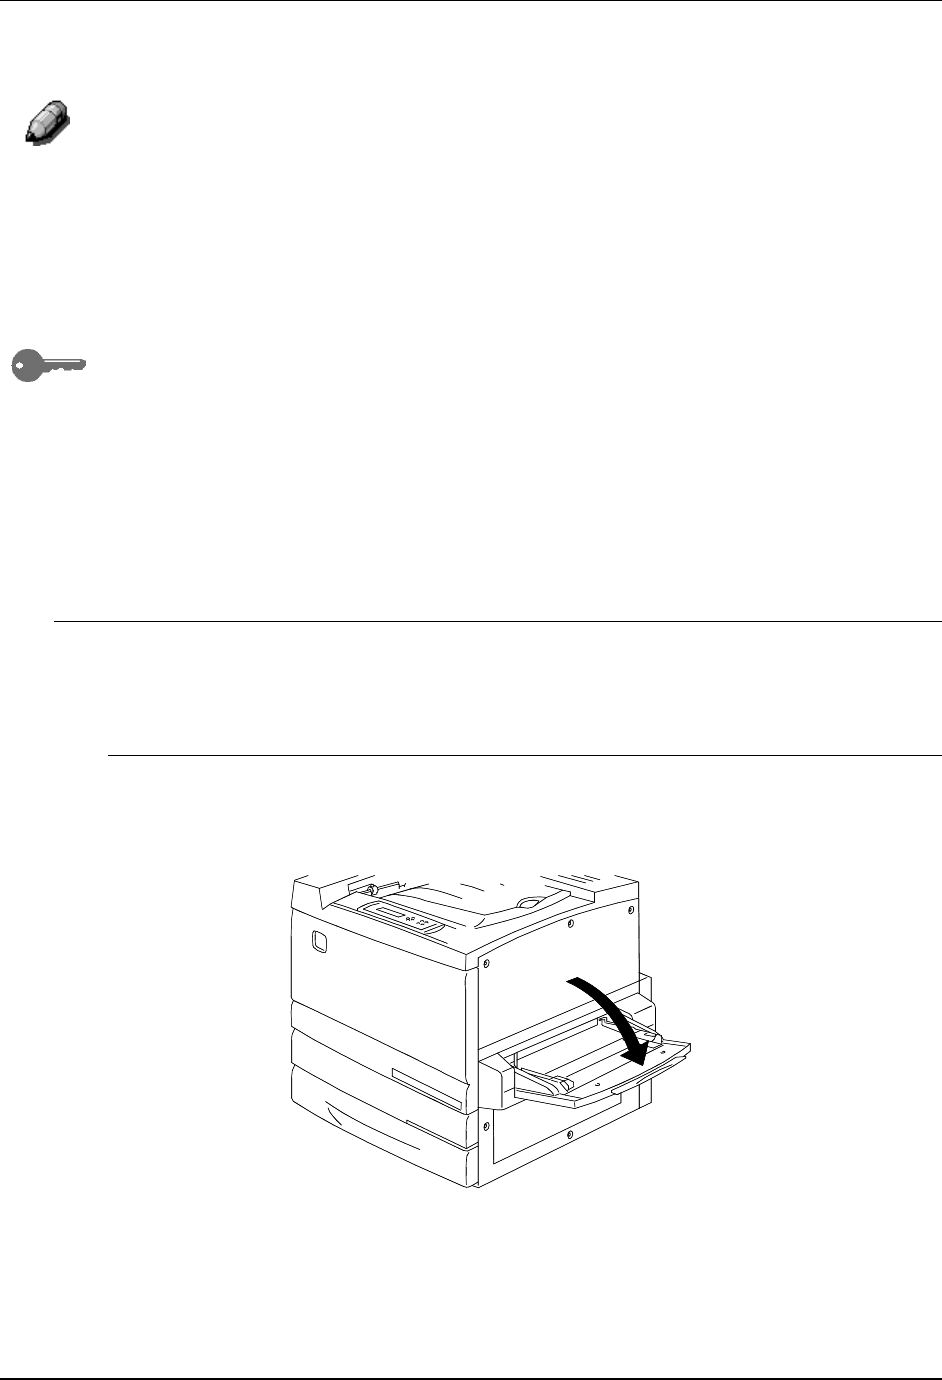
Use the following procedure to load the Bypass Tray:
1. Lower the Bypass Tray.
0
3
0
2
5
0
0
W
O
L
Copy Features
26
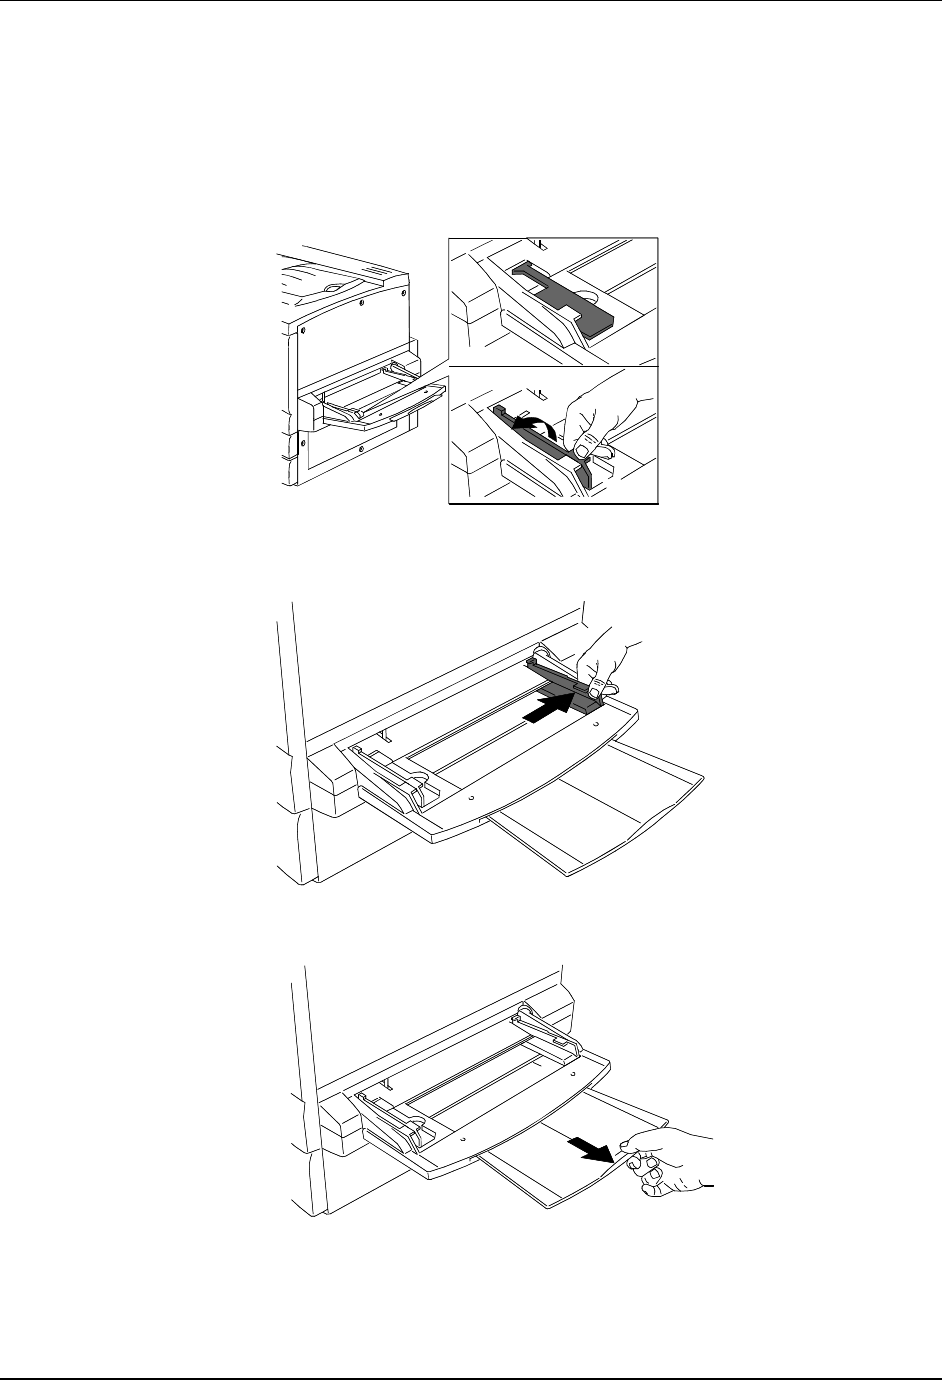
2. Perform one of the following:
• If loading A3 oversize paper, ensure that the blue-green, left-hand
Paper Guide is lowered and snapped into place.
• If loading any other size paper, lift the blue-green, left-hand Paper
Guide.
3. Slide the right-hand Paper Guide all the way to the right.
4. If you are printing on longer paper, pull out the Tray Extension.
0302502A-WOL
0
3
0
2
0
3
O
Copy Features
27
5. Insert your paper stock into the Bypass Tray. Place the left-hand edge of
the paper stock against the left-hand paper guide.
Follow these guidelines to help minimize paper jams in the Bypass Tray:
• Do not use paper that is folded, creased or curled.
• Do not load more sheets than can fit easily under the Paper
Guide Tab.
• Whenever possible, load paper for long edge feed.
6. Slide the right-hand Paper Guide to fit against your paper stock.
Pushing the Paper Guide to tightly against the paper stock can cause a
paper jam.
When paper stock is first loaded in the Bypass Tray, the Bypass Tray paper
selection screen automatically is displayed on the Copier Screen. For further
directions on using the Bypass Tray, go to the “Making a Copy Using the
Bypass Tray”.
0302504B-WOL
0302505A-WOL
Copy Features
28
Loading Transparencies into the Bypass Tray
Transparencies can be fed only from the Bypass Tray or optional
Transparency Tray that goes into Tray 1 position.
CAUTION
Do not use White-Framed Transparencies in this unit. To prevent the white
tape(s) from jamming inside the Fuser Unit, this machine is designed with a
White-Frame Detection Sensor. Upon detecting the White-Frame of the
Transparency, the unit stops feeding, causes a Jam Indication and the
Printer Screen displays: “WRONG OHP TYPE INSTALLED".
Leaving transparencies in the Bypass Tray can cause static build up, which
can cause a jam. Be sure to remove the transparencies when the job is
complete.
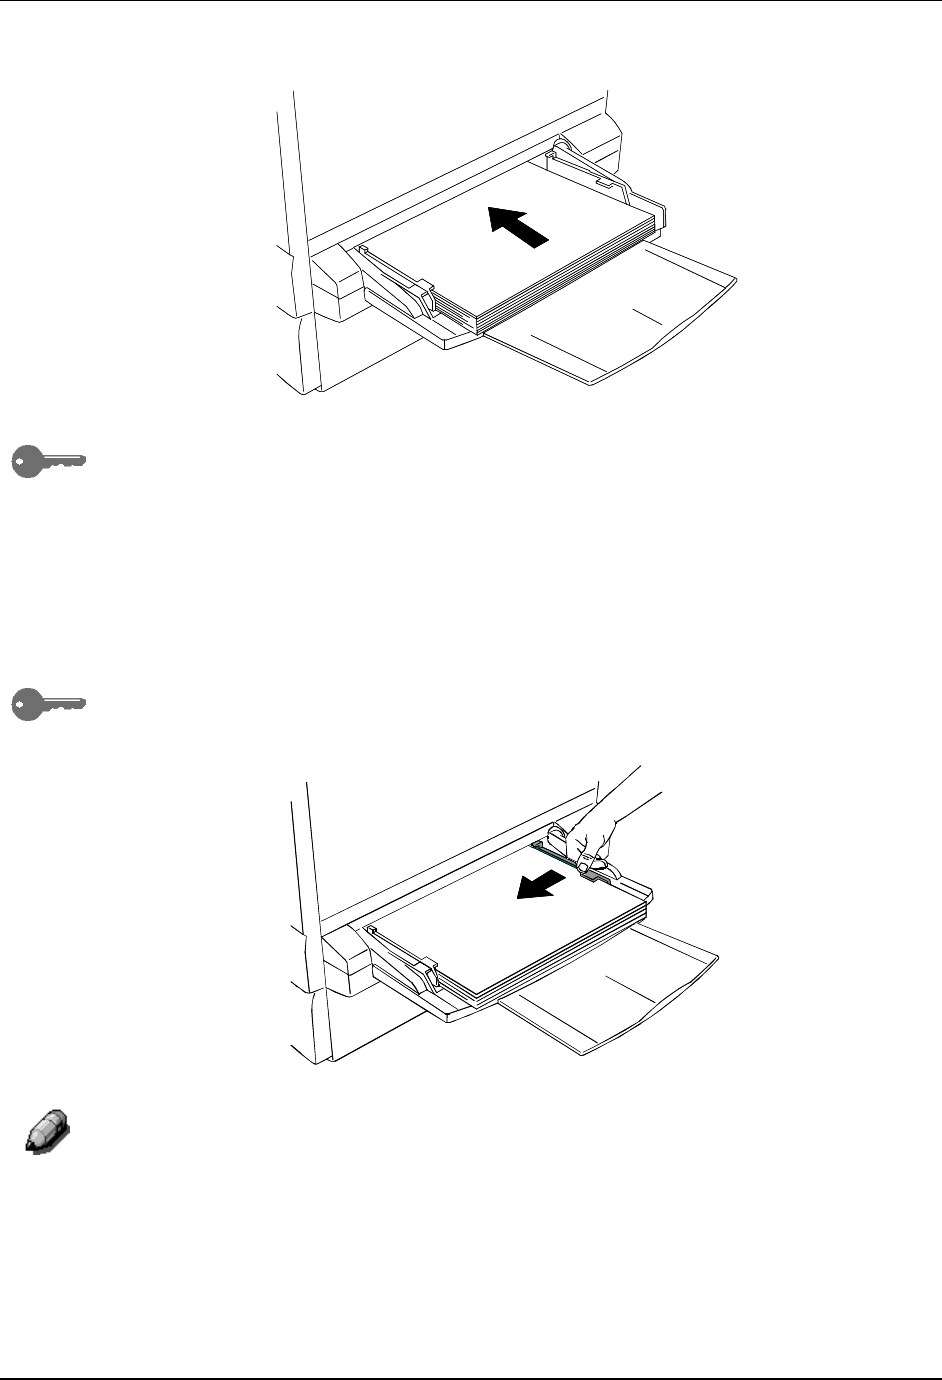
Use the following procedure to load transparencies into the Bypass Tray:
1. Fan the transparency sheets a few at a time to separate them and
prevent static.
2. Insert transparencies into the Bypass Tray until they are touching the
feeding slot. Slide the right-hand Paper Guide against the transparency
stack.
0302514A-WOL
Copy Features
29
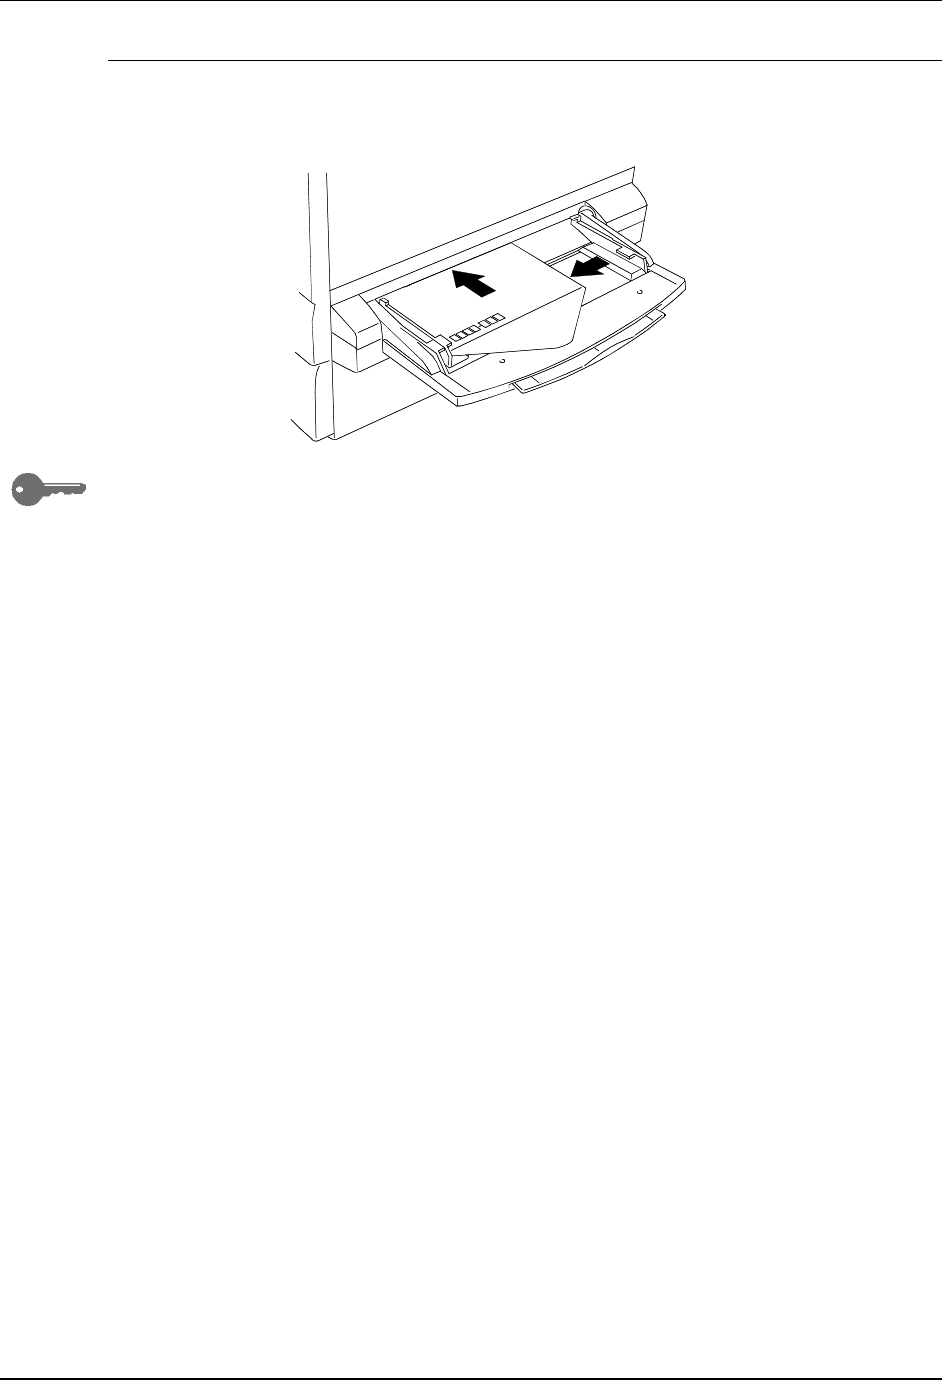
Loading Postcards into the Bypass Tray
Postcards must be fed through the Bypass Tray.
When printing on the back of pre-printed postcards, make sure that the
postcard is not bent. To avoid paper jams, flatten every bend by hand before
printing.
Use the following procedure to load postcards into the Bypass Tray:
1. Load a postcard into the Bypass Tray with the copy side face up.
2. Adjust the Paper Guides to fit snuggly against the postcard stack.
Use the Reduce/Enlarge feature to copy larger images onto a postcard.
0302507A -WOL
Copy Features
30
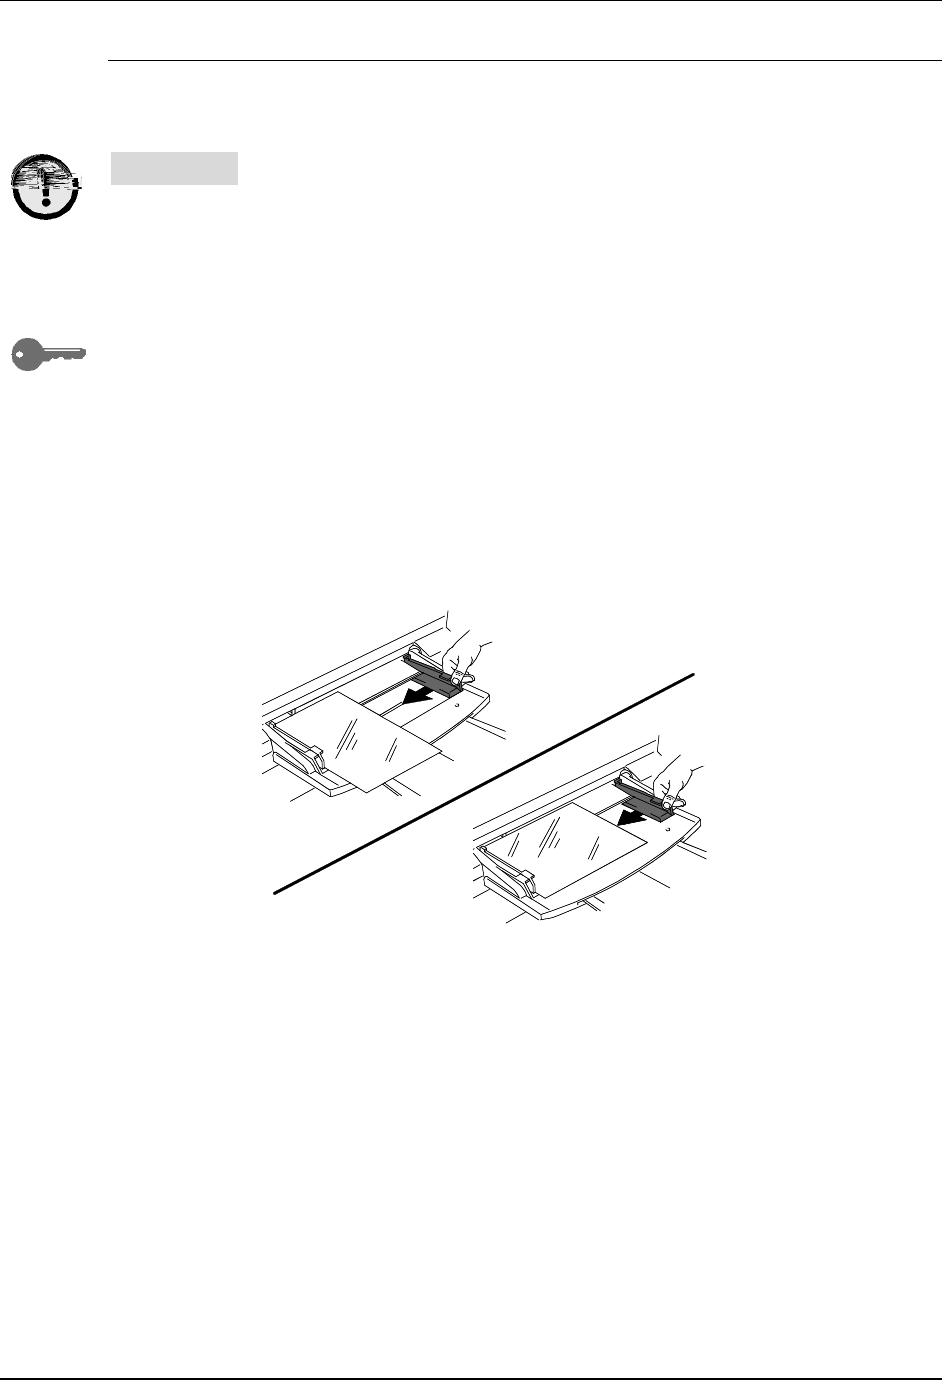
Loading Envelopes in the Bypass Tray
All envelopes must be fed through the Bypass Tray. Open the flap and insert
the envelope, one at a time, into the Bypass Tray as shown below.
Follow these guidelines when printing onto envelopes to help minimize
potential jams and other problems:
• Do not use envelopes that have tape seals. If you are using
an envelope with a glue seal, make sure it is dry before use.
• Only use landscape (horizontal) type envelopes (more than
3.5 inches wide, and more than 5.6 inches long with the flap
open). Portrait (vertical) type envelopes may not be used.
• Insert envelopes with the flap facing out and the glue side
down.
• Poor quality envelopes may crease, and may not print
properly.
0302508A-W O L
Copy Features
31
Making a Copy Using the Bypass Tray
Use the following procedure to make a copy using the Bypass Tray:
1. If the DP-C106 is in printer mode, press the Copy button to enter copy
mode.
2. Press the Clear All button to restore default settings.
3. Position the originals on the Document Glass or in the ADF.
For more information on positioning originals on the Document Glass or
using the ADF, go to the Basic Copying.
4. Use the Paper Supply buttons to select the Bypass Tray. The Bypass
Tray Selection screen is displayed on the Copier Screen.
5. Use the ( ) ARROW buttons to select one of the following:
• Side 1 if you are printing onto one of the following paper types and
the paper is not printed on:
• Plain
• Transparency
• Label
• Postcard (Pcard)
• Coated
• Glossy
• Thick
• Side 2 if you are printing onto one of the following paper types and
the paper has already been printed on.
• Plain
• Postcard (Pcard)
• Coated
• Glossy
• Thick
Use the Side 2 option to create a 2-Sided copy manually.

Copy Features
32
CAUTION
Feeding paper into the Bypass Tray that has been printed on one side from
another copier can damage the DP-C106 because of the differences in toner
temperature and chemical specifications. It is recommended that you create
manual, 2-Sided copies using paper printed on by the DP-C106 only.
6. Press the Select button. Paper Size selection is displayed on the Copier
Screen.
7. Use the ( ) ARROW buttons to highlight the paper size loaded in
the Bypass Tray.
8. Press the Select button. The Main Menu is displayed on the Copier
Screen. The Bypass Tray, along with your selected copy stock, will
display under the Paper Supply option.
9. Enter the desired number of copies using the Numeric Keypad.
10. Press the Start button.
Color Mode
The Color Mode feature allows you to define color specifications for your copy
output.
The following Color Mode options are available on the DP-C106
Copier/Printer:
• Auto – The Copier/Printer automatically detects if the original is color or
black and white.
Documents that are detected as color are copied in Text/Photo mode.
Documents that are detected as black and white are copied in Text
mode.
• Black – The Copier/Printer uses only black toner to create the copy. The
following Original Type selections are available in Black color mode:
• Text – Use this setting when the original is black and white and
contains only text.
• Text/Photo – Use this setting when the original is black and white
and contains both text and printed photographs.
• Photograph – Use this setting when the original is a black and white
photograph.

Copy Features
33
• Color - The Copier/Printer will use all Toner Cartridges for full color copy
output. The following Original Type selections are available in Full color
mode:
• Text/Photo – Use this setting when the original consists of color text
and photographs or color text and a photo from a magazine or
newspaper.
• Printed Photo – Use this setting when the original is a photograph
from a magazine or a newspaper.
• Photograph – Use this setting when the original document is an
original photograph (negative films, developed photographs), not a
printed photograph.
• 2 Color – Use this setting to produce two color output; black and one of
the following:
• Red
• Green
• Blue
• Yellow
• Purple
• Brown
• Yellow Green
• Light Blue
• Pink

Copy Features
34
Using the Color Mode Feature
Follow these steps to make a copy using the Color Mode feature:
1. If the DP-C106 is in printer mode, press the Copy button to enter copy
mode.
2. Press the Clear All button to restore default settings.
3. Position the original on the Document Glass or in the ADF.
For more information on positioning originals on the Document Glass and
using the ADF, go to the Basic Copying.
4. Press the Color Mode button. Color Mode selection is displayed on the
Copier Screen.
5. Use the ( ) ARROW buttons to select one of the following:
• Auto
• Black
• Color
• 2 Color
6. Press the Select button.
7. If you selected Auto Color Mode, skip to step 8. If you selected Black
Color Mode, Full Color Mode or 2 Color Mode, perform one of the
following:
• For Black Color Mode, use the ( ) ARROW buttons to select
the original type as Text, Text/Photo or Photograph.
• For Full Color Mode, use the ( ) ARROW buttons to select the
Original Type as Text/Photo, Print photo or Photograph.
• For 2 Color Mode, use the ( ) ARROW buttons to select the
color you want to print with Black, Red, Green, Blue, Yellow, Purple,
Brown, Yellow Green, Light Blue, or Pink.
8. Press the Select button. Copy Mode selection is displayed on the Copier
Screen
9. Press the Exit button. The Main Menu is displayed on the Copier Screen.
Your Color Mode setting displays on the Main Screen.
10. Enter your desired number of copies using the Numeric Keypad.
11. Press the Start button.
Copy Features
35
Lighten/Darken
The Lighten/Darken feature enables you to adjust the overall density of the
copy output. This feature offers an Auto Contrast option as well as five
lighten/darken levels.
When the Auto option is selected, the Copier/Printer automatically determines
the density of the original. The Copier/Printer then adjusts the density levels
of the copy output to optimize image quality.
Using the Lighten/Darken Feature
Follow these steps to make a copy using the Lighten/Darken feature:
1. If the DP-C106 is in printer mode, press the Copy button to enter copy
mode.
2. Press the Clear All button to restore default settings.
3. Position the original on the Document Glass or in the ADF.
For more information on positioning originals on the Document Glass and on
the ADF, go to the Basic Copying.
4. Press the Lighten/Darken button. Copy Density selection is displayed
on the Copier Screen.
5. Perform one of the following actions:
• Use the up ( ) ARROW button to go from Auto mode to manual
mode density selection.
• Use the ( ) ARROW buttons to select one of the fine copy
densities between Dark and Light in manual mode.
• Use the ( ) ARROW button to return to Auto mode from manual
mode selection.
6. Press the Select button. The Copier Screen returns to the main menu.
7. Enter your desired number of copies using the Numeric Keypad.
8. Press the Start button.
Copy Features
36
Quality Adjustment
The Quality Adjustment feature allows you to adjust the following features:
• Sharpness – to adjust the line sharpness of your copy output.
For detail use a darker line sharpness. For softness use a lighter line
sharpness.
• Color Level – to adjust the amount of color in the copy output.
• Background Mask – to keep undesired images printed on the back of an
original from appearing on the copy output.
The Background Suppression option is useful for copying newspaper and/or
magazine articles because it keeps the print on the back of the page from
appearing on the copy output.
Using the Sharpness Option
Follow these steps to make a copy using the Sharpness option:
1. If the DP-C106 is in printer mode, press the Copy button to enter copy
mode.
2. Press the Clear All button to restore default settings.
3. Position the original on the Document Glass or in the ADF.
For more information on positioning originals on the Document Glass and
Using the ADF, go to the Basic Copying.
4. Press the Quality Adjustment button. Quality Adjustment selection is
displayed on the Copier Screen.
5. Use the ( ) ARROW buttons to highlight the Sharpness option.
6. Press the Select button. Sharpness selection is displayed on the Copier
Screen.
7. Use the ( ) ARROW buttons to highlight a sharpness level between
Lighter and Darker.
A lighter sharpness level produces softer lines. A heavier sharpness level
produces more distinct lines.
Copy Features
37
8. Press the Select button. Quality Adjustment selection is displayed on
the Copier Screen.
9. Press the Exit button. The Main Screen is displayed on the Copier
Screen.
10. Enter your desired number of copies using the Numeric Keypad.
11. Press the Start button.
Using the Color Level Adjustment
Follow these steps to make a copy using the Color Level adjustment:
1. If the DP-C106 is in printer mode, press the Copy button to enter copy
mode.
2. Press the Clear All button to restore default settings.
3. Position the original on the Document Glass or in the ADF.
For more information on positioning originals on the Document Glass and
Using the ADF, go to the Basic Copying.
4. Press the Quality Adjustment button. Quality Adjustment selection is
displayed on the Copier Screen.
5. Use the ( ) ARROW buttons to highlight the Color Level selection.
6. Press the Select button. Color Level selection is displayed on the Copier
Screen.
7. Use the ( ) ARROW buttons to highlight a color level between Light
and Dark.
A lighter color level produces pale, weak colors. A darker color level
produces brighter, stronger colors.
8. Press the Select button. Quality Adjustment selection is displayed on
the Copier Screen.
9. Press the Exit button. The Main Screen is displayed on the Copier
Screen.
10. Enter your desired number of copies using the Numeric Keypad.
11. Press the Start button.
Copy Features
38
Using the Background Mask Feature
Follow these steps to make a copy using the Background Mask feature:
1. If the DP-C106 is in printer mode, press the Copy button to enter copy
mode.
2. Press the Clear All button to restore default settings.
3. Position the original on the Document Glass or in the ADF.
For more information on positioning originals on the Document Glass and
Using the ADF, go to the Basic Copying.
4. Press the Quality Adjustment button. Quality Adjustment selection is
displayed on the Copier Screen.
5. Use the ( ) ARROW Buttons to highlight the Background Mask
selection.
6. Press the Select button. Background Mask selection is displayed on the
Copier Screen.
7. Use the ( ) ARROW buttons to highlight ON to activate the
background suppression or to highlight OFF to turn the background
suppression off.
8. Press the Select button. Quality Adjustment selection is displayed on
the Copier Screen.
9. Press the Exit button. The Main Screen is displayed on the Copier
Screen.
10. Enter your desired number of copies using the Numeric Keypad.
11. Press the Start button.
Copy Features
39
Advanced Features
The Advanced Features option includes the following:
• Output – to change the tray that your copies output to. The option can
be set to either the Exit Tray, the left-hand side Output Tray, or the Top
Tray, the tray above the printer where print jobs are output.
• If the 10 Bin Sorter option is attached, there are other output selections
available. Refer to Determining Output with the Optional 10 Bin Sorter
for additional information.
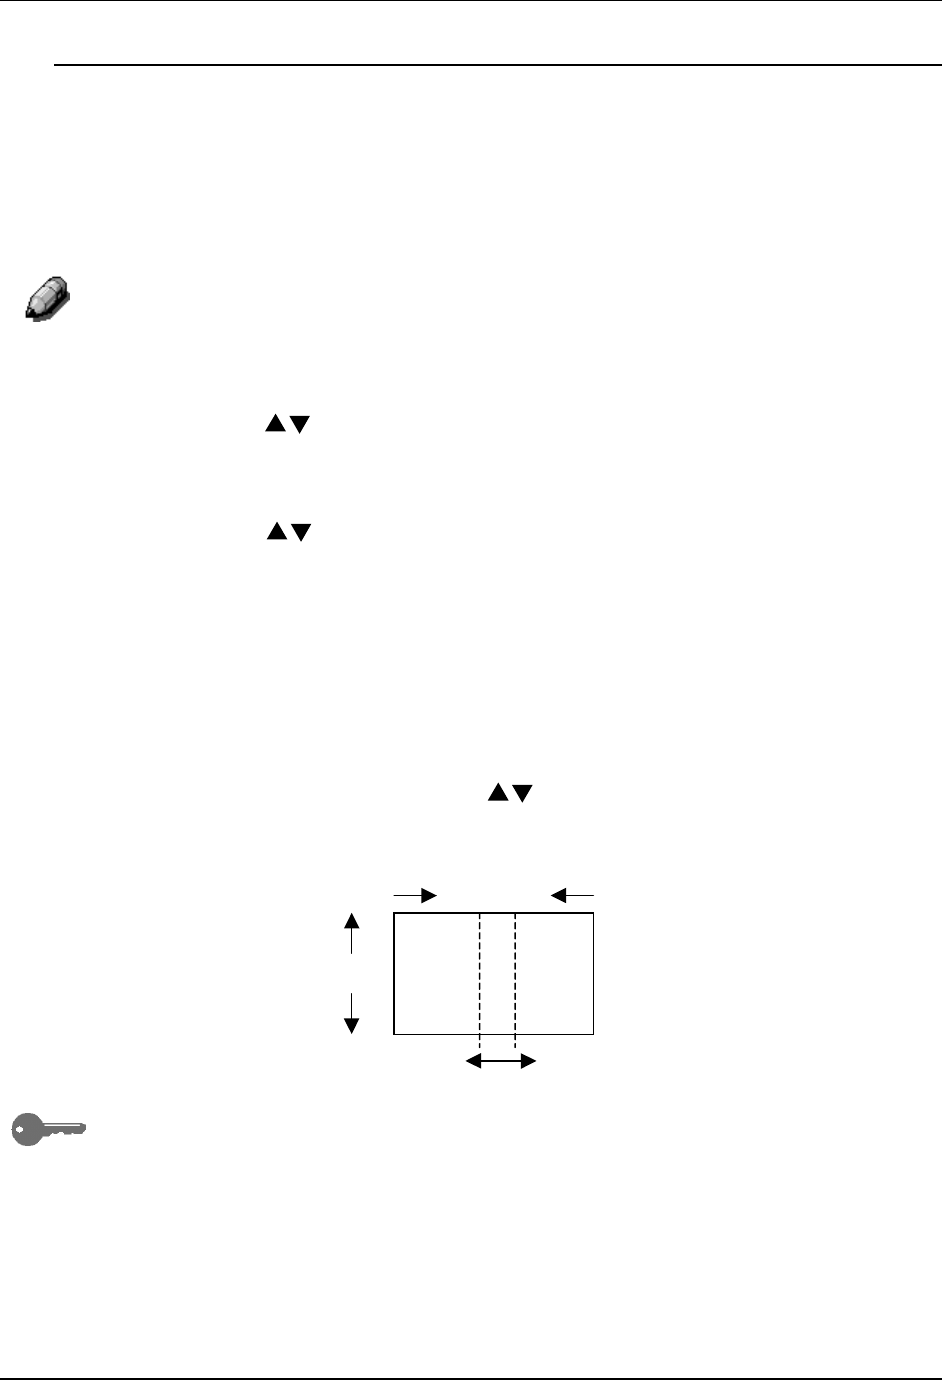
• Erase – to set an erase value from 0 — 50 mm for the following
dimensions on your copy output:
• Horizontal
• Vertical
• Center
The DP-C106 Copier/Printer automatically creates a 4 mm border on every
copy. This is not an erase feature and can not be deleted.
• 2-Sided – to produce double sided output, output with images on both
the front and back sides, from single sided input. The following
orientation options are available for the 2-Sided feature:
• Portrait – to have the images flip along the long edge of the output.
• Landscape – to have the images flip along the short edge of the
output.
• 2 Up – to copy two images onto a single page. The following image
positions are available for the 2 Up feature:
• ON (L➙R) – to position the images in order from left to right.
• ON (R➙L) – to position the images in order from right to left.
You can not use the 2 Up feature with the following:
• 2-Sided Selection
• Auto Paper Tray Selection
• Auto Reduce/Enlarge Feature
Copy Features
40
Using the Output Feature
Use the following procedure to make a copy using the Output feature:
1. If the DP-C106 is in printer mode, press the Copy button to enter copy
mode.
2. Press the Clear All button to restore default settings.
3. Position the original on the Document Glass or in the ADF.
For more information on position originals on the Document Glass and Using
the ADF, go to the Basic Copying.
4. Press the Advanced Features button. Advanced Features selection is
displayed on the Copier Screen.
5. Use the ( ) ARROW buttons to highlight the Output selection.
6. Press the Select button. Output Destination selection is displayed on the
Copier Screen.
7. Use the ( ) ARROW buttons to highlight one of the following:
• Exit Tray to direct output to the printer side output tray.
• Top Tray to direct output to the printer top output tray.
• Sort/Stack selections if option is enabled. Refer to Determining
Output with the Optional 10 Bin Sorter.
8. Press the Select button. Advanced Features selection is displayed on
the Copier Screen.
9. Press the Exit button. The Main Screen is displayed on the Copier
Screen.
10. Enter your desired number of copies using the Numeric Keypad.
11. Press the Start button.
Copy Features
41
Determining Output with the Optional 10 Bin Sorter
The 10 Bin Sorter functions are available to copy jobs only.
1. Select the Copy button on the copier control panel to enter Copy Mode.
2. Select the Advanced Features button.
3. Select the Output feature.
4. Select one of the following options:
12 x 18 Oversize paper cannot be sent to the 10 Bin Sorter.
• Exit Tray (default): Up to 100 output pages can be delivered to the
top output bin without sorting.
Example: Three copies of a single-sided three-page job will be
delivered in the order 3-3-3, 2-2-2, 1-1-1, with page 1 on top.
• High Cap: Up to 500 sheets can be stacked in the sorter’s bottom
high capacity bin without sorting. A message displays when the
high cap bin is full.
Example: One hundred copies of a single-sided three-page job will
be delivered so that 100 copies of page 3 are output first, followed
by 100 copies of page 2, then 100 copies of page 1, with page 1 on
top.
Only Plain paper jobs may be sorted or stacked. Transparencies, Thick,
Postcard or other special stock may be sent to the Exit Tray or High Cap bin.
• Sort (by set): Up to 30 sheets are sorted into a maximum of 10
sets and delivered to the sorting bins.
Example: Three copies of a single-sided three-page job will be
delivered in 3-2-1 order to each of the top three bins (page 3 is
copied first and placed in the bottom of the stack). The final order
will appear as 1-2-3, with page 1 on top.
• Stack (by page): Up to 30 sheets of the same page (up to 10
pages) can be delivered to each of the 10 sorting bins. If more than
10 pages are in the set, all extra copies will be sent to the High Cap
bin.
Example: Three copies of a single-sided three-page job will be
delivered with all copies of page three sent to bin 3, all copies of
page 2 sent to bin 2 and all copies of page 1 sent to the top bin.
5. Press Select, then Exit to continue programming the job.
6. After the job completes, select the Clear All button to return the settings
to the default.
Copy Features
42
Using the Erase Feature
Use the following procedure to make a copy using the Output feature:
1. If the DP-C106 is in printer mode, press the Copy button to enter copy
mode.
2. Press the Clear All button to restore default settings.
3. Position the original on the Document Glass or in the ADF.
For more information on positioning originals on the Document Glass and
Using the ADF, go to the Basic Copying.
4. Press the Advanced Features button. Advanced Features selection is
displayed on the Copier Screen.
5. Use the ( ) ARROW buttons to highlight the Erase feature.
6. Press the Select button. Erase selection is displayed on the Copier
screen.
7. Use the ( ) ARROW buttons to highlight one of the following:
• ON, to turn the Erase feature On.
• OFF, to turn the Erase feature Off.
8. Press the Select button. One of the following happens:
• If you selected OFF, Advanced Features selections will redisplay
on the Copier Screen. Skip to step 10.
• If you selected ON, Erase value selection is displayed on the
Copier Screen. Use the ( ) ARROW buttons to highlight an
erase dimension. Use the Numeric Keypad to enter an erase value
between 0 mm and 50 mm.
If you enter an incorrect value, press the Clear button to delete it.
Horizontal
Vertical
Center
Copy Features
43
9. Press the Select button. Advanced Features selection is displayed on
the Copier Screen.
10. Press the Exit button. The Main Screen is displayed on the Copier
Screen.
11. Enter your desired number of copies using the Numeric Keypad.
12. Press the Start button.
If you enter two values and wish to change the first, you must first exit and
then return before making the desired change.
Using the 2-Sided Feature
Use the following procedure to make a copy using the 2-Sided feature:
1. If the DP-C106 is in printer mode, press the Copy button to enter copy
mode.
2. Press the Clear All button to restore default settings.
3. Position the originals in the ADF.
You must use the ADF to create a 2-Sided copy. For more information on
positioning originals in the ADF, go to the Basic Copying.
4. Press the Advanced Features button. Advanced Features selection is
displayed on the Copier Screen.
5. Use the ( ) ARROW buttons to highlight the 2-Sided feature.
6. Press the Select button. 2-Sided selection is displayed on the Copier
Screen.
Copy Features
44
7. Use the ( ) ARROW buttons to highlight one of the following:
• OFF to turn the 2-Sided feature off.
• Long Edge Binding to flip the images along the long edge of the
output. This feature prints the top of the long edge side 1 image on
the same edge of the page as the top of the side 2 image. For
Portrait documents, this creates a book effect. For Landscape
documents, this creates a landscape effect.
• Short Edge Binding to flip the images along the short edge of the
output. This feature prints the top of the side 1 short edge image on
the opposite edge of the page from the top of the side 2 image. For
Portrait documents, this creates a calendar effect. For Landscape
documents, this creates a book effect.
The Copier Screen displays an error message if the 2 Up feature is on when
you try to switch the 2-Sided feature on. For information on using the 2 Up
feature, see “Using the 2 Up Feature.”
8. Press the Select button. One of the following happens:
• If you selected OFF, Advanced Features selection is displayed on
the Copier Screen. Skip to step 12.
• If you selected Portrait or Landscape, Page Count is displayed on
the Copier Screen.
9. Using the ( ) ARROW buttons, select one of the following:
• Number – to manually enter the number of originals.
• Auto Count – to have the copier detect the number of originals.
Skip to step 12.
10. Using the Numeric Keypad, enter the number of originals loaded in the
ADF.
11. Press the Select button. 2-Sided selection is displayed on the Copier
Screen.
12. Press the Exit button. The Main Screen is displayed on the Copier
Screen.
13. Enter your desired number of copies using the Numeric Keypad.
14. Press the Start button.
Copy Features
45
Using the 2 Up Feature
Use the following procedure to make a copy using the 2 Up feature:
1. If the DP-C106 is in printer mode, press the Copy button to enter copy
mode.
2. Press the Clear All button to restore default settings.
3. Position the originals in the ADF with the long edge of the paper entering
the ADF first (Long Edge Feed).
You must use the ADF to create a 2 Up copy. For more information on
positioning originals in the ADF, go to the Basic Copying chapter.
4. Select the Paper Supply and the % of Reduction/Enlargement required.
Several common sizes are listed below. Use the Zoom feature to
determine the best reduction for other sizes.
Original Desired 2-Up Output Reduction
8.5 x 11 in. Portrait 8.5 x 11 in. Landscape 64%
8.5 x 11 in. Portrait 11 x 17 in. Landscape 100%
8.5 x 11 in. Portrait 11 x 14 in. Landscape 75%
A4 Portrait A4 Landscape 70%
A4 Portrait B4 Landscape 86%
A4 Portrait A3 Landscape 100%
5. Load paper into the Paper Tray by placing the short edge of the paper to
feed into the machine first (Short Edge Feed).
6. Press the Advanced Features button to display the Advanced Features
selections on the Copier Screen.
7. Use the ( ) ARROW buttons to highlight the 2 Up feature.
8. Press the Select button to display the 2 Up selection on the Copier
Screen.

Copy Features
46
9. Use the ( ) ARROW buttons to select one of the following:
• NO to turn the 2 Up feature Off.
• YES (L→R) to turn the 2 Up feature On, and position the images
from left to right.
• YES (R→L) to turn the 2 Up feature On, and position the images
from right to left.
The Copier Screen displays an error message if the 2-Sided feature is On
when you try to switch On the 2 Up feature. For information on using the 2-
Sided feature, go to the “Using the 2-Sided Feature”.
10. Press the Select button.
• If you selected OFF, Advanced Features selection is displayed on
the Copier Screen. Skip to step 14.
• If you selected YES (L→R) or YES (R→L), Page Count selection is
displayed on the Copier Screen.
11. Using the ( ) ARROW buttons, select one of the following:
• Number – to manually enter the number of originals.
• Auto Count – to have the copier detect the number of originals.
Skip to step 12.
12. Using the Numeric Keypad, enter the number of originals loaded in the
ADF.
13. Press the Select button. 2 Up selection is displayed on the Copier
Screen.
14. Press the Exit button. Advance Features selection is displayed on the
Copier Screen.
15. Press the Exit button to return to the Main Screen.
16. Enter the desired number of copies using the Numeric Keypad.
17. Press the Start button.
The Copier Screen displays an error message if the Reduce/Enlarge feature
is set at Auto or if the Paper Supply feature is set at Auto. For information on
using the Reduce/Enlarge feature go to the “Using the Reduce/Enlarge
Feature”. For information on using the Paper Supply feature go to the “Using
the Paper Supply Feature”.

47
Tools Mode
Use the Tools button on the Copier Control Panel to access Tools Mode on
your DP-C106. The Tools Mode feature provides access to meter information
and the administrative features that allow you to customize and service your
copier.
For the Administration features, the default administrator password is 9999.
Change the password as soon as possible to prevent unauthorized
personnel from accessing the Administrator Menu and its options.
Meter Check
The Meter Check feature provides a statistical report on the number of
images produced on your DP-C106. The Billing Meters screen displays the
following image counts:
• Meter 1 displays the total number of color prints and copies made.
• Meter 2 displays the total number of black and white prints and copies
made.
• Meter 3 displays the total number of copies and prints made to date by
your DP-C106.
The Meter Check feature tracks the use of your Copier/Printer so that you
may follow maintenance and service requirements accurately.
The Meter Check feature also tracks the types of copies and prints made on
your DP-C106 so that you may customize your copy functions for this
purpose.
For example, if Meter 2 readings are always higher than Meter 1 readings,
your Copier/Printer is used more for color images than for black and white
images. You may change your default settings to reflect this function.
4

Tools Mode
48
Use the following procedure to access the Meter Check screen:
1. Press the Tools button on the Copier Control Panel to display the Tools
Main Menu on the Copier Screen.
2. Using the ( ) ARROW buttons highlight the Meter Check feature.
3. Press the Select button. Meter Check is displayed on the Copier Screen.
4. To exit the Meter Check feature, press the Exit button. The Tools Main
Menu is displayed on the Copier Screen.
5. Press the Tools button in order to exit Tools Mode.
Administrative Features
Accessing the Tools Mode allows you to alter several administrative features
available with the DP-C106. Those features include:
• Defaults for Copy
• Color
• Auto Color Adjust
• Detect Document Size
• Auto Mode Change
• Limit Copy Set Size
• Timer Preset
• Sound Preset
• User Password
• ADMIN Password
• Version Information
• Self Diagnostics
• Transporting Scanner
Tools Mode
49
Use the following procedure to access the Administrative Features menu:
1. Press the Tools button on the Copier Control Panel to display the Tools
Main Menu on the Copier Screen.
2. Using the ( ) ARROW buttons highlight the Admin menu selection.
3. Press the Select button. Password Input is displayed on the Copier
Screen.
The default system administrator password is 9999. Change the password
as soon as possible to prevent unauthorized personnel from accessing the
Administrator Menu and its options. For directions on changing the
Administrator Password, go to the Administrator Password procedure
4. Using the Numeric Keypad, enter your Administrator Password. The
numbers display as asterisks (*).
If you make a mistake while entering a password, press the Clear button.
5. Once the correct password is entered, the Administrator Menu is
displayed on the Copier Screen.
6. Use the ( ) ARROW buttons to highlight your desired feature. Press
the Select button to view the feature options.
Specific information on each of the available Administrative features is
discussed in the following sections.
7. To exit the Administrator Menu, press the Exit button. The Tools Main
Menu is displayed on the Copier Screen.
8. To exit Tools Mode, press the Tools button.
Tools Mode
50
Defaults for Copy
The DP-C106 automatically restores default feature settings.
• When the power is switched On.
• When restoring power from Energy Saver Mode.
• When the Clear All button is pressed.
To change the default settings for the following features, select the Defaults
for Copy option from the Administrator menu in Tools Mode:
• Paper: This option allows you to change the default setting for the Paper
Supply feature.
The Paper Supply default can be set at Auto, Tray 1, Tray 2 or Tray 3.
The Paper Supply default cannot be Auto if the Reduce/Enlarge default
setting is Auto %.
• Reduce/Enlarge: This option allows you to change the default setting for
the Reduce/Enlarge feature.
The Reduce/Enlarge can be set to Auto %, 100 %, or to any of the
Preset % options listed on the Copier Control Panel.
The Reduce/Enlarge default setting cannot be on Auto % if the Paper Supply
default is set to Auto.
• Copy Density: This option allows you to change the default setting for the
Lighten/Darken feature.
The Lighten/Darken default can be set to Auto or any of the five density
levels between Dark and Light.
Tools Mode
51
• Color Mode: This option allows you to change the default setting for the
Original Type feature.
The Original Type default can be programmed to one of the following:
• Black Text
• Black Text/Photo
• Black Photograph
• Color Text/Photo
• Color Prnt Photo
• Color Photograph
• Auto
Setting a default value for the Color Mode feature is useful when most
originals are of the same type.
• Output: This option allows you to change the default Output location for
copies.
The Output destination default can be set to the Exit Tray or the Top
Tray.
Media types other than Plain will automatically output to the Exit Tray, even if
Top Tray is selected. Additional output selections are available if the 10 Bin
Sorter option is part of the configuration. Refer to Determining Output with
the Optional 10 Bin Sorter in the Copy Features section for more information.
All paper fed from the Bypass Tray automatically outputs to the Exit Tray,
even if the Top Tray is set as the default.
• Erase: The option allows you to change the default measurements for the
Erase feature when it is on.
Each Erase dimension can be set at a value between 0 and 50 mm. The
new value is the default measurement for that dimension when the
Erase feature is on.
The default setting for the Erase option is Off. Changing the dimensional
values does not set the default to On; it only changes the default
dimensional values when the Erase feature is switched On.
Tools Mode
52
Use the following procedure to change a Defaults for Copy setting:
1. Press the Tools button on the Copier Control Panel to display the Tools
Main Menu on the Copier Screen.
2. Using the ( ) ARROW buttons highlight the Admin menu option.
3. Press the Select button. Password Input is displayed on the Copier
Screen.
4. Using the Numeric Keypad, enter your Administrator Password. The
numbers display as asterisks (*).
If you make a mistake while entering the password, press the Clear button.
5. Once the correct password is entered, the Administrator Menu is
displayed on the Copier Screen.
6. Use the ( ) ARROW buttons to highlight the Defaults for Copy option.
7. Press the Select button. Defaults for Copy selection is displayed on the
Copier Screen.
8. Using the ( ) ARROW buttons, highlight the feature whose defaults
you wish to change.
9. Press the Select button. The feature selections are displayed on the
Copier Screen.
10. Use the ( ) ARROW buttons to highlight a new default setting.
To change the default for the Erase feature, you must enter an erase
measurement using the Numeric Keypad. If you enter a wrong number,
press the Clear button and enter the correct number.
11. Press the Select button. Defaults for Copy selection are displayed on
the Copier Screen. The new default setting displays next to the
appropriate feature.
12. To change the default for another feature, repeat steps 8 through 11.
13. Press the Exit button. The Tools Main Menu is displayed on the Copier
Screen.
14. To exit Tools Mode, press the Tools button.
Tools Mode
53
Color
The color balance setting changes the toner density for the colors yellow,
magenta, cyan and black. Each color is set for a high, medium and low
density. Each color has a density setting for three document types:
Text/Photo, Print Photo, and Photograph.
The color balance adjustment is for copies only. When the machine is in the
printer mode, color adjustments do not affect the output.
Use the following procedure to adjust the Color settings:
1. Press the Tools button to display the Tools Main Menu on the Copier
Screen.
2. Using the ( ) ARROW buttons highlight the Admin menu option.
3. Press the Select button. Password Input is displayed on the Copier
Screen.
4. Using the Numeric Keypad, enter your Administrator Password. The
numbers display as asterisks (*).
If you make a mistake while entering a password, press the Clear button.
5. Once the correct password is entered, the Administrator Menu is
displayed on the Copier Screen.
6. Using the ( ) ARROW buttons, highlight the Color option.
7. Press the Select button. Color Types are displayed on the Copier
Screen.
8. Using the ( ) ARROW buttons, highlight one of the following:
• Text/Photo
• Print Photo for documents that are printed photographs,
photographs printed in magazines or newspapers.
• Photograph for documents that are photographs on photographic
paper.

Tools Mode
54
9. Press the Select button. Color selection is displayed on the Copier
Screen.
10. Using the ( ) ARROW buttons, highlight one of the following: Y for
Yellow, M for Magenta, C for Cyan and B for Black. Press the Select
button.
11. Using the ( ) ARROW buttons, adjust the color density between –3
and +3 for each of the three density levels, Low, Middle and High.
Use the Up and Down arrows to increase or decrease the density level. Use
the Left and Right arrows to switch between Low, Medium, and High
density.
Pressing the Clear button will return all color densities to 0.
12. Press the Select button. Color selection is displayed on the Copier
Screen. The new density value displays next to the appropriate color.
13. To change the density of other colors, repeat steps 10 through 12.
14. Press the Exit button. Document Type selection is displayed on the
Copier Screen.
15. To change the color density for other document types, repeat steps 8
though 14.
16. Press the Exit button. The Administrator Menu is displayed on the
Copier Screen.
17. Press the Exit button. The Tools Main Menu is displayed on the Copier
Screen.
18. Press the Tools button to exit Tools Mode.
Tools Mode
55
Auto Color Adjust
The Automatic Color Adjust option allows you to correct any color degradation
that occurs from use to maintain the optimum copy quality for the
Copier/Printer.
The color adjustment is for copying only. When the DP-C106 is in the printer
mode, the adjustments have no effect.
Use of High Brightness Paper (90 Brightness or higher) is strongly
recommended when making color adjustments.
Use the following procedure to apply the Auto Color Adjust feature:
1. Press the Tools button to display the Tools Main Menu on the Copier
Screen.
2. Using the ( ) ARROW buttons highlight the Admin menu option.
3. Press the Select button. Password Input is displayed on the Copier
Screen.
4. Using the Numeric Keypad, enter your Administrator Password. The
numbers display as asterisks (*).
If you make a mistake while entering a password, press the Clear button.
5. Once the correct password is entered, the Administrator Menu is
displayed on the Copier Screen.
6. Use the ( ) ARROW buttons to highlight the AutoColAdjust selection.
7. Press the Select button. AutoColAdjust document type selection is
displayed on the Copier Screen.
8. Using the ( ) ARROW buttons highlight one of the following
document types:
• Text/Photo
• Print Photo for originals that are photographs printed in magazines
or newspapers.
• Photograph for originals that are photographs on photographic
paper.
9. Press the Select button.
Tools Mode
56
10. Confirm that the Printout document option is highlighted. Press the
Select button.
11. Load 8.5 in. x 11 in. or A4 paper in the Bypass Tray and press the Start
button. Load by long edge first.
For directions on loading paper in the Bypass Tray, go to the Copy Features.
12. The Auto Color Adjustment Patch Page prints out to the Top Tray.
13. Place the Auto Color Adjustment Patch Page face down on the
Document Glass. Position the magenta patches on the left-hand side of
the glass.
14. Cover the Auto Color Adjustment Patch Page with 5 sheets of white
paper.
15. Press the Start button. The Copier/Printer begins the color adjustment
process.
16. Press the Exit button when the color adjustment is complete.
17. Use ( ) ARROW buttons to highlight Print confirmation.
18. Press the Select button.
19. Load 8.5 in. x 11 in. LEF or A4L paper in the Bypass Tray and press the
Start button. Load long edge first.
20. Retrieve the printout from the Top Tray and inspect it to see if an
accurate color compensation has taken place.
21. Use the ( ) ARROW buttons to highlight one of the following:
• No if the printout results are not satisfactory and to cancel the color
adjustment.
• Yes if the printout results are satisfactory and to apply the color
adjustment.
22. Press the Select button. AutoColAdjust document typeselection is
displayed on the Copier screen.
23. Press the Exit button. AutoColAdjust document type selection is
displayed on the Copier screen.
24. To perform the color adjustment for other document types, repeat steps
8 through 20.
25. Press the Exit button. The Administrator Menu is displayed on the
Copier Screen.
26. Press the Exit button. The Tools Main Menu is displayed on the Copier
Screen.
27. Press the Tools button to exit Tools Mode.
Tools Mode
57
Detect Document Size
The DP-C106 can automatically detect the size of an original if it is a certain
size. The copier measures original document sizes in millimeters or in
inches.
For a complete list of all paper sizes the DP-C106 can automatically detect,
go to the Basic Copying.
Use the following procedure to set the default unit of size:
1. Press the Tools button to display the Tools Main Menu on the Copier
Screen.
2. Using the ( ) ARROW buttons highlight the Admin menu option.
3. Press the Select button. Password Input is displayed on the Copier
Screen.
4. Using the Numeric Keypad, enter your Administrator Password. The
numbers display as asterisks (*).
If you make a mistake while entering a password, press the Clear button.
5. Once the correct password is entered, the Admin menu is displayed on
the Copier Screen.
6. Use the ( ) ARROW buttons to highlight the Detect Doc Size option.
7. Press the Select button. Unit of Size selection is displayed on the Copier
Screen.
8. Using the ( ) ARROW buttons highlight the desired unit of
measurement: mm (millimeters) or inch (inches).
9. Press the Select button. The Admin menu is displayed on the Copier
Screen.
10. Press the Exit button. The Tools Main Menu is displayed on the Copier
Screen.
11. Press the Tools button to the exit Tools Mode.
Tools Mode
58
Auto Mode Change
The DP-C106 can enter copy mode when originals are loaded into the ADF or
the ADF is opened if the Auto mode change feature is set to Copy. You do
not need to press the Copy button to enter Copy Mode.
For further information on using the Copy button to enter copy mode, go to
the Basic Copying.
Use the following procedure to access the Auto Mode Change option:
1. Press the Tools button to display the Tools Main Menu on the Copier
Screen.
2. Using the ( ) ARROW buttons highlight the Admin menu selection.
3. Press the Select button. Password Input is displayed on the Copier
Screen.
4. Using the Numeric Keypad, enter your Administrator Password. The
numbers displays as asterisks (*).
If you make a mistake while entering a password, press the Clear button.
5. Once the correct password is entered, the Administrator Menu is
displayed on the Copier Screen.
6. Use the ( ) ARROW buttons to highlight the Auto mode change
selection.
7. Press the Select button. Auto mode change selection is displayed on
the Copier Screen.
8. Use the ( ) ARROW buttons to highlight one of the following:
• Off to switch the Auto mode change feature Off. Copy mode can
only be entered by pressing the Copy button.
• On to switch the Auto mode change feature On. The Copier/Printer
enters copy mode when originals are loaded into the ADF or the
ADF is open.
9. Press the Select button. The Administrator Menu is displayed on the
Copier Screen.
10. Press the Exit button. The Tools Main Menu is displayed on the Copier
Screen.
11. Press the Tools button to exit Tools Mode.
Tools Mode
59
Limit Copy Set
The maximum number of copies allowed for a single job can be set between
1 set and 99 sets.
Use the following procedure to select a Limit Copy Set number:
1. Press the Tools button to display the Tools Main Menu on the Copier
Screen.
2. Using the ( ) ARROW buttons highlight the Admin menu option.
3. Press the Select button. Password Input is displayed on the Copier
Screen.
4. Using the Numeric Keypad, enter your Administrator Password. The
numbers display as asterisks (*).
If you make a mistake while entering a password, press the Clear button.
5. Once the correct password is entered, the Administrator Menu is
displayed on the Copier Screen.
6. Use the ( ) ARROW buttons to highlight the Limit Copy Set option.
7. Press the Select button. The Limit Copy Set screen is displayed on the
Copier Screen.
8. Use the Numeric Keypad to enter a maximum set limit between 1 and 99.
9. Press the Select button. The Administrator Menu is displayed on the
Copier Screen.
10. Press the Exit button. The Tool Main Menu is displayed on the Copier
Screen.
11. Press the Tools button to exit Tools Mode.
Tools Mode
60
Timer Preset
The DP-C106 has time limits for certain conditions. In Tools Mode, you can
change the timer settings for the following options:
• Auto Reset: If the Copier/Printer is not operated within a designated
amount of time, the machine returns to print mode. The time-out before
returning to print mode can be 1 – 4 minutes.
• Reset Time: When the DP-C106 is in an error condition, the error
message automatically returns to the main screen after a certain time.
This allows printing to resume. The reset time for when the original
screen will display after an error message can be 1 – 120 minutes. To
use copy mode, the error condition will have to be addressed. To clear
error conditions, refer to the problem solving section.
• Energy Saver Time: If the copier is not operated for a designated amount
of time, the copier will enter energy-saving mode. The time out before
changing to the energy saving mode can be 1 – 60 minutes.
Use the following procedure to change the timer settings:
1. Press the Tools button to display the Tools Main Menu on the Copier
Screen.
2. Using the ( ) ARROW buttons highlight the Admin menu selection.
3. Press the Select button. Password Input is displayed on the Copier
Screen.
4. Using the Numeric Keypad, enter your Administrator Password. The
numbers display as asterisks (*).
If you make a mistake while entering a password, press the Clear button.
5. Once the correct password is entered, the Admin menu is displayed on
the Copier Screen.

Tools Mode
61
6. Use the ( ) ARROW buttons to highlight the Timer preset selection.
7. Press the Select button. Timer Preset selection is displayed on the
Copier Screen.
8. Use the ( ) ARROW buttons to highlight the desired Timer feature
that you wish to change. Press the Select button.
If you are setting the Energy Saver Timer you must first turn the Energy
Saver Mode On and then you may set a time. Using the ( ) ARROW
buttons, highlight On and then press the Select button. The Copier Screen
prompts you to enter a timer setting.
9. Using the Numeric Keypad, enter a new time limit for the specified item.
You may only enter a value within the time range of the timer featue you are
setting. The Copier/Printer will not allow you to save any time settings
outside of the allowed values for the feature.
10. Press the Select button. Time selection is displayed on the Copier
Screen.
11. If you wish to change the timer setting for any other option, repeat steps
8 through 10.
12. Press the Exit button. The Administrator Menu is displayed.
13. Press the Exit button. The Tools Main Menu is displayed on the Copier
Screen.
14. Press the Tools button to exit Tools Mode.
Tools Mode
62
Sound Preset
The DP-C106 emits tones when it is in certain conditions. These tones alert
you when the Copier/Printer has reached a certain state.
The following Audio Tone selections are available on the DP-C106:
• Valid Tone: An entry can be made so that a tone is produced when the
buttons of the control panel are pressed accurately.
• Invalid Tone: An entry can be made so that a tone is produced when
copying ends abnormally, such as when paper runs out or there is a
paper or document jam.
• Job Complete Tone: An entry can be made so that a tone is produced
when copying ends.
• Ready Tone: An entry can be made so that a tone is produced when the
machine shifts from energy saver status to the use status.
• Alarm CRU Tone: An entry can be made so that a tone is produced when
the toner cartridge or drum cartridge requires replacement.
Use the following procedure to change the Audio Tone settings:
1. Press the Tools button to display the Tools Main Menu on the Copier
Screen.
2. Using the ( ) ARROW buttons highlight the Admin menu selection.
3. Press the Select button. Password Input is displayed on the Copier
Screen.
4. Using the Numeric Keypad, enter your Administrator Password. The
numbers display as asterisks (*).
If you make a mistake while entering a password, press the Clear button.
5. Once the correct password is entered, the Administrator Menu is
displayed on the Copier Screen.
Tools Mode
63
6. Use the ( ) ARROW buttons to highlight the Sound preset selection.
7. Press the Select button. Audio Tones selection is displayed on the
Copier Screen.
8. Use the ( ) ARROW buttons to select the audio tone feature you
would like to change.
9. Press the Select button to open the selection screen for the selected
audio tone option.
10. Use the ( ) ARROW buttons to highlight Off or On for the selected
Audio Tone.
11. Press the Select button. Audio Tone selection is displayed on the Copier
Screen.
12. If you wish to change the Audio Tone settings for any other selection,
repeat steps 8 through 11.
13. Press the Exit button. The Administrator Menu is redisplayed.
14. Press the Exit button. The Tools Main Menu is displayed on the Copier
Screen.
15. Press the Tools button to exit out of Tools Mode.
User Password
The DP-C106 allows you to restrict user access to the copier by setting up
user passwords.
If a User Password is set up, a user is required to enter a 4 digit number to
gain access to copy mode. If they do not have a user password, they cannot
use the copier.
For more information on accessing copy mode with a user password, go to
the Basic Copying.
Use the following procedure to set up a Use Password:
1. Press the Tools button to display the Tools Main Menu on the Copier
Screen.
2. Using the ( ) ARROW buttons highlight the Admin menu selection.
Tools Mode
64
3. Press the Select button. Password Input is displayed on the Copier
Screen.
4. Using the Numeric Keypad, enter your Administrator Password. The
numbers display as asterisks (*).
If you make a mistake while entering a password, press the Clear button.
5. Once the correct password is entered, the Administrator Menu is
displayed on the Copier Screen.
6. Use the ( ) ARROW buttons to highlight the Use Password selection.
7. Press the Select button. User Password selection is displayed on the
Copier Screen.
8. Use the ( ) ARROW buttons to turn the Use Password feature On or
Off.
Highlight the On selection if you are assigning a new user password.
Highlight the Off selection if you are changing a user password. To change a
user password, you must first turn the old password Off and then assign a
new password.
9. Press the Select button. The Copier/Printer prompts you to enter a 4-
digit number.
10. Using the Numeric Keypad enter a four-digit password.
If you make a mistake while entering the password, press the Clear button.
11. Press the Select button. When the change is confirmed the
Administrator Menu is displayed on the Copier Screen.
12. Press the Exit button. The Tools Main Menu is displayed on the Copier
Screen.
13. Press the Tools button to exit Tools Mode.
Tools Mode
65
ADMIN Password
The password for the machine supervisor is set to 9999 when the machine
ships from the factory. For secure control of the machine, please change this
password as soon as possible.
The Administrator Password can not be checked after it is entered. Record
this password so that it is not forgotten.
Use the following steps to change the Admin Password:
1. Press the Tools button to display the Tools Main Menu on the Copier
Screen.
2. Using the ARROW buttons highlight the Admin menu option.
3. Press the Select button. Password Input is displayed on the Copier
Screen.
4. Using the Numeric Keypad, enter your Admin Password. The numbers
display as asterisks (*).
If you make a mistake while entering a password, press the Clear button.
5. Once the correct password is entered, the Administrator Menu is
displayed on the Copier Screen.
6. Use the ( ) ARROW buttons to highlight the Admin Password
selection.
7. Press the Select button.
8. Use the Numeric Keypad to enter a four-digit password. Each entered
number displays as an asterisk (*).
If you make a mistake while entering the password, press the Clear button.
9. Use the Numeric Keypad to enter the same four-digit password as
confirmation. Each entered number displays as an asterisk (*).
If the password entered as confirmation is identical to the first password
entered, the password is changed and the Administrator Menu is
displayed on the Copier Screen.
If the password entered as confirmation is different from the first
password entered, you must enter the password again. Repeat steps 8
and 9.
10. Press the Exit button. The Tools Main Menu is displayed on the Copier
Screen.
11. Press the Tools button to exit Tools Mode.
Tools Mode
66
Version Information
If you should ever run into problems with your DP-C106 and have the need to
call for service, you may need to provide your software version information to
the service engineer helping you. You can access all software version
information through Tools Mode.
Use the following procedure to access Version Information:
1. Press the Tools button to display the Tools Main Menu on the Copier
Screen.
2. Using the ( ) ARROW buttons highlight the Admin menu selection.
3. Press the Select button. Password Input is displayed on the Copier
Screen.
4. Using the Numeric Keypad, enter your Administrator Password. The
number displays as an asterisk (*).
If you make a mistake while entering a password, press the Clear button.
5. Once the correct password is entered, the Administrator Menu is
displayed on the Copier Screen.
6. Use the ( ) ARROW buttons to highlight the Version Information
selection.
7. Press the Select button. The Version Information screen is displayed on
the Copier Screen.
8. All version information for the copier software and for all installed options
is listed on the Version Information screen.
9. Press the Exit button. The Administrator Menu is displayed.
10. Press the Exit button. The Tools Main Menu is displayed on the Copier
Screen.
11. Press the Tools button to exit Tools Mode.
Tools Mode
67
Self Diagnostics
The Self Diagnostics test allows you to prompt the DP-C106 to assess the
hardware status.
Use the following procedure to begin the self-diagnostics test:
1. Press the Tools button to display the Tools Main Menu on the Copier
Screen.
2. Using the ( ) ARROW buttons highlight the Admin menu selection.
3. Press the Select button. Password Input is displayed on the Copier
Screen.
4. Using the Numeric Keypad, enter your Administrator Password. The
numbers display as asterisks (*).
If you make a mistake while entering a password, press the Clear button.
5. Once the correct password is entered, the Administrator Menu is
displayed on the Copier Screen.
6. Use the ( ) ARROW buttons to highlight the Self Diag feature.
7. Press the Select button. Diagnostics selection displays on the Copier
Screen.
8. Use the ( ) ARROW buttons to highlight Self Diag selection.
9. Press the Start button. The DP-C106 automatically begins the
Diagnostics test.
10. When the Copier/Printer has completed the diagnostics test, one of the
following will happen:
• The Copier Screen will display a message saying that the copier
has passed the diagnostics test.
• The Copier Screen will display an error code indicating that the
copier did not pass the diagnostics test. If this should happen, call
for service immediately.
For information on calling for service, go to the Problem Solving chapter.
11. Press the Exit button. The Administrator Menu is displayed.
12. Press the Exit button. The Tools Main Menu is displayed on the Copier
Screen.
13. Press the Tools button to exit Tools Mode.
Tools Mode
68
Transporting the Scanner
The scanner module must be locked when transporting the DP-C106 to
ensure against damage. Locking the module keeps it from sliding and either
damaging itself or causing damage to other parts of the scanner.
Use the following procedure to lock the scanner module:
1. Press the Tools button to display the Tools Main Menu on the Copier
Screen.
2. Using the ( ) ARROW buttons highlight the Admin menu selection.
3. Press the Select button. Password Input is displayed on the Copier
Screen.
4. Using the Numeric Keypad, enter your Administrator Password. The
numbers display as asterisks (*).
If you make a mistake while entering a password, press the Clear button.
5. Once the correct password is entered, the Administrator Menu is
displayed on the Copier Screen.
6. Use the ( ) ARROW buttons to highlight the Transporting Scanner
selection.
7. Press the select button. Transporting Scanner selection is displayed on
the Copier Screen.
8. Use the ( ) ARROW buttons to select On.
The default setting for transporting the scanner is Off. If you do not wish to
transport the scanner at this time, press the Exit button to return to the
Administrator Menu. The Tools Main Menu is displayed on the Copier
Screen. To exit Tools Mode, press the Tools button.
9. The Copier/Printer locks the scanner module. The copier then prompts
you to turn Off the power.
10. Turn the power Off and proceed with moving the scanner.
For directions on turning the power Off, go to the Setting Up the DP-C106
chapter.
Once the scanner module is locked, you cannot return to any copy functions
until the scanner power is switched Off and then On again. This is the only
way to unlock the scanner module.

69
Problem Solving
The following list shows the types of problems identified in this chapter:
• Jam Clearance
• Copy/Print Quality Problems
• Power Problems
• Printer Error Messages
• Printer Error Codes
• Scanner Error Messages
Avoiding Paper Jams
The following conditions cause jams in the Printer.
• The paper guides in the paper tray are not adjusted to the size of the
paper. Refer to the Loading Paper in the Paper Tray procedure in the
Setting Up the DP-C106.
• The Automatic Document Feeder (ADF) document guides are not
adjusted to the size of the documents. Refer to the Automatic Document
Feeder information in the Setting Up the DP-C106.
• Transparencies are incorrectly loaded in the Bypass Tray. Refer to the
Loading Transparencies into the Bypass Tray procedure.
• Paper not recommended is used. Please use paper weight from 14 to 23
lbs. for Trays and 14 to 48 lbs. for Bypass Tray.
• Whenever possible, load paper to feed long edge first.
CAUTION
DO NOT open the Duplex Unit/Kit unless directed to do so from the Printer
Control Panel. Opening the Duplex Unit/Kit at any other time could create a
paper jam.
5
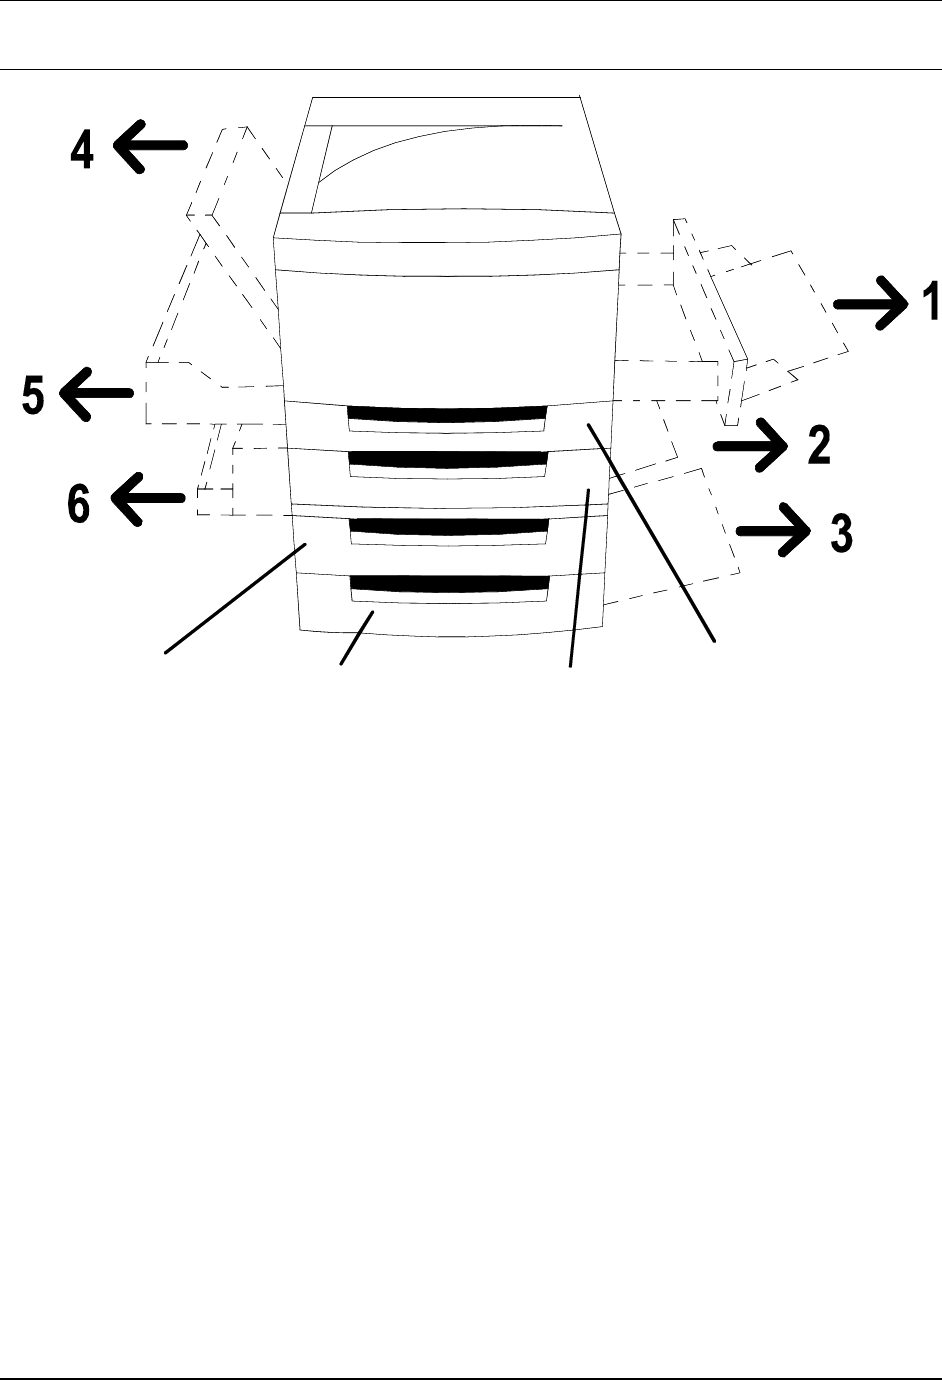
Problem Solving Clearing Paper Jams
70
Printer Jam Clearance Areas
D
CB
A
Area 1: Bypass Tray and Bypass Transport
Area 2: Paper Feed Area from Paper Tray 1 or the Duplex Unit/Kit, when
installed.
Area 3: Paper Feed Area from the System Console, when installed.
Area 4: Top Left-hand Cover
Area 5: Upper Inverter, if installed. Also provides access to the Fuser area.
Area 6: Lower Inverter, if installed
A: Duplex Unit/Kit, if installed
B: Paper Tray 1
C: Paper Tray 2, in the System Console
D: Paper Tray 3, in the System Console
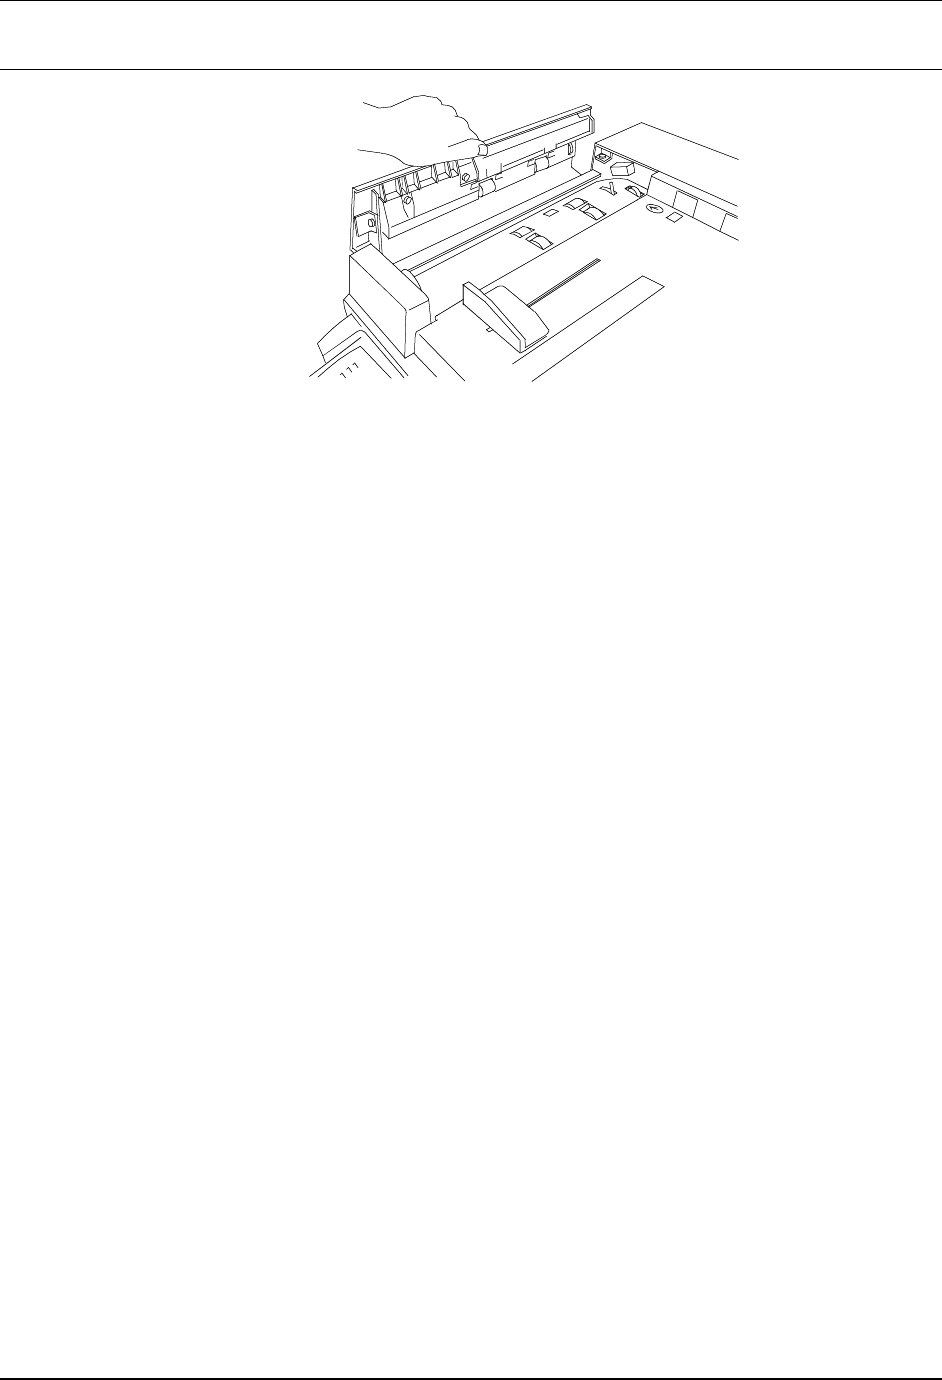
Clearing Paper Jams Problem Solving
71
ADF Jam Clearance Area
Lift to open the Left-hand ADF.

Problem Solving Clearing Paper Jams
72
This page is intentionally left blank.
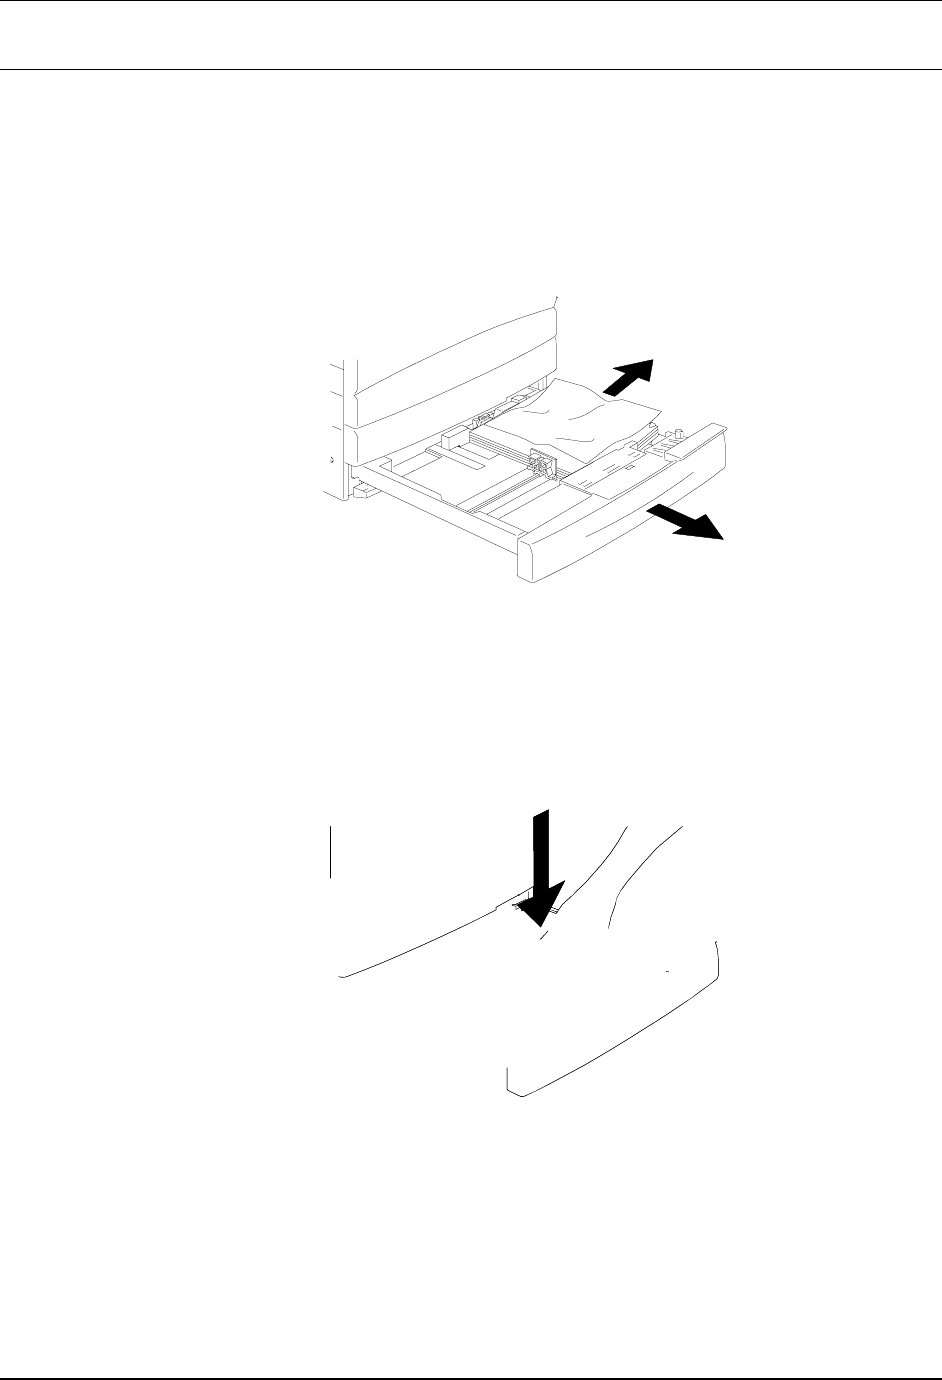
Clearing a Paper Tray Jam Problem Solving
73
Clearing a Paper Tray Jam
Perform this procedure when the message CHECK LOADING OF TRAY X (1,
2, or 3) is displayed on the Control Panel.
1. Slowly open the Paper Tray all the way. Remove the jammed paper and
any paper that is creased or torn. Ensure that there are no pieces of
torn paper remaining in the tray.
2. Remove the paper stack from the tray, and fluff the edges. Replace the
stock.
3. Ensure that the stack is flush on all four sides.
4. If this is Paper Tray 1, press down on the paper stack until the metal
plate on the bottom of the tray latches into place.
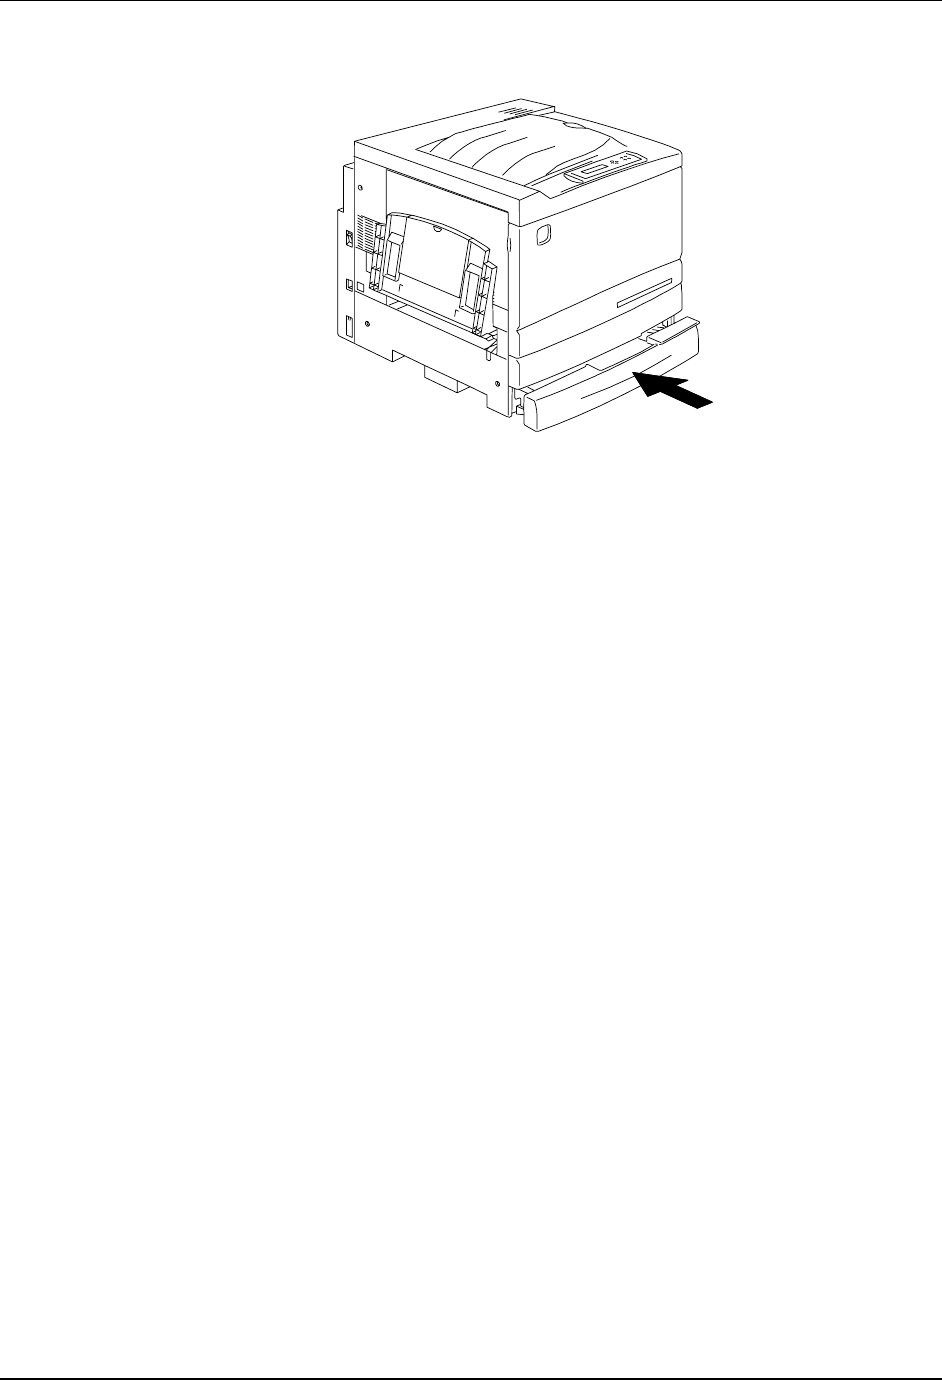
Problem Solving Clearing a Paper Tray Jam
74
5. Firmly close the Paper Tray.
6. Try running the job again.
7. If the problem still exists, open the tray and turn the stack of paper over.
8. Firmly close the Paper Tray.
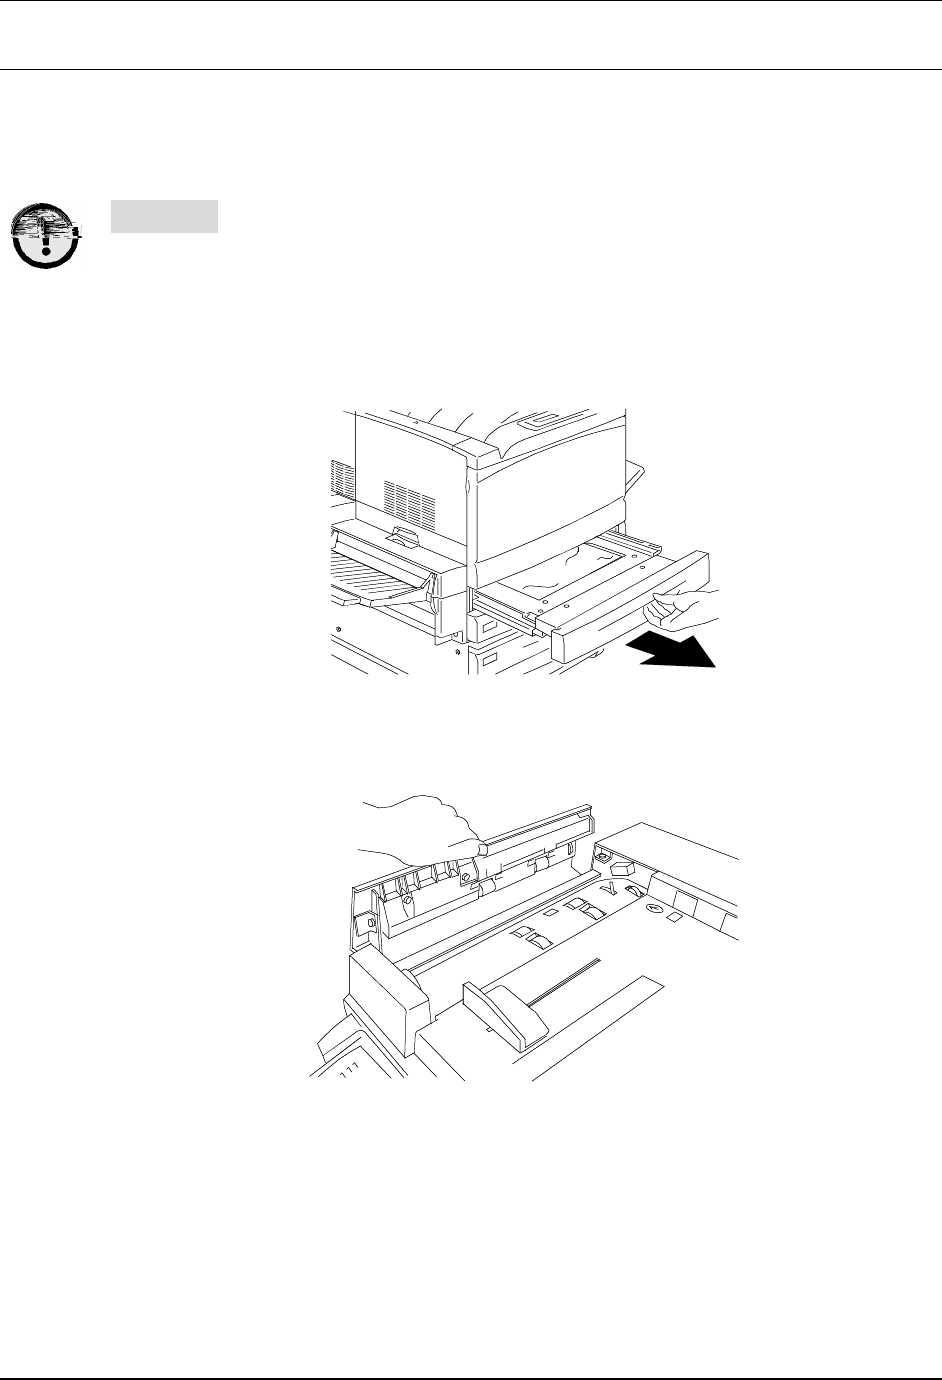
Clearing a Duplex Unit/Kit Jam Problem Solving
75
Clearing a Duplex Unit/Kit Jam
Perform this procedure only when the message CLEAR DUPLEX UNIT/KIT
JAM is displayed on the Control Panel.
CUTION
DO NOT open the Duplex Unit/Kit unless directed to do so from the Printer
Control Panel. Opening the Duplex Unit/Kit at any other time could create a
paper jam.
1. Slowly open the Duplex Unit/Kit all the way.
2. Remove the jammed paper and any paper that is creased or torn.
Ensure that there are no pieces of torn paper remaining in the tray.
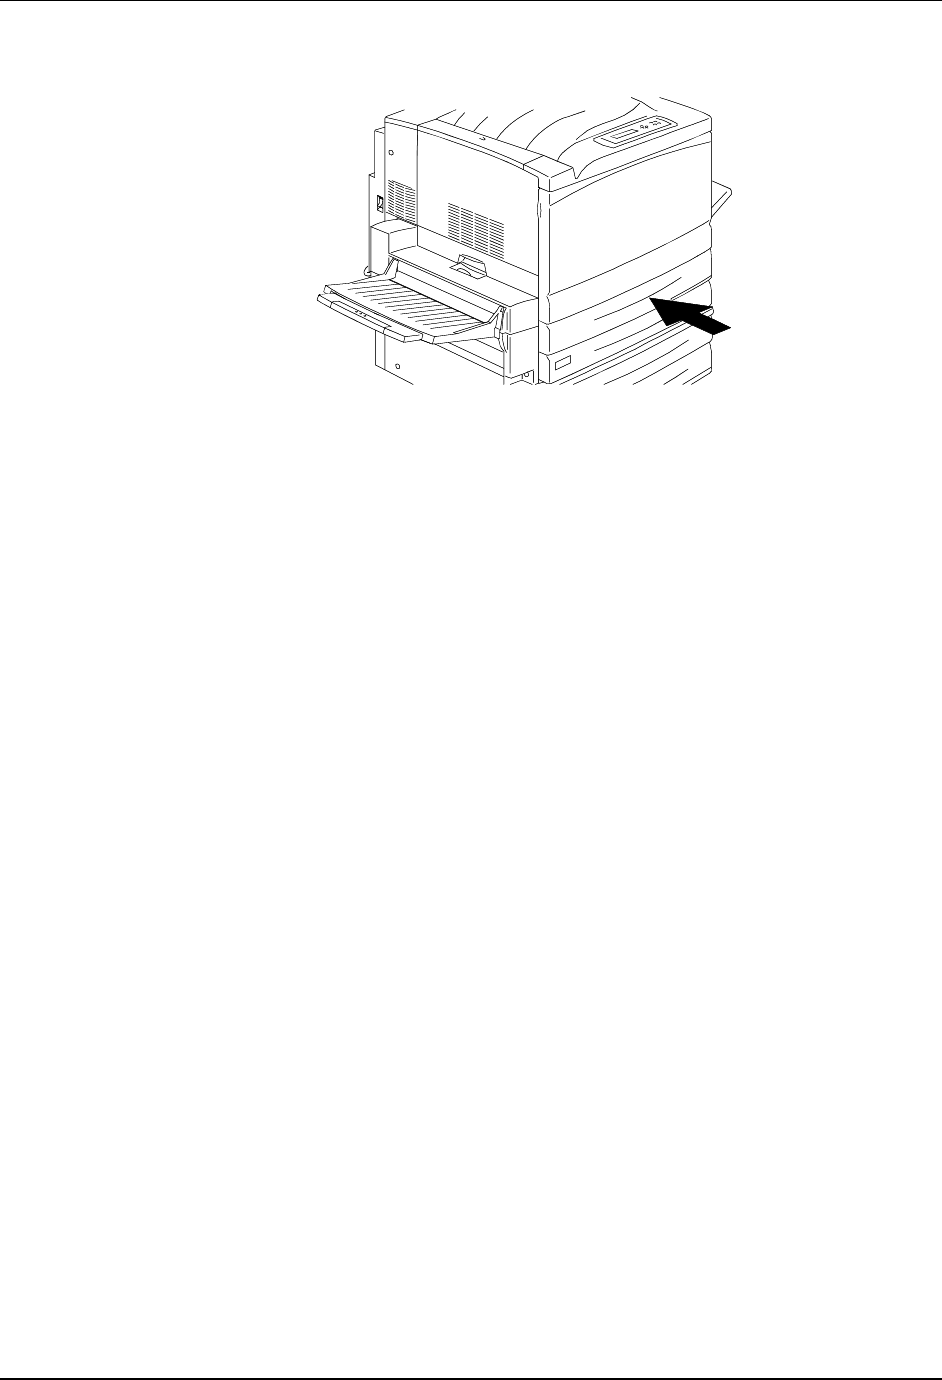
Problem Solving Clearing a Duplex Unit/Kit Jam
76
3. Firmly close the Duplex Unit/Kit.
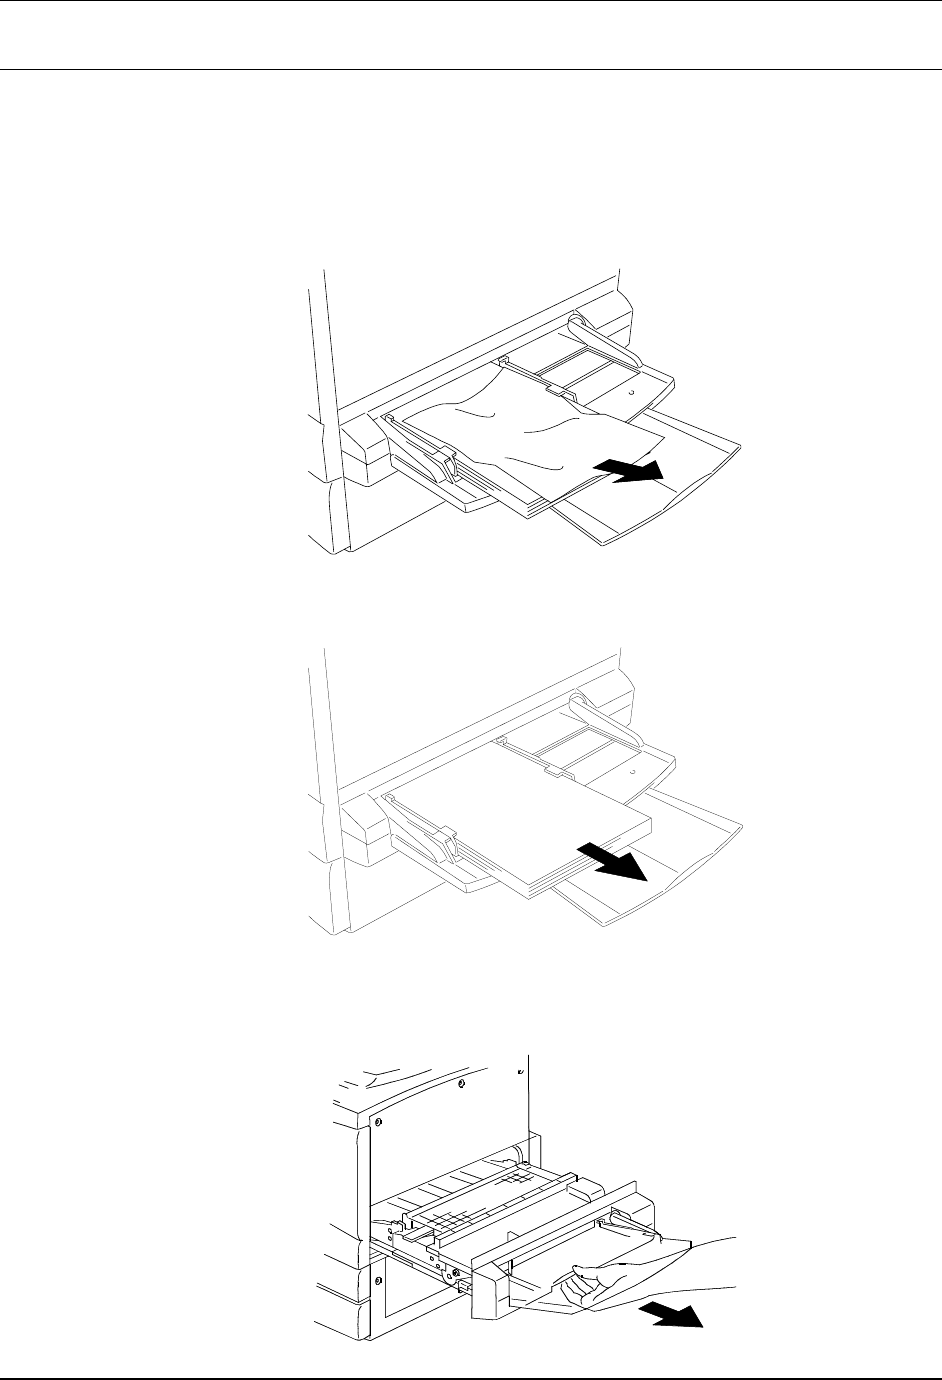
Clearing Area 1 Jams Problem Solving
77
Clearing Area 1 Jams
Perform this procedure when the message CLEAR JAM IN AREA 1 is
displayed on the Control Panel.
1. Remove any jammed or torn paper or other stock from Area 1, Bypass
Tray. Ensure that there are no pieces of torn stock remaining in the tray.
2. Remove any stock loaded in the Bypass Tray.
3. In order to access a jam in the transport, pull the Bypass Tray all the
way out of the Pinter.
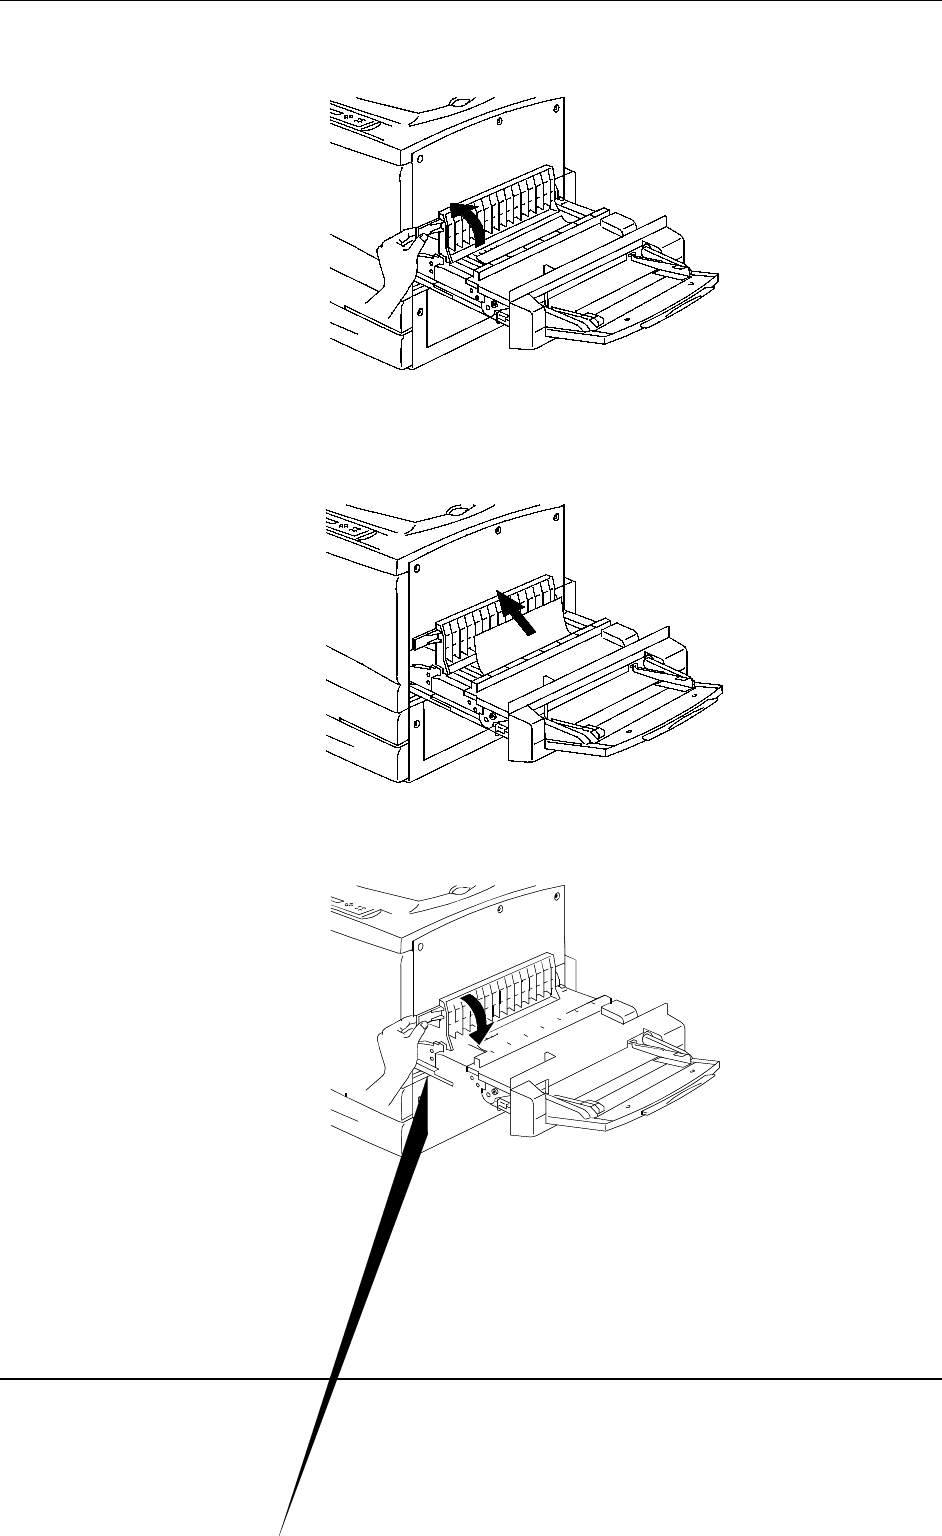
Problem Solving Clearing Area 1 Jams
78
4. Lift the Transport Cover using the handle as shown.
5. Remove any jammed or torn paper as shown below. Ensure that there
are no pieces of torn paper remaining in the transport.
6. Close the Transport Cover.
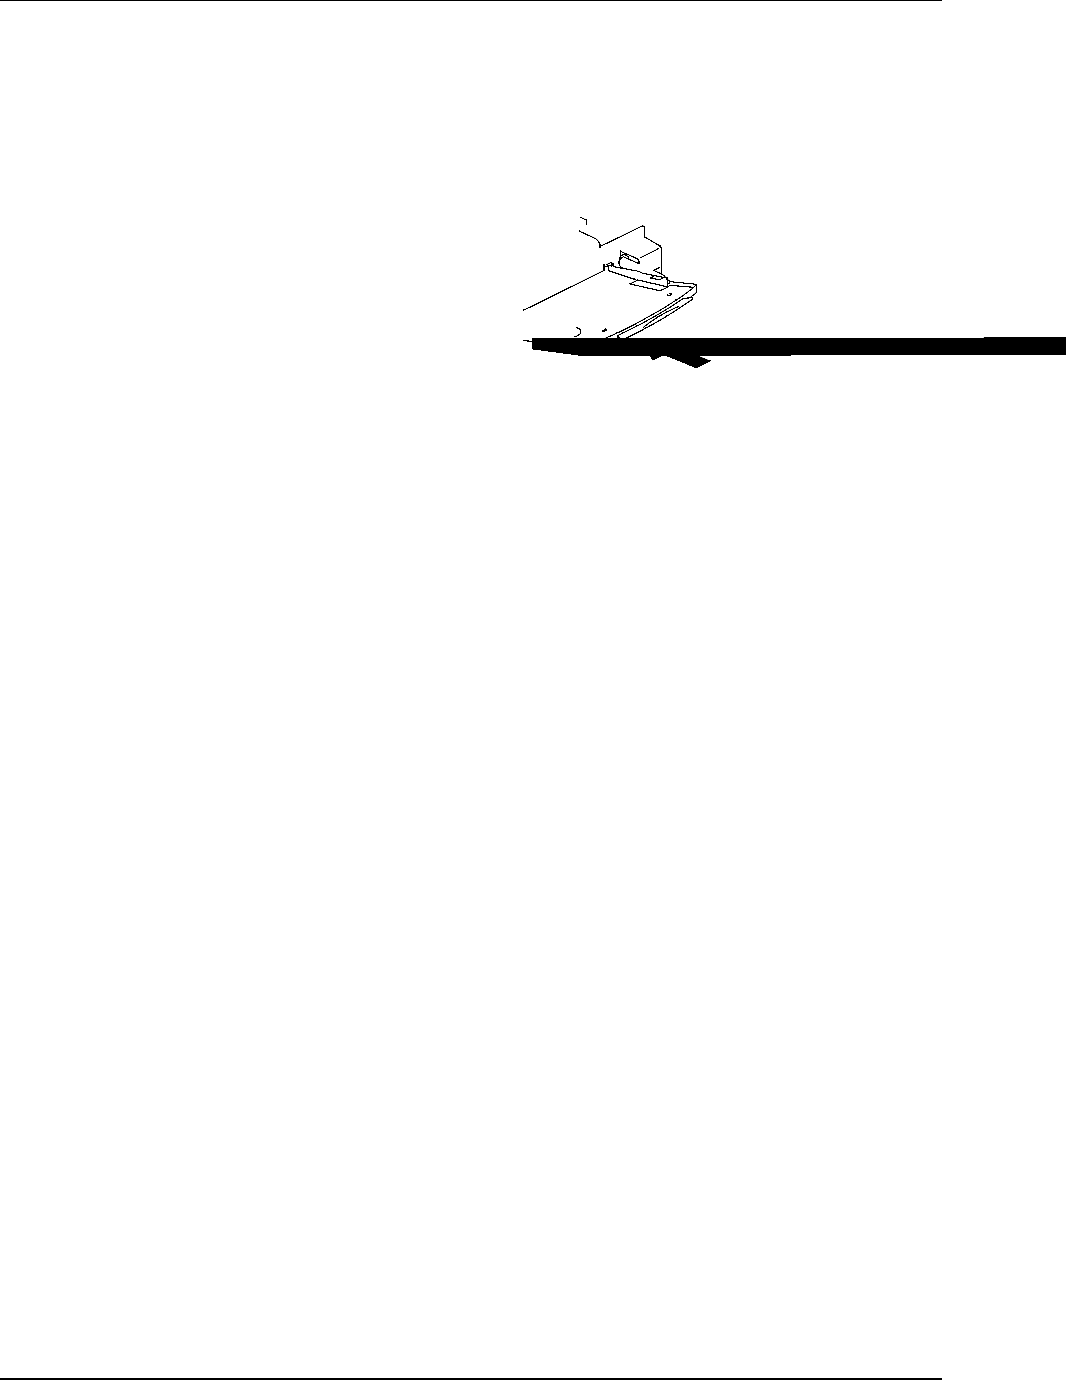
Clearing Area 1 Jams Problem Solving
79
7. Close the Bypass Tray.

Problem Solving Clearing Area 1 Jams
80
This page is intentionally left blank.
Clearing Area 2 Jams Problem Solving
81
Clearing Area 2 Jams
Perform this procedure when the message CLEAR JAM IN AREA 2 is
displayed on the Control Panel.
1. Lower the Area 2 Access Cover.
2. Remove any jammed or torn stock from Area 2. Ensure that there are
no pieces of torn stock remaining in the area.
3. Close the Access Cover.

Problem Solving Clearing Area 2 Jams
82
This page is intentionally left blank.
Clearing Area 3 Jams Problem Solving
83
Clearing Area 3 Jams
Perform this procedure when the message CLEAR JAM IN AREA 3 is
displayed on the Control Panel.
1. Open the Area 3 Access Door.
2. Remove any jammed or torn paper as shown below. Ensure that there
are no pieces of torn paper remaining in the feed area.

Problem Solving Clearing Area 3 Jams
84
This page is intentionally left blank.
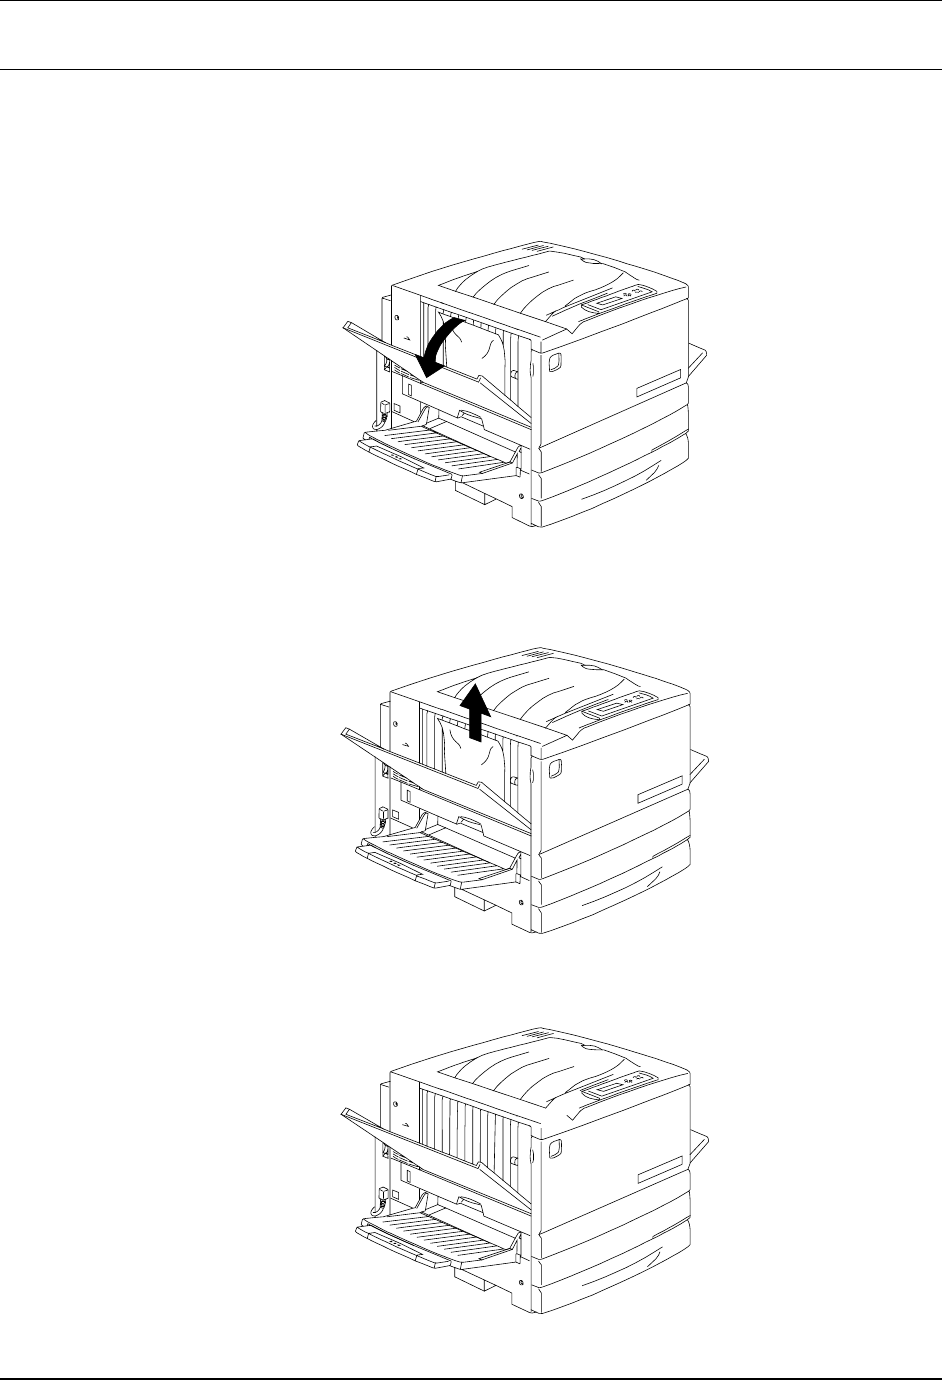
Clearing Area 4 Jams Problem Solving
85
Clearing Area 4 Jams
Perform this procedure when the message CLEAR JAM IN AREA 4 is
displayed on the Control Panel.
1. Open the Area 4 Top Left-hand Cover.
2. Remove the jammed paper. If the paper is torn ensure that there are no
pieces of torn paper remaining in the Printer.
3. Close the Top Left-hand Cover.

Problem Solving Clearing Area 4 Jams
86
This page is intentionally left blank.

Clearing Area 5 Jams Problem Solving
87
Clearing Area 5 Jams
Perform one of the following procedures when the message CLEAR JAM IN
AREA 5 is displayed on the Control Panel.
• If you do not have the Duplex Unit/Kit option installed perform the
Clearing the Fuser Area procedure below.
• If you have the Duplex Unit/Kit option installed, go to the Clearing the
Upper Inverter.
Clearing the Fuser Area
1. In order to access Area 5, pull open the Fuser Area Access Cover.
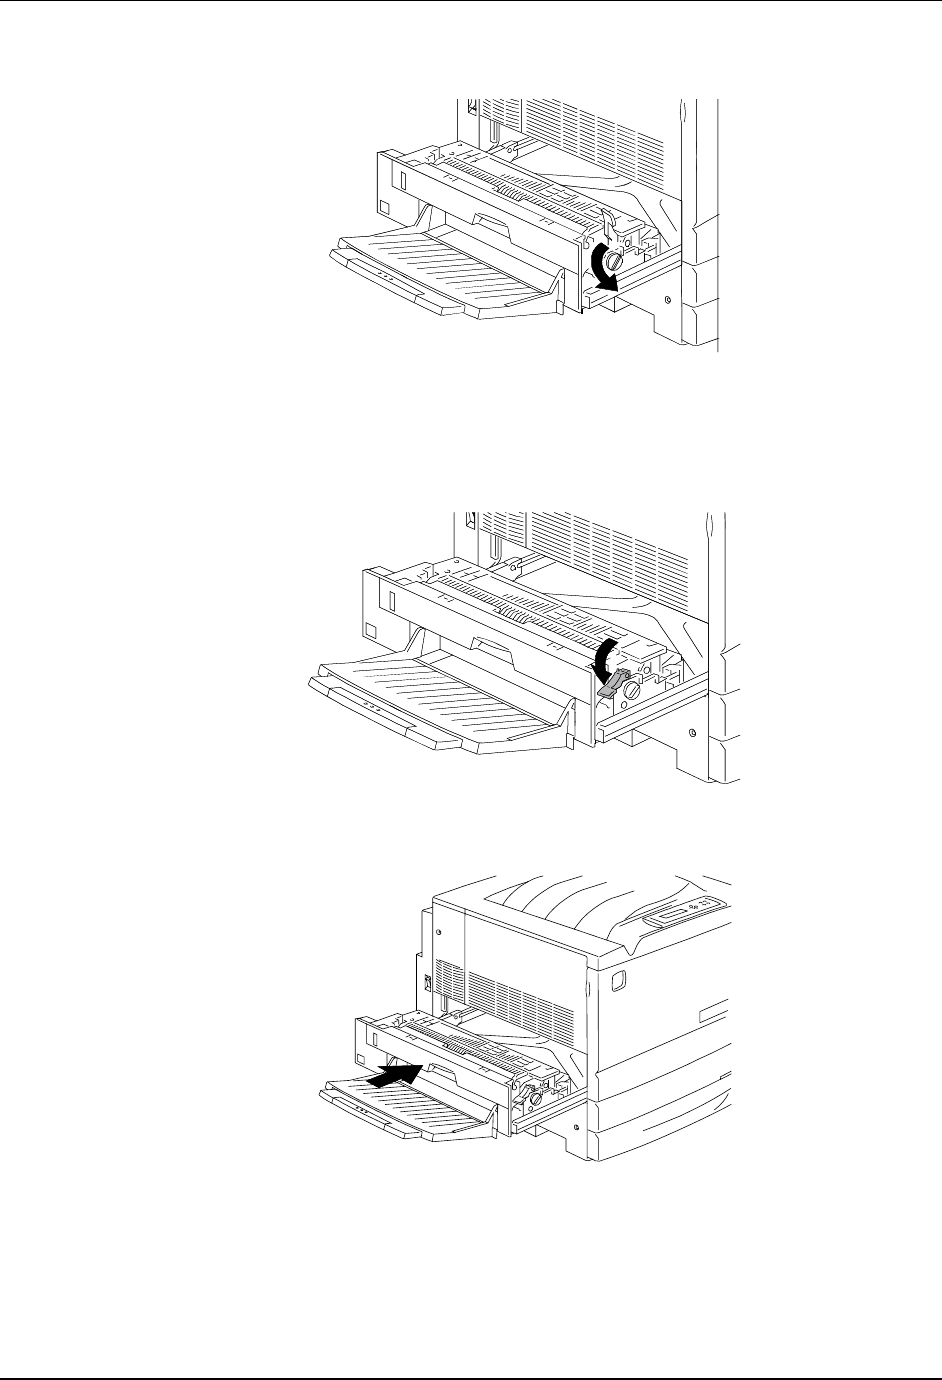
Problem Solving Clearing Area 5 Jams
88
3. If the paper is not visible, turn the Green Knob in the direction shown.
4. Ensure that there are no pieces of torn paper remaining in the Fuser
Area.
5. Return the Green Lever to the original position.
Firmly close the Fuser Area Access Cover.
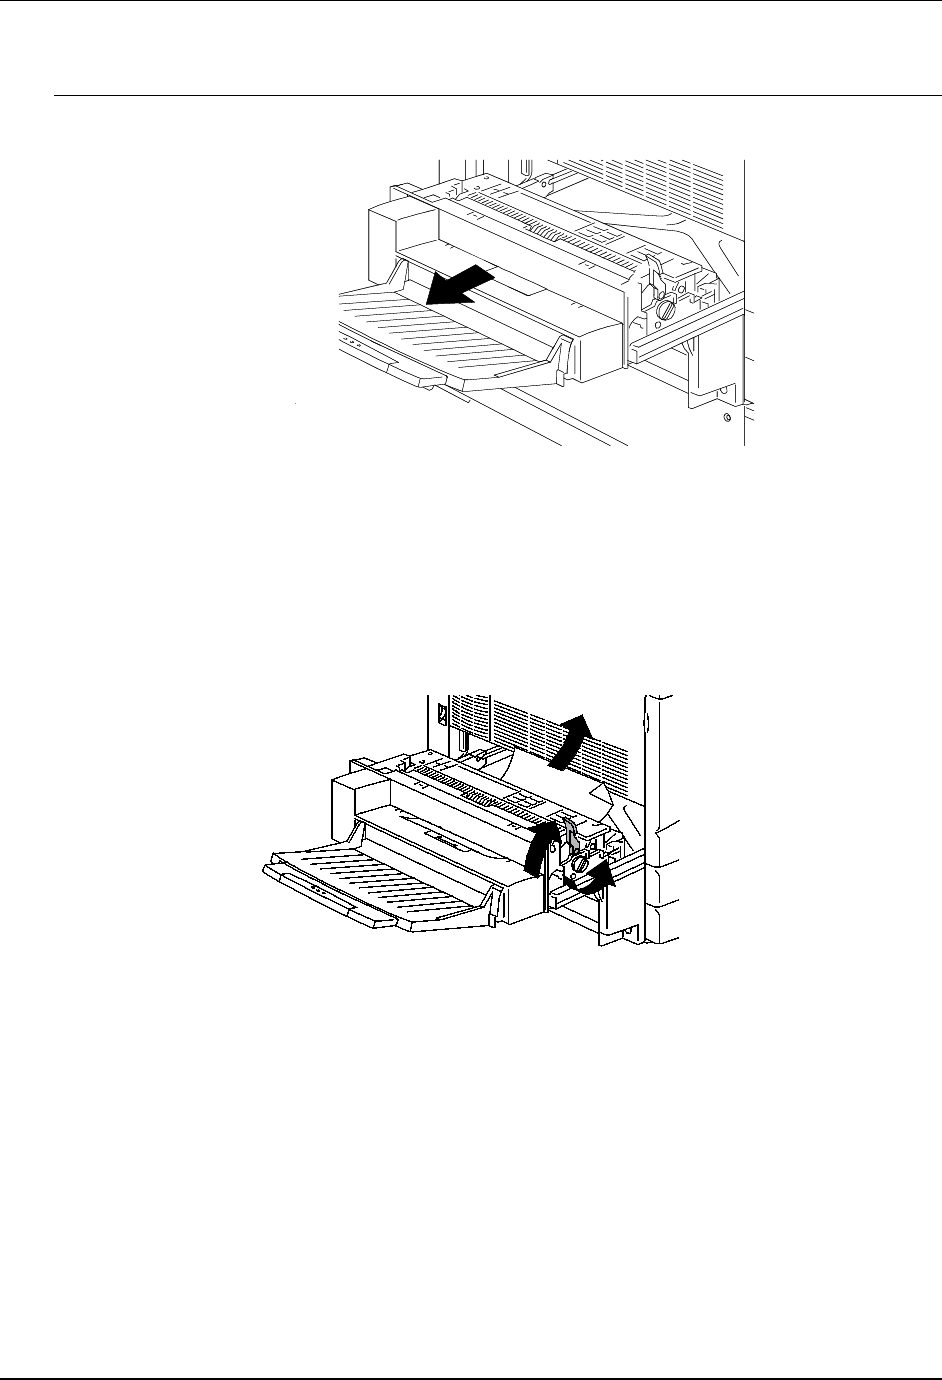
Clearing Area 5 Jams Problem Solving
89
Clearing the Upper Inverter
1. In order to access Area 5, pull open the Upper Inverter.
2. To release any paper, lift the Green Lever, and gently pull the paper in
the direction of the arrow. If the paper is not visible, turn the Green
Knob in the direction of the arrow.
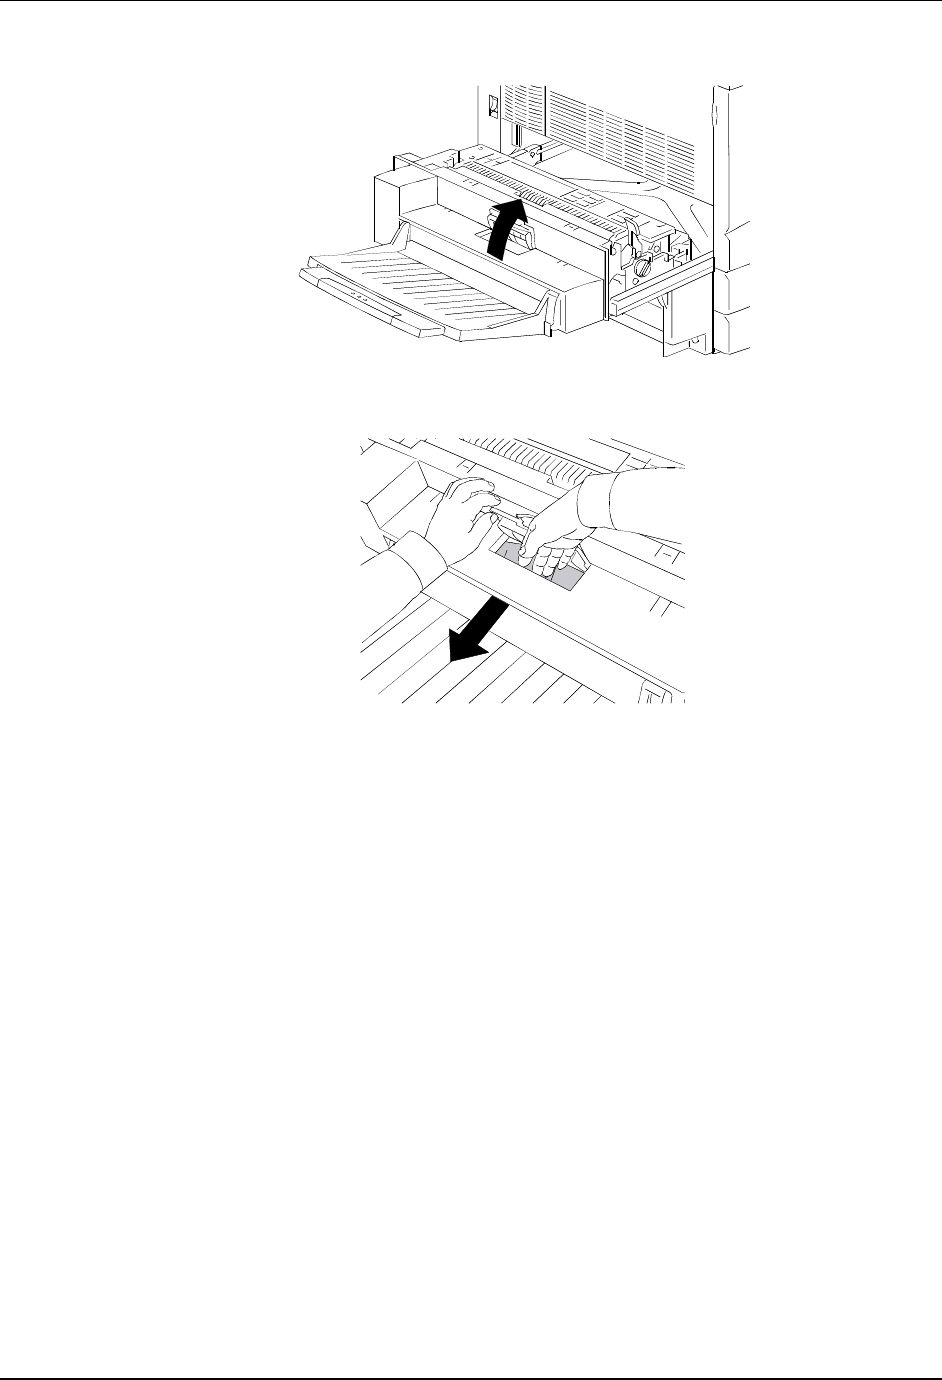
Problem Solving Clearing Area 5 Jams
90
3. Open the small, clear, cover and ensure that all the paper and paper bits
are removed.
a. If paper is visible under the clear cover, hold the cover open and
push the paper toward the paper exit with your fingers.
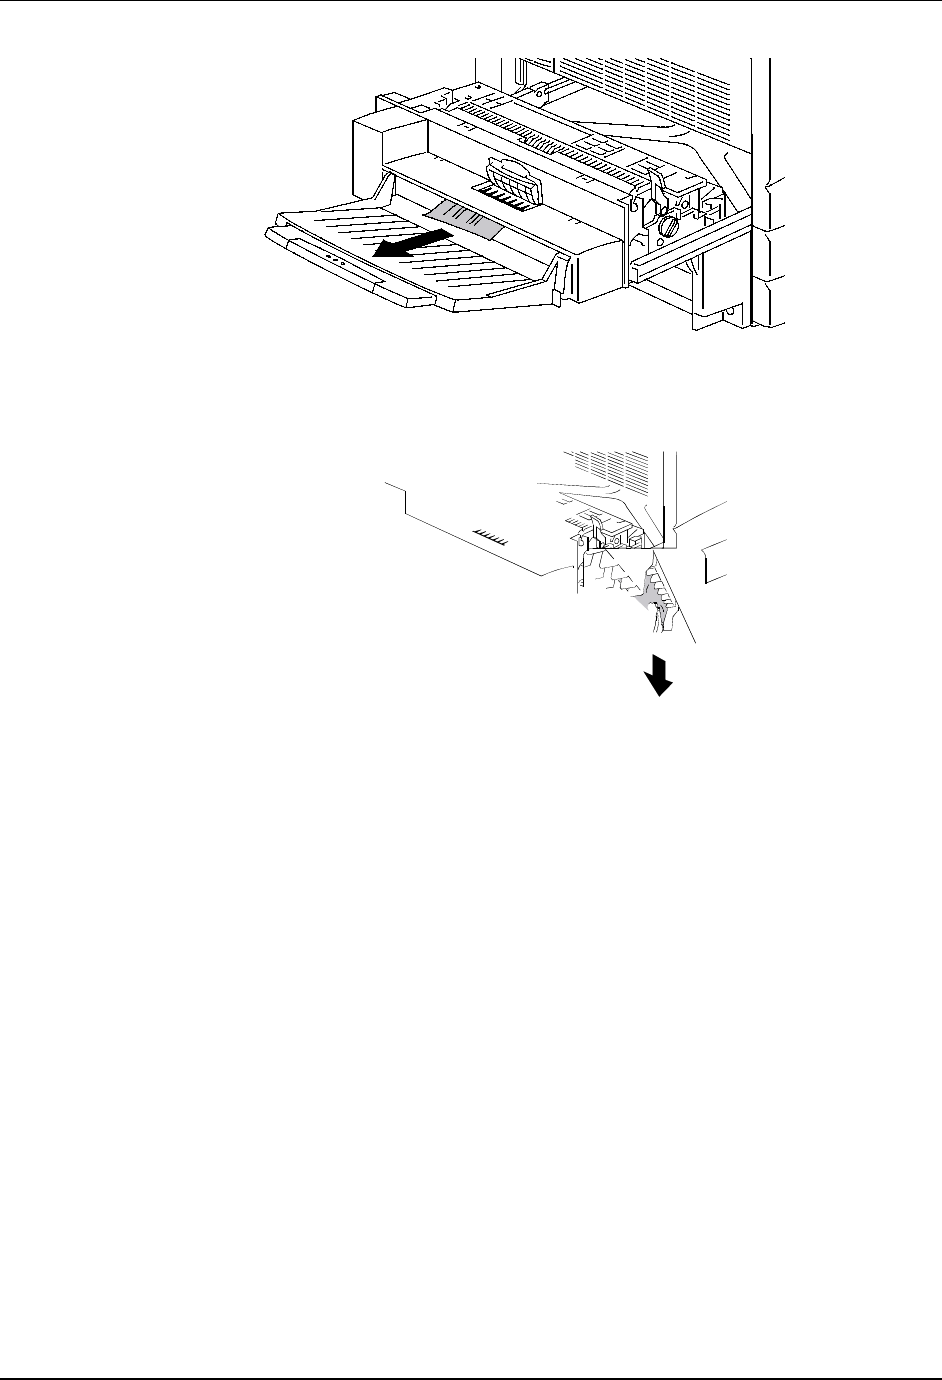
Clearing Area 5 Jams Problem Solving
91
b. Pull the paper in the direction of the arrow shown below.
c. If paper is only partially visible under the cover, check under the
tray for access to the paper.
d. Pull the paper down and remove.
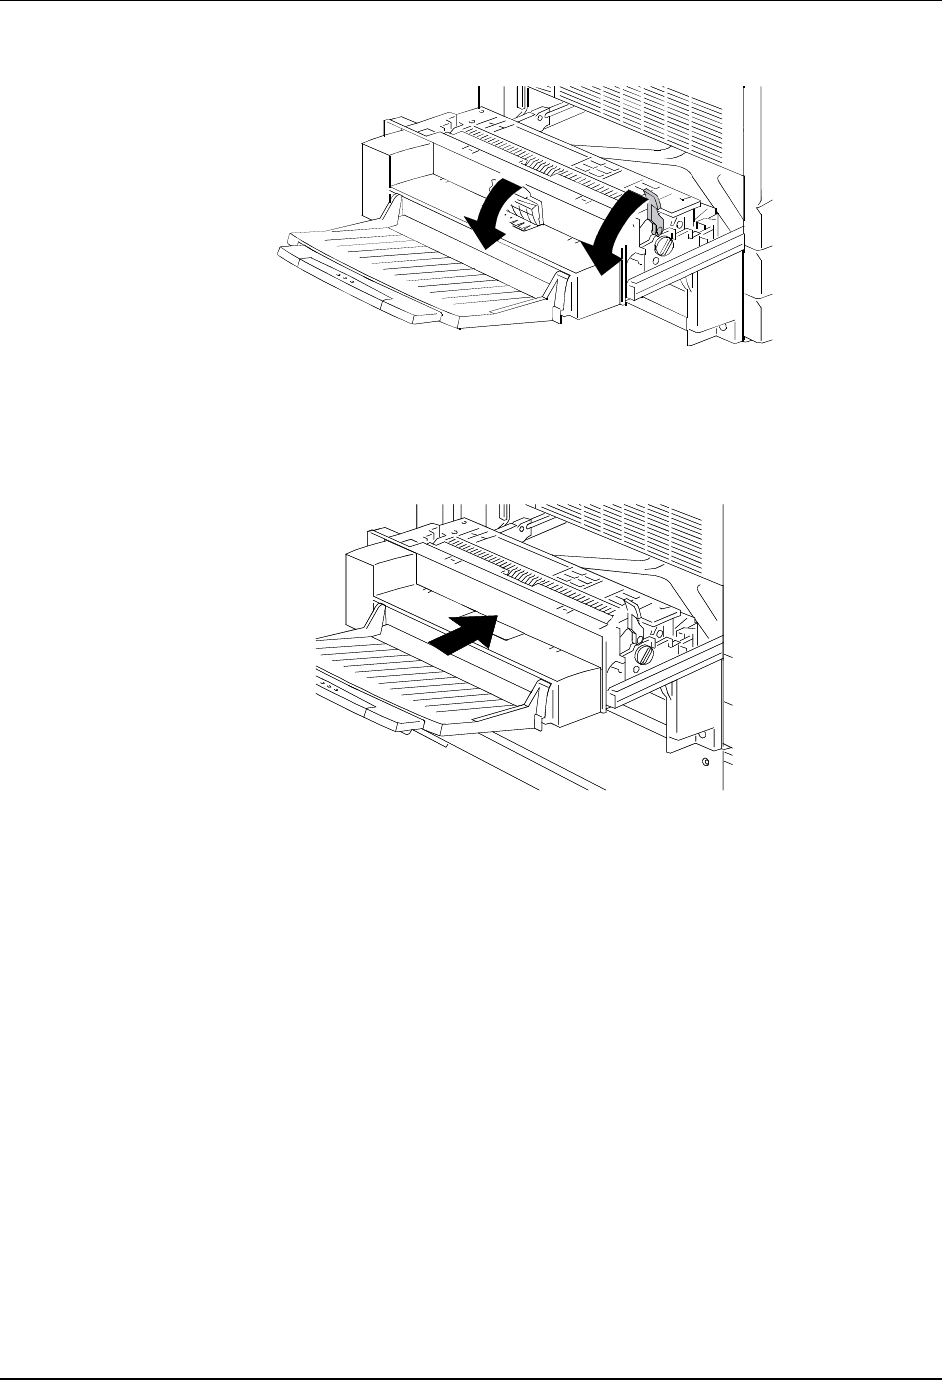
Problem Solving Clearing Area 5 Jams
92
4. Close the small clear cover and move the Green Lever to the lower
position.
0
301113A
-
W
OL
5. Firmly close the Upper Inverter.
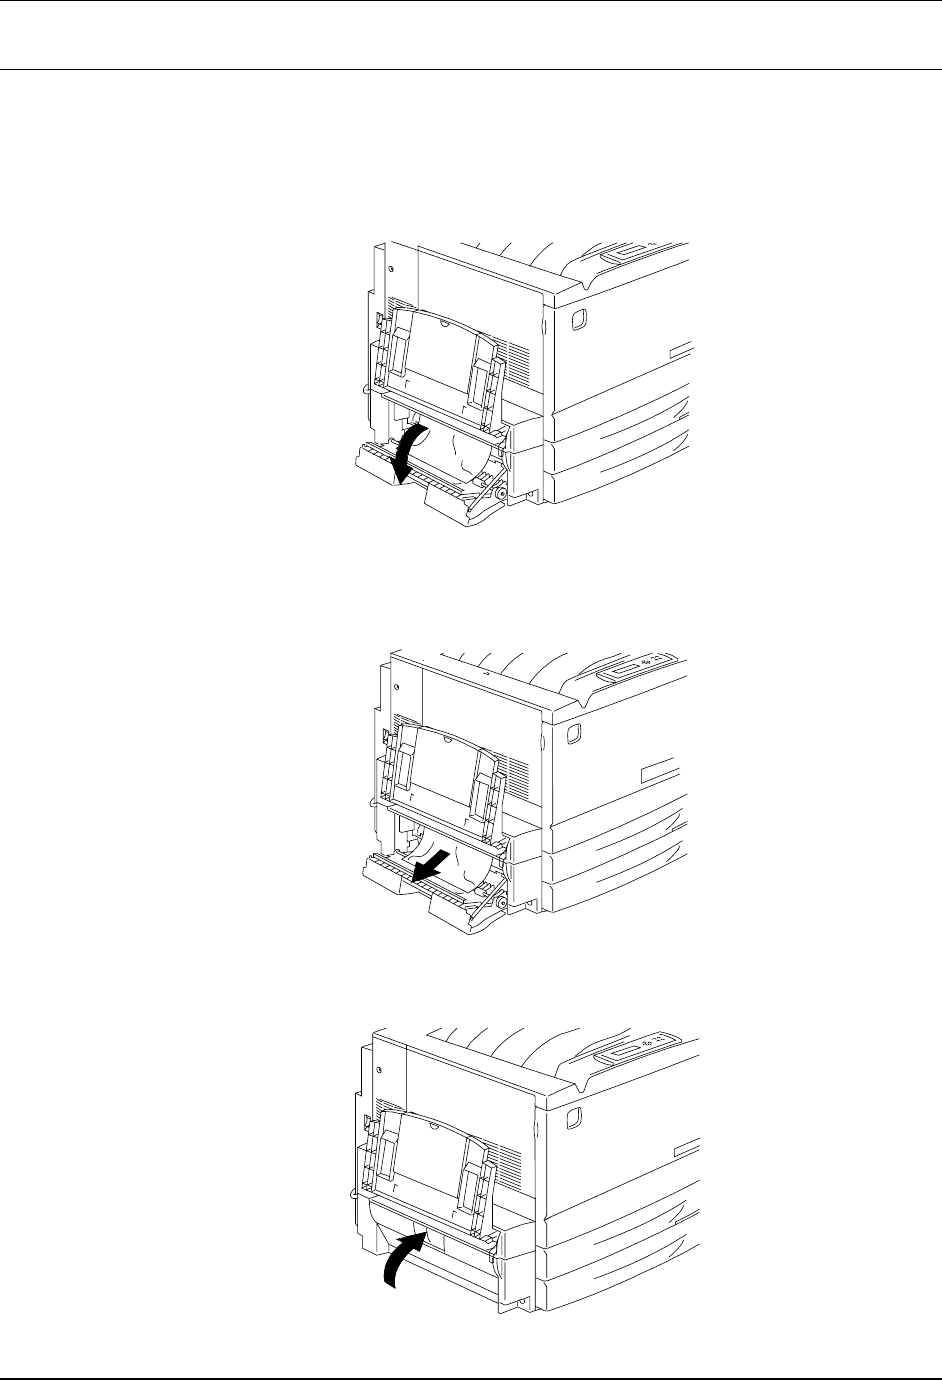
Clearing Area 6 Jams Problem Solving
93
Clearing Area 6 Jams
Perform this procedure when the message CLEAR JAM IN AREA 6 is
displayed on the Control Panel.
1. In order to access Area 6, open the Lower Inverter Cover.
2. Remove the jammed paper. Ensure that there are no pieces of torn
paper remaining in the Lower Inverter.
3. Close the Lower Inverter Cover.
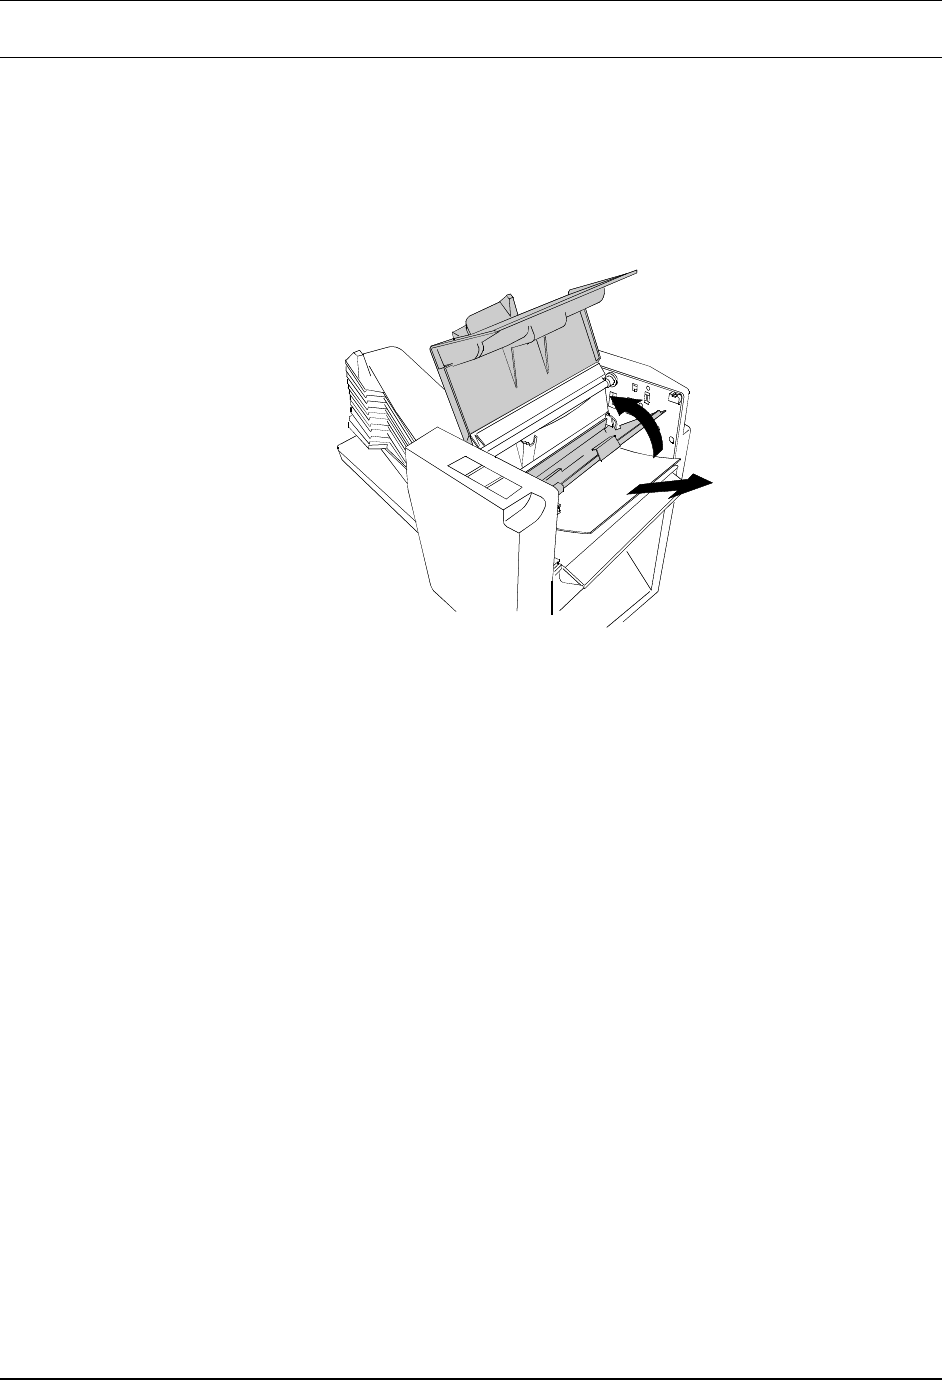
Problem Solving Clearing Area 6 Jams
94
Clearing Jams in the 10 Bin Sorter
1. Read the messages that display on the copier and printer control panels.
2. Slide the 10 Bin Sorter to the left away from the DP-C106.
3. Lift the Jam Clearance Cover.
4. Lift the Green Handle and gently remove any sheets that are jammed in
the output area.
5. Close the Jam Clearance Cover.
6. Continue to follow the messages that display in the copier and printer
control panels and clear any additional jams that have occurred in the
DP-C106.
Copy/Print Quality Problems Problem Solving
95
Copy/Print Quality Problems
If the problem still exists after following the instructions in this table, call your
local Authorized Panasonic Representative.
Description Possible Cause Action
Faded print/copy Printer out of adjustment. Go to Adjusting the Color in
this section.
The Print/Copy Cartridge is
old or damaged.
Go to Replacing the
Supplies in the
Maintenance section.
If only some colors are
faded, a Toner Cartridge is
old or damaged.
Go to Replacing the Toner
Cartridges in the
Maintenance section.
Stray black dots, or white
dots in solid black or color
areas
The Document Glass is
dirty.
Go to the Cleaning
Procedures in the
Maintenance section.
Vertical streaks The drum in the Print/Copy
Cartridge is old or
damaged.
Go to Replacing the
Print/Copy Cartridge in the
Maintenance section.
Horizontal streaks Dirt in the paper path. Clean the Document Glass,
and make 50 blank copies.
If the problem still exists,
call for service.
Repeating defect The drum in the Print/Copy
Cartridge is old or
damaged.
Go to Replacing the
Print/Copy Cartridge in the
Maintenance section.
Toner smears when
touched
The Fuser is not operating. Call for service.
Black pages The Print/Copy Cartridge is
old or damaged.
Go to Replacing the
Print/Copy Cartridge in the
Maintenance section.
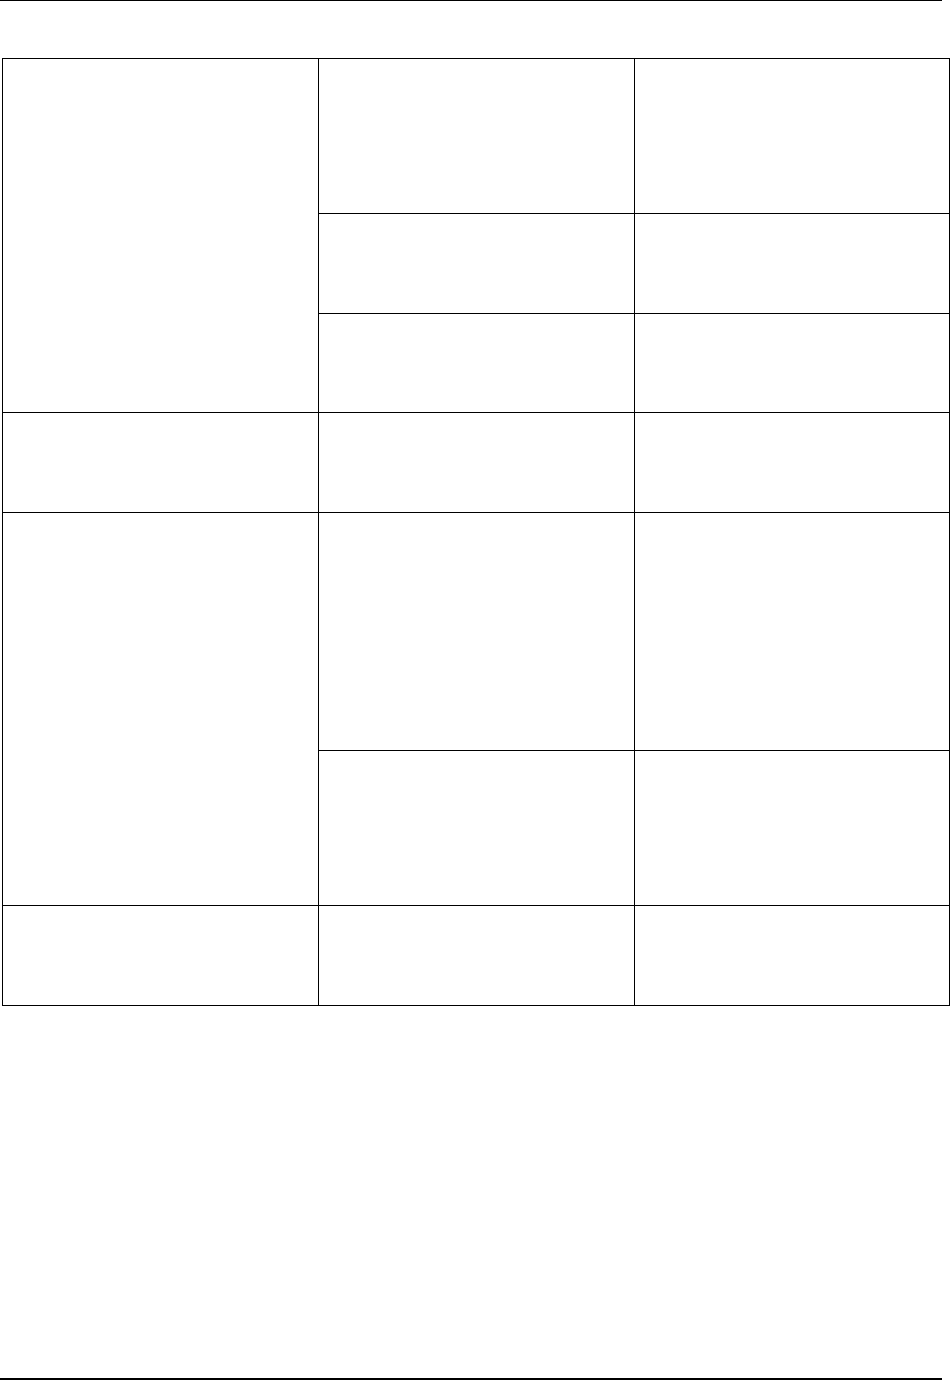
Problem Solving Copy/Print Quality Problems
96
Blank pages Sheets of paper are
sticking together.
Remove the paper stack
from the Paper Tray. Fan
the corners of the stack,
and replace it in the Paper
Tray.
The Low Toner message
is displayed on the Control
Panel.
Go to Replacing the Toner
Cartridges in the
Maintenance section.
The Print/Copy Cartridge is
old or damaged.
Go to Replacing the
Print/Copy Cartridge in the
Maintenance section.
Vertical blanks The Print/Copy Cartridge is
old or damaged.
Go to Replacing the
Print/Copy Cartridge in the
Maintenance section.
Image is slanted The Paper Guides in the
Paper Tray are not in the
appropriate position.
Open the Paper Tray and
adjust the Paper Guides to
the size of the paper. For
more information, go to the
Loading the Paper in the
Paper Tray procedure in
the Setting Up the DP-
C106.
The ADF guides may not
be in the appropriate
positions.
Adjust the ADF guides to
the size of the paper. For
more information, go to the
ADF procedure in the
Accessories section.
The color is too light or too
dark
Color is out of adjustment. Go to the Adjusting the
Color procedure in this
section.
Adjusting the Printer Color Problem Solving
97
Adjusting the Printer Color
Perform this procedure if you have color problems such as insufficient
amounts of one or more colors, or excessive amounts of one or more colors.
If a message to replace a Color Toner Cartridge is displayed on the Printer
Control Panel, replace the cartridge BEFORE performing this adjustment.
VisualCal
There are three parts to the VisualCal adjustment. Do not skip any steps or
perform any part out of sequence.
If you wish to stop the VisualCal adjustment, you may press the
CLEAR/STOP button at any time. Pressing the CLEAR/STOP button
returns the menu to READY.
1. Print Limits Page
The limits you select are used by the printer to adjust highlights, and contrasts
to compensate for normal print engine fluctuations.
1. Ensure that READY is displayed on the Printer Control Panel. Any error,
low toner, or paper messages will result in a printing warning to abort
calibration.
2. Press the MENU button repeatedly until VISUALCAL is displayed.
3. Press the ITEM/ENTER button. PRINT LIMITS YES is displayed on the
Control Panel screen.
4. Press the ITEM/ENTER button. PRINTING LIMITS PAGE is displayed
and after a few moments, the page is delivered to the Top Tray.
5. Under your normal lighting, study the BLACK START row.
a. Select the Left-most circle that you can distinguish from the
background and draw a circle around it.
View the page at an angle for the best results.
b. Select the Left-most circle that you can distinguish from the
background on the next row, BLACK END, and draw a circle
around it.
c. If you cannot see any circle in the row, write 9 next to the row.
Problem Solving Adjusting the Printer Color
98
d. If you see all the circles in a row, write 0 next to the row.
6. Repeat step 5 for each color rows, drawing circles around your preferred
selections or recording a 9 or a 0 next to the row.
7. For the 30% MATCH row, hold the sheet at arms length. Select the
circle that best matches the background and draw a circle around it.
8. BLACK START 4 is displayed on the Printer Control Panel. Press the
( ) ARROW buttons to enter the number that corresponds to the
value that you selected on the first row.
Pressing the ARROW button increases the number displayed. Pressing
ARROW button decreases the number.
a. When the desired number is displayed, press the ITEM/ENTER
button. BLACK END 4 appears on the Control Panel.
b. Use the ( ) ARROW buttons to enter the number that
corresponds to the value that you selected on the next row.
c. Press the ITEM/ENTER button. CYAN START 4 appears on the
Control Panel.
9. Repeat step 8 for each of the color rows and for the 30% MATCH row.
If you entered a 9 or a 0 for any row, VisualCal will generate another Print
Limits Page containing the adjustments from your previous selections.
Perform step 8 again until you are able to select circles within the desired 1
to 8 range.
10. When all the values are entered and accepted by VisualCal, PRINT
GRAYS YES is displayed on the Control Panel.

Adjusting the Printer Color Problem Solving
99
2. Gray Balance Page
The gray patch you select is used by the printer to balance all colors.
1. Press the ITEM/ENTER button. The PRINTING GRAY BALANCE
PAGE is displayed, and after a moment the page is delivered the
TopTray.
a. Select the color patch that is most like the gray that surrounds the
color patches.
b. Circle your selection.
2. BEST PATCH (ROW) is displayed on the Printer Control Panel. Use the
( ) ARROW buttons to enter the number of the row that corresponds
to your circled selection.
3. Press the ITEM/ENTER button and perform one of the following steps:
• If you enter any number other than 0, BEST PATCH (COL)
appears on the Control Panel.
a. Use the ( ) ARROW buttons to select the letter or name of
the column that corresponds to your circled selection.
b. Press the ITEM/ENTER button. PRINTING GRAY BALANCE
PAGE is displayed, and after a moment the page is delivered
the Top Tray.
c. Select the color patch that is most like the gray, and perform
steps 2 and 3 again.
• If you enter 0, PRINT COLOR TEST YES appears on the Control
Panel.
a. Press the ITEM/ENTER button PRINTING NEW COLOR
TEST PAGE is displayed, and after a moment, the
Comparison Page is delivered to the Top Tray.
b. Go to part 3 Comparison Page.

Problem Solving Adjusting the Printer Color
100
3. Comparison Page
The Comparison Page allows you to see the changes that you made during
the VisualCal adjustment. On the page are four rows of color photographs.
The first row and the third row show the color setup before you selected
VisualCal. Row two and row four show the color setup after the VisualCal
adjustment was completed. Now you must decide which setup is preferred.
Perform one of the following steps:
• APPLY CHANGES YES is displayed on the Printer Control Panel. If
you are satisfied with your adjustments press the ITEM/ENTER button.
VISUALCAL appears on the Control Panel.
The system saves your changes and after a moment READY is
displayed.
• If you are not satisfied with your adjustments, press the ARROW
button and select one of the following Printer Control Panel displays:
a. APPLY CHANGES NO to return to the previous settings (before
starting to perform this adjustment sequence).
b. APPLY CHANGES DEFAULT COLOR for the system to erase
your adjustments and returns to the color default settings.
After selecting the desired setup, press the ITEM/ENTER button.
VISUALCAL appears on the Control Panel.
The system saves the selected changes and after a moment READY is
displayed.
To adjust the Scanner Color, refer to Auto Color Adjust in the Tools Mode.
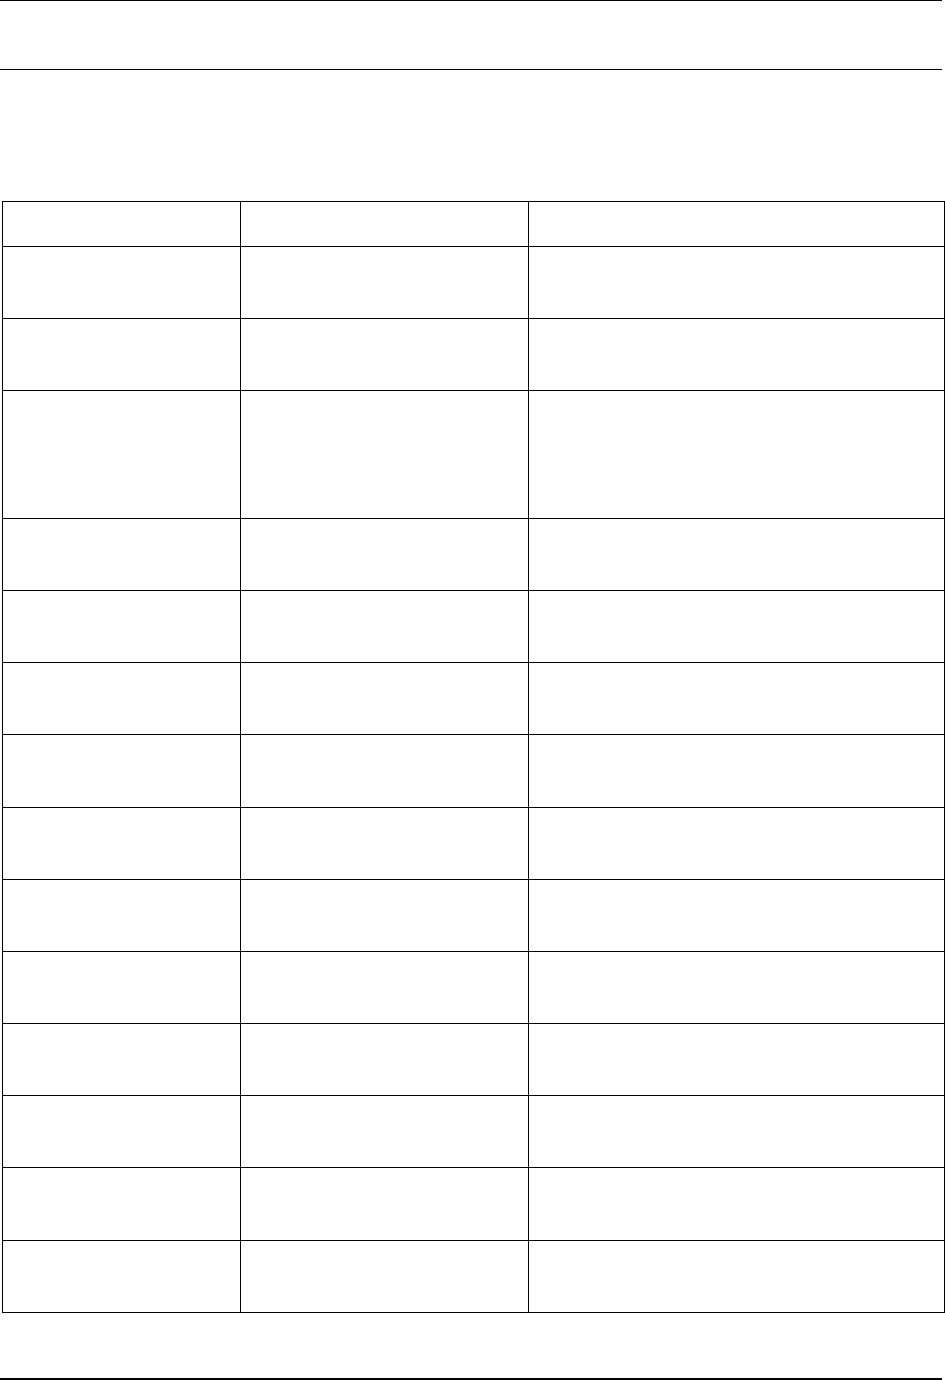
Printer Error Messages Problem Solving
101
Printer Error Messages
If the problem still exists after following the instructions in this table, call your
service support and report the problem.
Message Possible Cause Action
010-317 CALL FOR
SERVICE
There may be an
electrical problem.
Call your service support and report
the code displayed in the message.
BLACK TONER
LOW
The Black Toner
Cartridge is low.
When prompted, replace the Black
Toner Cartridge.
CHECK LOADING
OF [PAPER TRAY]
IN USE
The input document size
does not match the size
of the paper in the
selected tray.
Select Auto Tray.
Adjust the Paper Tray Width Guide.
CLEAR JAM IN
AREA 1
There is a paper jam in
Area 1.
Refer to the Area 1 Jam Clearance
procedure in this chapter.
CLEAR JAM IN
AREA 2
There is a paper jam in
Area 2.
Refer to the Area 2 Jam Clearance
procedure in this chapter.
CLEAR JAM IN
AREA 3
There is a paper jam in
Area 3.
Refer to the Area 3 Jam Clearance
procedure in this chapter.
CLEAR JAM IN
AREA 4
There is a paper jam in
Area 4.
Refer to the Area 4 Jam Clearance
procedure in this chapter.
CLEAR JAM IN
AREA 5
There is a paper jam in
Area 5.
Refer to the Area 5 Jam Clearance
procedure in this chapter.
CLEAR JAM IN
AREA 6
There is a paper jam in
Area 6.
Refer to the Area 6 Jam Clearance
procedure in this chapter.
CLEAR JAM IN
DUPLEX UNIT/KIT
There is a paper jam in
the Duplex Unit/Kit.
Refer to the Duplex Unit/Kit Jam
Clearance procedure in this chapter.
CLOSE AREA 1 The Area 1 Access
Cover is open.
Close the Area 1 Access Cover.
CLOSE AREA 2 The Area 2 Access
Cover is open.
Close the Area 2 Access Cover.
CLOSE AREA 3 The Area 3 Access
Cover is open.
Close the Area 3 Access Cover.
CLOSE AREA 4 The Area 4 Access
Cover is open.
Close the Area 4 Access Cover.
Problem Solving Printer Error Messages
102
Message Possible Cause Action
CLOSE AREA 5 The Area 5 Access
Cover is open.
Close the Area 5 Access Cover.
CLOSE DUPLEX
UNIT/KIT
The Duplex Unit/Kit is
open.
Close the Duplex Unit/Kit.
CLOSE FRONT
COVER
The Front Cover is open. Close the Front Cover.
CLOSE PAPER
TRAY 1
Paper Tray 1 is open. Close the Paper Tray 1.
CLOSE PAPER
TRAY 2
Paper Tray 2 is open. Close the Paper Tray 2.
CLOSE PAPER
TRAY 3
Paper Tray 3 is open. Close the Paper Tray 3.
CYAN TONER
LOW
The Cyan Toner
Cartridge is low.
When prompted, replace the Cyan
Toner Cartridge.
EMPTY TOP TRAY The Top Tray is full, or
contains unusable
copies.
Remove the copies from the Top
Tray.
INSTALL BLACK
TONER
CARTRIDGE
The Black Toner
Cartridge is empty.
Replace the Black Toner Cartridge.
INSTALL
PRINT/COPY
CARTRIDGE
The Print/Copy Cartridge
has failed or reached
end-of-life.
Replace the Print/Copy Cartridge.
INSTALL CYAN
TONER
CARTRIDGE
The Cyan Toner
Cartridge is empty
Replace the Cyan Toner Cartridge.
INSTALL
MAGENTA TONER
DARTRIDGE
The Magenta Toner
Cartridge is empty
Replace the Magenta Toner
Cartridge.
INSTALL WASTE
CONTAINER
The Toner Waste
Container is not in the
Printer, or is not pushed
in all the way.
Ensure that the Toner Waste
Container is installed and pushed all
the way into the Printer.
INSTALL TONER
WASTE
CONTAINER
The Toner Waste
Container is Full.
Replace the Toner Waste Container.
Printer Error Messages Problem Solving
103
Message Possible Cause Action
INSTALL YELLOW
TONER
CARTRIDGE
The Yellow Toner
Cartridge is empty
Replace the Yellow Toner Cartridge.
LOAD [STOCK
SIZE] IN TRAY 1
Paper Tray 1 is low on
the specified stock.
Fill the Paper Tray 1 with the
appropriate stock.
LOAD [STOCK
SIZE] IN TRAY 2
Paper Tray 2 is low on
the specified stock.
Fill the Paper Tray 2 with the
appropriate stock.
LOAD [STOCK
SIZE] IN TRAY 3
Paper Tray 3 is low on
the specified stock.
Fill the Paper Tray 3 with the
appropriate stock.
LOAD [STOCK
SIZE], [STOCK
TYPE] IN BYPASS
TRAY
The Bypass Tray is
empty.
Fill the Bypass Tray with the
appropriate stock.
MAGENTA TONER
LOW
The Magenta Toner
Cartridge is low.
When prompted, replace the
Magenta Toner Cartridge.
ORDER
PRINT/COPY
CARTRIDGE
The Print/Copy Cartridge
is approaching end-of-
life.
When prompted, replace the
Print/Copy Cartridge.
PRINTER
WARNING ABORT
CALIB
Paper or Toner is low
prior to starting Visual
Cal.
Printer is warming up.
Clear all fault messages and wait for
"READY" message prior to starting
VisualCal.
RELOAD [STOCK
SIZE] IN TRAY 2
Paper Tray 2 is low on
the specified stock.
Refill the Paper Tray 2 with the
appropriate stock.
RELOAD [STOCK
SIZE] IN TRAY 3
Paper Tray 3 is low on
the specified stock.
Refill the Paper Tray 3 with the
appropriate stock.
RELOAD [STOCK
SIZE], [STOCK
TYPE] IN BYPASS
TRAY
The Bypass Tray is
empty.
Refill the Bypass Tray with the
appropriate stock.
REPLACE
COPY/PRINT
CARTRIDGE
The Print/Copy Cartridge
has failed.
Replace Print/Copy Cartridge.
YELLOW TONER
LOW
The Yellow Toner
Cartridge is low.
When prompted, replace the Yellow
Toner Cartridge.

Problem Solving Printer Error Messages
104
This page is intentionally left blank.

Printer Error Codes Problem Solving
105
Printer Error Codes
An Error Code may indicate that an electrical or mechanical problem exists in
the Printer. Typical error codes, six digit numbers with a hyphen in the middle,
are followed by the words CALL FOR SERVICE.
If an Error Code should appear on the Printer Control Panel perform the
following steps:
1. Write down the code number.
2. Switch Off the Scanner power switch.
3. Wait 20 seconds.
4. Switch On the Scanner power switch.
• If the problem is resolved, resume printing.
• If the problem is not resolved, call your Authorized Panasonic
Representative and report the Error Code.

Problem Solving Printer Error Codes
106
This page is intentionally left blank.

Scanner Error Codes Problem Solving
107
Scanner Error Codes
An Error Code may indicate that an electrical or mechanical problem exists in
the Scanner. Typical error codes, xx digit numbers, are followed by the words
CALL FOR SERVICE.
If an error code should appear on the Scanner Control Panel perform the
following steps:
1. Write down the code number.
2. Switch Off the Scanner power switch.
3. Wait 20 seconds.
4. Switch On the Scanner power switch.
• If the problem is resolved, resume printing or copying.
• If the problem is not resolved, call your Authorized Panasonic
Representative and report the Error Code.

Problem Solving Scanner Error Codes
108
This page is intentionally left blank.

10 Bin Sorter Error Messages Problem Solving
109
10 Bin Sorter Error Messages
Message Cause and Solution
A3-Ov is not available with
Sorter. Select top tray.
The paper size selection you made for the job, for
example, 12 x 18 inches, is not valid. Redirect the
job to the printer Top Tray or change the output
paper size so the job may be sent to the 10 Bin
Sorter.
Check printer panel and remove
papers
Follow jam clearance procedures for the 10 Bin
Sorter and the DP-C106. For complete jam
clearance procedures for the DP-C106, refer to the
DP-C106 user documentation CD.
Check Sorter position The 10 Bin Sorter is not in place. Move the unit to
the right, adjacent to the DP-C106.
Clear Jam in Sorter There is a paper jam in the 10 Bin Sorter. Follow the
jam clearance procedures to clear the jam in the 10
Bin Sorter. You may also be instructed to clear jams
from other areas of the Copier/Printer.
Close Sorter Cover The 10 Bin Sorter Cover is not in place. Ensure that
the cover is completely closed.
Combination of this paper and
Sort or Stack is not available
The paper selection (size or type) you made for the
job is not valid. Redirect the job to the Top Tray or
change the paper size or type selection so the job
may be sent to the 10 Bin Sorter.
Empty Sorter bins This message is displayed at the conclusion of every
job sent to the 10 Bin Sorter. It is also displayed
when bin capacity has been reached. Remove the
sheets from the bins and continue copying.
Invalid for High Cap Tray The selections (such as paper size) you made for the
job are not valid for output to the high capacity bin.
Redirect the job to the Top Tray or change the
selections so the job may be sent to the high
capacity bin.
Invalid for Sort The selections (such as paper size) you made for the
job are not valid for sorting. Redirect the job to the
Top Tray or change the selections so the job may be
sent for sorting.

Problem Solving 10 Bin Sorter Error Messages
110
Invalid for Stack The selections (such as paper size) you made for the
job are not valid for stacking. Redirect the job to the
Top Tray or change the selections so the job may be
sent for stacking.
Remove papers from High Cap 500 sheets are in the high capacity bin. Remove the
sheets from the high capacity bin and continue
copying.
Remove papers from Sorter The capacity of the Exit Tray (bin 1) or other bins has
been reached. Remove the sheets from the bins and
continue copying.
Sort and Stack are selected.
Load originals in ADF
The 10 Bin Sorter is ready to receive the job. Load
the originals in the ADF and run the job.
Sorter is available up to 10 sets The desired number of sets exceeds the sorting limit.
Decrease the number to 10 and run the remaining
sets as part of another job.
Sorter malfunction A problem has occurred in the Sorter. Examine the
job specifications and any output. Rerun the job, if
possible. If you are unable to proceed, call for
service.
Stack is available up to 30
copies
The capacity of the output bins (30 sheets of 20 lb/
64 gsm paper) has been exceeded. Remove the
paper from the bins and continue running the job.
Stack is full. Remove papers Bin capacity has been reached. Remove the sheets
from the bins and continue copying
Stacker is full Bin capacity has been reached in the high capacity
bin. Remove the sheets from the high capacity bin
and continue copying.
Network Problem Solving Problem Solving
111
Network Problem Solving
Because the DP-C106 server is part of the Printer, most references in this
chapter are simply to the Printer. The word server is used to refer to network
servers.
Problems During Setup from the Control Panel
If you have difficulty printing the test page and no message is displayed,
perform the following steps:
1. Check the Printer status.
2. Use the table below to attempt to resolve the problem.
3. Try printing again.
Symptom Possible Cause Possible Solution
The power switch has
not been switched On.
Switch On the Printer
power switch.
The Power Cord is not
securely attached.
Ensure that the Power
Cord is securely plugged
into the wall and into the
Printer.
None of the Control
Panel lights are On.
Nothing is displayed on
the Control Panel
screen.
There is no power to the
electrical outlet.
Ensure that the outlet is
switched On.
The interface cable is
not connected properly.
Ensure that the network
or parallel cable
connector is properly
attached.
The PROCESSING
indicator does not light
when a print job is sent
over the network or the
parallel connection, or a
copy job is in progress. Either the print driver is
not installed or the
server has not been
correctly set up.
Check the settings on the
Host Server.

Problem Solving Network Problem Solving
112
Network Protocol Setup Messages
The following table lists the network protocol messages that you may see
during the Network Protocol setup. It also contains the last Setup screen
shown before the message appeared, a description of the problem, and any
action required.
Message Setup Screen Description and Action
NO APPLETALK
ZONE FOUND.
ENABLE APPLETALK
(NETWORK
PROTOCOL SETUP>
APPLETALK SETUP)
• The Ethernet network cable
is not attached to the
connector on the DP-C106 or
the network cable is not
plugged into the Hub or
Network. If your AppleTalk
network has zones, and you
want to specify a zone for the
Printer, you must connect the
network cable to the DP-
C106 before performing
AppleTalk Setup.
• AppleTalk network does not
have zones. Zones are not
required for printing to the
DP-C106. Press OK to
continue.
YOU MUST FIRST
ENABLE A
NETWORK PORT.
PROTOCOL SETUP
OR SERVICE SETUP
(NETWORK SETUP)
Enable at least one Network
Port (Ethernet) in Port Setup
before beginning Protocol
Setup or Service Setup.
INVALID FRAME
SIZE
FRAME TYPE
SELECTION
(NETWORK
PROTOCOL SETUP>
IPX>SPX SETUP)
The network hub is not
connected to a Novell server
when the DP-C106 tries to
bind.
WARNING IPX
NETWORK
NUMBER IS ZERO.
FRAME TYPE
SELECTION
(NETWORK
PROTOCOL SETUP>
IPX>SPX SETUP)
No other IPX computer can be
found on the network, or the
network hub is not connected
to the network when the DP-
C106 tries to bind. When this
occurs, the network number
defaults to zero.

Network Problem Solving Problem Solving
113
Message Setup Screen Description and Action
NO NDS TREES
FOUND.
ENABLE NDS
(NETWORK SETUP>
SERVICE SETUP>
PSERVER SETUP>
NDS SETUP)
No NDS trees were found on
the Novell network. Ensure that
the Frame Types on the Printer
are properly configured.
WARNING!
SELECTING A NEW
NDS TREE
DELETES BINDERY
SETUP.
SELECT NDS TREE
(NETWORK SETUP>
SERVICE SETUP>
PSERVER SETUP>
NDS SETUP)
You have previously connected
the DP-C106 to a different NDS
tree. NetWise supports only a
single NDS tree connection. To
avoid a potential conflict with
the existing tree connection, all
Bindery settings will be deleted.
When the message Delete
Bindery setup and continue?
appears:
• Select OK and Yes to delete
the current Bindery settings.
Reenter the settings in
Bindery Setup.
•

Problem Solving Network Problem Solving
114
Message Setup Screen Description and Action
ERROR. CANNOT
OPEN BINDERY
CONNECTION TO
NDS SERVER.
SELECT FILE
SERVER FROM LIST
(NETWORK SETUP>
SERVICE SETUP>
PSERVER SETUP>
BINDERY SETUP)
Select this server through NDS
Setup or disable NDS and
select it through Bindery.
NO NETWARE FILE
SERVER FOUND.
SELECT FILE
SERVER FROM LIST
(NETWORK SETUP>
SERVICE SETUP>
PSERVER SETUP>
BINDERY SETUP)
No file server was found when
the DP-C106 queried the
Network to create a list of
supported servers or a list of all
servers.
Check cable connections and
ensure that the NetWare server
is switched On.
FILE SERVER
NAME NOT
FOUND. TRY
AGAIN?
ENTER FIRST
LETTERS OF
SERVER NAME
(NETWORK SETUP>
SERVICE SETUP>
PSERVER SETUP>
BINDERY SETUP)
No file server with those letters
was found when the DP-C106
queried the Network. Check the
name of the NetWare file
server, check cable
connections, and ensure that
the NetWare server is switched
On.
NO FILE SERVER
IS SELECTED.
VIEW SERVER LIST,
EDIT CONNECTION
(NETWORK SETUP>
SERVICE SETUP>
PSERVER SETUP>
BINDERY SETUP)
No file server has been added
in Bindery Setup.
ALL
CONNECTIONS
USED. REMOVE
SERVER?
ADD FILE SERVER
(NETWORK SETUP>
SERVICE SETUP>
PSERVER SETUP>
BINDERY SETUP)
You have added the maximum
8 Bindery Servers. You must
disconnect one of those
servers in order to add a
different server.
NO NETWARE
PRINT SERVER
FOUND.
ADD SERVER, ENTER
YOUR LOGIN NAME,
ENTER YOUR FILE
SERVER PASSWORD
(NETWORK SETUP>
SERVICE SETUP>
PSERVER SETUP>
BINDERY SETUP)
No print server was found when
the DP-C106 queried the File
Server you selected.
You must configure a Print
Server and a Print Queue for
every NetWare file server that
will handle DP-C106 print jobs.
Network Problem Solving Problem Solving
115
Message Setup Screen Description and Action
NOVELL ERROR
CODE, FOLLOWED
BY A MESSAGE.
ANY BINDERY SETUP
SCREEN
Novell NetWare has reported
an error. The Printer Control
Panel reports the error number
and displays a brief message.
For the most common errors, a
screen is displayed, enabling
you to retry the action that
caused the error. If the action
cannot be completed, you are
prompted to notify the Novell
administrator to troubleshoot
the error on the network.
Consult NetWare Administrator
documentation for further
explanation of Novell error
codes.

Problem Solving Network Problem Solving
116
Novell Problems During Network Setup
In Network Setup, when you are configuring your IPX (Novell) connection, the
DP-C106 queries the network for Novell file servers and trees and temporarily
attaches to them. If a guest login is enabled, it will be used. If not, you will be
prompted to login from the DP-C106 Printer Control Panel.
If the selected NetWare file server or tree does not have a guest account, or if
the guest account has expired or has been disabled by the NetWare
supervisor, you will be prompted to notify the IPX (Novell) administrator. In
that case, you or the supervisor may perform one of the following actions:
• Enable a guest account on the NetWare server or tree for the purpose of
setup.
• Login with a different account. At the log in screen, change the default
name (guest) to supervisor or enter another valid login name. When you
are prompted for a password, enter the correct password for the account
you named.
For any Novell error, ensure that:
• The IPX (Novell) network is connected to the DP-C106. The NetWare
server you are trying to access is running.
• The Novell network has been configured with at least one print server
and queue for the DP-C106.
• You have the appropriate permissions and login information, including
user name and password, if necessary.
• The DP-C106 is configured with the correct frame types for
communication with the desired Novell servers.
• Enable a guest account on
the NetWare server for the
purpose of setup.
• Login to a different account.
On the login screen, change
the default name (guest) to
supervisor or enter another
valid login name. When you
are prompted for a password,
enter the correct password
for the account you named.
222
Unable to login to
the server.
Password has
expired for login
name.
The server has
connected to a file
server, but is unable to
login to the file server
or print server because
the password has
expired for the login
account name or the
named print server.
• Select a different login
account or print server.
• The error screen exits to the
File Server Login screen (if
login to the file server failed)
or NetWare Print Server
screen (if login to Print Server
failed). Press the Menu
button to display the PServer
Setup menu.
252
Unable to login to
the server.
Login does not
exist.
The server has
connected to a file
server, but is unable to
login to the server
because the selected
login account does not
exist on the file server.
Select a different login account.
The error screen exits to the
File Server Login screen.
Pressing the Menu button to
display the PServer Setup
menu.
255
Unable to connect
to file server.
File server is down
or out of
connections.
The Novell file server is
down or out of
connections.
This error occurs while
the server is trying to
connect to the
requested file server.
Select a different file server or
try to get someone else to log
off. Pressing the Menu button
to display the PServer Setup
menu
nnn Indicates other network
errors.
Notify the Novell Administrator
and report the error number.
Problem Solving Network Problem Solving
118
Message Cause Suggested Action or Exit
Notify IPX (Novell)
Administrator
DP-C106 is already
connected to a file
server. Something
unexpected has
happened and the user
generally cannot
recover without the
intervention of the
system administrator.
Error #197 indicates
that you have
exceeded the number
of login attempts
permitted for this
account on the
NetWare file server.
Error #255 usually
indicates a hard failure.
The error screen exits to the
PServer Setup screen.
Network Problem Solving Problem Solving
119
Runtime Printer Error Messages
For error messages related to canceling jobs and printing, including the Disk
Full message and alerts to local media, refer to the sections Job Management
Error Messages and Clearing the Printer.
Users can turn On PostScript error reporting as a print option from Mac OS
applications.
The following table lists the messages, a description of the problem, and
action to take.
Message Description and Action
Check power and cable Ensure that the interface cable
between the Server and the Printer is
connected, or the Printer may be Off.
Printer not found The printer may have a conflicting or
missing name, or address setting. The
required names are:
• TCP/IP host name (also known as
the DNS name), which is defined by
your organization. Enter the host
name as the Server Name in Printer
Setup.
• Remote Printer (internal machine)
name. Use either print or hold.
Configure one of the Fiery utilities on
each workstation if you change the
DNS name (also known as the TCP/IP
host name of the Printer).
Refer to the Name Table that follows
for the appropriate name to use.
Cannot connect to Printer
with Fiery utilities
Check the following:
• Printer Setup—the appropriate
network protocol must be enabled,
with the correct parameters (for
example, TCP/IP, the IP address,
etc.) and you must have published
either the Print queue and/or the
Hold queue.
Continued…

Problem Solving Network Problem Solving
120
Message Description and Action
• Check these settings quickly by
printing a Configuration page.
At the client workstation, ensure that
the appropriate network protocols are
loaded, and that the Windows directory
contains a configured Efinl.ini file.
Network Problem Solving Problem Solving
121
Name Table
In This
Location For This Item IPX/SPX
Networks TCP/IP
Networks
Server Setup Server Name
option
Administrator
defines name
Administrator
defines name
Windows NT
hosts file
Host name DNS name
(TCP/IP
hostname)
LPD host nameWindows NT
setup for TCP/IP
Name of Printer
on lpd host
machine
Print or hold
UNIX
/etc/printcap file
(BSD)
RP line Print or hold
Solaris LP ADMIN
queue name
Print or hold
NetWare
administration
utility
Print queues
(must be all
lower case and
in English)
_direct
_print
_hold
New Device Utilities are not
supported over
IPX/SPX.
Printer name
Add New Server
dialog box, when
configuring a
Fiery utility
Server Name Utilities are not
supported over
IPX/SPX.
DNS name
(TCP/IP host
name)

Problem Solving Network Problem Solving
122
Printing Problems
On a Windows Workstation
Setting Up Printing on Windows
NT 4.0 Workstations
If you have problems installing the Printer with
Windows NT 4.0, try installing another
PostScript Printer (such as the Apple Laser
Writer II g) and then reinstall the Printer.
Installing another Printer ensures that all files
are properly installed and available.
For additional details, refer to the Windows
NT 4.0 documentation or the Adobe README
file (ReadMeNT.txt) included in the
appropriate driver folder on the User Software
CD.
Reinstalling the Adobe
PostScript Printer Driver on
Windows 95/98/Me or Windows
2000
If you are reinstalling the Adobe PostScript
Printer Driver, delete any previous versions
and related files before installing. Search for
and delete all files named Efax.* in the
Windows\System folder.
For additional details, refer to the Adobe
README file (ReadMe9x.doc) included in the
prntdrvr folder on the User Software CD.
Problems with the Fiery Utilities
on Windows 95/98/Me,
Windows 2000 or Windows NT
4.0
1. If you are using Windows 95/98/Me or
Windows 2000, ensure that IPX/SPX and
TCP/IP networking protocols are enabled.
2. If you are using Windows NT 4.0, ensure
that the TCP/IP networking protocol is
enabled.
3. Ensure that the connection is configured
correctly for your site.
To check the current configuration, launch
a Fiery utility and select Open from the
File menu. Select the Printer and Modify
to see current settings. If the settings are
incorrect, you can change them in this
dialog box.

Network Problem Solving Problem Solving
123
On a Mac OS Workstation
Setting up the Printer in the
Chooser
If auto-setup does not work and you are
prompted to select the PPD, select the
appropriate Printer file in your
System:Extensions:Printer Descriptions
folder.
Select DP-C106.
Installing screen fonts If you experience problems installing the
PostScript screen fonts from the User
Software CD to the System:Fonts folder,
perform the following.
1. Quit all applications and close all windows.
2. Create a new folder and name it
Uninstalled Fonts. This folder must be
located outside of the System folder.
3. Move fonts that you are not using from the
System:Fonts folder to the Uninstalled
Fonts folder.
4. Install the fonts from the User Software CD
to a folder called CD fonts. Copy the fonts
to the System:Fonts folder.
5. Create aliases to the System:Fonts folder
and the Uninstalled Fonts folder.
6. Place both aliases on the desktop.
7. When necessary, use the aliases to open
both folders and move fonts between
them.
If you have any applications running, you
must quit and relaunch them in order to view
and use the newly installed fonts.
Alternately, you can try combining fonts from
multiple suitcases into a single suitcase.

Problem Solving Network Problem Solving
124
General Printing Problems
If this Happens Try this
You cannot connect to the
Printer.
Make sure that the Printer is not being
calibrated from the Control Panel.
If the Printer is being calibrated from
the Control Panel, you can select it in
the Chooser, but you cannot connect to
it. This ensures that only one person is
calibrating the server at any time and
that print jobs do not use unexpected
calibration.
You cannot select or view one of
the queues.
Have your system administrator enable
the queue in Setup.
You cannot connect to the Printer
from a Windows computer with
the Fiery utilities.
Make sure the connection is configured
correctly.
Printing seems to take too long. Print to a queue instead of to the Direct
connection.
When you print to a queue, the job is
stored on the Printer until it can be
processed and printed. When you print
to the Direct connection, the job cannot
be sent to the Printer until the previous
job is finished processing, so you must
wait longer to use your computer.
One or more Media Type options
are dimmed.
Select a Paper Source that supports
the Media Type you are using.
For information on requirements and
constraints pertaining to special papers
and transparencies, refer to Print
Options in CD's Operating Intructions.
The DP-C106 does not respond
to a Print command.
• Has someone disconnected the
Printer by selecting Suspend Printing
from the Functions Menu?
If the administrator or operator has
selected Suspend Printing on the
Printer Control Panel to interrupt
printing, your print job will not resume
until someone selects Resume
Printing from the Functions menu on
the Control Panel.

Network Problem Solving Problem Solving
125
• Did you select the DP-C106 as the
current Printer?
Before printing, you must select the
DP-C106 as the current Printer from
your Windows computer, Mac OS
computer, or UNIX workstation.
• Make sure that the Printer is
switched On.
Someone may have turned the
Printer Off, or the Automatic Power-
Off or Power Saver mode function
may have engaged.
• If you are printing over an IPX
(Novell) network, verify through the
PCONSOLE utility that the job was
sent to the Novell queue and that the
queue is being used by the Printer.
• Ensure that the job does not contain
a PostScript error.
Check with the operator, or use Fiery
WebSpooler to check the job status.
A job containing a PostScript error
appears in red.
To obtain information on the
PostScript error, make sure the Print
to PS Error option is set to Yes in
Printer Setup.
Jobs sent to the parallel port do
not print.
• Ask the administrator to increase the
parallel Port Timeout in Seconds
on the Printer Control Panel.
• Ask the administrator to change the
Ignore EOF Character setting on the
Printer Control Panel.
If you are printing in ASCII format
PostScript only, set Ignore EOF
Character to No; if you are printing in
Binary format PostScript, set it to
Yes.
• If you print using the DOS copy
command, make sure to use the /b
option when printing binary files.
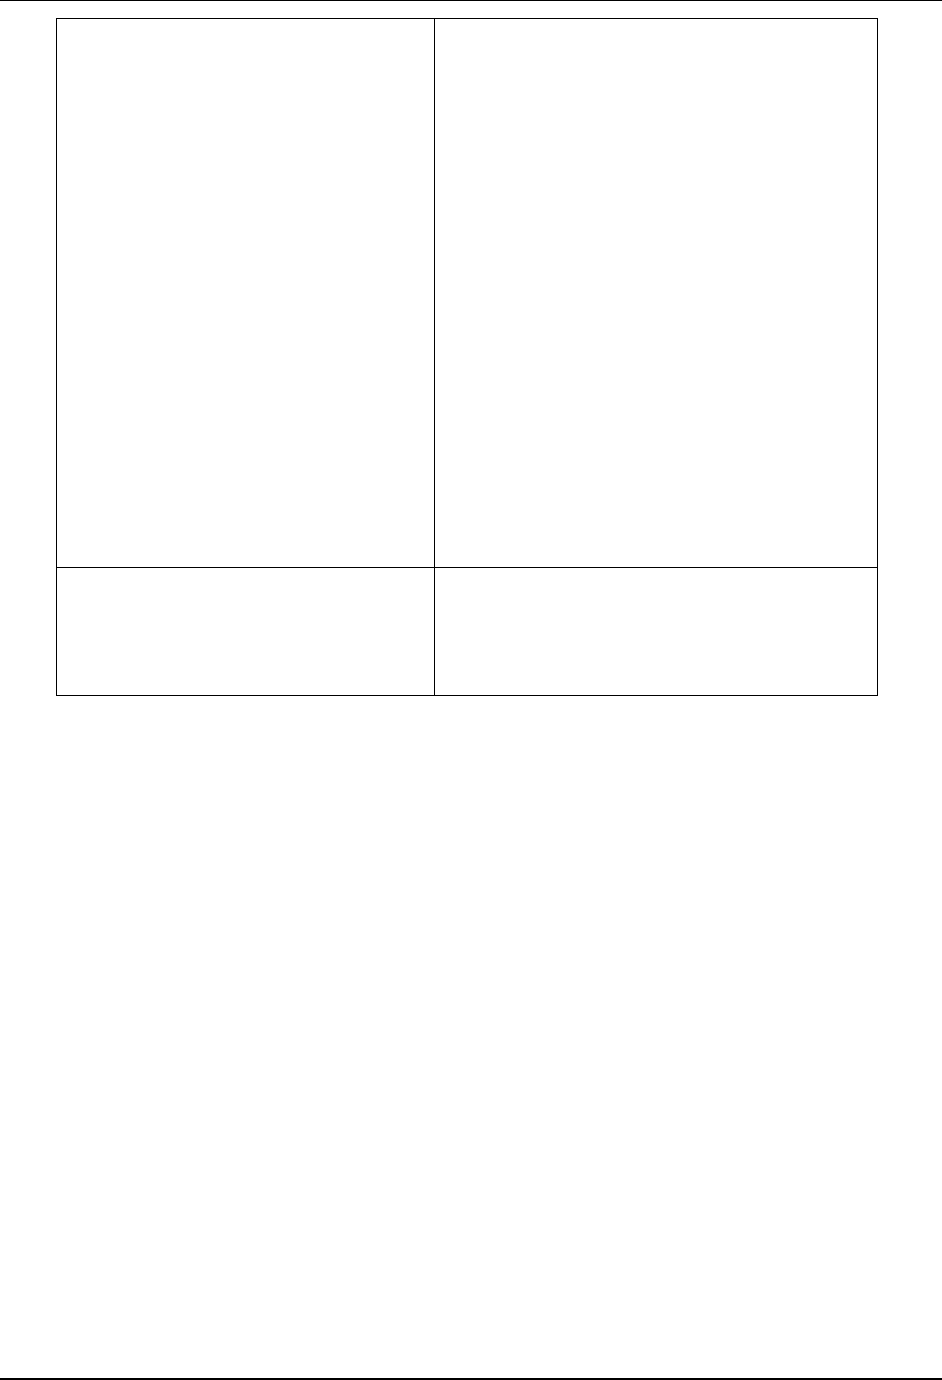
Problem Solving Network Problem Solving
126
• Restart your Windows computer,
enter BIOS setup, and if you have a
BIOS setting for the parallel port,
ensure that it is set to ECP mode and
not to Bi-Directional, EPP, or any
other mode.
• If you are using Windows 95/98/Me
or Windows 2000, open the System
Properties control panel. Select the
Device Manager tab and Ports.
Double-click the parallel port you are
using and ensure that the driver
selected is the ECP Printer Port
driver, and not EPP Port, or any
other driver.
For information about changing this
setting, refer to your Windows
documentation.
You cannot print with Quark
XPress 3.32 using the PSPrinter
8.5.1 driver on a Mac OS
workstation.
Remove the file called Balloon Help
from your Quark XPress application
folder and relaunch Quark XPress.
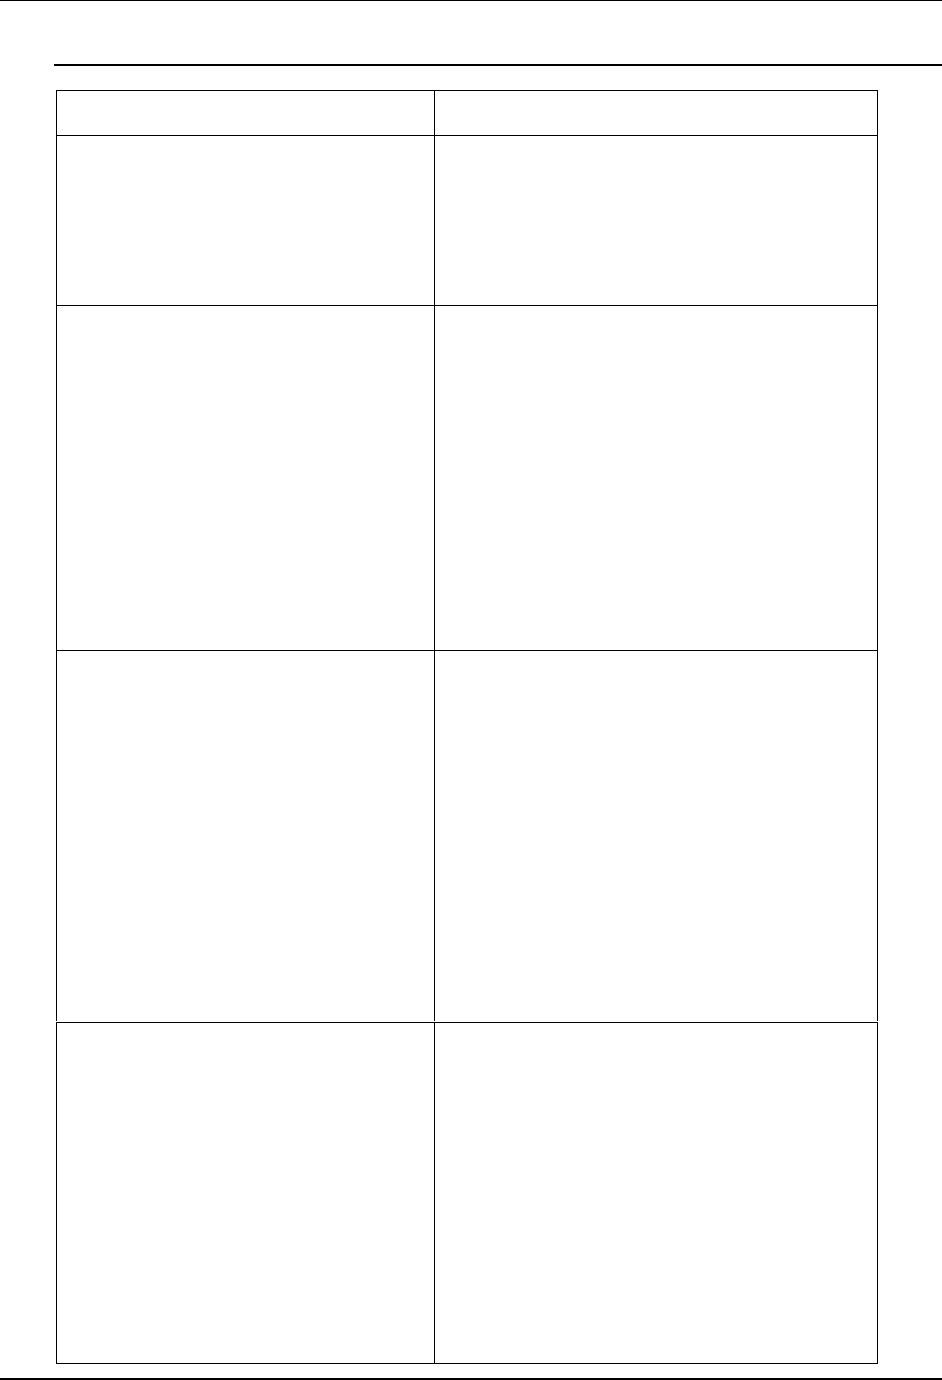
Network Problem Solving Problem Solving
127
Problems with Print Quality
If this Happens Try this
Print settings for your job output
do not match the settings you
gave.
Ensure that you did not override the
setting for the job in another place.
For information about options and
overrides, refer to Print Options in CD's
Operating Instructions.
You get poor printing results. • Does your application require one of
the DP-C106 Printer description
files?
If you are printing from Adobe
PageMaker, ensure that the DP-
C106 Printer description file is
installed correctly.
• Ensure the system has been
calibrated.
Separations do not combine
properly.
• Ensure that the file was initially
created as separations.
• If you are printing separations or a
DCS format file, set the Combine
Separations print option to On.
With Combine Separations On, all
four colors will be printed on a single
page; with Combine Separations Off,
four black-and-white pages will print
to simulate four single-color plates.
The registration or colors of an
image are not what you
expected.
Ask the operator to print a test page.
The problem may be with the Printer. If
your test page shows that the Printer is
working properly, correct the problem
within your application software. If the
test page is wrong, your Printer may
need to be calibrated or adjusted in
some other way.
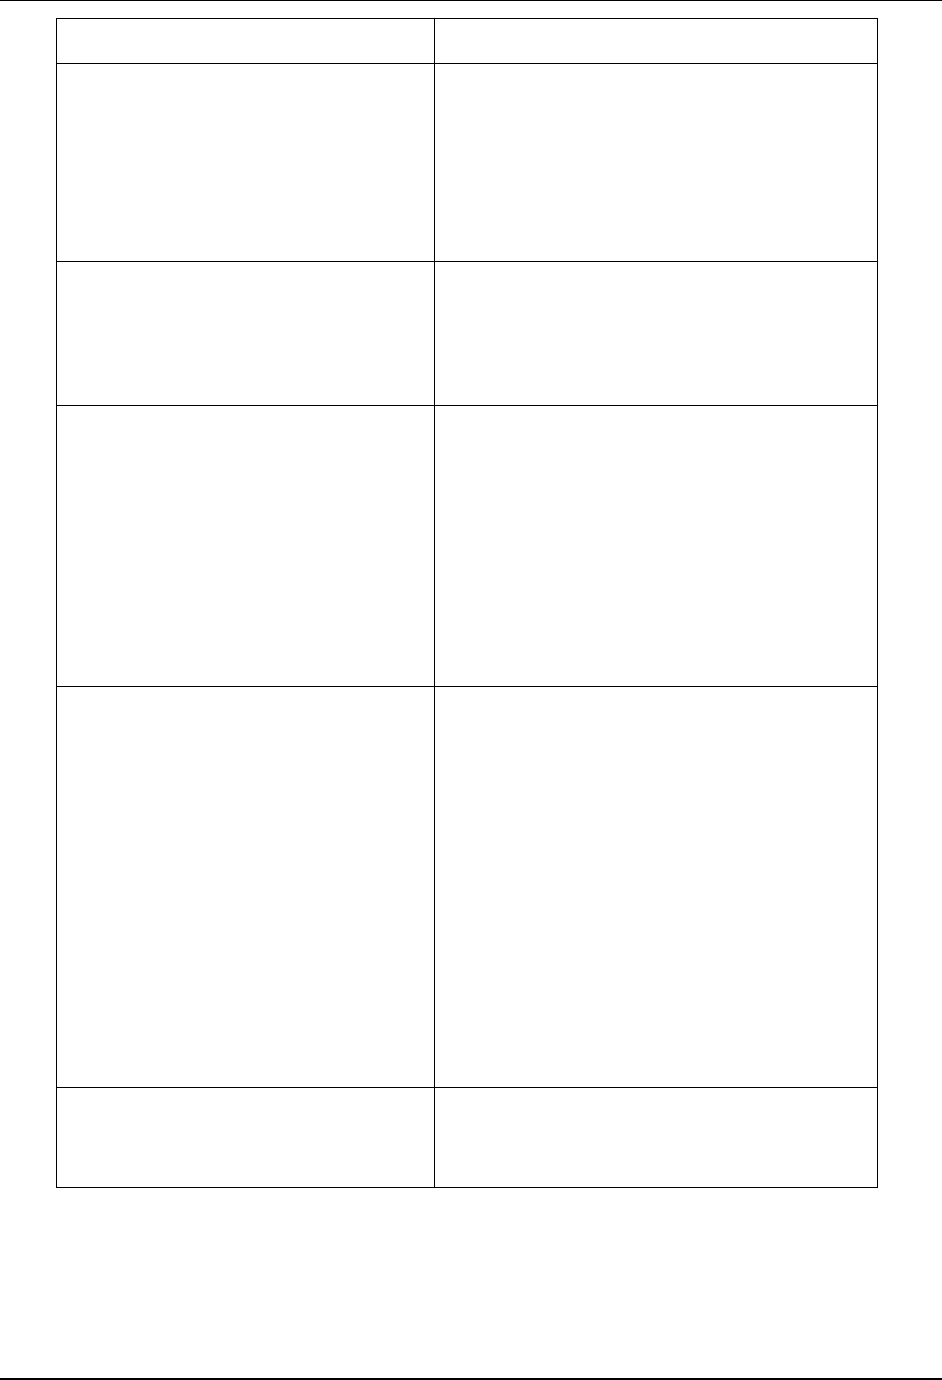
Problem Solving Network Problem Solving
128
If this Happens Try this
Your printed file appears too
dark.
Adjust the Brightness option.
Use the Brightness option when
printing from an application to lighten
your image whenever you print a
PostScript or Encapsulated PostScript
(EPS) file.
Color output is incorrect. Check with the operator or
administrator about the current
calibration information.
The Printer may need recalibration.
Color file prints in black and
white.
In the Color Matching dialog box, make
sure that Color/Grayscale or ColorSync
Color Matching or PostScript Color
Matching is selected (not Black and
White).
Ensure that the Color Mode print option
is set to CMYK or Standard
Color/Expert Color (Windows 95/98/Me
or Windows 2000) and not Grayscale.
Desktop Color Separations
(DCS) format images print
incorrectly.
• Ensure that you selected the correct
options to send separations in the
application Print dialog box.
• Ensure that you have the file for
every layer of separation that you are
printing.
• Set the Combine Separations option
to On.
This combines the high-resolution
files for an image and prints them.
With Combine Separations Off, the
low-resolution master file will print.
QuickDraw fill patterns print as
solids.
Use the Adobe PostScript Printer driver
(or the Apple LaserWriter 8.3 or later
Printer driver.
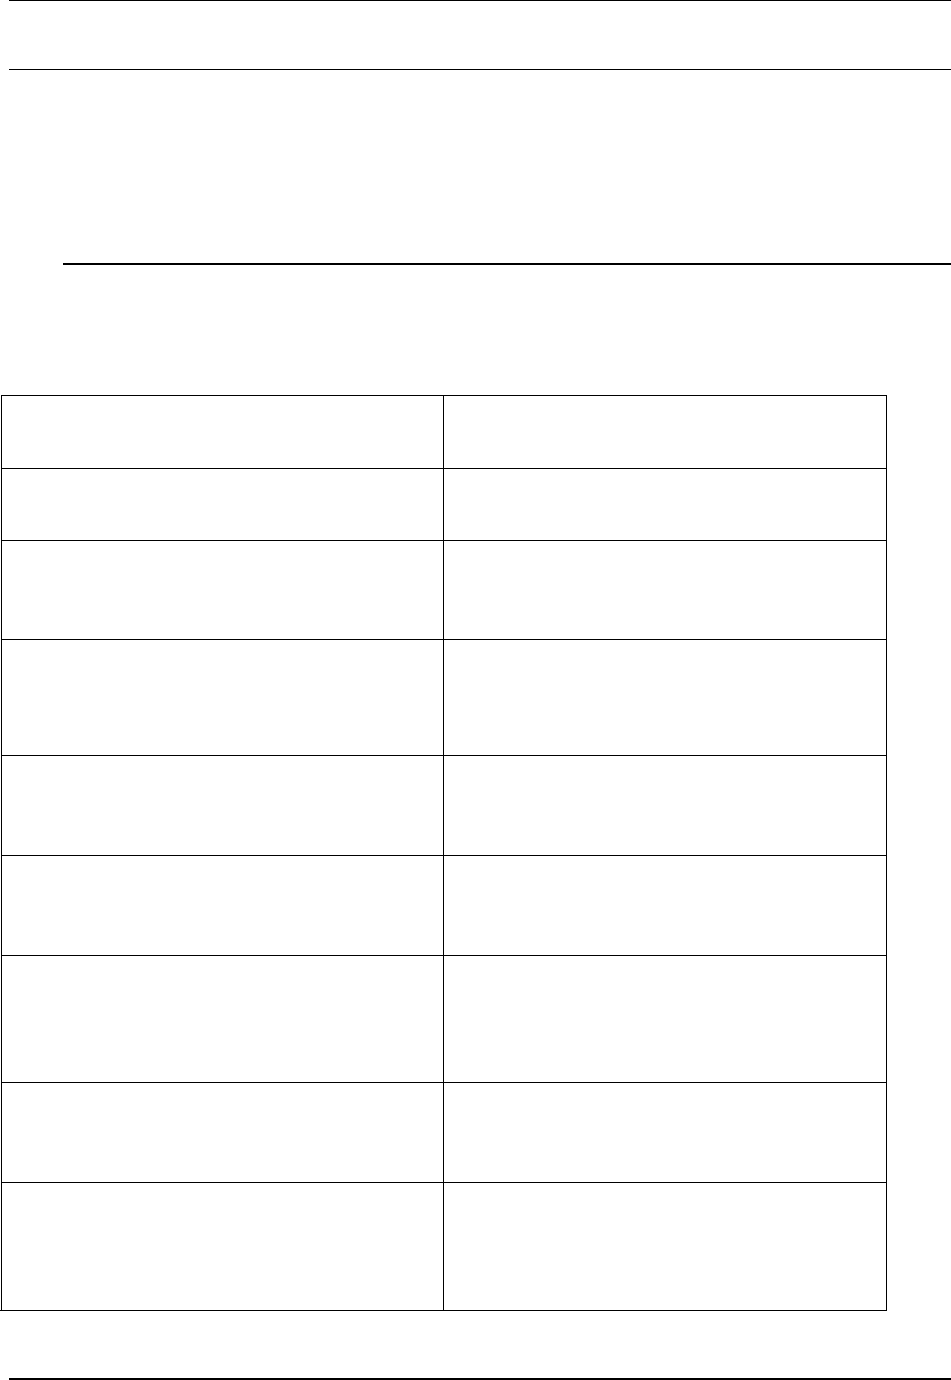
Network Problem Solving Problem Solving
129
Job Management Problem Solving
This section lists error messages you might see, and provides some
troubleshooting guidelines should a problem arise with the Printer. If you are
unable to resolve a problem after referring to this chapter, contact your
authorized service/support center.
Job Management Error Messages
Error messages can result from problems with the print job, a server, or the
DP-C106. Some of the most common error conditions are listed here.
Message Corrective Action/Additional
Information
Check power & cable Ensure that the Printer is On and all the
cables are secure.
Check scanner power & cable Ensure that the scanner is On. Check
that the cable between the Printer and
the scanner is securely connected.
Communication failure while printing.
Please resubmit job.
An Printer error occurred. Try printing
the job again.
Copier busy The DP-C106 has received a print job
while running a copy job. The job will
print when the copy job has completed.
Copier in Energy Save Mode The DP-C106 is in Energy Save Mode.
You must wait for the DP-C106 to
warm-up before printing.
Copier offline The Suspend Printing option has been
selected from the Functions menu.
Press Resume Printing in the
Functions menu.
Platen Scan in progress The Printer is completing a scan and
will be ready for printing in a few
minutes.
Print/Copy Cartrdg. misplaced The Print/Copy Cartridge is not
correctly placed in the Printer. Check
the cartridge and reinstall it as
necessary.
Problem Solving Network Problem Solving
130
Message Corrective Action/Additional
Information
Print/Copy Cartrdg. type mismatched The Print/Copy Cartridge installed is
not the correct cartridge. Remove the
cartridge and check your
documentation for specifications on the
correct cartridge to install.
Printing . . . This is a normal status message
indicating that printing is in progress.
Ready within 1 minute This is a normal status message. The
Printer is warming up. It will be ready
for printing in a minute.
Run setup and enter correct security
key
This message is displayed if your
model requires that you enter a
security code.
Trying to connect
Please wait . . .
An error may have occurred with the
Printer. Refer to the message panel for
information.
Turn power Off
and On.
Switch Off the Printer power, wait 20
seconds, and then switch On the
power.
Warming Up . . . This is a normal status message. The
print engine is powering up. It will be
ready for printing in a few minutes.
Network Problem Solving Problem Solving
131
Unexpected Printing Results
If this Happens This is the Problem
A cover page is not printed when
you reprint a saved raster job
Cover pages are not printed with saved
raster jobs that have already printed.
The job settings are not carried
out as you expected
If printing from a Mac OS, refer to Print
Options in CD's Operating Instructions
for the table of job properties and
conflicting properties.
If you expected the settings you see in
the Properties window, be aware that
the Copies field does not currently
reflect user settings. The Page Range
is All, and the Scale percent is 100%,
unless they were changed after being
sent for printing.
The job does not print Some printing errors may be displayed
in the Print status bar. When the job is
in the Printed Queue, jobs that had a
PostScript error are displayed in a light
red job row. Double-click anywhere in
the row to see the error message.
There are font errors If user-specified non-resident fonts are
not printing correctly in PostScript files
that are downloaded by users, request
that they embed the fonts in the
PostScript file or print directly from their
application. When users print from their
applications, if special fonts are not
downloaded automatically, they should
be downloaded directly to the Printer.
Users can load fonts, provided the
Direct Queue is enabled. For more
information, go to Using the Fiery
WebTools in CD's Operating
Instructions.

Problem Solving Network Problem Solving
132
Clearing the Printer
Clearing the Printer is an Administrator option that can be used as a last
resort if a job persists in the system and prevents printing despite attempts to
cancel or delete it. Clearing the Printer deletes all jobs currently saved in any
queue and all locally archived jobs. It also clears the Job Log and the index of
archived jobs.
Before clearing the Printer, export the Job Log if you have not recorded the
information in it. If you can, notify users that you will clear their jobs from the
Printer so they can back them up and resend them when the Printer is back in
operation.
You can clear the Printer from the Control Panel. Refer to Performing the
Setup from the Printer Control Panel in CD's Operating Instructions..
Users are Unable to Connect to the DP-C106
If users are unable to connect to the DP-C106, or are unable to find the DP-
C106 from their workstations, the system administrator may need to check
the network connections, and the settings on the servers they use for printing.
If the settings have changed, it may be necessary to reconfigure the Printer.
For example, if print servers or print queues on a Novell server are renamed
or deleted, or if accounts or permissions are changed, the system
administrator may have to edit the settings or enter new settings in IPX
(Novell) Setup to reflect the new configuration.
Mac OS users may fail to see the DP-C106 if a system administrator has
assigned it to a different zone, or has added zones where previously there
were none.
133
Maintenance
Cleaning Procedures
This section contains the recommended cleaning procedures for the DP-C106.
Cleaning the Printer Covers
The Printer does not require cleaning. However, if you wish to clean the
outside covers, perform the following procedure.
WARNING
Always switch Off the power and disconnect the power cord from the wall
outlet in order to avoid an electrical shock when cleaning the DP-C106.
1. Moisten a clean cloth and wipe any stains from the covers.
2. Wipe dry with a clean dry cloth.
3. If the stains are still present, moisten a clean cloth with a solution of a
synthetic detergent.
4. Wipe dry with a clean dry cloth.
CAUTION
DO NOT spray cleaning liquid or water directly onto the Printer.
NEVER use any cleaner other than a synthetic detergent.
DO NOT clean the interior of the Printer.
NEVER attempt to lubricate the Printer.
6
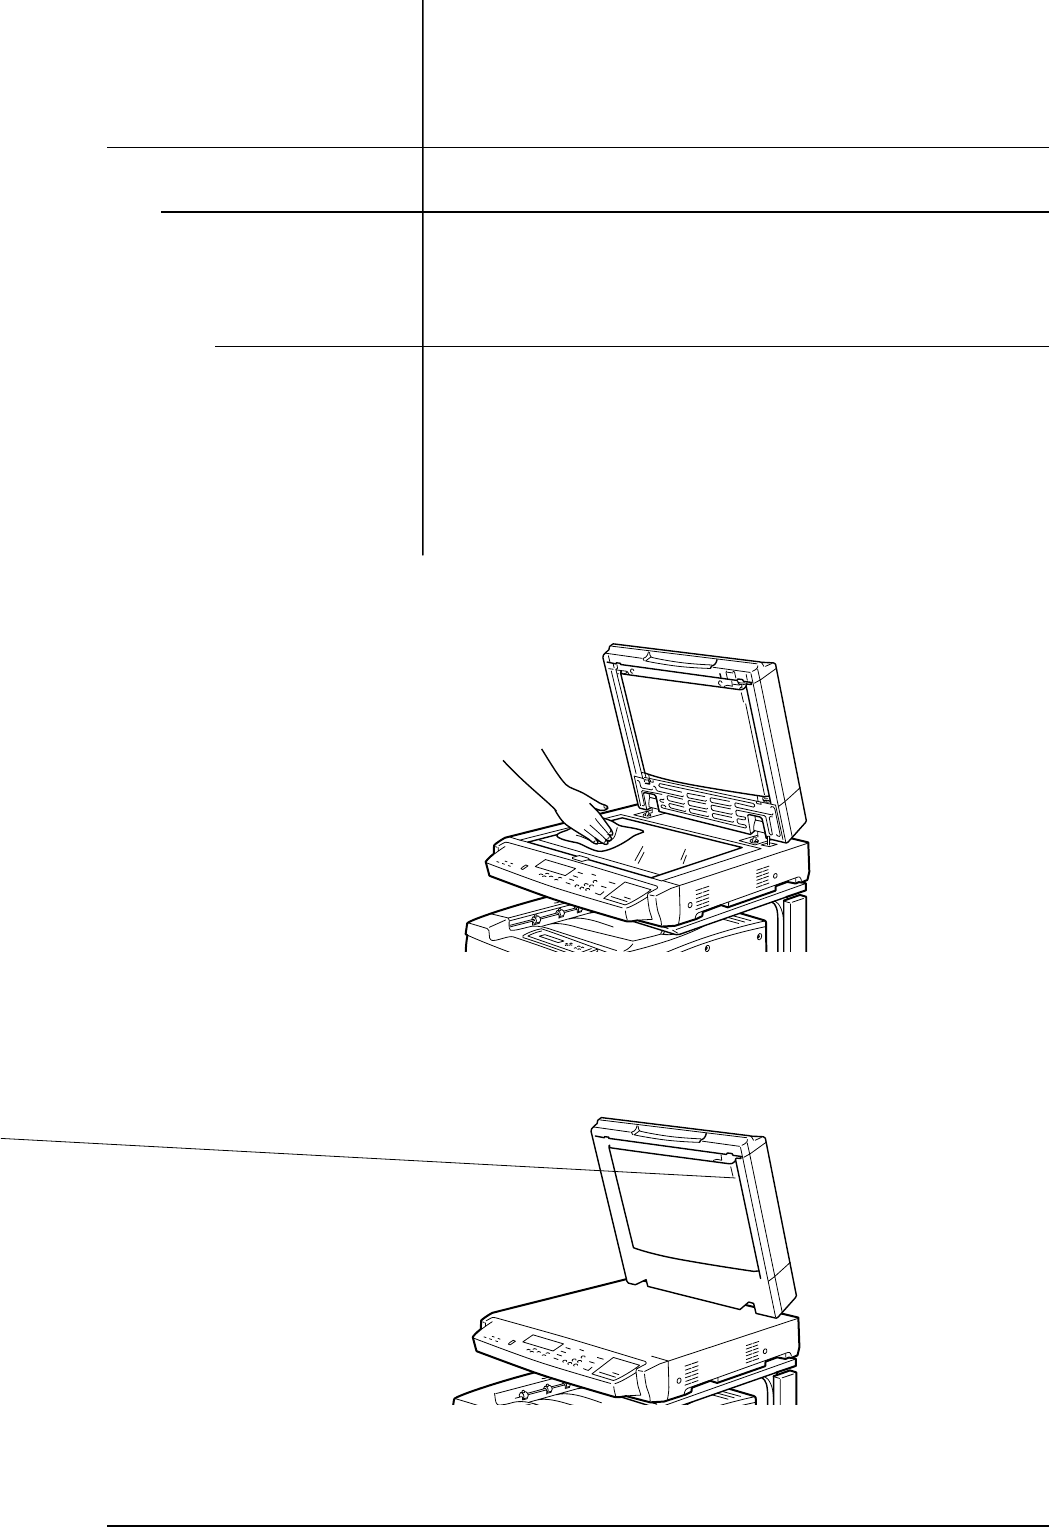
Maintenance Cleaning Procedures
134
Cleaning the Scanner
For the best copies, it is recommended that you clean the Scanner at least
once a month.
Document Glass and ADF Cover
If the Document Glass is dirty, the copy quality can be less than desirable. If
the inside of the ADF becomes dirty, the document size may not be
detectable by the Scanner.
1. Lift the ADF.
2. Moisten a clean, soft cloth with water and wipe the glass.
3. Wipe dry with a clean, dry, soft cloth.
4. Moisten another clean, soft cloth with water and wipe the white area
under the ADF.
5. Wipe dry with a clean, dry, soft cloth.
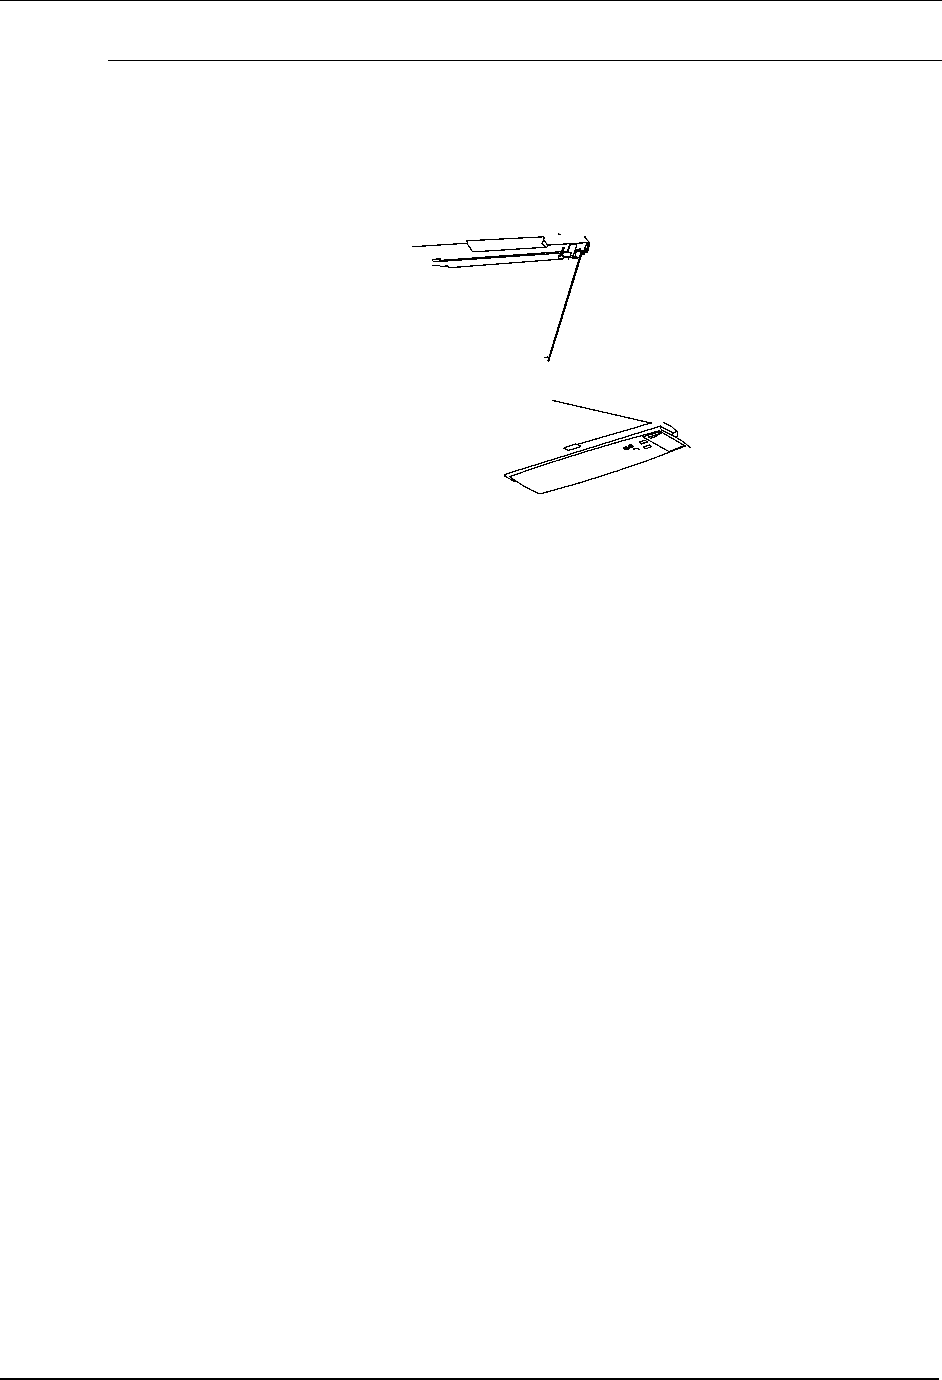
Cleaning Procedures Maintenance
135
Cleaning the Document Feeder (ADF)
Document jams can be created by dirt on the feed rollers or the feed belt of
the ADF. It is recommended that you clean the feeder once a month.
1. Lift the ADF.
2. Moisten a clean soft cloth with water and wipe the feed belt.
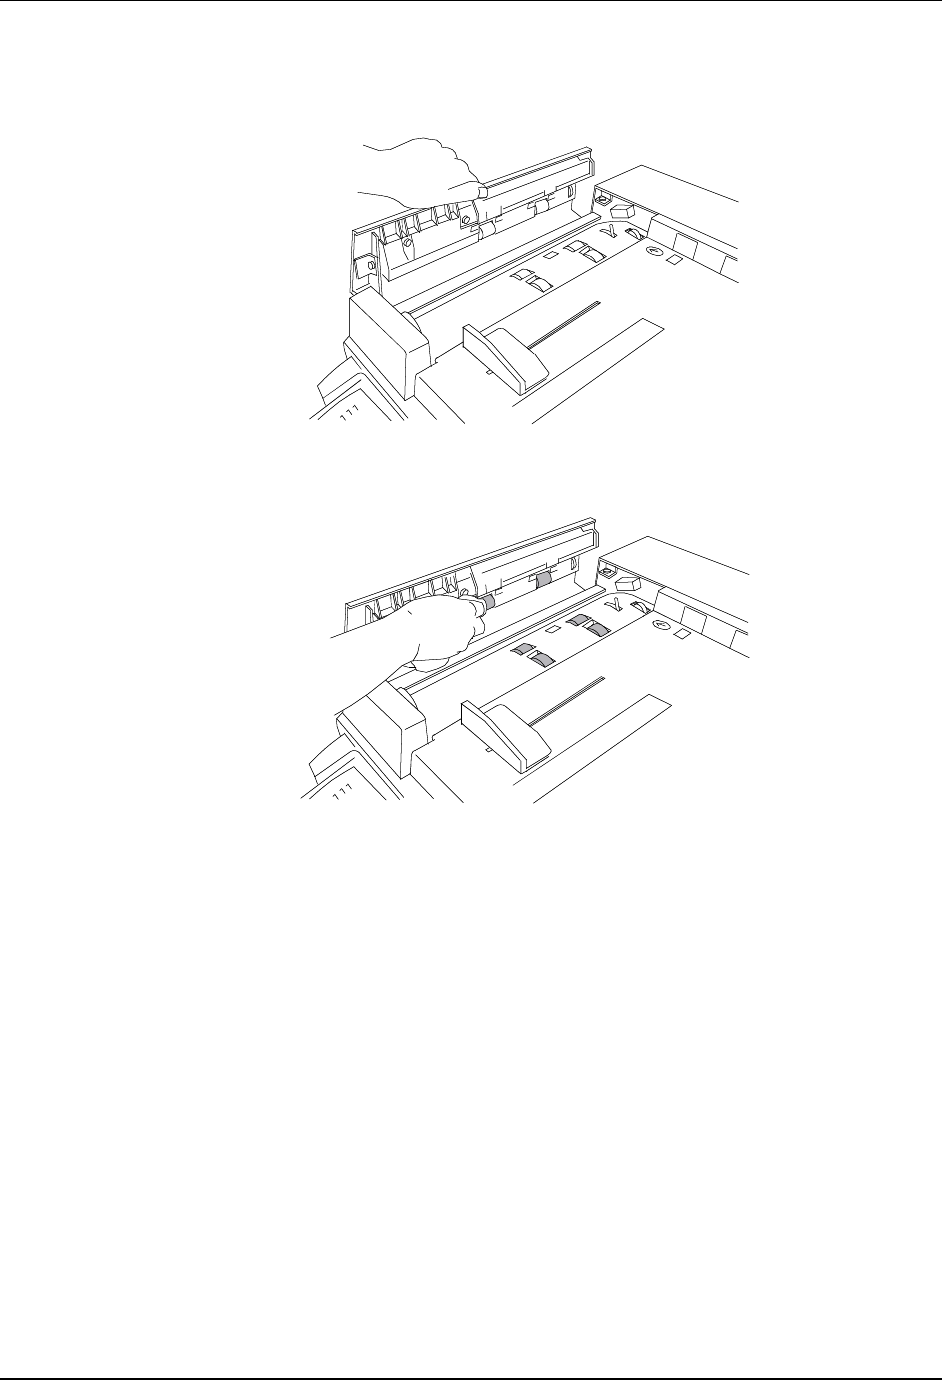
Maintenance Cleaning Procedures
136
4. Close the ADF.
5. Open the Jam Access Cover.
6. Clean the Feed Rollers as shown.
7. Close the Jam Access Cover.
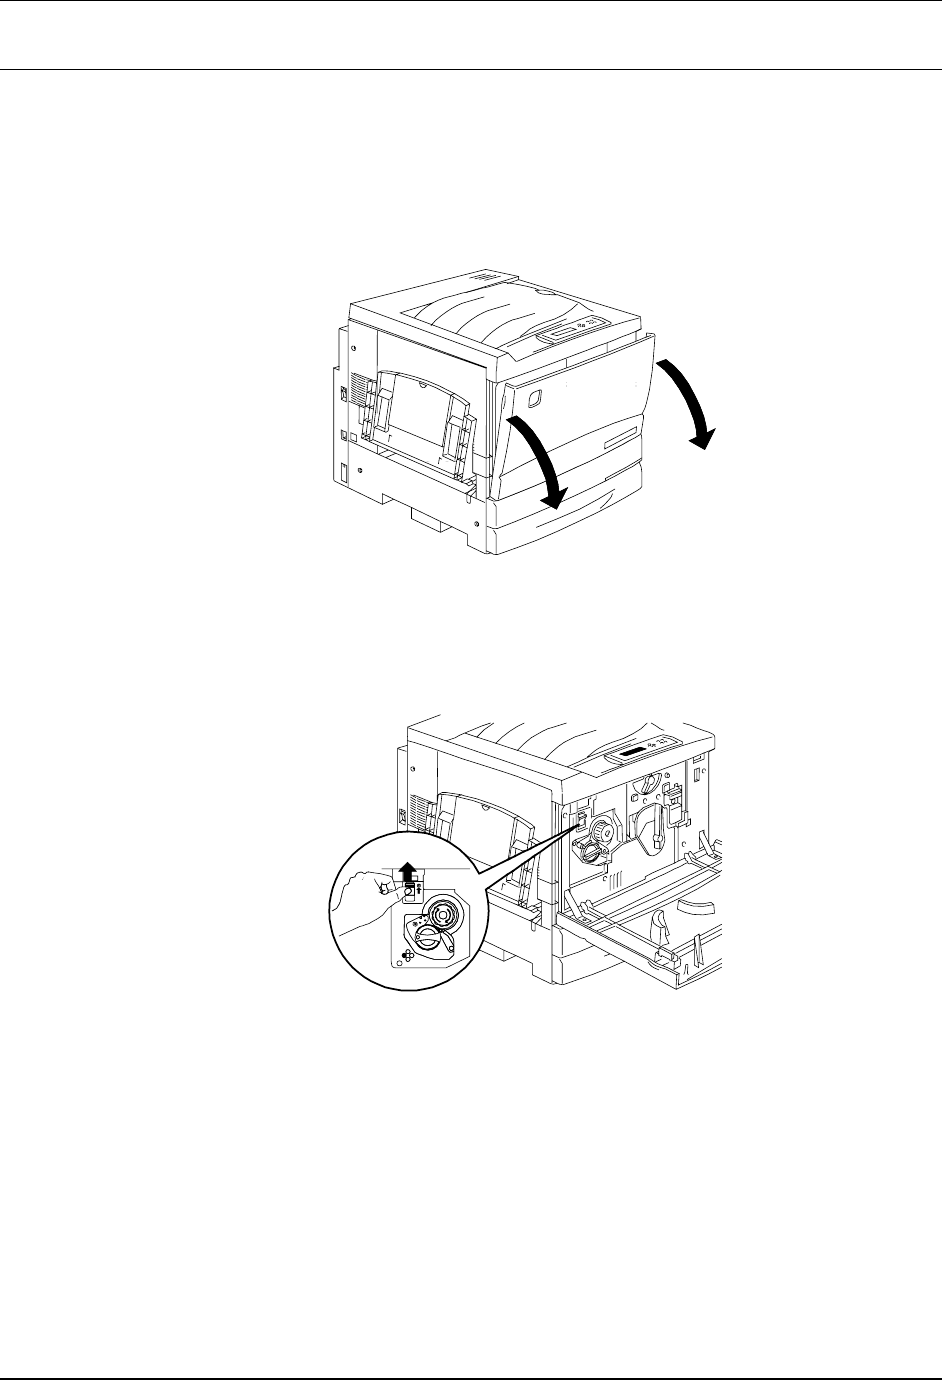
Replacing the Toner Cartridges Maintenance
137
Replacing the Toner Cartridges
Use this procedure when you are referred here from the Problem Solving
section, or when a message to install a Toner Cartridge is displayed on the
Control Panel.
1. Open the Printer Front Cover.
2. If the cartridge to be replace is not visible in the opening perform the
following steps:
a. Press the Anti-rotation Button..
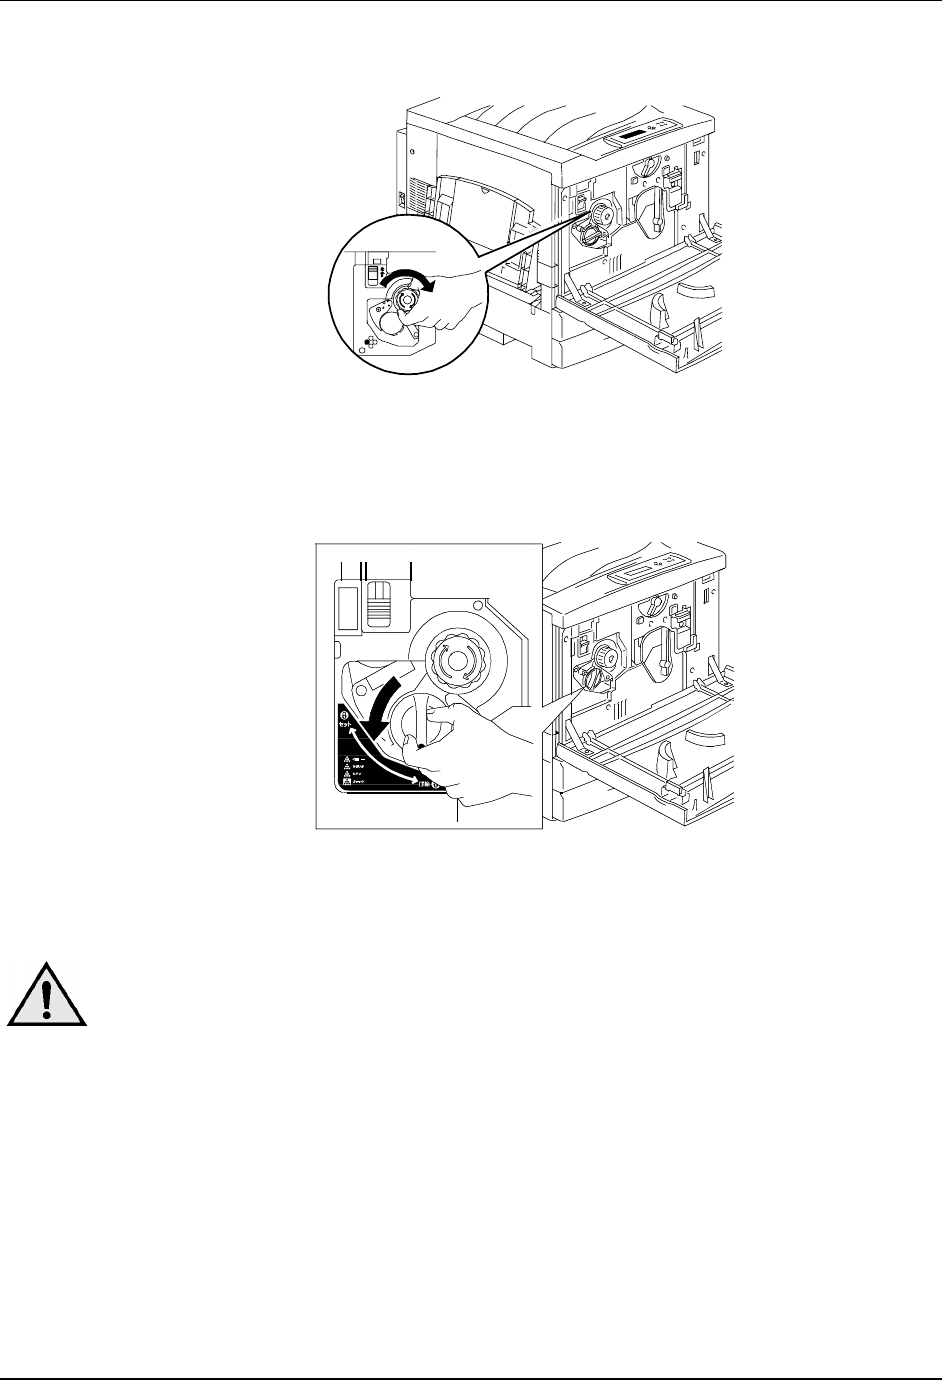
Maintenance Replacing the Toner Cartridges
138
b. Turn the Rotary Knob in the direction of the arrow until it stops.
c. Repeat the steps until the desired cartridge is visible in the opening.
3. With the desired cartridge visible in the opening, turn the cartridge in the
direction of the arrow until the Dot is aligned with the Unlock symbol.
4. Pull the Toner Cartridge out of the Printer.
WARNING
DO NOT attempt to use old cartridges, as they could cause print quality
problems.
NEVER dispose of old toner cartridges in an open flame. Toner is
flammable and could explode, causing burns and other injuries.
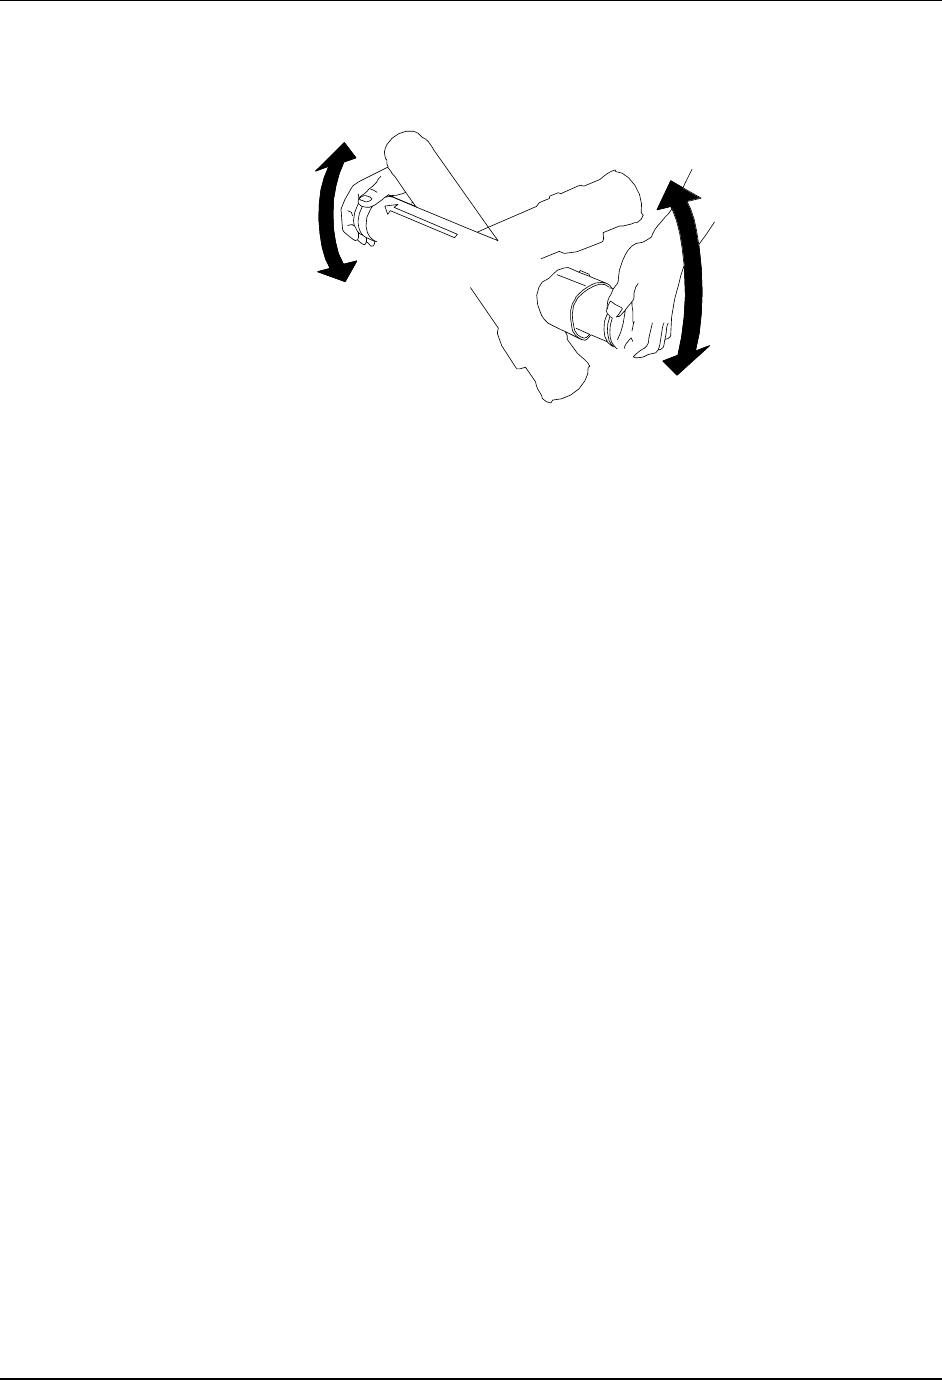
Replacing the Toner Cartridges Maintenance
139
5. Remove the new Toner Cartridge from the box and shake it seven or
eight times as shown.

Maintenance Replacing the Toner Cartridges
140
7. Use the handle on the end of the cartridge to rotate the cartridge in the
direction of the arrow. Ensure that the Dot on the cartridge is aligned
with the Locked symbol as shown.
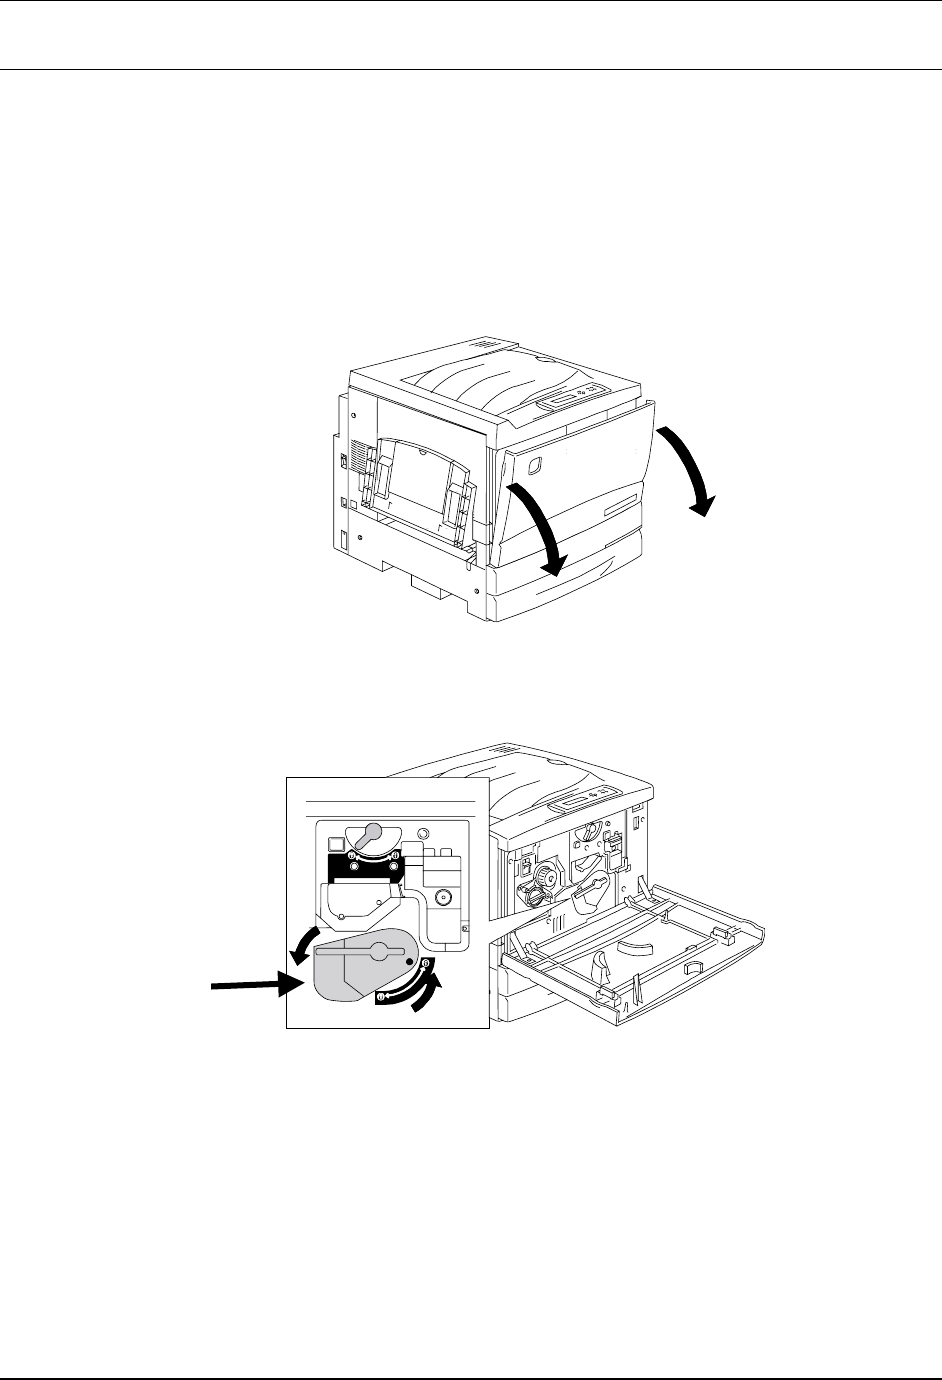
Replacing the Print/Copy Cartridge Maintenance
141
Replacing the Print/Copy Cartridge
Use this procedure when you are referred here from the Problem Solving
section, or when a message to change the Print/Copy Cartridge is displayed
on the Control Panel.
1. Place several sheets of used paper on the floor in order to protect the
floor from the old Print/Copy Cartridge.
2. Open the Front Cover of the Printer.
3. Rotate the yellow lever A in the direction of the arrow, until the Dot is
aligned with the Unlocked symbol.
A

Maintenance Replacing the Print/Copy Cartridge
142
4. Rotate the yellow lever B in the direction of the arrow, until the Dot is
aligned with the Unlocked symbol.
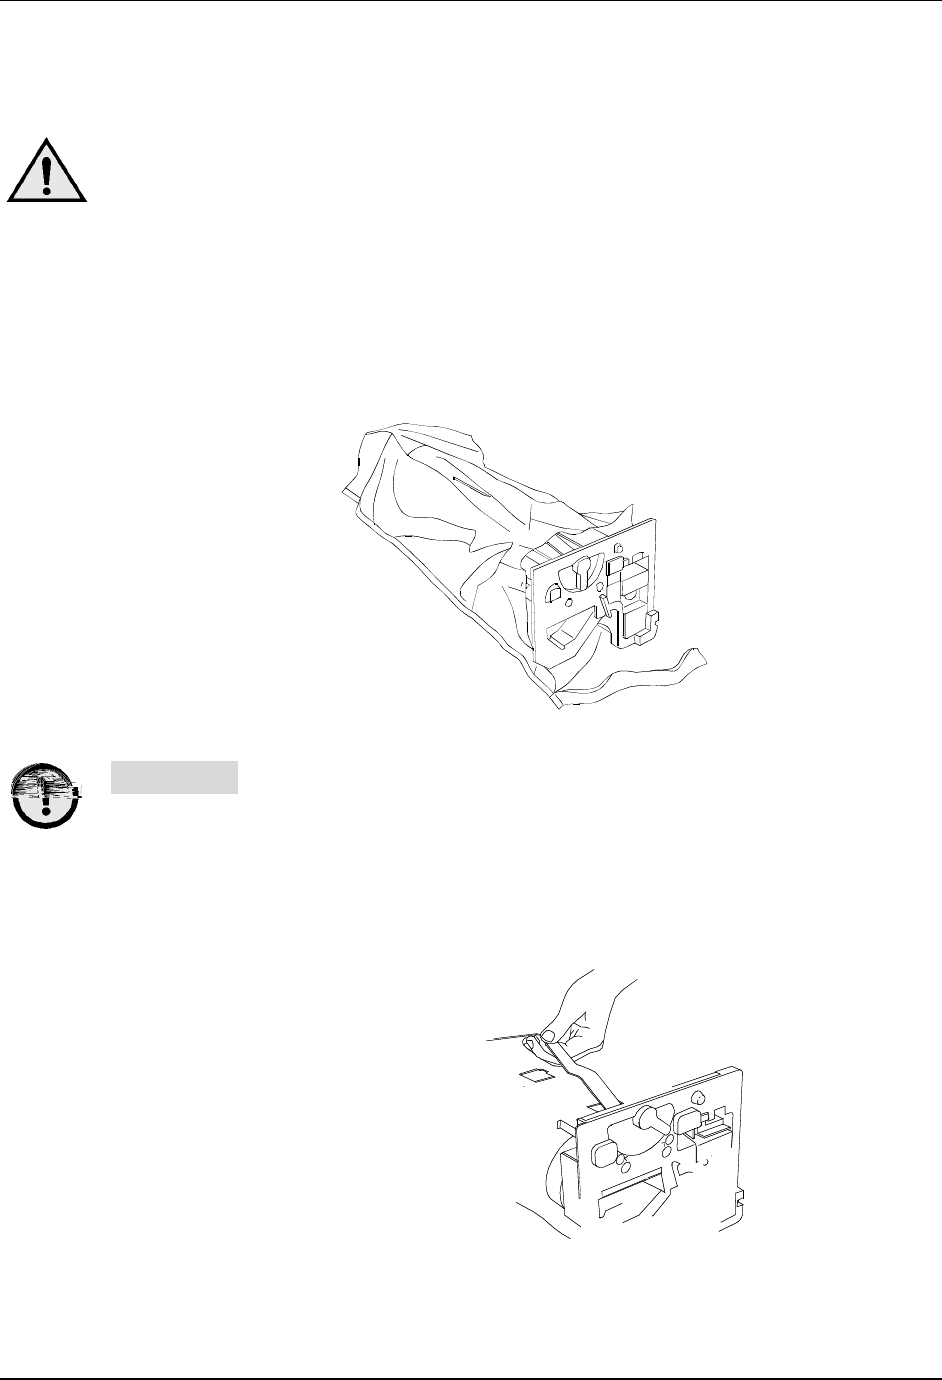
Replacing the Print/Copy Cartridge Maintenance
143
7. Place the Print/Copy Cartridge on several sheets of used paper.
WARNING
NEVER dispose of a used Print/Copy Cartridge in an open flame. Toner
could explode and cause burns.
8. Install the Print/Copy Cartridge:
a. Remove the Print/Copy Cartridge from the box.
b. Tear open the notched end of the silver protective bag and remove
the cartridge.
CAUTION
DO NOT touch the blue surface of the drum. If the drum is scratched, or
contaminated with oil from your hand, the output can be degraded.
c. Hold the cartridge by the handle. While keeping the cartridge level,
remove the protective foam wrap.
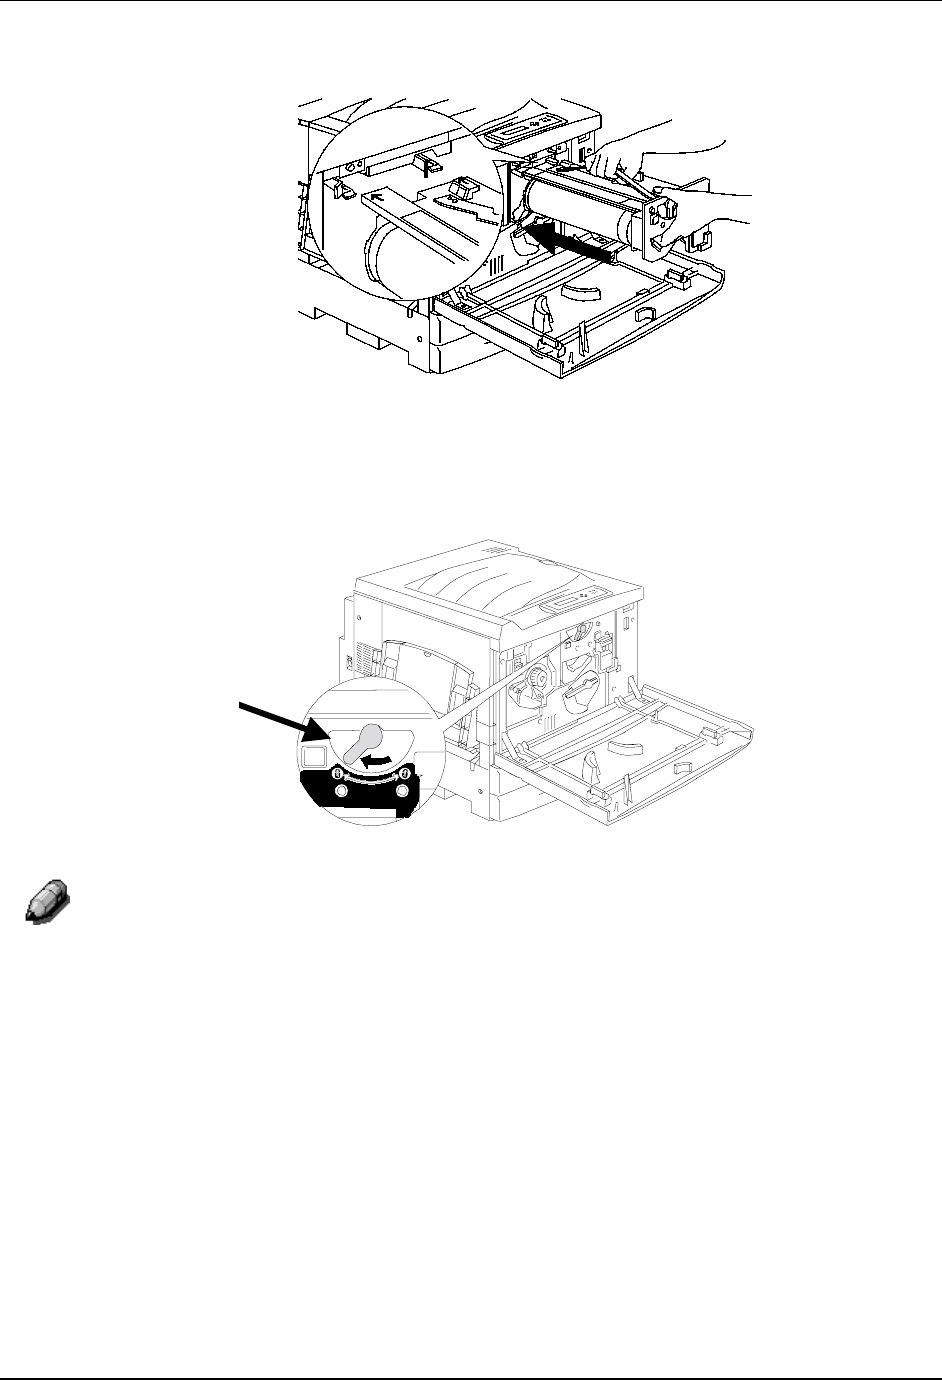
Maintenance Replacing the Print/Copy Cartridge
144
9. Holding the cartridge by the handle, align the guide with the Printer rail.
10. Push the cartridge all the way into the Printer until it snaps into place.
11. Rotate lever B in the direction of the arrow until the dot is aligned with
the Locked symbol.
If lever B will not move to the Locked position, ensure that the cartridge is
inserted all the way into the machine.
B

Replacing the Print/Copy Cartridge Maintenance
145
12. Rotate lever A in the direction of the arrow until the Dot is aligned with
the Locked symbol.

Maintenance Replacing the Print/Copy Cartridge
146
This page is intentionally left blank.
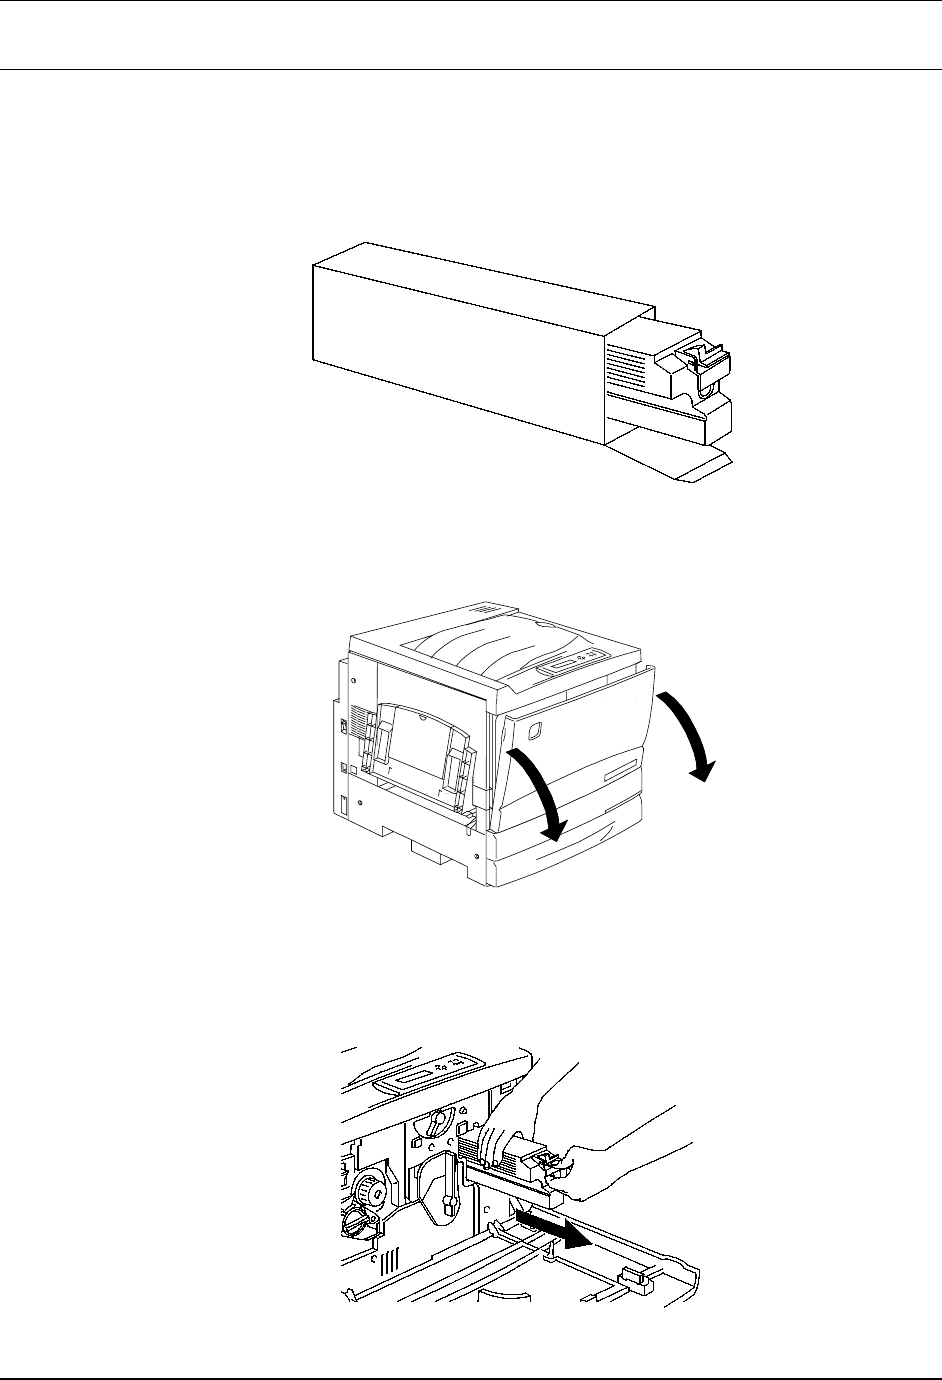
Replacing the Print/Copy Cartridge Maintenance
147
Replacing the Toner Waste Container
Perform this procedure when the message TONER WASTER CONTAINER
FULL is displayed on the Printer Control Panel.
1. Remove a new Toner Waste Container from the box, and save the box.
0301122A-WOL
2. Open the Printer Front Cover.
3. Grasp the Toner Waste Container handle, and pinch and hold the lever
as shown below.
4. Keeping the container level, pull it out of the Printer.
0301123A -WOL
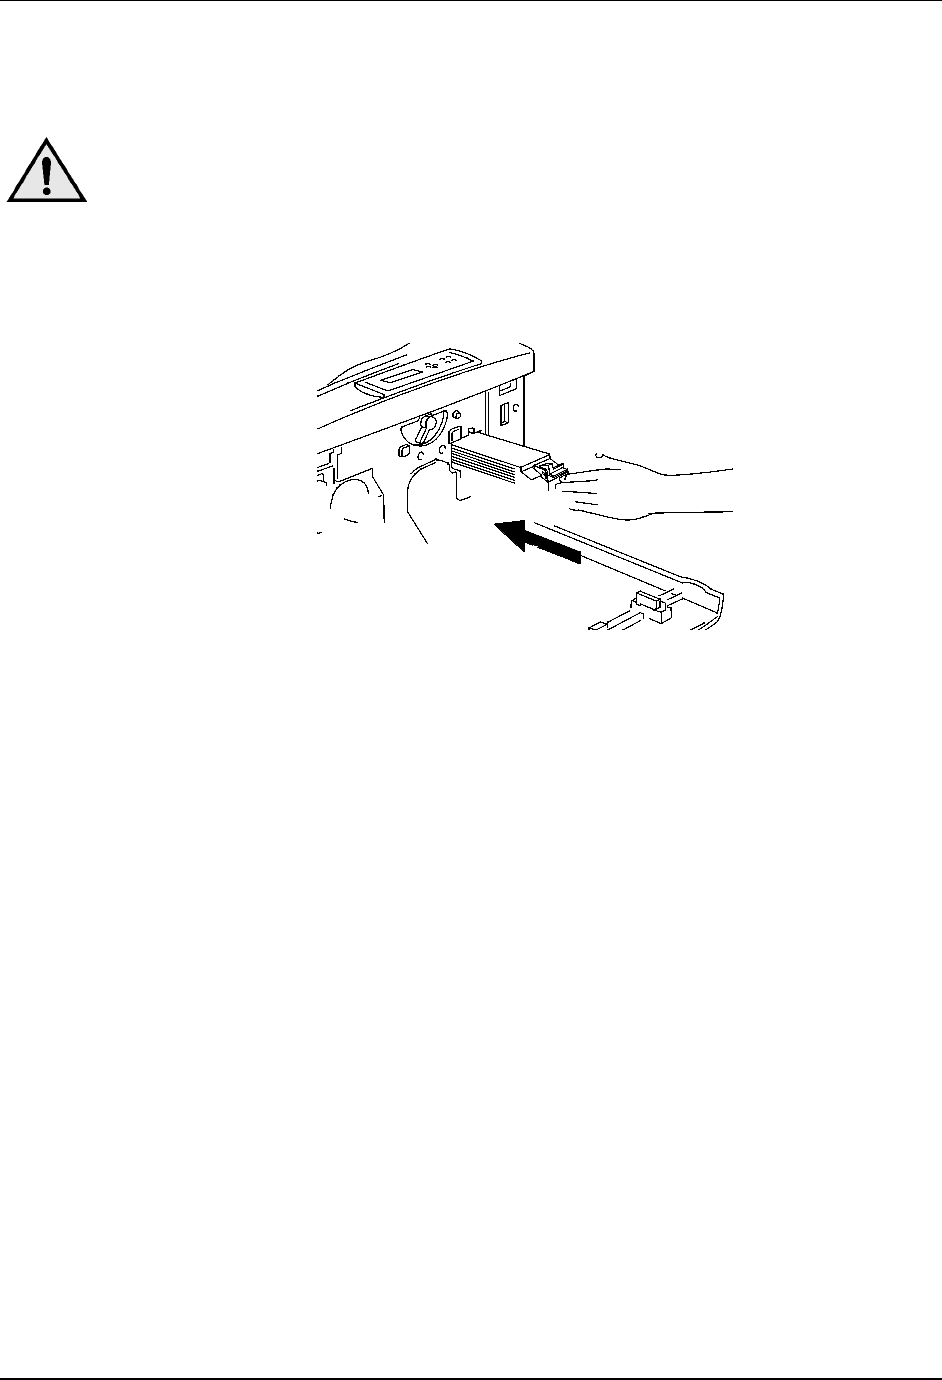
Maintenance Replacing the Print/Copy Cartridge
148
5. Place the used container in the box.
WARNING
DO NOT dispose of used Toner Waste Containers in an open flame. Used
Toner could explode and cause burns.
6. Push the new Toner Waste Container into the Printer until it clicks into
place.

Storing the Supplies Maintenance
149
Storing the Supplies
Toner Cartridges
• Store the Toner Cartridges away from direct sunlight in the following
environment:
• Temperature = 37-95° F (3-35° C)
• Humidity = 15-80% RH, with no condensation
• Avoid hot and humid locations
• Avoid magnetic fields, such as computer screens and disk drives
• Keep out of the reach of children

Maintenance Storing the Supplies
150
Print/Copy Cartridge
Types of Paper
This chart summarizes the characteristics of papers for digital color copying and printing. It is not intended to be an
exclusive guide to ordering paper. Rather, use it to create new ideas for using papers in jobs. Remember, not all
paper in a grade comes in every combination of size, weight, and/or finish.
For more detailed information about papers/materials, see the Color Material Usage Guide on the CD.
Grade and
Basis Size
(inches)
Common
Names Features Surfaces Standard Sizes
(inches)
Weight
(lbs)
Weight
(g/m2)
Calliper
(mils)
Name of
Specialty
Materials
Business
Papers
17x22
Bond, Forms,
Ledger,
Laser,
Xerographic,
Writing
Lightweight,
matching
envelopes,
pastels, light
colors, water-
marked
Cockle, Laid,
Linen, Parch-
ment, Ripple,
Wove
8.5x11, 8.5x14,
11x17, 12x18,
17x22, 17x28,
19x24, 18x28,
22x34, rolls
16, 24, 28,
30, 32
60, 75, 90,
105, 120
.002–.006 Color Xpressions
Eastern
Fox River
International
Paper
Premium
Text 25x38
Text Deckle edged,
textured, wide
range of
colors
Antique,
Embossed,
Felt, Laid,
Linen, Vellum
8.5x11, 8.5x14,
11x17, 12x18,
17.5x22.5, 23x35,
25x38, 26x40, rolls
70, 75, 80,
100
105, 113,
120, 150
.005–.008 Color Xpressions
Mohawk
Uncoated
Book
Papers
25x38
Book, Offset,
Opaque
Easy folding,
wide range of
colors
Antique,
Smooth,
Vellum, Wove
8.5x11, 8.5x14,
11x17, 12x18,
17.5x22.5, 23x29,
23x35, 25x38,
35x45, 38x50, rolls
30, 35, 40,
45, 50, 60,
70, 80
44, 52, 59,
67, 75, 90,
105, 120
.003–.006 Boise Cascade
Color Xpressions
Finch
Weyerhauser
Coated
Book
Papers
25x38
Coated,
Offset, Dull,
Enamel,
Gloss, Matte,
Slick
Good ink hold-
out, smooth
surfaces,
usually white
only
Cast, Dull,
Embossed,
Gloss, Matte
8.5x11, 8.5x14,
11x17, 12x18,
19x25, 23x29,
23x35, 25x38,
35x45, 38x50,
rolls
Sheets; 60,
70, 80, 100
Rolls; 40,
45, 50, 60,
70, 80, 100
Sheets; 90,
105, 120,
180
Rolls; 59, 67,
75, 90, 105,
120, 180
.003–.007 Champion
Color Xpressions
Scheufelen
Stora Enzo
Warsaw
Cover
20x26
C1S, C2S,
Cast coat,
Cover, Text,
Cover
Durable, stiff,
strong
Uncoated:
Antique,
Embossed,
Felt, Laid,
Linen, Smooth,
Vellum, Wove
Coated: Cast,
Dull,
Embossed,
Gloss, Matte
8.5x11, 8.5x14,
11x17, 12x18,
20x26, 23x35,
25x38, 26x40
50, 60, 65,
70, 80, 100
8pt, 10pt
135, 160,
175, 180,
190, 215,
220, 270
.006–.015 Champion
Color Xpressions
Mohawk
Index
25.5x30.5
Board, Bristol Stiff, strong,
thick
Antique,
Smooth,
Vellum, Wove
8.5x11, 22x28,
22.5x28.5, 23x29,
23x35, 24x36,
25.5x30.5, 28x44
90, 110,
125, 140,
170
160, 200,
225, 250,
310
.006–.050 International
Paper
Warsaw
Xerox
The Name of Paper manufacturers listed above are not recommendations, they just represent a few
examples of different paper manufacturers who sell paper that are available for use on this unit.
151
Types of Paper
This chart summarizes the characteristics of specialty materials for digital color copying and printing. It is not
intended to be an exclusive guide to ordering these materials. Rather, use it to create new ideas for using specialty
m
For more detailed information about papers/materials, see the Color Material Usage Guide on the CD.
aterials in jobs. Remember, not all materials come in every combination of size, weight, and/or finish.
Specialty
Materials Features Surfaces Standard Sizes
(inches)
Weight
(lbs)
Weight
(g/m2)
Calliper
(mils)
Name of
Specialty
Materials
Transparency Specially
coated for
crisp color
projection,
heat stabilized
Special coating
layers on a
plastic
substrate
––8.5x11 0.004
Pressure
Sensitive Label
Variety of con-
figurations
Uncoated,
Coated, (Gloss,
Matt, etc.)
––8.5x11 Varies Brown Bridge
Color Xpressions
Fasson
Transfer Paper Lasts longer,
image stands
up to more
washings
Specially
coated for easy
image transfer
and improved
productivity
– – .003–.007
Synthetic Films Durable, tear-
proof, water
resistant
Smooth,
textured
––
8.5x11, 11x17
8.5x11, 11x17 0.003 –
0.010
Newsprint Inexpensive,
lightweight
Vellum Rolls, 8.5x11,
11x17, 12x18,
13x19, 22x28,
24x36
32, 40, 50,
60, 70, 80,
90, 100,
125, 150
52, 65, 81,
105, 114,
130, 146,
163, 203,
244
.003–.007 –
Xerox NeverTear
Paper
Xerox Transfer
Paper
Color Xpressions
Color Xpressions
Presentation
Folder
Easy to
assemble,
on-demand
presentation
Bright, white
folders for
sharp images
–9x11 200 0.007
The Name of Paper manufacturers listed above are not recommendations, they just represent a few
examples of different paper manufacturers who sell paper that are available for use on this unit.
152

Digital Color Imaging System
Model No.
DP-C106
Operating Instructions
Before operating this machine, please read
these instructions completely and keep these
operating instructions for future reference.
Options
DA-TL28C/TL26C/RM64C/RM128C/DU26C/SM112C/S27C
WARRANTY
U.S.A. only
For Service Call:
Panasonic Document Imaging Company
A Business Unit of Matsushita Electric Corporation of America
Two Panasonic Way
Secaucus, New Jersey 07094
DZSD001526 S0701
July 2001
Printed in Japan
Panasonic Canada Inc.
5770 Ambler Drive
Mississauga, Ontario L4W 2T3
PANASONIC DOCUMENT IMAGING COMPANY MAKES NO WARRANTIES, GUARANTEES OR
REPRESENTATIONS, EXPRESSED OR IMPLIED, TO CUSTOMER WITH RESPECT TO THIS
PANASONIC MACHINE, INCLUDING BUT NOT LIMITED TO, ANY IMPLIED WARRANTY OF
MERCHANTABILITY OR FITNESS FOR A PARTICULAR PURPOSE.
PANASONIC DOCUMENT IMAGING COMPANY ASSUMES NO RISK AND SHALL NOT BE SUBJECT
TO LIABILITY FOR ANY DAMAGE, INCLUDING, BUT NOT LIMITED TO DIRECT, INDIRECT, SPECIAL,
INCIDENTAL OR CONSEQUENTIAL DAMAGES OR LOSS OF PROFITS SUSTAINED BY THE
CUSTOMER IN CONNECTION WITH THE USE OR APPLICATION OF THIS PANASONIC MACHINE.
SEE YOUR DEALER FOR DETAILS OF DEALER’S WARRANTY.
DP-C106
Operating Instructions
English
