Panasonic Arbitrator 360 Operating Instructions AG CPD20P
2015-05-18
: Panasonic Panasonic-Arbitrator-360-Operating-Instructions-731246 panasonic-arbitrator-360-operating-instructions-731246 panasonic pdf
Open the PDF directly: View PDF ![]() .
.
Page Count: 135 [warning: Documents this large are best viewed by clicking the View PDF Link!]
- Cover
- Contents
- About This Manual
- Features
- Control Reference Guide of the Remote Control Panel
- On Recording
- Starting Recording
- Stopping Recording
- Write-protect switch
- Pre-recording and post-recording
- Selecting the video source to record
- Audio sources when recording
- Power-on recording
- Loop recording
- Intermittent recording
- Changes in intermittent recording status
- Location and name of recording files
- Recording Error Warnings
- About the Trigger Signals
- License Plate Recognition (LPR) Mode
- Setup
- Text Files Used with the Recorder
- Basic Menu Operations
- Setting up/Deleting Officer Data
- Viewing Live Video
- Selecting pictures
- Zooming
- Making a backlit image easier to view
- Making a dark image easier to view
- Adjusting speaker volume
- Muting Audio 2 input sound
- Adjusting brightness of the LCD panel
- Turning off the LCD panel
- Adjusting image focus
- Adjusting image brightness
- Setting LPR mode
- Setting shutter speed (in LPR mode)
- Setting camera zoom (in LPR mode)
- Setting shutter speed (in PATROL mode)
- Setting camera zoom (in PATROL mode)
- Checking audio
- Adjusting the image enhancement
- Setting the output video
- Viewing the status of the recorder (Overlay OSD)
- Disconnecting the recorder from a Front-End application
- Recording
- Playback
- Displaying Product Information
- Transferring Files
- Restoring Files Automatically
- Rebooting This Unit
- Administrator Setup
- Menu List
- When the [MENU] button is pressed while recording is being stopped in the live screen
- When the [MENU] button is pressed in the playback screen
- When the [MENU] button is pressed while the live screen is being recorded
- When the [MENU] button is pressed in the Administrator setup screen
- When the [MENU] button is pressed in the Archive screen
- When the [MENU] button is pressed when recording is being stopped in the live screen while the Front-End application is running or streaming is performed on the Back-End application via the Front-End application
- When the [MENU] button is pressed when recording is performed in the live screen while the Front-End application is running
- When the [MENU] button is pressed when recording is being stopped in the live screen while streaming is performed on the Back-End application
- Indicator Lamps and Recorder Status
- Troubleshooting
- Error Message
- Camera Connection and Combination of Cameras
- Status Display
- Service Log
- Software License Agreement
Operating Instructions
Section 2 : Operation
M1009HT1129 -PB
ENGLISH
VQT2C59-1
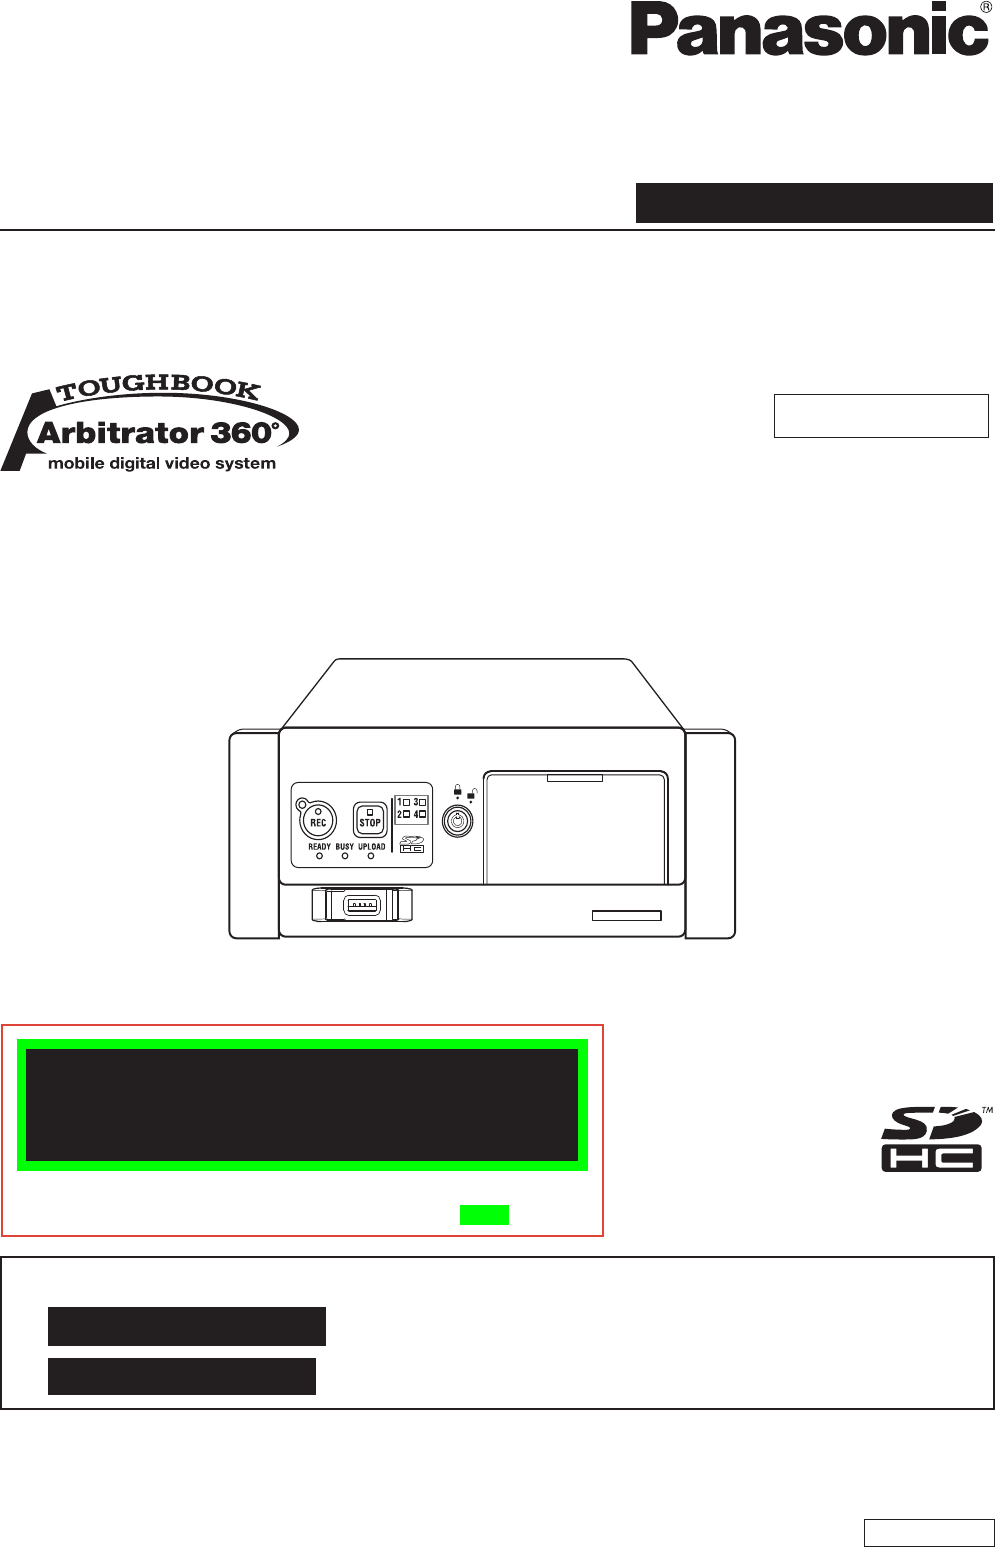
Memory Card Video Recorder
Model No. AG-CPD20P
Car Use only
Before operating this product, please read the instructions carefully and save this manual for
future use.
Manuals for this recorder are prepared in two parts:
Section 1 : Before Use (Control Reference Guide, Connections, etc.) (Paper)
Section 2 : Operation (This manual)
Playback with the remote control panel is not available at present.
Upgrading is scheduled for the future.
For playback, it is recommended to use the Front-End application
or Back-End Client application.
In this manual, each explanation for playback with the remote
control panel is enclosed in a colored frame, like .

2
3
About This Manual ...................................4
Features ....................................................5
Control Reference Guide of the Remote
Control Panel ...........................................6
On Recording ...........................................8
Starting Recording .........................................................8
Stopping Recording .......................................................9
Write-protect switch .....................................................10
Pre-recording and post-recording ................................10
Selecting the video source to record ...........................11
Audio sources when recording ....................................12
Power-on recording .....................................................12
Loop recording .............................................................12
Intermittent recording ...................................................13
Changes in intermittent recording status .....................14
Location and name of recording files ...........................15
Recording Error Warnings ...........................................16
About the Trigger Signals .....................17
License Plate Recognition (LPR) Mode
...18
Setup .......................................................19
Items officers can set ...................................................19
Items administrators can set ........................................20
Text Files Used with the Recorder ....... 29
File Types.....................................................................29
Saving Location and File Naming ................................29
File Specifications ........................................................30
Sample Files ................................................................31
Basic Menu Operations .........................34
Setting up/Deleting Officer Data ...........36
AUTO mode .................................................................36
MANUAL mode ............................................................37
LIST mode ...................................................................38
Setting the Source data ...............................................39
Setting the Area data ...................................................40
Setting the Shift data ...................................................41
Setting the Work Time data..........................................42
Deleting entered data ..................................................43
Viewing Live Video ................................44
Selecting pictures ........................................................44
Zooming .......................................................................44
Making a backlit image easier to view .........................44
Making a dark image easier to view ............................44
Adjusting speaker volume ............................................45
Muting Audio 2 input sound .........................................45
Adjusting brightness of the LCD panel ........................45
Turning off the LCD panel ............................................45
Adjusting image focus
....................................................... 46
Adjusting image brightness ..........................................47
Setting LPR mode ........................................................48
Setting shutter speed (in LPR mode) ...........................49
Setting camera zoom (in LPR mode) ...........................50
Setting shutter speed (in PATROL mode) ....................51
Setting camera zoom (in PATROL mode) ....................51
Checking audio ............................................................52
Adjusting the image enhancement ..............................53
Setting the output video ...............................................54
Viewing the status of the recorder (Overlay OSD) .......55
Disconnecting the recorder from a Front-End
application ....................................................................58
Recording ...............................................59
Starting and stopping recording ...................................59
A trial shoot ..................................................................60
Setting the target speed ...............................................61
To turn off the [REC] lamp during recording.................62
Playback ................................................. 63
Playback ......................................................................63
Changing playback method .........................................64
Setting bookmarks .......................................................66
Selecting a file for playback .................................................. 67
Turning Playback sound ON and OFF .............................68
Viewing the status of the recorder (Overlay OSD) .......69
Displaying Product Information ........... 71
Viewing SDHC Memory Card type and software
version .........................................................................71
Viewing error log data ..................................................72
Transferring Files ...................................73
Exporting files ..............................................................73
Uploading files .............................................................74
Restoring Files Automatically ..............75
Rebooting This Unit ...............................76
Contents
Playback with the remote control panel is not available
at present. Upgrading is scheduled for the future.
For playback, it is recommended to use the Front-End
application or Back-End Client application.

2
3
Figures in this manual
Figures for the main unit and display on the menu screen
may differ from the actual product.
Playback with the remote control panel is not available
at present. Upgrading is scheduled for the future.
For playback, it is recommended to use the Front-End
application or Back-End Client application.
Contents (continued)
Administrator Setup .............................. 77
Logging in the Setup/Admin screen .............................77
Audio Allocation ...........................................................78
Video Allocation ...........................................................79
Rec/Play ......................................................................81
Date/Time ....................................................................84
Registration ..................................................................85
Trigger ..........................................................................86
Embedded OSD ...........................................................87
Camera1 ......................................................................88
Management Mode ......................................................89
Radar/GPS ..................................................................90
File Management .........................................................91
Network ........................................................................92
Service .........................................................................94
Menu List ................................................97
When the [MENU] button is pressed while recording is
being stopped in the live screen ..................................97
When the [MENU] button is pressed in the playback
screen ........................................................................100
When the [MENU] button is pressed while the live
screen is being recorded ...........................................101
When the [MENU] button is pressed in the
Administrator setup screen ........................................102
When the [MENU] button is pressed in the Archive
screen ........................................................................103
When the [MENU] button is pressed when recording
is being stopped in the live screen while the Front-End
application is running or streaming is performed on the
Back-End application via the Front-End application
...104
When the [MENU] button is pressed when recording
is performed in the live screen while the Front-End
application is running .................................................105
When the [MENU] button is pressed when recording
is being stopped in the live screen while streaming is
performed on the Back-End application .....................106
Indicator Lamps and Recorder Status
... 107
Lamp Indication on the Memory Card Recorder ........107
Lamp Indication on the Memory Card Recorder or the
Remote Control Panel ...............................................108
Troubleshooting ...................................109
Error Message ...................................... 111
Camera Connection and Combination
of Cameras ........................................... 117
Status Display ...................................... 118
Service Log .......................................... 119
Contents ....................................................................119
Format .......................................................................122
Software License Agreement ..............123
Software License Agreement <GPL> ........................123
Software License Agreement <LGPL> ......................125
Software License Agreement <OpenSSL License> ...127
Software License Agreement <Blowfish License> .....127
Software License Agreement <DES License> ...........127
Software License Agreement <X.Org License> .........128
Software License Agreement
<Ralink firmware License> ........................................133
4
5
About This Manual
Manuals for this recorder are prepared in two parts:
“Section 1: Before Use” (Paper) and “Section 2: Operation”
(This manual).
This manual describes the operation of the recorder using
the remote control panel (sold separately).
Section 1: Before Use (Control Reference Guide,
Connections, etc.) (Paper)
Section 2: Operation (This manual)
Definition of terms
Officer :Anybody using the Remote Control Panel.
Administrator :A user with administration privileges to
collect and manage Memory Card Video Recorder
data.
Operations available to officers
The sections other than “Administrator Setup” describe
the operations available to officers with the remote control
panel (sold separately).
“Administrator Setup”
These sections describe operations available only
to administrators with the remote control panel (sold
separately).
Major contents
How to change the factory defaults as required by the
operating environment.
How to collect and keep the recorded data.
“Menu List”
This section lists the functions provided by the operation
menu displayed on the LCD panel of the Remote Control
Panel (sold separately).
•
•
Organization of the “Operation Using the
Remote Control Panel (sold separately)”
sections
This manual uses the following symbols to distinguish
between operations that involve button operations and
those that use LCD panel menus.
Example)
Button operations of the Remote Control Panel are
indicated as follows :
Selecting pictures
While menu operations are indicated as follows :
Adjusting image brightness
4
5
Features
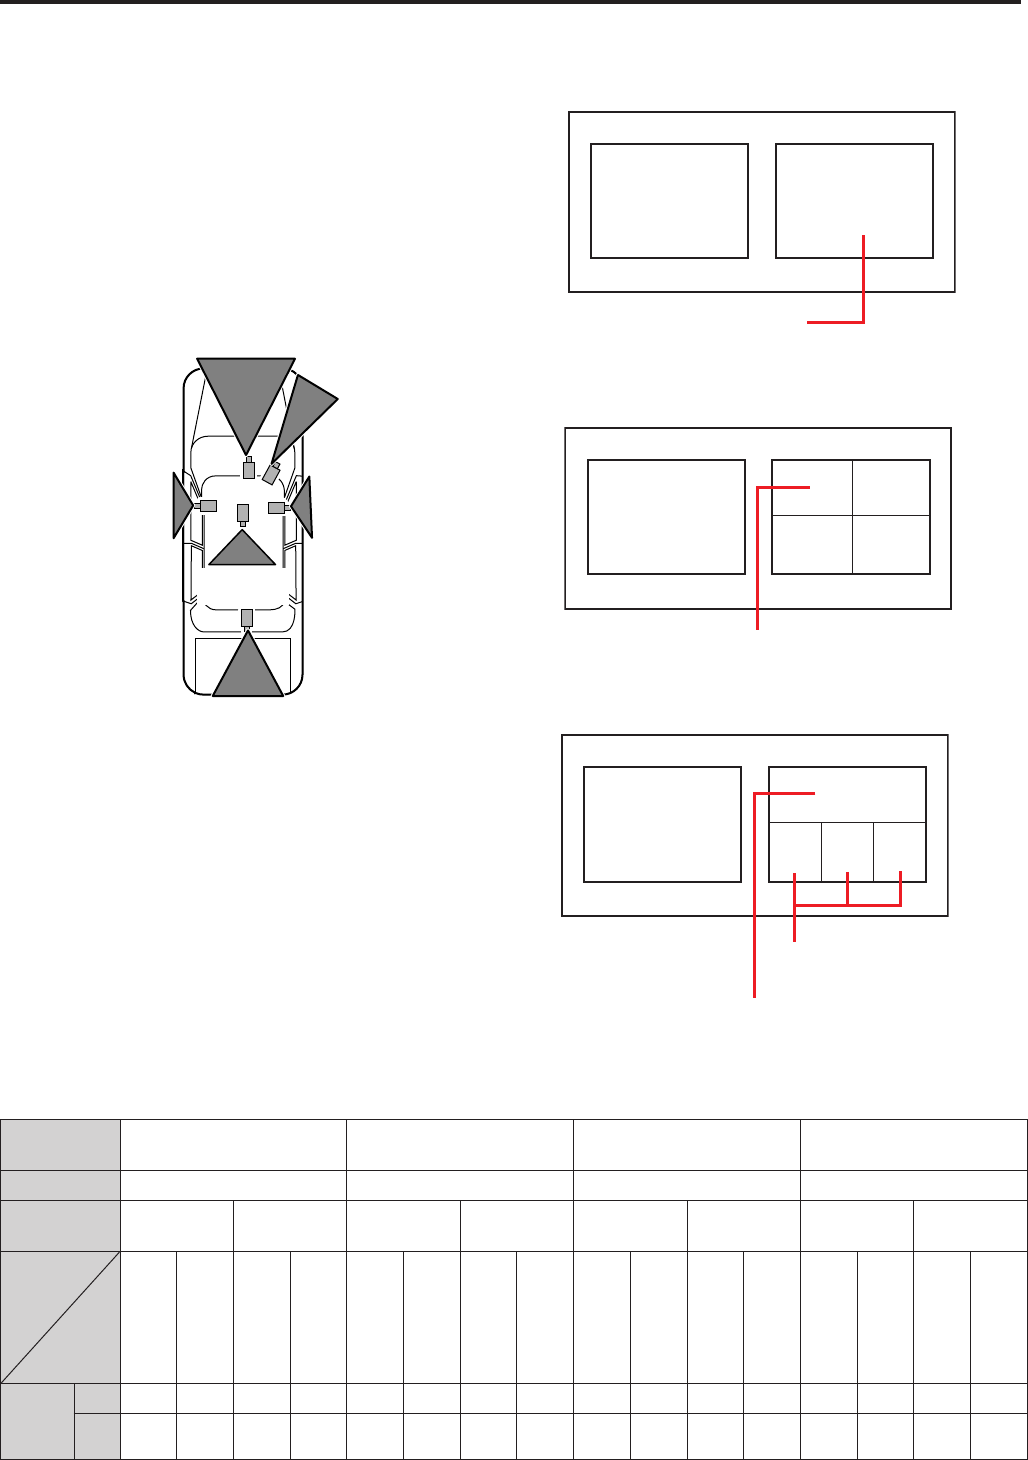
Multi-picture display and record
The memory card recorder allows to six cameras to be
connected at a time. Pictures captured by these cameras are
displayed on a Main and/or Sub windows and are recorded.
Main window: A picture of a camera selected from
among CAMERA 1, 2, and 3
Sub window: A picture selected from among CAMERA
1, 2, and 3, and pictures from CAMERA 4, 5, and 6 in
QUAD or PANORAMA pattern.
Example: connection of six cameras
Front
(CAMERA 1) LPR
(CAMERA 3)
R
(CAMERA 5)
L
(CAMERA 4)
Back
(CAMERA 6)
R-Seat
(CAMERA 2)
CAMERA
6
CAMERA
4
CAMERA
5
Main window
Sub window
(four pictures, QUAD)
Selected from among CAMERA 1, 2, and 3
Record
mode
D1 HI
(High quality mode)
D1 STD
(Standard quality mode)
CIF
(Low quality mode)
D1 10
(10 frames/second)
Resolution 720 x 480 720 x 480 352 x 240 720 x 480
Frame rate
[fps] 30 1 30 1 30 1 10 1
Main
window
only/
Sub
window
only
Main
window
+ Sub
window
Main
window
only/
Sub
window
only
Main
window
+ Sub
window
Main
window
only/
Sub
window
only
Main
window
+ Sub
window
Main
window
only/
Sub
window
only
Main
window
+ Sub
window
Main
window
only/
Sub
window
only
Main
window
+ Sub
window
Main
window
only/
Sub
window
only
Main
window
+ Sub
window
Main
window
only/
Sub
window
only
Main
window
+ Sub
window
Main
window
only/
Sub
window
only
Main
window
+ Sub
window
32 GB
1
approx.
32h
approx.
16h
approx.174h approx.
87h
approx.
48h
approx.
24h
approx.
232
h
approx.
116
h
approx.
96
h
approx.
48
h
approx.
648
h
approx.
324
h
approx.
64
h
approx.
32
h
approx.
416
h
approx.
208
h
4
approx.
128
h
approx.
64
h
approx.696h approx.348
h
approx.192
h
approx.96
h
approx.928
h
approx.464
h
approx.384
h
approx.192
h
approx.2592happrox.
1296
h
approx.
256
h
approx.
128
h
approx.
1664
h
approx.832
h
SDHC
Memory
Card
capacity
Number to
be used
CAMERA
4
CAMERA
6
CAMERA
5
Main window
Sub window
(four pictures, PANORAMA)
Selected from among CAMERA 2, and 3
(Upper and lower parts of a picture is cut by 1/6)
Pictures from three cameras are
reduced to 1/9.
Main window Sub window (one picture)
Selected from among CAMERA
2, and 3
Camera setup
Record time in each record mode

6
7
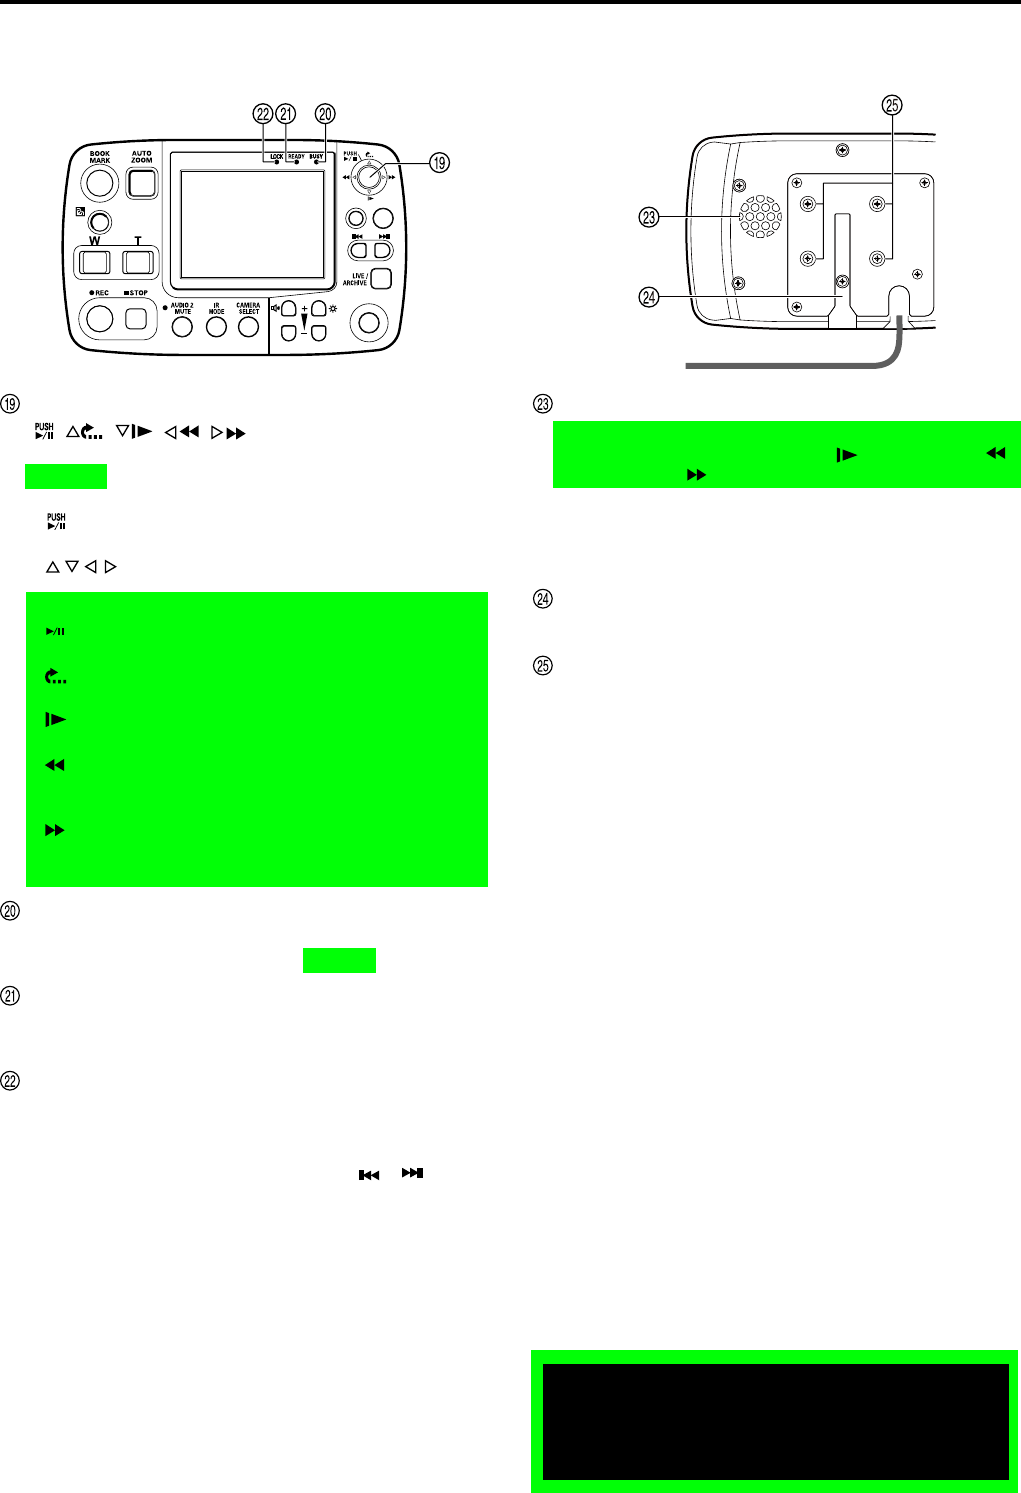
Control Reference Guide of the Remote Control Panel
LCD panel
Shows images and operation menus.
AUTO ZOOM button*1, *2
Provides automatic control of zoom-in, pause and zoom-
out operation.
The officer can set zoom ratio and pause time.
BOOK MARK button *2
Press during recording or playback to enter bookmarks.
A set bookmark displays an icon on the display for 1
to 2 seconds when pressed.
Backlight compensation button ( )*1, *2
Press to compensate for strong backlighting. This button
toggles between ON and OFF at each press.
Zoom buttons*1, *2
Use these buttons to zoom out (W-button) and zoom in
(T-button).
REC lamp
Lights or flashes during recording.
REC button *2
Press to start recording video and sound to SDHC
Memory Cards.
STOP button ( ) *2
Stops recording.
AUDIO 2 MUTE button/lamp
Starts/releases recording for Audio2. Pressing this button
turns the lamp on/off. While the lamp is lit, Audio2 is not
being recorded.
If “Audio2” on the Audio Allocation screen is set to OFF,
the button operation is disabled.
IR MODE button*1
Switches the IR mode to one of the following modes.
AUTO :
Automatically changes IR mode depending on
ambient brightness.
ON : Turns on the IR mode.
OFF : Turns off the IR mode.
Front panel
R E T U R N
M E N U
C O N T R O L P A N E L
O N /
O F F
CAMERA SELECT button
Each press of the button toggles the displayed picture
between Main and Sub.
If you hold the button pressed for more than two
seconds, the preset mode set on the Video Allocation
screen in Administrator setup (see page 79) (Preset1,
Preset2, or Preset3) is switched.
Note:
When you switch the preset mode, noise may occur in video.
Volume control buttons ( )
Adjusts speaker sound volume of the Remote Control
Panel.
Brightness buttons ( )
Adjusts LCD panel brightness.
CONTROL PANEL ON/OFF button
Turns on and off the LCD panel, lamp indications and
buttons when the Memory Card Video Recorder is on.
It cannot turn on or off the Memory Card Video Recorder
or Remote Control Panel.
LIVE/ARCHIVE button
Switches between the live and playback screen. Press
this button to open the Live screen when the “Information”
screen, “Archive” screen, Officer setup top screen or
Setup/Admin top screen is displayed.
Skip back button ( )
Press to return playback to the previous skip location.
Skip forward button ( )
Press to move playback to the next skip location.
RETURN button
Returns to the previous menu or screen.
MENU button
Opens menus on the LCD panel.
*1 Commercially available cameras connected to the [CAMERA 2],
[3], [4], [5] and [6] connectors cannot be controlled.
*2 The lamp turns on when the [CONTROL PANEL ON/OFF] button
is set to ON.
Playback with the remote control panel is not available
at present. Upgrading is scheduled for the future.
For playback, it is recommended to use the Front-End
application or Back-End Client application.
6
7
Control Reference Guide of the Remote Control Panel (continued)
Cursor buttons
( , , , , )
Use these buttons to manipulate menus and control
playback.
• During menu operation
[ ] : Press the center position of the button to confirm
an entry.
[ , , , ] : Press to move the cursor or change a set
value.
• During playback
[ ]: Press the center position of the button to toggle
between playback and pause.
[ ]: Press to return to a playback position that is 7
seconds earlier.
[ ]: Engages slow playback. Each press changes
playback speed between 1/10 and 1/2.
[ ]: Press to rewind.
Each press changes the rewind speed from x4 to
x20 and x200.
[ ]: Press to fast forward.
Each press changes the fast forward speed from
x4 to x20 and x200.
BUSY lamp
Lights or blinks when accessing an SDHC Memory Card
(for example during recording and playback).
READY lamp
Lights, flashes or goes off to indicate whether or not an
SDHC Memory Card can be recorded.
LOCK lamp
When lit:
Indicates that the [W], [T], [AUTO ZOOM],
[BACKLIGHT], [CAMERA SELECT], [IR MODE],
[AUDIO 2 MUTE], [LIVE/ARCHIVE], [ ], [ ], and
[BOOKMARK] buttons are locked.
When blinking:
Indicates that the license plate recognition mode is
running.
For details, see “License Plate Recognition (LPR)
Mode” on page 18.
Speaker
In playback screen mode:
Outputs audio. However, during [ ] slow playback, [ ]
rewind, and [ ] fast forward, audio is not output.
In Live screen mode:
The audio sound track is not normally available. For
how to monitor the audio, refer to “Checking audio”
on page 52.
Anchoring groove
Provides attachment for a commercially available stand.
Securing screw holes
Use the supplied screws to attach a commercially avail-
able mounting bracket.
R E T U R N
M E N U
C O N T R O L P A N E L
O N /
O F F
Front panel Rear panel
Playback with the remote control panel is not available
at present. Upgrading is scheduled for the future.
For playback, it is recommended to use the Front-End
application or Back-End Client application.

8
9
On Recording
Starting Recording
Recording Start Methods
Press the [REC] button (the REC buttons on the
recorder, Color Camera, Remote Control Panel, and
Front-End application all operate the same way).
Apply a recording trigger.
When power-on recording is enabled, recording starts
when the recorder is turned on.
The prerecord function (see “Pre-recording and
post-recording” on page 10) records video for a pre-specified
period prior to a recording-start trigger event (or pressing the
[REC] button). The amount of the prerecord time is set on
the Rec/Play screen (see “Rec/Play” on page 81). An audio
prerecord time, as well as an audio postrecord time, can
be set independently, although it cannot be longer than the
specified video prerecord/postrecord time. You can use this
function to prerecord video without audio.
Recording Triggers
The following types of recording triggers are available.
When [Action] set for detection of trigger signals (GPI1-16)
is “REC”, “P1REC”, “P2REC”, or “P3REC” and the trigger
signal is valid.
Vehicle Speed Signal
Speed data detected by the recorder serves as a recording
trigger when the specified speed is exceeded.
Select from the following detection methods according to
the intended application or installation conditions.
Detection of own vehicle speed:
Uses GPS or a radar gun
Target vehicle speed:
Uses a radar gun
Note:
To use the GPS or radar gun as the recording trigger, check
with your supplier to ensure that connections have been
made correctly, then specify the source device (see “Radar/
GPS” on page 90).
Notes:
If the GPS is enabled, and
the recording trigger is detected
by GPS, if the vehicle is stopped or a speed of 5 MPH or 5
km/h below the set speed is detected, the recording trigger
can be used again.
Recording is allowed only when the [READY] lamp on the
recorder and the Remote Control Panel is lit. If pressing
the [REC] button or applying a recording trigger fails to
start recording, the [REC] lamps on the recorder, Color
Camera and Remote Control Panel blink at a high rate.
The Remote Control Panel, the Color Camera and the
recorder [REC] lamps go on during recording.
Video signals set for Preset1, Preset2, and Preset3 are
recorded (see “Preset1, Preset2, Preset3” on page 80 and
“Trigger” on page 86).
Audio signals input to the [AUDIO IN] [1] to [4] connectors
are recorded, and recording of audio input to the [AUDIO
IN 2] connector can be turned on or off with a trigger
signal (see “Trigger” on page 86).
Recording stops if the SDHC Memory Card slot cover is
opened.
•
•
•
•
•
•
•
•
•
•
•
Recording cannot start unless the SDHC Memory Card
slot cover is closed.
Recording will not start while the user is configuring
administrator settings, even if the level signal satisfies the
recording start conditions. In this case, recording will still
not start when the user quits the administrator settings.
To start recording, the recording start conditions must
be satisfied again after configuration of the administrator
settings is finished.
When multiple recording triggers are enabled, recording
starts when the first recording start criteria are met, and if
a prerecord time has been set, the specified period before
the start event is also recorded.
If Loop recording is not activated, recording will not start
under the following condition even if there is space left on
an SDHC Memory Card.
-
When the number of files recorded on any SDHC Memory
Card inserted in slots 1, 2, 3 or 4 totals over 5,000 files.
•
•
•
•
Playback with the remote control panel is not available
at present. Upgrading is scheduled for the future.
For playback, it is recommended to use the Front-End
application or Back-End Client application.

8 9
On Recording (continued)
Stopping Recording
Setting criteria determines when recording stops. Settings
that affect when recording stops include the stop timer
setting for Rec Continue Time and the presence of the
recording trigger level signal.
The following conditions are handled in the same manner.
When the [STOP] button on the recorder is pressed.
When the [STOP] button on the Remote Control Panel is
pressed.
When the [STOP] button on the Front-End application is
pressed.
When the [REC] button on the Color Camera is kept
pressed for about 2 seconds.
When [Action] for detection of trigger signals (GPI1-16) is
set to “STOP” and the trigger signal has reached an active
edge.
Recording Stop Criteria
Level
Signal
Stop
Timer
Setting
Criteria to Stop Recording
(whichever happened earlier)
No No
[STOP] button is pressed.
Yes
[STOP] button is pressed or the time
set for the stop timer of the edge trigger
recording is reached.
Yes No
[STOP] button is pressed or the level
signal changes to an invalid level.
Yes
[STOP] button is pressed, the level
signal changes to an invalid level, or the
signal whose level is specied is invalid
and the stop timer setting for the edge
trigger recording is reached.
The post-recording function continues to record video after
the recording stop trigger event. The amount of time to
continue recording after the stop-recording event can be set
from the Remote Control Panel.
Recording stops also under the following
conditions.
There is no more space left on the SDHC Memory Card.
When an administrator setup is started.
When an error is detected on an SDHC Memory Card and
recording is no longer possible.
When the number of files recorded on an SDHC Memory
Card exceeds 5,000 files.
When the memory card slot cover opens.
When the recorder is turned off.
Notes:
Continuous video and audio from starting to stopping
recording, and including pre-recording and post-recording
periods, are recorded as one file on the SDHC Memory
Card.
If recording time exceeds 4 hours, or if the size of one
file would exceed 4 GB, the file is automatically split into
multiple files during recording.
Once recording starts, it may not be possible to stop it
during the first five seconds (approx.). Pressing the [STOP]
button during this period causes the [REC] lamp to blink
for about one second as recording continues.
•
•
•
•
•
•
•
•
•
•
•
•
•
•
Pressing the [STOP] button when recording is already
stopped also causes the [REC] lamp to blink for about one
second.
When recording is stopped by the stop timer at the end
of the Rec Continue Time, the post-recording function is
disabled.
After recording is started by a level trigger signal, it
continues for at least one minute regardless of changes
to the signal level. During this period, you can press the
[STOP] button to interrupt the recording.
If the [REC] button was pressed multiple times and the
recording trigger set as the edge signal had multiple active
edges, Rec Continue Time is applied to the last button
press and active edge.
Intermittent recording does not stop due to the Rec
Continue Time.
•
•
•
•
•
10
11
On Recording (continued)
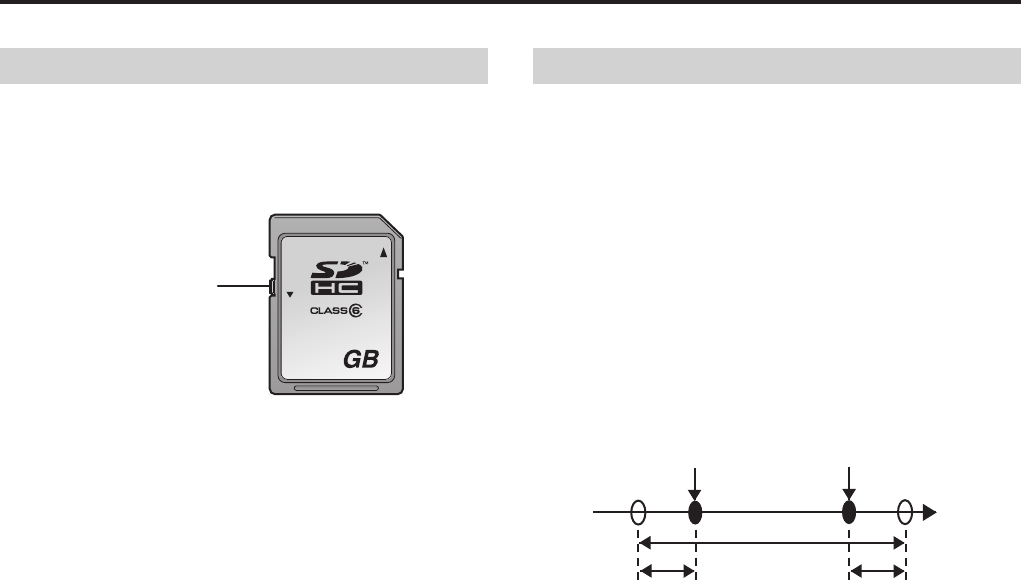
Write-protect switch
The SDHC Memory Card is equipped with a write-protect
switch. Sliding this switch to the LOCK position prevents
writing data, formatting SDHC Memory Cards and deleting
files.
Write-protect switch
32
LOCK
Note:
If the write-protect switch is set to the LOCK position on any
of the SDHC Memory Cards in the four card slots, recording
will not start.
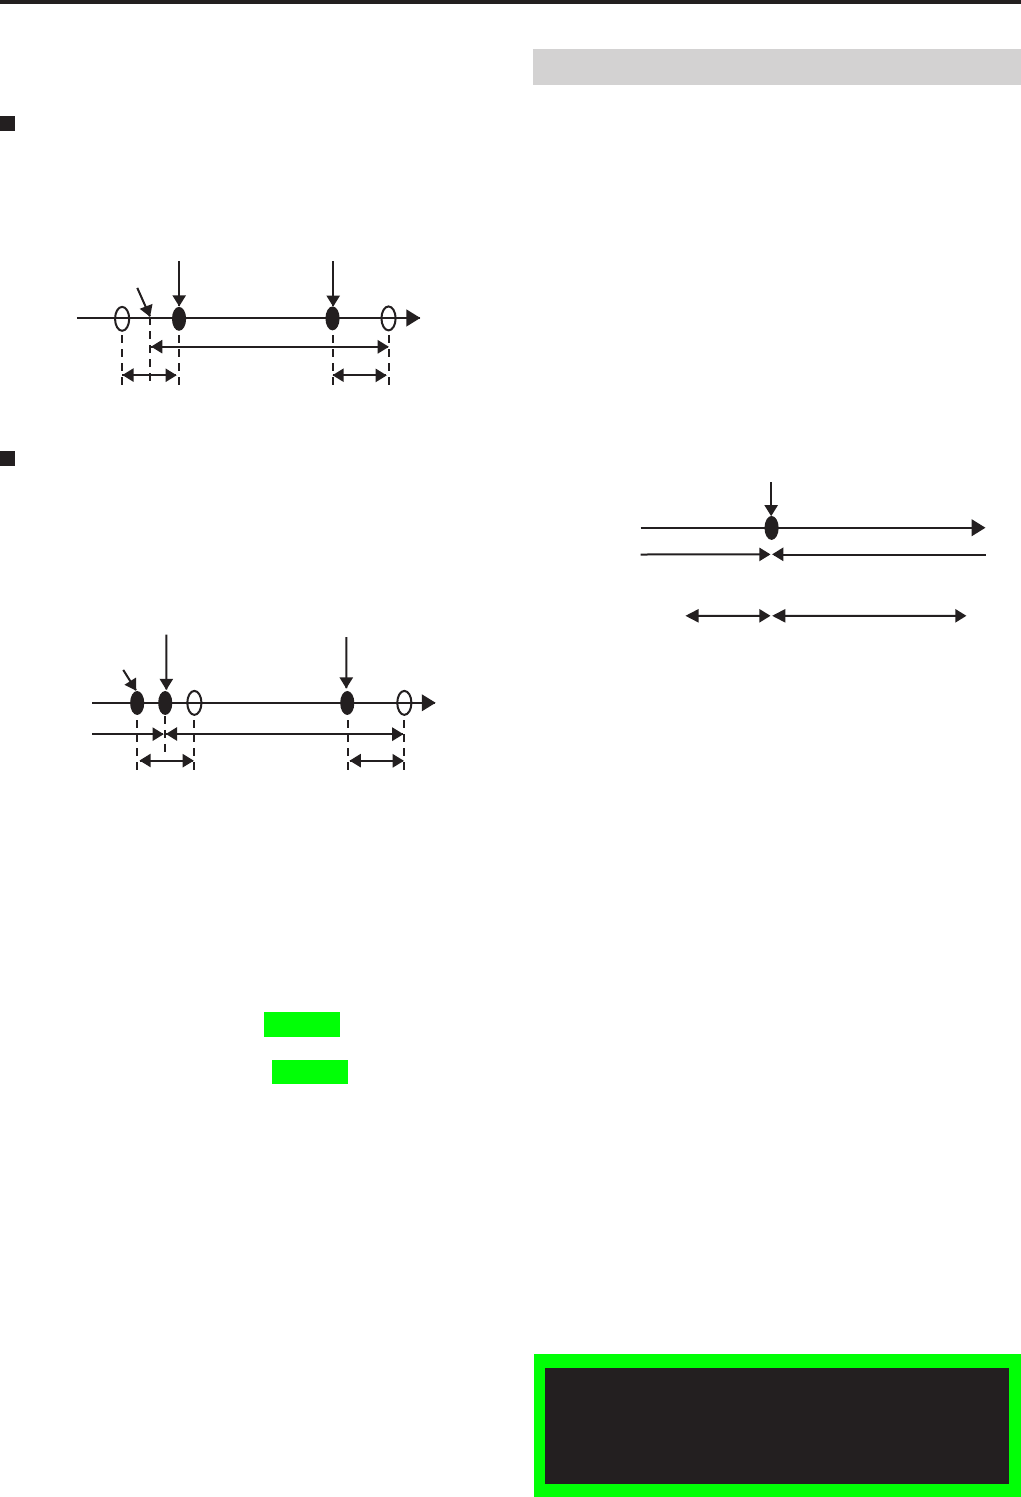
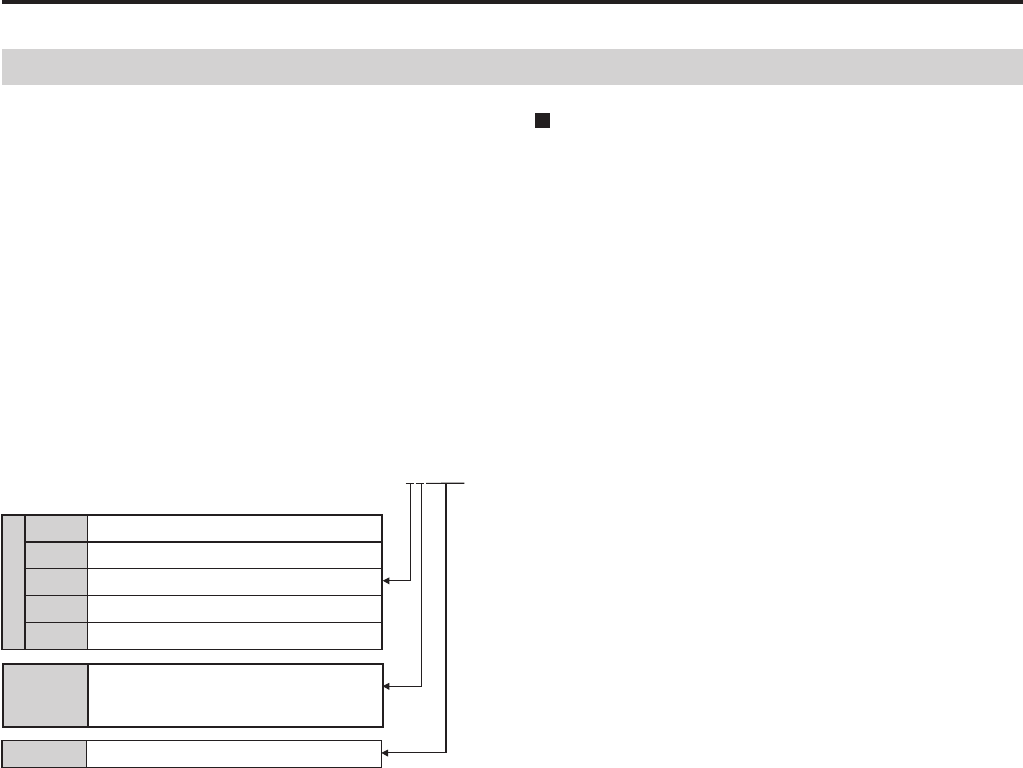
Pre-recording and post-recording
Pre-recording is the capability of including material from
an interval before the specified start point in a recording.
Similarly, post-recording is the capability of including
material from an interval after the specified stop point in a
recording.
Pre-recording and post-recording times can be set for each
recording time.
Audio pre-recording and post-recording times can be set
separately from video, so pre-recording and post-recording
audio may be partly omitted. Because video pre-recording
and post-recording time settings have priority, audio
pre-recording and post-recording times cannot be set longer
than video pre-recording and post-recording times.
[REC] button pressed
(Recording starts)
[STOP] button pressed
(Recording stops)
Actual recording time
Prerecord time Postrecord time
(Time)
Notes:
Pressing the [STOP] button turns off the [REC] lamp and
video and sound recordings stop when the post record
interval has elapsed.
Then the [BUSY] lamp goes off.
If “Loop Rec” is set to ON, pre-recording and post-
recording do not function.
•
•
10
11
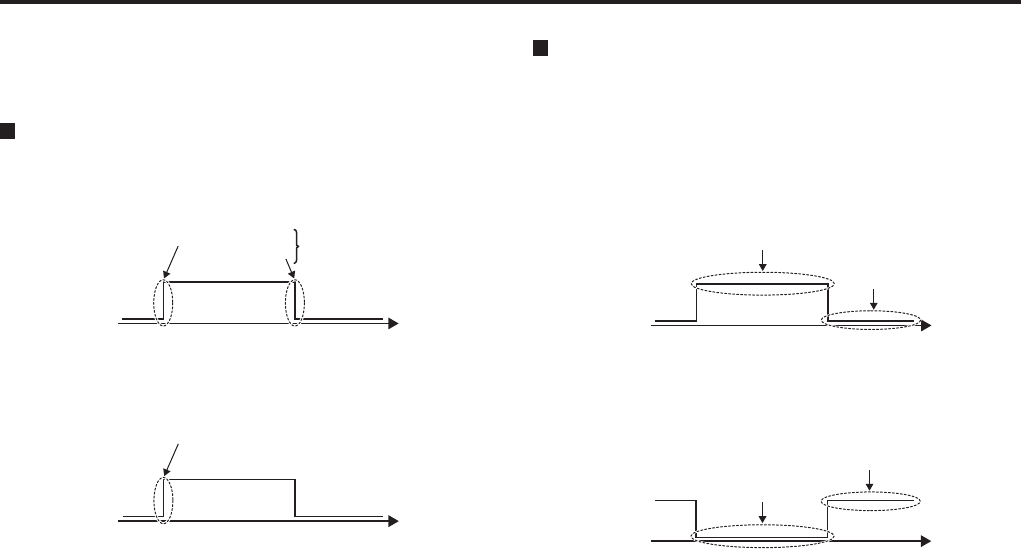
On Recording (continued)
In the cases shown below, the actual prerecord and
postrecord time may be shorter than the respective setting.
If recording is started immediately after system
startup
Prerecord time will be shorter.
[REC] button pressed
(Recording starts)
[STOP] button pressed
(Recording stops)
Actual recording time
Prerecord time Postrecord time
(Time)
Startup completed
If recording is started during postrecord
interval
Post-recording will be terminated and next recording
starts. There is no pre-recording interval for the second
recording.
[STOP] button
pressed
[REC] button pressed
(Post-recording halted and
next recording starts)
[STOP] button
pressed
(Recording stops)
Actual recording time
Prerecord time Postrecord time
(Time)
Notes:
If you press the [REC] button and [STOP] button
alternately in rapid succession, the system may not
separate the two recording sessions, resulting in a single
video file.
If the remaining capacity of the SDHC Memory Card is
low, the prerecord time or postrecord time may become
shorter.
Pre-recording is interrupted by playback, trial shoot
(RecCheck) or administrator setup.
Post-recording is interrupted by playback, trial shoot
(RecCheck), automatic file restoration or administrator
setup.
•
•
•
•
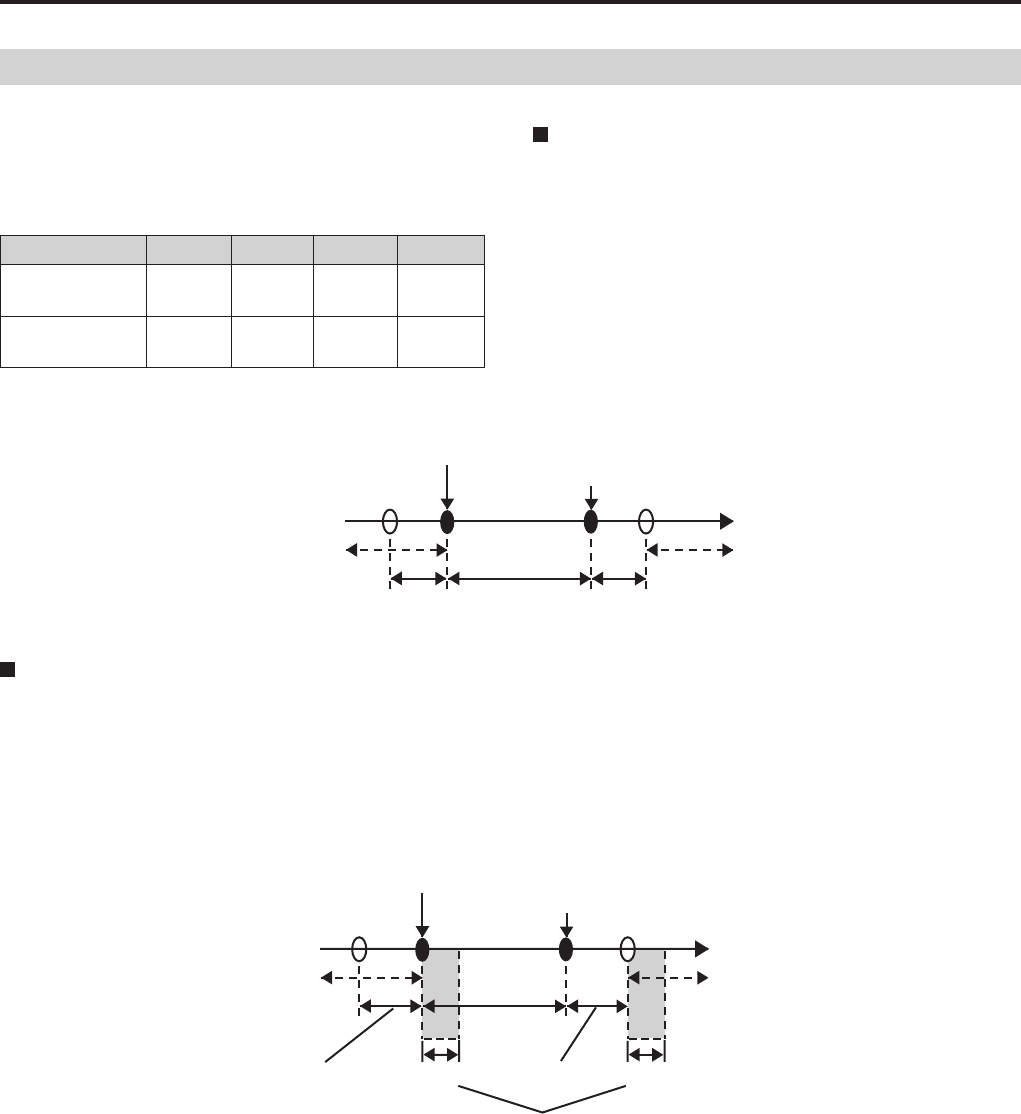
Selecting the video source to record
You can select and record video input at the [CAMERA]
[1], [2], [3], [4], [5], or [6] connector on the rear panel of
the recorder. Also, when the action set for the detection of
trigger signals
(GPI1-16) is “P1REC”, “P2REC” or “P3REC” and the
trigger signal is enabled, the selected video is recorded. If
pre-recording is enabled and the video source is switched
by a recording trigger, the prerecord video is taken from the
source selected before switching, and the video is taken
from the source selected after switching. You can select
whether the video source is switched by the recording trigger
or not, as well as selecting which video is recorded upon
switching.
Example: When video input set for “P2REC” is switched to
that set for “P1REC”
Recording start trigger activation
(Time)
Recording of signal from the
connector set for “P2REC”
Recording of signal from the
connector set for “P1REC”
Pre-recording Recording after
trigger activation
Notes:
When switching video input, the video or audio may be
briefly disrupted.
For best results, minimize the amount of video source
switching while recording.
•
•
Playback with the remote control panel is not available
at present. Upgrading is scheduled for the future.
For playback, it is recommended to use the Front-End
application or Back-End Client application.

12
13
On Recording (continued)
Audio sources when recording
The Memory Card Video Recorder can record up to four
audio channels (Audio1, 2, 3, and 4).
Pressing the [AUDIO 2 MUTE] button on the Remote
Control Panel disables recording of the signal input to the
[AUDIO IN 2] connector only.
Power-on recording
The recorder automatically starts recording when it is
powered on.
Also when the recorder is operating with the [PowerOff
Time] setting, recording will start automatically when the
recorder is turned on.
•
Loop recording
Loop recording continues recording new video while deleting
the oldest recorded files. When loop recording is set, the file
is split for every 60 minutes normally.
When the number of files recorded on an SDHC Memory
Card reaches the maximum value (5,000 files per card), loop
recording will continue recording, deleting the oldest file and
retaining the rest.
Notes:
If an error occurs during recording, the record file will be
split.
When loop recording is set, total recorded time is
displayed in the remaining record time section on the
Overlay OSD. See “Viewing the status of the recorder
(Overlay OSD)” on page 55.
During loop recording, recording stops under the following
conditions:
- When an error is detected in an SDHC Memory Card,
and recording is no longer possible.
- When the memory card slot cover opens.
If loop recording is started with a large number of files
recorded on an SDHC Memory Card, no pre-recording
may be obtained.
If “Loop Rec” is set to ON, pre-recording and post-
recording do not function.
•
•
•
•
•
12
13
On Recording (continued)
Intermittent recording
Intermittent recording records only one image per second
extending recording time. An audio signal is not recorded.
Intermittent recording and normal recording transit in the
same record mode. Recording in each record mode is as
shown below.
Record mode D1 HI D1 STD CIF D1 10
Normal
recording (fps)
30 30 30 10
Intermittent
recording (fps)
1 1 1 1
Interrupting intermittent recording
Entering a recording trigger during intermittent recording
interrupts intermittent recording and starts normal recording.
Normal recording includes pre-recording so intermittent
recording and pre-recording of normal recording may
overlap during pre-recording. When a recording stop criteria
other than the [STOP] button are met, intermittent recording
starts after post-recording.
*
When intermittent recording is
started after post-recording,
audio is postrecorded for the
duration of the video postrecord
time, regardless of the value set
for the audio postrecord time.
Period when recording cannot be terminated
Under the following conditions, pressing the [STOP] button
does not stop recording.
About the first five seconds after intermittent recording
transitions to normal recording (not including
pre-recording)
The first five seconds (approx.) after normal recording
transitions to intermittent recording
•
•
Notes:
When both intermittent recording and power-on recording
are set to “ON”, intermittent recording starts in the
intermittent recording mode when the recorder is turned
on. (When intermittent recording mode is set to “OFF”,
normal recording starts.)
When recording stops after the Rec Continue Time
elapses, intermittent recording starts without activating
post-recording.
When pre-recording time is set to something other than
“0”, and a recording trigger starts normal recording
during intermittent recording, the pre-recording time is
automatically set to start after the intermittent recording
start time.
•
•
•
Period when recording cannot be terminated just after
starting recording, intermittent recording transitions
to normal recording or normal recording transitions to
intermittent recording, may become longer when loop
recording is set to “ON”.
The [REC] lamp lights during post-recording after a
transition from normal to intermittent recording.
The Rec Continue Time setting does not function outside
of a recording trigger.
•
•
•
Recording trigger input When a recording stop criteria
other than the [STOP] button
are met
Intermittent recording
Normal recording
Pre-recording Post-recording
(Time)
∗
Recording trigger input When a recording stop criteria
other than the [STOP] button
are met
Intermittent recording
Normal recording
Pre-recording Post-recording
(Time)
About 5 seconds About 5 seconds
Period when recording cannot be terminated
∗
*
When intermittent recording is
started after post-recording,
audio is postrecorded for the
duration of the video postrecord
time, regardless of the value set
for the audio postrecord time.
14
15
On Recording (continued)
Changes in intermittent recording status
Status changes caused by button operations, recording
triggers, recording stop criteria and other inputs are shown
below for set intermittent recording conditions.
<When intermittent recording is set to “ON”>
Status prior to
input
Input
[STOP] button
pressed
[REC] button
pressed
When a recording stop criteria other
than the [STOP] button are met
Recording trigger
input
Recording stop
status
No change Intermittent
recording status
No change Normal recording
status
Intermittent
recording status
Recording stop
status
No change No change Normal recording
status
Normal recording
status
Recording stop
status
No change Intermittent recording status No change
<When intermittent recording is set to “OFF”>
Status prior to
input
Input
[STOP] button
pressed
[REC] button
pressed
When a recording stop criteria other
than the [STOP] button are met
Recording trigger
input
Recording stop
status
No change Normal recording
status
No change Normal recording
status
Normal recording
status
Recording stop
status
No change Normal recording status No change
14
15
On Recording (continued)
Location and name of recording files
The names of folders storing recording files are created
according to the Rule of Filename.
WT (world time) : “/DATA” is the base folder
LT (local time) : “/DATA /LOCAL” is the base folder
A folder indicating the recording start date is created in the
above base folder and a file indicating the recording start
time is created in that folder.
WT : Date and time are designated according to world time
LT : Date and time are designated according to local time
For example, if recording started at 10:23:39 on September
28, 2009,
Name of folder storing recording files: “/DATA/20090928”
Name of recording file: “102339xn.eee”
x
L Local time
_Derivative le
BBookmark le (in WT mode)
MBookmark le (in LT mode)
None No Files other than above
n Derivative number
(numbers are sometimes not
assigned)
.eee Extension
Derivative files are created when there are multiple file
names with the same start time.
Names of files that have been split up
automatically
The filename when the file automatically split has two
patterns; one is a filename indicating the derivative file, and
another is indicated by the recording start time.
Indicating the derivative file
The file name consists of the recording stat time to which
“_n” is appended. In the file list screen, “*” is added to the
end of the file name.
Indicating the recording start time
The time when the file is split automatically in loop
recording will be the file name.
•
•
16
17
On Recording (continued)
Recording Error Warnings
When the recorder detects that it cannot properly record
audio or video, it will output the warning signals described
below via GPO1, GPO2, and GPO3 (Pin number 25, 8, and
18 of the [GPIO] connector).
Data output via GPO1, GPO2, and GPO3
GPO1, GPO2, and GPO3
signals When not recording During
recording
When an error
occurs*1
OFF Unlit*2Unlit*2Unlit*2
ERROR Continued
(Fast blinking when recording
error was the prior status.)
Unlit*2Fast blinking*4
REC Unlit*2Lit*3Unlit*2
REC + ERROR Continued
(Fast blinking when recording error
was the prior status. Otherwise
Unlit.)
Lit*3Fast blinking*4
*1 A recording error indicates any of the following conditions.
Cannot record (a detailed description of examples
follow)
- SDHC Memory Card slot cover is open
- No recordable SDHC Memory Card is inserted or it is
not recognized
- No more SDHC Memory Card space available
- The write-protect switch of the SDHC Memory Card is
set to “LOCK”.
- When an error is detected on an SDHC Memory Card
and recording is no longer possible.
- When a new unformatted SDHC Memory Card is
inserted
- When an SDHC Memory Card is inserted and
the maximum number of recording files has been
exceeded
- When an administrator setup is started or is going on
- When [PowerOff Time] (see “PowerOff Time” on page
81) is set to “AUTO” and the engine switch is set to the
LOCK (OFF) position
Cannot recognize video signal from the camera
*2 Unlit : Output to GPO1, GPO2, or GPO3 is low (output
voltage 0 V).
*3 Lit : Output to GPO1, GPO2, or GPO3 is high (output
voltage 5 V).
*4 Fast blinking: Output to GPO1, GPO2, or GPO3
repeatedly cycles between low → high →
low (250 ms cycle).
•
•
GPO output
The [GPIO] connector on the recorder has four GPO outputs
and output the signals below.
The functions of GPO1, GPO2, and GPO3 can be changed
with settings (see “GPO1, GPO2, GPO3 Signal” on page
83). GPO4 always outputs the power status of the recorder,
and has no setting.
Pin number Signal
8 GPO2 (REC and ERROR)
18 GPO3 (REC)
19 GPO4 (Power status of the recorder)
25 GPO1 (REC and ERROR)
16
17
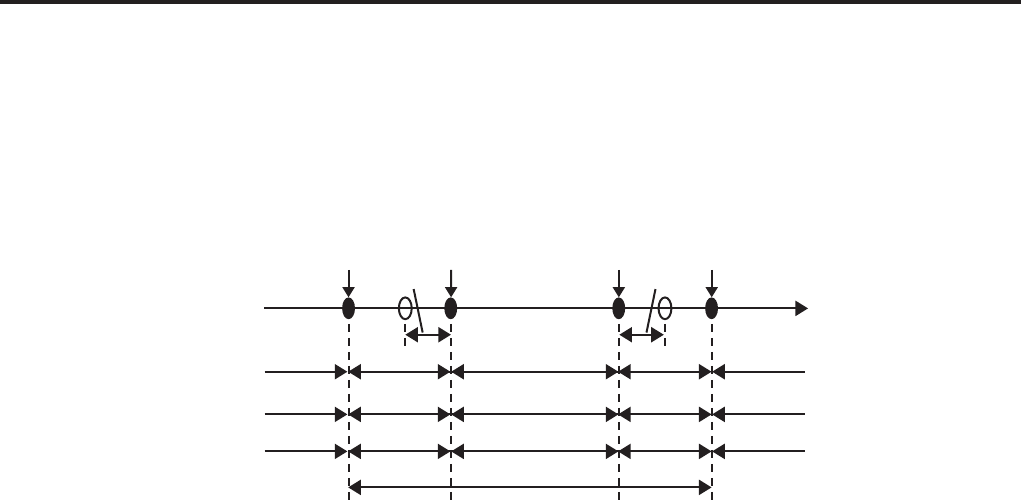
About the Trigger Signals
Trigger signals (GPI1 - 16), which are used for recording
control and Color Camera control, consist of edge and level
signals.
Edge signals
High-edge, low-edge and both-edge of an edge signal can
be specified. Control specified by Action starts when a
change in an edge of the specified signal is detected.
High-edge Both-edge
Low-edge
(Time)
High
Low
For example, when a high-edge of “AUTOZOOM”
is specified (see “Trigger1 to 16” on page 86):
Start of AUTOZOOM
(Time)
High
Low
Level signals
The high-level and low-level of a level signal can be
specified and control specified by Action (recording control)
occurs when a change is detected in the specified signal.
When high-level is specified:
A change in the signal from low to high starts recording
and a change from high to low stops it.
Recording starts
Recording
stops
(Time)
High
Low
When low-level is specified:
A change in the signal from high to low starts recording
and a change from low to high stops it.
Recording starts
Recording stops
(Time)
High
Low
18
19
License Plate Recognition (LPR) Mode
Engaging the License Plate Recognition (LPR) mode allows
you to start up the LPR system.
Set the color camera shutter speed to [LPR Shutter Speed]
(1/500 or 1/1000) when using the LPR system.
When a recording trigger starts a recording during license
plate recognition, however, the shutter speed automatically
switches to the setting configured for [Patrol Shutter Speed].
When recording stop criteria are met, the shutter speed
automatically returns to the setting configured for [LPR
Shutter Speed] (1/500 or 1/1000).
The diagram below shows how changes in LPR mode
settings and starting and stopping recording by an officer
affect shutter speed, camera zoom, and the [LOCK] lamp.
(Time)
[LPR Mode]
Shutter speed*
Camera zoom
Recording stop
criteria are met
[LOCK] lamp
PATROL LPR PATROL LPR PATROL
Patrol Shutter
Speed
LPR Shutter
Speed
Patrol Shutter
Speed
LPR Shutter
Speed
Patrol Shutter
Speed
Patrol Zoom
LPR Zoom
Patrol Zoom LPR Zoom Patrol Zoom
Blinking
Post-recording
Post-recording
[LPR Mode] is
set to “PATROL”
[LPR Mode] is
set to “LPR”
Recording
trigger input
* The settings available for [Patrol Shutter Speed] are AUTO, 1/100, 1/500, and 1/1000.
The settings available for [LPR Shutter Speed] are AUTO, 1/500, and 1/1000.
Notes:
The License Plate Recognition (LPR) mode is activated
when a color camera connected to the [CAMERA 1]
connector is used.
[Patrol Shutter Speed] and [Patrol Zoom] are available also
without the license plate recognition program. (When [Init
LPR Mode] is set to “DISABLE”, or when [Init LPR Mode]
is set to “ENABLE” and [LPR Mode] is set to “PATROL”.)
•
•

18
19
Setup
Factory default values are shown below.
Items officers can set
Setting Item Factory Default Value Description
1 Camera1 Color camera connected the [CAMERA 1] connector setting
AE[–2 -- +2] 0 Color camera video brightness setting totally
Setting : -2, -1, 0, +1, +2
LPR Mode PATROL LPR mode setting
Setting : PATROL (normal mode), LPR (License Plate Recognition
mode)
Patrol Shutter Speed AUTO Shutter speed setting with [LPR Mode] set to “PATROL”
Setting : AUTO, 1/100, 1/500, 1/1000
Patrol Zoom ×1.0 Zoom ratio setting with [LPR Mode] set to “PATROL”
Setting : ×1.0 - ×22.0
LPR Shutter Speed 1/1000 Shutter speed setting with [LPR Mode] set to “LPR”
Setting : AUTO, 1/500, 1/1000
LPR Zoom ×1.0 Zoom ratio setting with [LPR Mode] set to “LPR”
Setting : ×1.0 - ×22.0
2 Audio/Video Audio and video setting
Image Enhance OFF The brightness of a dark video image on the main screen adjustment
Setting: OFF (no enhancing)
LOW (enhancing slightly)
HIGH (enhancing strongly)
VIDEO OUT1 VIDEO OUT2 Output to [VIDEO OUT1] connector
Setting: CAM1 (Camera 1)*1
CAM3 (Camera 3)*1
VIDEO OUT2 (the same signal as that output from the
[VIDEO OUT2] connector)
3 Setup/Info Setup/Information
Ofcer Ofcer settings
Ofcer 1 ID ---- Ofcer 1 ID
Ofcer 1 Name ---- Ofcer 1 name
Ofcer 2 ID ---- Ofcer 2 ID
Ofcer 2 Name ---- Ofcer 2 name
Source*2---- Source
Area*2---- Area
Shift*2---- Shift
Work Time ---- Work Time
Overlay OSD OFF Overlay OSD setting
Setting : OFF, AUTO, SIMPLE, DETAILS,
Camera1 Rec LED ON Color camera [REC] lamp setting
Setting : ON, OFF
Target Speed OFF Target vehicle speed setting
Setting: OFF, 1, 2, …, 200*3
*1 CAM1 and CAM3 may not be displayed, depending on
the settings made on the Video Allocation screen in
Administrator setup.
*2 If the Front-End application is connected, the names,
Source, Area, and Shift, may be different from the
corresponding field names of the Front-End application.
The field name of the Front-End application can be
changed using the Back-End application.
*3 This may not be selected, depending on the setting made
on the Trigger screen in Administrator setup.

20
21
Setup (continued)
Items administrators can set
Setting Item Factory Default Value Description
1Audio Allocation Audio settings
Audio1 WMIC Audio signal connected to the [AUDIO IN 1] connector
Setting: WMIC (wireless microphone)
MIC (microphone)
OFF (no connection)
Audio2 MIC Audio signal connected to the [AUDIO IN 2] connector
Setting: WMIC (wireless microphone)
MIC (microphone)
OFF (no connection)
Audio3 OFF Audio signal connected to the [AUDIO IN 3] connector
Setting: WMIC (wireless microphone)
MIC (microphone)
OFF (no connection)
Audio4 OFF Audio signal connected to the [AUDIO IN 4] connector
Setting: WMIC (wireless microphone)
MIC (microphone)
OFF (no connection)
2Video Allocation Video settings
Detect Connection detecting automatically
CAM1 ON Connection to the [CAMERA 1] connector
Setting: ON, OFF
CAM2 ON Connection to the [CAMERA 2] connector
Setting: ON, OFF
CAM3 OFF Connection to the [CAMERA 3] connector
Setting: ON, OFF
CAM4 OFF Connection to the [CAMERA 4] connector
Setting: ON, OFF
CAM5 OFF Connection to the [CAMERA 5] connector
Setting: ON, OFF
CAM6 OFF Connection to the [CAMERA 6] connector
Setting: ON, OFF
Preset1 Preset 1 setting
Form 1Ch Channel mode setting
Setting: 1Ch, 2Ch, 4Ch-QUAD, 4Ch-PANORAMA, 5Ch-QUAD,
5Ch-PANORAMA, - (preset not used)
Main Sub 1, - Cameras for Main and Sub pictures setting
Setting: 1, - 2, - 3, -
1, 2 1, 3 2, 3
-, 1456 -, 2456 -, 3456
1, 2456 1, 3456 2, 3456
3, 2456
(Continued on the next page)

20
21
Setting Item Factory Default Value Description
2Preset2*1Preset 2 setting
Form 1Ch Channel mode setting
Setting: 1Ch, 2Ch, 4Ch-QUAD, 4Ch-PANORAMA, 5Ch-QUAD,
5Ch-PANORAMA, - (preset not used)
Main Sub 2, - Cameras for Main and Sub pictures setting
Setting: 1, - 2, - 3, -
1, 2 1, 3 2, 3
-, 1456 -, 2456 -, 3456
1, 2456 1, 3456 2, 3456
3, 2456
Preset3 Preset 3 setting
Form 2Ch Channel mode setting
Setting: 1Ch, 2Ch, 4Ch-QUAD, 4Ch-PANORAMA, 5Ch-QUAD,
5Ch-PANORAMA, - (preset not used)
Main Sub 1, 2 Cameras for Main and Sub pictures setting
Setting: 1, - 2, - 3, -
1, 2 1, 3 2, 3
-, 1456 -, 2456 -, 3456
1, 2456 1, 3456 2, 3456
3, 2456
Main Resolution/
RecRate
D1 HI Main-picture’s resolution and bit rate settings
Setting: CIF, D1 10, D1 STD, D1 HI
Sub Resolution/
RecRate
D1 HI Sub-picture’s resolution and bit rate settings
Setting: CIF, D1 10, D1 STD, D1 HI
3Rec/Play Recording and playback settings
PowerOff Time*2AUTO
Time from the SIGNAL turn-off to recorder shut-down (minutes)
Setting :
0 min, 10 min, 20 min, 30 min, 60 min, 90 min, 120 min, 180 min, AUTO
*3
Init Preset Select PRESET1 Initial Preset setting*4
Setting: PRESET1, PRESET2, PRESET3, LAST *5
Init VIDEO OUT1 VIDEO_OUT2 Initial through-out video setting*4
Setting: CAM1, CAM3, VIDEO_OUT2, LAST *5
PowerOn Rec OFF Automatically start recording with power-on
Setting : OFF, ON
Loop Rec OFF Loop recording
Setting : OFF, ON*6
Intermittent Rec OFF Intermittent recording
Setting : OFF, ON
Setup (continued)
(Continued on the next page)
*1 If the Preset2 or Preset3 setting is canceled on the Video
Allocation screen in Administrator setup, the setting of
Action on the Trigger screen may be changed to NONE.
*2 Depending on the vehicle, the battery may run out of
power during operation.
*3 When a PC with the Front-End application or Back-
End application installed is not connected:
Power is turned off immediately. Note, however, that
power is not turned off while data is being exported to a
USB memory device, but is turned off after completion
of data export.
When a PC with Front-End application or a Back-End
application installed is connected:
Power is turned off when control from a Front-End
application or Back-End application is released, when
upload, streaming, administrator setting, or updating
with Back-End application is terminated, or when the
SDHC Memory Card slot is opened.
*4 Depending on the settings on the Video Allocation screen
in Administrator setup, some items may not be displayed.
*5 Applies the setting in effect when power was last turned
off. Unless power is turned off properly, the operating state
may not be saved correctly.
*6 If “Loop Rec” is set to ON, pre-recording and post-
recording do not function.
Playback with the remote control panel is not available
at present. Upgrading is scheduled for the future.
For playback, it is recommended to use the Front-End
application or Back-End Client application.

22
23
Setup (continued)
Setting Item Factory Default Value Description
3Rec Continue Time CONTINUE Continuous recording time (minutes)
Setting : CONTINUE, 1 min, 2 min, 5 min, 10 min, 15 min, 20 min,
30 min, 60 min, 90 min
PreRec Time
(Video)
30 s Video Prerecord time (seconds)*1
Setting : 0 s, 10 s, 20 s, 30 s, 60 s, 90 s
PreRec Time
(Audio)
0 s Audio Prerecord time (seconds)*1
Setting : 0 s, 3 s, 10 s, 20 s, 30 s, 60 s, 90 s
PostRec Time
(Video)
0 s Video Postrecord time (seconds)*1
Setting : 0 s, 10 s, 20 s, 30 s, 60 s, 90 s
PostRec Time
(Audio)
0 s Audio Postrecord time (seconds)*1
Setting : 0 s, 3 s, 10 s, 20 s, 30 s, 60 s, 90 s
Rule of
Filename
WT Recording le naming method
Setting : WT(World time)
LT(Local time)
Init Audio2 Rec ON Initial on/off setting for Audio2 input (upon power on)
Setting : ON, LAST*1, OFF
Init Overlay OSD OFF Initial OSD (on-screen display) overlay setting
Setting : OFF, AUTO, SIMPLE, DETAILS, LAST*2
GPO1 Signal OFF GPO1 output signal setting*3
Setting: OFF, REC, ERROR, REC+ERROR
GPO2 Signal OFF GPO2 output signal setting*3
Setting: OFF, REC, ERROR, REC+ERROR
GPO3 Signal OFF GP 3 output signal setting*3
Setting: OFF, REC
Init Audio Out
(Play)
ON Initial audio output selection (upon power on)
Setting : ON, LAST*2, OFF
Play Mode SINGLE Select playback mode (relay playback setup)
Setting : SINGLE, RELAY
Skip Target Skip position
Trigger/Marker YES Select a trigger or marker location
Setting : YES, NO
Head of File YES Select the starting point of the le
Setting : YES, NO
*1 If “Loop Rec” is set to ON, pre-recording and post-
recording do not function.
Playback with the remote control panel is not available
at present. Upgrading is scheduled for the future.
For playback, it is recommended to use the Front-End
application or Back-End Client application.
*2 Applies the setting in effect when power was last turned
off. Unless power is turned off properly, the operating
state may not be saved correctly.
*3 The functions of GPO1, GPO2, and GPO3 can be
changed with settings, but GPO4 always outputs the
power status of the recorder, and has no setting.
(Continued on the next page)

22
23
Setup (continued)
Setting Item Factory Default Value Description
4Date/Time Date, Time and Time Zone Settings
TimeZone Eastern DST Time zone
Indicates time difference from world standard time.
Hawaii : Hawaiian standard time
Yukon : Alaska standard time
Yukon DST : Alaska daylight saving time
Pacific : Pacific standard time
Pacific DST : Pacific daylight saving time
Mountain : Mountain standard time
Mountain DST : Mountain daylight saving time
Central : Central standard time
Central DST : Central daylight saving time
Eastern : Eastern standard time
Eastern DST : Eastern daylight saving time
Atlantic : Atlantic standard time
Atlantic DST : Atlantic daylight saving time
Asia Tokyo : Japan standard time
Style USA Date display format setup
Setting : ISO (YYYY-MM-DD HH:MM:SS format),
USA (MM/DD/YYYY HH:MM:SS format)
Date/Time Current time Year/Month/Day Hour:Min.:Sec.
(Continued on the next page)

24
25
Setup (continued)
Setting Item Factory Default Value Description
5Trigger Trigger signal (GPI1-16) settings
Trigger ON All trigger signal input or no input
Setting : ON (All trigger signal input permission), OFF
Action NONE Action upon trigger signal (GPI1-16) detection
Setting:
NONE (no operation)
REC (recording), STOP (stopping)
AUTO ZOOM (automatically zooms in/out or pauses)
P1 (selects Preset1 input)
P2 (selects Preset2 input)*2
P3 (selects Preset3 input)*2
P1REC (records video of Preset1 input)
P2REC (records video of Preset2 input)*2
P3REC (records video of Preset3 input)*2
CMA1 LED (Changes the status setting (on/off) of the
[REC] lamp on a Color Camera connected to
the [CAMERA 1] connector)
AUDIO2ON (records audio input to the [AUDIO IN 2]
connector)
AUDIO2MUTE (not records audio input to the [AUDIO IN 2]
connector)
TGT (REC) (records with a TGT input)*1
TGT (P1REC) (records video of Preset 1 input with a TGT
input)*1
TGT (P2REC) (records video of Preset 2 input with a TGT
input)*1, *2
TGT (P3REC) (records video of Preset 3 input with a TGT
input) *1, *2
OWN (REC) (records with an OWN input)*1
OWN (P1REC) (records video of Preset 1 input with an OWN
input)*1
OWN (P2REC) (records video of Preset 2 input with an OWN
input) *1, *2
OWN (P3REC) (records video of Preset 3 input with an OWN
input) *1, *2
Detection H Method for trigger signal (GPI1-16) detection
Choice of signal detection depends on set [Action]
REC, P1REC, P2REC, and P3REC modes
Setting: H (high-edge trigger)
Level H (high-level trigger)
L (low-edge trigger)
Level L (low-level trigger)
B (both-edge trigger)
P1, P2, P3, CAM1 LED, AUTO ZOOM, AUDIO2ON,
AUDIO2MUTE, STOP modes
Setting: H (high-edge trigger)
L (low-edge trigger)
B (both-edge trigger)
TGT(REC), TGT(P1REC), TGT(P2REC), TGT(P3REC),
OWN(REC), OWN(P1REC), OWN(P2REC), and OWN(P3REC),
modes
Setting: OFF, 200, …, 2, 1
NONE mode
Setting: H (high-edge trigger)
L (low-edge trigger)
•
•
•
•
Display OFF Character denition when one letter is displayed in the OSD
Setting : OFF, A - Z, –
*1 These are selectable for Trigger 15 or Trigger 16.
*2 These cannot be selectable if Preset2 or Preset3 has
not been allocated on the Video Allocation screen in
Administrator setup.
(Continued on the next page)

24
25
Setup (continued)
Setting Item Factory Default Value Description
6Embedded OSD Embedded OSD
Main OSD ON Main OSD on/off setting
Setting: ON, OFF
Sub OSD ON Sub OSD on/off setting
Setting: ON, OFF
Display Position L-Upper Location display setting
Setting : L-Upper (upper left)
R-Upper (upper right)
L-Bottom (bottom left)
R-Bottom (bottom right)
Trigger ON OSD setting during trigger signal (GPI1-16) input
Setting : ON, OFF
Time ON Date and time display setting
Setting : ON, OFF
Source @Area OFF Display setting for the vehicle identication and name of a location
Setting : ON, OFF
(Continued on the next page)

26
27
Setup (continued)
Setting Item Factory Default Value Description
7Camera1 Color Camera connected to the [CAMERA 1] connector setting
Zoom Limit ×220 Maximum zoom magnication
Setting : ×22, ×220
AGC Level HIGH Color Camera automatic gain control setting
Setting : HIGH, OFF, LOW, MID
Init Backlight OFF Initial backlighting compensation setting (upon power on)
Setting : ON, OFF, LAST *1
(perform backlighting compensation when on)
Init AE Shift 0
Initial exposure compensation of Color Camera video (upon power on)
*2
Setting :0, +1, +2, LAST *1, -2, -1
Flip OFF Color Camera image top/bottom ip enable/disable
Setting : OFF (Top/bottom ip disabled)
ON (Top/bottom ip enabled)
AutoZoom
Magnication
×10 Magnication of auto zoom
Setting : ×10, ×15, ×22, ×1, ×2, ×3, ×4, ×5, ×7
AutoZoom Time 3 s Auto zoom magnication retention time (seconds)
Setting : 3 s, 5 s, 8 s
AutoZoom End Position ×1 Target magnication of auto zoom
Setting: ×1, ×2, ×3, …, ×22, LAST *1
Init Camera1 Rec
LED
ON Initial Color Camera [REC] lamp enable/disable setting (upon power
on)
Setting :
ON
(
[REC] lamp lights during recording
)
LAST*1
OFF
(
[REC] lamp does not light
)
Init IR Mode AUTO IR switching function
Setting :
AUTO
(Automatically switch IR function on/off),
OFF
(Force IR function off)
ON
(Force IR function on)
LAST *1
IR Level LOW IR auto switching level setting*3
Setting : LOW, HIGH
IR Time 30 s IR auto switching level detection time (seconds)*3
Setting : 30 s, 60 s, 300 s, 10 s
Auto Focus PRESET Select color camera focusing method when,
• [Init LPR Mode] is set to “DISABLE”
• [Init LPR Mode] is set to “ENABLE” and [LPR Mode] is set to
“PATROL”
• A recording trigger starts recording when [Init LPR Mode] is set to
“ENABLE” and [LPR Mode] is set to “LPR”.
Setting :
PRESET (When the zoom is 3x or below, the camera is
focused at a distance of about 15 m (50 feet).
Subsequent zooming will engage auto focus.)
DISABLE (Focus is locked at a distance of about 40 m (130
feet) and auto focus is disabled.)
AUTO (Set to auto focus when zoom ratio has been
changed.)
Init LPR Mode DISABLE LPR (License Plate Recognition) function switching
Setting :
DISABLE (LPR function is off and [LPR Mode] switches to
“PATROL”.)
ENABLE (LPR function is on.)
*1 Applies the setting in effect when power was last turned
off. Unless power is turned off properly, the operating
state may not be saved correctly.
*2 When the [Init AE Shift] setting is “+2” and the target is
dark, the image may not refresh at 30 frames/sec.
*3 The [IR Level] and [IR Time] settings apply only when the
[Init IR Mode] setting is “AUTO”.
(Continued on the next page)

26
27
Setup (continued)
Setting Item Factory Default Value Description
8Management Mode Ofcer management setup
Classify*1DISABLE Classify settings
Setting: DISABLE (disables adding)
ENABLE (enables adding)
FORCE (forcibly adding)
Setting Method AUTO Ofcer registration procedure
Setting : AUTO, MANUAL, LIST
Upload Mode MANUAL Upload mode setting
Setting: AUTO (uploading automatically)
MANUAL (uploading manually)
Export Menu DISABLE Export menu setting
Setting: ENABLE, DISABLE
Preset Select ENABLE Preset selection setting
Setting: ENABLE, DISABLE
Operation Key Lock OFF Lock of buttons by an administrator
Setting : OFF, ANY, STOP
9Radar/GPS Radar Gun*2, GPS and speed settings
Model Select ProLaser Radar gun type selection*3
Setting : ProLaser
STALKER_
GOLDEN_E
Connection of Radar OFF Radar Gun connection*2
Setting : OFF, Recorder
Connection of GPS Recorder GPS connection
Setting : Recorder, OFF
Collection Time 1 s Interval for GPS data collection (seconds)
Setting : 5 s, 10 s, 1 s, 2 s
Speed Unit MPH Speed measurement units
Setting : MPH, km/h
*1 If Loop Rec on the Rec/Play screen is set to ON, the
Classify does not function.
*2 When using a radar gun, contact your supplier.
*3 Only the first 8 characters appear in the [Model Select]
input field.
(Continued on the next page)
28
29
Setup (continued)
Setting Item Factory Default Value Description
10 Network Network setting
IP Address Each network setting
PC LAN Server1 DHCP Setting:
Server1, Server2
Server3, Server4
OFF*1
UPLOAD LAN Client DHCP Setting:
Client, OFF*2
USB WIRELESS
LAN
Client DHCP Setting:
Client, OFF*2
Wireless LAN Wireless network setting
AP Priority AP1 Highest AP (Access Point) priority setting
Setting: RANDOM, AP1 Highest
Network Access Point1 Network access point setting
Setting: Access Point1, Access Point2, …, Access Point10
Access Point DISABLE Access Point setting
Setting: ENABLE
DISABLE
Security ---- Security setting
Setting: WEP, WPA/WPA2-PSK, NONE
SSID ---- Service set ID setting
Network Key ---- Network key setting
Key Index -Key index setting
Setting: 1, 2, 3, 4
*1 If Server1, Server2, Server3, or Server4 is selected, the
IP Address, Subnet Mask, and Gateway are fixed as
shown below. If Off is selected, the IP Address, Subnet
Mask, and Gateway can be changed.
Server1 Server2 Server3 Server4 OFF
IP Address 192.168.10.10 192.168.217.192 172.24.217.192 10.216.217.192 192.168.10.10
Subnet Mask 255.255.255.0 255.255.255.0 255.255.255.0 255.255.255.0 255.255.255.0
Gateway -- -- -- -- --
Client OFF
IP Address -- --
Subnet Mask -- --
Gateway -- --
*2

28
29
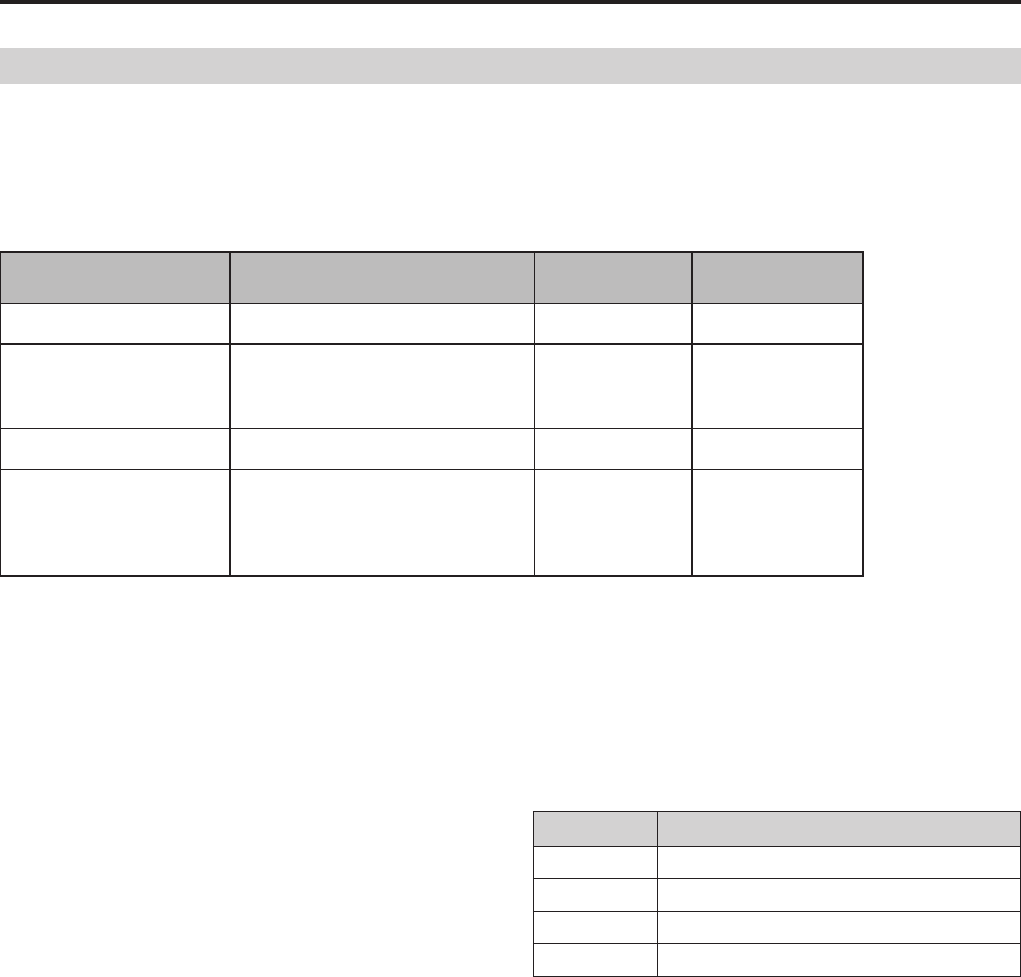
Text Files Used with the Recorder
The following types of text files can be used by the recorder,
and created with a commercially available text editor.
To display correctly, the files must meet the following
specifications. Refer to “Sample Files” on page 31 for
examples.
File Types
File Types Contents File Name
Ofcer Data File This le type contains ofcer settings. It is required when the ofcer
data setting method is “AUTO” or “MANUAL”. It is also used for log-in
authentication on the administrator settings screen.
\WIDKEY\
WID*****.TXT
Ofcer Registration
File
This le type contains batch ofcer registration data (for up to 1,000
ofcers) for the recorder. When the “LIST” ofcer data setting method is
selected, ofcers can select their own names from the registration list to
load their settings into the recorder.
It is also used for log-in authentication for the Front-End application.
\WIDKEY\
WOFFICER.TXT
Administrator
Registration File
This le type contains administrator registration data (for up to 10
administrators) that enables logging in to the administrator settings screen.
An ofcer data le is required for log-in authentication on the administrator
settings screen.
\WIDKEY\
WADMIN.TXT
Classify File The le is used to store classify tags on the recorder. Up to 10 les are
stored.
\WIDKEY\
CLASSIFY.TXT
Source File The le is used to store vehicle ID from the vehicle list when storing an
ofcer. Up to 1,000 les are stored.
\WIDKEY\WSOURCE.
TXT
Shift File The le is used to store work shift from the shift list when storing an ofcer.
Up to 100 les are stored.
\WIDKEY\WSHIFT.
TXT
Area File The le is used to store area from the area list when storing an ofcer. Up
to 100 les are stored.
\WIDKEY\WAREA.
TXT
Note:
When the officer or administrator registration file is as
follows, officer or administrator data is not registered, but
is deleted along with previously registered officer and
administrator data.
When no officer or administrator data is present
When the content of required items is invalid
•
•
Saving Location and File Naming
Text files to be used on the recorder must be stored in
a “WIDKEY” created under the root directory of a USB
memory device.
Be sure to save the Officer Data File to one USB memory
device.
Officer data file names are composed of up to eight
characters beginning with the prefix “WID”, and having the
extension “.TXT”. There are no restrictions on naming other
than the “WID” prefix.
When multiple officer data files are saved in the “WIDKEY”,
the file names are automatically sorted (in ascending order),
and the first 1 or 2 files are used as officer data.

30
31
Text Files Used with the Recorder (continued)
File Specifications
Syntax:
Officer data files may contain no more than one
statement per line.
Multiple statements or definitions on one line are invalid.
Line Feed Codes:
Line feeds are coded as the hexadecimal values 0Dh
0Ah or just 0Ah.
Blank Lines:
Blank lines are ignored. Aside from the line feed code,
a blank line may contain only space and tab (09h)
characters.
Comment Lines:
Lines beginning with “#” (ignoring leading spaces or tabs)
are considered to be comment lines. These have no
special meaning, but may contain notes or descriptions.
Valid comment characters are those from 20h to 7Eh.
Definition Lines:
An identifier is a definition value.
These lines define names and other data. Leading spaces
and tabs are ignored.
Identifier descriptions are shown in the following table.
◎
: Required item
○
: An item with significance or an object of inspection
×
: Ignored item
•
•
•
Identifier Max.
characters. Description Officer Data File Officer/Administrator
Registration File
Officer 1 Officer 2 Officer
Administrator
FirstName 50 Specify ofcer's rst name ◎ ◎ ◎ ◎
MiddleName 1 Specify ofcer's middle initial ○ ○ ○ ○
LastName 50 Specify ofcer's last name ◎ ◎ ◎ ◎
ID 50 Ofcer number for authentication ◎ ◎ ◎ ◎
Password 12 This should be entered when
making administrator settings. ○ ○ ○ ○
SDate 10 Shift start date YYYY-MM-DD ○ × × ×
SdayOfWeek 3 Shift start day of week × × × ×
STime 5 Shift start time hh:mm ○ × × ×
EDate 10 Shift end date YYYY-MM-DD ○ × × ×
EdayOfWeek 3 Shift end day of week × × × ×
ETime 5 Shift end time hh:mm ○ × × ×
WHour*5 Working period hh:mm ○ × ○ ×
Shift 50 A term for a work period, for
example, early shift. ○ × × ×
Area 50 Name of a location ○ × × ×
Source 50 Vehicle identication ○ × × ×
Border 73
Borders may be assigned to multiple
ofcers. Dened values are ignored.
For use within registration les.
× × ○ ○
Identifier Max.
characters. Description Classify
Classify 99 Denes Classify. ○
*
If SDate, STime, and ETime have been set, the WHour
setting will be ignored.
If a value of more than 24 hours is set, the default value of
8 hours will be set.
The minimum period to be set is 15 minutes.
•
•
•

30
31
Text Files Used with the Recorder (continued)
If no definition is provided for a required item (that is, it is
undefined), necessary data is considered to be incomplete
and invalid for registration or testing. Identifiers are not
case sensitive.
All item definition values are character strings consisting
of alphanumeric symbols other than “<” (3Ch), “>” (3Eh),
“\” (5Ch), “&” (26h) and “,” (2Ch), control character codes
00h to 1Fh, and “Delete” character code 7Fh. Characters
(including spaces) following “=” on a line are considered to
be the definition value. Any invalid characters are handled
as spaces. Characters exceeding the maximum character
length are ignored.
Identifiers having no defining characters are considered to
be undefined. For example, if a line contains a “=” followed
by a line feed character, that identifier is considered to be
undefined. If an identifier is multiply defined on different
lines, the last definition line has priority.
•
•
•
Sample Files
Officer data file:
If work day and time data (SDate, EDate, ETime) are not
specified, the time loading the officer data will be the work
start day and time. The work end day and time will be the
day and time after the work time (WHour) elapsed.
If WHour has not be specified, the work hour will be 8 hours.
FirstName=John
#MiddleName=
LastName=Smith
ID=ICV12345
Password=panasonic
SDate=2005-09-12
SdayOfWeek=MON
STime=08:15
#EDate=2005-09-12
#EdayOfWeek=MON
#ETime=20:00
WHoue=7:30
Shift=Patrol
Area=WEST
Source=Car123
# Format of the ofcer registration le
#
# Identier=denition_value
#
# Identier Length Description
# FirstName 50 First name
# MiddleName 1 Middle name
# LastName 50 Last name
# ID 50 Identier of ofcer
# Password 12 Password. It is desirable to set for administrator certication.
# SDate 10 Service start date YYYY-MM-DD
# SdayOfWeek 3 Service start day of week SUN/MON/TUE/WED/THU/FRI/SAT
# STime 5 Service start time hh:mm
# EDate 10 Service end date YYYY-MM-DD
# EdayOfWeek 3 Service end day of week SUN/MON/TUE/WED/THU/FRI/SAT
# ETime 5 Service end time hh:mm
# WHour 5 Service Time hh:mm
# Shift 50 The name of service
# Area 50 Regional name
# Source 50 Vehicles identier
#
# Denition value
# ASCII character Except < (0x3c), > (0x3e), \ (0x5c), & (0x26), ..., (0x2c)
# control character (0x00 ~ 0x1f), Delete (0x7f)

32
33
Text Files Used with the Recorder (continued)
Ofcer Registration File :
Border=------------------------------------
# Officer setting file
# John Smith
FirstName=John
MiddleName=
LastName=Smith
ID=ICV12345
Password=pana1122
WHour=7:00
Border=------------------------------------
# Jane White
FirstName=Jane
MiddleName=
LastName=White
ID=ICV12346
Password=pana1234
WHour=8:00
# FirstName 50 First name
# MiddleName 1 Middle name
# LastName 50 Last name
# ID 50 Identifier of officer
# Password 12 Password. It is desirable to set for administrator certification.
Administrator Registration File :
# Mike Brown
FirstName=Mike
MiddleName=
LastName=Brown
ID=ICV12347
Password=panasonic
Classify File :
#----------------------------------------------------------------------
# Classify file
# - Number of registration maximum data is 10
# - The maximum characters of data is 99
#----------------------------------------------------------------------
CLASSIFY=Patrol
CLASSIFY=Signal
CLASSIFY=Speed
Source File :
#----------------------------------------------------------------------
# Source file
# - Number of registration maximum data is 1000
# - The maximum characters of data is 50
#----------------------------------------------------------------------
Source=ND2032
Source=ND2213
Source=ND3194
Source=NDPC1199

32
33
Text Files Used with the Recorder (continued)
Shift File :
#----------------------------------------------------------------------
# Shift file
# - Number of registration maximum data is 100
# - The maximum characters of data is 50
#----------------------------------------------------------------------
Shift=EARLY
Shift=LATE
Shift=NIGHT
Shift=DAY
AreaFile :
#----------------------------------------------------------------------
# Area file
# - Number of registration maximum data is 100
# - The maximum characters of data is 50
#----------------------------------------------------------------------
Area=EAST
Area=NORTH
Area=SOUTH
34
35
Basic Menu Operations
For a list of all the menus, refer to “Menu List” on pages 97 - 106.
(This list also describes menus available only to administrators.)
RETURN
MENU
CONTROL PANEL
ON/
OFF
Cursor button
MENU button
Example: Audio1 Test
1. Press the [MENU] button.
The Menu appears.
A triangle displayed at the right edge of a menu item
indicates that it contains a submenu.
2. Press the cursor buttons [ ,] to select an
item.
Select
3. Press the center position of the cursor button
[ ] or [ ] to confirm the entry.
The selected item opens to reveal selection details.
Confirm
Confirm
or
4. Press the [ ,] buttons to select
[Audio1 Test].
Select
5. Press the [ ] button to confirm the entry.
The Audio1 test is now ready to run.
Confirm
34 35
Basic Menu Operations (continued)
RETURN
MENU
CONTROL PANEL
ON/
OFF
RETURN button
Cursor button
Changing the value
Press the [ , , , ] buttons to set a value.
Change
• A selected item with tiny triangles at the top and
bottom allow you to change its value by pressing [ ]
or [ ].
(Screen example) Change
• A selected item with tiny triangles to the left and right
allow you to change its value by pressing [ ] or [ ].
Change
Displaying the submenu
A triangle displayed at the right edge of the menu
item indicates that it contains a submenu.
Press the [ ] button to display the submenu.
Display
Returning to previous screen
Press the [RETURN] button to return to the previous screen.
The menu is cleared when the “Archive” screen, Officer
setup top screen or Setup/Admin top screen is displayed.
Long menus
Menus with arrows at the top and bottom contain items
that are currently not shown.
Press the [ ] or [ ] button to display the item.
(Screen example)
Display
(Screen example)
36
37
Setting up/Deleting Officer Data
When Front-End application is running, this unit freezes in
the live screen and officer data cannot be set or deleted.
In AUTO mode, officer data can be set using the USB
memory device.
Before using this unit, you must create and configure officer
data, such as an officer ID and officer name. For details
on creating officer data, refer to “Text Files Used with the
Recorder” on pages 29 - 33.
Three setup methods are available, called the AUTO,
MANUAL and LIST modes.
Check with the administrator which mode is selected (see
“Setting Method” on page 89).
Note:
Starting up Front-End application during officer data setup
will abort the setup operation. The recorder will then freeze
in the live screen and disable setup and deletion of officer
data.
AUTO mode
When a USB memory device is connected to the recorder,
or when connection is detected after turning power on, the
officer data for one or two officers is automatically read in
and activated (see “Text Files Used with the Recorder” on
pages 29 - 33).
Connect a USB memory device containing officer data
to the recorder.
The [READY] lamp flashes
for one second:
This indicates that the data
was correctly read.
The [BUSY] lamp flashes for one second:
This indicates that the data could not be correctly read.
Disconnect the USB memory device and then reconnect
it. If the [READY] lamp does not flash when the USB
memory device is connected again, check if the officer
data file has been correctly saved to the USB memory
device.
If the above measures do not correct this problem,
replace the USB memory device.
Notes:
If a USB memory device is connected and the officer data is
read during recording, the file will be split up at the location
where reading was effectuated.
Once the officer data has been read, the USB memory
device may be removed.
Once the officer data has been set up, it is not deleted
even when power is turned off or the mode changed.
•
•
•

36
37
Setting up/Deleting Officer Data (continued)
MANUAL mode
Display the menu on the LCD panel. Then read and load the
officer data from the Officer setup top screen.
RETURN
MENU
CONTROL PANEL
ON/
OFF
Cursor button
MENU button
1. Press the [MENU] button.
The Menu appears.
2. Press the [ ,] buttons to select [Setup/Info]
and press the [ ] button to confirm the entry.
Confirm
Select
3. Press the [ ,] buttons to select [Officer] and
press the [ ] button to confirm the entry.
Confirm
Select
The Officer setup top screen appears.
4. Connect a USB memory device containing
officer data to the recorder.
5. Press the [ ,] buttons to select [Officer1]
and press the [ ] button to confirm the entry.
Confirm
Select
6. Press the [ ,] buttons to select [Load] and
press the [ ] button to confirm the entry.
Select
Confirm
This registers officer1 and the name and ID appear.
Note:
Long names and IDs may not be displayed in full.
Entering Officer2 data
Replace the USB memory device with the one containing
data for another officer. Then select [Officer2] in Step 5
mentioned above and repeat Step 6.
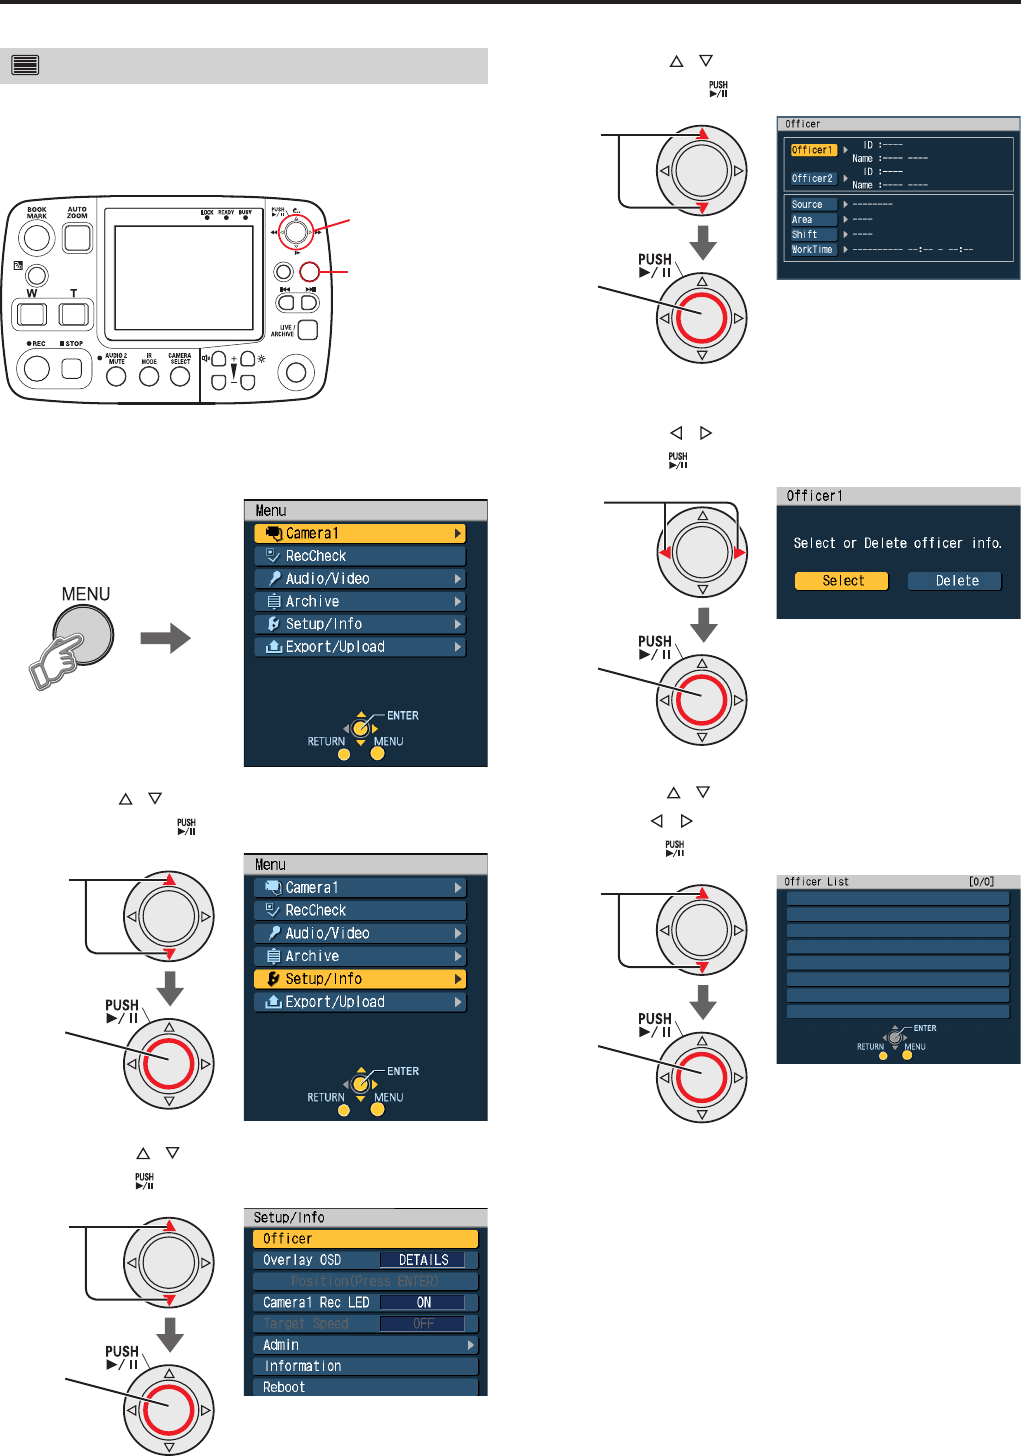
38
39
Setting up/Deleting Officer Data (continued)
LIST mode
Open the menu on the LCD panel and read in the officer data
registered in the recorder from the Officer setup top screen.
For details on registering officer data, refer to “Load Officer”
on page 85.
RETURN
MENU
CONTROL PANEL
ON/
OFF
Cursor button
MENU button
1. Press the [MENU] button.
The Menu appears.
2. Use the [ ,] buttons to select [Setup/Info]
and press the [ ] button to confirm the entry.
Confirm
Select
3. Press
the [
,
] buttons to select [Officer] and
press
the [ ] button
to confirm the entry.
Confirm
Select
The Officer setup top screen appears.
4. Press the [ ,] buttons to select [Officer1]
and press
the [ ] button
to confirm the entry.
Confirm
Select
A list of officers registered in the recorder appears.
5. Press the [ ,] buttons to select [Select] and
press the [ ] buttons to confirm the entry.
Select
Confirm
6. Press
the [
,
] buttons to select an officer,
(use the [
,
] buttons to go between pages) and
press
the [ ] button
to confirm the entry.
Confirm
Select
The Officer setup top screen appears when officer1 has
been set.
Note:
Long names and IDs may not be displayed in full.
Entering Officer2 data
Select [Officer2] in Step 4 mentioned above, and repeat
Steps 5 and 6.

38
39
Setting up/Deleting Officer Data (continued)
Setting the Source data
Display the menu on the LCD panel. Then read the Source
data loaded in the recorder and set. For details on loading
the Source data, see “Load Source” on page 85.
RETURN
MENU
CONTROL PANEL
ON/
OFF
Cursor button
MENU button
1. Press the [MENU] button.
The Menu appears.
2. Press the [ ,] buttons to select [Setup/Info]
and press the [ ] button to confirm the entry.
Confirm
Select
3. Press the [ ,] buttons to select [Officer] and
press the [ ] button to confirm the entry.
Confirm
Select
The Officer setup top screen appears.
4. Press the [ ,] buttons to select [Source] and
press the [ ] button to confirm the entry.
Confirm
Select
The registered Source data list appears.
5. Press the [ ,] buttons to select Source data
(use the [ ,] buttons to go between pages),
and press the [ ] button to confirm the entry.
Confirm
Select
The Source data are set, and the Officer setup top
screen appears.
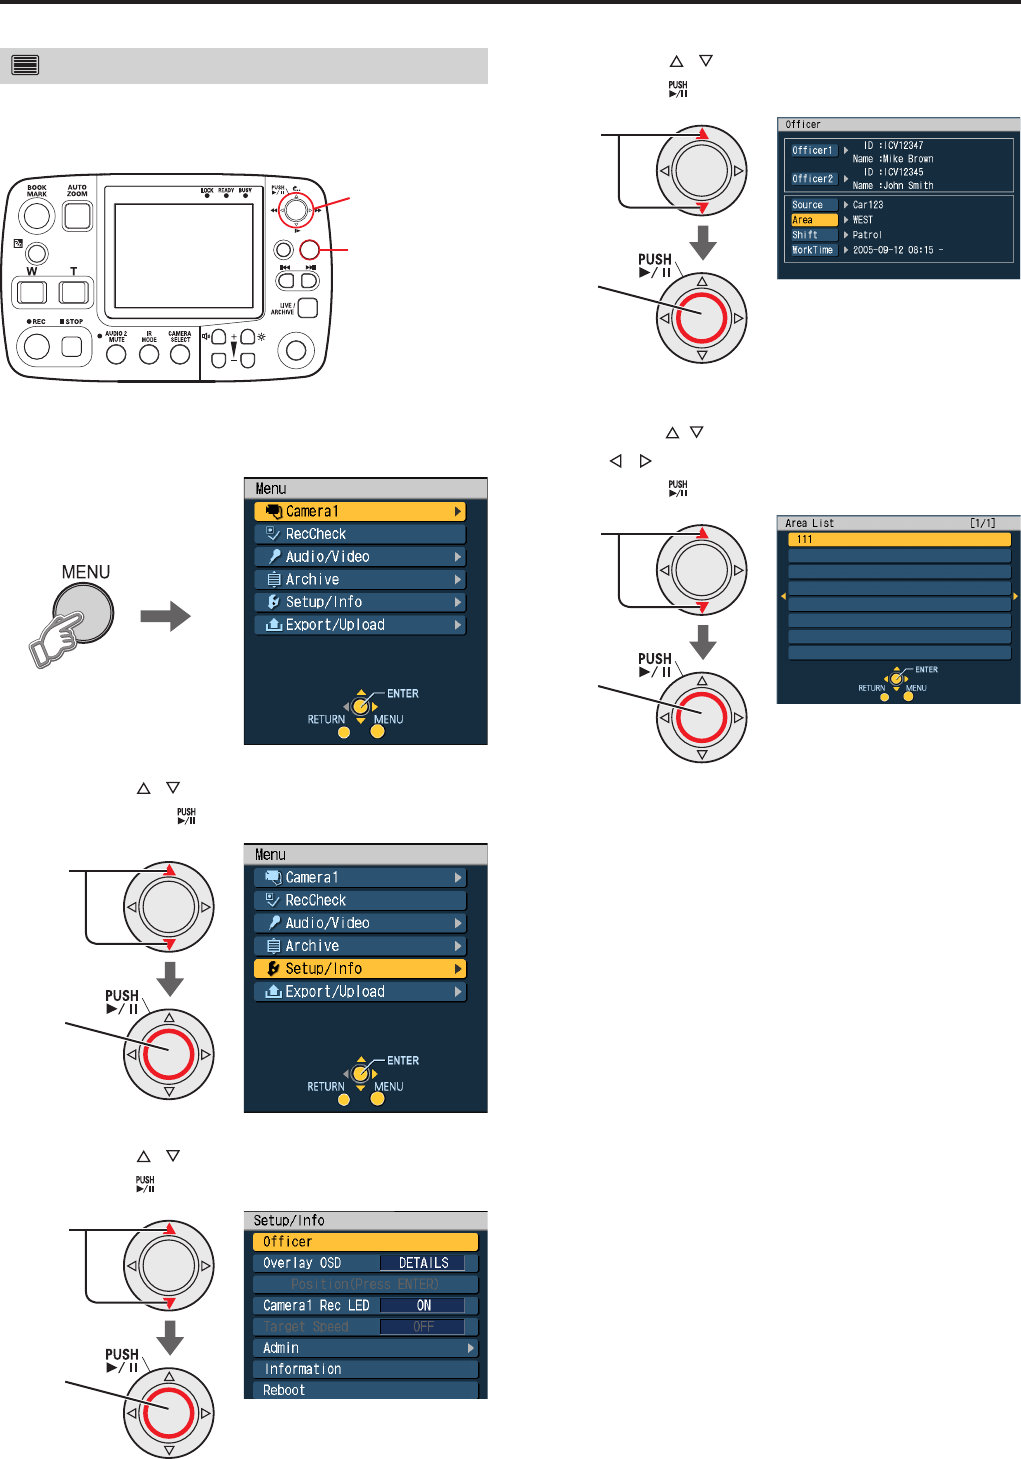
40
41
Setting up/Deleting Officer Data (continued)
Setting the Area data
Display the menu on the LCD panel. Then read the Area
data loaded in the recorder and set. For details on loading
the Area data, see “Load Area” on page 85.
RETURN
MENU
CONTROL PANEL
ON/
OFF
Cursor button
MENU button
1. Press the [MENU] button.
The Menu appears.
2. Press the [ ,] buttons to select [Setup/Info]
and press the [ ] button to confirm the entry.
Confirm
Select
3. Press the [ ,] buttons to select [Officer] and
press the [ ] button to confirm the entry.
Confirm
Select
The Officer setup top screen appears.
4. Press the [ ,] buttons to select [Area] and
press the [ ] button to confirm the entry.
Confirm
Select
The registered Area data list appears.
5. Press the [ ,] buttons to select Area data (use
the [ ,] buttons to go between pages), and
press the [ ] button to confirm the entry.
Confirm
Select
The Area data are set, and the Officer setup top screen
appears.

40
41
Setting up/Deleting Officer Data (continued)
Setting the Shift data
Display the menu on the LCD panel. Then read the Shift
data loaded in the recorder and set. For details on loading
the Shift data, see “Load Shift” on page 85.
RETURN
MENU
CONTROL PANEL
ON/
OFF
Cursor button
MENU button
1. Press the [MENU] button.
The Menu appears.
2. Press the [ ,] buttons to select [Setup/Info]
and press the [ ] button to confirm the entry.
Confirm
Select
3. Press the [ ,] buttons to select [Officer] and
press the [ ] button to confirm the entry.
Confirm
Select
The Officer setup top screen appears.
4. Press the [ ,] buttons to select [Shift] and
press the [ ] button to confirm the entry.
Confirm
Select
The registered Shift data list appears.
5. Press the [ ,] buttons to select Shift data (use
the [ ,] buttons to go between pages), and
press the [ ] button to confirm the entry.
Confirm
Select
The Shift data are set, and the Officer setup top screen
appears.
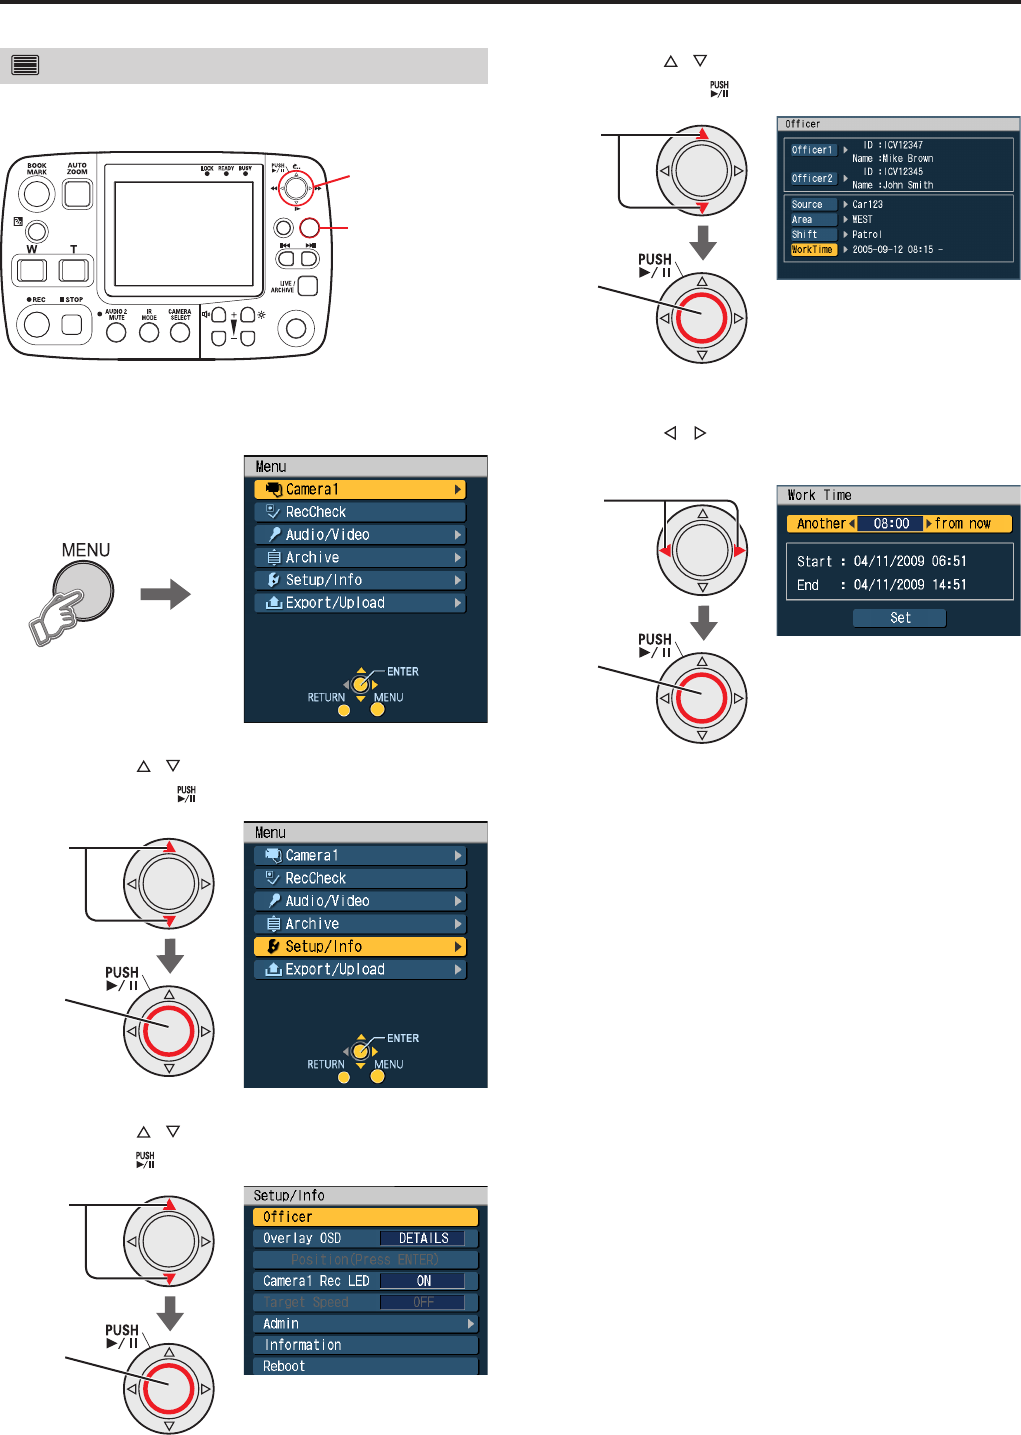
42
43
Setting up/Deleting Officer Data (continued)
Setting the Work Time data
Display the menu on the LCD panel. Then read the Work
Time data loaded in the recorder and set.
RETURN
MENU
CONTROL PANEL
ON/
OFF
Cursor button
MENU button
1. Press the [MENU] button.
The Menu appears.
2. Press the [ ,] buttons to select [Setup/Info]
and press the [ ] button to confirm the entry.
Confirm
Select
3. Press the [ ,] buttons to select [Officer] and
press the [ ] button to confirm the entry.
Confirm
Select
The Officer setup top screen appears.
4. Press the [ ,] buttons to select [Work Time]
and press the [ ] button to confirm the entry.
Confirm
Select
The Work Time setting screen appears.
5. Press the [ ,] buttons to set Work Time data.
The setting is made on a 15-minute basis.
Select
Confirm
6. Press the [Set] button.
The Work Time data are set, and the Officer setup top
screen appears.
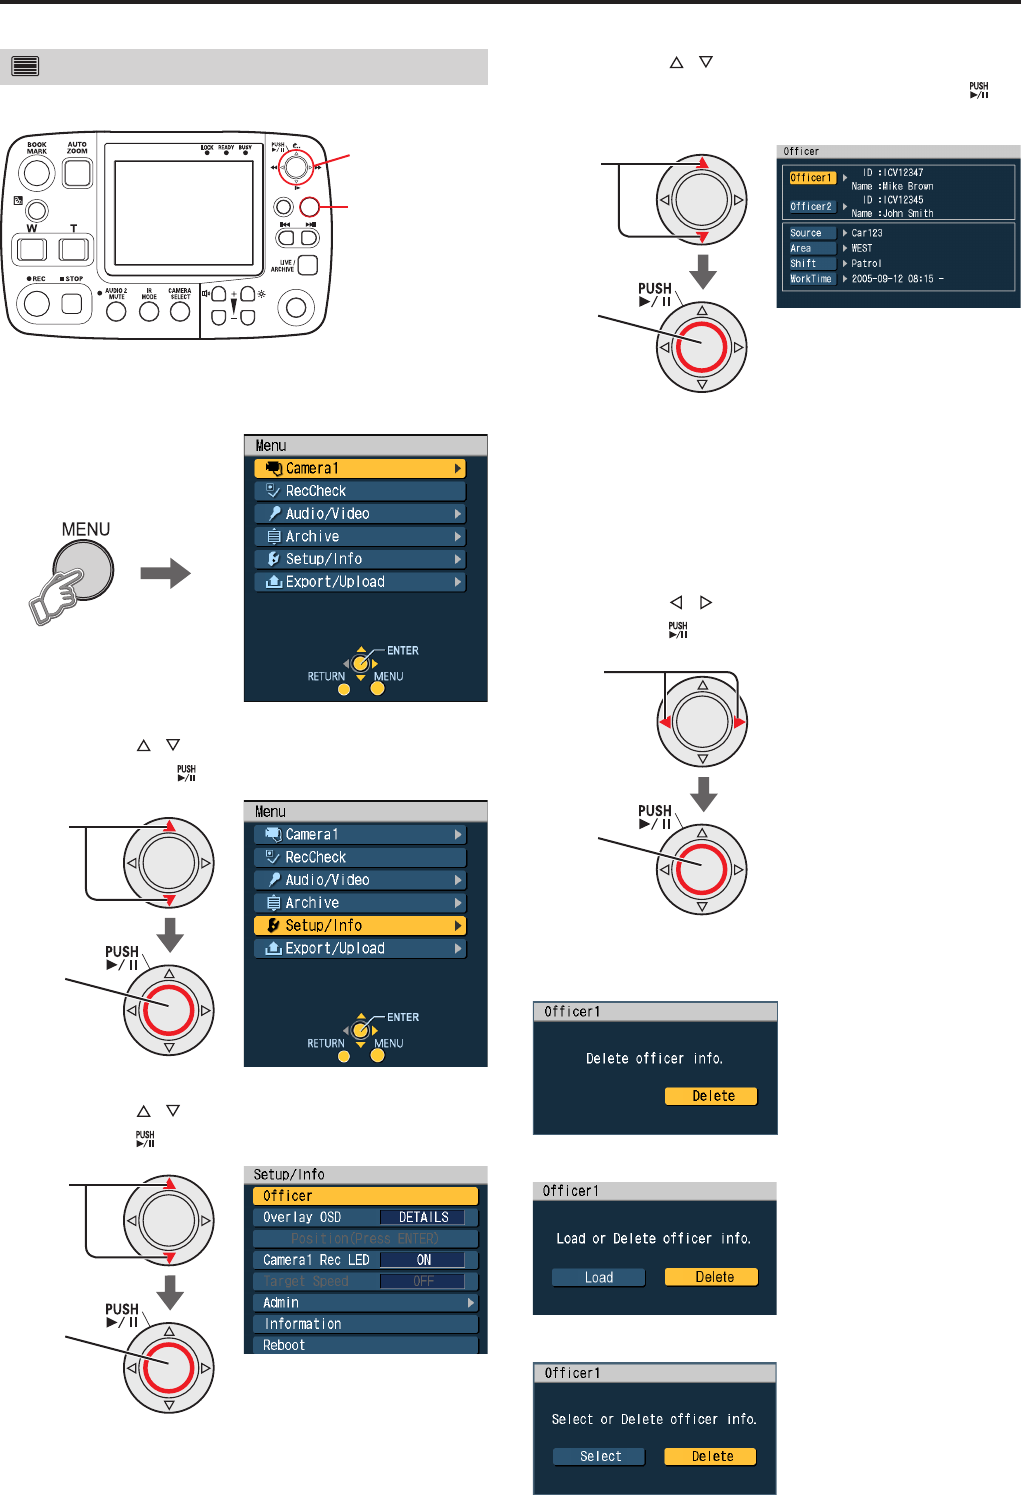
42
43
Setting up/Deleting Officer Data (continued)
Deleting entered data
RETURN
MENU
CONTROL PANEL
ON/
OFF
Cursor button
MENU button
1. Press the [MENU] button.
The Menu appears.
2. Press the [ ,] buttons to select [Setup/Info]
and press the [ ] button to confirm the entry.
Confirm
Select
3. Press the [ ,] buttons to select [Officer] and
press the [ ] button to confirm the entry.
Confirm
Select
The Officer setup top screen appears.
4. Press the [ ,] buttons to select [Officer1]
or [Officer2] to be deleted, and press the [ ]
button to confirm the entry.
Confirm
Select
Notes:
Only Officer1 and Officer2 data can be selected. Even if
Source, Area, Shift, or Work Time is selected, the data
cannot be deleted.
When the Officer1 data are deleted, the Source, Area,
Shift, and Work Time data for the Officer1 are also
deleted.
5. Press the [ ,] buttons to select [Delete] and
press the [ ] button to confirm the entry.
Select
Confirm
The displayed screen depends on the setup method.
<When set in AUTO mode>
<When set in MANUAL mode>
<When set in LIST mode>
This deletes officer data selected in Step 4.
•
•
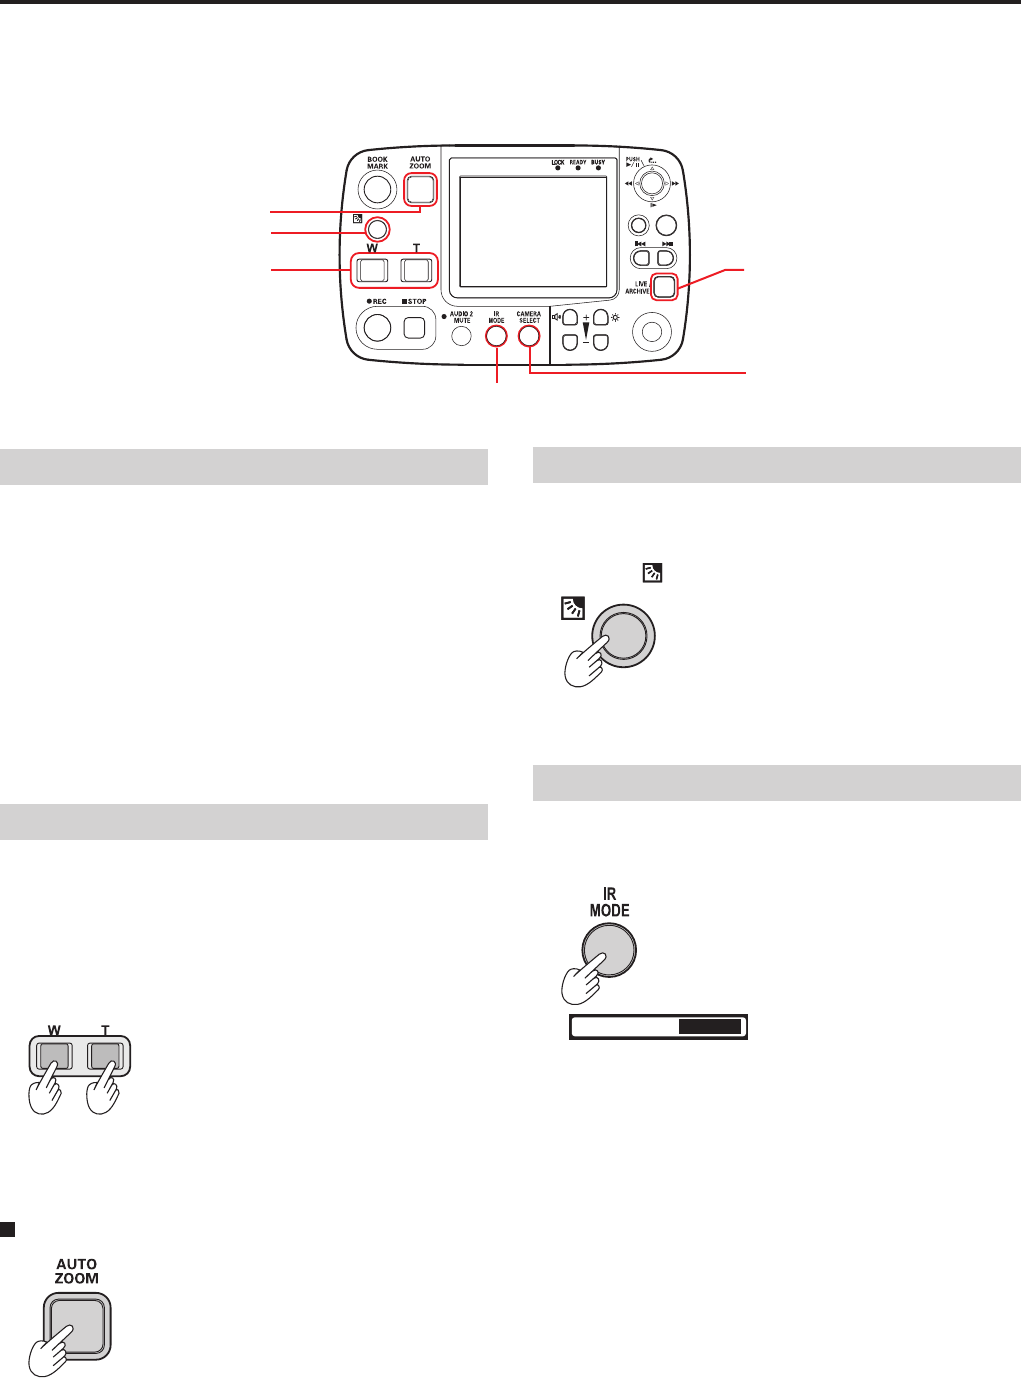
44
45
Use the functions described below to manipulate video output by the camera connected to the [CAMERA 1] connector and
sound from the microphone.
Press the [LIVE/ARCHIVE] button to view live video.
A commercially available cameras connected to the [CAMERA 2, 3, 4, 5, 6] connectors cannot be controlled.
Viewing Live Video
RETURN
MENU
CONTROL PANEL
ON/
OFF
Backlight compensation button
Zoom buttons
AUTO ZOOM button
IR MODE button
CAMERA SELECT button
LIVE/ARCHIVE button
◎Selecting pictures
Press the [CAMERA SELECT] button.
Each press of the button toggles the main and sub pictures.
Holding the button pressed for more than two seconds
switches the preset (Preset1, Preset2 or Preset3).
Notes:
Color Camera operations in the Remote Control Panel
menu cannot be accessed when one of the [CAMERA] [2]
to [6] connector input is selected.
If the preset setting is enabled, the main screen for
Preset1 is displayed with selection of the [CAMERA
SELECT] button.
◎Zooming
To view the overall scene, press the [W] button and zoom
out.
To view fine details, press the [T] button and zoom in.
1. Press the [W] button or the [T] button.
The camera zooms in or out while the button is kept
depressed.
or
2. Release the button when reaching the desired
image size.
Pressing [AUTO ZOOM] button
It zooms in the image to the target ratio and then pauses
before zooming out towards the wide angle end. When
the zoom in operation goes beyond the target ratio, it first
zooms out to the target ratio.
•
•
◎Making a backlit image easier to view
A dark subject against a bright background can be made
easier to view.
Press the [ ] button.
This button toggles between “ON” and “OFF” at each press.
Set this button to “OFF” for normal operation.
◎Making a dark image easier to view
Use the infrared mode to make dark images easier to view.
Press the [IR MODE] button.
The
IR
ON
appears.
Each press of this button switches the function from “AUTO”,
“ON” and “OFF”. Set this function to “AUTO” for normal
operation.
Note:
This function can be used together with “Adjusting image
brightness” (on page 47) to make an image brighter.
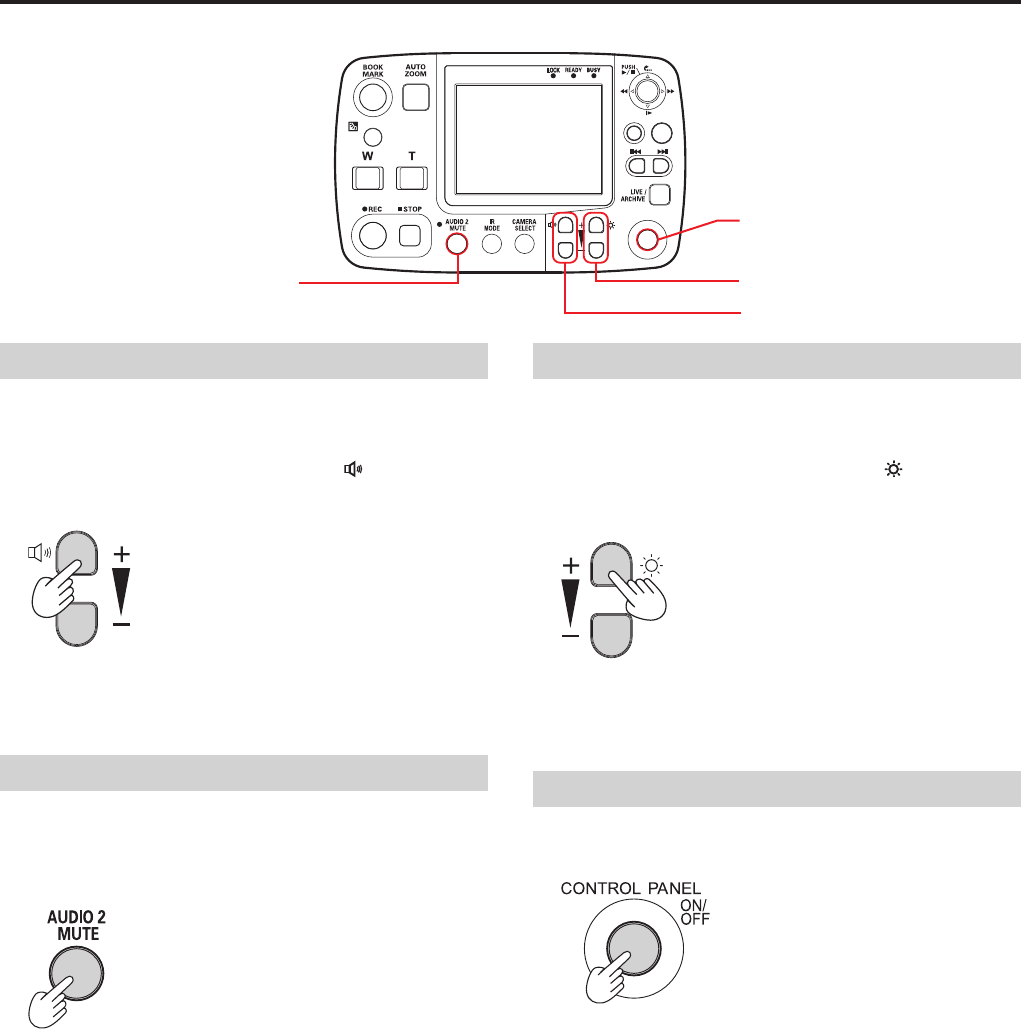
44
45
Viewing Live Video (continued)
RETURN
MENU
CONTROL PANEL
ON/
OFF
CONTROL PANEL
ON/OFF button
AUDIO 2 MUTE button Brightness buttons
◎Adjusting speaker volume
Adjust the sound volume of the speaker on the remote
control panel with the volume control buttons.
1. Press the [+] or [–] button of the [ ] button.
Pressing the [+] button increasing the volume, while
pressing the [–] button decreases the volume.
2. Release the button when reaching the desired
volume.
◎Muting Audio 2 input sound
Press the [AUDIO 2 MUTE] button.
Each press of this button toggles the button between record
and mute.
Note:
It is not possible to switch Audio1, 3, or 4 sound recording in
this manner.
◎Adjusting brightness of the LCD panel
Adjust the brightness of the LCD panel on the remote control
panel with the brightness buttons.
1. Press the [+] or [–] button of the [ ] buttons.
Pressing the [+] button makes the LCD panel brighter,
while pressing the [–] button makes the it darker.
2. Release the button when reaching the desired
brightness.
◎Turning off the LCD panel
Press the [CONTROL PANEL ON/OFF] button.
This turns off the LCD panel and lamps and disables all
button functions.
Pressing this button a second time turns on the LCD panel
and lamps and button operations again become available.
Volume control buttons
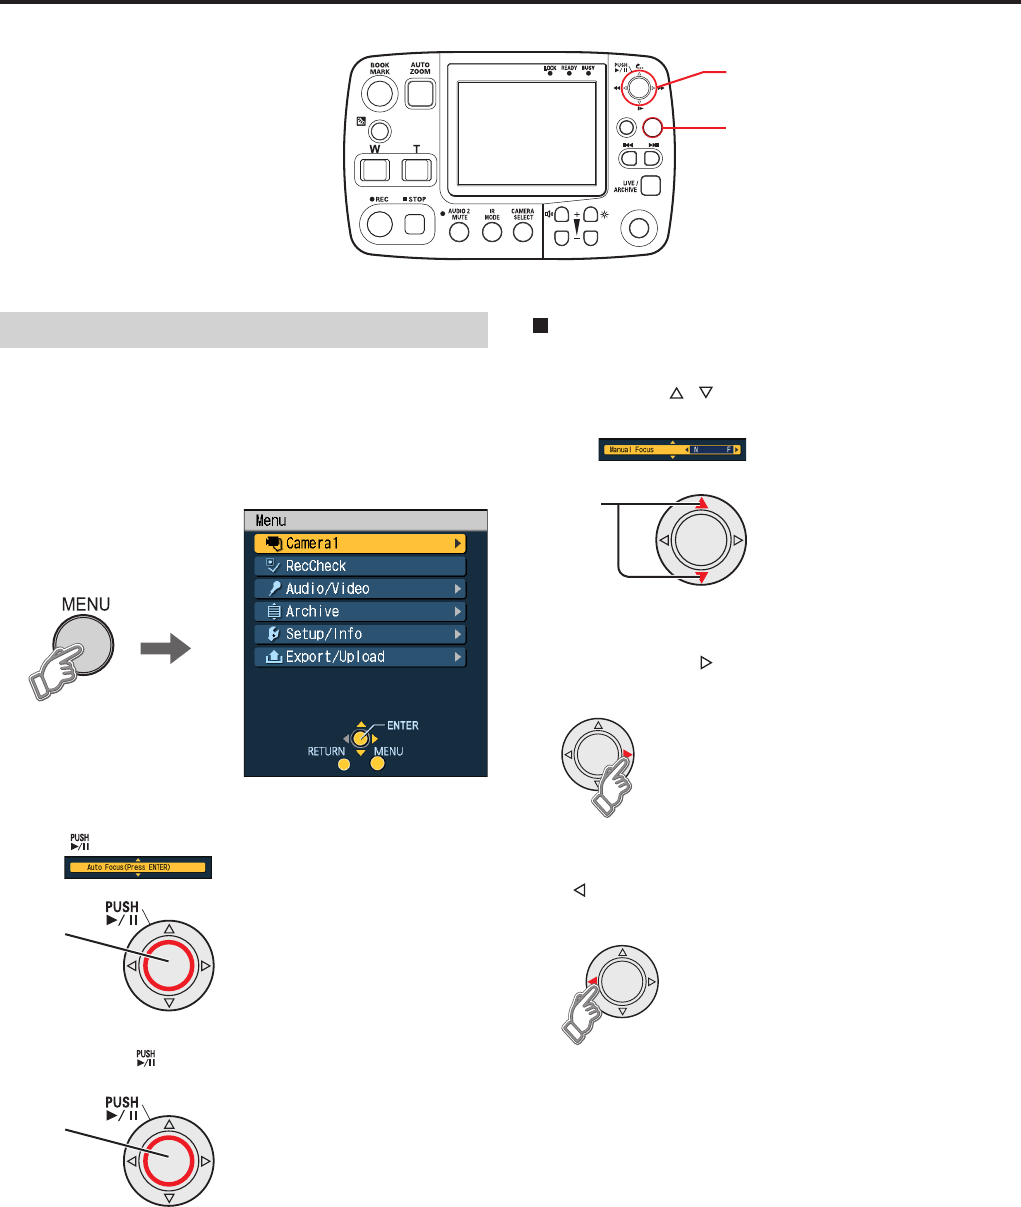
46
47
Viewing Live Video (continued)
RETURN
MENU
CONTROL PANEL
ON/
OFF
Cursor button
MENU button
◎Adjusting image focus
Note:
This menu is available only when the [CAMERA 1] connector
input is selected.
1. Press the [MENU] button.
The Menu appears.
2. Confirm that [Camera1] is selected, and press
the [ ] button.
The appears.
Confirm
3. Press the [ ] button.
Confirm
The autofocus function automatically focuses the image.
When the autofocus function cannot properly
focus the image.
1. Press the [ ,] buttons to select [Manual
Focus].
The appears.
Select
2. To focus on a more distant subject, keep
pressing the [ ] button and release it when it
comes into focus.
To focus on a closer subject, keep pressing the
[ ] button and release it when it comes into
focus.
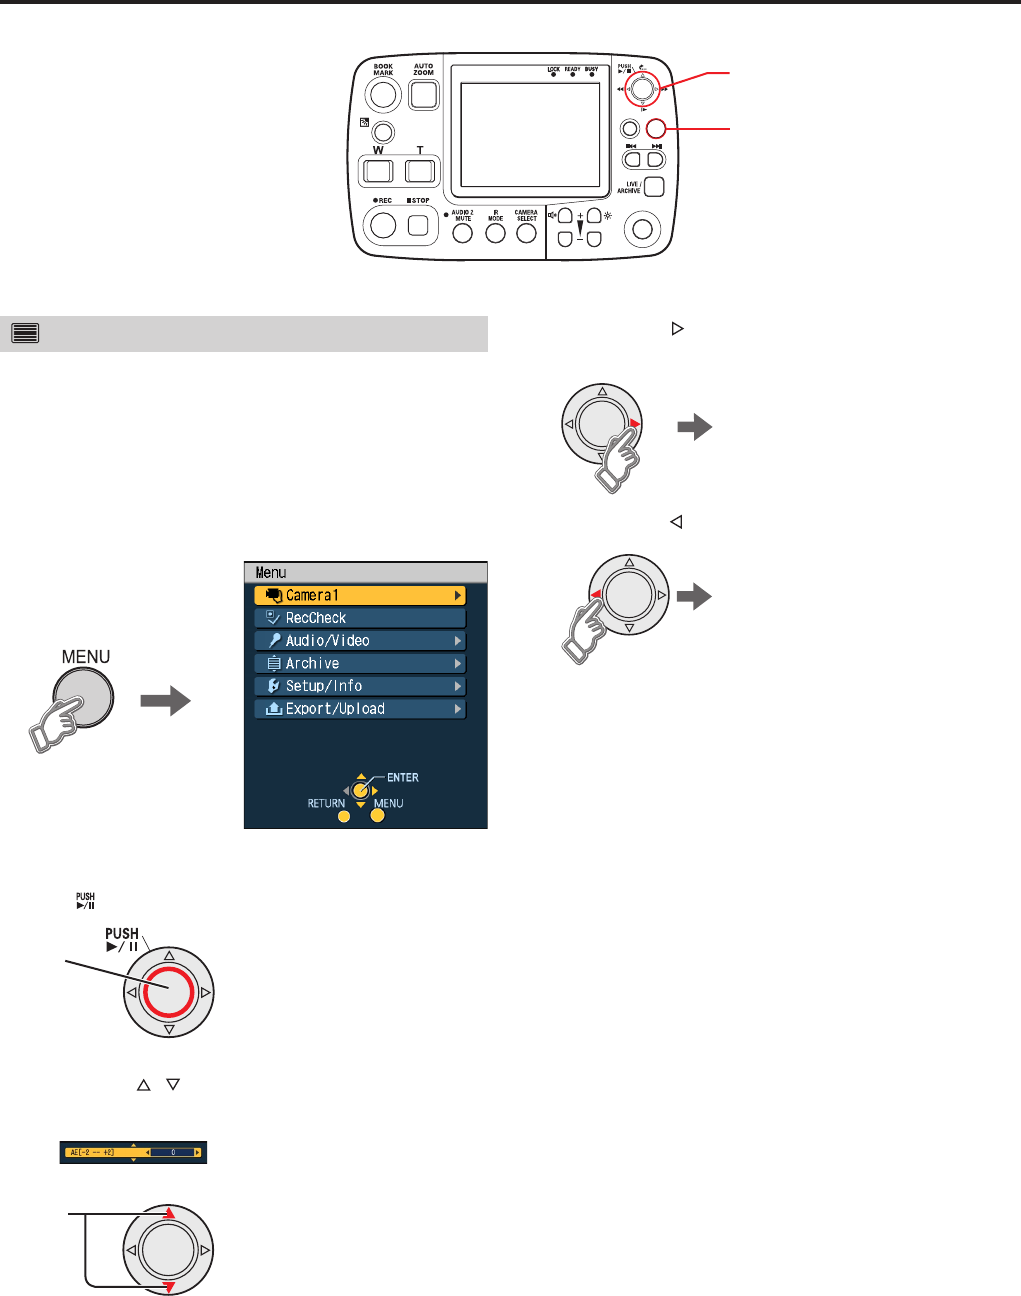
46
47
Viewing Live Video (continued)
Adjusting image brightness
Total brightness of the video captured by the color camera is
adjusted.
Note:
This menu is available only when the [CAMERA 1] connector
input is selected.
1. Press the [MENU] button.
The Menu appears.
2. Confirm that [Camera1] is selected, and press
the [ ] button.
Confirm
3. Press the [ ,] buttons to select
[AE [-2 -- +2]].
The appears.
Select
RETURN
MENU
CONTROL PANEL
ON/
OFF
Cursor button
MENU button
4. Press the [ ] button to make the image
brighter.
Brighter
Press the [ ] button to make the image darker.
Darker
Set this button to “0” (zero) for normal operation.
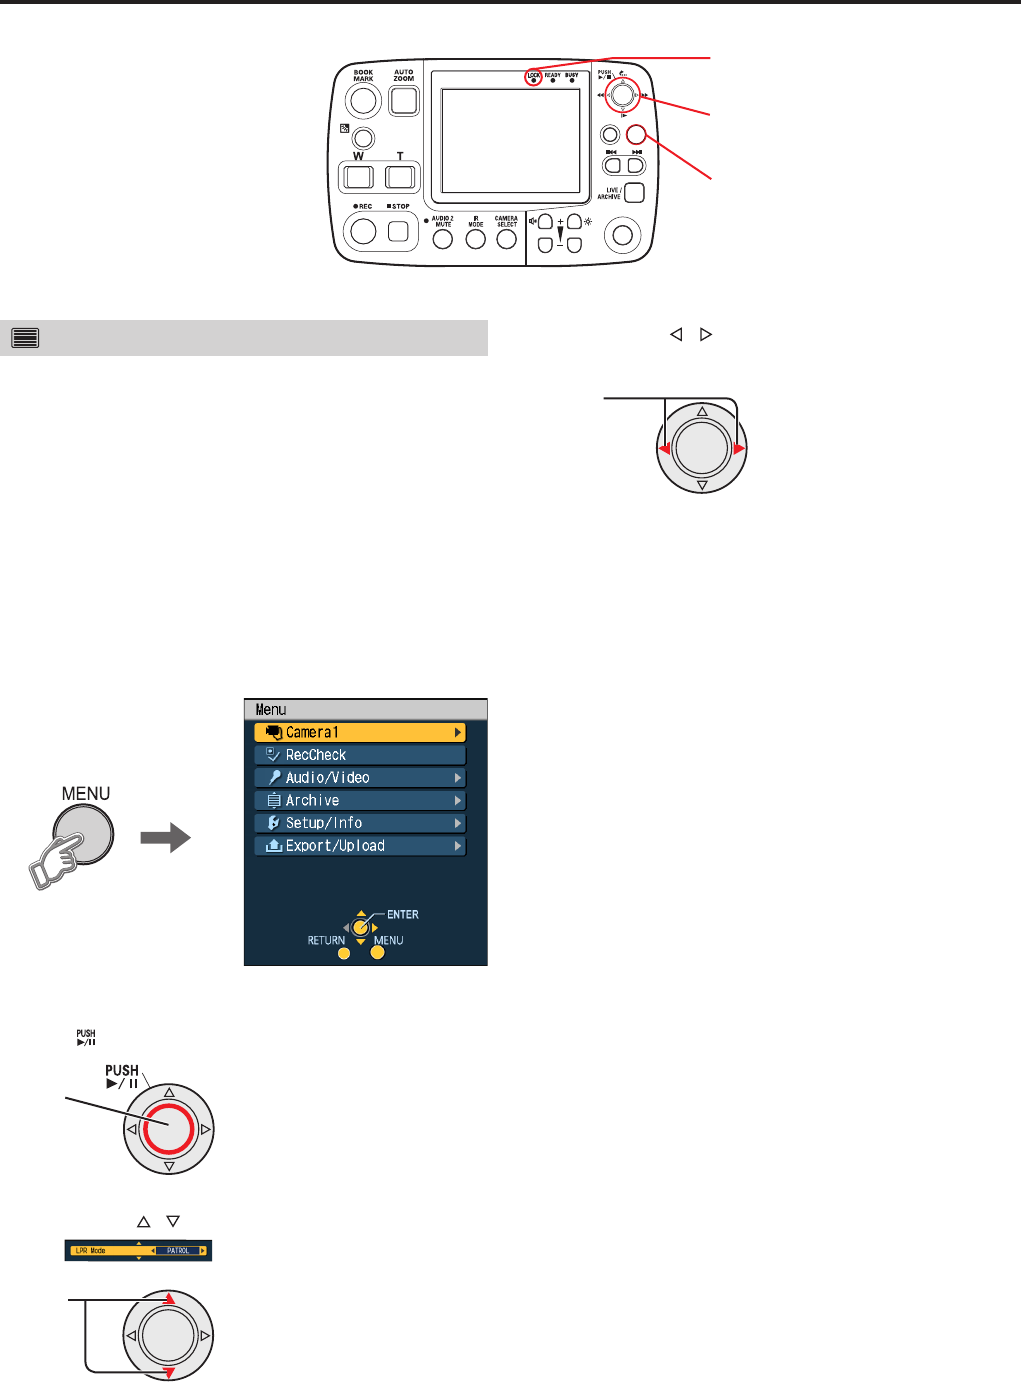
48
49
Viewing Live Video (continued)
RETURN
MENU
CONTROL PANEL
ON/
OFF
Cursor button
MENU button
LOCK lamp
Setting LPR mode
When the camera for the LPR mode is connected to the
[CAMERA 3] connector (see “Example” on page 5), use the
signal output from the [VIDEO OUT 1] connector, and set
[VIDEO OUT 1] on the Audio/Video screen to “CAM3”.
Use of license plate recognition requires the following setup.
This menu is available only when [Init LPR Mode] in
administrator setup is set to “ENABLE” (see “Camera1” on
page 88).
Note:
This menu is available only when the [CAMERA 1] connector
input is selected.
1. Press the [MENU] button.
The Menu appears.
2. Confirm that [Camera1] is selected, and press
the [ ] button.
Confirm
3. Press the [ ,] buttons to select [LPR Mode].
The appears.
Select
4. Press the [ ,] buttons to select the
recognition mode.
Select
LPR: Engages the License Plate Recognition mode and
the [LOCK] lamp blinks. [LPR Shutter Speed] and
[LPR Zoom] now become available.
PATROL: Engages the normal mode. [Patrol Shutter
Speed] and [Patrol Zoom] now become
available.
Note:
Changing [Init LPR Mode] to “DISABLE” in administrator
setup while setting “LPR” engages “PATROL” and [LPR
Mode] is no longer available.
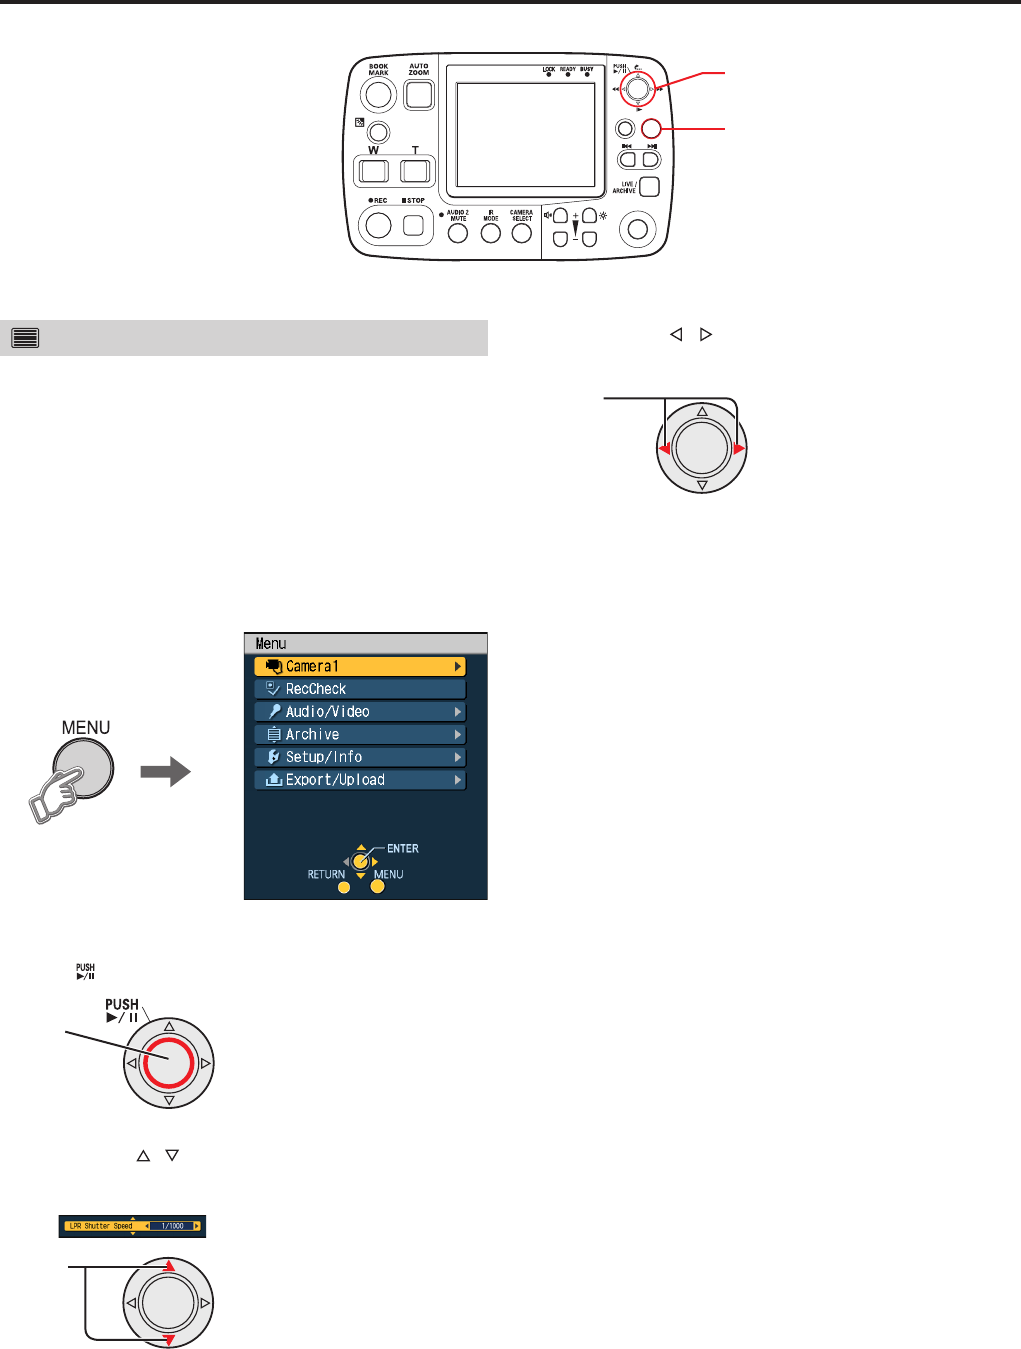
48
49
Viewing Live Video (continued)
RETURN
MENU
CONTROL PANEL
ON/
OFF
Cursor button
MENU button
Setting shutter speed (in LPR mode)
Set a shutter speed to capture sharp video of fast-moving
subjects.
This menu is available only when [Init LPR Mode] in
administrator setup is set to “ENABLE” and [LPR Mode] is
set to “LPR”.
Note:
This menu is available only when the [CAMERA 1] connector
input is selected.
1. Press the [MENU] button.
The Menu appears.
2. Confirm that [Camera1] is selected, and press
the [ ] button.
Confirm
3. Press the [ ,] buttons to select [LPR Shutter
Speed].
The appears.
Select
4. Press the [ ,] buttons to select a shutter
speed.
Select
AUTO:
Automatically adjusts the shutter speed to ambient
light.
1/500, 1/1000: Set as required by the subject.
Note:
A recording started by a recording trigger during license plate
recognition will automatically switch the shutter speed to
the value set by Patrol Shutter Speed. When recording stop
criteria are met, the shutter speed automatically returns to
the value set in Step 4.
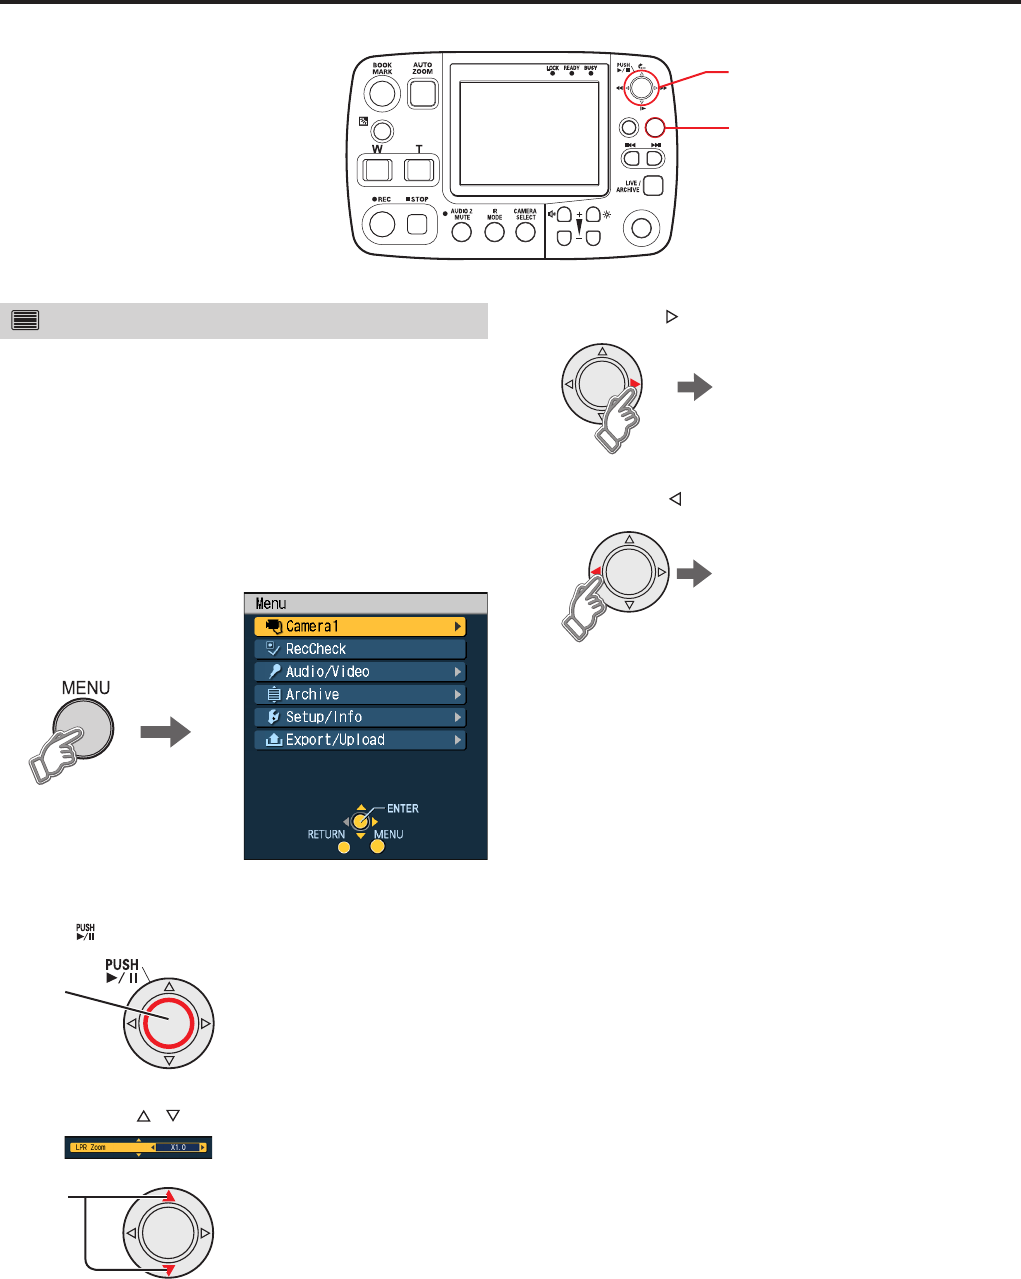
50
51
Viewing Live Video (continued)
RETURN
MENU
CONTROL PANEL
ON/
OFF
Cursor button
MENU button
Setting camera zoom (in LPR mode)
The camera zoom can be set in the range 1.0 to 22.0 x.
This menu is available only when [Init LPR Mode] in
administrator setup is set to “ENABLE” and [LPR Mode] is
set to “LPR”.
Note:
This menu is available only when the [CAMERA 1] connector
input is selected.
1. Press the [MENU] button.
The Menu appears.
2. Confirm that [Camera1] is selected, and press
the [ ] button.
Confirm
3. Press the [ ,] buttons to select [LPR Zoom].
The appears.
Select
4. Press the [ ] button to raise the ratio.
Raise the ratio.
Press the [ ] button to lower the ratio.
Lower the ratio.
Note:
A recording started by a recording trigger during license
plate recognition will automatically switch the camera zoom
setting to [Patrol Zoom]. When recording stop criteria are
met, the camera zoom setting is automatically switched to
[LPR Zoom].
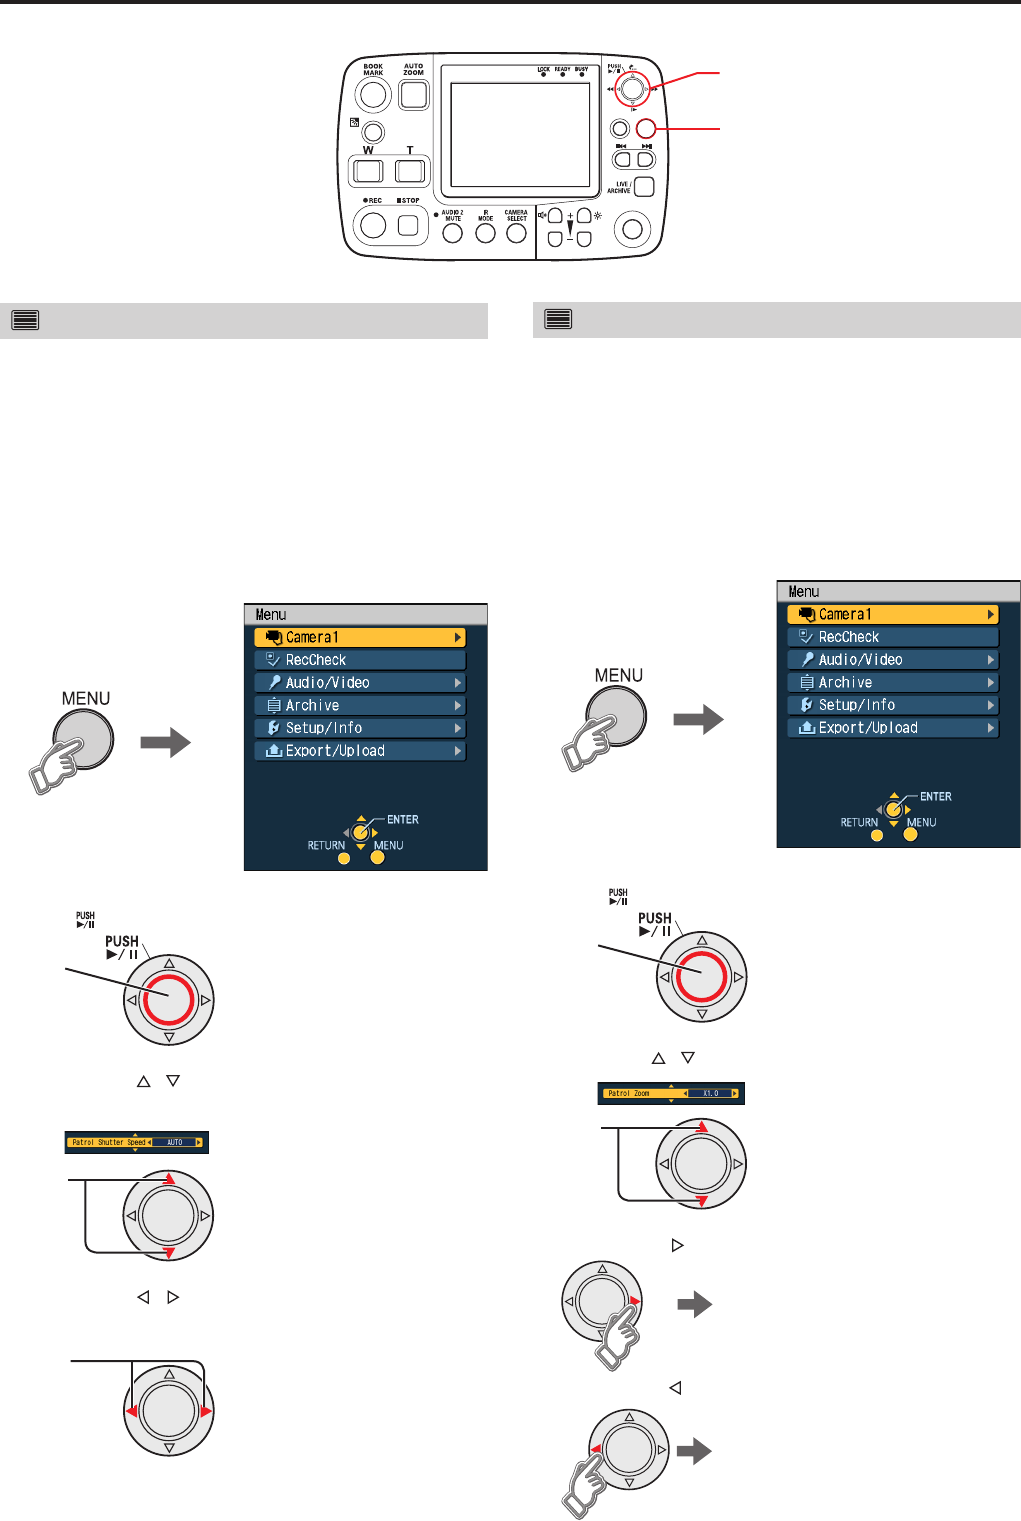
50
51
Viewing Live Video (continued)
RETURN
MENU
CONTROL PANEL
ON/
OFF
Cursor button
MENU button
Setting shutter speed (in PATROL mode)
Set a shutter speed to capture sharp video of fast-moving
subjects.
This menu is available only when [Init LPR Mode] in
administrator setup is set to “ENABLE” and [LPR Mode] is
set to “PATROL”.
Note:
This menu is available only when the [CAMERA 1] connector
input is selected.
1. Press the [MENU] button.
The Menu appears.
2. Confirm that [Camera1] is selected, and press
the [ ] button.
Confirm
3. Press the [ ,] buttons to select [Patrol
Shutter Speed].
The appears.
Select
4. Press the [ ,] buttons to select a shutter
speed.
Select
AUTO:
Automatically adjusts the shutter speed to
ambient light.
1/100, 1/500, 1/1000: Set as required by the subject.
Setting camera zoom (in PATROL mode)
The camera zoom can be set in the range 1.0 to 22.0 x.
This menu is available only when [Init LPR Mode] in
administrator setup is set to “ENABLE” and [LPR Mode] is
set to “PATROL”.
Note:
This menu is available only when the [CAMERA 1] connector
input is selected.
1. Press the [MENU] button.
The Menu appears.
2. Confirm that [Camera1] is selected, and press
the [ ] button.
Confirm
3. Use the [ ,] buttons to select [Patrol Zoom].
The appears.
Select
4. Press the [ ] button to raise the ratio.
Raise the ratio.
Press the [ ] button to lower the ratio.
Lower the ratio.
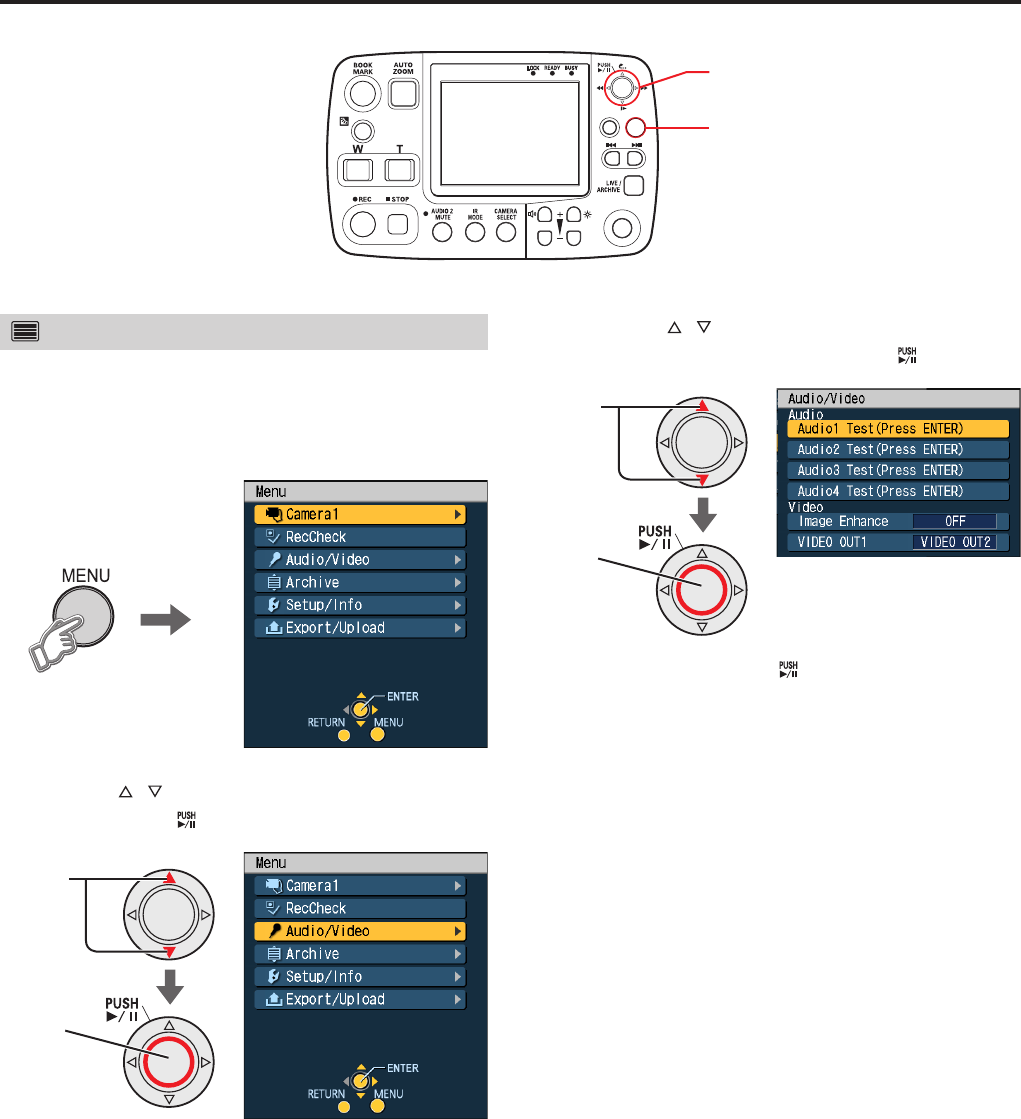
52
53
Viewing Live Video (continued)
RETURN
MENU
CONTROL PANEL
ON/
OFF
Cursor button
MENU button
Checking audio
Sound output is normally off when viewing live video. Use
the following steps to check that sound is input normally.
1. Press the [MENU] button.
The Menu appears.
2. Use the [ ,] buttons to select [Audio/Video]
and press the [ ] button to confirm the entry.
Confirm
Select
3.
Press the [
,
] buttons to select the channel
to be checked, and then press the [ ] button.
Confirm
Select
Sound is output while the [ ] button is depressed.
Notes:
The output sound may be too loud depending on the sound
volume setting. Lower the sound volume as required.
Audio channels set to OFF on the Audio Allocation screen
in Administrator setup cannot be selected.
•
•
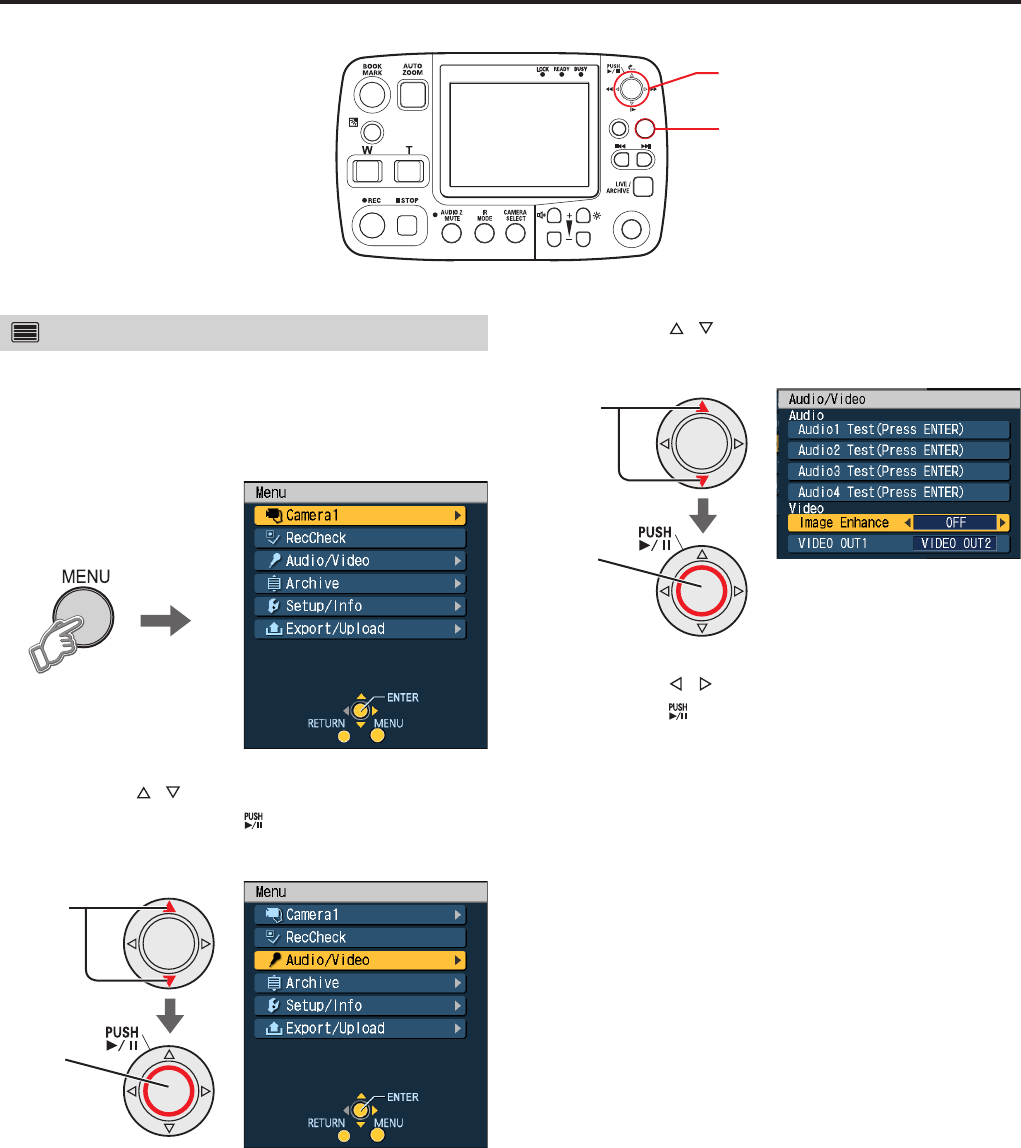
52
53
Viewing Live Video (continued)
RETURN
MENU
CONTROL PANEL
ON/
OFF
Cursor button
MENU button
Adjusting the image enhancement
The brightness of the dark part of the main picture is
adjusted. The sub picture is not adjusted.
1. Press the [MENU] button.
The Menu appears.
2. Press the [ ,] buttons to select [Audio/
Video] and press the [ ] button to confirm the
entry.
Confirm
Select
3. Press the [ ,] buttons to select [Image
Enhance].
Confirm
Select
4. Press the [ ,] buttons to set brightness, and
press the [ ] button to confirm the entry.
LOW: Adjusting slightly
HIGH: Adjusting strongly
OFF: No adjustment
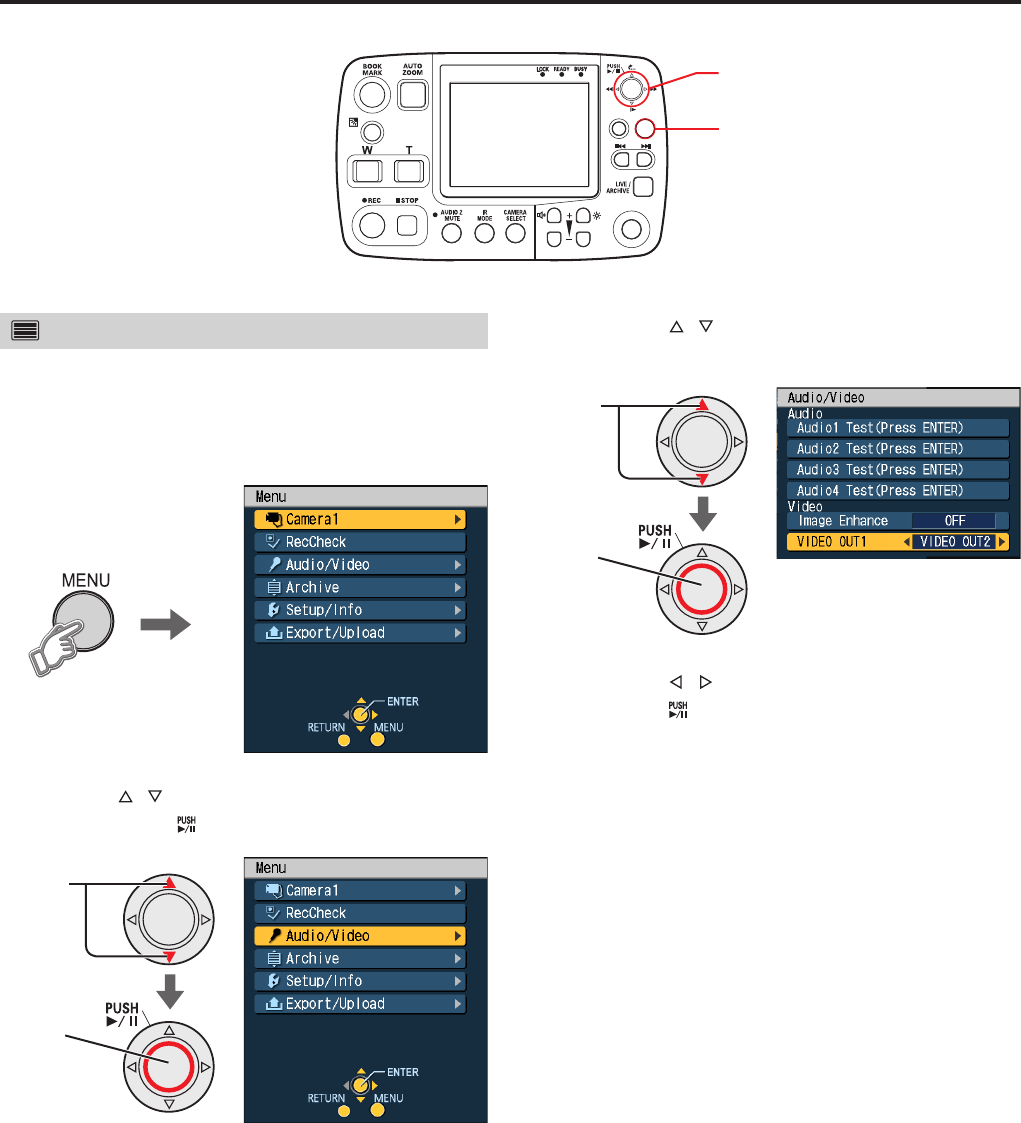
54
55
Viewing Live Video (continued)
RETURN
MENU
CONTROL PANEL
ON/
OFF
Cursor button
MENU button
Setting the output video
Set the through-out signal output from the [VIDEO OUT 1]
connector on the recorder.
1. Press the [MENU] button.
The Menu appears.
2. Use the [ ,] buttons to select [Audio/Video]
and press the [ ] button to confirm the entry.
Confirm
Select
3. Press the [ ,] buttons to select [VIDEO
OUT1].
Confirm
Select
4. Press the [ ,] buttons to select a signal, and
press the [ ] button to confirm the entry.
CAM1: Signal input to the [CAMERA 1] connector
CAM3: Signal input to the [CAMERA 3] connector
VIDEO OUT2: The same signal as that output from the
[VIDEO OUT 2] connector

54
55
Viewing Live Video (continued)
RETURN
MENU
CONTROL PANEL
ON/
OFF
Cursor button
MENU button
Viewing the status of the recorder
(Overlay OSD)
The following function is provided to enable viewing the
status of the recorder and the trigger signal (GPI1-16) status.
1. Press the [MENU] button.
The Menu appears.
2. Press the [ ,] buttons to select [Setup/Info]
and press the [ ] button to confirm the entry.
Confirm
Select
3. Press the [ ,] buttons to select [Overlay
OSD].
select
4.
Press the [
,
] buttons to select “AUTO”,
“SIMPLE”, “DETAILS” or “OFF”.
Select
AUTO: The simple overlay OSD (see page 56) appears
for 3 to 5 seconds when any of the following items
have been changed.
• Mode indication
• Status display
SIMPLE: The simple overlay OSD appears.
DETAILS: The detailed overlay OSD appears.
OFF: The overlay OSD closes.
Notes:
The administrator can set the Overlay OSD (Init Overlay
OSD) selected at power-on.
See the next page for how to read the overlay OSD.
When “AUTO” is selected and the [BOOK MARK] button is
pressed, the simple
overlay OSD
does not appear but the
bookmark icon appears for 1 to 2 seconds.
Adjusting the display position
When [Main OSD] or [Sub OSD] is set to OFF on the
Embedded OSD screen in administrator setup, select the
[Position (Press ENTER)] on the Setup/Info screen, and
press the [ ] button. Then the display position moves up
and down.
•
•
•
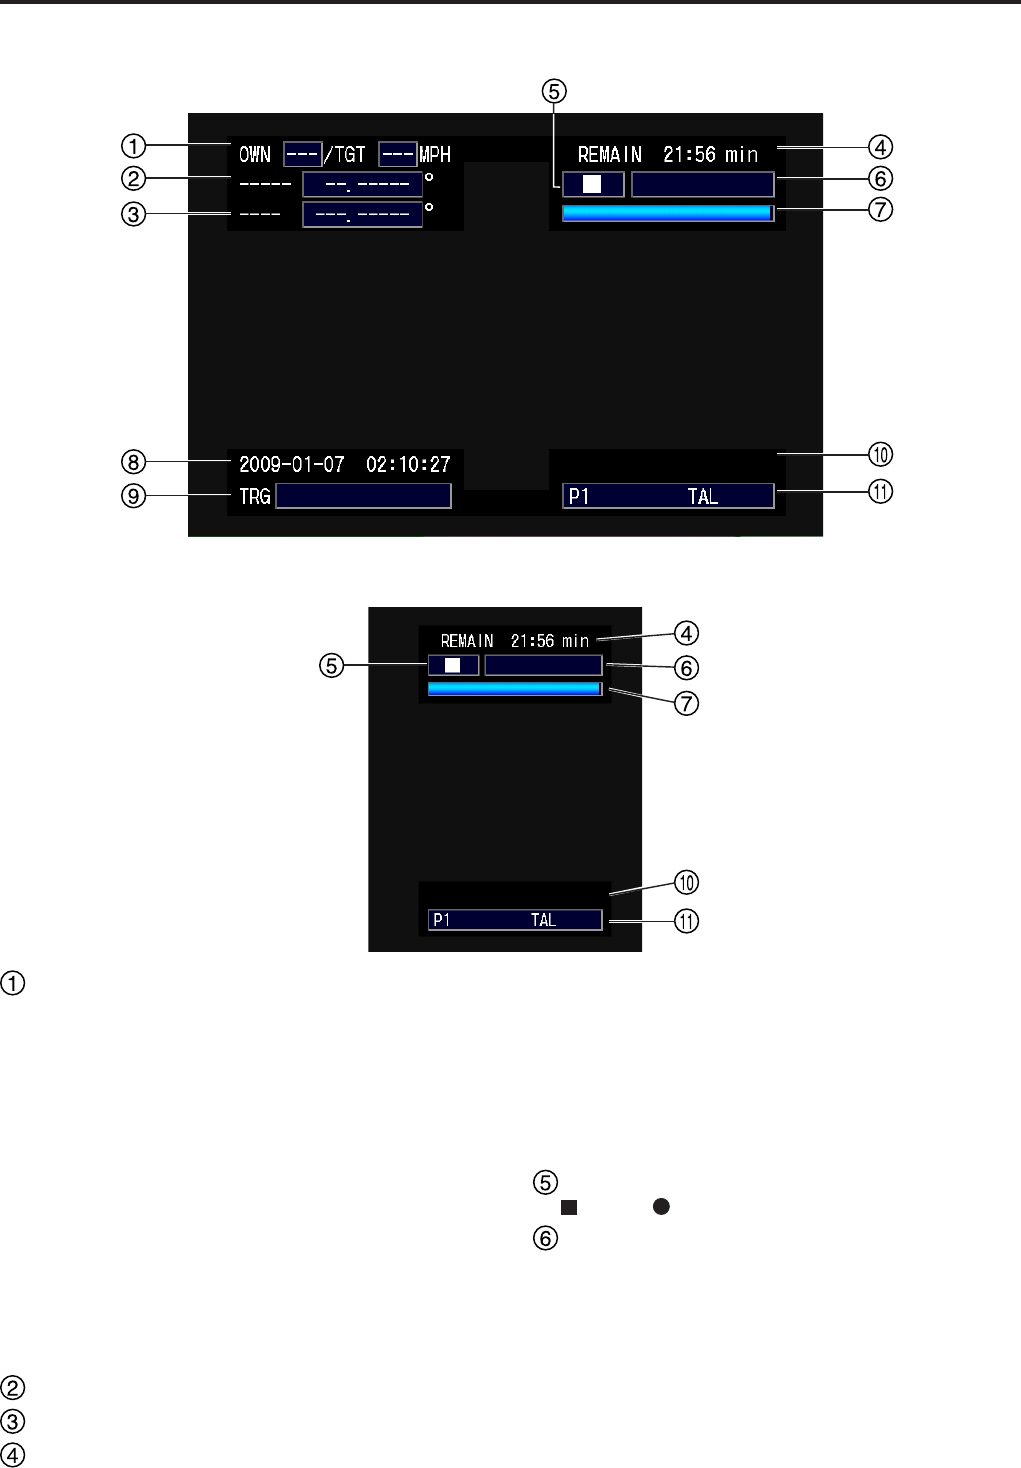
56
57
Viewing Live Video (continued)
<Detailed Overlay OSD>
<Simple Overlay OSD>
Speed (MPH / km/h)
OWN: Own vehicle speed
Own vehicle speed detected by a Radar or GPS
connected to the recorder is displayed. If the speed data
of both the Radar and GPS are sent from the recorder,
the speed detected by the Radar is displayed.
TGT: Target vehicle speed
Target vehicle speed indication depends on the type of
radar gun that is connected. For example, one ProLaser3
measurement indicates vehicle speed for a period of
about 10 seconds. If another measurement is made within
this 10 second period (approx.), the speed indication is
updated accordingly.
Note:
“ERR” appears to indicate that the radar gun measurement
result is not correct.
Location information (latitude)
Location information (longitude)
Remaining SDHC Memory Card recording time
(HH : MM)
REMAIN: The remaining recordable time
LOOP TIME: Loop period (total recording time)
The remaining recording time is updated about every
30 seconds.
When Loop recording is set to [ON], loop period (total
recording time) is displayed.
Note:
The total recording time does not include pre-recording and
post-recording time.
Mode indication
: paused : recording
Status display
Displays the status of the recorder and SDHC Memory
Card.
<Status of the recorder>
PON: Power ON recording “ON”
LOP: Loop recording “ON”
INT: Intermittent recording “ON”
<Status Display>
CARD FULL, CARD PROTECT, VUP CARD,
UNFORMATTED,
NO CARD, READ ERROR,
UNSUPPORTED, PLAY ERROR
(see “Status Display” on page 118)
•
•

56
57
Remaining time on the SDHC Memory Card
Displays the remaining time on the SDHC memory card
that can be recorded by the recorder.
Date/Time
Trigger signal (GPI1-16) input status
(GPI1 to 16 are displayed in order from the left.)
The characters assigned by [Display] appear when the
state set by [Detection] occurs.
Mark position
: Bookmark position
: Upload
Setup status of the recorder
P1 : Preset1 input is selected.
P2 : Preset2 input is selected.
P3 : Preset3 input is selected.
IR : Camera IR mode is “ON”.
IRA : Camera IR mode is “AUTO”.
BL : Camera backlight compensation is “ON”.
TAL : Camera1 Rec LED is “ON”.
LOCK : Operation button lock is “ON”.
Viewing Live Video (continued)
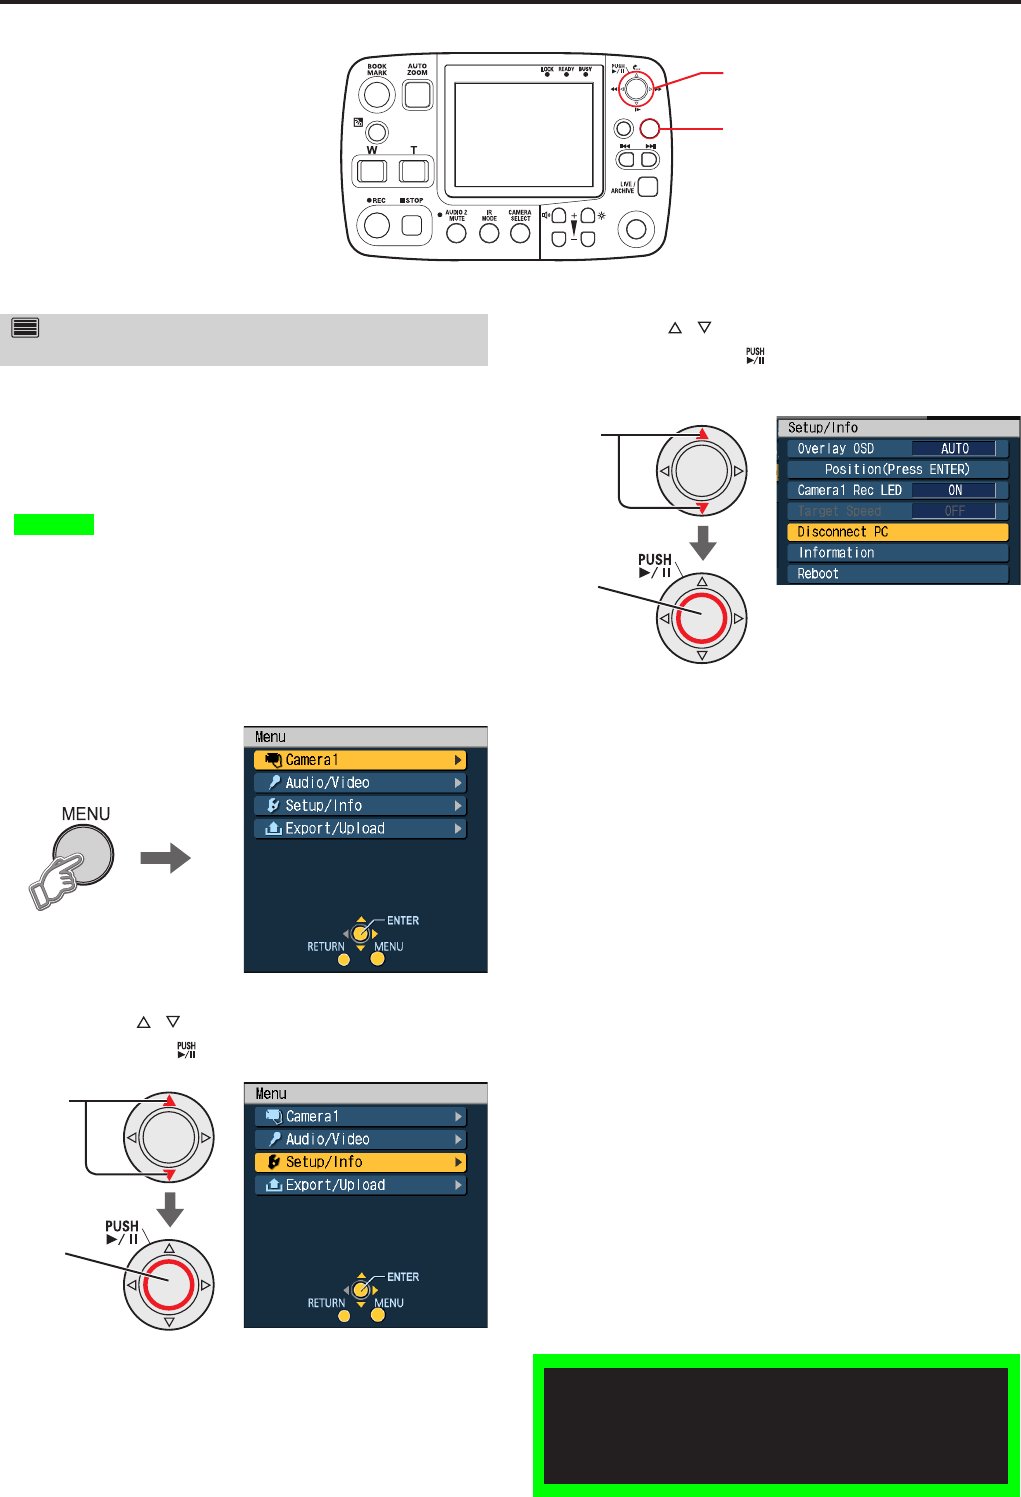
58
59
Viewing Live Video (continued)
RETURN
MENU
CONTROL PANEL
ON/
OFF
Cursor button
MENU button
Disconnecting the recorder from a Front-End
application
Connecting a PC with Front-End application installed to the
recorder and starting up a Front-End application freezes
the recorder in the live screen and disables the following
operations.
Setting up/Deleting Officer Data
A trial shoot
Playback
Administrator Setup
Exporting to the USB memory device
Follow these steps to disconnect a Front-End application
from the recorder to enable the above operations.
1. Press the [MENU] button.
The Menu appears.
2. Press the [ ,] buttons to select [Setup/Info]
and press the [ ] button to confirm the entry.
Confirm
Select
•
•
•
•
•
3. Press
the [
,
] buttons to select [Disconnect
PC] and press
the [ ] button
to confirm the
entry.
Confirm
Select
These steps disconnect the recorder from a Front-End
application.
Notes:
Do not disconnect a PC with Front-End application from
the recorder during automatic uploading.
For details on how to restart the Front-End application, see
the Operating Instructions of the Front-End application.
•
•
Playback with the remote control panel is not available
at present. Upgrading is scheduled for the future.
For playback, it is recommended to use the Front-End
application or Back-End Client application.
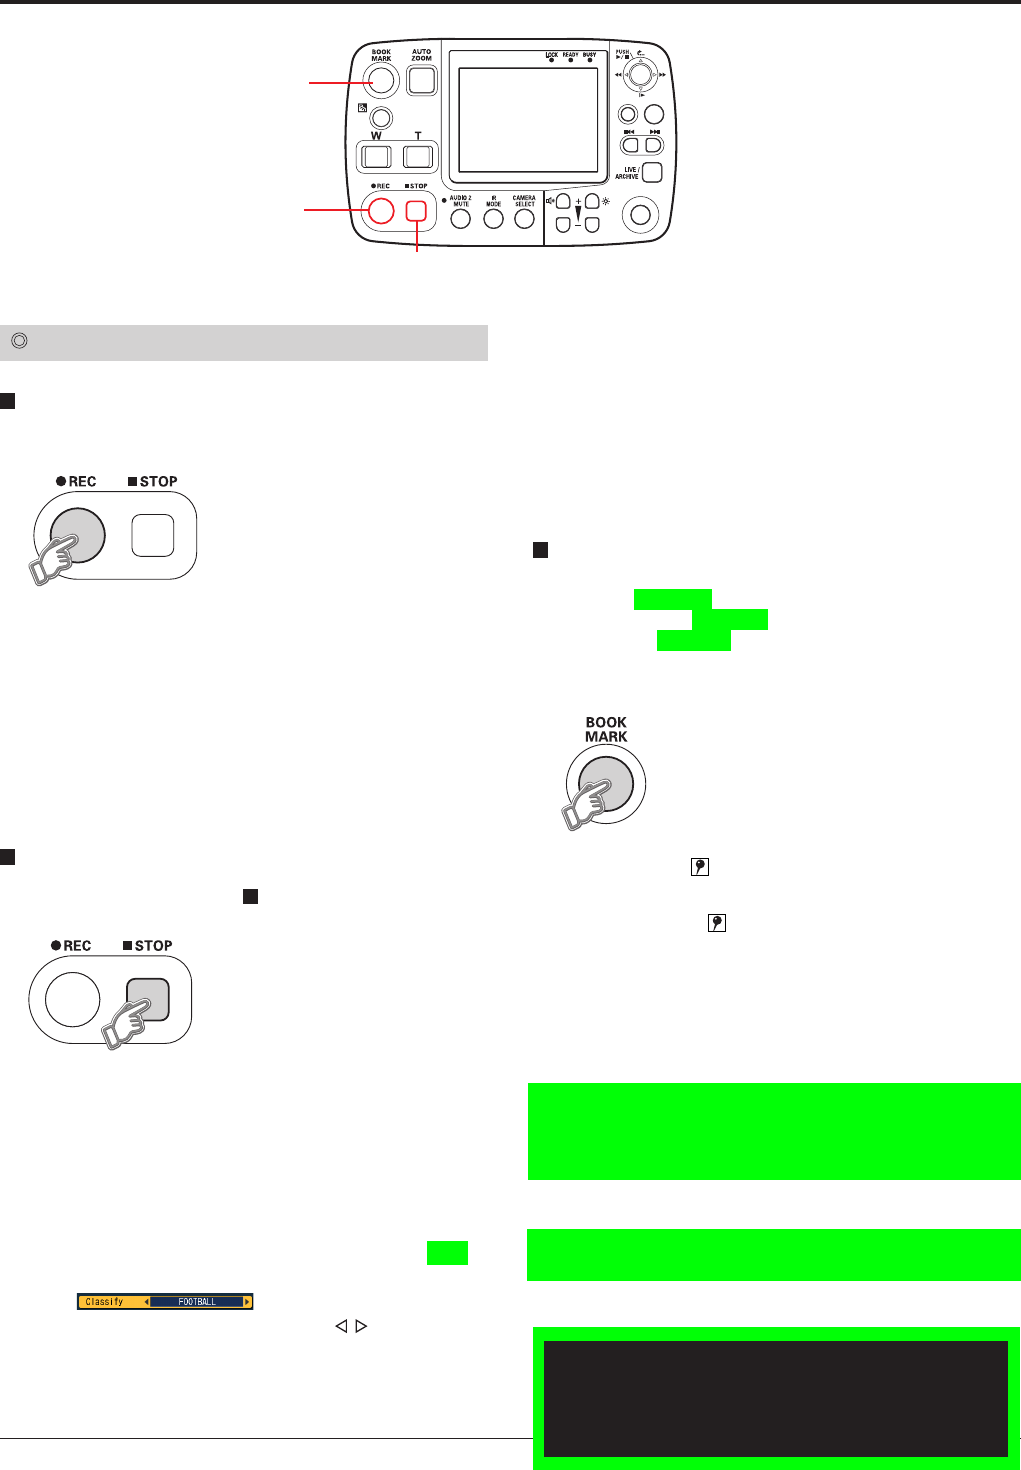
58
59
RETURN
MENU
CONTROL PANEL
ON/
OFF
Recording
REC button
STOP button
BOOK MARK button
Starting and stopping recording
Starting recording
Press the [REC] button.
This starts video and sound recording.
The live screen appears automatically if not already on. The
Remote Control Panel, the Color Camera and the Memory
Card Recorder [REC] lamps go on during recording.
Note:
The Color Camera [REC] lamp goes on regardless of camera
input setting.
There are also other methods for starting recording. For
details, refer to “Starting Recording” on page 8.
Stopping recording
Press the [STOP] button ( ).
Pressing the [STOP] button turns off the [REC] lamp and
video and sound recordings stop when the post record*1
interval has elapsed. Then the [BUSY] lamp goes off.
Notes:
When recording is stopped under the conditions in which
Classify information is registered (see page 89), Classify
on the Management Mode screen is set to “ENABLE” or
“FORCE” (see page 89), and Loop Rec on the Rec/Play
screen is set to “OFF” (see page 81), the Classify selection
screen appears.
Select the classify information with the [ ,] buttons and
press the [BOOK MARK] or [RETURN] button. The
classify information will be added to the file.
In the following cases, the Classify screen disappears and
the classify information cannot be added.
•
•
- When automatic uploading has started
- When automatic restoring has started
- When the CONTROL PANEL button is set to OFF
- When a fatal error has occurred
- When the SDHC Memory Card slot cover is open
- When the unit is in ACC-OFF mode
There are also other conditions for stopping recording.
For details, see “Stopping Recording” on page 9.
Adding bookmarks
A bookmark can be added to a file that is being recorded
to mark it for playback. (See “Moving back to a previous
skip location to start playback” and “Moving to the next skip
location to start playback” on page 65.)
Press the [BOOK MARK] button.
The bookmark icon appears for 1 or 2 seconds.
Notes:
The bookmark icon appears on the overlay OSD. When
[Overlay OSD] is “OFF” (see “Viewing the status of the
recorder (Overlay OSD)” on page 55), the bookmark icon
does not appear.
Bookmarks can be added with a minimum interval of 2
seconds.
A bookmark cannot be entered until about 2 seconds after
recording starts.
It is possible to move the playback location to the
bookmark during playback.
Bookmarks can be added also during playback.
(See “Adding bookmarks” on page 66.)
Bookmarks but not classify tags can be added during
recording.
Classify tags can be added only during playback.
(See “Adding bookmarks” on page 66.)
•
•
•
•
•
•
•
*1 Post record is the capability of including material from an interval
after the specified stop point in recording. The interval is set by
an administrator.
Playback with the remote control panel is not available
at present. Upgrading is scheduled for the future.
For playback, it is recommended to use the Front-End
application or Back-End Client application.
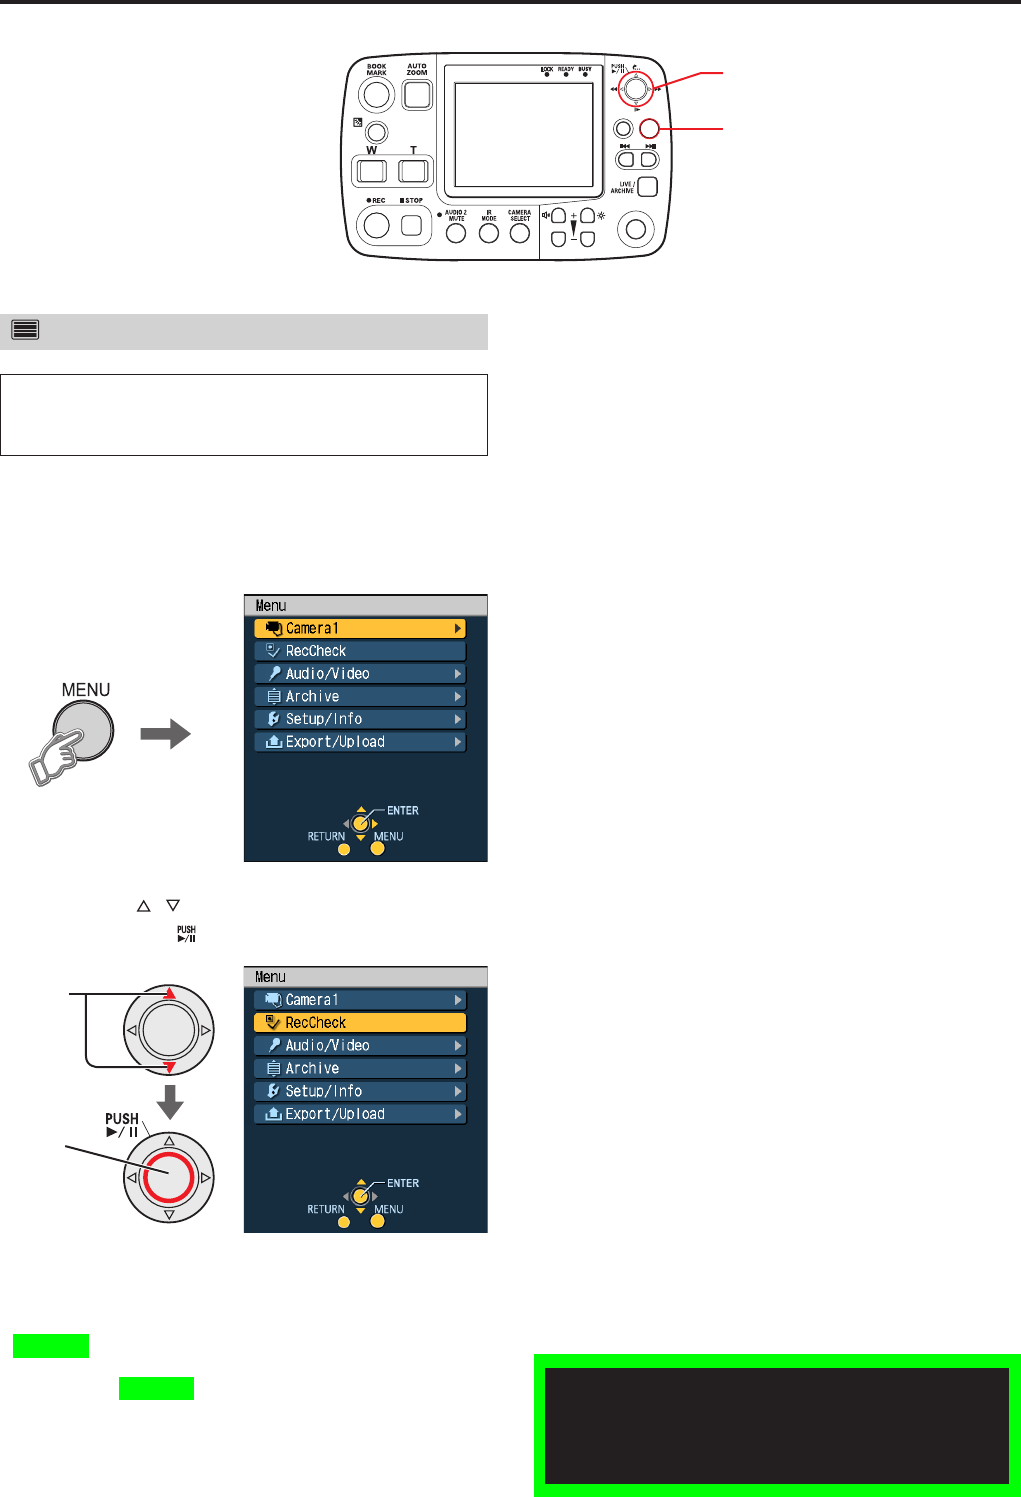
60
61
Recording (continued)
RETURN
MENU
CONTROL PANEL
ON/
OFF
Cursor button
MENU button
A trial shoot
When Front-End application is running, or Back-End
application is streaming a picture, this unit freezes in the
live screen, and a trial shoot is disabled.
The following is a description of a test to check if recording can
be correctly made.
1. Press the [MENU] button.
The Menu appears.
2. Press the [ ,] buttons to select [RecCheck]
and press the [ ] button to confirm the entry.
Confirm
Select
A five-second recording is made and played back.
Notes:
A trial shoot cannot be performed during recording or
playback.
The trial shoot portion of a recording is automatically
deleted after playback.
•
•
Playback with the remote control panel is not available
at present. Upgrading is scheduled for the future.
For playback, it is recommended to use the Front-End
application or Back-End Client application.
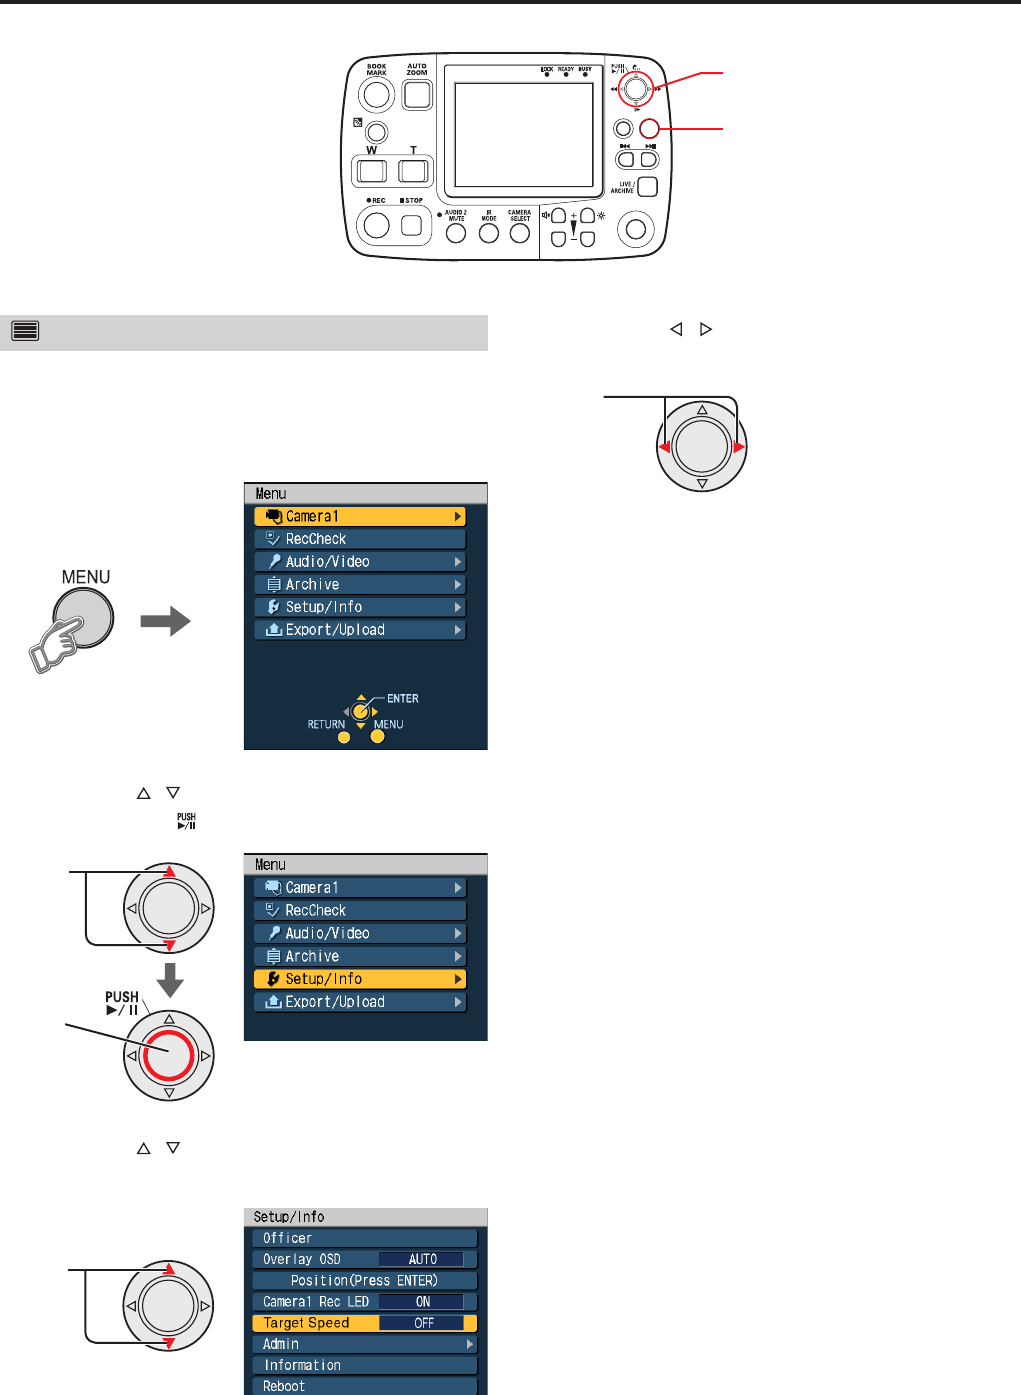
60
61
Recording (continued)
RETURN
MENU
CONTROL PANEL
ON/
OFF
Cursor button
MENU button
Setting the target speed
If the target speed detected with the radar gun exceeds the
value set here, it is used as a record trigger.
1. Press the [MENU] button.
The Menu appears.
2. Press the [ ,] buttons to select [Setup/Info]
and press the [ ] button to confirm the entry.
Confirm
Select
3. Press the [ ,] buttons to select [Target
Speed].
Select
4. Press the [ ,] buttons to set the speed.
Setting values: OFF, 1, 2, ..., 200
Select
Notes:
[Target Speed] may not be selected due to the settings on
the Trigger screen in Administrator setup.
Set Connection Of Radar on the Radar/GPS screen in
Administrator setup to “Recorder”.
•
•
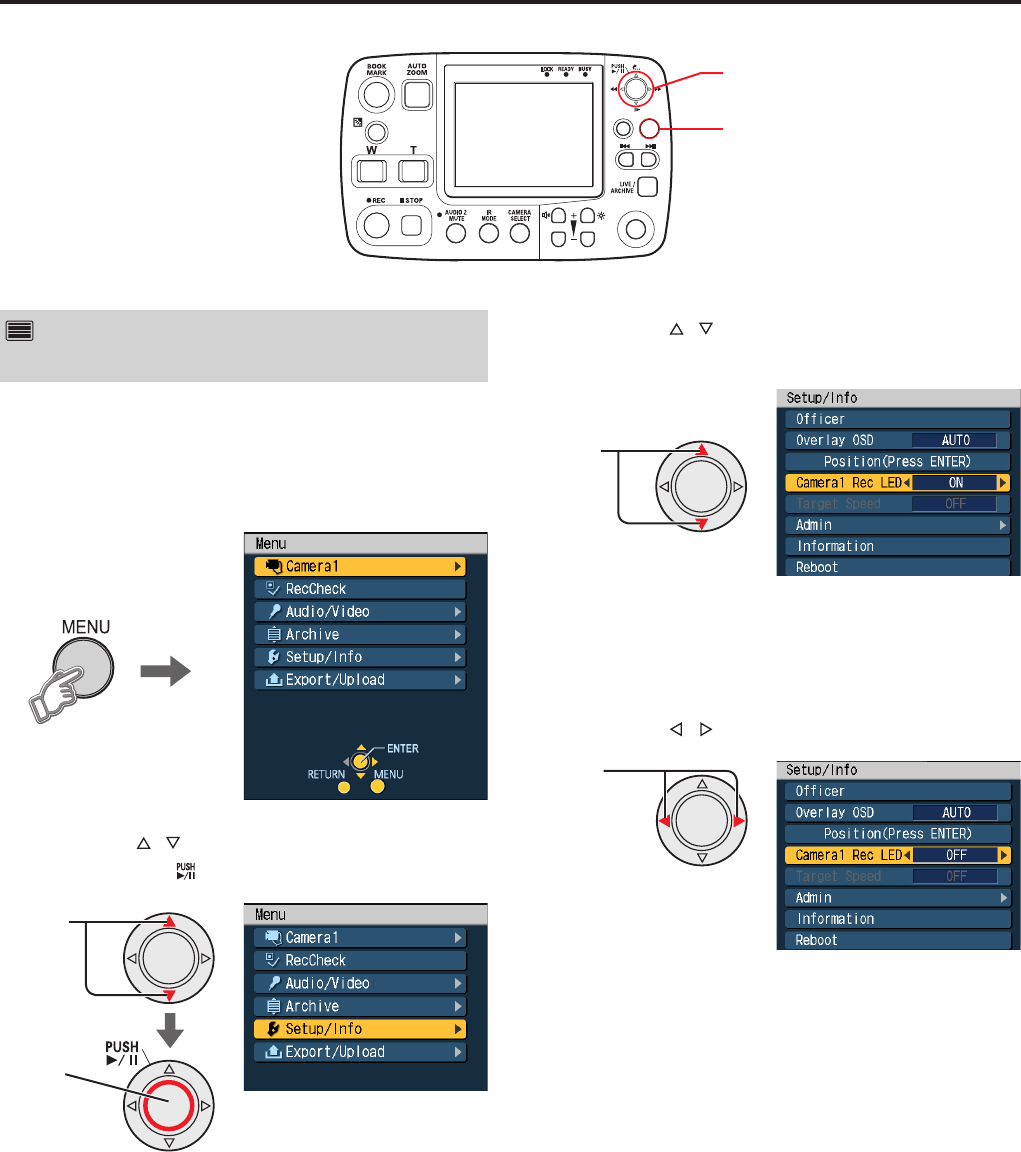
62
Recording (continued)
RETURN
MENU
CONTROL PANEL
ON/
OFF
Cursor button
MENU button
To turn off the [REC] lamp during
recording
The [REC] lamp on the camera connected to the [CAMERA 1]
connector lights during recording. The following steps allow
you to keep this lamp off at all times.
1. Press the [MENU] button.
The Menu appears.
2. Press the [ ,] buttons to select [Setup/Info]
and press the [ ] buttons to confirm the entry.
Confirm
Select
3. Press the [ ,] buttons to select [Camera1
Rec LED].
select
Note:
If “Camera1” has not be set for any of Preset1, Preset2, and
Preset 3 on the Video Allocation screen in Administrator
setup, [Camera1 Rec LED] cannot be selected.
4. Press the [ ,] buttons to select “OFF”.
select
The lamp will now remain off at all times.

63
Playback
RETURN
MENU
CONTROL PANEL
ON/
OFF
Cursor button
LIVE/ARCHIVE button
When Front-End application or the streaming player of
Back-End application is running, this unit freezes the live
screen, and the card cannot be played back.
Playback
Press the [LIVE/ARCHIVE] button.
The playback screen appears and playback starts from the
location where playback was last made.
If recording was started or stopped prior to pressing the
[LIVE/ARCHIVE] button, playback starts from the beginning
of the recorded file.
Notes:
In the following cases, recorded files may not be played
back from the beginning.
– When [Setup/Info]-[Admin]-[Date/Time]-[Date/Time] is
changed
– When [Setup/Info]-[Admin]-[Date/Time]-[TimeZone] is
changed
– When [Setup/Info]-[Admin]-[Rec/Play]-[Rule of Filename]
is changed
– When the clock time is corrected by GPS
If playback was previously ended at the end of the file,
playback is paused.
If the LCD panel is turned off by using the [CONTROL
PANEL ON/OFF] button, file playback stops.
If Front-End application or the streaming player of Back-
End application is activated during playback, playback
stops.
•
•
•
•
Name of record file
A record file name that appears on the overlay OSD or
playback file list screen takes a name that is based on the
local time when recording started.
A date format is set under Style on the Date/Time screen in
Administrator setup. (See “Date/Time” on page 84.)
Note:
A physical filename (for example, a filename that appears
on a PC) can be indicated either in world or local time
depending on Administrator setup.
Intermittent recording files
An intermittent recording file records only one video frame
per second but no audio.
Note:
The playback speed of an intermittent recording file is slower
than a normal file.
Loop recording files
A loop recording file is automatically separated, and the
starting time of recording at separation will be the filename.
Playback with the remote control panel is not available at
present. Upgrading is scheduled for the future.
For playback, it is recommended to use the Front-End
application or Back-End Client application.

64
65
Playback (continued)
Changing playback method
Playback and pause
Press the [ ] button.
Playback starts. Press again to pause playback. Use this
button to pause slow, rewind and fast forward.
Slow
Press the [ ] button.
Slow plays back at 1/10 or 1/2 of normal speed. Each press
changes playback speed from 1/10 to 1/2 and 1/10.
Note:
Intermittent recording files cannot be played back at slow
speed.
Quick Replay
Press the [ ] button.
Playback starts 7 seconds prior to the current location.
During slow playback, slow playback starts 7 seconds prior
to the current location.
Rewinding
Press the [ ] button.
Rewinding is performed at 4, 20 or 200 times normal speed.
Each press changes the rewind speed from 4, to 20, 200 and
back to 4 times normal speed.
Fast forward
Press the [ ] button.
Fast forwarding is performed at 4, 20 or 200 times normal
speed.
Each press changes the fast forward speed from 4, to 20,
200 and back to 4 times normal speed.
RETURN
MENU
CONTROL PANEL
ON/
OFF
Cursor button
Playback with the remote control panel is not available at
present. Upgrading is scheduled for the future.
For playback, it is recommended to use the Front-End
application or Back-End Client application.

64
65
Playback (continued)
RETURN
MENU
CONTROL PANEL
ON/
OFF
Skip back button
Skip forward button
Moving back to a previous skip location to start
playback
Press the [ ] button.
Playback starts from the previous skip location.
If the current location is 5 seconds or less away from a skip
location, playback starts from the skip location before the
previous skip location.
However, if the current location is 5 seconds or less away
from the first skip location in the file, playback starts from a
skip location in the previous file.
If there is no previous file, playback starts from the current
location without skipping.
Moving to the next skip location to start
playback
Press the [ ] button.
Playback starts from the next skip location.
If the current location comes after the last skip location in the
file, playback starts from a skip location in the next file. If there
is no next file, playback starts from the current location without
skipping.
Notes:
The skip location may be a bookmark, head of file or a
trigger position (one per file) at which recording began.
However, no trigger position can exist in automatically
divided files.
One of the following icons may appear on an overlay OSD
screen for about 2 seconds depending on the location
playback skips. When not shown on an overlay OSD
screen, they appear on the LCD panel.
: File beginning
: Trigger position
: Bookmark position
It is recommended that the skip location be placed at the
[Trigger/Marker] or [Head of File] in the administration
setup. (See “Skip Target” on page 83.)
Up to 999 bookmarks can be skipped. You cannot skip to
the bookmark position exceeding this limit.
When the [ ] button or [ ] button is pressed, playback
stops momentarily while the skip location is searched for,
and then playback resumes from that position.
•
•
•
•
•
Playback with the remote control panel is not available at
present. Upgrading is scheduled for the future.
For playback, it is recommended to use the Front-End
application or Back-End Client application.
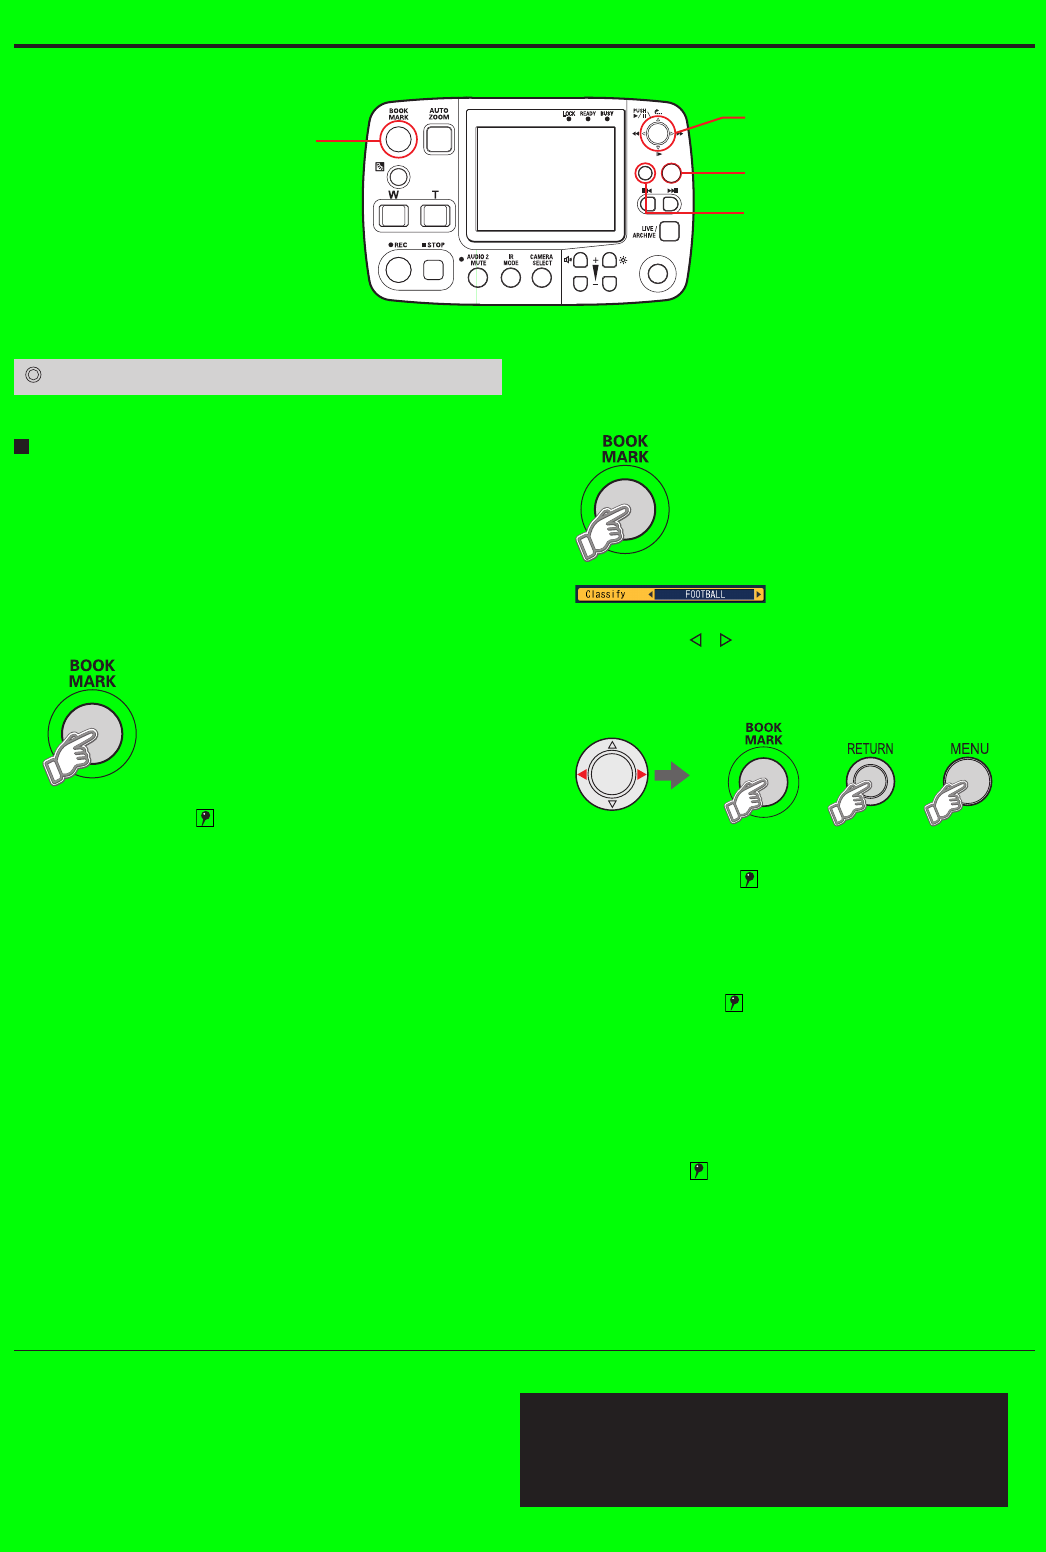
66
67
Playback (continued)
RETURN
MENU
CONTROL PANEL
ON/
OFF
Cursor button
MENU button
RETURN button
BOOK MARK button
Setting bookmarks
Adding bookmarks
Bookmarks can be added to a file during playback, pause or
slow playback. Loading Classify tags from a USB memory
device in advance to the recorder allows the operator to add
both bookmarks and Classify tags. (See “Load Classify” on
page 85.)
When no Classify tags are loaded
Press the [BOOK MARK] button.
A bookmark icon appears.
Playback or slow playback stops for a short while and
then resumes.
•
•
When Classify tags are loaded
1.
Press the [BOOK MARK] button.
*1 appears.
2. Press the [ ,] buttons to select an Classify
tag and press the [BOOK MARK], [RETURN] or
[MENU] button to confirm the entry.
or or
The recorder returns to previous playback status, and
the bookmark icon appears enabling insertion also of
Classify tags.
Playback or slow playback stops for a short while and
then resumes.
Notes:
The bookmark icon appears on the overlay OSD. When
[Overlay OSD] is “OFF” (see “Viewing the status of the
recorder (Overlay OSD)” on page 69), the bookmark icon
does not appear.
Bookmarks can be added with a minimum interval of 2
seconds.
Playing back a segment with a bookmark shows a
bookmark icon for about 2 seconds.
Once characters are set for a classify tag, the default
setting “---“ is not displayed.
If a classify tag of the video being played is not registered
on the recorder used for playback, the classify tag is
grayed out during playback. Once the grayed-out classify
tag is edited, the original classify tag cannot be retrieved.
•
•
•
•
•
•
•
*1 • The last used classify tag appears.
The last used classify tag remains even after a power off.
However, if classify tags are reloaded, “----“ appears.
Long classify tag character strings may not be displayed in
full.
Classify tags where bookmarks cannot be set, for example a
recording file with unregistered classify tags, are displayed in
gray.
•
•
•
Playback with the remote control panel is not available at
present. Upgrading is scheduled for the future.
For playback, it is recommended to use the Front-End
application or Back-End Client application.
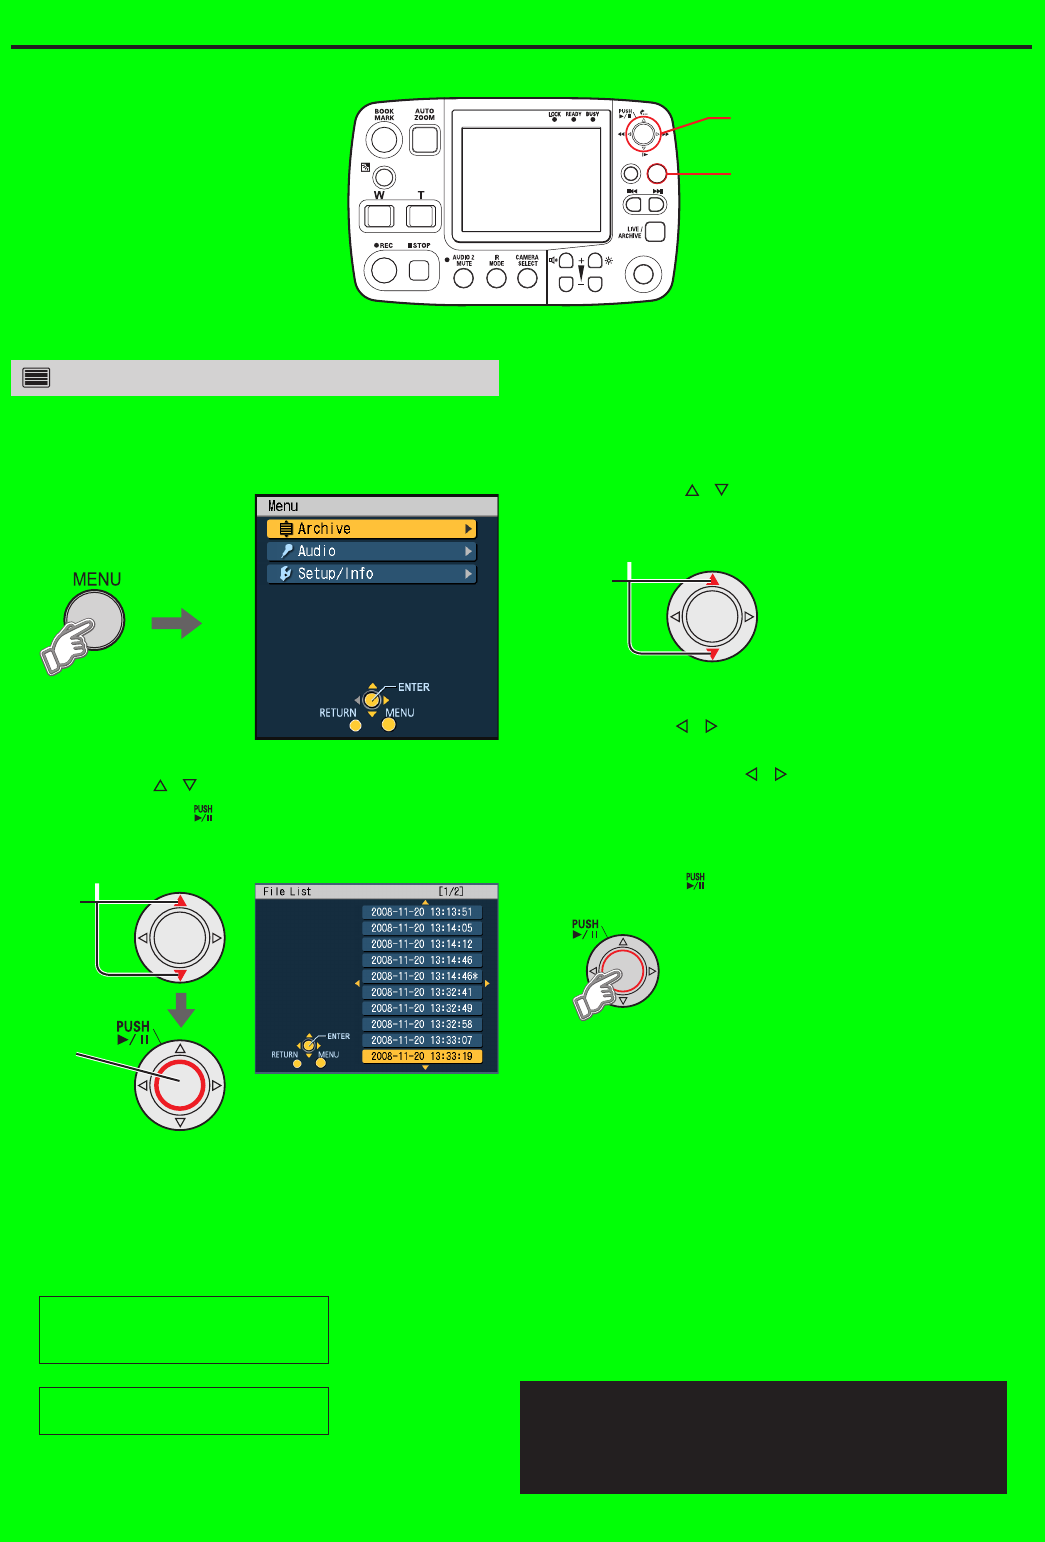
66
67
Playback (continued)
RETURN
MENU
CONTROL PANEL
ON/
OFF
Cursor button
MENU button
Selecting a file for playback
1. Press the [MENU] button.
The Menu appears.
2. Press the [ ,] buttons to select [Archive]
and press the [ ] button to confirm the entry.
The playback file list screen appears.
Confirm
Select
Notes:
[Archive] is not available when there are no playback
files.
Files appear in the order of the filenames (see “Rule of
Filename” on page 82) that are assigned at recording.
“WT” (world time) files are displayed
in recording start order (but the time is
converted and indicated in local time).
↓
“LT” (local time) files are displayed in
recording start order.
•
•
When a file is recorded across two SDHC Memory
Cards and is split into two files, the start time of the
latter file is suffixed by “*”. Also, if two or more files have
the same start time, the start time of the second and
succeeding files are suffixed by “*”.
3.
Press the [
,
] buttons to select a file to play
back.
Select
(Use the following functions to go between pages.)
Press the [ ,] buttons once to turn pages one at a
time.
Keep pressing the [ ,] buttons to go quickly
between pages. This function turns pages up to page
3 in one-page increments and pages from page 4 in
10-page increments.
4. Press the [ ] button to start playback.
Playback starts from the beginning of the file.
When playback reaches end of the file, playback is
paused.
•
•
•
Playback with the remote control panel is not available at
present. Upgrading is scheduled for the future.
For playback, it is recommended to use the Front-End
application or Back-End Client application.
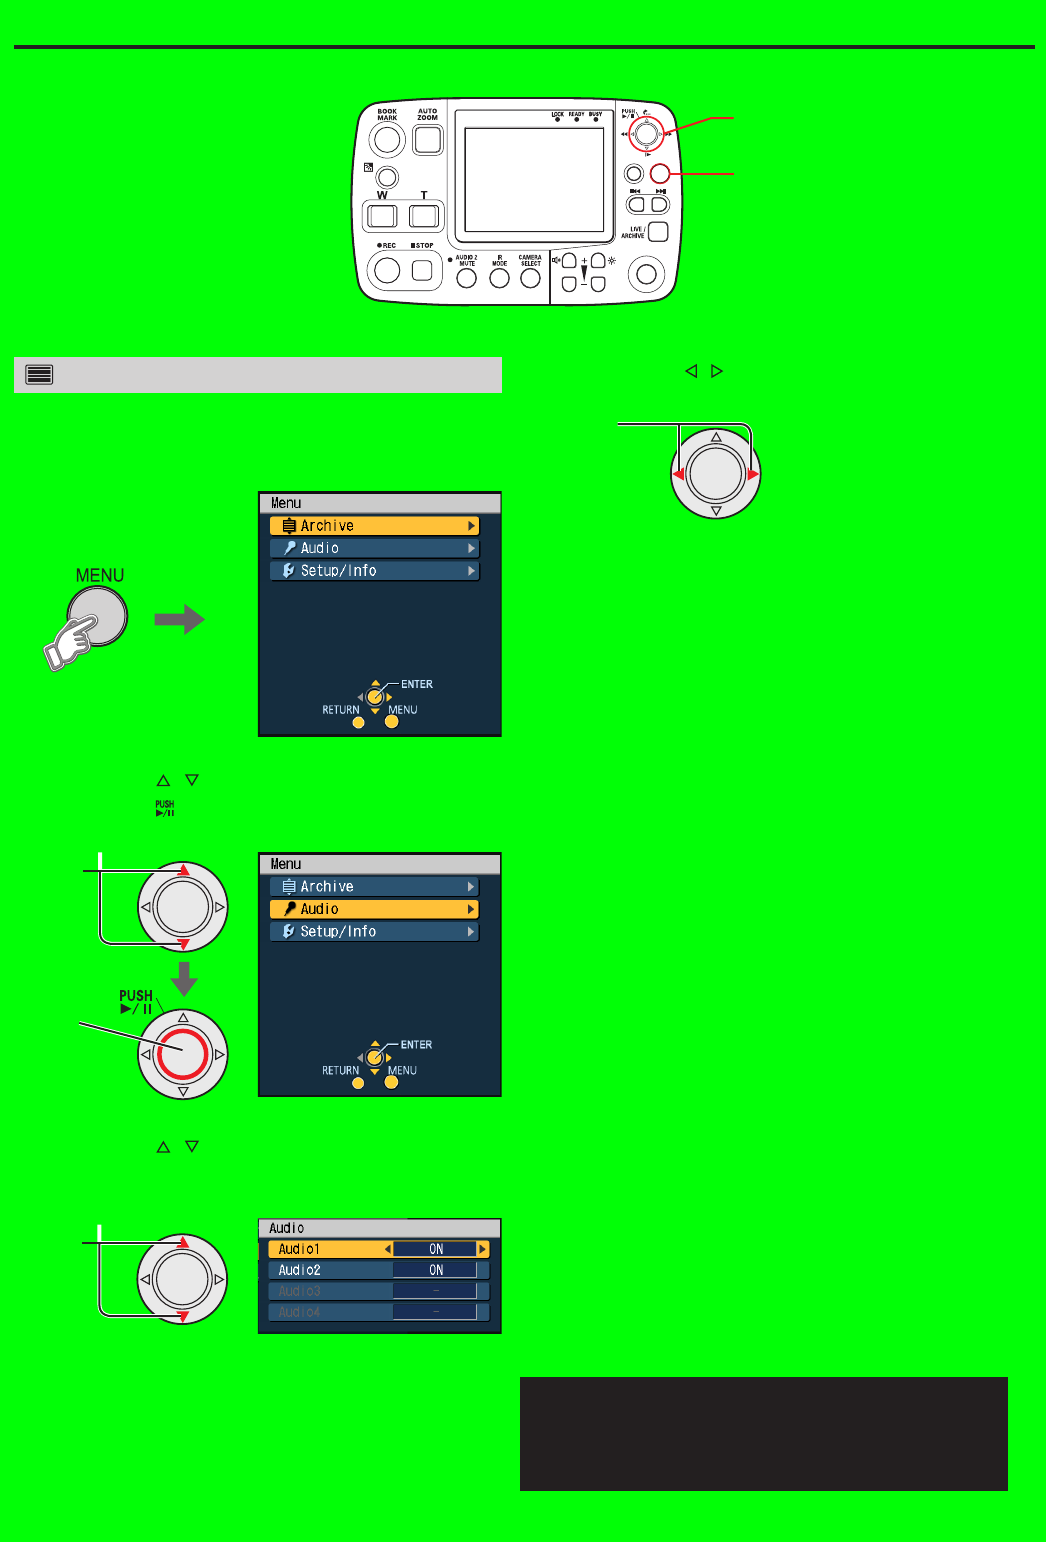
68
69
Playback (continued)
RETURN
MENU
CONTROL PANEL
ON/
OFF
Cursor button
MENU button
Turning Playback sound ON and OFF
1. Press the [MENU] button.
The Menu appears.
2. Press the [ ,] buttons to select [Audio] and
press the [ ] button to confirm the entry.
Confirm
Select
3. Press the [ ,] buttons to select an audio
channel to be played back.
Select
4. Press
the [
,
] buttons to select “ON” or “OFF”.
Select
Notes:
An administrator can set the audio output (Init Audio Out
(Play)) selected at power-on.
An audio channel set to OFF on the Audio Allocation
screen in Administrator setup cannot be selected. (See
“Audio Allocation” on page 78.)
•
•
Playback with the remote control panel is not available at
present. Upgrading is scheduled for the future.
For playback, it is recommended to use the Front-End
application or Back-End Client application.
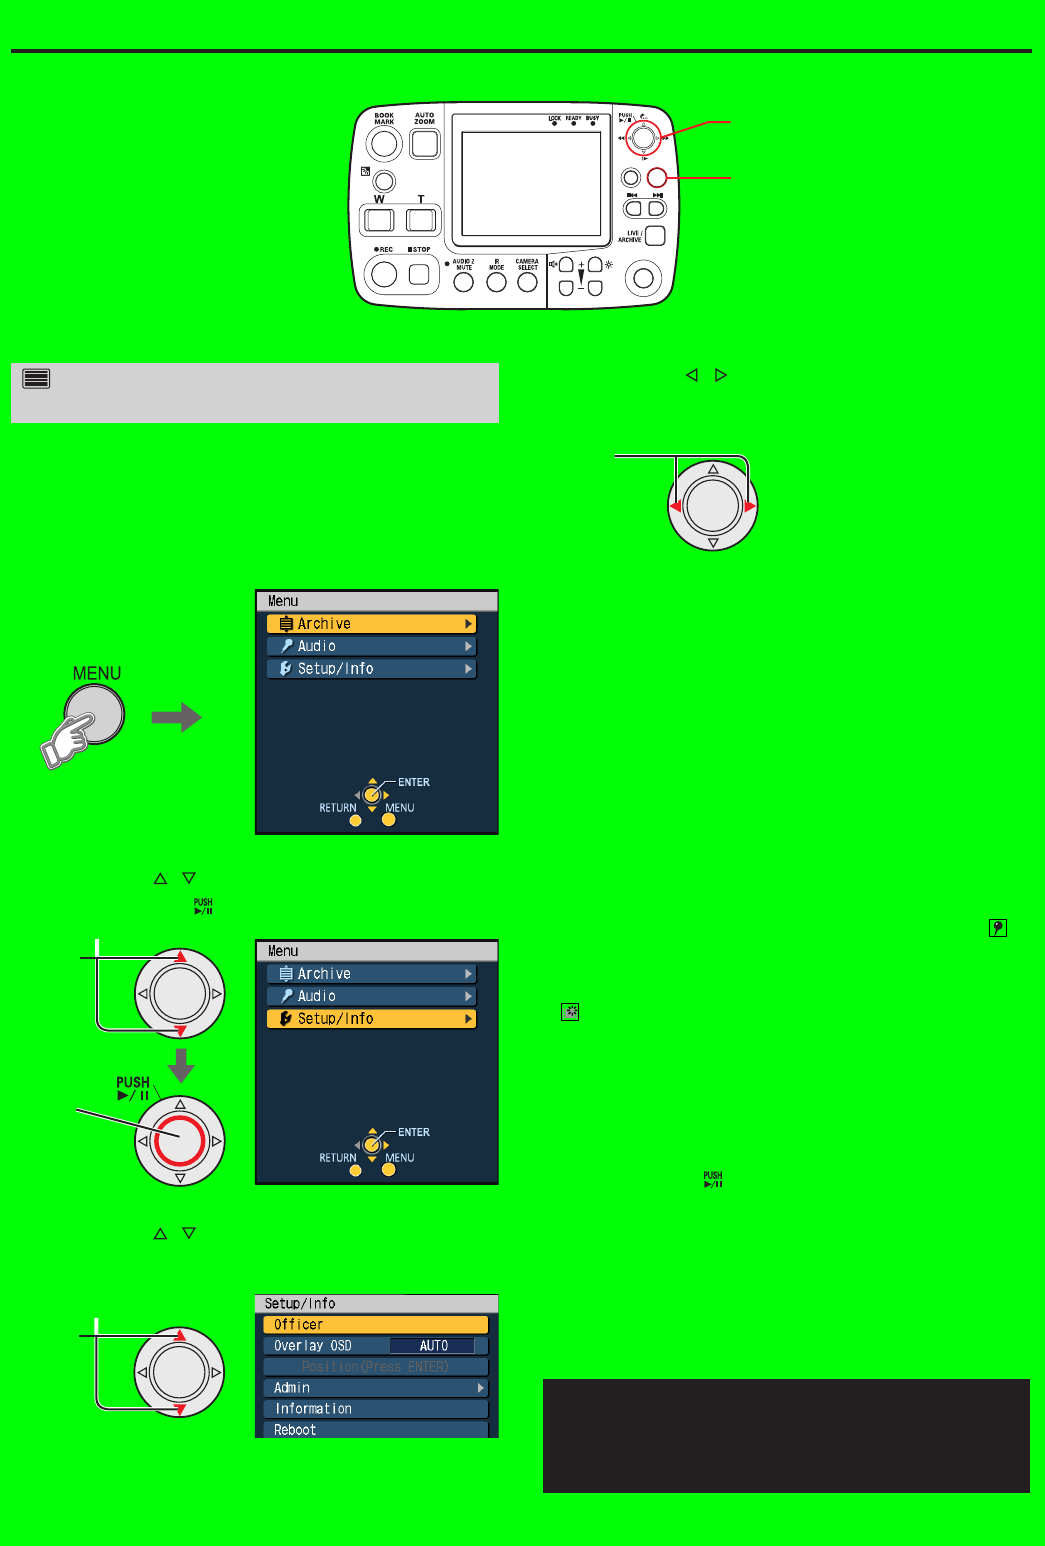
68
69
Playback (continued)
RETURN
MENU
CONTROL PANEL
ON/
OFF
Cursor button
MENU button
Viewing the status of the recorder
(Overlay OSD)
Use the following function to see the status of the recorder
or trigger signal (GPI1-16) status when a played back file
was recorded.
1. Press the [MENU] button.
The Menu appears.
2. Press the [ ,] buttons to select [Setup/Info]
and press the [ ] button to confirm the entry.
Confirm
Select
3. Press the [ ,] buttons to select [Overlay
OSD].
Select
4. Press
the [
,
] buttons to select “AUTO”,
“SIMPLE”, “DETAILS” or “OFF”.
select
AUTO :
The simple overlay OSD appears for 3 to 5 seconds
when any of the following items have been changed
(see page 70).
•
Playback filename
•
Mode indication
•
Playback speed and status indication
SIMPLE: The Simple
overlay OSD
appears.
DETAILS: The Detailed
overlay OSD
appears.
OFF:
Overlay OSD
closes.
Notes:
An administrator can set the Overlay OSD (Init Overlay
OSD) selected at power-on.
See the next page for how to read the overlay OSD.
When “AUTO” is selected and the [BOOK MARK] button
is pressed or the bookmark position is reached, the simple
overlay OSD does not appear but the bookmark icon
appears for 1 to 2 seconds.
When “AUTO” is selected and the trigger position is reached,
the simple
overlay OSD
does not appear but the trigger icon
appears for 1 to 2 seconds.
Adjusting the display position
When a picture recorded with Main OSD or Sub OSD
embedded on the Embedded OSD screen in Administrator
setup set to OFF is played, Trigger, Time, and Source@
Area that are set to ON on the Embedded OSD screen are
displayed. Select [Position (Press ENTER)] on the Setup/Info
screen then press [ ] button. Then the display position will
move up and down.
Note:
The OSD position of the picture recorded with Main OSD or
Sub OSD on the Embedded OSD screen in Administrator
setup set to ON cannot be changed.
•
•
•
•
Playback with the remote control panel is not available at
present. Upgrading is scheduled for the future.
For playback, it is recommended to use the Front-End
application or Back-End Client application.
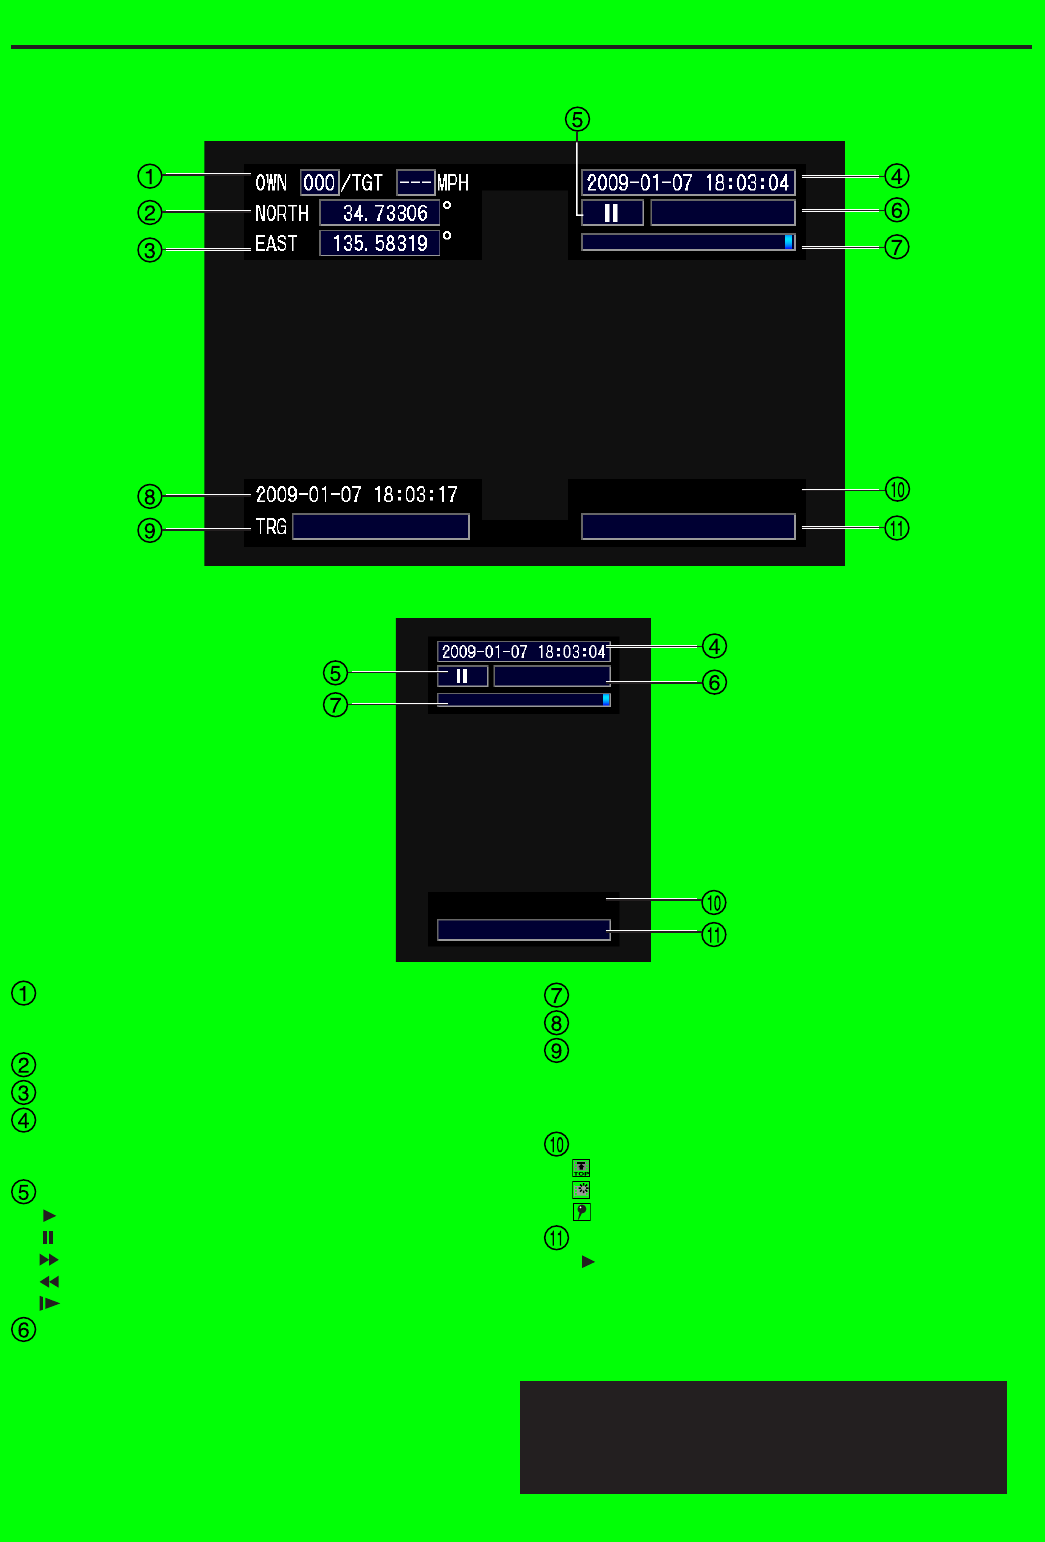
70
71
Playback (continued)
<Detailed Overlay OSD>
<Simple Overlay OSD>
Speed (MPH / km/h)
OWN : Own vehicle speed
TGT : Target vehicle speed
Location information (latitude)
Location information (longitude)
Playback filename
(Local time at start of recording)
“NO FILE” appears when there is no file to play back.
Mode indication
: Playback
: Pause
: Fast forward
: Rewind
: Slow
Playback speed and status indication
<Speed>
x1/10, x1/2, x4, x20, x200
<Status Display> (see “Status Display” on page 118)
READ ERROR, UNSUPPORTED,
PLAY ERROR
Playback location (in file units)
Date/Time
Trigger signal (GPI1-16) input status
(GPI1 to 16 are displayed in order from the left.)
The characters assigned by [Display] appear when the
state set by [Detection] occurs.
Mark position
: File beginning
: Trigger position
: Bookmark position
Sound output setting
( : appears only during playback)
A1, 2, 3, or 4 : Audio1, 2, 3, or 4 is output.
Playback with the remote control panel is not available at
present. Upgrading is scheduled for the future.
For playback, it is recommended to use the Front-End
application or Back-End Client application.
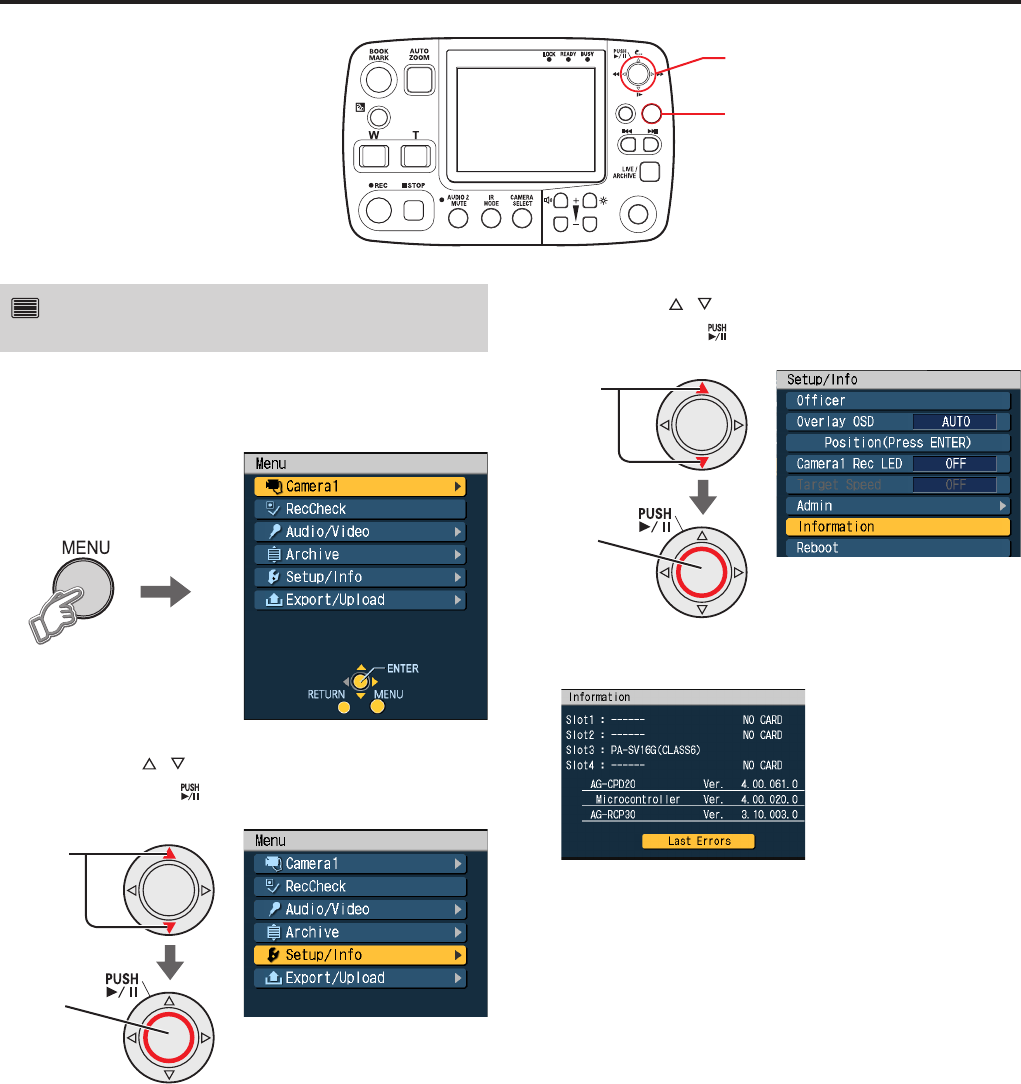
70
71
Displaying Product Information
Viewing SDHC Memory Card type and
software version
1. Press the [MENU] button.
The Menu appears.
2. Press the [ ,] buttons to select [Setup/Info]
and press
the
[ ] button to confirm the entry.
Confirm
Select
3.
Press the [
,
] buttons to select [Information]
and press the
[ ] button
to confirm the entry.
Confirm
Select
The Information screen appears.
This displays SDHC Memory Card model and card infor-
mation. The following information appears depending on
card type.
- UNFORMATTED
- CARD PROTECT
- CARD ERROR
- CARD FULL
- UNSUPPORTED
- VUP CARD
- NO CARD
This opens the product information screen that contains
the software version information.
The product name is defined by the SD Card Association
and may differ from the SDHC memory card product
number.
•
•
•
RETURN
MENU
CONTROL PANEL
ON/
OFF
Cursor button
MENU button
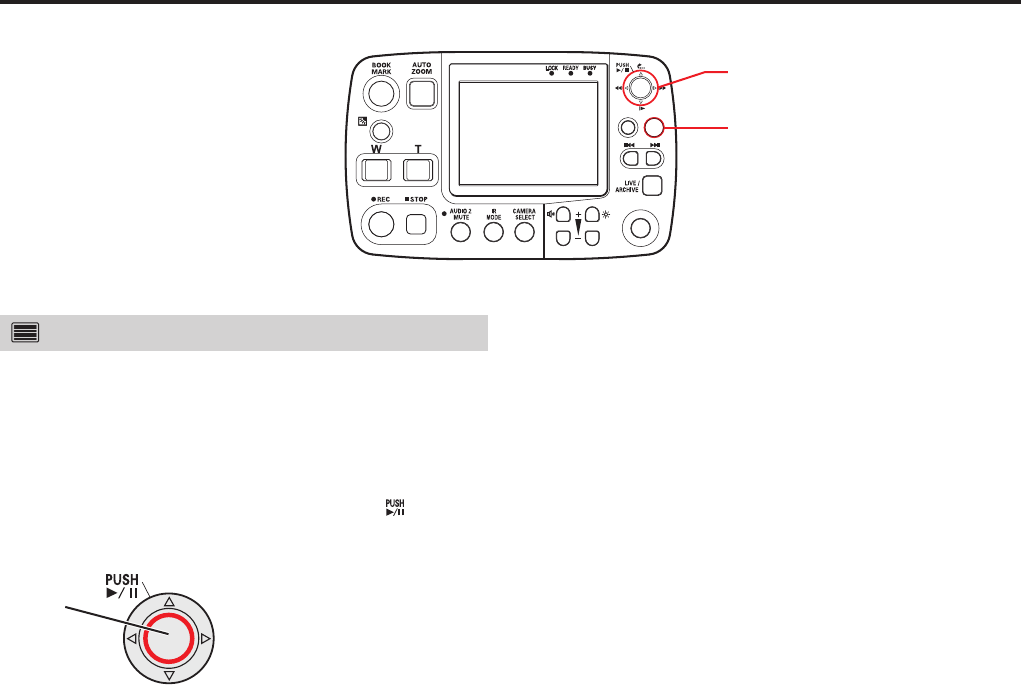
72
73
Displaying Product Information (continued)
RETURN
MENU
CONTROL PANEL
ON/
OFF
Cursor button
MENU button
Viewing error log data
Use the following procedure to open a dialog showing up to
five of the most recent errors.
1. Perform steps 1 to 3 in “ Viewing SDHC
Memory Card type and software version”.
2.
This selects [Last Errors]. Press the [ ] button
to accept.
Confirm
This dialog shows the most recent error data (the items
listed below).
Month/day (MM/DD)
Hour/minute (HH : MM)
Error No.
Error type (Fatal Error/Error)
Error message (the first 40 characters appear)
Notes:
Error data with a low priority is also displayed.
The following error numbers do not appear as error log
data.
E00604, E08601, E20901, E20911, E20912, E20921,
E20922, E22420 to E22432, E24010, E24011, E24030,
E24110, E28206 to E28203
•
•
•
•
•
•
•
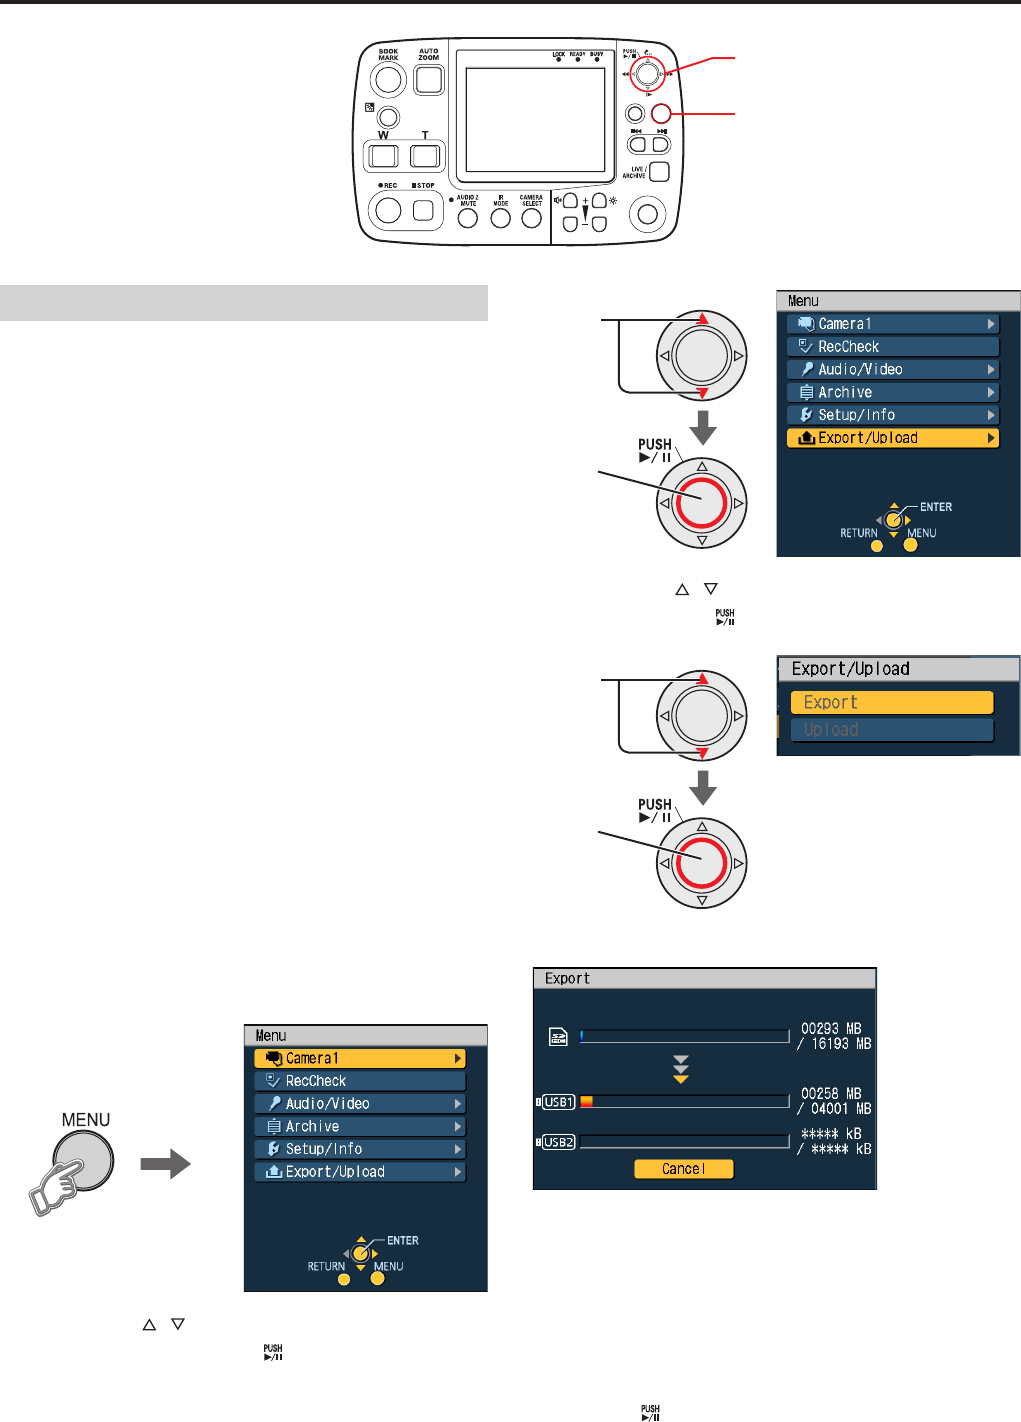
72
73
Exporting files
Video and audio data recorded on the SDHC Memory Cards
are copied to the USB memory device. Exported data are
deleted from the cards.
Notes:
Export cannot be executed while recording or post-
recording. If export is selected while recording, a
confirmation dialog box appears. Select [Stop] to stop
recording and start exporting, or [Cancel] to continue
recording. If export is selected while post-recording, post-
recording stops and export starts.
If the updating file is stored on the USB memory device,
error message “E28406” appears and files cannot be
exported.
If a USB memory device for authentication is removed
or inserted, an error message “E28201” appears. While
exporting, do not insert or remove the USB memory
device, even if it is not accessed.
Be sure to set Export Menu on the Management Mode
screen in Administrator setup to ENABLE. Otherwise
[Export/Upload] cannot be selected. (See “Export Menu”
on page 89.)
If the Front-End application is connected, export is
disabled.
Export will be canceled if the Front-End application is to
be connected during exporting.
1. Press the [MENU] button.
The Menu appears.
2. Press the [ ,] buttons to select [Export/
Upload] and press the [ ] button to confirm
the entry.
•
•
•
•
•
•
Transferring Files
RETURN
MENU
CONTROL PANEL
ON/
OFF
Cursor button
MENU button
Confirm
Select
3. Press the [ ,] buttons to select [Export]
and press the [ ] button to confirm the entry.
Confirm
Select
Files are exported.
Note:
The USB1 and USB2 progress bars are displayed on the
screen, but the USB connectors on the recorder are not
discriminated. If two USB memory devices are connected,
you cannot specify the device used for exporting. Check the
access lamp on the USB memory device.
Cancel exporting
Press the [ ] button.
Exporting is canceled immediately when the button is
pressed, but the data transferred before the button was
pressed are exported.
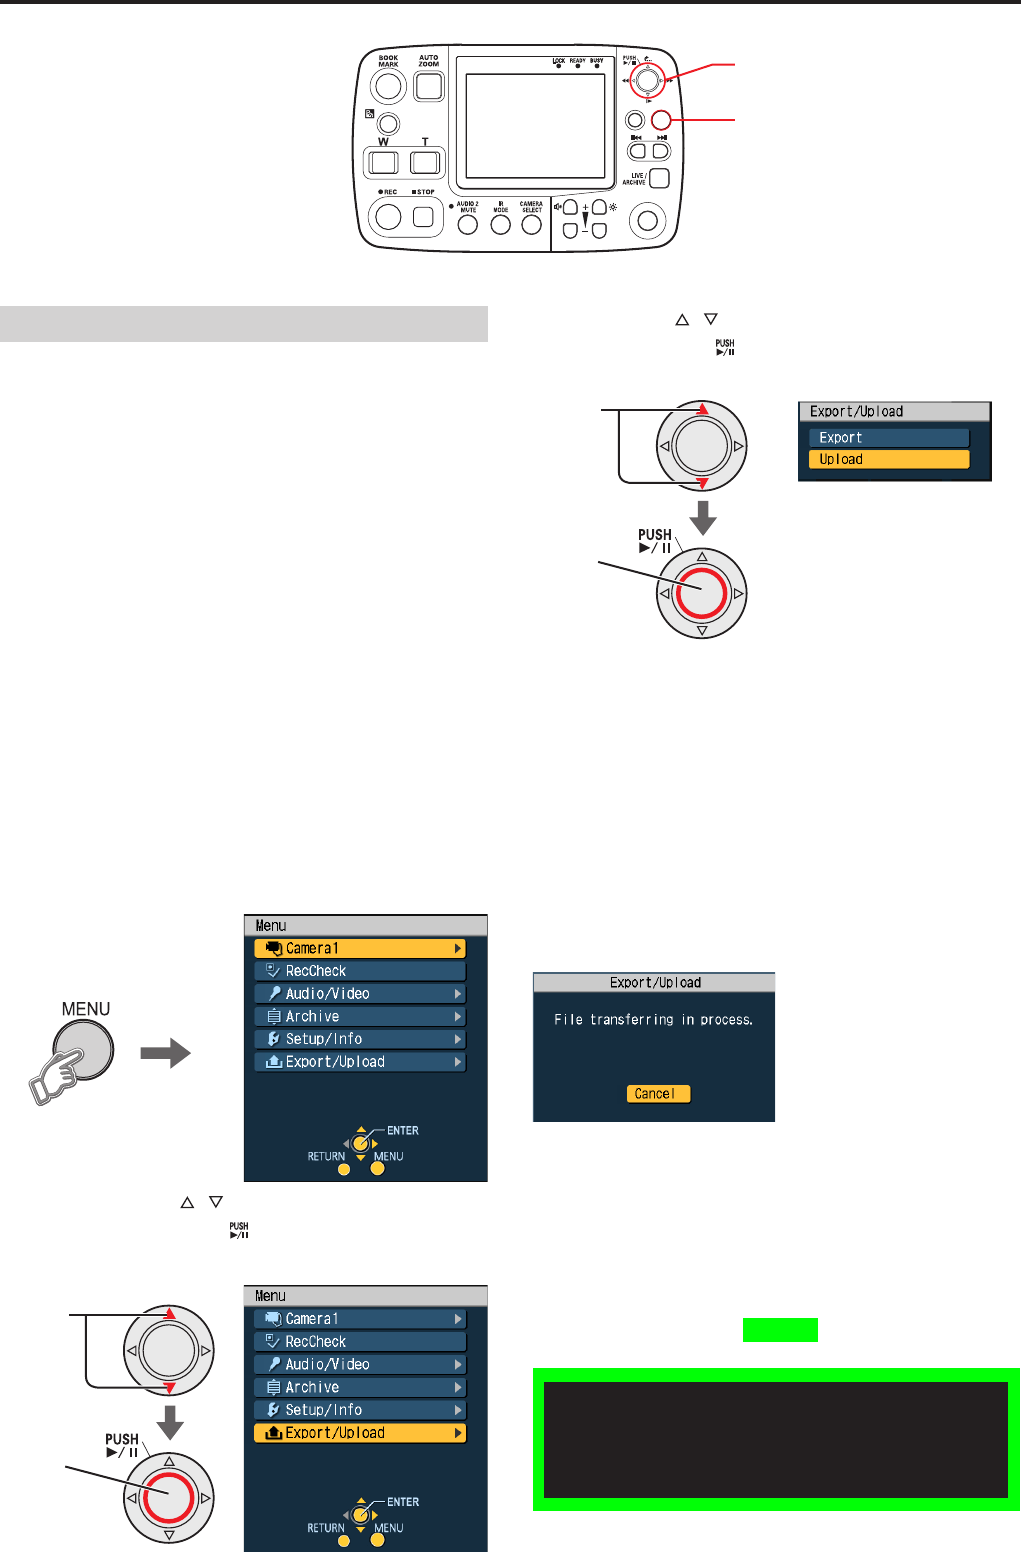
74
75
Transferring Files (continued)
RETURN
MENU
CONTROL PANEL
ON/
OFF
Cursor button
MENU button
Uploading files
Video and audio data recorded on the SDHC Memory
Cards are uploaded to the Back-End server. You can upload
data manually or automatically with Upload Mode on the
Management Mode screen in Administrator setup.
Uploaded data are deleted from the cards.
Notes:
Upload cannot be executed while recording or post-
recording. If upload is selected while recording, a
confirmation dialog box appears. Select [Stop] to stop
recording and start uploading, or [Cancel] to continue
recording. If upload is selected while post-recording, post-
recording stops and upload starts..
For uploading, the network connection must be enabled.
If the Back-End application is not connected, upload is
disabled.
Uploading files manually
Set the Upload Mode on the Management Mode screen in
Administrator setup to MANUAL. (See “Upload Mode” on
page 89.)
1. Press the [MENU] button.
The Menu appears.
2. Press the [ ,] buttons to select [Export/
Upload] and press the [ ] button to confirm the
entry.
Confirm
Select
•
•
•
3. Press the [ ,] buttons to select [Upload]
and press the [ ] button to confirm the entry.
Confirm
Select
Files are uploaded.
Note:
When the vehicle’s ignition switch is set to ACC-OFF
with Upload Mode on the Management Mode screen in
Administrator setup set to MANUAL and PowerOff Time
on the Rec/Play screen set to AUTO, uploading will start
automatically.
Cancel uploading
If the [Cancel] button is pressed on the screen, the [REC],
[MENU] or [RETURN] button on the remote control panel, or
the [STOP] button on the Memory Card Video Recorder is
pressed, uploading will be canceled.
Uploading files automatically
When “Upload Mode” on the Management Mode screen in
Administrator setup is set to “AUTO”, files are automatically
uploaded with the signal from the Back-End.
(See “Upload Mode” on page 89.)
Note:
If the SDHC Memory Cards are accessed during automatic
uploading for recording or playback, uploading will be
canceled.
Playback with the remote control panel is not available
at present. Upgrading is scheduled for the future.
For playback, it is recommended to use the Front-End
application or Back-End Client application.

74
75
If the power of the recorder is turned off or an SDHC
Memory Card is removed during recording, the file will be
corrupted and require restoring. In the following cases, files
are restored automatically.
When the SDHC Memory Card that requires restoring is
inserted to the recorder, and the recorder is turned on and
transferred to the live mode
When the SDHC Memory Card that requires restoring is
inserted to the recorder, the card slot cover is closed, and
the recorder transfers to the live mode
When the SDHC Memory Card that requires restoring is
inserted to the recorder, and the recorder is transferred to
the live mode from playback mode
During automatic-restoring, the restoring status is shown on
the LCD of the remote control panel.
Notes:
The restoration status is displayed when Overlay OSD
on the Setup/Info screen in Administrator setup is set to
AUTO, SIMPLE, or DETAILS. (See “Viewing the status of
the recorder (Overlay OSD)” on page 69.)
If the [MENU] button is pressed during automatic
restoration, the progress bar disappears, but the
restoration continues.
If recording, playback, or trial shooting begins, or if
Administrator setup mode is obtained, the progress bar
disappears, and the restoration is canceled.
•
•
•
•
•
•
Restoring Files Automatically
Playback with the remote control panel is not available
at present. Upgrading is scheduled for the future.
For playback, it is recommended to use the Front-End
application or Back-End Client application.
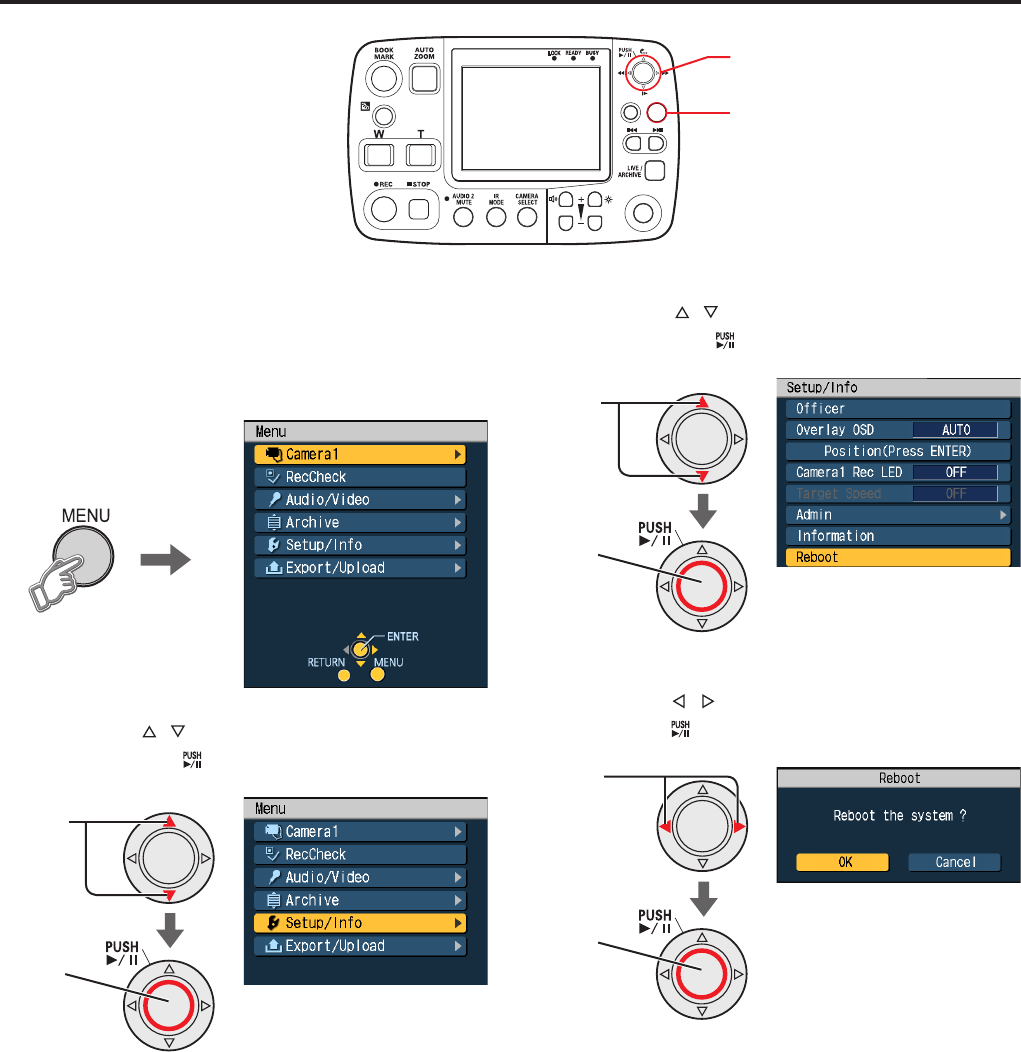
76
Rebooting This Unit
Should the operating status of the recorder become
unstable, use the following steps to reboot the recorder.
1. Press the [MENU] button.
The Menu appears.
2. Press the [ ,] buttons to select [Setup/Info]
and press the [ ] button to confirm the entry.
Confirm
Select
RETURN
MENU
CONTROL PANEL
ON/
OFF
Cursor button
MENU button
3. Press the [ ,] buttons to select [Reboot]
and press the [ ] button to confirm the entry.
Confirm
Select
The Reboot confirmation screen appears.
4. Press
the [
,
] buttons to select
[OK]
and
press
the [ ] button
to confirm the entry.
Select
Confirm
A reboot takes between 40 to 50 seconds to complete.
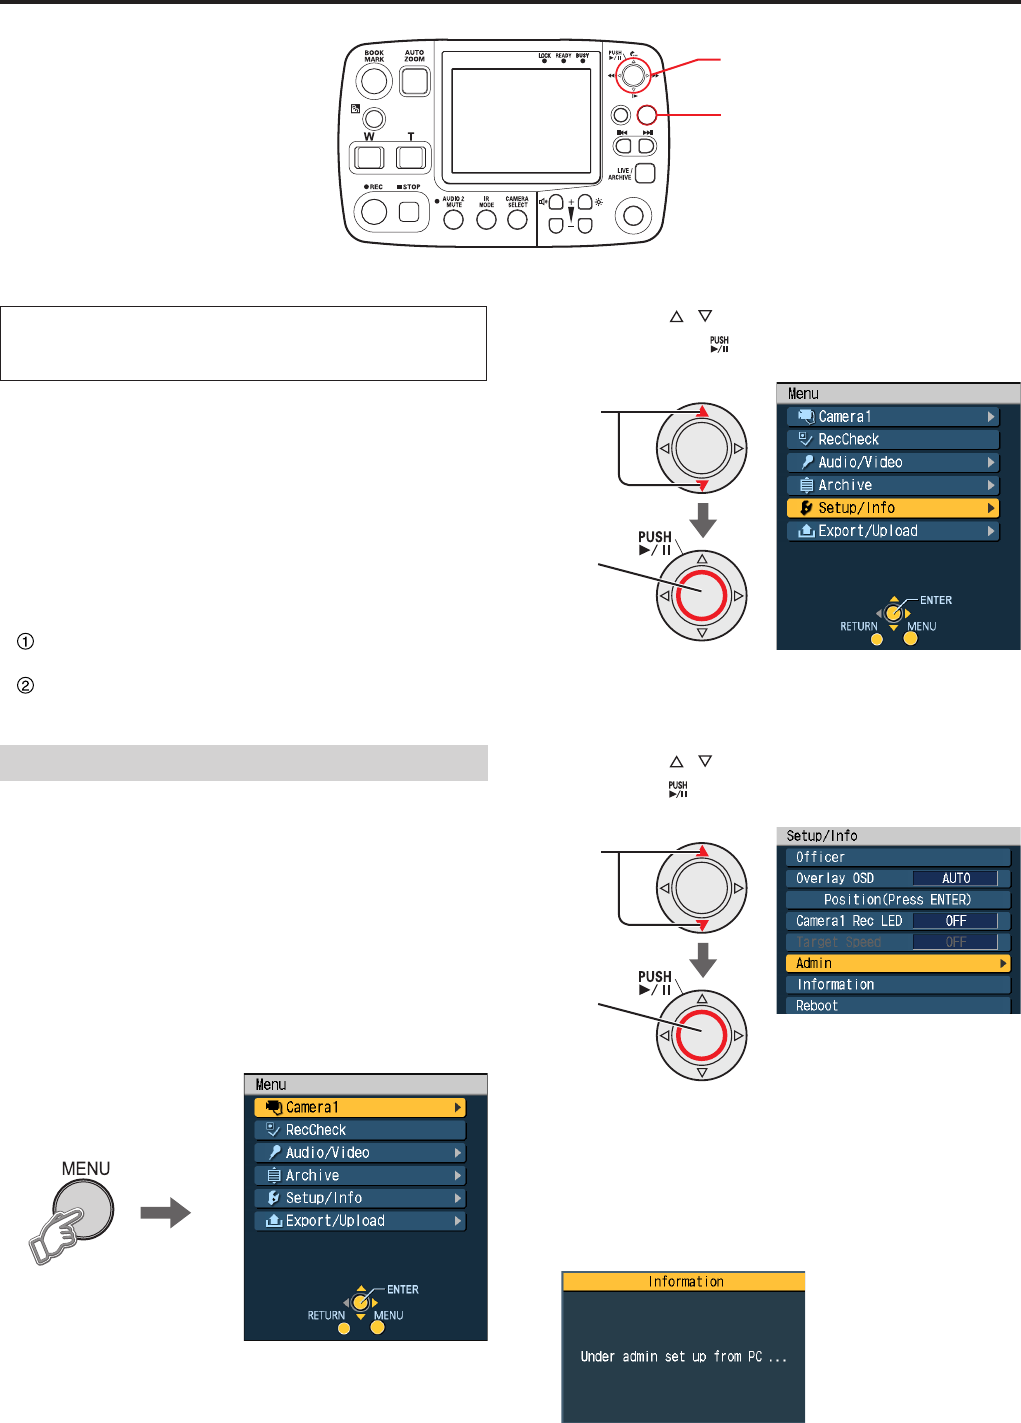
77
When a Front-End application is running or the Back-End
application is streaming a picture, the recorder freezes in
the live screen and disables Administrator Setup.
The setup of the recorder includes items that only an
administrator is allowed to set up.
Notes:
Starting up a Front-End application or streaming on the
Back-End application during Administrator Setup aborts
Administrator Setup. The recorder will then freeze in the
live screen and disable Administrator Setup.
Starting Administrator Setup from a Front-End or Back-
End application causes the following screen transitions.
The “Under admin setup from PC…” standby screen
replaces the live screen.
The live screen reappears when the Front-End or Back-
End application completes Administrator Setup.
Logging in the Setup/Admin screen
1. Use a computer to copy the administrator’s
officer data to a USB memory device.
For details on creating a text file with the administrator’s
officer data, refer to “Text Files Used with the Recorder”
on pages 29 - 33.
2. Connect the USB memory device to the
recorder.
3. Press the [MENU] button.
The Menu appears.
•
•
Administrator Setup
RETURN
MENU
CONTROL PANEL
ON/
OFF
Cursor button
MENU button
4. Press the [ ,] buttons to select [Setup/Info]
and press the [ ] button to confirm the entry.
Confirm
Select
Note:
Some USB memory devices may not be properly
recognized.
5. Press the [ ,] buttons to select [Admin] and
press the [ ] button to confirm the entry.
Confirm
Select
The first of the files automatically sorted (in ascending
order) from the USB memory device is loaded as the
administrator’s officer data.
If the Front-End application or Back-End application
is running, the message shown below appears, and
Administrator Setup is disabled.
(Continued on the next page)
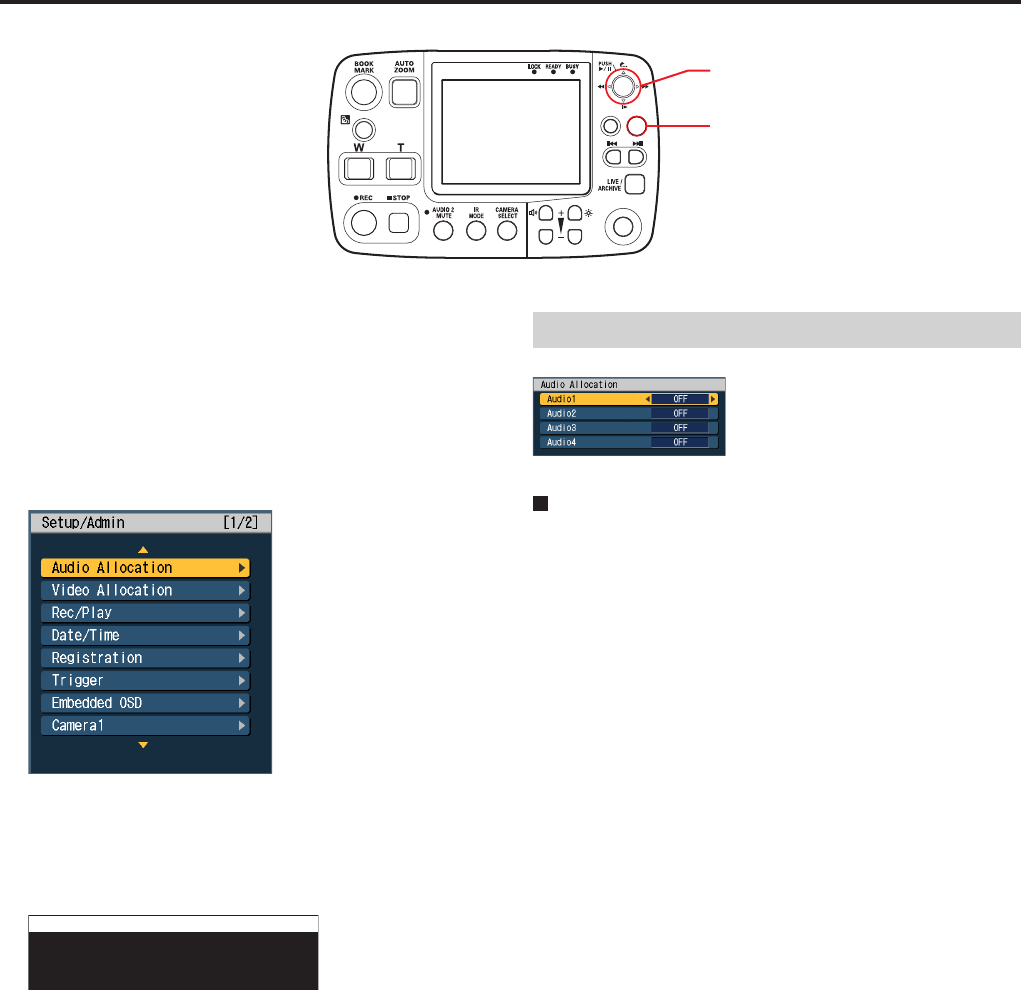
78
79
The recorder searches to determine whether officer
data for the administrator has already been registered,
and in the following cases, the Setup/Admin top screen
appears.
When no officer data for the administrator is registered,
such as immediately after purchase.
When identical officer data is already registered for the
administrator.
If officer data is already registered for the administrator
but is not identical, the following screen appears before
the Menu automatically reappears.
Obtain correct data from the administrator and repeat
operations from Step 1 above.
Authentication
Since you are not an administrator,
you cannot open this menu.
Note:
Refer to “Setup” on pages 19 - 28 for information on the
factory defaults.
•
•
Administrator Setup (continued)
RETURN
MENU
CONTROL PANEL
ON/
OFF
Cursor button
MENU button
Audio Allocation
Audio 1, Audio 2, Audio 3, and Audio 4
Select the signal level depending on the signal connected to
the [AUDIO IN] [1], [2], [3], or [4] connector.
WMIC: Wireless microphone
MIC: Microphone
OFF: No signal input
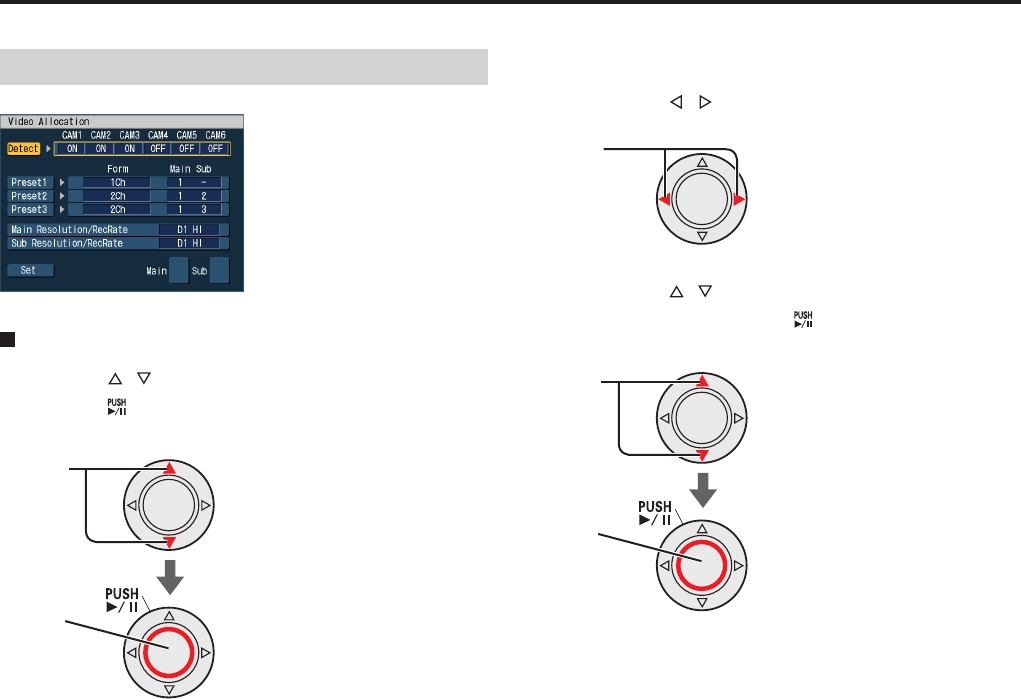
78
79
Administrator Setup (continued)
Video Allocation
Detect
Press the [ ,] buttons to select [Detect] and
press the [ ] button.
Confirm
Select
Cameras connected to the recorder are detected, and the
connected status are displayed.
ON: Connected
OFF: Not connected
The recommended preset settings are set for Preset1,
Preset2, and Preset3.
(See “Camera Connection and Combination of Cameras” on
page 117.)
Setting camera connection manually
1. Press the [ ,] buttons to select a camera.
Select
2. Press the [ ,] buttons to change the
settings and press the [ ] button.
Confirm
Select
Notes:
If it is set to “OFF” but a camera is connected, no signal
will be recorded.
If the camera input is disconnected on the Video Allocation
screen, the display will change to the Live screen.
•
•
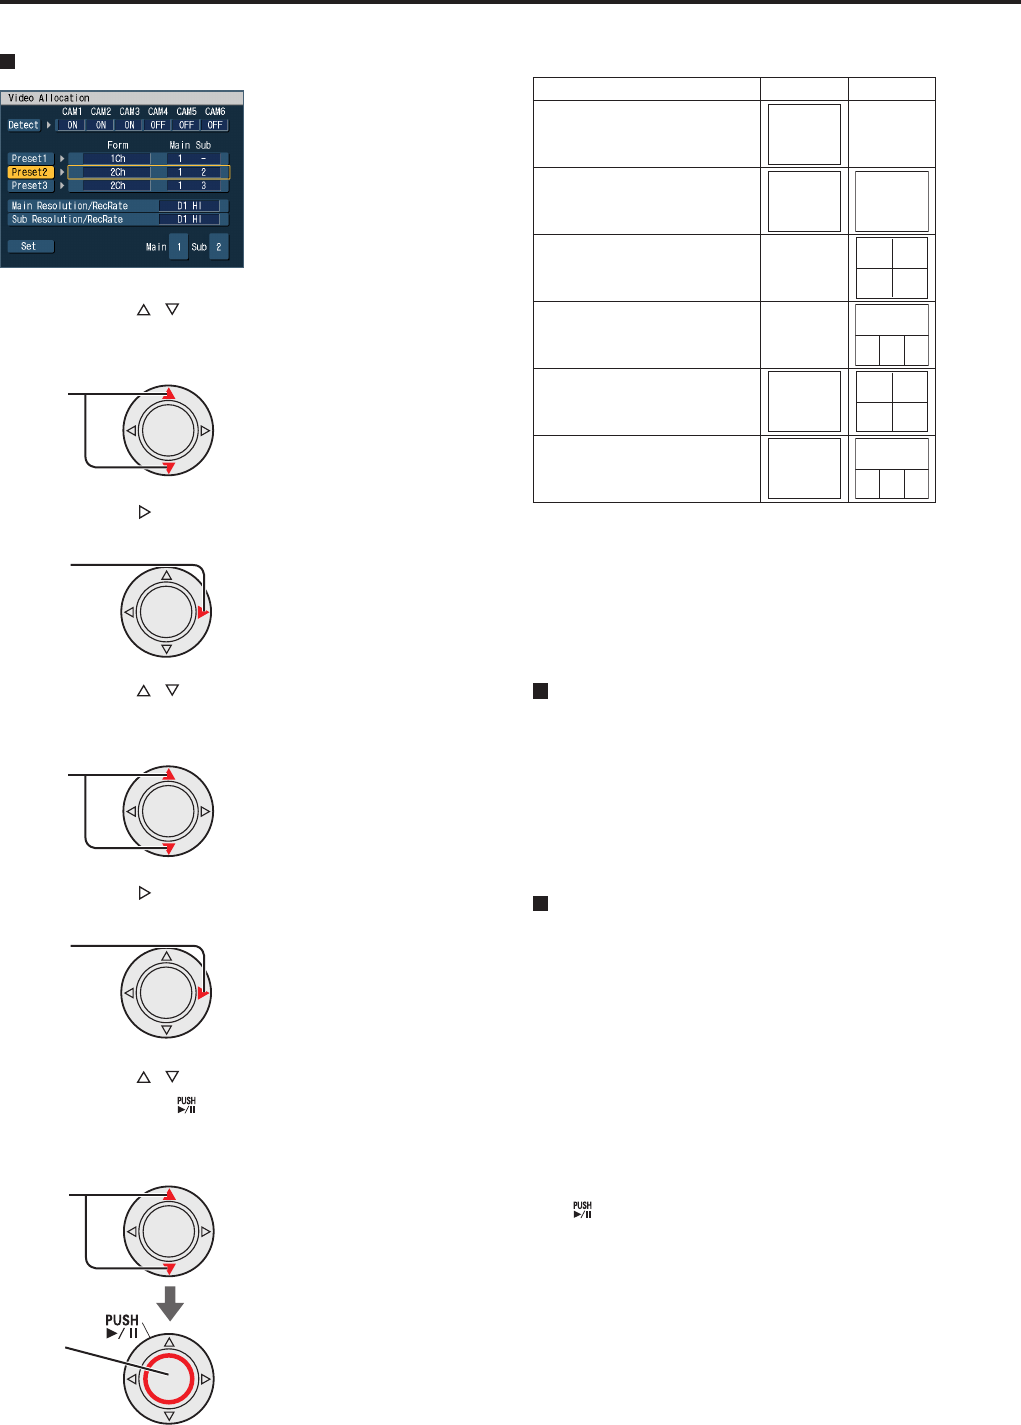
80
81
Administrator Setup (continued)
Preset1, Preset2, Preset3
1. Press the [ ,] buttons to select a preset
number to be set.
select
2. Press the [ ] button to select [Form].
Select
3. Press the [ ,] buttons to change the
settings.
select
4. Press the [ ] button to select [Main Sub].
Select
5. Press the [ ,] buttons to change the setting
and press the [ ] button to confirm the
setting.
Confirm
Select
Pattern of the selected Main video and Sub video is
displayed at the lower right on the screen.
Preset setting pattern
Form Main Sub
1Ch
1/2/3
–
2Ch
1/2
2/3
4Ch-QUAD –
1/2/3
4
6
5
4Ch-PANORAMA –
1/2/3
4 6 5
5Ch-QUAD
1/2/3
2/3
4
6
5
5Ch-PANORAMA
1/2/3
2/3
4 6 5
Notes:
Some pattern cannot be selected depending on the
connected cameras.
(See “Camera Connection and Combination of Cameras”
on page 117.)
If Form is set to “-“, no Preset can be selected.
Main Resolution/RecRate
Set the resolution and record rate of a main video.
Setting: CIF, D1 10, D1 STD, D1 HI
(For details, see “Record time in each record mode” on
page 5,)
Note:
If the Main Resolution/RecRate is set to “D1 10”, the setting
of the Sub Resolution/RecRate is changed to “D1 10”.
Sub Resolution/RecRate
Set the resolution and record rate of a sub video.
Setting: CIF, D1 10, D1 STD, D1 HI
(For details, see “Record time in each record mode” on
page 5,)
Note:
If the Sub Resolution/RecRate is set to “D1 10”, the setting
of the Main Resolution/RecRate is changed to “D1 10”.
Enabling the settings
When setting is changed on this screen, the [Set] button
appears at lower left on the screen.
To enable the settings on the screen, select [Set] and press
the [ ] button.
If you press the [Return] button on the remote control panel
to terminate the screen, the setting will not be updated.
Note:
If the Preset setting is enabled, the selection with the
[CAMERA SELECT] button will be the main picture of
Preset1.
•
•

80
81
Administrator Setup (continued)
Rec/Play
Page 1
PowerOff Time
Use this function to set the interval after which the Remote
Control Panel and the recorder will shut down after the
ignition switch has been set to the LOCK (OFF) position.
Setting : 0 min, 10 min, 20 min, 30 min, 60 min, 90 min,
120 min, 180 min, AUTO*1
Init Preset Select
Select a Preset number when the power is turned on. Only
the preset numbers set on the Video Allocation screen are
selectable. For example, if only Preset 1 and Preset 2 have
been set, Preset 3 cannot be selected.
Setting: PRESET 1, PRESET 2, PRESET 3, LAST *2
Init VIDEO OUT1
Select a signal output from the [VIDEO OUT 1] connector on
the recorder when the power is turned on. Only the cameras
set to ON on the Video Allocation screen are selectable.
For example, if CAM3 has been set to OFF, CAM3 is not
selectable.
Setting: CAM1, CAM3, VIDEO OUT2, LAST *2
PowerOn Rec
Use this function to set recording to start when the recorder
is turned on.
Setting: OFF, ON
Loop Rec
Use this function to continue recording new video while
deleting the oldest recorded files if no space is available on
an SDHC Memory Card.
Setting: OFF, ON
Notes:
If Upload Mode on the Management Mode screen is set to
AUTO, the setting is fixed to OFF, and loop recording will
be disabled.
If Loop Rec is set to ON, the Upload Mode on the
Management Mode screen cannot be set, and uploading
is disabled.
Intermittent Rec
Use this function to record one video frame per second*3.
Setting:OFF, ON
Rec Continue Time*4
Use this function to set recording continue time for normal
recording when a trigger is entered or when the [REC] button
is pressed.
Setting: CONTINUE, 1 min, 2min, 5min, 10 min, 15 min,
20 min, 30 min, 60 min, 90 min
•
•
*1 When recorder operation is not controlled by a Front-End or
Back-End application:
Power is turned off immediately. Note, however, that power is not
turned off while data is exported to a USB memory device, but is
turned off after completion of data export.
When recorder operation is controller by a Front-End or
Back-End application:
Power is turned off when control from a Front-End or Back-
End application is released, uploading, streaming, administrator
setup, or updating is finished on the Back-End application, or the
SDHC Memory Card slot cover is opened.
If uploading or exporting continues for more than three hours, it
will be interrupted to save battery charge, and the power will be
shut off.
*2 Applies the setting in effect when power was last turned off.
Unless power is turned off properly, the operating state may not
be saved correctly.
*3 Normal recording records 10 or 30 video and audio frames per
second.
*4 Intermittent recording does not stop with the time set on Rec
Continue Time.

82
83
Administrator Setup (continued)
Page 2
PreRec Time (Video)*1
Use this function to set how much of already stored video
will be retained when a trigger is entered or the [REC] button
is pressed.
Setting : 0 s, 10 s, 20 s, 30 s, 60 s, 90 s
PreRec Time (Audio)*1
Use this function to set how much of already stored audio
will be retained when a trigger is entered or the [REC] button
is pressed. However, the audio recording starts at the same
time when the video pre-recording starts, even if the PreRec
Time (Audio) is set longer than the PreRec Time (Video).
Setting : 0 s, 3 s, 10 s, 20 s, 30 s, 60 s, 90 s
PostRec Time (Video)*2
Use this function to set the time interval video recording will
continue after the [STOP] button is pressed.
Setting : 0 s, 10 s, 20 s, 30 s, 60 s, 90 s
PostRec Time (Audio)*2
Use this function to set the time interval audio recording
will continue after the [STOP] button is pressed. However,
the audio recording ends at the same time when the video
post-recording ends, even if the PostRec Time (Audio) is set
longer than the PostRec Time (Video).
Setting : 0 s, 3 s, 10 s, 20 s, 30 s, 60 s, 90 s
Rule of Filename
Use this function to set the rules for filenames generated
during recording.
WT : World time
LT : Local time
Init Audio2 Rec
Sets Audio2 recording when the power is turned ON.
ON : Recording is performed.
LAST : See footnote.*3
OFF : Recording is not performed.
Note:
If Audio2 on the Audio Allocation screen is set to OFF, this
setting is disabled.
Init Overlay OSD
Use this function to set the Overlay OSD used when the
power is on.
Setting : OFF, AUTO, SIMPLE, DETAILS, LAST *3
*1 Intermittent recording does not include pre-recording time.
*2 If recording is stopped by Intermittent recording, Rec Continue
Time, post-recording is not included.
*3 Applies the setting in effect when power was last turned off.
Unless power is turned off properly, the operating state may not
be saved correctly.

82
83
Administrator Setup (continued)
Page 3
GPO1, GPO2, GPO3 Signal
Use this function to select the output signal from GPO1,
GPO2, and GPO3.
GPO1, 2: OFF, REC, ERROR, REC+ERROR
GPO3: OFF, REC
Init Audio Out (Play)
Use this function to set Audio Out used when the power is
on.
ON : All audio channels are output.
LAST : See footnote. *1
OFF : All audio channels are not output.
Play Mode
Use this function to turn all valid files starting in order
from the oldest file on four SDHC Memory Cards into a
virtual file for playback.
SINGLE : Normal playback for playing back files one at
a time.
RELAY : Plays back multiple files as one single
file without the need for further operation.
Playback pauses upon reaching the end of the
large virtual file (the most recently recorded
file). Playback operation is the same as for
normal playback.
Notes:
Slow playback of a virtual file that contains intermittent
recording files will revert to normal playback speed at the
start of an intermittent recording file. Slow playback is not
restored for subsequent normal recording files.
Quick replay starts playback 7 seconds prior to current
location.
A large virtual file consists of multiple files and video
and sound may be momentarily interrupted in playback
between files.
•
•
•
Skip Target
Use this function to set the skip location when the [Skip
back] or [Skip forward] button is pressed.
Trigger / Marker
Pressing of the skip-buttons jumps to the trigger position (one
per file) at which recording began, or to a bookmark position,
whichever found earlier. However, no trigger position can
exist in automatically divided files.
YES: Jumping with the skip-buttons enabled
NO: Jumping with the skip-buttons disabled
Head of File
Use this function to move to the beginning of a file with the
skip-button operation.
YES: Jumping with the skip-buttons enabled
NO: Jumping with the skip-buttons disabled
Notes:
When both [Trigger/Marker] and [Head of File] are set
to “YES”, playback will restart from the first trigger or
bookmark that appears or restarts from the beginning of
the file.
[Trigger/Marker] and [Head of File] cannot both be set to
“NO”.
•
•
*1 Applies the setting in effect when power was last turned off.
Unless power is turned off properly, the operating state may not
be saved correctly.
Playback with the remote control panel is not available
at present. Upgrading is scheduled for the future.
For playback, it is recommended to use the Front-End
application or Back-End Client application.
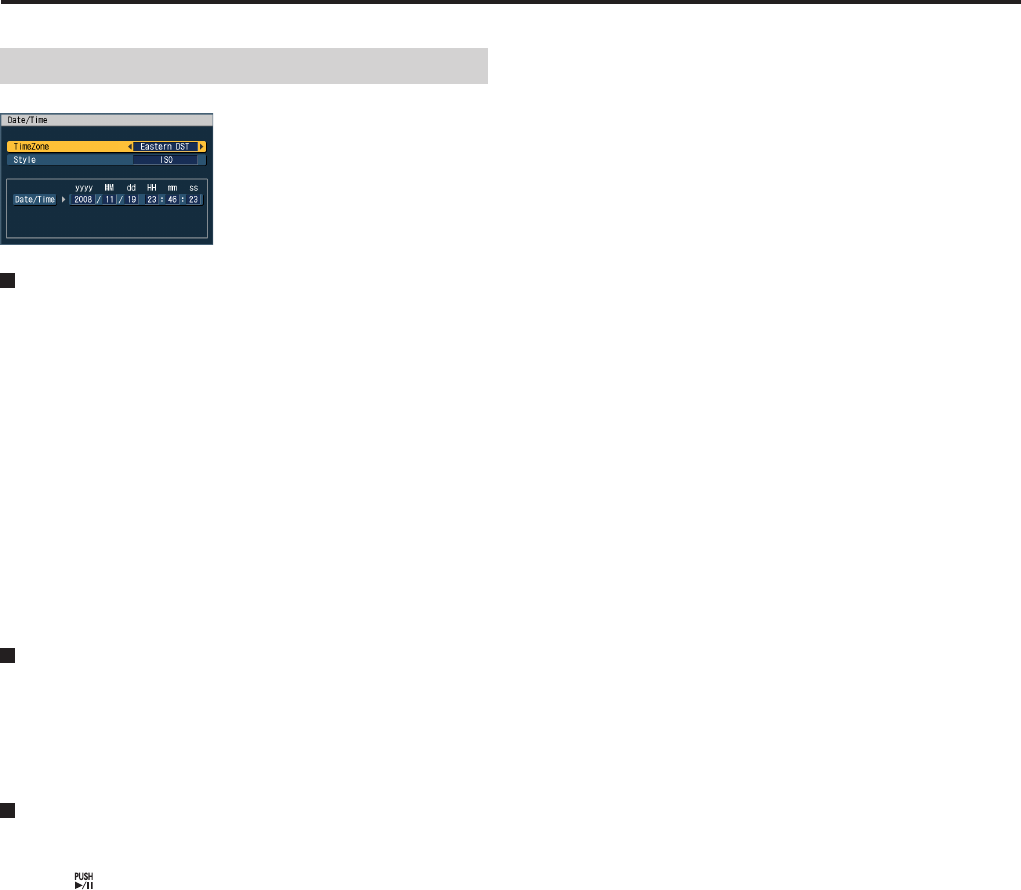
84
85
Administrator Setup (continued)
Date/Time
TimeZone
Indicates time difference from world standard time.
Hawaii : Hawaiian standard time
Yukon : Alaska standard time
Yukon DST : Alaska daylight saving time
Pacific : Pacific standard time
Pacific DST : Pacific daylight saving time
Mountain : Mountain standard time
Mountain DST : Mountain daylight saving time
Central : Central standard time
Central DST : Central daylight saving time
Eastern : Eastern standard time
Eastern DST : Eastern daylight saving time
Atlantic : Atlantic standard time
Atlantic DST : Atlantic daylight saving time
Asia Tokyo : Japan standard time
Style
Use this function to set a date format.
ISO : YYYY-MM-DD
HH : MM : SS
USA : MM/DD/YYYY
HH : MM : SS
Date/Time
The [Set] button appears when [Date/Time] is used to
change the date and time. Select the [Set] button and
use the [ ] button to confirm the entry. The [Set] button
disappears upon confirmation. Use the [MENU] button,
[CONTROL PANEL ON/OFF] button, [RETURN] button or
the [LIVE/ARCHIVE] button to cancel.
Setting :Year/month/day
hour : minute : second
Note:
If GPS information is used for the date and time setting,
setting of Date/Time on the menu will be invalid.
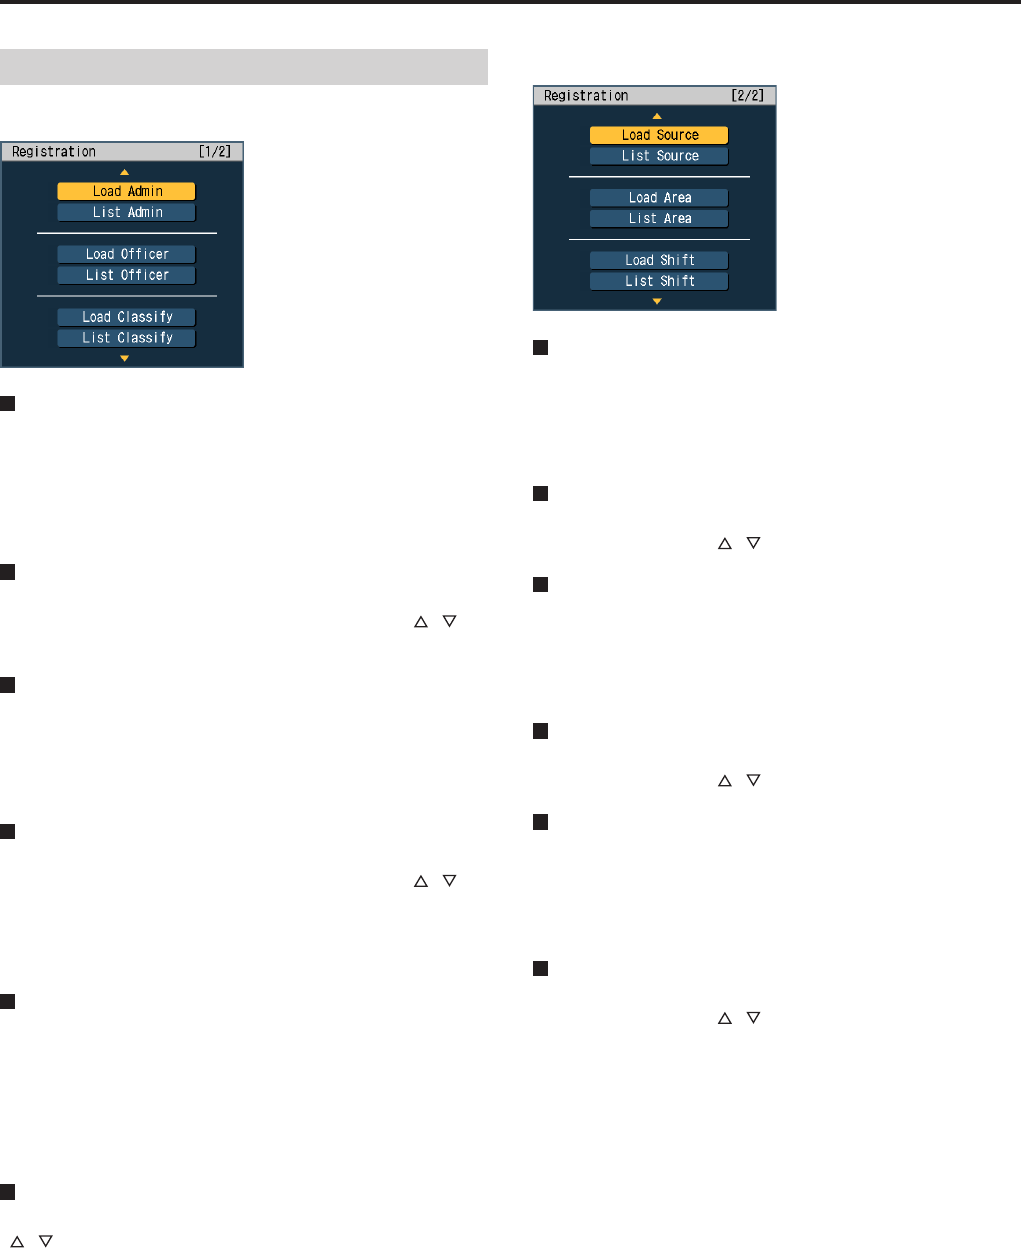
84
85
Administrator Setup (continued)
Registration
Page 1
Load Admin
Use this function to load administrator data from a USB
memory device, overwriting any existing administrator data.
Note:
No administrator data is registered when shipped from the
factory.
List Admin
Use this function to view the IDs of administrators and officer
names already registered in the recorder. Use the [ ,]
buttons to go between pages.
Load Officer
Use this function to load officer data from a USB memory
device, overwriting any existing officer data.
Note:
No officer data is registered when shipped from the factory.
List Officer
Use this function to view the IDs of officers and officer
names already registered in the recorder. Use the [ ,]
buttons to go between pages.
Note:
Long IDs and officer names may not be displayed in full.
Load Classify
Use this function to load classify tags from a USB memory
device, and delete any existing classify tags and update all
classify tags.
Note:
The recorder contains no classify tags when shipped from
the factory.
List Classify
Displays classify tags stored on the recorder. Use the
[,] buttons to go between pages.
Note:
Long classify tag character strings may not be displayed in
full.
Page 2
Load Source
Use this function to load source data from a USB memory
device, overwriting any existing source data.
Note:
No source data is registered when shipping from the factory.
List Source
Use this function to display source data already registered in
the recorder. Use the [ ,] button to go between pages.
Load Area
Use this function to load area data from a USB memory
device, overwriting any existing area data.
Note:
No area data is registered when shipping from the factory.
List Area
Use this function to display area data already registered in
the recorder. Use the [ ,] button to go between pages.
Load Shift
Use this function to load shift data from a USB memory
device, overwriting any existing shift data.
Note:
No shift data is registered when shipping from the factory.
List Shift
Use this function to display shift data already registered in
the recorder. Use the [ ,] button to go between pages.

86
87
Administrator Setup (continued)
Trigger
Trigger
Use this function to turn trigger on or off.
Setting : ON, OFF
Trigger1 to 16
< Action >
Enter actions for detection of trigger signals (GPI1–16). Enter
“NONE” for triggers that will not be used.
REC : Record
STOP : Stop
AUTO ZOOM : Automatically zooms in/out or pauses
P1, P2 *1, P3 *1 : Selects video set for Preset1,
Preset2, or Preset3
P1REC, P2REC *1, P3REC *1
: Records video set for Preset1,
Preset2, or Preset3
AUDIO2ON : Records audio input to the [AUDIO
IN 2] connector
AUDIO2MUTE : Not records audio input to the [AUDIO
IN 2] connector
TGT(REC) *2 : Starts recording with a TGT input
signal
TGT(P1REC) *2, TGT(P2REC) *1, *2, TGT(P3REC) *1, *2
: Starts recording video set for Preset1,
Preset2, or Preset3 with a TGT input
signal
OWN(REC) *2 : Starts recording with an OWN input
signal
OWN(P1REC)
*2
, OWN(P2REC)
*1
,
*2
, OWN(P3REC)
*1
,
*2
: Starts recording video set for
Preset1, Preset2, or Preset3 with an
OWN input signal
CAM1 LED : Changes the status setting (on/off) of
the [REC] lamp on a Color Camera
connected to the [CAMERA 1]
connector
NONE : No operation
Note:
When you switch the preset mode, noise may occur in video.
< Detection >
Enter conditions for detection of trigger signals (GPI1–16).
Choice of detection method depends on the setting selected
by <Action>.
In REC, P1REC, P2REC, and P3REC modes
H : High-edge trigger
Level H : High-level trigger
L : Low-edge trigger
Level L : Low-level trigger
B : Both-edge trigger
In P1, P2, P3, CAM1 LED, AUDIO2ON, AUDIO2MUTE,
AUTO ZOOM, and STOP modes
H : High-edge trigger
L : Low-edge trigger
B : Both-edge trigger
In NONE mode
H : High-edge trigger
L : Low-edge trigger
In TGT(REC), TGT(P1REC), TGT(P2REC), TGT(P3REC),
OWN(REC), OWN(P1REC), OWN(P2REC), and
OWN(P3REC) modes
Setting: OFF, 200, …, 2, 1
< Display >
Assign characters to be used in the Embedded OSD display.
Setting: OFF (no display), A to Z, –
Note:
The value set by <Display> appears when the state triggered
by <Detection> prevails. However, only when a value “B” is
set for <Detection>, the value set by <Display> will appear
during a high state.
•
•
•
•
*1 These are not displayed if Preset 2 and Preset 3 have not been
set on Video Allocation screen.
*2 TGT(REC), TGT(P1REC), TGT(P2REC), TGT(P3REC),
OWN(REC), OWN(P1REC), OWN(P2REC), and OWN(P3REC)
can be selected for Trigger 15 and Trigger 16.

86
87
Administrator Setup (continued)
Embedded OSD
Main OSD
Use this function to set whether the items in “Contents” are
to be embedded on the main screen on recording.
ON:
Trigger, Time, and Source@Area that are set to
ON are embedded on the screen during recording.
When a file with the items embedded is played,
the embedded items are displayed at the recorded
locations.
OFF: No item is embedded during recording.
Sub OSD
Use this function to set whether the items in “Contents” are
to be embedded on the sub screen during recording.
ON: Trigger, Time, and Source@Area, that are set to
ON are embedded on the screen during recording.
When a file with the items embedded is played,
the embedded items are displayed at the recorded
locations.
OFF: No item is embedded during recording.
Display Position
Use this function to set the display position for the On-
Screen Display on the screen and in record files.
L-Upper : Upper left
R-Upper : Upper right
L-Bottom : Lower left
R-Bottom : Lower right
Trigger
Use this function to turn trigger display on or off upon trigger
signal (GPI1–16) inputs.
Setting : ON, OFF
Note:
The Detailed Overlay OSD (see pages 56, 70) will hide this
indication.
Time
Use this function to turn date and time display on or off
during recording.
Setting : ON, OFF
Note:
The Detailed Overlay OSD (see pages 56, 70) will hide this
indication.
Display for the vehicle identification and name
of a location (Source@Area)
Use this function to turn vehicle identification and name of a
location on or off during recording.
This information appears as “Source@Area”.
The first 5 characters in the vehicle identification is displayed
as “Source” and the first 4 characters in the name of a
location is displayed as “Area”.
Setting : ON, OFF
Notes:
If the Source is less than 5 characters, the number of
characters for the Area is adjusted so that the total number
of characters becomes 10.
If the Area is less than 4 characters, the number of
characters for the Source is adjusted so that the total
number of characters becomes 10.
“@Area” is displayed when there is no Source.
The vehicle identification only is displayed when there is
no Area.
•
•
•
•
Playback with the remote control panel is not available
at present. Upgrading is scheduled for the future.
For playback, it is recommended to use the Front-End
application or Back-End Client application.
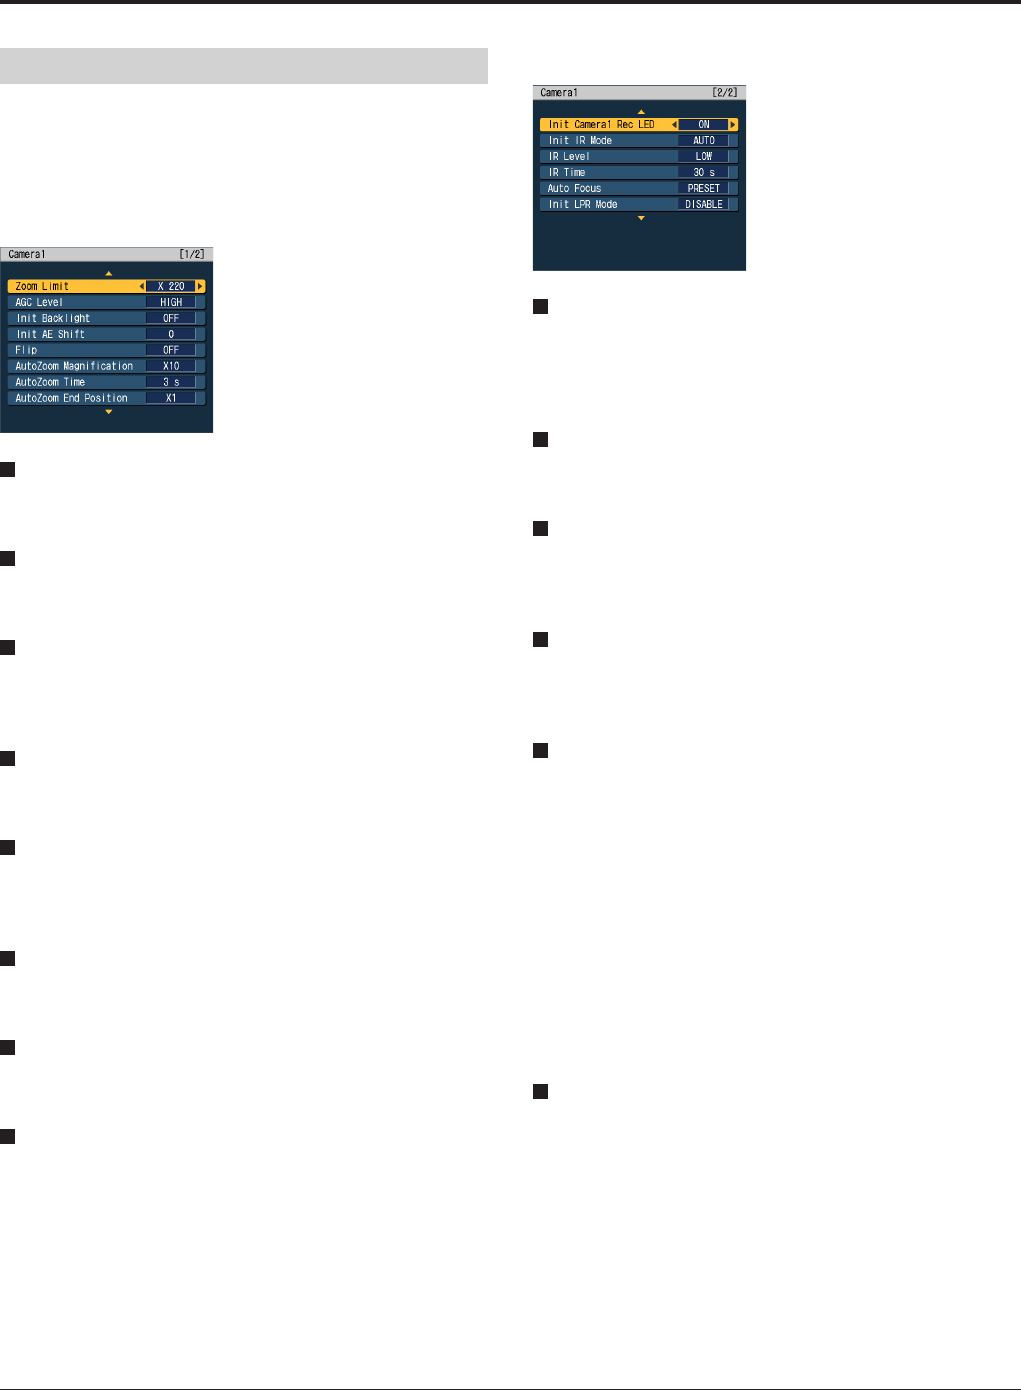
88
89
Administrator Setup (continued)
Camera1
Note:
If “Camera1” has not be set for any of Preset1, Preset2, and
Preset 3 on the Video Allocation screen in Administrator
setup, the Camera1 screen cannot be selected.
Page 1
Zoom Limit
Use this function to enter maximum zoom ratio.
Setting : ×22, ×220
AGC Level
Use this function to set the level of camera input gain control.
Setting : HIGH, OFF, LOW, MID
Init Backlight
Use this function to turn backlight compensation on or off
when the power is on.
Setting : OFF, ON, LAST *1
Init AE Shift
Use this function to adjust brightness when the power is on.
Setting : 0, -2, -1, +1, +2, LAST *1
Flip
Use this function to determine whether to vertically flip
camera video image or not.
Setting : OFF, ON
AutoZoom Magnification
Use this function to set the target zoom-in ratio.
Setting : ×10, ×15, ×22, ×1, ×2, ×3, ×4, ×5, ×7
AutoZoom Time
Use this function to set the zoom-in pause time.
Setting : 3 s, 5 s, 8 s
AutoZoom End Position
Use this function to set the zoom-end ratio for auto zoom.
Setting: x1, x2, x3, x4, x5, x7, x10, x15, x22, LAST *1
Page 2
Init Camera1 Rec LED
Use this function to turn the [REC] lamp on the camera
connected to the [CAMERA 1] connector on or off when the
power is on.
Setting : ON, LAST *1,OFF
Init IR Mode
Use this function to set the IR function when the power is on.
Setting : AUTO *2, OFF, ON, LAST *1
IR Level
Use this function to set the IR function level during automatic
switching.
Setting : LOW, HIGH
IR Time
Use this function to set the IR function detection time during
automatic switching.
Setting : 30 s, 60 s, 300 s, 10 s
Auto Focus
Selects color camera focusing method when,
[Init LPR Mode] is set to “DISABLE”.
[Init LPR Mode] is set to “ENABLE” and [LPR Mode] is set
to “PATROL”.
A recording trigger starts recording when [Init LPR Mode]
is set to “ENABLE” and [LPR Mode] is set to “LPR”.
PRESET : When the zoom is 3x or below, the camera is
focused at about 15 m (50 feet). Subsequent
zooming will engage auto focus.
DISABLE : Focus is locked at about 40 m (130 feet) and
auto focus is not available.
AUTO : Auto focus goes into operation when the
zoom ratio is changed.
Init LPR Mode
Enables or disables the LPR function (license plate
recognition) when the recorder is turned on.
DISABLE : Color camera shutter speed changes to
“AUTO”. The zoom position for the camera at
power on returns to the position it had when
the power was last turned off.
ENABLE : Allows changes to be made to the officer
[LPR Mode]. Values set in this mode will
persist through a power off and become
available at the next power on.
•
•
•
*1 Applies the setting in effect when power was last turned off.
Unless power is turned off properly, the operating state may not
be saved correctly.
*2 Automatically switches between ON and OFF.

88
89
Administrator Setup (continued)
Management Mode
Classify
Use this function to set whether the classify tag is added
upon stopping of recording.
DISABLE : Disables adding a classify tag.
ENABLE : Enables adding a classify tag.
FORCE : Add a classify tag forcibly.
If “Loop Rec” on the Rec/Play screen is set to ON, the
classify tag will not be added even if [ENABLE] or [FORCE]
is selected.
Setting Method
Use one of the following methods to enter officer data.
AUTO : Automatically reads and loads officer data
for up to two persons from a USB memory
device.
MANUAL : Display the menu on the LCD panel, and
then read in and configure officer data from
a USB memory device on the Officer setup
top screen.
LIST : Display the menu on the LCD panel and
allow you to set the officer data by selecting
from the list on the Officer setup top screen
after reading in the officer data already
stored on this unit.
Upload Mode
Use this function to set the upload mode.
AUTO : Data are uploaded automatically.
MANUAL : Data are uploaded manually.
Notes:
If Loop Rec on the Rec/Play screen is set to ON, the
Upload Mode cannot be set, and uploading is disabled.
If the Upload Mode is set to AUTO, connection with a
PC will be automatically started and maintained during
uploading.
Export Menu
Use this function to set Export menu.
ENABLE : Enables Export menu.
DISABLE : Disables Export menu.
Preset Select
Use this function to set preset selection.
ENABLE : Enables the preset selection.
DISABLE : Disables the preset selection.
•
•
Operation Key Lock
Use this function to lock the buttons on the remote control
panel.
OFF : All buttons can be used.
ANY : The [W], [T], [AUTO ZOOM], [BACKLIGHT],
[CAMERA SELECT], [IR MODE],
[AUDIO2MUTE], [LIVE/ARCHIVE], [PREV],
[NEXT], and [BOOKMARK] buttons are locked.
STOP : The buttons other than the [STOP] button are
locked.
Notes:
When a USB memory device containing administrator
data is connected, you can press the [MENU] button to
enter the Setup/Admin top screen via the menu items. Set
[Management Mode] – [Operation Key Lock] setting to
“OFF” in administrator setup to release key lock.
The key lock is activated for the first time when you move
to the live screen.
The [LOCK] lamp indicates whether the keys are locked.
The Color Camera zoom and brightness buttons cannot
be locked.
Trigger signal (GPI1-16) control (see page 86) is not
locked.
•
•
•
•
•

90
91
Administrator Setup (continued)
Radar/GPS
Radar Model
The model name of the radar gun connected to the recorder
is displayed.
Model Select
Use this function to select a radar gun.
ProLaser :
The recorder is set to support Kustom Signal’s Inc.’s
ProLaser3 as standard.
STALKER_:
The recorder is set to support Applied Concepts, Inc.’s
STALKER DUAL.
GOLDEN_:
The recorder is set to support Kustom Signals, Inc.’s
Golden Eagle II.
Note:
To use the recorder with other radar guns, consult your
supplier.
Add Model
1. Press the [ ,] buttons to select [Add Model],
and press the [ ] button to confirm the entry.
Confirm
Select
2. Connect the USB memory device containing
the model data to the recorder.
3. Press the [ ,] buttons to select [OK], and
press the [ ] button to confirm the entry.
Select
Confirm
A new radar gun is added.
Connection of Radar
Use this function to specify the radar gun connection port.
OFF : When not connected
Recorder: When connected to the recorder
Notes:
The remote control panel has no function for calculating
the speed of the target vehicle from the moving own
vehicle.
No distinction is made between the speed of an
approaching target vehicle and a receding one.
Some radar guns come with a function for setting
conditions that enable correct measurement of target
vehicle speed. Use this function according to the
instructions in the Operating Instructions of the radar gun.
Error messages appear when the radar gun is operating
abnormally.
GPS
Connection of GPS
Use this function to select GPS data source.
Recorder: Uses GPS data from the GPS module
attached to the recorder.
OFF : Does not use GPS data.
Collection Time
Use this function to set the time to collect GPS data.
Setting : 5 s, 10 s, 1 s, 2 s
Speed Information
Speed Unit
Use this function to set the speed unit for own and target
vehicles.
Setting : MPH, km/h
•
•
•
•
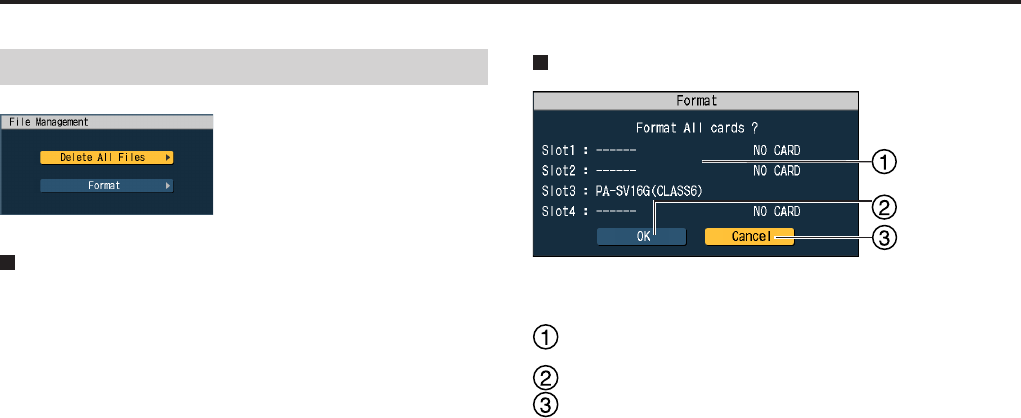
90
91
Administrator Setup (continued)
File Management
Delete All Files
Use this function to delete all video and audio data files on
the recorder. Select [OK] in the confirmation dialog box that
appears to delete the files or select [Cancel] to keep the
files.
Notes:
Do not make button operations or turn the power off during
a delete all files operation.
SDHC Memory Card files for which the following
information appears in the status display cannot be
deleted.
- CARD PROTECT
- VUP CARD
- UNFORMATTED
- NO CARD
•
•
Format
Use this function to format all SDHC Memory Cards in the
recorder.
: Displays the model of the inserted SDHC Memory
Card.
: Formats all SDHC Memory Cards.
: Cancels formatting.
Notes:
Do not make button operations or turn the power off during
a format operation.
An SDHC Memory Card for which the following information
appears in the status display cannot be formatted.
- CARD PROTECT
- VUP CARD
- NO CARD
- UNSUPPORTED
Format a new SDHC Memory Card or an SDHC Memory
Card to be used with another device, in the recorder or
with the “SD Memory Card Formatting Software”. “SD
Memory Card Formatting Software” can be downloaded
from the Web site below.
http://panasonic.jp/support/global/cs/sd/download/
sd_formatter.html
For formatting with the “SD Memory Card Formatting
Software”, be sure to set the FORMAT SIZE
ADJUSTMENT of the format option to “OFF”. If it is set
to “ON”, the recorder will not be able to use the SDHC
Memory Card.
The product name is defined by the SD Card Association
and may differ from the SDHC memory card product
number.
•
•
•
•
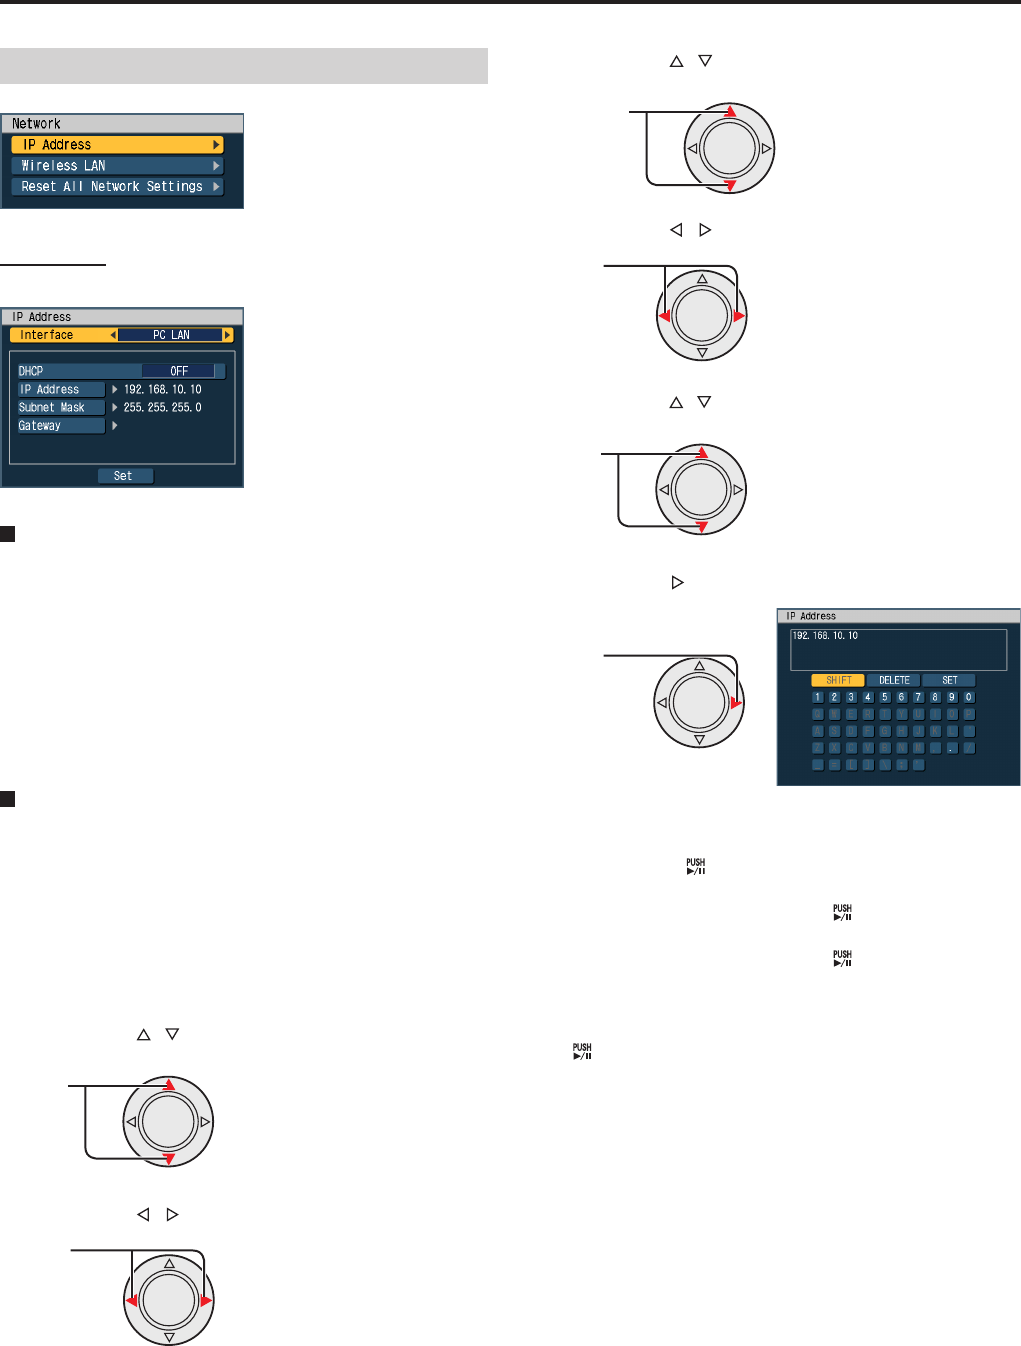
92
93
Administrator Setup (continued)
Network
IP Address
Use this function to set IP address.
Interface
Select an interface to be used.
PC LAN : Wired LAN for connecting the
Front-End application and the
recorder
UPLOAD LAN : Wired LAN for connecting the
Back-End application and the
recorder
USB WIRELESS LAN : USB Wireless LAN for
connecting the Back-End
application and the recorder
DHCP
Use this function to set DHCP.
• When “PC LAN” is selected for [Interface]
If [DHCP] is set to “Server1”, “Server2”, “Server3”, or
“Server4”, the recorder is set to the DHCP server and the
Front-End application is set to the DHCP client. In this case,
the IP address is fixed.
If [DHCP] is set to “OFF”, IP Address, Subnet Mask, and
Gateway can be set with the procedures described below.
1. Press the [ ,] buttons to select [Interface].
Select
2. Press the [ ,] buttons to select [PC LAN].
Select
3. Press the [ ,] buttons to select [DHCP].
Select
4. Press the [ ,] buttons to select [OFF].
Select
5. Press the [ ,] buttons to select [IP Address].
Select
6. Press the [ ] button.
Select
7. Enter the address.
Select a character to be entered with the cursor button,
and press the [ ] button.
To delete a entered character: Select [DELETE] with
the cursor button, and press the [ ] button.
To change displayed characters: Select [SHIFT] with
the cursor button, and press the [ ] button.
8. When all characters have been entered, select
[SET] with the cursor button, and press the
[ ] button.
Set Subnet Mask and Gateway in the same way.
• When “UPLOAD LAN” is selected for [Interface]
If the network includes a DHCP server, set [DHCP] to “Client”.
The recorder is set to the DHCP client, and obtains the IP
address from the server.
If the network does not include a DHCP server, set [DHCP]
to “OFF”. The IP address is fixed.
• When USB WIRELESS LAN is selected for [Interface]
If the network includes a DHCP server, set [DHCP] to “Client”.
The recorder is set to the DHCP client, and obtains the IP
address from the server.
If the network does not include a DHCP server, set [DHCP]
to “OFF”. The IP address is fixed.
Updating network setting
When network settings are changed, press the [Set] button.
The network setting will be updated.

92
93
Administrator Setup (continued)
Wireless LAN
Use this function to set details for the USB wireless LAN.
AP Priority
Use this function to set priority.
Random : Trying to connect to the access point at
random
AP1 Highest : Trying to connect to the access point in
order of Access Point1, Access Point2,
…, Access Point10
Network
Use this function to set the access point of the network.
Setting:
Access Point1, Access Point2, …, Access
Point10
Make the following settings for each access point.
Access Point
Set whether the access point is enabled or disabled.
Setting: ENABLE, DISABLE
Security
Use this function to set security.
Setting: WEP, WAP/WPA2-PSK, NONE
Service Set ID (SSID)
Use this function to set the service set ID.
Network Key
Use this function to set network key.
Key Index
Use this function to set key index.
Setting: 1, 2, 3, 4
[Set] button
Press this button when a setting is changed. The network
setting will be updated.
•
•
•
•
•
Reset All Network Settings
Use this function to reset the network settings.
1. Press the [ ,] buttons to select [Reset All
Network Settings].
Select
2. Press the [ ] button.
Select
3. Press the [ ,] buttons to select [OK] and
press the [ ] button to confirm the entry.
Select
Confirm
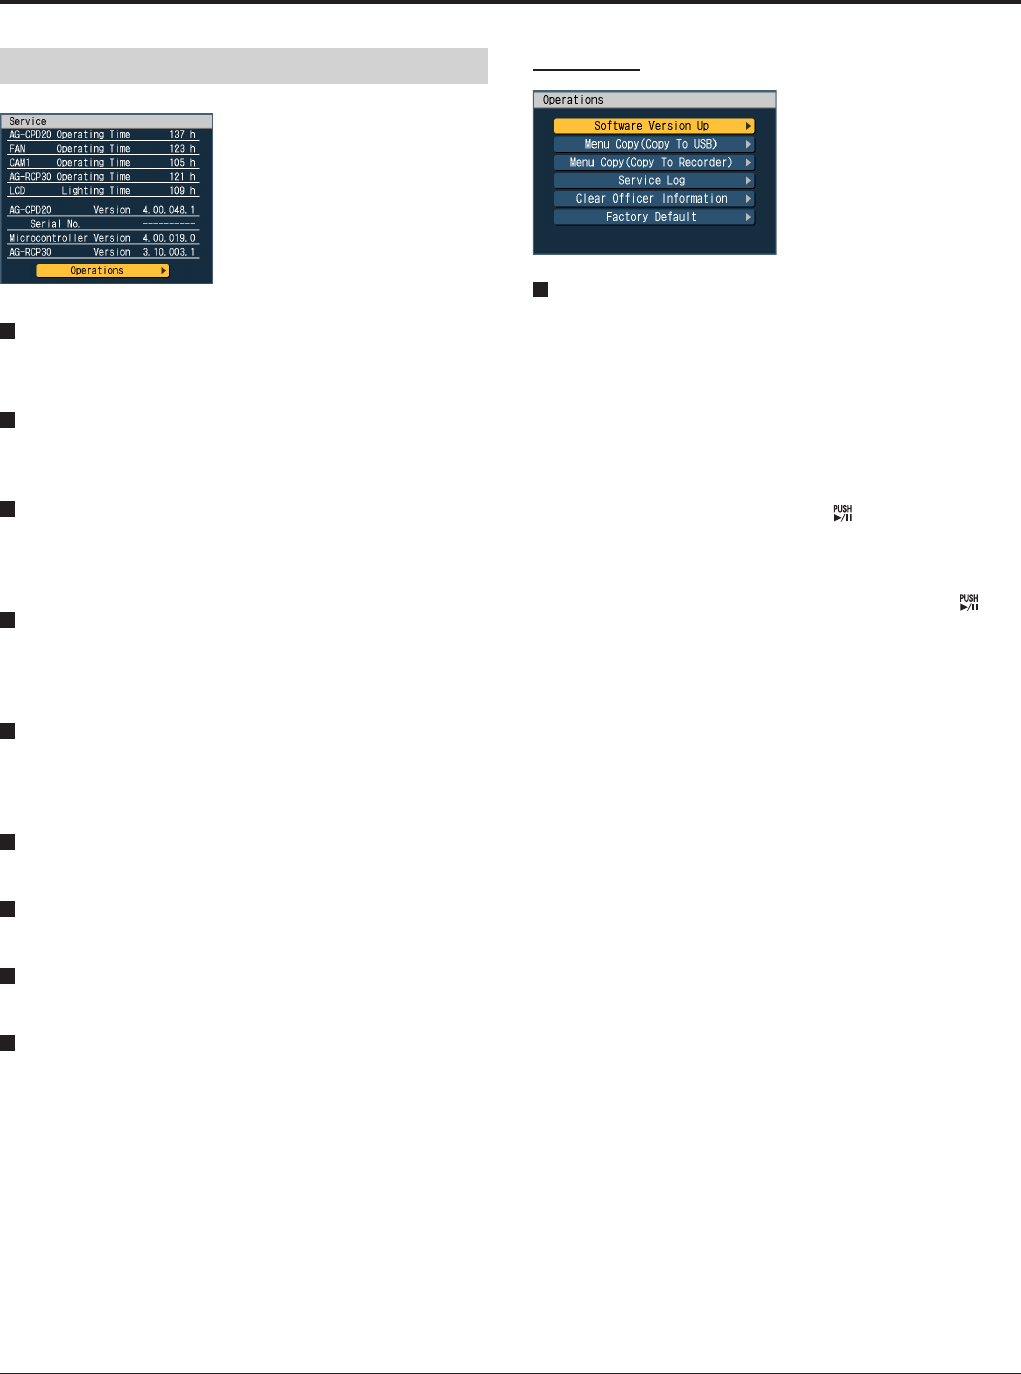
94
95
Administrator Setup (continued)
Service
AG-CPD20 Operating Time
Use this function to view the operating time of the recorder.
(unit: hours)
FAN Operating Time
Use this function to view the operating time of the fan.
(unit: hours)
CAM1 Operating Time
Use this function to view the operating time of the Camera
connected to the [CAMERA 1] connector.
(unit: hours)
AG-RCP30 Operating Time
Use this function to view the operating time of the Remote
Control Panel.
(unit: hours)
LCD Lighting Time
Use this function to view the cumulative lighting time of the
LCD panel.
(unit: hours)
AG-CPD20 Version
Use this function to view the version of the recorder.
Serial No.
Use this function to view the serial number of the recorder.
Microcontroller Version
Use this function to view the version of the microprocessor.
AG-RCP30 Version
Use this function to view the version of the Remote Control
Panel.
Operations
Software Version Up
For details on obtaining version upgrade files, consult your
supplier. Make sure to use a computer beforehand to save
the version upgrade file you obtain in the root directory*1 of
an SDHC Memory Card or USB memory device.
1. Insert the SDHC Memory Card or connect the
USB memory device to the recorder.
2. Select [Service] - [Operations] - [Software
Version Up], and press the [ ] button to
confirm the entry.
A confirmation dialog box appears.
3. Select [OK], and accept by pressing the [ ]
button.
The version upgrade is performed, and the recorder
automatically restarts.
Notes:
Do not make button operations or turn the power off during
a version upgrade.
An error screen appears if the version upgrade fails. (See
“Error Message” on pages 111-116.)
•
•
*1 Version upgrade cannot be performed when the following
conditions exist in the root directory.
If a DATA folder is present
If multiple version upgrade files (.VUP extension) are present
•
•
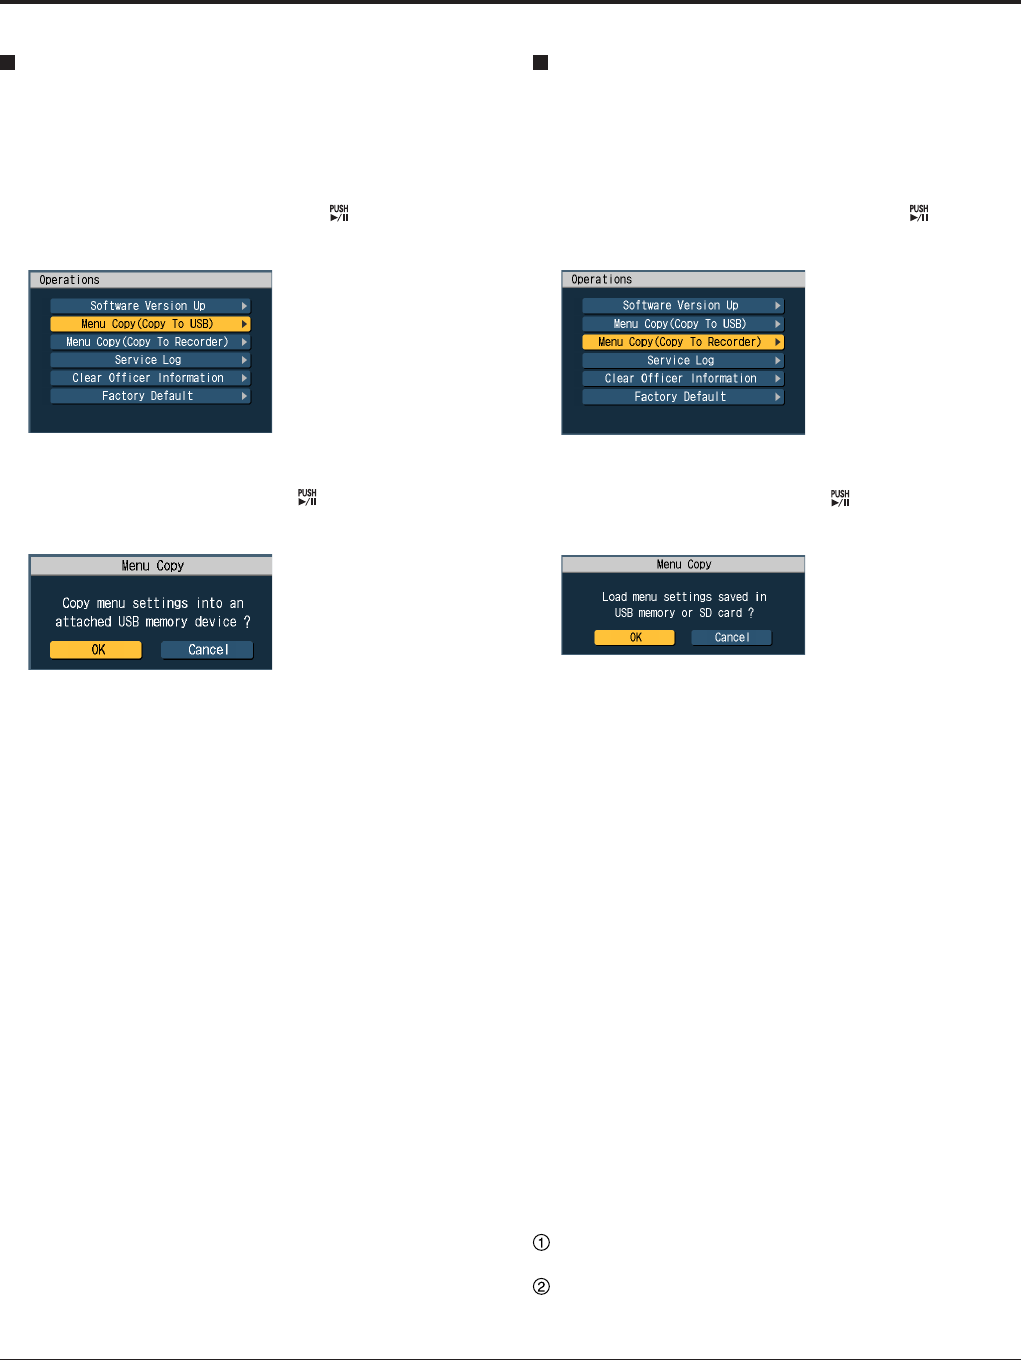
94
95
Administrator Setup (continued)
Menu Copy (Copy to USB)
Use this function to copy menu settings on this recorder to
another recorder.
1. Connect a USB memory device to this recorder.
2. Select [Service] – [Operations] – [Menu Copy
(Copy to USB)], and press the [ ] button to
confirm the entry.
A confirmation dialog box appears.
3. Select [OK], and press the [ ] button to
confirm the entry.
Menu Copy (Copy to Recorder)
Use this function to copy menu settings stored on a USB
memory device to this recorder.
1. Connect a USB memory device to this recorder.
2. Select [Service] – [Operations] – [Menu Copy
(Copy to Recorder)], and press the [ ] button
to confirm the entry.
A confirmation dialog box appears.
3. Select [OK], and press the [ ] button to
confirm the entry.
Menu settings are copied from a USB memory device.
Note:
The following lamp states indicate that an error has
occurred.
[BUSY] lamp fast blinking:
This indicates that an error occurred during configuration
file*1 check or administrator authentication.
If a configuration file*1 check error occurred, the followings
are probable causes.
- The configuration file is missing.
- There are multiple configuration files.
- The configuration file is corrupted.
If an administrator authentication error occurred,
administrator setup has been made on another recorder.
Use a PC to copy the administrator’s officer data to the
\WIDKEY on the USB memory device.
For details regarding text files containing administrator’s
officer data, see “Text Files Used with the Recorder” on
pages 29 – 33. Perform operations above from Step 1.
[READY] lamp goes off:
This indicates that the data could not be correctly loaded.
Perform the operations below in the stated order. If the
[READY] lamp still does not light, consult your supplier.
Remove the USB memory device, and perform the
operation from Step 1.
Replace the USB memory device, and perform the
operation from Step 1.
•
•
*1 The configuration file is the file with the “.CFG” extension. The
configuration file contains all information set on this recorder.
However, the following data are excluded.
Recorder Operating Time
Fan Operating Time
CAMERA 1 Operating Time
Remote Control Panel Operating Time
•
•
•
•
LCD Lighting Time
Recorder Version
Recorder serial number
Microcontroller Version
Remote Control Panel Version
Last erros
•
•
•
•
•
•
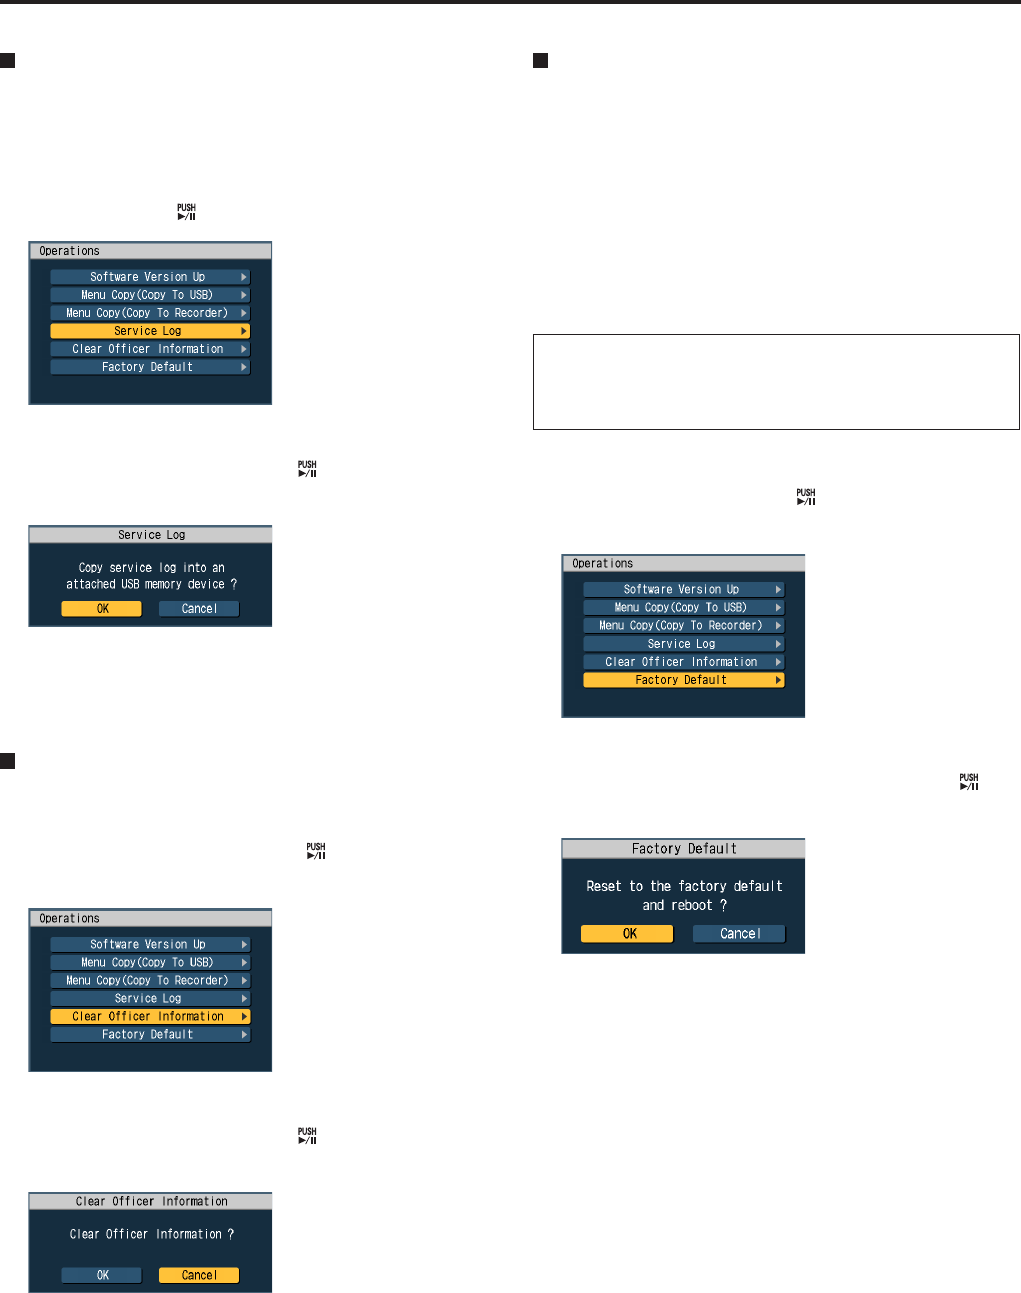
96
Administrator Setup (continued)
Service Log
Use this function to copy service log (see “Service Log” on
page 119) to an USB memory device.
1. Connect a USB memory device to this recorder.
2. Select [Service] – [Operations] – [Service Log],
and press the [ ] button to confirm the entry.
A confirmation dialog box appears.
3. Select [OK], and press the [ ] button to
confirm the entry.
A service log is created with the filename of SVddhhmm.
log (dd: day, hh: hours, mm: minutes), and copied to the
top folder of the USB memory device.
Select [Cancel] to stop copying.
Clear Officer Information
Use this function to delete officer data from a recorder.
1. Select [Service] – [Operations] – [Clear Officer
Information], and press the [ ] button to
confirm the entry.
A confirmation dialog box appears.
2. Select [OK], and press the [ ] button to
confirm the entry.
Officer data will be deleted.
Select [Cancel] to stop deleting officer data.
Factory Default
All recorder settings can be returned to their factory defaults.
The following settings do not return to their factory defaults.
• Recorder Operating Time
• FAN Operating Time
• CAM1 Operating Time
• Remote Control Panel Operating Time
• LCD Lighting Time
• Recorder Version
• Recorder serial number
• Microcontroller Version
• Remote Control Panel Version
Note that the recorder will not revert to user made settings
after being reset to their factory defaults. Make sure you
really want to return all settings to their factory defaults
before performing the following steps.
1. Select [Service] - [Operations] - [Factory
Default], and press the [ ] button to confirm
the entry.
A confirmation dialog box appears.
2. Select [OK], and accept by pressing the [ ]
button.
The recorder will reboot and start up in the factory default
settings.
Select [Cancel] to cancel returning to the factory defaults.
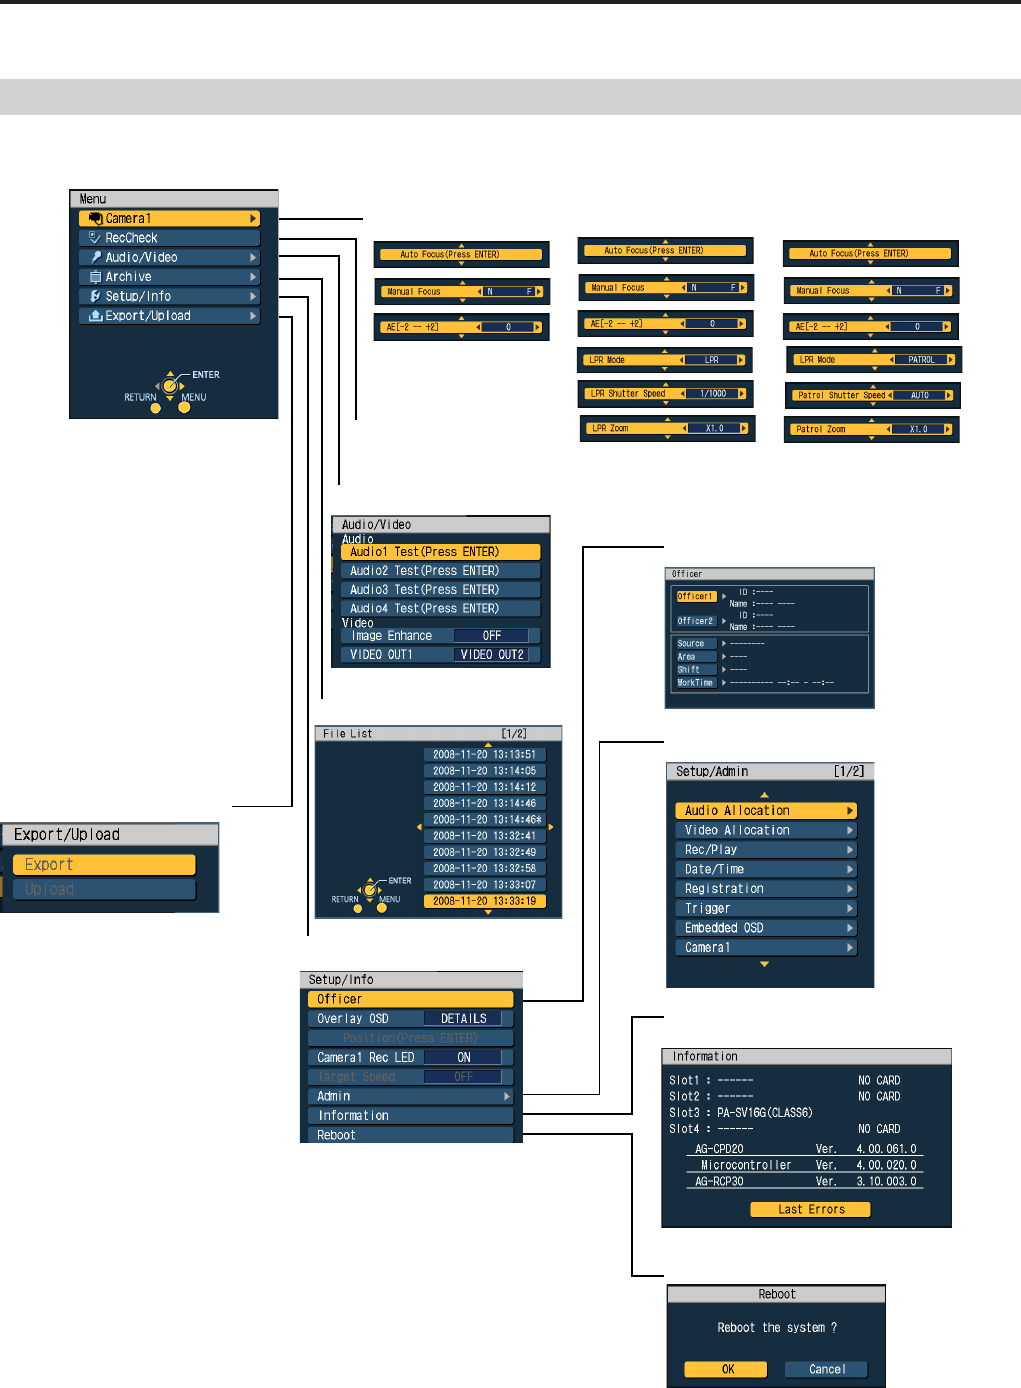
97
Menu List
Use menus provided by the Remote Control Panel to set up and adjust this recorder.
When the [MENU] button is pressed while recording is being stopped in the live screen
• Menu top screen Camera1 (see page 88)
When [Init LPR Mode] is
set to “DISABLE”:
When [Init LPR Mode] is
set to “ENABLE” and
[LPR Mode] is set to
“LPR”:
When [Init LPR Mode] is set
to “ENABLE” and [LPR Mode]
is set to “PATROL”:
RecCheck (see page 60)
A trial shoot can be performed.
Audio/Video (see pages 52-54)
Archive (see page 67)
Setup/Info (see page 37)
Officer (see page 37)
Setup/Admin (see page 78)
Information (see page 71)
Reboot (see page 76)
Export/Upload (see page 73)
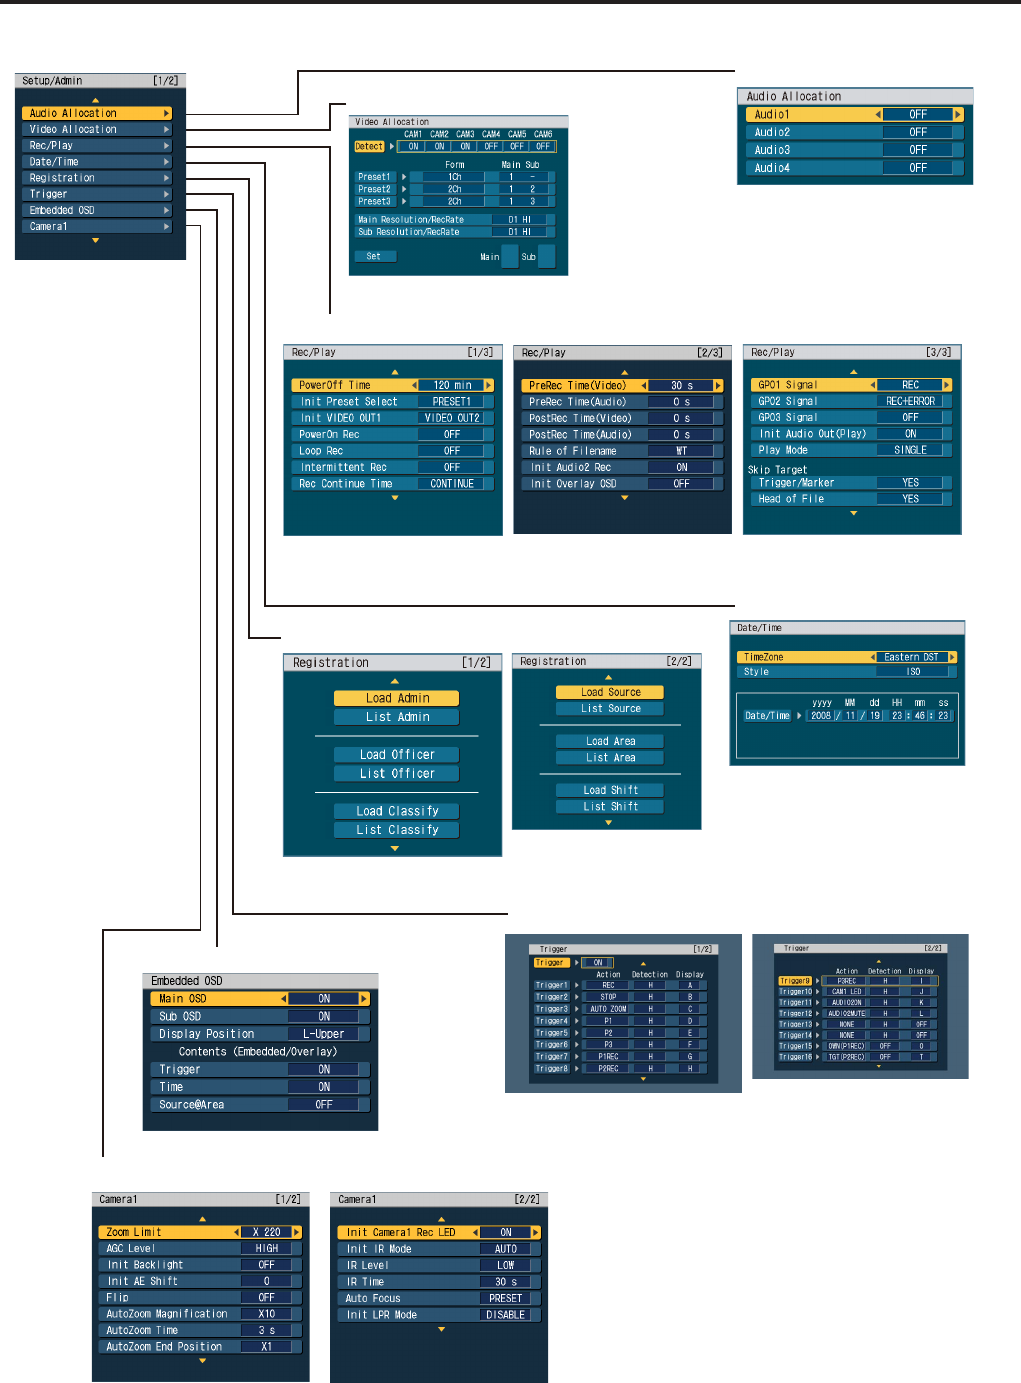
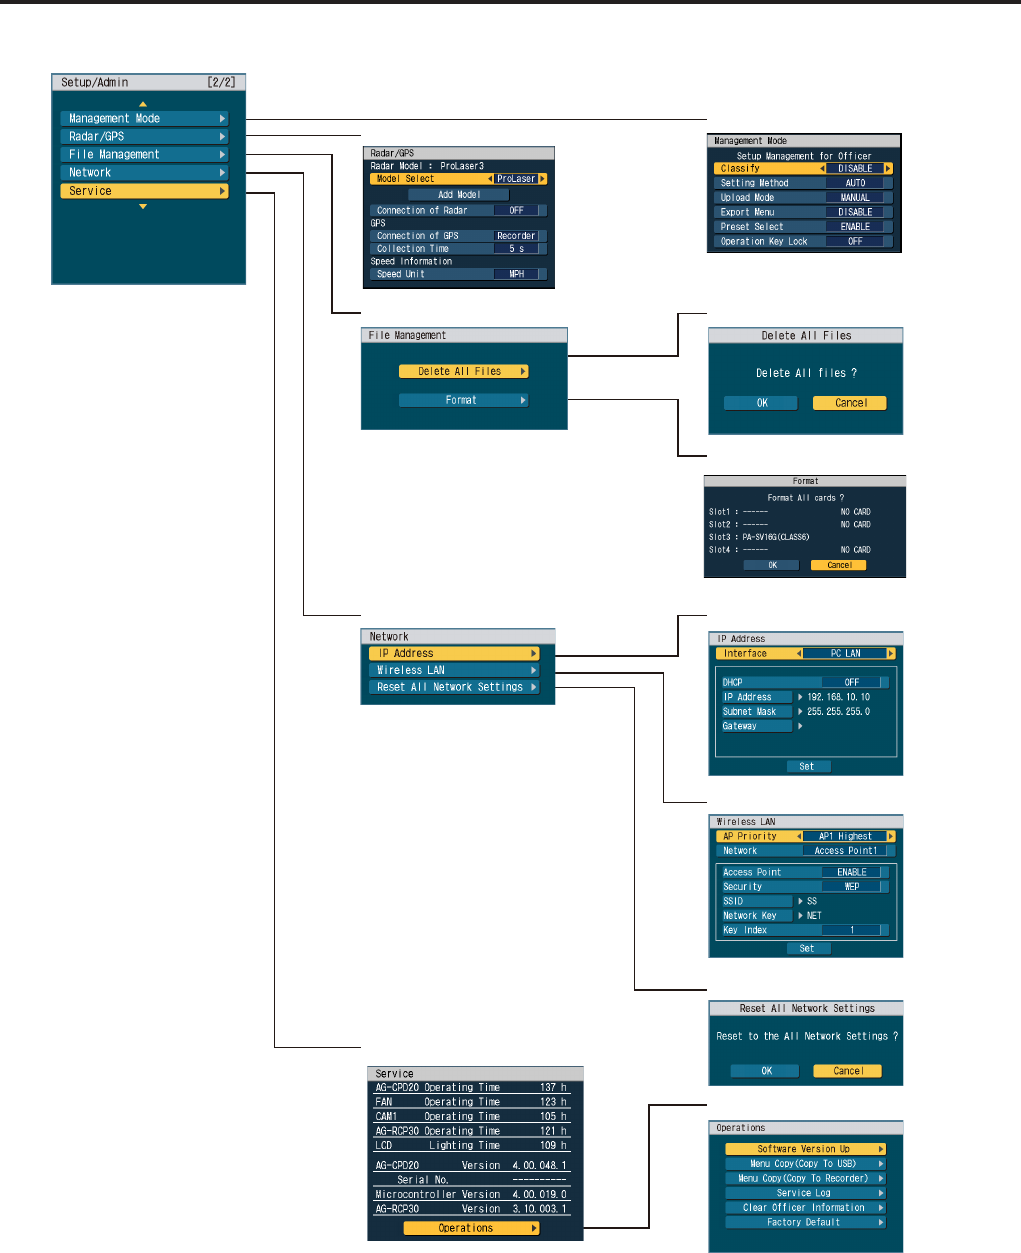
98
99
Menu List (continued)
•Setup/Admin top screen 2
Rader/GPS (see page 90)
Management Mode (see page 89)
File Management (see page 91)
Network (see page 92)
Delete All File (see page 91)
Format (see page 91)
IP Address (see page 92)
Wireless LAN (see page 93)
Service (see page 94)
Reset All Network Settings (see page 93)
Operations (see page 94)
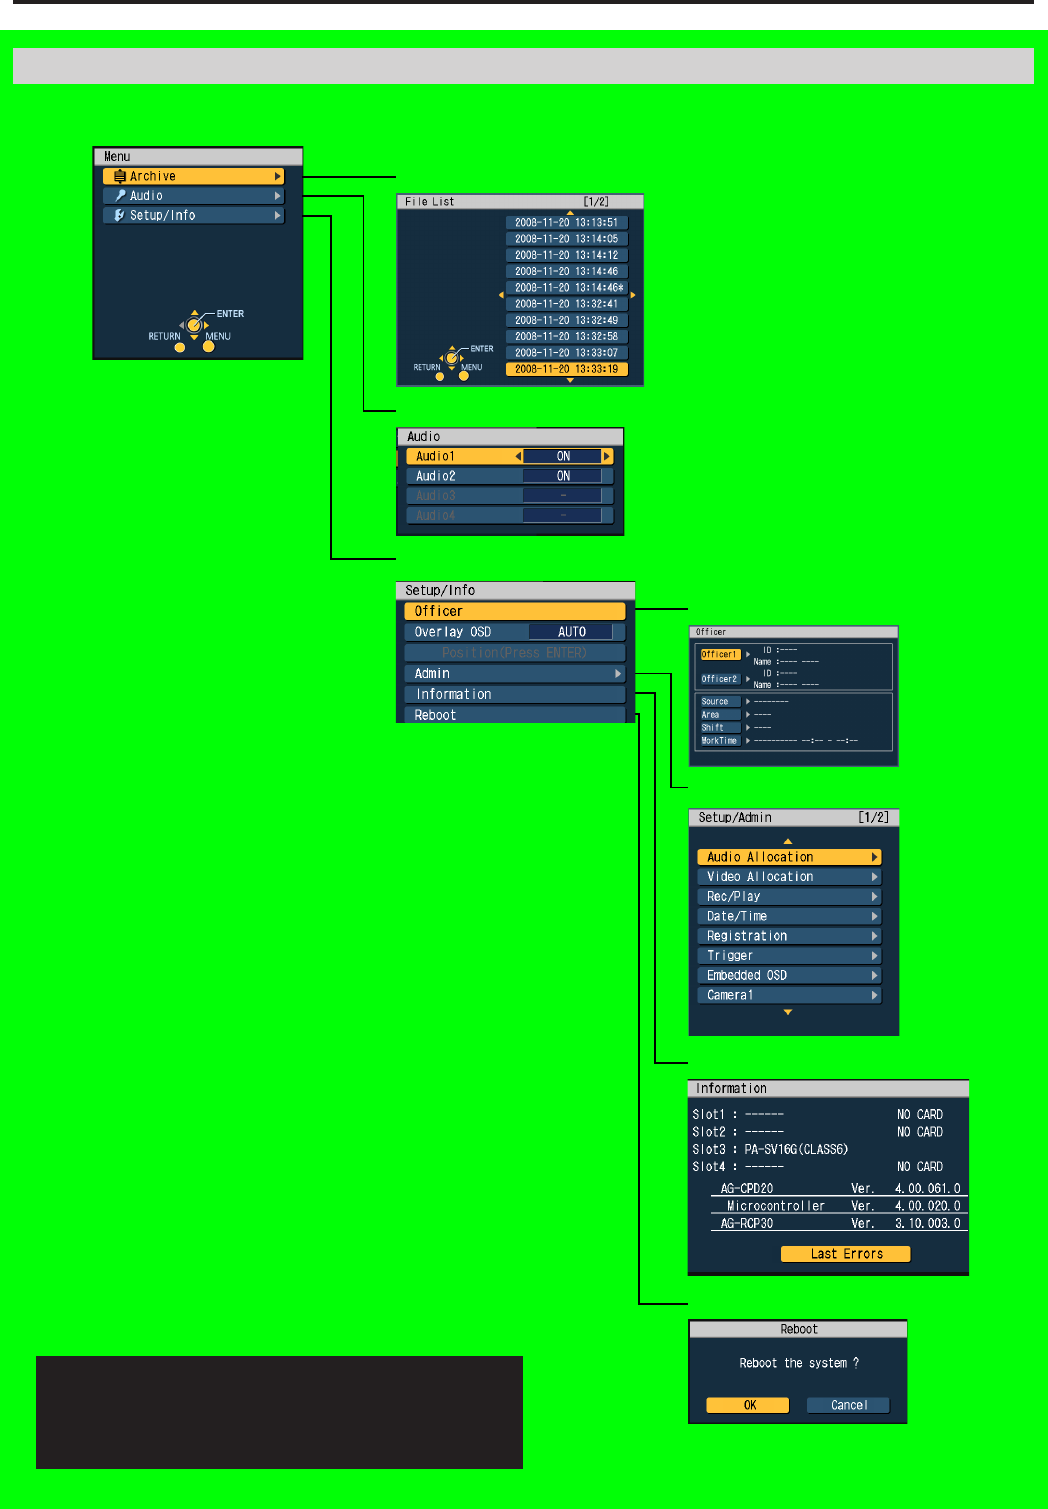
100
Menu List (continued)
101
• Menu top screen
Archive (see page 67)
Audio (see page 68)
Setup/Info (see page 37)
Officer (see page 37)
Setup/Admin (see page 78)
Information (see page 71)
Reboot (see page 76)
When the [MENU] button is pressed in the playback screen
Playback with the remote control panel is not available at
present. Upgrading is scheduled for the future.
For playback, it is recommended to use the Front-End
application or Back-End Client application.

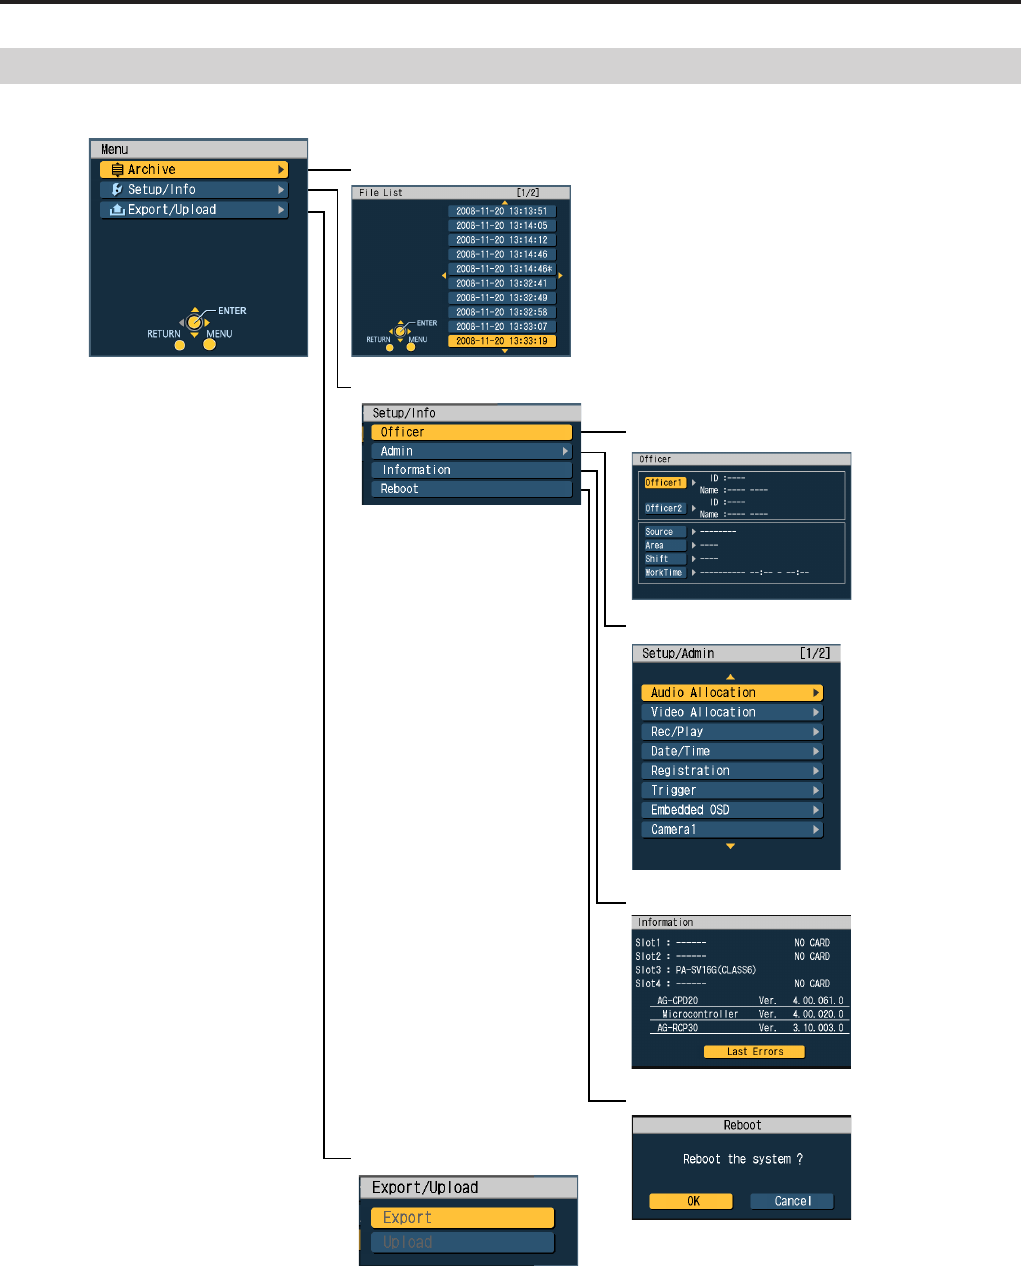
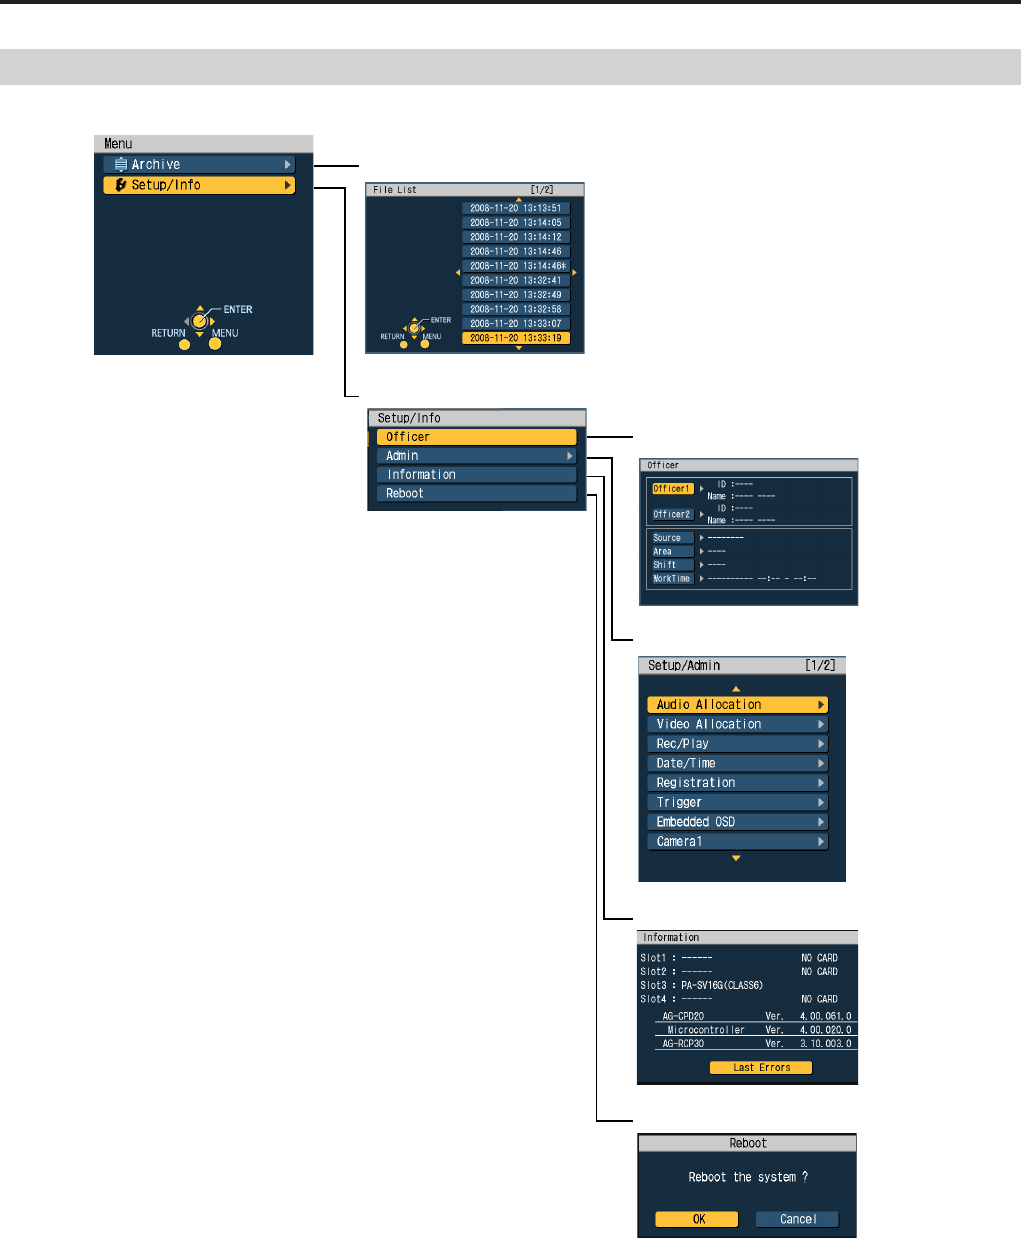
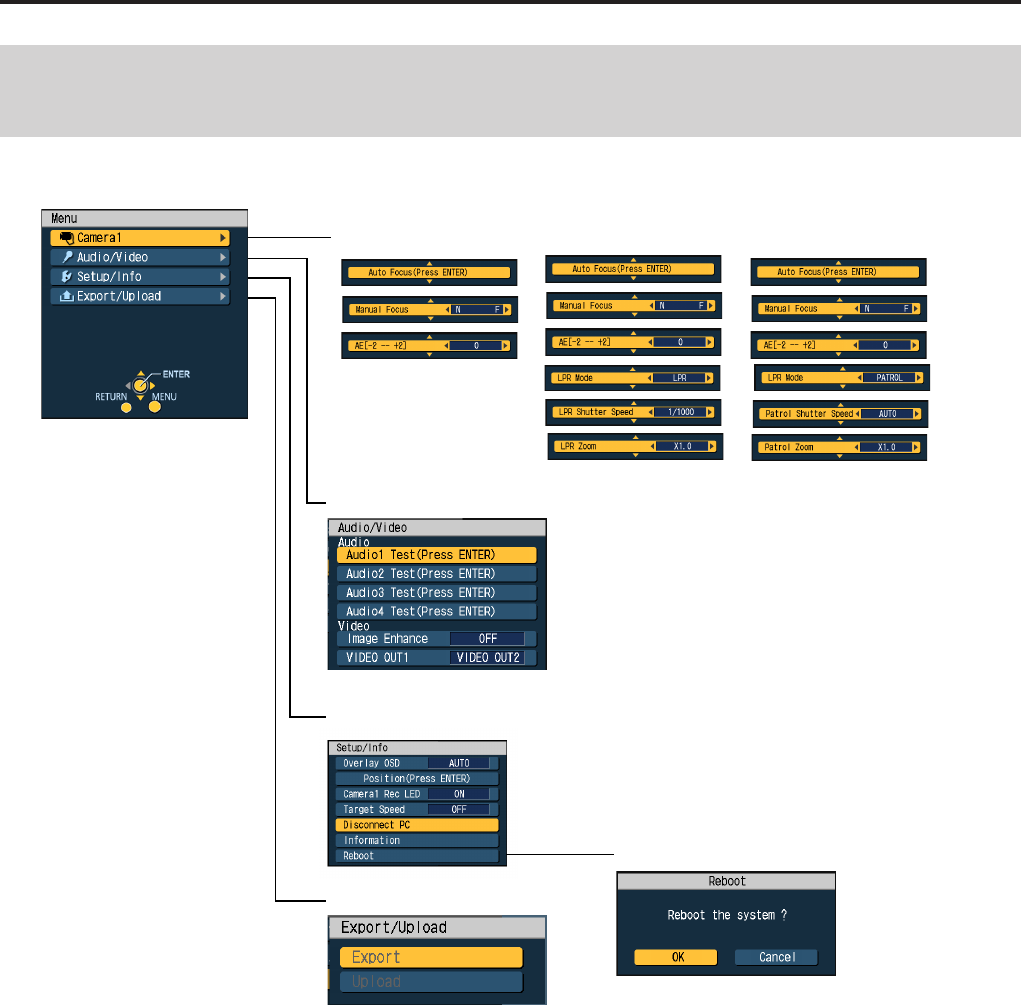
104
Menu List (continued)
105
When the [MENU] button is pressed when recording is being stopped in the live screen
while the Front-End application is running or streaming is performed on the Back-End
application via the Front-End application
• Menu top screen Camera1 (see page 88)
When [Init LPR Mode] is
set to “DISABLE”:
When [Init LPR Mode] is
set to “ENABLE” and
[LPR Mode] is set to
“LPR”:
When [Init LPR Mode] is set
to “ENABLE” and [LPR Mode]
is set to “PATROL”:
Audio/Video (see pages 52-54)
Setup/Info (see page 37)
Reboot (see page 76)
Export/Upload (see page 73)
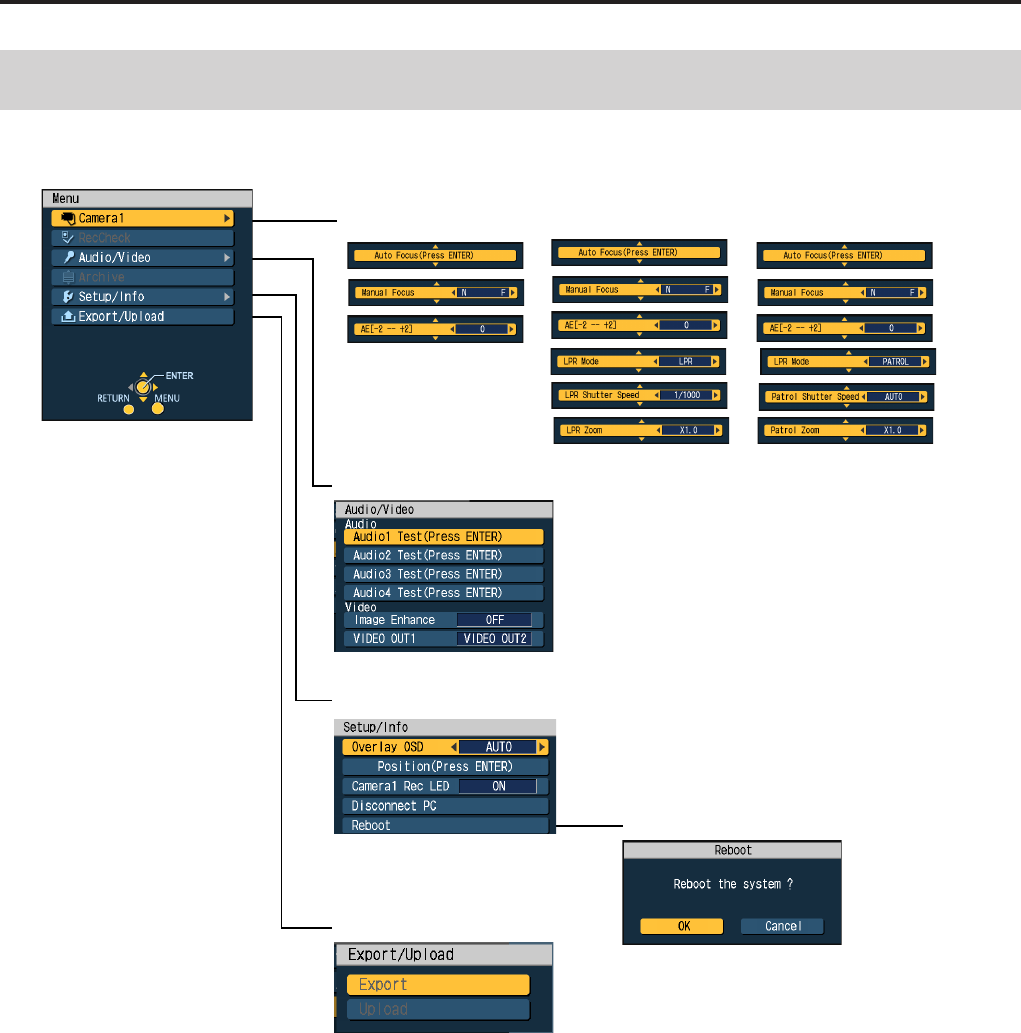
104
105
Menu List (continued)
When the [MENU] button is pressed when recording is performed in the live screen
while the Front-End application is running
• Menu top screen Camera1 (see page 88)
When [Init LPR Mode] is
set to “DISABLE”:
When [Init LPR Mode] is
set to “ENABLE” and
[LPR Mode] is set to
“LPR”:
When [Init LPR Mode] is set
to “ENABLE” and [LPR Mode]
is set to “PATROL”:
Audio/Video (see pages 52-54)
Setup/Info (see page 37)
Reboot (see page 76)
Export/Upload (see page 73)
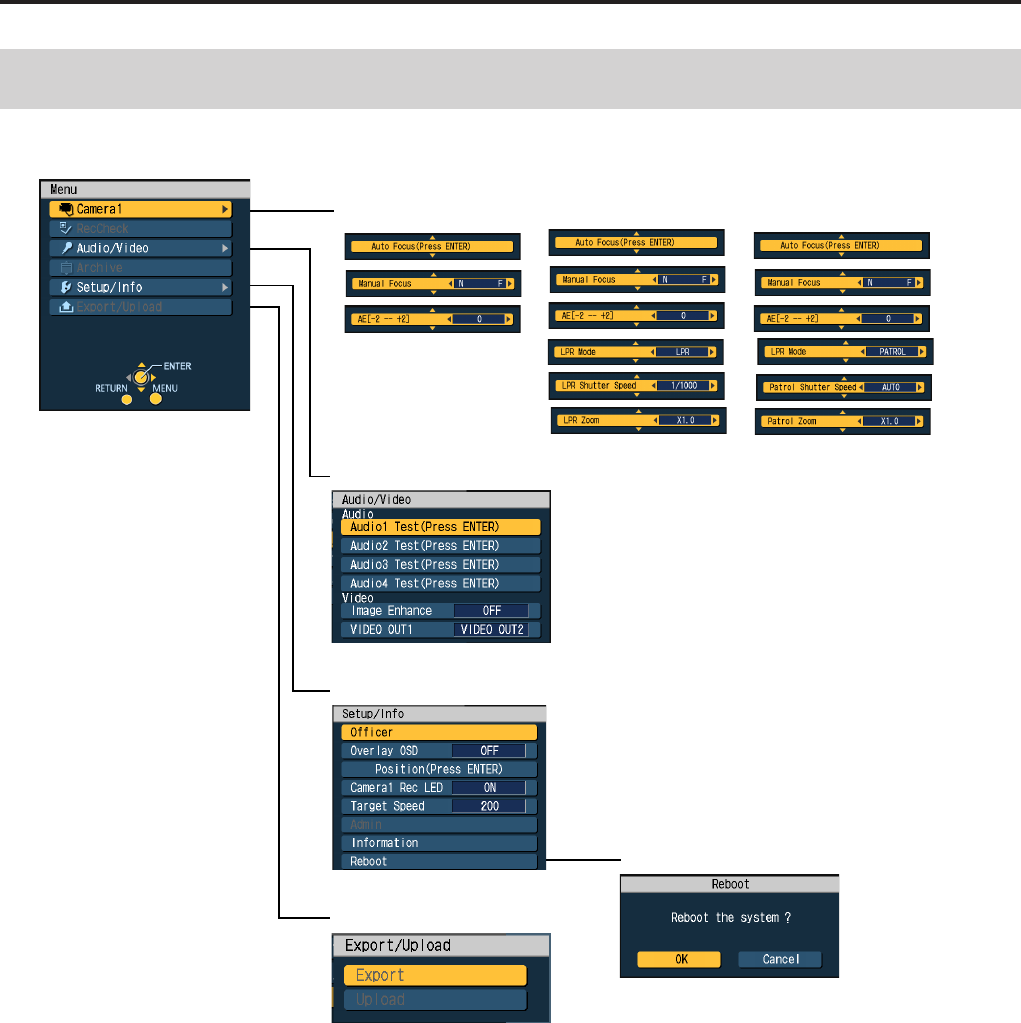
106
Menu List (continued)
When the [MENU] button is pressed when recording is being stopped in the live screen
while streaming is performed on the Back-End application
• Menu top screen Camera1 (see page 88)
When [Init LPR Mode] is
set to “DISABLE”:
When [Init LPR Mode] is
set to “ENABLE” and
[LPR Mode] is set to
“LPR”:
When [Init LPR Mode] is set
to “ENABLE” and [LPR Mode]
is set to “PATROL”:
Audio/Video (see pages 52-54)
Setup/Info (see page 37)
Reboot (see page 76)
Export/Upload (see page 73)
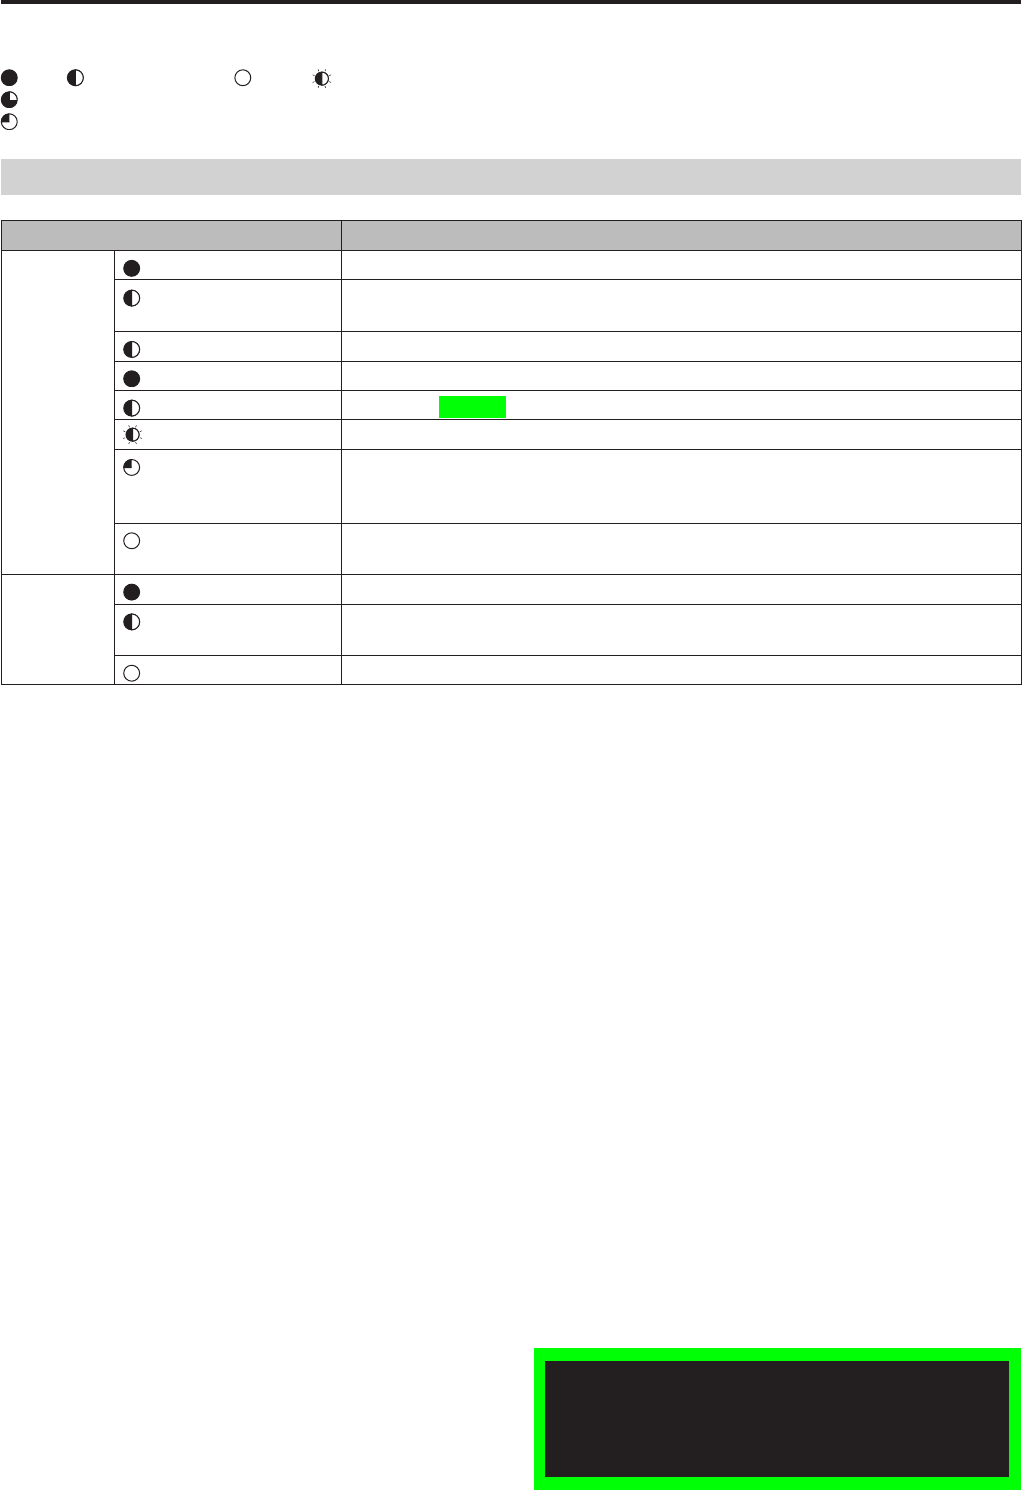
107
Indicator Lamps and Recorder Status
Lamp Indication on the Memory Card Recorder
Indicator Lamp Recorder Status
SDHC (green) Recordable SDHC Memory Cards are inserted.
(green) Data cannot be recorded on the SDHC Memory Cards inserted in the slots, but
can be read from the cards (write-protected or memory full).
(blue) Startup
(orange) The SDHC Memory Cards on which data have been recorded last.
(orange) Recording, playing, uploading
(orange) Recognizing or repairing the card
(orange) SDHC Memory Cards are not inserted in all four SDHC Memory Card slots, or at
least one of the inserted SDHC Memory Cards cannot be read from and/or written
to.
No SDHC Memory Card is inserted or the inserted SDHC Memory Card cannot be
recognized.
UPLOAD (green) Connecting the recorder and the Back-End server via UPLOAD-LAN
(green) Uploading to the Back-End server or exporting to an external media using the
Remote Control Panel, or displaying the UPLOAD/Export/DVD Burn screen
Back-End server is not connected.
This table shows the relationship between lamp Lit/Unlit/blinking states and the recorder’s operating status.
: Lit : Normal blinking : Unlit : Fast blinking (about three times/sec)
: Blinking consisting of short off intervals combined with long on intervals
: Blinking consisting of short on intervals combined with long off intervals
Playback with the remote control panel is not available
at present. Upgrading is scheduled for the future.
For playback, it is recommended to use the Front-End
application or Back-End Client application.
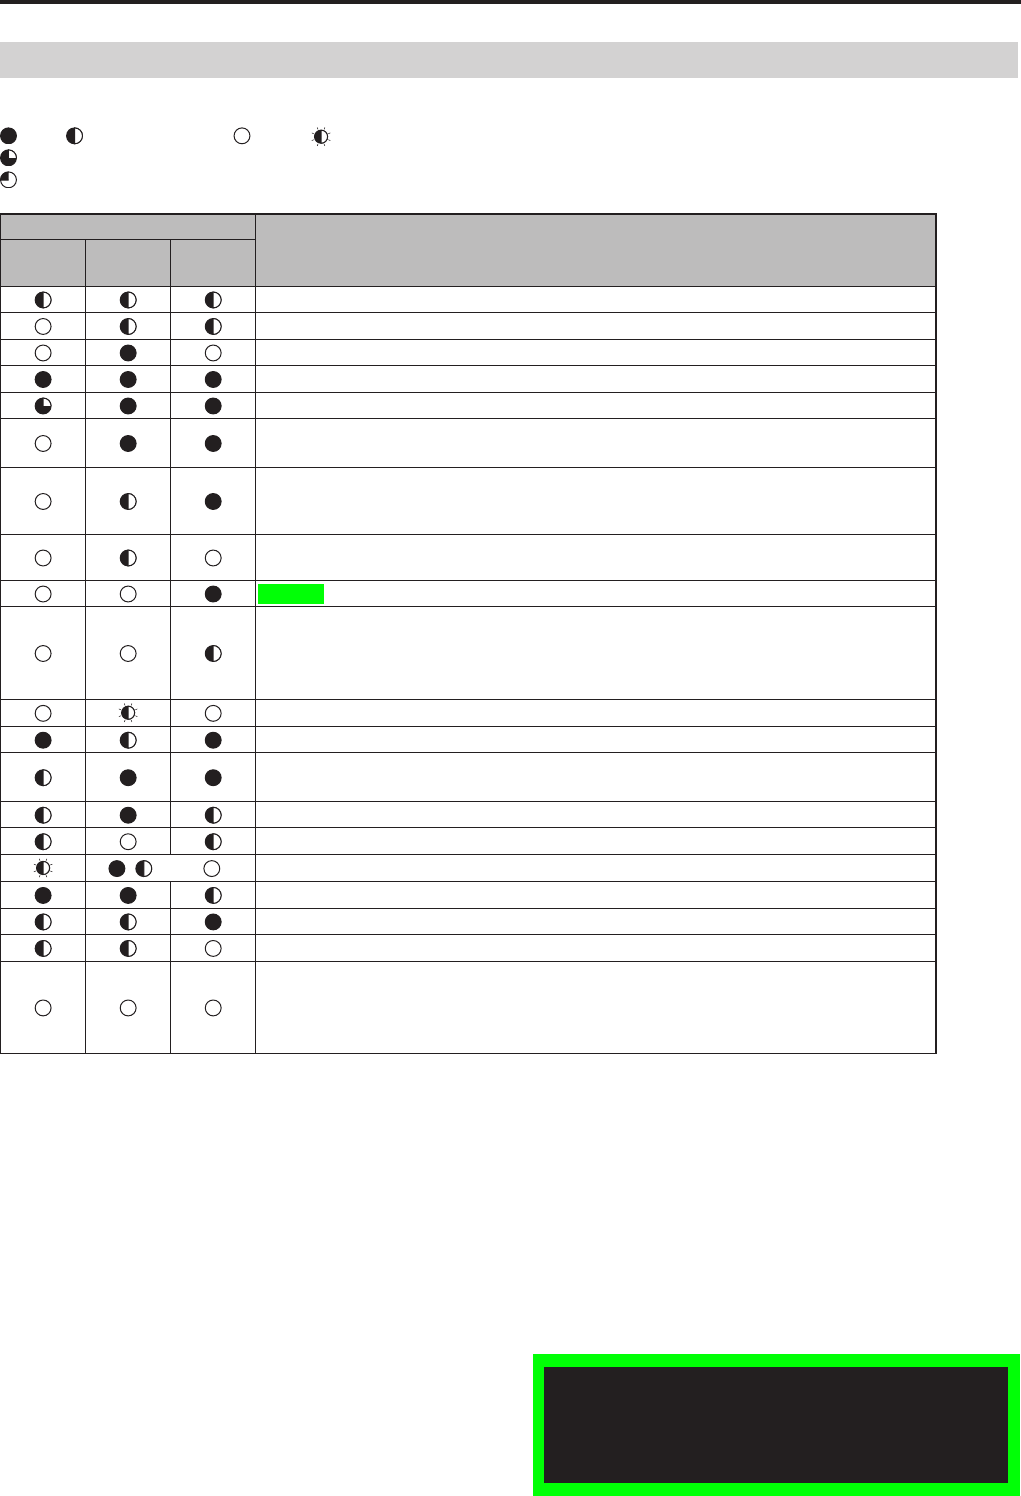
108
109
*1 The [REC] lamp normally blinks under the following
conditions:
• When there is little space left (about 30 minutes or less)
on an SDHC Memory Card
• When the number of files recorded on each SDHC
Memory Card inserted in slots 1, 2, 3, and 4 totals over
5,000 files
*2 For details on how to run the Front-End or Back-End
application, refer to the operating instructions supplied
with the Front-End or Back-End application.
*3 If the error is related to the status of the SDHC Memory
Card, the status will appear in the status display of the
Overlay OSD. Refer to “Viewing Live Video → Viewing
the status of the recorder” on page 55, or contact your
supplier.
Notes:
• If pressing the [REC] button or entering a recording
trigger fails to start recording, the [REC] lamp blinks at a
high rate.
• The [BUSY] lamp blinks when accessing the SDHC
Memory Card immediately after opening or closing the
recorder’s SDHC Memory Card slot cover.
Indicator Lamps and Recorder Status (continued)
Lamp Indication on the Memory Card Recorder or the Remote Control Panel
This table shows the relationship between lamp Lit/Unlit/blinking states and the recorder’s operating status.
: Lit : Normal blinking : Unlit : Fast blinking (about three times/sec)
: Blinking consisting of short off intervals combined with long on intervals
: Blinking consisting of short on intervals combined with long off intervals
Indicator Lamp
Recorder Status
REC
(Red)
READY
(Green)
BUSY
(Red)
Status immediately after power-on
Recorder booting, Front-End and Back-End applications running
Live video display
Normal recording*1, Loop recording
Intermittent recording*1
• Post-recording
•
Including Front-End and Back-End application operation*2
Restoring automatically
Administrator setting screen display with recording stopped
(accessing SDHC Memory Card), formatting, deleting a le
Administrator setting screen display with recording stopped
(not accessing SDHC Memory Card)
Playing, exporting, uploading
• Terminating operation
• SDHC Memory Card start processing (recognition when inserted)
• SDHC Memory Card shutdown processing (when a SDHC Memory Card slot
cover is opened)
The SDHC Memory Card slot cover is opened.
Updating recorder rmware
• Updating microprocessors on the recorder and Remote Control Panel
•
Copying menu settings
Successfully copied the menu settings
Failed to copy menu settings
, or
An error involving recording operations occurred during live screen display
*3
Starting upgrading
Finishing upgrading
Failed in upgrading
• No SDHC Memory Card is inserted, or it is not recognized
• No more SDHC Memory Card space available
• The write-protect switch of the SDHC Memory Card is set to “LOCK”
• An unformatted card
Playback with the remote control panel is not available
at present. Upgrading is scheduled for the future.
For playback, it is recommended to use the Front-End
application or Back-End Client application.

108
109
Troubleshooting
Before requesting service, check the points listed below. If the problem persists, contact your supplier.
Starting up
Symptom Remedy
Power does not come on. •
Check whether power cable (included in the sold separately Cable Kit) is connected
correctly.
Power gets turned off
automatically.
• If you have set a refer to “PowerOff Time” on page 81 and are running the recorder with
the ignition switch at LOCK (OFF), turn the ignition switch on and reboot the recorder
(see “Rebooting This Unit” on page 76).
• If the operating environment is hotter than the recommended temperature, the recorder
may turn off for safety reasons. If this happens, wait for the operating environment to
cool down before using the unit.
Operation
Symptom Remedy
Cover cannot be opened. • Are you using the supplied key?
Key cannot be removed from
lock.
• Is the SDHC Memory Card slot cover closed? The key can only be removed if the SDHC
Memory Card slot cover is closed.
SDHC Memory Card slot
cover cannot be closed.
• Is an SDHC Memory Card inserted correctly in an SDHC Memory Card slot?
The recorder does not
respond or another problem
has occurred.
•
To reset the
recorder
, keep pressing the [REC] button and [STOP] button on the recorder
together for about 10 seconds. When resetting, after all lamps turn off (1 or 2 seconds)
and then on (1 or 2 seconds), all lamps blink.
• If the button lock is enabled (“ANY” or “STOP”), change the setting to “OFF”
(see
“Operation Key Lock” on page 89)
.
Recorder was restarted
without performing a reset.
• If you remove the SDHC Memory Card during SDHC Memory Card access ([BUSY] lamp
is lit), the SDHC Memory Card slot may become inoperative. In such a case, the recorder
automatically restarts itself, and the card slot will become operative again.

110
111
Troubleshooting (continued)
Recording
Symptom Remedy
Cannot start recording.
Or a recording error warning appears.
• Is an SDHC Memory Card inserted in an SDHC Memory Card slot?
• Is the SDHC Memory Card slot cover closed?
• Is there any free space on the SDHC Memory Card? Check the remaining
space, and upload files to clear some space.
• Make sure that the write-protect switch of the SDHC Memory Card is not set to
LOCK.
• Is a new SDHC Memory Card formatted in the recorder?
• Are the [GPIO] connector or recording trigger criteria set correctly?
•
Check whether the recorder is set to administrator setup status.
• Check whether the correct cables have been connected to the video input
connectors.
Recorded data have become totally or
partially unusable.
• A power outage or power cable (included in the sold separately Cable Kit)
disconnection during recording may damage the SDHC Memory Card or corrupt
data on an SDHC Memory Card. Never turn the power off while recording to an
SDHC Memory Card.
• Do not insert or remove an SDHC Memory Card when another SDHC Memory
Card is being accessed as this may damage the SDHC Memory Card or corrupt
data on the SDHC Memory Card.
•
Corrupted data may be restored automatically (see “Restoring Files Automatically”
on page 75 for details).
Video is distorted or not recorded. •
Are Color Camera and video monitoring equipment connected properly?
• Are both the video input connector selection and the input selection made with
the Remote Control Panel the same?
• Are the video outputs settings correct for the connected equipment? Connect a
monitor to the [VIDEO OUT1] connector on the rear panel of the recorder and
check the picture.
Sound is distorted or not recorded. •
Is the cable connection to the audio input correct?
• Are both the audio input connector selection and the input selection made with
the Remote Control Panel the same?
• Are the audio outputs settings correct for the connected equipment? Refer to
the Operating Instructions for the connected device.
Information from equipment connected via
the [SERIAL] connector is not recorded in
the meta data file.
•
Do the communication settings of the connected device match those of the recorder’s
[SERIAL] connector? Check this while referring to the Operating Instructions for
connected equipment.

110
111
No. Message Measure
E00410 Invalid update file was found. The update le on the SDHC Memory Card or USB memory device is
corrupted.
• Check whether the update le for the recorder has been correctly copied
to the SDHC Memory Card or USB memory device.
• Reformat the SDHC Memory Card or USB memory device before use.
• Use another USB memory device.
E00411 Update file was not found. No update le could be found on the SDHC Memory Card or USB memory
device.
• Check whether the update le for the recorder has been correctly copied
to the SDHC Memory Card or USB memory device.
• Reformat the SDHC Memory Card or USB memory device before use.
• Use another USB memory device.
E00412 Two or more update files were
found.
Multiple update les were found on the SDHC Memory Card or USB
memory device.
• Check whether there are multiple update les on the SDHC Memory Card
or USB memory device.
• Check whether there are multiple SDHC Memory Cards and/or USB
memory devices containing update les.
E00413 Invalid update file was found. The update le on the SDHC Memory Card or USB memory device is
corrupted.
• Check whether the update le for the recorder has been correctly copied
to the SDHC Memory Card or USB memory device.
• Reformat the SDHC Memory Card or USB memory device before use.
• Use another USB memory device.
E00414
E00415
E00418 Update file was not found. No update le could be found on the SDHC Memory Card or USB memory
device.
• Check whether the update le for the recorder has been correctly copied
to the SDHC Memory Card or USB memory device.
• Reformat the SDHC Memory Card or USB memory device before use.
• Use another USB memory device.
E00419 This media cannot be used for
update.
The used SDHC Memory Card or USB memory device cannot be used for
updating.
• An SDHC Memory Card with a \DATA folder cannot be used for updating.
• A USB memory device containing a folder other than the \WIDKEY folder
cannot be used for updating.
E00420 Update file cannot be read. An update le load error occurred.
• Check whether the update le for the recorder has been correctly copied
to the SDHC Memory Card or USB memory device.
• Reformat the SDHC Memory Card or USB memory device before use.
• Use another USB memory device.
E00449 Unexpected update failure was
found.
Some other update error occurred.
• Check whether the update le for the recorder has been correctly copied
to the SDHC Memory Card or USB memory device.
• Reformat the SDHC Memory Card or USB memory device before use.
• Use another USB memory device.
E00460 Invalid update file was found. The update le on the SDHC Memory Card or USB memory device is
corrupted.
• Check whether the update le for the recorder has been correctly copied
to the SDHC Memory Card or USB memory device.
• Reformat the SDHC Memory Card or USB memory device before use.
• Use another USB memory device.
E00461 Update file was not found. No update le could be found on the SDHC Memory Card or USB memory
device.
• Check whether the update le for the recorder has been correctly copied
to the SDHC Memory Card or USB memory device.
• Reformat the SDHC Memory Card or USB memory device before use.
• Use another USB memory device.
E00462 Two or more update files were
found.
Multiple update les were found on the SDHC Memory Card or USB
memory device.
• Check whether there are multiple update les on the SDHC Memory Card
or USB memory device.
• Check whether there are multiple SDHC Memory Cards and/or USB
memory devices containing update les.
Error Message

112
113
Error Message (continued)
No. Message Measure
E00463 Invalid update file was found. The update le on the SDHC Memory Card or USB memory device is
corrupted.
• Check whether the update le for the recorder has been correctly copied
to the SDHC Memory Card or USB memory device.
• Reformat the SDHC Memory Card or USB memory device before use.
• Use another USB memory device.
E00464
E00465
E00466 Unexpected update failure was
found.
Some other update error occurred.
• Check whether the update le for the recorder has been correctly copied
to the SDHC Memory Card or USB memory device.
• Reformat the SDHC Memory Card or USB memory device before use.
• Use another USB memory device.
E00467
E00468 Update file was not found. No update le could be found on the SDHC Memory Card or USB memory
device.
• Check whether the update le for the recorder has been correctly copied
to the SDHC Memory Card or USB memory device.
• Reformat the SDHC Memory Card or USB memory device before use.
• Use another USB memory device.
E00469 This media cannot be used for
update.
The used SDHC Memory Card or USB memory device cannot be used for
updating.
• An SDHC Memory Card with a \DATA folder cannot be used for updating.
• A USB memory device containing a folder other than the \WIDKEY folder
cannot be used for updating.
E00470 Update file cannot be read. An update le load error occurred.
• Check whether the update le for the recorder has been correctly copied
to the SDHC Memory Card or USB memory device.
• Reformat the SDHC Memory Card or USB memory device before use.
• Use another USB memory device.
E00499 Unexpected update failure was
found.
Some other update error occurred.
• Check whether the update le for the recorder has been correctly copied
to the SDHC Memory Card or USB memory device.
• Reformat the SDHC Memory Card or USB memory device before use.
• Use another USB memory device.
E00602 AG-RCP30 needs to be updated!
Will start updating soon.
A connected AG-RCP30 was found to need an update.
The recorder reboots automatically to start an update.
E00603 Unsupported Control Panel!
Replace Control Panel.
A Remote Control Panel not supported by this recorder was detected.
Disconnect the Remote Control Panel.
E00604 Will power off after uploading.
Turn ACC ON to cancel power off.
The vehicle engine switch is set to LOCK (OFF) when “PowerOff Time” on
page 81 is set to “AUTO”. The system awaits that the connection with the
Front-End or Back-End application is released, or uploading, streaming,
administrator setup, or upgrading on the Back-End application is nished.
To continue using the recorder without turning it off, set the engine switch to
ON.
E02431 DSP error.
This system is rebooting.
Wait until the error message is cleared. Contact your supplier if the message
does not clear after about a minute.
E02432
E02440 System error.
Couldn’t format cards.
Insert another SDHC Memory Card.
E02441 Couldn’t format cards.
E02442 Write Protect cards found.
Couldn’t format.
Disable SDHC Memory Card write-protection.
E02444 No SDHC Cards found.
Couldn’t format.
Insert an SDHC Memory Card.
E02460 System error.
Couldn’t delete files.
Contact your supplier.

112
113
Error Message (continued)
No. Message Measure
E02461 Couldn’t delete files. Check the card information, and proceed as follows according to the
information.
CARD PROTECT:
Release the write-protect switch of the SDHC Memory Card.
UNFORMATTED:
Replace with the formatted SDHC Memory Card.
NO CARD:
Insert an SDHC Memory Card.
Others:
Replace the SDHC Memory Card with another one.
E02470 System error.
Couldn’t restore files.
Contact your supplier.
E02471 Couldn’t restore files.
E02481 Write error on slot1.
Record cannot be continued.
Be sure to use the correct procedure to remove and load SDHC Memory
Cards. Replace an SDHC Memory Card that is not recognized after
inserting it in the SDHC Memory Card slot and closing the SDHC Memory
Card slot cover.
E02482 Write error on slot2.
Record cannot be continued.
E02483 Write error on slot3.
Record cannot be continued.
E02484 Write error on slot4.
Record cannot be continued.
E07671 CAMERA1 communication error.
Please check the CAMERA1.
The Color Camera may not be correctly connected. Check whether the camera
cable (included in the Color Camera) is correctly connected to the Color
Camera. Contact your supplier if this measure does not solve the problem.
E08601 Playback and record cannot be
executed.
Close the SDHC Memory Card slot cover.
E08602 The recorder’s fan has stopped. Contact your supplier.
E10400 Radar model file was not found.
E10401 More than 10 radar model files
were found.
E10402
Invalid radar model file was found.
E10403 Radar model file cannot be read.
E10410
Radar communication error.
Please check the radar setting.
E15751 VUP Card found on slot1.
Record cannot be started. A card for upgrading is inserted. Data cannot be written to the card.
E15752 VUP Card found on slot2.
Record cannot be started.
E15753 VUP Card found on slot3.
Record cannot be started.
E15754 VUP Card found on slot4.
Record cannot be started.
E15755 Unsupported Card found on slot1.
Record cannot be started. The inserted card cannot be used.
Check card type.
E15756 Unsupported Card found on slot2.
Record cannot be started.
E15757 Unsupported Card found on slot3.
Record cannot be started.
E15758 Unsupported Card found on slot4.
Record cannot be started.
E15759
Unformatted Card found on slot1.
Record cannot be started.
An unformatted SDHC Memory Card has been inserted.
Replace it with a formatted SDHC Memory Card.
E15760
Unformatted Card found on slot2.
Record cannot be started.
E15761
Unformatted Card found on slot3.
Record cannot be started.
E15762
Unformatted Card found on slot4.
Record cannot be started.

114
115
No. Message Measure
E15763 Write Protect Card found on slot1.
Record cannot be started.
The write-protection switch on the SDHC Memory Card is set to the “LOCK”
position. Slide the write-protection switch away from the “LOCK” position.
E15764 Write Protect Card found on slot2.
Record cannot be started.
E15765 Write Protect Card found on slot3.
Record cannot be started.
E15766 Write Protect Card found on slot4.
Record cannot be started.
E15767 No SDHC Cards found.
Record cannot be started.
No SDHC Memory Card is inserted. Insert an SDHC Memory Card.
E15768 Write Error.
Record cannot be started.
The SDHC Memory Card cannot be written to. Replace the SDHC Memory
Card.
E15769 Card Full.
Record cannot be started.
The following conditions may have occurred.
• There is no space left on the SDHC Memory Card.
• Files contained in one of the SDHC Memory Cards inserted in the SDHC
Memory Card slots 1, 2, 3, and 4 exceed 5,000 les.
Replace the SDHC Memory Card with an SDHC Memory Card with free
capacity, or free up space in the SDHC Memory Card for new data. (free
space of more than 10 MB)
E20801 Recorder reboots by
unrecoverable card ejection error.
Be sure to use the correct procedure to remove and load SDHC Memory
Cards.
E20802 Please reinsert the card or reboot
the system.
Check the SDHC Memory Card and re-insert it, or reboot the recorder.
E20901 Firmware Update FAILED! An error occurred during the update.
• Check whether the update le for the recorder has been correctly copied
to the SDHC Memory Card or USB memory device.
• Reformat the SDHC Memory Card or USB memory device before use.
• Use another USB memory device.
• Check whether there are multiple update les on the SDHC Memory Card
or USB memory device.
• Check whether there are multiple SDHC Memory Cards and/or USB
memory devices containing update les.
• An SDHC Memory Card with a \DATA folder cannot be used for updating.
• A USB memory device containing a folder other than the \WIDKEY folder
cannot be used for updating.
E20911 Microcontroller Update FAILED! An error occurred during the update.
The recorder reboots automatically to restart an update.
Contact your supplier if the problem persists.
E20912 Unsupported Microcontroller
Detected!
The recorder has broken down.
Contact your supplier.
E20921 AG-RCP30 Update FAILED! An error occurred during an update of an AG-RCP30 connected to the
recorder.
The recorder reboots automatically to restart an update.
Contact your supplier if the problem persists.
E20922 Unsupported Control Panel
Detected!
A Remote Control Panel not supported by the recorder was detected.
Disconnect the Remote Control Panel.
E22420 Officer’s information file cannot be
loaded.
The ofcer data le (WID*****.TXT) is corrupted. Create a new ofcer’s data le,
save it to a USB memory device and re-register it.
E22421 Since you are not an
administrator, you cannot open
this menu.
You are not registered as an administrator and cannot open this menu. Ask a
registered administrator for assistance.
E22422 Officer’s information file cannot be
loaded.
There is no Ofcer Registration le or it contains the wrong data. Create a
correct Ofcer Registration le (WOFFICER.TXT), copy it to a USB memory
device and reload it.
E22423 Admin’s information file cannot be
loaded.
There is no Administrator Registration le or it contains the wrong data. Create
a correct Administrator Registration le (WADMIN.TXT), copy it to a USB
memory device and reload it.
E22425 Classification list cannot be
loaded.
There is no classify le or the content of the le is incorrect. Copy the
correct classify le (CLASSIFY.TXT) to the USB memory device and
reregister it.
Error Message (continued)

114
115
No. Message Measure
E22426 Menu copy failed. For copying to a USB memory device, connect a write-enabled USB
memory device. For copying to a recorder, connect a USB memory device
that contains data.
E22427 Source information file cannot be
loaded.
There is no source le or the content of the le is incorrect.
E22428 Shift information file cannot be
loaded.
There is no shift le or the content of the le is incorrect.
E22429 Area information file cannot be
loaded.
There is no area le or the content of the le is incorrect.
E22432 Service log copy failed. Copying service log is failed. Connect a writable USB memory device and
try copying again.
E22448 Operation was canceled to start
streaming.
Streaming starts, and the operation is canceled. Wait until streaming ends.
E25410
GPS communication error.
Please check the GPS module.
An error occurred in the GPS module.
Consult your supplier.
E27201
Storage capacity was not enough to
transfer the file.
Capacity of the server is not enough for uploading data, and uploading is
canceled.
E27202
File transfer was completed.
Restore file remained.
Upload was completed, but video les not restored remain on the SDHC
Memory card.
E27203
File not found in SDHC cards.
No le for uploading is found on an SDHC Memory card.
E27401 Write Protect cards found
.
Couldn’t start file transfer.
A read-only SDHC Memory Card is found, and uploading cannot be started.
E27403
Media error.
File transfer was incomplete.
A read/write error was detected with the media. Replace the SDHC Memory
Card with another one.
E27405
Storage write error.
File transfer was incomplete.
A verication error has occurred in the server storage, and uploading cannot
be completed.
E27407
No SDHC Cards found.
Couldn’t start file transfer.
No SDHC Memory card is inserted, and uploading cannot be started.
E27430
Couldn’t start file transfer.
Upload cannot be started. Check the network connection.
E27431
File transfer was incomplete.
Upload cannot be completed because of network trouble.
E27499
System error.
File transfer was incomplete.
A system error has occurred, and uploading cannot be completed.
E28201 USB storage capacity was not
enough to export.
Use other USB memory device that is not full.
E28202 Export was completed.
Restore file remained.
Restore the le not yet restored, and export it again.
E28203 File not found in
SDHC
cards.
There are no les to export. No export operation needed.
E28400 No USB storage devices found.
Couldn’t start export.
Connect a USB memory device.
E28401 Write Protect cards found.
Couldn’t start export.
Set the SDHC Memory Card write-protect switch away from the write-
protect position.
E28402
All USB storages are read only.
Couldn’t start export.
Connect a write-enabled USB memory device.
E28403 Media error.
Export was incomplete.
Replace the SDHC Memory Card or the USB memory device.
E28404
USB storage file system error.
Couldn’t start export.
Replace the USB memory device.
E28405 USB storage write error.
Export was incomplete.
E28406 Found update file in USB storage.
Couldn’t start export.
Delete the update le on the USB memory device.
E28407 No SDHC Cards found.
Couldn’t start export.
Insert an SDHC Memory Card with recorded les.
E28409 Couldn’t start export. Replace the SDHC Memory Card with another one.
E28499 System error.
Export was incomplete.
Reboot the recorder.
E28880 USB storage was ejected.
Export was incomplete.
Do not remove the USB memory device while exporting data. Reconnect the
USB memory device and export again.
Error Message (continued)

116
117
Error Message (continued)
No. Message Measure
E28881 USB storage was inserted.
Export was incomplete.
Export the data again.
E29400 Unsupported camera connection. A camera is connected only to the [CAMERA 4], [CAMERA 5], or
[CAMERA 6] connector. Check the input.
E29401 No CAMERA1 video signal. [CAMERA 1] connector input cannot be detected. Check whether the signal
is input to the [CAMERA 1] connector.
E29402 No CAMERA2 video signal. [CAMERA 2] connector input cannot be detected. Check whether the signal
is input to the [CAMERA 2] connector.
E29403 No CAMERA3 video signal. [CAMERA 3] connector input cannot be detected. Check whether the signal
is input to the [CAMERA 3] connector.
E29404 No CAMERA4 video signal. [CAMERA 4] connector input cannot be detected. Check whether the signal
is input to the [CAMERA 4] connector.
E29405 No CAMERA5 video signal. [CAMERA 5] connector input cannot be detected. Check whether the signal
is input to the [CAMERA 5] connector.
E29406 No CAMERA6 video signal. [CAMERA 6] connector input cannot be detected. Check whether the signal
is input to the [CAMERA 6] connector.
E30400 Network setting parameter error. Network settings are not correct. Check the network settings.
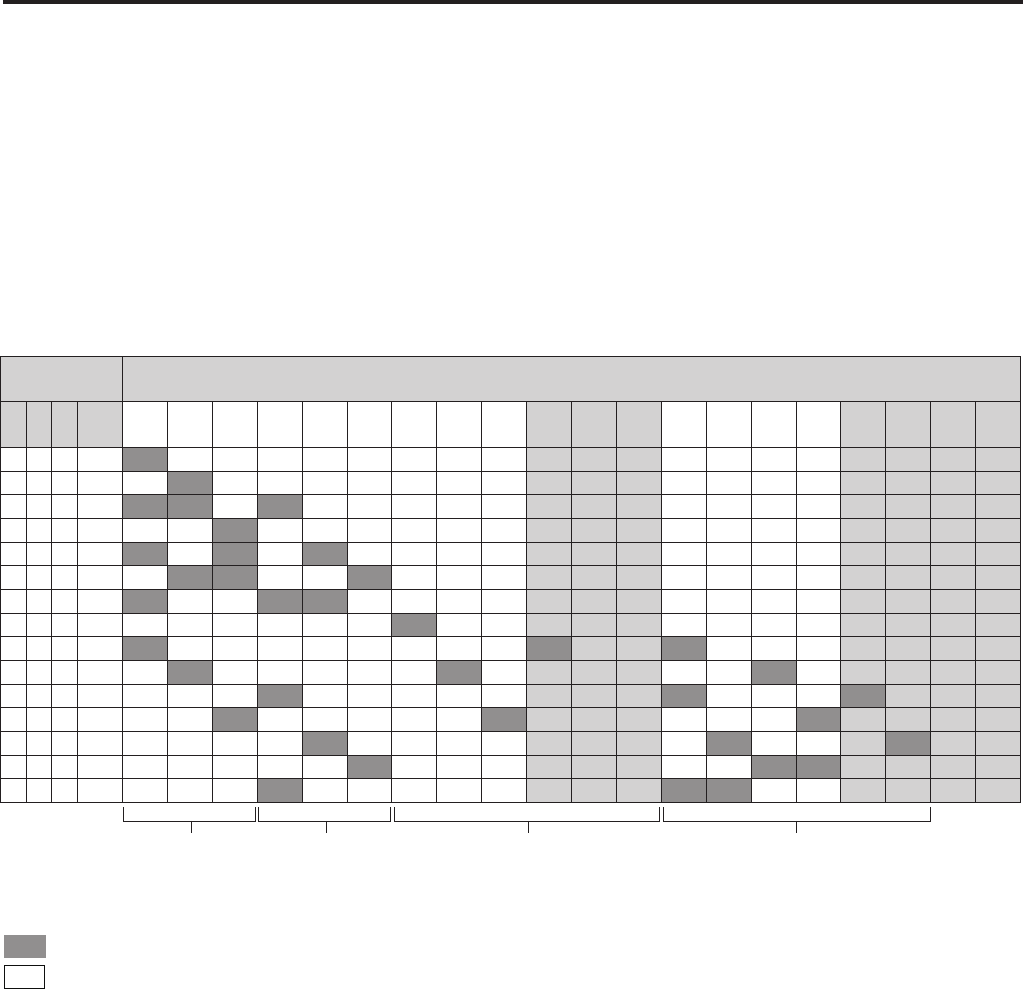
116
117
Camera Connection and Combination of Cameras
Combination of cameras depends on the cameras connected
to the recorder. Available combination is as shown below.
Selectable combination of cameras depends on the detected
cameras.
If only CAM4, CAM5, and CAM6 are set to OFF, preset
patterns, 4Ch-QUAD, 4Ch-PANORAMA, 5Ch-QUAD, and
5Ch-PANORAMA, cannot be selected.
If all of CAM1, CAM2, and CAM 3 are set to OFF, preset
patterns, 4Ch-PANORAMA and 5Ch-PANORAMA, cannot
be selected.
If two channels of CAM1, CAM2, and CAM 3 are not
connected, preset patterns, 5Ch-PANORAMA cannot be
selected.
•
•
•
Selectable preset patterns depends on the detected
cameras.
If CAM1 is set to OFF, any combination of cameras
indicated by “1” cannot be selected.
If CAM2 is set to OFF, any combination of cameras
indicated by “2” cannot be selected.
If CAM3 is set to OFF, any combination of cameras
indicated by “3” cannot be selected.
If any of CAM4, CAM5, or CAM6 is set to ON, a pattern
indicated by “456” can be selected.
•
•
•
•
Camera
connection Combination of cameras
1 2 3 456
1 2 3 1, 2 1, 3 2, 3
1456 2456 3456
1456P 2456P 3456P
1
,
2456
1
,
3456
2
,
3456
3
,
2456
1
,
2456P
1
,
3456P
2
,
3456P
3
,
2456P
0 x x x 1 -------------------
x 0 x x -1------------------
0 0 x x 1 2 -3----------------
x x 0 x - - 1-----------------
0 x 0 x 1-2-3--------------
x 0 0 x -1 2 - - 3--------------
0 0 0 x 1 ○ ○ 2 3 ○--------------
x x x 0 ------ 1-------------
0 x x 0 1 -----○-- 2- - 3-------
x 0 x 0 -1----- 2--○--- 3-----
0 0 x 0 ○ ○ - 1--○○-○○- 2--- 3- - -
x x 0 0 - - 1----- 2--○--- 3- - - -
0 x 0 0 ○ - ○ - 1-○-○○-○- 2--- 3- -
x 0 0 0 -○○-- 1-○○-○○-- 2 3 - - ○ ○
0 0 0 0 ○ ○ ○ 1○○○○○○○○ 2 3 ○-○○○-
1 Ch 2 Ch 4 Ch 5 Ch
P : Panorama
0 : A camera is connected.
x : A camera is not connected.
Preset number of recommended combination of cameras
○ Selectable combination of cameras

118
119
Status Display
Playback with the remote control panel is not available
at present. Upgrading is scheduled for the future.
For playback, it is recommended to use the Front-End
application or Back-End Client application.
The Status Display shows messages about the operating status of the SDHC Memory Card and the recorder. Take action as
appropriate for each status.
Status Display Measure
CARD FULL The following conditions may have occurred.
• There is no space left on the SDHC Memory Card.
• Files contained in one of the SDHC Memory Cards inserted in the SDHC Memory Card slots 1, 2,
3, and 4 exceed 5,000 les.
Replace the SDHC Memory Card with an SDHC Memory Card with free capacity, or free up
space in the SDHC Memory Card for new data.
CARD PROTECT The write-protect switch of the SDHC Memory Card is set to “LOCK”. Move the switch to enable
writing.
VUP CARD Writing is not possible on an SDHC Memory Card intended for version upgrade. Replace the card
with one that is not intended for version upgrade.
UNFORMATTED The SDHC Memory Card is not formatted. Replace it with a formatted card.
NO CARD No SDHC Memory Card is inserted. Insert an SDHC Memory Card.
READ ERROR An error occurred while reading. File playback is not possible, or the associated meta information
cannot be displayed correctly.
UNSUPPORTED Archive screen: The le is unsupported. Playback is not available.
Live screen: The memory card is unsupported. For the memory card supported, refer to “Usable
memory cards” in Operating Instructions Section 1: Before Use.
PLAY ERROR A decoder malfunction occurred. Playback is not available. Reboot the recorder.

118
119
Service Log
The operation history of the recorder can be obtained as service logs.
Contents
The items shown below can be obtained as service logs.
Normal operation
Items Level Character strings Timing
Starting (start, restart) N Power On just after start
Ending (all power off, restart) N Power Off just before end
Starting (start, restart) N System Start AG-CPD20 4.xx.xxx.0
Serial No. Destination
just after start
Ending (all power off, restart) NSystem End just before end
Ending with power off I System End Acc when occurred
Restarting by restart operation I System End Reboot when occurred
Recording start N Rec File Start factor slot1
data/yyyymmdd/mmhhss.av
when occurred
Recording end N Rec Stop End factor when occurred
Restoring a file (succeeded) N Restore File slot1
data/yyyymmdd/mmhhss.av
when occurred
Deleting a file (succeeded) N Delete File slot1
data/yyyymmdd/mmhhss.av
when occurred
Formatting SDHC Memory
cards
N Format when occurred
Deleting all files N DeleteAll when occurred
Application: transition to live
mode
I Mode Live when occurred
Application: transition to play
mode
I Mode Play when occurred
Application: transition to
administrator mode
I Mode Admin when occurred
Application: transition to
upload mode
I Mode Upload when occurred
Registering data from a USB
memory device
I Load Admin/Officer/…
number of cases
when occurred
Exporting start I Export Start when occurred
Exporting end I Export End when occurred
Uploading start I Upload Start when occurred
Uploading end I Upload End when occurred
Upgrading start I Vup Start New 4.xx.xxx.0 when occurred
Upgrading end I Vup End when occurred
Upgrading without menu
display start
I/N VupMenuless Start when occurred
Upgrading without menu
display end
I/N VupMenuless End when occurred
Menu exporting start I MenuExport Start when occurred
Playback with the remote control panel is not available
at present. Upgrading is scheduled for the future.
For playback, it is recommended to use the Front-End
application or Back-End Client application.

120
121
Items Level Character strings Timing
Menu exporting end I MenuExport End when occurred
Menu importing start (with or
without menu display)
I MenuImport Start when occurred
Menu importing end (with or
without menu display)
I MenuImport End when occurred
Initializing personal data I Clear Personal when occurred
Resetting to the factory default
settings
I Clear All when occurred
Resetting to the factory default
settings without menu display
N ClearMenuless All when occurred
Detecting the remote control
panel connection
I CP Attach 3.xx.xxx.x just after start
when occurred
Detecting the remote control
panel disconnection
I CP Detach when occurred
Detecting the SDHC Memory
card slot door open
N Slot Open just after start
when occurred
Detecting the SDHC Memory
card slot door closed
I Slot Close just after start
when occurred
Recognizing SDHC Memory
cards in slots 1 to 4
I Card Slot1 PA-SV16G (CLASS6)
Total capacity, free capacity, serial No., etc.
(hexadecimal number of MID//PRV//PSN//MDT)
Card Slot2 NO CARD
Card Slot3 NO CARD
Card Slot4 NO CARD
just after start
when the SDHC
Memory card slot door
closed
Detecting a USB memory
device inserted
I USBMem Attach 0/1 just after start
when detected
Detecting a USB memory
device removed
I USBMem Detach 0/1 when detected
Changing a USB memory
device status
I USB Front/Rear VendorID // ProductID //
manufacturer // product // serial
just after start
when occurred
Changing GPS status I GPS On just after start
when occurred
Changing GPS status I GPS Off just after start
when occurred
Adjusting the GPS time (other
than PPS)
I GPS Adjust when occurred
Radar gun connection status I Rader Detect model name First data reception
after start-up
Camera connection status
(1 to 6)
I Camera 1=On 2=Off 3=.. just after start
when occurred
Network connection status I Net PC=192.168.xx.xx
UPLOAD=NONE
WIRELESS=NONE
just after start
when occurred
Front-End and Back-End
application connection status
I PC FE=192.168.xx.xx
BE=NONE
when status changed
N (NOTICE): When a specified event is occurred
I (INFO): Debagging message
Service Log (continued)

120
121
Error (displayed)
Items Level Character strings Timing
Record error E Rec Error "error number"
"factor number"
when occurred
SDHC Memory card format
error
E Format Error "error number" when occurred
All deletion error E DeleteAll Error "error number" when occurred
Play error E Play Error "error number" when occurred
Export error E Export Error "error number" when occurred
Upload error E Upload Error "error number" when occurred
Upgrading error E Vup Error "error number" when occurred
Menu export error E MenuExport Error "error number" when occurred
Menu import error E MenuImport Error "error number" when occurred
Others E Misc Error "error number" when occurred
E (ERROR): When an error is generated
Error (not displayed)
Items Level Character strings Timing
Restoration error E Restore Error slot1
data/yyyymmdd/mmhhss.av
when occurred
Deletion error E Delete Error slot1
data/yyyymmdd/mmhhss.av
when occurred
Upgrading error without menu
display
E VupMenuless Error “factor number” when occurred
E (ERROR): When an error is generated
Service Log (continued)
Playback with the remote control panel is not available
at present. Upgrading is scheduled for the future.
For playback, it is recommended to use the Front-End
application or Back-End Client application.

122
123
Format
The format of the service log is as shown below.
<TS>UTC 2008-11-22 00:48:09</TS><LV>N</LV><OP>Power On</OP>
<TS>2008-11-22 09:48:12</TS><LV>N</LV><OP>System Start AG-CPD20 4.xx.xxx.0 ABCD123456 usa</OP>
<TS>2008-11-22 09:48:23</TS><LV>N</LV><OP>Slot Close</OP>
<TS>2008-11-22 09:48:27</TS><LV>N</LV><OP>Card Slot1 PA-SV16G (CLASS6) 15814656 15814560 1//88//2080763F//7B
</OP>
<TS>2008-11-22 09:48:27</TS><LV>N</LV><OP>Card Slot2 NO CARD</OP>
<TS>2008-11-22 09:48:27</TS><LV>N</LV><OP>Card Slot3 NO CARD</OP>
<TS>2008-11-22 09:48:27</TS><LV>N</LV><OP>Card Slot4 NO CARD</OP>
<TS>2008-11-22 10:23:45</TS><LV>N</LV><OP>Rec File GPIO1 slot1 data/20081122/102345.av</OP>
<TS>2008-11-22 11:07:32</TS><LV>N</LV><OP>Rec Stop STOP</OP>
<TS>2008-11-22 12:13:30</TS><LV>N</LV><OP>System End Acc</OP>
<TS>2008-11-22 12:13:35</TS><LV>N</LV><OP>System End</OP>
<TS>2008-11-22 12:13:37</TS><LV>N</LV><OP>Power Off</OP>
<TS> (Time Stamp): The local time is automatically added upon obtaining other user log. However, the times for the Power
On log, upgrading without displaying menu during start-up, and initializing to the factory default settings
during start-up are the UTC times.
Service Log (continued)

122
123
Software License Agreement
Software License Agreement <GPL>
GNU GENERAL PUBLIC LICENSE
Version 2, June 1991
Copyright (C) 1989, 1991 Free Software Foundation, Inc.
59 Temple Place, Suite 330, Boston, MA 02111-1307 USA
Everyone is permitted to copy and distribute verbatim copies of this license document, but
changing it is not allowed.
Preamble
The licenses for most software are designed to take away your freedom to share and
change it. By contrast, the GNU General Public License is intended to guarantee your
freedom to share and change free software--to make sure the software is free for all its
users. This General Public License applies to most of the Free Software Foundation’s
software and to any other program whose authors commit to using it. (Some other Free
Software Foundation software is covered by the GNU Library General Public License
instead.) You can apply it to your programs, too.
When we speak of free software, we are referring to freedom, not price. Our General Public
Licenses are designed to make sure that you have the freedom to distribute copies of free
software (and charge for this service if you wish), that you receive source code or can get
it if you want it, that you can change the software or use pieces of it in new free programs;
and that you know you can do these things.
To protect your rights, we need to make restrictions that forbid anyone to deny you
these rights or to ask you to surrender the rights. These restrictions translate to certain
responsibilities for you if you distribute copies of the software, or if you modify it.
For example, if you distribute copies of such a program, whether gratis or for a fee, you
must give the recipients all the rights that you have. You must make sure that they, too,
receive or can get the source code. And you must show them these terms so they know
their rights.
We protect your rights with two steps: (1) copyright the software, and (2) offer you this
license which gives you legal permission to copy, distribute and/or modify the software.
Also, for each author's protection and ours, we want to make certain that everyone
understands that there is no warranty for this free software. If the software is modified by
someone else and passed on, we want its recipients to know that what they have is not the
original, so that any problems introduced by others will not reflect on the original authors’
reputations.
Finally, any free program is threatened constantly by software patents. We wish to avoid the
danger that redistributors of a free program will individually obtain patent licenses, in effect
making the program proprietary. To prevent this, we have made it clear that any patent
must be licensed for everyone’s free use or not licensed at all.
The precise terms and conditions for copying, distribution and modification follow.
GNU GENERAL PUBLIC LICENSE
TERMS AND CONDITIONS FOR COPYING, DISTRIBUTION AND
MODIFICATION
0. This License applies to any program or other work which contains a notice placed by
the copyright holder saying it may be distributed under the terms of this General Public
License. The “Program”, below, refers to any such program or work, and a “work based
on the Program” means either the Program or any derivative work under copyright law:
that is to say, a work containing the Program or a portion of it, either verbatim or with
modifications and/or translated into another language. (Hereinafter, translation is included
without limitation in the term “modification”.) Each licensee is addressed as “you”.
Activities other than copying, distribution and modification are not covered by this License;
they are outside its scope. The act of running the Program is not restricted, and the output
from the Program is covered only if its contents constitute a work based on the Program
(independent of having been made by running the Program). Whether that is true depends
on what the Program does.
1. You may copy and distribute verbatim copies of the Program’s source code as you
receive it, in any medium, provided that you conspicuously and appropriately publish on
each copy an appropriate copyright notice and disclaimer of warranty; keep intact all the
notices that refer to this License and to the absence of any warranty; and give any other
recipients of the Program a copy of this License along with the Program.
You may charge a fee for the physical act of transferring a copy, and you may at your
option offer warranty protection in exchange for a fee.
2. You may modify your copy or copies of the Program or any portion of it, thus forming a
work based on the Program, and copy and distribute such modifications or work under
the terms of Section 1 above, provided that you also meet all of these conditions:
a) You must cause the modified files to carry prominent notices stating that you changed the
files and the date of any change.
b) You must cause any work that you distribute or publish, that in whole or in part contains
or is derived from the Program or any part thereof, to be licensed as a whole at no
charge to all third parties under the terms of this License.
c) If the modified program normally reads commands interactively when run, you must
cause it, when started running for such interactive use in the most ordinary way, to print
or display an announcement including an appropriate copyright notice and a notice that
there is no warranty (or else, saying that you provide a warranty) and that users may
redistribute the program under these conditions, and telling the user how to view a copy
of this License. (Exception: if the Program itself is interactive but does not normally print
such an announcement, your work based on the Program is not required to print an
announcement.)
These requirements apply to the modified work as a whole. If identifiable sections of that
work are not derived from the Program, and can be reasonably considered independent
and separate works in themselves, then this License, and its terms, do not apply to those
sections when you distribute them as separate works. But when you distribute the same
sections as part of a whole which is a work based on the Program, the distribution of the
whole must be on the terms of this License, whose permissions for other licensees extend
to the entire whole, and thus to each and every part regardless of who wrote it.
Thus, it is not the intent of this section to claim rights or contest your rights to work written
entirely by you; rather, the intent is to exercise the right to control the distribution of
derivative or collective works based on the Program.
In addition, mere aggregation of another work not based on the Program with the Program
(or with a work based on the Program) on a volume of a storage or distribution medium
does not bring the other work under the scope of this License.
3. You may copy and distribute the Program (or a work based on it, under Section 2) in
object code or executable form under the terms of Sections 1 and 2 above provided that
you also do one of the following:
a) Accompany it with the complete corresponding machine-readable source code, which
must be distributed under the terms of Sections 1 and 2 above on a medium customarily
used for software interchange; or,
b) Accompany it with a written offer, valid for at least three years, to give any third party, for
a charge no more than your cost of physically performing source distribution, a complete
machine-readable copy of the corresponding source code, to be distributed under the
terms of Sections 1 and 2 above on a medium customarily used for software interchange;
or,
c) Accompany it with the information you received as to the offer to distribute corresponding
source code. (This alternative is allowed only for noncommercial distribution and only if
you received the program in object code or executable form with such an offer, in accord
with Subsection b above.)
The source code for a work means the preferred form of the work for making modifications
to it. For an executable work, complete source code means all the source code for all
modules it contains, plus any associated interface definition files, plus the scripts used to
control compilation and installation of the executable. However, as a special exception,
the source code distributed need not include anything that is normally distributed (in either
source or binary form) with the major components (compiler, kernel, and so on) of the
operating system on which the executable runs, unless that component itself accompanies
the executable.
If distribution of executable or object code is made by offering access to copy from a
designated place, then offering equivalent access to copy the source code from the same
place counts as distribution of the source code, even though third parties are not compelled
to copy the source along with the object code.
4. You may not copy, modify, sublicense, or distribute the Program except as expressly
provided under this License. Any attempt otherwise to copy, modify, sublicense or
distribute the Program is void, and will automatically terminate your rights under this
License. However, parties who have received copies, or rights, from you under this
License will not have their licenses terminated so long as such parties remain in full
compliance.
5. You are not required to accept this License, since you have not signed it. However,
nothing else grants you permission to modify or distribute the Program or its derivative
works. These actions are prohibited by law if you do not accept this License. Therefore,
by modifying or distributing the Program (or any work based on the Program), you
indicate your acceptance of this License to do so, and all its terms and conditions for
copying, distributing or modifying the Program or works based on it.
6. Each time you redistribute the Program (or any work based on the Program), the
recipient automatically receives a license from the original licensor to copy, distribute
or modify the Program subject to these terms and conditions. You may not impose any
further restrictions on the recipients’ exercise of the rights granted herein. You are not
responsible for enforcing compliance by third parties to this License.
7. If, as a consequence of a court judgment or allegation of patent infringement or for any
other reason (not limited to patent issues), conditions are imposed on you (whether
by court order, agreement or otherwise) that contradict the conditions of this License,
they do not excuse you from the conditions of this License. If you cannot distribute so
as to satisfy simultaneously your obligations under this License and any other pertinent
obligations, then as a consequence you may not distribute the Program at all. For
example, if a patent license would not permit royalty-free redistribution of the Program
by all those who receive copies directly or indirectly through you, then the only way you
could satisfy both it and this License would be to refrain entirely from distribution of the
Program.
If any portion of this section is held invalid or unenforceable under any particular
circumstance, the balance of the section is intended to apply and the section as a whole is
intended to apply in other circumstances.
It is not the purpose of this section to induce you to infringe any patents or other property
right claims or to contest validity of any such claims; this section has the sole purpose of
protecting the integrity of the free software distribution system, which is implemented by
public license practices. Many people have made generous contributions to the wide range
of software distributed through that system in reliance on consistent application of that
system; it is up to the author/donor to decide if he or she is willing to distribute software
through any other system and a licensee cannot impose that choice.
This section is intended to make thoroughly clear what is believed to be a consequence of
the rest of this License.
8. If the distribution and/or use of the Program is restricted in certain countries either
by patents or by copyrighted interfaces, the original copyright holder who places the
Program under this License may add an explicit geographical distribution limitation
excluding those countries, so that distribution is permitted only in or among countries not
thus excluded. In such case, this License incorporates the limitation as if written in the
body of this License.
9. The Free Software Foundation may publish revised and/or new versions of the General
Public License from time to time. Such new versions will be similar in spirit to the present
version, but may differ in detail to address new problems or concerns.

124
125
Each version is given a distinguishing version number. If the Program specifies a version
number of this License which applies to it and “any later version”, you have the option of
following the terms and conditions either of that version or of any later version published
by the Free Software Foundation. If the Program does not specify a version number of this
License, you may choose any version ever published by the Free Software Foundation.
10. If you wish to incorporate parts of the Program into other free programs whose
distribution conditions are different, write to the author to ask for permission. For
software which is copyrighted by the Free Software Foundation, write to the Free
Software Foundation; we sometimes make exceptions for this. Our decision will be
guided by the two goals of preserving the free status of all derivatives of our free
software and of promoting the sharing and reuse of software generally.
NO WARRANTY
11. BECAUSE THE PROGRAM IS LICENSED FREE OF CHARGE, THERE IS NO
WARRANTY FOR THE PROGRAM, TO THE EXTENT PERMITTED BY APPLICABLE
LAW. EXCEPT WHEN OTHERWISE STATED IN WRITING THE COPYRIGHT
HOLDERS AND/OR OTHER PARTIES PROVIDE THE PROGRAM “AS IS” WITHOUT
WARRANTY OF ANY KIND, EITHER EXPRESSED OR IMPLIED, INCLUDING,
BUT NOT LIMITED TO, THE IMPLIED WARRANTIES OF MERCHANTABILITY AND
FITNESS FOR A PARTICULAR PURPOSE. THE ENTIRE RISK AS TO THE QUALITY
AND PERFORMANCE OF THE PROGRAM IS WITH YOU. SHOULD THE PROGRAM
PROVE DEFECTIVE, YOU ASSUME THE COST OF ALL NECESSARY SERVICING,
REPAIR OR CORRECTION.
12. IN NO EVENT UNLESS REQUIRED BY APPLICABLE LAW OR AGREED TO IN
WRITING WILL ANY COPYRIGHT HOLDER, OR ANY OTHER PARTY WHO MAY
MODIFY AND/OR REDISTRIBUTE THE PROGRAM AS PERMITTED ABOVE,
BE LIABLE TO YOU FOR DAMAGES, INCLUDING ANY GENERAL, SPECIAL,
INCIDENTAL OR CONSEQUENTIAL DAMAGES ARISING OUT OF THE USE OR
INABILITY TO USE THE PROGRAM (INCLUDING BUT NOT LIMITED TO LOSS OF
DATA OR DATA BEING RENDERED INACCURATE OR LOSSES SUSTAINED BY
YOU OR THIRD PARTIES OR A FAILURE OF THE PROGRAM TO OPERATE WITH
ANY OTHER PROGRAMS), EVEN IF SUCH HOLDER OR OTHER PARTY HAS BEEN
ADVISED OF THE POSSIBILITY OF SUCH DAMAGES.
END OF TERMS AND CONDITIONS
Software License Agreement (continued)

124
125
Software License Agreement <LGPL>
GNU LESSER GENERAL PUBLIC LICENSE
Version 2.1, February 1999
Copyright (C) 1991, 1999 Free Software Foundation, Inc. 59 Temple Place, Suite 330,
Boston, MA 02111-1307 USA
Everyone is permitted to copy and distribute verbatim copies of this license document, but
changing it is not allowed.
[This is the first released version of the Lesser GPL. It also counts as the successor of the
GNU Library Public License, version 2, hence the version number 2.1.]
Preamble
The licenses for most software are designed to take away your freedom to share and
change it. By contrast, the GNU General Public Licenses are intended to guarantee your
freedom to share and change free software--to make sure the software is free for all its
users.
This license, the Lesser General Public License, applies to some specially designated
software packages--typically libraries--of the Free Software Foundation and other authors
who decide to use it. You can use it too, but we suggest you first think carefully about
whether this license or the ordinary General Public License is the better strategy to use in
any particular case, based on the explanations below.
When we speak of free software, we are referring to freedom of use, not price. Our General
Public Licenses are designed to make sure that you have the freedom to distribute copies
of free software (and charge for this service if you wish); that you receive source code or
can get it if you want it; that you can change the software and use pieces of it in new free
programs; and that you are informed that you can do these things.
To protect your rights, we need to make restrictions that forbid distributors to deny you
these rights or to ask you to surrender these rights. These restrictions translate to certain
responsibilities for you if you distribute copies of the library or if you modify it.
For example, if you distribute copies of the library, whether gratis or for a fee, you must give
the recipients all the rights that we gave you. You must make sure that they, too, receive or
can get the source code. If you link other code with the library, you must provide complete
object files to the recipients, so that they can relink them with the library after making
changes to the library and recompiling it. And you must show them these terms so they
know their rights.
We protect your rights with a two-step method: (1) we copyright the library, and (2) we offer
you this license, which gives you legal permission to copy, distribute and/or modify the
library.
To protect each distributor, we want to make it very clear that there is no warranty for the
free library. Also, if the library is modified by someone else and passed on, the recipients
should know that what they have is not the original version, so that the original author’s
reputation will not be affected by problems that might be introduced by others.
Finally, software patents pose a constant threat to the existence of any free program. We
wish to make sure that a company cannot effectively restrict the users of a free program
by obtaining a restrictive license from a patent holder. Therefore, we insist that any patent
license obtained for a version of the library must be consistent with the full freedom of use
specified in this license.
Most GNU software, including some libraries, is covered by the ordinary GNU General
Public License. This license, the GNU Lesser General Public License, applies to certain
designated libraries, and is quite different from the ordinary General Public License. We
use this license for certain libraries in order to permit linking those libraries into non-free
programs.
When a program is linked with a library, whether statically or using a shared library, the
combination of the two is legally speaking a combined work, a derivative of the original
library. The ordinary General Public License therefore permits such linking only if the entire
combination fits its criteria of freedom. The Lesser General Public License permits more lax
criteria for linking other code with the library.
We call this license the “Lesser” General Public License because it does Less to protect
the user’s freedom than the ordinary General Public License. It also provides other
free software developers Less of an advantage over competing non-free programs.
These disadvantages are the reason we use the ordinary General Public License for
many libraries. However, the Lesser license provides advantages in certain special
circumstances.
For example, on rare occasions, there may be a special need to encourage the widest
possible use of a certain library, so that it becomes a de-facto standard. To achieve this,
non-free programs must be allowed to use the library. A more frequent case is that a free
library does the same job as widely used non-free libraries. In this case, there is little to
gain by limiting the free library to free software only, so we use the Lesser General Public
License.
In other cases, permission to use a particular library in non-free programs enables a greater
number of people to use a large body of free software. For example, permission to use the
GNU C Library in non-free programs enables many more people to use the whole GNU
operating system, as well as its variant, the GNU/Linux operating system.
Although the Lesser General Public License is Less protective of the users’ freedom, it does
ensure that the user of a program that is linked with the Library has the freedom and the
wherewithal to run that program using a modified version of the Library.
The precise terms and conditions for copying, distribution and modification follow. Pay close
attention to the difference between a “work based on the library” and a “work that uses
the library”. The former contains code derived from the library, whereas the latter must be
combined with the library in order to run.
GNU LESSER GENERAL PUBLIC LICENSE
TERMS AND CONDITIONS FOR COPYING, DISTRIBUTION AND
MODIFICATION
0. This License Agreement applies to any software library or other program which contains
a notice placed by the copyright holder or other authorized party saying it may be
distributed under the terms of this Lesser General Public License (also called “this
License”). Each licensee is addressed as “you”.
A “library” means a collection of software functions and/or data prepared so as to be
conveniently linked with application programs (which use some of those functions and data)
to form executables.
The “Library”, below, refers to any such software library or work which has been distributed
under these terms. A “work based on the Library” means either the Library or any derivative
work under copyright law: that is to say, a work containing the Library or a portion of
it, either verbatim or with modifications and/or translated straightforwardly into another
language. (Hereinafter, translation is included without limitation in the term “modification”.)
“Source code” for a work means the preferred form of the work for making modifications to
it. For a library, complete source code means all the source code for all modules it contains,
plus any associated interface definition files, plus the scripts used to control compilation and
installation of the library.
Activities other than copying, distribution and modification are not covered by this License;
they are outside its scope. The act of running a program using the Library is not restricted,
and output from such a program is covered only if its contents constitute a work based on
the Library (independent of the use of the Library in a tool for writing it). Whether that is true
depends on what the Library does and what the program that uses the Library does.
1. You may copy and distribute verbatim copies of the Library’s complete source code as
you receive it, in any medium, provided that you conspicuously and appropriately publish
on each copy an appropriate copyright notice and disclaimer of warranty; keep intact all
the notices that refer to this License and to the absence of any warranty; and distribute a
copy of this License along with the Library.
You may charge a fee for the physical act of transferring a copy, and you may at your option
offer warranty protection in exchange for a fee.
2. You may modify your copy or copies of the Library or any portion of it, thus forming a
work based on the Library, and copy and distribute such modifications or work under the
terms of Section 1 above, provided that you also meet all of these conditions:
a) The modified work must itself be a software library.
b) You must cause the files modified to carry prominent notices stating that you changed the
files and the date of any change.
c) You must cause the whole of the work to be licensed at no charge to all third parties
under the terms of this License.
d) If a facility in the modified Library refers to a function or a table of data to be supplied by
an application program that uses the facility, other than as an argument passed when the
facility is invoked, then you must make a good faith effort to ensure that, in the event an
application does not supply such function or table, the facility still operates, and performs
whatever part of its purpose remains meaningful.
(For example, a function in a library to compute square roots has a purpose that is
entirely well-defined independent of the application. Therefore, Subsection 2d requires
that any application-supplied function or table used by this function must be optional: if the
application does not supply it, the square root function must still compute square roots.)
These requirements apply to the modified work as a whole. If identifiable sections of that
work are not derived from the Library, and can be reasonably considered independent
and separate works in themselves, then this License, and its terms, do not apply to those
sections when you distribute them as separate works. But when you distribute the same
sections as part of a whole which is a work based on the Library, the distribution of the
whole must be on the terms of this License, whose permissions for other licensees extend
to the entire whole, and thus to each and every part regardless of who wrote it.
Thus, it is not the intent of this section to claim rights or contest your rights to work written
entirely by you; rather, the intent is to exercise the right to control the distribution of
derivative or collective works based on the Library.
In addition, mere aggregation of another work not based on the Library with the Library (or
with a work based on the Library) on a volume of a storage or distribution medium does not
bring the other work under the scope of this License.
3. You may opt to apply the terms of the ordinary GNU General Public License instead of
this License to a given copy of the Library. To do this, you must alter all the notices that
refer to this License, so that they refer to the ordinary GNU General Public License,
version 2, instead of to this License. (If a newer version than version 2 of the ordinary
GNU General Public License has appeared, then you can specify that version instead if
you wish.) Do not make any other change in these notices.
Once this change is made in a given copy, it is irreversible for that copy, so the ordinary
GNU General Public License applies to all subsequent copies and derivative works made
from that copy.
This option is useful when you wish to copy part of the code of the Library into a program
that is not a library.
4. You may copy and distribute the Library (or a portion or derivative of it, under Section 2)
in object code or executable form under the terms of Sections 1 and 2 above provided
that you accompany it with the complete corresponding machine-readable source code,
which must be distributed under the terms of Sections 1 and 2 above on a medium
customarily used for software interchange.
If distribution of object code is made by offering access to copy from a designated place,
then offering equivalent access to copy the source code from the same place satisfies the
requirement to distribute the source code, even though third parties are not compelled to
copy the source along with the object code.
Software License Agreement (continued)

126
127
5. A program that contains no derivative of any portion of the Library, but is designed to
work with the Library by being compiled or linked with it, is called a “work that uses the
Library”. Such a work, in isolation, is not a derivative work of the Library, and therefore
falls outside the scope of this License.
However, linking a “work that uses the Library” with the Library creates an executable that is
a derivative of the Library (because it contains portions of the Library), rather than a “work
that uses the library”. The executable is therefore covered by this License. Section 6 states
terms for distribution of such executables.
When a “work that uses the Library” uses material from a header file that is part of the
Library, the object code for the work may be a derivative work of the Library even though
the source code is not. Whether this is true is especially significant if the work can be linked
without the Library, or if the work is itself a library. The threshold for this to be true is not
precisely defined by law.
If such an object file uses only numerical parameters, data structure layouts and accessors,
and small macros and small inline functions (ten lines or less in length), then the use of the
object file is unrestricted, regardless of whether it is legally a derivative work. (Executables
containing this object code plus portions of the Library will still fall under Section 6.)
Otherwise, if the work is a derivative of the Library, you may distribute the object code for
the work under the terms of Section 6. Any executables containing that work also fall under
Section 6, whether or not they are linked directly with the Library itself.
6. As an exception to the Sections above, you may also combine or link a “work that
uses the Library” with the Library to produce a work containing portions of the Library,
and distribute that work under terms of your choice, provided that the terms permit
modification of the work for the customer’s own use and reverse engineering for
debugging such modifications.
You must give prominent notice with each copy of the work that the Library is used in it
and that the Library and its use are covered by this License. You must supply a copy of
this License. If the work during execution displays copyright notices, you must include the
copyright notice for the Library among them, as well as a reference directing the user to the
copy of this License. Also, you must do one of these things:
a) Accompany the work with the complete corresponding machine-readable source code for
the Library including whatever changes were used in the work (which must be distributed
under Sections 1 and 2 above); and, if the work is an executable linked with the Library,
with the complete machine-readable “work that uses the Library”, as object code and/
or source code, so that the user can modify the Library and then relink to produce a
modified executable containing the modified Library. (It is understood that the user who
changes the contents of definitions files in the Library will not necessarily be able to
recompile the application to use the modified definitions.)
b) Use a suitable shared library mechanism for linking with the Library. A suitable
mechanism is one that (1) uses at run time a copy of the library already present on the
user's computer system, rather than copying library functions into the executable, and (2)
will operate properly with a modified version of the library, if the user installs one, as long
as the modified version is interface-compatible with the version that the work was made
with.
c) Accompany the work with a written offer, valid for at least three years, to give the same
user the materials specified in Subsection 6a, above, for a charge no more than the cost
of performing this distribution.
d) If distribution of the work is made by offering access to copy from a designated place,
offer equivalent access to copy the above specified materials from the same place.
e) Verify that the user has already received a copy of these materials or that you have
already sent this user a copy.
For an executable, the required form of the “work that uses the Library” must include any
data and utility programs needed for reproducing the executable from it. However, as a
special exception, the materials to be distributed need not include anything that is normally
distributed (in either source or binary form) with the major components (compiler, kernel,
and so on) of the operating system on which the executable runs, unless that component
itself accompanies the executable.
It may happen that this requirement contradicts the license restrictions of other proprietary
libraries that do not normally accompany the operating system. Such a contradiction
means you cannot use both them and the Library together in an executable that you
distribute.
7. You may place library facilities that are a work based on the Library side-by-side in
a single library together with other library facilities not covered by this License, and
distribute such a combined library, provided that the separate distribution of the work
based on the Library and of the other library facilities is otherwise permitted, and
provided that you do these two things:
a) Accompany the combined library with a copy of the same work based on the Library,
uncombined with any other library facilities. This must be distributed under the terms of
the Sections above.
b) Give prominent notice with the combined library of the fact that part of it is a work based
on the Library, and explaining where to find the accompanying uncombined form of the
same work.
8. You may not copy, modify, sublicense, link with, or distribute the Library except as
expressly provided under this License. Any attempt otherwise to copy, modify, sublicense,
link with, or distribute the Library is void, and will automatically terminate your rights
under this License. However, parties who have received copies, or rights, from you under
this License will not have their licenses terminated so long as such parties remain in full
compliance.
9. You are not required to accept this License, since you have not signed it. However,
nothing else grants you permission to modify or distribute the Library or its derivative
works. These actions are prohibited by law if you do not accept this License. Therefore,
by modifying or distributing the Library (or any work based on the Library), you indicate
your acceptance of this License to do so, and all its terms and conditions for copying,
distributing or modifying the Library or works based on it.
10. Each time you redistribute the Library (or any work based on the Library), the recipient
automatically receives a license from the original licensor to copy, distribute, link with
or modify the Library subject to these terms and conditions. You may not impose any
further restrictions on the recipients’ exercise of the rights granted herein. You are not
responsible for enforcing compliance by third parties with this License.
11. If, as a consequence of a court judgment or allegation of patent infringement or for any
other reason (not limited to patent issues), conditions are imposed on you (whether
by court order, agreement or otherwise) that contradict the conditions of this License,
they do not excuse you from the conditions of this License. If you cannot distribute so
as to satisfy simultaneously your obligations under this License and any other pertinent
obligations, then as a consequence you may not distribute the Library at all. For
example, if a patent license would not permit royalty-free redistribution of the Library by
all those who receive copies directly or indirectly through you, then the only way you
could satisfy both it and this License would be to refrain entirely from distribution of the
Library.
If any portion of this section is held invalid or unenforceable under any particular
circumstance, the balance of the section is intended to apply, and the section as a whole is
intended to apply in other circumstances.
It is not the purpose of this section to induce you to infringe any patents or other property
right claims or to contest validity of any such claims; this section has the sole purpose of
protecting the integrity of the free software distribution system which is implemented by
public license practices. Many people have made generous contributions to the wide range
of software distributed through that system in reliance on consistent application of that
system; it is up to the author/donor to decide if he or she is willing to distribute software
through any other system and a licensee cannot impose that choice.
This section is intended to make thoroughly clear what is believed to be a consequence of
the rest of this License.
12. If the distribution and/or use of the Library is restricted in certain countries either by
patents or by copyrighted interfaces, the original copyright holder who places the Library
under this License may add an explicit geographical distribution limitation excluding
those countries, so that distribution is permitted only in or among countries not thus
excluded. In such case, this License incorporates the limitation as if written in the body
of this License.
13. The Free Software Foundation may publish revised and/or new versions of the Lesser
General Public License from time to time. Such new versions will be similar in spirit to
the present version, but may differ in detail to address new problems or concerns.
Each version is given a distinguishing version number. If the Library specifies a version
number of this License which applies to it and “any later version”, you have the option of
following the terms and conditions either of that version or of any later version published by
the Free Software Foundation. If the Library does not specify a license version number, you
may choose any version ever published by the Free Software Foundation.
14 . If you wish to incorporate parts of the Library into other free programs whose distribution
conditions are incompatible with these, write to the author to ask for permission. For
software which is copyrighted by the Free Software Foundation, write to the Free
Software Foundation; we sometimes make exceptions for this. Our decision will be
guided by the two goals of preserving the free status of all derivatives of our free
software and of promoting the sharing and reuse of software generally.
NO WARRANTY
15. BECAUSE THE LIBRARY IS LICENSED FREE OF CHARGE, THERE IS NO
WARRANTY FOR THE LIBRARY, TO THE EXTENT PERMITTED BY APPLICABLE
LAW. EXCEPT WHEN OTHERWISE STATED IN WRITING THE COPYRIGHT
HOLDERS AND/OR OTHER PARTIES PROVIDE THE LIBRARY “AS IS” WITHOUT
WARRANTY OF ANY KIND, EITHER EXPRESSED OR IMPLIED, INCLUDING,
BUT NOT LIMITED TO, THE IMPLIED WARRANTIES OF MERCHANTABILITY AND
FITNESS FOR A PARTICULAR PURPOSE. THE ENTIRE RISK AS TO THE QUALITY
AND PERFORMANCE OF THE LIBRARY IS WITH YOU. SHOULD THE LIBRARY
PROVE DEFECTIVE, YOU ASSUME THE COST OF ALL NECESSARY SERVICING,
REPAIR OR CORRECTION.
16. IN NO EVENT UNLESS REQUIRED BY APPLICABLE LAW OR AGREED TO
IN WRITING WILL ANY COPYRIGHT HOLDER, OR ANY OTHER PARTY WHO
MAY MODIFY AND/OR REDISTRIBUTE THE LIBRARY AS PERMITTED ABOVE,
BE LIABLE TO YOU FOR DAMAGES, INCLUDING ANY GENERAL, SPECIAL,
INCIDENTAL OR CONSEQUENTIAL DAMAGES ARISING OUT OF THE USE OR
INABILITY TO USE THE LIBRARY (INCLUDING BUT NOT LIMITED TO LOSS OF
DATA OR DATA BEING RENDERED INACCURATE OR LOSSES SUSTAINED BY
YOU OR THIRD PARTIES OR A FAILURE OF THE LIBRARY TO OPERATE WITH
ANY OTHER SOFTWARE), EVEN IF SUCH HOLDER OR OTHER PARTY HAS BEEN
ADVISED OF THE POSSIBILITY OF SUCH DAMAGES.
END OF TERMS AND CONDITIONS
Software License Agreement (continued)

126
127
Software License Agreement <OpenSSL License>
LICENSE ISSUES
The OpenSSL toolkit stays under a dual license, i.e. both the conditions of the OpenSSL
License and the original SSLeay license apply to the toolkit.
See below for the actual license texts. Actually both licenses are BSD-style Open Source
licenses. In case of any license issues related to OpenSSL please contact openssl-core@
openssl.org.
OpenSSL License
Copyright (c) 1998-2002 The OpenSSL Project. All rights reserved.
Redistribution and use in source and binary forms, with or without modification, are
permitted provided that the following conditions are met:
1. Redistributions of source code must retain the above copyright notice, this list of
conditions and the following disclaimer.
2. Redistributions in binary form must reproduce the above copyright notice, this list of
conditions and the following disclaimer in the documentation and/or other materials
provided with the distribution.
3. All advertising materials mentioning features or use of this software must display the
following acknowledgment: “This product includes software developed by the OpenSSL
Project for use in the OpenSSL Toolkit. (http://www.openssl.org/)”
4. The names “OpenSSL Toolkit” and “OpenSSL Project” must not be used to endorse or
promote products derived from this software without prior written permission. For written
permission, please contact openssl-core@openssl.org.
5. Products derived from this software may not be called “OpenSSL” nor may “OpenSSL”
appear in their names without prior written permission of the OpenSSL Project.
6. Redistributions of any form whatsoever must retain the following acknowledgment: “This
product includes software developed by the OpenSSL Project for use in the OpenSSL
Toolkit (http://www.openssl.org/)”
THIS SOFTWARE IS PROVIDED BY THE OpenSSL PROJECT “AS IS” AND ANY
EXPRESSED OR IMPLIED WARRANTIES, INCLUDING, BUT NOT LIMITED TO, THE
IMPLIED WARRANTIES OF MERCHANTABILITY AND FITNESS FOR A PARTICULAR
PURPOSE ARE DISCLAIMED. IN NO EVENT SHALL THE OpenSSL PROJECT OR ITS
CONTRIBUTORS BE LIABLE FOR ANY DIRECT, INDIRECT, INCIDENTAL, SPECIAL,
EXEMPLARY, OR CONSEQUENTIAL DAMAGES (INCLUDING, BUT NOT LIMITED TO,
PROCUREMENT OF SUBSTITUTE GOODS OR SERVICES; LOSS OF USE, DATA, OR
PROFITS; OR BUSINESS INTERRUPTION) HOWEVER CAUSED AND ON ANY THEORY
OF LIABILITY, WHETHER IN CONTRACT, STRICT LIABILITY, OR TORT (INCLUDING
NEGLIGENCE OR OTHERWISE) ARISING IN ANY WAY OUT OF THE USE OF THIS
SOFTWARE, EVEN IF ADVISED OF THE POSSIBILITY OF SUCH DAMAGE.
This product includes cryptographic software written by Eric Young (eay@cryptsoft.com).
This product includes software written by Tim Hudson (tjh@cryptsoft.com).
Original SSLeay License
Copyright (C) 1995-1998 Eric Young (eay@cryptsoft.com) All rights reserved.
This package is an SSL implementation written by Eric Young (eay@cryptsoft.com).
The implementation was written so as to conform with Netscapes SSL.
This library is free for commercial and non-commercial use as long as the following
conditions are aheared to. The following conditions apply to all code found in this
distribution, be it the RC4, RSA, lhash, DES, etc., code; not just the SSL code. The SSL
documentation included with this distribution is covered by the same copyright terms except
that the holder is Tim Hudson (tjh@cryptsoft.com).
Copyright remains Eric Young’s, and as such any Copyright notices in the code are not to
be removed.
If this package is used in a product, Eric Young should be given attribution as the author of
the parts of the library used.
This can be in the form of a textual message at program startup or in documentation (online
or textual) provided with the package.
Redistribution and use in source and binary forms, with or without modification, are
permitted provided that the following conditions are met:
1. Redistributions of source code must retain the copyright notice, this list of conditions and
the following disclaimer.
2. Redistributions in binary form must reproduce the above copyright notice, this list of
conditions and the following disclaimer in the documentation and/or other materials
provided with the distribution.
3. All advertising materials mentioning features or use of this software must display the
following acknowledgement: “This product includes cryptographic software written by Eric
Young (eay@cryptsoft.com)”
The word “cryptographic” can be left out if the rouines from the library being used are not
cryptographic related :-).
4. If you include any Windows specific code (or a derivative thereof) from the apps directory
(application code) you must include an acknowledgement: “This product includes
software written by Tim Hudson (tjh@cryptsoft.com)”
THIS SOFTWARE IS PROVIDED BY ERIC YOUNG “AS IS” AND ANY EXPRESS
OR IMPLIED WARRANTIES, INCLUDING, BUT NOT LIMITED TO, THE IMPLIED
WARRANTIES OF MERCHANTABILITY AND FITNESS FOR A PARTICULAR PURPOSE
ARE DISCLAIMED. IN NO EVENT SHALL THE AUTHOR OR CONTRIBUTORS BE
LIABLE FOR ANY DIRECT, INDIRECT, INCIDENTAL, SPECIAL, EXEMPLARY, OR
CONSEQUENTIAL DAMAGES (INCLUDING, BUT NOT LIMITED TO, PROCUREMENT
OF SUBSTITUTE GOODS OR SERVICES; LOSS OF USE, DATA, OR PROFITS; OR
BUSINESS INTERRUPTION) HOWEVER CAUSED AND ON ANY THEORY OF LIABILITY,
WHETHER IN CONTRACT, STRICT LIABILITY, OR TORT (INCLUDING NEGLIGENCE OR
OTHERWISE) ARISING IN ANY WAY OUT OF THE USE OF THIS SOFTWARE, EVEN IF
ADVISED OF THE POSSIBILITY OF SUCH DAMAGE.
The licence and distribution terms for any publically available version or derivative of this
code cannot be changed. i.e. this code cannot simply be copied and put under another
distribution licence [including the GNU Public Licence.]
Software License Agreement <Blowfish License>
Copyright (C) 1995-1997 Eric Young (eay@cryptsoft.com)
All rights reserved.
This package is an Blowfish implementation written by Eric Young (eay@cryptsoft.com).
This library is free for commercial and non-commercial use as long as the following
conditions are aheared to. The following conditions apply to all code found in this
distribution.
Copyright remains Eric Young's, and as such any Copyright notices in the code are not to
be removed.
Redistribution and use in source and binary forms, with or without modification, are
permitted provided that the following conditions are met:
1. Redistributions of source code must retain the copyright notice, this list of conditions and
the following disclaimer.
2. Redistributions in binary form must reproduce the above copyright notice, this list of
conditions and the following disclaimer in the documentation and/or other materials
provided with the distribution.
3. All advertising materials mentioning features or use of this software must display the
following acknowledgement:
This product includes software developed by Eric Young (eay@cryptsoft.com).
THIS SOFTWARE IS PROVIDED BY ERIC YOUNG “AS IS” AND ANY EXPRESS
OR IMPLIED WARRANTIES, INCLUDING, BUT NOT LIMITED TO, THE IMPLIED
WARRANTIES OF MERCHANTABILITY AND FITNESS FOR A PARTICULAR PURPOSE
ARE DISCLAIMED. IN NO EVENT SHALL THE AUTHOR OR CONTRIBUTORS BE
LIABLE FOR ANY DIRECT, INDIRECT, INCIDENTAL, SPECIAL, EXEMPLARY, OR
CONSEQUENTIAL DAMAGES (INCLUDING, BUT NOT LIMITED TO, PROCUREMENT
OF SUBSTITUTE GOODS OR SERVICES; LOSS OF USE, DATA, OR PROFITS; OR
BUSINESS INTERRUPTION) HOWEVER CAUSED AND ON ANY THEORY OF LIABILITY,
WHETHER IN CONTRACT, STRICT LIABILITY, OR TORT (INCLUDING NEGLIGENCE OR
OTHERWISE) ARISING IN ANY WAY OUT OF THE USE OF THIS SOFTWARE, EVEN IF
ADVISED OF THE POSSIBILITY OF SUCH DAMAGE.
The license and distribution terms for any publically available version or derivative of this
code cannot be changed. i.e. this code cannot simply be copied and put under another
distribution license [including the GNU Public License.]
The reason behind this being stated in this direct manner is past experience in code simply
being copied and the attribution removed from it and then being distributed as part of other
packages. This implementation was a non-trivial and unpaid effort.
Software License Agreement <DES License>
Copyright (C) 1995-1997 Eric Young (eay@cryptsoft.com) All rights reserved.
This package is an DES implementation written by Eric Young (eay@cryptsoft.com).
The implementation was written so as to conform with MIT’s libdes.
This library is free for commercial and non-commercial use as long as the following
conditions are aheared to. The following conditions apply to all code found in this
distribution.
Copyright remains Eric Young’s, and as such any Copyright notices in the code are not to
be removed.
If this package is used in a product, Eric Young should be given attribution as the author of
that the SSL library. This can be in the form of a textual message at program startup or in
documentation (online or textual) provided with the package.
Redistribution and use in source and binary forms, with or without modification, are
permitted provided that the following conditions are met:
1. Redistributions of source code must retain the copyright notice, this list of conditions and
the following disclaimer.
2. Redistributions in binary form must reproduce the above copyright notice, this list of
conditions and the following disclaimer in the documentation and/or other materials
provided with the distribution.
3. All advertising materials mentioning features or use of this software must display the
following acknowledgement:
This product includes software developed by Eric Young (eay@cryptsoft.com)
THIS SOFTWARE IS PROVIDED BY ERIC YOUNG “AS IS” AND ANY EXPRESS
OR IMPLIED WARRANTIES, INCLUDING, BUT NOT LIMITED TO, THE IMPLIED
WARRANTIES OF MERCHANTABILITY AND FITNESS FOR A PARTICULAR PURPOSE
ARE DISCLAIMED. IN NO EVENT SHALL THE AUTHOR OR CONTRIBUTORS BE
LIABLE FOR ANY DIRECT, INDIRECT, INCIDENTAL, SPECIAL, EXEMPLARY, OR
CONSEQUENTIAL DAMAGES (INCLUDING, BUT NOT LIMITED TO, PROCUREMENT
OF SUBSTITUTE GOODS OR SERVICES; LOSS OF USE, DATA, OR PROFITS; OR
BUSINESS INTERRUPTION) HOWEVER CAUSED AND ON ANY THEORY OF LIABILITY,
WHETHER IN CONTRACT, STRICT LIABILITY, OR TORT (INCLUDING NEGLIGENCE OR
OTHERWISE) ARISING IN ANY WAY OUT OF THE USE OF THIS SOFTWARE, EVEN IF
ADVISED OF THE POSSIBILITY OF SUCH DAMAGE.
The license and distribution terms for any publically available version or derivative of this
code cannot be changed. i.e. this code cannot simply be copied and put under another
distribution license [including the GNU Public License.]
The reason behind this being stated in this direct manner is past experience in code simply
being copied and the attribution removed from it and then being distributed as part of other
packages. This implementation was a non-trivial and unpaid effort.
Software License Agreement (continued)

128
129
Software License Agreement <X.Org License>
1. Introduction
The X.Org Foundation X Window System distribution is a compilation of code and
documentation from many sources. This document is intended primarily as a guide to
the licenses used in the distribution: you must check each file and/or package for precise
redistribution terms. None-the-less, this summary may be useful to many users. No
software incorporating the XFree86 1.1 license has been incorporated.
This document is based on the compilation from XFree86.
2. XFree86 License
XFree86 code without an explicit copyright is covered by the following copyright/license:
Copyright (C) 1994-2003 The XFree86 Project, Inc. All Rights Reserved.
Permission is hereby granted, free of charge, to any person obtaining a copy of this
software and associated documentation files (the "Software"), to deal in the Software
without restriction, including without limitation the rights to use, copy, modify, merge,
publish, distribute, sublicense, and/or sell copies of the Software, and to permit persons to
whom the Software is furnished to do so, subject to the following conditions:
The above copyright notice and this permission notice shall be included in all copies or
substantial portions of the Software.
THE SOFTWARE IS PROVIDED "AS IS", WITHOUT WARRANTY OF ANY KIND,
EXPRESS OR IMPLIED, INCLUDING BUT NOT LIMITED TO THE WARRANTIES
O F ME R C H AN TA BI L I T Y, FI T- NE S S FO R A PA RT IC UL AR PU RP OS E A N D
NONINFRINGEMENT. IN NO EVENT SHALL THE XFREE86 PROJECT BE LIABLE
FOR ANY CLAIM, DAMAGES OR OTHER LIABILITY, WHETHER IN AN ACTION OF
CONTRACT, TORT OR OTHERWISE, ARISING FROM, OUT OF OR IN CONNECTION
WITH THE SOFTWARE OR THE USE OR OTHER DEALINGS IN THE SOFTWARE.
Except as contained in this notice, the name of the XFree86 Project shall not be used in
advertising or otherwise to promote the sale, use or other dealings in this Software without
prior written authorization from the XFree86 Project.
3. Other Licenses
Portions of code are covered by the following licenses/copyrights. See individual files for
the copyright dates.
3.1 X/MIT Copyrights
3.1.1 X Consortium
Copyright (C) <date> X Consortium
Permission is hereby granted, free of charge, to any person obtaining a copy of this
software and associated documentation files (the "Software"), to deal in the Software
without restriction, including without limitation the rights to use, copy, modify, merge,
publish, distribute, sublicense, and/or sell copies of the Software, and to permit persons to
whom the Software is furnished to do so, subject to the following conditions:
The above copyright notice and this permission notice shall be included in all copies or
substantial portions of the Software.
THE SOFTWARE IS PROVIDED "AS IS", WITHOUT WARRANTY OF ANY KIND,
EXPRESS OR IMPLIED, INCLUDING BUT NOT LIMITED TO THE WARRANTIES
OF MERCHANTABILITY, FITNESS FOR A PARTICULAR PURPOSE AND
NONINFRINGEMENT. IN NO EVENT SHALL THE X CONSORTIUM BE LIABLE FOR ANY
CLAIM, DAMAGES OR OTHER LIABILITY, WHETHER IN AN ACTION OF CONTRACT,
TORT OR OTHERWISE, ARISING FROM, OUT OF OR IN CONNECTION WITH THE
SOFTWARE OR THE USE OR OTHER DEALINGS IN THE SOFTWARE.
Except as contained in this notice, the name of the X Consortium shall not be used in
advertising or otherwise to promote the sale, use or other dealings in this Software without
prior written authorization from the X Consortium.
X Window System is a trademark of X Consortium, Inc.
3.1.2 The Open Group
Copyright <date> The Open Group
Permission to use, copy, modify, distribute, and sell this software and its documentation
for any purpose is hereby granted without fee, provided that the above copyright notice
appear in all copies and that both that copyright notice and this permission notice appear in
supporting documentation.
The above copyright notice and this permission notice shall be included in all copies or
substantial portions of the Software.
THE SOFTWARE IS PROVIDED "AS IS", WITHOUT WARRANTY OF ANY KIND,
EXPRESS OR IMPLIED, INCLUDING BUT NOT LIMITED TO THE WARRANTIES
OF MERCHANTABILITY, FITNESS FOR A PARTICULAR PURPOSE AND
NONINFRINGEMENT. IN NO EVENT SHALL THE OPEN GROUP BE LIABLE FOR ANY
CLAIM, DAMAGES OR OTHER LIABILITY, WHETHER IN AN ACTION OF CONTRACT,
TORT OR OTHERWISE, ARISING FROM, OUT OF OR IN CONNECTION WITH THE
SOFTWARE OR THE USE OR OTHER DEALINGS IN THE SOFTWARE.
Except as contained in this notice, the name of The Open Group shall not be used in
advertising or otherwise to promote the sale, use or other dealings in this Software without
prior written authorization from The Open Group.
3.2 Berkeley-based copyrights:
3.2.1 General
Redistribution and use in source and binary forms, with or without modification, are
permitted provided that the following conditions are met:
1. Redistributions of source code must retain the above copyright notice, this list of
conditions and the following disclaimer.
2. Redistributions in binary form must reproduce the above copyright notice, this list of
conditions and the following disclaimer in the documentation and/or other materials
provided with the distribution.
3. The name of the author may not be used to endorse or promote products derived from
this software without specific prior written permission.
THIS SOFTWARE IS PROVIDED BY THE AUTHOR ``AS IS'' AND ANY EXPRESS
OR IMPLIED WARRANTIES, INCLUDING, BUT NOT LIMITED TO, THE IMPLIED
WARRANTIES OF MERCHANTABILITY AND FITNESS FOR A PARTICULAR PURPOSE
ARE DISCLAIMED. IN NO EVENT SHALL THE AUTHOR BE LIABLE FOR ANY DIRECT,
INDIRECT, INCIDENTAL, SPECIAL, EXEMPLARY, OR CONSEQUENTIAL DAMAGES
(INCLUDING, BUT NOT LIMITED TO, PROCUREMENT OF SUBSTITUTE GOODS OR
SERVICES; LOSS OF USE, DATA, OR PROFITS; OR BUSINESS INTERRUPTION)
HOWEVER CAUSED AND ON ANY THEORY OF LIABILITY, WHETHER IN CONTRACT,
STRICT LIABILITY, OR TORT (INCLUDING NEGLIGENCE OR OTHERWISE) ARISING
IN ANY WAY OUT OF THE USE OF THIS SOFTWARE, EVEN IF ADVISED OF THE
POSSIBILITY OF SUCH DAMAGE.
3.2.2 UCB/LBL
Copyright (c) 1993 The Regents of the University of California. All rights reserved.
This software was developed by the Computer Systems Engineering group at Lawrence
Berkeley Laboratory under DARPA contract BG 91-66 and contributed to Berkeley.
All advertising materials mentioning features or use of this software must display the
following acknowledgement: This product includes software developed by the University of
California, Lawrence Berkeley Laboratory.
Redistribution and use in source and binary forms, with or without modification, are
permitted provided that the following conditions are met:
1. Redistributions of source code must retain the above copyright notice, this list of
conditions and the following disclaimer.
2. Redistributions in binary form must reproduce the above copyright notice, this
documentation and/or other materials provided with the distribution.
3. All advertising materials mentioning features or use of this software must display the
following acknowledgement: This product includes software developed by the University
of California, Berkeley and its contributors.
4. Neither the name of the University nor the names of its contributors may be used to
endorse or promote products derived from this software without specific prior written
permission.
THIS SOFTWARE IS PROVIDED BY THE REGENTS AND CONTRIBUTORS ``AS IS''
AND ANY EXPRESS OR IMPLIED WARRANTIES, INCLUDING, BUT NOT LIMITED
TO, THE IMPLIED WARRANTIES OF MERCHANTABILITY AND FITNESS FOR A
PARTICULAR PURPOSE ARE DISCLAIMED. IN NO EVENT SHALL THE REGENTS OR
CONTRIBUTORS BE LIABLE FOR ANY DIRECT, INDIRECT, INCIDENTAL, SPECIAL,
EXEMPLARY, OR CONSEQUENTIAL DAMAGES (INCLUDING, BUT NOT LIMITED TO,
PROCUREMENT OF SUBSTITUTE GOODS OR SERVICES; LOSS OF USE, DATA, OR
PROFITS; OR BUSINESS INTERRUPTION) HOWEVER CAUSED AND ON ANY THEORY
OF LIABILITY, WHETHER IN CONTRACT, STRICT LIABILITY, OR TORT (INCLUDING
NEGLIGENCE OR OTHERWISE) ARISING IN ANY WAY OUT OF THE USE OF THIS
SOFTWARE, EVEN IF ADVISED OF THE POSSIBILITY OF SUCH DAMAGE.
3.2.3 The NetBSD Foundation, Inc.
Copyright (c) 2003 The NetBSD Foundation, Inc. All rights reserved.
This code is derived from software contributed to The NetBSD Foundation by Ben Collver
<collver1@attbi.com>
Software License Agreement (continued)

128
129
Redistribution and use in source and binary forms, with or without modification, are
permitted provided that the following conditions are met:
1. Redistributions of source code must retain the above copyright notice, this list of
conditions and the following disclaimer.
2. Redistributions in binary form must reproduce the above copyright notice, this list of
conditions and the following disclaimer in the documentation and/or other materials
provided with the distribution.
3. All advertising materials mentioning features or use of this software must display the
following acknowledgement: This product includes software developed by the NetBSD
Foundation, Inc. and its contributors.
4. Neither the name of The NetBSD Foundation nor the names of its contributors may be
used to endorse or promote products derived from this software without specific prior
written permission.
THIS SOFTWARE IS PROVIDED BY THE NETBSD FOUNDATION, INC. AND
CONTRIBUTORS ``AS IS'' AND ANY EXPRESS OR IMPLIED WARRANTIES,
INCLUDING, BUT NOT LIMITED TO, THE IMPLIED WARRANTIES OF
MERCHANTABILITY AND FITNESS FOR A PARTICULAR PURPOSE ARE DISCLAIMED.
IN NO EVENT SHALL THE FOUNDATION OR CONTRIBUTORS BE LIABLE FOR ANY
DIRECT, INDIRECT, INCIDENTAL, SPECIAL, EXEMPLARY, OR CONSEQUENTIAL
DAMAGES (INCLUDING, BUT NOT LIMITED TO, PROCUREMENT OF SUBSTITUTE
GO ODS OR S E RVICES ; LOSS OF U SE, DATA , OR PROFITS; OR BUSINESS
INTERRUPTION) HOWEVER CAUSED AND ON ANY THEORY OF LIABILITY, WHETHER
IN CONTRACT, STRICT LIABILITY, OR TORT (INCLUDING NEGLIGENCE OR
OTHERWISE) ARISING IN ANY WAY OUT OF THE USE OF THIS SOFTWARE, EVEN IF
ADVISED OF THE POSSIBILITY OF SUCH DAMAGE.
3.2.4 Theodore Ts'o.
Copyright Theodore Ts'o, 1994, 1995, 1996, 1997, 1998, 1999. All rights reserved.
Redistribution and use in source and binary forms, with or without modification, are
permitted provided that the following conditions are met:
1. Redistributions of source code must retain the above copyright notice, and the entire
permission notice in its entirety, including the disclaimer of warranties.
2. Redistributions in binary form must reproduce the above copyright notice, this list of
conditions and the following disclaimer in the documentation and/or other materials
provided with the distribution.
3. The name of the author may not be used to endorse or promote products derived from
this software without specific prior written permission.
THIS SOFTWARE IS PROVIDED ``AS IS'' AND ANY EXPRESS OR IMPLIED
WARRANTIES, INCLUDING, BUT NOT LIMITED TO, THE IMPLIED WARRANTIES
OF MERCHANTABILITY AND FITNESS FOR A PARTICULAR PURPOSE, ALL OF
WHICH ARE HEREBY DISCLAIMED. IN NO EVENT SHALL THE AUTHOR BE
LIABLE FOR ANY DIRECT, INDIRECT, INCIDENTAL, SPECIAL, EXEMPLARY, OR
CONSEQUENTIAL DAMAGES (INCLUDING, BUT NOT LIMITED TO, PROCUREMENT
OF SUBSTITUTE GOODS OR SERVICES; LOSS OF USE, DATA, OR PROFITS; OR
BUSINESS INTERRUPTION) HOWEVER CAUSED AND ON ANY THEORY OF LIABILITY,
WHETHER IN CONTRACT, STRICT LIABILITY, OR TORT (INCLUDING NEGLIGENCE OR
OTHERWISE) ARISING IN ANY WAY OUT OF THE USE OF THIS SOFTWARE, EVEN IF
NOT ADVISED OF THE POSSIBILITY OF SUCH DAMAGE.
3.2.5 Theo de Raadt and Damien Miller
Copyright (c) 1995,1999 Theo de Raadt. All rights reserved. Copyright (c) 2001-2002
Damien Miller. All rights reserved.
Redistribution and use in source and binary forms, with or without modification, are
permitted provided that the following conditions are met:
1. Redistributions of source code must retain the above copyright notice, this list of
conditions and the following disclaimer.
2. Redistributions in binary form must reproduce the above copyright notice, this list of
conditions and the following disclaimer in the documentation and/or other materials
provided with the distribution.
THIS SOFTWARE IS PROVIDED BY THE AUTHOR ``AS IS'' AND ANY EXPRESS
OR IMPLIED WARRANTIES, INCLUDING, BUT NOT LIMITED TO, THE IMPLIED
WARRANTIES OF MERCHANTABILITY AND FITNESS FOR A PARTICULAR PURPOSE
ARE DISCLAIMED. IN NO EVENT SHALL THE AUTHOR BE LIABLE FOR ANY DIRECT,
INDIRECT, INCIDENTAL, SPECIAL, EXEMPLARY, OR CONSEQUENTIAL DAMAGES
(INCLUDING, BUT NOT LIMITED TO, PROCUREMENT OF SUBSTITUTE GOODS OR
SERVICES; LOSS OF USE, DATA, OR PROFITS; OR BUSINESS INTERRUPTION)
HOWEVER CAUSED AND ON ANY THEORY OF LIABILITY, WHETHER IN CONTRACT,
STRICT LIABILITY, OR TORT (INCLUDING NEGLIGENCE OR OTHERWISE) ARISING
IN ANY WAY OUT OF THE USE OF THIS SOFTWARE, EVEN IF ADVISED OF THE
POSSIBILITY OF SUCH DAMAGE.
3.2.6 Todd C. Miller
Copyright (c) 1998 Todd C. Miller <Todd.Miller@courtesan.com>
Permission to use, copy, modify, and distribute this software for any purpose with or without
fee is hereby granted, provided that the above copyright notice and this permission notice
appear in all copies.
THE SOFTWARE IS PROVIDED "AS IS" AND TODD C. MILLER DISCLAIMS ALL
WARRANTIES WITH REGARD TO THIS SOFTWARE INCLUDING ALL IMPLIED
WARRANTIES OF MERCHANTABILITY AND FITNESS. IN NO EVENT SHALL TODD C.
MILLER BE LIABLE FOR ANY SPECIAL, DIRECT, INDIRECT, OR CONSEQUENTIAL
DAMAGES OR ANY DAMAGES WHATSOEVER RESULTING FROM LOSS OF USE,
DATA OR PROFITS, WHETHER IN AN ACTION OF CONTRACT, NEGLIGENCE OR
OTHER TORTIOUS ACTION, ARISING OUT OF OR IN CONNECTION WITH THE USE
OR PERFORMANCE OF THIS SOFTWARE.
3.2.7 Thomas Winischhofer
Copyright (C) 2001-2004 Thomas Winischhofer
Redistribution and use in source and binary forms, with or without modification, are
permitted provided that the following conditions are met:
1. Redistributions of source code must retain the above copyright notice, this list of
conditions and the following disclaimer.
2. Redistributions in binary form must reproduce the above ANYEXPRESS copyright
notice, this list of conditions and the following disclaimer in the documentation and/or
other materials provided with the distribution.
3. The name of the author may not be used to endorse or promote products derived from
this software without specific prior written permission.
THIS SOFTWARE IS PROVIDED BY THE AUTHOR ``AS IS'' AND ANY EXPRESSED
OR IMPLIED WARRANTIES, INCLUDING, BUT NOT LIMITED TO, THE IMPLIED
WARRANTIES OF MERCHANTABILITY AND FITNESS FOR A PARTICULAR PURPOSE
ARE DISCLAIMED. IN NO EVENT SHALL THE AUTHOR BE LIABLE FOR ANY DIRECT,
INDIRECT, INCIDENTAL, SPECIAL, EXEMPLARY, OR CONSEQUENTIAL DAMAGES
(INCLUDING, BUT NOT LIMITED TO, PROCUREMENT OF SUBSTITUTE GOODS OR
SERVICES; LOSS OF USE, DATA, OR PROFITS; OR BUSINESS INTERRUPTION)
HOWEVER CAUSED AND ON ANY THEORY OF LIABILITY, WHETHER IN CONTRACT,
STRICT LIABILITY, OR TORT (INCLUDING NEGLIGENCE OR OTHERWISE) ARISING
IN ANY WAY OUT OF THE USE OF THIS SOFTWARE, EVEN IF ADVISED OF THE
POSSIBILITY OF SUCH DAMAGE.
3.3 NVIDIA Corp
Copyright (c) 1996 NVIDIA, Corp. All rights reserved.
NOTICE TO USER: The source code is copyrighted under U.S. and international laws.
NVIDIA, Corp. of Sunnyvale, California owns the copyright and as design patents pending
on the design and interface of the NV chips. Users and possessors of this source code are
hereby granted a nonexclusive, royalty-free copyright and design patent license to use this
code in individual and commercial software.
Any use of this source code must include, in the user documentation and internal comments
to the code, notices to the end user as follows:
Copyright (c) 1996 NVIDIA, Corp. NVIDIA design patents pending in the U.S. and foreign
countries.
NVIDIA, CORP. MAKES NO REPRESENTATION ABOUT THE SUITABILITY OF THIS
SOURCE CODE FOR ANY PURPOSE. IT IS PROVIDED "AS IS" WITHOUT EXPRESS
OR IMPLIED WARRANTY OF ANY KIND. NVIDIA, CORP. DISCLAIMS ALL WARRANTIES
WITH REGARD TO THIS SOURCE CODE, INCLUDING ALL IMPLIED WARRANTIES OF
MERCHANTABILITY AND FITNESS FOR A PARTICULAR PURPOSE. IN NO EVENT
SHALL NVIDIA, CORP. BE LIABLE FOR ANY SPECIAL, INDIRECT, INCIDENTAL,
OR CONSEQUENTIAL DAMAGES, OR ANY DAMAGES WHATSOEVER RESULTING
FROM LOSS OF USE, DATA OR PROFITS, WHETHER IN AN ACTION OF CONTRACT,
NEGLIGENCE OR OTHER TORTIOUS ACTION, ARISING OUT OF OR IN CONNECTION
WITH THE USE OR PERFORMANCE OF THIS SOURCE CODE.
3.4 GLX Public License
GLX PUBLIC LICENSE (Version 1.0 (2/11/99)) ("License")
Subject to any third party claims, Silicon Graphics, Inc. ("SGI") hereby grants permission
to Recipient (defined below), under Recipient's copyrights in the Original Software (defined
below), to use, copy, modify, merge, publish, distribute, sublicense and/or sell copies of
Subject Software (defined below), and to permit persons to whom the Subject Software
is furnished in accordance with this License to do the same, subject to all of the following
terms and conditions, which Recipient accepts by engaging in any such use, copying,
modifying, merging, publishing, distributing, sublicensing or selling:
1. Definitions.
(a) "Original Software" means source code of computer software code which is
described in Exhibit A as Original Software.
(b) "Modifications" means any addition to or deletion from the substance or structure of
either the Original Software or any previous Modifications. When Subject Software is
released as a series of files, a Modification means (i) any addition to or deletion from
Software License Agreement (continued)

130
131
the contents of a file containing Original Software or previous Modifications and (ii)
any new file that contains any part of the Original Code or previous Modifications.
(c) "Subject Software" means the Original Software or Modifications or the combination
of the Original Software and Modifications, or portions of any of the foregoing.
(d) "Recipient" means an individual or a legal entity exercising rights under, and
complying with all of the terms of, this License. For legal entities, "Recipient"
includes any entity which controls, is controlled by, or is under common control with
Recipient. For purposes of this definition, "control" of an entity means (a) the power,
direct or indirect, to direct or manage such entity, or (b) ownership of fifty percent
(50%) or more of the outstanding shares or beneficial ownership of such entity.
2. Redistribution of Source Code Subject to These Terms. Redistributions of Subject
Software in source code form must retain the notice set forth in Exhibit A, below, in
every file. A copy of this License must be included in any documentation for such
Subject Software where the recipients' rights relating to Subject Software are described.
Recipient may distribute the source code version of Subject Software under a license of
Recipient's choice, which may contain terms different from this License, provided that
(i) Recipient is in compliance with the terms of this License, and (ii) the license terms
include this Section 2 and Sections 3, 4, 7, 8, 10, 12 and 13 of this License, which terms
may not be modified or superseded by any other terms of such license. If Recipient
distributes the source code version under a different license Recipient must make it
absolutely clear that any terms which differ from this License are offered by Recipient
alone, not by SGI. Recipient hereby agrees to indemnify SGI for any liability incurred by
SGI as a result of any such terms Recipient offers.
3. Redistribution in Executable Form. The notice set forth in Exhibit A must be
conspicuously included in any notice in an executable version of Subject Software,
related documentation or collateral in which Recipient describes the user's rights relating
to the Subject Software. Recipient may distribute the executable version of Subject
Software under a license of Recipient's choice, which may contain terms different from
this License, provided that (i) Recipient is in compliance with the terms of this License,
and (ii) the license terms include this Section 3 and Sections 4, 7, 8, 10, 12 and 13 of
this License, which terms may not be modified or superseded by any other terms of such
license. If Recipient distributes the executable version under a different license Recipient
must make it absolutely clear that any terms which differ from this License are offered by
Recipient alone, not by SGI. Recipient hereby agrees to indemnify SGI for any liability
incurred by SGI as a result of any such terms Recipient offers.
4. Termination. This License and the rights granted hereunder will terminate automatically
if Recipient fails to comply with terms herein and fails to cure such breach within 30
days of the breach. Any sublicense to the Subject Software which is properly granted
shall survive any termination of this License absent termination by the terms of such
sublicense. Provisions which, by their nature, must remain in effect beyond the
termination of this License shall survive.
5. No Trademark Rights. This License does not grant any rights to use any trade name,
trademark or service mark whatsoever. No trade name, trademark or service mark of
SGI may be used to endorse or promote products derived from the Subject Software
without prior written permission of SGI.
6. No Other Rights. This License does not grant any rights with respect to the OpenGL
API or to any software or hardware implementation thereof or to any other software
whatsoever, nor shall any other rights or licenses not expressly granted hereunder arise
by implication, estoppel or otherwise with respect to the Subject Software. Title to and
ownership of the Original Software at all times remains with SGI. All rights in the Original
Software not expressly granted under this License are reserved.
7. Compliance with Laws; Non-Infringement. Recipient shall comply with all applicable
laws and regulations in connection with use and distribution of the Subject Software,
including but not limited to, all export and import control laws and regulations of the U.S.
government and other countries. Recipient may not distribute Subject Software that (i) in
any way infringes (directly or contributorily) the rights (including patent, copyright, trade
secret, trademark or other intellectual property rights of any kind) of any other person or
entity or (ii) breaches any representation or warranty, express, implied or statutory, which
under any applicable law it might be deemed to have been distributed.
8. Claims of Infringement. If Recipient at any time has knowledge of any one or more third
party claims that reproduction, modification, use, distribution, import or sale of Subject
Software (including particular functionality or code incorporated in Subject Software)
infringes the third party's intellectual property rights, Recipient must place in a well-
identified web page bearing the title "LEGAL" a description of each such claim and a
description of the party making each such claim in sufficient detail that a user of the
Subject Software will know whom to contact regarding the claim. Also, upon gaining
such knowledge of any such claim, Recipient must conspicuously include the URL for
such web page in the Exhibit A notice required under Sections 2 and 3, above, and in
the text of any related documentation, license agreement or collateral in which Recipient
describes end user's rights relating to the Subject Software. If Recipient obtains such
knowledge after it makes Subject Software available to any other person or entity,
Recipient shall take other steps (such as notifying appropriate mailing lists or news-
groups) reasonably calculated to inform those who received the Subject Soft- ware that
new knowledge has been obtained.
9. DISCLAIMER OF WARRANTY. SUBJECT SOFTWARE IS PROVIDED ON AN "AS
IS" BASIS, WITHOUT WARRANTY OF ANY KIND, EITHER EXPRESSED OR
IMPLIED, INCLUDING, WITHOUT LIMITATION, WARRANTIES THAT THE SUBJECT
SOFTWARE IS FREE OF DEFECTS, MERCHANTABLE, FIT FOR A PARTICULAR
PURPOSE OR NON- INFRINGING. SGI ASSUMES NO RISK AS TO THE QUALITY
AND PERFORMANCE OF THE SOFTWARE. SHOULD ANY SOFTWARE PROVE
DEFECTIVE IN ANY RESPECT, SGI ASSUMES NO COST OR LIABILITY FOR ANY
SERVICING, REPAIR OR CORRECTION. THIS DISCLAIMER OF WARRANTY
CONSTITUTES AN ESSENTIAL PART OF THIS LICENSE. NO USE OF ANY SUBJECT
SOFTWARE IS AUTHORIZED HEREUNDER EXCEPT UNDER THIS DISCLAIMER.
10. LIMITATION OF LIABILITY. UNDER NO CIRCUMSTANCES AND UNDER NO LEGAL
THEORY, WHETHER TORT (INCLUDING, WITHOUT LIMITATION, NEGLIGENCE
OR STRICT LIABILITY), CONTRACT, OR OTHERWISE, SHALL SGI OR ANY SGI
LICENSOR BE LIABLE FOR ANY DIRECT, INDIRECT, SPECIAL, INCIDENTAL,
OR CONSEQUENTIAL DAMAGES OF ANY CHARACTER INCLUDING, WITHOUT
LIMITATION, DAMAGES FOR LOSS OF GOODWILL, WORK STOPPAGE, LOSS
OF DATA, COMPUTER FAILURE OR MALFUNCTION, OR ANY AND ALL OTHER
COMMERCIAL DAMAGES OR LOSSES, EVEN IF SUCH PARTY SHALL HAVE
BEEN INFORMED OF THE POSSIBILITY OF SUCH DAMAGES. THIS LIMITATION
OF LIABILITY SHALL NOT APPLY TO LIABILITY FOR DEATH OR PERSONAL
INJURY RESULTING FROM SGI's NEGLIGENCE TO THE EXTENT APPLICABLE
LAW PROHIBITS SUCH LIMITATION. SOME JURISDICTIONS DO NOT ALLOW THE
EXCLUSION OR LIMITATION OF INCIDENTAL OR CONSEQUENTIAL DAMAGES, SO
THAT EXCLUSION AND LIMITATION MAY NOT APPLY TO RECIPIENT.
11. Indemnity. Recipient shall be solely responsible for damages arising, directly or
indirectly, out of its utilization of rights under this License. Recipient will defend,
indemnify and hold harmless Silicon Graphics, Inc. from and against any loss, liability,
damages, costs or expenses (including the payment of reasonable attorneys fees)
arising out of Recipient's use, modification, reproduction and distribution of the Subject
Software or out of any representation or warranty made by Recipient.
12. U.S. Government End Users. The Subject Software is a "commercial item" consisting
of "commercial computer software" as such terms are defined in title 48 of the Code of
Federal Regulations and all U.S. Government End Users acquire only the rights set
forth in this License and are subject to the terms of this License.
13. Miscellaneous. This License represents the complete agreement concerning subject
matter hereof. If any provision of this License is held to be unenforceable, such provision
shall be reformed so as to achieve as nearly as possible the same economic effect
as the original provision and the remainder of this License will remain in effect. This
License shall be governed by and construed in accordance with the laws of the United
States and the State of California as applied to agreements entered into and to be
performed entirely within California between California residents. Any litigation relating
to this License shall be subject to the exclusive jurisdiction of the Federal Courts of the
Northern District of California (or, absent subject matter jurisdiction in such courts, the
courts of the State of California), with venue lying exclusively in Santa Clara County,
California, with the losing party responsible for costs, including without limitation, court
costs and reasonable attorneys fees and expenses. The application of the United
Nations Convention on Contracts for the International Sale of Goods is expressly
excluded. Any law or regulation which provides that the language of a contract shall be
construed against the drafter shall not apply to this License.
Exhibit A
The contents of this file are subject to Sections 2, 3, 4, 7, 8, 10, 12 and 13 of the GLX
Public License Version 1.0 (the "License"). You may not use this file except in compliance
with those sections of the License. You may obtain a copy of the License at Silicon
Graphics, Inc., attn: Legal Services, 2011 N. Shoreline Blvd., Mountain View, CA 94043 or
at http://www.sgi.com/software/opensource/glx/license.html.
Software distributed under the License is distributed on an "AS IS" basis.
ALL WARRANTIES ARE DISCLAIMED, INCLUDING, WITHOUT LIMITATION, ANY
IMPLIED WARRANTIES OF MERCHANTABILITY, OF FITNESS FOR A PARTICULAR
PURPOSE OR OF NON-INFRINGEMENT. See the License for the specific language
governing rights and limitations under the License.
The Original Software is GLX version 1.2 source code, released February, 1999. The
developer of the Original Software is Silicon Graphics, Inc. Those portions of the Subject
Software created by Silicon Graphics, Inc. are Copy-right (c) 1991-9 Silicon Graphics, Inc.
All Rights Reserved.
3.5 CID Font Code Public License
CID FONT CODE PUBLIC LICENSE (Version 1.0 (3/31/99))("License")
Subject to any applicable third party claims, Silicon Graphics, Inc. ("SGI") hereby grants
permission to Recipient (defined below), under SGI's copyrights in the Original Software
(defined below), to use, copy, modify, merge, publish, distribute, sublicense and/or sell
copies of Subject Software (defined below) in both source code and executable form,
and to permit persons to whom the Subject Software is furnished in accordance with this
License to do the same, subject to all of the following terms and conditions, which Recipient
accepts by engaging in any such use, copying, modifying, merging, publication, distributing,
sublicensing or selling:
1. Definitions.
a. "Original Software" means source code of computer software code that is described
in Exhibit A as Original Software.
b. "Modifications" means any addition to or deletion from the substance or structure of
either the Original Software or any previous Modifications. When Subject Software is
released as a series of files, a Modification means (i) any addition to or deletion from
the contents of a file containing Original Software or previous Modifications and (ii)
any new file that contains any part of the Original Code or previous Modifications.
c. "Subject Software" means the Original Software or Modifications or the combination
of the Original Software and Modifications, or portions of any of the foregoing.
d. "Recipient" means an individual or a legal entity exercising rights under the terms
of this License. For legal entities, "Recipient" includes any entity that controls,
is controlled by, or is under common control with Recipient. For purposes of this
definition, "control" of an entity means (i) the power, direct or indirect, to direct
or manage such entity, or (ii) ownership of fifty percent (50%) or more of the
outstanding shares or beneficial ownership of such entity.
e. "Required Notice" means the notice set forth in Exhibit A to this License.
f. "Accompanying Technology" means any software or other technology that is not a
Software License Agreement (continued)

130
131
Modification and that is distributed or made publicly available by Recipient with the
Subject Software. Separate software files that do not contain any Original Software
or any previous Modification shall not be deemed a Modification, even if such
software files are aggregated as part of a product, or in any medium of storage, with
any file that does contain Original Software or any previous Modification.
2. License Terms. All distribution of the Subject Software must be made subject to
the terms of this License. A copy of this License and the Required Notice must be
included in any documentation for Subject Software where Recipient's rights relating to
Subject Software and/or any Accompanying Technology are described. Distributions of
Subject Software in source code form must also include the Required Notice in every
file distributed. In addition, a ReadMe file entitled "Important Legal Notice" must be
distributed with each distribution of one or more files that incorporate Subject Software.
That file must be included with distributions made in both source code and executable
form. A copy of the License and the Required Notice must be included in that file.
Recipient may distribute Accompanying Technology under a license of Recipient's
choice, which may contain terms different from this License, provided that (i) Recipient
is in compliance with the terms of this License, (ii) such other license terms do not
modify or supersede the terms of this License as applicable to the Subject Software,
(iii) Recipient hereby indemnifies SGI for any liability incurred by SGI as a result of the
distribution of Accompanying Technology or the use of other license terms.
3. Termination. This License and the rights granted hereunder will terminate automatically
if Recipient fails to comply with terms herein and fails to cure such breach within 30
days of the breach. Any sublicense to the Subject Software that is properly granted
shall survive any termination of this License absent termination by the terms of such
sublicense. Provisions which, by their nature, must remain in effect beyond the
termination of this License shall survive.
4. Trademark Rights. This License does not grant any rights to use any trade name,
trademark or service mark whatsoever. No trade name, trademark or service mark of
SGI may be used to endorse or promote products derived from or incorporating any
Subject Software without prior written permission of SGI.
5. No Other Rights. No rights or licenses not expressly granted hereunder shall arise by
implication, estoppel or otherwise. Title to and ownership of the Original Software at all
times remains with SGI. All rights in the Original Software not expressly granted under
this License are reserved.
6. Compliance with Laws; Non-Infringement. Recipient shall comply with all applicable
laws and regulations in connection with use and distribution of the Subject Software,
including but not limited to, all export and import control laws and regulations of the U.S.
government and other countries. Recipient may not distribute Subject Software that (i) in
any way infringes (directly or contributorily) the rights (including patent, copyright, trade
secret, trademark or other intellectual property rights of any kind) of any other person
or entity, or (ii) breaches any representation or warranty, express, implied or statutory,
which under any applicable law it might be deemed to have been distributed.
7. Claims of Infringement. If Recipient at any time has knowledge of any one or more third
party claims that reproduction, modification, use, distribution, import or sale of Subject
Software (including particular functionality or code incorporated in Subject Software)
infringes the third party's intellectual property rights, Recipient must place in a well-
identified web page bearing the title "LEGAL" a description of each such claim and a
description of the party making each such claim in sufficient detail that a user of the
Subject Software will know whom to contact regarding the claim. Also, upon gaining
such knowledge of any such claim, Recipient must conspicuously include the URL for
such web page in the Required Notice, and in the text of any related documentation,
license agreement or collateral in which Recipient describes end user's rights relating
to the Subject Software. If Recipient obtains such knowledge after it makes Subject
Software available to any other person or entity, Recipient shall take other steps (such
as notifying appropriate mailing lists or newsgroups) reasonably calculated to provide
such knowledge to those who received the Subject Software.
8. DISCLAIMER OF WARRANTY. SUBJECT SOFTWARE IS PROVIDED ON AN
"AS IS" BASIS, WITHOUT WARRANTY OF ANY KIND, EITHER EXPRESSED OR
IMPLIED, INCLUDING, WITHOUT LIMITATION, WARRANTIES THAT THE SUBJECT
SOFTWARE IS FREE OF DEFECTS, MERCHANTABLE, FIT FOR A PARTICULAR
PURPOSE OR NON-INFRINGING. SGI ASSUMES NO RISK AS TO THE QUALITY
AND PERFORMANCE OF THE SOFTWARE. SHOULD ANY SOFTWARE PROVE
DEFECTIVE IN ANY RESPECT, SGI ASSUMES NO COST OR LIABILITY FOR ANY
SERVICING, REPAIR OR CORRECTION. THIS DISCLAIMER OF WARRANTY
CONSTITUTES AN ESSENTIAL PART OF THIS LICENSE. NO USE OF ANY SUBJECT
SOFTWARE IS AUTHORIZED HEREUNDER EXCEPT UNDER THIS DISCLAIMER.
9. LIMITATION OF LIABILITY. UNDER NO CIRCUMSTANCES AND UNDER NO LEGAL
THEORY, WHETHER TORT (INCLUDING, WITHOUT LIMITATION, NEGLIGENCE
OR STRICT LIABILITY), CONTRACT, OR OTHERWISE, SHALL SGI OR ANY
SGI LICENSOR BE LIABLE FOR ANY CLAIM, DAMAGES OR OTHER LIABILITY,
WHETHER IN AN ACTION OF CONTRACT, TORT OR OTHERWISE, ARISING FROM,
OUT OF OR IN CONNECTION WITH THE SUBJECT SOFTWARE OR THE USE OR
OTHER DEALINGS IN THE SUBJECT SOFTWARE. SOME JURISDICTIONS DO
NOT ALLOW THE EXCLUSION OR LIMITATION OF CERTAIN DAMAGES, SO THIS
EXCLUSION AND LIMITATION MAY NOT APPLY TO RECIPIENT TO THE EXTENT SO
DISALLOWED.
10. Indemnity. Recipient shall be solely responsible for damages arising, directly or
indirectly, out of its utilization of rights under this License. Recipient will defend,
indemnify and hold SGI and its successors and assigns harmless from and against
any loss, liability, damages, costs or expenses (including the payment of reasonable
attorneys fees) arising out of (Recipient's use, modification, reproduction and distribution
of the Subject Software or out of any representation or warranty made by Recipient.
11. U.S. Government End Users. The Subject Software is a "commercial item" consisting
of "commercial computer software" as such terms are defined in title 48 of the Code of
Federal Regulations and all U.S. Government End Users acquire only the rights set forth
in this License and are subject to the terms of this License.
12. Miscellaneous. This License represents the complete agreement concerning subject
matter hereof. If any provision of this License is held to be unenforceable by any judicial
or administrative authority having proper jurisdiction with respect thereto, such provision
shall be reformed so as to achieve as nearly as possible the same economic effect
as the original provision and the remainder of this License will remain in effect. This
License shall be governed by and construed in accordance with the laws of the United
States and the State of California as applied to agreements entered into and to be
performed entirely within California between California residents. Any litigation relating
to this License shall be subject to the exclusive jurisdiction of the Federal Courts of the
Northern District of California (or, absent subject matter jurisdiction in such courts, the
courts of the State of California), with venue lying exclusively in Santa Clara County,
California, with the losing party responsible for costs, including without limitation, court
costs and reasonable attorneys fees and expenses. The application of the United
Nations Convention on Contracts for the International Sale of Goods is expressly
excluded. Any law or regulation that provides that the language of a contract shall be
construed against the drafter shall not apply to this License.
Exhibit A
Copyright (c) 1994-1999 Silicon Graphics, Inc.
The contents of this file are subject to the CID Font Code Public License Version 1.0 (the
"License"). You may not use this file except in compliance with the License. You may obtain
a copy of the License at Silicon Graphics, Inc., attn: Legal Services, 2011 N. Shoreline
Blvd., Mountain View, CA 94043 or at http://www.sgi.com/software/opensource/cid/license.
html
Software distributed under the License is distributed on an "AS IS" basis. ALL
WARRANTIES ARE DISCLAIMED, INCLUDING, WITHOUT LIMITATION, ANY IMPLIED
WARRANTIES OF MERCHANTABILITY, OF FITNESS FOR A PARTICULAR PURPOSE
OR OF NON-INFRINGEMENT. See the License for the specific language governing rights
and limitations under the License.
The Original Software (as defined in the License) is CID font code that was developed by
Silicon Graphics, Inc. Those portions of the Subject Software (as defined in the License)
that were created by Silicon Graphics, Inc. are Copyright (c) 1994-1999 Silicon Graphics,
Inc. All Rights Reserved.
[NOTE: When using this text in connection with Subject Software delivered solely in object
code form, Recipient may replace the words "this file" with "this software" in both the first
and second sentences.]
3.6 Bitstream Vera Fonts Copyright
The fonts have a generous copyright, allowing derivative works (as long as "Bitstream"
or "Vera" are not in the names), and full redistribution (so long as they are not *sold* by
themselves). They can be be bundled, redistributed and sold with any software.
The fonts are distributed under the following copyright:
Copyright (c) 2003 by Bitstream, Inc. All Rights Reserved. Bitstream Vera is a trademark of
Bitstream, Inc.
Permission is hereby granted, free of charge, to any person obtaining a copy of the
fonts accompanying this license ("Fonts") and associated documentation files (the "Font
Software"), to reproduce and distribute the Font Software, including without limitation the
rights to use, copy, merge, publish, distribute, and/or sell copies of the Font Software, and
to permit persons to whom the Font Software is furnished to do so, subject to the following
conditions:
The above copyright and trademark notices and this permission notice shall be included in
all copies of one or more of the Font Software typefaces.
The Font Software may be modified, altered, or added to, and in particular the designs of
glyphs or characters in the Fonts may be modified and additional glyphs or characters may
be added to the Fonts, only if the fonts are renamed to names not containing either the
words "Bitstream" or the word "Vera".
This License becomes null and void to the extent applicable to Fonts or Font Software that
has been modified and is distributed under the "Bitstream Vera" names.
The Font Software may be sold as part of a larger software package but no copy of one or
more of the Font Software typefaces may be sold by itself.
THE FONT SOFTWARE IS PROVIDED "AS IS", WITHOUT WARRANTY OF
ANY KIND, EXPRESS OR IMPLIED, INCLUDING BUT NOT LIMITED TO ANY
WARRANTIES OF MERCHANTABILITY, FITNESS FOR A PARTICULAR PURPOSE AND
NONINFRINGEMENT OF COPYRIGHT, PATENT, TRADEMARK, OR OTHER RIGHT.
IN NO EVENT SHALL BITSTREAM OR THE GNOME FOUNDATION BE LIABLE FOR
ANY CLAIM, DAMAGES OR OTHER LIABILITY, INCLUDING ANY GENERAL, SPECIAL,
INDIRECT, INCIDENTAL, OR CONSEQUENTIAL DAMAGES, WHETHER IN AN ACTION
OF CONTRACT, TORT OR OTHERWISE, ARISING FROM, OUT OF THE USE OR
INABILITY TO USE THE FONT SOFTWARE OR FROM OTHER DEALINGS IN THE FONT
SOFTWARE.
Except as contained in this notice, the names of Gnome, the Gnome Foundation, and
Software License Agreement (continued)

132
133
Bitstream Inc., shall not be used in advertising or otherwise to promote the sale, use or
other dealings in this Font Software without prior written authorization from the Gnome
Foundation or Bitstream Inc., respectively. For further information, contact: fonts at gnome
dot org.
3.7 Bigelow & Holmes Inc and URW++ GmbH Luxi font license
Luxi fonts copyright (c) 2001 by Bigelow & Holmes Inc. Luxi font instruction code copyright
(c) 2001 by URW++ GmbH. All Rights Reserved. Luxi is a registered trademark of Bigelow
& Holmes Inc.
Permission is hereby granted, free of charge, to any person obtaining a copy of these Fonts
and associated documentation files (the "Font Software"), to deal in the Font Software,
including without limitation the rights to use, copy, merge, publish, distribute, sublicense,
and/or sell copies of the Font Software, and to permit persons to whom the Font Software is
furnished to do so, subject to the following conditions:
The above copyright and trademark notices and this permission notice shall be included in
all copies of one or more of the Font Software.
The Font Software may not be modified, altered, or added to, and in particular the designs
of glyphs or characters in the Fonts may not be modified nor may additional glyphs or
characters be added to the Fonts. This License becomes null and void when the Fonts or
Font Software have been modified.
THE FONT SOFTWARE IS PROVIDED "AS IS", WITHOUT WARRANTY OF
ANY KIND, EXPRESS OR IMPLIED, INCLUDING BUT NOT LIMITED TO ANY
WARRANTIES OF MERCHANTABILITY, FITNESS FOR A PARTICULAR PURPOSE AND
NONINFRINGEMENT OF COPYRIGHT, PATENT, TRADEMARK, OR OTHER RIGHT. IN
NO EVENT SHALL BIGELOW & HOLMES INC. OR URW++ GMBH. BE LIABLE FOR
ANY CLAIM, DAMAGES OR OTHER LIABILITY, INCLUDING ANY GENERAL, SPECIAL,
INDIRECT, INCIDENTAL, OR CONSEQUENTIAL DAMAGES, WHETHER IN AN ACTION
OF CONTRACT, TORT OR OTHERWISE, ARISING FROM, OUT OF THE USE OR
INABILITY TO USE THE FONT SOFTWARE OR FROM OTHER DEALINGS IN THE FONT
SOFTWARE.
Except as contained in this notice, the names of Bigelow & Holmes Inc. and URW++
GmbH. shall not be used in advertising or otherwise to promote the sale, use or other
dealings in this Font Software without prior written authorization from Bigelow & Holmes Inc.
and URW++ GmbH.
For further information, contact:
info@urwpp.de or design@bigelowandholmes.com
Software License Agreement (continued)

132
133
Software License Agreement <Ralink firmware License>
Copyright (c) 2007, Ralink Technology Corporation
All rights reserved.
Redistribution. Redistribution and use in binary form, without modification, are permitted
provided that the following conditions are met:
* Redistributions must reproduce the above copyright notice and the following disclaimer in
the documentation and/or other materials provided with the distribution.
* Neither the name of Ralink Technology Corporation nor the names of its suppliers may
be used to endorse or promote products derived from this software without specific prior
written permission.
* No reverse engineering, decompilation, or disassembly of this software is permitted.
Limited patent license. Ralink Technology Corporation grants a world-wide, royalty-free,
non-exclusive license under patents it now or hereafter owns or controls to make, have
made, use, import, offer to sell and sell (“Utilize”) this software, but solely to the extent
that any such patent is necessary to Utilize the software alone, or in combination with an
operating system licensed under an approved Open Source license as listed by the Open
Source Initiative at http://opensource.org/licenses. The patent license shall not apply
to any other combinations which include this software. No hardware perse is licensed
hereunder.
DISCLAIMER. THIS SOFTWARE IS PROVIDED BY THE COPYRIGHT HOLDERS AND
CONTRIBUTORS “AS IS” AND ANY EXPRESS OR IMPLIED WARRANTIES, INCLUDING,
BUT NOT LIMITED TO, THE IMPLIED WARRANTIES OF MERCHANTABILITY AND
FITNESS FOR A PARTICULAR PURPOSE ARE DISCLAIMED. IN NO EVENT SHALL THE
COPYRIGHT OWNER OR CONTRIBUTORS BE LIABLE FOR ANY DIRECT, INDIRECT,
INCIDENTAL, SPECIAL, EXEMPLARY, OR CONSEQUENTIAL DAMAGES (INCLUDING,
BUT NOT LIMITED TO, PROCUREMENT OF SUBSTITUTE GOODS OR SERVICES;
LOSS OF USE, DATA, OR PROFITS; OR BUSINESS INTERRUPTION) HOWEVER
CAUSED AND ON ANY THEORY OF LIABILITY, WHETHER IN CONTRACT, STRICT
LIABILITY, OR TORT (INCLUDING NEGLIGENCE OR OTHERWISE) ARISING IN ANY
WAY OUT OF THE USE OF THIS SOFTWARE, EVEN IF ADVISED OF THE POSSIBILITY
OF SUCH DAMAGE.
Software License Agreement (continued)
134
Section 1: Limited Warranty - Hardware
Panasonic Computer Solutions Company (referred to as "Panasonic") will repair the products
listed below with new or rebuilt parts, free of charge in the U.S.A. or other Panasonic approved
location for the period specified below from the date of original purchase in the event of a defect
in materials or workmanship. These warranties are extended solely to the original purchaser.
A purchase receipt or other proof of date of original purchase will be required before warranty
performance is rendered.
• Laptop Computers – 3 Years
• PDRC - LCD and Keyboard Assemblies – 3 Years
• MDWD – Mobile Computer and Wireless Display Assemblies - 3 Years
• Hand-held Computers (P1/P2) – 1 Year
• Arbitrator Video Camera – 1 Year
• Arbitrator Recorder Unit – 1 Year
• Arbitrator Remote Control Panel – 1 Year
• Arbitrator Wireless Receiver Unit – 1 Year
• Arbitrator P2 Card(s) (All Sizes) – 1 Year
• Arbitrator Wireless Microphone(s) / Transmitter – 90 Days
• Arbitrator System Component Interconnect Cables – 90 Days
Main Battery
The battery supplied with the product is covered under the warranty for one (1) year from date of
purchase, except as excluded in Section 3. Batteries purchased separately are covered under
the warranty for one (1) year from the date of purchase. A battery furnished under the warranty is
covered for the remaining period of the one year warranty on the original or purchased battery.
Options and Accessories
The below listed Panasonic brand or supplied options and accessories are covered under this
limited warranty for the period specified from the date of purchase or as specifically stated:
• AC Adapter / Power Cord – 3 Years
• Memory Card (Panasonic Brand) – 3 Years
• Car Mount Docking Station PCB or Complete Vehicle Docking Station – 3 Years
• Port Replicator / I-O Box – 3 Years
• Antenna Pass-through Cable – 3 Years
• Backlit or Full-sized keyboard - 3 Years or assumes warranty of the unit in which it is installed
• Integrated Panasonic supplied options and kits including, but not limited to Wireless Modems,
Media Bay Drives (Floppy, CD, DVD, Combo), GPS, Bluetooth, Smartcard Reader, and
Fingerprint readers – 3 Years or assumes warranty period of the unit in which it is installed
provided the integration was performed by Panasonic or an Authorized Options Integrator
• Hard Drive (separately purchased) – 1 Year
• E x t e r n a l U S B D r i v e s ( C D / D V D / F l o p p y / H a r d D r i v e ) –
1 Year
• Optional Battery – 1 Year
• Battery Charger – 1 Year
• Standard or Digitizer Stylus Pens – 90 Days (physical damage excluded)
Section 2 - Limited Warranty - Software
Panasonic Computer Solutions Company (referred to as "Panasonic") warrants to you only that the
disk(s) or other media on which the Programs are furnished will be free from defects in material
and workmanship under normal use for a period of sixty (60) days from the date of delivery thereof
to you, as evidenced by your purchase receipt.
This is the only warranty Panasonic makes to you. Panasonic does not warrant that the functions
contained in the Programs will meet your requirements or that the operation of the Programs will
be uninterrupted or error free. Panasonic shall have no obligation for any defects in the disk(s)
or other media on which the Programs are furnished resulting from your storage thereof, or for
defects that have been caused by operation of the disk(s) or other media.
Panasonic’s entire liability and your exclusive remedy under this warranty shall be limited to the
replacement, in the United States or other Panasonic designated location, of any defective disk
or other media which is returned to Panasonic's Authorized Service Center, together with a copy
of the purchase receipt, within the aforesaid warranty period. The customer is responsible for
ensuring that all data is backed up and made secure during normal use and before sending a unit
for service.
Section 3 - Limited Warranty Exclusions
Specifically excluded from the warranty are:
• All consumable items; such as screen protection films, logo badges, labels, cleaning cloths, carry
cases, manuals, cables, straps, belts, holsters, tethers, and harnesses and any other options and
accessories not listed above or covered under a separate warranty
• Failures related to the product operating system, hard drive image, software setup, software
program, virus, other program(s) or file(s) on the hard drive or in any computer memory location
• Failures due to BIOS settings or changes, as well as any cosmetic or physical damage to the unit
• Any unit or device with a missing or altered model number or serial number label
• Damage which occurs in shipment
• Failures which are caused by products not supplied by Panasonic
• Failures which result from alteration, accident, misuse, introduction of liquid or other foreign
matter into the unit, abuse, neglect, installation, maladjustment of consumer controls, improper
maintenance or modification, use not in accordance with product use instructions
• Failures due to service by anyone other than a Panasonic Authorized Service Provider
• Failures caused by improper integration by any company other than Panasonic Configuration and
Integration Centers
• Damage, failure, or loss due to the unit being stolen, lost, misplaced, or used by anyone other than
the original purchaser
• Damage that is attributable to acts of God
This warranty only covers failures due to defects in materials or workmanship which occur during
normal use.
Other Limits and Exclusions: There are no other express warranties except as listed above.
PANASONIC SHALL NOT BE LIABLE FOR LOSS OF DATA OR OTHER INCIDENTAL OR
CONSEQUENTIAL DAMAGES RESULTING FROM THE USE OF THIS PRODUCT, OR ARISING
OUT OF ANY BREACH OF THIS WARRANTY. ALL EXPRESS AND IMPLIED WARRANTIES,
INCLUDING THE WARRANTIES OF MERCHANTABILITY AND FITNESS FOR A PARTICULAR
PURPOSE ARE LIMITED TO THE APPLICABLE WARRANTY PERIOD SET FORTH ABOVE.
Some states do not allow the exclusion or limitation of incidental or consequential damages, or
limitations on how long an implied warranty lasts, so the above limitations or exclusions may not
apply to you.
This limited warranty gives you specific legal rights, and you may also have other rights which vary
from state to state.
For technical support or to arrange for service on your Panasonic computer product, call our toll-
free 24 hour hotline at 1-800-LAPTOP5.
Worldwide Product Warranties
Panasonic Computer Solutions Company

Panasonic Computer Solutions Company
50 Meadowlands Parkway, Panazip 2F-5,
Secaucus, NJ 07094
© 2009 P
