Pantech Co J-TOUCH Dual-band CDMA Phone with Bluetooth User Manual
Pantech Co Ltd Dual-band CDMA Phone with Bluetooth
UserManual.wiki
>
Pantech Co
>
J-TOUCH User Manual
>
User Manual
Contents
1.
User Manual
2.
Users Manual
User Manual
Navigation menu
Upload a User Manual
Namespaces
Wiki Guide
HTML
PDF
Info
Views
User Manual
Discussion / Help
Navigation

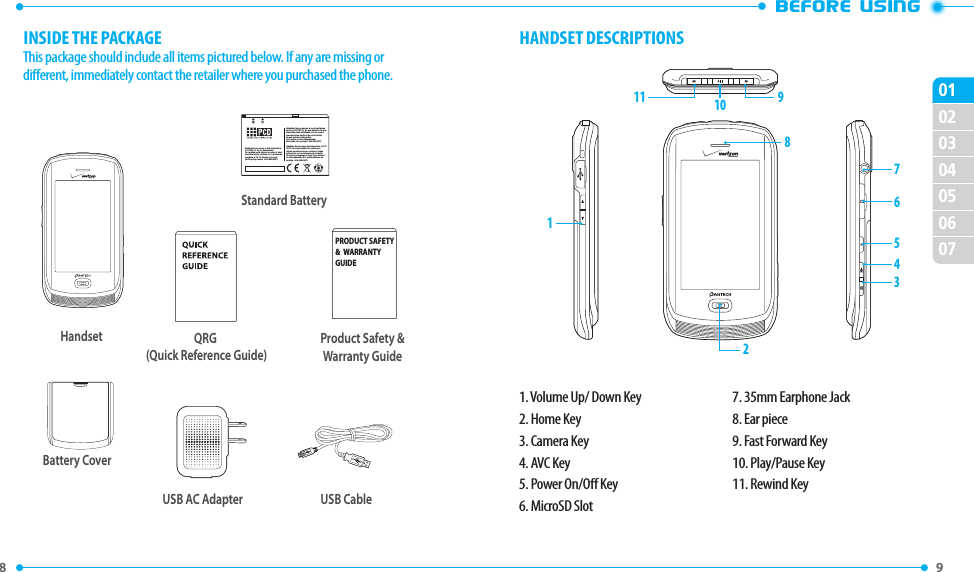
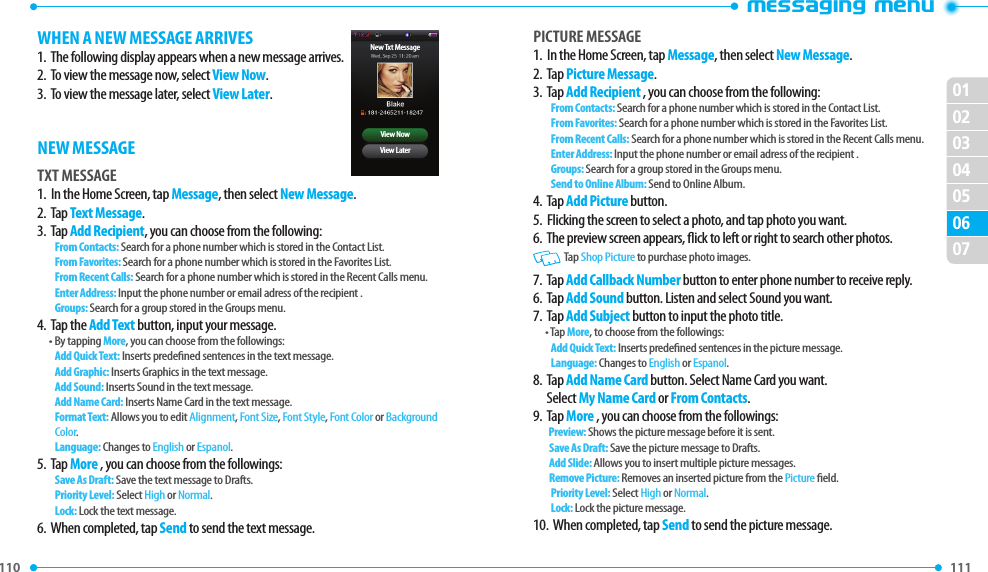
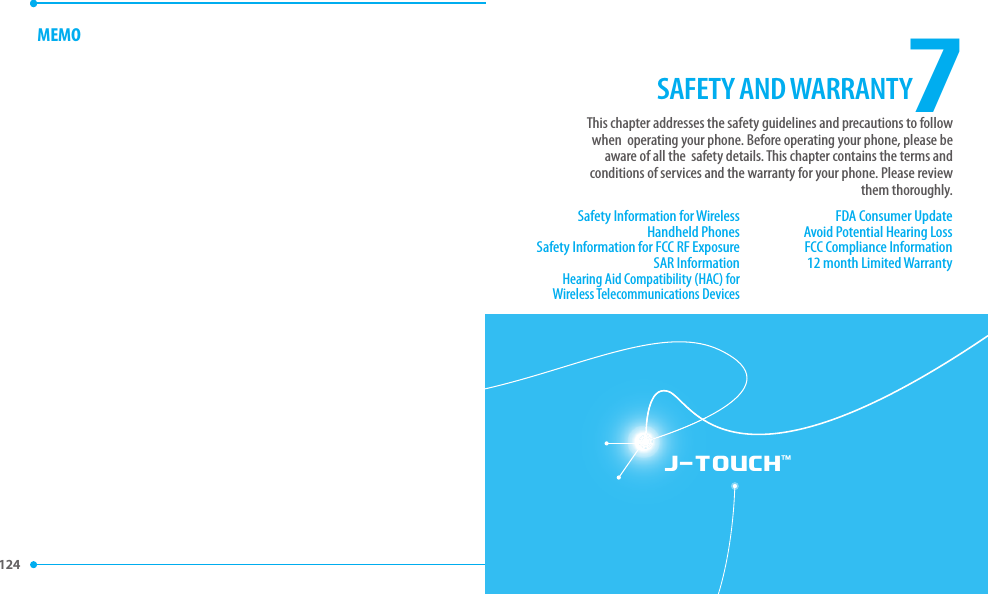
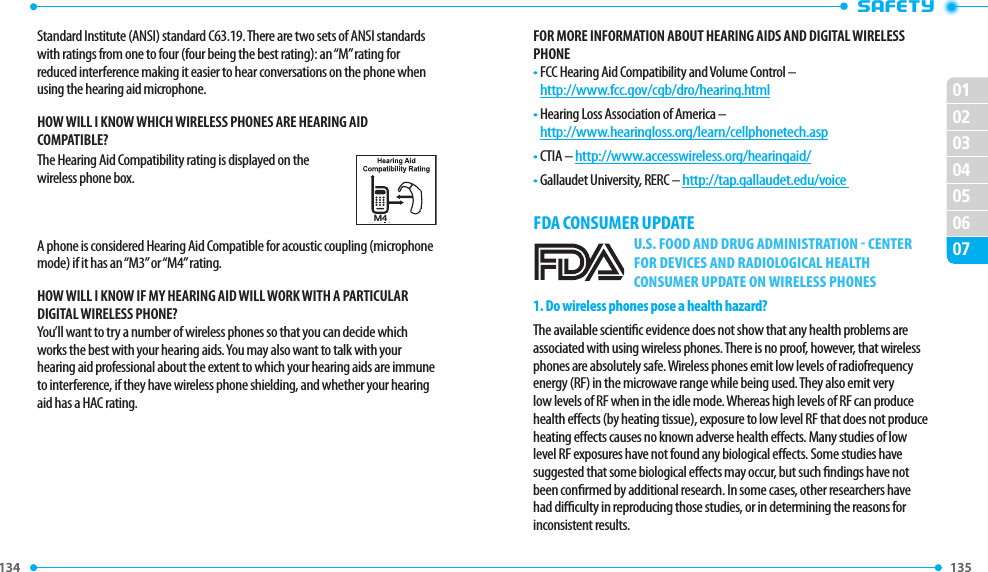
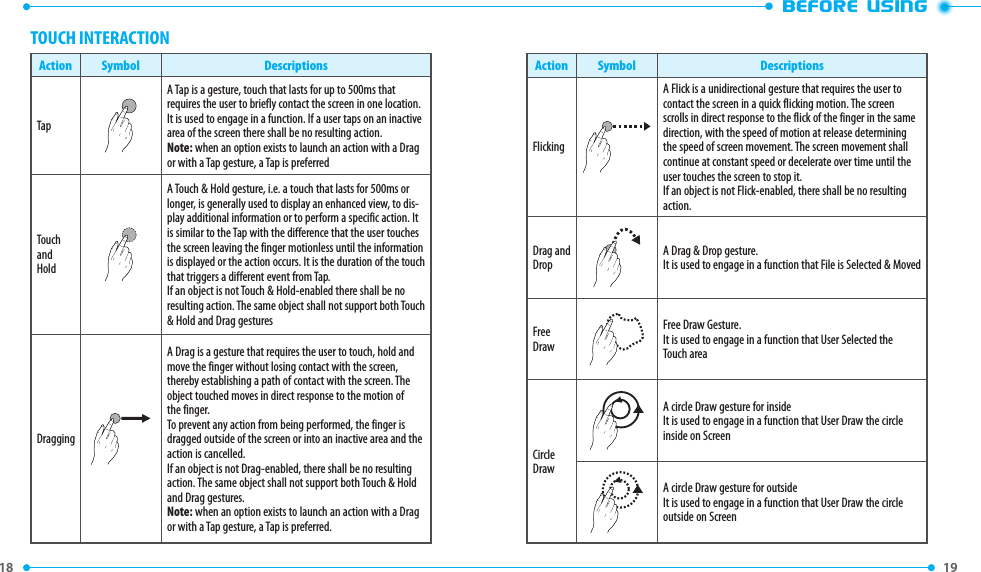
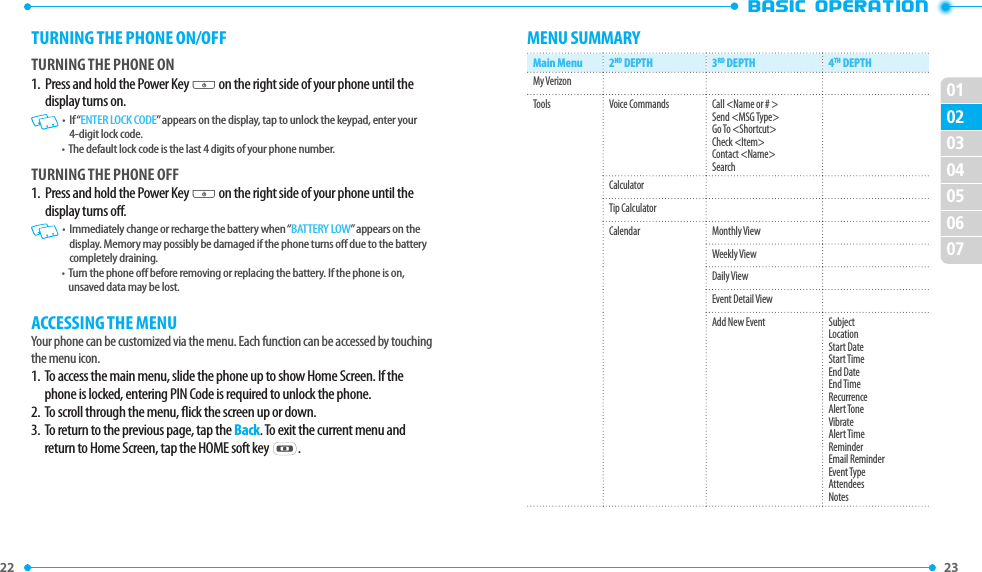
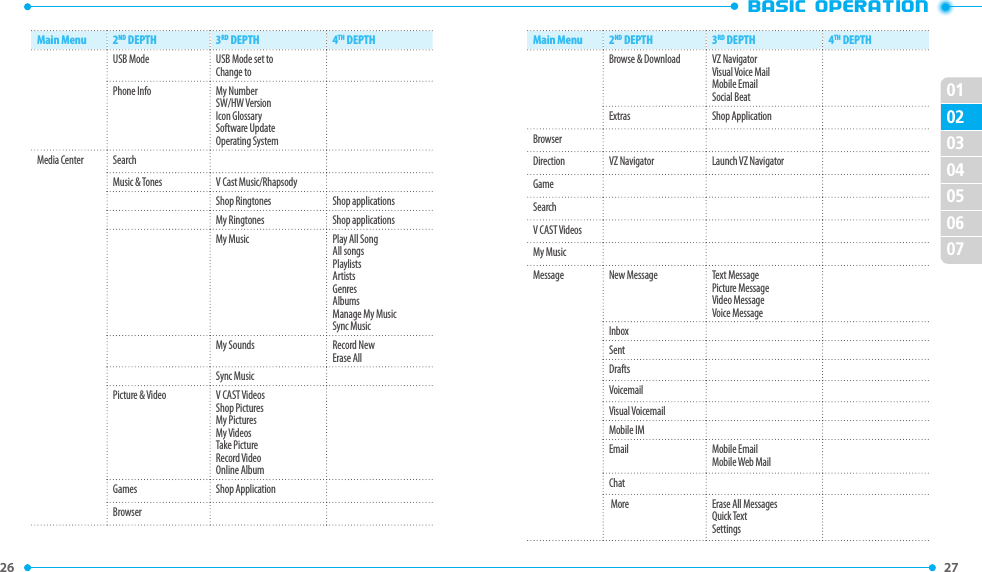
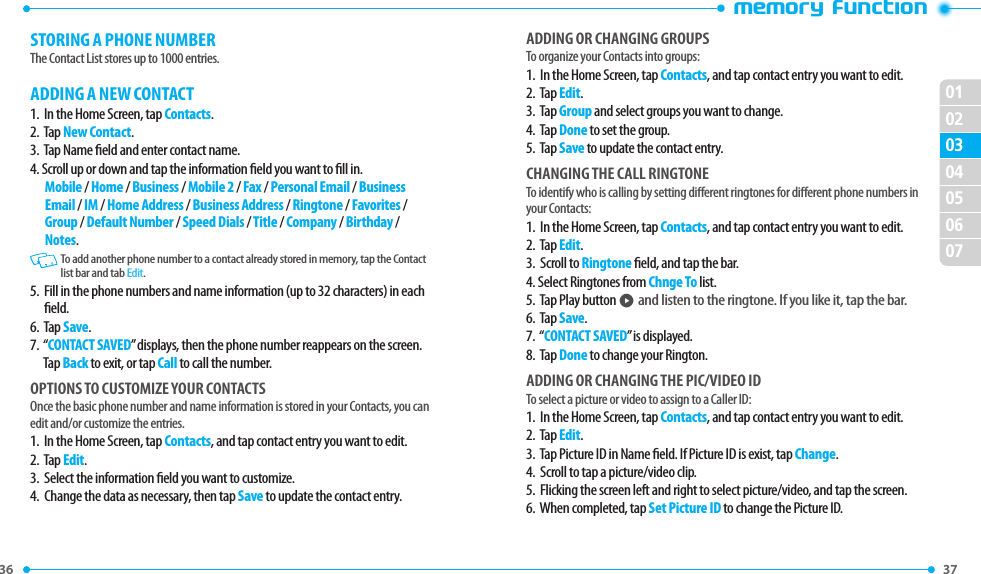
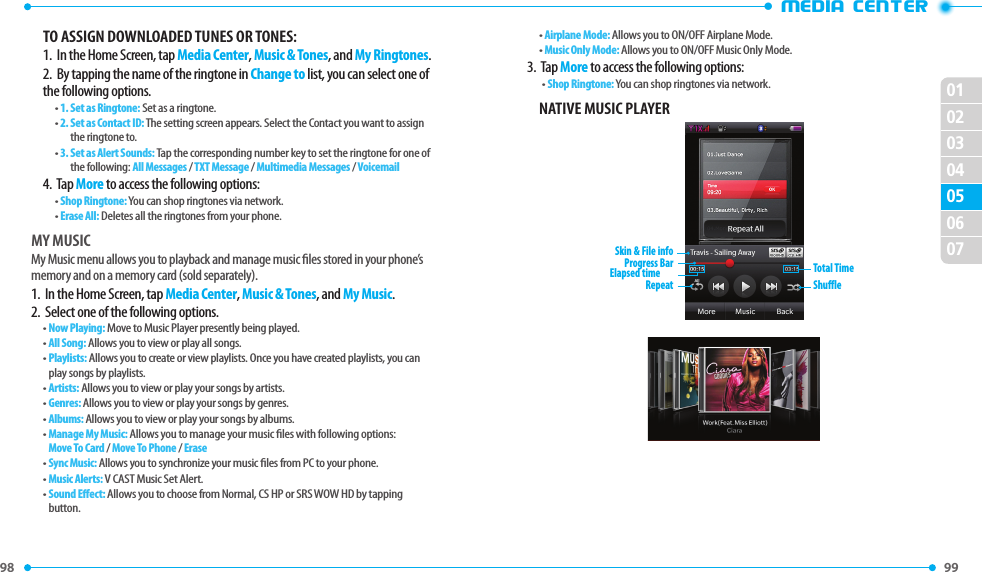
![10 11 02030405060701KEY DESCRIPTIONS 1. [ / ] Volume Keys: Press to adjust master volume in idle mode, adjust the earpiece volume during a call or volume when playing music. 2. [H] Home Key: Pressing the Home Key on devices allows the user to return to the Home screen from anywhere. 3. [Q] Camera/Video Key: Press to access the built-in camera. Press and hold to activate the Video Camera. 4. AVC Key: Activate Advanced Voice Commands function. 5. Power On/O Key: The Power key allows the user to power the device on and o. 6. microSD Card Slot: Insert a microSD card (sold separately) here to increase memory capacity. 7. Earphone Jack: Allows you to plug in an optional headset for convenient, hands-free conversations or for listening to music. 8. Earpiece: Allows you to hear the other caller. 9. Fast Forward Key10. Play/Pause Key11. Rewind KeyDISPLAY INDICATORSIcon Icon Descriptions1X: Indicates your phone is in the CDMA 1X network. More bars indicate a stronger signal.Digital: Indicates your phone is receiving digital data. More bars indicate a stronger signal.Airplane Mode: Transmitting and receiving information is restricted.Roaming: The phone is outside of the home service area.SSL (Secured Socket Layer): Indicates that secure communication between client and server has been established during data communication using encryption.Voice Privacy: Indicates Voice Privacy mode is active.Data Call: Indicates a Data Session is in progress.Dormant: Indicates phone is in a dormant state during a data call. Phonereverts to Dormant mode when there hasn't been activity on a page for some time - the connection is still active and you can make and receive calls.No Service: Phone cannot receive signal from the system.TTY: TTY mode is active.Voice Call: A call is in progress. * No icon indicates the phone is in idle mode.E911: Global Positioning Service (GPS) for E911 is set to On for emergency calls only.•BEFORE USING](https://usermanual.wiki/Pantech-Co/J-TOUCH.User-Manual/User-Guide-1290904-Page-6.png)
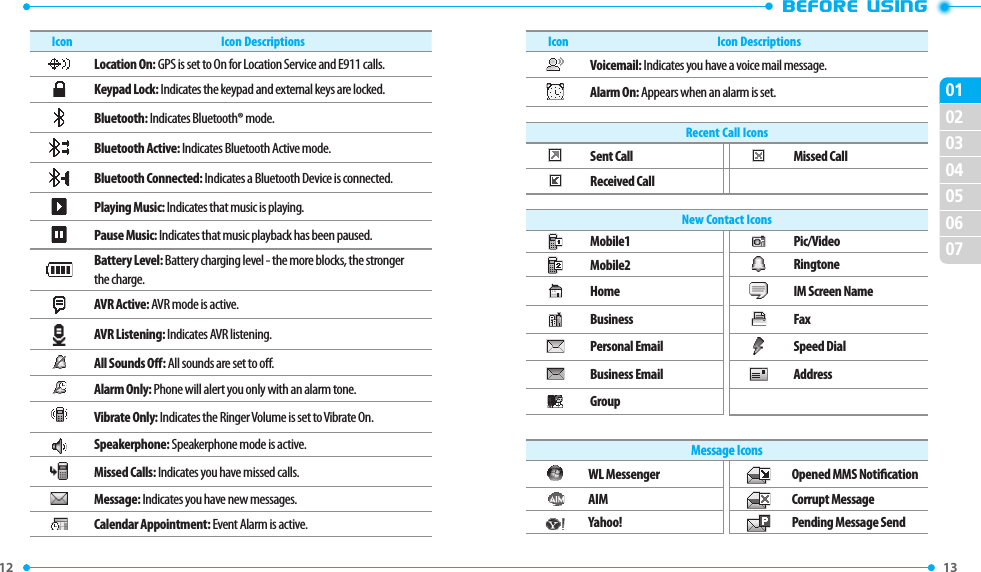
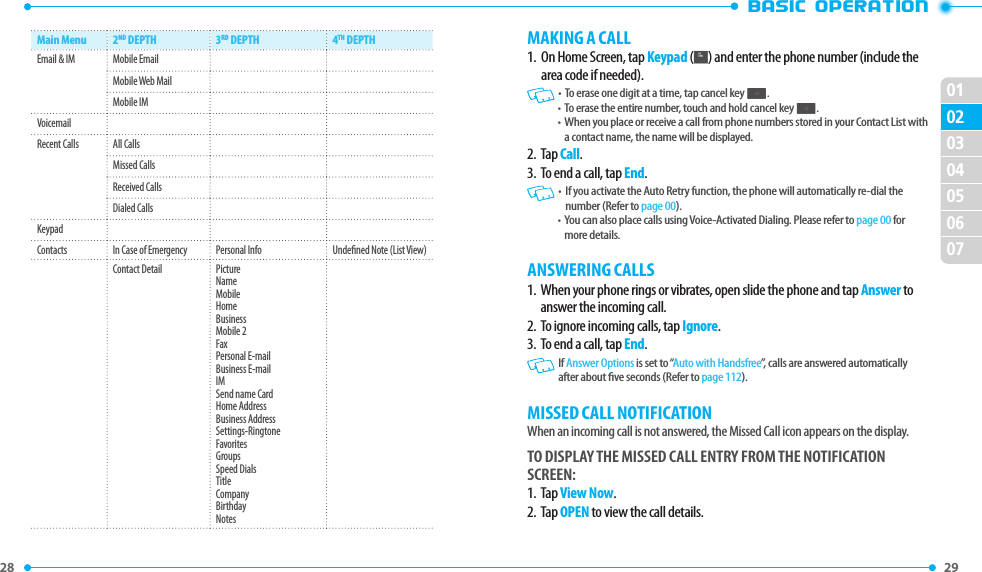

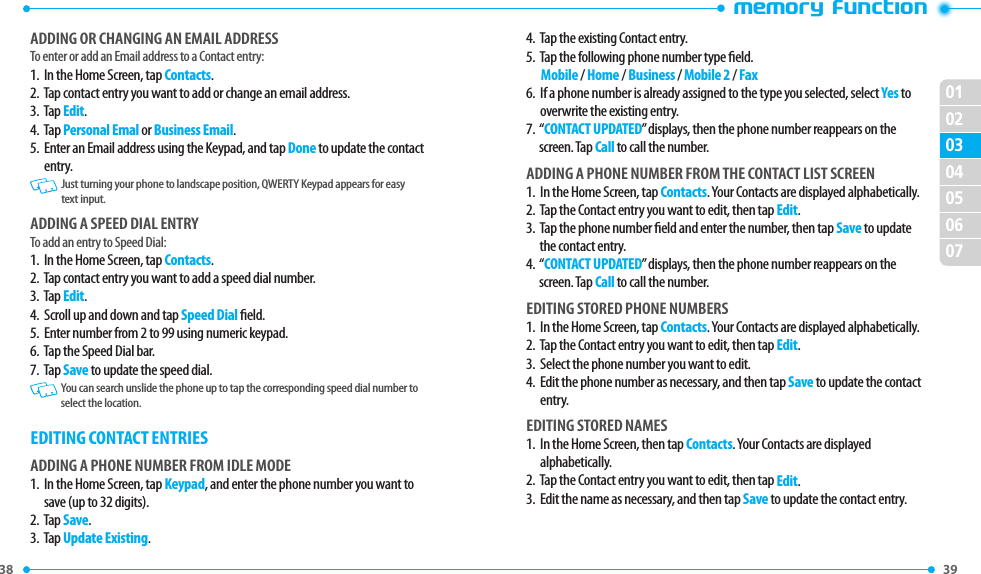
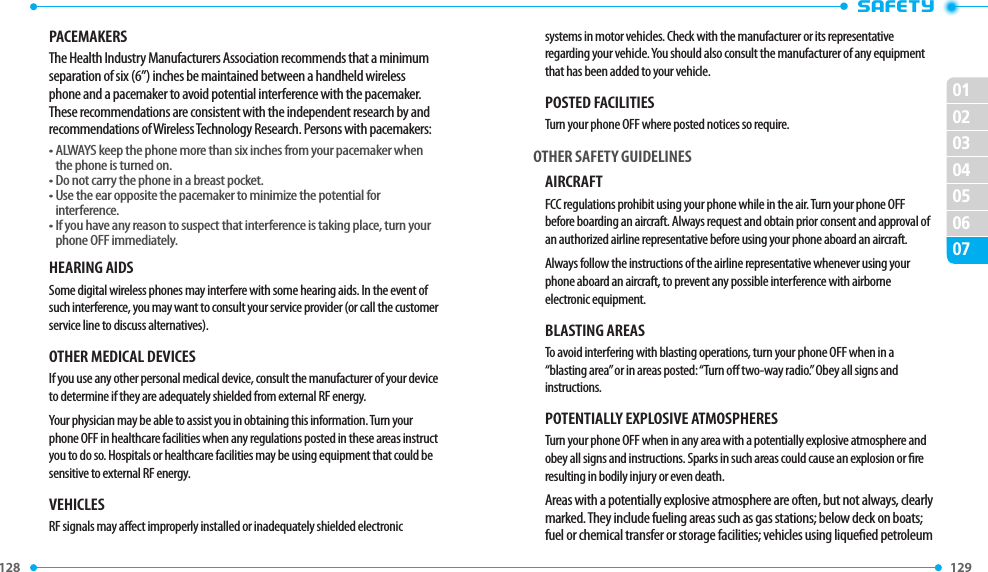
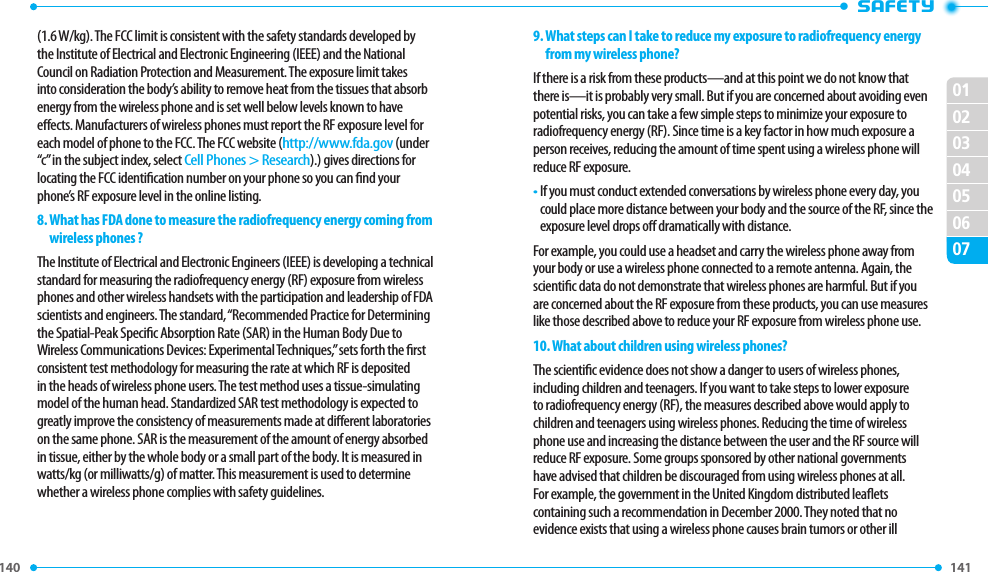
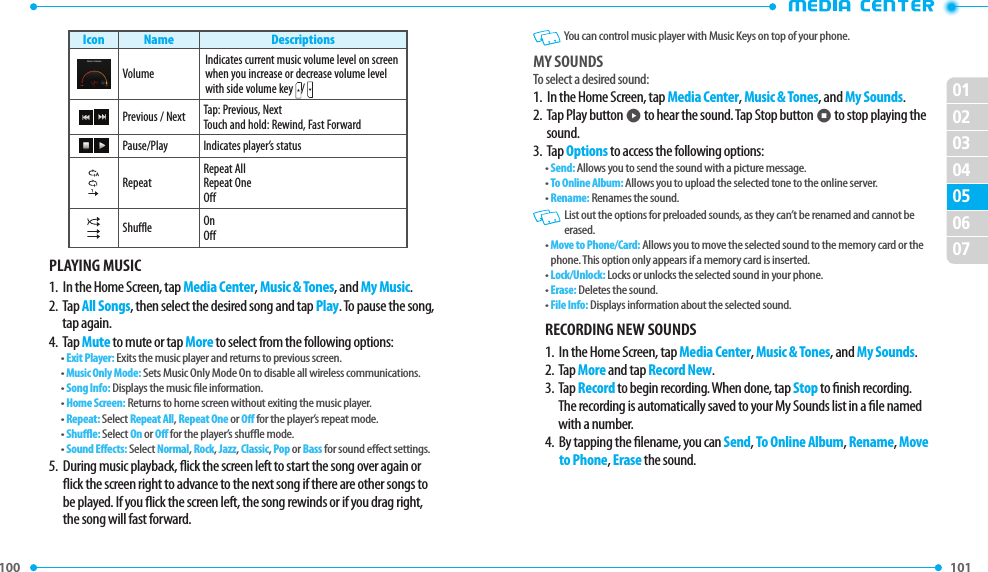
![44 45 •memory functionNUMERIC MODEYou can input numbers in this mode.1. Tap to change the numeric mode.2. Tap to and to input numbers. SYMBOL MODEYou can input symbols.1. Tap to view the symbols.2. Tap / to view other symbols3. Select symbol you want to insert.QWERTY KEYPAD1. Shift Key: Tap to select a letter case for the standard text [abc] input mode. 2. Done Key: Save input text and return to the previous screen.3. More Key: Go to More function available in text input mode.4. Mode Change Key:• When in Numeric entry mode- Tap to change between entering letters that appear on the same key.• When in Text entry mode- Tap to change between entering numbers and symbols that appear on the same key.5. Space Key: Tap to accept a word and add a space while entering letters. 6. Cancel Key: Cancel input text and return to previous screen.7. Enter Key: Tap to insert a carriage return.8. Clear Key: When in a Text entry eld and in entry mode, tap to delete the character to the left of the cursor. Touch and hold to delete the entire word or character string that was just entered.9. Keypad show/hide key: Tap to show or hide keypad.SWITCHING THE KEYPADYou can change your keypad just by turning your device vertically or horizontally. The on-screen keytop showings may change according to the input mode or the menu it is used.987614523](https://usermanual.wiki/Pantech-Co/J-TOUCH.User-Manual/User-Guide-1290904-Page-23.png)

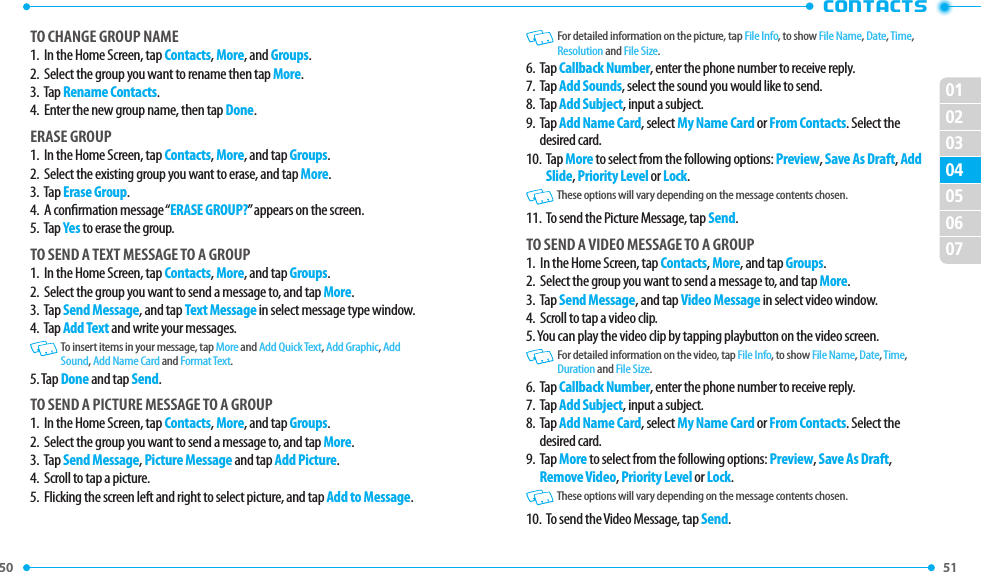
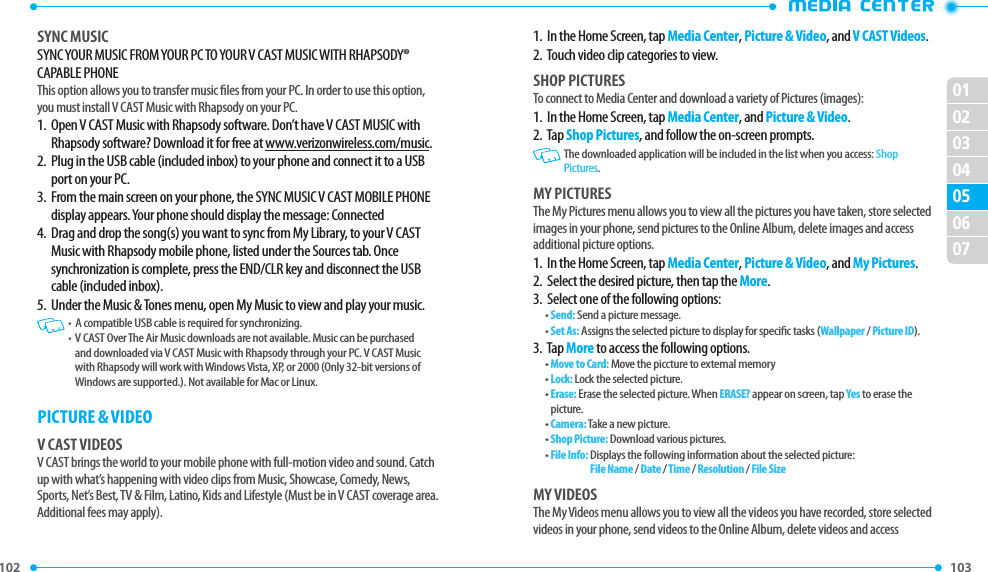
![48 49 01020305060704•CONTACTSNEW CONTACTTo add a new number to your Contact List: Using this submenu, the number is saved as a new Contact. To save the number into an existing Contact or edit the Contact entry.1. In the Home Screen, tap Contacts.2. Tap New Contact.3. Tap Name eld and enter contact name. To change the input mode, select text input mode ( [T9 Word], [ABC], [Abc], [abc], [123], [Sym] ).4. Scroll up or down and tap the information eld you want to ll in. Field includes:Mobile 1 / Home / Business / Mobile 2 / Fax / Personal Email / Business Email / IM / Home Address / Business Address / Ringtone / Favorites / Groups / Default Number / Speed Dials / Title / Company / Birthday / Notes5. Tap Save to create the contact entry.CONTACT LISTYou can review all the entries stored in your Contact List by icking the list or quickly nd a list by tapping a rst character on the keypad below. Keypad may be dragged down to show more list.1. In the Home Screen, tap Contacts. The list of names in your contacts is displayed.2. Select the name or number by scrolling Tray Icon, or tap initial letter to the alpha numeric keypad. • Any letter corresponding to the rst letter of a saved contact is touchable. Other letters are visually distinct and inactive. • Tap More, and you can choose Text, Pix, Video, Voice messages and Send Name Card:3. To dial the selected number, tap the Call button s or tap contact entry bar to Call, Send Message or Send Name Card.BACKUP ASSISTANTBackup Assistant is a wireless service that stores a copy of your Contact List to a secure web site.1. In the Home Screen, tap the Contacts, More, and Backup Assistant.2. Follow the on-screen prompts.GROUPSGroups allow you to classify phone entries into groups with up to 10 members in each group. The default groups include Family and Work and they cannot be erased or renamed.TO ADD NEW GROUP1. In the Home Screen, tap Contacts, More, and Groups.2. Tap New Group.3. Enter a new group name, tap Next and tap entries you want to add or Mark All and tap Done.TO ASSIGN PHONE NUMBER TO GROUP1. In the Home Screen, tap Contacts, More, and Groups.2. Select the group where you want to add the contact, and then tap Options.3. Tap Add.4. Your contact entries will be displayed in alphabetical order. Mark the contact you want to add or Mark All.5. Tap Done and “CONTACT ADDED TO GROUP” will be displayed.](https://usermanual.wiki/Pantech-Co/J-TOUCH.User-Manual/User-Guide-1290904-Page-25.png)
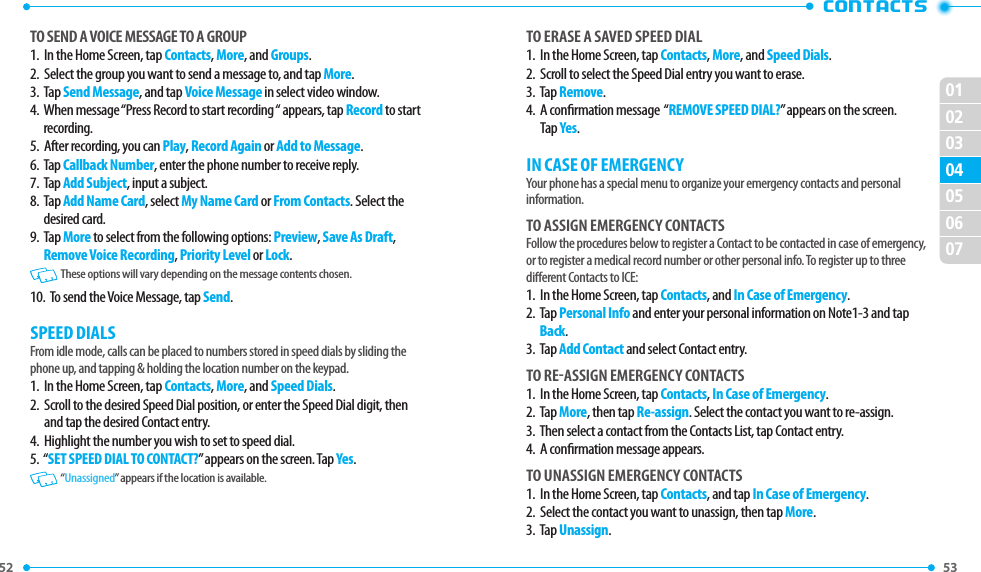
![54 55 01020305060704•CONTACTSTO CALL AN ASSIGNED EMERGENCY CONTACT 1. In the Home Screen, tap Contacts, and tap In Case of Emergency.2. Tap the contact entry you want to call or tap Call button (s).TO ADD PERSONAL INFOTo store a Medical Record Number or other information that may be useful in case of an emergency:1. In the Home Screen, tap Contacts, and tap In Case of Emergency.2. Select Personal Info.3. Select Note 1, Note 2 or Note 3 and then tap Edit.4. Enter the information using the Keypad and then tap Save.5. The entered information now appears, when you tap Note 1, Note 2 or Note 3.TO EDIT SAVED PERSONAL INFO1. In the Home Screen, tap Contacts, and tap In Case of Emergency.2. Select Personal Info.3. Select the Note you want to edit.4. Tap Edit, edit the Note with keypad, then tap Save.TO ERASE SAVED PERSONAL INFO1. In the Home Screen, tap Contacts, and tap In Case of Emergency.2. Select Personal Info.3. Select the Note you want to erase then tap Erase.4. “ERASE?” will be displayed on the screen. Tap Yes. A conrmation message appears.MY NAME CARDA Name Card with the handset’s mobile number automatically appears.EDIT MY NAME CARD1. In the Home Screen, tap Contacts, and tap My Name Card.2. Tap Edit.3. Edit the My Name Card entry and then tap Save to save your changes.CALL MY NAME CARD1. In the Home Screen, tap Contacts, More and Send Name Card.2. Select Send via Bluetooth, Send via Text Msg, Send via Picture Msg, Send via Video Msg or Send via Voice Msg.• Send via Bluetooth: Allows you to send Name Card to another Bluetooth® device.1. Tap Add New Devices. If the Bluetooth power is switched o, the following message will appear on the screen: “TURN BLUETOOTH POWER ON?”.2. When “PLACE DEVICE YOU ARE CONNECTING TO IN DISCOVERABLE MODE” appears, to start searching Bluetooth devices.3. Flick the screen up or down to select a desired device and tap Pair Device. Please refer to page 92 for more details on Bluetooth.4. The handset may prompt you for the passkey. Consult the Bluetooth accessory (sold separately) instructions for the appropriate passkey (typically “0000” - 4 zeroes). Enter the passkey.5. “Before Connecting To [Device Name]” will appear on the screen. Select Always Ask or Always Connect.• Send via Text Msg: Allows you to send Text messages with the Name Card as an attachment.1. Enter the recipient’s contact information.2. Enter your message in the Text eld and then tap Call.• Send via Picture Msg: Allows you to send picture messages with the Name Card as an attachment.1. Enter the recipient’s contact information.2. Save your Voice Message and save to draft or send. Please refer to page 143 for more details on Picture Message.](https://usermanual.wiki/Pantech-Co/J-TOUCH.User-Manual/User-Guide-1290904-Page-28.png)
![60 61 01020305060704•SETTINGSAIRPLANE MODE ON/OFFIn Airplane Mode, all menu functions can be accessed except making calls, receiving calls, data connection and Bluetooth®. Activating Airplane Mode will disable all wireless communications. Services that support Location On functions are temporarily disabled.To switch ON and OFF the Airplane Mode:1. In the Home Screen, tap Settings.2. Tap ON/OFF button of Airplane Mode.BLUETOOTH ON/OFFTo switch ON and OFF the Bluetooth.1. In the Home Screen, tap Settings.2. Tap ON/OFF button of Bluetooth. Bluetooth status window appears.MUSIC ONLY MODE ON/OFFTo switch ON and OFF the Music Only Mode:1. In the Home Screen, tap Settings.2. Tap ON/OFF button of Music Only Mode.BLUETOOTHBluetooth® technology connectivity enables wireless connections between electronic devices. If connected with a Bluetooth handsfree device, you can use your phone more freely. Since devices with Bluetooth connectivity communicate using radio waves, your phone and the other device do not need to be in direct line-of-sight. The two devices only need to be within 10 meters (30 feet) of each other. The connection can be subject to interference from obstructions such as walls or other electronic devices. This device is compliant with Bluetooth specication 2.1, supporting the following proles: Headset, Handsfree, Stereo, Phonebook Access, Object Push for vCard and File Transfer. To ensure interoperability between other devices supporting Bluetooth technology, use approved enhancements for this model. Check with the manufacturers of other devices to determine their compatibility with this phone. There may be restrictions on using Bluetooth technology in some locations. Check with your local authorities or Verizon Wireless. If you want more information on this function, visit the Bluetooth Technology organization Web site: https://www.bluetooth.org/. Important: Features using Bluetooth technology, or allowing such features to run in the background while using other features, increase the demand on battery power and reduce the battery life.ADD NEW DEVICESPairing is the process that allows the handset to locate, establish and register a 1-to-1 connection with the target device.1. In the Home Screen, tap Settings, Bluetooth Settings, and Add New Devices.2. “Place device you are connecting to in discoverable mode” appears on the LCD screen.3. Tap Next. “Searching for Bluetooth device...” appears.4. If the Bluetooth® power is switched o, the following message will appear on the LCD screen: “NO DEVICES FOUND, TRY AGAIN?”. Tap Yes.5. Devices will be listed on Devices found. Select the device you wish to pair to, then tap Pair.6. The handset may prompt you for the passkey. Consult the Bluetooth accessory (sold separately) instructions for the appropriate passkey (typically “0000” 4 zeroes). Enter the passkey. You do not need to input the passkey for pairing when the passkey of the Bluetooth headset or hands-free kit is 0000.7. The handset will prompt you with the following message on the LCD screen: Before Connecting To [Device Name]. If you would like to always conrm before connecting to the Bluetooth device, select Always Ask. Then the handset will prompt you with the message “Connect To [Device Name]?”. Select Yes. If you do not wish to conrm every time before connecting to the Bluetooth device, select Always Connect.](https://usermanual.wiki/Pantech-Co/J-TOUCH.User-Manual/User-Guide-1290904-Page-31.png)


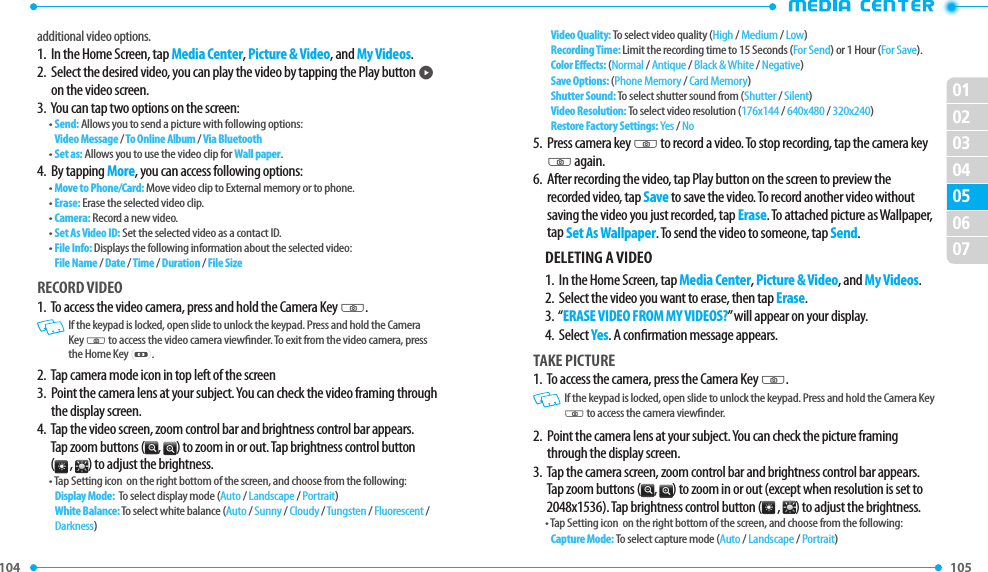
![106 107 01020304060705White Balance: Tap to select from Auto / Sunny / Cloudy / Tungsten / Fluorescent / DarknessSelf Timer: O / 3 Seconds / 5 Seconds/ 10 SecondsMulti-shot: 0 / 3 / 6 / 9Shutter Sound: Allows you to select the shutter sound from the following: (Shutter / Silent / Say Cheeze / Ready!123)Picture Resolution: [Landscape] 2048x1536,1600x1200,1280x960,640x480, 320x240,160x120, [Portrait] 1536x2048, 1200x1600, 960x1280, 480x640, 240x320, 120x160Color Eects: (Normal / Antique / Black & White / Negative)Save Options: (Phone Memory / Card Memory)Smile Shot: To toggle smile shot (ON / OFF)Face Tag: To toggle face tag (ON / OFF)Face Filter: To select face lter (None / Big Head / Facial Color / Out Focusing / Mosaic / Snow / Fisheye / Concave / Beauty Blur)Restore Factory Settings: Yes / No4. Press the Camera Key Q to take the picture.5. After taking the picture, it will be displayed. To save the picture, tap Save. To take another picture without saving the picture you just took, tap Erase. To send the picture to someone, tap Call.ONLINE ALBUMTo access Online Album:1. In the Home Screen, tap Media Center, Picture & Video, and Online Album.2. Follow the on-screen prompts.GAMESDOWNLOADING NEW GAMESTo download games and applications:1. In the Home Screen, tap Media Center, and Games.2. Select Get New Applications.3. Follow the on-screen prompts.PLAYING DOWNLOADED GAMES1. To play the game you downloaded, from the Games menu, select the game and tap PLAY to run the application.DELETING A DOWNLOADED GAME1. In the Home Screen, tap Media Center, and Games.2. Follow the on-screen prompts.BROWSERNow you can access news, sports, weather and Email from your phone. Mobile Web keeps you updated by providing access to up-to-date information when you subscribe to Internet service with your service provider. Please contact your service provider for a list of available websites and service details.1. In the Home Screen, tap Media Center, and Browser.2. Follow the on-screen prompts.BROWSE & DOWNLOADDOWNLOADING NEW APPLICATIONSTo download tools that can help you navigate to entertainment spots, restaurants, and provide you with up-to-date weather information:1. In the Home Screen, tap Media Center, and Browse & Download.2. Select Backup Assistant, Mobile Email or VZ Navigator. Follow the on-screen prompts. EXTRASDOWNLOADING NEW APPLICATIONSTo download Applications:1. In the Home Screen, tap Media Center, and Extras.2. Select Get New Applications.](https://usermanual.wiki/Pantech-Co/J-TOUCH.User-Manual/User-Guide-1290904-Page-54.png)