Pantech Co P9020 QUAD-BAND GSM/GPRS/EDGE AND DUAL-BAND WCDMA/HSDPA MOBILE STATION User Manual
Pantech Co Ltd QUAD-BAND GSM/GPRS/EDGE AND DUAL-BAND WCDMA/HSDPA MOBILE STATION Users Manual
UserManual.wiki
>
Pantech Co
>
P9020 User Manual
Users Manual
Navigation menu
Upload a User Manual
Namespaces
Wiki Guide
HTML
PDF
Info
Views
User Manual
Discussion / Help
Navigation


![Turn phone on/off To turn on 1. Press and hold [ ]. To turn off 1. Press and hold [ ]. Screen unlock Unlocking the keypad 1. Press [ ] to unlock. Essential display indications Signal strength. The greater the number of bars, the stronger the signal. When network is in searching mode is displayed A call is being made. When you are in no service area is displayed Call forwarding* is active Incoming calls set to ring only (Normal) Incoming calls set to Vibrate and Ring Incoming calls set to Vibrate Only Incoming calls set to Silent Flight Mode is active Received one or more text messages Received one or more multimedia messages Received one or more WAP push messages Received one or more configuration messages Received one or more voice messages A message is being sent A message is being received An alarm is set Schedule Alarm is set Browser is Active, Secured and being downloaded Bluetooth is active Bluetooth is transferring Bluetooth headset is connected Headset is connected USB is connected TTY is active A GPRS signal is available. It is displayed when there is an active GPRS session An EDGE signal is available. It is displayed when there is an active EDGE session microSD card is insert Battery strength. When the battery charge is low, is displayed Available, Away, Invisible Status of AIM Online, Away, Busy, Offline Status of MSN Available, Busy, Invisible Status of YAHOO You have received one or more IM messages BGM is play, pause and being stopped * Network dependent](https://usermanual.wiki/Pantech-Co/P9020/User-Guide-1220117-Page-16.png)
![Memory card You can use microSD card as a memory card. It gives you more space to save pictures, videos, music, etc. Inserting and removing the memory card 1. Open the memory card slot. 2. Insert the card. The [ ] icon will be display. 3. Press the card to remove. Using memory card You can save, move and delete the files between your phone and external memory card. You can also move and copy the files to computer from your phone. Resetting the card 1. Tap Menu > Settings > Reset. 2. Enter the password > External Memory Reset. Note: The default password is „1234‟. To copy the file to the card 1. Select the file > Options > Copy to External Memory. 2. To copy the file back to phone, tap Options > Copy to Phone. To move the file to the card 1. Select the file > Options > Move to External Memory. 2. To move the file back to phone, tap Options > Move to Phone. To delete the file from the card 1. Select the file from the card > Options > Delete. To move the file from the card to the computer 1. Connect the data cable with mobile and the computer. 2. Tap Menu > Settings > Connectivity. 3. Tap Select USB Mode. 4. Select Music Player, Mass Storage or Ask on Connection. 5. Follow the instruction on your computer screen. Note: Select Music Player when you want to add music to the playlist in your device. When you select Ask on Connection, it will ask you to select either the Music Player or Mass Storage every time you connect your device with your computer.](https://usermanual.wiki/Pantech-Co/P9020/User-Guide-1220117-Page-17.png)
![whether that be a text message, a web page, or an active call, quickly do something else. Multitask functions To using multitask function, Tap and hold the side up key [ ]. You can choose from one of the following function: • Call: Make a voice call while using the handset for other tasks. If Music Player is active, it is muted during the call. • Messaging: Send a text or multimedia message while using the handset for other tasks. • Mobile Web: Launch the browser while using the handset for other tasks. • Music Player: Launch the Music Player while using the handset for other tasks. If an incoming call is received or you want to make a call, the Music Player is muted. • Games & Apps: Access Games and Applications while using the handset for other tasks.](https://usermanual.wiki/Pantech-Co/P9020/User-Guide-1220117-Page-19.png)
![Make, receive and end calls Making a call 1. Enter the area code and phone number. 2. Tap [ ] key. Answering a call 1. Tap [ ]. Ending a call 1. Tap [ ]. Once the call is complete, a call summary is displayed. Rejecting a call 1. Tap [ ] or Ignore. Making a call using call list Your phone logs up to 20 dialed, received and missed call numbers. 1. Tap [ ] to display the Recent Calls list. 2. Tap to select All Calls, Missed Calls, Received Calls, or Dialed Calls 3. Select a number. 4. Tap [ ] to dial the selected number. NOTE: To redial the last number in the Recent Calls list, tap [ ]. Making a call during a call 1. Enter the phone number or look it up in Address Book. 2. Tap [ ] to dial the second call. The first call is automatically put on hold. Switching between two calls 1. Tap Swap. Making an international call 1. Press [ ] key for the international prefix until the „+‟ character appears. 2. Type the country code, area code, and phone number. 3. Tap [ ]. Making an emergency call You can make emergency calls even if your phone does not have a SIM card. 1. Tap Emergency Number, or Tap SOS if your phone does not have a SIM card. 2. Tap [ ]. Replying to a missed call 1. Tap View to display the list of missed calls. 2. Select a number to call by scrolling the screen. 3. Tap [ ].](https://usermanual.wiki/Pantech-Co/P9020/User-Guide-1220117-Page-21.png)
![Answering a second call** 1. Tap [ ]. The first call is automatically put on hold. 2. Tap [ ] to end the second call. The call on hold is automatically reconnected. Using video share You can share live or recorded video while on a call. You can send or receive video. NOTE: Video Share is not available in all markets. Both parties must be in a 3G service area–a 3G icon must appear by the signal bars prior to a call being placed, and both parties must remain in the 3G coverage area for the duration of the Video Share. <Call mode> <Video Share Mode> Making video share call 1. Enter the area code and phone number > [ ]. 2. Tap Options > Video Share. 3. Select Live or Recorded. Note: To use video share in the Recent Calls, tap Options > Video Share. Turning off the speakerphone 1. Tap Options > Speakerphone Off during video share mode. 2. Tap Options > Mute to mute the sound. Increasing or decreasing the brightness 1. Tap Options > Brightness. 2. Adjust the brightness by scrolling left or right.](https://usermanual.wiki/Pantech-Co/P9020/User-Guide-1220117-Page-22.png)
![Zoom in and out 1. Tap Options > Zoom. It ranges from x1 to x3. Stopping the recording 1. Tap Options > Stop Record. For details on setting for automatic recording, see page XX. Stopping or ending video share 1. Tap Stop to end the video share. 2. It will ask you whether you will stop video share > Yes to stop. Note: Even you end video share or close the folder, the call will not be ended. Tap [ ] to end the call. The recorded video will be saved in My Stuff > Video. Receiving video share 1. After receiving video share, it will ask you whether to accept or reject the video share > Yes to accept and No for reject. 2. Tap Options > Full Screen to enlarge the video to fill the entire screen. Note: When the flip is closed, open the flip to accept or tap Reject to reject video share. Options during a call Microphone off and on Switching your phone’s microphone off 1. Tap Options > Mute. Switching your phone’s microphone back on 1. Tap Options > Unmute. Talking on speaker 1. Tap Speaker Phone []. Putting a call on hold and returning** Putting a call on hold 1. Tap Options > Hold or tap [ ]. Returning to a held call 1. Tap Options > Unhold or tap [ ] again. Multi-party calls** You can talk with more than one person or have conference call.](https://usermanual.wiki/Pantech-Co/P9020/User-Guide-1220117-Page-23.png)
![Making a multi-party call 1. Call the first participant. 2. Call the second participant. The first call is automatically put on hold. 3. Tap Options > Join. Having a private conversation with one participant 1. Tap Options > Split. 2. Tap OK. 3. Select the participant and tap OK. All of the multi-party call participants can now hear each other. Removing one participant from a multi-party call 1. Tap Options > End. 2. Select the participant and tap OK. The call ends with that participant, but you can continue to talk to the other participants. Searching for a number in the address book during a call 1. Tap Phone book or tap Menu > Address Book. 2. Select a number by scrolling up or down > [ ]. Searching for a name or group in the address book Enter the first letters of the name for Name Search. The entries are displayed starting with the first entry matching your input. Finding a name manually in the address book 1. Tap the [[ / ] key. Viewing the details of the highlighted entry in the address book 1. Tap View. For details on address book, see page 25. Reading a message during a call 1. Tap Options > View Message. 2. Select a message > OK. Writing a message during a call 1. Tap Options > Send Message. For details on creating a text message, see page 30. Viewing calendar during a call 1. Tap Options > View Calendar. Writing a notepad during a call 1. Tap Options > Notepad. Voice recording 1. Tap Options > Voice Recording.](https://usermanual.wiki/Pantech-Co/P9020/User-Guide-1220117-Page-24.png)
![Setting DTMF 1. Tap Options > DTMF On or Off. Call settings Setting auto redial 1. Tap Menu > Settings > Call > Auto Redial. 2. Select On or Off. Answering by tapping any key 1. Tap Menu > Settings > Call > Any Key Answer. 2. Select Answer with Any Key. NOTE: You can answer with any key except [ ] and Ignore. Checking all calls You can view information about all Recent Calls. For more options for all, missed, received and dialed calls Tap Options. You can also view the call history simply by tapping [ ]. Viewing missed calls 1. Tap Menu > My Stuff > Tools or tap [ ] > Missed Calls. Viewing received calls 1. Tap Menu > My Stuff > Tools or tap [ ] > Received Calls. Viewing dialed calls 1. Tap Menu > My Stuff > Tools or tap [ ] > Dialed Calls. Viewing Ranking calls 1. Tap Menu > My Stuff > Tools or tap [ ] >Call Ranking. Deleting call logs 1. Tap Menu > My Stuff > Tools. 2. Tap Recent Calls > Delete Call Logs. 3. Select All Calls > Yes. Viewing call time 1. Tap Menu > My Stuff > Tools or tap [ ] > Call Time. 2. You can view Last Call, Received Calls, Dialed Calls and Total Calls. Resetting all call times 1. Tap Menu > My Stuff > Tools or tap [ ] > Call Time. 2. Tap Reset > Yes. 3. Enter password > OK.](https://usermanual.wiki/Pantech-Co/P9020/User-Guide-1220117-Page-25.png)
![NOTE: The default password is „1234‟. . Viewing data transmitted information 1. Tap Menu > My Stuff > Tools or tap Recent Calls > Packet Counter. - Total Info: You can view all the Sent, Received, Total and Duration transmitted data in Kbytes. - Current Info: You can view transmitted data in the current session, in Kbytes. Sent, Received and Total information are also available. - Last Info: You can view Sent, Received, Total and Duration information of the previous session‟s transmitted in Kbytes. 2. Tap Clear to clear the information. Speed dialing You can dial quickly using speed dialing. Up to 8 phone numbers can be programmed using numbers 2 to 9. [ ] : Voice mail [ ] : Prefix for international call Setting speed dial 1. Tap Menu > Address Book > My Settings > Speed Dial. 2. Select an empty entry and tap Add. 3. Select a person and tap OK or Select. Changing speed dialing person 1. Tap Menu > Address Book > My Settings > Speed Dial. 2. Select a number > Change or OK. 3. Select a person > OK or Select > Yes. Removing from speed dial 1. Tap Menu > Address Book > My Settings > Speed Dial. 2. Select a number > Remove. Using the address book You can save names, phone numbers, and information on the SIM or phone. Entries can depend on the capacity of the SIM card. Viewing the contact list 1. Tap Menu > Address Book > All Contacts. Searching for a phone number 1. Tap Menu > Address Book > All Contacts. 2. Input the first letter or two of the person's name and scroll with [ / ]. 3. Tap OK to view the detailed information.](https://usermanual.wiki/Pantech-Co/P9020/User-Guide-1220117-Page-26.png)
![4. To update information, tap Options > Edit Contact. Calling from the contact list 1. Tap [ ] or tap Menu > Address Book > All Contacts. 2. Select a person to call. 3. Tap [ ] Forwarding contact details 1. Tap [ ] or tap Menu > Address Book > All Contacts. 2. Select a contact > Options > Send Contact. 3. You can send the information using Multimedia Message or Bluetooth. Deleting a contact 1. Tap [ ] or tap Menu > Address Book > All Contacts. 2. Select a contact > Options > Delete Contact. Adding a contact 3. Tap Menu > Address Book > All Contacts > Add New Contact. 1. Input the fields. 2. Tap OK or Save. Making & edit groups 1. Tap Menu > Address Book > Groups. 2. To add new group, tap Options > Create New Group. 3. To edit group, tap Options >Edit Group > Add Members, Edit Members or Remove Members 4. To rename group, tap Options > Rename Group 5. To delete group, tap Options > Delete Group Address book settings Managing my info 1. Tap Menu > Address Book > My settings > My Info. 2. Select a person to call. Setting the sort order 1. Tap Menu > Address Book > My settings > Sort by 2. Select First Name or Last Name Setting Sync settings 1. Tap Menu > Address Book > My settings > Sync settings. 2. Select Auto Sync On or Auto Sync Off Setting SIM management 1. Tap Menu > Address Book > My settings > Sync settings.](https://usermanual.wiki/Pantech-Co/P9020/User-Guide-1220117-Page-27.png)
![2. Select Auto Sync On or Auto Sync Off > SIM Management Caller identification Caller identification** 1. Tap Menu > Settings > Call > Display My Number. 2. Select Network Default, Show or Hide > Select. Using your headset You can send or receive a call using your headset. When you connect your headset to the jack the button on the headset works as follows. Note: You need to use the headset designed for this device, and it is optional item. Also not every headset has a button. While in standby mode 1. Tap the button once to list recent calls. 2. Tap the button twice to redial the last call. Service numbers and fixed dialing Calling your service numbers* You can see the service number to reach the service provider. 1. Tap Menu > Address Book > My Settings > SIM Management > Service Numbers. 2. Select a number > tap [ ]. Viewing the fixed dialing list Fixed dialing is a service that limits your access to specific numbers in the address book list recorded on the SIM. Input the PIN2 to set up or cancel this service. 1. Tap Menu > Address Book > My Settings > SIM Management > FDN List. 2. Select a number > tap [ ]. NOTE: PIN2 must be correctly entered within 3 attempts. If you input the incorrect code three times in a row the PIN2 code will be blocked. If the PIN2 code is blocked please contact your service provider. PIN2 code supplied with the SIM card.](https://usermanual.wiki/Pantech-Co/P9020/User-Guide-1220117-Page-28.png)
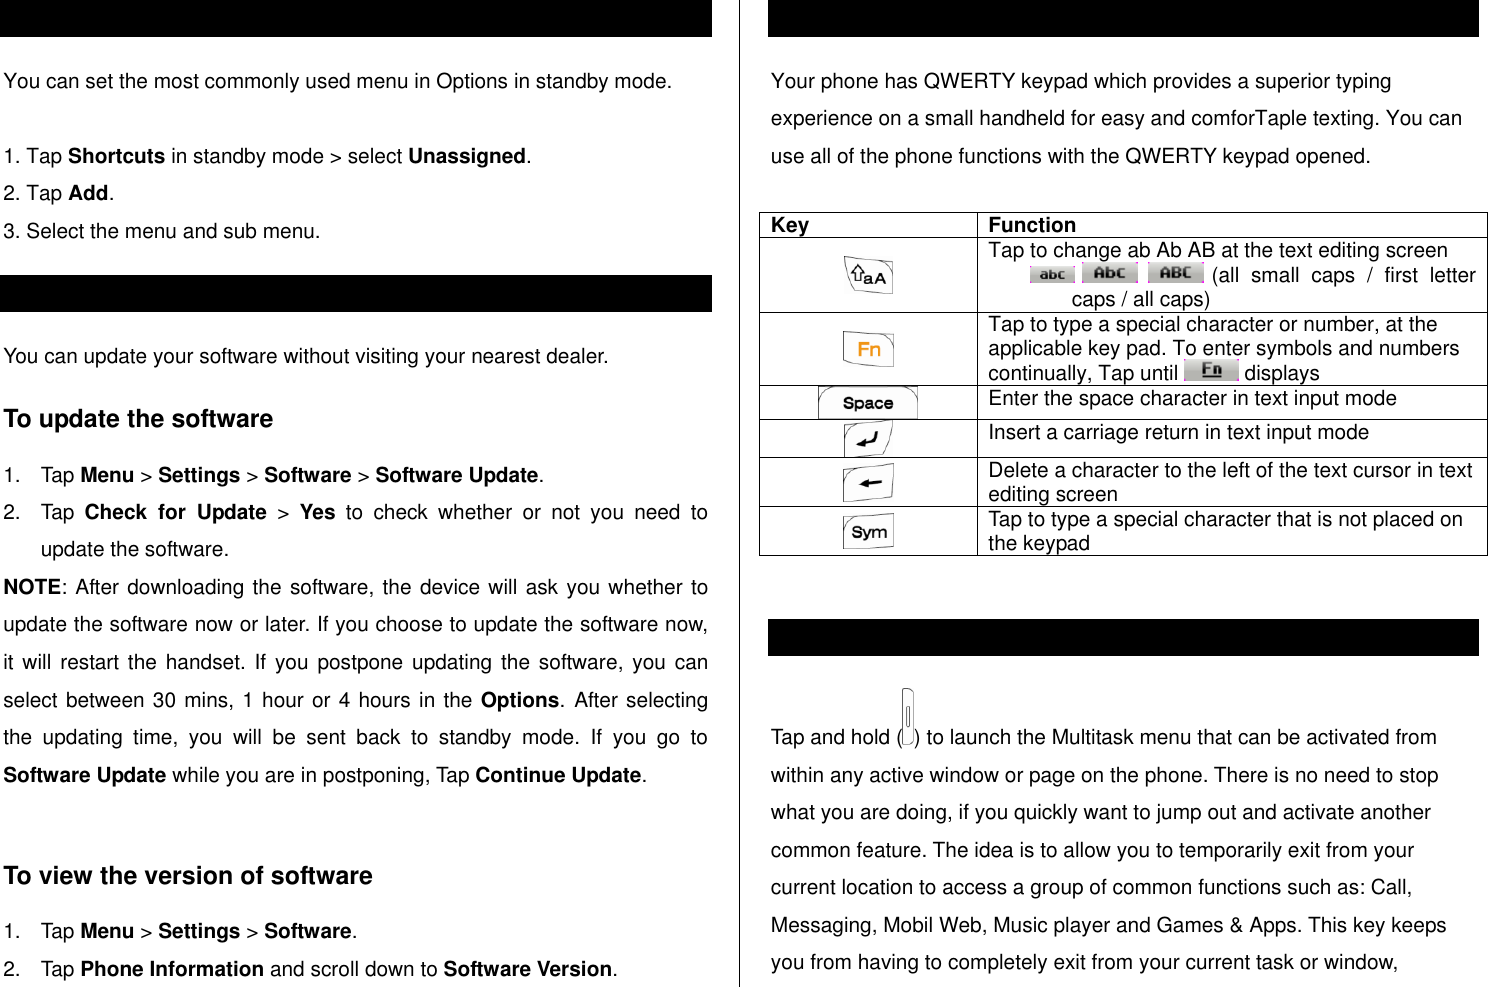
![Entering text You can enter text with multi-tap, predictive, numeric or symbol. Useful keys [ ] Display symbols [ ] Adding space [ ] Tap to change capital mode Tap to change ab Ab AB and Tap to change from multi to predictive to Number Multi-tap (all small caps / first letter caps / all caps) Predictive (all small caps / first letter caps / all caps) Number For details on using QWERTY key pad, see page 16. Key characters by language Each of the following keys will scroll through these sequential options listed by language. key English French Spanish 1 . , - ? ! / ' @ : . , - ? ! / ' @ : . , - ? ! / ' @ : 2 abc ç à ä á ã ç 3 def é è é 4 ghi í 5 jkl 6 mno ö ñ ó ñ 7 pqrs ß 8 tuv ù ü ú ü 9 wxyz Predictive mode The predictive mode automatically compares your keystrokes with an internal linguistic dictionary to determine the correct word. It will display the most commonly used word first. The most commonly used word will appear first. To save a word not listed in phone's dictionary, Tap Options > Predictive Settings > Selection List > On. 1. Tap [ ] to change the mode to predictive. 2. Tap [ ] to [ ] to input text. For example, to write „hello‟ Tap [ ] [ ] [ ] [ ] [ ]. Alphabet input mode Tap the key labeled with the target letter once for the first letter; Tap it twice for the second letter, and so on. 1. Tap [ ] to change the mode as multi-tap.](https://usermanual.wiki/Pantech-Co/P9020/User-Guide-1220117-Page-30.png)
![2. Tap [ ] to [ ] to input text repeatedly. To write the letter “C”, Tap [ ] 3 times. To write number 2 Tap [ ] 4 times. Numeric mode You can input numbers in this mode. 1. Tap [ ] to change the mode to 123. 2. Tap [ ] to [ ] and [ ] to input numbers. Symbol mode You can input symbols. 1. Tap [ ] to view the symbols. 2. Tap to select symbol. Messaging You can send, receive and save the text messages and multimedia messages. Managing memory When the message box is full the messages full icon will appear. All messages share memory. When It means Text message is full ( SIM and Phone messages ) Moving a message to SIM 1. Tap Menu > Messaging > Conversations. 2. Select a message > Options > Move to SIM. Deleting a message in a mailbox 1. Select a message > Options > Delete > Selected > OK. Deleting multiple messages 1. Tap Options > Delete > Multiple. 2. Select the message to erase by tapping OK. 3. Tap Options > Delete. 4. To select all message, tap Options > Select All. 5. To deselect message, tap Options > Deselect All. Replying to a message 1. Select a message > Options > Reply.](https://usermanual.wiki/Pantech-Co/P9020/User-Guide-1220117-Page-31.png)
![Viewing memory space information 1. Tap Menu > Messaging > Used Space. 2. Scroll left or right to view SIM and Phone memory. Receiving messages Viewing a new message 1. Tap View or Tap OK. Reading a message from the conversation box 1. Tap Menu > Messaging > Conversations. 2. Select a received message > View. Saving the sender address from a received message 1. Select a received message > View. 2. Tap Options > Save. 3. Select New Contact or Update Contact. Saving the object in the received multimedia message 1. Open the multimedia message. 2. Select an object. 3. Tap Options > Use > Save. It will be saved in one of the categories in the My Stuff folder. For details on photo album, see page 39. Listening to voice message 1. Tap and hold [ ] or tap Menu > Messaging > Voice Mail. It will automatically call the voice mail center. Loading URL using Push message 1. Tap Menu > Messaging > Conversations > Open. 2. Tap Options > Load URL. Save connection setting using configuration message 1. Tap Menu > Messaging > Conversations > Open. 2. Tap Options > Install. Creating and sending text messages Sending new text message 1. Tap Menu > Messaging > Create Message.](https://usermanual.wiki/Pantech-Co/P9020/User-Guide-1220117-Page-32.png)


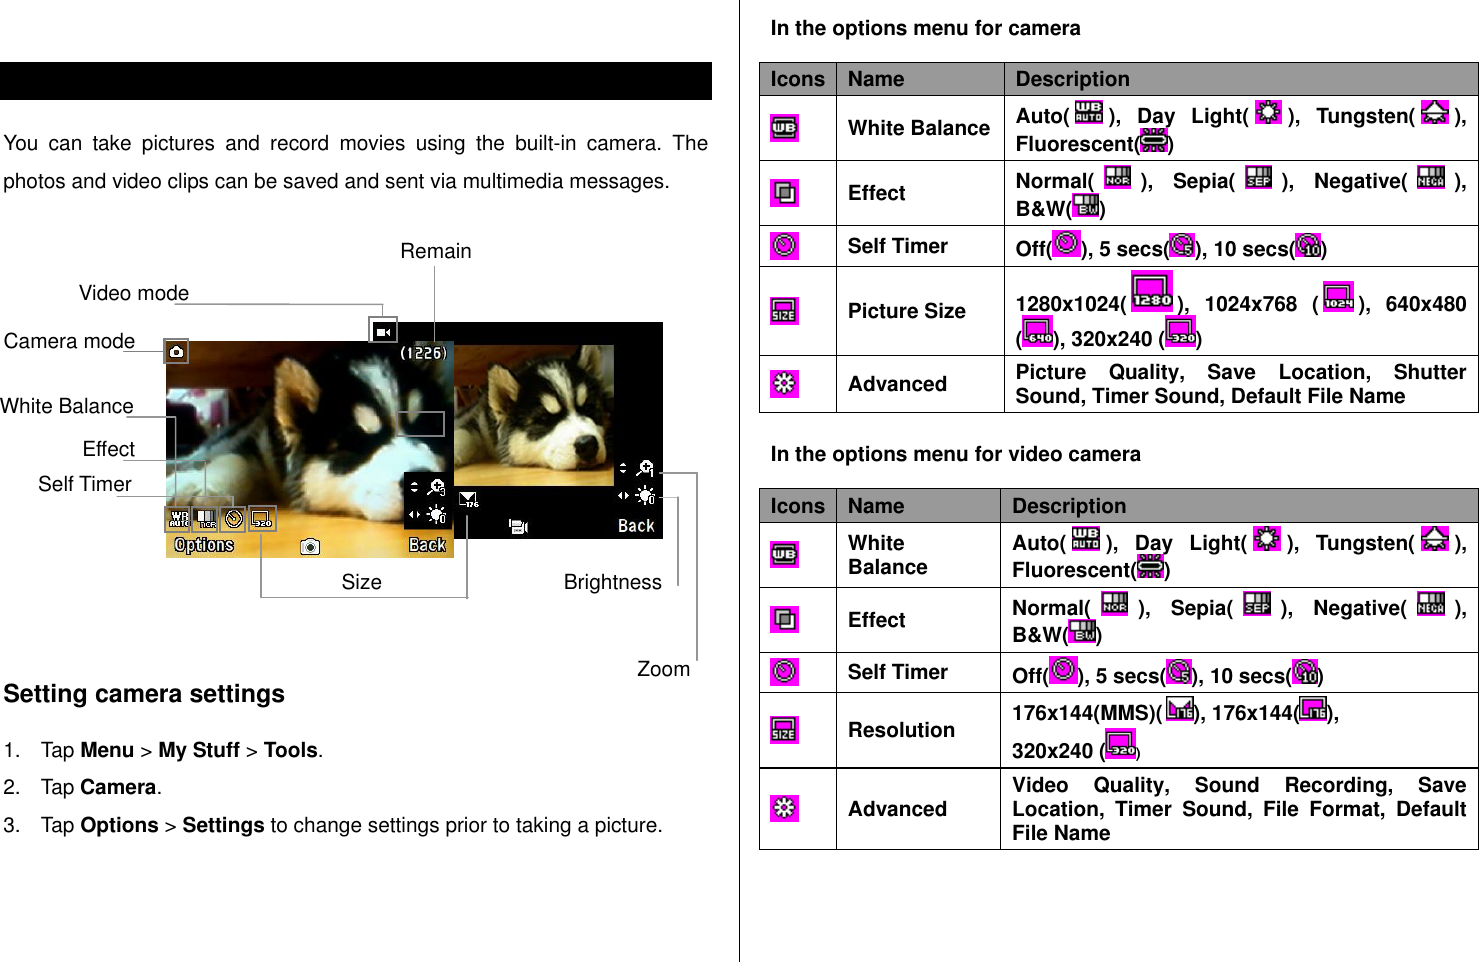
![Zoom in and out 1. Tap [ / ]. It ranges from x1 to x4. Increasing or decreasing the brightness 1. Tap / ]. It ranges from -2 to +2. Taking a picture 1. Press [ ] in standby mode or tap Menu > My Stuff > Tools Tap Camera. 2. Focus on the object > OK or tap Options > Capture. NOTE: Your photo will be saved automatically to My Stuff > Picture > Camera. Changing to video camera mode 1. Press [ ] in standby mode or tap Menu > My Stuff > Tools > Camera. 2. Tap Options while camera mode is activated. 3. Tap Video Camera Mode. 4. Focus on the object > OK or tap Options > Record. 5. Record the motion > Stop. NOTE: Your video will be saved automatically to My Stuff > Video. Viewing the taken picture 1. Press [ ] in standby mode or tap Menu > My Stuff > Tools > Camera. 2. Tap Options > Photo Album. 3. Select the picture > OK. After taking pictures To Tap Send a multimedia message Options > Send > as Multimedia Message Send using Bluetooth Options > Send > via Bluetooth Set as wallpaper Options > Set as > Wallpaper Set as address book Options > Set as > Caller ID Delete Options > Delete Rename Options > Rename View photo’s information Options > Properties Recording a video 1. Tap Menu > My Stuff > Tools > Video Camera. 2. Focus on the object > OK or tap Options > Record. 3. Tap Stop to stop. 4. Tap Options > Play to play the video clip. 5. Tap [ ] to go back to preview mode. Quality](https://usermanual.wiki/Pantech-Co/P9020/User-Guide-1220117-Page-40.png)
![Changing to camera mode 1. Tap Menu > My Stuff > Tools > Video Camera. 2. Tap Options while video camera mode is activated. 3. Tap Camera Mode. For details on taking a picture, see page 38. Viewing the recorded video clip 1. Tap Menu > My Stuff > Tools > Video Camera. 2. Tap Options > Video Album. 3. Select the video clip > OK. After saving recorded video clips To Tap Send a multimedia message Options > Send > as Multimedia Message Send using Bluetooth Options > Send > via Bluetooth View recorded video clip Options > Play Delete Options > Delete Rename Options > Rename View the information Options > Properties During recording a video To Tap Receive an incoming call [ ] Stop recording Stop Photo album You can view, send, save to your phone or an external memory card and also delete photos. JPEG format is supported, and other formats are saved in the Picture folder. NOTE: To access Picture, tap Menu > My Stuff > Picture. Viewing the saved pictures 1. Tap Menu > My Stuff. 2. Tap Picture > Camera. 3. Select a picture > OK. Setting as wallpaper in the display 1. Tap Menu > My Stuff. 2. Tap Picture > Camera. 3. Select a picture > Options > Set as > Wallpaper. Setting as caller identification 1. Tap Menu > My Stuff. 2. Tap Picture > Camera. 3. Select a picture > Options > Set as > Caller ID.](https://usermanual.wiki/Pantech-Co/P9020/User-Guide-1220117-Page-41.png)
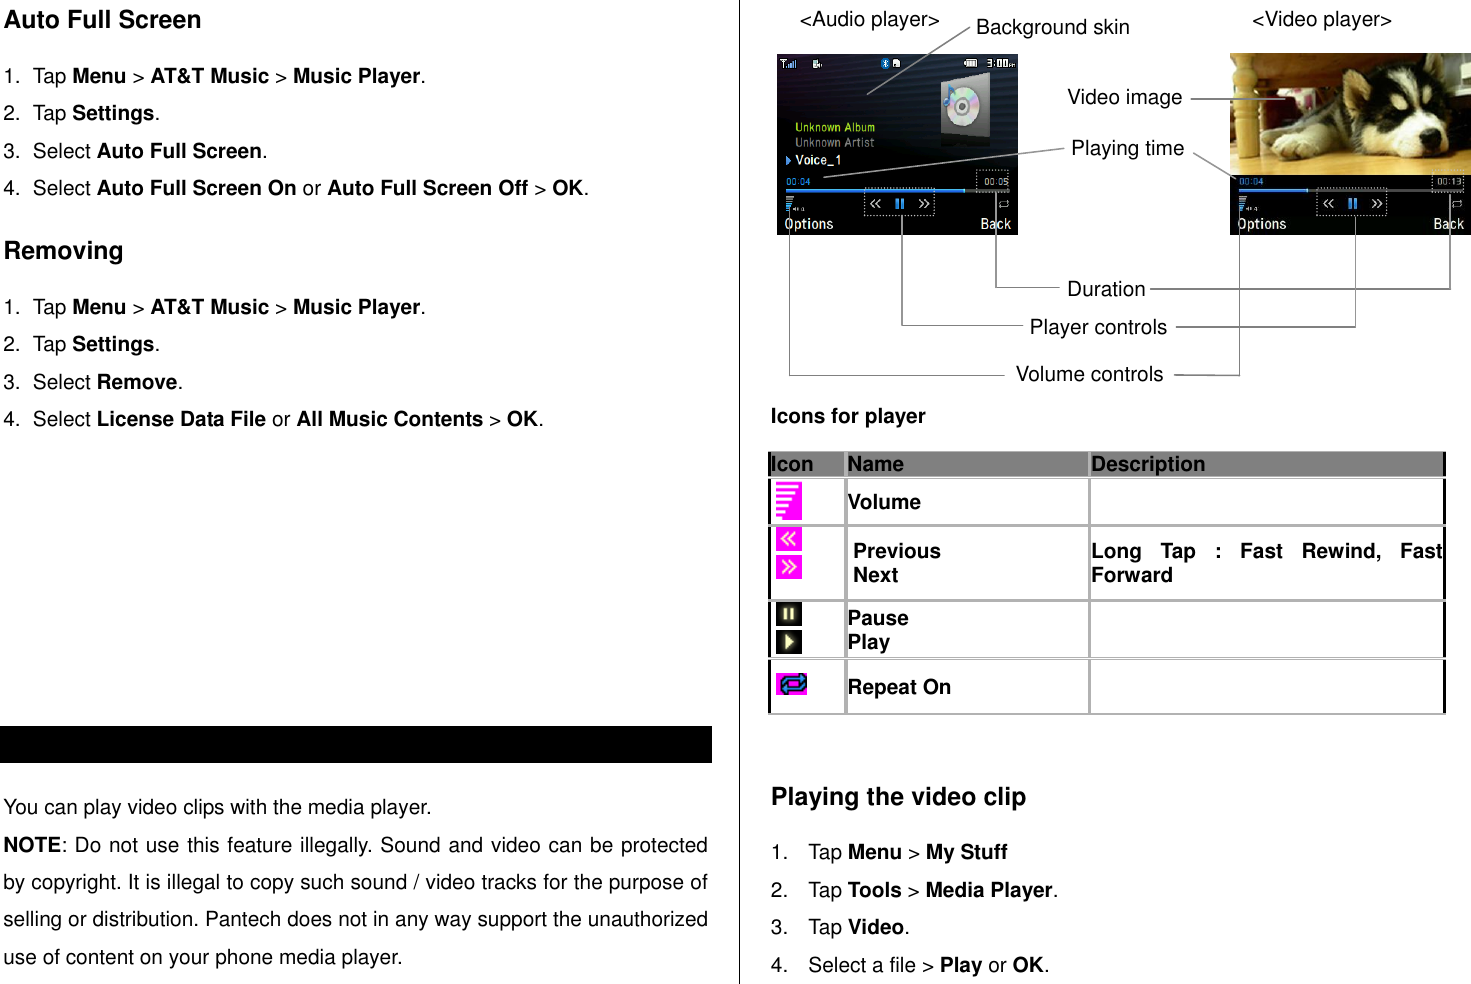
![Player is only compatible with and can play the following audio types saved in MP3, .AAC, .AAC+, and .WMA. When It means Music is playing Music has been paused Music has been stopped Note: microSD card must be inserted to transfer music to your device. Adding music from Windows Media PlayerTM 1. Connect the USB cable to the device and the computer. 2. Select Music Player > Yes. 3. Open the Sync Tap in Windows Media PlayerTM in your computer. 4. Select the music from the list and drag and drop to your device. Note: Windows Media PlayerTM 10, 11 and Window XP version is required. Playing the music 1. Tap Menu > AT&T Music > Music Player. 2. Select the categorize using [ / ] to play the music. 3. Select the file using [ / ] then tap OK. 4. Tap Options > Add to Playlist to add to the playlist. 5. Tap Options > Stop to stop playing. Note: Music will pause when you receive an incoming call and Music will resume when the call ends. Icons for player Icon Name Description Volume 7 Pause Play Fast Rewind Fast Forward Long Tap : Fast Rewind, Fast Forward Previous Track Next Track Short Tap : Previous, Next Repeat all Repeat off Repeat Single Track Shuffle On / Off ON: the current list of songs are randomly shuffled for playback OFF: songs play in order and are not shuffled Making playlist 1. Tap Menu > AT&T Music > Music Player. 2. Tap Playlists > New Playlist. 3. Input Playlist Name 4. Select All Music, Albums, Artists or Genres. 5. Select the music file using [ / ] then Tap OK to add to playlist.](https://usermanual.wiki/Pantech-Co/P9020/User-Guide-1220117-Page-44.png)
![6. Tap Done > Saved. Add music to playlist 1. Tap Menu > AT&T Music > Music Player. 2. Tap Playlists. 3. Select the playlist to add music > Options > Add Tracks. 4. Select the music to add > OK > Done. 5. To remove tracks tap Options > Remove Tracks > select the music by Taping OK > Remove. 6. To rename the playlist tap Options > Rename Playlist. 7. To delete the playlist tap Options > Delete. Listening music with Bluetooth headset 1. While music is playing in the standby mode, tap Menu > AT&T Music > Music Player. 2. Tap Now Playing > Options > Transfer to B/T Headset. Viewing the information 1. Tap Menu > AT&T Music > Music Player. 2. Select the categorize scrolling up or down to play the music. 3. Select the file scrolling up or down then Tap OK. 4. Tap Options > Properties. 5. Scrolling up or down to view Title, Artist, Album, Genre, Duration, File Name, File Size, Location, Format, Bit Rate, Created, License and Sharing. Setting as ringtone 1. Tap Menu > AT&T Music > Music Player. 2. Select the categorize scrolling up or down. 3. Select the file scrolling up or down. 4. Tap Options > Set as Ring Tone. Note: During playing the music the file can not be set as ring tone. You cannot set a file which is larger than 300 Kb as a ringtone. Deleting music 1. Tap Menu > AT&T Music > Music Player. 2. Select the music from the list. 3. Tap Options > Delete. Note: If the music is playing you cannot delete. Shopping the music 1. Tap Menu > AT&T Music. 2. Tap Shop Music. 3. To go to previous page tap [Clear].](https://usermanual.wiki/Pantech-Co/P9020/User-Guide-1220117-Page-45.png)
![Alarm Setting an alarm 1. Tap Menu > My Stuff > Tools> Alarm Clock. 2. Tap Create New for new alarm for the first time. 3. Set the Cycle, Time, Alarm Sound, Alert Type, Volume, Snooze and Power Alarm > Save. Viewing the saved alarms 1. Tap Menu > My Stuff > Tools> Alarm Clock. Editing existing alarms 1. Tap Menu > My Stuff > Tools> Alarm Clock. 2. Select an alarm > Edit. 3. Tap Options > Delete to delete an alarm. 4. Tap Options > Create New to add new alarm. Calendar Calendar helps you manage your schedule including your time for calls or special days. You can set a reminder on any given date with this function. Viewing calendar 1. Tap Menu > My Stuff > Tools > Calendar. Note: Monthly view is displayed as default. In the monthly view To Tap Move to another day [ ] for Previous [ ] for Next Creating a new event and edit 1. Select a day > Options > New Event. 2. Select Schedule, Task or Note. 3. Input the events > Save. Note: You can create events for dates from 01/01/2000 to 12/31/2099](https://usermanual.wiki/Pantech-Co/P9020/User-Guide-1220117-Page-50.png)
![Notepad and voice memo Using notepad 1. Tap Menu > My Stuff > Tools > Notepad. 2. Tap Create New for the first time. To add new note tap Create New or Options > Create New 3. To edit memo Tap Edit. 4. Tap Save to save. 5. If you want place a note on idle, tap Options > Place on Wallpaper 6. If you want remove the note from idle, tap Options > Remove from Wallpaper Recording voice memo 1. Tap Menu > My Stuff > Tools> Voice Memo. 2. Tap New Record for the first time. To add new voice memo tap New Record or Options > New Record 3. Tap Record. 4. Tap Stop to stop recording. It will automatically save on My Voice. 5. Tap Play to listen. Note: To access My Voice, tap Menu > My Stuff > Audio > My Voice. Listening the recorded sound 1. Tap Menu > My Stuff > Audio > My Voice. 2. Select a sound > Play. Using sound controls To Tap Pause OK Play [ ] Control volume Side key up or down Stop [ ] Mute [ ] Repeat [ ] Property Properties World time Using world time 1. Tap Menu > My Stuff > Tools> World Time 2. Select the city by using the up or down navigation key 3. Tap Save to save.](https://usermanual.wiki/Pantech-Co/P9020/User-Guide-1220117-Page-51.png)
![Note: If you want to set dual time in idle mode, tap Menu > Settings > Display> Home Screen > Clock Type > Internal Clocks > Clock Type5. Calculator, tip calculator and converter Using calculator 1. Tap Menu > My Stuff > Tools> Calculator. 2. Use [ + / - / X / /] to calculate. 3. Tap [C] to erase one digit. 4. Tap Reset to reset. 5. Tap [. ] to use the decimal point. Using tip calculator 1. Tap Menu > My Stuff > Tools> Tip Calculator. 2. Enter values for all variable fields (Bill($), Tip(%), Split) and the corresponding calculation fields (Tip($), Total($), You Pay) are updated automatically. 3. Tap Reset to reset. 4. Tap [. ] to use the decimal point. Using the converter 1. Tap Menu > My Stuff > Tools> Converter. 2. Select the categories 3. Select current unit and enter figure. Then other unit fields are updated automatically. Stop watch and timer Using stop watch 1. Tap Menu > My Stuff > Tools> Stop Watch. 2. Tap Start to start. 3. Tap Stop to stop. 4. Tap Continue to restart. 5. Tap Reset to clear. 6. To change to lap time, tap Mode > Lap Time Mode. 7. To split the stopwatch, tap Mode > Split Time Mode. Note: In Basic Mode, when you go out another menu or idle while stopwatch is working, you can see the clock icon on idle that means stopwatch is still working. And you enter the menu again, you can see it still working Using timer 1. Tap Menu > My Stuff > Tools> Timer 2. Tap Set to input the time](https://usermanual.wiki/Pantech-Co/P9020/User-Guide-1220117-Page-52.png)
![3. Enter the hour, minute and second > [ ] 4. Tap Start to start. 5. Tap Restart to restart Business card You can send your information by sending it as multimedia message or via Bluetooth. Creating your own business card 1. Tap Menu > Address Book > My Business Card. 2. Edit the fields > Save or tap OK. Forwarding 1. Tap Menu > Address Book > My Business Card. 2. Tap Options > Send This Card > Multimedia Message or Bluetooth. 3. Search for device or choose the device to send via Bluetooth and Tap Select. Write a message for Multimedia Message. 4. Tap Send to and select the person to send message and tap Select or OK. 5. Tap Send. Updating information 1. Tap Menu > Address Book > My Business Card. 2. Tap Edit. 3. Update information. 4. Tap Save. Memory information You can view the information of your phone for Used, Audio, Games, Applications, Picture, Video, Other Files and System. Viewing the information 1. Tap Menu > My Stuff > Used Space.](https://usermanual.wiki/Pantech-Co/P9020/User-Guide-1220117-Page-53.png)


![Alert message If you experience any problem while using your mobile phone, please refer to the following checklist. If the problem still persists, contact your dealer or nearest carrier. When the “Insert SIM Card” message appears: Make sure the SIM card is correctly installed. Check to see if the SIM card is working properly. If it does not work, try to clean the contact points of the card with a dry cloth. If it is out of order, take it to your service provider. When the “Messages full” message appears: The received or saved messages are full in your phone memory. You need to delete the message. When the “Phone and SIM messages is full. Delete Messages” message appears: The received or saved messages are full in your phone and SIM card memory. You need to delete the message. When the “Password” message appears in Phone locked state: Enter the phone password. The default password is”1234”. If you cannot remember the password, contact the nearest carrier. When the “Enter PIN1” message appears: Input PIN1. If you cannot remember it, contact your service provider. You can still receive calls even if your mobile phone becomes locked after entering the incorrect PIN1 on three consecutive attempts. When the “No Service” or “Network Search” appears: If you cannot make/receive a call when you are indoors or undergrounds where the signal strength is poor, move toward a window or go out to an open area. If you still cannot make a connection, contact your service provider. Troubleshooting checklist When audio quality is poor: End a call and try again. When the other party cannot hear you speaking: Your phone may be set to MUTE. Disable the MUTE function. Or your hand may be covering the microphone located below the [*] key. When battery lifetime is shorter than usual: This may happen when you are in an area with low signal strength. Turn off your phone when it is not in use. Change the battery when battery energy is exhausted.](https://usermanual.wiki/Pantech-Co/P9020/User-Guide-1220117-Page-63.png)