Pantech Co PC-8200N Dual- Mode CDMA Phone with Bluetooth User Manual PN 820
Pantech Co Ltd Dual- Mode CDMA Phone with Bluetooth PN 820
UserManual.wiki
>
Pantech Co
>
PC-8200N User Manual
>
Manual
Contents
1.
Manual
2.
Users Manual
Manual
Navigation menu
Upload a User Manual
Namespaces
Wiki Guide
HTML
PDF
Info
Views
User Manual
Discussion / Help
Navigation

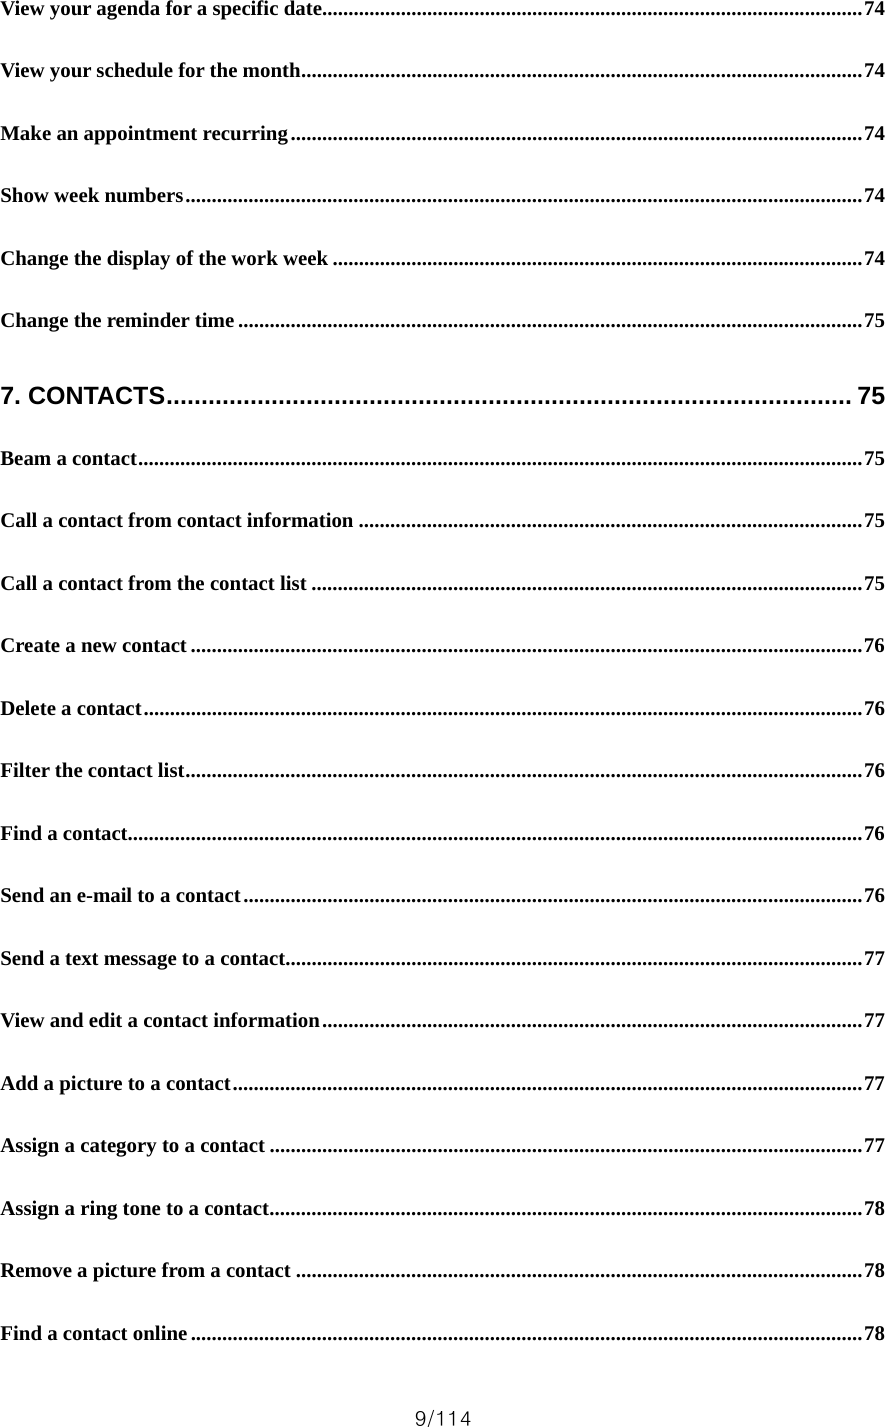
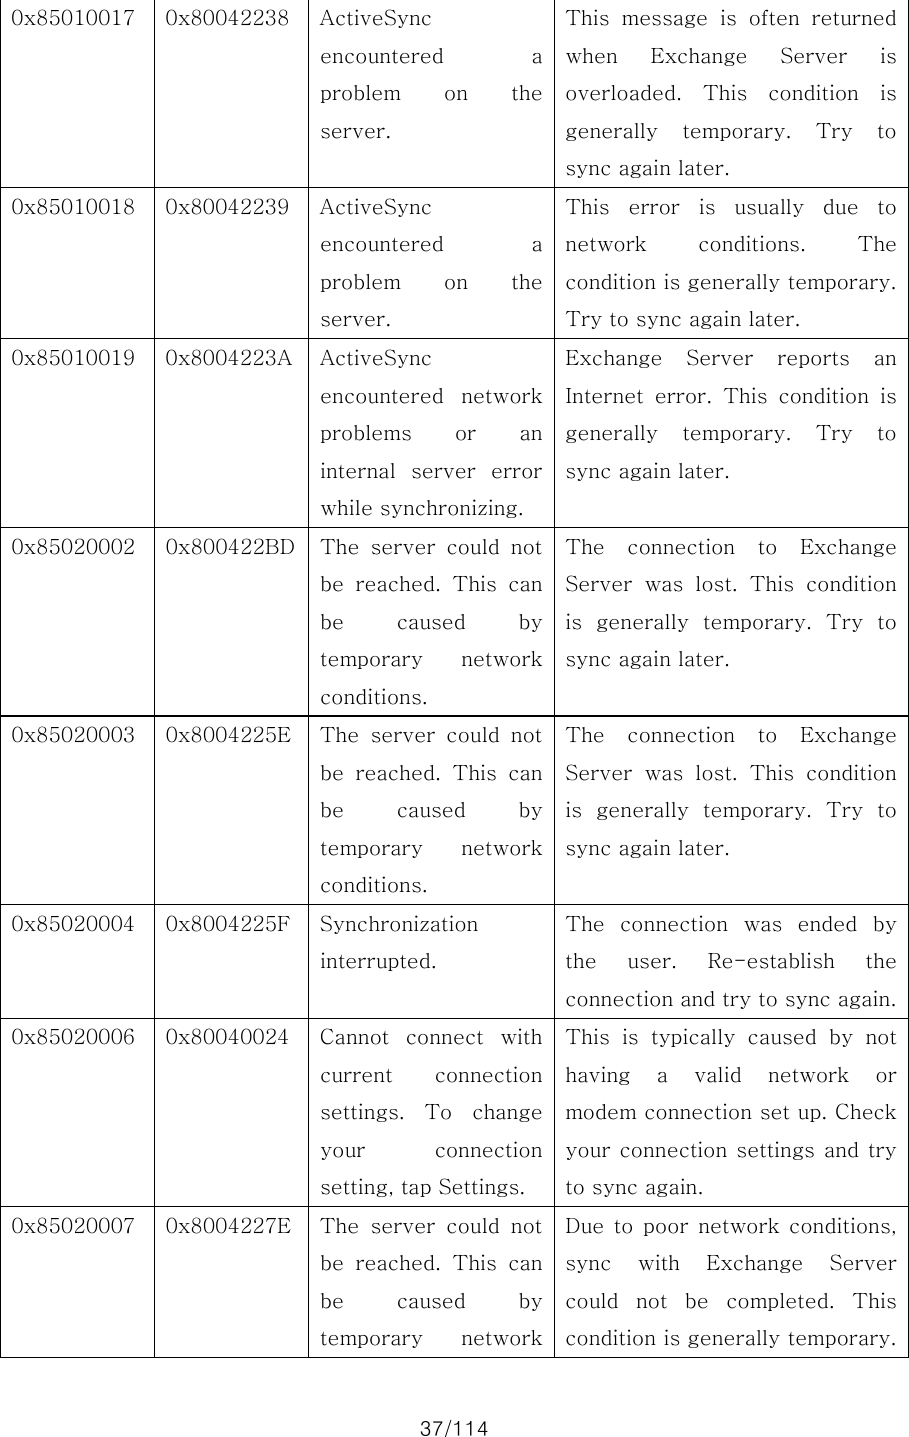
![18/114 phone turns off due to the battery completely draining. z Turn the phone off before removing or replacing the battery. If the phone is on, unsaved data may be lost. PLACING AND RECEIVING CALLS Placing Calls 1. Enter a phone number. 2. Press ‘Send Key ’ to initiate the call. Receiving Calls 1. To answer a call, press any key except ‘End Key’. 2. To end the call, press ‘End Key’. PROGRAMMING AND USING SPEED DIAL NUMBERS Programming Speed Dialing Numbers 1. Press ‘Functional Soft Key [Contacts]’. 2. Select the desired contact name, then press ‘OK’. 3. Select the desired phone number, then press ‘Functional Soft Key [Menu]’. 4. Use the navigation key to select ‘Add to Speed Dial’ menu on your display screen, then press ‘OK ’. 5. Use the navigation key to select the desired keypad assignment, then press ‘Functional Soft Key [Done]’. Using Speed Dialing 2-9: Press and hold the corresponding memory number for more than 1 second. 10-99: Press the first digit and second digits of the memory number short and long respectively. CHANGING RINGERS AND TONES Selecting a Ringer or Tone 1. Press ‘Functional Soft Key [Start]’. 2. Press ‘9 Key [Settings]’, press ‘2 Key [Sounds]’, then select ‘Ring tone’. 3. Select one of the available ring types. To confirm, press ‘Functional Soft Key [Done]’.](https://usermanual.wiki/Pantech-Co/PC-8200N.Manual/User-Guide-654214-Page-18.png)
![19/114 Adjusting Ringer or Tone Volume 1. Press ‘Volume Key Up ’ or ‘Volume Key Down ’ to select desired master volume level. Setting Ringer or Tone to Vibrate 1. Press ‘Quick List / Voice Key [Quick List]’, then press ‘6’ Key [Silent]’ ACCESSING YOUR VOICE MAIL New Customer 1. Press and hold ‘1 Key ’ or press ‘* ’, ‘8 Key ’, ‘6 Key ’, ‘Send Key ’. 2. Follow the voice tutorial to set up your account. Existing Customer 1. Press and hold ‘1 Key ’ or press ‘* Key ’, ‘8 Key ’, ‘6 Key ’, ‘Send Key ’. 2. Enter your password when prompted, then press ‘# Key ’. 3. To listen to new messages, press ‘1 Key ’. USING PIM ActiveSync Microsoft ActiveSync® allows you to synchronize information between your handheld device and a desktop/laptop computer. For more information about ActiveSync, please see the PN-820 online user manual located on the companion CD. 1. Install ActiveSync from the companion CD and follow the onscreen instructions. 2. Plug each end of the Chargeable Sync USB Cable into PN-820 and desktop/laptop computer. 3. Create a new partnership and follow the onscreen instruction to perform your first ActiveSync operation. Adding Contacts 1. Press ‘Functional Soft Key [Contacts]’, then press ‘Functional Soft Key [New]’. 2. Enter the desired information in the spaces provided and Press ‘Functional Soft Key d [Done]’. Adding Appointments 1. Press ‘Functional Soft Key [Start]’, then press ‘4 Key [Calendar]’. 2. Press ‘Functional Soft Key [Menu]’ , then press ‘1 Key [New Appointment]’. 3. Enter the rest of the desired information in the fields and press ‘Functional Soft Key [Done]’](https://usermanual.wiki/Pantech-Co/PC-8200N.Manual/User-Guide-654214-Page-19.png)
![20/114 Adding Tasks 1. Press ‘Functional Soft Key [Start]’, then press ‘2 Key [Tasks]’. 2. In the ‘Enter new task here box’, enter the task name and press ‘OK Key ’. TXT MESSAGING Sending a New TXT Message 1. Press ‘Functional Soft Key [Start]’, press ‘5 Key [Messaging]’, then press ‘1 Key [Text Messages]’. 2. Press ‘Functional Soft Key [New]’. 3. Enter the recipients phone number in the To: field. 4. Press ‘Navigation Down Key ’, then enter your message. 5. Press ‘Functional Soft Key [Send]’. Predictive TXT Input To choose Word mode, press and hold ‘* Key ’ then choose T9 English. This mode predicts the words you are entering using a built-in dictionary. Press each key only once for each letter and your phone will predict the word you are entering. PICTURE MESSAGING Snapping and Sending a Picture 1. Press ‘Camera Key ’ on the right side of the phone. 2. Using the phone screen as your viewfinder, press ‘OK Key ’ to snap picture. 3. Press ‘Functional Soft Key [Save]’, then press ‘Functional Soft Key [My PIX]’. 4. Choose picture with navigation key, press ‘Functional Soft Key [Menu]’, then press ‘1 Key [Send]’. 5. Press ‘3 Key [MMS Messages]’. 6. Press ‘Functional Soft Key [New]’. 7. Enter the recipients phone number in the To: field. 8. Press ‘Navigation Down Key ’, then enter your message into the text box area. 9. Press ‘Functional Soft Key [Send]’. 10. To confirm for sending a message, press ‘Functional Soft Key [OK]’. Receiving a New Picture Message 1. Press ‘Functional Soft Key [Start]’, press ‘5 Key [Messaging]’, then press ‘3 Key [MMS Messages]’. 2. Select desired message in inbox list.](https://usermanual.wiki/Pantech-Co/PC-8200N.Manual/User-Guide-654214-Page-20.png)
![21/114 3. Press ‘OK Key ’. S/W팀 추가 확인 필요 Replying to a Picture Message 1. Press ‘Functional Soft Key [Start]’, press ‘5 Key [Messaging]’, then press ‘3 Key [MMS Messages]’. 2. Select desired message in inbox list. 3. Press ‘Functional Soft Key [Menu]’, then press ‘2 Key [Reply]’. 4. Press ‘1 Key [Reply]’ to choose reply option. 5. The default call back number is automatically included. You can edit it. 6. Complete Snapping and Sending a Picture steps 7-10 as described on Page XX. S/W팀 추가 확인 필요 Adding Sound to a Message 1. Press ‘Functional Soft Key [Start]’, press ‘5 Key [Messaging]’, then press ‘3 Key [MMS Messages]’. 2. Press ‘Functional Soft Key [New]’. 3. Enter the recipients phone number in the To: field. 4. Press ‘Navigation Down Key ’, then enter your message into the text box area. 5. Press ‘Functional Soft Key [Menu]’, press ‘2 Key [Add Item]’, then press ‘3 Key [Sound]’. 6. Choose desired sound file. 7. Press ‘Functional Soft Key [Send]’. 8. To confirm for sending a message, press ‘Functional Soft Key [OK]’. S/W팀 추가 확인 필요 Creating Picture Caller IDs 1. Press ‘Functional Soft Key [Start]’, press ‘Functional Soft Key [More]’, then press ‘3 Key [Pictures and Videos]’. 2. Select desired picture with the navigation key and press ‘Functional Soft Key [Menu]’. 3. Press ‘3 Key [Save to Contact…], select desired contact, then press ‘Functional Soft Key [Select]’. Storing a Picture on Your Phone 1. Press ‘Camera Key ’ on the right side of the phone. 2. Using the phone screen as your viewfinder, press ‘OK Key ’ to snap picture. 3. Press ‘Functional Soft Key [Save]’. Sending a Message Using a Picture Stored in the Phone’s Galley 1. Press ‘Functional Soft Key [Start]’, press ‘Functional Soft Key [More]’, then](https://usermanual.wiki/Pantech-Co/PC-8200N.Manual/User-Guide-654214-Page-21.png)
![22/114 press ‘3 Key [Pictures and Videos]’. 2. Complete Snapping and Sending a Picture steps 4-10 as described on Page XX. Storing a Photo to the Online Album, Pix Place 삭제 예정 USING THE WIRELESS WEB BROWSER Launching the Browser 1. Press ‘Functional Soft Key [Start]’, then press ‘1 Key [Internet Explorer]’. 2. Choose favorite web site among the list or press ‘Functional Soft Key [Menu]’ and ‘1 Key [Address Bar]’ to open your desired web site. Ending a Browser Session 1. Press ‘End Key ’ to close and exit the browser. Note: If you not close the browser with ‘End Key ’ properly, the connection will remain dormant but will not be disconnected.](https://usermanual.wiki/Pantech-Co/PC-8200N.Manual/User-Guide-654214-Page-22.png)

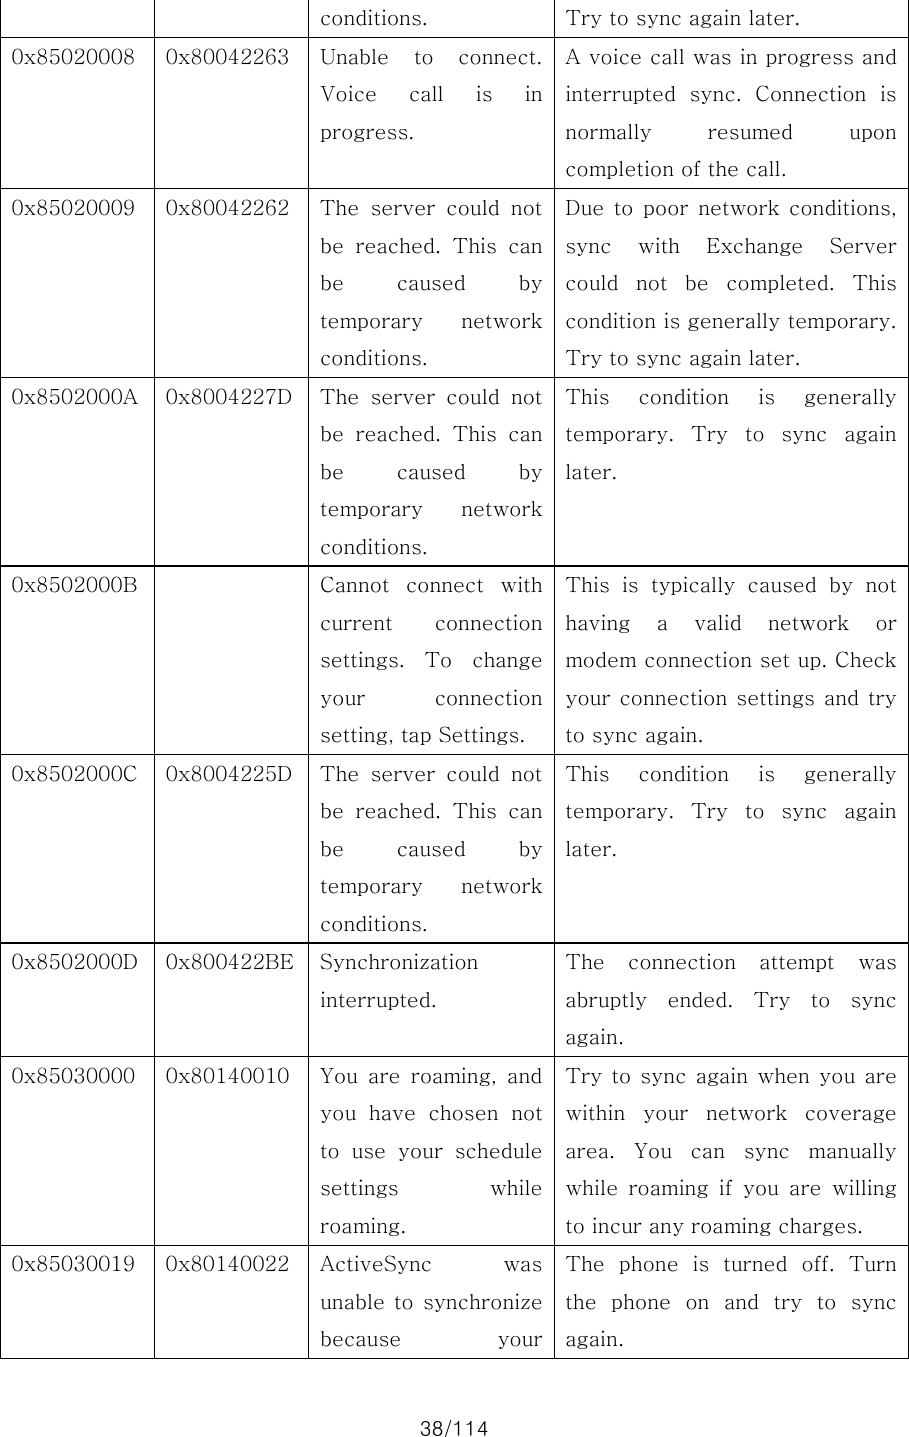
![34/114 the Status page. This topic maps these support codes to information that may help you respond to ActiveSync problems. Windows Mobile Version 5.0 Support Code Windows Mobile 2003 Support Code (if different) Error Message Troubleshooting information 0x85002002 0x80042001 There is not enough free memory on your device to synchronize information. Delete unused files from your device or close programs that are running to free up memory. ActiveSync ran out of storage. Try to sync again after you free more storage. 0x85002003 0x80042002 The server could not be reached. This can be caused by temporary network conditions. Sync was not completed because the device had to wait too long to establish a connection with Exchange Server. Try to sync again later. 0x85002004 You have stopped synchronization. This is an informative message and does not indicate an error. Synchronization was stopped manually. 0x85002007 0x80042006 ActiveSync encountered a problem on the server. There is a temporary problem with the server. Try again later. If the problem persists, you may need to contact an administrator.0x85002008 ActiveSync encountered a problem with the following item: [Item Type]: [Item Name] If the error persists, This is an error synchronizing a single item (a per-item error). This error can usually be corrected only by removing the item that caused the error. If you choose to sync again to see if the error persists, be aware](https://usermanual.wiki/Pantech-Co/PC-8200N.Manual/User-Guide-654214-Page-34.png)


![48/114 • In Domain, enter the domain name, if required. See also Create a VPN connection Create a Wi-Fi connection Create a proxy connection Every network connection is different. You should gather all of the relevant information or network settings you need before starting this process. 1. On the Home screen, click Start > Settings > Connections. 2. Click Proxy. 3. Click Menu > Add. 4. Enter the following information, and click Done. z In Description, enter a name for the connection. z In Connects from, select the type of network from which you will connect. z In Connects to, select the type of network to which you will connect. z In Proxy [name:port] enter the proxy server name and port number in this form: server name:port number. z In Type, select the type of proxy connection to create. z In User name, enter your user name for the network to which you will connect. z In Password, enter your password. Create a VPN connection Every network connection is different. You should gather all of the relevant information or network settings you need before starting this process. 1. On the Home screen, click Start > Settings > Connections. 2. Click VPN. 3. Click Menu > Add. 4. Enter the following information, and click Done. z In Description, enter a name for the connection. z In VPN type, select the type of VPN. z In Server, enter the VPN server name. z In Connects from, select the type of network from which you will connect to the VPN (typically The Internet). z In Connects to, select the type of network to which you will connect (typically My Corporate Network).](https://usermanual.wiki/Pantech-Co/PC-8200N.Manual/User-Guide-654214-Page-48.png)
![53/114 1. On the Home screen, click Start > Settings. 2. Click Connections > Beam. 3. Select Receive incoming beams. 4. Click Done. Beam an item In the Calendar, Contacts, Notes, Tasks, and Pictures programs, you can beam files and information to other devices using Bluetooth or infrared. 1. From the program, select the item you want to beam, such as an appointment in Calendar, a task in Tasks, a contact card in Contacts, or a picture in Pictures. In Calendar, first open the appointment in Agenda view. 2. Click Menu > Beam [type of item]. 3. Do one of the following: • If using Bluetooth, select the device to which you want to send the item. • If using infrared, align the infrared (IR) ports at close range until the target device name appears, and then select the device to which you want to send the item. 4. Click Beam. Tip When using Bluetooth, if the device that you want to beam to doesn't appear in the list, ensure that the device is turned on, discoverable, and within close range of your phone. Also, ensure that Bluetooth is turned on. See also Make your device discoverable Receive beamed information Overview of Bluetooth virtual COM ports Some programs can connect only though a serial (COM) port. This can be true even if the device itself is Bluetooth-enabled. To make it possible for such programs to use a Bluetooth connection, you must set up a virtual COM port. Once created, this virtual port can be used like any other COM port. You can use a virtual COM port for programs that, for example, connect to a GPS receiver, or to connect to a Bluetooth-enabled printer. Here are some examples of how to use incoming and outgoing virtual COM ports. Outgoing COM port You have a program on your device that cannot use Bluetooth directly but can print to a](https://usermanual.wiki/Pantech-Co/PC-8200N.Manual/User-Guide-654214-Page-53.png)


![66/114 resolution, either 240 x 320 pixels, or 176 x 200 pixels, depending on the phone. See also Change the Home screen appearance Copy a sound to your phone After a sound file is located on your phone, you can use it for a ring tone, notification, or reminder. Sound files in either .wav, .mid, or .wma formats can be used. 1. Connect the phone to your PC using a USB connection. 2. On your PC, copy the sound file you want. 3. In ActiveSync on your PC, click Explore and double-click My Windows Mobile-Based Device. 4. Do one of the following: • To save the sound file on your phone, double-click Application Data, double-click Sounds, and paste the file into that folder. • To save the sound file on your storage card, double-click Storage Card, and paste the file into the folder you want. See also Specify the sound for an event Change or turn sounds on or off On the Home screen, click Start > Settings > Sounds. Under Keypad control, select to the option you want, and click Done. Change the current profile 1. On the Home screen, click Profile [Type]. Example: Profile Normal. 2. Click a new profile, and click Done. Tip You can also change the profile by using the Quick List. Press POWER briefly and click a profile. Change the Home screen appearance 1. On the Home screen, click Start > Settings > Home Screen. 2. Under Home screen layout, Color scheme, and Background image, select the options you want, and click Done.](https://usermanual.wiki/Pantech-Co/PC-8200N.Manual/User-Guide-654214-Page-66.png)
![68/114 4. Click Done. Note You must turn your phone off and on again for the changes to take effect. Delete a certificate 1. On the Home screen, click Start > Settings > Security> Certificates. 2. Choose one of the following: • Personal to view the list of personal certificates. • Root to view the list of root certificates. 3. Select a certificate in the list. 4. Click Menu > Delete. Important note Deleting a root certificate can make it impossible to use Secure Sockets Layer (SSL) protocols, which help you to send personal information more securely. Delete a sound 1. On the Home screen, click Start > Settings > Sounds. 2. Click Menu > Delete Sounds. 3. Select the sound to delete. 4. Click Yes. Note You can only delete sounds that you have added. You cannot delete sounds included with the phone. Disable the phone lock 1. On the Home screen, click Start > Settings > Security. 2. Click Disable Phone Lock. 3. Enter the password, and click Done. Note After you have selected the time delay and created a password, you can enable the phone lock from the Quick List, without having to configure these settings again. See also Enable the phone lock Edit a profile 1. On the Home screen, click Profile [Type]. Example: Profile Normal.](https://usermanual.wiki/Pantech-Co/PC-8200N.Manual/User-Guide-654214-Page-68.png)