Pantech Co PG-1810 TripleBand GSM850/DCS1800/PCS1900 (BT, WAP & GPRS) User Manual
Pantech Co Ltd TripleBand GSM850/DCS1800/PCS1900 (BT, WAP & GPRS)
UserManual.wiki
>
Pantech Co
>
PG 1810 User Manual
Manual
Navigation menu
Upload a User Manual
Namespaces
Wiki Guide
HTML
PDF
Info
Views
User Manual
Discussion / Help
Navigation
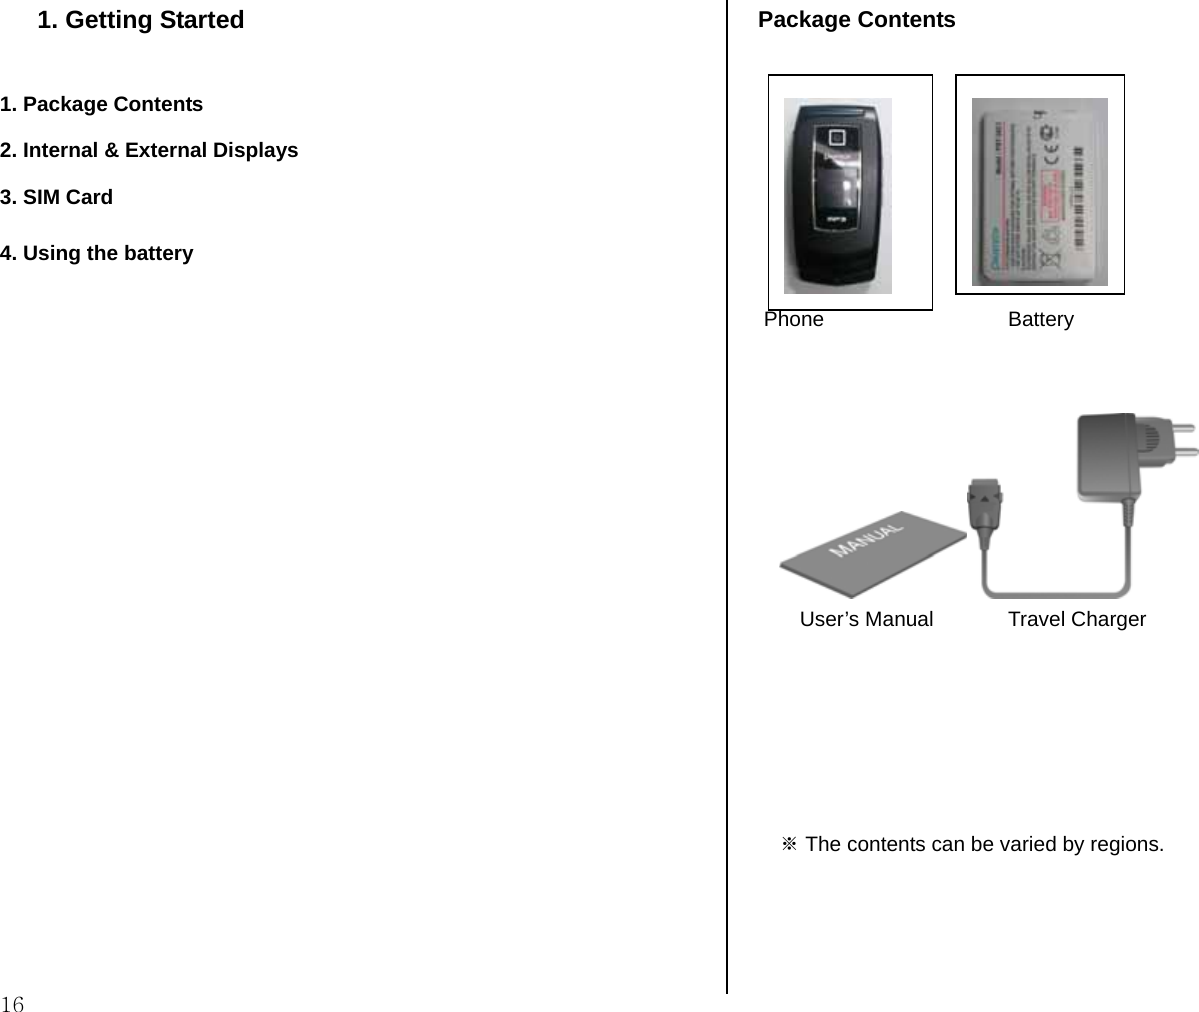
![빨간바탕위의 문구는 국가별 특이적용사항입니다. S/W, P/R등 관련부서에서는 필히 국가별 특이사항을 명확히 검수하시고 전달 부탁드립니다 USER MANUAL PG-1810[u1] Thank you for choosing Pantech PG-1810 and welcome to wireless mobile communication networking with the PG-1810, our tri-band GSM mobile phone. Pantech is delighted to introduce this brand new portable phone which will always keep you connected to the network. This user manual explains in detail its unique features and how to use them. NOTE: Some of the contents in this User Manual could vary from your phone. It may vary depending on the S/W version and the network provider you subscribed to.](https://usermanual.wiki/Pantech-Co/PG-1810/User-Guide-638875-Page-1.png)
![2 Specification Display Dual clamshell 262,144 TFT LCD internal and 65,536 Color STN LCD external. 28.032 mm x 35.04 mm display for 1.8” internal LCD 18.71 mm x 18.71 mm display for 1.04” external LCD Supports up to 262,144 colors within 128 x 160 pixels internal and 96 x 96 pixels external 7 lines for text in basic mode with 16-pixel font Two Soft keys and four-way scroll and selection ([OK]) keys Melody Yamaha 64 poly sound(Support MP3 Ringtones) MP3 Support fixed bit rate until 320kbps Micro SD Support FAT16 format until 512MB Camera Integrated VGA(300k) CMOS Camera. Resolution up to 640 x 480 (307,200 pixels) Self timer function (5 sec or 10 sec) Phone display used as a viewfinder Photo album in Gallery Photo Gallery for image storing and editing 3 image quality options: Fine, Normal, Low Auto white balance (AWB), Auto exposure(AE), Various effects Bluetooth Bluetooth version 2.0 compliant. Support Mono headset call, FTP, DUN, vCard, serial communication Dimension & Weight Weight: around 90 g Dimensions: 95 mm x 46 mm x 18.7 mm Power Management (Performance) Battery Type Capacity Standby Time Talk Time Standard (Li-ion) 720 mAh 110 Hours 2.4 Hours](https://usermanual.wiki/Pantech-Co/PG-1810/User-Guide-638875-Page-2.png)


![12 Table of Contents Getting Started Package Contents Internal & External Displays SIM Card Using the battery New Functions Video Caller ID Setting MJPEG for Idle Screen OTA Settings Service DRM/ Forward Lock Basic Functions Switching the Phone On or Off Switching the Phone On [1.1] Switching the Phone Off [1.2] Making a Call Making a Call [2.1] Ending a Call [2.2] Using Call Logs [2.3] Using Contacts [2.4] Making an International Call [2.5] Speed-dialling from Contacts [2.6] Making an Emergency Call [2.7] Answering a Call Answering a Call [3.1] Viewing Missed Calls [3.2] Rejecting a Call [3.3] Adjusting the Calling Volume [3.4] Calling Options Switching the Microphone off (Mute)[4.1] Holding a Call [4.2] Answering a Second Call [4.3] Searching for a Number in Contacts [4.4] Using DTMF Tones [4.5] Transferring a Call [4.6] Using the Message Service [4.7] Making a Multi-party Call [4.8] Using the Headset Using the Speaker Phone Selecting Menu Functions](https://usermanual.wiki/Pantech-Co/PG-1810/User-Guide-638875-Page-12.png)
![13 Entering into Menu Functions [6.1] Using the Shortcut key in Standby Mode [6.2] Entering Text Input Mode [7.1] Changing Text Input Mode [7.2] Using T9 Mode [7.3] ABC Mode [7.4] Using 123 Mode [7.5] Using Symbol Mode [7.6] Applications Messages Write New [1.1] Inbox [1.2] Outbox [1.3] Draft Box [1.4] Sent Box [1.5] Templates [1.6] Settings [1.7] Memory Info. [1.8]. Contacts Adding a New Contact [2.1] Editing Contacts [2.2] Searching a Name/Group [2.3] Group Setting [2.4] Speed Dial Setting [2.5] Delete All [2.6] Memory Info. [2.7] Service Number [2.8] Business Card [2.9] Memory In Use [2.10] Copy All [2.11] Call Logs Missed Calls [3.1] Received Calls [3.2] Dialled Calls [3.3] Recent Calls [3.4] Delete Call Logs [3.5] Call Timer [3.6] Call Cost [3.7] GPRS Info. [3.8] Media Gallery External Memory [4.1] Photo Gallery [4.2] Video Gallery [4.3] Image Gallery [4.4] Sound Gallery [4.5]](https://usermanual.wiki/Pantech-Co/PG-1810/User-Guide-638875-Page-13.png)
![14 Other Files [4.6] Memory Info. [4.7] Multimedia Camera [5.1] MP3 Player [5.2] Radio [5.3] Games [5.4] Java [5.5] Settings Display Settings [6.1] Sound Settings [6.2] Call Settings [6.3] Language [6.4] Time & Date [6.5] Favorite [6.6] Network Selection [6.7] Security Settings [6.8] Flight Mode [6.9] Software Version [6.10] Organiser Alarm [7.1] Calendar [7.2] Memo [7.3] World Time [7.4] Calculator [7.5] Converter [7.6] Stop Watch [7.7] Timer [7.8] Fatness Checker [7.9] Advanced Functions WAP Navigating the WAP Browser [1.1] Entering Text in the WAP Browser [1.2] Home [1.3] Resume [1.4] Bookmarks [1.5] Push Messages [1.6] Go to URL [1.7] Profiles [1.8] Cache [1.9] Security Cert [1.10] Version [1.11] USB Mass Storage](https://usermanual.wiki/Pantech-Co/PG-1810/User-Guide-638875-Page-14.png)
![15 Bluetooth Bluetooth [3.1] Paired Devices [3.2] Business Card [3.3] Outgoing Call Device [3.4] Visibility [3.5] Name [3.6] Address [3.7] SIM Toolkit Appendix Access Code Check List Performance and safety Glossary](https://usermanual.wiki/Pantech-Co/PG-1810/User-Guide-638875-Page-15.png)
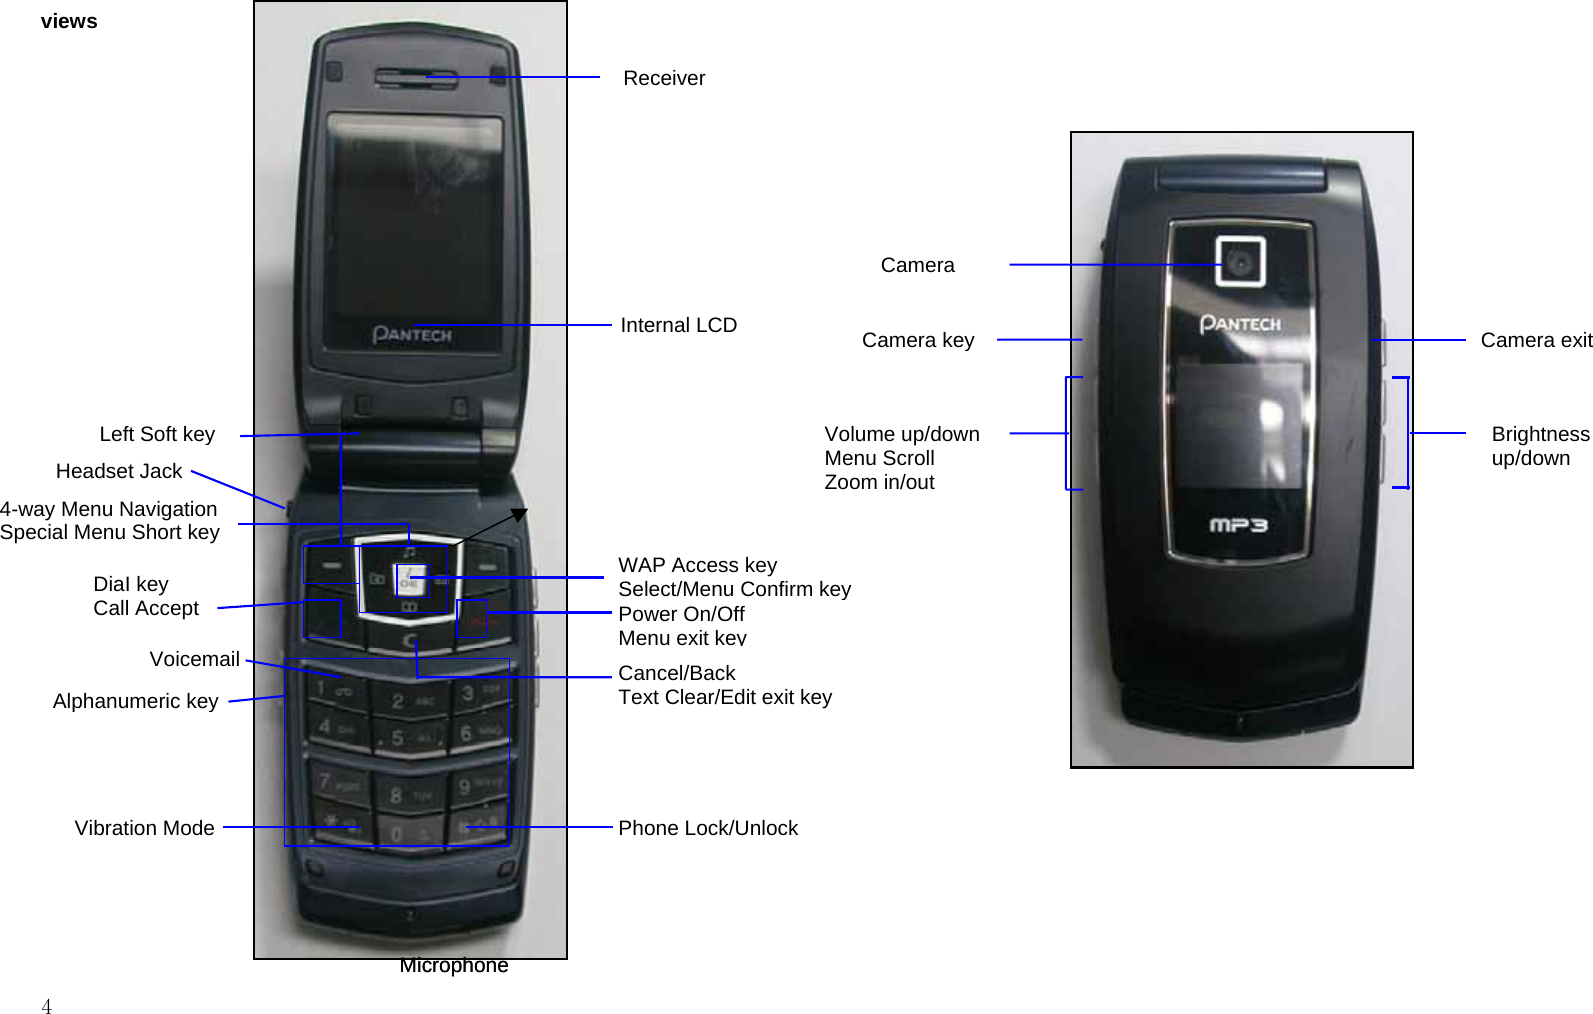
![17 Internal & External Displays This phone has 2 displays (internal and external) and icons on the top of the display indicate the phone status. Internal Display [2.1] Icon(s) Description Shows received signal strength. The greater the number of bars, the stronger the signal. Flight Mode indicator A call is being made. Outside the coverage area, you cannot make or receive a call. You have a new voice message. You have a message. If the text message memory is full the icon will look like(공용아이콘) (멕시코향에만 이 아이콘적용) If the multimedia message memory is full, the icon will look like ( 공용아이콘) (멕시코향에만 이 아이콘적용) If the email memory is full, the icon will look like Roaming indicator Within the GPRS range. When a GPRS session is in progress, the icon will look like Call diverting feature is activated You have set the alarm. You have set the alert type for incoming call to ring only. You have set the alert type for incoming call to ring ascent. You have set the alert type for incoming call to ring and vibrate. You have set the alert type for incoming call to vibrate then ring. You have set the alert type for incoming call to vibrate only. You have set the alert type for all tones to quiet and for all rings to vibrate only. Headset is connected. Auto-answering feature is activated. Battery level. The bar indicates the available battery charge. If your battery charge is low, this icon will look like Icons Area Text and Graphic Area Display in standby screen with information Area Information through cell broadcast service Network Name Time and Date Soft key Indication](https://usermanual.wiki/Pantech-Co/PG-1810/User-Guide-638875-Page-17.png)
![18 This becomes set when Bluetooth function is activated. This becomes set when Bluetooth Headset/Handsfree are connected. Display Off Mode. If you do not press any key within a minute while the internal and external displays are dimmed, the internal display goes into Off Mode to save power. Press any key to restore the display. Selecting Functions and Options. The phone provides several customisation functions, which are arranged in menus and sub-menus. You can access these functions using the two Soft keys ([ ] and [ ] key). Each menu and sub-menu allows you to view and change the settings of the particular function. The soft key function varies depending on the current context; the labels or icons at the bottom line of the display indicate the current function. To view various functions/options available or select the one that is required: 1. Press the appropriate Soft key. 2. To select the function displayed or option highlighted the [OK] key. 3. To highlight the next option on a list, press the Up key or Down key. 4. To move back to the previous function or option on a list, press the [C] key 5. To return to Standby Mode, press the [ ] key. In some functions, you may be prompted for a password or PIN. Enter the required code and press the [OK] key. External Display [2.2] You can use several menus even though the folder is closed. The following section describes the external display screen and easy-to-control external menus and their functions. Side Up - Adjusts the earpiece volume and moves the cursor up in the menu during a call. - Mutes the ring tone if pressed upon an incoming call. - Rejects the incoming call if pressed upon an incoming call. - Turns the flash on if pressed and held. - Starts scrolling if pressed while in the external menu screen. - Increases the volume in MP3. - Zooms in with the camera. Side Down - Adjusts the earpiece volume and moves the cursor down in the menu during a call. - Mutes the ring tone if pressed upon an incoming call. - Rejects the incoming call if pressed upon an incoming call - Starts scrolling if pressed in the external menu screen. -Goes to the external menu screen if pressed and held](https://usermanual.wiki/Pantech-Co/PG-1810/User-Guide-638875-Page-18.png)
![19 (Shown with MP3/Camera/) - Decreases the volume in radio and MP3. - Zooms out with the camera. Extra Key - Turns the camera capture mode on, - Works as a camera shutter in the capture mode - Turns Video Mode on if pressed and held. - Selects a menu or moves to the sub-menu, if pressed while in the external menu. - Exits from the menu screen and returns to the standby screen if pressed and held while in the external menu screen. button 1 - Functions as OK in the List. - Functions in the MP3 as Play/Pause, and as Hold if pressed and held button 2 - To move upward in the List. - To play the previous music in MP3. - To increase brightness when taking pictures with the Camera. button 3 - To move downward in the list. - To play the next music in MP3. - To lower brightness when taking pictures with the Camera. External Menu List Press and hold the side volume [ ] key in standby mode. MP3: Allows you to play MP3. Camera: Allows you to select either Camera or Video in order to take pictures. Side Key Special Functions. 1. Snap Shot Close the folder to initiate the camera function. Press and hold the side [ ] key to activate the camera mode. Press the [ ] key again to take a photo. And then, the image taken will be displayed on the screen. Press the [ ] key to save the picture with auto naming, when the folder is closed. Press and hold the [ ] key to activate the video mode when folder open.](https://usermanual.wiki/Pantech-Co/PG-1810/User-Guide-638875-Page-19.png)
![20 SIM Card SIM Card [3.1] When you subscribe to your network operator, you will get a SIM (Subscriber Identity Module) card containing your registration information. (PIN), the existence of additional service, etc. Like a credit card, it should be kept secure and handled carefully. Do not bend, scratch or expose it to moisture. Avoid static electricity. To avoid memory corruption of your SIM card, always switch off your phone before removing or inserting your SIM card. Installing/Removing the SIM card [3.2] 1. Remove the battery from the unit. 2. If the SIM slot is empty, insert the SIM card into the slot. 3. If you want to remove the SIM card, push the SIM card in the arrow direction as shown in the picture below.](https://usermanual.wiki/Pantech-Co/PG-1810/User-Guide-638875-Page-20.png)
![21 Using the battery Installing the battery [4.1] Put the contacts of the battery into the hole located at the bottom of the unit, as shown in the figure below. Press the upper side of the battery until you hear a “click” sound. Removing the battery [4.2] Push the battery lock button up and remove the battery. Charging the battery [4.3] This phone uses a Li-ion battery. Make sure to use an authorised battery and charger only. For more details, please inquire at your nearest dealer. You can use the phone during battery recharging. When the battery is mounted within the phone, open the cover located at the bottom of the phone and connect the adapter. An adapter is provided with the phone. If recharging is completed, detach the adapter connection from the outlet. 21](https://usermanual.wiki/Pantech-Co/PG-1810/User-Guide-638875-Page-21.png)
![22 Tip Your phone is powered by a Lithium Ion (Li-ion) battery. You can use the following Li-ion battery types for your phone. (Contact your local dealer for more information.) Standard-type battery. Precautions while Using the Battery [4.4] - Do not use a damaged battery or charger. - Use the battery for the specified purpose only. - The closer you are to the base station, the longer the phone usage time because less battery power is consumed for the connection. - Battery charging time varies depending on the remaining battery capacity and the battery and charger type in use. - Battery life is shortened as time passes by. - Use an authorised battery and charger only. - Since overcharging may shorten battery life, remove the battery from its charger once it is fully charged. Unplug the charger, once charging is complete. Leaving the battery in hot or cold places, especially inside a car in summer or winter, may reduce the capacity and life of the battery. Always keep the battery within normal temperatures. - Do not earth the battery. Earthing may occur when the battery is in contact with a conductive object. An earthed phone may also damage the battery. - Dispose and recycle used batteries in accordance with local regulations. - Do not dispose of the batteries in a fire. - Do not use an unauthorised charger. - In order to prevent injury or burns, ensure that metal objects do not come into contact with the + and – terminals of the battery.](https://usermanual.wiki/Pantech-Co/PG-1810/User-Guide-638875-Page-22.png)
![23 2. New Functions 1. Video Caller ID 2. Setting MJPEG for Idle Screen 3. OTA Settings Service 4. DRM/ Forward Lock Video Caller ID Save the video clip of a contact or other video clips. Select and set a video clip to the corresponding contact in the address book. When a call is received from the contact, the corresponding video clip will be played on the screen. You can use one of two setting methods. Contacts [1.1] 1. Select ‘Menu>2.Contacts>2.Add Contact’ 2. Select ‘2.Phone’ option under ‘Save to’ option and input the appropriate information in all the fields. 3. Press the navigation key in the image saving menu, and the ‘Contact Image’ popup will appear. 4. Select ‘3.Take a Video’ (For further details, see Applications Menu 5.1.2) or ‘4.Video Gallery’ (For further details, see Applications Menu 4.3) to specify the video file. 5. The selected video will be played when a call is received from the corresponding contact. Multimedia [1.2] 1. Select ‘Menu>5.Multimedia>1.Camera>2.Take a Video’ and save the video. (For further details, see Applications Menu 5.1.2) 2. Select ‘Menu>5.Multimedia>1.Camera>4.Video Gallery’ or ‘Menu>4.Media Gallery>3.Video Gallery’. (For further details, see Applications Menu 4.3)](https://usermanual.wiki/Pantech-Co/PG-1810/User-Guide-638875-Page-23.png)
![24 3. Select the Video Album and press the [Option] soft key [ ] and select [Set as]. 4. Select ‘2.Contact’ when the ‘Set as’ pop up appears, and select the target person and press the [ ] button. (At least one person should have been already stored in Contacts.) 5. The selected video will appear when a call is received from the corresponding number. Setting MJPEG for Idle Screen You can set a video file to play on the screen when the phone is idle. 1. Select ‘Menu>5.Multimedia>1.Camera>2.Take a Video’ and save the video. (For further details, see Applications Menu 5.1.2) 2. Select ‘Menu>5.Mutlimedia>1.Camera>4.Video Gallery’ or ‘Menu>4.Media Gallery>3.Video Gallery’. (For further details, see Applications Menu 4.3) 3. Select the Video Album and press the [Option] Soft key [ ] and select [Set as]. 4. Select ‘1.Wallpaper’ when the ‘Set as’ pop up appears. 5. The selected video will play on the screen when the phone is idle.](https://usermanual.wiki/Pantech-Co/PG-1810/User-Guide-638875-Page-24.png)
![25 OTA Settings Service WAP/ OTA Provisioning [3.1] In order to use the WAP Browser, you need to have proper connection settings on your phone. You may add and/or edit the WAP Profile manually or receive the settings directly as a configuration message according to the operators and/or service providers, at the latter case you need to save them on your phone. Please note that there should be some on-screen steps you need to follow to save and activate the settings. Please also note that the compatibility to Ericsson/Nokia WAP Provisioning OTA has been made. DRM/ Forward Lock DRM/ Forward Lock [4.1] Your phone supports a Digital Rights Management (DRM) system to protect acquired content. A piece of content, for example ring tones, wall papers, etc. can be protected by Forward Lock, which means the protected contents cannot be forwarded to other devices including other phones and desktops. Please note that you should and shall be informed by the service provider before and/or when you try to download such protected contents.](https://usermanual.wiki/Pantech-Co/PG-1810/User-Guide-638875-Page-25.png)
![26 3. Basic Functions 1 Switching the Phone On or Off 2. Making a Call 3. Answering a Call 4. Calling Options 5. Using the Headset 6. Using the Speaker Phone 7 Selecting Menu Functions 8. Entering Text Switching the Phone On or Off Switching the Phone On [1.1] 1. Open the folder. 2. Press the [ ] key until the phone switches on. 3. If the phone requests you to input a PIN, enter the PIN and press the [OK] Soft key. (For further details, see Applications Menu 6.8) Your phone starts to search for an available network and the current date and time will appear on the internal and external displays. Once connected to the network, you can send or receive a call. If a malfunction occurs while using the phone or it is not turned on, remove the battery and install it again after 5 or 10 seconds. NOTE: To change the language, use the Language menu option (For further details, see Applications Menu 6.4) Switching the Phone Off [1.2] To switch the phone off, press the [ ] key until the power-off animation displays.](https://usermanual.wiki/Pantech-Co/PG-1810/User-Guide-638875-Page-26.png)
![27 Making a Call Making a Call [2.1] Enter the area code and the phone number to make a call in standby mode, and press the [ ] key. NOTE: If you have set the [Auto Redial] option (For further details, see Applications Menu 6.3.4) to [On], the phone will attempt to make a call automatically for up to 10 times if it is not answered. To clear the last digit displayed, press the [C] key. To clear the all digits displayed, press and hold the [C] key. Ending a Call [2.2] When you want to finish your call, press the [ ] key or close the folder. Once the call is completed, a call summary (Recipient Name or Number, Service Time) will be displayed. Using Call Logs [2.3] The phone stores dialled, received and missed calls. The last call is saved in the first position. If the same number was dialled more than once, only the latest occurrence will be saved. 1. Press the [ ] key to see the call log list aligned dialled, chronologically. 2. Press the [Up/Down] key to select a number. 3. Press the [ ] key for dialling. (For further details, see Applications Menu 3) NOTE: Press and hold the [ ] key to redial the last number in the call log. Using Contacts [2.4] You can store used names and phone numbers in the SIM card or the phone memory. Therefore, you do not have to remember the phone numbers; simply can select the name to re-call the associated number. 1. Press the [ ] key and the [ ] key in the standby screen to access the ‘View Names’ List and ’2.Contacts’ Menu respectively 2. Select a number from ‘View Names’. 3. Press the [ ] key for dialling. (For further details, see Applications Menu 2)](https://usermanual.wiki/Pantech-Co/PG-1810/User-Guide-638875-Page-27.png)
![28 Making an International Call [2.5] 1. Press and hold the [0] key for the international prefix until the ‘+’ character appears on the display or enter the outgoing national code. 2. Enter the country code, area code and phone number you want to make a call to. 3. Press the [ ] key. Speed-dialling from Contacts [2.6] Press and hold the ‘Speed Dial’ number to make a call using the number you have saved. For example, press the “5” key longer to dial a number which has been saved as “5” in Speed Dial List. For speed dial numbers longer than 2 digits, press the first one and then press and hold the second one. (For further details, see Applications Menu 2.3) Making an Emergency Call [2.7] You can make an emergency call without the SIM. Enter 'Emergency Number'. Then press the [ ] key, or, press the [SOS] Soft key if no SIM Card is available.](https://usermanual.wiki/Pantech-Co/PG-1810/User-Guide-638875-Page-28.png)
![29 Answering a Call Answering a Call [3.1] When you receive a call, the phone rings (or vibrates) and the screen will display the name or the number of the caller (if the network supports the function and you have subscribed to it). If the caller can be identified, the caller’s phone number or name will be displayed if it is stored in your Contacts. 1. To answer a call, open the folder. 2. If it is already open, press the [ ] key. Tip: If the answer type is set as [Any Key], you can answer a call by pressing any key except the [ ] key. Viewing Missed Calls [3.2] If the incoming call could not be answered, a missed call message will appear on the screen to remind you of the missed call (Network and subscription dependent feature, not necessarily available in all areas) To reply to the missed call; 1. Keep the folder open. 2. Press the [View] Soft key to display a list of missed calls. 3. If necessary, scroll to the number you want by pressing the [Up/Down] keys. 4. Press the [ ] key to call the missed call. Press the [C] or [ ] key to close the missed call notification message Rejecting a Call [3.3] Press the [ ] key or the [Reject] Soft key when the folder is open. If the [Reject] Soft key is pressed, the caller will receive a busy line tone. When the folder is closed, press and hold the [Up/Down] key during an incoming call Adjusting the Calling Volume [3.4] If you wish to adjust the earpiece volume during a call, use the volume keys on the left side of the phone. Press the [Up] key to increase the volume level and the [Down] key to decrease it. In standby mode with the folder open, you can adjust the key tone volume using the [Up/Down] keys.](https://usermanual.wiki/Pantech-Co/PG-1810/User-Guide-638875-Page-29.png)
![30 Calling Options During a call, press the [ ] key to show the call options. Switching the Microphone Off (Mute) [4.1] You can temporarily switch off the microphone so that the person you talk to on the phone cannot hear you. For example, you want to say something to another person but do not want the person calling to hear you. Press the [Mute] Soft key. To switch on the microphone: Press the [Sound] Soft key. Holding a Call [4.2] You can place a current call on hold whenever you want to. You can make another call while you have a call in progress if your network service provider supports this service. Of these two calls, one is active and the other is on hold and you can switch between the calls. To place a call on hold, simply select the [Option] Soft key followed by [Hold], or press the [ ] key. You can reactivate the call whenever you want by selecting [Option] followed by [Retrieve]. Once a call is held, the name and icon of the caller will fade to grey. To make a call while you have a call in progress: 1. Enter the phone number that you want to dial or look it up in Contacts. 2. Press the key to dial the second call. The first call is automatically put on hold. To switch between two calls, press the [Swap] Soft key or [ ] key. The current call is placed on hold and the call on hold is reactivated so that you can continue your conversation. If you want to finish, complete each call normally by pressing the [ ] key. Answering a Second Call [4.3] You can answer an incoming call while you have a call in progress, if your network service provider supports this service and you have activated the [Call waiting] option (For further details, see Applications Menu 6.3.5). You will be notified of an incoming call by a call waiting tone. To answer a call while you have another call in progress: 1. Press the [ ] key to answer the incoming call.](https://usermanual.wiki/Pantech-Co/PG-1810/User-Guide-638875-Page-30.png)
![31 2. The first call is automatically put on hold. To switch between two calls, press the [Swap] Soft key or [ ] key.. To end the current call, press the [ ] key. The call on hold is automatically reconnected to you. Searching for a Number in Contacts [4.4] You can search for a number in your Contacts during a call. 1. Press the [Option] Soft key. 2. If necessary, press the [Up/Down] key to highlight the [Contacts] option. Press the [Select] Soft key. 3. Select the preferred search types like Name, Group, or Photo. 4. Press the [OK] Soft key. 5. The Contacts entries are displayed. 6. Enter the first letters of the name for Name Search. 7. The Contact entries are displayed starting with the first entry matching your input. NOTE: You can also scroll through Contacts from the beginning, by pressing the [Up/Down] key. 8. To view the highlighted entry, press the [OK] Soft key. (For further details, see Applications Menu 2) Using DTMF Tones [4.5] You can turn the DTMF key tones off on during a call. When the [DTMF Off] option is selected, your phone does not transmit the key tones. It allows you to press keys without hearing annoying key tones during a call. To communicate with answering machines or computerised telephone systems, the [DTMF On] option must be selected. Transferring a Call [4.6] You can transfer the current call to the call on hold if your network service provider supports this service, so that callers can talk to each other. You will be disconnected from both of them. 1. During a call, answer or make a call in the normal way, and press the [Option] Soft key. 2. Press the [Up/Down] key to select the [Transfer] option and press the [Select] Soft key or [OK] key. The two people will be connected to each other. Using the Message Service [4.7] You can read or write a new message during a call. 1. Press the [Option] Soft key. 2. Press the [Up/Down] key to highlight the [Messages] option. Press the [Select] Soft key or the [OK] key. 3. To read a received message, select the ‘Inbox’ submenu, and then scroll to the message that you want to read. 4. To write a new message, select the ‘Write New’ submenu.](https://usermanual.wiki/Pantech-Co/PG-1810/User-Guide-638875-Page-31.png)
![32 5. Press the [OK] Soft key. (For further details, see Applications Menu 1.1) Making a Multi-party Call [4.8] A multi-party call feature is a network service that allows up to six people to take part in a multi-party or conference call simultaneously. For more information, contact your service provider. To make a multi-party call: 1. Call the first participant in the normal way. 2. Call the second participant in the normal way. The first call is automatically put on hold. 3. To join the first participant to a multi-party call, press the [Option] Soft key and select the [Join All] option. 4. Press the [Select] Soft key or [OK] key. 5. To add a new person to the multi-party call, call the person in the normal way. Then, press the [Option] Soft key and select the [Join All] option. 6. Press the [Select] Soft key or [OK] key. You can add incoming callers by answering the call and selecting the [Join All] option. Repeat the above steps as needed. Upon organising a multi-party call, you may view the people and their status in Multiparty with the [Left/Right] key. An icon indicates either Far Multiparty or Far Hold. Having a Second Call During a Multi-party Call To answer or make a call when you have the multiparty call: 1. To place the multi-party call on hold, press the [Option] Soft key and select the [Hold All Calls] option. 2. Answer or make a call in the normal way. 3. You can reactivate the multi-party call on hold by pressing the [Swap] Soft key. 4. To end the multi-party call, press the [ ] key. Having a Private Conversation with One Participant 1. Press the [Option] Soft key and select the [Private] option. Press the [Select] Soft key or [OK] key. 2. Press the [Up/Down] key to highlight a participant and press the [OK] key. Now you can talk privately with that person. The other participants can continue the conversation with each other. 3. To return to the multi-party call, press the [Option] Soft key and select the [Join All] option. 4. Press the [Select] Soft key. All of the multi-party call participants can now hear each other. Removing One Participant 1. Press the [Option] Soft key and select the [Exclude] option. 2. Press the [Up/Down] key to highlight a participant and press the [Select] Soft key or the [OK] key.](https://usermanual.wiki/Pantech-Co/PG-1810/User-Guide-638875-Page-32.png)
![33 The call ends with that participant, but you can continue to talk with other participants. 3. Complete the multi-party call by closing the folder or pressing the [] key. Retrieving Call in Headset/Handsfree/Phone [4.9] This function becomes available when Bluetooth Headset/Handsfree are connected during a call. To talk using the Bluetooth Headset/ Handsfree during a phone, select [Option] -> [Retrieve Call in Headset/Handsfree]. On the other hand, selecting . [Option] -> [Retrieve Call in Phone] allows you to talk using the phone again. NOTE: While you are on a call using your mobile phone, a certain button of the Bluetooth Headset/Handsfree allows you to talk using the Bluetooth Headset/Handsfree. Using the Headset You can send or receive a call without touching the phone, using the headset. When you connect the headset to the jack located at the top of the phone, the button on the headset works as described below; To show the recent calls, press the button in standby mode To redial the last call, press the button twice in standby mode To answer a call, press the button when you receive a call To complete a call, press the button when you have finished a call Using the Speaker Phone During a call, to use speaker phone function, simply select the [Option] Soft key followed by [Speaker On]. You can deactivate the speaker phone function whenever you want by selecting [Option] followed by [Speaker Off]. NOTE: 1. Please use EarMic and Speaker phone Carkit while driving as using the speaker phone may be dangerous for your safe driving. 2. While using the Speaker Phone mode, do not move the phone close to your ear. That could damage your hearing.](https://usermanual.wiki/Pantech-Co/PG-1810/User-Guide-638875-Page-33.png)
![34 Selecting Menu Functions Entering into Menu Functions [7.1] Key Function [] key Goes to the main menu in standby mode. [] key Goes to the ‘View Names’ [u2]List [], [ ] key Moves within the main [u3]menu. [], [ ] key Searches for the sub-menu. [] key Goes to the sub-menu. Goes to the WAP menu. Press the 4-way navigation keys in the main menu to move the menu. See the bottom of the Sub Menu List to check the current setting values in the sub-menu. Then, press the [Left/Right] key followed by the [OK] key to change the preset menu value. If you do not press the [OK] key, the new value will be cleared without saving. NOTE: Press the [C] key to return to the previous menu. Input the menu number to access the sub-menu quickly. Using the Shortcut Key in Standby Mode [7.2] Key Menu selected if pressed If pressed and held [] key Menu [] key View Names’ [] key Messages Displays ‘Write New’ [] key Sound Settings List Sound Settings List [] key WAP Directly connect to WAP browser [] key Favorite Photo Gallery menu [] key Contacts Search List [] key Calendar Monthly View [] key Recent Calls Redial last call [] key Photo capture mode Video capture mode []key Mp3 Player Mode](https://usermanual.wiki/Pantech-Co/PG-1810/User-Guide-638875-Page-34.png)
![35 Entering Text Input Mode [8.1] On many occasions you need to input text while you are using your phone, (e.g., storing a name in the Contacts, writing a new message, creating your greeting or scheduling events on your calendar). The available text input modes include. T9 mode You can input a letter using only one keystroke per letter. The keypad has more than one letter on it – when you press the[5]key once, J, K or L may be displayed. The T9 mode automatically compares your keystrokes with an internal linguistic dictionary to determine the correct word, thus requiring far fewer keystrokes than the conventional ABC mode. ABC mode In this mode, you can input the letter you want by pressing the keypad once, twice, three or four times until the target letter appears. 123 mode You can input a number in this mode. Symbol mode You can input the special characters like Greek letters, currency units, or a period mark in this mode.](https://usermanual.wiki/Pantech-Co/PG-1810/User-Guide-638875-Page-35.png)
![36 Changing Text Input Mode [8.2] When you are in the area where you can input the text, the text input mode indicator will be displayed at the bottom of the LCD. Example: Entering a memo. To switch to other text input modes: 1. Press the right Soft key indicating the current text input mode. 2. Toggle to the mode you want to use by pressing the [ ] right Soft key. The ‘Language select’ option allows you to change the text input language. Inserting a Space To insert a space between words, press the [0] key. Or, at the end of line, press the [Right] key to add a new space character. Scrolling To move the cursor to the left or right within the text, press the [Left/Right] key. And also, to move the cursor to the up or down among the lines, press the [Up/Down] key. NOTE: By pressing the [Side Up/Down] key, the cursor can be moved very quickly to the beginning or the end of the text. Clearing Letters and Words To clear the letter to the left of the cursor, press the [C] key. You can clear all of the letters on the display by pressing the [C] key longer. Returning to the Previous Screen When the text input field is empty, press the [C] key to return to the previous screen. TIP: To change the text input mode quickly [*] Press long Shows symbol screen. [0] Press short Enters a space Character [#] Press long Changes the text input mode [C] Press short Deletes characters one by one. Returns to previous screen after deleting all characters. [C] Press long Deletes all characters and moves the cursor to the beginning of the input screen. The number of remaining characters you can enter. Editing area The current text input mode and language.](https://usermanual.wiki/Pantech-Co/PG-1810/User-Guide-638875-Page-36.png)
![37 Using T9 Mode [8.3] In the T9 alphabet Editor, each word is composed completely as you input the text. 1. Press the keys numbered [2] to [9] to input text. For example, press [4][3][5][5][6] in sequence to input ‘hello’. The word you are typing appears on the display. It may change with each key you press. 2. Enter the whole word before editing or deleting any keystrokes. 3. Upon searching a word, input the next text. 4. If the search fails, press the [ ] key to search which text can be typed in. The phone displays the most commonly used choices first. 5. Continue entering the next word. ABC Mode [8.4] When typing in ABC mode, press the key labelled with the target letter: - Press the key once for the first letter. - Press twice for the second letter. Example: To display the letter “C”, quickly press the [2] key three times. To display the letter “K”, press the [5] key twice. This method is called Multi-tap typing. NOTE: The cursor moves to the right when you press a different key. When entering the same letter twice or a different letter on the same key, just press the Right key or wait a few seconds for the cursor to move to the right automatically, and then enter the next letter. Refer to the table for more information about the characters available. The characters vary, depending on the text input language. Changing Case To change the case of the next letter(s) that you type, press the [#] key. There are three cases: - Lower case (no indicator) - Initial capital ( ) - Capital lock ( ) [English] KEY Characters in displayed order 1 . , - ? ! ' @: 1 2 a b c 2 3 d e f 3 4 g h i 4 5 j k l 5 6 m n o 6 7 p q r s 7](https://usermanual.wiki/Pantech-Co/PG-1810/User-Guide-638875-Page-37.png)
![38 8 t u v 8 9 w x y z 9 0 Space 0 Using 123 Mode [8.5] The number mode allows you to enter numbers into the text. Press the key corresponding to the digit you want to enter. Using Symbol Mode [8.6] The symbol mode allows you to enter symbols into your text. To display more symbols, press the [Up/Down] key. To input a symbol, press the number for a symbol, and the text will appear in the input screen. Press the [#] key longer or the [ ] Soft key to escape from Symbol mode. If you entered a symbol with the hot key ([#] long key), press the key again to return to the previous mode. Press the [ ] key to proceed to a mode next to the Symbol mode. If you entered a symbol with the [ ] key, press the key again to proceed to next mode from Symbol mode.](https://usermanual.wiki/Pantech-Co/PG-1810/User-Guide-638875-Page-38.png)

![40 Messages Select ‘Menu>1.Messages’. or press the [ ] key in standby mode. This menu allows you to create, send, read and save a message using Short Message Service (SMS: Text message), Enhanced Message Service (EMS: Message including simple image, animation or melody) or Multimedia Message Service (MMS: Message supporting presentation of various media types, such as full colour images and polyphonic ring tones) or Email Service. Voice mails are also available. Note: These features are available only if your service provider’s network supports it. Contact your service provider for more information. - Text Msg. Short message service (SMS) allows you to send and receive a short text message to and from other GSM phones. Additionally, your phone supports Enhanced Messaging Service (EMS), which allows you to make a short message consisting of a simple picture, melodies, animation and styled text that add new features to simple text messages. To send a text message by phone, you must obtain the number of the SMS centre from your service provider. - Multimedia Msg. Multimedia Message Service (MMS) is a messaging service quite similar to Short Message Service (SMS). It provides asynchronous delivery of personal multimedia messages. Adding to the familiar text content of the text message, the multimedia message can contain an image, graphic, and/or sound. The MMS message is a separate multimedia presentation in a single entry, not an attachment to the text file. Using the MMS feature, your phone can receive a multimedia message and/or send a picture message, depending on MMS availability from your service provider. Only the phone that supports the multimedia message feature can receive or display the multimedia message. - E-mail Before you can send, receive, retrieve, reply to, and forward e-mail to a separate e-mail account, you must Define your e-mail settings correctly. See (For further details, see Applications Menu 1.7) Write New [1.1] Select ‘Menu>1.Messages>1.Write New’ and press the [OK] key. - Text Msg.: Write new SMS or EMS message. - Multimedia Msg.: Write new MMS message. - E-mail: Write new email.](https://usermanual.wiki/Pantech-Co/PG-1810/User-Guide-638875-Page-40.png)
![41 Editor options for Text Msg. [1.1.1] While entering your message, press the [Option] Soft key [ ] to use the following options. When you press the [Up/Down] key to select an item and press the [OK] key using the following option: Add Picture: Loads the selected item. Add Animation: Loads the selected item. Add Melody: The melody will be set up and played back once. Add Template: Insert a clause stored in a Template. Language: The selected language will be displayed at the bottom of the right corner. Editor options for Multimedia Msg. [1.1.2] Slide page information will be displayed on the top right corner. You can add, edit, replace, or delete objects or templates in MMS with the following option. This menu option allows you to create a new multimedia message and then send it to several recipients. 1. Press the [Option] Soft key and select one of the following options using the [Up/Down] key. Add Subject or Edit Subject Edits subject. (For further details, see Basic Functions Menu 7) Add Text Enters a new message. (For further details, see Basic Functions Menu 7) Add Image Adds an image to the Image Gallery. Press the [OK] key to select the image when the image list appears. (For further details, see Application Menu 4.4) Add Photo Adds a photo to Photo Gallery. Press the [OK] key to select the phone when the photo list in each folder appears. (For further details, see Applications Menu 4.2) Take a Photo Adds a new photo by taking a photo using the camera feature. (For further details, see Applications Menu 5.1.1) Add Sound Adds a sound to the Sound Gallery. Press the [OK] key to select the sound when the sound list appears. (For further details, see Application Menu 4.5) Add Template Adds an MMS message template. This feature is available only when no item is in the slide. With more than one slide, Add Template will not be available. 2. Press the [Option] Soft key [ ] to use the following options. The options menu may not appear depending on situations.](https://usermanual.wiki/Pantech-Co/PG-1810/User-Guide-638875-Page-41.png)
![42 Delete Text Deletes the selected text. Add Object Add image, photo, sound or slide. Preview Shows the message as it appears on the recipient’s phone. Add Subject or Edit Subject Edits or modifies the subject.(For further details, see Basic functions Menu 7) Slide Timing Set the time duration that the received message is displayed. The display automatically scrolls to the next slide page after the specified time. Page Layout Arranges the image and text display position in the slide page. You can set ‘Image at Top’ or ‘Text at Top’. Edit Text Edits the selected text. Save as Draft Messages are moved to Draft Box and then saved in the phone memory. . 3. Press the [Edit], [Add] or [Replace] Soft key [ ] to use the following options. Edit: Edit Text Add: Adds Image, Photo, Sound, or Slide, takes a photo. Replace: Changes added objects. Editor options for E-mail [1.1.3] Select an E-mail and press the [Option] Soft key [Left ] at the left to select the following menu. Add subject (Edit subject) : Adds subjects. Add text (Edit text) : Adds texts. Add attachment : Adds attachments to the e-mail. Add template: Appends the text part of the email template in the template folder. Save as Draft :Messages are moved to Draft Box and then saved in the phone memory. [Right ] Soft key Add: Adds subject, the main text, or attachment Edit: Adds subject, the main text, or attachment Delete: Deletes selected object Sending and saving a message [1.1.3]](https://usermanual.wiki/Pantech-Co/PG-1810/User-Guide-638875-Page-42.png)
![43 To send Text Msg. 1. When you have completed entering the message, press the [OK] key. [option menu 없으므로 삭제] 2. Input the recipient’s phone number on the Number Screen. Press the [Option] Soft key [ ] to search for a number in Contacts or Recent Calls. You can add up to 5 recipients. 3. Press the [OK] key to display the transmission progress with a sending animation. If the transmission fails, the message is saved in the OutBox, from which it can be re-transmitted. To send Multimedia Msg. and E-mail 1. When you finish creating the message, press the [OK] key. [option menu 없으므로 삭제 2. Input the recipient's number or e-mail address. You can also search for a number or e-mail address in Contacts by pressing the [Option] Soft key 3. To send the message to several recipients (up to 15 recipients), repeat from step 3. 4. When you finish entering the recipient, press the [OK] key. Inbox [1.2] Select ‘Menu>1.Messages>2.Inbox’. Text Msg. [1.2.1] Select Inbox and press the [OK] key to view the received messages one by one. Press the [Reply] Soft key at the bottom right corner to write a new message. The Write New screen will appear. (For further details, see Applications Menu 1.1) Callback number is already registered. You add information. Press the [Option] Soft key [ ] to: Delete: Deletes the selected message. Forward: Sends the received message to another recipient. Delete All: Deletes all messages in the Inbox. Save to Phone/SIM: Saves the selected message to Phone or SIM. Reply: Writes and sends a new message using the recipient’s number. Select a message and press the [Option] Soft key [ ] at the left to select the following menu. Delete: Deletes the selected message. Forward: Edits or sends the received message to another recipient. Cut: Cut all objects integrated with a message. 1. Objects: Displays all objects integrated with a message. 2. Numbers: Selects any number in the received message. Select a function from View to extract and list numbers in the messages. Press the [Save] Soft key to add each number to a new or existing Contacts entry.](https://usermanual.wiki/Pantech-Co/PG-1810/User-Guide-638875-Page-43.png)
![44 3.URLs: Saves the URL information contained in the message. The selected URL is saved in the bookmark. Save as Template: Saves the current message in template form. Reply: Writes and sends a new message using the recipient’s number. Multimedia Msg. [1.2.2] You can receive a MMS notification through the SMS network and read only the downloaded MMS message. Check for the new message in the MMS Inbox. Select [Download] to download a message. If ‘Auto Download’ is set to ‘On’, notification will not be made but the message will be saved in the Inbox as unread. Press the [Option] Soft key [ ] to: Delete: Deletes the selected message. Forward: Edits or sends the received message to another recipient. Delete All: Deletes all messages in the Inbox. Reply: Writes and sends a new message using the recipient’s number. Select a message and press the [Option] Soft key [ ] on the left to select one of the following menus. Delete: Deletes the selected message. Forward: Forwards the received message to another recipient. Cut: Cut all objects integrated with a message. 1. Objects: Displays all objects integrated with a message. 2. Numbers: Selects any number in the received message. Select a function from View to extract and list numbers in the messages. Press the [Save] Soft key to add each number to a new or existing Contacts entry. 3.URLs: Saves the URL information contained in the message. The selected URL is saved in the bookmark . Save as Template: Saves the current message in template form. Message Info.: Displays information on the selected message (from, subject, size). Reply: Writes and sends a new message using the recipient’s number. CB Msg. Options [1.2.3] Press the [Option] Soft key [ ] to: Delete: Deletes the selected message. Delete All: Deletes all messages in Inbox. E-mail Options [1.2.4] Press the [Option] Soft key [Left ] to: Check for E-mail: Allows you to check and verify the emails not read from POP server that are saved in the settings. The POP server does not delete unread mails, since there may exist truncated](https://usermanual.wiki/Pantech-Co/PG-1810/User-Guide-638875-Page-44.png)
![45 mails depending on storage capacity. Download in Full: Allows you to download unto the available space in the User memory all the emails that have been truncated or could not be received due to the size limit in the Email Settings. Outbox [1.3] Select ‘Menu>1.Messages>3.Outbox’ and press the [OK] key. Text Msg. [1.3.1] The Outbox saves the message that you have failed to send. Press the [Resend] Soft key at the bottom right corner to send the failed message again. Press the [Option] Soft key [ ] to: Edit: Edits the selected message. Delete: Deletes the selected message. Delete All: Deletes all messages in the Outbox. Resend: Resends the selected message. Select a message and select [Option] Soft key [ ] at the left for the associated options. Edit: Sends the selected message. Delete: Deletes the selected message. Save as Template: Saves the current message in template. Resend: Resends the selected message. Draft Box [1.4] Draft Box saves the messages that you edited and saved. . Press the [Edit] Soft key at the bottom right corner to edit the saved message again. Press the [Option] Soft key [ ] to: Delete: Deletes the selected message. Delete All: Deletes all messages in the Draft Box. Edit: Edits the selected message. Select a message and press the [OK] key, and the press the [Option] Soft key [ ] for the associated options. Edit: Sends the selected message. Delete: Deletes the selected message. Save as Template: Saves the current message in template. Send: Sends the selected message. Sent Box [1.5] Sent Box saves the messages successfully sent. Press the [Resend] Soft key at the bottom right corner to resend the sent message again. Press the [Option] Soft key [ ] to:](https://usermanual.wiki/Pantech-Co/PG-1810/User-Guide-638875-Page-45.png)
![46 Edit: Edits the selected message. Delete: Deletes the selected message. Delete All: Deletes all messages in the Sent Box. Resend: Resends the selected message. Select a message and press the [OK] key, and the press the [Option] Soft key [ ] for the associated options. Edit: Sends the selected message. Delete: Deletes the selected message. Save as Template: Saves the current message in template. Resend: Resends the selected message. Templates [1.6] Select Menu>1.Messages>6.Templates’. Press the [Option] Soft key [ ] to: New: Makes a new template. Not available if the template space is full. 1. Text Msg.: Write a new Text Template. 2. Multimedia Msg.: Write a new Multimedia Template. 3. E-mail: Write a new E-mail Template. Delete: Deletes a template you have selected. Delete All: Deletes all templates. [u4]Edit: Edits the selected template. Select a message and press the [OK] key, and the press the [Option] Soft key [ ] for the associated options. Send: Sends the selected template. Delete: Deletes a template you have selected.[u5] Edit: Edits the selected template. Settings [1.7] Text Msg [1.7.1] You can set up default SMS information using this menu with the following options. - Message Centre: Allows you to store or change the number of your SMS centre required when sending a message. You must obtain this number from your service provider. - Message Lifetime: Allows you to set the duration of time your message is stored at the message centre while attempting to deliver it. - Message Type: Allows you to set the message type to Normal, Fax, Voicemail, ERMES, National Paging, X.400, or Internet. The network will convert the messages into the selected format. - Receive to: Allows you to select the storage location when a text Msg. is received. If the storage space of the selected location has been fully occupied, the message is saved in other](https://usermanual.wiki/Pantech-Co/PG-1810/User-Guide-638875-Page-46.png)
![47 storage location.. Press the [Left/Right] key to choose either Phone or SIM. - Save Message: Allows you to determine if the completed message will be saved in the Sent Box after it has been sent. Press the [Left/Right] key to choose either On or Off. - Delivery Report When this option is set to [Off], no delivery report will be received from the server on the text message sent by the user. - TTS Message Alert When this option is activated, receipt of a new message(s) is notified via TTS alert.. - TTS Message When checking the message, you can hear the message via TTS. NOTE : The SMS message is read in the default language set in the phone. If the SMS message contains a part(s) written in other language, no sound will be played for that part(s) or it may be played back in different sound. No sound may be heard for special characters or texts. (TTS Brazil만 들어감) Multimedia Msg. [1.7.2] MMS Profile [1.7.2.1] - Profile Name: Input the profile name. - Home URL: Input the connection URL. - Connection Type: Select WAP or HTTP. - GSM Settings[u6] - Gateway - IP Address: Input the IP address. A point will be added after every 3 digits. A comma will be added every 3 digits. - IP Port: Input the IP port number yourself. - Login ID: Input the ID to sign into the gateway. - Password: Input the password to sign into the gateway. - Data Call Type: Press the [Left/Right] key to choose either ISDN or Analogue. - Dial Number: Input the dial number manually - Login ID: Input the ID to sign into the GSM. - Password: Input the password to sign into the GSM. - GPRS Settings - Gateway - IP Address: Input the IP address. A comma will be added every 3 digits. - IP Port: Input the IP port number yourself. - Login ID: Input the ID to sign into the GPRS service - Password: Input the password to sign into the GPRS service. - APN: Input the Access Point Name yourself. - Login ID: Input the ID to sign into the GPRS service. - Password: Input the password to sign into the GPRS service. - DNS Settings: Enter the IP address for the Domain Name Server. You may enter primary and secondary DNS. This function is available only when you are connected to HTTP - Bearer:[u7] Press the [Left/Right] key to choose either GPRS](https://usermanual.wiki/Pantech-Co/PG-1810/User-Guide-638875-Page-47.png)
![48 Only/ GSM Only Message Lifetime [1.7.2.2] Allows you to set the duration of time your message is stored at the message centre while attempting to deliver it. Auto Download [1.7.2.3] Allows you to set how you receive a message. You can select either On or Off Save Message [1.7.2.4] Allows you to determine if the completed message will be saved in the Sent Box after it has been sent. Press the [Left/Right] key to choose either On or Off. Read Report [1.7.2.5] When this option is set to [On], the network informs you whether or not your message has been delivered successfully Delivery Report [1.7.2.6] When this option is set to [Off], your phone does not send a reply to the recipient’s phone even if the sender asks for the delivery confirmation reply E-mail [1.7.3] - Max. Message Download Size When downloading a message the maximum size of the message downloaded is controlled by this option. If the message is greater then the given size, it will be only header 30KB / 60KB / 100KB / 300KB. - Email Accounts Displays a list of email accounts. When selecting the OK key the currently selected account can either be deleted, renamed, set as the default account or edited. The default account is the account which is used to send emails with. The default account can not be deleted. When selecting an account for edit, the options listed below become available. The option to create a new account is also presented. - User Display Name Name which appears in sent email headers - Email Address Users email address - Username Used when authenticating against email server - Password Used when authenticating against email server - Data Connection Internet data connection to use to establish connection - GPRS : Select this menu and then press the [Edit] Soft key to edit APN Name , User Id , Password. - CSD : Select this menu and then press the [Edit] Soft key to edit Dial Number , User Id, Password, Modem](https://usermanual.wiki/Pantech-Co/PG-1810/User-Guide-638875-Page-48.png)
![49 Type (ISDN / Analog). - Incoming Server Incoming POP3 server - Outgoing Server Outgoing SMTP server - SMTP Authentication If set to Yes then the username and password will be used to authenticate the user Id when sending a message with the SMTP protocol. - Save Message Allows you to determine if the completed message will be saved in the Sent Box after it has been sent. Press the [Left/Right] key to choose either On or Off. - Saving Memory - Internal Memory : Saves the files attached to e-mails in the phone. However, file types that can be saved are limited. - External Memory : Saves the files attached to e-mails in the external memory. Please note that they will be saved in the “Attachments” directory without any limit. CB Msg. [1.7.4] - Language: Choose one of All, English, Chinese, or Deutsch. - Info. Subjects: Allows you to choose the subject of a CB Msg. - Standard: Predefined subjects list. - Custom: Userdefined subjects list. - Receive Press the [Left/Right] key to set whether the message will be received or not. Voice Mail [1.7.5] Use this function to access the voice mailbox provided by the network service provider. - Call: Call the predefined voice mail system to check a voice mail. - Voice Mail Number: Input the voice mail recipient number manually. Memory Info. [1.8] Select ‘Menu>1.Messages>>8.Memory Info.’ and press the [OK] key. You can see the used or available memory amount.](https://usermanual.wiki/Pantech-Co/PG-1810/User-Guide-638875-Page-49.png)
![50 Contacts You can store your personal contacts, which can be added or deleted at any time. You can save up to 800 contacts on the SIM or phone memory. Searching a Name/Group [2.1] Name Search [2.1.1] Select ‘Menu>2.Contacts>1.Search>1.Name Search’. Searches for the phone number from Contacts using the following procedure. 1. Input a name and press the [OK] key. The contact list is shown and the cursor is placed on an item that matches your input data. 2. Press the [Left/Right] key to view the recorded numbers 3. Press the [OK] key to view all. Press the [Option] Soft key [ ] to: Send Message: Sends a message to a selected recipient. Edit: Edits and saves the content[u8] Delete: Deletes the selected item. Send via Bluetooth: Sends contact information using Bluetooth. Add to Speed Dial: Adds the selected number to Speed dial. Move Memory: Moves Memory to SIM or Phone. Language: Change the language. New Contact: Creates a new contact. Group Search [2.1.2] Select ‘Menu>2.Contact>1.Search>2.Group Search’. Searches for the phone number of each group. Service Number [2.1.3] Select ‘Menu>2.Contacts>1.Search>3.Service Number’ Adding a New Contact [2.2] Select ‘Menu>2.Contacts>2.Add Contact’. Adds the contact information of other people. Initially, an empty field with a grey colour will appear until you input a text. Depending on the ‘Memory in Use’ setup, the following fields will be displayed. - Phone: Name, Mobile, Home, Office, Fax, Group, Picture, Melody, Email and Memo. - SIM Card: Name, Mobile, and Group - Phone or SIM: Select the saving location – phone or SIM. Editing Contacts [2.2] Edits the contact on the same screen with Add Contacts.](https://usermanual.wiki/Pantech-Co/PG-1810/User-Guide-638875-Page-50.png)
![51 Speed Dial Setting [2.3] Press a number in the Contacts in standby mode for Speed Dialling. To add Speed Dial, use [Add to Speed Dial] option. The Speed Dial number ranges from 2 to 9, totalling 8 Speed Dial numbers. To Set the Speed Dial [2.3] 1. Press the [Up/Down] key to move to an Empty Entry press the [Add] Soft key on the right. 2. Press the [Up/Down] key to choose a person and press the [Left/Right] key to select his number. 3. Press the [OK] key to save an item in the Speed Dial list. Delete: Deletes an item. Group Setting [2.4] Select ‘Menu>2.Contacts>4.Groups’. Changes the settings for the five predefined caller groups. Default Groups: No Group, Family, Friends, Business, and VIP. You can change the group ring tone by pressing [Group Ring Tones] in the option menu. You can also add your preferred new groups by pressing the [ ] key, on top of the predefined 5 groups. Business Card [2.5] Select ‘Menu>2.Contacts>5.Business Card Allows you to save your business card and send it to the phone of other user via IrDA or BlueTooth. You can edit or delete the saved numbers. Press the [Option] Soft key [ ] to: Bluetooth: Sends a business card using Bluetooth. Delete: Deletes the saved business cards. .Edit : Edits the saved business cards. Memory In Use [2.6] Select ‘Menu>2.Contacts>6. Memory In Use You can choose from Phone/ SIM Card/ SIM Card. Copy All [2.7]](https://usermanual.wiki/Pantech-Co/PG-1810/User-Guide-638875-Page-51.png)
![52 Select ‘Menu>2.Contacts>7.Copy All Phone to SIM: Allows you to copy the numbers saved in the Phone unto the SIM. SIM to Phone: Allows you to copy the number saved in the SIM unto the Phone. Delete All [2.8] Deletes all information saved on the Phone/SIM Card. Memory Info. [2.9] Displays the status of the Phone/SIM memory in use. This feature may not be available depending on your SIM card. The list of numbers in the SDN (Service Dial Number) will be displayed. If necessary, scroll to a number by pressing the [Up/Down] key and press the [ ] key to dial the number.](https://usermanual.wiki/Pantech-Co/PG-1810/User-Guide-638875-Page-52.png)
![53 Call Logs Press the [ ] key to see the recent calls in standby mode or select ‘Menu>3.Call Logs’. This function displays missed calls, received calls, and dialled calls. You can delete a call log and see the information for the call timer, call cost, and GPRS info in this menu. NOTE: If Contacts contains the phone number that you want to dial, the name will be displayed, or phone number, date, and time will be displayed alternatively on the Screen. Press SEND when the cursor is placed on the number or name to dial the number. Missed Calls [3.1] Select ‘Menu>3.Call Logs>1.Missed Calls’. Displays the missed calls list accompanied by the time and date of a missed call as well as the number or name of the recipient. Press the [Left/Right] key for selection. Press the [Option] Soft key [ ] to: Delete : Deletes received call records from the list. Delete All: Deletes all missed call records from the list. Send Message: Sends a message to the person you missed the call. When the call is not found in Contacts, the [Save Number] option will be created. Received Calls [3.2] Select ‘Menu>3.Call Logs>2.Received Calls’. Displays the received call list accompanied by the time and date of a received call as well as the number or name of the caller. Press the [Left/Right] key to select. Press the [Option] Soft key [ ] to: Delete : Deletes received call records from the list. Delete All: Deletes all received call records from the list. Send Message: Sends a message to the person you received a call. When the number of the caller is not found in Contacts, the [Save Number] option will be created. Dialled Calls [3.3] Select ‘Menu>3.Call Logs>3.Dialled Calls’ Displays the Dialled calls list accompanied by the time and date of a](https://usermanual.wiki/Pantech-Co/PG-1810/User-Guide-638875-Page-53.png)
![54 dialled call as well as the number or name of the recipient. Press the [Left/Right] key for selection. Press the [Option] Soft key [ ] to: Delete : Deletes the dialled call records from the list. Delete All[u9]: Deletes all the dialled call records from the list. Send Message: Sends a message to the person you made a call to. When the number of the caller is not found in Contacts Menu, the [Save Number] option will be created. Recent Calls [3.4] Select ‘Menu>3.Call Logs>4.Recent Calls’. The list of all recent calls including Missed Calls/Received Call/Dialled Calls are displayed.. Press the [Option] Soft key [ ] to: Save Number: When the call is not found in Contacts, this menu will be created. Send Message: Sends a message to the person you missed or received or made a call Delete : Deletes call records from the list. Delete Call Logs [3.5] Select ‘Menu>3.Call Logs>5.Delete Call Logs’. It deletes the missed, received, or dialled calls or deletes all the call records with ‘All Calls’. Press the [Yes] Soft key [ ] or [No] Soft key [ ] to execute or cancel this function. Call Timer [3.6] Select ‘Menu>3.Call Logs>6.Call Timer’. Indicates information on call time. - Last Call Time: Date and Time. - Received, Dialled, Total Call Time: Call Time only. - Reset Call Times: Initialises the call timer. Press the [OK] key and input the phone password. And then press the [OK] key one more time. Call Cost [3.7] Select ‘Menu>3.Call Logs>7.Call Cost’.](https://usermanual.wiki/Pantech-Co/PG-1810/User-Guide-638875-Page-54.png)
![55 Records information on call cost, and limits the call charge to prevent overcharges. - Last Call Cost: Displays the cost of the last call. - Total Call Cost: Displays the cost of all calls. - Clear Logs: Inputs PIN2 to delete all the logs of call cost. - Max. Cost: Reads or sets up the maximum value of the call cost unit in the service area. - Read Limit: Reads the maximum unit value. - Set Limit: Sets up the maximum units. - Cost Unit: Reads or sets up the unit defined in a service area. - Read Unit: Reads the cost unit. - Set Unit: Sets up the current cost unit and the cost per unit GPRS Info. [3.8] Select ‘Menu>3.Call Logs>8.GPRS Info.’. This displays the GPRS data transmission capacity. - Current Info.: Displays the total transmitted Kbytes at the moment. - Last Info.: Displays the total transmitted Kbytes in the past. - Total Info.: Displays the total transmitted Kbytes since connected. - Clear Logs: Deletes the log related to GPRS.](https://usermanual.wiki/Pantech-Co/PG-1810/User-Guide-638875-Page-55.png)
![56 Media Gallery In this menu, you can perform tasks such as checking, deleting or editing the photos, images or sounds saved by you. External Memory [4.1] Allows you to search the files of the MMC card, to move to other directories or enable certain basic functions. Select ‘Menu>4.Media Gallery>1.External Memory’. Press the [Option] Soft key [ ] to: Set As: Only applicable to the images of supported formats (music files are not supported.) 1. Wallpaper – Adds a photo to ‘Wallpaper’ in ‘Display Settings’. The photo is set as the background image of the main screen. 2. Contact – Assigns a specific photo image to Contacts. Send via 1.MMS : Files are transmitted via MMS. 2.Bluetooth: When Bluetooth is set for “On,”, files can be sent to other Bluetooth device.. Rename: Renames a file. Copy to phone : Copies a file in MMC to the phone memory. Delete: Deletes a file. Delete all : Deletes all files. Information: Views the information on a file. NOTE: The MMC card must be removed after the Phone has been turned off. Otherwise, the card may be damaged. Photo Gallery [4.2] Allows you to view or edit the photos saved in your phone. Views the Saved Photo. 1.Select the ‘Menu>4.Media Gallery>2.Photo Gallery’ or ‘Menu>5. Multimedia>1.Camera>3.Photo Gallery’ in the menu in this order to access the Photo Album List. 2. Press the [New] Soft key to add an album to Photo Gallery. - You can add up to 7 albums (including the default album ‘My Photo’). Press the [Option] Soft key to delete or add new user-defined album. 3. Select an album from the list and press the [OK] key to display the photo list in the album. Use the [Small] or [List] Soft key to change the list type (Small/List).](https://usermanual.wiki/Pantech-Co/PG-1810/User-Guide-638875-Page-56.png)
![57 4. Select a photo and press the [OK] key to enlarge the photo view. Press the [Left/Right] key to view other photos in the album. Using the Photo Options Press the [Option] Soft key [v] to apply the following options to a selected photo from the album. Set As: 1. Wallpaper – Adds a photo to ‘Wallpaper’ in ‘Display Settings’. The photo is set as the background image of the main screen. 2. Contact – Assigns a specific photo image to Contacts. Send as MMS: Sends the selected image to the MMS. Send Via: 1. MMS – Sends the selected image to the MMS. 2. Bluetooth – Sends a selected image to Bluetooth. Search: Searches for the name in the album. Rename: Renames a photo. Crop Photo: Press the [ ] to zoom in or out of a photo and save it again. This time, the image size will be converted to the display size. Delete: Deletes a photo. Delete All: Deletes all photos in the album. Information: Views the information on a photo. Print : Allows you to print a selected photo using Bluetooth. Copy to External: Copies a selected image to an external memory. Video Gallery [4.3] 1. Views or edits the video image saved in your phone. Select ‘Menu>4.Media Gallery>3.Video Gallery’ or ‘5.Multimedia>1.Camera>4.Video Gallery’ in the menu in sequence to gain access to the Video Album List. 2. Press the [New] Soft key to add an album to Video Gallery. You can add up to 7 albums (including default album (‘My Video’). Press the [Option] Soft key [ ] to delete or add new user-defined album. 3. Select an album from the list and press the [OK] key to display the video list in the album. Press the [Small] or [List] Soft key to change the list type 4. Select a video and press the [OK] key to play the video image automatically. Use [Stop] to pause the play and go back to the list. [u10] - Option: Set as Wallpaper, Set as Contact, Send via Bluetooth, Search, Rename, Delete, Delete All, Information, Copy to External Image Gallery [4.4] You can view or edit the image or information recorded in your phone in this menu.](https://usermanual.wiki/Pantech-Co/PG-1810/User-Guide-638875-Page-57.png)
![58 1. Select ‘Menu>4.Media Gallery>4.Image Gallery’ to the list of images saved in your phone. 2. Press the [Large] Soft key or press the [OK] key to zoom in the image selected from the list. 3. Press the [Left/Right] key to view other images in the list. Press the [List] Soft key to return to the list. Press the [Option] Soft key [ ] to apply the option to the selected image. - Option: Set as Wallpaper, Set as Contact, Send via MMS, Send via Bluetooth, Information, Copy to External NOTE: When the Bluetooth is active only the Send via Bluetooth and Information will be display in the option menu. If deactivate Bluetooth will show all in the option menu. Sound Gallery [4.5] Plays back sound in your phone or edits information. Select ‘Menu>4.Media Gallery>5.Sound Gallery’ to display the list of sounds recorded in your phone. The selected melody will be automatically played back once. Press the [Option] Soft key [ ] to apply the option to the sound concerned. - Option: Set as Ring Tone Send via MMS, Send via Bluetooth, Information, Copy to External NOTE: When the Bluetooth is active only the Send via Bluetooth and Information will be display in the option menu. If deactivate Bluetooth will show all in the option menu. * MP3 ring tone support (maximum size: 500 kb) NOTE: ‘Consumers who convert MP3 files may be subject to relevant copyright law. Therefore, please refrain from disseminating those files illegally. Other Files [4.6] Allows you to view or manage the list of the files of unsupported formats. Also, allows you to include in the list the files of supported formats via Bluethooth or other devices. Select ‘Menu>4.Media Gallery>6.Other Files’. Press the [Option] Soft key [ ] to: Set As: Only applicable to the images of supported formats (music files are not supported.) - Wallpaper – Adds a photo to ‘Wallpaper’ in ‘Display Settings’. The photo is set as the background image of the main screen. - Contact – Assigns a specific photo image to Contacts. Send Via: 1. MMS – Sends the selected image to the MMS. 2. Bluetooth – Sends a selected image to Bluetooth.](https://usermanual.wiki/Pantech-Co/PG-1810/User-Guide-638875-Page-58.png)
![59 Rename: Renames a file.. Delete: Deletes a file. Delete All: Deletes all photos in the album. Information: Views the information on a file. Copy to External: Copies a selected file to an external memory. Memory Info. [4.7] Displays information on the memory usage status for Photo, Video, Image, Sound, Java, and MMS and System used. NOTE: The 'System' memory information means the total used memory for the reserved objects, user-defined wallpapers, etc. Phone Memory : 폰 내부 메모리 정보 External Memory : 외부 메모리 정보 (전체,사용량,남은용량). Multimedia Camera [5.1] You can take a photo or video in various ways using your camera phone. The photo or video can be saved, or edited. Take a Photo [5.1.1] 1.Select ‘Menu>5.Multimedia>1.Camera>1.Take a Photo’ in the menu in sequence. * Tip: Press the [ ] key in standby mode to enter into capture mode immediately. 2. Adjust the image by aiming the camera at the subject. Press the Soft key [ ] to change the shooting mode. Shooting Mode Icon Description](https://usermanual.wiki/Pantech-Co/PG-1810/User-Guide-638875-Page-59.png)
![60 Single Capture General mode for a single shot. Multi Capture A mode to take multiple photos with the quantity determined by the [Multi-Shot] optionFrame Capture In this mode, the photo can be taken with the saved frame. Image size: 128X160 size (fixed) 3. Press the [ ] key or [ ] Key to take the picture in the current preview. Press the [Up / Down] key to zoom in/out of the image in proportion to the original ratio. Zooming is available only in sub mode shot. NOTE: The VGA mode only is not zooming function. Press the [Cancel] Soft key or [C] key to return to the camera preview screen. In Multi Capture mode, select [Mark]/[Unmark] to check the image box on the captured images to save them. 4. Select the [ ] key to display the Save Option screen, where you can select a photo album and edit the photo name under which it should be saved. In Multi Capture mode, the photo will be given a name automatically. However, you can manually input the name if only one image is selected. Definition of Camera Function Control Soft Key during Flip Open Function Available Menu Soft Key Image Size LCD/QVGA/VGA [] Brightness 7 levels (from 0 to 6) []/[ ] Zoom Control by levels []/[ ] Hide Icons On/Off [] Using the Camera Options [5.1.2] Press the [Option] Soft key [ ] in Capture mode to select the following information which will be applied to the image. Video: Moves to the Video Capture Mode. Photo Gallery: Moves to the Photo Gallery. Image Size: Displays the size of image that you want to shoot LCD(128X160), QVGA(320X240), VGA(640X480) Effect: Applies an effect to the Camera. White Balance : Auto, Sunlight, Cloudy, Fluorescent, Incandescent Multi-Shot: Controls the number of continuous shooting. Self Timer: Selects the delay time for all modes. When you press the [ ] key or [ ] Key, the camera will take a picture after the preset time. When the camera mode is off, the time value will return to the setup value.](https://usermanual.wiki/Pantech-Co/PG-1810/User-Guide-638875-Page-60.png)
![61 Hide Icons: Turns the icons in the screen Yes/No. Taking a Picture with the Folder Closed [5.1.3] 1. Press and hold the [ ] key on the right side of your phone with the folder closed to enter the Capture mode. 2. Adjust the image by aiming the camera at the subject. Press the [ ] key to zoom the image just taken image. Press the [ ] key to brightness control. Press the [ ] key to shoot the image in the current preview. Press and hold the [ ] key or press [ ] to escape from Capture mode. 3. To save the captured image, press the [ ] key and input a default name in the default album. After saving, the photo function will be finished. Press the [Side] key to move to the capture preview screen without saving the captured image. Take a Video [5.1.4] 1. Select ‘Menu>5.Multimedia>1.Camera>2.Take a Video’ from the menu this order to enter Video Shooting mode. 2. Upon entering Video Shooting mode, the image taken by the internal camera lens will be displayed. * Size of the video image is fixed to display 128X160 3. Adjust the image by aiming the camera at the subject. Use the [Up/Down] key to zoom In/Out and use [Left/Right] key to control the brightness. 4. Press the [ ] key to record the preview image. 5. Press the [Cancel] Soft key to cancel recording and return to the Preview screen. Press the [ ] key to stop recording. 6. If you press the [ ] key, the Save Option screen will pop up and you can select an album to save the video. Then enter a video file name. When ‘Auto Save’ is selected from the camera setting, the set name and album will be automatically saved without any Save Option screen. Press the [Cancel] Soft key to return to the Preview screen without saving video images.](https://usermanual.wiki/Pantech-Co/PG-1810/User-Guide-638875-Page-61.png)
![62 Press the [Play] Soft key to play the recorded video images. Press the [Option] Soft key [ ] to: Photo: Moves to the Camera Capture Mode. Video Gallery: Moves to the Video Gallery. Effect: Applies an effect to the Video. [u11]Frame Rate : Fine / Nomal Settings [5.1.5] Changes the default camera option value. - Image Size: Size of the image to be shot LCD*(128X160), QVGA (320X240), VGA (640X480) - Image Quality: Normal/Fine/Low - White Blance: Auto, Sunlight, Cloudy, Fluorescent, Incandescent - Multi-Shot: Control the number of continuous shots and speed. - Quantity: 4/6/9 - Speed: Normal/Fast/Slow - Self Timer: Select the delay time for all modes. When you press the [ ] key or [ ] Key shortly, the camera will shoot after the preset time. None/5 Secs/10 Secs - Shutter Sound: Off/Shutter/123/Smile/Whisky/Cheese * LCD is referred to as one of the image sizes. - Memory in Use: Phone Memory/External Memory - Auto Save: When Auto Save is on, the default name and album name will be automatically saved when a picture is take. On/Off MP3 Player [5.2] Select ‘Menu>5.Multimedia>2.Mp3 player’ and press the [OK] key - Player: The screen where a mp3 music is played. - Music Album: Allows you to upload the music list prepared bv you, or add or delete the list. - File Manager: Allows you to directly select desired music via the MMC card or to make a music list. . - Setting : Allows you to select Skin or Mode. Player [5.2.1] Player Screen Select ‘Menu>5.Multimedia>2.MP3 Player>1.Player’ in the menu in sequence. Press the [Option] Soft key [ ] to: Play All: Shows the music list in the MMC card. Basically, all the music can be played, but you can choose and delete certain music](https://usermanual.wiki/Pantech-Co/PG-1810/User-Guide-638875-Page-62.png)
![63 so that it is not played. Music Album: Allows you to select the music album made by you. Skin: Allows you to replace the images in the player with other ones. File Info.: Allows you to view the file information on the music currently selected. Function Available key Play/Pause [OK] key Next/Previous play [Left/Right] key Stop [Down] key Type of repeat [Up] key Volume 조절 [Side Up/Down] key RW/FF press [right/left ]key and hold NOTE : Type of repeat 1. : Plays the music in order with any repetition. 2. : Replays the select music one time. 3. : Replays one music repetitively. 4. : Replays all the music in order and unlimitedly. Music Album [5.2.2] Select ‘Menu>5.Multimedia>2.MP3 Player>2. Music Album’ in the menu in sequence. Allows you to make a music list. In case there exists no music list made by you, a music list will be loaded unto this menu automatically so that it can be newly added.. It is possible for you to choose, unselect, and save a desired music. . File Manager [5.2.3] Select ‘Menu>5.Multimedia>2.MP3 Player>3.File Manager’ in the menu in sequence. Displays the entire lists of MP3 files that exist in the MMC for you to select or unselect desired MP3 files. . Press the [Option] Soft key [ ] to: Save Album: Saves the selected MP3 items in the Album List. Rename: Changes the title of the selected MP3 item. Delete: Deletes the selected MP3 items. Delete All: Deletes the entire MP3 items. Select All: Selects the entire MP3 items.. Unselect All: Unselects the entire MP3 items Information: Shows information. Setting [5.2.4] Select ‘Menu>5.Multimedia>2.MP3 Player>4.Setting’ in the menu in sequence. - Mode: Sets playing method. Rock/ Country/Normal/Pop/Jazz/Classic/Dance](https://usermanual.wiki/Pantech-Co/PG-1810/User-Guide-638875-Page-63.png)
![64 - Skin: Provides various equalizer images of the screen. Equalizer/Animation01/Animation02 Games [5.4] The phone offers you the game(s) to play with. Each game has ‘Help’ menu to explain the controls keys. The control keys are different depending on a game. Java [5.5] You can download and execute a java game on your phone. Use the WAP browser to search for a java game and download it for installation. A java game has been installed in this phone. You can download more games at any time. View of Java Game List [5.5.1] Select ‘Menu>5.Multimedia>5.Java’ in the menu to select a Java menu. Select ‘1.Games’ to view the Java Application list stored in your phone. Java Game Execution/Deletion/Information Search [5.5.2] Select ‘Menu>5. Multimedia>5.Java’ in the menu to select a Java menu. Select ‘1.Games’ to view the Java Game list stored in your phone. Press the Navigation key to select a game. The Menu has an option to control the game. To: Press: Run the game Press the [Option] Soft key [ ] and select the [Run] Soft key, or press the [OK] key View Detail Information Press the [Option] Soft key [ ] and select the [Info.] Soft key, or press the [ ] Soft key. Delete the game Press the [Option] Soft key [ ] and select the [Delete] Soft key. [u12] View the Java Application Memory [5.5.3] Select ‘2.Memory Info.’ to see the memory used.](https://usermanual.wiki/Pantech-Co/PG-1810/User-Guide-638875-Page-64.png)
![65 Settings Select ‘Menu>6.Settings’. You can set up various handset functions at your choice in the settings menu. Display Settings [6.1] Select ‘Menu>6.Settings>1.Display Settings’. You can change the image or colour composition of the display. Main Screen [6.1.1] Select ‘Menu>6.Settings>1.Display Settings>1.Main Screen’ and press the [OK] key. You can change the background image of the main screen. - Wallpaper: Sets up Wallpaper by selecting from “Wallpaper”. Wallpaper stores items used to set up Wallpaper at Photo Gallery/Image Gallery. Other wallpapers than the default one may be deleted with the [Delete] Soft key. (The default one cannot be deleted permanently. - Wallpaper Type: Digital Clock 1/Digital Clock 2/Analogue Clock /Calendar/Greeting/D-day Greeting [6.1.2] Select ‘Menu>6.Settings>1.Display Settings>2.Greeting’ and press the [OK] key. You can set up the greeting message during Startup or Idle mode. Contrast [6.1.3] Allows you to set the color contrast chosen from level 1 to level 8 by using the left/right key. Back Light [6.1.4] You can set the Backlight. Press the [Left/Right] key to change the value that is displayed when you select ‘Menu>6.Settings>1.Display Settings>3.Back Light’ and press the [OK] key. (5 Secs/10 Secs/20 Secs/1 Min/10 Mins) Sound Settings [6.2] Select ‘Menu> 6.Settings>2.Sound Settings’ or press the [ ] key in standby mode. Sound Setting define how your phone reacts when you receive a call or a message, how your keypad sounds when you press a key, and more.](https://usermanual.wiki/Pantech-Co/PG-1810/User-Guide-638875-Page-65.png)
![66 Ring tone, key tone, and other settings for each of the five available profiles can be used with their default setting. They can also be customised to your needs. Select and customise a profile to match your preferences, such as when you are in a meeting or outdoors. The profiles available are Normal, Silent, Meeting, Outdoor and Car. Ring Tone [6.2.1] Select ‘Menu>6.Settings>2.Sound Settings>[Edit] Soft key>1.Ring Tone’ and press the [OK] key, or press the [ ] key and the [Edit] Soft key in standby mode and select ‘1.Ring Tone’. * You can choose the preferred ring type, ring volume. - Ring type: Ringing, Vibration, Vib then Ring, Vib and Ring, Ascending, None(Quiet) - Ring Volume: Controls the volume in 8 levels (0~7). Bell Sound [6.2.2] Select ‘Menu>6.Settings>2.Sound Settings>[Edit] Soft key>2.Bell Sound’ and press the [OK] key, or press the [ ] key and the [Edit] Soft key in standby mode and select ‘2.Bell Sound’. * You can choose the preferred melody to ring. - Sound Box: Melody Sound, Bell Sound, User Sound - Bell Sound: Sound is composed of several groups such as Melody Sound, Bell Sound and each Group has multiple tones. User Sound presents the melody of ‘Menu>4.Media Gallery>5.Sound Gallery’ as a consequence. Message Alert [6.2.3] Select ‘Menu>6.Settings>2.Sound Settings>[Edit] Soft key>3.Message Alert’ and press the [OK] key, or press the [ ] key and the [Edit] Soft key in standby mode and select ‘3.Message Alert’. You can select the preferred alert melody, its volume and reminder period when you have new messages. - Reminder: Use the [Left/Right] key to select one out of Off, Once, Every 2 Mins, Every 5 Mins., off - Ring Volume: Controls the volume in 8 levels (0~7). - Sound: Use the [Left/Right] key to set Message Alert Tone to Bell1, Bell2, Bell3. Key Tone [6.2.4] You can select the keypad sound to be used for dialling or in the menu screen. Select ‘Menu>6.Settings>2.Sound Settings>[Edit] Soft key>4.Key Tone’ and press the [OK] key, or press the [ ] key and the [Edit] Soft key in standby mode and select ‘4.Key Tone’.](https://usermanual.wiki/Pantech-Co/PG-1810/User-Guide-638875-Page-66.png)
![67 - Tone Type: You can turn the key tone on or off. - Ring Volume: Controls the volume in 8 levels(0~7). - Sound: Selects a key tone. Flip Open Tone [6.2.5] You can select a sound effect when you open or close the folder. Select ‘Menu>6.Settings>2.Sound Settings>[Edit] Soft key>5.Flip Open Tone’ and press the [OK] key, or press the [ ] key and the [Edit] Soft key in the standby mode and select ‘5.Flip Open Tone’. - Tone Type: Turns the key tone on or off. - Ring Volume: Controls the volume by 8 levels. - Sound: Sets Bell 1, Bell 2, Bell 3 to Flip Open/Close Tone. Sound Effect [6.2.6] Turns the default sound effect on or off. Select ‘Menu>6.Settings>2.Sound Settings>[Edit] Soft key>6.Sound Effect’ and press the [OK] key, or press the [ ] key and the [Edit] Soft key in standby mode and select ‘6.Sound Effect’. Press the [Mark] Soft key, and then press [OK] key to save. - Menu Moving: When you change a menu with the Navigation key. - Power On & Off: When you turn the power on or off. - Option Popup: When you press the [ ] key to see a popup window. - Call Connection: When you dial or hang up. - WAP Connection: When you connect or terminate WAP - Hour Alert: A sound effect every full hour while your phone is in standby mode - Minute Minder: A sound effect every minute while making a phone call. - Popup Alert: A warning, error, information or question sound effect. Profile Name [6.2.7] Select a profile name menu from the Sound Setting editing screen to rename it manually. Reset [6.2.8] Select the Reset menu from the Sound Setting editing screen and press the [Yes] Soft key to initialise all the sound related values in the profile. Call Settings [6.3] Select ‘Menu>6.Settings>3.Call Settings’.](https://usermanual.wiki/Pantech-Co/PG-1810/User-Guide-638875-Page-67.png)
![68 Call Divert [6.3.1] Select ‘Menu>6.Settings>3.Call Settings>1.Call Divert’. You can divert a receiving call to another phone number with this menu. You may choose one from All Calls, When Busy, On No Answer, When not Found, or Cancel All, all of which divert as required. Answer Type [6.3.2] Select ‘Menu>6.Settings>3.Call Settings>2.Answer Type’. You can set up the call receiving method. Use the [Left/Right] key to set the call receiving method. Press the [OK] key to save. - SEND key: You can answer the incoming call by pressing the [] key. - Any Key: You can answer incoming calls by pressing any key, except the [ ] key and the [Reject] Soft key. - Flip Open: You can answer an incoming call by opening the phone flip. - Auto Receive: Your phone automatically answers calls after 10 seconds. This feature is available only when the phone is connected to the headset jack. Auto Answer [6.3.3] The Auto Answer function works like an automatic answering machine. It relays the recorded message to the caller if you do not answer the call for a specified period of time. - Auto Answer : Set Auto Answer to [On/Off]. If set to [On], the Auto Answer function will be enabled. - Recorded Message: Displays a list of recorded messages during call active (In call). Each list displays the recorded date & time of the file and the message caller ID as well. Press the [Delete] Soft key to delete the message in the View list, and press the [Send] key to make a call while confirming recorded messages. - Response Message: Depending on your current situation, a different answering message will be played, including. [Absent/Meeting/Driving/User Message]. The User Message is the voice message of the local user that will be answered in the standby mode. - Response Time: Sets the automatic answering time (After 3 Secs/5 Secs/10 Secs/20 Secs). When the response time elapses without answering the incoming call, the recorded message will be relayed to the caller. If the caller decides to leave a voice message, recording will be started with a beep sound. - User Message: Displays your voice message set for the response message. Press the [ ] key for playback.](https://usermanual.wiki/Pantech-Co/PG-1810/User-Guide-638875-Page-68.png)
![69 Auto Redial [6.3.4] Select ‘Menu>6.Settings>3.Call Settings>4.Auto Redial’. This function automatically redials the number the call is made to. - On: Sets up Auto Redial. - Off: Cancels Auto Redial. Call Waiting [6.3.5] Select ‘Menu>6.Settings>3.Call Settings>5.Call Waiting’. The call waiting function informs you of a second call. - Activate: Sets up the Call Waiting function. - Deactivate: Cancels the Call Waiting function. - Status: Informs the setup condition. Send Caller ID [6.3.6] Select ‘Menu>6.Settings>3.Call Settings>6.Send Caller ID’. You can prevent your phone number from being displayed on the phone of the person being called. This service is dependent on the network. Please ask the network provider. Own Number [6.3.7] Select ‘Menu>6.Settings>3.Call Settings>7.Own Number’. The number for Own Number can vary depending on the SIM. Press the [Option] Soft key [ ] to: Add: Adds Own Number. Delete: Deletes Own Number. Edit: Edits Own Number. Active Line [6.3.8] Select ‘Menu>6.Settings>3.Call Settings>8.Active Line’.. Some SIM cards may be used with two subscriber numbers. This menu is available only if your SIM card supports it. This menu option allows you to select the Line1/ Line2/ Choice Line to be used to make calls. However, calls can be answered on both lines, regardless of the selected line. NOTE: Please contact your service provider to check the availability of this feature and how to subscribe to ALS(Alternate Line Service). Language [6.4] Select ‘Menu>6.Settings>4.Language’. You can select a language to be displayed on the phone.](https://usermanual.wiki/Pantech-Co/PG-1810/User-Guide-638875-Page-69.png)
![70 Time & Date [6.5] Set ‘Menu>6.Settings>5.Time & Date’. You can set up Time, Date, and Date Format, and Auto Update. (맥시코향에만 들어감) NOTE: Auto Update If your wireless service provider supports this feature, then you can allow the digital network to set the clock. Favorite [6.6] Select ‘Menu>6.Settings>6.Favorite’. The Favorite menu designates your additional favourites. You can access menus down to 2 levels the Media Gallery (멕시코향에서는 default 메뉴가 STK 임.) cannot be deleted because it is the default menu. The [OK] key means ADD with no item or Go to with an item. On the set values in Favorite, the Application Lock item asks for a password before Go to. Of the set values in Favorite, the item with security asks for a password before going further. Network Selection [6.7] Select ‘Menu>6.Settings>7.Network Selection’. You can select ‘Automatic’ or ’Manual’. Security Settings [6.8] Set ‘Menu>6.Settings>8.Security Settings’. The security settings enable you to restrict the use of your phone to other people and types of calls of your choice. Various codes and passwords are used to protect these features of your phone. They are described in the following sections. See also Access codes in the Appendix. The Security feature keeps your phone and SIM Card safe from unauthorised users and you may set up a password for your phone or use the Call Barring service and Fixed Dialling mode. SIM Lock [6.8.1] Press the [Left/Right] key for setup. You should input the password when entering into the sub-menu under Security Settings. If you fail to input the correct PIN number 3 times continuously, you will be prompted to input the PUK number. - Lock: You should input PIN1 to access to the main menu after](https://usermanual.wiki/Pantech-Co/PG-1810/User-Guide-638875-Page-70.png)
![71 power on. - Unlock: You don’t have to input PIN1 to access to the main menu after power on. Change PIN [6.8.2] Changes the PIN number. Phone Lock [6.8.3] Once selected, this option locks your phone until you input the right password. Press the [OK] key after you input the password. Change Password [6.8.4] Changes a password. Default Password is 1234. Application Lock [6.8.5] Input a password and select an application and then, press the [OK] key to lock the application. Call Barring [6.8.6] You can set limitations for making certain types of calls: - H/S Barring : You can ignore the incoming calls or restrict certain outgoing calls with this menu. - N/W Barring : This feature is dependent on network service provider and subscription. Some of the bars are set by the network service provider You can set limitations like these: - International Calls: Limits an outgoing and incoming international call. - Outgoing Calls: Limits all Outgoing calls. - Incoming Calls: Limits all incoming calls. - Incoming Calls When Abroad: When you are in the overseas where international roaming is in operation, this feature allows you to stop receipt of incoming calls. - Int. Calls Except to Home Country: Limits other international calls except home country. - Clear All: Cancels all the barring settings. - Change Password: Replaces the old password with a new one. CUG (Closed User Group) [6.8.7] Sets up a group of numbers that you want to dial or receive. Select CUG name and press [OK] to see the CUG name list as you input. Press the [Option] Soft key [ ] to: Delete: Deletes the preset CUG Identifier. Edit: Edits the CUG Identifier. NOTE: Without an existing record, the [ ] key will be disappeared.](https://usermanual.wiki/Pantech-Co/PG-1810/User-Guide-638875-Page-71.png)
![72 Fixed Dialling (Fixed Dialling Numbers) [6.8.8] Fixed Dialling is a service that limits your access to specific numbers in the Phonebook list recorded on the SIM. Input PIN2 to set up or cancel this service. (up to 3 times) - On - Off - Fixed Dial List: Displays the numbers recorded in the Fixed Dialling List. Change PIN2 [6.8.9] Changes PIN2. System Reset [6.8.10] Select ‘Menu>6.Settings>>8.Security Settings>10.System Reset’ Deletes all user settings and data from your phone and returns to factory default settings. Input the phone password and press the [OK] key to reset. The default password is 1234. Flight Mode [6.9] Select ‘Menu>6.Settings>9.Flight Mode’. Once you select "Flight Mode On", you cannot call and receive call. This mode enables you to cut off radio session but maintains power to other ancillary functions such as the calendar, games, etc. This mode supports use of these features in environments where transmitters and/or receivers are not allowed, such as on an airplane. If you select “Flight Mode Off”, your phone is now rebooting. Software Version [6.10] Allows you to check the current software version.](https://usermanual.wiki/Pantech-Co/PG-1810/User-Guide-638875-Page-72.png)
![73 Organiser Select ‘Menu>7.Organiser’. Organiser provides various functions alarm setting, main event record, memo, world time, calculator, unit conversion, stopwatch and timer. Alarm [7.1] Select ‘Menu>7.Organiser>1.Alarm’. You can set an alarm to sound up to 5 specific times. (Once you set the On Morning Call, an icon appears on the display) To set an alarm [7.1.1] Select ‘Menu>7.Organiser>1.Alarm’ to display the current alarm list. Select an alarm to set and press [OK]. Press the [New] Soft key in the list to set a new alarm with the edit alarm screen. Press the [Option] Soft key [ ] to: Delete: Deletes an Alarm from the list. On Snooze/Off Snooze: The alarm that is set to Snooze rings every 5 minutes for 3 times. Only one alarm can be set to On Snooze. On Wakeup Call/Off Wakeup Call: Alarm always sounds regardless of the ring type, vibration or whatever. Delete All: Deletes all Alarms from the list. Press the [OK] key to edit the Alarm, and then press the [Up/Down] key in the ‘Edit Alarm’ screen to set on Set, Time, or Melody. In the case of Melody type, press the [ ] key to enter the Sound Gallery to select a melody. In the case of Date, the selection is possible only when the alarm type is “Weekly.” After Date is selected, pressing the [ ] key allows you to move the screen where you can set desired weekday.. When selecting the desired weekday, you can set it by pressing the [Mark] Soft key which toggles between [Mark] and [Unmark]. Press the . [OK] key to save the day and move to the previous screen.. Calendar [7.2] Select ‘Menu>7.Organiser>2.Calendar’. The Calendar helps you manage your schedule including your time for calls or special days. Alarm service on a set date is included in this function. The Calendar consists of Monthly View, Daily View, and Event View & Edit.](https://usermanual.wiki/Pantech-Co/PG-1810/User-Guide-638875-Page-73.png)
![74 Monthly View[7.2.1] To: Press: Move to another day [Left] Previous Day [Right] Next Day Move to another week [Up] Previous Week [Down] Next Week Move to the previous or next month [1] Previous Month [3] Next Month Select ‘Menu>7.Organiser>2.Calendar’ from the menu to display the Monthly View. Press the [New] Soft key to add a new event. Press the [Option] Soft key [ ] to: View All Events: Shows all of your scheduled events Del Past Events: Deletes your past scheduled events. Del All Events: Deletes all of your scheduled events. Go to Today: Moves to today for selection. Go to Date: Moves to the set date. Memory Info.: Displays the number of stored events, not more than 50. Use the Navigation key to select the date and press the [OK] key. On a date with any schedule registered, move to Daily View to check the schedule. On a date with no registered schedule, add a new schedule. Any event registered on a date will be displayed at the bottom of the display in form of an icon. Daily View [7.2.2] Shows the schedule registered for a date. Select a schedule and press the [OK] key to view or edit the details of an event. Press the [Option] Soft key [ ] to: Delete: Deletes an event On D-day/Off D-day: Sets up or cancels D-Day. Move Date: Transfers an event to a specific date. Delete All: Deletes all events. Send Via Bluetooth: Sends the selected event via Bluetooth NOTE: When you select D-Day from Screen Control, ‘D-Date, Event Memo Content Part’ will appear in the standby screen. Upon setup of a new D-Day, the existing D-Day is automatically deleted. Event View & Edit [7.2.3] Shows the registered schedule item by item and edits the schedule or creates a new schedule. Create New Event (by View & Edit) 1. Select a day from Monthly View and press the [New] Soft key 2. Upon appearance of the New Event screen, select and input an](https://usermanual.wiki/Pantech-Co/PG-1810/User-Guide-638875-Page-74.png)
![75 event item by item for registration. 3. After input, press the [OK] key to save the event. NOTE: Maximum Quantity of Schedule for Registration: 50Maximum Daily Quantity of Schedule for Registration: 8 Period of Registration: 01/01/1950 ~31/12/2043 Memo [7.3] You can keep text memo or voice memo on your phone. Text Memo [7.3.1] Saves short notes in your phone. Press the [Option] Soft key [ ] to: Edit: Retrieve existing memos, edit the parts of your choice, and press the [OK] key for save. * Tip: Press the [OK] key and [Edit] Soft key to return to the editing screen. Delete/Delete All: Deletes any or all items. Voice Memo [7.3.2] The Voice Memo function records your voice message. You can use Record, Stop, Play, and Save for voice recording and playback. You can use the Text Editor for title input. Record 1. Press the [New] Soft key from the Option menu and press the [ ] key. 2. Press the [ ] key to terminate the recording process and press the [Play] Soft key to hear the recorded data. 3. Press the [ ] key, input a name, and press the [OK] Soft key to save the data. * Tip: When the memory is full, the “Not Enough Memory” message will appear and returns to the upper menu. Play Select an item and press the [ ] key to start play immediately. Press the [Option] Soft key [ ] to: Delete: Deletes the selected voice memo. Delete All: Deletes all voice memos. Rename: Renames the voice memo New: Creates new voice memo. Send Via MMS (Bluetooth): Sends the selected Item via MMS (Bluetooth) World Time [7.4]](https://usermanual.wiki/Pantech-Co/PG-1810/User-Guide-638875-Page-75.png)
![76 Select ‘Menu>7.Organiser>4.World Time’. This function informs you of world time. Press the [Option] Soft key [ ] to: On/Off Day Light Saving: The Day Light Saving function fits the time of the countries in summer who enforce Summer Time. Select Day Light Saving from the Option menu for setup. The icon for the country with Summer Time will be activated Shows that the Summer Time Saving function is on. * Tip: Summer Time sets the clock one hour ahead. Set as Local: Press the [Set] Soft key or select [Set as Local] from the Option menu and Target Area will be replaced with Home Area. Calculator [7.5] Select ‘Menu>7.Organiser>5.Calculator’. Your phone has a Calculator function. Calculator provides 4 basic operations +, -, x, and /. Press the number keys and direction keys to input a formula and press the [=] Soft key to display the result. * Tip: Press the [.] Soft key to input a decimal point. Press the [C] Soft key to reset the formula. Press the [C] key short to delete the text of a formula and press and briefly hold the [C] key to delete the whole formula. Converter [7.6] Select ‘Menu>7.Organiser>6.Converter’. Converter converts a figure between different units i.e. Length, Area, Volume, Weight, and Temperature. Select one from Length, Area, Volume, Weight, or Temperature. Press the [Down] key to move to the next line, press the [Left/Right] key to select a target unit, and press the number keys to input numbers. Press the [Down] key again to move to the next line and select a result unit and you will get the correct answer. * Tip: The result is automatically recalculated upon a change of unit or value. Press the [.] Soft key to input a decimal point. Stop Watch [7.7] Select ‘Menu>7.Organiser>7.Stop Watch’. The Stop Watch measures time for all sorts of sports. Press the [ ] key to operate the Stop Watch. Press the [ ] key to pause the Stop Watch and press the [ ] key to restart the Stop Watch. Whenever you select the [Lap] Soft key, the 4 lap times as a maximum are displayed and when you select the fourth [Lap], the Stop Watch](https://usermanual.wiki/Pantech-Co/PG-1810/User-Guide-638875-Page-76.png)
![77 stops. Press the [Reset] Soft key to initialise all. Timer [7.8] Select ‘Menu>7.Organiser>8.Timer.’ Sets the alarm bell to ring at a preset time. Press the [Set] Soft key to input a time and minute for countdown and press the [OK] key for setup. Press the [ ] key after input and the displayed time will start counting down. Now, press the [ ] key to pause the countdown and press the [] key to restart the countdown. After the preset time, an additional animation and alarm sound will be provided. Press the [Stop] Soft key to pause both. Press the [Set] Soft key to return to the initial state while Timer is out of operation. When the alarm is ringing with animation at the set time, stop their motion to return to the initial state. Fatness Checker [7.9] Select ‘Menu>7.Organiser>9.Fatness Checker.’ This function enables you to easily check your physical condition, which is affected by your weight changes, by displaying the fatness level and BMI index based on your height and weight data input by you. After inputting your height and weight, press the [OK] key to check your fatness level and BMI index. Press the [Option] Soft key [ ] to: Measure Again : This function allows you to re-input your height and weight. About Fatness :Shows the fatness level determined based on the fatness value. . About BMI : Shows the fatness level determined based on the BMI value. NOTE: Fatness : Present weight ratio against standard weight. BMI(Body Mass Index) : The Index of weight against height.](https://usermanual.wiki/Pantech-Co/PG-1810/User-Guide-638875-Page-77.png)
![78 5. Advanced Functions 1. WAP 2. USB Mass Storage 3. Bluetooth 4. Saving Memory 5. SIM Toolkit WAP Select ‘Menu>8.Connectivity>1.WAP You can access the Internet with a WAP (Wireless Application Protocol) browser. That means you can connect to the Internet anywhere and anytime where you have network coverage. The descriptions below can vary according to your Network provider. Therefore, ask your Network provider for detailed information. NOTE: Press the [OK] key short to access the WAP menu directly. Press and briefly hold the [OK] key during standby to proceed to the WAP homepage. Navigating the WAP Browser [1.1] To scroll through and select browser items, press the [Up/Down] key until the item you want is highlighted, and then press the [Select] Soft key. To return to the previous page, press the [C] key. To return to the startup homepage, select [Option]> Home. Entering Text in the WAP Browser [1.2] When you are prompted to enter text, the current text input mode](https://usermanual.wiki/Pantech-Co/PG-1810/User-Guide-638875-Page-78.png)
![79 appears above the right Soft key. (For further details, see Basic Functions Menu 7) Home [1.3] This menu contacts the network to load the Wireless Web service provider homepage. Resume [1.4] You can reconnect to the latest web site. Bookmarks [1.5] You can bookmark an Internet address using the WAP browser just as you do with a PC Internet browser. To register an URL and Name in the closest empty number of the Bookmark List, press the [Add] Soft key on the right. Press the [Option] Soft key [ ] to; Edit: Edits the URL and name of a bookmark Note: this feature will not be available if the manufacturer provides a default bookmark. Delete: Deletes a bookmark from the List. NOTE: This feature will not be available if the manufacturer provides a default bookmark. Go: Goes to the related site Push Messages [1.6] The phone can receive Push Messages from the Service Provider. Inbox [1.6.1] The Push message is stored in Inbox. Select and check a message from the message list of Inbox to contact the WAP page concerned. Press the [Option] Soft key [ ] to; Delete: Deletes a message. Delete All: Deletes all the messages in Inbox. Go to: Goes to related site. Receive Mode [1.6.2] Sets up Push Message receiving. - Accept All: Receives all Push messages. - Accept None: Rejects all Push messages.](https://usermanual.wiki/Pantech-Co/PG-1810/User-Guide-638875-Page-79.png)
![80 Go to URL [1.7] Allows you to directly input and connect to the desired URL. Profiles [1.8] NOTE: The parameter settings are already entered as required by the service provider. Care should be taken when you make any modification to a profile since it may cause WAP to be inoperative. Selects or edits the Connection Profile supplied by the phone. Select the Profile List and press the [OK] key for setup. The Unedited Profile will not be selected. Select the Profile List and press the [Edit] Soft key to edit a profile. - Profile Name: Pressing the [OK] key allows you to enter the edit mode to change a profile name. - Home URL: Pressing the [OK] key allows you to enter the edit mode to edit the Homepage URL provided by the service provider. - Connection Type: Select either WAP or HTTP. - GSM Settings: This menu allows you to set the GSM network proxy, and has the following sub-menus: - Gateway/Proxy: If you set the Connection Type for WAP, Gateway appears. If you set it for HTTP, Proxy appears. Pressing the [OK] key allows you to access the submenus such as IP Address, IP Port, Login ID and Password. For each submenu, pressing the OK button lets you enter edit mode to edit every item provided by the service provider. - Data Call Type: Use the left or right navigation key to select from the two modes: ISDN and Analogue. - Dial Number: Pressing the [OK] key allows you to enter the edit mode to change this item. - Login ID: Pressing the [OK] key allows you to enter the edit mode to change this item. - Password: Pressing the [OK] key allows you to enter the edit mode to change this item. - GPRS Settings: This menu allows you to set the GPRS network proxy, and it has the following sub-menus: - Gateway/Proxy: If you set the Connection Type for WAP, Gateway appears. If you set it for HTTP, Proxy appears. Pressing the [OK] key allows you to access the submenus such as IP Address, IP Port, Login ID and Password. For each submenu, pressing the [OK] key lets you enter edit mode to edit every item provided by the service provider. - APN: It stands for Access Point Name. Pressing the [OK] key lets you enter the edit mode to change this item. - Login ID: Pressing the [OK] key lets you enter the edit mode to change this item. - Password: Pressing the [OK] key lets you enter edit mode to change this item.](https://usermanual.wiki/Pantech-Co/PG-1810/User-Guide-638875-Page-80.png)
![81 - DNS Settings: Enter the IP address for the Domain Name Server. You may enter primary and secondary DNS. This function is available only when you are connected to HTTP. - Bearer: This lets you select the bearer type for each type of network access. Using the left or right navigation key allows you to select from the two modes: GSM Only and GPRS Only. - Reset Profile: Pressing the [OK] key initializes the parameter settings of a profile. You can select from Yes/No. Cache [1.9] Cache Mode [1.9.1] Sets up the Cache memory check. - Always Check: The Cache is always checked whenever a URL is loaded. - Never Check: The Cache is never checked. Clear Cache [1.9.2] This menu provides a function to clean the data stored in the Cache (recently visited WAP pages). Security Cert [1.10] You can see the saved security certificate. Press the [Option] Soft key [ ] to; Delete: Deletes a security certificate. Delete All: Deletes all security certificates. Version [1.11] This function is for viewing the software version of the WAP browser USB Mass Storage Select ‘Menu>8.Connectivity>3.USB Mass Storage Provides the function to use the MMC card of the phone as a movable storage site by using a USB Cable. To use a mass storage If the Mass Storage is set for [On]. “Connect USB Cable” will be displayed. At this time, connect the phone with the paired device, and when “Connecting” is displayed, you can use the MMC card as a movable storage site from the paired device. NOTE : When the USB cable has been already connected before you set the Mass Storage for [On], if you set Mass Storage for [On], “Connecting” will be displayed immediately.](https://usermanual.wiki/Pantech-Co/PG-1810/User-Guide-638875-Page-81.png)
![82 Bluetooth Select ‘Menu>8.Connectivity>4.Bluetooth Bluetooth refers to either the specifications for connecting wirelessly various devices such as computers, mobile phones and home appliances, which are located within a short distance, and then enabling real time, bi-directional communication among them, or the products complying to those specifications The mobile phone (PG-1800) supports the following profiles: - Serial port profile (SPP) with the PC connectivity software - Dial-up networking profile (DUN) as a gateway - Hands-free Profile (HFP) as an audio gateway - Object push profile (OPP) as a client and server - File transfer profile (FTP) as a client and server - Basic Image profile(BIP) for printing a photo Bluetooth technology enables cost-free wireless connections between electronic devices within a maximum range of 33 feet (10 meters). A Bluetooth connection can be used to send images, videos, texts, business cards, calendar notes, or to connect wirelessly to devices using Bluetooth technology, such as computers. Since devices using Bluetooth technology communicate using radio waves, your phone and the other devices do not need to be in direct line-of-sight. The two devices only need to be within a maximum of 33 feet (10 meters) of each other, although the connection can be subject to interference from obstructions such as walls or from other electronic devices. Using Bluetooth technology consumes the battery and the phone's operating time will be reduced. Take this into account when performing other operations with your phone. There may be restrictions on using devices using Bluetooth technology. Check with your local authorities. Bluetooth [3.1] : Selecting [On] activates Bluetooth, while selecting [Off] deactivates Bluetooth. Paired Device [3.2] : Displays the paired device or allows you to add a new device. The displayed icon type varies depending on the types of paired devices. Press the [Option] Soft key [ ] to: (Depending on the profiles provided by the paired device, different Option Menu appears.) Connect/Disconnect](https://usermanual.wiki/Pantech-Co/PG-1810/User-Guide-638875-Page-82.png)
![83 : It is displayed when devices provide Bluetooth Headset/Handsfree profile, and connects or disconnects each device. Browser Folder : It is displayed when the device provides FTP Server profile, and in this case, the FTP directory of the other device is displayed. . Edit Name : Allows you to edit the device names of the other party. Delete : Deletes desired devices from the Paired Device List. Set Authorised/Unauthorised : If the relevant device has been set for Authorized, it is possible to access your phone with any permission. On the other hand, if it is set for “Unauthorized, the device must have the privilege to access your phone. This menu is displayed only when the registered device type is PC/PDA.. Set as Default/Don’t set as Default : If two or more headsets/handsfrees have been registered, choose one of them to be set as the default headset. Placing or receiving calls through headset will be done via the default headset/handsfree. Although you can set a default headset using the menu, the last headset connected will be automatically set as the default headset. This menu is displayed only when the registered device type is PC/PDA. On the other hand, if the device is set for ”Don’t set as Default,” the settings of the device set for default become disabled. Add New Device : Performs the function to register a new device. When you select this option, a sub-menu will appear with features for additional registration. The menu allows you to select the device to be newly registered. - Search All - Audio Accessory - PC - Phone - Others If you choose from the above menu for the device you wish to search, “Search a device” appears. Press the [New] Soft key [ ] to: The menu allows you to select the device to be newly registered. Search All Audio Accessory PC Phone Others If you choose from the above menu for the device you wish to search, “Search a device” appears. To Search a device Every time a new device is searched, the List becomes updated. During the search process, selecting [Cancel] soft key stops searching and displays all the search results. At this time, select the [Refresh] Soft Key to resume the search function.. After selecting the device to be paired, press the OK key for pairing. .](https://usermanual.wiki/Pantech-Co/PG-1810/User-Guide-638875-Page-83.png)
![84 To Pair with a device Your handset will ask for the Passkey to be used for registering with the other party. If you enter the Passkey and then other party also enters the Passkey correctly, the registration will be completed. Business Card [3.3] If Receive/Send/Exchange is selected, Bluetooth devices supporting OPP Profile are searched.. If the desired device from the searched devices are selected, the operation relevant to the device is started. If you choose the desired device from the searched devices, the following tasks are started. - Receive : Receives the business card from the corresponding device and shows the card.. - Send : Sends my business card to the corresponding device.. - Exchange : Sends my business card to the corresponding device and receives a business card from the corresponding device and displays it. Outgoing call device [3.4] Before placing a call, select the device to be used. - Phone You can place a call in the normal way that you use your phone to make a call. - Headset You can place a call through the headset, provided that it has been successfully registered as the default headset. - Handsfree You can place a call through the handsfree, provided that it has been successfully registered as the default handsfree. - Always Ask As soon as you place a call, a popup message will appear asking you if you wish to use the headset/handsfree. When you press the Yes key, you make a call using the headset/handsfree. If you press the No key, you make a call using your handset. The popup message will continue to appear until the called party answers the phone. In case of no entry, the call will be made through your phone. Visibility [3.5] - Shown to All: Permits search to all other cell phones with Bluetooth technology. - Hidden: Permits search only to cell phones listed in the Paired device list](https://usermanual.wiki/Pantech-Co/PG-1810/User-Guide-638875-Page-84.png)
![85 Name [3.6] Allows you to edit the name of your phone, which will be shown to other phones with Bluetooth technology. Address [3.7] Displays the Bluetooth address of your cell phone. To send an object After selecting the desired file, if you select “Send via” from [Option] and then select “Bluetooth”, Search starts (See: ”To Search a device” ). After ”Search” is completed, if you choose the device to receive objects, “Send’ is processed. At this time, if the corresponding device requests for Pairing (see:To Pair with a device), “Send” is processed after the “Pairing” procedure has been completed. To receive an object The receiving process starts only when the receipt has been approved. If the received object is “Contact” information, when it is saved, it will be saved in the phone memory. If the object is an “Event,” when it is saved, it will be saved in the Schedule. Saving Memory Select ‘Menu>8.Connectivity>5.Saving Memory Bluetooth Sets the directory to be displayed when the corresponding device views my FTP directory using Bluetooth, as well as the Memory where the files received from the corresponding device will be saved. - Internal Memory: Shows the “Image Gallery/Sound Gallery/Other Files” directory to the corresponding device. Please note that only the files supported in each Gallery,Image Gallery/Sound Gallery can be saved in the respective Gallery. All other files can be saved in Other Files. When files are received from the corresponding device, image files are saved in the Image Gallery, and the sound files in the Sound Gallery. - External Memory:: Shows all the directories of the MMC card. All the files received from the corresponding device are saved in the MMC card.](https://usermanual.wiki/Pantech-Co/PG-1810/User-Guide-638875-Page-85.png)