Pantech Co PG-6200 Triple Band GSM900/DCS1800/PCS1900(w. WAP,GPRS&BT;) User Manual PG 6200 0328
Pantech Co Ltd Triple Band GSM900/DCS1800/PCS1900(w. WAP,GPRS&BT;) PG 6200 0328
UserManual.wiki
>
Pantech Co
>
PG 6200 User Manual
Manual
Navigation menu
Upload a User Manual
Namespaces
Wiki Guide
HTML
PDF
Info
Views
User Manual
Discussion / Help
Navigation

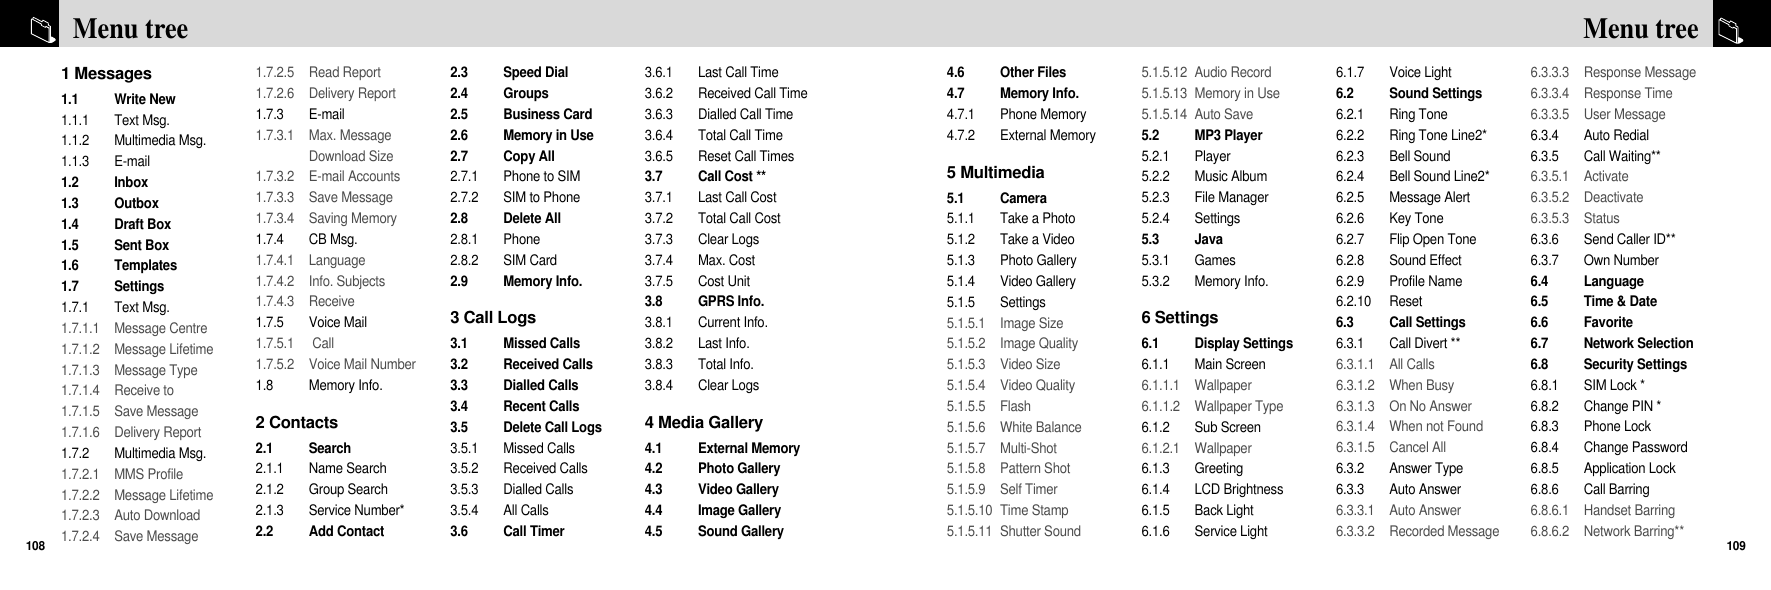
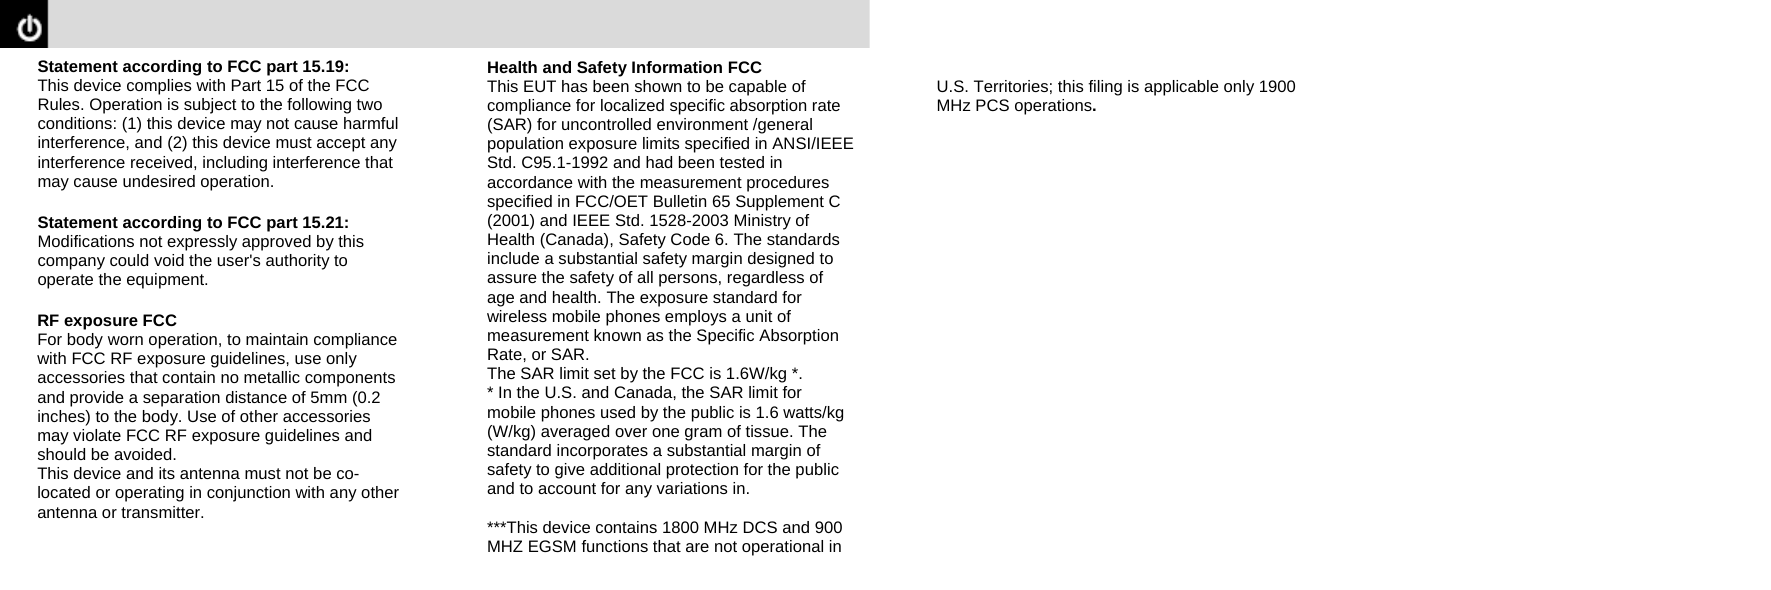
![5Quick & easy Key FunctionPerforms the functions shown in the bottom line of the display.Scrolls through the menu options in Menu mode.In Standby mode, Left key [K] displays the Favorite list screen.Right key [L] displays the Messages menu screen.Up key [F] displays the Registering and Managing Fingerprint screen.Down key [I] displays the Sound Settings menu, to change your phone’s sounds.For details, see Using shortcut keys in Standby mode on page 35.If pressed in Standby mode, displays the WAP (Wireless Application Protocol) menu.If pressed and held in Standby mode, launches the WAP browser directly.If pressed while using your phone, stores user-entered information (such as a name) or confirms an action.Deletes characters from the display, or returns to the previous menu.If pressed briefly in Standby mode, opens Calendar view.Makes or receives a call. If pressed in Standby mode, displays the Recent calls list.If pressed and held in Standby mode, redials the last number called.Ends the current call. If pressed and held in Menu mode, cancels user input and returns to Standby mode.If pressed and held, outside Menu mode, switches your phone on/off.Views4EarpieceMicInternal LCDRight Soft keyMP3 key(side)External LCDCamera flash lightCameraMicVolume up / down keyMircro-SD card slotCamera key(side)Left Soft keyPhone Lock / UnlockFingerprint recognitionCancel / BackText editing clear / Edit keyPower On / OffEnd Call key / Menu exit keyDiaI key / Send keyVoicemailAlphanumeric keypadVibration ModeMicrophoneWAP access keySelection / Confirmation keyFive-way scroll keySpecial menu selection keyLeftNNOcDPRight](https://usermanual.wiki/Pantech-Co/PG-6200/User-Guide-685650-Page-4.png)
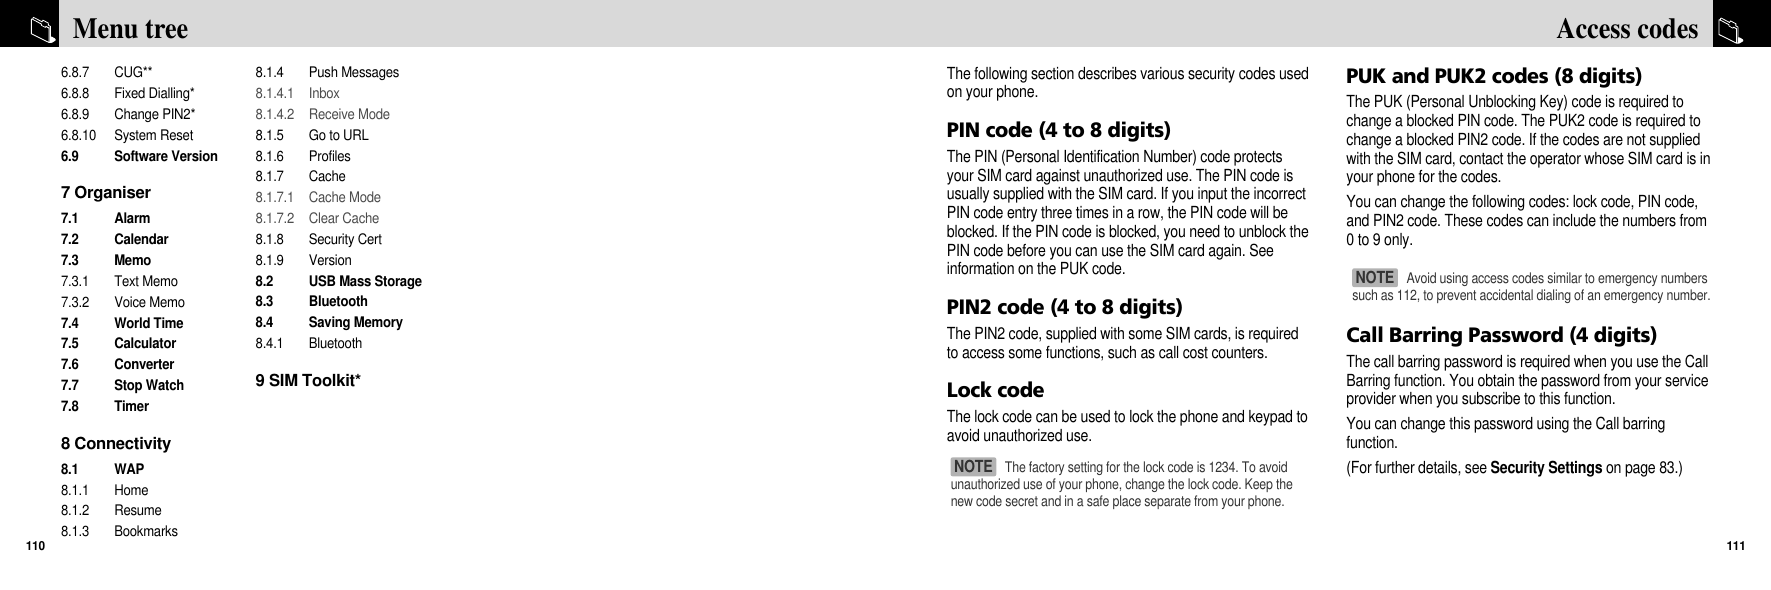
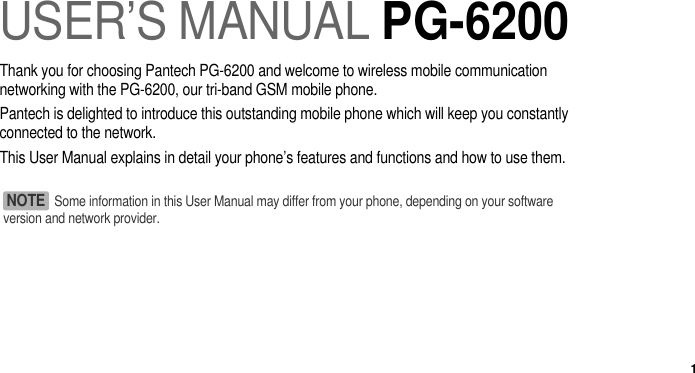
![23Selecting functions and optionsYour phone offers several ways for you to select the phonefunction you want, for your ease of use. You can access allof your phone’s functions when it is open. You can alsoaccess handy functions when your phone is closed, byselecting in the external menu or pressing special functionkeys on the side of your phone.Selecting functions and optionswhen your phone is openYour phone offers many phone operating and customizationfunctions arranged in menus and sub-menus.Each menu and sub-menu allows you to view and changethe settings of the particular function.You access these functions using the [left] Soft key and[right ] Soft key selection when your phone is open.Soft key functions change depending on the current context.The label or icon in the bottom line of the display, above theSoft keys, shows each key’s current function.To display the functions and options available, orselect the one required:Press the left or right Soft key as appropriate.To select the function displayed or option highlighted,press the left Soft key or the [O] key.To highlight the next or previous option in a list, press theDown or Up scroll key.To move back to the previous function or option in a list,press the [c] key.To return to Standby mode, press the [D] key.Selecting functions and optionswhen your phone is closedYou can select frequently used functions even when yourphone is closed, using the external menu.To display the external menu:Press and hold the [A] key on your phone’s side in Standbymode. The external menu contains the following functions.MP3 : Switches to MP3 player mode to enable you to play MP3music.Camera: Switches to Camera mode to enable you to take photos.Exit: Exits the external menu screen.Selecting functions and options22To select additional options by pressing special keys:Press the appropriate special key.Key DescriptionIf pressed during a call, increases the earpiece volume.If pressed on receiving a call, mutes the ring tone.If pressed and held, turns the flash light on for 10 seconds.If pressed while the external menu screen is displayed, scrolls upwards in the external menu. If pressed in MP3 player mode, increases the volume. If pressed in Camera mode, zooms in.If pressed during a call, reduces the earpiece volume.If pressed on receiving a call, rejects the incoming call.If pressed while the external menu screen is displayed, scrolls downwards in the external display menu.If pressed and held in Standby mode, displays the external menu.If pressed in MP3 player mode, reduces the volume. If pressed in Camera mode, zooms out.f pressed and held, turns Camera mode on. If pressed in Camera mode, takes a photo.If pressed while in the external menu, selects a menu or moves to the sub-menu.If pressed and held while in the external menu, exits from the menu screen and returns to the standby screen.If pressed while your phone is open, displays the MP3 player.If pressed and held while your phone is closed, displays the MP3 player.In some functions, you may be asked to enter a passwordor PIN. Enter the required code then press the [O] key.NOTE For further details on selecting functions on your phone,see 7. Selecting menu functions on page 35..NOTE Up(Phone side)Down(Phone side)Extra keyMP3 keyBACM](https://usermanual.wiki/Pantech-Co/PG-6200/User-Guide-685650-Page-13.png)
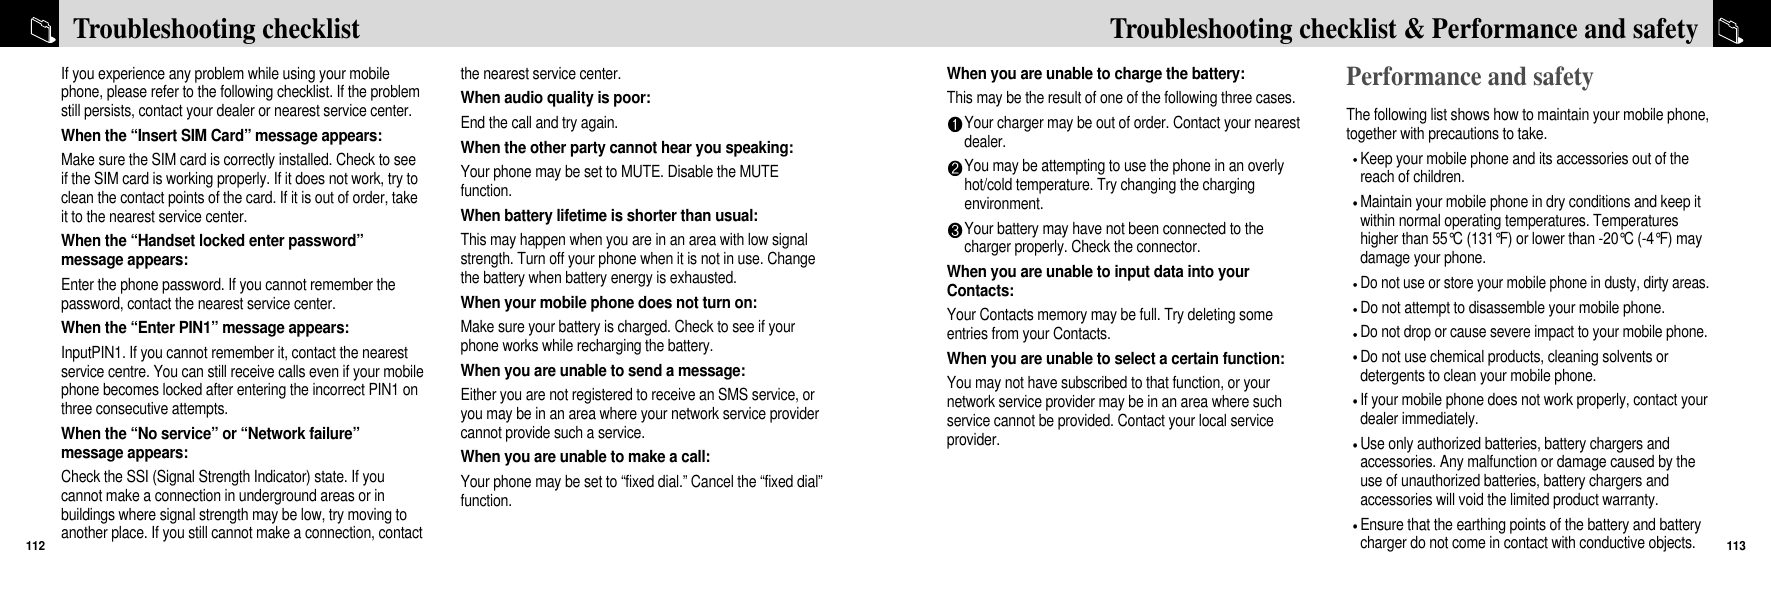
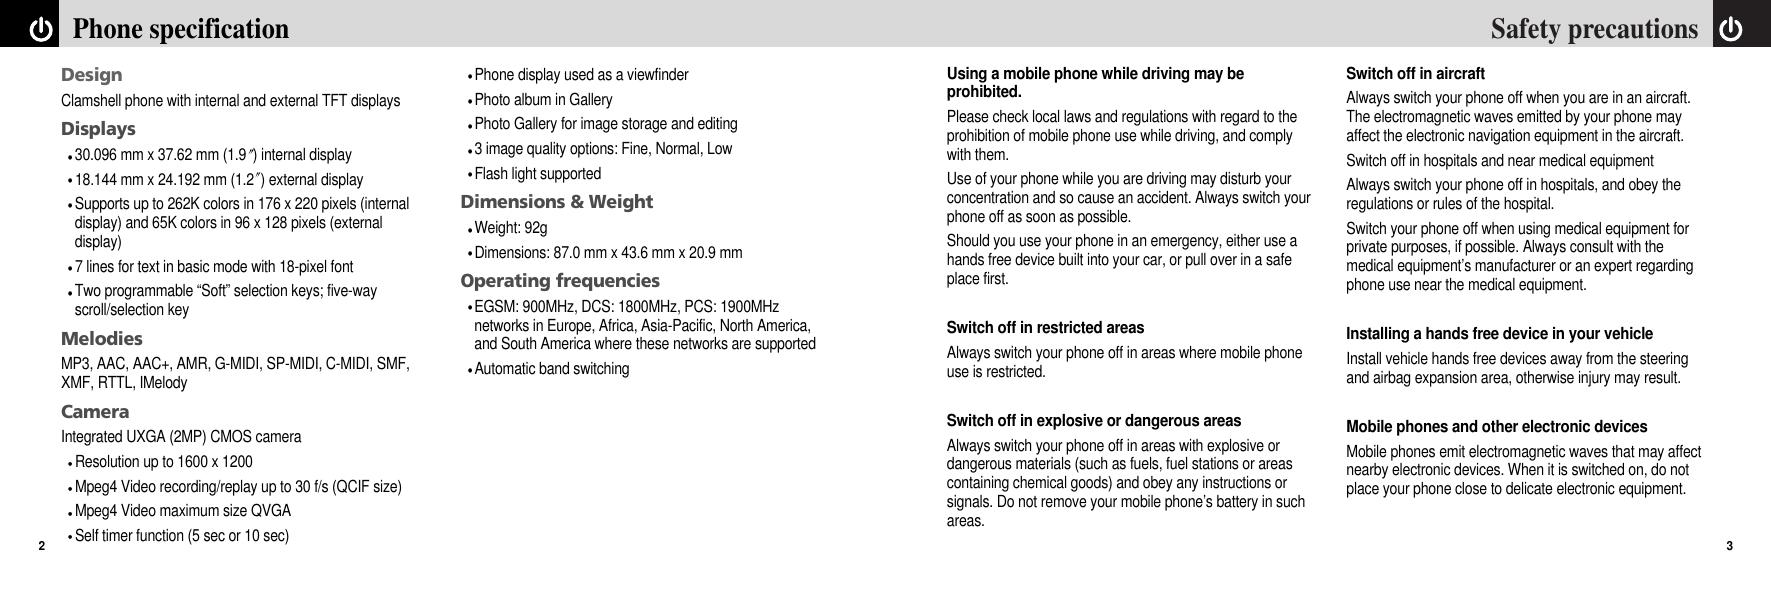
![2Basic functions1. Switching your phone on or off2. Making and ending a call3. Answering a call4. Options during a call5. Using your headset6. Using your phone’s speaker phone function7. Selecting menu functions8. Entering textSide key special functionsThe side keys on your phone provide quick access to yourphone’s special functions.CameraClose your phone to turn on the camera function.To take a photo:Press and hold the [C] side key to activate Cameramode.Press the [C] side key again to take a photo. The phototaken is shown on your display, in View mode.Press the [C] side key again to save the photo and nameit automatically.Press the [V] side key to return to Capture mode.To activate Video mode:Press and hold the [C] key while your phone is open.FlashlightYou can use your phone as an emergency flashlight. To use your phone as a flashlight:Press and hold the [B] side key in Standby mode. The camera’s flash is lit automatically for 10 seconds.To turn the flash off, press the [C] key or [V] key.Selecting functions and options 24](https://usermanual.wiki/Pantech-Co/PG-6200/User-Guide-685650-Page-14.png)
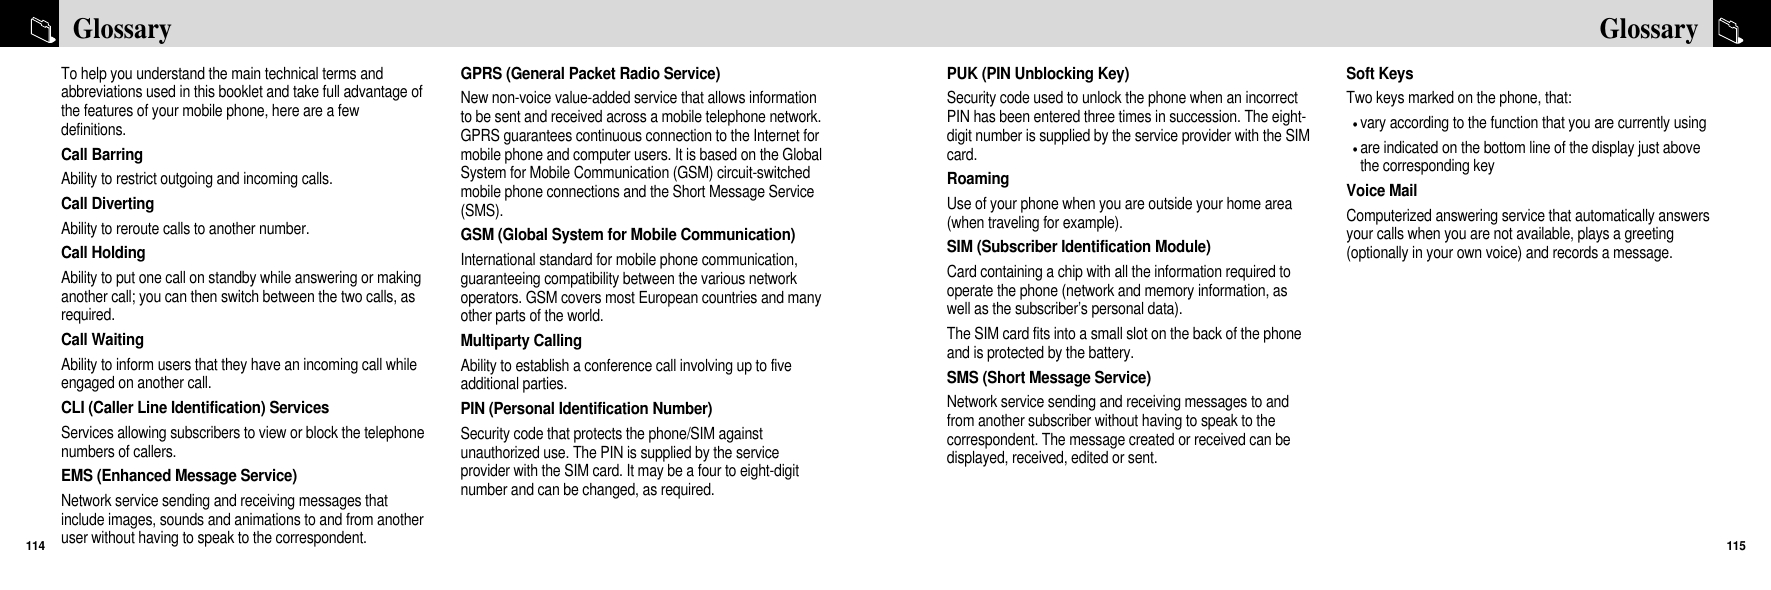
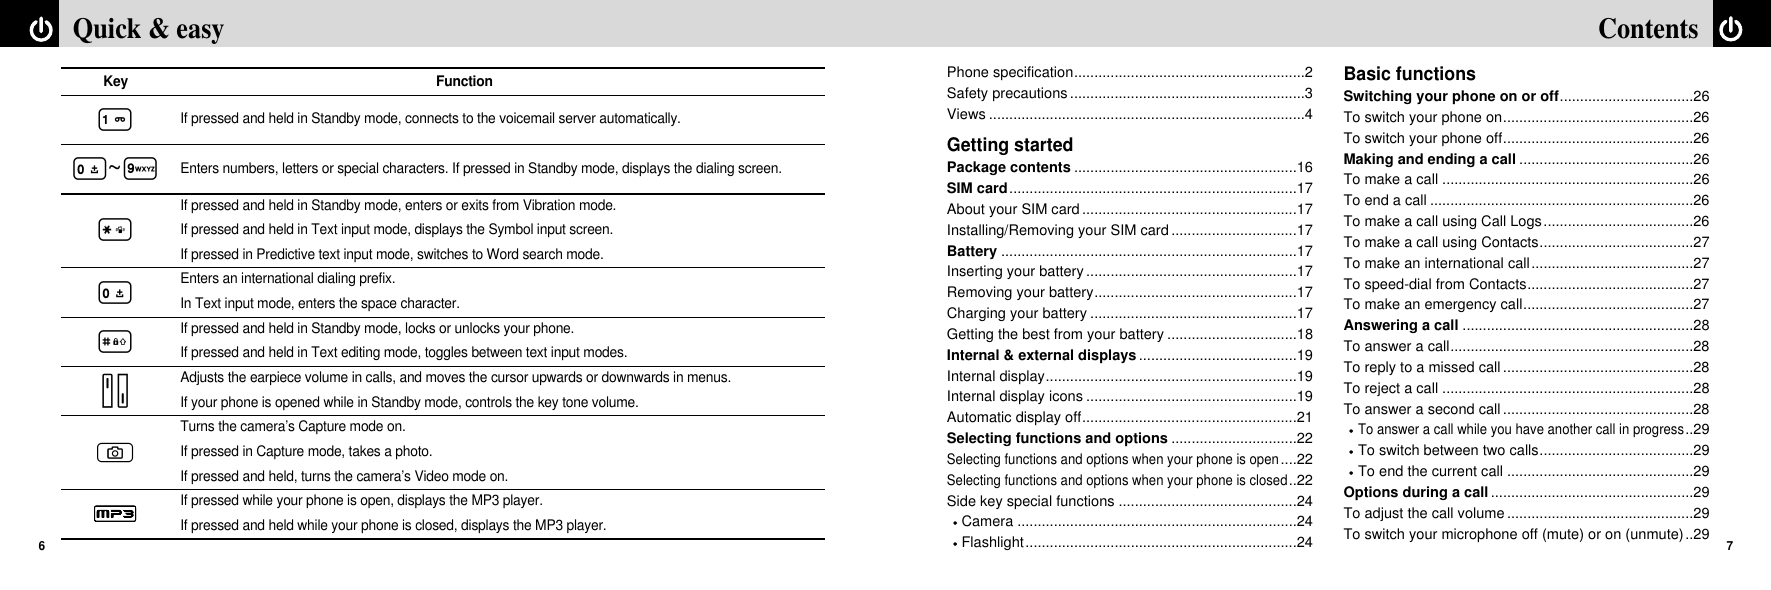
![Press the [D] key to display the Call Logs list of dialled,received or missed call numbers in reverse chronologicalorder. Press the [Up] or [Down] scroll key to select the numberyou want.Press the [D] key to dial the selected number.(For further details, see 3. Call Logs on page 58.)To make a call using ContactsYou can store frequently used names and phone numbers,called Contacts, in your SIM card or your phone’s memory.You therefore do not have to remember all your phonenumbers; simply select the name to recall the associatednumber.From Standby mode, press the [Right N] Soft key todisplay the View Names list, or press the [ ] key todisplay the 2. Contacts menu.Select the number you want from View Names.Press the [D] key to dial the selected number.(For further details, see 2. Contacts on page 54.)To make an international callPress and hold the [0] key for the international prefixuntil the ‘+’ character is shown on the display. Enter the country code, area code and phone numberyou want to make a call to.Press the [D] key.To speed-dial from ContactsPress and hold the Speed Dial number to make a call usingthe number you have saved. For example, press and holdthe “5” key to dial a number which you have saved as “5” inyour Speed Dial list. (For further details, see Speed Dialingon page 56.)To make an emergency callYou can make emergency calls even if your phone does notcontain a SIM card.Select Emergency Number, or press the [SOS] Soft keyif your phone does not contain a SIM card.Press the [D] key.27Making and ending a callTo switch your phone onOpen the folder.Press the [P] key until your phone switches on.If you are asked to input your PIN (Personal IdentificationNumber), enter your SIM card’s PIN and press the [O]key. (For further details, see Security Settings on page83.)Your phone starts to search for an available network andthe current date and time is shown on the internal andexternal displays. Once connected to the network, you canmake and receive calls.To switch your phone offPress and hold the [P] key until the power-off animation isdisplayed.Making and ending a callTo make a callEnter the area code and phone number from Standbymode, then press the [D] key.To clear the last digit displayed, press the [c] key.To clear the all digits displayed, press and hold the [c]key.To end a callPress the [P] key or close your phone.Once the call is completed, a call summary (displaying therecipient’s name or number, and the call length) is displayed.To make a call using Call LogsYour phone logs dialled, received and missed call numbers.The last call number is saved in the first position. If youdialed the same number more than once, only the latestoccurrence is saved.Switching your phone on or off & Making and ending a call26If a malfunction occurs while you use your phone or it isnot turned on, remove the battery then insert it again after 5 to 10seconds.NOTE If you have turned the [Auto Redial] option on (For furtherdetails, see Auto Redial on page 82), your phone will attempt tomake a call automatically for up to 10 times if it is not answered. NOTE To redial the last number in the Call Logs list, press andhold the [D] key. NOTE This function is standard to all mobile phones. In anemergency, you can make an emergency call using any mobilephone that does not contain a SIM card.NOTE To change the language if you are switching on yourphone for the first time, select the Language menu option. (Forfurther details, see Language on page 83.)NOTE](https://usermanual.wiki/Pantech-Co/PG-6200/User-Guide-685650-Page-15.png)
![To answer a call while you have anothercall in progressPress the [D] key. The first call is automatically put onhold.To switch between two callsPress the [Swap] Soft key.To end the current callPress the [P] key. The call on hold is automaticallyreconnected to you.Options during a callTo adjust the call volumeTo adjust the earpiece volume during a call, do one of thefollowing.To increase the call volume during a call, press the [Up]volume key on the left side of your phone.To decrease the call volume during a call, press the[Down] volume key on the left side of your phone.To switch your microphone off(mute) or on (unmute)You can temporarily switch your phone’s microphone off sothat the person you talk to on your phone cannot hear you.For example, you may wish to say something to anotherperson in the room but do not want the person calling tohear you.To switch your phone’s microphone offPress the [Mute] Soft key, or press [Option] then select [Mute].To switch your phone’s microphoneback onPress the [Sound] Soft key, or press [Option] then select[Sound]. To put a call on hold, and return to aheld callYou can put a call on hold whenever you want. You can make another call while you have a call in progressif your network service provider supports this service. Ofthese two calls, one is active and the other is on hold, andyou can switch between the calls.29Answering a call & Options during a callTo answer a callWhen you receive a call, your phone rings (or vibrates). If the caller can be identified, the caller’s phone number isdisplayed (or the caller’s name, if it is stored in your Contacts).To answer a call, open your phone. If your phone is already open, press the [D] key.To reply to a missed callIf the incoming call could not be answered, a missed callmessage is shown on your phone’s display to remind you ofthe call you have missed. To reply to a missed call, do the following.Keep your phone open.Press the [View] Soft key to display the list of missedcalls.If necessary, scroll to highlight the number you want bypressing the [Up] or [Down] scroll key.Press the [D] key to call the missed call’s number.Press the [c] key or [P] key to close the ‘missed call’notification message.To reject a callIf your phone is open, press the [P] key or the [Reject]Soft key.If your phone is closed, press and hold the [Up] or [Down]scroll key during the incoming call.The caller hears a ‘busy’ tone.To answer a second callYou can answer an incoming call while you have a call inprogress, if your network service provider supports thisservice and you have activated the Call waiting option. (Forfurther details, see Call Waiting on page 82.)You will be notified of an incoming call by a ‘call waiting’tone.Answering a call28This function is network and subscription dependent, andmay not be available in all areas.NOTE If your answer type is set to [Any Key], you can answercalls by pressing any key except the [P] key.NOTE This function is network and subscription dependent, andmay not be available in all areas.NOTE](https://usermanual.wiki/Pantech-Co/PG-6200/User-Guide-685650-Page-16.png)
![To add a new person to a multi-party callCall the person in the normal way.Press the [Option] Soft key then select the [Join All]option.Press the [Select] Soft key or [O] key.To add a caller to a multi-party callPress the [Option] Soft key then select the [Join All] option.To view the status of multi-party callparticipantsPress the [Left] or [Right] scroll key. An icon indicateswhether the remote party is participating in the multi-partycall ‘Far Multiparty’ or on hold ‘Far Hold’.To answer or make a second call duringa multi-party callPlace the multi-party call on hold by pressing the [Option]Soft key then selecting the [Hold All Calls] option.Answer or make a call in the normal way.To reactivate the multi-party call on hold, press the[Swap] Soft key.To end the multi-party call, press the [P] key in thenormal way.To have a private conversation with oneparticipantPress the [Option] Soft key then select the [Private]option. Press the [Select] Soft key or [O] key.Press the [Up] or [Down] scroll key to highlight theparticipant you want then press the [O] key. Now youcan talk privately with that person. The other participants can continue the conversation witheach other.To return to the multi-party call, press the [Option] Softkey then select the [Join All] option.Press the [Select] Soft key or [O] key.All of the multi-party call participants can now hear eachother.To remove one participant from a multi-party-callPress the [Option] Soft key then select the [Exclude]option.Press the [Up] or [Down] scroll key to highlight theparticipant then press [Select] Soft key or [O] key. Thecall ends with that participant, but you can continue to31Options during a callTo put a call on holdPress the [Option] Soft key then select [Hold], or press the[D] key. The callers name and icon are grayed while thecall is held.To return to the callPress the [Option] Soft key then select [Retrieve].To make a call while you are in a callEnter the phone number that you want to dial or look it upin Contacts.Press the [D] key to dial the second call. The first call isautomatically put on hold.To switch between two callsPress the [Swap] Soft key. The current call is put on holdand the held call is reactivated so that you can continueyour conversation with the caller.To end a callPress the [P] key in the normal way.Transferring a callYou can transfer (connect) the current call to the held call ifyour network service provider supports this service, so thatcallers can talk to each other. You will be disconnected fromboth of them.During a call, make or answer a call in the normal waythen press the [Option] Soft key.Press the [Up] or [Down] scroll key to highlight the[Transfer] option then press the [Select] Soft key or [O]key.The two callers will be connected to each other.Multi-party callsA multi-party call feature is a network service that allows upto six people to take part in a multi-party or conference callsimultaneously. For more information, contact your serviceprovider.To make a multi-party callCall the first participant in the normal way.Call the second participant in the normal way. The firstcall is automatically put on hold.To join the first participant to a multi-party call, press the[Option] Soft key then select the [Join All] option. Press the [Select] Soft key or [O] key.Options during a call30](https://usermanual.wiki/Pantech-Co/PG-6200/User-Guide-685650-Page-17.png)
![Reading or writing a messageduring a callYou can read or write a message during a phone call.Press the [Option] Soft key.Press the [Up] or [Down] scroll key to highlight the[Messages] option then press the [Select] Soft key or[O] key. To read a received message, select the Inboxsubcommand then scroll to the message that you want toread.To write a new message, select the Write Newsubcommand then press the [O] key. (For further details,see Write New on page 43.)To switch to a Bluetooth headset orhands free kit during a callThis function is available when a Bluetooth headset orhands free kit is connected during a call.To switch to a Bluetooth headset orhands free kitPress the [Option] Soft key then select the [Retrieve Call inHeadset/Handsfree] option.To switch back to your phone during a callPress the [Option] Soft key then select the [Retrieve Call inPhone] option.33Options during a calltalk with the other participants.End the multi-party call by closing your phone or pressingthe [P] key.Searching for a number in Contactsduring a callPress the [Option] Soft key.If necessary, press the [Up] or [Down] scroll key tohighlight the [Contacts] option. Press the [Select] Softkey.Select the preferred search type like Name, Group, orPhoto.Press the [O] key.The Contacts entries are displayed.To search for a name or group inContactsEnter the first letters of the name for Name Search, or thefirst letters of the group for Group Search. The entries aredisplayed starting with the first entry matching your input.To find a name manually in ContactsPress the [Up] or [Down] scroll key.To view the highlighted entry inContactsPress the [O] key. (For further details, see 2. Contacts onpage 54.)Using DTMF tonesYou can turn the DTMF key tones off or on during a call.When the [DTMF Off] option is selected, your phone doesnot transmit the key tones. It allows you to press keyswithout hearing any key tones during calls. To communicate with answering machines or computerisedtelephone systems, you must select the [DTMF On] option.To turn DTMF tones off or onPress the [Option] Soft key then select the [DTMF Off] or[DTMF On] option.Options during a call32While you are on a call using your phone, you can alsopress a button on the Bluetooth headset or hands free kit to talkusing the headset or hands free kit.NOTE](https://usermanual.wiki/Pantech-Co/PG-6200/User-Guide-685650-Page-18.png)
![Displaying your phone’s menu functionsTo display your phone’s menu functions, press the [Left]Soft key (Menu) in Standby mode.Moving within your phone’s menuand submenu functionsTo move within your phone’s functions and select thefunction or value you want, press the following keys.Using shortcut keys in Standbymode35Selecting menu functionsUsing your headsetYou can send or receive a call without touching your phone,using your headset.When you connect your headset to the jack located at thetop of your phone, the button on the headset works asfollows:To list recent calls, press the button in Standby modeTo redial the last call, press the button twice in StandbymodeTo answer a call, press the button when you receive thecallTo end a call, press the button when you have finishedthe callUsing your phone’s speaker phonefunctionTo use your phone’s speaker phone function during a call,press the [Option] Soft key then select [Speaker On], orpress the [left N] Soft key.To deactivate the speaker phone function, press the[Option] Soft key then select [Speaker Off].Using your headset & Using your phone’s speaker phone function341.You may cause an accident if you use the speakerphone function when driving. When driving you should use anEarMic and Speaker Phone car kit instead.2.While using the speaker phone function, do not place your phoneclose to your ear as this may damage your hearing. NOTE You can input the menu function number to access thesubmenu function quickly. For details of the menu tree listing allmenu function and subfunction numbers, see Menu tree on page108.NOTE Key Function[K]&[L] Key Moves within the main menu functions.[F]&[I] Key Moves within the submenu functions.[O] keyDisplays the submenu if one exists, orSelects the highlighted function or value, or Displays the WAP menu.[c] key Returns to the previous menu function.Key If pressed If pressed and held[Left N] key Displays menu[Right N] keyDisplays View Names[L] key Displays Messages Displays Write New menu menu[F] key Displays Fingerprint menu[O] keyDisplays WAP browserConnects directly to WAP browser[K] keyDisplays Favorite menuPhoto Gallery menu[I] key Displays Sound Settings menu[c] key Displays Calendar Monthly View[D] keyDisplays Recent Calls listRedials last call[C] key Activates Photo Activates Video Capture mode Capture mode[M] key Displays MP3 player menu](https://usermanual.wiki/Pantech-Co/PG-6200/User-Guide-685650-Page-19.png)
![Press the [Right N] Soft key indicating the current Textinput mode.Toggle to the mode you want to use by pressing the[Right N] Soft key again as many times as necessary.The Language select option allows you to change the textinput language.To insert a spaceTo insert a space between words, press the [0] key.To insert a space at the end of a line, press the [Right] scrollkey to add a new space character.ScrollingTo move the cursor to the left or right within the text, pressthe [Left] or [Right] scroll key. To move the cursor up or down within the lines, press the[Up] or [Down] scroll key.Clearing letters and wordsTo clear the letter to the left of the cursor, press the [c]key. To clear all of the letters on the display, press the [c] keylonger.Returning to the previous screenWhen the text input field is empty, press the [c] key toreturn to the previous screen.37Entering TextInput ModeOn many occasions you need to input text while you areusing your phone (when storing a name in your Contacts,writing a new message, creating your greeting or schedulingevents on your calendar, for example).You can select from the following methods (modes) ofinputting text on your phone.T9 modeYou can input a letter using only one keystroke per letter. The keypad has more than one letter on it - when you pressthe 5 key once, J, K or L may be displayed. The T9 mode automatically compares your keystrokes withan internal linguistic dictionary to determine the correctword, thus requiring far fewer keystrokes than theconventional ABC mode (see below).ABC modeIn this mode, you input the letter you want by pressing thekeypad once to select the first letter on the key, twice toselect the second letter on the key, three times to select thethird letter on the key and so on until the letter you wantappears.123 modeYou can input numbers in this mode.Symbol modeYou can input the special characters like Greek letters,currency units, or a period mark in this mode.To change Text input modeWhen you are in the area where you can input the text, thetext input mode indicator is displayed at the bottom of yourphone’s display.Example: When entering a memo.Entering Text36The number of remaining characters youcan enter.Editing areaThe current text input mode and languageBy pressing the [Up] or [Down] key on the side of yourphone, you can move the cursor very quickly to the beginning or theend of the text.NOTE Key Function[*] (long press) Displays the symbol screen.[0] (short press) Enters a space character[#] (long press) Changes the Text input mode[c] Deletes characters one by one. (short press) After deleting all characters, returns to the previous screen.[c] Deletes all characters and moves the (long press) cursor to the beginning of the input screen.To change the text input mode quickly, do the following.Tip](https://usermanual.wiki/Pantech-Co/PG-6200/User-Guide-685650-Page-20.png)
![Changing caseTo change the case of the next letter(s) that you type, pressthe [#] key. There are three cases:Lower case (no indicator)Initial capital ( )Capital lock ( )Using 123 modeThe number (123) mode allows you toenter numbers into your text. Press thekey corresponding to the digit you wantto enter.Using Symbol modeThe symbol mode allows you to entersymbols into your text.To display more symbols, press the[Up] or [Down] scroll key.To input a symbol, press the numberfor a symbol, and the text will appear inthe input screen. To exit from Symbolmode, press [#] longer, or press the[Right] Soft key. If you entered a symbol by pressing [#]longer, press the key again to return to the previouslyselected mode. To toggle to the mode following Symbolmode, press the [Right] Soft key.39Entering TextUsing T9 modeIn the T9 alphabet Editor, each word iscomposed completely as you input thetext.Press the keys numbered [2] to [9] to input text. Forexample, press [4][3][5][5][6] in sequenceto input ‘hello’. The word you are typing appears on thedisplay. It may likely change with each key you press.Enter the whole word before editing or deleting anykeystrokes.Upon searching a word, input the next text.If the search fails, press [*] key to search which textcan be typed in. Your phone displays the most commonlyused choices first.When the word you want is displayed, press [0] toenter a space character (and so complete the word).Continue entering the next word.Using ABC modeWhen typing in ABC mode, press thekey labeled with the target letter oncefor the first letter; press it twice for thesecond letter, and so on.Example: To display the letter “C”,quickly press the [2] key three times.To display the letter “K”, press the[5] key twice. This method is calledMulti-tap typing.Refer to the table below for more information about thecharacters available. The characters vary depending on thetext input language. Entering Text38The cursor moves to the right when you press a differentkey. When entering the same letter twice or a different letter on thesame key, just press the [Right] scroll key or wait a few seconds forthe cursor to move to the right automatically, and then enter thenext letter. NOTE Key Characters in displayed order1. , - ? ! ' @: _12a b c 23d e f 3Key Characters in displayed order4g h i 45j k l 56m n o 67p q r s 78t u v 89w x y z 90Space 0[English]](https://usermanual.wiki/Pantech-Co/PG-6200/User-Guide-685650-Page-21.png)
![Write NewPress the [Menu] Soft key then select 1. Messages thenselect 1.Write New, then press [O] key.Select the type of message you want to write.Text Msg.: Write new SMS or EMS message.Multimedia Msg.: Write new MMS message.E-mail: Write new E-mail.Editor options for Text Msg.While you are entering a text message, press the [Option]Soft key to select from the following functions.Language: The selected language is displayed at thebottom right corner of your phone’s display.Add Picture: Loads the selected item.Add Animation: Loads the selected item.Add Melody: Inserts the selected melody and plays itback once.Add Template: Inserts a clause stored in a Template.Save as Draft: Transfers the message to Draft Box andsaves it in your phone’s memory.Editor options for Multimedia Msg.While you are editing multimedia messages, slide pageinformation is displayed in the top right corner of yourphone’s display. While you are creating a multimedia message, the[Option] Soft key to select from the following functions.Edit Subject: Edits the message subject. (For furtherdetails, see 7. Selecting menu functions on page 35.)Add Text: Enters new text into the message. (For furtherdetails, see 7. Selecting menu functions on page 35.)Add Image: Adds an image from the Image Gallery.Press the [O] key to select the image from the image list.(For further details, see Image Gallery on page 65.)Add Photo: Adds a photo from Photo Gallery. Press the[O] key to select the photo from the photo list in a folder.(For further details, see Photo Gallery on page 63.)Take a Photo: Adds a new photo by taking a photo usingthe camera feature. (For further details, see Takingphotos when your phone is open on page 68.)Add Sound: Adds a sound. Press the [O] key to selectthe sound from the sound list. (For further details, seeSound Gallery on page 66.)Add Video: Adds a video clip from the Video Gallery.43MessagesThis function allows you to create, send, read and save amessage using the Short Message Service (SMS: textmessages), Enhanced Message Service (EMS: messagesincluding a simple image, animation or melody) orMultimedia Message Service (MMS: messages supportingpresentation of various media types, such as full colorimages and polyphonic ring tones) provided by yournetwork operator, or an e-mail service.Voice mails are also available.Press the [Menu] Soft key then select 1. Messages.Text Msg. Short message service (SMS) allows you to send andreceive a short text message to and from other GSMphones. To send a text message by phone, you must obtain thenumber of the SMS centre from your service provider.Multimedia Msg.Multimedia Message Service (MMS) is a messaging servicesimilar to Short Message Service (SMS). It providesasynchronous delivery of personal multimedia messages.In addition to the familiar text content of text messages,multimedia messages can contain images, graphics, and/orsound. An MMS message is a separate multimediapresentation in a single entry, not an attachment to the textfile.Using the MMS feature, your phone can receive amultimedia message and/or send a picture message,depending on MMS availability from your service provider.Only phones that support the multimedia message featurecan receive or display the multimedia message.Your phone also supports the Enhanced Messaging Service(EMS), which allows you to make a short messageconsisting of a simple picture, melodies, animation andstyled text that add new features to simple text messages.E-mailBefore you can send, receive, retrieve, reply to, and forwarde-mail to a separate e-mail account, you must define your e-mail settings correctly. (For further details, see Settings onpage 50.)Messages42These features are available only if your serviceprovider’s network supports it. Contact your service provider formore information.NOTE](https://usermanual.wiki/Pantech-Co/PG-6200/User-Guide-685650-Page-23.png)
![Press the [Edit], [Add] or [Replace] Right Soft key to use thefollowing options.Add: Adds the subject, main text or attachment.Edit: Adds the subject, main text or attachment.Delete: Deletes the selected object.Sending a messageTo send Text Msg.: When you have completed entering the message, pressthe [O] key. Input the recipient’s phone number on the NumberScreen. Press the [Option] Soft key to search for anumber in Contacts or Recent Calls. You can add up to 5recipients. Press the [O] key. If the transmission fails, the messageis saved in the Outbox, from where you can send itagain.To send Multimedia Msg. and E-mail:When you finish creating the message, press the [O]key.Input the recipient’s number or e-mail address. You canalso search for a number or e-mail address in Contactsby pressing the [Option] Soft key.To send the message to several recipients (up to 15recipients), repeat from step 2.When you have finished entering recipients, press the[O] key.InboxPress the [Menu] Soft key then select 1.Messages thenselect 2.Inbox, then press the [O] Key.The Inbox contains all message types, each of which isdetailed below.Text Msg.To list text messages in Inbox:In the Inbox, select Text Msg. then press the [O] key.To open a text message in Inbox:When the Text Msg. messages in Inbox are displayed,select the text message then press the [O] key.To reply to a text message:Press the [Reply] Soft key to write a new message to thesender’s number. The Write New screen is displayed. (Forfurther details, see Write New on page 43.)45MessagesPress the [O] key to select the video clip from the videoclip list.Take a Video: Takes a new video clip using the Camerafunction.Add Template: Adds a multimedia message template.This feature is available only when there are no items onthe slide. If there is more than one slide, the AddTemplate function is not available. While you are editing a multimedia message, press the[Option] Soft key to select from and use the followingoptions.Delete Text: Deletes the selected text.Add Object: Adds an image, photo, sound, slide or video.Preview: Shows the message as it appears on therecipient’s phone.Edit Subject: Edits or modifies the subject. (For furtherdetails, see 7. Selecting menu functions on page 35.)Slide Timing: Sets how long the received message isdisplayed for. The display automatically scrolls to the nextslide page after the specified time.Page Layout: Arranges the image and text displayposition in the slide page. You can set this to Image atTop or Text at Top.Save as Draft: Transfers your message to Draft Box andsaves it in your phone’s memory.Press the [Edit], [Add] or [Replace] Right Soft key to usethe following options.Edit: Edits the displayed text.Add: Adds an image, photo, sound or slide, or takes aphoto or video clip. Replace: Changes added objects.Editor options for E-mailWhile you are entering an E-mail message, press the[Option] Soft key to select from the following functions.Add Subject (or Edit Subject): Adds or edits a subject.Add Text (or Edit Text): Adds or edits text.Add Attachment (or Edit Attachment): Adds or edits an e-mail attachment.Add Template: Adds the text of an e-mail template to theemail text.Delete Object: (Displayed when an object is selected)Deletes the selected object.Save as Draft: Moves the e-mail message to the DraftBox and saves it in your phone’s memory.Messages44](https://usermanual.wiki/Pantech-Co/PG-6200/User-Guide-685650-Page-24.png)
![To manage multimedia messages:In Multimedia Msg., select the message you want tomanage.To select from the following functions, press the [Option]Soft key:Delete: Deletes the selected message.Forward: Prepares the received message for sending toanother recipient.Delete All: Deletes all multimedia messages in the Inbox.Reply: Creates a new multimedia message for sending tothe sender’s number.To edit a multimedia message:In Multimedia Msg., select the multimedia message youwant to edit then press the [O] key.To select from the following functions, press the [Option]Soft key:Delete: Deletes the selected message.Forward: Prepares the received message for sending toanother recipient.Cut: Cuts the following objects included in the message.1.Objects: Displays all objects included in the message.2.Numbers: Displays a list containing all numbers contained inthe received message, enabling you to select one for adding to anew or existing Contacts entry.3.URLs: Saves the URL information contained in the message.The selected URL is saved in the bookmark.Save as Template: Saves the current message intemplate form.Message Info.: Displays information on the selectedmessage (sender, subject, and size).Reply: Creates a new message for sending to thesender’s number.CB Msg. optionsCell Broadcast (CB) messages are messages sent regularlyto you through your service provider’s network. Thesecontain information such as news bulletins, weatherforecasts, sports results or other information sent to youautomatically. These messages are downloadedautomatically into the CB Msg. folder of the Inbox.To select from either of the following functions, press the[Option] Soft key:Delete: Deletes the selected message.Delete All: Deletes all CB messages in the Inbox.47MessagesTo manage text messages in Inbox:In Text Msg., select a text message then press the [Option]Soft key to select from the following functions:Delete: Deletes the selected message.Forward: Prepares the received message for sending toanother recipient.Delete All: Deletes all text messages in the Inbox.Save to Phone / SIM: Saves the selected message toPhone or SIM.Reply: Writes and sends a new message using therecipient’s number.To manage a text message opened in Inbox:When the text message is open, press the [Option] Soft keyto select from the following functions.Delete: Deletes the selected message.Forward: Prepares the received message for sending toanother recipient.Cut: Cuts the following objects included in the message.1.Objects: Displays all objects included in the message.2.Numbers: Displays a list containing all numbers contained inthe received message, enabling you to select one for adding toa new or existing Contacts entry.3.URLs: Saves the URL information contained in the message.The selected URL is saved in the bookmark.Save as Template: Saves the current message intemplate form.Reply: Writes and sends a new message using therecipient’s number.Multimedia Msg.You can choose to receive multimedia messagenotifications through the SMS network and so select whichspecific multimedia messages you want to download.To select multimedia messages for download inInbox:In the Inbox, select Multimedia Msg. then press the [O]Key.Check for new messages, and then select a messageyou wish to download.Select Download to download the message.If Auto Download is set to On, you will not be notified andthe message will be downloaded automatically andsaved in the Inbox as unread.Messages46](https://usermanual.wiki/Pantech-Co/PG-6200/User-Guide-685650-Page-25.png)
![Draft BoxDraft Box contains all messages you have edited andsaved.Press the [Menu] Soft key then select 1.Messages thenselect 4.Draft Box, then press the [O] key.To manage messages in Draft Box:In the Draft Box, select the saved message you want tomanage.Press the [Edit] Soft key to edit the saved message, orpress the [Option] Soft key to select from the followingfunctions:Delete: Deletes the message.Delete All: Deletes all messages in the Draft Box.Edit: Edits the selected message.To edit a message in Draft Box:In the Draft Box, select the unsent message you want toedit then press the [O] key.To select from the following functions, press the [Option]Soft key:Edit: Sends the message.Delete: Deletes the message.Save as Template: Saves the current message as atemplate.Send: Sends the message.Sent BoxSent Box saves all messages sent from your phone.Press the [Menu] Soft key then select 1.Messages thenselect 5.Sent Box, then press the [O] key.To resend a sent message:In the Sent Box, select the sent message you want toresend.Press Resend to send the message again.To manage messages in Sent Box:In the Sent Box, select the sent message you want tomanage.To select from the following functions, press the [Option]Soft key:Edit: Edits the selected message.Delete: Deletes the selected message.Delete All: Deletes all messages in the Sent Box.Resend: Resends the selected message.49MessagesE-mail optionsIn the Inbox, select E-mail then press the [O] key.To select from the following functions, press the [Option]Soft key:Check for E-mail: Checks whether you have received e-mails that have not been downloaded from your serviceprovider’s POP server. Download in Full: Downloads into your phone’s usermemory all e-mails that have been truncated or could notbe received due to the size limit in your phone’s E-mailSettings.OutboxThe Outbox contains all messages you have not yet sent.Press the [Menu] Soft key then select 1.Messages thenselect 3.Outbox, then press the [O] key.To resend an unsent message:In the Outbox, select the unsent message you want toresend.Press Resend to send the message again.To manage messages in Outbox:In the Outbox, select the unsent message you want toresend.To select from the following functions, press the [Option]Soft key:Edit: Edits the selected message.Delete: Deletes the message.Delete All: Deletes all messages in the Outbox.Resend: Resends the selected message.To edit a message in Outbox:In the Outbox, select the unsent message you want toedit then press the [O] key.To select from the following functions, press the [Option]Soft key:Edit: Sends the selected message.Delete: Deletes the message.Save as Template: Saves the current message as atemplate.Resend: Resends the message.Messages48The POP server does not delete unread e-mails, sincethere may be truncated e-mails depending on your phone’s storagecapacity. New e-mails are downloaded to your phone, not unread e-mails. NOTE](https://usermanual.wiki/Pantech-Co/PG-6200/User-Guide-685650-Page-26.png)
![Text Msg.Before you can send and receive text messages, you mustconfigure the following settings.Message Centre: The number of your SMS center,required when sending a message. You must obtain thisnumber from your service provider.Message Lifetime: The length of time your message isstored at the message center while attempting to deliver it. Message Type: The message type: Normal, Fax,Voicemail, ERMES, National Paging, X.400, or Internet.The service provider’s network converts text messagessent from your phone to the selected format.Receive to: The location where a text message is storedafter it is received. If the storage space of the selectedlocation is full, the message is saved in the other storagelocation. Press the [Left] or [Right] scroll key to chooseeither Phone or SIM.Save Message: Specifies whether the completedmessage is saved in the Sent Box after it is sent. Pressthe [Left] or [Right] scroll key to choose either On or Off.Delivery Report: If this option is set to Off, your phonedoes not send a reply to the sender’s phone if they ask fora delivery confirmation reply.TTS Message Alert: If this option is set to On, you aresent a TTS alert informing you when a new message isreceived.TTS Message: If this option is set to On, when checkingthe message you can hear the message via TTS.Multimedia Msg.Before you can send and receive multimedia messages,you must configure the following settings.MMS Profile:Profile Name: Input the profile name.Home URL: Input the connection URL.Connection Type: Select WAP or HTTP.GSM SettingsIP Address: The IP address. A point is added after every3 digits.IP Port: The IP port number.Login ID: The ID used to sign in to the gateway.Password: The password used to sign in to the gateway.Data Call Type: Press the [Left or [Right] scroll key tochoose either ISDN or Analog.51MessagesTo edit a message in Sent Box:In the Sent Box, select the sent message you want toedit then press the [O] key.To select from the following functions, press the [Option]Soft key:Edit: Sends the message.Delete: Deletes the message.Save as Template: Saves the current message as atemplate.Resend: Resends the message.TemplatesA template contains a block of text for quick insertion intotext messages, multimedia messages or e-mails.Press the [Menu] Soft key then select 1.Messages thenselect 6.Templates then press the [O] key.To manage templates:In Templates, select the template you want to manage.To select from the following functions, press the [Option]Soft key:New: Makes a new template. Not available if the templatespace is full. 1. Text Msg.: Creates a new text template.2. Multimedia Msg.: Creates a new multimedia template.3. E-mail: Creates a new e-mail template.Delete: Deletes the selected template.Delete All: Deletes all templates.Edit: Edits the selected template.To edit a template:In Templates, select the template you want to edit thenpress the [O] key.To select from the following functions, press the [Option]Soft key:Send: Sends the template.Delete: Deletes the template.Edit: Edits the template.SettingsBefore you can send or receive messages using yourphone, you must configure their settings first. Thisinformation is normally provided by your service provider.Messages50](https://usermanual.wiki/Pantech-Co/PG-6200/User-Guide-685650-Page-27.png)
![E-mailBefore you can send and receive e-mail messages, youmust configure the following settings.Max. Message Download Size:Defines the maximum size of e-mail messagesdownloaded. If the e-mail message is larger than thespecified size, it is truncated. Press the [Left] or [Right] scrollkey to select between 30KB, 60KB, 100KB, and 300KB.E-mail Accounts:Specifies the list of e-mail accounts. Press the [O] key todelete, rename, set as the default, or edit the selectedaccount. The default account is the account which is used tosend e-mails. The default account cannot be deleted. Whenyou choose to edit an account, you can configure thesettings below.You can also create a new account.User Display Name: The name which appears in sent e-mail headers.E-mail Address: Your e-mail address.Username: The ID used to sign in to the e-mail server.Password: The password used to sign in to the e-mailserver.Data Connection: The Internet data connection used toconnect to the email server.GPRS: Select this item then press the [Edit] Soft key toedit the APN Name, User ID, and Password.CSD: Select this item then press the [Edit] Soft key to editthe Dial Number, User ID, Password, and Modem Type(ISDN or Analog).Incoming Server: The POP3/IMAP server used to receiveemail.Outgoing Server: The SMTP server used to send e-mail.SMTP Authenticate: If set to Yes then the username andpassword are used to authenticate your identity when yousend e-mail messages using the SMTP protocol. Pressthe [Left] or [Right] scroll key to select either Yes or No.Save Message: Specifies whether e-mail messages aresaved in the Sent Box after they are sent. Press the [Left]or [Right] scroll key to select either On or Off.Saving Memory: Specifies where received e-mails arestored. Press the [Left] or [Right] scroll key to selectbetween the following:Internal Memory: Saves the files, which are attached to E-mail,in your phone. However, only certain file types can be saved.53MessagesDial Number: The dial number.Login ID: The ID to sign in via GSM.Password: The password used to sign in via GSM.GPRS SettingsIP Address: The IP address. A point is added after every3 digits.IP Port: The IP port number.Login ID: The ID used to sign in to the GPRS servicePassword: The password used to sign in to the GPRSservice.APN: The Access Point Name.Login ID: The ID used to sign in to the GPRS service.Password: The password used to sign in to the GPRSservice.DNS Settings: The IP addresses for the Domain NameServers. You can enter the primary and secondary DNS.This function is available only when you are connected toHTTP.Bearer: Press the [Left] or [Right] scroll key to selecteither GPRS Only or GSM Only.Message Lifetime:Allows you to set the duration of time your message isstored at the message centre while attempting to deliver it.Auto Download:Specifies whether you receive multimedia messagesautomatically on your phone or you are notified of receivinga multimedia message. Press the [Left] or [Right] scroll keyto select either On or Off.Save Message:Specifies whether multimedia messages are saved in theSent Box after they are sent. Press the [Left] or [Right] scrollkey to select either On or Off.Read Report:If this option is set to On, the network informs you whetheror not your message has been delivered successfully. Pressthe [Left] or [Right] scroll key to select either On or Off.Delivery Report:If this option is set to Off, your phone does not send a replyto the sender’s phone if they ask for a delivery confirmationreply. Press the [Left] or [Right] scroll key to select either Onor Off.Messages52](https://usermanual.wiki/Pantech-Co/PG-6200/User-Guide-685650-Page-28.png)
![Phone: Name, Mobile, Home, Office, Fax, Group, Picture,Melody, Email, and Memo.SIM Card: Name, Mobile, and GroupPhone or SIM: Select the saving location - your phone orSIM.Editing contactsYou edit your contacts using the Add Contact screen.Searching for a name or groupName SearchPress the [Menu] Soft key then select 2.Contacts thenselect 1.Search then select 1.Name Search. To search for aphone number from Contacts, do the following.Input a name then press the [O] key. The contact list isshown and the cursor is placed on an item that matchesyour input data.Press the [Left] or [Right] scroll key to view the recordednumbers.Press the [O] key to view all numbers.To manage contacts, press the [Option] Soft key to selectfrom the following functions:Send Message: Sends a message to a selected recipient.Edit: Edits and saves the selected contact’s detailsDelete: Deletes the selected item.Send via Bluetooth: Transmits the selected contact’sinformation via Bluetooth.Add to Speed Dial: Adds the selected number to Speeddial.Move to SIM/Phone: Moves the selected contact’s detailsto your SIM or your phone.Language: Changes the language.New: Creates a new contact.Group SearchPress the [Menu] Soft key then select 2.Contacts thenselect 1.Search then select 2.Group Search.This function lists all phone numbers in the group youspecify. Service NumberThis function displays the list of service numbers availableusing your SIM card is displayed.Press the [Menu] Soft key then select 2.Contacts thenselect 1.Search then select 3.Service Number. 55ContactsExternal Memory: Saves the files, which are attached to E-mail,in your phone’s memory. In this case, all file types can be savedin the Attachments folder.CB Msg.Before you can receive Cell Broadcast (CB) messages, youmust configure the following settings.Language: Specifies the language of CB messages yourphone will receive.Info. Subjects: Specifies the subject of CB messages yourphone will receive:Standard: Predefined subject list.Custom: User-defined subject list.Receive: Press the [Left] or [Right] scroll key to specifywhether or not you want to receive CB messages.Voice MailBefore you can access the voice mailbox provided by yournetwork service provider, you must configure the followingsettings.Call: Calls the predefined voice mail system to checkwhether you have voice mail.Voice Mail Number: Specifies the voice mail recipientnumber manually.Memory Info.This function displays the amount of used and availablememory on your phone.Press the [Menu] Soft key then select 1.Messages thenselect 8.Memory Info, then press the [O] key.ContactsYou can store your personal contacts, which can be addedor deleted at any time, on your phone. You can save up to800 contacts on the SIM or in your phone memory.Displaying your Contact detailsPress the [Menu] Soft key then select 2.Contacts.Adding a new contactPress the [Menu] Soft key then select 2.Contacts thenselect 2.Add Contact.Add the information for your new contact. Initially, anempty field with a gray color will appear until you inputtext.Messages & Contacts54Depending on how your phone’s Memory in Use setting isconfigured, the following fields are displayed.NOTE](https://usermanual.wiki/Pantech-Co/PG-6200/User-Guide-685650-Page-29.png)
![Memory Info.This function displays the amount of memory in use on yourphone/SIM.Press the [Menu] Soft key then select 2.Contacts thenselect 9.Memory Info.Business CardThis function enables you to save your business card andsend it to the phone of another Bluetooth user. You can editor delete the saved numbers. Press the [Menu] Soft key then select 2.Contacts thenselect 5.Business Card.To manage your business card information, press the[Option] Soft key to select from the following functions:Send via Bluetooth: Sends your business card viaBluetooth.Delete: Deletes the saved business card.Edit: Edits the saved business card.Memory in UseThis function enables you to specify whether you want tosave your contact information on your Phone, on your SIMCard, or on either Phone or SIM.Press the [Menu] Soft key then select 2.Contacts thenselect 6.Memory in Use.Copy AllPress the [Menu] Soft key then select 2.Contacts thenselect 7.Copy All.Select one of the following.Phone to SIM: Enables you to copy the numbers savedon your phone onto your SIM card.SIM to Phone: Enables you to copy the numbers savedon your SIM card onto your phone.57ContactsIf necessary, scroll to a number by pressing the [Up] or[Down] scroll key then press the [D] key to dial thenumber.Configuring Groups settingsThis function is used to configure the settings for the fivepredefined caller groups: No Group, Family, Friends,Business, and VIP.Press the [Menu] Soft key then select 2.Contacts thenselect 4.Groups.To change the group ring tone, press the [Option] Soft keythen select Group Ring Tones.To add your own groups to the predefined groups, press the[Right] scroll key when the predefined five groups aredisplayed.Speed DialingThis function enables you to use the Speed Dialing functionto dial a Contact by pressing a Speed Dial number inStandby mode. Managing Speed Dial numbersPress the [Menu] Soft key then select 2.Contacts thenselect Add to Speed Dial. The Speed Dial numbers rangefrom 2 to 9, totaling 8 Speed Dial numbers.To add a Speed Dial number:Press the [Up] or [Down] scroll key to move to an emptyentry then press the [Add] Soft key.Press the [Up] or [Down] scroll key to choose a contactthen press the [Left] or [Right] scroll key to select theirnumber.Press the [O] key to save the number in the Speed Diallist.To delete a Speed Dial numberPress the [Up] or [Down] scroll key to move to the entry youwant to remove from the Speed Dial list then press Delete.Delete AllThis function deletes all information saved on your phone orSIM card.Press the [Menu] Soft key then select 2.Contacts thenselect 8.Delete All.Contacts56This feature may not be available depending on your SIMcard.NOTE](https://usermanual.wiki/Pantech-Co/PG-6200/User-Guide-685650-Page-30.png)
![Dialled CallsThis function displays the dialed calls list showing the timeand date of dialed calls as well as the number or name ofthe caller. Press the [Menu] Soft key then select 3.Call Logs thenselect 3.Dialled Calls.Press the [Left] or [Right] scroll key to select a dialed call.To manage your dialed calls, press the [Option] Soft key toselect from the following functions:Save Number: (Displayed when the number you dialed isnot found in Contacts.) Enables you to record therecipient’s name and number in Contacts.Send Message: Sends a message to the person youcalled.Delete All: Deletes all dialed call records from the list.Recent CallsThis function lists all recent missed calls, received calls anddialed calls, showing the time and date of the calls as wellas the number or name of the other party. Press the [Menu] Soft key then select 3.Call Logs thenselect 4.Recent Calls.Press the [Left] or [Right] scroll key to select a call.To manage your calls, press the [Option] Soft key to selectfrom the following functions:Save Number: (Displayed when the number is not foundin Contacts.) Enables you to record the caller’s orrecipient’s name and number in Contacts.Send Message: Sends a message to the person youcalled or who called you.Delete All: Deletes all call records from the list.Delete Call LogsThis function allows you to choose to delete all missed,received, or dialed call records or delete all call records. Press the [Menu] Soft key then select 3.Call Logs thenselect 5.Delete Call Logs.Press [Yes] or [No] to confirm you want to execute or cancelthis function.Call TimerThis function displays information on call times.Press the [Menu] Soft key then select 3.Call Logs thenselect 6.Call Timer. The following information is displayed.59Call LogsThis function displays missed calls, received calls, anddialled calls. You can delete a call log and see theinformation for the call timer, call cost, and GPRS info in thismenu. Press the [D] key in Standby mode, or press the [Menu]Soft key then select 3.Call Logs.Missed CallsThis function displays the missed calls list showing the timeand date of missed calls as well as the number or name ofthe caller. Press the [Menu] Soft key then select 3.Call Logs thenselect 1.Missed Calls.Press the [Left] or [Right] scroll key to select a missed call.To manage your missed calls, press the [Option] Soft key toselect from the following functions:Save Number: (Displayed when the number of the calleris not found in Contacts.) Enables you to record thecaller’s name and number in Contacts.Send Message: Sends a message to the person whosecall you missed.Delete All: Deletes all missed call records from the list.Received CallsThis function displays the received call list showing the timeand date of a received call as well as the number or nameof the caller.Press the [Menu] Soft key then select 3.Call Logs thenselect 2.Received Calls.Press the [Left] or [Right] scroll key to select a received call.To manage your received calls, press the [Option] Soft keyto select from the following functions:Save Number: (Displayed when the number of the calleris not found in Contacts.) Enables you to record thecaller’s name and number in Contacts.Send Message: Sends a message to the person whosecall you received.Delete All: Deletes all received call records from the list.Call Logs58If Contacts contains the caller’s phone number, the name,date and time are displayed. If not, the caller’s phone number, date,and time are displayed. To dial a number, press SEND when thenumber or name is highlighted.NOTE](https://usermanual.wiki/Pantech-Co/PG-6200/User-Guide-685650-Page-31.png)
![This function is used to view, play, delete or edit the photos,images and sounds you have saved on your phone.External MemoryThis function allows you to manage the files saved on aMicro-SD card in your phone, to move them to other foldersor perform other functions.Press the [Menu] Soft key then select 4.Media Gallery thenselect 1.External Memory.To manage the image, photo and music files saved on yourMicro-SD card, press the [Option] Soft key to select from thefollowing functions.Set as: Displays the following subfunctions:Wallpaper - Adds an image or photo to the Wallpaper list inDisplay Settings and sets it as the background image shown onyour main display.Contact - Assigns an image or photo to a contact in Contacts.Send as MMS: Sends an image, photo or music file in amultimedia message.Rename: Renames an image, photo or music file.Delete: Deletes an image, photo or music file.Delete All: Deletes all image, photo and music files.Information: Displays information on an image, photo ormusic file.Send via Bluetooth: When Bluetooth is turned on, thisfunction sends an image, photo or music file to aBluetooth phone or other device.Copy to Phone: Copies image, photo or music files fromyour Micro-SD card onto your phone.Troubleshooting when “Check External Memory”popup window appears.In the situations described below, “External Memory MountStart” popup window appears when the card is pulled outand reinserted, and then the “Check External Memory”message may continue to appear. File is suddenly not saved.File list does not show up properly.Video clips run slow.etc.61Media GalleryLast Call Time: Displays the last call’s length, date andtime.Received, Dialled, Total Call Time: Displays the total calltime.Reset Call Times: Resets the call timer. To confirm theresetting of all call times, input your phone’s passwordthen press the [O] key.Call CostThis function records information on call cost and limits thecall charge to prevent you from exceeding your subscriptioncharge.Press the [Menu] Soft key then select 3.Call Logs thenselect 7.Call Cost. The following information is displayed.Last Call Cost: Displays the cost of the last call.Total Call Cost: Displays the cost of all calls.Clear Logs: If you input your PIN2 password, this functiondeletes all call cost logs.Max. Cost: Reads or sets the maximum call cost withinthe service area:Read Limit: Reads the maximum number of units.Set Limit: Sets the maximum number of units.Cost Unit: Reads or sets the cost unit for the service area.Read Unit: Reads the cost unit value.Set Unit: Sets the current cost unit value and the cost per unit.GPRS Info.This function displays the following information on thevolume of GPRS data transmitted.Press the [Menu] Soft key then select 3.Call Logs thenselect 8.GPRS Info. The following information is displayed.Current Info.: Displays the total volume of GPRS datatransmitted in the current session, in Kbytes.Last Info.: Displays the total volume of GPRS datatransmitted in previous sessions, in Kbytes.Total Info.: Displays the total volume of GPRS datatransmitted and received, in Kbytes.Clear Logs: Clears the logs recording how much GPRSdata you have transmitted.Call Logs60You must turn off your phone before removing a Micro-SD card from it. If not, the card or phone may be damaged. NOTE](https://usermanual.wiki/Pantech-Co/PG-6200/User-Guide-685650-Page-32.png)
![The “External Memory Mount Start” popup window appearswhen the Micro-SD card is pulled out from and reinserted intothe phone, and then normal operation starts.Photo GalleryThis function allows you to view or edit the photos saved onyour phone.Viewing and managing your photoalbumsEither press the [Menu] Soft key then select 4.Media Gallerythen select 2.Photo Gallery, or press the [Menu] Soft keythen select 5.Multimedia then select 1.Camera then select3.Photo Gallery, to display your Photo Gallery list.Press New to add an album to your Photo Gallery. You canadd up to six albums to the default album My Photo.Press the [Option] Soft key then select Delete to delete analbum you have created.Select an album in the list then press the [O] key to displaythe list of photos in the album. You can press [Small] or[List] to change the list’s appearance. Press the [Left] or[Right] scroll key to view other photos in the album.Viewing and managing photos in yourphoto albumsSelect a photo then press the [O] key to enlarge the photo.To manage the photo you select in an album (for furtherdetails, see Viewing and managing your photo albums,above), press the [Option] Soft key to select from thefollowing functions.Set as: Displays the following subfunctions:Wallpaper - Adds the photo to the Wallpaper list in DisplaySettings and sets it as the background image shown on your maindisplay.Contact - Assigns the photo to a contact in Contacts.Send via: Displays the following subfunctions:MMS - Sends the selected photo in a multimedia message.Bluetooth - Sends the selected photo via Bluetooth.Photo Magic: Applies special effects to the selectedphoto. Search: Searches in the album for the photo name youspecify.Rename: Renames the selected photo.63Media GalleryTake the following actions.Connect the phone and PC with USB cable. Press the [Menu] Soft key, select 8.Connectivity, select 3USB Mass Storage, and then select On.When you are using Windows, select from the followingoptions.Windows 2000he new portable disk folder shows in Windows Explorer. Right-click the mouse on the folder.Select Properties Tools Check Now...Check both “Automatically fix file system errors” and “Scan forand attempt recovery of bad sectors,” and click Start.Select “Yes” when Windows prompts you to restart the systembefore checking the disk.Select Start System Shutdown System Shutdown.Turn PC power on. Disk checking automatically starts. After checking is complete, press the [Menu] Soft key, select8.Connectivity, select 2.USB Mass Storage, and then selectOff.The “External Memory Mount Start” popup window appearswhen the MMC card is pulled out from and reinserted into thephone, and then normal operation starts. Windows XPThe new portable disk folder shows in Windows Explorer.Right-click the mouse on the folder.Select Properties Tools Check Now...Check both “Automatically fix file system errors” and “Scan forand attempt recovery of bad sectors” and click Start.Checking Disk Check Complete.Press the [Menu] Soft key, select 8.Connectivity, select 2.USBMass Storage, and then select Off.The “External Memory Mount Start” popup window appearswhen the MMC card is pulled out from and reinserted into thephone, and then normal operation starts.When using DOSSelect Start Programs Accessories Command Prompt.In the DOS window, type “CHKDSK F:/F” and press Enter.(Current Directory does not matter.)When the “Would you like to force a dismount on this volume(Y/N)?” message appears, type “Y”.When the “Convert lost chains to files? (Y/N)” message appears,type “Y”.After checking is complete, press the [Menu] Soft key, select8.Connectivity, select 2.USB Mass Storage, and then selectOff.Media Gallery62](https://usermanual.wiki/Pantech-Co/PG-6200/User-Guide-685650-Page-33.png)
![Bluetooth - Sends the selected video via Bluetooth.Search: Searches in the album for the video name youspecify.Rename: Renames the selected video.Delete: Deletes the selected video.Delete All: Deletes all videos in the album.Information: Views details of the selected video.Copy to Phone/External Memory: Copies the video ontoyour phone or onto your External Memory.Image GalleryThis function allows you to view or manage the imagessaved on your phone.Press the [Menu] Soft key then select 4.Media Gallery thenselect 4.Image Gallery to display your Image Gallery listingall images stored on your phone.Viewing and managing images in yourImage GalleryPress the [Large] Soft key or press the [O] key to zoom in tothe image selected in your Image Gallery (for further details,see Image Gallery, above). Press the [Left] or [Right] scrollkey to view other images in your Image Gallery.Press List to return to your Image Gallery list.To manage the image you select in your Image Gallery,press the [Option] Soft key to select from the followingfunctions.Set as: Displays the following subfunctions:Wallpaper - Adds the image to the Wallpaper list in DisplaySettings and sets it as the background image shown on your maindisplay.Contact - Assigns the image to a contact in Contacts.Send as MMS: Sends the selected image in a multimediamessage.Rename: Renames the selected image.Delete: Deletes the selected image.Delete All: Deletes all images in your Image Gallery.Information: Views details of the selected image.Send via Bluetooth: Sends the selected image viaBluetooth to a Bluetooth phone or other device.Copy to External Memory: Copies the image from yourphone onto your External Memory.65Media GalleryCrop Photo: To zoom in to the selected photo, press theLeft Soft key; press the Right Soft key to zoom out fromthe selected photo. The photo size is set to the displaysize when you save the photo.Delete: Deletes the selected photo.Delete All: Deletes all photos in the album.Information: Views details of the selected photo.Print: Prints the selected photo using Bluetooth. Copy to Phone/External Memory: Copies the photo ontoyour phone or onto your External Memory.Video GalleryThis function allows you to view or manage the videossaved on your phone.Viewing and managing your videoalbumsEither press the [Menu] Soft key then select 4.Media Gallerythen select 3.Video Gallery, or press the [Menu] Soft keythen select 5.Multimedia then select 1.Camera then select4.Video Gallery, to display your Video Gallery list.Press New to add an album to your Video Gallery. You canadd up to six albums to the default album My Video.Press the [Option] Soft key then select Delete to delete analbum you have created. Select an album in the list thenpress the [O] key to display the list of videos in the album.You can press [Small] or [List] to change the list’sappearance. Select a video then press the [O] key to playthe video automatically. Press the Up, Down, Right and Leftscroll keys while a video is playing to Pause, Stop, Move toNext or Previous Play (play the previous video in the album)the video.Viewing and managing videos in yourvideo albumsSelect a video (for further details, see Viewing andmanaging your video albums, above), then press the [O]key to enlarge the video.To manage the video you select in an album, press the[Option] Soft key to select from the following functions.Set as: Displays the following subfunctions:Wallpaper - Adds the video to the Wallpaper list in DisplaySettings and sets it as the background image shown on your maindisplay.Contact - Assigns the video to a contact in Contacts.Send via: Displays the following subfunctions:MMS - Sends the selected video in a multimedia message.Media Gallery64](https://usermanual.wiki/Pantech-Co/PG-6200/User-Guide-685650-Page-34.png)
![Managing other files saved on yourphoneTo manage the other files you select (for further details, seeOther Files, above), press the [Option] Soft key to selectfrom the following functions:Set as: Displays the following subfunctions:Wallpaper - Adds the image or photo (which must be in asupported format) to the Wallpaper list in Display Settings andsets it as the background image shown on your main display.Contact - Assigns the image or photo (which must be in asupported format) to a contact in Contacts.Send as MMS: Sends the selected file in a multimediamessage.Rename: Renames the selected file.Delete: Deletes the selected file.Delete All: Deletes all files in your Other Files.Information: Views details of the selected file.Send via Bluetooth: Sends the selected file via Bluetoothto a Bluetooth phone or other device.Copy to External Memory: Copies the file from yourphone onto your External Memory.Memory Info.This function displays the following memory information:Phone Memory: Displays how much memory is used andavailable on your phone for photos, videos, images, soundfiles, Java applications, multimedia messages and yourphone’s System information.External Memory: Displays how much memory is currentlyused and available on your External Memory.67Media Gallery Sound GalleryThis function allows you to play back or manage the soundfiles saved on your phone.Press the [Menu] Soft key then select 4.Media Gallery thenselect 5.Sound Gallery to display your Sound Gallery listingall sound files stored on your phone.The selected sound file is automatically played back once.Managing sound files in your SoundGalleryTo manage the sound file you select in your Sound Gallery(for further details, see Sound Gallery, above), press the[Option] Soft key to select from the following functions.Set as Ringtone: Sets the selected sound file as aringtone.Send as MMS: Sends the selected sound file in amultimedia message.Rename: Renames the selected sound file.Delete: Deletes the selected sound file.Delete All: Deletes all sound files in your Sound Gallery.Information: Views details of the selected sound file.Send via Bluetooth: Sends the selected sound file viaBluetooth to a Bluetooth phone or other device.Copy to External Memory: Copies the selected sound filefrom your phone onto your External Memory.Other FilesThis function allows you to manage files in unsupportedformats saved on your phone. It also lists files received viaBluetooth from Bluetooth phones or other devices.Press the [Menu] Soft key then select 4.Media Gallery thenselect 6.Other Files to list all other files stored on yourphone.Media Gallery 66Special objects, user-defined wallpapers and similarinformation are stored as System information on your phone.NOTE You can use MP3 files of up to 500 KB as ringtones.NOTE Consumers who convert MP3 files containing commercialmusic may be subject to copyright law. You therefore should notdistribute those files illegally.Your phone incorporates DRM (Digital Rights Management)software that prevents protected commercial music from beingforwarded illegally and so infringing copyright.NOTE](https://usermanual.wiki/Pantech-Co/PG-6200/User-Guide-685650-Page-35.png)
![Viewing your photosPress the [Up] or [Down] scroll key to zoom in or out of theselected photo relative to its original size. Press the [Cancel Soft key or the [c] key to return to thecamera preview screen.Saving your photosIn Multi Capture mode, select Mark or Unmark to checkor uncheck the image box beside the captured images tosave them.Press the [ ] key to display the Save Option screen,where you can select a Photo Album and edit the nameunder which the photo is saved.In Multi Capture mode, the photo is given a nameautomatically. However, you can input a name manually ifyou select only one photo.Using the camera’s photo optionsWhen your phone’s camera is in Photo Capture mode,press the [Option] Soft key to select the following optionsadjusting how the photo is taken or appears.Video: Switches to Video Capture mode.Photo Gallery: Displays the Photo Gallery.Image Size: Specifies the size of photo you want to take.You can choose LCD(176X220), QVGA(320X240),VGA(640X480), XGA(1024X768), SXGA(1280x1024), orUXGA(1600X1200).Effect: Applies an effect to the photo.Flash: Switches your phone’s camera flash light On or Off.White Balance: Adjusts the photo’s white balanceaccording to the ambient lighting. You can choose Auto,Day Light, Cloudy, Tungsten, or Fluorescent.Multi-Shot: Controls the number of photos taken rapidly insequence.Pattern Shot: Controls the number of photos taken inpattern shooting.Self Timer: Specifies the delay time for all shootingmodes. When you press the [ ] key or [C] key, thecamera takes a photo automatically after the specifiedtime.Hide Icons: Specifies whether the icons are shown onyour phone’s display. 69MultimediaCameraThis function enables you to use your camera phone to takea photo or video. You can then save and edit the photo orvideo on your phone.Taking photos when your phone is openPress the [Menu] Soft key then select 5.Multimedia thenselect 1.Take a Photo to enter your phone’s PhotoCapture mode when your phone is open.To change the photo shooting mode, press the Right Softkey. This toggles between the following options,represented by icons on your phone’s display.If necessary, adjust the camera options to improve thephoto quality. (For further details, see Using the camera’sphoto options, below.)Frame the image by aiming your phone’s camera at thesubject.Press the [ ] key or [C] key to take the photopreviewed on your phone’s display.Multimedia68The time value is reset to its default value when you exitCamera mode.NOTE Shooting Mode Icon DescriptionSingle Capture General mode for a single photo.Multi CaptureTakes multiple photos. The quantity of photos is determined by the Multi-Shot option.Frame Capture Takes the photo with the saved frame. Image size: 176X220 pixels (fixed)Pattern Capture Takes several photos and saves them in a single screen.If you are taking photos while your phone is open, you canuse the following keys to adjust your phone’s camera directly.TipFunction Options displayed KeyImage Size LCD/QVGA/VGA/ [*]XGA/SXGA/UXGA Brightness 7 levels (from 0 to 6) [K] and [L]Zoom Control by levels [F] and [I]Flash On/Off [#]Hide Icons On/Off [0]You cannot zoom in UXGA mode.NOTE You can press the [C] key in Standby mode to prepareto take photos directly.Tip](https://usermanual.wiki/Pantech-Co/PG-6200/User-Guide-685650-Page-36.png)
![Using the camera’s video optionsWhen your phone’s camera is in Video Capture mode,press the [Option] Soft key to select the following optionsadjusting how the video is taken or appears.Photo: Switches to Camera Capture mode.Video Gallery: Displays the Video Gallery.Video Size: Specifies the size of video you want to take.You can choose SQCIF(128X96), QVGA(320X240), orQCIF(176X144).Video Quality: Specifies the quality of video you want totake. You can choose Fine, Normal, Low, or for MMS.Frame Rate: Specifies the video frame rate. You canchoose 15 or 30 frames per second.Flash: Switches your phone’s camera flash light On or Off.Effect: Applies an effect to the video.White Balance: Adjusts the video’s white balanceaccording to the ambient lighting. You can choose Auto,Day Light, Cloudy, Tungsten, or Fluorescent.Self Timer: Specifies the delay time. You can chooseNone, 5 Secs or 10 Secs.Audio Record: Specifies whether or not sound is recordedin the video.Hide Icon: Specifies whether the icons are shown on yourphone’s display.SettingsUse this function to define your phone’s default camerasettings.You can configure the following default camera settings.Image Size: Defines the default size of photos you shoot.You can choose LCD (176X220), QVGA(320X240),VGA(640X480), XGA(1024X768), SXGA(1280x1024), orUXGA(1600X1200).Image Quality: Defines the default quality of photos youshoot. You can choose Normal, Fine or Low.Video Size: Specifies the default size of video you want totake. You can choose SQCIF(128X96), QVGA(320X240),or QCIF(176X144).Video Quality: Specifies the default quality of video youwant to take. You can choose Fine, Normal, Low, or forMMS.Flash: Switches your phone’s camera flash light On or Offby default.White Balance: Adjusts the video’s default white balanceaccording to the ambient lighting. You can choose Auto,71MultimediaTaking photos when your phone isclosedPress and hold the [C] key on the right side of yourphone to enter your phone’s Photo Capture mode whenyour phone is closed.Frame the image by aiming your phone’s camera at thesubject.If necessary, press the [V] key to zoom the image.Press the [C] key to take the photo previewed on yourphone’s display.Press and hold the [C] key to exit Photo Capturemode.To save the photo, press the [C] key and input a name forthe photo. The photo is saved in the default Photo Album.After the photo is saved, your phone exits Camera mode.To cancel the photo without saving it, press the [V] key toreturn to the preview screen.Taking a videoPress the [Menu] Soft key then select 5.Multimedia thenselect 2.Take a Video to enter your phone’s VideoCapture mode when your phone is open. The imagetaken by your phone’s internal camera is displayed. Press the [Up] and [Down] scroll keys to zoom in or out.Press the [Left] and [Right] scroll keys to control thebrightness.If necessary, adjust the camera options to improve thevideo quality. (For further details, see Using the camera’svideo options, below.)Frame the image by aiming your phone’s camera at thesubject.Press the [ ] key to record the previewed video.Press the [Cancel] Soft key to cancel recording andreturn to the Preview screen, or press the [ ] key tostop recording. If you press the [ ] key, the Save Option screen isdisplayed enabling you to select a Video Album to savethe video then enter a video name.To cancel saving the video, press the [c] key toreturn to the Preview screen.To play the recorded video, press the [O] key.Multimedia70When Auto Save is selected in the camera settings, thevideo is automatically saved with the default name in the defaultVideo Album.NOTE](https://usermanual.wiki/Pantech-Co/PG-6200/User-Guide-685650-Page-37.png)
![Display the Video Gallery. (For further details, see VideoGallery on page 64.)Select the Video Album containing the video clip thenpress the [Option] Soft key then select Set as.Select 2.Contact in the Set as screen, then select thecontact then press the [O] key. (You must have storedat least one person in your Contacts already.)The selected video is played whenever you receive callsfrom the contact.Selecting a video for display in StandbymodeYou can set a video clip to play on your phone’s displaywhenever it is on standby.Create and save a video. (For further details, see Takinga video on page 70.)Display the Video Gallery. (For further details, see VideoGallery on page 64.)Select the Video Album containing the video clip thenpress the [Option] Soft key then select Set as.Select 1.Wallpaper in the Set as screen.The selected video will play on your phone’s displaywhenever it is on standby.MP3 PlayerThis function enables you to play MP3 music files on yourphone.Press the [Menu] Soft key then select 5.Multimedia thenselect 2.MP3 Player then press the [O] key. The followingfunctions are listed.Player: Plays MP3 music. Music Album: Loads an existing Music Album of musictracks, or adds tracks to or deletes tracks from the Album. File Manager: Allows you to select music on your externalmemory directly or make a Music Album.Settings: Specifies the MP3 Player’s skin and mode.Select the function you want then press the [O] key. Eachfunction is detailed below.PlayerThis function displays the MP3 player’s Player screen.Press the [Menu] Soft key then select 5.Multimedia thenselect 2.MP3 Player then select 1.Player.To manage your MP3 Player’s features, press the [Option]Soft key to select from the following functions.73MultimediaDay Light, Cloudy, Tungsten, or Fluorescent.Multi-Shot: Defines the default quantity of photos takenrapidly in sequence, and the default speed.Pattern Shot: Controls the default quantity of photos takenin pattern shooting, and the default speed.Self Timer: Specifies the default delay time for allshooting modes. When you press the [ ] key or [C]key, the camera takes a photo automatically after thespecified time.Time Stamp: Specifies whether or not photos are timestamped by default.Shutter Sound: Specifies whether or not your phone’scamera makes a sound when you take photos. You canchoose Off, Shutter, 123, Smile, Whisky, or Cheese.Audio Record: Specifies whether or not sound is recordedin videos by default.Memory in Use: Specifies whether photos and videos aresaved in your phone’s memory or in external memory ona Micro-SD card.Auto Save: Specifies whether or not your phone choosesa default name and album when you take photos andvideos.Creating a video caller IDThis feature enables you to save a video clip representing acontact, then set that video clip to represent the contact inContacts. Whenever you receive a call from that contact,your phone plays the corresponding video clip on its display.You can use either of the following methods to create avideo caller ID.To create a video caller ID for a contact from Contacts:Display the contact’s information in the Add Contactscreen. (For further details, see Adding a new contacton page 54.)Press the [L] key when the image field is highlighted.The Contact Image screen is displayed.Select 3.Take a Video (For further details, see Taking avideo on page 70), or 4.Video Gallery (For furtherdetails, see Video Gallery on page 64) to specify a videofile.The selected video is played whenever you receive callsfrom the contact.To create a video caller ID for a contact fromMultimedia:Create and save a video. (For further details, see Takinga video on page 70.)Multimedia72](https://usermanual.wiki/Pantech-Co/PG-6200/User-Guide-685650-Page-38.png)
![File ManagerThis function lists all MP3 files on your external memory foryou to select or unselect MP3 files for playback. Press the[Menu] Soft key then select 5.Multimedia then select 2.MP3Player then select 3.File Manager. To manage your MP3files, press the [Option] Soft key to select from the followingfunctions.Save Album: Saves the selected MP3 files in the Album List.Rename: Changes the title of the selected MP3 file.Delete: Deletes the selected MP3 files.Delete All: Deletes all MP3 files.Select All: Selects all MP3 files.Unselect All: Unselects all MP3 files.Information: Shows information on the selected MP3 files.SettingsThis function allows you to configure your MP3 Player’soperation. Press the [Menu] Soft key then select5.Multimedia then select 2.MP3 Player then select4.Settings.Mode: Adjusts how MP3 music is played. You canchoose Rock, Country, Normal, Pop, Jazz, Classic, orDance.Skin: Specifies which image is displayed on the Playerscreen during playback. You can choose Equalizer,Animation01 or Animation02.JavaThis function allows you to download and run Java gameson your phone. You can use your WAP browser to search for Java gamesand download them for installation on your phone.Press the [Menu] Soft key then select 5.Multimedia thenselect 3.Java.Listing Java games stored on yourphonePress the [Menu] Soft key then select 5.Multimedia thenselect 3.Java then select 1.Games.Running and managing Java games onyour phoneDisplay the list of Java games stored on your phone. (Forfurther details, see Listing Java games stored on yourphone, above.) To run or manage Java games, select theJava game in the list then do the following.75MultimediaTransfer to A/V Headset / Transfer to Phone: Switchesmusic playback between your A/V Headset and yourphone.Play All: Lists all MP3 music files stored on your Micro-SDCard. If you want, you can then select or unselect MP3tracks from the list so they are not played.Music Album: Selects a Music Album made previously.Skin: Changes the images displayed in the Player.File Info.: Displays file information on the music currentlyselected.To control playback of the tracks in your Music Album, pressthe following keys.Music AlbumThis function allows you to make a Music Album of musictracks. If there is no Music Album on your phone, a MusicAlbum containing all tracks on your Micro-SD Card iscreated automatically. You can select, unselect and savethe tracks you want in a Music Album. Press the [Menu]Soft key then select 5.Multimedia then select 2.MP3 Playerthen select 2.Music Album.Multimedia74Key Function[OK] key Plays/Pauses playback[Left] scroll key Plays the previous track[Right] scroll key Plays the next track[Down] scroll key Stops playback[Up] scroll key Selects the type of repeat (see below)[Up] key Increases the volume(side of your phone)Key Function[Down] key Decreases the volume(side of your phone) Press and hold Rewind[Left] scroll keyPress and hold Fast forward[Right] scroll keyType of repeat:1. : Plays the tracks in sequence with no repetition.2. : Replays the selected track once.3. : Plays one track repeatedly.4. : Replays all the tracks in sequence repeatedly. NOTE](https://usermanual.wiki/Pantech-Co/PG-6200/User-Guide-685650-Page-39.png)
![Sub ScreenThis function allows you to change the background imageshown on your phone’s cover display.Press the [Menu] Soft key then select 6.Settings then select1.Display Settings then select 2.Sub Screen.Wallpaper: Sets your phone’s wallpaper by selecting fromthe Wallpaper list. Wallpaper lists images you can use to setas your wallpaper from your Photo Gallery or Image Gallery.To delete wallpapers other than the default, press the[Delete] Soft key. (You cannot delete the default wallpaper.)GreetingThis function allows you to set the greeting messagedisplayed in Startup or Idle mode.Press the [Menu] Soft key then select 6.Settings thenselect 1.Display Settings then select 3.Greeting.Input the greeting message then press the [O] key.LCD BrightnessThis function allows you to set the backlighting level for yourphone’s main display.Press the [Menu] Soft key then select 6.Settings thenselect 1.Display Settings then select 4.LCD Brightness.Choose the backlighting level you want. You can chooseLow, Medium, High, or Maximum.Press the [O] key.Back LightThis function allows you to specify for how long yourphone’s displays are backlit. Press the [Menu] Soft key then select 6.Settings thenselect 1.Display Settings then select 5.Back Light.Choose how long you want backlighting of your phone’sdisplays to remain on if you do not touch any key. Youcan choose 5 Secs, 10 Secs, 20 Secs, 1 Min, or 10 Mins.Press the [O] key.Service LightThis function allows you to specify the color indicating thatmobile network services are currently available, in the coverdisplay.Press the [Menu] Soft key then select 6.Settings thenselect 1.Display Settings then select 6.Service Light.Choose the color. You can choose Off, Green, Blue,Yellow, Cyan, Violet, White, or Red.Press the [O] key.77SettingsViewing the amount of Java applicationmemory usedPress the [Menu] Soft key then select 5.Multimedia thenselect 3.Java then select 2.Memory Info.SettingsThis function enables you to personalize how your phoneoperates.Display SettingsYou can define how information is displayed on your phone.Press the [Menu] Soft key then select 6.Settings then select1.Display Settings.Main ScreenThis function allows you to change the background imageshown on your phone’s main display.Press the [Menu] Soft key then select 6.Settings then select1.Display Settings then select 1.Main Screen.Wallpaper: Sets your phone’s wallpaper by selecting fromthe Wallpaper list. Wallpaper lists images you can use toset as your wallpaper from your Photo Gallery or ImageGallery. To delete wallpapers other than the default, pressthe [Delete] Soft key. (You cannot delete the defaultwallpaper.)Wallpaper Type: Specifies which information is displayed onyour phone’s main display. You can choose Digital Clock 1,Digital Clock 2, Analogue Clock, Calendar, Greeting, D-day.Multimedia & Settings76To: Press:Run the game Press the [Option] Soft key [Left N] then select [Run], or press the [O] key.View details of the gamePress the [Option] Soft key [LeftN] then select [Info.], or press the [Right N] Soft key.Delete the game Press the [Option] Soft key [LeftN] then select [Delete].](https://usermanual.wiki/Pantech-Co/PG-6200/User-Guide-685650-Page-40.png)
![Sound, Bell Sound, or User Sound.Melody Sound, Bell Sound or User Sound: Specifies themelody, ringtone or sound played.Message AlertThis function allows you to specify how your phone alertsyou when you receive messages.Press the [Menu] Soft key then select 6.Settings then select2.Sound Settings then press the [Edit] Soft key then select3.Message Alert, or press the [I] key in Standby modethen select 3.Message Alert.You can personalize the following.Reminder: Specifies at what intervals you will bereminded when you have received a message. Press the[Left] or [Right] scroll key to select Off, Once, Every 2Mins, or Every 5 Mins.Ring Volume: Specifies how loudly your phone rings. Youcan choose from eight levels ranging from silent to loud(0~7).Sound: Specifies the Message Alert Tone. Press the[Left] or [Right] scroll key to set the Message Alert Toneto Bell1, Bell2, or Bell3.Key ToneThis function allows you to select the sound you hear whenyou press your phone’s keys. Press the [Menu] Soft keythen select 6.Settings then select 2.Sound Settings thenpress the [Edit] Soft key then select 4.Key Tone, or pressthe [I] key in Standby mode then select 4.Key Tone.You can personalize the following.Tone Type: Specifies whether key tones are turned on or off.Ring Volume: Specifies the key tone’s loudness. You canchoose from eight levels ranging from silent to loud (0~7).Sound: Specifies the key tone sound.Flip Open ToneThis function allows you to select the sound you hear whenyou open or close your phone’s flip. Press the [Menu] Softkey then select 6.Settings then select 2.Sound Settings thenpress the [Edit] Soft key then select 5.Flip Open Tone, orpress the [I] key in Standby mode then select 5.Flip OpenTone. You can personalize the following.Tone Type: Specifies whether your phone’s flip tone isturned on or off.Ring Volume: Specifies the flip open tone’s loudness. Youcan choose from eight levels ranging from silent to loud(0~7).79SettingsVoice LightThis function allows you to specify whether or not yourphone’s cover display blinks when the other party talksduring a call.Press the [Menu] Soft key then select 6.Settings thenselect 1.Display Settings then select 7.Voice Light.Choose On or Off.Press the [O] key.Sound SettingsYou can define how sound is played on your phone.Sound Settings define how your phone reacts when youreceive a call or a message, how your keypad sounds whenyou press a key, and more. You can either leave the default ring tone, key tone, andother settings for each of the five available profilesunchanged, or you can personalize them to your needs.The five profiles available are Normal, Silent, Meeting,Outdoor and Car. Press the [Menu] Soft key then select 6.Settings then select2.Sound Settings.Ring ToneEither press the [Menu] Soft key then select 6.Settings thenselect 2.Sound Settings then press the [Edit] Soft key thenselect 1.Ring Tone, or press the [I] key in Standby modethen select 1.Ring Tone.You can personalize the following.Ring Type: Specifies how your phone rings or vibrateswhen you receive calls. You can choose Ringing,Vibration, Vib then Ring, Vib and Ring, Ascending, orNone(Quiet).Ringing Volume: Specifies how loudly your phone rings.You can choose from eight levels ranging from silent toloud (0~7).Bell SoundThis function allows you to specify whether your phonerings, plays music or plays a sound when you receive calls.Press the [Menu] Soft key then select 6.Settings then select2.Sound Settings then press the [Edit] Soft key then select2.Bell Sound, or press the [I] key in Standby mode thenselect 1.Bell Sound.You can personalize the following.Sound Box: Specifies whether your phone plays a MelodySettings78](https://usermanual.wiki/Pantech-Co/PG-6200/User-Guide-685650-Page-41.png)
![you press a key, and more. Press the [Menu] Soft key thenselect 6.Settings then select 3.Call Settings.Call DivertThis function allows you to divert incoming calls to anotherphone number. Press the [Menu] Soft key then select6.Settings then select 3.Call Settings then select 1.CallDivert.Choose All Calls, When Busy, On No Answer, When notFound, or Cancel All.Answer TypeThis function allows you to specify how calls are to beanswered on your phone.Press the [Menu] Soft key then select 6.Settings thenselect 3.Call Settings then select 2.Answer Type.Press the [Left] or [Right] scroll key to specify which ofthe following methods is to used to answer calls. SEND key: Incoming calls are answered by pressing the[D] key.Any Key: Incoming calls are answered by pressing anykey except the [P] key and [Reject] Soft key.Flip Open: Incoming calls are answered by opening yourphone’s flip.Auto Receive: Your phone automatically answers callsafter 10 seconds. This feature is available only when aheadset is connected to your phone’s headset jack.Press the [O] key.Auto AnswerThe Auto Answer function works like an automaticanswering machine. It plays the recorded message to yourcaller if you do not answer the call within the defined time.Press the [Menu] Soft key then select 6.Settings then select3.Call Settings then select 3.Auto Answer.The following information is displayed. Auto Answer: Specifies whether or not the Auto Answerfunction is activated.Recorded Message: Displays a list of messagesrecorded. Each recorded message is displayed with itsdate and time and the caller’s name or number. To deletethe highlighted message, press the [Delete] Soft key. Tocall the caller who left the highlighted message, press the[Send] key.Response Message: Defines which message your phoneplays to callers depending on your current situation.These include Absent, Meeting, Driving, and UserMessage.81SettingsSound: Specifies the flip open tone. You can choose fromBell 1, Bell 2, or Bell 3.Sound EffectThis function allows you to turn the default sound effect onor off for various events. Press the [Menu] Soft key thenselect 6.Settings then select 2.Sound Settings then pressthe [Edit] Soft key then select 6.Sound Effect, or press the[I] key in Standby mode then select 6.Sound Effect.You can specify whether the sound effect is played for thefollowing events.Menu Moving: When you change a menu with theNavigation key.Power On & Off: When you turn the power on or off.Option Popup: When you press the Left Soft key and apopup window is displayed.Call Connection: When you dial or hang up.WAP Connection: When you connect or end a WAPsession.Hour Alert: Every hour while your phone is in Standbymode.Minute Minder: Every minute while making a phone call.Popup Alert: A warning, error, information or question.Profile NameThis function allows you to rename your phone’s profiles.Select a profile name menu from the Sound Setting editingscreen to rename it manually.Press the [Menu] Soft key then select 6.Settings thenselect 2.Sound Settings then press the [Edit] Soft keythen select 7.Profile Name, or press in Standby modethen select 7.Profile Name.Input a new name for the profile.Press the [O] key.ResetThis function allows you to reset all sound related values inthe profile.Press the [Menu] Soft key then select 6.Settings thenselect 2.Sound Settings then press the [Edit] Soft keythen select 8.Reset.To confirm you want to reset the sound related values inthe profile, press the [O] key.Call SettingsCall Settings define how your phone reacts when youreceive a call or a message, how your keypad sounds whenSettings80](https://usermanual.wiki/Pantech-Co/PG-6200/User-Guide-685650-Page-42.png)
![Delete: Deletes your own number from your SIM card.Edit: Edits your own number on your SIM card.LanguageThis function allows you to select which language isdisplayed on your phone. Press the [Menu] Soft key thenselect 6.Settings then select 4.Language.Time & DateThis function allows you to set the time and date displayedon your phone. Press the [Menu] Soft key then select6.Settings then select 5.Time & Date. You can set the Time,Date, and Date Format. FavoriteThis function allows you to add your own favorites to aFavorite screen, enabling you to access your favoritefunctions and files quickly. Press the [Menu] Soft key thenselect 6.Settings then select 6.Favorite.If there is no item in the Favorite screen, press the [O] keyto add a favorite; if an item is selected, press the [O] key togo to that item.Network SelectionThis function allows you to specify whether your phoneselects its service provider network manually orautomatically.Press the [Menu] Soft key then select 6.Settings then select7.Network Selection.Select either Automatic or Manual.Security SettingsThe security settings enable you to restrict the use of yourphone to specific people and types of calls.Codes and passwords are used to protect these features ofyour phone. They are described in the following sections.See also 2. Access codes in the Appendix, on page 111.Your phone’s security features keep your phone and SIM83SettingsResponse Time: Defines the automatic answering time(After 3 Secs, 5 Secs, 10 Secs, or 20 Secs). If theincoming call is not answered within this time, your phoneplays the recorded message to the caller.User Message: Displays your voice message set as theResponse Message. Press the [ ] key to play your voicemessage. If no message is recorded, the function onlyrecords the caller’s message.Auto RedialThis function automatically redials the number you call ifyour call is unsuccessful.Press the [Menu] Soft key then select 6.Settings thenselect 3.Call Settings then select 4.Auto Redial.Select On or Off.Call WaitingThis function informs you that you have received a secondcall while you are in a call.Press the [Menu] Soft key then select 6.Settings thenselect 3.Call Settings then select 5.Call Waiting.Press the [Option] Soft key to select from the followingoptions.Activate: Activates the Call Waiting feature.Deactivate: Cancels the Call Waiting feature.Status: Indicates whether or not the Call Waiting featureis activated.Send Caller IDThis function prevents your phone number from beingdisplayed on the phone of the people you call.Press the [Menu] Soft key then select 6.Settings thenselect 3.Call Settings then select 6.Send Caller ID.Select On or Off.Own NumberThis function allows you to record your own phone numberon your phone.Press the [Menu] Soft key then select 6.Settings thenselect 3.Call Settings then select 7.Own Number.Press the [Option] Soft key to select from the followingoptions.Add: Adds your own number to your SIM card.Settings82You can add functions down to two levels of functioncommands. You cannot delete Media Gallery because it is thedefault function.For the set values in Favorite, the Application Lock item asks you toinput a password before you can Go to that item.For the set values in Favorite, all items requiring security ask you toinput a password before you can access that item.NOTE This service is network dependent. Please inquire withyour network provider.NOTE This function is SIM card dependent.NOTE](https://usermanual.wiki/Pantech-Co/PG-6200/User-Guide-685650-Page-43.png)
![Application LockThis function allows you to change your phone’s password.Press the [Menu] Soft key then select 6.Settings then select8.Security Settings then select 5.Application Lock.You must input the password before you can access thisfunction.Select the application you want to lock then press the [O]key.Call BarringThis function allows you to set restrictions on making certaintypes of calls.Press the [Menu] Soft key then select 6.Settings then select8.Security Settings then select 6.Call Barring.You must input the password before you can access thisfunction. You can choose the following.Handset Barring: Specifies whether incoming calls andcertain outgoing calls are restricted on your phone.Network Barring: This feature is network and subscriptiondependent. Some bars are set by the network serviceprovider. You can set restrictions on making the followingtypes of calls.International Calls: Restricts outgoing and incoming internationalcalls.Outgoing Calls: Restricts all outgoing calls.Incoming Calls: Restricts all incoming calls.Incoming Calls When Abroad: When you are abroad, this featureallows you to restrict incoming calls.Int. Calls Except to Home Country: Restricts international callsexcept to your home country.Clear All: Cancels all barring settings.Change Password: Replaces the old password with a new one.CUG (Closed User Group)This function allows you to set up a group of numbers thatyou want to dial or receive calls from.Press the [Menu] Soft key then select 6.Settings then select8.Security Settings then select 7.CUG.You must input the password before you can access thisfunction.Select the CUG name then press the [Option] Soft key toselect the following.85Settingscard safe from unauthorized use, and you can either set apassword for your phone or use the Call Barring service andFixed Dialling mode to restrict which calls can be madeusing your phone.Press the [Menu] Soft key then select 6.Settings then select8.Security Settings.SIM LockThis function allows you to specify whether your phonerequests the PIN number of SIM cards inserted in it.Press the [Menu] Soft key then select 6.Settings then select8.Security Settings then select 1.SIM Lock.You must input the password before you can access thisfunction. Press the [Left] or [Right] scroll key to select Lockor Unlock.Lock: You must input the PIN number to access to themain menu after you power on your phone.Unlock: You are not asked to input the PIN number toaccess to the main menu after you power on your phone.Change PINThis function enables you to change your SIM card’s PINnumber.Press the [Menu] Soft key then select 6.Settings then select8.Security Settings then select 2.Change PIN.You must input the password before you can access thisfunction.Phone LockThis function allows you to lock your phone until the correctpassword is input. Press the [Menu] Soft key then select 6.Settings then select8.Security Settings then select 3.Phone Lock.You must input the password before you can access thisfunction.Change PasswordThis function allows you to change your phone’s password.Press the [Menu] Soft key then select 6.Settings then select8.Security Settings then select 4.Change Password.You must input the password before you can access thisfunction. Input the new password then press the [O] key.The default password is 1234.Settings84If you have previously selected a fingerprint forauthentication, you must complete the authentication processbefore you use the fingerprint. If not, you must input a number touse this function with the locking/unlocking functions using apassword.NOTE If you fail to input the correct PIN number 3 times insuccession, you will be prompted to input the PUK number.NOTE](https://usermanual.wiki/Pantech-Co/PG-6200/User-Guide-685650-Page-44.png)
![Organiser provides various functions alarm setting, mainevent record, memo, world time, calculator, unit conversion,stopwatch and timer.Press the [Menu] Soft key then select 7.Organiser.AlarmThis function allows you to set an alarm to sound at up tofive different times. Press the [Menu] Soft key then select 7.Organiser thenselect 1.Alarm.To set an alarmPress the [Menu] Soft key then select 7.Organiser thenselect 1.Alarm. The current alarm list is displayed.Select an alarm to set then press the [O] key.Press the [New] Soft key to set a new alarm.To manage existing alarms, select the alarm then press the[Option] Soft key to select from the following functions.Delete: Deletes the alarm.On Snooze/Off Snooze: Sets the alarm to ring threetimes, every five minutes. Only one alarm can be set toOn Snooze.Delete All: Deletes all alarms from the list.To edit an existing alarm, select the alarm then press the[O] key.You can then set the Set, Time, Melody and On/OffWakeup Call options. To set the Melody type, press the[L] key to display the Sound Gallery in order to select amelody. You can only set the Date when the alarm type is“User Defined”. After you select Date, press the [L] key toset the weekdays you want. You can set these by pressingMark or Unmark. Press the [O] key to save the weekdayinformation.CalendarCalendar helps you manage your schedule including yourtime for calls or special days. You can set alarms service ona set date is included in this function. Calendar is displayedas the following views: Monthly View, Daily View, and EventView & Edit.Press the [Menu] Soft key then select 7.Organiser thenselect 2.Calendar.87OrganiserDelete: Deletes the preset CUG Identifier.Edit: Edits the CUG Identifier.Fixed Dialling (Fixed Dialing Numbers)Fixed Dialling is a service that limits access to specificnumbers in the Contacts list recorded on your SIM card.You must input your PIN2 code to set up or cancel thisservice.Press the [Option] Soft key to select one of the following.OnOffFixed Dial List: Defines the numbers recorded in yourFixed Dialling List.Change PIN2This function allows you to change your phone’s PIN2 code.Press the [Menu] Soft key then select 6.Settings then select8.Security Settings then select 9.Change PIN2.You must input the password before you can access thisfunction. Input the new password then press the [O] key.System ResetThis function allows you to delete all user settings and datafrom your phone and return to the factory default settings.Press the [Menu] Soft key then select 6.Settings then select8.Security Settings then select 10.System Reset.Input your phone’s password then press the [O] key. Yourphone’s default password is 1234.Software VersionThis function allows you to display your phone’s currentsoftware version. Press the [Menu] Soft key then select6.Settings then select 9.Software VersionSettings86If no record exists, press the [Add] Soft key to display thename input screen for a new CUG.NOTE When you set the On Morning Call, an icon is shown onyour phone’s display.NOTE](https://usermanual.wiki/Pantech-Co/PG-6200/User-Guide-685650-Page-45.png)
![Event View & EditThis function displays the events individually and edits theschedule or creates a new schedule. In Calendar, select3.Event View & Edit. To create a new event in Event View & Edit:Select a day in Monthly View then press the [New] Softkey.In the New Event screen, select and input the details ofthe event.Press the [O] key.MemoThis function enables you to create text and voice memoson your phone. Press the [Menu] Soft key then select7.Organiser then select 3.Memo.Text MemoThis function enables you to create text memos or notes onyour phone. Press the [Menu] Soft key then select7.Organiser then select 3.Memo then select 1.Text Memo.To manage text memos, press the [Option] Soft key toselect from the following functions.Edit: Retrieves existing memos for editing.Delete: Deletes selected memo.Delete All: Deletes all memosNew: Inputs text to create a new memo.Voice MemoThe Voice Memo function records your voice messages.You can use Record, Stop, Play, and Save for voicerecording and playback. Press the [Menu] Soft key thenselect 7.Organiser then select 3.Memo then select 2.VoiceMemo.To record a voice memo:Press the [Option] Soft key then select 1.New then pressthe [ ] key. Press the [ ] key to stop recording, then press the[Play] Soft key to hear your voice memo.Press the [ ] key then input a name then press the[OK] key to save your voice memo.89OrganiserMonthly ViewCalendar is displayed in this view by default.In Calendar, select 1.Monthly View.Press the following keys to move in Monthly View.Press the [New] Soft key to add a new event. To manage existing events, press the [Option] Soft key toselect from the following functions.View All Events: Shows all of your scheduled eventsDel. Past Events: Deletes your past scheduled events.Del. All Events: Deletes all of your scheduled events.Go to Today: Moves to today for selection.Go to Date: Moves to the set date.Memory Info.: Displays the number of stored events (upto 50).Use the scroll keys to select the date you want then pressthe [O] key.For dates containing events, switch to Daily View to checkthe schedule.Events recorded for a date are displayed at the bottom ofthe display as an icon.Daily ViewThis function displays the events recorded for a date. Selecta date then press the [O] key to view or edit the details ofspecific events. In Calendar, select 2.Daily View.To manage existing events, press the [Option] Soft key toselect from the following functions.Delete: Deletes an event.On D-day/Off D-day: Sets up or cancels D-Day.Move Events: Transfers an event to a specific date.Delete All: Deletes all events.Send via Bluetooth: Sends the selected event viaBluetoothOrganiser88To: Press:Move to the previous or next day [Left] or [Right] scroll keyMove to the previous or next week [Up] or [Down] scroll keyMove to the previous or next month [1] or [3]When you select D-Day from Screen Control, ‘D-Date,Event Memo Content Part’ is displayed in the Standby screen.When a new D-Day is created, the existing D-Day is automaticallydeleted.NOTE You can create up to 50 events. You can create up to 8events for a day. You can create events for dates from 01/01/1950to 12/31/2043.NOTE Press the [O] key then press the [Edit] Soft key to returnto the editing screen.Tip](https://usermanual.wiki/Pantech-Co/PG-6200/User-Guide-685650-Page-46.png)
![ConverterConverter converts a figure between different units, i.e.length, area, volume, weight and temperature.Press the [Menu] Soft key then select 7.Organiser thenselect 6.Converter.Select Length, Area, Volume, Weight, or Temperature.Press the [Down] scroll key to move to the next line, pressthe [Left] or [Right] scroll key to select a target unit, andpress the number keys to input numbers.Press the [Down] scroll key again to move to the next lineand select a result unit; the correct answer is displayedautomatically.Press the . key to input a decimal.The result is automatically recalculated when you changethe units or value.Stop WatchStop Watch measures time for all sorts of sports. Press the [Menu] Soft key then select 7.Organiser thenselect 7.Stop Watch.Press the [ ] key to start the Stop Watch.Press the [ ] key to pause the Stop Watch, then press the [ ] key to restart the Stop Watch.When you press the [Lap] Soft key, up to four lap timesare displayed in turn. When you press the [Lap] Soft key afourth time, the Stop Watch stops.Press the [Reset] Soft key to reset all Stop Watch timers.TimerTimer sets the alarm bell to ring at a preset time.Press the [Menu] Soft key then select 7.Organiser thenselect 8.Timer.Press the [Set] Soft key to input a time and the number ofminutes to count down then press the [O] key.Press the [ ] key to start the countdown.Press the [ ] key to pause the countdown, then press the [ ] key to restart the countdown.At the preset time, your phone plays an animation andalarm sound. Press the [Stop] Soft key to stop both.Press the [Set] Soft key to return to the reset the timerwhile Timer is not counting down.After the alarm and animation have played at the set time,both are reset automatically.91OrganiserTo play a voice memo:Select the voice memo then press the [ ] key.To manage voice memos:To manage voice memos, press the [Option] Soft key toselect from the following functions.Delete: Deletes the selected voice memo.Delete All: Deletes all voice memos.Rename: Renames the selected voice memo.Send as MMS: Sends the selected voice memo in amultimedia message.New: Creates a new voice memo.Send via Bluetooth: Sends the selected voice memo viaBluetooth.Copy to External Memory: Copies the selected voicememo to your External Memory.World TimeThis function informs you of world times. Press the [Menu]Soft key then select 7.Organiser then select 4.World Time.To manage world times, press the [Option] Soft key toselect from the following functions.On/Off Day Light Saving: Specifies whether the currenttime of the selected place is adjusted to Day Light Saving.A [ ] icon indicates that Summer Time is activated forthat place.Set as Local: Replaces Target Area with Home Area.CalculatorYour phone has a Calculator function. Calculator providesfour basic operations: +, -, x, and /.Press the [Menu] Soft key then select 7.Organiser thenselect 5.Calculator.Press the number keys and direction keys to input acalculation then press = to display the result.Press the [c] key to clear the current line of yourcalculation.Press and hold the [c] key to delete your entirecalculation. Organiser90When the memory is full, “Not Enough Memory” isdisplayed and you are returned to your phone’s main menu.TipSummer Time sets the clock one hour ahead.TipTo input a decimal, press the . key.Tip](https://usermanual.wiki/Pantech-Co/PG-6200/User-Guide-685650-Page-47.png)
![To manage existing bookmarks, select the bookmark thenpress the [Option] Soft key to select from the followingfunctions.Edit: Edits the URL and name of a bookmark. Delete: Deletes a bookmark from the List. Go: Goes to the bookmarked site.Push MessagesYour phone can receive Push Messages from your serviceprovider. Push messages are stored in your Inbox.Press the [Menu] Soft key then select 8.Connectivity thenselect 1.WAP then select 4.Push Messages then select1.Inbox.Select a Push Message then press the [O] key tocontact the WAP page concerned.To manage your Push Messages, select the message thenpress the [Option] Soft key to select from the followingfunctions.Delete: Deletes the selected message.Delete All: Deletes all Push Messages in your Inbox. Go to: Goes to the site of the selected message.Receive ModeThis function allows you to set up your phone for receivingPush Messages.Press the [Menu] Soft key then select 8.Connectivity thenselect 1.WAP then select 4.Push Messages then select2.Receive Mode.Press the [Option] Soft key to select one of the followingoptions.Accept All: Receives all Push messages.Accept None: Rejects all Push messages.Go to URLThis function allows you to directly input the address of aURL and connect to it.Press the [Menu] Soft key then select 8.Connectivity thenselect 1.WAP then select 5.Go To URL.Input the URL you want to go to, then press the [O] key.ProfilesThis function selects or edits WAP connection profiles onyour phone.95WAPYou can access the Internet with a WAP (WirelessApplication Protocol) browser on your phone. This means you can connect to the Internet anywhere andanytime you have network coverage. Press the [Menu] Soft key then select 8.Connectivity thenselect 1.WAP.Navigating using the WAP browserTo scroll through and select browser items, press the [Up]or [Down] scroll key until the item you want is highlightedthen press the [Select] Soft key.To return to the previous page, press the [c] key.To return to the startup homepage, press the [Option] Softkey then select Home.Entering text in the WAP browserWhen you are asked to input text, the current text inputmode is displayed above the Right Soft key.(For further details, see Input Mode on page 36.)HomeThis function contacts your network to load your WirelessWeb service provider’s homepage.Press the [Menu] Soft key then select 8.Connectivity thenselect 1.WAP then select 1.Home.ResumeThis function allows you to reconnect to the Web pagedisplayed most recently. Press the [Menu] Soft key thenselect 8.Connectivity then select 1.WAP then select2.Resume.BookmarksThis function allows you to bookmark an Internet addressusing the WAP browser just as you do with a PC Internetbrowser. Press the [Menu] Soft key then select 8.Connectivity thenselect 1.WAP then select 3.Bookmarks.To record a URL and Name in the first empty number inyour Bookmark List, press the [Add] Soft key.WAP94The descriptions below may vary depending on yourservice provider. Ask your service provider for detailed information.NOTE Press the [O] key to access the WAP menu directly.Press and hold the [O] key in Standby mode to display the WAPhomepage.TipThis function is not displayed for default bookmarks.NOTE This function is not displayed for default bookmarks.NOTE](https://usermanual.wiki/Pantech-Co/PG-6200/User-Guide-685650-Page-49.png)
![secondary DNS. NOTE: This function is available onlywhen your Connection Type is set to HTTP.Bearer: Select the bearer type for each type of networkaccess. Press the [Left] or [Right] scroll key to selectGSM Only or GPRS Only.Reset Profile: Press the [O] key to reset the settings ofthe selected profile. Press the [Left] or [Right] scroll key toselect Yes or No.CacheThis function sets up your phone’s cache. This feature isused to store WAP pages directly on your phone, to displaythem rapidly when you return to them.Cache ModeThis function sets up the cache memory check, whichverifies whether the WAP page’s information is alreadystored in your phone’s cache memory.Press the [Menu] Soft key then select 8.Connectivity thenselect 1.WAP then select 7.Cache then select 1.CacheMode.Select one of the following options.Always Check: The cache is always checked whenever aURL is loaded. Never Check: The cache is never checked.Clear CacheThis function clears all data stored in the cache (recentlyvisited WAP pages). Press the [Menu] Soft key then select8.Connectivity then select 1.WAP then select 7.Cache thenselect 2.Clear Cache.Security CertThis function displays and manages all security certificatesstored on your phone.Press the [Menu] Soft key then select 8.Connectivity thenselect 1.WAP then select 8.Security Cert.Select a security certificate then press the [Option] Softkey to select one of the following functions.Delete: Deletes the selected security certificate.Delete All: Deletes all security certificates stored on yourphone.VersionThis function displays the software version of your phone’sWAP browser. Press the [Menu] Soft key then select8.Connectivity then select 1.WAP then select 9.Version.97WAPYour phone is compatible with OTA (Over The Air)messages. These are used by service providers to sendconnection details directly to your phone. Please ask yourservice provider for details of this service.Press the [Menu] Soft key then select 8.Connectivity thenselect 1.WAP then select 6.Profiles.To select a profile, highlight it in the Profile List thenpress the [O] key. You cannot select Unedited Profile.To edit a profile, select it in the Profile List then press the[Edit] Soft key to select from the following functions.Profile Name: Press the [O] key to change the profilename.Home URL: Press the [O] key to edit the HomepageURL provided by your service provider.Connection Type: Press the [Left] or [Right] scroll key toselect either WAP or HTTP.GSM Settings: This function allows you to set the GSMnetwork proxy by inputting the following information.Gateway/Proxy: If you set the Connection Type to WAP,Gateway is displayed. If you set it to HTTP, Proxy is displayed.Press the [O] key to display the subfunctions IP Address, IP Port,Login ID and Password then input the appropriate information foreach of the following subfunctions, inputting the informationprovided by your service provider.Data Call Type: Press the Left or Right scroll key to select ISDNor Analog.Dial Number: Press the [O] key to input the appropriate dialupnumber.Login ID: Press the [O] key to input the appropriate login ID.Password: Press the [O] key to input the appropriate password.GPRS Settings: This menu allows you to set the GPRSnetwork proxy by inputting the following information.Gateway/Proxy: If you set the Connection Type to WAP,Gateway is displayed. If you set it to HTTP, Proxy is displayed.Press the [O] key to display the subfunctions IP Address, IP Port,Login ID and Password then input the appropriate information foreach of the following subfunctions, inputting the informationprovided by your service provider.APN: (Access Point Name.) Press the [O] key to input theappropriate APN.Login ID: Press the [O] key to input the appropriate login ID.Password: Press the [O] key to input the appropriate password.DNS Settings: Input the appropriate IP address for theDomain Name Server. You can input the primary andWAP96The settings for your WAP service are already entered asrequired by your service provider. Care should be taken when youmake any modification to a profile since it may cause WAP to beinoperative.NOTE](https://usermanual.wiki/Pantech-Co/PG-6200/User-Guide-685650-Page-50.png)
![Basic Image Profile (BIP) for printing photosAdvanced Audio Distribution Profile (A2DP) for A/VheadsetsBluetooth technology enables cost-free wireless connectionsbetween electronic devices within a maximum range of 33 feet(10 meters). A Bluetooth connection can be used to sendimages, videos, texts, business cards and calendar notes toanother Bluetooth phone, or to connect wirelessly to devicessuch as computers that also use Bluetooth technology. Sincedevices using Bluetooth technology communicate using radiowaves, your phone and the other devices do not need to be indirect line-of-sight (unlike infrared communication).The two Bluetooth phones or other devices need only to bewithin 33 feet (10 meters) of each other, although connectionsmay be subject to interference from obstructions such as thickwalls or other electronic devices. Bluetooth communicationconsumes your phone’s battery charge and your phone’soperating time will be reduced. You should take this intoaccount when performing other operations with your phone.BluetoothThis function activates or deactivates your phone’sBluetooth feature.Press the [Menu] Soft key then select 8.Connectivity thenselect 3.Bluetooth then select 1.Bluetooth.Select On to activate Bluetooth, or select Off todeactivate Bluetooth.Paired devicesThis function displays the paired Bluetooth phones or otherdevices and allows you to add a new Bluetooth phone orother device. The icon displayed beside each pairedBluetooth phone or other device varies depending on theBluetooth device’s type.Press the [Menu] Soft key then select 8.Connectivity thenselect 3.Bluetooth then select 2.Paired Devices. Pressthe [Option] Soft key to select from the followingfunctions. (The functions displayed vary depending onwhich profiles are supported by the paired Bluetoothphone or other device.)Connect/Disconnect: Displayed for Bluetooth phones andother devices supporting the BluetoothHeadset/Handsfree profile. Connects or disconnects the99BluetoothYou can use your phone’s Micro-SD card as a removablestorage site by using a USB cable.Press the [Menu] Soft key then select 8.Connectivity thenselect 2.Mass Storage.Using mass storageSet Mass Storage to On.If your USB cable is not connected, your phone displaysthe message “Connect USB Cable.” At this time, connectyour phone with the paired Bluetooth phone or otherdevice, and when “Connecting” is displayed, you can usethe Micro-SD Card as a movable storage site from thepaired Bluetooth phone or other device. If your USB cable is already connected when you setMass Storage to On, your phone immediately displays themessage “Connecting.”Use your PC’s software to transfer files between your PCand your phone’s Micro-SD card.When you have finished copying files between your PCand your phone’s Micro-SD card, set Mass Storage toOff.BluetoothThe term Bluetooth refers both to the specifications forconnecting various devices such as computers, mobilephones and home appliances wirelessly over a shortdistance and then enabling real time, bidirectionalcommunication between them, and to the productscomplying with those specifications. Your Pantech PG-6200phone supports the following Bluetooth profiles:Serial Port Profile (SPP) for communication with PCconnectivity softwareDial-Up Networking profile (DUN) as an Internet gatewayfor a PCHands-Free Profile (HFP) as an audio gatewayObject Push Profile (OPP) as a client and serverFile Transfer Profile (FTP) as a client and serverUSB Mass Storage & Bluetooth98When reading or writing a file on your Micro-SDcard, donot remove your card as it may be damaged.If you use your Micro-SD card as a removable disk, always use yourPC’s “Safely Remove Hardware” function to remove it before youdisconnect it from your PC, otherwise the files saved on your Micro-SD card may be damaged.NOTE There may be restrictions on using Bluetoothcommunication in certain areas. Check with your local authorities.NOTE](https://usermanual.wiki/Pantech-Co/PG-6200/User-Guide-685650-Page-51.png)
![Sending an objectTo send an object via Bluetooth, do the following.Select the file you want to send.Press the [Option] Soft key then select Send via thenselect Bluetooth. Your phone searches for Bluetoothphones and other devices nearby. (For further details, seePaired devices, above.) Select the Bluetooth phone orother device that is to receive the object then press Send.Receiving an objectYour phone only receives objects when this has beenapproved. If you receive Contacts information, it is saved inyour phone’s memory. If you receive an Event, it is saved inyour Calendar.Business CardThis function allows you to exchange electronic businesscards with a phone or other device via Bluetooth.Press the [Menu] Soft key then select 8.Connectivity thenselect 3.Bluetooth then select 3.Business Card.Press the [Option] Soft key then select one of thefollowing functions.Receive: Receives the business card from the Bluetoothphone or other device and displays the card.Send: Sends your business card to the Bluetooth phoneor other device.Exchange: Sends your business card to the Bluetoothphone or other device and receives a business card fromthe Bluetooth phone or other device then displays it. Yourphone searches for Bluetooth phones and other devicessupporting the OPP Profile.Select the appropriate Bluetooth phone or other devicefrom the list of Bluetooth phones and other devices foundthen press the [O] key. Your phone exchanges businesscards with the Bluetooth phone or other device in the wayyou have specified.Outgoing Call DeviceThis function allows you to choose whether your phone or aBluetooth headset/handsfree device is to be used to makecalls.Press the [Menu] Soft key then select 8.Connectivity thenselect 3.Bluetooth then select 4.Outgoing Call Device.101Bluetoothselected Bluetooth phone or other device.Browser Folder: Displayed for phones and other devicessupporting the FTP Server profile. Displays the FTPdirectory of the other Bluetooth phone or other device.Edit Name: Allows you to edit the name of the selectedother Bluetooth phone or other device. Delete: Deletes the selected Bluetooth phone or otherdevice from the Paired Device List.Set as Authorized/Unauthorized: Displayed for PCs andPDAs. If the selected device is set to Authorized, it canaccess your phone with any permission. If the selecteddevice is set to Unauthorized, the selected Bluetoothphone or other device must have permission to accessyour phone.Set as Default/Don’t set as Default: Displayed for PCsand PDAs. If two or more headsets/handsfrees havebeen paired, choose one of them to be set as the defaultheadset. All headset/handsfree calls will be made orreceived through the default headset/handsfree. Althoughyou can set a default headset using this function, the lastheadset connected is automatically set as the defaultheadset. If a device is set as “Don’t set as Default,” thesettings of the device set as default are disabled.Add New Device: Registers a new Bluetooth phone orother device. When you select this function, a submenu isdisplayed listing device types. Select which device typeyou want to register from the following options.Search All / Audio Accessory / PC / Phone \ OthersAfter you select which device type you want to search for,the message “Search a device” is displayed.Press the [New] Soft key to begin searching for alldevices of the selected type.Searching for a Bluetooth phone orother deviceEvery time you search for a new Bluetooth phone or otherdevice, the Paired Device List is updated. To cancel thesearch and display the search results, press the [Cancel]Soft key. You can then press the [Refresh] Soft key toresume the search.Select the Bluetooth phone or device to be paired thenpress the [O] key to pair with it.Pairing with a Bluetooth phone or other deviceYour phone next requests the Passkey to be used toregister with the other Bluetooth phone or other device. Ifyou and the other Bluetooth phone’s or other device’sowner both enter the same Passkey decided betweenyourselves, registration is completed.Bluetooth100If the Bluetooth phone or other device requests pairing (forfurther details, see Pairing with a Bluetooth phone or other device,above), the object is sent after pairing is completed.NOTE](https://usermanual.wiki/Pantech-Co/PG-6200/User-Guide-685650-Page-52.png)
![Saving MemoryThis function specifies whether your phone’s internalmemory or your external Memory is used to store files youreceive, and which directory is used in exchanging files viaFTP using Bluetooth. Press the [Menu] Soft key then select8.Connectivity then select 4.Saving Memory.BluetoothThis function specifies which directory is displayed whenBluetooth phones and other devices view your FTPdirectory via Bluetooth. It also specifies whether files youreceive from Bluetooth phones and other devices are savedin your phone’s internal memory or on your externalMemory.Press the [Menu] Soft key then select 8.Connectivity thenselect 4.Saving Memory then select 1.Bluetooth.To specify in which memory the files you receive aresaved, press the [Option] Soft key then select one of thefollowing options.Internal Memory: Displays your Image Gallery, SoundGallery or Other Files directory to Bluetooth phones andother devices. External Memory: Displays directories on your Micro-SDcard to Bluetooth phones and other devices. All filesreceived from Bluetooth phones and other devices aresaved on your External Memory.SIM ToolkitThis function varies depending on your SIM card and thenetwork services provided by your service provider.103Saving Memory & SIM Toolkit Press the [Option] Soft key then select one of thefollowing functions.Phone: You make a call using your phone in the normalway. Headset: You make a call through the Bluetooth headset,provided it has been successfully registered as the defaultheadset.Always Ask: When you make a call, a message isdisplayed asking you if you wish to use theheadset/handsfree. To make the call using theheadset/handsfree, press Yes. To make a call using yourphone in the normal way, press No. The messagecontinues to be displayed until the called party answersyour call. VisibilityThis function allows you to choose whether or not your phoneis visible to unpaired Bluetooth phones and other devices.Press the [Menu] Soft key then select 8.Connectivity thenselect 3.Bluetooth then select 5.Visibility.Press the [Option] Soft key then select one of thefollowing functions.Shown to All: Allows Bluetooth phones and other devicesto detect your phone in their searches.Hidden: Allows only Bluetooth phones and other deviceslisted in your Paired Device List to detect your phone intheir searches.NameThis function allows you to edit the name of your phone.This is shown to Bluetooth phones and other devices in theirsearches. Press the [Menu] Soft key then select8.Connectivity then select 3.Bluetooth then select 6.Name.AddressThis function displays the Bluetooth address of your phone.Press the [Menu] Soft key then select 8.Connectivity thenselect 3.Bluetooth then select 7.Address.Bluetooth102If you do not press Yes or No, the call is made throughyour phone.NOTE Only files supported in the Gallery concerned can besaved in that Gallery. When your receive files from a Bluetoothphone or other device, image files are saved in your phone’s ImageGallery; sound files are saved in your phone’s Sound Gallery. Allother files are saved in your phone’s Other Files directory.NOTE It is recommended to use “PS1” made by Pantechbecause Stereo Bluetooth function may not be compatible withStereo Bluetooth Headsets made by other companies. Please referto the Bluetooth Headset manual for Headset operation information.NOTE](https://usermanual.wiki/Pantech-Co/PG-6200/User-Guide-685650-Page-53.png)
![To allow the fingerprint to be used for authentication,select Set as Auth. You can set only one fingerprint forthis function.To edit the numbers associated with the currentfingerprint, select Edit Secret Dial.To disable the Secret Dial list associated with the currentfingerprint, select Remove Secret Dial.Secret DialSelect this command to view and edit the list of Secret Dialnumbers assigned to a fingerprint.You can then set Secret Dial numbers for each of 10fingerprints. These numbers can be dialed only when thoseusers’ fingerprints are scanned. You can enter the nameand the phone number, and you can copy a contact’sinformation from your phonebook. Copied numbers aremanaged separately from the phonebook. Numbers deletedfrom the phonebook are not removed from the Secret Diallist.Registering fingerprintsSelect the finger icon using the navigation keys thenpress the [Option] Soft key then select Enroll Finger.Scan the same finger at least 3 times. If this fails, selectthe command again to scan the finger again. You canscan a single fingerprint up to seven times to successfullyregister it.If you fail three times in a row, the Help animation isdisplayed to show you how to do it. Put your entire knuckle on the sensor, push it down hardand sweep downwards. Setting fingerprint authenticationSelect an existing fingerprint by pressing the [K] key and[L] key then press the [Option] Soft key then select Set asauthentication. You can select only one fingerprint forauthentication.Disabling fingerprint authenticationA finger icon is displayed in Idle mode.Press the [Unlock] Soft key to view the fingerprintauthentication screen.Press a number key to use this function and select theLock/Unlock function as you type your password.You can select only one fingerprint.105Fingerprint RecognitionFingerprint Recognition is used to allow dialing of specifiednumbers only when your phone detects the appropriatefingerprint.Using Fingerprint RecognitionTo select this function, press the [F] key then enter thepassword. (If the Fingerprint Recognition function is already set up,press the [F] key then select Fingerprint Recognition.)Getting the best out of FingerprintRecognitionThe Fingerprint Recognition function does not guaranteeperfect identification or verification. Pantech is in no wayliable for any losses caused through the use, or theinability to use, your phone’s Fingerprint Recognitionfunction.Always scan fingerprints smoothly and at a moderatespeed.Do not twist your finger as you remove it from theFingerprint Recognition sensor.Do not scratch or press the Fingerprint Recognitionsensor, or place magnetic materials near it.For best results, do not use this function after taking ashower or bath, or with hardened or cracked skin.For best results, do not use this function if your fingerprintis excessively moist, salty or caked with cosmetics.Fingerprint ManagementTo register (“enroll”) a new fingerprint or change thefingerprint recognition settings, select the appropriatefunction.To see detailed information on enrolled fingerprints, pressthe [O] key then select Detail View. If a fingerprint isrecognized and the Secret Dial function is activated, thename and the phone number are displayed. To see otherfingerprints, press the [K] key and [L] key.To enroll a new fingerprint, press the [Option] Soft key todisplay the setting commands:To add a fingerprint and set up Secret Dial and fingerprintauthentication, select Enroll Finger.To edit the Secret Dial list associated with the fingerprint,select Secret Dial List.To display guidance on scanning fingerprints, select Help.To delete an existing fingerprint, select Removefingerprint.Fingerprint Recognition104](https://usermanual.wiki/Pantech-Co/PG-6200/User-Guide-685650-Page-54.png)
![5Appendix1. Menu tree2. Access codes3. Troubleshooting checklist4. Performance and safety5. Glossary6. Phone specificationSetting Secret DialSelect an existing fingerprint as described in Settingfingerprint authentication (above) then select Set asSecret Dial and enter the name and phone number.You can either enter the name and phone number orcopy them from your Contacts.You can add or edit numbers only using the Fingerprintfunction.Using Secret DialWhen in Idle mode, press and hold the [F] key or the[F] key and [I] key scroll keys. The same scanninganimation you saw in the authentication setting will bedisplayed. You can then make a call to the numberassigned to an enrolled fingerprint by scanning the finger.When the Handset Lock is activated, this disablesauthentication mode, rather than the Secret Dial function.Skin CheckerThe Skin Checker function uses your phone’s fingerprintsensor to scan your skin and grade your skin condition by A,B, C and F. You can use this function to check your skin’sFineness, Shape, and Moisture.The skin grades are listed below; each grade is determinedby the average grade of fineness and shape.A: 80% or higherB: 75%~80% C: 60~75%F: 60% or lowerUsing Skin CheckerHighlight Skin Checker in the Fingerprint then select the[O] key.Scan your skin.Your skin condition is displayed when scanning iscompleted.Fingerprint Recognition & Skin Checker106](https://usermanual.wiki/Pantech-Co/PG-6200/User-Guide-685650-Page-55.png)