Pantech Co PREMIAV CDMA/GSM/LTE Phone with BT/WLAN/NFC User Manual User s Manual
Pantech Co Ltd CDMA/GSM/LTE Phone with BT/WLAN/NFC User s Manual
UserManual.wiki
>
Pantech Co
>
PREMIAV User Manual
>
User's Manual
Contents
1.
User's Manual
2.
user manual
3.
user manual
User's Manual
Navigation menu
Upload a User Manual
Namespaces
Wiki Guide
HTML
PDF
Info
Views
User Manual
Discussion / Help
Navigation


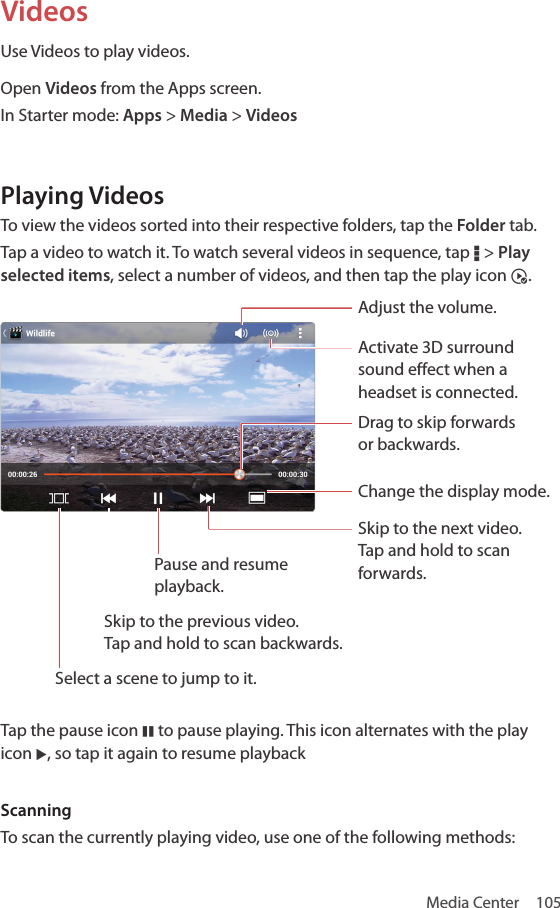
![98 Media CenterManaging SongsOn the list screen, tapping and holding a song displays a popup menu for file management.Adding Songs to PlaylistsUse one of the following methods:• On the list screen, tap and hold a song, choose Add to playlist, and then select a playlist for the song.• On the play screen, tap D > Add to playlist, and select a playlist for the song. Using Songs as RingtonesSongs can be used as ringtones. Use one of the following methods:• On the list screen, tap and hold a song and choose Set as ringtone.• On the play screen, tap D > Set as ringtone. Viewing Song InformationUse one of the following methods:• On the list screen, tap and hold a song and choose Properties.• On the play screen, tap the artwork and tap the info icon ] that appears on the lower of the artwork.Deleting SongsOn the list screen, tap and hold a song and choose Delete. To delete multiple songs, tap D > Delete, select songs to delete, and then tap the trash icon G.](https://usermanual.wiki/Pantech-Co/PREMIAV.User-s-Manual/User-Guide-1774216-Page-98.png)