Pantech Co PREMIAV CDMA/GSM/LTE Phone with BT/WLAN/NFC User Manual User s Manual
Pantech Co Ltd CDMA/GSM/LTE Phone with BT/WLAN/NFC User s Manual
Contents
- 1. User's Manual
- 2. user manual
- 3. user manual
User's Manual
Pantech Perception™
User Guide
This smartphone’s stylish design and
careful craftsmanship showcase a
vast range of advanced, convenient
and cutting-edge features. Our
state-of-the-art technology turns an
otherwise simple smartphone into a
comprehensive communication and
lifestyle tool.
This user guide has important
information to help maximize your
Perception experience.
TBD
S930LVWC811F.1A
2
Table of Contents
Read This First 9
Introduction ...........................................................................................................................9
Features ........................................................................................................................10
Legal Notices .......................................................................................................................12
Getting Started 14
Overview .............................................................................................................................. 14
Inserting the SIM card and Battery .............................................................................16
Inserting a Memory Card ................................................................................................17
Charging the Battery ........................................................................................................18
Elementary Controls .........................................................................................................19
Turning the Smartphone On and Off .................................................................19
Initial Setup .................................................................................................................19
Locking and unlocking the Smartphone ..........................................................20
Securing the Smartphone ......................................................................................21
On-screen Buttons ....................................................................................................22
Finger Gestures .......................................................................................................... 22
Hand Motions ............................................................................................................. 24
Geomagnetic Compass ........................................................................................... 26
Signing Up for a Google Account ...............................................................................27
3
Basic Operations 28
Status Icons..........................................................................................................................28
Standard Mode...................................................................................................................33
Home Screen ...............................................................................................................33
Apps Screen ................................................................................................................35
Starter Mode ....................................................................................................................... 38
Home Screen ...............................................................................................................38
Apps Screen ................................................................................................................40
Notifications ........................................................................................................................ 41
Always On Top .................................................................................................................... 43
Changing Interface Language ...................................................................................... 43
Entering Text ....................................................................................................................... 44
Networking .......................................................................................................................... 46
Connecting to a Wi-Fi Network ............................................................................46
Tethering or Mobile Hotspot ................................................................................. 47
Pairing with a Bluetooth Device ..........................................................................48
Wi-Fi Direct ..................................................................................................................49
Transferring Files via USB Connection ............................................................... 49
Exchanging Data via NFC .......................................................................................50
Net Media .....................................................................................................................51
Location-Based Services ................................................................................................. 54
Emergency Call ..................................................................................................................56
Capturing a Screenshot ..................................................................................................56
4
Calling & Messaging 57
Phone .....................................................................................................................................57
Phone Calls ..................................................................................................................57
Phone settings............................................................................................................59
Voice Dialer ..........................................................................................................................60
People ....................................................................................................................................61
Messaging ............................................................................................................................62
Internet 64
Browser .................................................................................................................................64
Browser Interface ......................................................................................................64
Viewing Webpages ...................................................................................................66
Bookmarks ................................................................................................................... 68
Browser Settings ........................................................................................................69
Email.......................................................................................................................................72
Gmail ......................................................................................................................................75
Talk ..........................................................................................................................................78
Google+ and Messenger ................................................................................................ 79
Circles ............................................................................................................................79
Stream ...........................................................................................................................80
Profile .............................................................................................................................81
Messenger....................................................................................................................82
Google Plus Settings ................................................................................................ 82
Color .......................................................................................................................................84
Creating and Posting Videos ................................................................................. 84
Posting Photos ...........................................................................................................85
Color Settings .............................................................................................................85
5
Media Center 86
Camera ..................................................................................................................................86
Taking Photos .............................................................................................................86
Taking Videos .............................................................................................................. 89
Gallery ...................................................................................................................................91
Viewing Pictures ........................................................................................................91
Managing Pictures .................................................................................................... 92
Editing Pictures ..........................................................................................................93
Music ......................................................................................................................................95
Playing Music .............................................................................................................. 95
Managing Songs ........................................................................................................98
Playlists........................................................................................................................100
Sleep Mode ................................................................................................................100
Music Settings ..........................................................................................................101
Play Music...........................................................................................................................102
Playing Music ............................................................................................................102
Playlists........................................................................................................................104
Videos ..................................................................................................................................105
Playing Videos ..........................................................................................................105
Managing Videos .....................................................................................................107
YouTube ..............................................................................................................................108
Watching Videos ......................................................................................................108
Uploading Videos ....................................................................................................109
YouTube Settings .....................................................................................................110
IMDb.....................................................................................................................................111
6
Menu Functions 113
Amazon ..............................................................................................................................113
Amazon Kindle .................................................................................................................115
Purchasing Books ....................................................................................................115
Reading Books ..........................................................................................................116
Managing Books ......................................................................................................119
Amazon Kindle Settings ........................................................................................119
Alarm/Clock .......................................................................................................................120
Alarm ...........................................................................................................................120
World Time .................................................................................................................121
Timer ............................................................................................................................122
Stopwatch ..................................................................................................................122
Audible ................................................................................................................................123
Purchasing Audiobooks ........................................................................................123
Listening to Audiobooks ......................................................................................123
Managing AudioBooks ..........................................................................................125
Audible Settings ......................................................................................................125
Camnote .............................................................................................................................127
Camnote Settings ....................................................................................................127
Taking a Picture ........................................................................................................127
Editing a Picture .......................................................................................................128
Managing Pictures ..................................................................................................128
Calculator ...........................................................................................................................130
Calendar ..............................................................................................................................131
Managing Events .....................................................................................................131
Calendar Settings ....................................................................................................132
Document Viewer ............................................................................................................134
Viewing Documents ...............................................................................................134
Managing Documents ...........................................................................................135
7
Downloads .........................................................................................................................137
Latitude ...............................................................................................................................138
Maps .....................................................................................................................................140
Places ...................................................................................................................................141
Play Store ............................................................................................................................143
Search ..................................................................................................................................145
Smart Voice ........................................................................................................................146
Task Manager ....................................................................................................................147
Voice Recorder ..................................................................................................................148
Weather ...............................................................................................................................150
Settings 152
Personalize .........................................................................................................................152
Mode change ............................................................................................................152
Personalization .........................................................................................................152
Wireless & Networks .......................................................................................................155
Airplane mode ..........................................................................................................155
Wi-Fi..............................................................................................................................155
Bluetooth....................................................................................................................155
Data usage .................................................................................................................155
Call settings ...............................................................................................................156
More .............................................................................................................................157
Device ..................................................................................................................................158
Sound ..........................................................................................................................158
Display .........................................................................................................................159
Storage ........................................................................................................................159
USB connection settings.......................................................................................160
Battery .........................................................................................................................160
Apps .............................................................................................................................160
8
Power saver ...............................................................................................................161
Motion recognition .................................................................................................161
Personal ..............................................................................................................................162
Accounts & sync .......................................................................................................162
Backup Assistant Plus ............................................................................................162
Setup wizard .............................................................................................................162
Location services .....................................................................................................162
Security .......................................................................................................................163
Language & input ....................................................................................................164
Backup & reset ..........................................................................................................165
System .................................................................................................................................165
Date & time ................................................................................................................165
Accessibility ...............................................................................................................165
Developer options ..................................................................................................167
About phone .............................................................................................................167
Appendix 168
Maintenance .....................................................................................................................168
Troubleshooting ......................................................................................................171
Maximizing Battery Life ........................................................................................172
Updating the Software ..........................................................................................174
App Management ...................................................................................................174
Safety Information ..........................................................................................................177
Safety Information for Wireless Handheld Phones..............................................179
Safety Information for FCC RF Exposure ................................................................184
Teletypewriter Devices ..................................................................................................188
FDA Consumer Updates................................................................................................189
Warranty .............................................................................................................................198
Read This First 9
Introduction
This smartphone is designed to be a multi-functional all-purpose
communications and media device. It is capable of advanced integrated
tasks that help enrich work life, entertainment and communication with
friends, family and coworkers.
There are several important steps involved in making the most out of this
highly engineered piece of technology.
Assembling the Phone
Before the phone can be used, it must be assembled. Be sure all of the
required parts are available. Extra accessories can be purchased from the
appropriate local dealer.
Using Wi-Fi
Wi-Fi is a profoundly useful alternative to regular mobile coverage. Mobile
coverage depends on local conditions, and data transfer plans often do
not allow limitless free data transfer. Using a local Wi-Fi network allows the
smartphone to access the Internet without burdening the mobile service or
risking high fees.
Setting Up Google Accounts
Google accounts are required to maximize users’ experience with this
smartphone.
Read This First
10 Read This First
Using the Interface
The touchscreen is the primary method for interacting with the smartphone.
It is a highly sensitive and versatile interactive surface. Learn about all
of its unique characteristics and capabilities to get the most from this
smartphone.
Transferring Files
Once the smartphone is up and running, learn how to transfer files to
and from the smartphone. There are many versatile methods designed to
accomplish this in a variety of situations.
Features
Interactivity
This smartphone is carefully designed to make human interactions easy
and efficient. With an ultra-sensitive and accurate interactive touchscreen
surface, the device has the ability to recognize a host of different human
gestures. This smartphone can even recognize voices and spoken
commands.
Full Media Experience
This advanced smartphone functions as an entertainment device, with the
ability to display high-quality audio and video and to act as a media and
entertainment center through connections to external devices.
Display images imported to the phone or taken with the dual onboard
cameras. Play music with the built-in music player, and both record and play
video. Users can even read books using the large, colorful display.
This smartphone also creates media. It has the ability to take detailed
pictures, record high-resolution video and audio and even edit media files.
Read This First 11
Enriching the Personal and Working World
Aside from being a handy communication tool, this smartphone also keeps
track of schedules, wakes users up in the morning and manages complex
lists of contact information.
Lectures and meetings can be recorded on video or audio. Keep blackboard
and whiteboard images for later reference. Manage contacts and
interface with Google and third-party services for easy updating and data
preservation.
Full-Access Internet
This device is designed to be an effective tool for maximizing access to the
online universe, whether surfing the web or chatting with friends. Internet
connections use both Wi-Fi and regular mobile networks. Over-usage can be
prevented through automatic settings to avoid large data-usage bills.
Navigation
Using a combination of features and apps, this smartphone becomes a
critical navigational tool. Use it to locate GPS signals, identify locations on
maps and get directions while in the field. It can even help to find local
services and points of interest, as well as helping to avoid traffic.
Sharing and Networking
All files created or saved on this device can be shared with other users
through a range of methods, including over the internet, multiple direct
connections to other devices or through messaging.

12 Read This First
Legal Notices
Bluetooth® is a registered trademark of Bluetooth SIG, Inc.
Wi-Fi® is a registered trademark of the Wi-Fi Alliance.
Google™, YouTube™, Picasa™, Gmail™, Google Maps™ and Play Store™ are
trademarks of Google, Inc.
Universal Plug and Play (UPnP)
Universal Plug and Play (UPnP) technology targets
home networks, proximity networks and networks
in small businesses and commercial buildings. It
enables data communication between any two
devices under the command of any control device
on the network. UPnP technology is independent
of any particular operating system, programming
language, or network technology.
Digital Living Network Alliance (DLNA)
You will find the DLNA Certified™ logo on all kinds
of new digital devices for your home and on the
go—TVs, PCs, mobile phones, you name it. But
they aren’t the same TVs, PCs and mobile phones
you’re used to. They may look familiar, but they
have new capabilities of DLNA Device Classes.
High-Definition Multimedia Interface (HDMI)
HDMI, the HDMI Logo, and High-Definition
Multimedia Interface are trademarks or registered
trademarks of HDMI Licensing LLC in the United
States and other countries.

Read This First 13
Dolby® Digital Plus
Dolby® Digital Plus is a trademark of Dolby
Laboratories. It is an advanced surround sound
audio codec. From home theaters and PCs to
mobile phones and online streaming, Dolby
Digital Plus defines high-fidelity audio.
Visit www.dolby.com for more information.
About DivX video
DivX® is a digital video format created by DivX,
LLC, a subsidiary of Rovi Corporation. This is an
official DivX Certified® device that plays DivX
video. Visit www.divx.com for more information
and software tools to convert your files into DivX
videos.
About DivX Video-On-Demand
This DivX Certified® device must be registered in order to play purchased
DivX Video-on-Demand (VOD) movies. To obtain your registration code,
locate the DivX VOD section in your device setup menu. Go to vod.divx.com
for more information on how to complete your registration.
DivX Certified® to play DivX® video up to HD 720p, including premium
content.
DivX®, DivX Certified®, and associated logos are trademarks of Rovi
Corporation or its subsidiaries and are used under licence.
Covered by one or more of the following U.S. patents:
7,295,673; 7,460,668; 7,515,710; 7,519,274
14 Getting Started
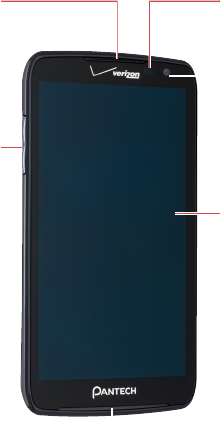
Overview
Touchscreen
Microphone
Front camera
Light and proximity
sensors
Volume button
Earpiece
Getting Started

Getting Started 15
Flash
NFC antenna
Headset jack
Power button
Rear cameraSpeaker
USB connector
16 Getting Started
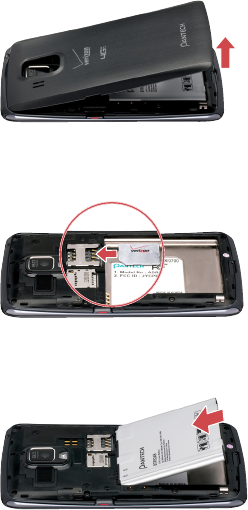
Inserting the SIM card and Battery
Insert the SIM card provided by the wireless carrier and the battery.
1. If the smartphone is on, press and hold the Power button and choose
Power off to turn it off. Remove the battery cover. Use the groove at the
bottom of the smartphone to lift the cover from the smartphone.
2. Insert the SIM card into the SIM card slot with the gold contacts facing
downward.
3. Insert the battery into the battery compartment with the contacts
aligned.
4. Replace the cover. Insert the top of the cover, and press the bottom and
sides into place.
Getting Started 17
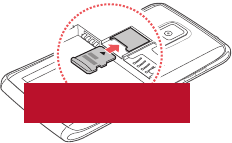
Inserting a Memory Card
Use a memory card to expand available file storage. This smartphone
accepts microMemory cards with maximum capacities of 32 GB, depending
on memory card manufacturer and type.
1. Turn off the smartphone and remove the battery cover and battery.
2. Insert a memory card into the memory card slot with the gold contacts
facing downward, pushing until it locks into place.
3. Replace the battery and cover.
Removing the Memory Card
Before removing the memory card, first unmount it for safe removal.
Go to Settings > Storage > Unmount SD card.
In Starter mode: Settings > System > Storage > Unmount SD card
Push the memory card until it is disengaged from the slot, and pull it out.
TBD
18 Getting Started
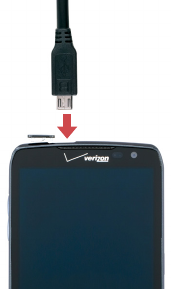
Charging the Battery
Plug the charger into a power outlet, and then plug the USB cable’s end into
the smartphone’s USB connector.
A computer can be also used to charge the smartphone by connecting via
the USB cable.
Caution
Avoid acts that may cause the battery to explode or catch fire.
• Do not disassemble, bend, crush, puncture or shred the battery.
• Do not dip the battery in water or other liquids.
• Do not short (connect) the contacts on the battery with a metallic
object.
Getting Started 19
Elementary Controls
Turning the Smartphone On and Off
Press and hold the Power button for a few seconds until the screen lights up.
To turn the Smartphone off, press and hold the Power button, then tap
Power off in the popup menu that appears.
Initial Setup
When the smartphone is activated for the first time, the setup wizard guides
users through the initial setup process. At each step, make a choice or skip
the step:
• Interface language: Select a language for the interface. This can be
changed under Settings > Language & input > Language.
In Starter mode: Settings > System > Language & input > Language
• Backup Service: Subscribe to Verizon’s backup service. This service keeps
a record of the phone’s vital data on Verizon’s backup servers, in case
the phone is lost or stolen. If skipped during setup, this service can be
activated later under Settings > Backup Assistant Plus.
In Starter mode: Settings > System > Backup Assistant Plus
• Email: Enter the relevant POP3 and other login data necessary to open
an account using the Email app. If skipped during setup, this can be
performed later under Settings > Accounts & sync.
In Starter mode: Settings > System > Accounts & sync
• Google account: A Google account is necessary to maximize the utility
of this phone’s many features. If skipped during setup, this can be
activated later under Settings > Accounts & sync.
In Starter mode: Settings > System > Accounts & sync
20 Getting Started
• Location Services: This feature requires user consent. Location services
keep track of the precise location of the smartphone and allow certain
apps to access this data. This presents some security risks. If skipped
during setup, this can be activated later under Settings > Location
services.
In Starter mode: Settings > System > Location services
• Interface mode: Select a interface mode. This can be changed under
Settings > Mode change.
In Starter mode: Settings > Mode & application > Mode change
The Setup Wizard app can be run any time to initialize this process again.
This app can be also found under Settings.
Locking and unlocking the Smartphone
When not in use, lock the smartphone to prevent unwanted operation.
Pressing the Power button turns the screen off and puts the smartphone in
lock mode.
The smartphone automatically locks if it is not used for a specified period.
Go to Settings > Display > Sleep, then set the length of time that the
smartphone waits before locking.
In Starter mode: Settings > System > Display > Sleep
To unlock the Smartphone, press the Power or Volume button to turn the
screen on, then drag the lock icon ‡ to the right.
Note
The direction in which to drag the lock icon varies depending on the
lock screen type.
Getting Started 21
Securing the Smartphone
Prevent others from using or accessing personal data and information
stored in the smartphone by using the available security features. The
smartphone requires a preset pattern, PIN, password, or the user’s face to
unlock it.
Go to Settings > Security > Screen lock or Settings > Personalization >
Screen lock > Select screen lock.
In Starter mode: Settings > Mode & application > Screen lock > Select
screen lock
Unlocking with a Pattern
Choose Pattern, draw a pattern by connecting four or more dots, and then
redraw the pattern for confirmation.
Unlocking with a PIN
Choose PIN, enter at least four numbers, and then re-enter the password for
confirmation.
Unlocking with a Password
Choose Password, enter at least four letters, including numbers and
symbols, and then enter the password again for confirmation.
Unlocking with the User’s Face
Choose Face unlock. Stare at the front camera and put the user’s face in the
dotted oval on screen. The oval turns green when the face is successfully
recognized. Set a pattern or PIN in case the phone fails to recognize the face.
22 Getting Started
On-screen Buttons
Use the three permanent on-screen buttons that appear at the bottom of
the screen to navigate between screens.
ABack Return to the previous screen.
BHome Return to the Home screen
CRecent
Apps
Display recently-used apps. Scroll up the list to see more
apps, and tap an app entry to reactivate it. To clear an app
entry from the list, slide it left or right.
Menu Icon
The Menu icon D appears on the top or bottom of the screen when a menu
is available. Each application and screen has a different set of menu options,
and they can only be viewed using the Menu icon.
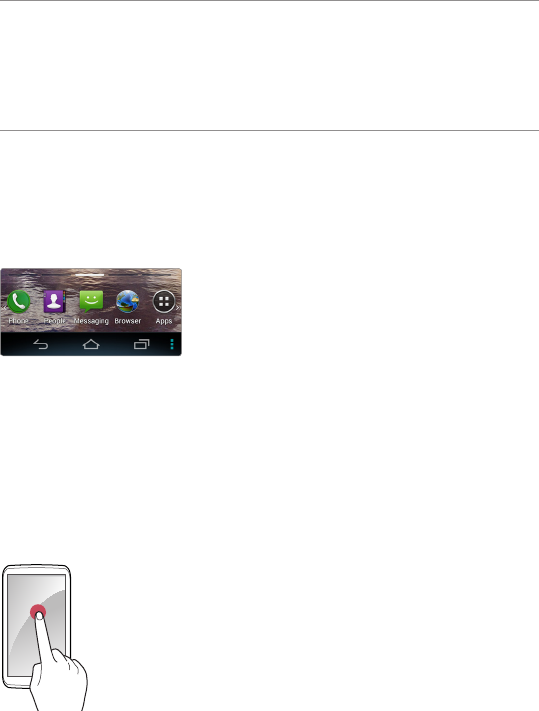
Finger Gestures
Tapping
To open an app, to select a menu item, to press an on-screen button, or to
type a letter using the on-screen keyboard, tap it with a finger.

Getting Started 23
Dragging
To move an icon or thumbnail to a new location, tap and hold it, then drag it
to the target position.
Double-tapping
Double-tap on a webpage, map or picture to zoom in. Double-tap again to
return.
Flicking
Flick left, right, up, or down to navigate on many screens or within many
apps.

24 Getting Started
Pinching
Spread two fingers apart on a webpage, map or picture to zoom in. Pinch to
zoom out.
Hand Motions
Simple hand motions allow easy control of the smartphone. Before using
hand motions, make sure the option for this feature is enabled.
Go to Settings, then turn on Motion recognition.
In Starter mode: Settings > System > Motion recognition.
Note
The front camera is used to sense motions. The interval between a hand
and the lens should be under 4 inches.
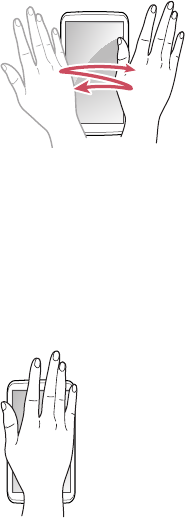
Sweeping
When using the Messaging, Music or Gallery app, sweep a hand to the left or
right over the screen to view the previous or next message, song or picture.
Getting Started 25
Waving
Wave a hand twice or more over the screen to answer a call. The
speakerphone can be used, as well.
Go to Settings > Motion recognition > Speaker phone usage, then choose
Use speaker phone.
In Starter mode: Settings > System > Motion recognition >
Speaker phone usage
Covering
When using the Music app, cover the screen with a palm to pause playback.
Draw it away from the screen to resume.
When using Gallery, cover the screen for a second to start or stop the
slideshow.
26 Getting Started
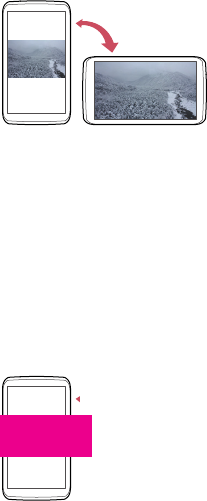
Rotating the Screen
Many apps allow to display in either portrait or landscape orientation.
Rotating the smartphone causes the display to automatically adjust to fit to
the new screen orientation.
To prevent the display from rotating automatically, open the Notifications
panel and turn off Auto rotate.
In Starter mode: Settings > System > Display > Auto-rotate screen
Geomagnetic Compass
Many apps, including Maps, Places, and user-installed games, use the
built-in geomagnetic compass for accurate directions. If it seems not to
work properly, wave the smartphone in a figure 8 pattern.
TBD
Getting Started 27
Signing Up for a Google Account
A Google account is necessary to maximize this smartphone’s usefulness.
• Google services rely on a Google account for contacts, and email and
the calendar.
• An account is necessary to buy free or paid apps from Play Store
To sign up for a new account, go to Settings > Accounts & sync > Add
Account > Google > New.
In Starter mode: Settings > System > Accounts & sync > Add Account >
Google > New
Enter the account information
• Provide a first and last name for the account user.
• Add a username. If the username is already taken, select one of the
alternates suggested or enter a new one.
• Enter a password of 8 letters or more.
• Add an email address and a security question, used to recover the
password if the password is lost.
• Agree to the terms.
• Tap Sync Contacts to sync the smartphone’s contacts list with the
Google account’s contacts. This provides a covnenient backup if the
smartphone is lost or stolen.
28 Basic Operations
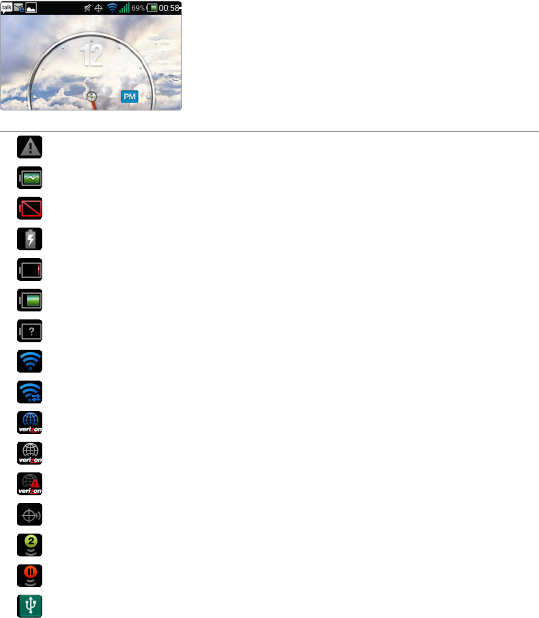
Status Icons
The icons displayed in the status bar at the top of the screen provide
information about the smartphone’s status.
Status bar
Error
Battery status : Charging
Battery status : Empty
Battery status : Not enough battery remaining
Battery status : Remaining battery life
Battery status : Connected to an unknown power supply
Battery status : Fully charged
Connected to a Wi-Fi network
Connected to Wi-Fi Direct
Verizon Wi-Fi AP connected and authentication succeeded
Verizon Wi-Fi AP detected
Verizon Wi-Fi AP connected but authentication failed
GPS active
Mobile Hotspot active
Mobile Hotspot paused
Mobile Broadband active
Basic Operations

Basic Operations 29
Bluetooth on and device connected with a paired device
Bluetooth on but device not connected with any other device
Speakerphone on
Signal Strength : The greater the number of bars, the stronger the
signal.
Signal Strength : No signal
Open Wi-Fi network available
Transferring through 4G network
Transferring through 3G network
Transferring through CDMA, 1XRTT
Transferring through EDGE
Transferring through GPRS
Transferring through HSDPA/HSUPA/HSPA/HSPAP
Wi-Fi off
Wi-Fi on but no Wi-Fi network detected
Wi-Fi on and Wi-Fi networks available
Wi-Fi error
Airplane mode active
USB connected
Updating App
Data service available
Firmware upgrade available
New apps available
More notifications
Upgrade off
Text input mode : English uppercase letters
Text input mode : English lowercase letters

30 Basic Operations
Text input mode : Numeric
Text input mode: Symbols
Text input mode: Korean
Synchronizing
Error during synchronization
Sound effect: Mute and Vibrate
Sound effect: Mute
Sound effect: Vibrate
Power saver active
Femtocell active
Call in process
Call in process via Bluetooth
Forwarding Call
Call on hold
Missed call
TTY mode active
Privacy call in process
Privacy call in process via Bluetooth
Privacy call on hold
Emergency callback mode
Calendar event notification
UICC activation
UICC detected
Unrecognized UICC
No UICC recognized
Roaming

Basic Operations 31
Synchronizing Backup Assistant Plus contacts
Loading SIM card contacts
Data usage about to exceed the limit
Data usage exceeded the limit
Continued data usage after exceeding the limit
Alarm set
Alarm snoozing
Timer on
Incoming SMS has arrived
High priority SMS has arrived
Incoming MMS has arrived
High priority MMS has arrived
CMAS has arrived
WAP has arrived
High priority WAP has arrived
Message not sent
New voicemail has arrived
High priority voicemail has arrived
Visual Voice Mail has arrived
On-going/complete download
Download queued
Completed download
On-going/complete upload
Upload queued
Completed upload
Requesting to render media files from other devices
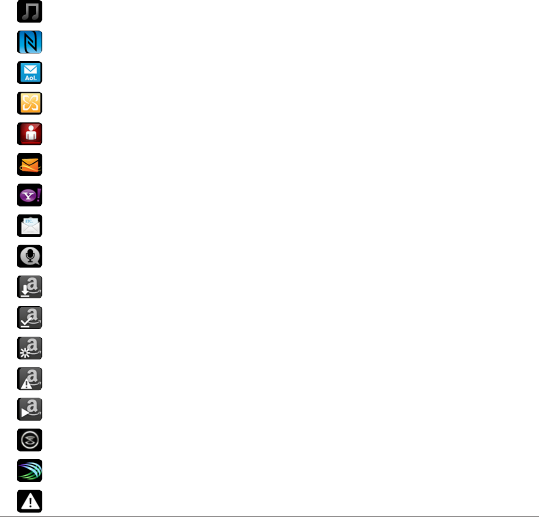
32 Basic Operations
Music currently playing (including BGM)
NFC on
Email to AOL accounts has arrived
Email to Exchange accounts has arrived
Email to Verizon accounts has arrived
Email to Hotmail accounts has arrived
Email to Yahoo accounts has arrived
Email to Other accounts has arrived
Safe-reader on
AmazonMP3: On-going download
AmazonMP3: download completed
AmazonMP3: loading contents
AmazonMP3: Playing content
AmazonMP3: Error
Slacker Radio: Play Radio
SwiftKey for Pantech notification
Data restricted
Go to Settings > About phone > Icon glossary to get more information
about and to see other status icons.
In Starter mode: Settings > System > About phone > Icon glossary
Basic Operations 33
Standard Mode
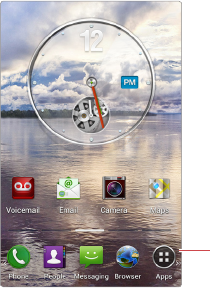
Home Screen
The Home screen is the starting point for accessing this smartphone’s
features. It displays widgets with useful functions and shortcuts to apps.
The Home screen has multiple pages. To see the other pages, flick the screen
left or right or, alternatively, tap the bar on the bottom of the screen.
Launcher
Launcher
The Launcher, which is on the lower part of the Home screen, provides
immediate access to the most frequently used apps. Tap an app shortcut to
open the app.
To see more app shorcuts in the Launcher, flick the Launcher left or right.
Moving Items
Tap and hold an item, and drag it to a new location. To move it to another
page, drag it to the side of the screen.
34 Basic Operations
Adding App Shortcuts
Open Apps, tap and hold an app, and then drag it onto a Home-screen page
preview.
Adding Widgets
Tap and hold an empty area on the Home screen or, alternatively, tap the
Menu icon D. Tap Widget, and then drag one of the widgets that appear
onto a Home-screen page preview.
Removing Shortcuts and Widgets
Tap and hold a shortcut or widget, then drag it to the Trash bin G at the top
of the screen.
Creating Folders
Tap and hold a shortcut, then drag it onto another shortcut. A folder is
created to contain them. Create a folder in the Launcher in the same way.
To change a folder’s name, tap the folder, tap the setting icon E, and then
enter a new name.
Adding Home-screen pages
Pinch the Home screen. Previews of the Home-screen pages are displayed.
Tapping New Panel produces a new page. Tap the Home button B to
finish.
Rearranging Home-screen pages
Pinch the Home screen, tap and hold a page preview, and then drag it to a
new location.
Removing Home-screen pages
Pinch the Home screen, tap and hold a page preview, and then drag it to the
trash bin G that appears.
Basic Operations 35
Setting Wallpaper
Tap D > Wallpaper. Wallpaper thumbnails are displayed in four taps.
• Live Wallpapers: animated images
• Wallpapers: still images
• Gallery: photos taken by the smartphone’s camera
• Downloaded Wallpapers: images downloaded from the Internet
Tap a wallpaper thumbnail to preview it, then tap Set wallpaper to finish.
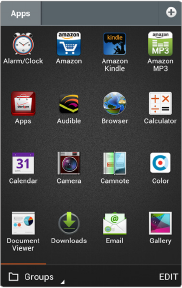
Apps Screen
Tap Apps in the Launcher to open the Apps screen. The Apps Screen
displays icons for all apps, including any new apps installed.
The Apps screen has multiple pages. Flick the screen left or right to see
other pages.
36 Basic Operations
Changing Display Modes
Tap the pop-up list on the bottom left of the screen to change display
modes.
• Groups: Display apps by group.
• Alphabetical: Display apps by name in alphabetical order.
• Downloads: Display only downloaded apps.
Searching for Apps
Tap D > Search, then enter a keyword into the search field. As letters are
entered, a list populates with matches. Further typing refines the search.
Rearranging Apps
Tap EDIT on the bottom right of the screen. Every app becomes movable
and marked with a pencil icon Ž. Tap and hold an app, then drag it to a new
location.
Viewing an App’s Information
Tap EDIT, tap the pencil icon Ž on an app, and then tap Info.
Hiding Apps
Tap EDIT, tap the pencil icon Ž on an app, and then tap Hide. To reveal a
hidden app, tap D > View hidden apps. Hidden apps are displayed. Tap the
pencil icon Ž on an app, then tap Unhide.
Creating Groups
Create groups to more easily manage apps.
Tap the pop-up list on the bottom left of the screen and choose Groups to
change the display mode. Tap the plus icon W or, alternatively, pinch the
Apps screen, then tap New group. Enter a group title. A tab is created with
the specified title for the new group.
To change the group’s title, tap the setting icon E next to the title, then
enter a new title.
Basic Operations 37
To move an app to another group, tap EDIT, tap and hold an app, then drag
it to a group tab.
Rearranging Groups
Pinch the Apps screen. Tap and hold a group preview, then drag it to a new
location. Tap any group preview to finish.
Removing Groups
Pinch the Apps screen. Tap and hold the preview of an empty group, then
drag it to the Trash bin G that appears.
38 Basic Operations
Starter Mode
This smartphone provides a simplified, easy-to-use interface for users who
are not familiar with smartphones.
Go to Settings > Mode change, then tap Starter mode.
To get back to Standard mode, go to Settings > Mode & application >
Mode change, then tap Standard mode.
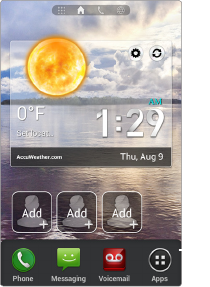
Home Screen
The Home screen is the starting point for accessing the smartphone’s
features. It displays shortcuts for favorite contacts and apps, and thumbnails
for web bookmarks.
The Home screen has multiple pages. To see the other pages, flick the screen
left or right, or tap one of the page icons on the top of the screen.
Launcher
Launcher
The Launcher, which is on the lower part of the Home screen, provides
immediate access to the most frequently used apps. Tap an app shortcut to
open the app.
Basic Operations 39
Setting Wallpaper
Tap D > Wallpaper. Wallpaper thumbnails are displayed in four taps.
• Live Wallpapers: animated images
• Wallpapers: still images
• Gallery: photos taken by the smartphone’s camera
• Downloaded Wallpapers: images downloaded from the Internet
Tap a wallpaper thumbnail to preview it, then tap Set wallpaper to finish.
Making a Call to a Favorite Contact
Go to the Favorite Contacts page À, then tap a contact.
To add a contact, tap a blank shortcut Y that is marked with a plus symbol,
then select a contact from the contacts list or tap Create new contact to
add a new contact.
To delete a contact, tap Edit, next to the contact shortcuts, tap a contact
which is marked with a minus symbol X, and then tap Done.
Dialing Manually
Go to the Dialer page j, enter a phone number, and then tap the handset
icon j on the dialpad. To send a message, tap the callout icon k.
Launching Favorite Apps
Go to the Favorite Apps page ¿, then tap an app.
To add an app, tap a blank shortcut Y, and then select an app.
To delete an app, tap Edit, tap an app which is marked with a minus symbol
X, then tap Done.
40 Basic Operations
Opening Bookmarked Webpages
Go to the Bookmarks page Á, then tap a bookmark thumbnail.
To add a bookmark, tap a blank shortcut Y, and then select a bookmark.
To delete a bookmark, tap Edit, tap a bookmark which is marked with a
minus symbol X, then tap Done.
Tap the search field to open the Search app. See “Search” on page 145 for
details.
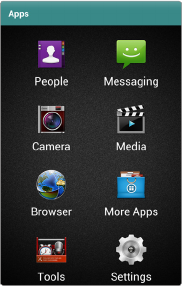
Apps Screen
Tap Apps in the Launcher to open the Apps screen. The Apps Screen
displays icons for all apps, including any new apps installed.
Basic Operations 41
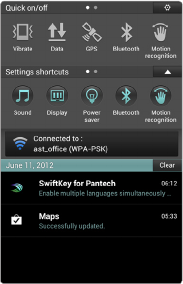
Notifications
Notification icons appear on the status bar at the top of the screen to report
missed calls, new messages, calendar events, and more.
Drag down from the status bar to open the Notifications panel. To close the
Notifications panel, drag up from the bottom of the screen.
Scroll down the list to see more alerts. Tap an alert entry to see the details.
To clear an alert entry, slide it left or right.
In addition, the Notifications panel provides quick access to the most
frequently changed settings.
In Standard Mode
• Vibrate: Mute the phone and enable vibration.
• Data: Allow data communication over mobile network.
• GPS: Activate the GPS to get the current location.
• Bluetooth: Activate the Bluetooth to connect to a Bluetooth device such
as a Bluetooth headset.
• Motion recognition: Activate the motion recognition feature.
• Airplane mode: Disable all wireless functions.
42 Basic Operations
• Auto rotate: Allow applications such as Gallery or Calculator to
automatically change the interface to fit to the smartphone’s direction,
portrait or landscape.
• Auto sync: Allow applications such as People or Calendar to sync
contacts, events or other data with Google services.
Extend Settings shortcuts by tapping the extend icon Z to see more
configurations, such as about Sound or Display. Tapping an item
immediately displays its detail options.
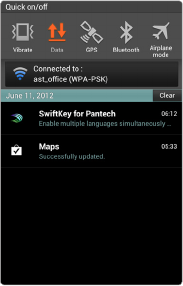
In Starter Mode
• Vibrate: Mute the phone and enable vibration.
• Data: Allow data communication over mobile network.
• GPS: Activate the GPS to get the current location.
• Bluetooth: Activate the Bluetooth to connect to a Bluetooth device,
such as a Bluetooth headset.
• Airplane mode: Disable all wireless functions.
Basic Operations 43
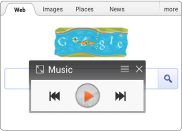
Always On Top
Use the always on top feature to force the simplified Music app to stay in
front of all the other apps.
Tap C > AOT > Music to launch the simplified Music app.
Tapping the list icon c displays the list of the currently playing songs.
Changing Interface Language
When the interface language changes, all of the operating system
instructions change.
Go to Settings > Language & input > Language, then choose a language.
In Starter mode: Settings > System > Language & input > Language
44 Basic Operations
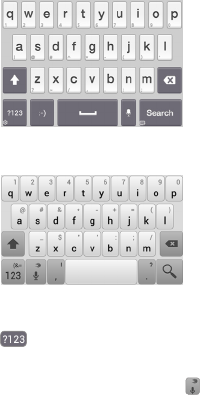
Entering Text
Changing the Keyboard
This phone supports several different language keyboards.
Go to Settings > Language & input > Default, then choose keyboard type.
In Starter mode: Settings > System > Language & input > Default
• Pantech keyboard allows to type symbol and emoticon characters
easily.
• SwiftKey for Pantech allows to type multiple languages.
To switch from the Pantech keyboard to SwiftKey for Pantech, tap and hold
the key and choose Select input method > SwiftKey for Pantech.
To switch from the SwiftKey for Pantech to the Pantech keyboard, tap
and hold the microphone key and choose Input method > Pantech
keyboard.
Typing Uppercase
Tap the Shift key before typing a letter. For all caps, tap it twice.
Basic Operations 45
Typing Extra Letters
A key has one or more extra letters. To type an extra letter, tap and hold the
key corresponding to the letter.
Speaking to Type
Tap the microphone key and speak into the microphone. Select one of the
suggested words that appear.
Adding Language Keyboards to SwiftKey for Pantech
Go to Settings > Language & input, then tap the equalizer icon h next to
SwiftKey for Pantech. Tap Languages & layouts and select a language to
add it.
In Starter mode: Settings > System > Language & input
Changing Language Keyboards on SwiftKey for Pantech
Tap and hold the space key, and slide it left or right.
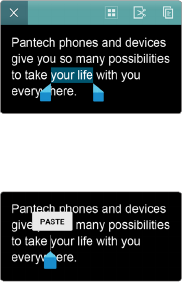
Copying and Pasting
Tap and hold over text, drag the opening marker º or the closing marker »
to the left and right or up and down to select more or less text, and then tap
the copy icon ~ or the cut icon .
To paste the text into a text input field, tap and hold at the place where it
will be inserted until PASTE appears, then tap it.
46 Basic Operations
Networking
A number of applications, such as Browser and YouTube, need to access the
Internet for proper operation. Data transfer over regular mobile service can
use up bandwidth and rack up substantial charges. The best idea is to use
Wi-Fi networks for data transfer.
Connecting to a Wi-Fi Network
Open Settings and turn on Wi-Fi.
In Starter mode: Settings > Wireless & network
Note
It is also possible to access the Wi-Fi settings from the Notifications
panel.
Joining a Wi-Fi Network
Tap Wi-Fi, select a network from the list of detected Wi-Fi networks, enter
a password if necessary, and then tap Connect. Networks that require a
password appear with a lock symbol.
After the smartphone connects to a Wi-Fi network, the smartphone
automatically connects to the Wi-Fi network any time it is available.
Adding Wi-Fi Networks
Tap SCAN to rescan for available networks. If a desired network does not
appear in the networks list, tap ADD NETWORK. Enter the network name,
specify the security type, enter the password if it is not an open network,
and then tap Save to finish.
Forgetting Wi-Fi Networks
Any network that has ever been used, including the current network, can be
forgotten so that the smartphone will not automatically connect to it. Tap
an undesired network and tap Forget.
Basic Operations 47
Tethering or Mobile Hotspot
Use Tethering or Mobile Hotspot to convert the smartphone into a
combination of modem and wireless router, if there is no available Wi-Fi
network. A computer and any other device connected to the smartphone
can access the Internet via the regular mobile service.
Note
If the smartphone is using regular mobile service to access the internet,
significant data use charges may occur.
Go to Settings > More > Tethering & mobile hotspot.
In Starter mode: Settings > System > More > Tethering & mobile hotspot
The network that the smartphone creates is available via three methods:
• USB tethering: Connect a computer to the smartphone via the USB
cable.
• Mobile hotspot: On a device, choose the smartphone’s network from
the list of available Wi-Fi networks.
• Bluetooth tethering: Pair a Bluetooth device with the smartphone.
Note
To quickly launch Mobile Hotspot, use one of the following methods:
• Open the Mobile Hotspot app from the Apps screen, then tap Mobile
hotspot.
• In Standard mode, open the Notifications panel, extend Settings
shortcuts, and then tap Mobile Hotspot.
Mobile Hotspot Settings
Tap Mobile Hotspot settings > Configure Mobile Hotspot.
• Network SSID: Enter a network name for the network that the
smartphone creates. Other devices use this name to connect to the
network.
• Hide SSID: Prevent other devices from detecting the smartphone’s
network.
• Security: Choose a security type.
• Password: Enter a password to be suitable for the security type chosen.
48 Basic Operations
Pairing with a Bluetooth Device
The smartphone is compatible with Bluetooth devices, such as headsets,
earphones, and keyboards. Bluetooth can also be used to transfer files with
another Bluetooth-enabled device.
Open Settings, turn on Bluetooth, and then tap Bluetooth.
In Starter mode: Settings > Wireless & network
A list of available Bluetooth devices appears after scanning.
To manually scan for Bluetooth devices again, tap SEARCH FOR DEVICES.
Select a desired device, and then accept the auto-generated passkey on
both devices for confirmation.
Changing the Bluetooth Device Name
Tap D > Rename phone, then enter a new name. The new name is used for
other Bluetooth devices to recognize the smartphone.
Changing Bluetooth Visibility
Tap the smartphone entry at the top of the Bluetooth devices list to make
the smartphone visible to other Bluetooth devices, so that they can detect
the smartphone. To make the smartphone invisible or only visible to the
device paired with the smartphone, tap the smartphone entry again.
To change the visibility time, tap D > Visibility timeout.
Sending and Receiving Data
Many applications support data transfer via Bluetooth. One example is the
Gallery.
1. Open the Gallery, select a picture, tap the share icon ¶, choose
Bluetooth, and then select one of the detected Bluetooth devices.
2. Accept the authorization request on the other device to receive the
picture.
3. The transferred file is saved in the Bluetooth folder.
Basic Operations 49
Wi-Fi Direct
The Wi-Fi Direct feature allows two Wi-Fi devices to directly connect to each
other with no need for a wireless router.
1. Activate Wi-Fi Direct on the target device.
2. Go to Settings > More, turn on Wi-Fi direct, and then tap Wi-Fi direct
settings.
In Starter mode: Settings > System > More
3. A list of available devices appears after scanning. To manually scan for
Wi-Fi Direct devices again, tap SEARCH. Select a target device and tap
Connect.
4. Accept the invitation from the smartphone on the target device.
Transferring Files via USB Connection
A USB connection between the smartphone and a computer allows them
to transfer files. Download the USB driver for this smartphone from the
Pantech website and install it on a computer to enable the computer to
recognize the smartphone.
1. Connect the smartphone to the computer via the USB cable.
2. Go to Settings > USB connection settings.
In Starter mode: Settings > System > USB connection settings
3. Choose one of these connection modes:
- Media device (MTP): The computer recognizes both the smartphone’s
internal memory and the memory card on it.
- Camera (PTP): The computer recognizes only the folders for the
smartphone’s camera.
- External memory (SD card): The computer recognizes only the
smartphone’s removable memory card. Tap Turn on USB storage to
activate this connection mode.
4. Copy files from the computer to the smartphone’s memory card, or vice
versa.

50 Basic Operations
To release the External memory connection, tap Turn off USB storage. If
the screen in question is closed, open the Notifications panel and tap Turn
off USB storage to get back to the screen.
Note
While the External memory connection is active, the smartphone
cannot access the memory card.
Exchanging Data via NFC
Near Field Communication technology allows users to exchange data, such
as a contact or webpage, between NFC-enabled smartphones. An example
is the Browser.
1. Go to Settings > More, then turn on both NFC and Android Beam.
In Starter mode: Settings > System > More
2. Launch the Browser and open a webpage.
3. Bring the smartphone into contact with another smartphone back to
back.
4. Tap Touch to beam that appears on the screen. The same webpage is
opened on the other smartphone.
Note
The NFC antenna is located on the lower half of the back cover. Use the
center of the area to get the best performance.
Align this point with an NFC device.
Basic Operations 51
Net Media
Net Media allows users to share and stream many kinds of media, including
music and video, between DLNA-enabled devices. Make sure DLNA devices
are connected to the smartphone via Wi-Fi Direct or on the same Wi-Fi
network.
Open Net Media from the Apps screen.
In Starter mode: Apps > More Apps > Net Media
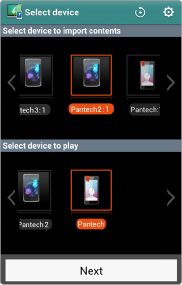
Connecting Devices
As Net Media is launched, any available linkable devices are displayed on
the screen.
• The screen’s upper panel shows devices which are ready to send media
files to another device.
• The screen’s lower panel shows devices which are ready to accept and
play media files from another device.
Flick the panel to move between devices if more than one is available.
To rescan for available DLNA devices and detect them, tap the refresh icon
O on the top right of the screen.
52 Basic Operations
The following active data transfer actions are available:
• Push a media file from the smartphone to another device for playing.
• Push a media file from another device to the smartphone for playing.
• Let the smartphone push a media file from a device to another device
for playing.
Follow this procedure:
1. Select the smartphone or a device in the upper panel to push a media
file.
2. Select the smartphone or a device in the lower panel to play the pushed
media file.
3. Tap Next. If an approach request is made on any side, allow it.
4. Select a file category.
5. Tapping a file starts to push the file for playing.
To merely send or fetch a file without playing it, tap and hold a file,
choose Upload or Download, and then follow the instructions.
Playing Media Files
When devices are successfully connected, the source device’s media files are
listed on the smartphone. This networked media file access can be applied
to several situations, including:
• The smartphone allowing a TV to play the smartphone’s media files
• The smartphone playing media files from a tablet
• The smartphone allowing a TV to play media files from a tablet
In every case, the smartphone controls playback. Net Media has a variety of
built-in media players to play different types of media file. For these media
players, refer to “Gallery”, “Music”, and “Videos”, though Net Media’s media
player interfaces differ.
The smartphone can also be put under the control of another device, as
well.
Basic Operations 53
Net Media Settings
Tap the setting icon F.
• Device Name: Enter a unique name for the smartphone. The name is
used for identification by other devices.
• Network Info: This shows the Wi-Fi network to which the smartphone is
currently connected.
• Net Media Server On: When activated, this setting allows other devices
to search media files in the smartphone.
• Contents Share: When activated, this setting allows other devices to
access and control media files in the smartphone.
• Sharing device management: Determine whether to permit or forbid a
device to share media files with the smartphone.
• Contents Position: Select the storage where the media files are stored.
• Contents Share Folder: Choose a folder to keep files for sharing. Only
files from this folder are visible over the network.
• Download directory: Select a directory to download media files.
• Upload directory: Select a directory to upload media files.
54 Basic Operations
Location-Based Services
Use the smartphone’s GPS features to get directions, to identify locations,
to keep track of weather conditions, and to tag messages and photographs
with location details.
This smartphone provides several location-based applications, including
Latitude, Maps, Places, and more. To use these apps properly, make sure the
following prerequisites are met.
• Go to Settings > Location services to active the GPS features. Check
Standalone GPS Services to activate GPS. Check Verizon Location
Services and Google’s location service to pinpoint the current location
more precisely. Check Location & Google search to allow Google to use
the user’s current location for better search results.
In Starter mode: Settings > System > Location services
• Make sure the smartphone is connected to the Internet via either Wi-Fi
or mobile service.
Note
Your wireless device can determine its physical and geographical
location (Location Information). Certain applications and services access,
collect and use Location Information and disclose the information to
others. Use caution and discretion when you make Location Information
available to them.
To limit potential unauthorized access to your Location Information,
Verizon Wireless devices are preset to E911 which only allows authorized
emergency response personnel to locate you when you dial 9-1-1 from
your wireless device.
When you select Verizon Location Services, Standalone GPS Services,
Google Location Services, or Location & Google search, you allow third
party access to Location Information. Any software, widget or peripheral
components or service you choose to download, add or attach to your
wireless device or otherwise access or use can use this information.
Check your wireless device periodically and only use software, widgets,
peripheral components and services from reliable sources.
Basic Operations 55
Verizon Wireless makes no representation of accuracy, completeness
or timeliness of any location data, product or service. When you use
your mobile Browser or other services and applications, you authorize
Verizon Wireless to collect, use and disclose your Location Information
to provide you with any location services. Verizon Wireless does
not retain Location Information longer than necessary to provide
the services to you. We will not knowingly disclose your Location
Information to third parties without your consent, except as required by
law.
Carefully review the privacy policies of application providers and third
parties who have access to your Location Information. Significant risks
can be associated with disclosing your Location Information to others.
56 Basic Operations
Emergency Call
Dialing 911 for emergency services does not require a subscription to a
mobile phone service. It is even possible to dial 911 without a SIM card. No
charges are made for 911 calls.
Capturing a Screenshot
Any screen displayed on the smartphone can be captured for future
reference.
Press and hold the Volume-Down button and the Power button at the same
time to create a screen capture. The screen capture image is saved in the
Screenshots folder.
Calling & Messaging 57
Phone
Open Phone from the Launcher.
Phone Calls
Making Calls
Several methods are available for calling, as follows:
• Enter a phone number using the dialpad, then tap the handset icon j.
As the number is entered, previosuly dialed numbers that match appear
in a list. Choose one, if appropriate.
• Tap Recent, then select a call from the history of incoming and outgoing
call.
• Tap Favorites, then select a contact from the list of favorite contacts.
• Tap the contacts icon p, then select a contact from the contacts list.
Answering Calls
Tap Answer to receive an incoming call, or tap Ignore to decline it. To
decline a call and send a message to the caller, tap Send MSG.
If a call comes in when the screen is off, drag the green handset icon to the
center to answer it. To decline it, drag the red handset icon to the center.
Calling & Messaging
58 Calling & Messaging
While on a Call
Tap Mute to turn the microphone off so that the phone doesn’t transmit
sound to the other party.
Tap Speaker to turn the speakerphone on.
When a Bluetooth headset is connected to the smartphone, tap Bluetooth
to switch to the headset.
Speed Dialing
To set speed-dial numbers, tap D > Speed dial setting, choose a blank speed
number, and then select a phone number from the contacts list.
Tap and hold a number on the keypad to place a call using a speed-dial
number. For numbers with two digits, hold only the last digit.
International Roaming Call
Tap D > Assisted dialing, and then turn Assisted dialing status on. Tap
Reference country and select a country as home location.
Making a call in a current country connects to the specified country.
Call Waiting
Call waiting is a service provided by wireless carriers. A user can use this
service to suspend a current call and switch to an incoming call.
While on a call, tap Accept to answer another call. To switch between the
two calling parties, tap Swap.
Conference Call
Make a call, then tap Add calls to invite another party to the call.
Using Music Files as Ringtones
Open the Music app, tap and hold a song and choose Set as ringtone. The
song appears as a ringtone in the list of ringtones.
Calling & Messaging 59
Phone settings
On the Dialpad screen, tap D > Settings.
• Receive call by vol.up key: Allow pushing the Volume-up button to
answer a call.
• Voicemail service: Select a wireless carrier for the voicemail service.
• Voicemail settings: Enter the voicemail number to dial for messages.
• Auto answer: Allow the button on a headset to answer calls.
• Assisted dialing: Check the Assisted dialing status box to allow
international roaming calls. Tap Reference country and select a country
as the home location.
• Always on top: Check the Display call status window box to allow the
Home button B to display the call status window while on a call.
• Lock screen: Allow the button on a headset button to make calls when
the screen is locked.
• Auto-retry: Set the interval to automatically redial after a call failure.
• TTY mode: Select teletypewriter mode.
• DTMF tones: Select touch tone for dialing. This is used for a variety of
call services.
• Voice privacy: Enable voice encryption for improved security.
• Show dialpad: Allow the dialpad to display service numbers and custom
numbers.
60 Calling & Messaging
Voice Dialer
Use Voice Dialer to dial by voice.
Open Voice Dialer from the Apps screen.
In Starter mode: Apps > More Apps > Voice Dialer
Speak a command, similar to these examples:
• “Call John Doe at home”
• “Dial 555-1234”
• “Dial 911”
• “Redial”
Select one of suggested words that appear after speaking.
Calling & Messaging 61
People
Use People to manage contacts, including phone numbers and email
addresses.
Open People from the Launcher.
In Starter mode: Apps > People
Adding Contacts
Tap the plus icon W. Either select a Google account to sync the new contact
to or select Phone to avoid synchronizing. Tap the figure icon m to add
a picture. Tap Add another field to add more information such as the
contact’s organization or website address. Tap Save to finish.
Editing Contacts
Select a contact and tap the pencil icon ƒ.
To add to favorite contacts, tap the Star icon ®.
Deleting Contacts
Select a contact, tap D > Delete contact.
Calling Contacts
Select a contact, and tap the handset icon j next to a phone number.
Messaging Contacts
Select a contact, and tap the callout icon k next to a phone number.
Searching for Contacts
Use one of the following methods:
• In the Groups or Favorites tab, tap the search icon ¼ and enter a
contact name, phone number, email address, or any other search
criteria.
62 Calling & Messaging
• In the People tab, enter search criteria into the search filed on the upper
part of the screen.
As letters are typed, a list appears with potential matches, any one of which
can be selected.
Sharing Contacts
Select a contact, tap D > Share contact, and then choose a sharing method.
Backing Up Contacts
Export the contacts to the SIM card or the memory card for backup.
Tap D > Import/export, then choose Export to SIM card or Export to SD
card.
To import the contacts from the SIM card or the memory card, choose SIM
card contacts or Import from SD card.
Backup Assistant Plus
Backup Assistant Plus is Verizon’s backup and sync service. To back up the
contacts to the Verizon online storage, tap D > Backup Assistant Plus.
Messaging
Use Messaging to send text or multimedia messages.
Open Messaging from the Launcher.
Sending Messages
Tap the plus icon W, then compose a message.
• Type phone numbers or names to add recipients. To select recipients
from the contacts list, recent calls, or a group of contacts, tap the figure
icon n.
Calling & Messaging 63
• If there are two or more recipients, either choose Individual Messages
to send the message to each recipient separately or choose Group
Conversation.
• To add a subject, tap D > Add subject.
• To insert an emoticon, tap D > Insert smiley.
• To insert a contact, web bookmark, or ready-made text such as “on my
way”, tap D > Insert text.
• To add more messages, tap D > Add slide.
• To attach pictures, videos or other files, tap Attach.
• Finally, tap Send to send the message.
Viewing Messages
Incoming messages are grouped into message threads by contact. Select a
contact to view that contact’s messages.
Searching for Messages
Tap D > Search and enter a search criteria.
Deleting Messages
Use one of the following methods:
• Tap and hold a message, select more messages by tapping, and then tap
the trash icon H.
• Tap D > Delete, select messages by tapping, and then tap the trash icon
H.
Sorting Messages
Tap D > Sort and choose a category.
64 Internet
Browser
Browser is an all-purpose web and internet reader. Use it to search for
information on the Internet and read webpages. Many of its functions are
fully customizable by configuring its security and other settings.
Notes
• An active internet connection is required, either via Wi-Fi or mobile
service.
• Data transfer fees may be very high if the Browser downloads
significant amounts of information over the regular mobile service.
Open Browser from the Apps screen.
In Starter mode: Apps > Browser
Viewing a Website
To view a website, enter the website address into the address field at the top
of the page, then tap the enter key.
Browser Interface
Navigating between Webpages on a Tab
To navigate between pages that have already been viewed on the same tab,
tap the Back button A or tap D > Forward.
Adjusting Brightness
Tap D > Brightness and adjust the brightness of the Browser screen for easy
reading. Check Automatic brightness to allow the phone to determine how
much light is required.
Internet
Internet 65
Scrolling
Scroll through long webpages by tapping and holding one finger on the
page and moving it up or down, or to the left and right for wide pages.
Zooming in often magnifies pages so that they are wider than the display
screen.
Standard versus Mobile Websites
Many websites offer a limited or smaller version when they detect a Browser
used on a smartphone or mobile device. Sometimes, the simpler versions
of these websites have reduced functionality. For example, simplified
sites often make it more difficult to enter information into forms or use
interactive services.
To see the regular version of the website, tap D > Request desktop site, and
the normal version appears, if it is available.
Full Screen Mode
Full screen mode allows more of a webpage to be visible on one screen.
Tap D > Settings > Labs.
• Quick controls: This hides not only the smartphone’s status bar but also
the Browser’s status bar.
• Fullscreen: This hides the smartphone’s status bar
When the Quick controls option is on, to access the screen’s controls,
hold a finger or thumb over the left or right screen edge with a very slight
outward-inward motion. The regular menu options appear as icons in a
hemispherical menu. Slide the finger to the desired item.
66 Internet
Viewing Webpages
The Homepage
Tap D > Home Page to return to the Browser’s homepage.
To set an open website as the Browser’s homepage, tap D > Settings >
General > Set new tab homepage > Current page.
Opening New Tabs
Tap the plus icon W on the top of the screen. A new page tab opens.
Switching Between Multiple Pages
The Browser can maintain many open webpages at the same time, stored on
different tabs. Tapping the tabs at the top of the Browser switches between
them.
When several pages are open in different tabs, tap D > Tab management to
view a preview of all of the available tabs and to choose between them.
Viewing Webpages while Incognito
Any pages viewed incognito are not preserved in the Browser’s history
and behind-the-scenes identifiers like cookies are deleted after the session
closes. Only downloaded files and bookmarks remain.
Tap D > New incognito tab to browse without saving any search or browsing
history.
Refreshing Webpages
Many webpages have live material that must be refreshed. Refresh
webpages by tapping the refresh icon P beside the webpage address at the
top of the Browser.
Halting Page Downloads
Stopping page downloading is useful when a link has been selected
accidentally, when a page has too much information to download. To stop
downloading, tap the × icon beside the address at the top of the Browser.
Internet 67
Searching the Web Using Google
Enter search criteria into the address field and tap the enter key. A Google
search page returns search results. Tap any of the search results to open
the relevant page. Google search results typically open on a new tab when
selected.
For Google Maps and other location services, enable the Browser’s location
services so the searching webpage can use the smartphone’s current
location to return accurate results. Location services are found under
Settings.
Searching Within a Webpage
To search for specific text on a webpage, Tap D > Find on page and enter
words into the search field. Any matching words are highlighted on the
page.
Tap the up icon S or down icon T to move to the previous or next
matching word, and tap the check icon [ when finished.
Saving Webpages
To save a webpage for later off-line viewing, tap D > Save for offline reading.
To view saved pages, tap D > Bookmarks, tap the Saved Pages tab, then
select a webpage.
Sharing Webpages
To share a webpage with contacts, tap D > Share page, then choose a
method to use to send the web address.
68 Internet
Bookmarks
Adding Bookmarks
Tap D > Save to bookmarks to save a webpage’s address for future reference.
Among the options, enter a label, modify the web address if necessary,
specify the Google account which will store the bookmark, and choose a
bookmark folder to save the bookmark.
Note
If a bookmark is saved to Local instead of a Google account, and if the
phone is lost or stolen, the bookmark is not recoverable.
Opening Bookmarks
To open a bookmarked webpage, tap ˆ or tap D > Bookmarks, then select a
bookmark. To keep the current page open but also open the bookmark on a
new tab, tap and hold the bookmark and choose Open in new tab.
Managing Bookmarks
Tap D > Bookmarks and tap and hold a bookmark.
• To alter the bookmark, tap Edit Bookmark and change its information.
• To create a shortcut for the bookmark on the Home screen for easy
access, tap Add shortcut to home.
• To send the bookmark, tap Share link and choose a sharing method.
• To copy the web address of the bookmark, tap Copy link URL and paste
it into any other app.
• To delete the bookmark from the list, tap Delete bookmark.
• To set the bookmark as the homepage, tap Set as homepage.
Internet 69
Browser Settings
Tap D > Settings.
General
• Set new tab homepage: Select what page appears when a new tab
opens.
• Form auto-fill: Online forms fill with data already entered under Auto-
fill text. This makes entering often-repeated data into forms much
easier.
• Auto-fill text: Enter standard text used to auto-fill fields on webpages.
Privacy and Security
• Clear all data: Clear all browsing information stored by the browser.
This data includes the cache, the history and all other forms of saved
web data. To erase only individual types of saved memory, but save, for
example, data entered into forms, select one or more of the options.
• Clear cache: Empty all saved data in the Browser’s memory cache.
• Clear history: Empty the Browser’s internet surfing records.
• Show security warnings: Allow the Browser to display security warnings
when appropriate.
• Accept cookies: Allow the Browser to automatically accept new cookies
from websites. Be aware that some cookies may be associated with
malicious or dangerous code that can breach privacy.
• Clear all cookie data: Delete all cookie information stored by web
browsing sessions.
• Remember form data: Force the Browser to preserve data entered
into online forms for future reference. This is especially useful when
repeatedly filling out online forms.
• Clear form data: Delete any stored form data still remaining in memory.
70 Internet
• Enable location: Allow websites to determine where the Browser is
operating from. This can assist websites that provide internet services
that need to know where a user is. It is possible for this to present a
security risks.
• Clear location access: Revoke the permission for websites to access to
the Browser’s location.
• Remember passwords: Force the Browser to remember passwords for
specific sites, so they do not have to be entered manually. The Browser
automatically fills in the password field on log-in screens that have
already been visited.
• Clear passwords: Clears all website passwords preserved by
Remembering passwords.
Accessibility
• Force enable zoom: Some websites do not allow zooming in or out. This
option overrides the website’s limitations.
• Text scaling: Move the slider to increase or decrease the text size
• Zoom on double-tap: Move the slider to increase or decrease the zoom
scale when zooming in or out by a simple double-tap
• Minimum font size: Specify the minimum font size.
• Inverted rendering: Activate to decolorize webpages with inverted
black and white colors.
Advanced
• Set search engine: Choose one of the listed search engines to use as the
default search engine.
• Open in background: When a new tab opens, it stays behind the
current tab, not in front.
• Enable java script: When JavaScript is enabled, the display of some
websites will be improved, but security and performance may suffer.
• Enable plug-ins: Enable downloading and installation of Browser plug-
ins to access some more advanced features of various websites. Some
plug-ins may alter Browser behavior and affect performance.
Internet 71
• Website settings: Adjust specific settings for various websites.
• Default zoom: Set the default zoom level when zooming in and out on
webpages.
• Open pages in overview: Force the Browser to open webpages zoomed
out in an overview. With this option inactive, the Browser opens
webpages displaying their top-left corners at 100% size.
• Auto-fit pages: Newly opened pages are automatically fitted to the
screen, regardless of the actual size.
• Block pop-ups: Force the Browser to block pop-ups. Allowing pop-
ups may cause the Browser performance to suffer when many
advertisements or other pop-ups appear. On the other hand, not
allowing pop-ups may prevent many sites from functioning properly.
• Text encoding: Choose a character encoding system to use for
webpages.
• Reset to default: Restore all of the Browser’s settings to their original
values.
• Large file transfer: Set the Browser to use only Wi-Fi networks to
download files that are larger than 5 megabytes.
Bandwidth management
• Search result preloading: With this option active, by predicting where
the user is likely to go next, the Browser can download page data in the
background and open those pages immediately if the user chooses to
view them.
• Load images: Disabling image loading may radically increase the
Browser’s ability to use slower or poor connections, as well as permitting
browsing without incurring high data transfer fees.
Labs
See “Full Screen Mode” on page 65.
72 Internet
Email
Open Email from the Apps screen.
In Starter mode: Apps > More Apps > Email
Setting Up Email Accounts
Set up an email account when opening Email for the first time. Enter an
email address and password. Either tap Next for a free private email account,
such as Google or Yahoo, or tap Manual setup for a private, corporate or
organizational email account. Follow on-screen instructions to complete the
setup.
To set up another email account, tap D and choose Accounts or Settings,
then tap D > Add account.
Removing Email Accounts
Tap D > Accounts, then tap D > Remove account(s). Select accounts, then tap
Done.
Sending Messages
Tap the plus icon W to compose a message.
• Type email addresses or names to add recipients. To select recipients
from the contacts list or recently-used email addresses, tap the figure
icon n.
• To add more recipients, tap D > Add Cc/Bcc.
• To attach pictures, videos or other files, tap Attach.
• To exit without sending the message, tap D > Discard.
• To save the message for future editing, tap D > Save as draft.
• To leave a reminder about the message on the calendar, tap D > Save to
calendar on.
• Finally, tap Send to send the message.
Internet 73
Reading Messages
To switch to another email account, tap Inbox. Selecting an email account
retrieves new messages. To manually retrieve new messages, tap D >
Refresh. To view another mailbox, tap the briefcase icon }.
Select a message to read it.
• To see attached contents, tap Attachments.
• To see details about the message, tap the corner symbol next to the
subject. To mark the message as a reminder, tap the star symbol next to
the sender.
• To reply to the message, tap t > Reply.
• To reply to all recipients, tap t > Reply all.
• To forward the message to others, tap t > Forward.
• To move the message to another mailbox, tap D > Move.
• To save the message as an event, tap D > Save calendar.
• To mark the message as a reminder, tap D > Mark as unread.
• To view the previous or next message, tap the previous icon Q or next
icon R.
• To view other messages, tap the list icon c.
• To get back to the Inbox, tap the back icon Q on the top of the screen.
• To delete the message, tap the trash icon G.
Searching for Messages
Tap D > Search, then enter a search criteria.
74 Internet
General Email Settings
Tap D > Settings > General Settings.
• Automatic picture view: Display images embedded in a message
immediately.
• Clear sender cache of “Show pictures”: Empty the list of senders from
whom messages are allowed to display embedded pictures.
• Discard Email: Delete a message immediately without confirmation.
• Message text size: Select a font size for message text.
• Clear auto-complete email address cache: Empty the list of all entered
email addresses.
Internet 75
Gmail
Use Gmail to quickly and directly access the Google mail service.
Open Gmail from the Apps screen.
In Starter mode: Apps > More Apps > Gmail
Though it appears that it does, Gmail does not actually use separate folders.
Instead, it attaches labels to each email. Deleting a message simply removes
the Inbox label from the email and adds a Trash label. When the trash is
emptied, Gmail purges all emails with the Trash label. Gmail stores all emails
until the trash is emptied.
This is important to remember because there are other labels that can
attach to emails, such as “Important”, “Sent”, “Already Read”, “Not Yet Read”,
among others.
Sending Messages
Tap the mail icon w to compose a message.
• Type email addresses or names to add recipients.
• To add more recipients, tap D > Add Cc/Bcc.
• Enter a subject and compose a message.
• To attach pictures, videos or other files, tap D > Attach file.
• To exit without sending the message, tap D > Discard.
• To save the message for future editing, tap D > Save draft.
• Finally, tap the Send icon x to send the message.
Reading Messages
To switch to another Gmail account, tap Inbox. Selecting an Gmail account
retrieves new messages. To manually retrieve new messages, tap the refresh
icon N. To view another mailbox, tap Inbox or the label icon u.
76 Internet
Select a message to read it.
• To view the previous or next message, flick the screen left or right.
• To mark the message as a reminder, tap the star icon ® text to the
subject.
• To reply to the message, tap the reply icon y next to the sender.
• To reply to all recipients, tap the menu icon D next to the sender and
choose Reply all. When in landscape view, tap the reply-to-all icon z.
• To forward the message to contacts, tap the menu icon D next to the
sender and choose Forward. When in landscape view, tap the forward
icon {.
• To mark the message as important, tap D > Mark important.
• To report the message as spam, tap D > Report spam.
• To hide the message, tap D > Mute. A muted message, including the
entire thread of the message, stays archived until a new message is
posted to the thread.
• To archive the message, tap the file cabinet icon |. Archived messages
are labeled as All Mail.
• To get back to the Inbox, tap the back icon Q on the top of the screen.
• To delete the message, tap the trash icon I.
Searching for Messages
In a mailbox, tap the Search icon ¼ and enter search criteria.
Internet 77
General Gmail Settings
Tap D > Settings > General settings.
• Confirm before deleting: Prevent a message from being deleted
without permission.
• Confirm before archiving: Prevent a message from being archived
without permission.
• Confirm before sending: Prevent a message from being sent without
permission.
• Reply all: Replace the reply icon y next to the sender name with the
reply-to-all icon z.
• Auto-advance: Choose what is displayed after deleting or archiving a
message. With Newer conversation chosen, the next unread message is
displayed in sequence.
• Message text size: Select a font size for message text.
• Hide checkboxes: Hide checkboxes in the list of messages to prevent
unintended changes to messages.
• Message actions: Display message action icons, including the reply
icon y, at the top of the screen all the time even when scrolling down
a message.
• Clear search history: Empty the list of all the search criteria entered.
• Ask to show pictures: Prevent pictures in a message from being
displayed without permission.
78 Internet
Talk
Use Talk to chat with contacts via Google Talk.
Open Talk from the Apps screen.
In Starter mode: Apps > More Apps > Talk
To switch to another Google account, tap the account ID next to the Talk
icon and select a Google account.
Public Profile
Tap the account ID at the top of the friends list to change the availability
status, photo or status message.
To insert a photo, tap the figure image.
To change the availability status, tap the text next to the figure image.
To enter a status message, tap below the figure image.
Adding Friends
Add a friend to the friends list. Tap the figure icon r, enter a Gmail address,
and then tap Done. A chat invitation is sent to the friend. After the friend
accepts the invitation, the friend appears in the friends list.
Chatting with Friends
Select a friend from the friends list, enter a message in the text field at the
bottom of the screen, and then tap the send icon x.
• To invite a friend to the current chat, tap D > Add to chat, then select a
friend.
• Chat histories are saved to the user’s Google account for future
reference. To chat off the record, tap D > Go off the record.
• To quit the chat, tap D > End chat.
Searching Friends
Tap the search icon ¼, then enter a friend’s name or email address.
Internet 79
Google+ and Messenger
Google Plus unites many Google services under one comprehensive
account. It is a convenient marriage of messaging and social networking.
Features include:
• uploading photos from a phone to a private Google Plus album
• chatting with multiple friends
• following local comment and chatting streams
• reading news and updates
Open Google+ from the Apps screen.
In Starter mode: Apps > More Apps > Google+
Google Plus requires a Google account. If no Google account is associated
with this smartphone, one must be linked to it or created.
When first launched, the app requests users to add an account either by
creating a new one or by linking a pre-existing account. Several options
appear in either case. These options alter how Google Plus interacts with
the smartphone, so they must be chosen carefully. For example, if Instant
Upload is activated, photos are automatically uploaded to the Google
account. The options can be changed later in Settings.
Circles
Circles are groups of users, such as friends or family, bound by common
interests or membership. These groups can have members who cross over
between them. This system creates an active, complex web or network of
people electronically linked to each other into communities, and users can
be members of many circles.
80 Internet
Finding and Inviting People
Before circles can be useful, users must find and add people to circles.
On the Circles page, tap the PEOPLE tab. Tap Find and invite people at
the top of the list. A list of suggested people appears, including many
institutions and other resources. Tap one of these to add it, or tap the search
icon ¼ to find individual users by name. Tapping on the user brings up
different types of information about that user.
Creating and Selecting Circles
Once friends or users have been added under PEOPLE, tap the CIRCLES tab
and select a circle to add users. Tap CREATE NEW CIRCLE on the bottom of
the page to add a completely new circle.
If the Just following option is activated, then the user’s account will simply
be monitoring the followed circle’s information. In essence, the information
flow stops with the user and is not passed on through the user’s other
circles.
Adding Users to Circles
Once users are added to circles, their updates and notes and other forms
of communication are sent to the Google Plus user’s account. Posts, photos
and other messages are regularly streamed.
To add a user, open a circle and tap ADD PEOPLE on the bottom of the
specific circle page. Select a user from the list that appears and tap OK.
Stream
Stream offers a continuous river of new and breaking stories and
information from friends and other users, along with commentary and
notes. Users can share stories and opinions with everyone else.
Internet 81
Writing Posts
Tap the write icon ‚ on the upper right. Select circles to let them view the
post, and enter text.
Multimedia can be incorporated into a post.
• Tap the photo icon ¨ to attach a picture from the library.
• Tap the camera icon ” to take and attach a photo or video.
• Tap the location icon „ to attach location information.
Tap the send icon x to finish.
Profile
The user profile is the key ingredient that makes Google Plus function. It
functions as the calling card that identifies the user to others. The profile
includes an image, contact information and basic data, such as the user’s
gender.
Note
Information cannot be changed on this page. This only displays the
profile information. Change the profile information in Google accounts.
Refreshing the profile
Tap D > Refresh on the Profile screen to update the profile information if any
information has been changed.
Posts
To see posts by the profile’s user, tap the POSTS tab and scroll through
them.
82 Internet
Messenger
Google Messenger functions as an independent internet chatting platform.
Text or chat with Google users anywhere else in the world.
Note
The Messenger app is actually a shortcut to the Messenger function of
the Google Plus app. Tap Messenger from the Apps screen to directly
access the Messenger function of Google Plus.
To begin a new conversation, tap the chat icon l.
Any online user with a Gmail account can be an active chat participant, so
long as the accounts are linked. Enter contacts or circles to invite them to
chat. To select from the list of contacts and circles, tap the plus icon Y. Enter
a message and tap the send icon x to begin chatting.
To block message notifications for the conversation, tap D > Mute.
To leave the conversation, tap D > Leave.
Google Plus Settings
Tap D > Settings to fine-tune how Google interacts with the smartphone.
To view Google’s online help for Google+ settings, tap D > Help.
Google+Notifications
• Google+ notifications: Allow notifications from Google Plus.
• Vibrate: Set the smartphone to vibrate when a new notification arrives.
• Ringtone: Select a ringtone for Google Plus notifications.
• Notification settings: Specify what kinds of notifications are allowed.
Messenger Notifications
• Who can message you: Specify who is allowed to send messages to the
user.
• Messenger notifications: Allow notifications for new messages.
Internet 83
• Vibrate: Set the smartphone to vibrate when a new message arrives.
• Ringtone: Select a ringtone for new messages.
Photo settings
• Turn on Instant Upload: Photos and videos instantly upload to the
user’s active Google account. If this happens over regular mobile
service, it can be quite time consuming and more expensive. For more
efficient use, upload only when connected to the internet via Wi-Fi.
• When to upload photos: When activated, newly taken pictures are
automatically uploaded to the Google account’s server.
• When to upload videos: Tap this to choose when video files are
uploaded. This should occur during non-busy usage periods, because
video files can be quite large. Also, use this option to keep mobile
network access fees low.
• Roaming uploads: Allow uploads when the phone is roaming outside
of its zone.
• Upload only when charging: Image uploads only occur when the
phone is charging, for user convenience.
• Upload all: All files immediately upload.
Phone contacts
• Sync contacts: Tapping this synchronizes contacts with the Gmail
account, preserving them if the smart phone is lost or stolen.
About
• Build version: This shows the current software version of the Google+
app.
• Open source licenses: This displays the licenses used in the creation of
the Google+ app and that allow the public to use it free of charge.
84 Internet
Color
Users can share videos and images with Facebook friends using Color.
Open Color from the Apps screen.
In Starter mode: Apps > More Apps > Color
Viewing Facebook Posts
Tap Feed, Timeline, or Friends to view Facebook posts. To view messages
from Facebook friends, tap Inbox.
To update any recent changes on Facebook, tap D > Refresh.
Creating and Posting Videos
Tap Broadcast and set the following options:
• Public: This makes a broadcast viewable by any Facebook user, whether
or not the users is a friend.
• Friends Only: This restricts the Facebook broadcast to Facebook friends
only.
• Custom: This activates the Pick button, allowing users to choose which
friends can view the broadcast.
• Caption: Tap Add and enter a caption to apply to the video.
• Camera: Tap the camera switch icon ˜ to swivel between the front and
rear camera.
• Audio: Activate this option to record audio along with video.
Tap Start to begin recording, and tap the × icon on the upper right to stop
recording. Add a caption and tap Done to upload the video to Facebook.
Internet 85
Posting Photos
To take a photo for posting, tap Take Photo and tap the shutter button.
To post existing photos, tap Upload Photos and choose an album. Tap a
photo in the album to select it, and a blue checkmark appears on the photo.
Tap the Next button to proceed.
After taking a photo or selecting photos, set the following options:
• Tag Friends: Add a tag to a friend image within the photo.
• Caption: Enter a caption to apply to the photo.
• Album: Choose a Facebook album to which to add the photo.
Tap Post to upload the photo or photos to Facebook.
Color Settings
Tap D > Settings.
• Broadcast alert sounds: This attaches an alert sound to a Color
broadcast or images, informing other users that an item has been
posted.
• Start alert sounds at: This sets alert sounds on a timer, starting them at
a specific time.
• Stop alert sounds at: This stop alert sounds after a specific time.
• Muted friends: Use this to choose which friends do not see alerts and
cannot view a broadcast.
• Invite friends to use Color: Use this option to invite specific Facebook
friends to use Color.
• Build information: This shows the most recent Color software version
information.
• Open source licenses: This displays the licenses used in the creation of
Color and that allow the public to use it free of charge.
• Rate Color: Tap this to rate Color on the Google Play market.
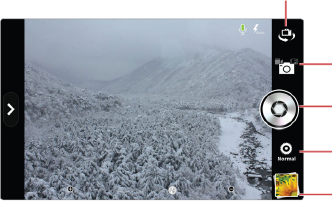
86 Media Center
Camera
Camera can take both photographs and video.
Open the Camera from the Apps screen.
In Starter mode: Apps > Camera
While the camera functions are very similar to those found on point-and-
shoot cameras, many more advanced options are available to help create
better images. Note that the options for the still and video camera are
very similar, but there are some differences. Most of these differences are
intuitive. For example, it is impossible to record sound on a still image, so
the record option is not available for pictures.
The actual storage space taken up by still images and video varies by the
resolution of the images and by the length and quality of the video.
Taking Photos
Change the camera mode.
Tap this shutter button to
take photos or videos.
Switch between normal
and HDR modes.
Open the image viewer
to display photos.
Switch between the front
and rear lenses.
Media Center
Media Center 87
Select any options, if necessary. Focus on the object and tap the shutter
button. The picture is automatically saved in the Camera folder.
Zooming In and Out
Use the slider to zoom in and out, on the left in portrait mode or the bottom
in landscape mode. Spread and pinch gestures are also available to zoom in
and out.
Front and Rear Camera
By default, the camera uses the rear lens. To switch between the front and
rear camera lens, tap the lens switch icon ™ on the lower right.
Adjusting Exposure
Tap Ä > Options > Exposure and adjust the light exposure. Use higher light
sensitivity in darker situations.
High Dynamic Range Pictures
To take a gentler picture, switch to HDR mode by tapping Normal œ below
the shutter button. It turns to HDR ›.
The Timer
Tap Ä > Options > Timer and set the timer. After the preset time elapses, the
camera automatically takes the picture.
Instant Pictures
Tap Ä > Mode > Instant Film. Press the shutter button to take a picture. The
picture appears in several seconds. Type a memo for the picture, adjust the
font if necessary, and then tap Save.
88 Media Center
Taking Self Photos
Tap the lens switch icon ™ to use the front lens, focus on the user’s face,
and then tap the shutter button.
Tapping Self — below the shutter button displays options for self images:
• To take a smoother picture, tap ž.
• To take a mirrored picture, tap µ.
Panoramic Pictures
To create a wide, panoramic picture, switch to panorama mode by tapping
the camera mode icon ” and selecting Â. Tap the shutter button, then
move the camera horizontally to the right. As the camera takes shots, the
bar on the bottom of the screen indicates the progress.
Division Shots
Tap Ä > Mode > Division. Tapping the shutter button takes four shots in
sequence. The photos are combined into one, divided horizontally and
vertically.
Changing Resolution
Tap Ä > Options > Resolution and select an image resolution. Higher
resolutions result in larger file sizes, which take up more memory and
reduce the total number of pictures that can be stored.
Shortcuts
To create a shortcut to any of the options, tap Ä and tap and hold an option.
When it changes color to orange, drag it to one of the shortcut slots on the
right.
To remove a shortcut, tap and hold a shortcut, drag it out of place until the
à symbol appears, and then release it.
Media Center 89
Camera Settings
Tap Ä > Settings.
• Review Screen: If this is set to anything other than off, the picture is
displayed on the screen for the specified length of time once it is taken.
• Photometry: Light is measured either Wide or Center. Center measures
light only in the middle of the image, and Wide averages it over the
entire image. Use Center for well-lit objects against a brighter or darker
background.
• Voice Recognition: Users can control the camera using voice
commands. Take pictures by speaking like: “take”, “capture”, “smile”, or
“cheese”.
• GPS: When this is activated, geolocation information attaches to the
image file.
• Shutter Sound: The shutter makes a click sound or is silent.
• Save Location: Choose the internal memory or the removable memory
card and select a folder to which pictures will be saved.
Taking Videos
The video camera operates using almost the same options as the camera.
However, some options are unavailable, and there are additional options
available.
Tap the camera mode icon ” and select š to switch to video mode. Tap
the shutter button to begin recording, and tap it again to stop recording.
Adding Color Effects
Tap Ä > Effects > Color Effect and select a color effect.
90 Media Center
Time-Lapse Videos
Time-lapse videos condense the filming period to make it seem as if people
and objects are moving faster.
Tap Ä > Options > Time Lapse and set an interval. To produce a video with
extremely limited depth of field, tap Ä > Effects > Time Lapse Effect > Tilt-
shift. In a video created with these two options, people moving with surreal
speed also look smaller.
Adding Face Effects
Tap Ä > Effects > Face Effect and select a face effect.
Adding Background Effects
Tap Ä > Effects > Background and select a background effect.
Capturing a Frame
Tap the capture icon Ÿ to capture a frame while taking video.
Video Settings
Tap Ä > Settings.
• Voice Rec.: Either activate or deactivate sound recording while taking
video.
• MMS Rec.: Lower the video quality and size for sending via messaging.
Media Center 91
Gallery
Gallery keeps a record of images and videos taken by the smartphone, as
well as any image or video files loaded onto the phone’s memory.
Open Gallery from the Apps screen.
In Starter mode: Apps > Media > Gallery
Viewing Pictures
Select an album, then select a picture to view it. Use the image slider along
the bottom of the screen to select another picture.
The action icons, including the image slider, disappear after a few seconds
for better viewing experience. Touch the screen to get them back.
Sorting Pictures
Use one of the following methods:
• On a group list, tap the drop-downlist on the top left of the screen and
choose a category.
• On a pictures list, tap D > Group by and choose a category.
The pictures are sorted by the chosen category.
Slideshow
Use one of the following methods:
• On a pictures list, tap the slideshow icon È.
• When a picture is open, tap D > Slideshow.
To stop the slideshow, tap anywhere on the screen.
Cropping Pictures
Tap D > Crop to cut out elements from the image. Move or resize the frame
to determine the area to crop out, then tap Crop.
92 Media Center
Rotating Pictures
Tap D and choose Rotate left or Rotate right to rotate the image 90 degrees.
View Picture Information
Tap D > Details to view the relevant information about the picture. This will
show how large or small the file is, which can be important if the file is being
sent via email or over the Internet.
Switching to and from the Camera
On a group list, tap the camera icon “ at the top of the screen to switch to
the Camera app. To view recently-taken photos from the Camera screen, tap
the image preview.
Managing Pictures
Deleting Pictures
Use one of the following methods:
• To delete one or more albums, tap and hold an album or tap D > Select
album, tap albums to select more, and then tap the trash icon H.
• To delete one or more pictures in an album, tap and hold a picture or
tap D > Select item, tap pictures to select more, and then tap the trash
icon H.
• When a picture is open, tap the trash icon H.
Uploading Pictures
When Backup Assistant Plus under Settings is activated, the Gallery library
is periodically uploaded to Verizon’s server for backup.
To back up manually, use one of the following methods:
• To upload one or more albums, tap and hold an album or tap D > Select
album, tap albums to select more, and then tap D > Upload.
Media Center 93
• To upload one or more pictures in an album, tap and hold a picture or
tap D > Select item, tap pictures to select more, and then tap D > Upload.
• When a picture is open, tap D > Upload.
To view the list of pictures and videos uploaded on the backup server, tap
the sync icon ° on the top of the screen.
Sharing Pictures
All of the picture files can be shared with contacts. Use one of the following
methods:
• To share one or more albums, tap and hold an album or tap D > Select
album, tap albums to select more, and then tap the share icon ¶ or tap
D > Share.
• To share one or more pictures in an album, tap and hold a picture or tap
D > Select item, tap pictures to select more, and then tap the share icon
¶.
• When a picture is open, tap the share icon ¶.
Editing Pictures
Tap D > Edit to alter images.
Use the back arrow d and forward arrow e to undo or redo the change.
Tap Save on the upper right of the edit screen to save any desired changes.
Lighting and Contrast
To change the image’s contrast, tap the contrast icon ¢. Choose one of
the options and observe the effect. Many options use a slider to control
precisely how much the contrast is altered.
Special effects
To use a special effect, tap FX and choose a special effect to alter the image.
Several effects can be combined to create interesting new effects.
94 Media Center
Color
To edit the image’s color, tap the palette icon ¡. Change the color, hue,
tone and saturation of the image. Some effects have a slider for fine-tuning
adjustments.
More Editing Tools
Tap the crop icon £ to open more editing tools for manipulating images.
• Crop: Move or resize the frame to crop the image.
• Red Eye: Tap individual faces to remove red eyes.
• Face Glow: Brighten faces using the slider.
• Face Tan: Darken faces using the slider.
• Straighten: Make minor adjustments to the image’s angle by dragging
a finger to the left or right on the screen. The image swivels around the
center.
• Rotate: Rotate the image 90 degrees by dragging a finger around on the
screen.
• Flip: Flip the image by dragging a finger to the left or right on the
screen.
• Sharpen: Make the image more or less coarse by using the slider.
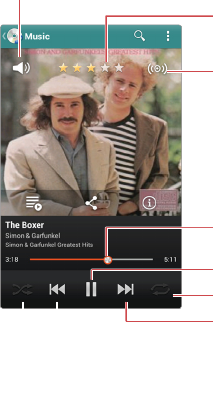
Media Center 95
Music
The Music app is a powerful music file player. It runs in the background, so
users can listen to music while performing other tasks on the smartphone.
Open Music from the Apps screen.
In Starter mode: Apps > Media > Music
Playing Music
On the list screen, flick the screen left or right to view music files by songs,
albums, artists, genres, folders, playlists, rating, or most played.
Tap a song in a tab page or list to play it.
Adjust the volume.
Rate this song.
Change the equalizer mode.
Drag to skip forwards or backwards.
Pause and resume playback.
Change the repeat mode.
Skip to the next song.
Tap and hold to scan forwards.
Skip to the previous song.
Tap and hold to scan backwards.
Turn on shuffle.
96 Media Center
The play screen has several important features that indicate its current
status.
• The current playing time progress bar shows how much time is left for
the currently playing song. Tap and drag to move the playing point.
• The repeat icon a indicates what repeat option is currently set.
• The shuffle icon _ indicates whether or not all songs in the album or
list are being randomly shuffled.
• Artist name indicates the singer or composer’s name, if this information
is attached to the file.
• Album title indicates the album the song belongs to, if this information
is attached to the file.
• Any album cover or artwork included in the album’s directory is
displayed when the song is playing.
• Star icons ® indicate the rating given to the song by the user.
Tap the pause icon M to pause playing. This icon alternates with the play
icon L, so tapping it again resumes playing.
To view the currently playing list, tap the artwork and tap the list icon b
that appears on the lower of the artwork.
Skipping
To move to the previous or next song, use one of the following methods:
• Tap the forward icon K to move to the next song. Tap the back icon J
to restart the currently playing song. Tap it twice quickly to move to the
previous song.
• Flick the album cover to left or right.

Media Center 97
Scanning
To scan the currently playing song, use one of the following methods:
• Tap and hold the forward icon K to scan forwards.
• Tap and hold the back icon J to scan backwards.
• Tap on the progress bar and drag it to the left or right to scan backwards
or forwards.
Randomly Playing
Tap the shuffle icon _ to randomly shuffle the music. It is active when the
symbol is white.
Repeating
Tap the repeat icon a to change repeat mode.
• a : Repeat all songs in the album or list.
• ` : Repeat only the current song.
• : No repeat.
Playing Music in Background
Tapping the Home button B does not stop the music that is currently
playing. The music continues to play in background. Use the Notifications
panel to straightforwardly control music playback.
98 Media Center
Managing Songs
On the list screen, tapping and holding a song displays a popup menu for
file management.
Adding Songs to Playlists
Use one of the following methods:
• On the list screen, tap and hold a song, choose Add to playlist, and then
select a playlist for the song.
• On the play screen, tap D > Add to playlist, and select a playlist for the
song.
Using Songs as Ringtones
Songs can be used as ringtones. Use one of the following methods:
• On the list screen, tap and hold a song and choose Set as ringtone.
• On the play screen, tap D > Set as ringtone.
Viewing Song Information
Use one of the following methods:
• On the list screen, tap and hold a song and choose Properties.
• On the play screen, tap the artwork and tap the info icon ] that appears
on the lower of the artwork.
Deleting Songs
On the list screen, tap and hold a song and choose Delete. To delete
multiple songs, tap D > Delete, select songs to delete, and then tap the trash
icon G.
Media Center 99
Searching for Songs
Use one of the following methods:
• On the list screen, tap D > Search.
• On the play screen, tap the search icon ¼.
Enter search criteria such as song, artist, or album. Select one of the search
results to listen to it.
Uploading Songs
When Backup Assistant Plus under Settings is activated, the music library is
periodically uploaded to Verizon’s server for backup.
To back up manually, use one of the following methods:
• On the list screen, tap and hold a song and choose Upload.
• To upload multiple songs, tap D > Upload on the list screen, select songs
to upload, and then tap the upload icon f.
• On the play screen, tap D > Upload.
To view the list of songs uploaded on the backup server, tap the sync icon °
on the top of the screen.
Sharing Songs
Use one of the following methods:
• On the list screen, tap and hold a song, choose Send, and then choose a
method to use to send the music file.
• On the play screen, tap the artwork, tap the share icon ¶ that appears
on the lower of the artwork, and then choose a method to use to send
the music file.
100 Media Center
Playlists
Playlists group songs together for easy playback. Any song can be added to
playlists to create themed categories. On the list screen, goto the Playlists
tab.
Creating Playlists
Tap D > New playlist, and enter a playlist name to identify it. Select songs,
navigating through the list of songs. To select from another category, tap
the current category icon and select a different category. To select all entries,
tap selected > Select all. Finally, tap Done to finish.
Adding Songs to Playlists
Tap and hold a playlist, choose Add tracks, select songs to add, then tap
Done.
Removing Songs from Playlists
Tap and hold a playlist, choose Remove tracks, select songs to remove, and
then tap the trash icon G.
Renaming Playlists
Tap and hold a playlist, choose Rename, and then enter a new name.
Deleting Playlists
Tap and hold a playlist and choose Delete.
Sleep Mode
Sleep mode stops playing after a specific period.
When a song is playing, tap D > Sleep mode. Select a time period for the
playback to continue. Once this period lapses, playback stops.
Media Center 101
Music Settings
Tap D > Settings.
• Sound effect: Each of the sound effects changes the playback of music
in some manner.
- Equalizer: This effect balances the frequencies of different sounds
in music. Use the slider to make adjustments, and select a specific
enhancement feature.
- Bass Boost: Amplify the lower frequencies in music.
- Virtualizer: This effect makes it appear as if the music is being played
live or in-concert. This effect requires an earphone to function.
- Preset Reverb: This effect adjusts the audio signal so that it resembles
sound reverberating or echoing through a room. Select a size of room
space for the effect.
• Tab category: Select tab categories to display. Checkmarks indicate
which tabs appear. Fine-tune sorting through the music library by
removing unused tabs.
• Auto plug-n-play: When this feature is turned on, music automatically
resumes playing when a wired headset is inserted into the phone.
• Data network connection notification: With notification turned on, the
user is notified when the smartphone is connected to the internet via
mobile service and not Wi-Fi. If it is connected over the mobile network
and not Wi-Fi, synchronizing the music library with Verizon’s backup
service may take up significant bandwidth and incur higher data usage
fees.
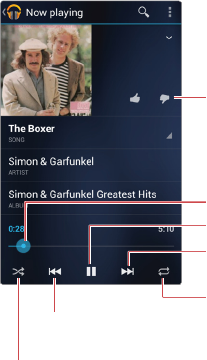
102 Media Center
Play Music
Play Music provides an alternative to the Music app for playing music files.
Note
Only one music application can run at a time. Either Music or Play Music
can run, but not both simultaneously.
Open Play Music from the Apps screen.
In Starter mode: Apps > More Apps > Play Music
Playing Music
On the list screen, flick the screen left or right to view music files by recent,
artists, albums, songs, playlists, or genres.
Tap a song in a tap or list to play it. To view more information about the
currently playing song, tap the up icon S at the right side above the
progress bar.
Rate this song.
Drag to skip forwards or backwards.
Pause and resume playback.
Skip to the next song.
Tap and hold to scan forwards.
Change the repeat mode.
Skip to the previous song.
Tap and hold to scan backwards.
Turn on shuffle.

Media Center 103
Tap the pause icon M to pause playing. This icon alternates with the play
icon L, so tapping it again resumes playing.
Scanning
To scan the currently playing song, use one of the following methods:
• Tap and hold the forward icon K to scan forwards.
• Tap and hold the back icon J to scan backwards.
• Tap on the progress bar and drag it to the left or right to scan backwards
or forwards.
Skipping
Tap the forward icon K to move to the next song in the playlist. Tap the
back icon J to restart the currently playing song. Tap it again in quick
sequence to move to the previous song in the playlist.
Randomly Playing
To set the music to shuffle between tracks randomly, tap D > Shuffle all.
Repeating
Tap the repeat icon a to change repeat mode.
• a : Repeat all songs in the album or list.
• ` : Repeat only the current song.
• : No repeat.
Searching for Songs
Tap the search icon ¼ and enter search criteria, such as song, artist, or
album. Select one of the search results to listen to it.
104 Media Center
Playlists
Playlists group songs together for easy playback. Any songs can be added to
playlists to create themed categories.
Creating Playlists
On the list screen, go to the PLAYLISTS tab, tap the plus icon Y, and then
enter a playlist name to identify it.
Renaming a Playlist
Tap and hold a playlist, choose Rename, and then enter a new name.
Deleting a Playlist
Tap and hold a playlist and choose Delete.
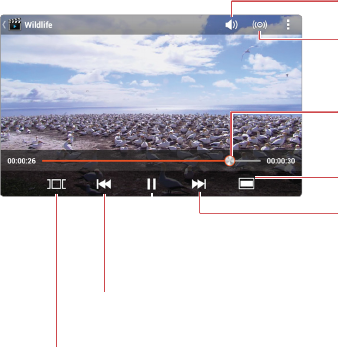
Media Center 105
Videos
Use Videos to play videos.
Open Videos from the Apps screen.
In Starter mode: Apps > Media > Videos
Playing Videos
To view the videos sorted into their respective folders, tap the Folder tab.
Tap a video to watch it. To watch several videos in sequence, tap D > Play
selected items, select a number of videos, and then tap the play icon ^.
Adjust the volume.
Activate 3D surround
sound effect when a
headset is connected.
Drag to skip forwards
or backwards.
Change the display mode.
Skip to the next video.
Tap and hold to scan
forwards.
Select a scene to jump to it.
Skip to the previous video.
Tap and hold to scan backwards.
Pause and resume
playback.
Tap the pause icon M to pause playing. This icon alternates with the play
icon L, so tap it again to resume playback
Scanning
To scan the currently playing video, use one of the following methods:
106 Media Center
• Tap and hold the forward icon K to scan forwards.
• Tap and hold the back icon J to scan backwards.
• Tap on the progress bar and drag it to the left or right to scan backwards
or forwards.
If the video is stopped or paused and resumed at a later time, the Videos
app remembers and resumes from the point where playback stopped.
Skipping
Tap the forwards icon K to move to the next video. Tap the back icon J to
play the previous video.
Repeating
On the play screen, tap D > Settings. Set the Repeat option either to repeat
all of the selected videos in sequence or to repeat just one video.
Changing Display Modes
Tap the display icon to change the display size and aspect ratio.
• ª : Display in the original size without scaling.
• ¬ : Fit the width of the screen.
• « : Fit the height of the screen.
Sorting Videos
On the list screen, tap D > Change order and choose a category. The videos
are sorted by the chosen category.
Captions
If captions are available, tap D > Caption settings and turn on Caption.
To adjust caption delay time, tap D > Caption settings > Sync. Plus and
minus icons appear on the right side of the screen. Tap the plus icon W
to increase caption speed 0.5 seconds, or tap the minus icon X to lower
caption speed by 0.5 seconds.
Media Center 107
Managing Videos
Viewing Video Information
On the list screen, tap and hold a video and choose Properties.
Deleting Videos
On the list screen, tap and hold a video and choose Delete. To delete
multiple videos, tap D > Delete, select songs to delete, and then tap the
trash icon G.
Searching for Videos
On the list screen, tap the search icon ¼ and enter search criteria. Select one
of the search results to watch it.
Uploading Videos
When Backup Assistant Plus under Settings is activated, the video library is
periodically uploaded to Verizon’s server for backup.
To back up manually, use one of the following methods:
• On the list screen, tap and hold a video and choose Upload.
• To upload multiple videos, tap D > Upload on the list screen, select
videos to upload, and then tap the upload icon f.
• On the play screen, tap D > Upload.
To view the list of videos uploaded on the backup server, tap the sync icon
° on the top of the screen.
Sharing Videos
To share videos with contacts, use one of the following methods:
• On the list screen, tap and hold a video and choose Share.
• To send multiple videos, tap D > Share on the list screen, select videos to
share, and then tap the share icon ¶.
• On the play screen, tap D > Share.
108 Media Center
YouTube
Use the YouTube app to watch videos from the YouTube website.
A Google account allows YouTube to tailor video selections to users’ unique
tastes, and to allow users to upload or comment on videos.
Open YouTube from the Apps screen.
In Starter mode: Apps > More Apps > YouTube
Watching Videos
Browsing Videos
Go to the BROWSE tab to browse the videos uploaded to YouTube by
category. The most popular or current videos are always displayed first.
Searching Videos
Tap the search icon ¼ on the upper right and enter search criteria. Select
one of the search results to watch it.
Favorites
To add a video to the favorites list, select a video, tap the add icon ¦, and
then choose Favorites.
To watch the favorite videos, go to the ACCOUNT tab, tap Favorites, and
then select a video to watch it.
Playlists
To add a video to a playlist, select a video, tap the add icon ¦, and then
choose a playlist to add it to, or choose New playlist and enter a name to
create a playlist and to add it to the new playlist.
To watch videos in a playlist, go to the ACCOUNT tab, tap Playlists, choose a
playlist, and then select a video to watch it.
Media Center 109
Subscriptions
To watch videos uploaded by specific YouTube users which the user
subscribes to, go to the ACCOUNT tab, tap Subscriptions, choose a YouTube
channel, and then select a video to watch it.
Note
Subscription entries cannot be added or deleted within this YouTube
app.
Sharing Videos
To share a currently playing video’s link, tap the Share icon ¶ and choose a
method to use to send the link. To simply copy the link, tap D > Copy URL.
Reporting a Video as Inappropriate
To report a currently playing video as inappropriate, tap D > Flag, The
Browser launches, accessing the YouTube website.
Uploading Videos
Use one of the following methods:
• Tap the HOME tab, tap the camcorder icon –, take a video, enter any
descriptive information about the video, and then tap Upload.
• Tap the ACCOUNT tab, tap the upload icon V, select one of the videos
stored on the smartphone, enter any descriptive information about the
video, and then tap Upload.
110 Media Center
YouTube Settings
Tap D > Settings.
General
• High quality on mobile: The quality of YouTube videos on mobile
devices vary depending on whether they are connected via mobile data
network or Wi-Fi. When connected via mobile data network, the video
quality is downgraded for streaming without delay. This setting allows
users to watch high-quality YouTube videos even when connected via
mobile data network.
• Caption font size: Adjust the font size of captions to make them easier
to read.
• Uploads: Determine to upload files either only when connected to a
Wi-Fi network or over any mobile connection.
Search
• Clear search history: Delete the YouTube search history.
• SafeSearch filtering: Select an option from the list. Higher security
settings block displaying of sensitive content.
Media Center 111
IMDb
The Internet Movie Database is one of the most comprehensive collections
of information and references on movies ever compiled. IMDb provides
instant access to this database in an easy-to-use format.
Open IMDb from the Apps screen.
In Starter mode: Apps > More Apps > IMDb
Tap the MOVIES, TV or CELEBS tab at the top of the screen to see the most-
viewed items in each category.
Searching
To find a movie, director, actor or actress, tap the search icon ½ and enter
search criteria. Tap one entry from the list of potential matches that is
returned.
Watching Movie Trailers
Select a movie and tap Trailer to watch the movie’s trailer.
Watchlist
To add a movie to the watchlist, select a movie and tap Watchlist.
To view the watchlist, tap D > Watchlist.
News
Tap D > News to see the latest stories about movies and TV shows.
To receive new information, including trailers and showtimes, about a
specific movie, select a movie and tap Notify Me.
Sharing Movie Information
Select a movie, tap Share, and select a method to use to send the link of the
movie information.
112 Media Center
Showtimes
IMDb shows local movie playtimes.
Tap D > Showtimes. Choose a date and the distance range from the phone
or a specific district. A list of matching results appears. Choose one to view
more details.
Viewing History
History keeps a record of items that have been searched or looked up.
Tap D > History to view the history. To clear it, tap Clear history at the
bottom of the list.
IMDB Settings
Tap D > Settings.
• Sign In: Use an IMDb, Amazon or Facebook account to sign in to IMDb.
• Location: Enter the closest postal code. Searches for local movies and
updates are based on this postal code.
• IMDB Site: Select an IMDb site to use.
• Amazon Store: Select an Amazon site to use.
• Wi-Fi Video Quality: Select a video resolution to use as the default
standard for IMDb. Higher resolutions require more bandwidth.
• Notification Settings: These setting control how IMDb sends
notifications to users.
• More: Tap this the IMDb app’s all functions and settings.
Menu Functions 113
Amazon
Amazon is a comprehensive, multi-purpose online shopping service.
Originally designed to sell books, it now sells virtually any object
purchasable online. The Amazon app is identical in function to the Amazon
website, and can be used interchangeably.
Note
An Amazon account and an active internet connection are required to
use this app.
Open Amazon from the Apps screen.
In Starter mode: Apps > More Apps > Amazon
When first launched, either sign into an account, or go through the process
to create an account.
Searching for Products
Tap D > Cart from any page, or tap the search field on the upper part of the
Amazon home screen.
Three methods are available to search for a product, as follows:
• Enter search criteria into the search field.
• Barcode images can be used for search. Tap Scan It, then focus on a
barcode on a product, keeping it to be completely in the framing grid.
Once the barcode is recognized, the framing grid turns green, and a list
appears, showing products that match or are relevant.
• Cover images of media and publication products, including books,
movies, music albums, and video games, can be used for search. Tap
Snap it, then take a photo of a product’s cover.
Menu Functions
114 Menu Functions
Purchasing Products
Tapping an entry from a products list shows details about it. Scroll down to
the bottom, and do one of the following:
• Tap Buy Now to buy the item immediately. Follow instructions to
complete the purchase process.
• Tap Add to Cart to add the item to the user’s cart for later purchase.
• Tap Add to Wish List to add the item to the user’s wish list for later
purchase. To go to the cart page from any page, tap D > Wish List.
Cart
Tap D > Cart from any page to view the items contained in the user’s cart.
Tapping Checkout on an item places an order. To place an order for all the
items, tap Checkout on the top right of the page.
Wish List
Tap D > Cart from any page to view the items contained in the user’s wish
list. To remove an item, tap and hold an item and choose Delete.
Canceling Orders
Tap D > Your Account > View/Cancel Items or Orders. Select an item from
the list of orders to cancel it.
Menu Functions 115
Amazon Kindle
Use Amazon Kindle to purchase ebooks from Amazon and to read them on
the smartphone.
Note
An Amazon account and an active internet connection are required to
use Amazon Kindle.
Open Amazon Kindle from the Apps screen.
In Starter mode: Apps > More Apps > Amazon Kindle
When first launched, either sign into an account, or go through the process
to create an account.
Amazon Kindle has four tabs:
• Home shows recommended books as well as books downloaded onto
the smartphone. Purchased books are displayed with their covers in the
center of the Home tab. At the bottom of the Home tab is a display of
recommended books. Flick them left and right to see more. Tapping one
opens it in the Store page for purchase.
• On Device shows books downloaded onto the smartphone.
• Archive shows books purchased but not downloaded onto the
smartphone. Tapping an entry begins to download the book. When
downloading is complete, it appears on the On Device tab.
• Store opens the Amazon Kindle bookstore for purchasing new books
and publications.
Purchasing Books
Tap the Store tab to open the Kindle bookstore. Enter search criteria into the
search field on the upper part of the page to find a particular book, or tap a
category and sub-category to browse entries.
On any open entry, tap Buy Now with 1-Click to purchase a selection. Tap
Try a Sample to download part of the book.
116 Menu Functions
Some publications, such as magazines or newspapers, offer subscriptions.
Two options usually appear for these, either Subscribe Now with 1-Click
or Buy Now with 1-Click. Buy Now purchases one edition, while Subscribe
Now delivers new editions to the Kindle account on a regular basis, and
charges a bulk price, which is generally lower per issue than buying a single
issue, but requires advance payment.
Accounts must have credit card information already associated with them to
finalize purchases. If no credit card information is present, users must enter
it when requested. This information can be kept for future reference and
associated with the account.
Canceling Purchases
To cancel a purchase in action, go to the Archive tab and tap the
downloading entry. Two buttons appear at the bottom of the screen. Tap
Pause to stop the entry from downloading. Tapping Cancel reverses the
transaction.
Once downloaded and opened, the transaction cannot be canceled.
Free Books
Go to the Store page. Tap the Free Popular Classics category to see a wide
selection of free ebooks. These do not require an account associated with a
credit card.
Full Website
At the bottom of any search results page, tap Amazon.com Full Site to see
Amazon’s full-service website in the Browser. This site generally includes far
more than simple books, and includes actual printed books, as well.
Reading Books
Tap D > Home to go to the Home tab from the Store tab. To read a book, tap
a book on either the Home tab or the On Device tab.
While reading, use available actions described in the following sub-sections.
Menu Functions 117
Navigating through Pages
Flick the screen left or right to turn pages. Touching the screen displays the
progress slider. Drag the slider to the left or right to jump to other pages.
To jump to a specific page, tap D > Go To and choose one of the following
options:
• Cover: Go to the front cover.
• Table of Contents: Go to the table of contents, if existing.
• Beginning: Go to the first page of the body text.
• Page: Enter a page number to go to it
• Location: Virtual page numbers are given to every 128 letters. This
enables the user to access the same place on any device. Enter a
location number to go it.
• My Notes & Marks: This option displays the list of notes, highlights, and
bookmarks made to the book. Select one from among them to go to its
page.
To go back to the previous page, tap D > Back.
To stop reading and get back to the Home tab, tap D > Home.
Page Appearance
Spread and pinch gestures are available to zoom text in and out.
Change the view options for easier reading. Tap D > View Options, and
adjust the text size, interline space, margin width, background color, and
brightness.
Annotating Books
To mark text with highlights, tap and hold a word, select more or less text by
dragging the markers, and then choose Highlight.
To tag a note on a phrase or sentence, tap and hold a word, select more or
less text, choose Note, and then type a note.
118 Menu Functions
Searching for Books
To find every sentence that contains a specific word or phrase, use one of
the following methods:
• Tap and hold a word, choose more or less text, and choose More >
Search in Book.
• Tap D > More > Search and enter a word or phrase.
Referencing
The following actions are available for reference:
• Tapping and holding a word displays its dictionary definition. When
tapping and holding a word for the first time, Amazon Kindle asks
whether to download the dictionary.
• To refer a word or phrase to Wikipedia, tap and hold a word, select more
or less text, and choose More > Search Wikipedia.
• To search the Web for a word or phrase, tap and hold a word, select
more or less text, and choose More > Search the Web.
Bookmarks
To add a bookmark to the current page, tap D > Bookmark. Choosing this
action on a bookmarked page removes the existing bookmark. To go to a
bookmarked page, tap D > Go To > My Notes & Marks, then select one from
the bookmarks list that appears.
Syncing Reading Progress
Amazon Kindle always remembers the last viewed page and shows it
when reopening a book. This is true across devices, and even applies when
viewing a book using Kindle on a computer or another device.
To read from the last page viewed on another device, tap D > Sync. Reading
notes and progress are updated.
Menu Functions 119
Managing Books
Manage books on the On Device tab:
Sorting Books
Tap D > Sort By to sort the books by title, author, or most recent.
Changing Display Modes
Tap D > View to display the books in a vertical list or grid format.
Deleting Books
Tap D > Remove Items, select books to remove, and then tap Remove.
Searching for Books
Tap D > More > Search and enter search criteria, such as title or author.
Syncing Books
Tap D > Sync to get the latest updates to all books.
Amazon Kindle Settings
From any other than the Store tab, tap D > Settings.
• Deregister this device: This unlinks the smartphone from the user’s
Amazon account.
• Volume Buttons Control: This enables to use the Volume buttons to
turn pages.
120 Menu Functions
Alarm/Clock
Use Alarm/Clock to set an alarm, check the time anywhere in the world, set a
timer to countdown, or measure elapsed time for an event.
Open Alarm/Clock from the Apps screen.
In Starter mode: Apps > Tools > Alarm/Clock
Alarm
Active alarms are listed under the Alarm tab.
Adding Alarms
Tap Add alarm, set the alarm options listed below, and then tap Save.
• Set a time and tap Set.
• Repeat: Set to repeat the alarm on specific days of the week.
• Ringtone: Choose a ringtone if the default ringtone is unacceptable.
• Vibrate: Set vibrate to on or off.
• Label: Add a name for the alarm, if necessary.
Changing Alarms
Select an alarm, change its options, and then tap Save.
Deleting Alarms
Tap the trash icon H, select alarms, and then tap the trash icon H.
Stopping Alarms
Tap Snooze to pause the alarm and resume after the specified interval or
tap Dismiss to stop the alarm.
Menu Functions 121
Alarm Settings
Tap the setting icon F.
• Alarm in silent: With this option active, alarms are sounded even when
the phone is in silent mode.
• Alarm volume: Adjust the alarm volume
• Snooze duration: Set how long an alarm pauses before it resumes.
• Auto silence: Set how long an alarm sounds before it stops.
• Volume buttons: Determine whether to snooze or dismiss alarms using
the Volume buttons.
• Set default ringtone: Select a ringtone to set it as the default ringtone
for alarms.
World Time
The World Time tab displays the current time in different time zones.
Daylight savings time is automatically taken into account.
Adding Cities
To add an entry from a specific time zone, tap Add new city and select a
city from the list. If the required city is not listed, choose a nearby city in the
same time zone. To find a specific city, enter the name into the search field.
Viewing a City’s location
Tap a city and choose a map app. The chosen map app launches, showing
the city’s location.
Deleting Cities
Tap the trash icon H, select cities, and then tap the trash icon H.
122 Menu Functions
Timer
Tap the Timer tab.
Tap the clock face to set how long the timer counts down. Tap Start to start
the countdown. Tap Pause to stop the timer.
Stopwatch
Tap the Stopwatch tab.
Tap Start to start the stopwatch, tap Stop to stop, and tap Record to record
the point when a specific event occurs.
Menu Functions 123
Audible
Use Audible to purchase audiobooks from the Audible audiobook store and
to listen to them on the smartphone.
Note
An Audible account and an active internet connection are required to
use this app.
Open Audible from the Apps screen.
In Starter mode: Apps > More Apps > Audible
When first launched, either sign into an account, or go through the process
to create an account.
Purchasing Audiobooks
Tap the cart icon ‘ at the top left corner of the screen to open the Audible
audiobook store. Enter search criteria into the search field on the upper part
of the page to find a particular audiobook, or tap Categories at the lower of
the page to browse entries.
On any open entry, tap Buy to purchase a selection and follow instructions
to complete the purchase process.
Downloading Purchased Audiobooks
After purchasing audiobooks, tap D > My Library to exit the store. Newly
purchased audiobooks are shown in the user library. Tap the download icon
U on a new entry to download it to the smartphone.
Listening to Audiobooks
Tap an audiobook entry to listen to it. Several control actions are available
as follows:
• Tap the pause icon M to pause playing. This icon alternates with the play
icon L, so tapping it again resumes playing.
124 Menu Functions
• Drag the progress slider to the left or right to move backwards or
forwards.
• Tap the back icon ³ to go back 30 seconds.
• Tap D > Button-Free to use the more simplified interface. For example,
swipe the screen right to go forward 30 seconds.
• To stop listening and get back to the library, tap D > My Library.
Chapters
An audiobook is usually made up of multiple chapters. To jump to a
particular chapter, tap the Chapters tab and select a chapter.
Bookmarks
Tap the bookmark icon ’ to add a bookmark to the current position.
To jump to a bookmarked position, tap the Bookmarks tab and select a
bookmark.
To delete a bookmark, tap and hold a bookmark and choose Delete.
Annotating Audiobooks
To tag a note on the current position, tap the bookmark icon ’, choose Add
notes, and then type a note.
To view notes, tap the Bookmarks tab. Tapping a note jumps to its
annotated position.
To delete a note, tap and hold a note and choose Delete.
To modify a note, tap and hold a note and choose Edit.
Viewing Audiobook information
Tap the Details tab to see the information about the currently playing
audiobook, including author, publisher, playback length, file size, and more.
Use the star icons ® to rate the audiobook.
Menu Functions 125
Sleep Mode
Sleep mode stops playing after a specific period. Tap D > Sleep and select
a period or position. When the specified period or position is reached,
playback stops.
Narration Speed
Tap D > Narrator Speed and select a speed to adjust the narration speed.
Sharing Audiobook Information
When listening to an audiobook, tap D > Share and choose a method for
sending general information about the audiobook.
Managing AudioBooks
Sorting Audiobooks
On the library screen, tap the bar at the lower screen and select a sort
category.
Searching for Audiobooks
On the library screen, tap D > Search and enter search criteria, such as title
or author.
Removing Audiobooks
To remove an audiobook from the smartphone, select an audiobook from
the library, tap the Details tab, scroll down to the bottom of the page, and
then tap Remove from Device .
Audible Settings
Tap D > Settings from the Audible home page.
126 Menu Functions
General Settings
• Disable Auto Lock: This option keeps the screen remain visible and
functional while playing.
• Shop in Browser: With this option active, the Browser is used for
shopping the Audible store.
• Status Bar Notifications: Choose situations when icons are displayed on
the status bar.
Playback Settings
• Jump Back Button: Set a specific time for backward jump.
• Jump Forward Button: Set a specific time for forward jump.
• Seamless Multipart Play: With this option active, volumes in a series of
books are played continuously when a volume ends.
Download Settings
• Only on Wi-Fi: With this option active, downloading is possible only
when a Wi-Fi connection is available.
• Download Format: Choose a quality level. High quality requires more
bandwidth.
Headset Settings
• Resume Playback: With this option active, playback resumes upon
connecting a headset.
• Pause Playback: With this option active, playback pauses upon
disconnecting a headset.
• Buttons Enabled: This option allows to use headset buttons.
• Fast Forward: Determine how the headset fast forward button affects
jumping forward.
• Rewind: Determine how the headset rewind button affects jumping
backward.
Menu Functions 127
Camnote
Camnote is designed to take pictures of whiteboards and other flat objects
with information written on them.
Open Camnote from the Apps screen.
In Starter mode: Apps > Tools > Camnote
Camnote Settings
Tap Setting.
• Scan mode: Choose a scan mode. There are two black and white modes,
a partial color mode and a full color mode.
• Save location: Choose the internal memory or the memory card in
which to save the pictures.
• Folder name: Choose a folder in which to save the pictures.
Taking a Picture
Use the following methods:
• Tab Macro or Board to change the framing grid. They alternate each
other. Use Macro to keep up the text lines written on the subject. Use
Board to keep the subject to be completely in the frame.
• Place a finger on the screen and drag it to the left or right to adjust the
brightness.
• Once a shot is taken, the picture immediately appears for editing. Tap
Multiple to take multiple shots without switching to edit mode.
• Tap Add note from the screen of the list of folders to take a new shot.
• Tap D > Add note from the screen of the list of pictures to take a new
shot.
128 Menu Functions
Editing a Picture
To edit existing pictures, tap Gallery, choose a folder, select a picture, and
then tap D > Edit. Use the following editing tools:
• Pen: Choose a pen type and color to draw on the picture.
• Post-it: Choose a post-it size and color to attach a note on the picture.
Tap and hold the post-it note and drag it to a desired location. Tap the
post-it note to enter a memo.
• Stamp: Choose a stamp type and size to stick a stamp on the picture.
Tap and hold the stamp and drag it to a desired location.
• Text: Choose a text size, font and color to write on the picture. Tap and
hold the text block and drag it to a desired location. Tap the text block
to enter a text.
• Eraser: Remove alterations made to the picture. Erase drawings by
scrubbing, or tap the à symbol that appears on post-it notes, stamps,
and text blocks to remove them.
• All clear: Remove all alterations made to the picture.
• Zoom: Zoom in the picture and drag it to a desired view.
Tap the checkmark [ to save the picture with its changes.
Managing Pictures
Adding Folders
Tap Gallery > Add folder, enter a name, choose a folder icon and color, then
choose a location for the folder.
Sorting Pictures
On the list screen, tap D > Sort and choose a category.
Menu Functions 129
Moving Pictures
Use one of the following methods:
• On the list screen, tap D > Move, select pictures to move, tap the move
icon §, and then select a destination folder.
• On the view screen, tap D > Move and select a destination folder.
Note
It is not possible to move files between the internal memory and the
removable memory card.
Deleting Pictures
Use one of the following methods:
• On the list screen, tap D > Delete, select pictures to delete, and then tap
the trash icon G.
• On the view screen, tap the trash icon G.
Sharing Pictures
Use one of the following methods:
• On the list screen, tap D > Share, select pictures to share, tap the share
icon ¶, and then choose a method to use to send the pictures.
• On the view screen, tap the share icon ¶, and then choose a method to
use to send the picture.
130 Menu Functions
Calculator
Use Calculator for simple or complex calculations.
Open Calculator from the Apps screen.
In Starter mode: Apps > Tools > Calculator
Press C once to delete a digit. Hold C to delete the entire number.
Scientific Calculator
Rotate the smartphone to landscape orientation to display the scientific
calculator.
Saving Calculations
To save a calculation result, tap Save and enter a note for it.
Editing Calculations
Tap List, select a calculation to edit, and then tap D > Edit.
Deleting Calculations
Use one of the following methods:
• Tap List, select a calculation to delete, and then tap the trash icon H.
• Tap List, tap the trash icon H, select calculations to delete, and then tap
the trash icon H.
Menu Functions 131
Calendar
Calendar keeps track of daily, weekly and monthly events, and produces
notifications when event deadlines approach. Calendar events can also be
sent to contacts and synced with the user’s Google Calendar.
Open Calendar from the Apps screen.
In Starter mode: Apps > Tools > Calendar
Flick the screen left or right to see previous or next dates. To get back to
today’s date Š, tap the calendar icon.
Managing Events
Adding Events
Tap and hold a day or tap the plus icon W, enter event information, then tap
Done.
Viewing and Editing Events
Dates with events are tagged with a colored dot. Tap an event to view more
detail. To edit the event, tap the edit icon Å. To delete the event, tap the
trash icon H.
Changing Display Modes
Tap the date on the upper left of the screen, and choose one of the
following options:
• Day shows the events planned for the given day.
• Week shows the events planned over the course of the week.
• Month shows the events planned over the course of the entire month
• Agenda shows all of the upcoming meetings in a list and provides their
dates and times.
132 Menu Functions
Syncing Events
Tap D > Calendar to display and select an account to sync.
To refresh the calendar, tap D > Refresh.
Searching Events
Tap D > Search and enter search criteria.
Calendar Settings
Tap D > Settings > General Settings.
Calendar View Settings
• Hide declined events: When this setting is active, Calendar does not
display events that the user has already declined.
• Show week number: This option displays how many weeks have already
passed over the year. There are 52 weeks in a year.
• Week starts on: Choose the day of the week that the display will list first.
This is typically either Monday or Sunday.
• Use home time zone: When traveling, the home time zone is used to
display event times, rather than the time zone in which the smartphone
happens to find itself.
• Display contacts events: This setting displays the events that contacts
choose to share.
• Clear search history: This wipes the calendar search history.
Menu Functions 133
Reminder settings
• Notifications: Enable this to produce warnings or notices when the
upcoming events approach.
• Choose ringtone: Choose a ringtone for notifications.
• Vibrate: Choose when notifications cause the phone to vibrate.
• Pop-up notification: Select whether or not a pop-up window appears
when a notification is produced.
• Default reminder time: Set the default time period to wait for before
producing notifications.
134 Menu Functions
Document Viewer
Document Viewer is a multipurpose document reader. It displays documents
in various formats, including text, PDF, and Microsoft Office files.
Open Document Viewer from the Apps screen.
In Starter mode: Apps > Media > Document Viewer
Viewing Documents
Once Document Viewer opens, it displays the list of all compatible
documents that are stored in the smartphone’s various memory storage
locations. From the file list, select a document to view it.
Tapping anywhere on the screen displays control icons:
• Tap the previous icon Q or the next icon R to move backwards or
forwards in the document. To go to a specific page, tap D > Go to page
and enter a page number.
• Tap the horizontal icon ¤ to fit the document to the screen’s width, or
the vertical icon ¥ to fit it to the height.
• Tap the magnifier icon ¼ and drag the zoom slider up or down to zoom
in or out.
Searching for Text
Tap D > Word search and enter search criteria. Tap the previous icon S or
the next icon T to view the previous or next entry that matches the search
criteria.
Changing the Background Color
When a text file is open, tap D > Color settings and choose black or white.
Menu Functions 135
Managing Documents
Filtering Documents
Tap the drop-down list above the file list and select a file extension. The files
that have the chosen extension are only displayed.
Sorting Documents
From the file list, tap D > Sort by and choose a category.
To view the list of folders where documents are stored, tap D > View type
and choose Folder list.
Uploading Documents
When Backup Assistant Plus under Settings is activated, the documents is
periodically uploaded to Verizon’s server for backup.
To back up manually, use one of the following methods:
• From the file list, tap D > Upload, select files to upload, and then tap the
upload icon g.
• From the file list, tap and hold a file and choose Upload.
To view the list of document uploaded on the backup server, tap the sync
icon ° on the top of the screen.
Sharing Documents
Use one of the following methods:
• From the file list, tap and hold a file, choose Share, then choose a
method for sending the file.
• When a document is open, tap D > Share.
136 Menu Functions
Deleting Documents
Use one of the following methods:
• From the file list, tap D > Delete, select files to delete, and then tap the
trash icon H.
• From the file list, tap and hold a file and choose Delete.
• When a document is open, tap D > Delete.
Menu Functions 137
Downloads
Use Downloads to see what files are downloaded through the applications.
Open Downloads from the Apps screen.
In Starter mode: Apps > More Apps > Downloads
Sorting Files
To view the file list by date, tap Sort by date. To view it by size, tap Sort by
size.
Deleting Files
Select files by tapping the checkbox next to a file entry, then tap the trash
icon I.
Sharing Files
Select a file, tap the share icon ¶, and then choose a method to use to send
the file.
138 Menu Functions
Latitude
Use Latitude to share current locations with friends or to check contacts’
locations.
Note
A Google account is required to use Latitude.
Open the Latitude from the Apps screen.
In Starter mode: Apps > More Apps > Latitude
Tap MAP VIEW to see any available contacts on the map.
Adding Friends
Add friends to share location information with them. To add friends, tap the
figure icon q and do any of the following:
• Tap Select from Contacts and select a contact from the contacts list.
• Tap Add via email address and enter an email address.
A sharing request is sent to the selected friends. The friends who accept the
request appear in the friends list.
Viewing Friends’ Location
Tap the update icon N to update the friends’ location information.
To view the friends’ locations, use one of the following methods:
• From the friends list, tap MAP VIEW. Tap the previous icon Q or the next
icon R to pinpoint the friends’ locations alternately.
• Select a friend from the friends list. Tap Map to view the friend’s
location. Tap Directions to get directions to it.
Finding Friends’ Location
Tap D > Show stale friends to display friends whose location are unknown,
if they are hidden from the friends list. Select one of them, then tap Ping for
check in to send the friend a notification asking for visibility.
Menu Functions 139
Removing Friends
Select a friend from the friends list, then tap Remove this friend.
Launching Location-Based Apps
Tap the drop-down list over the friends list and choose an app to open it.
Latitude Settings
Tap D > Location settings.
• Location reporting: Set the user’s location.
- Detect your location: Allow the smartphone’s GPS to detect the user’s
location.
- Set your location: Set the user’s location manually.
- Do not update your location: Hide the user’s location.
• Enable location history: Allow the Google Latitude serivce to record
where the user has been. To view the user’s location history, tap the
drop-down list over the friends list and choose Location history.
• Manage your friends: Add or remove friends.
• Sign out of Latitude: Stop using Latitude.
140 Menu Functions
Maps
Maps provides detailed local maps and navigation services, depending on
region.
Open Maps from the Apps screen.
In Starter mode: Apps > More Apps > Maps
Searching for Places
Tap the search icon ¼ and enter the name or address of the desired place.
Finding the Current Location
Tap the compass icon ‹. The current location is displayed with a blinking
blue pointer.
Getting Directions
Tap the direction icon … and enter the destination’s name. Choose car,
public transit or on foot and tap GET DIRECTIONS.
Map Layers
Tap the layers icon © to use multiple overlay maps, such as traffic, satellite,
terrain, and more.
Launching Location-Based Apps
Tap the drop-down list on the upper left of the screen and choose an app to
open it. Tapping the place icon „ launches the Places app.
Menu Functions 141
Places
Places identifies common destinations by name and points them out on a
map.
Open Places from the Apps screen.
In Starter mode: Apps > More Apps > Places
Browsing Places by Category
Choose a category, such as Restaurants or Gas stations. A list appears,
showing places that match the chosen category and are close to the
smartphone’s current location.
To view only places that are within a specific distance, tap Distance and
select a distance. To view only places that are rated higher than a certain
level, tap Rating and choose a minimum rating.
To see where these places are on the map, tap MAP VIEW at the bottom of
the screen.
From the places list, select a place to view its details, then use one of the
following actions:
• Tap the star icon ® to give the place a positive evaluation.
• Tap Map to pinpoint the place’s location.
• Tap Directions to get directions to the place.
• Tap Call to call the place.
• Tap the web address to access the place’s website, if available.
• Tap Street View to see a panoramic view of the adjacent street, if
available.
• Tap Share this place to send its information to contacts.
• Tap Search nearby to find other places close to the place.
• Tap Add as a contact to add the place to the contacts list.
• Tap Report a problem to report incorrect data, if any is found.
142 Menu Functions
Adding Categories
From the categories list, tap D > Add a search, then select one of the preset
categories, or enter a new category, such as “theaters”.
Searching for Places
From the categories list, tap the search icon ¼ and enter the name or
address of the desired place.
Menu Functions 143
Play Store
Use Play Store to purchase free or paid apps from the Google Play store.
Open Play Store from the Apps screen.
In Starter mode: Apps > More Apps > Play Store
Searching and Purchasing Apps
Flick the screen left or right to scan through the tabs. Each of the taps
presents apps in various categories.
To find a specific app, tap the search icon ¼ and enter search criteria. A list
appears, showing relevant apps.
Tap an app to view its details. Tap Install on the upper right of the screen to
download and install the app, if it is free. If it is charged, tap the price and
follow instructions to complete the purchase process.
Switching Accounts
Several Google accounts can be used in Play Store. To add or switch
between them, tap D > Accounts. Select between any available Google
accounts to use. To add a new account, tap Add account.
Updating Installed Apps
Tap D > My Apps to see the list of all apps installed on the smartphone.
An app entry is tagged with Update if update is available for it. Update apps
using one of the following methods:
• Tap N Update on the top of the screen to update all apps for which
updates are available.
• Tap Update beside an entry to update the app.
• Select an entry and tap Update.
Viewing App Information
Tap D > My Apps and tap an app to view its information, including update
details and user ratings and reviews.
144 Menu Functions
Removing Installed Apps
Tap D > My Apps, select an app, and then tap Uninstall on the upper right of
the screen.
Play Store Settings
Tap D > Settings.
• Notifications: Allow notifications from the Google Play store.
• Auto-update apps: Apps are automatically updated when an update is
detected.
• Update over Wi-Fi only: Updates only occur when the smartphone is
connected to the Internet via Wi-Fi.
• Auto-add widgets: Any widgets associated with an app are
automatically added to the home screen.
• Clear search history: Previous searches are wiped from the
smartphone’s memory.
• Content filtering: Inappropriate content is filtered out from search
results. This is suitable when the smartphone is used by younger users
or in sensitive situations.
• Set or change PIN: Add or change a PIN to the app for increased
download security.
• Google AdMob Ads: Permit or deny advertisements on Play Store.
Menu Functions 145
Search
Use Search to search not only the Web, but also apps and their contents on
the smartphone, including People and Music apps.
Open Search from the Apps screen.
In Starter mode: Apps > More Apps > Search
Searching the Smartphone
Tap the search field, enter search criteria, and then select one of the
suggested words that appear. If no results are returned from the apps, the
Browser appears, displaying search results.
Setting Search Scope
Tap D > Settings > Searchable items, then select apps to search.
146 Menu Functions
Smart Voice
Use Smart Voice to perform a variety of functions of the smartphone using
voice command, including calling, sending messages, opening apps and
searching the web.
Open Smart Voice from the Apps screen.
In Starter mode: Apps > More Apps > Smart Voice
Tap the microphone icon Œ, then speak a command similar to the following
examples:
• “Dial Michael mobile”
• “Tell Jane I’m almost there.”
• “What day is it today?”
• “How will be the weather today?”
• “Open Camera”
• “Launch Gallery”
• “Play El Condor Pasa”
If the command is not recognized, the Browser appears and searches the
web for it.
Menu Functions 147
Task Manager
Use Task Manager to check system status or close running apps.
Open Task Manager from the Apps screen.
In Starter mode: Apps > More Apps > Task Manager
Viewing Running Apps
Tap the drop-down list on the top of the screen and choose Running to
view the list of currently running apps.
Tapping End beside an app entry closes the app. To close all running apps,
tap End all at the lower of the screen.
To protect an app from being closed, select an app and turn on Protection
ended. The End button is not tagged on protected apps. To kill protected
apps, select an app from the running apps list and tap Shoutdown.
To sort apps, tap the eye icon ‰ and select a sort option.
Viewing System Status
Tap the drop-down list and choose Systems. System resources usage
is displayed, including the CPU, RAM, internal memory, and removable
memory.

148 Menu Functions
Voice Recorder
Use Voice Recorder to make audio recordings.
Open Voice Recorder from the Apps screen.
In Starter mode: Apps > Tools > Voice Recorder
Note
Sound recordings are created using whichever microphone is currently
in use. If a microphone-enabled headset is active, the microphone in
the headset is used to make the recording. If there is no headset, the
smartphone’s default microphone is used.
Creating Voice Recordings
Tap the record icon to begin recording. Tap the stop icon ¸ when
finished. The play screen appears once recording is complete. Tap the play
icon ¹ to play the recording back.
Changing the Default Storage
Tap the memory card icon ´ and choose either the internal memory or the
memory card to use it as the default storage.
Listening to Recordings
Tap the list icon c and select a recording to play it.
Renaming Recordings
Tap and hold a recording, choose Rename, then enter a new name. It is a
good idea to rename files so that their contents are more easily identifiable.
This is especially true when setting recordings as ringtones or when sending
them to contacts.
Menu Functions 149
Deleting Recordings
Use one of the following methods:
• Tap and hold a recording and choose Delete.
• To delete several recordings, tap D > Delete, select recordings to delete,
and then tap the trash icon H.
Sharing Recordings
Tap and hold a recording, choose Send, then choose a method for sending
the recording to contacts.
Setting Recordings as Ringtones
Tap and hold a recording and choose Set as Ringtone. The recording
appears in the list of ringtones.
Uploading Recordings
When Backup Assistant Plus under Settings is activated, voice recordings
can be uploaded to Verizon’s server for backup. Tap D > Upload, select
recordings to upload, and then tap the upload icon Æ.
150 Menu Functions
Weather
Use Weather to get weather forecast.
Open Weather from the Apps screen.
In Starter mode: Apps > More Apps > Weather
Adding Cities
Tap the plus icon W, enter a city name and choose from the list that
appears. This list appears even while the name is being entered. Add up to
15 cities to the list.
To add the current location to the list, tap the plus icon W and tap Add my
location to city list.
Viewing Weather Forecast
To update the current weather conditions, use one of the following
methods:
• Tap the update icon O on the top of the screen for all cities.
• Tap and hold a city and choose Update.
Tap a city, and a 4-day weather forecast for that city appears. To update the
forecast, tap the update icon O.
Deleting Cities
• On the city list, use one of the following methods:
Tap and hold a city and choose Delete.
Tap D > Delete, select cities to delete, and then tap the trash icon H.
• Select a city, then tap the trash icon H.
Menu Functions 151
Weather Settings
Tap D > Settings.
• Temperature scale: Choose Fahrenheit or Celsius.
• Auto update: With this option active, weather information is
automatically updated.
• Update interval: Set an interval for automatic update.
• Current location: With this option active, the current location is
displayed in the city list.
152 Settings
Use Settings to configure the smartphone and add accounts.
Open Settings from the Apps screen or, alternatively, tap D > Settings from
the Home screen.
In Starter mode: Apps > Settings > System
Note
In Starter mode, every setting option can be accessed through the
System menu.
Personalize
Mode change
• Starter mode: Use the simplified interface. This is appropriate for users
unfamiliar with smartphone interfaces.
• Standard mode: Use the standard Android interface.
Personalization
Screen lock
• Select screen lock: Choose a screen-lock type. The available options
vary according to the interface mode chosen, that is, Standard mode or
Starter mode.
- None: The smartphone unlocks itself immediately when pressing the
Power or Volume button.
Settings
Settings 153
- Slide lock: Unlock the smartphone or launch the Camera.
- Visual lock: Unlock the smartphone or launch one of designated
apps.
- Modern lock: Unlock the smartphone or launch one of designated
apps.
- Simple lock: Unlock the smartphone by dragging the lock icon.
- Face unlock: Unlock the smartphone by letting the smartphone
recognize the user’s face.
- Pattern: Draw a pattern to unlock the smartphone.
- PIN: Enter a PIN to unlock the smartphone.
- Password: Enter a password to unlock the smartphone.
• Wallpaper: Select a wallpaper for Visual lock or Modern lock.
• Shortcuts: Select apps to add them to Visual lock or Modern lock.
Dialpad style
The dialpad can take on different appearances. Select a dialpad skin.
Dialpad gesture
Dialpad skins can have gestures associated with them.
• Default: Associate no gesture.
• Motion-tilt: With this option chosen, tilt the smartphone back to display
the speed dialpad, and tilt forward to return to the normal dialpad.
• Motion-flip: With this option chosen, shake the smartphone back and
forth to switch between the normal dialpad and the speed dialpad.
154 Settings
Current default
Deselect apps that are set as default.
To set an app as the default application to open a file, perform an action
using the file and check Use by default for this action. For example, to set
an alternate browser as the default browser, deselect the current default
here, and then tap on a link. When the choice to select a browser appears,
check the option Use by default for this action.
Wallpaper
Select a wallpaper for the Home screen.
Phone ringtone
Select a ringtone for incoming calls.
Default notification
Select a ringtone to apply to notifications.
Settings 155
Wireless & Networks
Airplane mode
Switch the smartphone to Airplane mode to disable all wireless functions.
Wi-Fi
See “Connecting to a Wi-Fi Network” on page 46.
Bluetooth
See “Pairing with a Bluetooth Device” on page 48.
Data usage
Tap D and make sure Show Wi-Fi usage is turned on to check and control
data transfer via Wi-Fi as well as mobile service.
MOBILE
Fine-tune mobile data usage.
• Mobile data: Allow data communication over mobile networks. When
this is turned on, customized controls enable careful management of
data transfer limits to keep data transfer fees low.
• Limit mobile data usage: This function disables mobile data usage
when a preset limit is reached, as set in the parameters graph. Control
the limit by moving the red slidebar on the data usage graph.
• Alert me about data usage: The smartphone alerts the user when
mobile data usage reaches the preset warning amount. Control the
point by moving the orange slidebar on the data usage graph.
156 Settings
The graph on the lower part of the screen has several slidebars that set
limits. The white vertical bars control the time period, which can be set to
the customer’s billing cycle.
Tap D and check Restrict background data to prevent apps from
automatically updating information that is sent periodically without user
actions, such as data on some webpages, or data updated on Maps.
Tap D and check Data roaming to permit data roaming over mobile
networks. Note that this can incur excessive data transfer charges.
Wi-Fi
Tap the Wi-Fi tab to fine-tune how applications access the data network
using Wi-Fi.
Tap individual applications to modify how they interact with available data
networks. Tap View app settings to change the application’s settings from
this screen.
Call settings
See “Phone settings” on page 59.
Settings 157
More
• VPN: Add a virtual private network.
• Tethering & mobile hotspot: Allow other devices to access the Internet
via the mobile service that this smartphone uses. See “Tethering or
Mobile Hotspot” on page 47.
- USB tethering: Allow sharing over mobile network via USB
connection.
- Mobile hotspot: Allow sharing over mobile network via Wi-Fi.
- Mobile hotspot settings: Configure network settings for W-Fi
hotspot.
- Bluetooth tethering: Allow sharing over mobile network via
Bluetooth.
• NFC: See “Exchanging Data via NFC” on page 50.
• Android Beam: See “Exchanging Data via NFC” on page 50.
• Wi-Fi direct and Wi-Fi direct settings: See “Wi-Fi Direct” on page 49.
• Mobile networks
- Set up data service: Access the Verizon website to make changes to
the user’s data plan.
- Data enabled: Allow data communication over mobile network.
- Data roaming: Allow data communication even while roaming
abroad.
- Network mode: Select a wireless data communication method.
- Network operators: Select a network operator.
- Access Point Names: Edit the existing or create a new access point to
use GSM mobile networks.
- Network type and strength: View the type and strength of the
mobile network in use.
- Roaming: View the information about the roaming service in use.
• Data restrict time: Set a time slot to restrict data communication.
• SSLv2/SSLv3: Disable this data encryption protocol to avoice the
potential weakness for security if necessary.
158 Settings
Device
Sound
• Volumes: Adjust the volume for media playback, game, ringtone,
notifications, and alarms.
• Silent mode: Set to vibrate or mute ringtones and notification sounds.
• Vibrate and ring: Set to vibrate and ring at the same time.
• Phone ringtone: Select a default ringtone.
• Default notification: Select a sound for notifications, including
incoming messages, missed calls, and alarms.
• Dial pad touch tones: Set to sound when tapping a key on the dialpad.
• Touch sounds: Set to sound when tapping an on-screen button, icon,
or key.
• Screen lock sound: Set to sound when locking and unlocking the
smartphone.
• Vibrate on touch: Set to vibrate when tapping an on-screen button,
icon, or key.
• Emergency tone: Set to vibrate or sound when dialling 911.
• NFC sound in call: Set to sound when using the NFC feature while on a
call.
• Roaming sound: Set to sound when entering a roaming zone.
Settings 159
Display
• Brightness: Adjust the brightness. Checking Automatic brigtness lets
the smartphone automatically adjust brightness to suit current light
levels. Lowering the brightness or letting the phone lower it under low
light conditions helps to conserve battery power.
• Wallpaper: Select a wallpaper for the Home screen.
• Auto-rotate screen: Allow the interface to rotate when rotating the
smartphone.
• Sleep: Set the length of time that the smartphone waits before locking
itself.
• Font size: Select a default font size for the interface.
• Roaming banner: Set to display the roaming text when roaming
abroad.
Storage
Phone
Check how much of the internal memory and memory card is occupied.
• Mount SD card: Mount the memory card to use it.
• Unmount SD card: Unmount the memory card to erase or remove it
from the smartphone.
• Erase SD card: Delete all the data on the memory card.
Backup Assistant Plus
Check the capacity of the data stored on the Verizon’s backup server.
160 Settings
USB connection settings
Connect the smartphone to a computer as a removable storage device.
See “Transferring Files via USB Connection” on page 49.
• Media device (MTP): The computer recognizes both the smartphone’s
internal memory and the memory card.
• Camera (PTP): The computer recognizes only the folders for the
smartphone’s camera.
• External memory (SD card): The computer recognizes only the
smartphone’s memory card.
• PC data mode: This is only used by developers.
• Ask on plug: Set to display this setting screen when connecting the
smartphone to a computer.
Battery
Manage power usage.
Check Discharging to show the percentage of battery power remaining in
the status bar on the top of the screen.
Tap the graph to see a visual depiction of recent power usage.
Each item in the list below the graph indicates how much of the current
power drain it is responsible for.
Tapping on the item opens it up and may allow fine-tuning.
Apps
See “App Management” on page 174.
Settings 161
Power saver
This feature assists users in conserving the smartphone’s available power.
Tap More options to fine-tune which activities run or are turned off to save
power.
• Disable features below at: Specify a battery level below which the
features chosen below turn off.
• Mobile data: Deactivate mobile data transfer. Regular mobile service for
phone calls still functions.
• Wi-Fi: Deactivate Wi-Fi.
• Bluetooth: Deactivate Bluetooth.
• Touch feedback: Prevent vibration and sound from screen touch.
• Screen timeout: Set the lock timer to 15 seconds.
• Screen brightness: Allow the device to adjust the screen brightness
automatically to match current lighting conditions. In darker conditions,
the screen brightness drops to conserve power.
• Adjust screen brightness: Adjust the screen brightness using the slider.
Activate the power saving feature by tapping the power icon.
Motion recognition
See “Hand Motions” on page 24.
To configure details, tap Motion recognition.
162 Settings
Personal
Accounts & sync
See “Signing Up for a Google Account” on page 27.
Backup Assistant Plus
Back up the contacts, media files and documents to the Verizon online
storage. Check each item to back up.
• Update schedule: Select a recurring time slot for updates.
• Use networks: Allow updating to use either Wi-Fi and Mobile networks
or just Wi-Fi networks.
• Sending address: Enter an email address to receive messages from
Verizon.
• Change download setting: Choose which memory location to restore
backups to, either the internal memory or the memory card.
• General media settings: Tap Local file handling and allow overwriting
of existing data without prompting when restoring backups to the
smartphone. This may obliterate any changes to the smartphone’s data
since the last update.
Setup wizard
See “Initial Setup” on page 19.
Location services
“Location-Based Services” on page 54.
Settings 163
Security
The security options determine how the smartphone interacts with users.
Some of the following options are not available depending on the screen
lock chosen.
• Screen lock: See “Screen lock” on page 152.
• Owner info: Enter a slogan to display it on the lock screen.
• Lock detail settings: Select a wallpaper and app shortcuts to use them
with the screen lock chosen.
• Improve face matching: Make another face registration in a different
environment for improved recognition.
• Make pattern visible: Allow the display of patterns when they are being
drawn.
• Automatically lock: Set the length of time that the smartphone waits
before locking itself.
• Power button instantly locks: Set to enable the Power button to lock
the smartphone instantly.
• Vibrate on touch: Set to vibrate when drawing a pattern or entering a
PIN or password to unlock the smartphone.
• Encrypt phone: Encrypt all data on the smartphone. Turning on or
activating the smartphone or any of its apps requires the unencrypt
password. Without the password, the smartphone must be reset to
factory conditions, and all data is lost. Encrypting the phone can take
over an hour and, if interrupted, will likely corrupt the smartphone’s
data.
• Set up SIM card lock: Lock the SIM card, or change its PIN.
• Make passwords visible: Allow the display of passwords when they are
being entered into password fields . Otherwise, they are obscured to
prevent others from seeing them.
• Device administrators: View or deactivate the smartphone
administrators.
164 Settings
• Unknown sources: Allow installation of apps from sources other than
Play Store.
• Trusted credentials: View trusted website identification credentials. All
sites listed here are opened without high-level security blocks and are
trusted not to be spam or present malware infection opportunities.
• Install from SD card: Install credentials and certificates from the SD card.
• Clear credentials: Remove all certificates. Previously trusted sites must
be visited and approved again.
Language & input
• Language: Choose a language for the interface.
• Personal dictionary: Add words to the predictive text dictionary. These
words appear as options when typing text and are used for spell-
checking or correcting.
• Default: See “Entering Text” on page 44.
• Voice Search:
- Language: Choose a language for the voice recognition.
- SafeSearch: Select a level for filtering out explicit results from Google
Search.
- Block offensive words: Replace offensive words in transcription with
a placeholder.
• Text-to-speech output: Choose a speech synthesis engine, and set
speech rate.
• Pointer speed: Adjust the pointer speed of the Bluetooth mouse
connected to the smartphone.
Settings 165
Backup & reset
• Back up my data: Back up the app data, passwords and other setting
information to the Google server.
• Backup account: Select a Google account for backing up.
• Automatic restore: Allow automatic restoration of an app’s old setting
data when reinstalling an app.
• Factory data reset: Reset the smartphone to factory settings and erase
all data on it. Note that all data is lost, unless backed up.
System
Date & time
• Automatic date & time: Use the time information provided by the
mobile network.
• Automatic time zone: Use time zone information provided by the
mobile network.
• Set date: Set the current date manually.
• Set time: Set the current time manually.
• Select time zone: Select a time zone.
• Use 24-hour format: Use either the 24-hour or the 12-hour time format.
• Select date format: Select a date format.
Accessibility
• TalkBack: With this feature activated, the smartphone provides
spoken feedback so users with poorer vision can more easily use the
smartphone.
- Ringer volume: The phone speaks even if the ringer volume is low.
166 Settings
- Speak when screen is off: Even if the screen is deactivated or dark,
actions still involve the phone speaking.
- Speak caller ID: The smartphone speaks any caller ID information
available when other users call the smartphone.
- Use proximity sensor: With this activated, the phone does not speak
if the user is close to the phone.
- Bluetooth output: Check this to prevent the phone from speaking
through bluetooth headsets.
- Vibration feedback: The phone used vibrations to indicate phone
activity. Tap Assign vibration patterns to give certain actions a
specific vibration pattern. For example, choosing Exploring clickable
items and choosing hovered means that hovering over an active
clickable item such as a button or link causes vibration. Tap the play
button to feel a demo of the vibration.
- Sound feedback: The phone provides feedback sounds for assigned
actions.
- Sound volume: This set the sound volume for sound feedback.
- Assign sounds: This assigns specific sounds to items being “hovered”
over and to clickable items. Tap the Play button to hear a demo of the
sound.
• Large text: Permit larger text size for easier reading of the interface.
• Power button ends call: Allow the Power button to end a call.
• Auto-rotate screen: Allow the interface to rotate when rotating the
smartphone.
• Speak passwords: Allow the smartphone to read out passwords entered
if the Talkback feature is enabled.
• Touch & hold delay: Select a time delay for the smartphone to
recognize that the screen is tapped and held.
• Install web scripts: Allow apps to install web scripts that make their web
content more accessible. This can compromise Browser and Android
security.
Settings 167
Developer options
This menu contains many items designed for developers to assist in
developing applications. It has no user-serviceable content. Activating any
of these options may cause the operating system or the user interface to
become unpredictable.
About phone
This page displays smatphone information about the smartphone, including
the specific model number, software versions, and the build number.
• Icon glossary: This shows a useful, itemized list of all interface icons
used by the smartphone.
• Software update: See “Updating the Software” on page 174.
• Status: Tap Status to examine the smartphone’s battery power,
operating software conditions, and network connections.
• Legal Information: All software licenses are indicated here. Some are
open-source licenses, and some are Google legal licenses.
168 Appendix
Maintenance
Maintaining the smartphone in optimal condition helps give it a very long
service life.
There are several ways to make sure the phone remains in top condition.
Use a Case
A form-fitting, shock-absorbing case helps to protect the phone from more
than just the occasional scratch or nick. A case can protect against shock
from drops, impacts or neglect.
Avoid Water
Water is devastating to all electronic devices. Avoid exposure to water and
high humidity. If the phone is immersed in water, ensure that it is turned
off. Do not reactivate the phone until it is completely dry. The best idea is to
have it serviced.
The Display
The touchscreen is a very sensitive, durable but also carefully engineered
interactive surface. Scratches, excessive pressure and impacts damage the
screen’s ability to sense contact and to display.
Do not use excessive force when touching the screen and do not subject it
to impacts.
Avoid Drops and Shocks
This smartphone is a highly complex, precision-made electronic device.
Impacts, drops and shocks can damage or even destroy the phone. The
touchscreen is especially vulnerable to impacts.
Appendix
Appendix 169
Avoid Dust
Particulate matter like dust tends to corrupt and damage most electronic
devices. Keep the phone away from dust and fine particles.
Only Use Safe Software
Customizing the phone is fun and can be very useful. However, some
applications and procedures designed to alter the phone’s operating system
or bypass the phone’s security measures can damage the phone. At the very
least, data can be rendered irretrievable.
Avoid using dangerous procedures or installing applications from unverified
sources.
Cleaning
Keep the phone clean to avoid organic substance buildup or residues. To
clean the touchscreen, use a damp, soft cloth.
Do not use any abrasive cleaners, and do not pour water directly onto
the phone. The touchscreen and lens surfaces may be scratched. Avoid
contacting them with any abrasive substance.
Many cleaning products damage plastic, metal and glass components.
These cleaners can include benzine, paint thinners or alcohol-based
compounds. Be careful when choosing a cleaning product for use with this
smartphone.
Connectors
The connector is designed to fit snugly into the socket in the phone. Do not
exert pressure or torsion on the connector. This connection is vital for the
use of the phone, and if it is damaged, the phone may not be chargeable
and it may be impossible to transfer data to and from a computer.
The Battery
Do not subject the battery to abuse, pressure, shocks, moisture or fire.
The battery is a chemical power storage device. It also has a significant
electronic component. If it is shorted, it can cause fires. If pierced, its
chemical components may cause injury.
170 Appendix
Dispose of spent or damaged batteries safely, in accordance with local
regulations.
Inserting and Removing Cards
This device is precision-designed to be compact and versatile. As a result,
all of its moving parts are designed to take up as little space as possible. Do
not use force to remove or insert memory cards into the phone, as this can
damage both the card and the card socket.
Backup Data
Back up contacts, media files and email messages regularly, or keep them on
a remote service, such as Google. if the phone is reset, is lost, or is stolen, all
of the data and apps on the smartphone are lost. Backups help restore data
which would otherwise be irretrievable.
Charge Indoors
Be cautious when charging the phone outdoors. If left for a prolonged
period outdoors, the phone may suffer from changes in humidity, from
inclement weather or from unsanitary conditions.
Only Use the Provided Chargers
Do not use third-party chargers and charging cables or those meant for
other devices. Doing this could damage the smartphone and void the
warranty.
Avoid Electric Shocks
Do not subject the smartphone to electrical shocks or high levels of random
static electricity. As an electrical device, this smartphone may be damaged
by sudden surges in electrical power from either charging or from the
environment.
If the phone suffers from electrical damage, it may not be reparable.
Appendix 171
Avoid Heat
Do not leave the smartphone in very hot or sunny areas. The smartphone
can withstand a wide temperature range, but excessive amounts of time
sitting on the dashboard of a car in the sunlight, on a radiator or in a very
hot environment can damage the electronic and physical components.
Avoid Cold
Cold temperatures drain the battery more quickly than moderate or warm
temperatures. To avoid stressing the battery’s energy-retention ability and
shortening its life, avoid leaving the phone in sub-zero temperatures for
prolonged periods of time.
Do Not Disassemble
Do not take this smartphone apart. While it may be possible to reassemble
it, the parts and components of this smartphone are very delicate and are
encased in the protective shell to keep them safe. Disassembling the phone
can easily damage the phone’s internal components.
Avoid Strong Electromagnetic Fields
Devices with strong electromagnetic fields or areas with strong natural
electromagnetism may interfere with the phone’s ability to connect to
networks and may also interfere with the phone’s regular operation.
Troubleshooting
Short Battery Life
This happens when the phone is in an area with weak network coverage.
Move to an area with better signal coverage so the phone does not need to
expend as much energy to maintain reception. Also, refer to “Maximizing
Battery Life” on page 172.
172 Appendix
The Smartphone Will Not Turn On
Make sure the battery is charged. Once plugged in, the battery must charge
for a short time before the phone can be turned on.
Dropped Calls
Many issues can interrupt network signals, such as large metallic or concrete
objects, being underground or moving too quickly between network nodes.
The phone’s reception and data transfer abilities are tied to the strength of
the local network. Between network nodes, it is possible for the phone to
lose coverage. Also, though the phone dynamically shifts from one node to
the next as it travels, it is possible for nodes to be too far apart or to fail.
The simplest solution is to move to an area with better coverage. If signals
continue to drop while traveling, staying in one place often helps.
The phone has a very sensitive antenna, but in areas with poor signal
strength, try holding the phone away from any large objects, including the
human body. If necessary, use a hands-free device. Lifting it up sometimes
helps when inside buildings.
The object is always to create a clear path for network signals.
Maximizing Battery Life
Over time, the battery will slowly lose its ability to hold a charge. This is a
natural limitation of current battery technology. If the battery no longer
maintains a charge, have the battery replaced.
The more charging cycles the battery goes through, the more quickly its
ability to hold a charge will diminish. That said, even if it remains unused,
over time, the chemical power storage capacity of the battery will decrease.
Simply not using the battery is not a good strategy. Avoid buying multiple
spare batteries at the same time, as their ability to hold a charge begins to
decrease immediately after manufacture.
Under normal circumstances and use, the battery should be useful for years
and thousands of charging cycles.
Appendix 173
Power Saving Strategies
Several techniques exist to maintain power between charges.
• Signal Strength: Use the phone in an area with good wireless coverage.
Poor coverage forces the phone to use more power seeking out and
identifying network signals.
• Deactivating Wi-Fi: The Wi-Fi service drains significant amounts of
power. Use Wi-Fi while the phone is charging or restrict Wi-Fi usage to
times when the connection needs to remain active.
• Dimming the Screen: Lower the brightness level of the screen to
conserve power. The screen eats up a large amount of power under
normal circumstances.
• Close Unused Apps: Applications that are not in current use may drain
power by occupying the processor. Close them.
• Deactivating Bluetooth: Using Bluetooth drains power, even when
not paired with another device. Only keep Bluetooth active when it is
required.
Power Saving Settings
Many of these features are available under the Power saver menu in
Settings.
• Use Low Vibration: Making the phone vibrate less and lowering the
sound volume for notifications reduces power usage slightly.
• Use Silent Mode: Deactivating notifications makes a minor reduction in
power usage.
• Power saver: Activate the power saver function to make sure the phone
turns off when not in use.
• Screen Timeout: To conserve power, have the screen turn off in as short
a time as possible.
• Disable GPS: The GPS service drains power. Disable it when not needed.
• Disable Background Data: Constantly refreshing background data drains
power. Turn this off to converse power.
• Auto Screen Brightness Adjustment: Activate this feature to have the
phone automatically dim the screen whenever possible.
174 Appendix
Updating the Software
Many important software updates become available from time to time.
These updates may improve the phone’s performance or deal with any
outstanding issues.
The latest software can be directly transmitted to the smartphone via
wireless networks.
Go to Settings > About phone > Software update.
In Starter mode: Settings > System > About phone > Software update
This page shows the current software version. Tap Status to see the
smartphone’s current software operating state and the date of the last
update. Tap Check New to check out the latest software and download it to
your phone.
App Management
Go to Settings > Apps to individually manage the apps running on the
smartphone.
In Starter mode: Settings > System > Apps
This menu is more than a simple task-manager. Each app has options that
modify how it functions.
Note
Interfering with running applications may cause them to crash or may
even cause the smartphone to crash. To get the smartphone working
again, it might have to be restarted.
Apps have both processes and services. The process is the main
app functionality or the program itself. The services that run in the
background provide the process with valuable and often critical
information. Shutting down a service often corrupts or stops a process.
For example, the Clock app requires an update service that keeps the
clock accurate.
Appendix 175
There are three tabs:
• Downloaded displays all applications that have been downloaded onto
the smartphone.
• Running shows just those apps that are currently operating and the
services supporting those apps.
• All shows every app, both downloaded and running, installed on the
smartphone.
Tap an app to open its page. Any relevant information about the app
appears. This can include:
• Storage: This indicates how memory an app requires and is using, for
both the program and for data.
• Cache: This shows how much temporary data is stored for the program.
• Launch by default: If the app launches by default when a new file is
opened or the smartphone is turned on, its default status appears here.
• Permissions: These entries indicate what features on the smartphone
the app can access. These cannot be changed, as they are required
for the app to function, but this information can assist in determining
whether or not to continue using an app. For example, if using the GPS
location data is a security issue, this page will display whether or not the
app uses this feature.
On an app page, buttons appear, depending on the app. These buttons
allow users to control the app.
• Force stop: This cancels the application immediately.
• Uninstall updates: Tap this to remove any recent updates. This is useful
if a recent update has rendered an application inoperable.
• Clear data: Tapping this button clears an application’s stored data. This
is one way to, for example, wipe out any locally saved email or images,
erase account and password data and otherwise delete any remaining
information saved by the program.
Note
Deleted data cannot be restored. Proceed with extreme caution.
176 Appendix
• Clear cache: Clearing the cache wipes out the temporary data stored for
daily purposes, such as website images or data downloaded for faster
loading convenience or stored map information.
• Clear defaults: Some programs launch when a file is tapped or when
the smartphone is turned on. This button clears any default actions that
occur from time to time.
• Stop: This stops a program. It is the same as closing it within the
program.
• Report: If an app is failing, and a reporting service is available, tapping
Report sends a crash or failure report to the app’s producer.
• Settings: If an app has any modifiable settings, they may be accessible
from this page.
Appendix 177
Safety Information
USB
The connection to USB interfaces has to be limited to USB 2.0 version or
higher. The connection to so called power USB is prohibited.
Battery
For safe use of the battery, observe the following instructions:
a. Caution risk of explosion if battery is replaced by an incorrect type.
b. Dispose of used batteries according to the instructions.
c. Do not disassemble or open crush, bend or deform, puncture or shred.
d. Do not modify or remanufacture, attempt to insert foreign objects into
the battery, immerse or expose to water or other liquids, expose to fire,
explosion or other hazard.
e. Only use the battery for the system for which it is specified.
f. Only use the battery with a charging system that has been qualified
with the system per CTIA Certification Requirements for Battery System
Compliance to IEEE1725. Use of an unqualified battery or charger may
present a risk of fire, explosion, leakage, or other hazard.
g. Do not short circuit a battery or allow metallic conductive objects to
contact battery terminals.
h. Replace the battery only with another battery that has been qualified
with the system per this standard, IEEE-Std-1725. Use of an unqualified
battery may present a risk of fire, explosion, leakage or other hazard.
i. Promptly dispose of used batteries in accordance with local regulations
j. Battery usage by children should be supervised.
178 Appendix
k. Avoid dropping the phone or battery. If the phone or battery is
dropped, especially on a hard surface, and the user suspects damage,
take it to a service center for inspection.
l. Improper battery use may result in a fire, explosion or other hazard.
m. The adapter shall be installed near the equipment and shall be easily
accessible.
Appendix 179
Safety Information for Wireless Handheld
Phones
Read this information before using your handheld portable mobile
telephone.
Exposure to Radio Frequency Signals
Your wireless handheld portable telephone is a low power radio transmitter
and receiver. When it is ON, it receives and also sends out radio frequency
(RF) signals. In August 1996, the Federal Communications Commission (FCC)
adopted RF exposure guidelines with safety levels for handheld wireless
phones. Those guidelines are consistent with the safety standards previously
set by both U.S. and international standards bodies:
* ANSI C951 (1992)
** NCRP Report 86 (1986)
*** ICNIRP (1996)
Those standards were based on comprehensive and periodic evaluations of
the relevant scientific literature. For example, over 120 scientists, engineers,
and physicians from universities, government health agencies, and industry
reviewed the available body of research to develop the ANSI Standard
(C951).
The design of your phone complies with the FCC guidelines (and those
standards).
* American National Standards Institute.
** National Council on Radiation Protection and Measurements.
*** International Commission on Non-Ionizing Radiation Protection.
180 Appendix
Antenna Safety
Use only the supplied or an approved replacement antenna. Unauthorized
antennas, modifications, or attachments could impair call quality, damage
the phone, or result in violation of FCC regulations. Please contact your local
dealer for replacement antenna.
Do not use the phone with a damaged antenna. If a damaged antenna
comes into contact with the skin, a minor burn may result. Please contact
your local dealer for replacement antenna.
Driving Safety
Talking on the phone while driving is extremely dangerous and is illegal in
some states. Remember, safety comes first. Check the laws and regulations
on the use of phones in the areas where you drive. Always obey them. Also,
if using your phone while driving, please:
• Give full attention to driving. Driving safely is your first responsibility.
• Use hands-free operation, if available.
• Pull off the road and park before making or answering a call, if driving
conditions so require.
If you must use the phone while driving, please use one-touch, speed
dialing, and auto answer modes.
An airbag inflates with great force. DO NOT place objects, including both
installed or portable wireless equipment, in the area over the airbag or in
the air bag deployment area. If in-vehicle wireless equipment is improperly
installed and the air bag inflates, serious injury could result.
Warning
Failure to follow these instructions may lead to serious personal injury
and possible property damage.

Appendix 181
Protect Your Hearing
Listening to a headset at high volumes can damage your
hearing. Use only the minimum volume setting necessary to
hear your conversation or music.
Electronic Devices
Your wireless handheld portable telephone is a low power radio transmitter
and receiver. When it is ON, it receives and also sends out radio frequency
(RF) signals. Most modern electronic equipment is shielded from RF energy.
However, certain electronic equipment may not be shielded against the
RF signals from your wireless phone. Therefore, use of your phone must be
restricted in certain situations.
Pacemakers
The Health Industry Manufacturers Association recommends that a
minimum separation of six (6”) inches be maintained between a handheld
wireless phone and a pacemaker to avoid potential interference with the
pacemaker. These recommendations are consistent with the independent
research by and recommendations of Wireless Technology Research. Persons
with pacemakers:
• ALWAYS keep the phone more than six inches from your pacemaker
when the phone is turned on.
• Do not carry the phone in a breast pocket.
• Use the ear opposite the pacemaker to minimize the potential for
interference.
• If you have any reason to suspect that interference is taking place, turn
your phone OFF immediately.
Hearing Aids
Some digital wireless phones may interfere with some hearing aids. In the
event of such interference, you may want to consult your service provider
(or call the customer service line to discuss alternatives).
182 Appendix
Other Medical Devices
If you use any other personal medical device, consult the manufacturer
of your device to determine if they are adequately shielded from external
RF energy. Your physician may be able to assist you in obtaining this
information. Turn your phone OFF in healthcare facilities when any
regulations posted in these areas instruct you to do so. Hospitals or
healthcare facilities may be using equipment that could be sensitive to
external RF energy.
Vehicles
RF signals may affect improperly installed or inadequately shielded
electronic systems in motor vehicles. Check with the manufacturer or
its representative regarding your vehicle. You should also consult the
manufacturer of any equipment that has been added to your vehicle.
Posted Facilities
Turn your phone OFF where posted notices so require.
Other Safety Guidelines
Aircraft
FCC regulations prohibit using your phone while in the air. Turn your
phone OFF before boarding an aircraft. Always request and obtain prior
consent and approval of an authorized airline representative before using
your phone aboard an aircraft. Always follow the instructions of the airline
representative whenever using your phone aboard an aircraft, to prevent
any possible interference with airborne electronic equipment.
Blasting areas
To avoid interfering with blasting operations, turn your phone OFF when in
a “blasting area” or in areas posted: “Turn off two-way radio.” Obey all signs
and instructions.
Appendix 183
Potentially explosive atmospheres
Turn your phone OFF when in any area with a potentially explosive
atmosphere and obey all signs and instructions. Sparks in such areas could
cause an explosion or fire resulting in bodily injury or even death.
Areas with a potentially explosive atmosphere are often, but not always,
clearly marked. They include fueling areas such as gas stations; below
deck on boats; fuel or chemical transfer or storage facilities; vehicles using
liquefied petroleum gas (such as propane or butane); areas where the
air contains chemicals or particles, such as grain, dust, or metal powders;
and any other area where you would normally be advised to turn off your
vehicle’s engine.
Precautions
Your Handheld Portable Telephone is a high quality piece of equipment.
Before operating, read all instructions and cautionary markings on (1) USB
AC Adapter (2) Battery and (3) Product Using Battery.
Failure to follow the directions below could result in serious bodily injury
and/or property damage due to battery liquid leakage, fire or rupture.
• DO NOT use this equipment in an extreme environment where high
temperature or high humidity exists.
• DO NOT abuse the equipment. Avoid striking, shaking or shocking.
When not using, lay down the unit to avoid possible damage due to
instability.
• DO NOT expose this equipment to rain or spilled beverages.
• DO NOT use unauthorized accessories.
• DO NOT disassemble the phone or its accessories. If service or repair is
required, return unit to an authorized PCD mobile service center. If unit
is disassembled, the risk of electric shock or fire may result.
• DO NOT short-circuit the battery terminals with metal items etc.
184 Appendix
Safety Information for FCC RF Exposure
Read this information before using.
Cautions
In August 1996 the Federal Communications Commission (FCC) of the
United States with its action in Report and Order FCC 96-326 adopted
an updated safety standard for human exposure to radio frequency
electromagnetic energy emitted by FCC regulated transmitters. Those
guidelines are consistent with the safety standard previously set by both
U.S. and international standards bodies. The design of this phone complies
with the FCC guidelines and these international standards.
In the United States, 5180–5240 MHz band is restricted to indoor-use only.
Outdoor operation on this band is a strict violation of the FCC rules and
can cause harmful interference to commercial radar communications. For
outdoor operation, channels in 5180–5240 MHz band must not be used.
If using automatic channel assignment, add channels in this band to the
Automatic channel exclusion list.
Body-Worn operation
This device was tested for typical body-worn operations with the back of the
phone kept 1cm. from the body. To maintain compliance requirements, use
only belt-clips, holsters or similar accessories that maintain a 1cm separation
distance between the user’s Body and the back of the phone, including the
antenna.
The use of belt-clips, holsters and similar accessories should not contain
metallic components in its assembly. The use of accessories that do
not satisfy these requirements may not comply with FCC RF exposure
requirements, and should be avoided.
For more information about RF exposure, visit the FCC website at http://
www.fcc.gov.
Appendix 185
SAR information
This model phone meets the government’s requirements for exposure to
radio waves.
Your wireless phone is a radio transmitter and receiver. It is designed and
manufactured not to exceed the emission limits for exposure to radio
frequency (RF) energy set by the Federal Communications Commission of
the U.S. Government. These limits are part of comprehensive guidelines
and establish permitted levels of RF energy for the general population. The
guidelines are based on standards that were developed by independent
scientific organizations through periodic and thorough evaluation of
scientific studies. The standards include a substantial safety margin
designed to assure the safety of all persons, regardless of age and health.
The exposure standard for wireless mobile phones employs a unit of
measurement known as the Specific Absorption Rate, or SAR. The SAR limit
set by the FCC is 1.6 W/kg.* Tests for SAR are conducted with the phone
transmitting at its highest certified power level in all tested frequency
bands. Although the SAR is determined at the highest certified power
level, the actual SAR level of the phone while operating can be well below
the maximum value. This is because the phone is designed to operate at
multiple power levels so as to use only the power required to reach the
network. In general, the closer you are to a wireless base station antenna,
the lower the power output.
Before a phone model is available for sale to the public, it must be tested
and certified to the FCC that it does not exceed the limit established by
the government adopted requirement for safe exposure. The tests are
performed in positions and locations (e.g., at the ear and worn on the
body) as required by the FCC for each model. The highest SAR value for
this model phone when tested for use at the ear is 1.03 W/Kg and when
worn on the body, as described in this user guide, is 0.76 W/Kg. (Body-worn
measurements differ among phone models, depending upon available
accessories and FCC requirements.) While there may be differences between
the SAR levels of various phones and at various positions, they all meet the
government requirement for safe exposure.
The SAR testing for Body-worn operation was performed with a belt clip that
provided a 1cm separation. The User’s Manual indicates that any holsters/
clips used with this device should contain no metallic components.
186 Appendix
The FCC has granted an Equipment Authorization for this model phone with
all reported SAR levels evaluated as in compliance with the FCC RF exposure
guidelines.
SAR information on this model phone is on file with the FCC and can be
found under the Display Grant section of http://www.fcc.gov/oet/ea after
searching on JYCPREMIAV.
Additional information on Specific Absorption Rates (SAR) can be found
on the Mobile Telecommunications Industry Association (CTIA) web-site at
http://www.ctia.org.
* In the United States and Canada, the SAR limit for mobile phones used
by the public is 1.6 watts/kg (W/kg) averaged over one gram of tissue. The
standard incorporates a substantial margin of safety to give additional
protection for the public and to account for any variations in measurements.
Hearing Aid Compatibility for Wireless
Telecommunication Devices
PCD’s commitment
PCD believes that all of our customers should be able to enjoy the benefits
of digital wireless technologies.
We are committed to providing a selection of compatible devices for our
customers who wear hearing aids.
This phone has a HAC rating of M4/T3.
What is Hearing Aid Compatibility?
The Federal Communications Commission has implemented rules and a
rating system designed to enable people who wear hearing aids to more
effectively use these wireless telecommunications devices. The standard
for compatibility of digital wireless phones with hearing aids is set forth
in American National Standard Institute (ANSI) standard C6319. There are
two sets of ANSI standards with ratings from one to four (four being the
best rating): an “M” rating for reduced interference making it easier to hear
conversations on the phone when using the hearing aid microphone, and a
Appendix 187
“T” rating that enables the phone to be used with hearing aids operating in
the telecoil mode thus reducing unwanted background noise.
How will I know which wireless phones are hearing aid compatible?
The Hearing Aid Compatibility rating is displayed on the wireless phone box.
A phone is considered Hearing Aid Compatible for acoustic coupling
(microphone mode) if it has an “M3” or “M4” rating. A digital wireless phone
is considered Hearing Aid Compatible for inductive coupling (telecoil mode)
if it has a “T3” or “T4” rating.
This phone has been tested and rated for use with hearing aids for some
of the wireless technologies that it uses. However, there may be some
newer wireless technologies used in this phone that have not been tested
yet for use with hearing aids. It is important to try the different features
of this phone thoroughly and in different locations, using your hearing
aid or cochlear implant, to determine if you hear any interfering noise.
Consult your service provider about its return and exchange policies and for
information on hearing aid compatibility.
How will I know if my hearing aid will work with a particular digital
wireless phone?
You’ll want to try a number of wireless phones so that you can decide which
works the best with your hearing aids. You may also want to talk with your
hearing aid professional about the extent to which your hearing aids are
immune to interference, if they have wireless phone shielding, and whether
your hearing aid has a HAC rating.
188 Appendix
MORE INFORMATION ABOUT HEARING AIDS AND DIGITAL WIRELESS PHONE
• For FCC Hearing Aid Compatibility and Volume Control,
visit http://www.fcc.gov/cgb/dro/hearing.html.
• For Hearing Loss Association of America,
visit http://www.hearingloss.org/content/understanding-hearing-loss.
• For CTIA, visit http://www.accesswireless.org/Disability-Categories/
Hearing.aspx.
• For Gallaudet University, RERC, visit http://tap.gallaudet.edu/voice.
Teletypewriter Devices
You can use an optional teletypewriter (TTY) device with your phone to
send and receive calls. You must plug the TTY device into the phone’s
headset connector and set the phone to operate in one of three TTY modes.
Note
A TTY is a communication device used by people who are hard of
hearing or have a speech impairment. TTY does not work from mobile
phone to mobile phone. Use a TSB-121 compliant cable (provided
by the TTY manufacturer) to connect the TTY device to your phone.
Your phone has a 3.5mm jack. Set the phone to Medium volume level
for proper operation. If you experience a high number of incorrect
characters, adjust the volume as needed to minimize the error rate.
For optimal performance, your phone should be at least 12 inches (30
centimeters) from the TTY device. Placing the phone too close to the
TTY device may cause high error rates.

Appendix 189
FDA Consumer Updates
U.S. Food and Drug Administration Center for Devices and Radilogical
Health Consumer Update on Wireless Phones
1. Do wireless phones pose a health hazard?
The available scientific evidence does not show that any health problems
are associated with using wireless phones. There is no proof, however, that
wireless phones are absolutely safe. Wireless phones emit low levels of
radiofrequency energy (RF) in the microwave range while being used. They
also emit very low levels of RF when in the Home Screen. Whereas high
levels of RF can produce health effects (by heating tissue), exposure to low
level RF that does not produce heating effects causes no known adverse
health effects. Many studies of low level RF exposures have not found
any biological effects. Some studies have suggested that some biological
effects may occur, but such findings have not been confirmed by additional
research. In some cases, other researchers have had difficulty in reproducing
those studies, or in determining the reasons for inconsistent results.
2. What is FDA’s role concerning the safety of wireless phones?
Under the law, FDA does not review the safety of radiation-emitting
consumer products such as wireless phones before they can be sold, as it
does with new drugs or medical devices. However, the agency has authority
to take action if wireless phones are shown to emit radiofrequency energy
(RF) at a level that is hazardous to the user. In such a case, FDA could require
the manufacturers of wireless phones to notify users of the health hazard
and to repair, replace or recall the phones so that the hazard no longer
exists. Although the existing scientific data do not justify FDA regulatory
actions, FDA has urged the wireless phone industry to take a number of
steps, including the following:
190 Appendix
• Support needed research into possible biological effects of RF of the
type emitted by wireless phones;
• Design wireless phones in a way that minimizes any RF exposure to the
user that is not necessary for device function; and
• Cooperate in providing users of wireless phones with the best possible
information on possible effects of wireless phone use on human health.
FDA belongs to an interagency working group of the federal agencies that
have responsibility for different aspects of RF safety to ensure coordinated
efforts at the federal level. The following agencies belong to this working
group:
• National Institute for Occupational Safety and Health
• Environmental Protection Agency
• Federal Communications Commission
• Occupational Safety and Health Administration
• National Telecommunications and Information Administration
The National Institutes of Health participates in some inter-agency working
group activities, as well. FDA shares regulatory responsibilities for wireless
phones with the Federal Communications Commission (FCC). All phones
that are sold in the United States must comply with FCC safety guidelines
that limit RF exposure. FCC relies on FDA and other health agencies for
safety questions about wireless phones. FCC also regulates the base stations
that the wireless phone networks rely upon. While these base stations
operate at higher power than do the wireless phones themselves, the RF
exposures that people get from these base stations are typically thousands
of times lower than those they can get from wireless phones. Base stations
are thus not the subject of the safety questions discussed in this document.
3. What kinds of phones are the subject of this update?
The term “wireless phone” refers here to hand-held wireless phones with
built-in antennas, often called “cell,” “mobile,” or “PCS” phones. These types of
wireless phones can expose the user to measurable radiofrequency energy
(RF) because of the short distance between the phone and the user’s head.
Appendix 191
These RF exposures are limited by Federal Communications Commission
safety guidelines that were developed with the advice of FDA and other
federal health and safety agencies. When the phone is located at greater
distances from the user, the exposure to RF is drastically lower because a
person’s RF exposure decreases rapidly with increasing distance from the
source. The so-called “cordless phones,” which have a base unit connected to
the telephone wiring in a house, typically operate at far lower power levels,
and thus produce RF exposures far below the FCC safety limits.
4. What are the results of the research done already?
The research done thus far has produced conflicting results, and many
studies have suffered from flaws in their research methods. Animal
experiments investigating the effects of radiofrequency energy (RF)
exposures characteristic of wireless phones have yielded conflicting
results that often cannot be repeated in other laboratories. A few animal
studies, however, have suggested that low levels of RF could accelerate the
development of cancer in laboratory animals. However, many of the studies
that showed increased tumor development used animals that had been
genetically engineered or treated with cancer-causing chemicals so as to be
predisposed to develop cancer in the absence of RF exposure. Other studies
exposed the animals to RF for up to 22 hours per day. These conditions
are not similar to the conditions under which people use wireless phones,
so we don’t know with certainty what the results of such studies mean
for human health. Three large epidemiology studies have been published
since December 2000. Between them, the studies investigated any possible
association between the use of wireless phones and primary brain cancer,
glioma, meningioma, or acoustic neu-roma, tumors of the brain or salivary
gland, leukemia, or other cancers. None of the studies demonstrated the
existence of any harmful health effects from wireless phone RF exposures.
However, none of the studies can answer questions about long-term
exposures, since the average period of phone use in these studies was
around three years.
192 Appendix
5. What research is needed to decide whether RF exposure from wireless
phones poses a health risk?
A combination of laboratory studies and epidemiological studies of people
actually using wireless phones would provide some of the data that are
needed. Lifetime animal exposure studies could be completed in a few
years. However, very large numbers of animals would be needed to provide
reliable proof of a cancer promoting effect if one exists. Epidemiological
studies can provide data that is directly applicable to human populations,
but 10 or more years’ follow-up may be needed to provide answers about
some health effects, such as cancer. This is because the interval between the
time of exposure to a cancer-causing agent and the time tumors develop - if
they do -may be many, many years. The interpretation of epidemiological
studies is hampered by difficulties in measuring actual RF exposure during
day-to-day use of wireless phones. Many factors affect this measurement,
such as the angle at which the phone is held, or which model of phone is
used.
6. What is FDA doing to find out more about the possible health effects of
wireless phone RF?
FDA is working with the U.S. National Toxicology Program and with groups
of investigators around the world to ensure that high priority animal studies
are conducted to address important questions about the effects of exposure
to radiofrequency energy (RF). FDA has been a leading participant in the
World Health Organization International Electromagnetic Fields (EMF)
Project since its inception in 1996 An influential result of this work has been
the development of a detailed agenda of research needs that has driven
the establishment of new research programs around the world. The Project
has also helped develop a series of public information documents on EMF
issues. FDA and the Mobile Telecommunications & Internet Association
(CTIA) have a formal Cooperative Research and Development Agreement
(CRADA) to do research on wireless phone safety. FDA provides the
scientific oversight, obtaining input from experts in government, industry,
and academic organizations. CTIA-funded research is conducted through
contracts to independent investigators. The initial research will include both
laboratory studies and studies of wireless phone users. The CRADA will also
include a broad assessment of additional research needs in the context of
the latest research developments around the world.
Appendix 193
7. How can I find out how much radiofrequency energy exposure I can get
by using my wireless phone?
All phones sold in the United States must comply with Federal
Communications Commission (FCC) guidelines that limit radiofrequency
energy (RF) exposures. FCC established these guidelines in consultation
with FDA and the other federal health and safety agencies. The FCC limit for
RF exposure from wireless telephones is set at a Specific Absorption Rate
(SAR) of 1.6 watts per kilogram (1.6 W/kg). The FCC limit is consistent with
the safety standards developed by the Institute of Electrical and Electronic
Engineering (IEEE) and the National Council on Radiation Protection and
Measurement. The exposure limit takes into consideration the body’s ability
to remove heat from the tissues that absorb energy from the wireless
phone and is set well below levels known to have effects. Manufacturers of
wireless phones must report the RF exposure level for each model of phone
to the FCC. The FCC website (http://www.fda.gov (under “c” in the subject
index, select Cell Phones > Research).) gives directions for locating the
FCC identification number on your phone so you can find your phone’s RF
exposure level in the online listing.
8. What has FDA done to measure the radiofrequency energy coming
from wireless phones?
The Institute of Electrical and Electronic Engineers (IEEE) is developing a
technical standard for measuring the radiofrequency energy (RF) exposure
from wireless phones and other wireless handsets with the participation and
leadership of FDA scientists and engineers. The standard, “Recommended
Practice for Determining the Spatial-Peak Specific Absorption Rate (SAR) in
the Human Body Due to Wireless Communications Devices: Experimental
Techniques,” sets forth the first consistent test methodology for measuring
the rate at which RF is deposited in the heads of wireless phone users.
The test method uses a tissue-simulating model of the human head.
Standardized SAR test methodology is expected to greatly improve the
consistency of measurements made at different laboratories on the same
phone. SAR is the measurement of the amount of energy absorbed in tissue,
either by the whole body or a small part of the body. It is measured in
watts/kg (or milliwatts/g) of matter. This measurement is used to determine
whether a wireless phone complies with safety guidelines.
194 Appendix
9. What steps can I take to reduce my exposure to radiofrequency energy
from my wireless phone?
If there is a risk from these products—and at this point we do not know that
there is—it is probably very small. But if you are concerned about avoiding
even potential risks, you can take a few simple steps to minimize your
exposure to radiofrequency energy (RF). Since time is a key factor in how
much exposure a person receives, reducing the amount of time spent using
a wireless phone will reduce RF exposure.
If you must conduct extended conversations by wireless phone every day,
you could place more distance between your body and the source of the RF,
since the exposure level drops off dramatically with distance.
For example, you could use a headset and carry the wireless phone away
from your body or use a wireless phone connected to a remote antenna.
Again, the scientific data do not demonstrate that wireless phones are
harmful. But if you are concerned about the RF exposure from these
products, you can use measures like those described above to reduce your
RF exposure from wireless phone use.
10. What about children using wireless phones?
The scientific evidence does not show a danger to users of wireless phones,
including children and teenagers. to take steps to lower exposure to
radiofrequency energy (RF), the measures described above would apply
to children and teenagers using wireless phones. Reducing the time of
wireless phone use and increasing the distance between the user and the RF
source will reduce RF exposure. Some groups sponsored by other national
governments have advised that children be discouraged from using
wireless phones at all. For example, the government in the United Kingdom
distributed leaflets containing such a recommendation in December 2000.
They noted that no evidence exists that using a wireless phone causes brain
tumors or other ill effects. Their recommendation to limit wireless phone
use by children was strictly precautionary; it was not based on scientific
evidence that any health hazard exists.
Appendix 195
11. What about wireless phone interference with medical equipment?
Radiofrequency energy (RF) from wireless phones can interact with some
electronic devices. For this reason, FDA helped develop a detailed test
method to measure electromagnetic interference (EMI) of implanted cardiac
pacemakers and defibrillators from wireless telephones. This test method is
now part of a standard sponsored by the Association for the Advancement
of Medical instrumentation (AAMI). The final draft, a joint effort by FDA,
medical device manufacturers, and many other groups, was completed
in late 2000. This standard will allow manufacturers to ensure that cardiac
pacemakers and defibrillators are safe from wireless phone EMI. FDA has
tested hearing aids for interference from handheld wireless phones and
helped develop a voluntary standard sponsored by the Institute of Electrical
and Electronic Engineers (IEEE). This standard specifies test methods and
performance requirements for hearing aids and wireless phones so that
that no interference occurs when a person uses a “compatible” phone and
a “compatible” hearing aid at the same time. This standard was approved
by the IEEE in 2000. FDA continues to monitor the use of wireless phones
for possible interactions with other medical devices. Should harmful
interference be found to occur, FDA will conduct testing to assess the
interference and work to resolve the problem.
12. Where can I find additional information?
For additional information, please refer to the following resources:
• For FDA web page on wireless phones, visit http://www.fda.gov/
Radiation-EmittingProducts/RadiationEmittingProductsandProcedures/
HomeBusinessandEntertainment/CellPhones/default.htm).
• For Federal Communications Commission (FCC) RF Safety Program, visit
http://www.fcc.gov/oet/rfsafety.
• For International Commission on Non-Ionizing Radiation Protection,
visit http://www.icnirp.de.
• For World Health Organization (WHO) International EMF Project,
visit http://www.who.int/peh-emf/en/.
For National Radiological Protection Board (UK), visit http://www.hpa.org.
uk/radiation/.
196 Appendix
Avoid potential hearing loss
Prolonged exposure to loud sounds is the most common cause of
preventable hearing loss. Some scientific research suggests that using
portable audio devices, and mobile telephones, at high volume settings
for long durations may lead to permanent noise-induced hearing loss.
This includes the use of headphones (including headsets, earbuds and
Bluetooth® or other wireless devices). Exposure to very loud sound has
also been associated in some studies with tinnitus (a ringing in the ear),
hypersensitivity to sound and distorted hearing. Individual susceptibility to
noise-induced hearing loss and other potential hearing problems varies.
The amount of sound produced by a portable audio device varies
depending on the nature of the sound, the device, the device settings and
the headphones. You should follow some commonsense recommendations
when using any portable audio device:
• Set the volume in a quiet environment and select the lowest volume at
which you can hear adequately.
• When using headphones, turn the volume down if you cannot hear the
people speaking near you or if the person sitting next to you can hear
what you are listening to.
• Do not turn the volume up to block out noisy surroundings. If you
choose to listen to your portable device in a noisy environment, use
noise-cancelling headphones to block out background environmental
noise.
• Limit the amount of time you listen. As the volume increases, less time is
required before your hearing could be affected.
• Avoid using headphones after exposure to extremely loud noises,
such as concerts, that might cause temporary hearing loss. Temporary
hearing loss might cause unsafe volumes to sound normal.
• Do not listen at any volume that causes you discomfort. If you
experience ringing in your ears, hear muffled speech or experience
any temporary hearing difficulty after listening to your portable audio
device, discontinue use and consult your doctor.
Appendix 197
You can obtain additional information on this subject from the following
sources:
American Academy of Audiology
11730 Plaza America Drive, Suite 300
Reston, VA 20190
Voice: 800-AAA-2336
Email: infoaud@audiology.org
Internet: http://www.audiology.org/Pages/default.aspx
National Institute on Deafness and Other Communication Disorders
National Institutes of Health
31 Center Drive, MSC 2320
Bethesda, MD USA 20892-2320
Voice: (301) 496-7243
Email: nidcdinfo@nidcd.nih.gov
Internet: http://www.nidcd.nih.gov/health/hearing
National Institute for Occupational Safety and Health
1600 Clifton Rd
Atlanta GA 30333 USA
Voice: 1-800-CDC-INFO (1-800-232-4636)
Internet: http://www.cdc.gov/niosh/topics/noise/default.html
198 Appendix
Warranty
End User License Agreement (EULA)
Your use of Visual Voice Mail confirms that you are the account owner or
manager. This service requires traditional Voice Mail but does not support
all traditional Voice Mail features, which you can access by dialing *86
from your handset. Download and use of this app will be billed on a per-
megabyte basis, or according to any data package you have. Mobile to
mobile minutes do not apply. Standard rates apply to any calls or messages
initiated from Visual Voice Mail.
You may need to call customer care to cancel and if you cancel Visual Voice
Mail you may lose all stored voice mails and information. I understand that
by selecting “OK” my password and messages will be stored and anyone
in possession of this device will have access to my voice mail. I further
understand that my voice mail messages may be stored in electronic format
on this device. To limit unauthorized access to your voice mail you should
consider locking your phone when not in use. Not available in all areas or
over Wi-Fi. If you do not accept all of these terms and conditions do not use
Visual Voice Mail.
FCC compliance information
This device complies with Part 15 of FCC Rules.
Operation is subject to the following two conditions:
• This device may not cause harmful interference, and
• This device must accept any interference received. Including
interference that may cause undesired operation.
Appendix 199
Information to the User
This equipment has been tested and found to comply with the limits for a
Class B digital device pursuant to Part 15 of the FCC Rules. These limits are
designed to provide reasonable protection against harmful Interference in
a residential installation. This equipment generates, uses, and can radiate
radio frequency energy and, if Not installed and used in accordance with
the instructions, may cause harmful Interference to radio communications.
However, there is no guarantee that interference will not occur in a
particular Installation. If this equipment does cause harmful interference
to radio or television reception, which can be determined by turning
the equipment off and on, the user is encouraged to try to correct the
interference by one or more of the following measures:
• Reorient or relocate the receiving antenna.
Increase the separation between the equipment and receiver.
• Connect the equipment into an outlet of a circuit different from that to
which the receiver is connected.
• Consult the dealer or an experienced radio/TV technician for assistance.
Caution
Changes or modification not expressly approved by the party
responsible for Compliance could void the user’s authority to operate
the equipment. Connecting of peripherals requires the use of grounded
shielded signal cables.
12-month limited warranty
Personal Communications Devices, LLC. (the “Company”) warrants to the
original retail purchaser of this handheld portable mobile telephone, that
should this product or any part thereof during normal consumer usage and
conditions, be proven defective in material or workmanship that results in
product failure within the first twelve (12) month period from the date of
purchase, such defect(s) will be repaired or replaced (with new or rebuilt
parts) at the Company’s option, without charge for parts or labor directly
related to the defect(s).
200 Appendix
The antenna, keypad, display, rechargeable battery and battery charger,
if included, are similarly warranted for twelve (12) months from date of
purchase.
This Warranty extends only to consumers who purchase the product in the
United States or Canada and it is not transferable or assignable.
This Warranty does not apply to:
• Product subjected to abnormal use or conditions, accident,
mishandling, neglect, unauthorized alteration, misuse, improper
installation or repair or improper storage;
• Product whose mechanical serial number or electronic serial number
has been removed, altered or defaced.
• Damage from exposure to moisture, humidity, excessive temperatures
or extreme environmental conditions;
• Damage resulting from connection to, or use of any accessory or other
product not approved or authorized by the Company;
• Defects in appearance, cosmetic, decorative or structural items such as
framing and non-operative parts;
• Product damaged from external causes such as fire, flooding, dirt, sand,
weather conditions, battery leakage, blown fuse, theft or improper
usage of any electrical source.
The Company disclaims liability for removal or reinstallation of the product,
for geographic coverage, for inadequate signal reception by the antenna or
for communications range or operation of the mobile system as a whole.
When sending your wireless device to Personal Communications Devices
for repair or service, please note that any personal data or software stored
on the device may be inadvertently erased or altered. Therefore, we strongly
recommend you make a back up copy of all data and software contained
on your device before submitting it for repair or service. This includes all
contact lists, downloads (i.e. third-party software applications, ringtones,
games and graphics) and any other data added to your device. In addition,
if your wireless device utilizes a SIM or Multimedia card, please remove
the card before submitting the device and store for later use when your
device is returned, Personal Communications Devices is not responsible for
Appendix 201
and does not guarantee restoration of any third-party software, personal
information or memory data contained in, stored on, or integrated with
any wireless device, whether under warranty or not, returned to Personal
Communications Devices for repair or service.
To obtain repairs or replacement within the terms of this Warranty, the
product should be delivered with proof of Warranty coverage (e.g. dated bill
of sale), the consumer’s return address, daytime phone number and/or fax
number and complete description of the problem, transportation prepaid,
to the Company at the address shown below or to the place of purchase for
repair or replacement processing. In addition, for reference to an authorized
Warranty station in your area, you may telephone in the United States (800)
229-1235, and in Canada (800) 465-9672 (in Ontario call 416-695-3060).
THE EXTENT OF THE COMPANY’S LIABILITY UNDER THIS WARRANTY IS
LIMITED TO THE REPAIR OR REPLACEMENT PROVIDED ABOVE AND, IN NO
EVENT, SHALL THE COMPANY’S LIABILITY EXCEED THE PURCHASE PRICE
PAID BY PURCHASER FOR THE PRODUCT.
ANY IMPLIED WARRANTIES, INCLUDING ANY IMPLIED WARRANTY OF
MERCHANTABILITY OR FITNESS FOR A PARTICULAR PURPOSE, SHALL BE
LIMITED TO THE DURATION OF THIS WRITTEN WARRANTY. ANY ACTION
FOR BREACH OF ANY WARRANTY MUST BE BROUGHT WITHIN A PERIOD OF
18 MONTHS FROM DATE OF ORIGINAL PURCHASE. IN NO CASE SHALL THE
COMPANY BE LIABLE FOR AN SPECIAL CONSEQUENTIAL OR INCIDENTAL
DAMAGES FOR BREACH OF THIS OR ANY OTHER WARRANTY, EXPRESS OR
IMPLIED, WHATSOEVER. THE COMPANY SHALL NOT BE LIABLE FOR THE
DELAY IN RENDERING SERVICE UNDER THIS WARRANTY OR LOSS OF USE
DURING THE TIME THE PRODUCT IS BEING REPAIRED OR REPLACED.
No person or representative is authorized to assume for the Company any
liability other than expressed herein in connection with the sale of this
product. Some states or provinces do not allow limitations on how long
an implied warranty lasts or the exclusion or limitation of incidental or
consequential damage so the above limitation or exclusions may not apply
to you. This Warranty gives you specific legal rights, and you may also have
other rights, which vary from state to state or province to province.
202 Appendix
IN USA:
Personal Communications Devices.
555 Wireless Blvd.
Hauppauge, NY 11788
1-800-229-1235
IN CANADA:
PCD Communications Canada LLC.
5535 Eglinton Avenue West, Suite 234
Toronto, Ontario
M9C 5K5
1-800-465-9672