Pantech EZ2 Cellular/ PCS Phone User Manual 070522 CDM8630 EN M indd
Pantech Co., Ltd. Cellular/ PCS Phone 070522 CDM8630 EN M indd
UserManual.wiki
>
Pantech
>
EZ2 User Manual
>
Users Manual
Contents
1.
Users Manual
2.
User Manual
Users Manual
Navigation menu
Upload a User Manual
Namespaces
Wiki Guide
HTML
PDF
Info
Views
User Manual
Discussion / Help
Navigation
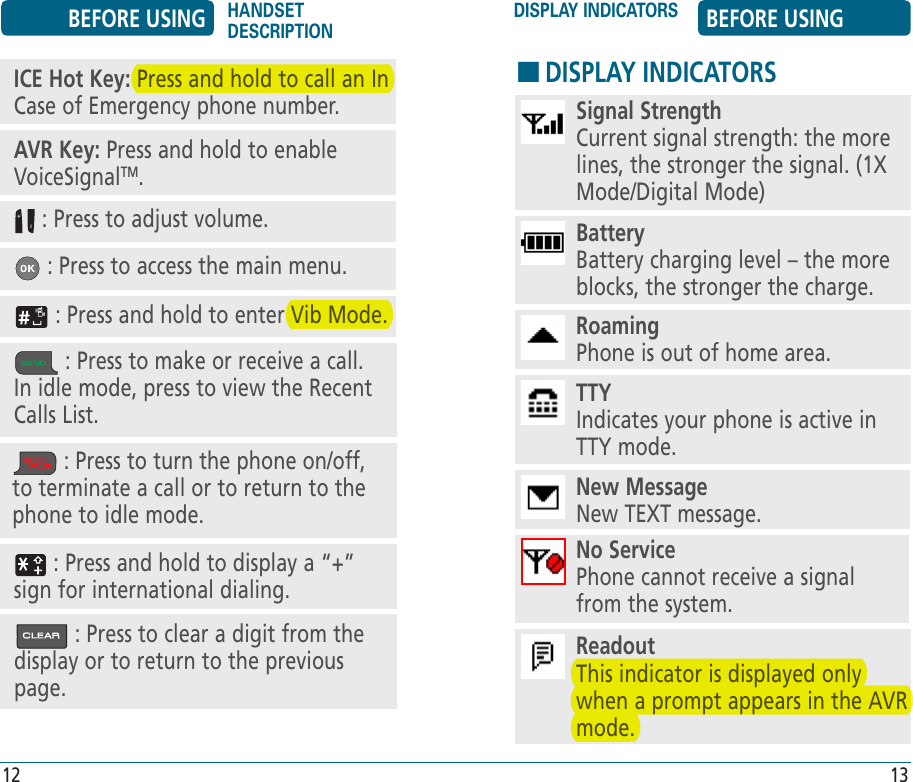
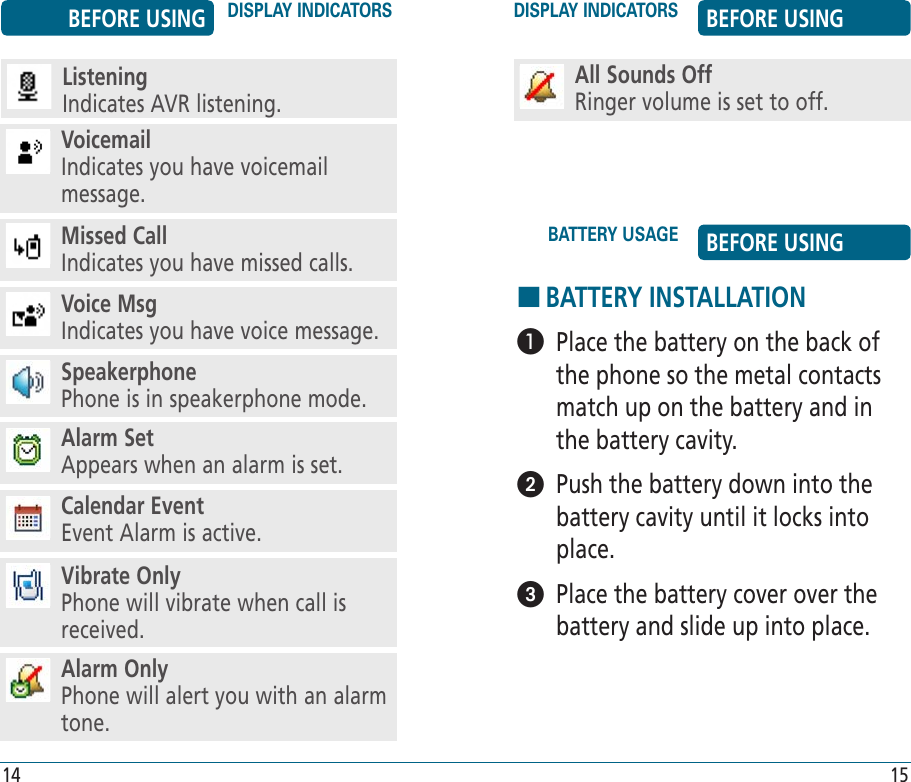
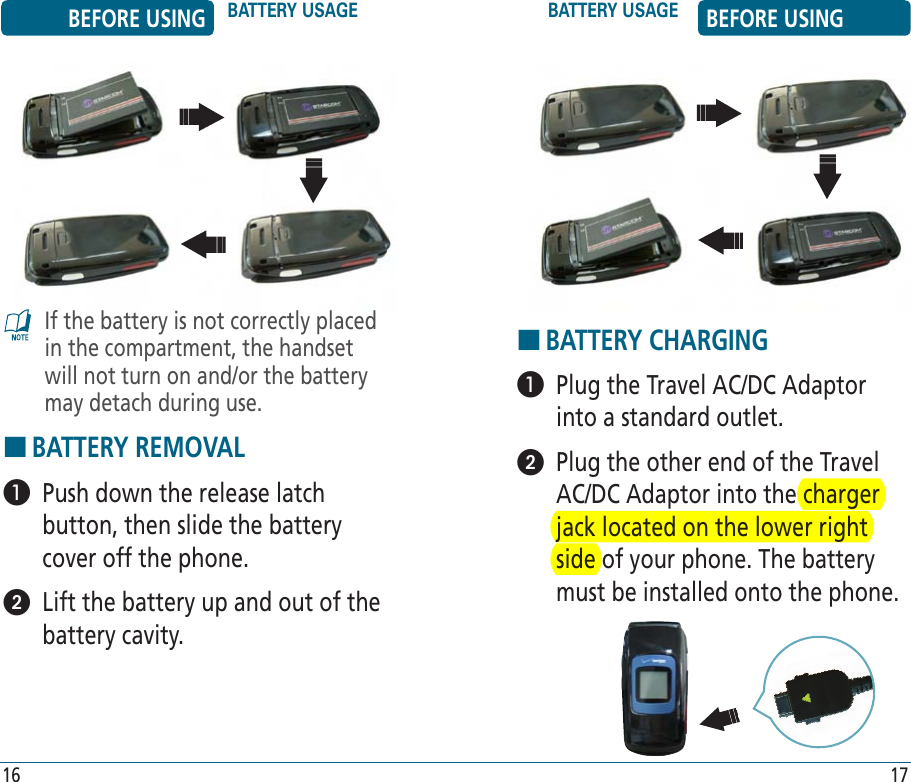
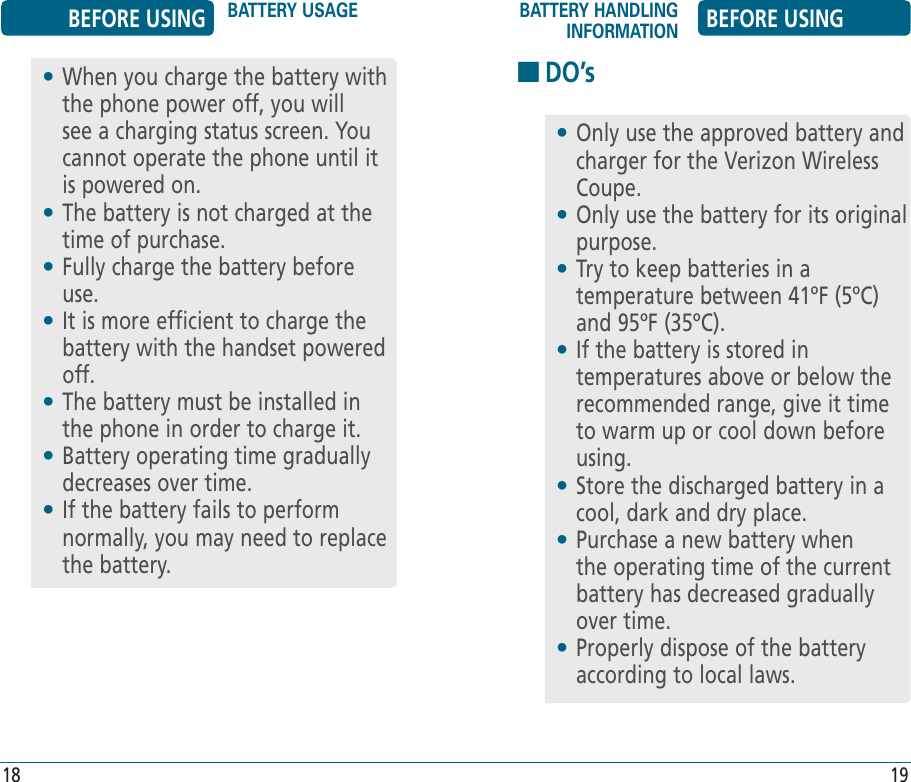

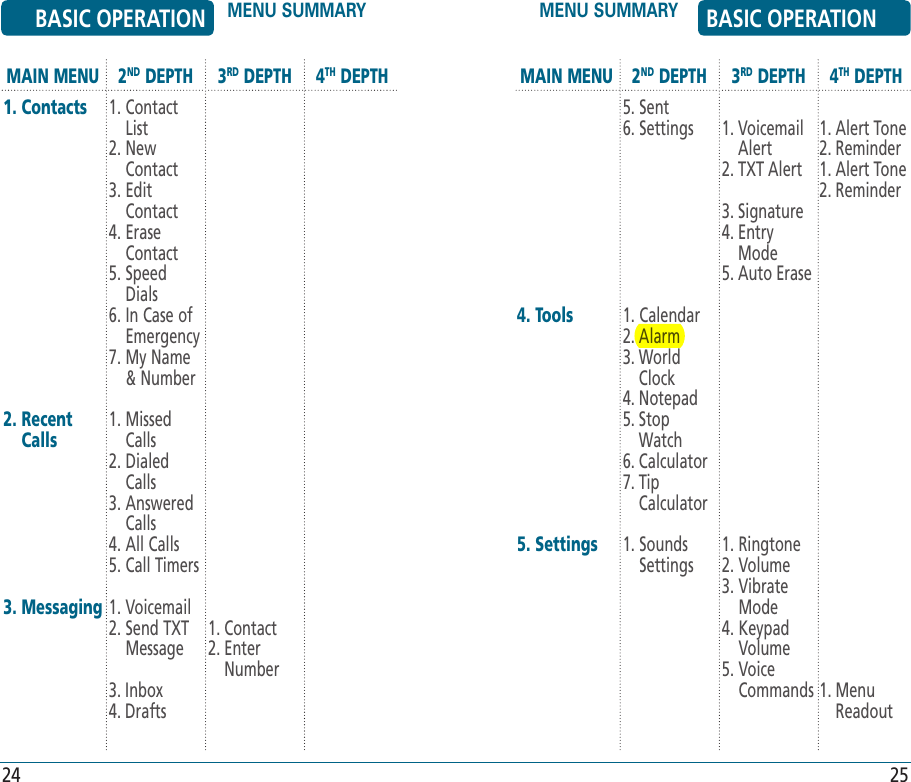
![HTURNING THE PHONE ON Press until your Power On logo appears on your internal display and the tone sounds.HTURNING THE PHONE OFF Press and hold until your Power Off logo appears on the internal display. • Immediately change or recharge the battery when “Low Battery” appears on the display. Memory may possibly be damaged if the phone turns off due to the battery completely draining.• Turn the phone off before removing or replacing the battery. If the phone is on, unsaved data may be lost. To access the menu, press the Left Soft Key [MENU]. Press the Navigation Key right, left, up or down to scroll through the menu. To return to the previous page, press . To exit the current menu and return to idle mode, press . Press to enter a function when its main page is displayed or press its assigned number to have direct access to the function.Your phone can be customized via the menu. Each function can be accessed by pressing the Navigation Key up, down, left or right. Or you can press the number that corresponds with the menu item.BASIC OPERATION TURNING THE PHONE ON / OFFACCESSING THE MENU BASIC OPERATION22 23](https://usermanual.wiki/Pantech/EZ2.Users-Manual/User-Guide-806843-Page-12.png)
![HANSWERING A CALL When your phone rings or vibrates, press to answer the incoming call. (Depending on your phone’s settings, you may also answer incoming calls by opening the phone or by pressing any key.)• To ignore incoming calls, press Right Soft Key [IGNORE].• To silence the ringer, press Left Soft Key [SILENCE]. To end the call, press twice.HCALLER IDIdentifies the person calling you by displaying their phone number. If the caller’s name and number are already stored in your phone book, their name and number will appear on the external display.The caller ID information is stored in Recent Calls.BASIC OPERATION BASIC FUNCTIONS BASIC FUNCTIONS BASIC OPERATION28 29HMAKING A CALL Enter a phone number.To modify the phone number you have entered:• Erase one digit at a time by pressing .• Erase the entire number by pressing and holding . Press . • If “CALL FAILED” appears on the display or the line is busy, press or . • When you place or receive a call from a phone number stored in your contact list with a contact name, the name and number will be displayed. To end a call, press .](https://usermanual.wiki/Pantech/EZ2.Users-Manual/User-Guide-806843-Page-15.png)
![HCALL WAITINGNotifies you of an incoming call when you are already on a call by sounding a beep tone and displaying the caller’s phone number.To answer another call while on the phone, press . This places the first call on hold. To switch back to the first caller, press again.HVOLUME ADJUSTMENTTo adjust the volume: When your phone is not in any menu or performing any functions, press the Side Volume Key up or down. Or, press Left Soft Key [MENU] Settings, Sounds Settings, Volume. BASIC OPERATION BASIC FUNCTIONS BASIC FUNCTIONS BASIC OPERATION30 31H3-WAY CALLINGWith 3-Way Calling, you can talk to two people at the same time. When you make a 3-Way Call, you will be charged the normal airtime rates for both calls. Enter the phone number you wish to call and press . When the person you called answers, enter the second number you wish to call and press . When the second person you called answers, press again and all 3 of you can begin talking.If one of the people you called hangs up during your call, you and the remaining caller stay connected. If you initiated the call and are the first to hang up, all three callers are disconnected.](https://usermanual.wiki/Pantech/EZ2.Users-Manual/User-Guide-806843-Page-16.png)
![HWAIT/2-SEC PAUSEPauses are used for automated systems (i.e., voicemail, calling cards). Insert a pause after a phone number then enter another group of numbers. The second set of numbers is dialed automatically after the pause. This feature is useful for dialing into systems that require a code. To insert a pause, enter a phone number then press Right Soft Key [OPTIONS]. Select either a Add 2-Sec Pause (“P” appears) or a Add Wait (“W” appears). Press to dial or Left Soft Key [SAVE] to store the number in your Contacts.Please refer to page 38 for more details about storing a phone number.BASIC OPERATION BASIC FUNCTIONS BASIC FUNCTIONS BASIC OPERATION32 33 Select one of the following options, then press to save it.Press the Side Volume Key up or down to adjust Earpiece volume during a call.HSPEAKERPHONEThe speakerphone feature lets you hear audio through the speaker and talk without holding the phone. To activate the speakerphone in idle mode or while on a call, press . The phone returns to normal (Speakerphone Off) after ending a call or when the phone is turned off and back on.• All Sounds Off• Alarm Only• Low / Med-Low / Medium / Med-High / High](https://usermanual.wiki/Pantech/EZ2.Users-Manual/User-Guide-806843-Page-17.png)
![RECENT CALLSEnables you to review the Recent Calls List while on a call.To view your Recent Calls List during a call, press Right Soft Key [OPTIONS], Recent Calls.PHONE INFOEnables you to view your phone’s software and hardware information while on a call.To view phone information during a call, press Right Soft Key [OPTIONS], Phone Info.MAIN MENUEnables access the phone's main menu while on a call.To access the Main Menu during a call, press Right Soft Key [OPTIONS], Main Menu.BASIC OPERATION DURING A CALL DURING A CALL BASIC OPERATION34 35HMUTE (UNMUTE)When you Mute a call, the caller cannot hear you or any sounds from your side but you can still hear them.To turn on the Mute function during a call, press Left Soft Key [MUTE].H �AVAILABLE OPTIONS DURING A CALLTo display menu options during a call, press Right Soft Key [OPTIONS].CONTACT LISTEnables you to review your Contacts list while on a call.To access your Contacts List during a call, press Right Soft Key [OPTIONS], Contact List.• To deactivate, press Left Soft Key [UNMUTE].• The phone will automatically unmute in Emergency Call or Callback mode.](https://usermanual.wiki/Pantech/EZ2.Users-Manual/User-Guide-806843-Page-18.png)
![CHAPTER 3MEMORYFUNCTIONSThis chapter addresses memory functions including:STORING A PHONE NUMBERENTERING LETTERS, NUMBERS & SYMBOLSMAKING A CALL FROM THE PHONE BOOK CHAPTER 3 MEMORY FUNCTIONS36BASIC OPERATION MAKING AN EMERGENCY CALLThe 911 feature puts the phone in the Emergency Call Mode when you dial the preprogrammed emergency number, 911, or when you press the 911 Hot Key .H �911 USING ANY AVAILABLE SYSTEM Press and hold “911 ” and press Left Soft Key [YES]. Or, Enter “911” and then press . The call connects. The phone maintains the Emergency Mode for 5 minutes.The 911 call does not appear in the Recent Call List. While the phone is in the emergency mode for 5 minutes, the phone can receive an incoming call from any available system.](https://usermanual.wiki/Pantech/EZ2.Users-Manual/User-Guide-806843-Page-19.png)
![The phone book stores up to 500 entries. Enter the phone number then press Left Soft Key [SAVE]. Choose “New Contact” or “Update Existing” then press to select. If “New Contact” is selected, press the Navigation Key up or down to choose the type of number you’re adding, as indicated by the Number Type. Press to select. If “Update Existing” is selected, your Contact List is displayed. Choose the entry to add the phone number to, then press Left Soft Key [SELECT]. Press the Navigation Key up or down to choose the type of number you’re adding, as indicated by the Number Type. Press to select. Enter a name. Please refer to page 40 for more details on entering letters, numbers & symbols. To change the input mode, press Right Soft Key [Abc]. Press the Navigation Key down to select other options (Mobile1.2, Home, Work, etc...). If you entered a phone number, press Right Soft Key [OPTIONS] to select one of the following options: To store the entry, press Left Soft Key [SAVE]. “Contact Saved” or ”Contact Updated” will be displayed.• Add 2-Sec Pause• Add WaitMEMORY FUNCTIONS STORING A PHONE NUMBERSTORING A PHONE NUMBER BASIC OPERATION38 39](https://usermanual.wiki/Pantech/EZ2.Users-Manual/User-Guide-806843-Page-20.png)
![The input mode (Alpha editor) will automatically be activated when necessary to enter letters and numbers. There are 5 available modes Standard input mode (Abc) and standard all capitals (ABC), T9Word input mode (Word), Numeric mode (123), and Symbol mode (Symbols).The input mode indicator appears on the upper right of the display when letters and numbers are entered. To select the desired input mode among the 5 modes below, press Right Soft Key [Abc], then enter letters and numbers.The following illustrates the function assigned to each key in the Alpha Editor.Abc - Press to change mode. [Abc][ABC][123][Word][Symbols]OK - Confirm the letters and numbers you entered.Clear - Press to delete a charac-ter to the left of the cursor.KEY FUNCTIONSpace - Press to accept a word and add a space.Caps Lock - Press to select a letter case of the standard text input or T9 text input mode. [Abc], [ABC] and [abc] indicate the standard text input. [Word], [WORD] and [word] indicate the predictive text input. Press and hold to change mode.Next - Press to view the next matching word if the highlight-ed word is not the word you intended in Word input mode.MEMORY FUNCTIONS ENTERING LETTERS, NUMBERS & SYMBOLSENTERING LETTERS, NUMBERS & SYMBOLS BASIC OPERATION40 41](https://usermanual.wiki/Pantech/EZ2.Users-Manual/User-Guide-806843-Page-21.png)
![HSTANDARD INPUT MODEUse the number keys to enter letters, numbers and characters. Enter letters using the key pad as follows:To change the input mode, press Right Soft Key [OPTIONS], then Entry Mode. When entering special character such as . @ ? ! - , & : ’ / 1, press repeatedly. Press1 TimePress2 timesPress3 timesPress4 timesPress5 timesKey PadADGJMBEHKNCFILO23456ADGJMPTWQUXRVYS8Z7T9 To enter a space, press . The cursor will automatically move to the next space. Repeat until letters are entered. To delete one digit, press . If you press and hold , it will delete characters up to last space. To change from lowercase to uppercase, press .FOR EXAMPLE:Select Abc mode by pressing Right Soft Key [Options], then Entry Mode. When you select this mode, the Abc icon appears as a visual confirmation.• Find the key that corresponds to the letter you want to enter. • Press it as many times as needed for the letter to appear on the screen.MEMORY FUNCTIONS ENTERING LETTERS, NUMBERS & SYMBOLSENTERING LETTERS, NUMBERS & SYMBOLS BASIC OPERATION42 43](https://usermanual.wiki/Pantech/EZ2.Users-Manual/User-Guide-806843-Page-22.png)
![• To enter the name “John”:Press [ ] JPress [ , , ] oPress [ , ] hPress [ , ] nHWORD INPUT MODEThe Word input mode incorporates a built-in-dictionary to determine a word based on the entered characters. A word can be entered more quickly by pressing a key once per character. Create a new TXT Message. See instructions on page 79. Select the Word mode by pressing Right Soft Key [OPTIONS], Entry Mode, Word. Press a digit key once to enter the character you want then enter all the characters to input the word you want. To view the next matching word, press . To accept the matching word and enter a space, press .To enter a compound word:• Enter the first part of the word and then press the Navigation Key right to accept it.• Enter the last part of the word and then press to enter the word.FOR EXAMPLE:To enter “Hello Bill” in Word input mode:When you select this mode, the Word icon appears as a visual confirmation.MEMORY FUNCTIONS ENTERING LETTERS, NUMBERS & SYMBOLSENTERING LETTERS, NUMBERS & SYMBOLS BASIC OPERATION44 45](https://usermanual.wiki/Pantech/EZ2.Users-Manual/User-Guide-806843-Page-23.png)
![HSYMBOL MODEAllows you to enter symbols. Select Symbol mode by pressing Right Soft Key [OPTIONS], Entry Mode, Symbols, then press [OK]. Select the symbol you want to enter by pressing the Navigation Key right, left, up or down.• After you enter the 1st letter, press Right Soft Key [OPTIONS], then Entry Mode to select input mode and to choose the lower case (Word).• Press , , , , and you will see “Hello” highlighted. Press to select it.• Press , , , until you see “Bill” highlighted.HNUMERIC MODEAllows you to enter numbers. Select Numeric mode by pressing Right Soft Key [OPTIONS], Entry Mode, 123, then press [OK]. To enter a number, press its corresponding digit key.To insert a number while in “Word“ or “Abc“ mode, press and hold the desired number key.MEMORY FUNCTIONS ENTERING LETTERS, NUMBERS & SYMBOLSENTERING LETTERS, NUMBERS & SYMBOLS BASIC OPERATION46 47](https://usermanual.wiki/Pantech/EZ2.Users-Manual/User-Guide-806843-Page-24.png)
![Stores up to 500 entries. Entries can be retrieved by name. HCONTACT LISTRetrieves an entry by name and calls by simply pressing . You can review all the entries stored in your Contact List or quickly find an entry by entering a name or its character string. Press Left Soft Key [MENU], Contacts, Contact List. Or in idle mode, press Right Soft Key [CONTACTS]. The list of names in your phone book is displayed alphabetically.• To use and manage contacts, press Right Soft Key [OPTIONS] then select:1. New Contact: To add a New Contact.2. Edit Contact: To edit a contact.3. Erase Contact: To delete a contact.4. Set as Emergency: To set as an In Case of an Emergency number.5. Send TXT Message: To create a TXT message.6. Erase All: To delete all names in the contact list.• To set as emergency number, select “In Case of Emergency“. Please refer to page 62 for more details on “In Case of Emergency“. Enter a name or part of a name or scroll through the list by pressing the Navigation Key up or down. Please refer to page 40 for more details on entering letters, numbers & symbols. To show entry details, press Left Soft Key [VIEW].MENU FUNCTIONS CONTACTS CONTACTS MENU FUNCTIONS50 51](https://usermanual.wiki/Pantech/EZ2.Users-Manual/User-Guide-806843-Page-26.png)
![52 53 To edit the entry, press Left Soft Key [EDIT]. Press Right Soft Key [OPTIONS] to see the options below: To call the selected number, press Right Soft Key [OPTIONS] and then select Call or press .1. Call: To call the contact.2. Set Speed Dial: To assign a speed dial.3. Add Picture ID: To add a picture ID. 4. Set as Default: To set as default call number.5. Erase Contact: To delete a contact.6. Send TXT Message: To create a TXT message.HNEW CONTACTAdds a new contact entry. To add a new entry to the phone book, press Left Soft Key [MENU], Contacts, New Contact. To enter a name or number, press the Navigation Key up or down to select the contact fields.• Contact Fields: Name / Mobile1 / Home / Work / Mobile2 / Other / Ringtone / Picture.• Under “Mobile 1”, “Mobile 2”, “Home”, “Work” or “Other” input the phone number, then press the Right Soft Key [OPTIONS], to access the following:1. Add 2-Sec Pause2. Add Wait• Please refer to page 40 for more details on entering letters, numbers & symbols.MENU FUNCTIONS CONTACTS CONTACTS MENU FUNCTIONS](https://usermanual.wiki/Pantech/EZ2.Users-Manual/User-Guide-806843-Page-27.png)
![ To show entry details, press Left Soft Key [VIEW]. To edit the entry, press Left Soft Key [EDIT]. To return to the previous page, press Right Soft Key [CANCEL].3. Erase Contact: To delete a contact.4. Set as Emergency: To set as an In Case of an Emergency number.5. Send TXT Message: To create a TXT message.6. Erase All: To delete all name in the contact list.• To set as emergency number, select “In Case of Emergency“. Please refer to page 62 for more details on “In Case of Emergency“. To save the entry, press Left Soft Key [SAVE]. To return to the previous page, press .If only a phone number is entered and the name field is left blank, the contact will still be saved and the Contact List will display the phone number.HEDIT CONTACTTo change the information you have saved for a Contact: Press Left Soft Key [MENU], Contacts, Edit Contact. The list of names in your phone book is displayed alphabetically.• To use and manage Contacts, press Right Soft Key [OPTIONS] then select:1. New Contact: To add a New Contact.2. Edit Contact: To edit a contact.MENU FUNCTIONS CONTACTS CONTACTS MENU FUNCTIONS54 55](https://usermanual.wiki/Pantech/EZ2.Users-Manual/User-Guide-806843-Page-28.png)
![HERASE CONTACT Press Left Soft Key [MENU], Contacts, Erase Contact. The list of names in your phone book is displayed alphabetically.• To use and manage contacts, press Right Soft Key [OPTIONS] then select:1. New Contact: To add a New Contact.2. Edit Contact: To edit a contact.3. Erase Contact: To delete a contact.4. Set as Emergency: To set as an In Case of an Emergency number.5. Send TXT Message: To create a TXT message.6. Erase All: To delete all contact list.• To set as emergency number, select “In Case of Emergency“. Please refer to page 62 for more details on “In Case of Emergency“. To show entry details, press Left Soft Key [VIEW]. To delete the entry, press Left Soft Key [ERASE]. To return to the previous page, press Right Soft Key [CANCEL].HSPEED DIALSIn idle mode, calls can be placed to numbers stored in speed dial by pressing & holding the location number on the key pad or press location number, then press . For a 2-digit location number, press the first number and then press and hold the second number.Speed Dial 1 is assigned to voicemail and cannot be changed.Speed Dials, 97, 98, and 99 are preset to access Verizon Wireless phone account information.MENU FUNCTIONS CONTACTS CONTACTS MENU FUNCTIONS56 57](https://usermanual.wiki/Pantech/EZ2.Users-Manual/User-Guide-806843-Page-29.png)

![To save a contact to Speed Dial: Press Left Soft Key [MENU], Contacts, Speed Dials. To assign a phone number to a location, press Left Soft Key [ASSIGN] then choose “From Contacts” or “Enter Number”. Press to select.• In idel mode long press 6 and if no phone number is stored in the location entered, “Location Not Assigned. Assign Now?” will appear on the screen.• To call an assigned number, press & hold the last digit of the speed dial # in idel mode. For example, to call the telephone number assigned to location #2, press and hold . To call the telephone number assigned to location #12, quickly press , then press and hold .ONE-TOUCH DIALING:1-9: Press and hold the corresponding memory number for more than 1 second.TWO-TOUCH DIALING:10-22, 97-99: Press the first digit and second digits of the memory number short and long respectively.1. From Contacts: Search for a phone number which is stored in the contacts list. To assign speed dial number press Left Soft Key [VIEW], and “Speed Dial Number Assigned” will be displayed.2. Enter Number: To store the new phone number in contacts. To save or assign a number press Left Soft Key [Assign] and “Contact Saved and Added as Speed Dial Number” will be displayed. MENU FUNCTIONS CONTACTS CONTACTS MENU FUNCTIONS60 61](https://usermanual.wiki/Pantech/EZ2.Users-Manual/User-Guide-806843-Page-31.png)
![HIN CASE OF EMERGENCYYour phone has a special menu to organize your emergency contacts and information. Press Left Soft Key [MENU], Contacts, In Case of Emergency. Select one of the entries by pressing the Navigation Key up or down. To set a new emergency number, choose Contact 1 ( ), Contact 2 ( ) or Contact 3 ( ). Press Left Soft Key [ASSIGN]. Select “From Contacts” or “Enter Number”, then press .1. From Contacts: Search for a phone number which stored in your Contacts List. To assign from the saved number press Left Soft Key [Select].PERSONAL INFOYou can use the “Personal Info” field to add personal notes, including allergies, medications and other health information. If you want to add emergency personal info, press the Navigation Key up or down to select “Personal Info“. Press Left Soft Key [VIEW]. Choose Note 1, 2 or 3, then press Left Soft Key [ADD]. Enter a special note that would prove useful in case of an emergency, then press Left Soft Key [SAVE] to save it. MENU FUNCTIONS CONTACTS CONTACTS MENU FUNCTIONS62 632. Enter Number: To store a number not stored in your Contacts List as a new emergency phone number in contacts. To save press Left Soft Key [Save].](https://usermanual.wiki/Pantech/EZ2.Users-Manual/User-Guide-806843-Page-32.png)
![64 65HMY NAME & NUMBERCreate your own business card, so that you can send all your details upon request by TXT message. Press Left Soft Key [MENU], Contacts, My Name & Number. Enter your name in the “My Name” field. Please refer to page 40 for more details on entering letters, numbers & symbols. Press Left Soft Key [SAVE]. Your My Name & Number information is displayed. To edit it, press Left Soft Key [EDIT]. Edit the information then press Left Soft Key [SAVE]. To send your My Name & Number information to someone via messaging from the My Name & Number menu, press Right Soft Key [SEND]. Follow directions for sending a new message on page 79.MENU FUNCTIONS CONTACTS CONTACTS MENU FUNCTIONS](https://usermanual.wiki/Pantech/EZ2.Users-Manual/User-Guide-806843-Page-33.png)
![HMISSED CALLSDisplays information about the 90 most recent calls you did not answer. Place a call to a missed call number by simply pressing . To see a list of the 90 most recently missed calls, press Left Soft Key [MENU] Recent Calls, Missed Calls. If the number is already stored in your contacts, only the name appears. If the number is not stored, only the phone number appears. Press Right Soft Key [OPTIONS] and then select “Save” to save it or select “Erase” to delete it. To view missed call details, press Left Soft Key [VIEW].Call details include date, time and phone number. Press Left Soft Key [SAVE/DETAILS]. Press Right Soft Key [MESSAGE] to send a TXT message. After 90 missed calls, the oldest call will automatically be erased from the history.• Send TXT Message: To send a TXT message to the caller.• Erase: To erase a missed calls entry.• Erase All: To erase all missed calls entries.• Save: To store the phone number in your contact.• Details: If the selected entry is already stored in the Contacts List, press to the caller’s information.MENU FUNCTIONS RECENT CALLS RECENT CALLS MENU FUNCTIONS66 67](https://usermanual.wiki/Pantech/EZ2.Users-Manual/User-Guide-806843-Page-34.png)
![HDIALED CALLSDisplays information about the 90 most recent calls you made. Place a call to a dialed call by simply pressing . To see a list of the 90 most recently dialed numbers, press Left Soft Key [MENU] Recent Calls, Dialed Calls. If the number is already stored in your contacts, only the name appears. If the number is not stored, only the phone number appears. Press Right Soft Key [OPTIONS] and then select “Save” to save it or select “Erase” to delete it.• Save: To store the phone number in your contact.• Details: If the selected entry is already stored in the Contact’s List, press to the caller’s information. To view dialed call details, press Left Soft Key [VIEW].Call details include date, time, call duration and phone number. Press Left Soft Key [SAVE/DETAILS]. Press Right Soft Key [MESSAGE] to send a TXT message. After 90 dialed calls, the oldest call will automatically be erased from the history.• Send TXT Message: To send a TXT message to the caller.• Erase: To erase a dialed calls entry.• Erase All: To erase all dialed calls entries.MENU FUNCTIONS RECENT CALLS RECENT CALLS MENU FUNCTIONS68 69](https://usermanual.wiki/Pantech/EZ2.Users-Manual/User-Guide-806843-Page-35.png)
![ To view answered call details, press Left Soft Key [VIEW].Call details include date, time, call duration and phone number. Press Left Soft Key [SAVE/DETAILS]. Press Right Soft Key [MESSAGE] to send a TXT message. After 90 answered calls, the oldest call will automatically be erased from the history.70 71HANSWERED CALLSDisplays information about the 90 most recently answered calls. Place a call to an answered call by simply pressing . To see a list of the 90 most recently answered calls, press Left Soft Key [MENU] Recent Calls, Answered Calls. If the number is already stored in your contacts, only the name appears. If the number is not stored, only the phone number appears. Press Right Soft Key [OPTIONS] and then select “Save” to save it or select “Erase” to delete it.• Save: To store the phone number in your contact.• Details: If the selected entry is already stored in the Contacts List, press to the caller’s information.• Send TXT Message: To send TXT message to teh caller.• Erase: To erase an answered calls entry.• Erase All: To erase all answered calls entries.MENU FUNCTIONS RECENT CALLS RECENT CALLS MENU FUNCTIONS](https://usermanual.wiki/Pantech/EZ2.Users-Manual/User-Guide-806843-Page-36.png)
![HALL CALLSDisplays information about the most recently answered, dialed and missed calls. To see a list of the 270 most recently answered, dialed and missed calls, press Left Soft Key [MENU], Recent Calls, All Calls. If the number is already stored in your contacts, only the name appears. If the number is not stored, only the phone number appears. Press Right Soft Key [OPTIONS] and then select “Save” to save it or select “Erase” to delete it. To view details, press Left Soft Key [VIEW].Call details include date, time, phone number and call duration (Except missed calls). Press Left Soft Key [SAVE/DETAILS]. Press Right Soft Key [MESSAGE] to send a TXT message. After 270 answered, dialed or missed calls, the oldest call will automatically be erased from the history.• Send TXT Message: To send TXT message to the caller.• Erase: To erase an all calls entry.• Erase All: To erase the entire all calls list.• Save: To store the phone number in your contact.• Details: If the selected entry is already stored in the Contacts List, press to the caller’s information. MENU FUNCTIONS RECENT CALLS RECENT CALLS MENU FUNCTIONS72 73](https://usermanual.wiki/Pantech/EZ2.Users-Manual/User-Guide-806843-Page-37.png)
![HCALL TIMERSChecks the usage time. The 7 timers include Last Call, All Calls, Received Calls, Dialed Calls, Last Reset, Roam Calls, Lifetime Calls: Press Left Soft Key [MENU], Recent Calls, Call Timers. Select “Last Call”, “All Calls”, “Received Calls”, “Dialed Calls”, “Last Reset”, “Roam Calls”, “Lifetime Calls” by pressing the Navigation Key up or down. To reset the timer, press Left Soft Key [RESET], then press Left Soft Key [YES]. To reset all timers, press Right Soft Key [RESET ALL], then press Left Soft Key [YES]. To return to the previous page, press .H �WHEN A NEW MESSAGE ARRIVES A display appears when a new message arrives. To display the message, press [VIEW].HVOICEMAILNew voicemail alerts are sent via an SMS text message. These messages indicate how many new and urgent voicemails are in your voicemail box. Open the text message to view the number of new voice messages in your voicemail. If a caller leaves a callback number, this number will also be sent via an SMS text message. It also Displays the number of voicemails. You can access them by pressing and holding .MENU FUNCTIONS RECENT CALLS MESSAGING MENU FUNCTIONS74 75](https://usermanual.wiki/Pantech/EZ2.Users-Manual/User-Guide-806843-Page-38.png)
![VOICEMAIL SETUP Press , , and then press . (If calling from a touch-tone phone, enter your wireless number.) At the recording, press .You will be charged airtime for using your wireless phone to set-up or retrieve voicemail. Toll and/or long distance charges may also apply. Follow the prompts to personalize your lock code.VOICEMAIL RETRIEVAL Press , , and then press . (To access your voicemail from outside the Verizon Wireless network or from a touch-tone phone, enter your wireless number.)76 77TO ACCESS YOUR VOICEMAIL BOX Press Left Soft Key [MENU], Messaging, Voicemail, then press . Or press [OK], then select “Yes“. Or, to dial voicemail directly, press , , and then . Follow the prompts to enter your password and retrieve your messages.• In idle mode, press and hold to call your voicemail box.• If you hear your own system greeting when you dial *VM ( , , ), press to interrupt it and follow the prompts to enter your password.MENU FUNCTIONS MESSAGING MESSAGING MENU FUNCTIONS](https://usermanual.wiki/Pantech/EZ2.Users-Manual/User-Guide-806843-Page-39.png)
![ At the recording, enter your password, then press .You will be charged airtime for using your wireless phone to set-up or retrieve voicemail. Toll and/or long distance charges may also apply. Enter your password and press .VOICEMAIL SHORTCUTS , Key: Fast Forward to End Key: Delete Message• After Listening to a Message Press: Key: Replay Key: Delete Key: Save Key: Help• While Listening to a Message Press: Key: Rewind Key: Pause Key: Fast Forward Key: Slower Key: Envelope Info (date/time) Key: Faster Key: Cancel Key: Help Key: Finish/Skip , Key: Rewind to BeginningHSEND TXT MESSAGETo send a new TXT message: Press Left Soft Key [MENU], Messaging, Send TXT Message. Select “Contact” or “Enter Number”, then press . 1. Contact: Search for a phone number stored in your Contacts List.2. Enter Number: To enter and save a new phone number in your Contacts List.MENU FUNCTIONS MESSAGING MESSAGING MENU FUNCTIONS78 79](https://usermanual.wiki/Pantech/EZ2.Users-Manual/User-Guide-806843-Page-40.png)
![ Press Left Soft Key [NEXT]. Input a new text message. (Please refer to page 40 for more details on entering letters, numbers and symbols.)• By pressing Right Soft Key [OPTIONS], you can choose from the following:1. Entry Mode: Press to change mode. [Abc][ABC][123][Word] [Symbols]2. Add Recipient: To add another phone number with your Contacts List.3. Cancel Message: To cancel the message. To send the text message, press Left Soft Key [SEND] or [OK].Input at least one text msg field or address to save in the draft box.• By pressing Right Soft Key [OPTIONS], you can choose from the following:1. Entry Mode: Press to change entry mode. [Abc][ABC][123] [Word][Symbols]2. Save As Draft: To save message in draft folder.3. Add Phrase: Inserts already written sentences in TXT message.4. Add Recipient: To add another phone number.5. Add Sound: Inserts a sound in your TXT message6. Add Image: Inserts a simple graphic image in TXT message.7. Add Name Card: Inserts your name card in the TXT message.8. Save Phrase: To save written sentences in TXT message.9. Cancel Msg: To cancel message.MENU FUNCTIONS MESSAGING MESSAGING MENU FUNCTIONS80 81](https://usermanual.wiki/Pantech/EZ2.Users-Manual/User-Guide-806843-Page-41.png)
![HINBOXThe Inbox manages received TXT messages. To access: Press Left Soft Key [MENU], Messaging, Inbox. The received messages list will be displayed. By pressing Right Soft Key [OPTIONS], the user can choose from the following:ERASETo erase a draft message: Press Right Soft Key [OPTIONS]. Press Erase. Press Left Soft Key [Yes]. ERASE INBOXTo erase all inbox messages: Press Right Soft Key [OPTIONS]. Press Erase Inbox. Press Left Soft Key [Yes]. LOCK & UNLOCKSelect “Lock” to lock the message or “Unlock” to unlock the message. Press Right Soft Key [OPTIONS]. Press Lock. Press Left Soft Key [Yes]. The “Lock” function is used to prevent received messages from being erased. Once a message is locked, you cannot delete the message with the Erase or Erase Inbox button. Unlock the message first to delete it.MENU FUNCTIONS MESSAGING MESSAGING MENU FUNCTIONS82 83](https://usermanual.wiki/Pantech/EZ2.Users-Manual/User-Guide-806843-Page-42.png)
![ Select a message and press Left Soft Key [VIEW]. The message is displayed. If you receive a EMS message, press Left Soft Key [MUTE/UNMUTE] to Turn On/Off EMS sound. Press Right Soft Key [REPLY] to reply to received message. By pressing Right Soft Key [OPTIONS], the user can choose from the following:ERASETo erase a message, select “Erase“ then select “Yes“.FORWARDTo forward the message: Input the phone number of the person you are sending the message to, then select 1. Contact or 2. Enter Number. Input any text message to go along with the forwarded message, then press Left Soft Key [SEND] or [OK].ADD TO CONTACTSTo save number to contacts.LOCK & UNLOCKSelect “Lock” to lock the message or “Unlock” to unlock the message.MENU FUNCTIONS MESSAGING MESSAGING MENU FUNCTIONS84 85](https://usermanual.wiki/Pantech/EZ2.Users-Manual/User-Guide-806843-Page-43.png)
![HDRAFTSDraft Folder contains any draft messages or saved messages. If message composition is interrupted by a voice call or other interrupting event, the text of the current composition is automatically saved in the drafts folder. Press Left Soft Key [MENU], Messaging, Drafts. By pressing Right Soft Key [OPTIONS], the user can choose from the following:ERASETo erase a draft message: Press Right Soft Key [OPTIONS]. Press Erase. Press Left Soft Key [Yes]. 86ERASE DRAFTSTo erase all inbox messages: Press Right Soft Key [OPTIONS]. Press Erase Drafts. Press Left Soft Key [Yes]. LOCK & UNLOCKSelect “Lock” to lock the message or “Unlock” to unlock the message. Press Right Soft Key [OPTIONS]. Press Lock. Press Left Soft Key [Yes]. The “Lock” function is used to prevent received messages from being erased. Once a message is locked, you cannot delete the message with the Erase or Erase Draft button. Unlock the message first to delete it.87MENU FUNCTIONS MESSAGING MESSAGING MENU FUNCTIONS](https://usermanual.wiki/Pantech/EZ2.Users-Manual/User-Guide-806843-Page-44.png)
![ Select a message and then press Left Soft Key [EDIT]. The message is displayed. Please refer to page 79 for more details on Send TXT Message.HSENTManages sent messages or messages waiting to be sent. Press Left Soft Key [MENU], Messaging, Sent. The sent messages list will be displayed. By pressing Right Soft Key [OPTIONS], the user can choose from the following:ERASETo erase a draft message: Press Right Soft Key [OPTIONS].MENU FUNCTIONS MESSAGING MESSAGING MENU FUNCTIONS88 89 Press Erase. Press Left Soft Key [Yes]. ERASE SENTTo erase all sent messages: Press Right Soft Key [OPTIONS]. Press Erase Sent. Press Left Soft Key [Yes]. LOCK & UNLOCKSelect “Lock” to lock the message or “Unlock” to unlock the message. Press Right Soft Key [OPTIONS]. Press Lock. Press Left Soft Key [Yes].](https://usermanual.wiki/Pantech/EZ2.Users-Manual/User-Guide-806843-Page-45.png)
![The “Lock” function is used to prevent received messages from being erased. Once a message is locked, you cannot delete the message with the Erase or Erase Sent button. Unlock the message first to delete it. Select a message and press Left Soft Key [VIEW]. The message is displayed. To erase a message, Left Soft Key [ERASE]. By pressing Right Soft Key [OPTIONS], the user can choose from the following:SEND AGAINTo re-send the message: Press Right Soft Key [OPTIONS]. Press Send Again.MENU FUNCTIONS MESSAGING MESSAGING MENU FUNCTIONS90 91 Press .FORWARDTo forward the Text message: Press Right Soft Key [OPTIONS]. Press Forward. Select 1. Contact or 2. Enter Number, then input the phone number of the person you are sending the message to. Input any Text message to go along with the forwarded message, then press Left Soft Key [SEND].](https://usermanual.wiki/Pantech/EZ2.Users-Manual/User-Guide-806843-Page-46.png)
![ADD TO CONTACTSTo save the number to your Contact List: Press Right Soft Key [OPTIONS]. Press Add to Contacts. Select the number. Press the Left Soft Key [SAVE]. Select “New Contact” or “Update Existing,” complete the contact details then press Left Soft Key [SAVE].LOCK & UNLOCKSelect “Lock” to lock the message or “Unlock” to unlock the message. Press Right Soft Key [OPTIONS]. Press Lock.The “Lock” function is used to prevent received messages from being erased. Once a message is locked, you cannot delete the message with the Erase or Erase Sent button. Unlock the message first to delete it. MESSAGE INFOTo view message information: Press Right Soft Key [OPTIONS]. Press Message Info. Press .HSETTINGSManages messaging features.ALERT SOUNDSTo select the type of sound you will hear when you receive an incoming voicemail message or TXT message:MENU FUNCTIONS MESSAGING MESSAGING MENU FUNCTIONS92 93](https://usermanual.wiki/Pantech/EZ2.Users-Manual/User-Guide-806843-Page-47.png)
![VOICEMAIL ALERTALERT TONE Press Left Soft Key [MENU], Messaging, Settings, Voicemail Alert, Alert Tone. Select one of the following options by pressing the Navigation Key up or down:94 To save, press Left Soft Key [SELECT].REMINDER Press Left Soft Key [MENU], Messaging, Settings, Voicemail Alert, Reminder. Select one of the following options by pressing the Navigation Key up or down: Press to save it.95• No Sound/Vibe Only/Beep Once/Canon/The song of the spring/Csikos post/Fusion orchestra/Moonlight/Queen of the night/Skate waltz/Ringtone 1/Ringtone 2/Ringtone 3/Tone 1/Tone 2/Tone 3/Chime high/Chime low/Chord high/Chord low/Claps/Ding/Drum/Fanfare/Notify/Tada• Press Right Soft Key [PLAY/STOP] to play/stop sound.Off/Every 5 Mins/Every 15 Mins/Every 30 MinsMENU FUNCTIONS MESSAGING MESSAGING MENU FUNCTIONS](https://usermanual.wiki/Pantech/EZ2.Users-Manual/User-Guide-806843-Page-48.png)
![TXT ALERTALERT TONE Press Left Soft Key [MENU], Messaging, Settings, TXT Alert, Alert Tone. Select one of the following options by pressing the Navigation Key up or down: To save, press Left Soft Key [SELECT].REMINDER Press Left Soft Key [MENU], Messaging, Settings, TXT Alert, Reminder. Select one of the following options by pressing the Navigation Key up or down: Press to save it.• No Sound/Vibe Only/Beep Once/Canon/The song of the spring/Csikos post/Fusion orchestra/Moonlight/Queen of the night/Skate waltz/Ringtone 1/Ringtone 2/Ringtone 3/Tone 1/Tone 2/Tone 3/Chime high/Chime low/Chord high/Chord low/Claps/Ding/Drum/Fanfare/Notify/Tada• Press Right Soft Key [PLAY/STOP] to play/stop sound.Off/Every 5 Mins/Every 15 Mins/Every 30 MinsMENU FUNCTIONS MESSAGING MESSAGING MENU FUNCTIONS96 97](https://usermanual.wiki/Pantech/EZ2.Users-Manual/User-Guide-806843-Page-49.png)
![SIGNATURETo create a signature that can automatically be inserted at the end of a message: Press Left Soft Key [MENU], Messaging, Settings, Signature. Input a new signature message. Press or Let Soft Key [SAVE] to save it.• By pressing Right Soft Key [OPTIONS], you can choose from the following:1. Entry Mode: Press to change entry mode. [Abc][ABC][123] [Word][Symbols]2. Cancel Signature: To cancel signature.ENTRY MODESets an Entry Mode as a default. For example, if Word Mode is the default, its icon will appear when editing a TXT messge. Press Left Soft Key [MENU], Messaging, Settings, Entry Mode. Select one of the following options by pressing the Navigation Key up or down: Press to save it.Abc/ABC/123/WordMENU FUNCTIONS MESSAGING MESSAGING MENU FUNCTIONS98 99](https://usermanual.wiki/Pantech/EZ2.Users-Manual/User-Guide-806843-Page-50.png)
![AUTO ERASEAutomatically erases Inbox messages when new messages arrive. Press Left Soft Key [MENU], Messaging, Settings, Auto Erase. Select either “Automatically” or “Manually” by pressing the Navigation Key up or down. Press to save it.• Automatically: Oldest message erased from inbox automatically when Inbox is full.• Manually: Oldest message not erased from inbox automatically when Inbox is full.HCALENDARSets an event and reminds you of that event. Press Left Soft Key [MENU], Tools, Calendar. Press Right Soft Key [OPTIONS] to manage your calendar. Press Add New, Add Special Occasion, Erase Passed or Erase All.ADD NEW Press the Navigation Key up, down, left or right to choose a date in the calendar. Press Right Soft Key [OPTIONS], Add New to enter a new event.MENU FUNCTIONS MESSAGING TOOLS MENU FUNCTIONS100 101](https://usermanual.wiki/Pantech/EZ2.Users-Manual/User-Guide-806843-Page-51.png)
![102 103 The Event field is highlighted. Enter the name of the event. Press the Navigation Key up or down to set the other fields for the event:EVENTUse the keypad to enter an appointment in your schedule.START TIMEUse the keypad to set a start time and press Right Soft Key to select “am” or “pm”.END TIMEUse the keypad to set an end time and press Right Soft Key to select “am” or “pm”.ALERTPress Right Soft Key [SET] to select a new ringtone. Press the Navigation Key up or down to highlight a ringtone, then press [SELECT] to save it.REMINDERPress the Navigation Key left or right to select an alert time interval option (Event Time, 5 min before, 10 min before).START DATEUse the keypad to change or enter the start date.RECURRENCEPress the Navigation Key left or right to set the recurrence of the event (Daily, Weekly, Monthly, Yearly). MENU FUNCTIONS TOOLS TOOLS MENU FUNCTIONS](https://usermanual.wiki/Pantech/EZ2.Users-Manual/User-Guide-806843-Page-52.png)
![END DATEUse the keypad to change or enter the end date. Press Left Soft Key [SAVE] or press to return to the calendar. The date of the event will be highlighted on your calendar.ADD SPECIAL OCCASION Press the Navigation Key up, down, left or right to choose a date in the calendar. Press Right Soft Key [OPTIONS], Add Special Occasion to enter a new occasion. The Occasion field is highlighted. Choose the type of occasion. Press the Navigation Key up or down to set the other fields for the event:OCCASIONPress the Navigation Key left or right to select an occasion type (Birthday, Anniversary, Party, Other).NOTEUse the keypad to enter a memo in the occasion field.DATEUse the keypad to change or enter the date.TIMEUse the keypad to set a start time and press Right Soft Key to select “am” or “pm”.MENU FUNCTIONS TOOLS TOOLS MENU FUNCTIONS104 105](https://usermanual.wiki/Pantech/EZ2.Users-Manual/User-Guide-806843-Page-53.png)
![ALERTPress Right Soft Key [SET] to select a new ringtone. Press the Navigation Key up or down to highlight a ringtone, then press [SELECT] to save it.REMINDERPress the Navigation Key left or right to select an alert time interval option (Event Day, 1 day before, 3 days before).RECURRENCEPress the Navigation Key left or right to set the recurrence of the event (Daily, Weekly, Monthly, Yearly). Press Left Soft Key [SAVE] or press to return to the calendar. The date of the occasion will be marked on your calendar.ERASE PASSEDIt will erase the past schedule from present date in the calender. Press Monthly View, select Option then 3.Erase Passed. The ‘Erase All Events’ will pop up. Yes for erase passed event and No for cancel.ERASE ALLIt will erase all the scehdule from the calender. Press Monthly View, select Option, then 4. Erase all. The ‘Erase All Events’ will pop up. Yes for erase all the events and No for cancel.VIEW PLAN LISTTo view items/appointments/agendas, etc. in your calendar: Press Left Soft Key [MENU] Tools, Calendar. Press the Navigation Key up or down to choose an event and then press Left Soft Key [VIEW]. MENU FUNCTIONS TOOLS TOOLS MENU FUNCTIONS106 107](https://usermanual.wiki/Pantech/EZ2.Users-Manual/User-Guide-806843-Page-54.png)
![If the event is set as recurrence, it will erase all the recurrence events. HALARM Press Left Soft Key [MENU] Tools, Alarm. Select one of the entries by pressing the Navigation Key up or down. If you want to turn an alarm on/off, press Right Soft Key [SET ON/SET OFF]. To set a new alarm, choose alarm 1, 2 or 3. To edit an existing alarm, select that alarm. Press Left Soft Key [EDIT]. 108 The Alarm field will be highlighted. Press the Navigation Key down to select alarm options.ALARMPress the Navigation Key left or right to select “Alarm On“ or “Alarm Off“.TIMEUse the keypad to set a time for the alarm and press Right Soft Key to select “am” or “pm”.FREQUENCYPress the Navigation Key left or right to select a setting for the alarm (Once, Daily, Mon - Fri, Weekends).SOUNDPress Right Soft Key [SET], then press the Navigation Key up or down to select the alert tone you wish to set.109MENU FUNCTIONS TOOLS TOOLS MENU FUNCTIONS• Erase: It will erase selected event.• Erase List: It will erase all the event from selected date.](https://usermanual.wiki/Pantech/EZ2.Users-Manual/User-Guide-806843-Page-55.png)
![ To save an alarm setting press Left Soft Key [SAVE]. To reset all alarm set, press Reset All, then press Left Soft Key [YES].HWORLD CLOCKTo display the time and date in pre-programmed cities: Press Left Soft Key [MENU] Tools, World Clock. Select a city by pressing Left Soft Key [CITIES]. Or press the Navigation Key up, down, left or right to select another city. The world map appears with the city, its date and time. 110 DST (Daylight Saving Time) information should be applied. Press Right Soft Key [DST] to set the DST options. Select either “On” or “Off” by pressing the Navigation Key up or down. Press to save it.HNOTEPADYour phone includes an internal notepad that can be used to compose and store reminders and notes. Press Left Soft Key [MENU], Tools, Notepad. To add a new memo, press New Note. Input a new text memo. (Please refer to page 40 for more details on entering letters, numbers & symbols.)111MENU FUNCTIONS TOOLS TOOLS MENU FUNCTIONS](https://usermanual.wiki/Pantech/EZ2.Users-Manual/User-Guide-806843-Page-56.png)
![If there are no memos stored, press or to directly go to the Edit mode. To save, press Left Soft Key [SAVE]. The list of all memos, in saved order, is displayed. Select a memo and then press Left Soft Key [VIEW]. To edit it, press Left Soft Key [EDIT].To erase a memo, press Right Soft Key [ERASE].HSTOP WATCHSimultaneously times up to seven different events. To operate the stop watch: Press Left Soft Key [MENU], Tools, Stop Watch. To measure a time period:1. To start the stop watch, press Left Soft Key [START].2. To pause it, press Left Soft Key [STOP].3. To resume it, press Left Soft Key [START]. To reset it, press Right Soft Key [RESET]. To time up to seven events at once:1. To start, press Left Soft Key [START].• By pressing Right Soft Key [OPTIONS], you can choose from the following:1. New: To add a new memo.2. Erase: To erase a memo.3. Erase All: To erase all memos.MENU FUNCTIONS TOOLS TOOLS MENU FUNCTIONS112 113](https://usermanual.wiki/Pantech/EZ2.Users-Manual/User-Guide-806843-Page-57.png)
![2. To stop a time period and continue measuring another one, press Right Soft Key [LAP].3. To stop the second and continue measuring a third one, press Right Soft Key [LAP].4. To measure up to seven time periods, repeat the above steps.5. To stop the stop watch, press Left Soft Key [STOP].6. To review the results, press the Navigation Key up or down.7. To start, press Left Soft Key [START].8. To reset it, press Right Soft Key [RESET].HCALCULATORTo access the calculator: Press Left Soft Key [MENU], Tools, Calculator. Follow the instructions below to calculate 8×6÷4-2.5=9.5Navigation Key right : X, Navigation Key down : -, Navigation Key left : ÷, Navigation Key up : +, : ., Left Soft Key : Clear All, Right Soft Key : =.MENU FUNCTIONS TOOLS TOOLS MENU FUNCTIONS114 115Input 8 and then press the Navigation Key right.Input 6 and then press the Navigation Key Left.Input 4 and then press the Navigation Key down.Input 2 and then press the to input (.).Press 5.Press and you will see the answer.](https://usermanual.wiki/Pantech/EZ2.Users-Manual/User-Guide-806843-Page-58.png)
![ To reset, press Left Soft Key [CLEAR ALL].• To change the displayed number from positive (+) to negative (-) and vice versa, press [±].• This did not work on phone. In its place add copy for adding “00” by pressing Right Soft Key [00].HTIP CALCULATORTo access the tip calculator: Press Left Soft Key [MENU], Tools, Tip Calculator. Follow the instructions below to tip calculate. To reset, press Right Soft Key [RESET].MENU FUNCTIONS TOOLS TOOLS MENU FUNCTIONS116 117• Enter the Total Bill amount then press the Navigation Key down. (Press Left Soft Key to input decimal)• Select Tip (%) with press down Navigation Key, and enter Tip (%). (Press Left Soft Key to input decimal)• Select split with press down Navigation Key, and enter how many parties will be splitting the bill.• Total/Each Bill appears on bottom below calculation.](https://usermanual.wiki/Pantech/EZ2.Users-Manual/User-Guide-806843-Page-59.png)
![HSOUNDS SETTINGSRINGTONEControls the Ringer volume and alerts you to incoming calls in the following modes. Press Left Soft Key [MENU], Settings, Sounds Settings, Ringtone. Select one of the pre-installed 18 music bells and 6 ring tones. Press Right Soft Key [PLAY/STOP]. To confirm, press Left Soft Key [SELECT].VOLUMEControls the Ringer, SMS Alert and alerts you to incoming calls in a variety of modes. Press Left Soft Key [MENU], Settings, Sounds Settings, Volume. 118 Select one of the following options: Press to save it.VIBRATE MODEWhen receiving an incoming call alert, ringer and vibration are activated at the same time. Press Left Soft Key [MENU], Settings, Sounds Settings, Vibrate Mode. Select either “On” or “Off” by pressing the Navigation Key up or down. Press to save it.119MENU FUNCTIONS TOOLS SETTINGS MENU FUNCTIONSHigh/Med-high/Medium/Med-low/Low/Alarm Only/All Sounds Off](https://usermanual.wiki/Pantech/EZ2.Users-Manual/User-Guide-806843-Page-60.png)
![KEYPAD VOLUMETo adjust key pad tone: Press Left Soft Key [MENU], Settings, Sounds Settings, Keypad Volume. Select one of the following options by pressing the Navigation Key up or down: Press to save it.VOICE COMMANDSYou can use voice commands to control your device. MENU READOUTThis function will read all the menus. Additionally it will read even the Notification Pop Ups and Confirmation Pop Ups from the Setting. Press Left Soft Key [MENU], Settings, Sounds Settings, Voice Commands, Menu Readout. Select either “On” or “Off” by pressing the Navigation Key up or down. Press to save it.DIGIT DIAL READOUTThis functions will read you each number from Number Edit. Press Left Soft Key [MENU], Settings, Sounds Settings, Voice Commands, Digit Dial Readout. Select either “On” or “Off” by pressing the Navigation Key up or down. Press to save it.High/Medium/Low/OffMENU FUNCTIONS SETTINGS SETTINGS MENU FUNCTIONS120 121](https://usermanual.wiki/Pantech/EZ2.Users-Manual/User-Guide-806843-Page-61.png)
![LAUNCH KEYSHere is where you set up the Voice Command Options. Press Left Soft Key [MENU], Settings, Sounds Settings, Voice Commands, Launch Keys. Select either “Voice Key Only” or “Key & Flip Open” by pressing the Navigation Key up or down. Press to save it.VOICEMAIL ALERT TONEYou can set up the alert tone option when you receive the Voicemail. Press Left Soft Key [MENU], Settings, Sounds Settings, Voicemail Alert Tone. MENU FUNCTIONS SETTINGS SETTINGS MENU FUNCTIONS122 123 Select one of the following options by pressing the Navigation Key up or down: To save, press Left Soft Key [SELECT].• No Sound/Vibe Only/Beep Once/Canon/The song of the spring/Csikos post/Fusion orchestra/Moonlight/Queen of the night/Skate waltz/Ringtone 1/Ringtone 2/Ringtone 3/Tone 1/Tone 2/Tone 3/Chime high/Chime low/Chord high/Chord low/Claps/Ding/Drum/Fanfare/Notify/Tada• Press Right Soft Key [PLAY/STOP] to play/stop sound.](https://usermanual.wiki/Pantech/EZ2.Users-Manual/User-Guide-806843-Page-62.png)
![TXT ALERT TONE Press Left Soft Key [MENU], Settings, Sounds Settings, TXT Alert Tone. Select one of the following options by pressing the Navigation Key up or down: To save, press Left Soft Key [SELECT].• No Sound/Vibe Only/Beep Once/Canon/The song of the spring/Csikos post/Fusion orchestra/Moonlight/Queen of the night/Skate waltz/Ringtone 1/Ringtone 2/Ringtone 3/Tone 1/Tone 2/Tone 3/Chime high/Chime low/Chord high/Chord low/Claps/Ding/Drum/Fanfare/Notify/Tada• Press Right Soft Key [PLAY/STOP] to play/stop sound.MENU FUNCTIONS SETTINGS SETTINGS MENU FUNCTIONS124 125ADVANCEDYou can do additional setting as Advanced at the Phone setting. ATTACH ACCESSORYYou can set up the alart option when you put in and put out the charger or ear piece. Press Left Soft Key [MENU], Settings, Sounds Settings, Advanced, Attach Accessory. Select either “On” or “Off” by pressing the Navigation Key up or down. Press to save it.](https://usermanual.wiki/Pantech/EZ2.Users-Manual/User-Guide-806843-Page-63.png)
![POWER ON/OFFTo select to hear a tone when you turn your phone on or off: Press Left Soft Key [MENU], Settings, Sounds Settings, Advanced, Power On/Off. Select either “Play Tone” or “Tone Off” by pressing the Navigation Key up or down. Press to save it.ROAM TONETo select to hear a tone when you enter a roaming area: Press Left Soft Key [MENU], Settings, Sounds Settings, Advanced, Roam Tone. Select either “On” or “Off” by pressing the Navigation Key up or down. Press to save it.MINUTE BEEPTo select to hear a tone every minute you’re on a call: Press Left Soft Key [MENU], Settings, Sounds Settings, Advanced, Minute Beep. Select either “On” or “Off” by pressing the Navigation Key up or down. Press to save it.MENU FUNCTIONS SETTINGS SETTINGS MENU FUNCTIONS126 127](https://usermanual.wiki/Pantech/EZ2.Users-Manual/User-Guide-806843-Page-64.png)
![128 Press the Navigation Key up, down, left or right to view Wallpaper optins. To expand a selected image, press Right Soft Key [VIEW]. To save, press Left Soft Key [SELECT].DISPLAY THEMES Press Left Soft Key [MENU] Settings, Phone Settings, Display Themes. Select either “MS Style” or “Free Style” by pressing the Navigation Key up or down. Press to save it.129CALL DISCONNECTTo select to hear a tone when you end a call: Press Left Soft Key [MENU], Settings, Sounds Settings, Advanced, Call Disconnect. Select either “On” or “Off” by pressing the Navigation Key up or down. Press to save it.HPHONE SETTINGSWALLPAPERTo set your phone to display wallpaper when the phone is in standby mode: Press Left Soft Key [MENU], Settings, Phone Settings, Wallpaper. MENU FUNCTIONS SETTINGS SETTINGS MENU FUNCTIONS](https://usermanual.wiki/Pantech/EZ2.Users-Manual/User-Guide-806843-Page-65.png)
![130NETWORKDisplay ERI text upper your personal banner, alerting you to the current cellular status. This is a network service. Press Left Soft Key [MENU], Settings, Phone Settings, Banner, Network. Select “On” or “Off” with the Navigation Key up or down. Press to save it.BACKLIGHTBacklights the display and key pad and activates dimming for easy viewing in dark places. Press Left Soft Key [MENU], Settings, Phone Settings, Backlight. 131BANNERYou can choose to display a personal Banner greeting or the Enhanced Roaming Indicator (ERI) banner on the phone’s screens:PERSONALThe text greeting can be up to 16 characters and is displayed on your phone’s screen in standby mode. Press Left Soft Key [MENU], Settings, Phone Settings, Banner, Personal. Enter a new personal greeting. To change the entry mode, press Right Soft Key [Abc]. Press Left Soft Key [SAVE] to save it. MENU FUNCTIONS SETTINGS SETTINGS MENU FUNCTIONS](https://usermanual.wiki/Pantech/EZ2.Users-Manual/User-Guide-806843-Page-66.png)
![ Select one of the following options by pressing the Navigation Key up or down: Press to save it.DIAL FONTTo adjust the size of the text on the display: Press Left Soft Key [MENU], Settings, Phone Settings, Dial Font. Select “Normal” or “Large Only” by pressing the Navigation Key up or down. Press to save it.SHORTCUT KEYSYour phone offers you the option of assigning a shortcut key ( ) to a favorite or often-used function. To assign a shortcut to the key: Press Left Soft Key [MENU], Settings, Phone Settings, Shortcut Keys. Select for Up Direction, for Down Direction, for Left Direction or for Right Direction. Select one of the following options by pressing the Navigation Key up or down: Press to save it.MENU FUNCTIONS SETTINGS SETTINGS MENU FUNCTIONS132 133On/7 Seconds/15 Seconds/ 30 Seconds /OffNone/Messaging/Calender/Alarm Clock/Calculator/Tip Calculator/Stop Watch/Inbox/Speed Dials/Tools/Settings](https://usermanual.wiki/Pantech/EZ2.Users-Manual/User-Guide-806843-Page-67.png)
![ADVANCEDLANGUAGE Press Left Soft Key [MENU], Settings, Phone Settings, Advanced, Language. Select “English” or “Español” by pressing the Navigation Key up or down. Press to save it.ANSWER CALL OPTIONSTo select an answer mode: Press Left Soft Key [MENU], Settings, Phone Settings, Advanced, Answer Call Options. Select by pressing the Navigation Key up or down, then press Right Soft Key [MARK/UNMARK]. Press Left Soft Key [SAVE] to save it. • If “Auto w/Headset“ is selected, the Automatic Answer feature is disabled when you close the phone. • The three functions can be used at the same time.MENU FUNCTIONS SETTINGS SETTINGS MENU FUNCTIONS134 135• Flip Open: Receive the phone call by opening your phone.• Any Key: Receive the phone call by pressing any key. • Auto w/ Headset: This function can only use when the headset is on. It will automatically receive the call after 5 second when the phone is opened.](https://usermanual.wiki/Pantech/EZ2.Users-Manual/User-Guide-806843-Page-68.png)
![SPEED DIAL CALL Press Left Soft Key [MENU], Settings, Phone Settings, Advanced, Speed Dial Call. Select by pressing the Navigation Key up or down, then press Right Soft Key [MARK/UNMARK]. Press Left Soft Key [SAVE] to save it. The two functions can be used at the same time.136TTYYour phone is able to operate with a TTY (Teletypewriter) device in both analog and digital modes. This feature is system dependent and may not be available in all areas. Press Left Soft Key [MENU], Settings, Phone Settings, Advanced, TTY. Select one of the following options by pressing the Navigation Key up or down: Press to save it.137MENU FUNCTIONS SETTINGS SETTINGS MENU FUNCTIONS• Press Hold Digit: It will dial the assigned phone number from the speed dial number. • Digit + Send: It will dial the assigned phone number. • TTY Off• TTY Full• TTY+Talk (VCO)• TTY+Hear (HCO)](https://usermanual.wiki/Pantech/EZ2.Users-Manual/User-Guide-806843-Page-69.png)
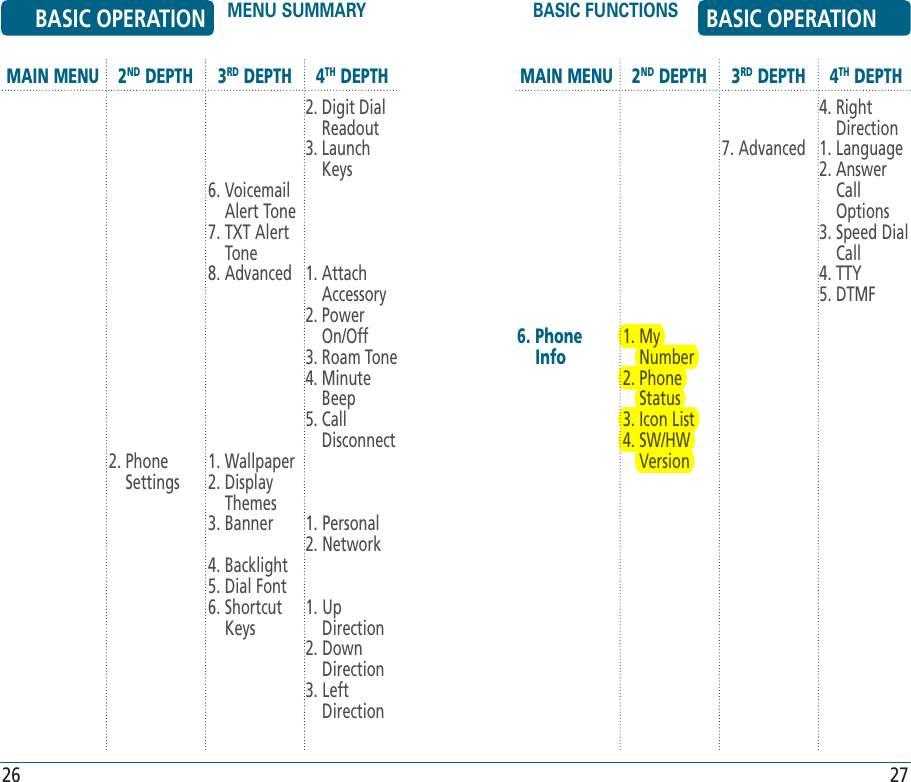
![DTMFTo adjust tone length: Press Left Soft Key [MENU], Settings, Phone Settings, Advanced, DTMF. Select “Normal” or “Long” with the Navigation Key up or down. Press to save it. To return to the previous page, press .HPHONE STATUSTo view the status of the battery level, volume, signal level, number of voicemails, missed calls, TXT messages, ERI TXT: Press Left Soft Key [MENU], Phone Info, Phone Status. The phone status appear. (Battery, Signal, Volume, Voicemails, Missed Calls, TXT Msg, ERI TXT) To return to the previous page, press .HICON LISTDisplays the Indicator Icons of your phone.MENU FUNCTIONS SETTINGS PHONE INFO MENU FUNCTIONS138 139HMY NUMBERDisplays your phone number. Press Left Soft Key [MENU], Phone Info, My Number. You will see the MDN/MIN and provider name.MENU FUNCTIONS PHONE INFO](https://usermanual.wiki/Pantech/EZ2.Users-Manual/User-Guide-806843-Page-70.png)
![ Press Left Soft Key [MENU], Phone Info, Icon List. A list of your phone indicator icons appear. To return to the previous page, press .HSW/HW VERSIONDisplays the Software version/PRL Number/ERI Number/Hardware version. Press Left Soft Key [MENU], Phone Info, SW/HW Version. The Software version/PRL version/ERI version/Hardware version appear. To return to the previous page, press .Your phone is equipped with an AVR (Advanced Voice Recognition) feature. This feature allows you to make calls or use the phone’s functions by simply using your voice. All you have to do is talk into the phone, and the phone will recognize your voice .and complete tasks by itself.H �AVR (ADVANCED VOICE RECOGNITION) Press and hold Side AVR Key located on the right side of the phone. The phone displays the Command menu and prompts you to say the name of the command you want to use. To complete your task, simply follow the voice prompts. You can speak the name of the command after you hear a beep.MENU FUNCTIONS PHONE INFO VOICE TOOLS MENU FUNCTIONS140 141](https://usermanual.wiki/Pantech/EZ2.Users-Manual/User-Guide-806843-Page-71.png)
![ Press and hold Side AVR Key located on the right side of the phone. Press Right Soft Key [SETTINGS], Choice Lists. Select “Automatic”, “Always On” or “Always Off”. Press Left Soft Key [OK] to save it.SOUNDPROMPTYou can turn audio prompts such as, “Say a name or shortcut,“ on or off. Press and hold Side AVR Key located on the right side of the phone. Press Right Soft Key [SETTINGS], Sound. Select Prompt, press . Select “On” or “Off”. Press Left Soft Key [OK] to save it.NAMEYou can turn name playback on or off when dialing a contact name. Press and hold Side AVR Key located on the right side of the phone. Press Right Soft Key [SETTINGS], Sound. Select Name, press . Select “On” or “Off”. Press Left Soft Key [OK] to save it.MENU FUNCTIONS VOICE TOOLS VOICE TOOLS MENU FUNCTIONS146 147](https://usermanual.wiki/Pantech/EZ2.Users-Manual/User-Guide-806843-Page-74.png)
![CHAPTER 5SAFETY ANDWARRANTYThis chapter addresses the safety guidelines and precautions to follow when operating your phone. Before operating your phone, please be aware of all the safety details. This chapter contains the terms and conditions of services and the warranty for your phone. Please review them thoroughly.SAFETY INFORMATION FOR WIRELESS HANDHELD PHONESSAFETY INFORMATION FOR FCC RF EXPOSURESAR INFORMATIONFCC HEARING-AID COMPATIBILITY (HAC) REGULATIONS FOR WIRELESS DEVICESFDA CONSUMER UPDATEPROTECT YOUR WARRANTYAVOID POTENTIAL HEARING LOSS.12 MONTH LIMITED WARRANTY CHAPTER 5 SAFETY AND WARRANTY148ABOUT Press and hold Side AVR Key located on the right side of the phone. Press Right Soft Key [SETTINGS], About. The VoiceSignal version appears. To return to the previous page, press .MENU FUNCTIONS VOICE TOOLS](https://usermanual.wiki/Pantech/EZ2.Users-Manual/User-Guide-806843-Page-75.png)
![U.S. FOOD AND DRUG ADMINISTRATION - CENTER FOR DEVICES AND RADIOLOGICAL HEALTH CONSUMER UPDATE ON WIRELESS PHONESThe M mark is intended to be synonymous with the U mark. The T mark is intended to be synonymous with the UT mark. The M and T marks are recommended by the Alliance for Telecommunications Industries Solutions (ATIS). The U and UT marks are referenced in Section 20.19 of the FCC Rules. The HAC rating and measurement procedure are described in the American National Standards Institute (ANSI) C63.19 standard.For information about hearing aids and digital wireless phone• Fcc Hearing Aid Compatibility and Volume Control http://www.fcc.gov/cgb/dro/hearing.html• Gallaudet University, RERC http://tap.gallaudet.edu/DigWireless.KS/DigWireless.htm• Self Help for Hard of Hearing People Inc. [SHHH] www.hearingloss.org/hat/TipsWirelessPhones.htm• The Hearing Aid Compatibility FCC Order http://hraunfoss.fcc.gov/edocs_public/attachmatch/ FCC-03-168A1.pdf1. Do wireless phones pose a health hazard?The available scientific evidence does not show that any health problems are associated with using wireless phones. There is no proof, however, that wireless phones are absolutely safe. Wireless phones emit low levels of radiofrequency energy (RF) in the microwave range while being used. SAFETY AND WARRANTYFCC HEARING-AID COMPATIBILITY (HAC) REGULATIONS FOR WIRELESS DEVICESFCC HEARING-AID COMPATIBILITY (HAC) REGULATIONS FOR WIRELESS DEVICESSAFETY AND WARRANTYFDA CONSUMER UPDATE SAFETY AND WARRANTY170 171](https://usermanual.wiki/Pantech/EZ2.Users-Manual/User-Guide-806843-Page-86.png)