Pantech GA-160C Dual Band Mobile Phone User Manual
Pantech Co., Ltd. Dual Band Mobile Phone Users Manual
UserManual.wiki
>
Pantech
>
GA 160C User Manual
Users Manual
Navigation menu
Upload a User Manual
Namespaces
Wiki Guide
HTML
PDF
Info
Views
User Manual
Discussion / Help
Navigation

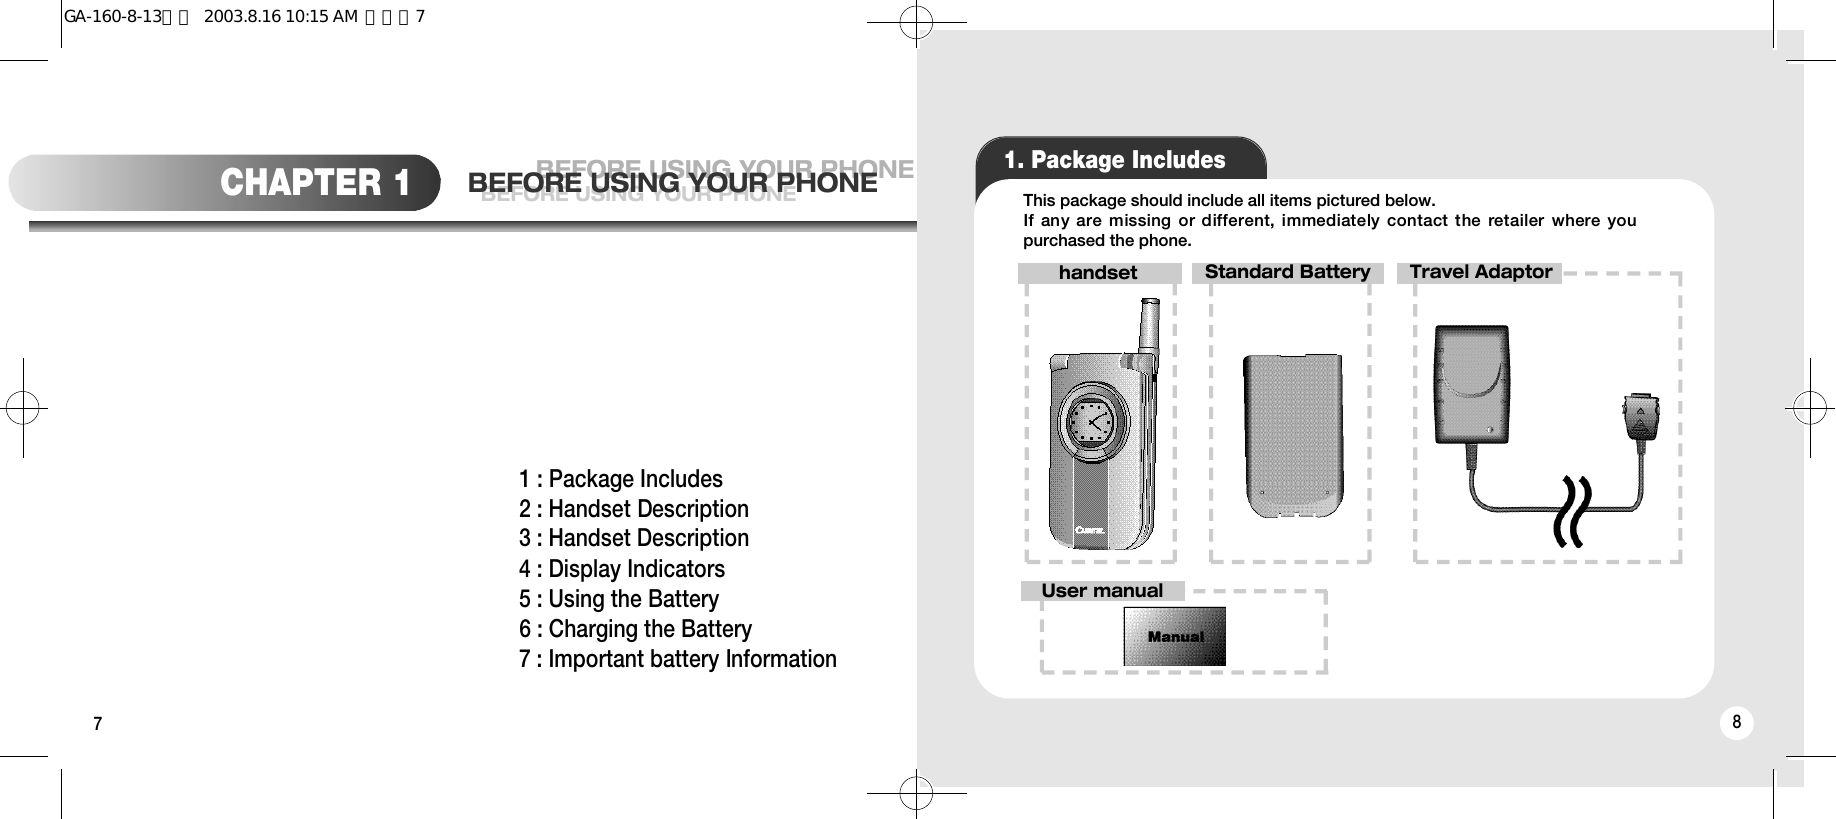
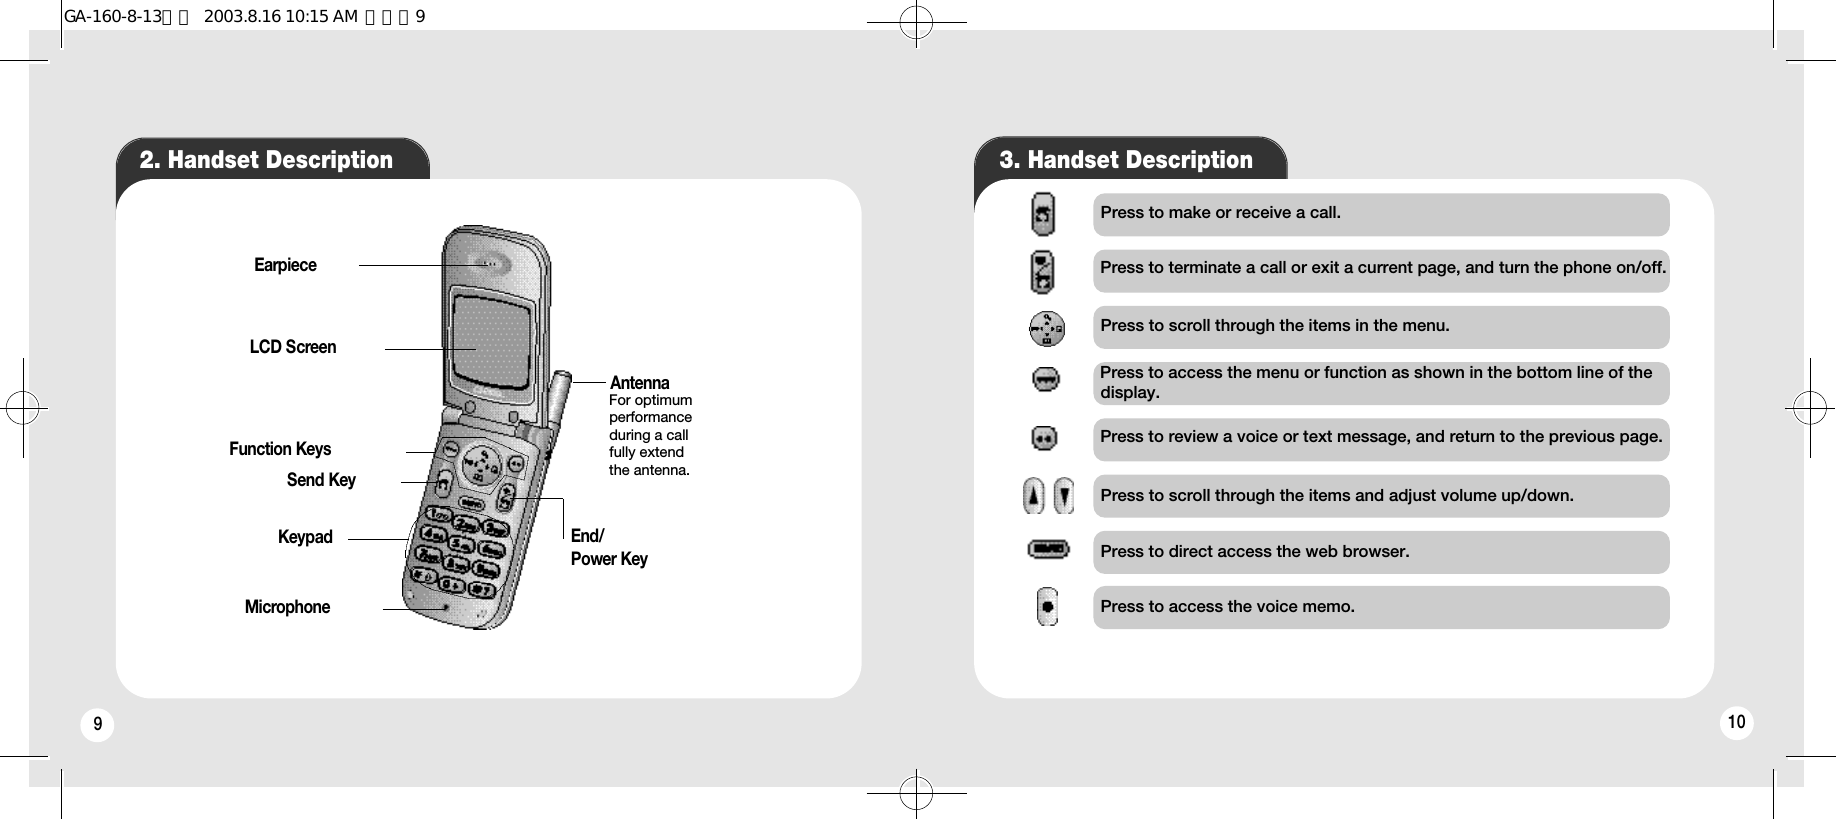
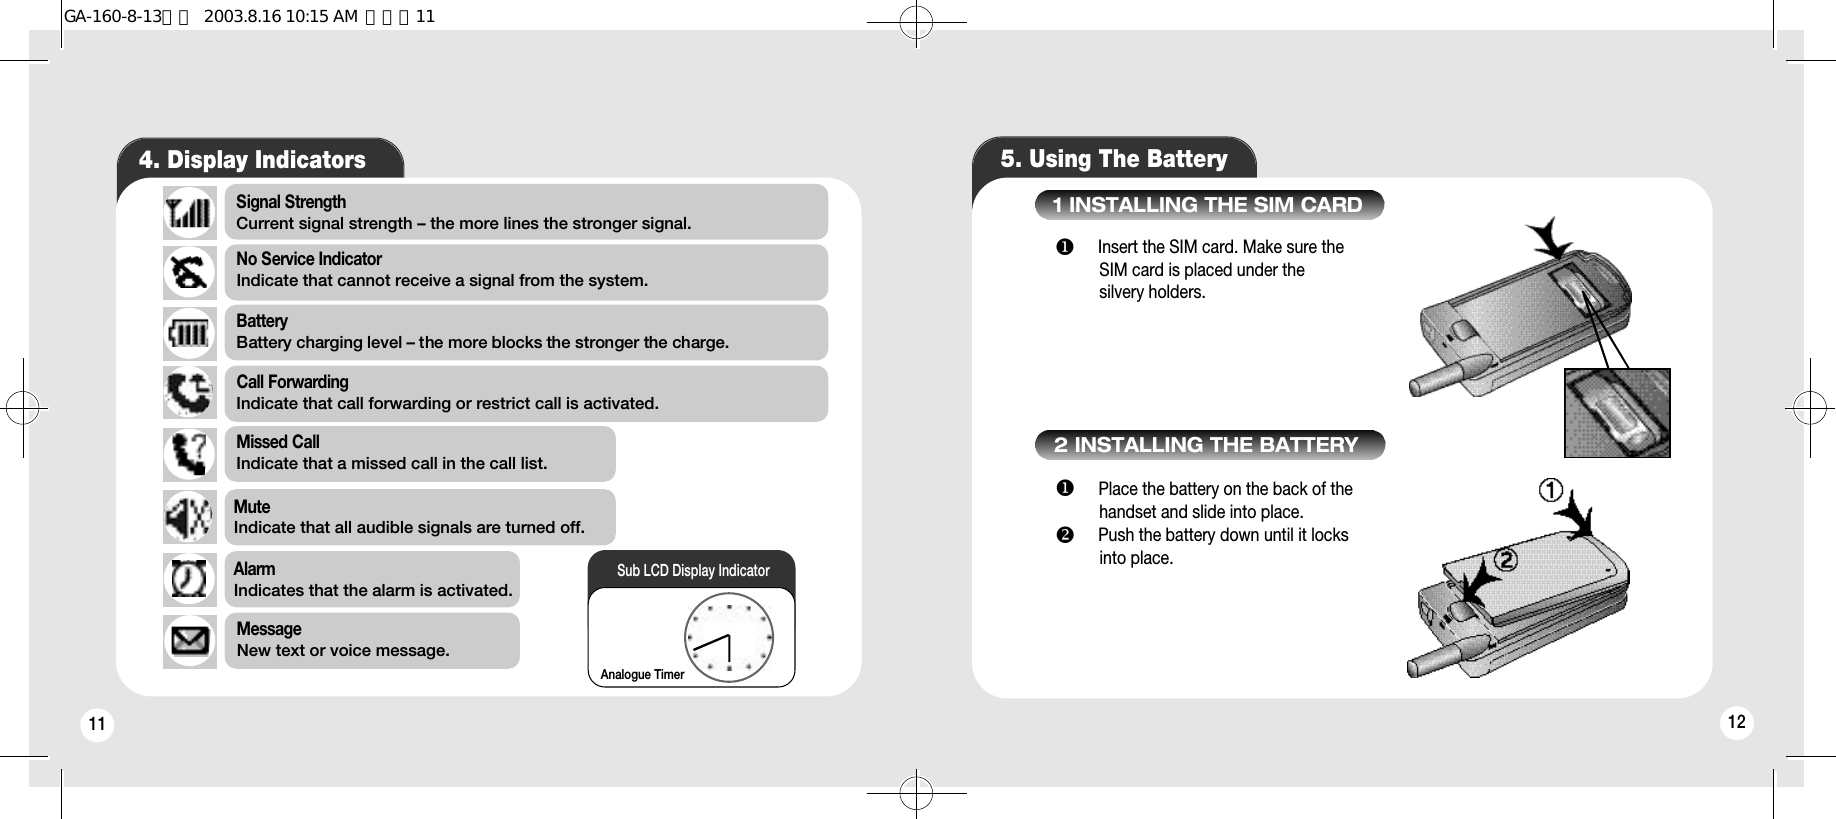
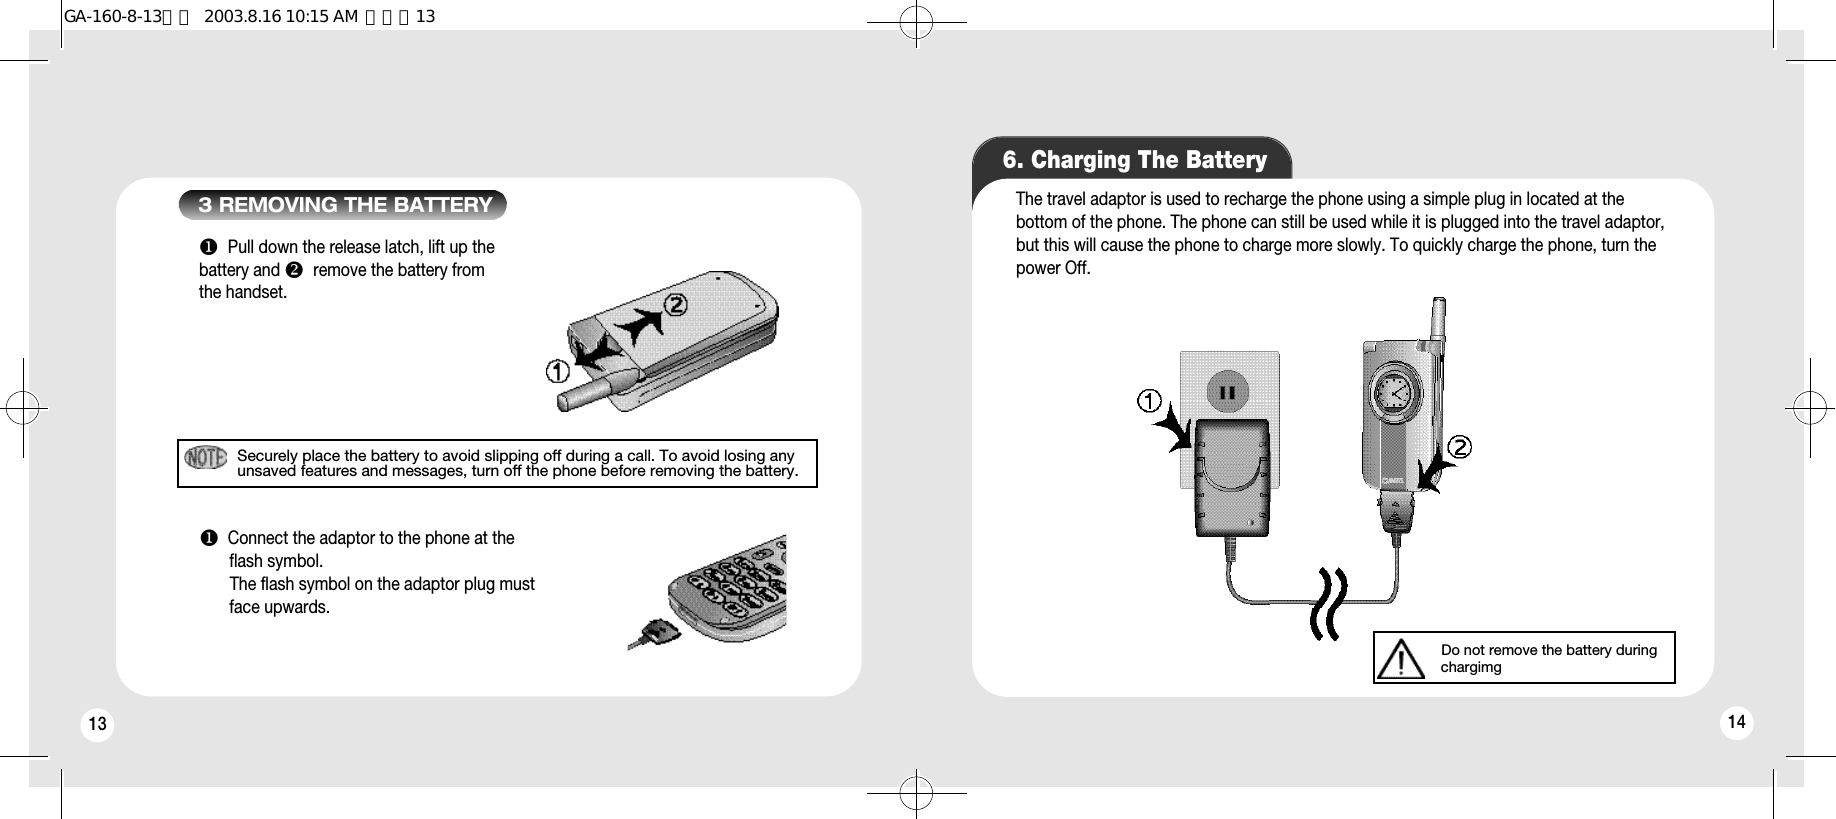
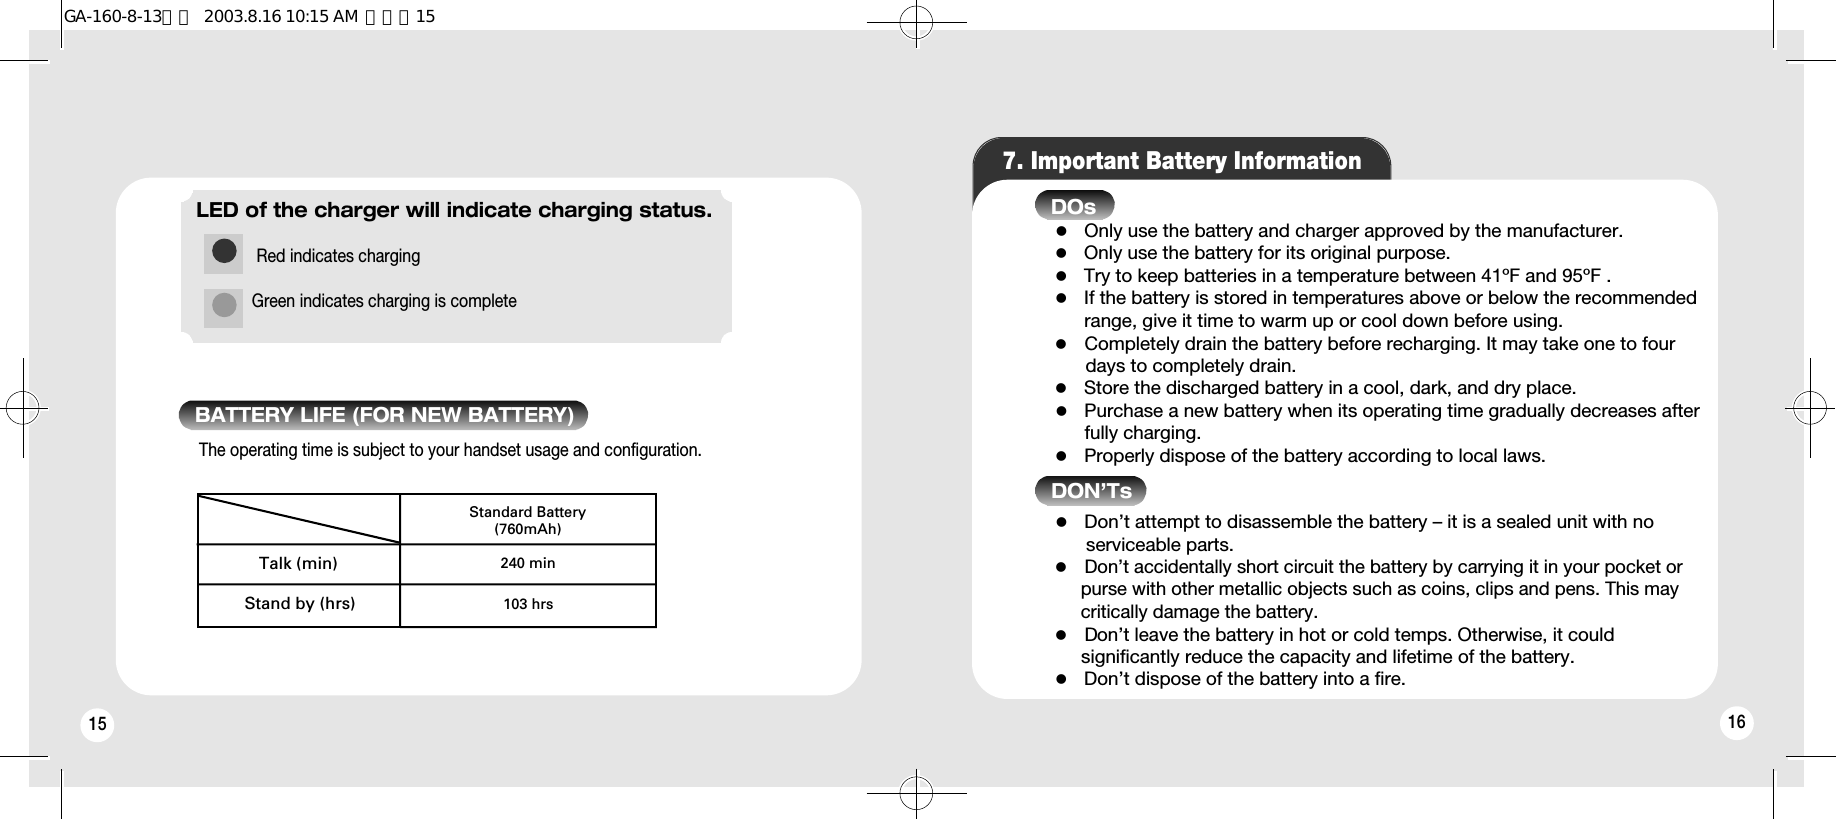
![17 181. Turning The Phone On and OffThe phone is locked if “PHONE LOCKED ” is displayed on thescreen. When “PHONE LOCKED ” is displayed, enter 4-digit lock code to unlock the phone.The default lock code is “0000”.Press and hold [ ], until the logo appears and the tone sounds.Press and hold [ ] until “ANIMATION ” is displayed.•Immediately change or recharge the battery when “Low Battery WarningPower Off” appears on the display. Memory may possibly be damaged if thephone turns off due to the battery completely draining.•Turn the phone off before removing or replacing the battery. If the phoneis on, data may be lost.TURNING THE PHONE ONTURNING THE PHONE OFFCHAPTER 2 BASIC OPERATIONBASIC OPERATIONBASIC OPERATION1 : Turning the Phone On and Off2 : How to Use the Menu3 : Menu Summary4 : Basic Functions5 : How to Store a Phone Number6 : How to Make a Call Using a Stored Phone Number7 : Functions During a CallGA-160-8-13영문 2003.8.16 10:15 AM 페이지17](https://usermanual.wiki/Pantech/GA-160C/User-Guide-376226-Page-9.png)
![19 202. How to Use The Menu 3. Menu SummaryIn the standby screen, press and hold [ ].In the menu,use scroll keys to view the menu selections. Use the following to scroll:[ ] ,volume [ ] ,located on side of handset.To go back to previous screen, press [ ] key.To the exit menu, press [ ] .To go into submenu press the corresponding number.[ ] and [ ] can be used while using the menu.1 2 3 4 5 6 Your phone can be customized via the menu. Each function can be accessed by scrolling with thenavigation keys or by pressing the number that corresponds with the menu item.1. Call Info1. Missed Calls2. Dialed Calls3. Call Costs4. Call Timers5. Set Next Call6. Options1. Last Call2. Total Cost3. Clear Total Cost4. Credit5. Set Credit6. Tariff7. Set Tariff8. Sent SMS 9. Clear Msg Count1. Last Call2. Total Time3. Outgoing Time4. Incoming Time5. Clear Timers1. Show My Number2. Hide My Number1. Clear Call History2. Set Call HistoryGA-160-8-13영문 2003.8.16 10:15 AM 페이지19](https://usermanual.wiki/Pantech/GA-160C/User-Guide-376226-Page-10.png)
![28274. Basic Function2 3 1 To modify the phone number you have entered :• Press [ ] to erase one digit at a time• Press and hold [ ] or [ ] to erase the entirenumber and input correct number again. Press [ ]. 1 : MAKING A CALLEnter a phone number.Press [ ] to end the call.XX-XXXX-XXXXCalling2 To end the call, press [ ].1 2 : HOW TO ANSWER CALLSWhen phone rings or LED blinks press [ ] or any key except side keys.XX-XXXX-XXXX3 : AUTO ANSWERThis function allows an incoming call to be connected to callingparty automatically. Press [ ], [ ], [ ], [ ].Press YES to answer a call.When you received the incoming call, you can connect the caller automatically.GA-160-8-13영문 2003.8.16 10:15 AM 페이지27](https://usermanual.wiki/Pantech/GA-160C/User-Guide-376226-Page-14.png)
![29 30When there is an incoming call, the caller’s phone number is displayed on the screen.4 : CALL ID FUNCTION5 : CALL WAITING FUNCTIONThis function notifies you there is an incoming call when you are onthe phone.To answer the call, press [ ]when you hear the beep.To switch back to the first caller, press [ ]again.Notifies of another incoming call when you are on the phone by making a beep sound anddisplays the caller’s phone number on the screen.1 2 7 : HOW TO ADJUST VOLUMEAdjust volume by using the volume control keys during the following operation.Idle During a Call : Earpiece volume adjustment.Status : Bell volume adjustment.Call status in hands-free : Hands-free volume adjustment.Displays the number of missed calls and the time the call was missed.The message will be cleared when you press the [ ] key.Press [ ]when the phone rings and it will mute the ringer.Displays the caller’s name and phone number, if available, in the phone book.6 : MISSED CALL DISPLAYAdjust the volume with the volume buttons on the side of the handset or through the menu entry.GA-160-8-13영문 2003.8.16 10:15 AM 페이지29](https://usermanual.wiki/Pantech/GA-160C/User-Guide-376226-Page-15.png)
![32315. How to Store a Phone NumberYou can store up to 100 frequently used phone numbers in memory.Press [ ] [ ] [ ].Then enter the phone number.12To enter a name, use [ ] and [ ], select a name entry, edit or enter a name, and press [ ].To save any change, use [ ] and [ ], select an entryfor save and exit, and press [ ].Enter a phone number which you want to save.Press [ ] to save it.Press [ ] to save it in phone book.Next steps are same procedure suchlike “SAVING IN MENU”345123432SAVING IN MENUSAVING IN IDLEEnter the phone number (more than 3 digits) you want to store and press [ ].Select Save To Sim/Save To Phone type then press [ ].The next available empty memory Location number is displayed. Press [ ] to “OK”.If there is a desired memory location number, enter the number.If the “[Name/Number] Overwrite?” message appears afterentering the memory location number, it means there is anotherstored phone number in that location already.1Save To SIM2Save To Phone[Select] [Back]Add Number[OK]Position:1[Back]Add NumberSave and exit?Add Number[Select] [Back]85674845JohnAdd Number[Select] [Back]Save and exit?JohnSavedYou can save phone numbers in phonebook menu.refer to 4. Phone Book 2) Add NumberGA-160-8-13영문 2003.8.16 10:15 AM 페이지31](https://usermanual.wiki/Pantech/GA-160C/User-Guide-376226-Page-16.png)
![3433 346. How to Make a Call Using a Stored Phone Number.1. SELECT FROM SAVED NAMEA call can also be make by pressing its first alphabet in the phone book.1Press long first alphabet keypad of name saved on phone book.2Select the one from saved list.3Press [ ] to start a call.2. SELECT FROM SAVED LOCATIONA call can also be made by pressing its location number and [ ].1Press the corresponding memory number and press [ ].2Select the one from saved list.3Press [ ] to start a call.GA-160-8-13영문 2003.8.16 10:15 AM 페이지33](https://usermanual.wiki/Pantech/GA-160C/User-Guide-376226-Page-17.png)
![36357. Functions Durning a Call1 : MUTE1 : Turn off Tones2 : Hold Call3 : Switch CallPress and hold [ ].Press [ ] ,then [ ] “Turn off Tones”.Press [ ] ,then [ ] “Hold Call”.Press [ ] ,then [ ] “Switch Call”.4 : Release ActionPress [ ] ,then [ ] “Release Action”.5 : Join CallsPress [ ] ,then [ ] “Join Calls”.6 : Transfer CallPress [ ] ,then [ ] “Transfer Call”.7 : Release AllPress [ ] ,then [ ] “Release All”.When connected the two calls, you can switch between the two calls.Displays your phone number during a call and automatically returns to the receiving mode infive minutes.During a call, you can turn off tones.The caller cannot hear you and any sound from your side, while you can hear his or her voice.You can disconnect the all calls.When connected the two calls, the two calls are now connected to each other.Call the next person you wish to include in the conference group.When the connected the two calls, you can disconnect the one calls.GA-160-8-13영문 2003.8.16 10:15 AM 페이지35](https://usermanual.wiki/Pantech/GA-160C/User-Guide-376226-Page-18.png)
![37 38MENU FUNCTIONMENU FUNCTIONMENU FUNCTIONCHAPTER 31 : Call Informations2 : Phone Settings3 : Sound4 : Phonebook5 : Messages6 : E-Mail7 : Accessories8 : WAP Browser1. Call Informations4 Press [ ]/[ ] to dial a phone number of themissed call list.Details include time, and phone number of missedcalls.2 Press [ ] to view the detail of a missed call when the number is highlighted.1 Press [ ][ ][ ].1) Missed Calls3 Use the scroll key to scroll through the last 10missed calls and to select a number.If you have missed a call, the message “missed call 1”appears in standby mode ( The number indicates the number of missed calls)GA-160-8-13영문 2003.8.16 10:15 AM 페이지37](https://usermanual.wiki/Pantech/GA-160C/User-Guide-376226-Page-19.png)
![40392) Call Lists4 Press [ ]/[ ] to dial the phone number ofthe selected call.Details include time, and phone number of receivedcalls.2 The detail information of a selected call will bedisplayed when the number is highlighted.Missed 1 Call9:21 PMCall Info[Select] [Back]1 Press [ ][ ][ ].3 Use the scroll key to scroll through the last 10received call and to select a number.You see the call number list of mobile originated and terminated calls.List is empty403) Call CostsPress [ ][ ][ ][ ] to view the cost oflast call “Last Call #.#” is to be displayed.1 : LAST CALL1Last Call2Total Cost3Clear Total Cost4Credit5Set Credit6Tariff[Select] [Back]Call CostsLast Call0.0Press [ ][ ][ ][ ] to view a total cost.“Total Cost #.#” is to be displayed.2 : TOTAL COSTPress [ ][ ][ ][ ] to clear the totalcost. PIN2 is required to clear total cost.3 : CLEAR TOTAL COSTPIN2:[OK] [Back]Card Locked1Last Call2Total Cost3Clear Total Cost4Credit5Set Credit6Tariff[Select] [Back]Call CostsTotal Cost0.0You can check the cost of your Last Call and the Total cost of your calls. GA-160-8-13영문 2003.8.16 10:15 AM 페이지39](https://usermanual.wiki/Pantech/GA-160C/User-Guide-376226-Page-20.png)
![41 42Press [ ][ ][ ][ ] to view a credit.Credit is to be displayed.4 : CREDITPress [ ][ ][ ][ ] to set the credit.PIN2 is required to set the credit.5 : SET CREDIT1Last Call2Total Cost3Clear Total Cost4Credit5Set Credit6Tariff[Select] [Back]Call CostsCheck CreditUnlimitedPIN2:[OK] [Back]Card LockedPress [ ][ ][ ][ ] to view a tariff“Tariff #.#” is to be displayed.6 : TARIFFPress [ ][ ][ ][ ] to set the tariff.7 : SET TARIFF2Total Cost3Clear Total Cost4Credit5Set Credit6Tariff7Set Tariff[Select] [Back]Call CostsTariff0.0PIN2:[OK] [Back]Card Locked28 : SENT SMS 19 : CLEAR MSG COUNT4Credit5Set Credit6Tariff7Set Tariff8Sent SMS9Clear Msg Count[Select] [Back]Call CostsSent SMS05Set Credit6Tariff7Set Tariff8Sent SMS9Clear Msg CountCall Costs[Select] [Back]Sent SMSreset?Yes NoPress [ ] to reset it when a message “Sent SMS reset?” appears on the screen.Press [ ][ ][ ][ ] to clear up thenumber of sent SMS.Press [ ][ ][ ][ ] to view the numberof sent SMS.GA-160-8-13영문 2003.8.16 10:15 AM 페이지41](https://usermanual.wiki/Pantech/GA-160C/User-Guide-376226-Page-21.png)
![43 444) Call Timers1 : LAST CALL2 : TOTAL SENT3 : OUTGOING CALLS4 : INCOMING CALLSPress [ ][ ][ ][ ] to check talk time of incoming calls“Incoming Calls #:##:##” is to be displayed.Press [ ][ ][ ][ ] to check talk time of all calls“Total Sent #:##:##” is to be displayed.Press [ ][ ][ ][ ] to check talk time of last call“Last call ##:##” is to be displayed.Press [ ][ ][ ][ ] to check talk time of outgoing calls“Out going Calls #:##:##” is to be displayed.You can check the duration of your Last Call, Outgoing Calls, Incoming calls and the Total Time.Press [ ][ ][ ][ ] to clear timers.You are to select one of the timers.5 : RESET TIMERS1: TOTAL CALL1 : Press [ ] and you will see “Total Calls Clear?” displayed on the screen.2 : Press [ ] to clear up total talk time.2: OUTGOING CALLS1 : Press [ ] and you will see “Out going Calls Clear?” displayed on the screen.2 : Press [ ] to clear up talk time of out going calls.3: INCOMING CALLS1 : Press [ ] and you will see “Incoming Calls Clear?” displayed on the screen.2 : Press [ ] to clear up talk time of incoming calls.Clear Timers[Select] [Back]1Total Time 2Outgoing Time3Incoming TimeClear Timers[Select] [Back]1Total Time 2Outgoing Time3Incoming TimeClear Timers[Select] [Back]1Total Time 2Outgoing Time3Incoming TimeTotal CallsClear?Outgoing CallsClear?Incoming CallsClear?[Yes] [No][Yes] [No][Yes] [No]GA-160-8-13영문 2003.8.16 10:15 AM 페이지43](https://usermanual.wiki/Pantech/GA-160C/User-Guide-376226-Page-22.png)
![45 465) Set Next CallPress [ ][ ][ ][ ] to show your phone number.Press [ ][ ][ ][ ] to hide your phone number.1 : SHOW MY NUMBER2Press [ ] to proceed with it when a message “Call List Clear?” appears.2 : HIDE MY NUMBER6) Options1Press [ ][ ][ ][ ] to delete a list of10 recently dialed calls.1 : CLEAR CALL LISTOptions[Select] [Back]1Clear Call List2Set Call ListCall ListClear?[Yes] [No]Press [ ][ ][ ][ ] toCheck into either of ENABLE or DISABLE and press [ ].2 : SET CALL HISTORYSet Call History[OK] [Back]EnableDisableGA-160-8-13영문 2003.8.16 10:15 AM 페이지45](https://usermanual.wiki/Pantech/GA-160C/User-Guide-376226-Page-23.png)
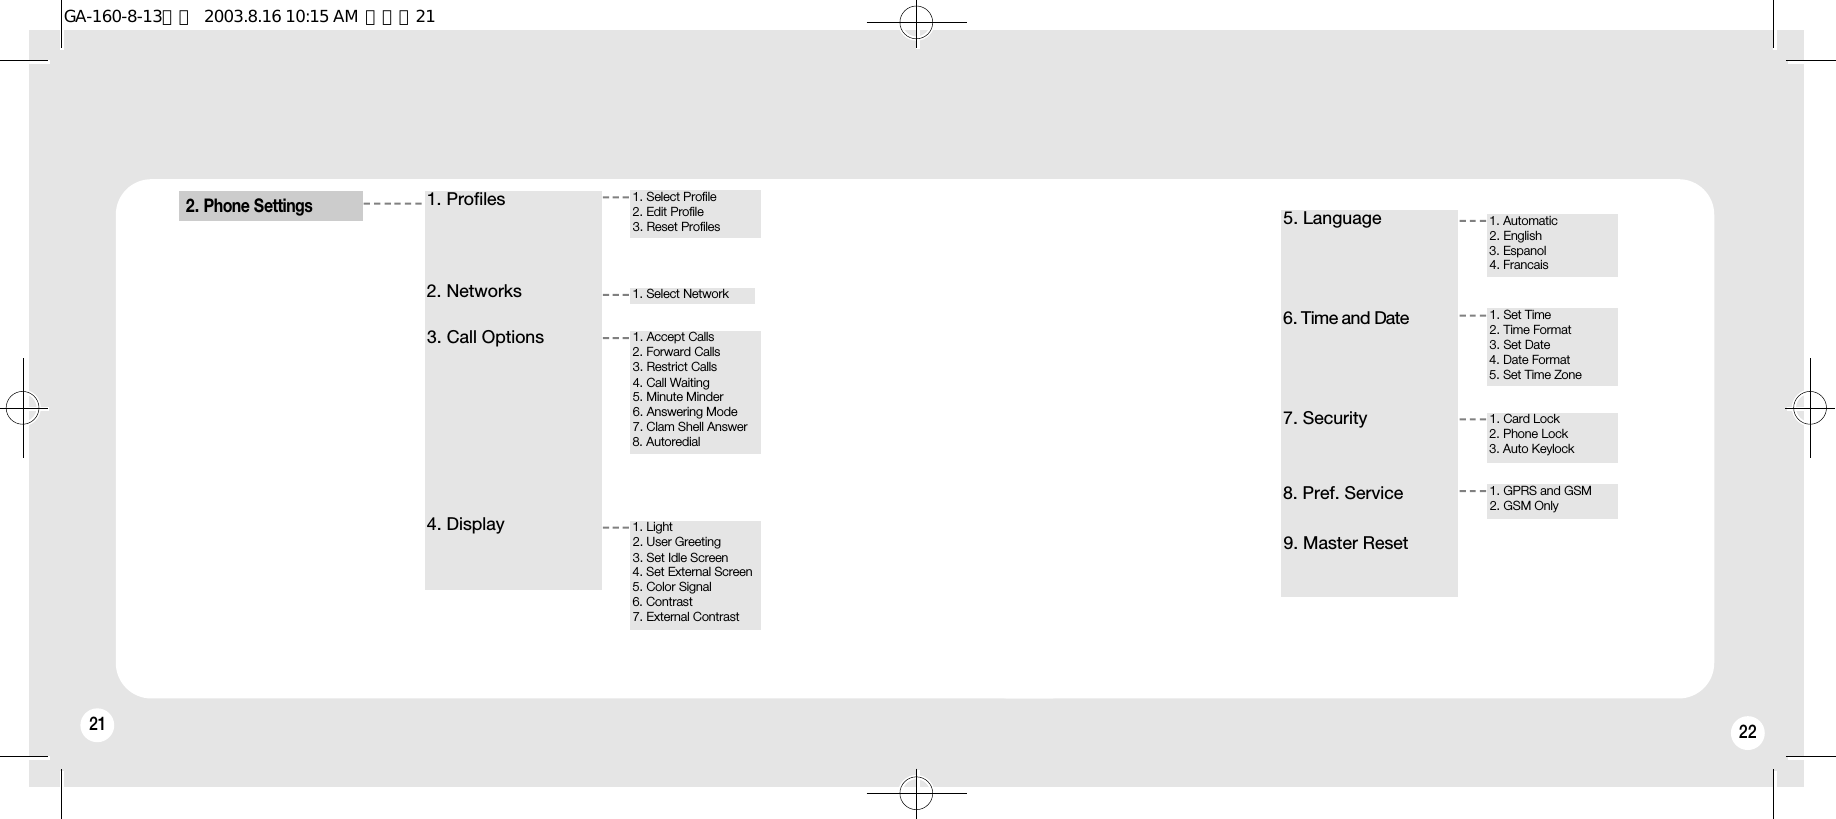
![47 482. Phone Settings1) ProfilesPress [ ][ ][ ][ ] to select a profileCheck into one of the following profiles and press [ ] to save it.Enables you to set a profile where you have a totally different set ofoptions, select a certain profile when necessary to use your phone withmore convenience and carefulness.1 : SELECT PROFILE2 : EDIT PROFILENormal/Meeting/Outdoors/Hands-free/Home.1 : BELL VOLUME1 : Press [ ][ ][ ][ ][ ] to adjust a ringer volume.2 : Turn up and down with the navigation key. You are to control the volume in 5 levels.[Select] [Back]NormalMeetingOutdoorsHands-freeHomeProfilesBell Volume[OK] [Back]2 : TURN SILENT ON / OFF1 : Press [ ][ ][ ][ ][ ] to mute or activate a key tone.2 : Check into either of ON or OFF.3 : Press [ ] to save it.3 : INCREASING BELL1 : Press [ ][ ][ ][ ][ ] to activate ordeactivate an increasing ringer.2 : Check into either of ON or OFF.3 : Press [ ] to save it.[OK] [Back]OnOffIncreasing Bell[OK] [Back]OnOffIncreasing BellGA-160-8-13영문 2003.8.16 10:15 AM 페이지47](https://usermanual.wiki/Pantech/GA-160C/User-Guide-376226-Page-24.png)
![49 505 : VIBRATING ALERT1 : Press [ ][ ][ ][ ][ ] to set vibrating alertCheck into one of the following options and press [ ] to save it.ON : Keep back light onOFF : Keep back light offAUTO ON/OFF : Control back light automaticallyYou are to choose one of the options (Rainbow/Colorred/Colorgreen/Color blue/Color yellow/Violet /Blue Green/White), once you check into either ON or AUTO ON/OFF and press [ ] to save it.4 : LIGHT1 : Press [ ][ ][ ][ ][ ] to control backlight.2 : Check into one of the following options and press [ ].6 : PROFILE NAME1 : Press [ ][ ][ ][ ][ ] to check out a profile name and edit it.2 : Press [ ] to maintain the profile name or Edit theexistent profile name and press [ ].On : Activate vibrating alertOn if silent : Activate vibrating alert when a ringer is mute.Bell after Vibration : A ringer sounds after vibration.Off : Deactivate vibrating alert.7 : AUTO ACTIVATION 1 : Press [ ][ ][ ][ ][ ] to set Auto Activation.2 : Check into either of ON or OFF and press [ ].8 : ACCESSORIES1 : Press [ ][ ][ ][ ][ ] to add an accessory.2 : Select “Add accessory?” and press [ ] to view a kind of accessories.3 : Select one with the navigation key and press [ ].4 : Press [ ] to add the accessory when you see“Associate accessory with current profile? Associate?”2Press [ ] to proceed with it.1Select Profile2Edit Profile3Reset ProfilesProfiles[Select] [Back]Reset profiles?1Press [ ][ ][ ][ ] to reset all profiles.3 : RESET PROFILES[Yes] [No]GA-160-8-13영문 2003.8.16 10:15 AM 페이지49](https://usermanual.wiki/Pantech/GA-160C/User-Guide-376226-Page-25.png)
![51 522Phone will search for an available network.1Press [ ][ ][ ][ ] to select a network available.1 : SELECT NETWORK2) Networks 3) Call OptionsDecides whether you are to accept calls or not.When you turn on the phone, it automatically searches for your homenetwork. If this is not within range, you may use another networkprovided your network operator has an agreement that allows you todo so. This is called roaming.2Check into one of the following items and press [ ]to save it.Decides to accept whose calls.1Press [ ][ ][ ][ ][ ].1 : ACCEPT OPTIONSAccept Calls[OK] [Back]From allFrom listFrom none1 Accept CallsFrom all : Accept all calls.From list : Accept only calls from the list of accepted persons.You will see “From list ” displayed on the screen.From none : Reject all calls.GA-160-8-13영문 2003.8.16 10:15 AM 페이지51](https://usermanual.wiki/Pantech/GA-160C/User-Guide-376226-Page-26.png)
![53 543Select a phone book entry and press [ ].2Move to “Add new?” with the navigation key andpress [ ].1Press [ ][ ][ ][ ][ ].Makes up a list of persons you are to accept call from.Forward all voice calls without ringing.Add new?Accepted List[Select] [Back]2 : ACCEPTED LIST2You are to choose one from the following items.Forward all voice calls to a specific phone number.If you select Phone Book, all calls are forwarded to a phone number in the phone book.If you select Voice mail, all calls are forwarded to your voice mailbox.If you select Other number, enter the phone number to which you want to forward calls.1Press [ ][ ][ ][ ][ ].1 : ALL VOICE CALLS1 : ACTIVATE2 : CANCEL3 : GET STATUSPress [ ] and choose Phone Book or Voice Mail or Other number.Press [ ] not to forward any call.Press [ ] to view the status of all voice calls.1All Voice Calls2When Busy3Not Reachable4No Reply5Fax Calls6Data CallsForward Calls[Select] [Back]2 Forward CallsThis network service lets you forward incoming calls to another phone numberGA-160-8-13영문 2003.8.16 10:15 AM 페이지53](https://usermanual.wiki/Pantech/GA-160C/User-Guide-376226-Page-27.png)
![55 56Forward calls to a specific phone number when the line is busy.1 : ACTIVATE2 : CANCEL3 : GET STATUSPress [ ] and enter a phone number then, press [ ].Press [ ] not to forward any call.Press [ ] to view its status.2You are to choose one from the following items.1Press [ ][ ][ ][ ][ ].2 : WHEN BUSY2You are to choose one from the following items.Forward calls to a specific phone number when the phone is out of service area.1Press [ ][ ][ ][ ][ ].3 : NOT REACHABLE1 : ACTIVATEPress [ ] and enter a phone number then, press [ ].2 : CANCEL3 : GET STATUSPress [ ] not to forward any call.Press [ ] to view its status.Forward calls if you are already on the phone. Forward calls if you phone is turned off or if you are unreachable.GA-160-8-13영문 2003.8.16 10:15 AM 페이지55](https://usermanual.wiki/Pantech/GA-160C/User-Guide-376226-Page-28.png)
![57 58Forward calls to a specific phone number when no one answers a call.1 : ACTIVATE2 : CANCEL3 : GET STATUSPress [ ] and enter a phone number then, press [ ].Press [ ] not to forward any call.Press [ ] to view its status.2You are to choose one from the following items.1Press [ ][ ][ ][ ][ ].4 : NO REPLY2You are to choose one from the following items.Forward calls to a specific phone number when you receive fax calls.1Press [ ][ ][ ][ ][ ].5 : FAX CALLS1 : ACTIVATEPress [ ] and enter a phone number then, press [ ].2 : CANCEL3 : GET STATUSPress [ ] not to forward any call.Press [ ] to view its status.Forward calls that you received fax calls.Forward calls that you do not answer within a specified time limit.GA-160-8-13영문 2003.8.16 10:15 AM 페이지57](https://usermanual.wiki/Pantech/GA-160C/User-Guide-376226-Page-29.png)
![59 60Forward calls to a specific phone number when you receive data calls.1 : ACTIVATE2 : CANCEL3 : GET STATUSPress [ ] and enter a phone number then, press [ ].Press [ ] not to forward any call.Press [ ] to view its status.2You are to choose one from the following items.1Press [ ][ ][ ][ ][ ].6 : DATA CALLSPress [ ][ ][ ][ ][ ] to check all.7 : CHECK ALLCancel all call forwarding.Forward calls that you received data calls.GA-160-8-13영문 2003.8.16 10:15 AM 페이지59](https://usermanual.wiki/Pantech/GA-160C/User-Guide-376226-Page-30.png)
![61 62Restrict outgoing international calls.1 : ACTIVATE2 : CANCEL3 : GET STATUSPress [ ] and enter a password then, press [ ].Press [ ] and enter a password not to restrict any outgoing international call.Press [ ] to view its status.2You are to choose one from the following items.1Press [ ][ ][ ][ ][ ].2 : OUTGOING INTERNATIONALRestrict Calls[Select] [Back]3 Restrict Calls2You are to choose one from the following items.Restrict outgoing international roaming calls.1Press [ ][ ][ ][ ][ ].3 : OUTGOING INTERNATIONAL ROAM1 : ACTIVATEPress [ ] and enter a password then, press [ ].Restrict all outgoing calls.1 : ACTIVATEPress [ ] and enter a password then, press [ ].2You are to choose one from the following items.1Press [ ][ ][ ][ ][ ].1 : ALL OUTGOING1 All Outgoing2 Outgoing Intl3 Outg Intl Roam4 All Incoming5 Inc when Roam6 Cancel AllRestrict Calls[Select] [Back]2 : CANCELPress [ ] and enter a password not to restrict any outgoing call.3 : GET STATUSPress [ ] to view its status.1 All Outgoing2 Outgoing Intl3 Outg Intl Roam4 All Incoming5Inc when Roam6Cancel AllThe Restrict Calls service allows you to restrict certain types of callsbeing made and received.GA-160-8-13영문 2003.8.16 10:15 AM 페이지61](https://usermanual.wiki/Pantech/GA-160C/User-Guide-376226-Page-31.png)
![63 64Restrict all incoming calls.1 : ACTIVATE2 : CANCEL3 : GET STATUSPress [ ] and enter a password then, press [ ].Press [ ] and enter a password not to restrict any incoming calls.Press [ ] to view its status.2You are to choose one from the following items.1Press [ ][ ][ ][ ][ ].2You are to choose one from the following items.Restrict incoming when roaming calls.1Press [ ][ ][ ][ ][ ].1 : ACTIVATEPress [ ] and enter a password then, press [ ].2 : CANCEL3 : GET STATUSPress [ ] and enter a password not to restrict incoming when roaming calls.Press [ ] to view its status.2 : CANCEL3 : GET STATUSPress [ ] and enter a password not to restrict any outgoing international roaming calls.Press [ ] to view its status.4 : ALL INCOMING5 : INCOMING WHEN ROAMGA-160-8-13영문 2003.8.16 10:15 AM 페이지63](https://usermanual.wiki/Pantech/GA-160C/User-Guide-376226-Page-32.png)
![65 662Enter a password and press [ ] to cancel any set restrictions.1Press [ ][ ][ ][ ][ ].6 : CANCEL ALL3Press [ ] to change a password.2Enter an old password and a new password then, repeat the new password.1Press [ ][ ][ ][ ][ ].7 : CHANGE PASSWORD2You are to choose one from the following items.1Press [ ][ ][ ][ ].Allows you to answer another incoming call when you already have one.Enables a feature of call waiting.1 : ACTIVATEPress [ ].2 : CANCEL3 : GET STATUSPress [ ].Press [ ].1Activate2Cancel3Get StatusCall Waiting[Select] [Back]4 Call WaitingGA-160-8-13영문 2003.8.16 10:15 AM 페이지65](https://usermanual.wiki/Pantech/GA-160C/User-Guide-376226-Page-33.png)
![67 682Check into On or Off with the navigation key and press [ ] to confirm it.1Press [ ][ ][ ][ ].1Press [ ][ ][ ][ ].If you turn on the minute minder, you hear a beep once every minuteduring a call.When clam shell is opened you can answer the call.The phone is automatically redialed the number you’re trying to call up.When using a portable handsfree unit, you can choose to answer a call by pressing any key (except the NO key) or set the phone to answer the call automatically.[OK] [Back]OnOffMinute Minder[OK] [Back]OnOffClam Shell Answer[OK] [Back]OnOffTurn Autoredial ON[OK] [Back]NormalAny KeyAutoAnswering Mode5 Minute Minder 7 Clam Shell Answer8 Turn Auto Redial On6 Answering Mode1Press [ ][ ][ ][ ].1Press [ ][ ][ ][ ].GA-160-8-13영문 2003.8.16 10:15 AM 페이지67](https://usermanual.wiki/Pantech/GA-160C/User-Guide-376226-Page-34.png)
![69 702Check into one of the following options andpress [ ].4) Display1Press [ ][ ][ ][ ] to adjust back light.1 : LIGHT1Press [ ][ ][ ][ ] to set User Greeting.Displays User Greeting as you set when you turn on the phone.The display light can be set to on, off, auto on/off. In automaticmode, the display light is turned off a few seconds after you pressthe last key.2 : USER GREETINGON : Keep backlight onOFF : Keep backlight offAUTO ON/OFF : Control selected backlight automatically.You are to choose one of the options (Rainbow/Color red/Color green/Color blue/Color yellow/Violet/Blue Green/White), once you check into either On or Auto On/Off. And press [ ]to save it.Display[Select] [Back]1Light2User Greeting3Set Main Screen4Set External5Colour Signal6 Main Contrast2Check into one of the following items and press [ ].STANDARDPress [ ] to preview standard user greeting or [ ] to activate or deactivate animation sound.Press [ ].Custom – Customize user greeting and press [ ]Off – Don’t display user greeting.Animation : Display animation on idle mode.World Map : Display World map on idle mode.Digital Time : Display Digital Time on idle mode.Day & Greeting : Display a user text on idle mode.Lunar & Greeting : Display lunar year and a user text on idle mode 2Check into one of the following items and press [ ].1Press [ ][ ][ ][ ] to set screen for Idle Mode.3 : SET IDLE SCREENCUSTOMOFFSet main idle screen out of 5’ screen modes.GA-160-8-13영문 2003.8.16 10:15 AM 페이지69](https://usermanual.wiki/Pantech/GA-160C/User-Guide-376226-Page-35.png)
![71 72Analog Watch : Display analog watch.Digital Watch : Display digital time.Curitel Watch : Display digital time and phone information.Greeting Watch : Display network name on the external LCD.2Check into one of the following items and press [ ].1Press [ ][ ][ ][ ] to set screen for external LCD.1Press [ ][ ][ ][ ] to set colour signal for a specificphone number.4 : SET EXTERNAL SCREEN5 : COLOR SIGNAL2Move to “Add new?” key and press [ ].3Select a phone number with the navigation key and press [ ].Enter a phone number and press [ ].Check into one of the options (Rainbow/Color red/Colorgreen/Color blue/Color yellow/Violet/Blue Green/White)Press [ ].Press [ ]to change color and check into one color. Press [ ]to delete color signal designated for the phone number. You will see “Deleted” displayed on the screen.GA-160-8-13영문 2003.8.16 10:15 AM 페이지71](https://usermanual.wiki/Pantech/GA-160C/User-Guide-376226-Page-36.png)
![73 742Adjust it in 7 levels with the navigation key.Press [ ] to save it.1Press [ ][ ][ ][ ] to adjust contrast for better view.2Check into one of the languages and press [ ]to save it.6 : CONTRAST1Press [ ][ ][ ] to decide what languageis to be used for display. (Automatic/English/Espanol/Francais)5) LanguageLanguage[OK] [Back]AutomaticEnglishEspanolFrancais2Adjust it in 7 levels with the navigation key.Press [ ] to save it.1Press [ ][ ][ ][ ] to adjust contrast for better view.7 : EXTERNAL CONTRASTGA-160-8-13영문 2003.8.16 10:15 AM 페이지73](https://usermanual.wiki/Pantech/GA-160C/User-Guide-376226-Page-37.png)
![75 76To change hour and minute, press [ ]to go back.6) Time and Date2Enter hour and minute digit by digit.3Press [ ] to save it.1Press [ ][ ][ ][ ] to set time.2Check into either 24 hours or am/pm with the navigationkey and press [ ] to save it.1Press [ ][ ][ ][ ] to set time format.1 : SET TIME2 : TIME FORMAT1Set Time2Time Format3Set Date4Date Format5Set Time Zone[Select] [Back]Time and Date2Enter day, month and year.3Press [ ] to save it.1Press [ ][ ][ ][ ] to set date.2Check into one of the formats with the navigation key andpress [ ] to save it.1Press [ ][ ][ ][ ] to set date format.3 : SET DATE4 : DATE FORMATTo change day, month and year, Press [ ]to go back.1Press [ ][ ][ ][ ] to set date format.5 : SET TIME ZONEThe time is always displayed in standby mode.GA-160-8-13영문 2003.8.16 10:15 AM 페이지75](https://usermanual.wiki/Pantech/GA-160C/User-Guide-376226-Page-38.png)
![77 787) Security2You are to see the following two items.1Press [ ][ ][ ][ ] to set card lock.Protection : Press [ ]and check into “ON” then, press [ ]to set up protection.Change PIN2 : Enter old PIN2, press [ ]. Enter new PIN2, press [ ].Enter the new PIN2 again and press [ ]to save it.1Press [ ][ ][ ][ ] to set Phone Lock.2 : PHONE LOCKSecurity[Select] [Back]1Card Lock2Phone Lock3Auto KeylockProtection : Press [ ]and check into “ON” then, Press[ ]to set up protection. Change Code : Enter old code, press [ ], enter newcode, press [ ].Enter the new code again and press [ ]to save it.2You are to see the following two items.1Press [ ][ ][ ][ ] to set Auto Key Lock.2Check into “ON ”or “OFF ”to activate or deactivate Auto Key Lock.Prevents accidental key press with this feature on.3 : AUTO KEYLOCK1 : CARD LOCKGA-160-8-13영문 2003.8.16 10:15 AM 페이지77](https://usermanual.wiki/Pantech/GA-160C/User-Guide-376226-Page-39.png)
![79 808) Pref. Service1Press [ ][ ][ ] to select Pref. service.9) Master ResetResets Phone lock code.3Press [ ].2Enter Phone Lock Code.1Press [ ][ ][ ] to reset Phone.PHONE LOCK CODEMaster Reset[OK] [Back]Phone lock code:You can select the GPRS and GSM service or GSM only service.GA-160-8-13영문 2003.8.16 10:15 AM 페이지79](https://usermanual.wiki/Pantech/GA-160C/User-Guide-376226-Page-40.png)
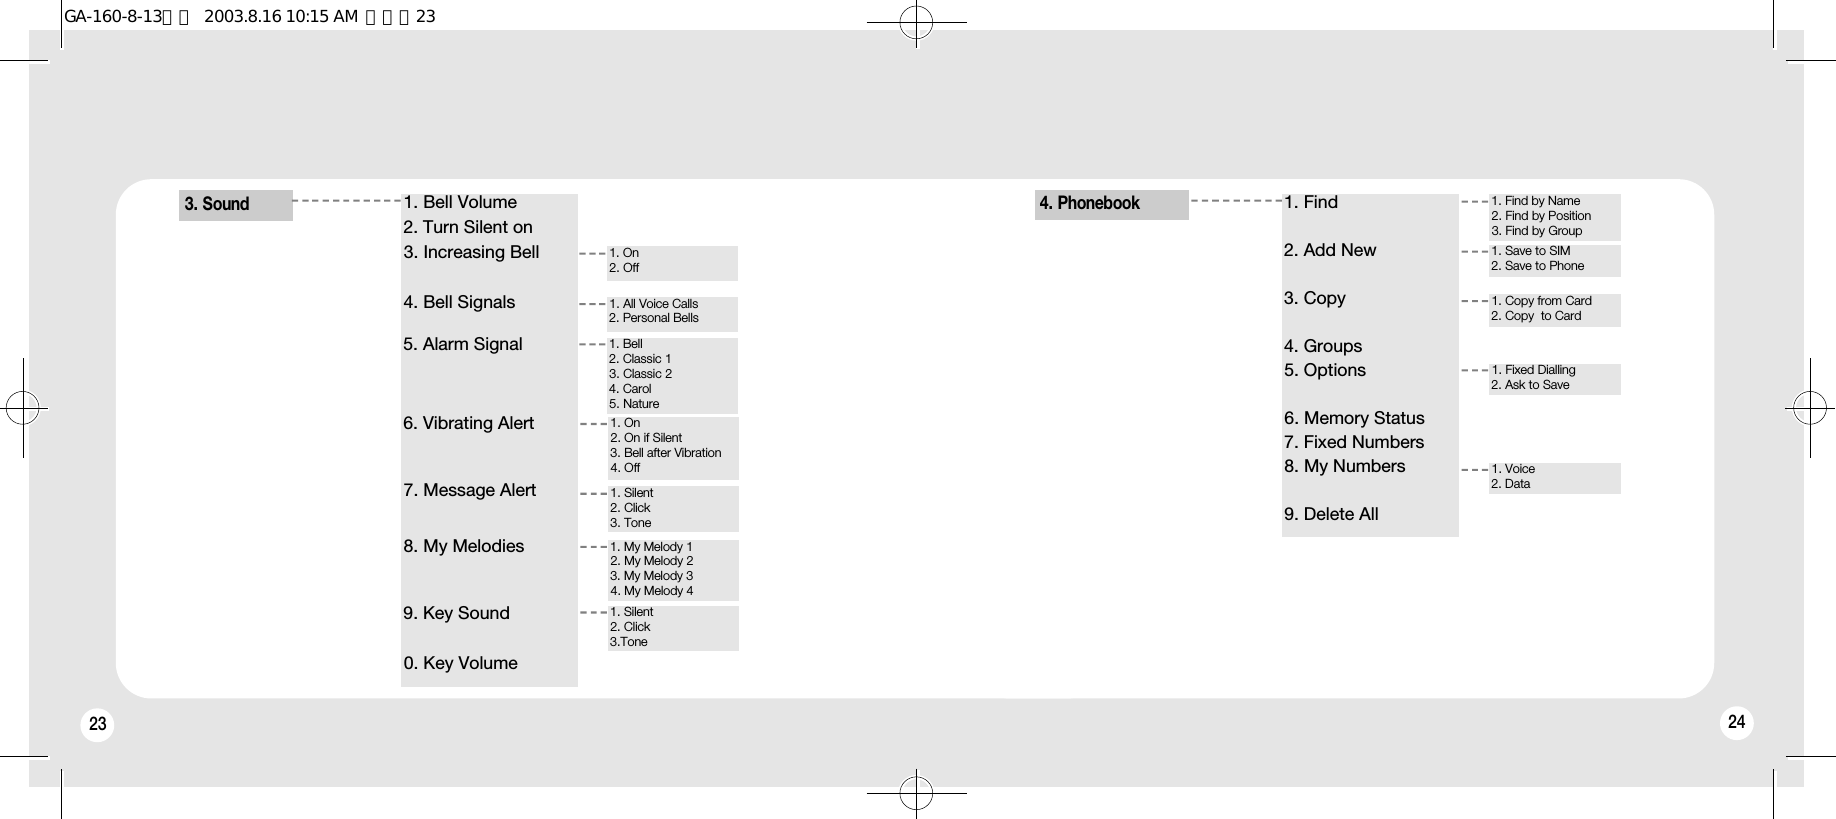
![81 823. Sound3Press [ ] to save it.2Turn up and down with the navigation key. You are to control the volume in 5 levels or mute theringer.2Check into “On” or “Off”, press [ ] to save it.1Press [ ][ ][ ] to mute or activate sound and tone.1) Bell Volume2) SilentBell Volume[OK] [Back]1Bell Volume2Silent3Increasing Bell 4Bell Signals5Alarm Signal6Vibrating Alert[Select] [Back]Sound Settings2Check into “ON” or “OFF”Press [ ] to save it.1Press [ ][ ][ ] to activate or deactivatean increasing bell.2You are to see the two items displayed as below.3) Increasing Bell1Press [ ][ ][ ] to assign a melody to a phone number.4) Bell Signals[OK] [Back]OnOffIncreasing BellYou can choose a ring signal from a list of different sounds and melodies.1Press [ ][ ][ ] to adjust bell volume.The bell volume can be set to 5 levels.You can also turn the bell volume off(0)You can choose a ring signal that rises in steps from the lowest volume to the highest.2Check into one of the following items with the navigation key andpress [ ] to go to submenu. (Bell/Classic1/Classic2/Carol/Nature)1Press [ ] to allow the same melody or bell to all incoming calls.ALL VOICE CALLSGA-160-8-13영문 2003.8.16 10:15 AM 페이지81](https://usermanual.wiki/Pantech/GA-160C/User-Guide-376226-Page-41.png)
![83 843Select one then, press [ ] to save it.4To Edit or delete an assigned melody or bell to a phone number,Move to the phone number and press [ ].Press [ ] to edit it or [ ] to delete it.3Enter a phone number and press [ ].Check into one of the following items with the navigation key andpress [ ] to go to submenu.(Bell/Classic1/Classic2/Carol/Nature)Select one then, press [ ] to save it.2Move to “Add new?” with the navigation key and press[ ] to add a phone number with a specific melody or bell.1Press [ ] to assign a melody to a phone number.PERSONAL BELLS3Select one then, press [ ] to save it.2Check into one of the following items with the navigation key andpress [ ] to go to submenu. (Bell/Classic1/Classic2/Carol/Nature)1Press [ ][ ][ ] to select a melody or bell for alarm signal.5) Alarm SignalIf your subscription includes the Calling Line Identification service, youcan assign a personal ring signal to up to ten callers.If the last seven digits of a caller’s number correspond to a number you have specified, then that caller’s ring signal is used.You can choose to be notified of an incoming call by the buzzing of the Vibrating alert. You can set the phone’s Vibrating alert to one of thefollowing:6) Vibrating AlertOn (keep vibrating alert on)On if Silent (on when the ring volme is turned off or when you setthe phone to silent)Bell after vibration (ring a sound after vibrating alert)Off (keep vibrating alert off)GA-160-8-13영문 2003.8.16 10:15 AM 페이지83](https://usermanual.wiki/Pantech/GA-160C/User-Guide-376226-Page-42.png)
![85 867) Message Alert2You are to select one of the following items with thenavigation key.3Press [ ] to save it.1Press [ ][ ][ ] to set Message Alert.Silent / Click / ToneMy Melody 1/My Melody 2/My Melody 3/My Melody 4SilentClickToneMessage Alert[OK] [Back]2Select the volume level by using the navigation keys.3Press [ ] to save it.1Press [ ][ ][ ] for key volume.If the warning alarm sounds because of low battery, the sound will not be heard even if the user presses the button.[ ] scroll up to increase volume.[ ] scroll down to lower volume or to set to silent.1Press [ ][ ][ ] to set My Melodies.3Press [ ] to save it.2You are to select one of the following items with thenavigation key.1Press [ ][ ][ ] to set Key Sound.Silent / Click / Tone9) Key SoundSilentClickToneKey Sound[OK] [Back]10) Key Volume2Check into one of the following options and press[ ] to save it.1Press [ ][ ][ ] to set Vibrating Alert .OnOn if silentBell after VibrationoffVibrating Alert[OK] [Back]You can set the key sound to silent, click or tone.Decide that user can what alert you are to be given to an incoming message.8) My MelodiesGA-160-8-13영문 2003.8.16 10:15 AM 페이지85](https://usermanual.wiki/Pantech/GA-160C/User-Guide-376226-Page-43.png)
![87 884. Phonebook1) Find3Find by name2Select the sort order to find.Press [ ] to find by name.Press [ ] to find by position.Press [ ] to find by group.1Press [ ][ ][ ]. To search phonebook number.1. Enter the name which is looking for. Press [ ].2. Select a name and press [ ] then calling out.3. Select the name which is looking for and press [ ].You can Delet / Edit / SMS / Copy in submenu.If the selected name is saved the number in handset.You can use the Navigation right / left key to select multi number and call out. (Home, Office, Mobile, Fax)Find by group1. Select a group.2. In group, press a member and call out.3. If you want to Delet / Edit / SMS / Copy, Select a member and press [ ].5Find by position1. Select a mode SIM or Phone to find.2. Enter a position which you look for,then press [ ].3. Select a position, then you can call out.4. You can Delet / Edit / SMS / Copy in submenu, Select a position and press [ ].Press [ ] to find from SIM.Press [ ] to find from phone.41Find from SIM2Find from Phone[Select] [Back]Find by positionName:l[OK] [Back]Find by nameGA-160-8-13영문 2003.8.16 10:15 AM 페이지87](https://usermanual.wiki/Pantech/GA-160C/User-Guide-376226-Page-44.png)
![89 902) Add New43Enter a position to save, press [ ].5Save to Phone - You are to save name, phone numbers for mobile, office and fax, e-mail, memo, group etc.1. To enter name, e-mail and memo, use [ ] and [ ], press [ ], edit or enter each one, and press [ ]2. To enter home, mobile, office and fax, use [ ] and [ ], press [ ], edit or enter each one, and press [ ].4. To save any change, use [ ] and [ ], select an entry for save and press [ ].3. To select a group, use [ ] and [ ], move to an entry for group, press [ ], select a group from the list, and press [ ].2SIM or Phone 1. Save to SIM : Press [ ][ ][ ][ ].2. Save to Phone : Press [ ][ ][ ][ ].1Press [ ][ ][ ]. Adds a phone number to the phonebook.1Save To SIM2Save To Phone[Select] [Back]Add newSave and exit?Add new?[OK] [Back]1. To enter a name, use [ ] and [ ], select a name entry, edit or enter a name, and press [ ].2. To enter a number, use [ ] and [ ], select a number entry, edit or enter a number, and press [ ].Save to SIM -You are to save name and number.3. To save any change, use [ ] and [ ], select an entry for save and exit, and press [ ].GA-160-8-13영문 2003.8.16 10:15 AM 페이지89](https://usermanual.wiki/Pantech/GA-160C/User-Guide-376226-Page-45.png)
![91 923Copy from cardSelect a copy mode either one by one or allPress [ ] to copy one by one from cord.Press [ ] to copy all from cord.1. One by OneSelect a record and press [ ]and select defacct number to be saved.2. Copy allYou will see “Entries saved in card memory will be copied. Copy from caed?”Press [ ] and you will see “Copying please wait”, “Phone book entries copied : ##”.Copy to cardSelect a copy mode either one by one or allPress [ ] to copy one by one from phone.Press [ ] to copy all from phone.1. One by OneUse Navigation right / left key to find a record to copy in number.2. Copy allYou will see “Entries saved in phone memory will be copied. Copy from caed?”Press [ ] and you will see “Copying please wait”, “Phone book entries copied : ##”.2Select a mode for copy.Press [ ] to copy from card.Press [ ] to copy from phone.3) Copy1Press [ ][ ][ ].To copy phonebook number.4GA-160-8-13영문 2003.8.16 10:15 AM 페이지91](https://usermanual.wiki/Pantech/GA-160C/User-Guide-376226-Page-46.png)
![93 944) Groups2Move to an existing group with the navigation key andpress [ ]. You can edit group name.1Press [ ][ ][ ].Groups phonebook entries under a name in order to organize them in anorderly manner.DeletePress [ ]and you will see “[group name] Delete?”Press [ ]to delete a group.Enter the group name and press [ ].You can make groups to Ten.FDN (Fixed Dialling Number)3Select “Add new?” and press [ ] to make a group.5) OptionsShows various optional items for you to decide on.Press [ ][ ][ ][ ].If you have FDN Card.You can make FDN emable or unable.You must enter your PIN2.1. FIXED DIALLINGIf ask to save is on, you are asked if you want to save any called or answered number that is not already saved in your phone book.Press [ ][ ][ ][ ].2. ASK TO SAVEPIN2:Fixed Number[OK] [Back]OnOffAsk to Save[OK] [Back]Groups[Select] [Back]Add new?FamilyFriendColleagueGA-160-8-13영문 2003.8.16 10:15 AM 페이지93](https://usermanual.wiki/Pantech/GA-160C/User-Guide-376226-Page-47.png)
![95 966) Memory Status1Press [ ][ ][ ] and the memory status is to be displayed as follows.Displays the status of memories, Card, Phone and E-mail.Status 3 (250)Status 0 (100)Card memory depends on SIM card.2Press [ ] to go back to the previous menu.4Enter a phone number and press [ ].6Press [ ] to save it.5Enter a name, select the memory in which you want the number to be saved.7) Fixed Numbers3Enter a PIN2 and press [ ].2Press [ ] to save a new number.1Press [ ][ ][ ].If you have FDN Card.You can only call phone numbers saved in phonebook.You must enter your PIN2.PIN2:Fixed Number[OK] [Back]PIN2:Fixed Number[OK] [Back]Name:lAdd contact[OK] [Back]Memory Status[OK] [Back]Status 3(250)Status 0(100)If your card isn’t FDN, this menu is disable.GA-160-8-13영문 2003.8.16 10:15 AM 페이지95](https://usermanual.wiki/Pantech/GA-160C/User-Guide-376226-Page-48.png)
![97 988) My NumbersPress [ ][ ][ ][ ] and select and enter the phone / data number and press [ ] to save it.Displays your phone number.9) Delete All1Press [ ][ ][ ] and you will see “Delete all in phonememory?”2Press [ ] to confirm it or [ ] to go back to the previous menu.Deletes all the data in the phone book memory.1Voice2Data[Select] [Back]My NumberGA-160-8-13영문 2003.8.16 10:15 AM 페이지97](https://usermanual.wiki/Pantech/GA-160C/User-Guide-376226-Page-49.png)
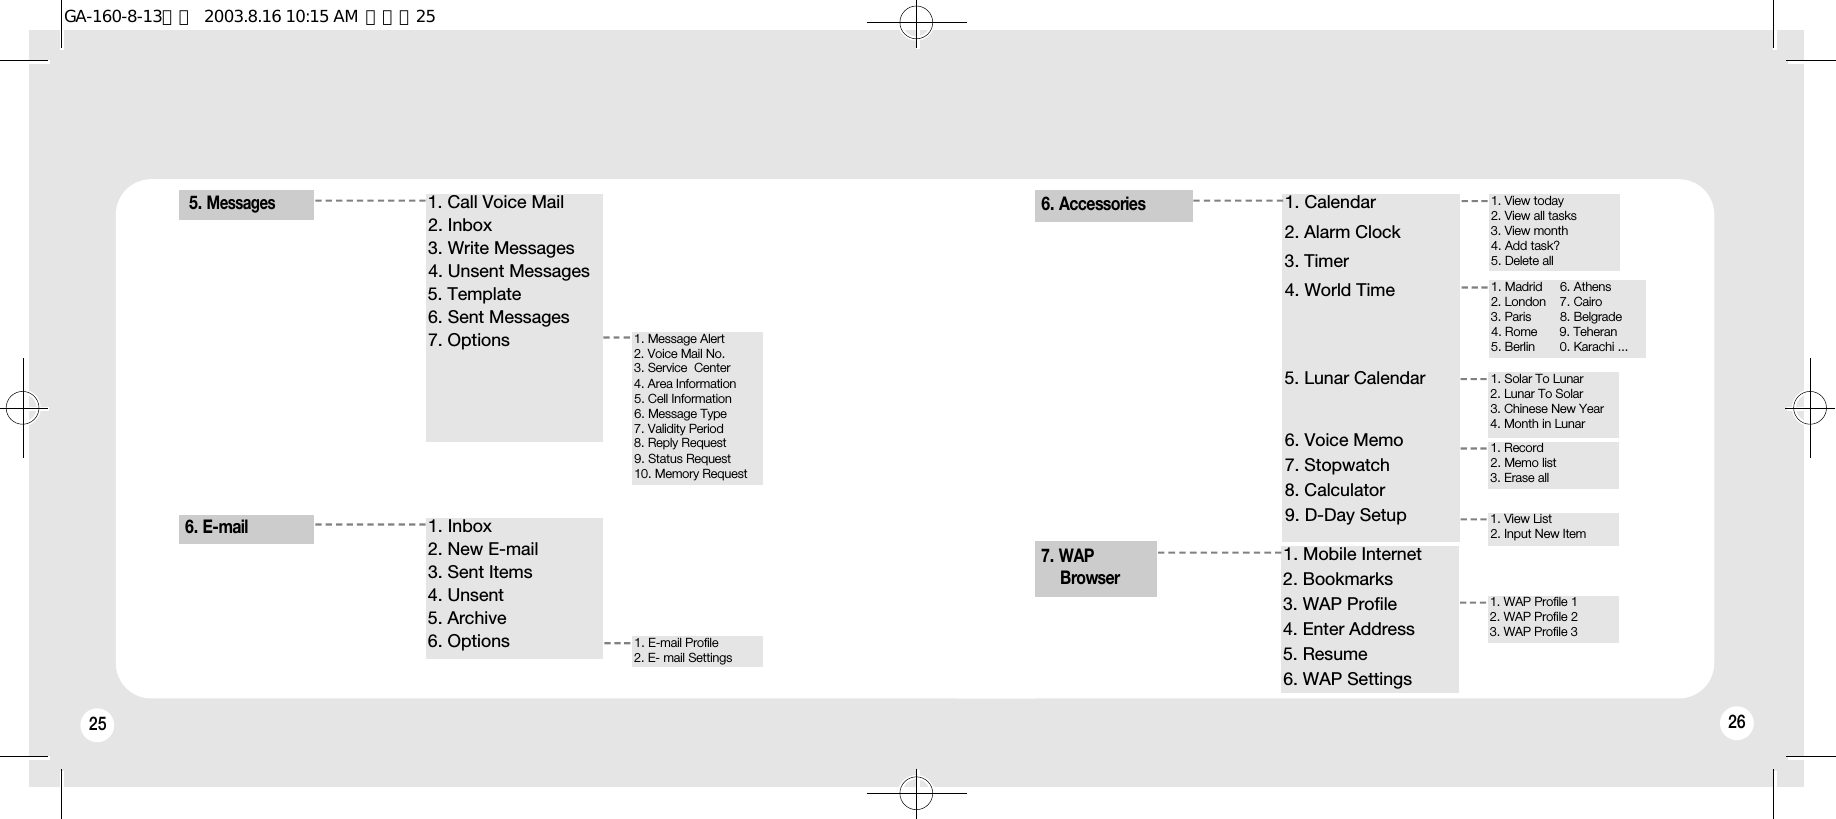
![99 1005. Messages2) InboxPress [ ][ ][ ] and you will see a list ofinbox message Select a message with thenevigation key and press [ ] to read.1Inbox2 New SMS3Call Voice Mail4Sent Items5 Unsent6OptionsMessages[Select] [Back]Delete the received SMS.Press [ ] and you will see “Deleted”.1. DELETEReply to the SMS sender.Press [ ] then, select a reply message type. Edit new or wirh the received or templates.2. REPLYForward the received SMS to someone.Press [ ] then, edit the message or press [ ].3. FORWARDSave the received SMS.Press [ ].4. SAVE1) Call Voice MailPress [ ][ ][ ] and place a call to yourVoice Mailbox to check a voicemail.CallingVoice Mail025218541This menu provides you with a quick way of accessing your voice mailbox.before using this feature, you must enter the voice mail No in optionsmenu.Store or change the server number obtained from your service provider.You can listen to your messages.Call the SMS sender.Press [ ] and you will call.5. CALLRead the next received SMS.Press [ ] and you will read the next SMS.6. READ NEXTWhen the icon appears, you have received new text messages.GA-160-8-13영문 2003.8.16 10:15 AM 페이지99](https://usermanual.wiki/Pantech/GA-160C/User-Guide-376226-Page-50.png)
![101 1023Enter a recipient’s phone number or press [ ] to retrieve anumber or a group from the phone book and press [ ] then,you will see “Sending Message”.Text:[New SMSNumber:lNew SMS[OK] [Back][OK] [Back]Number:lNew SMS[OK] [Back]Sendingmessageclose3) Write Messages1Press [ ][ ][ ] and enter a text message.2Press [ ] to enter the number.Before using this feature, you must enter the service centre in options menu.Store or change the server number obtained from your service provider.4) Unsent Press [ ][ ][ ] and you will see a list of messages not sentproperlySelect a message with the navigation key and press [ ] then, arecipient’s phone number and a message is to be displayed.Press [ ] to send, save or delete the unsent message.3Enter a recipient’s phone number and press [ ]then, you will see “Sending Message”Text:[Send2press [ ].1Send the unsent SMS.Press [ ] and enter a new message or edit anexisting one.1. SENDNumber:l[OK] [Back][OK] [Back]SendingmessageSend[Close]GA-160-8-13영문 2003.8.16 10:15 AM 페이지101](https://usermanual.wiki/Pantech/GA-160C/User-Guide-376226-Page-51.png)
![103 104Save the unsent SMS.Press [ ] and you will see “Saved on card #”.Delete the unsent SMS.Press [ ] and you will see “Deleted”.2. SAVEOnce the card memory is full, this item won’t be available.3. DELETENumber:l[Select] [Back]Save on card 1(12)MessagesNumber:l[Select] [Back]DeletedMessages Unsent[Select] [Back]XXXXXXXXXXXXXXXXXXXXX1Send2Save3Delete[Select] [Back]Messages2Select a template with the navigation key andpress [ ].3You are to Use Template or Delete Template.1Press [ ][ ][ ].To add a new template, Select “Add new?” and press [ ].Enter a template and press [ ]then, you willsee “Send message now?”Press [ ]to confirm it and follow the procedure of creating SMS below.[Select]Add new?Please callI am at homeI am at workTemplates[Back]5) TemplatesGA-160-8-13영문 2003.8.16 10:15 AM 페이지103](https://usermanual.wiki/Pantech/GA-160C/User-Guide-376226-Page-52.png)
![105 1061: EDIT TEMPLATE1 : Press [ ] and edit a text message using a template then, press [ ] .2 : Enter a phone number.3 : Press [ ] to send the template and you will see “Sending Message”.2: DELETE TEMPLATE1 : Press [ ] to delete the template.2 : Press [ ] to confirm it.1Create SMS2Edit Template3Delete Template[Select] [Back]TemplatesText:SMS Template 0]Delete?Edit Template[OK] [Back][Yes] [No]6) Sent ItemsPress [ ][ ][ ] and you will see a list of sent messages.Select a message with the navigation key and press [ ] then, arecipient’s phone number and a message is to be displayed.Press [ ] and select 1 for ‘Delete’, 2 for ‘Forword’, and 3 for ‘Save’.Delete the sent SMS.Press [ ] and you will see “Deleted”.1Forward the sent SMS to someone.Press [ ] and the message is to be displayed.Edit the message or press [ ].1. DELETE2. FORWARDSave the sent SMS. Press [ ].2Enter a recipient’s phone number and press [ ] then,you will “Sending Message”To clear a digit, press [ ]once.To clear all the digits at a time, press and hold [ ].3. SAVEGA-160-8-13영문 2003.8.16 10:15 AM 페이지105](https://usermanual.wiki/Pantech/GA-160C/User-Guide-376226-Page-53.png)
![107 1087) Options2Edit the existing Voice Mail number or enter a new one.3Press [ ] to save it.2Select a phone number of service center or add anew one Press [ ].1Press [ ][ ][ ][ ].3. SERVICE CENTREVoice Mail No.[OK] [Back]Number:025218541Service Centre[Select] [Back]Add new?044997599993Edit the existing phone number or enter a new one.4Press [ ] to save it.1Press [ ][ ][ ][ ] and a VoiceMail number is to be displayed.2. VOICE MAIL NO.1Press [ ][ ][ ][ ] .1Press [ ][ ][ ][ ].1: RECEPTION2: EDIT LISTTo turn area information on or off OnOffTo enter an area information code.Add new?Area Info[OK] [Back]OnOffAdd new?[Select] [Back]Area Info4. AREA INFO1. MESSAGE ALERTGA-160-8-13영문 2003.8.16 10:15 AM 페이지107](https://usermanual.wiki/Pantech/GA-160C/User-Guide-376226-Page-54.png)
![109 1101: SET ON SEND(Decides whether you are to receive a delivery acknowledgement or not)1 : Press [ ] and check into either of On or Off.2 : Press [ ] to save it.Press [ ][ ][ ][ ] and you will see two itemsdisplayed as follows.7. VALIDITY PERIOD[OK] [Back]Set on SendOnOffThe cell information channel is used by some network operators tosend messages to their subscribers within a certain network area.OnOff1Press [ ][ ][ ][ ].5. CELL INFORMAIONCell Information[OK] [Back]OnOff1: SET ON SENDDecides whether you are to set a message type whenever you send a message.1 : Press [ ] and check into either of On or Off.2 : Press [ ] to save it.1Press [ ][ ][ ][ ] and you will see two itemsdisplayed as follows.6. MESSAGE TYPE[OK] [Back]Set on SendOnOff2: SET DEFAULTEnables a message type as a default.1 : Press [ ] and select a message type with the navigation key.(Text/E-mail/Fax group3/Fax group4/Voice/Pager/ERMES)2 : Press [ ] to set the message type as a default.[OK] [Back]TextE-mailFax group 3Fax group 4VoicePagerMessage TypeGA-160-8-13영문 2003.8.16 10:15 AM 페이지109](https://usermanual.wiki/Pantech/GA-160C/User-Guide-376226-Page-55.png)
![112111 112(Asks for a reply to your message)Displays the status of memories and the Card for SMS.1Press [ ][ ][ ][ ].2Check into either of On or Off and press [ ] tosave it.8. REPLY REQUEST9. STARUS REQUEST10. MEMORY STATUS[OK] [Back]Reply RequestOnOff2: SET DEFAULT( Decides what time period you are to have before you receive a delivery acknowledgement.)1 : Press [ ] and select a time period with the navigation key.(1 hour/12 hours/1 day/1 week/Maximum)2 : Press [ ] to set the time period as a default.[OK] [Back]1 hour12 hours1 day1 weekMaximumValidity Period2Check into either of on of off and press [ ] to save it.1Press [ ][ ][ ][ ].1Press [ ][ ][ ][ ].GA-160-8-13영문 2003.8.16 10:15 AM 페이지111](https://usermanual.wiki/Pantech/GA-160C/User-Guide-376226-Page-56.png)
![114113abc mode : Standard input modeT9 English mode : Quick English input mode123 mode : Number input modeabcT9 English123Symbol mode : Symbol input modeSymbolThe input mode indicator appears on themiddle of the each soft key.Press and hold [ ] to select the desired inputmode among the 4 modes as described below,then press [ ] select you want.1148) Reference[OK] [Back]You can enter letters and numbers and symbols into your phone for a person’sname and phone number, writing a text message, and so on.Text :New SMST9 EnglishThis mode allows you to enter English letters by using basic text input.Space - ? ! , . : ; “ ‘ < = > ( ) _ 1 + & @ / % $ £ 0 To delete letters and numbersTo move the cursorTo shift between capital and lower-case letters # x Character orderKEY ↲- Press the appropriate key, until the character you want appears in the display - To enter lower-case letter, press [ ], enter the letter, for example an ‘A’. Lower-case letters appear until you press [ ] again. - To enter numbers, press and hold any numeric key. -To delete letters and numbers, press [ ].[OK]Text :[Back]New SMS1 ENTERING LETTERS, NUMBERS & CHARACTERS2 STANDARD INPUT MODE (abc MODE)A B C Å Ä Æ À Á Ç 2 à (a b c å ä æ à ç á 2 Ã)D E F È É 3 Ä Ö (d e f è é 3 )G H I Í Í 4 (g h I ì 4)J K L 5 (j k l 5 )M N O Ñ Ö O Ó Ó 6 (m n o ñ ö o ò ó 6)P Q R S 7 ¨± (p q r s 7 )T U V Ü Ù Ú 8 (t u v ü ù ú 8)W X Y Z 9 (w x y z 9)Select Abc mode, by pressing [ ].When you select this mode, the abc indicatorappears on the middle of the each soft key.- Find the key that corresponds to the letter you want to enter.- Press it as many times as needed for the letterto appear on the screen.- To enter the name “John”:Press [ ] JPress [ ][ ][ ] oPress [ ][ ] hPress [ ][ ] nGA-160-8-13영문 2003.8.16 10:15 AM 페이지113](https://usermanual.wiki/Pantech/GA-160C/User-Guide-376226-Page-57.png)
![116115This mode allows you to enter English letters with only once key pressing. This way, youpress each key only once, even if the letter you want is not the first letter on the key.When you press the keys, a word is suggested.Character orderKEY [OK]Text :[Back]New SMS1163 T9 ENGLISH MODEA B C Å Ä Æ À Á Ç 2 à (a b c å ä æ à ç á 2 Ã)D E F È É 3 Ä Ö (d e f è é 3 )G H I Í Í 4 (g h I ì 4)J K L 5 (j k l 5 )M N O Ñ Ö O Ó Ó 6 (m n o ñ ö o ò ó 6)T U V Ü Ù Ú 8 (t u v ü ù ú 8)W X Y Z 9 (w x y z 9)P Q R S 7 ¨± (p q r s 7 )To shift between capital and lower-case letters Press repeatedly to scroll betweenthe suggested words. To delete letters and numbers To move the cursor To add a space.To write “phone book” in the T9 English mode.- Press [ ] to select the T9 English mode. - Press [ ][ ][ ][ ][ ] and you willsee “phone” highlighted. Press [ ] to view other possible words then press [ ] to select.- Press [ ] for a space- Press [ ][ ][ ][ ] and you will see“book” highlighted. Press [ ] to move to the nextmatching word and [ ] to select the compound word or[ ] to give a space.GA-160-8-13영문 2003.8.16 10:15 AM 페이지115](https://usermanual.wiki/Pantech/GA-160C/User-Guide-376226-Page-58.png)
![1181173 Select the character by press [ ] key.This mode allows you to enter symbol easily. This mode allows you to enter numbers by pressing the appropriate key.1 Press [ ] key to change the mode for symbol.2 Move curser by [ ] key to select a symbol.[OK] [Back]5 SYMBOL MODE 6 123...MODE?,‵: -ヶ!…; ( “•” )《「 ・」》£ $¥C@※& / % #118GA-160-8-13영문 2003.8.16 10:15 AM 페이지117](https://usermanual.wiki/Pantech/GA-160C/User-Guide-376226-Page-59.png)
![1201196. E-mailE-MAILYou can use your phone to send and receive e-mail messages. This menu supports SMTP protocol for E-mail sending and POP3 protocol for receiving. For more information, consult your service provider.Before you startFirst make sure that you have:- Set up a data account. “E-mail options - Email settings - Set E-mailprofile →Access” on page?- Set up and select an E-mail account. See “E-mail Options – Email Settings” on page ?.2When the e-mail messages have been downloaded from the E-mail server to your phone, scroll to select them with navigation key.1Press [ ][ ][ ] to read received messages.You can read, reply to and forward received E-mail messages.1) Inbox3Press [ ] to read the selected one in the list.After reading, you can select the following option menus by pressing [ ].Select [ ] for ‘REPLY’, [ ] for ‘Delete’ and [ ] for ‘CopyToArchive’.2After editing the message, press [ ] to send the e-mail message.1Press [ ], then edit the message in the e-mail editor.Reply to the sender.1. REPLY1Press [ ] and you will see “Deleted”Delete the received e-mail messages.2. DELETE1Press [ ] and you will see “Saved”. And then you find the saved message in Archive menu(“6) Archive” menu on page ?).You can archive an e-mail message in order to read it later, or if you want to saveimport information.3. COPY TO ARCHIVEGA-160-8-13영문 2003.8.16 10:16 AM 페이지119](https://usermanual.wiki/Pantech/GA-160C/User-Guide-376226-Page-60.png)
![1221211Press [ ][ ][ ] to write an e-mail message.2) New E-mail1Press [ ] key and you will call.1Press [ ] key and you will go to.This menu is enabled when you select the included number in the E-mail message.Call the number in the E-mail message.4. CALLThis menu is enabled when you select the included number in the E-mail message.Go to URL in the E-mail message.5. GO TO1Enter an e-mail address which message is sent directly to the recipient. After writing, press [ ].1. TO:1If you want to send a copy of the message to someone, enter an e-mail address which message is sent to the recipient. And then, press [ ].2. Cc:1Write a title. After editing, press [ ].3. SUBJECT:1Write your messages. After editing, press [ ]. And then you will see “Sending Message”.4. TEXT:GA-160-8-13영문 2003.8.16 10:16 AM 페이지121](https://usermanual.wiki/Pantech/GA-160C/User-Guide-376226-Page-61.png)
![1241231Press [ ][ ][ ] and you will see a list of messages which sent (If any).Select a message with the navigation key and press [ ] then, a recipient’s e-mail address and a message is to be displayed. Press [ ] and select [ ] for ‘Send’ or [ ] for ‘Delete’.3) Sent Items2After editing the message, press [ ] to send the e-mail message. And then you will see “Sending Message”.1Enter a new message or edit an existing one.Send the sent message.1. SEND1Press [ ] and you will see “Deleted”Delete the sent e-mail messages.2. DELETE1Press [ ][ ][ ] and you will see a list of messages notsent properly(If any). Select a message with the navigation key andpress [ ] then, a recipient’s e-mail address and a message is tobe displayed. Press [ ] and select [ ] for ‘Send’ or [ ] for‘Delete’.4) Unsent2After editing the message, press [ ] to send the e-mail message. And then you will see “Sending Message”.1Enter a new message or edit an existing one.Send the unsent message.1. SEND1Press [ ] and you will see “Deleted”Delete the unsent e-mail messages.2. DELETEGA-160-8-13영문 2003.8.16 10:16 AM 페이지123](https://usermanual.wiki/Pantech/GA-160C/User-Guide-376226-Page-62.png)
![1261251Press [ ][ ][ ] and you will see a list of messages whichhave saved before(if any).5) Archive6) Options1Press [ ][ ][ ][ ] to select profile.Select the preferred E-mail profile which is edited in “2) E-mailSettings”.1. E-MAIL PROFILESelect a message with the navigation key, and then press [ ]to read it.Other wise, if you will delete any message in the list, press [ ].1Press [ ][ ][ ][ ] to selectprofile.If you want to use E-mail service, you must save the settings forE-mail service.2. E-MAIL SETTINGS1: RENAMEChange the selected profile name.1 : Press [ ][ ][ ][ ][ ] to set profile.2: ACCESS SETTINGSSet the information to acces the E-mail server.1 : Press [ ][ ][ ][ ][ ] to set profile.1. Access TypeSelect the access type (GSM data or GPRS).2. DNS IP AddressEnter DNS(Domain Name Server)IP address of the service provider for outgoing and incoming e-mail messages.- Enter a DNS IP address, and then press [ ] key to save it.GPRS Setting-APNEnter the APN(Access Point Name) which supported at mobile service provider(This menu is enabled when you selected GSM type( in Access type)).- User ID- PasswordGSM SettingIf you selcted the GSM type in Access type, ‘Phone Number’ menu is displayd.Otherwise, when you selected the GPRS thpe,‘APN’ menu is displayed.-Phone Number : Enter the phone number which supported at mobile service provider- User ID-Password< >1. Phone number : 172662. User ID : wap3. Password : wap < >1. APN :2. User ID 3. Password GA-160-8-13영문 2003.8.16 10:16 AM 페이지125](https://usermanual.wiki/Pantech/GA-160C/User-Guide-376226-Page-63.png)
![1281274: POP3 PORTChange the number of the port used by the POP3 protocol (If needed).1 : Press [ ][ ][ ][ ][ ] to set profile.5: MAILBOXEnter an E-mail ID, password and E-mail address for the e-mailaccount which E-mail service provider sypport.1 : Press [ ][ ][ ][ ][ ] to set profile.1. USER IDEnter a password for the e-mail account.2. PASSWORDEnter a password for the e-mail account.3. E-MAIL ADDRESSEnter the user e-mail address.3: POP3 SERVEREnter the name or IP address of the service provider for incoming e-mail messages.1 : Press [ ][ ][ ][ ][ ] to set profile.6: SMTP SERVEREnter the name or IP address of the service provider for outgoinge-mail messages.1 : Press [ ][ ][ ][ ][ ] to set profile.7: SMTP PORTChange the number of the port used by the SMTP protocol(If needed).1 : Press [ ][ ][ ][ ][ ] to set profile.8: FROM NAMEEnter the user name.1 :Press [ ][ ][ ][ ][ ] to set profile.9: COPY OUTGOINGSelect ‘On’, if you want e-mail messages sent from your phone alsoto be sent to an e-mail address of your choice. This way, your sentmessages are copied and can be saved for future reference.1 : Press [ ][ ][ ][ ][ ] to set profile.GA-160-8-13영문 2003.8.16 10:16 AM 페이지127](https://usermanual.wiki/Pantech/GA-160C/User-Guide-376226-Page-64.png)
![129 1307. Accessories1) CalendarPress [ ][ ][ ][ ] to view a date fortoday.2Press [ ] to delete a task shown.1Press [ ][ ][ ][ ] to view all tasksyou entered.1Press [ ][ ][ ][ ] to view a calendar by month.1View today2View all tasks3View month4All tasks ?5Delete all[Select] [Back]CalendarToday listemptyTasks[Select] [Back]Add task?2Press [ ] to add a new task or press [ ] to go back.4Enter a date for reminder and press [ ] to save it.3Check into “Set Reminder” and press [ ].2Enter a task and press [ ].Enter a date then, press [ ] to save it .1Press [ ][ ][ ][ ] to add a task.2Press [ ] to confirm it.4 : ADD TASK?1Press [ ][ ][ ][ ] to delete all tasks.5 : DELETE ALLEdit:[Add task1View today2View all tasks3View month4Add task?5Delete allCalendar[Select] [Back]Delete all?To move month to month, press [left] or [right].To move day to day, press [up] or [down].In the calendar you can add a maximum of 25 tasks for things thatyou have to remember. The tasks can be edited or deleted.3 : VIEW MONTH2 : VIEW ALL TASKS1 : VIEW TODAYGA-160-8-13영문 2003.8.16 10:16 AM 페이지129](https://usermanual.wiki/Pantech/GA-160C/User-Guide-376226-Page-65.png)
![131 1323) TimerPress [ ][ ][ ][ ] to cancel the timeryou set.2Press [ ] only when there is already an timer.Enter hour,minute and second,using digit keys and press [ ].1Press [ ][ ][ ] and you will be directed to “Set New Time” when there is no set timer.2 : SET NEW TIMETo edit the hour and minute, use the navigation key togo back and forth to each digit.The timer will appear on the idle mode.02:30:30(HH:MM:SS)Set New TIme[OK] [Back]2) Alarm Clock1 : CANCELPress [ ][ ][ ][ ] to cancel the alarmyou set.3Enter hour and minute,using digit keys and press [ ].2Press [ ] only when there is already an alarm.1Press [ ][ ][ ] and you will be directedto “Set New Time” when there is no set alarm.To edit the hour and minute, use the navigation key togo back and forth to each digit.1Cancel2Set New TimeAlarm Clock[Select] [Back]1Cancel2Set New TimeAlarm Clock[Select] [Back]The phone has a built-in 24-hour time. You set the time you want and when that timeis up, the phone beeps.The phone has an alarm clock which rings at the time set, even if the phone isturned off. The alarm rings for 60 seconds and is repeated every nine minutesfor 60 minutes until you turn it off.This item won’t show up when there is no set alarm.2 : SET NEW TIMEThis item won’t show up when there is no set timer.1 : CANCELGA-160-8-13영문 2003.8.16 10:16 AM 페이지131](https://usermanual.wiki/Pantech/GA-160C/User-Guide-376226-Page-66.png)
![133 1341Press [ ][ ][ ] and select one of thefollowing cities then press [ ].2 The world map is to be displayed with a date and time of city. Press [ ] to go back to the list. 4) World Time1. Madrid2. London3. Paris4. Rome5. Berlin6. Athens7. Cairo8. Belgrade9. Teheran0. Karachi(Calcutta / Rangoon / Bangkok / Beijing / Hong Kong / Taipei / Manila / Seoul / Tokyo / Melbourne / Sydney /Okhotsk / Wellington / Samoa / Honolulu / Seattle / San Francisco / Los Angles / Denver / Phoenix / Mexico City / Chicago / Miami / New York / Georgetown / GooseBay / Rio De Janeiro) Goose Bay05:58 03-30[Next]5) Lunar CalendarPress [ ][ ][ ][ ] “Solar to Lunar”.[Select] [Back]Lunar Calendar1 : SOLAR TO LUNARPress [ ][ ][ ][ ] “Lunar to Solar”.2 : LUNAR TO SOLARPress [ ][ ][ ][ ] “Chinese New Year”.3 : CHINESE NEW YEARPress [ ][ ][ ][ ] “Month in Lunar”.You can see lunar date on solar calendar.means the first day of lunar month.4 : MONTH IN LUNAR1 Solar To Lunar2 Lunar To Solar3 Chinese New Year4 Month in LunarDisplays a time for each preprogrammed city.GA-160-8-13영문 2003.8.16 10:16 AM 페이지133](https://usermanual.wiki/Pantech/GA-160C/User-Guide-376226-Page-67.png)
![135 1363Press [ ] again to stop it.2Press [ ] to start it.To reset the stop watch, press [ ].To go back to the previous page, press [ ] again.To make another stopwatch, press [ ] (up to 9stopwatches)Press [ ] to make other time : up to 9 timers.00:00:01Stopwatch[Start] [Back]1Press [ ][ ][ ] and a stopwatch is to be displayed.7) Stopwatch6) Voice MemoThe phone has a built-in stopwatch.1 Press [ ][ ][ ][ ] to play a voice memo.1 RECORDUser can store an appointment or a number through voice recording.It allows user to do voice recording while either on call or idle mode.1 Press [ ][ ][ ][ ] to play a voice memo.2 MEMO LISTIt lists up all voice memos. When selected, a voice memo is to be played. User needs topress 'clr' to delete a seleceted one.1 Press [ ][ ][ ][ ] to play a voice memo.3 ERASE ALLYou are to delete all voice memos with this feature.To enter voice memo when idle mode, press [ ]GA-160-8-13영문 2003.8.16 10:16 AM 페이지135](https://usermanual.wiki/Pantech/GA-160C/User-Guide-376226-Page-68.png)
![137 1388) Calculator1Press [ ][ ][ ].5Then, press [ ].Adds, Subtracts, Multiplies and Divides.4Press [ ] [ ] [ ] [ ].3Press [ ] [ ] [ ] [ ].2Press [ ][ ][ ][ ] to enter 1 0 .5Calculator[Calc] [Back]0.0.0.9) D-Day Setup2Use the navigation key to go to a schedule.Each schedule is to be displayed with page, date and time.1Press [ ][ ][ ][ ] to view a schedulewith deadline.1 : VIEW LISTTo delete a schedule, select which the user want to to deletepress [ ]when the schedule is displayed on the screen.D-Day1/1 07-01-00 12:01[Show] [Back]To calculate 10.5×2/3-7+5You can set some special day (special day setting).GA-160-8-13영문 2003.8.16 10:16 AM 페이지137](https://usermanual.wiki/Pantech/GA-160C/User-Guide-376226-Page-69.png)
![139 1404Check into either “Show on idle mode” or “Hide on idle mode” and press [ ] to save it.3Enter hour and minute and press [ ] to save it.Check into one of the following items (Bell 1~5,Melody 1~23) and press [ ] to save it.8. WAP BrowserPress [ ][ ][ ].2Select a bookmark and press [ ] to connectyou to a website without entering URL.1) Mobile Internet1Press [ ][ ][ ] to view bookmarks2) BookmarkGo to : Press [ ]to go directly to the website.Edit : Press [ ]to edit its addressDelete : Press [ ]to delete it.1 Mobile Internet2 Bookmark3 Enter Address4 WAP SettingWAP Service[Select] [Back]1MicrocellBookmark[Select] [Back]2Enter a schedule and press [ ].Enter day, month & year and press [ ] to save it.1Press [ ][ ][ ][ ] to input a newschedule with deadline.2 : INPUT NEW ITEMName:[D-Day NameIf you visit the WAP site that is set as your homepage.select this menu and press “Select”If there are some WAP pages that you often visit, you can savethese as bookmarks.GA-160-8-13영문 2003.8.16 10:16 AM 페이지139](https://usermanual.wiki/Pantech/GA-160C/User-Guide-376226-Page-70.png)
![1421413) WAP Profile2Press [ ] to connect.1Press [ ][ ][ ] to enter an addressEdit an existing address or enter a new one.4) Enter Address5) ResumeAddress:[Enter Address100If you want to visit other WAP sites except default site.you can use this menu.1 Press [ ][ ][ ] to select profile.Select the preferred wap profile which is edited in “6)WAP Settings”.[OK] [Back]Select profileWAP profile 1WAP profile 2WAP profile 3GA-160-8-13영문 2003.8.16 10:16 AM 페이지141](https://usermanual.wiki/Pantech/GA-160C/User-Guide-376226-Page-71.png)
![143 144Press [ ][ ][ ] to set WAP profiles.6) WAP Settings1R e n a m e2 Edi t H omepage3 Show Images4 A c c e s sWAP Settings[Select] [Back]Name:WAP profile 1Rename[OK] [Back]1 : RENAME3 : SHOW IMAGESPress [ ][ ][ ] [ ] to set profiles.Show Images[OK] [Back]Press [ ][ ][ ] [ ] to set profiles.OnOffIf you want to use WAP service. you must save the settingsfor WAP service.Change the profile name.If you want to display the images on the WAP, you can turnthem on.Title:ChinaEdit Homepage[OK] [Back]2 : EDIT HOMEPAGEPress [ ][ ][ ] [ ] to set profiles.If you want to change a default homepage, You can setdifferent homepages.<Chinamobile>1. Title : chinamobile2. Address : http://wap.monternet.com<Chinaunicom>1. Title : chinaunicom2. Address : http://211.095.065.006GA-160-8-13영문 2003.8.16 10:16 AM 페이지143](https://usermanual.wiki/Pantech/GA-160C/User-Guide-376226-Page-72.png)
![145 1463: GATEWAY1 : User ID2 : Password3 : Data address4 : Data mode1. User ID2. Password3. Data Address4. Data modeGateway[Select] [Back]2: GPRS DATA1 : User ID : wap2 : Password : wap3 : APN4 : Quality of Serv.1. User ID2. Password3. APN4. Quality of Serv.GPRS Data[Select] [Back]<Microcell>1. Phone Number : 172662. Dialtype : Analoge3. User ID : wap4. Password : wap<Microcell>1. User ID 2. Password 3. Data address : 010.000.000.1724. Data mode : conn.less<Microcell>1. User ID 2. Password 3. Data address : 211.095.065.1304. Data mode : conn.less<Microcell>1. Phone Number : 1652. Dialtype : Analoge3. User ID : wap4. Password : wap4 : ACCESSYour mobile phone must set the information to access theWAP server.Seconds:90Response Time[OK] [Back]Press [ ][ ][ ] [ ] [ ] toset profiles.1: RESPONSE TIMESome WAP pages take a long time to download datas.You can set the time to stop the download attempt.GA-160-8-13영문 2003.8.16 10:16 AM 페이지145](https://usermanual.wiki/Pantech/GA-160C/User-Guide-376226-Page-73.png)