Pantech GU-1000 GSM 900/1800/1900 UMTS Mobile Phone with BT User Manual GU 1000 M 0430
Pantech Co., Ltd. GSM 900/1800/1900 UMTS Mobile Phone with BT GU 1000 M 0430
Pantech >
User Manual

User’s Guide
GU-1000
23
TABLE OF CONTENTS
IMPORTANT SAFETY
PRECAUTIONS
CHAPTER 1. BEFORE USING YOUR PHONE ...................................................................7
INSIDE THE PACKAGE 8
HANDSET DESCRIPTION 9
THE FUNCTION KEYS 10
DISPLAY INDICATORS 11
BATTERY USAGE 12
BATTERY INSTALLATION 12
BATTERY CHARGING 13
POWER CONNECTION 13
GSM AND WCDMA BATTERY TIMES 14
BATTERY LIFE TIME (FOR NEW BATTERY) 14
BATTERY HANDLING INFORMATION 15
DOS 15
DON’TS 15
QUICK START 16
CHAPTER 2. BASIC OPERATION 17
SWITCHING ON OR OFF THE PHONE 18
ACCESS CODES 19
ACCESSING MENU 20
MENU SUMMARY 21
BASIC FUNCTIONS 24
MAKING AND ASWERING A VIDEO CALL 24
MAKING A VOICE CALL 24
MAJING A VOICE/VIDEO CALL FROM PHONEBOOK 24
MAKING INTERNATIONAL CALLS 25
MUTI CALLS 25
CALLER ID FUNCTION.............................................................................................................................25
CALL WAITING FUNCTION.....................................................................................................................25
ADJUSTING VOLUME .............................................................................................................................26
ETIQUETTE..............................................................................................................................................26
LOCK .......................................................................................................................................................26
DURING A CALL..........................................................................................................................................27
SPEAKER PHONE ....................................................................................................................................27
MEMO.....................................................................................................................................................27
MUTE(UNMUTE).....................................................................................................................................27
HOLD.......................................................................................................................................................27
VOICE RECORDING.................................................................................................................................27
DTMF OFF ...............................................................................................................................................28
DISCONNECT...........................................................................................................................................28
CALL ....................................................................................................................................................28
END ACTIVE ........................................................................................................................................28
END ALL ..............................................................................................................................................28
MAKING AN EMERGENCY CALL................................................................................................................29
EMERGENCY NUMBER IN LOCK MODE ................................................................................................29
EMERGENCY NUMBER USING ANY AVAILABLE SYSTEM ....................................................................29
CHAPTER 3. MEMORY FUNCTION ................................................................................31
STORING A PHONE NUMBER ....................................................................................................................32
ENTERING LETTERS, NUMBERS & SYMBOLS ............................................................................................34
USING THE T9 MODE .............................................................................................................................34
USING THE ABC MODE ..........................................................................................................................34
USING THE 123(NUMBER)MODE...........................................................................................................35
USING THE SYMBOL MODE...................................................................................................................35
MAKING A CALL THROUGH THE PHONE BOOK ......................................................................................36
SPEED DIAL#’S ........................................................................................................................................36
CHAPTER 4. MENU FUNCTION ......................................................................................37
PHONE BOOK ............................................................................................................................................38
SEARCH...................................................................................................................................................38
ADD CONTACT .......................................................................................................................................39
STORING A NUMBER IN THE PHONE'S MEMORY.............................................................................39
STORING A NUMBER ON THE SIM CARD ..........................................................................................40
ALL CALLS ...........................................................................................................................................40
MISSED CALLS.....................................................................................................................................41
DIALED CALLS.....................................................................................................................................41
Read these guidelines before using your wireless phone.
Failure to comply with them may be dangerous or illegal.
Road safety at all times
Do not use a hand-held phone while driving; park the vehicle first.
Switching off when refuelling
Do not use the phone at a refuelling point (service station) or near fuels or
chemicals.
Switching off in an aircraft
Wireless phones can cause interference. Using them in an aircraft is both illegal and
dangerous.
Switching off near all medical equipment
Switch off your phone near medical equipment. Hospitals or health care facilities
may be using equipment that could be sensitive to external RF energy.
Follow any regulations or rules in force.
Special regulations
Meet any special regulations in force in any area and always switch off your phone
whenever it is forbidden to use it, or when it may cause interference or danger (in a
hospital for example).
Sensible use
Use only in the normal position (held to the ear). Avoid unnecessary contact with
the antenna when the phone is switched on.
Emergency call
Key in the emergency number for your present location, then press the key.
Give all necessary information as accurately as possible. Do not end the call until
given permission to do so.
Keeping small children away from your phone
Keep the phone and all its parts including accessories out of the reach of small
children.
Accessories and batteries
Use only Pantech-approved accessories and batteries.
Use of any unauthorised accessories could damage your phone and may be
dangerous.
Qualified service
Only qualified service personnel may repair your phone.
For more detailed safety information, see “Health and safety information” on page
196.

45
TABLE OF CONTENTSTABLE OF CONTENTS
RECEIVED CALLS.................................................................................................................................42
PACKET COUNTER..............................................................................................................................42
CALL COSTS ........................................................................................................................................43
CALL TIMER ........................................................................................................................................43
GROUP ....................................................................................................................................................44
CREATING A NEW CALLER GROUP....................................................................................................44
SPEED DIAL.............................................................................................................................................45
SPEED DIALING...................................................................................................................................45
VOICE DIAL.............................................................................................................................................46
MY NAME CARD ....................................................................................................................................46
OWN NUMBER .......................................................................................................................................47
SERVICE NUMBER...................................................................................................................................47
MEMORY STATUS ..................................................................................................................................47
ORGANISER ................................................................................................................................................48
ALARMS..................................................................................................................................................48
WAKE UP ALARM...................................................................................................................................48
MEMO PAD.............................................................................................................................................49
MONTHLY VIEW.....................................................................................................................................49
CREATING A NEW CALLER GROUP....................................................................................................49
SCHEDULING A NEW EVENT..............................................................................................................50
TODAY'S EVENT .....................................................................................................................................52
EVENT LIST..............................................................................................................................................53
SEARCH...................................................................................................................................................53
MEMORY STATUS ..................................................................................................................................54
TOOLS.........................................................................................................................................................55
VOICE RECORDER...................................................................................................................................55
RECORDING A VOICE RECORDER ......................................................................................................55
PLAYING A VOICE RECORDER ...........................................................................................................55
ANSWERING MACHINE..........................................................................................................................55
MESSAGE BOX....................................................................................................................................55
ACTIVITY.............................................................................................................................................56
GREETING RECORDER ........................................................................................................................56
CALCULATOR..........................................................................................................................................56
WORLD CLOCK.......................................................................................................................................57
STOPWATCH...........................................................................................................................................57
CONVERTER............................................................................................................................................58
JAVA .......................................................................................................................................................58
APPLICATIONS ....................................................................................................................................58
DOWNLOADS .....................................................................................................................................58
PROFILE...............................................................................................................................................59
MEMORI STATUS................................................................................................................................59
SYNC ML .................................................................................................................................................60
WAP ............................................................................................................................................................61
LOAD HOMEPAGE..................................................................................................................................61
BOOKMARKS..........................................................................................................................................61
ENTER ADDRESS.....................................................................................................................................61
HISTORY..................................................................................................................................................62
SETTINGS.................................................................................................................................................62
PROFILES .............................................................................................................................................62
BROWSER OPTIONS............................................................................................................................63
MEMORY OPERATIONS .....................................................................................................................63
SECURITY ............................................................................................................................................63
STORAGE ................................................................................................................................................63
ON-LINE MENU...................................................................................................................................64
MESSAGE....................................................................................................................................................65
WHEN A NEW MESSAGE ARRIVES ........................................................................................................65
TEXT, PICTURE, VIDEO MESSAGE ......................................................................................................65
VOICE MAIL ........................................................................................................................................65
NEW TEXT MESSAGE..............................................................................................................................65
NEW MULTIMEDIA MESSAGE................................................................................................................66
INBOX .....................................................................................................................................................68
DRAFTS ...................................................................................................................................................69
OUTBOX..................................................................................................................................................69
EMAIL......................................................................................................................................................70
CREATE NEW E-MAIL .........................................................................................................................70
INBOX .................................................................................................................................................71
DRAFTS ...............................................................................................................................................71
OUTBOX..............................................................................................................................................72
E-MAIL SETTINGS................................................................................................................................72
INSTANT MESSENGER ............................................................................................................................73
MY SETTINGS......................................................................................................................................73
TEMPLATES.............................................................................................................................................75
MMBOX ..................................................................................................................................................75
DELETE ALL.........................................................................................................................................75
SORT....................................................................................................................................................76
SETTINGS.................................................................................................................................................77
SMS SETTINGS.....................................................................................................................................77
MMS SETTINGS. .................................................................................................................................78
VOICE MAIL .......................................................................................................................................79
CB SETTING .........................................................................................................................................80
PUSH SETTING ...................................................................................................................................80
DELETE ALL.............................................................................................................................................81
MEMORY STATUS ..................................................................................................................................81
PROFILE.......................................................................................................................................................82
MEDIA GALLERY ........................................................................................................................................83
IMAGE.....................................................................................................................................................83
MUSIC .....................................................................................................................................................83
RINGTONE...............................................................................................................................................84
VIDEO......................................................................................................................................................85
ETC ..........................................................................................................................................................86
EXTERNAL MEMORY..............................................................................................................................87
CAMERA .................................................................................................................................................88
VIEW FINDER (TAKE A PHOTO) .........................................................................................................88
MY PHOTOS........................................................................................................................................89
CAMCORDER ..........................................................................................................................................90
VIEW FINDER ......................................................................................................................................90
MY VIDEO...........................................................................................................................................91
MEDIA PLAYER.......................................................................................................................................92
VIDEO FOLDER ...................................................................................................................................92
MY PLAY LIST .....................................................................................................................................92
SETTING ..............................................................................................................................................93
MUSIC PLAYER .......................................................................................................................................94
DOWNLOADING AND RECEIVING MP3 MUSIC FILES .......................................................................94
PLAYER ...............................................................................................................................................94
MY MUSIC...........................................................................................................................................95
MY PLAY LIST .....................................................................................................................................95
SETTING ..............................................................................................................................................95
MEMORY STATUS ..............................................................................................................................95
SETTINGS ....................................................................................................................................................96
SOUND SETTINGS ...................................................................................................................................96
RINGER................................................................................................................................................96
RINGER TYPE ......................................................................................................................................96
VOLUME .............................................................................................................................................97
ETC. SOUNDS ......................................................................................................................................97
DISPLAY SETTINGS .................................................................................................................................98
GREETING MESSAGE ..........................................................................................................................98
MAIN LCD ...........................................................................................................................................98
SUB LCD ..............................................................................................................................................98
MENU STLYE.......................................................................................................................................98
LCD BRIGHTNESS ................................................................................................................................98
BACKLIGHT .........................................................................................................................................99
PHONE SETTINGS....................................................................................................................................99
SHORTCUTS ........................................................................................................................................99
RECEIVE TYPE ...................................................................................................................................100
LANGUAGE .......................................................................................................................................100
CALL SETTINGS .....................................................................................................................................100
DIVERTING CALLS.............................................................................................................................100
BARRING CALLS................................................................................................................................101
WAITING CALLS................................................................................................................................101
ACCEPT CALLS ..................................................................................................................................101
6
MEMO
CALLER ID .........................................................................................................................................102
AUTO REDIAL ...................................................................................................................................102
VIDEO CALL SETTING .......................................................................................................................102
TIME & DATE ........................................................................................................................................103
SET TIME & DATE .............................................................................................................................103
FORMAT............................................................................................................................................103
NETWORK.............................................................................................................................................104
NETWORK SELECTION......................................................................................................................104
NETWORK MODE .............................................................................................................................104
DATA STATS .....................................................................................................................................104
BLUETOOTH..........................................................................................................................................104
DEVICE SEARCH................................................................................................................................105
MY DEVICE .......................................................................................................................................105
SETTINGS...........................................................................................................................................106
SECURITY ..............................................................................................................................................107
PHONELOCK .....................................................................................................................................107
PIN.....................................................................................................................................................108
CHANGE PIN2 ...................................................................................................................................108
FDN ...................................................................................................................................................109
PRIVACY LOCK .................................................................................................................................109
MASTER RESET .....................................................................................................................................109
CHAPTER 5. APPENDIX ................................................................................................111
HEALTH AND SAFETY INFORMATION ....................................................................................................112
SAR CERTIFICATION INFORMATION....................................................................................................112
PRECAUTIONS WHEN USING BATTERIES ............................................................................................113
ROAD SAFETY.......................................................................................................................................114
OPERATING ENVIRONMENT................................................................................................................114
ELECTRONIC DEVICES...........................................................................................................................115
PACEMAKERS ...................................................................................................................................115
HEARING AIDS..................................................................................................................................115
OTHER MEDICAL DEVICES ...............................................................................................................115
VEHICLES...........................................................................................................................................115
POSTED FACILITIES ..........................................................................................................................115
POTENTIALLYY EXPLOSIIVE ENVIRONMENTS ....................................................................................116
EMERGENCY CALLS..............................................................................................................................116
OTHER IMPORTANT SAFETY INFORMATION......................................................................................117
CARE AND MAINTENANCE..................................................................................................................118
TROUBLE SETTING ...................................................................................................................................119
GLOSSARY................................................................................................................................................121
CHAPTER 1 BEFORE USING YOUR PHONE
This chapter provides important information about using the
GU-1000 including:
INSIDE THE PACKAGE
HANDSET DESCRIPTION
BATTERY USAGE
BATTERY HANDLING INFORMATION
CHAPTER 1
BEFORE
USING
YOUR PHONE
89
BEFORE USING BEFORE USING
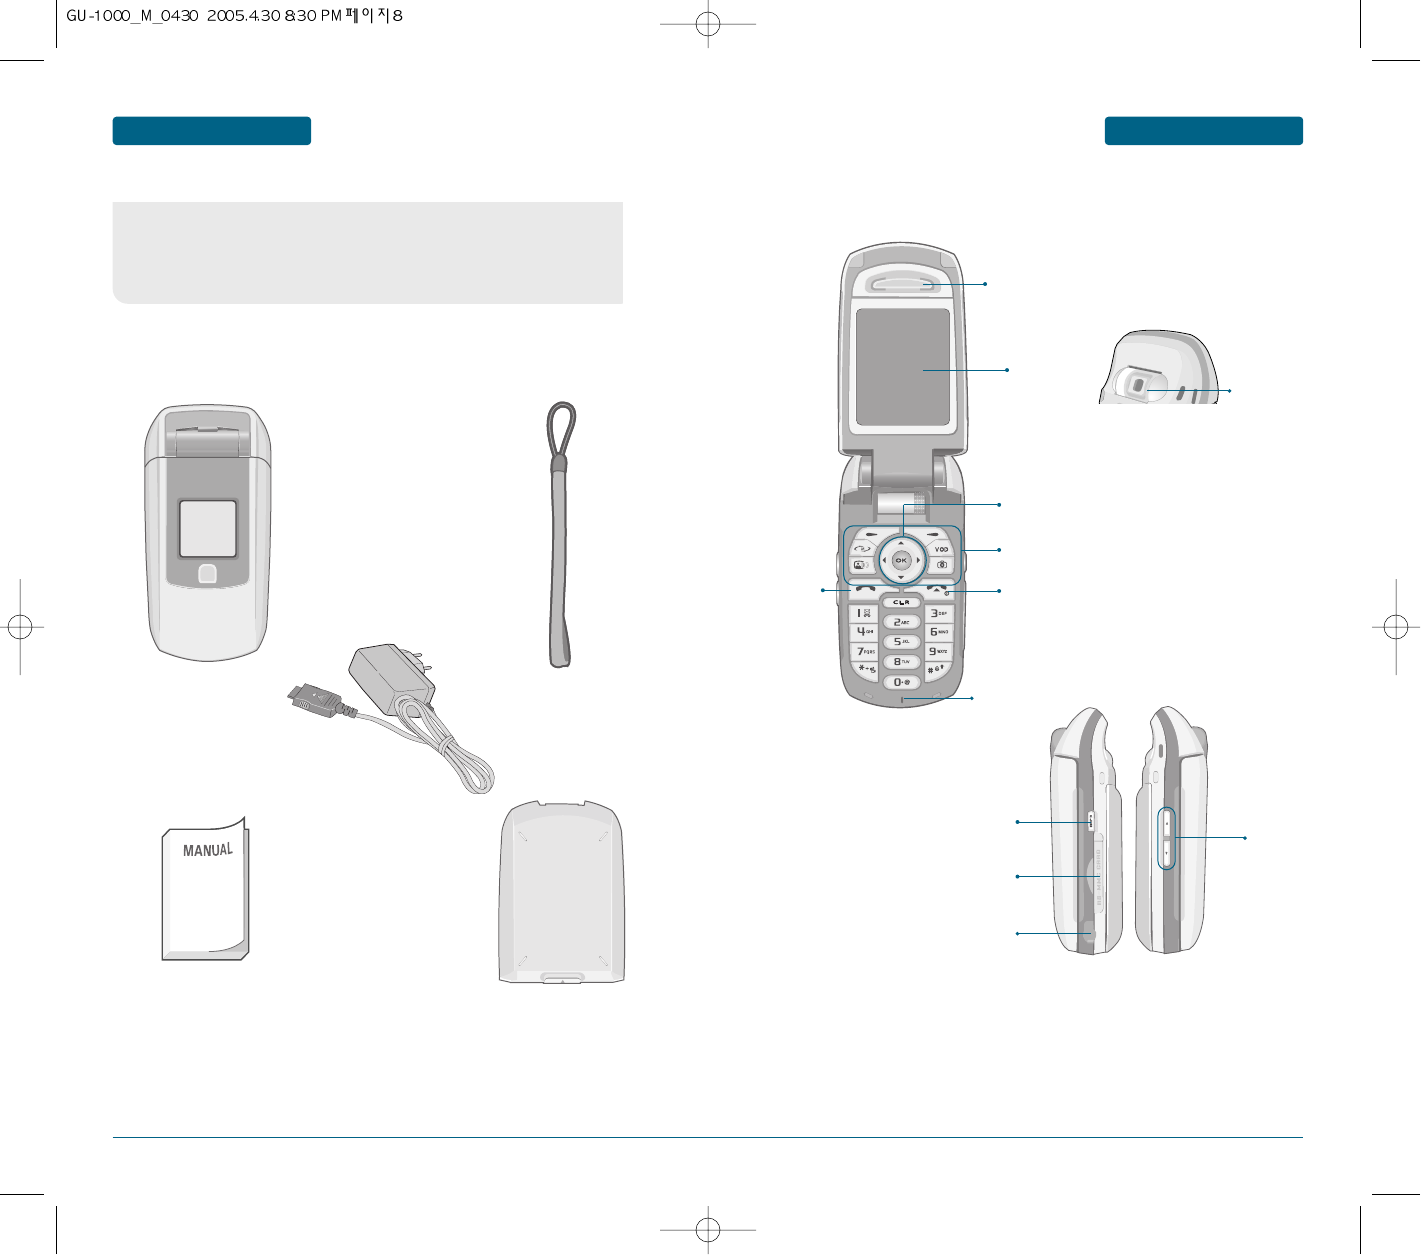
This package should include all items pictured below.
If any are missing or different, immediately contact the retailer where
you purchased the cellular telephone.
INSIDE THE PACKAGE
Handset
Earpiece
LCD
Screen
END / Power Key
Send Key
Microphone
H
Front view
Handstrap
User Manual
AC Charger
Standard Battery
HANDSET DESCRIPTION
Earjack
H
SIDE VIEW
MP3
RS-MMC CARD
Function Keys
4-way navigation key
Rotate
Camera
Side Key
10 11
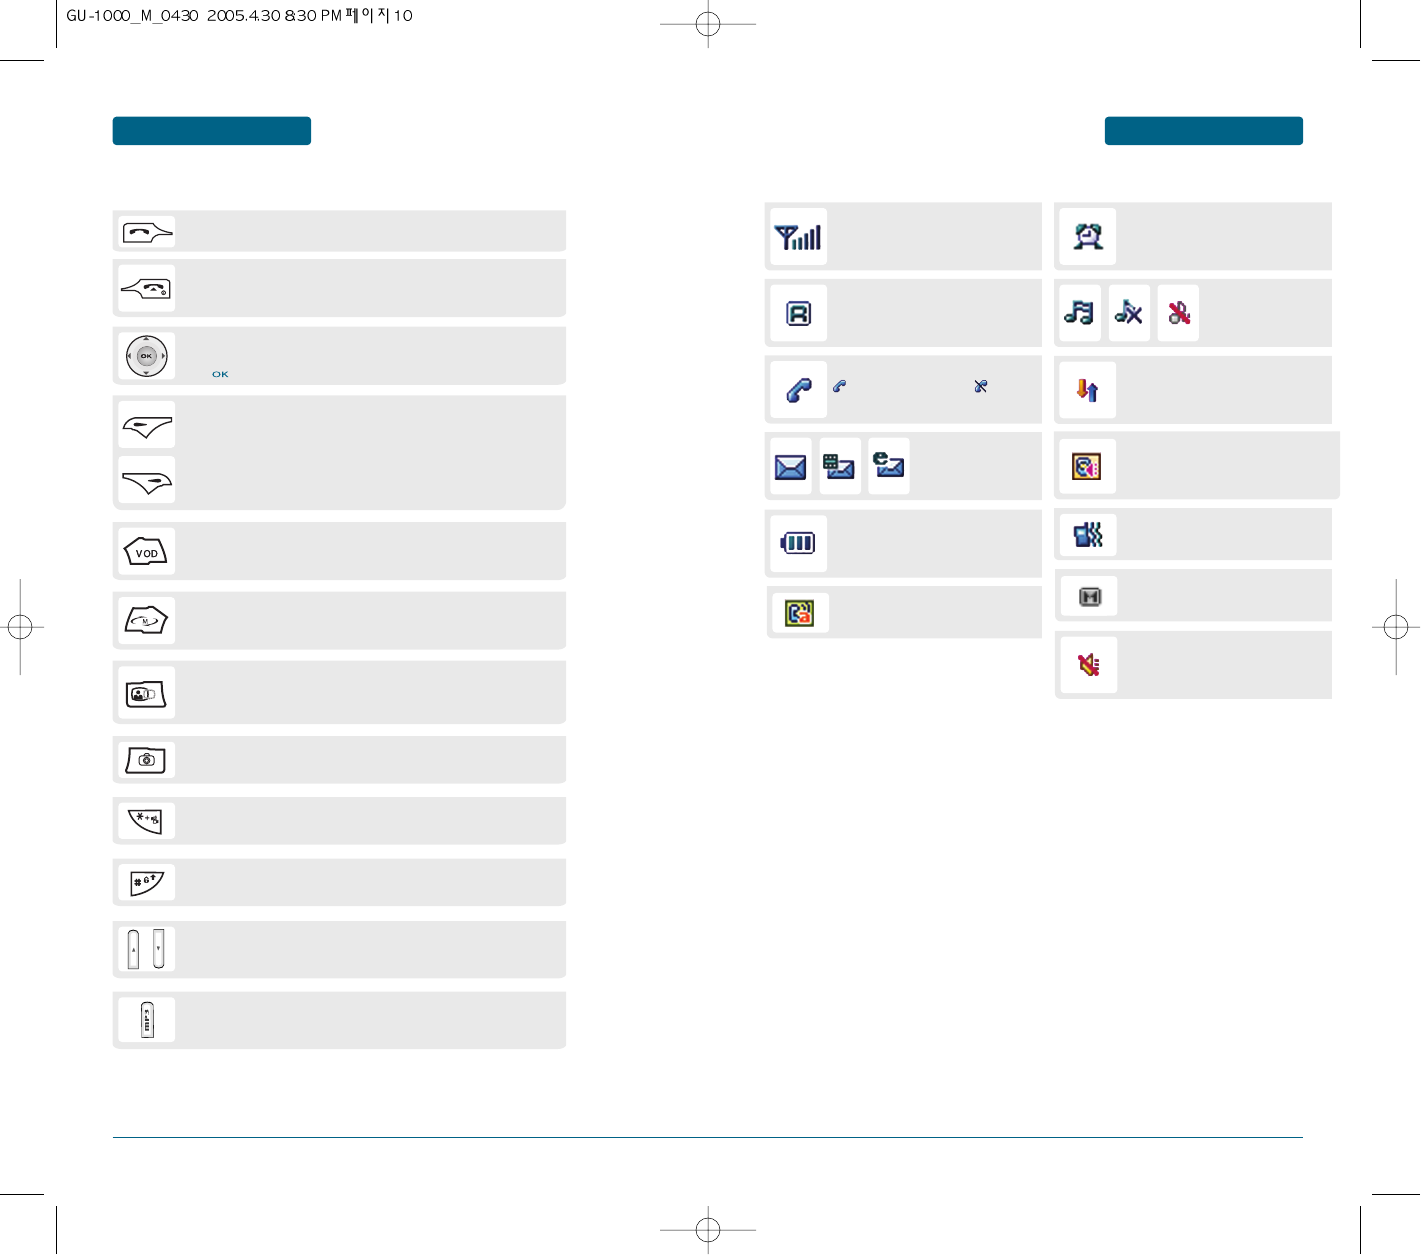
AUTO ANSWER
Phone is in answering machine mode.
MUTE
Phone is mute during a call.
DISPLAY INDICATORS BEFORE USINGBEFORE USING
SIGNAL STRENGTH
Current signal strength: the more lines,
the stronger the signal.
SEND KEY
Press to make or receive a call. Press enter Call Record.
END KEY
Press to terminate a call or to return to the initial page.
Press and hold to turn the phone on and off.
NAVIGATION KEY
Within a menu, use to scroll through menu options.
Press to select an option.
VOD KEY
Press to access the media player.
MULTI TASK KEY
Press to access the multi menu.
CAMCORDER KEY
Press to access the call record.
Press and hold to enter camcorder mode.
MULTIMEDIA KEY
Press to access the multimedia menu.
LOCK KEY
Press and hold to enter Lock mode.
ETIQUETTE MODE
Press and hold to enter Etiquette (Vibrate) Mode.
SIDE SOFT KEYS
Volume control keys.
MP3 KEY
Press to access the MP3 menu.
SOFT KEYS
(Left Key) Press to access the main menu or function displayed on the bottom line.
(Right Key) Press to access your phonebook or to access the function displayed
on the bottom line.
ALARM
Appears when either an event or an alarm
is set.
ROAMING
Phone is out of home area.
RING MODE
Appears when a ringer is
set as a ringer mode.
SERVICE INDICATOR
Indicates call is in progress, indicates
the phone cannot receive a signal from the
system.
MESSAGE
New text or voice
message.
DATA ONLY
Receives an async. call as a voice call.
BATTERY
Battery charging level – the more blocks,
the stronger the charge.
SILENT
Appears when Silent is selected as the
ring mode.
ETIQUETTE
Phone will vibrate when call is received.
HANDSET DESCRIPTION
H
THE FUNCTION KEYS
H
DISPLAY INDICATORS
SPEAKERPHONE
Phone is in speakerphone mode.
12 13
BATTERY USAGEBATTERY USAGE
BEFORE USING BEFORE USING
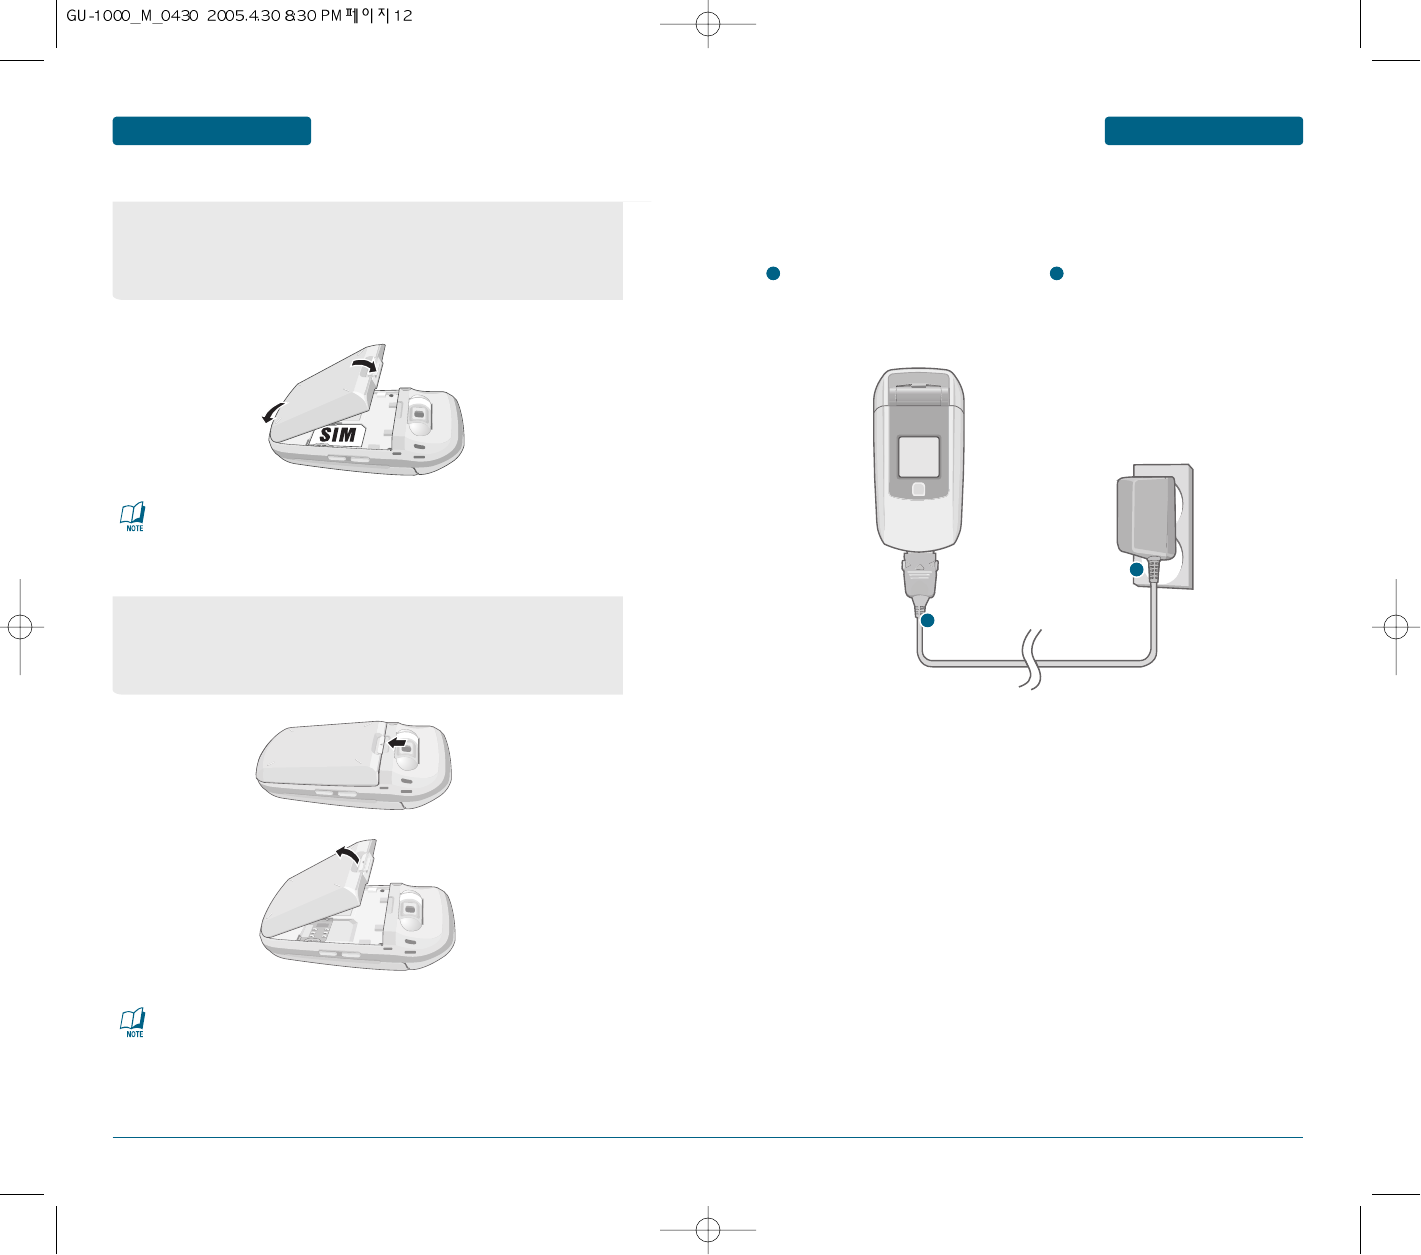
Plug the AC Charger into a standard
outlet.
1
1
Plug the other end of the AC Charger
into the bottom of your phone.
The battery must be installed on to the
phone.
2
As shown in the picture below, put the metal locators of the battery into the
holes located in the bottom of the unit.
³
Place the bottom of the battery into the bottom of the handset and push the
top of the battery down until it locks into place.
2
H
INSTALLING THE BATTERY
As shown in the picture below, put the metal locators of the battery into the
holes located in the bottom of the unit.
³
Place the bottom of the battery into the bottom of the handset and push the
top of the battery down until it locks into place.
H
REMOVING THE BATTERY
■
BATTERY CHARGING
POWER CONNECTION
³
³
·
·
Make sure the battery is securely in place to avoid slipping off during a call.
If the battery is not correctly placed in the battery compartment, the handset will not turn on
and/or the battery may detach during use.
14 15
BATTERY HANDLING INFORMATIONBATTERY USAGE BEFORE USINGBEFORE USING
The operating time is subject to your handset usage and configuration.
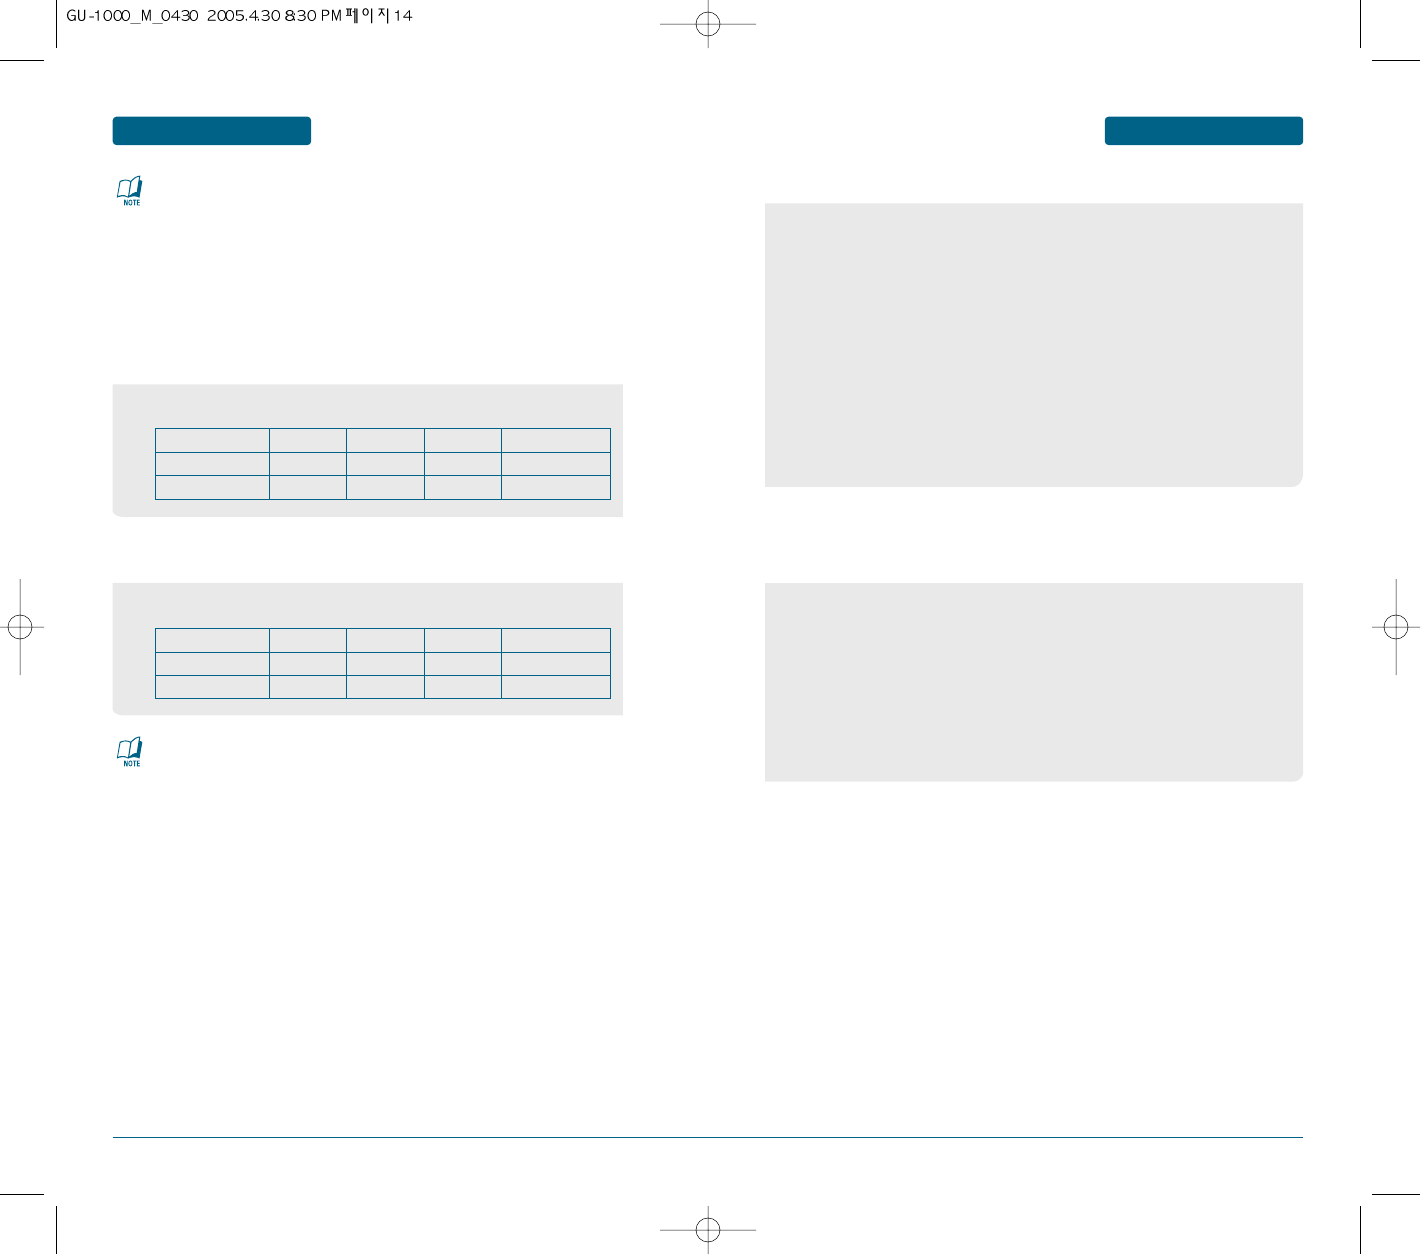
Battery Capacity GSM
STD 1100 mAh 280m
SLIM 830 mAh 210m
DCS
260m
190m
PCS
260m
190m
WCDMA
150m
110m
The operating time is subject to your handset usage and configuration.
•Only use the battery and charger approved by the manufacturer.
•Only use the battery for its original purpose.
•Try to keep batteries in a temperature between 41ºF (5ºC ) and 95ºF (35ºC).
•If the battery is stored in temperatures above or below the recommended
range, give it time to warm up or cool down before using.
•Completely drain the battery before recharging.
It may take one to four days to completely drain.
•Store the discharged battery in a cool, dark, and dry place.
•Purchase a new battery when its operating time gradually decreases after fully
charging.
•Properly dispose of the battery according to local laws.
• Don’t attempt to disassemble the battery – it is a sealed unit with no
serviceable parts.
• Don’t accidentally short circuit the battery by carrying it in your pocket or
purse with other metallic objects such as coins, clips and pens.
This may critically damage the battery.
• Don’t leave the battery in hot or cold temps.
Otherwise, it could significantly reduce the capacity and lifetime of the battery.
• Don’t dispose of the battery into a fire.
These times are for a new battery. Talking and Standby time may decrease over time.
• When you charge the battery with the phone power off, you will see a charging status
screen. You cannot operate the phone until it is powered on.
• The battery is not charged at the time of purchase.
• Fully charge the battery before use.
• It is more efficient to charge the battery with the handset powered off.
• The battery must be connected to the phone in order to charge it.
• Battery operating time gradually decreases over time.
• If the battery fails to perform normally, you may need to replace the battery
H
DOs
BATTERY LIFE (FOR NEW BATTERY)
GSM AND WCDMA BATTERY TIMES
H
DONT’s
Battery Capacity GSM
STD 1100 mAh 280~490 h
SLIM 830 mAh 220~370 h
DCS
280~490 h
220~370 h
PCS
280~490 h
220~370 h
WCDMA
240~440 h
180~330 h
16
BEFORE USING
CHAPTER 2 BASIC OPERATION
This chapter addresses and explains the basic features of your
cellular telephone including:
TURNING THE PHONE ON / OFF
ACCESSING THE MENU
MENU SUMMARY
BASIC FUNCTIONS
DURING A CALL
MAKING AN EMERGENCY CALL
CHAPTER 2
BASIC OPERATION
QUICK START
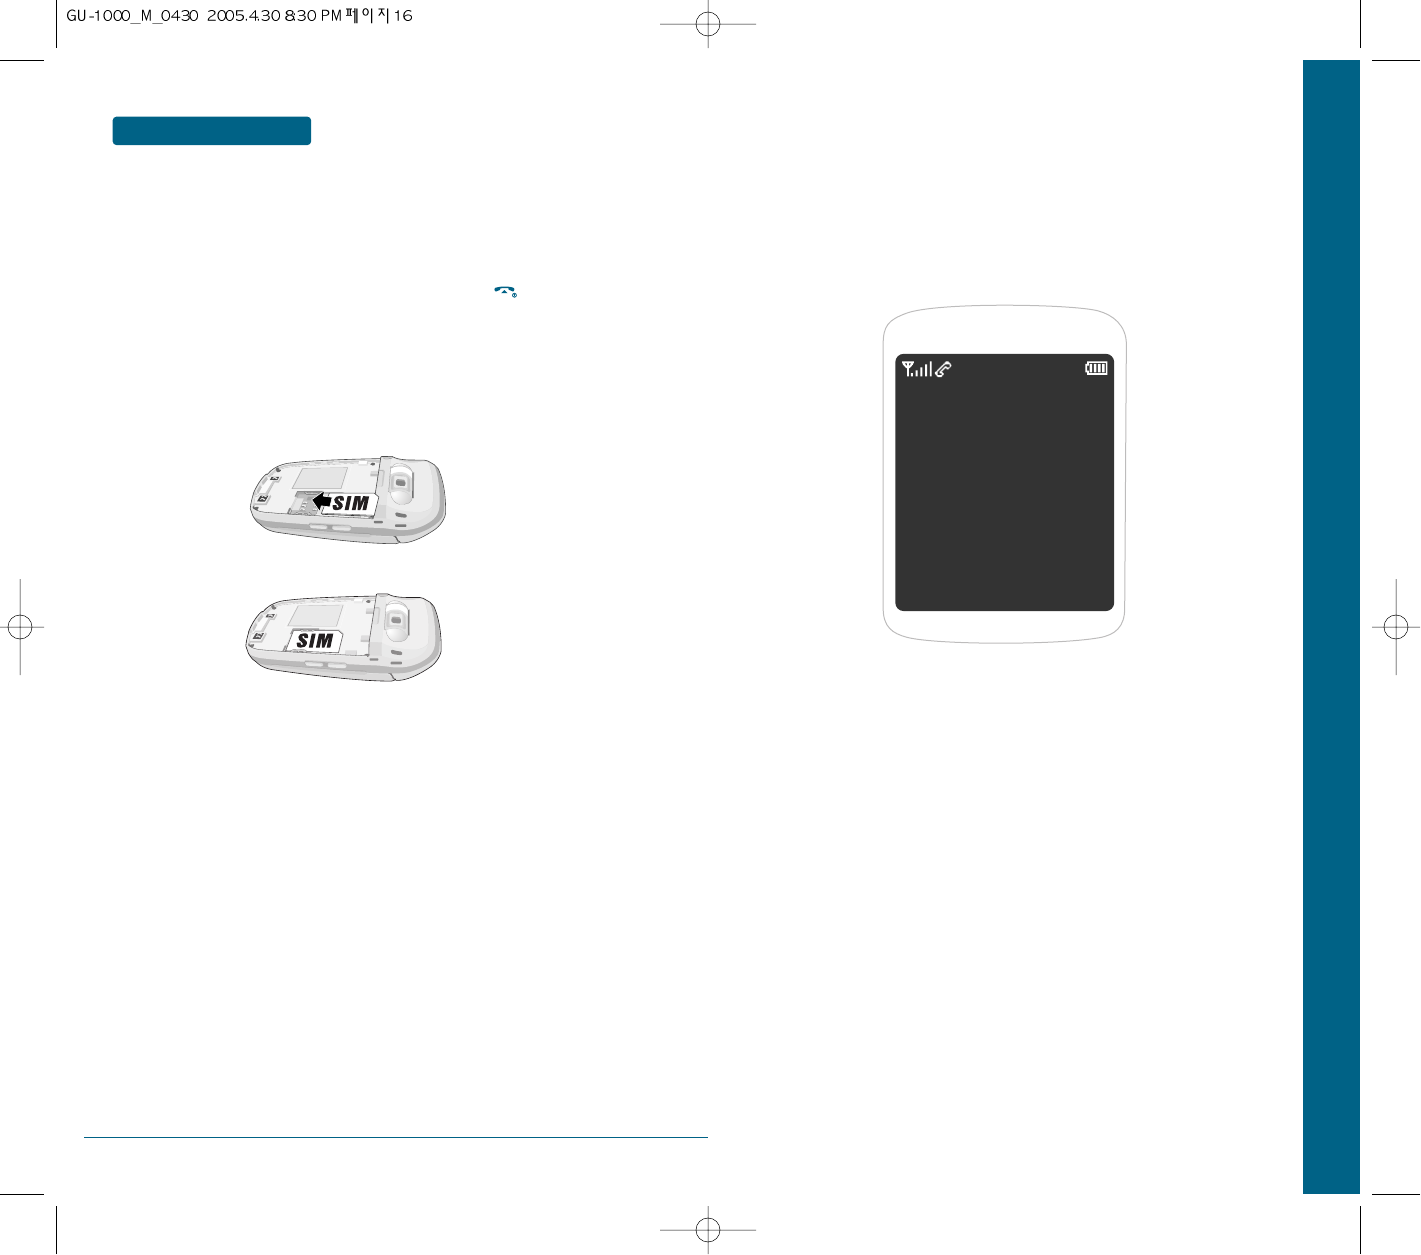
In order for you to use the phone the first time, you must follow the steps shown
below.
Install the SIM card inside the handset.
When you subscibe to a cellular network, you are provided with a plug-in SIM
card loaded with your subscription information (such as pin number, available
optional service, etc.)
If necessary, turn off your phone by pressing and holding the key until the
power-off message appears.
³
Remove the battery from the phone.
·
Check the sim slot is empty and install the SIM card into the slot.
»
If you wish to remove the SIM card, push it in the arrow direction shown in
the picture below.
³
·

18 19
TURNING THE PHONE ON / OFF
BASIC OPERATION
H
SWITCHING ON OR OFF THE PHONE
H
ACCESS CODES
³
Open the phone.
·
Press and hold the key until the phone switches on.
»
If the phone asks you to enter a password, enter the password and press the OK
soft key. The password is preset to “0000” at the factory. For further
details, see page 193.
¿
If the phone asks for a PIN, enter the PIN and press the OK soft key.
For further details, see page 194.
The phone searches for your network and, after finding it, the idle screen appears
on the display.
Now, you can dial or receive calls.
´
When you wish to switch off the phone, press and hold the key until the
power-off image displays.
You can use the access codes described in this section to avoid unauthorized use of
your phone. The access codes (except PUK and PUK2 codes) can be changed by using
the Change codes feature [Menu 9.6.2].
PIN CODE (4 TO 8 DIGITS)
The PIN (Personal Identification Number) code protects your SIM card against
unauthorized use. The PIN code is usually supplied with the SIM card.
When the PIN Code Request is set to Enable, your phone will request the PIN code
every time it is switched on. When the PIN Code Request is set to Disable,
your phone connects to the network directly without the PIN code.
PIN2 CODE (4 TO 8 DIGITS)
The PIN2 code, supplied with some USIM cards, is required to access functions such
as Fixed Dial Number. These functions are only available if supported by your SIM
card.
PUK CODE (4 TO 8 DIGITS)
The PUK (PIN Unblocking Key) code is required to unlock a blocked PIN code.
The PUK code may be supplied with the SIM card.
If not, contact 3 Customer Services for the code.
If you lose the code, contact 3 Customer Services.
PUK2 CODE (4 TO 8 DIGITS)
The PUK2 code, supplied with some SIM cards, is required to unlock a blocked PIN2
code. If you lose the code, contact 3 Customer Services.
PHONELOCK (4 DIGITS)
The phonelock code protects the unauthorized use of your phone.
The default phonelock code is set to ‘0000’ and the security code is required to
delete all phone entries and to restore the handset to factory setting.
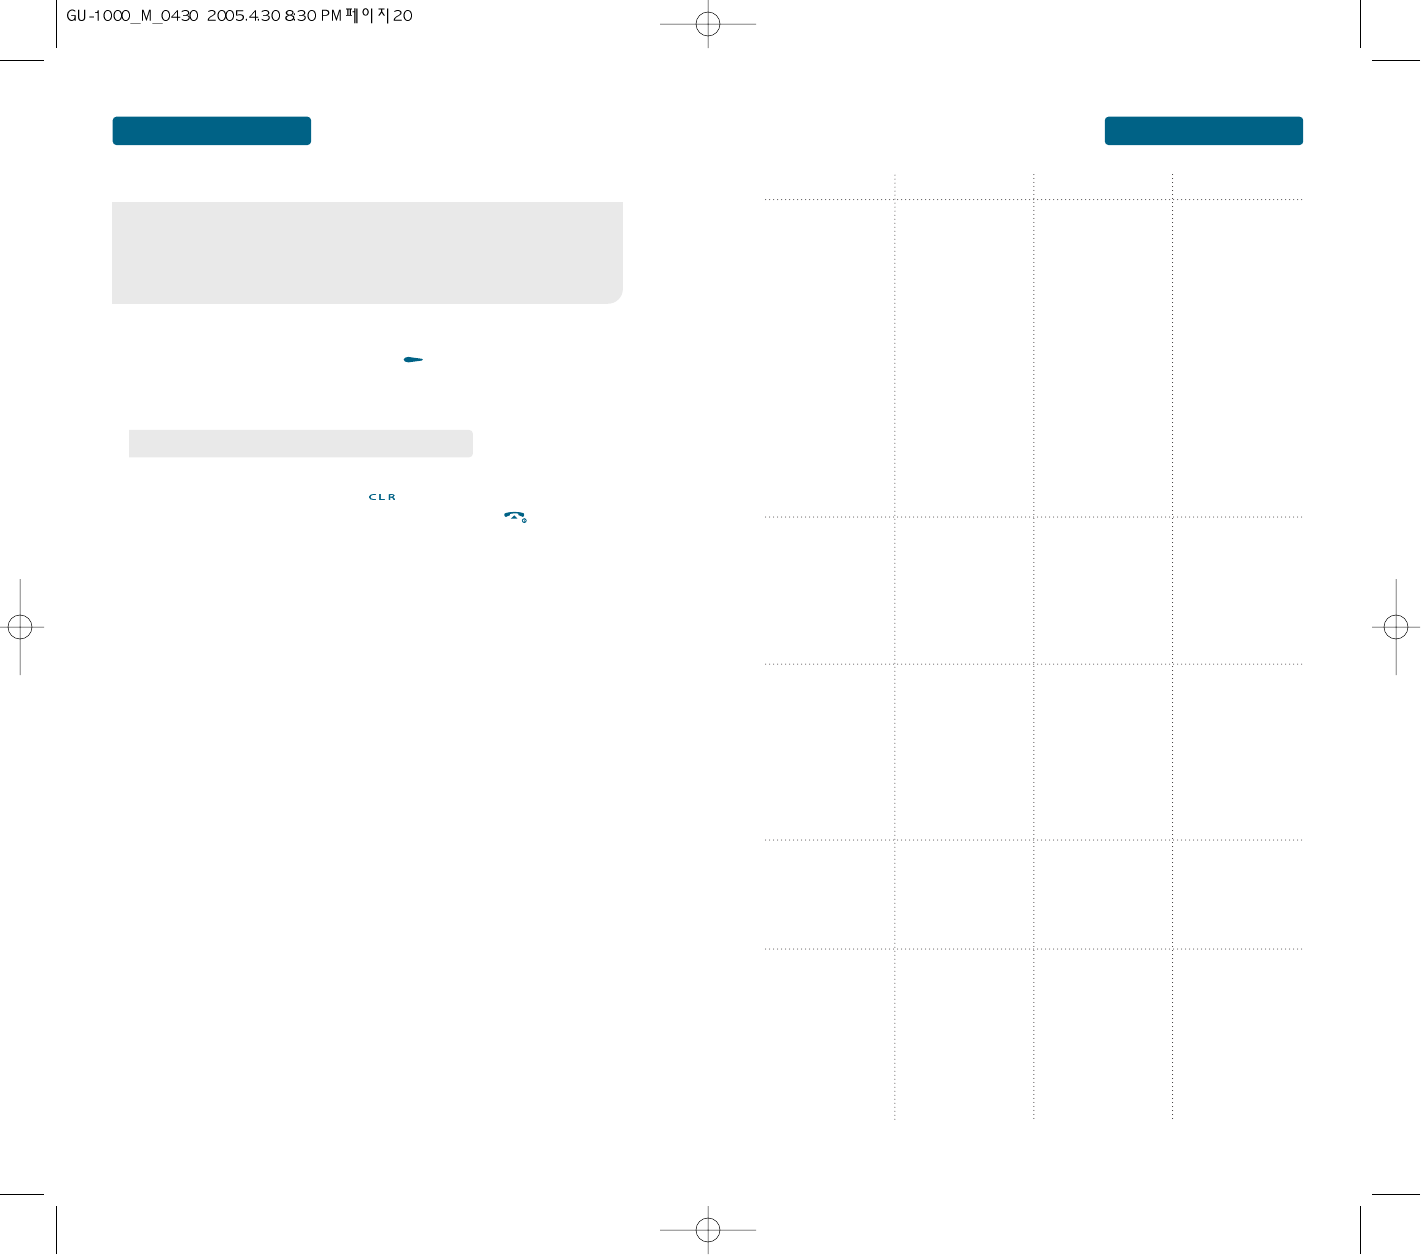
• To change languages, use the Language menu (Menu 9.3.3).
For further details, see page 168.
• When your phone is closed, you first need to open
the phone to activate the display and the keypad.
ACCESSING THE MENU BASIC OPERATION
21
20
MENU SUMMARY BASIC OPERATION
❶
To access the menu in the idle mode, press [MENU].
❷
Use the Navigation key to scroll through the menu.
❸
To return to the previous page, press .
To exit the current menu and return to the idle mode, press .
❹
Press the Navigation key to enter a function when its main page is displayed or
press its assigned number to have direct access to the function.
Your phone can be customized via the menu. Each function can be
accessed by scrolling with the Navigation key or by pressing the
number that corresponds with the menu item.
•
To search through the menu in numerical order, press down.
ACCESSING THE MENU
BASIC OPERATION
1.Phone book
2. Organiser
3. Tools
4. WAP
5. Messag
1.1 Search
1.2. Add contact
1.3. Call record
1.4. Groups
1.5. Speed Dial
1.6. Voice dials
1.7. My name card
1.8. Own number
1.9. Service numbers
1.0. Memory status
2.1 Alarms
2.2 Wakeup Alarm
2.3 Memo Pad
2.4 Monthly view
2.5 Today's View
2.6 Event list
2.7 Search
2.8 Memory status
3.1 Voice Recorder
3.2 Answering
machine
3.3 Calculator
3.4 World clock
3.5 Stop watch
3.6 Converter
3.7 Java games
3.8 Sync ML
4.1 Load Homepage
4.2 Bookmarks
4.3 Enter Address
4.4 History
4.5 Settings
4.6 Storage
5.1 New text Message
5.2 New multimedia
Message
5.3 Inbox
5.4 Drafts
5.5 Outbox
5.6 Email
5.7 Instant Messenger
5.8 Templates
5.9 MMbox
1.2.1 To phone
1.2.2 To SIM
1.3.1 All calls
1.3.2 Missed calls
1.3.3 Dialed calls
1.3.4 Received calls
1.3.5 Packet counter
1.3.6 Call costs
1.3.7 Call timer
3.2.1 Message box
3.2.2 Activity
3.2.3 greeting recorder
MAIN MANU 2ND DEPTH 3RD DEPTH 4TH DEPTH

22 23
MENU SUMMARYMENU SUMMARY BASIC OPERATIONBASIC OPERATION
6. Profiles
7. Media gallery
8. Multimedia
5.0 Settings
5.11 Delete all
5.12 Memory status
6.1 Normal
6.2 Silent
6.3 Meeting
6.4 Outdoor
6.5 Car
6.6 Headset
6.6 User profile 1
6.7 User profile 2
7.1 Image
7.2 Music
7.3 Ringtone
7.4 My Voice
7.5 Video
7.6 ETC
7.7 External memory
8.1 Camera
8.2 Camcorder
8.3 Media player
8.4 Music player
5.0.1 SMS message
5.0.2 MMS settings
5.0.3 Voice mail
5.0.4 CB Setting
5.0.5 Push Setting
8.1.1 View finder
8.1.2 My Photos
8.2.1 View finder
8.2.2 My Video
8.3.1 Media player
8.3.2 Video folder
8.3.3 My playlist
8.3.4 Settings
8.4.1 Player
8.4.2 My music
8.4.3 My playlist
8.4.4 Settings
8.4.5 Memory status
5.0.1.1 Sending settings
5.0.1.2 SMS settings
5.0.2.1 Profiles
5.0.2.2 Send/Create
5.0.2.3 Receive/Display
5.9.5.1 Receive CBS
5.9.5.2 Channels
MAIN MANU 2ND DEPTH 3RD DEPTH 4TH DEPTH MAIN MANU 2ND DEPTH 3RD DEPTH 4TH DEPTH
9. Settings 9.1 Sound settings
9.2 Display settings
9.3 Phone settings
9.4 Call settings
9.5 Time & Date
9.6 Network
9.7 Bluetooth
9.8 Security
9.9 Master Reset
9.1.1 Ringer
9.1.2 Ringer type
9.1.3 Volume
9.1.4 ETC. sounds
9.2.1 Greeting message
9.2.2 Main LCD
9.2.3 Sub LCD
9.2.4 Menu style
9.2.5 LCD brightness
9.2.6 Backlight
9.3.1 Shortcuts
9.3.2 Receive type
9.3.3 Language
9.3.4 Software upgrade
9.4.1 Diverting calls
9.4.2 Barring calls
9.4.3 Waiting calls
9.4.4 Accept calls
9.4.5 Caller ID
9.4.6 Auto redial
9.4.7 Video call settings
9.5.1 Set time & Date
9.5.2 Format
9.6.1 Network selection
9.6.2 Network Mode
9.6.3 Data Stats
9.7.1 Device Search
9.7.2 My Device
9.7.3 Settings
9.8.1 Phonelock
9.8.2 PIN
9.8.3 Change PIN2
9.8.4 FDN
9.8.4 Privacy Lock
9.2.2.1 Wallpaper
9.2.2.2 Display
9.2.2.3 Text
9.2.3.1 Clock
9.2.3.1 Sub title
9.2.3.1 Wallpaper
9.3.2.1 Active folder
9.3.2.1 Anykey answer
9.3.2.1 Send key answer

Ensure you tell the other party before recording a voice call.
MAKING AND ANSWERING A VIDEO CALL
You can make/answer a video call to a 3G video phone the other party must have a 3G video
phone and be in a video service area.
To make/answer a video call, do the following.
³
Input the phone number using the keypad, or select the phone number from the
calls made/received lists.
·
If you do not want to use the speakerphone, ensure you have the headset
plugged in.
»
To start the video function, press the right soft key [Video call].
¿
Adjust the camera position if necessary.
´
Press the end key to finish the call, or close the handset.
MAKING A VOICE CALL
³
Make sure your handset is powered on.
·
Enter the number including the full area code.
»
Press the key to make the call.
¿
Press the key to finish the call, or close the handset.
MAKING A VOICE DIAL
³
Press the for a long time to call someone using voice dial.
24 25
To modify the phone number you have entered :
• To erase one digit at a time press .
• To erase the entire number, press and hold .
MEMO BASIC OPERATION
BASIC FUNCTIONS
BASIC OPERATION
To modify the phone number you have entered :
• To erase one digit at a time press .
• To erase the entire number, press and hold .
The video call may take some time to connect. Please be patient.
The connection time will also depend on how quickly the other party answers the call.
While the video call is connecting, you will see your own images; after the other
party has answered, their image will be displayed on screen.
H
MAKING AND ANSWERING CALLS MAKING A VOICE/VIDEO CALL FROM PHONEBOOK
It is easy to call anyone whose number you have stored in your phonebook.
Press the right soft key to access phonebook list.
³
Scroll to your chosen phonebook and press the key.
·
To make a voice call press the key.
»
To make a video call press the [OPTION]key.
¿
Select a video call.
´
Press the key to finish the call, or close the handset.
MAKING INTERNATIONAL CALLS
³
Press and hold the key for the international prefix.
The ‘+’ character can be replaced with the international access code.
·
Enter the country code, area code, and the phone number.
»
Press the key.
MULTI CALLS
³
Press a phone number followed by a send key during a call, to call a 3rd person.
Identifies caller by displaying their phone number. If the caller’s name and number are already
stored in your phone book, they both will appear.
H
CALLER ID FUNCTION
The caller ID is stored in the call history.
Notifies you of an incoming call when you are already on a call by sounding a beep tone and
displaying the caller’s phone number.
To answer another call while on the phone, press .
This places the first call on hold.
To switch back to the first caller, press again.
H
CALL WAITING FUNCTION
Call Waiting is a system dependent feature. Please contact your
service provider for details.
³
27
26
BASIC FUNCTIONS
BASIC OPERATION
³
Press [MENU] , , then select one of
the following.
³
To turn etiquette mode on/off, press and hold .
will be displayed to indicate etiquette mode is active.
Mutes key tones and activates the vibration mode to alert you of an incoming call or
message.
Adjust the volume of the ringer, key beep and speaker.
H
ADJUSTING VOLUME
Locks your phone and prevents unauthorized use.
Phone can only be used after inputting the password.
H
ETIQUETTE
H
LOCK
Press 1, 2, 3 to unlock the key guard.
To adjust earpiece volume during a call move the Navigation Key up or down.
³
To lock the phone, press and hold .
·
To unlock the phone, press any key then input the password.
•
Lock feature will deactivate when the phone is powered off.
Upon next power up, you will need to press to lock phone again.
•
Ringer volume : Controls the ringer volume.
•
Call volume : Controls the call volume.
•
Key volume : Controls the key tone.
·
Adjust volume then press to save it.
BASIC OPERATION
DURING A CALL
Activates the speaker phone when you are on a call.
The phone returns to normal (speaker phone off) after ending or call or when the phone is
turned off and back on.
To display menu options during a call, press [Option].
H
SPEAKER PHONE
Mutes the microphone while you are on a call so the other party cannot hear you if you speak.
H
MUTE (UNMUTE)
Enter a memo when you are on a call.
H
MEMO
It is possible to call another party while holding a call.
H
HOLD
Voice recording when you are on a call.
H
VOICE RECORDING
28 29
BASIC OPERATION
MAKING AN EMERGENCY CALL
BASIC OPERATION DURING A CALL
CALL
Termination of selected phone call.
³
Press [MENU] , .
END ACTIVE
Termination of activated phone call.
³
Press [MENU] , .
END ALL
Termination of all phone calls.
³
Press [MENU] , .
H
DISCONNECT
H
DTMF OFF
³
Enter Emergency number and press .
·
The call connects.
»
The phone exits the Lock Mode for 5 minutes.
The Emergency number call service is available even in the lock mode.
H
EMERGENCY NUMBER IN LOCK MODE
The 911 call service is available even in the lock mode.
H
EMERGENCY NUMBER USING ANY AVAILABLE SYSTEM
³
Enter Emergency number and press .
·
The call connects.
»
The phone maintains the Emergency Mode for 5 minutes.
The Emergency Call feature puts your phone in the Emergency Call Mode when you dial the
preprogrammed emergency numbers, 000, 106, 112, *911. It also operates in the lock mode and
out of the service area.
•
TThe phone returns to the Lock Mode.
•
While the phone is in the emergency mode for 5 minutes, the phone
can receive an incoming call from any available system.
However it can't make a call.
•
When the call ends, the phone returns to the Lock Mode.
Emergency
Number
30
BASIC OPERATION MEMO
CHAPTER 3 MEMORY FUNCTION
This chapter addresses memory functions including:
STORING A PHONE NUMBER
ENTERING LETTERS, NUMBERS & SYMBOLS
MAKING A CALL THROUGH THE PHONE BOOK
CHAPTER 3
MEMORY FUNCTION
32 33
MEMORY FUNCTION
As soon as you start to enter a number, Save appears above the left soft key to allow you
to store the number in Phonebook.
To store a number in the phone’s memory:
³
Enter phone number and press [SAVE].
·
Use and to select a "Phone".
»
Use and to select a "Save type".
¿
Select an icon to identify the category in which the number is to be stored.
5 categories are available:
To select the category, press the or key and press the Select soft key.
´
Press the Down key to move and change the setting or enter more
information, if necessary.
STORING A PHONE NUMBER
•
New
•
Update
•
Mobile
•
Home
•
Office
•
Other number
•
Fax
•
Last name/First name : Enter the entry name. For further details
about how to enter characters, see page 32.
•
Mobile/Home/Office/Fax/Fax : Add a number for any category.
•
Email : Enter an e-mail address.
•
URL : Enter a URL.
•
Instant messenger : Enter a instant messenger.
•
Group : Select one of the default relation groups, where the entry
is included. Grouping the entries enables you to search for
a number within the group. See page 60.
•
Image : Assign an image as a caller ID image to be displayed when
you receive a call from the selected number.
•
Ringtone : Select a unique ringer melody for the entry.
By selecting a different tone for each entry,
incoming voice calls having a caller ID can be
distinguished from each other.
•
Memo : Add a memo about the person.
To store a number on the SIM card:
³
Enter phone number and press [SAVE].
·
Select SIM and press the Select soft key.
»
Enter a name and press the Down key.
¿
If necessary, change the phone number and press the Down key.
´
If you do not want to save the number and name in the suggested location,
press the key to clear the location number and enter another location
by pressing the number keys.
²
When you have finished entering the Phonebook information for the entry,
press the Save soft key.
MEMORY FUNCTION
STORING A PHONE NUMBER
When you change phones, any numbers stored in your SIM card memory are
automatically available with the new phone, whereas any numbers stored in the
phone’s memory will need to be reentered.
35
34
MEMORY FUNCTION
The input mode (Alpha editor) will be automatically activated when necessary to enter letters
and numbers. As shown below, there are 5 available modes ; Standard input mode (Ab, AB), T9
input mode (T9AB), Numeric mode (123), and Symbol mode (Symbols).
The input mode indicator appears on the upper right of the display when letters and
numbers are entered.
To select the desired input mode among the 5 modes below, press [MODE],
then enter letters and numbers.
ENTERING LETTERS, NUMBERS & SYMBOLS
MEMORY FUNCTION ENTERING LETTERS, NUMBERS & SYMBOLS
³
When you are in the T9 predictive text input mode, start entering a word by
pressing keys to . Press one key per letter.
The T9 predictive text input mode allows you to enter words easily with a minimum number of
key presses. As you press each key, the handset begins to display the characters that it thinks
you are typing based on a built-in dictionary. As new letters are added, the word changes to
reflect the most likely candidate from the dictionary.
H
Using the T9 Mode
•
The word changes as letters are typed - ignore what’s on the screen
until the word is typed completely.
•
If the word is still incorrect after typing completely, press the key
once or more to cycle through the other word options.
e.g.
To enter “phone book” in the T9 mode.
•
Press ,,,,to type "phone".
•
Enter the whole word before editing or deleting any keystrokes.
•
Complete each word with a space by pressing the key.
³
Press the key labeled with the required letter:
·
To insert a space, press the key once.To delete letters, press the key.
Press and hold down the key to clear the display.
Use the to keys to enter your text.
H
Using the ABC Mode
•
Once for the first letter
•
Twice for the second letter
•
And so on
The 123 Mode enables you to enter numbers in a text message
(a telephone number, for example).
Press the keys corresponding to the required digits before
manually switching back to the appropriate text entry mode.
H
Using the 123 (Number) Mode
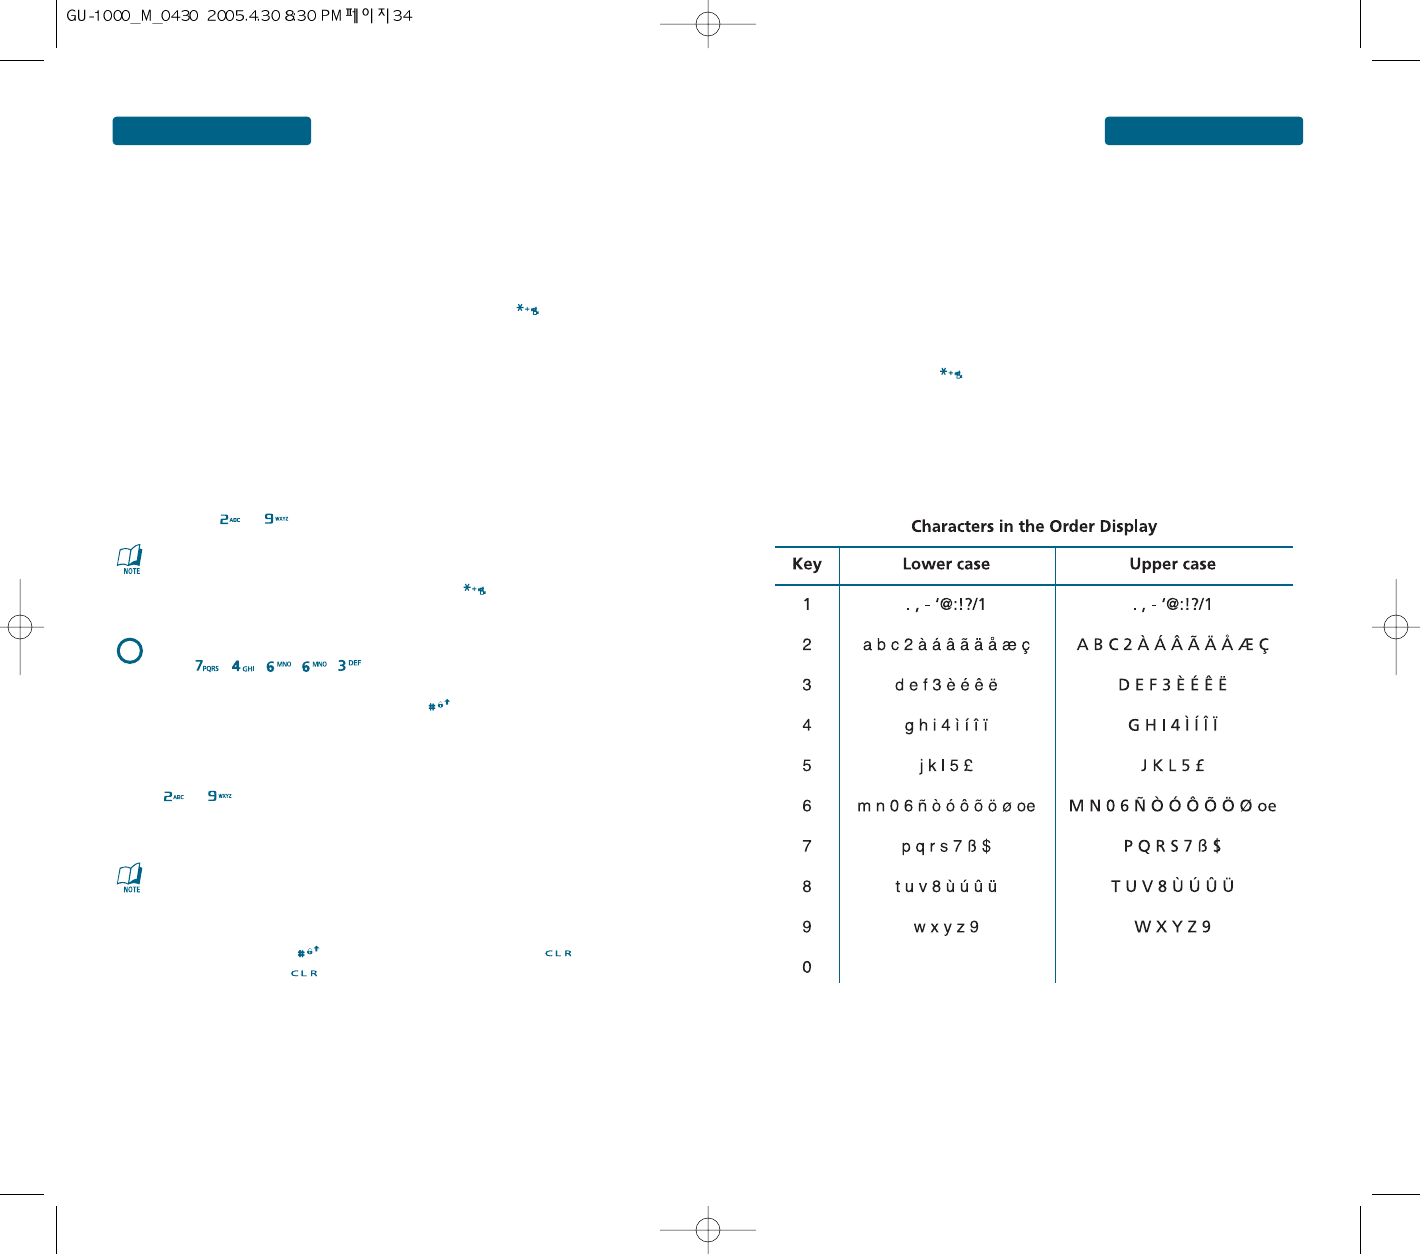
The symbol mode enables you to enter various symbols or special characters.
To enter a symbol, press the key [Symbol].
Use the navigation and numeric keys to select the desired symbol.
Refer to the table below for more information on the characters available using the
keys.
H
Using the Symbol Mode
0 0
36
MEMORY FUNCTION MAKING A CALL THROUGH THE PHONE BOOK
H
SPEED DIAL#’S
•
“Unassigned” appears if the location is available.
•
If a phone number is set as Secret, you will have to enter the password.
•
To call an assigned number, press & hold the last digit of the
speed dial #.
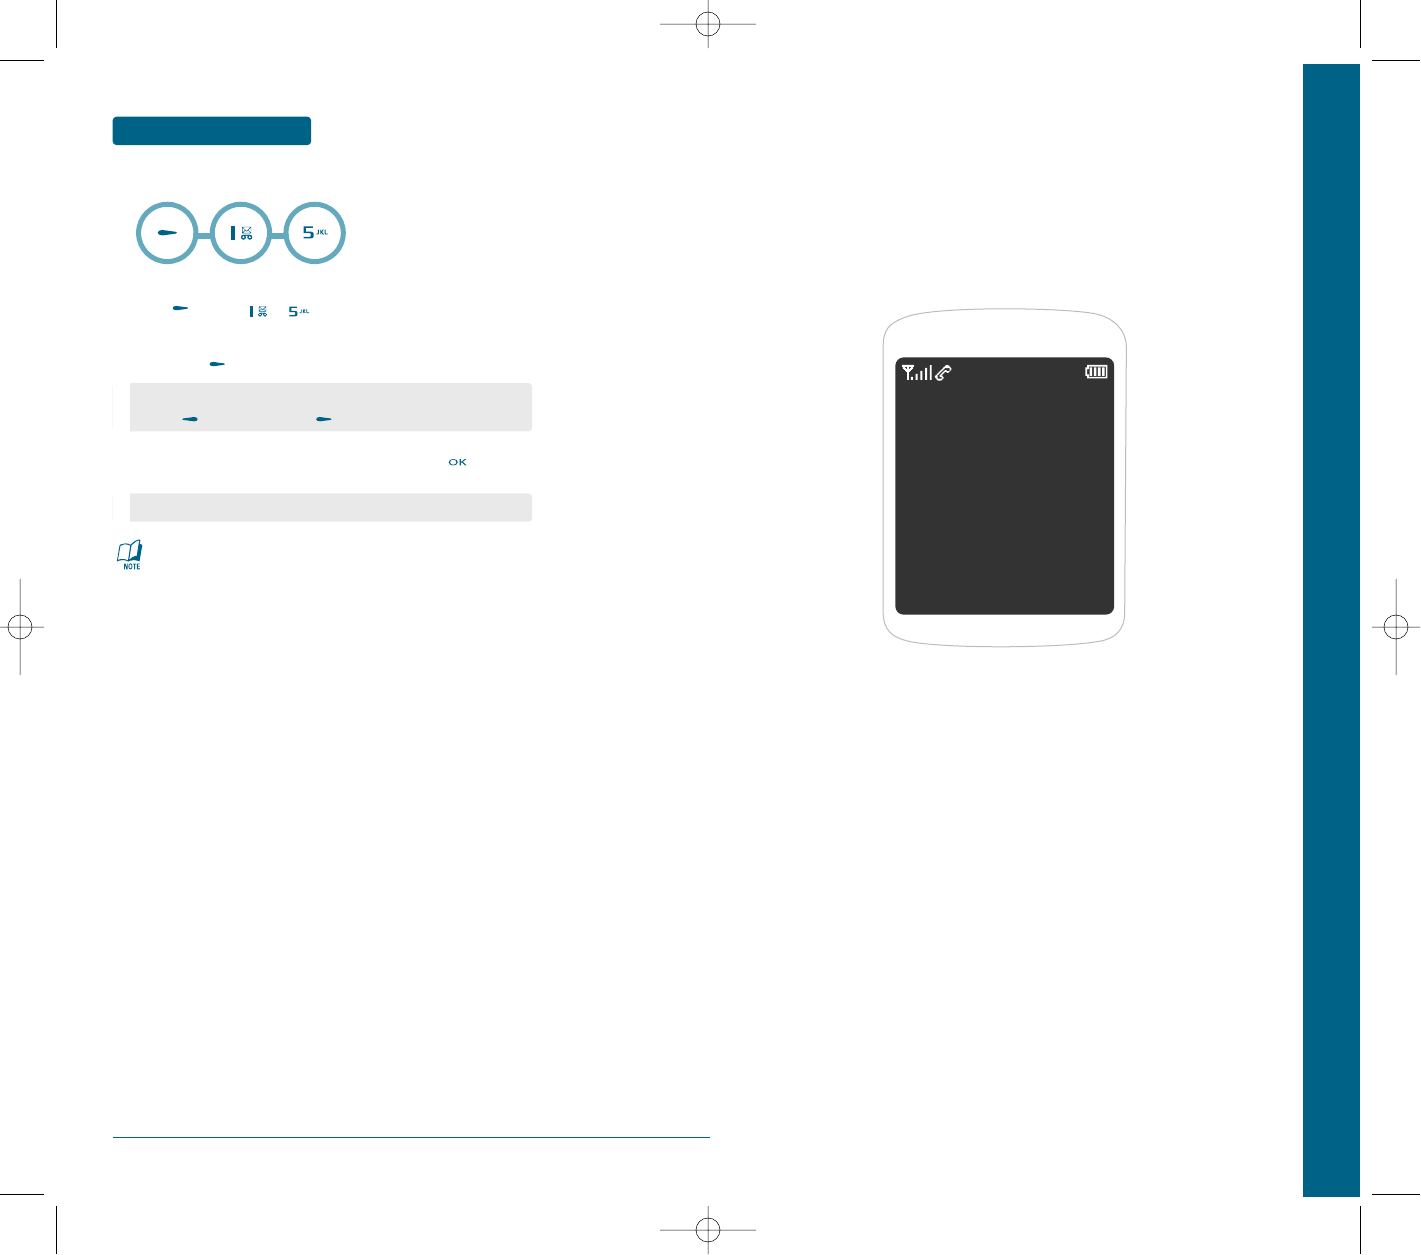
³
Press [MENU] , .
·
To assign a phone number to a location, select the location
then press [Add].
»
Select the entry with the Navigation Key and press .
•
If a phone number is already assigned to the location,
press [Option-Delete] and [Ok] to delete.
•
If the entry is set to secret, you will be asked for your password.
CHAPTER 4 MENU FUNCTION
This chapter addresses accessing the menu and using its functions
and features to customize your phone.
PHONE BOOK
ORGANISER
TOOLS
WAP
MESSAGE
PROFILE
MEDIA GALLERY
MULTIMEDIA
SETTINGS
CHAPTER 4
MENU FUNCTION
38 39
MENU FUNCTION
PHONE BOOK
MENU FUNCTION PHONE BOOK
H
SEARCH
³
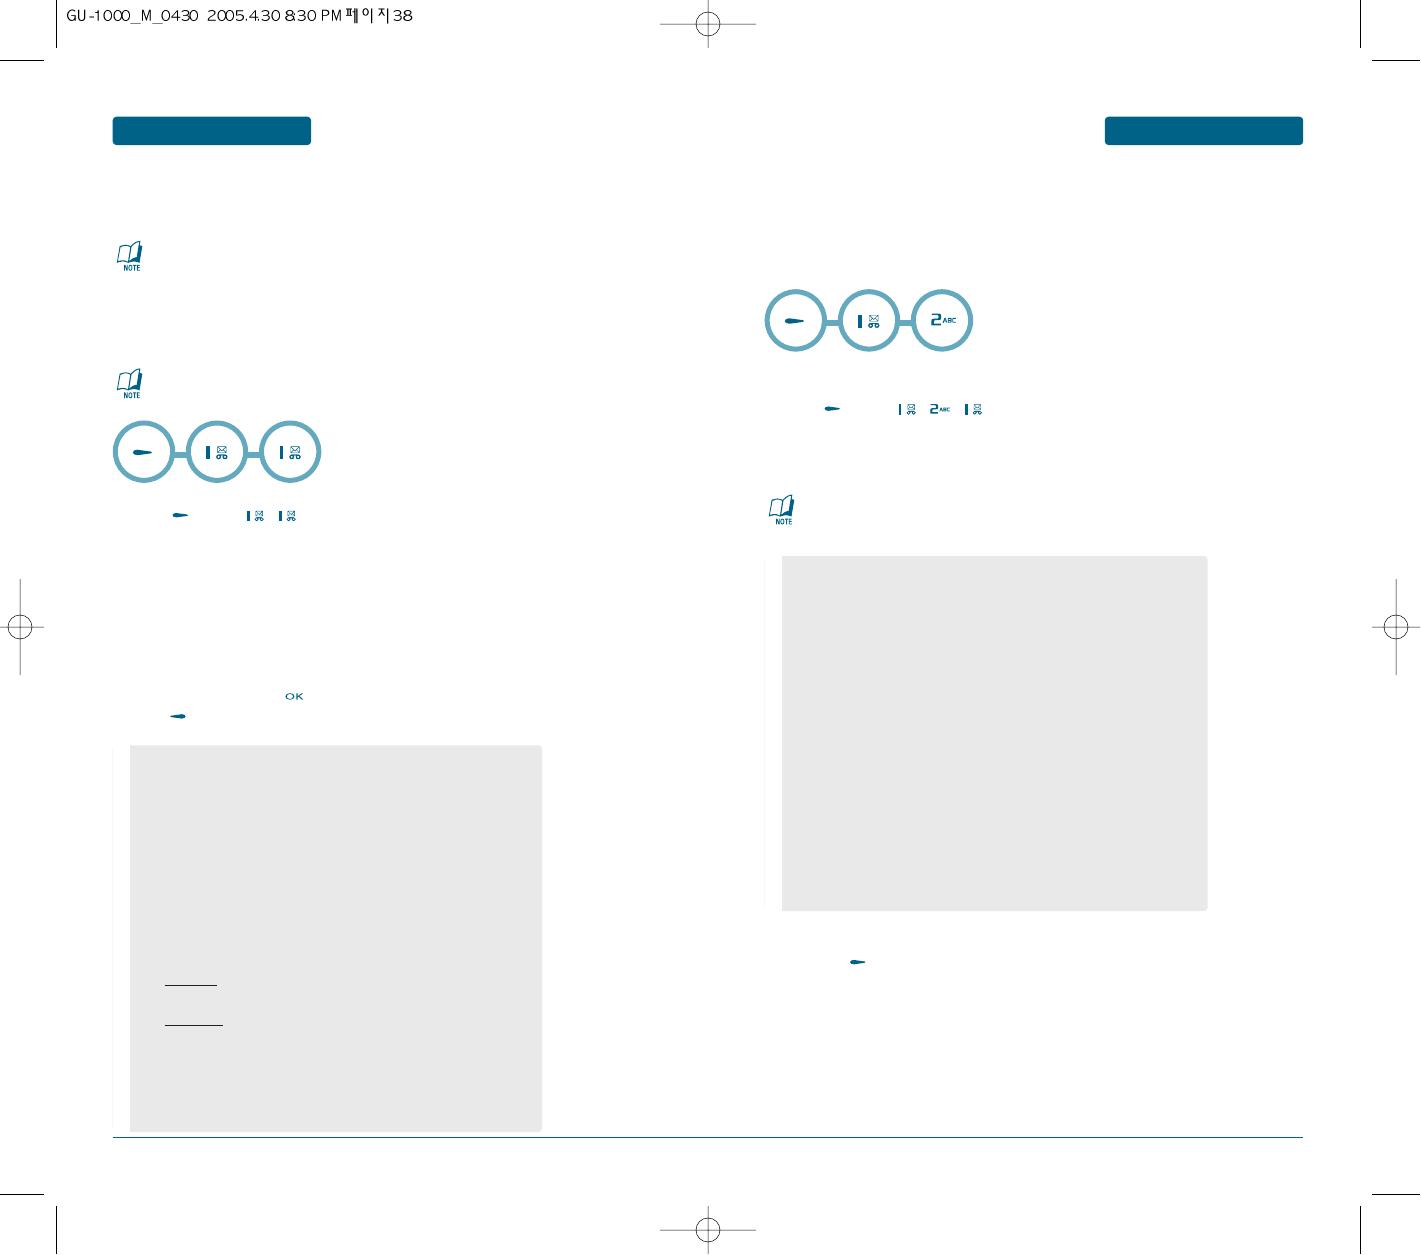
Press [MENU] , . The list of names in your phone book is
displayed alphabetically.
·
Enter a name or character string or scroll through the list by pressing
the Navigation Key up or down.
Please refer to page 35 for instructions on entering letters, numbers
and symbols.
»
The list beginning with the letter you entered is displayed.
Highlight an entry. Press to edit the entry.
Press [OPTION] to view options.
In this menu, you can search for numbers in Phonebook by entering names.
You can store phone numbers and their corresponding names in both your SIM card
and your phone’s memories. They are physically separate but are used as a single
entity, called Phonebook.
••
Press the Options soft key to access the following options:
- Call : Making a call.
- Video Call : Making a video call.
- Send message : allows you to send an SMS, MMS, or
e-mail message to the selected number or e-mail address.
- Speed dial : Set a speed dial.
- Copy to "phone" or "SIM" : allows you to copy the number to
another location, either Phone or SIM.
- Copy all to : allows you to copy the all number to another
location, either Phone or SIM.
- SEND: allows you to access the following sending options:
Via MMS: allows you to send the selected name as a business
card by MMS message.
Via E-mail: allows you to send the selected name as a business
card by e-mail.
- Delete : allows you to delete the selected name from
Phonebook.
- Delete all : allows you to delete the all name from
Phone or SIM.
Depending on your particular SIM card, the maximum number of phone
numbers the SIM card can store may differ.
You can quickly enter this menu by pressing the Phonebook soft key in
Idle mode.
H
ADD CONTACT
STORING A NUMBER IN THE PHONE’S MEMORY
³
Press [MENU] , , .
·
Press the Down key to move and change the setting, or enter more information,
if necessary.
»
When you have finished entering the contact information for the entry,
press the [Save] key.
This menu allows you to add a new entry into Phonebook. In the phone’s memory, a name can
contain up to 5 numbers in different categories: Mobile, Home, Office, Other number, and Fax.
You can save name and number in a SIM card entry.
••
Last name/First name : Enter the entry name. For further details
about how to enter characters, see page 35.
••
Mobile/Home/Office/Other number/Fax : Add a number for any
category.
••
Email : Enter an e-mail address.
••URL : Enter a URL.
••Instant messenger : Enter a instant messenger.
••Group : Select one of the default relation groups, where the entry
is included. Grouping the entries enables you to search for
a number within the group. See page 60.
••Image : Assign an image as a caller ID image to be displayed when
you receive a call from the selected number.
••Ringtone : Select a unique ringer melody for the entry.
By selecting a different tone for each entry,
incoming voice calls having a caller ID can be
distinguished from each other.
••Memo : Add a memo about the person.
Depending on the selected memory, information or settings you can
enter may be different.
40 41
MENU FUNCTION
PHONE BOOK
MENU FUNCTION PHONE BOOK
STORING A NUMBER ON THE SIM CARD
³
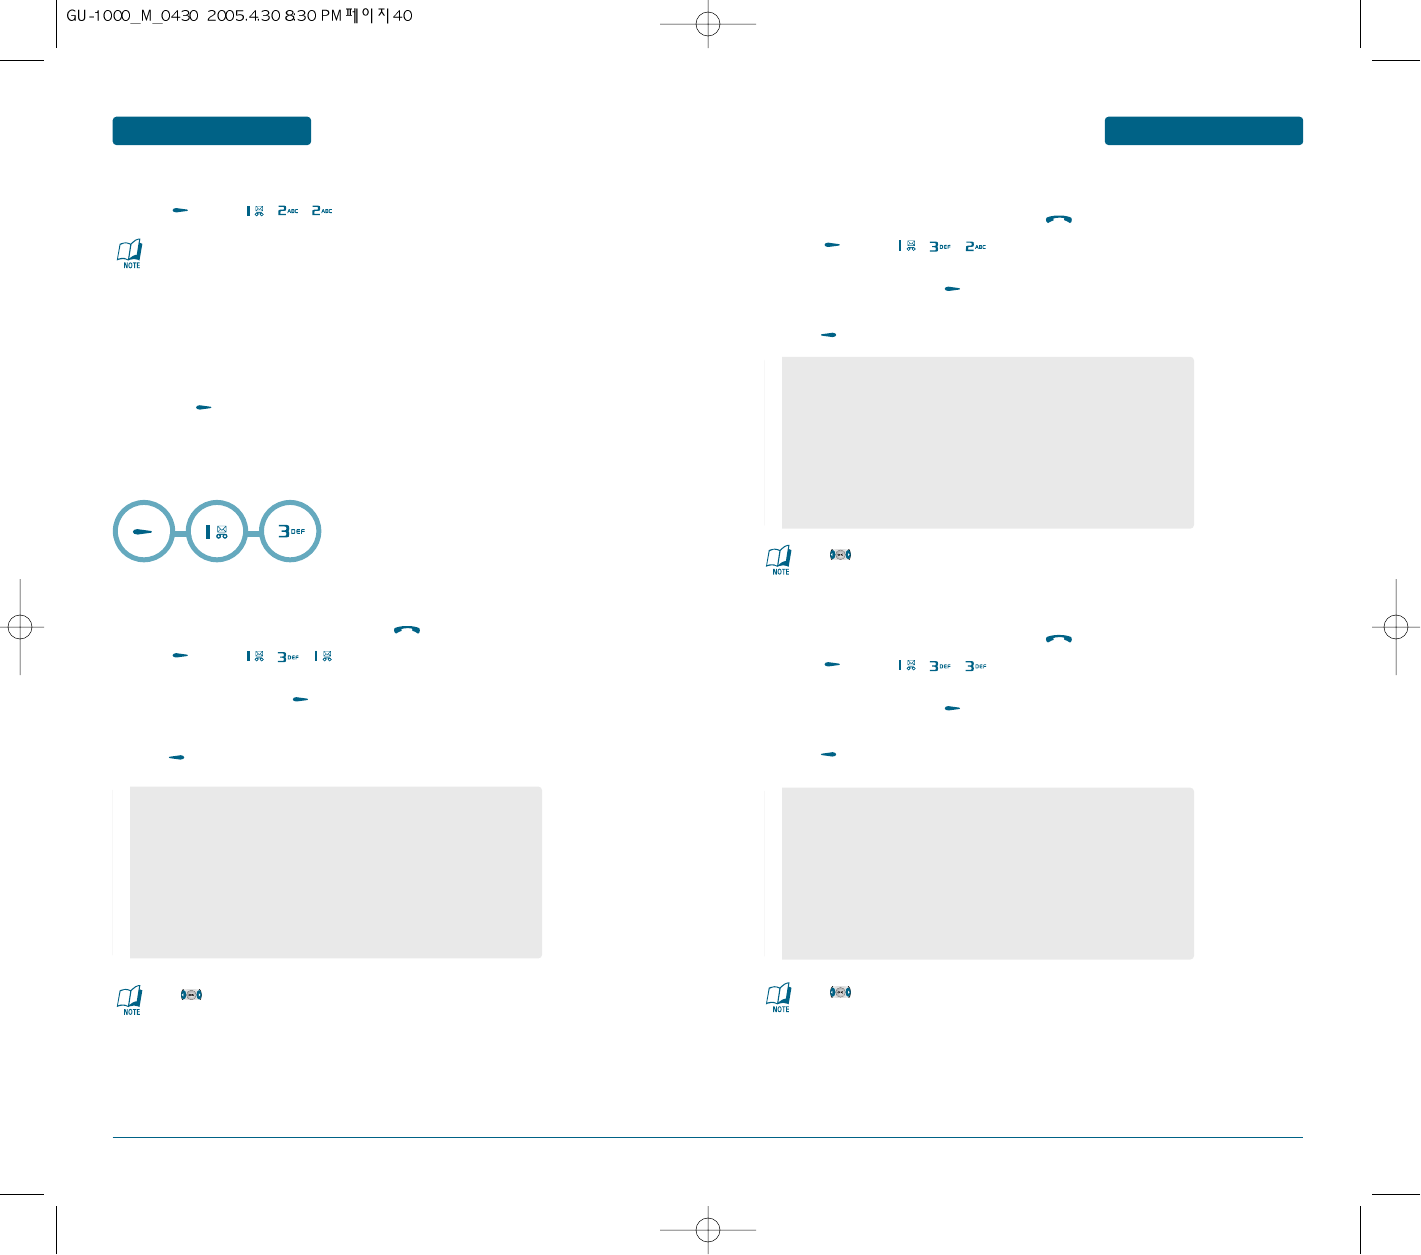
Press [MENU] , , .
·
Enter a name and press the Down key.
»
Enter a phone number.
¿
Press the [Save] key.
H
CALL RECORDS
ALL CALLS
Displays information about the 60 most recent numbers dialed, missed and received.
Places a call to a selected number by simply pressing .
³
Press [MENU] , ,
.
·
To view call details, press [View].
·
Press [Option] to view options.
MISSED CALLS
Displays information of the 20 most recently answered calls.
Places a call to a selected number by simply pressing .
³
Press [MENU] , ,
.
·
To view call details, press [View].
·
Press [Option] to view options.
DIALED CALLS
Displays information of the 20 most recently dialed calls.
Places a call to a selected number by simply pressing .
³
Press [MENU] , , .
·
To view call details, press [View].
·
Press [Option] to view options.
When you change phones, any numbers stored on your SIM card
memory are automatically available with the new phone, whereas any
numbers stored in the phone’s memory will need to be reentered.
Press to change the mode "Dialed", "Missed" or "Received".
Press to change the mode "Dialled", "Missed" or "Received".
Press to change the mode "Dialled", "Missed" or "Received".
••
Press the Options soft key to access the following options:
- Call : Dials the number.
- Video Call : Making a video call.
- Send message : allows you to send an SMS, MMS, or
e-mail message to the selected number or e-mail address.
- Save : allows you to save the number in your Phonebook.
- Delete : deletes the number.
- Delete all : allows you to delete all calls.
42 43
MENU FUNCTION
PHONE BOOK
MENU FUNCTION PHONE BOOK
RECEIVED CALLS
Displays information of the 20 most recently answered calls.
Places a call to a selected number by simply pressing .
³
Press [MENU] , , .
·
To view call details, press [View].
·
Press [Option] to view options.
PACKET COUNTER
Checks the log of all kilobyte data transmissions.
³
Press [MENU] , , .
Transmitted
To show the transmitted kilobyte usage on a user definable interval.
ቢ
Press [Option] to view options.
Rreceived
To show the received kilobyte usage on a user definable interval.
ቢ
Press [Option] to view options.
CALL COSTS
This network feature lets you view the cost of calls. This menu may not be available, depending on
your SIM card.
³
Press [MENU] , , .
CALL TIMER
This menu lets you view the time log for calls made and received.
³
Press [MENU] , , .
Press to change the mode "Dialled", "Missed" or "Received".
The actual time invoiced by your service provider may vary, depending
on network features, roundingoff for billing purposes, and so on.
••
Press the Options soft key to access the following options:
- Call : Dials the number.
- Video Call : Making a video call.
- Send message : allows you to send an SMS, MMS, or
e-mail message to the selected number or e-mail address.
- Save : allows you to save the number in your Phonebook.
- Delete : deletes the number.
- Delete all : allows you to delete all calls.
- Total cost : shows the total cost of all calls you have made since
the cost counter was last reset. If the total cost exceeds the
limit cost set in the Set limit cost option, you can no longer
make any calls until you reset the counter.
- Last call cost : shows the cost of the last call you made.
- Limit cost : shows the maximum cost set in the Set max cost
option.
- Dialed : Displays usage time of dialed call.
- received : Displays usage time of received call.
- Last Call : Displays usage time of last call.
••
Press the Options soft key to access the following options:
- RESET
- RESET All
••
Press the Options soft key to access the following options:
- Reset Call Cost
- Set Limit Cost
••
Press the Options soft key to access the following options:
- Reset
- Reset All
••
Press the Options soft key to access the following options:
- Reset
- Reset All
44 45
MENU FUNCTION
PHONE BOOK
MENU FUNCTION PHONE BOOK
H
GROUP
Allows you to classify phone entries into groups. Existing groups include family, friends, office, Etc.
and All.
CREATING A NEW CALLER GROUP
³
On the Group screen, press the [Options] soft key.
·
Select the Add group option and press the key.
»
Enter a name for your group and press the Down key.
For further details about how to enter characters, see page 32.
¿
Press the Down key to move to the Ringtone field.
´
Press the [Save] soft key. The new group is added to the Group list.
CREATING A NEW CALLER GROUP
After creating caller groups and adding members to the groups, the Group list shows the group
names and the numbers of members in each group.
H
SPEED DIAL
Calls can be placed to numbers stored in speed dial by pressing & holding the speed dial location
number on the key pad. To enable assign a phone number 2~20.
³
To assign a phone number to a location, select the location and press .
·
Enter the name you want to find, or scroll to a number using the Up or Down key.
»
Press the Select soft key.
When you select a key on the Speed dial screen, you can access the following options
by pressing the Options soft key:
SPEED DIALLING
To speed dial the numbers assigned to the 2 to 9 keys, press and hold the appropriate
key in Idle mode.
••
Press the browser soft key and select a ringtone.
••
Press the Options soft key to access the following options:
- View members : shows the list of the members in the group.
- Add group : allows you to add a new group.
- Edit group: allows you to change the properties of the currently
selected group, such as the name, image, and melody.
- Delete group: allows you to delete the currently selected
group. When you delete a group, the members in the
group are not deleted from Phonebook.
••
Press the Options soft key to access the following options:
- Change : allows you to assign a different number to the key.
This option shows for an occupied key.
- delete : allows you to delete the setting so that no number is
assigned to the key.
46 47
MENU FUNCTION
PHONE BOOK
MENU FUNCTION PHONE BOOK
H
VOICE DIAL
Voice Dial allows you to record a voice tag for a contact number so you can call that person by simply
saying the voice tag.
³
Press the Add soft key.
·
Enter the name you want to find, or scroll to a number using the Up or Down key.
»
Press the Select soft key.
¿
Instructions will be displayed "Please press Start, and speak after beep".
´
To play voice dial, press [Play].
H
MY NAME CARD
In this menu, you can create a name card for yourself. After creating a name card, you can send it to
other people via several different routes.
In this menu, you can create a name card for yourself.
After creating a name card, you can send it to other people via several different routes.
Create your name card as you would for saving a number in Phonebook.
For further details, see page 57.
H
OWN NUMBER
This function is a memory aid, which you can use to check your own phone numbers if you need to do
so.
You can:
• assign a name to each of your own phone numbers registered on your SIM card.
• delete the names and numbers.
Any changes made here do not in any way affect the actual subscriber numbers on your
SIM card.
H
SERVICE NUMBER
You can view the list of Service Dialling Numbers (SDN) assigned by your service provider.
These numbers include emergency numbers, directory enquiries, and voice mail numbers.
³
Scroll through the numbers by pressing the Up or Down key.
·
Press the Dial soft key to dial the number displayed.
H
MEMORY STATUS
You can check how many names are stored in Phonebook, in both the phone’s memory
and on the SIM card.
The display shows you the number of entries you have stored and the total number of
the entries you can store in the phone’s memory and on the SIM card.
••
Press the Options soft key to access the following options:
- Change : change voice dial
- Edit : retrain voice dial.
- Delete : delete a voice dial.
Press for a long time in idle status to activate voice dial.
You can call by speaking the name/word recorded for the
particular number you wish to call.
Speak after the “beep”. After saying words, pronounce them
exactly the same once more in order to record them. If you
pronounce differently from the first time, you need to start the
recording process again from the beginning.
This menu is available only when your SIM card supports Service Dialling
Numbers.
48 49
MENU FUNCTION
ORGANISER
MENU FUNCTION ORGANISER
³Select your desired alarm to configure in the alarm list.
If there is no alarm, press the [Create] key to add a new alarm.
·When you have completed configuration, press the [Save] key to save the
changed alarm configuration.
The alarm function allows you to set up multiple separate alarms. You can also
set the time, repetition interval and alarm sound.
H
ALARMS
- Set/Cancel alarm: On or Off the alarm using the navigation key.
- Input alarm time: Input your desired alarm time by specifying
hour and minute. If the time format is 12 hours-based format,
you have to select either ‘AM’ or ‘PM’ using the right soft key.
- Select repeat mode: Select desired repeat mode using the
navigation key.
- Select tone: Select the bell to use for the alarm using the right
soft key.
- Input memo: Input alarm name.
³Select your desired memo to configure in the alarm list.
If there is no memo, press the [Create] key to add a new memo.
·When you have completed configuration, press the [Save] key to save the
changed alarm configuration.
Your phone includes an internal memo pad that can be used to compose and
store reminders and notes.
CREATING A NEW CALLER GROUP
When you select the Monthly view menu, the calendar displays with today’s date
indicated by blue box. At the bottom of the calendar, the number of events
scheduled for that day displays. The following icons on the bottom of the screen
tell you what kind of events they are:
• Schedule
• Task
• Anniversary
• Memo
H
MEMO PAD
H
MONTHLY VIEW
- Input memo: Input alarm name.
³Select your desired alarm to configure in the alarm list.
If there is no alarm, press the [Create] key to add a new alarm.
·When you have completed configuration, press the [Save] key to save the
changed alarm configuration.
H
WAKE UP ALARM
- Set/Cancel alarm: On or Off the alarm using the navigation key.
- Input alarm time: Input your desired alarm time by specifying
hour and minute. If the time format is 12 hours-based format,
you have to select either ‘AM’ or ‘PM’ using the right soft key.
- Select repeat mode: Select desired repeat mode using the
navigation key and press the
key to "Mark" or "Unmark".
- Select Snoozing: Use the Navigation Key to select a Snooze
setting.
- Select tone: Select the bell to use for the alarm using the right
soft key.
50 51
MENU FUNCTION
ORGANISER
MENU FUNCTION ORGANISER
The following options are available when you press the Options soft key:
SCHEDULING A NEW EVENT
You can schedule up to 400 events for the calendar. More than one event per
day can be scheduled.
Entering a new schedule event
ቢAfter selecting a day on the calendar, press the Option soft key.
ባSelect the Create new option and press the Select soft key.
ቤSelect Schedule press the Select soft key.
ብScroll through the entry fields by pressing the Up or Down key.
Enter the information you want or select the settings you want.
ቦWhen you finish entering the event, press the Save soft key.
Entering a New task event
ቢAfter selecting a day on the calendar, press the Options soft key.
ባSelect the Create new option and press the Select soft key.
ቤSelect task press the Select soft key.
ብScroll through the entry fields by pressing the Up or Down key.
Enter the information you want or select the settings you want.
ቦWhen you finish entering the task, press the Save soft key.
Entering a new anniversary event
ቢAfter selecting a day on the calendar, press the Options soft key.
ባSelect the Create new option and press the Select soft key.
ቤSelect anniversary press the Select soft key.
ብScroll through the entry fields by pressing the Up or Down key.
Enter the information you want or select the settings you want.
ቦWhen you finish entering the anniversary, press the Save soft key.
- Create: allows you to add a new event, task, anniversary, or memo.
- Today's event: view a today's list.
- Event list: go to event list.
- Go to today: allows you to go to the current date.
- Go to date: allows you to go to a specific date.
- Subject: enter the title of the event.
- Details: enter the event details.
- Start date: enter the starting date.
- End date: enter the ending date of the event.
- Location: enter information about the event location.
This option is only available for Schedule.
- Alarm: press the
navigation
key to set a "On time", "10min befor",
"30 men befor", "1hour befor" or "no alarm".
- Aler tone: select an alarm tone.
- Priority: select a priority level, High, Normal, or Low.
- Task: enter information about the task.
- Start date: enter the starting date.
- Due date: enter the ending date.
- Priority: select a priority level, High, Normal, or Low.
- Occasion: enter information about the occasion.
- Date: enter the date.
- Time: enter the time when the alarm sounds.
- Alarm: set when the alarm will alert you before the day arrives;
On Time/1Day Before/1Week Before/No Alarm
- Alarm tone: select an alarm tone.
- Repeat every year: press the key to remind you every year.
- Priority: select a priority level, High, Normal, or Low.
52 53
MENU FUNCTION
ORGANISER
MENU FUNCTION ORGANISER
Entering a Memo
ቢAfter selecting a day on the calendar, press the Options soft key.
ባSelect the Create new option and press the Select soft key.
ቤSelect Memo press the Select soft key.
ብScroll through the entry fields by pressing the Up or Down key.
Enter the information you want or select the settings you want.
ቦWhen you finish entering the Memo, press the Save soft key.
- Memo: enter the memo.
- Date: enter the date.
- Priority: select a priority level, High, Normal, or Low.
This menu allows you to schedule new events for the current day.
Events scheduled for future dates automatically appear on your Day’s
event display for that particular day.
The following icons tell you what kind of events they are:
• Schedule
• Task
• Anniversary
• Memo
If more than one event is stored and press the key to view the
event.
H
TODAY'S EVENT
••
Press the Options soft key to access the following options:
- Create new: allows you to add a schedule, task, anniversary, or
memo.
- Monthly view: switches to the calendar screen.
- Event list: select event list.
- Delete: allows you to delete the selected event.
- Delete all: allows you to delete all of the events stored on that
date.
In this menu, you can view a list of the schedule events.
If more than one event is stored, scroll to an event using the Up or
Down key and press the key to view the event.
H
EVENT LIST
³ Scroll through the entry fields by pressing the Up or Down key.
Enter the information you want or select the settings you want.
· When you finish entering the information, press the Search soft key.
H
SEARCH
••
Press the Options soft key to access the following options:
- Create new: allows you to add a schedule, task, anniversary, or
memo.
- Monthly view: switches to the calendar screen.
- Delete: allows you to delete the selected event.
- Delete all: allows you to delete all of the events stored on that
date.
Whenever press , enables you to search for schedule, task,
anniversary and memo.
- From: enter the date.
- To: enter the date.
- Search in: All/Schedule/Task/Anniversary/Memo
- Keyword: enter the keyword.
54 55
MENU FUNCTION
TOOLS
MENU FUNCTION ORGANISER
You can check the total amount of memory for the calendar, the number of events you
have created and the total number of events you can store. You can view how
many events are currently stored in each type. Press the Up or Down key to scroll through
the screen.
H
MEMORY STATUS
Voice recorder allows you to record a reminder message that can be.
To record a recorder:
RECORDING A VOICE RECORDER
³ To record a voice memo, press . Instructions will be displayed and you will hear
“Please record at the tone”.
· When you have finished, press [STOP].
PLAYING A VOICE RECORDER
³ To playing a voice memo, press .
H
ANSWERING MACHINE
A unique feature of Pantech mobile is the answering machin function, which allows a user to
record up to message. the user can also overhear the recording and can choose to accept or
reject the call
MESSAGE BOX
³Press [MENU] , , .
H
VOICE RECORDER
••
Press the Options soft key to access the following options:
- My voice records: shows you the list of the voice memos
you have recorded.
- Recording settings: enter default filename.
56 57
MENU FUNCTION
TOOLS
MENU FUNCTION TOOLS
ACTIVITY
³Press [MENU] , , .
·Select “On” or “Off” and press [Save].
GREETING RECORDER
³Press [MENU] , , .
This feature allows you to record a message of your choice that will be played on
the answering machine.
To record a response message, press button to start recording, and then
speak the message clearly into the mouth piece/microphone. The maximum
recording time is 30 seconds. Once the message (the user defined message) is
recorded, it become automatically selected as the response message.
H
CALCULATOR
To access the calculator:
³Follow the instructions below to calculate 8*6/4-2.5=9.5
·To reset, press [RESET].
H
WORLD CLOCK
This menu allows you to find out what time it is in another part of the world and apply Daylight
Savings Time, the summer time adjustment used in many countries.
The screen shows the selected city name, and current time and date.
³Select a city.
·The world map appears with the city, its date and time.
H
STOP WATCH
Simultaneously times up to six different events. To operate the stop watch:
³To measure a time period.
ቢTo start the stop watch, press [START].
ባTo pause it, press [STOP].
ቤTo resume it, press [START].
To reset it, press [RESET].
·To time up to 99 events at once:
ቢTo start the stop watch, press [START].
ባPress [SPLIT].
Input 8.
Move the Navigation Key to the right.
Input 6 and press the Navigation Key to the left.
Input 4 and press the Navigation Key down.
Input 2 and press the to input (.).
Press 5.
Then press and you will see the answer.
: x, :
-, : /, : +, : ., : RESET, : =.
As the daylight saving time is not applied, it may be different from the
actual time during DST.
- Use the Navigation Key to select another city.
58 59
MENU FUNCTION
TOOLS
MENU FUNCTION TOOLS
H
CONVERTER
This function converts any measurement into a unit you want.
There are 6 types of units that can be converted:
Currency, Length, Area, Volume, Weight, and Temperature.
³After moving down by using the key, select a unit to calculate by using the
or key.
Input value to calculate by using key pad.
Use the key to input a decimal point.
·Select the calculation unit by using the or key.
Whenever inputting values or changing units, the converter outputs the results.
H
JAVA
This Handset supports JavaTM so that you can download games and other applications from 3
Services, and run them on your handset.
APPLICATIONS
³Press [MENU] , , .
This menu is used to locate and run downloaded applications, e.g. games. Select
Download to view the list of applications that have been downloaded to the
handset.
DOWNLOADS
³Press [MENU] , , .
When you access the Downloads menu, the list of default games appears.
Once you have downloaded games, they are added to the list.
PROFILE
This menu is used to configure the Java Internet portal site to connect to in order to
download applications.
If this menu is selected, the list of currently saved Java Internet portal sites and the
currently configured item is displayed.
The first Settings screen: Shows the item list if there are saved items.
³Press [MENU] , , .
·Select an item using the up or down navigation keys.
»Press the key to activate the selected item service.
¿Press the option key to display the popup menu.
Select [Edit] from the popup menu to edit the contents of the selected item.
MEMORY STATUS
In this menu, you can view the total and used memory amounts for Java games.
³Press [MENU] , , .
••
Press the Options soft key to access the following options:
- Select
- View
- Copy
- Reset
60 61
MENU FUNCTION
WAP
MENU FUNCTION TOOLS
H
SYNC ML
Allows you to transfer data when your phone is connected to a PC.
H
LOAD HOMEPAGE
Selecting this menu connects the phone to the network and loads the homepage of the Wireless
Web service provider. The contents of the Browser startup homepage depends on your Wireless
Web service provider. To scroll through the screen, use the Up or Down key.
H
BOOKMARKS
This function allows you to store and edit frequently accessed sites.
This menu allow you to show the list of stored bookmarks, and manage each
bookmark. If you want to connect a bookmark in the list, select a bookmark using
the Up or Down key and press the left soft key.
H
ENTER ADDRESS
This function allows you to enter the address that you want to connect directly and show the list
of address entered before.
If you select the address entered before, focus on address using Up and Down key and press the
left soft key.
••
Press the Menu soft key to access the following options.
- Open : connect the selected bookmark.
- Edit : allow to edit title or address of the selected bookmark.
- New bookmark : add new bookmark.
- Send link in.. : allow to send URL of bookmark by E-mail, MMS,
SMS message.
- Delete : delete the selected bookmark.
- Delete all : delete all bookmarks.
••
Press the Menu soft key to access the following options.
- view: view a profile.
- Creat: Sync set name/Sync items/User ID/Password/Server URI/
Server port/Database URI/Sync type/Authority type/Network setting
- Edit: edit a Sync.
- Delete
- Delete all
- History
••
Press the Menu soft key to access the following options.
- Save bookmark : save the address to bookmark.
- Send URL : send URL by E-mail, MMS, SMS message.
- Open : connect to the selected address.
- Edit : edit the selected address.
- Delete : delete the selected address.
- Delete all : delete all addresses.
62 63
MENU FUNCTION WAP
H
HISTORY
This function allows you to show the history of visited site.
H
SETTINGS
This function allows you to configure profile setting, browser options, memory operations,
security certification.
PROFILES
This menu allow you to show the list of stored profile settings for browsing, and
manage each profile setting.
If you want to use a profile in the list, select a profile using the Up or Down key and
press the left soft key.
••
Press the Details soft key to access the following options.
- show the detail information for the selected address.
••
Press the Option soft key to access the following options.
- Create : Create a new profile.
- Edit : modify the selected profile's setting.
- Delete : delete the selected profile.
••
Press the Option soft key to access the following options.
- Open : open the selected page
- Delete : delete the selected page
••
Press the Select soft key on the Create/Edit Option Menu.
- Profile Name: set the name of the profile.
- Home URL : set the homepage URL
- Connection Type : select network connection
- Proxy setting : set the proxy setting with the following submenu,
if browsing connection requires proxy.
i) IP Address : set the Proxy (or Gateway) IP address
ii) Port :set the Proxy (or Gateway) port number
iii) Login ID : set the login ID of proxy server
iv) Password : set the password of proxy
••
Press the Menu soft key to access the following options.
- Go : connect the selected address.
- Send URL : send URL by E-mail, MMS, SMS message.
- Delete : delete the selected address.
- Delete All : delete all address.
MENU FUNCTION
WAP
BROWSER OPTIONS
This menu allow you to set browser options.
- Enable CSS : allow to set the enable/disable CSS functionality during browsing.
- Fit to Screen : allow to set fitting to screen or not during browsing.
- Show Images : allow to set showing images or not during browsing.
- Show Movies : allow to set showing movies or not during browsing.
- Play Sounds : allow to set playing sound or not during browsing.
- Cookies : allow to set using cookies or not during browsing.
MEMORY OPERATIONS
This menu allow you to do memory operations.
- Clear Cache : delete the information related to the web-pages you previously
visited.
- Clear Cookies : delete the cookies stored in the memory.
- Clear History : delete the history related to the web-pages you previously visited.
SECURITY
This menu allow you to do security operations.
- Certificates : show the list of certificate.
- Change Auth. Pin : change the authentication pin code.
- Change SignText Pin : change the SignText pin code.
- Session Info : show the session information in security connection.
- Current Certificate : show the current certificate if use it.
- Contracts : show the stored contracts.
H
STORAGE
This function allows you to show list of locally stored web pages.
64 65
MENU FUNCTION
MESSAGE
Using the Messages menu, you can use various message formats, such as:
• Text messages
• Multimedia messages
• E-mail messages
• WAP push messages
• Voice mail
• Cell broadcast messages
H
WHEN A NEW MESSAGE ARRIVES
TEXT, PICTURE, VIDEO MESSAGE
³The following display appears when a new message arrives.
³To display the message, press [READ].
VOICE MAIL
Displays the number of voice mails and accesses them by pressing .
H
NEW TEXT MESSAGE
To send a new message:
³Input a new text message.
·Press [Done].
••
Press the Options soft key to access the following options:
- Text style: allows you to format the style of the text.
- Text copy
- Text cut
- Add media item: allows you to add a picture, animated image, or
melody to the message. Select the category of the content to be
added. In each category, you can select from the various
factoryset items or choose an item received from other sources,
such as the Internet or other phones.
- Add template: allows you to apply one of the preset message
templates to the text.
- Add phonenumber
- Save to drafts
MENU FUNCTION WAP
ON-LINE MENU
You can use these menus while you are in online.
Homepage
Returns to the initial homepage.
Forward
Moves to the next page.
Refresh
Refresh the current page.
Enter address
Enter URL for browsing.
Send Address
Send URL of current page.
Object mode
Save function will be provided to select an object such as image.
Bookmark
This function allows you to store and edit frequently accessed sites.
History
This function allows you to show the history of visited site.
66 67
MESSAGE MENU FUNCTIONMENU FUNCTION MESSAGE
»Enter the phone number.
¿To send the text message, select [Send].
H
NEW MULTIMEDIA MESSAGE
Multimedia Message Service (MMS) is a service providing delivery of personal multimedia
messages from phone to phone or from phone to e-mail. In addition to the familiar text
content, multimedia messages can contain images, video clips, audio clips, and combinations of
these things. Images could include downloads and photos you have taken, while audio clips
could be downloads or could be recorded sounds or voice memos.
Using MMS, your phone can send and receive these multimedia messages.
This function is available only if it is supported by your service provider.
Only phones that offer multimedia messaging features can receive and display multimedia
messages.
³Select "Add picture".
¿Press the Down key to move to the Add text.
´Enter a text
²Press the Down key to move to the Add sound.
¶Press the Down key to move to the Add video.
ºWhen you have finished creating the message, press the Select soft key.
ºWhen you are finished, choose the Send option and press the Select soft key.
••
Press the Options soft key to access the following options:
- Search: Allows the user to search the phone number which is
stored in the phone book.
- Group search: Allows to select all the phone numbers in a
group.
- Recent calls: Allows the user to search the phone number in a
recent calls.
- Save to drafts
••
Press the Options soft key to access the following options:
- Add video: allows you to add a video clip. You can record a new
video clip or select one of the video clips you have recorded or
downloaded from the Wireless Web.
- Page timing: allows you to set how long a page displays on the
message presentation screen. After a specified time, the display
automatically scrolls to the next page.
- Background color: select background color.
- Back: returns to the message screen.
- Insert new page: allows you to add more pages. You can move to
each page by pressing the Left or Right key on the message
screen.
- Send: allows you to send the message.
Add recipient : allows you to retrieve a number or an e-mail
address from Phonebook.
To: enter a receiver's phone number.
Cc: enter a phone number or e-mail address.
Subject : enter a message title.
- Save: allows you to save the message in the Draft.
- Save as template: allows you to save the message in the template.
- Preview: shows the message you created.
- Page timing: allows you to set how long a page displays on the
message presentation screen. After a specified time, the display
automatically scrolls to the next page.
- Background color: select background color.
- Back: returns to the message screen.
••
Press the Options soft key to access the following options:
- Add picture : allows you to add a photo or downloaded image.
You can take a new photo, or select one of the photos you have taken,
or select images downloaded from the Wireless Web.
- Page timing: allows you to set how long a page displays on the message
presentation screen. After a specified time, the display automatically
scrolls to the next page.
- Background color: select background color.
- Back: returns to the message screen.
••
Press the Options soft key to access the following options:
- Add sound: allows you to select a sound downloaded from the
Wireless Web.
- Page timing: allows you to set how long a page displays on the
message presentation screen. After a specified time, the display
automatically scrolls to the next page.
- Background color: select background color.
- Back: returns to the message screen.
69
68
MENU FUNCTION MESSAGE MENU FUNCTION
MESSAGE
H
INBOX
When a new multimedia message comes in, the display shows the MMS icon. A list of
multimedia messages you have received displays with the senders' names, if they are available in
Phonebook, or subjects. The icons on the left tell you the status of the messages:
• : MMS notifications that you have read.
• : MMS notifications that you have not read.
• : Messages that you have read.
• : Messages that you have not read.
• : Messages that you are retrieving from the server.
³Select a message from the list and press the key to read the message
contents.
·Press the Up or Down key to scroll through the contents.
»Press the Left or Right key to scroll to the call or option.
H
DRAFTS
³You can view saved messages. Select a message and then press the key to
view the message.
·You can use the following functions by using the left soft key [Options].
H
OUTBOX
³You can view saved messages. Select a message and then press the key to
view the message.
·You can use the following functions by using the left soft key [Options].
••
Press the Options soft key to access the following options:
- Edit: You can edit a selected message.
- Send: You can send a selected message.
- Delete: deletes the message.
- Delete all: You can delete all messages.
- Forward: allows you to forward the message to another person.
- Delete: deletes the message.
- Delete all: You can delete all messages.
••
Press the Options soft key to access the following options:
- Reply: allows you to send a reply to the sender.
- Forward: allows you to forward the message to another person.
- Sort: Sorts message.
- Delete: deletes the message.
- Delete all: allows you to delete all of the messages stored in the
Inbox.
70 71
MENU FUNCTION
MESSAGE
MENU FUNCTION MESSAGE
H
EMAIL
This menu allows you to edit, delete and add an Email account.
To set up an Email account, do the follows.
CREATE NEW E-MAIL
³Press [MENU] , , .
·Enter the subject of your e-mail.
On the Subject screen, press the Options soft key to access the following options:
»Press the Down key to move to the Message field.
¿Enter the e-mail text.
´Press the Down key to move to the File attachments field.
You can attach files of various types from the Images, Videos, Music, and Sounds
folders.
After attaching a file, the display returns to the message screen.
²If you want to change added items, press the Up or Down key to highlight a field
or an attached file and press the Options soft key.
²When you have finished creating the e-mail, choose the done and press
the Select soft key.
¶Enter an e-mail address.
You can access the following options by pressing the
Options soft key while entering an address:
INBOX
This menu allows you to check the e-mail server for new e-mails and review the e-mail messages
you have received.
³Press [MENU] , , .
·Select a message from the list and press the key to read the message
contents.
»Press the Up or Down key to scroll through the contents.
¿Press the Left or Right key to scroll to the call or option.
DRAFTS
After creating an e-mail, you can store it in this message box to be sent at a later time.
When you send an e-mail stored in this message box, the e-mail is deleted from this message
box.
³Press [MENU] , , .
·You can view saved messages. Select a message and then press the key to
view the message.
- Attach: allows you to add subjects, e-mail text, and media files.
Add picture/Add sound/Add video/Add application/Add text
- Save to drafts
- Search
- Group search
- Save to drafts
- Add phone number
- Save to drafts
••
Press the Options soft key to access the following options:
- Reply: allows you to send a reply to the sender.
- Forward: allows you to forward the message to another person.
- Sort: Sorts message.
- Delete: deletes the message.
- Delete all: allows you to delete all of the messages stored in the
Inbox.
••
Press the Options soft key to access the following options:
- Edit: You can edit a selected message.
- Send: You can send a selected message.
- Delete: deletes the message.
- Delete all: You can delete all messages.
72 73
MENU FUNCTION MESSAGE MENU FUNCTION
MESSAGE
Blocking subject
1. Press [MENU] , , , , .
2. Enter a subject.
3. If you want to add more subject, press the Down key.
3. If necessary, repeat step 1 and 2 to add more subject.
You can enter up to 7 subject.
4. Press the to save it.
Blocking from address
Using this menu, you can set up a message filter by entering e-mail addresses so that the
phone rejects message from those e-mail addresses.
1. Press [MENU] , , , , .
2. Enter an e-mail address.
3. If you want to add more e-mail addresses, press the Down key.
3. If necessary, repeat step 1 and 2 to add more e-mail addresses.
You can enter up to 7 e-mail addresses.
4. Press the to save it.
H
INSTANT MESSENGER
MY SETTINGS
³Press [MENU] , , .
My presence
ቢPress [MENU] , , , .
ባUse left and right navigation key to select a my presence.
ቤUse left and right navigation key to select a mood.
ብEnter a presence text.
OUTBOX
When you select this menu, the list of the e-mail messages you have sent or tried to send
displays, along with the subject and the recipient’s e-mail address.
³Press [MENU] , , .
·You can view saved messages. Select a message and then press the key to
view the message.
E-MAIL SETTINGS
You can change the default settings for email.
³Press [MENU] , , .
Email accounts
ቢPress [MENU] , , , .
Blocking settings
ቢPress [MENU] , , , .
Blocking
1. Press [MENU] , , , , .
2. select "Off" or "On".
- Forward: allows you to forward the message to another person.
- Delete: deletes the message.
- Delete all: You can delete all messages.
When an e-mail is being sent or retrieved from the e-mail server,
you are unable to change the e-mail account settings.
••
Press the Options soft key to access the following options:
- Creat: you can configure up to 4 e-mail accounts using different
e-mail servers.
- Edit: edit a setting
- DELETE: delete a accounts
My presence: Not available/Discreet/Available
Mood: Happy/Sad/Angry/Ashamed/Excited/Loving/Jealous/Sleepy
74 75
MENU FUNCTION MESSAGE MENU FUNCTION
MESSAGE
My buddy details
ቢPress [MENU] , , , .
ባEnter a nickname.
ቤPress the Down key to move to the City field.
ብInput city name.
ቦPress the Down key to move to the Country field.
ቧInput country name.
ቨPress the Down key to move to the Memo field.
ቩEnter a memo.
ቪPress to save it.
Auto login
ቢPress [MENU] , , , .
ባSelect "On", "Off" or "Boot login" and press to save it.
H
TEMPLATES
Using this menu, you can preset a maximum of 11 messages that you use most frequently.
³On the message template list, press the Options soft key to access the following
options:
H
MMBOX
DELETE ALL
³Press [MENU] , , .
Delete locally
ቢPress [MENU] , , , .
ባWhen you select, “Delete all items in this folder?” appears on the screen.
ቤPress [Ok] to delete it.
Delete from server
ቢPress [MENU] , , , .
ባWhen you select, “Delete all items in this folder?” appears on the screen.
ቤPress [Ok] to delete it.
••
Press the Options soft key to access the following options:
- Create new
- Delete: allows you to delete the message template.
- Delete all: allows you to delete the all message template.
77
76
MENU FUNCTION MESSAGE MENU FUNCTION
MESSAGE
Delete locally and from server
ቢPress [MENU] , , , .
ባWhen you select, “Delete all items in this folder?” appears on the screen.
ቤPress [Ok] to delete it.
SORT
³Press [MENU] , , .
H
SETTINGS
In this menu, you can set up default message information. A setting group is a collection of
settings required to send messages.
SMS SETTINGS
³Press [MENU] , , .
Sending Setting
ቢPress [MENU] , , , .
SMS Setting
ቢPress [MENU] , , , .
ባselect the Edit key.
- Network selection: GSM Only/GPRS Prefered
- Delivery report: allows you to activate or deactivate the report
function. When this function is activated, the network informs
you whether or not your message has been delivered.
••
Press the Edit soft key to access the following options:
- Center address : enter the address.
- Validity period : Allows you to set the length of time for which
your text messages will be stored at the Text msge center
while attempts are made to deliver them to the recipient.
- Default type: The default message type should be Text.
78 79
MENU FUNCTION
MESSAGE
MENU FUNCTION MESSAGE
RECIEVE/DIS
ቢPress [MENU] , , , .
ባYou can select the Auto. retrieve using the left or right navigation key.
ቤPress the Down key to move to the Reject anonymous message field.
ብYou can select the Reject anonymous message using the left or right
navigation key.
ቦPress the Down key to move to the Auto. reply on delivery field.
ቧYou can select the Auto. reply on delivery using the left or right
navigation key.
ቦPress the Down key to move to the Auto. display images field.
ቧYou can select the Auto. display images using the left or right
navigation key.
VOICE MAIL
³Press [MENU] , , .
·Enter the center address.
»Press [Save].
MMS SETTINGS
³Press [MENU] , , .
Profile
ቢPress [MENU] , , , .
ባSelect one of the following items and press ok key to save it
SEND/CREATE
ቢPress [MENU] , , , .
ባYou can select the Expiry time using the left or right navigation key.
ቤPress the Down key to move to the Delivery report field.
ብYou can select the Delivery report using the left or right navigation key.
ቦPress the Down key to move to the Read report field.
ቧYou can select the Read report using the left or right navigation key.
Expiry time : 1day/12hours/1hour/Off/1week
Auto. retrieve : Retrieve/Defer/Always ask
Reject anonymous message
: On/Off
Auto. reply on delivery
: On/Off
Auto. display images
: On/Off
Delivery report : On/Off
Read report : On/Off
••
Press the Option soft key to access the following options:
- Select
- View
- Copy
- Reset
80 81
MENU FUNCTION MESSAGE MESSAGE
CB SETTING
³Press [MENU] , , .
Receive CBS
ቢPress [MENU] , , , .
ባSelect "Yes" or "No".
ቤPress to save it.
Channels
ቢPress [MENU] , , , .
Channel list
1. Press [MENU] , , , , .
2. View a channel list.
Select channel
1. Press [MENU] , , , , .
2. Select a channel list.
PUSH SETTING
Allows you to set whether or not your phone receives push messages.
³Press [MENU] , , .
·You can select the Push security using the left or right navigation key.
»Press the Down key to move to the Push SL on/off field.
¿You can select the Push SL on/off using the left or right navigation key.
´Press the Down key to move to the Load push SL messages field.
²You can select the Load push SL messages using the left or right
navigation key.
¶Press the Down key to move to the Push whitelist images field.
ºYou can select the Push whitelist using the left or right navigation key.
H
DELETE ALL
³You are to select one of the following options and press to delete messages.
H
MEMORY STATUS
In this menu, you can view the memory status for text, multimedia, e-mail, or push
messages.
MENU FUNCTION
Push security
: Accept always/Never accept
Push SL on/off
:
SL On/SL Off
Load push SL messages
:
Always/Never
Push whitelist
:
Enable/Disable
Scroll
down
Delete
all
Scroll
down
Memory
Status
82 83
MENU FUNCTION PROFILE
H
PROFILE
You can configure Voice/Vibration ringtune, key tone, flip tone, sound effects,
switch on, switch off, and volume. The ringtune type supports MP3, .3gp, AAC,
MIDI, WAV and AMR.
Supported profiles are Normal, Silent, Vibration only, Car, Headset, Outdoor, User
profile 1, and User profile 2 profile. Select a desired profile, and press the key
to activate the profile. The Silent, Vibrate only, Car and Headset profile does not
provide an option menu. When the cursor is moved to a profile, the corresponding
menu appears on the soft bar. If you select View/Edit menu, you can view the
settings of the profile, or can edit settings of the profile.
Profiles menu have the submenus as shown below.
MEDIA GALLERY
H
IMAGE
This menu shows the list of photo and downloaded still images.
³Scroll through the photo and downloaded images to display the
image and press [Select].
H
MUSIC
This menu shows the list of downloaded MP3.
³Scroll through the downloaded MP3 and press [Play].
MENU FUNCTION
- Call alert type: This option determines the incoming call
notification mode. You can select from Ring, Vibration, Mute, Vib
and Melody.
- Voice call alert type: This option determines the Voice ringtune
for incoming call notification.
- Video call: This option determines the Video ringtune for
incoming call notification.
- Ringer volume: This option determines the ringtune volume for
incoming call notification.
- Message alert: This option determines the message alert that
sounds when a message has arrived.
- Message tone: This option determines the message tone that
sounds when a new message has arrived.
- Key tone: This option determines the key tone that is sounded
when a key is pressed.
- Key volume: This option determines the volume of the key tone.
- ETC. sounds: This option determines the volume of the key tone.
- Call answer mode: Automatic/Off
••
Press the option soft key to access the following options:
- Delete file : delet a file.
- Rename file : Rename a file.
- Slide show
- File properties : shows the properties of the file.
- View thumbnails : shows the thumbnails of the file.
- Lock
- Send as : allows you to send an E-Mail or MMS.
••
Press the option soft key to access the following options:
- My play list : view a play list.
- Send by : allows to access the following sending options:
MMS: allows you to send the photo to another person
as part of a multimedia message.
Email: allows you to send the photo to another person as part of
an e-mail.
- Set as ringtone: allows you to select a ring melody.
- Copy to : allows you to copy the file to another location,
either Download or Memory card.
- Move to : allows you to move the file to another location,
either Download or Memory card.
- Rename : Rename a file.
- Delete : allows you to delete the file.
- Delete all : allows you to delete all of the file.
85
84
MENU FUNCTION MEDIA GALLERY MEDIA GALLERY MENU FUNCTION
H
RINGTONE
This menu shows the list of downloaded Ringtones.
³Scroll through the downloaded ringtones and press [Play].
H
MY VOICE
This menu shows the list of saved voice memo.
³Scroll through the saved voice memo and press [Play].
H
VIDEO
This menu shows the list of video.
³Scroll through the downloaded ringtones and press [Play].
••
Press the option soft key to access the following options:
- My play list : view a play list.
- Send by : allows to access the following sending options:
MMS: allows you to send the photo to another person
as part of a multimedia message.
Email: allows you to send the photo to another person as part of
an e-mail.
- Set as ringtone: allows you to select a ring melody.
- Copy to : allows you to copy the file to another location,
either Download or Memory card.
- Move to : allows you to move the file to another location,
either Download or Memory card.
- Rename : Rename a file.
- Delete : allows you to delete the file.
- Delete all : allows you to delete all of the file.
••
Press the option soft key to access the following options:
- Delete file : allows you to delete the file.
- Rename file : Rename a file.
- File properties : shows the properties of the file.
- Lock
- Send as : allows to access the following sending options:
MMS: allows you to send the photo to another person
as part of a multimedia message.
••
Press the option soft key to access the following options:
- My play list : view a play list.
- Send by : allows to access the following sending options:
MMS: allows you to send the photo to another person
as part of a multimedia message.
Email: allows you to send the photo to another person as part of
an e-mail.
- Set as ringtone: allows you to select a ring melody.
- Copy to : allows you to copy the file to another location,
either Download or Memory card.
- Move to : allows you to move the file to another location,
either Download or Memory card.
- Rename : Rename a file.
- Delete : allows you to delete the file.
- Delete all : allows you to delete all of the file.
87
86
MENU FUNCTION MEDIA GALLERY MEDIA GALLERY MENU FUNCTION
H
ETC
H
EXTERNAL MEMORY
••
Press the option soft key to access the following options:
- Send by : allows to access the following sending options:
MMS: allows you to send the etc file to another person
as part of a multimedia message.
Email: allows you to send the etc file to another person as part
of an e-mail.
bluetooth: allows you to send the etc file to another person as
part of an bluetooth.
- Copy to : allows you to copy the file to another location,
either ETC or Memory card.
- Move to : allows you to move the file to another location,
either ETC or Memory card.
- Delete : allows you to delete the file.
- Lock
••
Press the option soft key to access the following options:
- Create folder
- Several
- Rename
- Activate key
- Key management
- Properties
88 89
MENU FUNCTION MULTIMEDIA
H
CAMERA
VIEW FINDER (TAKE A PHOTO)
³Press [MENU] , , .
·Access the View finder menu, or you can also press and hold the Camera key of
the phone in Idle mode.
The image to be captured appears on the display.
»Adjust the image by aiming the camera at the subject.
¿Press the key or the Camera key to take the photo.
The photo automatically saves in the My Photos folder (Menu 8.1.2).
Using the keypad in Capture mode
You can use the keypad to customise your camera settings when you are in
Capture mode.
Key Function
Left soft Capture
Right soft Option
OK Capture
Clear Back
Navigation Up Zoom in
Navigation Down Zoom out
Navigation Left Brightness (-)
Navigation Right Brightness (+)
Using camera options in Capture mode
In Capture mode, you can access various options by pressing the left soft key.
MY PHOTOS
³Press [MENU] , , .
In this menu, you can view the photos you have moved from the Photos folder to
this image box.
MULTIMEDIA MENU FUNCTION
••
Press the option soft key to access the following options:
- Capture option
1.Size:176x144 | 320x240 | 640x480 | 1024x768 | 1280 x 1024
2.Quality:High | Middle | Low
3.Brightness:Auto | Level -2 ~ +2
4.White balance:Auto | Day light | Tungsten | Fluorescent
5.Effect:Off | Sepia | Negative | B&W
6.Flash:On | Off | Auto | Lantern
7.Timer:Off | 5 sec. | 10 sec.
- Add frame : allows you to use a decorative frame. Select a
frame from the list using the Navigation keys.
- Camcorder mode
- My photos
- Settings
••
Press the option soft key to access the following options:
- Rename: allows you to change the name of the photo.
- Send by : allows to access the following sending options:
MMS: allows you to send the photo to another person
as part of a multimedia message.
Email: allows you to send the photo to another person as part of
an e-mail.
- Wallpaper
- Caller ID
- Properties :shows you the properties of the video clip, such as the
file name, the time and date it was saved, file format, resolution,
size, recording duration, quality, and protection status.
90 91
MENU FUNCTION MULTIMEDIA
H
CAMCORDER
When you access this menu, a list of the videos you have recorded displays.
VIEW FINDER
³Press [MENU] , , .
·You can access the following options while playing a camcorder:
The following buttons are available:
Key Function
Left soft Pause/Record
Right soft Stop
OK Pause/Record
Clear Cancel
Navigation Up Zoom in
Navigation Down Zoom out
Navigation Left Brightness (-)
Navigation Right Brightness (+)
MY VIDEO
³Press [MENU] , , .
In this menu, you can view the video clips you have moved from the Video clips
folder to this image box.
MULTIMEDIA MENU FUNCTION
••
Press the option soft key to access the following options:
- Recording option
1.Size:176x144 | 320x240 | 640x480 | 1024x768 | 1280 x 1024
2.Quality:High | Middle | Low
3.Brightness:Auto | Level -2 ~ +2
4.White balance:Auto | Day light | Tungsten | Fluorescent
5.Effect:Off | Sepia | Negative | B&W
6.Flash:On | Off | Auto | Lantern
7.Timer:Off | 5 sec. | 10 sec.
- Add frame : allows you to use a decorative frame. Select a
frame from the list using the Navigation keys.
- Camera mode
- My video
- Settings
••
Press the option soft key to access the following options:
- Play: plays the video clip.
- Rename: allows you to change the name of the video clip.
- Send by: allows you to access the following sending options:
MMS: allows you to send the photo to another person
as part of a multimedia message.
Email: allows you to send the photo to another person as part of
an e-mail.
- Properties :shows you the properties of the video clip, such as the
file name, the time and date it was saved, file format, resolution,
size, recording duration, quality, and protection status.
92 93
MENU FUNCTION MULTIMEDIA
H
MEDIA PLAYER
This application plays recorded video (.3gp or MPEG4 files). Select a desired video.
The following options are provided by the Media Player.
MEDIA PLAYER
³Press [MENU] , , .
Key Function
Right soft Option
OK Pause/play
Clear Cancel
Navigation Down Stop
Navigation Left Previous file
Navigation Right Next file
Navigation Up Full screen
VIDEO FOLDER
³Press [MENU] , , .
·Scroll to the folder you want and press the key.
MY PLAY LIST
³Press [MENU] , , .
·To play a video clip, scroll to the video clip you want and press the key.
SETTING
³Press [MENU] , , .
·You can select the Play mode, using the left or right navigation key.
»Press the Down key to move to the Volume field.
¿You can control the volume level, using the left or right navigation key.
´Press the Down key to move to the Incoming call field.
²You can select the Incoming call using the left or right navigation key.
MULTIMEDIA MENU FUNCTION
••
Press the option soft key to access the following options:
- My Play list: Shows a list of video files.
- Video folder
- Send by
- Properties
- Video
- ETC
- External memory
Play mode
: Once all/Repeat one/Repeat all/Random/Once one
Incoming call
: Connect all/Reject all
94 95
MENU FUNCTION MULTIMEDIA
H
MUSIC PLAYER
You can enjoy music using your phone as an MP3 player.
Before using the MP3 player, you first need to save MP3 music files in your
phone’s memory.
DOWNLOADING AND RECEIVING MP3 MUSIC FILES
You can download or receive music files using the following methods:
• from the Wireless Web.
• from a computer. You can download music files from your computer to the
phone through the EasyStudio programme.
• from received multimedia messages or e-mails.
• Via IrDA.
• Via Bluetooth. For further details about receiving data via Bluetooth.
The downloaded or received files are stored in the My Music folder.
PLAYER
³Press [MENU] , , .
Key Function
Left soft Repeat
OK Play / Pause
Navigation Up Skin
Navigation Down Stop
Navigation Left Previous file
Navigation Right Next file
MY MUSIC
³Press [MENU] , , .
MY PLAY LIST
³Press [MENU] , , .
SETTINGS
³Press [MENU] , , .
MEMORY STATUS
You can check the total amount of memory for MP3.
³Press [MENU] , , .
MULTIMEDIA MENU FUNCTION
••
Press the option soft key to access the following options:
- Create folder
- My play list
- Several
- Rename
- Activate key
- Key management
- Properties
••
Press the option soft key to access the following options:
- VIEW
- CREATE
- Edit
- Delete
- Delete all
- SKIN : Select a skin.
- Player : Play mode/Volume
- Sub Lcd : Select list/folder close option

96 97
MENU FUNCTION SETTINGS
H
SOUND SETTINGS
You can customise various sound settings.
RINGER
³Press [MENU] , , .
·Press the Down key to move to the Voice call field.
Press edit soft key and select a tone.
»Press the Down key to move to the Message tone field.
Using the left or right key, and select message tone.
¿Press the Down key to move to the Key tone field.
Using the left or right key, and select key tone.
´Press the Down key to move to the POWER ON/OFF field.
Press edit soft key and select a tone.
²Press the Down key to move to the Folder tone field.
Using the left or right key, and select folder tone.
RINGER TYPE
³Press [MENU] , , .
·Press the Down key to move to the Call alert type field.
Using the left or right key, and select alert type.
»Press the Down key to move to the Message alert field.
Using the left or right key, and select message alert.
VOLUME
³Press [MENU] , , .
·Press the Down key to move to the Ringer volume field.
Using the left or right key to select a volume level.
»Press the Down key to move to the Call volume field.
Using the left or right key to select a volume level.
¿Press the Down key to move to the Key volume field.
Using the left or right key to select a volume level.
ETC. SOUNDS
³Press [MENU] , , .
·Select one of the available sound and press mark key to save it.
SETTINGS MENU FUNCTION
99
98
MENU FUNCTION SETTINGS
H
DISPLAY SETTINGS
In this menu, you can change various settings for the display or the backlight.
GREETING MESSAGE
³Press [MENU] , , .
·Enter a greeting of your own and press to save it.
MAIN LCD
³Press [MENU] , , .
SUB LCD
³Press [MENU] , , .
MENU STLYE
³Press [MENU] , , .
³Using the left or right key, and select "grid" or "list".
LCD BRIGHTNESS
³Press [MENU] , , .
³Using the left or right key to select a LCD bright level.
BACKLIGHT
³Press [MENU] , , .
·Press the Down key to move to the LCD field.
Using the left or right key, and select backlight time.
»Press the Down key to move to the KEYPAD field.
Using the left or right key, and select backlight time.
H
PHONE SETTINGS
Many different features of your phone can be customised to suit your preferences.
SHORTCUTS
The Navigation keys can be used as shortcut keys. In Idle mode, they allow you to
access specific menus directly.
³Press [MENU] , , .
·Select the key to be used as a shortcut key by pressing the Navigation keys.
»Press the Edit soft key.
¿Using the up or down key, and select menu.
´Press the Save soft key.
SETTINGS MENU FUNCTION
- WALLPAPER : Select a wallpaper(My photos/Photos/Download)
- Display : Dual time/Calendar/Digital clock/Analog clock
- TEXT :
Enter a text.
- Clock : Digital clock/Analog clock
- Sub tilte :
Enter a text
- Wallpaper : Select a wallpaper(My photos/Photos/Download)
••
Press the option soft key to access the following options:
- Edit: Edit a shortcut menu.
- Delete : deactivates the shortcut key assignment to
the selected key.
- Delete all: deactivates all of the shortcut assignments.
101
100
MENU FUNCTION SETTINGS
RECEIVE TYPE
³Press [MENU] , , .
·Select one of the available receive type and press to save it.
LANGUAGE
³Press [MENU] , , .
·Press the Down key to move to the Screen text field.
Press Edit soft key and select a language.
»Press the Down key to move to the Input T9 field.
Press Edit soft key and select a language.
H
CALL SETTINGS
These menu functions access network services. Please contact your service provider
to check their availability and then subscribe to them, if you wish.
DIVERTING CALLS
This network service enables incoming calls to be
rerouted to a number that you specify.
³Press [MENU] , , .
BARRING CALLS
The call barring network service allows you to restrict your calls.
³Press [MENU] , , .
WAITING CALLS
This network service informs you when someone is trying to reach you during
another call.
You can specify individual call waiting options for voice calls and/or data calls.
³Press [MENU] , , .
ACCEPT CALLS
³Press [MENU] , , .
·Select one of the available Accept call and press to save it.
SETTINGS MENU FUNCTION
- Divert always: all calls are diverted.
- When Busy: calls are diverted when you are already on another
call.
- Not reachable: calls are diverted when you are not in an area
covered by your service provider or when your phone is switched
off.
- No reply: calls are diverted when you do not answer the phone.
- Deactivate all: all call diverting options are cancelled.
- Divert status: divert status.
- All outgoing: calls cannot be made.
- International: international calls cannot be made.
- International except to home: when abroad, calls can be made
only to numbers within the current country and to your home
country, which is the country where your home network provider
is located.
- All incoming: calls cannot be received.
- Incoming while abroad: calls cannot be received when you are
using your phone outside of your home country.
- Deactivate all: all call barring settings are deactivated; calls can
be made and received normally.
- Barring status
- Change password: you can set and change the call barring
password obtained from your service provider.
103
102
MENU FUNCTION SETTINGS
CALLER ID
You can prevent your phone number from being displayed on the phone of the
person being called.
³Press [MENU] , , .
·Select one of the available Caller ID and press to save it.
AUTO REDIAL
The menu enables you to configure the auto redial function when a call attempt has
failed.
³Press [MENU] , , .
·Select On or Off and press to save it.
VIDEO CALL SETTING
³Press [MENU] , , .
Display settings
ቢPress [MENU] , , , .
ባYou can select the Main display, using the left or right navigation key.
Camera settings
ቢPress [MENU] , , , .
ባYou can select the Camera setting, using the left or right navigation key.
Camera settings
ቢPress [MENU] , , , .
ባSelect "Earpiece" or "Speakerphone" and press to save it.
Retry call
ቢPress [MENU] , , , .
ባSelect "Video call", "Voice call"or "disconnect" and press to save it.
SETTINGS MENU FUNCTION
H
TIME & DATE
This menu allows you to change the current time and date displayed.
SET TIME & DATE
³Press [MENU] , , .
·Press the Down key to move to the Home time field.
Enter the time.
»Press the Down key to move to the Home date field.
Enter the date.
¿Press the Down key to move to the Summer time field.
Using the left or right key, and select "On" or "Off".
´Press the Down key to move to the Time zone field.
Using the left or right key, and select "On" or "Off".
²Press the Edit soft key.
¶Using the up or down key, and select menu.
ºPress the Save soft key.
FORMAT
³Press [MENU] , , .
·Press the Down key to move to the Home time field.
Using the left or right key, and select "12HR" or "24HR".
»Press the Down key to move to the Date format field.
¿Press the Save soft key.
Main display
: Partner main/My picture main/Partner only
105
104
MENU FUNCTION SETTINGS
H
NETWORK
This menu allows you to change the current time and date displayed.
NETWORK SELECTION
The Network Selection feature enables you to automatically or manually select the
network used when roaming outside of your home area.
³Press [MENU] , , .
·Using the Up or Down key, and select "Automatic" or "Manual".
NETWORK MODE
³Press [MENU] , , .
·Using the Up or Down key, and select "Automatic", "GSM" or "UMTS".
DATA STATS
³Press [MENU] , , .
·Using the Up or Down key, and select "Profile".
H
BLUETOOTH
Bluetooth technology enables cost-free wireless connections between electronic
devices within a maximum range of 10 meters. A Bluetooth connection can be
used to send photos, images, videos, phonebook, scheduled items, and to connect
wirelessly to devices using Bluetooth technology, such as computers.
Since Bluetooth devices communicate using radio waves, your phone and the
other Bluetooth device do not need to be in line of sight to each other.
The 2 devices only need to be within a maximum of 10 meters of each other,
although the connection can be subjected to interference from obstructions, such
as walls or other electronic devices. In some countries, there may be restrictions on
using Bluetooth devices.
Please contact your service provider.
SETTINGS MENU FUNCTION
DEVICE SEARCH
In order to search, basically 9/7/3/1 activation should be enabled.
You should do the pairing in order to use the searched device.
³Press [MENU] , , .
·If you select the device to use followed by a pair, a password input window
appears.
»If you select the device to use followed by a pair, a password input window
appears.
MY DEVICES
³Press [MENU] , , .
·Press the Select soft key when Search new device highlights.
If you have searched for devices before, the phone displays the More devices
option along with the devices you have searched for previously. To search
for new devices, select the More devices option and press the Select soft key.
If you want to stop searching, press the Stop soft key.
»Scroll to a device and press the Select soft key to connect to the device to be
paired.
¿Enter the PIN code and press the OK soft key.
When pairing with headset and hands free for Bluetooth, the
pairing is completed by inputting the number which is already set
up in each device (as suggested in the product manual). When
pairing with laptop, phone, PDA, etc., enter any 4 digit number
that the user desires. Then, a password input window pops up in
the user’s device. The pairing is successful only if you press the
identical number as the 4 digit number you have already inputted.
The device with the pairing is stored in 9/7/2 My devices to be
continuously used.
107
106
MENU FUNCTION SETTINGS
SETTINGS
³Press [MENU] , , .
- Activation: Activate/deactivate Bluetooth.
- Visibility: Shows whether the other party can ‘see’ your phone.
If it is “on”, the other party can find your phone, but if it is “off”,
the other party cannot find your phone.
If Bluetooth is off, visibility is automatically turned off.
- Security: Set up your phone’s Bluetooth related security (for
sending and receiving files).
- Accept without pairing: Allow the connection with all the
devices.
- Accept only pairing: Allow the connection only with the device
paired with your phone.
- Not accept: Prohibit the connection with all the devices.
SETTINGS MENU FUNCTION
H
SECURITY
The Security feature enables you to restrict the use of your phone by others and to
restrict the types of calls made.
Various codes and passwords are used to protect the features of your phone. They
are described in the following sections.
PHONELOCK
Phonelock
When the Phone Lock feature is enabled, the phone is locked and you must enter
a 4- to 8-digit phone password each time the phone is switched on.
The password is preset to “0000” at the factory. To change the phone password,
see the Change password menu.
ቢPress [MENU] , , , .
Change password
ቢPress [MENU] , , , .
The Change Password feature allows you to change your current phone
password to a new one. You must enter the current password before you can
specify a new one.
The password is preset to “0000” at the factory.
Once you have entered a new password, you are asked to confirm it by
entering it again.
- LOCK: You are required to enter the phone password when you
switch on the phone.
- UNLOCK: You are not asked to enter the phone password
when you switch on the phone.
109
108
MENU FUNCTION SETTINGS
PIN
PIN lock
When the PIN lock feature is enabled, you must enter your PIN each time you
switch on the phone.
Consequently, any person who does not have your PIN cannot use your phone
without your approval.
ቢPress [MENU] , , , .
Change PIN
ቢPress [MENU] , , , .
This feature allows you to change your current PIN to a new one, provided that
the PIN Check feature is enabled.
You must enter the current PIN before you can specify a new one.
Once you have entered a new PIN, you are asked to confirm it by entering it
again.
CHANGE PIN2
³Press [MENU] , , .
The Change PIN2 feature allows you to change your current PIN2 to a new one. You must
enter the current PIN2 before you can specify a new one.
Once you have entered a new PIN2, you are asked to confirm it by entering it again.
SETTINGS MENU FUNCTION
- LOCK: You are required to enter the phone password when you
switch on the phone.
- UNLOCK: You are not asked to enter the phone password
when you switch on the phone.
FDN
³Press [MENU] , , .
FDN (Fixed Dial Number) mode, if supported by your SIM card, allows you to restrict your
outgoing calls to a limited set of phone numbers.
PRIVACY LOCK
³Press [MENU] , , .
Using this menu, you can lock your media contents, such as multimedia messages, e-mails,
images, videos, music files, and sounds. Once you have locked the contents, you must enter
the phone’s password to access the associated menus.
H
MASTER RESET
Using this menu, you can reset the Phone settings, Display settings, and Sound
settings menus individually. You can also reset all the settings in your
phone at one time.
³Enter the 4- to 8-digit phone password and press the OK soft key.
- Enable: you can only call phone numbers stored in Phonebook.
You must enter your PIN2.
- Disable: you can call any number.
110
MEMO
CHAPTER 5 APPENDIX
Health and Safety Information
Troubleshooting
CHAPTER 5
Appendix

112 113
■
SAR CERTIFICATION INFORMATION
This phone meets European Union (EU) requirements concerning exposure
to radio waves.
Your mobile phone is a radio transmitter and receiver. It is designed and
manufactured so as not to exceed the limits for exposure to radio-
frequency (RF) energy, as recommended by the EU Council. These limits are
part of comprehensive guidelines and establish permitted levels of RF
energy for the general population. The guidelines were developed by
independent scientific organisations
through the periodic and thorough evaluation of scientific studies.
The limits include a substantial safety margin designed to ensure the safety
of all persons, regardless of age and health.
The exposure standard for mobile phones employs a unit of measurement
known as SAR (Specific Absorption Rate). The SAR limit recommended by
the EU Council is 2.0W/kg.*
SAR tests are conducted using standard operating positions with the
phone transmitting at its highest certified power level in all tested
frequency bands.
Although the SAR is determined at the highest certified power level, the
actual SAR level of the phone while operating can be well below the
maximum value. This is because the phone is designed to operate at
multiple power levels so as to use only the power required to reach the
network. In general, the closer you are to a base station, the lower the
power output of the phone.
Before a new model phone is available for sale to the public, compliance
with the European R&TTE Directive must be shown. This directive includes
as one of its essential requirements the protection of the health and
safety of the user and any other person.
* The SAR limit for mobile phones used by the public is 2.0 watts/kilogram (W/kg)
averaged over ten grams of body tissue. The limit incorporates a substantial margin
of safety to give additional protection for the public and to account for any
variations in measurements. The SAR values may vary, depending on national
reporting requirements and the network band.
■
PRECAUTIONS WHEN USING BATTERIES
•
Never use any charger or battery that is damaged in any way.
•
Use the battery only for its intended purpose.
•
If you use the phone near the network’s base station, it uses less power; talk and
standby time are greatly affected by the signal strength on the cellular network
and the parameters set by the network operator.
•
Battery charging time depends on the remaining battery charge, the type of
battery and the charger used. The battery can be charged and discharged
hundreds of times, but it will gradually wear out. When the operation time (talk
time and standby time) is noticeably shorter than normal, it is time to buy a new
battery.
•
If left unused, a fully charged battery will discharge itself over time.
•
Use only Pantech-approved batteries and recharge your battery only with
Pantech-approved chargers. When a charger is not in use, disconnect it from the
power source. Do not leave the battery connected to a charger for more than a
week, since overcharging may shorten its life.
•
Extreme temperatures will affect the charging capacity of your battery: it may
require cooling or warming first.
•
Do not leave the battery in hot or cold places, such as in a car in summer or winter
conditions, as you will reduce the capacity and lifetime of the battery. Always
try to keep the battery at room temperature. A phone with a hot or cold battery
may temporarily not work, even when the battery is fully charged. Li-ion batteries
are particularly affected by temperatures below 0 °C (32 °F).
•
Do not short-circuit the battery. Accidental shortcircuiting can occur when a
metallic object (coin, clip or pen) causes a direct connection between the + and
– terminals of the battery (metal strips on the battery), for example when you
carry a spare battery in a pocket or bag. Short-circuiting the terminals may
damage the battery or the object causing the shortcircuiting.
•
Dispose used batteries in accordance with local regulations. Always recycle.
Do not dispose of batteries in a fire.
APPENDIX HEALTH AND SAFETY INFORMATION HEALTH AND SAFETY INFORMATION APPENDIX

114 115
Most modern electronic equipment is shielded from radio frequency (RF) signals.
However, certain electronic equipment may not be shielded against the RF signals
from your wireless phone. Consult the manufacturer to discuss alternatives.
PACEMAKERS
Pacemaker manufacturers recommend that a minimum distance of 15 cm (6 inches)
be maintained between a wireless phone and a pacemaker to avoid potential
interference with the pacemaker. These recommendations are consistent with the
independent research and recommendations of Wireless Technology Research.
Persons with pacemakers:
• Should always keep the phone more than 15 cm (6 inches) from their pacemaker
when the phone is switched on
• Should not carry the phone in a breast pocket
• Should use the ear opposite the pacemaker to minimise potential interference
If you have any reason to suspect that interference is taking place, switch your
phone off immediately.
HEARING AIDS
Some digital wireless phones may interfere with some hearing aids. In the event of
such interference, you may wish to consult your hearing aid manufacturer to discuss
alternatives.
OTHER MEDICAL DEVICES
If you use any other personal medical devices, consult the manufacturer of your
device to determine if it is adequately shielded from external RF energy. Your
physician may be able to assist you in obtaining this information. Switch your phone
off in health care facilities when any regulations posted in these areas instruct you
to do so. Hospitals or health care facilities may be using equipment that could be
sensitive to external RF energy.
VEHICLES
RF signals may affect improperly installed or inadequately shielded electronic
systems in motor vehicles. Check with the manufacturer or its representative
regarding your vehicle.
You should also consult the manufacturer of any equipment that has been added to
your vehicle.
POSTED FACILITIES
Switch your phone off in any facility where posted notices require you to do so.
Your wireless phone gives you the powerful ability to communicate
by voice, almost anywhere, anytime. But an important responsibility
accompanies the benefits of wireless phones, one that every user
must uphold.
When driving a car, driving is your first responsibility.
When using your wireless phone behind the wheel of a car, make
sure that you are following the special regulations in a given area or
country.
■
OPERATING ENVIRONMENT
Remember to follow any special regulations in force in any area and
always switch your phone off whenever it is forbidden to use it, or
when it may cause interference or danger.
When connecting the phone or any accessory to another device, read
its user’s guide for detailed safety instructions.
Do not connect incompatible products.
As with other mobile radio transmitting equipment, users are advised
that for the satisfactory operation of the equipment and for the
safety of personnel, it is recommended that the equipment should
only be used in the normal operating position (held to your ear with
the antenna pointing over your shoulder).
■
ROAD SAFETY
■
ELECTRONIC DEVICES
APPENDIX HEALTH AND SAFETY INFORMATION HEALTH AND SAFETY INFORMATION APPENDIX

116 117
APPENDIX HEALTH AND SAFETY INFORMATION
■
POTENTIALLY EXPLOSIVE ENVIRONMENTS
Switch your phone off when in any area with a potentially explosive atmosphere
and obey all signs and instructions. Sparks in such areas could cause an explosion or
fire resulting in bodily injury or even death.
Users are advised to switch the phone off while at a refuelling point (service
station). Users are reminded of the need to observe restrictions on the use of radio
equipment in fuel depots (fuel storage and distribution areas), chemical plants or
where blasting operations are in progress.
Areas with a potentially explosive atmosphere are often but not always clearly
marked. They include the areas below decks on boats, chemical transfer or storage
facilities, vehicles using liquefied petroleum gas, such as propane or butane, areas
where the air contains chemicals or particles, such as grain, dust or metal powders,
and any other area where you would normally be advised to turn off your vehicle
engine.
■
EMERGENCY CALLS
This phone, like any wireless phone, operates using radio signals, wireless and
landline networks as well as userprogrammed functions, which cannot guarantee
connection in all conditions. Therefore, you should never rely solely on any wireless
phone for essential communications (medical emergencies, for example).
Remember, to make or receive any calls the phone must be switched on and in a
service area with adequate signal strength. Emergency calls may not be possible on
all wireless phone networks or when certain network services and/or phone features
are in use. Check with local service providers.
To make an emergency call, proceed as follows.
1. If the phone is not on, switch it on.
2. Key in the emergency number for your present location (for example, 112 or
any other official emergency number). Emergency numbers vary by location.
3. Press the Send key.
If certain features are in use (call barring, for example), you may first need to
deactivate those features before you can make an emergency call. Consult this
document and your local cellular service provider.
When making an emergency call, remember to give all the necessary information as
accurately as possible.
Remember that your phone may be the only means of communication at the scene
of an accident; do not cut off the call until given permission to do so.
■
OTHER IMPORTANT SAFETY INFORMATION
• Only qualified personnel should service the phone or install the phone in a
vehicle. Faulty installation or service may be dangerous and may invalidate any
warranty applicable to the device.
• Check regularly that all wireless phone equipment in your vehicle is mounted
and operating properly.
• Do not store or carry flammable liquids, gases or explosive materials in the same
compartment as the phone, its parts or accessories.
• For vehicles equipped with an air bag, remember that an air bag inflates with
great force. Do not place objects, including both installed or portable wireless
equipment in the area over the air bag or in the air bag deployment area. If
wireless equipment is improperly installed and the air bag inflates, serious
injury could result.
• Switch your phone off before boarding an aircraft. The use of wireless phones
in an aircraft may be dangerous to the operation of the aircraft, and is
illegal.
• Failure to observe these instructions may lead to the suspension or denial of
telephone services to the offender, or legal action, or both.
• Failure to observe these instructions may lead to the suspension or denial of
telephone services to the offender, or legal action, or both.
HEALTH AND SAFETY INFORMATION APPENDIX

118 119
If you experience problems while using your mobile phone, please refer to the following
checklist. If the problem persists, contact your dealer or nearest service center.
When the <Insert SIM Card> message appears:
Make sure the SIM card is correctly installed. Check to see if the SIM card is
working properly. If it does not work, try cleaning the contact point of the card. If it
is out of order, take it to the nearest service center.
When the <Handset locked enter password> message
appears:
Enter the lock code. If you cannot remember the lock code, contact the
nearest service center.
When the <Enter PIN1> message appears:
Enter the PIN1. If you cannot remember it, contact the nearest service
center. You can still receive calls even if your phone becomes locked as a
result of entering incorrect PIN1 three times in a row
When the ”No service” or “Network failure”
message appears:
Check the SSI (Signal Strength Indicator) state.
If you cannot make a connection in underground areas or in
buildings where signal strength may be low, try moving to another
place. If you still cannot make a connection, contact the nearest
service center.
When call quality is poor:
End the phone call and try again.
When the other party cannot hear you speaking:
Your phone may be set to MUTE. Disable the MUTE function by
converting to the UNMUTE mode.
When battery lifetime becomes shorter than usual:
This may happen when you are in an area with low signal strength.
Turn off your mobile phone when it is not in use. Change the battery
when the battery lifetime ends.
When your phone does not turn on:
Make sure your battery is charged. Check to see if your phone
works while recharging the battery.
APPENDIX HEALTH AND SAFETY INFORMATION
■
CARE AND MAINTENANCE
Your phone is a product of superior design and craftsmanship and should be
treated with care. The suggestions below will help you fulfill any warranty
obligations and allow you to enjoy this product for many years.
• Keep the phone and all its parts and accessories out of the reach of small
children.
• Keep the phone dry. Precipitation, humidity and liquids contain minerals that
corrode electronic circuits.
• Do not use the phone with a wet hand. Doing so may cause an electric shock to
you or damage to the phone.
• Do not use or store the phone in dusty, dirty areas, as its moving parts may be
damaged.
• Do not store the phone in hot areas. High temperatures can shorten the life of
electronic devices, damage batteries, and warp or melt certain plastics.
• Do not store the phone in cold areas. When the phone warms up to its normal
operating temperature, moisture can form inside the phone, which may
damage the phone’s electronic circuit boards.
• Do not drop, knock or shake the phone. Rough handling can break internal
circuit boards.
• Do not use harsh chemicals, cleaning solvents or strong detergents to clean the
phone. Wipe it with a soft cloth slightly dampened in a mild soap-and-water
solution.
• Do not paint the phone. Paint can clog the device’s moving parts and prevent
proper operation.
• Do not put the phone in or on heating devices, such as a microwave oven, a
stove or a radiator. The phone may explode when overheated.
• Use only the supplied or an approved replacement antenna. Unauthorised
antennas or modified accessories may damage the phone and violate
regulations governing radio devices.
• For body-worn operation, the phone meets FCC RF exposure guidelines
provided that it is used with a non-metallic accessory with the handset at
least 1.5 cm from the body. Use of other accessories may not ensure
compliance with FCC RF exposure guidelines.
• If the phone, battery, charger or any accessory is not working properly, take it
to your nearest qualified service facility. The personnel there will assist you,
and if necessary, arrange for service.
TROUBLE SETTING APPENDIX

120 121
APPENDIX TROUBLE SETTING
When you are unable to send a message:
Either you have not been registered to receive the SMS service, or
you may be out of the service range of your network service provider.
When you are unable to make a call:
Your phone may be set to <fixed dial.> Cancel the <fixed dial>function.
When you are unable to charge the battery:
This may be the result of one of the following three cases.
1. Your charger may be out of order. Contact your nearest dealer.
2. You may be attempting to use the phone in overly hot/cold
temperature. Try changing the charging environment.
3. Your battery may have not been connected to the charger properly.
Check the connector.
When you are unable to input data into the Phonebook:
Your Phonebook memory may be full. Try deleting some entries
from your Phonebook.
When you are unable to select a certain function:
You may not have been subscribed for that function, or your
network service provider may be in an area where such service
cannot be provided. Contact your local service provider.
To help you understand the main technical terms and abbreviations
used in this booklet, and to take full advantage of the features of your
mobile phone, here are a few definitions:
3G
Third Generation wireless communication system. 3G means next
generation wireless communication system developed based on
the second generation wireless communication systems. 3G
system supports real-time communication service and high-rate
packet-data service. 3G refers to UMTS developed based on GSM
in European countries,
Access point
Access point refers to a point through which users can connect to
the network so that the users can use the network services.
Call barring
Ability to restrict outgoing and incoming calls.
Call diverting
Ability to reroute calls to another number.
Call waiting
Informs you that you have an incoming call when you are engaged on
another call.
Caller line identification services (Caller ID)
Services allowing subscribers to view or block the telephone numbers
of callers.
Download
Download means transmitting files from one computer system to
another. Downloading usually means transmitting files from a big
system to a small system.
GPRS (General Packet Radio Service)
New non-voice value-added service that allows information to be sent
and received across a mobile telephone network. GPRS provides
continuous connection to the Internet for mobile phone and
computer users. It is based on the Global System for Mobile
Communication (GSM) circuit-switched cellular phone connections and
the Short Message Service (SMS).
GLOSSARY APPENDIX

122 123
APPENDIX GLOSSARY
GSM (Global System for Mobile Communication)
International standard for cellular communication, guaranteeing
compatibility between the various network operators. GSM covers
most European countries and many other parts of the world.
JavaTM
Programming language generating applications that can run on all
hardware platforms, whether small, medium or large, without
modification. It has been promoted for and geared heavily to the
Web, both for public Web sites and Intranets. When a Java program
runs from a Web page, it is called a Java applet. When it is run on a
mobile phone or pager, it is called a MIDlet.
MMS (Multimedia Message Service)
A message service for the handset environment, standardized by
the WAP Forum and the 3rd Generation Partnership Program (3GPP).
For phone users, MMS is similar to Short Message Service (SMS)-it
provides automatic, immediatedelivery of user-created content from
phone to phone. The message addressing used is primarily phone
numbers, thus the traffic goes from phone to phone. MMS also
provides support for e-mail addressing, so that messages can also be
sent by email. In addition to the text content of SMS, MMS messages
can contain still images, voice or audio clips, and later also video clips
and presentation information.
MP3
Moving Picture Experts Group Layer-3 Audio. A file format to
provide high-quality audio whose quality is equal to that of CD.
MP3 is a digital audio standard developed by MPEG, or Moving
Picture Experts Group and is widely used for digital audio files.
Multimedia
Multimedia means media that include various media data such as
voice, character string, image, and video data. Currently, the
meaning of multimedia includes services provided through
multimedia.
Phone password
Security code used to unlock the phone when you have selected the
option to lock it automatically each time it switches on.
PIN (Personal Identification Number)
Security code that protects the phone against unauthorised use. The
PIN is supplied by the service provider with the SIM card. It may be a
four to eightdigit number and can be changed, as required.
PUK (PIN Unblocking Key)
Security code used to unlock the phone when an incorrect PIN has
been entered three times in succession. The eight-digit number is
supplied by the service provider with the SIM card.
Roaming
Use of your phone when you are outside your home area (when
travelling for example).
SDN (Service Dialling Numbers)
Telephone numbers supplied by your network provider and giving
access to special services, such as voice mail, directory inquiries,
customer support and emergency services.
SIM (Subscriber Identification Module)
Card containing a chip with all the information required to operate
the phone (network and memory information, as well as the
subscriber’s personal data). The SIM card fits into a small slot on the
back of the phone and is protected by the battery.
SMS (Short Message Service)
Network service sending and receiving messages to and from another
subscriber without having to speak to the correspondent. The message
created or received can be displayed, received, edited or sent.
SDN (Service Dialling Numbers)
Telephone numbers supplied by your network provider and giving
access to special services, such as voice mail, directory inquiries,
customer support and emergency services.
GLOSSARY APPENDIX

124
APPENDIX GLOSSARY
UMTS
Universal Mobile Telephony System. UMTS refers to asynchronous 3G
wireless technology of WCDMA that is developed based on GSM, the
2G wireless technology.
Video call
A communications service that enables users to talk watching each
other over a 64Kbps data channel. Real-time video call service is a new
type of service provided by WCDMA wireless communication system
that is developed based on GSM+GPRS technology.
Voice mail
Computerised answering service that automatically answers your
calls when you are not available, plays a greeting and records a
message.
MODEL : PC-7100