Pantech PN-218 Dual- Mode CDMA Phone (CDMA/ PCS CDMA) User Manual PN E218 ALLTEL 060321
Pantech Co., Ltd. Dual- Mode CDMA Phone (CDMA/ PCS CDMA) PN E218 ALLTEL 060321
UserManual.wiki
>
Pantech
>
PN 218 User Manual
Users Manual
Navigation menu
Upload a User Manual
Namespaces
Wiki Guide
HTML
PDF
Info
Views
User Manual
Discussion / Help
Navigation

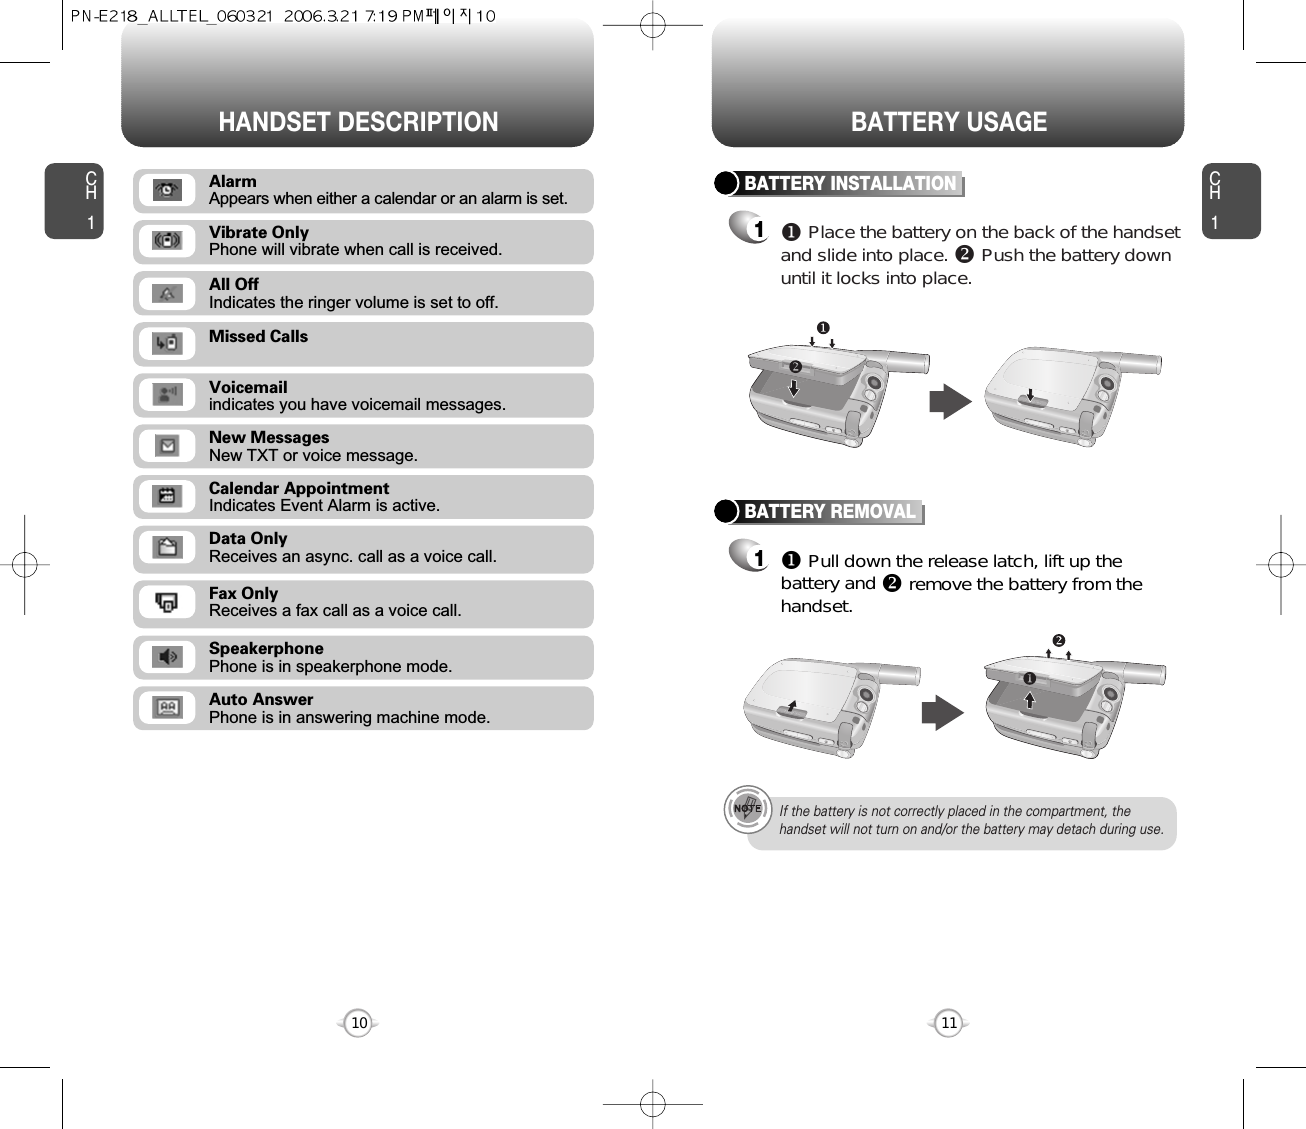
![ACCESSING THE MENUCH2Your phone can be customized via the menu. Each function can beaccessed by scrolling with the Navigation Key or by pressing thenumber that corresponds with the menu item.1To access the menu in the idle mode, press [MENU].2Press the Navigation Key up or down to scrollthrough the menu options.3To return to the previous page, press .To exit the current menu and return to the idlemode, press . 4Press to enter a function when its mainpage is displayed or press its assigned number.17CH2TURNING THE PHONE ON1Press , then your “ALLTEL” logo appears andthe tone sounds.• To select a logo, refer to page 63 for more details.(Settings>Display>Graphics>Power On).• If your phone is locked when “Password” appears on thedisplay enter your 4-digit password to unlock your phone.• The default password is the last 4 digits of your phone number.16TURNING THE PHONE OFF1Press and hold , until your “ALLTEL” logoappears.• Immediately change or recharge the battery when “Low Battery Warning Power Off” appears on the display.Memory may possibly be damaged if the phone turns offdue to the battery completely draining.• Turn the phone off before removing or replacing the battery.If the phone is on, unsaved data may be lost.Hotkey In idle mode, move the Navigation Key as follows to access these functions:• Upward movement : Contacts• Downward movement : Messaging• Rightward movement : Axcess Apps• Leftward movement : Mobile WebTURNING THE PHONE ON / OFF1. Contacts2. Recent Call3. Messaging7. Settings8. Tools9. Camera6. Media Gellery4. Axcess Apps5. Mobile Web](https://usermanual.wiki/Pantech/PN-218/User-Guide-654715-Page-9.png)
![MENU SUMMARYCH221CH2208. Tools9. Camera6. System7. Phone Info8. Airplane Mode1. Voice Service2. Schedule3. Alarm4. Memo Pad5. Calculator6. World Clock7. Stop Watch1. Take a Photo2. Photo Gallery3. Photo Message4. Help4. Voice Privacy5. TTY Mode6. Location1. Set Mode2. Nam Setting3. PRL ID1. S/W Version2. H/W Version3. Axcess Version1. Voice Memo2. Voice Dial3. Train Words4. Voice Setting1. Add New Plan2. View Plan1. Alarm 12. Alarm 23. Alarm 31. Add Memo2. View Memo3. Settings1. New Photo2. Saved Photo1. Auto NAM2. Change NAM1. Record2. Playing3. Play Speaker4. Erase All1. Record2. Playing3. Play Speaker4. Erase All1. Yes2. No3. Wake-Up4. Undo Train AllSet ActiveHFK ModeBASIC FUNCTIONSMAKING A CALL1Enter a phone number.To modify the phone number you have entered :• To erase one digit at a time press .• To erase the entire number, press and hold .To find the phone number with your contact list :• Enter a part of the phone number, then press [FIND],to display contacts entry list. Phone number display in contact listIf name field of the contact list entry is empty, the highestpriority phone number will be displayed. When name andphone number fields are empty, e-mail address will bedisplayed. Reference “Contact display order”.All matching entries will be displayed. To call the selectednumber, press .To send a txt or pix message with phone number :• Enter a part of the phone number, then press[MENU], select “Send Text Msg or Send Photo Msg.”. Please refer to page 105 or page 106 for more details on“Send Text Msg or Send Photo Msg”.2Press . The indicator, , appears on the display.• If “CALL FAILED” appears on the display or the line is busy,press or . • If you activate the “Auto Retry” function, the phone willautomatically retry for the number of times you haveselected. (refer to page 74).• When you place or receive a call from stored phonenumbers, both the name or phone number will be displayed.• There is another way to make a call through the VR mode,which is called “VAD (Voice Activated Dialing)”. Please refer to page 97 (Voice Service) for more details.• If “Enter Lock Code” appears on the display enter your 4 digit password to unlock your phone.3To end a call, press .](https://usermanual.wiki/Pantech/PN-218/User-Guide-654715-Page-11.png)
![BASIC FUNCTIONS BASIC FUNCTIONSCH223CH222To ignore incoming calls, press [IGNORE].ANSWERING CALLS1When your phone rings or vibrates, press to answer the incoming call. (Depending on your phone’s settings, you mayalso answer incoming calls by flip open or bypressing any digit key.)2To end a call, press .The speaker phone feature lets you hear audio through the speaker andtalk without holding the phone.SPEAKER PHONE1To activate the speaker phone in idle, answeringor calling modes, press and hold .2The phone returns to normal (Speaker Phone Off)after ending a call or when the phone is turned offand back on.ANSWERING A CALL1To answer a call, press any key except , ,, , or .2To end the call, press .In Auto Answer Mode, a call is automatically answered after apreset number of ring tones. See page 74 for more details.lPress [MENU] . Select among “Any Key”, “Send Key”, “Flip Open”, and “Auto Answer” answering a call options. lf “Send Key” isselected, the phone can only be answered by pressing .See page 73 for more information.Pauses are used for automated systems (i.e., voice mail, calling cards).Insert a pause after a phone number then enter another group ofnumbers. The second set of numbers is dialed automatically after thepause. This feature is useful for dialing into systems that require a code.HARD/TIMED PAUSE FEATURE1To insert a hard/timed pause, enter a phonenumber then press [MENU]. Select either aHard Pause (“P”) or a Timed Pause (“T”).2Press to dial or to save.Please refer to page 30 for more details about storing a phone number.Hard Pause : Inserting a “Hard Pause” means that the caller has to press the “Send” key to send the DTMF tone before the dialing continues.Timed Pause : Inserting a “Timed Pause” shall suspend the dialing for 2 seconds when it reaches the “Timed Pause”.ll](https://usermanual.wiki/Pantech/PN-218/User-Guide-654715-Page-12.png)
![BASIC FUNCTIONS BASIC FUNCTIONSCH225CH224If one of the people you called hangs up during your call, youand the remaining caller stay connected. If you initiated the calland are the first to hang up, all three callers are disconnected.With 3-Way Calling, you can talk to two people at the same time. When using this feature, the normal airtime rates will be applied foreach of the two calls.3-WAY CALLING1Enter a number you wish to call then press .2Once you have established the connection,enter the second number you wish to call thenpress .3When you’re connected to the second party,press again to begin your 3-Way call.Identifies caller by displaying their phone number. If the caller’s nameand number are already stored in your phone book, name or numberwill appear. The caller ID is stored in the call history.CALLER ID FUNCTIONNotifies you of an incoming call when you are already on a call bysounding a beep tone and displaying the caller’s phone number.CALL WAITING FUNCTION1To answer another call while on the phone,press . This places the first call on hold. To switch back to the first caller, pressagain.Adjusts the volume of the ringer, key beep and speaker.ADJUSTING VOLUME1Press [MENU] then select oneof the following.2Adjust volume then press to save it.Ringer : Controls the ringer volume.Key Tone : Controls the keypad tone.Voice Call : Controls the earpiece volume.Speaker Phone : Controls the speaker volume.llllCall Waiting is a system dependent feature. Please contact yourservice provider for details.• When you are on a voice call, the side up/down volume keyshall raise/lower the earpiece or headset volume respectively.• To adjust master volume, press the side up/down key whenphone is in idle mode.ENTER LOCK MODE1To lock the phone, press and hold .2To unlock the phone, press or [UNLOCK],then input your password, then press .](https://usermanual.wiki/Pantech/PN-218/User-Guide-654715-Page-13.png)
![DURING A CALL DURING A CALLCH227CH226Increases security during a call.VOICE PRIVACYEnables the network to locate your current location through GlobalPositioning System (GPS). (Refer to page 76 for more details.)LOCATION1Press [MENU] .1Press [MENU] .Enables you to send a Text message (SMS) during a call.To display menu options during a call, press [OPTIONS].SEND TEXT MSG1Press [MENU] .To select the phone number in your recent calls List.RECENT CALLSAutomatically transmits your phone number to a pager during a call.(Dependent on pager service)SEND DTMFEnables you to send a Photo message (MMS) during a call.SEND PHOTO MSG1Press [MENU] .To select the phone number in your internal Contact List.CONTACTS1Press [MENU] .1Press [MENU] .1Press [MENU] .With mute activated, the caller cannot hear you or any sounds fromyour side but you can still hear them.MUTE (UNMUTE)1Press [MUTE].To deactivate, press [UNMUTE].The phone will automatically un-mute in Emergency Call or Callback mode.ll](https://usermanual.wiki/Pantech/PN-218/User-Guide-654715-Page-14.png)
![STORING A PHONE NUMBERENTERING LETTERS, NUMBERS & SYMBOLSCH331CH.330Enter a name, press . Please refer to page 31 for more details onentering letters, numbers & symbols. To change the input mode, press [Abc]. Press the Navigation Key down to select otheroptions (Mobile1.2, E-mail1.2, etc...). If entered phone number, press [MENU] toselect one of the following options:Input mode indicatorT9Word : T9 modeAbc : Abc modeNUM : Number modeSymbols : Symbol modeThe input mode (Alpha editor) will automatically be activated whennecessary to enter letters and numbers. As shown below, there are 4 available modes ; Standard input mode (Abc), T9 input mode(T9Word), Numeric mode (NUM), and Symbol mode (Symbols).The following illustrates the function assigned to each key in theAlpha Editor.The phone book stores up to 500 entries.1Enter phone number, press [SAVE] thenchoose “New Contact” or “Existing Contact”.Press to select. The input mode indicator appears on the upper rightof the display when letters and numbers are entered.To select the desired input mode among the 4 modesbelow, press [Abc], then enter letters andnumbers.2If “New Contact” is selected, the phone numberwill appear above a list. Press the NavigationKey left or right to choose the type of numberyou’re adding, as indicated by the icon. Press to select. If “Existing Contact” isselected, your contact list is displayed. Choosethe entry to add the phone number to, thenpress . You will then see the phone numberlisted with the entry. Press to select.34To store the entry, press [SAVE]. “New contact added!” will be displayed.AbcNextSpaceCaps LockClearSavePress to change mode.[T9Word][Abc][NUM][Symbols]Press to view the next matching word ifthe highlighted word is not the word youintended.Press to accept a word and add a space.Press to select a letter case of thestandard text input or T9 text input mode.[Abc], [ABC] and [abc] indicate thestandard text input.[T9Word], [T9WORD] and [T9word]indicate the predictive text input.Press and hold to change mode.Press to delete a character to the left ofthe cursor.Store the letters and numbers you enter.KEY FUNCTIONlSend Text MsglSend Photo MsglPrefixlHard PauselTimed Pause](https://usermanual.wiki/Pantech/PN-218/User-Guide-654715-Page-16.png)
![ENTERING LETTERS, NUMBERS & SYMBOLS ENTERING LETTERS, NUMBERS & SYMBOLSCH333CH332The T9 input mode incorporates a built-in-dictionary to determine aword based on the entered characters. A word can be entered morequickly by pressing a key once per character.T9 INPUT MODE1Select the T9Word mode by pressing [Abc].2Press a digit key once to enter the characteryou want then enter all the characters to inputthe word you want.3To view the next matching word, press .To enter a compound word:• Enter the first part of the word then press to accept it.• Enter the last part of the word then press to enter the word.Select Abc mode by pressing [Abc].When you select this mode, the Abc icon appears as a visualconfirmation.- Find the key that corresponds to the letter you want to enter.- Press it as many times as needed for the letter to appear on thescreen.- To enter the name “John”:Press [ ] JPress [ ] oPress [ ] hPress [ ] nUse the digit keys to enter letters, numbers and characters.STANDARD INPUT MODE1Enter letters using the key pad as follows:2To enter a space, press . The cursor willautomatically move to the next column.3Repeat until letters are entered. There is a 16-letter limit.4To delete one digit, press . If you press and hold , it will delete lettersword by word, and numbers in whole.Press repeatedly, until the desired symbolappears (. 1 @ ? ! - , & : ‘ ).To change the input mode, press [Abc].Key Pad2ABC3DEF4GHI:9WXYZADG:WBEH:XCFI:Y234:ZADG:91 TimeRepetitions2 timesRepetitions3 timesRepetitions4 timesRepetitions5 times4To accept the matching word and enter aspace, press .5To change from lowercase to uppercase, press .To enter “Fun fare” in the T9 input mode.- After you enter the 1st letter, press [Abc] to select T9 modeand to choose the lower case (T9Word).- Press and you will see “Fun” highlighted. Press to select it.- Press and you will see “ease” highlighted. Press to select the next matching word; press until you see"fare". To accept and add a space, press .](https://usermanual.wiki/Pantech/PN-218/User-Guide-654715-Page-17.png)
![ENTERING LETTERS, NUMBERS & SYMBOLSMENU FUNCTIONThis chapter addresses accessing the menu and using its functionsand features to customize your phone.Chapter 4CH435CH334CONTACTSRECENT CALLSAXCESSMEDIA GALLERYSETTINGSUTILITIESCAMERANUMERIC MODE1Press [Abc] and scroll to the input mode tochange to “Symbols (Symbol mode)”. 1Press [Abc] and scroll to the input mode tochange to “NUM (Numeric mode)”.2To enter a number, press a digit key.Press [ ],orPress [ ].2Select symbol you want to enter with theNavigation Key.lUse the Navigation Key to view a different line of symbols.SYMBOL MODEAllows you to enter numbers.Allows you to enter symbols.](https://usermanual.wiki/Pantech/PN-218/User-Guide-654715-Page-18.png)
![CH437CH436CONTACTS CONTACTSShortcut: From standby mode, press [CONTACTS] todisplay your internal Phone Book list.Stores up to 300 entries, each of which can be assigned to a group.Entries can be retrieved by name, phone number or group.Retrieves an entry by name and calls by simply pressing . You can review all the entries stored in your phone book list orquickly find an entry by entering a name or phone number. Lists contacts alphabetically so you can quickly find a name.Lists contacts numerically so you can quickly find a number.FINDPress [MENU] or .Enter a name or character string or scrollthrough the list with the Navigation Key. Please refer to page 31 for more details onentering letters, numbers & symbols.Please refer to page 105 or page 106 for moredetails on “New Text Msg” & “New Photo Msg”.The list of names in your phone book isdisplayed alphabetically.The list beginning with the letter you entered isdisplayed. Highlight an entry. Press to edit theentry. Press [MENU] to view options. If the contact has a mobile phone number youroptions will be 1. Send Text Msg, 2. Send PhotoMsg, 3. Prefix or 4. Erase. If no mobile number issaved for the contact, your options will be 1. Prefix, 2. Erase. If only an email or web addressis saved for the contact, your options will be 1. Send Text Msg, 2. Send Photo Msg or 3. Erase.To call the selected number, press .If the entry is set to secret, you will be asked for your password.lFIND BY NAME12345Press [MENU] or .Enter a part of the phone number or scrollthrough the list with the Navigation Key.The name associated with that number will bedisplayed at the bottom of the screen.Please refer to page 105 or page 106 for moredetails on “New Text Msg” & “New Photo Msg”.The list of phone numbers saved in your phonebook will be displayed in numerical order.The list of phone numbers matching what youentered is displayed. Highlight an entry. Press to edit the entry. Press [MENU] to view options. If the contacthas a mobile phone number your options will be1. Send Text Msg, 2. Send Photo Msg, 3. Prefixor 4. Erase. If no mobile number is saved for thecontact, your options will be 1. Prefix, 2. Erase.If only an email or web address is saved for thecontact, your options will be 1. Send Text Msg,2. Send Photo Msg or 3. Erase.To call the selected number, press .If the entry is set to secret, you will be asked for your password.lFIND BY NUMBER12345](https://usermanual.wiki/Pantech/PN-218/User-Guide-654715-Page-19.png)
![CH4CH438CONTACTS CONTACTS39CHANGE GROUP NAME2Select an existing group name that you haveadded with the Navigation Key.4Input a new group name.5Press to save it.3Press [MENU] to select “Rename”.ERASE GROUP2Use the Navigation Key to select, then deletethe group. 3Press [ERASE] to delete it.4Press to erase it.The default group names (All, Personal, Business, Etc.) cannotbe changed.To add a phone book entry to a group, select the name of the groupfrom the Group field when you add or edit the phonebook entry.• The default group names (All, Personal, Business, Etc.)cannot be erased.• When executing erase group, the saved entries are movedto the Etc. group.1Press [MENU] or .1Press [MENU] or .12To add a new entry to the phone book, press [MENU] or .Adds a new entry.ADD NEWThe Contact screen appears. Enter the name ofthe entry and press . Press the NavigationKey down to enter information for the otherphone book fields.Please refer to page 31 for more details on enteringletters, numbers & symbols.33.1 To save the entry, press [SAVE]. 3.2 To return to the previous page, press .PHONE BOOK FIELD : Name/Mobile/Home/Office/Pager/Fax/E-Mail/Wireless Addr./Group/Ringer/Msg.Ringer/Graphic/Memo/ Set Secret.lGROUPAllows you to classify phone entries into groups. Existing groupsinclude Personal, Business, Etc. and All. A maximum of seven groupsis allowed.13To add a new group, press [MENU]or .ADD NEW GROUPInput a new group name.4Press to save it.2Press [MENU] to select “Add Group”.](https://usermanual.wiki/Pantech/PN-218/User-Guide-654715-Page-20.png)
![CH441CH440CONTACTS CONTACTSMSG. GROUPAllows the user to group up to 10 phone numbers. The user can add,change, and delete Msg.Group.13To add a new group, press [MENU]or .A maximum of five groups is allowed.ADD NEW MSG. GROUPInput a new group name.4Press to save it.2Press [MENU] to select “Add Group”.CHANGE MSG. GROUP NAME2Select an existing group name with theNavigation Key.4Input a new group name.5Press to save it.3Press [MENU] to select “Rename”.1Press [MENU] or .In idle mode, calls can be placed to numbers stored in speed dial bypressing & holding the location number on the key pad. For a 2-digitlocation number, press the first number, then press and hold thesecond number.SPEED DIAL1Press [MENU] or .2To assign a phone number to a location, selectthe location, then press [SET].3Select the entry with the Navigation Key thenpress .If a phone number is already assigned to the location, press [ERASE] and to delete.lIf the entry is set to secret, you will be asked for your password.l4“Speed Dial # X edited” will be displayed.• “Unassigned” appears if the location is available.• To call an assigned number, press & hold the last digit of thespeed dial #.To add a phone book entry to a Msg group, press [MENU], select the Msg group, then press . Choose alocation, then press [SET]. Then scroll to the phone book entry, then press .](https://usermanual.wiki/Pantech/PN-218/User-Guide-654715-Page-21.png)
![CH443CH442CONTACTS CONTACTSERASE MSG. GROUP2Select an existing group name with theNavigation Key.3Press [ERASE] to delete it.4Press to erase it.SEND PHOTO MSG. GROUP2Scroll to the group name. Select an existinggroup name with the Navigation Key.5To send the picture message, press [MENU], then select “Send”, then press .Please refer to page 106 for more details on “New Photo Msg”.4Input a “Message”, “Subject”, “CC” and “BCC”.3Press [MENU] to select “Send Photo Msg.”.1Press [MENU] or .1Press [MENU] or .1Press [MENU] or .SEND TEXT MSG. GROUP2Scroll to the group name. Select an existinggroup name with the Navigation Key.4Press the Navigation Key down to select theMessage field.53Press [MENU] to select “Send Text Msg.”.5.1. To send the text message, press [MENU], then select “Send”, then press .5.2. To save the text message, press [MENU], then select “Save to Outbox”, then press .Please refer to page 105 for more details on “New Text Msg”.](https://usermanual.wiki/Pantech/PN-218/User-Guide-654715-Page-22.png)
![CH445CH444CONTACTS RECENT CALLSCall details include type of call, date, time and phone number.After the 60 received, dialed or missed calls, the oldest call willautomatically be erased from the history.Displays information about the most recent received, dialed andmissed calls.In idle mode, you can access recent calls by pressing [MENU] .ALL CALLS1To see a list of the 60 most recent incoming,outgoing and missed calls, press [MENU]. If the number is already stored in yourphone book, only the name appears. If thenumber is not stored, only the phone numberappears.23To view details, press .Save: To store the phone number in your phone book.Prefix: The user may add the desired number before the number.It is useful when you add “1” during long distance call.You may save it in the phone book after Prefix.Send Text Msg: To send a Text Message, insert the phone number.Send Photo Msg: To send a photo message, insert the phone number.Erase All: To erase all recent calls list.lllllPress [MENU] select “SAVE” to save it orpress [ERASE] to delete it.To display your phone number and service provider:MY PHONE #1Press [MENU] or .2To return to the previous page, press .](https://usermanual.wiki/Pantech/PN-218/User-Guide-654715-Page-23.png)
![CH44746CH4RECENT CALLSRECENT CALLSCall details include date, time and phone number.After 20 received calls, the oldest call will automatically be erased from the history.Displays information about the 20 most recently answered calls. Place a call to a received call by simply pressing .RECEIVED CALLS1To see a list of the 20 most recently answeredcalls, press [MENU] . If the number is already stored in your phone book, only thename appears. If the number is not stored, onlythe phone number appears.2To view incoming call details, press .3Save: To store the phone number in your phone book.Prefix: The user may add the desired number before the number.It is useful when you add “1” during long distance call.You may save it in the phone book after Prefix.Send Text Msg: To send a Text Message, insert the phone number.Send Photo Msg: To send a photo message, insert the phone number.Erase All: To erase all received calls list.lllllPress [MENU] select “SAVE” to save it orpress [ERASE] to delete it.Displays information about the 20 most recently missed calls. Place a call to a missed call number by simply pressing . To see a list of the 20 most recently missed calls, press [MENU] . If the numberis already stored in your phone book, only thename appears. If the number is not stored, onlythe phone number appears.MISSED CALLS12To view missed call details, press .Call details include date, time and phone number.After 20 missed calls, the oldest call will automatically be erased from the history.3Save: To store the phone number in your phone book.Prefix: The user may add the desired number before the number.It is useful when you add “1” during a long distance call.You may save it in the phone book after Prefix.Send Text Msg: To send a Text Message, insert the phone number.Send Photo Msg: To send a photo message, insert the phone number.Erase All: To erase all missed calls list.lllllPress [MENU] select “SAVE” to save it orpress [ERASE] to delete it.](https://usermanual.wiki/Pantech/PN-218/User-Guide-654715-Page-24.png)
![CH449CH448RECENT CALLS48RECENT CALLSChecks the usage time and manages your calls within the limit youset. The five timers include:Displays usage time of last call.CALL TIMERS1Press [MENU] .2To return to the previous page, press .LAST CALLDisplays usage time of all calls made within Home area.HOME CALLS1Press [MENU] .2To view the time of the following items:3To reset the timer, press [RESET]. To return to the previous page, press .Voice CallData/Fax CallDisplays usage time of all incoming and outgoing calls, excludingweb access calls.ALL CALLS1Press [MENU] .2To view the time of the following items:3To return to the previous page, press .Voice CallData/Fax CallllllCall details include type of call, date, time and phone number.After 20 dialed calls, the oldest call will automatically be erased from the history.Displays information about the 20 most recently dialed numbers.Place a call to a dialed call by simply pressing .DIALED CALLS1To see a list of the 20 most recently dialednumbers, press [MENU] . If the number is already stored in your phonebook, only the name appears. If the number isnot stored, only the phone number appears.2To view dialed call details, press .3Save: To store the phone number in your phone book.Prefix: The user may add the desired number before the number.It is useful when you add “1” during long distance call.You may save it in the phone book after Prefix.Send Text Msg: To send a Text Message, insert the phone number.Send Photo Msg: To send a photo message, insert the phone number.Erase All: To erase all dialed calls list.lllllPress [MENU] select “SAVE” to save it orpress [ERASE] to delete it.](https://usermanual.wiki/Pantech/PN-218/User-Guide-654715-Page-25.png)
![CH451CH450RECENT CALLS50RECENT CALLSDisplays usage time of all incoming and outgoing calls, excludingweb access calls.12To view the time of the following items:Press [MENU] .CUMULATIVE CALLS3To reset the timer, press [RESET]. To return to the previous page, press .Voice CallData/Fax CallDisplays usage time of roaming calls.ROAM CALLS1Press [MENU] .2To view the time of the following items:3To reset the timer, press [RESET]. To return to the previous page, press .Voice CallData/Fax CallllllChecks the log of all kilobyte data transmissions.To show the received kilobyte usage on a user definable interval:To show the transmitted kilobyte usage on a user definable interval:To show the received or transmitted kilobyte usage on a user definableinterval:DATA CALLS1Press [MENU] .2RECEIVEDTo reset the counter, press [RESET]. To return to the previous page, press .TRANSMITTED1Press [MENU] .2To reset the counter, press [RESET]. To return to the previous page, press .TOTAL1Press [MENU] .2To return to the previous page, press .](https://usermanual.wiki/Pantech/PN-218/User-Guide-654715-Page-26.png)
![CH453CH452AXCESS52AXCESSYour phone provides “Axcess”, a unique feature that enables you todownload melody ringers, wallpapers, games, and more from yournetwork to your phone. Please contact your service provider for theavailability of these services.START AXCESS1To launch “Axcess” from the standby mode,press [MENU] or . 2The name of the icon will appear at the bottomof the screen. Select the “Axcess Shop ” bypressing the Navigation Key left or right.4To end the application, press .The phone will return to the standby mode orthe previous screen status.3To start the application, press .DOWNLOADING APPLICATIONS1Press [MENU] or . 2Select “Axcess Shop ”, then press .3Select “Catalog”, then press .4The phone will access your service provider’sserver. Follow the prompt to downloadapplications.Before downloading melody ringers and wallpapers,you need to download the dedicated downloader.Please contact your service provider for details.DOWNLOADING MELODIES/WALLPAPERSTo select an option, scroll to the option by pressing , then press .When a prompt appears, press to proceed or to cancel. llDownloaded melody ringers apply to several functions including theincoming call alert, new text message alert, alarm clock andscheduler alarm. See Ringer Type on page 58.Downloaded wallpapers apply to the standby mode.See Wallpaper on page 63.Downloaded melody ringers, wallpapers and applications are savedto the data folder in your phone.APPLYING MELODIES/WALLPAPERSCHECKING DATA FOLDER MEMORY1Press [MENU] or . 2Select “Settings ”, then press .3Select “Manage Apps”, then press [SYSTEM INFO]. The memory status will bedisplayed.4To exit, press .](https://usermanual.wiki/Pantech/PN-218/User-Guide-654715-Page-27.png)
![This menu shows the list of downloaded still images.This menu shows the list of downloaded or saved images.CH455CH454AXCESS54MEDIA GALLERYIMAGES1Press [MENU] .GRAPHICS1Press [MENU] .ANIMATIONS2Scroll through the downloaded images to displaythe picture you want to send, then press [SEND].3To write your picture message, see “New PhotoMsg” on page 106.44.1 To send the photo message, press [MENU] then select “Send”, then press [OK].4.2 To save the photo message, press [MENU] then select “Save to Outbox”, thenpress [OK].44.1 To send the photo message, press [MENU] then select “Send”, then press [OK].4.2 To save the photo message, press [MENU] then select “Save to Outbox”, thenpress [OK].2Scroll through the downloaded images to displaythe picture you want to send, then press [SEND].3To write your picture message, see “New PhotoMsg” on page 106.Press [MENU] to select 1.Erase, 2.Erase All, 3.Change Title.Press [MENU] to select 1.Erase, 2.Erase All, 3.Change Title.ERASING AN APPLICATION1Press [MENU] or . 2Select “Settings ”, then press .4Select the application to be erased then press .3Select “Manage Apps”, then press .The memory status will be displayed.5Select “Remove”, then press to remove it.](https://usermanual.wiki/Pantech/PN-218/User-Guide-654715-Page-28.png)
![CH457CH456MEDIA GALLERY56MEDIA GALLERY1Press [MENU] .PHOTOS1Press [MENU] .TONES2Scroll through the captured pictures to display thepicture you want to send, then press [SEND].3The New Photo Msg screen will appear. Enter theinformation in all the necessary fields. See "NewPhoto Msg" on page 106.42Scroll to the saved voice memo or downloadedringtone you want to send then press [SEND].3The New Photo Msg screen will appear. Enter theinformation in all the necessary fields. See “NewPhoto Msg” on page 106.4Press [MENU] to select 1.Erase, 2.Erase All, 3.Change Title.This menu shows the list of photos that have been taken with the camera.This menu shows the list of downloaded ringtones and saved voice memos.Sending tones or voice memos is done through the New Photo Msg screen.4.1 To send the photo message, press [MENU] then select “Send”, then press [OK].4.2 To save the photo message, press [MENU] then select “Save to Outbox”, thenpress [OK].4.1 To send the photo message, press [MENU] then select “Send”, then press [OK].4.2 To save the photo message, press [MENU] then select “Save to Outbox”, thenpress [OK].This menu shows the list of downloaded or saved images.This menu shows the list of downloaded or saved ring tones.SHUFFLE1Press [MENU] .WALLPAPER1Press [MENU] .RING TONE2Scroll through the downloaded images to displaythe picture you want to send, then press [SEND].3To write your picture message, see “New PhotoMsg” on page 106.44.1 To send the photo message, press [MENU] then select “Send”, then press [OK].4.2 To save the photo message, press [MENU] then select “Save to Outbox”, thenpress [OK].44.1 To send the photo message, press [MENU] then select “Send”, then press [OK].4.2 To save the photo message, press [MENU] then select “Save to Outbox”, thenpress [OK].2Scroll to the saved ringtone or downloadedringtone you want to send then press [SEND].3To write your picture message, see “New PhotoMsg” on page 106.Press [MENU] to select 1.Erase, 2.Erase All, 3.Change Title.Press [MENU] to select 1.Erase, 2.Erase All, 3.Change Title.](https://usermanual.wiki/Pantech/PN-218/User-Guide-654715-Page-29.png)
![CH459CH458SETTINGS58SETTINGSSets Ringer Type, Volume, Alert, Roam Ringer, Tone Length and Etiquette.To select a ringer type for incoming calls:To select a ringer type for receiving messages:To select a ringer type for receiving voice mail:Customizes your phone and optimizes performance through a varietyof settings.SOUNDSRINGER TYPE1Press [MENU] .2Select your desired ringer type.3Select one of the available ring types.To confirm, press [SELECT].RINGER2Press the Navigation Key up or down to select “Tone 1, 2, 3, 4, 5, 6, 7, 8, 9, 10”.3To confirm, press [SELECT].2Press the Navigation Key up or down to select “Tone 1, 2, 3, 4, 5, 6, 7, 8, 9, 10”.3To confirm, press [SELECT].1Press [MENU] .MESSAGES1Press [MENU] .VOICE MAILLeft or Right key : Select “Ring Tones”, “Music Bells” or “Downloads”.Up or Down key : Select “Ringer”.Downloads : Downloaded ringer types and familiar music.Controls the Ringer, Key Tone, Voice Call and Speakerphone volume.VOLUMERINGER1Press [MENU] .2Select one of the following options bypressing the Navigation Key to the right.3To confirm, press .1Press [MENU] .Silent : Mute the ringer, press (Min).Ringer OffVibrate OnRinger Mode : Up & Down (Level 1~5)High & Vib : The ringer sounds after vibration, press (Max).To adjust key pad tone:Controls the Ringer volume and alerts you to incoming calls in themodes listed in the gray box below.KEY TONE2Adjust the key pad tone with the Navigation Key.3To activate, press .1Press [MENU] .To adjust earpiece volume (Lets you adjust the ringer volume instandby mode with side volume key):VOICE CALL2Adjust the earpiece volume with the Navigation Key.3To activate, press .Level 1 - 5 (Min- , Max- )Off (Min- )Level 1 - 5 (level 5, Max- )](https://usermanual.wiki/Pantech/PN-218/User-Guide-654715-Page-30.png)
![SETTINGS SETTINGSCH461CH460When set, this setting alerts you to the following handset changes:Sounds an alert every minute during a call.ALERTMINUTE2Select “Off” or “On” with the Navigation Key, thenpress to activate it.1Press [MENU] .Sounds an alert when leaving a service area and entering a roamingservice area.ROAM2Select “Off” or “On” with the Navigation Key, thenpress to activate it.1Press [MENU] .Notifies you that a call has been successfully placed.CONNECT2Select “Off” or “On” with the Navigation Key, thenpress to activate it.1Press [MENU] .1Press [MENU] .To adjust speakerphone volume:SPEAKERPHONE2Adjusts the speakerphone volume using theNavigation Key.3To activate, press .Level 1 - 5 (Min- , Max- )Sounds an alert when entering an area where calls cannot be madedue to weak signal strength.FADE2Select “Off” or “On” with the Navigation Key,then press to activate it.1Press [MENU] .Allows you to activate/deactivate the power on/off tones.ON/OFF TONES2Select “Off” or “On” with the Navigation Key,then press to activate it.1Press [MENU] .](https://usermanual.wiki/Pantech/PN-218/User-Guide-654715-Page-31.png)
![SETTINGS SETTINGSCH463CH462To place the phone in Etiquette Mode so all phone sounds are muted:ETIQUETTE1Press [MENU] .2Select “On” or “Off” with the Navigation Key,then press to activate it.Shortcut:From standby mode, press and hold to Etiquette ModeOn/Off.Sounds a different ringer when you are in a roaming service area.ROAM RINGER1Press [MENU] .2Select “Distinctive” or “Normal” with theNavigation Key, then press to activate it.Normal : Sounds the same ringer type as used in Home area.Distinctive : Sounds a different ringer type.llTo adjust tone length:TONE LENGTH1Press [MENU] .2Select “Normal” or “Long” with the NavigationKey, then press to activate it.Allows you to customize the display.DISPLAYWALLPAPER1Press [MENU] .To select an LCD display:GRAPHICS2Select Default to choose a pre-installed displayor scroll through Downloads or Photo # tochoose a display you have downloaded to yourphone.3Press [SELECT] to activate it.2Select “ALLTEL” with the Navigation Key.3Press [SELECT] to activate it.1Press [MENU] .POWER ON1Press [MENU] .POWER OFF2Select “ALLTEL” with the Navigation Key.3Press [SELECT] to activate it.](https://usermanual.wiki/Pantech/PN-218/User-Guide-654715-Page-32.png)
![SETTINGS SETTINGSCH465CH4641Press [MENU] .RECEIVED1Press [MENU] .DIALED2Select “Default” with the Navigation Key.3Press [SELECT] to activate it.2Select “Default” with the Navigation Key.3Press [SELECT] to activate it.1Press [MENU] .SCREEN SAVER2Select “Time Setting” or “Screen Saver” withthe Navigation Key.3To activate, press [SELECT].Time Setting : Off, 5 Secs, 10 Secs, 20 Secs, 30 Secs.Screen Saver : Select picture image.(Photo/Multimedia/Images).By pressing [MENU], the user can choose from the following:1. Erase: To erase pictures saved in the current album. 2. Erase All: To erase all pictures saved in the current album.3. Change Title: To edit the title of a picture file.llSet the time of Screen Saver, then select the images (default ordownloaded from Cricket Clicks), then the image will be displayed onthe LCD.SUB SCREEN1Press [MENU] .2Select “Digital” or “Analog” with the Navigation Key.3To activate, press .To input a personal greeting:GREETING MESSAGE1Press [MENU] .2The message field will be highlighted. Press the Navigation Key left or right to choosebetween on and off. Press the Navigation Keydown to move to the next field, font color. Press the Navigation Key left or right to choose acolor. Repeat for both fields. Press the Navigation Key down to entry message.Enter your greeting.To save, press [SAVE].3Message : On/Off.Font Color: White, Blue, Dark blue, Magenta, Gray, Black.Entry Message : Enter message (Default-ALLTEL).lll](https://usermanual.wiki/Pantech/PN-218/User-Guide-654715-Page-33.png)
![CH467SETTINGSCH466SETTINGSTo adjust the display contrast:CONTRAST1Press [MENU] .MAIN LCD/SUB LCDTo save, press .23Select “Main LCD” or “Sub LCD”, then select oneof the following options with the Navigation Key.Main LCD : Level 1~5.Sub LCD : Level 1~5.llBacklights the display and key pad for easy viewing in dark places.BACKLIGHT3To save, press .1Press [MENU] .LCD/KEY PAD2Select “LCD” or “Key Pad”, then select one ofthe following options with the Navigation Key.LCD : 5 Secs/15 Secs/30 Secs/60 Secs/Always On.Key Pad : 5 Secs/15 Secs/30 Secs/60 Secs/Always On/Always Off.llDATA SERVICE2Select one of the following connection modeswith the Navigation Key.3Press to activate.This function is available only when the phone is connectedto data cable.CONNECTION1Press [MENU] .Choose the connection mode for the usage of your phone.Voice Call : To receive a voice call.Data Only : To receive data when connected to PC.Fax Only : To function as a fax when connected to PC.lll2Select “WAP”, “BREW” or “QNC Only” with theNavigation Key.3To save it, press .WAP/BREW1Press [MENU] .When connected to “WAP” or “BREW”, allows the user to eitherchoose “QNC”.2Select “Yes” or “No”, then press to activate it.AIRTIME WARNING MESSAGE1Press [MENU] .](https://usermanual.wiki/Pantech/PN-218/User-Guide-654715-Page-34.png)
![CH469SETTINGSCH468SETTINGSPrevents unauthorized use of your phone. The following settings canbe restricted:SECURITYPrevents the phone from being used without entering the passwordfirst.1Press [MENU] , enter your password.PHONE LOCK3To activate, press .2Press , then select “Lock Now”, “Lock OnPower Up” or “Unlock”.Lock Now : Lock the phone now.Lock On Power Up : Not locked, but it is automaticallylocked when power is recycled.Unlock : Do not lock the phone.lllThe default password is the last 4 digits of your phone number.RESTRICTBlocks all dialed calls – except emergency calls – but allows anincoming call to be placed.When you attempt to make a restricted call, “This phone is restricted”appears on the screen.2Press , then select “Allow” or “Restrict”with the Navigation Key.3To activate, press .DIALEDAllow : Allows a dialed call.Restrict : Restricts a dialed call.ll1Press [MENU] , enter your password.1Press [MENU] , enter your password.1Press [MENU] , enter your password.1Press [MENU] , enter your password.2Press , then select “Allow” or “Restrict”with the Navigation Key.3To activate, press .Allow : Allows a recent call.Restrict : Restricts a recent call.llRECENT CALLSBlocks access to Recent Call List.2Press , then select “Allow” or “Restrict”with the Navigation Key.Restricts access to camera mode.3To activate, press .CAMERAAllow : Allows access to the camera.Restrict : Restricts access to the camera. ll2Press , then select “Allow” or “Restrict”with the Navigation Key.Restricts a data call from being placed.3To activate, press .DATA CALLAllow : Allows a data call.Restrict : Restricts a data call.ll](https://usermanual.wiki/Pantech/PN-218/User-Guide-654715-Page-35.png)
![CH471SETTINGSCH470SETTINGSRestricts calling 900 dial service numbers.3To activate, press .900#SAllow : Allows calls to a 900-dial service.Restrict : Restricts calls to a 900-dial service.ll2Press , then select “Allow” or “Restrict”with the Navigation Key.Restricts calling long distance numbers – the phone is limited tocalling numbers within the area.3To activate, press .LONG DISTANCEAllow : Allows a long distance call.Restrict : Restricts a long distance call.ll2Press , then select “Allow” or “Restrict”with the Navigation Key.Changes your 4-digit password.CHANGE CODE2Press .3Enter a new password, then press . 4Enter the new password again, then press .Stores 3 phone numbers that can be called even in the lock mode.2Press , then select a location with theNavigation Key.3Press [SET] and input a phone number,press again to save.SPECIAL #’SClears all contacts, downloads, and photo gallery entries from your phone.2Press .ERASE ALL3Press [CHECK] to check “Contacts”,“Downloads” or “Photo Gallery”, then pressto erase all the items in those categories.1Press [MENU] , enter your password.1Press [MENU] , enter your password.1Press [MENU] , enter your password.1Press [MENU] , enter your password.1Press [MENU] , enter your password.](https://usermanual.wiki/Pantech/PN-218/User-Guide-654715-Page-36.png)
![CH473SETTINGSCH472SETTINGSResets phone to default settings.RESET PHONE3Select “Yes” or “No” with the Navigation Key.Press .When you select “Yes” and , you will see “Reset Phone !This will reset to default setting” on the display.2Press .4To reset the phone, press .OTHERS1Press [MENU] .2Select “Any Key” or “Send Key” with theNavigation Key.3To activate, press .ANSWER OPTIONSAny Key : Press any key to answer an incoming call except , , and .Send Key : Press only to answer a call.llTo select an answer mode:CALL ANSWERTo select active flip answer mode.1Press [MENU] .2Select “On” or “Off” with the Navigation Key.3To activate, press .ACTIVE FLIPWhen Active Flip On is selected, an incoming phone call canbe answered simply by opening the phone.When Active Flip Off is selected, you will need to open thephone and follow the Answer mode you have selected.ll1X PASSWORDTo change your User ID:2Press for “PAP User ID”. Your User ID appears in the Editor screen.3To save, press [STORE].PAP USER IDTo change your PASSWORD:2Press for “PAP Password”. Your password appears in the Editor screen.3To save, press [STORE].PAP PASSWORD1Press [MENU] , enter your password.1Press [MENU] , enter your password.1Press [MENU] , enter your password.](https://usermanual.wiki/Pantech/PN-218/User-Guide-654715-Page-37.png)
![CH475SETTINGSCH474SETTINGSPress [MENU] .Automatically answers a call after a preset amount of time. Auto Answer only works when the phone is open.12Select one of the following with the Navigation Key.3To activate, press .AUTO ANSWEROff/5 Secs/10 Secs/18 Secs.lThis function will not be active when you select Vibrate, Silent,Etiquette or Ringer after Vib as a ringer mode.1Press [MENU] .Automatically redials a call up to 5 times after a set time interval.23Retry time to field is shown. Press the NavigationKey left or right to choose the amount of time. (Off, 3 Secs, 5 Secs, 7 Secs, 10 Secs.)When a time is chosen for retry time, the repeatfield is shown. Press the Navigation Key down tohighlight the repeat field. Press the NavigationKey left or right to choose the amount ofrepeats. (1 Time, 3 Times, 5 Times).4To activate, press .AUTO RETRY1Press [MENU] .2Select either “English” or “Spanish” with theNavigation Key.3To activate, press .LANGUAGESelects the language in which letters are displayed on screen.3To activate, press .“Enhanced” : Makes it more difficult to wire tap.lEnhances voice privacy and avoids tapping during a call.1Press [MENU] .2Select “Standard” or “Enhanced” with theNavigation Key.VOICE PRIVACY](https://usermanual.wiki/Pantech/PN-218/User-Guide-654715-Page-38.png)
![CH477SETTINGSCH476SETTINGS3To activate, press .To determine whether or not the network system can detect yourposition:1Press [MENU] .2Select “911 Only” or “Location On” with theNavigation Key.LOCATION911 Only : Your location will be hidden from network & application except 911.Location On : Your location is now available to the network.llYour phone is able to operate with a TTY (Teletypewriter) device indigital mode. This feature is system dependent and may not beavailable in all areas.1Press [MENU] .2Select one of the following options (TTY Off /TTY+TALK / TTY+HEAR / TTY Full) with theNavigation Key, then press .TTY MODESelects the Preferred System.SYSTEMPress [MENU] .Select one of the following options (Automatic B/Automatic A/Home Only) with the NavigationKey, then press .Automatic B : Scans the radio channels based on the Automatic B setting.Automatic A : Scans the radio channels based on theAutomatic A setting.Home Only : Only within your home area or home affiliatedarea.SET MODE12lll12Press [MENU] .Select “Yes” or “No”, then press toactivate it.Enables Auto NAM (Number Assignment Modules) or manually selects a NAM.Automatically switches phone to proper NAM when you have multipleNAM registrations.AUTO NAMNAM SETTING](https://usermanual.wiki/Pantech/PN-218/User-Guide-654715-Page-39.png)
![SETTINGS SETTINGSCH479CH47812Press [MENU] .Select “NAM1-ALLTEL” or “NAM2-ALLTEL”, then press to activate it.Changes the NAM used by the phone when you have multipleregistrations.CHANGE NAMDisplays the phone’s PRL (Preferred Roaming List).12Press [MENU] .To return to the previous page, press .PRL IDDisplays the version of your phone:PHONE INFO1Press [MENU] .2The software version appears.3Press .S/W VERSION1Press [MENU] .2The hardware version appears.3Press .H/W VERSION1Press [MENU] .2The “AXCESS” software version appears.3Press .AXCESS VERSION](https://usermanual.wiki/Pantech/PN-218/User-Guide-654715-Page-40.png)
![SETTINGS UTILITIESCH481CH480When your phone is in Airplane Mode, it cannot send or receive anycalls or access online information. You may still use the phone’s otherfeatures, such as Notepad, Voice Memos, etc., while you are inAirplane Mode.AIRPLANE MODE1Press [MENU] .2Read the message, then press .3Select “On” or “Off”, then press toactivate it.While in Airplane Mode, your phone’s standby screen willdisplay “Airplane Mode” and the Time/Date disappears.SCHEDULE1Press [MENU] .ADD NEW PLANSets an plan and reminds you of that plan.23Use the Navigation Key to choose a date in thecalendar, then press .Use the keypad to change or enter the datethen press . Default : To set default ringer type.Change : Choose a ringer type from the list.DATE SETTINGUse the keypad to set a time and when highlighted,press to select “AM” or “PM”, then press . TIME SETTINGSelect an alert time interval option (On Time, 10 MinBefore, 30 Min Before, 1 Hour Before, No Alarm) bypressing the Navigation Key left or right. SETTINGTo set a Ringer, press [MENU], then select“Default” or “Change” using the Navigation Key. To save it press [SELECT].RINGER SETTINGUse the keypad to input a plan message then press . PLAN SETTINGThe date field is highlighted. Press the NavigationKey down to set the other options.](https://usermanual.wiki/Pantech/PN-218/User-Guide-654715-Page-41.png)
![UTILITIES UTILITIESCH483CH4821To view the Event List, press [MENU] .VIEW PLAN2Move the Navigation Key to choose an event,then press or [ERASE]. Press [MENU], then select “Erase All” usingthe Navigation Key. “Erase all plans?” will bedisplayed. Press to delete.4Press [SAVE] to save it or [CLR] toreturn to the calendar.5The date of the plan will be marked on yourcalendar.You can set up to 3 alarms.ALARMTo display alarm entries, press [MENU] .1Select one of the entries using the Navigation Key. To set a new alarm, choose alarm 1, 2 or 3.To edit an existing alarm, select that alarm. Press .2The Setting field will be highlighted. Press theNavigation Key down to select alarm options.3Use the Navigation Key to select a setting for thealarm (Once, Daily, Weekly, Monthly, Off). SETTINGOnce: Select the single date of the alarm.Daily: Select alarm for same time each day.Weekly: Select “Monday”, “Tuesday”, “Wednesday”, “Thursday”, “Friday”, “Saturday”, “Sunday”.Monthly: Select day 1 through 31.OffUse the keypad to set a time for the event and the to select “AM” or “PM” then press . TIME SETTINGUse the keypad to change or enter the date for thealarm then press . If Weekly is chosen for the setting, date fieldbecomes a day of the week.DATE SETTING](https://usermanual.wiki/Pantech/PN-218/User-Guide-654715-Page-42.png)
![CH485UTILITIESCH484UTILITIESTo save an alarm setting press [SAVE].4Default : To set default ringer type.Change : To choose a ringer type from the list.To set a “Ringer” press [MENU], then select“Default” or “Change” using the Navigation Key. To save it press [SELECT] to save it.RINGER SETTINGUse the Navigation Key to select a Snooze setting(Off, 1 time after 5 min, 1 time after 10 min, 3 timesby 5 min). SNOOZE SETTINGUsing the keypad, input an alarm message thenpress . PLAN SETTINGYour phone includes an internal memo pad that can be used tocompose and store reminders and notes.MEMO PAD1Press [MENU] .ADD MEMO2Input a new text memo.(Please refer to page 31 for more details on enteringletters, numbers & symbols.)11.1. Press [MENU] .VIEW MEMO2The list of all memos, in saved order, is displayed.Select a memo, then press .3The selected memo will appear. To edit it, press [MENU], select “Edit” and input a newtext memo, then press to save edit memo.1Press [MENU] .SETTINGS2Select (Paper/Pattern/Sea/Sky/Flower) by pressingNavigation Key left or right, then press .To compose a memo (there is an 80-letter limit):To view a saved memo:To select memo pad background image:1.2. To erase a memo, press [ERASE].1.3. To add a new memo, press [MENU] “New Memo”.1.4. To erase all memos, press [MENU] “Erase All”.3Press to save memo.](https://usermanual.wiki/Pantech/PN-218/User-Guide-654715-Page-43.png)
![CH487UTILITIESCH486UTILITIES1Press [MENU] .2Follow the instructions below to calculate8*6Ö4-2.53To reset, press [RESET].1Press [MENU] .To access the calculator:CALCULATORTo display the time and date in pre-programmed cities:WORLD CLOCKPress 8.Press the Navigation Key to the right.Press 6.Press the Navigation Key to the left.Press 4.Press the Navigation Key down.Press 2 then press to input (.). Press 5.Then press and you will see the answer.: X, : -, : /, : +, : ., : Reset, : =.24Select a city with the Navigation Key.3The world map appears with the city, its dateand time.Use the Navigation Key to select another city.As the daylight saving time is not applied, it may be different fromthe actual time during DST.To return to the previous page, press .](https://usermanual.wiki/Pantech/PN-218/User-Guide-654715-Page-44.png)
![CH489CAMERACH488UTILITIES1Press [MENU] .23Simultaneously times up to six different events. To operate thestop watch:STOP WATCHTo measure a time period.1. To start the stop watch, press [START].2. To pause it, press [STOP].3. To resume it or [RESET] to return to the previous page, press [EXIT].To time up to six events at once:1. To start, press [START].2. To stop a time period and continue measuring another one, press [CONT].3. To stop the second and continue measuring a third one, press [CONT].4. To measure up to six time periods, repeat theabove steps.5. To stop the stop watch, press [STOP].6. To review the results, press [VIEW].7. To return to the stop watch, press .8. To reset it, press [RESET].Taking pictures with your phone’s built-in camera is as simple aschoosing a subject, pointing the lens and pressing a button. You canactivate the Camera Mode and take pictures when the phone is open.TAKE A PHOTOPress [MENU] or press .Point the camera lens at your subject.You can check the picture framing through the main display screen.Press [OK] or the side camera button totake the picture.TAKING A PICTURE THROUGH THE MENUPress the Side Camera button or press andhold to activate Camera Mode.Point the camera lens at your subject. You can check the picture framing through themain display screen.Press the side camera button to take the picture.TAKING A PICTURE IN IDLE MODE1234123To save the picture, press [SAVE] then input apicture title, then press . To go back to idlemode without saving the picture, press . Tosend the picture to someone, press [SEND].4You cannot place or receive calls while in Camera Mode. All incoming voice calls will be forwarded to voicemail.To save the picture, press [SAVE] then input apicture title, then press . To go back to idlemode without saving the picture, press . Tosend the picture to someone, press [SEND].](https://usermanual.wiki/Pantech/PN-218/User-Guide-654715-Page-45.png)
![90CAMERACH4CH491CAMERACAMERA MODE OPTIONSWhen the phone is open and in Camera Mode, several user optionsare available.Press [GALLERY] to enter Review Mode. From there you can viewthe captured pictures, view a running count of stored pictures and more.GALLERYPress the Navigation Key up or down to adjust the picture size from High (640x480 pixels) to Med (320x240 pixels) to Low (160x120 pixels).The current picture size appears at the top left side of the display screen.RESOLUTIONPress the Navigation Key left or right to change the magnification. (Zoom to 1x, 2x or 4x magnification in Low Resolution and 1X and 2X in Medium Resolution.)ZOOMThe sub LCD will show a representation of the picture to be taken. Use the sub LCD to help frame yourself for a self portrait.SUB LCDUNDER [MENU]To activate the camera’s timer function. (Off / 5 Secs / 10 Secs)SELF TIMERTo select an option from the following. (Brightness / Image Effect /Contrast / Quality)IMAGE CONTROLSTo select a shutter sound. (Off / Shutter 1 / Shutter 2 / Shutter 3 / Say “Cheese”)SHUTTER SOUNDTo activate the flash function. (Off / On this shot / Always On)FLASHPHOTO GALLERY1Press [MENU] or .Your phone enters Review Mode after taking a picture.In Review Mode you can view all the pictures you have taken,store selected images in your phone, send pictures to theOnline Album, delete images and access additional pictureoptions.Press [MENU] to display the following options :1. Thumbnail : To switch the display from full-screen to thumbnail view.2. Edit Title : Edit the picture’s title.3. Send Photo : Upload the picture to a message.4. Assign Picture : Assigns the selected photo to display for specific tasks (Wallpaper/Screen Saver/Picture CallerID/Incoming Call).5. Erase : Erase the current picture from your phone.6. View Lists : Displays all pictures.7. Photo Info : Displays information on the selected picture, such as title, date/time, size, etc.Press [CAM] to return to Camera mode to take anotherpicture.2Press to select a picture.](https://usermanual.wiki/Pantech/PN-218/User-Guide-654715-Page-46.png)
![CH493CAMERACH492CAMERAPHOTO MESSAGEOnce you’ve taken a picture, you can use the messaging capabilities ofyour phone to instantly share it with family and friends. To send a pictureto a recipient’s email address or to their wireless phone:1Press [MENU] or .2Press for “New Photo” or for a “SavedPhoto”. If you are looking for a saved photo,scroll through the captured pictures to select thepicture you want to send.3Highlight the picture, then press .4Under “Send To”, enter the email address ormobile phone number, then press . 5Under “Message”, press . The picture willcome up with the flashing cursor underneath.Enter the message, then press . Press [MENU] to 1. Voice Record, 2. Insert Q.Text, 3. Delete Photo, 4. Insert Sound, 5. Insert Slide or 6. Slide Duration.7If you want to send the picture to any additionalrecipients, enter their information under “CC” or“BCC”.Press [MENU] to 1. Find, 2. Save or 3. Msg.Group.8To send the picture, press [MENU] .Press [MENU] to 1. Send, 2. Preview, 3. Saveto Outbox, 4. Priority or 5. Expiration.Please refer to page 106 for more details on “New Photo Msg”.6Under “Subject”, enter a subject line for themessage. Press .HELP1Press [MENU] or .Use up/down keys to change picture size, left/right keys tochange zoom and Side up/down keys control rotation onpreview mode. Camera menu provides more settings:1. SUB LCD: Enable previewing on external LCD.2. FLASH: Provides just enough light to allow pictures to be taken.3. SELF TIMER: Set timer to take a self portrait.4. IMAGE CONTROLS4.1 BRIGHTNESS 4.2 IMAGE EFFECT4.3 CONTRAST 4.4 QUALITY 5. SHUTTER SOUND: Select a sound to use for shutter.](https://usermanual.wiki/Pantech/PN-218/User-Guide-654715-Page-47.png)
![CH597VOICE TOOLS MENUCH596VOICE TOOLS MENUVOICE MEMOVoice Memo allows you to record a reminder message that can be upto 60 seconds. To record a memo:1Press [MENU] to start Voice Tools menu.2To enter a voice memo, press .1.5. Press [SEND] to access the “New Photo Msg” see “New Photo Msg” on page 106.31.1. To record a voice memo, press . Instructions will be displayed and you will hear “Please record at the tone.”1.2. To stop recording a memo, press [STOP] or [PAUSE/RESUME].1.3. Press [MENU] after recording a voice memoto “1. Re-record” or “2. Review”.1.4. Press [SAVE] to input a “Voice Memo” title, then press . (See page 31 for more information on entering letters, numbers and symbols.)2. To playing voice memo, press .Select the message you want to play then press [PLAY] or press [MENU] to 1. Edit Title or 2. Send. Press [ERASE] to erase the memo.3. To play the voice memo using the speakerphone,press . Select the message you want to play then press [PLAY] or press [MENU] to 1. Edit Title or 2. Send. Press [ERASE] to erase the memo.4. To erase all voice memos, press .“Erase all voice memos?” will be displayed. Press to erase all voice memos.VOICE DIALVoice Dial allows you to record a voice tag so you can call a person inyour phone book simply by saying their name. To access Voice Dial:1Press [MENU] to start Voice Tools menu.2To enter Voice Dial, press .31.1. To record a voice tag, press . The phone book list will be displayed alphabetically. Select a name, then press . Instructions will be displayed and you will hear “Name Please”.1.2. Say the name for the voice tag and repeat the name when prompted. You will hear “Got it”.2. To playing a voice tag, press . Highlight the name you want to play then press [PLAY] or press [ERASE].3. To play a voice tag using the speakerphone, press .Highlight the name you want to play then press [PLAY] or press [ERASE].4. To erase all voice tags, press .“Removing all voice tags Proceed?” will be displayed. Press to erase all voice tags.](https://usermanual.wiki/Pantech/PN-218/User-Guide-654715-Page-49.png)
![CH599VOICE TOOLS MENUCH598VOICE TOOLS MENUTRAIN WORDSTrain allows you to use Control words to make a call without using thekeypad.2“Please listen closely to hear instructions”will be displayed and you will hear “Nowtraining control words. Please say the wordyes”. 3Say “Yes”. You will hear “Again”. Say “Yes”again. You will hear “Training word successful”.Use to train or untrain the Voice Recognition with the control word,“Yes”.YES1Press [MENU] .2“Please listen closely to hear instructions” willbe displayed and you will hear “Now trainingcontrol words. Please say the word no”.3Say “No”. You will hear “Again”. Say “No” again.You will hear “Training word successful”.Use to train or untrain the Voice Recognition with the control word,“No”.NO1Press [MENU] .WAKE-UP1Press [MENU] .UNDO TRAIN ALL2“Undo voice recognition for all procedures?” will be displayed. Press [OK] to undo alltrained words.Press [MENU] .1Use to train or untrain the Voice Recognition with the control word,“Wake-Up”.Undo Train All erases all “trained” words.2“Please listen closely to hear instructions” willbe displayed and you will hear “Now trainingcontrol words. Please say the word Wake-Up”. 3Say “Wake-Up”. You will hear “Again”. Say “Wake-Up” again. You will hear “Trainingword successful”.](https://usermanual.wiki/Pantech/PN-218/User-Guide-654715-Page-50.png)
![CH5101VOICE RECOGNITION MODECH5100VOICE TOOLS MENUVOICE SETTING1Press [MENU] . 1Press [MENU] .SET ACTIVEHFK MODE2Select “Active Flip” or “Send Key” bypressing the Navigation Key left or right.3To activate, press .2Scroll to HFK Mode. Select “On” or “Off” bypressing the Navigation Key left or right.3To activate, press .Allows the user to activate or deactivate voice dial service.While using the Hands Free Kit, activates or deactivates the voicerecognition function.NAMEVoice Recognition (VR) enables you to place calls using your voiceand to record voice memos.1Press and hold until your phone turns toVoice Recognition mode.2“Please say the name after theprompt tone” will be displayedand you will hear “Name please”.1Press and hold until your phone turns toVoice Recognition mode.2Say a tag name when prompted. The memberand name will appear on the display and you willhear “Calling (Name)”.If no recorded voice dial, “No entries recorded” message will be displayed.](https://usermanual.wiki/Pantech/PN-218/User-Guide-654715-Page-51.png)
![1To access your voice mail, press [MENU] or .Displays the number of voice mails and accesses them by pressing .VOICE MAILCH6105CH6104WHEN A NEW MESSAGE ARRIVES NEW TEXT MSG1The following display appearswhen a new message arrives.2To display the message, press [READ].1Press [MENU] or . To send a new message:2Under “Send To”, input the phone number, then press .3Under “Message”, input a new text message,then press .By pressing [MENU], you can choose from the following:1. Find: Search the phone number which is stored in the phone book.2. Save: Stores the phone number the message was sent to.3. Msg. Group: Select, all the phone numbers in a group.4The default call back number is automaticallyinputted into the Default CB# field. You can scroll to the number and edit it or simply press [EDIT].77.1. To send the text message, press [MENU], then select “Send”, then press .7.2. To save the text message, press [MENU], then select “Save to Outbox”, then press .5Press the Navigation Key down for more fields.Under “Priority”, select “Normal” or “Urgent”.6Under “Insert Signature”, select “On” or “Off”.(Please refer to page 31 for more details on entering letters,numbers and symbols.)FIRST TIME USER1Dial *86, then press .2At the recording, press .3Follow the voice tutorial to set up your account.EXISTING USER1Dial *86, then press .2At the recording, enter your 4 digit password,then press .3To listen to new messages, press .By pressing [MENU], in the message input screen you canchoose from the following:1. Insert Quick Text: Inserts canned text into a Text Msg.2. Insert Sound: Inserts sound in Text Msg.3. Insert Picture: Inserts picture in Text Msg. 4. Insert Animation: Inserts Animation in Text Msg.5. Save to Quick Text: Saves the written sentences into Quick Text.](https://usermanual.wiki/Pantech/PN-218/User-Guide-654715-Page-53.png)
![NEW PHOTO MSG NEW PHOTO MSGCH6107CH61061Press [MENU] or . To send a new picture message:3Under “Send To”, input the phone number, then press .4Under “Message”, input a new text message,then press .(Please refer to page 89 for more details on take a photo.)5Under “Subject”, input a message subject, thenpress .(Please refer to page 31 for more details on entering letters,numbers and symbols.)6To send a message to another person, selectthe “CC” or “BCC” and input the phonenumbers, then press .77.1. To send the picture message, press [MENU], then select the “Send”, then press .7.2. To save the picture message, press [MENU], then select “Save to Outbox”, then press .2Phone goes into camera mode automatically. Take a picture, then press .By pressing [MENU], the user can choose from the following:1. Find: Allows the user to search the phone number which isstored in the phone book.2. Save: Stores the phone number the message was sent to.3. Msg. Group: Allows you to select all the phone numbers in agroup.By pressing [MENU], the user can choose from the following:1. Take Photo: To take a new photo.2. Voice Record: To record a voice memo.3. Insert Q.Text: Insert Quick Text function inserts already saved sentences.4. Insert/Delete Photo: To insert/delete a picture from your photo gallery.5. Insert/Delete Sound: To Insert/delete a sound in Photo Msg.6. Insert/Delete Slide: To insert/delete a picture in Photo Msg.7. Slide Duration: To select a slide duration time.By pressing [MENU], the user can choose from the following:1. Send: To send a picture message.2. Preview: To preview a written picture message.3. Send to Outbox: To save a message to “Outbox” folder.4. Priority: To select priority “Normal” or “High”. 5. Expiration: To select expiration time “Off”, “1 day”, “2 days”, “3 days”, “4 days” or “5 days”.By pressing [MENU], the user can choose from the following:1. Find: Allows the user to search the phone number which isstored in the phone book.2. Save: Stores the phone number the message was sent to.3. Msg. Group: Allows you to select all the phone numbers in agroup.4. Online Album: To send pictures by using online Address Book.](https://usermanual.wiki/Pantech/PN-218/User-Guide-654715-Page-54.png)
![INBOX INBOXCH6109CH6108*SAVE MEDIA1Select Save Media to save the picture from thereceived message to the media gallery folder.(Please refer to page 110 “NOTE” for more details.)SAVE TO CONTACT1Select Save to Contact to save the contactinformation from the message to your contact list.FORWARD1Select Forward to forward the message toanother person.2Input the phone number of the person you aresending the message to, then press .3Input any text message to go along with theforwarded message, then press .1Press [MENU] or . : Urgent New Msg (not read): Urgent Read Msg: New Msg (not read): Old Msg (already read): Lock (already read and locked)The Inbox manages received text messages. To access:2Select a message, then press . The message is displayed. To delete a message,press [ERASE].Press [MENU] to view options.3REPLY1Select Reply to reply to the message.2Type your reply, then press .REPLY WITH COPY12345Select Reply With Copy to reply to a messageand include a copy of the received message.The default call back number is automaticallyinputted into the Default CB# field. You can scroll to the number and edit it.To send the text message, press [SEND].To save the text message, press [MENU] andselect the “Save to Outbox” then press .Under “Insert Signature”, select “On” or “Off”.*PHOTO INFO1Select Poto Info to display the photo messageinformation.(Please refer to page 110 “NOTE” for more details.)A slide show consists of up to 3 pictures in one message with textand/or sound.*PLAY SLIDE SHOW1Select Play Slide Show to play all slides in aslide show from a photo message. There is a5 second interval between slides.(Please refer to page 110 “NOTE” for more details.)](https://usermanual.wiki/Pantech/PN-218/User-Guide-654715-Page-55.png)
![INBOX OUTBOXCH6111CH6110SAVE TO SAVED1Select Save to Saved to save the message inyour phone.SAVE TO QUICK TEXTLOCK & UNLOCK1Select Lock & Unlock to lock or unlock themessage.2Select “Lock” to lock the message or “Unlock”to unlock the message, then press .1Select Save to Quick Text to save the receivedtext message to the Quick Text list.*BLOCK SENDER1Select Block Sender to block all incomingmessages from the sender of the message.• "*Photo Info" and "*Play Slide Show" menus appear only whenyou receive a photo message.• "*Save Media" menu appears only when you receive a photomessage or EMS message.• "*Block Sender" menu appears only when you receive a textmessage.CHECKING SENT TEXT MESSAGES1Press [MENU] or . RESEND1Select Resend to resend the message.*PHOTO INFO1Select Photo Info to display the photomessage information.(Please refer to page 112 “NOTE” for more details.)Manages sent text messages or messages waiting to be sent.: Auto resend: Fail: Not send: Sent22.1. Select a message, then press .The text message is displayed.Press [MENU] for more options.32.2. To erase message, press [ERASE].](https://usermanual.wiki/Pantech/PN-218/User-Guide-654715-Page-56.png)
![CH6113CH6112WEB ALERTSOUTBOX*STATE1Select State to display the status of the message.SAVE TO SAVED1Select Save to Saved to save the message inyour phone.LOCK & UNLOCK1Select Lock & Unlock to lock or unlock themessage.2Select “Lock” to lock the message or “Unlock”to unlock the message, then press .SAVE TO CONTACT1Select Save to Contact to save the number toyour contacts list.• "*Photo Info" menus appear only when you receive a photomessage.• "*State" menu appears only when you receive a text message.EDIT MESSAGE13Input the phone number, then press .2Input a text message, then press .Select Edit Message to edit the message. WEB ALERTS1Press [MENU] or . 2To select GoTo, press .To select Erase Message, press .3The Web Alerts message will be displayed.[ ] : Read Message.[ ] : Unread Message.[ ] : Displays the remaining text.GoTo : Connecting to Selected Site.Erase : Erase Selected Message.V](https://usermanual.wiki/Pantech/PN-218/User-Guide-654715-Page-57.png)
![CH6115CH6114QUICK TEXTSAVED1Press [MENU] or . To edit the quick text message you have saved:QUICK TEXT22.1. Select a message from the list. Press [MENU].2.2. To add a new quick text message, press [ADD NEW]. To edit the quick text message you have selected, press [EDIT].3To erase the saved quick text message, press [ERASE].Manages saved messages from the Inbox/Outbox.SAVED1Press [MENU] or . 22.1. Select a text message then press .The text message is displayed.2.2. To erase message, press [ERASE].4If the text message is saved from the “Inbox”menu, this screen will be displayed.3Press [MENU].If the text message is saved from the “Outbox”menu, this screen will be displayed.5Select one by pressing .To select inbox menu : *Photo Info, *Play Slide Show, Reply, Reply With Copy, Forward, Save to Quick Text, *Save Media, Block Sender, Save to Contact, Lock & UnlockTo select outbox menu : *Photo Info, Resend, Edit Message, Save to Contact, Lock & Unlock, *State• "*Photo Info" or "*Play Slide Show" menu only appears when youreceive a photo message.• "*Save Media" menu appears only when you receive a photomessage or EMS message.• "*State" menu appears only when you receive a text message.](https://usermanual.wiki/Pantech/PN-218/User-Guide-654715-Page-58.png)
![CH6117CH6116SETTINGSERASE ALLAUTO SAVEPress [MENU] or .Press . Select either “Off”, “On” or “Prompt” withthe Navigation Key.Press .SAVE SENT MSGPress . Select “Automatic” or “Prompt” withNavigation Key.Press .PHOTO RECEIVEManages messaging features through various features.12323Press [MENU] or .1ERASE MESSAGES1Press [MENU] or . 21. To erase all the inbox messages, press .3Select “OK” or “Cancel” with [OK] or [CANCEL].2. To erase all the outbox messages, press .3. To erase the saved messages, press .Old Inbox : To erase all messages already read.(However, the locked Message(s) will not be deleted).Entire Inbox : To erase all messages.](https://usermanual.wiki/Pantech/PN-218/User-Guide-654715-Page-59.png)
![CH6119CH6118SETTINGSSETTINGSDEFAULT CALLBACK1Press [MENU] or . 2Press .Input a callback number, then press .Edits a default callback number so that the recipient can callback or reply.You can look it up from the phone book bypressing [FIND].Press .Select “Disable” or “Enable” with Navigation Key. Press .OUTBOX123Press [MENU] or .Press [MENU] or .AUTO ERASEPress .Select “Disable” or “Enable” with Navigation Key.Automatically erases inbox/outbox messages when new messagesarrive.Press .INBOX1231Press [MENU] or . 1Press [MENU] or . REMIND23Press . Select “On” or “Off” with the Navigation Key.Press .EDIT VOICE CALLBACK2Press . Input a new voice callback number or editvoice call back number.3Press .You can look it up from the phone book bypressing [FIND].](https://usermanual.wiki/Pantech/PN-218/User-Guide-654715-Page-60.png)
![CH6120SETTINGSENTRY MODE12Press .Select “Alpha Mode” or “T9 Mode” withthe Navigation Key.3Press .Sets an Entry Mode as a default. The T9 mode indicator will appearwhenever the input mode is activated if the T9 mode is the default.Press [MENU] or . CH6121SETTINGSDIRECT VIEW12Press .Select “On” or “Off” with the Navigation Key.On : Set to read msg without entering inbox in SMS menu.Off : Set to read msg after entering inbox in SMS menu.3Press .Press [MENU] or . If the Direct View is set to on, the user will be able to view themessage by pressing the read key. If the Direct View is set to off,the user can view the message by entering SMS Menu-> Inbox.Create a signature that can be automatically inserted at the end of amessage.EDIT SIGNATURE1Press [MENU] or . 2Press .To input “Signature”, put the cursor on EditSignature, then enter Signature Edit window byusing right or left direction keys. 3To activate Signature function, put the cursor onInsert Signature, then select “On” by using rightor left direction keys. To deactivate Signaturefunction, select “Off”.4Press .3Press .BLOCK OR UNBLOCK12Press .Select “Block”, “Unblock” or “View List ofBlocked Address” with the Navigation Key.Press [MENU] or . Block : Enter the address to block.Unblock : Enter the address to remove from block.View List of Blocked Address : Display the blockedlist on LCD.](https://usermanual.wiki/Pantech/PN-218/User-Guide-654715-Page-61.png)
![START INTERNET BROWSER BROWSER MENUCH7125CH7124ACCESS THE INTERNET1To start your Internet browser and accesswebsites through your wireless handset, press[MENU] .To forward to the next page, press [MENU], then press . To clear browser memory, press [MENU], then press . BACK1To return to the previous page, press [MENU], then press . HOME1To display the homepage, press [MENU], then press . ADDRESS1To select “Address”, press [MENU], then press . REFRESH1To select “Refresh”, press [MENU], then press . BROWSER MENUThe browser menu lists the actions necessary to operate the browser.To access press [MENU] .When the history item is selected from the browser menu, the browser isdisplayed with the browser version and copyright information. The device layer version is also displayed.When the home item is selected from the browser menu, the phonedisplays the home page.Selecting the “Address” action displays the URL of the currentpage.Selecting the refresh item from the browser menu refreshes the currentpage.HISTORY1To select “History”, press [MENU], then press . FORWARD1CLEAR MEMORY1SETTINGS1To select “Settings”, press [MENU], then press .](https://usermanual.wiki/Pantech/PN-218/User-Guide-654715-Page-63.png)
![BROWSER MENUSAFETY ANDWARRANTYThis chapter addresses the safety guidelines and precautions tofollow when operating your phone. Before operating your phone,please be aware of all the safety details.This chapter contains the terms and conditions of services and thewarranty for your phone. Please review them thoroughly. SAFETY INFORMATION FOR WIRELESS HANDHELD PHONESSAFETY INFORMATION FOR FCC RF EXPOSURESAR INFORMATIONFCC HEARING-AID COMPATIBILITY (HAC) REGULATIONS FOR WIRELESS DEVICESFDA CONSUMER UPDATEPROTECT YOUR WARRANTY12 MONTH LIMITED WARRANTYChapter 8127CH7CH8126ADVANCED1To select “Advanced”, press [MENU], then press . Selecting the advanced item in the browser menu displays theadvanced menu items.To exit browser, press [MENU], then press . EXIT1](https://usermanual.wiki/Pantech/PN-218/User-Guide-654715-Page-64.png)


![137136CH8CH8On July 10, 2003, the U.S. Federal Communications Commission(FCC) Report and Order in WT Docket 01-309 modified the exception ofwireless phones under the Hearing Aid Compatibility Act of 1988 (HACAct) to require digital wireless phones be compatible with hearing-aids.The intent of the HAC Act is to ensure reasonable access totelecommunications services for persons with hearing disabilities. While some wireless phones are used near some hearing devices(hearing aids and cochlear implants), users may detect a buzzing,humming, or whining noise. Some hearing devices are more immunethan others to this interference noise, and phones also vary in theamount of interference they generate.The wireless telephone industry has developed a rating system forwireless phones, to assist hearing device users find phones that may becompatible with their hearing devices. Not all phones have been rated.Phones that are rated have the rating on their box or a label located onthe box. The ratings are not guarantees. Results will vary depending on theuser’s hearing device and hearing loss. If your hearing device happensto be vulnerable to interference, you may not be able to use a ratedphone successfully. Trying out the phone with your hearing device isthe best way to evaluate it for your personal needs.M-Ratings: Phones rated M3 or M4 meet FCC requirements and arelikely to generate less interference to hearing devices than phones thatare not labeled. M4 is the better/higher of the two ratings.Hearing devices may also be rated. Your hearing device manufactureror hearing health professional may help you find this rating. Higherratings mean that the hearing device is relatively immune to interferencenoise. The hearing aid and wireless phone rating values are then addedtogether. A sum of 5 is considered acceptable for normal use. A sum of6 is considered for best use. In the above example, if a hearing aid meets the M2 level rating and thewireless phone meets the M3 level rating, the sum of the two valuesequal M5. This should provide the hearing aid user with “normal usage”while using their hearing aid with the particular wireless phone. “Normalusage” in this context is defined as a signal quality that is acceptablefor normal operation. The M mark is intended to be synonymous with the U mark. The T markis intended to be synonymous with the UT mark. The M and T marksare recommended by the Alliance for Telecommunications IndustriesSolutions (ATIS). The U and UT marks are referenced in Section 20.19of the FCC Rules. The HAC rating and measurement procedure aredescribed in the American National Standards Institute (ANSI) C63.19standard.For information about hearing aids and digital wireless phonelFcc Hearing Aid Compatibility and Volume Controlhttp://www.fcc.gov/cgb/dro/hearing.htmllGallaudet University, RERChttp://tap.gallaudet.edu/DigWireless.KS/DigWireless.htmlSelf Help for Hard of Hearing People Inc. [SHHH]www.hearingloss.org/hat/TipsWirelessPhones.htmlThe Hearing Aid Compatibility FCC Orderhttp://hraunfoss.fcc.gov/edocs_public/attachmatch/FCC-03-168A1.pdfFCC HEARING-AID COMPATIBILITY (HAC)REGULATIONS FOR WIRELESS DEVICES FCC HEARING-AID COMPATIBILITY (HAC)REGULATIONS FOR WIRELESS DEVICES](https://usermanual.wiki/Pantech/PN-218/User-Guide-654715-Page-69.png)