Pantech PN-810 Dual Band CDMA Cellular Phone With Bluetooth User Manual 061023 PN 810 EN
Pantech Co., Ltd. Dual Band CDMA Cellular Phone With Bluetooth 061023 PN 810 EN
UserManual.wiki
>
Pantech
>
PN 810 User Manual
User Manual
Navigation menu
Upload a User Manual
Namespaces
Wiki Guide
HTML
PDF
Info
Views
User Manual
Discussion / Help
Navigation
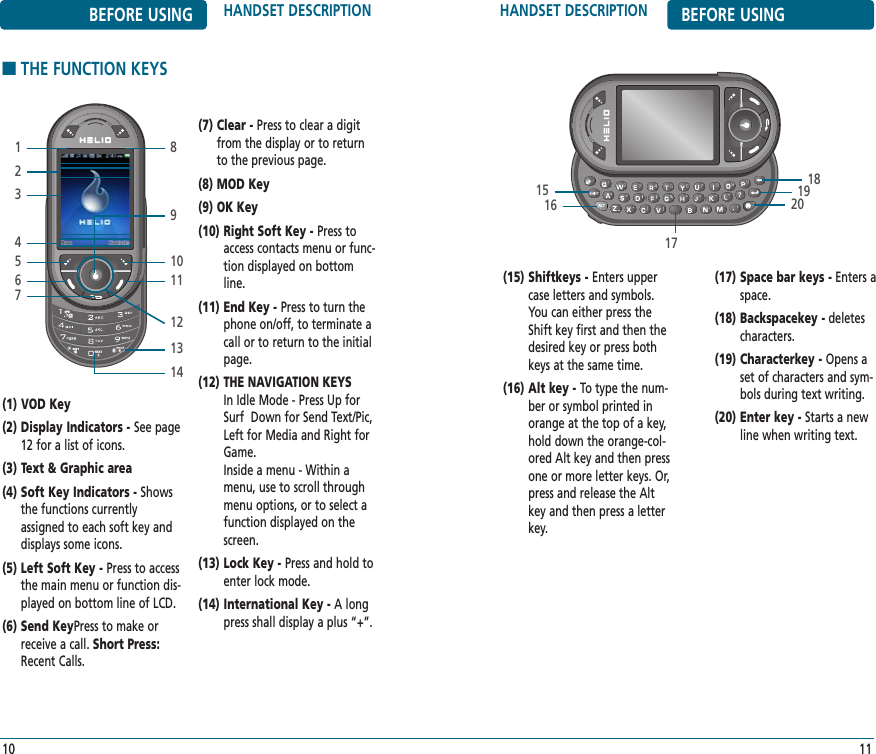
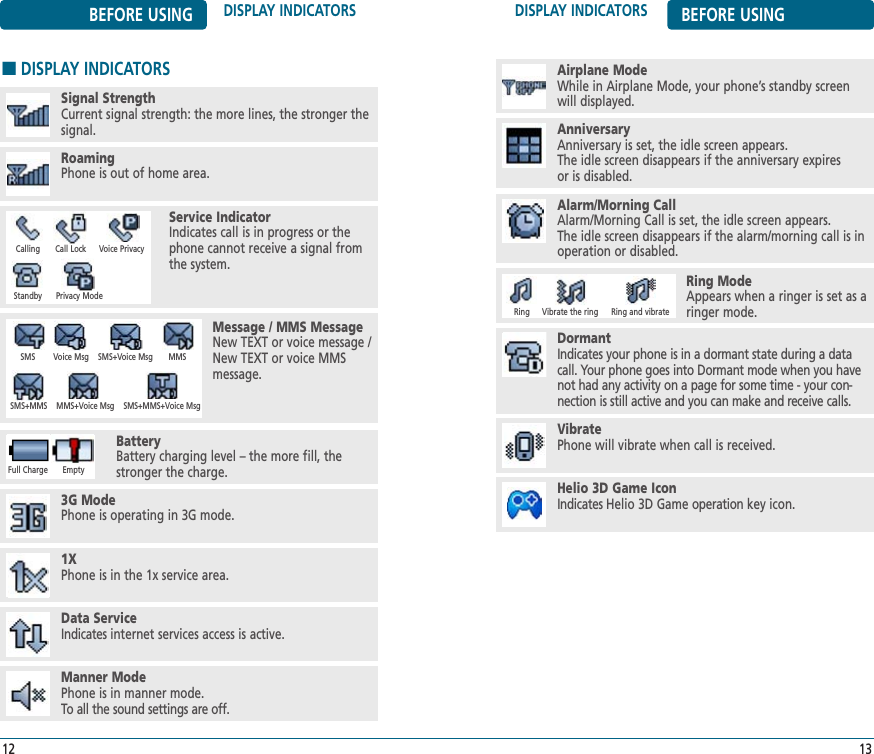
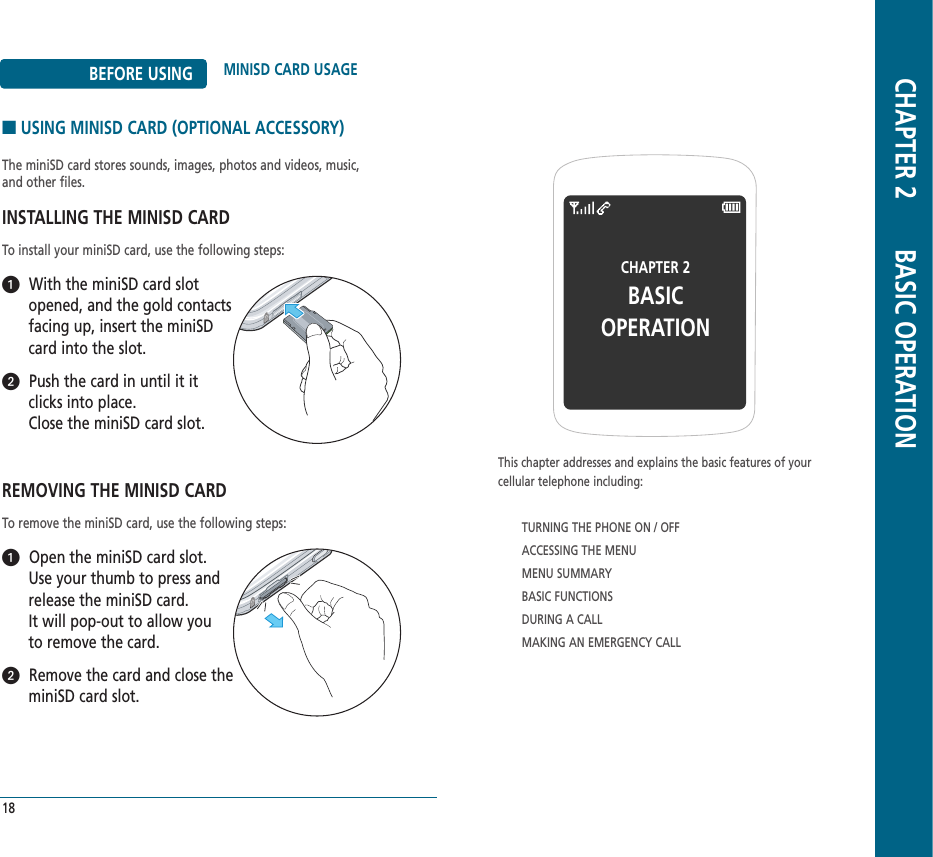
![ACCESSING THE MENU BASIC OPERATIONTo access the menu in idle mode, slide the phoneopen, press [MENU].Use the Navigation Key to scroll through the menu.To return to the previous page, press .To exit the current menu and return to idle mode,press . Press the Navigation Key and then press , toenter a function when its main page is displayed orpress its assigned number to have direct access tothe function.21Your phone can be customized via the menu. Each functioncan be accessed by scrolling with the Navigation Key or bypressing the number that corresponds to the menu item.HotkeyIn idle mode, move the Navigation Key as follows to accessthese functions:•:SURF•:Send Text/Pic•:Game•:MediaBASIC OPERATION TURNING THE PHONEON / OFF■TURNING THE PHONE ONSlide the phone open, press and hold , until“HELIO” Logo and animation appears and the wakeup tone sounds.20•If your phone is locked, enter your 4-digit password tounlock your phone when “Enter 4-digit password”appears on the display.•The default password is “0000”.•Immediately change or recharge the battery when “Low Battery” appears on the display. Memory maypossibly be damaged if the phone turns off due to thebattery completely draining.•Turn the phone off before removing or replacing thebattery. If the phone is on, unsaved data may be lost.■TURNING THE PHONE OFFSlide the phone open, press and hold , until“HELIO” Logo and animation appears and the tonesounds.](https://usermanual.wiki/Pantech/PN-810/User-Guide-731388-Page-11.png)
![BASIC FUNCTIONS BASIC OPERATION■SPEAKER PHONEThe speaker phone feature lets you hear audio through the speakerand talk without holding the phone.To activate or deactivate the speaker phone during call,press .25BASIC OPERATION BASIC FUNCTIONS■MAKING A CALL24To modify the phone number you have entered:•Erase one digit at a time by pressing .•Erase the entire number by pressing and holding .To send a Text or Photo message to the phone number:•Enter a part of the phone number, then press [MENU], select “Send Text/Pic or Send Email”. Please refer to page 113 or page 115 for more details on “Send Text/Pic or Send Email”.•If “CALL FAILED” appears on the display or the line is busy, press or . •If you activate the “AUTO REDIAL” function, the phone will automatically retry for 2 times. (Refer to page 55).•If “Enter Lock Code” appears on the display enter your 4-digit password to unlock your phone.NUMBERPress . The indicator, , appears on the display.To end a call, slide the phone closed or press .Slide the phone open, enter a phone number.■ANSWERING A CALLWhen your phone rings or vibrates, slide the phoneopen, press to answer the incoming call.(Depending on your phone’s settings, you may alsoanswer incoming calls by opening the phone or bypressing any number key.)To end the call, slide the phone closed or press .•To silence the ringer and ignore incoming calls, press [SILENT] and then press [IGNORE].•When you place or receive a call from stored phone numbers, both the name and phone number will be displayed.The phone returns to normal (Speaker Phone Off) after ending a call or when the phone is turned off and back on.■CALLING A NUMBER FROM CONTACTSPress [CONTACT] to access the directory. Select the desired phone number and press .■MAKING AN INTERNATIONAL CALLPress and hold . When “+” is displayed, enter thecountry and area codes, then complete the number andsend the call.](https://usermanual.wiki/Pantech/PN-810/User-Guide-731388-Page-13.png)
![BASIC FUNCTIONS BASIC OPERATION27Call Waiting is a system dependent feature. Please contactyour service provider for details.BASIC OPERATION BASIC FUNCTIONS■3-WAY CALLINGWith 3-Way Calling, you can talk to two people at the same time.When using this feature, normal airtime rates will apply to the twocalls.Slide the phone open, enter a number you wish tocall and press .Once you have established the connection, enterthe second number you wish to call and press .When you’re connected to the second party, press again to begin your 3-Way call.26If one of the people you called hangs up during your call,you and the remaining caller stay connected. If you initiated the call and are the first to hang up, allthree callers are disconnected.NUMBERNUMBER■CALL WAITINGNotifies you of an incoming call when you are already on a call bysounding a beep tone and displaying the caller’s phone number.To answer another call while on the phone, press .This places the first call on hold. To switch back to thefirst caller, press again.■ENTER LOCK MODETo lock the phone, slide the phone open, press andhold .To unlock the phone, press any function key (Except , numeric key, ), then input yourpassword.■2SEC/HARD PAUSEPauses are used for automated systems (i.e., voice mail, callingcards). Insert a pause after a phone number then enter anothergroup of numbers. The second set of numbers is dialed automatically after the pause. This feature is useful for dialing intosystems that require a code.To insert a pause, enter a phone number then press [MENU]. Select either a “2sec Pause” (“P”) or a “Hard Pause” (“W”). Press to dial or [SAVE] to store the phone number.Please refer to page 36 for more details about storing a phone number.NUMBERSelect“2” or ”3”](https://usermanual.wiki/Pantech/PN-810/User-Guide-731388-Page-14.png)
![BASIC FUNCTIONS BASIC OPERATION29BASIC OPERATION BASIC FUNCTIONS■ADJUSTING VOLUMEAdjust the volume of the ringer, key beep and speaker phone.Select one of the following.Adjust volume and press [SAVE] to save it.28•Ring Volume: Controls the ringer volume.•Receiver: Controls the receiver volume.•Keypad: Controls the keypad volume.•Effects: Controls the effects volume.•Wake-up Call: Controls the wake-up call volume.•Alert: Controls the alert volume.•Power Up/Down: Controls the power up/down volume.To adjust volume in idle mode, press side speaker key.■CALLER IDIdentifies callers by displaying their phone number. If the caller’s name and number are already stored inyour phone book, they will both appear.■MP3 PLAYERMusic Player is for playing MP3 files saved on the miniSDCard. To display music list with the phone closed, press and select a music file with the Navigation Key, press[PLAY], then press [PAUSE] or press [FFW] or press [FRW] to select another MP3 file.In order to stop the music player while it is playing with shellclosed, it is required to open the shell and press .The caller ID information is stored in Call History.The MP3 Player can only play MP3 files recorded at 192 kbps orless. Please consult the recorded source file for details.■USING FLASHLIGHTThis function allows you to use the phone’s camera flash as a miniatureflashlight. To use this function, your phone must be in standby mode.In standby mode, press and hold .](https://usermanual.wiki/Pantech/PN-810/User-Guide-731388-Page-15.png)
![DURING A CALL BASIC OPERATION31BASIC OPERATION BASIC FUNCTIONS30■CALL LOGDisplays information about All Calls, Missed Calls, Received Calls,Dialed Calls and Rejected calls.Press .To see a list of the 40 most recent All Calls, MissedCalls, Received Calls, Dialed Calls and Rejected calls.If the number is already stored in your phone book,only the name appears. If the number is not stored,only the phone number appears.Press [MENU] to save a selected number orpress [WRITE] to send a messageTo view details, press . To access options, press [MENU].•Save: To save the number to a contact list.•Delete: To delete a call log.•Delete All: To delete all call logs.•Send Caller Info: To send a caller information to someoneelse.•Save: To save the number to a contact list.•Delete: To delete a call log.•Send Caller Info: To send a caller information to someoneelse.If you are in call logs, you may also navigate to the next orprevious call logs (All Calls, Missed Calls, Received Calls,Dialed Calls and Rejected calls) by pressing the NavigationKey right or left.Call details include type of call, date, time and phone number.■AVAILABLE OPTIONS DURING A CALLTo display menu options during a call, press [MENU].CONTACT LISTTo search or save the phone number in your contacts list.Press [MENU] .CALL LOGTo displays the list of call log.Press [MENU] .MUTE (UNMUTE)Mutes the microphone while you are on a call so the other partycannot hear you when you speak.Press [MENU] .3-WAY CALLTo call a second party during a call, dial the number or select itfrom the directory by accessing the menu during a call.Press [MENU] .•To deactivate, press [MENU] .•The phone will automatically unmute in Emergency Call or Callback mode.](https://usermanual.wiki/Pantech/PN-810/User-Guide-731388-Page-16.png)
![MAKING AN EMERGENCY CALL BASIC OPERATION33BASIC OPERATION DURING A CALL32SEND MESSAGEEnables you to send a message (SMS) during a call.Press [MENU] .MY NUMBEREnables you to see your phone number while on a call.Press [MENU] .RECORD CALLRecords the conversation for up to three minutes during a call.Press [MENU] .This 911 feature puts the phone in the Emergency Call Mode whenyou dial the preprogrammed emergency number, 911. It also operates in the lock mode and out of the service area.■911 IN LOCK MODEThe 911 call service is available even in the lock mode.Enter “911” and press .The call connects.■911 USING ANY AVAILABLE SYSTEMThe 911 call service is available even in the lock mode.Enter “911” and press .The call connects.•When the call ends, the phone returns to the Lock Mode.•While the phone is in the emergency mode for 5 minutes, the phone can receive an incoming call from any available system. However it can't make a call.The 911 call is not recorded in the recent call list.EmergencyNumber](https://usermanual.wiki/Pantech/PN-810/User-Guide-731388-Page-17.png)
![ENTERING LETTERS, NUMBERS & SYMBOLS MEMORY FUNCTIONSThe input mode (T9 editor) will automatically be activated when necessary to enter letters and numbers.As shown below, there are 5 available modes ; Standardinput mode (Abc), T9Word input mode (T9Abc), Numericmode (123), Symbol mode (Sym) and korean mode(Korean).The input mode indicator appears on the below right ofthe display when letters and numbers are entered. Toselect the desired input mode among the 5 modes below,press [Abc], then enter letters and numbers.The following illustrates the function assigned to eachkey in the Alpha Editor.37MEMORY FUNCTIONS STORING A PHONE NUMBERThe phone book stores up to 1200 entries.Slide the phone open, enter phone # then press[SAVE], and then choose “New Contact” or “Existing Contact”. Press to select.If “New Contact” is selected, enter a contact editwindow. If “Existing Contact” is selected, your contact list isdisplayed. Choose the entry to add the phone number to, then press .Enter a name. Please refer to page 37 for more details on enteringletters, numbers & mbols. To change the input mode, press [Abc]. Press the Navigation Key down to select otheroptions. To store the entry, press [SAVE]. “Save changes?” and then press [YES].36•Contact Field: First Name, Last Name, Graphic, Phone Number 1 ~ 5, , Ring, Default number,Email, Instant Message, MySpace, Notes,Group.•Phone Number Type: Mobile, Home, Work, Fax, Other.•If you entered a phone number or others, press [Add...] to select options. (Phone/E-Mail/Address/Nickname/Title/Company/Department/Website)FUNCTIONKEYAbcPress to change mode.[T9Abc][Abc][123][Sym][Korean]NextPress to view the next matching word if the highlighted word is not the word you intended.SpacePress to accept a word and add a space.ClearPress to delete a character to the left of the cursor.Caps LockPress to select a letter case of the standard textinput or T9 text input mode. [Abc], [ABC] and [abc]indicate the standard text input. [T9Abc], [T9ABC]and [T9abc] indicate the predictive text input. Pressand hold to change mode.](https://usermanual.wiki/Pantech/PN-810/User-Guide-731388-Page-19.png)
![ENTERING LETTERS, NUMBERS & SYMBOLS MEMORY FUNCTIONS■T9WORD INPUT MODEThe T9Word input mode incorporates a built-in-dictionary to determine a word based on the entered characters. A T9Word canbe entered more quickly by pressing a key once per character.Select the T9Abc mode by pressing [Abc].Press a digit key once to enter the character youwant then enter all the characters to input theword you want.To view the next matching word, press .To accept the matching word and enter a space,press .39To enter a compound word:•Enter the first part of the word then press to accept it.•Enter the last part of the word then press to enter the word.MEMORY FUNCTIONS ENTERING LETTERS, NUMBERS & SYMBOLS■STANDARD INPUT MODEUse the number keys to enter letters, numbers and characters.Enter letters using the key pad as follows:Press repeatedly, until the desired symbolappears (. , - ? ! ' @ : 1). To change the input mode, press [Abc].To enter a space, press . The cursor will automatically move to the next column.Repeat until letters are entered. To delete one digit, press . If you press and hold , it will delete lettersentirely as well as entire numbers.To change from lowercase to uppercase, press .38Key Pad Press1 TimePress2 timesPress3 timesPress4 timesPress5 times2ABC3DEF4GHI:9WXYZADG:WBEH:XCFI:Y234:ZADG:9](https://usermanual.wiki/Pantech/PN-810/User-Guide-731388-Page-20.png)
![ENTERING LETTERS, NUMBERS & SYMBOLS MEMORY FUNCTIONS■USING QWERTY KEYBOARDYour phone is specifically designed QWERTY keyboard provides asuperior typing experience on a small handheld for easy and comfortable text writing. You can use all of the phone functionswith the keyboard either closed or open. When you open the keyboard you have the extra benefit of a full messaging keyboard.The handheld includes a fully-functional QWERTY keyboard you can use to compose text for email messages, notes, and so on.41MEMORY FUNCTIONS ENTERING LETTERS, NUMBERS & SYMBOLS■NUMERIC MODEAllows you to enter numbers.Press [Abc] and scroll down to “123” andpress to change to Numeric Mode.To enter a number, press a digit key. ■SYMBOL MODEAllows you to enter symbols.Press [Abc] and scroll down to “Sym” andpress to change to Symbol Mode.Select the symbol you want to enter by pressing thecorresponding digit key.■KOREAN MODEAllows you to enter korean characters.Press [Abc] and scroll down to “Korean” andpress to change to Korean Mode.To enter korean characters, press a keypad. 40•Use the Navigation Key to view a different set of symbols. There are 8 sets of symbols.FUNCTIONKEYTo type upper-case letters, hold down the Shiftkey and then press one or more letter keys.Alternatively, you can briefly hold down a letterkey to capitalize a letter. Or, press and releasethe Shift key and then press a letter key.Shift + letterTo type the number or symbol printed in orangeat the top of a key, hold down the orange-colored Alt key and then press one or more letter keys. Or, press and release the Alt key andthen press a letter key.Alt + letter Press the Space key to type a blank space.Press the Enter key to insert a carriage return.Space KeyEnter KeyPress the Delete key to delete a character to theleft of the text cursor.Clear KeyFor best performance in low-light environments, your phoneincludes a backlight feature that can illuminate both the display and the keyboard so you can keep reading and typing.](https://usermanual.wiki/Pantech/PN-810/User-Guide-731388-Page-21.png)
![CUSTOMIZE MENU FUNCTIONS45MENU FUNCTIONS CUSTOMIZE■RINGSYou can select a ringtone that will play when receiving a call. You canselect from downloaded ringtones as well as the default ringtones. Press [MENU] .To select your desired ringer type.To play a select ringtone, press [PLAY]. Press [MENU], select one of the followingoptions.To save it, press [SET].44•Rings: Select a live ringtone.•Bell Rings: Select from your downloaded ringtones.•Freebies: Select from the default ringtones.•Delete: Delete the selected live ringtone.•Delete All: Delete all contents in the live ringtone list.•File Info: Display the selected live ringtone information.■DOWNLOAD RINGSConnects directly to the Helio Store, where you can download ringtones.Press [MENU] .Connecting to Helio Service.■SCREENSSelect the wallpaper image displayed in idle mode. In addition to thedefault images, you can select a downloaded image, Video Screen,Photos or Video Recordings as your screen.Press [MENU] .To select your desired image type.To view/play a select image, press [VIEW/PLAY]. Press [MENU], select one of the followingoptions.To save it, press [SET].•Screens: Select from downloaded screens or from theprovided freebies.•Video Screens: Select a Video Screen.•Photos: Select from saved taken images.•Video Recordings: Select from saved taken video clips.•Freebies: Select from the default screens.•Sort: Sort the content list.•Rename: Rename the selected content.•Delete: Delete the selected content.•Delete All: Delete all contents in the content list.•Lock On/Off: Lock On/Off the selected content.•File Info: Display the selected content information.](https://usermanual.wiki/Pantech/PN-810/User-Guide-731388-Page-23.png)
![CUSTOMIZE MENU FUNCTIONS47MENU FUNCTIONS CUSTOMIZE46■DOWNLOAD SCREENSConnects directly to the Helio Store, where you can download screens.Press [MENU] .Connecting to Helio Service.■CALL SCREENSSelect the screen that will be displayed when receiving a call. In addition to the default images, you can select a downloaded image,Video Screen or Photos as the call screen.Press [MENU] .To select your desired image type.To view/play a select image, press [VIEW/PLAY]. Press [MENU], select one of the followingoptions.To save it, press [SET].•Screens: Select from downloaded screens or from theprovided freebies.•Video Screens: Select a Video Screen.•Photos: Select from saved taken images.•Freebies: Select from the default screens.•Sort: Sort the content list.•Rename: Rename the selected content.•Delete: Delete the selected content.•Delete All: Delete all contents in the content list.•Lock On/Off: Lock On/Off the selected content.•File Info: Display the selected content information.■HOT SCREENSStart H.O.T.TM (Helio On Top) screens. Press [MENU] .To select your desired downloaded image.To preview a select image, press [PREVIEW]. Press [MENU], select one of the followingoptions.To save it, press [SET].•Delete: Delete the selected content.•Delete All: Delete all contents in the content list.•File Info: Display the selected content information.It’s Helio On Top. Multiple channels of dynamic content(sports scores, music news, stock data, and more)delivered automatically right to your screen!](https://usermanual.wiki/Pantech/PN-810/User-Guide-731388-Page-24.png)
![CUSTOMIZE MENU FUNCTIONS49MENU FUNCTIONS CUSTOMIZE48■DOWNLOAD HOTConnects directly to the Helio Store, where you can download H.O.T.screen.Press [MENU] .Connecting to Helio Service.■SETTINGSCustomizes your phone and optimizes performance through a variety of settings. SOUNDSets Vibration, Volume, Alerts, Sound Effects and Missed Calls.VIBRATIONTo select a Vibration Mode:Press [MENU] .To set your desired Vibration Mode.To save, press [SET].•Ringtones•Vibration•None•Ring then Vib•Ring and VibVOLUMEControls the Ring Volume, Receiver, KeyPad, Effects, Wake-upCall, Alert and Power Up/Down volume.Press [MENU] .To set your desired Vibration Mode.To save, press [SAVE].ALERTSTo setting an Alerts ringer type:Press [MENU] .To setting an Alerts ringer type.To save, press [SAVE].•Ring Volume: Level 0 ~ Level 5.•Receiver: Level 0 ~ Level 5.•KeyPad: Level 0 ~ Level 5.•Effects: Level 0 ~ Level 5.•Wake-up Call: Level 0 ~ Level 5.•Alert: Level 0 ~ Level 5.•Power Up/Down: Level 0 ~ Level 5.•Call Connection: To set Call Connection ring tone withleft or right Navigation Key. (Off, Call Connection)•Minute Beep: To set Minute Beep ring tone with left orright Navigation Key. (Off, Bell)•No Service: To set Out-of-service ring tone with left orright Navigation Key. (Off, Bell)•Low Battery: To set Battery Low ring tone with left orright Navigation Key. (Off, Low Battery1,Low Battery2)](https://usermanual.wiki/Pantech/PN-810/User-Guide-731388-Page-25.png)
![CUSTOMIZE MENU FUNCTIONS51MENU FUNCTIONS CUSTOMIZE50SOUND EFFECTSTo select a sound effects ringer type:Press [MENU] .To set your desired sound effects ringer type.To save, press [SAVE].•Keypad: To set key tone with left or right Navigation Key.(KeyClick, Tick, Arp, Henry, Off)•Slide: To set Slide tone with left or right Navigation Key.(Mambo1, Mambo2, Mambo3, Off)•Menu: To set menu select tone with left or rightNavigation Key. (Menu Change 1, Menu Change 2,Menu Change 3, Off)•Confirm/Save: To set Confirm/Save select tone with leftor right Navigation Key. (Confirm/Save1,Confirm/Save2, Confirm/Save3, Off)•Cancel/Warning: To set Cancel/Warning select tone withleft or right Navigation Key.(Cancel/Warning1, Cancel/Warning2,Cancel/Warning3, Off)•Silent Mode: To set Silent Mode select tone with left orright Navigation Key. (On, Off)MISSED CALLSTo set a Missed Calls options:SET ALERTPress [MENU] .To select alarm set mode with up or downNavigation Key.To save, press [SET].ALERT TYPEPress [MENU] .To select alarm tone with up or down NavigationKey. To save, press [SET].•Mute / Every 2 min / Once after 2 min •Alarm1 / Vibration](https://usermanual.wiki/Pantech/PN-810/User-Guide-731388-Page-26.png)
![SCREENTo select images to display on the main LCD:OVERLAYTo select a Overlay Mode:CALENDAR / CLOCKPress [MENU] .To select Calendar/Clock set mode with up ordown Navigation Key. You want to previewmode, press [PREVIEW].To save, press [SET].DUAL CLOCKPress [MENU] .The world map appears with the city, its date andtime, and then select city with Navigation Key. To save, press [SET].CUSTOMIZE MENU FUNCTIONS53MENU FUNCTIONS CUSTOMIZE52•Cal. 1mon 1 ~ Cal. 1mon 5, Cal. 2mon 1 ~ Cal. 2mon 4,Digital Clock 1 ~ Digital Clock 4 , Analog Clock 1 ~ AnalogClock 4, None•Left or Right Navigation Key: Move to city’s situation.•Up or Down Navigation Key: Move to city’s name.ANIMATED STICKERPress [MENU] .To select Animated Sticker image with theNavigation Key.To save, press [SET].BANNERTo select a Banner Mode:Press [MENU] .To select Banner set mode with up or downNavigation Key. You want to preview mode, press [PREVIEW].To save, press [SAVE].FONTTo select a Font Mode:Press [MENU] .To select Font set mode with up or downNavigation Key.To save, press [SET].•Banner: To select Banner with left or right Navigation Key.(Use, None) •Text: To enter a banner.•Font Color: To select a banner color with left or rightNavigation Key.1. English: Eng Font1/Eng Font22. Korean: Kor Font1/Kor Font2](https://usermanual.wiki/Pantech/PN-810/User-Guide-731388-Page-27.png)
![CUSTOMIZE MENU FUNCTIONS55MENU FUNCTIONS CUSTOMIZE54BACKLIGHTBacklights the LCD light, while the slide is closed and keypad lightfor easy viewing in dark places.Press [MENU] .To select Backlight set mode with up or downNavigation Key.To save, press [SET].CALLAllows you to customize the call options.ANSWER CALL ONTo select an answer call option:Press [MENU] .Select one of the following options with up ordown Navigation Key.To save, press [SET].1. Display Duration: 15 Seconds, 30 Seconds, 1 Minute, 3 Minute, 10 Minute2. Display Brightness: Level 1 ~ Level 5 3. Keypad Duration: Slide Up, 15 Seconds, 30 Seconds, 60 Seconds, Off•Slide Open•Open & Any Key•Open & Send Key•Send Key OnlyAUTO FUNCTIONSTo select an auto function option:Press [MENU] .Select one of the following options with up ordown Navigation Key.To save, press [SET].CALL FORWARDINGThe phone can divert incoming calls to another number if you arebusy, not reachable or do not reply. You can also choose to divertall calls. A phone number field in which you enter a phone number to be used for diverting calls. Select an entry from theContacts phonebook. Your incoming calls will not be diverted.Press [MENU] .Select one of the following options with up ordown Navigation Key.To save, press [SET].1. Auto Redial: Automatically redials a call up to a set timeinterval. (On, Off)2. Auto Headset: If headset is connected, call is automatically connected. (On, Off)3. Auto Speaker: If Speaker is connected, call is automatically connected. (On, Off)4. AutoRcvAfter 2Sec: After 2 seconds, call is automaticallyconnected. (On, Off)1. On/Off: To select “On” or “Off” with Navigation Key.2. Set Number: Input a new call forwarding number.](https://usermanual.wiki/Pantech/PN-810/User-Guide-731388-Page-28.png)
![CUSTOMIZE MENU FUNCTIONS57MENU FUNCTIONS CUSTOMIZE56BLOCK CALLSWhen you attempt to make a restricted call.Press [MENU] and enteryour password.Select one of the following options with up ordown Navigation Key.To save, press [SET].VOICE PRIVACYEnhances voice privacy and avoids tapping during a call.Press [MENU] .Select “On” or “Off” with up or down Navigation Key.To save, press [SET].TTYTo turn TTY Mode on or off:Press [MENU] .Select one of the following options with up ordown Navigation Key.To save, press [SET].NETWORKAllows you to customize the network options.RECEIVE MODESelect a Receive Mode based on the handset usage.Press [MENU] .Select one of the following receive mode with upor down Navigation Key..To save, press [SET].•TTY Full•TTY + Talk•TTY + Hear•TTY Off•Voice: To receive a voice call.•Data: To receive data when connected to PC.•Fax: To function as a fax when connected to PC.•Outgoing Call: To select “On” or “Off” with Navigation Key.•Incoming Calls: To select “On” or “Off” with Navigation Key.•Contacts: -Block List: Press [ADD], to add blocked phone number (Input Number, Contact List, Call Log).To delete blocked phone number, press [MENU], then select “Remove” or “Remove All”. -Block Setting: To select “On” or “Off” with Navigation Key.](https://usermanual.wiki/Pantech/PN-810/User-Guide-731388-Page-29.png)
![CUSTOMIZE MENU FUNCTIONS59MENU FUNCTIONS CUSTOMIZE58NETWORK MODETo select a network mode option:Press [MENU] .Select one of the following network mode withup or down Navigation Key.To save, press [SET].DEVICEDisplays the following information about your phone: Memory Info, S/W Version, My Number, resets phone to default settings and On Close Timeout.MEMORY INFOTo view “Internal“ or “External“ memory information. Press [MENU] .Select “Internal Memory” or “External Memory”with left or right Navigation Key.To return to the previous page, press [OK].S/W INFODisplays the software version of your phone: Press [MENU] .The software version appears.To return to the previous page, press [OK].MY NUMBERDisplays the phone number of your phone:Press [MENU] .The my phone number appears.To return to the previous page, press [OK].RESETResets contacts or phone to default settings.Press [MENU] .Select “Delete Contacts” or “Reset Defaults” withthe Navigation Key.Enter your password. (The default password is “0000”.)Read the message. (Initialize?/Reset to DefaultSettings?)Press [NO] or [YES].ON CLOSE TIMEOUTWhen closing (Portrait) slide or QWERTY slide, The process shallbe continued for user’s setting time.Press [MENU] .Select On Close Timeout time with up or downNavigation Key.To save, press [SET].•5 sec•10 sec•1X only•EVDO mode•EVDO only](https://usermanual.wiki/Pantech/PN-810/User-Guide-731388-Page-30.png)
![CUSTOMIZE MENU FUNCTIONS61MENU FUNCTIONS CUSTOMIZE60SECURITYPrevents unauthorized use of your phone. The following settingscan be restricted:PHONE LOCKPrevents the phone from being used without entering the password first.Press [MENU] and enter yourpassword. (The default password is “0000”.)Press “Phone Lock”.Select “Lock Now”, “Lock at Power Up” or“Unlock” with up or down Navigation Key.To save, press [SET].OUTSIDE KEY LOCKPrevents the press key without entering the password first.Press [MENU] and enter yourpassword. (The default password is “0000”.)Press “Outside Key lock”.Select “On” or “Off” with up or down NavigationKey.To save, press [SET].SET PASSWORDTo changes your 4-digitpassword.Press [MENU] and enter yourpassword. (The default password is “0000”.)Press “Set Password”.Enter your password. (The default password is “0000”.)Enter a new password and down Navigation Key.Enter the new password again and press [SET].BLUETOOTHYour phoneis compatible with devices that support theBluetoothheadst and hands-free profiles. You may createand store 10 pairingswithin your phoneand connect toone device at a time. The approximate communicationrange for Bluetooth wireless technology is up to 30 feet (10 meters). Your phone is a Bluetooth V1.1 compatible device.This means you canuse Bluetooth V1.1 headsets andBluetooth V1.0 hands-free deviceswith your phone.POWERThe Power feature allows you to turn the Bluetooth function on and off. Press [MENU] .Select “On” or “Off” then press [OK] to save it.•Lock Now: Lock the phone now.•Lock at Power Up: Not locked, but it is automaticallylocked when power is recycled.•Unlock: Do not lock the phone.](https://usermanual.wiki/Pantech/PN-810/User-Guide-731388-Page-31.png)
![CUSTOMIZE MENU FUNCTIONS63MENU FUNCTIONS CUSTOMIZE62DEVICE LISTDevice List is a list of the devices that have paired withyourphone via the Bluetooth functionality. Select thename of a deviceto enable it to work with your phone. Press [MENU] .DISCOVERY MODEWhen Discovery Mode is on, other Bluetooth devices inthe areacan find your phone. Press [MENU] .Select “On” or “Off” then press [OK] tosaveit and wait in the idle mode.DEVICE SCANDevice Scan allows you to scan for remote bluetoothdevices fromthe phone. Press [MENU] .DEVICE NAMEDevice Name allows you to change the name of aBluetoothdevice that is listed in your phone so you canmore readily recognize which device you want to enable. Press [MENU] .Enter a new name, press [OK] to save it.1. After 60 seconds, the phone returns todiscovery mode“Off”.2. If my phone is in discovery mode on, remote bluetoothdevices can scan my phone. LANGUAGESelects the language in which letters are displayed on screen.Press [MENU] .Select either “English” or “Korean” with up ordown Navigation Key.To save, press [SET].AIRPLANE MODEAirplane Mode allows you to use many of your phone’s features,such as Games, Voice Memos, etc., when you are in an airplane orin any other area where making or receiving calls or data is prohibited. When your phone is in Airplane Mode, it cannot sendor receive any calls or access online information.Press [MENU] .Select “On” or “Off” with up or down NavigationKey.To save, press [SET].](https://usermanual.wiki/Pantech/PN-810/User-Guide-731388-Page-32.png)
![MYSPACEWhen “MySpace” is selected from the Browser Menu, it allows you to save the recent Web site address.VIDEOSWhen “Videos” is selected from the Browser Menu, it allows you to save the recent Web site address.GAMESWhen “Games” is selected from the Browser Menu, it allows you to save the recent Web site address.RINGSWhen “Rings” is selected from the Browser Menu, it allows you to save the recent Web site address.SCREENSWhen “Screens” is selected from the Browser Menu, it allows you to save the recent Web site address.SURF MENU FUNCTIONS65MENU FUNCTIONS SURF64■ACCESS HELIO PORTALNow you can access news, sports, weather, and e-mail from yourphone. Accessing Mobile Web keeps you updated by providingaccess to up-to-date information such as news, sports, weather andstock quotes when you subscribe to Internet service with your service provider. Please contact your service provider for a list ofavailable websites and service details.■BROWSER MENUThe browser menu contains various browser options. To access thebrowser menu, press [MENU] or press .BOOKMARKSBookmarks allow you to store the address of your favorite Websites for easy access at a later time.ADDWhen “Add” is selected from the Browser Menu, it allows you to save the recent Web site address.VIEW ALLWhen “View All” is selected from the Browser Menu, allows you to view and access bookmarked sites.OR1. MySpace: To launches Helio MySpace web site.2. Video: To launches Helio Video web site.3. Games: To launches Helio Games web site.4. Rings: To launches Helio Rings web site.5. Screen: To launches Helio Screen web site.](https://usermanual.wiki/Pantech/PN-810/User-Guide-731388-Page-33.png)
![■CAMERATaking pictures with your phone’s built-in camera is as simple as choosing a subject, pointing the lens, and pressing a button. You can activate the Camera Mode and take pictures when the phone is open.TAKING A PHOTO THROUGH THE MENUPress [MENU] .Point the camera lens at your subject. You can check the photo framing through the main display screen.Press [SNAP] or the side camera button to take the photo.To save the picture, press [SAVE]. The picture will be saved in “Photo Album”.To go back to idle mode without saving the picture,press .To send the picture to someone, press [SEND].Press [MENU], to access the taken picture’s otheroptions.SNAP MENU FUNCTIONS69MENU FUNCTIONS SNAP68ORTAKING A PHOTO IN IDLE MODESlide the phone open, press and hold to activate Camera Mode.Point the camera lens at your subject.You can check the photo framing through the main display screen.Press [SNAP] or the side camera button totake the photo.To save the picture, press [SAVE]. The picture will be saved in “Photo Album”.To go back to idle mode without saving the picture,press .To send the picture to someone, press [SEND].Press [MENU], to access the taken picture’s otheroptions.Helio Up: To upload picture to Helio Screen web site.Send Message: To send a picture message.Send Email: To send a Email.Set As Screen: To assign to display for idle screen.Set As Call Screen: To assign to display for call screen.Set As Contact Pic: To assign to display for contact’s ID.Enter edit mode: To launches Helio Screen web site.Helio Up: To upload picture to Helio Screen web site.Send Message: To send a picture message.Send Email: To send a Email.Set As Screen: To assign to display for idle screen.Set As Call Screen: To assign to display for call screen.Set As Contact Pic: To assign to display for contact’s ID.Enter edit mode: To launches Helio Screen web site.](https://usermanual.wiki/Pantech/PN-810/User-Guide-731388-Page-35.png)
![SNAP MENU FUNCTIONS71MENU FUNCTIONS SNAP70CAMERA MODE OPTIONSWhen the phone is open and in Camera Mode, several user optionsare available.WHITE BALANCEPress to directly adjust the white balance.(Auto, Outside, Cloudy, Fluorescent, Bulb)FLASHPress to directly adjust the flash option. (Auto, Off, On).BRIGHTNESSPress the Navigation Key left or right to directlyadjust the brightness. The current brightness levelappears at the bottom of the display screen.ZOOMPress the Navigation Key up or down to change themagnification. The current zoom level appears at theright side of the display screen.ALBUMPress [ALBUM] to view all the pictures you havetaken. Only the pictures in “Photo Album” can beviewed.UNDER [MENU] - 1. Camera ModeTo select a camera mode. (Photo, Video)UNDER [MENU] - 2. Shot ModeTo select a Shot Mode. (Single, Auto Series 4cuts,Auto Series 6cuts, Auto Series 9cuts). If you taking apicture with the phone closed, to select a Shot Mode.(Single, Auto Series 4cuts, Auto Series 6cuts, AutoSeries 9cuts, Split Series 4cuts, Split Series 9cuts, SplitSeries 16cuts)UNDER [MENU] - 3. ResolutionTo select a resolution for a picture. (320X240, 240X320, 240X180) If you taking a picture with the phone closed, toselect a resolution for a picture. (1600X1200,1280X960, 1024X768, 800X600, 640X480, 320X240,240X320, 240X180) UNDER [MENU] - 4. QualityTo select a picture quality. (Super Fine, Fine, Normal)UNDER [MENU] - 5. White BalanceTo select a white tone balance. (Auto, Outside,Cloudy, Fluorescent, Bulb)](https://usermanual.wiki/Pantech/PN-810/User-Guide-731388-Page-36.png)
![UNDER [MENU] - 9. Photo FrameTo select a resolution for a picture. (No Frame, Heart 1, Beach, Hero, Bee, Baby, Mask, Cry,Woman, Candy, Photo, Hill, Bear, Clown, Hula Dance,Heart 2, Balloons, Devil, Rabit Ears 1, Rabit Ears 2,Hawaii, Birthday) UNDER [MENU] - *. StorageTo activate the storage function. (Internal, External)UNDER [MENU] - #. Preview ModeTo activate the preview mode function. (IndicatorsOnly, Indicators+Crosshair, Crosshair Only, Hide All)Press [SAVE] to save camera option.SNAP MENU FUNCTIONS73MENU FUNCTIONS SNAP72UNDER [MENU] - 6. FlashTo activate the flash function. (Off, On, Auto)UNDER [MENU] - 7. TimerTo activate the camera’s timer function. (Off, 5 sec, 10 sec)UNDER [MENU] - 8. EffectsTo select picture effects. (Normal, Gray, Sepia,Negative, Solarze)■VIDEO CAMERATaking videos with your phone’s built-in camera is as simple as choosing a subject, pointing the lens, and pressing a button. You canactivate the Camera Mode and take videos when the phone is open.Press [MENU] .Point the camera lens at your subject. You can check the video framing through the main display screen.Press or the side camera button to take thevideo.To stop recording, press or . To Pause/Resume recording, press [PAUSE/RESUME].To save the video, press [SAVE]. The picture will be saved in “Video Album”.To go back to idle mode without saving the picture,press .To replay video, press [PREVIEW].Press [MENU], to access the taken video’s otheroptions.Helio Up: To upload video to Helio Screen web site.Send Message: To send a picture message.Send Email: To send a Email.Set As Screen: To assign to display for idle screen.](https://usermanual.wiki/Pantech/PN-810/User-Guide-731388-Page-37.png)
![SNAP MENU FUNCTIONS75MENU FUNCTIONS SNAP74VIDEO MODE OPTIONSWhen the phone is open and in Video Mode, several user optionsare available.WHITE BALANCEPress to directly adjust the white balance.(Auto, Outside, Cloudy, Fluorescent, Bulb)FLASHPress to directly adjust the flash option.(Auto, Off, On).ALBUMPress [ALBUM] to view all the videos you havetaken.BRIGHTNESSPress the Navigation Key left or right to directlyadjust the brightness. The current brightness levelappears at the bottom of the display screen.ZOOMPress the Navigation Key up or down to change themagnification. The current zoom level appears at theright side of the display screen.UNDER [MENU] - 1. Camera ModeTo select a camera mode. (Photo, Video)UNDER [MENU] - 2. Recording TypeTo select a video recording type. (Normal, MMS Movie, Idle Screen Movie)UNDER [MENU] - 3. ResolutionTo select a resolution for a video. (320X240, 176X144) UNDER [MENU] - 4. QualityTo select a video quality. (High, Standard, Economy)UNDER [MENU] - 5. White BalanceTo select a white tone balance. (Auto, Outside,Cloudy, Fluorescent, Bulb)UNDER [MENU] - 6. FlashTo activate the flash function. (Off, On)UNDER [MENU] - 7. TimerTo activate the camera’s timer function. (Off, 5 sec, 10 sec)](https://usermanual.wiki/Pantech/PN-810/User-Guide-731388-Page-38.png)
![SNAP MENU FUNCTIONS77MENU FUNCTIONS SNAP76UNDER [MENU] - 8. StorageTo select a saved video location. (Internal, External)UNDER [MENU] - 9. Preview ModeTo activate the preview mode function. (Indicators Only,Indicators+Crosshair, Crosshair Only, Hide All)Press [SAVE] to save video option.■PHOTO ALBUMIn Review Mode you can view all the pictures you have taken, storeselected images in your phone, send pictures to the Online Album,delete images and access additional picture options.Press [MENU] .Select saved Photo’s Folder. To access floder’s options, press [MENU].In Review Mode, you can view all the pictures youhave stored in folder.Select the picture with the Navigation Key and then press [VIEW] or press [CHECK] •Rename: To rename a selected folder.•Lock Folder: To lock the selected folder.•Add Folder: To add a new folder.•Delete Folder: To delete a selected folder.](https://usermanual.wiki/Pantech/PN-810/User-Guide-731388-Page-39.png)
![SNAP MENU FUNCTIONS79MENU FUNCTIONS SNAP78■VIDEO ALBUMIn Review Mode, you can view all the videos you have taken, storeselected videos in your phone, send videos to the Online Album, delete videos and access additional video options.Press [MENU] .Select saved Video’s Folder. To access floder’s options, press [MENU].In Review Mode, you can view all the videos you have stored in folder.Select the video with the Navigation Key and then press [PLAY] or press [CHECK] To access options, press [MENU].•Set As: To select screen setting. (Screen, Call Screen, Contact Pic)•Send Message: To send a picture message.•Helio Up: To upload picture to Helio Screen web site.•Sort Files: - Sort by (Date, Name, Size)- Sort Order (Descending, Ascending)•Copy: To copy the selected picture to the other saved location or folders.•Move: To move the selected picture to the other savedlocation or folders.•Delete: To delete the current picture from your folder.•Rename: To edit or rename the picture’s title.•Lock: To lock the selected picture.•Check All: To check all pictures.•File Info: Displays information of the selected picture.•Rename: To rename a selected folder.•Lock Folder: To lock the selected folder.•Add Folder: To add a new folder.•Delete Folder: To delete a selected folder.](https://usermanual.wiki/Pantech/PN-810/User-Guide-731388-Page-40.png)
![SNAP MENU FUNCTIONS81MENU FUNCTIONS SNAP80To access options, press [MENU].•Helio Up: To upload video to Helio Screen web site.•Set As Screen: To assign to display for idle screen.•Send Message: To send a picture message.•Sort Files: - Sort Type (Date, Name, Size)- Sort Order (Descending, Ascending)•Move: To move the selected video to the other savedlocation or folders.•Delete: To delete the current video from your folder.•Rename: To edit or rename the video’s title.•Lock: To lock the selected video.•Check All: To check all videos.•File Info: Displays information of the selected video.■SETTINGSTo select your camera settings:Press [MENU] .Press [SET] to save option.•When Slide Closed: To select “Stop Preview” or“Continue Preview” with up ordown Navigation Key.•Call Receiving: To select “Call answer” or “No answer”with up or down Navigation Key.•Shutter Sound: To select “Ready Sound(Cheese, Mute,Naughty Boy, Ready)” and “ShutterSound (Sound 1 ~ Sound 3)” with up ordown Navigation Key.•Voice Recording: To select “Include” or “Not Include”with up or down Navigation Key.•Set Storage: To select “Internal” or “External” with up or down Navigation Key.•Viewfinder: To select “Shot Settings (Show all indicators,Hide indicators)” and “Crosshairs (Hide,Show)” with up or down Navigation Key.](https://usermanual.wiki/Pantech/PN-810/User-Guide-731388-Page-41.png)
![SNAP MENU FUNCTIONS83MENU FUNCTIONS SNAP82■PRINT PHOTOSThe PN-810 comes equipped with a 2-megapixel built-in camera thatallows you to print images directly to a printer using PictBridge technology. A USB cable must be connected between your phone andthe printer before any printing can occur.Connect the USB cable between your phone and theUSB connector on the printer (Printer must supportPictBridge technology).Press [MENU] . Read the message and press [OK].■MEMORY INFOTo view “Internal” or “External” memory information.Press [MENU] .Select “Internal Memory” or “External Memory”with the left or right Navigation Key.The memory information appears.To return to the previous page, press [OK].](https://usermanual.wiki/Pantech/PN-810/User-Guide-731388-Page-42.png)
![8584VIDEO+MUSIC MENU FUNCTIONSMENU FUNCTIONS VIDEO+MUSIC■VIDEOPress [MENU] .Select one of the following options with up ordown Navigation Key.■MUSICPress [MENU] .Select one of the following options with up ordown Navigation Key.■DOWNLOAD VIDEOConnects directly to the Helio Store, where you can download videos.Press [MENU] .Connecting to Helio Service.■DOWNLOAD MUSICConnects directly to the Helio Store, where you can download musics.Press [MENU] .Connecting to Helio Service.1. Playlists: To play, add, rename or delete a playlists.2. Videos: To display all video lists. 3. Settings-Play Time: To select “Unlimited”, “30 min”, “1 hr”, “1 hr 30 min”, “2 hr” or “3 hr” with Navigation Key, then press . -Play Mode: To select “Normal”, “Shuffle All”, “RepeatAll” or “Repeat One” with Navigation Key, then press . 1. Playlists: To play, add, rename or delete a playlists.2. Artists: To display all artist lists. 3. Albums: To display all album lists. 4. Songs: To display all song lists. 5. Genres: To display all genre lists. 6. Settings-Play Time: To select “Unlimited”, “30 min”, “1 hr”, “1 hr 30 min”, “2 hr” or “3 hr” with Navigation Key, then press . -Play Mode: To select “Normal”, “Shuffle All”, “RepeatAll” or “Repeat One” with Navigation Key, then press . -Equalizer: To select “Auto” or “Genre 1 ~ Genre 5” with Navigation Key, then press .](https://usermanual.wiki/Pantech/PN-810/User-Guide-731388-Page-43.png)
![8786MENU FUNCTIONS VIDEO+MUSIC■SETTINGSBACKLIGHT DURATIONPress [MENU] .PLAY TIMEPress [MENU] .PLAY OPTIONPress [MENU] .](https://usermanual.wiki/Pantech/PN-810/User-Guide-731388-Page-44.png)
![8988CONTACT MENU FUNCTIONSMENU FUNCTIONS CONTACTStores up to 1200 entries, each of which can be assigned to agroup. Entries can be retrieved by name, phone number or group.SERVICE NUMBER•Customer Care: 611•Emergency: 911•Helio UP: *87•Information: 411•My Number: 000-000-0000•Voicemail: 310-254-7103OR■NEW CONTACTAdds a new entry.To add a new entry to the phone book, press [MENU] .To enter a name or number, use the Navigation Keyto select the phone book field.3.1 To save the entry, press [SAVE]. 3.2 To return to the previous page, press .Please refer to page 37 for more details on entering letters,numbers & symbols.•Contact Field: First Name, Last Name, Graphic, Phone Number 1 ~ 5, SpeedDial, Ring,Default number, Email, Instant Message,MySpace, Notes, Group.•Phone Number Type: Mobile, Home, Work, Fax, Other.•Group Type: None, Friends, Family, Work, Co-Workers,School, Other, New Group, Rename Group.•If you entered a phone number or others info, press[Add...] to select options. (Phone/Email/Address/Nickname/Title/Company/Department/Website)](https://usermanual.wiki/Pantech/PN-810/User-Guide-731388-Page-45.png)
![9190CONTACT MENU FUNCTIONSMENU FUNCTIONS CONTACT■EDIT CONTACTPress [MENU] .The list of names in your phone book is displayedalphabetically. Select entry with the Navigation Key.Press [MENU] .Press [MENU] to 1. Add more details, 2. Merge Contacts.To edit a entry, then save contact, press [SAVE].■DELETEPress [MENU] .The list of names in your phone book is displayedalphabetically. Select entry with the Navigation Key.Press [MENU] .Read the message. (Delete “entry’s name”?)Press [CANCEL] or [OK].■VIEW DETAILRetrieves an entry by name and number, and calls the number bysimply pressing . You can review all the entries stored in yourphone book list or find an entry quickly by entering all or part of aname. Press [MENU] .The list of names in your phone book is displayedalphabetically. Select entry with the Navigation Key.Press [MENU] or press [VIEW].To display the entry’s details.Press [MENU] to 1. Edit, 2. Send my name card,3. Copy to Clipboard.To call the selected number, press [CALL].To send a message, press [MSG].](https://usermanual.wiki/Pantech/PN-810/User-Guide-731388-Page-46.png)
![9392CONTACT MENU FUNCTIONSMENU FUNCTIONS CONTACT■SELECT MULTIPLEPress [MENU] .To marked entry with [MARK/UNMARK].Press [MENU] to 1. Delete Marked, 2.Mark All,3.Unmark All.■SEND MY MAME CARDPress [MENU] .The list of names in your phone book is displayedalphabetically. Select entry with the Navigation Key.Press [MENU] .To move a Email editor.■SORT CONTACTS LISTSPress [MENU] .Press [MENU] .To select “Online Status” or “Alphabetically” thenpress to save it.](https://usermanual.wiki/Pantech/PN-810/User-Guide-731388-Page-47.png)
![9594GAMES MENU FUNCTIONS■DOWNLOAD GAMEPress [MENU] or .MENU FUNCTIONS GAMESORPress the [MENU] to access the following Option:•Move to Folder: •Rename: •Info: •Delete: •New Folder: •Purchase History: •Wishlist: •Settings:](https://usermanual.wiki/Pantech/PN-810/User-Guide-731388-Page-48.png)
![9796CONTENTSUse the keypad to input an anniversary plan message.Press [SAVE] to save it or [CLR] to returnto the calendar.To set a new schedule, press [MENU] thenselect “New Event”. Select “Set Time”, “Everyday”,“Every Week”, “Every Month” or “Every Year”.The title/period field is highlighted. Press theNavigation Key down to set the schedule options.TITLEUse the keypad to enter a title in your schedule.START TIMEUse the keypad to set a start time and to select“AM” or “PM”. END TIMEUse the keypad to set an end time and to select“AM” or “PM”. CONTENTSUse the keypad to input an anniversary plan message.PLAN MENU FUNCTIONSMENU FUNCTIONS PLAN■CALENDARSets an event reminder.Press [MENU] .Move the Navigation Key left, right, up or down tochoose a date in the calendar and then press .Press [MENU] to 1. New Event, 2. NewAnniversary, 3. Delete Range, 4. View List, 5. AlarmSettings, 6. Search Calendar or 7. Delete. Press[MONTHLY/ WEEKLY/DAILY] to exchange displaymode.To set a new anniversary, press [MENU] thenselect “New Anniversary”. The title field is highlighted. Press the Navigation Key down to setthe anniversary options.TITLEUse the keypad to enter a title in your anniversary.DateUse the keypad to change or enter the date.ANNUALLYPress to check annually set.](https://usermanual.wiki/Pantech/PN-810/User-Guide-731388-Page-49.png)
![9998PLAN MENU FUNCTIONSMENU FUNCTIONS PLANALARM ONUse the Navigation Key to select alarm On/Off.ALARM TIMEUse the keypad to set an end time and to select“AM” or “PM”.Press [SAVE] to save it or [CLR] to returnto the calendar.■WAKE-UP CALLSets a Wake-up Call.Press [MENU] .The Set Wake-up Call field is highlighted. Press theNavigation Key down to set the Wake-up Calloptions.SET WAKE-UP CALLUse the Navigation Key to select Set Wake-up Call“Off”, “Mon-Fri”, “Mon-Sat”, “Everyday”.NO HOLIDAYPress to check No Holiday.ALARM TIMEUse the keypad to set an alarm time and toselect “AM” or “PM”. REPEATUse the Navigation Key to select repeat time “None”,“2 times”, “3 times”, “4 times”, “5 times”.](https://usermanual.wiki/Pantech/PN-810/User-Guide-731388-Page-50.png)
![101100PLAN MENU FUNCTIONSMENU FUNCTIONS PLANINTERVALUse the Navigation Key to select interval time “5 min”, “10 min”, “15 min”.RINGTONETo set a “Ringtone” using the left or right NavigationKey. (Beep, Spring, Up Run Down, Hiphop 2005, SpaceDragon, Monk, Parana, Samadhi, Rainyday, ShanghaiCruising, Smile Baby, Venus3, We Got Music, or video#)VIBRATEUse the Navigation Key to select vibrate type “Ringtones”, “Vibration”, “Ring then Vib”, “Ring and Vib”.SCREENTo set a “Screen” using the left or right Navigation Key.Press [SAVE] to save it.■ALARMPress [MENU] .To set a new alarm, press [NEW].To select alarm options.ALARM ONUse the Navigation Key to select alarm on On/Off.NO HOLIDAYPress to check No Holiday.DATEUse the keypad to change or enter the date.•After 10 min: To set alarm after 10 minutes.•After 20 min: To set alarm after 20 minutes.•After 30 min: To set alarm after 30 minutes.•After 1 hour: To set alarm after 1 hour.•Set Time: To set alarm time.•Everyday: To set alarm time every day.•Every Week: To set alarm time every week.•Every Month: To set alarm time every month.](https://usermanual.wiki/Pantech/PN-810/User-Guide-731388-Page-51.png)
![103102PLAN MENU FUNCTIONSMENU FUNCTIONS PLANALARM TIMEUse the keypad to set an alarm time and toselect “AM” or “PM”. MEMOUse the keypad to input an alarm message.Press [SAVE] to save it.Press [MENU] to 1. Delete or 2. Delete All.■CALCULATORTo access the calculator:Press [MENU] .Follow the instructions below to calculate 8x64-2.5=9.50To reset, press [AC].•Input 8.•Press the Up Navigation Key (x).•Input 6.•Press the Down Navigation Key ().•Input 4.•Press the Right Navigation Key (-).•Input 2 and press , to input (.).•Press 5, .•Answer appears on the right side of the orange boxbelow calculation.•To change the displayed number from positive (+) tonegative (-) and vice versa, press [].•To view cal history, press [HISTORY].](https://usermanual.wiki/Pantech/PN-810/User-Guide-731388-Page-52.png)
![105104PLAN MENU FUNCTIONSMENU FUNCTIONS PLAN■WORLD TIMETo display the time and date in pre-programmed cities:Press [MENU] .Select a city with the Navigation Key.The world map appears with the city, its date andtime.To return to the previous page, press .If daylight saving time does not apply, it may be differentfrom the actual time during DST, press [DST].■UNIT CONVERTERTo access the unit converter:Press [MENU] .Select the desired convert unit item with left orright Navigation Key, and input number.To change the unit type (for example: m, cm...) withleft or right Navigation Key.Press [OK] to result appears on bottom belowconverter. •cm: Centimeter, Meter, Inch, Feet, Yard, Mile, Cheok, Gan, Jeong.•Cm2: Pyeong, Square meter, Are, Square Foot, Square Yard, Acre. •Kg: g, Kg, Ton, Grain, Ounce(oz), Pound(lbs), Don, Geun, Gwan.•MI: Hob, Dwoe, Mal, Cubic Cm, Cubic Meter, Liter, Cubic Inch, Cubic Foot, Cubic Yard, Galon.•C: Celsius, Fahrenheit.](https://usermanual.wiki/Pantech/PN-810/User-Guide-731388-Page-53.png)
![■NOTEPADYour phone includes an internal notepad that can be used to compose and store reminders and notes. To compose a memo (thereis a 220-letter limit):Press [MENU] .Input a new text memo, press [NEW]. (Please refer to page 37 for more details on enteringletters, numbers & symbols.)Press [SAVE] to save memo.The list of all memos, in saved order, is displayed. Select a memo, press [VIEW].- Press [MENU] to “Edit”, “Delete”, “Delete All”.- To add a new memo, press [NEW].The selected memo will appear. To edit it, press [EDIT], select “Edit” and input anew text memo, then press [SAVE] to save editmemo.107106PLAN MENU FUNCTIONSMENU FUNCTIONS PLAN■VOICE MEMOVoice Memo allows you to record a reminder message that can be upto remain time. To record a memo:Press [MENU] .Record a new voice memo, press [NEW]. To stop recording a memo, press [SAVE] to savevoice memo.The list of all memos, in saved order, is displayed. Select a memo and press [PLAY].Press [MENU] to “Delete”, “Delete all”,“Rename”, “View File Info”, “Send Message”.](https://usermanual.wiki/Pantech/PN-810/User-Guide-731388-Page-54.png)
![■STOPWATCHSimultaneously times up to 20 different events. To operate the stopwatch:Press [MENU] .To measure a time period.- To start the stopwatch, press [START].- To pause it, press [PAUSE].- To resume it, press [RESUME] or press [RESET] to reset it.- To return to the previous page, press .To time up to 20 events at once:- To start, press [START].- To stop a time period and continue measuring another one, press [SAVE].- To stop the second and continue measuring a third one, press [SAVE].- To measure up to 20 time periods, repeat the above steps.- To stop the stopwatch, press [PAUSE].- To review the results, press [VIEW].- To return to the stopwatch, press [CANCEL].- To reset it, press [RESET].109108PLAN MENU FUNCTIONSMENU FUNCTIONS PLAN■CONNECT TO PCPress [MENU] .Enter your password.Connected your PC.To return to the previous page, press , thenpress [YES].](https://usermanual.wiki/Pantech/PN-810/User-Guide-731388-Page-55.png)
![111110■MEMORY INFOTo view “Internal” or “External” memory information.Press [MENU] .Select “Internal” or “External” with left or rightNavigation Key.The memory information appears.To return to the previous page, press [OK].PLAN MENU FUNCTIONSMENU FUNCTIONS PLAN■FILE MANEGERPress [MENU] .Enter your password.](https://usermanual.wiki/Pantech/PN-810/User-Guide-731388-Page-56.png)
![■SEND TEXT/PICTo compose a new text message:Press [MENU] or .The “To” field is highlighted. Input the recipientphone number and press .■WHEN A NEW MESSAGE ARRIVESThe following display appears when a new message arrives.To display the message, press [READ].•By pressing [MENU], you can choose from the following:1. Groups: To select all the phone number in a group.2. Call Log: To search for a phone number in the calllogs.3. Enter Email: To search for a phone number in theenter email.4. All Contact: To search for a phone number in the all contact.MESSAGE MENU FUNCTIONS113MENU FUNCTIONS MESSAGE112OR■MESSAGEPress [MENU] .•By pressing [MENU], you can choose from the following:1. Sign Out All: 2. Setup e-mail accounts: 3. Move: 4. Change language: 5. Allow Korea Input: 6. Manage QuickText: 7. SW Version: ](https://usermanual.wiki/Pantech/PN-810/User-Guide-731388-Page-57.png)
![115114The “Message Contents” field is highlighted. Input a new text message and press .The “ADD” field is highlighted. To insert an image or music.To send the Text message, press [SEND].•By pressing [MENU], you can choose from the following:1. Insert Symbol: To insert a symbol.2. Insert Emoticon: To insert an emoticon image.3. Insert Quick text: To insert the written sentencesfrom the Quick Text list.4. Add wallpaper: To select “quotes”, “leaves”, “block-sue”, “martini”, “lipstick”, “Helions”,“hearts”, “gradient”, “bluefield” or“balloon” with up/down NavigationKey.5. Add Background Color: To select background colorfrom fill color chart.6. Change Text color: To select Text color from fill colorchart.MESSAGE MENU FUNCTIONSMENU FUNCTIONS MESSAGE•By pressing [MENU], you can choose from the following:1. Add Picture: To attach a picture image.2. Add Sound: To attach a Sound file.3. Add Video: To attach a video file.4. Save as draft: To save a message to “Draft” folder.■SEND EMAILTo compose a new Email message:Press [MENU] .The “From:” field is highlighted. Input the recipientemail and press .The “To:” field is highlighted. Input the recipientemail and press .•By pressing [MENU], you can choose from the following:1. Lookup: 2. Add attachment: 3. Save to drafts: 4. Add Cc: 5. Add Bcc: 6. Return to Mailbox: ](https://usermanual.wiki/Pantech/PN-810/User-Guide-731388-Page-58.png)
![117116MESSAGE MENU FUNCTIONSMENU FUNCTIONS MESSAGEThe “Re:” field is highlighted. Input the recipientemail and press .The “Re:” field is highlighted. Input a new text message.To send the Text message, press [SEND].•By pressing [MENU], you can choose from the following:1. Insert symbol: 2. Add attachment: 3. Save to drafts: 4. Add Cc: 5. Add Bcc: 6. Return to Mailbox: •By pressing [MENU], you can choose from the following:1. Insert symbol: 2. Add attachment: 3. Save to drafts: 4. Add Cc: 5. Add Bcc: 6. Return to Mailbox: ■TEXT/PIC INBOXThe Inbox manages received Text messages. To access:Press [MENU] .•By pressing [MENU], you can choose from the following:1. Write Message: To edit a message.2. Replay: Type your reply.3. Folder: To select “Saved”, “Sent”, “Draft” or “Trash”with up/down Navigation Key.4. Forword: Input the phone number of the person youare sending the message.5. Save Message: To save the Text/Pic message in yourphone.6. Mark/Unmark: ](https://usermanual.wiki/Pantech/PN-810/User-Guide-731388-Page-59.png)
![MESSAGE MENU FUNCTIONS121MENU FUNCTIONS MESSAGE120■HELIO MAILTo compose a new Helio Email message:Press [MENU] .•By pressing [MENU], you can choose from the following:1. New email: To edit a message.2. Forword: Type your reply.3. Replay All: To select “Saved”, “Sent”, “Draft” or“Trash” with up/down Navigation Key.4. Check mail: Input the phone number of the personyou are sending the message.5. Work offine: To save the Text/Pic message in yourphone.6. View Folders: 7. Sort by: 8. View sender: 9. Delete all: 0. Select Multiple: *. Mark read/unread: #. Settings: ■YAHOO!Press [MENU] .Input the “Yahoo! ID” and press .Input the “Password” and press .■AOLPress [MENU] .Input the “Screen Name” and press .Input the “Password” and press .■WINDOWS LIVEPress [MENU] .Input the “MSN ID” and press .Input the “Password” and press .](https://usermanual.wiki/Pantech/PN-810/User-Guide-731388-Page-61.png)
![APPS MENU FUNCTIONS123122Access your downloaaded games and applications. You can alsospecify settings for application such as Helio On Top(HOT).Press [MENU] .MENU FUNCTIONS MESSAGE■GMAILPress [MENU] .Read the message, press .•By pressing [MENU], you can choose from the following:1. New email: To edit a message.2. Forword: Type your reply.3. Replay All: To select “Saved”, “Sent”, “Draft” or“Trash” with up/down Navigation Key.4. Check mail: Input the phone number of the personyou are sending the message.5. Work offine: To save the Text/Pic message in yourphone.6. View Folders: 7. Sort by: 8. View sender: 9. Delete all: 0. Select Multiple: *. Mark read/unread: #. Settings:](https://usermanual.wiki/Pantech/PN-810/User-Guide-731388-Page-62.png)
![FCC HEARING-AID COMPATIBILITY(HAC) REGULATIONS FOR WIRELESS DEVICESSAFETY AND WARRANTYIn the above example, if a hearing aid meets the M2 level ratingand the wireless phone meets the M3 level rating, the sum of thetwo values equal M5. This should provide the hearing aid user with“normal usage” while using their hearing aid with the particularwireless phone. “Normal usage” in this context is defined as a signal quality that is acceptable for normal operation.The M mark is intended to be synonymous with the U mark. The Tmark is intended to be synonymous with the UT mark. The M and Tmarks are recommended by the Alliance for TelecommunicationsIndustries Solutions (ATIS). The U and UT marks are referenced inSection 20.19 of the FCC Rules. The HAC rating and measurementprocedure are described in the American National StandardsInstitute (ANSI) C63.19 standard.135SAFETY AND WARRANTY FCC HEARING-AID COMPATIBILITY(HAC) REGULATIONS FOR WIRELESS DEVICESOn July 10, 2003, the U.S. Federal Communications Commission(FCC) Report and Order in WT Docket 01-309 modified the exception of wireless phones under the Hearing Aid CompatibilityAct of 1988 (HAC Act) to require digital wireless phones be compatible with hearing-aids. The intent of the HAC Act is toensure reasonable access to telecommunications services for personswith hearing disabilities.While some wireless phones are used near some hearing devices(hearing aids and cochlear implants), users may detect a buzzing,humming, or whining noise. Some hearing devices are moreimmune than others to this interference noise, and phones alsovary in the amount of interference they generate.The wireless telephone industry has developed a rating system forwireless phones, to assist hearing device users find phones that maybe compatible with their hearing devices. Not all phones have beenrated. Phones that are rated have the rating on their box or a labellocated on the box.The ratings are not guarantees. Results will vary depending on theuser’s hearing device and hearing loss. If your hearing device happens to be vulnerable to interference, you may not be able touse a rated phone successfully. Trying out the phone with yourhearing device is the best way to evaluate it for your personalneeds.M-Ratings: Phones rated M3 or M4 meet FCC requirements and arelikely to generate less interference to hearing devices than phonesthat are not labeled. M4 is the better/higher of the two ratings.Hearing devices may also be rated. Yourhearing device manufacturer or hearinghealth professional may help you find thisrating. Higher ratings mean that the hearingdevice is relatively immune to interferencenoise. The hearing aid and wireless phonerating values are then added together. A sum of 5 is consideredacceptable for normal use. A sum of 6 is considered for best use.134For information about hearing aids and digital wirelessphone•Fcc Hearing Aid Compatibility and Volume Controlhttp://www.fcc.gov/cgb/dro/hearing.html•Gallaudet University, RERChttp://tap.gallaudet.edu/DigWireless.KS/DigWireless.htm•Self Help for Hard of Hearing People Inc. [SHHH]www.hearingloss.org/hat/TipsWirelessPhones.htm•The Hearing Aid Compatibility FCC Orderhttp://hraunfoss.fcc.gov/edocs_public/attachmatch/FCC-03-168A1.pdf](https://usermanual.wiki/Pantech/PN-810/User-Guide-731388-Page-68.png)