Pantech PX-500 Dual-Mode CDMA PC Wireless Card (CDMA/PCS-CDMA) User Manual Sprint PX 500 060417 qxp
Pantech Co., Ltd. Dual-Mode CDMA PC Wireless Card (CDMA/PCS-CDMA) Sprint PX 500 060417 qxp
Pantech >
Users Manual

[Cover]

www.sprint.com
Sprint PCS Connection CardTM
PX-500
© 2005 Sprint Nextel. All rights reserved. No reproduction in whole or in
part without prior written approval. Sprint, the
"
Going Forward
"
logo,
the NEXTEL name and logo, and other trademarks are trademarks of
Sprint Nextel.
Printed in the U.S.A.

Table of Contents
Welcome to Sprint . . . . . . . . . . . . . . . . . . . . . . . . . . . . . . . . .i
Introduction . . . . . . . . . . . . . . . . . . . . . . . . . . . . . . . . . . . . . .ii
Section 1: Sprint PCS Connection Card Basics . . . . . . . . .1
1A. Introducing the Sprint PCS Connection Card . . . . . . . . . .3
Your Sprint PCS Connection Card . . . . . . . . . . . . . . . . . . . . . . . . .4
A Network Card . . . . . . . . . . . . . . . . . . . . . . . . . . . . . . . . . . . . . . . . .5
Package Contents . . . . . . . . . . . . . . . . . . . . . . . . . . . . . . . . . . . . . . .5
AboutThis Guide . . . . . . . . . . . . . . . . . . . . . . . . . . . . . . . . . . . . . . . .6
1B. Getting Started With Your Sprint PCS Connection Card . . .7
Getting Started . . . . . . . . . . . . . . . . . . . . . . . . . . . . . . . . . . . . . . . . .8
The Sprint PCS Connection Card Software . . . . . . . . . . . . . . . . .8
Activating and Using Sprint PCS Service . . . . . . . . . . . . . . . . . . .9
Care and Maintenance . . . . . . . . . . . . . . . . . . . . . . . . . . . . . . . . .11
1C. Installing the Sprint PCS Connection Card . . . . . . . . . . .13
Getting Started . . . . . . . . . . . . . . . . . . . . . . . . . . . . . . . . . . . . . . . .14
Installing the Sprint PCS Connection Manager Software . .16
Inserting and Removing the Sprint PCS Connection Card . .18
ActivatingYour Sprint PCS Connection Card . . . . . . . . . . . . . .22
Section 2: Using the Sprint PCS Connection Card . . . . .25
2A. Sprint PCS Connection Manager Software . . . . . . . . . . .27
The Sprint PCS Connection Manager Software . . . . . . . . . . .28
Starting the Sprint PCS Connection Manager Software . . .29
The Sprint PCS Connection Manager Software Window . . .30
Taskbar Icons . . . . . . . . . . . . . . . . . . . . . . . . . . . . . . . . . . . . . . . . . .39
Establishing and Terminating Connections . . . . . . . . . . . . . .40
Sprint PCS Connection Manager Software
Menu Options . . . . . . . . . . . . . . . . . . . . . . . . . . . . . . . . . . . . . . . . .41
Accessing Links . . . . . . . . . . . . . . . . . . . . . . . . . . . . . . . . . . . . . . . .48

2B. Menu Options . . . . . . . . . . . . . . . . . . . . . . . . . . . . . . . . . . .49
Overview of Menu Items . . . . . . . . . . . . . . . . . . . . . . . . . . . . . . . .50
ActivationWizard . . . . . . . . . . . . . . . . . . . . . . . . . . . . . . . . . . . . . .51
Alert Log . . . . . . . . . . . . . . . . . . . . . . . . . . . . . . . . . . . . . . . . . . . . . . .51
Connection History . . . . . . . . . . . . . . . . . . . . . . . . . . . . . . . . . . . .52
Device Info & Diagnostics . . . . . . . . . . . . . . . . . . . . . . . . . . . . . . .53
Links (Notebook PCs) . . . . . . . . . . . . . . . . . . . . . . . . . . . . . . . . . . .54
Software Updates . . . . . . . . . . . . . . . . . . . . . . . . . . . . . . . . . . . . . .54
Settings . . . . . . . . . . . . . . . . . . . . . . . . . . . . . . . . . . . . . . . . . . . . . . .55
About Sprint PCS Connection Manager . . . . . . . . . . . . . . . . . .55
2C. Troubleshooting Tips . . . . . . . . . . . . . . . . . . . . . . . . . . . . .57
Problem Causes and Suggestions . . . . . . . . . . . . . . . . . . . . . . .58
Reinstalling the Sprint PCS Connection Card Driver . . . . . . .62
Resolving Resource Conflicts . . . . . . . . . . . . . . . . . . . . . . . . . . . .67
Using the Menu Tools . . . . . . . . . . . . . . . . . . . . . . . . . . . . . . . . . . .69
Section 3: Sprint PCS Vision . . . . . . . . . . . . . . . . . . . . . . . .71
3A. Sprint PCS Vision . . . . . . . . . . . . . . . . . . . . . . . . . . . . . . . . .73
Launching the Web . . . . . . . . . . . . . . . . . . . . . . . . . . . . . . . . . . . . .74
Using Sprint PCS Mail . . . . . . . . . . . . . . . . . . . . . . . . . . . . . . . . . . .75
Sprint PCS Vision FAQs . . . . . . . . . . . . . . . . . . . . . . . . . . . . . . . . . .78
Section 4: Technical Specifications and
Regulatory Information . . . . . . . . . . . . . . . . . . . . . . . . . . .81
4A. Technical Specifications . . . . . . . . . . . . . . . . . . . . . . . . . . .83
Environmental Specifications . . . . . . . . . . . . . . . . . . . . . . . . . . .84
Mechanical Specifications . . . . . . . . . . . . . . . . . . . . . . . . . . . . . .84
Software Specifications . . . . . . . . . . . . . . . . . . . . . . . . . . . . . . . .85
Transmitter Specifications . . . . . . . . . . . . . . . . . . . . . . . . . . . . . .86
Receiver Specifications . . . . . . . . . . . . . . . . . . . . . . . . . . . . . . . . .87
Hardware Specifications . . . . . . . . . . . . . . . . . . . . . . . . . . . . . . . .88
Miscellaneous . . . . . . . . . . . . . . . . . . . . . . . . . . . . . . . . . . . . . . . . .88

4B. Regulatory Information . . . . . . . . . . . . . . . . . . . . . . . . . . .89
Regulatory Notices . . . . . . . . . . . . . . . . . . . . . . . . . . . . . . . . . . . . .90
Section 5: Safety and Terms & Conditions . . . . . . . . . . .93
5A. Safety and Notices . . . . . . . . . . . . . . . . . . . . . . . . . . . . . . . .95
Important Notice . . . . . . . . . . . . . . . . . . . . . . . . . . . . . . . . . . . . . .96
Safety and Hazards . . . . . . . . . . . . . . . . . . . . . . . . . . . . . . . . . . . . .97
5B. Terms and Conditions . . . . . . . . . . . . . . . . . . . . . . . . . . . . .99
Terms and Conditions of Service . . . . . . . . . . . . . . . . . . . . . . .100
Index . . . . . . . . . . . . . . . . . . . . . . . . . . . . . . . . . . . . . . . . . .113

Welcome to Sprint
Sprint is committed to bringing you the best wireless
technology available. When it comes to mobile
connectivity, the Sprint PCS Connection CardTM offers more
freedom than ever before. No wires, no cables, just access
to your data when you need it. The power of the Internet
and your company data is truly at your fingertips.
This guide will familiarize you with our technology and
with your new Sprint PCS Connection CardTM and Sprint PCS
Connection ManagerSM Software through simple, easy-to-
follow instructions.
Welcome and thank you for choosing Sprint.
i

ii
Introduction
This User’s Guide introduces you to Sprint PCS Service
and all the features of your new phone. It’s divided into
five sections:
ࡗSection 1: Sprint PCS Connection Card Basics
ࡗSection 2: Using the Sprint PCS Connection Card
ࡗSection 3: Sprint PCS VisionTM
ࡗSection 4: Technical Specifications and Regulatory Information
ࡗSection 5: Safety Information and Terms & Conditions
Throughout the guide, you’ll find tips that highlight special
shortcuts and timely reminders to help you make the most
of your new phone and service. The Table of Contents and
Index will help you locate specific information quickly.
You’ll get the most out of your phone if you read each
section. However, if you’d like to get right to a specific
feature, simply turn to that page. Follow the instructions in
that section and you’ll be ready to use your phone in no time.

Sprint PCS Connection
Card Basics
Section 1

2

Section 1A: Introducing the Sprint PCS Connection Card 3
Section 1A
Introducing the Sprint PCS
Connection CardTM
In This Section
ࡗYour Sprint PCS Connection Card
ࡗA Network Card
ࡗPackage Contents
ࡗAbout This Guide
This section introduces the basic features and functions of
your Sprint PCS Connection Card, the materials included
with your card, and an overview of the sections in this
User’s Guide.
Introducing Your Card

4 Section 1A: Introducing the Sprint PCS Connection Card
Your Sprint PCS Connection Card
Your Sprint PCS Connection Card fits into a Type II PC Cardslot
(available on most notebook PCs) and functions as a wireless
network card.
This card allows you to:
ⅷAccess your company network
ⅷSend and receive email
ⅷAccess the Internet
CDMA Networks
The Sprint PCS Connection Card operates over a type of wireless
network called CDMA (Code Division Multiple Access).
To use the Sprint PCS Connection Card, you need an account
that gives you access to a CDMA network.
Every CDMA network operates on one of three radio
frequency bands. Your Sprint PCS Connection Card
PX-500
leverages the high-speed CDMA 1xEV-DO nework and
operates on the
1900
MHz band.
The Sprint PCS Connection Card utilizes CDMA 1xEV-DO
technology enabling real-time high-speed wireless access to
email, the Internet, or your company network. The card runs
on most current Windows-compatible laptop or desktop
computers, and it provides data transmission of up to 3.1
Megabits and down to 1.8 Megabits per second (Mbps).
Tip: More information about CDMA networks is available on the CDMA
Development Group Web site,www.cdg.org.

Section 1A: Introducing the Sprint PCS Connection Card 5
A Network Card
During Sprint PCS VisionSM connections, the Sprint PCS
Connection Card is a true network card, functioning just like the
network cards familiar to most business computer users. Once
installed and configured, the card connects instantly to the
CDMA network with just a few mouse clicks. To surf the Web,
you can just insert the card, click a few buttons, and launch your
Internet browser. To access your company network, you may
need to launch an extranet client after you connect to the
CDMA network.
Tip: To optimize your settings for faster speeds and data conservation
when accessing your company network, work in "Offline" mode and
synchronize periodically to send and receive company email. Do not use
the Preview Pane; also, save or drag and drop attachments to a desktop
folder before opening them (rather than double-clicking them in the
email). For more detailed information, access the Microsoft whitepaper
at http://www.microsoft.com/office/outlook/evaluation/perform.doc.
Package Contents
Your Sprint PCS Connection Card package contains the
following components:
ⅷSprint PCS Connection Card
PX-500
ⅷStart Here Guide
ⅷInstallation CD containing the Sprint PCS Connection
ManagerSM Software and this User’s Guide
ⅷWarranty
Introducing Your Card

6 Section 1A: Introducing the Sprint PCS Connection Card
About This Guide
This User’s Guide is designed to provide you with all the
information you need to install and use your Sprint PCS
Connection Card.
ⅷ
Section 1
(which you are reading) gives you an overview of
the card and its basic features and provides instructions
for installing your Sprint PCS Connection Card and
Sprint PCS Connection Manager Software.
ⅷ
Section 2
provides detailed, step-by-step instructions for
using the card.
ⅷ
Section 3
introduces Sprint PCS Vision Services.
ⅷ
Section 4
provides electrical, radiofrequency, and other
specifications for the Sprint PCS Connection Card, as well
as regulatory notices concerning your Sprint PCS
Connection Card.
ⅷ
Section 5
provides important safety and liability
information and includes the Terms and Conditions of use
for the Sprint PCS Connection Card.

Section 1B: Getting Started 7
Section 1B
Getting Started With Your
Sprint PCS Connection CardTM
In This Section
ࡗGetting Started
ࡗThe Sprint PCS Connection Card Software
ࡗActivating and Using Sprint PCS Service
ࡗCare and Maintenance
This section outlines the basics of getting started with
your Sprint PCS Connection Card, including installing the
Sprint PCS Connection ManagerSM Software and inserting
and activating your card.
Getting Started

8 Section 1B: Getting Started
Getting Started
Before you can begin using your Sprint PCS Connection Card,
you must:
1. Install the Sprint PCS Connection ManagerSM
Software, including the Sprint PCS Connection
Card driver software.
2. Activate your Sprint PCS Account (unless the card has
been pre-activated).
3. Configure the Sprint PCS Connection Card to use
your account.
The Sprint PCS Connection Card Software
The Sprint PCS Connection Card comes with the
following software:
ⅷ
Sprint PCS Connection Manager Software
allows you to
manage the card’s actions and monitor your connections.
ⅷThe
driver software
establishes the interface between the
card and your Windows®operating system.
The software must be installed before you insert the
Sprint PCS Connection Card for the first time.

Section 1B: Getting Started 9
Activating and Using Sprint PCS Service
Before using your Sprint PCS Connection Card, you must first set
up your Sprint PCS wireless network account.
To set up your Sprint PCS Connection Card wireless
network account:
Call Sprint Customer Service
ⅷIf you will be using your Sprint PCS Connection Card
primarily for business purposes, call
1-877-789-3969.
ⅷIf your card is intended primarily for personal use, call
1-888-715-4588.
You should have the following information available:
ⅷYour billing address
ⅷYour Social Security number or Tax ID number
ⅷYour driver’s license number
ⅷYour Sprint PCS Connection Card’s ESN (electronic serial
number) The ESN is printed on the card’s label and can also
be displayed during the installation process.
ⅷA pen and paper to write down your account information
Getting Started

10 Section 1B: Getting Started
During this call, Sprint Customer Service will help you select
your service plan and guide you through the activation process.
They will also provide you with the following important
account information:
ⅷYour card’s Activation Code
ⅷYour card’s Phone Number
ⅷYour card’s Lock Code
Tip: You can use the Lock Code feature to prevent others from using your
account should your Sprint PCS Connection Card be lost or stolen.
Unless your card has been pre-activated, the Sprint PCS
Connection Manager Software application will automatically
detect that no account has been configured when you run it for
the first time. The Sprint Activation Wizard will then launch to
guide you through the activation and configuration process.

Section 1B: Getting Started 11
Care and Maintenance
As with any electronic device, the Sprint PCS Connection Card
must be handled with care to ensure reliable operation. Follow
these guidelines in using and storing the card:
ⅷDo not apply adhesive labels to the card. They may cause
the card to become jammed inside the card slot.
ⅷThe card should fit easily into your
Type II PC Card
slot.
Forcing the card into a slot may damage the connector pins.
ⅷProtect the card from liquids, dust, and excessive heat.
ⅷWhen not installed in your computer, store the card in a
safe place.
ⅷNever force the Sprint PCS Connection Card in or out of
your computer’s PC Card slot.
ⅷWhen moving your computer, always remove the
Sprint PCS Connection Card from the PC Card slot to
avoid any damage.
Getting Started

12

Section 1C: Installing the Sprint PCS Connection Card 13
Section 1C
Installing the Sprint PCS
Connection Card
In This Section
ࡗGetting Started
ࡗInstalling the Sprint PCS Connection Manager Software
ࡗInserting and Removing the Sprint PCS Connection Card
ࡗActivating Your Sprint PCS Connection Card
This section guides you through the steps necessary to
install your Sprint PCS Connection CardTM and make it
operational on your notebook PC.
Installing Your Card

14 Section 1C: Installing the Sprint PCS Connection Card
Getting Started
Before you can use your new Sprint PCS Connection Card, you
must first:
1. Install the Sprint PCS Connection ManagerSM Software,
located on the installation CD, onto your computer.
Note: Before installing your new software, delete or uninstall any
previously existing modem or dialer software from your system. Do not
insert the Sprint PCS Connection Card into the slot until you have
installed the Sprint PCS Connection Manager Software onto your PC or
until instructed to do so by the installation CD.
2. Insert the card into your computer’s PC Card slot (Sprint
label facing up). Windows will detect the card and
automatically install the necessary card drivers.
Tip: A driver is software that forms the interface between a device (such
as the Sprint PCS Connection Card) and the operating system on your PC.
3. Launch the Sprint PCS Connection Manager Software
application.
4. Activate your Sprint PCS Connection Card and Account,
unless it was pre-activated. If your card has not
previously been activated, the Activation Wizard will
automatically launch and guide you through the
process.

Section 1C: Installing the Sprint PCS Connection Card 15
System Requirements
The Sprint PCS Connection Card is supported on the following
operating systems:
ⅷ
Windows
®
2000
ⅷ
Windows
®
XP
To install and run the Sprint PCS Connection Card and
accompanying Sprint PCS Connection Manager Software,
your system requires these minimum resources:
Note: Special Note for Windows®2000 Users: To function properly, the
Sprint PCS Connection Card’s IOTA protocol requires support for high-
security 128-bit encryption. If the installer does not detect high-security
support on your system, a pop-up window will appear instructing you to
update your Windows 2000 to support 128-bit security. Follow the
onscreen instructions to update your system.
Installing Your Card
CPU PentiumIII (166 MHz or higher)
Card Slots Type II PC Card Slot (32 bit bus)
Communications Ports 1 available
Disk Drive CD-ROM
I/O Resources 1 IRQ, 32 bytes I/O space
Memory 32 MB
Disk Space 14 MB

16 Section 1C: Installing the Sprint PCS Connection Card
Installing the Sprint PCS Connection
Manager Software
Follow the instructions below to install the Sprint PCS
Connection Manager Software from the installation CD. This
process requires you to restart your PC at the end of the
installation; therefore, we recommend that you quit all open
applications before you begin installation. The Sprint PCS
Connection Manager Software automatically determines your
PC’s operating system and installs all appropriate software.
Note: Windows®2000: Users of Windows 2000 must be logged in
with administrative privileges to install the Sprint PCS Connection
Manager Software.
Windows®XP: Users of Windows XP may insert the card prior to installing
the software. You may also require administrative privileges, depending
on your XP installation.
Installing the Sprint PCS Connection Manager Software and the
Sprint PCS Connection Card driver:
1. Insert the installation CD into your CD-ROM drive. The
CD should auto-start and display a menu.
2. If the CD does not auto-start, select Start > Run and
d:\launch.exe (where dis the letter of your CD-ROM
drive).
3. From the CD start-up window, select Install Sprint PCS
Connection Manager. This will launch the InstallShieldfi
Wizard.
4. The License Agreement window appears. Click Yes to
accept the agreement and proceed with the installation.

Section 1C: Installing the Sprint PCS Connection Card 17
5. Select Sprint PCS Connection Card and click Next on the
"Select your card" screen.
6. Click Next to install the software to the default
destination folder (recommended). If you need to install
the software to a different folder, click Choose and select
an alternate installation destination.
7. Click Finish or Restart to complete the installation and
launch the Sprint PCS Connection Manager.
8. Wait for your PC to reboot.
Windows 2000: You may need to restart your PC
manually by selecting Start>Shutdown>Restart.
9. Click OK when you are prompted to insert the
Sprint PCS Connection Card. Insert the card into
the Type II PC Card slot.
Note: Do not forcefully insert the Sprint PCS Connection Card. This may
damage the connector pins.
10. Windows will detect the new hardware (Sprint PCS
Connection Card) and will install the necessary drivers.
The Add New Hardware Wizard or Found New Hardware
Wizard will launch, depending on your operating system.
11. Follow the onscreen prompts to allow the wizard to install
the drivers.
12. Click OK when you are notified that the installation
is complete.
On completion of this step, the Sprint PCS Connection Manager
Software and the Sprint PCS Connection Card driver are
installed and you can proceed to activate your card (if it has not
already been activated).
Installing Your Card

18 Section 1C: Installing the Sprint PCS Connection Card
Inserting and Removing the Sprint PCS
Connection Card
Inserting the Sprint PCS Connection Card
Before you insert the Sprint PCS Connection Card, you must first
install the Sprint PCS Connection Manager Software.
Once you have completed the software installation procedure,
you may insert your card into your computer’s PC Card slot. The
Sprint label should be facing up and the 68-pin connector, located
atthe end of the card, should be inserted directly into the computer's
PC Card slot. The antenna must be positioned in the vertical position.
Note: The Sprint PCS Connection Card should fit snugly, but you should
be able to insert or remove it easily from your computer’s PC Card slot.
A portion (the black section) of the card will remain outside the PC
Card slot. This section contains the card’s antenna and the LED
(light emitting diode). Because the card is not entirely contained
in your computer’s PC Card slot, it is important to remove the card
when transporting your notebook or Tablet PC.
Section 1C: Installing the Sprint PCS Connection Card 19
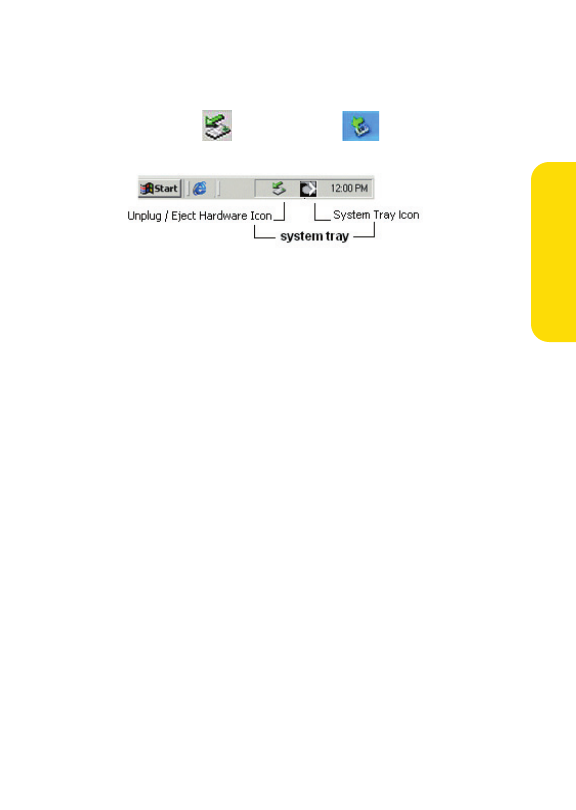
When you insert the card, the following should occur:
ⅷ
If sound effects are enabled, the PC beeps.
ⅷ
The Unplug/Eject Hardware appears in the system tray
(unless the feature has been disabled).
ⅷ
The Sprint PCS Connection Manager Software launches
(unless the auto-launch feature has been disabled).
The card is powered as soon as you insert it.
Removing Power from the Sprint PCS Connection Card
When the Sprint PCS Connection Card is connected to the
computer it has power and is trying to communicate with the
network. To remove power, the Sprint PCS Connection Manager
software must be closed and the card must be properly ejected
from the PC Card slot.
Windows 2000 Windows XP
Installing Your Card
20 Section 1C: Installing the Sprint PCS Connection Card
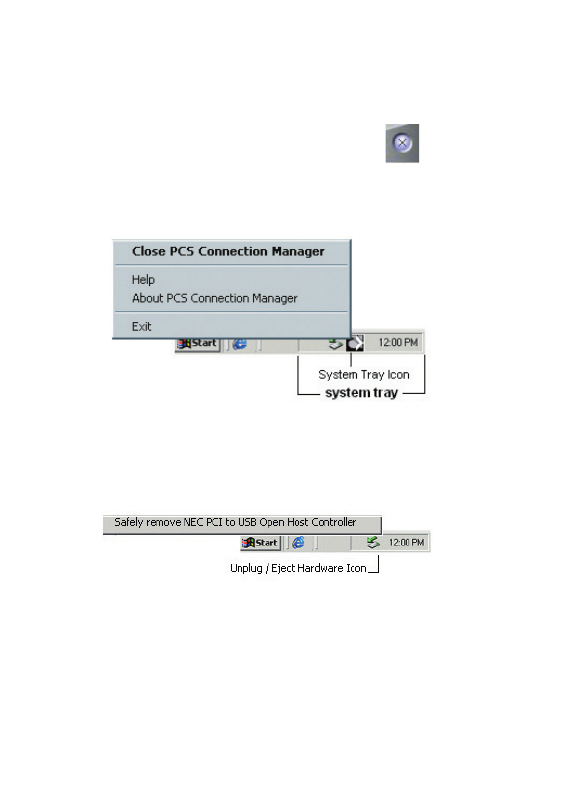
Removing the Sprint PCS Connection Card
To remove the card:
1. Close the Sprint PCS Connection Manager program if it is
running. There are two methods to closing the program:
Click the close icon on the interface
Right- click the Sprint PCS Connection Manager system
tray icon and select Exit from the menu.
2. Left-click the Unplug/Eject Hardware icon in the system
tray. A message bar appears.
Section 1C: Installing the Sprint PCS Connection Card 21
3. Click "Safely remove NEC PCI to USB Open Host
Controller". A dialog box notifies you that it is safe to
remove the card.
ⅢWindows 2000: Once the Safe to Remove Hardware
message appears, click OK and use the ejector
button (most laptops have a ejector button located
next to the PC Card slot) to remove the card.
ⅢWindows XP: Once Safe to Remove Hardware
message appears in the system tray, use the ejector
button (most laptops have a ejector button located
next to the PC Card slot) to remove the card.
4. Remove the Sprint PCS Connection Card from your
computer’s PC Card slot by gripping the card by both of
its sides and pulling straight out. (If available, use your
computer’s card ejector tool).
Installing Your Card
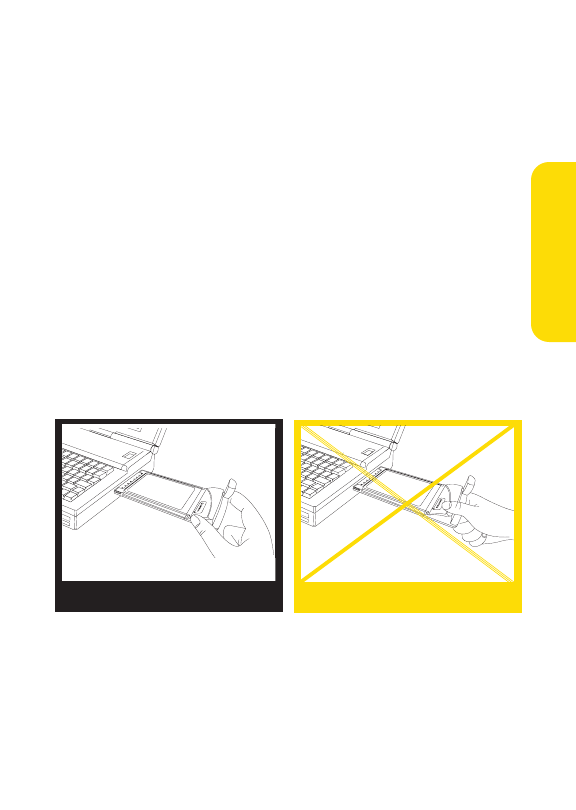
Correct Incorrect
When inserting or removing your
Sprint PCS Connection Card, grip
the card by both of its sides.
Do not handle or remove the
Sprint PCS Connection Card by
pulling on the antenna.

22 Section 1C: Installing the Sprint PCS Connection Card
ActivatingYour Sprint PCS Connection Card
The final step to making your Sprint PCS Connection Card
operational is configuring it to use your account.
Tip: For an overview of account activation and configuration.
If you purchased a pre-activated Sprint PCS Connection Card,
this step is not necessary. Once the application software and
driver are installed, the card is ready for use.
Otherwise, you must use the Sprint Activation Wizard to
activate and configure your account. Activation involves
phoning Sprint Customer Service, exchanging information
and entering your account information into the appropriate
fields in the wizard.
To activate an account and configure your Sprint PCS
Connection Card:
1. Insert the card into your PC Card slot. The Activation
Wizard will launch automatically.
2. Click Next to begin the activation process. The windows
will describe the process.
3. Please telephone Sprint Customer Service to set up your
Sprint PCS wireless network account.
ⅢIf you will be using your Sprint PCS Connection Card
primarily for business purposes, call 1-877-789-3969.
ⅢIf your card is intended primarily for personal use,
call 1-888-715-4588.

Section 1C: Installing the Sprint PCS Connection Card 23
You should have the following information available:
Ⅲ
Your billing address
Ⅲ
Your Social Security or Tax ID number
Ⅲ
Your driver
’
s license number
Ⅲ
Your Sprint PCS Connection Card
’
s ESN (electronic serial
number) The ESN is printed on the card
’
s label and can
also be displayed during the installation process.
Ⅲ
A pen and paper to write down your account information.
Inform your Sprint Customer Service Specialist that you
are activating a Sprint PCS Connection Card PX-500.
During this call, Sprint Customer Service will help you
choose a service plan and guide you through the activation
process.
4. Click Next when you are asked for your card’s ESN
(electronic serial number). The third window will appear,
which displays your card’s ESN in the top field.
5. Carefully repeat the ESN to the Service Representative.
You will be given an activation code.
6. Enter the activation code into the bottom field of the
window and click Next to continue to the next window.
7. Once your Sprint Customer Service Specialist has given
you your card’s phone number, enter the number in the
top and bottom fields and click Next to continue.
Note: If the phone numbers you enter into the top and bottom fields do
not match, a warning will appear requesting that you verify that the
phone numbers are correct.
Installing Your Card

24 Section 1C: Installing the Sprint PCS Connection Card
8. You have now successfully completed the activation
process. Your phone number and lock code will be
displayed at the bottom of the final activation window.
Click Finish to exit the Sprint Activation Wizard.
On completion of this step, your Sprint PCS Connection Card is
ready for use. Section 2A: Sprint PCS Connection Manager
Software on page 27 explains how to use the Sprint PCS
Connection Manager Software to manage and monitor
your connections.

Using the
Sprint PCS Connection Card
Section 2

26

Section 2A: Sprint PCS Connection Manager Software 27
Section 2A
Sprint PCS Connection ManagerSM
Software
In This Section
ࡗThe Sprint PCS Connection Manager Software
ࡗStarting the Sprint PCS Connection Manager Software
ࡗThe Sprint PCS Connection Manager Software Window
ࡗTaskbar Icons
ࡗEstablishing and Terminating Connections
ࡗSprint PCS Connection Manager Software Menu Options
ࡗAccessing Links
This chapter outlines the Sprint PCS Connection Manager
Software interface for your notebook PC, including the
components of the main window, button usage, taskbar
icons, and more. Once you’ve mastered the basics here, you’ll
be ready to begin using your Sprint PCS Connection CardTM.
Sprint PCS Connection
Manager Software

28 Section 2A: Sprint PCS Connection Manager Software
The Sprint PCS Connection
Manager Software
Sprint PCS Connection Manager Software allows you to
manage and monitor the connection between your
Sprint PCS Connection Card and the CDMA network.
Use the Connection Manager Software to:
ⅷDetermine your signal strength, roaming status,
Sprint PCS VisionSM availability, and other network
parameters.
ⅷInitiate data calls.
ⅷView call statistics.
ⅷEnable and disable features such as Always on Top (which
allows you to set the card software to display in front of
other application windows).
ⅷSet options related to sounds played, and the lock code
security feature (which you can use to prevent others from
using your card).
You must run the Sprint PCS Connection Manager Software
anytime you use the Sprint PCS Connection Card.
Section 2A: Sprint PCS Connection Manager Software 29
Starting the Sprint PCS Connection
Manager Software
To launch the Sprint PCS Connection Manager Software:
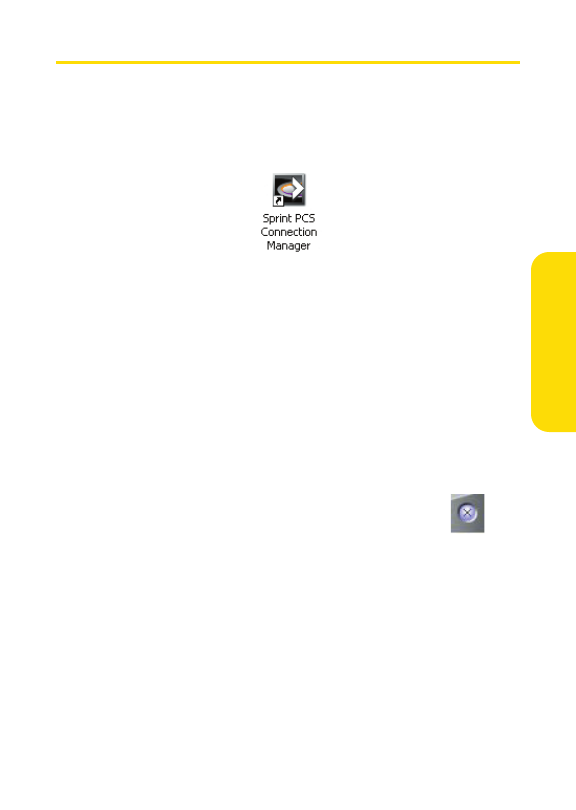
ᮣDouble-click the Sprint PCS Connection Manager desktop
icon, located on your desktop.
or
ᮣSelect Start > Programs > Sprint > UTStarcom
Depending on your settings in the Options window, the
software launches automatically anytime you insert the
Sprint PCS Connection Card.
Once you make a connection in the card software, you can
launch whichever application you want to use (such as your
Web browser or email application).
Use the close button in the upper-right corner of the
interface to exit.
Sprint PCS Connection
Manager Software
30 Section 2A: Sprint PCS Connection Manager Software
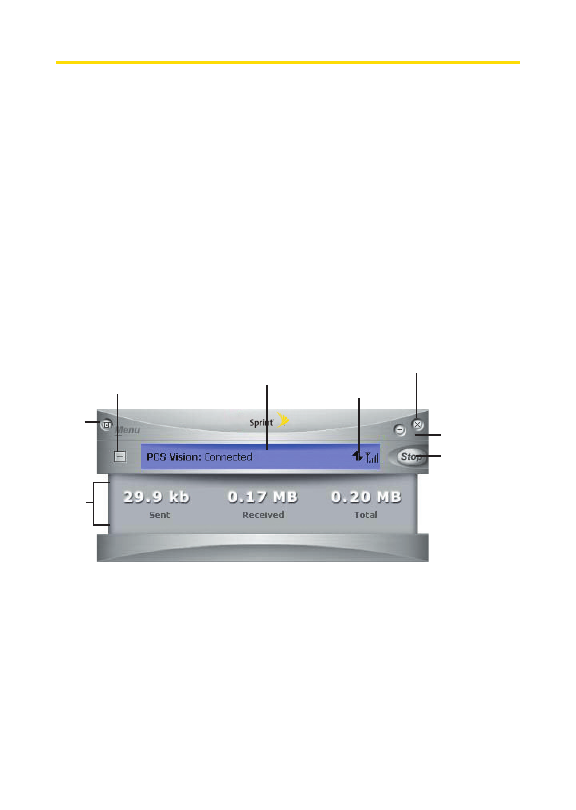
The Sprint PCS Connection Manager
Software Window
The Sprint PCS Connection Manager Software features its
own Custom Main Interface (CMI) window. It includes the
following components:
ⅷA Menu button in the upper-left corner.
ⅷMinimize and Close buttons in the upper-right corner.
ⅷAn indicator area (to the immediate right of the
message area).
ⅷA button ("GO") used to establish/cancel a connection.
ⅷA Detail Drawer that displays the amount of data being
transfered and received.
Open / Close Detail Drawer
Menu
Detail
Drawer
Message Area
Indicator Area
Close / Exit
Sprint PCS ConnectionManager
Minimize View to
System Tray Mode
Detail
Establish /
Cancel
Connection

Section 2A: Sprint PCS Connection Manager Software 31
About the Interface
The following application functions are available within the
main window of the Sprint PCS Connection Manager
Software:
ⅷClose: Closes the interface and Exits the software.
ⅷGo: Initiates a connection.
ⅷStop: Ends or cancels a connection.
ⅷMinimize: Minimizes the interface to System Tray Mode.
ⅷMenu: Provides access to tools and options settings.
ⅷMessage Area: Displays "Connect your phone or card...",
"Ready", "Disconnect", "Connect", "Connecting" or
"Connected" states.
ⅷImage Compression (if applicable): Indicates the relative
speed of your Sprint PCS VisionSM connections.
ⅷTransfer/Receive: Visual indicator of data activity.
ⅷSignal Strength: Visual indicator of signal strength.
ⅷDetail Drawer: Displays byte counter. Click + to expand
and - to close.
Sprint PCS Connection
Manager Software
32 Section 2A: Sprint PCS Connection Manager Software
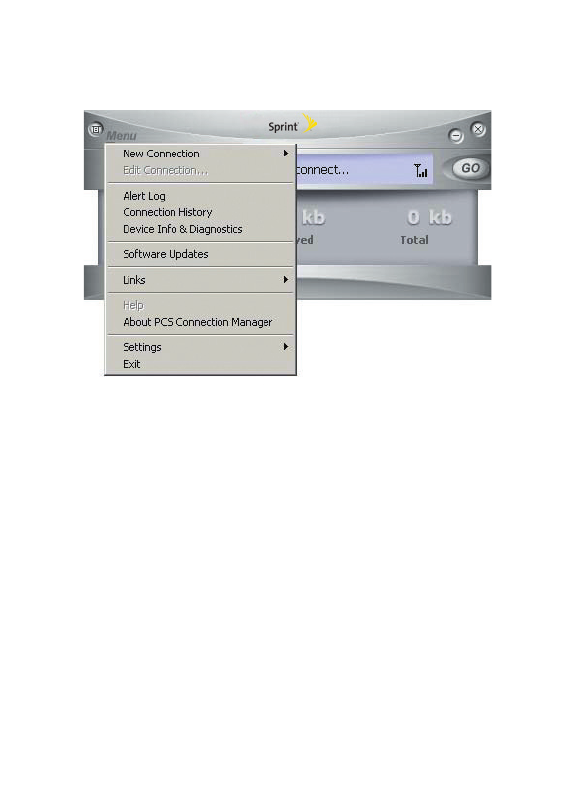
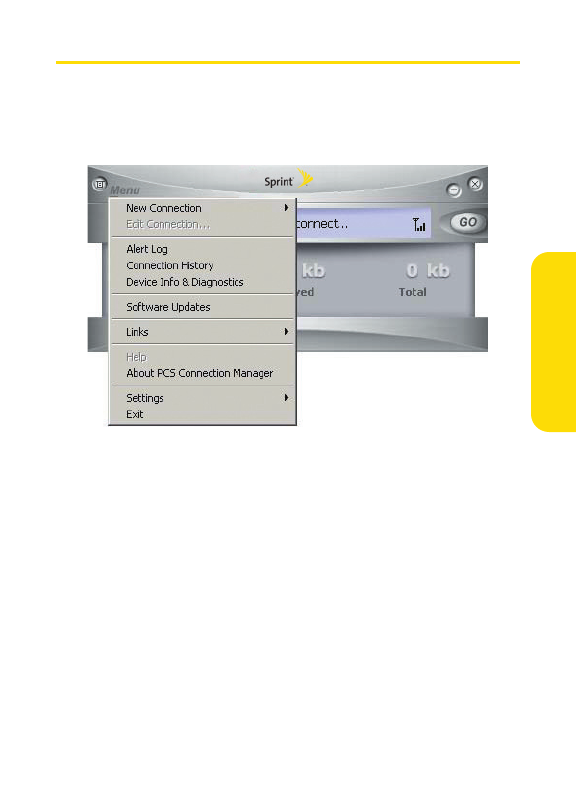
Secondary Menu Options
Clicking the Menu button, located in the upper-left corner of
the interface, provides access to the Sprint PCS Connection
Manager Software secondary menu.
If there is a Dial-up Networking Connection available, the Go
(Connect) menu selection expands to reveal a submenu
containing all available connections. The Go (Connect) menu
does not open a submenu if only the Sprint PCS VisionSM
connection is available. The Go (Connect) menu is replaced by
Stop (Disconnect) once you establish a connection. The Go
(Connect) and Links menus are inactive if no card is connected
to the PC.
Once your card is connected to the PC, the Links menu will
remain inactive until a connection is established.

Section 2A: Sprint PCS Connection Manager Software 33
The Minimize and Close Buttons
The Minimize button closes the window but leaves the program
running. When the program is minimized, its icon in the system
tray can be used to determine the card status. (See page 39.)
Once minimized, you can redisplay the program by double-clicking
the desktop shortcut or launching the card software from the Start
menu. (See page 29.) You can also click the icon in the status area.
(The icons are shown in the section "Taskbar Icons" on page 39.) The
Close button is used to exit the card software.
Minimize Close
Sprint PCS Connection
Manager Software

34 Section 2A: Sprint PCS Connection Manager Software
Connection Status
The Sprint PCS Connection Manager Software interface
provides information about your current connection status.
Connect your phone or card...
If the Sprint PCS Connection Manager Software fails to detect
a Sprint PCS Connection Card, the message "Connect your
phone or card..." displays.
Note:In this state, the GO button is unavailable to indicate it cannot be
engaged. The signal strength and image compression icons also are not visible.
Disconnected
If the Sprint PCS Connection Manager interface fails to detect
a Sprint PCS Connection Card, the message "Connect your
phone or card..." will continue to display.
In this state, the GO button is available and the signal strength
icon is visible.Click GO to initiate a connection.
Section 2A: Sprint PCS Connection Manager Software 35
If a Dial-up Networking Connection is also available, the GO
submenu displays. The GO submenu lists all available
connections grouped by connection type and in alphabetical
order. The connection type (Sprint PCS Vision or Dial-up
Networking) appears on the left with the connection name to
its right. Duplicate connections appear only once.
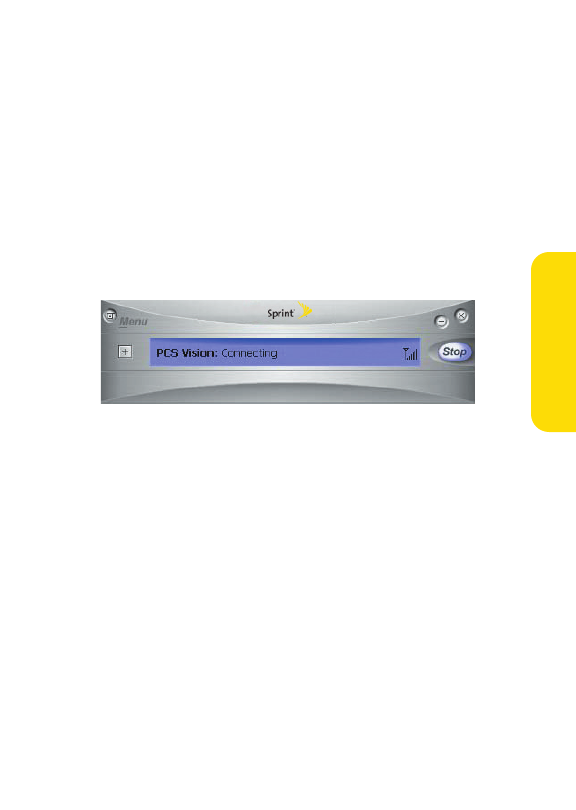
Connecting
In this state, the Sprint PCS Connection Manager is
attempting to make a connection. During this action, the
display will progress from "Connecting" to "Authenticating,"
to "Authenticated." The signal strength icon is visible and the
GO button changes to Stop.
If you attempt to establish a Sprint PCS Vision connection that
requires a password or a Dial-up Networking Connection
requiring a remote login and password, a dialog box will
appear. Enter the relevant information and click OK to
continue the connection process.
To cancel the connection, click Stop.
Sprint PCS Connection
Manager Software

36 Section 2A: Sprint PCS Connection Manager Software
Connected
Once the connection is established, the message area
displays "Connected" and the transfer/receive icon is
now visible.
Click Stop to disconnect.
For other messages, see "Troubleshooting Tips" on page 57.
Indicator Area
The indicator area displays icons that help you keep track of
your signal strength and roaming status, notify you when you
receive messages, and indicate whether certain options or
features are enabled.
The following table lists the indicator area icons and explains
the significance of each icon.
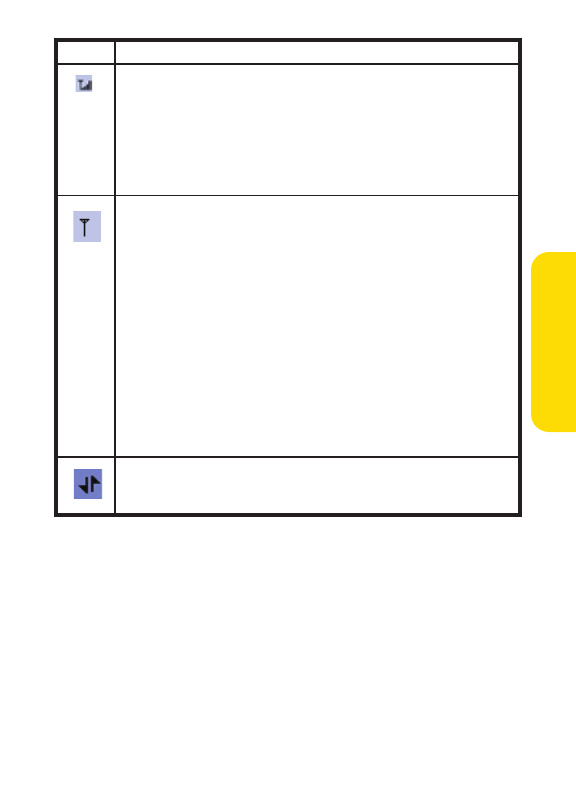
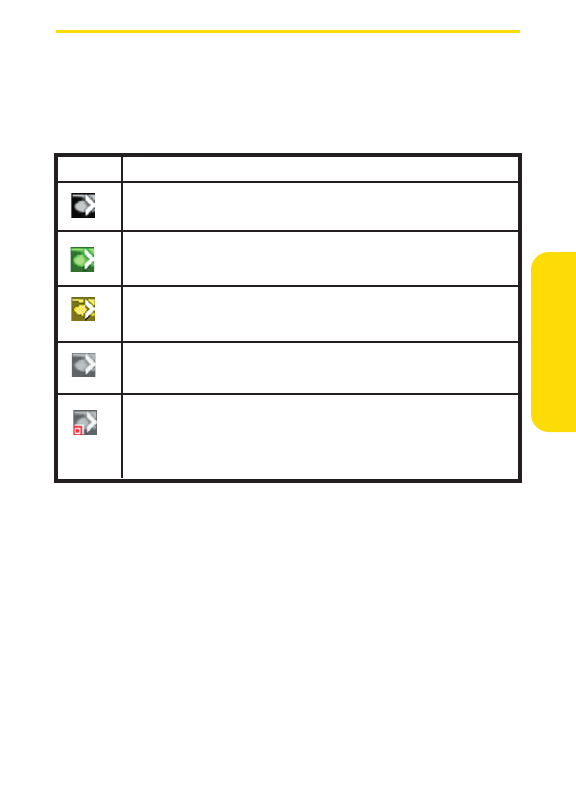
Section 2A: Sprint PCS Connection Manager Software 37
Indicator Area Icons
Sprint PCS Connection
Manager Software
Icon Meaning
The Signal Strength indicator uses bars to show the strength
of the radio signal. The number of bars increases (up to a
maximum of four) as the signal strength increases.
Note : This icon is displayed only when data services are
available.
When no bars are shown, no connection is possible for one
of the following reasons:
ᮣNo antenna is attached.
ᮣYou are outside of the Nationwide Sprint PCS
Network service area.
ᮣThe signal strength is too weak.
ᮣA network or account probelm is preventing the
Sprint PCS Connection Card from obtaining service.
Once a connection is established, this icon is replaced by the
Transmit/Receive icon.
The Transmit/Receive indicator lets you know that a
Sprint PCS Vision data connection is active.

38 Section 2A: Sprint PCS Connection Manager Software
The GO Button
The GO button is used to establish and cancel a connection. The
text on the button changes during different connection stages.
ⅷGO Ready to establish a connection. Click the button to
start a connection (if only one is defined) or to display a list
from which you can select a connection (if more than one
connection is defined).
ⅷStop Once a connection is established, the GO button
changes to read Stop. A connection is being established or
is already established. Click the button to cancel or
disconnect.
Section 2A: Sprint PCS Connection Manager Software 39
Taskbar Icons
The Sprint PCS Connection Manager Software displays an icon
in the system tray (in the lower-right portion of the display
screen on your computer). The system tray icon indicates your
connection status.
Sprint PCS Connection
Manager Software
Icon Meaning
Connecting - Sprint PCS Connection Card is ready to connect
or is currently making a connection.
Connected - Connection established to Nationwide
Sprint PCS Network and data transfer in process.
Dormant- Connection established but no data transfer
taking place.
Disconnected- Sprint PCS Connection Manager running, but
no connection in progress.
Error- Sprint PCS Connection Manager has encountered a
hardware failure in your computer’s modem or other error
while attempting to connect.

40 Section 2A: Sprint PCS Connection Manager Software
Establishing and Terminating Connections
The Sprint PCS Connection Manager Software interface can
be used to establish and terminate connections with the
Sprint PCS Connection Card.
ManagingConnections
In addition to connecting immediately using the Sprint PCS
Connection Manager Software interface, you can create a new
Sprint PCS Vision connection, a Dial-up Networking
connection, or edit a previously created connection. New
Sprint PCS Vision connections can be stored on your notebook.
Dial-up Networking connections are always stored on your
notebook PC.
For information on using the Sprint PCS Connection Manager
Software to establish, terminate, and manage connections.
Section 2A: Sprint PCS Connection Manager Software 41
Sprint PCS Connection Manager
Software Menu Options
Click the Menu button, located at the upper left of the
interface to launch the Sprint PCS Connection Manager
secondary menu.
Sprint PCS Connection
Manager Software
42 Section 2A: Sprint PCS Connection Manager Software
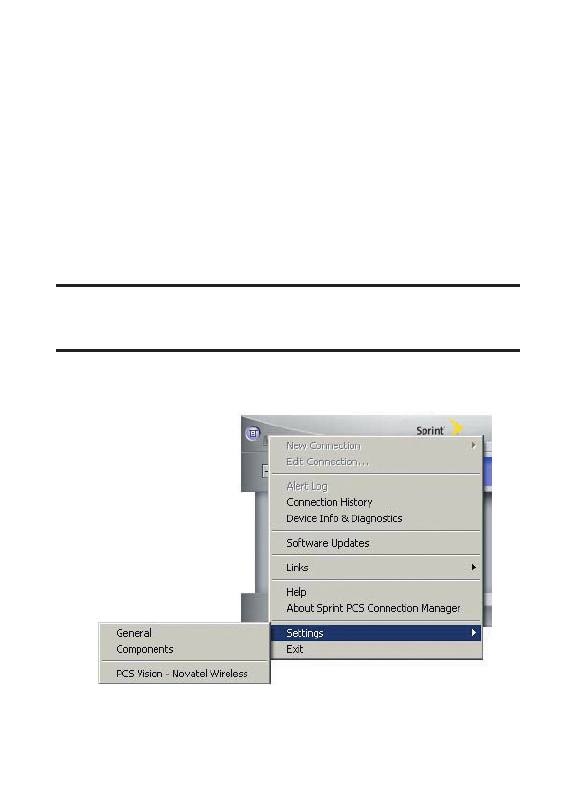
Settings
The Settings window allows you to configure the
Sprint PCS Connection Manager Software to suit your
preferences. In the Settings window you can:
ⅷEnable and disable several features, including Window
Always on Top, Connection History...
Access Settings
1. Click Menu on the Sprint PCS Connection Manager
Software interface.
2. Select Settings from the submenu.
Note: For details on additional items available through the Sprint PCS
Connection Manager Software’s Menu button, see Section 2B: Menu
Options beginning on page 49.
Access Settings
The Settings window contains five tabs: General, Sound,
Advanced, Lock, and Location.

Section 2A: Sprint PCS Connection Manager Software 43
Sprint PCS Connection
Manager Software
General
Set general Sprint PCS Connection Manager Software settings
by checking or unchecking the options:
ⅷPlay Sound Effects Select this checkbox to play a clicking
sound whenever an action is made on the Sprint PCS
Connection Manager software.
ⅷAlways on Top When checked, the Sprint PCS Connection
Manager window displays in front of all other open
application windows, even if another window is placed over
the Sprint PCS Connection Manager Software window.
ⅷStart in System Tray Select this checkbox to have
Sprint PCS Connection Manager interface visible on your
screen regardless of what application are open.
ⅷKeep Connection History When selected, the Sprint PCS
Connection Manager Software logs all connections in the
connection history.
ⅷLaunch when Windows Starts When selected, the
Sprint PCS Connection Manager Software launches
automatically upon startup of your computer.
ⅷEnable Bytemobile Optimization Client When selected,
the image compression software is enabled. When
finished, click Apply and then OK to save changes and close
Settings dialog box.
Software Updates
It is recommended that you check for updates to the
Sprint PCS Connection Manager Software regularly,
for the latest features and network enhancements.
Place a checkmark in the "Check for Updates about Once a
Month" option for automatic updates or select Check Now for
immediate access to Sprint PCS Connection Manager
Software updates that are available.

44 Section 2A: Sprint PCS Connection Manager Software
Components
The Components dialog box offers the ability to make
changes to enable or disable Sprint PCS Connection Manager
components.
1. Select the component (Sprint PCS Vision) you want to
enable or disable.
2. Arrange the order in which the components appear in
the Sprint PCS Connection Manager Software.
3. Press Cancel to undo any changes.
4. Else click Apply or OK to save changes and close the
Settings dialog box.
Sprint PCS Vision
The Sprint PCS Vision dialog box offers the ability to affect the
behavior of your Sprint PCS Vision access.
ⅷSelect the Show Welcome screen checkbox if you would like
to have a welcome screen appear upon a successful
connection to the Sprint PCS Vision network.
ⅷSelect the Perform Pre-Connect Tests checkbox if you would
like to see what may have caused a failure if the Connection
Manager was unable to connect.
ⅷSelect the Go automatically when ready checkbox to
automatically connect to the Nationwide Sprint PCS
Network after Sprint PCS Connection Manager launches and
senses a compatible Sprint PCS device.
ⅷThe Activation Wizard is used only when activating a new
Sprint PCS device.
ⅷThe Change User Lock enables you to change and customize
your User Lock Code.
Section 2A: Sprint PCS Connection Manager Software 45
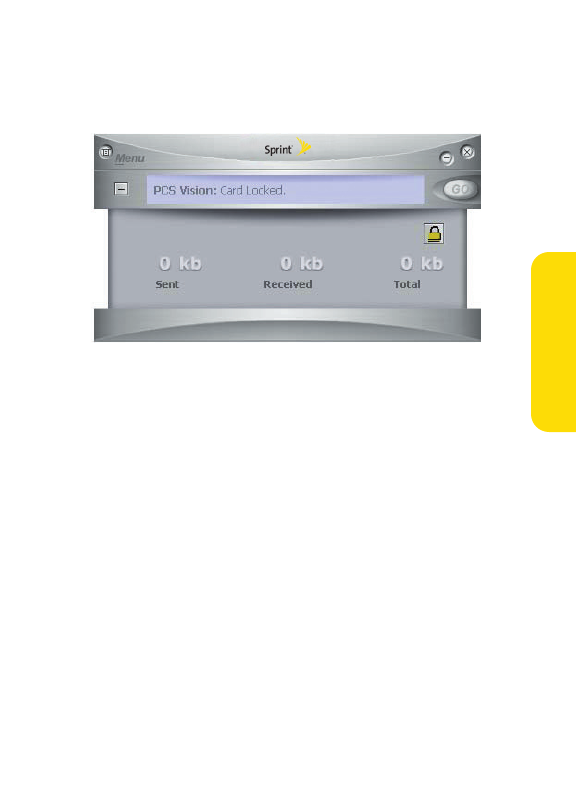
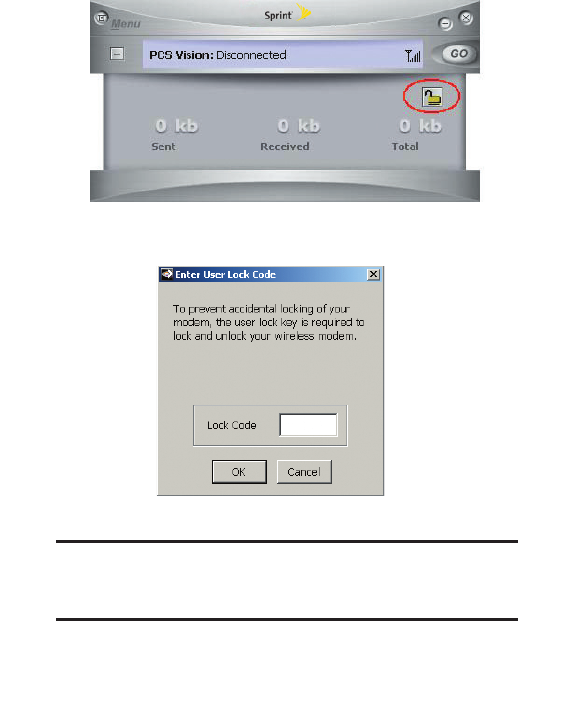
Lock Code
The Lock Code feature can be used to prevent others from
using your Sprint PCS Connection Card and your account.
When the lock code is enabled, the message area will display
Card Locked and the lock icon will appear in the indicator area.
While the card is in lock mode, you may not launch a data
session without first entering your four-digit lock code. The
default lock code is the last four digits of your Sprint PCS
Connection Card phone number. (See Tip on next page.)
Sprint PCS Connection
Manager Software
46 Section 2A: Sprint PCS Connection Manager Software
To enable the lock feature
1. Click the Locked/Unlocked icon located in Detail Drawer
of the Sprint PCS Connection Manager interface.
2. The Enter Lock Code window appears.
3. Enter your lock code and click OK.
Tip:Your default lock code is the last four digits of your Sprint PCS
Connection Card’s phone number. If you can’t recall your card’s phone
number, go to Menu>Device Info and Diagnostics or call Sprint Customer
Service at 1- 888-211-4PCS (4727).

Section 2A: Sprint PCS Connection Manager Software 47
ᮣ
To change your lock code, access the Settings window.
Select
Menu>Settings>PCS Vision
and click
Change Lock
Code
. Enter your new lock code in the first field and
confirm it by re-entering it into the second field.
Note: Running the Activation Wizard resets the lock code to the last four
digits of the most recently activated phone number.
ᮣ
Select a lock status:
UnLock
to leave the Sprint PCS
Connection Card unlocked,
Lock Now
to enable the lock
code feature immediately, and
Lock On Power Up
to
enable the lock code feature the next time the card
powers up.
ᮣ
Click
OK
to save changes and close the Settings
dialog box.
Note: The Sprint PCS Connection Manager Software interface will allow
you to place outgoing calls to emergency numbers, even if the Sprint PCS
Connection Card is locked.
Sprint PCS Connection
Manager Software

48 Section 2A: Sprint PCS Connection Manager Software
Accessing Links
For your convenience, Sprint incorporates links to select
Sprint PCS Products and Services within the Sprint PCS
Connection Manager Software menu. To access these links:
1. Click Menu on the Sprint PCS Connection Manager
Software interface.
2. Select Links from the submenu.
3. Select Sprint PCS Web Site or Sprint PCS
Business Connection.
Note: The Sprint PCS Connection Manager Software interface Links
menu does not allow you to add/remove links. Continue to manage
direct links to your favorite Web sites through your Web browser.

Section 2B: Menu Options 49
Section 2B
Menu Options
In This Section
ࡗOverview of Menu Items
ࡗActivationWizard
ࡗAlert Log
ࡗConnection History
ࡗDevice Info & Diagnostics
ࡗLinks (Notebook PCs)
ࡗSoftware Updates
ࡗSettings
ࡗAbout Sprint PCS Connection Manager
This chapter provides an overview and brief description of
each menu option you may encounter while using your
Sprint PCS Connection CardTM and Sprint PCS Connection
ManagerSM Software.
Menu Options

50 Section 2B: Menu Options
Overview of Menu Items
The following table outlines various menu items and provides
a brief description and links on where in this guide to locate
more detailed information about the item.
Menu Items
Menu Item
Go (Connect)
ActivationWizard
AlertLog
ConnectionHistory
Device Info&
Diagnostics
Links
Software Updates
Settings
Description
Establish a data connection.
Configure the card to use your
Sprint PCS Wireless Network Account.
View information on card errors or
failures by date/time, alert, connection
name, and type.
View information on data connections
by date/time, number dialed and type.
View detailed information about the
Sprint PCS Connection Card, software,
and connections.
When connected to the Nationwide
Sprint PCS Network, provides links to
the Sprint PCS Web site and the
Sprint PCS Business ConnectionSM
Web site.
Check for posted updates to the
Sprint PCS Connection ManagerSM
Software or configure to automatically
check for updates.
Configure the Sprint PCS Connection
Manager Software to best suit your
needs and preferences.
For more
information,see:
Page 55
Page 54
Page 54
Page 53
Page 52
Page 51
Page 51
Page 38

Section 2B: Menu Options 51
Activation Wizard
The Activation Wizard is used to configure the Sprint PCS
Connection Card to use with your account. An overview of this
process is provided on page 9. Specific instructions on using
the Activation Wizard begin on page 22.
Alert Log
The Alert Log provides a record of all alerts that have been
generated while establishing and maintaining your
connections and settings. You can use the Alert Log to help
isolate and resolve connection issues.
To display the Alert Log:
ᮣSelect MENU > Alert Log
To clear the Alert Log:
1. From the Alert Log window, click Clear.
2. You will see a prompt: "Clear all entries from the Alert
Log?" Click Yes to delete all records. Click No to cancel.
Menu Options
MenuItem
About Sprint PCS
Connection
Manager
Close
Description
View the opening Sprint PCS
Connection Manager Software
identification screen.
Close the Sprint PCS Connection
Manager Software application.
Formore
information,see:
Page 55
Page 33

52 Section 2B: Menu Options
Connection History
The Connection History maintains a record of your outgoing
and incoming calls and data connections. In the Settings
window (displayed when you select MENU > Settings) on the
General tab, you can choose whether or not to keep a
connection history.
To enable or disable Connection History (notebook PCs):
ᮣSelect MENU > Settings > General > Keep
Connection History.
A check mark next to the option indicates that it is enabled.
To display the Connection History:
ᮣSelect MENU > Connection History.
For each message, the Connection History displays:
ⅷThe date and time the connection was initiated.
ⅷThe type of connection (Sprint PCS VisionSM connection).
Deleting Records
To delete all records in the Connection History:
1. From the Connection History window, click Clear.
2. You will see a prompt: "Clear all entries from the
Connection History?" Click Yes to delete all records. Click
No to cancel.

Section 2B: Menu Options 53
Device Info & Diagnostics
The Device Info & Diagnostics window displays detailed
information about your Sprint PCS Connection Card,
Sprint PCS Connection Manager Software, signal strength,
port configuration, and more. The information displayed in
this window includes:
ⅷThe manufacturer.
ⅷSprint PCS Connection Card model: PX-500
ⅷThe hardware version.
ⅷThe version of software in use.
ⅷThe Sprint PCS Connection Manager Software version
and build.
ⅷThe version of the PRL (Preferred Roaming List, which
specifies the radio frequency channels that the card is
permitted to use).
ⅷThe card’s designed capabilities and coverage.
ⅷVarious communication and card tests and results.
To access the Device Info & Diagnostics menu:
ᮣSelect Menu > Device Info & Diagnostics.
Menu Options

54 Section 2B: Menu Options
Links (Notebook PCs)
During an active Sprint PCS VisionSM connection, this menu
option provides hyperlinks to the Sprint PCS Web site
(www.sprint.com) and the Sprint PCS Business ConnectionSM
Web site (businessconnection.sprint.com). To access links,
select MENU > Links > Sprint PCS Web Site or Sprint PCS
Business Connection.
Note: The Sprint PCS Connection Manager Software Links menu does
not allow you to add or remove links. Continue to manage direct links to
your favorite Web sites through your Web browser menu.
Software Updates
From time to time, Sprint may release updates for your
Sprint PCS Connection Manager Software. These updates
may add new features or improve the network performance.
This menu option allows you to check for any posted updates
or to set up an automatic monthly check for updates.
To check for software updates:
ᮣSelect MENU > Software Updates > Check Now.
To enable or disable automatic monthly checks:
ᮣSelect MENU > Software Updates > Check for updates
once a month.
A check mark next to the option indicates that it is enabled. Click
OKto save changes and exit the Software Updates dialog box.

Section 2B: Menu Options 55
Settings
The Sprint PCS Connection Manager Software Settings menu
allows you to configure a variety of general and advanced
settings for your Sprint PCS Connection Manager Software.
For complete details on the Settings options.
Always on Top (Notebooks Only)
When "Window always on top" is enabled, the Sprint PCS
Connection Manager Software displays in front of all other
application windows, even when you position another
window over the manager. This allows you to view connection
status indicators while using another application, such as
your Internet browser.
To enable or disable Always on Top:
ᮣSelect MENU > Settings > General > Window always
on top.
A check mark next to the option indicates that it is enabled.
About Sprint PCS Connection Manager
The About Sprint PCS Connection Manager menu option
allows you to display the Sprint PCS Connection Manager
Software opening splash screen, which appears when you
launch the Sprint PCS Connection Manager Software.
ᮣSelect MENU > About Sprint PCS Connection Manager.
Menu Options

56

Section 2C: Troubleshooting Tips 57
Section 2C
Troubleshooting Tips
In This Section
ࡗProblem Causes and Suggestions
ࡗReinstalling the Sprint PCS Connection Card Driver
ࡗResolving Resource Conflicts
ࡗUsing the Menu Tools
This section provides assistance in diagnosing and solving
many common problems you may experience while using
your Sprint PCS Connection CardTM and Sprint PCS
Connection ManagerSM Software with your notebook PC.
Troubleshooting Tips

58 Section 2C: Troubleshooting Tips
Problem Causes and Suggestions
When properly installed, the Sprint PCS Connection CardTM is a
highly reliable product. Most problems are caused by one of
these issues:
ⅷThe wrong driver has been installed.
ⅷSystem resources required by the card are being used by
other devices.
ⅷNetwork coverage is not available (either because you are
outside the Nationwide Sprint PCS Network or because of
an account or network problem).
This section describes how to diagnose and solve these and
other problems. If, after reading this section, you are unable to
resolve a problem, please visit www.sprint.com or contact
Sprint Customer Service at 1-888-211-4PCS (4727).
Error: Searching for Sprint PCS Connection Card...
The Sprint PCS Connection ManagerSM Software interface
displays this message: "Searching for Sprint PCS
Connection Card..."
Possible Causes
a. The card is not completely inserted
into the PC Card slot.
b. The wrong driver is installed for
the card.
c. There is a resource conflict.
Suggestions
a. Eject and reinsert the card.
b. See "Reinstalling the Sprint PCS
Connection Card Driver"
on page 62.
c. See "Resolving Resource Conflicts"
on page 67.

Section 2C: Troubleshooting Tips 59
Error: Splash Screen is Frozen
The splash screen of the Sprint PCS Connection Manager
Software is frozen.
Error: Not in Service
The Sprint PCS Connection Manager Software interface
displays the message, "Not in Service."
Troubleshooting Tips
Possible Causes
If you are unable to resolve this
problem by restarting your PC, you
may have a resource conflict.
Suggestions
See "Resolving Resource Conflicts" on
page 67.
Possible Causes
Inadequate signal strength may
occur for any of these reasons:
a. You are outside the Nationwide
Sprint PCS Network.
b. Your antenna is not attached or is
pointed in the wrong direction.
c. You may be inside a building or
near a structure that is causing
radio interference.
Suggestions
a. Verify that you are within the
Nationwide Sprint PCS Network.
Coverage maps are
available at www.sprint.com.
b. Ensure your antenna is properly
attached and is perpendicular to
the card. Re-orient your antenna.
c. Change your location.

Error: Not able to prepare data services(Windows®2000)
The Sprint PCS Connection Manager Software interface
displays the message, "Unable to prepare data services."
Suggestions
Perform upgrades as described in the
release notes. Upgrades may be
downloaded from:
Windows 2000 High Encryption Pack:
http://www.microsoft.com/windows20
00/ downloads/recommended/
encryption/default.asp
60 Section 2C: Troubleshooting Tips
Possible Causes
You need to perform the high-
security 128-bit upgrades required
for IOTA execution.

Section 2C: Troubleshooting Tips 61
Error: Connection Gets Dropped
When attempting a data connection with Sprint PCS
Connection Manager Software, the connection gets dropped
as soon as it is established (the status goes from "Connecting"
and "Connected" back to "Click ’GO’ to Connect").
Troubleshooting Tips
Possible Causes
The connection properties are
not optimal.
Suggestions
1. Windows XP: Click Start > Connect To >
Sprint PCS Vision Connection
Windows 2000: Click Start > Settings >
Network and Dial-Up Connections >
Sprint PCS Vision Connection
2. Click Properties.
3. Click the Networking tab.
4. Click Settings.
5. Ensure that Enable LCP Extensions and
Negotiate multi-link for single-link
connections are not selected.
6. Click OK.

62 Section 2C: Troubleshooting Tips
Reinstalling the Sprint PCS
Connection Card Driver
There is a Sprint PCS Connection Card driver for each
supported Windows operating system. Unless the
appropriate driver for your version of Windows is installed,
you will not be able to establish a network connection with
the card. This section provides instructions on verifying that
you have the correct card driver installed.
Note:You must have the Sprint PCS Connection Card installation CD to
complete this procedure.
Windows®2000
To verify that the correct driver is installed:
1. Locate the existing driver.
2. Update the driver.
To locate the driver:
1. Close all Windows programs and open the Control Panel
by selecting Start > Settings > Control Panel.
2. Double-click the System icon.
3. Click the Hardware tab.
4. Click the Device Manager button.

Section 2C: Troubleshooting Tips 63
5. Locate the Sprint PCS Connection Card entries by using
the "+" signs to expand the listings. (For example, to see
all the installed modems, click the "+" sign to the left of
Modems.) The card should have three entries:
ⅢThe card should display under Multifunction
adapters as Sprint PX-500 Modem Parent.
ⅢThe card should display under Modems as
Sprint PX-500 Modem.
ⅢThe card should display under Network adapters as
Sprint PX-500 Modem Modem Adapter.
If the listings above do not appear, identify the listing for the
Sprint PCS Connection Card by ejecting the card. This causes
the driver listing for the card to disappear from the list.
Reinsert the card again to cause the driver listing to reappear.
You can identify the entries for the Sprint PCS Connection
Card by observing which entries are affected when you eject
and reinsert the card.
Updating the Driver
1. If the installation CD is not already in your CD-ROM
drive, insert it. If the CD start-up menu appears, use the
exit option in the lower-left corner of the screen to exit
the menu.
2. Right-click Sprint PX-500 Modem Parent.
3. Click the Properties button.
4. Click the Driver tab.
5. Click the Update Driver button to launch the Update
Device Driver Wizard.
6. Click Next.
Troubleshooting Tips

64 Section 2C: Troubleshooting Tips
7. Select Display a list of known drivers for this device so
that I can choose a specific driver and click Next.
8. Click the Have Disk button..
9. Enter d:\Drivers\Win2K (where d is the letter of your
CD-ROM drive).
10. Click OK.
11. If the Digital Signature Not Found window displays,
click Yes.
12. Click Finish. Repeat steps 6-12 as prompted.
If you are prompted to restart your PC, click Yes. Otherwise,
restart your PC from the Start menu. (You must restart your PC
to complete the driver installation.)
The correct driver should then be installed.
Windows®XP
To verify that the correct driver is installed:
1. Uninstall the existing driver.
2. Install the Windows XP driver from the Sprint PCS
Connection Card installation CD.
To uninstall the existing driver:
1. Open the Control Panel by selecting Start >
Control Panel.
2. If "Pick a Category" is displayed, select Switch to
Classic View.
3. Double-click the System icon.
4. Click the Hardware tab.

Section 2C: Troubleshooting Tips 65
Troubleshooting Tips
5. Click the Device Manager button.
6. Locate the Sprint PCS Connection Card entries by using
the "+" signs to expand the listings. (For example, to see
all the installed modems, click the "+" sign to the left of
Modems.) The card should have three entries:
ⅢThe card should display under Multifunction
adapters as Sprint PX-500 Modem Parent.
ⅢThe card should display under Modems as
Sprint PX-500 Modem.
ⅢThe card should display under Network adapters as
Sprint PX-500 Modem Modem Adapter.
If the listings above do not appear, identify the listing for
the Sprint PCS Connection Card by ejecting the card. This
causes the driver listing for the card to disappear from the
list. Reinsert the card again to cause the driver listing to
reappear. You can identify the entries for the Sprint PCS
Connection Card by observing which entries are affected
when you eject and reinsert the card.
7. Right-click Sprint PX-500 Modem Parent.
8. Select Uninstall from the pop-up menu.
9. Click OK to confirm the uninstall.
The Sprint PCS Connection Card listings should be removed.

66 Section 2C: Troubleshooting Tips
Installing the Windows XP Sprint PCS Connection Card Drive
1. If the installation CD is not already in your CD-ROM
drive, insert it. If the CD start-up menu appears, use the
exit option in the lower-left corner of the screen to exit
the menu.
2. Eject and reinsert the Sprint PCS Connection Card to
launch the Found New Hardware Wizard.
3. Select Install from a list or specific location (Advanced)
on the first window of the Found New Hardware Wizard
and click Next to proceed.
4. Select the Search for the best driver in these locations
radio button and the Include this location in the search
check box, then enter d:\Drivers\WinXP (where d is the
letter of your CD-ROM drive). Click Next to proceed to
the next window.
5. If a warning appears stating that Sprint PCS Connection
Card has not passed Windows Logo testing, click
Continue Anyway.
6. Click Finish and repeat steps 1 to 5 as prompted.
The correct driver is then installed.

Section 2C: Troubleshooting Tips 67
Resolving Resource Conflicts
Note: You require your Sprint PCS Connection Card installation CD to
complete this procedure.
The Sprint PCS Connection Card requires these system resources:
ⅷ1IRQ
ⅷ32 bytes of I/O space
ⅷ1available communications ports
If these resources are not available to the card, you have a resource
conflict. If another PC Card is installed, you may be able to free the
necessary resources simply by ejecting the other device. Otherwise,
you may need to disable another device (such as an internal
modem, infrared device, or network card) to resolve the resource
conflict. This section explains how to disable other devices.
Windows®2000
To resolve a resource conflict in Windows 2000:
ᮣDisable a device (internal modem, infrared device, or
network card).
Disabling an Internal Modem, Infrared Device, or Network Card
1. Close all Windows programs and open the Control Panel
by selecting Start > Settings > Control Panel.
2. Double-click the System icon.
3. Click the Hardware tab.
4. Click the Device Manager button.
Troubleshooting Tips

68 Section 2C: Troubleshooting Tips
5. Locate the device that you want to disable:
ⅢIf you want to disable an internal modem, expand the
Modem tree by clicking the "+" sign to its left.
ⅢIf you want to disable an infrared device, expand the
Infrared Devices tree by clicking the "+" sign to its left.
ⅢIf you want to disable a network card, expand the
Network Adapters tree by clicking the "+" sign to its left.
6. Right click the device you want to disable, choose Disable
from the pop-up menu that appears and click OK.
Windows®XP
To resolve a resource conflict in Windows XP:
ᮣDisable a device (internal modem, infrared device, or
network card)
Disabling an Internal Modem, Infrared Device, or Network Card
1. Close all Windows programs and open the Control Panel by
selecting Start > Settings > Control Panel.
2. Double-click the Systemicon.
3. Click the Hardwaretab.
4. Click the Device Manager button.
5. Locate the device that you want to disable:
ⅢIf you want to disable an internal modem, expand the
Modem tree by clicking the "+" sign to its left.
ⅢIf you want to disable an infrared device, expand the
Infrared Devices tree by clicking the "+" sign to its left.
ⅢIf you want to disable a network card, expand the
Network Adapters tree by clicking the "+" sign to its left.
6. Right click the device you want to disable, choose Disable
from the pop-up menu that appears and click OK.

Section 2C: Troubleshooting Tips 69
Using the Menu Tools
Connection History
Connection History provides you with a detailed record of the
connections established using your Sprint PCS Connection
Card. Since Connection History allows you to sort records by
connection name, you can easily distinguish between
personal and business usage.
Accessing Connection History
ᮣSelect Menu > Connection History from the Sprint PCS
Connection Manager Software interface.
About Connection History
The Connection History window displays a table with three
columns: Date/Time, Connection Name, and Type. The "Type"
column will label the connection as "Sprint PCS Vision." You
can select entries by using the arrow keys or your mouse.
Selected entries are highlighted. By default, no entry is
selected. Click the Clear button to access the Clear
Connection History dialog box. Click Yes to confirm the delete
or No to cancel.
Alert Log
The Alert Log provides a record of all alerts that have been
received while establishing and maintaining your
connections. You can use the Alert Log to help isolate and
resolve connection issues.
Accessing Alert Log
ᮣSelect Menu > Alert Log from the Sprint PCS Connection
Manager Software interface.
Troubleshooting Tips

70 Section 2C: Troubleshooting Tips
About Alert Log
The Alert Log displays a table with four columns: Date/Time,
Alert, Connection Name, and Type.
You can select entries by using the arrow keys on your
keyboard or the mouse. Selected entries are highlighted. By
default, no entry is selected.
Click the Clear button to access the Clear Alert Log dialog box.
Click Yes to confirm the delete or No to cancel.
Device Info & Diagnostics
Device Info & Diagnostics can help identify problems
associated with connecting to the Nationwide Sprint PCS
Network. Device Info & Diagnostics evaluates issues with
your USB port, port configuration, Sprint PCS Connection Card
signal strength, battery status, the Nationwide Sprint PCS
Network, and more. Once the program runs a diagnostics
check it can recommend possible solutions.
Accessing Diagnostics
ᮣSelect Menu > Device Info & Diagnostics from the
Sprint PCS Connection Manager Software interface.
About Device Info & Diagnostics
The Device Info & Diagnostics dialog box allows you to select
a number of ways to troubleshoot or obtain more information
about your Sprint PCS Connection Card.
The tests automatically execute when the window opens.

Sprint PCS VisionSM
Section 3

72

Section 3A: Sprint PCS VisionSM 73
Section 3A
Sprint PCS VisionSM
In This Section
ࡗLaunching the Web
ࡗUsing Sprint PCS Mail
ࡗSprint PCS Business Connection Personal Edition
ࡗSprint PCS Vision FAQs
Sprint PCS VisionSM brings you clarity you can see and hear,
with enhanced, always-on advanced multimedia services
like email, Web browsing, and Sprint PCS Business
ConnectionSM that are easy to learn and use. This rich,
colorful graphic experience is a revolutionary way to look at
wireless communications.
Sprint PCS Vision

74 Section 3A: Sprint PCS VisionSM
Web
Launching the Web
To access this information:
1. Launch the Sprint PCS Connection ManagerSM Software
by double-clicking the icon on your desktop.
2. Click GO to launch your Sprint PCS Vision connection.
3. Once your Sprint PCS Vision connection is established,
you may launch your browser application (for example,
Internet Explorer or Netscape Navigator).
Your User Name
When you buy a Sprint PCS Connection CardTM and sign up for
service, you’re automatically assigned a User Name. Then,
when you use Sprint PCS Vision services, your User Name is
submitted to identify you to the Nationwide Sprint PCS
Network. The User Name is also useful as an address for email
and text messaging, as a way to personalize Internet services,
and as an online virtual identity.
A User Name is typically based on the customer’s name and a
number, followed by "@sprintpcs.com." For example, the
third John Smith to sign up for Sprint PCS Vision services
might have jsmith003@sprint.com as his User Name. If you
want a particular User Name, you can visit www.sprint.com
and get the name you want as long as nobody else has it.
Your User Name will be automatically programmed into your
Sprint PCS Connection Card. You don’t have to enter it.

Section 3A: Sprint PCS VisionSM 75
Sprint PCS Vision
Messaging
Using Sprint PCS Mail
With Sprint PCS Mail, you can set up an account at no
additional charge and perform many of the typical email
functions from your Sprint PCS Connection Card that you can
from your desktop computer.
You can manage your Sprint PCS Mail Account from your
Sprint PCS Connection Card or desktop computer at
www.sprint.com. You can also access other select email
providers from the Web.
Accessing Sprint PCS Mail Messages
To access Sprint PCS Mail Messages:
1. From the Web home page, select the Messaging folder.
2. Select E-mail. If you’re a first-time user, prompts will help
you set up your email account by establishing a User
Name and password.
3. To view your messages, select Inbox.
4. Select the message you wish to read.
5. Once you’ve read a message, use the quick actions at the
end of each message (Erase, Reply, Reply All or Next
Message) or select Menu for a full list of options.

76 Section 3A: Sprint PCS VisionSM
Composing Sprint PCS Mail Messages
To compose a Sprint PCS Mail Message:
1. From the Web home page, select the Messaging folder.
2. Select E-mail.
3. Select Compose.
4. Select Add Name to enter the address of the person to
whom you’re sending a message.
5. Select Next to enter the subject of your email and your
specific message.
6. Select Send when your message is ready to be delivered.
Sprint PCS Business Connection
Personal Edition
Sprint PCS Business ConnectionSM Personal Edition gives you
secure, real-time mobile access to your MicrosoftfiOutlookfior
Lotus Notesfiemail, calendar, company directory, and personal
contacts. Sprint PCS Business Connection Personal Edition
delivers the following features:
ⅷBusiness email access: Read, reply to, forward, delete, and
compose your company email.
ⅷCompany directory and contacts: Search, view, call, and
email contacts from your company’s directory. Do all this
and add/edit your personal contacts.
ⅷWork calendar: Accept and decline meetings, view daily
summaries and details, and navigate to various dates.

Section 3A: Sprint PCS VisionSM 77
ⅷFiles/information on your PC: Browse folders, download,
and view documents from any device using a PC browser
or Pocket Internet Explorer.
Sprint PCS Business Connection Personal Edition requires no
hardware or software installation on your company’s
network. Just install the Sprint PCS Business Connection
Personal Edition software on your work PC. This allows data to
be securely retrieved in rea-time by your wireless device when
connected to the nationwide Sprint PCS network. There is a
monthly charge for Sprint PCS Business Connection and usage
charges will also apply.
When your work PC isn’t on, you can share connections with
your co-workers so that you always have access to your email,
calendar, and contacts. Your data remains secure behind the
corporate firewall and any changes you make on your wireless
device are instantly updated on your company server without
the need to synchronize.
Additional Sprint PCS Business Connection solutions are
available for your company. For more details, visit
businessconnection.sprintpcs.com.
Sprint PCS Vision

78 Section 3A: Sprint PCS VisionSM
Sprint PCS Vision FAQs
How will I know when my Sprint PCS Connection Card is ready for
SprintPCS Vision service?
Your User Name (for example, bsmith001@sprint.com) will display
on the Sprint PCS Connection Manager Software display screen.
How do I sign-in for the first time?
You are automatically signed in to Sprint PCS Vision services when
you launch the Sprint PCS Connection Manager Software.
How do I know when my Sprint PCS Connection Card is connected to
SprintPCS Vision services?
Your Sprint PCS Connection Card automatically connects when
Sprint PCS Vision service is used or an incoming message arrives.
When is my data connection active?
Your connection is active when data is being transferred. When
active, "Connected" appears the Sprint PCS Connection Manager
Software display screen.
When is my data connection dormant?
If no data is transmitted or received for approximately 10 seconds,
the connection goes dormant. (The connection can go active again
quickly.) If no data is transmitted or received for an extended period
of time, the connection will terminate.

Section 3A: Sprint PCS VisionSM 79
Can I sign out of data services?
You can sign out without turning off your Sprint PCS
Connection Card; however you will not be able to browse the
Web or use other Sprint PCS Vision services. You may sign in
again at any time. To sign out, go to Settings > Internet > Sign
Out in the Sprint PCS Connection Manager Software menu.
How can I optimize my settings to achieve faster speeds and send
and receive less data while dialing into my company network?
For optimized results, work in "Offline" mode and synchronize
periodically to send and receive company email. Also, save or
drag-and-drop attachments into desktop folders before opening
them (rather than double-clicking them in the email). For more
detailed information, access the Microsoft whitepaper at
http://www.microsoft.com/office/outlook/evaluation/perform.doc.
Sprint PCS Vision

Technical Specifications
and
Regulatory Information
Section 4Section 4

82

Section 4A: Technical Specifications 83
Section 4A
Technical Specifications
In This Section
ࡗEnvironmental Specifications
ࡗMechanical Specifications
ࡗSoftware Specifications
ࡗTransmitter Specifications
ࡗReceiver Specifications
ࡗHardware Specifications
ࡗMiscellaneous
This section outlines the environmental and technical
specifications for your new Sprint PCS Connection CardTM.
Technical Specifications

84 Section 4A: Technical Specifications
Environmental Specifications
Mechanical Specifications
Operating temperature
Storage temperature
Humidity
Vibration stability
Drop
Contact discharge (Level 2)
Air discharge (Level 3)
-20oC to +60oC
-40oC to +85oC
90%RH @ 70oC, 24 hours
5Hz to 500Hz, 3.1G
76 cm drop, 6 face, 3 cycle
8 kv
15 kv
Dimensions (W x D x H)
Weight
Battery Pack
Power Button
Headset Jack
LED
Antenna
116mm x 54mm x 5mm
50 g
N/A
No support
No support
Yes (Green/Red)
Embedded Dual Band Diversity
Antenna

Section 4A: Technical Specifications 85
Software Specifications
Technical Specifications
CDMA specification
Data service
FAX
IOTA
OTASP (IS-683A)
OTAPA (IS-683A)
PRL (preferred roaming list)
Authentication
Voice
NAM
E911 & Position Location
TTY/Accessibility
Mobile IP
WNP (wireless number
portability)
1xEVDO
Support
No support
Support
Support
Support
Support
Support
No support
2
No support
No support
Support
Support

86 Section 4A: Technical Specifications
Transmitter Specifications
Type of multiplexing
Normal output power
TX Max power
Frequency range
Frequency stability
Bandwidth
Occupied bandwidth
Modulation method
Waveform quality
Conducted spurious emission
Common RF impedance
EVDO and 1xRTT
7-10 dBm
23 dBm
800MHz to 1900MHz
Compliant with CDG1
1.25MHz
1.25MHz
O-QPSK/HPSK
0.990
Complies with Title 47, Part22,24 of
the FCC Rules
50ohms

Section 4A: Technical Specifications 87
Receiver Specifications
Technical Specifications
Type of receiving
Frequency range
Bandwidth
Occupied bandwidth
Modulation method
Receiver sensitivity
Inter-modulation spurious
response attenuation
Common RF impedance
EVDO and 1xRTT
800MHZ to 1900MHz
1.25MHz
1.25MHz
O-QPSK/HPSK
-104dBm
Complies with CDG stage 1
50ohms

88 Section 4A: Technical Specifications
Hardware Specifications
Miscellaneous
Technical Specifications
Interface type
Common air interface
Channel spacing
Chip set
Transmitting
(max. data rate)
Supply voltage
Battery
Charger (charging time)
Current consumption
Sleep/idle
Average in-use
Max. (peak)
Communication ports
Voice capability
Type II PC Card
1xEVDO and 1xRTT
50 KHz
QUALCOMMTM MSM6800
Forward link: 3.1 Mbps
Reverse link: 1.8 Mbps
3.3V
N/A
N/A
60mA
400mA
850mA
USB
No support
DUI & driver
Accessories
Certification & Approval
Windows 2000/XP
CD-ROM (PCS Connection Manager,
User Guide), Start Here Guide
FCC (parts 2, 15, 22, & 24, SAR), UL,
CDG, etc.

Section 4B: Regulatory Information 89
Section 4B
Regulatory Information
In This Section
ࡗRegulatory Notices
This section outlines important regulatory notices
concerning your new Sprint PCS Connection CardTM.
Regulatory Information

90 Section 4B: Regulatory Information
Regulatory Notices
This device is compliantwith Parts 15,22 and 24 of the FCC Rules.
Operation of this device is subject to the following two conditions:
1. This device may not cause harmful interference, and
2. This device must accept any interference received,
including interference that may cause undesirable
operations.
FCC ID: PP4PX-500
CAUTION
Unauthorized modifications or changes not expressly
approved by Sprint Communications Company L.P. could void
compliance with regulatory rules and thereby your authority
to use this equipment.
WARNING (EMI) - United States FCC Information
This equipment has been tested and found to comply with the limits
pursuantto Part15 , 22 & 24 of the FCC Rules. These limits are designed
to provide reasonable protection against harmful interference in an
appropriate installation. This equipment generates, uses, and can
radiate radio frequency energy and, if not installed and used in
accordance with the instructions, may cause harmful interference to
radio communication. However, there is no guarantee that
interference will not occur in a particular installation.
If this equipment does cause harmful interference to radio or
television reception, which can be determined by turning the
equipment off and on, the user is encouraged to try to correct the
interference by one or more of the following measures:

Section 4B: Regulatory Information 91
ⅷReorient or relocate the receiving antenna.
ⅷIncrease the separation between the equipment and
receiver.
ⅷConnect the equipment into an outlet on a circuit
different from that to which the receiver is connected.
ⅷConsult the dealer or an experienced radio/TV technician
for help.
WARNING (EMI) - Canada
This digital apparatus does not exceed the Class B limits for
radio noise emissions from digital apparatus as set out in the
interference causing equipment standard entitled "Digital
Apparatus", ICES-003 of the Department of Communications.
Cet appareil numØrique respecte les limites de bruits
radioØlectriques applicables aux appareils numØriques de
Classe B prescrites dans la norme sur le matØriel brouilleur:
"Appareils NumØriques", NMB-003 ØdictØe par le ministre des
Communications.
If you have purchased this product under a United States
Government contract, it shall be subject to restrictions as set
forth in subparagraph (c)(1)(ii) of Defense Federal
Acquisitions Regulations (DFARs) Section 252.227-7013 for
Department of Defense contracts, and as set forth in Federal
Acquisitions Regulations (FARs) Section 52.227-19 for civilian
agency contracts or any successor regulations. If further
government regulations apply, it is your responsibility to
ensure compliance with such regulations.
Regulatory Information

92

Safety and
Terms & Conditions
Section 5

94

Section 5A: Safety and Notices 95
Section 5A
Safety and Notices
In This Section
ࡗImportant Notice
ࡗSafety and Hazards
This section outlines important liability and safety guidelines
concerning your new Sprint PCS Connection CardTM.
Safety and Notices

96 Section 5A: Safety and Notices
Important Notice
Because of the nature of wireless communications,
transmission and reception of data can never be guaranteed.
Data may be delayed, corrupted (i.e., have errors), or be totally
lost. Although significant delays or losses of data are rare
when wireless devices such as the Sprint PCS Connection Card
PX-500 CDMA modem are used in a normal manner with a well-
constructed network, they should not be used in situations
where failure to transmit or receive data could result in damage
of any kind to the user or any other party, including but not
limited to personal injury, death, or loss of property. SPRINT
SPECTRUM L.P. accepts no responsibility for damages of any
kind resulting from delays or errors in data transmitted or
received using the Sprint PCS Connection Card PX-500 CDMA
modem, or for failure of the Sprint PCS Connection Card - model
PX-500 to transmit or receive such data.

Section 5A: Safety and Notices 97
Safety and Hazards
Do not operate the Sprint PCS Connection CardTM PX-500 in areas
where blasting is in progress, where explosive atmospheres may
be present, near medical equipment, life support equipment, or
any equipment which may be susceptible to any form of radio
interference. In such areas, the Sprint PCS Connection Card
PX-500 MUST BE POWERED OFF. It can transmit signals that
could interfere with this equipment.
Do not operate the Sprint PCS Connection Card PX-500 in any
aircraft, whether the aircraft is on the ground or in flight. In
aircraft, the Sprint PCS Connection Card PX-500 MUST BE
POWERED OFF. When operating, it can transmit signals that
could interfere with various onboard systems.
The driver or operator of any vehicle should not operate the
Sprint PCS Connection Card PX-500 while in control of a vehicle.
Doing so will detract from the driver or operator’s control and
operation of that vehicle. In some jurisdictions, operating such
communications devices while in control of a vehicle is an
offense.
WARNING!:
This product contains a chemical known to the State of California to
cause cancer.
This product contains a chemical known to the State of California to
cause birth defects or other reproductive harm.
Safety and Notices

98

Section 5B: Terms and Conditions 99
Section 5B
Terms and Conditions
In This Section
ࡗTerms and Conditions of Services
This section contains the terms and conditions of service
for your new Sprint PCS Connection CardTM.
Terms and Conditions

100 Section 5B: Terms and Conditions
Terms and Conditions of Service
Terms and Conditions of Services
(Effective September 1, 2005)
Thanks for choosing Sprint. These terms and conditions are part of your
agreement with Sprint for PCS (CDMA) Services. Separate terms apply for
any iDEN products or services.
Please note these terms may not be the most current version. You can get a
current version of the terms on our website at www.sprint.com or by
requesting a copy from us at 1-888-211-4PCS.
A Para solicitar esta literatura en espaæol, por favor contactar a
1-888-211-4PCS(4727).
General. This agreement ("Agreement") covers the terms on which we
agree to provide and you agree to accept any service or product we make
available to you, including your wireless services, wireless devices, etc.
(collectively "Services"). You accept this Agreement when you do any of the
following: (a) provide your written or electronic signature; (b) accept
through an oral or electronic statement; (c) attempt to or in any way use
any of the Services; (d) pay for any Services; or (e) open any materials or
package that says you are accepting when you open it. The Agreement
includes the terms in this document together with the terms associated
with the Services you select (as described in our marketing materials, e.g.,
service plan brochures, or on our website). You represent that you are at
least 18 years old. In this document, we use the words "we," "us," "our" or
"Sprint" to refer to Sprint Spectrum L.P. and its affiliates doing business as
Sprint PCS.
Agreement. We may change the Agreement at any time with notice. Any
changes to the Agreement are effective when we publish them. If you use
our Services or make any payment to us on or after the effective date of the
changes, you accept the changes. If we change a material term of the
Agreement and that change has a material adverse effect on you, you may

Section 5B: Terms and Conditions 101
terminate the Agreement without an Early Termination Fee by calling 1-
888-567-5528 within 30 days after the changes go into effect. You
understand and agree that taxes, Universal Service fees and other charges
imposed by the government or based on government calculations may
increase or decrease on a monthly basis, and that this paragraph does not
apply to any increases in such taxes, Universal Service fees or other charges.
Activating Service. Before activation, we may check your credit and
verify your identity. You must have and maintain satisfactory credit to
receive and continue to receive Services. We may charge a nonrefundable
activation fee, deposit, prepayment or other fee to establish or maintain
Services.
Term Commitments. Unless we specifically tell you otherwise, our
service plans require that you maintain service for a minimum term ("Term
Service Plan"), usually
1 or 2 years. After satisfying this minimum term, your service plan will
continue on a month-to-month basis unless you have agreed to extend the
term for additional period(s). Certain service, promotional or product offers
may require that you agree to or extend a Term Service Plan. As discussed
below, we may charge you an Early Termination Fee if you deactivate a Term
Service Plan before the end of the term.
Using Services. You agree to not use our Services in an unlawful,
fraudulent or abusive manner. You may not resell or lease Services to
anyone. Sprint is not responsible for any opinions, advice, statements,
services applications or other information provided by third parties and
accessible through our various Services, including the internet. Neither
Sprint , its vendors or licensors guarantees the accuracy, completeness or
usefulness of information that is obtained through these Services. You are
responsible for evaluating such content. You are also responsible for any
use of our Services through any wireless device on your account
including, but not limited to, use by children or minors. We strongly
recommend that you closely monitor any such usage
Terms and Conditions

102 Section 5B: Terms and Conditions
Changing Services. Changes to Services will generally be effective at the
start of your next full invoicing cycle. In certain instances, the changes may
take place sooner, in which case your invoice will reflect pro-rated charges.
Certain changes may be conditioned upon payment of an Early Termination
Fee or certain other charges.
Termination of Services. Consistent with this Agreement: (a) we may
terminate Services at any time with notice to you and, in certain instances,
without notice; and (b) you may terminate Services at any time with prior
notice to us. Except as otherwise provided in this Agreement, IF YOU
TERMINATE YOUR TERM SERVICE PLAN EARLY, OR WE DO SO FOR GOOD
CAUSE, YOU WILL BE REQUIRED TO PAY THE APPLICABLE EARLY
TERMINATION FEE ASSOCIATED WITH YOUR SERVICES. We will not charge
an Early Termination Fee for deactivations consistent with our Return Policy
or for service plans being provided on a month-to-month basis. If any
Services are terminated before the end of your current invoicing cycle, we
will not prorate charges to the date of termination, and you will not receive
a credit or refund for any unused Services.
Wireless Devices, Numbers & E-mail Addresses. We did not
manufacture your wireless device and we are not responsible for any
defects or for the acts or omissions of the manufacturer. The only
warranties on your device are any limited warranties extended by the
manufacturer directly to you or passed on to you through us. Your device
may not accept Services directly from any other carrier. You do not have any
rights to any number, e-mail address or other identifier we may assign to
your device or account; you may not modify, change or transfer any of these
except as we allow or as allowed for by law. In certain instances, you may
transfer your number from another carrier to us, or from us to another
carrier. We do not guarantee that transfers to or from us will be successful.
If you transfer your number away from us, the terms of this Agreement
(e.g., Early Termination Fee, etc.) still apply. If a transfer to Sprint is not
successful, you will be responsible for any discounts provided to you
with the purchase of your device. See our printed in-store materials or

Section 5B: Terms and Conditions 103
visit www.sprint.com for additional important information on
number transfers.
Coverage. Available coverage areas for Services are generally identified in
our mapping brochures and at www.sprint.com. This may include coverage
on our digital network (the "Sprint Nationwide PCS Network") as well as
coverage we make available to you through agreements with other carriers
("off network" or "roaming" coverage). All coverage maps are high level
representations of outdoor coverage and there are gaps in coverage
within areas shown as covered on the maps. Coverage is not available
everywhere, nor can we guarantee you will receive coverage at all
times, or without interruptions or delays (e.g., dropped calls, blocked
calls, etc.) in the coverage areas we identify. Actual coverage and
quality of Services may be affected by conditions within or beyond
our control, including network problems, software, signal strength,
your equipment, structures (including buildings in which you may be
located), atmospheric, geographic, or topographic conditions.
Roaming Coverage. You are roaming anytime your phone indicates that
you are roaming. Roaming coverage is only available with certain devices
and, unless included as part of your Services, will result in additional
charges. Roaming calls placed "manually" (through an operator or with a
credit card) will always incur separate and additional charges. Depending
on your phone settings, you may automatically roam if there is a gap or
interruption in coverage within the Sprint Nationwide PCS Network
coverage area and roaming coverage areas. See your phone guide for how
to adjust phone settings. Certain features and services may not be available
in roaming coverage areas (including PCS Vision, voicemail, call waiting, call
forwarding, etc.).
Charges. Carefully review the terms of your Services. You will be assessed
charges based on the terms of your Services including, without limitation,
monthly recurring charges and charges based on actual usage (e.g., charges
for long distance, roaming, call forwarding, directory assistance, etc.).
Airtime and other time based usage charges are calculated from when your
Terms and Conditions

104 Section 5B: Terms and Conditions
device first initiates contact with a network until the network connection is
broken, whether or not you were actually successful in connecting to the
intended destination. However, you will not be charged for voice calls that
ring and do not pick up, or if you get a busy signal. For voice calls received by
your device, you are charged from the time shortly before the phone starts
ringing until the call is terminated. You are charged for an entire voice call
based on the time period in which the call is initiated. Partial minutes of use
are rounded up to the next minute.
Sprint PCS Vision Charges. Vision usage is measured in bytes, not in
minutes. Bytes are rounded up to kilobytes. Usage rounding occurs at the
top of each clock hour while in a session and at the end of each session and
is then charged to you based on the terms of your Services. Depending on
your Services, usage may be charged against an allowance or on a fixed
price per kilobyte. Usage charges may be rounded up to the next cent at
monthly or other intervals. In certain instances, you may not know that
your session has not ended. As long as your device is connected to our
network, you will incur data usage charges. You will be charged for all data
directed to the internet address (or "IP address") assigned to your device,
regardless of who initiates the activity or whether your device actually
receives the data. This includes, but is not limited to, the amount of data
associated with the particular information/item (e.g. game, ringer, email,
etc.), additional data used in accessing, transporting and routing this
information/item on our network, data from partial or interrupted
downloads, re-sent data, and data associated with unsuccessful attempts
to reach websites or use applications. Based on these and a number of
other factors (e.g., the specific application, network performance, etc.) data
used and charged to you will vary widely, even for the same activity.
Estimates of data usage for example, the size of downloadable files will
not be accurate or a reliable predictor of actual usage. Your invoice will not
separately identify the number of kilobytes attributable to your use of
specific sites, sessions or services.
Taxes and Surcharges. We invoice you for taxes, fees and other charges
levied by or remitted directly to federal, state, local or foreign governments

Section 5B: Terms and Conditions 105
including, without limitation, sales, gross receipts, Universal Service, use,
and excise taxes. If you claim any tax exemption, you must provide us with
a valid tax-exempt document. Tax exemptions are not applied
retroactively. We also invoice you for surcharges that we collect and keep to
pay for the costs of complying with government programs such as number
pooling and portability, and Enhanced 911 service; these charges are not
the taxes nor government imposed assessments.
Invoicing & Payment. Invoicing cycles and dates may change from time
to time. Monthly recurring and related charges for Services are generally
invoiced one invoicing cycle in advance. Other charges are invoiced soon
after they are incurred. Most usage is generally applied to the invoicing
cycle in which they are incurred, but in some instances may be applied to
subsequent invoicing cycles. You are responsible for all charges associated
with any device activated on your account, regardless of who used the
device. You must pay all charges by the due date on the invoice. Past due
amounts accrue late charges until paid at the rate of 5% per month or
at the highest rate allowed by law and may result in immediate
suspension of your account. If you agree to any auto-payment option
through banking or credit account, we may initiate payment from the
account for all amounts we invoice you without additional authorization or
notice. Based on your credit or payment history, we may require certain
forms of guaranteed payment as a condition of maintaining Services. If we
invoice you for amounts on behalf of a third-party, payments received are
first applied to amounts due to us. You may be charged additional fees for
certain methods of payment and for payments denied by a financial
institution. Acceptance of payments (even if marked "paid in full") does not
waive our right to collect all amounts that you owe us.
Disputed Charges. Disputes concerning any charges invoiced must be
raised within 60 days of the date of the invoice. You accept all charges not
disputed in this time period. Disputes can only be made by calling or
writing us as directed on your invoice.
Terms and Conditions

106 Section 5B: Terms and Conditions
Account Spending Limit & Deposits. We may impose an account
spending limit ("ASL") on any account without notice. We will notify you of
an ASL based on your credit or payment history and may reduce the ASL at
any time with prior notice. An ASL should not be relied on to manage usage
on your account. We may suspend an account without prior notice when
the account balance reaches the ASL, even if the account is not past due.
Services can be restored upon payment of an amount that brings the
account balance below the ASL and any past due amounts. If we require a
deposit for you to establish or maintain an account, we will hold the deposit
as partial guarantee of payment for Services. We may change the deposit
amount at any time with notice for good reason. Except as we allow, a
deposit may not be used to pay any invoice or delay payment. The deposit
amount, the length of time we hold the deposit and changes to the deposit
amount are determined based on your credit and payment history. The rate
of interest, if any, on the deposit is subject to change. We may mix deposits
with our other funds. If your account is terminated for any reason, we may
without notice apply your deposit to any outstanding charges. We may
send any remaining deposit amounts to your last known address within 75
days after account termination. If the funds are returned to us, you may
claim these funds for one year from the date of return. Any money held
during this one-year period will not accrue interest for your benefit and are
subject to a servicing fee charged against the balance. You forfeit any
portion of the money left after the one-year period.
Other Sprint PCS Vision Terms. You will not receive voice calls while using
Vision. Vision is not available for use with server devices or host computer
applications, other systems that drive continuous heavy traffic or data
sessions, or as substitutes for private lines or frame relay connections.
Unlimited Vision plans/options may not be used with Sprint PCS phones or
smart phones being used as a modem in connection with other equipment
(e.g., computers, etc.) through use of connection kits or other phone-to-
computer/PDA accessories, or Bluetooth or other wireless technology. We
may terminate services without notice for any misuse. You may have access
to certain games, ringers, screen savers and other items on our Vision site

Section 5B: Terms and Conditions 107
("Premium Services") that are available for an additional charge. You will be
billed for Premium Service purchases on your Sprint PCS invoice based on
the charges as specified at purchase. Subject to the terms of the content
purchased, we may delete premium and non-premium items downloaded
to any storage areas we may provide, including any pictures, games and
other content. We may limit the amount of Premium Services you may
purchase in a specific timeframe (month, week, day, or other time period).
Voice Command. Calls to 911 or similar emergency numbers cannot be
placed through the Voice Command feature. See our printed in-store
materials or visit www.sprint.com for additional important information on
this option.
Wireless Web. Wireless Web Services may be available depending on your
device and Service plan/option. This is not a Vision service. Usage is
calculated on minutes used and generally deducts from your Service plan
minutes. See our printed in-store materials or visit www.sprint.com for
additional important information on this option.
Lost or Stolen Equipment. If your device is lost or stolen, please notify us
immediately by calling 1-888-211-4PCS. You are responsible for all
charges incurred before you notify us of the loss or theft. You agree to
cooperate reasonably with us in investigating suspected unlawful or
fraudulent use.
Messaging.You may incur charges in accessing, sending or receiving
messages on your device. We may impose limits on the number of
voicemail, text, email or other messages that can be retained through your
account. Indicators of messages on your device, including mailbox icons,
may not always provide an up to date indication of new messages and you
may at times need to manually reset or clear your mailbox indicator.
Legitimate messages may be interrupted by software aimed at prevention
of SPAM or similar messages.
Caller ID. If you do not want people you call to receive the number assigned
to your phone, call us at 1-888-211-4PCS for information about automatic
Terms and Conditions

108 Section 5B: Terms and Conditions
Caller ID blocking. The number assigned to your phone can be blocked on a
per-call basis by dialing *67 + Destination Number + TALK (or similar key).
Caller ID blocking is not available when using Vision or Wireless Web
services.
TTY Access. A TTY (also known as TDD or Text Telephone) is a
telecommunications device that allows people who are deaf or hard of
hearing, or who have speech or language disabilities, to communicate by
telephone. TTY doesn’t work with all devices. If you have a TTY-capable
device, it may not function effectively, or at all, when attempting 911 calls
and should not be relied on for such calls.
Disclaimer of Warranties. WE MAKE NO REPRESENTATIONS OF
WARRANTIES, EXPRESS OR IMPLIED, INCLUDING (TO THE EXTENT ALLOWED
BY LAW) ANY IMPLIED WARRANTY OF MERCHANTABILITY OR FITNESS FOR A
PARTICULAR PURPOSE CONCERNING YOUR SERVICES OR WIRELESS DEVICE.
WE DO NOT PROMISE UNINTERRUPTED OR ERROR-FREE SERVICES AND YOU
AGREE TO HOLD US HARMLESS FOR ALL SUCH PROBLEMS.
Limitation of Liability. Neither we nor our vendors, suppliers or licensors
are liable for any damages arising out of or in connection with any: (a) act or
omission by your, or another person or company; (b) providing or failing to
provide Services, including deficiencies or problems with your wireless
device, our network coverage or Services (e.g., dropped, blocked,
interrupted calls/messages, etc.); (c) traffic or other accidents, or any
health-related claims allegedly arising from the use of Services, any
wireless devices or related accessories; (d) content or information accessed
while using our Services, such as through the internet; (e) interruption or
failure in accessing or attempting to access emergency services from your
phone, including through 911, E911 or otherwise; or (f) events due to
factors beyond our control, including acts of God (including, without
limitation, weather-related phenomena, fire or earthquake), war, riot,
strike, or orders of governmental authority. In the event we are found to
be responsible to you for monetary damages relating to the Services
(including wireless devices), you agree that any such damages will

Section 5B: Terms and Conditions 109
not exceed the pro-rated monthly recurring charge for your Services
during the affected period.
NO CONSEQUENTIAL OR OTHER DAMAGES. UNDER NO
CIRCUMSTANCES ARE WE LIABLE FOR ANY INCIDENTAL, CONSEQUENTIAL,
PUNITIVE OR SPECIAL DAMAGES OF ANY NATURE WHATSOEVER ARISING
OUT OF OR IN CONNECTION WITH PROVIDING OR FAILING TO PROVIDE
SERVICES, PHONES OR OTHER EQUIPMENT USED IN CONNECTION WITH
THE SERVICES, INCLUDING, WITHOUT LIMITATION, LOST PROFITS, LOSS OF
BUSINESS, OR COST OF REPLACEMENT PRODUCTS AND SERVICES. THIS
SECTION SURVIVES TERMINATION OF THIS AGREEMENT.
MANDATORY ARBITRATION OF DISPUTES. INSTEAD OF SUING IN COURT,
YOU AND SPRINT AGREE TO ARBITRATE ANY AND ALL CLAIMS,
CONTROVERSIES OR DISPUTES AGAINST EACH OTHER ARISING OUT OF OR
RELATING TO THIS AGREEMEN, INCLUDING, WITHOUT LIMITATION, THE
SERVICES, ANY PHONES/EQUIPMENT, OR ADVERTISING, EVEN IF IT ARISES
AFTER YOUR SERVICES HAVE TERMINATED, AND INCLUDING CLAIMS YOU
MAY BRING AGAINST SPRINT’S EMPLOYEES, AGENTS, AFFILIATES OR OTHER
REPRESENTATIVES, OR THAT SPRINT MAY BRING AGAINST YOU ("CLAIMS").
THE FEDERAL ARBITRATION ACT APPLIES TO THIS AGREEMENT AND ITS
PROVISIONS, NOT STATE LAW, GOVERN ALL QUESTIONS OF WHETHER A
CLAIM IS SUBJECT TO ARBITRATION. THIS PROVISION DOES NOT PREVENT
EITHER YOU OR SPRINT FROM BRINGING APPROPRIATE CLAIMS IN SMALL
CLAIMS COURT, BEFORE THE FEDERAL COMMUNICATIONS COMMISSION
OR A STATE PUBLIC UTILITIES COMMISSION.
YOU AND SPRINT FURTHER AGREE THAT NEITHER SPRINT NOR YOU WILL
JOIN ANY CLAIM WITH THE CLAIM OF ANY OTHER PERSON OR ENTITY IN A
LAWSUIT, ARBITRATION OR OTHER PROCEEDING; THAT NO CLAIM EITHER
SPRINT OR YOU HAS AGAINST THE OTHER SHALL BE RESOLVED ON A CLASS-
WIDE BASIS; AND THAT NEITHER SPRINT NOR YOU WILL ASSERT A CLAIM IN
A REPRESENTATIVE CAPACITY ON BEHALF OF ANYONE ELSE. IF FOR ANY
REASON THIS ARBITRATION PROVISION DOES NOT APPLY TO A CLAIM, WE
AGREE TO WAIVE TRIAL BY JURY.
Terms and Conditions

110 Section 5B: Terms and Conditions
A single arbitrator engaged in the practice of law will conduct the
arbitration. The arbitration will be filed with and the arbitrator will be
selected according to the rules of either JAMS or the National Arbitration
Forum ("NAF"), or, alternatively, as we may mutually agree. We agree to act
in good faith in selecting an arbitrator. The arbitration will be conducted by
and under the then-applicable rules of JAMS or NAF, wherever the
arbitration is filed or, if the arbitrator is chosen by mutual agreement of the
parties, the then-applicable rules of JAMS will apply unless the parties
agree otherwise. All expedited procedures prescribed by the applicable
rules will apply. We agree to pay our respective arbitration costs, except as
otherwise required by rules of JAMS or NAF, as applicable, but the arbitrator
can apportion these costs as appropriate. The arbitrator’s decision and
award is final and binding, and judgment on the award may be entered in
any court with jurisdiction.
If any party files a judicial or administrative action asserting a claim that is
subject to arbitration and another party successfully stays such action or
compels arbitration, the party filing that action must pay the other party’s
costs and expenses incurred in seeking such stay or compelling arbitration,
including attorneys’ fees.
If any portion of this Mandatory Arbitration of Disputes section is
determined to be invalid or unenforceable, the remainder of the Section
remains in full force and effect.
Miscellaneous. You may notify us by calling us at 1-888-211-4PCS, or use
that number to get our current address for written notice. We may send you
notice to your last known address in our invoicing records, or by calling
leaving you a voice message on your wireless device or home phone.
Properly addressed written notice is effective three days after deposit in the
U.S. mail, postage prepaid. This Agreement is governed by and must be
construed under federal law and the laws of the State of Kansas, without
regard to choice of law principles. If either of us waives or fails to enforce
any requirement under this Agreement in any one instance, that does not
waive our right to later enforce that requirement. If any part of this

Section 5B: Terms and Conditions 111
Agreement is held invalid or unenforceable, the rest of this Agreement
remains in full force and effect. Section headings are for descriptive, non-
interpretive purposes only. You may not assign this Agreement to any other
person or entity without our prior written approval. This Agreement
(including any referenced documents and attachments) makes up the
entire agreement between us and replaces all prior written or spoken
agreements.
Terms and Conditions

Index 113
Index
A
Activating the Card 22
Activation Wizard 51
Alert Log 51, 69
B
Business Connection 76
C
CDMA Networks 4
Close Button 33
Connection History 52, 69
Connection Manager - See
Sprint PCS Connection
Manager Software
Connection Status 34
Connections
Establishing and
Terminating 40
D
Device Info & Diagnostics
53, 70
E
Environmental
Specifications 84
Establishing Connections
40
G
GO Button 38
H
Hardware Specifications 88
I
Indicator Area Icons 37
Installing the Card 13-24
L
Links 48, 54
Lock Code 45
M
Mechanical Specifications
84
Menu Options 49-55
Overview 50
Menu Tools 69
Minimize Button 33
P
Package Contents 5
R
Receiver Specifications 87
Regulatory Notices 90
Reinstalling the Driver 62
Resource Conflicts 67
S
Safety and Hazards 97
Software Specifications 85
Software Updates 54
Sprint Customer Service 9
Sprint PCS Connection Card
Activating 22
Care and Maintenance
11
Inserting and Removing
18
Installing 13-24
Index

114 Index
Software Overview 8
Sprint PCS Connection
Manager Software 27-48
Indicator Area 36
Installing 16
Interface 31
Menu Options 41
Secondary Menu Options
32
Settings 42
Software Updates 43
Starting 29
Window (illus.) 30
Sprint PCS Mail 75
Sprint PCS Service
Activating 9
Sprint PCS Vision 44, 73-79
System Requirements 15
T
Taskbar Icons 39
Terminating Connections
40
Terms and Conditions 100
Transmitter Specifications
86
Troubleshooting 57-70
U
User Name 74
W
Web
Launching 74
Welcome i

Notes
________________________________________________________
________________________________________________________
________________________________________________________
________________________________________________________
________________________________________________________
________________________________________________________
________________________________________________________
________________________________________________________
________________________________________________________
________________________________________________________
________________________________________________________
________________________________________________________
________________________________________________________
________________________________________________________
________________________________________________________
________________________________________________________
________________________________________________________

Safety Information
1 . SAFETY INFORMATION FOR FIXED WIRELESS TERMINALS
.POTE NTIALLY EXPLOSIVE ATMOSPHERES
Turn your phone OFF when in any area with a potentially explosive atmosphere
and obey all signs and instructions. Sparks in such areas could cauls e an
explosion or fire resulting in bodily injury or even death.
.
INTERFERENCE TO MEDICAL DIVICES
Certain electronic equipment may be shielded against RF signal from you wireless
phone. (pacemakers, Hearing Aids, and so on) Turn your phone OFF in health care
facilities when any regulations posted in these areas instruct you to do so.
RF signals may affect improperly installed or inadequately shielded electronic
system in motor vehicles.
.EXPOSURE TO RF ENERGY
Use only the supplied or an approved replacement antenna.
Do not touch the antenna unnecessarily when the phone is in use.
Do not move the antenna close to, or touching any exposed part of the body when
making a call.

SAR INFORMATION
THIS MODEL PHONE MEETS THE GOVERNMENT’S
REQUIREMENTS FOR EXPOSURE TO RADIO WAVES.
Your PC wireless card is a radio transmitter and receiver. It is designed and manufactured not to
exceed the emission limits for exposure to radiofrequency (RF) energy set by the Federal
Communications Commission of the U.S. Government. These limits are part of comprehensive
guidelines and establish permitted levels of RF energy for the general population. The
guidelines are based on standards that were developed by independent scientific organizations
through periodic and thorough evaluation of scientific studies. The standards include a
substantial safety margin designed to assure the safety of all persons, regardless of age and
health. The exposure standard for wireless mobile phones employs a unit of measurement
known as the Specific Absorption Rate, or SAR. The SAR limit set by the FCC is 1.6 W/kg. *
Tests for SAR are conducted with the phone transmitting at its highest certified power level in all
tested frequency bands. Although the SAR is determined at the highest certified power level,
the actual SAR level of the phone while operating can be well below the maximum value. This is
because the phone is designed to operate at multiple power levels so as to use only the power
required to reach the network. In general, the closer you are to a wireless base station antenna,
the lower the power output. Before a phone model is available for sale to the public, it must be
tested and certified to the FCC that it does not exceed the limit established by the government
adopted requirement for safe exposure. The tests are performed in positions and locations (e.g.,
at the ear and worn on the body) as required by the FCC for each model. The highest SAR
value for this model when tested for use at the when worn on the body, as described in this user
guide, is 0.537W/Kg . (Body-worn measurements differ among models, depending upon
available accessories and FCC requirements). While there may be differences between the
SAR levels of various and at various positions, they all meet the government requirement for
safe exposure. The FCC has granted an Equipment Authorization for this model with all
reported SAR levels evaluated as in compliance with the FCC RF exposure guidelines. SAR
information on this model is on file with the FCC and can be found under the Display Grant
section of http://www.fcc.gov/ oet/fccid after searching on FCC ID: PP4PX-500 .
Additional information on Specific Absorption Rates (SAR) can be found on the Cellular
Telecommunications Industry Association (CTIA) web-site at http://www.wow-com.com.
* In the United States and Canada, the SAR limit for mobile phones used by the public is 1.6
watts/kg (W/kg) averaged over one gram of tissue. The standard incorporates a sub-stantial
margin of safety to give additional protection for the public and to account for any variations in
measurements.

SAFETY INFORMATION FOR RF EXPOSURE
Near-Body operation
This device was tested in multiple notebook computer configurations with side PCMCIA
slot configurations for typical near-body operations with the back of the PC-CARD
kept 20mm from the body. To maintain compliance with FCC RF exposure requirements it can
be used in notebook computers with substantially similar physical dimensions,construction,
and electrical and RF characteristics,and that maintain a minimum 20mm separation
distance between the user's body and the back of the PC-CARD, including the antenna.
The antenna(s) used for this transmitter must not be co-located or must not operate in
conjunction with any other antenna or transmitter within a host device.
FCC Compliance Information
This device complies with Part 15 of FCC Rules.
Operation is subject to the following two conditions:
(1) This device may not cause harmful interference, and
(2) This device must accept any interference received.
Including interference that may cause undesired operation.
U.S.A.
U.S.FEDERAL COMMUNICATIONS COMMISSION
RADIO FREQUENCY INTERFERENCE STATEMENT
INFORMATION TO THE USER
NOTE : This equipment has been tested and found to comply with the limits for a Class B
digital device pursuant to Part 15 of the FCC Rules.
These limits are designed to provide reasonable protection against harmful Interference in
a residential installation This equipment generates, uses, and can radiate radio frequency
energy and, if Not installed and used in accordance with the instructions, may cause
harmful Interference to radio communications. However, there is no guarantee that
interference will not occur in a particular Installation. If this equipment does cause harmful
interference to radio or television reception, which can be determined by turning the
equipment off and on, the user is encouraged to try to correct the interference by one or
more of the following measures:
z Reorient or relocate the receiving antenna.
z Increase the separation between the equipment and receiver.
z Connect the equipment into an outlet of a circuit different from that to which
the receiver is connected.
z Consult the dealer or an experienced radio/TV technician for assistance.
Changes or modification not expressly approved by the party responsible for Compliance
could void the user’s authority to operate the equipment. Connecting of peripherals requires
the use of grounded shielded signal cables.