Pantech TX-230 CDMA/ PCS-CDMA Cellular Phone User Manual TX 230VW CDM 8945 050712
Pantech Co., Ltd. CDMA/ PCS-CDMA Cellular Phone TX 230VW CDM 8945 050712
Pantech >
Contents
- 1. User Manual 1
- 2. User Manual 2
- 3. Users Manual
Users Manual
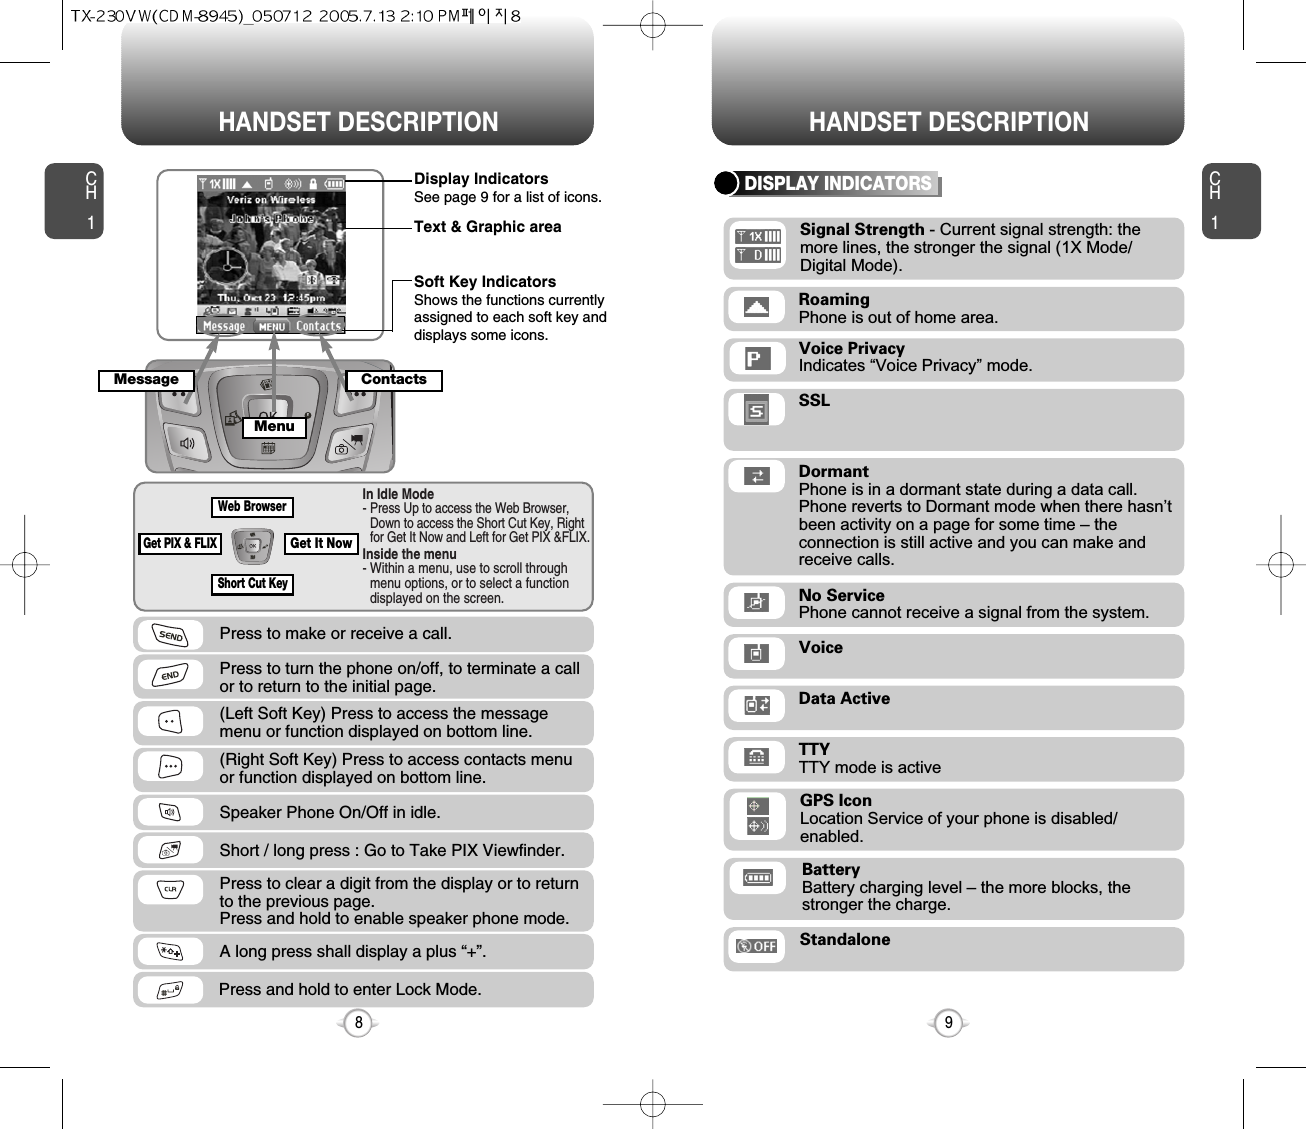
![ACCESSING THE MENUCH2Your phone can be customized via the menu. Each function can beaccessed by scrolling with the Navigation Key or by pressing thenumber that corresponds with the menu item.1To access the menu in the idle mode, press [MENU].2To scroll through the menu use the NavigationKey.3To return to the previous page, press .To exit the current menu and return to the idlemode, press . 4Press the Navigation Key to enter a functionwhen its main page is displayed or press itsassigned number to have direct access to the function.17CH2TURNING THE PHONE ON1Press and hold until your “Power On” logo appears and the tone sounds.• To select a logo, refer to page 59 for more details. (Settings & Tools>Display>Wallpaper) for more detail.• If “Password” appears on the display enter your 4-digitpassword to unlock your phone.• The default password is the last 4 digits of your phone number.16TURNING THE PHONE OFF1Press and hold until your “Power Off” logoappears.• Immediately change or recharge the battery when “LOW BATTERY!! PHONE IS TURNING OFF!” appears onthe display. Memory may possibly be damaged if the phoneturns off due to the battery completely draining.• Turn the phone off before removing or replacing the battery.If the phone is on, unsaved data may be lost.Hotkey In idle mode, move the Navigation Key as follows to access these functions:• Upward movement : Web Browser• Downward movement : Short Cut Key• Rightward movement : Get It Now• Leftward movement : Get PIX & FLIXTURNING THE PHONE ON / OFFlTo search through the menu in numerical order, press the Navigation Key.GET IT NOWMESSAGINGCONTACTSRECENT CALLSSETTINGS & TOOLS](https://usermanual.wiki/Pantech/TX-230.Users-Manual/User-Guide-565307-Page-9.png)

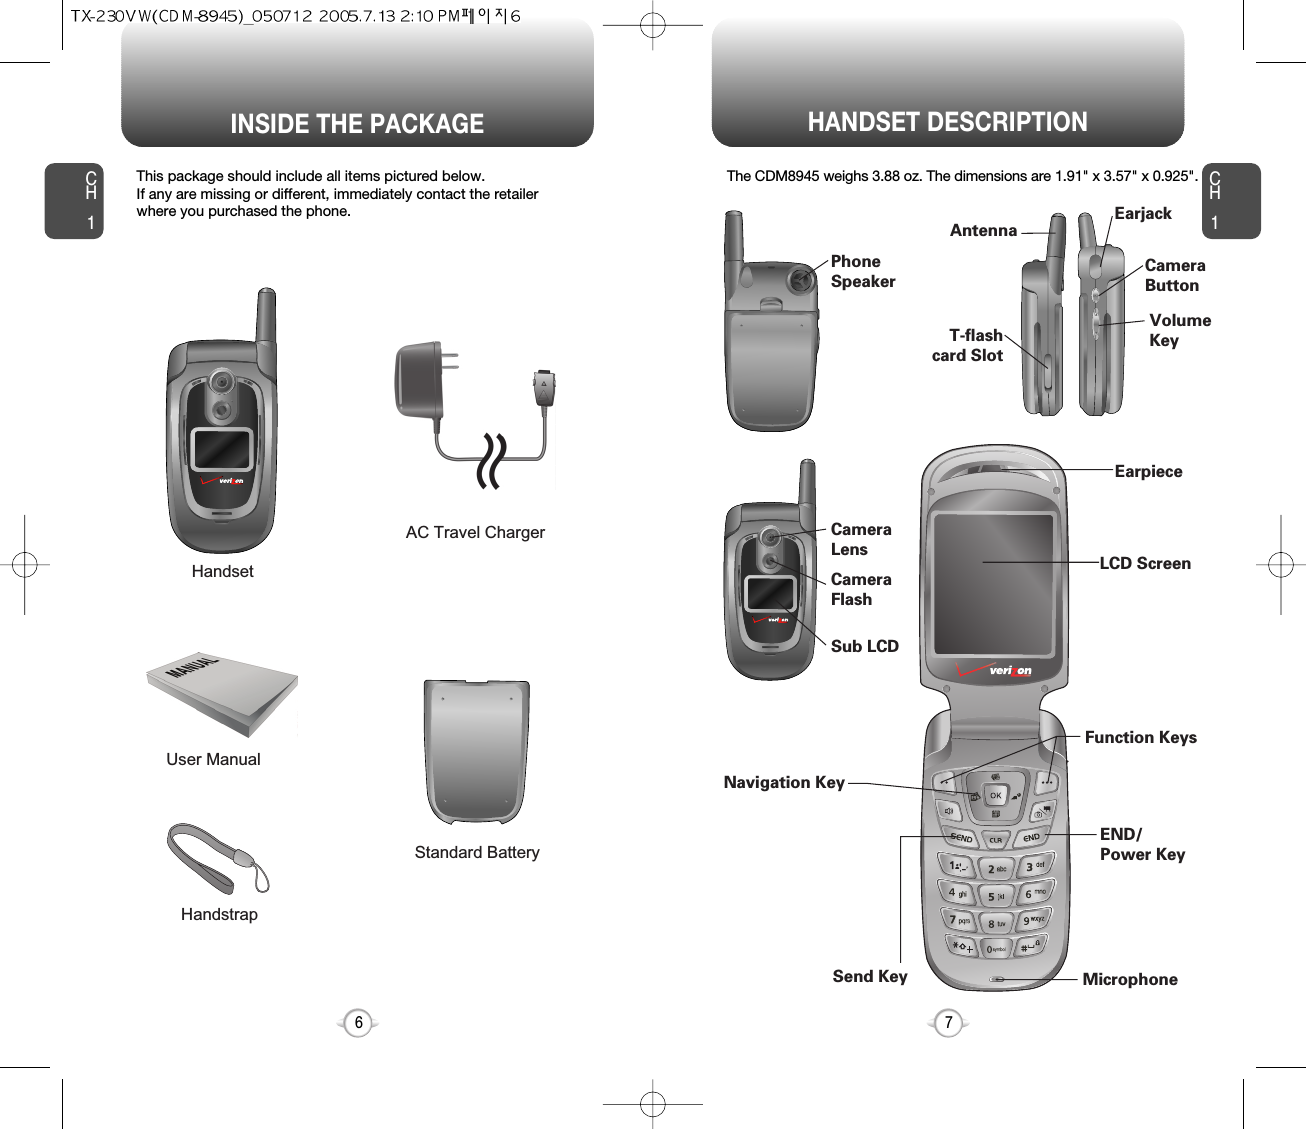
![BASIC FUNCTIONSCH221CH220BASIC FUNCTIONSMAKING A CALL1Enter a phone number.To modify the phone number you have entered :• To erase one digit at a time press .• To erase the entire number, press and hold .To find the phone number in your contact list :• Enter a part of the phone number, press [Options],select then “Search”. Phone number display in contact listIf there is no name in the Contact’s name field, the highestpriority phone number is displayed. If no phone numbersare stored, the email address appears. All matching entries will be displayed. To call the selectednumber, press .To send the txt or pix message with phone number :• Enter a part of the phone number, then press[Options], select “Send Txt Msg or Send PIX Msg”. Please refer to page 103 or page 104 for more details on“Send Txt Msg or Send PIX Msg”.2Press . The indicator, , appears on the display.• If “CALL FAILED” appears on the display or the line is busy,press or . • If you activate the “AUTO RETRY” function, the phone willautomatically retry for the number of times you haveselected. (refer to page 70).• When you place or receive a call from stored phonenumbers, both the name and phone number will bedisplayed.• There is another way to make a call through the VR mode,which is called “VAD (Voice Activated Dialing)”. Please refer to page 72 (Voice Service) for more details.• If “Enter Lock Code” appears on the display enter your 4-digit password to unlock your phone.3To end a call, press .To ignore incoming calls, press [IGNORE].ANSWERING CALLS1When your phone rings or vibrates, press to answer the incoming call. (Depending on your phone’s settings, you mayalso answer incoming calls by opening thephone or by pressing any digit key.)2To end a call, press .The speaker phone feature lets you hear audio through the speaker andtalk without holding the phone.SPEAKER PHONE1To activate the speaker phone in idle, answeringor calling modes, press .2The phone returns to normal (Speaker Phone Off)after ending a call or when the phone is turned offand back on.](https://usermanual.wiki/Pantech/TX-230.Users-Manual/User-Guide-565307-Page-11.png)
![BASIC FUNCTIONS BASIC FUNCTIONSCH223CH222ANSWERING A CALL1To answer a call, press any key except , ,, , , or .2To end the call, press .In Auto Answer Mode a call is automatically answered after apreset number of ring tones. See page 69 for more details.If one of the people you called hangs up during your call, youand the remaining caller stay connected. If you initiated the calland are the first to hang up, all three callers are disconnected.lTo select an answering option, press [MENU] then selectthe “Settings & Tools” by pressing , Select either“Flip Open,” “Any Key,” or “Send Only”. lf “Send Only” is selected, the phone can only be answered bypressing . See page 69 for more information.With 3-Way Calling, you can talk to two people at the same time. When using this feature, the normal airtime rates will be applied foreach of the two calls.3-WAY CALLING1Enter the number you wish to call then press .2Once you have established the connection,enter the second number you wish to call thenpress .3When you’re connected to the second party,press again to begin your 3-Way call.Pauses are used for automated systems (i.e., voice mail, calling cards).Insert a pause after a phone number then enter another group ofnumbers. The second set of numbers is dialed automatically after thepause. This feature is useful for dialing into systems that require a code.WAIT/PAUSE FEATURE1To insert a wait/pause, enter a phone numberthen press [OPTIONS]. Select either a HardPause (“P” appears) or a Wait (“W” appears).2Press to dial or to save.Please refer to page 30 for more details about storing a phone number.Identifies caller by displaying their phone number. If the caller’s nameand number are already stored in your phone book, they both willappear. The caller ID is stored in the call history.CALLER ID FUNCTIONNotifies you of an incoming call when you are already on a call bysounding a beep tone and displaying the caller’s phone number.CALL WAITING FUNCTION1To answer another call while on the phone,press . This places the first call on hold. To switch back to the first caller, pressagain.Call Waiting is a system dependent feature. Please contact yourservice provider for details.](https://usermanual.wiki/Pantech/TX-230.Users-Manual/User-Guide-565307-Page-12.png)
![BASIC FUNCTIONS DURING A CALLCH225CH224ENTER LOCK MODE1To lock the phone, press and hold .2To unlock the phone, press or [UNLOCK],then input your password, then press [OK].The lock feature will deactivate when the phone is powered off. Upon next power up, you will need to press to lock phone again.lAdjusts the volume of the ringer, key beep and speaker.ADJUSTING VOLUME1Press [MENU], then select “Settings & Tools”menu, press then select one of the following.2Adjust volume then press [OK] to save it.Master Volume : Controls the ringer volume.Keypad Volume : Controls the keypad volume.Earpiece Volume : Controls the earpiece volume.lll• To adjust earpiece volume during a call, press the NavigationKey up or down.• To adjust master volume, press short side up/ down key.•In Idle Mode:Side Volume Up key Long Press: Volume key shall bring device out of silence.Side Volume Down key Long Press: Switch between on/off sound including alarm but except speaker.Enables you to send a TXT message (SMS) during a call.To display menu options during a call, press [Options].SEND TXT MSG1Press [OPTIONS] .To select a phone number in your Recent Calls List:RECENT CALLSEnables you to send a PIX message (MMS) during a call.SEND PIX MSG1Press [OPTIONS] .To select a phone number in your internal Contact List:CONTACTS1Press [OPTIONS] .1Press [OPTIONS] .The caller cannot hear you or any sounds from your side but you canstill hear them.MUTE (UNMUTE)1Press [Mute].To deactivate, press [UNMUTE].The phone will automatically un-mute in Emergency Call or Callback mode.ll](https://usermanual.wiki/Pantech/TX-230.Users-Manual/User-Guide-565307-Page-13.png)
![DURING A CALL MAKING AN EMERGENCY CALLCH227CH226Increases security during a call.VOICE PRIVACYEnables the network to locate your current location through GlobalPositioning System (GPS). (Refer to page 65 for more details.)LOCATION1Press [OPTIONS] .1Press [OPTIONS] .Automatically transmits your phone number to a pager during a call.(Dependent on pager service)SEND DTMF1Press [OPTIONS] .The 911 feature automatically places the phone in the EmergencyCall Mode when you dial the preprogrammed emergency number,911. It also operates in the Lock Mode and out of the service area.The 911 call service is available even in the Lock Mode.911 IN LOCK MODE1Enter “911” then press .When the call ends, the phone returns to the Lock Mode.2The call connects.3The phone exits the Emergency Mode for 5 minutes.911 USING ANY AVAILABLE SYSTEM1Enter “911” then press .The phone returns to the Lock Mode.While the phone is in the Emergency Mode for 5 minutes,the phone can receive an incoming call from any availablesystem. However, it can’t make a call.2The call connects.3The phone remains in Emergency Mode for 5 minutes.lllThe 911 call is not recorded in the recent call list.](https://usermanual.wiki/Pantech/TX-230.Users-Manual/User-Guide-565307-Page-14.png)
![Enter a name. Please refer to page 31 for more details onentering letters, numbers & symbols. To change the input mode, press [Abc]. Press the Navigation Key down to select otheroptions (Mobile1.2, E-mail1.2, etc...). If entering a phone number, press [OPTIONS]to select one of the following options:Input mode indicatorT9Word : T9 modeAbc : Abc modeABC : ABC mode123 : Number modeSymbols : Symbol modeSTORING A PHONE NUMBERENTERING LETTERS, NUMBERS & SYMBOLSCH3The input mode (Alpha editor) will automatically be activated whennecessary to enter letters and numbers. As shown below, there are 4 available modes ; Standard input mode (Abc), T9 input mode(T9Word), Numeric mode (123), and Symbol mode (Symbols).The following illustrates the function assigned to each key in theAlpha Editor.31CH.3The phone book stores up to 500 entries.1Enter phone # then press [SAVE] thenchoose “Create New” or “Update Existing”.Press [OK] to select. The input mode indicator appears on the upper rightof the display when letters and numbers are entered.To select the desired input mode among the 4 modesbelow, press [Abc], then enter letters andnumbers.2If “Create New” is selected, the phone numberwill appear above a list. Press the NavigationKey up or down to choose the type of numberyou’re adding, as indicated by the icon. Press [OK] to select. If “Update Existing” isselected, your contact list is displayed. Choosethe entry to add the phone number to, thenpress [OK]. You will then see the phonenumber listed about a list. Press [OK] to select.34To store the entry, press [SAVE]. “CONTACT SAVED” will be displayed.30AbcNextSpaceCaps LockClearSendPress to change mode.[T9Word][Abc][ABC][123][Symbols]Press to view the next matching word ifthe highlighted word is not the word youintended.Press to accept a word and add a space.Press to select a letter case of thestandard text input or T9 text input mode.[Abc], [ABC] and [abc] indicate thestandard text input.[T9Word], [T9WORD] and [T9word]indicate the predictive text input.Press to delete a character to the left ofthe cursor.Send the letters and numbers you enter.KEY FUNCTIONlSet Speed DiallSet Voice DiallSet As DefaultlAdd Pause](https://usermanual.wiki/Pantech/TX-230.Users-Manual/User-Guide-565307-Page-16.png)
![ENTERING LETTERS, NUMBERS & SYMBOLS ENTERING LETTERS, NUMBERS & SYMBOLSCH3The T9 input mode incorporates a built-in-dictionary to determine aword based on the entered characters. A word can be entered morequickly by pressing a key once per character.T9 INPUT MODE1Select the T9Word mode by pressing [Abc].2Press a digit key once to enter the characteryou want then enter all the characters to inputthe word you want.3To view the next matching word, press .To enter a compound word:• Enter the first part of the word then press to accept it.• Enter the last part of the word then press to enter the word.Select Abc mode by pressing [Abc].When you select this mode, the Abc icon appears as a visualconfirmation.- Find the key that corresponds to the letter you want to enter.- Press it as many times as needed for the letter to appear on thescreen.- To enter the name “John”:Press [ ] JPress [ ] oPress [ ] hPress [ ] n33CH3Use the digit keys to enter letters, numbers and characters.STANDARD INPUT MODE1Enter letters using the key pad as follows:2To enter a space, press . The cursor willautomatically move to the next column.3Repeat until letters are entered. There is a 16-letter limit.4To delete one digit, press . To delete theentire entry, press and hold .To change the input mode, press [Abc].32Key Pad12ABC3DEF4GHI:9WXYZ.ADG:W@BEH:X?CFI:Y!234:Z-ADG:91 TimeRepetitions2 timesRepetitions3 timesRepetitions4 timesRepetitions5 times4To accept the matching word then enter aspace, press .5To change from lowercase to uppercase, press .To enter “Fun fare” in the T9 input mode.- After you enter the 1st letter, press [Abc] to select T9 modeand to choose the lower case (T9Word).- Press and you will see “Fun” highlighted. Press to select it.- Press and until you see “ease” highlighted. Press to select the next matching word, you will see “fare” then enter a space.](https://usermanual.wiki/Pantech/TX-230.Users-Manual/User-Guide-565307-Page-17.png)
![ENTERING LETTERS, NUMBERS & SYMBOLS MAKING A CALL THROUGH THE PHONE BOOKCH3NUMERIC MODE1Press [Abc] then scroll to and select“Symbols (Symbol mode)”35CH3341Press [Abc] then scroll to and select “NUM(Numeric mode)”2To enter a number, press a digit key.Press [ ],orPress [ ].2Select symbol you want to enter with theNavigation Key.lUse the Navigation Key to view a different line of symbols.SYMBOL MODEAllows you to enter numbers.Allows you to enter symbols.Ideal for frequently dialed numbers, this feature allows phone bookentries to be dialed via the keypad with only one or two key presses.ONE-TOUCH/TWO-TOUCH DIALING1-9 : Press and hold the corresponding memory number for more than 1 second.ONE-TOUCH DIALING:10-22/97-99 : Press the first digit and second digits of the memory number short and long respectively.TWO-TOUCH DIALING:• If no phone number is stored in the location entered,“Unassigned location” will appear on the screen.](https://usermanual.wiki/Pantech/TX-230.Users-Manual/User-Guide-565307-Page-18.png)
![CH439CH438Stores up to 500 entries, each of which can be assigned to a group.Entries can be retrieved by name or group.Retrieves an entry by name and calls by simply pressing . You can review all the entries stored in your phone book list orquickly find an entry by entering a name or its character string. CONTACT LISTCONTACTS CONTACTS12345Press [MENU], then press “Contact List”or press [CONTACTS].Enter a name or its character string or scrollthrough the list with the Navigation Key. Please refer to page 31 for more details onentering letters, numbers & symbols.The list of names in your phone book isdisplayed alphabetically.To edit the entry, press [EDIT]. To show detail the entry, press [VIEW]. Press [OPTIONS] to 1. New Contact, 2. Erase,3. Send Txt Msg, 4. Send PIX Msg or 5. Call.To call the selected number, press [OPTIONS]then select “Call” or press .12Press [MENU], then press “New Contact”.Adds a new entry.NEW CONTACTTo enter a name or number, use the NavigationKey to select the phone book field.Please refer to page 31 for more details on enteringletters, numbers & symbols.33.1 To save the entry, press [SAVE]. 3.2 To return to the previous page, press .PHONE BOOK FIELDS :Name/Mobile1/Home/Work/E-mail1/Group/Picture/Ringtone/Mobile2/Fax/E-mail2.Under “Mobile 1” or “Mobile 2”, input the phone number,then by pressing [OPTIONS], you can choose from thefollowing:1. Set Speed Dial2. Set Voice Dial3. Set As Default4. Add Pausell• For each new contact, at least 1 phone number or emailaddress needs to be saved with the contact. "Please insert atleast one phone or email" will be displayed if neither have beenadded.• Even though entry name is left empty while the phone numberis provided, the entry will be saved and displayed with phonenumber.](https://usermanual.wiki/Pantech/TX-230.Users-Manual/User-Guide-565307-Page-20.png)
![CH4CH440CONTACTS CONTACTS41CHANGE GROUP NAME2Select an existing group name that you haveadded with the Navigation Key.4Input a new group name.5To save it, press [SAVE].3To select “Rename”, press [OPTIONS].1Press [MENU], press “Groups”.GROUPSGroups allows you to classify phone entries into groups with up to 10numbers in each group. The existing groups include FAMILY andWORK and they cannot be erased or renamed. You can add up to 28more groups which can be changed or erased.13Press [MENU], then press “Groups”.ADD NEW GROUPInput a new group name.4To save it, press [SAVE].2To select “New”, press [NEW].1Press [MENU], press “Groups”.13To assign phone numbers to a Group, select “Add”, press [OPTION].ASSIGN PHONE NUMBER TO GROUPSelect the contact for the group thenpress [DONE]. “Contact Added to (GroupName)” will be displayed.Repeat for each location for the Group.2“Unassigned” locations appear. Select a location then press [OK]. Your phone book entries will be displayed inalphabetical order.SEND TXT MSG. GROUP2Select an existing group name with theNavigation Key.4Input a “Message”, press [OPTION] toselect “Add”, “Save As Drafts”, “PriorityLevel” and “Call Back #”.53To select “Send Txt Msg.”, press [OPTIONS].5.1. To send the text message, press [SEND].5.2. To save the text message, press [OPTIONS]then select “Save As Drafts”, then press [OK].](https://usermanual.wiki/Pantech/TX-230.Users-Manual/User-Guide-565307-Page-21.png)
![CH4CH442CONTACTS CONTACTS43In idle mode, calls can be placed to numbers stored in speed dial bypressing & holding the location number on the key pad. For a 2-digitlocation number, press the first number, then press and hold thesecond number.SPEED DIALS12To assign a phone number to a location, selectthe location then press [SET].3Select the contact with the Navigation Key thenpress [OK]. To confirm, press [OK].45To select “Yes” or “No”, press [OK].“SPEED DIAL SET” will be displayed.• “Unassigned” appears if the location is available.• To call an assigned number, press & hold the last digit of thespeed dial #.ERASE GROUP2Select an existing group name with theNavigation Key.3To select “Erase”, press [OPTIONS].4Select “Yes” to erase it, press [OK].1Press [MENU], press “Groups”.SEND PIX MSG. GROUP1Press [MENU], press “Groups”.2Select an existing group name with theNavigation Key.4Input a “Text”, “PIX or FLIX”, “Sound”, “Subject”,then press [OPTION] to select “Preview”,“Add Quick Text”, “Save As Drafts”, “PriorityLevel”, “Remove Picture”, “Remove Sound”,“Add Slide”.53To select “Send PIX Msg”, press [OPTIONS].5.1. To send the pix message, press [SEND].5.2. To save the pix message, press [OPTIONS] then select “Save As Drafts”, then press [OK].Press [MENU], press “Speed Dials”.](https://usermanual.wiki/Pantech/TX-230.Users-Manual/User-Guide-565307-Page-22.png)
![CH445CH444RECENT CALLS RECENT CALLSDisplays information about the 20 most recently missed calls. Place a call to a missed call number by simply pressing . To see a list of the 20 most recently missed calls, press [MENU], then select “RecentCalls” menu, press “Missed”. If thenumber is already stored in your phone book,only the name appears. If the number is notstored, only the phone number appears.MISSED12To view missed call details, press [OPEN].Call details include date, time and phone number.• After 20 missed calls, the oldest call will automatically be erased from the history.• Press [MESSAGE], to send the Txt or PIX message.• “Details” menu appears only stored phone numbers.3Save : To store the phone number in your phone book.Details : To view the caller’s information.Erase : To erase a missed calls list.Lock/Unlock : To lock or unlock missed calls list.Erase All : To erase all missed calls list.View Timers : To display usage time.llllllPress [OPTIONS] then select “SAVE” tosave it or select “Erase” to delete it.Call details include date, time and phone number.• After 20 received calls, the oldest call will automatically be erased from the history.• Press [MESSAGE], to send the Txt or PIX message.• “Details” menu appears only stored phone numbers.Displays information about the 20 most recently answered calls. Place a call to a received call by simply pressing .RECEIVED1To see a list of the 20 most recently answeredcalls, press [MENU], then select “RecentCalls” menu, press “Received”. If thenumber is already stored in your phone book,only the name appears. If the number is notstored, only the phone number appears.2To view incoming call details, press [OPEN].3Save : To store the phone number in your phone book.Details : To view the caller’s information.Erase : To erase a received calls list.Lock/Unlock : To lock or unlock received calls list.Erase All : To erase all received calls list.View Timers : To display usage time.llllllPress [OPTIONS] then select “SAVE” tosave it or select “Erase” to delete it.](https://usermanual.wiki/Pantech/TX-230.Users-Manual/User-Guide-565307-Page-23.png)
![CH447CH446RECENT CALLS RECENT CALLSCall details include type of call, date, time and phone number.• After 20 dialed calls, the oldest call will automatically be erased from the history.• Press [MESSAGE], to send the Txt or PiIX message.• “Details” menu appears only stored phone numbers.Displays information about the 20 most recently dialed numbers.Place a call to a dialed call by simply pressing .DIALED1To see a list of the 20 most recently dialednumbers, press [MENU], then select“Recent Calls” menu, press “Dialed”. If the number is already stored in your phonebook, only the name appears. If the number isnot stored, only the phone number appears.2To view dialed call details, press [OPEN].3Save : To store the phone number in your phone book.Details : To view the caller’s information.Erase : To erase a dialed calls list.Lock/Unlock : To lock or unlock dialed calls list.Erase All : To erase all dialed calls list.View Timers : To display usage time.llllllPress [OPTIONS] then select “SAVE” tosave it or select “Erase” to delete it.Call details include type of call, date, time and phone number.• After the 20 received, dialed or missed calls, the oldest callwill automatically be erased from the history.• Press [MESSAGE], to send the Txt or PIX message.• “Details” menu appears only stored phone numbers.Displays information about the most recent incoming, outgoing andmissed calls.ALL1To see a list of the 60 most recent incoming,outgoing and missed calls, press [MENU], then select “Recent Calls” menu, press “All”. If the number is already stored in your phone book,only the name appears. If the number is not stored,only the phone number appears.23To view details, press [OPEN].Save : To store the phone number in your phone book.Details : To view the caller’s information.Erase : To erase a recent calls list.Lock/Unlock : To lock or unlock recent calls list.Erase All : To erase all recent calls list.View Timers : To display usage time.llllllPress [OPTIONS] then select “SAVE” tosave it or select “Erase” to delete it.](https://usermanual.wiki/Pantech/TX-230.Users-Manual/User-Guide-565307-Page-24.png)
![CH44948CH4SETTINGSRECENT CALLSChecks the usage time and manages your calls within the limit youset. The 11 timers include (Last Call, All Calls, Received Calls, Dialed Calls, Roaming, Transmit Kilobytes, Received Kilobytes, Total Kilobytes, Last Reset, Lifetime Calls, Lifetime Data Counter):VIEW TIMERSPress [MENU], select “Recent Calls” menu,press “View Timers”.To reset the timers except Lifetime calls andlifetime data counter, press [RESET], then select “Yes”, press .To return to the previous page, press [OK].12Controls the Ringer volume and alerts you to incoming calls in themodes listed in the gray box below.Customizes your phone and optimizes performance through a varietyof settings.SOUNDSMASTER VOUME2Select one of the following options by pressingthe Navigation Key to the right.3Select one of the available ring types.To confirm, press [OK].1Press [MENU], then select “Settings & Tools”menu, press “Sounds” then select“Master Volume”.All Sound OffAlarm OnlyVibrate OnlyLow, Med Low, Med, Med High, High.Press to play sound.](https://usermanual.wiki/Pantech/TX-230.Users-Manual/User-Guide-565307-Page-25.png)
![CH451CH450SETTINGS50SETTINGSTo select a ringer type for incoming calls:CALL SOUNDS2Select your desired ringer type.3Select one of the available ring types.To confirm, press [OK].1Press [MENU], then select “Settings & Tools”menu, press “Sounds” then select “Call Sounds”, press “Call Ringtone”.Up or Down key : Select “Ringer”.Press Play/Pause to Play/Pause the ringer.CALL RINGTONE2Select “On” or “Off” with the Navigation Key thenpress [OK] to save it.1Press [MENU], then select “Settings & Tools”menu, press “Sounds” then select “Call Sounds”, press “Call Vibrate”.CALL VIBRATEWhen selected, this setting alerts you to the following handset changes:ALERT SOUNDS1Press [MENU], then select “Settings & Tools”menu, press “Sounds” then select “Alert Sounds”, press “Txt Message”.TXT MESSAGE2Select “Tone”, “Vibrate” or “Reminder” with theNavigation Key then select one of the followingoptions by pressing the Navigation Key.Tone : Select your desired ringer type.Vibrate : Select “On” or “Off”.Reminder : Select “Once”, “Every 2 Minutes”, “Every 15 Minutes” or “Off”.3To save, press [OK].1Press [MENU], then select “Settings & Tools”menu, press “Sounds” then select “Alert Sounds”, press “Pix Message”.PIX MESSAGE2Select “Tone”, “Vibrate” or “Reminder” with theNavigation Key then select one of the followingoptions by pressing the Navigation Key.Tone : Select your desired ringer type.Vibrate : Select “On” or “Off”.Reminder : Select “Once”, “Every 2 Minutes”, “Every 15 Minutes” or “Off”.3To save, press [OK].](https://usermanual.wiki/Pantech/TX-230.Users-Manual/User-Guide-565307-Page-26.png)
![CH453CH452SETTINGS52SETTINGS1Press [MENU], then select “Settings & Tools”menu, press “Sounds” then select “Alert Sounds”, press “Voicemail Message”.VOICEMAIL MSG2Select “Tone”, “Vibrate” or “Reminder” with theNavigation Key then select one of the followingoptions by pressing the Navigation Key.Tone : Select your desired ringer type.Vibrate : Select “On” or “Off”.Reminder : Select “Once”, “Every 2 Minutes”, “Every 15 Minutes” or “Off”.3To save, press [OK].To adjust key pad tone:KEYPAD VOLUME2Select one of the following options by pressingthe Navigation Key to the right.3Select one of the available ring types.To confirm, press [OK].1Press [MENU], then select “Settings & Tools”menu, press “Sounds” then select“Keypad Volume”.OffLow, Med Low, Med, Med High, HighTo adjust earpiece volume:EARPIECE VOLUME2Select one of the following options by pressingthe Navigation Key to the right.3Select one of the available ring types.To confirm, press [OK].1Press [MENU], then select “Settings & Tools”menu, press “Sounds” then select“Earpiece Volume”.Low Med Low, Med, Med High, High](https://usermanual.wiki/Pantech/TX-230.Users-Manual/User-Guide-565307-Page-27.png)
![SETTINGS SETTINGSCH455CH454Sounds an alert when leaving a service area and entering a roamingservice area.SERVICE ALERTS1Press [MENU], then select “Settings & Tools”menu, press “Sounds” then select “Service Alerts”, press “ERI”.ERI (Enhanced Roaming Indicator)2Select “On” or “Off” with the Navigation Key thenpress [OK] to save it.Sounds an alert every minute during a call.1Press [MENU], then select “Settings & Tools”menu, press “Sounds” then select “Service Alerts”, press “Minute Beep”.MINUTE BEEP2Select “On” or “Off” with the Navigation Key thenpress [OK] to save it.Notifies you that a call has been successfully placed.1Press [MENU], then select “Settings & Tools”menu, press “Sounds” then select “Service Alerts”, press “Call Connect”.CALL CONNECT2Select “On” or “Off” with the Navigation Key thenpress [OK] to save it.Allows you to activate/deactivate the power on tones.POWER ON/OFF SOUNDS1Press [MENU], then select “Settings & Tools”menu, press “Sounds” then select “Power On/Off Sounds”, press “Power OnSound”.POWER ON SOUND2Select “On” or “Off” with the Navigation Key thenpress [OK] to save it.Allows you to activate/deactivate the power off tones.1Press [MENU], then select “Settings & Tools”menu, press “Sounds” then select “Power On/Off Sounds”, press “Power OffSound”.POWER OFF SOUND2Select “On” or “Off” with the Navigation Key thenpress [OK] to save it.Display -> Banner -> ERI Banner must be set for “ON” for smooth operation of all the functions.](https://usermanual.wiki/Pantech/TX-230.Users-Manual/User-Guide-565307-Page-28.png)
![SETTINGS SETTINGSCH457CH456To select a ringer type for alarm sound:ALARM SOUNDS2Select your desired ringer type.3Select one of the available ring types.To confirm, press [OK].1Press [MENU], then select “Settings & Tools”menu, press “Sounds” then select “Alarm Sounds”, press “Alarm Tone”.ALARM TONE2Select “On” or “Off” with the Navigation Key thenpress [OK] to save it.1Press [MENU], then select “Settings & Tools”menu, press “Sounds” then select “Alarm Sounds”, press “Alarm Vibrate”.ALARM VIBRATEAllows you to customize the display.DISPLAYTo input a personal/ERI banner greeting:The text greeting can be up to 16 characters and is displayed onyour phone’s screen in standby mode.BANNER2Enter a new personal greeting.To change the input mode, press [Abc]. To return to the previous page, press[CANCEL].3Press [OK] to save it.1Press [MENU], then select “Settings & Tools”menu, press “Display” then select “Banner”, press “Personal”.PERSONAL2Select “On” or “Off” with the Navigation Key thenpress [OK] to save it.1Press [MENU], then select “Settings & Tools”menu, press “Display” then select “Banner”, press “ERI Banner”.ERI BANNERUp or Down key : Select “Ringer”.Press Play/Pause to Play/Pause the ringer.](https://usermanual.wiki/Pantech/TX-230.Users-Manual/User-Guide-565307-Page-29.png)
![SETTINGS SETTINGSCH459CH458Backlights the display and key pad and activates dimming for easyviewing in dark places.BACKLIGHT2Select one of the following options with theNavigation Key.3Press [OK] to save it.1Press [MENU], then select “Settings & Tools”menu, press “Display” then select “Backlight”, press “LCD”.LCDAlways On, Always Off, 5 Seconds, 15 Seconds, 30 Seconds.2Select one of the following options with theNavigation Key.3Press [OK] to save it.1Press [MENU], then select “Settings & Tools”menu, press “Display” then select “Backlight”, press “Keypad”.KEYPADAlways On, Always Off, 5 Seconds, 15 Seconds, 30 Seconds.To adjust the display contrast:CONTRAST3Press [OK] to save it.1Press [MENU], then select “Settings & Tools”menu, press “Display” then select “Contrast”.2Select one of the following options with theNavigation Key.Level 1 ~ Level 5WALLPAPER1Press [MENU], then select “Settings & Tools”menu, press “Display” then select “Wallpaper”.3Select Default to choose a pre-installed display,Downloads, PIX # or Flix # to choose a displayyou have downloaded to your phone.To launch “Get It Now”, press [GET NEW]. To expand selected image, press [VIEW].4Select a display from the Animation and theGraphic list using the Navigation Key then press [OK] to save it.2Select “My PIX” or “My FLIX” with the NavigationKey.](https://usermanual.wiki/Pantech/TX-230.Users-Manual/User-Guide-565307-Page-30.png)
![SETTINGS SETTINGSCH461CH460DISPLAY THEMES3Press [OK] to save it.1Press [MENU], then select “Settings & Tools”menu, press “Display” then select “Display Themes”.2Select one of the following options with theNavigation Key.Theme 1Theme 2Theme 3Theme 4SCREENSAVER1Press [MENU], then select “Settings & Tools”menu, press “Display” then select “Screensaver”.3Select Default to choose a pre-installed display,Downloads, PIX # or Flix # to choose a displayyou have downloaded to your phone.To launch “Get It Now”, press [GET NEW]. To expand selected image, press [VIEW].4Select a display from the Animation and theGraphic list using the Navigation Key then press [OK] to save it.FONTS1Press [MENU], then select “Settings & Tools”menu, press “Display” then select “Fonts”.2Select “Normal” or “Large” with the NavigationKey then press [OK] to save it.Allows you to the power on animation.POWER ON/OFF ANIMATIONS1Press [MENU], then select “Settings & Tools”menu, press “Display” then select “Power On/Off Animations”, press “Power On Animations”.POWER ON ANIMATIONSAllows you to the power off animation.1Press [MENU], then select “Settings & Tools”menu, press “Display” then select “Power On/Off Animations”, press “Power Off Animations”.POWER OFF ANIMATIONS3Press [OK] to save it.2Select one of the following options with theNavigation Key.Animation 1Animation 23Press [OK] to save it.2Select one of the following options with theNavigation Key.Animation 1Animation 22Select “My PIX” or “My FLIX” with the NavigationKey.](https://usermanual.wiki/Pantech/TX-230.Users-Manual/User-Guide-565307-Page-31.png)
![SETTINGS SETTINGSCH463CH462SYSTEMSelects the Preferred System.SYSTEM SELECT1Press [MENU], then select “Settings & Tools”menu, press “System” then select “System Select”.3Press [OK] to save it.2Select one of the following options with theNavigation Key.Automatic BAutomatic AHome OnlyEnables Auto NAM (Number Assignment Modules) or manuallyselects a NAM.NAM SELECTION1Press [MENU], then select “Settings & Tools”menu, press “System” then select “NAM Selection”, press “Auto NAM”.3Press [OK] to save it.2Select one of the following options with theNavigation Key.NAM 1 - VERIZONNAM 2 - VERIZONAutomatically switches phone to proper NAM when you have multipleNAM registrations.AUTO NAM2Select “On” or “Off” with the Navigation Key thenpress [OK] to save it.1Press [MENU], then select “Settings & Tools”menu, press “System” then select “NAM Selection”, press “Change NAM”.Changes the NAM used by the phone when you have multipleregistrations.CHANGE NAMSTANDALONE MODE1Press [MENU], then select “Settings & Tools”menu, press “System” then select “Standalone Mode”.2Select “On” or “Off” with the Navigation Key thenpress [OK] to save it.](https://usermanual.wiki/Pantech/TX-230.Users-Manual/User-Guide-565307-Page-32.png)
![SETTINGS SETTINGSCH465CH464Displays the information of your phone:DEVICE INFO1Press [MENU], then select “Settings & Tools”menu, press “System” then select “Device Info”, press “My Number”.Displays the your phone number (MDN/MIN number and provider) :MY NUMBER3To return to the previous page, press [OK].3To return to the previous page, press [OK].1Press [MENU], then select “Settings & Tools”menu, press “System” then select “Device Info”, press “SW Version”.Displays the (Software/PRL/ERI/Browser/Get It Now) version.SW VERSION2You are to see the Indicator Icons of yourcellular telephone.2You are to see the version of software,hardware and others.2You are to see the MDN/MIN number andprovider name.3To return to the previous page, press [OK].1Press [MENU], then select “Settings & Tools”menu, press “System” then select “Device Info”, press “Icon Glossary”.Displays the Indicator Icons of your cellular telephone.ICON GLOSSARYTo determine whether or not the network system can detect yourposition:LOCATION1Press [MENU], then select “Settings & Tools”menu, press “System” then select “Location”.3Press [OK] to save it.2Select one of the following options with theNavigation Key.Location OnE911 Only](https://usermanual.wiki/Pantech/TX-230.Users-Manual/User-Guide-565307-Page-33.png)
![SETTINGS SETTINGSCH467CH4664Press [OK] to save it.Device : Lock, Unlock, On Power UpLocation : Lock, UnlockPrevents unauthorized use of your phone. The following settings canbe restricted:Prevents the phone from being used without entering the password first.SECURITY1Press [MENU], then select “Settings & Tools”menu, press “System” then select “Security”, then enter your password, press [OK].3Select “On” or “Off” with the Navigation Keythen press [OK] to save it.2Select “Common Code”.COMMON CODEThe default password is the last 4 digits of your phone number.1Press [MENU], then select “Settings & Tools”menu, press “System” then select “Security”, then enter your password, press [OK].3Select “Device” or “Location” then select one ofthe following options with the Navigation Key.2Select “Lock Mode”.LOCK MODEThe default password is the last 4 digits of your phone number.4Enter a new lock code then press [OK]. 5Confirm the lock code then press [OK] tosave it. 1Press [MENU], then select “Settings & Tools”menu, press “System” then select “Security”, then enter your password, press [OK].3Select “Device” or “Location” then select one ofthe following options with the Navigation Key.2Select “Edit Code”.EDIT CODEThe default password is the last 4 digits of your phone number.Changes your Device/Location 4-digit password.](https://usermanual.wiki/Pantech/TX-230.Users-Manual/User-Guide-565307-Page-34.png)
![CH469SETTINGSCH468SETTINGSSelects the language in which letters are displayed on the screen.LANGUAGE1Press [MENU], then select “Settings & Tools”menu, press “System” then select “Language”.3Press [OK] to save it.2Select “English” or “Spanish” with the NavigationKey.Calendar/Tunes & Tones/Gallery/Fun & Games/News & Info/Inbox/Sent/Email/Chat/IM/Settings & Tools/Alarm Clock/CalculatorYour phone offers you the option of assigning a short-cut key (Down Navigation Key) to a favorite or often-used function. To assign a shortcut to the key:SHORT CUT KEY1Press [MENU], then select “Settings & Tools”menu, press “System” then select “Short Cut Key”.3The Shortcut can now be accessed by pressingthe “Down Navigation Key”.2Select your desired menu option then press[OK].CALL SETTINGSANSWER OPTIONS1Press [MENU], then select “Settings & Tools”menu, press “Call Settings” then select “Answer Options”.2Select one of the following with the Navigation Key.3To save, press [OK].To select an answer mode:Flip OpenAny KeySend OnlyAuto Answer – HandsfreeAuto Answer – HeadsetAuto Answer – Handset](https://usermanual.wiki/Pantech/TX-230.Users-Manual/User-Guide-565307-Page-35.png)
![CH471SETTINGSCH470SETTINGS1Press [MENU], then select “Settings & Tools”menu, press “Call Settings” then select “Auto Retry”.Automatically redials a call up to 5 times after a set time interval.23Retry time field is shown. Press the NavigationKey left or right to choose the amount of time. (Off, 3 Seconds, 5 Seconds, 7 Seconds or 10 Seconds)When a time is chosen for retry time, the repeatfield is shown. Press the Navigation Key down tohighlight the repeat field. Press the NavigationKey left or right to choose the number ofrepeats. (1 Time, 3 Times or 5 Times).4To save, press [OK].AUTO RETRY1Press [MENU], then select “Settings & Tools”menu, press “Call Settings” then select “TTY Mode”.Your phone is able to operate with a TTY (Teletypewriter) device inboth analog and digital modes. This feature is system dependent andmay not be available in all areas.3To save, press [OK].TTY MODE2Select one of the following with the Navigation Key.TTY OffTTY+ TALKTTY + HEARTTY FullllllEnhances voice privacy and avoids tapping during a call.On : Makes it more difficult to wire tap.l1Press [MENU], then select “Settings & Tools”menu, press “Call Settings” then select “One Touch Dial”.ONE TOUCH DIAL2Select “On” or “Off” with the Navigation Key thenpress [OK] to save it.1Press [MENU], then select “Settings & Tools”menu, press “Call Settings” then select “Voice Privacy”.VOICE PRIVACY2Select “On” or “Off” with the Navigation Key, then press [OK] to save it.1Press [MENU], then select “Settings & Tools”menu, press “Call Settings” then select “Data Setting”.Choose the connection mode for the usage of your phone.3To save, press [OK].DATA SETTING2Select one of the following connection modeswith the Navigation Key.Voice Call : To receive a voice call.Data Only : To receive data when connected to PC.ll](https://usermanual.wiki/Pantech/TX-230.Users-Manual/User-Guide-565307-Page-36.png)
![CH473SETTINGSCH472SETTINGSVOICE SERVICES1Press [MENU], then select “Settings & Tools”menu, press “Call Settings” then select “Voice Services”, press “Voice Setting”.VOICE SETTING2Under “Set Active”, select “Off”, “Active Flip”or “Send Key”.3Under “HFK Mode”, select a option “On” or “Off”.After turning on Set Active, open the flip to on to VR mode. Afterturning on HFK mode, put Hands-free kit and say “wake up” to onto VR mode.1Press [MENU], then select “Settings & Tools”menu, press “Call Settings” then select “Voice Services”, press “Voice Dial”.4To save, press [OK].Voice Dial allows you to call a person by simply saying their name.To access Voice Dial:2.1. Press [NEW]. The phone book list will be displayed alphabetically. Select a name then press [OK]. Instructions (Please OK and say name) will be displayed and [OK]. You will hear “Name Please”.2.2. Say the name for the voice tag and repeat the name when prompted. You will hear “Added”.To play a voice dial: Highlight the voice tag you want to play then press [PLAY].To detail a voice dial: Highlight the voice tag you want to detail viewthen press [OPTIONS] then select “Detail”.To re-record a voice dial: Highlight the voice tag you want to re-record thenpress [OPTIONS] then select “Re-record”.To erase or erase all voice dial:Highlight the voice tag you want to erase or eraseall then press [OPTIONS] then select “Erase”or “Erase All”. To play speaker a voice dial: Highlight the voice tag you want to play speakerthen press [OPTIONS] then select “PlaySpeaker”.VOICE DIAL234567](https://usermanual.wiki/Pantech/TX-230.Users-Manual/User-Guide-565307-Page-37.png)
![CH475SETTINGSCH474SETTINGS1Press [MENU], then select “Settings & Tools”menu, press “Call Settings” then select “Voice Services”, press “Train Words”.TRAIN WORDS2Under “Yes”, “No”, “Wake-Up”: “Please listen closely to hear instructions” will bedisplayed and you will hear “Now training controlwords. Please say the word”. Say word. You willhear “Again”. Say word again. You will hear“Training word successful”.To undo voice recognition, select a word you wantto undo then press [UNDO].3Under “Undo Train All”:“Undo this voice recognition for all procedures?” will be displayed. Press [OK] to undo alltrained words.Train allows you to use Control words to make a call without usingthe keypad. Use to train or untrain Voice Recognition with the controlwords, “Yes”, “No” or “Wake-Up”.1Press [MENU], then select “Settings & Tools”menu, press “Call Settings” then select “DTMF Tones”.3To save, press [OK].DTMF TONES2Select one of the following with the Navigation Key.NormalLongOfflllTo adjust tone length:](https://usermanual.wiki/Pantech/TX-230.Users-Manual/User-Guide-565307-Page-38.png)
![SETTINGS SETTINGSCH477CH476CLOCK FORMAT1Press [MENU], then select “Settings & Tools”menu, press “Clock Format” then select “Main Clock”.3To save, press [OK].MAIN CLOCK2Select one of the following with the Navigation Key.DigitalAnalogOfflllTo change the main clock’s appearance on the standby screen:1Press [MENU], then select “Settings & Tools”menu, press “Clock Format” then select “Front Clock”.3To save, press [OK].FRONT CLOCK2Select one of the following with the Navigation Key.DigitalAnalogOfflllTo change the front clock’s appearance on the standby screen:RINGER ID12Press [MENU], then select “Settings & Tools”menu, press “Ringer ID”.Select “On” or “Off” with the Navigation Key,then press [OK] to save it.PICTURE ID12Press [MENU], then select “Settings & Tools”menu, press “Picture ID”.Select “On” or “Off” with the Navigation Key,then press [OK] to save it.](https://usermanual.wiki/Pantech/TX-230.Users-Manual/User-Guide-565307-Page-39.png)
![CH479TOOLSCH478TOOLSUse the keypad to change or enter the end date. END DATEUse the Navigation Key to select a time zone.(OFF, EST, EDT, CST, CDT, MST, PST, PDT,AKST, AKDT, HAST, HADT or GMT/UTC). TIME ZONEUse the keypad to select the alert tone you wishto set.ALERTUse the Navigation Key to select vibrate on/off.VIBRATEUse the Navigation Key to select an alert timeinterval option (0 Minutes, 5 Minutes, 10 Minutes,15 Minutes). REMINDER4Press [SAVE] to save it or [CLR] to returnto the calendar.5The date of the event will be marked on yourcalendar.1To view the Calendar List:VIEW PLAN LIST2Move the Navigation Key to choose an event thenpress [VIEW]. Press [ERASE], then select “Yes”, press .CALENDARADD NEWSets an event and reminds you of that event.23Move the Navigation Key left, right, up or down tochoose a date in the calendar then press [OK].Press [OPTIONS] to 1. New, 2. Go To Date, 3.Erase Passed or 4. Erase All.Press [MONTHLY/WEEKLY] to exchangedisplay mode.Use the keypad to set a start time and toselect “AM” or “PM”. START TIMEUse the keypad to enter an appointment in yourschedule.APPOINTMENTUse the keypad to change or enter the start date. START DATEUse the Navigation Key to select a repeat settingfor the the calendar. (Daily, Weekly, Monthly orYearly). RECURRENCYThe date field is highlighted. Press the NavigationKey down to set the alarm options.Use the keypad to set an end time and toselect “AM” or “PM”. END TIME1Press [MENU], then select “Settings & Tools”menu, press “Tools” then select“Calendar”.Use the keypad to entering a count.BY COUNT](https://usermanual.wiki/Pantech/TX-230.Users-Manual/User-Guide-565307-Page-40.png)
![CH481TOOLSCH480TOOLSTo display the time and date in pre-programmed cities:WORLD CLOCK24Select a city by pressing the [CITIES].3The world map appears with the city, its dateand time.Use the Navigation Key to select another city.If user press [DST], then all DST supporting cities DST turnon/off.To return to the previous page, press [OK].1Press [MENU], then select “Settings & Tools”menu, press “Tools” then select “World Clock”.ALARM CLOCKSelect one of the entries using the Navigation Key.To set a new alarm, choose alarm 1, 2 or 3.To edit an existing alarm, select that alarm. Press [OK].Press [OPTIONS] to 1. On/Off, 2. Reset, 3. Reset All.21The setting field will be highlighted. Press theNavigation Key down to select alarm options.3Use the Navigation Key to select a setting for thealarm (Once, Daily, Monday - Friday, Weekends). FREQUENCYPress [MENU], then select “Settings & Tools”menu, press “Tools” then select “Alarm Clock”.Use the Navigation Key to select alarm on/off.ALARMUse the keypad to set a time for the alarm andto select “AM” or “PM”. TIMEUse the keypad to select the alert tone you wishto set.RINGERTo save an alarm setting press [SAVE].4](https://usermanual.wiki/Pantech/TX-230.Users-Manual/User-Guide-565307-Page-41.png)
![CH483TOOLSCH482TOOLS2Follow the instructions below to calculate8*64-2.5= 9.53To reset, press [CLEAR].To access the calculator:CALCULATORInput 8.Move the Navigation Key rightward.Input 6 then press the Navigation Key.Move it leftward.Input 4 then press the Navigation Key.Move it downward.Input 2 then press the to input (.). Press 5.Then press and you will see the answer.: X, : -, : /, : +, : ., : Clear, : =.1Press [MENU], then select “Settings & Tools”menu, press “Tools” then select “Calculator”.• To change the displayed number from positive (+) to negative (-)and vice versa, press [].• If user press [OPERATOR], to use multi parenthesis support and parenthesis rules [(,)] or power [^].Your phone includes an internal notepad that can be used tocompose and store reminders and notes.NOTEPAD1Press [MENU], then select “Settings & Tools”menu, press “Tools” then select “Notepad”.ADD MEMO2To add a new memo, press [NEW].Input a new text memo.(Please refer to page 31 for more details on enteringletters, numbers & symbols.)1VIEW MEMO2The list of all memos, in saved order, is displayed.Select a memo then press [VIEW].33.1. The selected memo will appear. To edit it, press [EDIT] and input a new text memo, then press [SAVE] to save it.To compose a memo (there is an 80-letter limit):To view a saved memo:Press [MENU], then select “Settings & Tools”menu, press “Tools” then select “Notepad”.3.3. To erase a memos, press [OPTIONS] “Erase”.3.2. To add a new memo, press [NEW].3.4. To erase all memos, press [OPTIONS] “Erase All”.3To save memo, press [SAVE].](https://usermanual.wiki/Pantech/TX-230.Users-Manual/User-Guide-565307-Page-42.png)
![GET IT NOWYour phone provides a unique feature -Get It Now- that enables youto download ringtones, wallpapers, games and more from yournetwork to your phone. Please contact your service provider for theavailability of these services.GET IT NOWChapter 58584CH585TOOLSCH4213Simultaneously times up to six different events. To operate thestop watch:STOP WATCHTo measure a time period:1. To start the stop watch, press [START].2. To pause it, press [STOP].3. To resume it, press [START].To reset it, press [RESET]. To time up to six events at once:1. To start, press [START].2. To stop a time period and continue measuring another one, press [CONT].3. To stop the second and continue measuring a third one, press [CONT].4. To measure up to six time periods, repeat theabove steps.5. To stop the stop watch, press [STOP].6. To review the results, press [VIEW].7. To return to the stop watch, press [OK].8. To reset it, press [RESET].Press [MENU], then select “Settings & Tools”menu, press “Tools” then select “Stop Watch”.](https://usermanual.wiki/Pantech/TX-230.Users-Manual/User-Guide-565307-Page-43.png)
![CH587GET IT NOWCH586GET IT NOWGET TUNES & TONESDOWNLOADING NEW TUNES & TONES1Press [MENU], then select “Get It Now” menuor press , then press “Get Tunes &Tones” then select “Get New Ringtones” theselect “Get New App.”. (The Get It Now willlaunch and take you to the download menu.)3Use your Navigation Key to select a “Tunes orTones” you wish to download, press [OK].2Use your Navigation Key to select a provider’sbrowser, press [OK]. 4To save a downloaded tunes or tones to the“Get Tunes & Tones” list and to sort file type.USING DOWNLOADED TUNES & TONES1Press [MENU], then select “Get It Now” menuor press , then press “Get Tunes & Tones”.2To play downloaded tunes or tones:Select the tunes or tones you want to play, thenpress [PLAY].3To erase downloaded tunes or tones:Select the tunes or tones you want to erase, thenpress [ERASE], then select “Yes”, press .4To assign downloaded tunes or tones:Select the tunes or tones you want to assign, then press [OPTIONS].Select “Set As Ringtone” or “Set As Ringer ID”,then select “Yes”, press .4To save a downloaded tunes or tones to the“Get Tunes & Tones” list and to sort file type.By pressing [SOLT], you can choose sort type:File type / Alphabet / Date (Recent-Old) / File Size (Large-Small)By pressing [OPTIONS], you can choose from the following:1. Set As Ringtone2. Set As Ringer ID3. RenameRECORDING NEW TONES1Press [MENU], then select “Get It Now” menuor press , then press “Get Tunes &Tones” then select “My Sounds”.3To stop recording a memo, press [STOP].2To record a voice memo, press [OK]Instructions will be displayed and you will hear“Beep Sound”.](https://usermanual.wiki/Pantech/TX-230.Users-Manual/User-Guide-565307-Page-44.png)
![CH589GET IT NOWCH588GET IT NOWGET V CAST MUSIC1Press [MENU], then select “Get It Now” menuor press , then press “Get Tunes &Tones” then select “Get V CAST Music”.(The Get It Now will launch and take you to thedownload menu.)MY RINGTONES1Press [MENU], then select “Get It Now” menuor press , then press “Get Tunes &Tones” then select “My Ringtones” theselect “Get New Ringtones”. (The Get It Now willlaunch and take you to the download menu.)MY MUSIC1Press [MENU], then select “Get It Now” menuor press , then press “Get Tunes &Tones” then select “My Music” the select“Get V CAST Music”. (The Get It Now will launchand take you to the download menu.)SYNC MUSIC1Press [MENU], then select “Get It Now” menuor press , then press “Get Tunes &Tones” then select “Sync Music”. (The Get It Now will launch and take you to thedownload menu.)](https://usermanual.wiki/Pantech/TX-230.Users-Manual/User-Guide-565307-Page-45.png)
![CH591GET IT NOWCH590GET IT NOWGET PIX & FLIXGET V CAST VIDEO1Press [MENU], then select “Get It Now” menu,then press “Get Pix & Flix” or press ,then select “Get V CAST Video”.2Browser launches.GET NEW PIX1Press [MENU], then select “Get It Now” menu,then press “Get Pix & Flix” or press ,then select “Get New PIX” the select “GetNew App.”. (The Get It Now will launch and takeyou to the download menu.)2Browser launches.MY PIX3Select the picture with the Navigation Key, thenpress [VIEW].2In Review Mode, you can view all the picturesyou have stored in your phone.To view the previous or next picture in detail view, press theNavigation Key right or left.By pressing [OPTIONS], you can choose from the following:1. Send: To send a picture message.2. To PIX Place: To upload selected picture to pix server.3. Get New: To download picture.4. Set As: Assigns the selected pix to display for specific tasks. (Wallpaper/Screen Saver/Picture ID/Power On/Power Off.).5. Rename: To edit the picture’s title. 6. Go to T-flash card: To switch save location from pictures to the phone list or T-flash card. 7. Move to T-flash card: To move the selected picture to the other save location. 8. Lock/Unlock: To select “Lock” or “Unlock”. 9. Erase: Erase the current picture from your phone.10. Erase All: To erase all the pictures in your phone. 11. Pix Info: Displays information on the selected picture, such as “Pix Name”, “Date”, “Time”, “Resolution”, “File size”.12. Memory Info: Displays memory information on the phone or T-flash card. “Go to T-flash card”, “Move to T-flash card” or “Memory Info” menu appears only when connecting T-flash card.Press [CAMERA] to return to Camera mode to take another picture.In Review Mode you can view all the pictures you have taken, storeselected images in your phone, send pictures to the Online Album,delete images and access additional picture options.1Press [MENU], then select “Get It Now” menu,then press “Get PIX & FLIX” or press orpress and hold side camera key, then select“My PIX”.](https://usermanual.wiki/Pantech/TX-230.Users-Manual/User-Guide-565307-Page-46.png)
![CH593GET IT NOWCH592GET IT NOWMY FLIX3Select the video with the Navigation Key, then press [PLAY].2In Review Mode, you can view all the videos youhave stored in your phone.To view the previous or next video in detail view, press theNavigation Key right or left.By pressing [OPTIONS], you can choose from the following:1. Send: To send a picture message.2. To Pix Place: To upload selected video to flix server.3. Get V CAST Video: To download V CAST video.4. Set As: Assigns the selected pix to display for specific tasks. (Wallpaper/Screen Saver/Set As Ringer ID).5. Rename: To edit the video’s title. 6. Go to T-flash card: To switch save location from videos to the phone list or T-flash card. 7. Move to T-flash card: To move the selected video to the other save location. 8. Lock/Unlock: To select “Lock” or “Unlock”. 9. Erase: Erase the current video from your phone.10. Erase All: To erase all the videos in your phone. 11. Flix Info: Displays information on the selected video, such as “Flix Name”, “Flix Type”, “Date”, “Time”, “Resolution”, “Playing Time (h:mm:ss)”, “File size”.12. Memory Info: Displays memory information on the phone or T-flash card. “Go to T-flash card”, “Move to T-flash card” or “Memory Info” menu appears only when connecting T-flash card.Press [VIDEO] to return to Camera mode to take another video.In Review Mode you can view all the videos you have taken, storeselected video in your phone, send video to the Online Album, deletevideos and access additional video options.1Press [MENU], then select “Get It Now” menu,then press “Get Pix & Flix” or press orpress and hold side camera key, then select“My FLIX”.MY GRAPHICS3Select graphic with the Navigation Key, thenpress [VIEW]. You can see detail graphic.2In Review Mode, you can view all the graphicsyou have stored in your phone.In detail view, user can view previous or next graphic by pressing left or right Navigation Key.By pressing [OPTIONS], you can choose from the following:1. Send: To send a graphic message.2. To PIX Place: To uploading selected graphic to pix server.3. Get New: To download graphic.4. Set As: Assigns the selected graphic to display for specific tasks. (Wallpaper/Screen Saver/Graphic ID/Power On/Power Off.).5. Rename: To edit the graphic’s title. 6. Go to T-flash card: To switch save location from graphics to the phone list or T-flash card. 7. Move to T-flash card: To move the selected graphic to the other save location. 8. Lock/Unlock: To select “Lock” or “Unlock”. 9. Erase: Erase the current graphic from your phone.10. Erase All: To erase all the graphics in your phone. 11. Pix Info: Displays information on the selected graphic, such as “Pix Name”, “Date”, “Time”, “Resolution”, “File size”.12. Memory Info: Displays memory information on the phone or T-flash card. “Go to T-flash card”, “Move to T-flash card” or “Memory Info” menu appears only when connecting T-flash card.In Review Mode you can view all the graphic you have taken, storeselected images in your phone, send pictures to the Online Album,delete images and access additional graphic options.1Press [MENU], then select “Get It Now” menu,then press “Get Pix & Flix” or press orpress and hold side camera key, then select“My Graphics”.](https://usermanual.wiki/Pantech/TX-230.Users-Manual/User-Guide-565307-Page-47.png)
![CH595GET IT NOWCH594GET IT NOWTAKING PIX1Press [MENU], then select “Get It Now” menu,then press “Get Pix & Flix” or press orpress and hold side camera key, then select“Take PIX”. Or press .3Press side camera key or press [TAKE] totake the picture.2Point the camera lens at your subject. You cancheck the picture framing through the maindisplay screen.To view captured images, press [MY PIX].By pressing [OPTIONS], you can choose from the following:1. Self Portrait: Take a picture of yourself by checking the viewon the Sub LCD.2. Resolution: To select a resolution for a picture.(640x480/320x240/176x144/160x120)3. Self Timer: To activate the camera’s timer function.(Off/5 Seconds/10 Seconds)4. Flash: To activate the flash function. (Off/Auto Flash/Always On/On This Shot)5. White Balance: To select white balance. (Auto/Sunny/Tungsten/Fluorescent)6. File Quality: To select a picture quality.(High/Normal/Economy)7. Shutter Sound: To select a shutter sound.(Shutter/Say “Cheesse”/Ready!123/Silent)8. Color Effect: To select a color effects. (Normal/Gray/Sepia/Negative/Embossing)9. Fun Frame: Select your favorite fun picture frame to decorate your picture. (Flower/Mask/Sweet Heart/Fist-Punch/Sports/ Stars/Candle/Event/Roses/Lips/Sea/Sky/Snowman/ Tropics/Window/Off)0. Display Icon: To select a icon “Display” or “Hide”.*. Save location: To select a save location. (Phone/T-flash card)This menu appears only when connected to a T-flash card.User can control brightness and zoom directly by pressing theNavigation Key up and down.Navigation Up / Down: Zoom up/down (Except 640x480 mode).Navigation Left / Right: Brightness up/down( -2, -1, 0, +1, +2). 4After taking the picture it will be displayed.To save the picture, press [SAVE].To go back to idle mode without saving thepicture, press . To take another picture without saving the pictureyou just took, press [ERASE].To send the picture to someone, press [SEND].Please refer to page 104 for more details on“New PIX MSG”.](https://usermanual.wiki/Pantech/TX-230.Users-Manual/User-Guide-565307-Page-48.png)
![CH597GET IT NOWCH596GET IT NOWTAKING FLIX1Press [MENU], then select “Get It Now” menu,then press “Get Pix & Flix” or press orpress and hold side camera key, then select“Take FLIX”.34Press side camera key or press [REC] to takethe video.2Point the camera lens at your subject. You cancheck the picture framing through the maindisplay screen.To view captured videos, press [MY FLIX].By pressing [OPTIONS], you can choose from the following:1. Self Portrait: Take a video of yourself by checking the viewon the Sub LCD.2. Self Timer: To activate the camera’s timer function.(Off/5 Seconds/10 Seconds)3. Movie Light: To activate the flash function. (Off/Always On)4. White Balance: To select white balance. (Auto/Sunny/Tungsten/Fluorescent)5. Mute / Unmute: Phone is mute or unmute while recording a video.6. Save location: To select a saved location. (Phone/T-flash card)This menu appears only when connecting T-flash card.User can control brightness and zoom directly by pressing theNavigation Key up and down.Navigation Up / Down: Zoom up/down.Navigation Left / Right: Brightness up/down( -2, -1, 0, +1, +2). To pause/resume recording,press [PAUSE/RESUME].To stop recording, press [STOP].5After taking the video it will be displayed.To save the picture, press [SAVE].To go back to idle mode without saving the video,press . To replay video, press [REPLAY].To send the video to someone, press [SEND].Please refer to page 104 for more details on“New PIX MSG”.](https://usermanual.wiki/Pantech/TX-230.Users-Manual/User-Guide-565307-Page-49.png)
![CH599GET IT NOWCH598GET IT NOWPIX PLACE2Connect “WAP Browser”.1Press [MENU], then select “Get It Now” menu,then press “Get Pix & Flix” or press orpress and hold side camera key, then select“Pix Place”.GET FUN & GAMESDOWNLOADING NEW FUN & GAMES1Press [MENU], then select “Get It Now” menuor press , then press “Get Fun & Games”then select “Get New”. (The Get It Now willlaunch and take you to the download menu.)3Use your Navigation Key to select a “Fun orGames” you wish to download, press [OK].2Use your Navigation Key to select a provider’sbrowser, press [OK]. 4To save a downloaded fun or games to the “GetFun & Games” list and to sort file type.PLAYING DOWNLOADED FUN & GAMES1Press [MENU], then select “Get It Now” menuor press , then press “Get Fun & Games”.2To play downloaded fun or games:Select the fun or games you want to play, thenpress [PLAY].3To launch “Get It Now”.By pressing [SOLT], you can choose sort type:File type / Alphabet / Date (Recent-Old) / File Size (Large-Small)](https://usermanual.wiki/Pantech/TX-230.Users-Manual/User-Guide-565307-Page-50.png)
![VOICE MAIL, TXT, PIXMESSAGINGThis chapter addresses Voice Mail, TXT, Pix Messaging functionsincluding: WHEN A NEW MESSAGE ARRIVESVOICE MAILNEW TXT MSGNEW PIX MSGINBOXSENTDRAFTSE- MAILMOBILE IMCHATERASE ALLSETTINGSChapter 6101100CH6101GET IT NOWCH5GET GOINGCONNECTING GET GOING1Press [MENU], then select “Get It Now” menuor press , then press “Get Going” thenselect “Get New App.”.2To launch “Get It Now”.GET EXTRASCONNECTING GET EXTRAS1Press [MENU], then select “Get It Now” menuor press , then press “Get Extras” thenselect “Get New App.”.2To launch “Get It Now”.GET NEWS & INFOCONNECTING NEWS & INFO1Press [MENU], then select “Get It Now” menuor press , then press “Get News & Info”then select “Get New App.”.2Connect “WAP Browser”.](https://usermanual.wiki/Pantech/TX-230.Users-Manual/User-Guide-565307-Page-51.png)
![Displays the number of voice mails and accesses them by pressing .VOICE MAILCH6103CH6102WHEN A NEW MESSAGE ARRIVES NEW TXT MSG1The following display appearswhen a new message arrives.2To display the message, select “View Now”,then press [OK].1Press [MENU], then select “Messaging”menu, press “New Txt Msg” or press[MESSAGE], press “New Txt Msg”.To send a new txt message:2Under “To”, input the phone number then press [OK].3Under “Message”, input a new TXT messagethen press [OK].By pressing [ADD], you can choose from the following:1. Contacts : Search for a phone number which is stored in the contacts list.2. Recent Calls : Search the phone number which is stored in the recent calls list.Press [OPTIONS], then “ADD,” to choose from the following:1. Graphics : Inserts simple graphic images in TXT Msg.2. Sounds : Inserts EMS sound in TXT Msg.3. Quick Text : Inserts already written sentences in TXT Msg.(Please refer to page 31 for more details on entering letters,numbers and symbols.)FIRST TIME USER1Dial *86 then press [SEND].2At the recording, press .3To set up your account follow the voice tutorial.EXISTING USER1Dial *86 then press [SEND].2At the recording, enter your 4 digit password,then press .3To listen to new messages, press .Each field supports a maximum of 100 characters.If one of field is inserted in txt msg field, message save atdraft box.5To send the TXT message, press [SEND].4Press [OPTIONS], then select “Priority Level”,select “High” or “Normal”, then press [OK].Press [OPTIONS], then select “Call Back #”,select “On” or “Off”, then press [OK].To save the TXT message, press [OPTIONS], then select “Save As Drafts”.1Press [MENU], then select “Messaging”menu, press “Voice Mail” or press[MESSAGES], press “Voice Mail”.](https://usermanual.wiki/Pantech/TX-230.Users-Manual/User-Guide-565307-Page-52.png)
![NEW PIX MSG NEW PIX MSGCH6105CH61041Press [MENU], then select “Messaging”menu, press “New PIX Msg” or press[MESSAGE], press “New PIX Msg”.To send a new pix message:2Under “To”, input the phone number then press [OK].3Under “Text”, input a new TXT message thenpress [OK].By pressing [ADD], you can choose from the following:1. Contacts : Search for a phone number which is stored in the contacts list.2. Recent Calls : Search the phone number which is stored in the recent calls list.3. To PIX Place : To send pictures by using online Address.By pressing [OPTIONS].Add Quick Text : Inserts already written sentences in TXT Msg.(Please refer to page 31 for more details on entering letters,numbers and symbols. A maximum of 1,000 characters is allowed.)6Under “Subject”, input a subject then press[OK].By pressing [OPTIONS].Add Quick Text : Inserts already written sentences in TXT Msg.(Please refer to page 31 for more details on entering letters,numbers and symbols. Max 100 characters support.)4Under “PIX or FLIX”, user can insert/remove onlyone picture or video. Press [GALLERY], then select the picture orvideo you’d like to send, then press [OK].Each field supports a maximum of 100 characters.8To send the Pix message, press [SEND].7Press [OPTIONS], then select “Priority Level”,select “High” or “Normal”, then press [OK].To save the Pix message, press [OPTIONS], then select “Save As Drafts”.To preview a written picture message, press[OPTIONS], then select “Preview”.To remove picture or video, press [OPTIONS],then select “Remove Picture”.To remove sound, press [OPTIONS], then select “Remove Sound”.To add slide, press [OPTIONS], then select “Add Slide”.5Under “Sound”, user can insert/remove only onesound. Press [SOUND], then select the sound you’d like to send then press [OK].](https://usermanual.wiki/Pantech/TX-230.Users-Manual/User-Guide-565307-Page-53.png)
![INBOX INBOXCH6107CH6106SAVE PICTURE1Select to save a picture to the “My Pix” folder.SAVE VIDEO1Select to save a video to the “My Flix” folder.FORWARD1Select to forward the TXT or PIX message.2Input the phone number of the person you aresending the message, then press [OK].3Input any text message to go along with theforwarded message, then press [OK].The Inbox manages received TXT/PIX/Web Alert messages. To access:2Select a message, then press [OPEN]. The message is displayed. To delete a message,press [ERASE], press [OK].If you select web alert message, press [GET],to launch the browser.Press [OPTIONS].3REPLY1Type your reply then press [OK].PLAY AGAIN1To play a received pix/flix message.REPLY WITH COPY123Select to reply to a received message andinclude the received message into the message.The default call back number is automaticallyincluded into the Default CB# field. You can scroll to the number and edit it.To send the TXT or PIX message, press [SEND].SAVE SOUND1Select to save a sound to the “My Sound” folder.1Press [MENU], then select “Messaging”menu, press “Inbox” or press[MESSAGE], press “Inbox”.• “Save Picture", “Save Video", “Save Sound" menu only appearswhen you receive a pix/flix message or EMS/MMS message.• “Reply with Copy" menu appears only when you receive a TXTmessage.“Play Again" menu appears only when you receive a pix/flixmessage or EMS message.: Lock: Priority: Read: Unread: EMS Unread: Pix Unread: Pix Read: MMS Push: Wap Push: EMS Read](https://usermanual.wiki/Pantech/TX-230.Users-Manual/User-Guide-565307-Page-54.png)
![INBOX SENTCH6109CH6108LOCK/UNLOCK1Select to lock or unlock the TXT or PIX message.2Select “Lock” to lock the message or “Unlock”to unlock the message, then press .MESSAGE INFO1Select to show received pix message information.• “Message Info” menu appears only when you receive a pix/flix message.• Place a call to a received message number(Include Fr/CB phone number) by simply pressing .“Play Again” menu appears only when you receive a MMSmessage.1Press [MENU], then select “Messaging”menu, press “Sent” or press [MESSAGE],press “Sent”.Manages sent TXT/PIX messages or messages waiting to be sent.2Select a message then press [OPEN]. The message is displayed. To delete a message,press [ERASE], press [OK].Press [OPTIONS].3FORWARD1Select to forward the TXT or PIX/FLIX message.2Input the phone number of the person you aresending the message, then press [OK].3Input any text message to go along with theforwarded message, then press [OK].PLAY AGAIN1Select to play already a sent MMS message.: Lock: Priority: Sent: Incomplete Delivery: Deliverd: Sent but Delievery FailedSAVE QUICK TEXT1Select to save received text msg to “Quick Text”.ADD TO CONTACTS1Select to save number to contacts.](https://usermanual.wiki/Pantech/TX-230.Users-Manual/User-Guide-565307-Page-55.png)
![SENT DRAFTSCH6111CH6110SAVE QUICK TEXT1Select to save received text msg to “Quick Text”.ADD TO CONTACTS1Select to save number to contacts.LOCK/UNLOCK1Select to lock or unlock the TXT or PIX/FLIXmessage.2Select “Lock” to lock the message or “Unlock”to unlock the message, then press .SAVE QUICK TEXT1Select to save received text msg to “Quick Text”.ADD TO CONTACTS1Select to save number to contacts.SEND1Select to send a selected message.LOCK/UNLOCK1Select to lock or unlock the TXT or PIX/FLIXmessage.2Select “Lock” to lock the message or “Unlock”to unlock the message, then press .MESSAGE INFO1Select to show received pix message information.• “Message Info” menu appears only when you receive a pix/flix message or EMS/MMS message.• Place a call to a received message number by simply pressing .RESEND1Select to resend a TXT or PIX/FLIX message.ERASE1To erase this message, select “Erase”, thenselect “Yes”, press [OK].1Press [MENU], then select “Messaging”menu, press “Drafts” or press[MESSAGE], press “Drafts”.2Select a message then press [EDIT]. The message is displayed. To delete a message,press [ERASE], press [OK].Press [OPTIONS].3Draft Folder contains any draft messages or saved messages.If message composition is interrupted by a voice call or otherinterrupting event, the text of the current composition is automaticallysaved in the drafts folder.: Lock: PIX Drafts: SMS/EMS Drafts](https://usermanual.wiki/Pantech/TX-230.Users-Manual/User-Guide-565307-Page-56.png)
![CH6113CH6112MOBILE IME- MAIL1Press [MENU], then select “Messaging”menu, press “E-mail” or press[MESSAGE], press “E-mail”.2Browser launches.1Press [MENU], then select “Messaging”menu, press “Mobile IM” or press[MESSAGE], press “Mobile IM”.2Browser launches.](https://usermanual.wiki/Pantech/TX-230.Users-Manual/User-Guide-565307-Page-57.png)
![CH6115CH6114ERASE ALLCHAT22.1. To erase all the inbox messages, press [ERASE INBOX].3Select “Yes”, then press .2.2. To erase all the drafts messages, press [ERASE DRAFTS].2.3. To erase the sent messages, press [ERASE SENT].2.4. To erase the all message, press [ERASE ALL].1Press [MENU], then select “Messaging”menu, press “Chats” or press[MESSAGE], press “Chat”.1Press [MENU], then select “Messaging”menu, press [OPTIONS] or press[MESSAGE], press [OPTIONS].2Browser launches.](https://usermanual.wiki/Pantech/TX-230.Users-Manual/User-Guide-565307-Page-58.png)
![CH6117CH6116SETTINGSSETTINGSAUTO SAVEPress [AUTO SAVE]. Select “On”, “Off” or “Prompt” with theNavigation Key.Press [OK].Manages messaging features through various features.23AUTO ERASEAutomatically erases inbox messages when new messages arrive.1Press [MENU], then select “Messaging”menu, press [SETTINGS] or press[MESSAGE], press [SETTINGS].Press [AUTO ERASE]. Select “On” or “Off” with the Navigation Key.Press [OK].231Press [MENU], then select “Messaging”menu, press [SETTINGS] or press[MESSAGE], press [SETTINGS].AUTO VIEW TXTPress [AUTO VIEW TXT]. Select “On” or “Off” with the Navigation Key.Press [OK].23AUTO RECEIVE1Press [MENU], then select “Messaging”menu, press [SETTINGS] or press[MESSAGE], press [SETTINGS].Press [AUTO RECEIVE]. Select “On” or “Off” with the Navigation Key.Press [OK].231Press [MENU], then select “Messaging”menu, press [SETTINGS] or press[MESSAGE], press [SETTINGS].If the “Auto View Txt” is set to on, the user will be able to directlyview the message. If the “Auto View Txt” is set to off, the user canview the message by entering SMS Menu-> Inbox.On : All sent messages saved in the Sent box.Off : All sent messages not saved in the Sent boxPrompt : “Yes”, “No” dialogue box displayed after sent message.On : Oldest message erased from inbox automatically when message is full.Off : Oldest message not erased from inbox automatically when message is full.On : Text message automatically displays.Off : User can retrieve messages from the Inbox after selecting yes or no.On : PIX message automatically downloaded.Off : User can retrieve messages from the Inbox after selecting yes or no.](https://usermanual.wiki/Pantech/TX-230.Users-Manual/User-Guide-565307-Page-59.png)
![CH6119CH6118SETTINGSSETTINGSCreate a signature that can be automatically inserted at the end of amessage.SIGNATURE2Press [SIGNATURE].To activate Signature function, put the cursoron Insert Signature then select “Custom” byusing up or down direction keys. To deactivateSignature function, select “None”.3To input “Signature”, put the cursor on EditSignature then enter Signature Edit window byusing right or left direction keys. 4Press [OK].1Press [MENU], then select “Messaging”menu, press [SETTINGS] or press[MESSAGE], press [SETTINGS].VOICE MAIL#2Press [VOICE MAIL#].Input a new voice call back number or editvoice call back number.3Press [OK].CALLBACK#Edits a default callback number so that the recipient can callback orreply.Press [CALLBACK#]. Select “On” or “Off” with the Navigation Key.Select “On”, then input a callback number, press [OK].231Press [MENU], then select “Messaging”menu, press [SETTINGS] or press[MESSAGE], press [SETTINGS].1Press [MENU], then select “Messaging”menu, press [SETTINGS] or press[MESSAGE], press [SETTINGS].1Press [MENU], then select “Messaging”menu, press [SETTINGS] or press[MESSAGE], press [SETTINGS].3Press [OK].BLOCK/UNBLOCK2Press [BLOCK/UNBLOCK].Select “Block”, “Unblock” or “View List ofBlocked Addresses” with the Navigation Key.BLOCK : Enter the address to block.UNBLOCK : Enter the address to remove from block.VIEW LIST OF BLOCKED ADDRESSES : Display the blockedlist on LCD.](https://usermanual.wiki/Pantech/TX-230.Users-Manual/User-Guide-565307-Page-60.png)
![CH6121CH6120SETTINGSSETTINGSFONT SIZE2Press [FONT SIZE].Select “Small”, “Large” or “Normal” with theNavigation Key.3Press [OK].1Press [MENU], then select “Messaging”menu, press [SETTINGS] or press[MESSAGES], press [SETTINGS].ENTRY MODE2Press [ENTRY MODE].Select “T9Word”, “Abc”, “ABC” or “123” withthe Navigation Key.3Press [OK].Sets an Entry Mode as a default. For example, if T9 Mode is thedefault, its icon will appear.To edit the Quick Text message you have saved:QUICK TEXT2Press [QUICK TEXT].2.1. Select a message from the list. Press [OK].2.2. To add a new Quick Text message, press [OPTIONS] to select “Add New”. To edit the Quick Text message you have selected, press [OPTIONS] to select “Edit”, then enter text, press [SAVE].3To erase the saved Quick Text message, press [ERASE].1Press [MENU], then select “Messaging”menu, press [SETTINGS] or press[MESSAGE], press [SETTINGS].1Press [MENU], then select “Messaging”menu, press [SETTINGS] or press[MESSAGE], press [SETTINGS].Pre-defined Quick Text messages include:1. What’s up?/2. Let’s meet./3. Check this out!/4. Whachadoing?/5. Thanks/6. What do you think?/7. You’ve gotta be hereto enjoy this./8. Would you like to join me for a date tonight?/9. On my way./10. Yes/11. You’re the best!/12. Call me.](https://usermanual.wiki/Pantech/TX-230.Users-Manual/User-Guide-565307-Page-61.png)
![BROWSER MENUThe browser menu lists the actions necessary to operate the browser.To access, press , then press [MENU] .STARTING INTERNET BROWSER BROWSER MENUCH7125CH7124BACK1To return to the previous page:Press , then press [MENU] . LAUNCHING MOBILE WEB 2.01To start your Internet browser and accesswebsites through your wireless handset press . VZW HOME1To display the homepage: Press , then press [MENU] . ADDRESS1To select “Address”:Press , then press [MENU] . REFRESH1To select “Refresh”:Press , then press [MENU] . The history list is available from the Browser Menu and the user maydelete all items from the history. When the “VZW Home” item is selected from the Browser Menu, the phone displays the homepage.When the “Back” item is selected from the Browser Menu, the phonedisplays the previous page in the history. When the “Forward” item is selected from the Browser Menu, the phonedisplays the next page in the history. This is only available if the user hasnavigated backward in the history. Now you can access news, sports, weather, and e-mail from yourphone. Mobile Web 2.0 keeps you updated by providing access to up-to-date information such as news, sports, weather and stockquotes when you subscribe to Internet service with your serviceprovider. Please contact your service provider for a list of availablewebsites and service details.Selecting the “Address” item from the Browser Menu displays theURL of the current page.The user may clear cache, history, cookies and auto fill from thememory.Selecting the “Refresh” item from the Browser Menu refreshes thecurrent page.HISTORY1To select “History”:Press , then press [MENU] . FORWARD1To forward to the next page:Press , then press [MENU] . CLEAR MEMORY1To clear browser memory:Press , then press [MENU] .](https://usermanual.wiki/Pantech/TX-230.Users-Manual/User-Guide-565307-Page-63.png)
![BROWSER MENUCH7126ADVANCED1To select “Advanced”:Press , then press [MENU] . Selecting the “Advanced” item in the Browser Menu displays theadvanced menu items.When the “Exit” item is selected from the Browser Menu, the userexits out of the browser and is returned to the phone idle mode.To exit browser:Press , then press [MENU] . EXIT1SETTINGS1To select “Settings”:Press , then press [MENU] . BROWSER MENUCH7127Downloads : Selecting the “Downloads” item allows the user toenable/disable downloading images, background sounds, and object downloads when a URL is accessed.Restart Browser : Selecting “Restart Browser” causes the history and cache to be cleared and returns the user to the homepage.Scroll Mode : Selecting the “Scroll Mode” allows the user to select between time-square scrolling (referred to as block scrolling) and smooth scrolling and to select the speed of the smooth scrolling. Scrolling speed choices are medium, fast, and slow. Send Referrer : When the “Send Referrer” item is selected from the Settings menu, the browser allows the user to turn on or off sending the referrer URL. Key Press Timeout : When the “Key Press Timeout” item is selected from the Settings menu, the browser allows the user to set the key press timeout as fast, medium or slow. Medium is 1.5 seconds, slow 2 seconds and fast is 1 second. The key press timeout is the period of time after which the cursor auto-advances to the next entry position. In most cases, a single key can be used to enter more than one character. Each time the key is pressed the last character of the line is replaced by the next choice for that key. As long as the same key is re-pressed within key press timeout, the last character cycles between all the choices for the key. Connection Timeout : When the Connection Timeout item is selected from the Settings menu, the browser allows the user to set the connection timeout. The connection timeout determines how long the browser will wait for a response from the network for a network request.About... : When the “About” item is selected information about the browser version, copyright information and certificate information is displayed. Encryption : Selecting the “Encryption” item from the Advanced Menu enable the user access to Encryption features of the browser.1. Authentication : The “Authentication” item in the Encryption menu allows the user to toggle authentication caching. 2. Root Certificate : The “Root Certificate” item in the Encryption menu allows the user to view the list of certificates.3. Current Certificate : The “Current Certificate” item in the Encryption menu allows the user to view the current certificate. This is only available if a secure connection is established.](https://usermanual.wiki/Pantech/TX-230.Users-Manual/User-Guide-565307-Page-64.png)
![139138FDA CONSUMER UPDATE1. Do wireless phones pose a health hazard?The available scientific evidence does not show that any health problems areassociated with using wireless phones. There is no proof, however, that wirelessphones are absolutely safe. Wireless phones emit low levels of radiofrequencyenergy (RF) in the microwave range while being used. They also emit very lowlevels of RF when in the stand-by mode. Whereas high levels of RF can producehealth effects (by heating tissue), exposure to low level RF that does not produceheating ef-fects causes no known adverse health effects. Many studies of low levelRF exposures have not found any biological ef-fects. Some studies havesuggested that some biological ef-fects may occur, but such findings have notbeen confirmed by additional research. In some cases, other researchers have haddifficulty in reproducing those studies, or in determining the reasons forinconsistent results.2. What is FDA’s role concerning the safety of wireless phones?Under the law, FDA does not review the safety of radiation-emitting consumerproducts such as wireless phones before they can be sold, as it does with newdrugs or medical de-vices. However, the agency has authority to take action ifwire-less phones are shown to emit radiofrequency energy (RF) at a level that ishazardous to the user. In such a case, FDA could require the manufacturers ofwireless phones to notify users of the health hazard and to repair, replace or recallthe phones so that the hazard no longer exists. Although the existing scientific datado not justify FDA regula-tory actions, FDA has urged the wireless phone industryto take a number of steps, including the following:• Support needed research into possible biological effects of RF of the type emitted by wireless phones;• Design wireless phones in a way that minimizes any RF ex-posure to the user that is not necessary for device function;and• Cooperate in providing users of wireless phones with the best possible information on possible effects of wireless phone use on human health. FDA belongs to an interagency working group of the federal agencies that haveresponsibility for different aspects of RF safety to ensure coordinated efforts at thefederal level. The following agencies belong to this working group:• National Institute for Occupational Safety and Health• Environmental Protection Agency• Federal Communications Commission• Occupational Safety and Health Administration• National Telecommunications and Information AdministrationThe National Institutes of Health participates in some inter-agency working groupactivities, as well. FDA shares regulatory responsibilities for wireless phones withthe Federal Communications Commission (FCC). All phones that are sold in theUnited States must comply with FCC safety guidelines that limit RF exposure. FCCrelies on FDA and other health agencies for safety questions about wirelessphones. FCC also regulates the base stations that the wireless phone networksrely upon. While these base stations operate at higher power than do the wirelessphones themselves, the RF expo-sures that people get from these base stationsare typically thousands of times lower than those they can get from wire-lessphones. Base stations are thus not the subject of the safety questions discussed inthis document.3. What kinds of phones are the subject of this update?The term “wireless phone” refers here to hand-held wireless phones with built-inantennas, often called “cell,” “mobile,” or “PCS” phones.U.S. Food and Drug Administration -Center for Devices andRadiological Health Consumer Update on Wireless PhonesCH8CH8HEARING AID COMPATIBILITY WITHMOBILE PHONES FCC Hearing-Aid Compatibility (HAC) Regulations for Wireless DevicesOn July 10, 2003, the U.S. Federal Communications Commission (FCC) Report andOrder in WT Docket 01-309 modified the exception of wireless phones under theHearing Aid Compatibility Act of 1988 (HAC Act) to require digital wireless phonesbe compatible with hearing-aids. The intent of the HAC Act is to ensure reasonableaccess to telecommunications services for persons with hearing disabilities. While some wireless phones are used near some hearing devices (hearing aids andcochlear implants), users may detect a buzzing, humming, or whining noise. Somehearing devices are more immune than others to this interference noise, andphones also vary in the amount of interference they generate.The wireless telephone industry has developed a rating system for wireless phones,to assist hearing device users find phones that may be compatible with theirhearing devices. Not all phones have been rated. Phones that are rated have therating on their box or a label located on the box. The ratings are not guarantees. Results will vary depending on the user’s hearingdevice and hearing loss. If your hearing device happens to be vulnerable tointerference, you may not be able to use a rated phone successfully. Trying out thephone with your hearing device is the best way to evaluate it for your personalneeds. lM-Ratings: Phones rated M3 or M4 meet FCC requirements and are likely togenerate less interference to hearing devices than phones that are notlabeled. M4 is the better/higher of the two ratings.Hearing devices may also be rated. Your hearing device manufacturer or hearinghealth professional may help you find this rating. Higher ratings mean that thehearing device is relatively immune to interference noise. The hearing aid andwireless phone rating values are then added together. A sum of 5 is consideredacceptable for normal use. A sum of 6 is considered for best use. In the right example, if a hearing aid meets the M2 levelrating and the wireless phone meets the M3 level rating,the sum of the two values equal M5. This should providethe hearing aid user with “normal usage” while using theirhearing aid with the particular wireless phone. “Normalusage” in this context is defined as a signal quality that isacceptable for normal operation. The M mark is intended to be synonymous with the U mark. The T mark is intendedto be synonymous with the UT mark. The M and T marks are recommended by theAlliance for Telecommunications Industries Solutions (ATIS). The U and UT marksare referenced in Section 20.19 of the FCC Rules. The HAC rating andmeasurement procedure are described in the American National Standards Institute(ANSI) C63.19 standard.For information about hearing aids and digital wireless phonelFcc Hearing Aid Compatibility and Volume Controlhttp://www.fcc.gov/cgb/dro/hearing.htmllGallaudet University, RERChttp://tap.gallaudet.edu/DigWireless.KS/DigWireless.htmlSelf Help for Hard of Hearing People Inc. [SHHH]www.hearingloss.org/hat/TipsWirelessPhones.htmlThe Hearing Aid Compatibility FCC Orderhttp://hraunfoss.fcc.gov/edocs_public/attachmatch/FCC-03-168A1.pdf](https://usermanual.wiki/Pantech/TX-230.Users-Manual/User-Guide-565307-Page-70.png)