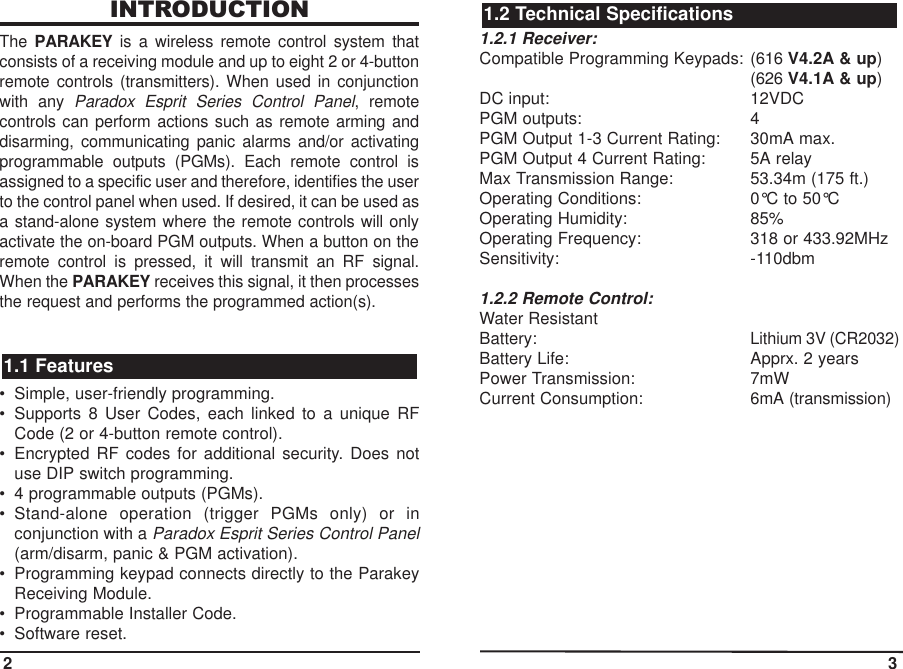
Paradox Security Systems PARAKEYTX User Manual Parkei02
Paradox Security Systems Parkei02
UserManual.wiki
>
Paradox Security Systems
>
PARAKEYTX User Manual
>
USERS MANUAL
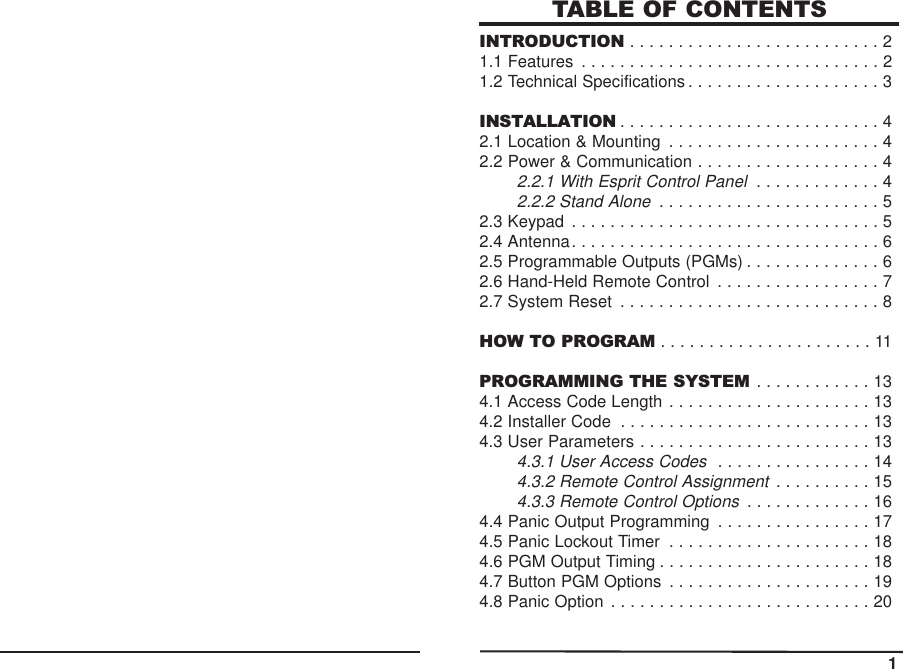
Contents
1.
USERS MANUAL
2.
PROGRAMMING GUIDE
USERS MANUAL
Navigation menu
Upload a User Manual
Namespaces
Wiki Guide
HTML
PDF
Info
Views
User Manual
Discussion / Help
Navigation

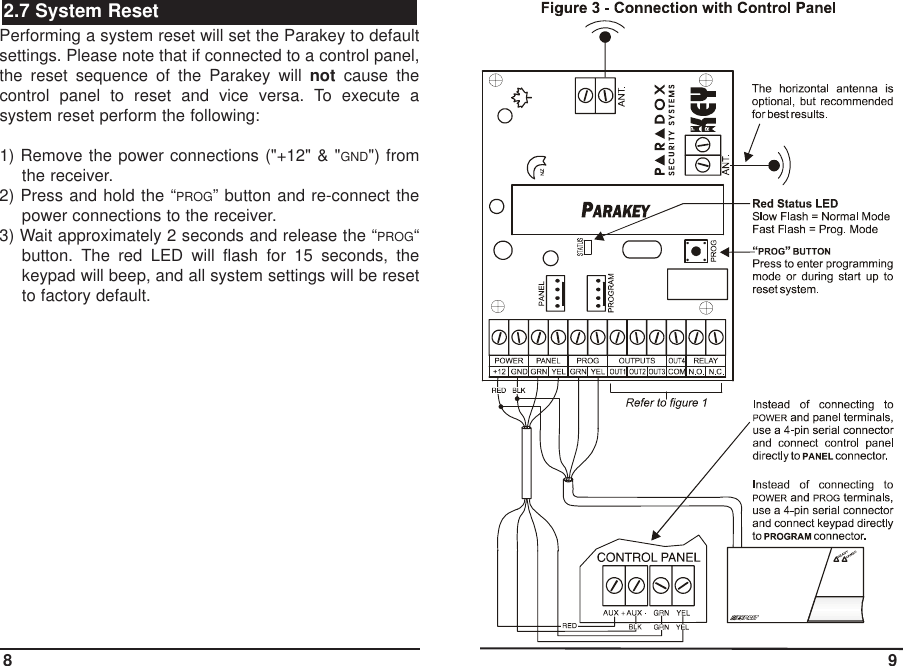
![HOW TO PROGRAMPress the [CLEAR] key at any time to revert to the precedingstep, unless entering data, in which case you will remainin the section and the current data entry will be erased.3.1.1 Step 1 - Enter the Programming ModeWhen in "Normal Mode", the red LED on the ParakeyReceiver flashes on and off at 2-second intervals. Toenter the Programming Mode, press the "PROG" buttonlocated on the Parakey Receiver. The program keypadwill beep once, the red LED will flash and the keypad's"READY" light will illuminate.If at any time you wait longer than 2 minutesbetween each key entry, the Parakey willautomatically exit the Programming Mode. 3.1.2 Step 2 - Key in Installer CodePress [ENTER] and key in the [INSTALLER CODE]. The [ENTER]key will flash. Default installer code: [757575]3.1.3 Step 3 - Key in Desired Section Key in the desired 2-digit [SECTION] you wish to program.The [ENTER] key will remain illuminated. The [2ND]key willflash if the current section is empty. Pressing the [2ND]key followed by the [ENTER]key will clear the contents ofthe current section.3.1.4 Step 4 - Key in the required data• Sections [00] - [08] Access Code Programming - Use any digits from 0to 9 to enter the desired access code. When the10 11](https://usermanual.wiki/Paradox-Security-Systems/PARAKEYTX.USERS-MANUAL/User-Guide-31854-Page-7.png)
![required data is entered, the keypad will emit aconfirmation beep and the Parakey willautomatically save and exit the section. If you makea mistake, pressing [CLEAR] when entering data willerase the current entry. Return to step 3 or press[CLEAR] to exit Programming Mode.• Sections [09] to [16]RF Programming - Press the [ENTER] key and pressbutton 1 twice on the remote control to assignremote control to corresponding user. The keypadwill emit a confirmation beep and the Parakey willsave and exit the section. Return to step 3 or press[CLEAR] to exit Programming Mode.• Sections [25] - [30]Decimal Select - Each section represents onefeature and each key from [0] to [8] represents aspecific setting. Unlike feature select programming,only one key can be selected. The selected key willremain illuminated. Press the key representing thedesired setting and press [ENTER].• Sections [17] - [24] & [31] - [35]Feature Select - After entering the section, each keyfrom [1] to [8] represents a feature or option. The on/offstatus of these keys determines the feature's setting.Turn the keys on/off by pressing the appropriate keyuntil the desired options are set and press the [ENTER]key. The keypad will emit a confirmation beep and theParakey will save and exit the section. Return to step3 or press [CLEAR] to exit Programming Mode.PROGRAMMING THE SYSTEMSection [35] - Feature Select Programming: [1]The Parakey can be set to accept 6-digit or 4-digit Userand Installer Access Codes. Key [1] OFF = 4-digit access codes.Key [1] ON = 6-digit access codes (default).This option must be set to the same access codelength as set in the control panel at address 088,key [9].Section [00] - Access Code ProgrammingThe Installer Code provides you with access to programall the functions & features of the Parakey System. TheInstaller Code can be 4 or 6 digits in length (see section4.1) with each digit being any value from 0 to 9. The Parakey system supports up to eight users, each with adifferent remote control. As demonstrated in figure 5, thethree parameters listed below are specific to each user andeach user must be defined with all three of these parameters.• User Access Code• Remote Control Assignment• User Remote Control Options 4.3 User Parameters4.2 Installer Code (Default: 757575)4.1 Access Code Length12 13](https://usermanual.wiki/Paradox-Security-Systems/PARAKEYTX.USERS-MANUAL/User-Guide-31854-Page-8.png)
![4.3.1 User Access CodesSections [01] to [08] - Access Code ProgrammingWhen a user presses a button, the Parakey determineswhich user the remote control belongs to and transmits thecorresponding User Access Code to the control panel. Toarm/disarm the system, the Paradox Esprit Series ControlPanelmust receive a valid access code. Therefore, theprogrammed User Access Code must be the same as aUser Access Code programmed in the Paradox EspritSeries Control Panel. If no access code is programmed,only the programmed PGMs will be activated. The UserAccess Codes can be 4 or 6 digits in length (see section 4.1)with each digit being any value from 0 to 9. Program theUser Access Code into the section corresponding to thedesired user, where sections [01] to [08] represent users 1through 8 respectively (figure 5).The User Access Code programmed in theParakey must be the same as a User AccessCode programmed in the Paradox Esprit SeriesControl Panel. 4.3.2 Remote Control AssignmentSections [09] to [16] - RF ProgrammingEvery time a button is pressed on the remote control, ittransmits its RF code to the Parakey, identifying it as a userin the system. Therefore, each remote control in thesystem must be assigned to a user. After entering thesection corresponding to the desired user (see figure 5),press the [ENTER] key and the “READY” and “ARM” lights willilluminate. Then press button 1 on the remote control once,the Parakey will beep once. Press button 1 again forconfirmation, the Parakey will beep twice to indicate thatthe remote control was successfully assigned. One longbeep indicates that remote control assignment wasunsuccessful (i.e. remote control already assigned toanother user). To delete a remote control, enter the desiredsection, press the [2ND] key and press the [ENTER] key.14 15](https://usermanual.wiki/Paradox-Security-Systems/PARAKEYTX.USERS-MANUAL/User-Guide-31854-Page-9.png)
![4.3.3 Remote Control OptionsSections [17] to [24] - Feature Select: [1] to [8]As described in figure 5, sections [17] to [24] correspondto users 1 through 8 respectively. By turning keys [1] to[8] on or off, set the desired remote control options asdescribed below and press [ENTER].Buttons 1 and 2 on the remote controls can be set to performdifferent arming and disarming actions when pressed,depending on the setting of keys [1] to [3] as shown in thetable below. (Default: Button 1 = Regular Arming)Each key from [4] to [7] represents buttons 1 through 4respectively. When the key is enabled, pressing thecorresponding button will activate (toggle) any PGMs definedby the Button PGM Options(section 4.7). Default all ON.Key [4] OFF = DisabledON = Button 1 PGM EnabledKey [5] OFF = DisabledON = Button 2 PGM EnabledKey [6] OFF = DisabledON = Button 3 PGM Enabled (4-button remote only)Key [7] OFF = DisabledON = Button 4 PGM Enabled (4-button remote only)When the [8] key is enabled, pressing any two buttonssimultaneously on the remote control will generate apanic alarm (see sections 4.4, 4.5 and 4.8)Key [8] OFF = Panic DisabledON = Panic Enabled (Default)Section [25] - Decimal Select: [0] to [4]When a remote control-activated panic alarm is generated(see section 4.3.3), the Parakey can activate one of the fouron-board PGM outputs. In section [25], select only one:4.4 Panic Output Programming16 17](https://usermanual.wiki/Paradox-Security-Systems/PARAKEYTX.USERS-MANUAL/User-Guide-31854-Page-10.png)
![Section [25]Key [0] ON = No output on panic alarmKey [1] ON = Toggle output 1 on panic alarmKey [2] ON = Toggle output 2 on panic alarmKey [3] ON = Toggle output 3 on panic alarm (default)Key [4] ON = Toggle output 4 on panic alarm Section [26] - Decimal Select: [0] to [4]When a remote control-activated panic alarm isgenerated (see section 4.3.3), the Parakey can ignoreany incoming RF signals for a specified period. Thisprevents an aggressor from disarming the system in caseof a panic situation. In section [26], select only one:Section [26]Key [0] ON = No signal lock-out on panic alarm (default)Key [1] ON = 30 second signal lockout on panic alarmKey [2] ON = 60 second signal lockout on panic alarmKey [3] ON = 90 second signal lockout on panic alarmKey [4] ON = 120 second signal lockout on panic alarmSection [27] to [30] - Decimal Select: [0] to [8]When any of the PGM outputs are activated (see section4.3.3 & 4.4), the Parakey can latch the output in itsopposite state until the output is toggled again or for aspecified period of time. At the end of this period, theoutput will return to its normal state. Each PGM outputcan be programmed with a separate output timer. In thesection corresponding to the desired PGM output, wheresections [27] to [30] represent PGM outputs 1 through 4respectively, select the desired output timer.Key [0] ON = Latched Key [5] ON = 40 sec.Key [1] ON = 1 sec. Key [6] ON = 60 sec.Key [2] ON = 5 sec. (default) Key [7] ON = 2 min.Key [3] ON = 10 sec. Key [8] ON = 4 min.Key [4] ON = 20 sec.Sections [31] to [34] - Feature Select: [1] to [4]This feature allows you to determine which PGM outputsa PGM enabled button will activate (see section 4.3.3). Please note that this feature is a global feature.For example, if button 1 is programmed to togglePGM outputs 1 and 2, then button 1 on all theremote controls will toggle PGM outputs 1 and 2. In the section corresponding to the desired button, wheresections [31] to [34] represent buttons 1 through 4respectively, select which outputs will be triggered.OFF Key ONDisabled [1] Activate Output 1Disabled [2] Activate Output 2Disabled [3] Activate Output 3Disabled [4] Activate Output 44.7 Button PGM Options4.6 PGM Output Timing4.5 Panic Lockout Timer18 19](https://usermanual.wiki/Paradox-Security-Systems/PARAKEYTX.USERS-MANUAL/User-Guide-31854-Page-11.png)
![Section [35] - Feature Select: [2]When a remote control-activated panic alarm isgenerated (see section 4.3.3), the Parakey can performone of two actions:Key [2] OFF = Panics generated from the remote controlwill only toggle the enabled PGM output(see section 4.4).Key [2] ON = Panics generated from the remote controlwill toggle any enabled PGM outputs (seesection 4.4) and sends the Paniccommand to the control panel generatinga Panic alarm on the control panel.WarrantyThe Seller warrants its products to be free from defects inmaterials and workmanship under normal use for aperiod of one year. Except as specifically stated herein,all express or implied warranties whatsoever, statutory orotherwise, including without limitation, any impliedwarranty of merchantability and fitness for a particularpurpose, are expressly excluded. Because Seller doesnot install or connect the products and because theproducts may be used in conjunction with products notmanufactured by Seller. Seller cannot guarantee theperformance of the security system. Seller obligation andliability under this warranty is expressly limited torepairing or replacing, at Seller's option, any product notmeeting the specifications. In no event shall the Seller beliable to the buyer or any other person for any loss ordamages whether direct or indirect or consequential orincidental, including without limitation, any damages forlost profits stolen goods, or claims by any other party,caused by defective goods or otherwise arising from theimproper, incorrect or otherwise faulty installation or useof the merchandise sold.FCC WarningsThis device complies with part 15 of the FCC Rules.Operation is subject to the followintg two conditions: (1)this device may not cause interference, and (2) thisdevice must accept any interference, includinginterference that may cause undesired operation of thedevice.4.8 Panic Option20](https://usermanual.wiki/Paradox-Security-Systems/PARAKEYTX.USERS-MANUAL/User-Guide-31854-Page-12.png)