Paragon Child 000000 944217 User Manual user mannual RC English
Paragon Child Products Co., Ltd. 944217 user mannual RC English
Contents
- 1. user mannual-RC_English
- 2. caution
- 3. user mannual-RC_French
user mannual-RC_English
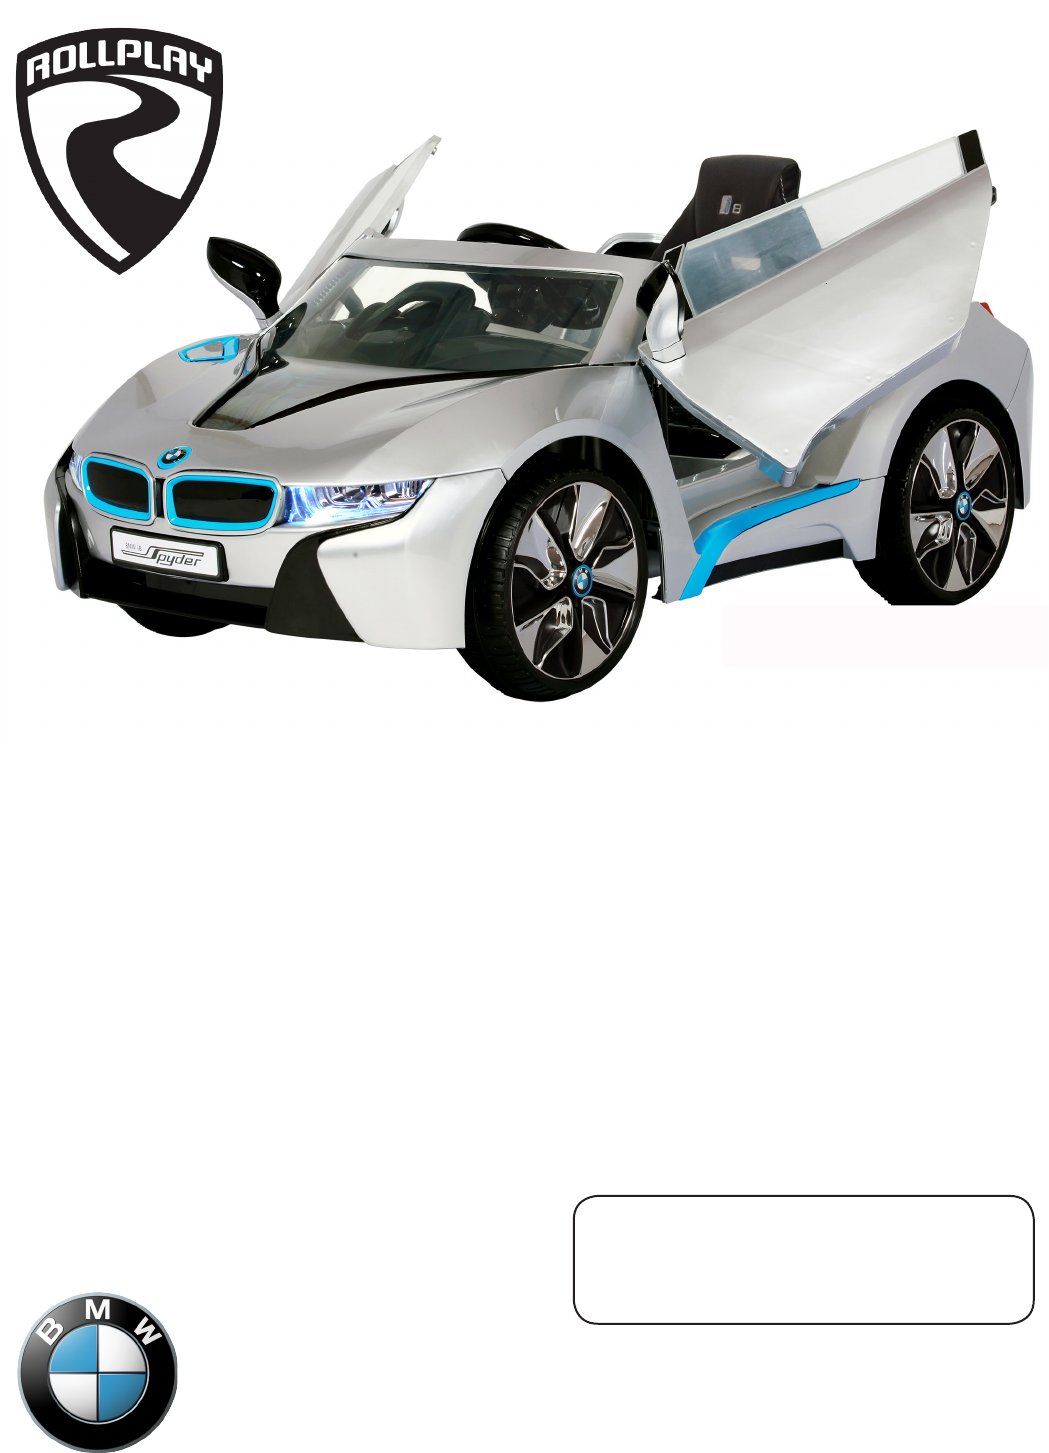
BMW i8 Children’s Electronic Car manufactured by Paragon Child Products Co., Ltd. The BMW
trademarks are used under license from BMW AG. BMW i8 name and associated logos are
trademarks of BMW AG.
Owner’s Manual and Assembly Instructions
Model W480E-FRC
Read and understand the entire manual before assembly and operation. The vehicle must be
assembled by an adult who has read and understands the instructions.
Made in China.
Styles and colours may vary. Do not return to store. Visit us online at www.rollplay.net for
assistance and replacement parts.
Save this manual with your sales receipt.
6V BMW i8 Spyder

Introduction
Thank you for purchasing the BMW i8. We hope the rider enjoys it for miles
to come. Please read this instruction guide carefully before assembling and
operating the vehicle.
Please contact RollPlay Customer Service with any questions.
Hours: 9 AM - 5 PM (CST), Monday - Friday
Web: www.rollplay.net
Email: customerservice@rollplay.net
Phone: 1-888-982-9309
Specifications:
BATTERY
MOTOR
AGE
MAX WEIGHT
PRODUCT SIZE
SPEED
RECHARGE TIME
TYPICAL RUN TIME
CHARGER OUTPUT
6V 7AH
6V 15W
3 Years and Up
77 lbs.
64 x 40 x 127 cm
(25,2 x 15,75 x 50 in)
4 km/h (2.5 mi/h)
8-12 Hours
1-2 Hours
DC 7.0V0.7A

IMPORTANT!
YOU MUST CHARGE THE BATTERY
FOR 24 HOURS BEFORE FIRST USE!
Charge the battery after each use.
Charge the battery at least once a month, even if the vehicle is not in use.
DO NOT RETURN THIS ITEM
TO THE STORE!
Email or call Customer Service if you need assistance or replacement
parts.
customerservice@rollplay.net
1-888-982-9309
Read this entire manual to ensure
proper assembly and safe operation
of the vehicle.

This page is intentionally left blank.

5
Table of Contents
Safety ..........................................................6
Parts ..........................................................8
Charging Instructions ...............................9
Assemble the Front Wheels .................... 10
Assemble the Left Rear Wheel ...............11
Assemble the Right Rear Wheel ............12
Attach the Steering Wheel ......................13
Attach the Mirrors ...................................14
Attach the Seat ........................................15
Battery Removal ......................................16
Operating Instructions ............................17
Remote Operating Instructions ..............18
Remote Operating Instructions ..............19
Maintenance ............................................20
General Care ............................................21
Troubleshooting Guide ............................22
FCC Information ......................................24
Service and Repairs ...............................25
Warranty ...................................................26
Product Registration ...............................28

6Safety
WARNING: SAFETY RIDING RULES
The user must follow all safety rules and guidelines, or serious injury or death may
occur to the user.
• Always use common sense and safe practices when using the vehicle. The user
must be at least 3 years old and weigh no more than 35 kg (77 lbs).
• This product contains small parts that are for adult assembly only. Keep small
children away when assembling. Remove and dispose of all protective material
and plastic bags before assembly.
• Riders must always wear a tted helmet that complies with U.S. Consumer
Product Safety Commission (CPSC) Standard CFR 1203.
• Only sit on the seat in the vehicle.
• Do not allow more than one rider.
• Do not overload the vehicle. Do not remove the weight restriction decals.
• Do not pull the vehicle with another vehicle or similar device.
• Keep body parts such as hands, legs, hair and clothing away from moving parts.
Moving parts can cause serious injury.
• Always wear shoes in the vehicle.
• Do not operate near streets or motor vehicles.
• Do not operate near drop-offs such as steps, steep inclines or hills. Operate on
relatively level ground.
• Do not operate near water, swimming pools or other uids.
• Do not operate in dangerous weather conditions such as rain or snow.
• Do not operate near loose dirt, mud, sand or ne gravel.
• Do not operate near ammable vapors (gasoline, paint thinner, acetone, etc.).
• Always use the vehicle in a safe, secure environment with adult supervision.
PREVENT INJURIES AND DEATHS:
NEVER LEAVE CHILD UNATTENDED. ALWAYS keep child in view when child is in
vehicle. Direct adult supervision is REQUIRED.
NEVER use in roadways, near cars, on or near steep inclines or steps, swimming
pools or other bodies of water.
ALWAYS wear shoes
ALWAYS sit on the seat
RISK OF FIRE. Do not bypass.
DO NOT mix old and new batteries
DO NOT mix alkaline, standard (carbon-zinc) or
rechargeable (nickel-cadmium) batteries.
7
Safety
(Continued)
WARNING: BATTERY SAFETY
• Battery posts, terminals and related accessories contain lead and lead compound
(asic) chemicals known to the state of California to cause cancer, reproductive
harm, and are toxic and corrosive. DO NOT open the battery.
• Contact exposure to battery leakage (lead acid) may cause serious injury.
Immediately contact your doctor if exposure occurs. If the chemical is on the skin,
ush immediately with cool water for 15 minutes. If the chemical is swallowed,
immediately give the person water or milk. Do not give water or milk if the person
is vomiting or has decreased alertness. Do not induce vomiting.
• Tampering with or modifying the electric circuit system may cause shock, re or
explosion. It could permanently damage the system. Keep the charger housing
closed to prevent exposed wiring, which may cause electric shock.
IMPORTANT: Before using the vehicle for the rst time, the battery must be
charged for a full 24 hours (no more than 30 hours).
WARNING: ADULT SUPERVISION
REQUIRED
• Before using the vehicle, the rider must understand the vehicle controls and safety
issues.
• It is the responsibility of the adult to educate the child and to determine if the child
is capable of understanding the vehicle controls.
• An adult must ALWAYS directly supervise the use of this vehicle.
• NEVER leave a child unsupervised in the vehicle.
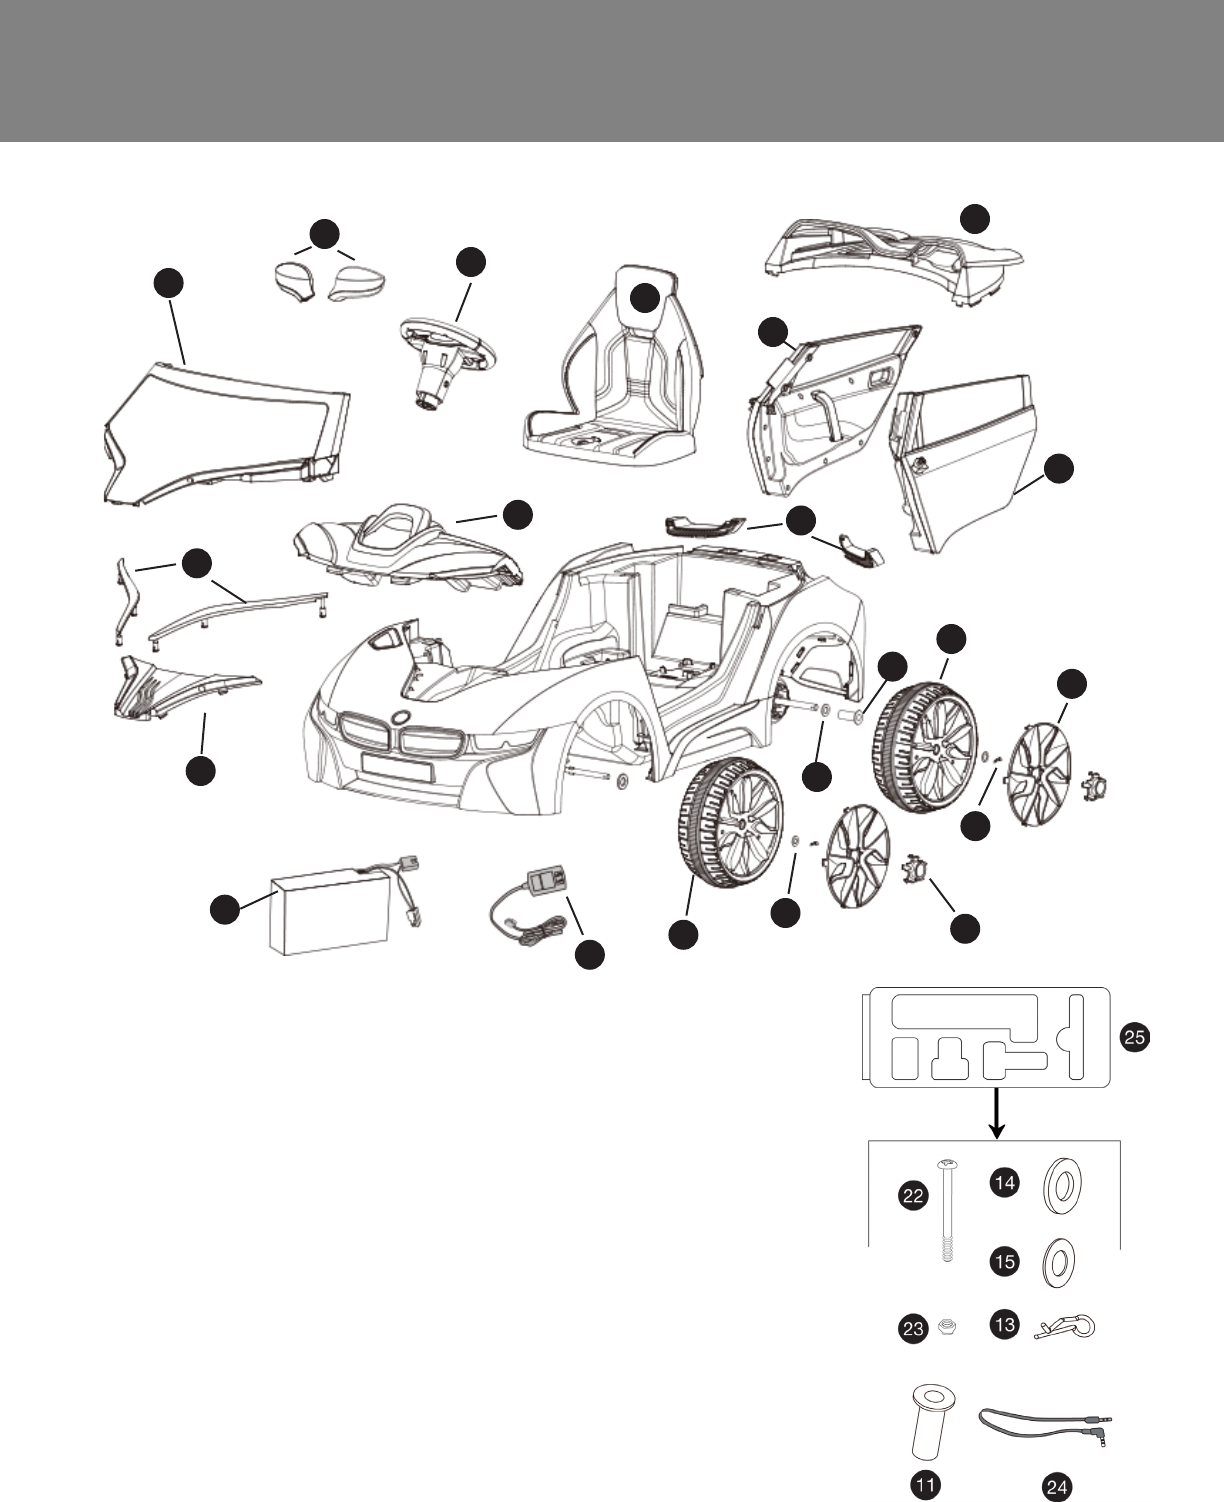
8Parts
1. Windshield
2. Mirrors (2)
3. Steering Wheel Assembly
4. Seat
5. Spoiler
6. Right Door
7. Left Door
8. Rear Caps (2)
9. Rear Wheels (2)
10. Front Wheels (2)
11. Inner Wheel Spacer
12. Rims (4)
13. Snap Pins (4)
14. Large Washers Φ12 (3)
15. Small Washers Φ10 (4)
16. Hubcaps (4)
17. Charger
18. Battery
19. Front Grill
20. Front Panels (2)
21. Dashboard
22. Steering Wheel Screw
23. Steering Wheel Nut
24. MP3 Cable
25. Blister Pack (parts 11,
13-15, 22-24)
1
2
3
4
5
6
7
8
9
10
12
15
14
11
16
13
17
18
19
20
21
9
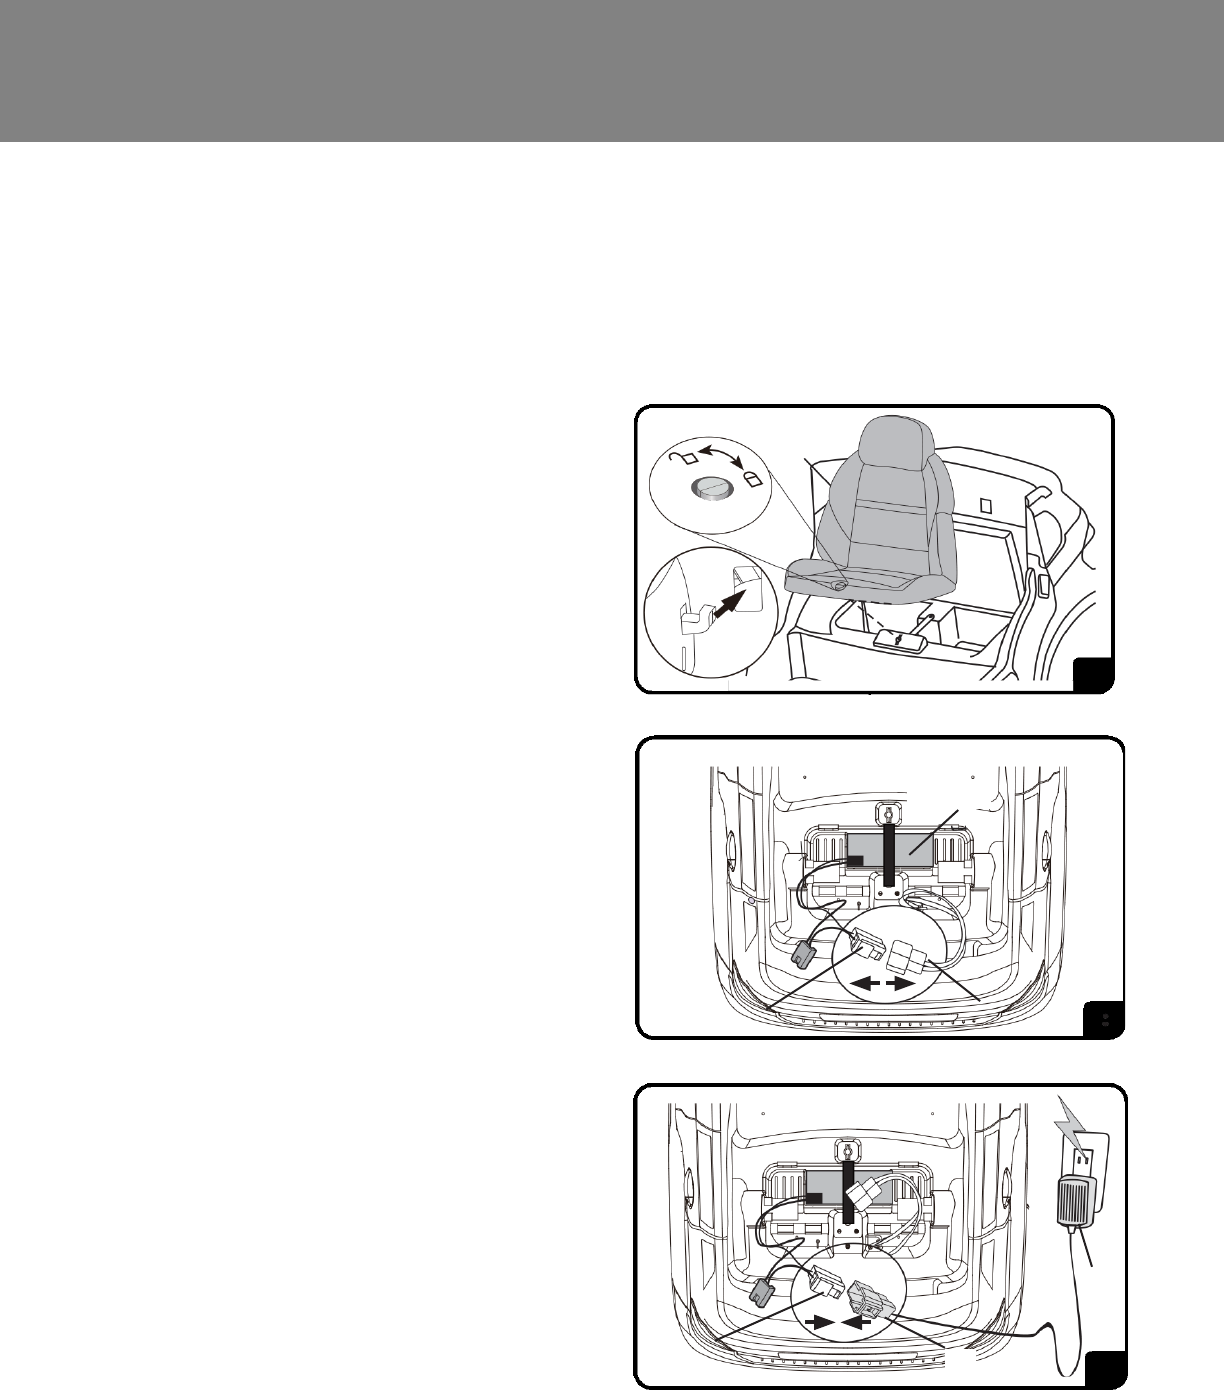
Charging Instructions
ONLY AN ADULT SHOULD HANDLE THE BATTERY AND CHARGER.
To Charge the Battery:
1. Ensure the car is stopped and
turned off.
2. Unlock and remove the seat.
3. Unplug the red battery connector
(A) from the red engine connector
(B).
4. Plug into a 120 V outlet.
To Unplug the Battery:
1. Unplug the battery charger (D)
from the outlet.
2. Unplug the red battery connector
(A).
3. Reconnect the red battery
connector (A) to the red engine
connector (B).
4. Replace the seat and tighten lock.
Note: It is not necessary to remove
the battery for charging. However, if
the battery does not reach the outlet,
it can be removed for charging. For
Battery Removal instructions, see
Page 16.
AC
Battery
AB
D
YOU MUST CHARGE THE BATTERY FOR 24
HOURS BEFORE THE FIRST USE!
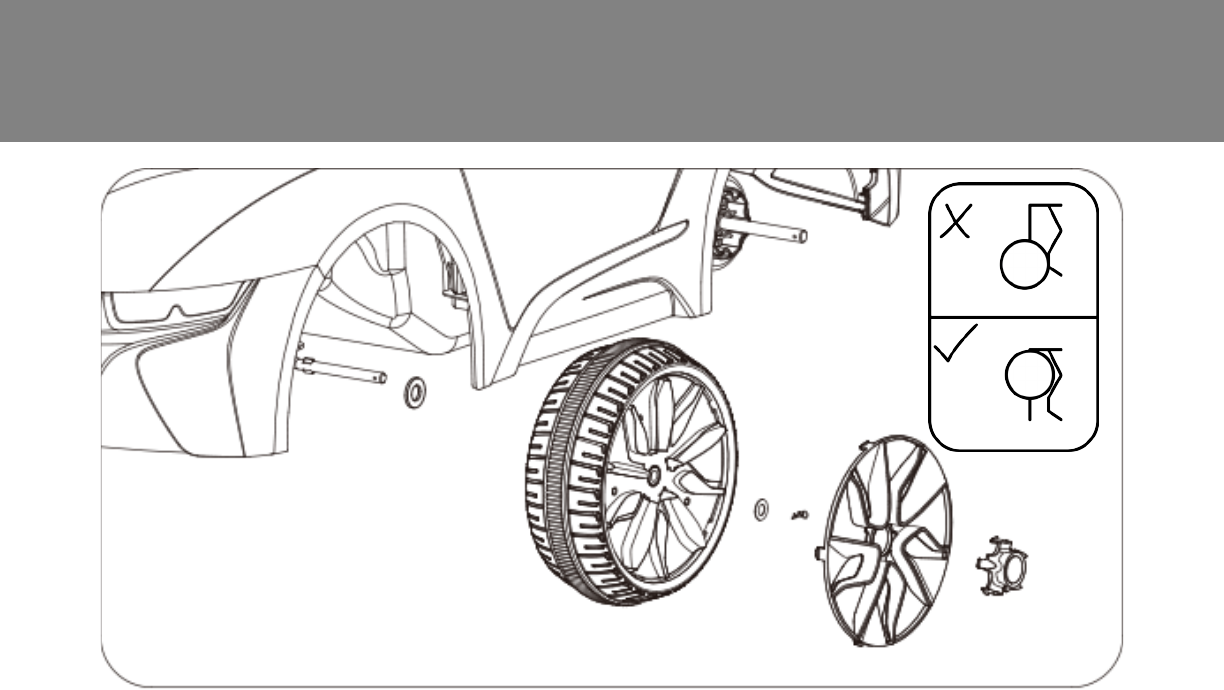
10 Assemble the Front Wheels
1. Locate the snap pins (13) and small washers (15) from the
blister pack.
2. Slide a small washer (15) onto the axle.
3. Slide the front wheel (10) onto the front wheel axle.
4. Slide another small washer (15) onto the axle.
5. Push the straight end of the snap pin (13) into the hole on the
front wheel axle to secure the parts into place.
6. Snap the rim onto the wheel (12), and snap the hubcap (16) onto
the rim.
7. Repeat steps 1-5 for the other front wheel.
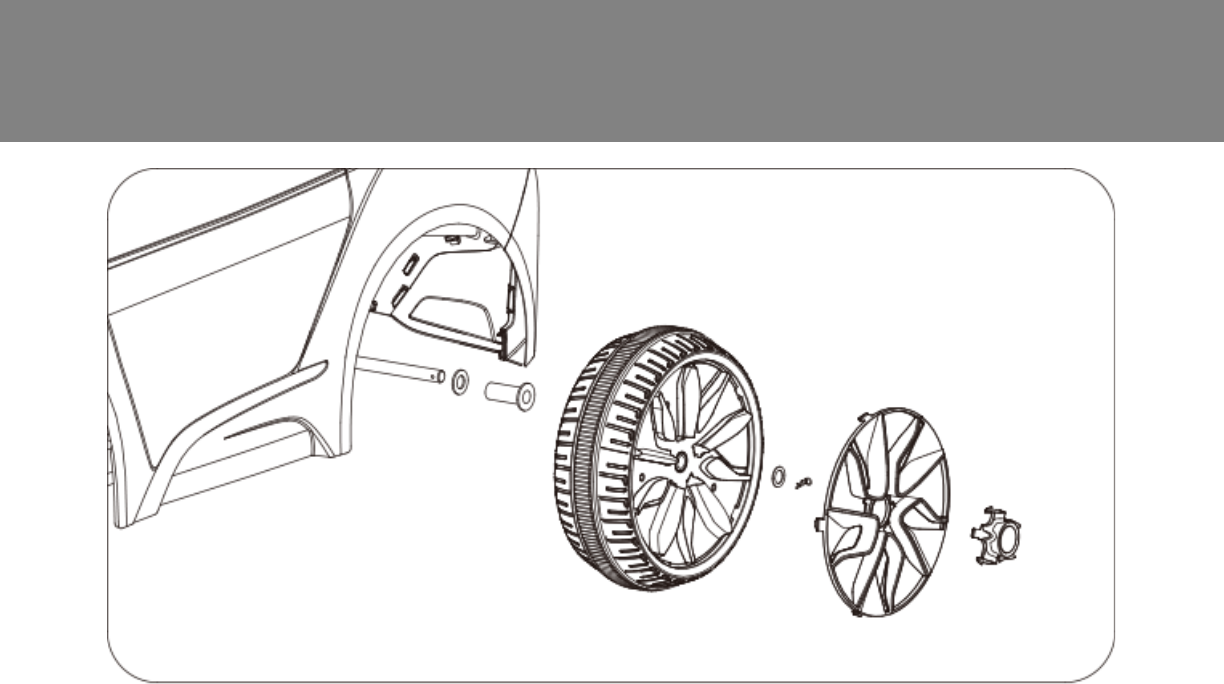
11
Assemble the Left Rear Wheel
1. Locate the snap pins (13), inner wheel spacer (11), and large
washers (14) from the blister pack.
2. Slide a large washer (14) onto the rear wheel axle.
3. Slide the inner wheel spacer onto the rear left wheel axle.
4. Slide the rear wheel onto the axle.
5. Slide another large washer onto the rear axle.
6. Push the straight end of the snap pin (13) into the hole on the
axle.
7. Snap the rim onto the wheel, and snap the hubcap onto the rim.
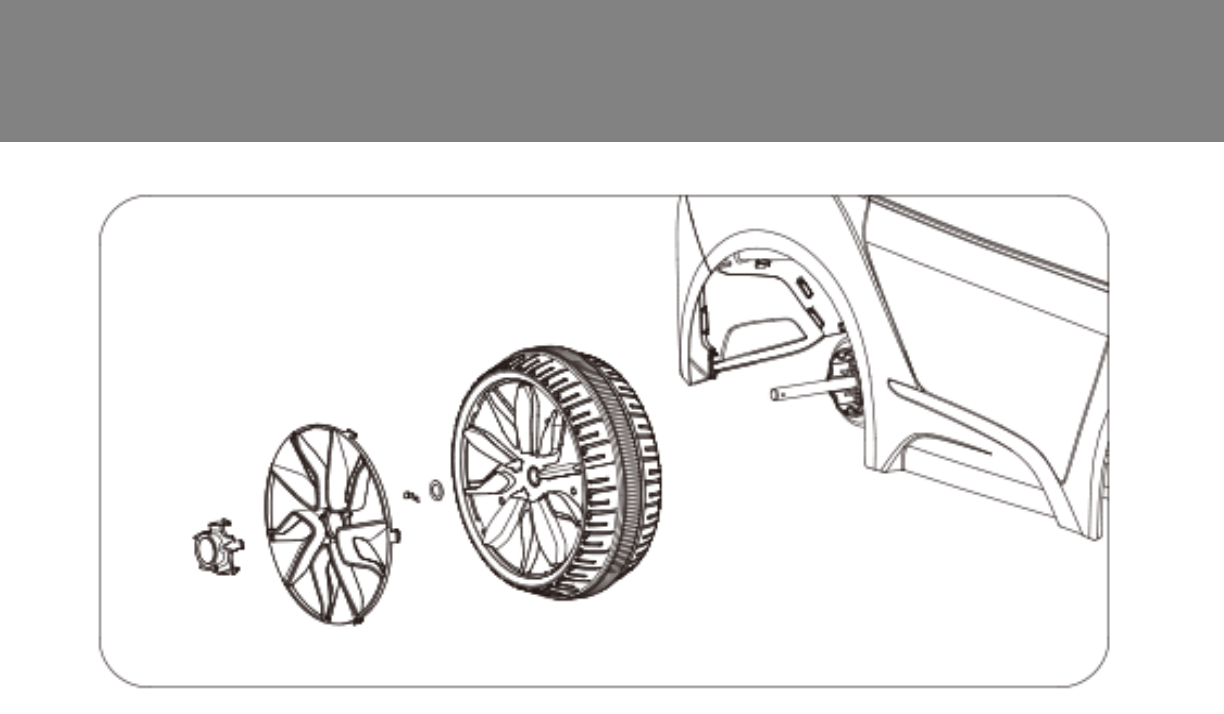
12
1. Slide the rear wheel with the gear teeth facing inward onto the
right rear wheel axle.
2. Line up the gear teeth on the wheel with the grooves on the
gear box.
3. Slide the large washer (14) onto the rear wheel axle.
4. Push the straight end of the snap pin through the hole on the
rear wheel axle.
5. Snap the rim onto the wheel, and snap the hubcap onto the
rim.
Assemble the Right Rear Wheel
13
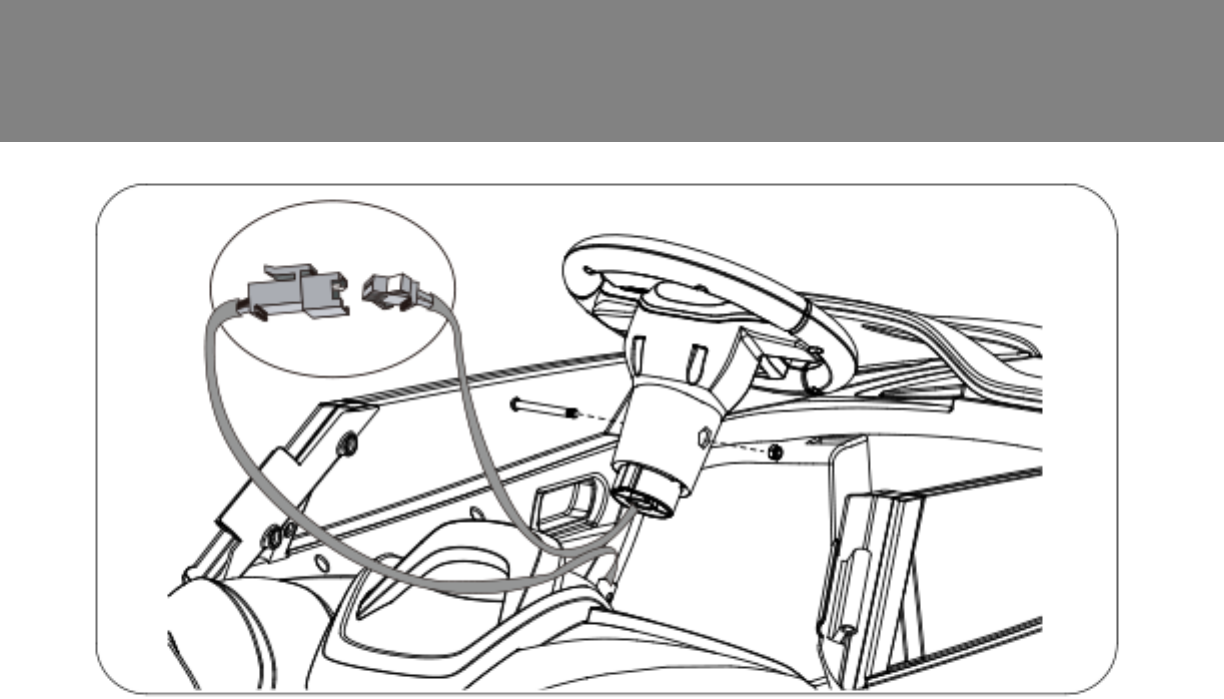
Attach the Steering Wheel
1. Locate the steering wheel screw (22) and steering wheel nut (23)
from the blister pack.
2. Plug the steering wheel connector (A) into the dashboard connector
(B).
3. Insert the steering wheel (3) into the steering rod, and match the
screw holes of the steering wheel and the steering rod.
4. Insert the screw into the hole and fasten the nut to secure.
A
B
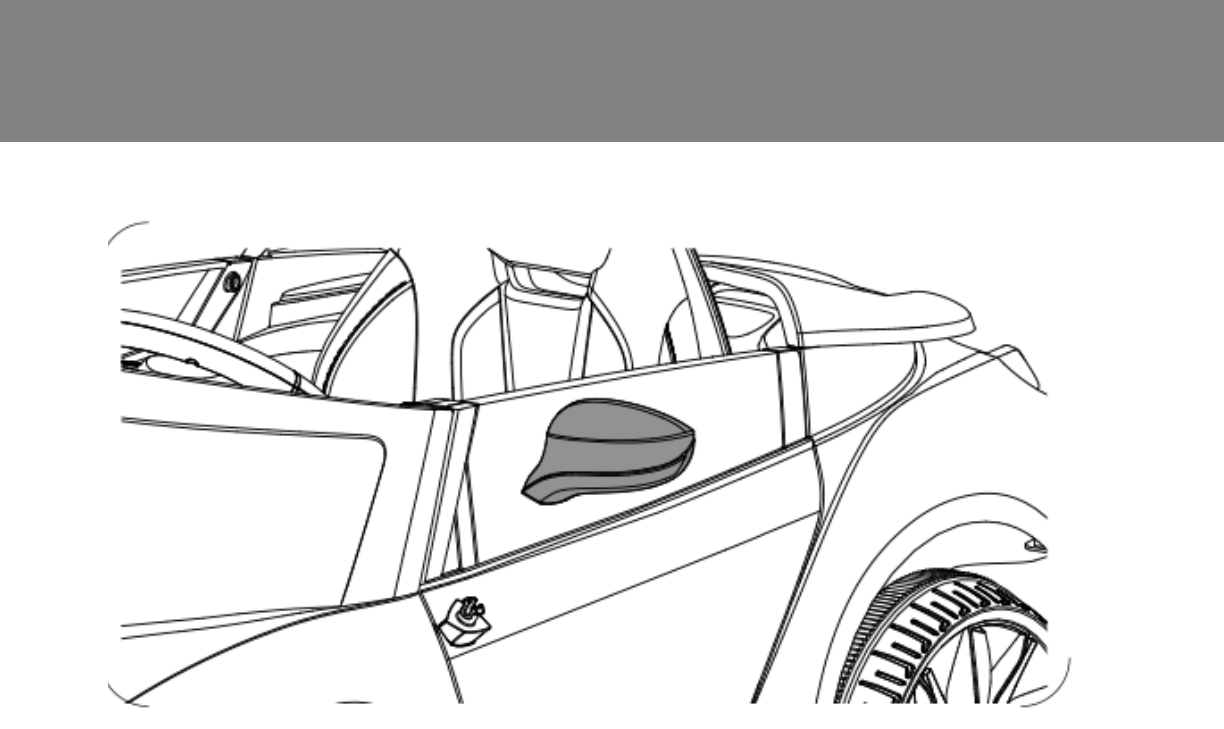
14 Attach the Mirrors
1. Insert the left mirror into the slot on the left door near the
windshield
2. Push down on the mirror until it clocks into place
3. Repeat steps 1-2 for the right mirror
15
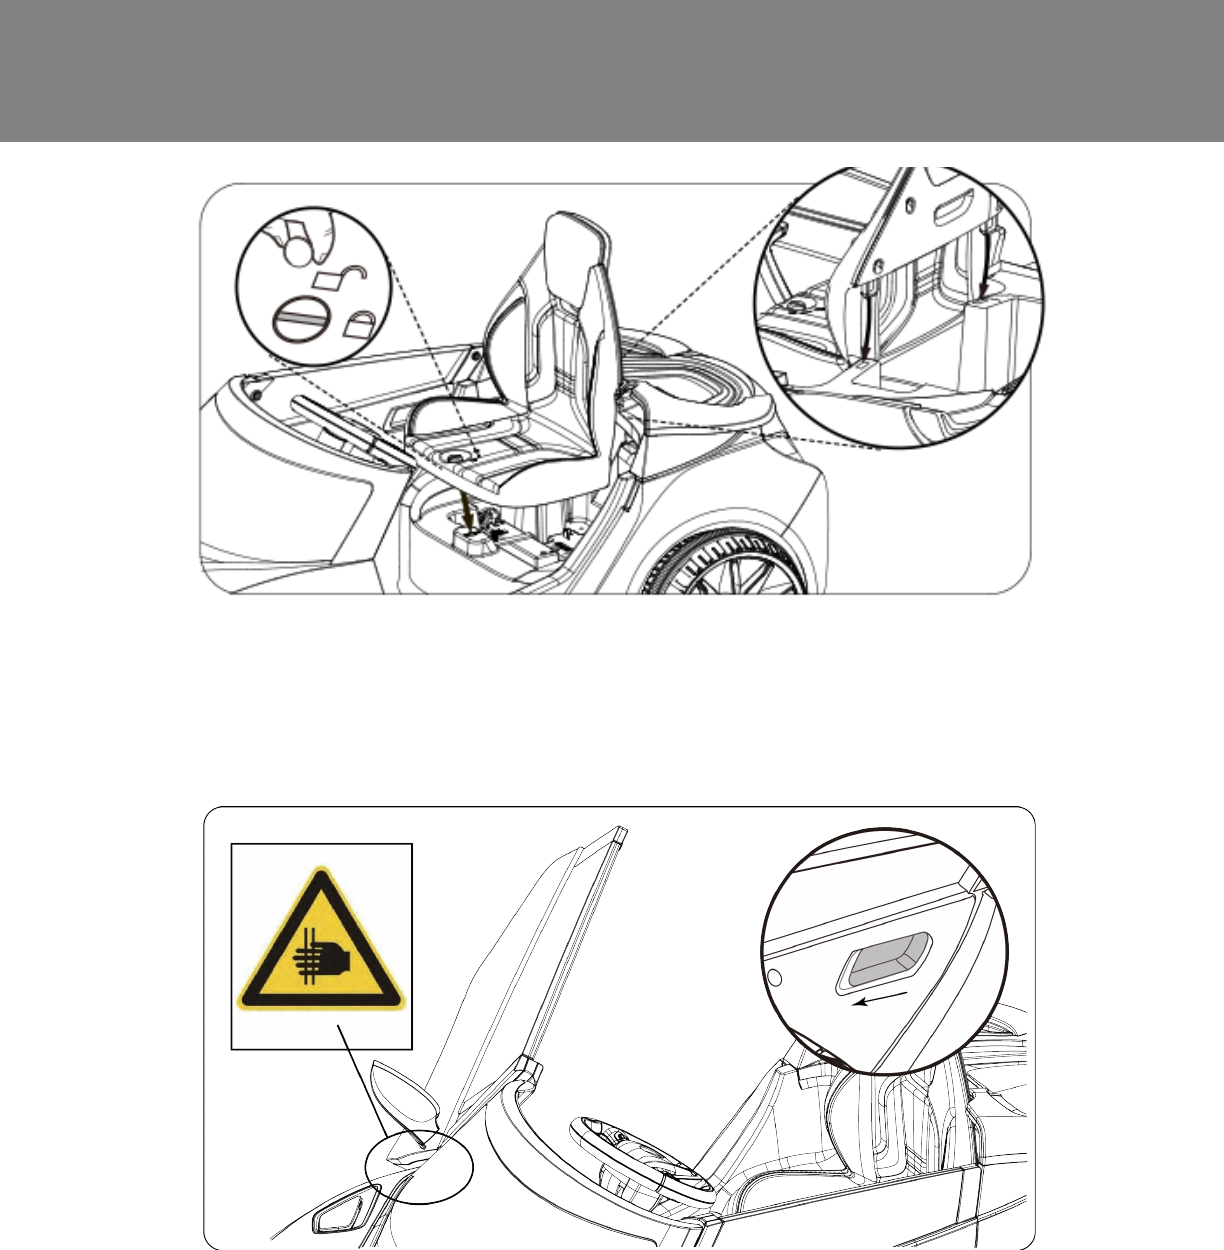
Attach the Seat
1. Position the seat over the battery compartment
2. Slide in the latches on the back of the seat into the slots on the body
of the car
3. Turn the thumbscrew on the seat clockwise to lock it into place
Opening Doors
1. To open the doors, locate the handle inside the door. Push the
handle in, and pull the door out slightly. The door will nish opening
automatically.
2. Push the door back to the close position, and it will lock into place.
Caution: Pinch Point
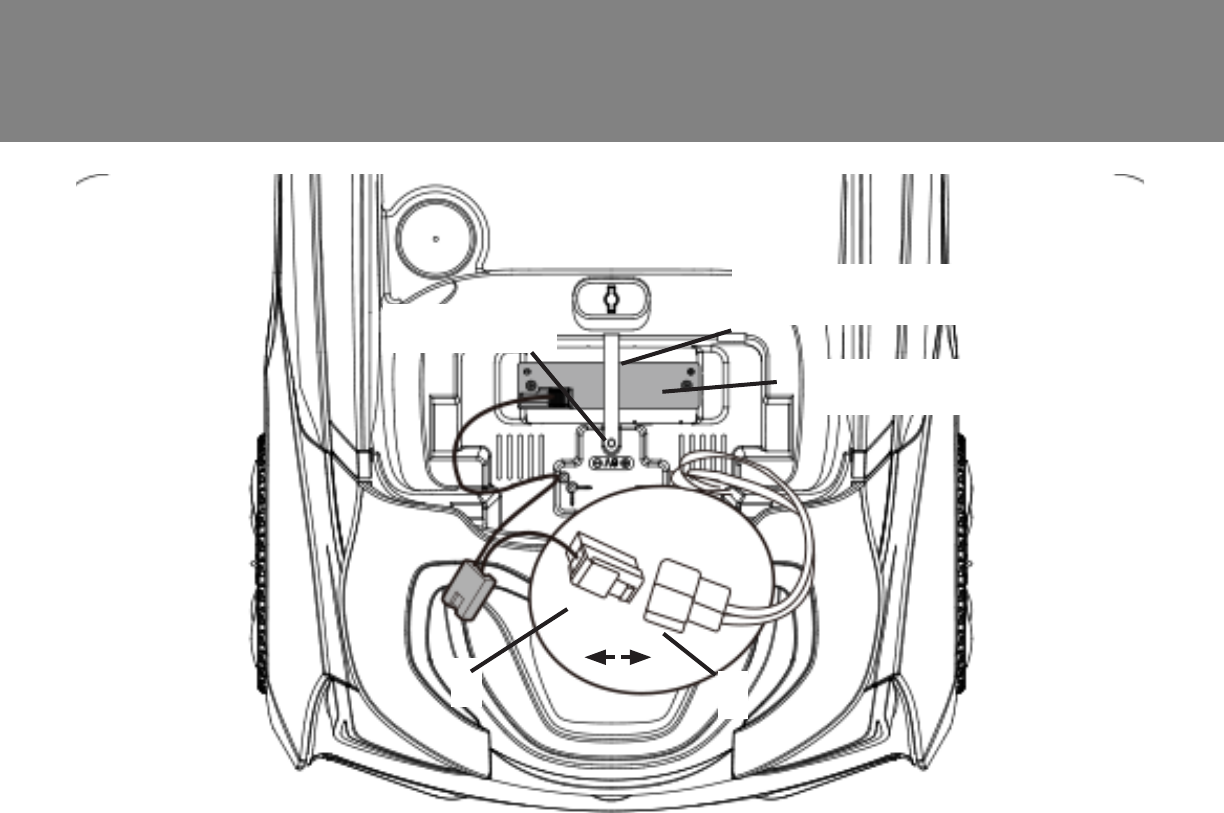
16 Battery Removal
1. Disconnect the red battery connector (A) from the red engine
connector (B) .
2. Loosen and remove the screw.
3. Pull out the battery strap bar.
4. Remove the battery.
Note: It is not necessary to remove the battery for charging. However, if
the battery does not reach the outlet, it can be removed for charging.
Battery Strap
Screw
Battery
AB
17
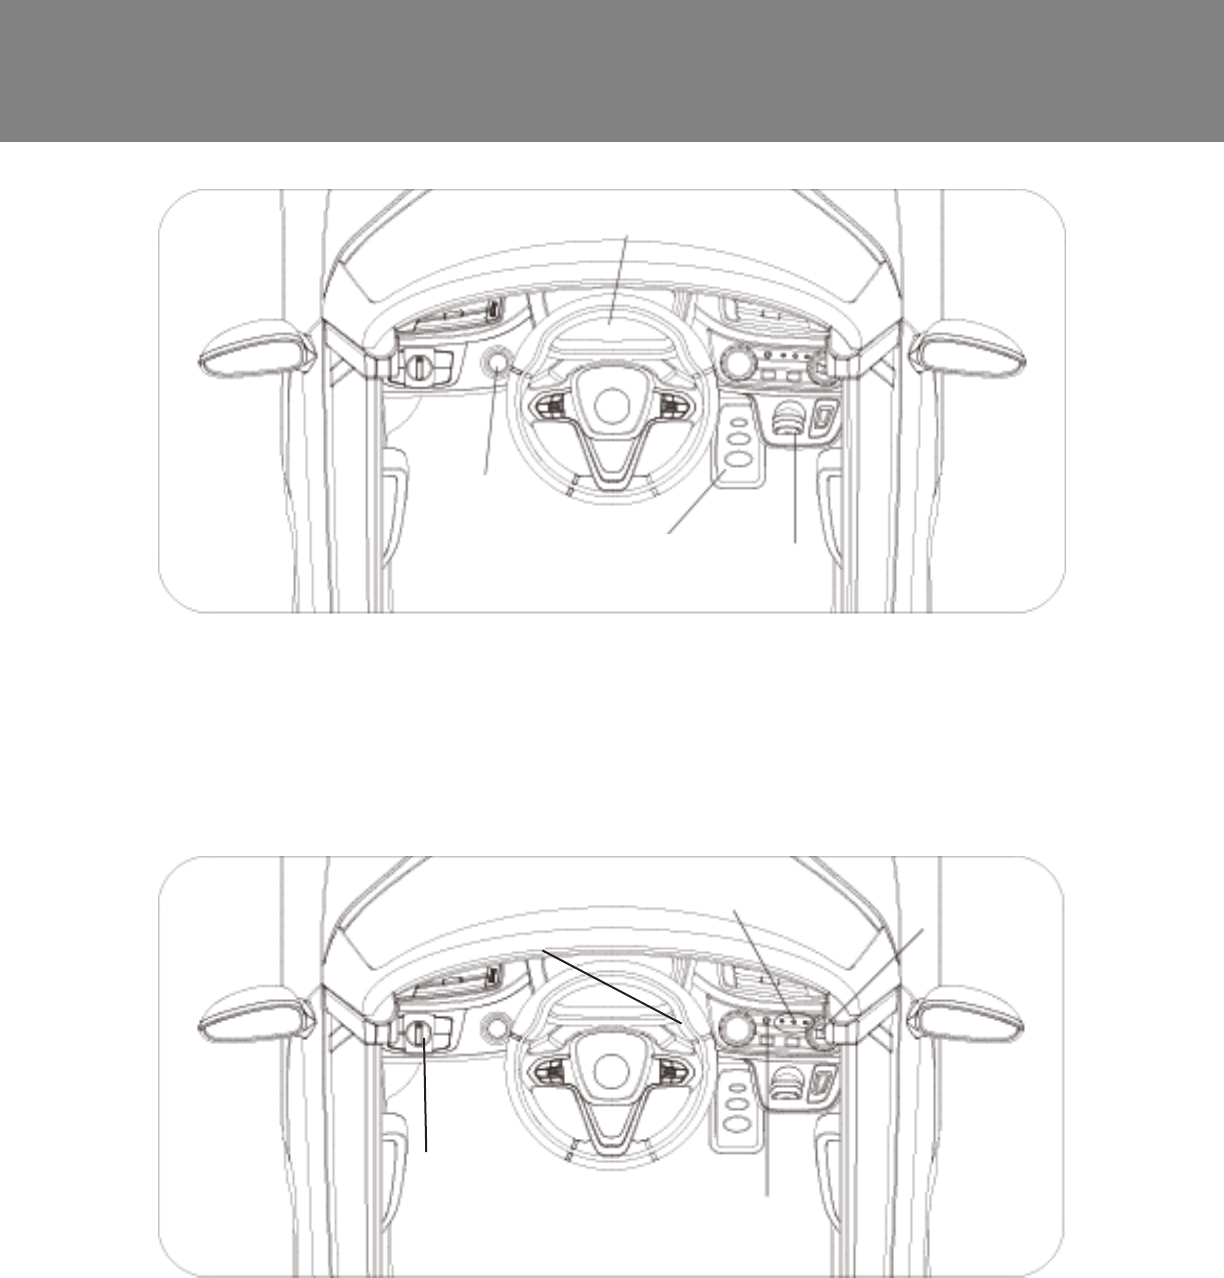
Operating Instructions
• Power Switch: Press the power switch to turn on the car. A power light will indicate that the car
is turned on. Press the power switch to turn off the car.
• Dashboard Lights: The dashboard lights will light up when the power switch is pushed to on
• Gas Pedal: Press the gas pedal to put the car in motion. Release to stop. The headlights will
turn on when the car is moving forward.
• Shifter: Push the shifter up to move forward, press down to move in reverse.
Power Switch
Gas Pedal Shifter
Dashboard
Lights
• Battery Life Button: When the car is on, press the battery life indicator button to check the
battery life.
• Battery Life Indicator: Green, Yellow, Red Lights: Battery is fully charged. Yellow, Red Lights:
Battery power is low. Red Light: Battery is extremely low and needs recharging.
• MP3 Connector: Insert the MP3 cable into the MP3 jack and connect to an MP3 device. The
volume is controlled on the MP3 device.
• Manual/RC: See Page 18.
Battery Life
Indicator
MP3 jack
MP3 ON/OFF/Volume
Manual/RC

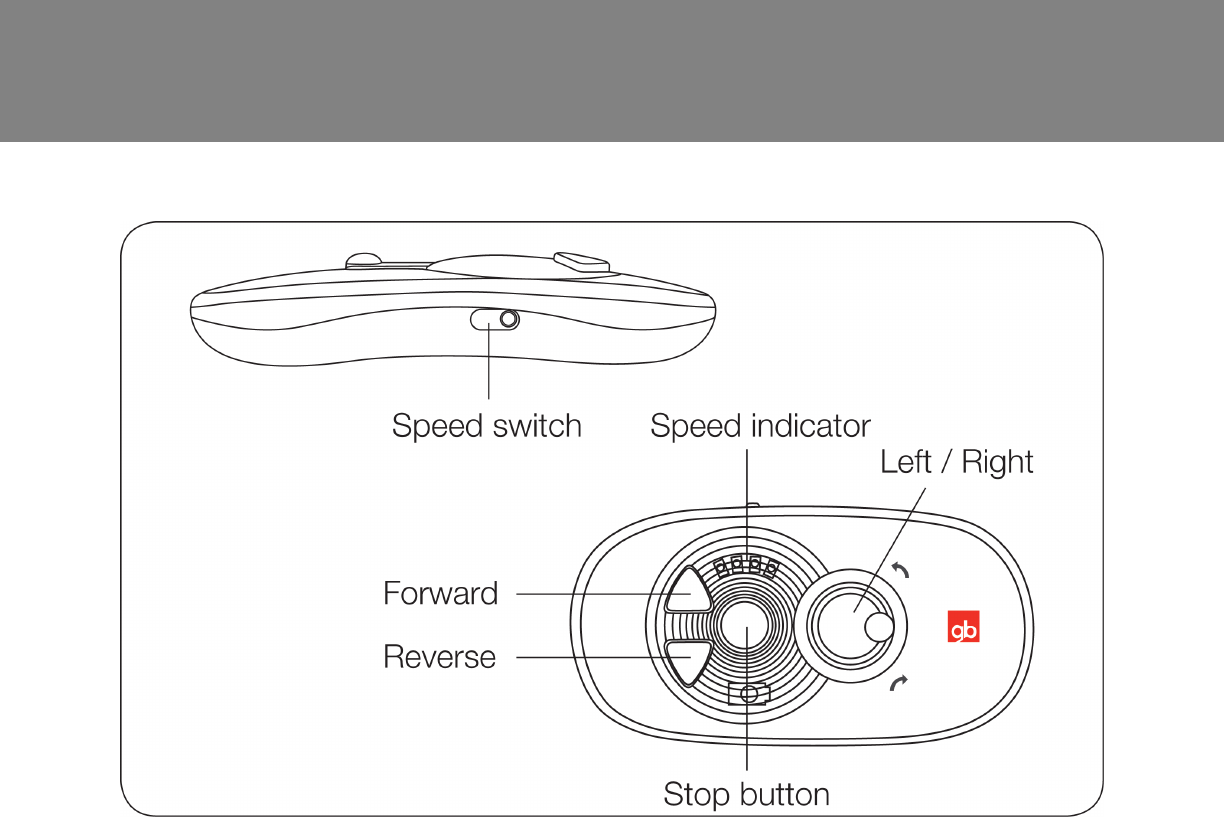
18 Remote Operating Instructions
1. You need 2 x 1.5V AAA batteries (not included).
2. Open the battery cover with a screwdriver.
3. Put the two batteries into the battery compartment with correct polarity, and
put the battery cover on. Note: If the red bulb does not work, change the
battery according to the instructions.
Connecting Remote Control:
1. Press the small button on the bottom of the remote control, and the speed
indicator lights on the remote will ash.
2. Press the switch on the circuit board under the car seat. Hold down the switch
until the ashing light on the remote stops. The remote and car are now
connected.
3. To turn off the remote connection, press the button on the remote control.
DO NOT mix old and new batteries
DO NOT mix alkaline, standard
(carbon-zinc) or rechargeable (nickel-
cadmium) batteries.
19
Remote Operating Instructions
Remote Control:
1. Turn on Power switch.
2. There are four speed levels showed on remote control. 1 indicator is
the lowest speed, and four indicators is the fastest. Set the optional
speed.
3. Press Forward button to go forward. Press Reverse button to go
backward. The car stops when not pressing any button.
4. ´Left/Right button on remote control turns the car to the left and right
direction.
5. The remote will turn off automatically after ve seconds with no
operation.
6. The stop button can stop the car in both manual and remote control
mode.

20 Maintenance
Important Battery and Charger Information
• Only an adult who has read and understands the safety warnings may
handle and operate the battery and battery charger. Keep away from
children.
• Charge the battery for 24 hours before using the vehicle for the rst
time.
• Charge the battery immediately after each use. Charge for at least 8-12
hours, but no more than 20 hours.
• Charge the battery at least once a month, even if the vehicle is not used
or stored.
• Never leave the battery in a discharged condition.
• Connect the terminal of the battery and charger, then plug the charger
into a 120V AC outlet.
• It is normal for the charger to heat slightly. If the charger rises above
71°C / 160°F, disconnect the charger and call Customer Service for
assistance.
• Keep the charger away from water or excessive moisture to prevent
short-circuiting.
• Only use the charger specied with the original item. Do not charge the
battery with any other charger.
• Do not attempt to recharge non-rechargeable batteries with the original
charger.
• Do not replace the battery with any other battery, or the warranty
will be voided. If you need a replacement battery, see Page 25 for
replacement information.
• Remove damaged batteries from the car immediately. Recycle or
dispose of the used batteries responsibly.
• Do not short circuit the supply terminals.
• Do not leave the battery connected in the vehicle for extended periods
of time when the vehicle is not being used. Disconnect the battery
connector from the engine connector before storing.
• The vehicle is equipped with a thermal fuse to protect the electric
circuit. If the vehicle cuts out, turn the vehicle off and on to reset.

21
General Care
• Regularly inspect all vehicle parts to ensure they are in good working
condition.
• Regularly inspect the charger, cord, plug, and other related parts for
damage.
• Remove any damaged parts and immediately contact Customer Service
for replacement parts. See Service and Repairs on Page 25 for more
information.
• DO NOT operate the vehicle if there are any damaged parts.
• Carefully clean the vehicle with a damp cloth and mild soap. Do not
get water in or near any electrical parts. Do not wash the vehicle with a
hose.
• Store the vehicle indoors or use a tarp to cover it. Keep away from
stoves, heaters, or other sources of heat.

22 Troubleshooting Guide
Problem Potential Cause Solution
Vehicle does not run Battery is low Recharge the battery
Thermal fuse tripped Reset fuse
Snap pins are loose Tighten snap pins
Loose wires or loose
connectors
Ensure the battery connectors
are securely attached. If wires
are loose, contact Consumer
Service for
Battery is dead Call Customer Service for
replacement battery
Electrical system is
damaged
Call Customer Service
Motor is damaged Call Customer Service
Vehicle only runs for a
short time
Undercharged battery Ensure a secure connection
when the battery is
recharging. Recharge for at
least 8-12 hours
Overcharged battery Never charge the battery for
more than 30 hours
Battery is old Replace battery
Vehicle runs slowly Battery is not fully
charged
Ensure a secure connection
when the battery is recharging
Battery is old Call Customer Service to
order replacement battery
Too much weight on
vehicle
Reduce weight on vehicle (77
lbs max)
Harsh conditions Operate the vehicle on level
ground and safe surfaces
Completely read through the manual and troubleshooting guide before
contacting Customer Service.

23
Problem Potential Cause Solution
Vehicle needs a push to
start
Loose wires or loose
connectors
Ensure the battery connectors
are securely attached. If wires
are loose, contact Customer
Service
“Dead spot” on motor A “dead spot” means
electricity is not being
delivered to the terminal.
Contact Customer Service
Difculty shifting Attempting to shift while
vehicle is moving
Stop the vehicle before
shifting
Motor or gear box
making grinding noises
Motor or gear damage Contact Customer Service
Battery will not recharge Charger is not plugged in Plug in the charger to a
functional wall outlet
Charger is not working Call Customer Service for a
replacement
Loose connector or loose
adapter
Check that the connectors are
securely plugged in to each
other
Battery makes bubbling
noise while recharging
This is normal No action required
Charger is warm This is normal No action required

24 FCC Information
This device complies with part 15 of the FCC Rules. Operation is subject
to the following two conditions: (1) this device may not cause harmful
interference, and (2) this device must accept any interference received,
including interference that may cause undesired operation.
This equipment has been tested and found to comply with the limits for a
Class B digital device, pursuant to Part 15 of the FCC Rules. These limits
are designed to provide reasonable protection against harmful interference
in a residential installation.
This equipment generates, uses and can radiate radio frequency energy
and, if not installed and used in accordance with the instructions, may
cause harmful interference to radio communications. However, there is no
guarantee that interference will not occur in a particular installation. If this
equipment does cause harmful interference to radio or television reception,
which can be determined by turning the equipment off and on, the user
is encouraged to try to correct the interference by one or more of the
following measures:
• Reorient or relocate the receiving antenna.
• Increase the distance between the equipment and the receiver.
• Consult dealer or an experienced radio/TV technician for help.
• Connect the equipment into an outlet on a circuit different from that to
which the receiver is connected.
• Check the state or local requirements for the product before using the
product.
Caution: Changes or modications not expressly approved by the party
responsible for compliance could void the user’s authority to operate the
equipment.

25
Do not return this vehicle to the store.
If your product requires service, repairs or replacement parts, please visit
us online at www.rollplay.net
Or contact us at:
Phone: 1-888-982-9309
Email: customerservice@rollplay.net
Web: www.rollplay.net
Hours: 9 AM - 5 PM (CST), Monday - Friday
For a list of available replacement parts, please visit www.rollplay.net.
Service and Repairs

26 Warranty
RollPlay™ 6-Volt Limited Warranty
• One-year limited warranty from the date of purchase with proof of purchase from
an RollPlay certied retailer.
• Six month limited warranty on the 6-Volt battery with proof of purchase from an
RollPlay certied retailer.
• This one-year limited warranty covers the ride-on vehicle against defects in
materials and workmanship to the original purchaser. Proof of purchase receipt
from an RollPlay certied reseller is required.
• RollPlay ensures the original 6-Volt battery is warranted for 6 months from initial
purchase of the vehicle from a certied retailer. Proof of purchase receipt required.
• This warranty covers normal use and does not cover the RollPlay vehicle or
battery if deemed damaged by unreasonable use, modication, neglect, accident,
abuse, misuse, improper service or other causes not arising out of defects in
materials or workmanship. Evidence of any attempt at consumer repair will void
this warranty.
• This warranty does not cover, and is not intended to exclude any liability on the
part of RollPlay, whether under this warranty or implied by law for any indirect or
consequential damages for breach of warranty. Some states may not allow the
exclusion or limitation so this limitation may not apply to you.
Should you need service or assistance with your vehicle during the warranty period:
• Please do not return vehicle to the store.
• Consult the troubleshooting guide in this manual and online at www.rollplay.net
or
• Call RollPlay Customer Service at 1-888-982-9309
Note: This warranty gives you specic legal rights. You may also have other rights that
may vary from state to state.
Please save your original sales receipt.

27
This page is intentionally left blank.

28 Product Registration
Fill out the form below and mail it to:
RollPlay Products
1131 W Blackhawk St.
Second Floor
Chicago, IL 60642
OR ll out the form online at www.rollplay.net
We will use the information provided only for your warranty. We will not sell,
rent or share your personal information.
First Name: Last Name: Title:
Address:
City: State: Zip Code:
Email: Phone:
Date of Purchase:
e following product information is on the cover of the owner’s manual.
Product Name: Model Number:
Serial Number: Place of Purchase:
Product Registration
Questions or comments? Contact us at www.rollplay.net or 1-888-982-9309