Partner Tech OT200 HANDHELD TERMINAL User Manual
Partner Tech Corporation HANDHELD TERMINAL
Users Manual
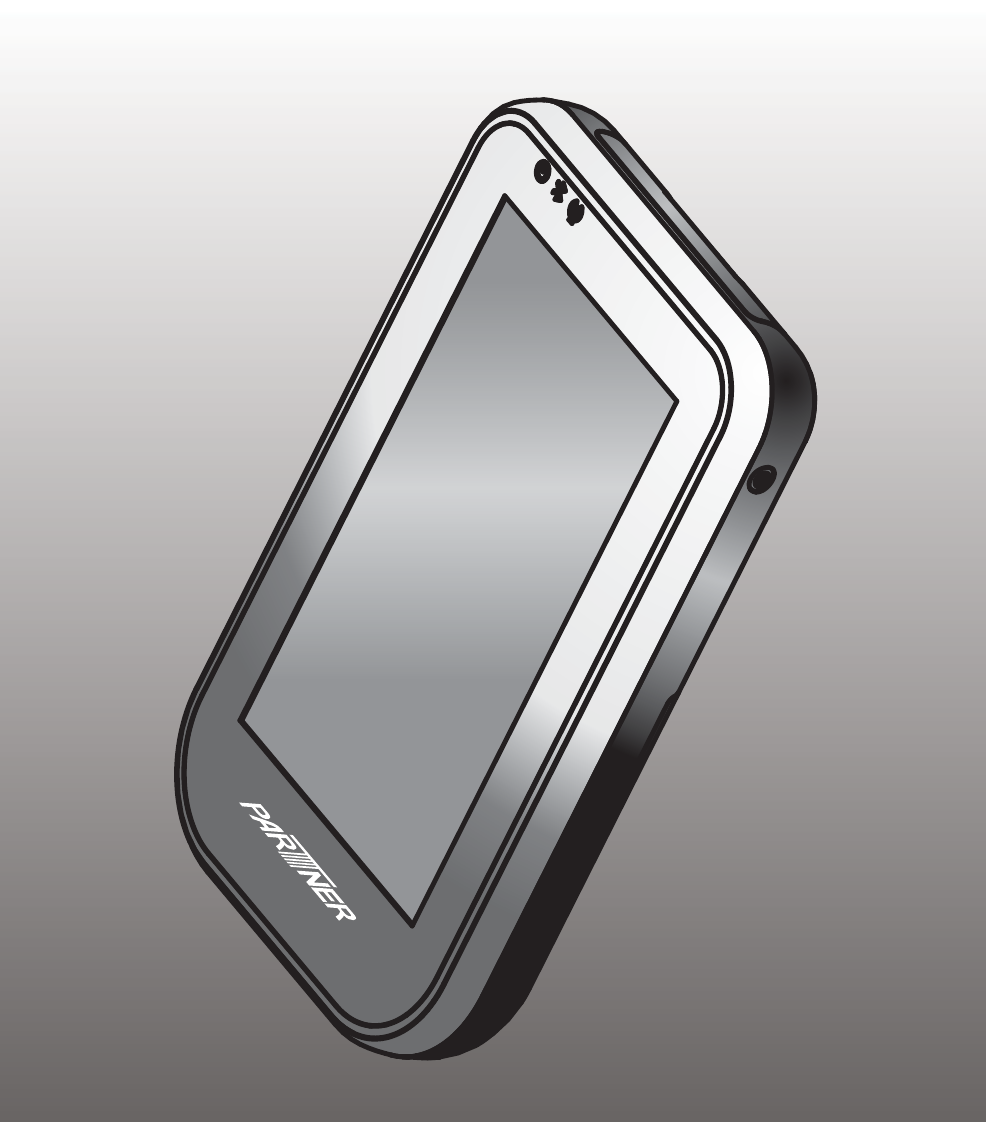
OT-200
User Manual
i
Copyright
This publication, including all photographs, illustrations and software, is protected under international
copyright laws, with all rights reserved. Neither this manual, nor any of the material contained herein, may be
reproduced without written consent of PARTNER Tech Corp.
Disclaimer
The information in this document is subject to change without notice. The manufacturer makes no
revise this publication and to make changes from time to time in the content hereof without obligation of the
manufacturer to notify any person of such revision or changes.
Trademark recognition
All product names used in this manual are the properties of their respective owners and are acknowledged.
Federal Communications Commission (FCC)
This equipment has been tested and found to comply with the limits for a Class B digital device, pursuant
to Part 15 of the FCC Rules. These limits are designed to provide reasonable protection against harmful
interference in a residential installation. This equipment generates, uses, and can radiate radio frequency
energy and, if not installed and used in accordance with the instructions, may cause harmful interference
to radio communications. However, there is no guarantee that interference will not occur in a particular
installation. If this equipment does cause harmful interference to radio or television reception, which can be
determined by turning the equipment off and on, the user is encouraged to try to correct the interference by
one or more of the following measures:
Reorient or relocate the receiving antenna.
Increase the separation between the equipment and the receiver.
Connect the equipment onto an outlet on a circuit different from that to which the receiver is connected.
Consult the dealer or an experienced radio/TV technician for help.
Shielded interconnect cables and a shielded AC power cable must be employed with this equipment to
expressly approved by the system’s manufacturer could void the user’s authority to operate the equipment.
FCC RF Radiation Exposure Statement
1. This Transmitter must not be co-located or operating in conjunction with any other antenna or transmitter.
2. This equipment complies with FCC RF radiation exposure limits set forth for an uncontrolled environment.
This device was tested for handheld operations with the device contacted directly to the human body.
To maintain compliance with FCC RF exposure compliance requirements,avoid direct contact
to the transmitting antenna during transmitting.
Declaration of conformity
This device complies with part 15 of the FCC rules. Operation is subject to the following conditions:
This device may not cause harmful interference, and
This device must accept any interference received, including interference that may cause undesired operation.
ii
Revision history
Version 1.0, July 2010
About this manual
This manual is intended for system administrators who are familiar with setting up a new system and
installing programs.
The manual consists of the following sections:
Chapter 1 Getting Started: This section covers unpacking and checking the
package contents, identifying components, charging the
battery, installing the MicroSD card, and powering on
the device.
Chapter 2 Using The Device: This section provides information on how to use the
device features.
Chapter 3 Using The Accessories: This section provides information on how to use the
accessories.
Appendix: The appendix covers troubleshooting, information
on having the OT-200 serviced and technical
Safety information
Before installing and using the OT-200, take note of the following precautions:
SAR compliance for body-worn operations requires at least 2 cm of separation between the device and
the user’s body
Request service for damaged products: Turn off the product, unplug it from the electrical outlet, and
request service from a service partner under the following conditions:
The power cord or plug is damaged.
Liquid has been spilled into the product.
An object has fallen into the product.
The product has been exposed to rain or water.
The product has been dropped or damaged.
The product does not operate normally when you follow the operating instructions.
Avoid hot areas: The product should be placed away from heat sources such as radiators, heat registers,
Allow the product to cool: Allow the product to cool before removing covers and touching internal
components.
Avoid wet areas: Never use the product in a wet location.
Avoid inserting objects into product: Never insert objects of any kind into slots or other openings in the
product.
Clean the product properly: Unplug the product from the wall outlet before cleaning it. Do not use liquid
cleaners or aerosol cleaners. Use a soft cloth dampened with water for cleaning exterior components, but
NEVER apply water directly to the product or to an LCD screen.
iii
Use the product with approved equipment: Use your product only with the computers and accessories
Adjust the volume: Turn down the volume before using headphones or other audio devices.
When device will not be used for a long period of time, please remove the battery, and store both device
and battery in a cool, dark, and dry place. For storage over a long period of time, please place product
in a dry box.
SAR compliance for body-worn operations requires at least 2 cm of separation between the device and
the user’s body.
Battery Handling Precaution
Do not attempt to disassemble or reconstruct the packs. The battery has integrated protection circuits
and safety functions to avoid danger. If battery is damaged, it may rupture, generate heat, or cause smoke
Do not short circuit battery. Neither short connect the positive terminal and negative terminal with
metals, nor carry or store the battery with metal objects. If the battery is short circuited, excessive large
metals. Please cover the plug with waterproof cap when not using the battery.
Do not incinerate or heat the battery. This will cause the insulator to melt, damage the gas release vent,
and cause loss of safety function, or electrolyte ignition. Above mentioned matters will cause battery to
Do not use near high temperature areas.
Do not immerse the battery in water, seawater, or get it wet. This may cause internal short circuits to
If the battery protection circuit does not
function properly due to high temperature, or it is broken, the battery will be charged at an abnormal
current, and abnormal chemical reaction may occur, causing the battery to rupture, generate heat, or cause
If the battery is charged
in unusual conditions, it will cause loss of safety functions, or abnormal chemical reactions, causing the
Do not try to damage the battery. Do not drive a nail into the battery, strike it with a hammer, or tread on
Do not attempt to solder anything onto the battery. This will cause the insulator to melt due to heat, or
Do not connect battery to a plug socket or car-cigarette plug. Connecting high voltage to the battery,
Do not use battery for powering other equipment. If the battery is used for powering other equipment, it
Do not touch a leaked battery directly. If battery leaks and hands touch leaked electrolyte, wash your
hands with soap immediately. If leaked electrolyte gets into your eyes, do not rub them, and wash eyes
iv
immediately with fresh water. Consult a doctor immediately.
time, let it stop charging. There is a possibility that the battery might be defective, and continued charging
Do not insert battery into a microwave or high pressure container. This may cause battery to deform,
condition of the battery.
If liquid leaks from the battery, or the battery give outs a bad smell,
Do not use an abnormal battery. If battery has a bad smell, changes color, deforms, or causes something
wrong during usage, remove it from equipment or charger, and do not use. If an abnormal battery is used, it
WARNING
Warning! Batteries may explode if not handled properly. Do not
disassemble or dispose of them in fire. Keep them away from children.
Follow local regulations when disposing of used batteries.
娤⌈
ᷴ㭊䢡✗㛛㏂曢㱇㛪㛰䇭䂟䙫⍘暑˛€⏖㛛㏂䂡⻇┭⻡字䙫䛟⏳曢㱇ㇽ䛟⏳❲
曢㱇˛媲ᾄ㓁⻇┭媑㗵㛟㢫何曢㱇˛
㮦⿍
䔏攀寖❲⏞䔜㱇㛛㍉ἁ㛰䇭䂟⍘晐⊈⾬㋰䅎寛㗵⣫何䔏⭳䙫䔜㱇˛
㮦⿍
㭊̧̯ẋ㏂̯̜͂̀曢㱇̤䇭䙡̱ͣ⍘晡̤͖̱̚͢˛壤怇㥔俬͆㎏⥏̱ͣ曢
㱇⎯͇⏳Εͺέ͆曢㱇̀ẋ㏂̯̭̜̾ᷲ˛ὦ䔏⽳͆曢㱇ͪ㍏̾ͣ㘩͇壤怇㥔
俬͆㋮䤡̓⽺̻̭̜̾ᷲ˛
v
TABLE OF CONTENTS
CHAPTER 1 GETTING STARTED ................................................ 1
Unpacking the OT-200 ..................................................................................1
Checking the package contents ....................................................................2
Identifying components .................................................................................4
Charging Cradle .............................................................................................8
Setup the OT-200 ...........................................................................................9
Using the cradle ...........................................................................................12
Charge the device in cradle .........................................................................12
Charge the battery in cradle .........................................................................12
Changing the battery ....................................................................................13
Using MicroSD cards ...................................................................................16
Installing a MicroSD card .............................................................................16
View the contents of a MicroSD card ...........................................................19
CHAPTER 2 USING THE DEVICE ............................................. 21
Entering text .................................................................................................21
Shortcut menus ............................................................................................21
Performing a reset........................................................................................22
Opening and closing programs ....................................................................22
Status icons..................................................................................................22
Adjusting the volume ....................................................................................23
Changing the device name ..........................................................................24
Entering owner information ..........................................................................25
Recalibrating the screen ..............................................................................26
Setting the date and time .............................................................................27
Turning WiFi, Bluetooth on or off .................................................................28
Setting the screen orientation ......................................................................29
Connecting to a WiFi network ......................................................................30
Automatically connect to a WiFi network .................................................30
Manually connect to a WiFi network ........................................................31
Find your IP address ................................................................................32
Specify the IP address and domain name servers (DNS) .......................32
Lock OT-200.................................................................................................34
Unlock OT-200 .............................................................................................35
Synchronization............................................................................................36
Synchronize your data with ActiveSync and Windows XP ...........................36
Synchronize your data with ActiveSync and Windows Vista/ 7 ....................37
vi
...............................38
..............................38
.............................38
Install and remove programs........................................................................39
CHAPTER 3 USING THE ACCESSORIES ............................... 41
Attaching the stylus cord ..............................................................................41
Attaching the hand strap ..............................................................................42
Using the leather pouch ...............................................................................43
Attaching the leather pouch cord .................................................................44
Using the high quality stylus.........................................................................45
APPENDIX .................................................................................. 47
Troubleshooting ...........................................................................................47
Tips for Troubleshooting ...............................................................................47
General Problems .......................................................................................47
Having the OT-200 Serviced .......................................................................48
Guidelines for care and maintenance ..........................................................48
Using the device ......................................................................................48
Cleaning the device .................................................................................48
Transporting and storing the device.........................................................48
...............................................................................................49

49
CPU Samsung S3C6410 667 MHz processor
Operating System Microsoft® Windows™ Mobile 6.5 Professional
Display 4.3” TFT LCD with Touch Screen, widescreen 800*480
Memory 256MB Flash, 256MB SDRAM
Communication WiFi 802.11 b/g
Bluetooth 2.0 class 2
Telecom standards
EDGE
Atheros
Extension slot
Interface Mini-USB 2.0
Other
Internal microphone
Speaker
Features
Wireless roaming
5510 Lock
Battery cover safety protection
Remote Desktop
Lock screen
Ruggedness IP54
1.2 meters drop tested
Environmental Operating temperature: 0oC to 40oC
Storage temperature: -20oC to 60oC
Battery
Dimensions
82 *133 * 19 mm
Weight Approximately 245g with battery
Optional modules
Accessories AC adaptor, Cradle, Battery Stylus cord, Hand strap, Leather pouch,
Leather pouch cord, Shoulder strap, High quality stylus
EMC: FCC / CE / 3C / BSMI / VCCI
2 CHAPTER 1 GETTING STARTED
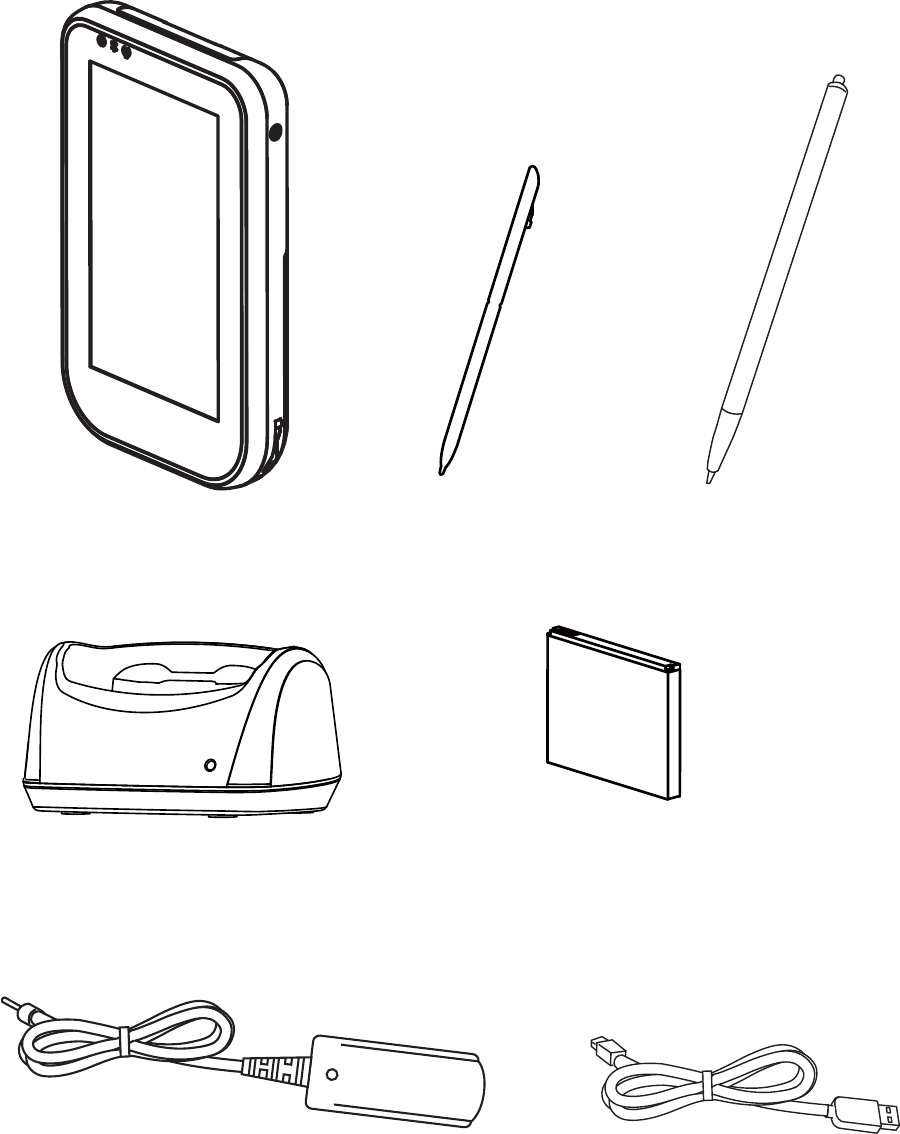
Checking the package contents
After you unpack the device check that the following items are included.
OT-200 Stylus
Battery
High quality stylus
AC adaptor
Cradle
mini-USB to USB cable

49
CPU Samsung S3C6410 667 MHz processor
Operating System Microsoft® Windows™ Mobile 6.5 Professional
Display 4.3” TFT LCD with Touch Screen, widescreen 800*480
Memory 256MB Flash, 256MB SDRAM
Communication WiFi 802.11 b/g
Bluetooth 2.0 class 2
Telecom standards
EDGE
Atheros
Extension slot
Interface Mini-USB 2.0
Other
Internal microphone
Speaker
Features
Wireless roaming
5510 Lock
Battery cover safety protection
Remote Desktop
Lock screen
Ruggedness IP54
1.2 meters drop tested
Environmental Operating temperature: 0oC to 40oC
Storage temperature: -20oC to 60oC
Battery
Dimensions
82 *133 * 19 mm
Weight Approximately 245g with battery
Optional modules
Accessories AC adaptor, Cradle, Battery Stylus cord, Hand strap, Leather pouch,
Leather pouch cord, Shoulder strap, High quality stylus
EMC: FCC / CE / 3C / BSMI / VCCI
4 CHAPTER 1 GETTING STARTED
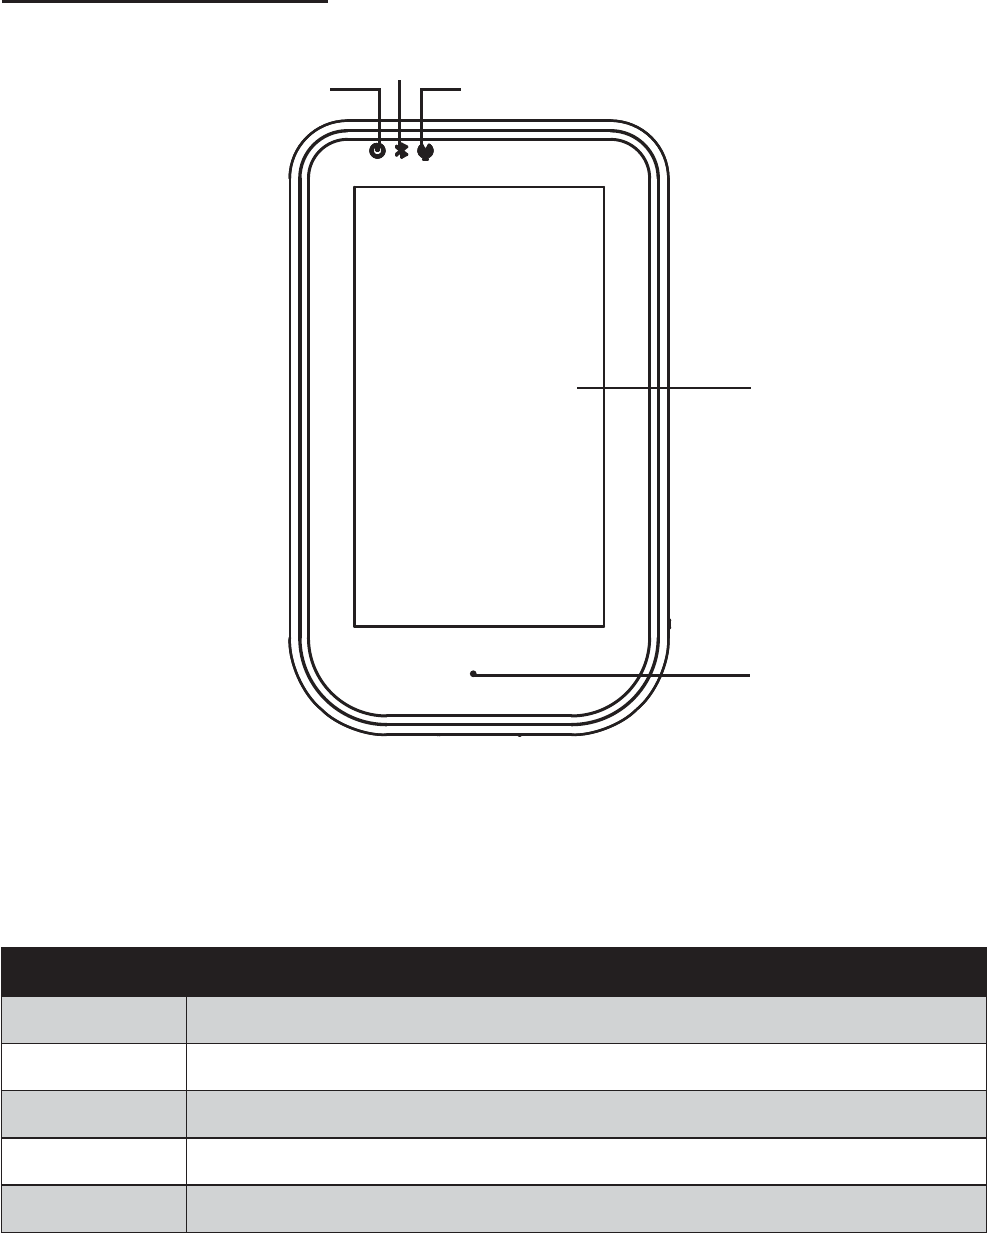
Identifying components
This section describes the parts and connectors on the OT-200.
Front panel components
4
5
123
Figure 1.2 Front view
Component Description
1
2
3
4 4.3-inch touch screen
5 Microphone
5
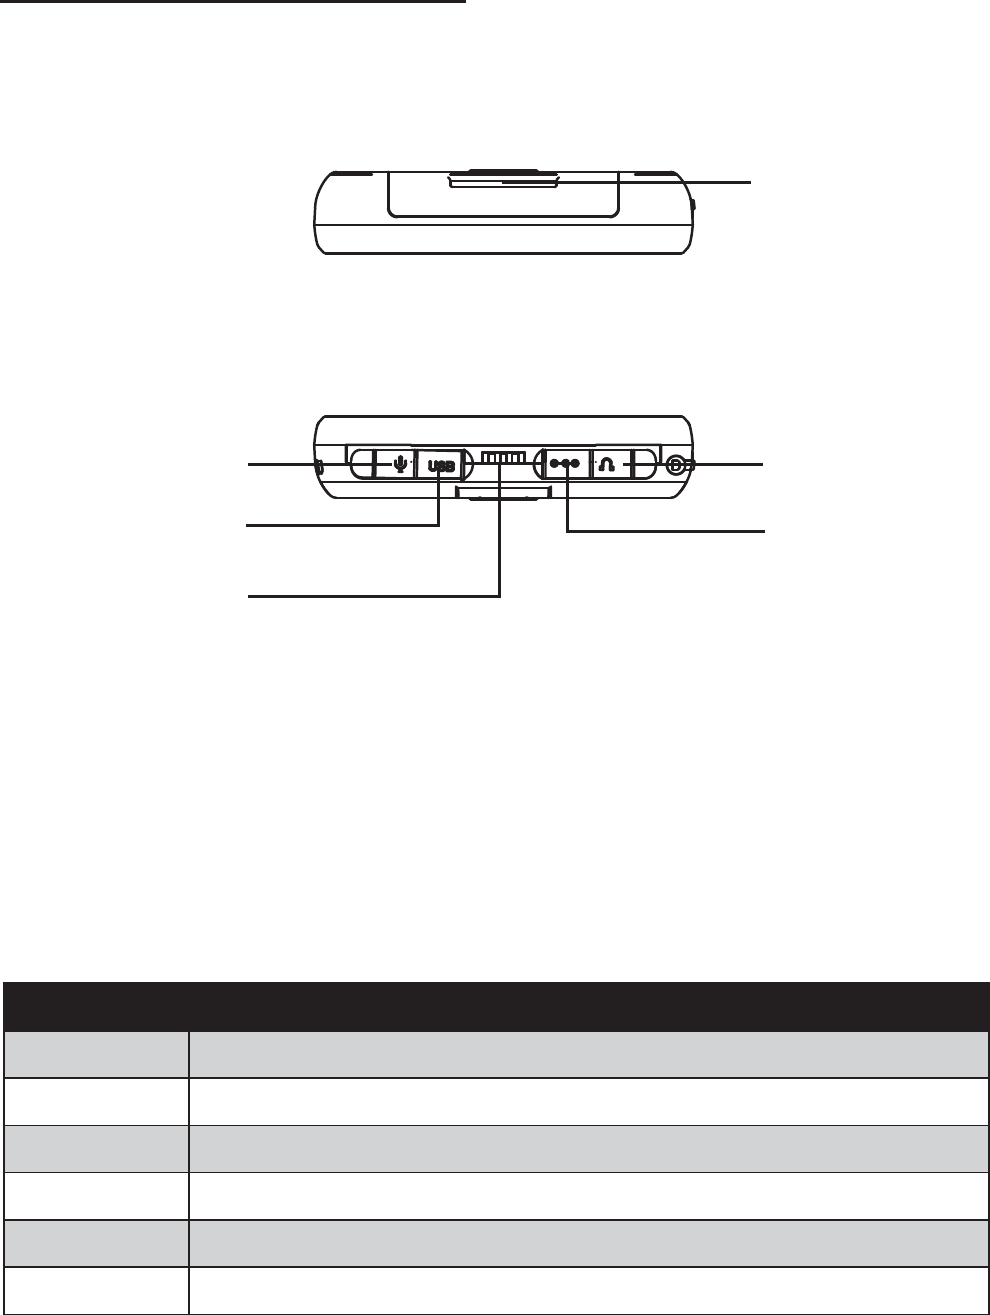
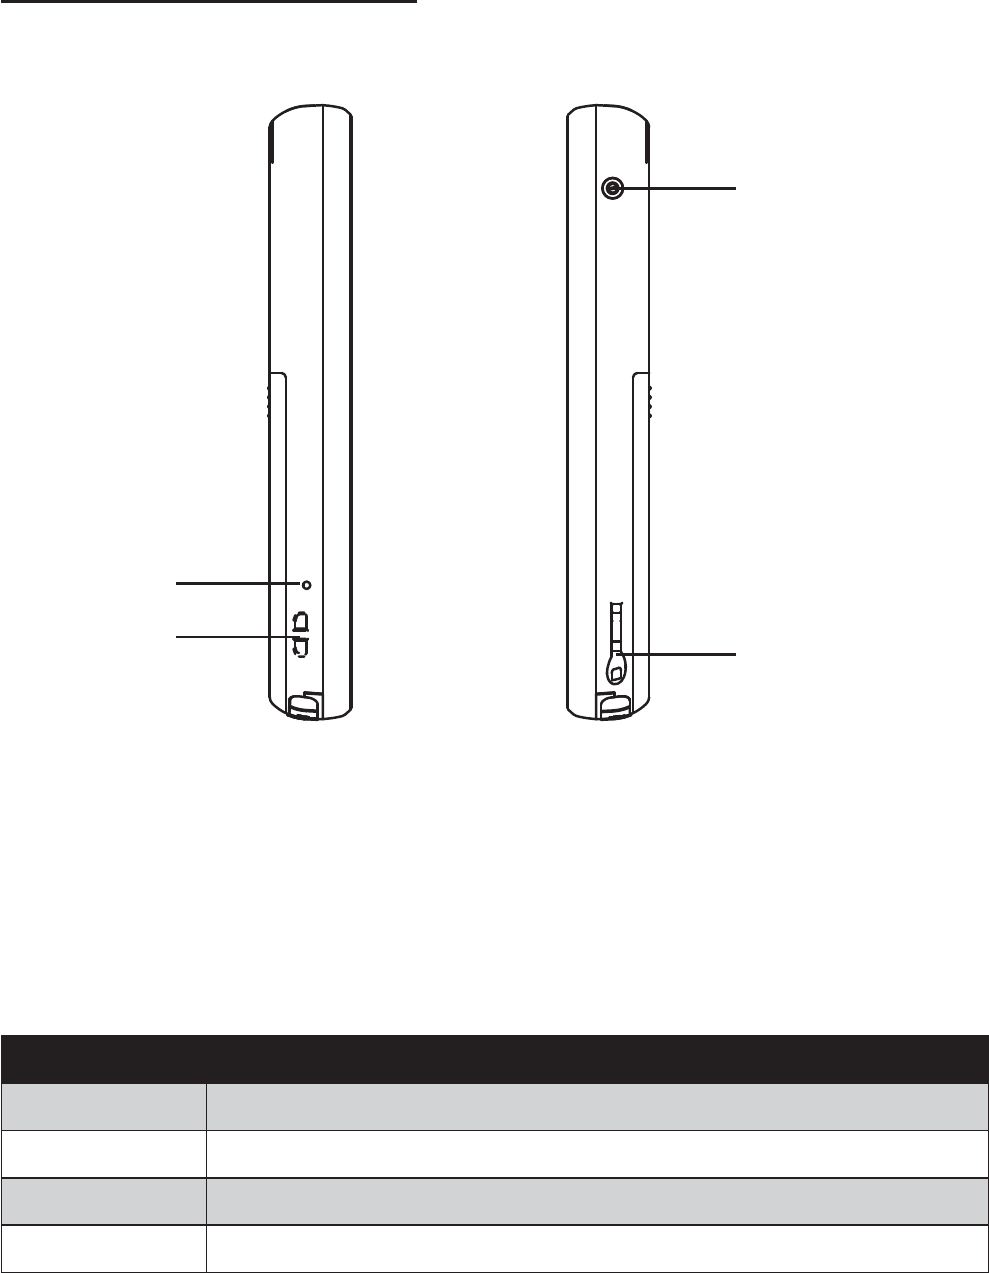
Top and bottom panel components
1
Figure 1.3 Top and bottom view
Component Description
1 Top hand strap eyelet
2 2.5mm microphone jack
3 Mini-USB port
4 Cradle connector
5 DC power jack
6 3.5mm headphone jack
3
2
4
6
5
6 CHAPTER 1 GETTING STARTED
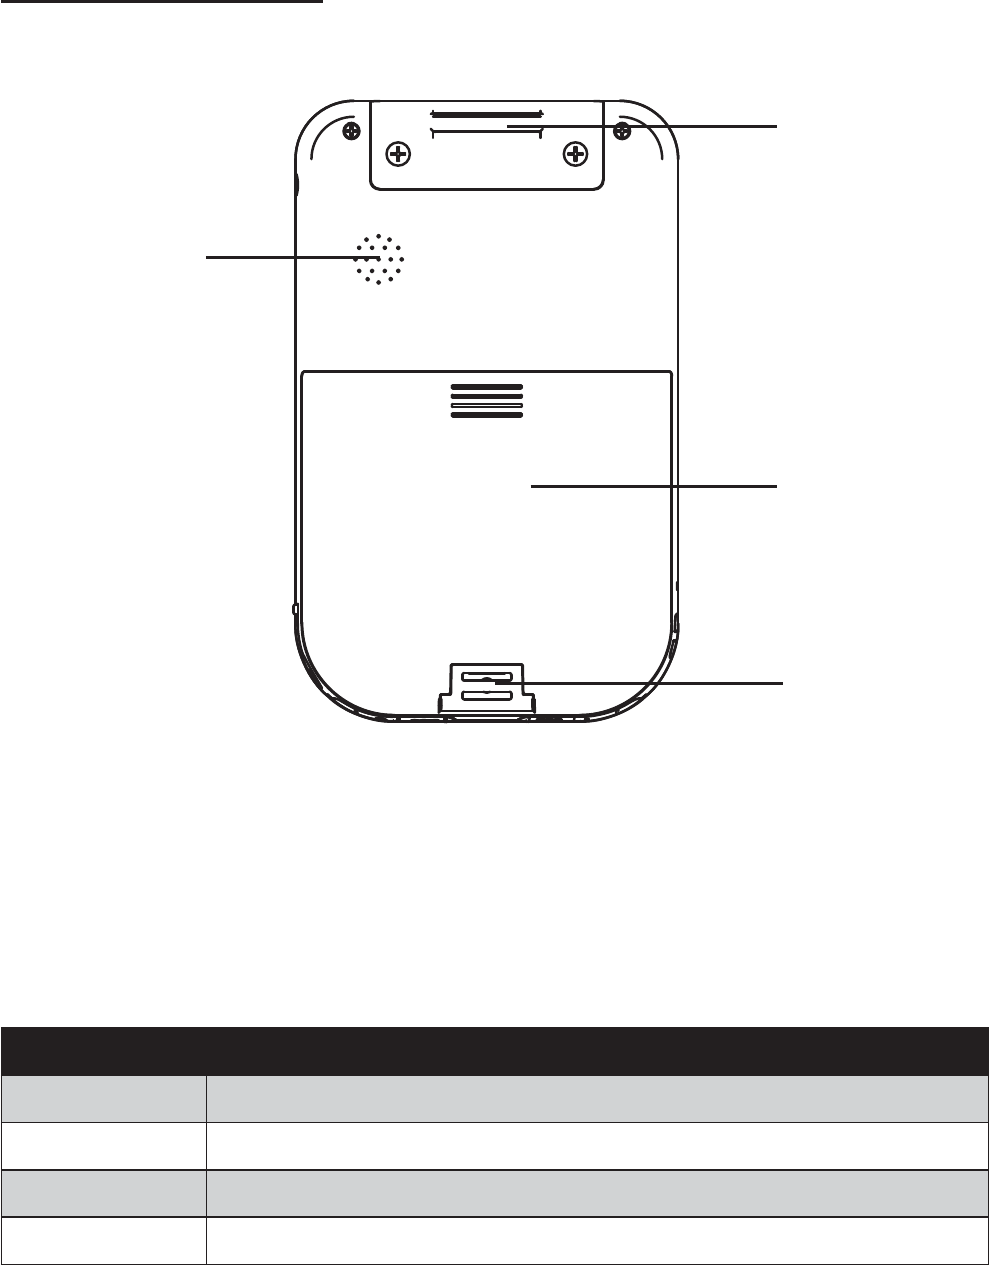
Left and right side components
Figure 1.4 Left and right side view
4
1
2
3
Connector Description
1 Reset button
2 Leather pouch strap eyelet
3 Power button
4 Stylus dock
7
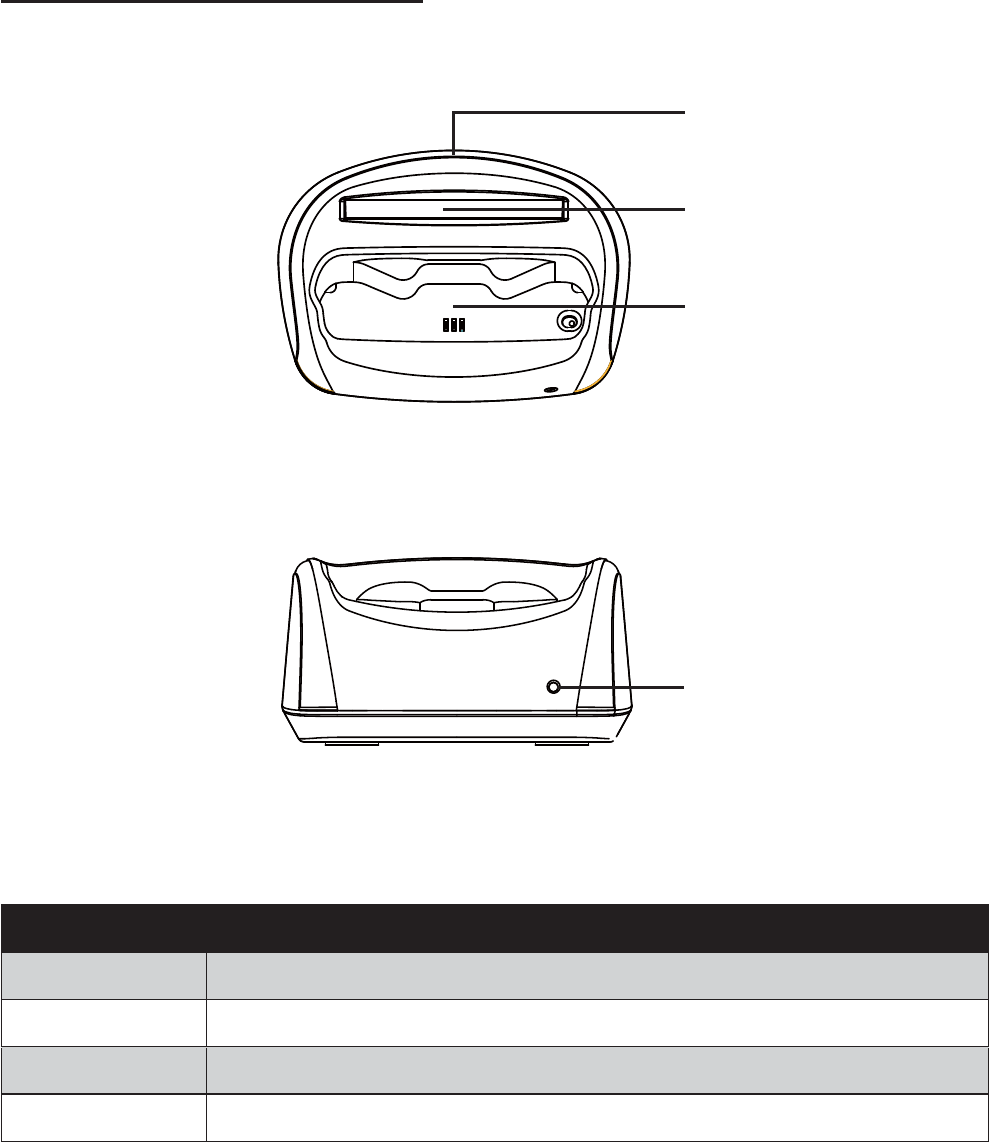
Back panel components
4
1
2
3
Connector Description
1 Top hand strap eyelet
2 Speaker
3 Battery cover
4 Bottom hand strap eyelet
Figure 1.5 Back view
8 CHAPTER 1 GETTING STARTED
Charging Cradle
This section introduces the charging cradle for the OT-200.
The charging cradle is used to charge the OT-200. A second slot is also available for charging a spare battery.
Top and front view of the cradle
4
1
2
3
Connector Description
1 DC power connector
2 Battery slot
3 OT-200 socket
4 Battery slot charging indicator
Figure 1.6 Top view of the cradle
Figure 1.7 Front view of the cradle
9
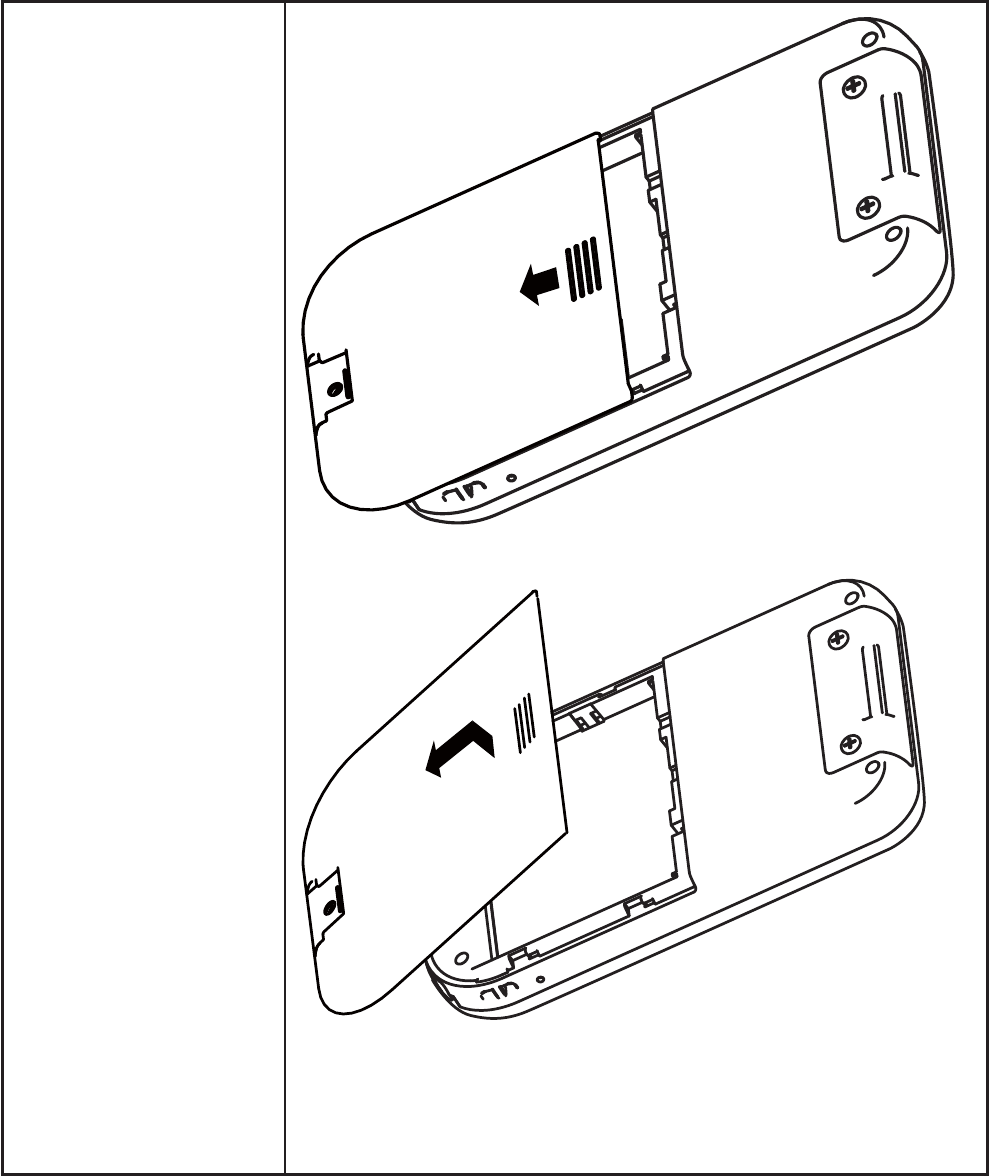
Setup the OT-200
Refer to the following to setup the OT-200.
1. Remove the battery
cover.
Slide the cover downwards to open.
Lift up to remove the battery cover.
10 CHAPTER 1 GETTING STARTED
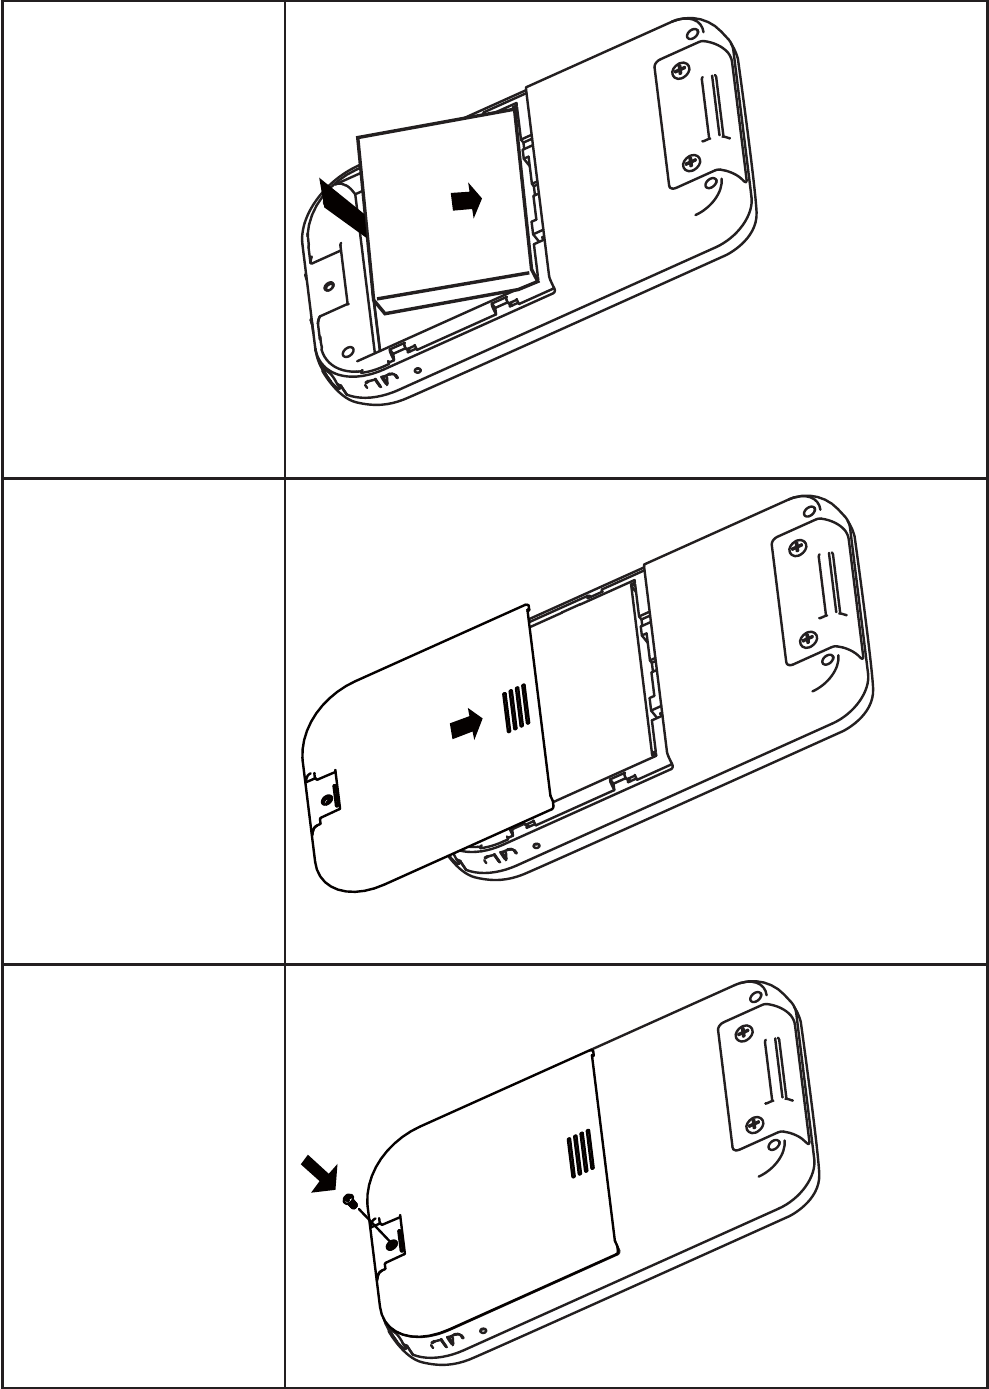
2. Install the battery.
Align the battery connectors on the battery with the pins in the battery
compartment and insert the battery.
3. Replace the battery
cover.
Slide the battery cover back until it locks.
4. Install the screw if
required.
11
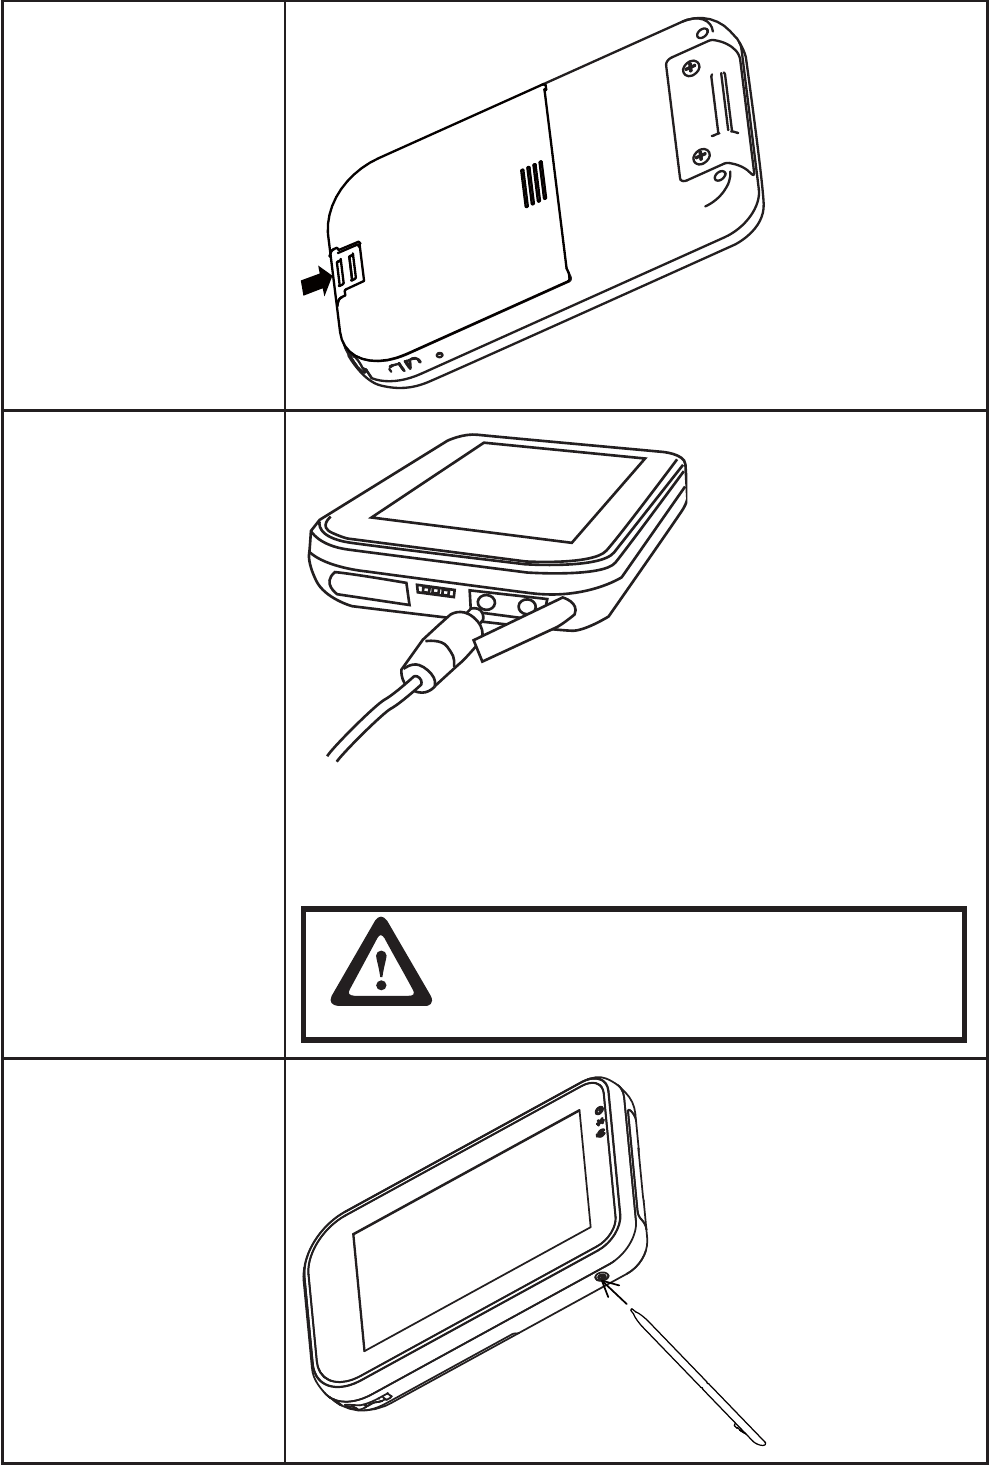
5. Insert the plastic hinge,
or attach the hand strap.
(Refer to Chapter
3 - Attaching the hand
6. Charge the battery.
Open the power jack cover. Plug the AC adaptor power cord into an
electrical outlet, then connect the DC plug of the adaptor cable to the
OT-200. It takes approximately 6 hours to fully charge the battery for the
CAUTION
To avoid damaging OT-200 or the AC adaptor,
make sure all connectors are properly
connected.
7. Press Power Button for
OT-200.
To turn off OT-200.
Press Power Button
prompt, tap Power Off.
12 CHAPTER 1 GETTING STARTED
Using the cradle
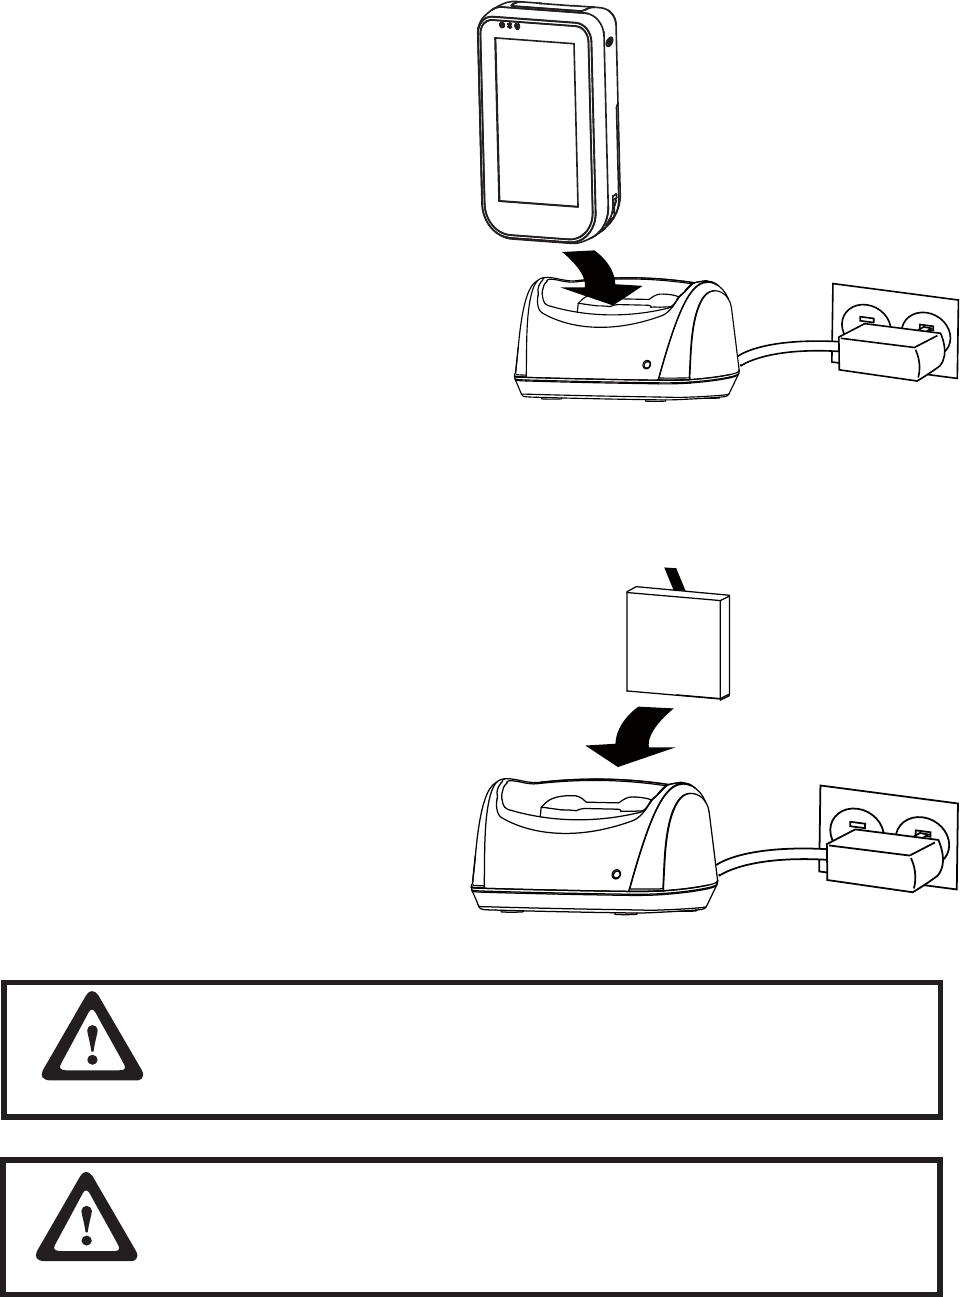
The charging cradle allows a more convenient way to charge OT-200. You can charge a spare battery
Charge the device in cradle
1. Plug the AC adaptor power cord into an electrical
outlet, then connect the DC plug of the adaptor
cable to the power jack at the back of cradle.
2. Insert OT-200 into the cradle with front of device on
same side as front of cradle.
3. When device is inserted into cradle correctly, the
Power LED on top left of device should turn red.
Device charging is complete when the device Power
LED turns green.
Charge the battery in cradle
1. Plug the AC adaptor power cord into an electrical outlet, then connect the DC plug of the adaptor cable to
the power jack at the back of cradle.
2. Align the battery connectors on the battery with the
pins in the second battery slot of the cradle, then
install the battery in the direction of the arrow.
3. When battery is inserted into cradle correctly, the
battery LED on the cradle should light up red.
Battery charging is complete when the battery LED
on the cradle turns green.
IMPORTANT
To protect and prolong the life of the battery, do not charge it for 24
hours or longer at a time.
If battery is not used, please store in dry area, ideally with storage
IMPORTANT
13
Changing the battery
Refer to the following to change the battery.
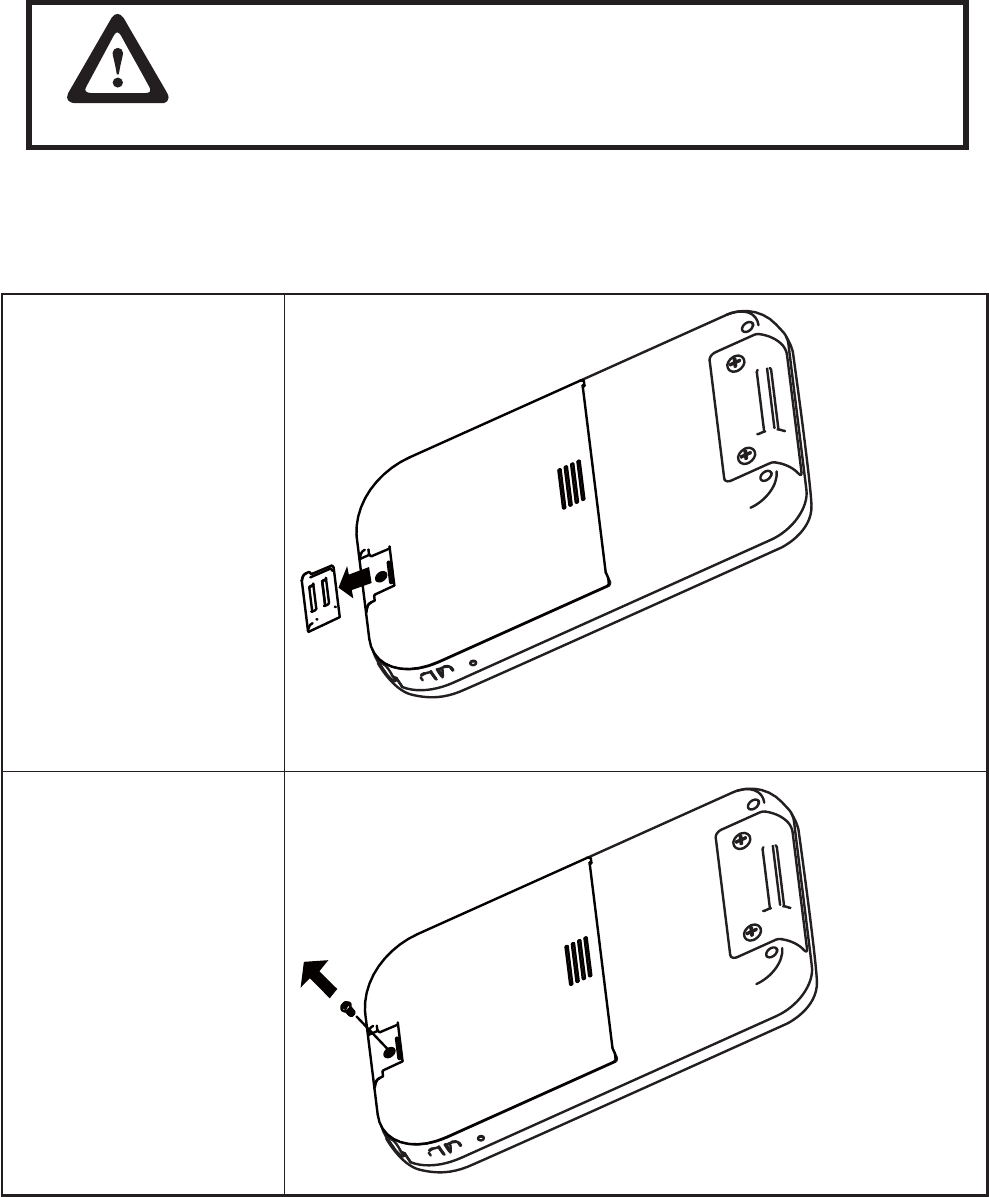
1. Press the Standby
button to turn off the
OT-200.
2. Remove the plastic
hinge or the bottom of
the hand strap.
Slide the plastic hinge or hand strap down and away from the battery
cover.
3. Remove the screw if the
battery cover is locked.
Please make sure to perform 3 complete full charge and discharge
cycles to get optimal battery capacity. Failure to comply will result in
shorter battery lifespan.
IMPORTANT
14 CHAPTER 1 GETTING STARTED
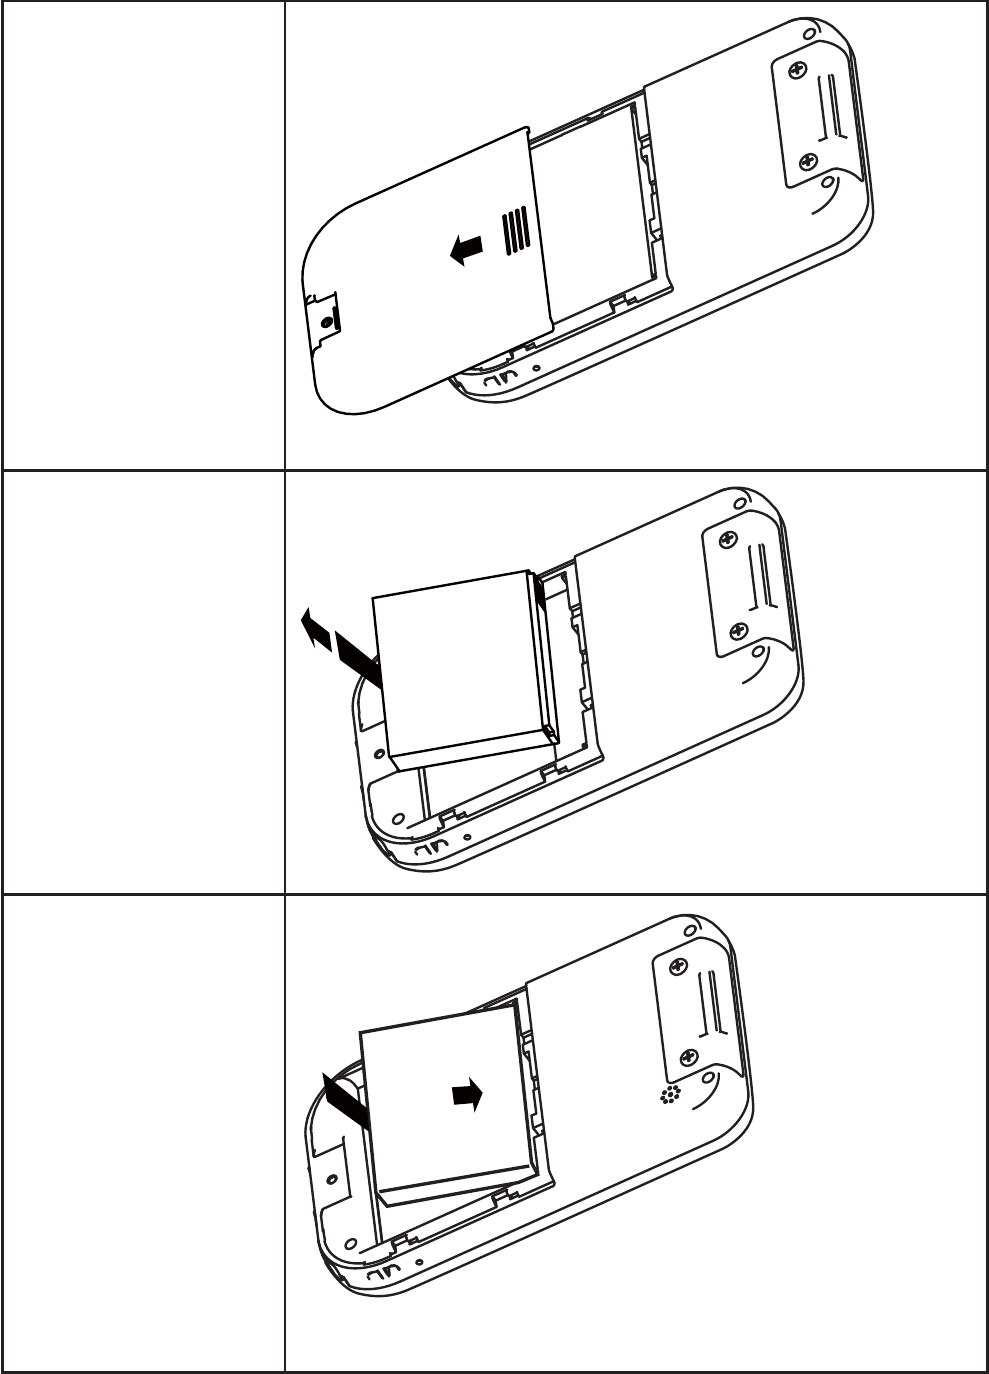
4. Remove the battery
cover.
Slide the cover down, then lift up to remove.
5. Remove the battery by
pulling on the plastic
6. Install the new battery.
Align the battery connectors on the battery with the pins in the battery
compartment and insert the battery.
15
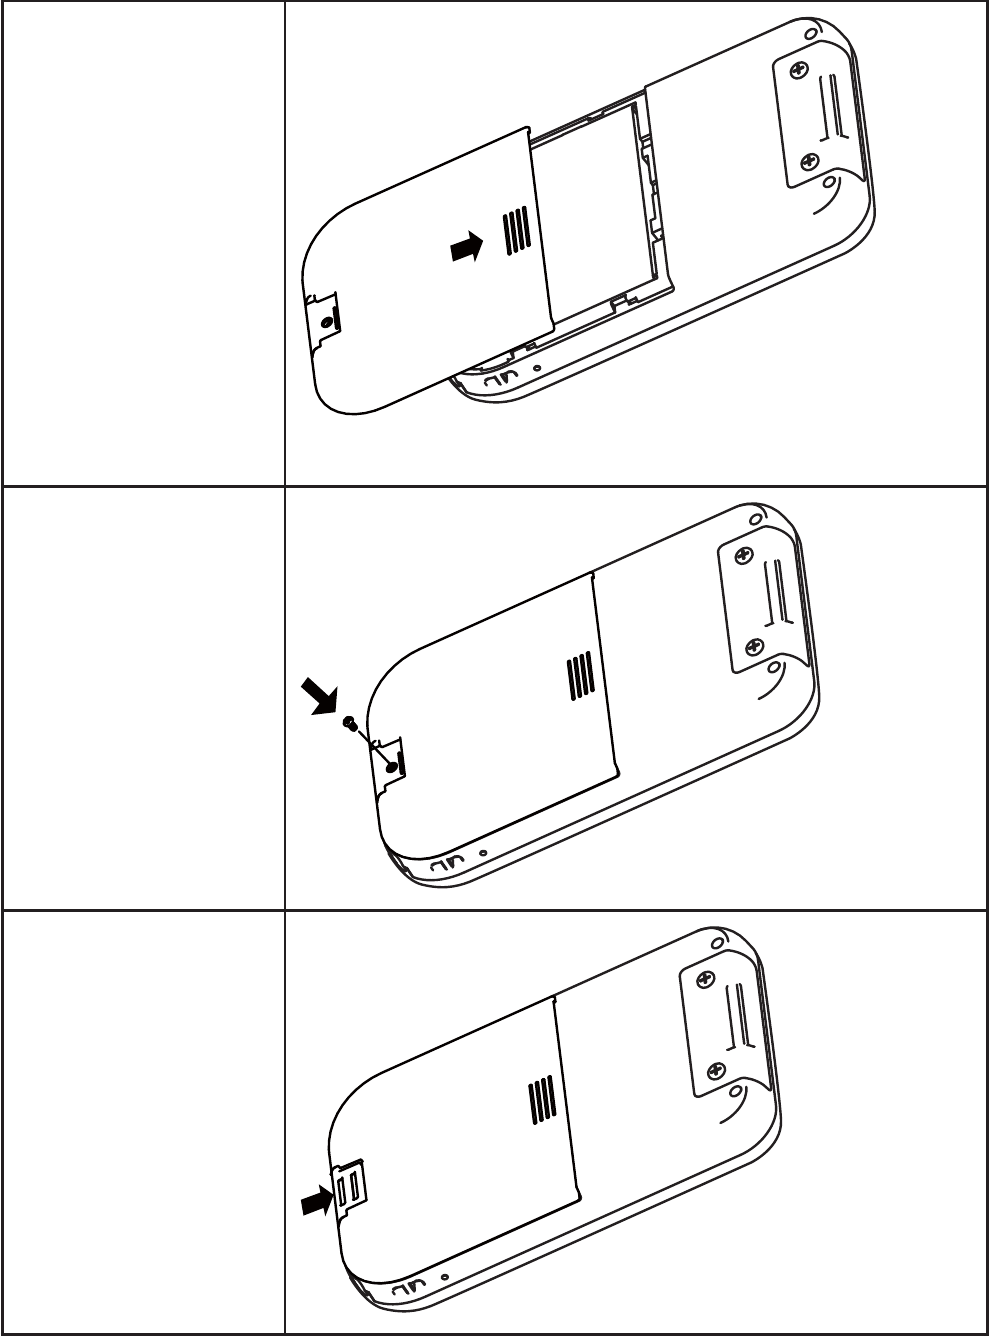
7. Replace the battery
cover.
Slide the battery cover back until it locks.
8. Reinstall the screw.
9. Replace the plastic
hinge or the bottom of
the hand strap.
16 CHAPTER 1 GETTING STARTED
Using MicroSD cards
Use MicroSD cards for:
Expanding the memory of the OT-200
Adding functionality
The OT-200 supports SDHC MicroSD cards.
NOTE
SD cards must be purchased separately and are not included with the
OT-200.
Installing a MicroSD card
Refer to the following to install a MicroSD card.
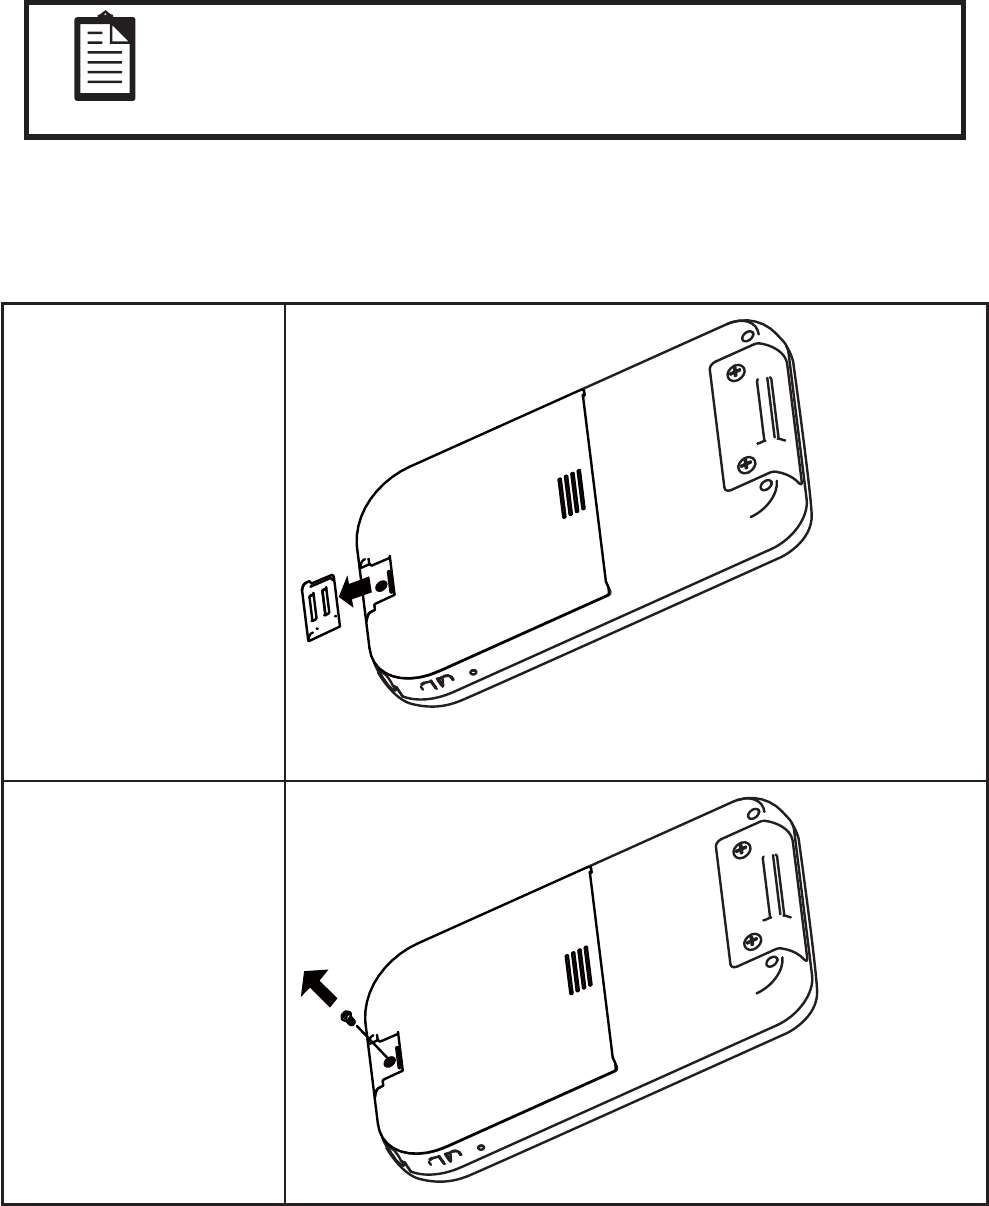
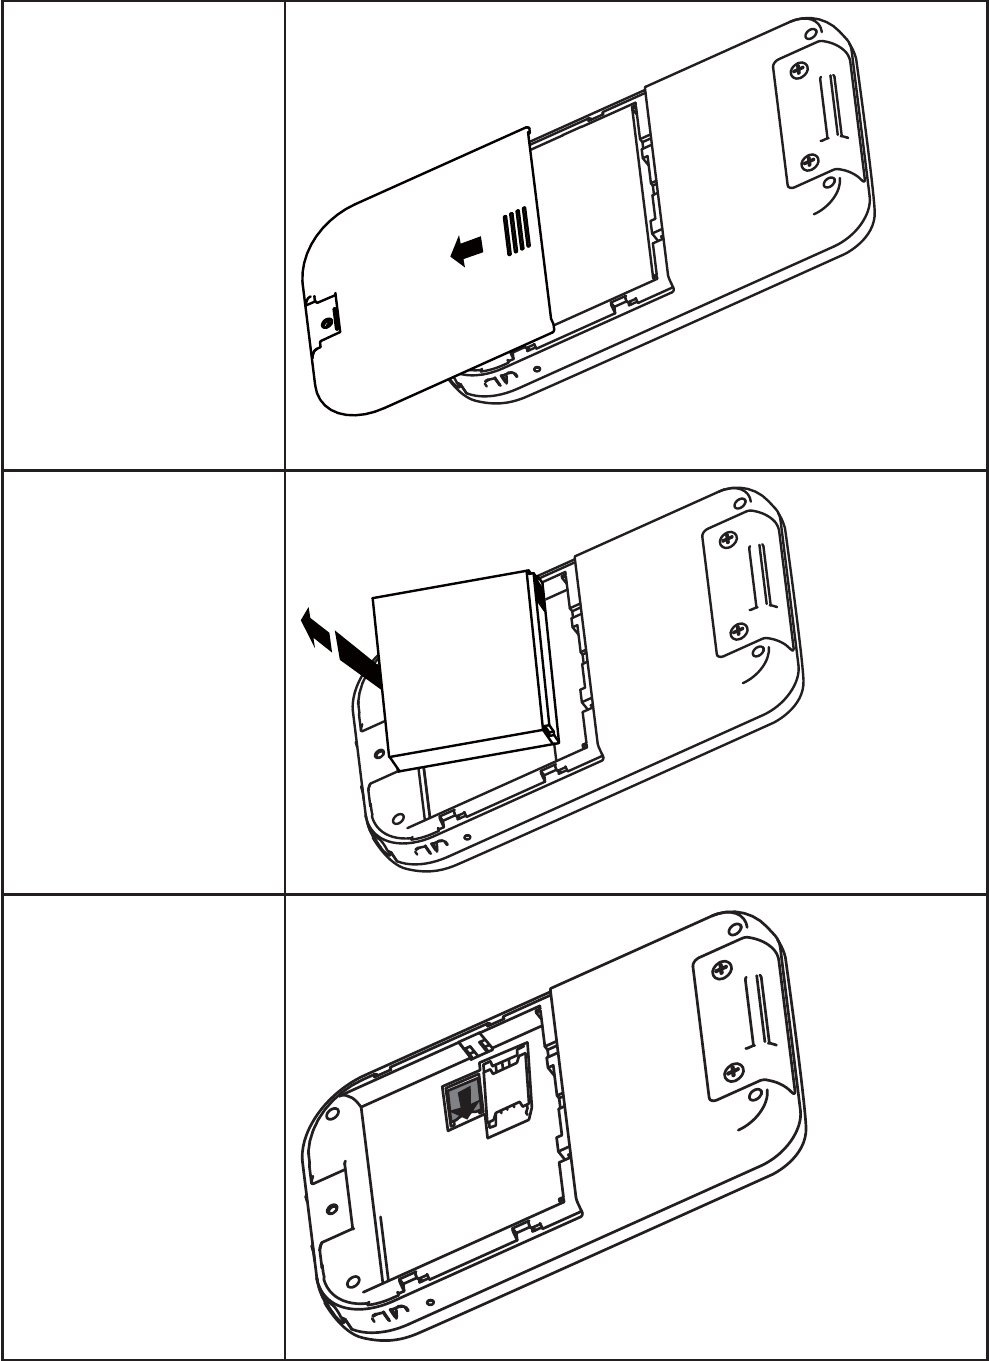
1. Press the Standby
button to turn off the
OT-200.
2. Remove the plastic
hinge or the bottom of
the hand strap.
Slide the plastic hinge or hand strap down and away from the battery
cover.
3. Remove the screw if the
battery cover is locked.
17
4. Remove the battery
cover.
Slide the cover down, then lift up to remove.
5. Remove the battery by
pulling on the plastic
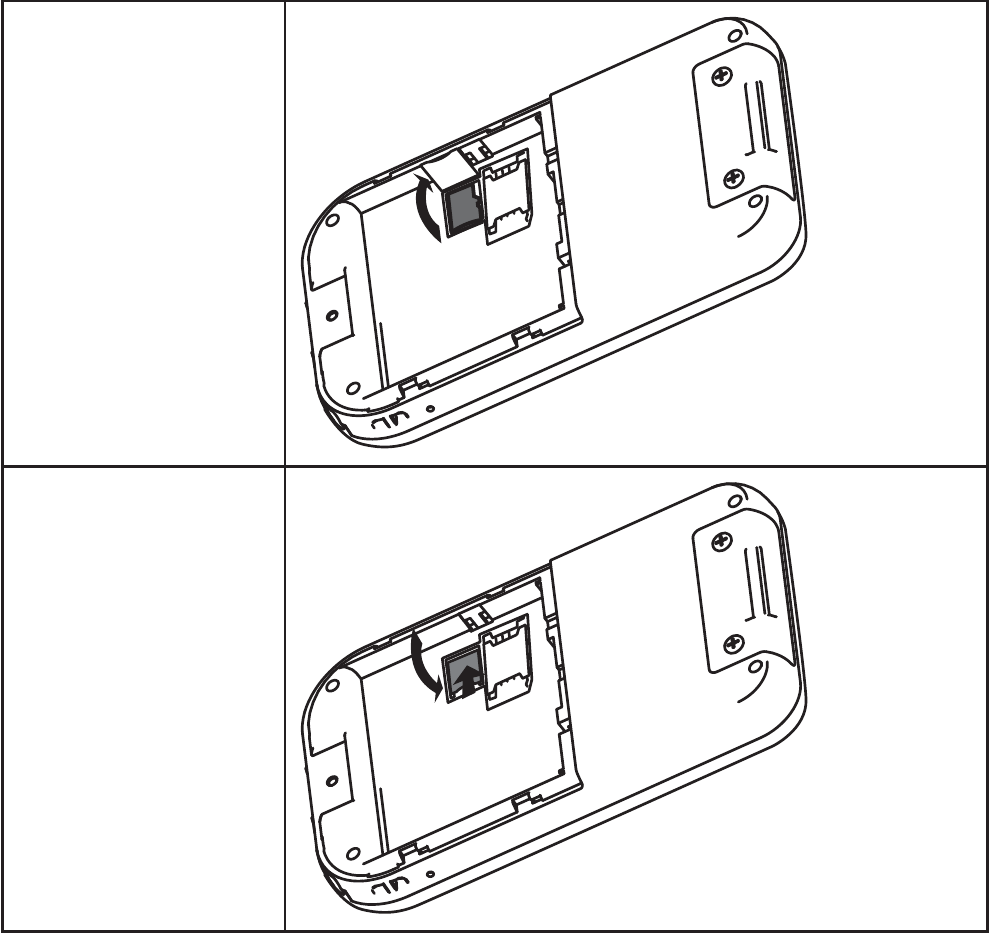
6. Slide the MicroSD slot
clip horizontally to the
open position.
18 CHAPTER 1 GETTING STARTED
7. Flip the clip.
8. Insert the MicroSD card
into the slot with the
label facing out.
9. Flip the clip back down.
10. Slide the clip to lock it.
19
View the contents of a MicroSD card
Refer to the following to view the contents of a SD card.
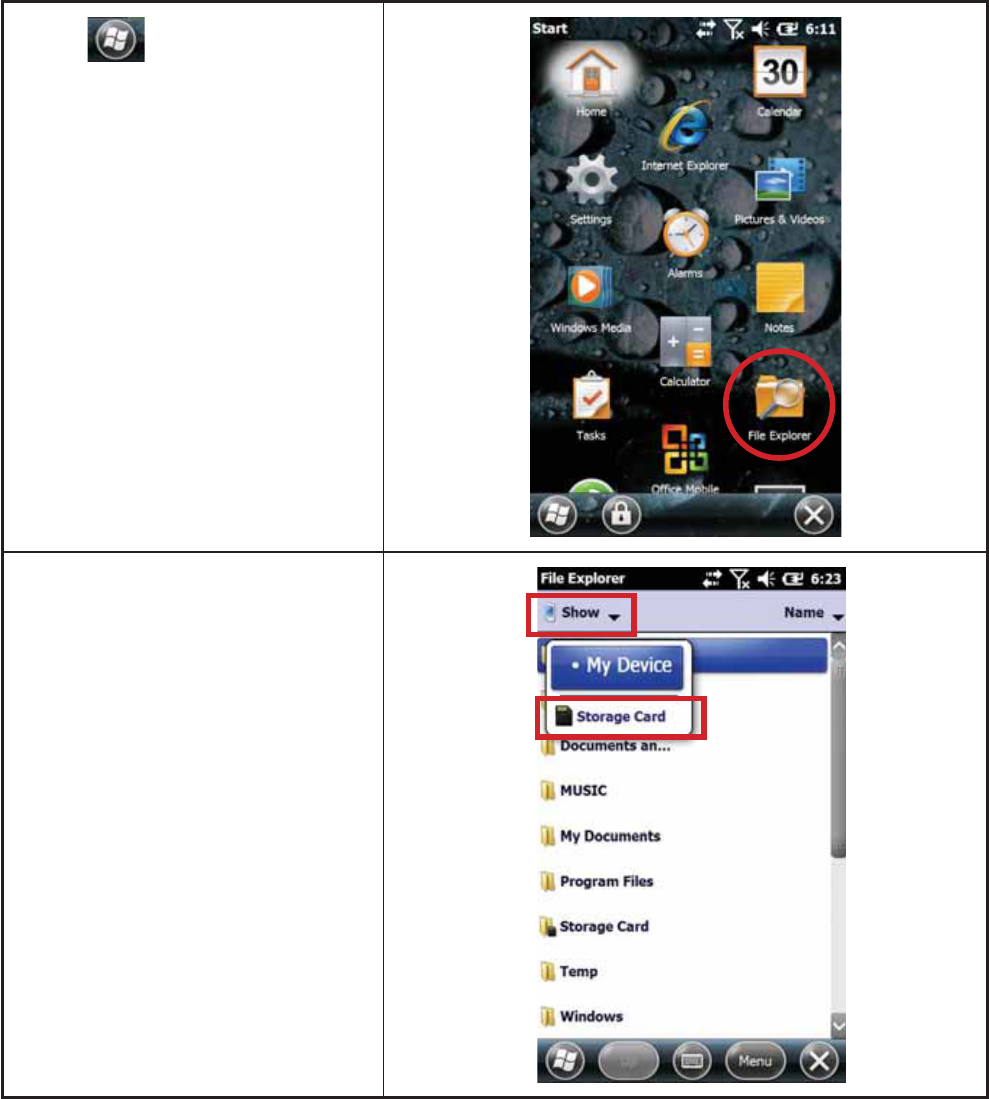
1. Tap
2. Tap File Explorer.
3. Tap Storage Card to see a list of
If the OT-200 does not recognize
your MicroSD card, make sure you
card into the slot.

20 CHAPTER 1 GETTING STARTED
21
CHAPTER 2
USING THE DEVICE
This chapter describes how to use OT-200 features. The following topics are described.
Entering text
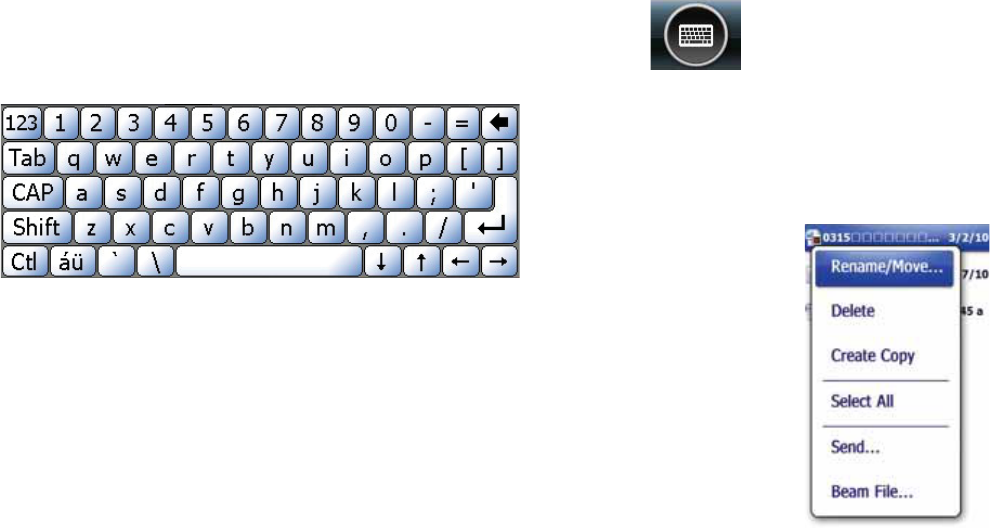
You can use the Input Panel to enter text. To use the Input Panel, tap the on the taskbar.
Tap keys on the Input Panel to enter text.
Shortcut menus
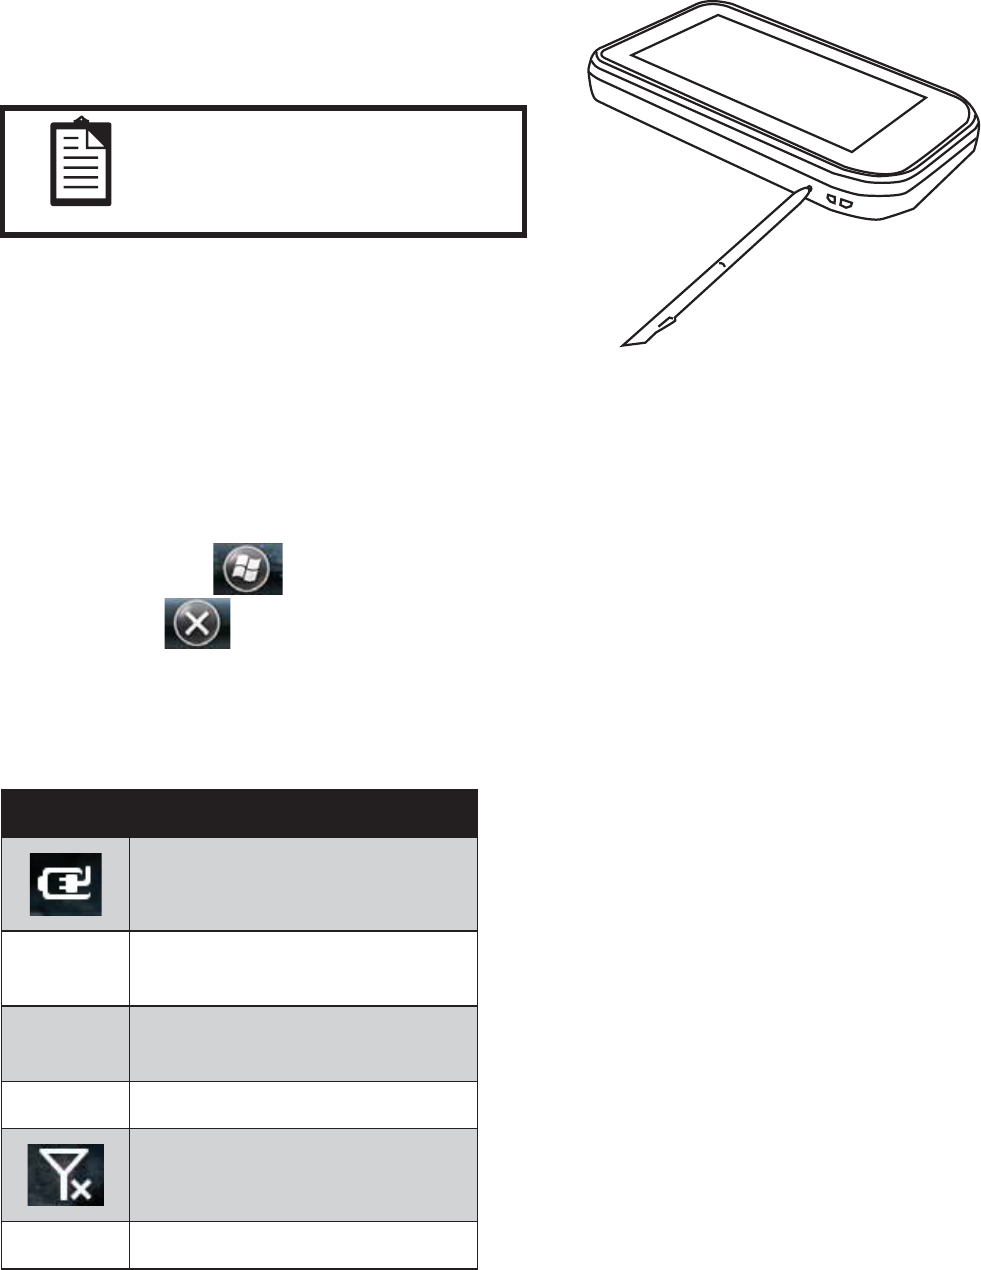
A shortcut menu is displayed when you tap and hold an item. This menu displays the
action you want to perform. To close a shortcut menu without performing an action, tap
anywhere outside the menu.
22 CHAPTER 2 LEARNING THE BASICS
Performing a reset
A reset stops all running applications, but does not erase any
programs, saved data, or registry information.
NOTE
Be sure to close all running
applications before performing
a reset.
To perform a reset:
1. Locate the recessed Reset button on the device.
2. Use the stylus to lightly press the Reset button.
Opening and closing programs
You do not need to exit a program to open another or to conserve memory. The system manages memory
automatically.
To open a program, tap , and then select the required program from the desktop.
In most cases, tap will close an application.
Status icons
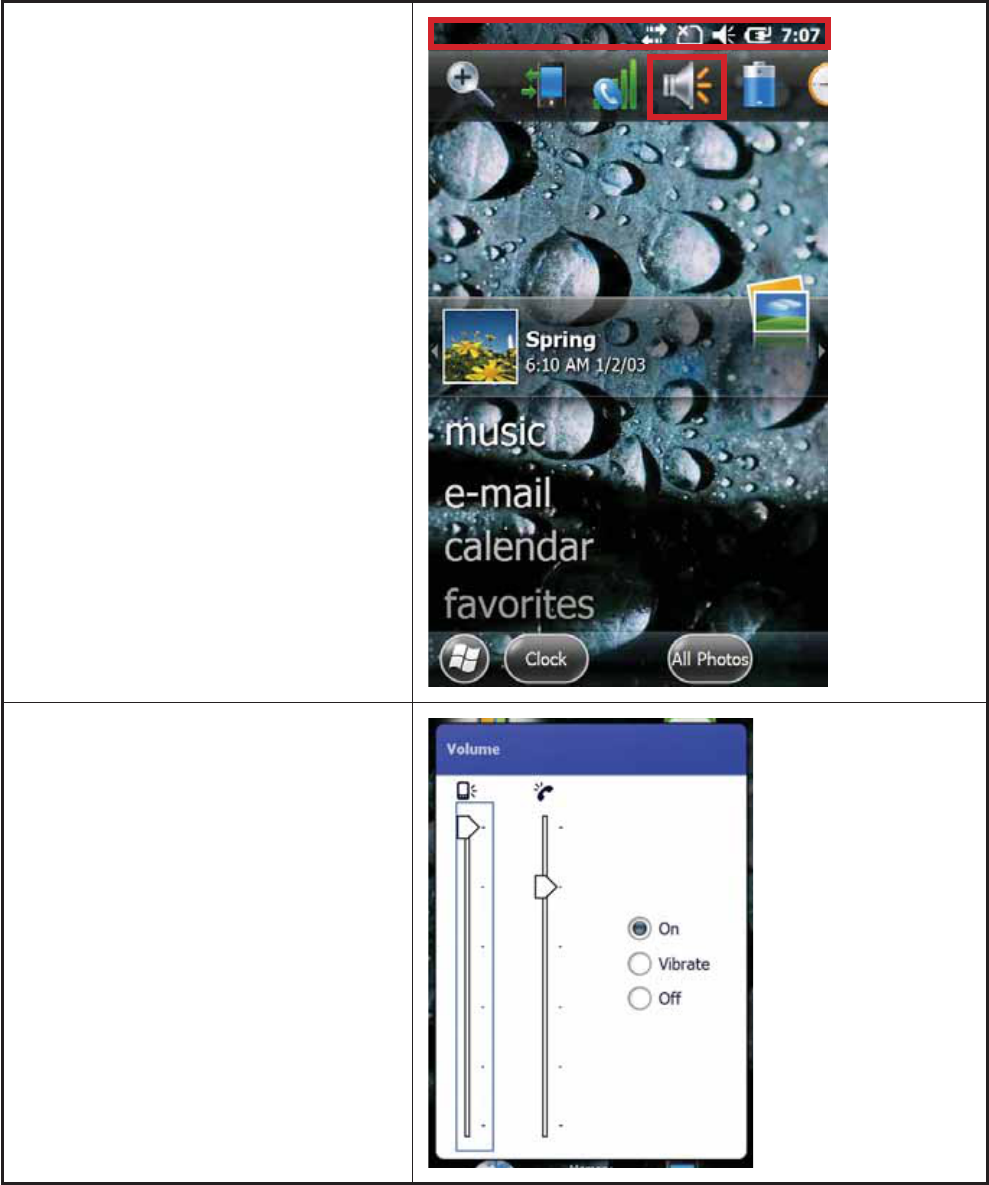
There are status icons in taskbar. The following table lists the icons and their meanings.
Icon Status
Battery charging
Battery level low
Battery level critical
WiFi connected
WiFi not connected
USB connected
23
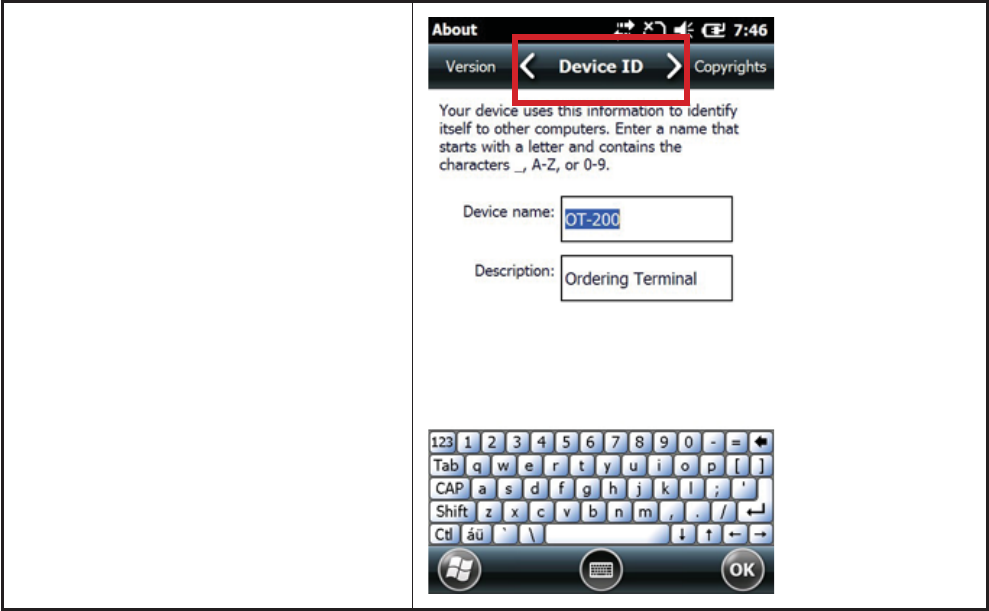
Adjusting the volume
1. Tap the status bar.
2. Tap the Speaker icon.
3. Move the system/ phone volume slider
on the screen to the required volume
level. Also you can switch to On/
Vibrate or Off.
4. Tap the OK button.
24 CHAPTER 2 LEARNING THE BASICS
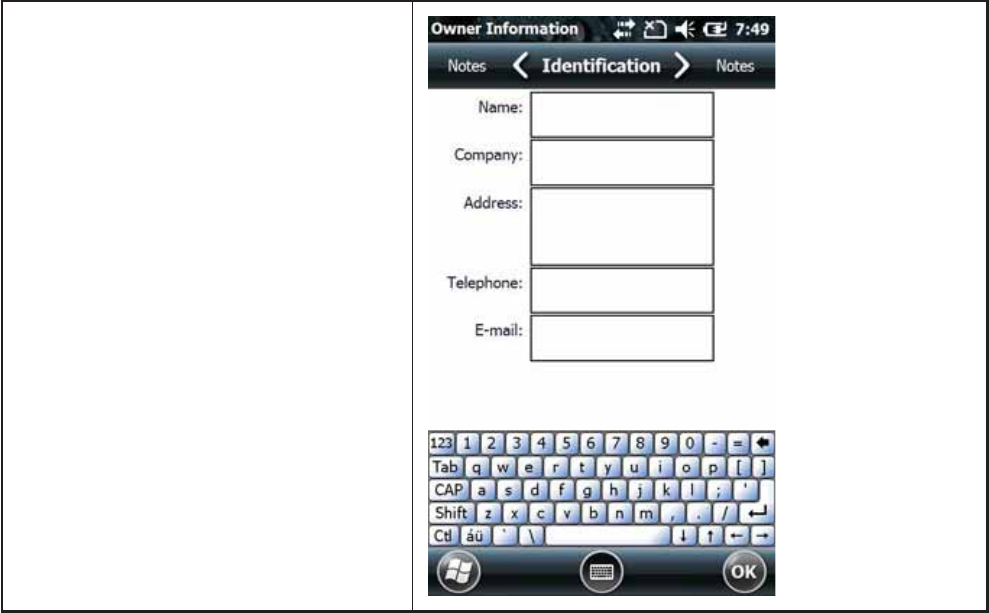
Changing the device name
The device name is used to identify the OT-200 in the following situations:
Connecting with a computer
Connecting to a network
Refer to the following to change the device name.
1.
About.
2. Select the Device ID tab.
3. Enter a name. The device name must
begin with a letter, consist of letters
from A to Z and numbers from 0 to 9,
and should not contain spaces.
4. Tap the OK button.
25
Entering owner information
Enter your personal information, such as your name and address, so that the OT-200 can be returned to you if
it is lost. Refer to the following to enter the information.
1.
Owner Information.
2.
personal information.
26 CHAPTER 2 LEARNING THE BASICS
Recalibrating the screen
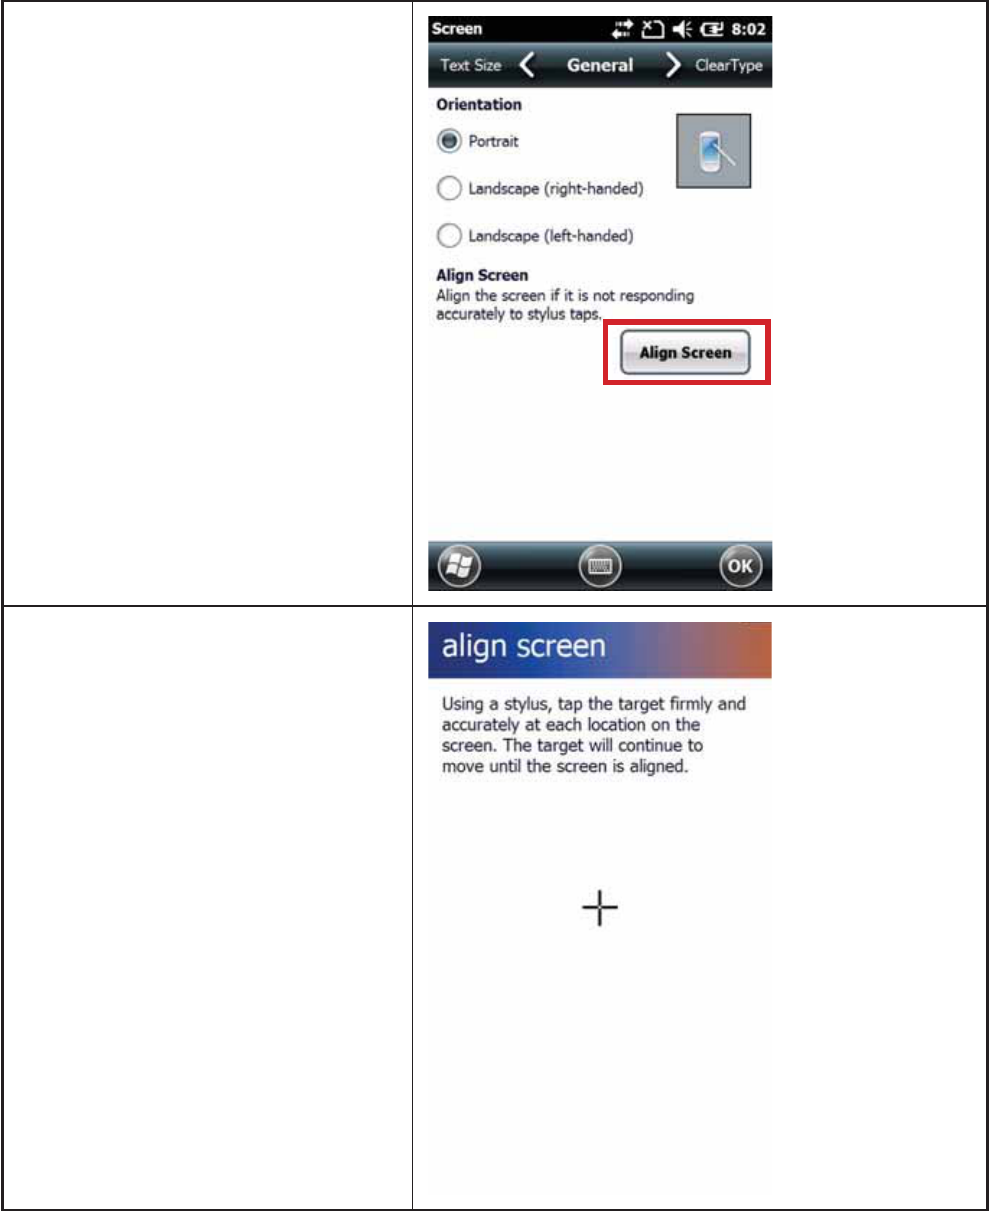
If your stylus seems to be out of sync with the screen, then recalibrate the screen using your stylus.
1.
Screen.
2. On the General tab, tap the Align
Screen button.
3. Follow the displayed instructions
to recalibrate. Please use the stylus
to calibrate the screen for better
accuracy.
27
Setting the date and time
Refer to the following to set date and time.
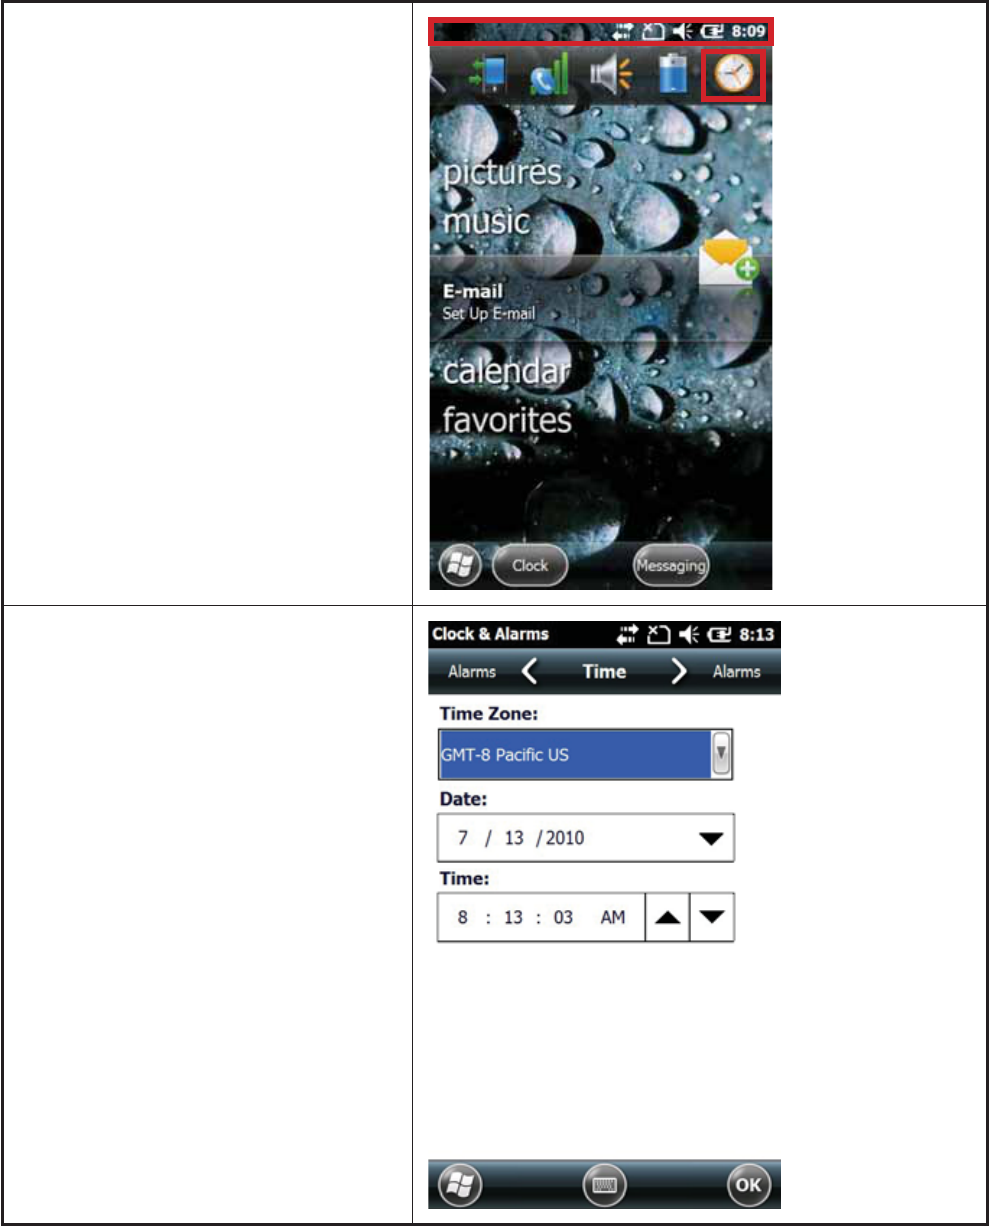
1. Tap the status bar.
2. Tap the Clock icon.
3. Change the date or time and select the
correct time zone.
4. Tap the OK button.
29
Setting the screen orientation
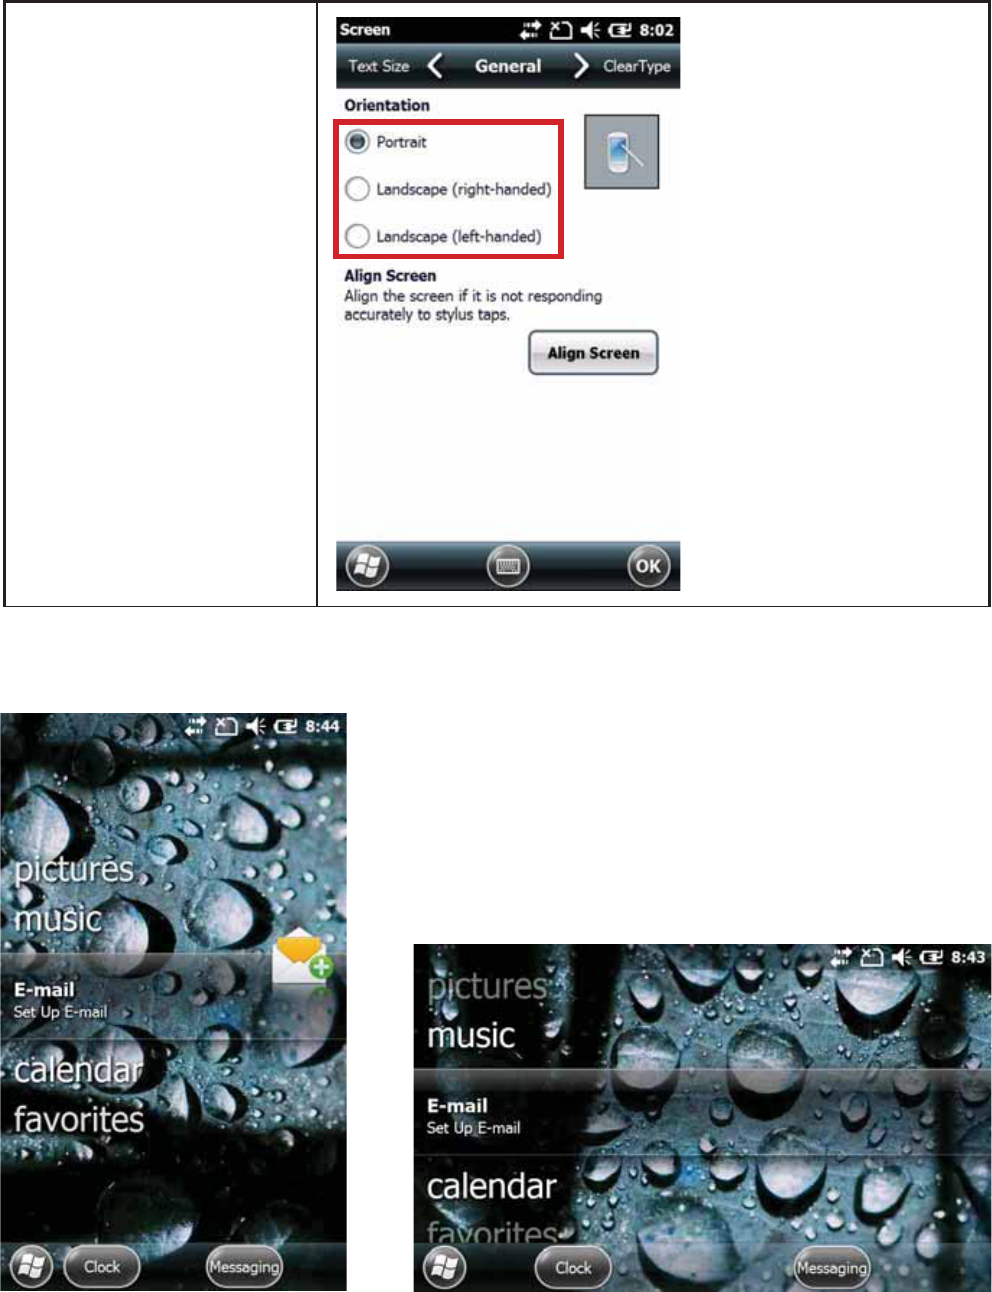
Refer to the following to set the screen orientation.
1.
2. On the General tab select
Portrait or Landscape.
Portrait
Landscape

30 CHAPTER 2 LEARNING THE BASICS
Connecting to a WiFi network
With wireless access, you can connect the device to the Internet. The OT-200 can connect to an IEEE
802.11b/g device or connect directly to other WiFi-enabled devices.
Automatically connect to a WiFi network
When you turn on the WiFi radio, OT-200 automatically detects WiFi networks that are broadcasting their
it manually. Before trying to connect to a WiFi network, determine if authentication information is needed by
contacting your network administrator.
To automatically connect to a WiFi network:
1. Turn on the WiFi.
2. Double tap or on the taskbar.
3. Select the Wireless Information
tab.
4. Select an available network.
5. Tap the Connect button.

31
6. Set the properties. Normally,
all settings will be detected
automatically. If necessary, you
can change settings as follow.
To use data encryption, select
an encryption method from the
Encryption list.
To use authentication, select the
authentication method from the
Authentication list.
7. Tap the OK button.
Manually connect to a WiFi network
A wireless network can be added manually by entering the settings information to add the network. Contact
your network administrator to determine if authentication information is needed before trying to connect to a
WiFi network.
To manually connect to a WiFi network:
1.
2. Double tap or on the taskbar.
3. Select the Wireless Information
tab.
4. Tap Add New...

32 CHAPTER 2 LEARNING THE BASICS
5. Set the properties.
6. Enter the SSID.
To use data encryption, select
an encryption method from the
Encryption list.
To use authentication, select the
authentication method from the
Authentication list.
7. Tap the OK button.
Find your IP address
1. Double tap or on the
taskbar.
2. The WiFi IP address
is displayed at the IP
Information tab.
Specify the IP address and domain name servers (DNS)
The IP address and name server addresses are automatically assigned if DHCP in enabled on the wireless
access point or network server. If your network does not automatically assign the addresses, ask your network
administrator for the information and follow the instructions below.
1.

33
2. Double tap the Network and Dial-up
Connections icon.
3. Double tap the WiFi connection icon.
4. Tap Specify an IP address.
5. Enter IP address, Subnet Mask,
Default Gateway.
6. Tap the Name Servers tab on top
7. Enter the DNS or WINS addresses.
8. Tap the OK button.
34 CHAPTER 2 LEARNING THE BASICS
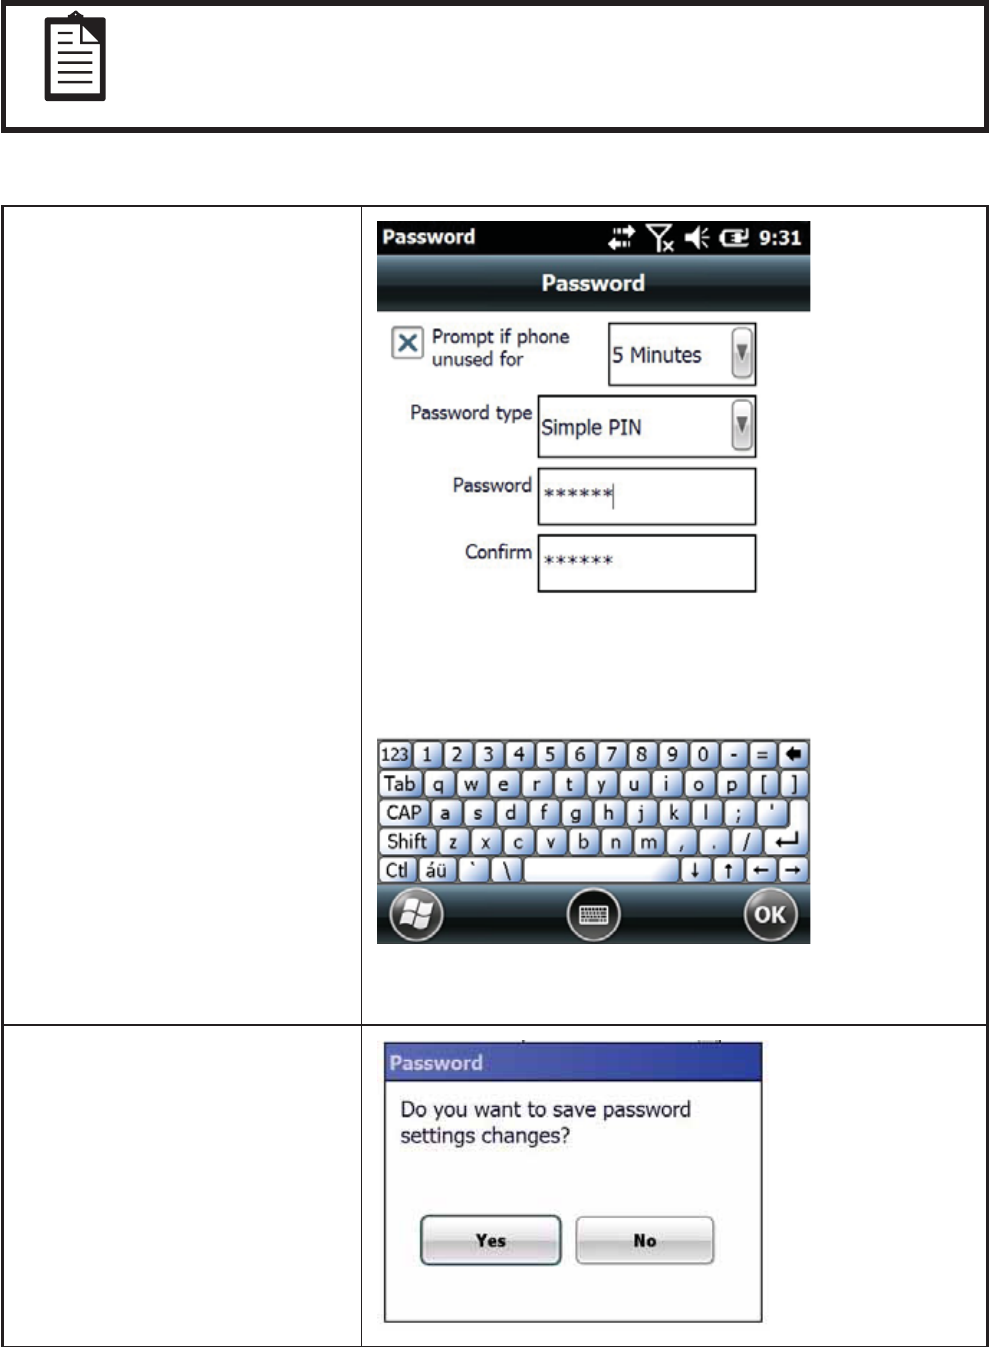
Lock OT-200
private.
NOTE
To create or change the password
1.
2. Select the Prompt if phone
unused for check box.
3. Tap the list next to the Prompt if
phone unused for check box, and
then tap the amount of time that
you want.
4. Tap the Password type list
box, and then tap the type of
password you want.
Simple PIN is a 4-digit
password that uses only the
numbers 0-9.
Strong alphanumeric is a pass-
word that can have uppercase
and lowercase letters, numbers,
and symbols, such as punctua-
tion marks.
5. Tap the Password box, and then
enter the password you want
to use.
6.
password box, and then enter the
password you want to use again.
7. Tap OK Done.
8. At the prompt, tap Yes.
35
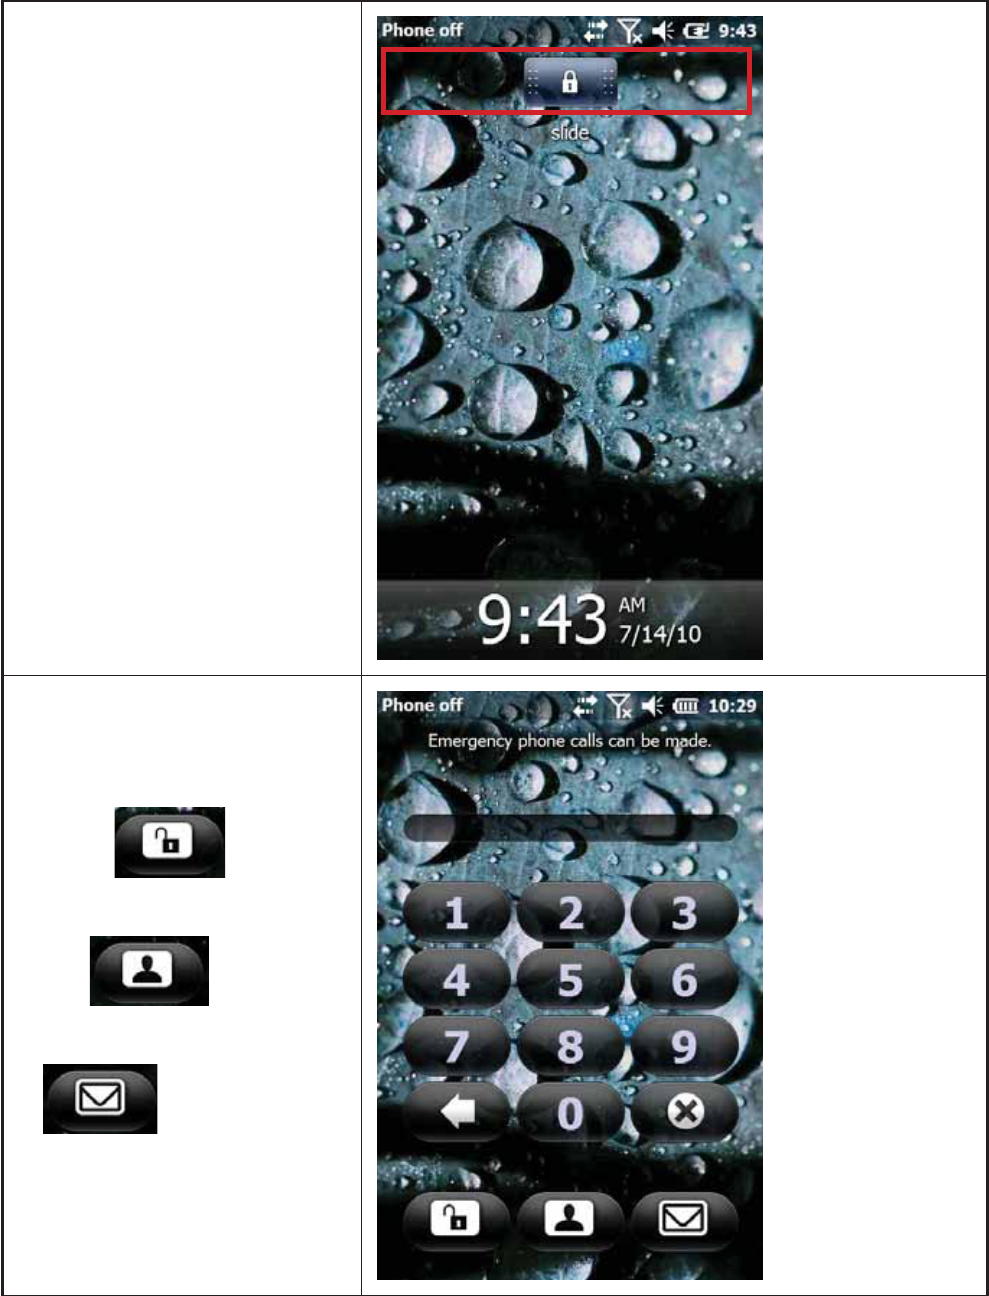
Unlock OT-200
To unlock your phone
1. Drag the lock slider to either
edge of the screen.
2. If you use a password, enter the
password, and then click the
icon for where you want to go:
To go to the Desktop screen, tap
Unlock.
To go to your contacts,tap Con-
tacts.
To go to your e-mail, tap E-mail.
36 CHAPTER 2 LEARNING THE BASICS
Synchronization
By synchronizing OT-200 with your computer, you have access to the same information—your Microsoft
or your computer. It’s a good idea to synchronize regularly.
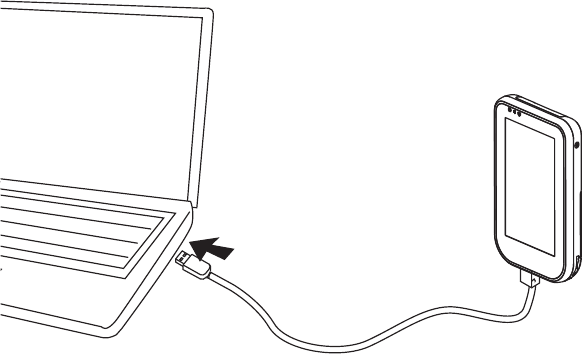
Before you begin, get the Mini-USB to USB cable, you’ll use it to download and install a program that syncs
content between OT-200 and your computer.
If your computer is running Windows Vista or 7, synchronization settings are managed through Windows
WMDC.
Synchronize your data with ActiveSync and Windows XP
1. Install Microsoft ActiveSync. If your computer is running Windows XP or an earlier version,
synchronization settings are managed through Microsoft ActiveSync. You can visit http://www.microsoft.
com/windowsmobile for more information or to download Microsoft ActiveSync.
2. Download and install ActiveSync on your computer.
3. Plug OT-200 into the computer by using a Mini-USB to USB cable.
4.
5.
37
Synchronize your data with ActiveSync and Windows Vista/ 7
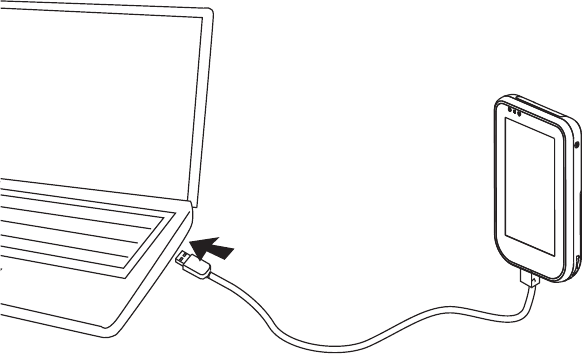
1. Download and install WMDC on your computer. If your computer is running Windows Vista or 7,
visit http://www.microsoft.com/windowsmobile to download WMDC.
2. Plug OT-200 into the computer by using a Mini-USB to USB cable.
3.
4.
38 CHAPTER 2 LEARNING THE BASICS
1. Connect OT-200 to the computer using a Mini-USB to USB cable.
2. On the computer, select Start > Programs > ActiveSync.
3. In the ActiveSync window, select Explore.
4. Double-click My Windows Mobile-Based Device.
5.
6.
7.
Right-click in the folder that you want to move it to, and then click Copy, Cut, or Paste.
8. If the File Conversion dialog box appears, click OK.
1. Connect OT-200 to the computer using a Mini-USB to USB cable and wait for WMDC to launch
automatically.
2. Click File Management to open the Mobile Device folder for OT-200.
3.
4.
5.
Right-click in the folder that you want to move it to, and then click Copy, Cut, or Paste.
6. If the File Conversion dialog box appears, click OK.
39
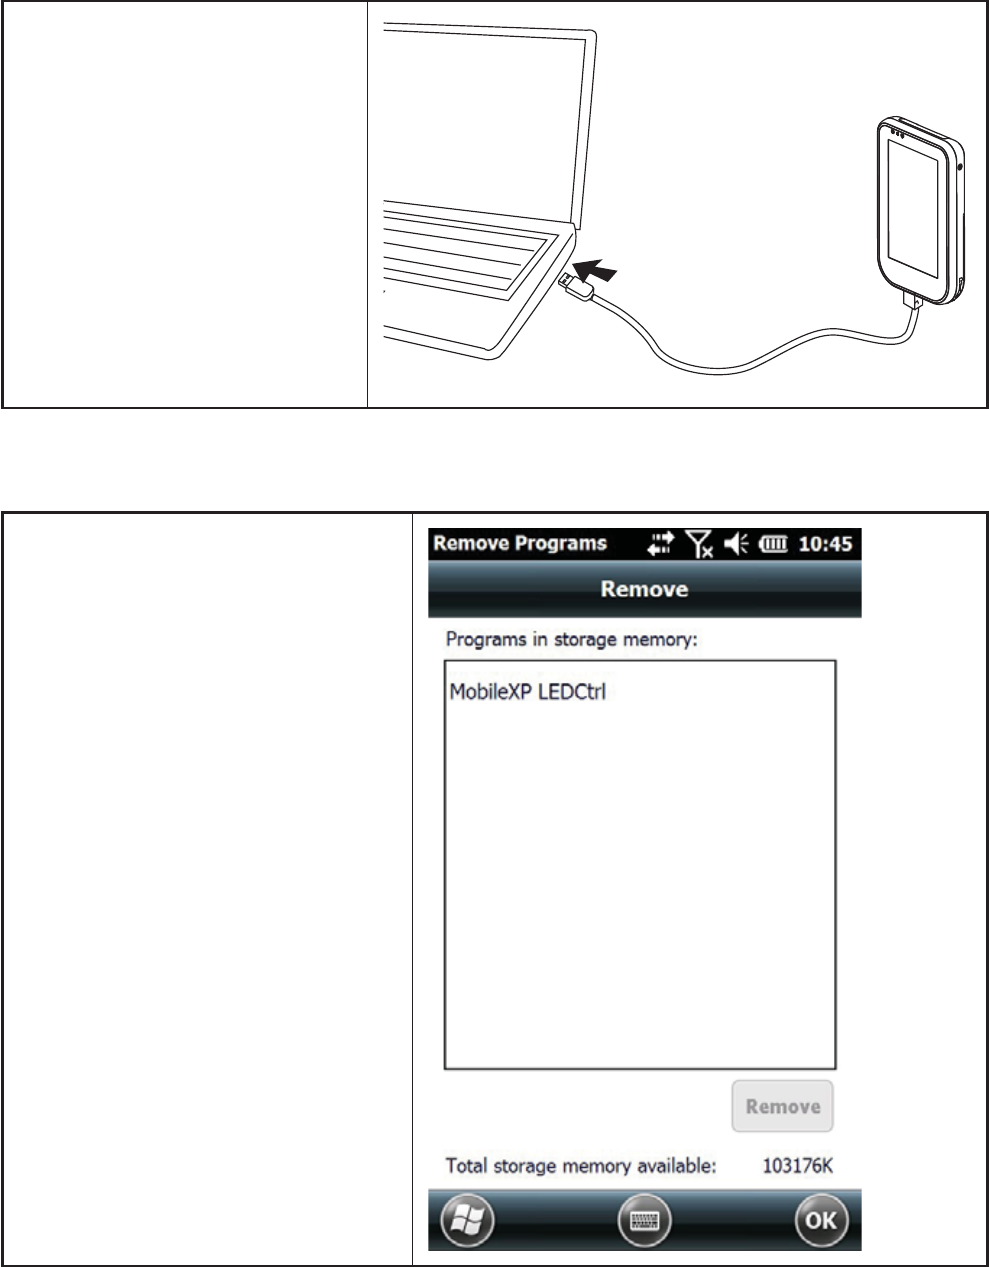
Install and remove programs
To install programs on the OT-200:
1. Use a Mini-USB to USB cable
to connect the OT-200 to the
computer.
2. Follow the instructions in the
Installation Wizard provided with
the program you want to install.
3. Check the screen on the
OT-200 to see if any further steps
are necessary to complete the
program installation.
To remove programs from the OT-200:
1.
Remove Program.
2. Select the check boxes for programs
you want to remove, and then tap
Remove.

40 CHAPTER 2 LEARNING THE BASICS
41
CHAPTER 3
USING THE ACCESSORIES
This chapter describes how to use the device accessories.
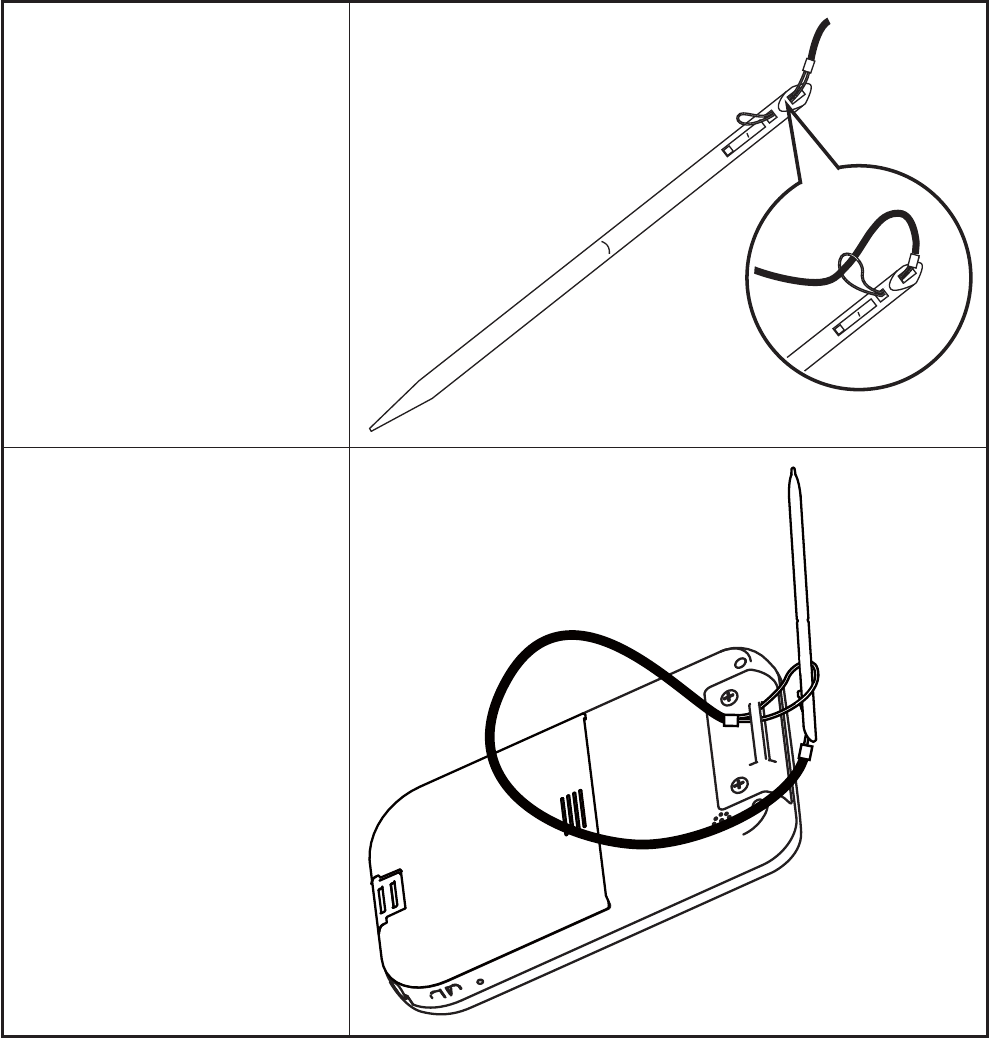
Attaching the stylus cord
Refer to the following to attach the stylus cord.
1. Thread the small loop of the
stylus cord through the strap
eyelet on the stylus and pull the
other end of the cord through
the small loop until the cord is
2. Thread the other small loop of
the stylus cord through the top
hand strap eyelet on the device
and use stylus pull the cord
through the small loop until the
42 CHAPTER 3 USING THE ACCESSORIES
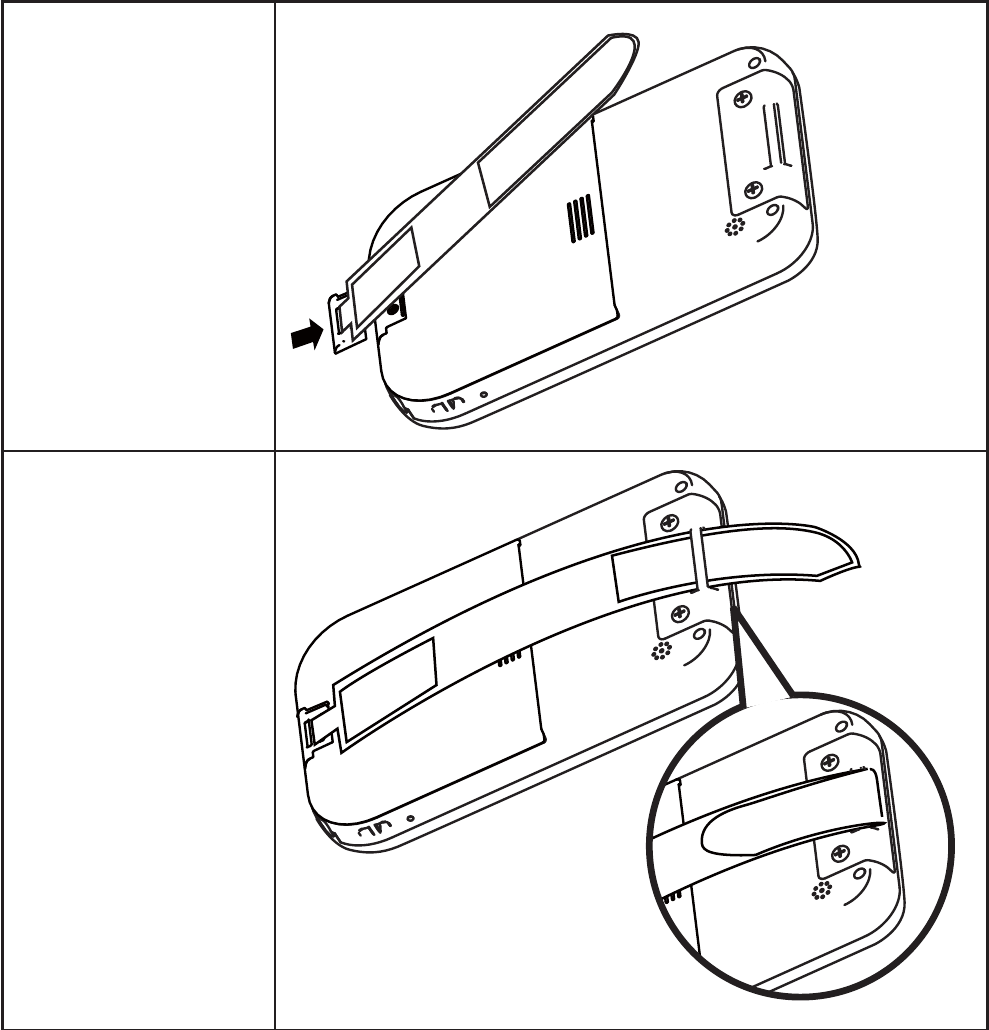
Attaching the hand strap
Refer to the following to attach the hand strap.
1. Insert the bottom of the
hand strap into the slot
at the bottom of the
battery cover, until it
clicks into place.
2. Thread the end of the
hand strap through the
top hand strap eyelet
on the device then fold
and stick together.
The hand strap length
can be adjusted by
sticking the Velcro to a
higher or lower position
on the strap.
43
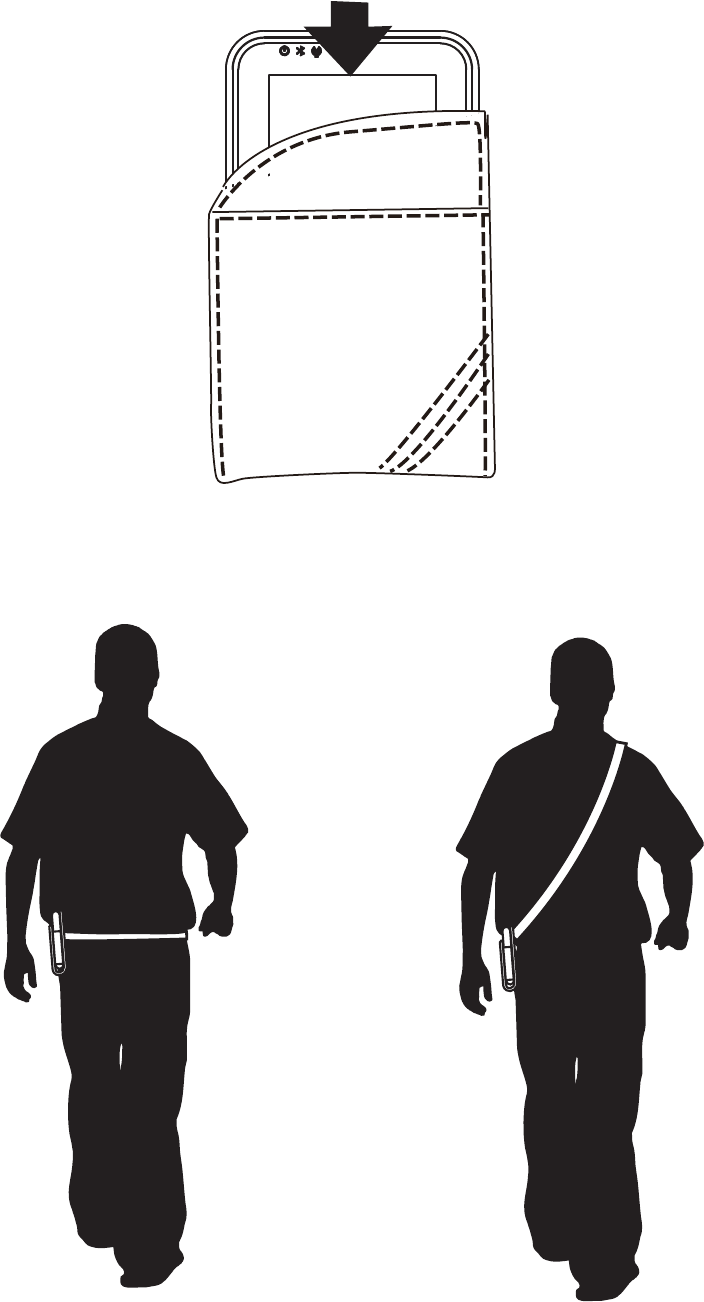
Using the leather pouch
Using the leather pouch to carry the OT-200 is a good way to keep it protected. Simply insert the device into
the leather pouch as shown below.
A belt clip located on the back of the leather pouch allows you to wear the OT-200 on your side. In addition, a
shoulder strap can be attached to the two integrated rings on the back side.
Shoulder strap is
adjustable
Clip to your belt
44 CHAPTER 3 USING THE ACCESSORIES
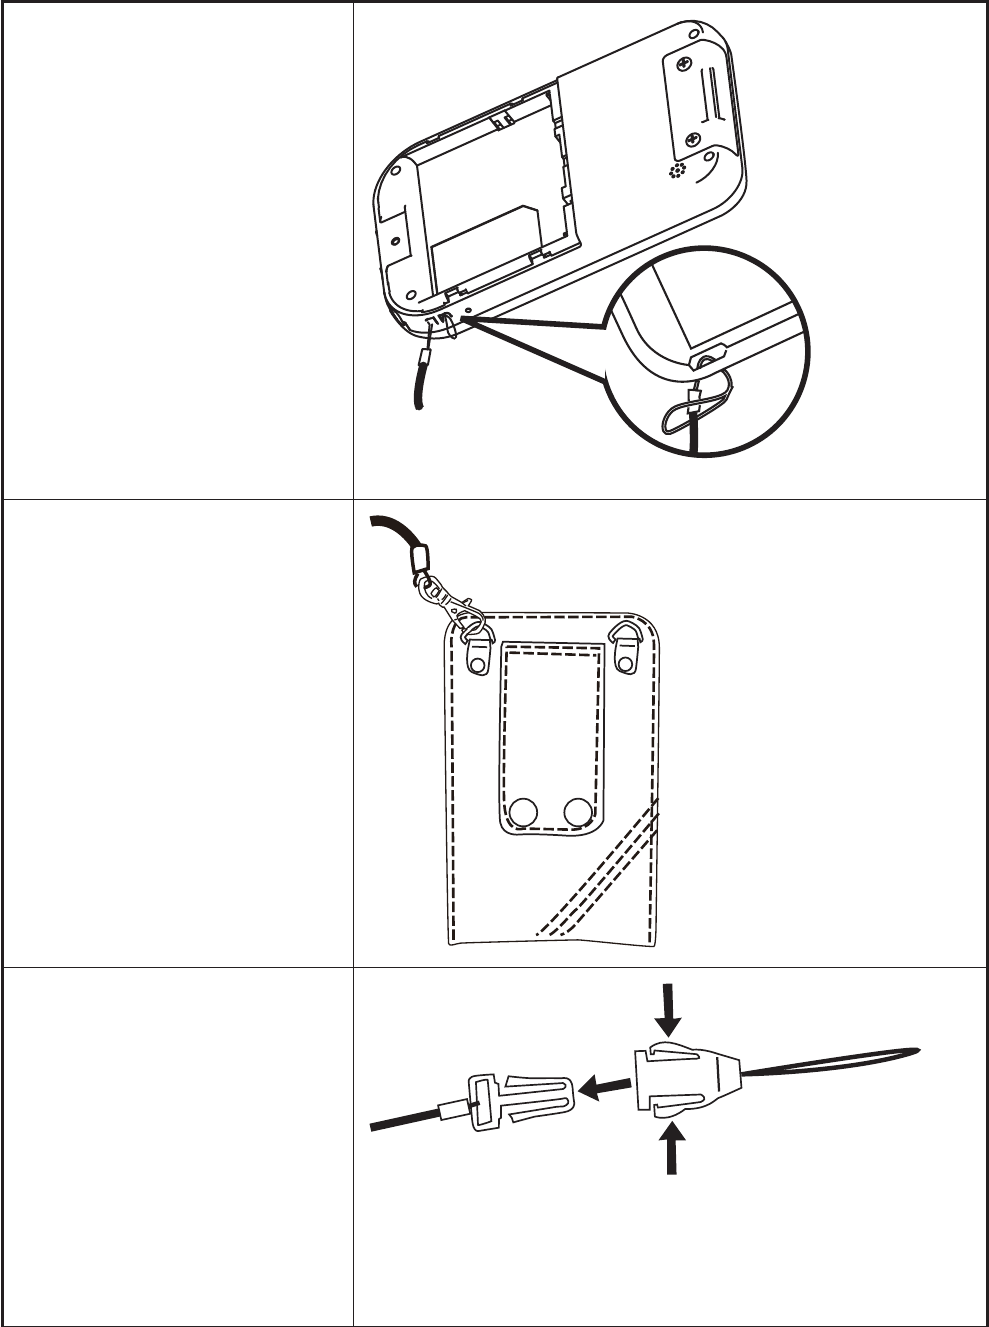
Attaching the leather pouch cord
A leather pouch cord is provided to attach device to the leather pouch.
1. Open the battery cover.
2. Thread the small loop of the
cord through the bottom corner
strap eyelet on the device.
Pull the other end of the cord
through the small loop until the
3. Replace the battery cover.
4. Lock the other end of the cord
to one of the rings on the back
of the leather pouch.
5. To insert device into cradle
for charging, simply detach as
shown.
45
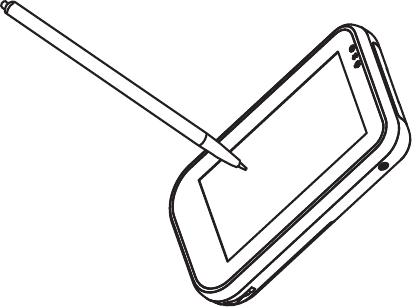
Using the high quality stylus
A high quality stylus is included for your convenience.

46 CHAPTER 3 USING THE ACCESSORIES

47
APPENDIX
This appendix describes locating and solving problems that you may encounter while using the OT-200.
Troubleshooting
Often after time spent troubleshooting, the problem is traced to something as simple as a loose connection.
Tips for Troubleshooting
more quickly. Try to pinpoint the problem and thus avoid replacing non-defective parts. For example, if you
replace batteries and the problem remains, put the original batteries back and go to the next step.
Keep a record of the steps you take when troubleshooting: The information may be useful when calling for
technical support or for passing on to service personnel.
General Problems
Refer to the following for general problems you may encounter.
PROBLEM SOLUTION
You cannot turn on the device Plug AC adaptor directly into device to check device is
functioning. If device functions properly, then issue may be
with the battery.
Check that the battery is fully charged and properly installed
into device.
You have trouble charging the battery Check that the AC adaptor is plugged in correctly to the DC
jack on the device, and the other end into the wall outlet.
If using the cradle for charging, check that the AC adaptor is
plugged in correctly to the cradle and the wall outlet.
Check for damage to the power cables.
If battery has been used extensively and is old, replace with
new battery and try again.
You have trouble connecting to the
Internet
Check that device is connected to a WiFi network with the
Check if the WiFi network provides an IP address
automatically via DHCP. If not, contact your network
administrator for the relevant IP address, subnet, gateway,
and DNS servers, which you need to enter manually.

48 APPENDIX
Why does the device operate slowly at
times?
Reset device. Does problem remain? If this solves problem,
check if user installed applications are causing system to
slow down.
Check that enough free storage memory remains on device,
If device shows low storage memory, delete unnecessary
Having the OT-200 Serviced
If you are unable to solve the problem, you should have the device serviced. Pack the device in the original
the device to the place you purchased it.
Guidelines for care and maintenance
It is recommended that you follow certain guidelines to prevent possible damage to the device and to keep it
in a good condition.
Using the device
Avoid using the device in dusty and extremely high or low temperature environments.
Do not spill water on the device or expose it to the rain.
Avoid removing the battery without turning off the device.
Do not apply strong force or shocks to the device.
Keep the device and its accessories away from children.
Do not insert metal objects into the charging/communications port of the device. This can short-circuit
the battery and result in danger.
Cleaning the device
Use a soft, clean, and slightly moistened cloth to clean the device. Do not let water come into contact
with the microphone, speaker, or with any of the connectors.
Do not wipe the device with any corrosive liquid or coarse objects. This can damage the outer surface
of the device.
Transporting and storing the device
Do not leave the device in extremely high or low temperature environments.
If device is to be transported or stored for a long period of time, please remove the battery, and store
both device and battery in a cool, dark, and dry place. Ideally, batteries should be stored at around
need to be charged every 3 months to prevent battery degradation
Batteries in storage need to be charged every 3 months to prevent battery degradation.

49
CPU Samsung S3C6410 667 MHz processor
Operating System Microsoft® Windows™ Mobile 6.5 Professional
Display 4.3” TFT LCD with Touch Screen, widescreen 800*480
Memory 256MB Flash, 256MB SDRAM
Communication WiFi 802.11 b/g
Bluetooth 2.0 class 2
Telecom standards
EDGE
Atheros
Extension slot
Interface Mini-USB 2.0
Other
Internal microphone
Speaker
Features
Wireless roaming
5510 Lock
Battery cover safety protection
Remote Desktop
Lock screen
Ruggedness IP54
1.2 meters drop tested
Environmental Operating temperature: 0oC to 40oC
Storage temperature: -20oC to 60oC
Battery
Dimensions
82 *133 * 19 mm
Weight Approximately 245g with battery
Optional modules
Accessories AC adaptor, Cradle, Battery Stylus cord, Hand strap, Leather pouch,
Leather pouch cord, Shoulder strap, High quality stylus
EMC: FCC / CE / 3C / BSMI / VCCI

50 APPENDIX