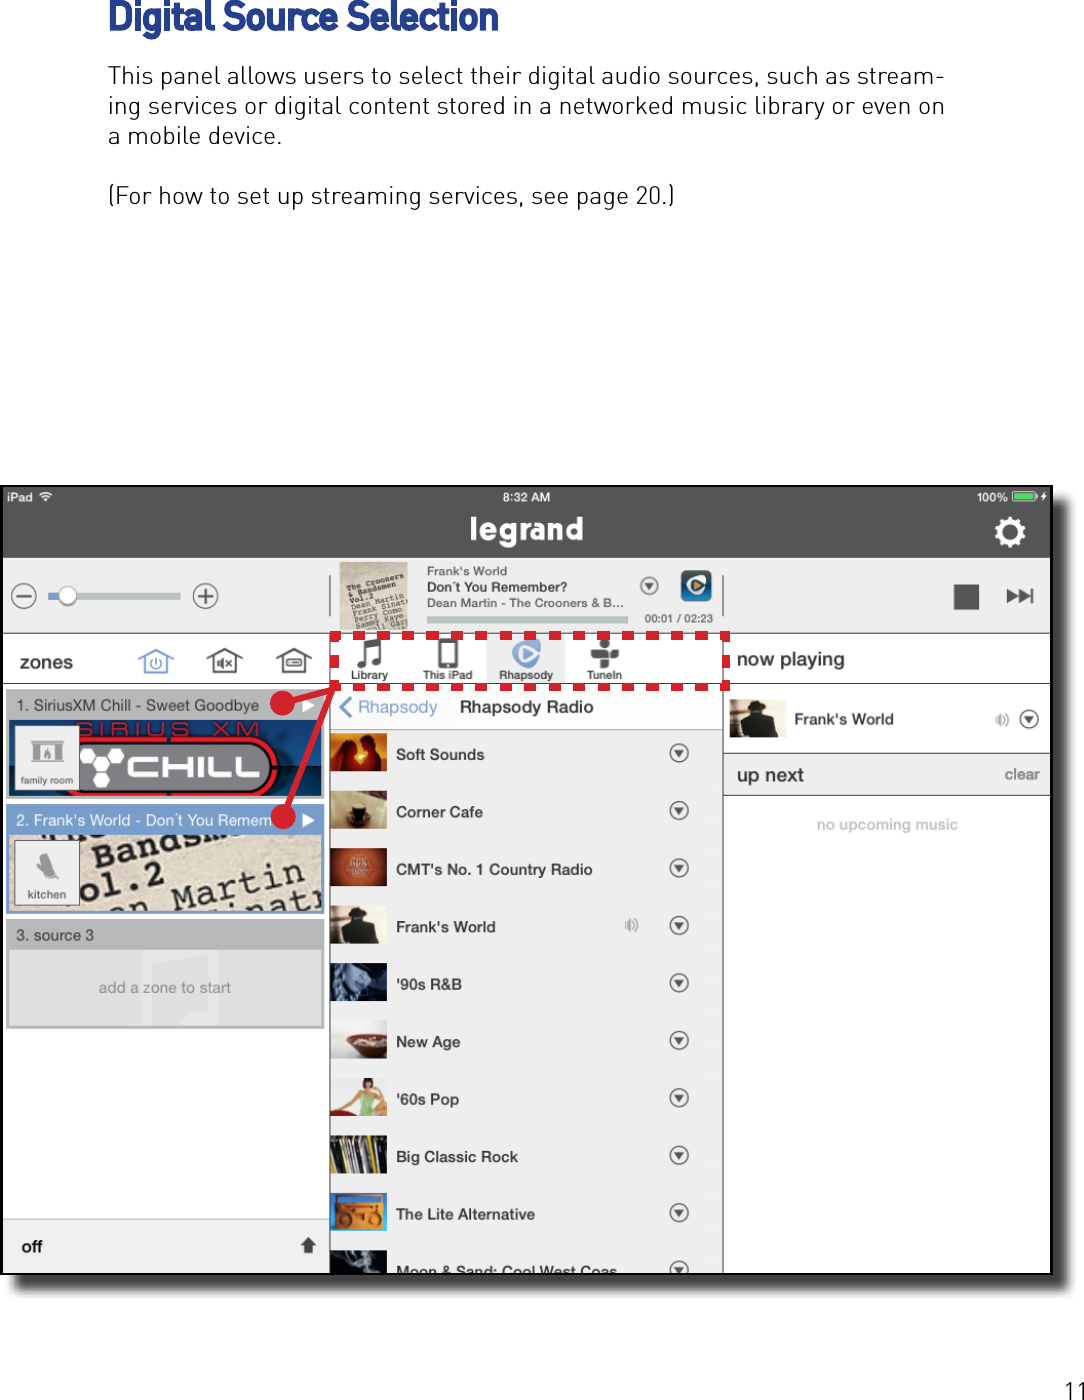
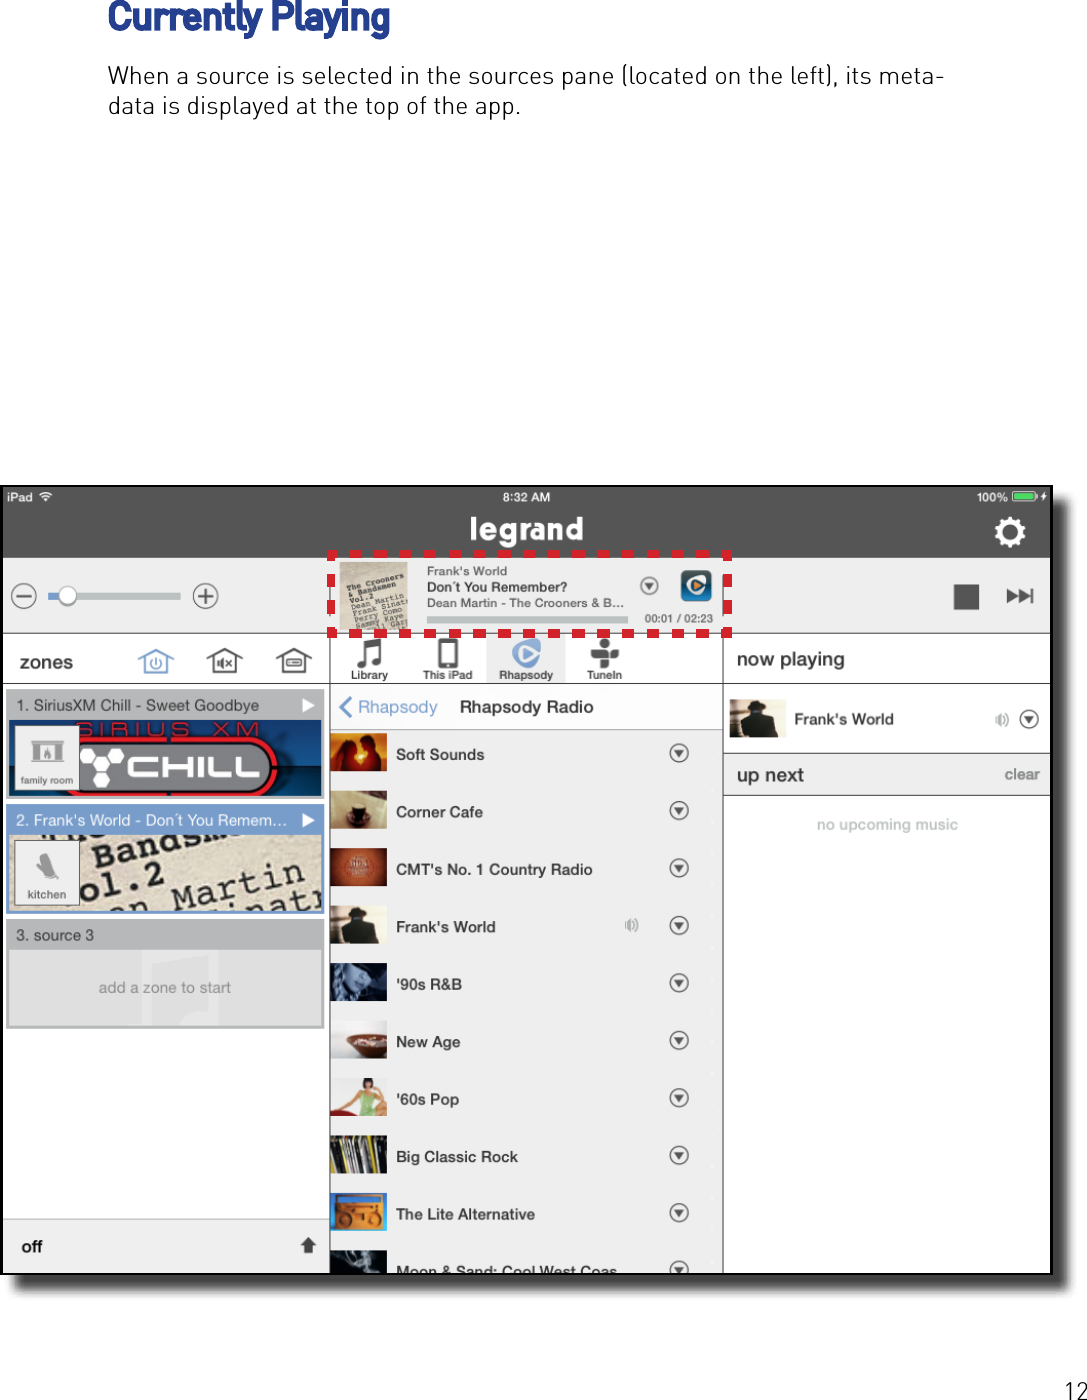
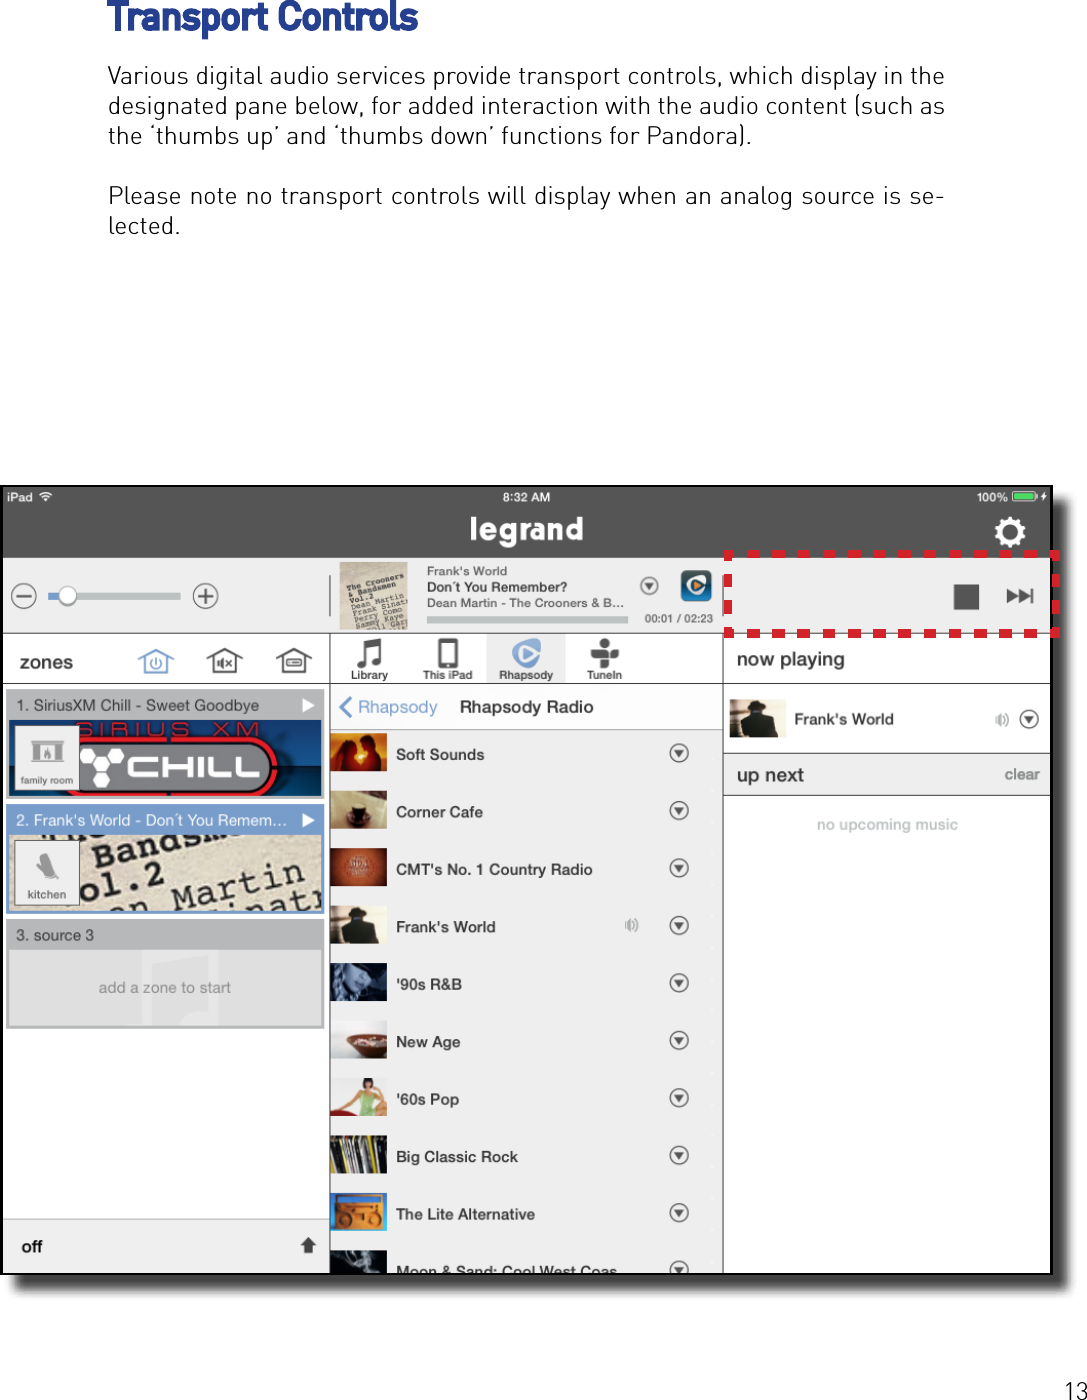
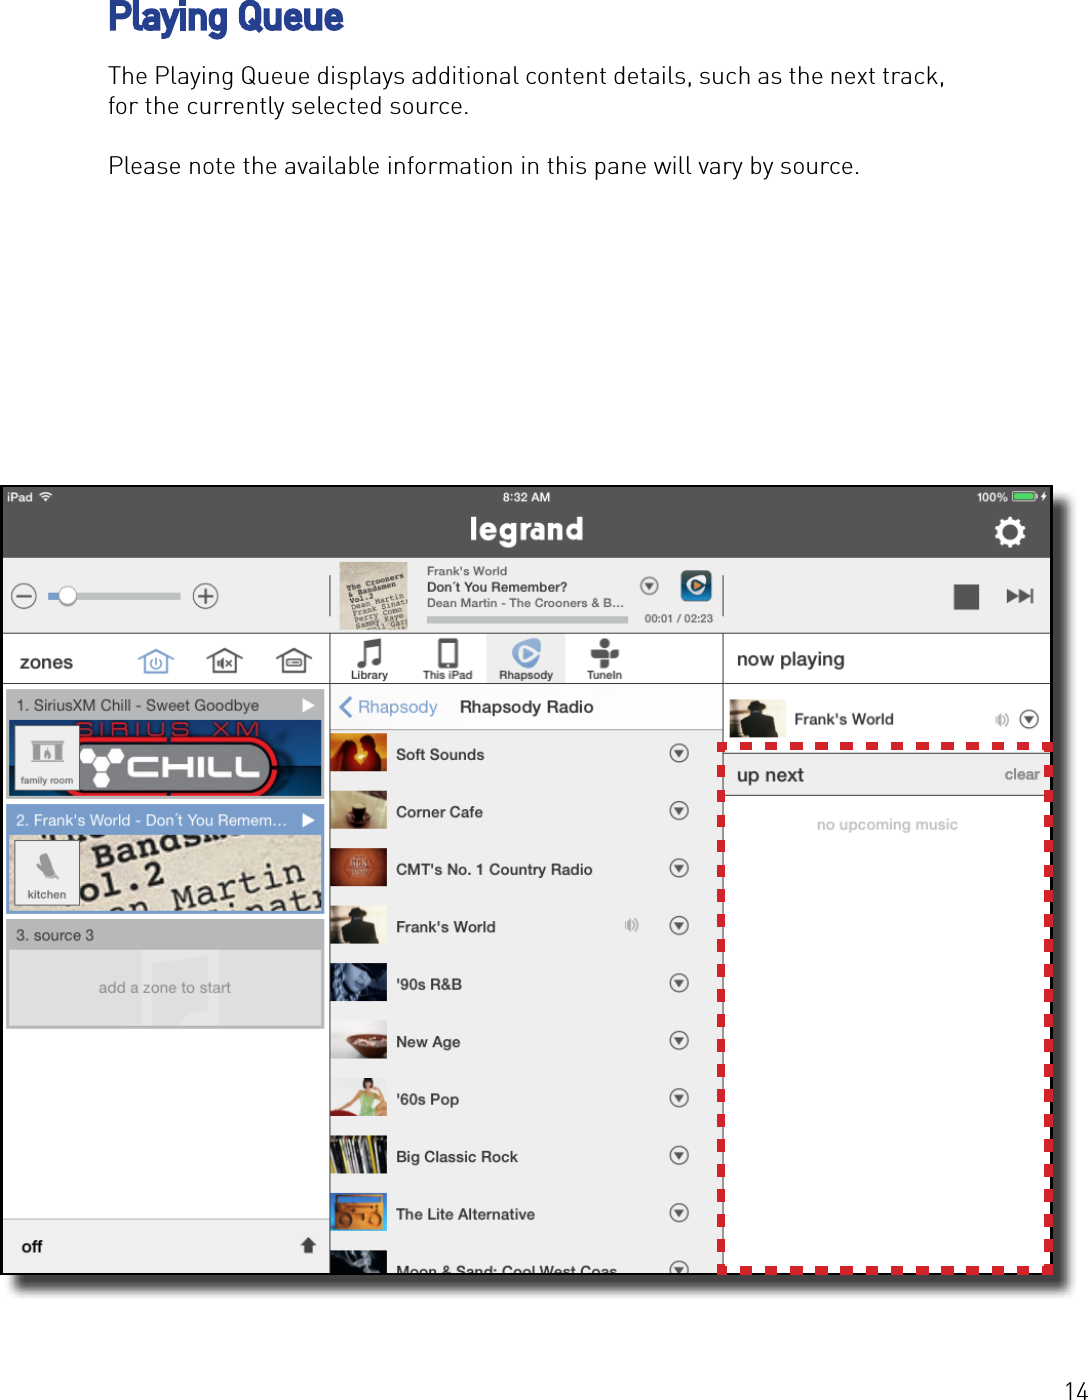
Pass and Seymour d b a Legrand AU7100 DIGITAL AUDIO BT RCVR V4.0 W/ A2DP User Manual Digital Audio Quick Start Guide

Pass & Seymour, Inc. d/b/a Legrand DIGITAL AUDIO BT RCVR V4.0 W/ A2DP Digital Audio Quick Start Guide

User Manual

1Legrand Digital Audio System User Guide
2Contents1  Legrand Digital Audio System User Guide3  System Overview4 Controllers5  What’s in the Enclosure?5 Modules6  What’s in the Wall?6  Keypads & Inputs7  The Control App - Getting Around7  Zones Pane (Rooms)8  Sources Pane9  Whole House Control10  Volume Control11  Digital Source Selection12  Currently Playing13  Transport Controls14  Playing Queue15 Settings16  Wall Devices16  The AU7010 Digital Audio Amplified Keypad17  The AU7007 Global Source Input18  The AU7008 Local Source Input19  The AU7100 Digital Audio Bluetooth Receiver20  AU7100 Pairing and LED indication21  Adding Digital Services - Pandora22  Adding Digital Services - TuneIn23  Adding Digital Services - Rhapsody24  Adding Digital Services - SiriusXM25  Adding Digital Services - Music Libraries26  Adding Digital Services - Music Libraries27  Playing Music with the App27  Selecting a Zone (Room) to start Music28  Selecting music for your zone29  Selecting a Global Source Input 30  Selecting a Local Source Input31  The Control App - Settings31 Settings32  Settings - Creating Persistent Groups 133  Settings - Creating Persistent Groups 234  Settings - Disbanding Persistent Groups 135  Settings - Disbanding Persistent Groups 236  Settings - Zones Settings37  Settings - Naming a Digital Audio Global/Local Source38  Settings - General/About 39  Settings - General/About/Software Update40  FCC and IC information
3System OverviewThe Digital Audio System distributes four sources to up to sixteen zones, with features such as access to digital audio content from Internet Radio, streaming services, and net-worked devices, as well as analog components. It is con-trollable through the system’s amplified keypads, as well as convenient iOS and Android apps for mobile devices. The system begins with the Digital Audio Distribution Mod-ule (AU7000) which distributes up to four audio sources to four zones. The audio is digitally transmitted from the sourc-es to a zone’s Digital Audio Amplified Keypad (AU7010-XX). This system can be expanded to up to sixteen zones us-ing up to three Digital Audio Expansion Modules (AU7004).  Source options include the Digital Input Module (AU7001) which provides access to content* such as Pandora, Rhap-sody (subscription needed), SiriusXM (subscription needed), and TuneIn, as well as networked iTunes or Windows Me-dia library content, NAS drive music files, and more.  Analog sources can also be accommodated with use of the Digital Audio Local Source Input (AU7008-XX) and the Digital Audio Global Source Input (AU7007-XX).  The AU7010-XX keypads are the standard power device, providing 20 watts of power to a zone.  Common functions like power on/off, volume, mute, and source selection can be controlled directly from this keypad.  Additionally, the keypad offers a favorite feature that enables users to set a favorite music or news source at a preferred volume by pressing and holding the favorite but-ton. The keypad will then allow users to press the favorite button and return to that source/volume quickly. Easy to use, the  Digital Audio System is a flexible, feature-rich, and accessible structured wiring audio solution.
4The Digital Audio System can be controlled by smartphones, tablets and by the AU7010-XX Keypad.  For controlling the system via smartphone or tablet, free applications are available for both Android and iOS devices through the Google Play and App Stores. Please search for ‘On-Q Digital Audio’ to down-load the app.  ControllersAndroid TabletiOS TabletiOS PhoneAndroid PhoneDigital Audio Amplified KeypadAU7010-xx
5The Digital Audio System is comprised of enclosure-based modules, as well as keypad and input devices located throughout the home. The heart of the system, the Digital Audio Distribution Module (AU7000), as well as the Digital Audio Power Distribution Module (PW1020), are required for every system. Depending on a system’s specific configuration, however, the enclosure might also include the Digital Audio Input Module (AU7001) and/or Digital Audio Ex-pansion Module (AU7004). The AU7001 provides access to networked digital audio content and streaming music services. Up to four AU7001 modules can be used within a system. For systems with more than four intended zones, the AU7004 modules can be used to expand the system, in increments of four, to up to 16 total zones.What’s in the Enclosure?Digital Audio Input Module AU7001Digital Audio Expansion Module AU7004Digital Audio Power  Distribution   Module PW1020Digital Audio Distribution ModuleAU7000Modules
6In addition to the enclosure-based modules, every Digital Audio System also includes use of in-wall Digital Audio Amplified Keypads (AU7010-XX) in every zone. Each keypad provides both the amplification for a specific zone, as well as convenient access to core controls, such as power on/off, volume up/down, mute, and source selection. Additionally, the Digital Audio Amplified Keypads also include a Favorite feature, offering quick access to a preferred source/volume setting. Also installed in a specific zone, a Digital Audio System might include the use of a Digital Audio Global Source Input (AU7007-XX) or a Digital Audio Lo-cal Source Input (AU7008-XX). These provide global (full system) or local (the specific zone) access to traditional analog devices, such as Set Top Boxes, TV’s,  MP3 players, Xbox systems, etc.What’s in the Wall?Digital Audio Amplified KeypadAU7010-XXDigital Audio Global Source InputAU7007-XXDigital Audio Local Source InputAU7008-XXKeypads & Inputs
7Zones Pane (Rooms)Offering complete control of a Digital Audio System, the free applications (apps) available for Android and iOS devices provide both simple navigation and a complete view of a system’s current status.It all starts with the zones, or rooms, a system includes. In this example, we will use two zones, the Family Room and the Living Room. When all zones are off (not playing music), all available zones will display in the bottom left hand corner of the screen.Please note an iPad in portrait mode removes the zone pane from view. Se-lecting ‘Zones’ will display the panel, as shown in Figures 2 and 3 below. In the case of a smartphone, once content is playing, pressing the home icon will return the app to the zones pane (Figures 4 and 5).The Control App - Getting Around12 345TT
8Sources PaneAlso on the left hand side of the app screen, the Digital Audio System’s avail-able sources will be displayed. The example below shows a system with two Digital Audio Input Modules and one Digital Audio Global Source. This example is showing two Digital Audio Input Modules as sources one and two (identified by “select music...”) and one Global Source Input (identified by “source 3”).
9Whole House ControlThis area of the application provides global commands that affect all zones simultaneously.                                This command turns all zones off               This command mutes and un-mutes all zones               This command selects a single source for all on zones
10Volume ControlVolume can be controlled by sliding the fader, or incrementally increased by tapping the plus (+) or minus (-) buttons.  If a single zone is playing, adjusting the volume will affect that single zone. If multiple zones are playing within a group, multiple volume control faders will open to adjust each zone
11Digital Source SelectionThis panel allows users to select their digital audio sources, such as stream-ing services or digital content stored in a networked music library or even on a mobile device.  (For how to set up streaming services, see page 20.)
12Currently PlayingWhen a source is selected in the sources pane (located on the left), its meta-data is displayed at the top of the app.
13Transport ControlsVarious digital audio services provide transport controls, which display in the designated pane below, for added interaction with the audio content (such as the ‘thumbs up’ and ‘thumbs down’ functions for Pandora). Please note no transport controls will display when an analog source is se-lected.
14Playing QueueThe Playing Queue displays additional content details, such as the next track, for the currently selected source. Please note the available information in this pane will vary by source.
15SettingsThe gear icon in the top right corner of the app screen accesses the system’s settings. Within Settings, you can add zones, setup additional streaming ser-vices, or manually access software updates.
16The AU7010 Digital Audio Amplified KeypadThe Digital Audio Keypad provides the amplification that powers the speakers in the zone and provides access to core control functions such as volume up/down, mute, power on/off, source selection and access to preset favorites.To set a favorite, select the desired source and adjust volume to a preferred level, then press and hold the ‘F1’ button until all the lights on the keypad flash indicating the favorite has been set.  Note: Wall devices are available in White, Light Almond and Nickel finishes.Digital Audio Amplified KeypadAU7010-XXVolume ControlSource SelectionVolume LED Bar GraphVolume UpVolume DownMute KeySource SelectionPower ON/OFFWall Devices
17The AU7007 Global Source InputThe Digital Audio Global Source Input (AU7007-XX) introduces analog sourc-es into the Digital Audio System for global access through all zones. Sourc-es connect to the Digital Audio Global Source Input either through a stereo 3.5mm line cable, in the case of a MP3 player, or through an adapter cable for 3.5mm to RCA connection, in the case of Cable Box or gaming consoles. The source is then selectable through both keypad and app control.Digital Audio Amplified KeypadAU7010-XX3.5mm Audio Input
18The AU7008 Local Source InputSimilar to the AU7007-XX, the Digital Audio Local Source Input (AU7008-XX) also introduces analog sources into the Digital Audio System. However, it is for localized access within the specific zone where it is connected.   Selec-tion of the AU7008 is done at the keypad via the Source Selection button or through the application.Digital Audio Local Source InputAU7008-XX3.5mm Audio Input
19The AU7100 Digital Audio Bluetooth ReceiverThe AU-7100 Bluetooth receiver was specially designed to fit into the AU-7007 Global SOurce Input and AU-7008 Local Source Input.  This bluetooth receiver offers one thousand unique SSID names, multiple units can be deployed in a single installation and uniquely identified. AU7100 installed ona AU7007 local SourceInput
20AU7100 Pairing and LED indicationTo pair with the AU7100......Instruction here
21Adding Digital Services - PandoraTo add the Pandora music service to a Digital Audio System:1. Select ‘Add a Source’ or the Settings icon.2. If you are already a Pandora user, select ‘I have an account.’ Otherwise, you can set up a free account at this time.3. Enter the user credentials for your Pandora account. 4. Press ‘Done’ and return to the home screen. Your Pandora account is now an available source in your Digital Audio System.1 23 4TT
22Adding Digital Services - TuneInTo add the TuneIn music service to a Digital Audio System:1. Select ‘Add a Source’ or the Settings icon.2. If you are already a TuneIn user, select ‘I have an account.’ Otherwise, you can set up a free account at this time.3. Enter the user credentials for your TuneIn account. 4. Press ‘Done’ and return to the home screen. Your TuneIn account is now an available source in your Digital Audio System. NOTE: TuneIn Radio is a service that works with or without an account.  Se-lecting TuneIn on the Source Selection Wheel will bring up radio choices as well as local choices that are based upon your location. 1 23 4TT
23Adding Digital Services - RhapsodyRhapsody is a paid subscription service. To add a Rhapsody subscription account:1. Select ‘Add a Source’ or the Settings icon.2. If you are already a Rhapsody user, select ‘I have an account.’ Otherwise, you can set up a free trial at this time.3. Enter the user credentials for your Rhapsody account. 4. Press ‘Done’ and return to the home screen. Your Rhapsody account is now an available source in your Digital Audio System.1 23TT
24Adding Digital Services - SiriusXMSiriusXM is a paid subscription service. To add a SiriusXM subscription account:To add the SiriusXM music service to a Digital Audio System:1. Select ‘Add a Source’ or the Settings icon.2. If you are already a SiriusXM user, select ‘I have an account.’ Otherwise, you can set up a free trial at this time.3. Enter the user credentials for your SiriusXM account. 4. Press ‘Done’ and return to the home screen. Your SiriusXM account is now an available source in your Digital Audio System.1 23TT
25Adding Digital Services - Music LibrariesIn addition to providing access to digital streaming music services, the      Legrand Digital Audio System can access digital files located on the home’s network.  Files stored on NAS drives or one or more iTunes, WIndows Media or music folders can be accessed.  There are multiple ways to gain access to these folders.  The easiest is to download and use the NuVo Music Share program available for PC and Mac from the Legrand.us website. Download and install the program, run the program and follow the instruc-tions.1 23 45
26Adding Digital Services - Music LibrariesAnother method is to enter the path for the folder you wish to access, as shown in steps one through three.1 23
27Selecting a Zone (Room) to start MusicTo begin playing music, a zone or room must be selected.  To play music:1. Press and hold your finger on a zone icon to select, as seen in Figure 1 below.2. Drag the selected icon to the desired source. 3. Once hovering above the desired source, release the room icon and it will now be placed into source one.  From there we will need to go to the sources pane and select some content to play.1 23 4Playing Music with the AppTTT
28Selecting music for your zoneTo play music, press the source pane with your desired zone, then select the desired service or device from the selection pane in the center panel of the app screen (highlighted in red in the image below). To browse all available services or devices, simply slide finger left or right. Once you’ve selected a service or device, the center panel will display the available content for selection.
29Selecting a Global Source Input To select the Digital Audio Global Source Input (AU7007-XX) as your source, begin by dragging the appropriate zone icon to the source pane for the AU7007-XX.  1 2
30Selecting a Local Source InputTo select the Digital Audio Local Source Input (AU7008-XX) as your source, be-gin by dragging the appropriate zone icon to the source pane for the AU7008-XX. Please note this source will only be available in the zone where it is con-nected.1 23 4TTT
31SettingsThe Settings section of the Digital Audio app, represented by the gear icon, provides additional control and customization for your system.   This is where  music services can be added and removed, zone parameters can be adjusted, status of the system components can be determined, as well as other fea-tures.To enter the Settings tap the Settings Gear.The Control App - SettingsT
32Settings - Creating Persistent Groups 1Within Settings, one option for customizing a system is the creation of per-sistent groups. This allows multiple zones to be joined together more per-manently than by simply dragging multiple zones into the same source pane. To create a group:1. Go to Settings, Zones & Groups2. Select ‘Add New Group’3. From the list of available zones, select the desired zones for your group 1 23a 3bTTTT
33Settings - Creating Persistent Groups 2Continuing instructions from the previous page:4. Select an icon for the new group5. Name the group, then tap ‘Done’6. The newly created group will now display on the home page.4 56 6bTTT
34Settings - Disbanding Persistent Groups 1To disband a persistent group, follow the steps below:1. Go to Settings, Zones & Groups2. Select the group you wish to disband3. Select ‘Ungroup’4. Confirm the request  1 23 4TTTT
35Settings - Disbanding Persistent Groups 2Continuing instructions from the previous page:5. You will now notice that the group has been disbanded and the individual members are now on their own.6. Go to he home page to see the individual zones again.5 6T
36Settings - Zones SettingsZones have many settings that can assist with the user experience of how the system operates.  To enter the zone settings do the following:1. Go to Settings, Zones & Groups2. Select a Zone3. Adjust your desired setting options, as shown in pictures three and four1 23 4TTT
37Settings - Naming a Digital Audio Global/Local SourceSources can be named and it’s suggested to only name Global and Local Source Inputs.  These inputs will be attached to known devices such as a Cable Box or the Family Room Cable Box.  It is possible to name digital sources but is not recom-mended.To name a source:1. Go to Settings, Sources2. Select the source you intend to name3. Type in name and press ‘Save’1 23 4TTTT
38Settings - General/About This portion of the application shows details about the Digital Audio Distribu-tion Module or the Digital Audio Input Module.  Details such as the current firmware build, IP address can be accessed.  This is also where the Distribu-tion Module can be restarted or factory reset.  Be very careful with Factory Reset, if this is accidently enabled, the system will need to be  reprogrammed. There is a warning splash screen to give you a second chance to make sure you want to reset the systemTo access this information do the following:1. Go to Settings, General, About2. Select ‘Distribution Module’ or ‘Digital Input Module’3. If required, typically a tech support situation, invoke “Restart” or “Factory Reset”.1 23TTT
39Settings - General/About/Software UpdateIn general, if a software update is available for either the AU7000 Digital Au-dio Distribution Module or for the AU7001 Digital Audio Input Module you will be prompted with a splash screen alerting you and asking for permission to proceed with the download.  Alternatively, software updates can manually be checked by doing the follow-ing:1. Go to Settings, General, Software Update2. Select ‘Distribution Module’ or ‘Digital Input Module’3. Information will be presented.  Most likely it will say ‘Installed’ and that your software is up to date.1 23TT3TTDigital Audio User Manual 20141115 RevA
40FCC and IC informationThis device complies with Part 15 of the FCC Rules / Industry Canada licence-ex-empt RSS standard(s). Operation is subject to the following two conditions: (1) this device may not cause harmful  interference, and (2) this device must accept any interfer-ence received, including interference that may cause undesired operation.Le présent appareil est conforme aux CNR d’Industrie Canada applicables aux appareils radio exempts de licence. L’exploitation est autorisée aux deux conditions suivantes : (1) l’appareil ne doit pas produire de brouillage, et (2) l’utilisateur de l’appareil doit accepter tout brouillage radioélectrique subi, même si le brouillage est susceptible d’en compromettre le fonctionnement.Changes or modifications not expressly approved by the party responsible for compliance could void the user’s authority to operate the equipment.This equipment has been tested and found to comply with the limits for a Class B digital device, pursuant to part 15 of the FCC Rules. These limits are designed to provide reasonable protection against harmful interference in a residential installation. This equipment generates uses and can radiate radio frequency energy and, if not installed and used in accordance with the instructions, may cause harmful interference to radio communications. However, there is no guarantee that interference will not occur in a particular installation. If this equipment does cause harmful interference to radio or television reception, which can be determined by turning the equipment off and on, the user is encouraged to try to correct the interference by one or more of the following measures:—Reorient or relocate the receiving antenna.—Increase the separation between the equipment and receiver.—Connect the equipment into an outlet on a circuit different from that to which the receiver is connected.—Consult the dealer or an experienced radio/TV technician for help.

Navigation menu