Passtime USA SPTU1 Vehicle Starter Interrupt System User Manual SPTU 1 Quick Reference Guide
Passtime USA Vehicle Starter Interrupt System SPTU 1 Quick Reference Guide
User Manual

SPTU-1
Quick Reference Guide
Version 2.0
PassTime™
861 Southpark Dr, Suite 200
Littleton, CO 80120
Toll Free: 877-PASSTIME
Fax: 303-225-8343
info@passtimeusa.com
© Copyright 2008 All rights reserved. Printed in the U.S.A.
Please read the following Notices below regarding FCC rules and
regulations:
NOTE: This equipment has been tested and found to comply with the limits for a
Class A digital device, pursuant to Part 15 of the FCC Rules. These limits are
designed to provide reasonable protection against harmful interference when the
equipment is operated in a commercial environment. This equipment generates,
uses, and can radiate radio frequency energy and, if not installed and used in
accordance with the instruction manual, may cause harmful interference to radio
communications. Operation of this equipment in a residential area is likely to
cause harmful interference in which case the user will be required to correct the
interference at his own expense.
NOTICE:
This device complies with Part 15 of the FCC Rules [and with RSS-210 of
Industry Canada].
Operation is subject to the following two conditions:
(1) this device may not cause harmful interference, and
(2) this device must accept any interference received, including
interference that may cause undesired operation.
NOTICE:
This Class A digital apparatus complies with Canadian ICES-003.
Cet appareil numérique de la classe A est conforme à la norme NMB-003 du
Canada.
NOTICE:
Changes or modifications made to this equipment not expressly approved by
PassTime™ may void the FCC authorization to operate this equipment.

Contents
Using PassTime
Plus...................................................................................................................1
Logging In to
PassTime..................................................................................................................1
Adding a New
Customer..................................................................................................................2
Entering Codes into the
Vehicle.....................................................................................................................4
Generating a Next (Pay)
Code.........................................................................................................................4
Appendix..........................................................................................................6
Field Descriptions for Add New Customers
Screen.......................................................................................................................7
Frequently Asked
Questions...................................................................................................................8
Glossary.....................................................................................................................9
Index..................................................................................................................11
This document serves as a quick reference guide to adding a new PassTime Plus™
customer via the Web-based application. For more information on the PassTime™
products, including code descriptions, or for detailed instructions on other PassTime Plus
functions, please see the PassTime™ Online Code Management System User Reference
Manual.
Using PassTime Plus
Logging In to PassTime
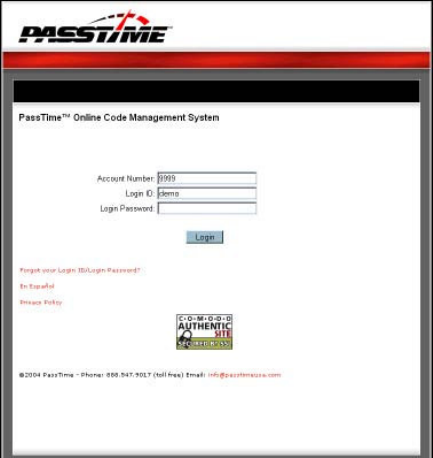
To log in to PassTime and access the PassTime Plus module:
1. In your Web browser location bar, enter the Web URL https://secure.passtimeusa.com; then
press the ENTER key on your keyboard. The PassTime Online Code Management System
login screen displays.
2. To make it easier next time you want to access the PassTime Online Code Management
System, you can save the Web URL to your desktop or Favorites folder. (Specific procedures
vary depending on what browser you are using. For instructions on how save the URL to you
desktop or Favorites folder, refer to your Web browser Help.)
3. At the PassTime login screen, enter your account number, login ID, and login password; then
click Login. The PassTime welcome screen displays.
4. In the PassTime menu bar, click Add New Customer. The Select a PassTime Product screen
displays.
5. Click the PassTime Plus icon. The Add New Customer – PassTime Plus screen displays.
(See screenshot on next page.)
Note: Your screen may differ from this image. Only the products used by your dealership will
display on your screen.

Adding a New Customer
On the Add New Customer – PassTime Plus screen:
1. Enter the customer, vehicle and payment information.
Notes:
• The start date must be the current date or a future date.
• If you don’t enter a first or last name, the account becomes “Blank Blank.”
2. If the account should be assigned to a particular division, select the dealership division from
the Division list. (This is only applicable if you have enabled Divisions. (For more
information, see the Glossary listing for “Divisions.”)
3. In the Select Serial Number and Code Type section:
• Serial Number: From the Serial Number drop-down list, select the unit’s serial number.
Note: PassTime Plus unit serial numbers are from 1 to 999,999. If the serial number does
not appear in the list, contact PassTime Support at (800) 865-3260 for assistance.
• Turn On Diesel Mode: The PassTime Plus unit can be installed on diesel vehicles. To
enable this feature, click Turn On Diesel Mode.
• Turn Off Anti-Theft: The PassTime Plus unit comes with the anti-theft feature enabled. To
disable it, click Turn Off Anti-Theft. (For more information on the Anti-Theft feature,
see the PassTime Online Code Management System User Reference Manual.)
• Turn Off Diesel Mode: To disable Diesel mode, click Turn Off Diesel Mode.
• Turn On Anti-Theft: To enable Anti-Theft mode, click Turn On Anti-Theft.
5. If you are using the Right To Cure (RTC) feature:
Note: This applies to Right to Cure states only. For assistance, contact PassTime Support at
(800) 865-3260.
• Select State: From the drop-down menu, select your state.
• Last RTC Date: If applicable, enter the date in mm/dd/yy format; e.g., 01/05/06
• Number of times RTC used: If applicable, enter the number of times RTC can be used.
6. To process the information you entered, click Add Customer. The First Code confirmation
screen displays the following information:
• Your account name and number.
• Customer name.
• RF code for Set Date.
• RF code(s) for Set Date. Diesel or Anti-Theft mode(s) if enabled or disabled in step 3.
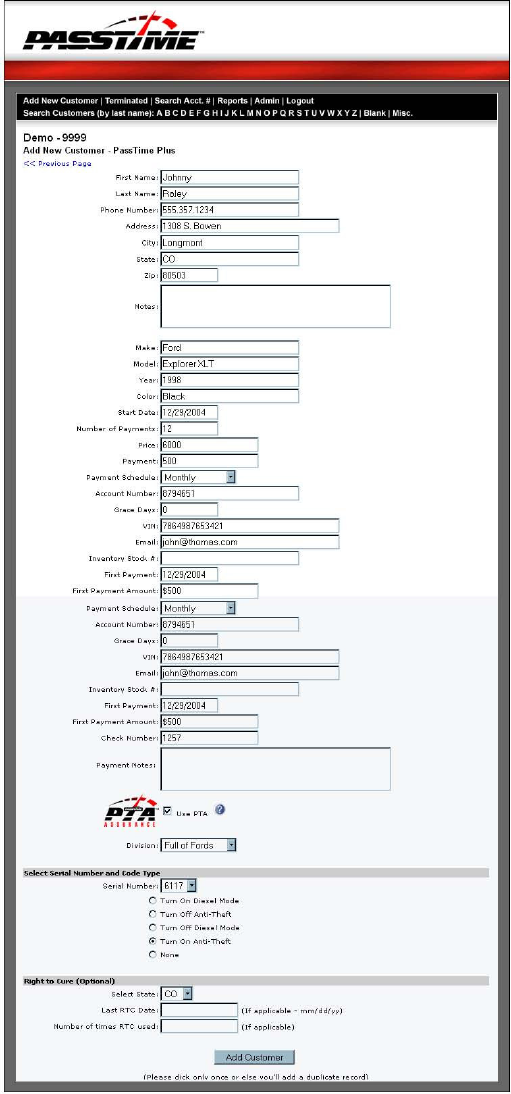
7. You can now click the link to generate a Next code for this vehicle, return to the Customer
Details screen, or select from the PassTime Plus menu to perform other functions.
Entering Codes into the Vehicle
If you selected an option that generated an RF code on the First Code confirmation screen, you
must enter the RF code(s) in the order displayed on the confirmation page. If you have left the
confirmation page, you can find the codes at the bottom of the Customer Detail page.
Note: The codes are in reverse order on this page! Remember to enter codes in the following
order:
1) Set Date 2) Anti-Theft Mode (On or Off) 3) Diesel Mode (On or Off)
To enter a code into the vehicle:
1. Take the remote out to the vehicle and point the remote towards the vehicles ignition.
2. To enter the Set Date code, push CLEAR on the remote; then enter the 15-digit Set Date code.
3. Once the Set Date code as been accepted, return to the computer to generate a Next (Pay) code.
Generating a Next (Pay) Code
You can generate a Next (Pay) code at any time after generating a Set Date code (see Adding a
New Customer on page 2).
1. On the First Code confirmation screen, click Return to Customer Details. The Customer
Details screen displays.
2. In the red tool bar, click Next/Pay Code. The Next Code screen displays.
3. Enter or select information as described below.
Note: Where indicated, certain fields require that you enter data or select an option.
• Regular Days or Until Date: Required. Enter the number of regular days; or enter a
future date in the Until Date field. You can also click Show Calendar to select the date
from the calendar. When the calendar displays, click the date, which will automatically
enter it into the Until Date field.
• Warning Days: Required. Enter the number of warning days; or enter a future date in
the Until Date field. You can also click Show Calendar to select the date from the
calendar. You can also click Show Calendar to select the date from the calendar. When
the calendar displays, click the date, which will automatically enter it into the Until Date
field.
• Emergency Days: Required. The default is two days. You can change the number of
emergency days by highlighting the number in the text box and entering a new number.
• Payment Amount: Optional. Enter the amount of this payment.
• Check Number: Optional. Enter the payment check number.
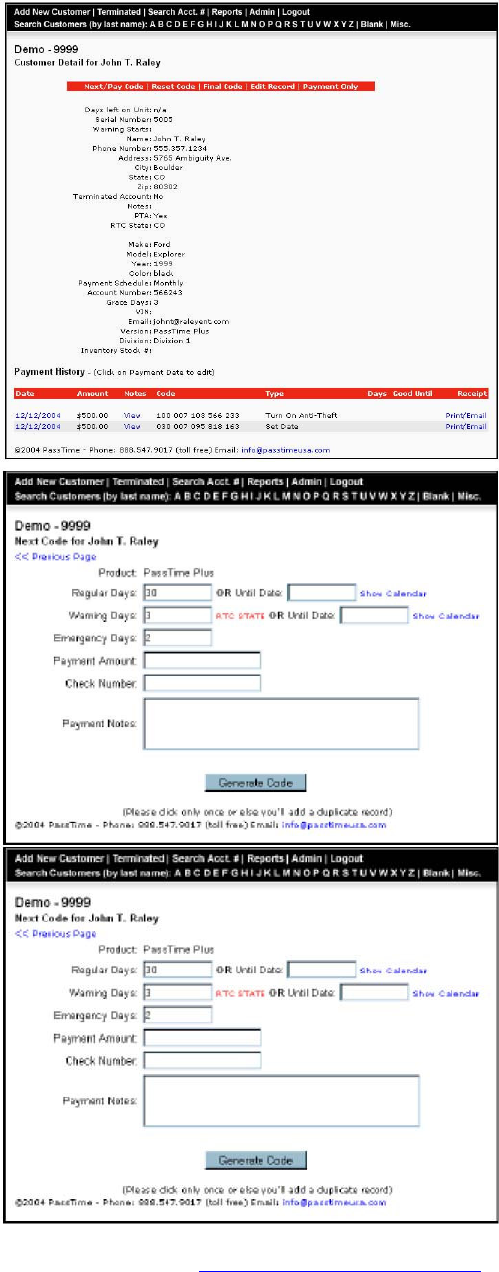
4. Click Generate Code. The Next Code confirmation screen displays the code you will enter
into the unit. (See Entering Codes into the Vehicle.)
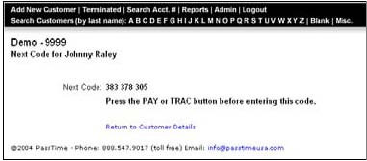
5. After the unit receives the code, the vehicle can be driven.
6. To generate and enter additional codes, or for instructions on starting the vehicle, refer to
Section 1, Basic Procedures in the PassTime Online Code Management System User
Reference Manual.
For additional information, refer to the PassTime Online Code Management
System User Reference Manual.
Appendix
• Field Descriptions for Add New Customer Screen
Descriptions of fields on the Add New Customer screen, including whether the field is
required or optional.
• Frequently Asked Questions
Questions often asked by PassTime Plus customers about features such as the Time Stamp,
Serial Numbers, Warning Days, Right to Cure law, the Anti-Theft system and Diesel mode.
• Glossary
Definitions of words and terms you may encounter in this documentation.

Field Descriptions for Add New Customers Screen
* Required for complete and adequate information. Although, some information may depend on whether an
option is selected; for example, purchase of additional air time requires entry of credit card information.
** RTC available for Right to Cure states only.
Field Label Field Description Required?
First Name Customer first name Required*
Last Name Customer last name Required*
Phone Number Customer office or home telephone number Recommended
Address Customer mailing address Recommended
City Customer city Recommended
State Customer state Recommended
Zip Customer zip+4 Recommended
Notes Any notes pertaining to this customer Optional
Make Make of vehicle; e.g., Ford Recommended
Model Model of vehicle; e.g., Explorer XLS Recommended
Year Year of vehicle; e.g., 1999 Recommended
Color Color of vehicle Recommended
Start Date Payment start date Default
Number of Payments Total number of payments Optional
Price Total price of vehicle Optional
Payment Amount of each payment Optional
Payment Schedule Schedule for each payment; i.e., monthly, weekly, bi-
monthly
Optional
Account Number Customer account number Required*
Grace Days Account grace days; i.e., 3, 5, etc. Optional
VIN Vehicle Identification Number Recommended
Email Customer e-mail address Recommended
Inventory Stock # Inventory stock number Optional
First Payment Date of first payment Optional
First Payment Amount Amount of first payment Optional
Check Number Check number of payment Optional
Payment Notes Any notes pertaining to the payment Optional
Division Aggregate of customer locations in a specified area Optional
Serial Number Unit serial number Required*
Turn On Diesel Mode Activate diesel mode Optional
Turn Off Anti-Theft Deactivate anti-theft mode Optional
Turn Off Diesel Mode Deactivate diesel mode Optional
Turn On Anti-Theft Activate anti-theft mode Optional
None Make no changes to existing anti-theft or diesel modes Optional
Right to Cure Optional
Select State State for RTC Optional
Last RTC Date** If applicable; i.e., 06/06/05 for June 6, 2005 Optional
Number of times RTC
used**
If applicable, enter number Optional
Frequently Asked Questions
What is the Time Stamp?
The Time Stamp is the current date, which the PassTime unit uses (along with other things,
such as the serial number) to create all codes. The unit’s Time Stamp must match the
computer’s time stamp and must be set before a payment code can be accepted. Typically,
you need to set the Time Stamp only during the initial installation or if power has been
removed from the unit for more than five days.
To set the unit for the number of days needed, the dealer must enter two codes when
initializing the unit: the Set Date code followed by a payment code.
Why do you need the serial number?
In addition to the Time Stamp, the system also uses a serial number to generate codes, which
are specific to the unit’s serial number. In order to generate a code for a unit, you must have
the serial number of that unit. The serial number is located on the top of the unit, and each
unit comes with an addition serial number label for the car visor or door jam.
Can I program a specific number of warning days?
The unit can be programmed for a specific number of warning days. When programming a
unit, you will be prompted to enter a number of regular days, warning days, and emergency
days. You can program up to 90 regular days, 90 warning days and nine emergency days.
When the unit enters the warning period, it will sound the warning alert every time the
vehicle is started and turned off. The last day before unit is disabled, it will emit a different
“French Ambulance” warning.
Does the unit comply with Right to Cure laws?
The PassTime™ Code Generator incorporates the Right to Cure parameters for each state.
The unit’s warning period will be programmed to correspond with the state’s Right to Cure
laws. Please note that it is an additional feature that must be turned on in the dealer’s site.
Can you permanently turn off the anti-theft system?
You can turn off the Anti-Theft feature by generating and entering a specific RF code. This
was instituted for dealer or rental agencies not interested in the anti-theft system.
Can the device be installed on a diesel car?
You can put the unit in Diesel mode to accommodate the delayed start in a diesel vehicle with
the Anti-Theft portion of the PassTime™ device. To do so, generate a Turn On Diesel Mode
code from the user interface.
How do I enter a Reset code?
You must be in the car with a PassTime™ remote to enter a Reset code. Press the CLEAR
button; then enter the 15-digit code. The unit will respond with a positive tone upon
completion.
How do I enter a Payment code?
You must be in the car with a PassTime™ remote to enter a payment code. Press the PAY
button; then enter the nine-digit code. The unit will respond with a positive tone upon
completion.
Do I need to press the PAY button before entering an Emergency code?
No, just enter 999 999. The unit will respond with a positive tone upon completion. The
PassTime™ Plus device will not take an Emergency code if there is time still remaining on
the device from the Next/Pay code or a prior Emergency code.
Glossary
Anti-Theft Feature
The PassTime unit may include a state-of-the-art anti-theft system. Anti-theft mode is
enabled by default, but can be disabled during the setup of a new customer account or later as
a Reset code. If the Anti-Theft feature has been disabled, it can also be enabled with a Reset
code. For detailed information, see the PassTime Online Code Management System User
Reference Manual.
Code Generator
The PassTime application that generates the codes used by the PassTime units.
Daily Code Report
Lists codes generated on a specific day.
Diesel Mode
Allows start-up time necessary for diesel vehicles in conjunction with the Anti-Theft Mode.
To change the Diesel mode (On/Off) for an existing account, go to the Reset Code screen
from the Customer Detail screen.
Divisions
The Divisions function assists dealerships with multiple sites to allow viewing of some or all
of their accounts by location. Division access is based on the user’s site login permissions as
configured during setup of each user account. A user can have one or all divisions associated
to that login ID. Users without Divisions access will not have the Divisions option display on
their viewed screens.
Double-Chirp
Sound indicating the vehicle is ready to start.
Emergency Codes
Six-digit number (999 999) that allows use of the vehicle for a 24-hour period.
Emergency Days
Number of days a customer can enter the emergency code after the unit has disabled the
vehicle starter. Each code allows 24 hours of operation.
Grace Period
Number of days after the payment due date that the PassTime unit will still allow the vehicle
to start. Can be Regular or Warning days.
Negative Tone
Sound made by PassTime unit when code has not been accepted, or in response to having no
time remaining after pressing the TIME button on the remote.
Network Server
A computer on your network that contains the PassTime database, making it available to
connected workstations with access permission.
Payment Code
The nine-digit payment codes used to program the device to warn a customer, disable a
vehicle, and determines the amount of Emergency codes given to a customer.
Positive Tone
Sound made by PassTime unit when code entered has been accepted.
Regular Days
Number of days during which the vehicle will operate normally before entering the customer
reminder or warning period.
Remote
Portable device for entering codes into the PassTime unit; works via RF signal.
Reset Codes
Codes available from the Reset Codes menu screen: Anti-Theft (On/Off), Diesel mode
(On/Off), and Set Date.
Set Date Code
The Set Date, or First, code is the first code to be entered into the unit and is generated when
you add a new customer account. This code sets the correct Time Stamp for the unit.
To change the Set Date code for an existing account, go to the Reset Code screen from the
Customer Detail screen.
Terminated Accounts
Inactive customer accounts.
TIME Button (Remote)
Allows customer to check the number of days before the PassTime unit will prevent vehicle
from starting. Remote beeps once for each day remaining.
Warning Days
Number of days device will alert customer before vehicle starter is disabled. Each time
vehicle is started or turned off, the alert sounds for 20 seconds.