Patterson Medical 81669928 Jamar Smart Hand Dynamometer User Manual
Patterson Medical Holdings, Inc Jamar Smart Hand Dynamometer
UserManual.wiki
>
Patterson Medical
>
81669928 User Manual
User Manual
Navigation menu
Upload a User Manual
Namespaces
Wiki Guide
HTML
PDF
Info
Views
User Manual
Discussion / Help
Navigation
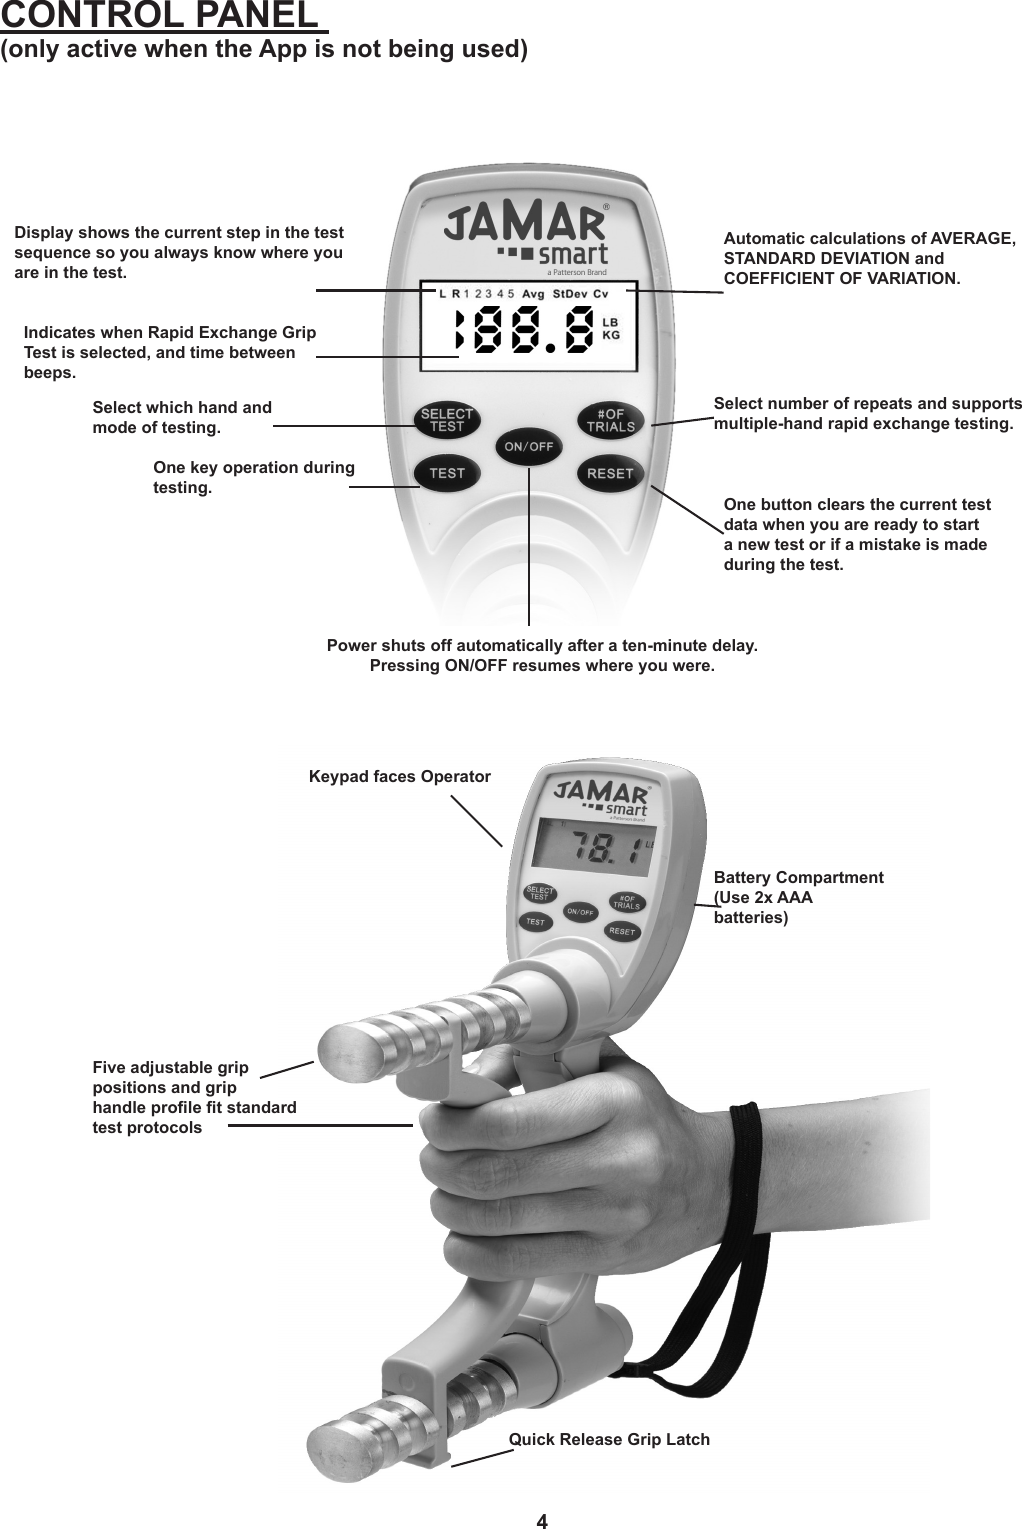
![5SET-UP/TESTPower ONPress the [ON/OFF] key on the face of the Jamar Smart Hand Dynamometer. The dis-play will appear as shown below, with the display showing the most recent test proto-col. The default test protocol is “R” (Right) “3”, which means the test protocol is set for the Right Hand with three (3) repeats.CHOOSING THE HAND TO BE TESTEDPress the [RESET] key to clear any test which might be in progress. Then press the [SELECT TEST] key to step through the available choices. Press [SELECT TEST] for these choices:Display Test1 Standard Test Single HandL1 Standard Test Left HandR1 Standard Test Right HandLR1 Standard Test Left and Right Hand LR 1.5R x 10 Rapid Exchange Grip Test 1.5 second intervalsLR 3.0 R x 10 Rapid Exchange Grip Test 3.0 second intervals](https://usermanual.wiki/Patterson-Medical/81669928/User-Guide-2840357-Page-5.png)
![6CHANGING THE NUMBER OF TRIALSPress the [RESET] key to clear any test which might be in progress. Then press the [# OF TRIALS] key to step through the available choices. These choices are:Test ChoicesStandard Hand TestEither Hand, Left, Right, or Both 1 to 5 trialsRapid Exchange Grip Test 1.5 or 3.0 Intervals 10 or 20 total trialsPractice changing the hand selection and number of grip repeats to see how these functions work. Once test protocol is changed, the Jamar Smart Hand Dynamometer retains the current protocol until changed. NOTE: If the batteries are allowed to run down after the Low Battery indicator comes on, or if they are removed from the instrument for a period of more than approximately one (1) minute, the instrument may return to the default factory test protocol, “R 3”. If this happens, simply replace the batteries and reset the desired test protocol.SELECTING POUNDS OR KILOGRAMSLB KG](https://usermanual.wiki/Patterson-Medical/81669928/User-Guide-2840357-Page-6.png)
![7ADJUSTING GRIP POSITIONThe grip handle may be placed in any of ve (5) positions to accommodate the size and comfort of the user’s hand. Push the lower end of the handle so that the slotted portion rotates away from the lower shaft (See diagram below). Making sure not to drop the handle, allow it to separate from the top shaft. Determine the appropriate grip position and replace the top part of the handle on the top shaft. Rotate the lower part of the handle onto the lower shaft until it clicks into place. The special ball detent on the lower part of the handle helps prevent the handle from separating from the shaft during normal use.INSTALLING AND REPLACING BATTERIESTurn the instrument so the Key Pad Operator faces front and the back of the Key Pad Housing faces toward you. Open the compartment cover and install two (2) AAA batteries. (Quality, alkaline or re-chargeable batteries are recommended). Replace the cover after installation. Press the [ON/OFF] key on the face of the Jamar Smart Hand Dynamometer to ensure battery installation is correct. As the batteries approach the end of their life cycle, the “BATT” indication will be displayed on the instrument display. Batteries should be replaced as soon as this is displayed to ensure proper unit function.](https://usermanual.wiki/Patterson-Medical/81669928/User-Guide-2840357-Page-7.png)
![8PERFORMING GRIP STRENGTH MEASUREMENTS1. [LB/KG]: The Jamar Smart Hand Dynamometer is originally set to display in LBs. To change to KG, open up the battery compartment and move the frequency switch down to KG. 2. Adjust the grip handle to best suit patient comfort and test requirement (See Adjusting Grip Posi-tion, page 7). 3. Press the [ON/OFF] key to start the instrument. 4. Determine which hand will be used. Using the [SELECT TEST] key, scroll to the “L” (Left) or “R” (Right) icon to select the hand to be tested. 5. To select the number of test repetitions (up to 5) to be recorded for that hand, press the [# OF TRIALS] key. Each of the ve numbers (1 through 5) will be displayed on the upper line of the display. Stop scrolling on the number which represents the number of tests to be taken. 6. Have the patient grasp the Jamar Smart Hand Dynamometer gently so that the palm ts comfort-ably to the rear of the instrument and the ngers curl around the adjustable grip at the front of the instrument. 7. Press the [TEST] key to begin the test. Under the present test protocol, start with the rst test trial and the number “1” will appear and ash at the top of the display, indicating that the rst test for the chosen hand is ready. Have the patient squeeze the grip and be ready to enter the second trial (if test protocol setting has more than 1 trial). 8. When the rst test is completed, press the [TEST] key one time to scroll to the next test. Repeat the number of trials to complete the test cycle for the chosen hand.Example: The right hand is chosen to perform four tests. Press the [SELECT TEST] key and scroll to the “R” (Right) icon. Press the [# OF TRIALS] key until the number “4” is displayed. Press the [TEST] key to begin the test. “R” and “1” will be displayed on the upper line. Have the patient perform the rst test. Press the [TEST] key to move the display to “R2”. Have the patient perform the second test. Press the [TEST] key after each test until all four tests have been performed.](https://usermanual.wiki/Patterson-Medical/81669928/User-Guide-2840357-Page-8.png)
![99. When testing is completed for the chosen hand and the required data is recorded, press the [RESET] key to clear the previous test data. Repeat steps 4 through 9 for the remaining hand if de-sired.10. To alternate left and right hand tests (i.e., L1 - R1, L2 - R2, L3 - R3, etc) press [SELECT TEST] until both the “L” and “R” are displayed. The instrument will automatically alternate “L” and “R” hand test cycles.11. Press the [ON/OFF] key to turn the instrument OFF when testing is complete and return it to a safe storage location.RECORDING GRIP STRENGTH MEASUREMENTSUpon completion of the desired tests for a patient’s left and/or right hand, the therapist can select one of two methods for recording the data obtained by those tests. 1. After each individual test, the therapist may choose to record the data displayed on the instrument and perform subsequent calculations at a later date. 2. After all the test trials are completed, the therapist may choose to review the test results stored in the Jamar Smart Hand Dynamometer. All the test and calculation results can be viewed on the display by repeatedly pressing the [TEST] key. All results will be displayed in the sequence of: Test Trial 1, Test Trial 2...Test Trial N, AVG, STDEV, CV. There will be an indicator icon shown in the display for each respective result. CALCULATIONSThree important calculations are performed automatically by the Jamar Smart Hand Dynamometer: Test Average, Standard Deviation, and Coefcient of Variation.Test Average: Each reading taken for the left hand or right hand is recorded in memory for that hand. When the test is completed, the Therapist uses the [TEST] key, located in the lower left of the keypad, to review the average measure of the multiple test trials.Standard Deviation: The Jamar Smart Hand Dynamometer calculates the standard deviation of reading taken. Use the [TEST] key to review the standard deviation of the multiple test trials.Coefcient of Variation: To obtain disbursement data, the instrument divides the standard deviation by the average as shown below. Use the [TEST] key to scroll to the “CV” icon to display the result.](https://usermanual.wiki/Patterson-Medical/81669928/User-Guide-2840357-Page-9.png)
![12Quick Start Guide 1. Press the [ON/OFF] key to start the instrument. 2. Determine which hand will be used. Using the [SELECT TEST] key, scroll to the “L” (Left) or “R” (Right) icon to select the hand to be tested. 3. To alternate left and right hand tests (i.e., L1 - R1, L2 - R2, L3 - R3, etc.) press [SELECT TEST] until both the “L” and “R” are displayed. The instrument will automatically alternate “L” and “R” hand test cycles. 4. To select the number of test repetitions (up to 5) to be recorded for that hand, press the [# OF TRIALS] key. Each of the ve numbers (1 through 5) will be displayed on the upper line of the display. Stop scrolling on the number which represents the number of tests to be taken. 5. Have the patient grasp the Jamar Smart Hand Dynamometer gently so that the palm ts comfortably to the rear of the instrument and the ngers curls around the adjustable grip at the front of the instrument. 6. Press the [TEST] key to begin the test. Under the present test protocol, start with the rst test trial and the number “1” will appear and ash at the top of the display, indicating that the rst test for the chosen hand is ready. Have the patient squeeze the grip and be ready to enter the second trial (if test protocol setting has more than 1 trial). 7. When the rst test is completed, press the [TEST] key one time to scroll to the next test. Repeat the number of trials to complete the test cycle for the chosen hand. 8. When testing is completed for the chosen hand and the required data is recorded, press the [RESET] key to clear the previous test data. Repeat steps 2 through 9 for the remaining hand if desired. 9. After all the test trials are completed, the test and calculation results can be viewed on the display by repeatedly pressing the [TEST] key. All results will be displayed in the sequence of: Test Trial 1, Test Trial 2...Test Trial N, AVG, STDEV, CV. There will be an indicator icon shown in the display for each respective result. 10. Hold the [ON/OFF] button for two seconds to turn the instrument OFF when testing is com-plete and return it to a safe storage location.](https://usermanual.wiki/Patterson-Medical/81669928/User-Guide-2840357-Page-12.png)