Paypal Mobile Payments Library 2012 Ios Developers Guide PP_MPL_Developer_Guide_and_Reference_1 4_iPhone
Mobile Payments Library - 2012 - Developer Guide and Reference – iOS PP_MPL_DG_iPhone_2012 Free User Guide for PayPal Software, Manual
2015-07-27
: Paypal Paypal-Mobile-Payments-Library-2012-Ios-Developers-Guide-777966 paypal-mobile-payments-library-2012-ios-developers-guide-777966 paypal pdf
Open the PDF directly: View PDF ![]() .
.
Page Count: 57

Mobile Payments Library
Developer Guide and
Reference –
iOS Edition
Last updated: Augst 2012
PayPal Mobile Payments Developer Guide and Reference – iOS Edition
Document Number 10105.en_US-201208
© 2011 PayPal, Inc. All rights reserved. PayPal is a registered trademark of PayPal, Inc. The PayPal logo is a
trademark of PayPal, Inc. Other trademarks and brands are the property of their respective owners.
The information in this document belongs to PayPal, Inc. It may not be used, reproduced or disclosed without the
written approval of PayPal, Inc.
Copyright © PayPal. All rights reserved. PayPal S.à r.l. et Cie, S.C.A., Société en Commandite par Actions.
Registered office: 22-24 Boulevard Royal, L-2449, Luxembourg, R.C.S. Luxembourg B 118 349
Consumer advisory: The PayPal™ payment service is regarded as a stored value facility under Singapore law. As
such, it does not require the approval of the Monetary Authority of Singapore. You are advised to read the terms
and conditions carefully.
Notice of non-liability:
PayPal, Inc. is providing the information in this document to you “AS-IS” with all faults. PayPal, Inc. makes no
warranties of any kind (whether express, implied or statutory) with respect to the information contained herein.
PayPal, Inc. assumes no liability for damages (whether direct or indirect), caused by errors or omissions, or
resulting from the use of this document or the information contained in this document or resulting from the
application or use of the product or service described herein. PayPal, Inc. reserves the right to make changes to
any information herein without further notice.
Mobile Payments Library Developer Guide and Reference –iOS Edition August 2012 3
Contents
Preface ............................................................................................................... 5
Purpose ........................................................................................................................ 5
Scope ............................................................................................................................ 5
Revision History ............................................................................................................ 5
Where to Go for More Information ................................................................................ 6
1. PayPal Mobile Payments Library ............................................................... 7
Mobile Payments Library API Reference ..................................................................... 7
Required Methods in the Mobile Payments Library ............................................... 7
Optional Methods in the Mobile Payments Library .............................................. 11
Delegate Methods in the Mobile Payments Library ............................................. 13
After the Payment ................................................................................................ 14
Simple, Parallel, and Chained Payments ................................................................... 14
Simple Payments ................................................................................................. 16
Parallel Payments ................................................................................................ 16
Chained Payments ............................................................................................... 17
Preapprovals............................................................................................................... 18
How Preapprovals Work ...................................................................................... 18
About Preapproval Keys ...................................................................................... 18
About Preapproval Pins ....................................................................................... 18
Method Signature for Preapproval Checkout ....................................................... 19
Method Sequence for Preapproval Checkout ...................................................... 20
Custom Objects in the Mobile Payments Library ....................................................... 21
Enumerated Values in the Mobile Payments Library ................................................. 26
Localization Support in the Mobile Payments Library ................................................ 28
Library Support for the devices and OS versions. ...................................................... 29
Adding the Mobile Payments Library to Your Xcode Project ..................................... 29
Sample Code .............................................................................................................. 30
Header File ........................................................................................................... 30
Implementation File .............................................................................................. 31
Placing the Pay with PayPal Button ..................................................................... 32
Creating the PayPalPayment Object ................................................................... 32
Checking Out ....................................................................................................... 33
Handling the Callback .......................................................................................... 33
Dynamic Amount Calculation ............................................................................... 34
2. The Checkout Experience with the Mobile Payments Library ............... 36
Checkout Experience #1 – Goods or Services with Shipping .................................... 36
4 August 2012 PayPal Mobile Payments Developer Guide and Reference – iOS Edition
Checkout Experience #2 – Goods or Services without Shipping ............................... 37
Checkout Experience #3 – Donations ........................................................................ 38
Checkout Experience #4 – Personal Send Money Payments .................................... 39
Checkout Experience #5 – Create Pin ....................................................................... 40
Checkout Experience #6 – Preapproval ..................................................................... 41
Basic Preapproval Checkout ................................................................................ 41
Creating Preapproval PINs During Preapproval Checkout .................................. 42
3. Submitting Your Application to PayPal ................................................... 43
A. Currencies Supported by PayPal ............................................................. 44
B. Countries and Regions Supported by PayPal ......................................... 45
C. Creating an Ad Hoc Build ......................................................................... 49
Creating a Distribution Certificate ............................................................................... 49
Creating and Approving a Certificate Signing Request ....................................... 49
Creating a Distribution Certificate ........................................................................ 50
Adding Device IDs ...................................................................................................... 50
Locating your Device ID ....................................................................................... 51
Adding Devices to the iPhone Developer Program Portal ................................... 51
Using Updated Provisioning Profiles for New Devices ........................................ 51
Creating the App ID .................................................................................................... 51
Creating a Distribution Provisioning Profile ................................................................ 53
Creating the Build in Xcode ........................................................................................ 54
Notes .......................................................................................................................... 56
Saving the Private Key and Transferring It to Other Systems ............................. 56
Verifying a Successful Ad Hoc Distribution Build ................................................. 57
Correcting an Unsuccessful Ad Hoc Distribution Build ........................................ 57

Mobile Payments Library Developer Guide and Reference –iOS Edition August 2012 5
Preface
The PayPal Mobile Payments Library provides secure, extensible, and scalable PayPal payment
functionality to the Apple iPhone, iPod and iPad platforms.
Purpose
The PayPal Mobile Payments Library provides an easy way for you to integrate payments into
your iPhone, iPod touch, and iPad applications. You can download the library from X.com and
include it in your application. With the library, you need only a few lines of code to integrate the
library into your application.
When a buyer makes a payment, the library controls the checkout experience – logging in,
reviewing, and completing the payment. After buyers complete their payments, the library returns
them to your application.
Scope
This document describes how to integrate the PayPal Mobile Payments Library with your
application. You must create and provide your build to PayPal so PayPal can review your
application before it is approved to accept payments by way of the library. The approval process
is described later in the document.
Revision History
The following table lists revisions made to the PayPal Mobile Payments Library Developer
Guide and Reference – iOS Edition.
Version Date Published Description
1.2.2 June 2011 Added iPad support.
1.2.1 January 2011 Added the initializationStatus method to check
the status of initializeWithAppID. If an error occurs
during initializeWithAppID you can now retry the
method.
Added the ability for merchants to notify the library of an
error condition during dynamic amount calculation.
Disabled Keep Me Logged in functionality.
1.1 December 2010 Added information about preapproval; dropped support for
the enumeration value BUTTON_118x24.

6 August 2012 PayPal Mobile Payments Developer Guide and Reference – iOS Edition
Version Date Published Description
1.0 October 2010 Added information on Adaptive Payments support, including
“Refunds can be supported by manual refund using the
PayPal account interface or by means of the
RefundTransaction API. AdaptivePayments Refund API call
is not supported for MPL-generated pay keys. More details
and documentation are available at:
https://cms.paypal.com/cms_content/US/en_US/files/develo
per/PP_AdaptivePayments.pdf
Simple, Parallel, and Chained Payments.”
0.72 July 2010 Added topic “After the Payment” that lists features to let you
track the payment after it is completed; added additional
code samples; code samples are now in plain text so they can
be copied and pasted into applications.
0.71 June 2010 Updated “The Checkout Experience with the Mobile
Payments Library” with use cases for goods with no
shipments, donations, and personal Send Money; added
“Currencies Supported by PayPal” and “
Countries and Regions Supported by PayPal.”
0.7 April 2010 The setPayButton method is renamed the getPayButton
method; the checkout method takes a new
PayPalMEPPayment object as its only parameter.
0.6 March 2010 Added topics “feePayer ” on page 12 and
“dynamicAmountUpdateEnabled ” on page 12; added topics
for new data structures in “Custom Objects in the Mobile
Payments Libary” on page 15; added topic “The Checkout
Experience with the Mobile Payments Library” on page 36.
0.5 February 2010 First publication.
Where to Go for More Information
• Adaptive Payments Developer Guide
• Sandbox User Guide
• Merchant Setup and Administration Guide
• PayPal X Developer Network (x.com)

Mobile Payments Library Developer Guide and Reference –iOS Edition August 2012 7
1. PayPal Mobile Payments Library
This section provides details about the Mobile Payments Library API, and it provides instructions
and examples for integrating the library with your iPhone application.
Mobile Payments Library API Reference
The flow of the library is:
1. Your application initializes the library.
2. The library creates a Pay with PayPal UIButton and returns it to you so you can place it on
the screen.
3. (Optional) Your application enables dynamic amount calculation to recalculate the payment
amount, tax, currency, and shipping values when buyers change the shipping address for the
payment.
4. Your application sets all of the payment parameters including the amount, currency, recipient,
and item details.
5. When buyers select the Pay with PayPal button, the library takes them through the PayPal
Checkout experience. The library displays itself on top of the application’s Window object,
so be sure that you do not take control of the Window after the buyer clicks Pay with
PayPal.
6. (Optional) If you enabled dynamic amount calculation in step 1 above:
a. When a buyer chooses an address for the payment, the library returns a callback to
your application with the address information.
b. Your application recalculates the payment and other amounts, based on the address
and returns those on the callback.
c. The library returns the buyer to the checkout experience, which uses the updated
payment amount, tax, currency, and shipping values.
7. After buyers complete their payments, the library returns a callback to your application with
the transaction id and status of the payment. Note that, at this time, the library is still in
control of the UI and has not returned control to your application.
8. After the library flow is complete, the library returns a callback to your application indicating
it is relinquishing control of the UI.
Required Methods in the Mobile Payments Library
initializeWithAppID Method
The initializeWithAppID method creates and returns the PayPal object.
NOTE: If you do not set the optional parameter forEnvironment, the library defaults to use
the PayPal production servers. When testing your application, PayPal recommends that
you initialize the library to use the PayPal test servers, instead.
8 August 2012 PayPal Mobile Payments Developer Guide and Reference – iOS Edition
NOTE: The Mobile Payments Library binds specific devices to specific application IDs, for
enhanced security. For each of your application IDs, you must use a different sandbox
account for each of your devices or simulators. To switch a device or simulator to use a
different sandbox account, go to the PayPal Sandbox website on your computer, select
Profile > Mobile Applications, and then unbind the device from the application ID.
You have two options for when to call the initializeWithAppID method:
• Initialize the PayPal object on the main thread, when you need it. Initialize the library
each time before you call the getPayButtonWithTarget method. This implementation is
simple because it uses a single-threaded programming model. The initializeWithAppID
call is blocking, so your application waits for the initialization to complete.
To use this method, you can use one line of code:
[PayPal initializeWithAppID:appID];
Or:
[PayPal initializeWithAppID:appID forEnvironment:env];
On subsequent lines you can then reference the PayPal object with [PayPal
getInstance].
• Initialize the PayPal object on a separate thread, when your application starts. Initialize
the library once. This implementation is complex because it uses a multiple-threaded
programming model. The initializeWithAppId call is not blocking, so your main
application thread continues while the initialization completes in the background. This way
the button is ready to display when you need it.
The following sample code initializes the PayPal object on a separate thread.
- (void)applicationDidFinishLaunching:(UIApplication *)application {
[window addSubview:navController.view];
[window makeKeyAndVisible];
[NSThread detachNewThreadSelector:@selector(initializePayPal)
toTarget:self withObject:nil];
}
-(void)initializePayPal {
[PayPal initializeWithAppID:@"APP-80W284485P519543T"
forEnvironment:ENV_SANDBOX];
}
Inside the AppDelegate’s applicationDidFinishLaunching method, the code starts the
initializeWithAppId method on a new thread.

Mobile Payments Library Developer Guide and Reference –iOS Edition August 2012 9
In either case, you need to make sure the initialization is successful by sending an
initializationStatus message to the PayPal object.
The following table lists the possible status values returned from the initializationStatus
query:
Status Definition
STATUS_NOT_STARTED Initialization never attempted.
STATUS_COMPLETED_SUCCESS Initialization completed successfully.
STATUS_COMPLETED_ERROR Initialization completed with errors. The error is displayed in
the device or simulator logs.
STATUS_INPROGRESS Initialization in progress. Must wait until the current
initialization attempt completes before attempting to retry
initialization.
You can perform this check on the viewDidLoad method of the UIViewController that will
contain the Pay with PayPal button.
An example to verify that the initialization process completed successfully is:
if ([PayPal initializationStatus] == STATUS_COMPLETED_SUCCESS) {
//We have successfully initialized and are ready to pay
} else {
//An error occurred
}
}
NOTES:
• The Pay with PayPal button returned by the getPayButtonWithTarget method is
disabled until the initialization is complete. Once the initialization is complete, if it was
successful, the button is enabled.
• When initialization status returns STATUS_COMPLETED_ERROR - Request timeouts or
host unavailable (Network connection failure) are valid initialization error cases for
initializePayPal retry attempts.
• If initialization failed due to a buyer error, the error message presents as a UIAlertView.
+(PayPal*)initializeWithAppID:(NSString const *)PayPalApplicationID
(Optional:) forEnvironment:(PayPalEnvironment)env;
10 August 2012 PayPal Mobile Payments Developer Guide and Reference – iOS Edition
Parameter Description
PayPalApplicationId: (Required) PayPal Application ID from X.com. For the Sandbox
environment, you should use APP-80W284485P519543T.
env: (Optional) Sets the PayPal server to Live, Sandbox, or None. Allowable
values are:
• ENV_LIVE (does not support simulators)
• ENV_SANDBOX
• ENV_NONE
For details of the different servers, see “Enumerated Values in the
Mobile Payments Library.”
getPayButtonWithTarget Method
You must get the Pay with PayPal payment button from the Mobile Payments Library. Use this
method, which returns a UIButton, to place the button on your page. If you need to move the
button, when your application supports rotation for example, change the button frame. The target
parameter sets the delegate property of the PayPal object, which receives the
PayPalPaymentDelegate callbacks. If invalid data is entered, you receive an alert in a
UIAlertView.
See an example of placing the Pay button in “Placing the Pay with PayPal Button.”
-(UIButton *)getPayButtonWithTarget:(const
id<PayPalPaymentDelegate>)target andAction:(SEL)action
andButtonType:(PayPalButtonType)buttonType
andButtonText:(PayPalButtonText)buttonTextType;
Parameter Description
target: (Required) The PayPalPaymentDelegate that is the delegate for
callbacks.
action: (Required) Called when a buyer taps the Pay with PayPal button.
buttonType: (Required) Size and appearance of the Pay with PayPal buttons.
Allowable values are:
• BUTTON_152x33
• BUTTON_194x37
• BUTTON_278x43
• BUTTON_294x43
For images of the different button types, see “Enumerated Values in the
Mobile Payments Library.”
Mobile Payments Library Developer Guide and Reference –iOS Edition August 2012 11
Parameter Description
buttonTextType: (Optional) Determines whether the button displays “Pay with PayPal”
or “Donate with PayPal”. The default value is BUTTON_TEXT_PAY.
• BUTTON_TEXT_PAY
• BUTTON_TEXT_DONATE
Checkout Methods
The library provides 2 methods that launch the PayPal Checkout experience. The Checkout
method handles simple payments, which support single receivers of payments with one
transaction. The AdvancedCheckout method handles parallel and chained payments, which
support multiple receivers of payments with one transaction.
When you place the Pay with PayPal button on your mobile screen, specify a method of your
own to call when buyers tap the button. In the method that you specify, call the PayPal checkout
method that supports your business model for payment recipients.
Both checkout methods accept a payment object, which defines different aspects of a payment. If
you provide invalid data, you receive an alert in a UIAlertView.
The library displays itself on top of your application’s Window object. Make sure that you do not
take control of the Window after the buyer clicks Pay with PayPal.
-(void)checkoutWithPayment:(PayPalPayment *)inPayment;
Parameter Description
inPayment: (Required) A PayPalPayment object that contains information about
the payment. For the properties of this object type, see
“PayPalPayment.”
-(void)advancedCheckoutWithPayment:(PayPalAdvancedPayment *)inPayment;
Parameter Description
inPayment: (Required) A PayPalAdvancedPayment object that contains
information about the payment. For the properties of this object type,
see “PayPalAdvancedPayment.”
Optional Methods in the Mobile Payments Library
lang Property
This property allows you to define the language settings that the library uses. If the property is
not set, the library retrieves the current language settings from the device.
@property (nonatomic, retain) NSString *lang;

12 August 2012 PayPal Mobile Payments Developer Guide and Reference – iOS Edition
For a complete list of languages supported by the library, please see the section “Localization
Support in the Mobile Payments Library.”
shippingEnabled Property
This property lets buyers specify shipping addresses. With this property enabled, buyers choose
from the shipping addresses in their PayPal account. The chosen shipping address is used then for
the payment. If this property is disabled, the library does not display shipping options to the
buyer. Shipping is enabled by default, so you need to enable it only if you have previously
disabled it after initializing the library.
@property (nonatomic, assign) BOOL shippingEnabled;
payPalContext Property
Use this property to resume a payment when your application closes and restarts. This lets you
avoid calling the PayPal getPayButtonWithTarget and checkout methods, again. The usage
is to initialize the PayPal object, get the context object from wherever your application stored it,
and then call this method. In order to resume payments later, store the value of this property in the
applicationWillTerminate method of your AppDelegate class.
@property (nonatomic, retain) PayPalContext *payPalContext;
getInstance Method
This method returns the singleton PayPal object.
+(PayPal *)getInstance;
feePayer Property
Set this property to determine who pays any fees. Available values are FEEPAYER_SENDER,
FEEPAYER_PRIMARYRECEIVER, FEEPAYER_EACHRECEIVER, and
FEEPAYER_SECONDARYONLY. The default value is FEEPAYER_EACHRECEIVER.
@property (nonatomic, assign) PayPalFeePayer feePayer;
dynamicAmountUpdateEnabled Property
Setting this property to TRUE lets you recalculate the payment amount, tax, currency, and
shipping values based on the shipping address chosen by a buyer. If you call this method before
the checkout starts, the library calls the delegate's
adjustAmountsForAddress:andCurrency:andAmount:andTax:andShipping: or
adjustAmountsAdvancedForAddress:andCurrency:andReceiverAmounts: method,
depending on the payment checkout method. The library passes the buyer’s address as a
PayPalAddress object. Implement the delegate method in the PayPalPaymentDelegate
protocol, and return the adjusted amount object(s) that contain the updated payment amount,
currency, tax, and shipping.
NOTE: If shipping is not enabled, this property is ignored.
@property (nonatomic, assign) BOOL dynamicAmountUpdateEnabled;

Mobile Payments Library Developer Guide and Reference –iOS Edition August 2012 13
There are two delegate functions, one for Simple Payments and one for Advanced Payments:
-(PayPalAmounts *)adjustAmountsForAddress:(PayPalAddress const
*)inAddress andCurrency:(NSString const *)inCurrency
andAmount:(NSDecimalNumber const *)inAmount andTax:(NSDecimalNumber
const *)inTax andShipping:(NSDecimalNumber const *)inShipping
andErrorCode:(PayPalAmountErrorCode *)outErrorCode;
-(NSMutableArray *)adjustAmountsAdvancedForAddress:(PayPalAddress const
*)inAddress andCurrency:(NSString const *)inCurrency
andReceiverAmounts:(NSMutableArray *)recieverAmounts
andErrorCode:(PayPalAmountErrorCode *)outErrorCode;
NOTE: If an error occurs during dynamic amount calculation, you can notify the library using the
outErrorCode parameter of either of the above delegate methods to report the error to the
library. You would do this using code similar to the following:
*outErrorCode = AMOUNT_ERROR_OTHER;
The possible values for the outErrorCode parameter are as follows:
Parameter Value Description
AMOUNT_ERROR_NONE This is the default value for the error parameter, and indicates that no
error occurred.
AMOUNT_ERROR_SERVER If you set outErrorCode to this value, the library displays a fatal
error indicating that a network error occurred and allows the buyer to
return to your app.
AMOUNT_ERROR_OTHER If you set outErrorCode to this value, the library displays a fatal
error with a generic error message and allows the buyer to return to
your app.
Delegate Methods in the Mobile Payments Library
NOTE: Due to an issue with buyers choosing to exit the application as soon as they saw the
Success screen, the PayPalPaymentDelegate (formerly PayPalMEPDelegate) protocol has
been updated.
paymentSuccess Method
This method is called as soon as the library completes a payment or preapproval. The payKey is
a unique identifier for the payment, while paymentStatus is an enumerated type which can be
STATUS_COMPLETED, STATUS_CREATED, or STATUS_OTHER. The merchant app should store
the fact that the payment succeeded (for later display) and perform any desired bookkeeping at
this point, such as tracking the payment on a merchant-controlled server, but should not perform
any user interface updates. If the transaction is a preapproval, the preapproval key is returned in
place of the payKey.
-(void)paymentSuccessWithKey:(NSString *)payKey
andStatus:(PayPalPaymentStatus)paymentStatus;

14 August 2012 PayPal Mobile Payments Developer Guide and Reference – iOS Edition
paymentCanceled Method
This method is called as soon as the buyer cancels the payment for any reason. The merchant app
should store the fact that the payment was canceled (for later display), but should not perform any
user interface updates.
-(void)paymentCanceled;
paymentFailed Method
This method is called as soon as the library fails to complete a payment for any reason. The
correlationID is a code used for tracking the transaction on the server (useful when seeking
assistance from PayPal), the error code is a numerical (or in some cases non-numerical) error
identifier, and the errorMessage is a human-readable error string. The merchant app should
store the fact that the payment failed (for later display), but should not perform any user interface
updates.
-(void)paymentFailedWithCorrelationID:(NSString *)correlationID
andErrorCode:(NSString *)errorCode
andErrorMessage:(NSString*)errorMessage;
paymentLibraryExit Method
This method is called when the library is finished with the device display and is returning control
to the merchant app. The merchant app should handle displaying the payment status
(success/failed/canceled) to the buyer at this point.
-(void)paymentLibraryExit;
After the Payment
After the payment is completed, the Mobile Payments Library returns the payKey. Also, a
number of other features are available to you to assist you with the payment: Instant Payment
Notification, Transaction Details, and Refunds.
Instant Payment Notification
Instant Payment Notification (IPN) is PayPal’s message service that sends a notification when a
transaction is affected. You can integrate IPN with your systems to automate and manage your
back office. More details and documentation are available at: www.paypal.com/ipn. This is
triggered when the payment is completed, even if the consumer closes or quits your application.
You can specify the IPN URL in the payment object of the checkout method.
Transaction Details
You can integrate with the PayPal PaymentDetails API to retrieve details on a payment based
on the payKey. More details and documentation are available at:
https://cms.paypal.com/cms_content/US/en_US/files/developer/PP_AdaptivePayments.pdf
Refunds
Refunds can be supported by manual refund using the PayPal account interface or by means of
the RefundTransaction API. AdaptivePayments Refund API call is not supported for MPL-

Mobile Payments Library Developer Guide and Reference –iOS Edition August 2012 15
generated pay keys. More details and documentation are available at:
https://cms.paypal.com/cms_content/US/en_US/files/developer/PP_AdaptivePayments.pdf
16 August 2012 PayPal Mobile Payments Developer Guide and Reference – iOS Edition
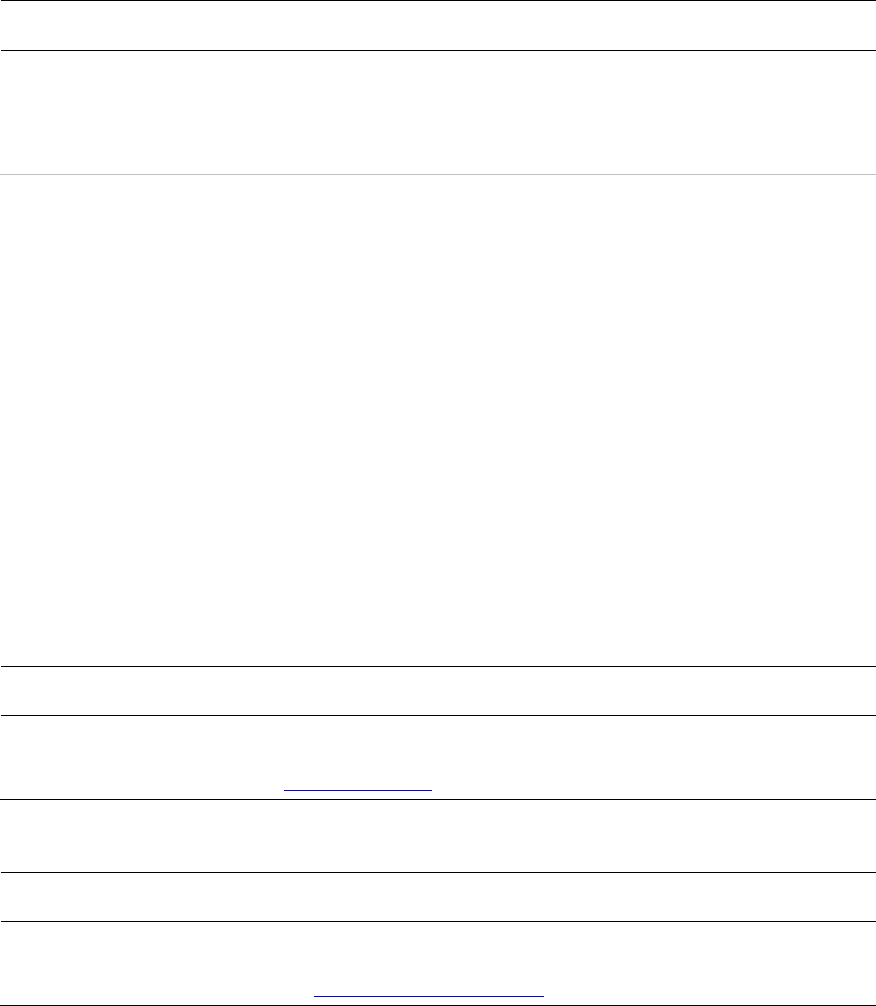
Simple, Parallel, and Chained Payments
Simple payments have a single recipient. Parallel and chained payments have multiple recipients
and differ in the how the payments are split.
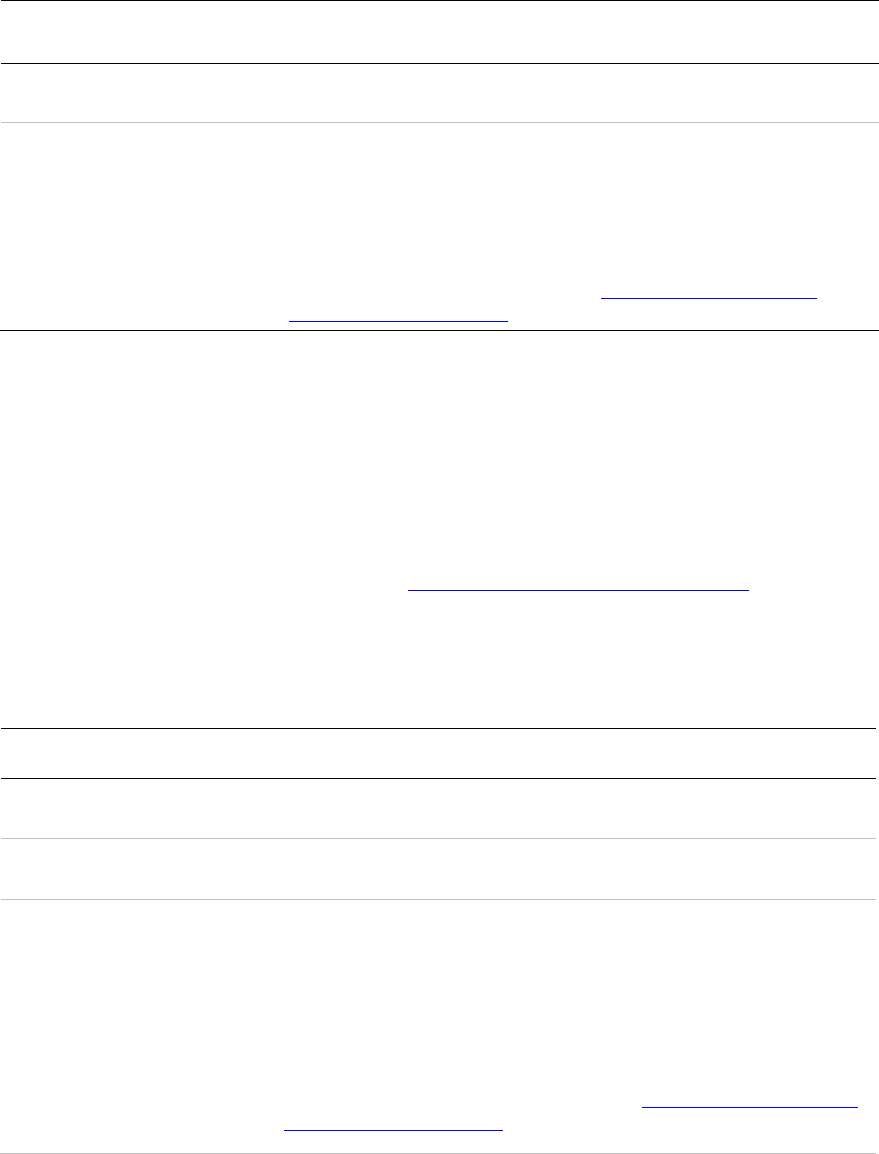
Simple Payments
Simple payments use the PayPalPayment object, which supports a payment to a single
recipient.
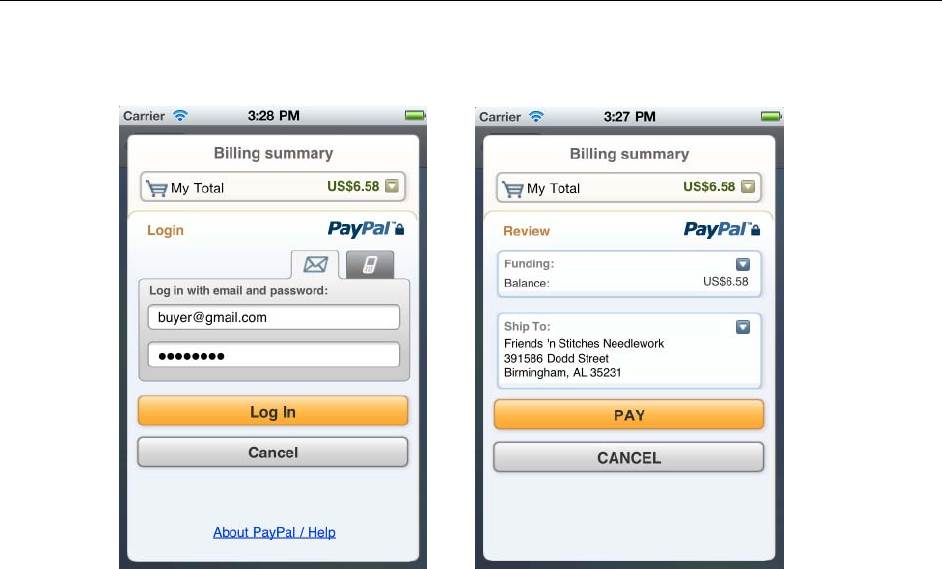
Parallel Payments
Parallel payments allow you to make payments for any amount to 2 to 6 recipients. You create a
parallel payment by making a payment with multiple recipients that has no primary recipient.
From the buyer’s standpoint, a parallel payment affects the UI by showing the details for each
recipient. Unlike chain payments, the recipients of a parallel payment are not linked together in
terms of amount.
Mobile Payments Library Developer Guide and Reference –iOS Edition August 2012 17
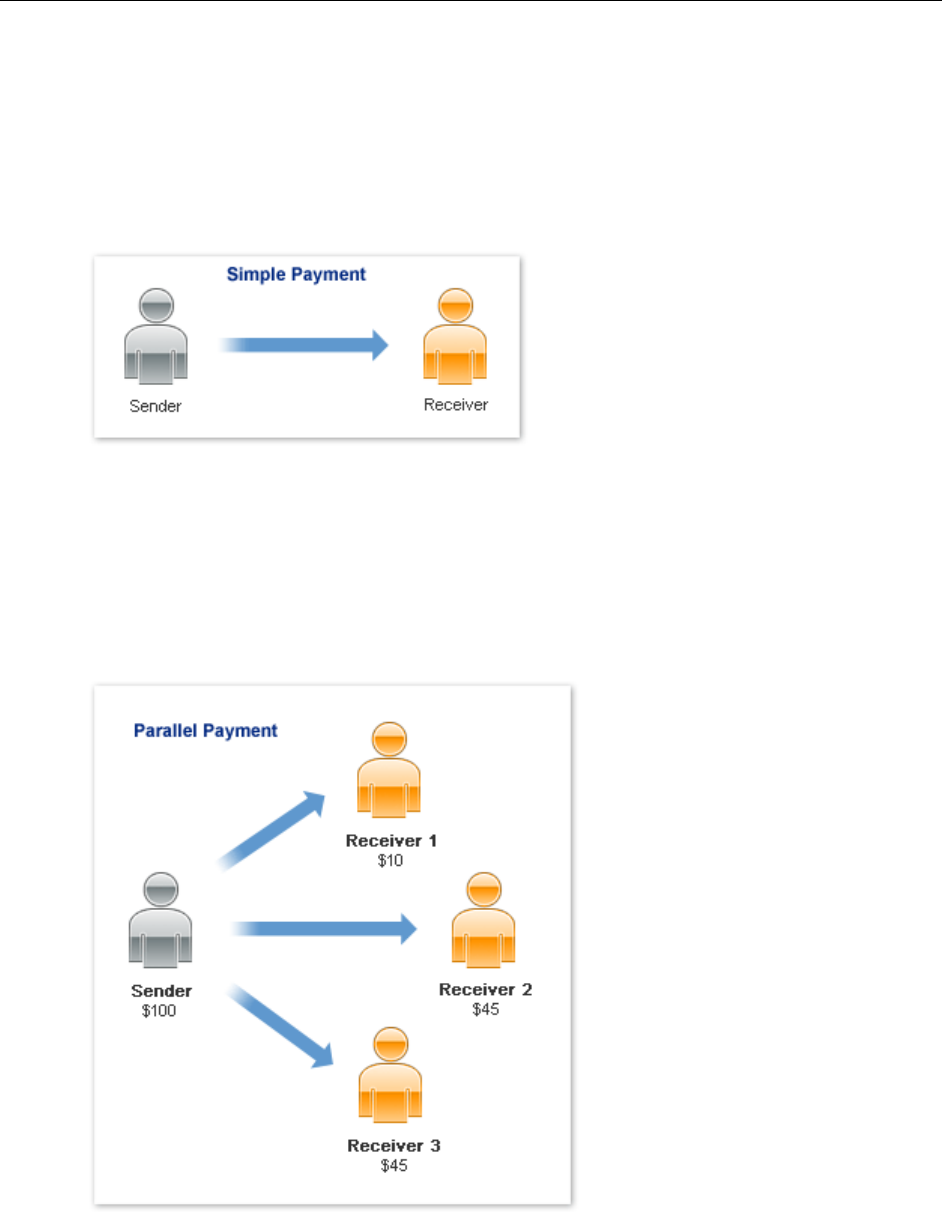
Chained Payments
A chained payment is a payment from a sender that is indirectly parallel among multiple
receivers. It is an extension of a typical payment from a sender to a receiver; however, a receiver,
known as the primary receiver, passes part of the payment to other receivers, who are called
secondary receivers.
NOTE: Chained payments require a specific permission level on the part of the API caller and
merchant. For information, refer to the section “Adaptive Payments Permission Levels” in the
Adaptive Payments Developer Guide.
You can have at most one primary receiver and from 1 to 5 secondary receivers. Chained
payments are useful in cases when the primary receiver acts as an agent for other receivers. The
sender deals only with the primary receiver and does not know about the secondary receivers,
including how a payment is parallel among receivers. The following example shows a sender
making a payment of $100:
In this example, the primary receiver receives $100 from the sender’s perspective; however, the
primary receiver actually receives only $10 and passes a total of $90 to secondary receivers
Receiver 2 and Receiver 3.
NOTE: The scenario above is an example only and does not take PayPal fees into account.

18 August 2012 PayPal Mobile Payments Developer Guide and Reference – iOS Edition
Preapprovals
The PayPal Mobile Payments Library lets you obtain authorization in advance from buyers for
future payments to you without requiring buyers to authorize each payment individually. For
example, you might use the library to establish preapproval agreements for subscriptions to
mobile content, such as mobile streaming audio or video. Or, you might use the library to
establish preapproval agreements for payments to gain access to higher levels of difficulty in
mobile games.
How Preapprovals Work
There are three steps to setting up and using preapprovals.
1. Obtain a pending preapproval key from PayPal.
From your web server, send a Preapproval request to PayPal with the terms of your
preapproval agreement.
2. Obtain authorization from the buyer for the preapproval agreement.
From your mobile application, call the preapprovalWithKey method with the pending
preapproval key. The library launches the preapproval checkout experience and returns a
confirmed preapproval key.
3. Take payments from the buyer under the terms of the preapproval agreement.
From your web server, send a Pay request to PayPal with the buyer’s confirmed
preapproval key.
For more information about the Preapproval and Pay requests, see the Adaptive Payments
Developer Guide.
About Preapproval Keys
Preapproval keys uniquely identify preapproval your agreements. Preapproval keys that you
obtain by using the Preapproval API identify your pending preapproval agreements. No buyers
have yet agreed to them. Pending approval keys remain valid for 3 hours before expiring without
confirmation from buyers.
Call the preapprovalWithKey method to launch the preapproval checkout experience to
confirm a buyer’s agreement to a pending preapproval. If the buyer completes the preapproval
checkout, the library returns a confirmed preapproval key. Maintain a record of buyers and their
confirmed preapproval keys on your web server. Later on your web server, take payments from
buyers by sending Pay requests with buyers’ preapproval keys to PayPal.
About Preapproval Pins
Confirmed preapproval keys let you take payments from buyers without requiring them to log in
to PayPal to authorize payments individually. Depending on your business model, you may want
to obtain consent quickly from buyers before you take individual payments. Preapproval PINs are

Mobile Payments Library Developer Guide and Reference –iOS Edition August 2012 19
special codes that buyers enter to authorize preapproved payments individually without logging in
to PayPal.
For example, you might have a mobile game that requires payment from buyers to enter a higher
level of difficulty. You could take the payment, without notice, when the buyer enters the higher
level. However, the buyer might dispute the payment later, despite the preapproval agreement and
the automatic payment notice from PayPal. Obtain a buyer’s consent before you take the entrance
fee to help improve the buying experience.
Specify that you want your preapprovals to use preapproval PINs when you send Preapproval
requests from your web server to PayPal. Set the PreapprovalRequest.pinType to
REQUIRED. PayPal returns preapproval keys that require buyers to create preapproval PINs
during preapproval checkout.
Later, when you take payments by using a buyer’s confirmed preapproval key, prompt the buyer
for the preapproval PIN. Pass the buyer’s PIN to PayPal when you send the Pay request from
your web server. PayPal recommends that you display the payment reason and payment amount
when you prompt buyers for their preapproval PINs.
Method Signature for Preapproval Checkout
- (void)preapprovalWithKey:(NSString *)preapprovalKey
andMerchantName:(NSString *)merchantName;
NOTE: See “Delegate Methods in the Mobile Payments Library” for callback method details.

20 August 2012 PayPal Mobile Payments Developer Guide and Reference – iOS Edition
Method Sequence for Preapproval Checkout
Mobile Payments Library Developer Guide and Reference –iOS Edition August 2012 21
Custom Objects in the Mobile Payments Library
The Mobile Payments Library includes custom objects for passing information between the
library and your application during checkout.
PayPalAddress
This object is passed to the PayPalPaymentDelegate in the AdjustAmounts method. Use
this address to update the payment amount, tax, currency, and shipping values of the payment.
Then, the buyer continues to check out with the new amounts. Use this object if you enable
dynamic amount calculation by calling the DynamicAmountUpdate method.
Property Description
name The name of the address.
street1 First line of the street address.
street2 Second line of the street address.
city Name of the city.
state Name of the state or province.
postalcode U.S. ZIP code or other country-specific postal code.
countrycode The 2-character country code.
country The name of the country.
PayPalAmounts
This object is returned to the library by the AdjustAmounts method of the
PayPalPaymentDelegate. This object contains the values for the updated payment. Use this
object if you enable dynamic amount calculation by calling the DynamicAmountUpdate
method.
Property Description
currency Currency code of the amount. Defaults to @”USD”.
payment_amount NSDecimalNumber * amount of the payment before tax or
shipping.
tax NSDecimalNumber * tax amount associated with the item. If no
tax amount, can be nil.
shipping NSDecimalNumber * shipping amount for the item. If no
shipping amount, can be nil.

22 August 2012 PayPal Mobile Payments Developer Guide and Reference – iOS Edition
PayPalPayment
This object is passed to the library in the Checkout method. This object contains all the values
for a payment.
Property Description
subTotal (Required) NSDecimalNumber* the amount of the payment
(subtotal).
paymentType (Optional) Purpose of payment. Defaults to TYPE_NOT_SET.
paymentSubType (Optional) Subtype of the “TYPE_SERVICE” paymentType.
Applicable only if you have been approved for special pricing plans.
Defaults to SUBTYPE_NOT_SET.
recipient (Required) The email address or phone number of the payment’s
recipient. When specifying a number, include the country code; for
example, “+14029352050”.
Character length and limits: 255 characters.
paymentCurrency (Optional) Currency code for the payment. Defaults to @”USD”. Can
be nil.
invoiceData (Optional) PayPalInvoiceData* that contains information
regarding shipping, tax, and a breakdown of the items in the payment.
description (Optional) Payment note.
customId (Optional) Merchant's custom ID.
merchantName (Optional) Displayed at the top of the library screen. If left nil, it
displays as blank.
ipnUrl (Optional) The URL to be used for instant payment notification.
memo (Optional)
NOTE: The recipient should be a registered user on an existing PayPal Sandbox or Live account,
depending on the environment. The recipient does not need to be registered for personal
payments.
Mobile Payments Library Developer Guide and Reference –iOS Edition August 2012 23
PayPalAdvancedPayment
This object is passed to the library in the AdvancedCheckout method. This object contains all
the values for an advanced payment which can be used to create a parallel or chained payment
(see discussion in “Refunds can be supported by manual refund using the PayPal account
interface or by means of the RefundTransaction API. AdaptivePayments Refund API call is not
supported for MPL-generated pay keys. More details and documentation are available at:
https://cms.paypal.com/cms_content/US/en_US/files/developer/PP_AdaptivePayments.pdf
Simple, Parallel, and Chained Payments” section).
Property Description
receiverPaymentDeta
ils (Required) An NSMutableArray * containing all of the
PPReceiverPaymentDetails objects that define a payment to a
single recipient of an advanced payment. For more information, please
see the discussion on PPReceiverPaymentDetails below.
paymentCurrency (Optional) Currency code for the payment. Defaults to @”USD”. Can
be nil.
ipnUrl (Optional) The URL to be used for instant payment notification.
memo (Optional)
PPReceiverPaymentDetails
This object is used in the PayPalAdvancedPayment object to specify the details of a single
receiver.
Property Description
recipient (Required) The email address or phone number of the payment’s
recipient.
Character length and limits: 255 characters.
subtotal (Required) NSDecimalNumber* the amount of the payment
isPrimary (Optional) BOOL specifying whether this receiver is the primary
receiver of a multiple recipient payment. There can be only one
primary receiver per PayPalAdvancedPayment. If there is a
primary receiver, the payment is treated as a Chain Payment; otherwise,
it is treated as a Parallel Payment.
paymentType (Optional) The payment type of the payment (see “Enumerated Values
in the Mobile Payments Library”). Allowable values are:
• TYPE_SERVICE
• TYPE_GOODS
• TYPE_PERSONAL
• TYPE_NOT_SET
24 August 2012 PayPal Mobile Payments Developer Guide and Reference – iOS Edition
Property Description
paymentSubType (Optional) The payment subtype for a “SERVICES” type payment (see
“Enumerated Values in the Mobile Payments Library”). Applicable
only if you have been approved for special pricing plans. For any
paymentType other than TYPE_SERVICE or if you have not been
approved for special pricing plans, use SUBTYPE_NOT_SET as the
paymentSubType. Allowable values are:
• SUBTYPE_NOT_SET
• SUBTYPE_AFFILIATE_PAYMENTS
• SUBTYPE_B2B
• SUBTYPE_PAYROLL
• SUBTYPE_REBATES
• SUBTYPE_REFUNDS
• SUBTYPE_REIMBURSEMENTS
• SUBTYPE_DONATIONS
• SUBTYPE_UTILITIES
• SUBTYPE_TUITION
• SUBTYPE_GOVERNMENT
• SUBTYPE_INSURANCE
• SUBTYPE_REMITTANCES
• SUBTYPE_RENT
• SUBTYPE_MORTGAGE
• SUBTYPE_MEDICAL
• SUBTYPE_CHILD_CARE
• SUBTYPE_EVENT_PLANNING
• SUBTYPE_GENERAL_CONTRACTORS
• SUBTYPE_ENTERTAINMENT
• SUBTYPE_TOURISM
• SUBTYPE_INVOICE
• SUBTYPE_TRANSFER
invoiceData (Optional) PayPalInvoiceData* that contains information
regarding shipping, tax, and a breakdown of the items in the payment.
description (Optional) Payment note.
customId (Optional) Merchant's custom ID.
merchantName (Optional) This is used to identify the recipient of the payment to the
buyer. For simple and chained payments, this is displayed above the
checkout cart. For parallel payments, this is displayed in the shopping
cart. If this is not supplied, the recipient's email or phone number can
be used instead.

Mobile Payments Library Developer Guide and Reference –iOS Edition August 2012 25
PayPalInvoiceData
This object is an optional parameter to a PayPalPayment or a
PPReceiverPaymentDetails object. This object holds data regarding the tax shipping and
a per-item breakdown of the items included in the payment. While this is an optional class, once
it is added to a container, it must be populated with the following required fields.
Property Description
totalTax (Required) NSDecimalNumber * The tax amount for the payment.
This summed up with the totalShipping and the containing object's
subtotal to determine the total amount sent to the receiver.
totalShipping (Required) NSDecimalNumber * The shipping amount for the
payment. This summed up with the totalTax and the containing object's
subtotal to determine the total amount sent to the receiver.
invoiceItems (Required) An NSMutableArray * of PayPalInvoiceItems
(see discussion on PayPalInvoiceItem below). These items do not affect
the total amount of the payment but must equal the subtotal.
PayPalInvoiceItem
This object is an optional parameter to a PayPalPayment or a
PPReceiverPaymentDetails object. Note that this is required if the
PayPalInvoiceData parameter is used. This object holds data regarding the tax, shipping
and a per-item breakdown of the items included in the payment. While this is an optional class,
once it is added to a container, it must be populated with the following required fields.
NOTE: The itemPrice and itemCount multiplied together must equal the totalPrice.
The totalPrices of all invoiceItems to a PayPalPayment or a
PPReceiverPaymentDetails object must equal the subtotal of that object.
Property Description
name (Required) The name of the item.
itemId (Optional)
totalPrice (Required) NSDecimalNumber * specifying the total price of the
item. The total price can differ from (itemPrice * itemCount),
for example, when you are providing a coupon based on volume.
itemPrice (Required) NSDecimalNumber *specifying the unit price of the
item.
itemCount (Required) NSNumber * specifying the quantity of this item.
26 August 2012 PayPal Mobile Payments Developer Guide and Reference – iOS Edition
PayPalReceiverAmounts
This object is used in the dynamic amount calculation for Advanced Payment types. It is always
contained in an array.
Property Description
amounts (Required) PayPalAmounts * specifying details about how much
this receiver should receive.
recipient (Required) The email address or phone number of this recipient.
Character length and limits: 255 characters
Enumerated Values in the Mobile Payments Library
The enumerated values supported by various methods in the library are:
PayPalEnvironment
• ENV_LIVE: Use the PayPal production servers.
• ENV_SANDBOX: Use the PayPal testing servers.
• ENV_NONE: Do not use any PayPal servers. Operate in demonstration mode, instead.
Demonstration mode lets you view various payment flows without requiring production or
test accounts on PayPal servers. Network calls within the library are simulated by using
demonstration data held within the library.
NOTE: ENV_LIVE does not support simulators.
PayPalButtonType
BUTTON_152x33
BUTTON_194x37
BUTTON_278x43
BUTTON_294x43

Mobile Payments Library Developer Guide and Reference –iOS Edition August 2012 27
NOTE: If the buttonTextType parameter is set to 'TEXT_DONATE,’ the word “Pay” in the
above buttons is replaced by “Donate.” The language of the button also changes based on
the language you pass into the setLang method or the auto detected language on the
phone.
PayPalPaymentType
TYPE_NOT_SET
TYPE_GOODS
TYPE_SERVICE
TYPE_PERSONAL
NOTE: For Personal payment types, the PayPal Checkout experience differs slightly from other
payment types. Additionally for Personal payment types, senders in some cases can
choose who pays any fees: the sender or the recipient. In India and Germany, recipients
always pay any fees.
For more information, see “feePayer Property.”
PayPalPaymentSubType
SUBTYPE_NOT_SET
SUBTYPE_AFFILIATE_PAYMENTS
SUBTYPE_B2B
SUBTYPE_PAYROLL
SUBTYPE_REBATES
SUBTYPE_REFUNDS
SUBTYPE_REIMBURSEMENTS
SUBTYPE_DONATIONS
SUBTYPE_UTILITIES
SUBTYPE_TUITION
SUBTYPE_GOVERNMENT
SUBTYPE_INSURANCE
SUBTYPE_REMITTANCES
SUBTYPE_RENT
SUBTYPE_MORTGAGE
SUBTYPE_MEDICAL
SUBTYPE_CHILD_CARE
SUBTYPE_EVENT_PLANNING
SUBTYPE_GENERAL_CONTRACTORS
SUBTYPE_ENTERTAINMENT
SUBTYPE_TOURISM
SUBTYPE_INVOICE
SUBTYPE_TRANSFER
NOTE: You should only specify a subtype if directed to do so by the vetting team when applying
for business payments. For Service payment types, the PayPalPaymentSubType is used to
further qualify the payment if you are using special pricing plans.
28 August 2012 PayPal Mobile Payments Developer Guide and Reference – iOS Edition
PayPalPaymentStatus
STATUS_COMPLETED: The payment has completed on the back end.
STATUS_CREATED: The payment has been created but not completed.
STATUS_OTHER: The payment success state is other than created or completed.
PayPalAmountErrorCode
AMOUNT_ERROR_NONE: No error occurred during dynamic amount calculation.
AMOUNT_ERROR_SERVER: A connectivity or server error occurred during dynamic amount
calculation.
AMOUNT_ERROR_OTHER: A generic error occurred during dynamic amount calculation.
PayPalInitializationStatus
STATUS_NOT_STARTED: Initialization never attempted.
STATUS_COMPLETED_SUCCESS: Initialization completed successfully.
STATUS_COMPLETED_ERROR: Initialization completed with errors. The error is displayed in
the device or simulator logs.
STATUS_INPROGRESS: Initialization in progress. Must wait until the current initialization
attempt completes before attempting to retry initialization.
Localization Support in the Mobile Payments Library
The Mobile Payments Library supports many locales. Set the locale when you initialize the
library. The default is the locale of the device. If the library does not support the device locale,
the library uses en_US, instead.
How to Set the Language and the Region
Set the locale using the lang property. You can set this property any time after you initialize the
library. Set the lang property before you call the getPayButtonWithTarget method so you
obtain a localized Pay with PayPal button.
Locales Supported by the Mobile Payments Library
The library supports the following locale codes:
Country or Region Supported Locale Codes
Argentina es_AR
Brazil pt_BR
Australia en_AU
Belgium en_BE nl_BE fr_BE
Canada en_CA fr_CA
France fr_FR en_FR

Mobile Payments Library Developer Guide and Reference –iOS Edition August 2012 29
Country or Region Supported Locale Codes
Germany de_DE en_DE
Hong Kong zh_HK en_HK
India en_IN
Italy it_IT
Japan ja_JP en_JP
Mexico es_MX en_MX
Netherlands nl_NL en_NL
Poland pl_PL en_PL
Singapore en_SG
Spain es_ES en_ES
Switzerland de_CH en_CH fr_CH
Taiwan zh_TW en_TW
United States en_US
Library Support for the devices and OS versions.
The Mobile Payments Library fully supports OS 4.0 as well as the Apple iPad. You can compile
the library files into the following configurations:
• 3.0, 3.1.x (iPhone only)
• 3.2 (iPad only)
• 3.x (Universal)
• 4.x
The demo application also fully supports OS 4.0 and the Apple iPad. You can compile the demo
application into the preceding configurations.
The single library file can be used to support armv6 and armv7 architectures for SDK 4.0 and
below. Support is provided only for Xcode 3.2.3 at this time.
Adding the Mobile Payments Library to Your Xcode Project
PayPal provides a package that contains 11 header files:
• PayPal.h
• PayPalAddress.h
• PayPalAdvancedPayment.h
• PayPalAmounts.h
• PayPalContext.h
• PayPalInvoiceData.h

30 August 2012 PayPal Mobile Payments Developer Guide and Reference – iOS Edition
• PayPalInvoiceItem.h
• PayPalPayment.h
• PayPalPreapprovalDetails.h
• PayPalReceiverAmounts.h
• PPReceiverPaymentDetails.h
Also, the package contains a static library file: libPayPalMEP.a.
1. Open your Xcode project.
2. CONTROL+CLICK your project, and then select Add > Existing Files….
3. Select the .h and .a files, and then click Add.
NOTE: You need to add only the PayPalAmounts.h, PayPalReceiverAmounts.h and
PayPalAddress.h files if you are using the Dynamic Amount Calculation feature.
Sample Code
The following section provides an example library implementation. The demo application
initializes the library and places the Pay with PayPal button on the screen where buyers review
the order (PaymentViewController.m). The callback is handled in the same class.
Header File
#import <UIKit/UIKit.h>
#import "PayPal.h"
@interface PaymentViewController : UIViewController
<PayPalPaymentDelegate> {
}
-(void)payWithPayPal;
@end
Details:
#import “PayPal.h”
The preceding line imports the library header file.
<PayPalPaymentDelegate>
The preceding line states that this class implements the PayPalPaymentDelegate protocol.
-(void)payWithPayPal;
This preceding line is called by the Pay with PayPal button when a buyer taps it.

Mobile Payments Library Developer Guide and Reference –iOS Edition August 2012 31
Implementation File
The following snippet shows a simplified version of the PaymentViewController and
illustrates the library methods for an advanced parallel payment. For reference, see the demo
application source.
- (void)viewDidLoad {
PayPalPaymentType paymentType = HARD_GOODS;
//Get the PayPal Library button.
//We will be handling the callback,
//so we declare 'self' as the target.
//We want a large button, so we use BUTTON_278x43.
//Our checkout method is 'payWithPayPal',
//and we pass through our payment type.
//We can move the button afterward if desired.
UIButton *button = [[PayPal getInstance]
getPayButtonWithTarget:self andAction:@selector(payWithPayPal)
andButtonType:BUTTON_278x43;
[super viewDidLoad];
}
-(void)payWithPayPal {
//Advanced Payment
PayPal *ppMEP = [PayPal getInstance];
ppMEP.shippingEnabled = forDelivery;
ppMEP.dynamicAmountUpdateEnabled = TRUE;
ppMEP.feePayer = FEEPAYER_EACHRECEIVER;
PayPalAdvancedPayment *payment = [[[PayPalAdvancedPayment alloc]
init] autorelease];
payment.paymentCurrency = @"USD";
payment.paymentType = paymentType;
payment.paymentSubType = paymentSubType;
payment.receiverPaymentDetails = [NSMutableArray array];
NSArray *emails = [NSArray arrayWithObjects:
@"
recipient1@email.com",
@"recipient2@email.com",
@"recipient3@email.com",
nil];
for (int i = 0; i < emails.count; i++) {
PPReceiverPaymentDetails *details =
[[[PPReceiverPaymentDetails
alloc] init] autorelease];
String order, tax, shipping;
order = orderAmount[i];

32 August 2012 PayPal Mobile Payments Developer Guide and Reference – iOS Edition
tax = taxAmount[i];
shipping = shippingAmount[i];
details.invoiceData = [[[PayPalInvoiceData
alloc] init] autorelease];
details.invoiceData.totalShipping = [NSDecimalNumber
decimalNumberWithString:order];
details.invoiceData.totalTax = [NSDecimalNumber
decimalNumberWithString:tax];
details.invoiceData.totalShipping = [NSDecimalNumber
decimalNumberWithString:shipping];
details.description = description;
details.recipient = [emails objectAtIndex:i];
details.merchantName = [NSString
stringWithFormat:@"Recipient %d",i+1];
[payment.receiverPaymentDetails addObject:details];
}
[ppMEP advancedCheckoutWithPayment:payment]; }
Placing the Pay with PayPal Button
UIButton *button = [[PayPal getInstance] getPayButtonWithTarget:self
andAction:@selector(payWithPayPal) andButtonType:BUTTON_278x43
andButtonText:BUTTON_TEXT_PAY];
[self.view addSubview:button];
[super viewDidLoad];
The getPayButtonWithTarget method returns the Pay with PayPal button. Then, you can
add the button to your UIViewController. The demo application payWithPayPal method is
passed through so the Pay with PayPal button can call it on touchUpInside. For this example
payment, the payment type is Hard Goods. Set the left and top position of the button by
specifying those parameters.
The getPayButtonWithTarget method follows standard memory management conventions
and is autoreleased.
For a list of button image types, see PayPalButtonType.
Creating the PayPalPayment Object
PayPalPayment *currentPayment = [[[PayPalPayment alloc] init]
autorelease];
currentPayment.paymentCurrency = @”USD”;
currentPayment.paymentType = TYPE_GOODS;
currentPayment.subTotal = [NSDecimalNumber
decimalNumberWithString: @”10.00”];
currentPayment.recipient = @”recipient@paypal.com”;
currentPayment.merchantName = @“Recipient Name”;
Mobile Payments Library Developer Guide and Reference –iOS Edition August 2012 33
currentPayment.invoiceData = [[[PayPalInvoiceData
alloc] init] autorelease];
currentPayment.invoiceData.totalTax = [NSDecimalNumber
decimalNumberWithString: @”1.00”];
currentPayment.invoiceData.totalShipping = [NSDecimalNumber
decimalNumberWithString: @”2.00”];
The PayPalPayment object is created and the properties are set.
After the checkout method is called, the library releases the currentPayment object.
Checking Out
[ppMEP checkoutWithPayment:currentPayment];
The payment object is passed through to the library. The library displays itself on top of the
application’s Window object, so be sure that you do not take control of the Window after the
checkout call is invoked.
Handling the Callback
-(void)paymentSuccessWithKey:(NSString *)payKey
andStatus:(PayPalPaymentStatus)paymentStatus;
This method is called as soon as the library completes a payment or preapproval. You could use
this message to trigger your own background bookkeeping. This message occurs while the library
is still using the device display, so your application should wait to do any user interface actions
until it receives the paymentLibraryExit message.
-(void)paymentCanceled
This method is called as soon as the buyer cancels the transaction. As with the
paymentSuccess callback, your application should perform no user interface updates until it
receives the paymentLibraryExit message.
-(void)paymentFailedWithCorrelationID:(NSString *)correlationID
errorCode:(NSString *)errorCode errorMessage:(NSString
*)errorMessage;
This method is called immediately upon failure of the payment, and you could do background
bookkeeping at this point. However, you should wait until you receive the
paymentLibraryExit method before doing any user interface updates.
-(void)paymentLibraryExit;
This method is called when the library is finished with the device display and is returning control
to the merchant app. The merchant app should handle displaying the payment status
(success/failed/canceled) to the buyer at this point.
34 August 2012 PayPal Mobile Payments Developer Guide and Reference – iOS Edition
Dynamic Amount Calculation
This method is called by the library when buyers choose a shipping address. The demo
application calculates the tax based on the state of the shipping address, and then it passes the
updated amounts to the library.
Your method must be implemented as shown:
-(PayPalAmounts *)adjustAmountsForAddress:(PayPalAddress const
*)inAddress andCurrency:(NSString const *)inCurrency
andAmount:(NSDecimalNumber const *)inAmount andTax:(NSDecimalNumber
const *)inTax andShipping:(NSDecimalNumber const *)inShipping
andErrorCode:(PayPalAmountErrorCode *)outErrorCode;
-(NSMutableArray *)adjustAmountsAdvancedForAddress:(PayPalAddress const
*)inAddress andCurrency:(NSString const *)inCurrency
andReceiverAmounts:(NSMutableArray *)recieverAmounts
andErrorCode:(PayPalAmountErrorCode *)outErrorCode;
The demo application implements this method like this:
- (PayPalAmounts *)adjustAmountsForAddress:(PayPalAddress const
*)inAddress andCurrency:(NSString const *)inCurrency
andAmount:(NSDecimalNumber const *)inAmount
andTax:(NSDecimalNumber const *)inTax
andShipping:(NSDecimalNumber const *)inShipping
andErrorCode:(PayPalAmountErrorCode *)outErrorCode {
//do any logic here that would adjust the amount based on the shipping
address
PayPalAmounts *newAmounts = [[[PayPalAmounts alloc] init]
autorelease];
newAmounts.currency = @"USD";
newAmounts.payment_amount = (NSDecimalNumber *)inAmount;
//change tax based on the address
if ([inAddress.state isEqualToString:@"CA"]) {
newAmounts.tax = [NSDecimalNumber
decimalNumberWithString:[NSString
stringWithFormat:@"%.2f",[inAmount floatValue] * .1]];
} else {
newAmounts.tax = [NSDecimalNumber
decimalNumberWithString:[NSString
stringWithFormat:@"%.2f",[inAmount floatValue] * .08]];
}
newAmounts.shipping = (NSDecimalNumber *)inShipping;
//if you need to notify the library of an error condition, do one of
the following
//*outErrorCode = AMOUNT_ERROR_SERVER;
//*outErrorCode = AMOUNT_ERROR_OTHER;
return newAmounts;
}
Mobile Payments Library Developer Guide and Reference –iOS Edition August 2012 35
- (NSMutableArray *)adjustAmountsAdvancedForAddress:(PayPalAddress const
*)inAddress andCurrency:(NSString const *)inCurrency
andReceiverAmounts:(NSMutableArray *)receiverAmounts
andErrorCode:(PayPalAmountErrorCode *)outErrorCode {
NSMutableArray *returnArray = [NSMutableArray
arrayWithCapacity:[receiverAmounts count]];
for (PayPalReceiverAmounts *amounts in receiverAmounts) {
//leave the shipping the same, change the tax based on the
state
if ([inAddress.state isEqualToString:@"CA"]) {
amounts.amounts.tax = [NSDecimalNumber
decimalNumberWithString:[NSString
stringWithFormat:@"%.2f",[amounts.amounts.payment_amount floatValue] *
.1]];
} else {
amounts.amounts.tax = [NSDecimalNumber
decimalNumberWithString:[NSString
stringWithFormat:@"%.2f",[amounts.amounts.payment_amount floatValue] *
.08]];
}
[returnArray addObject:amounts];
}
//if you need to notify the library of an error condition, do one of
the
following
//*outErrorCode = AMOUNT_ERROR_SERVER;
//*outErrorCode = AMOUNT_ERROR_OTHER;
return returnArray;
}
36 August 2012 PayPal Mobile Payments Developer Guide and Reference – iOS Edition
2. The Checkout Experience with the
Mobile Payments Library
The following screen shots illustrate several different PayPal Checkout experiences that occur
after buyers click the PayPal button that your application obtains from the library by using the
getPayPalButton()method.
NOTE: The checkout experience is in Portrait orientation only. Landscape orientation is currently
not supported.
Checkout Experience #1 – Goods or Services with Shipping
Payment type = Hard Goods or Services / Shipping = enabled
In the preceding experience, buyers enter their PayPal login credentials in the Log In To PayPal
screen. Then, they can review details of the payment in the second screen and change funding
source or shipping address. If satisfied, buyers click Pay to complete the payment.
Mobile Payments Library Developer Guide and Reference –iOS Edition August 2012 37
Checkout Experience #2 – Goods or Services without Shipping
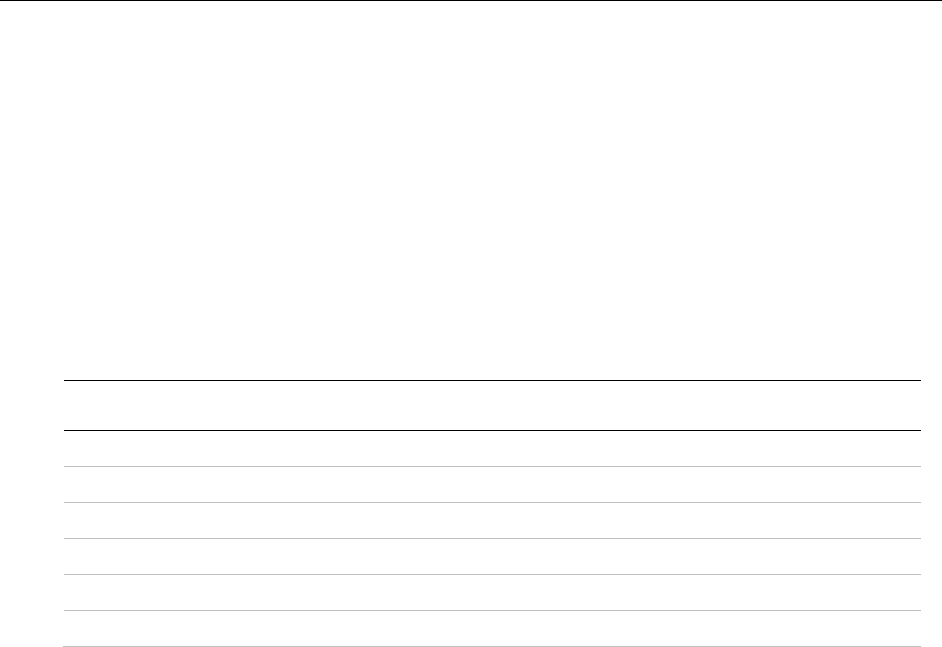
Payment type = Hard Goods or Services / Shipping = disabled
In this case, shipping is not required (such as, manual pick up of goods or services). Shipping is
disabled by a call to the disableShipping library method. Buyers enter their PayPal login
credentials and directly pay by clicking Pay on the first screen. Buyers can review funding
choices by clicking Review on the same page.
38 August 2012 PayPal Mobile Payments Developer Guide and Reference – iOS Edition
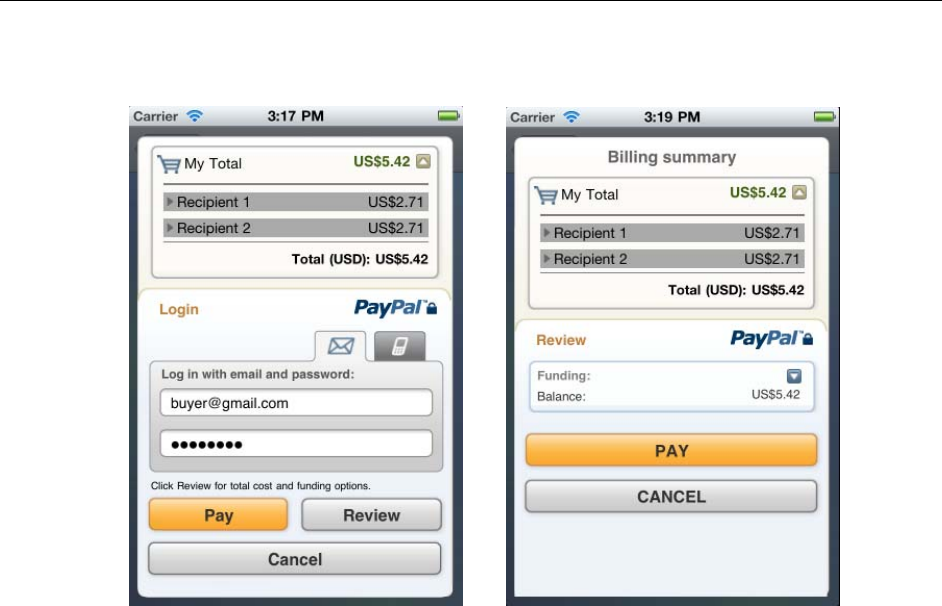
Checkout Experience #3 – Donations
Payment type = Service / Button text = Donations / Shipping = enabled
In the preceding experience, buyers make a donation to a charity or other cause. In this context,
the charity or cause wants to leverage PayPal members’ addresses as mailing addresses for
donation receipts. By enabling shipping in the library, buyers are presented with their primary
mailing address, or they can choose another mailing address from the ones in their PayPal
accounts.

Mobile Payments Library Developer Guide and Reference –iOS Edition August 2012 39
Checkout Experience #4 – Personal Send Money Payments
Payment type = Personal payments / Shipping = disabled
In the preceding experience, PayPal members make personal payments to other PayPal members.
There are no transaction fees when the transaction is funded by PayPal balance or by a bank
account on file. The transaction carries a fee when it is funded by a credit or debit card. In some
cases, senders choose who pays any fees – sender or recipient. In India and Germany, recipients
always pay any fees.
For more information on PayPal Send Money and pricing, refer to:
https://cms.paypal.com/us/cgi-bin/?cmd=_render-
content&content_ID=marketing_us/send_money
40 August 2012 PayPal Mobile Payments Developer Guide and Reference – iOS Edition
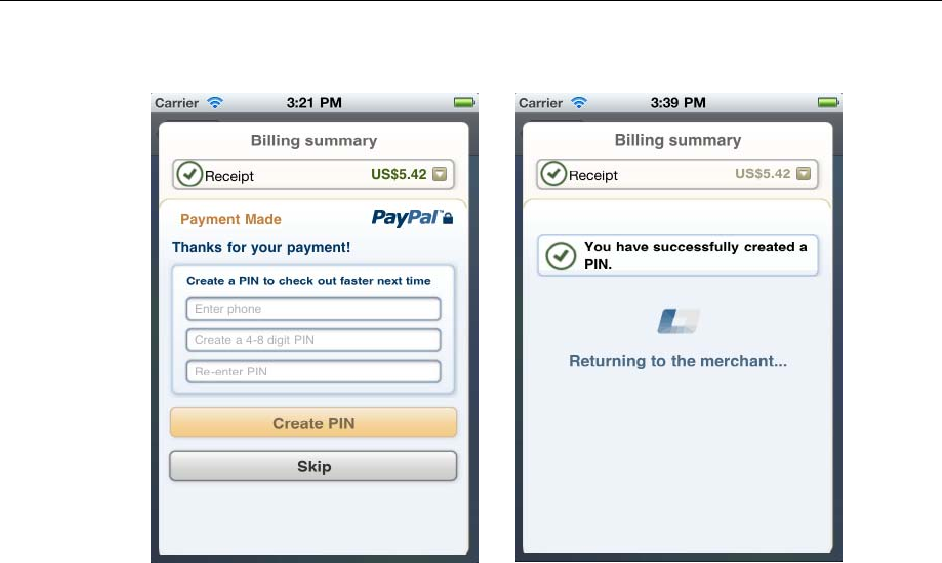
Checkout Experience #5 – Create Pin
In the preceding experience, a PayPal member has just completed a payment and does not
currently have a PIN associated with their account. By following the on-screen instructions, the
buyer can associate their account with a phone number and PIN for easier login in the future.
Upon successful creation of the PIN, the buyer is returned to your application triggering the
paymentSuccess() delegate callback.

Mobile Payments Library Developer Guide and Reference –iOS Edition August 2012 41
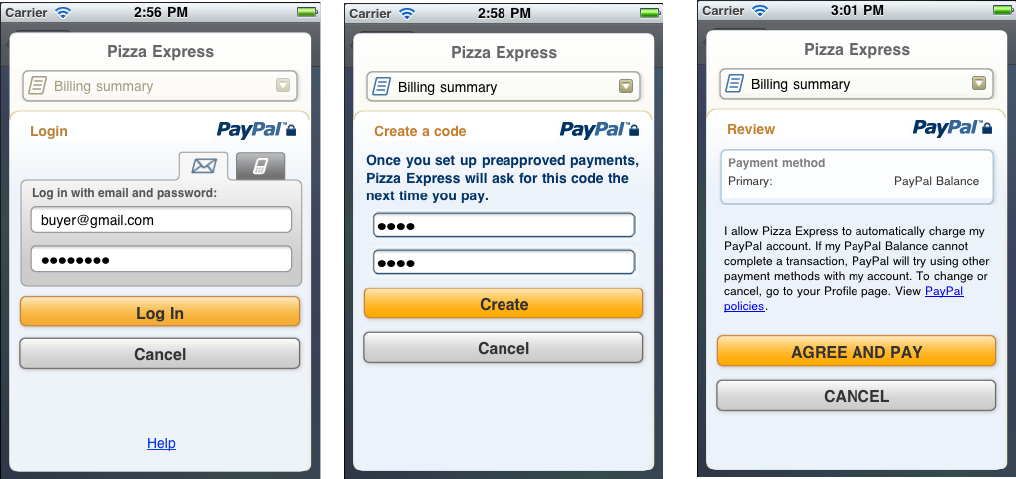
Checkout Experience #6 – Preapproval
In this experience, you executed the preapproval checkout method, as discussed under
“Preapprovals” on page 18.
Basic Preapproval Checkout
Login Screen Agree and Pay Screen
During a preapproval checkout, the buyer agrees to the terms of a preapproval agreement. The
agreement authorizes you to take payments without requiring the buyer to log in to PayPal to
authorize the payments individually. After the buyer completes the checkout, PayPal returns the
buyer’s confirmed preapproval key to your mobile application.
Use the buyer’s confirmed preapproval key to take the preapproved payments. The library does
not take the payments for you. After UI control returns to your mobile application, store the
buyer’s preapproval key on you web server. Then, take your first preapproved payment by
sending a Pay request with the buyer’s preapproval key from your web server to PayPal.
42 August 2012 PayPal Mobile Payments Developer Guide and Reference – iOS Edition
Creating Preapproval PINs During Preapproval Checkout
Depending on your business model, you may require buyers to create preapproval PINs during
preapproval checkout. Preapproval PINs are special codes that buyers specify during checkout to
let them consent quickly later to individual payments. If your preapproval agreements require
PINs, PayPal displays the optional Create a code screen during preapproval checkout.
Login Screen Create a Code Screen Agree and Pay Screen
After logging in to PayPal, the buyer enters a code that only the buyer and PayPal know. Later,
before you take a preapproved payment, prompt the buyer to enter the preapproval PIN. Then
from your web server, include the PIN that the buyer entered with the Pay request that you send
to PayPal. PayPal recommends that you display the payment reason and payment amount when
you prompt the buyer for the preapproval PIN.

Mobile Payments Library Developer Guide and Reference –iOS Edition August 2012 43
3. Submitting Your Application to PayPal
Before you submit your application to Apple and distribute your mobile application publicly, you
need an authorized application ID from PayPal. PayPal tests all mobile applications before
issuing application IDs. Test your mobile application thoroughly in the PayPal Sandbox by using
APP-80W284485P519543T as your test application ID. Then, submit your test application to
PayPal.
1. Log in or sign up on PayPal’s developer website, x.com.
2. After logging in successfully, click the My Apps tab.
3. Click SUBMIT NEW APP.
4. Fill in the 2-page “Submit New App” form.
If you need more time, you can save your form as a draft and return later to complete it.
5. Click Submit.
Result:
For those using simple or parallel payments, PayPal reviews your application within 24 hours
and responds by sending you your PayPalApplicationID. Reviewers at PayPal follow up
by email with questions, should they arise, before they approve your mobile application. For
those using chained payments or preapprovals, the review may take longer.
After completing this task:
Wait until PayPal sends you your application ID. Then, make sure that you update your
software with the following changes before you submit your mobile application to Apple:
• Application ID: in your calls to initWithApplicationId
• Environment: in your calls to initWithApplicationId
• Recipient: in the PayPalPayment object

44 August 2012 PayPal Mobile Payments Developer Guide and Reference – iOS Edition
A. Currencies Supported by PayPal
PayPal uses 3-character ISO-4217 codes for specifying currencies in fields and variables.
Currency Currency Code
Australian Dollar AUD
Brazilian Real
NOTE: This currency is supported as a payment currency
and a currency balance for in-country PayPal
accounts only.
BRL
Canadian Dollar CAD
Czech Koruna CZK
Danish Krone DKK
Euro EUR
Hong Kong Dollar HKD
Hungarian Forint HUF
Israeli New Shekel ILS
Japanese Yen JPY
Malaysian Ringgit
NOTE: This currency is supported as a payment currency
and a currency balance for in-country PayPal
accounts only.
MYR
Mexican Peso MXN
N
orwegian Krone NOK
N
ew Zealand Dollar NZD
Philippine Peso PHP
Polish Zloty PLN
Pound Sterling GBP
Singapore Dollar SGD
Swedish Krona SEK
Swiss Franc CHF
Taiwan New Dollar TWD
Thai Baht THB
U.S. Dollar USD

Mobile Payments Library Developer Guide and Reference –iOS Edition August 2012 45
B. Countries and Regions Supported by
PayPal
PayPal uses 2-character IS0-3166-1 codes for specifying countries and regions that are supported
in fields and variables.
Country or Region Code
Aghanistan AF
Åland Islands AX
Albania AL
Algeria DZ
American Samoa AS
Andorra AD
Angola AO
Anguilla AI
Antarctica AQ
Antigua and Barbuda AG
Argentina AR
Armenia AM
Aruba AW
Australia AU
Austria AT
Azerbaijan AZ
Bahamas BS
Bahrain BH
Bangladesh BD
Barbados BB
Belarus BY
Belgiium BE
Belize BZ
Benin BJ
Bermuda BM
Bhutan BT
Bolivia BO
Bosnia and Herzegovina BA
Botswana BW
Bouvet Island BV
Brazil BR
Britiish Indian Ocean
Territory
IO
Brunei Darussalam BN
Country or Region Code
Bulgaria BG
Burkina Faso BF
Burundi BI
Cambodia KH
Cameroon CM
Canada CA
Cape Verde CV
Caymen Islands KY
Central African Republic CF
Chad TD
Chile CL
China CN
Christmas Island CX
Cocos (Keeling) Islands CC
Columbia CO
Comoros KM
Congo CG
Congo, The Democratic
Republic of
CD
Cook Islands CK
Costa Rica CR
Côte d’Ivoire CI
Croatia HR
Cuba CU
Cyprus CY
Czech Republic CZ
Denmark DK
Djibouti DJ
Dominica DM
Dominican Republic DO
Ecuador EC
Egypt EG
El Salvador SV
Eqautorial Guinea GQ

46 August 2012 PayPal Mobile Payments Developer Guide and Reference – iOS Edition
Country or Region Code
Eritrea ER
Estonia EE
Ethiopia ET
Falkland Islands
(Malvinas)
FK
Faroe Islands FO
Fiji FJ
Finland FI
France FR
French Guiana GF
French Polynesia PF
French Southern
Territories
TF
Gabon GA
Gambia GM
Georgia GE
Germany DE
Ghana GH
Gibraltar GI
Greece GR
Greenland GL
Grenada GD
Guadeloupe GP
Guam GU
Guatemala GT
Guernsey GG
Guinea GN
Guinea-Bissau GW
Guyana GY
Haiti HT
Heard Island and
McDonald Islands
HM
Holy See (Vatican City
State)
VA
Honduras HN
Hong Kong HK
Hungary HU
Iceland IS
India IN
Indonesia ID
Iran, Islamic Republic of IR
Iraq IQ
Ireland IE
Country or Region Code
Isle of Man IM
Israel IL
Italy IT
Jamaica JM
Japan JP
Jersey JE
Jordan JO
Kazakhstan KZ
Kenya KE
Kiribati KI
Korea, Democratic
People’s Republic of
KP
Korea, Republic KR
Kuwait KW
Kyrgyzstan KG
Lao People’s Democratic
Republic
LA
Latvia LV
Lebanon LB
Lesotho LS
Liberia LR
Libyan Arabjamahiriya LY
Liechtenstein LI
Lithuania LT
Luxembourg LU
Macao MO
Macedonia, The Former
Yugoslav Republic of
MK
Madagascar MG
Malawi MW
Malaysia MY
Maldives MV
Mali ML
Malta MT
Marshall Islands MH
Martinique MQ
Mauratania MR
Mauritius MU
Mayotte YT
Mexico MX
Micronesia, Federated
States of
FM
Moldova, Republic of MD

Mobile Payments Library Developer Guide and Reference –iOS Edition August 2012 47
Country or Region Code
Monaco MC
Mongolia MN
Monstserrat MS
Morocco MA
Mozambique MZ
Myanmar MM
N
amibia NA
N
auru NR
N
epal NP
N
etherlands NL
N
etherlands Antilles AN
N
ew Caledonia NC
N
ew Zealand NZ
N
icaragua NI
N
iger NE
N
igeria NG
N
iue NU
N
orfolk Island NF
N
orthern Mariana Islands MP
N
orway NO
Oman OM
Pakistan PK
Palau PW
Palestinian Territory,
Occupied
PS
Panama PA
Papua New Guinea PG
Paraguay PY
Peru PE
Philippines PH
Pitcairn PN
Poland PL
Portugal PT
Puerto Rico PR
Qatar QA
Reunion RE
Romania RO
Russian Federation RU
Rwanda RW
Saint Helena SH
Saint Kitts and Nevis KN
Saint Lucia LC
Country or Region Code
Saint Pierre and Miquelon
PM
Saint Vincent and the
Grenadines
VC
Samoa WS
San Marino SM
Sao Tome and Principe ST
Saudi Arabia SA
Senegal SN
Serbia and Montenegro CS
Seychelles SC
Sierra Leone SL
Singapore SG
Slovakia SK
Slovenia SI
Solomon Islands SB
Somalia SO
South Africa ZA
South Georgia and the
South Sandwich Islands
GS
Spain ES
Sri Lanka LK
Sudan SD
Suriname SR
Svalbard and Jan Mayen SJ
Swaziland SZ
Sweden SE
Switzerland CH
Syrian Arab Republic SY
Taiwan, Province of China
TW
Tajikistan TJ
Tanzania, United Republic
of
TZ
Thailand TH
Timor-Leste TL
Togo TG
Tokelau TK
Tonga TO
Trinidad and Tobago TT
Tunisia TN
Turkey TR
Turkmenistan TM
Turks and Caicos Islands TC
Tuvala TV
48 August 2012 PayPal Mobile Payments Developer Guide and Reference – iOS Edition
Country or Region Code
Uganda UG
Ukraine UA
United Arab Emirates AE
United Kingdom GB
United States US
United States Minor
Outlying Islands
UM
Ururguay UY
Uzbekistan UZ
Vanuatu VU
Country or Region Code
Venezuela VE
Viet Nam VN
Virgin Islands, British VG
Virgin Islands, U.S. VI
Wallis and Futuna WF
Western Sahara EH
Yemen YE
Zambia ZM
Zimbabwe ZW
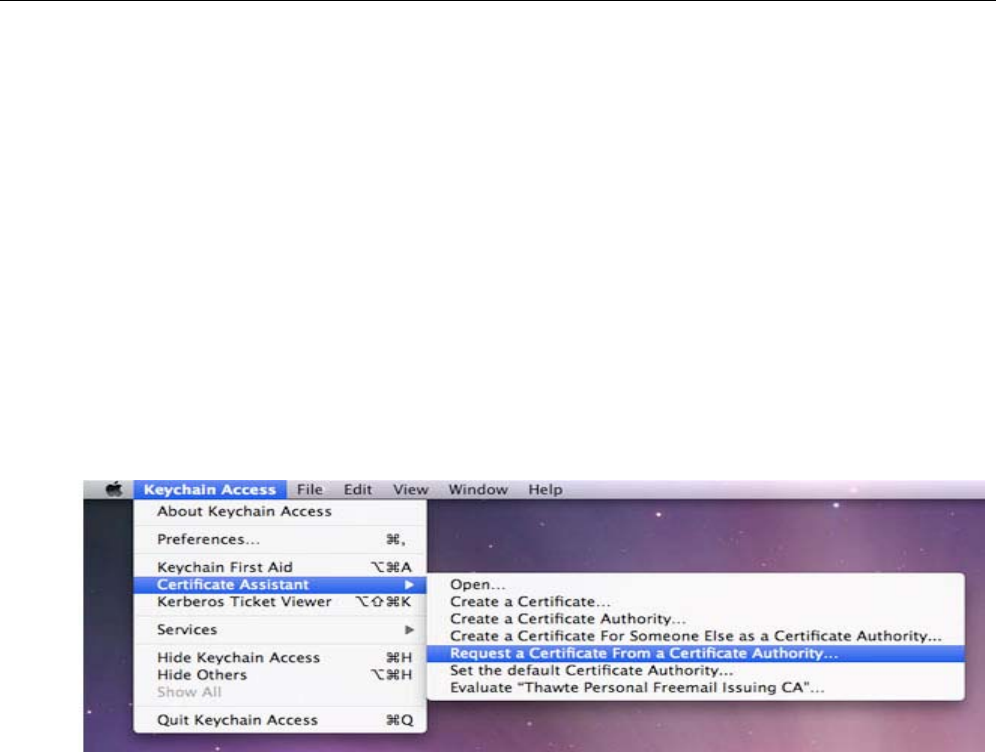
Mobile Payments Library Developer Guide and Reference –iOS Edition August 2012 49
C. Creating an Ad Hoc Build
The Ad Hoc distribution method for iPhone apps allows for distribution of the build to internal or
external sources. PayPal provides the Device ID values for PayPal’s devices. In the process below, you
add PayPal’s devices to your Ad Hoc Provisioning Profile. You then compile the build, sign it with
your Ad Hoc Provisioning Profile, and deliver the zipped build and the Ad Hoc Provisioning Profile to
PayPal.
Creating a Distribution Certificate
Distribution Certificates are paired with private keys linked to computers. A Distribution Certificate is
one component of the Distribution Provisioning Profile that you use to sign the build in Xcode.
Creating and Approving a Certificate Signing Request
To request an iPhone Development Certificate, generate a Certificate Signing Request (CSR) utilizing
the Keychain Access application in Mac OS X Leopard. When you create a CSR, Keychain Access
generates your public and private key pair to establish your iPhone Developer identity. Your private key
is stored in the login Keychain by default, and you can view it in the Keychain Access application
under the Keys category.
1. In your Applications folder, open the Utilities folder and launch Keychain Access.
2. In the Preferences menu, set Online Certificate Status Protocol (OSCP) and Certificate
Revocation List (CRL) to Off.
3. Choose Keychain Access > Certificate Assistant > Request a Certificate from a Certificate
Authority.
NOTE: If you highlight a non-compliant private key in the Keychain during this process, the
Program Portal does not accept the resulting Certificate Request. Confirm that you are
selecting Request a Certificate From a Certificate Authority… and not selecting Request
a Certificate From a Certificate Authority with <Private Key>….
4. In the User Email Address field, enter your email address.
Ensure that the email address entered matches the information that you submitted when you
registered as an iPhone Developer.

50 August 2012 PayPal Mobile Payments Developer Guide and Reference – iOS Edition
5. In the Common Name field enter your name.
Ensure that the name entered matches the information that you submitted when you registered as an
iPhone Developer. No CA (Certificate Authority) Email Address is required. The ‘Required’
message is removed after you complete the following step.
6. Select the Saved to Disk radio button and if prompted, select Let me specify key pair information
and click Continue.
7. If you selected Let me specify key pair, specify a file name and click Save.
8. In the screen that follows, select 2048 bits for the Key Size and RSA for the Algorithm. Then,
click Continue.
9. The Certificate Assistant creates a CSR file on your desktop.
IMPORTANT: Export the private key immediately and share it with all developers who need to compile
and sign builds for distribution. For more details, see “Saving the Private Key and
Transferring It to Other Systems” on page 56.
Creating a Distribution Certificate
After creating the Certificate Signing Request (CSR), you can create a Distribution Certificate.
1. Log in to the iPhone Developer Program Portal and navigate to Certificates > Distribution and
click Add Certificate.
2. Click Upload file, select your CSR and click Submit.
If the Key Size was not set to 2048 bits during the CSR creation process, the Portal rejects the CSR.
3. Click Approve to approve your iPhone Distribution Certificate.
4. In the Certificates > Distribution section of the Portal, CONTROL+CLICK the WWDR
Intermediate Certificate link and select Saved Linked File to Downloads to initiate download of
the certificate.
5. After downloading, double-click the certificate to launch Keychain Access and install.
6. In the same area of the Program Portal, click the name of the iPhone Distribution Certificate to
download.
7. On your local machine, double-click the downloaded .cer file to launch Keychain Access and
install your certificate.
Adding Device IDs
The Devices section of the iPhone Developer Program Portal lets you enter the Apple devices that you
use for iPhone OS development. To install your iPhone OS application on an Apple device, enter the
Unique Device Identifier (UDID) for each iPhone, iPod touch, and iPad in the Program Portal. A UDID
is a 40-character string that is tied to a single device. UDIDs are similar to hardware serial numbers.
These UDIDs are included in the provisioning profiles that you create later. Enter a maximum of 100
devices for your development team.
You need to add your devices, as well as PayPal’s devices. You receive UDID values for PayPal’s
devices from PayPal.
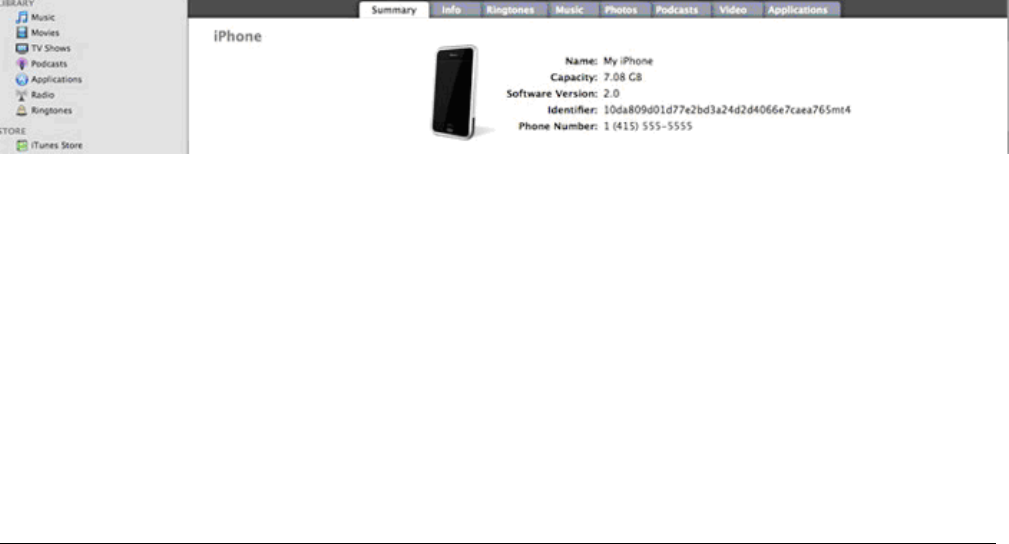
Mobile Payments Library Developer Guide and Reference –iOS Edition August 2012 51
Locating your Device ID
1. Connect your device to your Mac and open Xcode.
2. In Xcode, navigate to the Window drop-down menu and select Organizer.
The 40 hex character string in the Identifier field is your device’s UDID.
Adding Devices to the iPhone Developer Program Portal
1. Navigate to the Devices section of the Program Portal and click Add Device.
2. Enter a descriptive name for the device, as well as the UDID, and then click Submit.
Using Updated Provisioning Profiles for New Devices
If any new devices must be supported, add them to the Program Portal using the above steps. Then edit
the provisioning profile and select the new devices for support.
Import the updated provisioning file into Xcode and use them to sign new builds. The old provisioning
profile does not work for builds signed with the updated profile, so you must distribute the new profile
to all Ad Hoc users who use the new build, not only to users of newly-added devices.
Creating the App ID
An App ID is a unique identifier that iPhone OS uses to allow your application to connect to the Apple
Push Notification service, to share keychain data between applications, and to communicate with
external hardware accessories that you want paired with your iPhone OS application. To install your
application on an iPhone OS device, you must create an App ID.
Each App ID consists of a universally unique 10-character “Bundle Seed ID” prefix generated by Apple
and a “Bundle Identifier” suffix that is entered by a Team Admin in the Program Portal. PayPal
recommends the use of a reverse-domain-name-style string for the “Bundle Identifier” portion of the
App ID. An example App ID is:
8E549T7128.com.apple.AddressBook
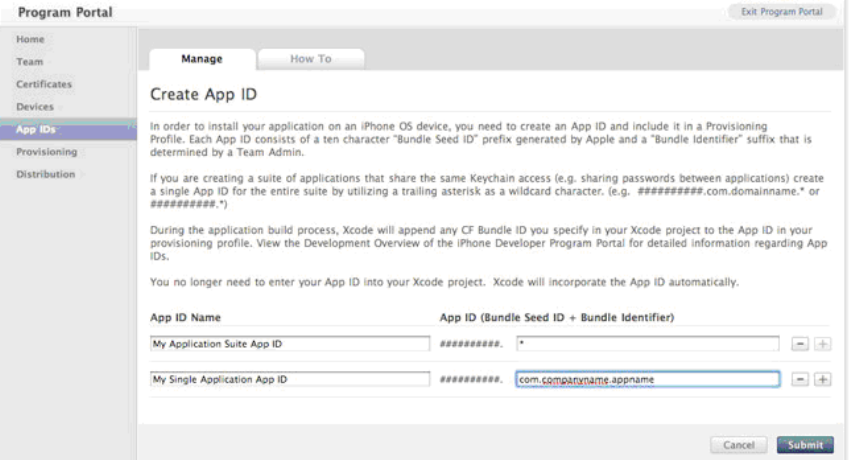
52 August 2012 PayPal Mobile Payments Developer Guide and Reference – iOS Edition
1. Navigate to the App ID section of the Program Portal.
2. Click Add ID.
3. Enter a common name for your App ID.
This is a name for easy reference and identification within the Program Portal.
4. Enter a Bundle Identifier in the free-form text field.
PayPal recommends a reverse-domain-name-style string, such as
com.domainname.applicationname. For application suites that share the same Keychain
access, use a wild-card character in the Bundle Identifier, such as com.domainname.* or *. Your
Bundle Identifier must match the CF Bundle Identifier that you use for your application in Xcode.
5. Click Submit.
The 10-character Bundle Seed ID is generated and concatenated with the Bundle Identifier that you
entered. The resulting string is your App ID.
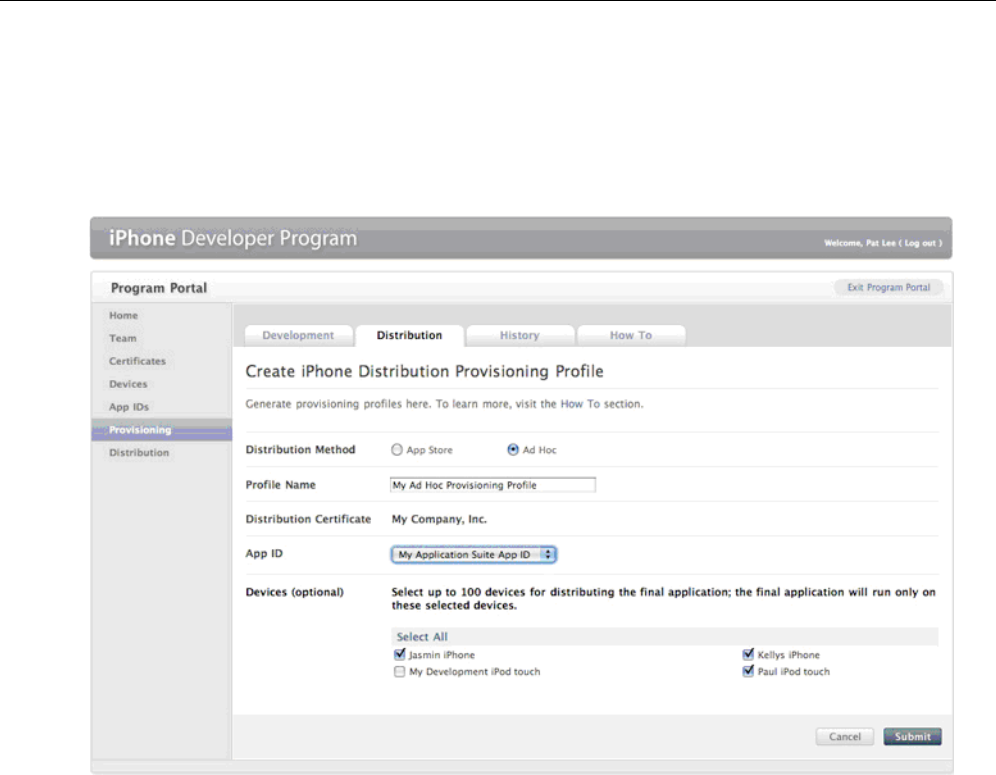
Mobile Payments Library Developer Guide and Reference –iOS Edition August 2012 53
Creating a Distribution Provisioning Profile
To successfully build your application in Xcode for Ad Hoc distribution, you must create and download
an Ad Hoc Distribution Provisioning Profile.
1. Navigate to the Provisioning section of the Program Portal.
2. Click the Distribution tab.
3. Select the Ad Hoc radio button.
4. Enter the name for your Ad Hoc Distribution Provisioning Profile.
5. Confirm that your iPhone Distribution Certificate has been created and is displayed.
6. Select the App ID for the application or application suite that you want to distribute.
7. Select up to 100 UDIDs on which you want to run your application.
8. Click Submit.
9. Download the .mobileprovision file by clicking the name of the Distribution Provisioning
Profile.
10. Install the .mobileprovision file by dragging it onto the Xcode or iTunes icon in the dock.
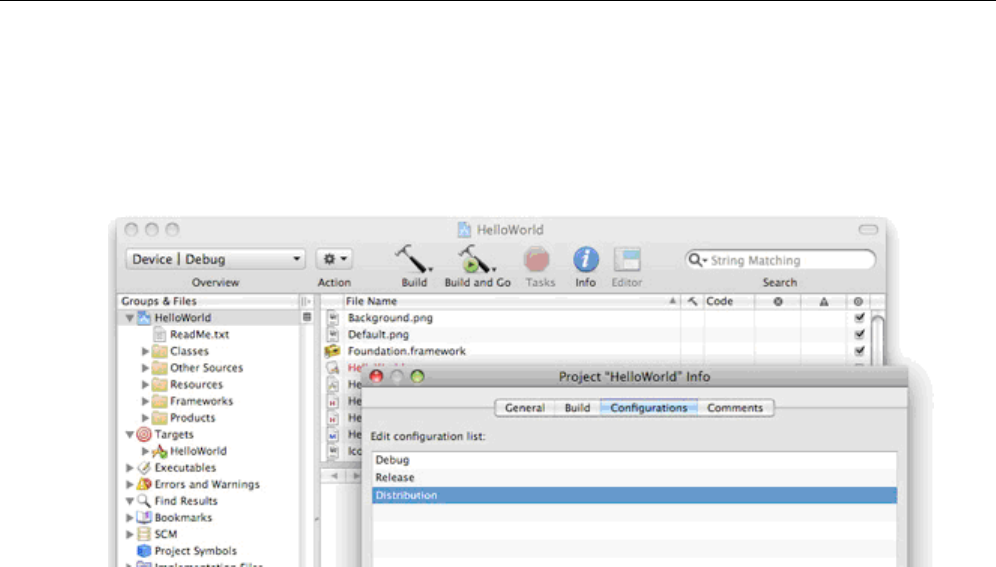
54 August 2012 PayPal Mobile Payments Developer Guide and Reference – iOS Edition
Creating the Build in Xcode
After the Distribution Provisioning Profile is created, you can compile and sign your application.
1. Open the project in Xcode and duplicate the Release configuration in the Configurations pane of
the Info panel for the project.
2. Rename this new configuration “Distribution”.
3. In the Target Info window, click the Build tab and set the Configuration to Distribution.
4. In the Target Info window, navigate to the Build pane.
5. Click the Any iPhone OS Device pop-up menu below the Code Signing Identity field. Then,
select the iPhone Distribution Certificate/Provisioning Profile pair that you want to use to sign and
install your code. Your iPhone Distribution certificate is in bold, with its associated Provisioning
Profile in grey above it.
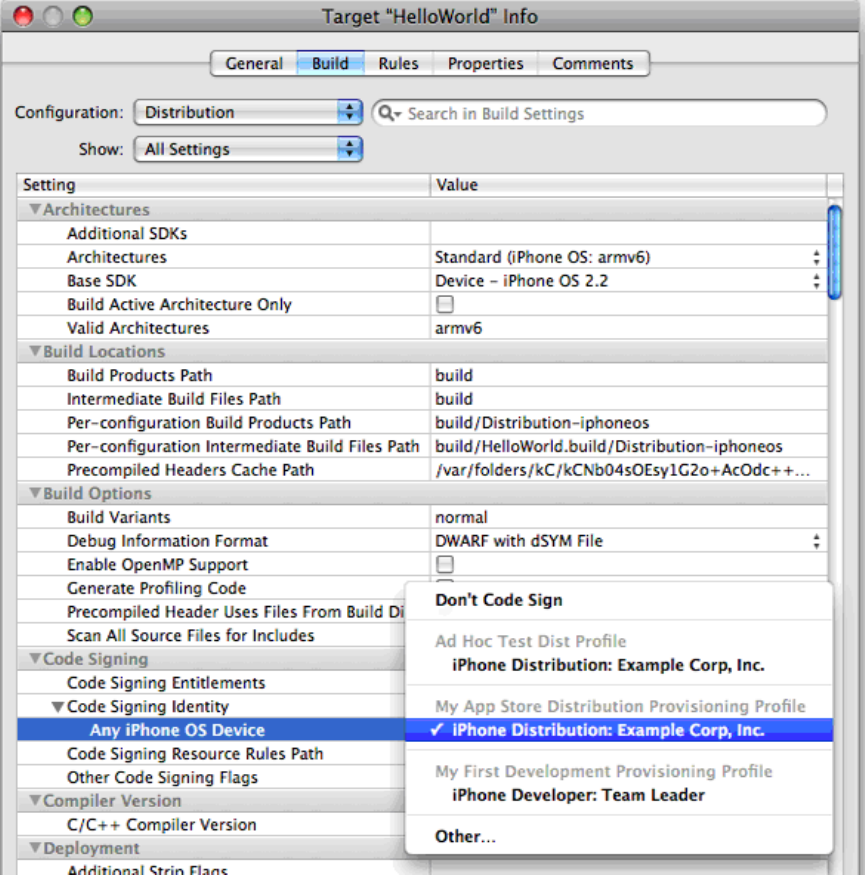
Mobile Payments Library Developer Guide and Reference –iOS Edition August 2012 55
The preceding example shows ‘iPhone Distribution: Example Corp, Inc.’ as the Distribution
Certificate and ‘My App Store Distribution Provisioning Profile’ as its associated
.mobileprovision file.
6. In the Properties Pane of the Target Info window, enter the Bundle Identifier portion of your App
ID. If you used an explicit App ID, enter the Bundle Identifier portion of the App ID in the
Identifier field. For example, enter com.domainname.applicationname if your App ID is
A1B2C3D4E5.com.domainname.applicationname. If you used a wildcard asterisk character in
your App ID, replace the asterisk with any string.
7. In the project window, select the Distribution Active Configuration from the overview popup and
set the Active SDK to the desired Device.
8. In the File Menu, select New File > iPhone OS > Code Signing > Entitlements.

56 August 2012 PayPal Mobile Payments Developer Guide and Reference – iOS Edition
9. Name the file “Entitlements.plist” and click Finish.
This creates a copy of the default entitlements file within the project.
10. Select the new Entitlments.plist file, uncheck the get-task-allow property, and save the
Entitlements.plist file.
11. Select the Target and open the Build settings inspector.
12. In the Code Signing Entitlements build setting, type the filename of the new
Entitlements.plist file, including the extension.
Do not specify a path unless you put the Entitlements.plist file somewhere other than the top
level of the project.
13. Click Build.
14. Highlight the app located within the Products sub-folder and select Reveal in Finder from the
Action popup.
15. Use the compress option in Finder to create a .zip file that contains your application. Be sure to
compress only the .app file only and not the entire build folder.
16. Provide this .zip file to PayPal, along with the Distribution Provisioning Profile
(.mobileprovision) file. You upload this file to x.com as an attachment when you submit your
application.
Notes
Saving the Private Key and Transferring It to Other Systems
It is critical that you save your private key somewhere for safekeeping in case you need to develop on
multiple computers or you decide to reinstall your system OS. Without your private key, you cannot
sign binaries in Xcode nor test your application on Apple devices.
When a CSR is generated, the Keychain Access application creates a private key on your login
keychain. This private key is tied to your user account and cannot be reproduced if lost. If you plan to
develop and test on multiple systems, you must import your private key to all of the systems on which
you work.
1. Open up the Keychain Access application and select the Keys category.
2. CONTROL+CLICK the private key associated with your iPhone Development Certificate, and then
click Export Items in the menu.
The private key is identified by the iPhone Developer: <First Name> <Last Name> public
certificate that is paired with it.
3. Save your key in the Personal Information Exchange (.p12) file format.
4. When prompted, create a password to use when you import this key on another computer.
Result:
You can transfer this .p12 file between systems by double-clicking the .p12 file to install it on a
system. When prompted, use the password that you entered in Step 4 above.
Mobile Payments Library Developer Guide and Reference –iOS Edition August 2012 57
Verifying a Successful Ad Hoc Distribution Build
1. Open the Build Log detail view and confirm the presence of the “embedded.mobileprovision”
file.
This takes you to the line in the build log that shows the provisioning profile was called
successfully. Ensure that the embedded.mobileprovision file is located in the proper
“Distribution” build directory and not a “Debug” or “Release” build directory. Also, make sure the
destination path at the end of the build message is the app that you are building.
2. Search for the term “CodeSign” in the Build Log detail view.
This takes you to the line in the build log that confirms your application was signed by your iPhone
Certificate.
Correcting an Unsuccessful Ad Hoc Distribution Build
Distribution builds can fail if your project is lacking the embedded.mobileprovision file or points
to the wrong directory.
1. Select the Target and open the Build Settings Inspector.
Make sure you are in the Distribution Configuration.
2. Delete the Code Signing Identity: iPhone Distribution: COMPANYNAME
3. In the Xcode Build Menu, select Clean all Targets.
4. Delete any existing build directories in your Xcode project by using the Finder.
5. Re-launch Xcode and open your Project.
6. Re-enter the code-signing identity iPhone Distribution: COMPANYNAME in the Target Build
Settings Inspector.
7. Rebuild your project.
