Paypal Payflow 2009 Link Fraud Protection Services Users Guide User’s
Payflow - 2009 - Link Fraud Protection Services User’s Guide PP_PayflowLink_FPS_2009 Free User Guide for PayPal Software, Manual
2015-07-27
: Paypal Paypal-Payflow-2009-Link-Fraud-Protection-Services-Users-Guide-777979 paypal-payflow-2009-link-fraud-protection-services-users-guide-777979 paypal pdf
Open the PDF directly: View PDF ![]() .
.
Page Count: 120 [warning: Documents this large are best viewed by clicking the View PDF Link!]
- Payflow Link Fraud Protection Services User’s Guide
- Contents
- Preface
- Introduction
- How Fraud Protection Services Protect You
- Configuring Payflow Link
- Integrating Your Web Site with Payflow Link (Basic Integration)
- Integrating Your Web Site with Payflow Link (Advanced Integration)
- Testing Payflow Link
- Activating Payflow Link
- Managing Payflow Link
- Assessing Transactions that Triggered Filters
- Integrating TeleCheck Transactions
- Transaction Responses
- Submitting Transaction Data to the Payflow Link Server
- About the Confirmation Email Messages
- Payflow Link Transaction Types
- Frequently Asked Questions
- Index

Payflow Link Fraud
Protection Services
User’s Guide
For Professional Use Only
Currently only available in English.
A usage Professional Uniquement
Disponible en Anglais uniquement pour l’instant.
Last updated: June 2009
Payflow Link Fraud Protection Services User’s Guide
Document Number: 200004.en_US-200906
© 2009 PayPal, Inc. All rights reserved. PayPal is a registered trademark of PayPal, Inc. The PayPal logo is a trademark of PayPal, Inc. Other
trademarks and brands are the property of their respective owners.
The information in this document belongs to PayPal, Inc. It may not be used, reproduced or disclosed without the written approval of PayPal, Inc.
Copyright © PayPal. All rights reserved. PayPal (Europe) S.à r.l. et Cie., S.C.A., Société en Commandite par Actions. Registered office: 22-24 Boulevard
Royal, L-2449, Luxembourg, R.C.S. Luxembourg B 118 349.
Consumer advisory: The PayPal™ payment service is regarded as a stored value facility under Singapore law. As such, it does not require the approval
of the Monetary Authority of Singapore. You are advised to read the terms and conditions carefully.
Notice of non-liability:
PayPal, Inc. is providing the information in this document to you “AS-IS” with all faults. PayPal, Inc. makes no warranties of any kind (whether express,
implied or statutory) with respect to the information contained herein. PayPal, Inc. assumes no liability for damages (whether direct or indirect), caused
by errors or omissions, or resulting from the use of this document or the information contained in this document or resulting from the application or use
of the product or service described herein. PayPal, Inc. reserves the right to make changes to any information herein without further notice.

Payflow Link Fraud Protection Services User’s Guide iii
Contents
Preface . . . . . . . . . . . . . . . . . . . . . . . . . . . . . . . . . . ix
This Document . . . . . . . . . . . . . . . . . . . . . . . . . . . . . . . . . . . . . . . . . ix
Organization of This Document . . . . . . . . . . . . . . . . . . . . . . . . . . . . . . . . ix
Customer Support . . . . . . . . . . . . . . . . . . . . . . . . . . . . . . . . . . . . . . . x
Related Information . . . . . . . . . . . . . . . . . . . . . . . . . . . . . . . . . . . . . . x
Chapter 1 Introduction . . . . . . . . . . . . . . . . . . . . . . . . . 1
What is Payflow Link? . . . . . . . . . . . . . . . . . . . . . . . . . . . . . . . . . . . . . 2
Payflow Link Features . . . . . . . . . . . . . . . . . . . . . . . . . . . . . . . . . . . 2
How Payflow Link Works. . . . . . . . . . . . . . . . . . . . . . . . . . . . . . . . . . . . 3
PayPal Express Checkout Transaction Processing . . . . . . . . . . . . . . . . . . . . 3
Flow of the Payflow Link Order Processing Pages . . . . . . . . . . . . . . . . . . . . 4
Reporting . . . . . . . . . . . . . . . . . . . . . . . . . . . . . . . . . . . . . . . . . 6
Introduction to Integrating with Payflow Link. . . . . . . . . . . . . . . . . . . . . . . . . . 7
Requirements for Using Payflow Link . . . . . . . . . . . . . . . . . . . . . . . . . . . . . 7
Payment Types, Credit Cards, and Processing Platforms Supported by Payflow Link . . . . 8
Supported Payment Types. . . . . . . . . . . . . . . . . . . . . . . . . . . . . . . . . 8
Supported Credit Cards . . . . . . . . . . . . . . . . . . . . . . . . . . . . . . . . . . 9
Supported Processing Platforms . . . . . . . . . . . . . . . . . . . . . . . . . . . . . 9
Chapter 2 How Fraud Protection Services Protect You . . . . . . . .11
The Threats . . . . . . . . . . . . . . . . . . . . . . . . . . . . . . . . . . . . . . . . . 11
Hacking . . . . . . . . . . . . . . . . . . . . . . . . . . . . . . . . . . . . . . . . . 11
Credit Card Fraud . . . . . . . . . . . . . . . . . . . . . . . . . . . . . . . . . . . . 11
Protection Against the Threats—Fraud Filters . . . . . . . . . . . . . . . . . . . . . . . . 12
Example Filter . . . . . . . . . . . . . . . . . . . . . . . . . . . . . . . . . . . . . . 12
Configuring the Filters . . . . . . . . . . . . . . . . . . . . . . . . . . . . . . . . . . 12
Reviewing Suspicious Transactions . . . . . . . . . . . . . . . . . . . . . . . . . . . 12
Buyer Authentication Service . . . . . . . . . . . . . . . . . . . . . . . . . . . . . . . . 12

Contents
iv Payflow Link Fraud Protection Services User’s Guide
Generating Buyer Authentication Reports . . . . . . . . . . . . . . . . . . . . . . . . 13
Special Considerations. . . . . . . . . . . . . . . . . . . . . . . . . . . . . . . . . . . . 13
Merchants with an Instant Fulfillment Business Model . . . . . . . . . . . . . . . . . 13
Merchants using the Recurring Billing Service . . . . . . . . . . . . . . . . . . . . . 14
Protection From System-wide Threats—The Premium Services . . . . . . . . . . . . . . 14
Account Monitoring Service . . . . . . . . . . . . . . . . . . . . . . . . . . . . . . . 14
Chapter 3 Configuring Payflow Link . . . . . . . . . . . . . . . . . .15
Configuring Payflow Link Settings . . . . . . . . . . . . . . . . . . . . . . . . . . . . . . 15
Chapter 4 Configuring the Fraud Protection Services Filters . . . . .19
Phase 1: Run Test Transactions Against Filter Settings on Test Transaction Security Servers .
20
Phase 2: Run Live Transactions on Live Transaction Servers in Observe Mode . . . . . . 21
Phase 3: Run All Transactions Through the Live Transaction Security Servers Using Active
Mode . . . . . . . . . . . . . . . . . . . . . . . . . . . . . . . . . . . . . . . . . . . . . 22
Chapter 5 Integrating Your Web Site with Payflow Link (Basic
Integration)23
Example of a Simple Integration . . . . . . . . . . . . . . . . . . . . . . . . . . . . . . . 23
Chapter 6 Integrating Your Web Site with Payflow Link (Advanced
Integration)25
Example of a Custom Integration . . . . . . . . . . . . . . . . . . . . . . . . . . . . . . 25
Chapter 7 Testing Payflow Link . . . . . . . . . . . . . . . . . . . .27
Testing Credit Card Transactions . . . . . . . . . . . . . . . . . . . . . . . . . . . . . . 27
Verify that the Transaction Process Mode is set to TEST . . . . . . . . . . . . . . . . 27
Performing Test Transactions . . . . . . . . . . . . . . . . . . . . . . . . . . . . . . 28
Alternative Methods for Generating Specific Result Codes . . . . . . . . . . . . . . . 30
Testing Address Verification Service (AVS) . . . . . . . . . . . . . . . . . . . . . . . . . 31
Testing Card Security Code . . . . . . . . . . . . . . . . . . . . . . . . . . . . . . . . . 32
Testing the Buyer Authentication Service . . . . . . . . . . . . . . . . . . . . . . . . . . 33
Test Account Numbers. . . . . . . . . . . . . . . . . . . . . . . . . . . . . . . . . . 33
Chapter 8 Activating Payflow Link . . . . . . . . . . . . . . . . . . .35

Payflow Link Fraud Protection Services User’s Guide v
Contents
Determining Whether Your Payflow Account is Currently Active. . . . . . . . . . . . . . . 35
Activating Your Payflow Account. . . . . . . . . . . . . . . . . . . . . . . . . . . . . . . 35
Chapter 9 Managing Payflow Link . . . . . . . . . . . . . . . . . . .37
Management Tasks Available in PayPal Manager . . . . . . . . . . . . . . . . . . . . . . 37
Generating Reports . . . . . . . . . . . . . . . . . . . . . . . . . . . . . . . . . . . . . 37
Chapter 10 Assessing Transactions that Triggered Filters . . . . . . .39
Reviewing Suspicious Transactions . . . . . . . . . . . . . . . . . . . . . . . . . . . . . 39
Acting on Transactions that Triggered Filters . . . . . . . . . . . . . . . . . . . . . . 42
Rejecting Transactions . . . . . . . . . . . . . . . . . . . . . . . . . . . . . . . . . 42
Fine-tuning Filter Settings—Using the Filter Scorecard . . . . . . . . . . . . . . . . . . . 43
Ensuring Meaningful Data on the Filter Scorecard . . . . . . . . . . . . . . . . . . . 44
Re-running Transactions That Were Not Screened . . . . . . . . . . . . . . . . . . . . . 44
Chapter 11 Integrating TeleCheck Transactions . . . . . . . . . . . . .45
Integrating Check Processing . . . . . . . . . . . . . . . . . . . . . . . . . . . . . . . . 45
Enabling Customers to Specify the Payment Method . . . . . . . . . . . . . . . . . . 46
Data That You Must Post if You Do Not Use Payflow Link’s Order Form . . . . . . . . . . 46
Transaction Results Returned for TeleCheck Transactions . . . . . . . . . . . . . . . . . 47
Testing TeleCheck Transactions . . . . . . . . . . . . . . . . . . . . . . . . . . . . . . . 48
Appendix A Transaction Responses . . . . . . . . . . . . . . . . . . .49
RESULT Codes and RESPMSG Values . . . . . . . . . . . . . . . . . . . . . . . . . . . 49
RESULT Values for Transaction Declines or Errors . . . . . . . . . . . . . . . . . . . 50
RESULT Values for Communications Errors . . . . . . . . . . . . . . . . . . . . . . 55
AVS Result Codes . . . . . . . . . . . . . . . . . . . . . . . . . . . . . . . . . . . . 58
Processors that Support AVS . . . . . . . . . . . . . . . . . . . . . . . . . . . . . . 58
AVS Results . . . . . . . . . . . . . . . . . . . . . . . . . . . . . . . . . . . . . . . . . 59
Card Security Code Result Codes . . . . . . . . . . . . . . . . . . . . . . . . . . . . . . 59
Card Security Code Results . . . . . . . . . . . . . . . . . . . . . . . . . . . . . . . 60
Processors and Credit Cards Supporting Card Security Code . . . . . . . . . . . . . 61
American Express Card Security Code Enhancements . . . . . . . . . . . . . . . . 61
. . . . . . . . . . . . . . . . . . . . . . . . . . . . . . . . . . . . . . . . . . . . . . 62
Appendix B Submitting Transaction Data to the Payflow Link Server . .63

Contents
vi Payflow Link Fraud Protection Services User’s Guide
About PayPal’s Transaction Database . . . . . . . . . . . . . . . . . . . . . . . . . . . . 63
Collecting Customer Transaction Data, Option 1 . . . . . . . . . . . . . . . . . . . . . . 64
Using the Payflow Link Order Form . . . . . . . . . . . . . . . . . . . . . . . . . . . 64
Collecting Customer Transaction Data, Option 2 . . . . . . . . . . . . . . . . . . . . . . 66
Collecting Data on Your Web Page and Posting to the Payflow Link Server . . . . . . 66
Optional Transaction Data . . . . . . . . . . . . . . . . . . . . . . . . . . . . . . . . . . 68
Returning Data to Your Web Site . . . . . . . . . . . . . . . . . . . . . . . . . . . . . . 70
Retaining Session Data and other Temporary Information . . . . . . . . . . . . . . . 71
Specifying How Data is Returned to Your Web Site . . . . . . . . . . . . . . . . . . . 71
Data Returned by the Post and Silent Post Features . . . . . . . . . . . . . . . . . . . . 72
Values Returned When ECHODATA is False . . . . . . . . . . . . . . . . . . . . . . 73
Values Returned When ECHODATA is True. . . . . . . . . . . . . . . . . . . . . . . 74
Parameters That Specify Payflow Link Operation . . . . . . . . . . . . . . . . . . . . . . 75
Appendix C About the Confirmation Email Messages . . . . . . . . . .77
Example Customer Email Message . . . . . . . . . . . . . . . . . . . . . . . . . . . . . 77
Example Merchant Email Message . . . . . . . . . . . . . . . . . . . . . . . . . . . . . 78
Fields Returned in the Confirmation Email Message . . . . . . . . . . . . . . . . . . . . 78
Transaction Information . . . . . . . . . . . . . . . . . . . . . . . . . . . . . . . . . 79
Billing Information . . . . . . . . . . . . . . . . . . . . . . . . . . . . . . . . . . . . 79
Shipping Information. . . . . . . . . . . . . . . . . . . . . . . . . . . . . . . . . . . 79
Additional Information . . . . . . . . . . . . . . . . . . . . . . . . . . . . . . . . . . 79
Appendix D Payflow Link Transaction Types. . . . . . . . . . . . . . .81
Appendix E Fraud Filter Reference. . . . . . . . . . . . . . . . . . . .83
Filters Included with the Fraud Protection Services . . . . . . . . . . . . . . . . . . . . . 83
Filters Included with the Basic Fraud Protection Services Option . . . . . . . . . . . . 83
Filters Included with the Advanced Fraud Protection Services Option . . . . . . . . . 84
About the Fraud Risk Lists . . . . . . . . . . . . . . . . . . . . . . . . . . . . . . . . . . 84
Filters Applied After Processing . . . . . . . . . . . . . . . . . . . . . . . . . . . . . 85
Unusual Order Filters . . . . . . . . . . . . . . . . . . . . . . . . . . . . . . . . . . . . 85
Total Purchase Price Ceiling Filter . . . . . . . . . . . . . . . . . . . . . . . . . . . . 85
Total Item Ceiling Filter . . . . . . . . . . . . . . . . . . . . . . . . . . . . . . . . . 85
Shipping/Billing Mismatch Filter . . . . . . . . . . . . . . . . . . . . . . . . . . . . . 86
Product Watch List Filter. . . . . . . . . . . . . . . . . . . . . . . . . . . . . . . . . 86
High-risk Payment Filters . . . . . . . . . . . . . . . . . . . . . . . . . . . . . . . . . . 87
AVS Failure Filter . . . . . . . . . . . . . . . . . . . . . . . . . . . . . . . . . . . . 87

Payflow Link Fraud Protection Services User’s Guide vii
Contents
Card Security Code Failure Filter . . . . . . . . . . . . . . . . . . . . . . . . . . . . 89
BIN Risk List Match Filter . . . . . . . . . . . . . . . . . . . . . . . . . . . . . . . . 91
Account Number Velocity Filter . . . . . . . . . . . . . . . . . . . . . . . . . . . . . 91
High-risk Address Filters . . . . . . . . . . . . . . . . . . . . . . . . . . . . . . . . . . . 92
ZIP Risk List Match Filter . . . . . . . . . . . . . . . . . . . . . . . . . . . . . . . . 92
Freight Forwarder Risk List Match Filter. . . . . . . . . . . . . . . . . . . . . . . . . 92
USPS Address Validation Failure Filter . . . . . . . . . . . . . . . . . . . . . . . . . 93
IP Address Match Filter . . . . . . . . . . . . . . . . . . . . . . . . . . . . . . . . . 93
Email Service Provider Risk List Match Filter . . . . . . . . . . . . . . . . . . . . . . 94
Geo-location Failure Filter . . . . . . . . . . . . . . . . . . . . . . . . . . . . . . . . 94
IP Address Velocity Filter . . . . . . . . . . . . . . . . . . . . . . . . . . . . . . . . 95
High-risk Customer Filters . . . . . . . . . . . . . . . . . . . . . . . . . . . . . . . . . . 96
Bad Lists . . . . . . . . . . . . . . . . . . . . . . . . . . . . . . . . . . . . . . . . . 96
International Order Filters . . . . . . . . . . . . . . . . . . . . . . . . . . . . . . . . . . 96
Country Risk List Match Filter . . . . . . . . . . . . . . . . . . . . . . . . . . . . . . 96
International Shipping/Billing Address Filter . . . . . . . . . . . . . . . . . . . . . . . 97
International IP Address Filter . . . . . . . . . . . . . . . . . . . . . . . . . . . . . . 97
International AVS Filter . . . . . . . . . . . . . . . . . . . . . . . . . . . . . . . . . 98
Accept Filters. . . . . . . . . . . . . . . . . . . . . . . . . . . . . . . . . . . . . . . . . 99
Good Lists . . . . . . . . . . . . . . . . . . . . . . . . . . . . . . . . . . . . . . . . 99
Total Purchase Price Floor Filter. . . . . . . . . . . . . . . . . . . . . . . . . . . . . 99
Custom Filters . . . . . . . . . . . . . . . . . . . . . . . . . . . . . . . . . . . . . . . .100
Appendix F Frequently Asked Questions . . . . . . . . . . . . . . . 101
Using Payflow Link with other Applications . . . . . . . . . . . . . . . . . . . . . . .101
How Payflow Link Works . . . . . . . . . . . . . . . . . . . . . . . . . . . . . . . .101
Using Payflow Link. . . . . . . . . . . . . . . . . . . . . . . . . . . . . . . . . . . .102
Index. . . . . . . . . . . . . . . . . . . . . . . . . . . . . . . . . . . 105

Contents
viii Payflow Link Fraud Protection Services User’s Guide

Payflow Link Fraud Protection Services User’s Guide ix
Preface
This Document
Payflow Link Fraud Protection Services User’s Guide is intended for merchants who subscribe
to PayPal Fraud Protection Services and that will integrate Payflow Link with their e-
commerce Web site. The documentation first describes a simple implementation that “gets you
up and running” quickly. More complex solutions are described in later chapters.
Organization of This Document
This guide is organized as follows:
zChapter 1, “Introduction,” contains an overview of Payflow Link.
zChapter 2, “How Fraud Protection Services Protect You,” describes the security tools that
make up the Fraud Protection Services.
zChapter 3, “Configuring Payflow Link,” briefly describes how to configure the Payflow
Link Configuration page.
zChapter 4, “Configuring the Fraud Protection Services Filters,” describes the process of
configuring all aspects of security management for your Payflow account.
zChapter 5, “Integrating Your Web Site with Payflow Link (Basic Integration),” describes
the process of customizing and adding HTML text into your Web page. This HTML code
passes your customer (and a set of data) to PayPal’s Payflow Link server for transaction
processing.
zChapter 6, “Integrating Your Web Site with Payflow Link (Advanced Integration),”
describes a more sophisticated integration between your Web store and Payflow Link.
zChapter 7, “Testing Payflow Link,” describes the process that you follow to test your
Payflow Link integration and to verify that it is operating correctly.
zChapter 8, “Activating Payflow Link,” provides instructions on activating your Payflow
Link account and changing the appropriate configuration settings.
zChapter 9, “Managing Payflow Link,” provides an overview of basic PayPal Manager
tasks.
zChapter 10, “Assessing Transactions that Triggered Filters,” explains how you can use
PayPal Manager to set up the fraud filters to meet your business needs.
zChapter 11, “Integrating TeleCheck Transactions,” provides instructions on enabling
TeleCheck transactions for your customers.

Preface
Customer Support
xPayflow Link Fraud Protection Services User’s Guide
zAppendix A, “Transaction Responses,” provides reference material on the transaction
response information in reports.
zAppendix B, “Submitting Transaction Data to the Payflow Link Server,” provides
guidance for those who wish to develop more complex interactions between their Web
page and Payflow Link.
zAppendix C, “About the Confirmation Email Messages,” describes the content of the
optional confirmation email.
zAppendix D, “Payflow Link Transaction Types,” describes the two Payflow Link
transaction types.
zAppendix E, “Fraud Filter Reference,” describes the Transaction filters that make up part
of the PayPal Fraud Protection Services.
zAppendix F, “Frequently Asked Questions,” contains information about Payflow Link.
Customer Support
When you purchase Payflow Link, PayPal provides telephone-based customer support. If you
purchased Payflow Link as a separate service, phone support is available during your initial
integration phase Monday through Friday between 8 AM and 6 PM Pacific Time.
Once your account is integrated with your Web store, PayPal provides free email support 24
hours per day, 7 days per week.
If you have purchased Payflow Link as part of a Commerce Package, your are entitled to free
phone support Monday through Friday between 8 AM and 6 PM Pacific Time and 24-hour
email support for as long as you use the service.
For integration and connectivity issues, PayPal provides online documentation, direct email
support, and phone support. For technical support on shopping carts, please contact the
vendor.
PayPal is committed to providing you with the most advanced technical support expertise to
ensure availability and reliability of your e-commerce applications.
Online Information: https://www.paypal.com/us/cgi-bin/helpweb?cmd=_help
This site offers an FAQ (frequently asked question) section.
Email: payflow-support@paypal.com
Phone: 1 888-883-9770
Related Information
You will need to reference the following documentation:

Payflow Link Fraud Protection Services User’s Guide xi
Preface
Related Information
PayPal Manager online help describes the use of PayPal Manager—the Web-based
administration tool that you use to process transactions manually, issue credits, generate
reports, and configure Payflow Link.

Preface
Related Information
xii Payflow Link Fraud Protection Services User’s Guide

Payflow Link Fraud Protection Services User’s Guide 1
1Introduction
Payflow Link is the fast and easy way to add transaction processing to your Web site. With
Payflow Link, your customers are linked to Order forms on PayPal’s secure Web server where
transactions are processed in real time.
With Payflow Link’s simple “cut and paste” integration, you can be up and running with a
completely automated payment solution in a matter of hours. You can:
zCustomize the look and feel of your secure Order forms to match the other pages on your
Web site.
zAutomatically send email confirmation to customers.
zPost transaction data “behind-the-scenes” to your Web server.
zTake advantage of security features.
zUse PayPal Manager to generate Payflow Link report and to view transaction reports.
zUse the Buyer Authentication Service to protect your business from fraud.
IMPORTANT:PayPal recommends that you use PayPal Manager to verify each order and
the dollar amount of all Payflow Link transactions.
It is your responsibility to protect your passwords and other confidential data
and to implement security safeguards on your Web site and in your
organization, or to ensure that your hosting company or internal Web
operations team is implementing them on your behalf.

Introduction
What is Payflow Link?
1
2Payflow Link Fraud Protection Services User’s Guide
What is Payflow Link?
Payflow Link is a secure, PayPal-hosted, HTTP-based Internet payment solution. It allows you
(a merchant with an internet merchant account) to securely connect your customers to
PayPal’s secure server and use it to automate order acceptance, authorization, processing, and
transaction management. Payflow Link is the choice for merchants who process low to
moderate order quantities and prefer a solution that is especially easy to implement and
maintain.
NOTE:If your Web site processes more than 500 transactions per month, you should consider
using Payflow Pro, PayPal’s high performance Internet payment solution.
Payflow Link Features
zEasy to implement and use. PayPal supplies you with the HTML code you need to get
started.
zCustomizable to your Web site. You can customize the look and feel of the PayPal-
hosted Order forms to reflect your Web site design.
zResponsive and reliable. Payflow Link immediately advises customers whether their
transaction was successful.
zEmail receipt notification. With approved transactions, Payflow Link can send an email
confirmation receipt to you and to your customers.
zHigh security. All transactions processed on PayPal-hosted forms occur over secure SSL
connections. All certificates required to ensure both authentication and security are hosted
by PayPal. You can specify that only certain Web pages (for example, your e-commerce
site) are valid entry points for the transaction processing pages.
zFraud protection. Payflow Link supports a large set of automated fraud protection tools,
including Card Security Code (CSC).
zPayPal Manager. PayPal Manager enables you to perform transactions, and manage them
with features like search tools, reports, and so on.
zAccess for offline orders. PayPal Manager gives you the flexibility to process orders
offline, including orders received by phone, fax, email, or in person.
IMPORTANT:Payflow Link is a single payment amount solution. If you want your
customers to be able to order multiple items or quantities, you must develop a
solution that calculates the total transaction amount based upon customer
choices. If you do not have development staff, you could use a shopping cart
that integrates Payflow Link.

Payflow Link Fraud Protection Services User’s Guide 3
Introduction
How Payflow Link Works 1
How Payflow Link Works
You insert a short bit of HTML text into your Web page. The code creates a Buy button on
your Web page that links your customers to PayPal’s secure Payflow Link pages.
When your customers click the Buy button at your Web store, they are redirected to a
sequence of secure Payflow Link Order processing forms hosted on the PayPal servers. All
forms except the Receipt form are optional. Using the Payflow Link Configuration page, you
specify the content of these forms and configure their appearance to reflect the look and feel of
your Web store (including your logo).
You can provide PayPal Express Checkout as a payment option to your customers. For more
information, refer to “PayPal Express Checkout Transaction Processing” on page 3.
When the customer submits the Payflow Link Order form, PayPal acts as the gateway to the
transaction processing networks (much like the swipe machine for physical credit cards). Once
the transaction is processed, the customer is returned to your site (or to any URL that you
specify).
You can configure Payflow Link to send both you and your customer email receipts. You can
also configure Payflow Link to return transaction data to your site.
NOTE:As a security measure, if a customer makes five invalid purchase attempts, access to
Payflow Link is disabled. The customer must exit the Web site and attempt the
purchase again.
PayPal Express Checkout Transaction Processing
This section provides guidelines on how to use PayPal Express Checkout with Payflow Link.
What is Express Checkout
PayPal Express Checkout offers your buyers an easy, convenient checkout experience. It lets
them use shipping information stored securely at PayPal to check out, so they do not have to
re-enter it on your site.
With Express Checkout, your buyers finish their orders on your Website, not PayPal’s, so you
can:
zGet real time notification of success payments.
zAutomate your internal business processes.
zEnsure buyers make it to your final confirmation page.
Introduction
How Payflow Link Works
1
4Payflow Link Fraud Protection Services User’s Guide
How it works
The following steps describe how PayPal Express Checkout works with Payflow Link:
1. After selecting products to purchase, your buyers select PayPal Express Checkout as the
method of payment. (Express Checkout gives you the flexibility to put PayPal either first in
your checkout process, or on your billing page along with other payment options.)
2. When the buyers click Submit, they are redirected to the PayPal site where they log in to
PayPal using their PayPal login and password.
3. After logging in, they verify the shipping address, or select an address if they have multiple
addresses stored, and click Continue Checkout.
4. The buyers are then returned to the Confirmation page on your website where they can
verify the order details and submit the transaction. The Receipt page contains a summary of
the transaction.
For complete details on PayPal Express Checkout, refer to the Express Checkout Integration
Guide.
Flow of the Payflow Link Order Processing Pages
The following example pages appear in the order shown here. You can configure the pages to
include different or additional information.
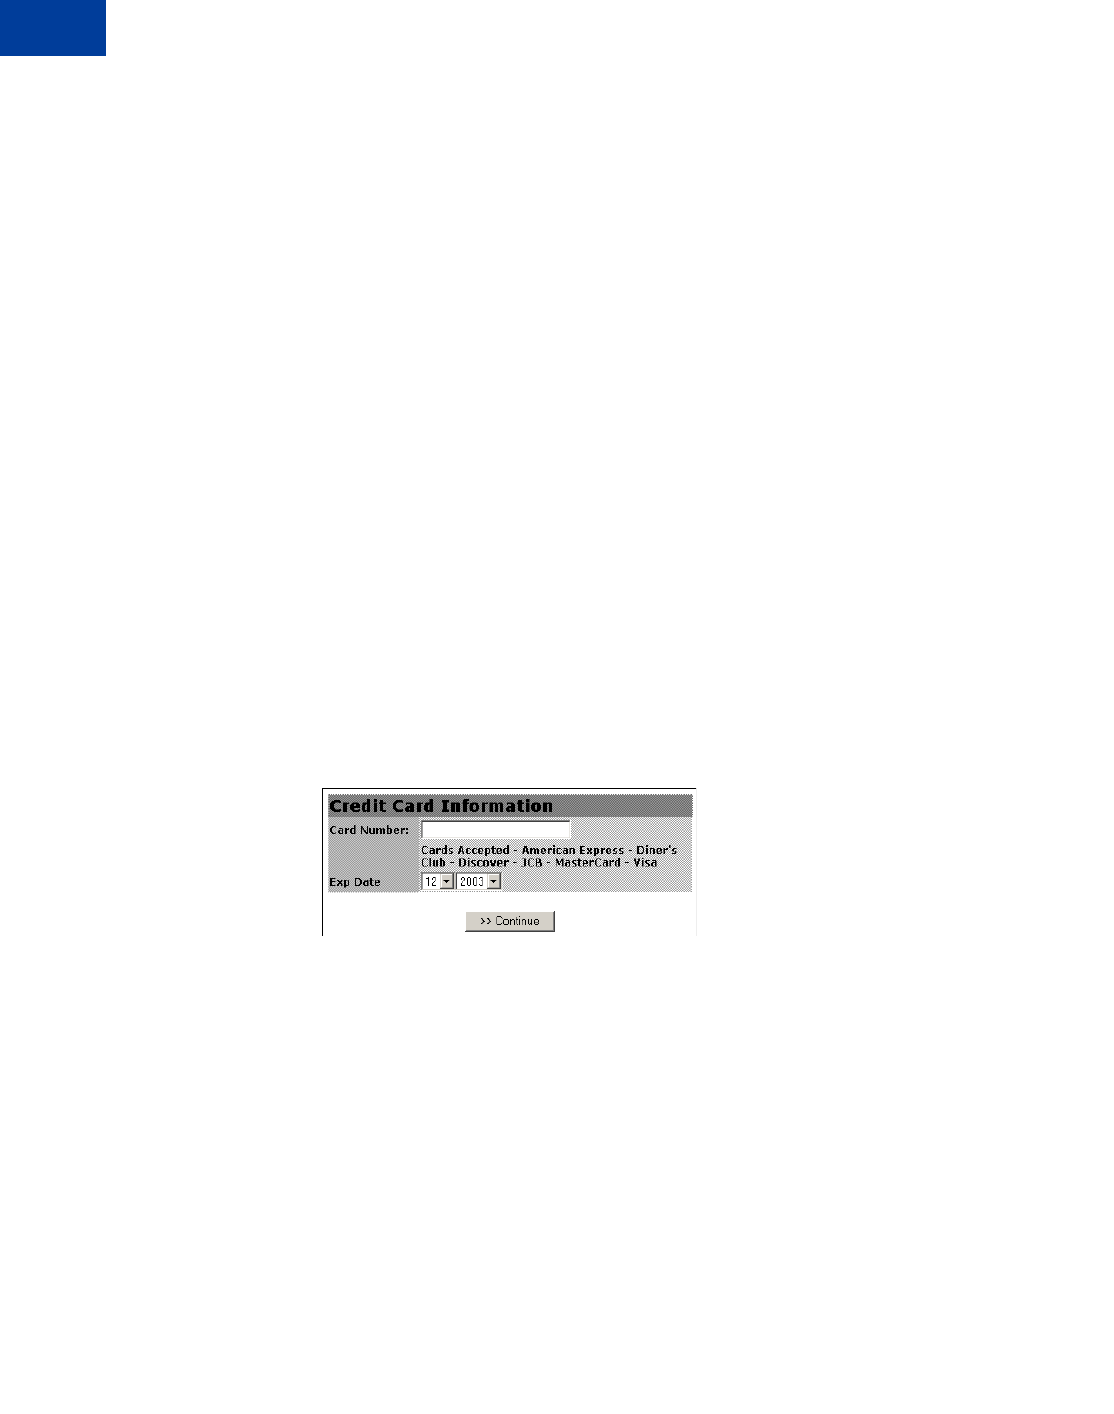
Form 1: (Optional) Credit Card Information
If your Web site does not collect the
credit card number, then the Credit
Card Information page opens to
enable the customer to enter the
account information.
The benefit of using this page is
that you do not have to invest in the
security infrastructure required to
accept account information at your
site.
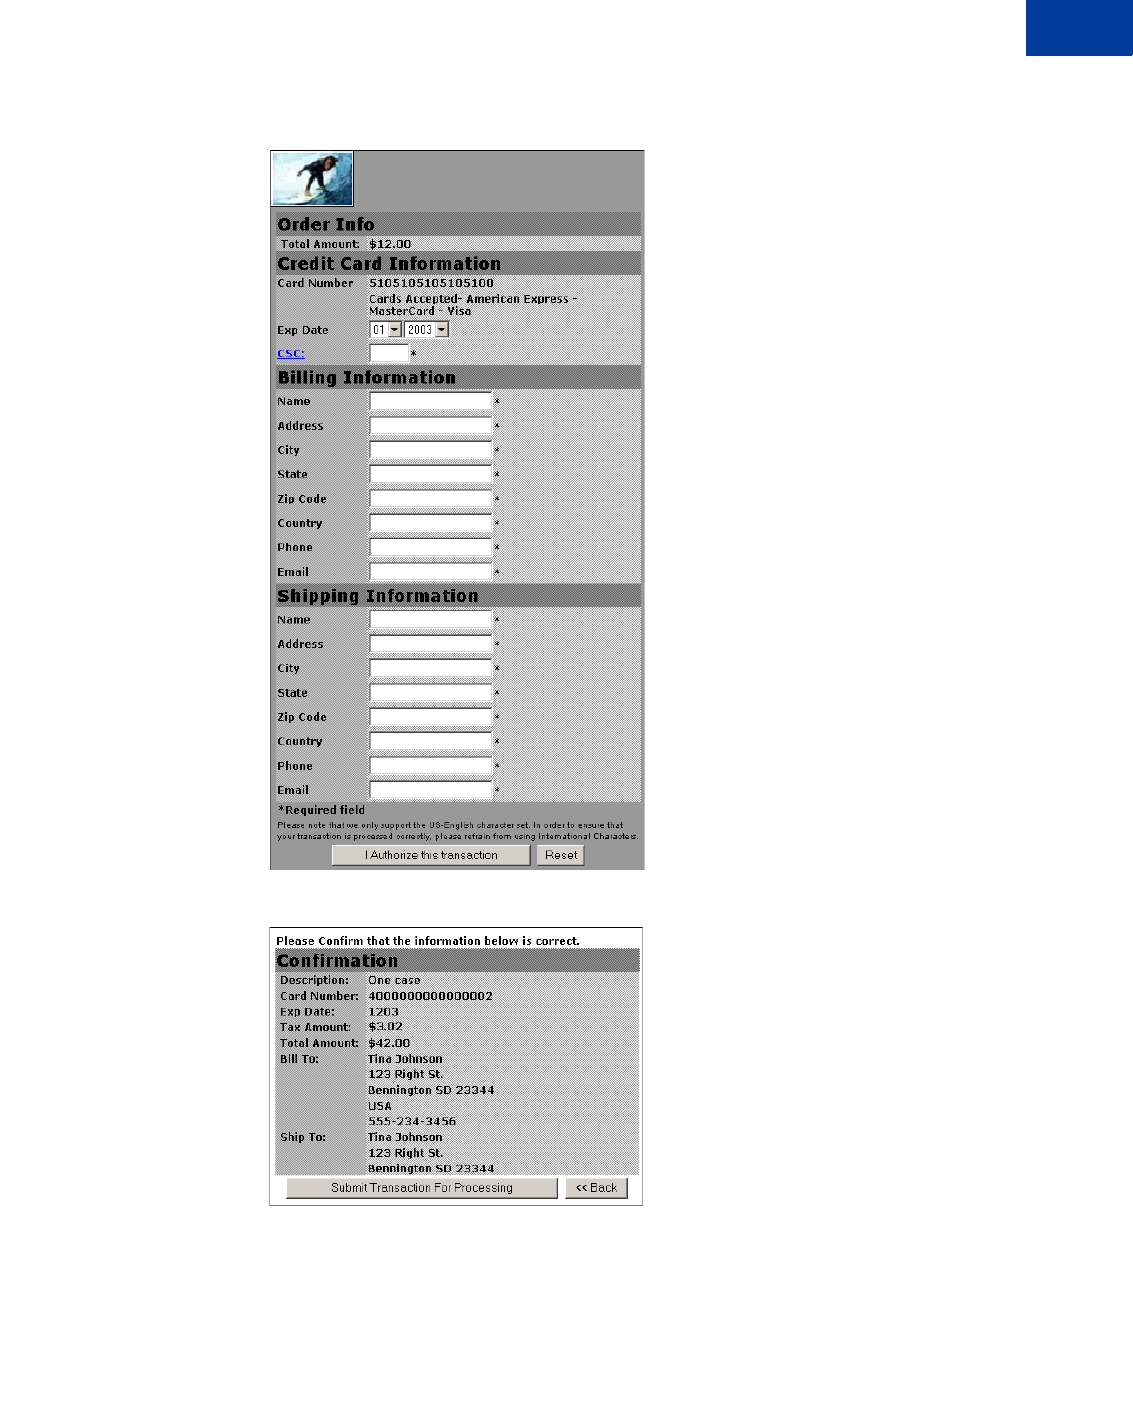
Payflow Link Fraud Protection Services User’s Guide 5
Introduction
How Payflow Link Works 1
Form 2: Order
Form 3: Confirmation
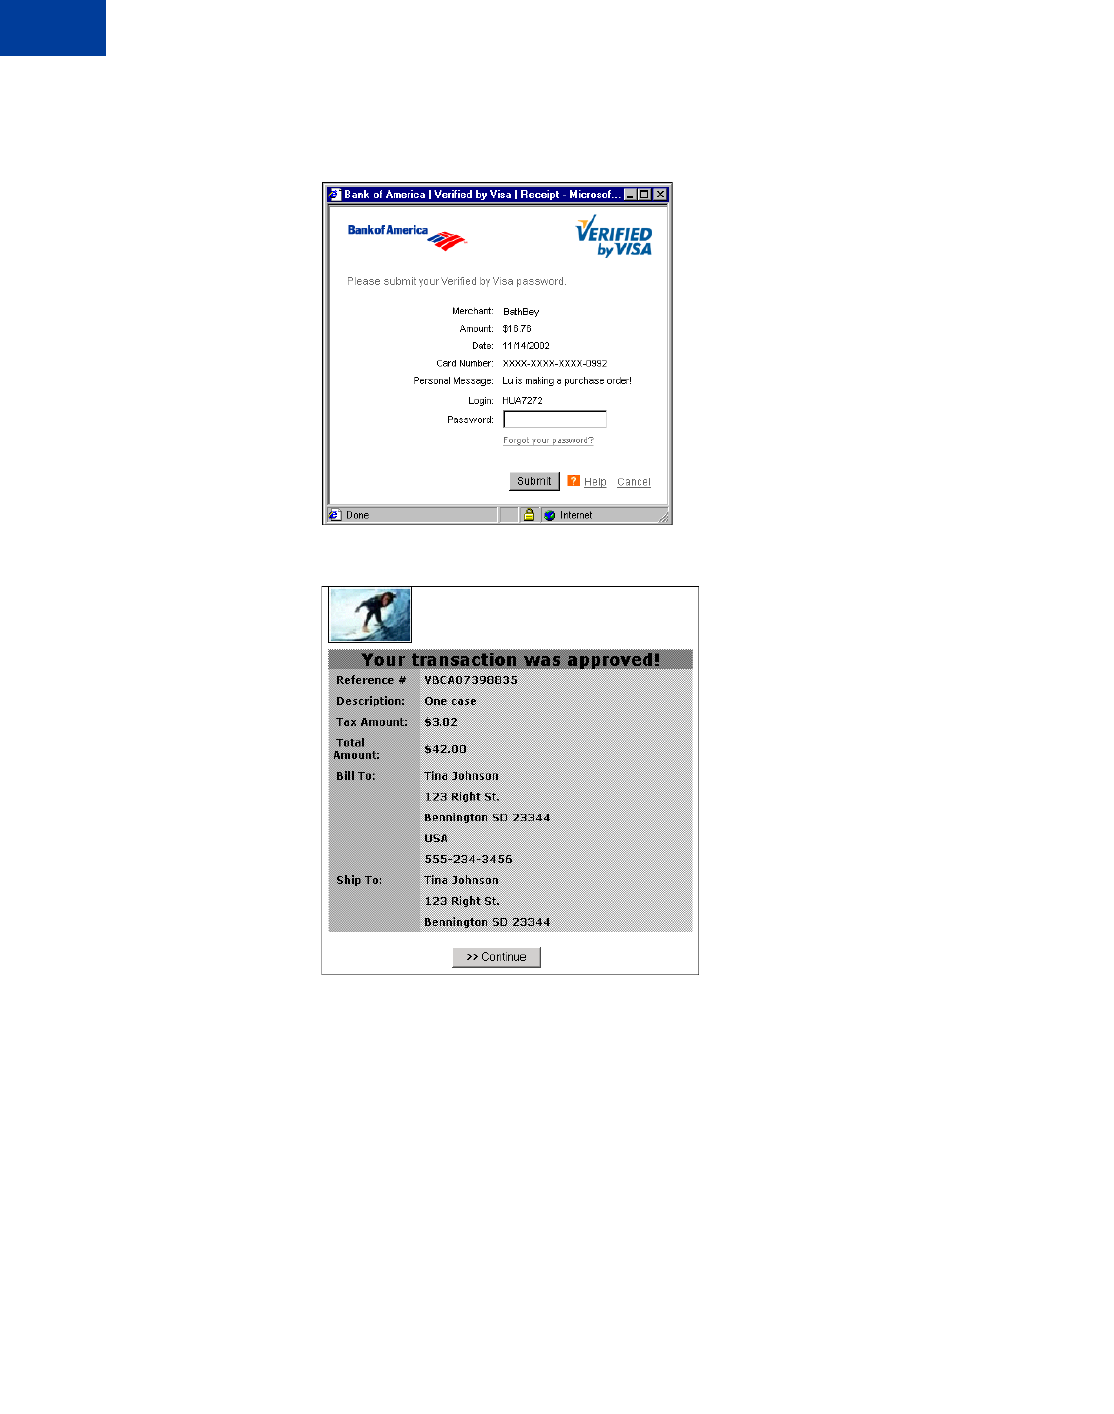
Form 3A: Buyer Authentication form
If you subscribe to PayPal’s Buyer Authentication Service, then the card-issuing bank presents
the Buyer Authentication form on which the customer submits the password associated with
The Order form enables the
customer to enter any additional
order data on Payflow Link’s secure
servers. You have the option to
eliminate this page and pass the
transaction data directly to the
Payflow Link server.
In this example, the merchant added
their logo to the form. To improve the
customer experience and to foster
trust, PayPal strongly recommends
that you add your logo to the pages
and customize the color scheme to
match your Web store pages. You
can do this using PayPal Manager.
Refer to PayPal Manager help for
detailed instructions.
The Confirmation page enables
the customer to verify and submit
the order.
If you subscribe to PayPal’s Buyer
Authentication Service, then you
must display this page to
customers. Otherwise, you can
choose not to display it.
Introduction
How Payflow Link Works
1
6Payflow Link Fraud Protection Services User’s Guide
the credit card. The issuing bank verifies the password and securely transmits the success
message to Payflow Link. The transaction then continues in the normal manner.
Form 4: Receipt
Reporting
Along with Payflow Link you also receive access to the PayPal Manager portal. Once you
have Payflow Link in daily operation, you can use the Reports tab on the PayPal Manager to
generate and review reports on transaction activity. Reports can be printed, or saved as ASCII
files for use in other applications.
In addition, you can run the following reports using PayPal Manager:
zFraud Transaction. View a list of transaction that were, or were not screened by fraud
filters. You can also specify transaction that the filters rejected, or accepted, or set aside for
review.
The Buyer Authentication form
appears only if:
zYou use PayPal’s Buyer
Authentication service
and
zThe cardholder is enrolled with the
issuer’s 3-D Secure program.
Because the card-issuing banks
present this page, its appearance
varies.
The Receipt page presents a
summary of the transaction and
returns the customer to the URL
that you specify (typically your Web
store).
Optionally, you can specify that
Payflow Link should perform an
HTML Post operation to send the
transaction data to your Web
server.
This is the only Payflow Link page
that you must present to the
customer.

Payflow Link Fraud Protection Services User’s Guide 7
Introduction
Introduction to Integrating with Payflow Link 1
zFilter Scorecard. View the number of times that each filter was triggered and the
percentage of all transactions that triggered each filter during a specified time period.
zBuyer Authentication Transaction. View both authentication results and the associated
payment authorizations.
zBuyer Authentication Audit. View authentication results. In addition, you can use this
report to troubleshoot the Buyer Authentication service.
For more information on generating reports using PayPal Manager, see PayPal Manager online
help.
Introduction to Integrating with Payflow Link
You follow these steps to integrate your Web store with Payflow Link:
1. Register for a Payflow Link account and apply for an internet merchant account at
https://www.paypal.com/us/cgi-bin/webscr?cmd=_payflow-link-overview-outside.
2. Configure Payflow Link by specifying the appearance and content of your PayPal-hosted
order processing forms. Refer to Chapter 3, “Configuring Payflow Link.”
3. Connect your Web store to the Payflow Link service: Paste a few lines of HTML text into
your Web page. This HTML code passes your customer (and the transaction data) to
PayPal’s Payflow Link server for transaction processing. This step is described in
Chapter 5, “Integrating Your Web Site with Payflow Link (Basic Integration).”
4. Test Payflow Link before you activate your Web store for customer use. This step is
described in Chapter 7, “Testing Payflow Link.”
5. Activate your account to go live. This step is described in Chapter 8, “Activating Payflow
Link.”
Requirements for Using Payflow Link
To use Payflow Link, you must have the following:
zWeb page. You must have a Web page for your e-commerce business. You must also be
able to upload changes to your Web site.
zInternet Service Provider. An ISP must host your Web site.
zA basic text editor or HTML editor. You will use the editor to add the HTML text that
links your site to Payflow Link.
zWeb browser. You must have Internet Explorer 5.5 (or newer) to access the PayPal
Manager application.

Introduction
Payment Types, Credit Cards, and Processing Platforms Supported by Payflow Link
1
8Payflow Link Fraud Protection Services User’s Guide
zInternet Merchant Account. You must have an internet merchant account before you can
begin accepting payments at your Web site. PayPal has partnered with several internet
merchant account providers to make applying easy.
zYour Web page must calculate the total transaction amount. Payflow Link enables
your customers to process a single transaction amount. Payflow Link does not calculate the
transaction amount based on customer selections. To enable customers to order multiple
items or quantities, you must develop a solution that dynamically calculates the total
transaction amount based upon customer selections in your Web store. Your code then
passes the total transaction amount to the Payflow Link server. PayPal provides simple
HTML code that passes the amount, as described in Chapter 5, “Integrating Your Web Site
with Payflow Link (Basic Integration).”
zTo use fraud protection tools, you must subscribe to PayPal’s Fraud Protection Services.
Merchants must meet the following eligibility requirements to enroll with and use Fraud
Protection Services:
– Merchant must have a current, paid PayPal Payflow Pro or Payflow Link gateway
service account.
– Merchant must be in Live mode (activated) with the gateway service.
– Merchant must have its business operations physically based in the United States.
– Merchant must use one of the following terminal-based processors: American Express,
FDMS First Data Nashville, FDMS First Data South, Global Payments - East, Nova,
Paymentech, or Vital.
Payment Types, Credit Cards, and Processing Platforms
Supported by Payflow Link
Supported Payment Types
Payflow Link supports the following tender types:
Credit cards
Check/debit cards issued by MasterCard or Visa
Telecheck electronic checks
Pinless debit cards

Payflow Link Fraud Protection Services User’s Guide 9
Introduction
Payment Types, Credit Cards, and Processing Platforms Supported by Payflow Link 1
Supported Credit Cards
Payflow Link supports the following credit cards:
American Express/Optima
Diners Club
Discover/Novus
JCB
MasterCard
Visa
Supported Processing Platforms
Payflow Link supports the following processing platforms:
American Express Phoenix
American Express APA
First Data Merchant Services (FDMS) Nashville
First Data Merchant Services (FDMS) North
First Data Merchant Services (FDMS) South
First Data Resources (FDR) Australia
Global Payments Central
Global Payments East
Nova
Paymentech New Hampshire
Paymentech Tampa
TeleCheck
Vital

Introduction
Payment Types, Credit Cards, and Processing Platforms Supported by Payflow Link
1
10 Payflow Link Fraud Protection Services User’s Guide

Payflow Link Fraud Protection Services User’s Guide 11
2How Fraud Protection Services
Protect You
This chapter describes the security tools that make up the Fraud Protection Services.
In This Chapter
z“The Threats” on page 11
z“Protection Against the Threats—Fraud Filters” on page 12
z“Buyer Authentication Service” on page 12
z“Special Considerations” on page 13
z“Protection From System-wide Threats—The Premium Services” on page 14
The Threats
There are two major types of fraud—hacking and credit card fraud.
Hacking
Fraudsters hack when they illegally access your customer database to steal card information or
to take over your gateway account to run unauthorized transactions (purchases and credits).
The Account Wizard features minimize the risk of hacking by enabling you to place powerful
constraints on access to and use of your PayPal Manager and Payflow accounts.
Credit Card Fraud
Fraudsters can use stolen or false credit card information to perform purchases at your Web
site, masking their identity to make recovery of your goods or services impossible. To protect
you against credit card fraud, Fraud Protection Services uses software filters that identify
potentially fraudulent activity and let you decide whether to accept or reject the suspicious
transactions.

How Fraud Protection Services Protect You
Protection Against the Threats—Fraud Filters
2
12 Payflow Link Fraud Protection Services User’s Guide
Protection Against the Threats—Fraud Filters
Configurable filters screen each transaction for evidence of potentially fraudulent activity.
When a filter identifies a suspicious transaction, the transaction is marked for review.
Fraud Protection Services offers two levels of filters: Basic and Advanced. The filters are
described in Appendix E, “Fraud Filter Reference.”
Example Filter
The Total Purchase Price Ceiling filter compares the total amount of the transaction to a
maximum purchase amount (the ceiling) that you specify. Any transaction amount that
exceeds the specified ceiling triggers the filter.
Configuring the Filters
Through PayPal Manager, you configure each filter by specifying the action to take whenever
the filter identifies a suspicious transaction (either set the transaction aside for review or reject
it). See PayPal Manager online help for detailed filter configuration procedures.
Typically, you specify setting the transaction aside for review. For transactions that you deem
extremely risky (for example, a known bad email address), you might specify rejecting the
transaction outright. You can turn off any filter so that it does not screen transactions.
For some filters, you also set the value that triggers the filter—for example the dollar amount
of the ceiling price in the Total Purchase Price Ceiling filter.
Some filters are designed to automatically accept transactions that meet specific criteria, like a
known good customer’s account number that you specify.
Reviewing Suspicious Transactions
As part of the task of minimizing the risk of fraud, you review each transaction that triggered a
filter through PayPal Manager to determine whether to accept or reject the transaction. See
PayPal Manager online help for details.
Buyer Authentication Service
Buyer Authentication Service integrates Visa’s Verified by Visa and MasterCard’s SecureCode
into secure calls to the Payflow service. These services prompt buyers to provide a password
to their card issuer before being allowed to execute a credit card purchase.
Buyer Authentication is the only screening tool that promises to shift fraud liability from the
merchant. The Buyer Authentication password is the digital equivalent to a FDMS shopper’s
handwritten signature. The use of the password protects merchants from some chargebacks
when a customer claims not to have authorized the purchase.

Payflow Link Fraud Protection Services User’s Guide 13
How Fraud Protection Services Protect You
Special Considerations 2
Buyer Authentication Service is a separately-purchased option and operates with the Buyer
Authentication Failure filter. To enroll for the Buyer Authentication Service, click the Buyer
Authentication banner on the PayPal Manager Home page. Follow the on-screen instructions.
(In particular, both your processor and your acquiring bank must support buyer authentication.
If they both support the service, then you can enroll for Buyer Authentication Service.)
Buyer Authentication reduces your risk and builds your customers' confidence. The card
brands make marketing resources available to you to promote your Web site and logos you can
build into your checkout process.
For more information, visit:
zhttp://usa.visa.com/business/accepting_visa/ops_risk_management/vbv_marketing_support.html
zhttp://www.securecodemerchant.com
Generating Buyer Authentication Reports
If you subscribe to Buyer Authentication Service, you can generate the following reports types
through PayPal Manager:
zThe Buyer Authentication Audit report displays authentication results. Because you are
charged only for buyer authentication transactions for which the cardholder is enrolled, this
report can help you to understand your Buyer Authentication bill. In addition, you can use
this report to troubleshoot the Buyer Authentication service.
zThe Buyer Authentication Transaction report displays both authentication results and the
associated payment authorizations. The report provides an end-to-end view of
authentication through authorization. You can view any or all authentication result types:
successful, unsuccessful, and attempted.
To generate these reports, log on to PayPal Manager and navigate to Reports > Fraud
Protection. For detailed information, click Help on these pages.
Special Considerations
Merchants with an Instant Fulfillment Business Model
For businesses with instant fulfillment business models (for example, software or digital goods
businesses), the Review option does not apply to your business—you do not have a period of
delay to review transactions before fulfillment to customers. Only the Reject and Accept
options are applicable to your business model.
In the event of server outage, Fraud Protection Services is designed to queue transactions for
online processing. This feature also complicates an instant fulfillment business model.

How Fraud Protection Services Protect You
Protection From System-wide Threats—The Premium Services
2
14 Payflow Link Fraud Protection Services User’s Guide
Merchants using the Recurring Billing Service
To avoid charging you to filter recurring transactions that you know are reliable, Fraud
Protection Services filters do not screen recurring transactions.
To screen a prospective recurring billing customer, submit the transaction data using PayPal
Manager. The filters screen the transaction in the normal manner. If the transaction triggers a
filter, then you can follow the normal process to review the filter results.
Protection From System-wide Threats—The Premium Services
Account Monitoring Service
The Account Monitoring Service provides premium protection against unauthorized use of
your Payflow account. Account Monitoring Service includes:
zTransaction monitoring by trained security professionals who identify fraudulent account
activity prior to settlement
zProactive notification of suspicious account events
zCall-in number to security representatives to discuss suspicious account activity
zComplete investigation and research of suspicious account events. Includes:
– Investigation of internet log files and all audit trails relevant to your account
Packaging of all relevant data to be delivered to banks and law enforcement to assist in funds
recovery and prosecution.

Payflow Link Fraud Protection Services User’s Guide 15
3Configuring Payflow Link
IMPORTANT:If you currently use Payflow Link and recently added a Fraud Protection
Services package, then you do not need to reconfigure Payflow Link and can
safely skip this chapter. The AVS and card security code security functions will
now be performed by filters. Follow the instructions in Chapter 4,
“Configuring the Fraud Protection Services Filters,”
If you subscribe to PayPal’s Buyer Authentication Service, then you must
display the Confirmation page to customers.
If you are using Payflow Link for the first time, then follow the instructions in
this chapter, and then follow the instructions in Chapter 4, “Configuring the
Fraud Protection Services Filters.”
Once you have registered for a Payflow Link account, your first step is to configure Payflow
Link using the PayPal Manager application. Using PayPal Manager, you specify the
appearance and content of your PayPal-hosted order processing forms. In addition, you have
the option to specify which fields your customers need to fill in, and how transaction data is
passed and posted to scripts on your Web site.
Configuring Payflow Link Settings
To configure Payflow Link, log in to the PayPal Manager at https://manager.paypal.com.
Navigate to Service Settings > Payflow Link and click on the Configuration page. For
information about configuration, click Help on that page.
Table 3.1 contains brief descriptions of the fields that appear on the PayPal Manager Payflow
Link Configuration page:
TABLE 3.1 PayPal Manager Payflow Link Confirmation Page
Field Description
Form Configuration: Enables you to specify the URL to which customers return, required and optional fields that
should appear on the Payflow Link forms, and how data is handled upon completion of a transaction.
Return URL Method Specify one of the following values:
Link: Default setting and is strongly recommended for merchants new to
HTML. This setting returns the customer to the specified site. No
additional transaction data is posted if this option is specified.
Post: Returns the customer and transaction data to the Web site that you
specify in the Return URL field.

Configuring Payflow Link
Configuring Payflow Link Settings
3
16 Payflow Link Fraud Protection Services User’s Guide
Return URL Enter the URL of the Web site to which customers should be sent upon
clicking Continue on the Receipt page. This URL is typically your
merchant site. If you do not specify a URL, then the Continue button does
not appear on the Receipt page.
Silent POST URL Ensure that the transaction data is passed back to your Web site when a
transaction is completed.
Force Silent Post Confirmation In conjunction with Silent POST, causes Payflow Link to verify that the
Silent Post data was received by your Web site
Billing Address
Required Fields The fields listed in this section represent information that you collect from
the customer.
Editable Fields A check mark in this section means that the customer can edit the contents
of the field on the PayPal-hosted order processing forms.
Transaction Process Mode Specify whether to conduct simulated or real transactions.
General Display Options: Enables you to configure the appearance of the order processing forms. You can display
your organization's name and logo and specify the colors to be used on the forms.
Merchant Display Name Specify text that will be displayed in the browser title area for all forms, at
the top of all order forms (unless you specify a logo), and on email
receipts.
Configure Display Configure the look and feel of your Web page by selecting the color,
uploading a logo, changing the background, and specifing the alignment.
Express Checkout Configuration: Specify the customer shipping address that will be used by Payflow Link. This
would either be the address passed into Payflow Link (if one is passed), or the address on file with PayPal.
You can also customize the Express Checkout page by specifying a color for the page and displaying a logo on it.
Receipt Display Options: Enables you to customize the Receipt page that customers see after a transaction has
been successfully processed.
Receipt Header Text Specify up to 510 characters of text to be displayed at the top of the
Receipt page.
Receipt Footer Text Specify up to 510 characters of text to be displayed at the bottom of the
Receipt page.
Receipt Button Text Specify up to 32 characters for the Receipt button—the button that returns
your customer to your Web site.
Email Options: Enables you to send the customer email receipts for each successful transaction.
Email Receipt to Customers Specify Yes to automatically send a confirmation email message to the
customer, confirming each successful transaction.
Specify No to not send a confirmation email.
TABLE 3.1 PayPal Manager Payflow Link Confirmation Page
Field Description

Payflow Link Fraud Protection Services User’s Guide 17
Configuring Payflow Link
Configuring Payflow Link Settings 3
Email from Merchant Address Enter the email address to which successful transaction confirmation
emails should be sent.
Email to Merchant Address (copy) If desired, enter a second email address to which successful transaction
confirmation emails should be sent.
Email Header Text You have the option of sending order confirmation email messages to the
customer, to you, or to both.
Email Footer Text You have the option of sending order confirmation email messages to the
customer, to you, or to both.
Security Options: Enables you to configure the AVS, card security code, and Accepted URL security features.
AVS The Address Verification Service (AVS) verifies the cardholder’s billing
address to combat fraud in card-not-present transactions (for example, mail
order, telephone order, Internet).
CSC The card security code is a 3- or 4-digit number printed on the back of a
credit card (typically in the signature field). Check with your bank to
determine whether they support Card Security Code validation.
Accepted URL 1 through 5 In the Accepted URL fields, enter up to five URLs from which Payflow
Link should accept orders (that is, the URL from which the HTML Post
operation originates). These are typically your Web store address, a
specific page on your Web store, or specific servers for your Web store. If
someone attempts to post from a URL not specified in this list, Payflow
Link rejects the order.
TABLE 3.1 PayPal Manager Payflow Link Confirmation Page
Field Description

Configuring Payflow Link
Configuring Payflow Link Settings
3
18 Payflow Link Fraud Protection Services User’s Guide

Payflow Link Fraud Protection Services User’s Guide 19
4Configuring the Fraud Protection
Services Filters
This chapter describes how to configure the Fraud Filters for your account. The chapter
explains a phased approach to implementing the security of transactions. You are not required
to use the approach described in this chapter. However it enables you to fine tune your use of
filters before you actually deploy them in a live environment.
You first make and fine-tune filter settings in a test environment. Then you move to a live
transaction environment to fine-tune operation in an Observe-only mode. Finally, when you
are fully satisfied with your settings, you move to live Active mode to begin screening all live
transactions for fraud.
Filter operation is fully described in Appendix E, “Fraud Filter Reference.”
IMPORTANT:Upon completing the configuration procedures within each of the phases
described below, you must click the Deploy button to deploy the filter settings.
Filter settings take effect only after you deploy them.
Filter setting changes are updated hourly (roughly on the hour). This means
that you might have to wait up to an hour for your changes to take effect. This
waiting period only occurs when you move from one mode to the next.
zPhase 1: Run test transactions in Test mode using test transaction servers
In the test phase of implementation, you configure fraud filter settings for test servers that
do not affect the normal flow of transactions. You then run test transactions against the
filters and review the results offline to determine whether the integration was successful.
Once you are happy with the filter settings, you move to the next phase and the settings that
you decided upon in the test phase are transferred to the live servers.
zPhase 2: Run live transactions on live transaction security servers using Observe mode
When you deploy to Observe mode, the settings that you decided upon in the test phase are
automatically transferred to the live servers.
In Observe mode, the filters examine each live transaction and mark the transaction with
each triggered filter’s action. You can then view the actions that would have been taken on
the live transactions had the filters been active. Regardless of the filter actions, all
transactions are submitted for processing in the normal fashion.
zPhase 3: Run live transactions on live transaction security servers using Active mode
Once you have set all filters to the optimum settings, you deploy the filters to Active mode.
In Active mode, filters on the live servers examine each live transaction and take the
specified action when triggered.
NOTE:Remember that you can test a new filter setting using the test servers at any time
(even if your account is in Active mode), and then, if desired, make an adjustment
to the live filter settings.

Configuring the Fraud Protection Services Filters
Phase 1: Run Test Transactions Against Filter Settings on Test Transaction Security Servers
4
20 Payflow Link Fraud Protection Services User’s Guide
Phase 1: Run Test Transactions Against Filter Settings on Test
Transaction Security Servers
In this phase of implementation, you configure filter settings for test servers that do not affect
the normal flow of live transactions. You then run test transactions against the filters and
review the results offline to determine whether the integration was successful. Continue
modifying and testing filters as required.
NOTE:There is no per-transaction fee when you use the test servers.
1. In the Service Summary section of the PayPal Manager home page, click the Basic or
Advanced Fraud Protection link.
Click Service Settings > Fraud Protection >Test Setup.
2. Click Edit Standard Filters. The Edit Standard Filters page appears.
3. For each filter:
– Click the filter check box to enable it and click-to-clear the check box to disable it.
– Select the filter action that should take place when the filter is triggered.
For some filters, you set a trigger value. For example, the Total Purchase Price Ceiling
filter trigger value is the transaction amount that causes the filter to set a transaction
aside.
NOTE:To make decisions about how the filters work, see Appendix E, “Fraud Filter
Reference.”
4. Once you complete editing the page, click Deploy.
IMPORTANT:If you do not deploy the filters, then your settings are not saved.
5. To run test transactions, you can use PayPal Manager’s Virtual Terminal. See PayPal
Manager for online help instructions.
6. Review the filter results by following the instructions in Chapter 10, “Assessing
Transactions that Triggered Filters.”
7. Based on your results, you may want to make changes to the filter settings. Simply return
to the Edit Filters page, change settings, and redeploy them. Once you are happy with your
filter settings, you can move to Phase 2.

Payflow Link Fraud Protection Services User’s Guide 21
Configuring the Fraud Protection Services Filters
Phase 2: Run Live Transactions on Live Transaction Servers in Observe Mode 4
Phase 2: Run Live Transactions on Live Transaction Servers in
Observe Mode
In this phase, you configure filters on live servers to the settings that you had fine-tuned on the
test servers. In Observe mode, filters examine each live transaction and mark the transaction
with the filter results. The important difference between Observe and Active mode is that,
regardless of the filter actions, all Observe mode transactions are submitted for processing in
the normal fashion.
Observe mode enables you to view filter actions offline to assess their impact (given current
settings) on your actual transaction stream.
NOTE:You are charged the per-transaction fee to use the live servers in either Observe or
Active mode.
1. Click Service Settings > Fraud Protection >Test Setup. Click Move Test Filter Settings
to Live. The Move Test Filter Setting to Live page appears. Remember that in this phase,
you are configuring the live servers.
2. Click Move Test Filter Settings to LiveOn the page that appears, click Move Test Filter
Settings to Live again.
3. The Move Test Filter Settings to Live page prompts you whether to deploy the filters in
Observe modeor in Active mode. Click Deploy to Observe Mode.
Once you deploy the filters, all transactions are sent to the live servers for screening by the live
filters. In Observe mode, each transaction is marked with the filter action that would have
occurred (Review, Reject, or Accept) had you set the filters to Active mode
This enables you to monitor (without disturbing the flow of transactions) how actual customer
transactions would have been affected by active filters.
IMPORTANT:Deployed filter setting changes are updated hourly (roughly on the hour).
This means that you might have to wait up to an hour for your changes to
take effect. This waiting period only occurs when you move from one mode
to the next.
4. Review the filter results by following the instructions in Chapter 10, “Assessing
Transactions that Triggered Filters.” The Filter Scorecard (described on page 43) will be
particularly helpful in isolating filter performance that you should monitor closely and in
ensuring that a filter setting is not set so strictly so as to disrupt normal business.
5. Once you are happy with your filter settings, you can move to Phase 3.

Configuring the Fraud Protection Services Filters
Phase 3: Run All Transactions Through the Live Transaction Security Servers Using Active Mode
4
22 Payflow Link Fraud Protection Services User’s Guide
Phase 3: Run All Transactions Through the Live Transaction
Security Servers Using Active Mode
Once you have configured all filters to optimum settings, you convert to Active mode. Filters
on the live servers examine each live transaction and take the specified action.
6. Click Move Test Filter Settings to Live. On the page that appears, click Move Test Filter
Settings to Live again.
7. On the Move Test Filter Settings to Live page, click Deploy to Active Mode.
At the top of the next hour, all live transactions will be inspected by the filters.
8. Use the instructions in Chapter 10, “Assessing Transactions that Triggered Filters,” to
detect and fight fraud.
IMPORTANT:Remember that you can make changes to fine-tune filter settings at any time.
After changing a setting, you must re-deploy the filters so that the changes
take effect.

Payflow Link Fraud Protection Services User’s Guide 23
5Integrating Your Web Site with
Payflow Link (Basic Integration)
IMPORTANT:If you currently use Payflow Link and have added a Fraud Protection
Services package, then you must change the Payflow Link URL in your HTML
code. Use: https://payflowlink.paypal.com
The examples in this chapter use the Fraud Protection Services URL.
This chapter provides full instructions for a simple integration option that enables you to begin
to process transactions using Payflow Link in about an hour.
IMPORTANT:PayPal strongly recommends that you implement this minimum integration to
familiarize yourself with Payflow Link operation before implementing a more
customized integration.
To implement a more robust implementation that customizes the customer’s purchase
experience, you can add data fields to the Payflow Link pages or eliminate the pages by
collecting transaction data at your Web store and posting the data to the Payflow Link server.
For more information on taking advantage of Payflow Link’s advanced integration
capabilities, see Chapter 6, “Integrating Your Web Site with Payflow Link (Advanced
Integration).”
NOTE:Payflow Link enables your customers to process a single transaction amount. Payflow
Link does not calculate the transaction amount based on customer selections. To enable
customers to order multiple items or quantities, you must develop a solution that
calculates the total transaction amount based upon customer selections in your Web
store. Your code must then pass the total transaction amount to the Payflow Link server
as described in this chapter.
Example of a Simple Integration
To connect your Web site to Payflow Link, you enter a few lines of HTML text into your
store’s Web page. In that text, you specify your Payflow account information and the amount
and type of transaction. That’s it!
As a result, a Buy button appears on your Web page (you can specify the text that appears on
the button). When a customer clicks the button, their browser displays the PayPal-hosted
pages, from which they submit the transaction. Upon closing the Receipt page, the customer is
returned to your Web site.
Follow these steps:
1. Copy and paste the following text into a text editor. (If you are viewing this document
online, use the Adobe Acrobat Reader Text tool to select the text and click Ctrl-C to
copy and Ctrl-V to paste it into the text editor.)

Integrating Your Web Site with Payflow Link (Basic Integration)
Example of a Simple Integration
5
24 Payflow Link Fraud Protection Services User’s Guide
<form method="POST" action="https://payflowlink.paypal.com">
<input type="hidden" name="LOGIN" value="Your LOGIN here">
<input type="hidden" name="PARTNER" value="Your PARTNER here">
<input type="hidden" name="AMOUNT" value="Total transaction AMOUNT here">
<input type="hidden" name="TYPE" value="Transaction TYPE here">
<input type="submit" value="Click here to Purchase">
</form>
2. Replace the bold text with actual values for the LOGIN, PARTNER, AMOUNT, and TYPE
parameters, as follows:
–LOGIN: The login name that you chose for your Payflow account.
–PARTNER: The name of your Partner was provided to you by your reseller.
–AMOUNT: Total amount of the transaction. The value must be greater than 1.00.
–TYPE: A single letter that identifies the type of transaction (S: Sale or
A: Authorization). Transaction types are described on page 81.
Be sure to change only the text shown in bold in the example text. Leave the quotation
marks (“) in place.
3. Save the file and insert the HTML text into your Web page at the point where Payflow
Link should complete the transaction.
4. Your next step is to open your Web page and test the button to ensure that it opens the
PayPal transaction pages and performs the transaction properly. See Chapter 7, “Testing
Payflow Link,” for complete instructions.

Payflow Link Fraud Protection Services User’s Guide 25
6Integrating Your Web Site with
Payflow Link (Advanced
Integration)
IMPORTANT:If you currently use Payflow Link and added a Fraud Protection Services
package, then you must change the Payflow Link URL in your HTML code.
Use: https://payflowlink.paypal.com
The examples in this chapter use the Fraud Protection Services URL.
If you have HTML knowledge or Web development skills, you can create more customized
Payflow Link integrations by starting with the code described in this chapter.
This chapter discusses an example appropriate for a simple Web site (one used for donations,
single item purchases, and so on.) If your Web site is more complex (accommodates
functionality like multiple item purchases, taxes, shipping fees, and so on), PayPal
recommends that you get a shopping cart.
PayPal strongly recommends that before you implement the integration described in this
chapter, you familiarize yourself with Payflow Link operation by implementing the simple
integration described in Chapter 5, “Integrating Your Web Site with Payflow Link (Basic
Integration).”
NOTE:Payflow Link enables your customers to process a single transaction amount. Payflow
Link does not calculate the transaction amount based on customer selections. To enable
customers to order multiple items or quantities, you must develop a solution that
calculates the total transaction amount based upon customer selections in your Web
store. Your code must then pass the total transaction amount to the Payflow Link server
as described in this chapter.
Example of a Custom Integration
You may choose to collect detailed transaction data on your Web store and then pass the
information to Payflow Link. Payflow Link accepts optional data fields that customize the
purchase process. This enables either of the following options:
zCollect all billing information on your forms and pass it to PayPal. The only data left for
the customer to enter (on the secure PayPal-hosted Credit Card Information form) is the
credit card information.
zCollect all billing and credit card information on your forms and pass the data to PayPal.
This enables you to disable all PayPal-hosted pages (except the required Receipt page).
Example HTML Code
The following example collects purchase data on your form. When a customer enters data and
clicks the button, the code sends the data to the Payflow Link server and opens the PayPal-
hosted Credit Card Information form.

Integrating Your Web Site with Payflow Link (Advanced Integration)
Example of a Custom Integration
6
26 Payflow Link Fraud Protection Services User’s Guide
<form method="POST" action="https://payflowlink.paypal.com">
<!-- The following fields are required: -->
<input type="hidden" name="LOGIN" value="Your LOGIN here">
<input type="hidden" name="PARTNER" value="Your PARTNER here">
<input type="hidden" name="AMOUNT" value="Total transaction amount here">
<input type="hidden" name="TYPE" value="Valid transaction type here">
<!-- See “Payflow Link Transaction Types” on page 81 for the list of valid
transaction types. -->
<!-- The following fields are optional--you can choose these or others: -->
<input type="hidden" name="DESCRIPTION" value="Order description here">
<input type="hidden" name="NAME" value="Billing name here">
<input type="hidden" name="ADDRESS" value="Billing address here">
<input type="hidden" name="CITY" value="Billing city here">
<input type="hidden" name="STATE" value="Billing state here">
<input type="hidden" name="ZIP" value="Billing zip here">
<input type="hidden" name="COUNTRY" value="Billing country here">
<input type="hidden" name="PHONE" value="Billing phone here">
<input type="hidden" name="FAX" value="Billing fax here">
<p>Enter your Customer ID Number <input type="text" name="USER1"
size="12"></p>
<p>Select the form of payment <select name="METHOD" size="1">
<option selected value="CC">Credit Card</option>
<p><input type="submit" value="Click Here to Purchase"></p>
</form>
NOTE:The example code shows a representative list of fields. You can further customize the
code provided in this example by using fields described in Appendix B, “Submitting
Transaction Data to the Payflow Link Server.”
Passing Transaction Data to Payflow Link
If you are collecting transaction data on your forms, you must write a script that passes the
data to the Payflow Link HTML code.
Alternatively, you can collect data by changing the fields from hidden fields to text fields.
Instead of <input type="hidden"...>, use <input type="text"...>. This creates
text boxes into which customers can enter information. The data is passed to PayPal when the
customer submits the order.

Payflow Link Fraud Protection Services User’s Guide 27
7Testing Payflow Link
IMPORTANT:If you currently use Payflow Link in Live mode and you wish to return to Test
mode because you added a Fraud Protection Services package, then you
should know that in Test mode:
— All test transactions go to PayPal’s simulator servers.
— No transactions are submitted to the Processor network, therefore
no funds are transferred.
This means that all transactions on your account will be lost until you return
to Live mode.
In Chapter 5, “Integrating Your Web Site with Payflow Link (Basic Integration),” you entered
HTML code to connect your Web site to Payflow Link. Before you activate your Web store for
customer use, you should test Payflow Link to verify proper operation. PayPal’s test server
enables you to simulate transactions on your Web site and ensure that they are submitted
correctly. Transactions are handled through a test system and no actual funds are exchanged.
This chapter describes the process that you follow to test your Payflow Link integration and to
verify that it is operating correctly.
“Testing TeleCheck Transactions” on page 48 provides guidance on simulating TeleCheck
transactions.
Testing Credit Card Transactions
NOTE:For information on testing the Buyer Authentication Service, see “Testing the Buyer
Authentication Service” on page 33.
Follow these steps to test the integration between your Web page and Payflow Link:
Verify that the Transaction Process Mode is set to TEST
Before you can begin simulating transactions, you must first ensure that the Transaction
Process Mode is set to TEST so that no funds are transferred. Follow these steps:
1. Open PayPal Manager and navigate to Service Settings > Payflow Link and click on the
Configuration page.
2. On the Forms Configuration section, under Shipping Information, change Transaction
Process Mode from Live to Test. Click the Save Changes button. Your account now
connects with PayPal’s test servers so that you can safely run simulated transactions.

Testing Payflow Link
Testing Credit Card Transactions
7
28 Payflow Link Fraud Protection Services User’s Guide
NOTE:Test Transactions are processed through PayPal’s simulated payment network to
enable you to test Payflow Link—no money changes hands. You must activate your
account and set Transaction Process Mode to LIVE before accepting real orders.
Refer to PayPal Manager online help for information on activating your account.
Performing Test Transactions
To perform test transactions, perform the purchase process from your Web site as described
here. Verify that the transactions are approved, declined, or referred as is appropriate.
Testing Guidelines
zPayPal provides test card numbers. Other numbers produce an error.
zExpiration Date must be a valid date in the future (use the mm/yy format).
zTo view the credit card processor that you have selected for testing, navigate to Account
Administration > Processor & Merchant Bank Information > Processor Information
on PayPal Manager.
Credit Card Numbers Used for Testing
Use the following card numbers for testing. Any other card number produces the error
message Live card used on test system or Result 23—Invalid Account Number.
TABLE 7.1 Test credit card numbers
Credit Card Test Number
American Express 378282246310005
American Express 371449635398431
American Express Corporate 378734493671000
Diners Club 38520000023237
Diners Club 30569309025904
Discover 6011111111111117
Discover 6011000990139424
MasterCard 5555555555554444
MasterCard 5105105105105100
Visa 4111111111111111
Visa 4012888888881881
Visa 4222222222222

Payflow Link Fraud Protection Services User’s Guide 29
Testing Payflow Link
Testing Credit Card Transactions 7
Testing RESULT Code Responses
You can use the amount of the transaction to generate a particular RESULT code.
NOTE:“RESULT Values for Transaction Declines or Errors” on page 50 describes each
transaction RESULT code.
NOTE:For all processors except FDI: Credit (C) and Force (F) transactions will always be
approved regardless of dollar amount or card number.
Table 7.2 lists the general guidelines for specifying amounts.
PayPal Result Codes Returned Based on Transaction Amount
This table lists the RESULT values that you can generate using the amount of the transaction.
To generate a specific code, submit an amount of 1000 plus the code number (for example,
submit an amount of 1013 for a result code of 13).
TABLE 7.2 Result codes resulting from amount submitted
Amount Result
$0 – $1000 0 (Approved)
$1001 – $2000 Certain amounts in this range will return specific PayPal result codes, and can be
generated by adding $1000 to that result code. For example, for Result 13
(Referral), submit the amount 1013.
If the amount is in this range but does not correspond to a PayPal result code
supported by this testing mechanism, result 12 (Declined) is returned.
$2001+ 12 – Decline

Testing Payflow Link
Testing Credit Card Transactions
7
30 Payflow Link Fraud Protection Services User’s Guide
Alternative Methods for Generating Specific Result Codes
In some cases, you may get the results shown in Table 7.4 using the result code plus 1000 even
though this table suggests another means of obtaining the result code.
TABLE 7.3 Result values supporting the amount control
Processing Platform RESULT Values Available for Testing
American Express Phoenix
American Express Brighton
0, 12, 13, 104, 1000
First Data Merchant Services Nashville 0, 12, 13, 104
First Data Merchant Services South 0, 12, 13, 104
Global Payments Central 0, 4, 5, 8, 12, 13, 23, 24, 104, 111, 114, 1000
Global Payments East 0, 4, 5, 12, 13, 23, 24, 30, 100, 104, 114, 1000
Elavon (Formerly Nova) 0, 12, 13, 104
Paymentech Salem (New Hampshire) 0, 12, 13, 104
TSYS Acquiring Solutions (Formerly
Vital Processing Services) 0, 4, 12, 13, 23, 104, 114, 1000
TABLE 7.4 Obtaining PayPal result code
Result Definition How to test using Payflow Link
0Approved Use an AMOUNT of $1000 or less. Credit (C) and Force (F)
transactions will always be approved regardless of dollar
amount or card number.
1User authentication failed Use an invalid PWD
2Invalid tender Use an invalid TENDER, such as G
3Invalid transaction type Use an invalid TRXTYPE, such as G
4Invalid amount Use an invalid AMOUNT, such as –1
12 Declined Use an AMOUNT of 1012 or an AMOUNT of 2001 or more
13 Referral Use an AMOUNT of 1013
19 Original transaction ID
not found Submit a Delayed Capture transaction with an invalid
ORIGID
23 Invalid account number Submit an invalid account number, for example,
000000000000000
24 Invalid expiration date Submit an invalid expiration date, for example, 0298

Payflow Link Fraud Protection Services User’s Guide 31
Testing Payflow Link
Testing Address Verification Service (AVS) 7
Testing Address Verification Service (AVS)
IMPORTANT:Once you deploy the filters to Live mode (either Observe or Active), the AVS
and card security code checks that you may have previously set on the Payflow
Link Configuration page are replaced by the AVS and card security code filter
settings. In Observe mode, no action is taken on AVS and card security code.
To take action if you are confident of your filter settings, deploy to Active
mode.
The PayPal testing server simulates AVS by returning a value for AVSADDR based on the
first three characters of the submitted value for STREET, as shown in Table 7.5.
The testing server returns a value for AVSZIP based on the submitted ZIP value as shown in
Table 7.6.
25 Transaction type not
mapped to this host Submit a transaction for a card or tender you are not
currently set up to accept, for example, a Diners card if you
aren’t set up to accept Diners.
101 Time-out value too small Set timeout value to 1.
103 Error reading response
from host Use an AMOUNT of 1103.
104 Timeout waiting for
processor response Use an AMOUNT of 1104.
105 Credit error Attempt to credit an authorization.
108 Void error Attempt to void a captured authorization.
111 Capture error Capture an authorization twice.
112 Failed AVS check Use an AMOUNT of 1112. Note that in production this will
only be encountered if you are configured by customer
service to use the “AVS Deny” feature.
TABLE 7.4 Obtaining PayPal result code
Result Definition How to test using Payflow Link

Testing Payflow Link
Testing Card Security Code
7
32 Payflow Link Fraud Protection Services User’s Guide
If STREET starts with 667-999, or begins with a non-numeric character, as anything above
999 will revert to a 3-character check. So if a merchant puts in 1111 and thinks that they will
get a X because it is “higher” than 667, then they will actually get a Y because the pilot AVS
only checks the first three digits.
Testing Card Security Code
If you submit a value for a card security code, the cardholder’s bank returns a Yes/No/Not
Supported (Y/N/X) response on whether the value matches the number on file at the bank.
NOTE:Some processors will decline (result code 12) a transaction if the card security code
does not match without returning a CVV2MATCH value. Test the results and check
with your processor to determine whether they support card security code checking.
IMPORTANT:Once you deploy the filters to Live mode (either Observe or Active), the AVS
and card security code checks that you may have previously set on the Payflow
Link Configuration page are replaced by the AVS and card security code filter
settings. In Observe mode, no action is taken on AVS and card security code.
To take action if you are confident of your filter settings, deploy to Active
mode.
TABLE 7.5 Testing AVS STREET
Submitted Value for STREET Example STREET value AVS Address Result
000-333 24234 Elm Y
334-666 49365 Main N
667 or higher or begins with a non-
numeric character 79287 Maple X
TABLE 7.6 Testing AVS ZIP
Submitted Value for ZIP Example ZIP value AVS ZIP Result
00000-50000 00382 Y
50001-99999 94303 N
Any value (if street address is 667 or
higher or begins with a non-numeric
character)
Address=79287 Maple,
ZIP=20304 X

Payflow Link Fraud Protection Services User’s Guide 33
Testing Payflow Link
Testing the Buyer Authentication Service 7
For testing, the first three characters of the submitted card security code value determine the
card security code result, as shown in Table 7.7.
If you are using card security code checking and the Silent Post feature, then you can identify
which transactions have been voided by looking for the following value:
RESPMSG=CSCDECLINED.
NOTE:Be sure to look at the response message for your transaction. Even if your result code is
0, your response message might say that the transaction has failed.
Testing the Buyer Authentication Service
In Test mode:
zAll test transactions go to PayPal’s simulator servers.
zNo transactions are submitted to the Processor network, therefore no funds are transferred.
zPassword/PIN: Test transaction results are determined solely by the test account number
submitted, so you can enter any password on the test Buyer Authentication page.
Test Account Numbers
To generate particular results, use the following test account numbers:
TABLE 7.7 card security code values and results
card security code value card security code Result
000 Null
001-300 Y
301-600 N
601 or higher X
TABLE 7.8 Test account numbers for obtaining particular results
Test
Case Test Account
Number Test Results Resulting Activity
1 5100000000000008
5200000000000007
4000000000000002
4000000000000101
Card enrolled
Successful authentication
Successful signature
verification
ACS page displayed, enter any password,
Payflow Link always displays successful
authentication.

Testing Payflow Link
Testing the Buyer Authentication Service
7
34 Payflow Link Fraud Protection Services User’s Guide
2 5100000000000008
5200000000000007
4000000000000002
400000000000010
Card enrolled
Failed authentication
Successful signature
verification
ACS page displayed, enter any password,
buyer authentication fails.
34111111111111111 Card enrolled
Attempt authentication
Successful signature
verification
ACS page is displayed and immediately
disappears. Payflow Link returns
Successful authentication attempt
4 5105105105105100
4000000000000507
Card not enrolled Payflow Link return user with
authentication not available. No ACS page
displayed. Payflow Link should proceed as
unauthenticated transaction.
5 5555555555554444
4012888888881881
Can not verify card enrollment Payflow Link displays “Unable to
authenticate”. ACS page is not displayed.
Payflow Link should proceed as
unauthenticated transaction.
6 5100000000000008
5200000000000007
4000000000000002
4000000000000101
Card eligible for authentication
User cancelled authentication
After the ACS page is displayed, click the
Cancel button. Payflow Link should
proceed as unauthenticated transaction.
7 5300000000000006
4000000000000309
Card enrolled for
authentication
Unable to authenticate
Successful signature
verification
ACS will not ask for PIN/password but
directly returns to Payflow Link. Payflow
Link displays “Unable to authenticate”.
8 5500000000000004 Card enrolled
Unsuccessful Validate
Authentication
ACS page displayed. Enter any
PIN/password. Payflow Link/merchant
display “Failed to verify ACS signature”.
12 Any valid MasterCard
or Visa account number Merchant not registered for this
feature or is deactivated.
(merchant authentication
failure)
TABLE 7.8 Test account numbers for obtaining particular results
Test
Case Test Account
Number Test Results Resulting Activity

Payflow Link Fraud Protection Services User’s Guide 35
8Activating Payflow Link
Once you have established your internet merchant account with a merchant bank, configured
the Payflow Link forms, linked your Web store page to Payflow Link, and tested your Web
site’s integration with Payflow Link, you are ready to activate your account to submit live
financial transactions.
Determining Whether Your Payflow Account is Currently Active
When you log in to PayPal Manager, the Account Status section on the Home page shows the
status of your Payflow account
Activating Your Payflow Account
Perform the following tasks:
zStep 1, “Register your account”
zStep 2, “Configure transactions to go to the live Payflow Link servers.”
zStep 3, “Verify that live transactions are processed correctly”
Step 1 Register your account
Registration informs PayPal that you will begin performing live transactions. PayPal will now
begin billing you to use the Payflow Link service. (You may have already performed this step
when you registered for the service.)
NOTE:Registering your account does not activate your account. Your Payflow Link
account is still in TEST mode until you perform the next step.
If you have already registered your Payflow Link account, skip to Step 2, “Configure
transactions to go to the live Payflow Link servers.” on page 36”.
Follow these steps to register:
1. Log in to PayPal Manager at https://manager.paypal.com. For information about logging on
to PayPal Manager, refer to the PayPal Manager online help on the login page.
2. On the PayPal Manager Home page, click Activate Your Account in the Your Account
Status section.

Activating Payflow Link
Activating Your Payflow Account
8
36 Payflow Link Fraud Protection Services User’s Guide
Step 2 Configure transactions to go to the live Payflow Link servers.
In this step, you set the Transaction Process status to LIVE.
1. Log in to PayPal Manager at https://manager.paypal.com.
2. Navigate to Service Settings > Payflow Link > Configuration. In the Form
Configuration section on the Configuration page, change Transaction Process Mode
from Test to Live. Click Save Changes.
Step 3 Verify that live transactions are processed correctly
Perform a transaction on your Web store as if you were a customer. Verify proper operation as
follows:
zForms appear correctly (colors, logos, and text).
zThe transaction is declined when a test credit card number is used.
zThe transaction is approved when a working credit card number is used. (You can use
PayPal Manager to credit the card after testing.)

Payflow Link Fraud Protection Services User’s Guide 37
9Managing Payflow Link
This chapter describes how to use PayPal Manager to manage your Payflow Link account
settings and transaction activity as well as to generate a variety of transaction reports. This
chapter also describes the reports that you use to monitor your Payflow Link account.
NOTE:Before proceeding, learn how to get around in PayPal Manager. Refer to PayPal
Manager’s online help for information on using any page or field. To view online help,
click the Help link.
Management Tasks Available in PayPal Manager
Complete instructions for using PayPal Manager and a more detailed discussion of available
reports appear in PayPal Manager online help.
Using PayPal Manager, you can perform the following tasks:
zChange your configuration settings.
zPerform manual transactions (Sale, Credit, Void, and so on) and view transaction details.
Submit groups of automated Delayed Capture, Credit, and Void transactions.
NOTE:For manual transactions performed from PayPal Manager, AVS responses are
returned, but the actions specified by the Payflow Link AVS setting (accept,
decline, and so on) are not taken.
zPerform reference transactions. A reference transaction is an existing transaction from
which parameter (field) values are re-used to create a new transaction.
zConfigure recurring payments. PayPal’s Recurring Billing Service is a scheduled payment
solution that enables you to automatically bill your customers at regular intervals—for
example, a monthly fee of $42 for 36 months with an initial fee of $129.
zSearch for transactions, for example, by credit card number or Transaction ID.
zSpecify, generate, and view reports.
Generating Reports
Use the Reports tab on PayPal Manager to generate and review reports to track Payflow Link
transaction activity.
For detailed information about generating reports, refer to PayPal Manager online help.

Managing Payflow Link
Generating Reports
9
38 Payflow Link Fraud Protection Services User’s Guide

Payflow Link Fraud Protection Services User’s Guide 39
10 Assessing Transactions that
Triggered Filters
As part of the task of minimizing the risk of fraud, you review each transaction that triggered a
filter. You decide, based on the transaction’s risk profile, whether to accept or reject the
transaction. This chapter describes how to review transactions that triggered filters, and
provides guidance on deciding on risk.
NOTE:The Fraud Protection Services package (Basic or Advanced) to which you subscribe
determines the number of filters that screen your transactions. Basic subscribers have
access to a subset of the filters discussed in this chapter. Advanced subscribers have
full access. See “Filters Included with the Fraud Protection Services” on page 81 for
complete lists of Basic and Advanced filters.
In This Chapter
z“Reviewing Suspicious Transactions” on page 39
z“Fine-tuning Filter Settings—Using the Filter Scorecard” on page 43
z“Re-running Transactions That Were Not Screened” on page 44
Reviewing Suspicious Transactions
Transactions that trigger filters might or might not represent attempted fraud. It is your
responsibility to analyze the transaction data and then to decide whether to accept or reject the
transaction. Accepting a transaction requires no further action. To reject a transaction, a
separate void of the transaction is required.
The first step in reviewing filtered transactions is to list the transactions.
1. Click Reports > Fraud Protection > Fraud Transactions
The Fraud Transactions Report page appears.
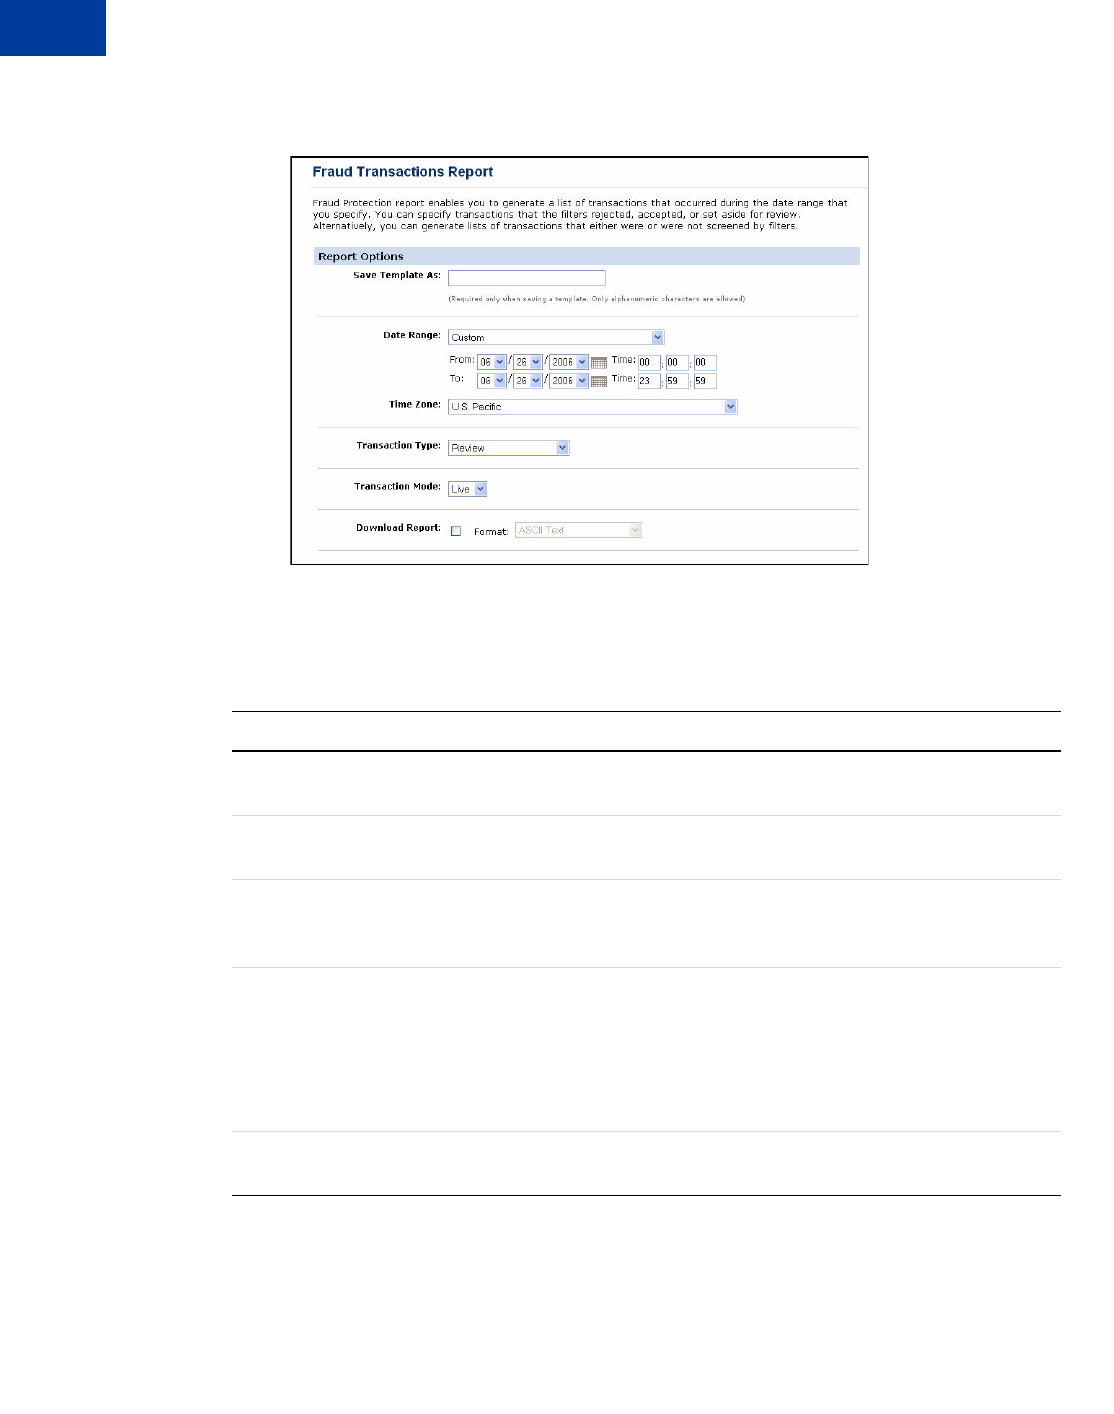
Assessing Transactions that Triggered Filters
Reviewing Suspicious Transactions
10
40 Payflow Link Fraud Protection Services User’s Guide
FIGURE 10.1Fraud Transactions Report page
2. Specify the date range of the transactions to review.
3. Specify a Transaction Type:
4. Specify the Transaction Mode, and click Run Report.
The Fraud Transactions Report page displays all transactions that meet your search
criteria.
TABLE 10.1 Transaction types
Transaction Type Description
Reject Transactions that the filters rejected. These transactions cannot be settled.
The type of filter that took this action is called a Reject filter.
Review Transactions that the filters set aside for your review. The type of filter that
took this action is called a Review filter.
Accept Transactions that the filters allowed through the normal transaction
submission process. The type of filter that took this action is called an Accept
filter.
Not Screened by
Filters Transactions that were not screened by any filter. This condition (Result Code
127) indicates that an internal server error prevented the filters from
examining transactions. This conditional occurs only in Test mode or Live
mode. In Observe mode all results codes are always 0.
You can re-screen any of these transactions through the filters as described in
“Re-running Transactions That Were Not Screened” on page 44.
Screened by Filters All transactions that were screened by filters, regardless of filter action or
whether any filter was triggered.

Payflow Link Fraud Protection Services User’s Guide 41
Assessing Transactions that Triggered Filters
Reviewing Suspicious Transactions 10
NOTE:If filters are deployed in Observe mode, then all transactions have been submitted for
processing and are ready to settle. Transactions are marked with the action that the
filter would have taken had the filters been deployed in Active mode.
The following information appears in the report:
The following transaction status values can appear in the report:
Click the Transaction ID of the transaction of interest.
TABLE 10.2 Transactions Report field descriptions
Heading Description
Report Type The type of report created.
Date Date and time range within which the transactions in this report were
run.
Time Zone Time zone represented in this report.
Transaction Mode Test, Observe, or Active
Transaction ID Unique transaction identifier. Click this value to view the Transaction
Detail page.
Transaction Time Time and date that the transaction occurred.
Transaction Type The transaction status that resulted from filter action, as described in
Table 10.1.
Card Type MasterCard or Visa.
Amount Amount of the transaction.
TABLE 10.3 Transaction status values
Stage of Review Transaction
Status Result
Code Result Message
Report in Which
the Transaction
Appears
Screened by filters Pass 0Approved Approved report
Screened by filters Approved report
Screened by filters Reject 125 Declined by Fraud Service Declined report
Screened by filters Accept 0Approved Approved report
Screened by filters Service Outage 127 Unprocessed by Fraud Service Approved report
After review by
merchant Accepted 0Approved Approved report
Rejected 128 Declined by Merchant Declined report

Assessing Transactions that Triggered Filters
Reviewing Suspicious Transactions
10
42 Payflow Link Fraud Protection Services User’s Guide
The Fraud Details page appears, as discussed in the next section.
Acting on Transactions that Triggered Filters
The Fraud Details page displays the data submitted for a single transaction. The data is
organized to help you to assess the risk types and to take action (accept, reject, or continue in
the review state).
The following notes describe data in the Fraud Details page shown in the figure.
1. This transaction was set aside because it triggered the AVS Failure filter.
2. The transaction was not screened by any of the filters in the Skipped Filters section because
the data required by these filters did not appear in the transaction data or was badly
formatted. In special cases, all filters appear here. See “Re-running Transactions That Were
Not Screened” on page 44
3. Specify the action to take on the transaction:
– Review: Take no action. You can return to this page at any time or reject or accept the
transaction. The transaction remains unsettleable.
– Reject: Do not submit the transaction for processing. See “Rejecting Transactions” on
page 42.
– Accept: Submit the transaction for normal processing.
4. You can enter notes regarding the disposition of the transaction or the reasons for taking a
particular action. Do not use the & < > or = characters.
5. Click Submit to save the notes, apply the action, and move to the next transaction.
NOTE:You can also view the Fraud Details page for transactions that were rejected or
accepted. While you cannot change the status of such transactions, the page provides
insight into filter performance.
Rejecting Transactions
If you decide to reject a transaction, you should notify the customer that you could not fulfill
the order. Do not be explicit in describing the difficulty with the transaction because this
provides clues for performing successful fraudulent transactions in the future. Rejected
transactions are never settled.
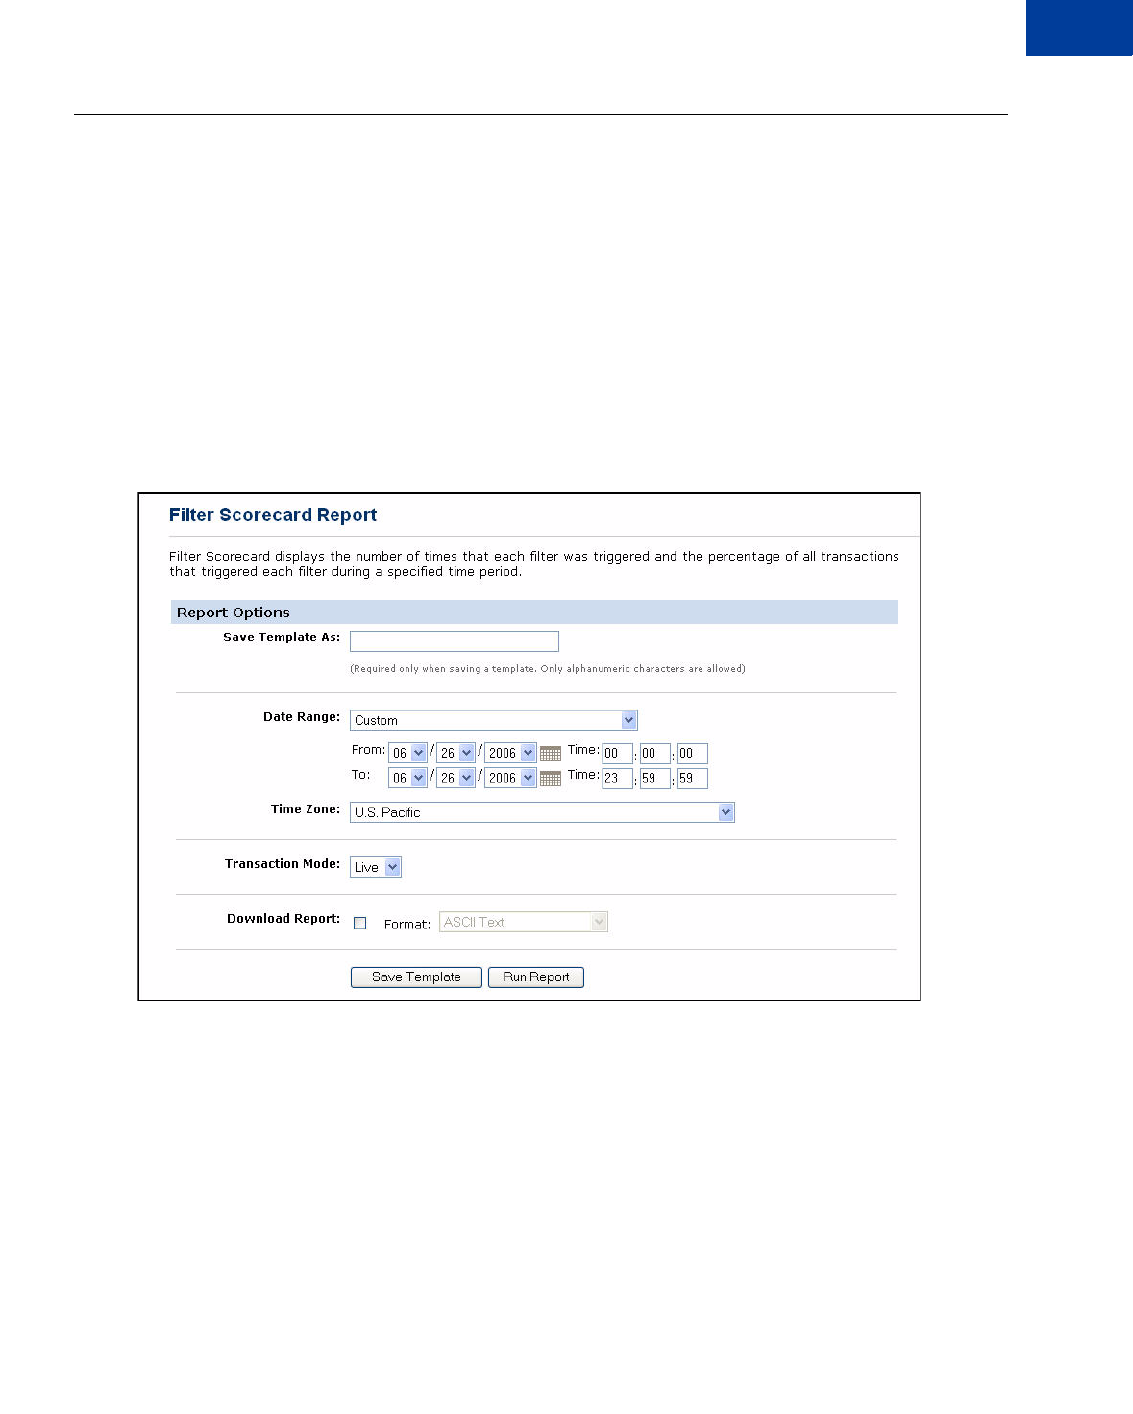
Payflow Link Fraud Protection Services User’s Guide 43
Assessing Transactions that Triggered Filters
Fine-tuning Filter Settings—Using the Filter Scorecard 10
Fine-tuning Filter Settings—Using the Filter Scorecard
The Filter Scorecard displays the number of times that each filter was triggered and the
percentage of all transactions that triggered each filter during a specified time period.
This information is especially helpful in fine-tuning your risk assessment workflow. For
example, if you find that you are reviewing too many transactions, then use the Filter
Scorecard to determine which filters are most active. You can reduce your review burden by
relaxing the settings on those filters (for example, by setting a higher amount for the Purchase
Price Ceiling filter).
1. Click Reports > Filter Scorecard. The Filter Scorecard Report page appears.
FIGURE 10.2Filter Scorecard Report page
2. Specify the date range of the transactions to review.
3. In the Transaction Mode field, specify transactions screened by the live or the test servers.
4. Click Run Report.
The Filter Scorecard Report page displays the number of times that each filter was
triggered and the percentage of all transactions that triggered each filter during the time
span that you specified.

Assessing Transactions that Triggered Filters
Re-running Transactions That Were Not Screened
10
44 Payflow Link Fraud Protection Services User’s Guide
Ensuring Meaningful Data on the Filter Scorecard
The Scorecard shows the total number of triggered transactions for the time period that you
specify, so if you had changed a filter setting during that period, the Scorecard result for the
filter might reflect transactions that triggered the filter at several different settings.
Say, for example, you changed the Total Purchase Price Ceiling on August 1 and again on
August 7. You then run a Filter Scorecard for July 1 to August 31. Between July 1 to August
31, three different price ceiling settings caused the filter to trigger, yet the Scorecard would not
indicate this fact.
To ensure meaningful results in the Filter Scorecard, specify a time period during which the
filter settings did not change.
Re-running Transactions That Were Not Screened
Perform the following steps if you wish to re-run a transaction that was not screened by filters
(transactions with Result Code 127):
1. Navigate to Reports > Fraud Protection > Fraud Transaction Report. The Fraud
Transaction Report page appears.
2. Select the appropriate time period for the search, and select the “Not Screened by Filters”
option for Transaction Type.
3. Click RunView Report. The Fraud Transaction Report Results page appears. It contains
all the transactions that were not screened by filters.
4. Click on the Transaction ID of the transaction you would like to re-run. The Confirm Rerun
page appears.
5. Click Yes to re-run that transaction. The Success page appears if your transaction was
successful.
NOTE:If multiple attempts at screening fail, then the transaction may have data formatting
problems. Validate the data, and contact Customer Service.
If you encounter 50 or more transactions with Result Code 127, then contact Customer
Service, who can resubmit them as a group.

Payflow Link Fraud Protection Services User’s Guide 45
11 Integrating TeleCheck
Transactions
In addition to accepting credit cards, your Web site can accept TeleCheck electronic checks
using Payflow Link. This chapter describes how to implement TeleCheck payments.
NOTE:Be sure to read Appendix B, “Submitting Transaction Data to the Payflow Link
Server,” for information on more advanced implementations.
NOTE:If you did not indicate that you want to accept checks during the registration process
for Payflow Link, you must contact PayPal customer service to enable this function.
For more information on TeleCheck, see the TeleCheck Web site at
http://www.telecheck.com.
Integrating Check Processing
IMPORTANT: Payflow Link cannot void TeleCheck transactions.
To integrate check processing with Payflow Link, you use the same HTML code that you use
for credit cards, as described in Chapter 5, “Integrating Your Web Site with Payflow Link
(Basic Integration).” However for check processing, the TYPE value must always be S, as
shown in this example code:
<form method="POST" action="https://payflowlink.paypal.com">
<input type="hidden" name="LOGIN" value="AcmeTrampolines">
<input type="hidden" name="PARTNER" value="Reseller_name">
<input type="hidden" name="AMOUNT" value="42.00">
<input type="hidden" name="TYPE" value="S">
<input type="submit" value="Click here to Purchase">
</form>
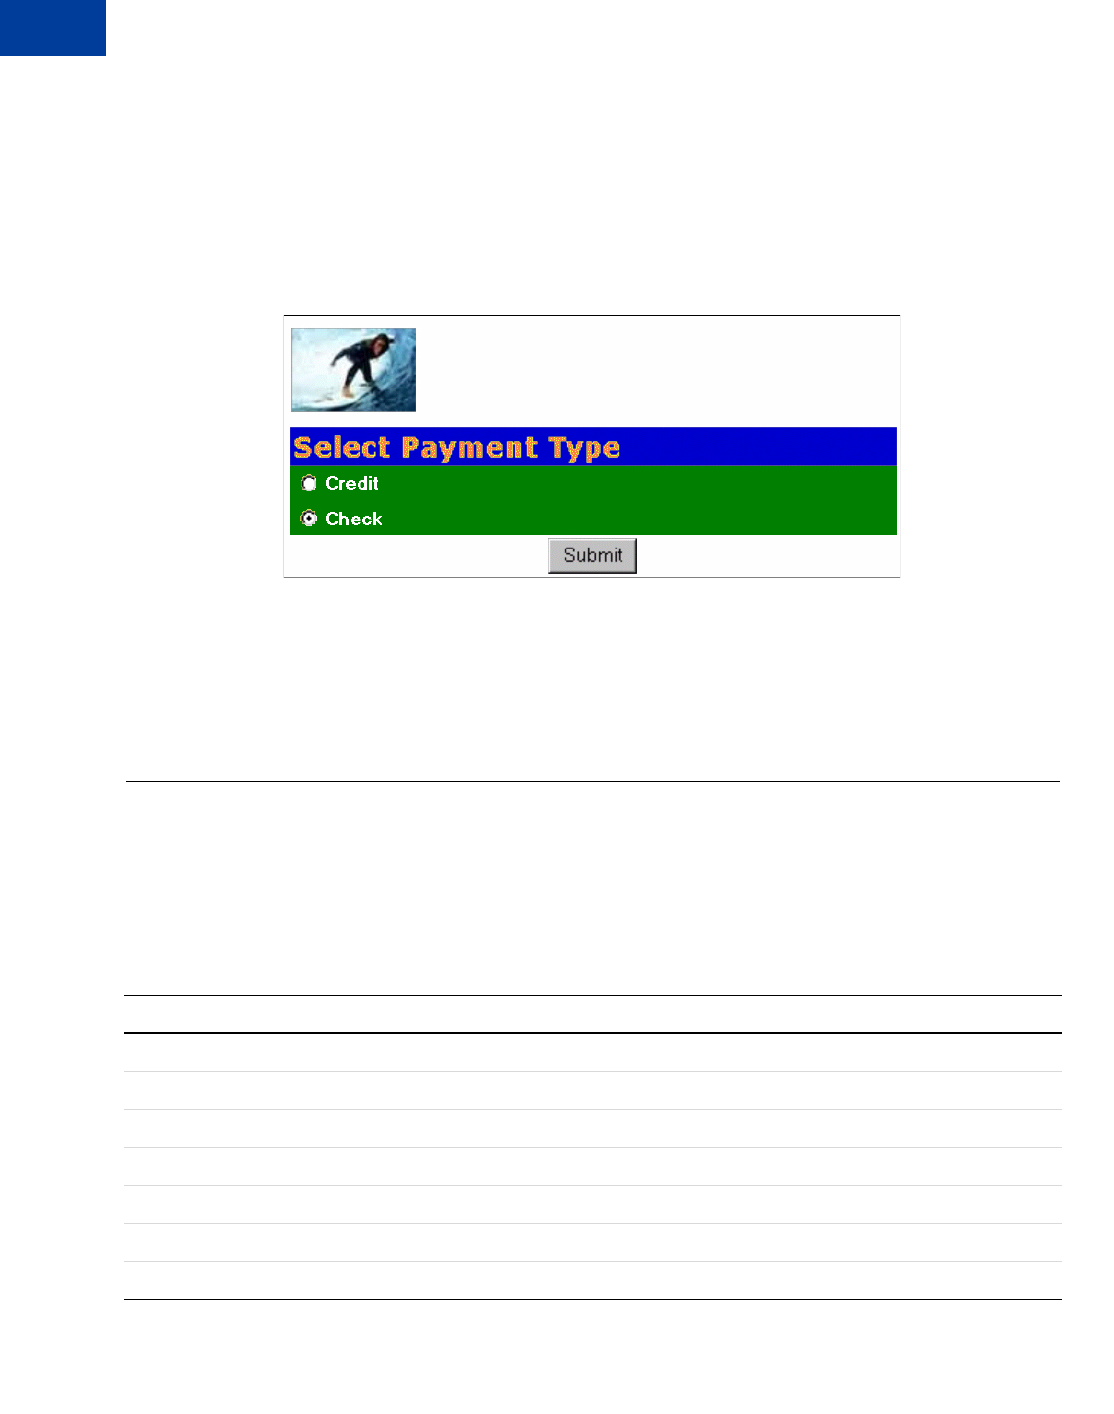
Integrating TeleCheck Transactions
Data That You Must Post if You Do Not Use Payflow Link’s Order Form
11
46 Payflow Link Fraud Protection Services User’s Guide
Enabling Customers to Specify the Payment Method
If your Web site is structured to accept both checks and credit cards, then, by default, your
customers will see the Select Payment Type page to enable them to specify the method of
payment.
FIGURE 11.1Select Payment Type page
To hide the page
You can specify that the Payflow Link server should not display the page by specifying that
the method of payment is TeleCheck. Include the following line in your HTML code:
<input type="hidden" name="METHOD" value="ECHECK">
Data That You Must Post if You Do Not Use Payflow Link’s Order
Form
To use your custom order forms rather that the PayPal-hosted forms, set ORDERFORM to
False and Post the following name/value pairs to the Payflow Link server:
TABLE 11.1 Transaction data required if ORDERFORM=False
Field Name Description Max Length
ADDRESS Billing address. 60
CHECKNUM Check number. 11
CITY Billing city. 32
DLNUM Driver’s License Number. This value is required. 33
EMAIL Billing email address. 40
LOGIN The login name that you chose while enrolling for your Payflow account.
METHOD Method of customer payment. Enter ECHECK for electronic check.

Payflow Link Fraud Protection Services User’s Guide 47
Integrating TeleCheck Transactions
Transaction Results Returned for TeleCheck Transactions 11
Transaction Results Returned for TeleCheck Transactions
The HOSTCODE parameter returns the following six-digit code values:
NOTE:For more information on other returned values, see Appendix B, “Submitting
Transaction Data to the Payflow Link Server.”
For more information on TeleCheck responses, see the TeleCheck Web site at
http://www.telecheck.com/ica/ica.html
MICR MICR number of the check. The string appears at the bottom of the check. 31
NAME Billing name. 60
PARTNER The name of your Partner was provided to you by your PayPal Reseller.
PHONE Billing phone. 20
STATE Billing state. 20
STATEOFDL Driver’s license state (two-letter abbreviation). This value is required. 3
TYPEOFCHECK Type of check (P = Personal, B = Business). P is the default.
ZIP Billing ZIP code. 10
TABLE 11.2 Values returned by HOSTCODE
Code Description Status
000800 Sale Approved Direct Check Sale/ECA approved
000801 Sale Approved Direct Check Sale approved (no ECA)
000802 Sale Approved Direct Check Sale/ECA approved no guarantee
000803 Sale Approved Direct Check Sale approved no ECA no guarantee
000804 Check Declined Direct Check Sale declined negative data
000805 Check Declined Direct Check Sale Decline Scoring
000807 Check Failure Direct Check Sale Check Failed
TABLE 11.1 Transaction data required if ORDERFORM=False(Continued)
Field Name Description Max Length

Integrating TeleCheck Transactions
Testing TeleCheck Transactions
11
48 Payflow Link Fraud Protection Services User’s Guide
Testing TeleCheck Transactions
Use the following test data to test TeleCheck transactions:
TABLE 11.3 Test TeleCheck transaction data
Bank (MICR) Number Check No. Resulting HOSTCODE Value
1234567804390850001001 1001 0800 — Check Approved ECA
1234567804390850011001 1001 0801 — Check Approved No ECA
1234567804390850021001 1001 0802 — Check Approved ECA, No Guarantee
1234567804390850031001 1001 0803 — Check Approved No ECA, No Guarantee
1234567804390850041001 1001 0804 — Check Decline Negative Data
1234567804390850051001 1001 0805 — Check Decline Scoring
1234567804390850071001 1001 0807 — Check Failed

Payflow Link Fraud Protection Services User’s Guide 49
ATransaction Responses
When a transaction is completed, PayPal returns transaction response information. PayPal
Manager displays transaction responses on the following pages:
zPerform Transaction Results page, returned whenever you complete a transaction using the
Perform Transaction tab.
zReport pages
zTransaction Detail page, which you can access using the search utilities or by clicking the
Transaction ID on most report pages
For details on these pages, refer to PayPal Manager online help.
RESULT Codes and RESPMSG Values
RESULT is the first value returned in the PayPal server response string. The value of the
RESULT parameter indicates the overall status of the transaction attempt.
zA value of 0 (zero) indicates that no errors occurred and the transaction was approved.
zA value less than zero indicates that a communication error occurred. In this case, no
transaction is attempted.
zA value greater than zero indicates a decline or error.
The response message (RESPMSG) provides a brief description for decline or error results.

Transaction Responses
RESULT Codes and RESPMSG Values
A
50 Payflow Link Fraud Protection Services User’s Guide
RESULT Values for Transaction Declines or Errors
For non-zero Results, the response string includes a RESPMSG name/value pair. The exact
wording of the RESPMSG (shown in bold) may vary. Sometimes a colon appears after the
initial RESPMSG followed by more detailed information.
TABLE A.1 Payflow transaction RESULT values and RESPMSG text
RESULT RESPMSG and Explanation
0Approved
1User authentication failed. Error is caused by one or more of the following:
zLogin information is incorrect. Verify that USER, VENDOR, PARTNER, and
PASSWORD have been entered correctly. VENDOR is your merchant ID and
USER is the same as VENDOR unless you created a Payflow Pro user. All fields
are case sensitive.
zInvalid Processor information entered. Contact merchant bank to verify.
z"Allowed IP Address" security feature implemented. The transaction is coming
from an unknown IP address. See PayPal Manager online help for details on how to
use Manager to update the allowed IP addresses.
zYou are using a test (not active) account to submit a transaction to the live PayPal
servers. Change the host address from the test server URL to the live server URL.
2Invalid tender type. Your merchant bank account does not support the following
credit card type that was submitted.
3Invalid transaction type. Transaction type is not appropriate for this transaction. For
example, you cannot credit an authorization-only transaction.
4Invalid amount format. Use the format: “#####.##” Do not include currency
symbols or commas.
5Invalid merchant information. Processor does not recognize your merchant account
information. Contact your bank account acquirer to resolve this problem.
6Invalid or unsupported currency code
7Field format error. Invalid information entered. See RESPMSG.
8Not a transaction server
9Too many parameters or invalid stream
10 Too many line items
11 Client time-out waiting for response
12 Declined. Check the credit card number, expiration date, and transaction information to
make sure they were entered correctly. If this does not resolve the problem, have the
customer call their card issuing bank to resolve.

Payflow Link Fraud Protection Services User’s Guide 51
Transaction Responses
RESULT Codes and RESPMSG Values A
13 Referral. Transaction cannot be approved electronically but can be approved with a
verbal authorization. Contact your merchant bank to obtain an authorization and submit
a manual Voice Authorization transaction.
14 Invalid Client Certification ID. Check the HTTP header. If the tag, X-VPS-VIT-
CLIENT-CERTIFICATION-ID, is missing, RESULT code 14 is returned.
19 Original transaction ID not found. The transaction ID you entered for this
transaction is not valid. See RESPMSG.
20 Cannot find the customer reference number
22 Invalid ABA number
23 Invalid account number. Check credit card number and re-submit.
24 Invalid expiration date. Check and re-submit.
25 Invalid Host Mapping. Error is caused by one or more of the following:
zYou are trying to process a tender type such as Discover Card, but you are not set up
with your merchant bank to accept this card type.
zYou are trying to process an Express Checkout transaction when your account is not
set up to do so. Contact your account holder to have Express Checkout added to
your account.
26 Invalid vendor account. Login information is incorrect. Verify that USER, VENDOR,
PARTNER, and PASSWORD have been entered correctly. VENDOR is your merchant
ID and USER is the same as VENDOR unless you created a Payflow Pro user. All
fields are case sensitive.
27 Insufficient partner permissions
28 Insufficient user permissions
29 Invalid XML document. This could be caused by an unrecognized XML tag or a bad
XML format that cannot be parsed by the system.
30 Duplicate transaction
31 Error in adding the recurring profile
32 Error in modifying the recurring profile
33 Error in canceling the recurring profile
34 Error in forcing the recurring profile
35 Error in reactivating the recurring profile
36 OLTP Transaction failed
37 Invalid recurring profile ID
TABLE A.1 Payflow transaction RESULT values and RESPMSG text (Continued)
RESULT RESPMSG and Explanation

Transaction Responses
RESULT Codes and RESPMSG Values
A
52 Payflow Link Fraud Protection Services User’s Guide
50 Insufficient funds available in account
51 Exceeds per transaction limit
99 General error. See RESPMSG.
100 Transaction type not supported by host
101 Time-out value too small
102 Processor not available
103 Error reading response from host
104 Timeout waiting for processor response. Try your transaction again.
105 Credit error. Make sure you have not already credited this transaction, or that this
transaction ID is for a creditable transaction. (For example, you cannot credit an
authorization.)
106 Host not available
107 Duplicate suppression time-out
108 Void error. See RESPMSG. Make sure the transaction ID entered has not already been
voided. If not, then look at the Transaction Detail screen for this transaction to see if it
has settled. (The Batch field is set to a number greater than zero if the transaction has
been settled). If the transaction has already settled, your only recourse is a reversal
(credit a payment or submit a payment for a credit).
109 Time-out waiting for host response
110 Referenced auth (against order) Error
111 Capture error. Either an attempt to capture a transaction that is not an authorization
transaction type, or an attempt to capture an authorization transaction that has already
been captured.
112 Failed AVS check. Address and ZIP code do not match. An authorization may still
exist on the cardholder’s account.
113 Merchant sale total will exceed the sales cap with current transaction. ACH
transactions only.
114 Card Security Code (CSC) Mismatch. An authorization may still exist on the
cardholder’s account.
115 System busy, try again later
116 VPS Internal error. Failed to lock terminal number
TABLE A.1 Payflow transaction RESULT values and RESPMSG text (Continued)
RESULT RESPMSG and Explanation

Payflow Link Fraud Protection Services User’s Guide 53
Transaction Responses
RESULT Codes and RESPMSG Values A
117 Failed merchant rule check. One or more of the following three failures occurred:
An attempt was made to submit a transaction that failed to meet the security settings
specified on the PayPal Manager Security Settings page. If the transaction exceeded the
Maximum Amount security setting, then no values are returned for AVS or CSC.
AVS validation failed. The AVS return value should appear in the RESPMSG.
CSC validation failed. The CSC return value should appear in the RESPMSG.
118 Invalid keywords found in string fields
119 General failure within PIM Adapter
120 Attempt to reference a failed transaction
121 Not enabled for feature
122 Merchant sale total will exceed the credit cap with current transaction. ACH
transactions only.
125 Fraud Protection Services Filter — Declined by filters
126 Fraud Protection Services Filter — Flagged for review by filters
Important Note: Result code 126 indicates that a transaction triggered a fraud filter.
This is not an error, but a notice that the transaction is in a review status. The
transaction has been authorized but requires you to review and to manually accept the
transaction before it will be allowed to settle.
Result code 126 is intended to give you an idea of the kind of transaction that is
considered suspicious to enable you to evaluate whether you can benefit from using the
Fraud Protection Services.
To eliminate result 126, turn the filters off.
For more information, see the Fraud Protection Services documentation for your
payments solution. It is available on the PayPal Manager Documentation page.
127 Fraud Protection Services Filter — Not processed by filters
128 Fraud Protection Services Filter — Declined by merchant after being flagged for
review by filters
131 Version 1 Payflow Pro SDK client no longer supported. Upgrade to the most recent
version of the Payflow Pro client.
132 Card has not been submitted for update
133 Data mismatch in HTTP retry request
150 Issuing bank timed out
151 Issuing bank unavailable
200 Reauth error
201 Order error
TABLE A.1 Payflow transaction RESULT values and RESPMSG text (Continued)
RESULT RESPMSG and Explanation

Transaction Responses
RESULT Codes and RESPMSG Values
A
54 Payflow Link Fraud Protection Services User’s Guide
402 PIM Adapter Unavailable
403 PIM Adapter stream error
404 PIM Adapter Timeout
600 Cybercash Batch Error
601 Cybercash Query Error
1000 Generic host error. This is a generic message returned by your credit card processor.
The RESPMSG will contain more information describing the error.
1001 Buyer Authentication Service unavailable
1002 Buyer Authentication Service — Transaction timeout
1003 Buyer Authentication Service — Invalid client version
1004 Buyer Authentication Service — Invalid timeout value
1011 Buyer Authentication Service unavailable
1012 Buyer Authentication Service unavailable
1013 Buyer Authentication Service unavailable
1014 Buyer Authentication Service — Merchant is not enrolled for Buyer
Authentication Service (3-D Secure).
1016 Buyer Authentication Service — 3-D Secure error response received. Instead of
receiving a PARes response to a Validate Authentication transaction, an error response
was received.
1017 Buyer Authentication Service — 3-D Secure error response is invalid. An error
response is received and the response is not well formed for a Validate Authentication
transaction.
1021 Buyer Authentication Service — Invalid card type
1022 Buyer Authentication Service — Invalid or missing currency code
1023 Buyer Authentication Service — merchant status for 3D secure is invalid
1041 Buyer Authentication Service — Validate Authentication failed: missing or
invalid PARES
1042 Buyer Authentication Service — Validate Authentication failed: PARES format is
invalid
1043 Buyer Authentication Service — Validate Authentication failed: Cannot find
successful Verify Enrollment
TABLE A.1 Payflow transaction RESULT values and RESPMSG text (Continued)
RESULT RESPMSG and Explanation

Payflow Link Fraud Protection Services User’s Guide 55
Transaction Responses
RESULT Codes and RESPMSG Values A
RESULT Values for Communications Errors
A RESULT value less than zero indicates that a communication error occurred. In this case, no
transaction is attempted.
A value of -1 or -2 usually indicates a configuration error caused by an incorrect URL or by
configuration issues with your firewall. A value of -1 or -2 can also be possible if the PayPal
servers are unavailable, or an incorrect server/socket pair has been specified. A value of -1 can
also result when there are internet connectivity errors. Contact customer support regarding any
other errors.
1044 Buyer Authentication Service — Validate Authentication failed: Signature
validation failed for PARES
1045 Buyer Authentication Service — Validate Authentication failed: Mismatched or
invalid amount in PARES
1046 Buyer Authentication Service — Validate Authentication failed: Mismatched or
invalid acquirer in PARES
1047 Buyer Authentication Service — Validate Authentication failed: Mismatched or
invalid Merchant ID in PARES
1048 Buyer Authentication Service — Validate Authentication failed: Mismatched or
invalid card number in PARES
1049 Buyer Authentication Service — Validate Authentication failed: Mismatched or
invalid currency code in PARES
1050 Buyer Authentication Service — Validate Authentication failed: Mismatched or
invalid XID in PARES
1051 Buyer Authentication Service — Validate Authentication failed: Mismatched or
invalid order date in PARES
1052 Buyer Authentication Service — Validate Authentication failed: This PARES was
already validated for a previous Validate Authentication transaction
TABLE A.2 RESULT values for communications errors
RESULT Description
-1 Failed to connect to host
-2 Failed to resolve hostname
-5 Failed to initialize SSL context
TABLE A.1 Payflow transaction RESULT values and RESPMSG text (Continued)
RESULT RESPMSG and Explanation

Transaction Responses
RESULT Codes and RESPMSG Values
A
56 Payflow Link Fraud Protection Services User’s Guide
-6 Parameter list format error: & in name
-7 Parameter list format error: invalid [ ] name length clause
-8 SSL failed to connect to host
-9 SSL read failed
-10 SSL write failed
-11 Proxy authorization failed
-12 Timeout waiting for response
-13 Select failure
-14 Too many connections
-15 Failed to set socket options
-20 Proxy read failed
-21 Proxy write failed
-22 Failed to initialize SSL certificate
-23 Host address not specified
-24 Invalid transaction type
-25 Failed to create a socket
-26 Failed to initialize socket layer
-27 Parameter list format error: invalid [ ] name length clause
-28 Parameter list format error: name
-29 Failed to initialize SSL connection
-30 Invalid timeout value
-31 The certificate chain did not validate, no local certificate found
-32 The certificate chain did not validate, common name did not match URL
- 40 Unexpected Request ID found in request.
- 41 Required Request ID not found in request
-99 Out of memory
-100 Parameter list cannot be empty
-103 Context initialization failed
TABLE A.2 RESULT values for communications errors(Continued)
RESULT Description

Payflow Link Fraud Protection Services User’s Guide 57
Transaction Responses
RESULT Codes and RESPMSG Values A
-104 Unexpected transaction state
-105 Invalid name value pair request
-106 Invalid response format
-107 This XMLPay version is not supported
-108 The server certificate chain did not validate
-109 Unable to do logging
-111 The following error occurred while initializing from message file: <Details of
the error message>
-113 Unable to round and truncate the currency value simultaneously
TABLE A.2 RESULT values for communications errors(Continued)
RESULT Description

Transaction Responses
RESULT Codes and RESPMSG Values
A
58 Payflow Link Fraud Protection Services User’s Guide
AVS Result Codes
IMPORTANT:The AVS result is for advice only. Banks do not decline transactions based on
the AVS result—you make the decision to approve or decline each transaction.
You must manually check the results of each manual transaction to view its
AVS result and to act on it appropriately.
AVS does not operate for manual transactions.
For US cardholders, the Address Verification Service (AVS) compares the submitted street
address and zip code with the values on file at the cardholder’s bank. (AVS is supported by
most US banks and by some International banks.)
The International AVS response (IAVS) indicates whether AVS response is international (Y),
USA (N), or cannot be determined (X). Payflow Pro client version 3.06 or later is required.
Processors that Support AVS
PayPal supports the AVS services as listed in the table below.
TABLE A.3 Processing platforms supporting AVS
Processing Platform
American
Express Discover MasterCard Visa
American Express Phoenix X — — —
American Express Brighton X — — —
FDMS Nashville X X X X
FDMS North X X X X
FDMS South X X X X
Global Payments Central X X X X
Global Payments East X X X X
Merchant e-Solutions X X X X
Elavon (formerly Nova) X X X X
Paymentech Salem (New
Hampshire) X X X X
Paymentech Tampa X X X X
TSYS Acquiring Solutions
(formerly Vital Processing
Services)
X X X X

Payflow Link Fraud Protection Services User’s Guide 59
Transaction Responses
AVS Results A
AVS Results
Any one of the following results can appear in the AVS Street Match and AVS ZIP Match
fields on the Transaction Detail page:
NOTE:Results can vary on the same Transaction Detail page. In other words, AVS Street
Match = Y and AVS ZIP Match = N (and vice versa) could appear on the same
Transaction Detail page. Also note that sometimes when service is unavailable, no
code at all will be returned.
Card Security Code Result Codes
The card security code is a 3- or 4-digit number (not part of the credit card number) that
appears on the credit card. Because the card security code appears only on the card and not on
receipts or statements, the card security code provides some assurance that the physical card is
in the possession of the buyer.
NOTE:This fraud prevention tool has various names, depending on the card type. Visa calls it
CVV2 and MasterCard calls it CVC2. To ensure that your customers see a consistent
name, PayPal recommends use of the term card security code on all end-user materials.
NOTE:Check with your acquiring bank to determine whether they support Card Security Code
validation.
On most cards, the card security code appears on the back of the card (usually in the signature
field). All or part of the card number appears before the card security code (567 in the
example). For American Express, the 4-digit number (1122 in the example) is printed on the
front of the card, above and to the right of the embossed account number.
TABLE A.4 AVS Result Codes
Result Meaning
YInformation submitted matches information on file with cardholder's bank.
NInformation submitted does not match information on file with the cardholder's
bank.
XCardholder's bank does not support AVS checking for this information.

Transaction Responses
Card Security Code Result Codes
A
60 Payflow Link Fraud Protection Services User’s Guide
FIGURE A.1 Credit card security code locations
Card Security Code Results
If you submit the transaction request parameter for card security code (that is, the CVV2
parameter), the cardholder’s bank returns a Yes/No/ response in the CVV2MATCH response
parameter, as per the table below.
Card security code results vary depending on your processing platform, as described in the
table below.
TABLE A.5 CVV2MATCH response values
CVV2MATCH Value Description
YThe submitted value matches the data on file for the card.
NThe submitted value does not match the data on file for the card.
XThe cardholder’s bank does not support this service.
TABLE A.6 Card security code results
Processing Platform Results
American Express Phoenix
Global Payments – East
Global Payments – Central
Merchant e-Solutions
Nova
Vital
Card security code mismatches may cause a non-approved result
(RESULT = 112 or 114) in some cases. In other cases, the
transaction may be approved despite the card security code
mismatch.
The match or mismatch information is indicated in the
CVV2MATCH value.
FDMS Nashville
FDMS South
Paymentech New Hampshire
Paymentech Tampa
Transactions that have card security code mismatches can come
back as an approved transaction (RESULT = 0).
The match or mismatch information is indicated in the
CVV2MATCH value.
As with AVS, if the Authorization was successful, you must make
a decision based on the CVV2MATCH value whether or not to
proceed with the order.

Payflow Link Fraud Protection Services User’s Guide 61
Transaction Responses
Card Security Code Result Codes A
Processors and Credit Cards Supporting Card Security Code
PayPal supports card security code validation as listed in the table below.
American Express Card Security Code Enhancements
American Express recommends that you include the following information in your
transactions to enhance their ability to detect fraud.
TABLE A.7 Processing platforms supporting card security code
Processing Platform
American
Express Discover MasterCard Visa Switch/Solo
Maestro
American Express Phoenix X — — — —
American Express Brighton X — — — —
FDMS Nashville — X X X —
FDMS North X X X X —
FDMS South X X X X —
Global Payments Central X X X X —
Global Payments East X X X X —
Merchant e-Solutions X X X X —
Elevon (formerly Nova) — X X X —
Paymentech Salem (New
Hampshire) X X X X X
Paymentech Tampa X X X X —
TSYS Acquiring Solutions
(formerly Vital Processing
Services)
X X X X —
TABLE A.8 Processing platforms supporting card security code
Processing Platform
American
Express JCB Diners MasteCard Visa
American Express APAC X — — — —
Citibank Singapore (CSIN) — — — — —
First Data International (FDI) X X X X X

Transaction Responses
Card Security Code Result Codes
A
62 Payflow Link Fraud Protection Services User’s Guide
Card-Not-Present Environment
In a card-not-present environment, American Express recommends that you include the
following information in your authorization message:
zCard member billing name
zShipping information (SHIPTO* parameters) such as:
–Address
–Name
– Shipping method
zCustomer information such as:
– Email address
– IP address
–Host name
– Browser type
zOrder information (such as product SKU)
Card-Present Environment
In a card-present environment, American Express recommends that you include track 1
magnetic stripe data. The stripe includes additional data elements that increase their ability to
detect fraud when a card is swiped.

Payflow Link Fraud Protection Services User’s Guide 63
BSubmitting Transaction Data to
the Payflow Link Server
This chapter is intended for merchants with intermediate or advanced HTML knowledge or
Web development skills. It describes the options you have for sending transaction data to the
Payflow Link server.
This chapter also describes the transaction parameters that you can send to the Payflow Link
server and the data that you can choose to have returned to your Web site when a transaction is
complete.
In This Chapter
z“About PayPal’s Transaction Database” on page 63
z“Collecting Customer Transaction Data, Option 1” on page 64
z“Collecting Customer Transaction Data, Option 2” on page 66
z“Optional Transaction Data” on page 68
z“Returning Data to Your Web Site” on page 70
z“Data Returned by the Post and Silent Post Features” on page 72
z“Parameters That Specify Payflow Link Operation” on page 75
About PayPal’s Transaction Database
All of the transaction data submitted to the Payflow Link server—whether the source is the
Payflow Link Order form or your Web page—is stored in PayPal’s transaction database. You
can search for particular transaction data using the search tools available on the PayPal
Manager.
Some transaction parameters are intended to enable you to retain session information and
other temporary data—these values are not stored in the database. See “Retaining Session
Data and other Temporary Information” on page 71.

Submitting Transaction Data to the Payflow Link Server
Collecting Customer Transaction Data, Option 1
B
64 Payflow Link Fraud Protection Services User’s Guide
Collecting Customer Transaction Data, Option 1
Using the Payflow Link Order Form
You can use the Payflow Link Order form to collect transaction data from the customer. This
default configuration is described in Chapter 5, “Integrating Your Web Site with Payflow Link
(Basic Integration).” This configuration minimizes the data that you must collect at your site
and pass to PayPal.
NOTE:One significant benefit of using this configuration is that you do not have to invest in
the security infrastructure required to accept account information (credit card number
and expiration date) at your site—PayPal performs the secure transfer of this data.
You specify the fields that appear on the Order form by selecting them in the Configuration
page.
For this case, the minimum set of data that you must Post to Payflow Link is described in
“Data That You Must Pass if You Use Payflow Link’s Order Form” on page 65. In addition,
you can pass any of the data described in “Optional Transaction Data” on page 68.
Pre-populating Order Form Fields
To improve your customer’s experience, you may wish to populate the Order form with
information that your site has already collected. You can pre-populate any Order form field by
using the HTML Post method to send the associated name/value pair to the Payflow Link
server. In this example, you populate the Total Amount (a required value), Name, Address,
and City fields:
<form method="POST" action="https://payflowlink.paypal.com">
<input type="hidden" name="LOGIN" value="BeachBums">
<input type="hidden" name="PARTNER" value="reseller_name">
<input type="hidden" name="TYPE" value="S">
<input type="hidden" name="AMOUNT" value="12.00">
<input type="hidden" name="NAME" value="Tina Johnson">
<input type="hidden" name="ADDRESS" value="123 Main St.">
<input type="hidden" name="CITY" value="Tahoma">
<input type="submit" value="Buy">
</form>
As a result, the values appear in the Order form (the card number and expiration date values
were collected by the Credit Card Information page):

Payflow Link Fraud Protection Services User’s Guide 65
Submitting Transaction Data to the Payflow Link Server
Collecting Customer Transaction Data, Option 1 B
FIGURE B.1 Order form with values
Data That You Must Pass if You Use Payflow Link’s Order Form
In “Example of a Simple Integration” on page 23, we discussed the minimum data set required
by Payflow Link if you use Payflow Link’s Order form to collect transaction information from
the customer. Table B.1 lists the minimum data set.
You have the option to turn off the Confirmation page by setting SHOWCONFIRM=False.
The Confirmation page enables the customer to confirm the transaction information before
submitting the transaction. The page appears after the customer submits the Order form.
IMPORTANT:Parameter names are case-sensitive and must be typed exactly as shown.
Incorrectly specified parameter values are ignored.

Submitting Transaction Data to the Payflow Link Server
Collecting Customer Transaction Data, Option 2
B
66 Payflow Link Fraud Protection Services User’s Guide
Collecting Customer Transaction Data, Option 2
Collecting Data on Your Web Page and Posting to the Payflow Link Server
You can bypass the Payflow Link forms by collecting all transaction data on your Web page
and passing it directly to the Payflow Link server. (A simple version of this option appears in
“Example of a Custom Integration” on page 25.) In this case, you:
1. Turn off the Payflow Link Order form and collect the transaction data at your Web site.
Optionally, you can also turn off the Confirmation page.
2. Post all transaction data to the Payflow Link server.
If you pass both the credit card number and expiration date, then the Credit Card
Information page does not appear. The required Payflow Link Receipt page still appears
when the transaction is complete.
The minimum set of data that you must Post to Payflow Link is described in Table B.2 on
page 67. In addition, you can pass any of the data described in “Optional Transaction Data”
on page 68.
TABLE B.1 Transaction data required for all Payflow Link transactions
Field Name Description Max Length
LOGIN The login name that you chose while enrolling for your Payflow
account.
PARTNER The name of your Partner was provided to you by your Reseller.
AMOUNT The total amount of the transaction.
Decimal number with two decimal places. Amount must be greater
than 1.00.
This value appears on PayPal Manager reports, on the Transaction
Confirmation page, on the Receipt page, and in email receipts to
both merchant and customer.
TYPE Transaction type: S for Sale or A for Authorization. For more
information, see “Payflow Link Transaction Types” on page 81.1

Payflow Link Fraud Protection Services User’s Guide 67
Submitting Transaction Data to the Payflow Link Server
Collecting Customer Transaction Data, Option 2 B
Data That You Must Post if You do not use Payflow Link’s Order Form
If you turn off Payflow Link’s Order form by setting ORDERFORM=False, the customer
must enter all transaction data at your Web site. Because the Order form does not collect the
transaction data, you must Post the data listed in Table B.2 to the Payflow Link server.
You also have the option to turn off Payflow Link’s Confirmation form by setting
SHOWCONFIRM=False. The Confirmation page enables the customer to confirm the
transaction information before submitting the transaction. The page appears after the customer
submits the Order form.
IMPORTANT:Parameter names are case-sensitive and must be typed exactly as shown.
Incorrectly specified parameter values are ignored.
If you plan to collect credit card information on your site and pass it to
PayPal over the Internet, you should use a secure server to ensure secure
transfer of this data.
TABLE B.2 Transaction data required if ORDERFORM=False
Field Name Description Max Length
ADDRESS Billing address. 60
CARDNUM Credit card number.
Numeric only. No spaces or dashes.
31
CITY Billing city. 32
EXPDATE Credit card’s expiration date.
Valid formats are: mmyy, mmyyyy, mm<separator>yy, and
mm<separator>yyyy.
You can use either backslash or period as the
separator (\ .)
7
LOGIN The login name that you chose while enrolling for your Payflow account.
PARTNER The name of your Partner was provided to you by your Reseller.
AMOUNT The total amount of the transaction.
Decimal number with two decimal places. Amount must be greater than 1.00.
This value appears on PayPal Manager reports, on the Transaction Confirmation
page, on the Receipt page, and in email receipts to merchant and customer.
TYPE Transaction type.
S for Sale or A for Authorization. See “Payflow Link Transaction Types” on
page 81.
1
METHOD Method of customer payment.
C or CC for credit card.
ECHECK for electronic check.
P for Express Checkout.

Submitting Transaction Data to the Payflow Link Server
Optional Transaction Data
B
68 Payflow Link Fraud Protection Services User’s Guide
Optional Transaction Data
For any transaction, you can pass the optional parameters listed in Table B.3 to the Payflow
Link server. You can also return any of these values to your Web server using the Return Post
or Silent Post method.
If you use the Payflow Link Order form, then the values that you send are populated into the
form (if the associated field appears on the form).
If you turned off the Payflow Link Order form, then some of these values are required, as
noted in the table.
NOTE:A different set of optional parameters is used to configure Payflow Link operation. See
“Parameters That Specify Payflow Link Operation” on page 75.
ZIP Billing ZIP (postal) code. 10
TABLE B.3 Optional parameters
Field Name Description Max Length
ADDRESS Billing address.
Required if you use the AVS feature. Required if you turn off the
Payflow Link Order form.
60
ADDRESSTOSHIP Shipping address. 120
CARDNUM Credit card number. Numeric only. No spaces or dashes.
Appears as Account # in PayPal Manager reports.
Required if you turn off the Payflow Link Order form.
31
CITY Billing city.
Required if you turn off the Payflow Link Order form.
32
CITYTOSHIP Shipping city. 32
COUNTRY Billing country. 4
COUNTRYCODE Shipping country. 4
COMMENT1 and
COMMENT2 Use these parameters to pass information that appears in the PayPal
Manager Custom Report. String type.
These values are not returned by the Post or Silent Post features.
255
CSC Card Security Code. String type. Required if you use the card security
code feature. 3 or 4
TABLE B.2 Transaction data required if ORDERFORM=False(Continued)
Field Name Description Max Length

Payflow Link Fraud Protection Services User’s Guide 69
Submitting Transaction Data to the Payflow Link Server
Optional Transaction Data B
CUSTID This string type parameter is intended to temporarily store data that you
specify (for example, a number or text name that you use to identify the
customer). This parameter enables you to return the value to your Web
server by using the Post or Silent Post feature.
Note: CUSTID is not stored in PayPal’s transaction database.
11
DESCRIPTION Your (merchant’s) description of the transaction. String type.
Displayed on the Transaction Confirmation page and in email receipts to
both merchant and customer.
255
DLNUM Driver’s License Number.
TeleCheck transactions only.
33
EMAIL Billing email address. 40
EMAILTOSHIP Shipping email address. 40
EXPDATE Account expiration date. For cards that do not use an expiration date,
use the issuing date plus ten years.
Required if you turn off the Payflow Link Order form.
Valid formats are: mmyy, mmyyyy, mm<separator>yy, and
mm<separator>yyyy.
You can use any of the following separators: \ / . -
7
FAX Billing fax number. 20
FAXTOSHIP Shipping fax number. 20
INVOICE Invoice number. If passed, the value is displayed on the Order form.
Displayed as INV NUM on the Custom Report. Alphanumeric string
type.
Displayed on the Transaction Confirmation page and in email receipts to
both merchant and customer.
Returned to your storefront if you implement either the Post or Silent
Post feature.
9
METHOD Method of customer payment. C or CC for credit card. ECHECK for
electronic check.
Required if you turn off the Payflow Link Order form
(ORDERFORM=False).
The default METHOD is CC when ORDERFORM=True (the default
setting for ORDERFORM).
NAME Billing name. 60
NAMETOSHIP Shipping name. 60
PHONE Billing phone. 20
PHONETOSHIP Shipping phone. 20
TABLE B.3 Optional parameters(Continued)
Field Name Description Max Length

Submitting Transaction Data to the Payflow Link Server
Returning Data to Your Web Site
B
70 Payflow Link Fraud Protection Services User’s Guide
Returning Data to Your Web Site
You can use the Post or Silent Post feature to configure the Payflow Link server to send
transaction data to a URL that you specify. These “behind the scenes” HTTP Post operations
deliver information that you can use for purposes such as keeping a log of transactions or
updating a database.
You must create a CGI or ASP script to capture the Posted information. For outbound Post
processes, Payflow Link servers support only port 80 for HTTP and port 443 for HTTPS.
NOTE:PayPal recommends that you use PayPal Manager reports to verify each order and the
dollar amount of each transaction when using the Silent Post and Forced Silent Post
features.
If you enable Post or Silent Post, then, for each completed transaction, PayPal sends a
response string made up of name/value pairs. The values are a combination of the results of
your transaction request and the original transaction data that was submitted. This example is a
response to a credit card Sale transaction request:
PONUM Purchase Order number. This alphanumeric string value cannot include
spaces. 25
SHIPAMOUNT The cost of shipping. Decimal number with two decimal places.
STATE Billing state. 20
STATETOSHIP Shipping state. 20
TAX The amount of tax on a transaction. 12
USER1
through
USER10
These ten string type parameters are intended to store temporary data
(for example, variables, session IDs, order numbers, and so on). These
parameters enable you to return the values to your server by using the
Post or Silent Post feature.
Note: USER1 through USER10 are not displayed to the customer and
are not stored in the PayPal transaction database.
255
ZIP Billing ZIP (postal) code.
Required if you use the AVS feature. Required if you turn off the
Payflow Link Order form.
10
ZIPTOSHIP Shipping ZIP (postal) code. 10
TABLE B.3 Optional parameters(Continued)
Field Name Description Max Length

Payflow Link Fraud Protection Services User’s Guide 71
Submitting Transaction Data to the Payflow Link Server
Returning Data to Your Web Site B
RESULT=0&AUTHCODE=010101&RESPMSG=Approved&AVSDATA=YNY&PNREF=V63F28770576&HO
STCODE=&INVOICE=3452345&AMOUNT=117.03&TAX=&METHOD=CC&TYPE=S&DESCRIPTION=1+f
elt+hat%2C+Model+FC&CUSTID=NT1000&NAME=Nancy+Thompson&ADDRESS=1428+Elm+Stre
et&CITY=Springwood&STATE=CA&ZIP=66666&COUNTRY=USA&PHONE=121-325-
4253&FAX=&EMAIL=nthompson@buyalot.com&USER1=User1+value&USER2=&USER3=&USER4
=&USER5=&USER6=&USER7=&USER8=&USER9=&USER10=&NAMETOSHIP=Nancy+Thompson&ADDR
ESSTOSHIP=1428+Elm+Street&CITYTOSHIP=Springwood&STATETOSHIP=&ZIPTOSHIP=6666
6&COUNTRYCODE=USA&PHONETOSHIP=121-325-
4253&FAXTOSHIP=&EMAILTOSHIP=&CSCMATCH=Y
The full list of returned data is described in “Data Returned by the Post and Silent Post
Features” on page 72.
Retaining Session Data and other Temporary Information
Because the customer’s browser is redirected to the Payflow Link pages to collect transaction
information, your Web server loses session information. PayPal provides parameters (USER1
through USER10 and CUSTID) that enable you to store such temporary information and
retrieve it when the Payflow Link server returns the results of the transaction and the customer
returns to your Web site.
If you submit values for these parameters in the transaction request, then, when the Payflow
Link server posts the transaction response back to your site, the response text echoes the
values that you submitted with the transaction. You can use User1 through User10 to store
variables, session IDs, order numbers, and so on. In addition, you might use the CUSTID
parameter to store a text name that identifies the customer, for example.
NOTE:These values are intended to hold temporary data and are not stored in PayPal’s
transaction database.
Specifying How Data is Returned to Your Web Site
You have the following options for returning transaction data to your Web site.
Post
The Post feature returns data using the HTML Post method when the customer clicks the
Continue button on the Receipt page.
You receive posted information only on approved transactions. If the customer does not click
the Return button, or if the transaction is declined, then the transaction data is not posted to
your site. For declined transactions, the customer gets a Declined button that returns them to
your Order page.

Submitting Transaction Data to the Payflow Link Server
Data Returned by the Post and Silent Post Features
B
72 Payflow Link Fraud Protection Services User’s Guide
Silent Post
The Silent Post feature returns data using the HTML Post method whenever a transaction
succeeds. The data is sent at the same time as when the Receipt page is displayed.
To ensure that transactions proceed only if your script actually receives the data returned by
the Silent Post, you must also select the Force Silent Post Confirmation feature.
Force Silent Post Confirmation
The Force Silent Post Confirmation feature ensures that no transactions proceed unless your
Web site receives the Silent Post data.
If you enable this feature, Payflow Link sends the Silent Post data and waits for a 200 OK
from your server (indicating the server’s receipt of the data). If Payflow Link does not receive
the success response, then the transaction is voided and the customer sees a communication
error message. In this case, PayPal Manager displays both a transaction that succeeded and a
transaction that was voided.
Data Returned by the Post and Silent Post Features
The Post and Silent Post features return the data described in this section. You have the option
to return either of the following lists of values:
zReturn a short list of values generated by PayPal and the issuing bank to provide status
information on the submitted transaction. For this option, set the optional ECHODATA
parameter to False.
zReturn both the short list of generated values plus all transaction data that was submitted
for the transaction. For this option, set the optional ECHODATA parameter to True. This
is the default setting.

Payflow Link Fraud Protection Services User’s Guide 73
Submitting Transaction Data to the Payflow Link Server
Data Returned by the Post and Silent Post Features B
Values Returned When ECHODATA is False
The values described in Table B.4 are generated by PayPal (or the cardholder’s issuing bank)
to provide status information for the transaction. The values are described in Table B.4. All
values are also stored in the PayPal database.
TABLE B.4 Transaction responses
Field Description/Format Max Length
AUTHCODE For Authorization and Sale credit card transactions, transactions approved by
the issuing bank receive this bank authorization code.
AVSDATA Returns a three-character response (for example, YNY). The characters are
defined as follows:
AVS Street Match: Y (match), N (no match) or X (service not supported or not
completed)
AVS ZIP Match: Y (match), N (no match) or X (service unavailable or not
completed).
AVS OR Operation: Compares the AVS Street and AVS ZIP values. If either
or both values are Y, then the AVS OR Operation value is set to Y. Otherwise,
the AVS OR Operation field is set to N.
2
HOSTCODE HOSTCODE is returned only for TeleCheck transactions. For details on the
values returned by this response parameter, see “Testing TeleCheck
Transactions” on page 48.
PNREF Payment Network Reference ID (PNREF), a number generated by PayPal that
uniquely identifies the transaction. You can use this identifier to refer to the
original transaction when performing credit, void, or delayed capture
transactions from PayPal Manager.
This value is displayed on PayPal Manager reports as Transaction ID, on the
Receipt page as Order ID, and appears in email receipts to both merchant and
customer.
12
RESPMSG The response message returned with the transaction RESULT code. Exact
wording of the RESPMSG varies. Sometimes a colon will appear after the
initial RESPMSG followed by a more detailed description.
If you are using AVS or card security code checking, PayPal voids any
transactions for which the returned value does not meet your configured
criterion. For this Void transaction, the RESPMSG is AVSDECLINED or
CSCDECLINED and RESULT=0.
NOTE:Be sure to look at the response message for your transaction. Even if
your result code is 0, your response message might say that the
transaction has failed.
RESULT The outcome of the attempted transaction. RESULT=0 indicates the transaction
was approved, any other number indicates a decline or error.

Submitting Transaction Data to the Payflow Link Server
Data Returned by the Post and Silent Post Features
B
74 Payflow Link Fraud Protection Services User’s Guide
Values Returned When ECHODATA is True
When ECHODATA=True, all values returned for ECHODATA=False are returned plus all
transaction data that was submitted for the transaction. Here is a list of all possible values
returned when ECHODATA=True. These parameters are described in the sections on
submitting transactions.
ADDRESS
ADDRESSTOSHIP
AMOUNT
AUTHCODE
AVSDATA
CITY
CITYTOSHIP
COUNTRY
COUNTRYCODE
CSCMATCH (Card Security Code match response. The cardholder’s bank returns
a Y, N, or X response on whether the submitted CSC matches the number on
file at the bank.
CUSTID
DESCRIPTION
EMAIL
EMAILTOSHIP
FAX
FAXTOSHIP
HOSTCODE (HOSTCODE is returned only for TeleCheck transactions. See
“Testing TeleCheck Transactions” on page 48.)
INVOICE
METHOD
NAME
NAMETOSHIP
PHONE
PHONETOSHIP
PNREF
PONUM
RESPMSG
RESULT
STATE
STATETOSHIP
TYPE
USER1 through USER10
ZIP
ZIPTOSHIP

Payflow Link Fraud Protection Services User’s Guide 75
Submitting Transaction Data to the Payflow Link Server
Parameters That Specify Payflow Link Operation B
Parameters That Specify Payflow Link Operation
You can use the optional parameters listed in Table B.5 to specify Payflow Link operation.
TABLE B.5 Parameters used to configure Payflow Link
Field Name Description Valid Entries
ECHODATA Controls the amount of data returned to your Web site when Payflow
Link is configured to return data to your Web site using the Post or
Silent Post feature.
See “Data Returned by the Post and Silent Post Features” on page 72.
True, False
True is the
default.
EMAILCUSTOMER Specifies whether or not to notify the customer by email when a
successful transaction occurs. If not specified, defaults to the value set
on the PayPal Manager Payflow Link Confirmation page.
Specifying this value in a Payflow Link transaction overwrites the
information stored in the PayPal Manager Payflow Link Confirmation
page.
True, False
ORDERFORM Controls whether the customer’s browser is redirected to the Payflow
Link Order form, on which the customer enters transaction
information.
ORDERFORM=True displays the form.
If you set ORDERFORM to False, then you must pass the transaction
parameter values listed in Table B.2, “Transaction data required for all
Payflow Link transactions on page 67.
True, False
True is the
default.
SHOWCONFIRM Controls whether the Payflow Link Confirmation page is displayed to
the customer.
The Confirmation page enables the customer to confirm the transaction
information before submitting the transaction The page appears after
the customer submits the Order form.
If you use PayPal’s Buyer Authentication service, then you must
present the Confirmation page to the customer by setting
SHOWCONFIRM=True.
True, False
True is the
default.

Submitting Transaction Data to the Payflow Link Server
Parameters That Specify Payflow Link Operation
B
76 Payflow Link Fraud Protection Services User’s Guide
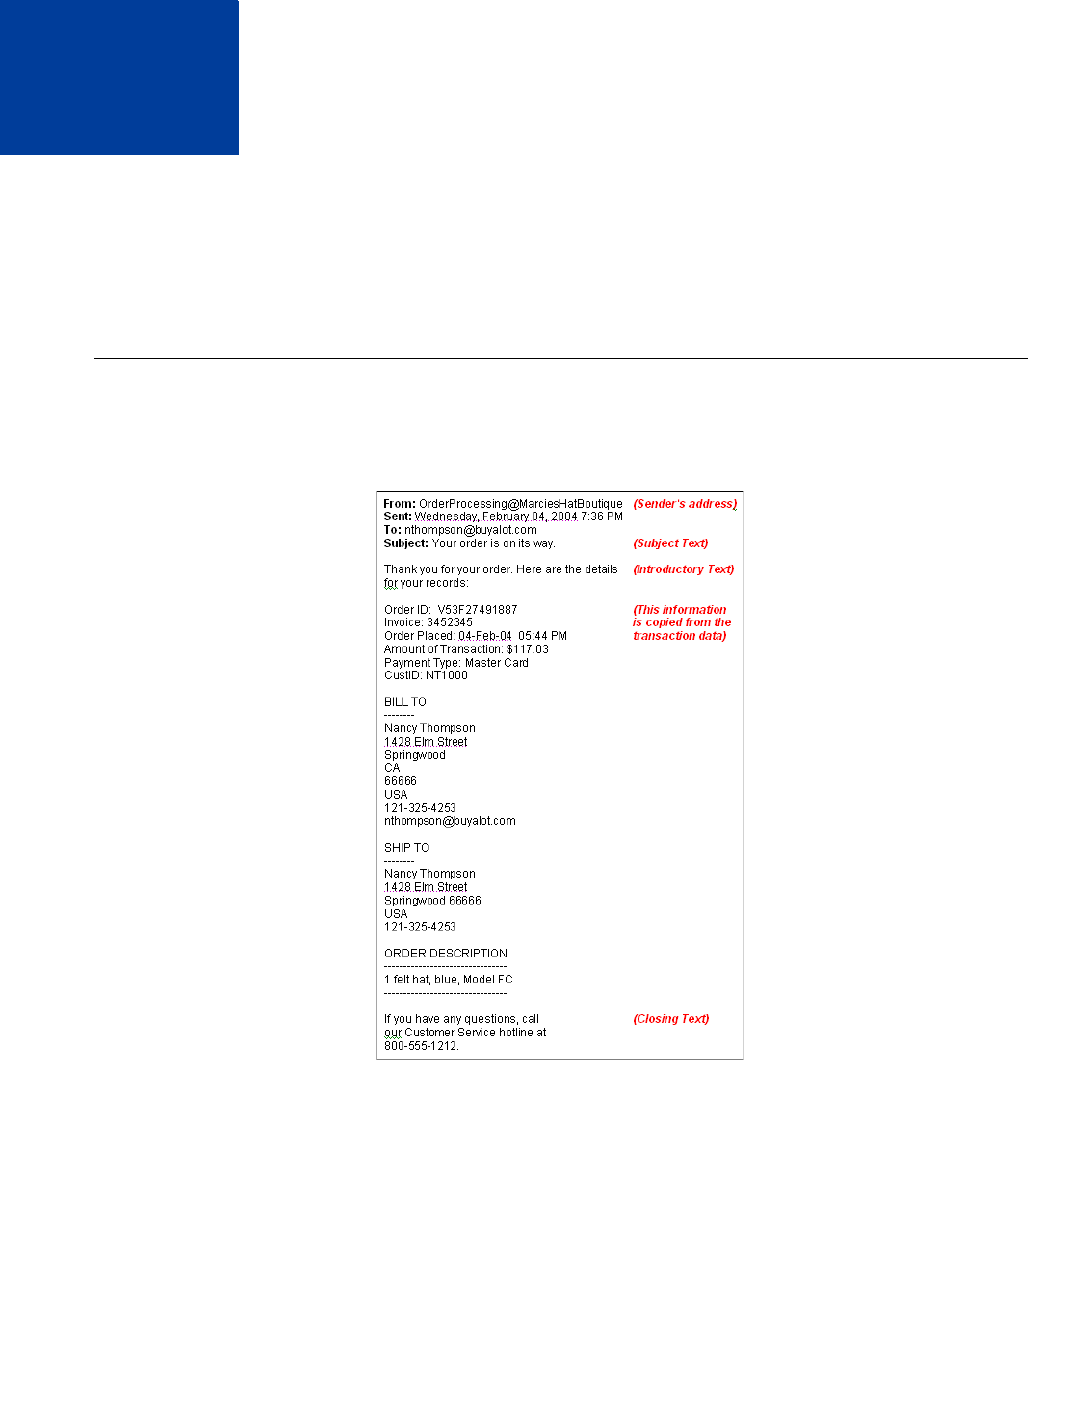
Payflow Link Fraud Protection Services User’s Guide 77
CAbout the Confirmation Email
Messages
You have the option of sending order confirmation email messages to the customer, to
yourself, or to both. The messages resemble the examples in this appendix.
Example Customer Email Message
FIGURE C.1 Example customer email message
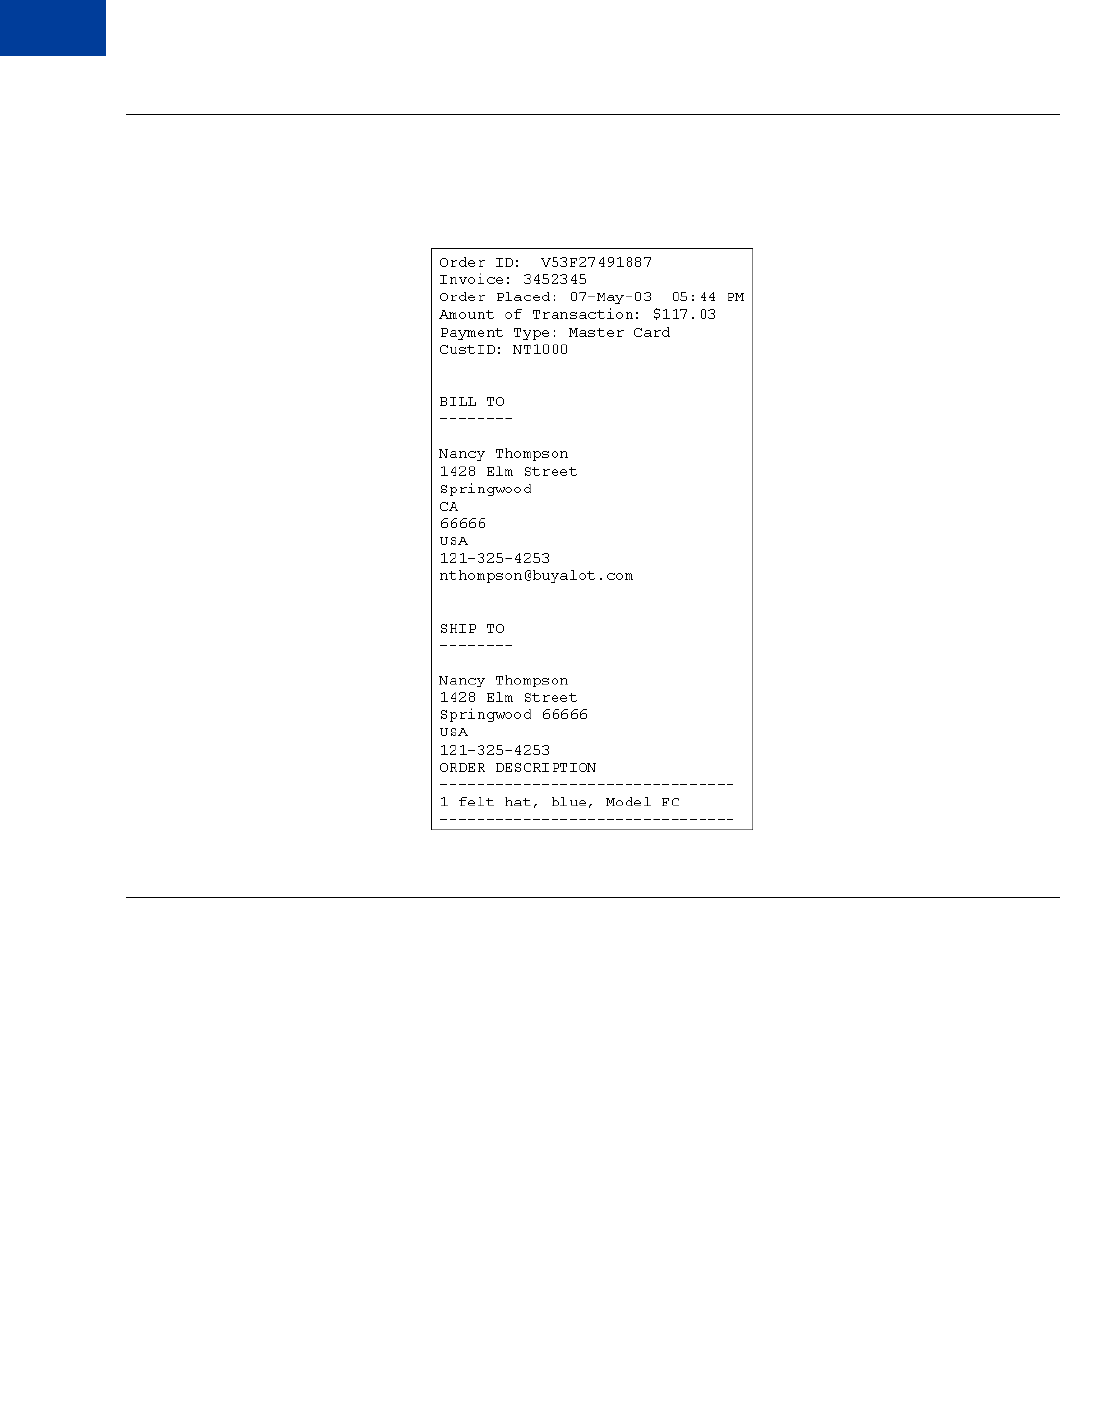
About the Confirmation Email Messages
Example Merchant Email Message
C
78 Payflow Link Fraud Protection Services User’s Guide
Example Merchant Email Message
FIGURE C.2 Example merchant email message
Fields Returned in the Confirmation Email Message
NOTE:The confirmation email messages return only those values that were submitted with the
transaction.
The customer email message includes the header and footer text that you specified on the
PayPal Manager Payflow Link Confirmation page. The merchant email message includes the
identical transaction data without the header and footer text.
The messages can include values for the following Payflow Link parameters:

Payflow Link Fraud Protection Services User’s Guide 79
About the Confirmation Email Messages
Fields Returned in the Confirmation Email Message C
Transaction Information
INVOICE
SHIPAMOUNT
TAX
AMOUNT
CUSTID
Billing Information
NAME
ADDRESS
CITY
STATE
ZIP
PHONE
FAX
EMAIL
Shipping Information
NAMETOSHIP
ADDRESSTOSHIP
CITYTOSHIP
ZIPTOSHIP
COUNTRYCODE
PHONETOSHIP
FAXTOSHIP
EMAILTOSHIP
Additional Information
DESCRIPTION

About the Confirmation Email Messages
Fields Returned in the Confirmation Email Message
C
80 Payflow Link Fraud Protection Services User’s Guide

Payflow Link Fraud Protection Services User’s Guide 81
DPayflow Link Transaction Types
Payflow Link supports the following transaction types:
TABLE D.1 Transaction types
Type
Code Transaction
Name Description
SSale / Payment Charges the specified amount against the account, and marks the transaction for
immediate funds transfer (capture) during the next settlement period. PayPal
performs settlement on a daily basis.
AAuthorization A request to charge a cardholder. An Authorization reduces the cardholder’s
open-to-buy (credit card limit), but does not actually capture the funds. Merchants
who do not ship goods immediately should use this transaction type.
To actually charge the account and transfer the funds (settle the Authorization),
you submit a Delayed Capture transaction using PayPal Manager. If the
Authorization is not settled within a certain period (determined by the issuing
bank), it is deleted. The cardholder’s open-to-buy is typically cleared in 5 to 7
days.

Payflow Link Transaction Types
D
82 Payflow Link Fraud Protection Services User’s Guide

Fraud Protection Services User’s Guide 83
EFraud Filter Reference
This appendix describes the filters that make up part of the Fraud Protection Services. Filters
analyze transactions and act on those that show evidence of potential fraudulent activity.
Filters can set such transactions aside for your review or reject them outright, depending on
settings that you specify.
Filters are grouped to help you to assess the risk types and to take action (accept, reject, or
continue in the review state).
In This Appendix
z“Filters Included with the Fraud Protection Services” on page 83
z“About the Fraud Risk Lists” on page 84
z“Filters Applied After Processing” on page 85
z“Unusual Order Filters” on page 85
z“High-risk Payment Filters” on page 87
z“High-risk Address Filters” on page 92
z“High-risk Customer Filters” on page 96
z“International Order Filters” on page 96
z“Accept Filters” on page 99
z“Custom Filters” on page 100
Filters Included with the Fraud Protection Services
Fraud Protection Services offers Basic and Advanced options. The filters included with each
option are listed here.
Filters Included with the Basic Fraud Protection Services Option
z“Total Purchase Price Ceiling Filter” on page 85
z“Total Item Ceiling Filter” on page 85
z“Shipping/Billing Mismatch Filter” on page 86
z“AVS Failure Filter” on page 87
z“Card Security Code Failure Filter” on page 89
z“ZIP Risk List Match Filter” on page 92
z“Freight Forwarder Risk List Match Filter” on page 92

Fraud Filter Reference
About the Fraud Risk Lists
E
84 Fraud Protection Services User’s Guide
z“IP Address Velocity Filter” on page 95
Filters Included with the Advanced Fraud Protection Services Option
All Basic filters plus:
z“To enforce the minimum Visa regulations, set the filter to Medium strength with an action
of Reject. This setting rejects N responses, however, so there is no liability benefit.” on
page 90
z“USPS Address Validation Failure Filter” on page 93
z“Email Service Provider Risk List Match Filter” on page 94
z“IP Address Match Filter” on page 93
z“Account Number Velocity Filter” on page 91
z“Geo-location Failure Filter” on page 94
z“Bad Lists” on page 96
z“International Shipping/Billing Address Filter” on page 97
z“International AVS Filter” on page 98
z“International IP Address Filter” on page 97
z“Country Risk List Match Filter” on page 96
z“Good Lists” on page 99
z“Total Purchase Price Floor Filter” on page 99
z“Custom Filters” on page 100
z“Product Watch List Filter” on page 86
About the Fraud Risk Lists
Filters whose name includes “Risk List” make use of lists that the Fraud Protections Services
manage. Extensive statistical analysis of millions of e-commerce transactions is performed to
determine transaction data elements (for example BIN numbers or ZIP codes) that are
statistically more likely than average to be correlated with fraudulent transactions.
Inclusion in a Risk List is not an absolute indication of fraud, only a statistical correlation that
indicates that you should evaluate the transaction more closely (and in conjunction with other
filter results for the transaction).

Fraud Protection Services User’s Guide 85
Fraud Filter Reference
Unusual Order Filters E
Filters Applied After Processing
Most filters are applied to the transaction request before forwarding the request to the
processor. The following filters are applied to the transaction results that the processor returns:
Unusual Order Filters
Unusual Order Filters identify transactions that exceed the normal size for your business.
Because fraudsters might not feel limited in their purchasing power, they sometimes place
orders that are much larger than the norm.
Total Purchase Price Ceiling Filter
What does the filter do?
This filter compares the total amount of the transaction (including tax, shipping and handling
fees) to the maximum purchase amount (the ceiling) that you specify.
The specified action is taken whenever a transaction amount exceeds the specified ceiling.
IMPORTANT:The Maximum amount per transaction setting in the Account menu controls
all transactions, even those that are less than or exceed the Total Purchase
Price Ceiling filter.
How does the filter protect me?
An unusually high purchase amount (compared to the average for your business) can indicate
potential fraudulent activity. Because fraudsters are not paying with their own money, they are
not price-sensitive.
Total Item Ceiling Filter
What does the filter do?
This filter compares the total number of items (or volume for bulk commodities) to the
maximum count (the ceiling) that you specify.
The specified action is taken whenever the item count in a transaction exceeds the specified
ceiling.
How does the filter protect me?
An unusually high item count (compared to the average for your business) can indicate
potential fraudulent activity. Fraudsters frequently attempt to order large numbers of attractive
items that can easily be resold.
NOTE:In addition, some items are more susceptible to fraud than others. For example, a
computer can be resold for much more money than can a pair of sport shoes. The
likelihood of selling the item quickly is also a factor.

Fraud Filter Reference
Unusual Order Filters
E
86 Fraud Protection Services User’s Guide
Shipping/Billing Mismatch Filter
What does the filter do?
This filter screens for differences between the shipping information and the billing information
(street, state, ZIP code, and country).
The specified action is taken whenever the shipping information differs from the billing
information.
Data Normalization
The Shipping/Billing Mismatch filter is tolerant of minor address inaccuracies that result from
typographical or spelling errors. The filter checks relationships among the street address, city,
state, and ZIP code and determines if a minor change is needed before screening the
transaction.
NOTE:This normalization is performed purely on the billing and shipping data, and does not
authenticate the customer.
Because this normalization happens during data validation by the server, the data as entered by
the customer will still appear in its original form on all transaction data review pages. This
means that you might see the following entries not flagged as mismatches on the Fraud
Details page:
Billing Shipping
Steve Morrison Steve Morrison
4390 Ramirez4390 Ramires
San Francisco, CA San Francisco, CA
9411494113
How does the filter protect me?
There are legitimate reasons for a shipping/billing mismatch with a customer purchase—for
example, gift purchases might fit this profile. But a mismatch could also indicate that someone
is using a stolen identity to complete a purchase (and having the items sent to another address
from which they can retrieve the stolen items).
To help to distinguish between legitimate and fraudulent orders, review all mismatches by
cross-checking other purchase information such as AVS and card security code.
Product Watch List Filter
What does the filter do?
The Product Watch List filter compares the SKUs (or other product identifier) of the products
in a transaction against a Product Watch List that you create. Any transaction containing an
SKU in the list triggers the filter. If you enable this filter, then you must set up the list of
products that should be monitored.
NOTE:Items that you enter in the test Product Watch List are not carried over to the
configuration for the live servers, so do not spend time entering a complete list for the
test configuration.

Fraud Protection Services User’s Guide 87
Fraud Filter Reference
High-risk Payment Filters E
How does the filter protect me?
Some products are attractive to fraudsters (especially popular products with high resale value
like computers or televisions). The Product Watch List filter gives you the opportunity to
review transactions involving such products to ensure that the order is legitimate.
High-risk Payment Filters
High-risk Payment Filters identify transactions that show billing/shipping discrepancies or an
indication that someone other than the legitimate account holder is initiating the transaction.
AVS Failure Filter
What does the filter do?
Address Verification Service (AVS), compares the street number and the ZIP code submitted
by the customer against the data on file with the issuer.
The AVS response is composed of a Y, N, or X value for the customer’s street address and a Y,
N, or X value for the ZIP code. For example, the response for a correct street number and an
incorrect ZIP code is YN.
If AVS information is not submitted with the transaction, then the response is NN.
AVS checks only for a street number match, not a street name match, so 123 Main Street
returns the same response as 123 Elm Street. The “USPS Address Validation Failure Filter”
on page 93 validates the address information
NOTE:.
The specified action is taken whenever the AVS response does not meet the criterion that you
specified.
IMPORTANT:The AVS Failure filter performs the action after the transaction is processed.
This means that, if set to reject, the filter rejects the transaction after the
transaction is authorized by the processor. To charge the customer for such a
transaction, you must resubmit the transaction data.
TABLE E.1 AVS responses
Result Meaning
Y The submitted information matches information on file with the account holder's bank.
N The submitted information does not match information on file with the account holder's
bank.
X The account holder's bank does not support AVS checking for this information.
(Null) In some cases banks return no value at all.

Fraud Filter Reference
High-risk Payment Filters
E
88 Fraud Protection Services User’s Guide
Processors that Support AVS
The AVS services listed in the table below are supported.
Specify one of the AVS settings:
zFull: Take action if a transaction returns any value other than YY (Y for street address and
Y for ZIP code).
zMedium: Take action if a transaction returns values other than these: XX, XY, YX, and
YY.
zLight: Take action only if NN is returned.
This table summarizes AVS levels:
TABLE E.2 Processing platforms supporting AVS
Processing Platform
American
Express Discover MasterCard Visa
American Express Phoenix X—— —
American Express Brighton X—— —
FDMS Nashville XXX X
FDMS North XXX X
FDMS South XXX X
Global Payments Central XXX X
Global Payments East XXX X
Merchant e-Solutions XXX X
Elavon (formerly Nova) XXX X
Paymentech Salem (New
Hampshire) XXX X
Paymentech Tampa XXX X
TSYS Acquiring Solutions
(formerly Vital Processing
Services)
XXX X
TABLE E.3 AVS responses
AVS Setting Allowed Responses
Full (Y, Y)
Medium (X, X), (X, Y), (Y, X), (Y, Y)
Light (X, X), (X, Y), (Y, X), (X, N), (N, X), (N, Y), (Y, N), (Y, Y)
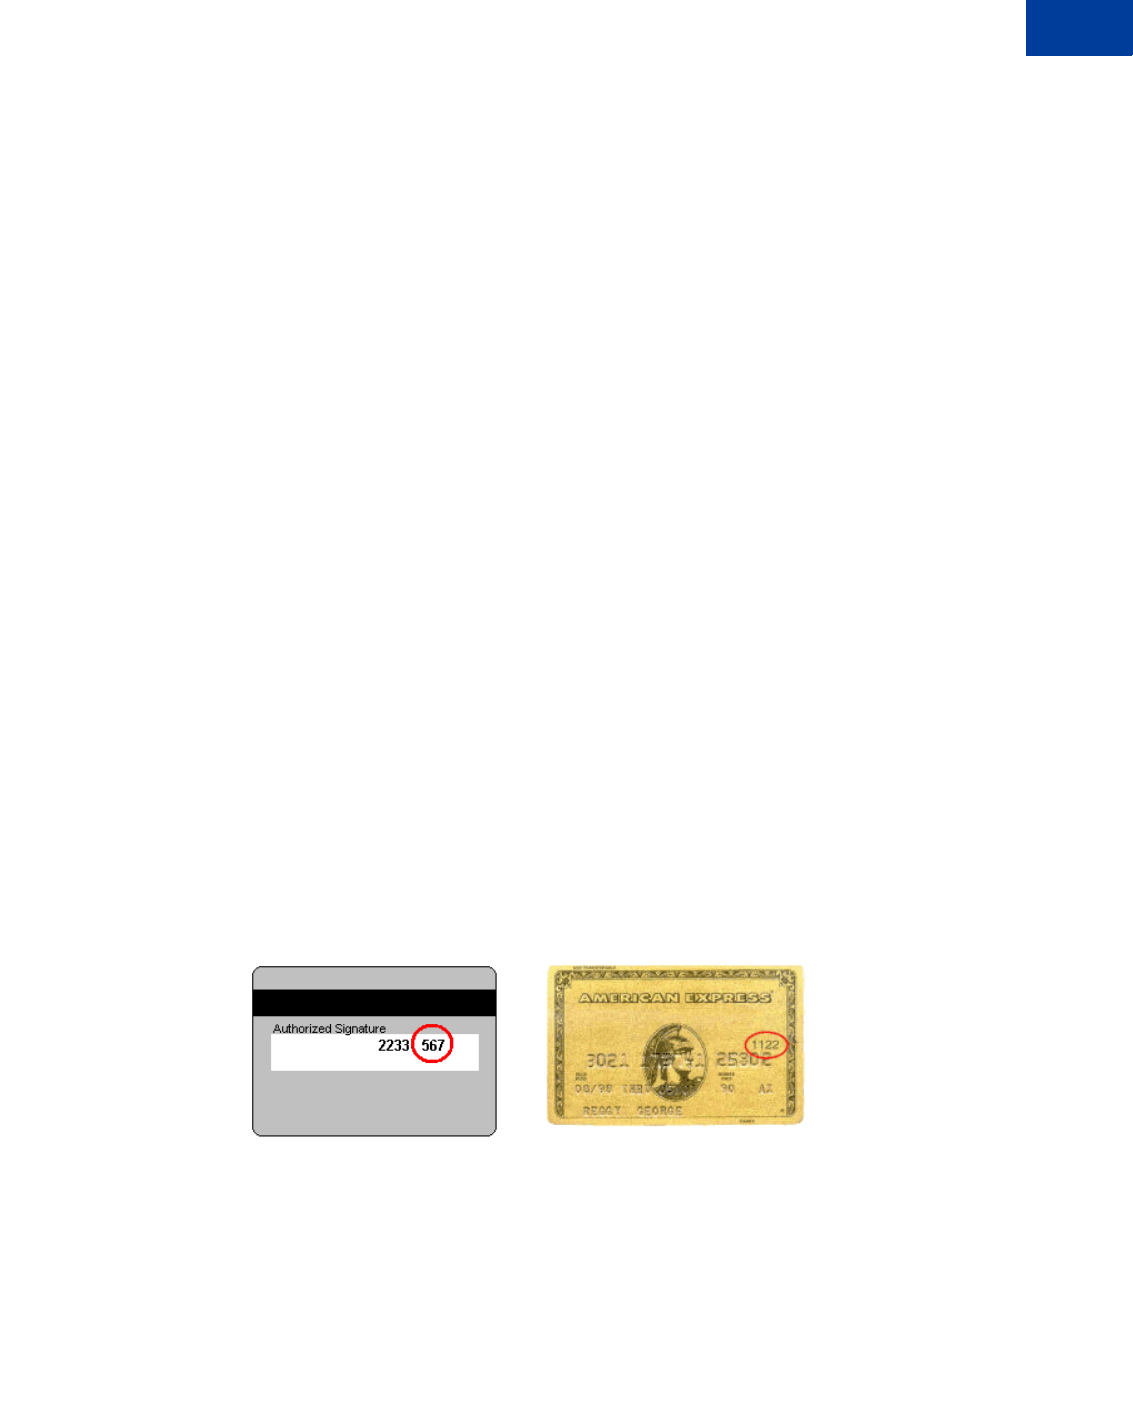
Fraud Protection Services User’s Guide 89
Fraud Filter Reference
High-risk Payment Filters E
Once you deploy the filters to Live mode (either Observe or Active), the AVS and card
security code checks that you may have previously set on the Payflow Link Configuration
page are replaced by the AVS and card security code filter settings. In Observe mode, no
action is taken on AVS and card security code. To take action if you are confident of your filter
settings, deploy to Active mode.
How does the filter protect me?
Buyers who can provide the street number and ZIP code on file with the issuing bank are more
likely to be the actual account holder.
AVS matches, however, are not a guarantee. Use card security code and Buyer
Authentication in addition to AVS to increase your certainty.
Card Security Code Failure Filter
What does the filter do?
The card security code is a 3- or 4-digit number (not part of the credit card number) that
appears on credit card. Because the card security code appears only on the card and not on
receipts or statements, the card security code provides some assurance that the physical card is
in the possession of the buyer.
IMPORTANT:The Card Security Code Failure filter performs the action after the
transaction is processed. This means that, if set to reject, the filter rejects the
transaction after the transaction is authorized by the processor. To charge the
customer for such a transaction, you must resubmit the transaction data.
About the Card Security Code
The card security code is printed on the back of most cards (usually in the signature field). All
or part of the card number appears before the card security code (567 in the example). For
American Express, the 4-digit number (1122 in the example) is printed on the front of the card,
above and to the right of the embossed account number. Be sure to explain this to your
customers.

Fraud Filter Reference
High-risk Payment Filters
E
90 Fraud Protection Services User’s Guide
The card security code check compares the number provided by the customer with the number
on file with the issuer and returns one of the following responses:
Card Security Code Failure Filter Action
The specified action is taken whenever the card security code response is the value that you
specified.
The Best Practices action is to review all transactions with responses other than Y. You set the
“strength” of the filter as follows:
zFull: Take action if a value of N or X is returned.
zMedium: Take action only if a value of N is returned.
NOTE:Once you deploy the filters to Live mode (either Observe or Active), the AVS and card
security code checks that you may have previously set on the Payflow Link
Configuration page are replaced by the AVS and card security code filter settings. In
Observe mode, no action is taken on AVS and card security code. To take action if you
are confident of your filter settings, deploy to Active mode
Processors and Credit Cards that Support Card Security Code
Card security code validation is supported as listed in the table below. Card security code
appears on the Edit Configuration page only if the server is certified with your processor
Even though your processor may be certified for card security code, they may not be certified
for all card types. The list will change as the service offering is enhanced.
NOTE:To enforce the minimum Visa regulations, set the filter to Medium strength with an
action of Reject. This setting rejects N responses, however, so there is no liability
benefit.
TABLE E.4 Card security code responses
Result Meaning
Y The submitted information matches information on file with account holder's bank.
N The submitted information does not match information on file with the account holder's
bank.
X Account holder's bank does not support this service.
(Null) In some cases banks return no value at all.

Fraud Protection Services User’s Guide 91
Fraud Filter Reference
High-risk Payment Filters E
BIN Risk List Match Filter
What does the filter do?
The Bank Identification Number (BIN) makes up the first six digits of a credit card number.
The BIN identifies the bank that issued the card. This filter screens every credit card number
for BINs on the high-risk list.
The specified action is taken whenever a BIN matches one on the list.
How does the filter protect me?
Certain BINs might be associated with a greater degree of fraud because the issuer uses less
stringent authentication policies when issuing cards. In other cases, because some issuers have
a large number of cards in circulation, the cards are more likely to fall into the hands of
fraudsters.
Account Number Velocity Filter
What does the filter do?
The Account Number Velocity filter triggers when any credit card account number is used five
times within a three-day (72-hour) period.
IMPORTANT:The specified action is performed on only the transaction that triggered the
filter and not on the previous four transactions. You must manually review and
act upon those transactions. Generate a Transaction Details report and click
the Account Velocity link to view the transactions.
What is Velocity?
In the risk management industry, an event’s velocity is a measure of its frequency of
occurrence during a defined time period. Unusually high velocity is can be associated with a
fraudster making repeated attacks on a system. Legitimate customers do not typically perform
multiple transactions in quick succession.
How does the filter protect me?
Fraudsters often submit multiple purchases with a single account number to try to discover the
card’s valid billing address or card security code. Alternatively, the fraudster may attempt to
bypass ceiling filters by making multiple small purchases with a know good account number.

Fraud Filter Reference
High-risk Address Filters
E
92 Fraud Protection Services User’s Guide
High-risk Address Filters
High Risk Address Filters identify transactions associated with high-risk geographical
locations or poorly-matched transaction data.
ZIP Risk List Match Filter
What does the filter do?
This filter compares the Ship To and Bill To ZIP codes (US only) against the high-risk list.
High-risk ZIP codes are determined based on analysis of millions of e-commerce transactions.
The specified action is taken whenever a submitted ZIP code appears in the risk list.
NOTE:Fraud tends to correlate to densely populated areas like major cities. For this reason,
ZIP codes on the risk list will likely correlate to major cities.
How does the filter protect me?
Matching a ZIP code on the risk list does not necessarily indicate a fraudulent purchase, but
that you should evaluate these transactions more closely than other transactions.
Freight Forwarder Risk List Match Filter
What does the filter do?
This filter screens the full Ship To address against a list of addresses of freight forwarders.
NOTE:Unlike the other Risk Lists, the Freight Forwarder Risk List was not developed through
statistical evaluation of e-commerce transactions. Rather, this is a list of know
addresses associated with freight forwarders.
The specified action is taken whenever a shipping address matches the address of a known
freight forwarding service.
NOTE:The Freight Forwarder filter requires a valid US shipping address. If the USPS
Address Validation filter determines that the address does not exist, then the Freight
Forwarder filter is skipped and placed in the Unused Filters list on the Fraud Details
page.
How does the filter protect me?
Freight forwarding services enable a customer to open an account using the forwarder’s
corporate address, and to have the service forward all packages to another end destination.
While there are legitimate uses for a freight forwarding service, forwarders also enable
fraudsters to hide their true location.
Whenever a customer orders delivery to a freight forwarder, you should research the
transaction more closely.

Fraud Protection Services User’s Guide 93
Fraud Filter Reference
High-risk Address Filters E
USPS Address Validation Failure Filter
What does the filter do?
This filter screens the Ship To and Bill To addresses (street number, street name, state, and
ZIP code) against the United States Postal Service database of existing addresses. The USPS
updates the database continually.
The specified action is taken whenever the address cannot be validated (it does not exist or is
incorrect in some way).
NOTE:The filter does not validate that the person named in the transaction data lives at that
address or even that the address is currently occupied—only that the address exists in
the database.
How does the filter protect me?
To trick a merchant’s filters, fraudsters sometimes deliberately misspell or make up street
names. This enables the fraudster to spoof AVS, geo-location, and high-risk address filters.
You can identify this basic form of spoofing by using the USPS Address Validation filter to
determine whether an address really exists.
NOTE:One useful side effect of the filter is that mis-keyed addresses of legitimate customers
can be identified before shipping.
IP Address Match Filter
What does the filter do?
This filter screens the IP address from which a transaction originates against a list of high-risk
IP addresses. An IP (Internet protocol) address is a unique identifier for a computer on a
TCP/IP network that can identify a particular network and a particular computer on that
network.
NOTE:IP Addresses are not always fixed like the addresses to physical buildings. Some
computers get a new IP address each time they connect to a network. The most general
level of the IP address indicates the region or country from which the computer is
connecting, and is thus relatively fixed. Therefore the IP Address risk list is most
effective as a screen for overseas fraud.
The specified action is taken whenever a submitted IP address appears in the risk list.
How does the filter protect me?
A customer’s IP address identifies a country, region, state, or city. As with ZIP codes, these
addresses can be associated with higher or lower likelihood of fraud. This is especially true
with high-risk countries that are known to be associated with especially high rates of fraud.
Required Transaction Data
You must send the customer’s IP address to use this filter.

Fraud Filter Reference
High-risk Address Filters
E
94 Fraud Protection Services User’s Guide
Email Service Provider Risk List Match Filter
What does the filter do?
This filter compares the e-mail service provider used by the customer against a list of high-risk
e-mail service providers.
NOTE:Fraudsters most often use free services at which they do not need to provide traceable
billing information. (Free services are also popular among legitimate shoppers—
because they are free.)
It is therefore a good practice to check whether the billing name appears in some form
in the e-mail address. For example, Tina Johnson should have an e-mail address of
TinaJohnson@hotmail.com or Johnson42@hotmail.com, or some similar variant. Such
an e-mail address is less suspicious than xy12@hotmail.com.
The specified action is taken whenever the e-mail service provider is found in the risk list.
How does the filter protect me?
Online merchants rarely talk to their customers. The customer’s e-mail address is a critical
communications channel between the merchant and customer. For example, e-mail is often
used to confirm a purchase and to notify the customer that shipment has been made.
It is therefore important for merchants to determine how reliably the e-mail address is tied to
the identity of the customer. Some e-mail service providers make it especially easy to open and
close e-mail accounts without ever providing personal information, enabling fraudsters to use
false identities to cover their tracks.
You should examine any transaction in which a high-risk e-mail service provider is involved.
Geo-location Failure Filter
What does the filter do?
This filter compares the IP address of the customer’s computer (captured in real-time when the
transaction is submitted) and compares its geographical location to the billing and shipping
addresses. IP (Internet protocol) addresses are unique identifiers for computers that can often
be mapped to a specific city or area code.
The specified action is taken whenever the IP address, shipping address, and billing address do
not fall within a 100 mile radius. If you provide only one physical address (billing or shipping
address), then the filter triggers when the distance between the IP address and the address that
you provided is greater than 100 miles.
NOTE:Gift purchases shipped far from the billing address will trigger the filter.
Every effort has been made to ensure that IP address mapping is accurate and
up-to-date. Given the nature of the Internet’s architecture, however, some Internet
Service Providers use data centers far from the customers being serviced. In addition, as
described in the IP Address Risk List Match filter, IP addresses can change
dynamically. For these reasons, treat this filter as an indicator of suspicious activity, not
as a definitive result.

Fraud Protection Services User’s Guide 95
Fraud Filter Reference
High-risk Address Filters E
How does the filter protect me?
Comparing the geographical location associated with the IP address to the submitted shipping
and billing information can be an effective method for identifying identity spoofing.
Fraudsters often pretend to live in a location, but live and shop from another.
All three elements should match one realistic customer profile. For example, a customer with a
billing address in New York would typically shop from a computer in New York, and request
delivery to a New York address. While there may be some minor inconsistencies in the overall
profile, it should generally fit together. Remember, however, that gift purchases sent to another
part of the country will not fit this profile.
NOTE:You should be especially wary when a customer has an international IP address but
uses U.S. billing and shipping information.
IP Address Velocity Filter
What does the filter do?
The IP Address Velocity filter triggers when five or more transactions within three days (72
hours) originate from any individual IP address.
IMPORTANT:The specified action is performed on only the transaction that triggered the
filter and not on the previous four transactions. You must manually review and
act upon those transactions. Generate a Transaction Details report and click
the IP Address Velocity link to view the transactions.
IP addresses do not always identify a unique computer or user. For example,
an Internet Service Provider (ISP) may use a limited number of IP addresses
for all of its users. To protect against triggering the filter in this case, set up an
IP Address Velocity Ignore List (described in the online help).
What is Velocity?
In the risk management industry, an event’s velocity is a measure of its frequency of
occurrence during a defined time period. Unusually high velocity is can be associated with a
fraudster making repeated attacks on a system. Legitimate customers do not typically perform
multiple transactions in quick succession.
How does the filter protect me?
Fraudsters often submit multiple purchases using an automated script that tests unknown card
numbers. Alternatively, the fraudster may attempt to bypass other filters by making multiple
small purchases with multiple stolen account numbers.

Fraud Filter Reference
High-risk Customer Filters
E
96 Fraud Protection Services User’s Guide
High-risk Customer Filters
Bad Lists
What does the filter do?
This filter compares the customer’s e-mail address and credit card number against lists (that
you create) of addresses and numbers for known bad customers.
NOTE:Unlike the Risk lists managed by PayPal, you, solely, manage and update the Bad
Lists.
Any transaction that is an exact match with an entry in one of your bad lists triggers the filter.
If you enable this filter, then your next step will be to set up lists of bad email addresses and
bad card numbers. Be sure to type the e-mail addresses and credit card numbers accurately.
Enter only numerals in the credit card number list—no spaces or dashes.
NOTE:Items that you enter in the test Bad lists are not carried over to your configuration for
the live servers, so do not spend time entering a complete list for the test configuration.
How does the filter protect me?
This filter enables you to block repeat fraud.
In the e-commerce world, once someone successfully performs a fraudulent transaction, they
are very likely to try again. For this reason, you should set up lists of cards and email addresses
and configure this filter to take action on transactions with data elements appearing in the bad
lists.
International Order Filters
International Order Filters identify transactions associated with risky international locations.
Country Risk List Match Filter
What does the filter do?
This filter screens the customer’s shipping and billing address information for matches with
countries on the list of high-risk countries.
The specified action is taken whenever any of the information matches a country on the risk
list.
How does the filter protect me?
Orders from customers in foreign countries are more likely to be fraudulent than orders from
domestic customers. This is due to the difficulty of authenticating foreign citizens and the
difficulty of cross-border legal enforcement against fraudulent activities.

Fraud Protection Services User’s Guide 97
Fraud Filter Reference
International Order Filters E
Certain countries, however, are much riskier than others. These countries have high likelihood
of fraud and you should evaluate transactions from these countries closely.
International Shipping/Billing Address Filter
What does the filter do?
This filter screens the customer’s shipping and billing information for non-U.S. addresses. The
filter checks for country code 840, or any derivation of “United States” (U.S., USA, United
States of America, America, and so on) in the country fields. Any other country name triggers
the filter.
How does the filter protect me?
Orders from customers in foreign countries are more likely to be fraudulent than orders from
domestic customers. This is due to the difficulty of authenticating foreign citizens and the
difficulty of cross-border legal enforcement against fraudulent activities.
The International Shipping/Billing Address filter sets aside transactions from customers in
foreign countries so that you can evaluate them more fully.
International IP Address Filter
What does the filter do?
This filter screens for international IP addresses. An IP (Internet protocol) address is a unique
identifier for a computer that can identify a particular network and a particular computer on
that network.
The specified action is taken whenever the IP address indicates an international computer or
network.
How does the filter protect me?
Orders from customers in foreign countries are more likely to be fraudulent than orders from
domestic customers. This is due to the difficulty of authenticating foreign citizens as well as
the difficulty of cross-border legal enforcement against fraudulent activities.
The International IP Address filter sets aside transactions from customers in foreign
countries so that you can evaluate them more fully.

Fraud Filter Reference
International Order Filters
E
98 Fraud Protection Services User’s Guide
International AVS Filter
What does the filter do?
International Address Verification Service (IAVS), determines whether the issuer is domestic
(US) or international.
The specified action is taken whenever AVS returns Y.
Special Requirements
zYou must use Payflow Pro client version 3.06 or newer to use the IAVS filter.
zInternational AVS is not currently widely supported by processors. Check to see if your
processor supports international AVS.
– FDMS Nashville and NOVA return IAVS responses for all card types.
– EDS Aurora and FDMS South return IAVS responses for VISA cards only.
– All other processors always return N or X.
How does the filter protect me?
Orders from customers in foreign countries are more likely to be fraudulent than orders from
domestic customers. This is due to the difficulty of authenticating foreign citizens as well as
the difficulty of cross-border legal enforcement against fraudulent activities.
The International AVS filter sets aside transactions from customers with cards issued in
foreign countries so that you can evaluate them more fully.
TABLE E.5 AVS filter results
Result Meaning
Y The card number is associated with an international issuer.
N The card number is associated with a US issuer.
X Account holder's bank does not support IAVS.
(Null) In some cases banks return no value at all.

Fraud Protection Services User’s Guide 99
Fraud Filter Reference
Accept Filters E
Accept Filters
Accept Filters immediately approve transactions that meet characteristics that you specify. If a
filter in this group is triggered, then the transaction is accepted regardless of Review filter
results.
IMPORTANT:The Accept filters are designed to reduce the load on your staff by reducing
the number of transactions set aside for review. The Accept filters do not
reduce risk.
Good Lists
What does the filter do?
This filter compares the customer’s e-mail address and credit card number against lists (that
you create) of addresses and numbers for known good customers. You create the lists.
Any transaction for which the e-mail address or credit card number is an exact match with an
entry in one of your good lists is accepted and no other filters are applied. Enter only numerals
in the credit card number list—no spaces or dashes.
NOTE:Unlike the Risk lists that PayPal manages, you, solely, manage and update the Good
Lists.
Items that you enter in the test Good lists are not carried over to your configuration for
the live servers, so do not spend time entering a complete list for the test configuration.
If you activate this filter, then you must set up lists of good email addresses and good card
numbers. Be sure to type the e-mail addresses and credit card numbers accurately.
IMPORTANT:The Good Lists do not authenticate individuals. If a fraudster were to steal
e-mail addresses or credit card account numbers from this list, then they
would be able to bypass the filter.
How does the filter protect me?
To ensure that loyal repeat customers are not held up by your fraud review process, you may
want to create lists of e-mail addresses and card numbers that should be accepted. This ensures
that an abnormal shopping pattern on the part of a loyal customer (for example making a
purchase while on vacation overseas) does not trigger a filter and delay the transaction.
Total Purchase Price Floor Filter
What does the filter do?
This filter screens the total amount of a transaction (including tax, shipping and handling fees).
If a transaction amount is below the price set for this filter, then the transaction is accepted and
no other filters are applied.

Fraud Filter Reference
Custom Filters
E
100 Fraud Protection Services User’s Guide
How does the filter protect me?
Merchants with an especially high transaction volume can use this filter to reduce the number
of transactions that their staff must review—transactions below the specified price level are
accepted without further analysis.
Custom Filters
You create Custom filters by combining up to five existing filters. A well-designed Custom
filter can more accurately identify suspicious transactions because it is fine-tuned to the
unique needs of your business (for example, you can specify a particular combination of
amount, buyer location, and shipping location). For this reason, fewer legitimate transactions
are unnecessarily held for review.
For example, a Custom filter that triggers only when both the Card Security Code Failure and
AVS Failure filters trigger will set aside transactions that are quite suspicious.
NOTE:You can create a combined maximum (test plus live) of 15 Custom Filters. For
example, if you currently have 5 test Custom Filters and 10 live Custom Filters, you
cannot create any more Custom Filters until you delete one of the existing Custom
Filters.
See PayPal Manager online help for details on creating a custom filter.

Payflow Link Fraud Protection Services User’s Guide 101
FFrequently Asked Questions
Using Payflow Link with other Applications
Can I use Payflow Link with my existing shopping cart?
If your existing shopping cart is pre-integrated with Payflow Link, follow the instructions for
integrating and configuring your cart for Payflow Link. Otherwise, integrating will require
extensive programming.
Will I be to able use Payflow Link with my current merchant account?
Currently Payflow Link is available for Internet merchant accounts processing through FDMS
Nashville. Contact your PayPal Sales Representative to verify merchant account compatibility.
Are there browser-specific issues that I need to be aware of when using
Payflow Link?
Yes. You must have Internet Explorer 3.0+ or Netscape 4.0+ in order to access the PayPal
administrative Web site. This will enable you to get started configuring the Payflow service to
meet your needs and run test transactions to ensure everything is working satisfactorily.
How Payflow Link Works
With Payflow Link do my customers leave my site when they enter their credit
card numbers?
Yes. Your customers will leave your Web site and will notice the URL change. They will be
connected to PayPal's secure order form and use it to enter their credit card numbers.
Do I need to know how to use HTML to integrate with Payflow Link?
Yes. You will need to understand some basic principles of HTML.
How do I perform a Delayed Capture transaction for an Authorization
transaction?
You perform delayed capture transactions using the PayPal Manager Perform Transactions
tab. Refer to PayPal Manager online help for details.

Frequently Asked Questions
F
102 Payflow Link Fraud Protection Services User’s Guide
Using Payflow Link
Does Payflow Link allow me to customize the display of my order form?
Yes. The General Display Options of Payflow Link enables you to customize the appearance
of the order form the customers use to fill in their personal information.
When my customers are declined, can I program the button on the decline page
to bring them back to my Web site? Currently, it returns them to the order page.
No, the BACK button on the decline page cannot currently be programmed.
In Payflow Link Manager, I've entered my Web site URL in the Return URL Field.
But, when I get to the Approval page and hit the Return button, I receive an
error.
If you are simply linking to a Web site, or to a page on a Web site, make sure the Return
Process Method is set to LINK, not to Post.
I'm receiving all declines using your test numbers in test mode. I'm using an
amount less than $100 which should receive an approval. What's causing the
declines?
It could be your AVS setting in the Payflow Link Configuration Page on PayPal Manager. If
you set AVS to Medium or Full, all test transactions are declined in test mode. AVS does not
work in test mode.
How is data returned for Post and Silent Post?
The data is returned as name=value pairs separated by the & character. The data is a
combination of the results of your transaction request and the original transaction data that was
submitted. This example is a response to a credit card Sale transaction request:
&RESULT=0&AUTHCODE=010101&RESPMSG=Approved&AVSDATA=YNY&PNREF=V63F28770576&H
OSTCODE=&INVOICE=3452345&AMOUNT=117.03&METHOD=CC&TYPE=S&DESCRIPTION=1+felt+
hat%2C+Model+FC&CUSTID=NT1000&NAME=Nancy+Thompson&ADDRESS=1428+Elm+Street&C
ITY=Springwood&STATE=CA&ZIP=66666&COUNTRY=USA&PHONE=121-325-4253 . . .
The values are described in “Data Returned by the Post and Silent Post Features” on page 72.
Can I Post or Silent Post to a secured server?
Yes, but for Silent Post you must add port number 443 to the URL. For example:
https://www.hostname.com:443/silentpostscript.asp
This does not pertain to regular return Post.
Can I use my own gif or jpg image for the Submit button that links to PayPal?
The gray Submit button doesn't fit my page design.
Yes. You must write Javascript to accomplish this. You cannot change the button on the
PayPal-hosted forms, however.
I keep getting an error when I try to upload an image in the Payflow Link
Configuration Screen.
Make sure there are no spaces in the file name. Instead of logo image.gif it should read
logoimage.gif or logo_image.gif.

Payflow Link Fraud Protection Services User’s Guide 103
Frequently Asked Questions F
I'm using Silent Post to retrieve transaction information. I'm also using the AVS
security options in Manager. If the AVS information doesn't match, then
Payflow Link voids the transaction. However, my Silent Post script only
receives notification of the sale. I don't get a second silent post for the void.
How will I know which transactions are voided?
You can tell by the RESPMSG. You will need to have your script call on this variable. If
RESULT=0 and RESPMSG=AVSDECLINED, then that means the transaction was
successfully voided.
NOTE:Be sure to look at the response message for your transaction. Even if your result code is
0, your response message might say that the transaction has failed.
My order forms show I accept more cards than I actually do. How can I change
the forms to reflect only the cards I accept?
Contact Customer Service by email (payflow-support@paypal.com) and we will make the
change for you.
Does Payflow Link support International Characters?
Not officially. We have included text on our Payflow Link Order Forms discouraging the use
of International Characters. If you disable our forms, we encourage you to use similar text on
your site. We also encourage you to run test transactions using the characters that you expect
your customers to use to verify that you do not run into any issues.
I'm not getting the merchant confirmation email, even though I enabled it on
the Payflow Link Configuration page.
This is a problem for AOL email accounts. If you use the same AOL account in the EMAIL
FROM MERCHANT field and the EMAIL TO MERCHANT field, you most likely will not
get an email message. For some reason, AOL does not allow the same mail account in these
two fields. To get around this problem, either set up a new AOL mail account or use another
email account.

Frequently Asked Questions
F
104 Payflow Link Fraud Protection Services User’s Guide

Payflow Link Fraud Protection Services User’s Guide 105
Index
Index
A
Accepted transactions 40
account
activating Payflow Link 35
Account Monitoring Service 14
Account Number Velocity Filter 91
Active mode 19
Address Verification Service 58
authorization transaction type 81
AVS Failure Filter 87
AVS result codes 58
AVS, <Emphasis>see Address Verification Service
B
BIN Risk List Match Filter 91
Buyer Authentication form 6
Buyer Authentication Service 12
C
Card Security Code Failure Filter 89
check processing 45
communications errors 55
configuring
email messages 77
Payflow Link 15
configuring filters 12
Confirmation page 5
credit card fraud 11
Credit Card Information page 4
credit cards
test transactions 28
credit cards supported 9
D
deploying filters 21
E
email
configuring 77
E-mail Service Provider Risk List Match Filter 94
F
fields
optional 68
required 65
Filter Scorecard 43
filter types
High-risk Address 92
High-risk Payment 87
Unusual Order 85
filters
Account Number Velocity 91
AVS Failure 87
BIN Risk List Match 91
Card Security Code Failure 89
configuring 12
defined 12
E-mail Service Provider Risk List Match 94
examples 12
Freight Forwarder Risk List Match 92
Geo-location Failure 94
IP Address Match 93
IP Address Velocity 95
Product Watch List 86
Shipping/Billing Mismatch Filter 86
Total Item Ceiling 85
Total Purchase Price Ceiling 85
USPS Address Validation Failure 93
ZIP Risk List Match 92
forms
Buyer Authentication 6
fraud liability
reducing 12
Freight Forwarder Risk List Match Filter 92
G
Geo-location Failure Filter 94
going live
defined 35

Index
106 Payflow Link Fraud Protection Services User’s Guide
H
hacking 11
High-risk Address Filters 92
High-risk Payment Filters 87
I
instant fulfillment 13
integration
custom 25
minimum 23, 25
IP Address Match Filter 93
IP Address Velocity Filter 95
L
liability
reducing 12
live operation 35
O
Observe mode 19, 21
optional fields 68
Order form 5
P
parameters
optional 68
required 65
Partner Manager
overview xi
Payflow Link
testing 27
Payflow parameters
RESULT 55
PayPal Manager xi
processors supported 9
Product Watch List Filter 86
R
Receipt page 6
recurring transactions 14
rejected transactions 40
rejecting transactions 42
RESPMSG value 50
result codes
AVS 58
RESULT value 49
RESULT values
communication errors 55
Returned Data 70
Reviewed transactions 40
reviewing transactions 40
risk lists 84
S
sale/payment transaction type 81
SecureCode 12
Shipping/Billing Mismatch Filter 86
supported
credit cards 9
processors 9
tender types 8
T
TeleCheck transactions, testing 48
tender types supported 8
Test phase 19
test transactions 28
testing 20
transactions, credit card 27
transactions, TeleCheck 48
testing Payflow Link 27
Total Item Ceiling Filter 85
Total Purchase Price Ceiling Filter 85
Transaction Process Mode 27
live 36
transaction processors 9
transaction response
RESPMSG parameter 50
RESULT parameter 49
transaction status values 41
transactions
authorization 81
rejecting 42
required data 65
sale 81
testing credit card 27


Index
108 Payflow Link Fraud Protection Services User’s Guide
