Paypal Pro 2012 Integration Guide
Pro - 2012 - Integration Guide PP_PayPalPro_2012 Free User Guide for PayPal Software, Manual
2015-07-27
: Paypal Paypal-Pro-2012-Integration-Guide-777994 paypal-pro-2012-integration-guide-777994 paypal pdf
Open the PDF directly: View PDF ![]() .
.
Page Count: 99
- PayPal Pro Integration Guide
- About This Guide
- Intended Audience
- Revision History
- Documentation Feedback
- Getting Started with PayPal Pro
- Integrating Your Website Using HTML
- Customising Your PayPal Payment Page
- Integrating iFrame in Your Website
- Integrating Your Website Using API
- Testing Your Integration in Sandbox
- Order Processing
- Protecting Buttons by Using Encrypted Website Payments
- Public Key Encryption Used by Encrypted Website Payments
- Setting Up Certificates Before Using Encrypted Website Payments
- Generating Your Private Key Using OpenSSL
- Generating Your Public Certificate Using OpenSSL
- Uploading Your Public Certificate to Your PayPal Account
- Downloading the PayPal Public Certificate from the PayPal Website
- Removing Your Public Certificate
- Using Encrypted Website Payments to Protect Your Payment Buttons
- Blocking Unprotected and Non-encrypted Website Payments
- Optional API Operations
- Moving from Website Payments Standard to PayPal Pro
- Error Messages
- Currency Codes
- Index

PayPal Pro
Integration Guide
Last updated: July 2012
PayPal Pro Integration Guide
Document Number: 10116.en_US-201207
© 2012 PayPal, Inc. All rights reserved. PayPal is a registered trademark of PayPal, Inc. The PayPal logo is a trademark of PayPal, Inc. Other
trademarks and brands are the property of their respective owners.
The information in this document belongs to PayPal, Inc. It may not be used, reproduced or disclosed without the written approval of PayPal, Inc.
Copyright © PayPal. All rights reserved. PayPal (Europe) S.à r.l. et Cie., S.C.A., Société en Commandite par Actions. Registered office: 22-24 Boulevard
Royal, L-2449, Luxembourg, R.C.S. Luxembourg B 118 349.
Consumer advisory: The PayPal™ payment service is regarded as a stored value facility under Singapore law. As such, it does not require the approval
of the Monetary Authority of Singapore. You are advised to read the terms and conditions carefully.
Notice of non-liability:
PayPal, Inc. is providing the information in this document to you “AS-IS” with all faults. PayPal, Inc. makes no warranties of any kind (whether express,
implied or statutory) with respect to the information contained herein. PayPal, Inc. assumes no liability for damages (whether direct or indirect), caused
by errors or omissions, or resulting from the use of this document or the information contained in this document or resulting from the application or use
of the product or service described herein. PayPal, Inc. reserves the right to make changes to any information herein without further notice.

Contents
Preface . . . . . . . . . . . . . . . . . . . . . . . . . . . . . . . . . . 7
About This Guide. . . . . . . . . . . . . . . . . . . . . . . . . . . . . . . . . . . . . . . . 7
Intended Audience . . . . . . . . . . . . . . . . . . . . . . . . . . . . . . . . . . . . . . . 7
Revision History . . . . . . . . . . . . . . . . . . . . . . . . . . . . . . . . . . . . . . . . 7
Documentation Feedback . . . . . . . . . . . . . . . . . . . . . . . . . . . . . . . . . . . 8
Chapter 1 Getting Started with PayPal Pro . . . . . . . . . . . . . . . 9
Overview . . . . . . . . . . . . . . . . . . . . . . . . . . . . . . . . . . . . . . . . . . . . 9
Features and Benefits . . . . . . . . . . . . . . . . . . . . . . . . . . . . . . . . . . . . . 9
How PayPal Pro Works . . . . . . . . . . . . . . . . . . . . . . . . . . . . . . . . . . . 10
Seller Protection . . . . . . . . . . . . . . . . . . . . . . . . . . . . . . . . . . . . . . . 11
Instant Payment Review . . . . . . . . . . . . . . . . . . . . . . . . . . . . . . . . . 11
PayPal Express Checkout Transaction Processing . . . . . . . . . . . . . . . . . . . . . 12
Introduction to Integrating with PayPal Pro . . . . . . . . . . . . . . . . . . . . . . . . . 13
Chapter 2 Integrating Your Website Using HTML. . . . . . . . . . . .15
Simple PayPal Pro Integration . . . . . . . . . . . . . . . . . . . . . . . . . . . . . . . . 15
Sample Integration. . . . . . . . . . . . . . . . . . . . . . . . . . . . . . . . . . . . 16
HTML Variables . . . . . . . . . . . . . . . . . . . . . . . . . . . . . . . . . . . . . . . 17
Chapter 3 Customising Your PayPal Payment Page . . . . . . . . . .21
Modifying Your PayPal Account Settings . . . . . . . . . . . . . . . . . . . . . . . . . . 21
Settings . . . . . . . . . . . . . . . . . . . . . . . . . . . . . . . . . . . . . . . . . 23
Customisation . . . . . . . . . . . . . . . . . . . . . . . . . . . . . . . . . . . . . . 25
Adding HTML Variables . . . . . . . . . . . . . . . . . . . . . . . . . . . . . . . . . . . 31
Chapter 4 Integrating iFrame in Your Website . . . . . . . . . . . . .33
Integrating iFrame . . . . . . . . . . . . . . . . . . . . . . . . . . . . . . . . . . . . . . 34
Manual Integration . . . . . . . . . . . . . . . . . . . . . . . . . . . . . . . . . . . . 34
API Integration . . . . . . . . . . . . . . . . . . . . . . . . . . . . . . . . . . . . . . 35

Contents
4
Chapter 5 Integrating Your Website Using API . . . . . . . . . . . . .39
Button Hosting . . . . . . . . . . . . . . . . . . . . . . . . . . . . . . . . . . . . . . . . 39
Using the Button Manager API with PayPal Pro Checkout . . . . . . . . . . . . . . . . . 40
Using URL Returned in the Response (Recommended) . . . . . . . . . . . . . . . . 40
Using Form POST . . . . . . . . . . . . . . . . . . . . . . . . . . . . . . . . . . . . 41
Encrypting Buttons Using Public and Private Key . . . . . . . . . . . . . . . . . . . . 43
Example of Initiating PayPal ProCheckout . . . . . . . . . . . . . . . . . . . . . . . 43
BMCreateButton API Operation . . . . . . . . . . . . . . . . . . . . . . . . . . . . . . . 45
BMCreateButton Request . . . . . . . . . . . . . . . . . . . . . . . . . . . . . . . . 45
BMCreateButton Response . . . . . . . . . . . . . . . . . . . . . . . . . . . . . . . 46
BMCreateButton Errors . . . . . . . . . . . . . . . . . . . . . . . . . . . . . . . . . 46
Chapter 6 Testing Your Integration in Sandbox . . . . . . . . . . . .49
Creating a Preconfigured Account . . . . . . . . . . . . . . . . . . . . . . . . . . . . . . 49
Testing Your Integration and Settings . . . . . . . . . . . . . . . . . . . . . . . . . . . . 53
Testing Your Integration . . . . . . . . . . . . . . . . . . . . . . . . . . . . . . . . . 53
Testing Your Settings . . . . . . . . . . . . . . . . . . . . . . . . . . . . . . . . . . 54
Chapter 7 Order Processing . . . . . . . . . . . . . . . . . . . . . .55
Verifying Transaction Status and Authenticity . . . . . . . . . . . . . . . . . . . . . . . . 55
Validate Instant Payment Notification (IPN) . . . . . . . . . . . . . . . . . . . . . . . 55
Execute a GetTransactionDetails API Call. . . . . . . . . . . . . . . . . . . . . . . . 56
Fulfilling Order . . . . . . . . . . . . . . . . . . . . . . . . . . . . . . . . . . . . . . . . 56
Chapter 8 Protecting Buttons by Using Encrypted Website Payments 57
Public Key Encryption Used by Encrypted Website Payments . . . . . . . . . . . . . . . 58
Setting Up Certificates Before Using Encrypted Website Payments. . . . . . . . . . . . . 58
Generating Your Private Key Using OpenSSL. . . . . . . . . . . . . . . . . . . . . . 59
Generating Your Public Certificate Using OpenSSL . . . . . . . . . . . . . . . . . . . 59
Uploading Your Public Certificate to Your PayPal Account . . . . . . . . . . . . . . . 59
Downloading the PayPal Public Certificate from the PayPal Website . . . . . . . . . . 60
Removing Your Public Certificate . . . . . . . . . . . . . . . . . . . . . . . . . . . . 60
Using Encrypted Website Payments to Protect Your Payment Buttons . . . . . . . . . 61
Blocking Unprotected and Non-encrypted Website Payments . . . . . . . . . . . . . 62
Appendix A Optional API Operations. . . . . . . . . . . . . . . . . . .63

5
Contents
GetTransactionDetails API . . . . . . . . . . . . . . . . . . . . . . . . . . . . . . . . . . 63
GetTransactionDetails Request . . . . . . . . . . . . . . . . . . . . . . . . . . . . . 63
GetTransactionDetails Response . . . . . . . . . . . . . . . . . . . . . . . . . . . . 64
RefundTransaction API . . . . . . . . . . . . . . . . . . . . . . . . . . . . . . . . . . . 73
RefundTransaction Request . . . . . . . . . . . . . . . . . . . . . . . . . . . . . . 73
RefundTransaction Response . . . . . . . . . . . . . . . . . . . . . . . . . . . . . 74
DoCapture API . . . . . . . . . . . . . . . . . . . . . . . . . . . . . . . . . . . . . . . . 74
DoCapture Request . . . . . . . . . . . . . . . . . . . . . . . . . . . . . . . . . . . 74
DoCapture Response . . . . . . . . . . . . . . . . . . . . . . . . . . . . . . . . . . 77
Chapter B Moving from Website Payments Standard to PayPal Pro . .81
Sample Code Comparison. . . . . . . . . . . . . . . . . . . . . . . . . . . . . . . . 82
Appendix C Error Messages . . . . . . . . . . . . . . . . . . . . . . .85
Appendix D Currency Codes . . . . . . . . . . . . . . . . . . . . . . .95

Contents
6

PPreface
About This Guide
The PayPal Pro Integration Guide describes how to integrate with PayPal Pro. It includes
information about:
-Features and benefits of PayPal Pro.
-Seller Protection.
-Moving from Website Payments Standard to PayPal Pro.
-Integrating your website with PayPal Pro.
-Customising your hosted payment page.
-Testing your integration in the Sandbox environment.
-Verifying the status and authenticity of the transactions before fulfilling the orders.
Intended Audience
This guide is for merchants and developers that want to integrate with PayPal Pro to add
transaction processing to their website.
Revision History
Revision history for Website Payments Pro Hosted Solution Integration Guide.
TABLE P.1 Revision History
Date Description
July 2012 Removed references to the deprecated HTML variable: shopping_url
June 2012 -Updated the requirements for the billing address fields in the
HTML Variables section.
-Added a character limitations note to the following sections:
HTML Variables, Adding HTML Variables and
BMCreateButton API Operation.
-Corrected the HTML samples in Chapter 2 and Chapter 5.
May 2012 Added IE9 to list of browsers that support iFrame.


9
1Getting Started with PayPal Pro
Overview
PayPal Pro is a payment platform allowing merchants to receive payments funded by card or
PayPal account.This solution is hosted by PayPal. You do not have to capture or store credit
card information on your website, thereby helping towards achieving PCI compliance.
PayPal Pro is the choice for merchants who prefer a solution where all financial details are
handled by PayPal.
In addition to PayPal Pro, PayPal recommends that you implement the PayPal Express
Checkout button on your website. The button appears much earlier in the payment flow and
gives existing PayPal account holders the opportunity to use PayPal, thereby increasing the
transaction completion rate.
Features and Benefits
Here are the features and benefits of PayPal Pro:
-PCI compliance - Payment Card Industry (PCI) Data Security Standards (DSS) is a global
security standard which applies to all businesses that collect, store, process, or transmit
card holder information. You can use PayPal’s hosted payment page as part of the PCI
compliance solution for your business.
NOTE:PayPal Pro implementation helps achieving PCI compliance, and does not
necessarily guarantee it.
-Supports iFrame - PayPal offers a compact payment form that can be integrated in an
iFrame on your website. The buyer completes the payment on your website and you can
maintain the checkout look and feel in the master frame that surrounds the compact
form.The credit card fields are part of the compact form so you do not have to collect this
information separately. For more information, refer to Chapter 4, “Integrating iFrame in
Your Website.
-Soluzione di Pagamento Telefonico - PayPal-hosted online payment form, which enables
you to accept phone fax, mail orders for all major credit cards.
-Seller Protection - This program protects you against chargebacks on transactions funded
by credit card or a PayPal account. For more information, refer to “Seller Protection” on
page 11
-PayPal Express Checkout - Two-click payment option for PayPal account holders. For
more information, refer to “PayPal Express Checkout Transaction Processing” on page 12.
Getting Started with PayPal Pro
How PayPal Pro Works
10
-Supports Major Credit and Debit Cards - Supports Visa, MasterCard, Carta Aura
(processed by Cetelem), Postepay (Visa), PayPal prepaid card (MasterCard).
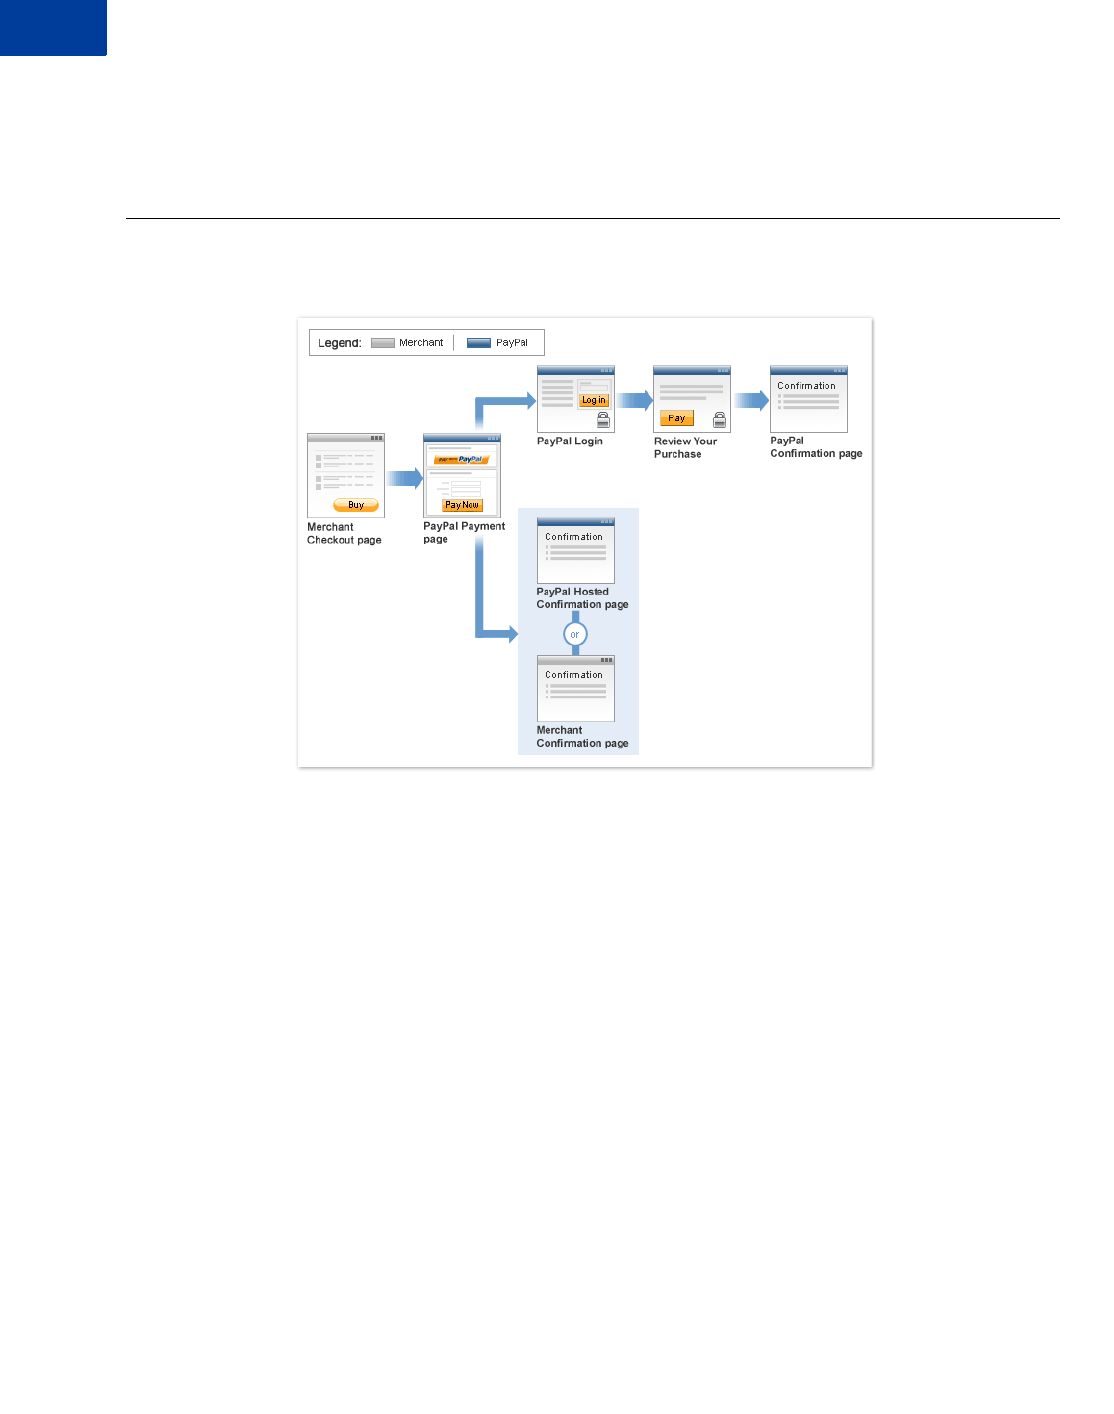
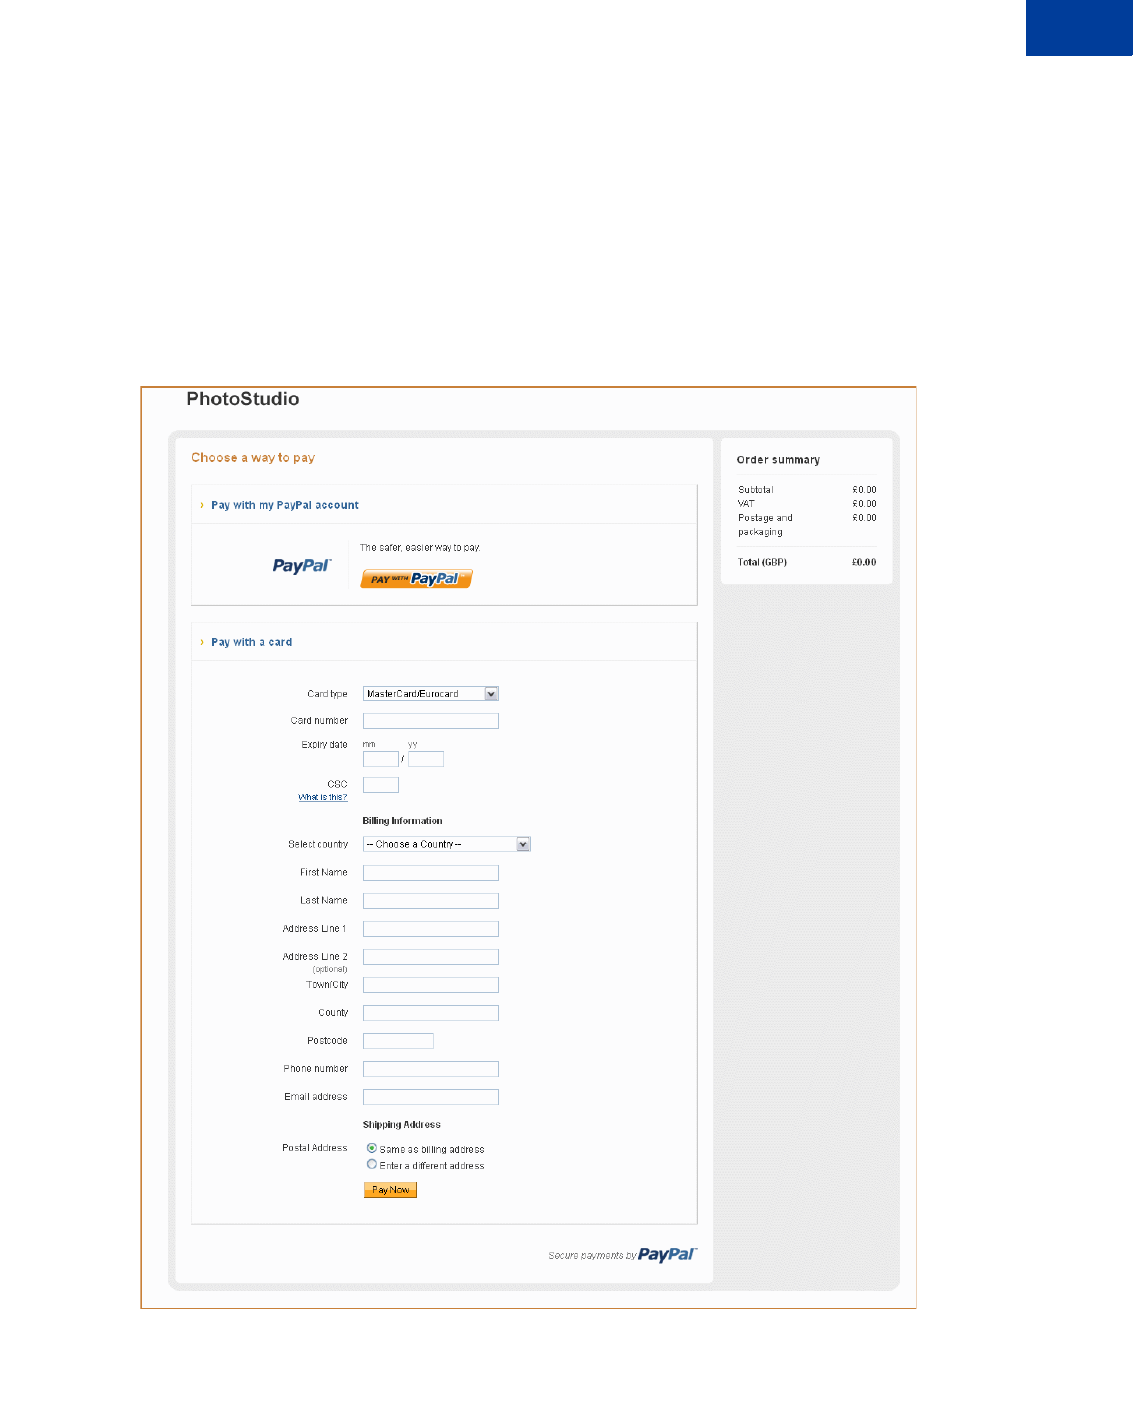
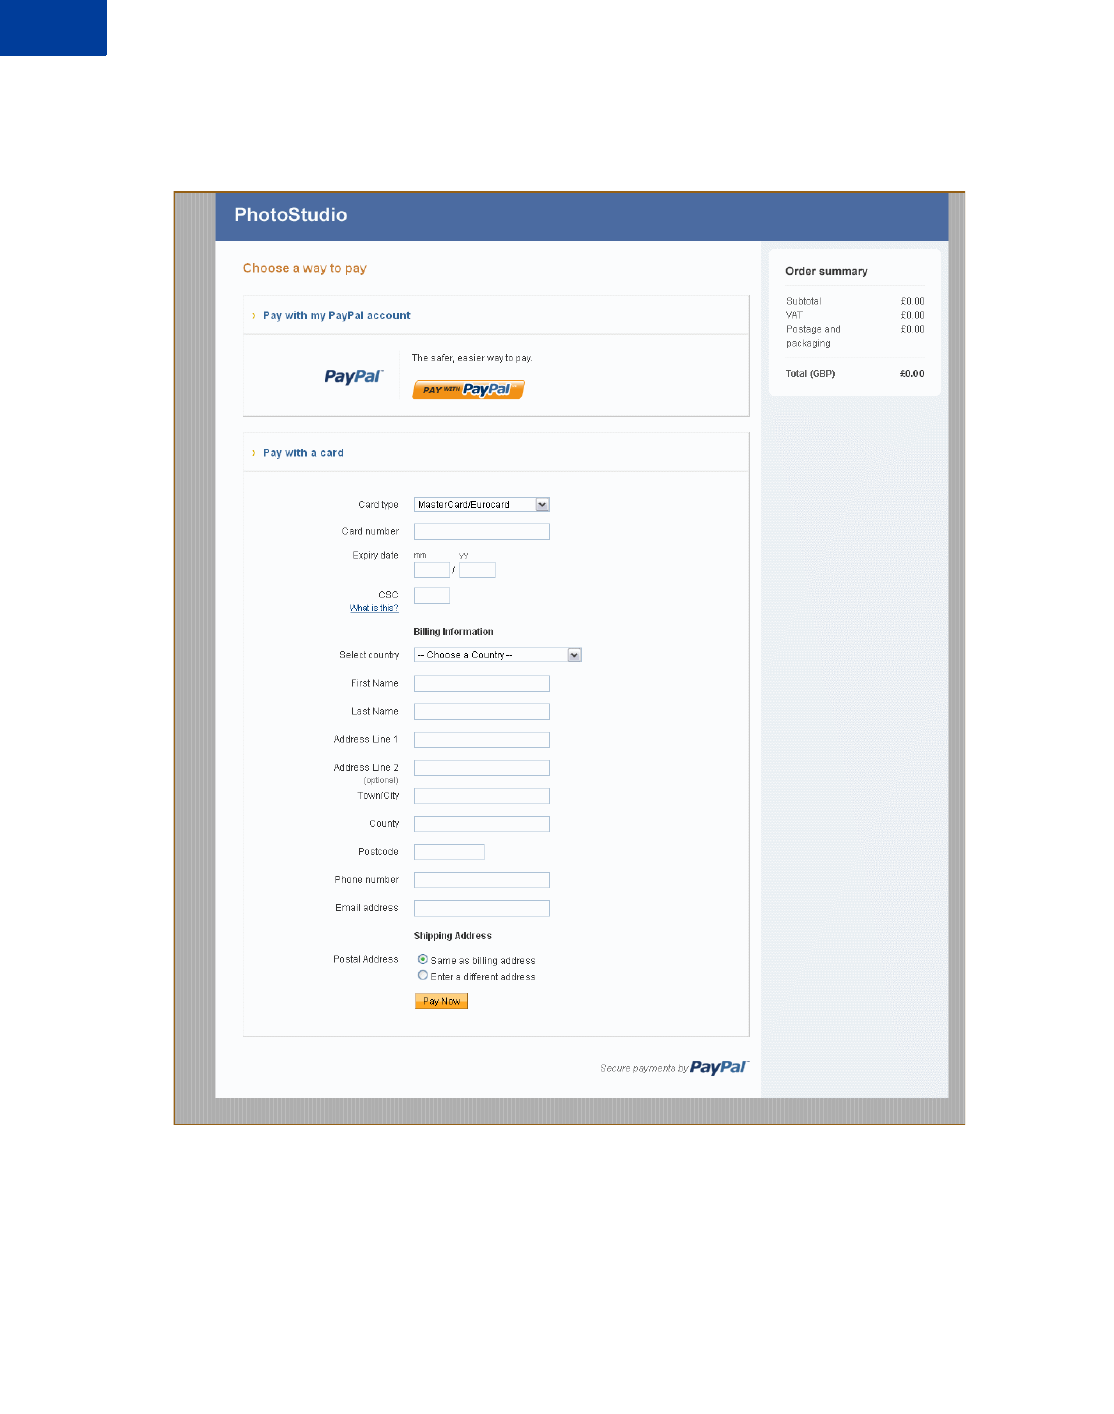
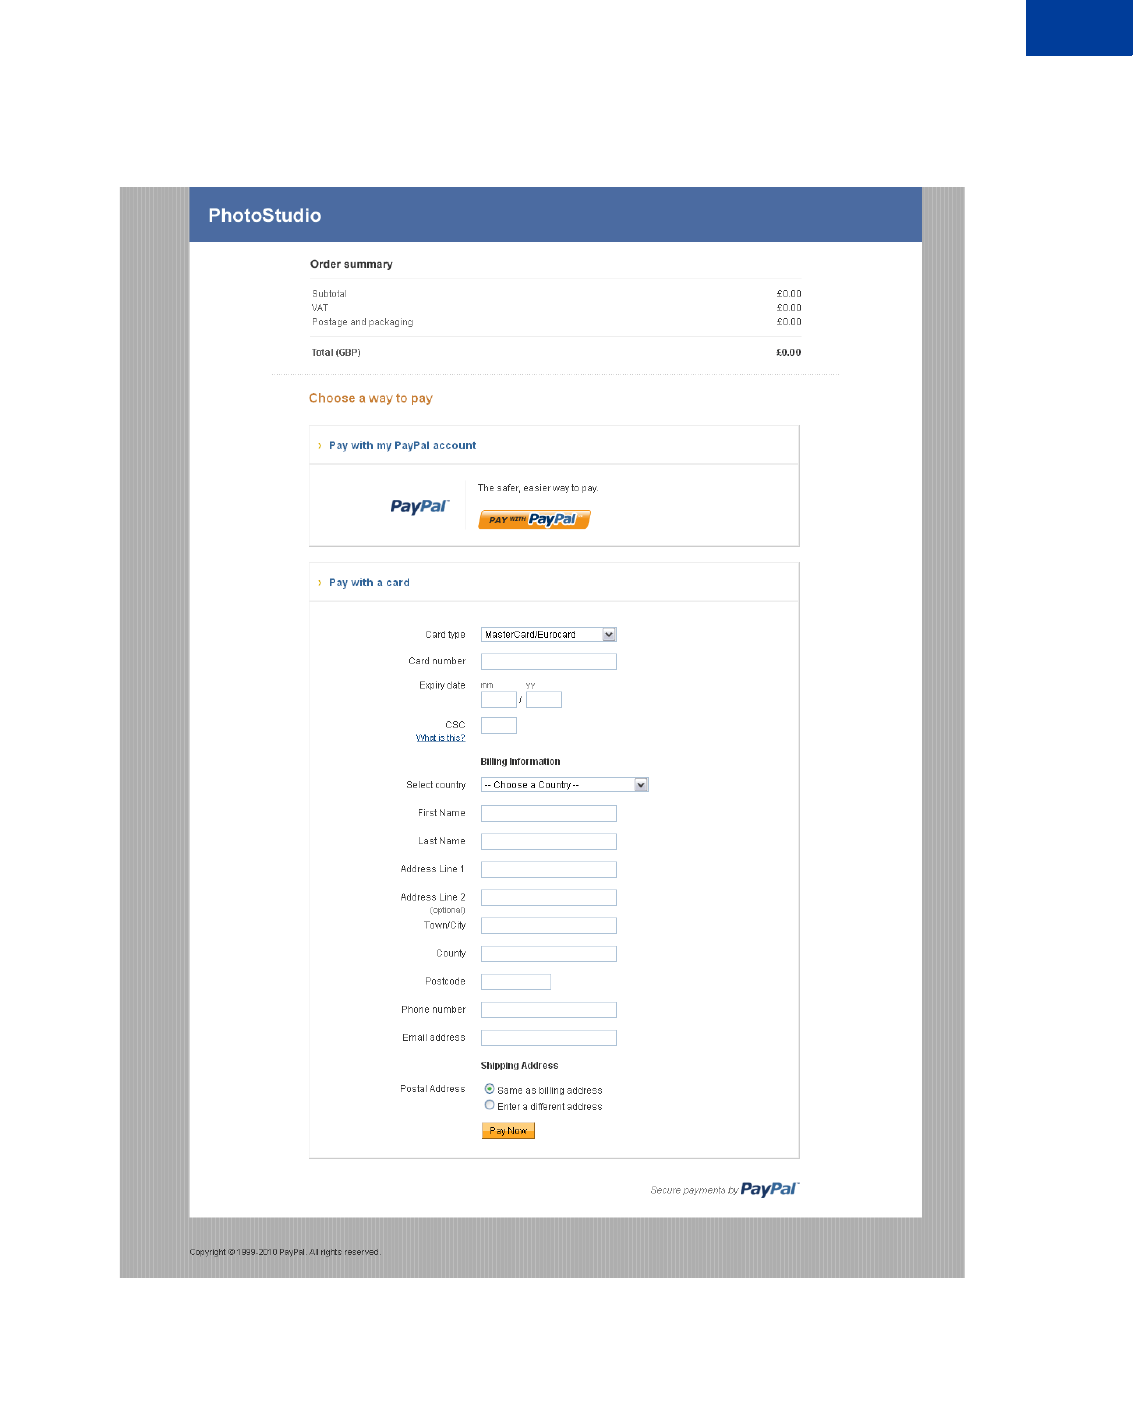
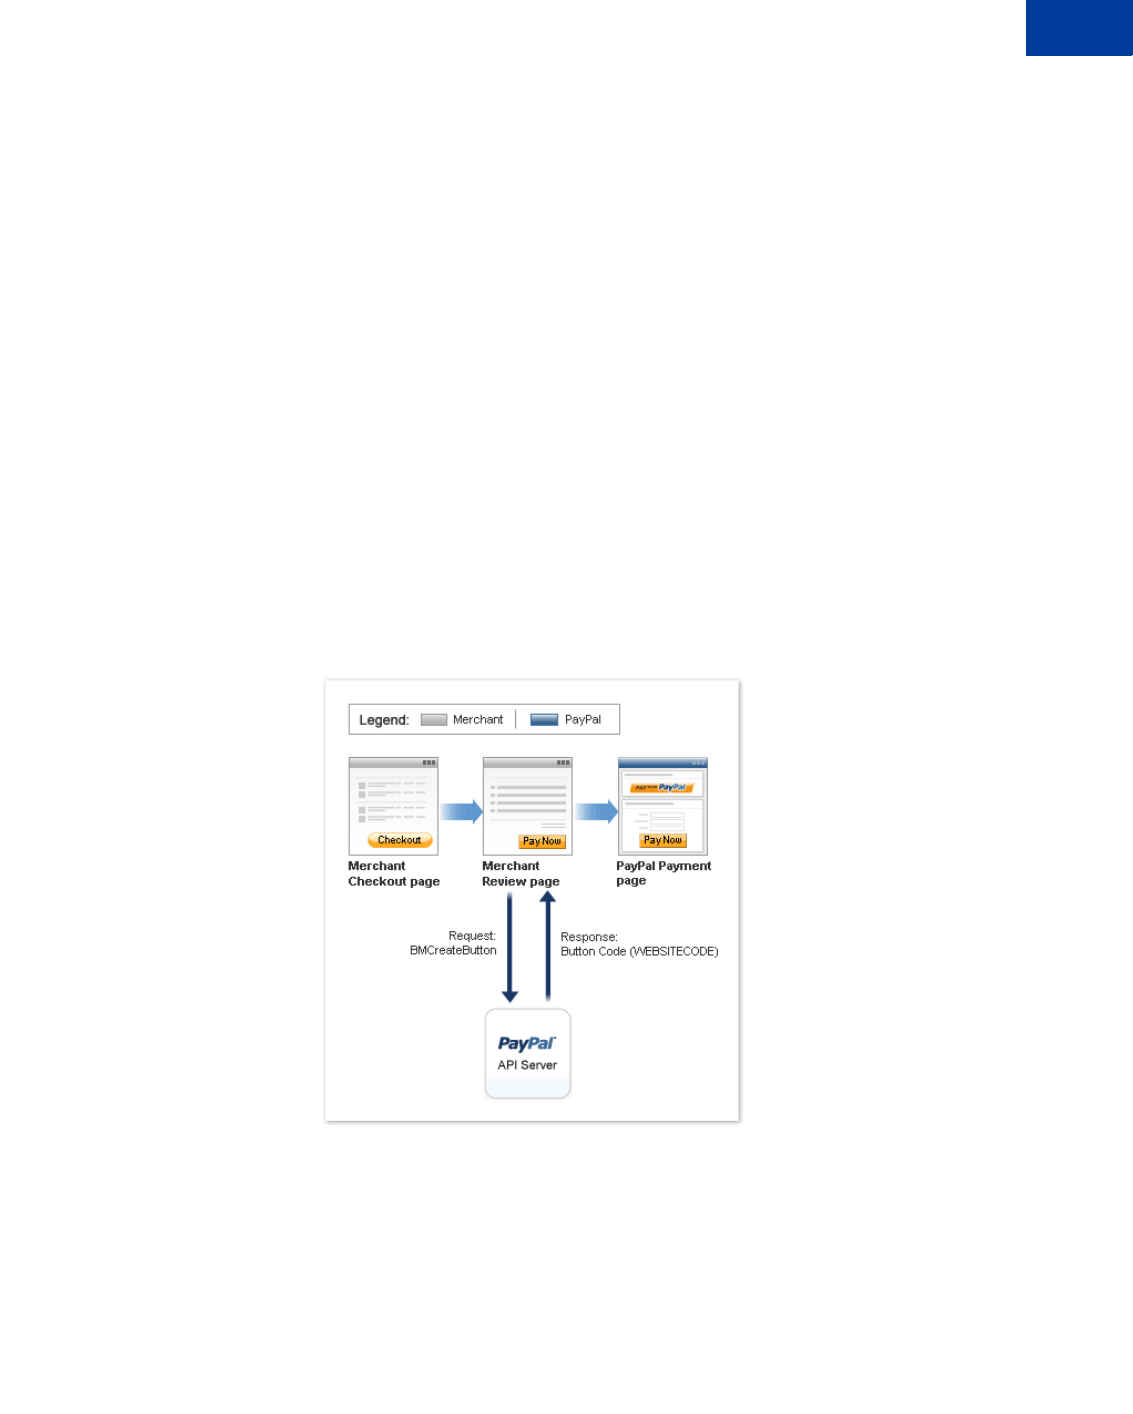
How PayPal Pro Works
In the figure above, the top flow is for paying using your PayPal account and the bottom flow
is for paying with a card.
To integrate your website with PayPal Pro:
1. Generate a button in your website checkout flow using HTML or API solution. The button
could be labeled Pay or Buy or similar. When the buyer clicks this button, they are
redirected to the payment page hosted by PayPal.
2. On the payment page, the buyer enters their debit or credit card information and clicks the
Pay Now button.They do not have to have a PayPal account, although they have the option
to use it if they have one.
3. If the transaction is successful, the buyer either sees PayPal’s confirmation page or is
redirected to a URL you specify. If the transaction is unsuccessful, an error message is
displayed, and the buyer can rectify the error and retry the transaction.
You can specify the content of the payment page and configure its appearance to reflect the
look and feel of your website (including your logo).

Getting Started with PayPal Pro
Seller Protection
Seller Protection
If PayPal is the only payment method on your website, transactions processed through Intégral
Evolution are eligible for PayPal’s Seller Protection. It covers payments done through the
payment flow of your website for items sold domestically and internationally. These items can
be purchased using a credit card or through the PayPal account.
To benefit from Seller Protection, the purchased item must be shipped to the address you
communicated to PayPal.
For this, you must perform the following tasks:
-Send all the details of the billing and shipping address provided by the buyer in the Form
POST.
-Set the address_override variable to true and showShippingAddress variable to
false (or unselect it in the Settings page on your Profile page).
IMPORTANT: Conditions apply. To see all conditions, please refer to PayPal e-Terminal and
PayPal Intégral Evolution User Agreement.
Instant Payment Review
To take advantage of Seller Protection, you must integrate with Instant Payment Review.
Payment Review is a feature that identifies high-risk transactions and notifies you so that you
can hold shipments until the risk has been evaluated by PayPal. It is made available to all
merchants and it reduces seller loss and makes the transactions eligible for Seller Protection.
When a transaction is initiated, PayPal runs additional buyer-risk assessment. PayPal scores all
transactions (Authorization and Sale) instantly and flags high-risk transactions as “Under
Review” and you are immediately notified. You should not ship merchandise or, in the case of
electronic media, you should not allow download access while the payment is under review.
PayPal fraud agents review the transaction within 24 hours and update the order as Completed
(released as safe by Payment Review) or Reversed (rejected by Payment Review). For risky
transactions, PayPal advises you to not ship the items until the transaction has been determined
as Completed. Payments that are completed are eligible for PayPal’s Seller Protection.
You can determine the status of a payment in the following ways:
-Logging into https://www.paypal.com and viewing the status information in the
Transaction History.
-Checking email sent by PayPal
-Reviewing the Instant Payment Notification (IPN) message

Getting Started with PayPal Pro
PayPal Express Checkout Transaction Processing
12
-Verifying the status of a transaction programatically. To check the initial status of a
transaction, use any of the following API operations:
– DoExpressCheckoutPayment
– DoReferenceTransaction
– DoAuthorization
– DoReauthorization
You can check the subsequent status of a transaction programatically by calling the
GetTransactionDetails API operation. For more information, refer to “GetTransactionDetails
API” on page 63.
NOTE:You must use version 58.0 (or +) of the API to obtain the initial status information
provided by DoExpressCheckoutPayment, DoReferenceTransaction, DoAuthorization,
or DoReauthorization.
To use payment review with DoExpressCheckoutPayment, DoReferenceTransaction,
DoAuthorization, and DoReauthorization Payment API operations, you must
1. Check the payment status in the response to the API operation; specifically, check whether
PaymentStatus is set to Pending.
2. If the PaymentStatus is set to Pending, check whether the PendingReason is set to
PaymentReview, because there are other reasons that a transaction may become pending.
For example, an unsettled authorization’s PaymentStatus is set to Pending; however, its
PendingReason is set to authorization, which is not related to payment review.
If PaymentStatus is set to Pending and the PendingReason is set to PaymentReview,
you should not ship merchandise or, in the case of electronic media, you should not allow
download access.
Because the payment status will change after review, you must periodically check the payment
status using the GetTransactionDetails API operation, checking email from PayPal, reviewing
IPN messages, or checking the Transaction History on https://www.paypal.com.
PayPal Express Checkout Transaction Processing
PayPal Express Checkout is PayPal’s premier checkout solution. It makes it easier for your
buyers to pay and allows you to accept PayPal while retaining control of the buyer and overall
checkout flow. It enables the buyers to use shipping information stored securely at PayPal to
check out, so they do not have to re-enter it on your site. The Pay with PayPal button can be

Getting Started with PayPal Pro
Introduction to Integrating with PayPal Pro
placed on both the product page as well as the shopping cart page and is a great tool to increase
checkout conversion.
The following steps describe how PayPal Express Checkout works
1. After selecting products to purchase on your website, buyers click Pay with PayPal
button.
2. They are redirected to the PayPal site where they log in using their PayPal login and
password.
3. After logging in, they review the order summary, and click Continue Checkout to
authorise the transaction.
4. The buyers are then returned to the confirmation page on your website where they can
verify the order details and submit the transaction.
For complete details on PayPal Express Checkout, refer to Express Checkout Integration Guide.
Introduction to Integrating with PayPal Pro
After signing up for PayPal Pro, follow these steps to integrate your website with:
1. Connect your website to PayPal Pro: Identify a point in your website checkout flow where
you want to place a Pay or similar button that the buyer clicks on to initiate the payment.
You can do this using HTML or API. Clicking on this button redirects the buyer’s browser
to PayPal’s payment page for transaction processing. Depending on how you want to
integrate, follow the steps described in Chapter 2, “Integrating Your Website Using HTML
or Chapter 5, “Integrating Your Website Using API.
2. Optionally, customise the appearance and content of your PayPal-hosted payment page by
either sending the appropriate HTTP variables or by editing your PayPal account settings.
Refer to Chapter 3, “Customising Your PayPal Payment Page.
3. Optionally, test your integration in the PayPal Sandbox environment. This step is described
in Chapter 6, “Testing Your Integration in Sandbox.

Getting Started with PayPal Pro
Introduction to Integrating with PayPal Pro
14

2Integrating Your Website Using
HTML
This chapter provides instructions for a simple integration that enables you to begin processing
transactions using PayPal Pro.
NOTE:PayPal recommends that you implement the simple integration to familiarise yourself
with PayPal Pro before implementing a more customised integration.
As part of a simple integration, you get the default settings on your payment page. To
customise the look and feel of the page so it matches your website, you can do one of the
following:
-Change your settings in your Profile section on PayPal.com, as described in “Modifying
Your PayPal Account Settings” on page 21.
-Add the appropriate HTML variables to the payment page, as described in Table 2.1,
“HTML Variables for Settings of Payment Page and Table 3.1, “HTML Variables for Look
and Feel of Payment Page.
IMPORTANT: HTML variables will override the settings you save on your profile page.
Simple PayPal Pro Integration
To integrate your website with PayPal Pro, identify a point in your website checkout flow
where you want to place a button that the buyer clicks to initiate the payment. The button
should be labeled Continue to Payment, Pay or similar, and when clicked, should execute a
Form POST to PayPal. Clicking on this button redirects the buyer’s browser to the PayPal
payment page where they can pay with credit card, or their PayPal account.
The Form POST contains a set of HTML variables that describe the transaction. In the Form
POST, you must specify the following:
-subtotal - amount of the transaction
-business - Secure Merchant ID (found on the profile page) or the email address
associated with your PayPal account.
-paymentaction - Indicates whether the transaction is for payment on a final sale or an
authorisation for a final sale (to be captured later).
The default currency is USD. Additionally, you can specify the appropriate HTML variables
listed in Table 2.1, “HTML Variables for Settings of Payment Page to customise the
information collected on the payment page or Table 3.1, “HTML Variables for Look and Feel
of Payment Page to customise the look and feel of the page. If the payment is successful, then
the buyer either sees the PayPal confirmation page or is redirected to the URL you specify in
your configuration.

Integrating Your Website Using HTML
Simple PayPal Pro Integration
16
The return URL is appended with a Transaction ID on the query string during the redirect back
from the payment page to your website. This Transaction ID can be used to retrieve the status
and verify the authenticity of the transaction. For detailed information on verifying the
authenticity of the transaction before fulfilling the order, refer to Chapter 7, “Order
Processing.
Sample Integration
Below is an example of a simple PayPal Pro integration:
1. Sample PayPal Pro Form POST:
<form action="https://securepayments.paypal.com/cgi-bin/acquiringweb"
method="post">
<input type="hidden" name="cmd" value="_hosted-payment">
<input type="hidden" name="subtotal" value="50">
<input type="hidden" name="business" value="HNZ3QZMCPBAAA">
<input type="hidden" name="paymentaction" value="sale">
<input type="hidden" name="return"
value="https://yourwebsite.com/receipt_page.html">
<input type="submit" name="METHOD" value="Pay">
</form>
The bold text is the value for the corresponding variable. It is recommended that you
enclose the values in quotes. For detailed information on these values, refer to Table 2.1,
“HTML Variables for Settings of Payment Page.
2. Output the HTML text into your website at the point where buyers will proceed with their
checkout.
3. Open your checkout page and test the button to ensure that it opens the PayPal payment
page.
You can also use the PayPal sandbox environment to test your integration. For complete
information on testing your integration in the PayPal Sandbox environment, refer to
Chapter 6, “Testing Your Integration in Sandbox.

17
Integrating Your Website Using HTML
HTML Variables
HTML Variables
The table below lists the PayPal Pro HTML variables you can use to send in additional
transaction information along with your web request. For a list of HTML variables that you
can use to customise the look and feel of your payment page, refer to Table 3.1, “HTML
Variables for Look and Feel of Payment Page.
NOTE:The values you pass must not contain any of these special characters (){}<>\";
NOTE:Some merchants are required to pass billing information with every transaction. It is
recommended that you test your integration first, particularly if you plan to use iFrame,
to determine if the billing information fields are required.
TABLE 2.1 HTML Variables for Settings of Payment Page
V a r i a b l e D e s c r i p t i o n R e q u i r e d
address1 Street name of shipping address. (1 of 2 fields). No
address2 Street name of shipping address. (2 of 2 fields). No
address_override The payer is shown the passed-in address but cannot edit
it. This variable is overridden if there are errors in the
address. The allowable values are true/false. Default is
false.
No
billing_address1 Street name of the billing address. (1 of 2 fields). Conditional
billing_address2 Street name of the billing address. (2 of 2 fields). No
billing_city City name of the billing address. Conditional
billing_country Country code of the billing address. Conditional
billing_first_name First name of person the item is being billed to. Conditional
billing_last_name Last name of person the item is being billed to. Conditional
billing_state State name of the billing address. Conditional
billing_zip Zip code of the billing address. Conditional
bn Identifies the source that built the code for the button.
Format - <Company>_<Service>_<Product>_<Country>
No
business Your PayPal account email address or your PayPal ID
(Secure Merchant ID) associated with your PayPal
account. It is recommended that you use your PayPal ID,
which can be found on the top section of the Profile page
on PayPal.com
Yes
buyer_email Email address of the buyer. No

Integrating Your Website Using HTML
HTML Variables
18
cancel_return The browser will be redirected to this URL if the buyer
clicks “Return to Merchant” link. Be sure to enter the
complete URL, including http:// or https://.
No
cbt Sets the text for the “Return to Merchant” link on the
PayPal confirmation page. For business accounts, the
return button displays your business name in the place of
the word “Merchant” by default.
No
city City name of shipping address. No
country Country name of shipping address. No
currency_code The currency of the payment. The default is USD. No
custom Pass through variable never presented to the payer. No
first_name First name of person the item is being shipped to. No
handling Handling charged. This amount is added to subtotal for
the total amount.
No
invoice Order number in the merchant’s ordering/invoice system. No
last_name Last name of person the item is being shipped to. No
lc The language of the login or sign-up page. No
night_phone_a The area code of the U.S. phone number, or the country
code of the phone number outside the U.S. This pre-
populates the buyer’s home phone number.
No
night_phone_b The three-digit prefix for U.S. phone numbers, or the
entire non-U.S. phone number for numbers outside the
U.S., excluding the country code. This pre-populates the
buyer’s home phone number.
NOTE:Use this variable for non-US numbers.
No
night_phone_c The four-digit phone number for U.S. phone numbers.
This pre-populates the buyer’s home phone number.
No
notify_url The URL to which PayPal posts information about the
transaction in the form of Instant Payment Notification. Be
sure to enter the complete URL, including http:// or
https://.
No
paymentaction Indicates whether the transaction is for payment on a final
sale or an authorisation for a final sale (to be captured
later).
-Allowable Values: - authorization or sale
-Default Value - sale
Yes
TABLE 2.1 HTML Variables for Settings of Payment Page (Continued)
V a r i a b l e D e s c r i p t i o n R e q u i r e d

19
Integrating Your Website Using HTML
HTML Variables
return The URL to which the buyer’s browser is redirected to
after completing the payment. Be sure to enter the
complete URL, including http:// or https://.
No
shipping Shipping charged. This amount is added to subtotal for
the total amount.
No
state State of the shipping address. No
subtotal Amount charged for the transaction. If shipping, handling,
and taxes are not specified, this is the total amount
charged.
Yes
tax Taxes charged. This amount is added to subtotal for the
total amount.
No
zip Postal code of the shipping address. No
TABLE 2.1 HTML Variables for Settings of Payment Page (Continued)
V a r i a b l e D e s c r i p t i o n R e q u i r e d

Integrating Your Website Using HTML
HTML Variables
20

21
3Customising Your PayPal
Payment Page
You can customise the look and feel of the PayPal payment page in the following two ways:
-Modifying Your PayPal Account Settings
-Adding HTML Variables
NOTE:HTML variables will override the settings you save on your profile page.
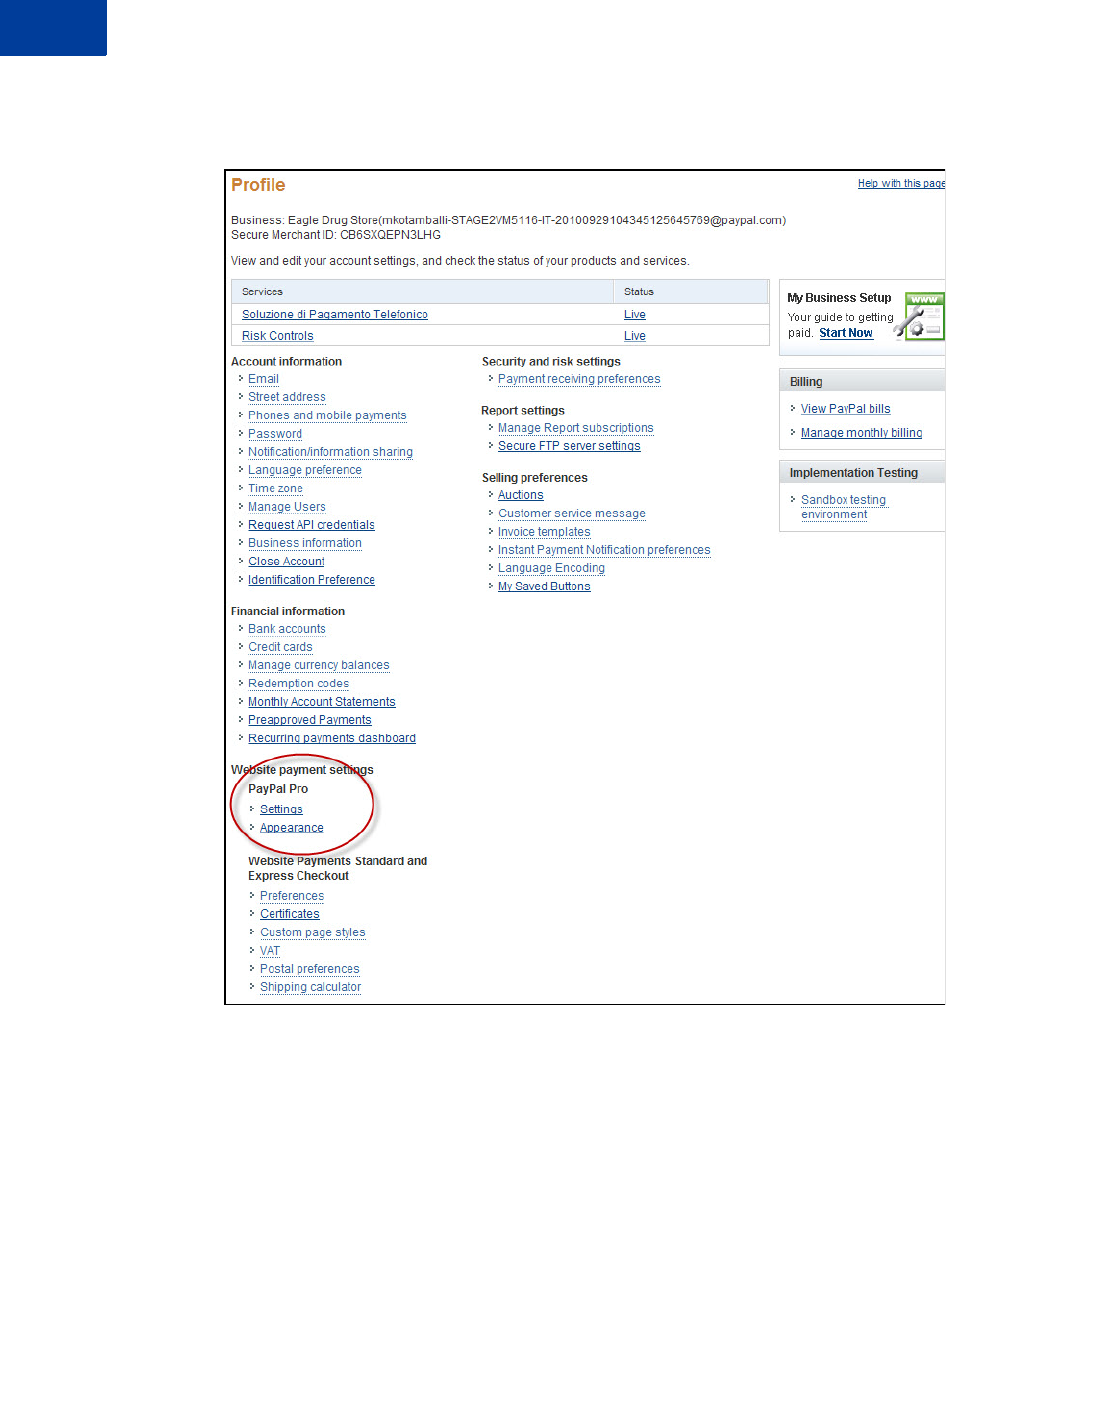
Modifying Your PayPal Account Settings
In your Profile section on PayPal.com, you can change the look and feel of the payment page
by modifying the settings on the following pages under the Website Payment Settings section.
-Settings
-Customisation
Customising Your PayPal Payment Page
Modifying Your PayPal Account Settings
22
Customising Your PayPal Payment Page
Modifying Your PayPal Account Settings
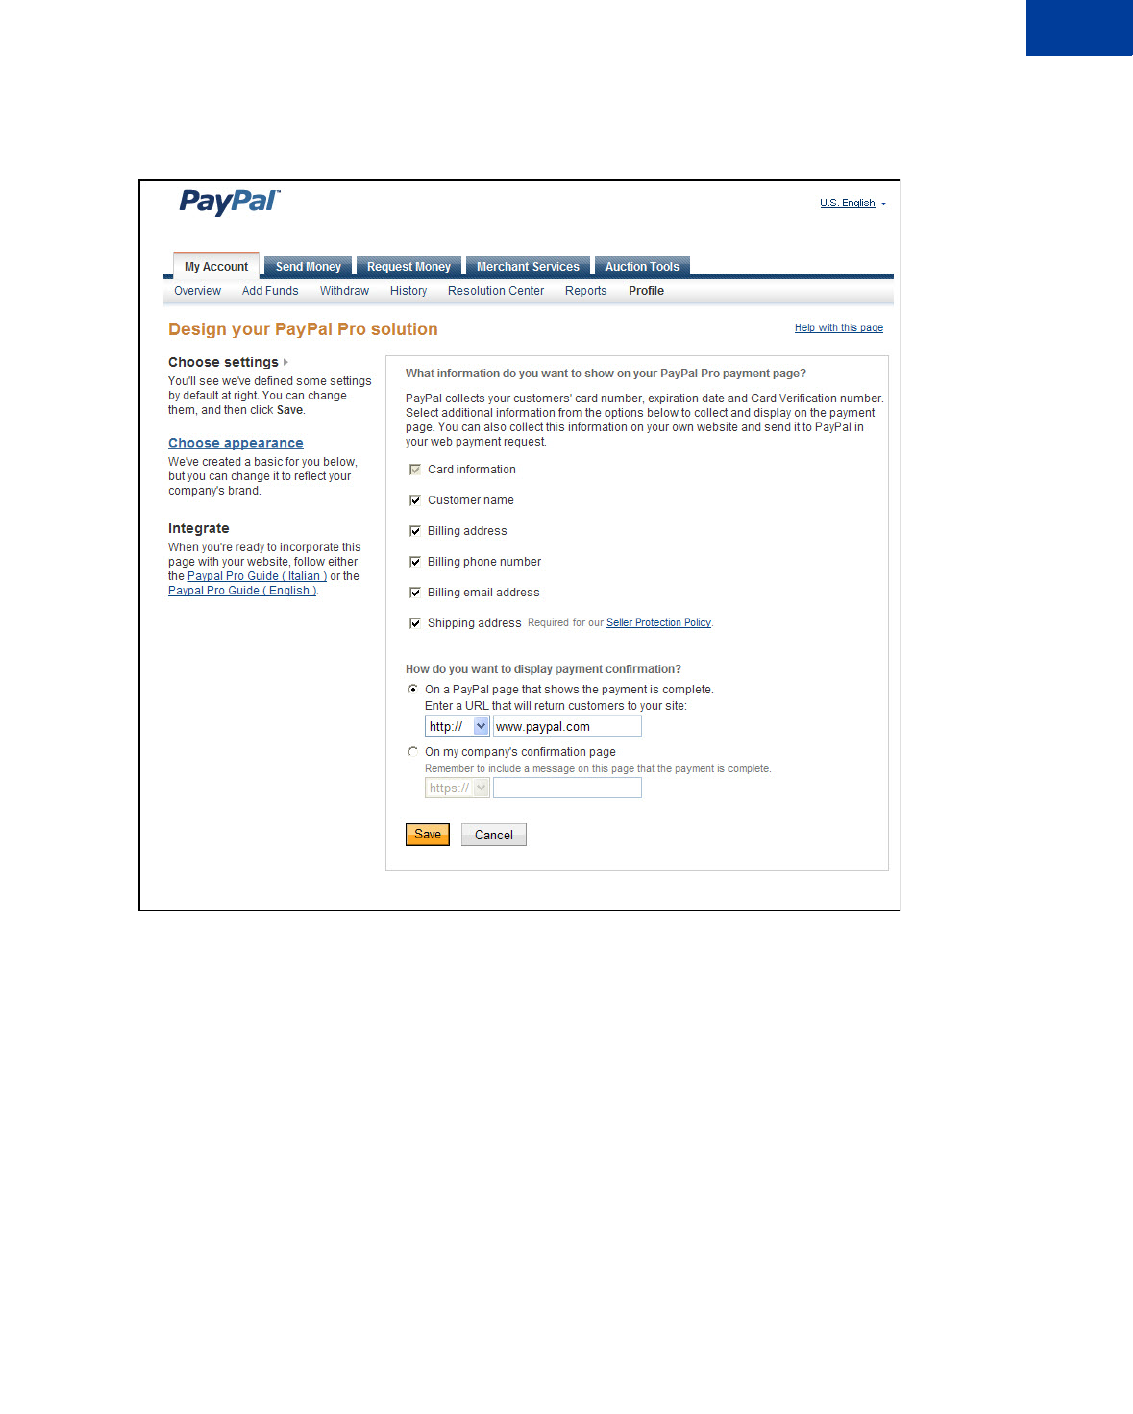
Settings
This page allows you to select the information you want to collect and display on your
payment page and where you want to display the payment confirmation.
Although we offer many options on this page, we recommend that you display as few options
as possible on the payment page. For example, you may have already collected shipping
address on your own website in order to calculate the shipping cost and passed it on to
PayPal's payment page. Therefore, it is not necessary to show this option on the payment page
again.
You could have information that has already been collected on your website, but you may
want to pass it to PayPal and display it on the hosted payment page again. This information
will be pre-filled and editable on this page.

Customising Your PayPal Payment Page
Modifying Your PayPal Account Settings
24
What information do you want to show on your PayPal Pro payment page?
You can select the fields that are displayed on your hosted payment page. You have the
following options:
-Card Information - Buyer's credit card information. This field is always displayed and
selected by default.
-Customer Name - Buyer's first and last name
-Billing Address - Buyer's billing address
-Billing Phone Number - Buyer's phone number
-Billing Email Address - Buyer's email address
-Shipping Address - Buyer's shipping address. This is required for seller protection. Ensure
that you set the buyer's shipping address HTML variable if you do not select this box.
How do you want to display payment confirmation?
Once the transaction is successful, you can choose to display your payment confirmation on
either a PayPal's confirmation page or on your own payment confirmation page.
-On a PayPal page that shows the payment is complete - The payment confirmation
appears on the PayPal confirmation page. Optionally, you can also provide a URL on the
confirmation page to take your buyer back to your website. To do so, enter the appropriate
URL in the field provided.
-On the Company's confirmation page - The payment confirmation will appear on your
own payment confirmation page. For this, enter the URL of the page that will display the
payment confirmation. You will have to message the outcome of the transaction to the
buyer when PayPal redirects back to this URL. Be sure to display specifics of the order so
the buyer sees a meaningful confirmation. You can get the specifics of the order using the
Transaction ID we pass back to you with the return URL.
Customising Your PayPal Payment Page
Modifying Your PayPal Account Settings
Customisation

Customising Your PayPal Payment Page
Modifying Your PayPal Account Settings
26
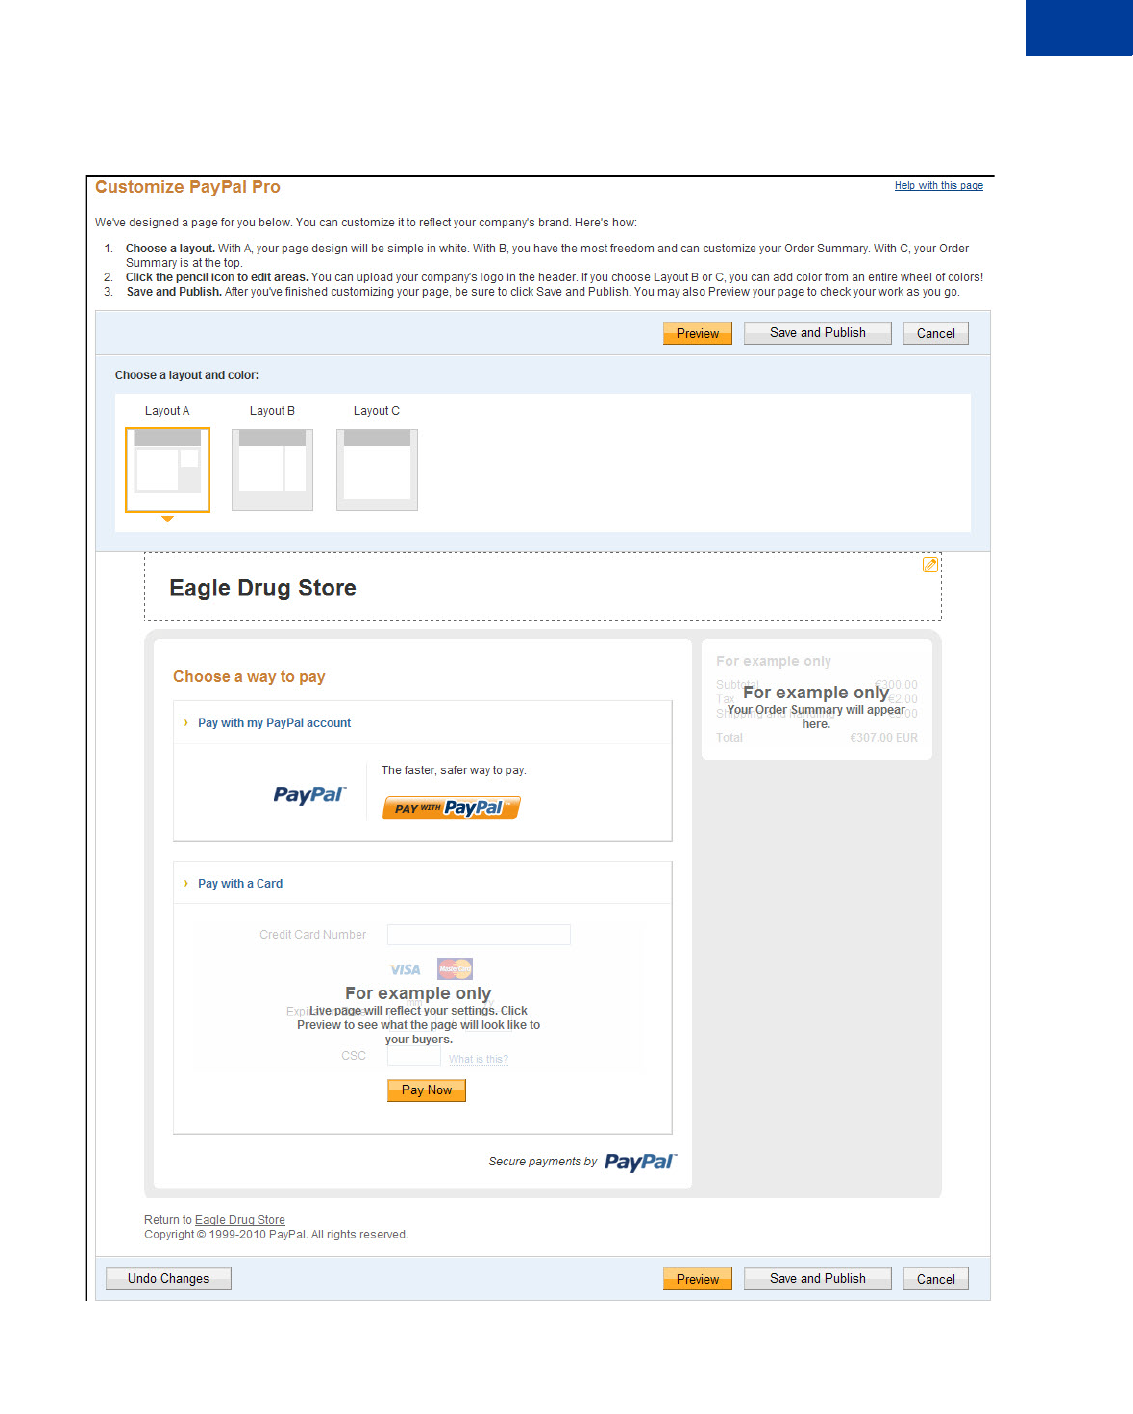
This page allows you to customise your payment page. You can customise the header,
background, title, button, and the order summary column of your payment page.
PayPal offers three design templates for you to choose. Template A is the default template,
however, you can choose from any of the templates offered.
NOTE:Your buyers will not see the payment page until you have completed the HTML
integration with your website.
Preview the design of your payment page. You can either change the design of your template,
or select and customise a different template on this page. To make changes, left-click on the
section you are trying to modify or the corresponding Click to Edit button for that section. On
the pop-up that appears, click the color selector to change the color, or enter the appropriate
URL, as needed.
If the buyer pays by logging into PayPal, the look and feel of that flow can be customised
through the Website Payment Standard customisation options on the Profile page.
After making the changes, click one of the following buttons:
-Preview - Preview the changes you have made to your template before saving and
publishing it.
-Save and Publish - Save all the changes you have made and publish the updated template.
Your buyers will see the updated payment page.
-Cancel - Discard all the changes you have made in this session.
-Previous Version - Discard all changes you have made since the last time you saved the
template. Your buyers will see the last saved template.
NOTE:You must make all modifications (including changing templates) within the same
session, otherwise all changes will be lost and you will have to redo your changes. If
the session times out, the design of the template will remain at the version that was last
published.
Customising Your PayPal Payment Page
Modifying Your PayPal Account Settings
28
Template B. Customise the header, background, title, button, and the order summary column.
FIGURE 3.2 Template B
Customising Your PayPal Payment Page
Modifying Your PayPal Account Settings
Template C. Customise the header, background, title, and the button.
FIGURE 3.3 Template C

Customising Your PayPal Payment Page
Modifying Your PayPal Account Settings
30
Customising Your Template
Consider the following when you customise your template:
-Header (applicable to Template A, B, and C) - By default, the business name from your
profile is shown in the header. You can change the following:
– Header height and color
– Font type, size, and color
– Swap between displaying the business name or the business logo image
– Position of the business name or the logo
NOTE:We recommend that you host your images on a secure server (https://) to avoid the
security dialog window that may hurt conversion.
-Background (applicable to Template B and C) - You can change the following:
– Background color
– Background image URL
-Title and Button (applicable to Template B and C) - You can change the following:
–Header color
– Title bar color and title text color
– Button color and button text color
-Order Summary Column (applicable to Template C) - You can change the following:
– Column color
–Image URL

Customising Your PayPal Payment Page
Adding HTML Variables
Adding HTML Variables
The table below lists the PayPal Pro HTML variables you can use to customise the look and
feel of your payment page.
NOTE:The values you pass must not contain any of these special characters (){}<>\";
TABLE 3.1 HTML Variables for Look and Feel of Payment Page
Variable Description
bodyBgColor Color of the surrounding background of the payment page.
bodyBgImg Image of the surrounding background of the payment page. The file
extension can be .gif, .jpg, .jpeg, or .png format.
footerTextColor Color of the footer text.
headerBgColor Color of the header background.
headerHeight Height of the header banner. It can be from 50 to 140 pixels. The
width cannot be changed. It is always 940 pixels.
logoFont Font type of the logo text.
logoFontColor Color of the logo text.
logoFontSize Font size of the logo text.
logoImage Image displayed in the logo. The acceptable file extension formats
are .gif, .jpg, .jpeg, or .png. The width of the image cannot be more
than 940 pixels.
logoImagePosition Position of the image in the logo.
logoText Business name displayed on your profile page. This field is editable
and text specified here is displayed on the header if logoImage is not
specified.
orderSummaryBgColor Color of the Order Summary column on the right side of the payment
page. You cannot change the color of the Order Summary box.
orderSummaryBgImage Background image you can put in the Order Summary Column. The
acceptable file extension formats are .gif, .jpg, .jpeg, or .png.
pageButtonBgColor Background color of the Pay Now button.
pageButtonTextColor Color of the Pay Now button. You cannot change the text of the
button.
pageTitleTextColor Color of the text used in the title of the page. (Text that says “Choose
a way to pay.”)
sectionBorder Background of the section that displays “Pay with my PayPal
account” or “Pay with a Card”.

Customising Your PayPal Payment Page
Adding HTML Variables
32
showCustomerName Display customer name (first name and last name).
-Default Value: true
-Allowable Value: true or false, where true = show and false =
hide.
showBillingAddress Display billing address information.
-Default Value: true
-Allowable Value: true or false, where true = show and false =
hide.
showBillingPhone Display billing phone number.
-Default Value: true
-Allowable Value: true or false, where true = show and false =
hide.
showBillingEmail Display email address for billing purposes.
-Default Value: false
-Allowable Value: true or false, where true = show and false =
hide.
showHostedThankyouPage Display PayPal’s confirmation page.
-Default Value: true
-Allowable Value: true or false, where true = show and false =
hide.
showShippingAddress Display shipping address.
-Default Value: false
-Allowable Value: true or false, where true = show and false =
hide.
subheaderText Color of the “Pay with my PayPal account” or “Pay with a Card”
text.
template Template used for your payment page. Options are TemplateA,
TemplateB, and TemplateC. TemplateD is used for iFrame
integration only and is not an option on the Customization page on
PayPal.com.
TABLE 3.1 HTML Variables for Look and Feel of Payment Page
Variable Description

4Integrating iFrame in Your
Website
PayPal offers a compact payment form that can be integrated in an iFrame on your website.
Since this form is integrated on your website, the buyer never leaves your website, thereby
reducing potential drop-offs. You can also maintain your checkout look and feel in the master
frame that surrounds the compact payment form. The credit card fields are part of the compact
payment form so you do not have to collect this information separately.
IMPORTANT: Due to security concerns involving iFrame, the following browsers are
supported and secure to use - Internet Explorer 7.0, 8.0 and 9.0, Firefox 8,
Chrome 4 and 4.1, Safari 4.x and 5.x. Transactions involving users of other
browsers should not use the iFrame flow or abandon the transaction.
Additionally, there is another risk beyond the iFrame flow - should the
PayPal iFrame become the source of an attack, it would appear that the attack
is originating from the merchant site; do not use the iFrame flow if you wish
to avoid this additional risk.
NOTE:Due to spoof concerns, the form does not contain any PayPal branding.
The compact payment form contains the following fields:
-Credit card number
-Expiry date
-CVV2 number (if applicable, based on the card type)
-Any additional fields required for other card types, such as start date and issue number for
Maestro or Switch.
The form also offers the following options:
-Remove the Pay with PayPal button. Although the form offers the option to pay using
PayPal account by default, you can contact your account manager or customer support to
turn this option off.
-Manually customize the color of the Pay Now button.
IMPORTANT: The compact payment form does not display the buyer's billing address, even
if showBillingAddress=true is passed. However, for some merchants,
it may be necessary to pass the billing address to successfully process the
transactions.

Integrating iFrame in Your Website
Integrating iFrame
34
Integrating iFrame
Choose one of the following methods to integrate the compact payment form in your website:
-Manual Integration
-API Integration
IMPORTANT: For optimal performance, PayPal recommends that you load the iFrame asset
before other assets such as images and JavaScripts. If there are too many
assets running on your payment page when you load iFrame, the request for
the iFrame may not be placed or might get delayed. This may result in the
buyers seeing a blank iFrame.
Manual Integration
To manually integrate the compact payment form in your website, perform the following
steps:
1. Enter the iFrame tag at the location where you want the compact payment form to appear
on your website. For example:
<iframe name="hss_iframe" width="570px" height="540px"></iframe>
The allowable size for the compact payment form is 570 pixels in width to 540 pixels in
height.
2. Below is the iFrame code, add the hidden form that is populated with the appropriate
PayPal Pro variables (including the total amount to be paid) and specify the variable
TemplateD. For example,
<form style="display:none" target="hss_iframe" name="form_iframe"
method="post"
action="https://securepayments.paypal.com/cgi-bin/acquiringweb">
<input type="hidden" name="cmd" value="_hosted-payment">
<input type="hidden" name="subtotal" value="50">
<input type="hidden" name="business" value="HNZ3QZMCPBAAA">
<input type="hidden" name="paymentaction" value="sale">
<input type="hidden" name="template" value="templateD">
<input type="hidden" name="return"
value="https://yourwebsite.com/receipt_page.html">
</form>
NOTE:If the iFrame transactions fail, pass the billing address

35
Integrating iFrame in Your Website
Integrating iFrame
3. Ensure that the target name matches the iFrame name, as highlighted in the example below:
<iframe name="hss_iframe" width="570px" height="540px"></iframe>
<form style="display:none" target="hss_iframe" name="form_iframe"
method="post"
action="https://securepayments.paypal.com/cgi-bin/acquiringweb">
4. Submit the form using JavaScript. For example:
<script type="text/javascript">
document.form_iframe.submit();
</script>
Example of Manual Integration
The complete example as per the above steps is as follows:
<iframe name="hss_iframe" width="570px" height="540px"></iframe>
<form style="display:none" target="hss_iframe" name="form_iframe"
method="post"
action="https://securepayments.paypal.com/cgi-bin/acquiringweb">
<input type="hidden" name="cmd" value="_hosted-payment">
<input type="hidden" name="subtotal" value="50">
<input type="hidden" name="business" value="HNZ3QZMCPBAAA">
<input type="hidden" name="paymentaction" value="sale">
<input type="hidden" name="template" value="templateD">
<input type="hidden" name="return"
value="https://yourwebsite.com/receipt_page.html">
</form>
<script type="text/javascript">
document.form_iframe.submit();
</script>
API Integration
To integrate the compact payment form in your website using the API, refer to “Using the
Button Manager API with PayPal Pro Checkout” on page 40.
NOTE:Use template=templateD for this type of integration.
There are two options in the response to initiate the PayPal Pro payment flow:
-Using URL Returned in the Response
-Using Form POST

Integrating iFrame in Your Website
Integrating iFrame
36
Using URL Returned in the Response
In the URL identified in the response as EMAILLINK, add “src” for iFrame as per the
example below to redirect the buyer and initiate the payment flow.
<iframe src="https://www.paypal.com/...?hosted_button_id=HSS-.."
width="570px" height="540px"></iframe>
The allowable size of the compact payment form is 570 pixels in width to 540 pixels in height.
IMPORTANT: This option is not supported by Safari browsers. Use the Form POST option
described below.
Using Form POST
Identify the WEBSITECODE in the response and use the code to create a Pay Now button on
your review page. When your buyer clicks the button, they are redirected to the PayPal hosted
payment page. Like the URL, the button is usable for approximately two hour or until the
payment is successful.
1. Enter the iFrame tag at the location where you want the compact payment form to appear
on your website. For example:
<iframe name="hss_iframe" width="570px" height="540px"></iframe>
The allowable size for the compact payment form is 570 pixels in width to 540 pixels in
height.
2. Insert the following in the iFrame tag:
WEBSITECODE=<form action="https://www.paypal.com/cgi-bin/webscr"
method="post">
<input type="hidden" name="cmd" value="_s-xclick">
<input type="hidden" name="hosted_button_id" value="HSS-
bXkpgPTNgZi7CyfIwWTAkWPSDbKziokU">
<input type="image" src="https://www.paypal.com/i/btn/btn_paynow_LG.gif"
border="0" name="submit" alt="PayPal - The safer, easier way to pay
online.">
<img alt="" border="0" src="https://www.paypal.com/i/scr/pixel.gif"
width="1" height="1">
</form>
3. Submit the form using JavaScript. For example:
<script type="text/javascript">
document.form_iframe.submit();
</script>

37
Integrating iFrame in Your Website
Integrating iFrame
Example of API (Form POST) Integration
The complete example as per the above steps is as follows:
<iframe name="hss_iframe" width="570px" height="540px"></iframe>
WEBSITECODE=<form action="https://www.paypal.com/cgi-bin/webscr"
method="post">
<input type="hidden" name="cmd" value="_s-xclick">
<input type="hidden" name="hosted_button_id" value="HSS-
bXkpgPTNgZi7CyfIwWTAkWPSDbKziokU">
<input type="image" src="https://www.paypal.com/i/btn/btn_paynow_LG.gif"
border="0" name="submit" alt="PayPal - The safer, easier way to pay
online.">
<img alt="" border="0" src="https://www.paypal.com/i/scr/pixel.gif"
width="1" height="1">
</form>
<script type="text/javascript">
document.form_iframe.submit();
</script>

Integrating iFrame in Your Website
Integrating iFrame
38

5Integrating Your Website Using
API
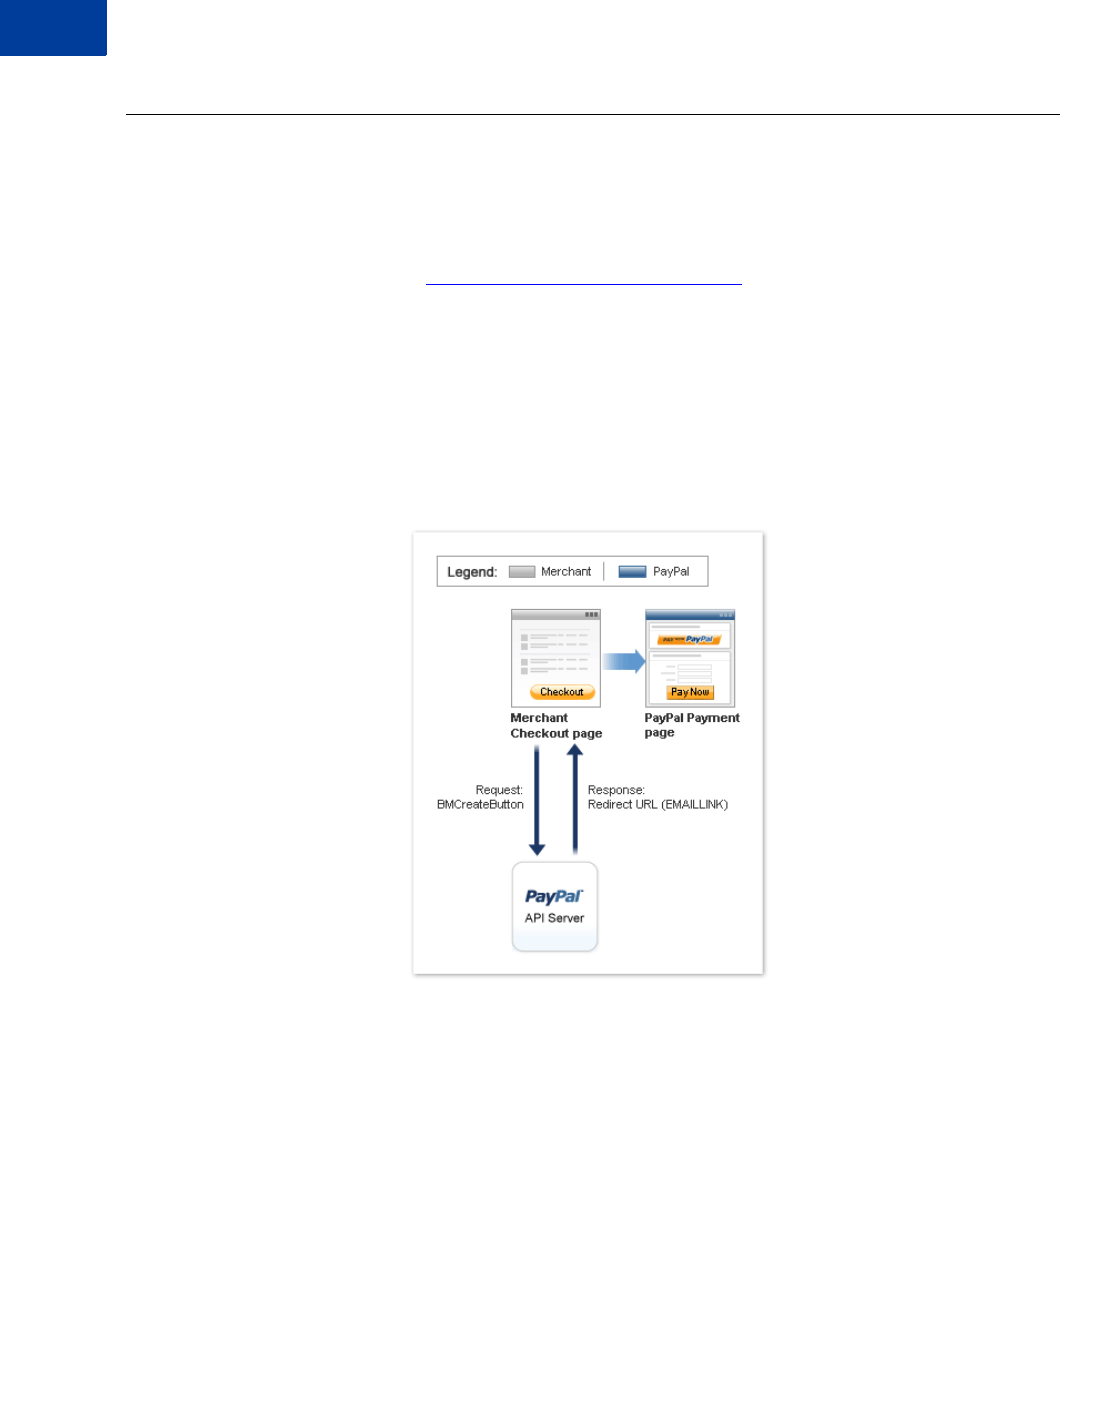
Using the Button Manager API, you can programmatically create the checkout button that
initiates the PayPal Pro checkout flow on your website. You create the checkout button
dynamically when the buyer attempts to checkout on your website. When the buyer clicks on
your checkout button, you call the BMCreateButton API operation to create a checkout
button and display it on your web page. When the buyer clicks on this checkout button, he or
she is redirected to the PayPal payment page where he or she can complete the payment.
HTML variables control the presentation of the PayPal payment pages, the information
contained on the pages, and pages to which your buyer can be returned to when leaving the
payment pages. For a list of HTML variables, refer to “HTML Variables” on page 17.
For complete information on the Button Manager API, refer to the Button Manager API (NVP)
or Button Manager API (SOAP).
NOTE:Using the Button Manager API, you can programmatically create the checkout button,
but not manage, edit, or delete it.
Button Hosting
For PayPal Pro, using BUTTONTYPE=PAYMENT, you can create the following kinds of
checkout buttons:
-Token buttons (BUTTONCODE=TOKEN) are not stored on PayPal. They are dynamic and
initiate the PayPal Pro checkout flow. The parameters associated with this kind of button
are secure. They have a lifetime of approximately two hours, if not used.
-Encrypted buttons (BUTTONCODE=ENCRYPTED) are not stored on PayPal. The
parameters associated with this kind of button are encrypted. You must update the web
pages that use an encrypted button each time the button or the associated information
changes.
-Clear text buttons (BUTTONCODE=CLEARTEXT) are not stored on PayPal. The
parameters associated with this kind of button are not encrypted. They can be used
dynamically because you can change the value of a parameter anytime. However, if you
use them, recognize the risk that sensitive information can be altered or stolen.
NOTE:Hosted buttons (BUTTONCODE=HOSTED) are not supported for PayPal Pro and will
return an error if used.
For more information about Button Manager API usage, refer to “BMCreateButton API
Operation” on page 45.
Integrating Your Website Using API
Using the Button Manager API with PayPal Pro Checkout
40
Using the Button Manager API with PayPal Pro Checkout
To create a checkout button on your website, you call the BMCreateButton API operation.
When the buyer clicks on the checkout button, PayPal initiates the PayPal Pro checkout flow.
You must decode the response from the BMCreateButton API. For information about URL
encoding, refer to the Name-Value Pair API Developer Guide.
There are two options in the response to initiate the PayPal Pro payment flow:
-Using URL Returned in the Response (Recommended)
-Using Form POST
Using URL Returned in the Response (Recommended)
Using the URL identified in the response as EMAILLINK, you can redirect the buyer and
initiate the payment flow.
Example of TOKEN
EMAILLINK=https://www.paypal.com/cgi-bin/webscr?cmd=_s-
xclick&hosted_button_id=HSS-
2MTCOLOp9LoPGdFYsYclhbGyjJVNrMHO&HOSTEDBUTTONID=HSS-
2MTCOLOp9LoPGdFYsYclhbGyjJVNrMHO&TIMESTAMP=2010-09-
15T00:30:35Z&CORRELATIONID=2fc9a340a2356&ACK=Success&VERSION=65.0&BUILD=150
0269
41
Integrating Your Website Using API
Using the Button Manager API with PayPal Pro Checkout
Example of ENCRYPTED
EMAILLINK=https://www.paypal.com/acquiringweb?cmd=_hosted-
payment&business=idc%2dautomation%2duk%2dpro%2dt1%40paypal%2ecom&tax=2&ship
ping=3&business=K5HHZSMWMCN58&subtotal=11&handling=4&TIMESTAMP=2010-09-
15T00:39:06Z&CORRELATIONID=23d12ce1161f2&ACK=Success&VERSION=65.0&BUILD=150
0269
Example of CLEARTEXT
EMAILLINK=https://www.paypal.com/acquiringweb?cmd=_hosted-
payment&business=idc%2dautomation%2duk%2dpro%2dt1%40paypal%2ecom&tax=2&ship
ping=3&business=K5HHZSMWMCN58&subtotal=11&handling=4&TIMESTAMP=2010-09-
15T00:40:32Z&CORRELATIONID=64553e7c7c84&ACK=Success&VERSION=65.0&BUILD=1500
269
The button variables control the presentation in the flow and the information that is provided
to the buyer initially. Because the URL is associated with a PayPal Pro token, the URL is
usable for approximately two hours after it is created or until the payment is successful.
Using Form POST
Identify the WEBSITECODE in the response and use the code to create a Pay Now button on
your review page. When your buyer clicks the button, they are redirected to the PayPal hosted
payment page. Like the URL, the button is usable for approximately two hours or until the
payment is successful.

Integrating Your Website Using API
Using the Button Manager API with PayPal Pro Checkout
42
Example for TOKEN
WEBSITECODE=<form action="https://www.paypal.com/cgi-bin/webscr"
method="post">
<input type="hidden" name="cmd" value="_s-xclick">
<input type="hidden" name="hosted_button_id" value="HSS-
2MTCOLOp9LoPGdFYsYclhbGyjJVNrMHO">
<input type="image"
src="https://www.paypal.com/en_US/i/btn/btn_auto_billing_LG.gif" border="0"
name="submit" alt="PayPal - The safer, easier way to pay online.">
<img alt="" border="0" src="https://www.paypal.com/en_GB/i/scr/pixel.gif"
width="1" height="1">
</form>
Example for ENCRYPTED
WEBSITECODE=<form action="https://www.paypal.com/cgi-bin/webscr"
method="post">
<input type="hidden" name="cmd" value="_s-xclick">
<input type="hidden" name="encrypted" value="BEGIN PKCS7......END PKCS7">
<input type="image"
src="https://www.paypal.com/en_US/i/btn/btn_auto_billing_LG.gif" border="0"
name="submit" alt="PayPal - The safer, easier way to pay online.">
<img alt="" border="0" src="https://www.paypal.com/en_GB/i/scr/pixel.gif"
width="1" height="1">
</form>
Example of CLEARTEXT
WEBSITECODE=<form action="https://www.paypal.com/acquiringweb"
method="post">
<input type="hidden" name="cmd" value="_hosted-payment">
<input type="hidden" name="business" value="test1@paypal.com">
<input type="hidden" name="tax" value="2">
<input type="hidden" name="shipping" value="3">
<input type="hidden" name="business" value="K5HHZSMWMCN58">
<input type="hidden" name="subtotal" value="11">
<input type="hidden" name="paymentaction" value="sale">
<input type="hidden" name="handling" value="4">
<input type="image"
src="https://www.paypal.com/en_US/i/btn/btn_auto_billing_LG.gif" border="0"
name="submit" alt="PayPal - The safer, easier way to pay online.">
<img alt="" border="0" src="https://www.paypal.com/en_GB/i/scr/pixel.gif"
width="1" height="1">
</form>

43
Integrating Your Website Using API
Using the Button Manager API with PayPal Pro Checkout
NOTE:The PayPal payment page displays a button identified as Pay Now to complete the
checkout flow. The Pay Now button on the PayPal page is different than the Pay Now
button created by the BMCreateButton API operation on the review page. You may
need to change the URL for the latter in BUTTONIMAGEURL to avoid confusion.If a
URL is not specified in BUTTONIMAGEURL, then the default Pay Now is used for the
button.
Encrypting Buttons Using Public and Private Key
Using Encrypted Website Payments helps secure payment buttons that you generate or write
manually. Encrypted Website Payments protects the HTML button code that contains pricing
information by encrypting it. HTML button code that you protect by using Encrypted Website
Payments cannot be altered by malicious third parties to create fraudulent payments. For
detailed information, refer to Chapter 8, “Protecting Buttons by Using Encrypted Website
Payments
Example of Initiating PayPal ProCheckout
The example shows the NVP parameters using BUTTONCODE=TOKEN for creating a URL to
initiate the PayPal Pro checkout flow.
...
BUTTONCODE=TOKEN
BUTTONTYPE=PAYMENT
BUTTONIMAGEURL=https://www.paypal.com/en_US/i/btn/btn_billing.gif
L_BUTTONVAR0=subtotal=11
L_BUTTONVAR1=tax=2
L_BUTTONVAR2=shipping=3
L_BUTTONVAR3=handling=4
L_BUTTONVAR4=first_name=Bob
L_BUTTONVAR5=last_name=Jones
L_BUTTONVAR6=address1=Gardens
L_BUTTONVAR7=address2=99343
L_BUTTONVAR8=city=Paris
L_BUTTONVAR9=state=Alsace
L_BUTTONVAR10=zip=75002
L_BUTTONVAR11=country=FR
L_BUTTONVAR12=billing_first_name=BobBilling
L_BUTTONVAR13=billing_last_name=JonesBilling
L_BUTTONVAR14=billing_address1=5088 - 061 Craven Hill Gardens
L_BUTTONVAR15=billing_address2=Apt# 199343
L_BUTTONVAR16=billing_city=Wolverhampton
L_BUTTONVAR17=billing_state=West Midlands
L_BUTTONVAR18=billing_zip=W12 4LQ
L_BUTTONVAR19=billing_country=GB
L_BUTTONVAR20=night_phone_a=408
L_BUTTONVAR21=night_phone_b=398
L_BUTTONVAR22=night_phone_c=3065

Integrating Your Website Using API
Using the Button Manager API with PayPal Pro Checkout
44
L_BUTTONVAR23=notify_url=www.yourcompany.com
L_BUTTONVAR24=custom=custom1
L_BUTTONVAR25=cancel_return=http://www.cancel_return.com
L_BUTTONVAR26=paymentaction=sale
L_BUTTONVAR27=currency_code=GBP
L_BUTTONVAR28=invoice=123456789
L_BUTTONVAR29=lc=GB
L_BUTTONVAR30=showBillingAddress=false
L_BUTTONVAR31=showShippingAddress=false
L_BUTTONVAR32=showBillingEmail=true
L_BUTTONVAR33=showBillingPhone=true
L_BUTTONVAR34=showCustomerName=true
L_BUTTONVAR35=showCardInfo=true
L_BUTTONVAR36=showHostedThankyouPage=true
L_BUTTONVAR37=bn=GBD
L_BUTTONVAR38=cbt=Merchant ABCD
L_BUTTONVAR39=address_override=false
L_BUTTONVAR40=cpp_header_image=Red
L_BUTTONVAR41=logoText=YourCompanyLogo
L_BUTTONVAR42=logoImage=http://yourcompanyimages.com/logo.gif
L_BUTTONVAR43=logoImagePosition=center
L_BUTTONVAR44=logoFont=Arial Bold
L_BUTTONVAR45=logoFontSize=24px
L_BUTTONVAR46=logoFontColor=#f0ff0f
L_BUTTONVAR47=bodyBgImg=sdf
L_BUTTONVAR48=bodyBgColor=#AEAEAE
L_BUTTONVAR49=headerHeight=70px
L_BUTTONVAR50=headerBgColor=#4B6BA1
L_BUTTONVAR51=PageTitleTextColor=Blue
L_BUTTONVAR52=PageCollapseBgColor=Blue
L_BUTTONVAR53=PageCollapseTextColor=Yellow
L_BUTTONVAR54=PageButtonBgColor=Blue
L_BUTTONVAR55=PageButtonBgColor=Blue
L_BUTTONVAR56=orderSummaryBgColor=#EDF2F7
L_BUTTONVAR57=orderSummaryBgImage=http://teamworks/scr_bg_ordersummary.jpg
L_BUTTONVAR58=footerTextColor=#333333
L_BUTTONVAR59=footerTextlinkColor=#00f00f
L_BUTTONVAR60=template=templateC
L_BUTTONVAR61=return=http://www.yourcompany.com

45
Integrating Your Website Using API
BMCreateButton API Operation
BMCreateButton API Operation
Use the BMCreateButton API operation to create PayPal Pro checkout button.
-BMCreateButton Request
-BMCreateButton Response
-BMCreateButton Errors
BMCreateButton Request
The request fields specify the characteristics of your button, which include associated menu
items related to the button. You can specify up to 5 menu items, each of which can include up
to 10 possible selections.
BMCreateButton Request Fields
NOTE:The values you pass must not contain any of these special characters (){}<>\";
Field Description
METHOD (Required)
BMCreateButton
BUTTONCODE (Optional) The kind of button code to create. It is one of the following values:
-TOKEN - A secure button, not stored on PayPal, used only to initiate the
PayPal Pro checkout flow; default for Pay Now button. Since version 65.2
-ENCRYPTED - An encrypted button, not stored on PayPal
-CLEARTEXT - An unencrypted button, not stored on PayPal
BUTTONTYPE (Required) The kind of button you want to create.
PAYMENT - Pay Now button; since version 65.2
L_BUTTONVARn(Optional) HTML standard button variables

Integrating Your Website Using API
BMCreateButton API Operation
46
BMCreateButton Response
The response contains an ID if the button is hosted on PayPal, and code for HTML in a
website and for a link in email.
BMCreateButton Response Fields
BMCreateButton Errors
Field Description
WEBSITECODE HTML code for web pages
EMAILLINK Code for URL for the PayPal Pro checkout flow
HOSTEDBUTTONID ID of a PayPal Pro token
Error
Code Short Message Long Message Correcting This Error...
10001 Internal Error Internal Error
11923 Invalid Argument The button image value specified is
invalid.
11924 Invalid Argument The button image URL specified is
invalid.
11925 Invalid Argument The button type specified is invalid.
11926 Invalid Data One of the parameters specified using
ButtonVar is invalid.
11927 Invalid Argument The buy now button text specified is
invalid.
11928 Invalid Argument The email or merchant ID specified is
invalid.
11929 Invalid Data A cart button must have an item name and
amount specified.
11931 Invalid Argument The subscription button text specified is
invalid.
11932 Invalid Data You must specify a corresponding number
of entries for option names and selections.
11933 Invalid Data You cannot skip index numbers for option
selections. Option selections must be
specified sequentially.

47
Integrating Your Website Using API
BMCreateButton API Operation
11934 Invalid Data You must specify the same number of
entries for option prices and selections.
11936 Invalid Data You cannot specify both an item price and
prices for individual selections within an
option.
11937 Invalid Argument A text box name specified is invalid. Text
box names must not exceed 64 characters.
11938 Invalid Argument The button code value specified is invalid.
11940 Invalid Argument An option name specified is invalid.
Option names must not exceed 64
characters.
11941 Invalid Argument An option selection value specified is
invalid. Option selection values must not
exceed 64 characters.
11942 Invalid Argument An option price value specified is invalid.
Make sure any punctuation marks are in
the correct places.
11943 Invalid Argument The button country value specified is
invalid.
11945 Invalid Data The button country and language code
combination specified is invalid.
11947 Invalid Argument The tax rate specified is invalid. Make
sure any punctuation marks are in the
correct places and value specified is in the
range 0.0 to 100.
11948 Invalid Argument The amount specified is invalid. Make
sure any punctuation marks are in the
correct places.
12210 Invalid Argument The currency code value specified is
invalid.
13117 Invalid Argument Subtotal amount is not valid.
13118 Invalid Argument Tax amount is not valid.
13119 Invalid Argument Handling amount is not valid.
13120 Invalid Argument Shipping amount is not valid.
Error
Code Short Message Long Message Correcting This Error...

Integrating Your Website Using API
BMCreateButton API Operation
48
49
6Testing Your Integration in
Sandbox
The PayPal Sandbox is a self-contained environment within which you can prototype and test
PayPal features. The PayPal Sandbox is an almost identical copy of the live PayPal website.
Its purpose is to give developers a shielded environment for testing and integration purposes,
and to help avoid problems that might occur while testing PayPal integration solutions on the
live site. Before moving any PayPal-based application into production, you should test the
application in the Sandbox to ensure that it functions as you intend and within the guidelines
and standards set forth by the PayPal Developer Network (PDN).
For complete details on using Sandbox, refer to Sandbox User Guide.
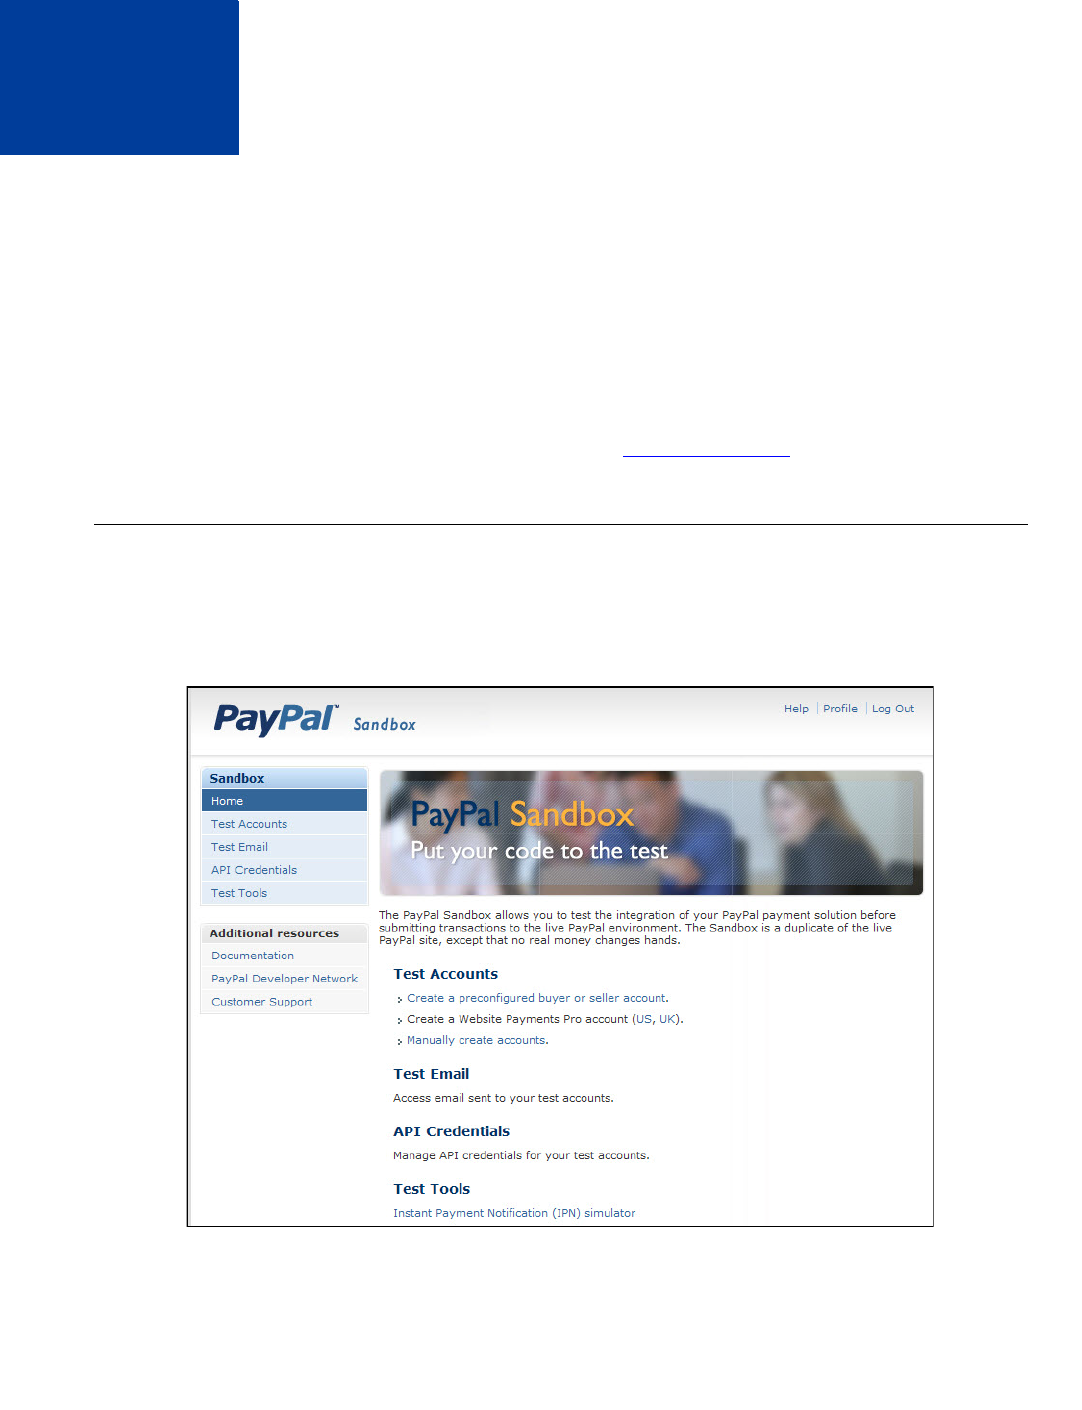
Creating a Preconfigured Account
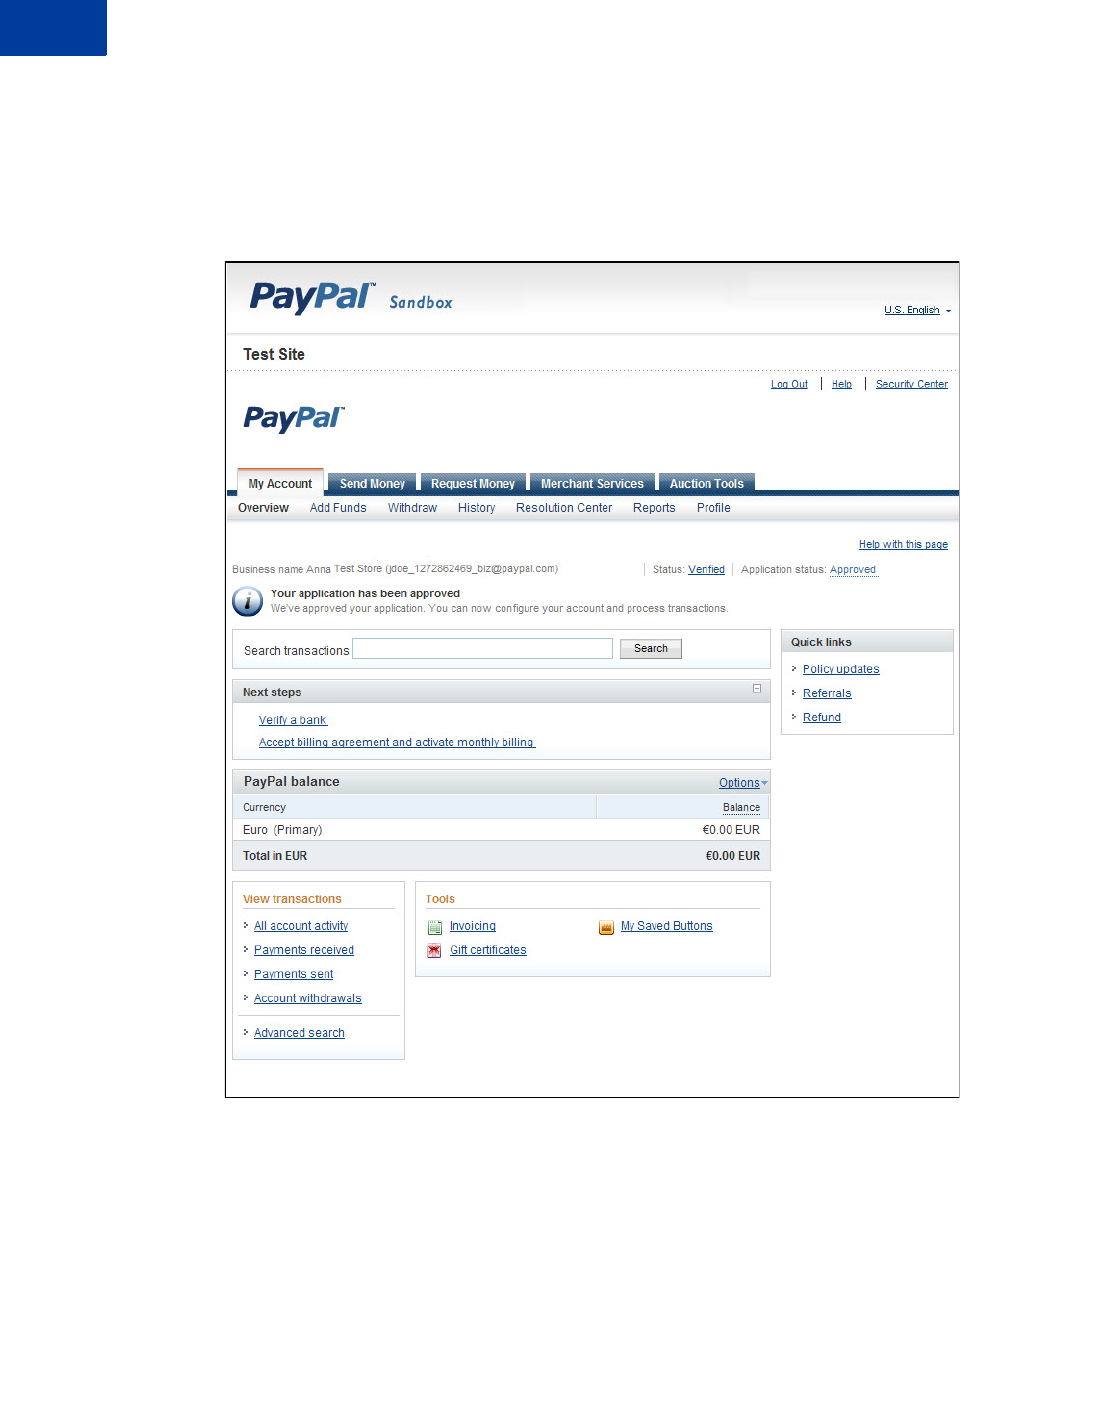
When you log in to the Sandbox, the Sandbox Test Environment home page appears, as shown
below:
Testing Your Integration in Sandbox
Creating a Preconfigured Account
50
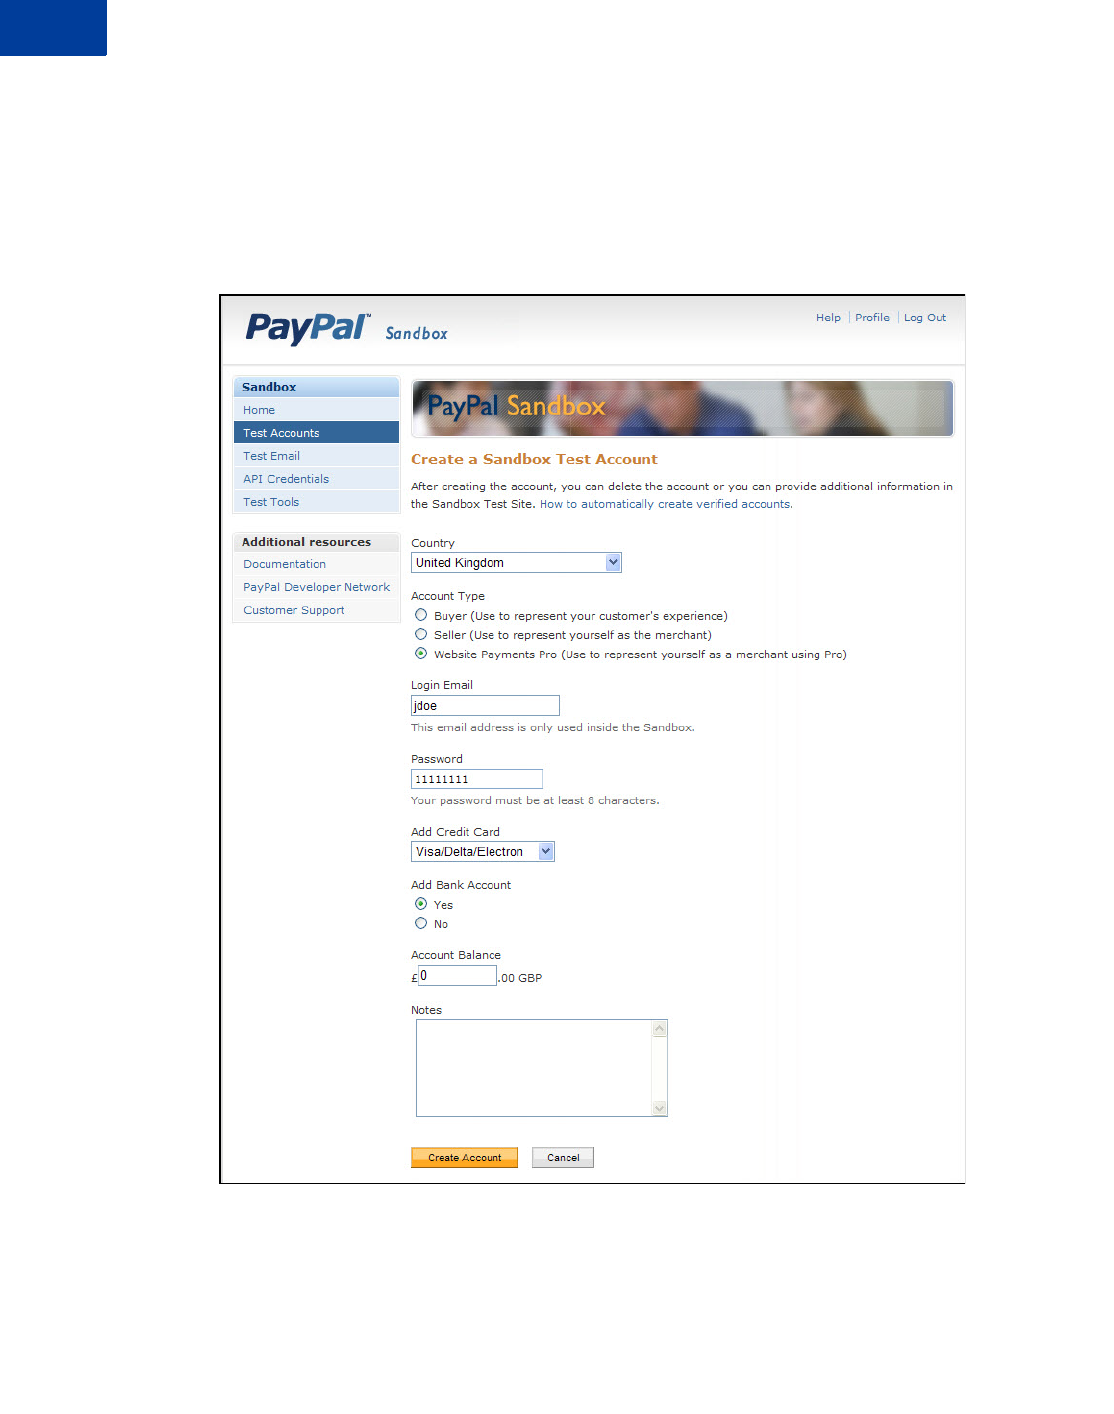
To test your PayPal Pro integration, create a preconfigured account using the following steps:
1. On the Sandbox Home page, under the Test Accounts section, and click Create a
preconfigured buyer or seller account.
2. The Create a Sandbox Test Account page appears, as shown below:
Testing Your Integration in Sandbox
Creating a Preconfigured Account
3. Choose Italy from the Country drop-down menu.
4. Select Website Payments Pro as the Account Type.
5. The Login Email and Password fields are pre-filled. The rest of the fields are optional so
make the appropriate selections or accept the defaults.
NOTE:Make a note of the password as you will need it to log into the Sandbox Test Site.
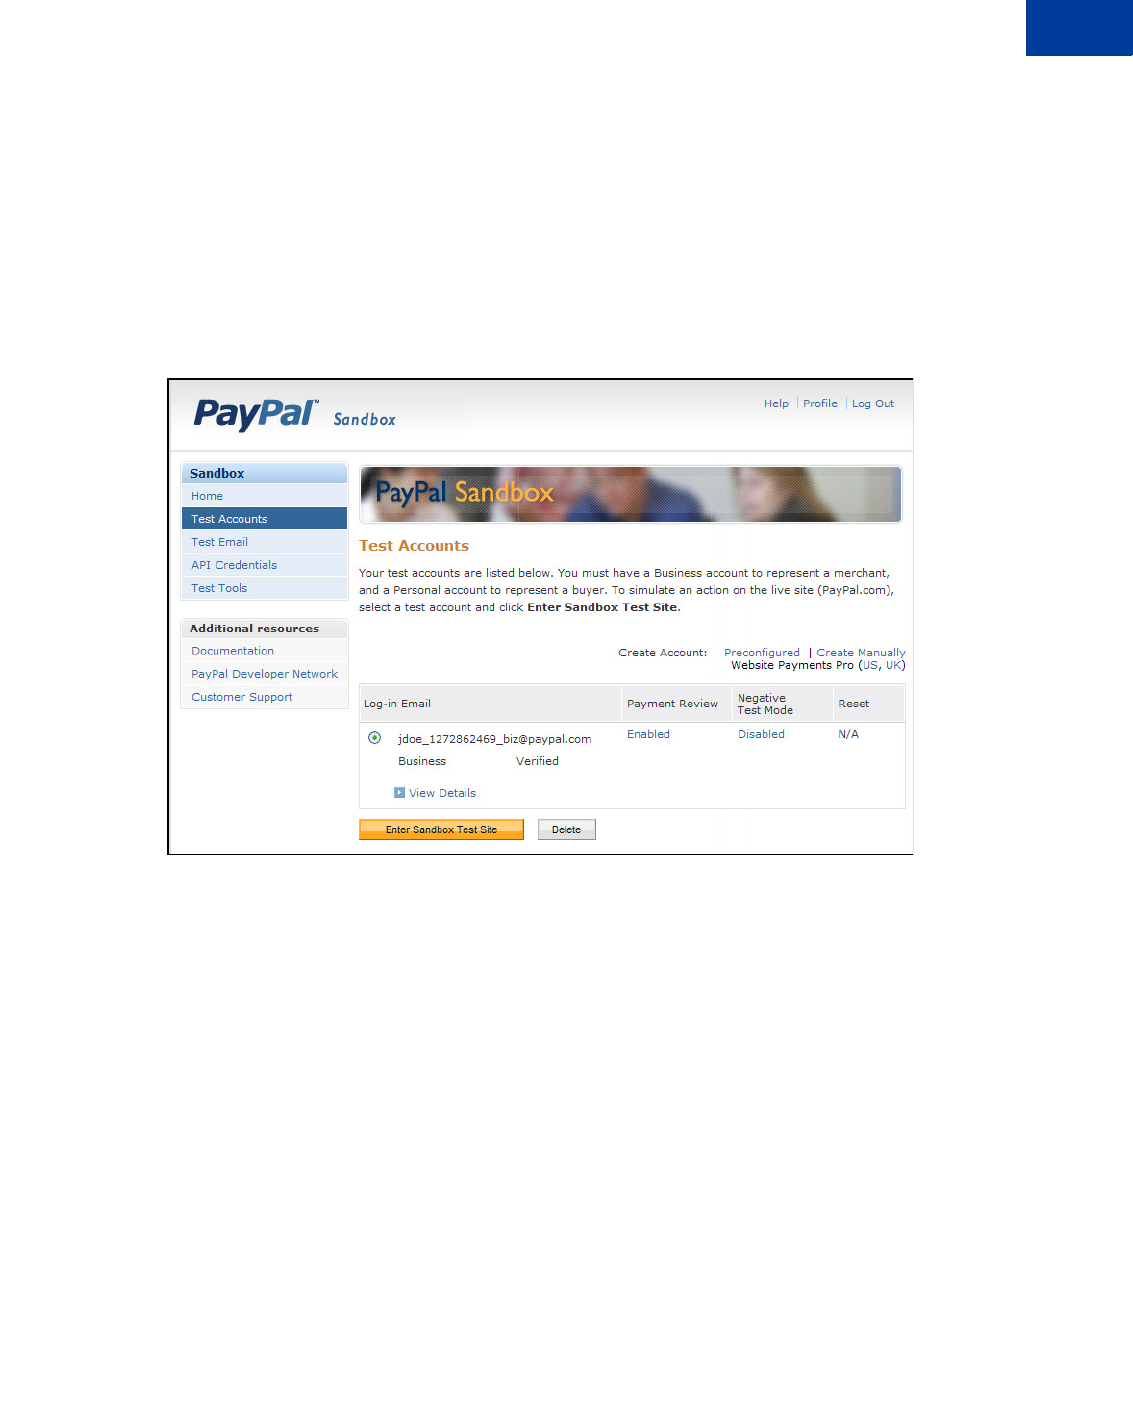
6. Click Create Account. The following page confirms the creation of the test account:
NOTE:The login email is a pseudo-randomized address, which is based on the address you
specified. Credit card and bank account numbers are also generated randomly,
which are displayed when you click View Details.
7. Ensure that Payment Review is set to Enabled. In doing so, all transactions on this account
are put into pending review state. You can then click accept or decline on the Transaction
Details page to simulate the fraud agent’s action.
Testing Your Integration in Sandbox
Creating a Preconfigured Account
52
8. Click Enter Sandbox Test Site. The Sandbox Test Site appears in a different browser
window, as shown below. If you are not automatically logged in to the Sandbox Test Site,
log in using the email address created for the test account as part of step 6 and the password
you noted in step 5.
You are ready to test your PayPal Pro integration on the Sandbox Test Site.

Testing Your Integration in Sandbox
Testing Your Integration and Settings
Testing Your Integration and Settings
The following sections contain information for testing your integration and modifying the look
and feel of your payment page in the Sandbox environment.
-Testing Your Integration
-Testing Your Settings
Testing Your Integration
To test your integration in the Sandbox environment, follow the steps specified in “Simple
PayPal Pro Integration” on page 15. For testing purposes, you must make the following
changes in the Form POST:
1. Change the URL to point to the Sandbox environment.
From:
<form action="https://securepayments.paypal.com/acquiringweb"
method="post">
<input type="hidden" name="cmd" value="_hosted-payment">
to:
<form action="https://securepayments.sandbox.paypal.com/acquiringweb"
method="post">
<input type="hidden" name="cmd" value="_hosted-payment">
2. Change the business value to the Secure Merchant ID value that is specified at the top
of the Profile page of the Sandbox Test Site.
Accordingly, the Form POST for testing purposes will be:
<form action="https://securepayments.sandbox.paypal.com/acquiringweb"
method="post">
<input type="hidden" name="cmd" value="_hosted-payment">
<input type="hidden" name="subtotal" value="50">
<input type="hidden" name="business" value="HNZ3QZMCPBAAA">
<input type="hidden" name="paymentaction" value="sale">
<input type="hidden" name="return"
value="https://yourwebsite.com/receipt_page.html">
<input type="submit" name="METHOD" value="Pay Now">
</form>

Testing Your Integration in Sandbox
Testing Your Integration and Settings
54
Testing Your Settings
To change the look and feel of your payment page, modify the settings of the Customisation
and Settings pages in the Profile section of the Sandbox Test Site. For complete details, refer
to “Modifying Your PayPal Account Settings” on page 21.

55
7Order Processing
This chapter walks you through the end of end order processing experience. It includes
information about verifying the status and authenticity of the order before fulfilling it.
Verifying Transaction Status and Authenticity
When the buyer successfully completes a transaction, they are redirected either to the PayPal
confirmation page or a website you specified in the return variable or on the Settings page
in the Profile section (as outlined in “Simple PayPal Pro Integration” on page 15). When the
browser is redirected to the website you specified, a Transaction ID is appended to it.
When you receive the redirect (URL with Transaction ID), you must verify that the order was
completed successfully on PayPal before sending the items to the buyer. You can do so by
checking the confirmation email sent to you by PayPal or by verifying the transaction history.
You can also using one of the following methods:
Validate Instant Payment Notification (IPN)
IPN enables you to receive messages about transaction payments and activity from PayPal
through asynchronous, server-to-server communication. This allows you to integrate your
online payments with your order fulfillment process.
Through IPN, you receive messages for the following:
-Payments and their status (pending, complete, or denied)
-Fraud Management Filter actions
-Recurring Payment activity
-Authorisations, chargebacks, disputes, reversals, and refunds.
After a transaction has been processed, PayPal sends an IPN to the notification URL specified
in your transaction using the parameter notify_url, or in your PayPal Profile. You must
verify that the Transaction ID, transaction amount, and other order specific parameters such as
Invoice ID that are sent in the IPN match with the information you have in your order
processing system. For more details, refer to Instant Payment Notification Guide.

Order Processing
Fulfilling Order
56
Execute a GetTransactionDetails API Call
Using GetTransactionDetails API, you can obtain information about a specific
transaction.
If you are integrated with PayPal APIs, you can call GetTransactionDetails with the
Transaction ID that was returned in the web redirect to validate the authenticity of the order.
For complete details, refer to “GetTransactionDetails API” on page 63.
Fulfilling Order
After you have verified the authenticity of the payment amount and status, you can fulfil the
order by shipping the item to the buyer.
NOTE:To benefit from PayPal’s Seller Protection, the item must be shipped to the address
specified on the PayPal payment page or communicated to PayPal. Otherwise, the item
is not eligible for Seller Protection. For more information, refer to “Seller Protection”
on page 11.

8Protecting Buttons by Using
Encrypted Website Payments
Using Encrypted Website Payments helps secure payment buttons that you generate or write
manually. Encrypted Website Payments protects the HTML button code that contains pricing
information by encrypting it. HTML button code that you protect by using Encrypted Website
Payments cannot be altered by malicious third parties to create fraudulent payments.
Encrypted Website Payments relies on standard public key encryption for protection. With
public and private keys, you can dynamically generate HTML code for payment buttons and
encrypt the payment details before displaying the buttons on your website. The below table
illustrates the sequence of actions that occur with payment buttons protected by using
Encrypted Website Payments.
TABLE 8.1 How Encrypted Website Payments Works
Website Actions Buyer Action PayPal Action
Generate a public key for the
website, upload it to PayPal, and
download the PayPal public
certificate to the website.
NOTE:Do this action only once,
when you first integrate
PayPal Pro with your
website.
Generate HTML code for a payment
button.
Encrypt the generated code by using
the PayPal public key and then
signing the encrypted code with the
website’s private key.
Publish the signed, encrypted
HTML code for the payment button
to the website
Click the published PayPal payment
button.
Check the authenticity of the data by
using the website’s public key,
which was previously uploaded to
PayPal.
Decrypt the protected button code
by using the PayPal private key.
Redirect the payer’s browser to the
appropriate PayPal checkout
experience, as specified in the
HTML variables of the decrypted
button code.

Protecting Buttons by Using Encrypted Website Payments
Public Key Encryption Used by Encrypted Website Payments
58
Public Key Encryption Used by Encrypted Website Payments
Encrypted Website Payments uses public key encryption, or asymmetric cryptography, which
provides security and convenience by allowing senders and receivers of encrypted
communication to exchange public keys to unlock each others messages. The fundamental
aspects of public key encryption are:
-Public keys – Public keys are created by receivers and are given to senders before they
encrypt and send information. Public certificates comprise a public key and identity
information, such as the originator of the key and an expiry date. Public certificates can be
signed by certificate authorities, who guarantee that public certificates and their public
keys belong to the named entities.
You and PayPal exchange each others’ public certificates.
-Private keys – Private keys are created by receivers are kept to themselves.
You create a private key and keep it in your system. PayPal keeps its private key on its
system.
-The encryption process – Senders use their private keys and receivers’ public keys to
encrypt information before sending it. Receivers use their private keys and senders’ public
keys to decrypt information after receiving it. This encryption process also uses digital
signatures in public certificates to verify the sender of the information.
You use your private key and PayPal’s public key to encrypt your HTML button code.
PayPal uses it’s private key and your public key to decrypt button code after people click
your payment buttons.
Setting Up Certificates Before Using Encrypted Website
Payments
Do the following before you use Encrypted Website Payments to protect your payment
buttons:
-Generating Your Private Key Using OpenSSL
-Generating Your Public Certificate Using OpenSSL
-Uploading Your Public Certificate to Your PayPal Account
-Downloading the PayPal Public Certificate from the PayPal Website
PayPal uses only X.509 public certificates, not public keys. A public key can be used for
decryption but contains no information identifying who provided the key. A public certificate
includes a public key along with information about the key, such as when the key expires and
who the key belongs to. PayPal accepts public certificates in OpenSSL PEM format from any
established certificate authority, such as VeriSign.
You can generate your own private key and public certificate using open source software such
as OpenSSL (https://www.openssl.org), which is detailed in the following section.

59
Protecting Buttons by Using Encrypted Website Payments
Setting Up Certificates Before Using Encrypted Website Payments
Generating Your Private Key Using OpenSSL
Using the openssl program, enter the following command to generate your private key. The
command generates a 1024-bit RSA private key that is stored in the file my-prvkey.pem:
openssl genrsa -out my-prvkey.pem 1024
Generating Your Public Certificate Using OpenSSL
The public certificate must be in PEM format. To generate your certificate, enter the following
openssl command, which generates a public certificate in the file my-pubcert.pem:
openssl req -new -key my-prvkey.pem -x509 -days 365 -out my-pubcert.pem
Uploading Your Public Certificate to Your PayPal Account
To upload your public certificate to your PayPal account:
1. Log in to your PayPal account at https://www.paypal.it
2. Click the Profile subtab.
3. In the Hosted Payment Settings column, click Website Payment Certificates.
The Website Payment Certificates page appears.
4. Scroll down the page to the Your Public Certificates section, and click the Add button.
The Add Certificate page appears.
5. Click Browse, and select the public certificate that you want to upload to PayPal from your
local computer.
NOTE:The file you upload must be in PEM format.
6. Click Add.
After your public certificate is uploaded successfully, it appears in the Your Public
Certificates section of the Website Payment Certificates page.
7. Store the certificate ID that PayPal assigned to your public certificate in a secure place. You
need the certificate ID that PayPal assigned to encrypt your payment buttons by using the
Encrypted Website Payments software provided by PayPal.

Protecting Buttons by Using Encrypted Website Payments
Setting Up Certificates Before Using Encrypted Website Payments
60
Downloading the PayPal Public Certificate from the PayPal Website
To download the PayPal public certificate:
1. Log in to your PayPal account at https://www.paypal.it
2. Click the Profile subtab.
3. In the Seller Preferences column, click the Encrypted Payment Settings link.
4. Scroll down the page to the PayPal Public Certificate section.
5. Click Download, and save the file in a secure location on your local computer.
Removing Your Public Certificate
IMPORTANT: If you remove your public certificate, its associated certificate ID is no longer
valid for encrypting buttons, and any buttons that you generated or wrote
manually for your website that use the ID will not function correctly.
To remove one or more of your public certificates:
1. Log in to your PayPal account at https://www.paypal.it
2. Click the Profile subtab.
3. In the Seller Preferences column, click the Encrypted Payment Settings link.
4. Scroll down the page to the PayPal Public Certificate section.
5. Select the radio button next to the certificate you want to remove, and click Remove.
The Remove Certificate page appears.
6. Click Remove to confirm the removal of the public certificate that you selected.

61
Protecting Buttons by Using Encrypted Website Payments
Setting Up Certificates Before Using Encrypted Website Payments
Using Encrypted Website Payments to Protect Your Payment Buttons
Encrypted Website Payments includes Java and Microsoft Windows software to protect the
payment buttons that you generate or write manually. Download the software from the
following location after logging in to PayPal: https://www.paypal.com/us/cgi-
bin/webscr?cmd=p/xcl/rec/ewp-code
After you download and extract the software, copy your private key, public certificate, p12 file
and the PayPal public certificate to the folder where the software is located.
1. Prepare an input file of PayPal Pro variables and values for each encrypted button that you
want to generate. Each variable and value must be on a separate line, as in the following
example.
NOTE:The cert_id variable identifies the public certificate you uploaded to PayPal
website.
cert_id=Z24MFU6DSHBXQ
cmd=_xclick
business=sales@company.com
item_number=1234
custom=sc-id-789
amount=500.00
currency_code=USD
tax=41.25
shipping=20.00
address_override=true
address1=123 Main St
city=Austin
state=TX
zip=94085
country=US
no_note=1
cancel_return=http://www.company.com/cancel.htm
2. Run the encryption software using the appropriate syntax, as shown below:
–Java: PPEncrypt CertFile PrivKeyFile PPCertFile InputFile
OutputFile [Sandbox]
–Microsoft Windows: java ButtonEncryption CertFile PKCS12File
PPCertFile Password InputFile OutputFile [Sandbox]

Protecting Buttons by Using Encrypted Website Payments
Setting Up Certificates Before Using Encrypted Website Payments
62
where the argument is:
–CertFile: The pathname to your own public certificate
–PKCS12File: The pathname to the PKCS12-format of your own public certificate
–PPCertFile: The pathname to a copy of the PayPal public certificate
–Password: The passphrase to the PKCS12-format of your own public certificate
–InputFile: The pathname to file containing the non-encrypted Website Payments HTML
Form variables
–OutputFile: A file name for the encrypted output
–[Sandbox]: The optional word Sandbox that lets you test payment buttons in the PayPal
Sandbox that you protected with Encrypted Website Payments
3. Copy the encrypted code to your website.
Blocking Unprotected and Non-encrypted Website Payments
For extra security of your protected and encrypted buttons, update your PayPal account profile
to block unprotected and non-encrypted payments.
To block payments from unprotected and non-encrypted Website Payments Standard buttons:
1. Log in to your PayPal account at https://www.paypal.it
2. Click the Profile subtab.
3. In the Seller Preferences column, click the Encrypted Payment Settings link.
4. Scroll down to the Encrypted Website Payments section.
5. Next to the Block Non-encrypted Website Payment label, select the On radio button.
6. Scroll to the bottom of the page, and click Save.

A
63
Optional API Operations
Using the Transaction ID, a number of PayPal API operations are available. The most
commonly used for PayPal Pro are:
-GetTransactionDetails API
-RefundTransaction API
-DoCapture API
GetTransactionDetails API
Obtain information about a specific transaction.
-GetTransactionDetails Request
-GetTransactionDetails Response
GetTransactionDetails Request
TABLE A.1 GetTransactionDetails Request Fields
Field Description
METHOD Must be GetTransactionDetails.
TRANSACTIONID (Required) Unique identifier of a transaction.
NOTE:The details for some kinds of transactions cannot be retrieved
withGetTransactionDetails. You cannot obtain details of bank
transfer withdrawals, for example.
Character length and limitations - 17 single-byte alphanumeric
characters.

Optional API Operations
GetTransactionDetails API
64
GetTransactionDetails Response
NOTE:All fields defined in the formal structure of GetTransactionDetails Response are not
necessarily returned. Data is returned in a response only if PayPal has recorded data
that corresponds to the field.
-Receiver Information Fields
-Payer Information Fields
-Payer Name Fields
-Address Fields
-Payment Information Fields
-Payment Item Information Fields
-Payment Item Fields
-Auction Fields
-Subscription Term Fields
Receiver Information Fields
TABLE A.2 Receive Information Fields
Field Description
RECEIVERMAIL Primary email address of the payment recipient (the seller).
If you are the recipient of the payment and the payment is sent to your
non-primary email address, the value of Receiver is still your primary
email address.
Character length and limitations - 127 single-byte alphanumeric
characters
RECEIVERID Unique account ID of the payment recipient (the seller). This value is
the same as the value of the recipient's referral ID.

Optional API Operations
GetTransactionDetails API
Payer Information Fields
Payer Name Fields
TABLE A.3 Payer Information Fields
Field Description
EMAIL Email address of payer.
Character length and limitations - 127 single-byte characters
PAYERID Unique PayPal customer account identification number.
Character length and limitations - 13 single-byte alphanumeric
characters.
PAYERSTATUS Status of payer. Valid values are:
-verified
-unverified
Character length and limitations - 10 single-byte alphabetic
characters.
SHIPTOCOUNTRYCODE Payer’s country of residence in the form of ISO standard 3166 two-
character country codes.
Character length and limitations - Two single-byte characters
PAYERBUSINESS Payer’s business name.
Character length and limitations - 127 single-byte characters
TABLE A.4 Payer Name Fields
Field Description
SALUTATION Payer’s salutation.
Character length and limitations - 20 single-byte characters
FIRSTNAME Payer’s first name.
Character length and limitations - 25 single-byte alphanumeric
characters.
MIDDLENAME Payer’s middle name.
Character length and limitations - 25 single-byte alphanumeric
characters.
LASTNAME Payer’s last name.
Character length and limitations - 25 single-byte alphanumeric
characters.

Optional API Operations
GetTransactionDetails API
66
Address Fields
SUFFIX Payer’s suffix.
Character length and limitations - 12single-byte alphanumeric
characters.
TABLE A.5 Address Fields
Field Description
ADDRESSOWNER eBay company that maintains this address.
Valid values are:
-eBay
-PayPal
ADDRESSSTATUS Status of street address on file with PayPal.
Valid values are:
-none
-Confirmed
-Unconfirmed
SHIPTONAME Person’s name associated with this address
Character length and limitations - 32 single-byte characters.
SHIPTOSTREET First street address
Character length and limitations - 100 single-byte characters.
SHIPTOSTREET2 Second street address
Character length and limitations - 100 single-byte characters.
SHIPTOCITY Name of the city
Character length and limitations - 100 single-byte characters.
SHIPTOSTATE State or province
Character length and limitations - 40 single-byte characters.
SHIPTOZIP US zip code or other country-specific postal code.
Character length and limitations - 40 single-byte characters.
SHIPTOCOUNTRYCODE Expanded name of country
Character length and limitations - 20 single-byte characters.
SHIPTOPHONENUMBER Country code.
Character length and limitations - two single-byte characters.
SHIPTOPHONENUM Country code.
Character length and limitations - Two single-bye characters.
TABLE A.4 Payer Name Fields
Field Description

Optional API Operations
GetTransactionDetails API
Payment Information Fields
TABLE A.6 Payment Information Fields
Field Description
TRANSACTIONID Unique transaction ID of the payment.
Character length and limitations: 17 single-byte characters
PARENTTRANSACTIONID Parent or related transaction identification number. This field is
populated for the following transaction types:
-Reversal - Capture of an authorised transaction.
-Reversal - Reauthorisation of a transaction.
-Capture of an order - The value of ParentTransactionID is the
original OrderID.
-Authorisation of an order - The value of ParentTransactionID is
the original OrderID.
-Capture of an order authorisation.
-Void of an order - The value of ParentTransactionID is the original
OrderID.
Character length and limitations - 16 digits in xxxx-xxxx-xxxx-xxxx
format
RECEIPTID Receipt identification number
Character length and limitations - 16 digits in xxxx-xxxx-xxxx-xxxx
format
TRANSACTIONTYPE The type of transaction
Valid values:
-cart
-express-checkout
Character length and limitations - 15 single-byte characters
PAYMENTTYPE Indicates whether the payment is instant or delayed.
Character length and limitations - Seven single-byte characters
Valid values:
-none
-echeck
-instant
ORDERTIME Time/date stamp of payment. For example: 2006-08-15T17:23:15Z.
AMT The final amount charged, including any shipping and taxes from your
Merchant Profile.
Character length and limitations - Does not exceed $10,000 USD in
any currency. No currency symbol. Regardless of currency, decimal
separator is a period (.), and the optional thousands separator is a
comma (,). Equivalent to nine characters maximum for USD.
CURRENCYCODE A three-character currency code.

Optional API Operations
GetTransactionDetails API
68
FEEAMT PayPal fee amount charged for the transaction
Character length and limitations - Does not exceed $10,000 USD in
any currency. No currency symbol. Regardless of currency, decimal
separator is a period (.), and the optional thousands separator is a
comma (,). Equivalent to nine characters maximum for USD.
SETTLEAMT Amount deposited in your PayPal account after a currency conversion.
TAXAMT Tax charged on the transaction.
Character length and limitations - Does not exceed $10,000 USD in
any currency. No currency symbol. Regardless of currency, decimal
separator is a period (.), and the optional thousands separator is a
comma (,). Equivalent to nine characters maximum for USD.
EXCHANGERATE Exchange rate if a currency conversion occurred. Relevant only if your
are billing in their non-primary currency. If the customer chooses to
pay with a currency other than the non-primary currency, the
conversion occurs in the customer’s account.
Character length and limitations - a decimal that does not exceed 17
characters, including decimal point.
TABLE A.6 Payment Information Fields
Field Description

Optional API Operations
GetTransactionDetails API
PAYMENTSTATUS Status of the payment.
The status of the payment:
-None - No status
-Canceled-Reversal - A reversal has been canceled; for example,
when you win a dispute and the funds for the reversal have been
returned to you.
-Completed - The payment has been completed, and the funds have
been added successfully to your account balance.
-Denied - You denied the payment. This happens only if the
payment was previously pending because of possible reasons
described for the PendingReason element.
-Expired - the authorisation period for this payment has been
reached.
-Failed - The payment has failed. This happens only if the payment
was made from your customer’s bank account.
-In-Progress - The transaction has not terminated, e.g. an
authorisation may be awaiting completion.
-Partially-Refunded - The payment has been partially refunded.
-Pending - The payment is pending. See the PendingReason field
for more information.
-Refunded - You refunded the payment.
-Reversed - A payment was reversed due to a chargeback or other
type of reversal. The funds have been removed from your account
balance and returned to the buyer. The reason for the reversal is
specified in the ReasonCode element.
-Processed - A payment has been accepted.
-Voided - An authorisation for this transaction has been voided.
TABLE A.6 Payment Information Fields
Field Description

Optional API Operations
GetTransactionDetails API
70
PENDINGREASON NOTE:PendingReason is returned in the response only if
PaymentStatus is Pending.
The reason the payment is pending:
-none - No pending reason.
-address - The payment is pending because your customer did not
include a confirmed shipping address and your Payment Receiving
Preferences is set such that you want to manually accept or deny
each of these payments. To change your preference, go to the
Preferences section of your Profile.
-authorisation - The payment is pending because it has been
authorised but not settled. You must capture the funds first.
-echeck - The payment is pending because it was made by an
eCheck that has not yet cleared.
-intl - The payment is pending because you hold a non-U.S. account
and do not have a withdrawal mechanism. You must manually
accept or deny this payment from your Account Overview.
-multi-currency - You do not have a balance in the currency sent,
and you do not have your Payment Receiving Preferences set to
automatically convert and accept this payment. You must manually
accept or deny this payment.
-order - The payment is pending because it is part of an order that
has been authorised but not settled.
-paymentreview - The payment is pending while it is being
reviewed by PayPal for risk.
-unilateral - The payment is pending because it was made to an
email address that is not yet registered or confirmed.
-verify - The payment is pending because you are not yet verified.
You must verify your account before you can
accept this payment.
-other - The payment is pending for a reason other than those listed
above. For more information, contact PayPal customer service.
REASONCODE The reason for a reversal if TransactionType is reversal:
-none - No reason code
-chargeback - A reversal has occurred on this transaction due to a
chargeback by your customer.
-guarantee - A reversal has occurred on this transaction due to your
customer triggering a money-back guarantee.
-buyer-complaint - A reversal has occurred on this transaction due
to a complaint about the transaction from your customer.
-refund - A reversal has occurred on this transaction because you
have given the customer a refund.
-other - A reversal has occurred on this transaction due to a reason
not listed above.
TABLE A.6 Payment Information Fields
Field Description

Optional API Operations
GetTransactionDetails API
Payment Item Information Fields
PROTECTIONELIGIBILITY Since version 64.4, the kind of seller protection in force for the
transaction, which is one of the following values:
-Eligible – Seller is protected by PayPal's Seller Protection Policy
for Unauthorised Payments and Item Not Received
-ItemNotReceivedEligible – Seller is protected by PayPal's Seller
Protection Policy for Item Not Received
-UnauthorizedPaymentEligible – Seller is protected by PayPal's
Seller Protection Policy for Unauthorized Payment
-Ineligible – Seller is not protected under the Seller Protection
Policy
TABLE A.7 Payment Item Information Fields
Field Description
INVNUM Invoice number you set in the original transaction.
Character length and limitations - 127 single-byte alphanumeric
characters
CUSTOM Custom field you set in the original transaction.
Character length and limitations - 127 single-byte alphanumeric
characters
NOTE Memo entered by your customer in PayPal Website Payments note
field.
Character length and limitations - 255 single-byte alphanumeric
characters
SALESTAX Amount of tax charged on payment.
TABLE A.6 Payment Information Fields
Field Description

Optional API Operations
GetTransactionDetails API
72
Payment Item Fields
Auction Fields
TABLE A.8 Payment Item Fields
Field Description
L_DESCn Amount of tax charged on payment.
These parameters must be ordered sequentially beginning with 0 (for
example L_DESC0, L_DESC1).
L_NUMBERn Item number set by you. If this was a shopping cart transaction, PayPal
appends the number of the item to the HTML item_number variable.
For example, item_number1, item_number2, and so forth.
Character length and limitations - 127 single-byte alphanumeric
characters.
These parameters must be ordered sequentially beginning with 0 (for
example L_NUMBER0, L_NUMBER1).
L_QTYn Quantity set by you or entered by the customer.
Character length and limitations - no limit
L_AMTn Cost of item.
These parameters must be ordered sequentially beginning with 0 (for
example L_AMT0, L_AMT1).
L_OPTIONSNAMEn PayPal option names for an item in the shopping cart; each name
corresponds to an option value. There can be multiple option names per
item.
The option names are ordered sequentially beginning with 0 (for
example,L_OPTIONSNAMES0, L_OPTIONSNAME1).
L_OPTIONSVALUEn PayPal option values corresponding to option names of an item in the
shopping cart.
The option names are ordered sequentially beginning with 0 (for
example,L_OPTIONSVALUE0, L_OPTIONSVALUE1).
TABLE A.9 Auction Fields
Field Description
BUYERID Customer’s auction ID
CLOSINGDATE Auction’s close date
MULTIITEM Counter used for multi-item auction payments

Optional API Operations
RefundTransaction API
Subscription Term Fields
RefundTransaction API
Issue a refund to the PayPal account holder associated with a transaction.
-RefundTransaction Request
-RefundTransaction Response
RefundTransaction Request
TABLE A.10 Subscription Terms Fields
Field Description
AMT The amount subscriber is to be charged in one payment.
Character length and limitations: no limit
PERIOD The period of time that the subscriber will be charged.
Character length and limitations: no limit
TABLE A.11 RefundTransaction Request Fields
Field Description
METHOD Must be RefundTransaction.
TRANSACTIONID (Required) Unique identifier of a transaction.
Character length and limitations - 17 single-byte alphanumeric
characters.
REFUNDTYPE (Required) Type of refund you are making:
-Other
-Full
-Partial
AMT Refund amount. Amount is required if RefundType is Partial.
NOTE:If RefundType is Full, do not set the Amount.
NOTE (Optional) Custom memo about the refund.
Character length and limitations - 255 single-byte alphanumeric
characters.

Optional API Operations
DoCapture API
74
RefundTransaction Response
DoCapture API
Capture an authorized payment.
-DoCapture Request
-DoCapture Response
DoCapture Request
TABLE A.12 RefundTransaction Response Fields
Field Description
REFUNDTRANSACTIONID Unique transaction ID of the refund.
Character length and limitations - 17 single-byte alphanumeric
characters.
FEEREFUNDAMT Transaction fee refunded to original recipient of payment.
GROSSREFUNDAMT Amount of money refunded to original payer.
NETREFUNDAMT Amount subtracted from PayPal balance of original recipient of
payment to make this refund.
TABLE A.13 DoCapture Request Fields
Field Description
METHOD (Required) Must be DoCapture.
AUTHORIZATIONID (Required) The authorisation identification number of the payment you
want to capture.This is the transaction id returned from
DoExpressCheckoutPayment or DoDirectPayment.
Character length and limitations - 19 single-byte characters
maximum.
AMT (Required) Amount to capture.
Limitations - Value is a positive number which cannot exceed $10,000
USD in any currency. No currency symbol. Must have two decimal
places, decimal separator must be a period (.), and the optional
thousands separator must be a comma (,).
CURRENCYCODE (Optional) A three-character currency code. Default: USD.

Optional API Operations
DoCapture API
COMPLETETYPE (Required) The value Complete indicates that this the last capture you
intend to make.
The value NotComplete indicates that you intend to make additional
captures.
NOTE:If Complete, any remaining amount of the original authorised
transaction is automatically voided and all remaining open
authorisations are voided.
Character length and limitations - 12 single-byte alphanumeric
characters.
INVNUM (Optional) Your invoice number or other identification number that is
displayed to the merchant and customer in his transaction history.
NOTE:This value on DoCapture will overwrite a value previously set
on DoAuthorisation.
NOTE:The value is recorded only if the authorisation you are
capturing is an order authorisation, not a basic authorisation.
Character length and limitations - 127 single-byte alphanumeric
characters
NOTE (Optional) An informational note about this settlement that is displayed
to the payer in email and in his transaction history.
Character length and limitations - 255 single-byte characters.
TABLE A.13 DoCapture Request Fields
Field Description

Optional API Operations
DoCapture API
76
SOFTDESCRIPTOR (Optional) The soft descriptor is a per transaction description of the
payment that is passed to the consumer’s credit card statement.
If a value for the soft descriptor field is provided, the full descriptor
displayed on the customer’s statement has the following format:
<PP * | PAYPAL*><Merchant descriptor as set in the Payment
Receiving Preferences><1space><soft descriptor>
The soft descriptor can contain only the following characters.
-Alphanumeric characters
-- (dash)
-* (asterisk)
-. (period)
-{space}
If you use any other characters (such as “,”), an error code is returned.
The soft descriptor does not include the phone number, which can be
toggled between the merchant’s customer service number and PayPal’s
customer service number.
The maximum length of the total soft descriptor is 22 characters. Of
this, either 4 or 8 characters are used by the PayPal prefix shown in the
data format. Thus, the maximum length of the soft descriptor passed in
the API request is:
22- len(<PP * | PAYPAL *>) - len(<Descriptor set in Payment
ReceivingPreferences> + 1)
For example, assume the following conditions:
-The PayPal prefix toggle is set to PAYPAL* in PayPal’s admin
tools.
-The merchant descriptor set in the Payment Receiving Preferences
is set to EBAY.
-The soft descriptor is passed in as JanesFlowerGifts LLC.
The resulting descriptor string on the credit card would be:
PAYPAL*EBAY JanesFlow
TABLE A.13 DoCapture Request Fields
Field Description

Optional API Operations
DoCapture API
DoCapture Response
-DoCapture Response Fields
-PayerInfo Type Fields
-Ship To Address Fields
-Payer Name Fields
NOTE:If you use version 56.0 or later of the DoCapture API,only the authorisation ID,
transaction ID, transaction type, paymentdate, gross amount and payment status are
guaranteed to be returned.If you need the values of other fields and they are not
returned,you can obtain their values later by calling GetTransactionDetails or by using
the reporting. mechanism.
DoCapture Response Fields
PayerInfo Type Fields
TABLE A.14 DoCapture Response Fields
Field Description
AUTHORIZATIONID The authorisation identification number you specified in the request.
Character length and limitations - 19 single-byte characters
maximum.
TABLE A.15 PayerInfo Type Fields
Field Description
EMAIL Email address of payer.
Character length and limitations - 127 single-byte characters.
PAYERID Unique PayPal customer account identification number.
Character length and limitations - 13 single-byte alphanumeric
characters.
PAYERSTATUS Status of payer. Valid values are:
-verified
-unverified
Character length and limitations - 10 single-byte alphabetic
characters.
COUNTRYCODE Payer’s country of residence in the form of ISO standard 3166 two-
character country codes.
Character length and limitations - Two single-byte characters.

Optional API Operations
DoCapture API
78
Ship To Address Fields
BUSINESS Payer’s business name.
Character length and limitations - 127 single-byte characters.
TABLE A.16 Ship To Address Fields
Field Description
ADDRESSSTATUS Status of street address on file with PayPal.
Valid values are:
-none
-Confirmed
-Unconfirmed
SHIPTONAME Person’s name associated with this address.
Character length and limitations - 32 single-byte characters.
SHIPTOSTREET First street address.
Character length and limitations - 100 single-byte characters.
SHIPTOSTREET2 Second street address.
Character length and limitations - 100 single-byte characters.
SHIPTOCITY Name of city.
Character length and limitations - 40 single-byte characters.
SHIPTOSTATE State or province.
Character length and limitations - 40 single-byte characters.
SHIPTOZIP Required for U.S. addresses only.
U.S. ZIP code or other country-specific postal code.
Character length and limitations - 20 single-byte characters.
SHIPTOCOUNTRYCODE Country code.
Character length and limitations - Two single-byte characters.
TABLE A.15 PayerInfo Type Fields
Field Description

Optional API Operations
DoCapture API
Payer Name Fields
TABLE A.17 Payer Name Fields
Field Description
SALUTATION Payer’s salutation.
Character length and limitations - 20 single-byte characters.
FIRSTNAME Payer’s first name.
Character length and limitations - 25 single-byte characters.
MIDDLENAME Payer’s middle name.
Character length and limitations - 25 single-byte characters.
LASTNAME Payer’s last name
Character length and limitations - 25 single-byte characters.
SUFFIX Payer’s suffix
Character length and limitations - 12 single-byte characters.

Optional API Operations
DoCapture API
80

B
81
Moving from Website Payments
Standard to PayPal Pro
If you are moving from Website Payment Standard to PayPal Pro, you must make the
following changes:
1. In the FORM tag, change the cmd value in the action attribute
from:
<form action="https://www.paypal.com/cgi-bin/webscr" method="post">
<input type="hidden" name="cmd" value="_xclick">
to:
<form
action="https://securepayments.paypal.com/acquiringweb?cmd=_hosted-
payment" method="post"><input type="hidden" name="cmd" value="_hosted-
payment">
2. Change HTML variable amount to subtotal.
NOTE:Website Payment Standard has separate values for amount and quantity,
whereas PayPal Pro uses subtotal only. Ensure that the subtotal includes the
amount you want to charge the buyer, taking into account any applicable discount
and the quantity of items.
3. If you have already customised your checkout flow, such as color and background, you will
need to redo those settings for PayPal Pro. For more information about customising the
look and feel of your payment page, refer to Chapter 3, “Customising Your PayPal
Payment Page.

Moving from Website Payments Standard to PayPal Pro
82
Sample Code Comparison
Below is a comparison of Website Payment Standard code and PayPal Pro code.
NOTE:In the samples below, note that for Website Payment Standard, amount and quantity
are specified as 10 and 2 respectively. For PayPal Pro, the subtotal is 20, which is
the product of the above-mentioned amount and quantity. This is highlighted in
bold below.
Sample Website Payments Standard Code
<form action="https://www.paypal.com/cgi-bin/webscr" method="post">
<input type="hidden" name="cmd" value="_xclick">
<input type="hidden" name="business" value="seller@designerfotos.com">
<input type="hidden" name="amount" value="10">
<input type="hidden" name="quantity" value="2">
<input type="hidden" name="tax" value="1">
<input type="hidden" name="currency_code" value="USD">
<input type="hidden" name=" invoice" value="MEM32507725">
<!-- Enable override of payer’s stored PayPal address. -->
<input type="hidden" name="address_override" value="1">
<!-- Set prepopulation variables to override stored address. -->
<input type="hidden" name="first_name" value="John">
<input type="hidden" name="last_name" value="Doe">
<input type="hidden" name="address1" value="345 Lark Ave">
<input type="hidden" name="city" value="San Jose">
<input type="hidden" name="state" value="CA">
<input type="hidden" name="zip" value="95121">
<input type="hidden" name="country" value="US">
<input type="hidden" name="bn" value="CC_Partner_WPS">
<input type="hidden" name="notify_url" value="https://www.paypal.com/IPN/">
<input type="image" name="submit" border="0"
src="https://www.paypal.com/img.gif ">
</form>
Sample PayPal Pro Code
<form action=”https://securepayments.paypal.com/acquiringweb?cmd=_hosted-
payment” method="post"><input type="hidden" name="cmd" value="_hosted-
payment">
<input type="hidden" name="business" value="HNZ3QZMCPBAAA">
<input type="hidden" name="subtotal" value="20">
<input type="hidden" name="paymentaction" value="sale">
<input type="hidden" name="currency_code" value="USD">
<input type="hidden" name="invoice" value="MEM32507725">
<input type="hidden" name="template" value=”TemplateB">
<!-- Enable override of payer’s stored PayPal address. -->
<input type="hidden" name="address_override" value="true">
<input type="hidden" name="showShippingAddress" value="false">
<!-- Set prepopulation variables to override stored address. -->
<input type="hidden" name="first_name" value="John">
<input type="hidden" name="last_name" value="Doe">
<input type="hidden" name="address1" value="345 Lark Ave">

Moving from Website Payments Standard to PayPal Pro
<input type="hidden" name="city" value="San Jose">
<input type="hidden" name="state" value="CA">
<input type="hidden" name="zip" value="95121">
<input type="hidden" name="country" value="US">
<input type="hidden" name="billing_first_name" value="John">
<input type="hidden" name=" billing_last_name" value="Doe">
<input type="hidden" name=" billing_address1" value="345 Lark Ave">
<input type="hidden" name=" billing_city" value="San Jose">
<input type="hidden" name=" billing_state" value="CA">
<input type="hidden" name=" billing_zip" value="95121">
<input type="hidden" name=" billing_country" value="US">
<input type="hidden" name="bn" value="CC_Partner_H3S">
<input type="hidden" name="notify_url" value="https://www.paypal.com/IPN/">
<input type="image" name="submit" border="0"
src="https://www.paypal.com/img.gif ">
</form>

Moving from Website Payments Standard to PayPal Pro
84

C
85
Error Messages
The table below lists error codes and the appropriate correction action.
TABLE C.1 Error Codes and the Corresponding Corrective Actions
Error Code Error Message Corrective Action
10001 Your payment can't be
processed right now. Please
try again later.
Try again later.
10004 Your payment can't be
processed. Please contact the
merchant directly with this
code.
There is a problem with your integration. Check the
parameters that you have supplied.
10009 Your payment can't be
processed. Please contact the
merchant directly with this
code.
Try again later.
10010 Your payment can't be
processed. Please contact the
merchant directly with this
code.
Provide a valid invoice ID.
10413 Your payment can't be
processed. Please contact the
merchant directly with this
code.
Subtotal, shipping, handling, and tax. Review the totals
in your integration.
10500 Your payment can't be
processed. Please contact the
merchant directly with this
code.
You have not agreed to the billing agreement.
10501 Your payment can't be
processed. Please contact the
merchant directly with this
code.
Billing agreement is disabled or inactive.
10502 Your credit card has expired.
Please pay with a valid card.
Credit card used has expired.
10504 Please enter a valid card
security code.
CVV provided is invalid. The CVV is between 3-4
digits long.

Error Messages
86
10507 Your payment can't be
processed. Please contact the
merchant directly with this
code.
Your PayPal account is restricted. Contact PayPal with
this error code.
10508 Please enter a valid card
expiration date.
Expiration date must be in the correct format.
10509 Your payment can't be
processed. Please contact the
merchant directly with this
code.
PayPal was unable to determine the IP address of the
buyer.
10511 Your payment can't be
processed. Please contact the
merchant directly with this
code.
Review the integration to ensure that a valid
PaymentAction value is supplied.
10512 Please enter a first name. First name of the buyer is required.
10513 Please enter a last name. Last name of the buyer is required.
10520 Your payment can't be
processed. Please contact the
merchant directly with this
code.
Amounts supplied do not match.
10523 Your payment can't be
processed right now. Please
try again later.
Try again later.
10525 Please enter a valid amount. Verify your integration to ensure that the amounts are
not zero.
10527 Please enter a valid card
number.
Credit card entered is invalid.
10534 Your payment can't be
processed. Please contact the
merchant directly with this
code.
Credit card entered is currently restricted by PayPal.
Contact PayPal with this error code.
10535 Please enter a valid credit
card number.
Credit card entered is invalid.
10536 Your payment can't be
processed. Please contact the
merchant directly with this
code.
All shopping cart items must be in the same currency.
TABLE C.1 Error Codes and the Corresponding Corrective Actions(Continued)
Error Code Error Message Corrective Action

87
Error Messages
10539 Your payment can't be
processed. Please contact the
merchant directly with this
code.
Transaction was declined by fraud filter managed by the
merchant. To accept this translation, change your risk
settings on PayPal.
10540 Please enter a valid address. Transaction was declined by PayPal because of an
invalid address. Buyer should provide the correct
address.
10541 Please enter a valid credit
card number.
Credit card entered is currently restricted by PayPal.
Contact PayPal with this error code.
10542 Please enter a valid email
address.
Email address is in an invalid format. Buyer should
provide the email address in the correct format.
10544 Your payment can't be
processed. Please contact the
merchant directly with this
code.
Transaction was declined by PayPal. Contact PayPal
with this error code.
10545 Your payment can’t be
processed. Please pay with
another credit card.
Transaction was declined by PayPal because of possible
fraudulent activity. Contact PayPal with this error code.
10546 Your payment can't be
processed. Please contact the
merchant directly with this
code.
Transaction was declined by PayPal because of possible
fraudulent activity on the IP address. Contact PayPal
with this error code.
10547 Your payment can't be
processed. Please contact the
merchant directly with this
code.
None - this is a PayPal internal error.
10548 Your payment can't be
processed. Please contact the
merchant directly with this
code.
Merchant account attempting the transaction is not a
business account at PayPal. Check your account
settings.
10549 Your payment can't be
processed. Please contact the
merchant directly with this
code.
Merchant account attempting the transaction is not able
to process Direct Payment transactions. Contact PayPal
with this error code.
10550 Your payment can't be
processed. Please contact the
merchant directly with this
code.
Access to Direct Payment was disabled for your
account. Contact PayPal with this error code.
TABLE C.1 Error Codes and the Corresponding Corrective Actions(Continued)
Error Code Error Message Corrective Action

Error Messages
88
10552 Your payment can't be
processed. Please contact the
merchant directly with this
code.
Merchant account attempting the transaction does not
have a confirmed email address with PayPal. Check
your account settings.
10553 Your payment can't be
processed. Please contact the
merchant directly with this
code.
Merchant attempted a transaction where the amount
exceeded the upper limit for that merchant.
10557 Your payment can't be
processed. Please contact the
merchant directly with this
code.
Check your payment receiving preferences. Contact
PayPal if you more help.
10558 Your payment can't be
processed. Please contact the
merchant directly with this
code.
Credit card supplied cannot be charged in the currency
requested.
10561 Please enter a complete
billing address.
Buyer should enter the complete billing address.
10562 Please enter a valid year for
the credit card expiration
date.
Buyer should enter a valid year for card expiration.
10563 Please enter a valid month
for the credit card expiration
date.
Buyer should enter a valid month for card expiration.
10564 Your payment can't be
processed. Please contact the
merchant directly with this
code.
A duplicate transaction was detected, advice buyer to
try again later.
10565 Your payment can't be
processed. Please contact the
merchant directly with this
code.
Merchant country is not supported.
10566 Your payment can't be
processed. Please pay with a
different card type.
Credit card type is not supported.
10570 Your payment can’t be
processed. Please pay with
another credit card.
Credit card supplied doesn’t support “Authorization”.
10701 Please enter a valid name for
the billing address.
Buyer should enter a valid name in the billing address.
TABLE C.1 Error Codes and the Corresponding Corrective Actions(Continued)
Error Code Error Message Corrective Action

89
Error Messages
10702 Please enter a valid address
in line 1 of the billing
address.
Buyer should enter a valid address in line 1 of the bill-
ing address.
10703 Please enter a valid address
in line 2 of the billing
address.
Buyer should enter a valid address in line 2 of the bill-
ing address.
10704 Please enter a valid city in
the billing address.
Buyer should enter a valid city in the billing address.
10705 Please enter a valid state in
the billing address.
Buyer should enter a valid state in the billing address.
10706 Please enter a valid ZIP code
in the billing address.
Buyer should enter a valid zip code in the billing
address.
10707 Please enter a valid country
in the billing address.
Buyer should enter a valid country in the billing
address.
10708 Please enter a complete
billing address.
Buyer should enter the complete billing address.
10709 Please enter an address in
line 1 of the billing address.
Buyer should enter an address in line 1 of the billing
address.
10710 Please enter a city in the
billing address.
Buyer should enter a city in the billing address.
10711 Please enter a state in the
billing address.
Buyer should enter a state in the billing address.
10712 Please enter a valid postal
code in the billing address.
Buyer should enter a valid zip code in the billing
address.
10713 Please enter a country in the
billing address.
Buyer should enter a country in the billing address.
10714 Please enter a valid name in
the billing address.
Buyer should enter a valid name in the billing address.
10715 Please enter a valid state in
the billing address.
Buyer should enter a valid state in the billing address.
10716 Please enter a valid postal
code in the billing address.
Buyer should enter a valid zip code in the billing
address.
10717 Please enter a valid postal
code in the billing address.
Buyer should enter a valid zip code in the billing
address.
10718 Please enter a valid city in
the billing address.
Buyer should enter a valid city.
TABLE C.1 Error Codes and the Corresponding Corrective Actions(Continued)
Error Code Error Message Corrective Action

Error Messages
90
10719 Please enter a valid
addressee name in the
shipping address.
Buyer should enter a valid addressee name for shipping
address.
10720 Please enter a valid address
in line 1 of the shipping
address.
Buyer should enter a valid address in line 1 of the ship-
ping address.
10721 Please enter a valid address
in line 2 of the shipping
address.
Buyer should enter a valid address in line 2 of the ship-
ping address.
10722 Please enter a valid city in
the shipping address.
Buyer should enter a valid city in the shipping address.
10723 Please enter a valid state in
the shipping address.
Buyer should enter a valid state in the shipping address.
10724 Please enter a valid postal
code in the shipping address.
Buyer should enter a valid postal code in the shipping
address.
10725 Please enter a valid country
in the shipping address.
Buyer should enter a valid country in the shipping
address.
10726 Please enter a complete
shipping address.
Buyer should enter a complete shipping address.
10727 Please enter an address in
line 1 of the shipping
address.
Buyer should enter an address1 in the shipping address.
10728 Please enter a city in the
shipping address.
Buyer should enter a city in the shipping address.
10729 Please enter a state in the
shipping address.
Buyer should enter a state in the shipping address.
10730 Please enter a postal code in
the shipping address.
Buyer should enter a valid postal code in the shipping
address.
10731 Please enter a country in the
shipping address.
Buyer should enter a country in the shipping address.
10732 Please enter a valid
addressee name in the
shipping address.
Buyer should enter a valid addressee in the shipping
address.
10733 Please enter a valid state in
the shipping address.
Buyer should enter a valid state in the shipping address.
10734 Please enter a valid postal
code in the shipping address.
Buyer should enter a valid postal code in the shipping
address.
TABLE C.1 Error Codes and the Corresponding Corrective Actions(Continued)
Error Code Error Message Corrective Action

91
Error Messages
10735 Please enter a valid postal
code in the shipping address.
Buyer should enter a valid postal code in the shipping
address.
10736 Please enter a valid city and
state in the shipping address.
Buyer should enter a valid city and state in the shipping
address.
10744 Please enter a valid country
in the billing address.
Buyer should enter a valid country in the billing
address.
10745 Please enter a valid country
in the shipping address.
Buyer should enter a valid country in the shipping
address.
10746 Your payment can't be
processed. Please contact the
merchant directly with this
code.
Credit card from this country is not supported.
10747 Your payment can't be
processed. Please contact the
merchant directly with this
code.
Contact PayPal with this error code.
10748 Please enter a card security
code.
Buyer should enter a Card Security Code.
10750 Please enter a valid state in
the shipping address.
Buyer should enter a valid state in the shipping address.
10751 Please enter a valid state in
the billing address.
Buyer should enter a valid state in the billing address.
10752 Your payment can't be
processed. Please pay with
another card.
Transaction was declined by the issuing bank, not
PayPal. Buyer should attempt another card.
10754 Your payment can't be
processed. Please pay with
another card.
Buyer should use a different credit card.
10755 Your payment can't be
processed. Please contact the
merchant directly with this
code.
Review your integration to ensure that the currency
code is supported.
10756 Your payment can't be
processed. Please pay with
another card.
Buyer should use a different credit card.
10759 Your payment can't be
processed. Please pay with
another card.
Transaction was declined by PayPal. Contact PayPal
with this error code.
TABLE C.1 Error Codes and the Corresponding Corrective Actions(Continued)
Error Code Error Message Corrective Action

Error Messages
92
10761 Your payment can't be
processed because this
transaction appears to be a
duplicate of a recent
transaction.
Transaction was declined because PayPal is currently
processing a transaction by the same buyer for the same
amount. This error can occur when a buyer submits
multiple, identical transactions in quick succession.
10762 Your payment can't be
processed. Please pay with
another card.
Excessive CVV failures on the credit card. Buyer
should try a different card.
10763 Your payment can't be
processed. Please contact the
merchant directly with this
code.
None - this is a PayPal internal error.
10764 Your payment can't be
processed. Please contact the
merchant directly with this
code.
Transaction was declined by PayPal. Contact PayPal
with this error code.
11998 Please enter the date when
your credit card became
valid.
Buyer should give the correct start date for their credit
card.
15001 Your payment can't be
processed. Please pay with
another card.
Transaction was rejected by PayPal because of
excessive failures over a short period of time for this
credit card. Contact PayPal with this error code.
15002 Your payment can't be
processed. Please pay with
another card.
Transaction was declined by PayPal. Contact PayPal
with this error code.
15003 Your payment can't be
processed. Please contact the
merchant directly with this
code.
Transaction was declined because the merchant does
not have a valid commercial entity agreement on file
with PayPal. Contact PayPal with this error code.
15004 Please enter a valid Card
Security Code.
Transaction was declined because the CVV entered
does not match the credit card.
15005 Your payment can't be
processed. Please pay with
another card.
Transaction was declined by the issuing bank, not
PayPal. Buyer should attempt another card.
15006 Please enter a valid card
number.
Transaction was declined by the issuing bank, not
PayPal. Buyer should attempt another card.
15007 Your card is expired. Please
pay with a valid card.
Transaction was declined by the issuing bank because
of an expired credit card. Buyer should attempt another
card.
TABLE C.1 Error Codes and the Corresponding Corrective Actions(Continued)
Error Code Error Message Corrective Action

93
Error Messages
15008 Your payment can't be
processed. Please contact the
merchant directly with this
code.
Review your integration to ensure that the totals match.
15009 Your payment can't be
processed. Please contact the
merchant directly with this
code.
There is a mismatch in the currency code. Contact
PayPal with this error code.
99998 Your payment can't be
processed. Please contact the
merchant directly with this
code.
Credit card data is invalid. Contact PayPal with this
error code.
TABLE C.1 Error Codes and the Corresponding Corrective Actions(Continued)
Error Code Error Message Corrective Action

Error Messages
94

D Currency Codes
The table below lists all the currencies supported by PayPal.
TABLE D.1 Currency Codes
Currency
Code Country Name
AUD Australian Dollar
CAD Canadian Dollar
CHF Swiss Franc
CZK Czech Koruna
DKK Danish Krone
EUR Euro
GBP British Pound Sterling
HKD Hong Kong Dollar
HUF Hungarian Forint
JPY Japanese Yen
NOK Norwegian Krone
NZD New Zealand Dollar
PLN Polish Zloty
SEK Swedish Krona
SGD Singapore Dollar
USD U.S. Dollar

Currency Codes
96

97
Index
A
address_override 17
address1 17
address2 17
API integration 39
B
background 30
billing_address1 17
billing_address2 17
billing_city 17
billing_country 17
billing_first_name 17
billing_last_name 17
billing_state 17
billing_zip 17
BMCreateButton API 39
BMCreateButton API Operation 45
BMCreateButton Errors 46
BMCreateButton Request 45
BMCreateButton Request Fields 45
BMCreateButton Response 46
BMCreateButton Response Fields 46
bn 17
bodyBgColor 31
bodyBgImg 31
business 17
button 30
button hosting 39
clear text buttons 39
encrypted buttons 39
token buttons 39
Button Manager API 39
BUTTONCODE 45
BUTTONCODE=CLEARTEXT 39
BUTTONCODE=ENCRYPTED 39
BUTTONCODE=HOSTED 39
BUTTONCODE=TOKEN 39
BUTTONTYPE 45
BUTTONTYPE=PAYMENT 39
buyer_email 17
C
cancel_return 18
cbt 18
city 18
clear text buttons 39
CLEARTEXT 39
country 18
currency codes 95
currency_code 18
custom 18
customising payment page 21
customising your template 30
D
DoCapture API 74
E
EMAILLINK 36, 40, 46
ENCRYPTED 39
encrypted buttons 39
encryption 43
encryption process 58
error messages 85
Express Checkout 12
F
first_name 18
footerTextColor 31
G
GetTransactionDetails API 56, 63

Index
98
H
handling 18
header 30
headerBgColor 31
headerHeight 31
HOSTED 39
HOSTEDBUTTONID 46
HTML integration 15
HTTP variables 17, 31
I
iFrames 33
API integration 35
manual integration 34
InputFile 62
Instant Payment Notification (IPN) 55
integration
API 39
HTML 15
invoice 18
L
L_BUTTONVAR 45
last_name 18
lc 18
logoFont 31
logoFontColor 31
logoFontSize 31
logoImage 31
logoImagePosition 31
logoText 31
M
METHOD 45
modifying account settings 21
N
night_phone_a 18
night_phone_b 18
night_phone_c 18
notify_url 18
O
optional API operations 63
order processing 55
order summary column 30
orderSummaryBgColor 31
orderSummaryBgImage 31
OutputFile 62
overview 9
P
pageButtonBgColor 31
pageButtonTextColor 31
pageTitleTextColor 31
paymentaction 18
PCI complicance 9
PPCertFile 62
preconfigured account 49
preview 26
previous version 26
private key 43
private keys 58
generating 59
public certificate
downloading 60
generating 59
removing 60
uploading 59
public key 43
public keys 58
R
RefundTransaction API 73
return 19
S
save and publish 26
sectionBorder 31
Seller Protection 9, 11
settings 23
shipping 19
showBillingAddress 32
showBillingEmail 32
showBillingPhone 32

