Dungeon Architect User Guide 01
01%20User%20Guide%20-%20Dungeon%20Architect
01%20User%20Guide%20-%20Dungeon%20Architect
01%20User%20Guide%20-%20Dungeon%20Architect
01%20User%20Guide%20-%20Dungeon%20Architect
User Manual: Pdf
Open the PDF directly: View PDF ![]() .
.
Page Count: 100
Dungeon Architect User Guide
for Unity 5
1 Introducon
Dungeon Architect is a plugin for Unity that helps in streamlining the level creaon pro-
cess. It allows you to quickly create levels procedurally (or manually) by blocking out
volumes and having the plugin build the environment automacally around it. This doc-
ument introduces you to the various features of Dungeon Architect
2 Generaon Overview
A dungeon is generated in two phases
• Layout Generaon
• Visual Generaon
2.1 Layout Generaon
In this phase, only the layout of the dungeon is generated in memory. No meshes or
actors are actually spawned.
Next, the level is populated with invisible points called Markers around the generated
layout. A marker has only a name and a transformaon in the 3D space.
In the above image, aer the layout has been built, the dungeon builder has populated
the level with marker points around the layout of the dungeon
1
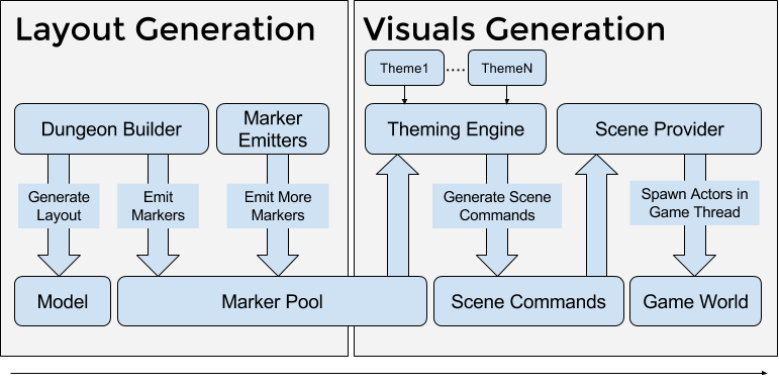
Figure 1: Architecture
2.2 Visual Generaon
This phase spawns the actors in your scene. It takes all the marker points inserted in
the previous phase and replaces them with actors (meshes, lights, blueprints etc) that
you have mapped in your theme files
The theming engine is executed for each marker inserted in the Layout generaon phase.
In the above example, when a Ground marker is encountered, it would look for a Ground
marker mapping in your theme file and replace the marker with the meshes you have
mapped to it
The advantage of this data driven theme based approach is that theme files can be
swapped to give your dungeon a completly different look. Theme files can also be
shared across mulitple projects / teams
Mulple themes can also be used within the same dungeon to create variaons
3 Dungeon Prefab
A dungeon prefab is used to build your dungeons. Dungeon Architect supports building
dungeons with different layouts. The current supported ones are Grid, SimpleCity and
2
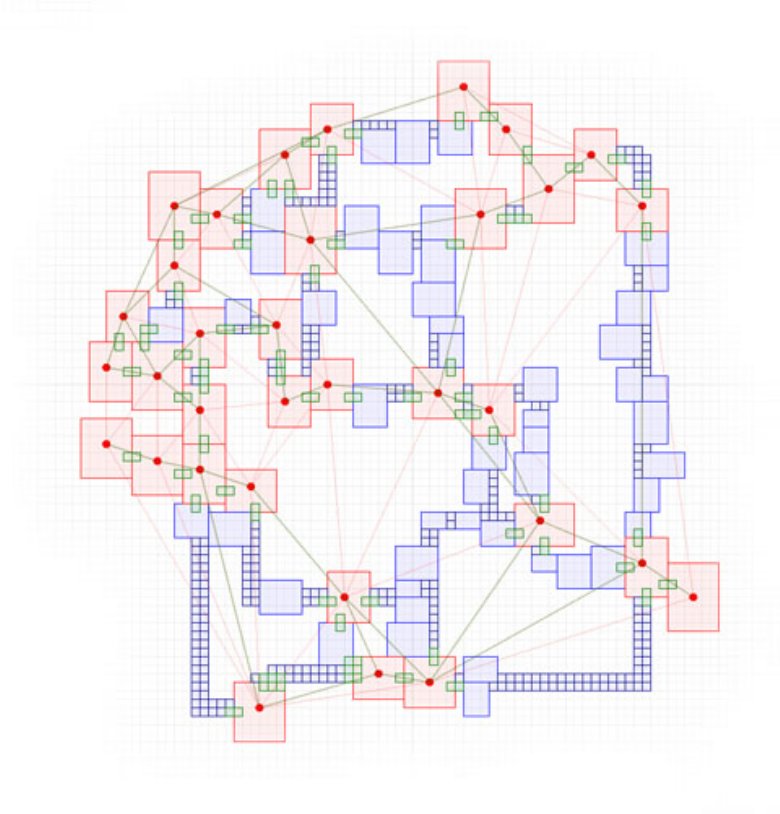
Figure 2: Layout of the dungeon in memory
3
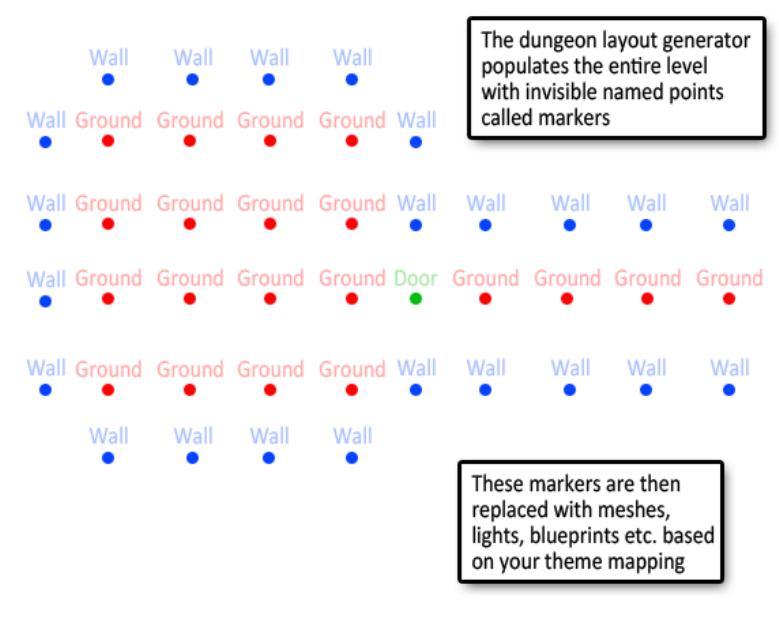
Figure 3: Markers populated for a sample room
4
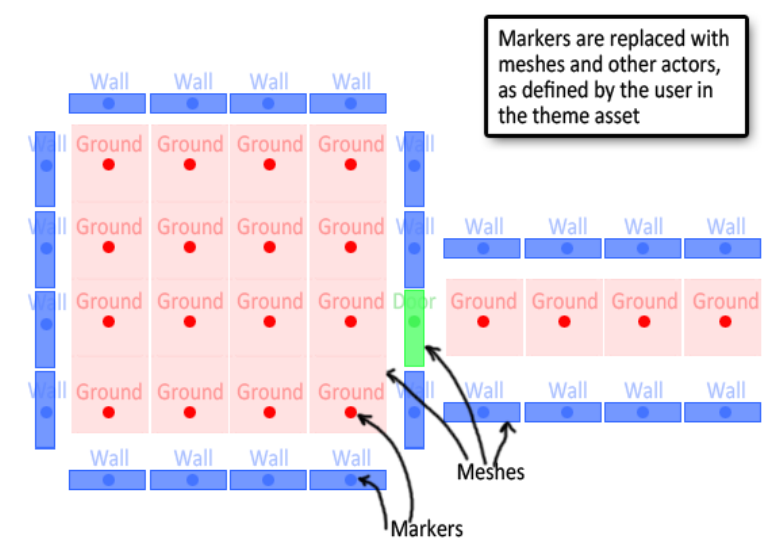
Figure 4: Actors spawned by a theme mapping
5
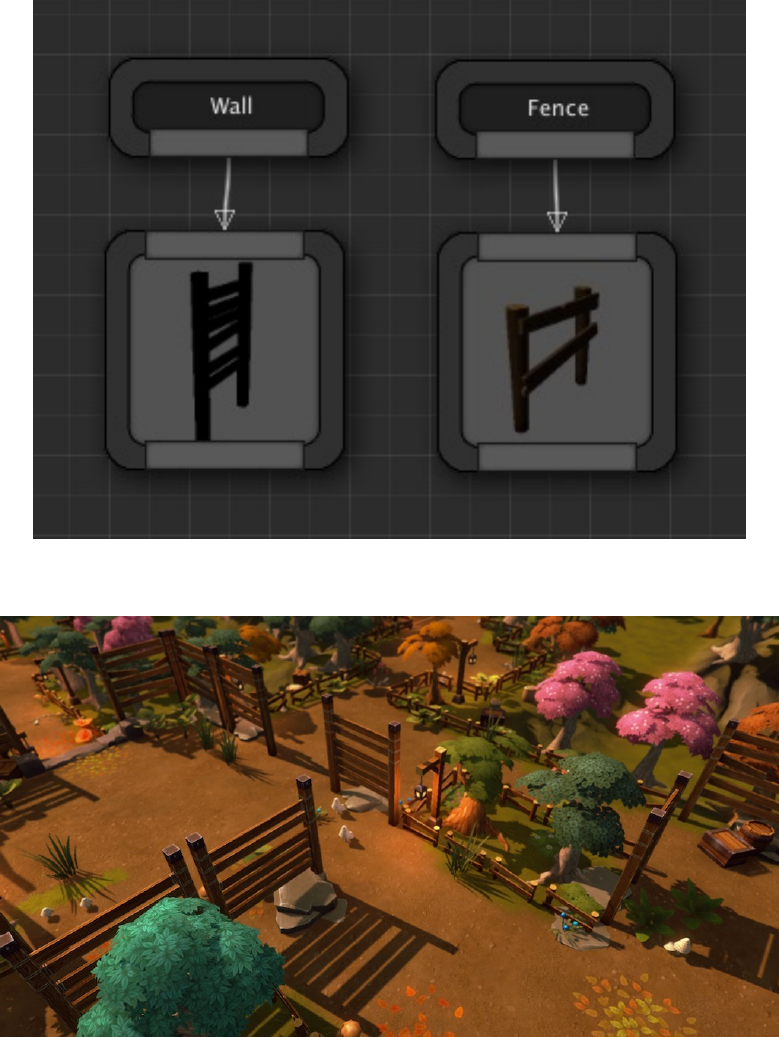
Figure 5: Sample Theme Mapping
Figure 6: Result aer theme mapping
6
Floorplan. Drop the appropriate dungeon prefab into the scene and reset its transform
Figure 7: Dungeon Prefab
The dungeon game object generate a procedural layout for your dungeon based on the
various configuraon paramters.
Aer the layout has been generated, it spawns meshes, lights, blueprints etc, based on
the mappings you have defined in the Theme file. This way you can define what meshes
needs to be aached to the floors, walls, ceilings, etc
3.1 Properes
The Dungeon game object lets you perform various acons on your procedural dungeon.
Select the Dungeon game object and have a look at the configuraon in the Inspector
window
Build Dungeon: Builds a procedural dungeon. You need to define atleast one theme
before you build
Destroy Dungeon: Destroys an exisng dungeon owned by this actor. If you want to
rebuild a dungeon aer modifying the theme, there is no need to destroy first and you
can directly click build
Themes: A theme file lets you design the look and feel of your dungeon. The theme
editor lets you interacvely design your own themes. You need to specify atleast one
theme file before you can build your dungeon (sample content comes with many pre-
created themes to get you started)
Debug Draw: Draws debug informaon in the scene view
7
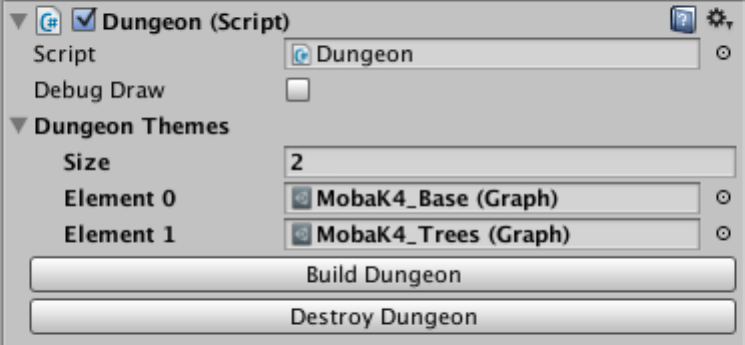
Figure 8: Dungeon Actor Properes
3.2 Config Parameters
Select the Dungeon Actor and navigate to the Inspector window
The various config parameters determine how the layout of the dungeon is generated
procedurally. The default layout generator algorithm is implemented based on the ex-
cellent writeup by TinyKeep’s author Phi Dinh
The various parameters are:
•Seed: Changing this number would completely change the layout of the dungeon.
This is the base random number seed that is used to build the dungeon. There is
a convenience funcon to randomize this value (buon labeled R)
•Num Cells: The number of cells to use while building the dungeon. You will not
see these cells in the final result. A larger number would create a bigger and more
complex dungeon. A number of 100-150 builds a medium to large sized dungeon.
Experiment with different ranges
•Grid Cell Size: The dungeon generator works on a grid based system and required
modular mesh assets to be placed on each cell (floors, walls, doors etc). This
important field specifies the size of the cell to use. This size is determined by the
art asset used in the dungeon theme designed by the arst. In the demo, we
have a floor mesh that is 400x400. The height of a floor is chosen to be 200 units
as the stair mesh is 200 units high. Hence the defaults are set to 400x400x200.
8
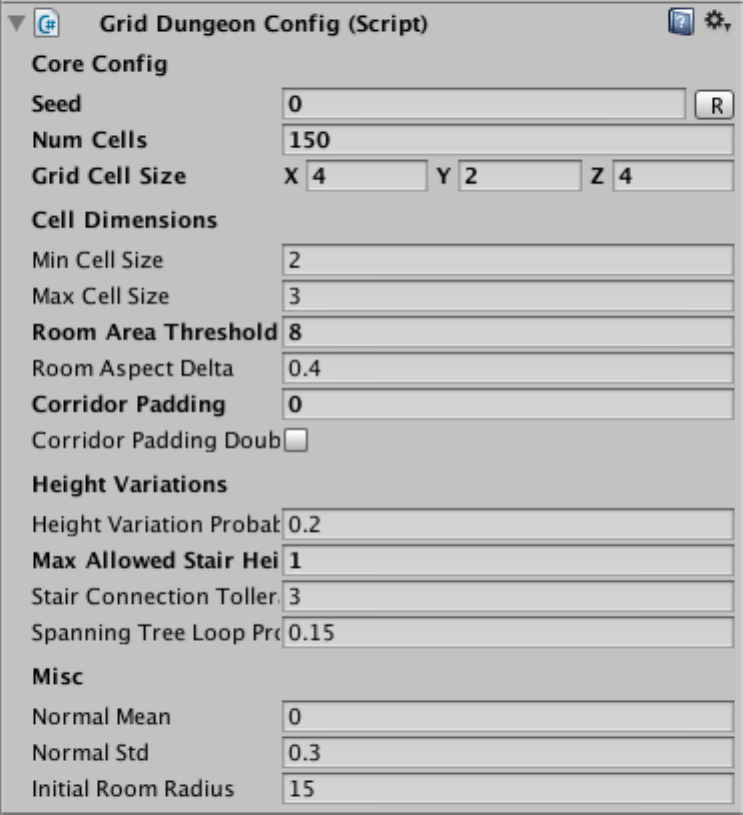
Figure 9: Dungeon Config Parameters
9
You should change this to the dimension of the modular asset your designer has
created for the dungeon
•Min/Max Cell Size: This is how big or small a cell size can be. While generaon,
a cell is either converted to a room, corridor or is discarded completely. The Cell
width / height is randomly chosen within this range
•Room Area Threshold: If a cell size exceeds past this limit, it is converted into a
room. Aer cells are promoted to rooms, all rooms are connected to each other
through corridors (either directly or indirectly. See spanning tree later)
•Room Aspect Delta: The aspect rao of the cells (width to height rao). Keeping
this value near 0 would create square rooms. Bringing this close to 1 would create
elongated / stretched rooms with a high width to height rao
•Corridor Padding: The extra width to apply to one side of a corridor
•Corridor Padding Double Sided: Flag to apply the padding on both sides of the
corridor
•Height Variaon Probability: Tweak this value to increase / reduce the height
variaons (and stairs) in your dungeon. A value close to 0 reduces the height
variaon and increases as you approach 1. Increasing this value to a higher level
might create dungeons with no place for proper stair placement since there is
too much height variaon. A value of 0.2 to 0.4 seems good
•Max Allowed Stair Height: The number of logical floor units the dungeon height
can vary. This determines how high the dungeon’s height can vary (e.g. max 2
floors high). Set this value depending on the stair meshes you designer has cre-
ated. In the sample demo, there are two stair meshes, one 200 units high (1 floor)
and another 400 units high (2 floors). So the default is set to 2
•Spanning Tree Loop: Determines how many loops you would like to have in your
dungeon. A value near 0 will create fewer loops creang linear dungeons. A value
near 1 would create lots of loops, which would look unoriginal. Its good to allow
a few loops so a value close to zero (like 0.2 should be good)
•Stair Connecon Tolerance: The generator would add stairs to make different
areas of the dungeon accessible. However, we do not want too many stairs. For
e.g., before adding a stair in a parcular elevated area, the generator would check
if this area is already accessible from a nearby stair. If so, it would not add it. This
tolerance parameter determines how far to look for an exisng path before we
10
can add a stair. Play with this parameter if you see too many stairs close to each
other, or too few
•Normal Mean / Std: The random number generator used in the dungeon gener-
ator does not use a uniform distribuon. Instead it uses a normal distribuon to
get higher frequency of lower values and fewer higher values (and hence fewer
room cells and a lot more corridor cells). Play with these parameters for different
results
•Inial Room Radius: Internal Usage. Keep to a low value like 10-15
4 Theme Overview
A theme file lets you design the look and feel of you dungeons with an intuive graph
based approach
Themes are saved as a separate assets on disk. Dungeon Architect also provides an
interacve editor to help you design beauful levels
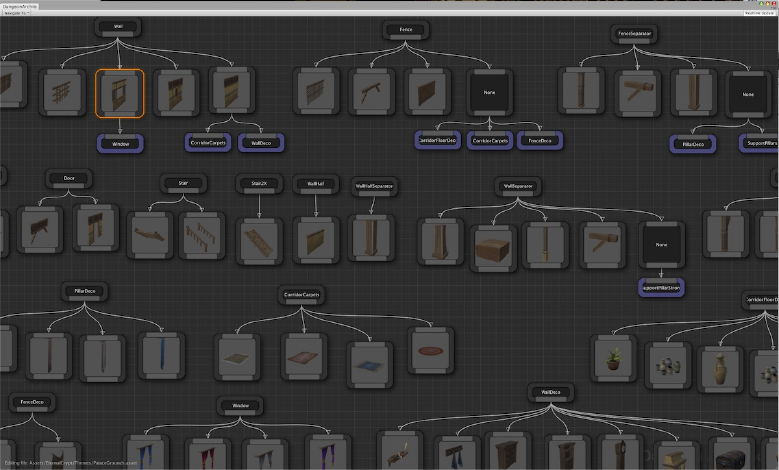
Figure 10: An example theme
11
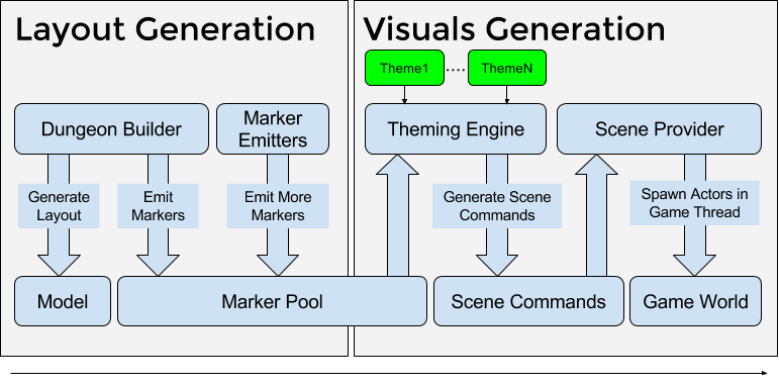
Figure 11: Themes are used by the Theming Engine
4.1 Create a Theme
To create a new theme, right click in the content browser and choose “Dungeon Theme”
5 Theme Editor
Double click a dungeon theme asset to open it in the Theme Editor
5.1 Interacve Eding
As you design your theme, the scene view automacally gets updated based on your
theme graph mapping. To make this happen, you need to have a dungeon game object
in the scene with the current theme being edited applied to it
Whenever you change the theme, the theme editor would search for a dungeon game
object in the scene (that has this theme applied to it) and rebuild it. This way, you get
an immediate visual feedback while designing the look and feel of you levels
12
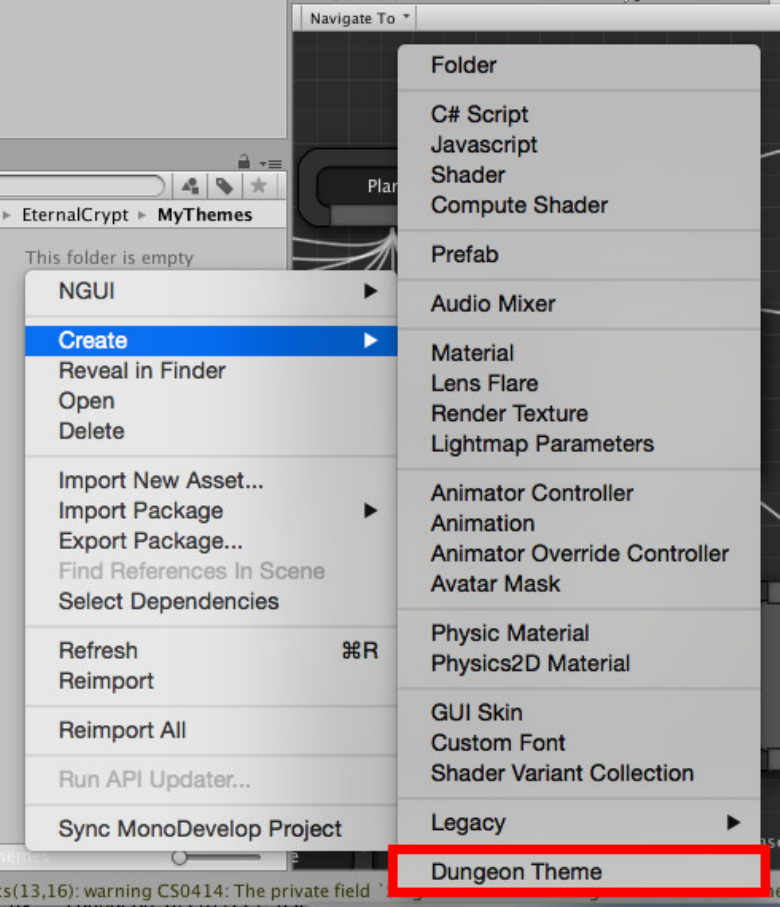
Figure 12: Create a dungeon theme
13
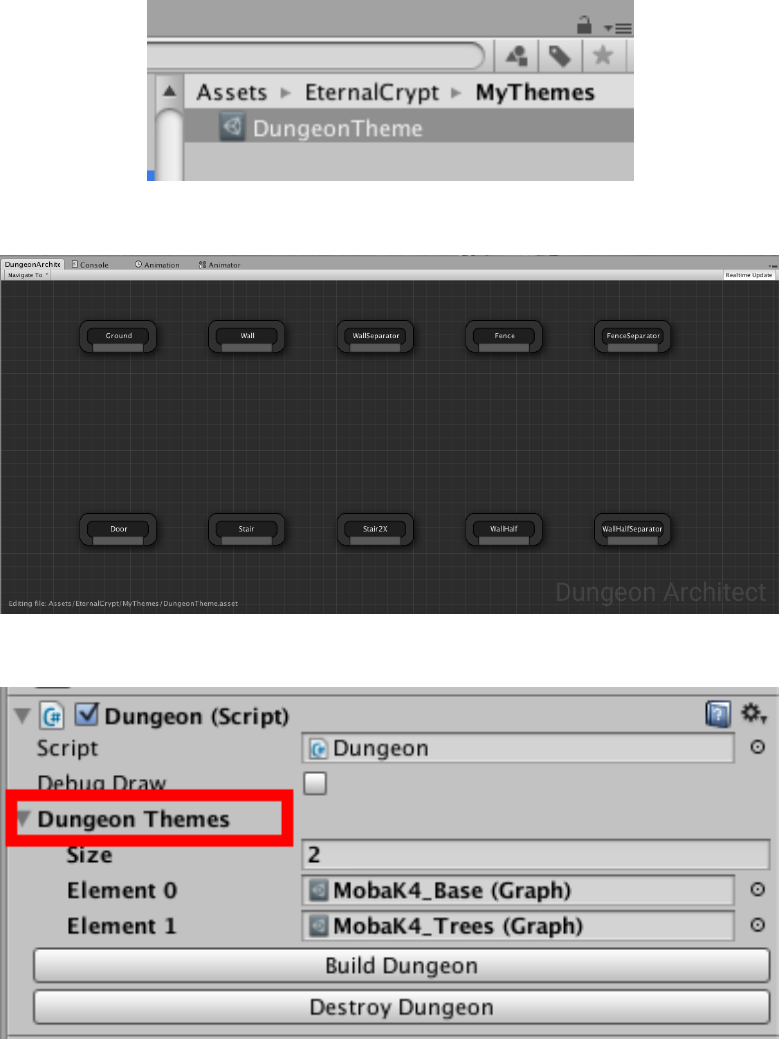
Figure 13: Dungeon Theme Asset
Figure 14: Dungeon Architect Theme Editor
Figure 15: Dungeon Architect Theme Editor
14
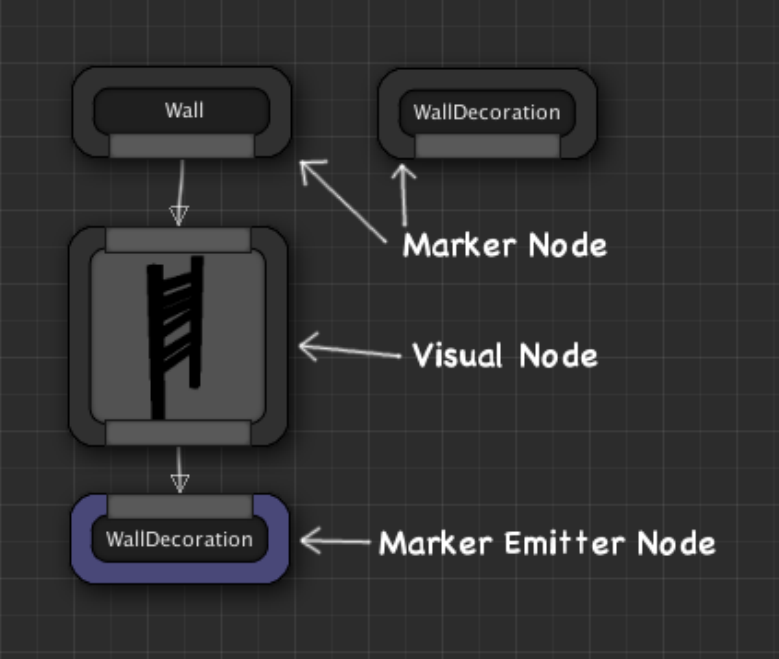
6 Theme Nodes
A Theme can have 3 category of nodes
•Marker Nodes
•Visual Nodes
•Marker Emier Nodes
Figure 16: Theme Node categories
15
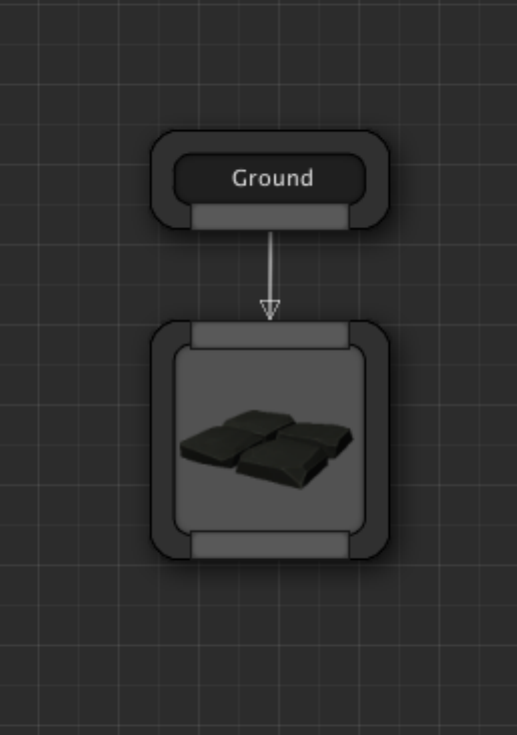
6.1 Marker Nodes
Aer the layout generaon phase, the scene would be scaered with invisible named
points called Markers. Then, for every marker point in the scene, the theming engine
looks for a corresponding Marker Node with that marker name. If found, it would start
execung all the nodes defined below the marker node.
For e.g., if you have a marker node named Ground, it would be invoked for every Ground
marker found in the scene. Once invoked, the theming engine executes all the nodes
defined below it from le to right unll a certain condion is met
Figure 17: Ground Node
16
In the above example:
1. In the first phase, the layout builder has populated the map with ground markers,
wherever a ground mesh was expected.
2. Then in the next phase, the theming engine ecounters the Ground marker while
iterang through all the markers in the scene
3. It then looks for a Marker Node named Ground in the theme graph
4. Once found, it executes the visual nodes defined below it, starng from le to
right
When you create a new theme asset, the theme graph comes with a set of default
marker nodes.
You can define new marker nodes and build your own hierarcy for advanced theming
Names of custom marker nodes can be changed by double clicking on them, or from
the details tab
6.1.1 Creang marker nodes
To create a marker node, right click anywhere in the empty area and choose Add Marker
Node
6.2 Visual Nodes
Visual nodes are used for spawning visual objects into the scene (e.g. any game objects,
sprites etc). They are usually aached to a marker node and executed whenever an
marker with that name is encountered in the scene. When executed, it spawns a game
object defined within it and places it in the scene where the marker was encountered
You can create the following visual nodes:
•Game Object Node - Spawns any type of a game object. Expects a game object
template (e.g. prefabs)
•Sprite Node - Spawns a sprite for your 2D games. Expects a sprite reference. Also
have sprite specific properes
17
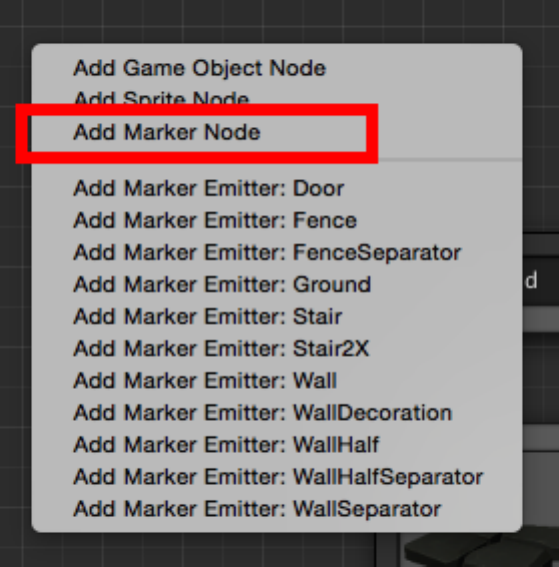
Figure 18: Add new marker node from the Context Menu
18
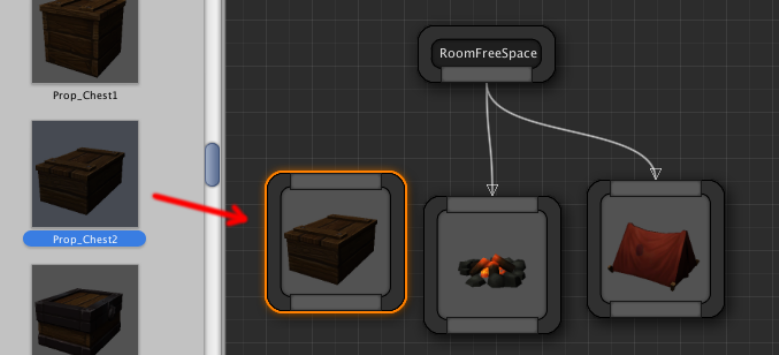
6.2.1 Creang visual nodes
There are several ways to create a new visual node:
Drag and drop a game object from the Project window on to the theme editor to create
a Game Object or Sprite node
Figure 19: Drag an drop prefabs into the theme editor
Alternavely, drag a link out of the marker node you intend to aach it on and select
the appropriate visual node you desire
Then select the node and assign the game object template from the inspector window
6.3 Marker Emier Nodes
Marker Emiers emit new markers into the scene. These nodes are aached to visual
nodes and if the parent visual node is executed, it would insert a named marker into
the scene.
Marker Emier nodes are similar in apperarance to Marker Nodes. However, they are
purple in color and have an input pin, instead of an output pin
In the above example, the Wall Marker has 3 Mesh nodes aached to it with probability
such that any one for the 3 would be randomly chosen.
One of the 3 meshes has a window in it and we would like to decorate that mesh with
19
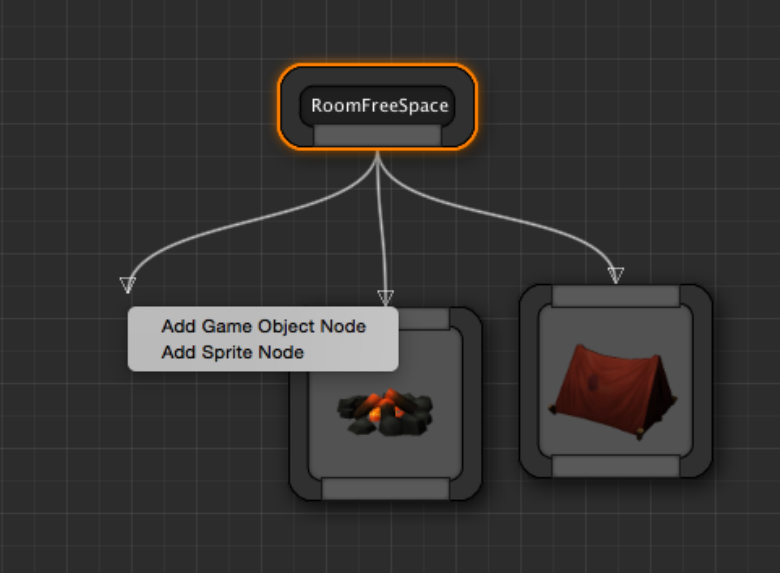
Figure 20: Drag a link from exisng marker nodes
20
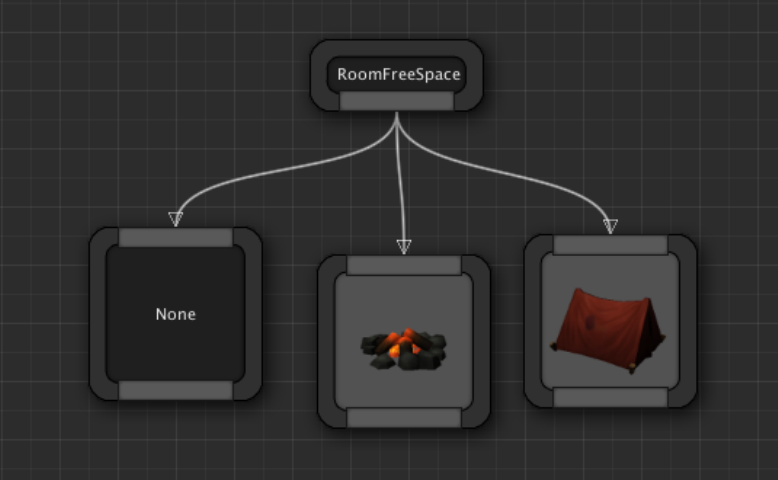
Figure 21: This would create an empty visual node
curtains, but only if that node is selected. So, we define a new Marker named Curtains
(can be any name) and aach curtain meshes to it. Then we emit aCurtain Marker
Node from the desired visual node. Hence, if the mesh in the middle is executed, it
would also insert a marker named Curtain in its posion. Then the theming engine
would execute everything beneath the Curtain marker and pick a random curtain and
aach to the wall
This ability of defining your own hierarchy lets you design powerful themes for your
levels
6.3.1 Creang marker emier nodes
To create a Marker Emier Node, drag a link out of a visual node and select a marker
name you would like to emit
Alternavely, right click anywhere in the empty area and expand the Marker Emitters
category and click choose a marker to emit
You can create a marker emier for any of the exisng markers in the scene
21
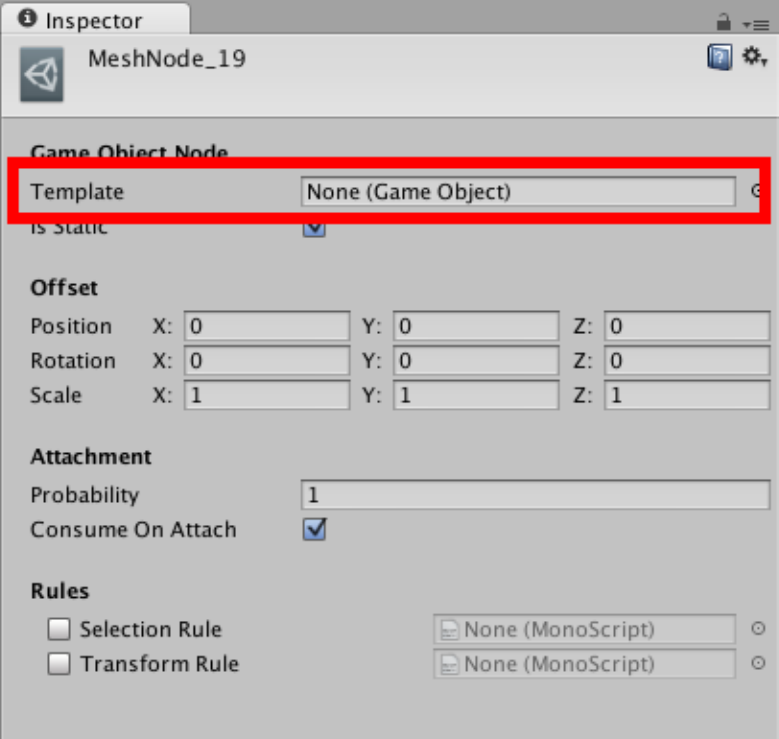
Figure 22: This would create an empty visual node
22
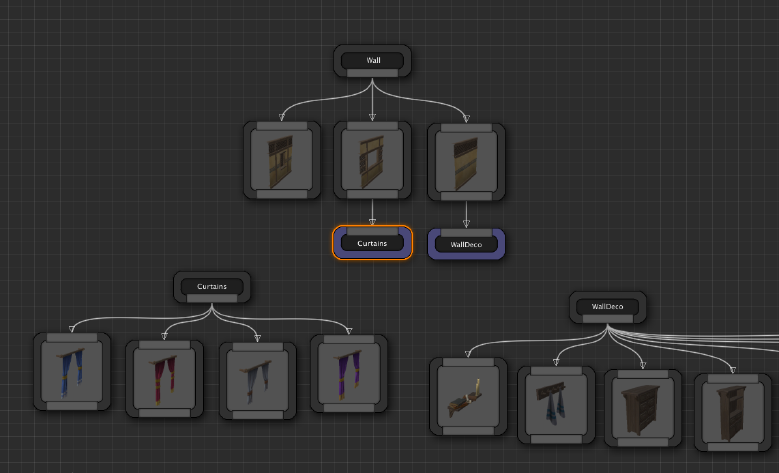
Figure 23: Marker Emier Sample
6.3.2 Cycles
Cycles are not allowed when you emit markers since we do not want to connuously
emit markers in an infinite loop
The editor takes care of not allowing cycles and nofies you with a user-friendly message
when you aempt to create a connecon with a marker emier that might cause a loop
7 Theme Node Properes
A node in the theme graph can be customized from the Details Tab
7.1 Visual Nodes
Select a visual node (e.g. a Game Object node) and have a look at the details tab:
23
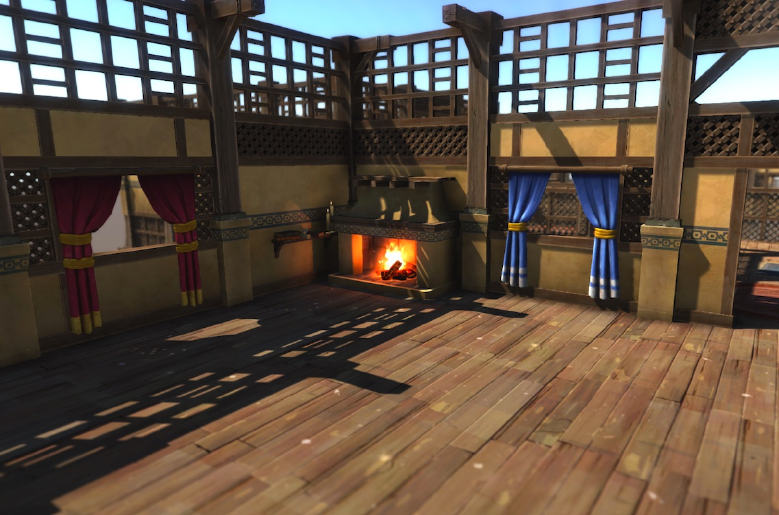
Figure 24: Sample Dungeon Scene
24
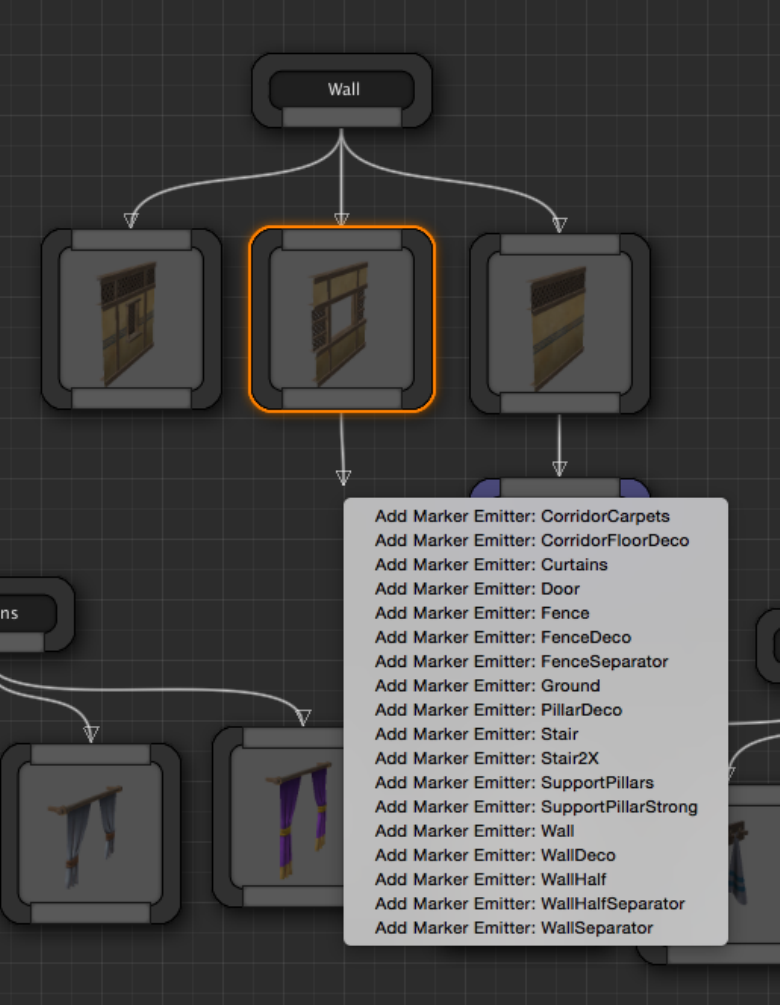
Figure 25: Choose a Marker to emit from the filtered context menu
25
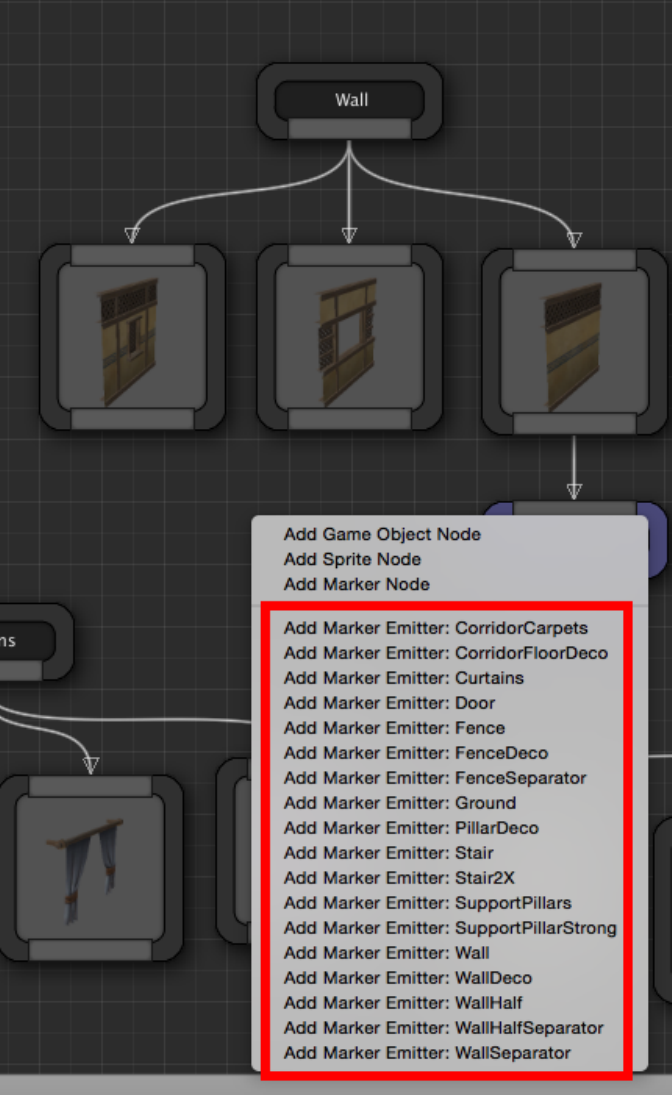
Figure 26: Choose a Marker to emit from the context menu
26
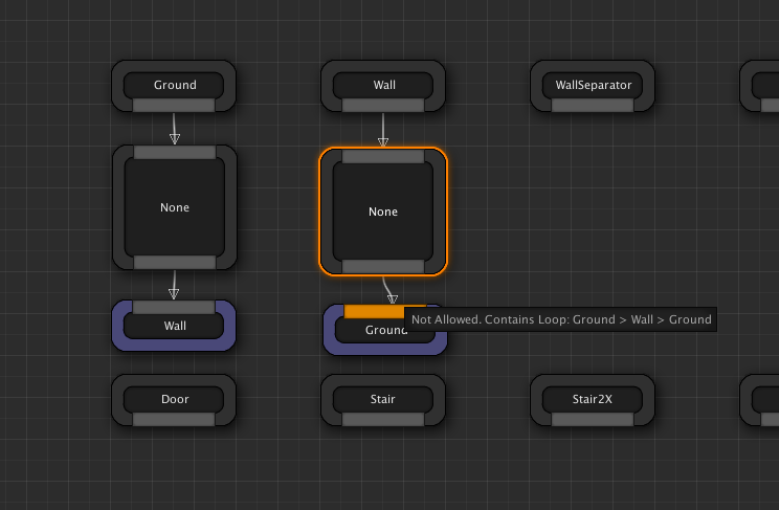
Figure 27: Cycles not allowed
27
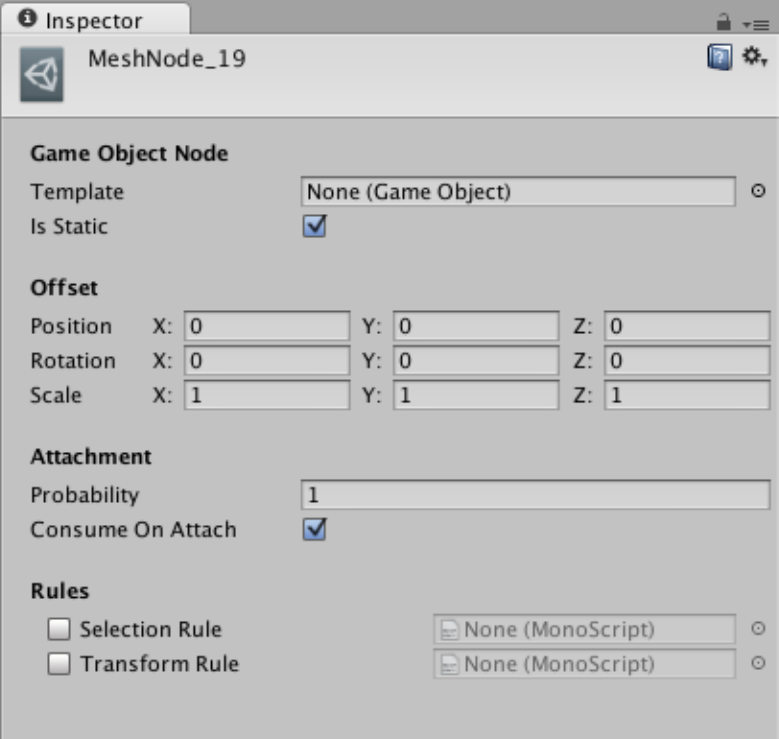
Figure 28: Game Object Node properes
28
The properes that are common to all Visual nodes (Game Object, Sprite etc) are ex-
plained below:
Offset: Apply transformaon offset to your visual object relave to the marker locaon.
This is a very useful property while designing your theme. If the pivot of the mesh your
arst has designed isn’t where you wish it were, you can easily adjust it here to translate
/ rotate it around. You can also scale objects if they are too small / big. While designing
your theme, you’ll find this property useful to re-posion your visual nodes, if required.
Probability: This is the probability of aachment. When this node is executed, the
theming engine looks at this variable and rolls a dice and decides whether to insert
this visual object into the scene or not. If this value is 1.0, then it would insert it 100%
of the me. If the value is 0, then it would not insert it since selecon probability 0%. If
it is 0.5, then it would insert it 50% of the me
Consume on Aach: If the visual object was indeed spawned into the scene (based on
the probability above), the theming engine would then look at this flag to decide if we
need to execute the next sibling visual node. If it is checked, then execuon stops for
this marker. If it is unchecked, the next sibling gets processed. Affinity and Consume on
Aach can be combined to create interesng possiblies in your theme
Selecon Logic: Lets you define selecon logic scripts. You have seen an example above
of node selected based on random probability (Probability property). The selecon pro-
cess can be far more power than a simple random probability based selecon. You can
define you own behavior scripts and assign it here so your custom logic can decide if a
node is to be selected or not. More details below
Transform Logic: In the Offset property as seen above, you can define a stac offset
transformaon to move/scale/rotate the visual object from the marker posion. With
Transform Logic, your behavior scripts can provide dynamic tranform offsets based on a
logic. For e.g., you might want to rotate/scale/translate a tree randomly to give natural
variaon instead of having them all face the same direcon. More on this later
7.1.1 Game Object Node
A game object not lets you instanate any type of game object on the scene
Template: Specify a game object template (prefab) to spawn in the scene. The node’s
thumbnail will update to reflect the game object assigned here
29

Figure 29: Game Object Node specific properes
Stac: Set this if you want to make your object stac. If you are spawning dynamic
objects (like NPCs), then uncheck this flag
7.1.2 Sprite Class Node
If you are making a 2D game, you’ll use Sprite nodes to build your scene
Here are the sprite specific parameters:
Sprite: Assign the sprite you would like to spawn with this node. The thumbnail of the
node displays this sprite, if assigned
Color: The color nt to assign on the sprite node
Material Override: Specify the different material to use on your sprite (e.g. translucent,
masked etc). If unassigned, the default material would be used that is spawned with
Unity’s sprite object
Sorng Layer Name: The name of the 2D sorng layer used with Unity’s 2D framework
Order in Layer: The order this mesh should appear in the layer. This value is set in Unity’s
2D sprite object
Stac: Set this if you want to make your object stac. If you are spawning dynamic
objects (like NPCs), then uncheck this flag
7.2 Marker Node
You can change the name of a marker node by seng it’s Name field
30
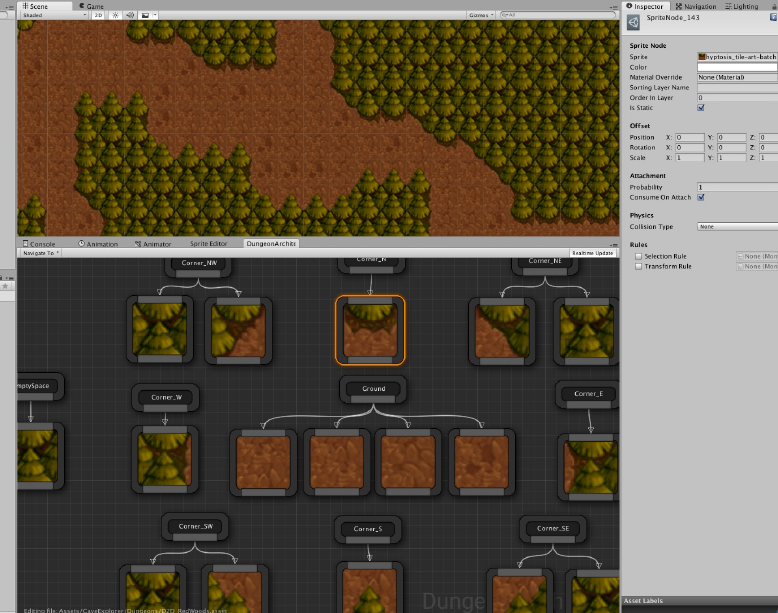
Figure 30: 2D Procedural Scene
31
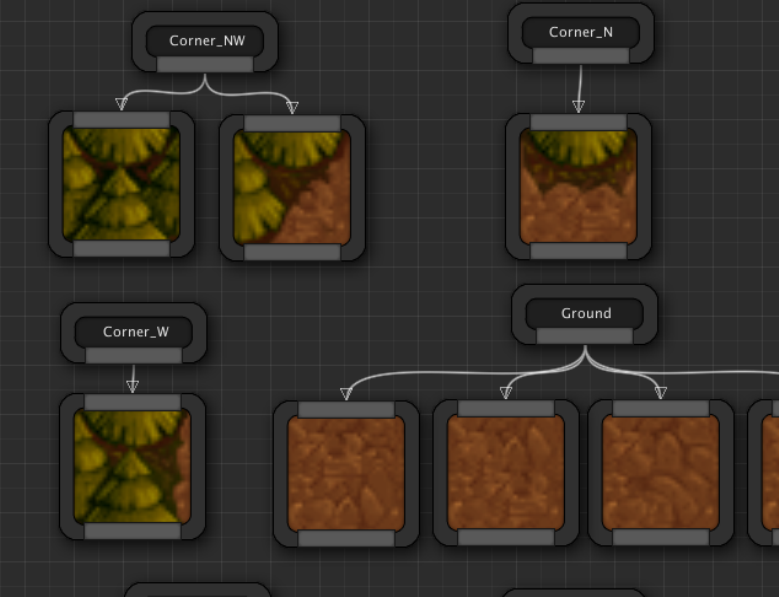
Figure 31: Sprite Nodes
32
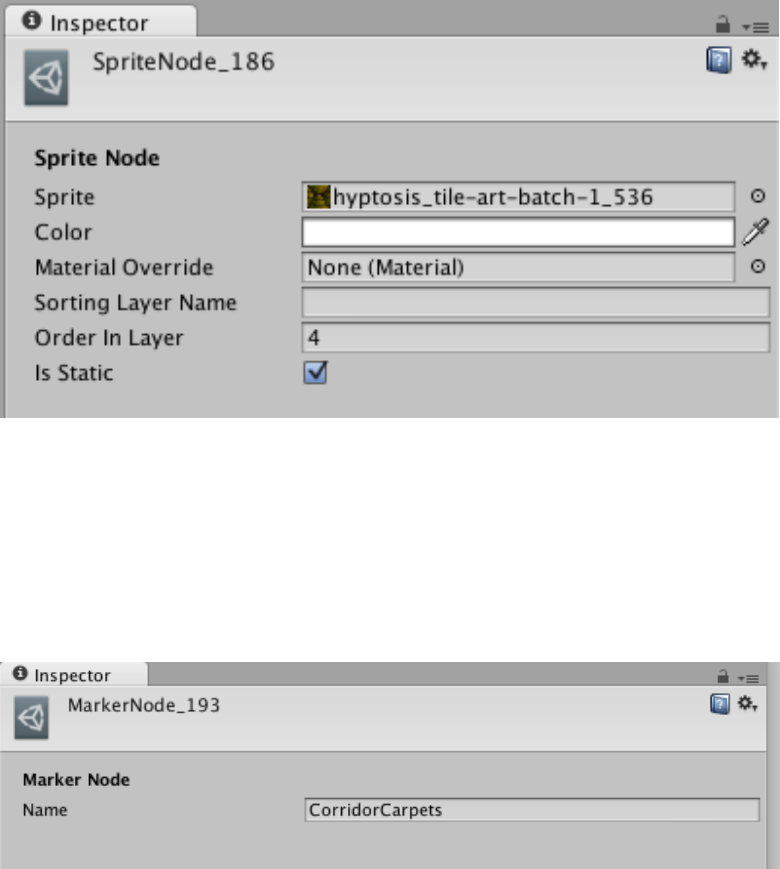
Figure 32: Sprite Node Properes
Figure 33: Marker Node Properes
33
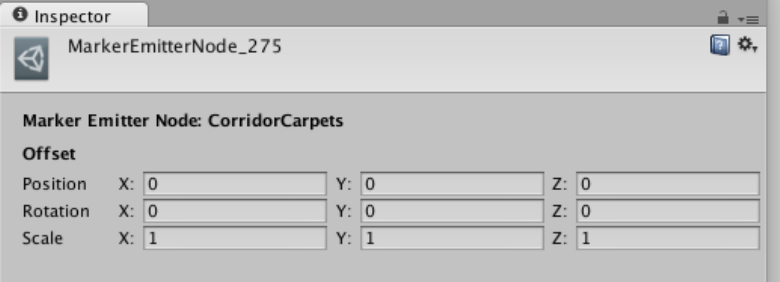
7.3 Marker Emier Node
When you emit a marker, you can apply an offset to the emied marker in the Offset
field
Figure 34: Marker Emier Node Properes
8 Rules
You can aach script to add logic on the theme nodes for more control. There are two
types of rules you can aach to Visual nodes
8.1 Selecon Rule
A selecon rule is a behavior script that is used to decide if the current node is to be
aached to the scene. This rule replaces the default Probability property that is used
for randomly deciding if visual node needs spawning based on a probability.
Selecon rules gives you more power, when you need it. In the rule’s script logic, you
can query the dungeon model and determine if this node should be inserted into the
scene
34
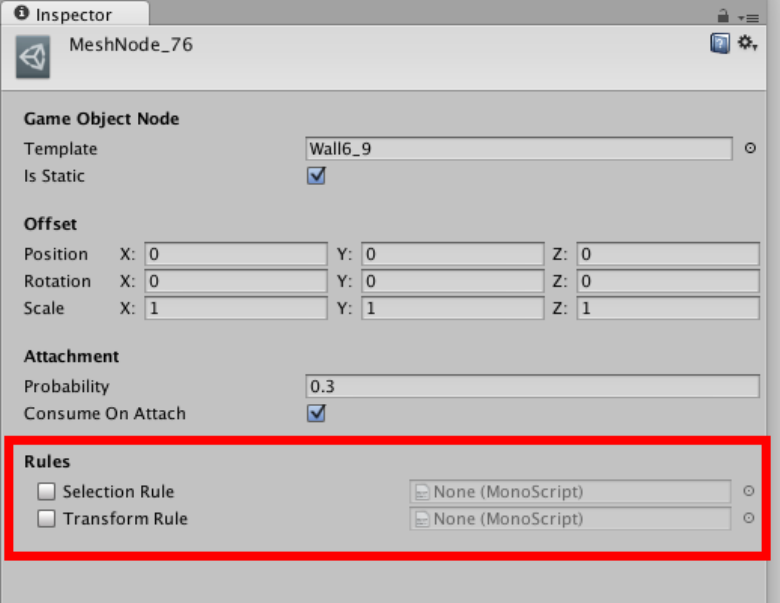
Figure 35: Visual Node Rules
35
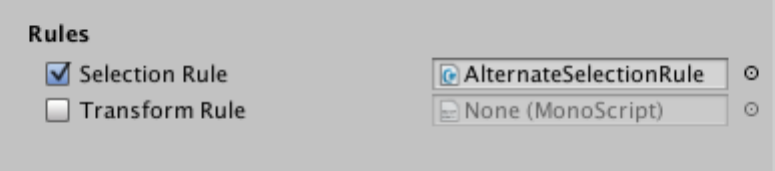
8.1.1 Using Selecon Rules
To assing an exisng rule into the node, Check the Use Selecon Logic property and
drop in the Selecon Rule script you would like to aach to the node
Figure 36: Assign an exisng Selecon Rule
You can create new Selecon Rules by overriding the AlternateSelectionRule class
under the DungeonArchitect namespace
using UnityEngine;
using System.Collections;
using DungeonArchitect;
public class MySelectionRule : SelectorRule {
public override bool CanSelect(PropSocket socket, Matrix4x4 propTransform, DungeonModel model, System.Random random) {
bool selected = false;
// Your selection logic here
return selected
}
}
8.1.2 Example #1
This theme decorates the sides of the walls with props. Somemes, they get in the way
and block the doors.
A selecon rule is used to query the dungeon model and check if it is near a door. If so,
it returns false indicang that we don’t want to insert it here
using UnityEngine;
36
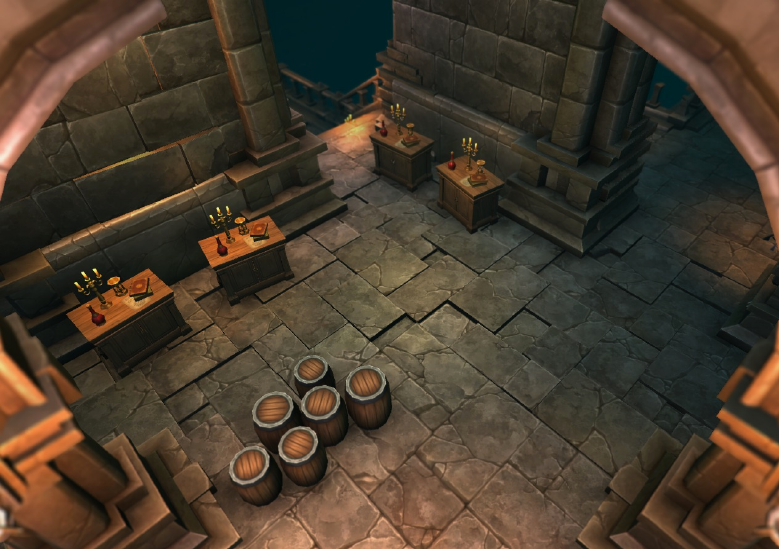
Figure 37: Decorave props blocking the door pathway
37
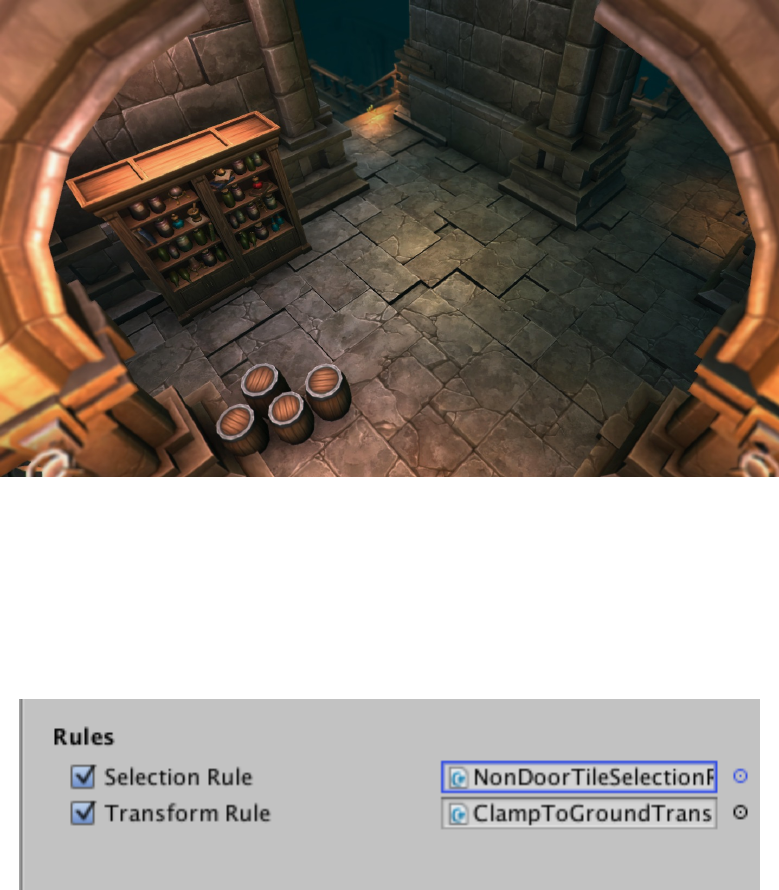
Figure 38: Decorave props removed near doors
Figure 39: Rule to avoid creaon of props near doors
38
using System.Collections;
using DungeonArchitect;
using DungeonArchitect.Utils;
using DungeonArchitect.Builders.Grid;
public class NonDoorTileSelectionRule : SelectorRule {
public override bool CanSelect(PropSocket socket, Matrix4x4 propTransform, DungeonModel model, System.Random random) {
if (model is GridDungeonModel) {
var gridModel = model as GridDungeonModel;
var config = gridModel.Config as GridDungeonConfig;
var cellSize = config.GridCellSize;
var position = Matrix.GetTranslation(ref propTransform);
var gridPositionF = MathUtils.Divide (position, cellSize);
var gridPosition = MathUtils.ToIntVector(gridPositionF);
var cellInfo = gridModel.GetGridCellLookup(gridPosition.x, gridPosition.z);
return !cellInfo.ContainsDoor;
} else {
return false;
}
}
}
8.1.3 Example #2
In this Diablo like dungeon level, the way our camera is setup, we don’t want a room
wall to block our view when we are inside a room
So we create non-view blocking fences instead of walls at certain wall facing direcons
In the above theme, the rule is aached to the first node, and if true, it would emit a
RoomblockingWall marker which would create a wall and decorave props. Otherwise,
it would proceed to the next node, which emits a Fence marker and would create the
fence meshes defined under it
This is done with a simple rule that checks the direcon of the wall and decides if the
view would be blocked from here
using UnityEngine;
39
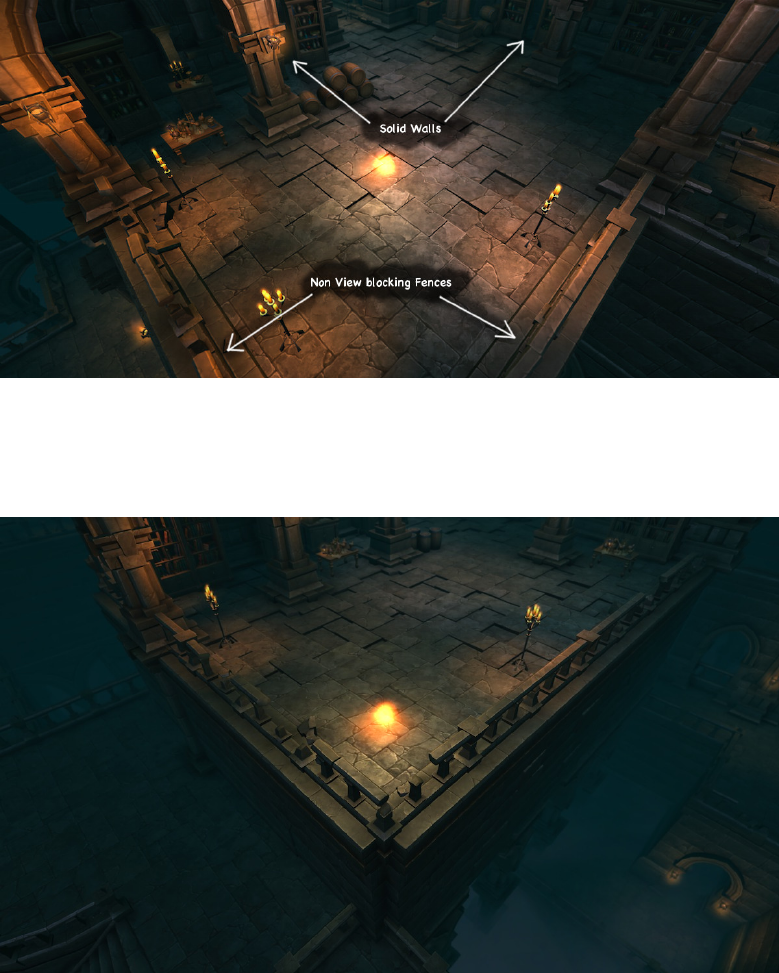
Figure 40: Rule to disallow wall creaon in the +X and +Z-axis
Figure 41: View not blocked by walls
40
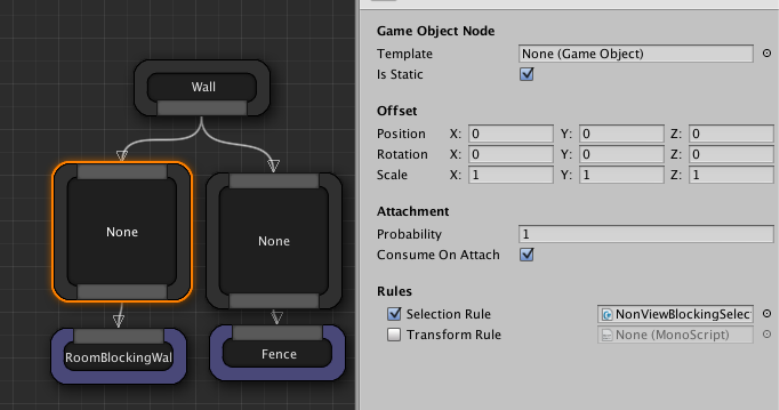
Figure 42: Rule assignment to the wall node
using System.Collections.Generic;
using DungeonArchitect;
using DungeonArchitect.Utils;
public class NonViewBlockingSelectionRule : SelectorRule {
static Vector3[] validDirections = new Vector3[] {
new Vector3(1, 0, 0),
new Vector3(0, 0, 1),
};
public override bool CanSelect(PropSocket socket, Matrix4x4 propTransform, DungeonModel model, System.Random random) {
var rotation = Matrix.GetRotation(ref socket.Transform);
var baseDirection = new Vector3(1, 0, 0);
var direction = rotation * baseDirection;
foreach (var testDirection in validDirections) {
var dot = Vector3.Dot(direction, testDirection);
if (dot > 0.707f) return true;
}
return false;
}
41
}
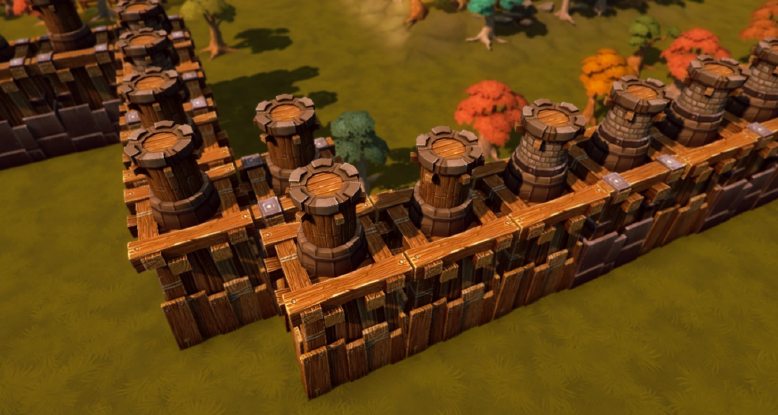
8.1.4 Example #3
In this example the towers are too crowded and close to each other.
Figure 43: Towers are too close to each other
A selector rule is created to select alternate cells
using UnityEngine;
using System.Collections;
using DungeonArchitect;
public class AlternateSelectionRule : SelectorRule {
public override bool CanSelect(PropSocket socket, Matrix4x4 propTransform, DungeonModel model, System.Random random) {
return (socket.gridPosition.x + socket.gridPosition.z) % 2 == 0;
}
}
The above logic uses a checker board paern, where you sum the X and Y posion and
return true if it is an even number
42
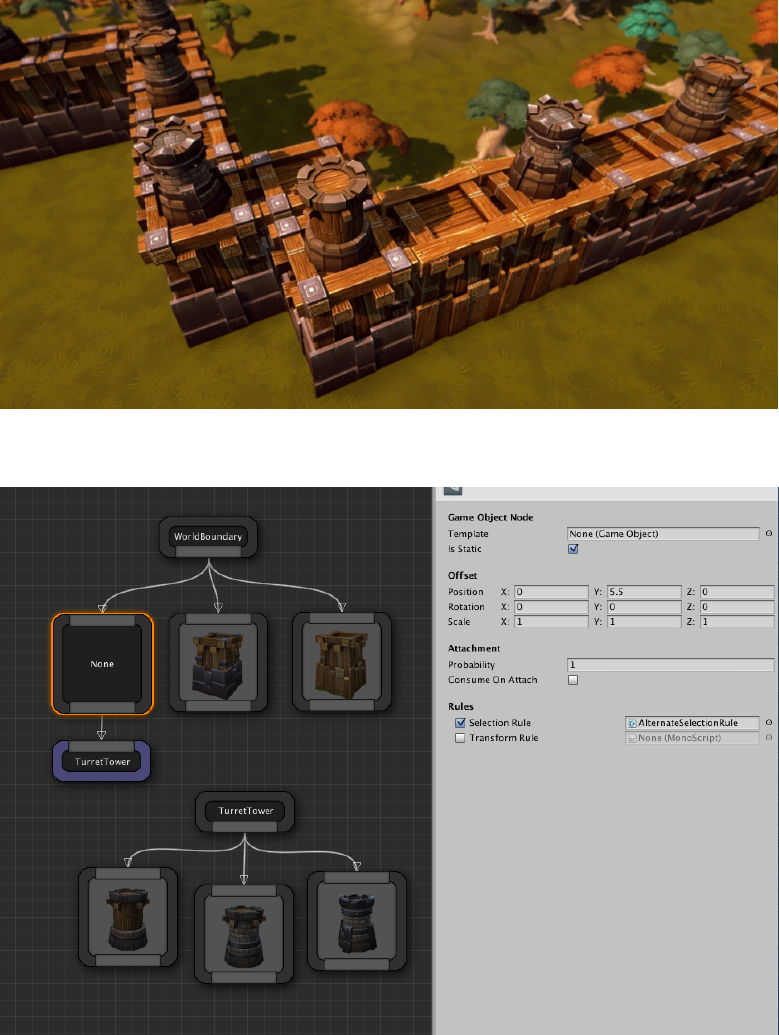
Figure 44: Select alternate cells
Figure 45: Rule assignment
43
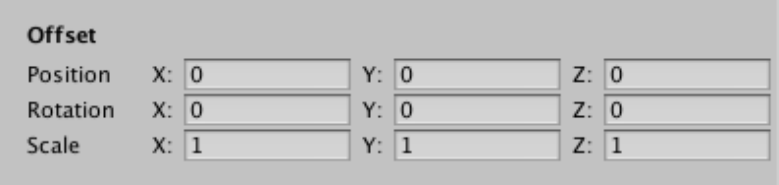
8.2 Transform Rule
Dungeon Architect lets you specify offsets to your visual nodes to move/scale/rotate
them from their relave marker locaons.
Figure 46: Stac node Offset
However, if you want a more dynamic way of applying offsets (based on scripts), you
can do so with a Transform Rule. This can be very useful to add variaons to your levels
for certain props
8.2.1 Using Transform Rules
To assing an exisng rule into the node, Check the Use Transform Logic property and
select the rule you would like to aach to the transform script
You can create new transform rules by implemenng the TransformationRule class
under the DungeonArchitect namespace
using UnityEngine;
using System.Collections;
using DungeonArchitect;
using DungeonArchitect.Utils;
public class RandomRotYTransformRule : TransformationRule {
public override void GetTransform(PropSocket socket, DungeonModel model, Matrix4x4 propTransform, System.Random random, out Vector3 outPosition, out Quaternion outRotation, out Vector3 outScale) {
base.GetTransform(socket, model, propTransform, random, out outPosition, out outRotation, out outScale);
// Your transform logic here.
// Update the outPosition, outRotation or outScale if necessary
44
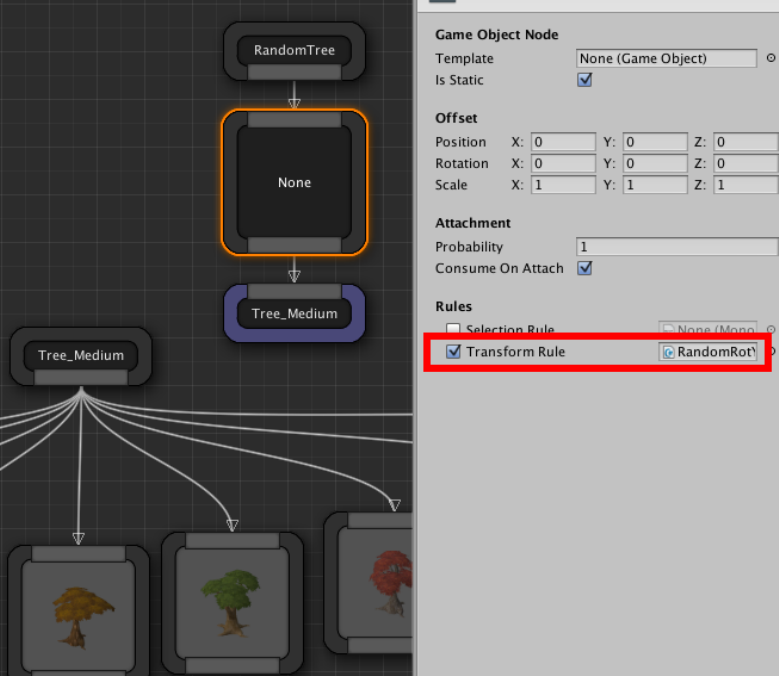
Figure 47: Assigning a Transform Rule
45
}
}
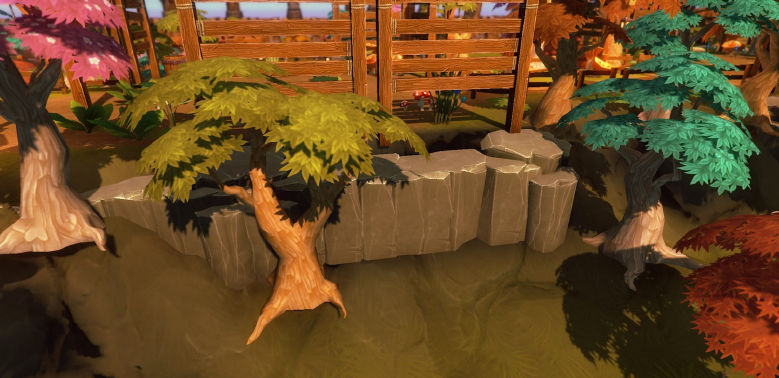
8.2.2 Example #1
In this example, the cliff rocks are facing the same direcon and look boring and unnat-
ural
Figure 48: Rocks without transform rules
using UnityEngine;
using System.Collections;
using DungeonArchitect;
using DungeonArchitect.Utils;
public class RandomCliffTransformRule : TransformationRule {
public override void GetTransform(PropSocket socket, DungeonModel model, Matrix4x4 propTransform, System.Random random, out Vector3 outPosition, out Quaternion outRotation, out Vector3 outScale) {
base.GetTransform(socket, model, propTransform, random, out outPosition, out outRotation, out outScale);
// Randomly rotate along the Y-axis
var angle = random.NextFloat() * 360;
var rotation = Quaternion.Euler(0, angle, 0);
46
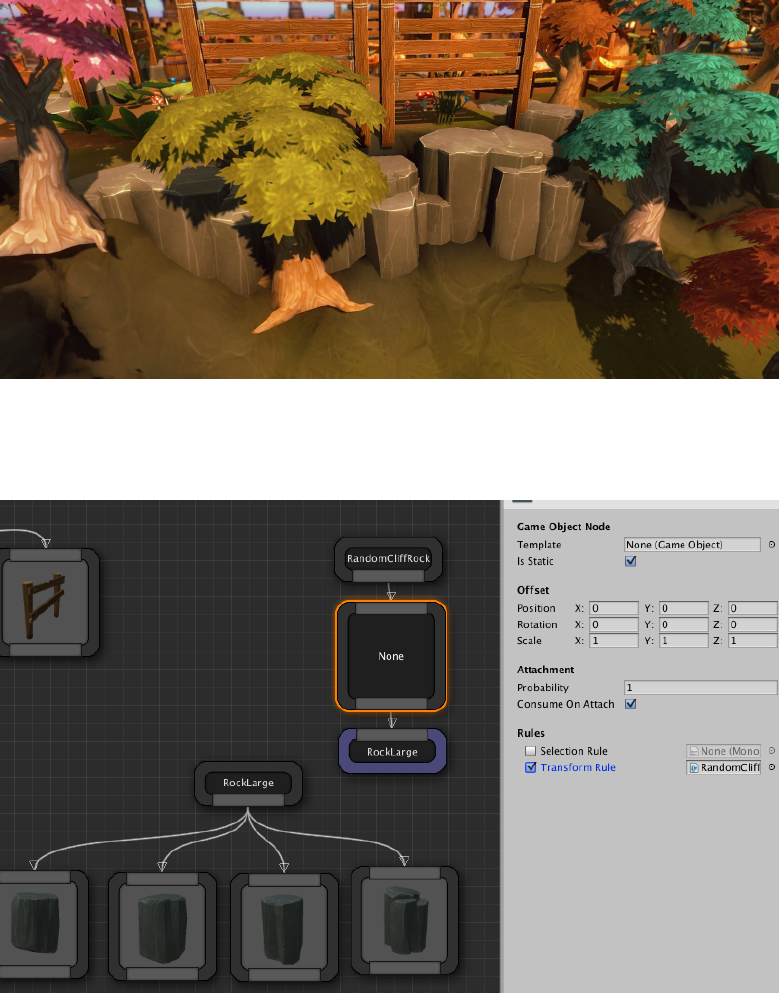
Figure 49: Rocks randomly rotated and slightly translated
Figure 50: Rule assignment on the rock’s base node
47
outRotation = rotation;
// Slightly translate the node
var variation = new Vector3(0.25f, -1, 0.25f);
outPosition = Vector3.Scale (random.OnUnitSphere(), variation);
}
}
A similar rule is applied to trees to randomly rotate them along the Y-axis and randomly
scale them slightly
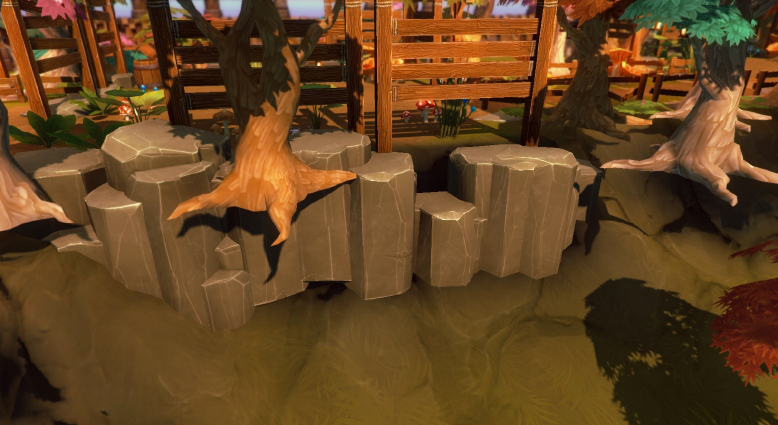
8.2.3 Example #2
In this example, the outer trees are spawned in the same height as the dungeon layout
Figure 51: Tree spawned near the dungeon layout
However, we also have a terrain that Dungeon Architect modifies, whose steepness
value is controlled by the user using a curve.
So, we would like to clamp this tree’s base on the dynamic terrain.
48

Figure 52: Proper offset applied to move it to the terrain ground
This is done by finding the height of the terrain at that locaon, and creang an offset
such that the tree would move up or down to properly clamp on it
using UnityEngine;
using System.Collections;
using DungeonArchitect;
using DungeonArchitect.Utils;
public class ClampToTerrainTransformRule : TransformationRule {
public override void GetTransform(PropSocket socket, DungeonModel model, Matrix4x4 propTransform, System.Random random, out Vector3 outPosition, out Quaternion outRotation, out Vector3 outScale) {
base.GetTransform(socket, model, propTransform, random, out outPosition, out outRotation, out outScale);
var terrain = Terrain.activeTerrain;
if (terrain == null) {
return;
}
var position = Matrix.GetTranslation(ref propTransform);
var currentY = position.y;
49

var targetY = LandscapeDataRasterizer.GetHeight(terrain, position.x, position.z);
// Apply an offset so we are touching the terrain
outPosition.y = targetY - currentY;
}
}
8.2.4 Example #3
In this example a small random rotaon is applied to ground les. Useful while creang
ruins when laying down broken le meshes
Figure 53: Transform rule applied to ground les
using UnityEngine;
using System.Collections;
using DungeonArchitect;
using DungeonArchitect.Utils;
public class BrokenTilesTransformRule : TransformationRule {
50
public float maxAngle = 5;
public override void GetTransform(PropSocket socket, DungeonModel model, Matrix4x4 propTransform, System.Random random, out Vector3 outPosition, out Quaternion outRotation, out Vector3 outScale) {
base.GetTransform(socket, model, propTransform, random, out outPosition, out outRotation, out outScale);
var rx = random.Range(-maxAngle, maxAngle);
var ry = random.Range(-maxAngle, maxAngle);
var rz = random.Range(-maxAngle, maxAngle);
outRotation = Quaternion.Euler(rx, ry, rz);
}
}
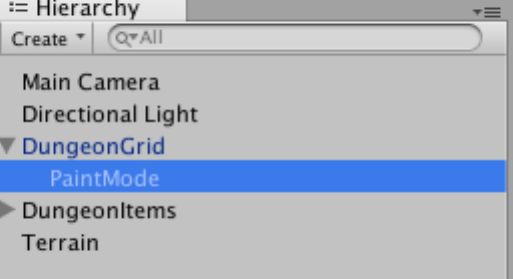
9 Paint Mode
Dungeon Architect also allows you to paint your own dungeon layouts with an editor
extension. This gives you more arsc control as you are no longer restricted by what
the procedural algorithm creates for you
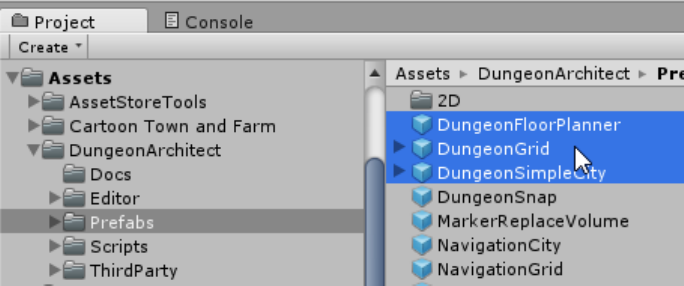
To Acvate the Paint Editor mode and start painng, expand the DungeonGrid game
object and select the PaintMode game object. This would change your editor’s scene
view into Paint Mode
Figure 54: Acvate Paint Mode
When you are in the Paint Mode, the Scene View shows the layout of your dungeon in
Blue
51
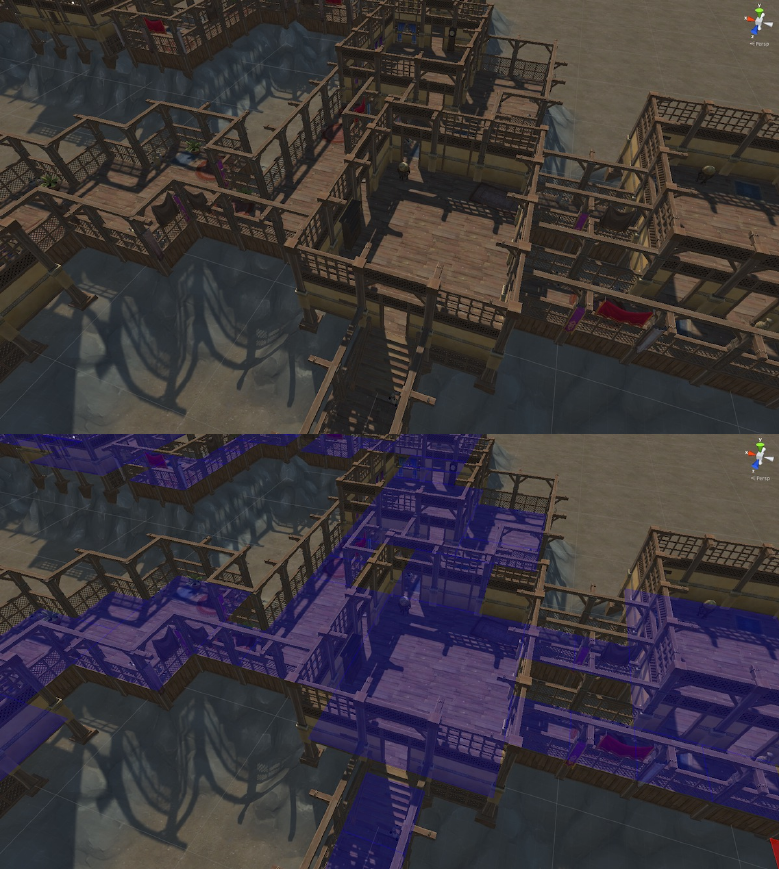
You can now paint your layout on the Scene View
•Le Click: Paint layout
•Shi + Le Click: Delete painted layout
•Mouse Wheel: Change paint height
52
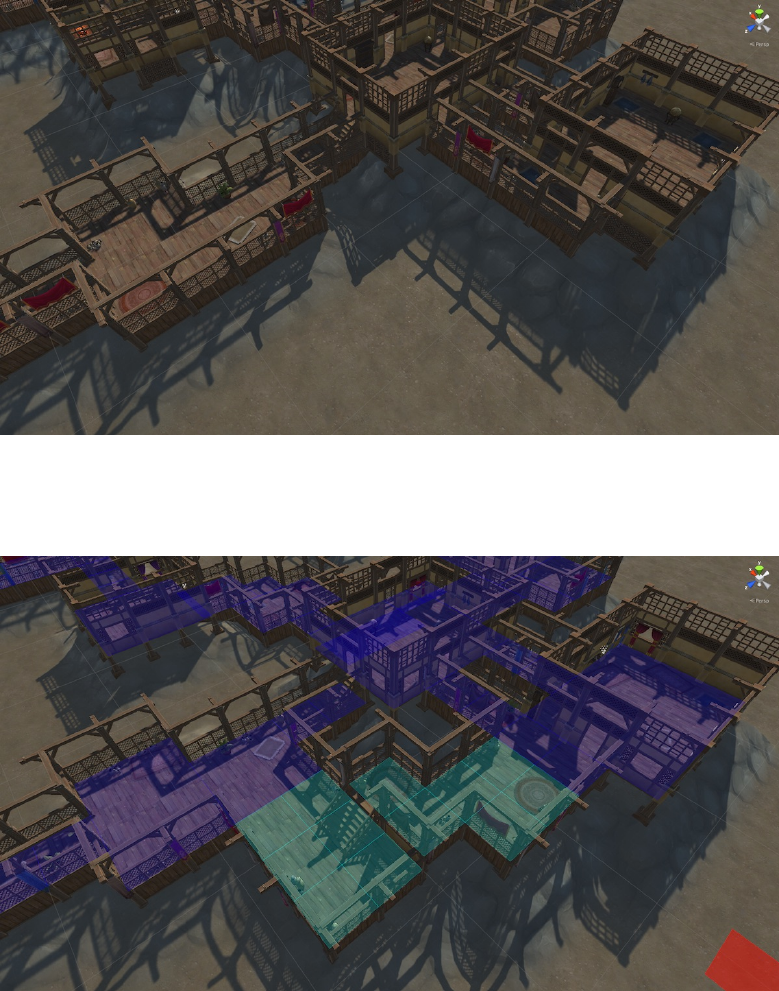
Figure 55: Starng Scene
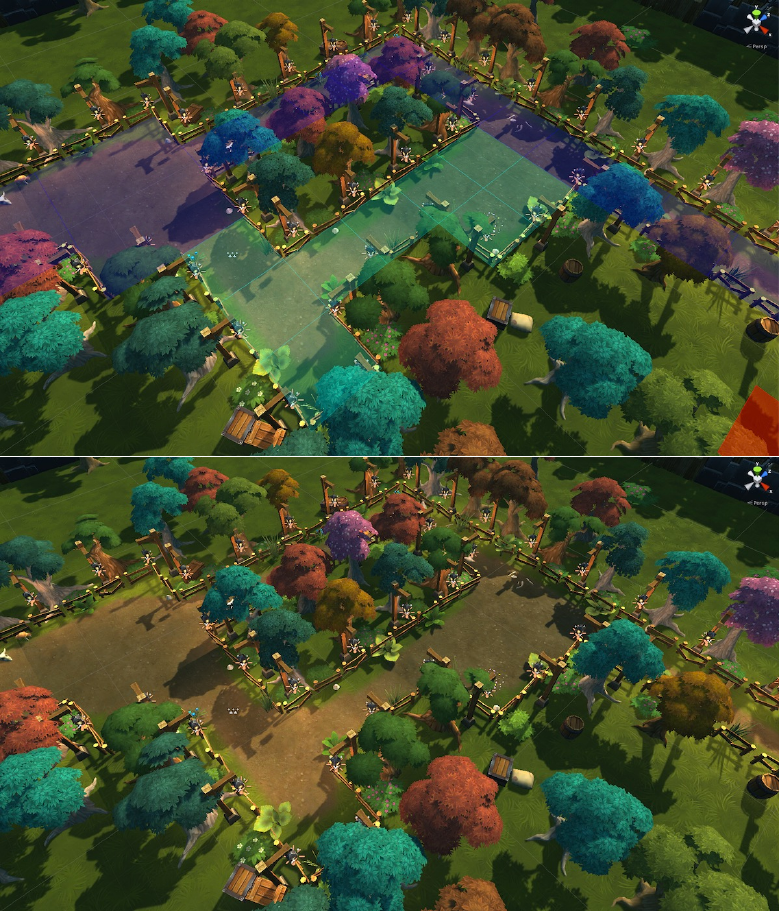
Figure 56: Painted cells show up in Cyan color
53
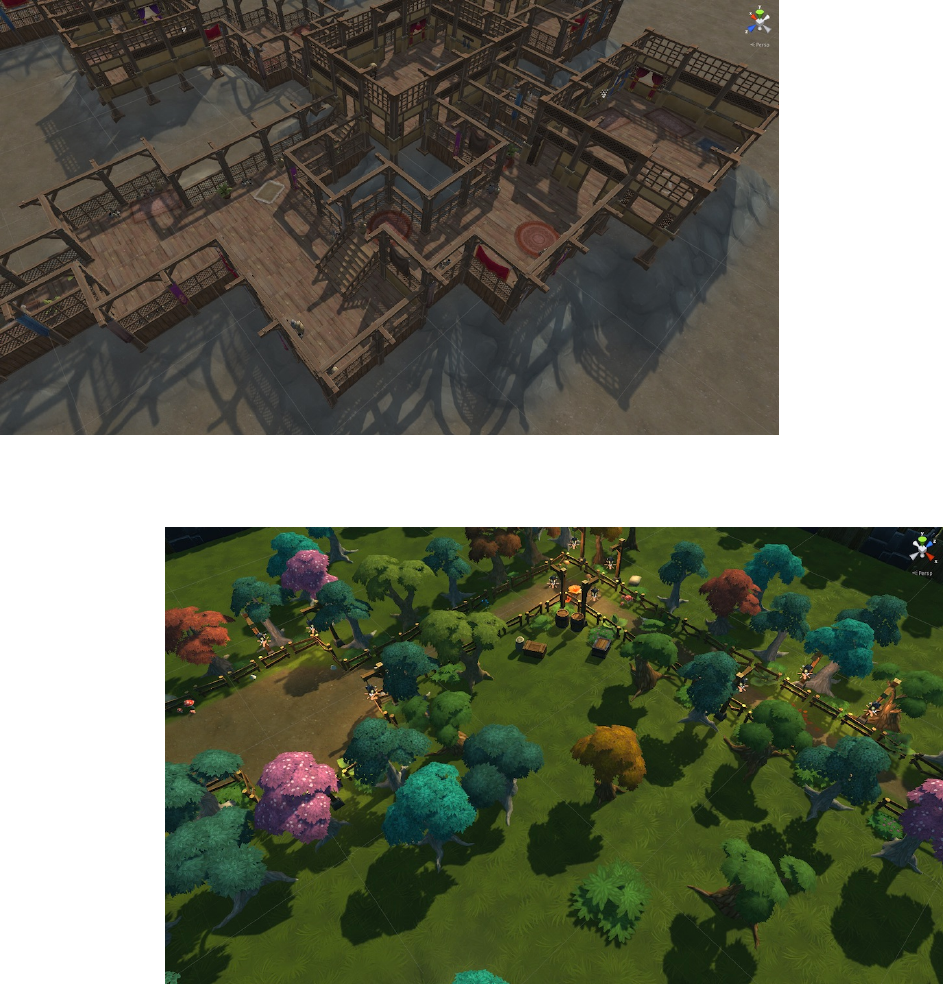
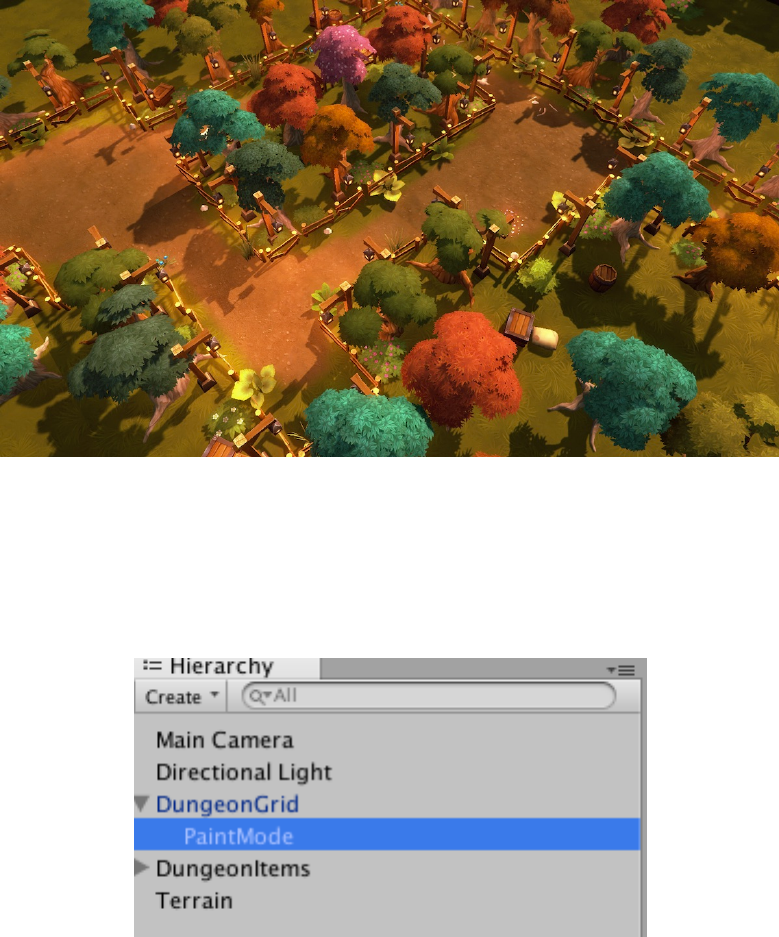
Figure 57: Modifed layout
Another Example:
54
55
9.1 Paint Mode Properes
When you select the Paint mode game object, you can set various parameters to control
the paint tool:
Figure 58: Paint Mode Game Object
56
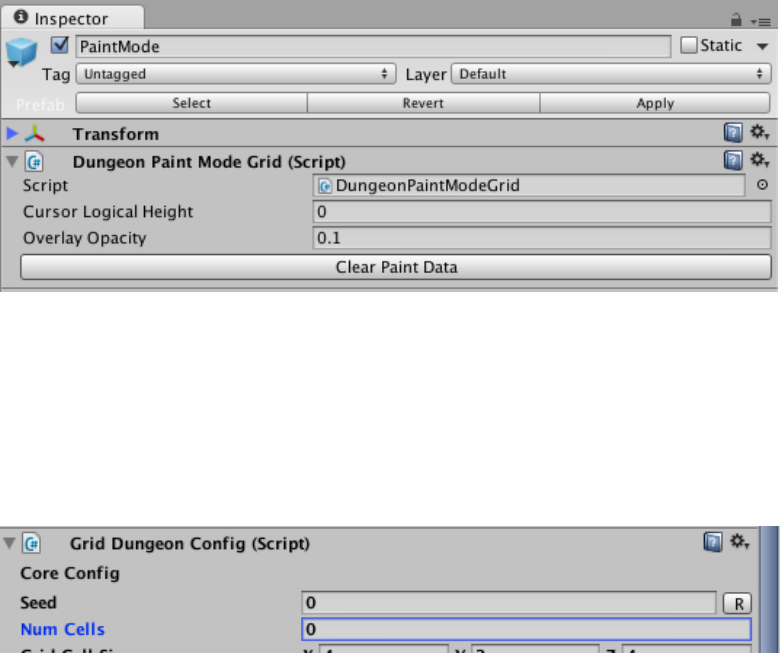
Figure 59: Paint Mode Properes
9.2 Non-Procedural Painng
If you do not want any procedural content to be generated when you paint your level,
then set the Num Cells property to 0in your Dungeon Actor’s Configuraon secon
Figure 60: Stop procedural layout generaon
This way the dungeon would have an empty layout, allowing you to paint from scratch
If you do want procedural content but want to remove certain procedural areas that are
geng in your way, then use a Negaon Volume
10 Volumes
Dungeon Architect provides various volumes to help you influence your dungeon as per
your requirements.
You can find the various volume prefabs under Assets/DungeonArchtitect/Prefabs
57
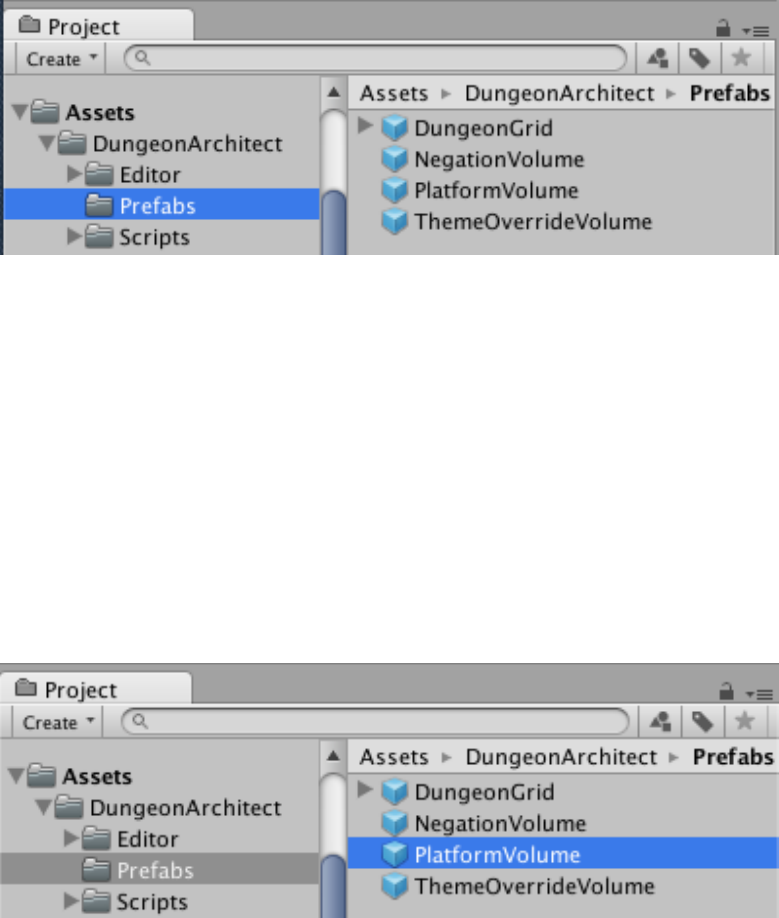
Figure 61: Plaorm Volume Prefab
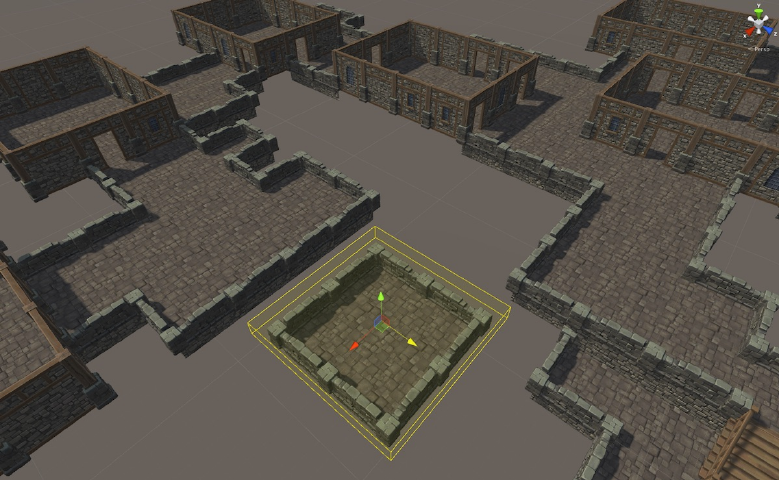
10.1 Plaorm Volume
Place a plaorm volume anywhere in the scene and Dungeon Architect would adjust
the dungeon layout and create a plaorm (room or corridor) at that locaon. Scale
the volume along the XZ plane to change the size of the generated plaorm. You can
move the plaorm volume with the move tool to the desired locaon. (Rotaon is not
supported)
This gives you arsc control and lets you manipulate the dungeon to suit your needs
To place a plaorm volume, navigate to Assets/DungeonArchtitect/Prefabs
Figure 62: Plaorm Volume Prefab
Drag and drop the Plaorm Volume Prefab into the scene view
Select the plaorm volume and have a look at it’s properes
58

Figure 63: Plaorm Volume Prefab
Figure 64: Plaorm Volume Properes
59
The Volume needs to know which dungeon the volume belongs to (DA Supports mulitple
dungeons within the same scene).
Assign the dungeon you’d like this volume to affect in the Dungeon field
Select the type of cell to create on this plaorm’s locaon (Room or Corridor)
Corridors form isolated plaorms in the dungeon which merge nicely with exisng cor-
ridor cells
Figure 65: Corridor plaorm
Rooms always connect to atleast one other room in the dungeon. Changing the Cell
type to Room creates this result
A buon to rebuild the dungeon is provided for convenience. It rebuilds the dungeon
in the scene
10.2 Theme Override Volume
Give certain areas of you dungeons a different look and feel. Layout inside this volume
would use the theme defined by this volume.
60
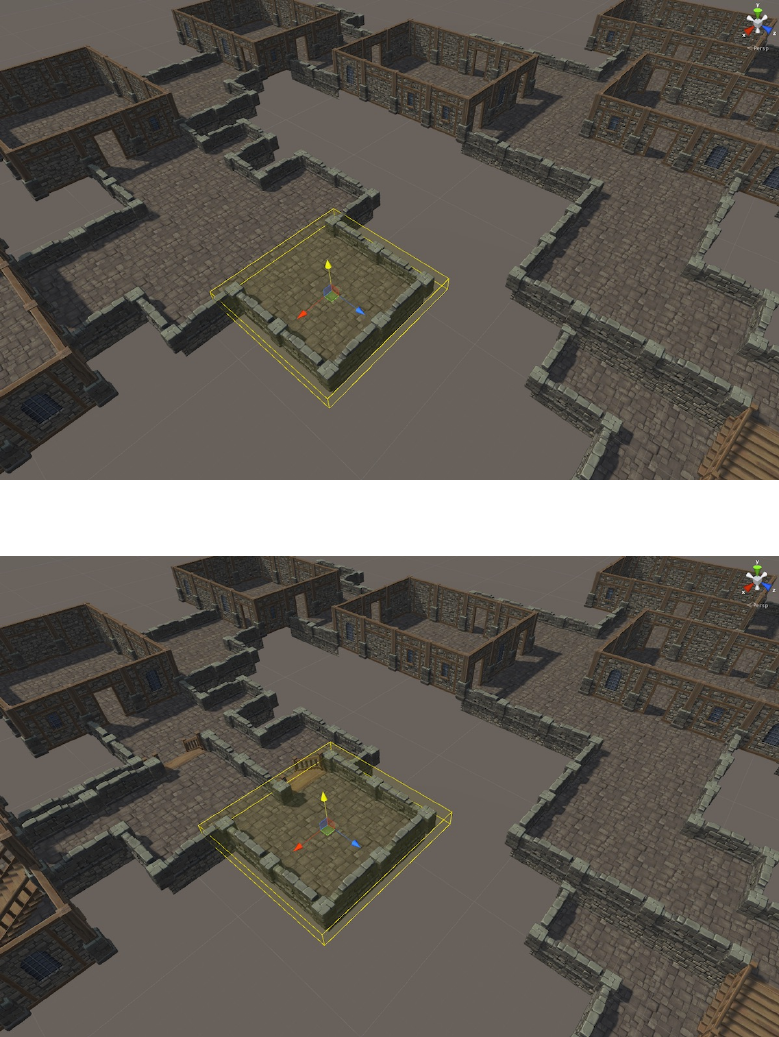
Figure 66: Merges nicely with exisng procedural layout
Figure 67: Volume moved up along the Y-axis
61
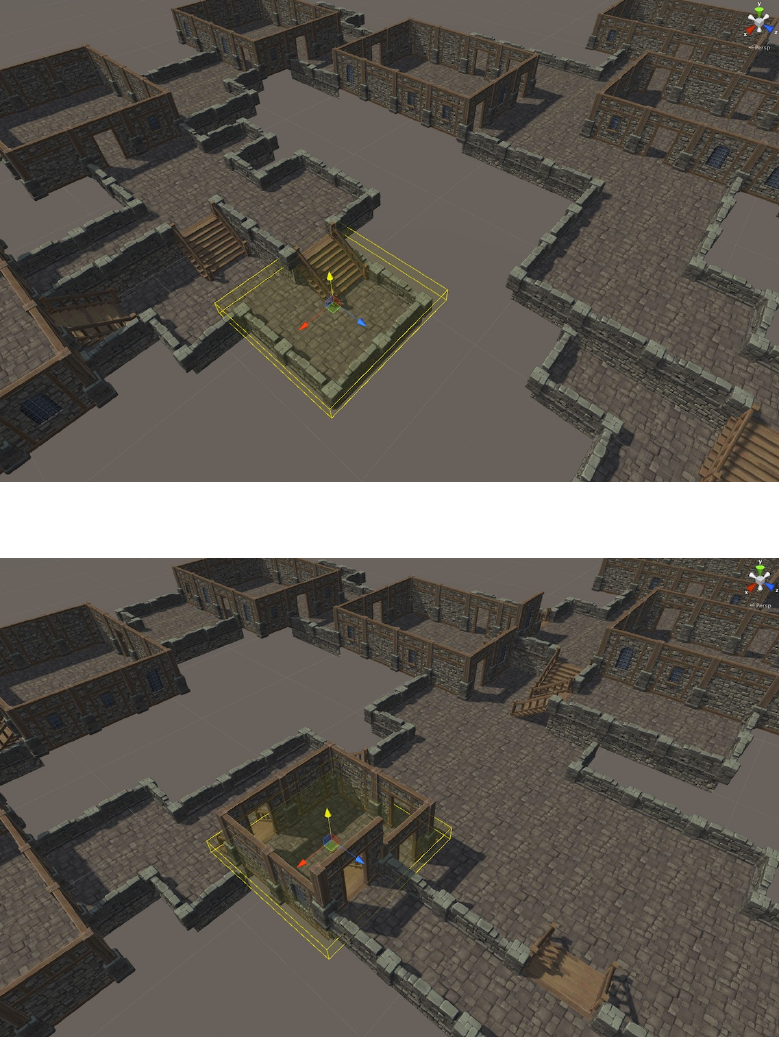
Figure 68: Volume moved down along the Y-axis
Figure 69: Room plaorm
62
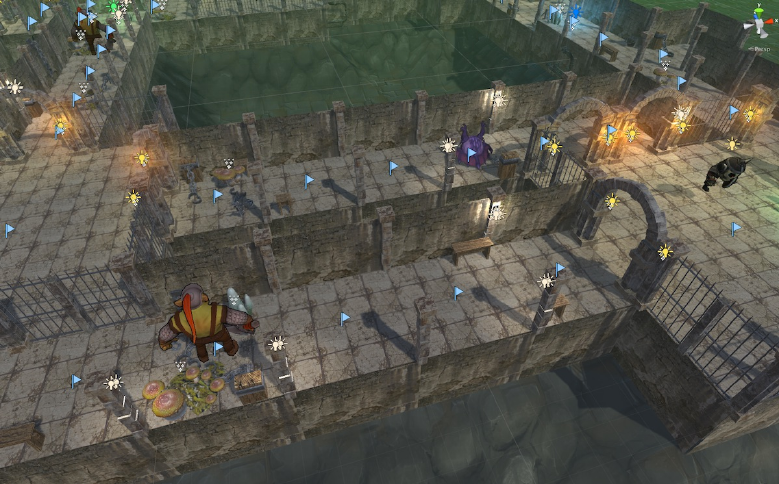
This is useful for adding variaons to your level
Figure 70: Sample Dungeon
Select the theme override volume and have a look at it’s properes
Dungeon: Set the dungeon game object this volume should affect
Override Theme: Set the dungeon theme asset you would like to apply to the geometry
within this volume
Note: When overriding, the themes needs to be designed for the same grid cell size for
proper results
A buon to rebuild the dungeon is provided for convenience. It rebuilds the dungeon
in the scene
10.3 Negaon Volume
This volume removes all procedural geometry inside of this volume. Use this to get rid
of procedural geometry in areas you do not need or when it is geng in the way while
manually painng your layout
63

Figure 71: Selecve areas overriden by Theme Override Volumes
Select the negaon volume and have a look at it’s properes
Dungeon: Set the dungeon game object this volume should affect
A buon to rebuild the dungeon is provided for convenience. It rebuilds the dungeon
in the scene
10.4 Marker Replacement Volume
A marker replacement volume replaces marker in the dungeon with your own supplied
markers. This is useful if say, you want to replace a wall with a door. You would add a
mapping that would replace all the “Wall” markers with “Door” markers. Since this is
executed before the theming is applied, this gives you a lot of low level control
Check the video for instrucons on how to use it
64
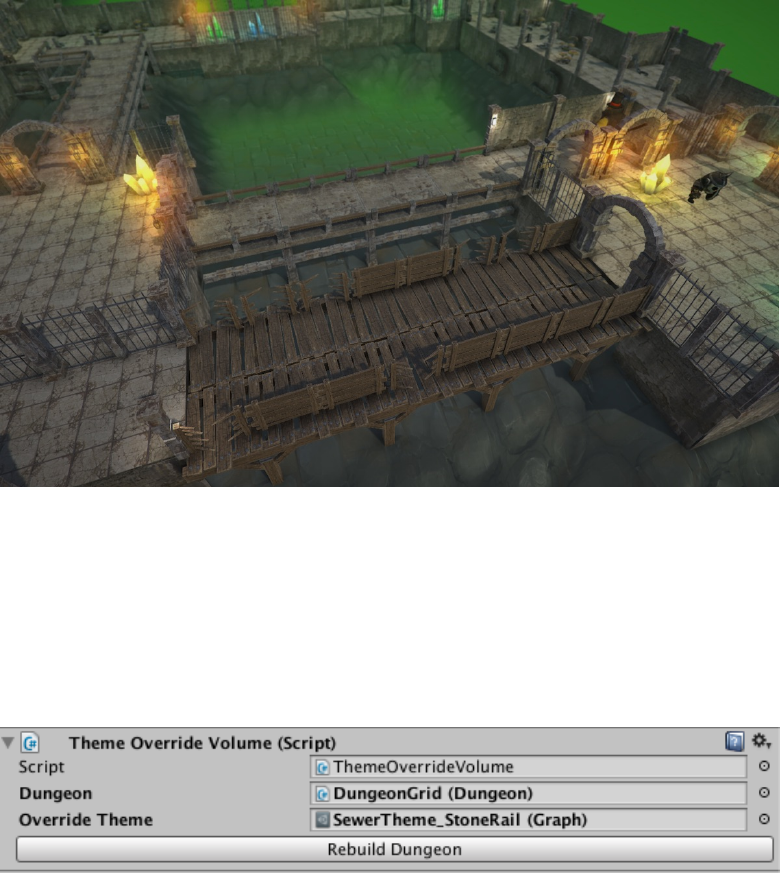
Figure 72: Geometry within the volume picks up the theme defined by the volume
Figure 73: Theme Override Volume Properes
65
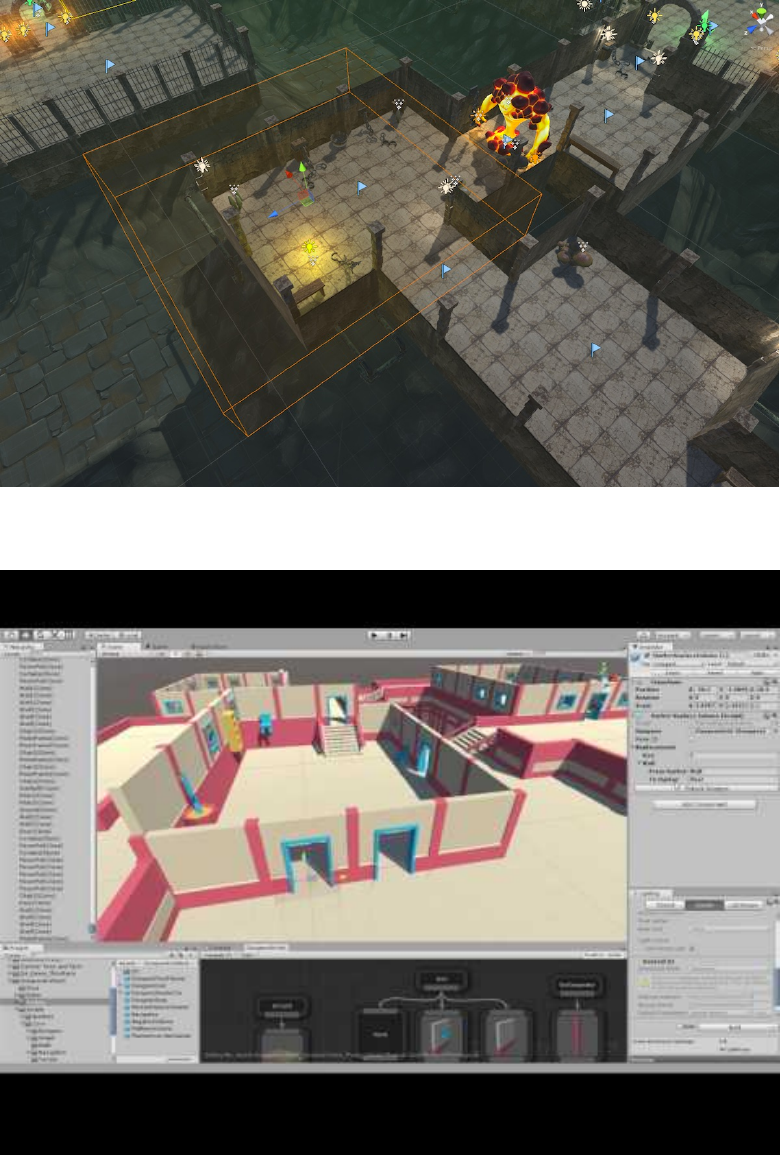
Figure 74: Procedural geometry we’d like to remove
66
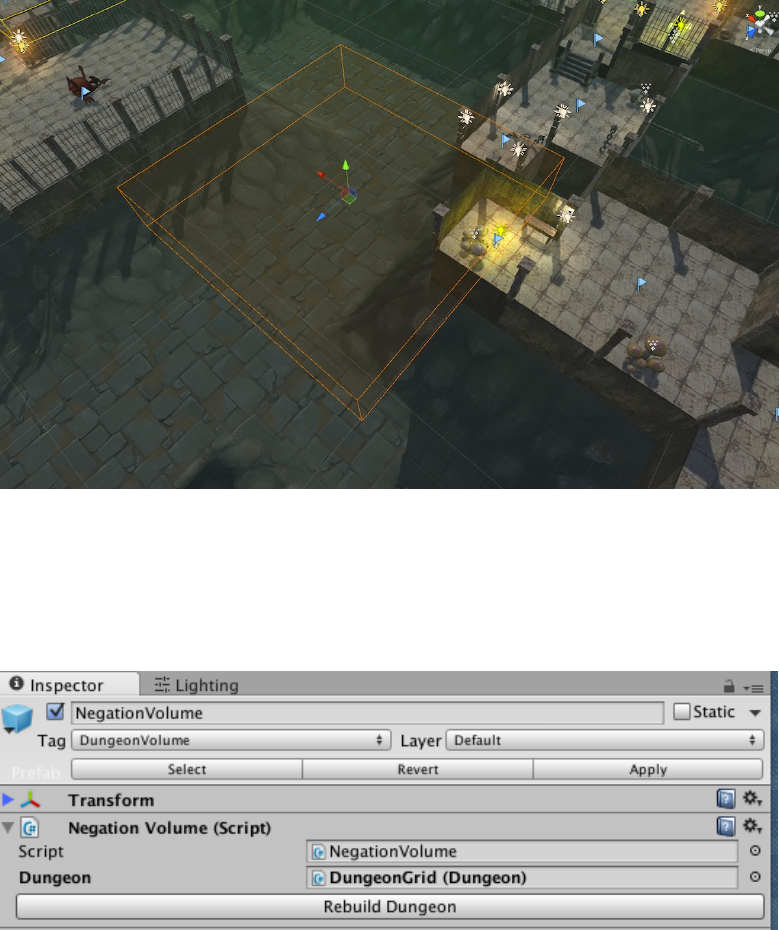
Figure 75: Geometry inside the volume removed aer a rebuild
Figure 76: Geometry inside the volume removed aer a rebuild
67
View in Youtube
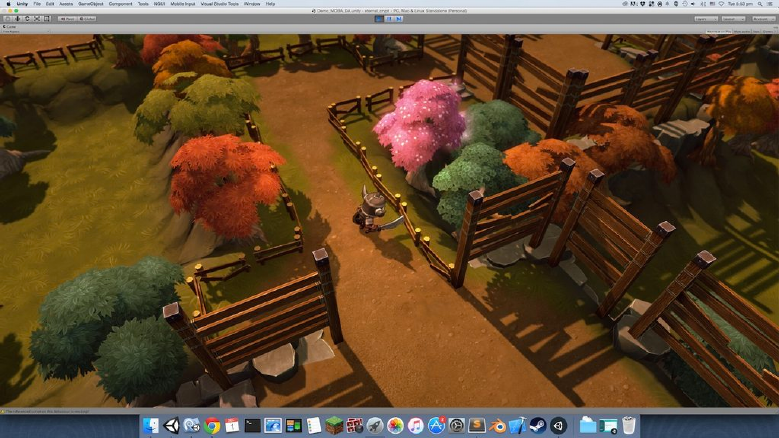
11 Landscape Transformer
Dungeon architect can also modify the landscape when it builds the dungeon. Starng
with an empty terrain, it can modify its height and paint it in intresng ways.
Figure 77: Terrain Transformed along the dungeon layout
In the above screenshot, a blank terrain was provided as input to the script. It has
updated its height (based on a steepness curve provided by the user) and painted the
ground, cliffs and pathways with input textures (noce the organic dirt pathway along
the layout)
Here’s another Example:
11.1 Usage
Navigate to Assets/DungeonArchitect/Scripts/Dungeon/Landscape
Aach the script LandscapeTransformerGrid to the Dungeon actor
68
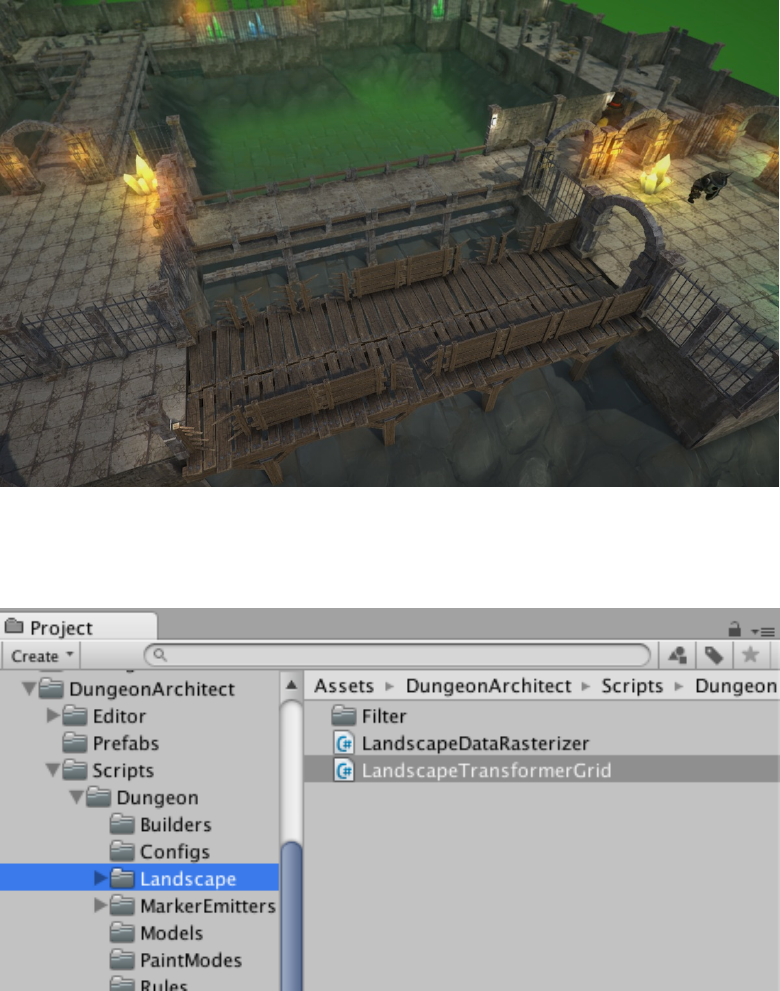
Figure 78: Terrain Transformed along the dungeon layout
Figure 79: Landscape Transformer script
69
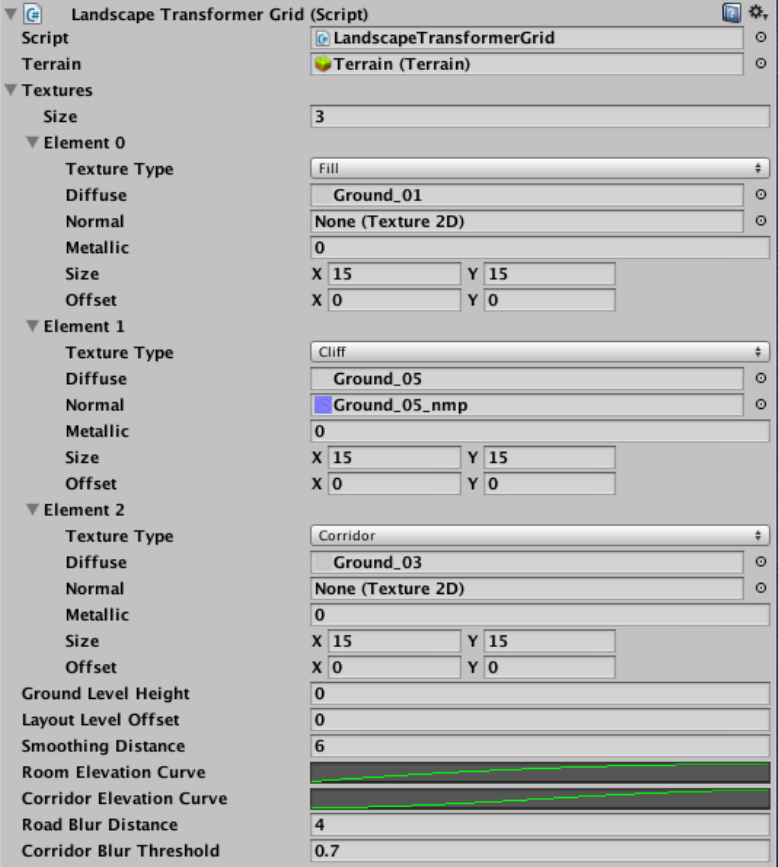
Figure 80: Landscape Transformer Properes
70
11.1.1 Terrain Setup
Create a new terrain and center it on the dungeon (e.g. set the X and Z to -250).
Also move the terrain down along Y by around -20 (an approx lowest point your dungeon
layout might reach). This is needed because the height map doesn’t take negave values
Select the terrain and go to sengs and set the Control Texture Resoluon
11.1.2 Properes
Terrain: Assign the this terrain reference to the Terrain field in the above script proper-
es
Textures: Assign textures to paint the terrain transformer script and the terrain would
be painted based on the texture type
Ground Level Height: Set the default ground level height of the terrain
Layout Level Offset: If set to 0, the terrain would raise up to touch the layout of the
dungeon. Somemes you would like this value to be lower, if you already have a ground
mesh like the image below
Room Elevaon Curve: The curve defines the steepness of the landscape around the
rooms
Corridor Elevaon Curve: The curve defines the steepness of the landscape around the
corridors
Assign a preset curve if unassigned for the transformer to work properly
Smoothing Distance: The distance to perform the smoothing of the heights using the
above curves
RoomBlurDistance / CorridorBlurDistance: A smooth pathway is painted on the land-
scape using blurring algorithms. These fields affect how the smooth corridor painng is
performed along the rooms and corridors
71
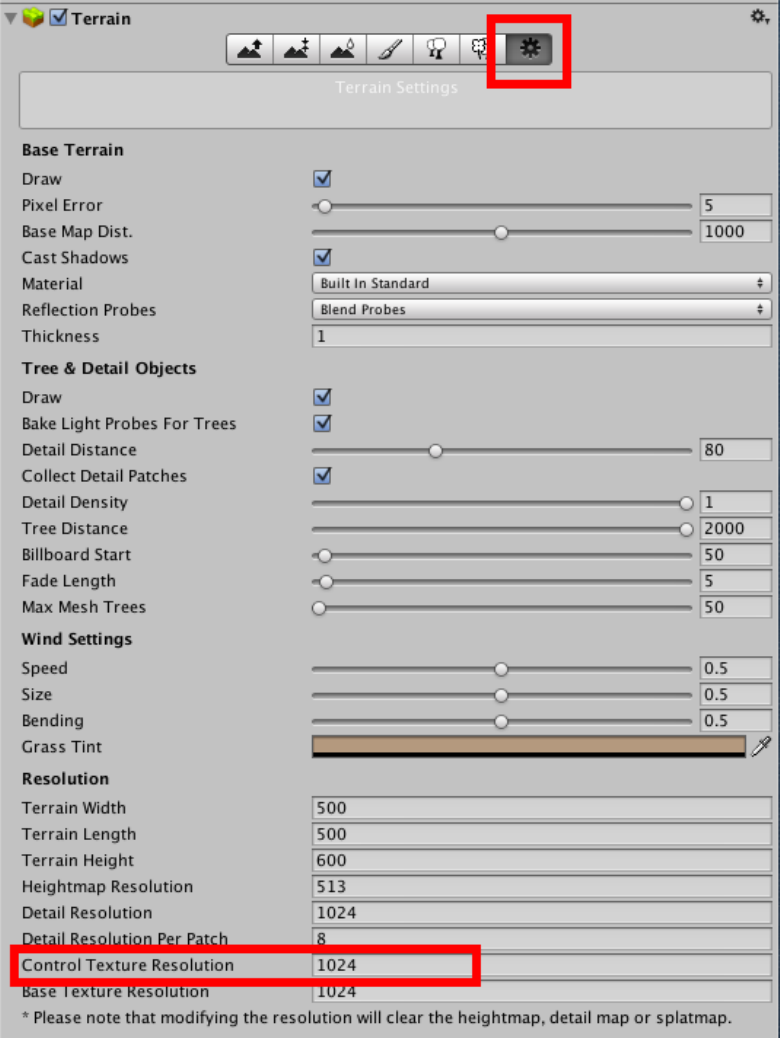
Figure 81: Increase Terrain texture resoluon
72
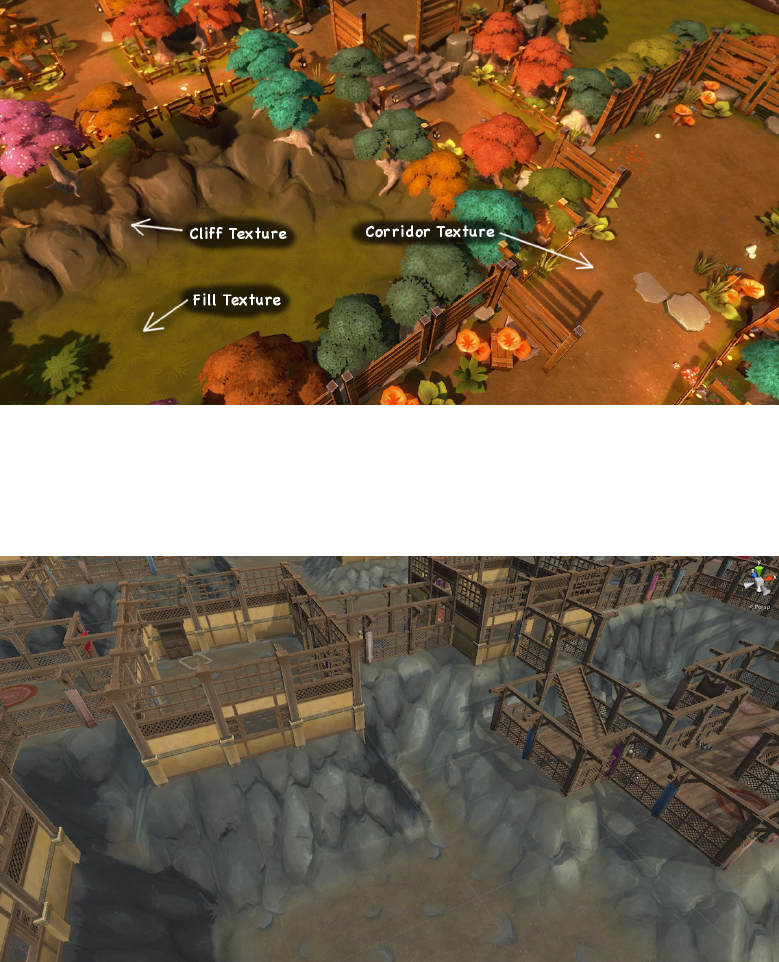
Figure 82: Landscape Transformer Properes
Figure 83: Landscape touches the layout ground
73
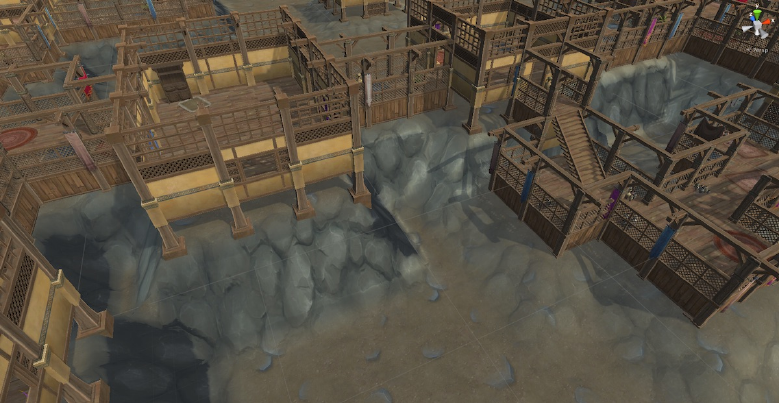
Figure 84: Offset applied to move it down using LayoutLevelOffset
12 Marker Emier Scripts
Marker Emiers are behavior scripts that lets you emit your own markers anywhere in
the map
As seen previously, Markers are emied by the Dungeon Builder class around the layout
of the dungeon (e.g. Wall, Ground, Fence etc) and you can insert actors at that locaon
from the Theme graph. You can even create your own markers emied off of those
parent markers, but without Marker Emiers you are restricted to the starng markers
the dungeon builder has inially emied for you
Marker Emiers gives you a lot of flexibility and you can query the dungeon model and
emit markers anywhere in the map
A Marker Emier is invoked right aer the Dungeon Builder emits all the markers for
the dungeon (Ground, Wall etc)
12.1 Creang a Marker Emier
To create a Marker Emier, you need to create a script inherited from DungeonMarkerEmitter
under the DungeonArchitect namespace
74
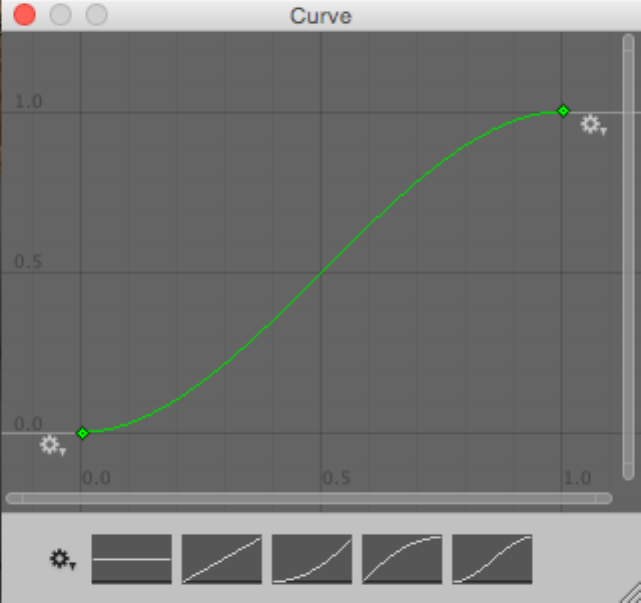
Figure 85: Offset applied to move it down using LayoutLevelOffset
75
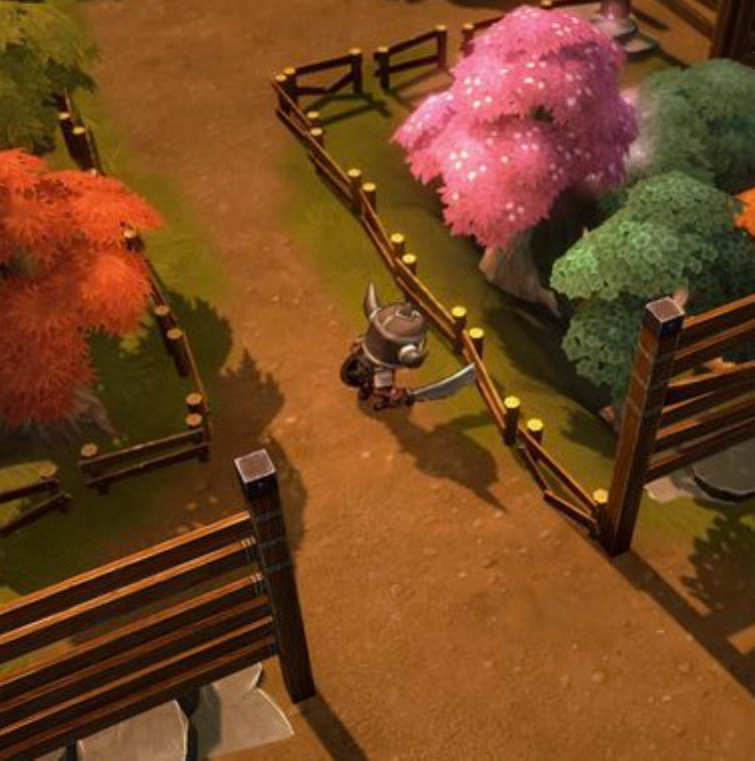
Figure 86: Corridor pathway texture
76
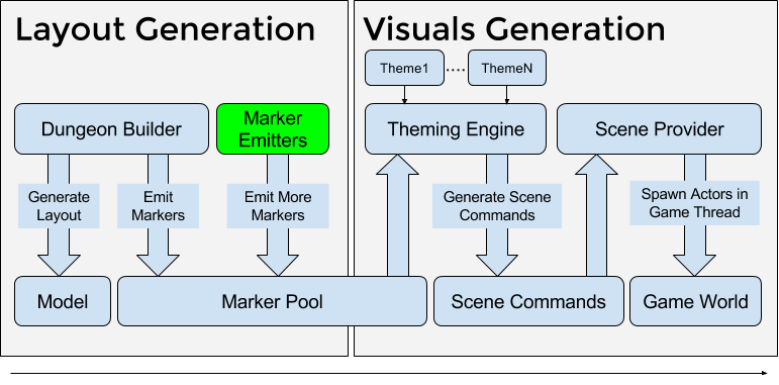
Figure 87: Architecture
using UnityEngine;
using System.Collections;
using DungeonArchitect;
using DungeonArchitect.Utils;
public class MyAwesomeEmitter : DungeonMarkerEmitter
{
public override void EmitMarkers(DungeonBuilder builder)
{
base.EmitMarkers(builder);
// Your emitter logic here
// Emit as many markers as you like.
// Emit a marker like this:
// Fill up the marker data
var markerName = "MyMarker"; // This name will be picked up in your theme file
var transform = Matrix4x4.TRS(position, rotation, scale);
// Additionaly specify the grid based meta data (optional)
77
var gridPosition = new IntVector(); // specify a position value here in grid coordinates
var cellId = -1;
builder.EmitMarker(markerName, transform, gridPosition, cellId);
}
}
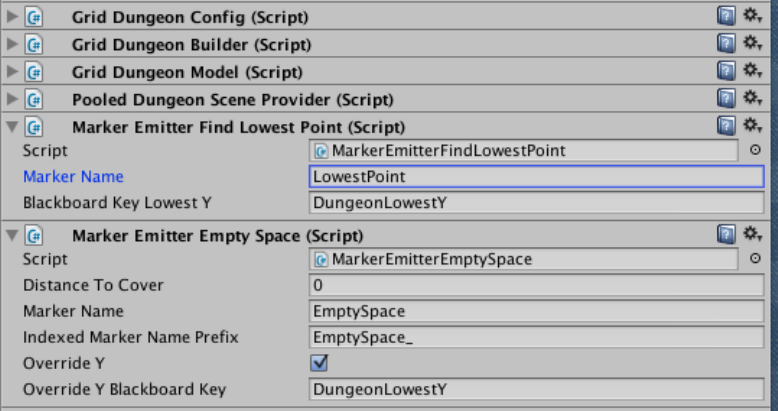
To aach a marker emier to your Dungeon game object, simply add this script to the
game object
Figure 88: Marker Emiers aached to the Dungeon Game Object
Explore the exisng marker emiers that come with Dungeon Architect under
Assets/DungeonArchitect/Scripts/MarkerEmitters/Grid
12.2 Example #1
In this example, we’d like to decorate the area outside the dungeon layout that Dungeon
Architect has created for us. Since DA creates marker points within the layout, we create
a marker emier to find nearby points in the empty space and emit markers named
“EmptySpace_N” where N is 1, 2, 3, 4, 5 etc. These markers are then available to us in
the themem file
78
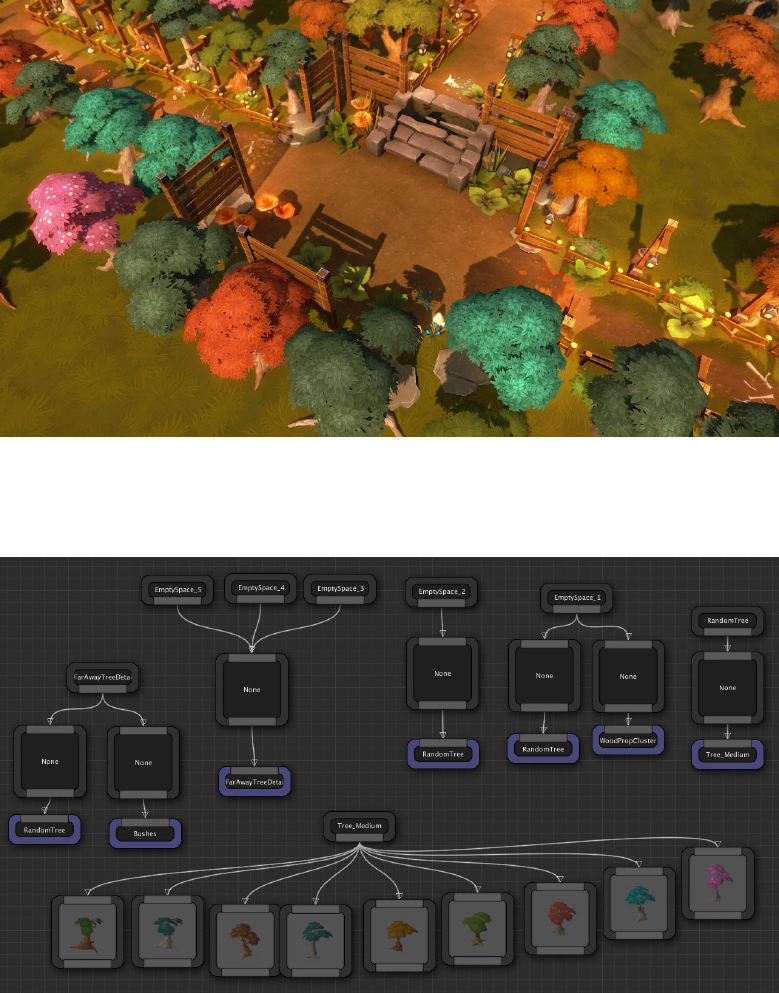
Figure 89: Trees spawned outside the dungeon layout
Figure 90: Theme to decorate the markers created by the emier script
79
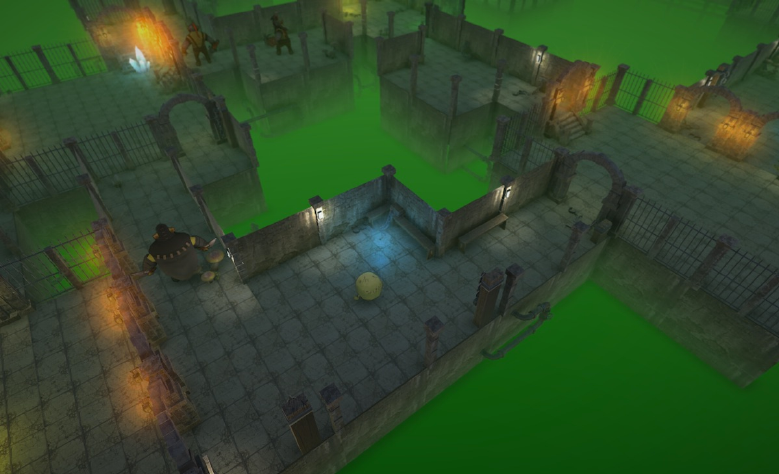
12.3 Example #2
Somemes, it’s useful to find the lowest point of the dungeon, so a large plane can be
placed there (e.g. water plane, lava plane etc)
The MarkerEmitterFindLowestPoint lets you do just that
Figure 91: An acid plane created at the boom of the dungeon
This emier emits a marker named LowestPoint, at the lowest Y point of the dungeon
with the appropriate scale, which we can decorate with any object in the theme file
12.4 Example #3
A marker emier is created to add extra contextual markers to beaufy a 2D level layout
(can also be used with 3D)
Check the marker named MarkerEmitterCornerBeautifier
All the Corner_* markers seen in the theme file above were emied by the marker
emier script
80
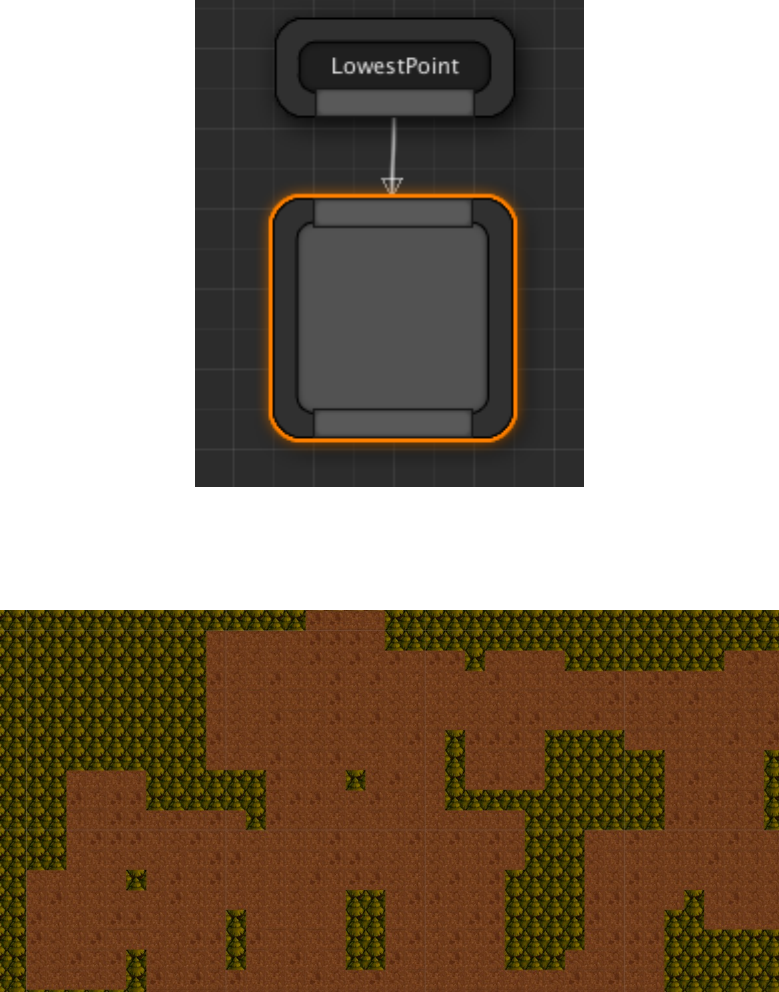
Figure 92: Node to aach a plane mesh to this marker
Figure 93: Simple layout with a red ground sprite
81
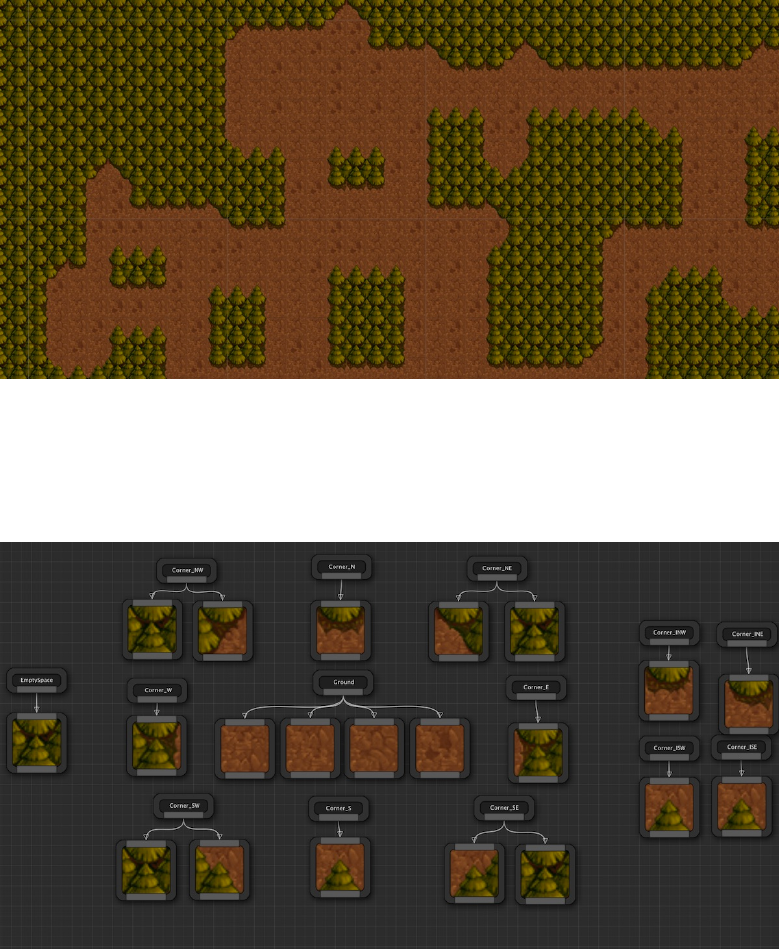
Figure 94: Added decorated sprites with spaal contextual markers
Figure 95: Theme to add the decorave sprites
82
13 Navigaon Mesh
Dungeon Architect supports runme navigaon mesh generaon, which is not sup-
ported in Unity 5 yet. This is necessary for moving your NPCs intelligently across your
procedurally generated level
Figure 96: Navigaon
This is based on the Recast Navigaon library, so it provides very high quality results.
13.1 Setup
To build a navigaon mesh during runme, place the DungeonNavigaon prefab on to
your scene
Select the game object you just placed and have a look at the inspector window
To build the nav mesh, input geometry for walkable and blocked areas needs to be pro-
vided. This is done by Triangle Providers
There are two types of triangle providers already aached to the navigaon object
83
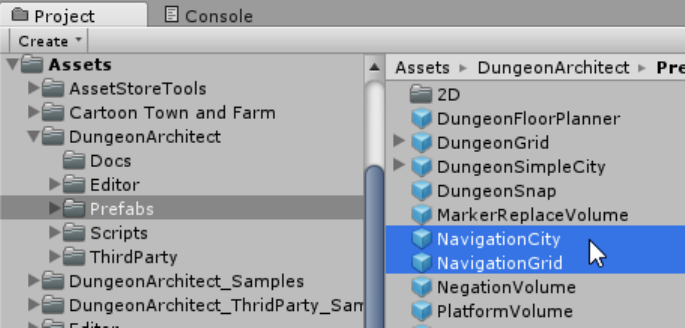
Figure 97: Navigaon Prefab
•Collision Triagle Provider: Uses the collision mesh of the colliders present in the
scene to build the navigaon mesh
•Layout Floor Triangle Provider: This provides the floor layout of a dungeon as
walkable area to the navigaon mesh input
Assign the dungeon reference you would like to use
Click Build
13.2 Theme Influence
The dungeon objects (meshes, prefabs etc) do not affect the navigaon by default. You
need to set the Affects Navigaon flag of the visual node to make it affect the navigaon.
The object also has to be stac in order to affect the navigaon. So the Is Stac flag also
needs to be set.
Important: You should set the Affects Navigaon flag only when it is absolutly required
to maintain a good nav mesh generaon speed while building
84
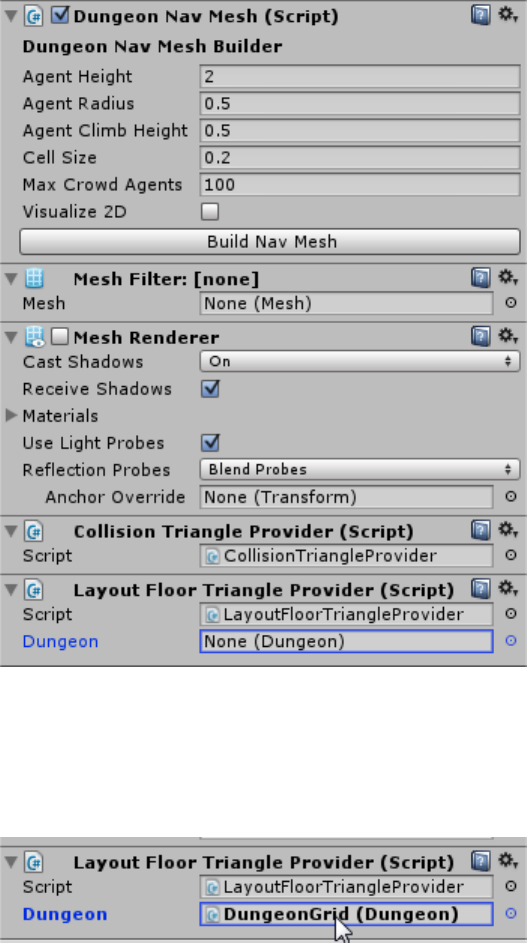
Figure 98: Navigaon Properes
Figure 99: Navigaon Triangle Provider
85
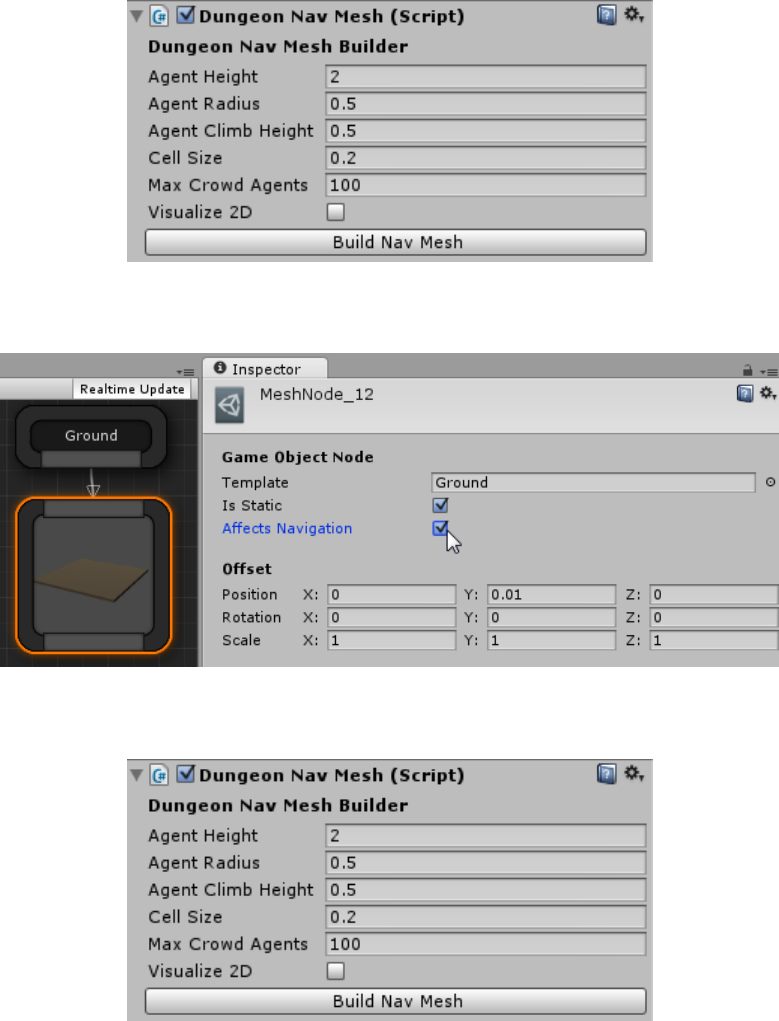
Figure 100: Navigaon Properes
Figure 101: Influence Navigaon from Theme Graph
Figure 102: Navigaon Generaon Config
86
13.3 Config
•Cell Size: Controls the mesh generaon accuracy vs speed. It determines the res-
oluon of the generated nav mesh. Lowering this number will generate nicer
edges and a more accurate navmesh but requires more procesing power and
slower. A good value is between 0.2 to 0.3
•Agent Height: The max height of the agents in your game
•Agent Radius: The max radius of the agents in your game
•Agent Climb Height: The max height an agent can climb on. Objects with height
lower than this will not be considered obstacles, as the agent would be able to
climb over them
•Max Crowd Agents: The max no. of agents that can be present in the game at a
me.
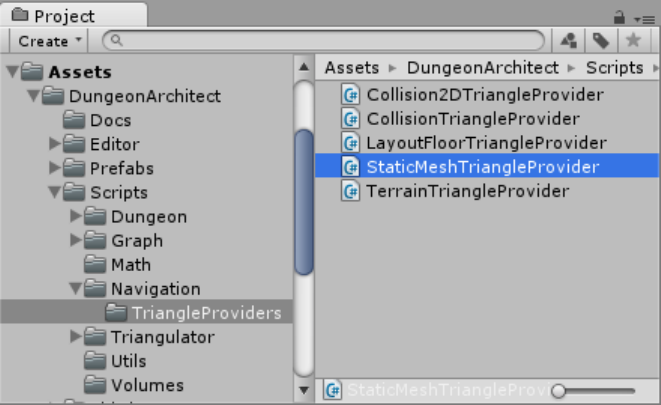
13.4 Triangle Providers
To generate a navigaon mesh, the nav mesh system requires input triangles so it can
build a world and generate the nav mesh. Dungeon Architect comes with various tri-
angle providers to help you affect the nav mesh in various ways. We have seen two of
them already above
Figure 103: Navigaon Mesh Triangle Providers
87
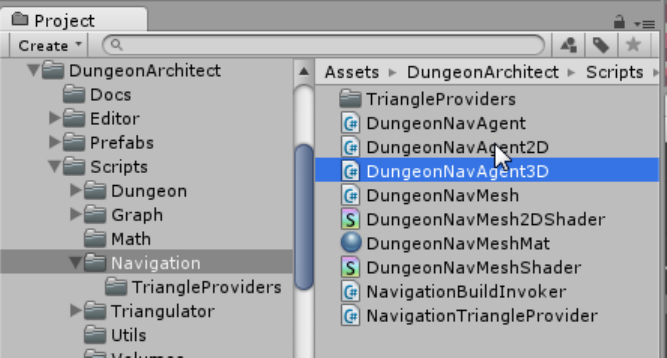
•StacMeshTriangleProvider: Uses the mesh geometry (verces, indices) for all
the meshes defined in the prefab as a source for the input triangles to generate
the nav mesh. This is usually slower but creates detailed results
•CollisionTriangleProvider: Uses the colliders defined in the prefab as a source for
the input triangles to generate the nav mesh. This is much faster than the Stat-
icMesh triangle provider as it works with the low poly collision geoemtry. How-
ever it requires a collider to be present in the prefab to work
•TerrainTriangleProvider: Feeds the terrain geometry into the nav mesh genera-
on system. So you can have your dynamic navmesh build around terrains
•LayoutFloorTriangleProvider: Feeds the layout of a dungeon to the nav mesh
generaon system. This is usually faster than providing a ground mesh in the
CollisionTriangleProvider
You can use mulple triangle providers at once. You can use only the CollisionTrian-
gleProvider for beer performance. However, you can increase the performance even
further by disabling the gound mesh from affecng your navigaon (because there will
be lots of ground meshes) and providing that ground data from an addional Layout-
FloorTriangleProvider script.
13.5 Navigaon Agent
Use the NavAgent to move your NPCs in the dynamic navigaon mesh
Figure 104: Navigaon Mesh Triangle Providers
88
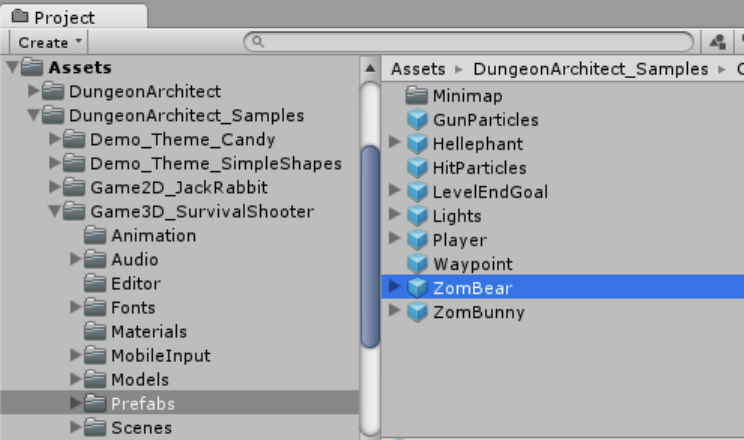
An fully working example of this with AI is provided in the SurvivalShooter demo game
bundled with Dungeon Architect
Figure 105: Sample NPCs with Navigaon Agent behaviors
The nav mesh agent requies a CharacterController script to be present in the game ob-
ject
var agent = GetComponent<DungeonNavAgent>();
// Move the agent to the target position
agent.Destination = targetPosition;
var velocity = agent.Velocity; // Agents velocity
var direction = agent.Direction; // Agents movement direction
var distanceToDestination = agent.GetRemainingDistance();
// Stop moving the agent
agent.Stop();
// Resume movement
agent.Resume();
89
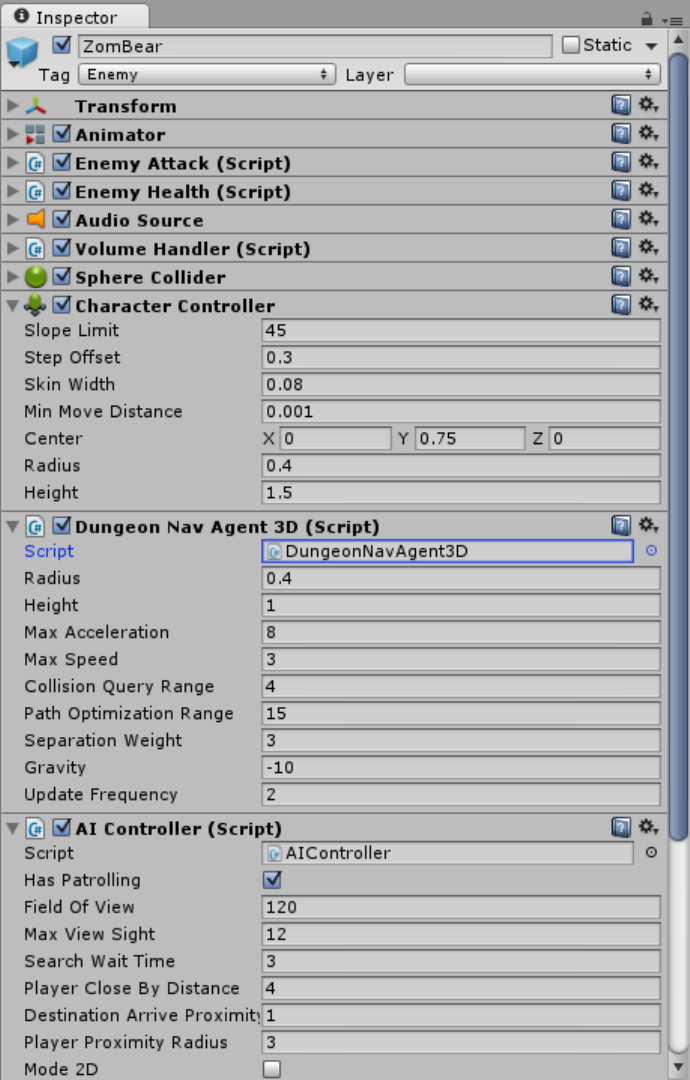
Figure 106: Sample NPCs with Navigaon Agent behaviors
90
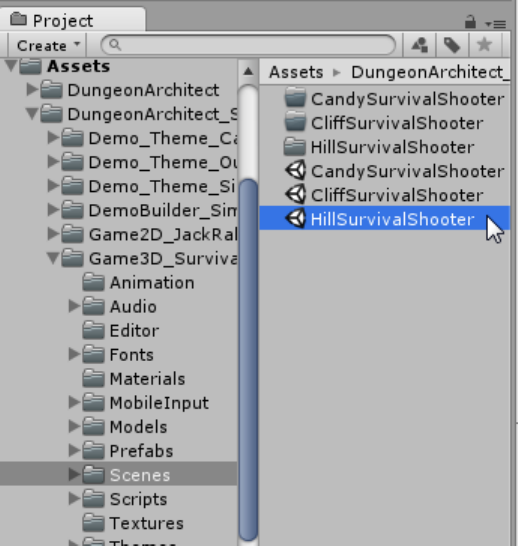
Have a look at the shooter game demo in the samples folder for a complete example
Figure 107: Shooter Game Demo in the Samples folder
14 2D Support
Dungeon Architect fully supports 2D. You can use the same workflow to create beauful
2D levels.
A sample 2D game comes along with Dungeon Architect to help you get started. It de-
mos dynamic 2D procedural level generaon, dynamic 2D navigaon mesh generaon,
2D AI with patrol, seek and search behaviours
2D dynamic navigaon mesh generaon is also support.
91
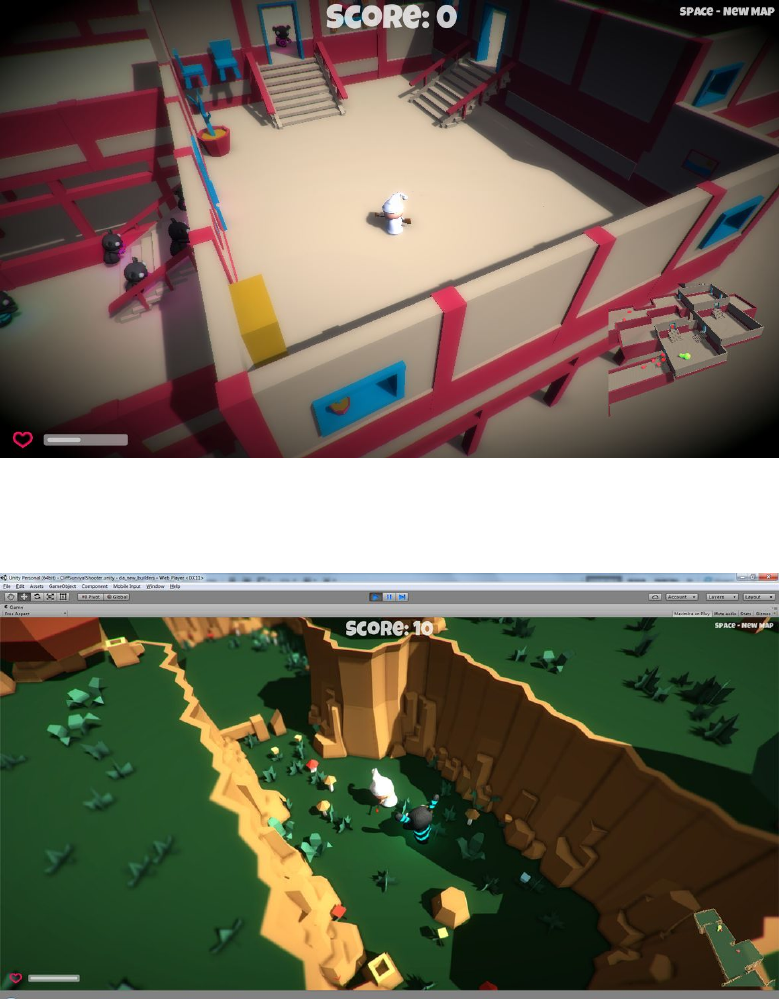
Figure 108: Shooter Game Demo
Figure 109: Shooter Game Demo
92

Figure 110: Shooter Game Demo
Figure 111: 2D Demo game
93
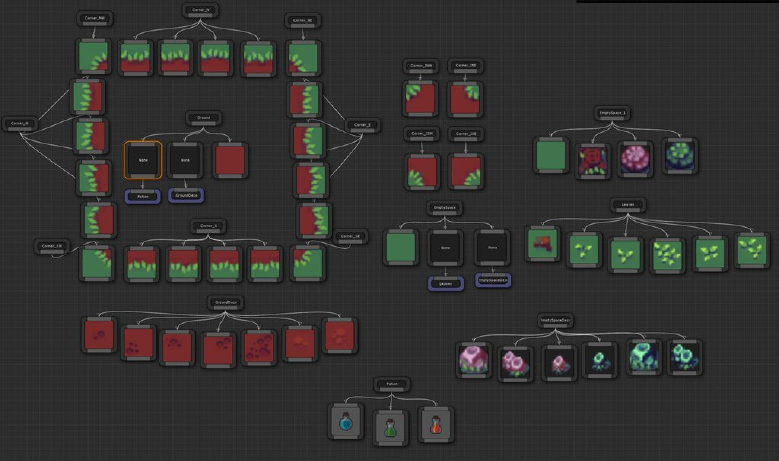
Figure 112: Theme with 2D Sprites
15 Dungeon Builders
The Default dungeon builder used to create the layout is swappable and you can provide
your own implementaon
This is useful if you want to use your own algorithm for generang the layout of your
dungeons.
You are not limited to a grid based system.
15.1 Creang a new Builder
To create a new builder, subclass DungeonBuilder under the DungeonArchitect
namespace and implement the virtual methods
using UnityEngine;
using System.Collections;
using System.Collections.Generic;
using System.Linq;
94
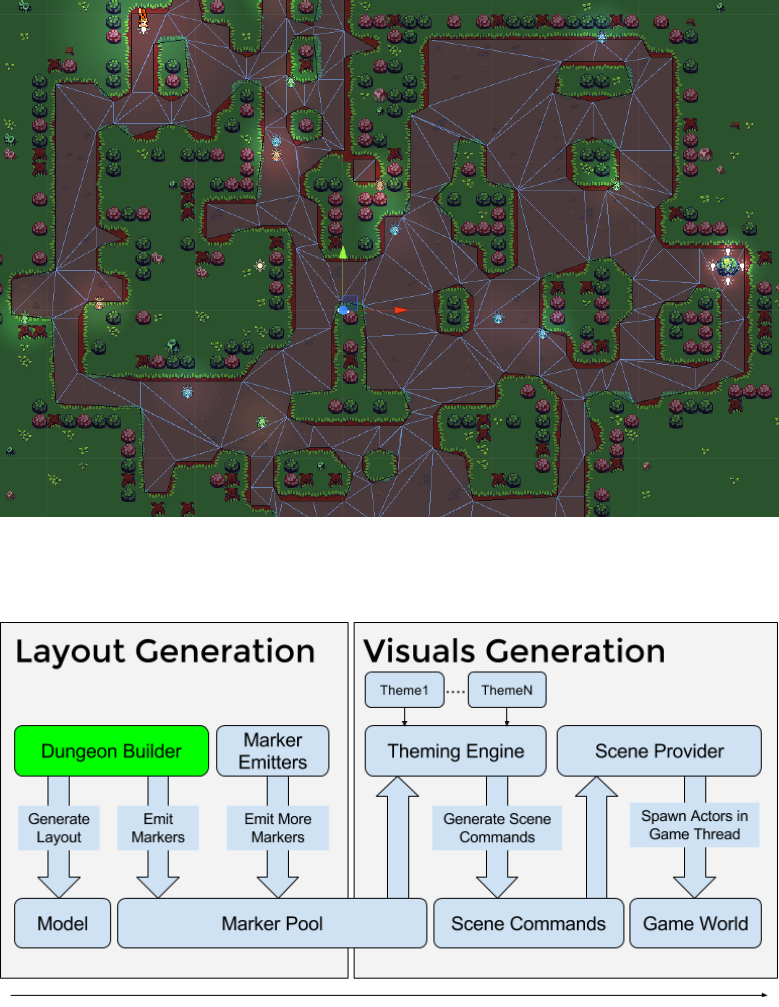
Figure 113: 2D Demo game
Figure 114: The Dungeon Builder can be swapped with your own implementaon
95
using System.Text;
using DungeonArchitect.Utils;
[ExecuteInEditMode]
public class MyDungeonBuilder : DungeonBuilder
{
public override void BuildDungeon(DungeonConfig config, DungeonModel model) {
base.BuildDungeon(config, model);
// Add your builder logic here
}
public override void EmitMarkers() {
base.EmitMarkers();
// Emit markers here by calling EmitMarker()
}
}
Have a look at GridDungeonBuilder under Assets/DungeonArchitect/Scripts/Builders/GridDungeonBuilder.cs
for reference
15.2 Using a different Builder
If you’ve created a builder and would like to use it with your dungeon actor, drop in an
exisng dungeon actor, remove the exisng builder script and replace it with your own
15.3 Example Builders
Dungeon Architect comes with a sample builder named SimpleCity. It could be used as
a good reference for building your own builders
There are also examples on how this sample builder can be further extended by the
users using Marker Emiers script. It is used emit markers around the boundary of the
city, so theme files can decorate them as strongholds
96
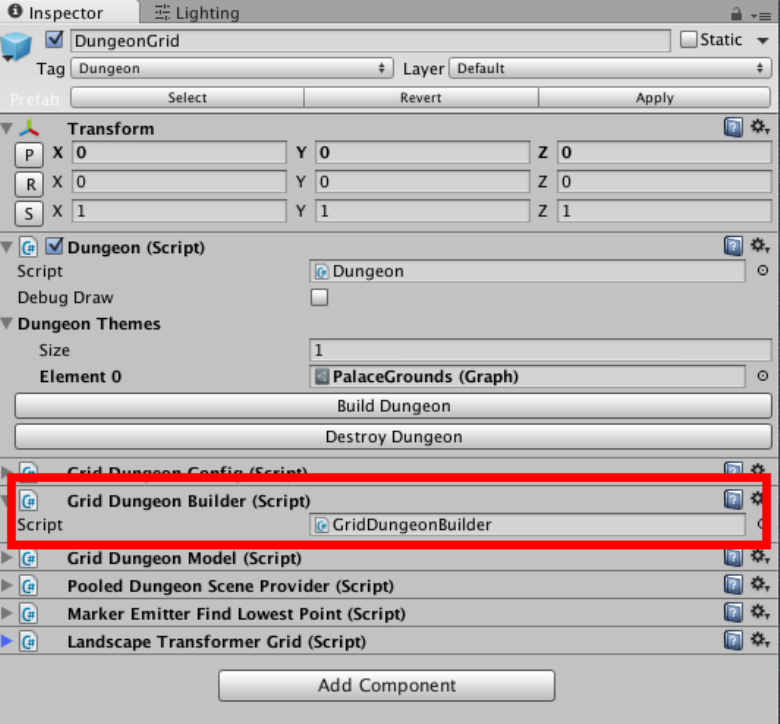
Figure 115: Dungeon builder script aached to the Dungeon game object
97
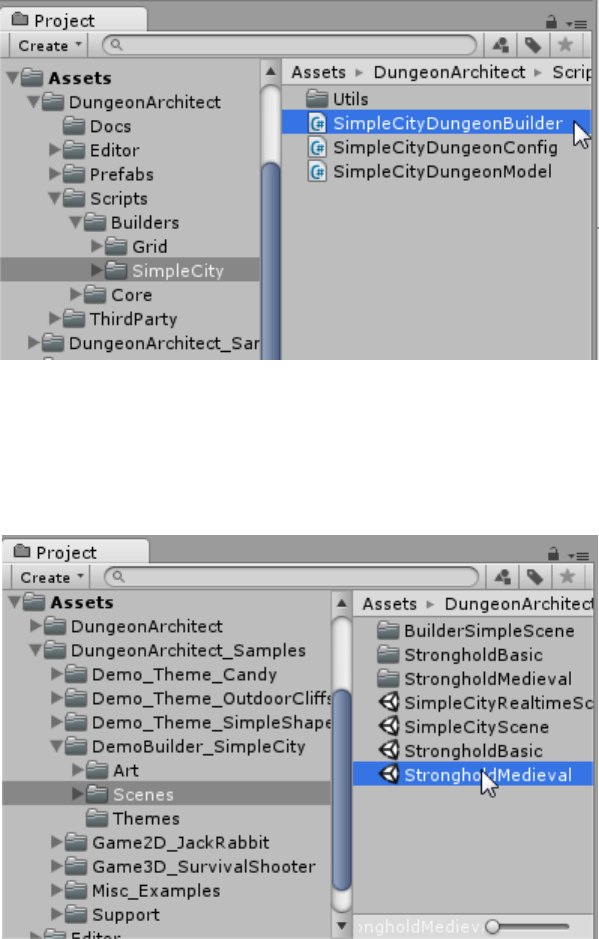
Figure 116: Builder Code Locaon
Figure 117: Builder Samples Locaon
98
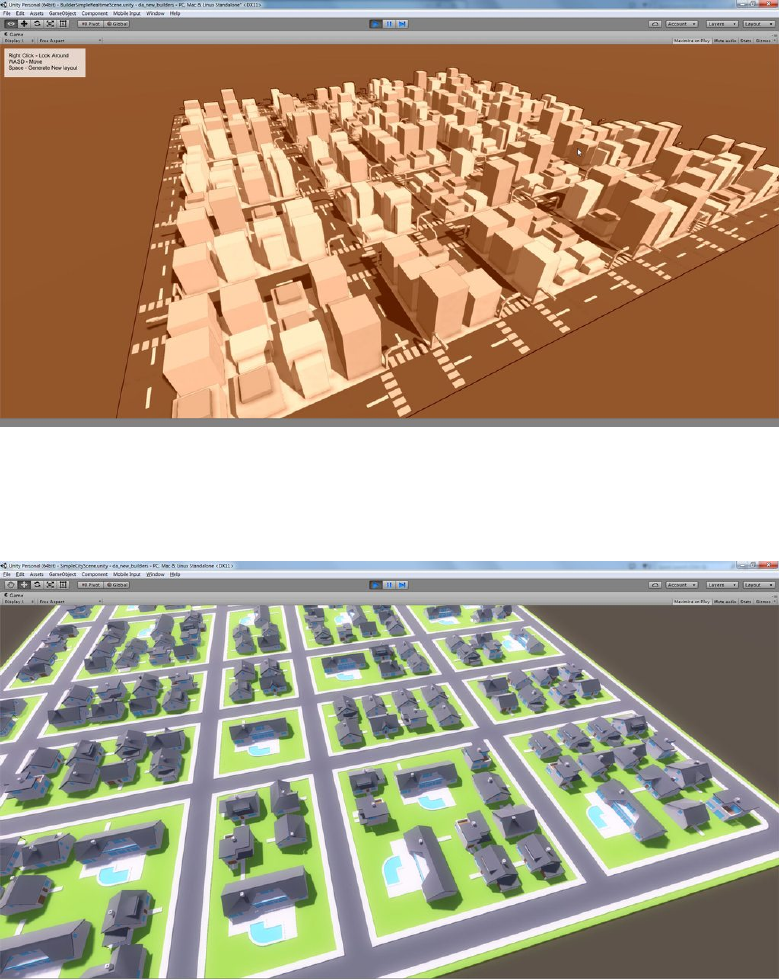
Figure 118: Sample City Builder
Figure 119: Sample City Builder
99
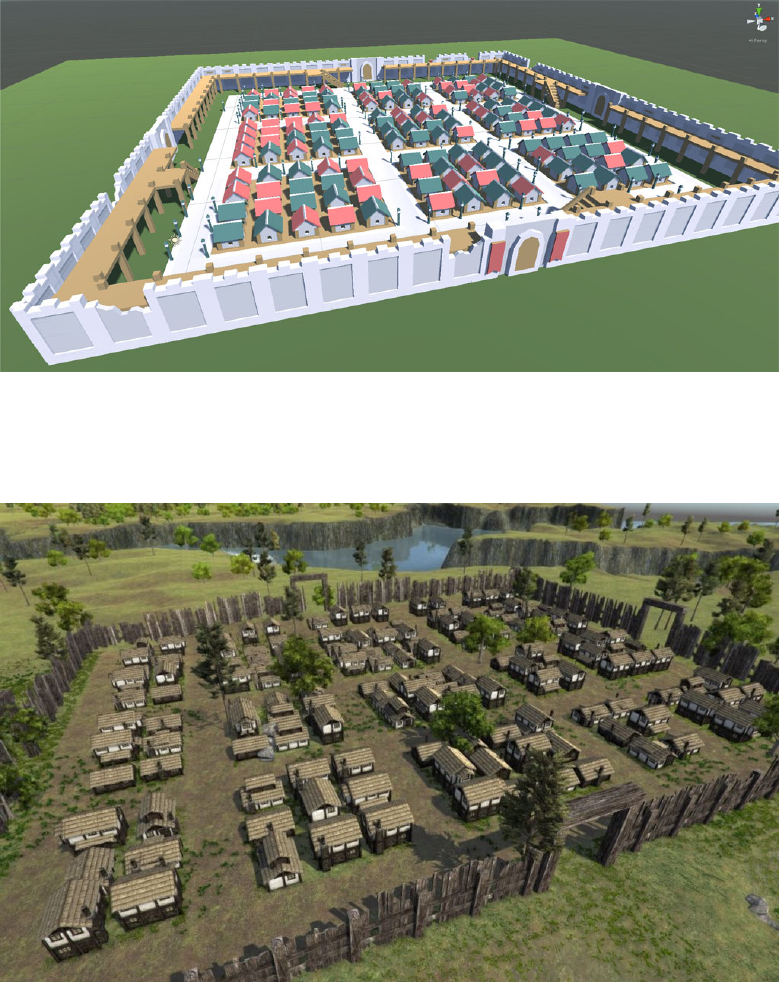
Figure 120: Stronghold Wall Emier
Figure 121: Stronghold Wall Emier
100
