07 Manual Export Node Data IFM
User Manual: Pdf
Open the PDF directly: View PDF ![]() .
.
Page Count: 4
node-export v0.1
FEFLOW IFM plug-in
Nodal data export in transient simulations
Axayacatl Maqueda
axa.maqueda@protonmail.ch
September 29, 2017
1 Objective
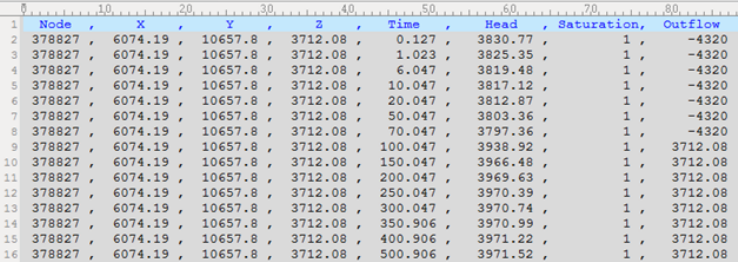
Export to TXT selected nodal data from transient simulations at selected times by the
user. It is compiled for FEFLOW 7 64bit. Figure (1) shows an export example which
contains: node number, coordinates, simulation time (days), hydraulic head, saturation,
and outflow. Outflow is the boundary component of the budget made at the node. In a
pumping well, the boundary component of the budget is equal to pumping rate.
Figure 1: Text file export example
2 How it works
The plug-in needs two TXT input files to work:
1. a node list where the data will be collected and later exported. Remember node
number = node ID -1.
2. a time-step list at which data is exported
Both files are lists. The plug-in reads them and stores them in vectors. At every Post-
TimeStep callback, the plug-in compares the simulation time with the next time-step in
the list. If the simulation time is greater, a data export is made.
1
Finally at leave OnLeaveSimulator callback a final data export is made. But the final
export lacks the last column with the outflow value since budget data is lost once the
simulation ends.
3 How to use the plug-in
3.1 Generate input files for the plug-in
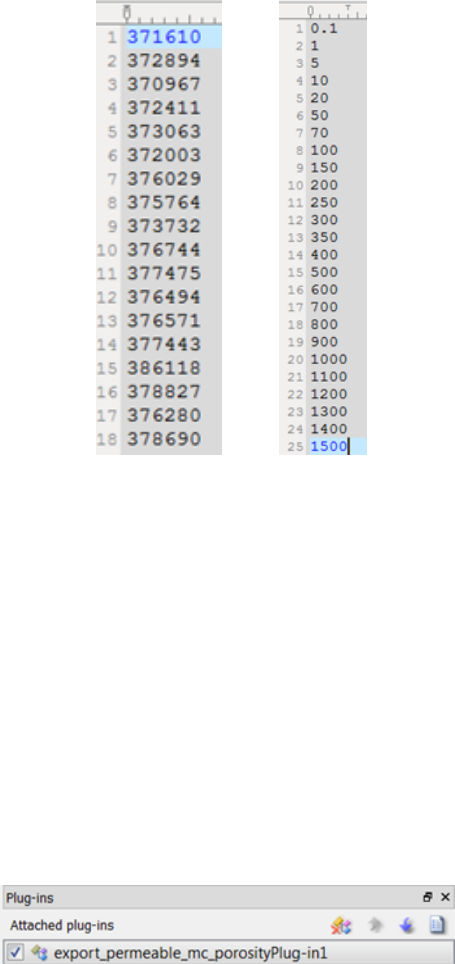
Figure (2(a)) is an example of the node list for export. Every line is 1 node, 16 nodes
total. Figure (2(b)) is a list of simulation times for export.
(a) (b)
Figure 2: a) list of node numbers, b) list of export times in days
3.2 Add the plug-in to the simulation
Follow FEFLOW online help:
http://www.feflow.info/html/help/HTMLDocuments/reference/panels/plugins.htm
3.3 Edit plug-in properties
Once the plug-in is attached to the simulation the plug-ins panel should look like figure
(3.3)
Figure 3: Plug-in in plug-ins panel
2
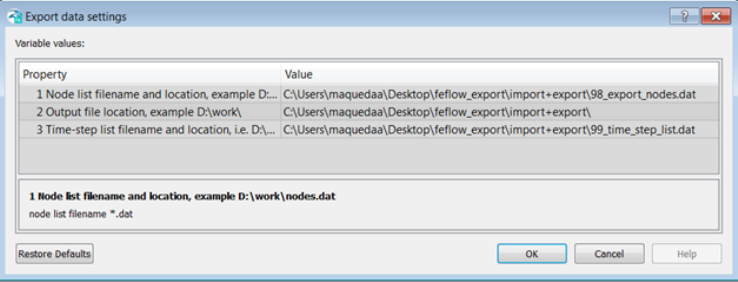
A right-click on it opens a menu, select properties and the window shown in figure ()
opens:
Figure 4: Plug-in properties
The values can be modified according to the locations of both input files.
1. value 1 is for the location of the file containing the list of nodes for export
2. value 2 is the location of the directory where export files will be saved. In the example
there are 16 nodes, thus there are 16 exports files named 1 to 16 corresponding to
the order of the nodes in the input file.
3. value 3 is the location of the file with the time-step list.
Click OK and store the values. If the simulation is saved, values 1, 2 and 3 are saved
also at the end of the FEM file and are recovered when the FEM file is used in following
simulations.
3.4 Run the simulation
The simulation can be run now and data will be exported at the times set in the time-step
input file. While the simulation is running export files are generated in the selected path.
The directory looks like figure (3.4).
3

Figure 5: Export directory
3.5 GitHub project file list
1. export_permeable_mc_porosityPlug-in1.dll - compiled solution. DLL ready to
use in FEFLOW 7
2. export_permeable_mc_porosityPlug-in1.cpp - C++ source code for the plug-in
4
