PKG Series Installation Directions
2016-08-17
: Pdf 1000513114-Installationsheet 1000513114-InstallationSheet B3 unilog
Open the PDF directly: View PDF ![]() .
.
Page Count: 5

Operating Instructions PKG Series
MaxLite LED Parking Garage Canopy Fixture
• To reduce the risk of death, personal injury or property damage from
fire, electric shock, falling parts, cuts/abrasions, and other hazards
read all warnings and instructions included with and on the fixture
box and all fixture labels.
• Before installing, servicing, or performing routine maintenance upon
this equipment, follow these general precautions.
• Commercial installation, service and maintenance of luminaires
should be performed by a qualified licensed electrician.
• For Residential installation: If you are unsure about the installation or
maintenance of the luminaires, consult a qualified licensed electrician
and check your local electrical code.
• DO NOT INSTALL DAMAGED PRODUCT!
• This fixture is intended to be connected to a properly installed and
grounded UL listed junction box.
WARNING:
RISK OF ELECTRICALSHOCK
• Turn off electrical power at fuse or circuit breaker box before wiring fixture to the power supply.
• Turn off the power when you perform any maintenance.
• Verify that supply voltage is correct by comparing it with the luminaire label information.
• Make all electrical and grounded connections in accordance with the National Electrical Code
and any applicable local code requirements.
• All wiring connections should be capped with UL approved wire connectors.
CAUTION:
RISK OF INJURY
• Wear gloves and safety glasses at all times when removing luminaire from carton, installing,
servicing or performing maintenance.
• Avoid direct eye exposure to the light source while it is on.
• Account for small parts and destroy packing material, as these may be hazardous to children.
CAUTION:
RISK OF FIRE
• Keep combustible and other materials that can burn away from luminaire and lamp/lens.
• MIN 90°C SUPPLY CONDUCTORS.
PKG30U50B 120-277V 50/60 Hz
PKG45U50B 120-277V 50/60 Hz
© Copyright 2016. MaxLite, Inc. All Rights Reserved.
12 York Ave, West Caldwell, NJ 07006 Tel: 800-555-5629 Fax: 973-244-7333 Email: info@maxlite.com
Page: 1
REV: 3/23/16
®
Picture is for illustration purposes only.
Your model may vary.
General Safety Information
CAUTION: Turn off electrical power at fuse or circuit breaker box before wiring fixture to the power supply.
All units must be individually connected to the AC supply. (see page 1 for voltage by model)
Page: 2
REV: 3/23/16
© Copyright 2016. MaxLite, Inc. All Rights Reserved.
12 York Ave, West Caldwell, NJ 07006 Tel: 800-555-5629 Fax: 973-244-7333 Email: info@maxlite.com
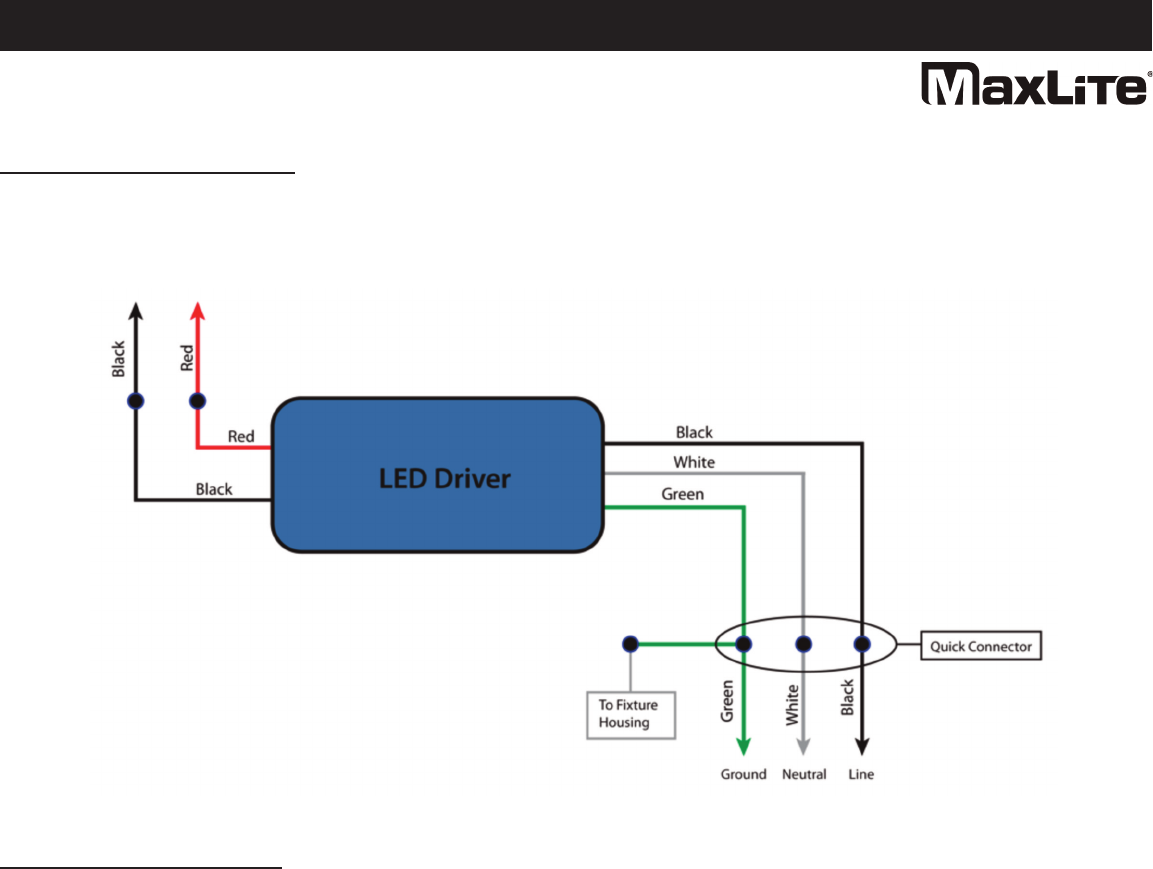
General Wiring Diagram
1. Feed wires through way and secure using connector (not supplied) if needed.
2. Connect supply wires to quick connect originating from INPUT side of driver. Black/Hot supply to quick connect
with black wire. White/Neutral supply to quick connect with white wire. Be sure to confirm connections are
secure.
3. Connect ground wire to quick connect with green wire. Be sure to confirm grounding connection is secure.
AC Wiring Instructions
Operating Instructions PKG Series
MaxLite LED Parking Garage Canopy Fixture
®
Installation & Operation
Disconnect the power by turning off the circuit breaker or by removing the appropriate fuse at the fuse box.
Turning the power off using the light switch is not sufficient to prevent electrical shock.
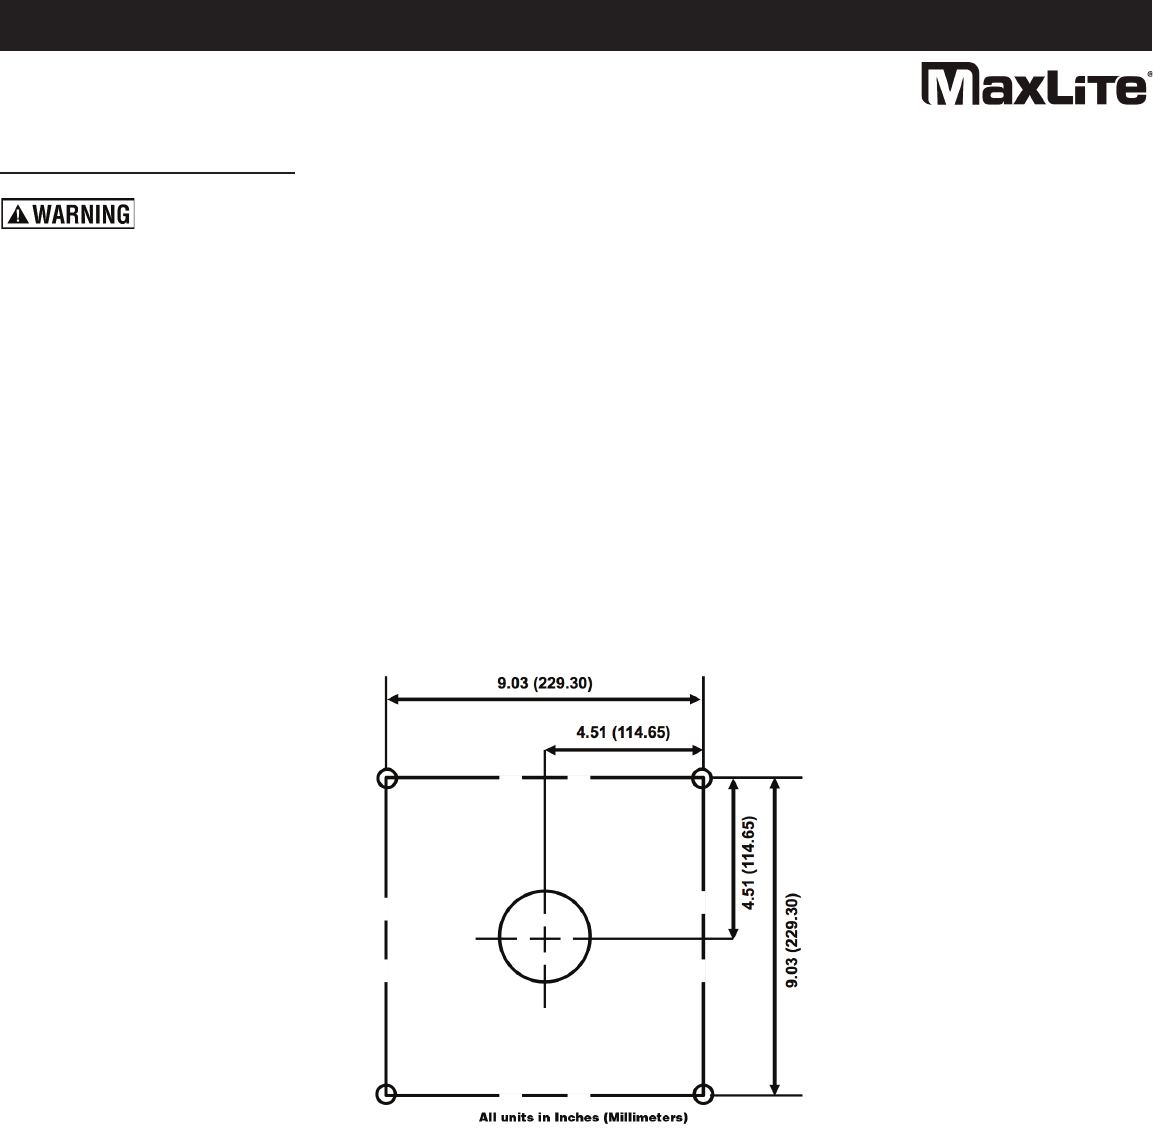
1. Drill four mounting holes into mounting surface using a 1/4” drill bit. Use template 1 to locate mounting holes.
2. Use a Phillips Head screwdriver to loosen (4) screws securing fixture light engine/lens assembly. Remove
fixture base plate from fixture.
3. Use a flat head screwdriver to remove appropriate wire way covering from housing. This is to be determined
by the installer.
4. Take care to avoid damaging driver, wires and quick connectors and drill holes through casting over fixture
mounting holes.
5. Affix fixture to mounting surface by installing anchors (not supplied) through fixture mounting holes into holes
drilled into the mounting surface. Be sure to use an anchor appropriate for the mounting surface in which the
fixture is installed.
6. Add 1/4” bead of exterior grade silicone sealant around the outside perimeter in the seam between the
mounting surface and the fixture base to inhibit any moisture from attachment screws.
7. Reattach fixture light engine/lens assembly to fixture base housing.
8. Connect driver OUTPUT leads to quick connect originating from LED array. Red output to quick connect
with red wires, black output to quick connect with black wires.
9. Reattach fixture using Phillips Head screws removed in mounting step 2.
Page: 3
REV: 3/23/16
© Copyright 2016. MaxLite, Inc. All Rights Reserved.
12 York Ave, West Caldwell, NJ 07006 Tel: 800-555-5629 Fax: 973-244-7333 Email: info@maxlite.com
Operating Instructions PKG Series
MaxLite LED Parking Garage Canopy Fixture
®

Page: 4
REV: 3/23/16
© Copyright 2016. MaxLite, Inc. All Rights Reserved.
12 York Ave, West Caldwell, NJ 07006 Tel: 800-555-5629 Fax: 973-244-7333 Email: info@maxlite.com
Operating Instructions PKG Series
MaxLite LED Parking Garage Canopy Fixture
®

LIMITED WARRANTY FOR CERTAIN MAXLITE® LED LIGHTING FIXTURES, SPECIFICALLY WALL PACKS;
FLOOD LIGHT; AREA LIGHT; CANOPY; GARAGE; PARKING; SECURTIY LIGHT; VAPOR TIGHT AND ROADWAY.
This limited warranty is provided by the MaxLite company described below ("Seller") to you as the original purchaser
of the LED lighting product that is identified on Seller's invoice reflecting its original purchase (the "Product"). The
Seller is the MaxLite Company identified as such on the invoice. This limited warranty may be transferred to
subsequent purchasers of the Product, provided that such Product is resold in new condition and in its original
packaging. Seller warrants that the Product, when delivered in new condition and in its original packaging, will be free
of defects in material and workmanship for a period of FIVE (5) YEARS from the date of original purchase or the
number of hours used has not exceeded the L70 life stated for each LED fixture. The determination of whether the
Product is defective shall be made by Seller in its sole discretion with consideration given to the overall performance
of the Product. A Product shall not be considered defective solely as a result of the failure of individual LED
components to emit light if the number of inoperable components is less than 10% of the total number of LED
components in the Product.
If Seller determines the Product is defective, Seller will elect, in its sole discretion, to refund you the purchase price of
the Product, repair the Product or replace the Product. This limited warranty does not apply to loss or damage to the
Product caused by: negligence; abuse; misuse; mishandling; improper installation, storage or maintenance; damage
due to fire or acts of God; vandalism; civil disturbances; power surges; improper power supply; electrical current
fluctuations; corrosive environment installations; induced vibration; harmonic oscillation or resonance associated with
movement of air currents around the Product; alteration; accident; failure to follow installation, operating, maintenance
or environmental instructions prescribed by Seller or applicable electrical codes; or improper service of the Product
performed by someone other than Seller or its authorized service provider. This limited warranty excludes field labor
and service charges related to the repair or replacement of the Product. THIS LIMITED WARRANTY IS VOID IF THE
PRODUCT IS NOT USED FOR THE PURPOSE FOR WHICH IT IS DESIGNED.
Seller reserves the right to utilize new, reconditioned, refurbished, repaired or remanufactured products or parts in the
warranty repair or replacement process. Such products and parts will be comparable in function and performance to
an original product or part, as determined by Seller in its sole discretion, and warranted for the remainder of the
original warranty period.
In order to make a warranty claim, you must notify Seller in writing within sixty (60) days after your discovery of the
defect, provide proof of purchase such as the invoice and comply with Seller's other warranty requirements. Upon re-
ceiving that notice, Seller may require you to promptly return the Product to Seller, or its authorized service provider,
freight prepaid. Your warranty claim should be addressed to MaxLite, Inc., 12 York Ave. West Caldwell NJ 07006.
This limited warranty only applies to specified LED fixtures. Backup batteries, photocells, mounting accessories and
other fixture accessories can be found at www.MaxLite.com/lighting/products/warranty.
THE FOREGOING WARRANTY PROVISIONS ARE EXCLUSIVE AND ARE GIVEN AND ACCEPTED IN LIEU OF
ANY AND ALL OTHER WARRANTIES, WHETHER EXPRESS OR IMPLIED, INCLUDING WITHOUT LIMITATION
ANY WARRANTY AGAINST INFRINGEMENT AND ANY IMPLIED WARRANTIES OF MERCHANT ABILITY OR
FITNESS FOR A PARTICULAR PURPOSE.
IN NO EVENT SHALL SELLER BE LIABLE FOR INCIDENTAL, COMPENSATORY, CONSEQUENTIAL, INDIRECT,
SPECIAL OR OTHER DAMAGES. SELLER'S AGGREGATE LIABILITY WITH RESPECT TO A DEFECTIVE
PRODUCT SHALL IN ANY EVENT BE LIMITED TO THE MONIES PAID TO SELLER FOR THAT DEFECTIVE
PRODUCT.
This warranty is effective for purchases of Product on or after the effective date set forth below. Seller reserves the
right to modify this warranty from time to time. Any modification of this warranty shall be effective for all orders placed
with Seller on or after the effective date of such revised warranty.
Effective Date: May 12, 2014
Page: 5
REV: 3/23/16
© Copyright 2016. MaxLite, Inc. All Rights Reserved.
12 York Ave, West Caldwell, NJ 07006 Tel: 800-555-5629 Fax: 973-244-7333 Email: info@maxlite.com
Warranty
Operating Instructions PKG Series
MaxLite LED Parking Garage Canopy Fixture
®
