2018 NissanConnect Owner's Manual | Nissan USA (Altima, Maxima, And Murano) Connect Navigation
User Manual: Pdf 2018 Nissan Murano Owners Manual PDF | SERVICE MANUAL OWNERS
Open the PDF directly: View PDF ![]() .
.
Page Count: 259 [warning: Documents this large are best viewed by clicking the View PDF Link!]

For your safety, read carefully and keep in this vehicle.
2018 NISSANCONNECT®NCGNJ-N
NCGNJ-N
Printing : June 2018
Publication No.:
Printed in the U.S.A.
N18E NCGNJU1
2018 NISSANCONNECT®
OWNER’S MANUAL
MAXIMA MURANO
ALTIMA
Foreword
Prologue
NCGNJN1402-120906-251BEBC1-23DC-4665-B405-18A0830C57B1
NISSAN CONSUMER AFFAIRS DE-
PARTMENT
NCGNJN1402-120906-0A572194-58C0-4CCD-A796-B7907E2D317D
For assistance or inquiries about the
NISSAN Navigation System, NISSAN war-
ranty, service or general questions, con-
tact the NISSAN Consumer Affairs
Department at:
For U.S. customers
Nissan North America, Inc.
Consumer Affairs Department
P.O. Box 685003
Franklin, TN 37068-5003
1-800-NISSAN-1
(1-800-647-7261)
For Canadian customers
Nissan Canada Inc.
5290 Orbitor Drive
Mississauga, Ontario L4W 4Z5
1-800-387-0122
NISSAN NAVIGATION SYSTEM
HELPDESK CONTACT INFORMA-
TION
NCGNJN1402-120906-7E109BAF-7F49-429A-8CC5-3267D2E74C0F
To order updated map data, contact the
NISSAN NAVIGATION SYSTEM HELPDESK
at:
.E-MAIL: nissan-navi-info@here.com
.WEBSITE: www.NissanNavigation.com
.PHONE: 1-888-661-9995
NISSANCONNECT
SM
SERVICES
HELPDESK CONTACT INFORMA-
TION GUID-25DEBBE3-2812-46C0-9B00-52166087D9D9
For assistance or inquiries about the
NissanConnect
SM
Services, contact Nis-
sanConnect
SM
Services helpdesk at:
.E-MAIL: nissanownerservices@nissan-
usa.com
.WEBSITE: https://www.nissanusa.
com/connect/support
.PHONE: 1-855-426-6628

FOREWORD
Thank you for purchasing a NISSAN vehi-
cle.
This user’s manual is for NissanConnect
SM
with Navigation and Services offered in
your NISSAN vehicle.
Operation instructions for the following
systems are included in this manual.
.Audio
.Hands-Free Phone
.NissanConnect
SM
Services
.Navigation
.Voice recognition
.Information and settings viewable on
NissanConnect
SM
Please read this manual carefully to en-
sure safe operation of NissanConnect
SM
with Navigation and Services.
.Because of possible specification
changes and optional equipment,
some sections of this manual may
not apply to your vehicle.
.All information, specifications and il-
lustrations in this manual are those in
effect at the time of printing. NISSAN
reserves the right to change specifica-
tions or design at any time without
notice.
.Do not remove this manual from the
vehicle when selling this vehicle. The
next user of the system may need the
manual.

Table of Contents
1Introduction
How to use this manual.... 1-2
Safety information................ 1-3
Trademarks................................ 1-4
Regulatory information .... 1-5
Licenses......................................... 1-7
2Getting started
Control buttons and
touch screen display .......... 2-2
Starting system.................... 2-14
Basic operation.................... 2-14
System settings................... 2-23
3Audio system
Audio operation
precautions ................................ 3-2
Names and functions
of audio control
buttons ....................................... 3-10
Audio operations ................ 3-14
Audio settings....................... 3-37
CD/USB memory device
care and cleaning .............. 3-38
4Hands-Free Phone
Bluetooth®
Hands-Free Phone
System ........................................... 4-2
5Information
Information menu................. 5-2
NissanConnect
SM
Services (if so
equipped)..................................... 5-7
SiriusXM Travel Link
(for U.S. and Canada)....... 5-18
Apple CarPlay ....................... 5-20
Android Auto.......................... 5-23
6Navigation
Safety information................ 6-3
Map operation ......................... 6-3
Setting destination............ 6-14
Route guidance.................... 6-28
Viewing traffic
information (for U.S. and
Canada)...................................... 6-47
Storing a
location/route....................... 6-50
Navigation settings........... 6-58
General information for
navigation system ............. 6-61
7Voice recognition
Voice recognition .................. 7-2
8Troubleshooting guide
Customer assistance.......... 8-2
System unit ................................ 8-3
Audio system............................ 8-5
Bluetooth®
Hands-Free Phone
System ........................................ 8-14

1 Introduction
How to use this manual .......................................................... 1-2
For safe operation ................................................................. 1-2
Reference symbols................................................................ 1-2
Screen illustrations ............................................................... 1-2
Safety information ....................................................................... 1-3
Trademarks ....................................................................................... 1-4
Regulatory information ........................................................... 1-5
Laser product ......................................................................... 1-5
Bluetooth® devices ............................................................. 1-5
Licenses ............................................................................................... 1-7
Telematic Control Unit Gen2K (if
so equipped) ............................................................................ 1-7
1. Introduction
HOW TO USE THIS MANUAL
This manual uses special words, symbols,
icons and illustrations organized by func-
tion.
Please refer to the following items and
familiarize yourself with them.
FOR SAFE OPERATION
WARNING
This is used to indicate the presence
of a hazard that could cause death or
serious personal injury. To avoid or
reduce the risk, the procedures must
be followed precisely.
CAUTION
This is used to indicate the presence
of a hazard that could cause minor or
moderate personal injury or damage
to your vehicle. To avoid or reduce the
risk, the procedures must be followed
carefully.
NOTE:
Indicates items that help you under-
stand and maximize the performance of
your vehicle. If ignored, they may lead to
a malfunction or poor performance.
REFERENCE SYMBOLS
INFO:
This indicates information that is neces-
sary for efficient use of your vehicle or
accessories.
Reference page:
This indicates the title and page that you
should refer to.
<>:
Indicates a button on the control panel.
[]:
This indicates a key/item displayed on the
screen.
Voice Command:
This indicates an operation by voice
command.
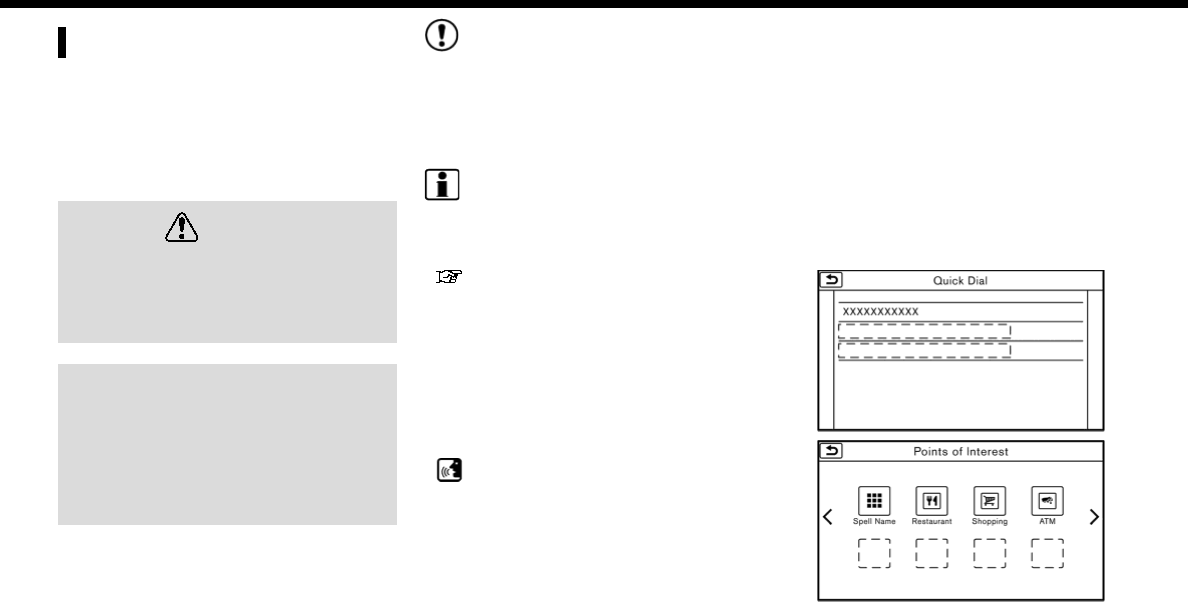
SCREEN ILLUSTRATIONS
.The illustrations in this manual are
representatives of various models
and may not be identical with the
design and specifications of your ve-
hicle.
.Icons and menu items displayed on
the screen may be abbreviated or
omitted from the screen illustrations
when appropriate. The omitted icons
and menu items are described as
dotted lines as illustrated.
1-2

SAFETY INFORMATION
This system is primarily designed to help
you support pleasant driving as outlined
in this manual. However, you, the driver,
must use the system safely and properly.
Information and the availability of services
may not always be up to date. The system
is not a substitute for safe, proper and
legal driving.
Before using the system, please read the
following safety information. Always use
the system as outlined in this manual.
WARNING
.To operate the system, first park
the vehicle in a safe location and
set the parking brake. Operating
the system while driving can dis-
tract the driver and may result in a
serious accident.
.Exercise extreme caution at all
times so full attention may be
given to vehicle operation. If the
system doesn’t respond immedi-
ately, please be patient and keep
your eyes on the road. Inattentive
driving may lead to a crash result-
ing in serious injuries or death.
.Do not rely on route guidance
alone. Always be sure that all
driving maneuvers are legal and
safe in order to avoid accidents.
.Do not disassemble or modify this
system. If you do, it may result in
accidents, fire or electrical shock.
.If you notice any foreign objects in
the system hardware, spill liquid
on the system or notice smoke or a
smell coming from it, stop using
the system immediately and it is
recommended you contact a
NISSAN dealer. Ignoring such con-
ditions may lead to accidents, fire
or electrical shock.
CAUTION
.Some jurisdictions may have laws
limiting the use of video screens
while driving. Use this system only
where it is legal to do so.
.Extreme temperature conditions
[below −4°F (−20°C) and above
158°F (70°C)] could affect the per-
formance of the system.
.The display screen may break if it
is hit with a hard or sharp object. If
the display screen breaks, do not
touch it. Doing so could result in an
injury.
NOTE:
Do not keep the system running with
the engine or the hybrid system
stopped. Doing so may discharge the
vehicle battery (12V battery). When you
use the system, always keep the engine
or the hybrid system running.
1. Introduction
1-3
1. Introduction
TRADEMARKS
Windows® and Windows Media® are regis-
tered trademarks or trademarks of Micro-
soft Corporation in the United States of
America and/or other countries.
Windows Media Player:
This product is protected by certain
intellectual property right of Microsoft.
Use or distribution of such technology
outside of this product is prohibited with-
out a license from Microsoft.
“Made for iPod” and “Made for iPhone”
mean that an electronic accessory has
been designed to connect specifically to
iPod or iPhone, respectively, and has been
certified by the developer to meet Apple
performance standards. Apple is not re-
sponsible for the operation of this device
or its compliance with safety and regula-
tory standards. Please note that the use of
this accessory with iPod or iPhone may
affect wireless performance.
Apple, the Apple logo, iPhone, iPod, iPod
classic, iPod nano, and iPod touch are
trademarks of Apple Inc., registered in the
U.S. and other countries. Lightning is a
trademark of Apple Inc. App Store is a
service mark of Apple Inc.
The Bluetooth® word mark and logos are
registered trademarks owned by Blue-
tooth SIG, Inc. and any use of such marks
by Clarion Co., Ltd. is under license. Other
trademarks and trade names are those of
their respective owners.
HD Radio Technology manufactured un-
der license from iBiquity Digital Corpora-
tion. U.S. and Foreign Patents. For patents
see http://patents.dts.com/. HD Radio
and the HD, HD Radio, and “ARC” logos
are registered trademarks or trademarks
of iBiquity Digital Corporation in the Uni-
ted States and/or other countries.
SiriusXM® services require a subscription
after trial period and are sold separately
or as a package. The satellite service is
available only in the 48 contiguous USA
and DC. SiriusXM satellite service is also
available in Canada; see www.siriusxm.ca.
SiriusXM Satellite Radio and SiriusXM Traf-
fic subscriptions are sold separately or as
a package, and are continuous until you
call SiriusXM to cancel. See SiriusXM Cus-
tomer Agreement for complete terms at
www.siriusxm.com. SiriusXM Travel Link is
available in select markets. For more
information, call Listener Care at 1-877-
447-0011 or visit siriusxm.com/traffic.
SiriusXM Satellite Radio and SiriusXM Tra-
vel Link subscriptions are sold separately
or as a package, and are continuous until
you call SiriusXM to cancel. See SiriusXM
Customer Agreement for complete terms
at www.siriusxm.com. SiriusXM Travel Link
is available in select markets. For more
information, call Listener Care at 1-877-
447-0011 or visit siriusxm.com/travellink.
1-4

App Store
Apple and the Apple logo are trademarks
of Apple Inc., registered in the U.S. and
other countries. App Store is a service
mark of Apple Inc.
Siri
Siri is a trademark of Apple Inc., registered
in the U.S. and other countries.
Apple CarPlay
Apple CarPlay is a trademark of Apple Inc.,
registered in the U.S. and other countries.
Google Play
TM
Google, Google Play are trademarks of
Google Inc.
Google
TM
Google is a trademark of Google Inc.
REGULATORY INFORMATION
LASER PRODUCT
This NissanConnect
SM
with Navigation
and Services (if so equipped) is certified
as a Class 1 laser product.
For U.S. and Canada:
The system complies with DHHS Rules 21
CFR Chapter 1, Subchapter J.
WARNING
.Do not disassemble or modify this
system. There are no user service-
able parts in the system.
.If maintenance, adjustments and
operations other than those spe-
cified in this manual are at-
tempted, injury due to laser
radiation and exposure could oc-
cur.
BLUETOOTH® DEVICES
FCC Regulatory information (for
U.S.)
FCC ID: WY2QY8050
NOTE
This device compiles with part 15 of the
FCC Rules. Operation is subject to the
following two conditions: (1) This device
may not cause harmful interference, and
(2) this device must accept any interfer-
ence received, including interference that
may cause undesired operation.
FCC WARNING
Changes or modifications not expressly
approved by the party responsible for
compliance could void the user’s authority
to operate the equipment.
CAUTION: Radio Frequency Radiation Ex-
posure
This equipment complies with FCC radia-
tion exposure limits set forth for uncon-
trolled environment and meets the FCC
radio frequency (RF) Exposure Guidelines
in Supplement C to OET65. This equip-
ment has very low levels of RF energy that
it deemed to comply without maximum
permissive exposure evaluation (MPE). But
it is desirable that it should be installed
and operated with at least 20 cm and
1. Introduction
1-5

1. Introduction
more between the radiator and person’s
body (excluding extremities: hands, wrists,
feet and ankles).
Co-location: This transmitter must not be
co-located or operated in conjunction
with any other antenna or transmitter.
IC Regulatory information (for
Canada)
The antenna cannot be removed (and
changed) by user.
This device complies with Industry Cana-
da license-exempt RSS standard(s). Op-
eration is subject to the following two
conditions: (1) This device may not cause
interference, and (2) this device must
accept any interference, including inter-
ference that may cause undesired opera-
tion of the device.
CAUTION: Radio Frequency Radiation Ex-
posure
This equipment complies with IC radiation
exposure limits set forth for uncontrolled
environment and meets RSS-102 of the IC
radio frequency (RF) Exposure rules. This
equipment has very low levels of RF
energy that it deemed to comply without
maximum permissive exposure evalua-
tion (MPE). But it is desirable that it should
be installed and operated with at least 20
cm and more between the radiator and
person’s body (excluding extremities:
hands, wrists, feet and ankles.)
Co-location: This transmitter must not be
co-located or operated in conjunction
with any other antenna or transmitter.
This Class B digital apparatus meets all
requirements of the Canadian Interfer-
ence-Causing Equipment Regulations.
For Quebec :
L’antenne ne peut être enlevée (et mod-
ifié) par l’utilisateur.
NOTE
Le présent appareil est conforme aux CNR
d’Industrie Canada applicables aux appa-
reils radio exempts de licence. L’exploita-
tion est autorisée aux deux conditions
suivantes : (1) l’appareil ne doit pas pro-
duire de brouillage, et (2) l’utilisateur de
l’appareil doit accepter tout brouillage
radioélectrique subi, même si le brouillage
est susceptible d’en compromettre le
fonctionnement.
ATTENTION : l`exposition aux rayonne-
ments radiofréquence
Cet équipement est conforme aux limites
d’exposition aux radiations IC définies
pour un environnement non contrôlé et
satisfait RSS-102 de la fréquence radio (RF)
IC règles d`exposition. Cet équipement
présente des niveaux très faibles d’énergie
RF réputé conforme sans évaluation de
l`exposition maximale permissive (MPE).
Mais il est souhaitable qu’il devrait être
installé et fonctionner avec au moins 20
cm entre le radiateur et le corps de la
personne (à l`exception des membres:.
Mains, poignets, pieds et chevilles).
Co-localisation : Cet émetteur ne doit pas
être co-implantés ou exploités en con-
jonction avec une autre antenne ou un
autre émetteur.
Regulatory information (for Mex-
ico)
La operación de este equipo está sujeta a
las siguientes dos condiciones: (1) es
posible que este equipo o dispositivo no
cause interferencia perjudicial y (2) este
equipo o dispositivo debe aceptar cual-
quier interferencia, incluyendo la que
pueda causar su operación no deseada.
1-6

LICENSES
TELEMATIC CONTROL UNIT
GEN2K (if so equipped)
A. INTRODUCTION
This product Telematic Control Unit
Gen2K incorporates the following soft-
ware:
(1) the software developed by, or devel-
oped for, Ficosa International, S.A. (“Fico-
sa”),
(2) the software owned by third party and
licensed to Ficosa,
(3) the software licensed under the GNU
GENERAL PUBLIC LICENSE, Version 2
(“GPL”),
(4) the software licensed under the GNU
LIBRARY GENERAL PUBLIC LICENSE, Ver-
sion 2.0 or the GNU LESSER GENERAL
PUBLIC LICENSE, Version 2.1 (collectively
“LGPL”), the Mozilla Public license v2
(“MPL”), the GPL-2.0 license with-
OpenSSL-exception (“GPLOpenSSL”) and
GNU GENERAL PUBLIC LICENSE, Version 3
with GCC exception (together with the
GPL software, jointly “Copyleft Software”),
and/or
(5) open sourced software licensed under
terms and conditions other than Copyleft
Software.
For the software classified as (3) or (4)
above, a copy of the license text is
included with the source code in the URL
indicated below, and please also refer to
the terms and conditions of Copyleft
Software licenses at the websites listed
below:
GPL: http://www.gnu.org/licenses/old-
licenses/gpl-2.0.html and https://www.
gnu.org/licenses/gpl-3.0.en.html
LGPL: http://www.gnu.org/licenses/old-
licenses/lgpl-2.1.html and http://www.
gnu.org/licenses/old-licenses/lgpl-2.0.
html
MPL: https://www.mozilla.org/en-US/
MPL/2.0/
GPL-2.0-with-OpenSSL-exception:
https://gitlab.com/cryptsetup/cryptset-
up/blob/master/COPYING
GPLv3 GCC Exception: https://www.gnu.
org/licenses/gcc-exception-3.1.en.html
The software classified as (3) and (4)
above are copyrighted by multiple people.
Please refer to the websites below regard-
ing the copyright notices of those people.
https://www.ficosa.com/software/
opensource/
The software licensed under the licenses
indicated in (3) and (4) above (“Copyleft
Software”) is distributed in the hope that it
will be useful, but WITHOUT ANY WAR-
RANTY, without even the implied warranty
of MERCHANTABILITY or FITNESS FOR A
PARTICULAR PURPOSE.
For at least three (3) years from delivery of
a device embedding the above product,
Ficosa will give to any third party who
contacts us at the Contact Information
provided below, for a charge no more
than our cost of physically performing
source code distribution, a complete ma-
chine-readable copy of the source code
corresponding to the Copyleft Software
indicated above. When requesting this
source code, please specify Product: Tele-
matic Control Unit Gen2K and version Cx9.
Furthermore, source code and licenses
corresponding to the Copyleft Software
listed above is freely available to you and
any member of the public at the website
listed below:
https://www.ficosa.com/software/
opensource/
1. Introduction
1-7

1. Introduction
[Contact Information]
For enquiries about open source software
at FICOSA, please contact Ficosa’s Com-
pliance Officer by email: FOSS@ficosa.com
Please note that we are unable to answer
any queries regarding source code details,
etc.
In addition, it is necessary for end users to
provide their own internet connection.
The end user is responsible for any con-
nection or line charges incurred through
browsing websites or downloading.
B. LICENSING ANC COPYRIGHT NOTICE
INFORMATION
The software classified as (5) above con-
tains various open sourced software
(“OSS”) listed in the below website. Please
see the website indicted next for the
terms and conditions of the licenses
(OSS Licenses) and other information
regarding the OSS contained this Product:
https://www.ficosa.com/software/
opensource/
1-8

2 Getting started
Control buttons and touch screen display .............. 2-2
Control panel (for U.S. and Canada) ........................ 2-2
Control panel (for Mexico) ............................................... 2-4
Liquid crystal display ........................................................... 2-6
Steering wheel controls (for U.S.
and Canada)............................................................................... 2-7
Steering wheel controls (for Mexico) ................... 2-10
Display Commander (if so equipped) .................. 2-11
USB (Universal Serial Bus) Connection Port
and AUX (auxiliary) input jack .................................... 2-12
Starting system ........................................................................... 2-14
Start-up screen ..................................................................... 2-14
Basic operation ........................................................................... 2-14
Selecting menu from Launch Bar .......................... 2-14
Touch panel operation ................................................ 2-16
Main screen operations ............................................... 2-16
Adjusting settings ............................................................ 2-18
How to input letters and numbers ..................... 2-18
How to view and operate HOME
MENU screen ........................................................................ 2-19
Functions disabled while driving .......................... 2-22
System settings.......................................................................... 2-23
Settings menu ..................................................................... 2-23
Display settings .................................................................. 2-24
Volume and Beeps settings ..................................... 2-24
Clock settings ...................................................................... 2-25
Language and unit settings ..................................... 2-25
Connecting Bluetooth® device .............................. 2-26
2. Getting started
CONTROL BUTTONS AND
TOUCH SCREEN DISPLAY
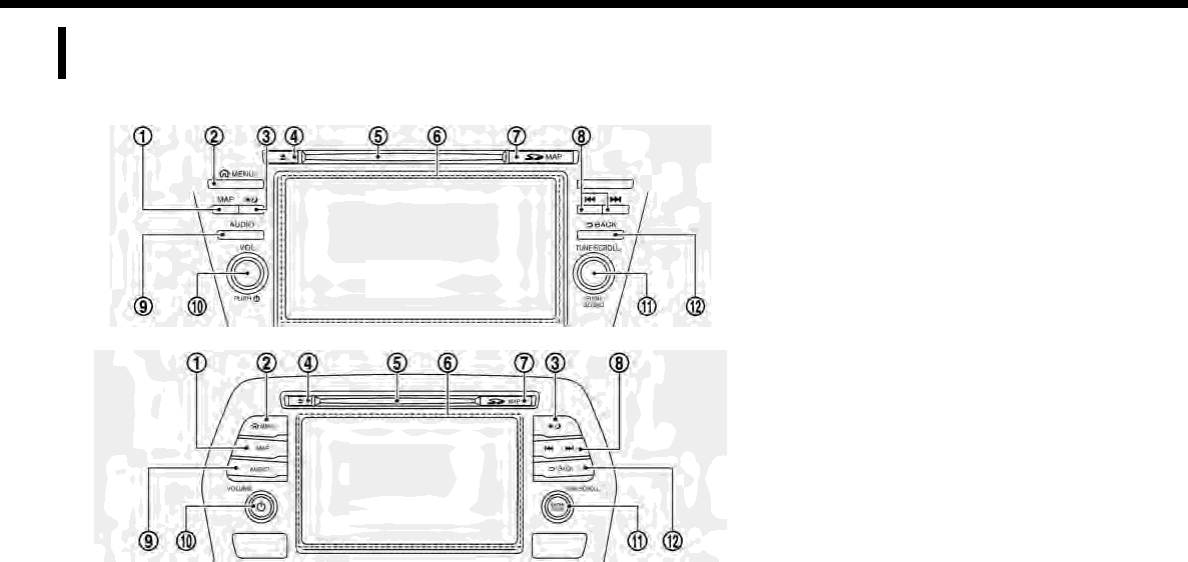
CONTROL PANEL (for U.S. and Canada)
Type A (if so equipped)
Type B (if so equipped)
2-2
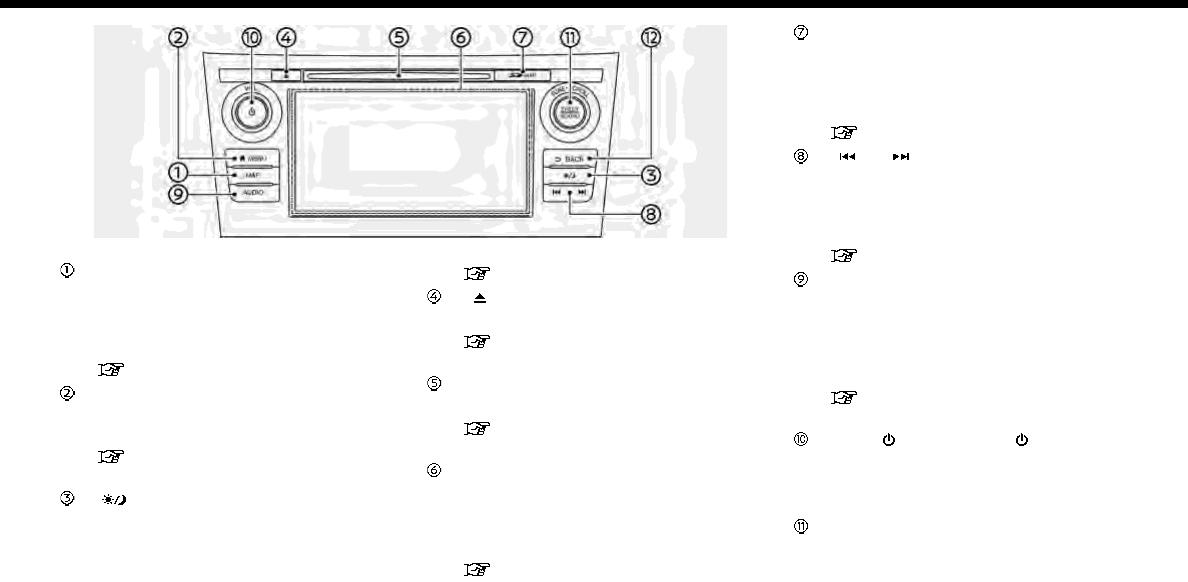
Type C (if so equipped)
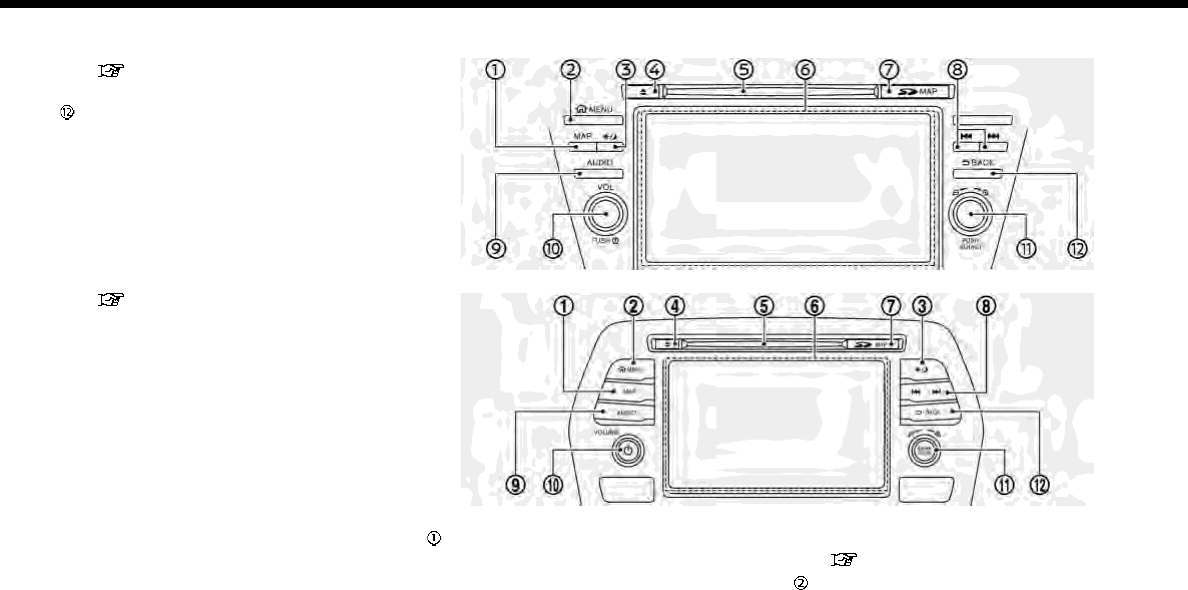
<MAP>:
Push to display the current location
map. During route guidance with a
map screen displayed, push this but-
ton to show/hide the split screen.
“Map operation” (page 6-3)
<MENU>:
Push to display the HOME MENU
screen.
“How to view and operate HOME
MENU screen” (page 2-19)
< >:
Push to switch between the day
screen (bright) and the night screen
(dark) and to adjust the level of screen
brightness. Push and hold the button
to turn off the display. Push the
button again to turn on the display.
“Display settings” (page 2-24)
< >:
Push to eject a CD.
“Compact Disc (CD) player”
(page 3-21)
CD slot:
Insert a CD into the slot.
“Compact Disc (CD) player”
(page 3-21)
Touch screen display:
Various information and operation
menus are displayed on the liquid
crystal display. Touch keys and icons
on the screen for operation.
“Touch panel operation”
(page 2-16)
Map data card slot:
The slot is for the map data SD card
provided with your vehicle. To eject
the SD card, open the lid and push the
SD card in and then release.
“Map data” (page 6-67)
< >/< >:
In audio operation, selecting and fast-
forwarding/rewinding tracks as well
as radio station/channel scanning
can be performed.
“3. Audio system”
<AUDIO>:
Push to display the audio screen.
When this button is pushed while the
audio screen is displayed, a screen to
select an audio source will be dis-
played.
“Selecting audio source”
(page 3-14)
<VOL/ >/<VOLUME/ >:
Push to turn the power of the audio
system on and off. Turn to adjust the
volume.
<TUNE·SCROLL/SOUND>:
When a menu screen is displayed, turn
the dial to select items on the screen.
Push to confirm the selected item or
setting.
2. Getting started
2-3
2. Getting started
The button can also be used for audio
operations.
“Audio main buttons (for U.S. and
Canada)” (page 3-10)
<BACK>:
Depending on the screen, pushing the
button will display the previous
screen.
For character input operation, push or
push and hold to delete the charac-
ters entered.
Push and hold to quit the voice
recognition session.
“7. Voice recognition”
CONTROL PANEL (for Mexico)
Type A (if so equipped)
Type B (if so equipped)
<MAP>:
Push to display the current location
map. During route guidance with a
map screen displayed, push this but-
ton to show/hide the split screen.
“Map operation” (page 6-3)
<MENU>:
Push to display the HOME MENU
2-4

screen.
“How to view and operate HOME
MENU screen” (page 2-19)
< >:
Push to switch between the day
screen (bright) and the night screen
(dark) and to adjust the level of screen
brightness. Push and hold the button
to turn off the display. Push the
button again to turn on the display.
“Display settings” (page 2-24)
< >:
Push to eject a CD.
“Compact Disc (CD) player”
(page 3-21)
CD slot:
Insert a CD into the slot.
“Compact Disc (CD) player”
(page 3-21)
Touch screen display:
Various information and operation
menus are displayed on the liquid
crystal display. Touch keys and icons
on the screen for operation.
“Touch panel operation”
(page 2-16)
Map data card slot:
The slot is for the map data SD card
provided with your vehicle. To eject
the SD card, open the lid and push the
SD card in and then release.
“Map data” (page 6-67)
< >/< >:
In audio operation, selecting and fast-
forwarding/rewinding tracks as well
as radio station scanning can be
performed.
“3. Audio system”
<AUDIO>:
Push to display the audio screen.
When this button is pushed while the
audio screen is displayed, a screen to
select an audio source will be dis-
played.
“Selecting audio source”
(page 3-14)
<VOLUME/ >:
Push to turn the power of the audio
system on and off. Turn to adjust the
volume.
< /SOUND>:
Turn to highlight an item on the
screen, and push to select the high-
lighted item.
On the map screen, turn to adjust the
map scale.
The button can also be used for audio
operations.
“Audio main buttons (for Mexico)”
(page 3-12)
<BACK>:
Depending on the screen, pushing the
button will display the previous
screen.
For character input operation, push or
push and hold to delete the charac-
ters entered.
Push and hold to quit the voice
recognition session.
“7. Voice recognition”
CAUTION
.Never insert foreign objects such
as coins into the SD card slot.
Doing so may result in a malfunc-
tion of the device.
.Do not apply too much pressure
when inserting the SD card into the
slot. Doing so may result in a
malfunction of the device.
.The SD card may be hot when it is
removed from the device. This
does not indicate a malfunction.
2. Getting started
2-5

2. Getting started
NOTE:
Do not remove the SD card containing
map data. If the SD card containing map
data is accidentally removed, reinsert
the SD card containing map data into
the slot and place the ignition switch in
the OFF position.
LIQUID CRYSTAL DISPLAY
The display is a liquid crystal display and
should be handled with care.
WARNING
Never disassemble the display. Some
parts utilize extremely high voltage.
Touching them may result in serious
personal injury.
Characteristics of liquid crystal
display
.If the temperature inside the vehicle is
especially low, the display will stay
relatively dim or the movement of the
images may be slow. These conditions
are normal. The display will function
normally when the interior of the
vehicle has warmed up.
.Some pixels in the display are darker or
brighter than others. This condition is
an inherent characteristic of liquid
crystal displays, and it is not a mal-
function.
.A remnant of the previous display
image may remain on the screen. This
screen burn is inherent in displays, and
it is not a malfunction.
.The screen may become distorted by
strong magnetic fields.
Maintenance of display
CAUTION
.To clean the display screen, use a
dry, soft cloth. If additional clean-
ing is necessary, use a small
amount of neutral detergent with
a soft cloth.
.Clean the display with the ignition
switch in the OFF position. If the
display is cleaned while the igni-
tion switch is placed in the ON
position, unintentional operation
may occur.
.To clean the display, never use a
rough cloth, alcohol, benzine, thin-
ner or any kind of solvent or paper
towel with a chemical cleaning
agent. They will scratch or deterio-
rate the panel.
.Do not splash any liquid such as
water or car fragrance on the dis-
play. Contact with liquid will cause
the system to malfunction.
To clean the display screen, use a dry, soft
cloth. If additional cleaning is necessary,
use a small amount of neutral detergent
with a soft cloth. Never spray the screen
with water or detergent. Dampen the
cloth first, then wipe the screen.
2-6
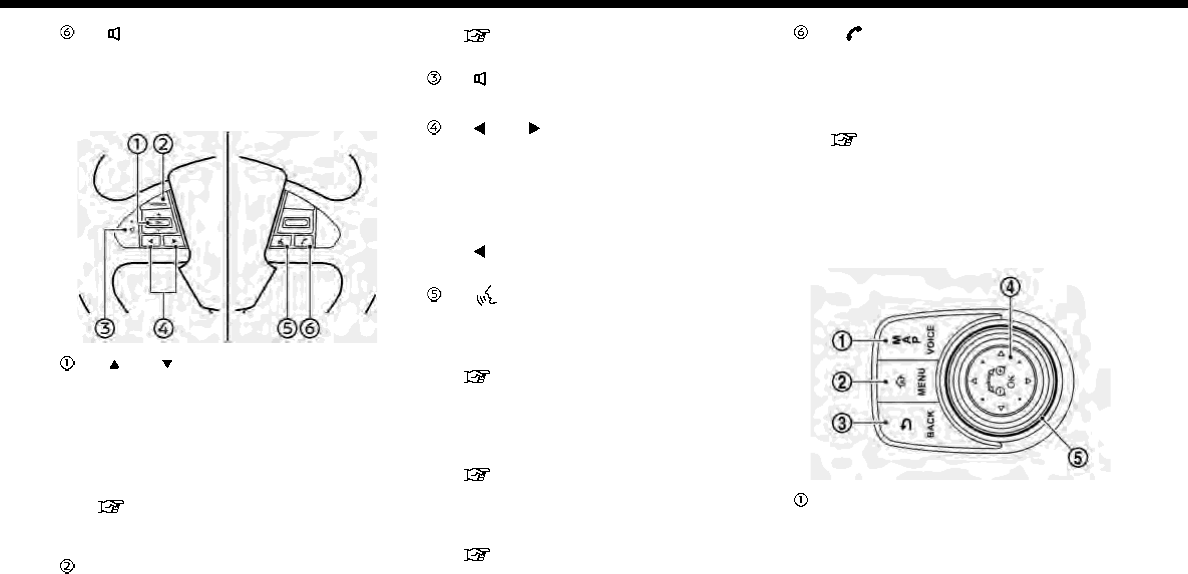
STEERING WHEEL CONTROLS (for
U.S. and Canada)
INFO:
Steering wheel switches are mainly for the
vehicle information display control and
may not be able to operate the touch
screen display depending on the condi-
tions. Follow the pop-up guide messages
and labels shown on the vehicle informa-
tion display.
Some of the information displayed on the
vehicle information display are linked with
the touch screen display.
For other details of the vehicle informa-
tion display, refer to the vehicle Owner’s
Manual.
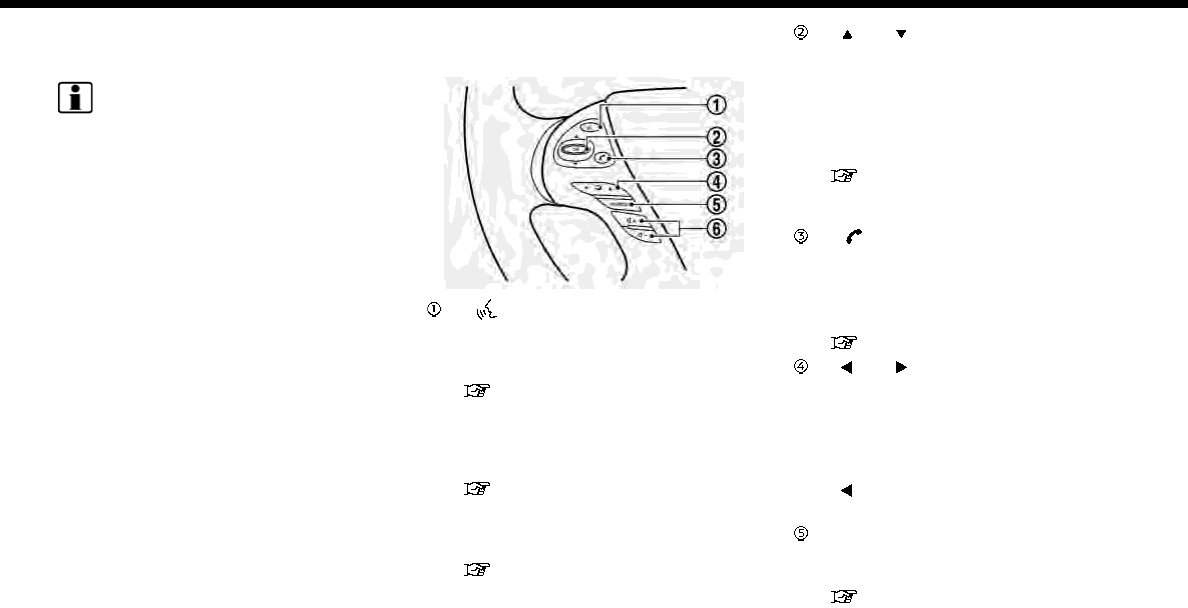
Steering wheel switches (Type A)
(if so equipped)
< > (TALK) :
Push this button to use the voice
recognition system. Push and hold to
end the voice recognition session.
“Giving voice commands”
(page 7-2)
When Apple CarPlay is active, pushing
and holding this button will start a Siri
voice control session.
“Siri operation” (page 5-21)
When Android Auto is active, pushing
and holding this button will start an
Android Auto voice control session.
“Operating with voice”
(page 5-25)
< >/< >,<OK>:
During voice recognition operation,
tilt up/down to highlight different
items, and push to select the high-
lighted item.
Audio operations are also possible by
tilting the switch up and down.
“Steering wheel mounted audio
control buttons (for U.S. and
Canada)” (page 3-13)
< > :
Push to display the hands-free phone
operation screen.
When you receive a phone call, push
this button to answer the call.
“4. Hands-Free Phone”
< >/< >:
The buttons are used mainly for the
vehicle information display operation.
Refer to the vehicle Owner’s Manual
for details.
During voice recognition operation,
<>can be used to return to the
previous screen.
<SOURCE>:
Push to change the audio source to
the available mode.
“Selecting audio source”
(page 3-14)
2. Getting started
2-7
2. Getting started
< >:
Push + or - to adjust the volume.
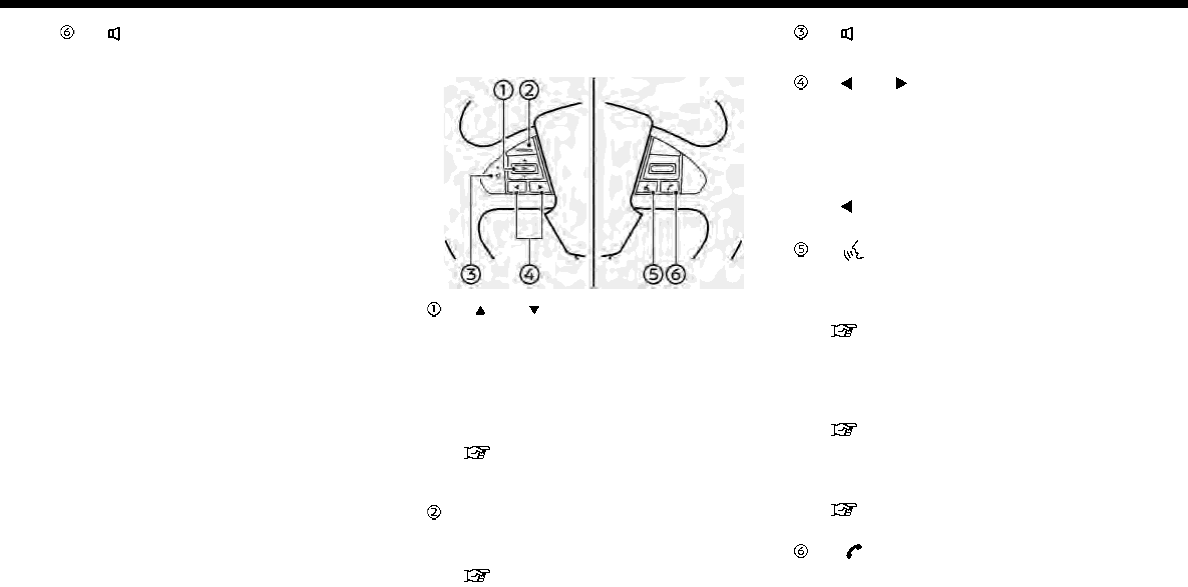
Steering wheel switches (Type B)
(if so equipped)
< >/< >,<OK>:
During voice recognition operation,
tilt up/down to highlight different
items, and push to select the high-
lighted item.
Audio operations are also possible by
tilting the switch up and down.
“Steering wheel mounted audio
control buttons (for U.S. and
Canada)” (page 3-13)
<SOURCE>:
Push to change the audio source to
the available mode.
“Selecting audio source”
(page 3-14)
< >:
Push + or - to adjust the volume.
< >/< >:
The buttons are used mainly for the
vehicle information display operation.
Refer to the vehicle Owner’s Manual
for details.
During voice recognition operation,
<>can be used to return to the
previous screen.
< > (TALK):
Push this button to use the voice
recognition system. Push and hold to
end the voice recognition session.
“Giving voice commands”
(page 7-2)
When Apple CarPlay is active, pushing
and holding this button will start a Siri
voice control session.
“Siri operation” (page 5-21)
When Android Auto is active, pushing
and holding this button will start an
Android Auto voice control session.
“Operating with voice”
(page 5-25)
< >:
Push to display the hands-free phone
operation screen.
2-8
When you receive a phone call, push
this button to answer the call.
“4. Hands-Free Phone”
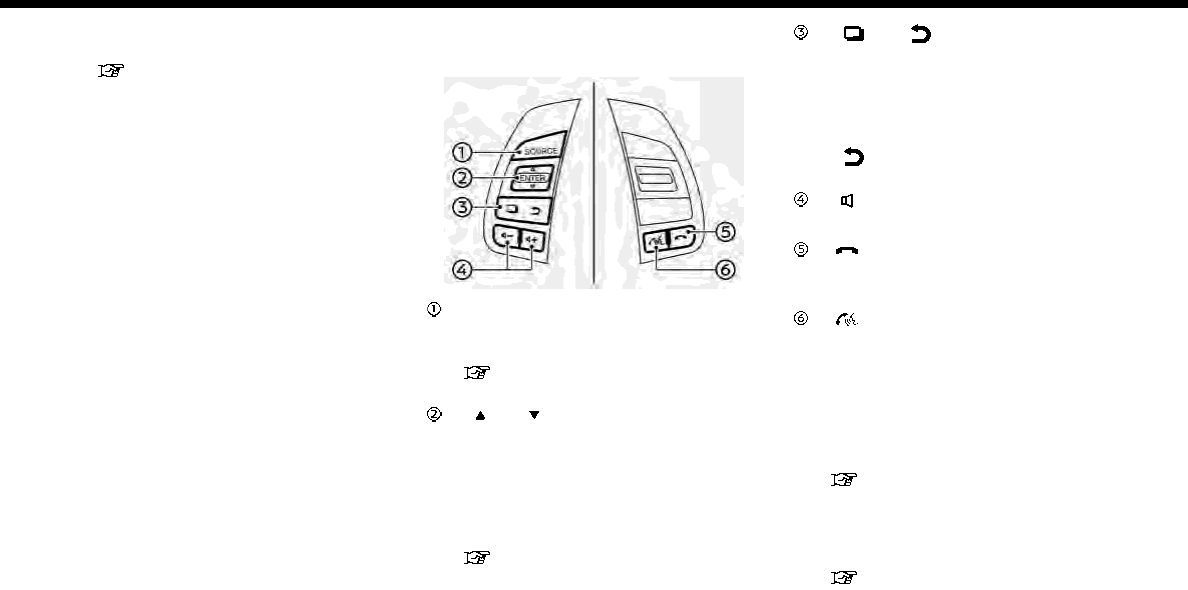
Steering wheel switches (Type C)
(if so equipped)
<SOURCE>:
Push to change the audio source to
the available mode.
“Selecting audio source”
(page 3-14)
< >/< >,<ENTER>:
During voice recognition operation,
tilt up/down to highlight different
items, and push to select the high-
lighted item.
Audio operations are also possible by
tilting the switch up and down.
“Steering wheel mounted audio
control buttons (for U.S. and
Canada)” (page 3-13)
< >/< >:
The buttons are used mainly for the
vehicle information display operation.
Refer to the vehicle Owner’s Manual
for details.
During voice recognition operation,
<>can be used to return to the
previous screen.
< >:
Push + or - to adjust the volume.
< > :
Push the button to reject the incom-
ing call or to end an active call.
< >:
Push and hold to display the hands-
free phone operation screen. When
you receive a phone call, push this
button to answer the call.
Push this button to use the voice
recognition system. Push and hold to
end the voice recognition session.
“Giving voice commands”
(page 7-2)
When Apple CarPlay is active, pushing
and holding this button will start a Siri
voice control session.
“Siri operation” (page 5-21)
When Android Auto is active, pushing
2. Getting started
2-9

2. Getting started
and holding this button will start an
Android Auto voice control session.
“Operating with voice”
(page 5-25)
STEERING WHEEL CONTROLS (for
Mexico)
INFO:
Steering wheel switches are mainly for the
vehicle information display control and
may not be able to operate the touch
screen display depending on the condi-
tions. Follow the pop-up guide messages
and labels shown on the vehicle informa-
tion display.
Some of the information displayed on the
vehicle information display are linked with
the touch screen display.
For other details of the vehicle informa-
tion display, refer to the vehicle Owner’s
Manual.
Steering wheel switches (Type A)
(if so equipped)
< > (TALK):
Push this button to use the voice
recognition system. Push and hold to
end the voice recognition session.
“Giving voice commands”
(page 7-2)
When Apple CarPlay is active, pushing
and holding this button will start a Siri
voice control session.
“Siri operation” (page 5-21)
When Android Auto is active, pushing
and holding this button will start an
Android Auto voice control session.
“Operating with voice”
(page 5-25)
< >/< >,<OK>:
During voice recognition operation,
tilt up/down to highlight different
items, and push to select the high-
lighted item.
Audio operations are also possible by
tilting the switch up and down.
“Steering wheel mounted audio
control buttons (for Mexico)”
(page 3-14)
< >:
Push to display the hands-free phone
operation screen.
When you receive a phone call, push
this button to answer the call.
“4. Hands-Free Phone”
< >/< >:
The buttons are used mainly for the
vehicle information display operation.
Refer to the vehicle Owner’s Manual
for details.
During voice recognition operation,
<>can be used to return to the
previous screen.
<SOURCE>:
Push to change the audio source to
the available mode.
“Selecting audio source”
(page 3-14)
2-10
< >:
Push + or - to adjust the volume.
Steering wheel switches (Type B)
(if so equipped)
< >/< >,<OK>:
During voice recognition operation,
tilt up/down to highlight different
items, and push to select the high-
lighted item.
Audio operations are also possible by
tilting the switch up and down.
“Steering wheel mounted audio
control buttons (for Mexico)”
(page 3-14)
<SOURCE>:
Push to change the audio source to
the available mode.
“Selecting audio source”
(page 3-14)
< >:
Push + or - to adjust the volume.
< >/< >:
The buttons are used mainly for the
vehicle information display operation.
Refer to the vehicle Owner’s Manual
for details.
During voice recognition operation,
<>can be used to return to the
previous screen.
< > (TALK) :
Push this button to use the voice
recognition system. Push and hold to
end the voice recognition session.
“Giving voice commands”
(page 7-2)
When Apple CarPlay is active, pushing
and holding this button will start a Siri
voice control session.
“Siri operation” (page 5-21)
When Android Auto is active, pushing
and holding this button will start an
Android Auto voice control session.
“Operating with voice”
(page 5-25)
< >:
Push to display the hands-free phone
operation screen.
When you receive a phone call, push
this button to answer the call.
“4. Hands-Free Phone”
DISPLAY COMMANDER (if so
equipped)
With this system, the same operations as
those for the control panel are possible
using the Display Commander.
<MAP/VOICE>:
Push to display the vehicle’s current
location on the map.
Push and hold to hear the current
guidance for a programmed route.
2. Getting started
2-11
2. Getting started
<MENU>:
Push to display the HOME MENU
screen.
< BACK>:
Push to go back to the previous
screen.
<OK>:
Push to enter the selected item.
If this button is pushed while a map is
displayed, the map menu is shown on
the display.
“Map Menu screen” (page 6-13)
Center dial/Slide switch:
Turning operation
Turn the dial to scroll the highlighted
item or to adjust a setting (treble,
brightness, etc.).
While the map screen is displayed,
adjust the map scale by turning the
dial.
Sliding operation
Depending on the screen, sliding the
slide switch can select areas on the
screen or scroll the pages.
“Basic operation” (page 2-14)
While the map screen is displayed,
scroll the map screen by sliding the
switch.
USB (Universal Serial Bus) CON-
NECTION PORT AND AUX (auxili-
ary) INPUT JACK
WARNING
Do not connect, disconnect or operate
the USB device while driving. Doing so
can be a distraction. If distracted you
could lose control of your vehicle and
cause an accident or serious injury.
CAUTION
.Do not force the USB device into
the USB connection port. Inserting
the USB device tilted or up-side-
down into the port may damage
the port. Make sure that the USB
device is connected correctly into
the USB connection port.
.Do not grab the USB connection
port cover (if so equipped) when
pulling the USB device out of the
port. This could damage the port
and the cover.
.Do not leave the USB cable in a
place where it can be pulled unin-
tentionally. Pulling the cable may
damage the port.
The vehicle is equipped with USB connec-
tion port(s) and an AUX input jack. When
connected, the in-vehicle audio system
can play audio contents from the compa-
tible device.
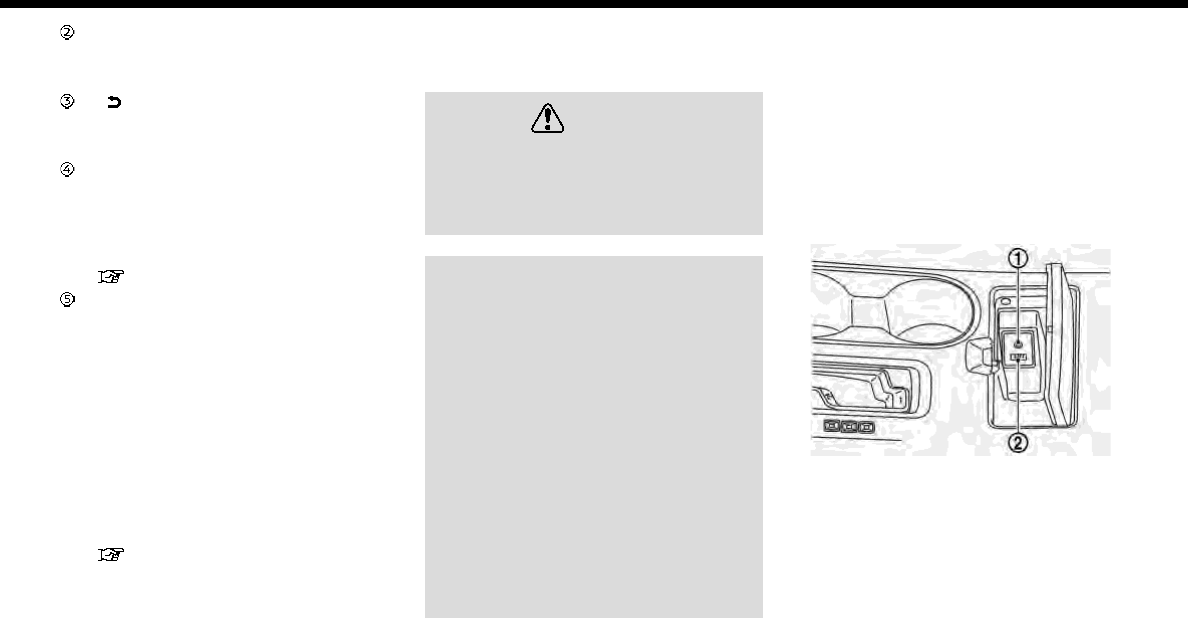
Type A (if so equipped):
USB connection port 1 is located in the
media pocket. USB connection port 2 is
located at the rear of the center console
box. The AUX input jack is located in the
media pocket.
Media pocket
2-12
Rear of center console box
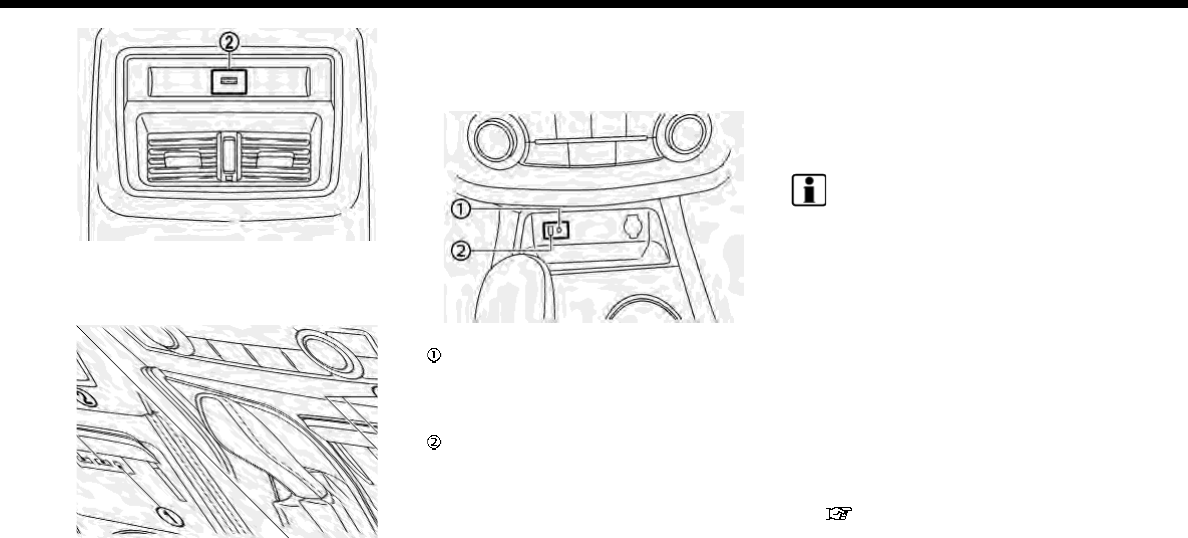
Type B (if so equipped):
Two USB connection ports and the AUX
input jack are located in the media pocket.
Media pocket
Type C (if so equipped):
USB connection port and the AUX input
jack are located on the lower part of the
instrument panel.
USB connection port and AUX input jack
AUX (Auxiliary) input jack:
Connect an audio player that accepts
a 1/8 in (3.5 mm) TRS connector (such
as an MP3 player etc.) to play music.
USB connection port 1, USB connec-
tion port 2 (if so equipped):
Connect a compatible device to play
media from an iPod, iPhone or a USB
memory device.
For models with two USB connection
ports:
The iPhone or the Android phone
must be connected to USB connec-
tion port 1 to be used for Apple Car-
Play and Android Auto.
USB connection port 1 is located in the
media pocket.
Type A: front side port
Type B: left side port
INFO:
.Refer to your AUX and USB device
manufacturer’s owner information re-
garding the proper use and care of the
device.
.Cables made by Apple Inc. should be
used to connect electronic devices
marketed by Apple Inc.
.Models with two USB connection
ports:
One USB memory device or one iPod
can be operated by the voice recogni-
tion system. When two USB memory
devices are connected, only one of the
devices can be operated by the voice
recognition system.
“Voice recognition settings”
(page 7-23)
2. Getting started
2-13
2. Getting started
STARTING SYSTEM
The system starts when the ignition
switch is placed in the ACC or ON position.
START-UP SCREEN
The start-up screen is displayed when the
ignition switch is placed in the ACC or ON
position.
Models with NissanConnect
SM
Services:
After an animated start-up screen is
displayed, a message screen will be dis-
played. Touch [OK] after reading and
agreeing to the message displayed on
the screen. If you do not agree to the
message, some of the functions on the
system will be disabled.
NOTE:
Do not keep the system running with
the engine or the hybrid system
stopped. Doing so may discharge the
vehicle battery (12V battery). When you
use the system, always keep the engine
or the hybrid system running.
BASIC OPERATION
The system can be operated with the
touch panel as well as switches on the
control panel, steering wheel and the
Display Commander (if so equipped).
This manual mainly describes the touch
panel operation.
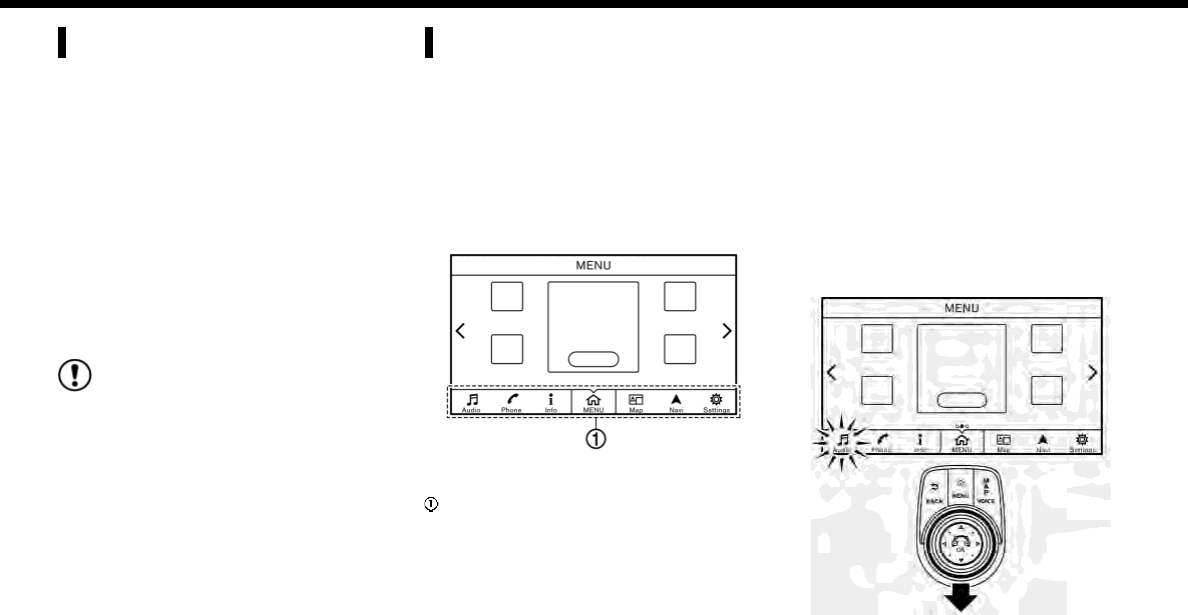
SELECTING MENU FROM LAUNCH
BAR
Various system functions can be accessed
by touching the items on the Launch Bar
which is displayed on most of the main
menu screens. (The Launch Bar does not
appear on some screens such as scrolled
map screen, keyboard screen, etc.)
Touch the keys on the Launch Bar to
display the corresponding menu screens.
The following menus are available on the
Launch Bar.
.[Audio]
.[Phone]
.[Info]
.[MENU]
.[Map]
.[Navi]
.[Settings]
Launch Bar operation with Display Com-
mander (if so equipped):
2-14
Sliding the slide switch backwards will
enable the center dial operation of the
Launch Bar. Slide the switch forward to
return to operate Shortcuts with the
center dial.
Audio
Touching [Audio] on the Launch Bar will
display the audio screen. When [Audio] is
touched while the audio screen is dis-
played, the audio source menu screen will
be displayed.
“Selecting audio source” (page 3-14)
INFO:
Pushing <AUDIO> will also display the
audio screen.
Phone
Touching [Phone] on the Launch Bar will
display the phone menu screen.
INFO:
Models with <>:
.Pushing <>on the steering wheel
will also display the phone menu
screen.
“4. Hands-Free Phone”
Models with <>:
.Pushing and holding <>on the
steering wheel will also display the
phone menu screen.
“4. Hands-Free Phone”
Info
Touching [Info] on the Launch Bar will
display the information menu screen.
Various information can be accessed and
viewed from the information menu
screen.
“Information menu” (page 5-2)
MENU
Touching [MENU] on the Launch Bar will
display the center page of the HOME
MENU screen.
The HOME MENU screen consists of three
pages which can be personalized by
displaying preferred Shortcuts/Widgets.
“How to view and operate HOME
MENU screen” (page 2-19)
INFO:
Pushing <MENU> will also display the
HOME MENU screen.
Map
Touching [Map] on the Launch Bar will
display the map of the current vehicle
location.
INFO:
Pushing <MAP> will also display the map
screen.
“Displaying current vehicle location”
(page 6-3)
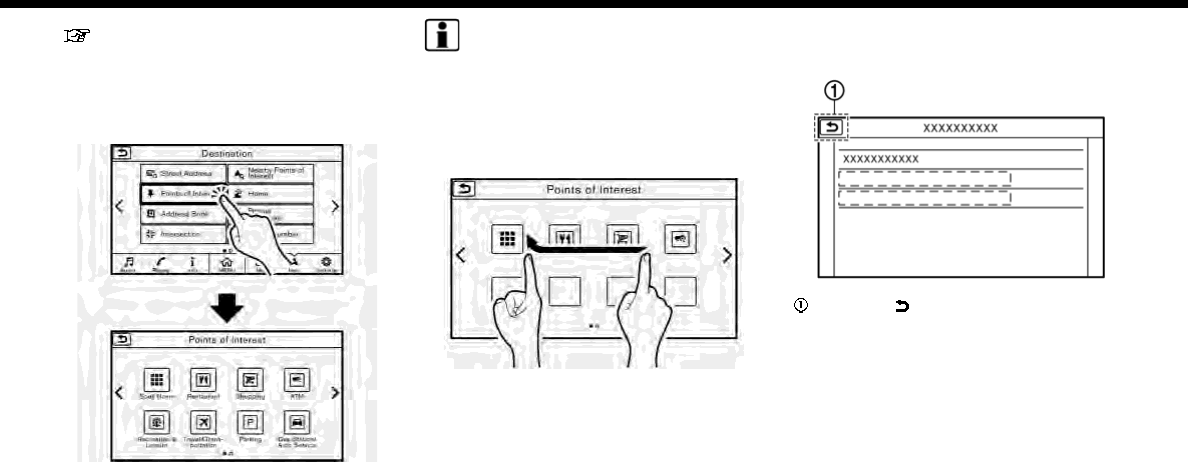
Navi
Touching [Navi] on the Launch Bar will
display the destination setting screen or
the route menu screen, depending on
whether a route is set for route guidance.
When a route is not set, menus used to set
destination for route guidance can be
accessed from this screen.
“Setting destination” (page 6-14)
When a route is set, menus for route
information and route editing are dis-
played on this screen.
“Route menu” (page 6-34)
Settings
Touching [Settings] on the Launch Bar will
display the setting menu screen.
Settings for the various functions in the
system can be changed from this screen.
2. Getting started
2-15
2. Getting started
“Settings menu” (page 2-23)
TOUCH PANEL OPERATION
The system can be controlled mainly by
the touch panel operation.
.Touch
Select a key on the screen to select the
item and to display the corresponding
screen.
INFO:
Some keys function differently depending
on whether the key is touched briefly or
when it is being touched and held for a
few seconds.
.Swipe/Flick
Menu screen pages will skip to the
next page when swiped/flicked hori-
zontally.
Some of the list screens can also be
scrolled by swiping/flicking on the
screen vertically.
MAIN SCREEN OPERATIONS
.Displaying previous screen
Touch [ ] to return to the screen
displayed previously.
2-16

.Horizontal scrolling
Touch [<] to scroll to the previous
page.
Touch [>] to scroll to the next page.
Indicates the position of the currently
displayed page.
Page scrolling with Display Com-
mander (if so equipped):
Slide the slide switch leftward to scroll
to the previous page. Slide the slide
switch rightward to scroll to the next
page.
.Vertical scrolling
Touch [ ]or[ ] to scroll the
message or list one item at a time.
Touch [ ]or[ ] to skip to the next
page.
Indicates the total number of items in
the list and the entry number of the
selected item.
2. Getting started
2-17
2. Getting started
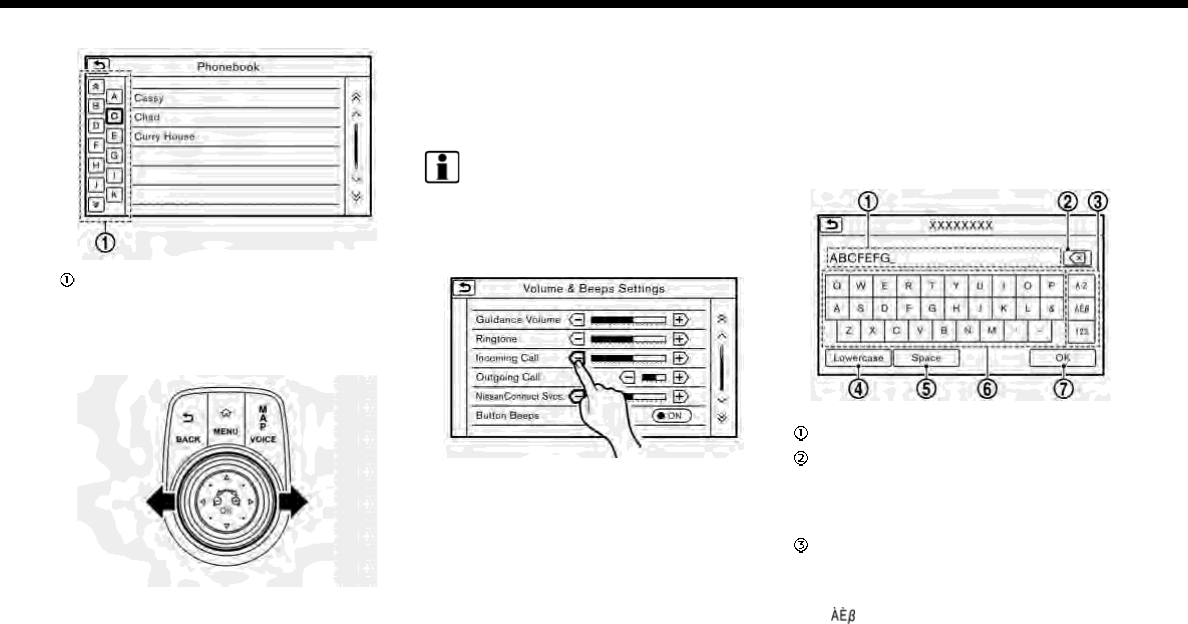
.Scrolling list by selecting alphabet
Touch one of the alphabetical keys to
scroll the list to the section of the list
that begins with the letter selected.
Alphabetical scrolling with Display
Commander (if so equipped):
To operate the alphabetical keys for
alphabetical scrolling with the Display
Commander, slide the slide switch to
the left so that the alphabetical keys
can be selected by rotating the center
dial. Slide the slide switch rightward to
return to operate the list.
INFO:
Depending on the screens, swiping on the
touch screen can scroll pages vertically or
horizontally.
ADJUSTING SETTINGS
Touch adjustment keys, such as [-]/[+],
etc., to adjust each item. Each time a key is
touched, the indicator moves along the
bar.
For items with [ON] indicator, touch the
menu item to turn on/off the setting. The
indicator light will turn on when the
setting is turned on.
HOW TO INPUT LETTERS AND
NUMBERS
Basic operations to enter letters and
numbers are explained here.
Character and number input screens vary
depending on the conditions.
Alphabet input screen
Example
Entered characters are displayed.
Touch to delete the last character
entered.
Touch and hold to delete all the
characters entered.
Touch to change the type of key-
board.
[A-Z]: Displays alphabet input screen.
[]: Displays symbol input screen.
2-18
[123]: Displays number input screen.
Touch to switch between the upper-
case and lowercase character input
screen.
Touch to enter a space.
Touch to enter a character.
Touch to confirm the entry.
INFO:
.Push <BACK> briefly to delete the last
character entered. Push and hold the
button to delete all the characters
entered.
.For Mexico:
Searching with two or more words is
possible by touching [AND] between
keywords.
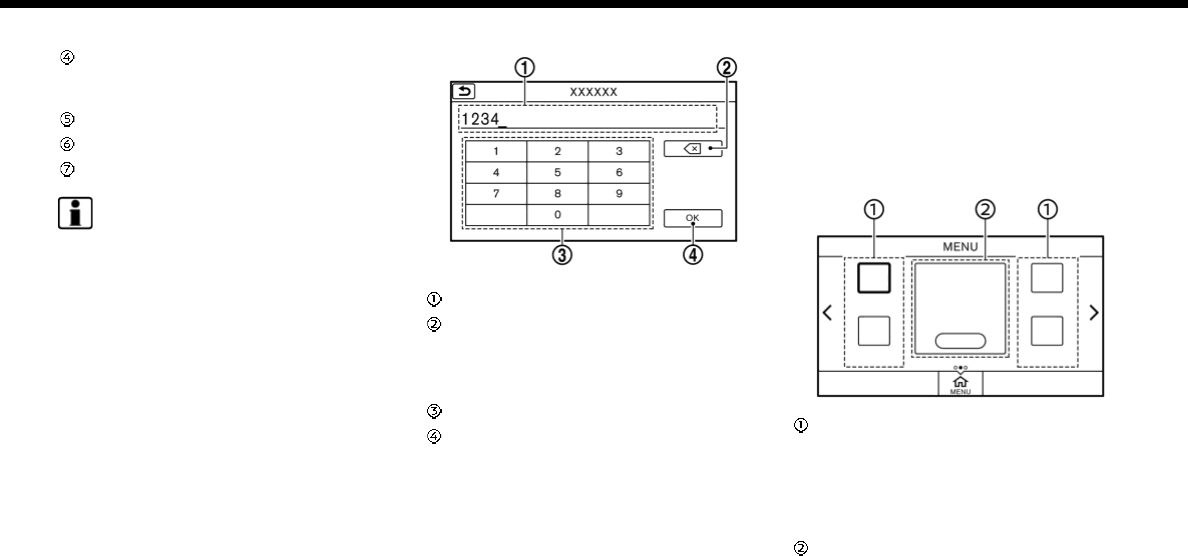
Number input screen
Example
Entered characters are displayed.
Touch to delete the last number
entered.
Touch and hold to delete all the
characters entered.
Touch to enter a number.
Touch to confirm the entry.
HOW TO VIEW AND OPERATE
HOME MENU SCREEN
Push <MENU> or touch [MENU] on the
Launch Bar to display the HOME MENU
screen.
On the HOME MENU screen which consists
of 3 pages, preferred Shortcuts and Wid-
gets can be laid out.
Shortcut icons:
Icons for frequently used menu items
can be placed on the HOME MENU
screens as Shortcuts. Shortcuts of
navigation, information, phone, audio
and setting menus are available.
Widget:
Useful information such as audio,
weather, clock, etc. can be displayed
as Widgets. Depending on the con-
2. Getting started
2-19

2. Getting started
tents, keys in the box can be touched
for operations.
INFO:
The HOME MENU screen can be edited.
“Customizing HOME MENU screen”
(page 2-21)
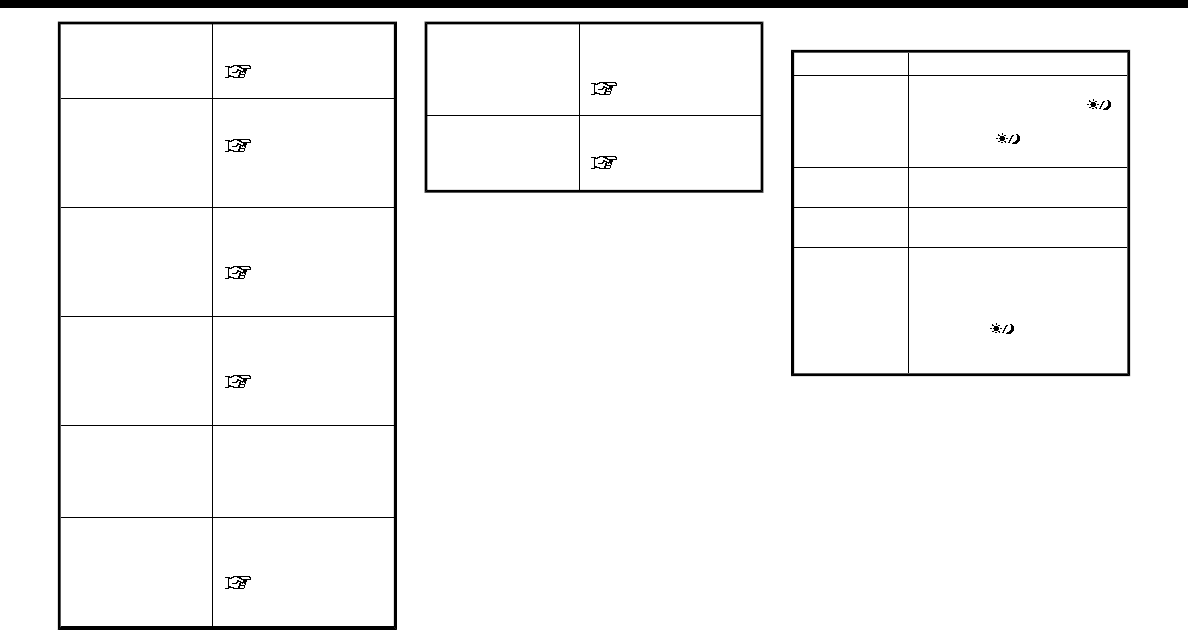
Default menus:
The following Shortcuts and Widgets are
set to be displayed as default on the
HOME MENU screen.
Available Shortcuts and Widgets may vary
depending on models and specifications.
For U.S. and Canada
Shortcuts/Widgets Content
[Home] Page 6-21
[Smartphone Con-
nection]
Displayed when
neither iPhone nor
Android phone is
connected.
[Apple CarPlay]
*1
Page 5-20
[Android Auto]
*2
Page 5-23
[Previous Destina-
tions]
Page 6-22
[Call History] Page 4-4
[Audio Information] Page 3-14
[SXM Traffic] Page 5-2
[SXM Fuel Prices] Page 5-2
[SXM Sports] Page 5-2
[SXM Stocks] Page 5-2
[SXM Weather] Page 5-2
[Edit Menu] Page 2-21
[Digital Clock] Digital clock is dis-
played.
*1: Displayed when iPhone is connected.
*2: Displayed when Android phone is
connected.
For Mexico
Shortcuts/Widgets Content
[Home] Page 6-21
[Smartphone Con-
nection]
Displayed when
neither iPhone nor
Android phone is
connected.
[Apple CarPlay]
*1
Page 5-20
[Android Auto]
*2
Page 5-23
[Previous Destina-
tions]
Page 6-22
[Call History] Page 4-4
[Audio Information] Page 3-14
[Edit Menu] Page 2-21
[Digital Clock] Digital clock is dis-
played.
*1: Displayed when iPhone is connected.
*2: Displayed when Android phone is
connected.
INFO:
.Default menus on the HOME MENU
screen are subject to change without
notice.
.A SiriusXM Travel Link or SiriusXM
Traffic subscription is necessary to
receive SXM information services (for
2-20
U.S. and Canada).
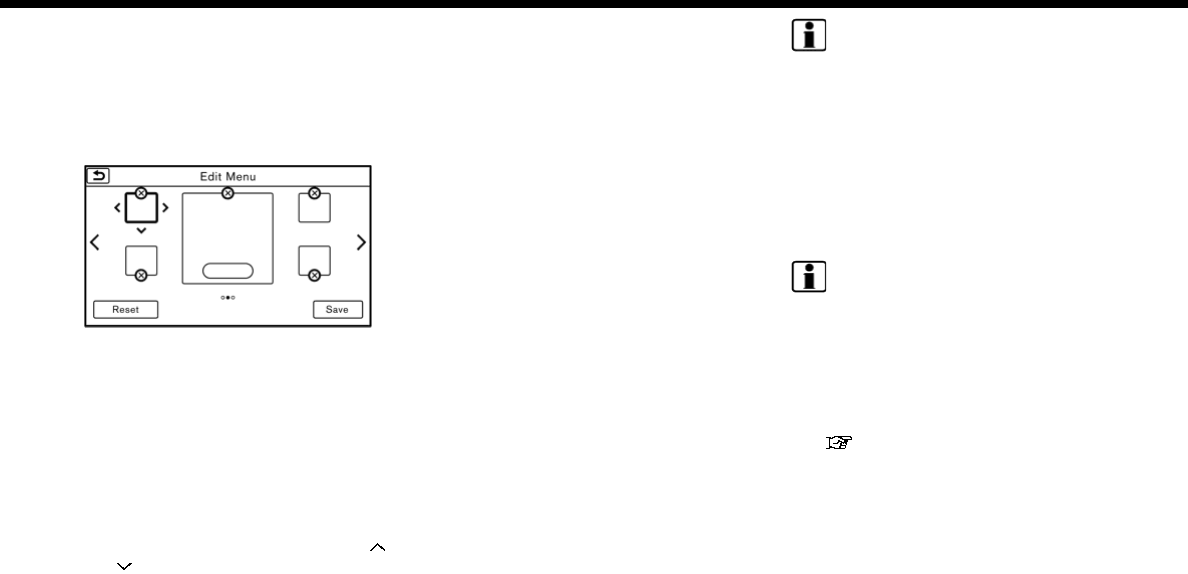
Customizing HOME MENU screen
The HOME MENU screen can be persona-
lized by selecting which Shortcuts and
Widgets to be displayed and where to
place them on the screen.
1. Push and hold <MENU> or touch and
hold [MENU] while the HOME MENU
screen is displayed.
2. Edit the Shortcuts and the Widgets on
the Edit Home Menu screen.
3. Touch [Save] to apply the change.
Following editing operations are available.
Moving an item:
1. Touch a Widget or a Shortcut icon you
wish to move. The arrows [ < ], [ > ], [ ]
or [ ] will appear by the icon. (Only [ <
] and [ > ] are available for the Widget.)
2. Touch the arrows to move the icon.
Adding an item:
1. Touch a blank box for Widget/Short-
cut.
2. Touch [ + ] displayed by the box.
3. Touch [Shortcut Icons] or [Widgets]
and select a preferred item you wish
to add.
.Available Shortcut categories
— [Audio Source]
— [Phone]
— [Info]
— [Navigation]
— [Settings]
.Available Widgets
— [Audio Information]
— [Current Conditions] (for U.S. and
Canada)
— [5-Day Weather Forecast] (for U.S.
and Canada)
— [Digital Clock]
— [Analog Clock]
INFO:
To add a Widget, 4 open Shortcut spots
are needed.
Deleting an item:
Touch [ X ] on the Shortcut or Widget you
wish to delete. Touch [Delete] to confirm.
Setting layout to default:
Touch [Reset] on the Edit Home Menu
screen. Touch [Yes] to confirm.
INFO:
.Touching [Settings] on the Launch Bar
and touching [Edit Home Menu] will
also display the Edit Home Menu
screen.
.Access to the SiriusXM Travel Link
services requires a SiriusXM subscrip-
tion (for U.S. and Canada).
“SiriusXM Travel Link (for U.S. and
Canada)” (page 5-18)
.Available Shortcuts/Widgets and the
default menus on the HOME MENU
screen are subject to change without
notice.
2. Getting started
2-21

2. Getting started
FUNCTIONS DISABLED WHILE DRIVING
Example
To ensure safe driving, some functions
cannot be operated or have limited op-
eration while the vehicle is in motion.
The on-screen text and keys for these
restricted functions will be “grayed-out” or
muted and cannot be selected while
driving. In some cases, a screen message
will appear indicating a restricted func-
tion.
Restricted functions while driving include:
.Character (letter and number) input
screen
.Scrolling and viewing of certain list
screens
.Displaying detail information and
touching item on some information
screen
.Adding/editing home location, ad-
dress book entries and current route
.Registering cellular phones
.Connecting Bluetooth® devices for the
first time
.Making a call by dial number and
handset phonebook
.Setting phone, NissanConnect
SM
Ser-
vices (if so equipped), Bluetooth® func-
tions, etc.
2-22

.Various other settings
These functions will become available
again when the vehicle is not in motion.
Some of the destination setting functions
that become unavailable while driving can
be operated by voice recognition system.
Available voice commands may differ
depending on the language setting.
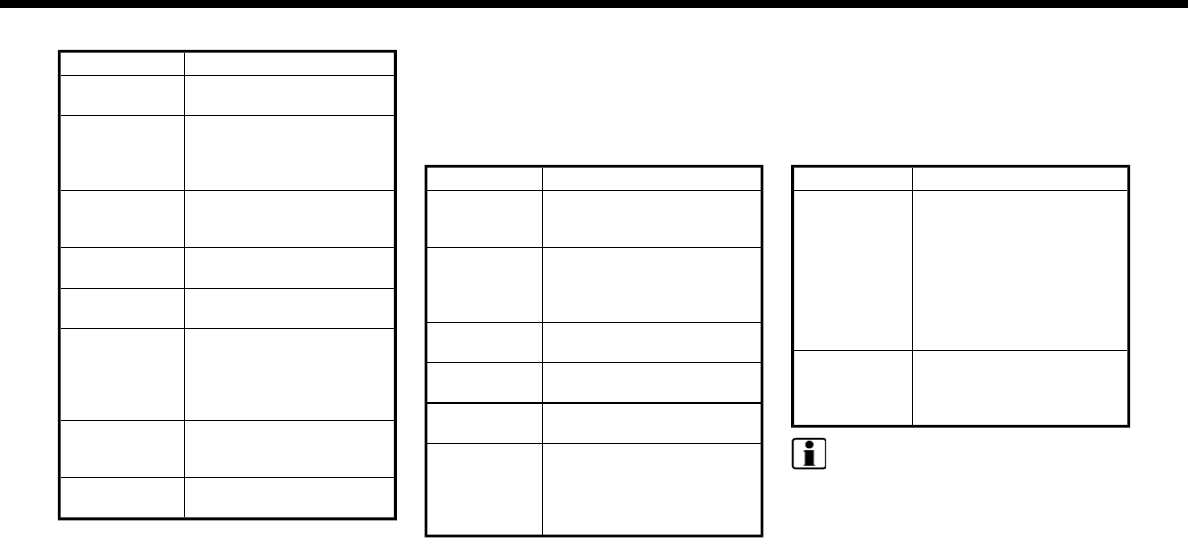
SYSTEM SETTINGS
The system settings can be changed for
convenience.
SETTINGS MENU
Touch [Settings] on the Launch Bar and
touch a setting item you wish to adjust.
Available setting items may vary depend-
ing on models and specifications.
Available setting items
Setting item Result
[Bluetooth] Displays the Blue-
tooth® Audio and
Phone setting screen.
“Bluetooth® set-
tings” (page 2-26)
[Phone] Displays the Phone &
Mail setting screen.
“Phone and text
message assis-
tant settings”
(page 4-10)
[Navigation] Displays the naviga-
tion settings screen.
“Navigation set-
tings” (page 6-58)
[Sound] Displays the audio
settings screen.
“Audio settings”
(page 3-37)
[Display] Displays the display
settings screen.
“Display settings”
(page 2-24)
[Volume & Beeps] Displays the volume
adjustment screen.
“Volume and
Beeps settings”
(page 2-24)
2. Getting started
2-23
2. Getting started
[Clock] Displays the clock ad-
justment screen.
“Clock settings”
(page 2-25)
[Edit Home Menu] Displays the menu
editing screen.
“Customizing
HOME MENU
screen”
(page 2-21)
[NissanConnect
Services]
Displays the Nissan-
Connect
SM
Services
settings screen.
“NissanConnect-
SM
Services set-
tings” (page 5-17)
[Voice Recogni-
tion]
Displays the voice re-
cognition system set-
tings screen.
“Voice recogni-
tion settings”
(page 7-23)
[Camera] Displays the Camera
setting screen.
See vehicle Owner’s
Manual for details of
the monitor system.
[Language &
Units]
Displays the Language
and Units settings
screen.
“Language and
unit settings”
(page 2-25)
[Apple CarPlay
Settings]
Displays the Apple
CarPlay setting
screen.
“Apple CarPlay ”
(page 5-20)
[Android Auto Set-
tings]
Displays the Android
Auto setting screen.
“Android Auto”
(page 5-23)
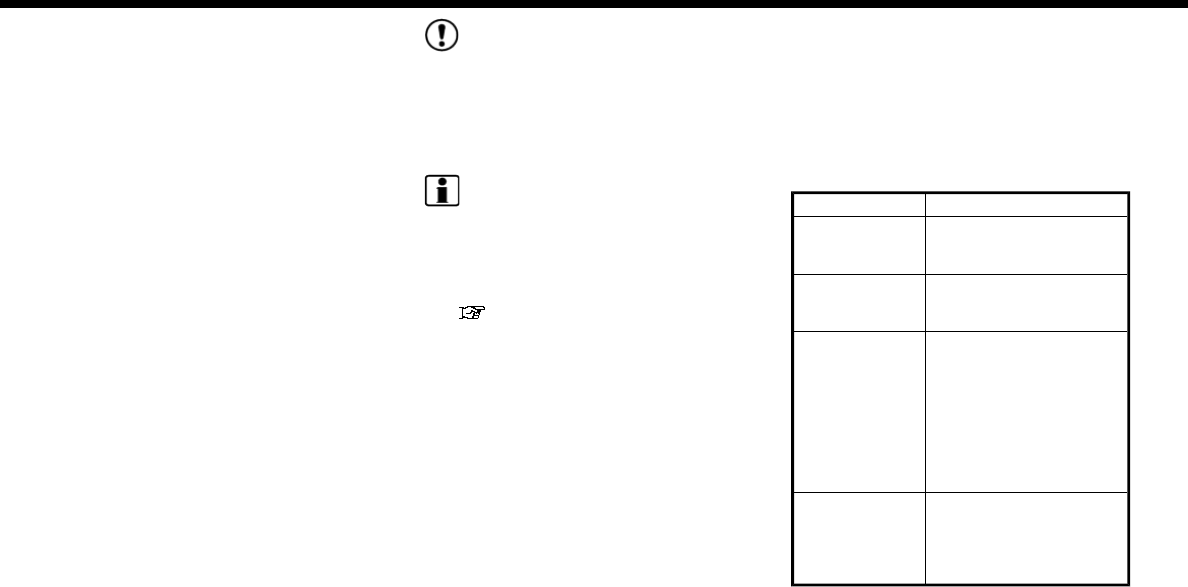
DISPLAY SETTINGS
Menu items to adjust display settings are
available.
1. Touch [Settings] on the Launch Bar.
2. Touch [Display].
3. Touch a preferred adjustment item
and adjust to the preferred setting.
Available setting items
Setting item Action
[Display] Turns the screen off.
Pushing and holding <>
will also turn off the screen.
Push the <>to turn the
screen back on.
[Brightness] Adjusts the brightness of
the display.
[Contrast] Adjusts the contrast of the
display.
[Background
Color]
Changes the background
color of the map screen.
Select the color mode from
[Day] and [Night].
Pushing <>will also
change the background
color.
VOLUME AND BEEPS SETTINGS
The volume of various functions including
audio, phone, navigation voice guidance,
and system beeps can be adjusted.
1. Touch [Settings] on the Launch Bar.
2. Touch [Volume & Beeps].
Available setting items may vary depend-
ing on models and specifications.
2-24
Available setting items
Setting item Action
[Audio Vo-
lume]
Adjusts the volume level
of the audio system.
[Guidance Vo-
lume]
Adjusts the volume level
of the guidance voice and
the voice recognition sys-
tem voice responses.
[Ringtone] Adjusts the volume level
of the ringtone of incom-
ing calls.
[Incoming
Call/Siri]
Adjusts the volume level
of the incoming call or Siri.
[Outgoing Call] Adjusts the outgoing call
volume.
[NissanCon-
nect Svcs.]
Adjusts the volume level
of “text-to-speech” for
text messaging and Nis-
sanConnect
SM
Services
announcements.
[Button Beeps] Turns on/off the button
beep sound and alarm for
a prohibited operations.
[Guidance
Voice]
Turns on/off the voice
guidance.
CLOCK SETTINGS
Clock settings of the system can be
changed.
1. Touch [Settings] on the Launch Bar.
2. Touch [Clock].
Available setting items
Setting item Action
[On-screen
Clock]
Sets the clock display on/
off. When this item is on,
the clock display appears.
[Clock For-
mat (24h)]
Turns on/off the 24-hour
display mode. When turned
off, the clock is set to the
12-hour mode.
[Offset (hour)] Adjusts the offset value
(hour).
[Offset (min)] Adjusts the offset value
(minutes).
[Daylight
Savings Time]
Turns on/off the daylight
saving time setting.
[Time Zone] Select an appropriate time
zone from the list. When
selecting [Auto], the system
selects the time zone
automatically.
LANGUAGE AND UNIT SETTINGS
This changes the display language and
measurement unit used in the system.
1. Touch [Settings] on the Launch Bar.
2. Touch [Language & Units].
Available setting items
Setting item Action
[Select Lan-
guage]
Selects the system lan-
guage. The language
setting is applied to the
touch screen display, voice
announcements, the voice
recognition system.
It can also be applied to
the vehicle information
display.
[Select Units] Selects the system unit.
The unit setting can also
be applied to the informa-
tion vehicle display.
INFO:
Do not change the position of the ignition
switch while changing the language.
If the selected language is also supported
by the vehicle information display, a con-
firmation message asking if you would like
to also change the language for the
vehicle information display is displayed.
Select [Yes] to change the language on
2. Getting started
2-25
2. Getting started
the vehicle information display.
CONNECTING BLUETOOTH® DE-
VICE
Your vehicle is equipped with the Blue-
tooth® Hands-Free Phone System and
Bluetooth® audio device. If you are an
owner of a compatible Bluetooth® en-
abled cellular phone or Bluetooth® audio
device, you can set up the wireless con-
nection between your cellular phone and
the in-vehicle phone module or Blue-
tooth® audio and in-vehicle audio module.
With Bluetooth® wireless technology, you
can make or receive a telephone call with
your cellular phone in your pocket and
listen to Bluetooth® audio.
Connecting cellular phone/audio
device
To use the Bluetooth® device with the in-
vehicle system for the first time, the device
connection operation is required.
1. Touch [Settings] on the Launch Bar.
2. Touch [Bluetooth] and touch [Connect
Device]. A message is displayed.
3. Touch [Yes] to connect a cellular
phone. Touch [No] to connect an audio
device and operate as guided by the
system. (Operations may differ de-
pending on the device.)
NOTE:
Some cellular phones or other devices
may cause interference or a buzzing
noise to come from the audio system
speakers. Storing the device in a differ-
ent location may reduce or eliminate the
noise.
INFO:
.Up to 5 Bluetooth® devices can be
connected. If 5 devices are already
connected, one of the devices must
first be deleted before another device
can be connected.
“Bluetooth® settings” (page 2-26)
.The pairing procedure of the cellular
phone varies according to each cellu-
lar phone. See the cellular phone Own-
er’s Manual for the details.
.For U.S. and Canada:
Visit www.nissanusa.com/bluetooth/
for a recommended Bluetooth®
device.
.For Mexico:
Consult a NISSAN dealer for informa-
tion regarding Bluetooth® device con-
nection to your vehicle.
Bluetooth® settings
The Bluetooth® settings can be changed
according to your preference.
1. Touch [Settings] on the Launch Bar.
2. Touch [Bluetooth].
3. Touch a preferred item.
Available setting items
Setting item Action
[Bluetooth] Turns the Bluetooth®
connection to the vehicle
on/off.
[Connect De-
vice]
Bluetooth® devices can
be connected to the in-
vehicle system.
[Select BT De-
vice]
Registered Bluetooth®
devices are shown on the
list. Select a device you
wish to use from the list.
You can also edit the
name, delete registered
devices or display infor-
mation of the registered
device.
[Edit Bluetooth
Information]
The in-vehicle system
name and the PIN code
can be changed. A device
address can also be
viewed.
2-26

INFO:
From [Edit Bluetooth Information], the
device name that appears on the screen
can be changed and be renamed from the
name set as default to the preferred name
(such as “Steve’s Car” for example).
2. Getting started
2-27

2. Getting started
MEMO
2-28

3 Audio system
Audio operation precautions .............................................. 3-2
Radio ................................................................................................ 3-2
Compact Disc (CD) player ................................................ 3-4
USB (Universal Serial Bus) connection port....... 3-5
Compressed Audio Files (MP3/WMA/AAC)......... 3-7
Bluetooth® streaming audio ......................................... 3-9
Names and functions of audio
control buttons ........................................................................... 3-10
Audio main buttons (for U.S. and Canada) ...... 3-10
Audio main buttons (for Mexico) ............................ 3-12
Steering wheel mounted audio control
buttons (for U.S. and Canada) ................................... 3-13
Steering wheel mounted audio control
buttons (for Mexico) .......................................................... 3-14
Audio operations ....................................................................... 3-14
Audio main operation ................................................... 3-14
Radio........................................................................................... 3-15
Compact Disc (CD) player .......................................... 3-21
USB memory device player ....................................... 3-24
iPod player ............................................................................. 3-28
Bluetooth® audio .............................................................. 3-32
Auxiliary (AUX) devices .................................................. 3-35
Audio settings.............................................................................. 3-37
Audio adjustments when map, audio or
HOME MENU is displayed............................................ 3-38
CD/USB memory device care and cleaning......... 3-38
CD ................................................................................................. 3-38
USB memory device ....................................................... 3-39
3. Audio system
AUDIO OPERATION PRECAU-
TIONS
CAUTION
.Operate the audio system only
when the vehicle engine or the
hybrid system is running. Operat-
ing the audio system for extended
periods of time with the engine or
the hybrid system turned off can
discharge the vehicle battery.
.Do not allow the system to get wet.
Excessive moisture such as spilled
liquids may cause the system to
malfunction.
RADIO
Place the ignition switch in the ACC or ON
position before turning on the radio. If you
listen to the radio with the engine or the
hybrid system not running, the ignition
switch should be placed in the ACC
position.
Radio reception is affected by station
signal strength, distance from radio trans-
mitter, buildings, bridges, mountains and
other external influences. Intermittent
changes in reception quality normally
are caused by these external influences.
Using a cellular phone in or near the
vehicle may influence radio reception
quality.
Radio reception
Your radio system is equipped with state-
of-the-art electronic circuits to enhance
radio reception. These circuits are de-
signed to extend reception range, and to
enhance the quality of that reception.
However there are some general charac-
teristics of both FM and AM radio signals
that can affect radio reception quality in a
moving vehicle, even when the finest
equipment is used. These characteristics
are completely normal in a given recep-
tion area, and do not indicate any mal-
function in your radio system.
Reception conditions will constantly
change because of vehicle movement.
Buildings, terrain, signal distance and
interference from other vehicles can work
against ideal reception. Described below
are some of the factors that can affect
your radio reception.
Some cellular phones or other devices
may cause interference or a buzzing noise
to come from the audio system speakers.
Storing the device in a different location
may reduce or eliminate the noise.
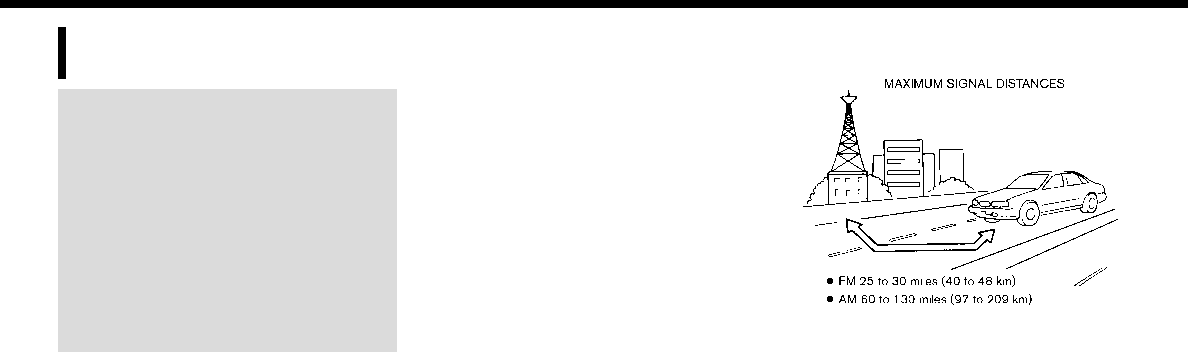
FM radio reception
Range: the FM range is normally limited to
25 to 30 miles (40 to 48 km), with
monaural (single station) FM having
slightly more range than stereo FM. Ex-
ternal influences may sometimes interfere
with FM station reception even if the FM
station is within 25 miles (40 km). The
strength of the FM signal is directly related
to the distance between the transmitter
and receiver. FM signals follow a line-of-
sight path, exhibiting many of the same
characteristics as light. For example they
will reflect off objects.
Fade and drift: As your vehicle moves
away from a station transmitter, the
3-2

signals will tend to fade and/or drift.
Static and flutter: During signal interfer-
ence from buildings, large hills or due to
antenna position, usually in conjunction
with increased distance from the station
transmitter, static or flutter can be heard.
This can be reduced by lowering the treble
setting to reduce the treble response.
Multipath reception: Because of the re-
flective characteristics of FM signals, di-
rect and reflected signals reach the
receiver at the same time. The signals
may cancel each other, resulting in mo-
mentary flutter or loss of sound.
AM radio reception
AM signals, because of their low fre-
quency, can bend around objects and skip
along the ground. In addition, the signals
can bounce off the ionosphere and be
bent back to earth. Because of these
characteristics, AM signals are also sub-
ject to interference as they travel from
transmitter to receiver.
Fading: Occurs while the vehicle is passing
through freeway underpasses or in areas
with many tall buildings. It can also occur
for several seconds during ionospheric
turbulence even in areas where no ob-
stacles exist.
Static: Caused by thunderstorms, electri-
cal power lines, electric signs and even
traffic lights.
HD Radio
TM
Technology reception
(for U.S.)
HD Radio Technology reception needs to
be activated to receive HD Radio broad-
casts.
“Radio Menu” (page 3-18)
This enables you to receive radio broad-
casts digitally (where available), providing
a better quality sound with clear recep-
tion. When this feature is not activated or
HD Radio broadcasts are not available,
you will receive analog radio (AM/FM)
broadcasts.
Satellite radio reception (for U.S.
and Canada)
When the satellite radio is used for the first
time or the battery has been replaced, the
satellite radio may not work properly. This
is not a malfunction. Wait more than 10
minutes with the satellite radio ON and
the vehicle outside of any metal or large
building for the satellite radio to receive all
of the necessary data.
SiriusXM services require a subscription
after trial period and are sold separately
or as a package. The satellite service is
available only in the 48 contiguous USA
and DC. SiriusXM satellite service is also
available in Canada; see www.siriusxm.ca.
The satellite radio performance may be
affected if cargo carried on the roof blocks
the satellite radio signal.
If possible, do not put cargo near the
satellite antenna.
A buildup of ice on the satellite radio
antenna can affect satellite radio perfor-
mance. Remove the ice to restore satellite
radio reception.
3. Audio system
3-3

3. Audio system
COMPACT DISC (CD) PLAYER
.Do not force a compact disc into the
CD insert slot. This could damage the
CD and/or CD player.
.Trying to load a CD with the CD door
closed could damage the CD and/or
CD player.
.During cold weather or rainy days, the
player may malfunction due to the
humidity. If this occurs, remove the CD
and dehumidify or ventilate the player
completely.
.The player may skip while driving on
rough roads.
.The CD player sometimes cannot
function when the passenger com-
partment temperature is extremely
high. Decrease the temperature before
use.
.Only use high quality 4.7 in (12 cm)
round discs that have the “COMPACT
disc DIGITAL AUDIO” logo on the disc or
packaging.
.Do not expose the CD to direct sun-
light.
.CDs that are of poor quality, dirty,
scratched, covered with fingerprints
or that have pin holes may not work
properly.
.The following CDs may not work
properly:
— Copy control compact discs (CCCD)
— Recordable compact discs (CD-R)
— Rewritable compact discs (CD-RW)
.Do not use the following CDs as they
may cause the CD player to malfunc-
tion.
— 3.1 in (8 cm) discs
— CDs that are not round
— CDs with a paper label
— CDs that are warped, scratched, or
have abnormal edges
.This audio system can only play pre-
recorded CDs. It has no capabilities to
record or burn CDs.
.If the CD cannot be played, one of the
following messages will be displayed.
Disc read error:
Indicates a CLV, Focus, TOC or Access
error. Check and reinsert the CD. Make
sure that it is inserted correctly.
Please eject disc:
Indicates a mechanism error. If the CD
can be ejected, eject and reinsert the
CD. If the CD cannot be ejected, it is
recommended you visit a NISSAN deal-
er for service.
Unplayable file:
Indicates that a readable file is not
found on the inserted CD. Check the
data in your CD.
3-4

USB (Universal Serial Bus) CON-
NECTION PORT
WARNING
Do not connect, disconnect or operate
the USB device while driving. Doing so
can be a distraction. If distracted you
could lose control of your vehicle and
cause an accident or serious injury.
CAUTION
.Do not force the USB device into
the USB connection port. Inserting
the USB device tilted or up-side-
down into the port may damage
the port. Make sure that the USB
device is connected correctly into
the USB connection port.
.Do not grab the USB connection
port cover (if so equipped) when
pulling the USB device out of the
port. This could damage the port
and the cover.
.Do not leave the USB cable in a
place where it can be pulled unin-
tentionally. Pulling the cable may
damage the port.
The vehicle is not equipped with a USB
device. USB devices should be purchased
separately as necessary.
This system cannot be used to format
USB devices. To format a USB device, use a
personal computer.
In some states/areas, the USB device for
the front seats plays only sound without
images for regulatory reasons, even when
the vehicle is parked.
This system supports various USB mem-
ory devices, USB hard drives and iPod
players. Some USB devices may not be
supported by this system.
.Partitioned USB devices may not be
played correctly.
.Some characters used in other lan-
guages (Chinese, Japanese, etc.) are
not displayed properly on the display.
Using English language characters
with a USB device is recommended.
General notes for USB use:
Refer to your device manufacturer’s own-
er information regarding the proper care
of the device.
Notes for iPod use:
.Improperly plugging in the iPod may
cause a checkmark to be displayed on
and off (flickering). Always make sure
that the iPod is connected properly.
.Audiobooks may not play in the same
order as they appear on an iPod.
3. Audio system
3-5
3. Audio system
Specification chart for USB
Supported media USB2.0
Supported file systems FAT12, FAT16, FAT32
Folder levels Folder levels: 8, Files via folder: 255, Folders: 512 (including root folder), Files: 8000
Tag information (Song title, Artist name and
Album name)
ID3 tag VER1.0, VER1.1, VER2.2, VER2.3, VER2.4 (MP3 only)
WMA tag (WMA only)
AAC tag (AAC only)
Format Sampling frequency Supported bitrate
MP3 *1 MPEG1 Layer-3 32, 44.1, 48 kHz 32-320 kbps
MPEG2 16, 22.05, 24 kHz 8-160 kbps
WMA *2 8, 11.025, 16 ,22.05, 32, 44.1, 48 kHz 12-192 kbps
AAC (MPEG4) *3 (Extension “m4a” only) 11.025, 16, 22.05, 32, 44.1, 48 kHz 8-320 kbps
*1 MPEG2.5 is not supported.
*2 WMA7, WMA8, WMA9, WMA9.1, WMA9.2 are supported. (WMA9 Professional, Lossless, Voice are not supported.)
*3 Only AAC files encoded by iTunes are supported. HE-AAC (High-Efficiency) is not supported.
3-6

COMPRESSED AUDIO FILES (MP3/
WMA/AAC)
Explanation of terms
.MP3 — MP3 is short for Moving Pictures
Experts Group Audio Layer 3. MP3 is
the most well-known compressed di-
gital audio file format. This format
allows for near “CD quality” sound,
but at a fraction of the size of normal
audio files. MP3 conversion of an audio
track can reduce the file size by
approximately a 10:1 ratio (Sampling:
44.1 kHz, Bit rate: 128 kbps) with
virtually no perceptible loss in quality.
The compression reduces certain
parts of sound that seem inaudible to
most people.
.WMA — Windows Media Audio (WMA) is
a compressed audio format created by
Microsoft as an alternative to MP3. The
WMA codec offers greater file com-
pression than the MP3 codec, enabling
storage of more digital audio tracks in
the same amount of space when
compared to MP3s at the same level
of quality.
.Bit rate — Bit rate denotes the number
of bits per second used by a digital
music file. The size and quality of a
compressed digital audio file is deter-
mined by the bit rate used when
encoding the file.
.Sampling frequency — Sampling fre-
quency is the rate at which the sam-
ples of a signal are converted from
analog to digital (A/D conversion) per
second.
.Multisession — Multisession is one of
the methods for writing data to media.
Writing data once to the media is
called a single session, and writing
more than once is called a multises-
sion.
.ID3/WMA tag — The ID3/WMA tag is the
part of the encoded MP3 or WMA file
that contains information about the
digital music file such as song title,
artist, album title, encoding bit rate,
track time duration, etc. ID3 tag in-
formation is displayed on the Album/
Artist/Track title line on the display.
.AAC — Advanced Audio Coding (AAC) is
a compressed audio format. AAC of-
fers greater file compression than MP3
and enables music file creation and
storage at the same quality as MP3.
Playback order
.The folder names of folders not con-
taining compressed audio files are not
shown on the display.
.The playback order is the order in
which the files were written by the
writing software, so the files might not
3. Audio system
3-7

3. Audio system
play in the desired order.
.Music playback order of compressed
audio files is as illustrated.
Specification chart for CD
Supported media CD, CD-R, CD-RW
Supported file systems CD, CD-R, CD-RW
Supported ver-
sions*1
MP3
Version MPEG1 Audio Layer3, MPEG2 Audio Layer3
Sampling frequency MPEG1 Audio Layer3: 32kHz, 44.1kHz, 48kHz
MPEG2 Audio Layer3: 16kHz, 22.05kHz, 24kHz
Bit rate MPEG1 Audio Layer3: 32 kbps - 320 kbps
MPEG2 Audio Layer3: 8 kbps - 160 kbps
WMA*2
Version WMA7, WMA8, WMA9, WMA9.1, WMA9.2
Bit rate/Sampling fre-
quency
Bit rate: Ver7, Ver8: 32-192kbps Ver9,Ver9.1,Ver9.2:32-192kbps, VBR
Sampling frequency: Ver7, Ver8:8k/11.025k/16k/22k/32k/44.1k Ver9,Ver9.1,
Ver9.2:8k/11.025k/16k/22k/32k/44.1k/48 kHz
AAC*3 Bit rate/Sampling fre-
quency
Bit rate: 8-256 kbps, VBR
Sampling frequency: 11.025-48kHz
Tag information (Song title, Artist name and Album
name)
ID3 tag VER1.0, VER1.1, VER2.2, VER2.3, VER2.4 (MP3 only)
WMA tag (WMA only)
AAC tag (AAC only)
Folder levels CD, CD-R, CD-RW: Folder levels: 8, Folders: 255 (including root folder), Files: 510 (Max.
255 files for one folder)
Displayable character codes*4 01: SHIFT-JIS, ASCII, ISO-8859-1, UTF-8, UTF-16 BOM, UTF-16 Big Endian, UTF-16 Little
Endian, 02: UNICODE, 03: UTF-16
3-8

*1 Files created with a combination of 48 kHz sampling frequency and 64 kbps bit rate cannot be played.
*2 Protected WMA files (DRM) cannot be played.
*3 Made by iTunes.
*4 Available codes depend on what kind of media, versions and information are going to be displayed.
BLUETOOTH® STREAMING AUDIO
.Some Bluetooth® audio devices may
not be recognized by the in-vehicle
audio system.
.It is necessary to set up the wireless
connection between a compatible
Bluetooth® audio device and the in-
vehicle Bluetooth® module before
using the Bluetooth® streaming audio.
.The Bluetooth® streaming audio may
stop playing when
— receiving a hands-free call.
— checking the connection to the
hands-free phone.
— connecting the hands-free phone or
the audio device.
— downloading the phonebook mem-
ory from the connected cellular
phone.
.Do not place a Bluetooth® audio de-
vice in an area surrounded by metal or
far away from the in-vehicle Blue-
tooth® module to prevent tone quality
degradation and wireless connection
disruption.
.While an audio device is connected
through a Bluetooth® wireless con-
nection, the battery of the device
may discharge quicker than usual.
.This system supports the Bluetooth®
Advanced Audio Distribution Profile
(A2DP) and Audio/Video Remote Con-
trol Profile (AVRCP).
.Wireless LAN (Wi-Fi) and the Blue-
tooth® functions share the same fre-
quency band (2.4 GHz). Using the
Bluetooth® and the wireless LAN func-
tions at the same time may slow down
or disconnect the communication and
cause undesired noise. It is recom-
mended that you turn off the wireless
LAN (Wi-Fi) when using the Bluetooth®
functions.
3. Audio system
3-9
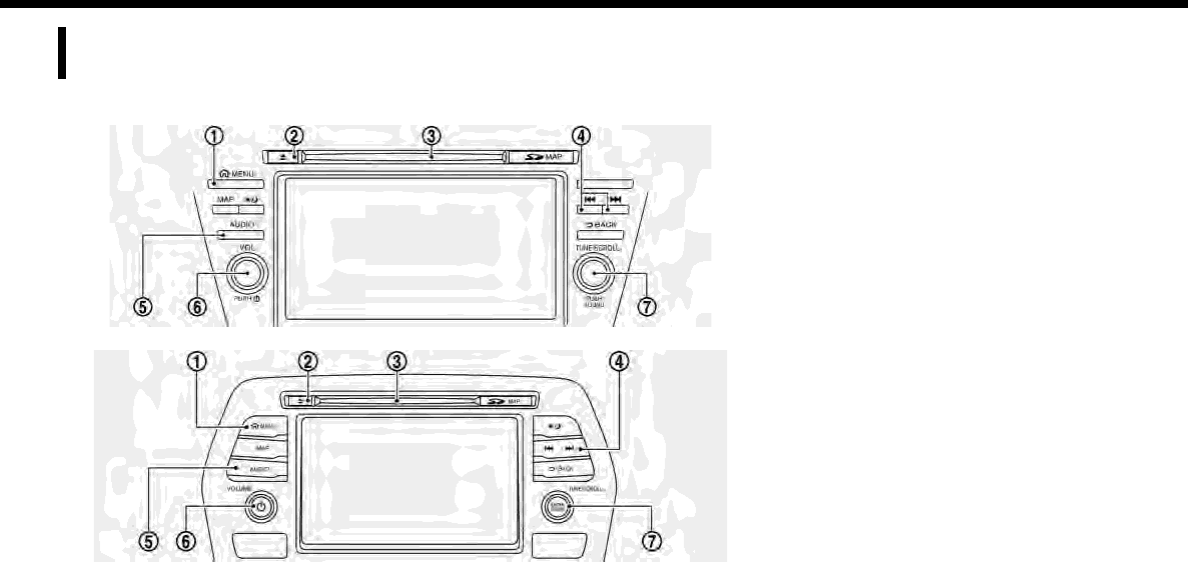
3. Audio system
NAMES AND FUNCTIONS OF
AUDIO CONTROL BUTTONS
AUDIO MAIN BUTTONS (for U.S. and Canada)
Type A (if so equipped)
Type B (if so equipped)
3-10
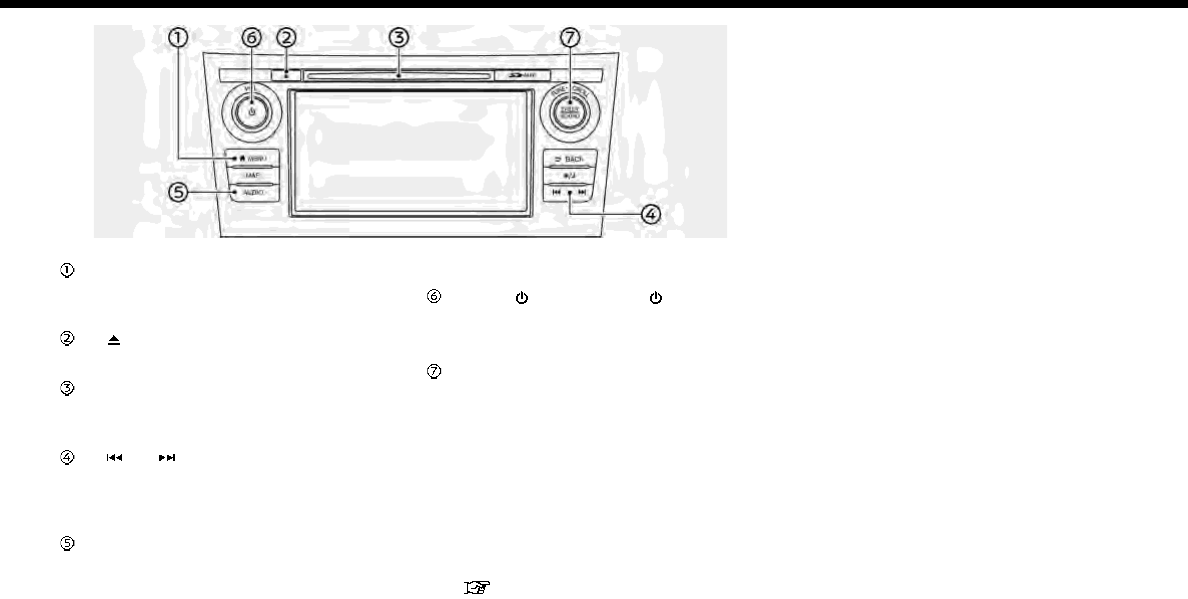
Type C (if so equipped)
<MENU>:
Push this button to go to the menu
screen.
< >:
Push to eject a CD.
CD slot:
Insert a CD with the label side facing
up.
< >/< >:
Selecting and fast-forwarding/re-
winding tracks and radio station/
channel scanning can be performed.
<AUDIO>:
Push to display the audio screen of
the previously selected source.
Push again to display the audio
source list screen.
<VOL/ >/<VOLUME/ >:
Push to turn on/off the audio system.
Turn to adjust the volume.
<TUNE·SCROLL/SOUND>:
Turn to manually tune AM/FM, to
select SiriusXM categories and to
select MP3/WMA/AAC folders. If no
folders are found, tracks will be
skipped.
Push to select the highlighted item
when a menu screen is displayed.
When this button is pushed when no
item on the screen is highlighted, the
audio settings can be changed.
“Audio adjustments when map,
audio or HOME MENU is dis-
played” (page 3-38)
3. Audio system
3-11
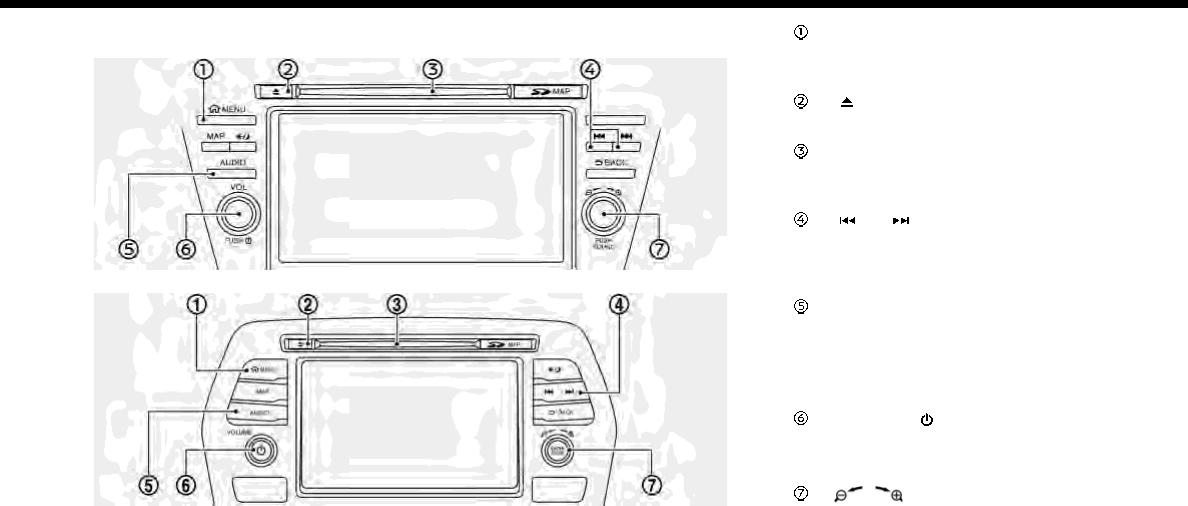
3. Audio system
AUDIO MAIN BUTTONS (for Mexico)
Type A (if so equipped)
Type B (if so equipped)
<MENU>:
Push this button to go to the menu
screen.
< >:
Push to eject a CD.
CD slot:
Insert a CD with the label side facing
up.
< >/< >:
Selecting and fast-forwarding/re-
winding tracks and radio station
scanning can be performed.
<AUDIO>:
Push to display the audio screen of
the previously selected source.
Push again to display the audio
source list screen.
<VOLUME/ >:
Push to turn on/off the audio system.
Turn to adjust the volume.
< /SOUND>:
Turn the dial to scroll the highlighted
item.
Push to select the highlighted item
when a menu screen is displayed.
When this button is pushed when no
3-12
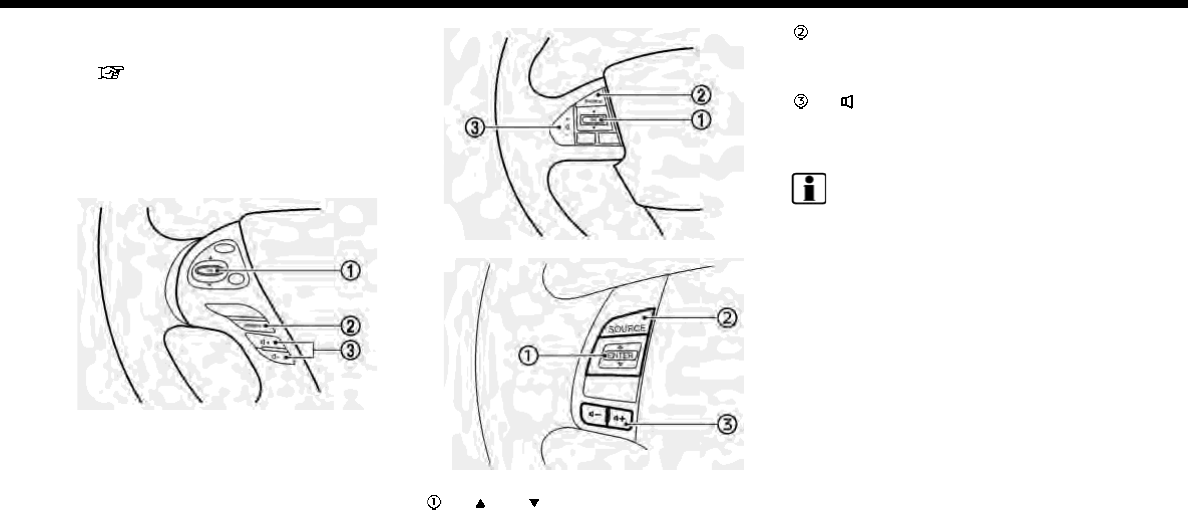
item on the screen is highlighted, the
audio settings can be changed.
“Audio adjustments when map,
audio or HOME MENU is dis-
played” (page 3-38)
STEERING WHEEL MOUNTED
AUDIO CONTROL BUTTONS (for
U.S. and Canada)
Type A (if so equipped)
Type B (if so equipped)
Type C (if so equipped)
< >/< >:
Tilting the switch up/down while the
audio system is turned on can oper-
ate the audio system such as chan-
ging tracks and radio preset stations
or channels.
<SOURCE>:
Push the switch to change the mode
to available audio source.
< > (Volume control):
Push + or - side of the switch to adjust
the volume.
INFO:
Steering wheel switches are mainly for the
vehicle information display control and
may not be able to operate the touch
screen display depending on the condi-
tions. Follow the pop-up guide messages
and labels shown on the vehicle informa-
tion display.
3. Audio system
3-13
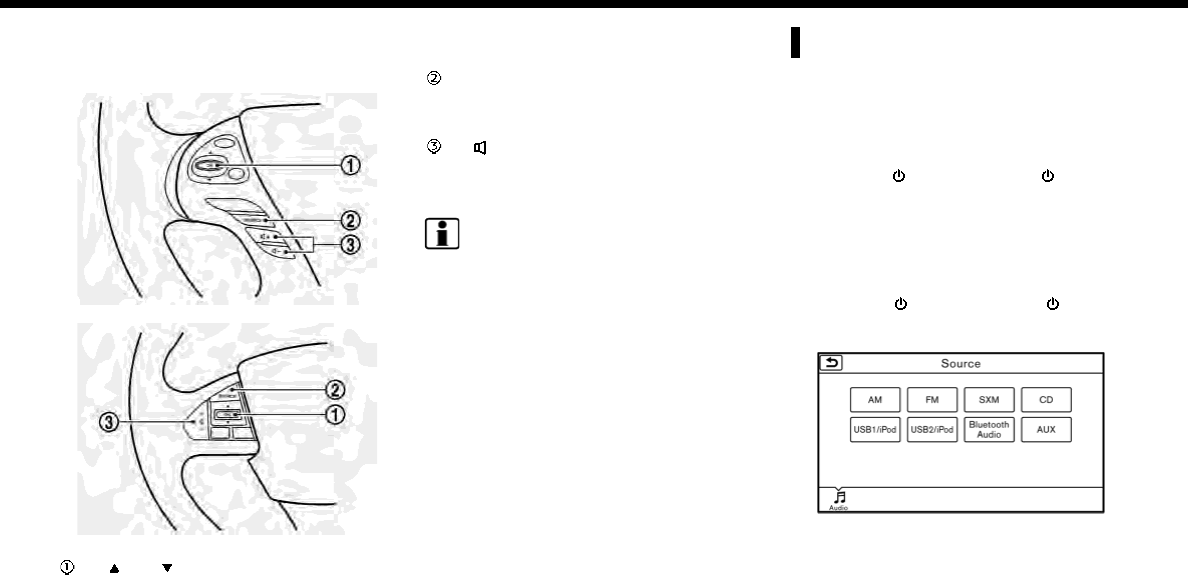
3. Audio system
STEERING WHEEL MOUNTED
AUDIO CONTROL BUTTONS (for
Mexico)
Type A (if so equipped)
Type B (if so equipped)
< >/< >:
Tilting the switch up/down while the
audio system is turned on can oper-
ate the audio system such as chan-
ging tracks and radio preset stations.
<SOURCE>:
Push the switch to change the mode
to available audio source.
< > (Volume control):
Push + or - side of the switch to adjust
the volume.
INFO:
Steering wheel switches are mainly for the
vehicle information display control and
may not be able to operate the touch
screen display depending on the condi-
tions. Follow the pop-up guide messages
and labels shown on the vehicle informa-
tion display.
AUDIO OPERATIONS
AUDIO MAIN OPERATION
Turning audio system on/off
The ignition switch must be in the ACC or
ON position to turn on the audio system.
Push <VOL/ >or <VOLUME/ > to turn
on the last audio source that was playing
immediately before the system was
turned off. Pushing <AUDIO> will also turn
on the audio system and the correspond-
ing audio screen will be displayed for
operation. To turn off the audio system,
push <VOL/ >or <VOLUME/ > again.
Selecting audio source
1. Push <AUDIO> or touch [Audio] on the
Launch Bar when the audio screen is
displayed.
3-14
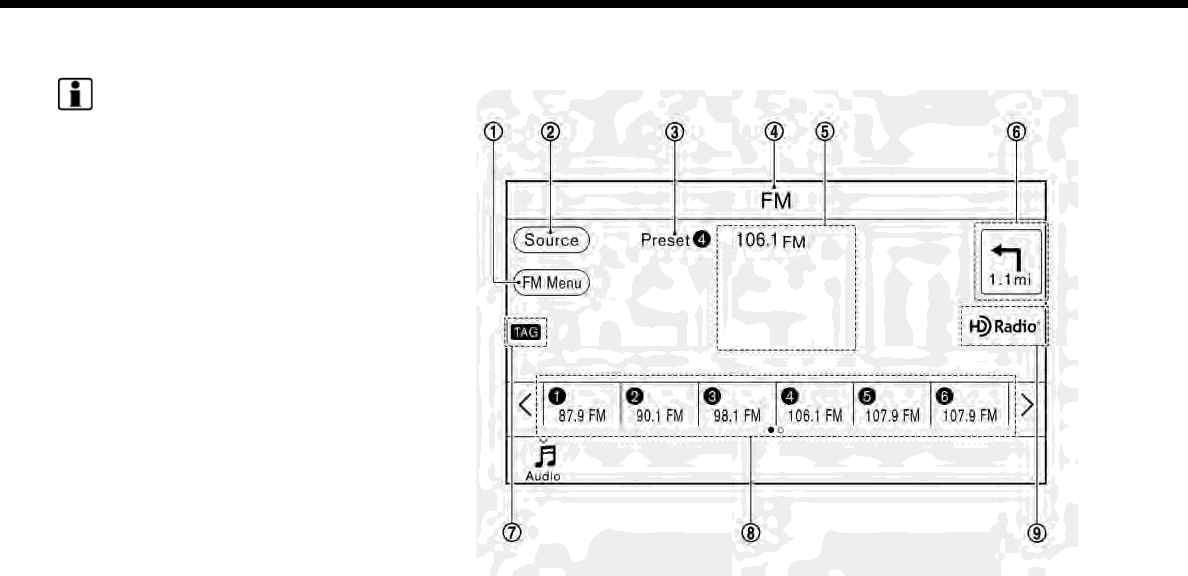
2. Select an item from the audio source
menu screens.
INFO:
Touching [Source] on the upper left cor-
ner of the audio screen will also display
the audio source menu screen.
RADIO
How to view radio screen
3. Audio system
3-15
3. Audio system
The radio screen can be viewed and
operated on the touch screen display.
[AM Menu]/[FM Menu]/[SXM Menu]
(for U.S. and Canada):
[AM Menu]/[FM Menu] (for Mexico):
Touch to display the radio menu
screen.
“Radio Menu” (page 3-18)
[Source]:
Touch to display the audio source
screen to select the other audio
source.
“Selecting audio source”
(page 3-14)
Preset number:
A preset number is displayed if the
current frequency is stored as a pre-
set station or channel (if so equipped).
Audio source indicator:
Indicates the currently selected audio
source.
Reception information display:
Reception information currently avail-
able such as frequency, station, or
channel (if so equipped) name, etc. are
displayed.
Turn direction indicator:
When a route to the destination is set,
turning direction and the distance to
the next turn is displayed.
TAG indicator (for U.S.):
TAG indicator is displayed if the
iTunes Tagging information exists in
the HD Radio broadcast signal.
“Radio Menu” (page 3-18)
Preset list:
To listen to a preset station, touch the
corresponding key in the preset list.
Touch [ < ] or [ > ] to scroll the preset
list. Touch and hold one of the keys in
the preset list to store the station or
channel (if so equipped) currently
tuned to.
“Presetting” (page 3-17)
Mode indicator (for U.S.):
On AM and FM screens, HD Radio icon
will appear when HD Radio mode
setting is turned on.
“Radio Menu” (page 3-18)
“Live” will appear when in ballgame
mode during reception of the HD
Radio broadcast.
INFO:
.An icon indicating the signal strength
appears on the SXM screen.
.HD Radio (for U.S.) reception needs to
be activated to receive HD Radio
broadcasts. This enables you to re-
ceive radio broadcasts digitally (where
available), providing a better quality
sound with clear reception. When this
feature is not activated or HD Radio
broadcasts are not available, you will
receive analog radio (AM/FM) broad-
casts.
“Radio Menu” (page 3-18)
Radio operation (for U.S. and Ca-
nada)
Radio activation and band selection:
To listen to the radio, turn on the audio
system and select a preferred radio band
on the audio source menu screen.
“Selecting audio source” (page 3-14)
3-16
INFO:
When the stereo broadcast signal is weak,
the radio will automatically change from
stereo to monaural reception.
Tuning:
To tune to stations/channels manually,
turn <TUNE·SCROLL/SOUND> until the
preferred station is selected.
Seek tuning:
Tilt and hold <>/< > on the steering
wheel to seek up/down to the next
receivable broadcast station or channel.
Scan tuning:
To scan tune the stations/channels,
touch [FM Menu], [AM Menu] or [SXM
Menu] on the radio screen and then touch
[SCAN]. The stations/channels will be
tuned from low to high frequencies and
stop at each broadcasting station/chan-
nel for several seconds. Touching [SCAN]
again during this period of several sec-
onds will stop scan tuning and the radio
will remain tuned to that station/channel.
Pushing and holding <>/< > will also
scan tune the stations/channels.
Presetting:
Up to 6 for AM, 12 for FM and 18 for SXM
stations/channels can be registered in the
preset list.
1. Select a radio band (AM, FM or SXM).
2. Tune to the station/channel you wish
to store in the preset list.
3. Touch and hold one of the preset
numbers in the preset list.
4. The information such as frequency
(AM/FM), channel number (SXM), etc.
will be displayed on the preset list.
To select and listen to the preset stations/
channels, tilt <>/< > on the steering
wheel briefly or touch a preferred station/
channel on the preset list on the radio
screen.
Radio operation (for Mexico)
Radio activation and band selection:
To listen to the radio, turn on the audio
system and select a preferred radio band
on the audio source menu screen.
“Selecting audio source” (page 3-14)
INFO:
When the stereo broadcast signal is weak,
the radio will automatically change from
stereo to monaural reception.
Tuning:
To tune to stations manually, push
<>/< > until the preferred station is
selected.
Seek tuning:
Tilt and hold <>/< > on the steering
wheel to seek up/down to the next
receivable broadcast station.
Scan tuning:
To scan tune the stations, touch [FM
Menu] or [AM Menu] on the radio screen
and then touch [SCAN]. The stations will
be tuned from low to high frequencies
and stop at each broadcasting station for
several seconds. Touching [SCAN] again
during this period of several seconds will
stop scan tuning and the radio will remain
tuned to that station.
Pushing and holding <>/< > will also
scan tune the stations.
3. Audio system
3-17
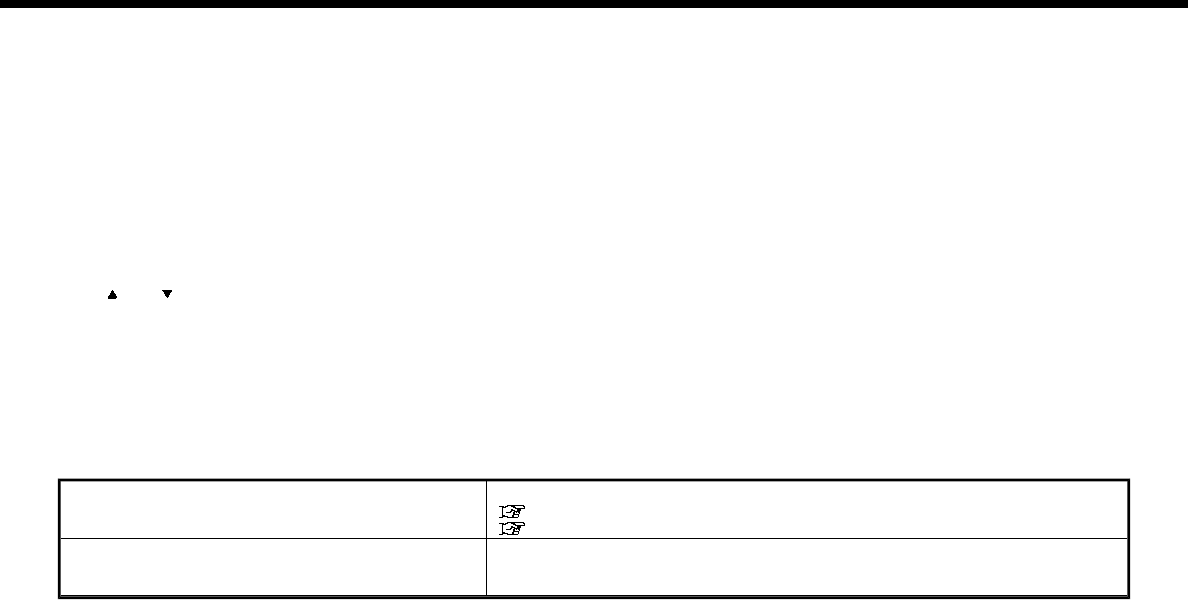
3. Audio system
Presetting:
Up to 6 for AM or 12 for FM stations can be
registered in the preset list.
1. Select a radio band (AM or FM).
2. Tune to the station you wish to store in
the preset list.
3. Touch and hold one of the preset
numbers in the preset list.
4. Information such as frequency (AM/
FM), etc. will be displayed on the preset
list.
To select and listen to the preset stations,
tilt <
>/< > on the steering wheel
briefly or touch a preferred station on
the preset list on the radio screen.
Radio Menu
Touch [FM Menu], [AM Menu], and [SXM Menu] (for U.S. and Canada) on the FM, AM or SXM (for U.S. and Canada) screen to display the
corresponding screen.
The following items are available.
[FM Menu]/[AM Menu]:
[SCAN] Touch to scan tune the stations.
“Radio operation (for U.S. and Canada)” (page 3-16)
“Radio operation (for Mexico)” (page 3-17)
[Tag]
(HD Radio broadcasts only)
Touch to register the tag information for iTunes Tagging. If an iPod is plugged in
after the registration, the tag information can be stored in an iPod and be used to
purchase the songs via iTunes.
3-18
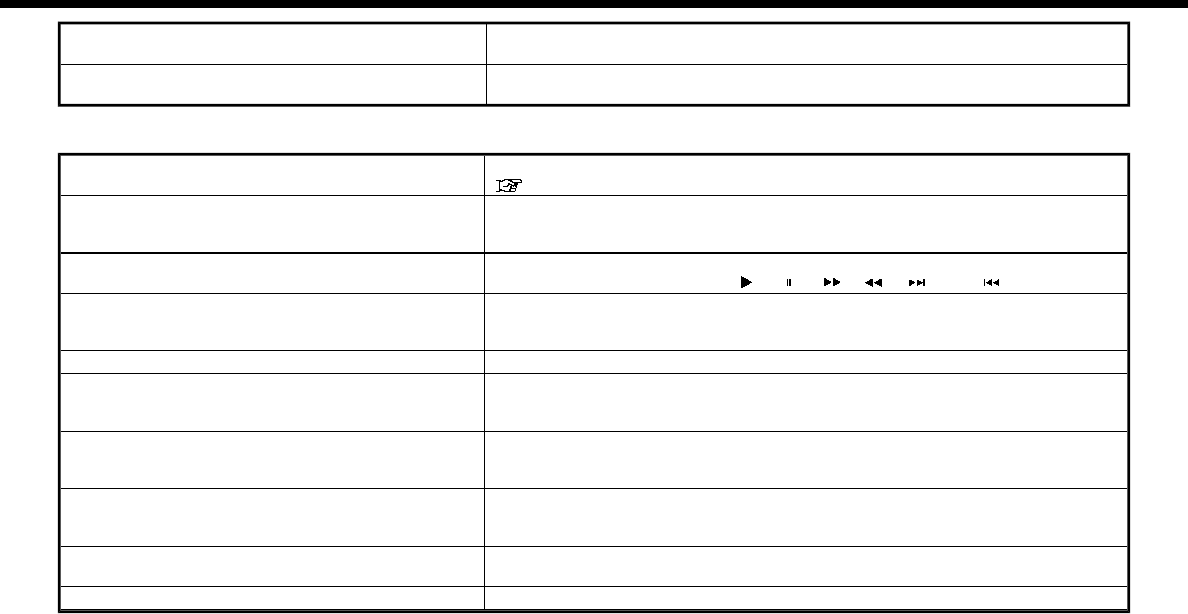
[Station List]
(for U.S. and Canada)
Touch to display the available station list.
Touch [Update Station List] to update the station list.
[HD Radio Mode]
(HD Radio broadcasts only)
When this item is turned on, the analog and digital reception switches auto-
matically. When this item is turned off, the reception is fixed in the analog mode.
[SXM Menu] (for U.S. and Canada):
[SCAN] Touch to scan tune the channels.
“Radio operation (for U.S. and Canada)” (page 3-16)
[Tag] Touch to register the tag information for iTunes Tagging. If an iPod is plugged in
after the registration, the tag information can be stored in an iPod and be used to
purchase the songs via iTunes.
[Replay] Up to 30 minutes of the broadcast of the channel that has been tuned in to can be
replayed. Touch to select from [ ], [ ], [ ], [ ], [ ] and [
].
[Favorite] Touch to display a pop-up screen to register the content of an active channel. On
the registration screen, touch [Artist] to save to a list of favorite artist. Touch [Song]
to save to a list of favorite songs. Touch [Cancel] to close the registration screen.
[Categories/Genres] Touch to display the category/genre list.
[Customize Channel List] Touch to customize the channel list. Only the selected channels will be tuned in to
when you seek or scan the channels. You can select each item or select [All Select]/
[All Clear].
[Favorite Artists] Touch to display a list of saved artists. Up to 8 artists can be stored. To turn on alerts
for a favorite artist, select the artist and touch [Turn Alerts ON]. Touch [Delete All
Favorites] to delete all the registered favorite artists.
[Favorite Songs] Touch to display a list of saved songs. Up to 8 songs can be stored. To turn on alerts
for a favorite song, select the song and touch [Turn Alerts ON]. Touch [Delete All
Favorites] to delete all the registered favorite songs.
[Direct Tune] Touch to display the keypad to enter the frequency and directly tune to the channel.
Touch [Now Playing] to return to the SXM screen.
[Artist Alert History] Touch to display the artist alert history.
3. Audio system
3-19

3. Audio system
[Song Alert History] Touch to display the song alert history. Touch [Now Playing] to return to the SXM
screen.
[Alert Settings] [Alerts for Artists] Touch to turn on/off the alert notice.
Favorite artists and songs can be registered to receive an alert notice when a song
of the registered conditions is on the radio. To tune to the respective channel, touch
[Tune] on the alert screen. The alert can be ignored by touching [Cancel].
[Alerts for Songs]
[Alerts on non-Audio
screens]
[Channel Lock Settings]* [Use Channel Lock] Turn this item on to activate the channel lock function.
[Passcode Change] Touch to display the keyboard screen to change the passcode.
[Lock Channel Setting] Touch to display the Lock Channel setting screen. Touch and turn on the indicator
of the channels on the list you wish to lock out.
*: The default passcode is “1234”.
INFO:
.SiriusXM services require a subscrip-
tion after trial period and are sold
separately or as a package. The satel-
lite service is available only in the 48
contiguous USA and DC. SiriusXM sa-
tellite service is also available in Cana-
da; see www.siriusxm.ca.
.It may take some time to receive the
activation signal after the initiation of
the SiriusXM Satellite Radio subscrip-
tion. After receiving the activation
signal, an available channel list will
automatically be updated in the radio.
Change the position of the ignition
switch from LOCK to ACC to update
the SiriusXM channel list.
3-20
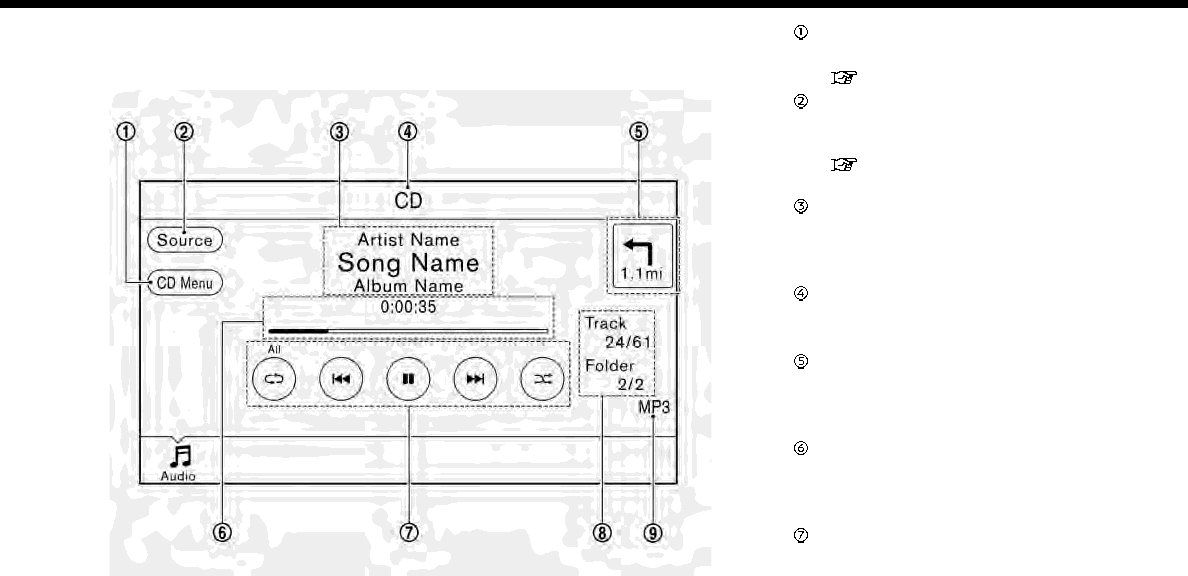
COMPACT DISC (CD) PLAYER
How to view CD screen
[CD Menu]:
Touch to display the CD Menu screen.
“CD Menu” (page 3-23)
[Source]:
Touch to switch to the source select
screen.
“Selecting audio source”
(page 3-14)
Track information:
Track information such as the song
title, artist name and album name are
displayed.
Audio source indicator:
Indicates that CD is currently selected
among other sources.
Turn direction indicator:
When a route to the destination is set,
the turn direction and the distance to
the next turn are displayed.
Play time and progress bar:
The play time of the track is displayed.
The bar indicates the progress in
playing the current track.
CD operation keys:
Touch an icon for operations.
3. Audio system
3-21
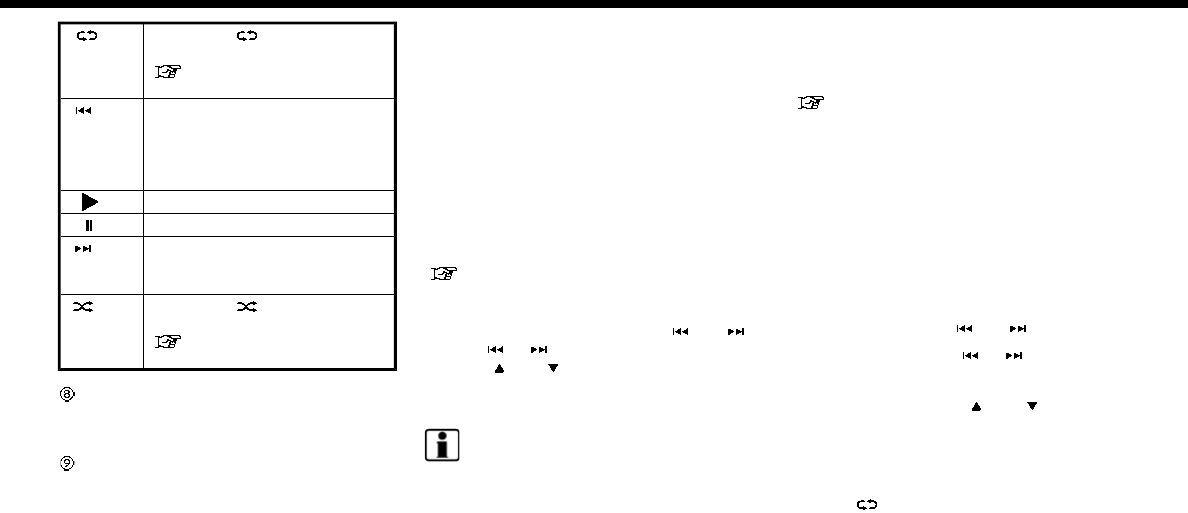
3. Audio system
[ ] Each time [ ] is touched, the
repeat mode changes.
“Changing play mode”
(page 3-22)
[] Touch once to return to the
beginning of the current track.
Touch again to select the pre-
vious track. Touch and hold to
rewind the current track.
[] Touch to play the track.
[] Touch to pause the track.
[] Touch to select the next track.
Touch and hold to fast-forward
the track.
[] Each time [ ] is touched, the
random mode changes.
“Changing play mode”
(page 3-22)
Track and folder number:
Indicates the track number and the
folder number.
Data type indicator:
Indicates the type of data currently
playing.
CD player operation
Loading:
Insert a CD into the slot with the label side
facing up. The CD will be guided auto-
matically into the slot and start playing.
After loading the CD, the CD screen will
appear on the display.
Activation and playing:
The CD mode can be also selected from
the source list with a CD loaded.
“Selecting audio source” (page 3-14)
Skipping tracks:
To skip the tracks, push<>/< >,
touch [ ]/[ ] on the screen, or tilt up/
down <>/< > on the steering wheel
repeatedly until preferred track is se-
lected.
INFO:
Depending on the condition, skipping to
the previous track may require pushing
the button or touching the key twice.
Pushing the button or touching the key
once may only restart the currently track
from the beginning.
Changing folders:
To change folders, touch [CD Menu] and
touch [Folder List].
“CD Menu” (page 3-23)
For U.S. and Canada
Turn <TUNE·SCROLL/SOUND> to skip to
different folders. If no folders are found,
tracks will be skipped.
Fast-forwarding/rewinding:
The following operation methods are
available for rewinding and fast-forward-
ing the track.
Control panel operation:
.Push and hold <>/< >.
.Touch and hold [ ]/[ ].
Steering wheel switch operation:
.Tilt and hold <>/< > on the
steering wheel.
Changing play mode:
Repeat mode
Touch [ ] on the CD screen to change
the repeat mode as follows.
.CD:
[Disc] [1 Track]
3-22

.CD with compressed audio files:
[All] ?[1 Track] ?[1 Folder] ?[All]
Random mode
Touch [ ] on the CD screen to change
the random mode as follows.
.CD:
(off) [Disc]
.CD with compressed audio files:
(off) ?[1 Folder] ?[All] ?(off)
Ejecting CD:
Push <>to eject a CD. If the CD is
ejected and left unremoved, it will be
reloaded into the slot for protection.
INFO:
The ignition switch must be placed in the
ACC or ON position in order for the CD to
eject.
CD Menu
Touch [CD Menu] on the CD screen to
display the CD menu screen.
The following items are available.
[Now Playing] Touch to return to the CD
screen.
[SCAN] Touch to scan the tracks on
the CD. During scanning,
the first several seconds of
all the tracks will be played.
Touching [SCAN] again will
cancel the scanning mode
and the CD will return to
play normally from the
track which is playing.
[Folder List]* Touch to display the folder
list. Touch an item on the
list to select the folder.
Touch [ ] and go back to
the previous screen to se-
lect tracks in the folder.
Track List A list of the tracks on the CD
is displayed. Touch an item
on the list to select the
track.
*: Displayed only when available.
3. Audio system
3-23

3. Audio system
USB MEMORY DEVICE PLAYER
Connecting USB memory device
WARNING
Do not connect, disconnect or operate
the USB device while driving. Doing so
can be a distraction. If distracted you
could lose control of your vehicle and
cause an accident or serious injury.
CAUTION
.Do not force the USB device into
the USB connection port. Inserting
the USB device tilted or up-side-
down into the port may damage
the port. Make sure that the USB
device is connected correctly into
the USB connection port.
.Do not grab the USB connection
port cover (if so equipped) when
pulling the USB device out of the
port. This could damage the port
and the cover.
.Do not leave the USB cable in a
place where it can be pulled unin-
tentionally. Pulling the cable may
damage the port.
Refer to your device manufacturer’s own-
er information regarding the proper use
and care of the device.
When compatible storage devices are
plugged into the port, compatible audio
files on the storage devices can be played
through the vehicle’s audio system.
For the location of the USB connection
port(s):
“USB (Universal Serial Bus) Connec-
tion Port and AUX (auxiliary) input
jack” (page 2-12)
INFO:
Models with two USB connection ports:
Only one of the two connected USB
devices can be operated with the voice
recognition system.
“Voice recognition settings”
(page 7-23)
3-24
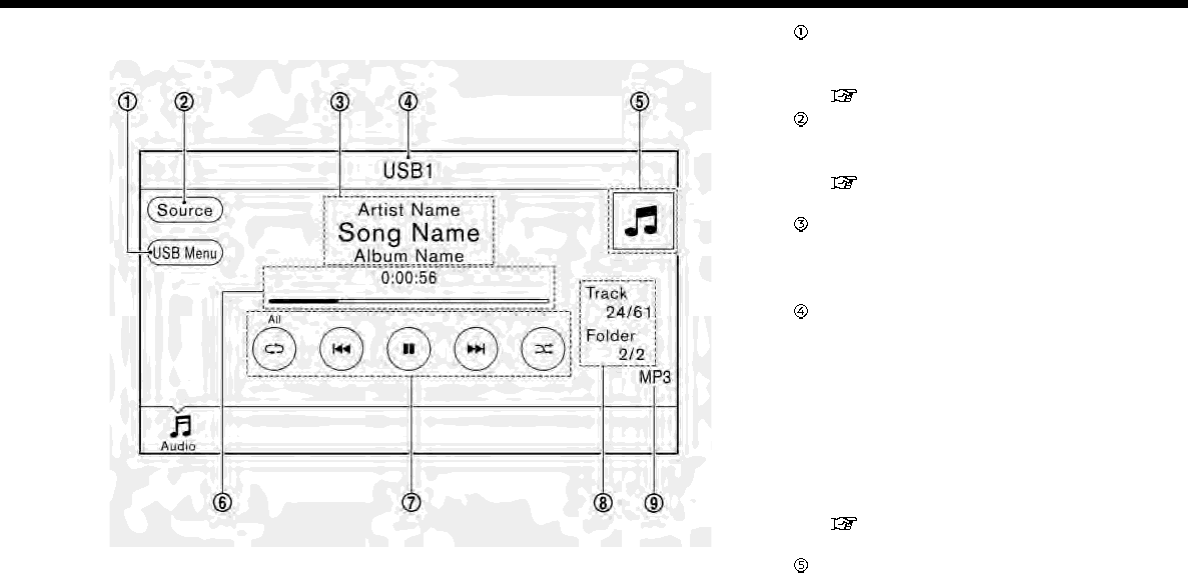
How to view USB screen [USB Menu]:
Touch to switch to the USB Menu
screen.
“USB Menu” (page 3-27)
[Source]:
Touch to switch to the source select
screen.
“Selecting audio source”
(page 3-14)
Track information:
Track information such as the song
title, artist name and album name are
displayed.
Audio source indicator:
Models with one USB connection port:
Indicates that an USB device is cur-
rently selected among other sources.
Models with two USB connection
ports:
Indicates which USB memory device
(USB1 or USB2) is currently selected.
To switch to the USB1 and USB2,
touch [Source] on the audio screen.
“Selecting audio source”
(page 3-14)
Album artwork/Turn direction indica-
tor:
Image of an album artwork is dis-
3. Audio system
3-25
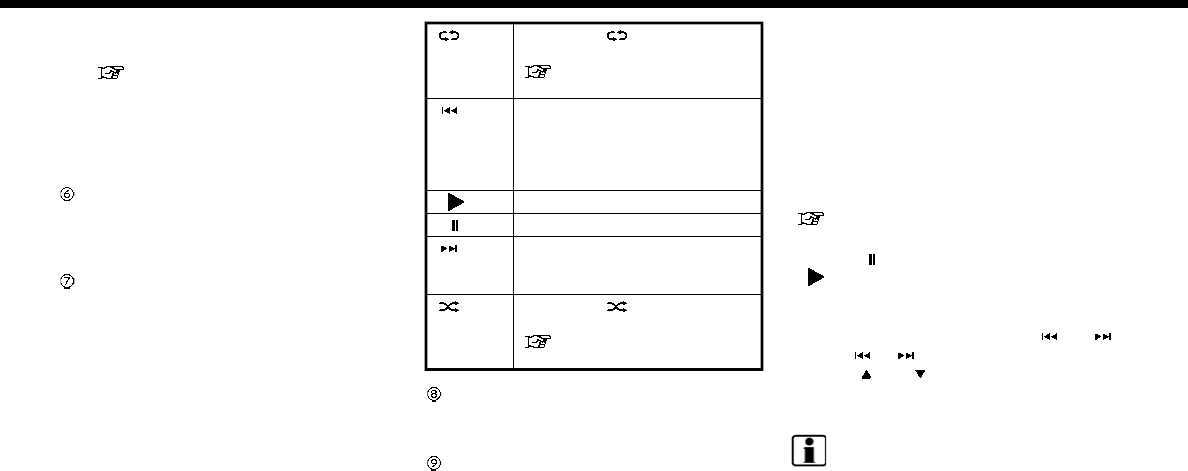
3. Audio system
played when available if the setting is
turned on.
“USB Menu” (page 3-27)
When the album artwork display
setting is turned off, the turn direction
and the distance to the next turn are
displayed when a route is set with the
navigation system.
Play time and progress bar:
The play time of the track is displayed.
The bar indicates the progress in
playing a track.
USB operation keys:
Touch an icon for operations.
[ ] Each time [ ] is touched, the
repeat mode changes.
“Changing play mode”
(page 3-27)
[] Touch to return to the begin-
ning of the current track.
Touch again to select the pre-
vious track. Touch and hold to
rewind the current track.
[] Touch to play the track.
[] Touch to pause the track.
[] Touch to select the next track.
Touch and hold to fast-forward
the track.
[] Each time [ ] is touched, the
random mode changes.
“Changing play mode”
(page 3-27)
Track and folder number:
Indicates the track number and the
folder number.
Data type indicator:
Indicates the type of data currently
playing.
USB memory device player op-
eration
Activation and playing:
Connecting the USB memory device into
the port will activate the USB mode.
USB memory device can also be played by
selecting the source on the audio source
menu screen.
“Selecting audio source” (page 3-14)
To pause playing the USB memory device,
touch [ ]. To resume playing, touch
[].
Skipping tracks:
To skip the tracks, push <>/< >,
touch [ ]/[ ] on the screen, or tilt up/
down <>/< > on the steering wheel
repeatedly until preferred track is se-
lected.
INFO:
Depending on the condition, skipping to
the previous track may require pushing
the button or touching the key twice.
Pushing the button or touching the key
once may only restart the current track
from the beginning.
3-26
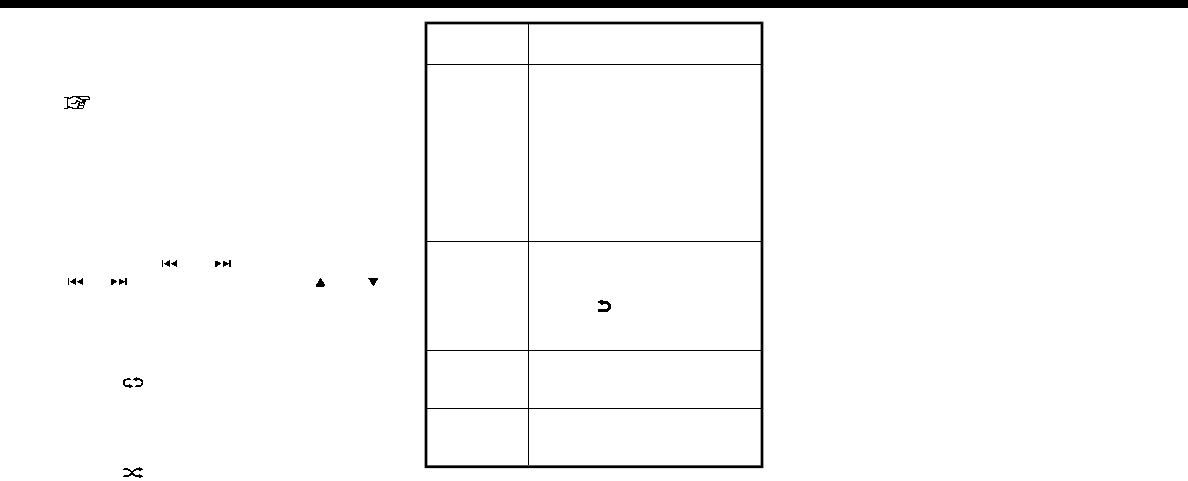
Changing folders:
To change folders, touch [USB Menu] and
touch [Folder List].
“USB Menu” (page 3-27)
For U.S. and Canada
Turn <TUNE·SCROLL/SOUND> to skip to
different folders. If no folders are found,
tracks will be skipped.
Fast-forwarding/rewinding:
To rewind or fast-forward the track, push
and hold <>/< >, touch and hold
[]/[ ], or tilt and hold < >/< >
on the steering wheel.
Changing play mode:
Repeat mode
Touch [ ] on the screen to change the
repeat mode as follows.
[All] ?[1 Track] ?[1 Folder] ?[All]
Random mode
Touch [ ] on the screen to change the
random mode as follows.
(off) ?[1 Folder] ?[All] ?(off)
USB Menu
Touch [USB Menu] on the USB screen to
display the USB Menu screen.
The following items are available.
[Now Play-
ing]
Touch to display the USB
screen.
[SCAN] Touch to scan the tracks in
the USB memory device.
During scanning, the first
several seconds of all the
tracks will be played. Touch-
ing [SCAN] again will cancel
the scanning mode and the
USB memory device will re-
turn to play normally from
the track which is playing.
[Folder List]
*
Touch to display the folder
list. Touch an item on the list
to select the folder.
Touch [ ] and go back to
the previous screen to select
tracks in the folder.
[Album Art-
work]
Touch to turn on/off the
album artwork display on the
USB screen.
Track List A list of the tracks in the USB
is displayed. Touch an item
on the list to select the track.
*: Displayed only when available.
3. Audio system
3-27

3. Audio system
iPod PLAYER
Connecting iPod
WARNING
Do not connect, disconnect or operate
the USB device while driving. Doing so
can be a distraction. If distracted you
could lose control of your vehicle and
cause an accident or serious injury.
CAUTION
.Do not force the USB device into
the USB connection port. Inserting
the USB device tilted or up-side-
down into the port may damage
the port. Make sure that the USB
device is connected correctly into
the USB connection port.
.Do not grab the USB connection
port cover (if so equipped) when
pulling the USB device out of the
port. This could damage the port
and the cover.
.Do not leave the USB cable in a
place where it can be pulled unin-
tentionally. Pulling the cable may
damage the port.
Connect the iPod to the USB connection
port(s).
“USB (Universal Serial Bus) Connec-
tion Port and AUX (auxiliary) input
jack” (page 2-12)
The battery of the iPod will be charged
while the device is connected to the
vehicle if the iPod supports charging via
a USB connection.
Depending on the device and firmware
version of the iPod, the display on the iPod
shows a NISSAN or Accessory Attached
screen when the connection is completed.
When the iPod is connected to the vehicle,
the iPod music library can only be oper-
ated by the vehicle audio controls.
Compatibility:
Made for
.iPod (5th generation)
.iPod touch (4th generation)
.iPod touch (3rd generation)
.iPod touch (2nd generation)
.iPod touch (1st generation)
.iPod touch
.iPod classic (80G/160GB)
.iPod classic (120GB)
.iPod nano (7th generation)
.iPod nano (6th generation)
.iPod nano (5th generation)
.iPod nano (4th generation)
.iPod nano (3rd generation)
.iPod nano (2nd generation)
.iPod nano (1st generation)
.iPhone 6s Plus
.iPhone 6s
.iPhone 6 Plus
.iPhone 6
.iPhone 5s
.iPhone 5c
.iPhone 5
.iPhone 4s
.iPhone 4
.iPhone 3GS
.iPhone 3G
.iPhone
3-28
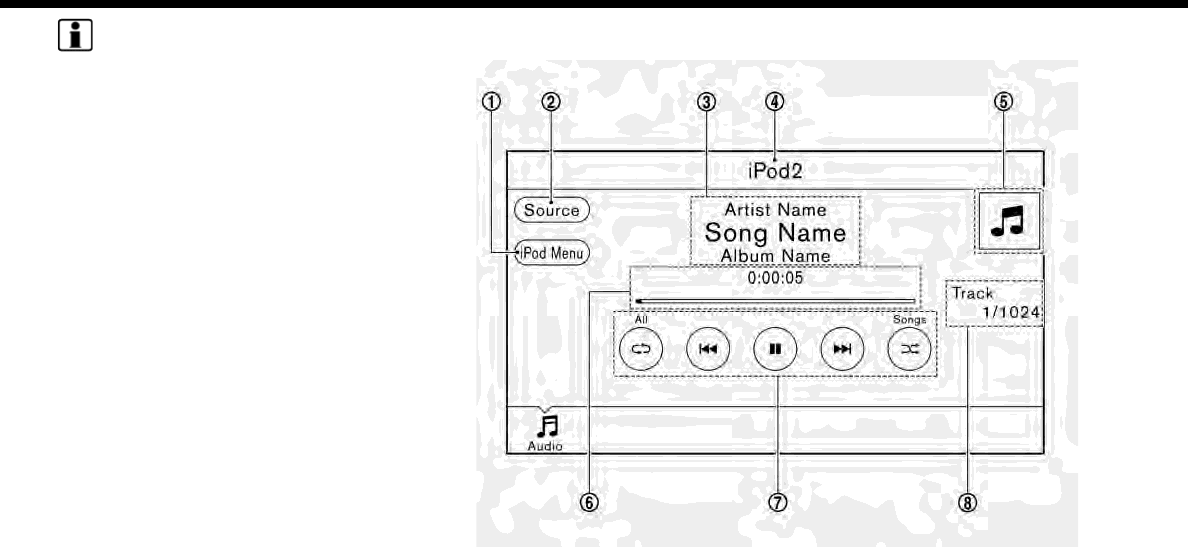
INFO:
.Make sure that the iPod firmware is
updated.
.The Lightning
TM
connector works with
iPhone 5, iPod touch (5th generation),
and iPod nano (7th generation).
The 30-pin connector works with
iPhone 4s, iPhone 4, iPhone 3GS,
iPhone 3G, iPhone, iPod touch (1st
through 4th generation), iPod classic
and iPod nano (1st through 6th gen-
eration).
USB works with iPhone 5, iPhone 4s,
iPhone 4, iPhone 3GS, iPhone 3G,
iPhone, iPod touch (1st through 5th
generation) iPod classic and iPod nano
(1st through 7th generation).
.Refer to your device manufacturer’s
owner information regarding the
proper use and care of the device.
How to view iPod screen
3. Audio system
3-29
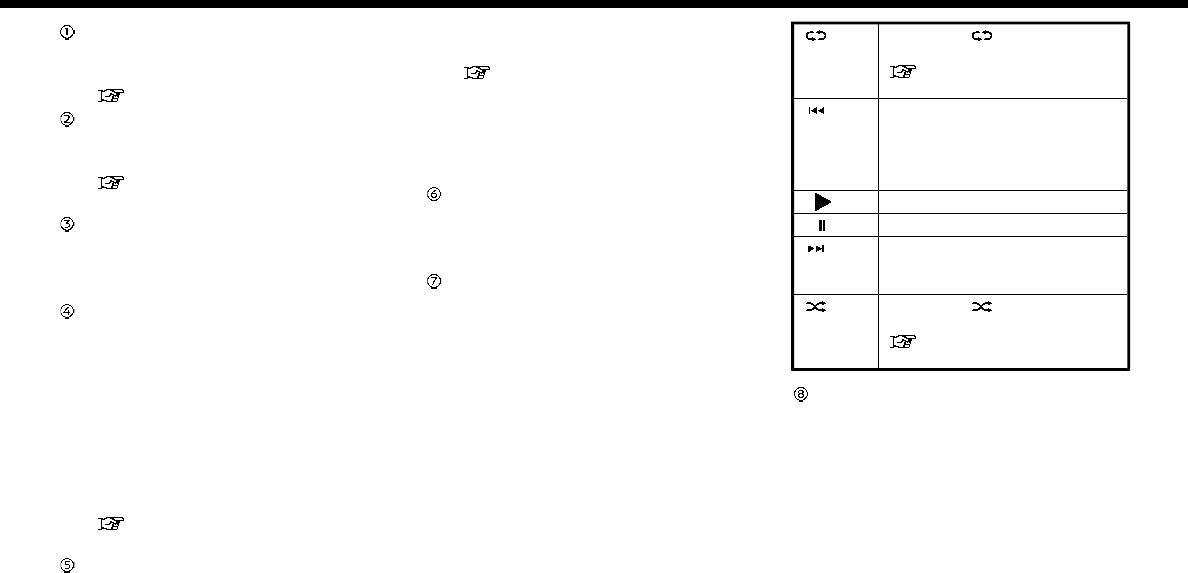
3. Audio system
[iPod Menu]:
Touch to display the iPod Menu
screen.
“iPod Menu” (page 3-31)
[Source]:
Touch to switch to the source list
screen.
“Selecting audio source”
(page 3-14)
Track information:
Track information such as the song
title, artist name and album name are
displayed.
Audio source indicator:
Models with one USB connection port:
Indicates that an iPod device is cur-
rently selected among other sources.
Models with two USB connection
ports:
Indicates which iPod memory device
(iPod1 or iPod2) is currently selected.
To switch to the iPod1 and iPod2,
touch [Source] on the audio screen.
“Selecting audio source”
(page 3-14)
Album artwork/Turn direction indica-
tor:
Image of an album artwork is dis-
played when available if the setting is
turned on.
“iPod Menu” (page 3-31)
When the album artwork display
setting is turned off, the turn direction
and the distance to the next turn are
displayed when a route is set with the
navigation system.
Play time and progress bar:
The play time of the track is displayed.
The progress bar indicates the pro-
gress in playing the current track.
iPod operation keys:
Touch an icon for operations.
[ ] Each time [ ] is touched, the
mode changes.
“Changing play mode”
(page 3-31)
[] Touch to return to the begin-
ning of the current track. Touch
again to select the previous
track. Touch and hold to re-
wind the current track.
[] Touch to play the track.
[] Touch to pause the track.
[] Touch to select the next track.
Touch and hold to fast-forward
the track.
[] Each time [ ] is touched, the
mode changes.
“Changing play mode”
(page 3-31)
Track number:
Indicates the track number and the
total number of tracks.
iPod player operation
Activation and playing:
Connecting iPod to the vehicle via USB
cable will activate the iPod mode.
The iPod can also be played by selecting
the source on the audio source menu
screen.
3-30
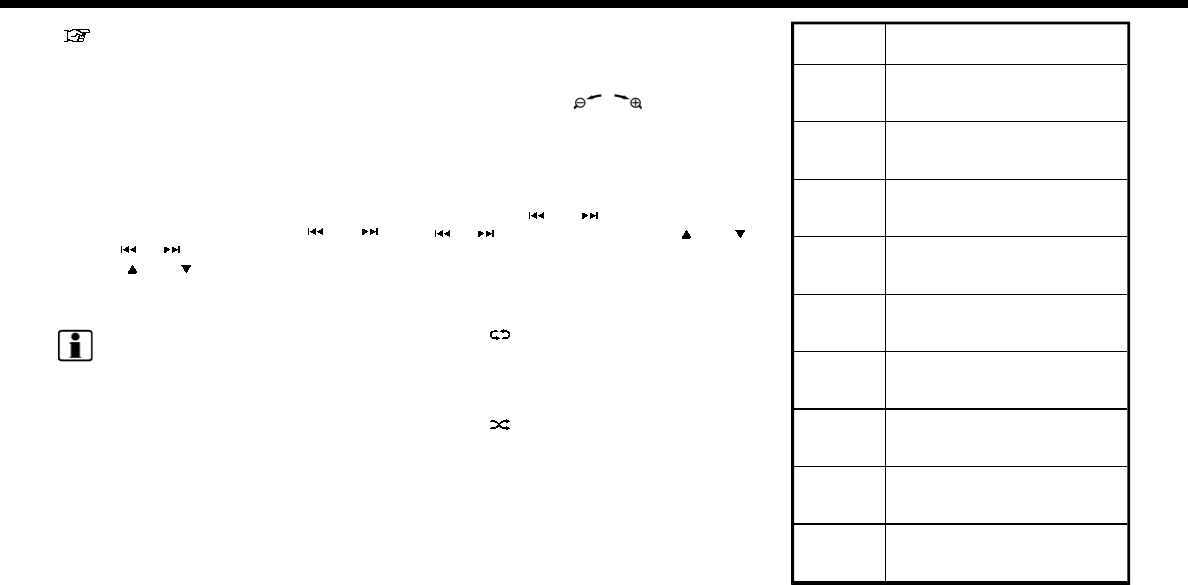
“Selecting audio source” (page 3-14)
Selecting search method:
A list of search methods is displayed in the
iPod menu.
Touch [iPod Menu] to display the iPod
menu. Touch and select an item to play
the iPod in your preferred settings.
Skipping tracks:
To skip the tracks, push <>/< >,
touch [ ]/[ ] on the screen, or tilt up/
down <>/< > on the steering wheel
repeatedly until preferred track is se-
lected.
INFO:
Depending on the condition, skipping to
the previous track may require pushing
the button or touching the key twice.
Pushing the button or touching the key
once may only restart the current track
from the beginning.
For U.S. and Canada
Turning <TUNE·SCROLL/SOUND> while a
track is playing will also skip the tracks.
Skipping items:
Touch [iPod Menu] to display the item list.
Turn <TUNE·SCROLL/SOUND> (for U.S.
and Canada) or </SOUND> (for
Mexico) to skip to different items on the
list.
Fast-forwarding/rewinding:
To fast-forward or rewind the track, push
and hold <>/< >, touch and hold
[]/[ ], or tilt and hold < >/< >
on the steering wheel.
Changing play mode:
Repeat mode
Touch [ ] on the screen to change the
repeat mode as follows.
(off) ?[One] ?[All] ?(off)
Random mode
Touch [ ] on the screen to change the
random mode as follows.
(off) ?[Songs] ?[Albums] ?(off)
iPod Menu
Touch [iPod Menu] on the iPod screen to
display the iPod menu screen.
The following items are available.
[Now
Playing]
Touch to display the iPod
screen.
[Current
List]
Touch to display the menu list
which was displayed most re-
cently.
[Album
Artwork]
Touch to turn on/off the al-
bum artwork display on the
iPod screen.
[Playlists] Touch to display the playlist
and touch an item on the list
to select the playlist.
[Artists] Touch to display the artist list
and touch an item on the list
to select the artist.
[Albums] Touch to display the album list
and touch an item on the list
to select the album.
[Songs] Touch to display the song list
and touch an item on the list
to select the song.
[Podcasts] Touch to display the podcast
list and touch an item on the
list to select the podcast.
[Genres] Touch to display the genre list
and touch an item on the list
to select the genre.
[Compo-
sers]
Touch to display the compo-
ser list and touch an item on
the list to select the composer.
3. Audio system
3-31

3. Audio system
[Audio-
books]
Touch to display the audio-
book list and touch an item on
the list to select the audio-
book.
INFO:
On the list screen, touch and hold [ ]or
[] on the right side of the screen to
jump by letter for faster scrolling.
BLUETOOTH® AUDIO
Your vehicle is equipped with Bluetooth®
Audio.
If you have a compatible Bluetooth®
device with streaming audio (A2DP pro-
file), you can set up a wireless connection
between your Bluetooth® device and the
in-vehicle audio system. This connection
allows you to listen to the audio from the
Bluetooth® device using your vehicle
speakers. It also may allow basic control
of the device for playing and skipping
audio files using the AVRCP Bluetooth®
profile. Not all Bluetooth® devices have the
same level of controls for AVRCP. Please
consult the manual for your Bluetooth®
device for more details.
Wireless LAN (Wi-Fi) and the Bluetooth®
functions share the same frequency band
(2.4 GHz). Using the Bluetooth® and the
wireless LAN functions at the same time
may slow down or disconnect the com-
munication and cause undesired noise. It
is recommended that you turn off the
wireless LAN (Wi-Fi) when using the Blue-
tooth® functions.
Connecting Bluetooth® audio de-
vice
A Bluetooth® audio device must be con-
nected to the vehicle before operation.
“Connecting Bluetooth® device”
(page 2-26)
3-32
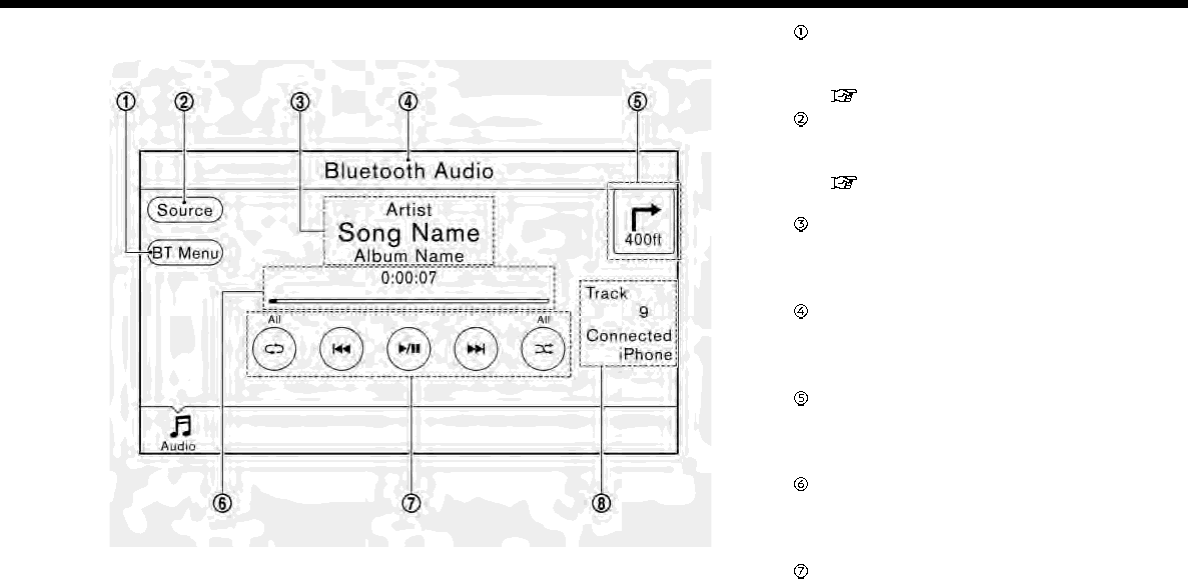
How to view Bluetooth® audio screen [BT Menu]:
Touch to display the Bluetooth® audio
menu screen.
“BT Menu” (page 3-35)
[Source]:
Touch to switch to the source list
screen.
“Selecting audio source”
(page 3-14)
Track information:
Track information such as the song
title, artist name and album name are
displayed.
Audio source indicator:
Indicates that Bluetooth® audio is
currently selected among other
sources.
Turn direction indicator:
When a route to the destination is set,
the turn direction and the distance to
the next turn are displayed.
Play time and Progress bar:
The play time of the track is displayed.
The Progress bar indicates the pro-
gress in playing the current track.
Bluetooth® audio operation keys:
Touch an icon for operations.
3. Audio system
3-33
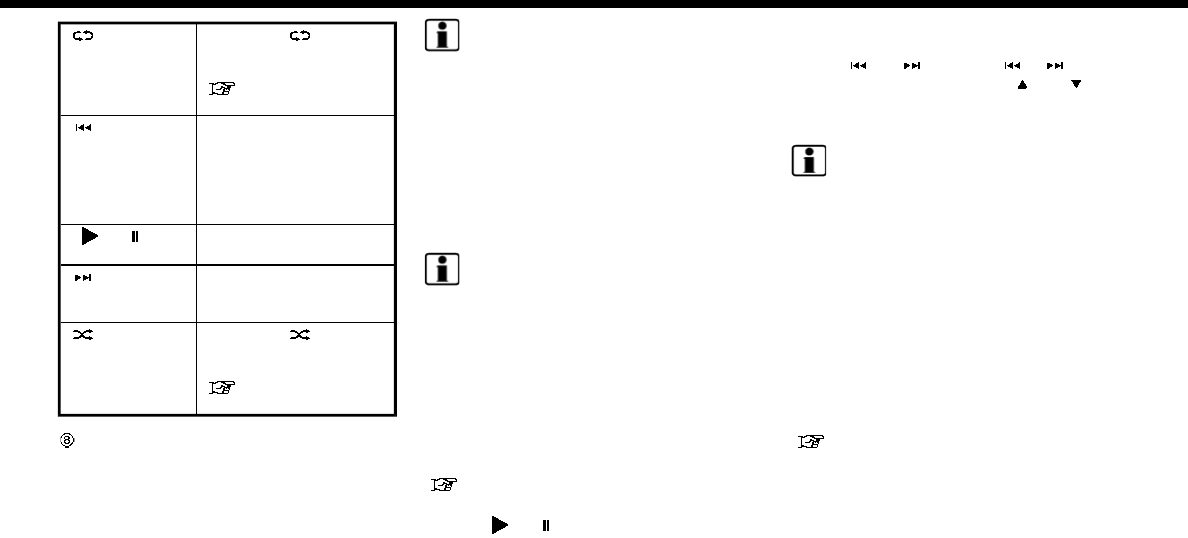
3. Audio system
[ ] Each time [ ]is
touched, the repeat
mode changes.
“Changing play
mode” (page 3-35)
[] Touch to return to the
beginning of the current
track. Touch again to
select the previous
track. Touch and hold to
rewind the current track.
[/ ] Touch to play and pause
the track.
[] Touch to select the next
track. Touch and hold to
fast-forward the track.
[] Each time [ ]is
touched, the random
mode changes.
“Changing play
mode” (page 3-35)
Track number and device name:
Indicates the track number and the
selected Bluetooth® device name.
INFO:
Depending on the audio device that is
connected to the vehicle, track informa-
tion may not be displayed.
Bluetooth® audio operation
The ability to pause, change tracks, fast
forward, rewind, randomize and repeat
music may be different between devices.
Some or all of these functions may not be
supported on each device.
INFO:
Depending on the Bluetooth® audio de-
vice that is connected, it may not be
possible to perform audio operations or
a time lag may occur before music is
played back.
Activation and playing:
A Bluetooth® audio device can be played
by selecting the source on the audio
source menu screen.
“Selecting audio source” (page 3-14)
To pause playing the Bluetooth® audio,
touch [ / ]. Touch again to resume
playing.
Skipping tracks:
Push <>/< >, touch [ ]/[ ] on the
screen, or tilt up/down <>/< > on
the steering wheel briefly to skip to the
next or the previous track.
INFO:
Depending on the condition, skipping to
the previous track may require pushing
the button or touching the key twice.
Pushing the button or touching the key
once may only restart the current track
from the beginning.
For U.S. and Canada
While a track is playing, turning <TUNE·SC-
ROLL/SOUND> will also skip the tracks.
Changing folders:
To change folders, touch [BT Menu] and
touch [Folder List].
“BT Menu” (page 3-35)
For U.S. and Canada
Turn <TUNE·SCROLL/SOUND> to skip to
different folders. If no folders are found,
tracks will be skipped.
3-34
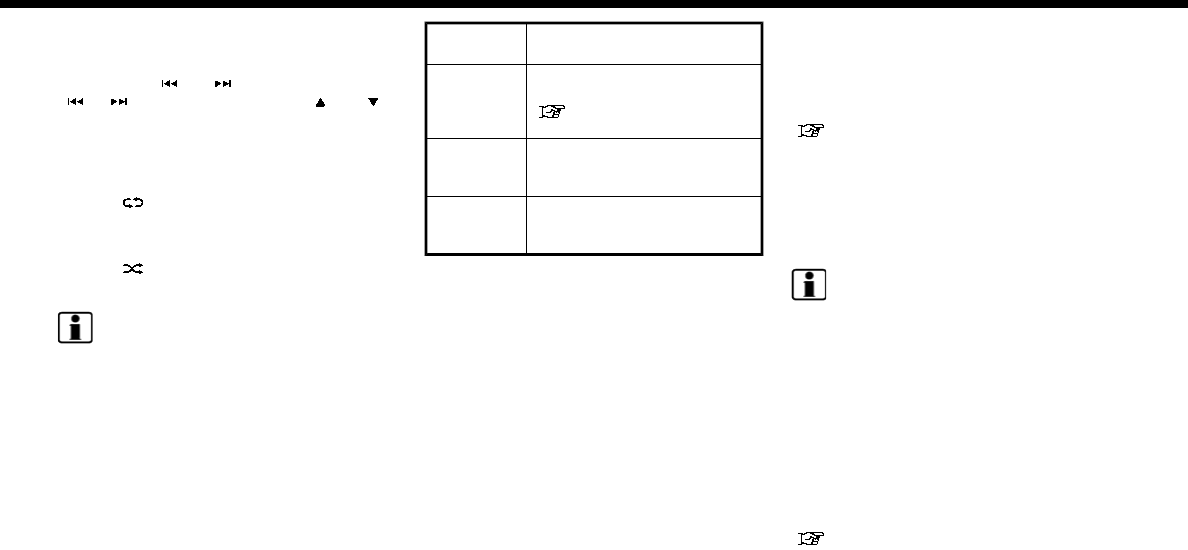
Fast-forwarding/rewinding:
To fast-forward or rewind the track, push
and hold <>/< >, touch and hold
[]/[ ], or tilt and hold < >/< >
on the steering wheel.
Changing play mode:
Repeat mode
Touch [ ] on the screen to change the
repeat mode.
Random mode
Touch [ ] on the screen to change the
random mode.
INFO:
Available repeat/random modes change
depending on the connected device.
BT Menu
Touch [BT Menu] on the Bluetooth® audio
screen to display the Bluetooth® audio
menu screen.
The following items are available.
[Now Play-
ing]
Touch to display the Blue-
tooth® audio screen.
[Bluetooth
Settings]
Touch to display the Blue-
tooth® settings screen.
“Bluetooth® settings”
(page 2-26)
[Folder List]
*
Touch to display the folder
list. Touch an item on the list
to select the folder.
Track List A list of the tracks is dis-
played. Touch an item on the
list to select the track.
*: Displayed only when available.
AUXILIARY (AUX) DEVICES
Connecting auxiliary devices
The auxiliary input jack is located in the
media pocket.
“USB (Universal Serial Bus) Connec-
tion Port and AUX (auxiliary) input
jack” (page 2-12)
The auxiliary input jack accepts any stan-
dard analog audio input such as from a
portable cassette player, CD player or MP3
player.
INFO:
Insert a 1/8 in (3.5 mm) stereo mini plug in
the audio input jack. If a cable with a mono
plug is used, the audio output may not
function normally.
AUX operation
Activation and playing:
Turn on an AUX device.
Connect an AUX cable to the AUX device
and the AUX jack. Select AUX mode from
the audio source menu screen.
“Selecting audio source” (page 3-14)
3. Audio system
3-35
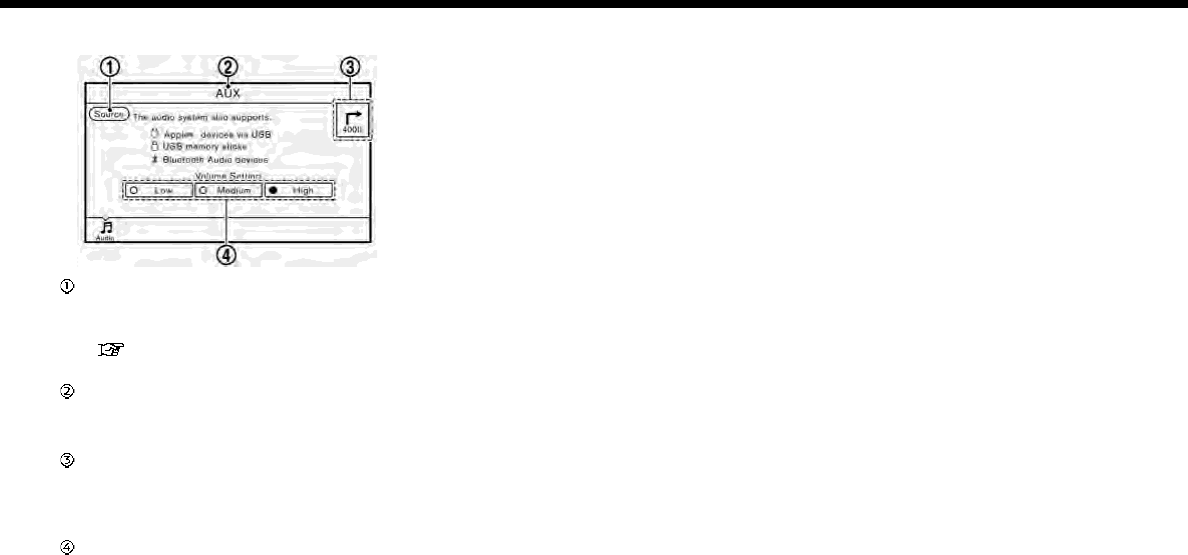
3. Audio system
How to view AUX screen
[Source]:
Touch to switch to the source list
screen.
“Selecting audio source”
(page 3-14)
Audio source indicator:
Indicates that an AUX device is cur-
rently selected among other sources.
Turn direction indicator:
When a route to the destination is set,
the turn direction and the distance to
the next turn are displayed.
Volume Setting keys:
Touch one of the keys to select the
sound output gain from [Low], [Med-
ium] and [High].
3-36
AUDIO SETTINGS
Audio settings can be adjusted or audio related functions can be turned on/off with the following procedure.
1. Touch [Settings] on the Launch Bar.
2. Touch [Sound].
Setting items Action
[Bass]
Adjust the speaker tone quality and sound balance by touching [+]/[-], [L]/[R] or [R]/[F].
[Treble]
[Balance]
[Fade]
[Speed Sensitive Volume] Automatically adjusts the volume depending on the vehicle speed. Touch [+]/[-] to change
the sensitivity level.
[BOSE® Centerpoint]
(if so equipped)
When this item is turned on, surround sound playback is generated from a traditional
stereo recording. Turn on the item to activate BOSE® Centerpoint and to change its effect
level with [Surround Volume].
[Surround Volume]
(if so equipped)
Touch [+]/[-] to adjust the Surround Volume level if BOSE® Centerpoint [ON].
[Driver’s Audio Stage]
(if so equipped)
When this item is turned on, a better sound will be provided to the driver’s position. The
driver can enjoy a more crisp and clear sound that is specialized for the driver’s seat
position. The prominency of the effect of this feature depends on the type of music that is
played. For some music, it may be difficult to recognize the effect of the feature.
INFO:
The setting items [BOSE® Centerpoint] and [Surround Volume] will be disabled when an analog radio signal is received.
3. Audio system
3-37
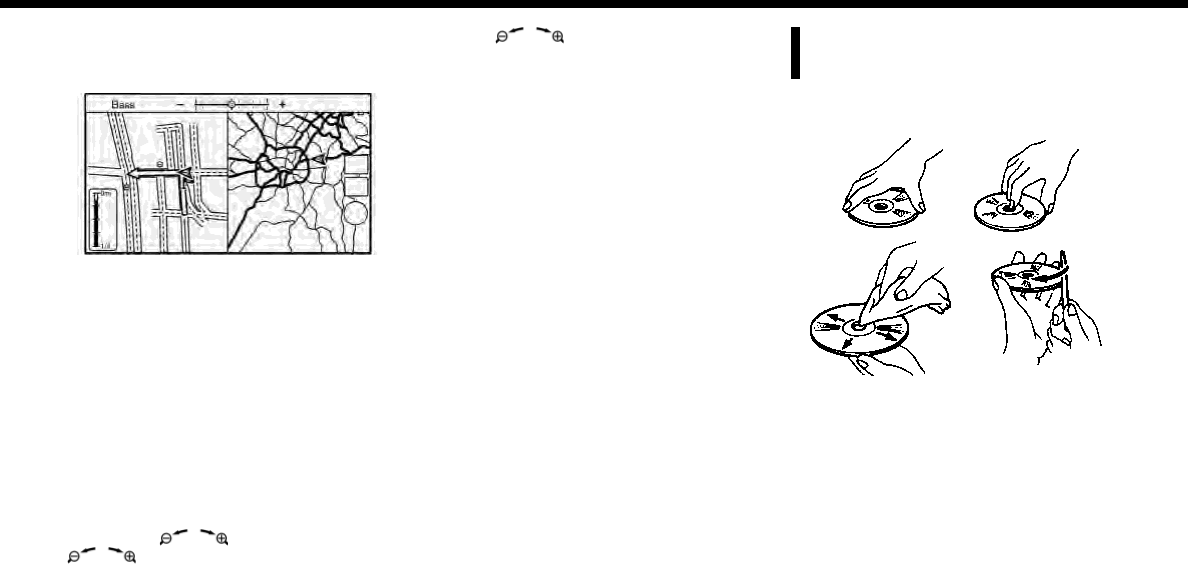
3. Audio system
AUDIO ADJUSTMENTS WHEN MAP,
AUDIO OR HOME MENU IS DIS-
PLAYED
For U.S. and Canada
When the Map, Audio or HOME MENU
screen is displayed, some audio settings
can be adjusted with <TUNE·SCROLL/
SOUND>. Each time <TUNE·SCROLL/
SOUND> is pushed, the selected setting
item will change as follows.
[Bass] ?[Treble] ?[Balance] ?[Fade]
Rotate <TUNE·SCROLL/SOUND> to adjust
the level of the selected setting item.
For Mexico
When the Map or Audio screen is dis-
played, some audio settings can be ad-
justed with </SOUND>. Each time
</SOUND> is pushed, the se-
lected setting item will change as follows.
[Bass] ?[Treble] ?[Balance] ?[Fade]
Rotate </SOUND> to adjust the
level of the selected setting item. CD/USB MEMORY DEVICE CARE
AND CLEANING
CD
.Handle a CD by its edges. Never touch
the surface of the disc. Do not bend
the disc.
.Always place the discs in the storage
case when they are not being used.
.To clean a disc, wipe the surface from
the center to the outer edge using a
clean, soft cloth. Do not wipe the disc
using a circular motion.
Do not use a conventional record
3-38

cleaner or alcohol intended for indus-
trial use.
.A new disc may be rough on the inner
and outer edges. Remove the rough
edges by rubbing the inner and outer
edges with the side of a pen or pencil
as illustrated.
USB MEMORY DEVICE
.Never touch the terminal portion of
the USB memory device.
.Do not place heavy objects on the USB
memory device.
.Do not store the USB memory device
in highly humid locations.
.Do not expose the USB memory device
to direct sunlight.
.Do not spill any liquids on the USB
memory device.
Refer to the USB memory device Owner’s
Manual for the details.
3. Audio system
3-39

3. Audio system
MEMO
3-40

4 Hands-Free Phone
Bluetooth® Hands-Free Phone System ....................... 4-2
Indicators...................................................................................... 4-3
Phone .............................................................................................. 4-4
Hands-free text messaging assistant .................... 4-6
Phone and text message assistant
settings ..................................................................................... 4-10
Bluetooth® setting ........................................................... 4-13

4. Hands-Free Phone
BLUETOOTH® HANDS-FREE
PHONE SYSTEM
WARNING
.Use a phone after stopping your
vehicle in a safe location. If you
have to use a phone while driving,
exercise extreme caution at all
times so full attention may be
given to vehicle operation.
.If you find yourself unable to de-
vote full attention to vehicle op-
eration while talking on the phone,
pull off the road to a safe location
and stop your vehicle before doing
so.
CAUTION
To avoid draining the vehicle battery,
use a phone only after starting the
engine or the hybrid system.
Your vehicle is equipped with Bluetooth®
Hands-Free Phone System. If you are an
owner of a compatible Bluetooth® en-
abled cellular phone, you can set up the
wireless connection between your cellular
phone and the in-vehicle phone module.
With Bluetooth® wireless technology, you
can make or receive a telephone call with
your cellular phone in your pocket.
Once a cellular phone is connected to the
in-vehicle phone module, the procedure
for connecting the phone does not need
to be performed again. Your phone is
automatically selected with the in-vehicle
phone module when the ignition switch is
placed in the ON position with the se-
lected cellular phone turned on and
carried in the vehicle.
You can register up to 5 different Blue-
tooth® devices in the in-vehicle phone
module. However, you can talk on only
one cellular phone at a time.
The Voice Recognition system supports
phone commands, so dialing a phone
number using your voice is possible.
“7. Voice recognition”
Before using the Bluetooth® Hands-Free
Phone System, refer to the following
notes.
.Wireless LAN (Wi-Fi) and the Blue-
tooth® functions share the same fre-
quency band (2.4 GHz). Using the
Bluetooth® and the wireless LAN func-
tions at the same time may slow down
or disconnect the communication and
cause undesired noise. It is recom-
mended that you turn off the wireless
LAN (Wi-Fi) when using the Bluetooth®
functions.
.Set up the wireless connection be-
tween a compatible cellular phone and
the in-vehicle phone module before
using the Bluetooth® Hands-Free
Phone System.
.For U.S. and Canada:
Some Bluetooth® enabled cellular
phones may not be recognized by
the in-vehicle phone module. Visit the
website below for a recommended
phone list.
www.nissanusa.com/bluetooth/
.For Mexico:
Some Bluetooth® enabled cellular
phones may not be recognized by
the in-vehicle phone module. Consult
a NISSAN dealer for details regarding
phone compatibility.
.You will not be able to use a hands-
free phone under the following condi-
tions:
— Your vehicle is outside of the tele-
phone service area.
— Your vehicle is in an area where it is
difficult to receive radio waves; such
as in a tunnel, in an underground
4-2
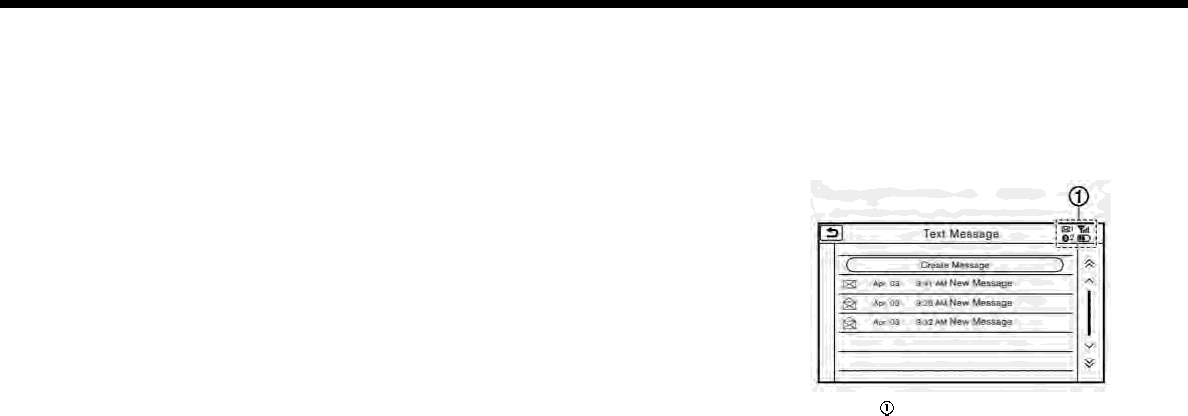
parking garage, behind a tall build-
ing or in a mountainous area.
— Your cellular phone is locked in
order to prevent dialing.
.When the radio wave condition is not
ideal or ambient sound is too loud, it
may be difficult to hear the other
person’s voice during a call.
.Immediately after the ignition switch is
placed in the ON position, it may be
impossible to receive a call for a short
period of time.
.Do not place the cellular phone in an
area surrounded by metal or far away
from the in-vehicle phone module to
prevent tone quality degradation and
wireless connection disruption.
.While a cellular phone is connected
through the Bluetooth® wireless con-
nection, the battery power of the
cellular phone may discharge quicker
than usual.
.For U.S. and Canada:
Visit the website below for trouble-
shooting help if the Bluetooth® Hands-
Free Phone System seems to be mal-
functioning.
www.nissanusa.com/bluetooth/
.For Mexico:
If the Bluetooth® Hands-Free Phone
System seems to be malfunctioning, it
is recommended you consult a NISSAN
dealer for support.
.Some cellular phones or other devices
may cause interference or a buzzing
noise to come from the audio system
speakers. Storing the device in a dif-
ferent location may reduce or elim-
inate the noise.
.Refer to the cellular phone Owner’s
Manual regarding the telephone pair-
ing procedure specific to your phone,
battery charging, cellular phone an-
tenna, etc.
.The antenna display on the monitor
may not coincide with the antenna
display of some cellular phones.
.The battery display on the monitor
may not coincide with the battery
display of some cellular phones.
.Keep the interior of the vehicle as quiet
as possible to hear the caller’s voice
clearly as well as to minimize its
echoes.
.If reception between callers is unclear,
adjusting the incoming or outgoing
call volume may improve the clarity.
.The microphone is located near the
map light.
.Reduce background noise as much as
possible by closing windows and
pointing HVAC vents away from the
ceiling.
INDICATORS
Indicators for phone and text messa-
ging are displayed on the top of the
screen.
4. Hands-Free Phone
4-3
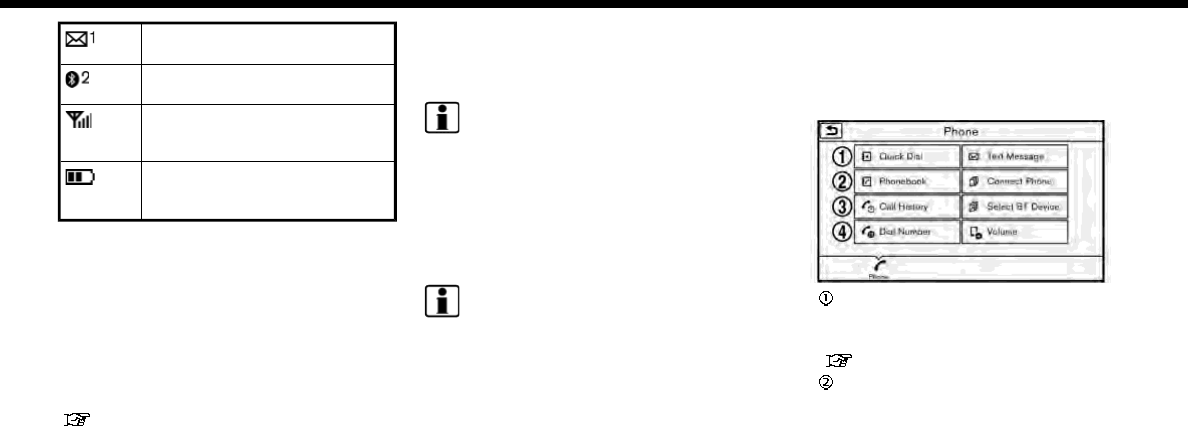
4. Hands-Free Phone
Indicates the number of unread
received messages.
Indicates the Bluetooth® device
that is selected.
Indicates the strength of the
signal the Bluetooth® device is
receiving.
Indicates the amount of re-
maining Bluetooth® device bat-
tery.
PHONE
Connecting Bluetooth® Hands-
free Phone
A cellular phone device must be con-
nected to the Bluetooth® Hands-Free
Phone System before operation. Up to 5
Bluetooth® devices can be connected to
the system.
“Connecting Bluetooth® device”
(page 2-26)
Phone selection
Select one of the connected devices for
operation.
1. Touch [Phone] on the Launch Bar.
2. Touch [Select BT Device]. A list of the
connected cellular phones is dis-
played.
3. Touch one of the connected cellular
phones from the list.
4. Touch [Connect].
INFO:
Touch [Edit] to change the device
name. Touch [Delete] to delete the
device from the device list.
5. When the device selection is success-
ful, a message on the touch screen
display indicates that the cellular
phone was selected.
INFO:
To select a phone, Bluetooth® of the
phone device needs to be turned on.
Making a call
1. Touch [Phone] on the Launch Bar.
2. Select one of the following methods to
make a call.
[Quick Dial] :
Select a telephone number from a list
of personally selected numbers.
“Quick Dial” (page 4-12)
[Phonebook] :
Select a person and the phone num-
ber you wish to call from the phone-
book.
Depending on the device, the phone-
book will be downloaded from the
cellular phone automatically when it
is connected. If the automatic down-
load does not take place, the tele-
phone number must be transferred to
the hands-free phone system from the
cellular phone prior to using this
method.
4-4
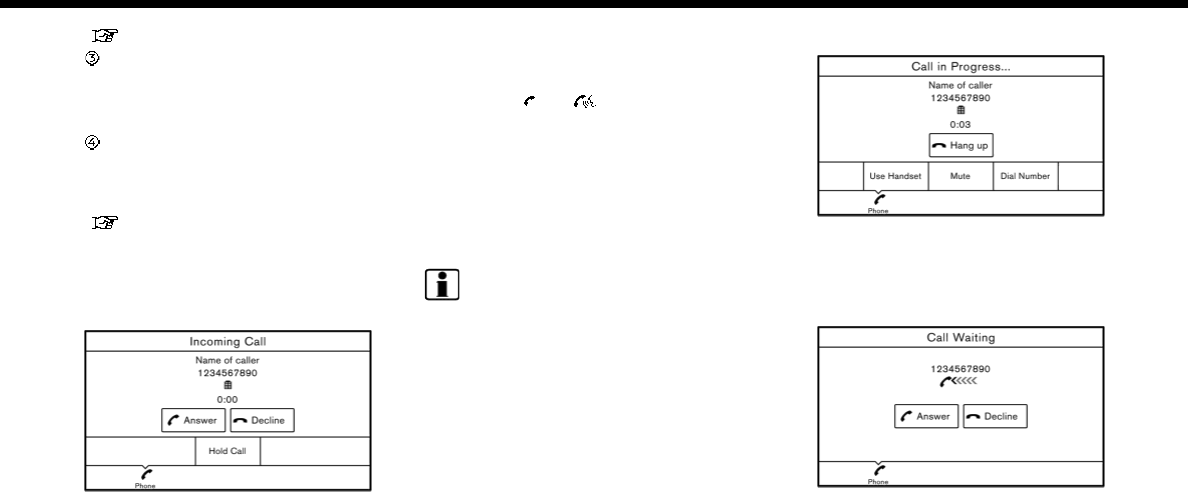
“Phone settings” (page 4-10)
[Call History] :
Select a telephone number from re-
cent incoming, outgoing or missed
calls.
[Dial Number] :
Enter the phone number manually
using the keypad displayed on the
screen and touch [OK].
“How to input letters and num-
bers” (page 2-18)
3. Dialing will start and the screen will
change to the call in progress screen.
Receiving a call
When you receive a phone call, a notifica-
tion message is displayed on the touch
screen display with a ring tone.
Taking a call:
To answer the call, take one of the
following actions.
.Push <>/< > on the steering
wheel.
.Touch [Answer].
Rejecting a call:
To reject the call, touch [Decline].
Holding a call:
To hold the call, touch [Hold Call].
INFO:
Operation for answering and rejecting a
received phone call is also available on the
vehicle information display. Refer to the
vehicle Owner’s Manual for details.
During a call
The screen as illustrated will appear dur-
ing a call.
To hang up the phone, touch [Hang up].
Call from a second person:
When another phone call is received
during a call, the screen as illustrated will
appear.
4. Hands-Free Phone
4-5

4. Hands-Free Phone
Rejecting call from a second person:
To reject a call from the second person
and continue the conversation with the
first caller, touch [Decline].
Answering call from a second person:
To answer the call from the second
person and place the first caller on hold,
take one of the following actions.
.Push <>/< > on the steering
wheel.
.Touch [Answer].
The screen as illustrated will appear dur-
ing a call with a second person.
To hang up the phone and return to the
conversation with the first caller, touch
[Hang up].
To switch between two calls on line, touch
[Switch Call].
Operations during a call:
There are some options available other
than hanging up a call or answering/
rejecting incoming calls.
Touch one of the following displayed keys
on the screen to take action.
Available
item
Action
[Use Handset] Transfer the call to the
cellular phone.
[Mute]/[Can-
cel Mute]
When muted, your voice
will not be heard by the
person on the other end of
the line.
[Dial Number] Using the touch tone, send
digits to the connected
party for using services
such as voicemail.
[Switch Call]* Answer another incoming
call. The person you are
talking to will be placed on
hold. Push once more to
speak to the person on
hold again.
*: Available when a call is received while on
the line with another person. The avail-
ability of this function depends on the
phone device.
INFO:
To adjust the person’s voice to be louder
or quieter, push + or - side of <>on the
steering wheel or turn <VOL/ >or
<VOLUME/ >, while talking on the
phone.
HANDS-FREE TEXT MESSAGING
ASSISTANT
WARNING
.Use the text messaging feature
after parking your vehicle in a safe
location. If you have to use the
feature while driving, exercise ex-
treme caution at all times so full
attention may be given to vehicle
operation.
.Laws in some jurisdictions may
restrict the use of “Text-to-
Speech.” Check local regulations
before using this feature.
.Laws in some jurisdictions may
restrict the use of some of the
applications and features, such as
social networking and texting.
Check local regulations for any
requirements.
4-6
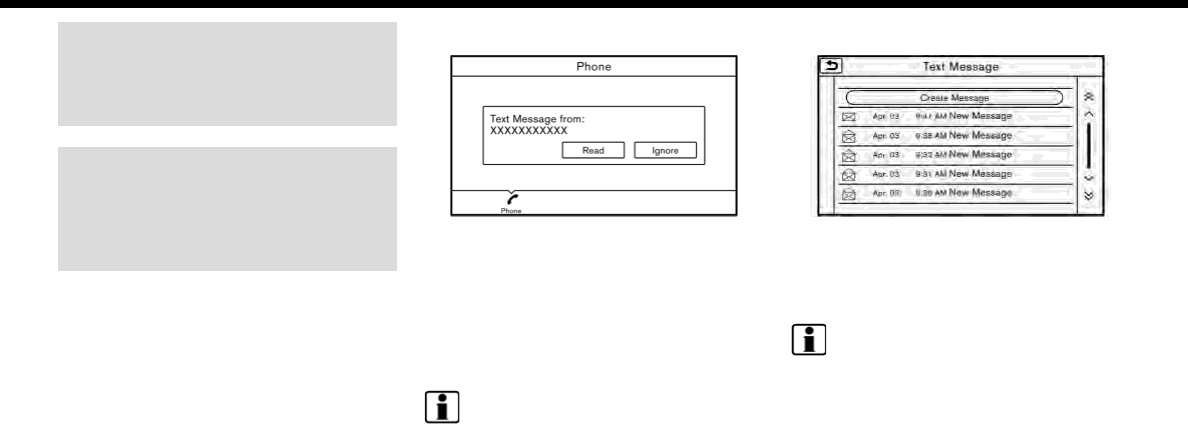
.If you are unable to devote full
attention to vehicle operation
while using the text messaging
feature, pull off the road to a safe
location and stop your vehicle.
CAUTION
This feature is disabled if the con-
nected device does not support it. See
the phone’s Owner’s Manual for de-
tails and instructions.
The system allows for the sending and
receiving of text messages through the
vehicle interface.
Receiving a message
When the cellular phone connected to the
vehicle receives a text message, a notifi-
cation will appear on the vehicle informa-
tion display and on the touch screen
display with a tone.
To check the message, touch [Read].
Touch [Ignore] to save the message to
be checked later.
INFO:
.Depending on the phone device, noti-
fication display setting needs to be
turned on on the phone device.
.Operation for reading a new message
is also available on the vehicle infor-
mation display. Refer to the vehicle
Owner’s Manual.
Displaying received message list
1. Touch [Phone] on the Launch Bar.
2. Touch [Text Message].
3. Touch an item on the list to read or
reply to the message.
INFO:
Up to 20 messages can be stored in the
message list.
4. Hands-Free Phone
4-7
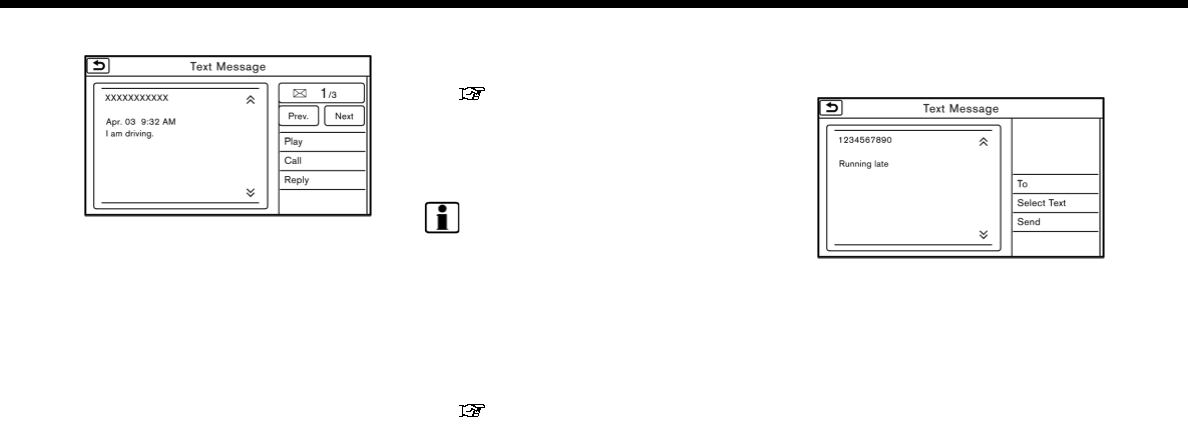
4. Hands-Free Phone
Received message screen
Example
Touching [Read] on the new message
notification screen or selecting a message
from the message list will show the details
of the received message on the display.
Available actions:
.[Prev.]:
Touch to read the previous message.
.[Next]:
Touch to read the next message.
.[Play]/[Stop]:
Touch [Play] to have the hands-free
phone system read out the received
message. Touch [Stop] to stop read-
ing.
.[Call]:
If the sender of the message is regis-
tered in the Phonebook, touch this
icon to make a call to the sender.
.[Reply]:
A reply message can be selected from
the template.
“Sending a text message”
(page 4-8)
.[Exit]:
Touch to exit the text messaging
screen.
INFO:
.Available keys may vary depending on
the situations.
.If the sender’s name and phone num-
ber is registered in the Phonebook, the
name of the sender is displayed when
a message is received.
.The volume of the voice for text
message reading can be adjusted.
“Volume and Beeps settings”
(page 2-24)
.Some of the operations are also avail-
able on the vehicle information dis-
play. Refer to the vehicle Owner’s
Manual for details.
Sending a text message
This function may not be supported
depending on the phone device.
1. Touch [Phone] on the Launch Bar.
2. Touch [Text Message].
3. Touch [Create Message].
4-8

The following items are available.
Available item Action
[To]
[Quick Dial] Select a recipient from Quick Dial.
[Phonebook] Select a contact from the Phonebook.
[Call History] Select a contact/phone number from call history.
[Enter Number by Keypad] Enter the phone number of the recipient using the keypad. Touch [OK] to
confirm the address.
[Select Text] [Fixed Text] Touch to display a list of pre-defined text messages.
[Custom Text] Touch to display a list of custom text message templates.
Custom text can be created or edited from the setting menu.
“Phone and text message assistant settings” (page 4-10)
[Send] Touch to send the message.
4. Hands-Free Phone
4-9

4. Hands-Free Phone
PHONE AND TEXT MESSAGE ASSISTANT SETTINGS
Phone settings
Bluetooth® Hands-Free Phone System settings can be changed according to the user’s preference.
1. Touch [Settings] on the Launch Bar.
2. Touch [Phone].
The following phone setting items are available.
Setting item Action
[Quick Dial] [Edit] Entries in the Quick Dial can be edited. Touch [Add New] to register
a new entry.
[Delete All] Deletes all of the phone number in the Quick Dial.
[Call History] [Incoming] Items in the calls history can be deleted or be registered in the
Quick Dial.
[Outgoing]
[Missed]
[Phonebook] [Download Entire Phonebook] All of the phone numbers that are stored in a phonebook of a
cellular phone that is connected to the vehicle are downloaded at
once.
[Download 1 Entry] Each of the phone numbers that are stored in the phonebook of a
cellular phone that is connected to the vehicle is downloaded one
by one.
[Downloaded List] The downloaded phonebook data is displayed. The items on the
list can be added to the Quick Dial entries or be deleted from the
phonebook.
4-10

[Text Message] [Text Message] Turns the message function on/off.
[Text Message Ringtone] Turns the incoming message sound on/off.
[Signature] Turns the signature setting for the outgoing text message on/off.
[Auto Reply] Turns the automatic reply of fixed messages on/off.
[Auto Reply Text Message] Selects and sets an automatic reply message.
[Sending Retry Count] Sets the number of retries after failing to send a text message.
[Edit Custom Text] Edits the custom text.
[Volume] [Ringtone] Adjust the volume level of the ringtone by touching [+] or [-].
[Incoming Call] Adjust the incoming call volume by touching [+] or [-].
[Outgoing Call] Adjust the outgoing call volume by touching [+] or [-].
[Automatic Hold] When this function is activated, an incoming phone call will be put
on hold automatically.
[Vehicle Ringtone] When this function is activated, a specific ringtone that is different
from that of the cellular phone will sound when receiving a call.
[Auto Downloaded] Turns the automatic download on/off.
INFO:
The phone volume can also be changed by touching [Phone] on the Launch Bar and then touching [Volume].
4. Hands-Free Phone
4-11
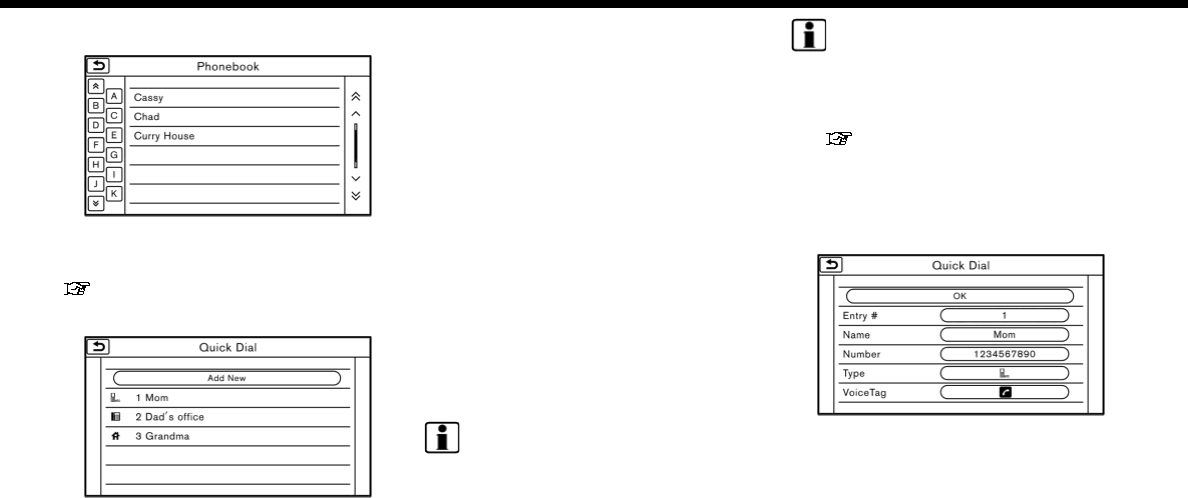
4. Hands-Free Phone
Phonebook
Phonebook information in cellular phones
can be downloaded to be used for making
calls and sending text messages.
“Phone settings” (page 4-10)
Quick Dial
Up to 5 Quick Dial entries can be regis-
tered.
Quick Dial entries can be used to make a
call or to send text messages.
Registration:
1. Touch [Phone] on the Launch Bar.
2. Touch [Quick Dial].
3. Touch [Add New] to register a phone
number to the Quick Dial list.
4. Select a method for registration.
Available methods:
.[Copy from Call History]:
A phone number can be selected
from [Incoming], [Outgoing], or
[Missed] call history lists.
.[Copy from Phonebook]:
A phone number can be selected
from the Phonebook.
.[Enter Number by Keypad]:
A phone number can be entered
manually using keypad.
INFO:
Available methods may vary depend-
ing on conditions.
5. The registration screen is displayed.
Enter the phone number and edit the
entry information as necessary.
6. Touch [OK] to save the entry.
INFO:
Quick Dial entries can also be regis-
tered by touching [Settings] on the
Launch Bar and then selecting
[Phone].
“Phone settings” (page 4-10)
Voice Tag:
A custom voice tag can be recorded for
each of the items registered in the Quick
Dial and be used to dial the number by
speaking it.
On the Quick Dial registration screen,
select [VoiceTag].
4-12

Available
Items
Action
[Play] Play the recorded voice tag.
[Store] Touch to record a voice tag for
the phone number.
[Replace] Touch to rerecord the voice
tag.
[Delete] Touch to delete the voice tag.
BLUETOOTH® SETTING
The Bluetooth® setting can be changed.
1. Touch [Settings] on the Launch Bar.
2. Touch [Bluetooth].
Available item Action
[Bluetooth] If this setting is turned off, the connection between the Bluetooth® devices and the in-
vehicle Bluetooth® module will be canceled.
[Connect Device] Connects to the Bluetooth® device. Up to 5 devices can be registered.
[Select BT Device] [Phone] Registered devices are shown on the list. Select a Bluetooth® device from the list.
Information of the selected device can be edited and the device can also be deleted from
the device list.
[Audio Player]
[Edit Bluetooth Informa-
tion]
[OK] Touch to apply the changes after editing the Bluetooth® information.
[PIN] PIN code can be checked and changed.
[Device Name] Device Name can be checked and changed.
[Device Address] Device Address can be checked.
4. Hands-Free Phone
4-13

4. Hands-Free Phone
MEMO
4-14

5 Information
Information menu ........................................................................ 5-2
NissanConnect
SM
Services (if so equipped) ............. 5-7
Subscription to NissanConnect
SM
Services ....... 5-7
Legal disclaimer ...................................................................... 5-7
NissanConnect
SM
Services features ........................ 5-7
NissanConnect
SM
Services Menus ......................... 5-11
Emergency support........................................................... 5-15
NissanConnect
SM
Services settings ...................... 5-17
SiriusXM Travel Link (for U.S. and Canada) ............ 5-18
Viewing SiriusXM Travel Link...................................... 5-18
Apple CarPlay ............................................................................. 5-20
Compatibility ........................................................................ 5-20
Apple CarPlay operation ............................................. 5-21
Apple CarPlay settings ................................................. 5-22
Apple CarPlay system limitations ........................ 5-22
Android Auto ................................................................................ 5-23
Compatibility ........................................................................ 5-23
Initial Android phone settings ................................ 5-24
Android Auto operation .............................................. 5-24
Android Auto settings ................................................... 5-25
Android Auto system limitations .......................... 5-26
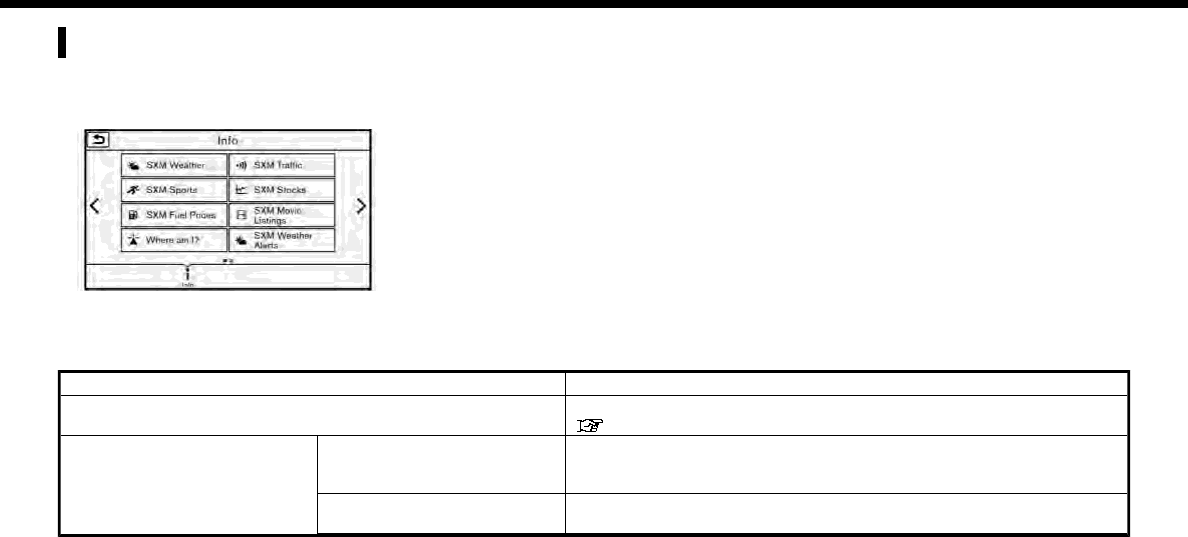
5. Information
INFORMATION MENU
The information screen sets or displays various information that is helpful for using the vehicle. Available items include the SiriusXM
Travel Link information (for U.S. and Canada), traffic information (for U.S. and Canada), vehicle information, current location
information, navigation software version, etc.
Touch [Info] on the Launch Bar on the screen to display the Information menu.
Available items may vary depending on models and specifications.
For U.S. and Canada
Menu item Result
[NissanConnect Services] Display the NissanConnect
SM
Service menu screen.
“NissanConnect
SM
Services” (page 5-7)
[SXM Weather] [Current Conditions] Display current weather condition information. Touch [Favorite City] to
see conditions for a favorite location. To change the favorite location,
touch [Change City].
[5-Day Forecast] Touch [Favorite City] to see the 5-day weather forecast for a selected
location. To change the selected location, touch [Change City].
5-2

Menu item Result
[Graphical Map] Display a graphical map of the weather information on the display.
Initially, the system will display all available information. Touch the scale
button to show [Zoom In]/[Zoom Out] for changing the map scale to 320
miles (640 km) U.S., 32 miles (64 km) Middle scale or 5 miles (10 km) Detail
scale. Touch [Radar] to stop displaying the weather radar map. Touch
[Chart] to stop displaying weather surface features and pressure, when
the map scale is U.S. Touch [Storm] to stop displaying Storm information,
when the map scale is U.S. or Middle scale. Touch [Winds] to stop
displaying wind information, when map scale is Detail scale.
[Alert Map] Show Alert Map information on the display. Touch [Legend] to display the
detailed contents of information used for the current warning/advisory
map by type. Touch the scale button to show [Zoom In]/[Zoom Out] for
changing the map scale to 320 miles (640 km) U.S., 32 miles (64 km)
Middle scale or 5 miles (10 km) Detail scale.
[Weather Alert] Turn the weather alert on/off.
[SXM Traffic] [Info on Route] Touch to display traffic information detected on the route to the
destination.
[Nearby Traffic Info] Touch to display traffic information detected near the current vehicle
location.
[SXM Sports] Touch [Yes] to view a list of available sports that can be added or touch
[No] to go back. Select a favorite sport and division/conference from the
list to view scores. A favorite team cannot be selected. When viewing a
favorite, a list of recent and near future games/events is displayed. Touch
[Tune] to go to a channel that is broadcasting the event live. A score will
also display while the event is broadcasting. Touch [Delete One] to delete
a favorite sport or [Delete All] to delete all favorite sports. Up to 10 sports
can be saved.
5. Information
5-3

5. Information
Menu item Result
[SXM Stocks] To add a favorite stock, touch [Yes] to display a List of Matching Stocks.
Select a stock by performing a search or typing in the symbol. Touch [Yes]
to add a stock to the list or touch [No] to go back. Touching [Add Stock]
will also allow adding a favorite stock. Once a stock is added, it’s price,
trend, and date can be viewed. Red indicates the stock is down and green
indicates the stock is up. Touch [Delete Stock] to [Delete All] or [Delete
One]. Up to 20 stocks can be saved. Only supported stocks can be added.
[SXM Fuel Prices] [Select Fuel] Select a gas station from the list to see all of the fuel prices or to set it as a
destination.
Touch [Select Fuel] to display prices for a different fuel type.
Touch [By Distance]/[By Price] to sort the list by distance or by price.
Touch [Near Dest]/[Nearby] to show a list of gas stations near the
destination or near the current location.
[By Distance]/[By Price]
[Near Dest]/[Nearby]
[SXM Movie Listings] [Nearby Theaters] Displays a list of theaters by distance. Select the theater for Theater
Details such as its location and phone number. While viewing the Theater
Details, touch [Go here] for route guidance. While viewing the list of
Nearby Theaters, touch [Movies] to display a list of movies that are
playing at that theater. Select the movie to display Movie Details including
the rating, running time, and show times.
[Current Movies] Displays a list of movies that are currently playing. Touch [Details] to
display Movie Details including the rating, running time, and show times.
While viewing the list of Current Movies, select the movie to display a list
of Nearby Theaters. Select the theater for Theater Details such as its
location and phone number. Touch [Movies] for a detailed description
and show times of the selected movie. Touch [Go Here] for route
guidance to the selected theater.
[Vehicle] [Energy Flow] (model with hy-
brid system)
Displays energy information. Touch [History] to display the Fuel Economy
History screen.
For details of the Energy Flow, refer to the vehicle Owner’s Manual.
[Eco Drive Report] Displays the Eco Drive Report.
5-4

Menu item Result
[Where am I?] The name and distance of the next/previous street, and other informa-
tion that indicates the current vehicle location are displayed. GPS
coordinates and altitude are shown on the bottom right.
[SXM Weather Alerts] Display the list of weather alerts.
Touch [Nearby Current] to display nearby current alerts, touch [Nearby
Destination] to display nearby destination alerts.
[Navigation Version] Displays the information of the current map version, program version,
unit code, etc.
[GPS Position] Displays GPS information, such as number of satellites, latitude/long-
itude, and approximate altitude.
[Apple CarPlay] Displays the Apple CarPlay screen.
“Apple CarPlay ” (page 5-20)
[Nissan’s Help for Apple CarPlay] Displays tips for Apple CarPlay operation.
“Apple CarPlay ” (page 5-20)
[Android Auto] Displays the Android Auto screen.
“Android Auto” (page 5-23)
[Nissan’s Help for Android Auto] Displays tips for Android Auto operation.
“Android Auto” (page 5-23)
INFO:
A SiriusXM Travel Link or SiriusXM Traffic subscription is necessary to receive SiriusXM information services.
5. Information
5-5

5. Information
For Mexico
Menu item Result
[Where am I?] The name and distance of the next/previous street, and other information
that indicates the current vehicle location are displayed. GPS coordinates
and altitude are shown on the bottom right.
[Navigation Version] Displays the information of the current map version, program version, unit
code, etc.
[GPS Position] Displays GPS information, such as number of satellites, latitude/longitude,
and approximate altitude.
[Apple CarPlay] Displays the Apple CarPlay screen.
“Apple CarPlay ” (page 5-20)
[Nissan’s Help for Apple CarPlay] Displays tips for Apple CarPlay operation.
“Apple CarPlay ” (page 5-20)
[Android Auto] Displays the Android Auto screen.
“Android Auto” (page 5-23)
[Nissan’s Help for Android Auto] Displays tips for Android Auto operation.
“Android Auto” (page 5-23)
5-6

NISSANCONNECT
SM
SERVICES
(if so equipped)
SUBSCRIPTION TO NISSANCON-
NECT
SM
SERVICES
Except for services received under De-
monstration Mode, it is necessary to
subscribe to NissanConnect
SM
Services in
order to use the NissanConnect
SM
Ser-
vices. To activate NissanConnect
SM
Ser-
vices, you can enroll via the
NissanConnect
SM
Services Companion
App, NissanConnect
SM
portal website, or
it is recommended you contact a NISSAN
dealer.
NissanConnect
SM
Services are offered by
SiriusXM or other third party vendors in
accordance with the terms and condi-
tions and privacy policies outlined in a
Subscription Agreement.
LEGAL DISCLAIMER
Avoid operating NissanConnect
SM
Ser-
vices in such a way that you are distracted
while driving. Except for services provided
under Demonstration Mode, a NissanCon-
nect
SM
Services Subscription Agreement
is required to use this service.
Beginning on the date of purchase of your
vehicle, a trial period for the services is
included for a limited period of time. At the
expiration of the trial subscription period,
your credit card will be charged if there is
a credit card on file, and your service will
automatically renew in accordance with
the terms of your NissanConnect
SM
Ser-
vices Subscription Agreement.
Services are dependent upon subscription
enrollment and the telematics device
being in operative condition, cellular con-
nection availability, navigation map data,
and GPS satellite signal reception, which
can limit the ability to reach NissanCon-
nect
SM
Services or to receive support. The
service requires a compatible GSM/GPRS
cellular network. Should the cellular pro-
vider terminate or restrict network ser-
vice, services will not be available. Under
this circumstance, your service may be
suspended or terminated without notice
and without liability to NISSAN, NISSAN’s
third party service providers, the under-
lying wireless carrier or any third party
beneficiary. In the event that a change of
telecommunications systems or services
becomes necessary, you are solely re-
sponsible for replacing, as well as the cost
of replacing, any equipment in the vehicle
that is necessitated. Terms and conditions
of NissanConnect
SM
Services Subscription
Agreement apply.
NISSANCONNECT
SM
SERVICES
FEATURES
NissanConnect
SM
Services provides var-
ious types of information and services by
connecting your vehicle to the Nissan-
Connect
SM
Services Data Center and Nis-
sanConnect
SM
Services Response Center
using the TCU (Telematics Control Unit)
installed in your vehicle.
WARNING
.Radio waves could adversely af-
fect electric medical equipment.
Individuals who use a pacemaker
should contact the device manu-
facturer regarding any possible
effects before using the system.
.The TCU antenna is installed inside
the upper central part of the in-
strument panel. An occupant
should not get any closer to the
antenna than specified by the
pacemaker manufacturer. The
radio waves from the TCU antenna
may adversely affect the opera-
tion of the pacemaker while using
the NissanConnect
SM
Services.
.Please note that the Automatic
Collision Notification (ACN) service
and Emergency Calling (E-Call)
5. Information
5-7

5. Information
function cannot be used in the
following conditions:
— The vehicle moves outside the
NissanConnect
SM
Services area
and connection with the TCU
(Telematics Control Unit) is af-
fected.
— The vehicle is in a location with
poor signal reception such as a
tunnel, underground parking,
behind a building or in a moun-
tainous area.
.It may not be possible to make an
emergency call depending on the
severity of a collision and/or emer-
gency.
.Emergency functions and services
will not be available without a paid
subscription to NissanConnect
SM
Services.
.The Automatic Collision Notifica-
tion (ACN) service may not function
properly depending on the sever-
ity of a collision and/or emer-
gency.
INFO:
.NissanConnect
SM
Services features
are dependent upon subscription en-
rollment and the telematics device
being in operative condition, cellular
connectivity, navigation map data and
GPS satellite signal reception. Terms
and conditions of the NissanCon-
nect
SM
Services Subscription Agree-
ment apply.
.Enrollment is required in order to
receive NissanConnect
SM
Services.
The services that can be received vary
depending on the plan in which you
are enrolled.
.A trial period is included beginning on
the date of purchase, however you
must still be enrolled and activated to
use services.
.After the trial period, you must enroll in
a paid subscription for NissanCon-
nect
SM
Services to continue using the
features. The services that can be
received vary depending on the plan
to which you subscribe.
.Laws in some jurisdictions may restrict
the use of “Text-to-Speech.” Check
local regulations before using this
feature.
NissanConnect
SM
Services may be up-
dated. The latest detailed information is
available on the following websites or
from the support line.
NissanConnect
SM
Services website:
For U.S.
www.nissanusa.com/connect
For Canada
www.nissan.ca/nissanconnect
(English)
www.nissan.ca/nissanconnect/fr
(French)
NissanConnect
SM
Services support
line:
1-855-426-6628
.Roadside Assistance Service:
Enhanced Roadside Assistance allows
you to receive assistance from the
Roadside Response Specialist for a
non-emergency incident that requires
a towing or third-party response ser-
vice. The service is accessed by touch-
ing the Voice Menu button on the
navigation screen. Roadside Assis-
tance may also be used in conjunction
with the Emergency Assistance ser-
vice, if warranted.
“Emergency support” (page 5-15)
5-8

.Emergency Calling (E-Call):
The Emergency Calling (E-Call) feature
provides emergency assistance by
connecting to a Response Specialist.
In the event of an emergency, by push
the in-vehicle <SOS> button to use this
feature. The Response Specialist pro-
vides various assistance depending on
the situation.
“Emergency support” (page 5-15)
.Automatic Collision Notification
(ACN):
The TCU (Telematics Control Unit)
generates a signal automatically to
the NissanConnect
SM
Services Re-
sponse Center in the case of an
accident severe enough to trigger
one of the vehicle’s air bags. Upon
the signal, a Response Specialist re-
ceives the vehicle location and custo-
mer information and notifies the
proper authorities in accordance with
established policies and procedures.
.Curfew Alert:
Customers can set time interval for
acceptable and unacceptable opera-
tion of the vehicle via NissanCon-
nect
SM
Portal Website and
NissanConnect
SM
Services Companion
App. If the time restrictions are vio-
lated, the customer will be automati-
cally notified (e-mail, text message, or
phone call).
.Remote Door Lock/Unlock:
The Remote Door Lock/Unlock feature
allows the customer to access the
vehicle remotely from the NissanCon-
nect
SM
Services website or Companion
App to send lock or unlock commands
to the vehicle.
“Connecting to Interactive Voice
Menu” (page 5-12)
.Remote Sound Horn and Flash
Lights:
Customers can activate the vehicle’s
headlights and horn via the Nissan-
Connect
SM
Services website or Com-
panion App.
.Remote Engine Start (if so equipped):
Customers can remotely start the
vehicle via the NissanConnect
SM
Ser-
vices website or Companion App.
.Alarm Notification:
Customers will be notified if the vehicle
alarm system is activated based on
their notification preferences (e-mail,
text, phone call).
.Boundary Alert:
Customers can set an area for the
vehicle to stay in or out of via the
NissanConnect
SM
Services website or
Companion App. Customers will be
notified when vehicle is out-of-bounds
based on their notification prefer-
ences (e-mail, text, phone call).
.Maintenance Alert/Reminder:
The center sends maintenance and
other relevant info. to registered e-
mail address (PC/Mobile) based on the
vehicle information (e.g. driving mile-
age and etc.) sent at the center access
timing. Details of vehicle information
are separately examined.
.Send to Car:
Customers can access turn-by-turn
navigation provided by Google maps
and sent directly to the NissanCon-
nect
SM
vehicle.
.Journey Planner:
Customers can create a multiple way-
point route via Journey Planner on the
NissanConnect
SM
Services website
and send the details directly to their
vehicle.
.Destination Download:
Customers can search for different
locations via the NissanConnect
SM
Services website and send them di-
rectly to their vehicle.
5. Information
5-9

5. Information
.Connected Search:
Customers can access Internet search
engines directly from the vehicle to
find exact destinations to navigate to.
.Stolen Vehicle Locator:
In the event that the customer’s vehi-
cle is stolen, after filing a police report
the customer can contact NissanCon-
nect
SM
Services via phone and report
the vehicle stolen. At that point, Nis-
sanConnect
SM
Services emergency
support staff will work with authorities
to attempt to recover the vehicle.
.Valet Alert:
Customers will be notified if their
vehicle is driven more than 0.2 miles
once they activate Valet Alert via the
NissanConnect
SM
Services website or
Companion App.
Notice to Bluetooth® Hands-Free
Phone users
The Bluetooth® Hands-Free Phone Sys-
tem will be disabled and not be able to
take phone calls while the vehicle is
connected to the NissanConnect
SM
Ser-
vices Response Specialists or the emer-
gency support staff at the
NissanConnect
SM
Service Response Cen-
ter. This is to avoid various services by
NissanConnect
SM
Services Response Spe-
cialists (such as Assisted Search) and
NissanConnect
SM
Services emergency
support staff being interrupted by incom-
ing calls. Incoming phone calls received
while the vehicle is connected to the
Service Center will not be listed in the call
history of the Bluetooth® Hands-Free
Phone System. However those incoming
calls may be listed in the call history of
your mobile phone, depending on its
capabilities. After disconnecting commu-
nication with the NissanConnect
SM
Ser-
vices Response Specialist or
NissanConnect
SM
Services emergency
support staff, check the incoming call
history on your mobile phone when it is
safe to do so.
Service application
A separately purchased NissanConnect
SM
Services subscription is required. For more
details, refer to the NissanConnect
SM
Ser-
vices website or contact the NissanCon-
nect
SM
Services support line.
NissanConnect
SM
Services website:
For U.S.
www.nissanusa.com/connect
For Canada
www.nissan.ca/nissanconnect
(English)
www.nissan.ca/nissanconnect/fr
(French)
NissanConnect
SM
Services support
line:
1-855-426-6628
INFO:
If the vehicle is owned by another person
and is resold, the subscription for this
service must be canceled and all data
stored on the device must be deleted.
Operating tips
WARNING
.Use NissanConnect
SM
Services
after stopping your vehicle in a
safe location. If you have to use
NissanConnect
SM
Services while
driving, exercise extreme caution
at all times so full attention may be
given to vehicle operation.
.If you are unable to devote full
attention to vehicle operation
while talking with the NissanCon-
nect
SM
Services, pull off the road to
a safe location and stop your
vehicle.
5-10

.Do not use NissanConnect
SM
Services
with the engine or the hybrid system
stopped. Doing so may discharge the
vehicle battery.
.NissanConnect
SM
Services cannot be
used under the following conditions:
— NissanConnect
SM
Services subscrip-
tion has expired.
— The vehicle is outside the area
where the cellular network service
is receivable.
— The vehicle is in a location with poor
signal reception such as tunnels,
underground parking garages, be-
hind buildings or in mountainous
areas.
— The line is busy.
— The TCU (Telematics Control Unit) or
other systems of your vehicle are
not working properly.
— The NissanConnect
SM
Services net-
work system is disabled.
.Information Feeds download cannot
be used when the vehicle is connected
to the NissanConnect
SM
Services Data
Center and NissanConnect
SM
Services
Response Center.
.Communication with the NissanCon-
nect
SM
Services Data Center is related
to the data communication mode and
may cause occasional difficulty in
receiving signals, and the signal recei-
vable area may be limited compared
to regular mobile phones.
.You may hear clicks or experience
interruptions while speaking with the
NissanConnect
SM
Services Response
Specialists. This is due to a shift in the
connection zone and is not a malfunc-
tion.
.Depending on the line used, the sound
volume may decrease. Adjust the vo-
lume as necessary.
.Received sounds may be distorted or
ambient noise may sound like voices
of a crowd. This is due to the use of the
digital line and is not a malfunction.
.You may hear your own voice from the
speaker when talking with the Nissan-
Connect
SM
Services Response Specia-
lists due to a network disturbance.
When this occurs, reconnect the line
after a few minutes or at a different
location.
.This vehicle incorporates a communi-
cation device that is called a TCU
(Telematics Control Unit). The commu-
nication connection between this unit
and the NissanConnect
SM
Data Center
allows for various services. When the
system connects to the NissanCon-
nect
SM
Data Center, an antenna icon
will appear in the upper right corner of
the screen. Use the service in a loca-
tion where the symbol representing
good signal reception appears on the
screen.
: When the signal reception is good
: When the signal reception is bad
.NissanConnect
SM
Services uses the
TCU (Telematics Control Unit). Even if
the signal strength bar of the in-
vehicle data communication module
indicates good reception, connection
to the NissanConnect
SM
Data Center
may be disabled. This does not indi-
cate a malfunction. Operate the sys-
tem again after a few minutes.
NISSANCONNECT
SM
SERVICES
MENUS
With the NissanConnect
SM
Services, var-
ious information can be received and
displayed on the screen. The information
can also be announced by the system.
1. Touch [Info] on the Launch Bar.
5. Information
5-11
5. Information
2. Touch [NissanConnect Services].
3. Select an item from the NissanCon-
nect
SM
Services menu screens.
Available items Content
[Connect to Voice
Menu]
The system con-
nects to the Nissan-
Connect
SM
Services
center. Various ser-
vices to support
your driving are
available by an-
swering Interactive
Voice Menu.
“Connecting to
Interactive
Voice Menu”
(page 5-12)
[Connected Search] Searches for a des-
tination via the In-
ternet and
commands the na-
vigation system to
set a route to the
destination.
“Searching by
connecting to
the internet”
(page 6-22)
[Message Box] The messages from
the NissanCon-
nect
SM
Data Center
that were referred
to previously are
displayed.
“Message Box”
(page 5-13)
[All Information
Feeds]
Displays a list of
available informa-
tion feeds.
“Viewing infor-
mation feeds”
(page 5-14)
[NissanConnect Ser-
vices Settings]
NissanConnect
SM
Services settings
can be changed.
“NissanConne-
ct
SM
Services
settings”
(page 5-17)
Connecting to Interactive Voice
Menu
Various services to support your driving
are available by using Interactive Voice
Menu. For more details, refer to the
NissanConnect
SM
Services website or
contact the NissanConnect
SM
Services
support line.
NissanConnect
SM
Services website:
For U.S.
www.nissanusa.com/connect
For Canada
www.nissan.ca/nissanconnect
(English)
www.nissan.ca/nissanconnect/fr
5-12

(French)
NissanConnect
SM
Services support
line:
1-855-426-6628
1. Touch [Info] on the Launch Bar.
2. Touch [NissanConnect Services].
3. Touch [Connect to Voice Menu].
4. The system connects to the Nissan-
Connect
SM
Services center and menu
options will be announced. Speak your
preferred option.
.Destination Assistance
Set a destination using an Interac-
tive operator system.
.Roadside Assistance
Connect to the Roadside Response
Specialist.
.Valet Alert
Turns on the Valet Alert function
and monitors the vehicle move-
ment within a certain range.
.Personal Assistance
Connects to the NissanConnect
SM
Services Response Specialist.
INFO:
.You can also connect to the Nissan-
Connect
SM
Services Interactive Voice
Menu by touching the Voice Menu
button on the map.
.After selecting [Connect to Voice
Menu], it may take some time until
the system initiates connection, de-
pending on the technical environment
and whether the TCU (Telematics
Control Unit) is being used by other
services.
.To avoid disconnecting the line, do not
turn off the engine or the hybrid
system.
Setting route to a searched des-
tination
Use Connected Search to find destina-
tions via the internet and set a route to
them directly from your navigation sys-
tem.
1. Touch [Info] on the Launch Bar.
2. Touch [NissanConnect Services].
3. Touch [Connected Search]. A key-
board is displayed.
4. Enter the keyword and touch [Search].
The system will connect to the Inter-
net and the search results will be
displayed.
5. Touch a preferred destination from
the list and touch [Start] to start the
route guidance.
INFO:
The Connected Search can also be set by
touching [Navi] on the Launch Bar and
then touching [Connected Search].
Message Box
The text messages from the NissanCon-
nect
SM
Data Center that were previously
received to are displayed.
5. Information
5-13
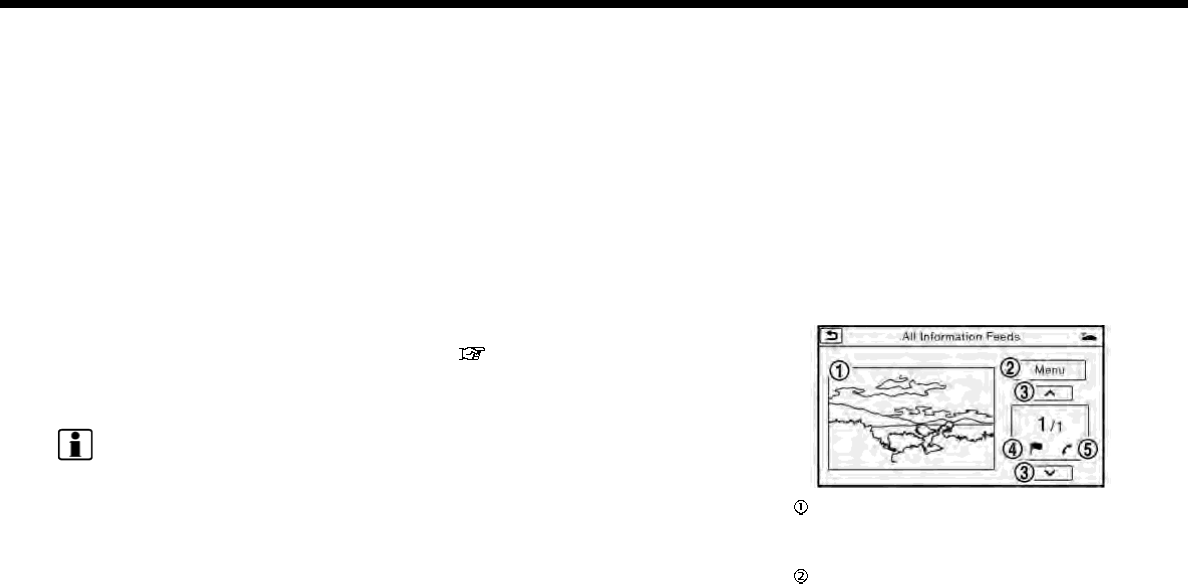
5. Information
1. Touch [Info] on the Launch Bar.
2. Touch [NissanConnect Services].
3. Touch [Message Box].
4. A history list is displayed. Highlight the
information.
Viewing information feeds
Contents of the various NissanConnect
SM
Services information can be downloaded.
1. Touch [Info] on the Launch Bar.
2. Touch [NissanConnect Services].
3. Touch [All Information Feeds]. A list
screen is displayed.
4. Touch a preferred folder. A list of
information feeds is displayed. The
content is announced by the system
(Text-to-Speech) while the vehicle is
being driven, or if parked, you can read
the content on the display.
INFO:
.Touch [Stop] during communication
with the NissanConnect
SM
Services
Data Center to cancel the connection.
.A message is displayed when the
communication is disconnected while
downloading information due to a
poor communication status. Select
[Yes] to restart the download.
.Laws in some jurisdictions may restrict
the use of “Text-to-Speech.” Check
local regulations before using this
feature.
.Some terminology such as personal
names, place names, special terms,
symbols, etc. may not be announced
correctly. This is not a malfunction.
.The system will pause announce-
ments when interrupted by the voice
guidance given by the navigation sys-
tem. When the voice guidance finishes,
the system will restart the announce-
ment.
.The volume can be adjusted when the
system announces the information.
“Volume and Beeps settings”
(page 2-24)
.The selected content is read out while
the vehicle is being driven, or if parked,
you can read the content on the
display.
.Content settings can be made using
the NissanConnect
SM
Services web-
site. For more details, refer to the
NissanConnect
SM
Services website or
contact the NissanConnect
SM
Services
support line.
NissanConnect
SM
Services website:
For U.S.
www.nissanusa.com/connect
For Canada
www.nissan.ca/nissanconnect
(English)
www.nissan.ca/nissanconnect/fr
(French)
NissanConnect
SM
Services support
line:
1-855-426-6628
Screen information
When information is downloaded from the
NissanConnect
SM
Services Data Center,
the contents of the information are dis-
played while the vehicle is stopped.
Contents:
The contents of the NissanConnect
SM
Services feeds are displayed.
Menu:
Stops the Text-to-Speech voice an-
5-14
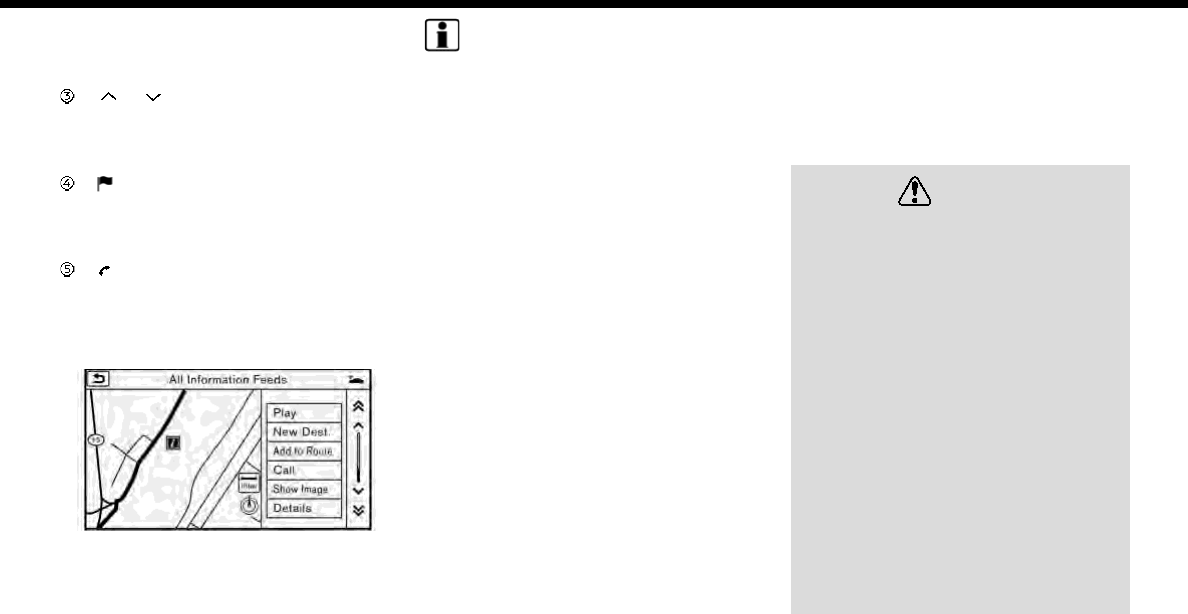
nouncements and displays the opera-
tion menu items on the right side of
the screen.
[ ]/[ ]:
Turns to the next or previous page if
the information has a number of
content pages.
:
If the information contains map in-
formation, the icon be displayed. It
can be set as the destination.
:
If the information contains phone
number information, the icon is dis-
played. It is possible to make a phone
call to the facility.
After parking the vehicle in a safe location
and touching [Menu], the operation menu
is displayed on the right side of the screen.
INFO:
The availability of the operation menu
items differs depending on the contents
of the selected information.
EMERGENCY SUPPORT
NissanConnect
SM
Services provides var-
ious services to support dealing with
emergencies of the subscribed vehicle
and the driver.
For example, in case of an illness or
serious injury, you can seek support by
pushing the in-vehicle <SOS> button and
connecting to NissanConnect
SM
Services.
NissanConnect
SM
Services can specify the
location of the vehicle via GPS, and the
information will be sent to the police or
other agencies as needed.
For information about other NissanCon-
nect
SM
Services emergency support re-
lated services, refer to the
NissanConnect
SM
Services Services web-
site or contact the NissanConnect
SM
Ser-
vices support line.
NissanConnect
SM
Services website:
For U.S.
www.nissanusa.com/connect
For Canada
www.nissan.ca/nissanconnect
(English)
www.nissan.ca/nissanconnect/fr
(French)
NissanConnect
SM
Services support
line:
1-855-426-6628
WARNING
.Please note that the Automatic
Collision Notification service and
Emergency Call function cannot be
used in the following conditions:
— Emergency functions and ser-
vices will not be available with-
out a paid subscription to
NissanConnect
SM
Services.
— The NissanConnect
SM
Services
network system is disabled.
— The vehicle moves outside the
service area where the TCU
(Telematics Control Unit) is con-
nected to the system.
— The vehicle is outside the area
where the cellular network ser-
vice is receivable.
— The vehicle is in a location with
poor signal reception such as
tunnels, underground parking
5. Information
5-15
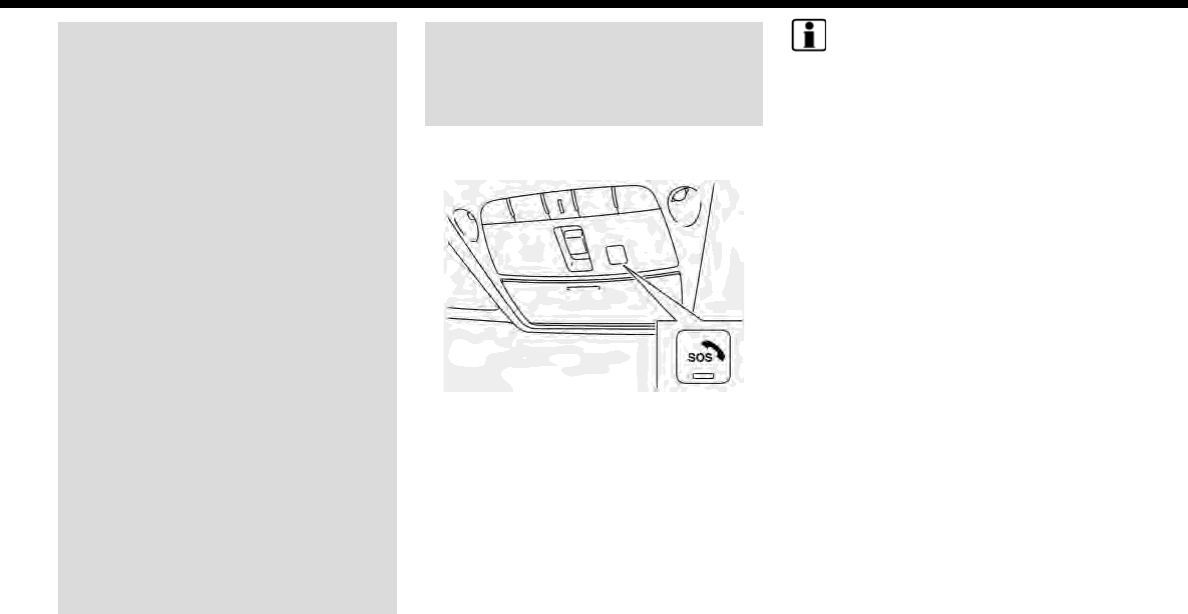
5. Information
garages, behind buildings or in
mountainous areas.
— The line is busy.
— The TCU (Telematics Control
Unit) or other systems of your
vehicle are not working properly.
— It may not be possible to make
an emergency call depending on
the severity of a collision and/or
emergency.
.Park the vehicle in a safe location
and set the parking brake before
operating <SOS>.
.Only use this service in case of an
emergency. There may be a pen-
alty for inappropriate use of the
service.
.Radio waves could adversely af-
fect electric medical equipment.
Individuals who use a pacemaker
should contact the device manu-
facturer regarding any possible
effects before using the system.
.The TCU (Telematics Control Unit)
antenna is installed inside the
upper central part of the instru-
ment panel. An occupant should
not get any closer to the antenna
than specified by the pacemaker
manufacturer. The radio waves
from the TCU antenna may ad-
versely affect the operation of the
pacemaker while using the Nis-
sanConnect
SM
Services.
Making an emergency call
1. Push <SOS>.
2. When the line is connected, speak to
the Response Specialist.
If you want to cancel the emergency call,
push and hold <SOS> for a few seconds.
INFO:
.After <SOS> is pushed, it may take
some time until the system initiates
connection, depending on the techni-
cal environment and whether the TCU
(Telematics Control Unit) is being used
by other services.
.An indicator light on <SOS> shows the
readiness of the emergency support
system. If the indicator light is not
illuminated, pushing <SOS> does not
connect your vehicle to the Response
Specialist.
The indicator light blinks while con-
nected to the NissanConnect
SM
Ser-
vices Response Center.
.Even when the indicator light is illumi-
nated, connection to the NissanCon-
nect
SM
Services Response Center may
not be possible. If this occurs in an
emergency situation, contact the
authorities by other means.
.To avoid disconnecting the line, do not
turn off the engine or the hybrid
system.
5-16
NISSANCONNECT
SM
SERVICES SETTINGS
The NissanConnect
SM
Services setting can be changed.
1. Touch [Info] on the Launch Bar.
2. Touch [NissanConnect Services].
3. Touch [NissanConnect Services Settings].
INFO:
[NissanConnect Services] can also be accessed from [Settings] on the Launch Bar.
Menu Action
[Information Feed Setting] [Edit Feed List] [Sync All Feeds] The latest information feeds received from the NissanConnect
SM
Services center.
[Initialize Feed List] Return the channel list to default.
[Delete Message Box] Delete all the items in the Message Box.
[Vehicle Information Shar-
ing with Nissan]
[Share Vehicle Information] Turn the vehicle information sharing function on/off.
[Delete Shared Vehicle Information] Delete all the items in the shared vehicle information.
[Unit ID Information] Display the Unit ID, TCU (Telematics Control Unit) ID, SIM ID and VIN
Information necessary for user registration.
[Reset all NissanConnect Services settings to default] All NissanConnect
SM
Services settings are returned to default.
[Vehicle Data Transmission Setting] When [OK] is touched, data transmission to the NissanConnect
SM
Data Center is enabled. Touch [Decline] to disable the Nissan-
Connect
SM
Services functions.
5. Information
5-17
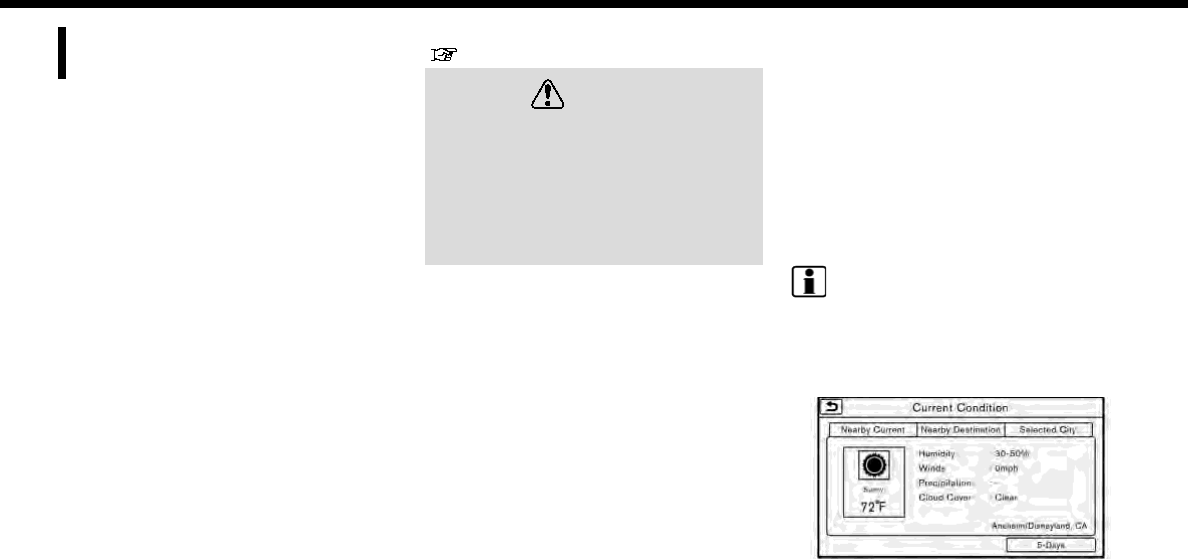
5. Information
SiriusXM TRAVEL LINK (for U.S.
and Canada)
SiriusXM Travel Link information is a sub-
scription service offered by SiriusXM Sa-
tellite Radio. It is necessary to subscribe to
use the SiriusXM Travel Link information.
This service provides real-time informa-
tion regarding current weather, fuel
prices, sports scores, stock tickers and
movie times where available. The SiriusXM
Travel Link is broadcast to the vehicle by
SiriusXM Satellite Radio.
The service enables you to view the
following information on the navigation
system:
*Current information around the destina-
tion
*Detailed information and forecasts of an
area of interest
*Countrywide and local maps with the
current weather, temperature, warnings
and road condition information
*List of warning/watches events detected
around the current location
*Pop-up messages on the navigation
screen with voice announcements when
warnings and watches are detected
around the current location
SXM service menus can be accessed from
the information screen.
“Information menu” (page 5-2)
WARNING
SiriusXM Travel Link information is not
a substitute for attentive driving.
Weather conditions change con-
stantly and emergency situations
can arise without warning. Relying
only on SiriusXM Travel Link informa-
tion could result in serious personal
injury.
VIEWING SiriusXM TRAVEL LINK
SiriusXM Satellite Radio and SiriusXM Tra-
vel Link subscriptions are sold separately
or as a package, and are continuous until
you call SiriusXM to cancel. See SiriusXM
Customer Agreement for complete terms
at www.siriusxm.com (for U.S.) or www.
siriusxm.ca (for Canada). SiriusXM Travel
Link is available in select markets.
For more information, refer to the Sir-
iusXM website or call Listener Care.
SiriusXM website:
For U.S.
www.siriusxm.com/travellink
For Canada
www.siriusxm.ca/siriusxm-traffic-
services/siriusxm-travel-link (English)
www.siriusxm.ca/fr/services-
siriusxm-traffic/siriusxm-travel-link
(French)
Listener Care:
For U.S.
1-877-447-0011
For Canada
1-877-438-9677
INFO:
.If a contract is not completed for the
SiriusXM Travel Link information ser-
vice, a message appears and it will not
be possible to check the information
on the traffic information system.
Example
5-18

.The weather information is available
only for areas that provide weather
information to SiriusXM Travel Link.
.Not all vehicles or devices are capable
of receiving all services offered by
SiriusXM. Data displays and individual
product availability vary by vehicle
hardware. Current information and
features may not be available in all
locations, or on all receivers. SiriusXM
is not responsible for any errors or
inaccuracies in the data services or
their use in the vehicle.
Notes on SiriusXM Traffic infor-
mation
.The SiriusXM Traffic information ser-
vice is not provided for some cities. In
addition, the cities for which the traffic
information service is provided may be
changed.
.In some cases, infrastructure pro-
blems may prevent the complete dis-
play of the traffic information. This is
not a malfunction.
.Due to infrastructure problems, or due
to the time when the traffic informa-
tion service broadcast is received, the
displayed information may differ from
the actual traffic conditions.
.Depending on the traffic information, a
detour route may be slower than the
original route.
.SiriusXM Satellite Radio and SiriusXM
Traffic subscriptions are sold sepa-
rately or as a package, and are con-
tinuous until you call SiriusXM to
cancel. See SiriusXM Customer Agree-
ment for complete terms at the Sir-
iusXM website.
SiriusXM website:
For U.S.
www. siriusxm.com
For Canada
www.siriusxm.ca (English)
www.siriusxm.ca/fr (French)
SiriusXM Travel Link is available in
select markets. For more information,
refer to the SiriusXM website or call
Listener Care.
SiriusXM website:
For U.S.
www.siriusxm.com/traffic
For Canada
www.siriusxm.ca/siriusxm-traffic-
services/siriusxm-travel-link (English)
www.siriusxm.ca/fr/services-
siriusxm-traffic/siriusxm-travel-link
(French)
Listener Care:
For U.S.
1-877-447-0011
For Canada
1-877-438-9677
.SiriusXM Traffic is available in over 130
metropolitan markets. For the most
current list of markets covered, please
refer to the SiriusXM website or call
Listener Care.
SiriusXM website:
For U.S.
www.siriusxm.com/siriusxmtraffic
For Canada
www.siriusxm.ca/siriusxm-traffic-
services/siriusxm-traffic (English)
www.siriusxm.ca/fr/services-
siriusxm-traffic/siriusxm-traffic
(French)
Listener Care:
For U.S.
1-877-447-0011
For Canada
1-877-438-9677
5. Information
5-19

5. Information
.Due to road maintenance, infrastruc-
ture problems (e.g. malfunction of
road sensors, outage of central com-
puter of infrastructure) or natural dis-
asters, there are times when some or
all traffic information may not be
available.
.Incident information is based on hu-
man collection. Not all incidents that
have happened are collected and
provided.
.Due to infrastructure problems, or
transmission delay, there are times
when the information may differ from
the actual condition. Always observe
safe driving practices and follow all
traffic regulations.
.Due to the coverage and quality of
traffic information and road condi-
tions, it is not always possible for the
system to provide the shortest time
route even when traffic information is
considered.
.Traffic information that is displayed
may differ from information from
other media (e.g., radio), as other
media may use different information
sources.
Apple CarPlay
WARNING
.Stop your vehicle in a safe location
and apply the parking brake be-
fore connecting your iPhone to the
vehicle or operating your con-
nected iPhone for setup.
.If you are unable to devote full
attention to vehicle operation
while using Apple CarPlay, pull off
the road to a safe location and
stop your vehicle.
You can use Apple CarPlay by connecting
a compatible iPhone to your vehicle via a
USB cable.
With Apple CarPlay, your in-vehicle system
can be used as a display and a controller
for some of the iPhone functions. The
Apple CarPlay features Siri which enables
operations via voice controls. Visit Apple.
com for information about the functions
that are available and details about Ap-
ple’s privacy policy.
Certain vehicle information (e.g. location
and speed) may be shared with your
device while Apple CarPlay is in use.
Carrier charges may apply to use Apple
CarPlay.
COMPATIBILITY
Only iPhone 5 or later models and iOS 8.3
or later versions are compatible with
Apple CarPlay.
Refer to the Apple website for more
information.
INFO:
.For best results, always update your
device to the latest software version.
.Apple CarPlay will take the place of
your Bluetooth® audio and Bluetooth®
Hands-Free Phone functionality.
5-20
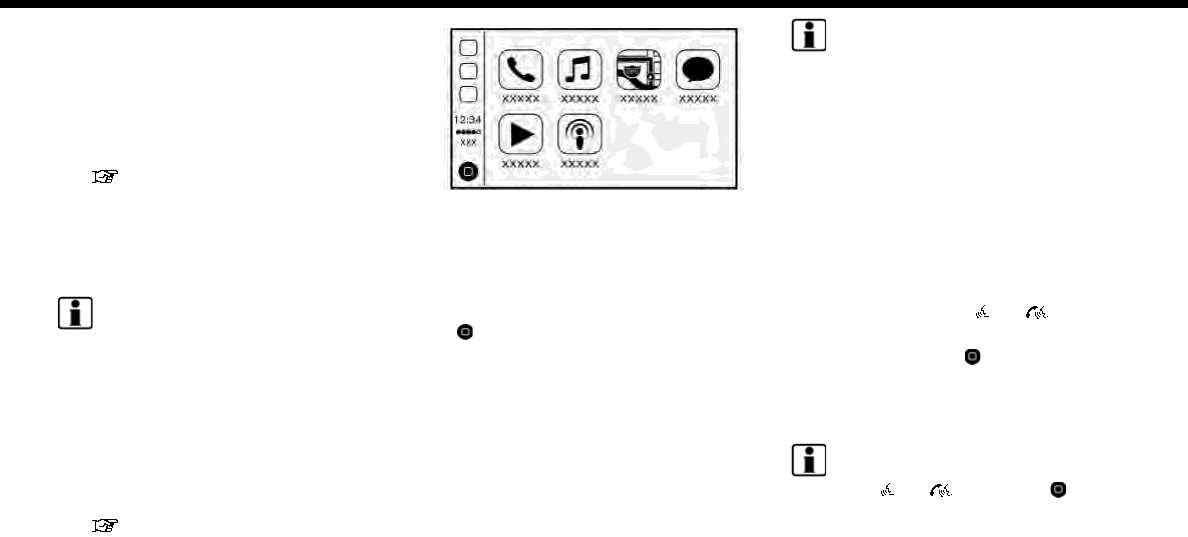
Apple CarPlay OPERATION
1. Connect the iPhone to USB connec-
tion port.
For models with two USB connection
ports, your iPhone must be connected
to USB connection port 1 for Apple
CarPlay operation.
“USB (Universal Serial Bus) Con-
nection Port and AUX (auxiliary)
input jack” (page 2-12)
2. Depending on the setting, a Startup
Information screen will appear. Touch
[Yes] to use Apple CarPlay.
INFO:
If you do not wish to display the
Startup Information screen each time
you activate Apple CarPlay, touch
[Don’t show again] on the Startup
Information screen. The Startup Infor-
mation screen will not be displayed
from the next Apple CarPlay activation.
The Startup Information screen can be
set to appear again in the Apple Car-
Play setting menu.
“Apple CarPlay settings”
(page 5-22)
Example of Apple CarPlay top menu
3. The Apple CarPlay top menu screen
will appear. The iPhone functions dis-
played on the screen should now be
operable using the in-vehicle system.
4. To return to the Apple CarPlay top
menu screen after operation, touch
[] on the lower left corner of the
Apple CarPlay screen.
5. To exit the Apple CarPlay screen and
display the other screens, push
<MENU> or the other buttons on the
control panel and touch the desired
menus.
6. To return to the Apple CarPlay screen,
touch [Info] on the Launch Bar and
then touch [Apple CarPlay]. The Apple
CarPlay screen can also be displayed
by touching [Apple CarPlay] after
touching [MENU] on the Launch Bar
or after pushing <MENU>.
INFO:
When your iPhone is locked with a pass-
code, Apple CarPlay can still be activated
by operating the iPhone and allowing
Apple CarPlay activation when asked.
Siri operation
With Siri, some of the functions in your
iPhone can be voice controlled when
Apple CarPlay is active.
Activation:
There are three ways to start a Siri
session.
.Push and hold <>/< > on the
steering wheel.
.Touch and hold [ ] at the lower left
corner of the Apple CarPlay screen.
.Say “Hey Siri” (requires “Allow
“Hey Siri”
”
activation on the iPhone).
INFO:
.Push <>/< > or touch [ ] to end
Siri operation.
.Keep the interior of the vehicle as quiet
as possible. Close the windows to
eliminate the surrounding noises (traf-
fic noises, vibration sounds, etc.),
which may prevent the system from
5. Information
5-21

5. Information
recognizing the voice commands cor-
rectly.
.For functions that can be used with
Siri, please refer to the Apple website.
.The volume level of Siri can be ad-
justed.
“Volume and Beeps settings”
(page 2-24)
Phone operation (if so equipped)
If you wish to use your phone while Apple
CarPlay is activated, follow the procedure
below:
1. Touch [Phone] on the Launch Bar.
2. Operate the screen displayed to make
a call, etc.
Apple CarPlay SETTINGS
1. Touch [Settings] on the Launch Bar.
2. Touch [Apple CarPlay Settings].
Available items:
.[Always Start Apple CarPlay]:
When this item is turned on, Apple
CarPlay will activate automatically
when the iPhone is connected to USB
connection port.
.[Nissan’s Help for Apple CarPlay]:
Displays tips for Apple CarPlay opera-
tion.
.[Show Startup Information]:
Allows you to set whether or not to
show the Apple CarPlay Startup Infor-
mation screen upon each iPhone con-
nection.
Touch [No] if you do not wish to show
the Startup Information screen each
time the iPhone is connected to USB
connection port.
Touch [Yes] to show the Startup In-
formation screen upon each connec-
tion of your iPhone to USB connection
port.
This setting item will be grayed out
until you touch [Don’t show again] on
the Startup Information screen to turn
the setting on.
INFO:
.Models with two USB connection
ports, your iPhone must be connected
to USB connection port 1 for Apple
CarPlay operation.
.[Nissan’s Help for Apple CarPlay] can
also be accessed from the Information
menu.
“Information menu” (page 5-2)
.Phone menu and access to the con-
nected phone through voice recogni-
tion system will be disabled while
Apple CarPlay is connected. To access
your phone, use the Siri function or
select the phone icon in the Apple
CarPlay top menu screen.
.Normal voice recognition access to
songs on your iPod music will not be
available when connected to Apple
CarPlay. To access your iPod music,
use the Siri function or select the
music icon in the Apple CarPlay top
menu screen.
Apple CarPlay SYSTEM LIMITA-
TIONS
For all features of Apple CarPlay to oper-
ate correctly, it is necessary to have a
compatible iPhone, a cellular connection
and a data plan.
When Apple CarPlay is operating, system
performance is affected by the strength of
the cellular connection or performance of
the phone itself. If performance of the
system decreases:
.Disconnect and reconnect your phone
.Close all apps and restart them
.Cycle phone power off/on to restart
It is also recommended to use the Apple
Lightning cable that was provided with
your phone and confirm the latest soft-
ware version is installed.
5-22

Functionality of Apple CarPlay may de-
crease or be lost if there are changes to
operating systems, hardware, software or
other technologies central to supporting
the system that are outside of NISSAN’s
control. Changing government regula-
tions may also affect operation of Apple
CarPlay.
Android Auto
WARNING
.Stop your vehicle in a safe location
and apply the parking brake be-
fore connecting your Android
phone to the vehicle or operating
your connected Android phone for
setup.
.If you are unable to devote full
attention to vehicle operation
while using Android Auto, pull off
the road to a safe location and
stop your vehicle.
You can use Android Auto by connecting a
compatible Android phone to your vehicle
via a USB cable. It is also recommended to
use the Android phone OEM cable that
was provided with your phone.
With Android Auto, your in-vehicle system
can be used as a display and a controller
for some of the Android phone functions.
Voice control of some of the Android
phone functions is also possible with
Android Auto. Visit www.android.com for
information about the functions that are
available and details about Google’s
privacy policy.
Certain vehicle information (e.g. location
and speed) may be shared with your
device while Android Auto is in use. Carrier
charges may apply to use Android Auto.
COMPATIBILITY
Only Android 5.0 (Lollipop) or later ver-
sions are compatible with Android Auto.
Refer to the Android Auto website for
more information.
INFO:
.Download the Android Auto applica-
tion from Google Play to Android
phone in advance.
.For best results, always update your
device to the latest Android software
and Android Auto app version. When
you connect the Android phone to the
in-vehicle system, it will automatically
update Android software and Android
Auto app version.
.Android Auto will take the place of
your Bluetooth® audio and Bluetooth®
Hands-Free Phone functionality.
.If you set a destination with navigation
applications on your Android phone
while Android Auto is active, the route
setting of the in-vehicle navigation
5. Information
5-23

5. Information
system will be canceled.
INITIAL ANDROID PHONE SET-
TINGS
Before using Android Auto, Android Auto
app must be downloaded on your Android
phone.
For downloading the Android Auto app,
refer to the Google Play on website.
Android Auto OPERATION
Unlock your phone’s screen before con-
necting your Android phone.
1. Connect your Android phone to a USB
connection port.
For models with two USB connection
ports, your Android phone must be
connected to USB connection port 1
for Android Auto operation.
“USB (Universal Serial Bus) Con-
nection Port and AUX (auxiliary)
input jack” (page 2-12)
2. Depending on the setting, a Startup
Information screen will appear on the
touch screen display. Touch [Yes] to
use Android Auto.
INFO:
.If you do not wish to display the
Startup Information screen each
time you activate Android Auto,
touch [Don’t ask anymore] on the
Startup Information screen. The
Startup Information screen will not
be displayed from the next Android
Auto activation. The Startup Infor-
mation screen can be set to appear
again in the Android Auto setting
menu.
“Android Auto settings”
(page 5-25)
.Bluetooth® will turn on automati-
cally when Android Auto is con-
nected to the vehicle.
Example of Android Auto top menu
3. The Android Auto top menu screen will
appear. The Android phone functions
displayed on the screen should now be
operable using the in-vehicle system.
4. To return to the Android Auto top
menu screen after operation, touch
[] on the lower right corner of the
Android Auto screen.
5. To exit the Android Auto screen and
display the other screens, push
<MENU> or the other buttons on the
control panel and touch the desired
menus.
6. To return to the Android Auto screen,
touch [Info] on the Launch Bar and
then touch [Android Auto]. The An-
droid Auto screen can also be dis-
played by touching [Android Auto]
after touching [MENU] on the Launch
Bar or after pushing <MENU>.
INFO:
.While the Android Auto is activated on
the Android phone, the phone opera-
tions such as making or receiving calls
can only be done with Android Auto.
.When an Android phone is connected
to the USB connection port, the Blue-
tooth® function turns on automati-
cally. Keep the Bluetooth® turned on
to use the phone functions.
.Depending on the device, an Android
phone requires MTP mode to be se-
lected in the USB transfer setting.
5-24
Operating with voice
Some of the functions in your Android
phone can be voice controlled when
Android Auto is active.
Activation:
There are three ways to start a voice
operation session.
.Push and hold <>/< > on the
steering wheel.
.Touch [ ] at the upper right corner of
the Android Auto screen.
.Say “OK Google” (requires the appro-
priate setting on the Android phone).
INFO:
.Push <>/< > or touch [ ] to end
voice operation.
.Keep the interior of the vehicle as quiet
as possible. Close the windows to
eliminate the surrounding noises (traf-
fic noises, vibration sounds, etc.),
which may prevent the system from
recognizing the voice commands cor-
rectly.
.For functions that can be used with
the voice operation, refer to the An-
droid Auto website.
.The volume level of voice operation
can be adjusted.
“Volume and Beeps settings”
(page 2-24)
Phone operation (if so equipped)
If you wish to use your phone while
Android Auto is activated, follow the
procedure below:
1. Touch [Phone] on the Launch Bar.
2. Operate the screen displayed to make
a call, etc.
Android Auto SETTINGS
1. Touch [Settings] on the Launch Bar.
2. Touch [Android Auto Settings].
Available items:
.[Always Start Android Auto]:
When this item is turned on, Android
Auto will activate automatically when
the Android phone is connected to the
USB connection port.
.[Show Startup Information]:
Allows you to set whether or not to
show the Android Auto Startup Infor-
mation screen upon each Android
phone connection.
Touch [No] if you do not wish to show
the Startup Information screen each
time the Android phone is connected
to USB connection port.
Touch [Yes] to show the Startup In-
formation screen upon each connec-
tion of your Android phone to USB
connection port.
This setting item will be grayed out
until you touch [Don’t ask anymore] on
the Startup Information screen to turn
the setting on.
.[Nissan’s Help for Android Auto]:
Displays helpful tips for Android Auto
operation.
INFO:
.For models with two USB connection
ports, your Android phone must be
connected to USB connection port 1
for Android Auto operation.
.[Nissan’s Help for Android Auto] can
also be accessed from the Information
menu.
.For restrictions on using Android Auto,
refer to [Nissan’s Help for Android
Auto].
.The Phone menu of the in-vehicle
system and access to the connected
phone through the Voice Recognition
System will be disabled while Android
Auto is connected. To access your
5. Information
5-25

5. Information
phone, use the voice operation func-
tion or touch [Phone] on the Launch
Bar on the Android Auto top menu
screen.
Android Auto SYSTEM LIMITA-
TIONS
For all features of Android Auto to operate
correctly, it is necessary to have a com-
patible Android phone, a cellular connec-
tion and a data plan. When Android Auto is
operating, system performance is af-
fected by the strength of the cellular
connection or performance of the phone
itself. If performance of the system de-
creases:
.Disconnect and reconnect your phone
.Close all apps and restart them
.Cycle phone power off/on to restart
It should also be confirmed that the latest
version of both Android OS and Android
Auto application are installed on the
cellular phone.
Functionality of Android Auto may de-
crease or be lost if there are changes to
operating systems, hardware, software or
other technologies central to supporting
the system that are outside of NISSAN’s
control. Changing government regula-
tions may also affect operation of Android
Auto.
5-26

6 Navigation
Safety information ....................................................................... 6-3
Map operation ................................................................................. 6-3
Displaying current vehicle location .......................... 6-3
Map types..................................................................................... 6-3
Road color ................................................................................... 6-6
Moving map................................................................................ 6-6
Changing scale of map ..................................................... 6-7
Changing map.......................................................................... 6-8
Map view settings .................................................................. 6-9
Setting information on map....................................... 6-12
Traffic information on map (for U.S.
and Canada)............................................................................ 6-13
Map Menu screen ............................................................... 6-13
Setting destination ................................................................... 6-14
Basic operations .................................................................. 6-14
Finding address .................................................................... 6-17
Finding nearby place ........................................................ 6-18
Finding points of interest ............................................. 6-19
Setting home as destination ..................................... 6-21
Searching from address book .................................. 6-21
Searching from previous destinations ............... 6-22
Searching by connecting to the internet (if
so equipped) ........................................................................... 6-22
Setting intersection ........................................................... 6-22
Setting by phone number ............................................ 6-23
Setting city center .............................................................. 6-23
Setting freeway entrance/exit.................................. 6-24
Setting from stored routes ....................................... 6-24
Setting point on map .................................................... 6-25
Setting with NissanConnect
SM
Services (if
so equipped) ......................................................................... 6-25
Options before starting the
route guidance ................................................................... 6-26
Route guidance .......................................................................... 6-28
About route guidance................................................... 6-28
Route menu .......................................................................... 6-34
Setting new destination .............................................. 6-37
Canceling Route ................................................................ 6-37
Confirming route .............................................................. 6-37
Editing route ......................................................................... 6-37
Recalculating route ......................................................... 6-40
Searching for detour route using traffic
information (for U.S. and Canada) ....................... 6-40
Setting detour route ...................................................... 6-41
Route guidance settings............................................. 6-41
Viewing traffic information (for U.S.
and Canada) ................................................................................. 6-47
Viewing available traffic information ................ 6-47
Traffic information setting ........................................ 6-49
Storing a location/route ..................................................... 6-50
Storing location ................................................................. 6-50
Storing route ........................................................................ 6-51
Storing avoid area ........................................................... 6-51
Editing stored information ........................................ 6-53
Deleting stored item ...................................................... 6-55
Transferring information to/from
address book.......................................................................... 6-56
Navigation settings .................................................................. 6-58
General information for navigation system ......... 6-61
Current vehicle location ................................................ 6-61
Route calculation .............................................................. 6-65
Route guidance .................................................................. 6-66
Map data ................................................................................. 6-67
How to handle the SD card ...................................... 6-75

SAFETY INFORMATION
The navigation system is primarily de-
signed to help you reach your destination.
However, you, the driver, must use the
system safely and properly. Information
concerning road conditions, traffic signs
and the availability of services may not
always be up to date. The system is not a
substitute for safe, proper, and legal driv-
ing.
WARNING
Do not rely on route guidance alone.
Always be sure that all driving man-
euvers are legal and safe in order to
avoid accidents.
MAP OPERATION
DISPLAYING CURRENT VEHICLE
LOCATION
Push <MAP> or touch [Map] on the
Launch Bar to display the map of current
vehicle location.
MAP TYPES
Two types of map views are available: 2D
map and Birdview™ (3D) map.
6. Navigation
6-3
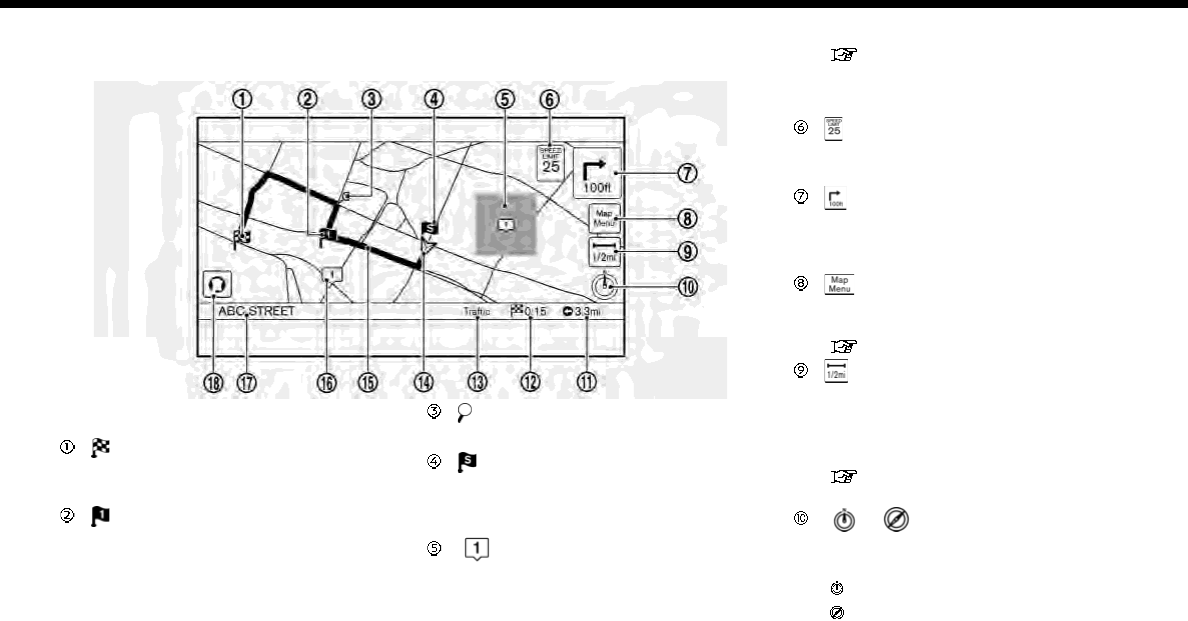
6. Navigation
2D map
The 2D map displays the map in a two-dimensional environment similar to a road map.
Screen information:
Destination:
Indicates the location of the final
destination.
Waypoint:
Displays the location of the waypoint
the vehicle will stop by before heading
to the final destination. A maximum of
5 waypoints can be set.
Guide point:
Indicates a guide point on the route.
Starting point:
Displays the vehicle location, with
which the route is set, as the starting
point.
Avoid area:
Displays the areas to avoid that are
stored in the Address Book. Route
guidance can be set to avoid the
registered avoid areas.
“Storing avoid area” (page 6-51)
Green: Freeways included
Blue: Freeways not included
Speed limit icon:
Displays the speed limit of the road
the vehicle is on.
Arrow and distance:
Indicates the distance to the next
guide point and the turning direction
at that guide point.
icon:
Touch the icon to display the Map
Menu.
“Map Menu screen” (page 6-13)
Scale indicator:
Indicates the scale of the map.
Touch the icon to display the scale
bar. The map scale can be adjusted
using the scale bar.
“Changing scale of map”
(page 6-7)
/ Direction indicator:
Indicates the directional setting of the
map.
: North always pointing up.
: Direction of the vehicle heading
6-4
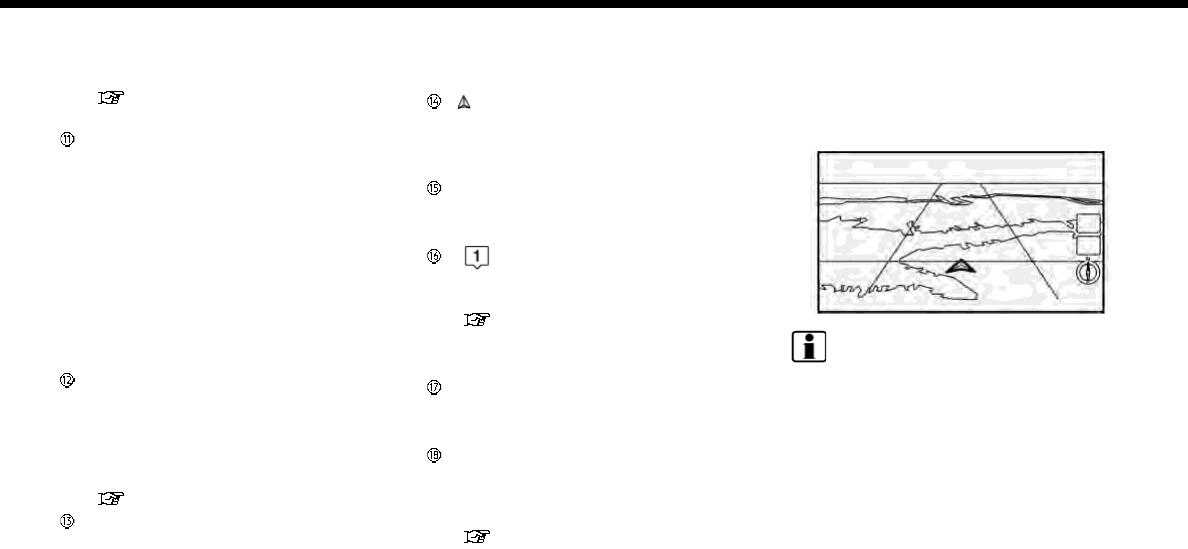
always pointing up.
Touch the icon to change the map
view and the map orientation.
“Changing map view and map
orientation” (page 6-8)
Remaining distance to the destina-
tion:
Indicates the approximate remaining
distance to the destination or way-
point. This indicator will appear when
a destination or waypoint is set and
route guidance is started.
The arrow displayed here indicates
the direction of the destination. It can
be displayed only when the map scale
is in the range of 1/64 miles (25 m) -
1/8 miles (200 m).
Estimated time to the destination:
Indicates the estimated time to the
destination or waypoint. This indica-
tor will appear when a destination or
waypoint is set and route guidance is
started.
“Guidance settings” (page 6-42)
Traffic indicator (for U.S. and Canada):
Indicates the reception condition of
the traffic information transmitted
from the provider.
Green: Reception condition is good.
Gray: Reception condition is not good.
The indicator does not appear with-
out a SiriusXM Traffic subscription.
Vehicle icon:
Indicates the current vehicle location
and the direction the vehicle is head-
ing.
Suggested route:
Appears in bold blue during route
guidance.
Stored location (yellow):
Displays the locations that are stored
in the Address Book.
“Storing location” (page 6-50)
The icons can be changed according
to your preferences.
Street name:
Displays the name of the street that
the vehicle is currently driving on.
Voice Menu button (if so equipped):
Touch the icon to connect to the
NissanConnect
SM
Services Voice
Menu.
“Connecting to Interactive Voice
Menu” (page 5-12)
Birdview™ (3D) map
Birdview™ displays the map from an
elevated perspective. In Birdview™, it is
easy to recognize an image of the route
because it provides a panoramic view
over a long distance.
INFO:
Note the following items about the Bird-
view™ display.
.“Birdview™” is a registered trademark
of Clarion Co., Ltd.
.The map in Birdview™ always appears
with the current forward direction
facing up.
6. Navigation
6-5
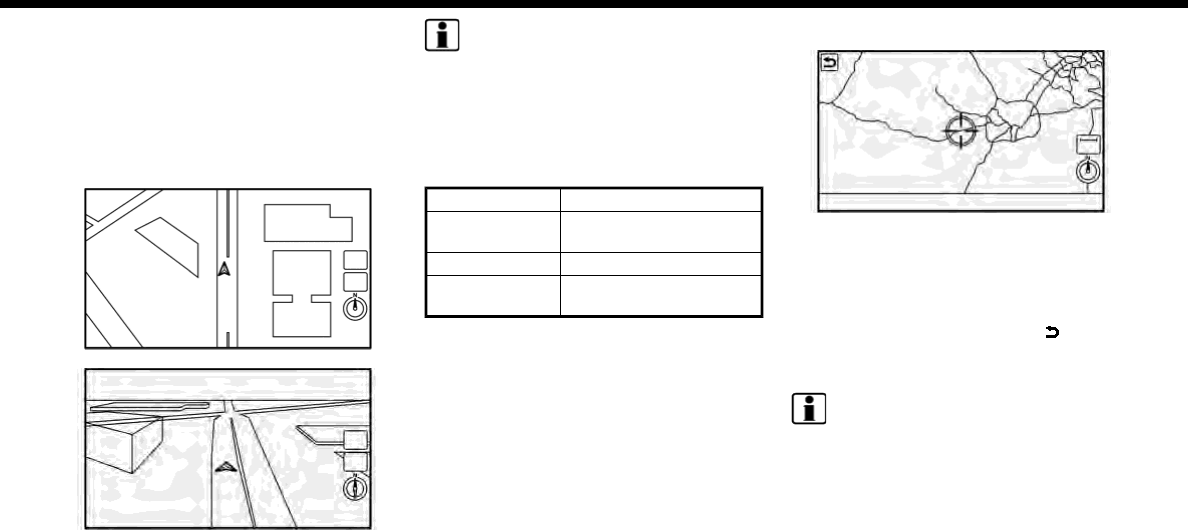
6. Navigation
Building graphics
In an area where the building graphics are
stored in the map data, the building
graphics are displayed when the map is
zoomed in. On the 2D map display, these
are called “Building footprint graphics”,
and on the Birdview™ display, these are
called “3D building graphics”.
Building footprint graphics (2D map)
3D building graphics (Birdview™ map)
INFO:
In an area where the building graphics are
not stored in the map data, the normal
map is displayed even when the map is
zoomed in.
ROAD COLOR
The road types are differentiated by color.
Red Freeway
Brown
Dark Yellow
Main road
Gray Narrow street
Dark green Road with incomplete
map data
MOVING MAP
Map can be scrolled by touch screen
operations. Map scrolling operations are
limited and not fully available while driv-
ing.
Touch:
2D map:
When the map on the screen is touched,
the cross pointer is displayed and the
position touched is set as the center of
the screen.
After moving the map, touch [ ] on the
map screen to display the current location
map screen.
INFO:
.Touch [Slow] on the map screen to
display the 8-directional key for fine
adjustments of the location. Touch
[Cancel] to cancel the fine adjustment
mode.
.Sliding the Display Commander (if so
equipped) can also operate the map.
Birdview
TM
(3D) map:
6-6
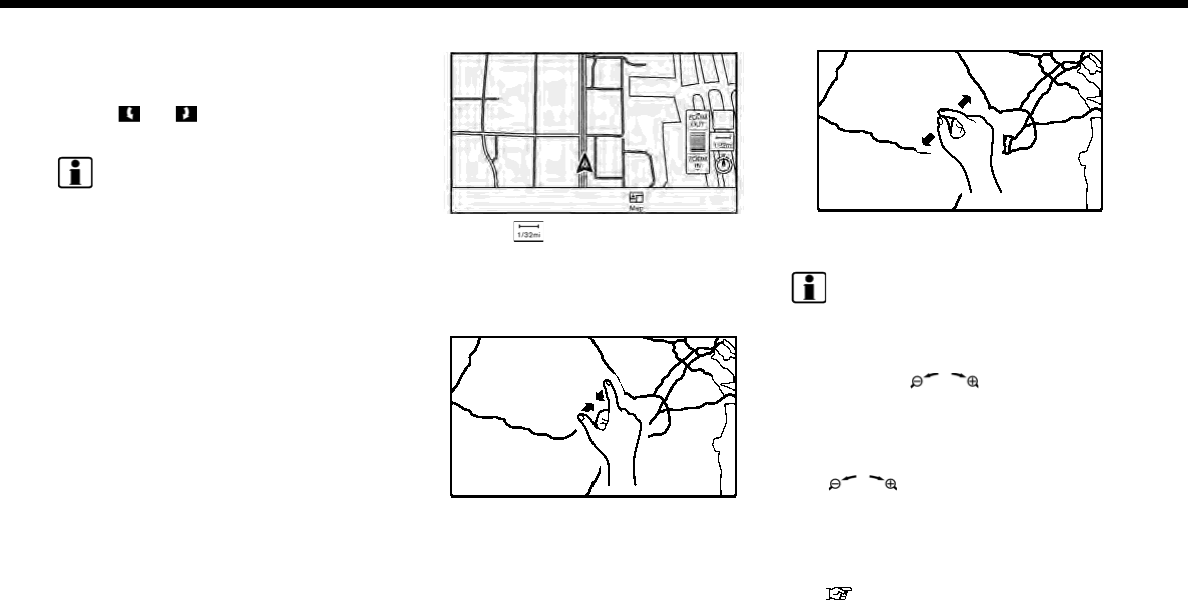
Touch the screen. The cross pointer is
displayed at the center of the map.
Touching the screen again will scroll the
map toward the touched location.
Touch [ ]or[ ] to change the direction
of the map.
INFO:
Sliding the Display Commander (if so
equipped) can also operate the map.
Long touch:
Touch the direction to move to. The map
continues to scroll while the screen is
touched.
Drag:
Drags the map while the screen is
touched.
Swipe/flick:
Swipe or flick the screen to scroll the map
screen quickly.
CHANGING SCALE OF MAP
1. Touch [ ].
The scale bar is displayed.
2. Touch [ZOOM IN] or [ZOOM OUT] to
change the scale.
Pinch-in
To view a wider area, pinch-in the map
screen.
Pinch-out
To view the map in detail, pinch-out the
map screen.
INFO:
.While driving, pinch-in and pinch-out
operations are disabled.
.Map scale can also be changed by
rotating </SOUND> (if so
equipped) or the center dial on the
Display Commander (if so equipped).
.Free Zoom:
Depending on the setting, using the
</SOUND> (if so equipped) or
center dial on the Display Commander
(if so equipped) to change the map
scale may adjust the scale normally, or
it may engage the free zoom (finer
scale adjustment in smaller steps).
“Navigation settings” (page 6-58)
6. Navigation
6-7
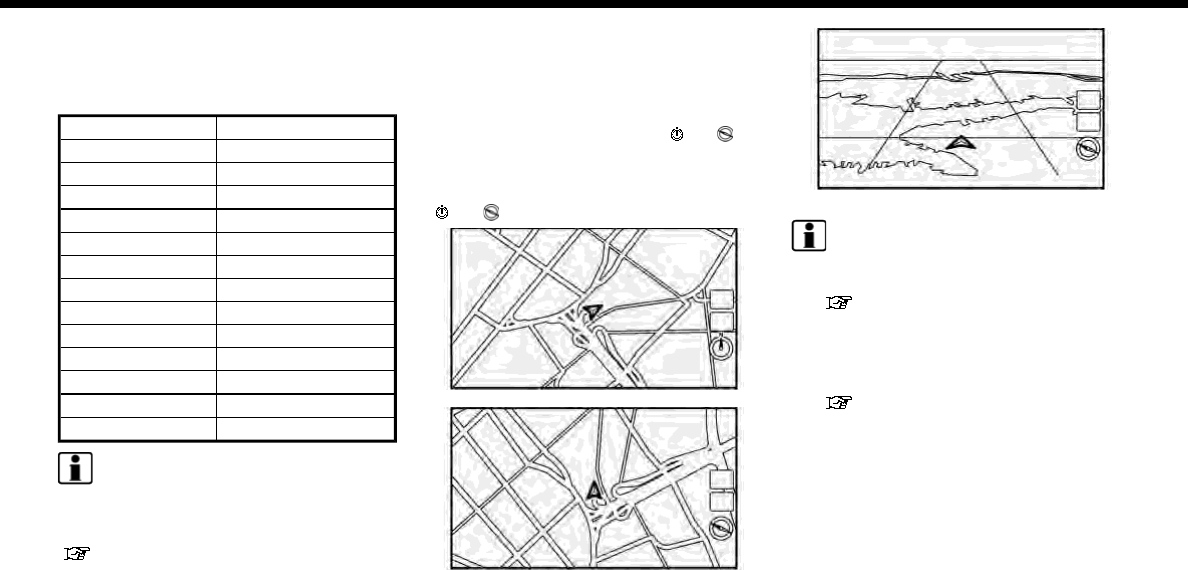
6. Navigation
Map scale
Map scale (map coverage) between 320
miles (640 km) and 1/64 mile (25 m) can be
selected.
US Units Metric Units
320 mi 640 km
80 mi 160 km
32 mi 64 km
8mi 16km
5mi 10km
2mi 4km
1mi 2km
1/2 mi 1 km
1/4 mi 500 m
1/8 mi 200 m
1/16 mi 100 m
1/32 mi 50 m
1/64 mi 25 m
INFO:
Depending on the map scale, traffic in-
formation icons cannot be displayed on
the map screen (for U.S. and Canada).
“Traffic information on map”
(page 6-48)
CHANGING MAP
Changing map view and map
orientation
The map view and the map orientation
can be changed by touching [ ]/[ ]on
the map screen.
The screen will change to North Up,
Heading Up and Birdview
TM
each time
[]/[ ] is touched.
North Up
Heading Up
Birdview™
INFO:
.You can also change the map view
from the map view settings screen.
“Map view settings” (page 6-9)
.A long range map is available that
displays a wider area in the direction
the vehicle is moving in the Heading
Up view.
“Map view settings” (page 6-9)
Setting split screen
Two different maps can be displayed on a
screen with the split screen setting.
6-8

1. Touch [ ] on the map screen.
2. Touch [Map View].
3. Touch [Change View].
4. Select [Split: 2D Map] or [Split: Birdview
Map].
INFO:
The settings on the left split map can be
changed from map view settings menu.
“Map view settings” (page 6-9)
MAP VIEW SETTINGS
The setup for the map view is performed
from the Settings menu on the touch
screen display.
1. Touch [ ] on the map screen.
2. Touch [Map View].
INFO:
[Map View] can also be accessed from
[Settings] on the Launch Bar.
“Navigation settings” (page 6-58)
6. Navigation
6-9
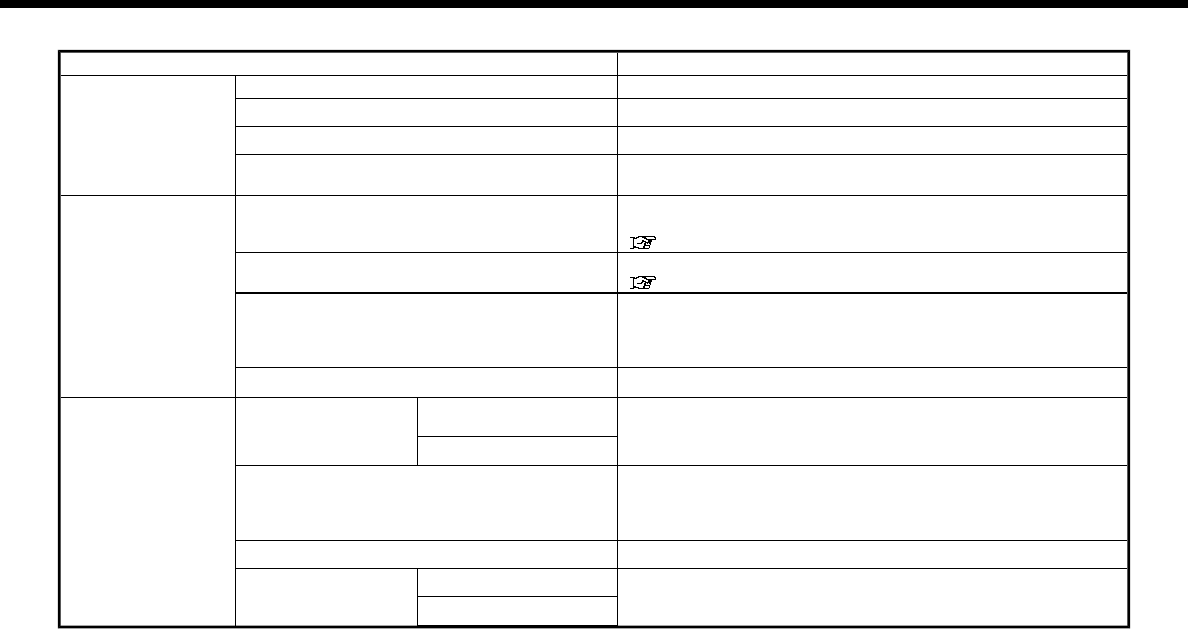
6. Navigation
The following settings are available.
Menu item Action
[Change View] [2D Map] Display 2D map.
[Split: 2D Map] Display 2D map on both left and right side of the split screen.
[Birdview (3D)] Display 3D map.
[Split: Birdview Map] Display 2D map on the left side and 3D map on the right side of the
screen.
[View Settings] [Intersection] Display the enlarged view of intersection on the left side of the
screen during route guidance.
“Route guidance screens” (page 6-32)
[Turn List] Display the turn list on the left screen when a route is set.
“Route guidance screens” (page 6-32)
[Drive Report] (if so equipped) Display your ECO driving performance score on the left side of the
screen. Touch [Log] to view the Drive Report history. Touch [Reset]
to clear the past records.
Push <MAP> to switch to the full map screen.
[Full Map] Display full map screen.
[Map Settings] [Map Orientation] [North Up] Select a map view to be applied to the map screen. [Map
Orientation] is available only when 2D map is displayed.
[Heading Up]
[Long Range] The position of the vehicle icon can be changed to view a wider
area in the traveling direction. The vehicle icon is located slightly
lower than the center of the screen. Long Range Map View is
available only when the map view is “Heading Up”.
[Map Color] Sets map color from color 1 - 4.
[Map Text Size] [Large] Sets the font size of text displayed on the map screen.
[Medium]
6-10

Menu item Action
[Small]
[Birdview Angle] Adjusts the Birdview™ angle using the adjust bar displayed on the
left side of the screen. [Birdview Angle] is available only when 3D
map is displayed.
[North Up when Zoomed Out] When this setting is ON, the orientation of the map is automatically
changed to North Up when the widest map scale is selected.
[Select Text to Display
on Map]
[Place Names] Allows place names to be displayed on the map screen.
[Facility Names] Allows facilities names to be displayed on the map screen.
[Road Names] Allows road names to be displayed on the map screen.
[Left Split Map Set-
tings]
[Map Orientation] The map orientation for the left side of split screen can be selected
from North Up or Heading Up.
[Long Range] Long Range Map View is available only when the left side of split
screen is in Heading Up mode.
With this item turned on, the vehicle position icon on the left
screen will be located slightly lower than the center of the screen
so that a wider area in the traveling direction can be viewed.
[Map Scale] Allows to change the scale of the map displayed on the left side of
the split screen.
[Show all Freeway Exits on Route] (for U.S. and
Canada)
Turns on/off the freeway exit information display.
[Auto. Show Turn List on Freeway] The turn list can be set to on or off to be displayed automatically
while driving on a freeway.
[Back to Map] Back to the current location map.
6. Navigation
6-11
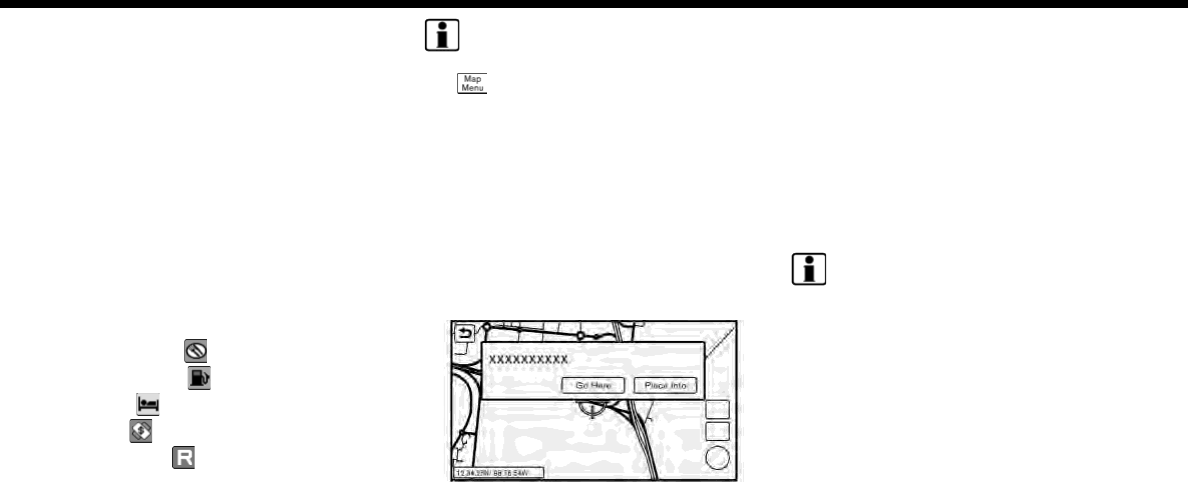
6. Navigation
SETTING INFORMATION ON MAP
Some information on the map can be
displayed or hidden.
Displaying map icons
Displays map icons of certain points of
interest (such as restaurants and gas
stations, etc.) on the map around the
current vehicle location.
1. Touch [Settings] on the Launch Bar.
2. Touch [Navigation].
3. Touch [Map Icons].
4. Touch the preferred icon. The indica-
tor of the selected icon illuminates.
Available setting icons
.Restaurant:
.Gas Station:
.Hotel:
.ATM:
.Rest Area:
INFO:
.[Map Icons] can also be accessed from
[] on the Map screen.
.The map icons are not displayed on
the map screen when the map scale is
set to 1/4 mile (500 m) or wider in the
2D and Birdview™ map.
.If brand icons are registered in the
map data, the brand will be displayed
on the map instead of the general map
icons listed.
Displaying map scrolling informa-
tion
Information about the location, on which
the center of the cross pointer is placed by
scrolling on the map, can be set to be
displayed.
1. Touch [Settings] on the Launch Bar.
2. Touch [Navigation] and touch [Others].
3. Touch [Map Scrolling Information].
4. Touch the preferred information item.
The following information items are
available.
.[Address Book Icons]
.[Destination/Waypoint Icons]
.[Show pop-up for POIs]
.[Latitude/Longitude Info]
INFO:
.When the settings are turned on,
placing the cross pointer on the stored
location icons, Destination/Waypoint
icons or map icons will display the
information in a pop-up window. The
latitude/longitude of any point on the
map where the cross pointer is located
will be displayed on the bottom left
corner of the map screen.
.When the [Go Here] is displayed on the
pop-up window, destination can be
set by touching it. Touch [Place Info] to
display the place information screen.
On the place information screen,
touch [Show Map] to display the map
around the location and touch [Call] to
call the selected place if the key is
6-12
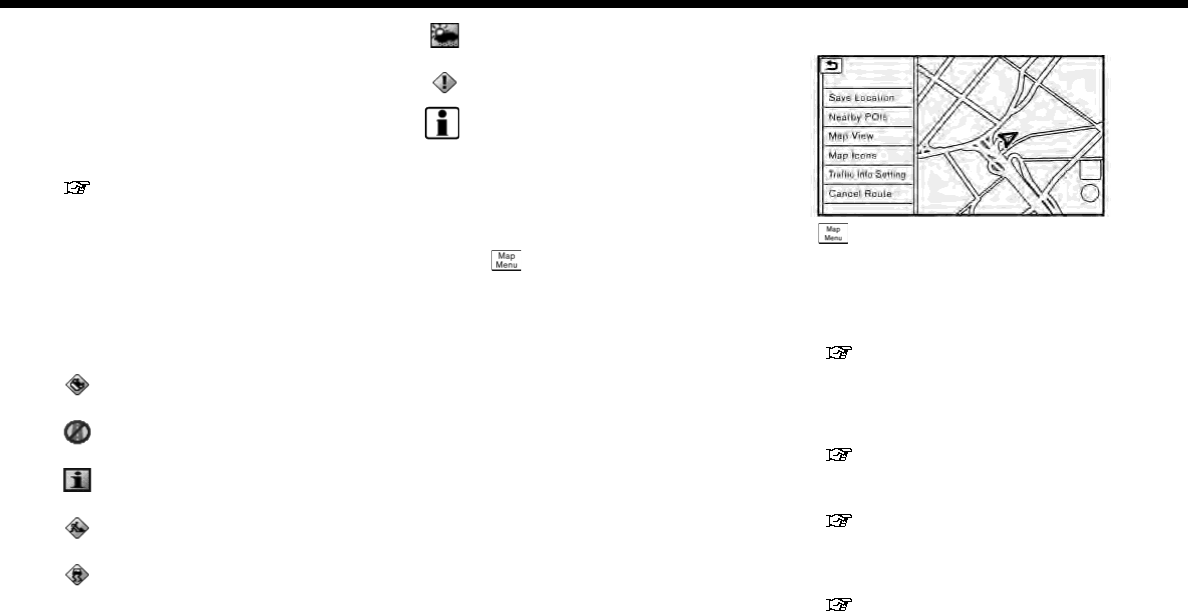
available. When available, touch [De-
tails] to show detail information of the
place.
TRAFFIC INFORMATION ON MAP
(for U.S. and Canada)
With a subscription to SiriusXM Traffic,
traffic information is displayed.
“Traffic information on map”
(page 6-48)
Free Flow: Green arrow
Moderate traffic: Yellow arrow
Heavy traffic: Red
Section affected by serious traffic event:
Purple
The following traffic information icons
may be displayed.
: Accident
: Closed road
: Information
: Road work
: Slippery road
: Weather
: Incident
INFO:
Traffic icons are displayed in the scale
level of 1/64 miles (25 m) - 5 miles (10 km)
range. Some traffic icons are displayed
only on the map at higher detail levels.
MAP MENU SCREEN
Touch [ ] while the current location
map screen or a scrolled map screen is
displayed to display the menu corre-
sponding to that screen.
This menu can be used to quickly access
helpful functions, such as setting a desti-
nation and searching for points of interest
nearby.
Current location map screen
If [ ] is touched while the current
location map screen is displayed, the
following options are available.
.[Save Location]:
Stores the current vehicle location in
the Address Book.
“Storing location by moving map”
(page 6-51)
.[Nearby POIs]:
Searches for points of interest near
the current vehicle location.
“Finding nearby place” (page 6-18)
.[Map View]:
Map view settings can be changed.
“Map view settings” (page 6-9)
.[Map Icons]:
The map icons can be displayed or
hidden by type.
“Displaying map icons” (page 6-12)
6. Navigation
6-13
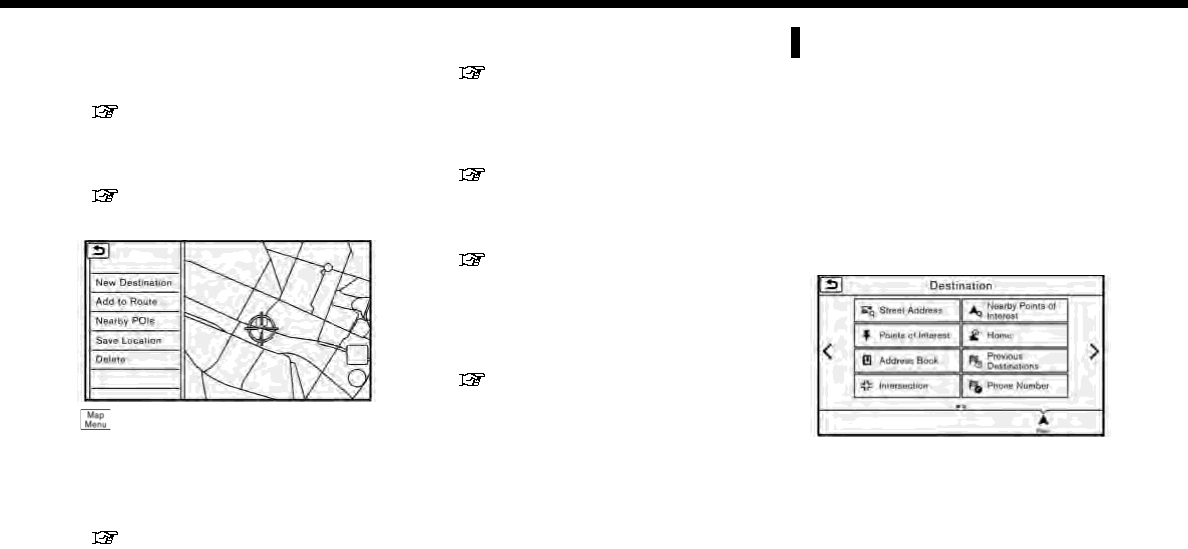
6. Navigation
.[Traffic Info Setting] (for U.S.and Cana-
da):
Set the various functions of the Sir-
iusXM Traffic information system.
“Traffic information on map”
(page 6-48)
.[Cancel Route]:
Delete destination and waypoints.
“Canceling Route” (page 6-37)
Scrolled location map screen
If [ ] is touched while a scrolled map
screen is displayed, the following options
are available.
.[New Destination]:
Sets the map location pointed at by
the cross pointer as a new destination.
“Setting point on map”
(page 6-25)
.[Add to Route]:
Adds the map location pointed at by
the cross pointer as a destination or a
waypoint to the route already set.
“Setting destination or waypoint”
(page 6-38)
.[Nearby POIs]:
Searches for points of interest near
the map location.
“Finding nearby place” (page 6-18)
.[Save Location]:
Stores the map location pointed at by
the cross pointer in the Address Book.
“Storing location by moving map”
(page 6-51)
.[Delete]:
Deletes a stored location or destina-
tion (waypoint) which the cross poin-
ter is placed over an icon.
“Deleting individual item on map”
(page 6-56)
SETTING DESTINATION
The destination you wish to drive to can
be set for route guidance.
BASIC OPERATIONS
Displaying destination setting
menu
There are several methods that can be
used to set a destination. Select a pre-
ferred method for finding and setting a
destination.
Touch [Navi] on the Launch Bar.
The destination screen will be displayed
when a route is not set.
6-14
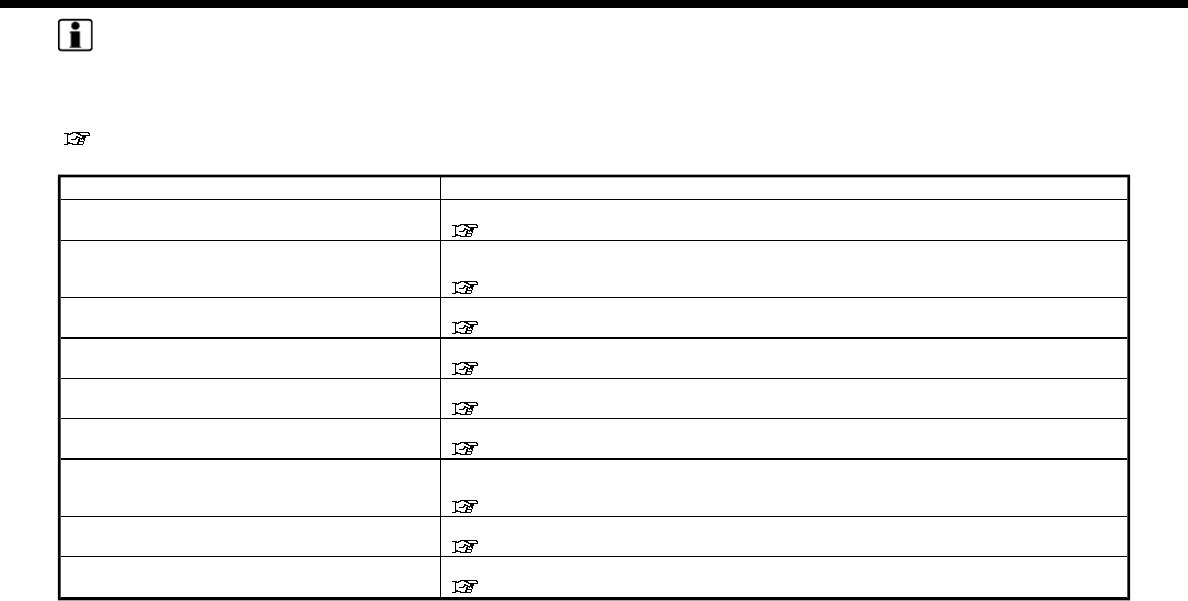
INFO:
If a route is set, the route menu screen will
be displayed when [Navi] on the Launch
Bar is touched. Touch [New Destination]
to set a destination.
“Route menu” (page 6-34)
Available destination setting methods:
Setting item Action
[Street Address] Searches for a destination by address.
“Finding address” (page 6-17)
[Nearby Points of Interest] Searches for points of interest near the current vehicle location, such as restaurants and
gas stations, etc.
“Finding nearby place” (page 6-18)
[Points of Interest] Searches for a destination from various categories of businesses or locations.
“Finding points of interest” (page 6-19)
[Home] Searches for a route from the current location to the previously stored home location.
“Setting home as destination” (page 6-21)
[Address Book] Searches for a destination from Address Book.
“Searching from address book” (page 6-21)
[Previous Destinations] Searches for the destination from the previous destinations and a previous start point.
“Searching from previous destinations” (page 6-22)
[Connected Search] (if so equipped) Input a keyword of a point of interest and connect and search the NissanConnected
SM
Services Data Center.
“Searching by connecting to the internet” (page 6-22)
[Intersection] Sets an intersection as a destination.
“Setting intersection” (page 6-22)
[Phone Number] Searches for a point of interest by a telephone number.
“Setting by phone number” (page 6-23)
6. Navigation
6-15
6. Navigation
Setting item Action
[City Center] Sets the center of a city as the destination.
“Setting city center” (page 6-23)
[Freeway Entrance/Exit] Sets a freeway entrance/exit as a destination.
“Setting freeway entrance/exit” (page 6-24)
[Stored Routes] Sets a route from the stored route data.
“Setting from stored routes” (page 6-24)
INFO:
.After setting a destination, the location
of the destination can be adjusted and
the location can be stored in the
Address Book, etc.
“Options before starting the route
guidance” (page 6-26)
.The destination can be deleted.
“Canceling Route” (page 6-37)
6-16

Specifying region
With some destination setting methods,
state/province and city can be specified
prior to searching for destination loca-
tions.
1. Touch [Navi] on the Launch Bar.
2. Touch the desired search method.
3. Touch [State/Province] or [City] if dis-
played.
4. Enter the name of the state, province
or city and then touch [List]. A list
screen is displayed.
5. Touch the preferred state, province or
city from the list.
INFO:
.When the system is restarted, the state
and province in which the vehicle is
recognized by the GPS to be located
will be set automatically as a state and
province for location search.
.Touch [Change Area] to change the
area for conducting the location
search (for U.S. and Canada).
.Touch [Current State] to search for the
destination within the state or pro-
vince where the vehicle is currently
located.
.Touch [Space] to enter a space be-
tween letters.
.After touching [City], touch [Last 5
Cities] to display the last 5 cities set
as destinations.
.In some cases, when a city name has
been entered, the number of matching
destinations in the “Matches” column
may be different from the number
displayed on the list screen. If this
occurs, enter more characters to
further reduce the number of
matches.
.It is not possible to search for a route
from the continental United States,
Canada or Mexico to Hawaii, Virgin
Islands, Puerto Rico, etc.
FINDING ADDRESS
Searches for a destination by address.
1. Touch [Navi] on the Launch Bar.
2. Touch [Street Address]. The street
address input screen is displayed.
3. Input the street address.
.Touch [State/Province] to enter the
state or province name.
.Touch [House #] to enter the house
number. If the house number is not
available, touch [No House #].
.Touch [Street] to enter the street
name. After finishing the entry,
touch [List]. A list of streets is
displayed.
.Touch [City] to enter the city name.
If the city name is not available,
touch [All Cities].
6. Navigation
6-17
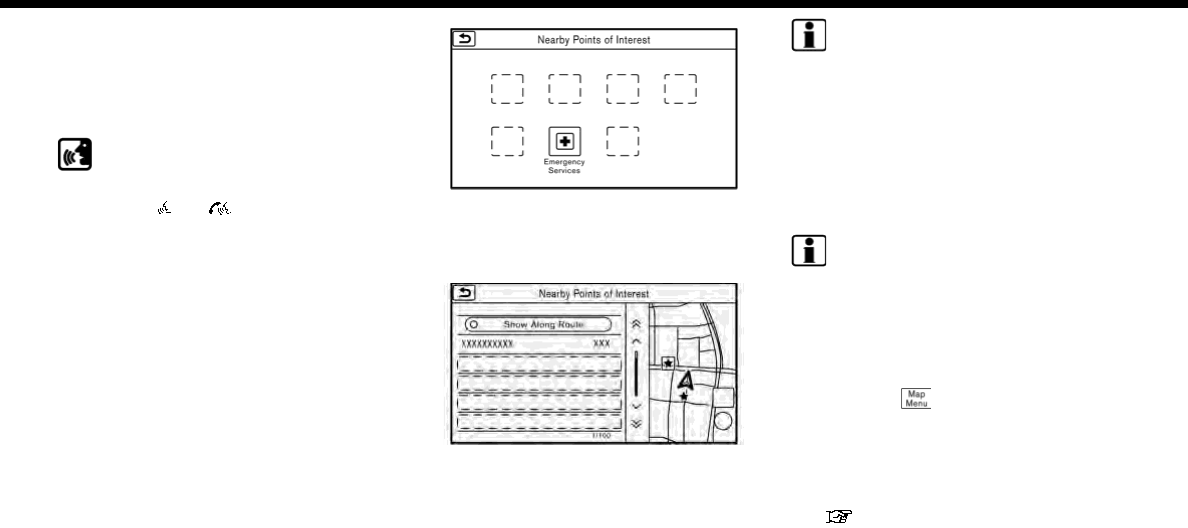
6. Navigation
4. Enter the state/province, house num-
ber, street and city of the destination
and then touch [OK]. The route is
displayed.
5. Touch [Start] to start route guidance.
Voice command
For U.S. and Canada
1. Push <>/< > located on the
steering wheel.
2. After the tone sounds, speak a com-
mand.
Use the following voice command to
search for a destination by address:
“Street Address”*
*: This voice command operation is avail-
able only when the language setting is in
English.
FINDING NEARBY PLACE
A facility located near the current vehicle
location can be set as the destination.
1. Touch [Navi] on the Launch Bar.
2. Touch [Nearby Points of Interest]. The
category list is displayed.
3. Select [Emergency Services] for exam-
ple.
4. Select preferred category from the sub
category list.
5. Touch the preferred destination from
the list. The position of the selected
location is displayed in the preview on
the touch screen display.
INFO:
.If the suggested route is already set,
by touching [Show Along Route] on
the touch screen display, the sys-
tem displays only the facilities lo-
cated along the route.
.A maximum of 100 facilities can be
displayed on the list screen.
6. Touch [Start] to start route guidance.
INFO:
.Depending on the type of facility, a
message asking if you have checked
the facility availability may be dis-
played. Touch [Yes] or [No] after read-
ing the message.
.You can also set the destination by
touching [ ] when scrolling the map
and selecting [Nearby POIs] from the
menu.
.Nearby Points of Interest category list
can be customized from [Customize
Nearby POIs].
“Navigation settings” (page 6-58)
6-18

Voice command
1. Push <>/< > located on the
steering wheel.
2. After the tone sounds, speak a com-
mand.
Use the following voice command to set a
nearby place as a destination:
“Nearby”
FINDING POINTS OF INTEREST
This allows you to find a facility by name
or by category. Specify the region and city
of the destination to find it more quickly.
NOTE:
Locations and business hours of facil-
ities are subject to change, which may
not be reflected in the map data. Dou-
ble-check this information before you
go to an emergency facility to ensure
that you can receive the proper support.
Otherwise, you may not receive emer-
gency help when you arrive at the
destination.
A confirmation message also appears
on the navigation screen. Follow the
displayed instructions and check the
items required.
Searching for a specific name
1. Touch [Navi] on the Launch Bar.
2. Touch [Points of Interest].
3. Touch [Spell Name]. A character input
screen is displayed.
INFO:
Touch [City] and touch [Last 5 Cities] to
display the last 5 cities recently set as
destinations.
4. Enter the name of the destination
facility. After finishing the entry, touch
[List]. A list screen is displayed.
5. Touch the preferred destination facil-
ity from the list.
Sorting and filtering:
.[By Distance]:
Shows a list of facilities that are
near the current vehicle location.
.[By Category]:
Display the list that summarizes the
listed names into categories. Select
the category to narrow down the
search.
INFO:
.Touch [ i ] on the list screen to
display the detailed information
about the POI that is selected on
the touch screen display.
.For U.S. and Canada:
To search for a POI with two or
more words, touch [Space] to enter
a space between each word.
.For Mexico:
To search for a POI with two or
more words, touch [AND] between
keywords.
6. A map of the selected place is dis-
played. Touch [Start] to start route
guidance.
6. Navigation
6-19
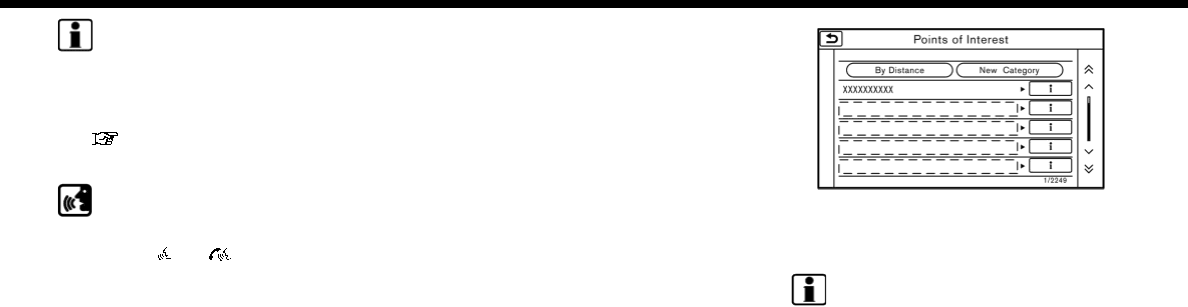
6. Navigation
INFO:
.After setting a destination, the location
of the destination can be adjusted and
the location can be stored in the
Stored Location, etc.
“Options before starting the route
guidance” (page 6-26)
Voice command
For U.S. and Canada
1. Push <>/< > located on the
steering wheel.
2. After the tone sounds, speak a com-
mand.
Use the following voice command to
search for Points of Interest from a facility
name:
“Points of Interest <POI Name>”*
*: This voice command operation is avail-
able only when the language setting is set
to English.
Searching Points of Interest by
category
1. Touch [Navi] on the Launch Bar.
2. Touch [Points of Interest]. The main
category menu is displayed.
3. Touch the main category. The subca-
tegory list is displayed.
4. Touch the subcategory. Narrow down
condition screen is displayed.
5. Touch the narrow down category.
Search conditions:
.[By Name]:
Enter the name of the facility
.[Select a City]:
Input the city to narrow down the
target city.
.[Near Current Location]:
Facilities near the current vehicle
location are displayed in a list.
.[Near Destination]:
When the destination is set, this
indicates a list of facilities around
the destination.
6. Touch the preferred destination facil-
ity from the list.
Touch [Start] to start route guidance.
INFO:
.Subcategories may not be displayed
depending on the selected main cate-
gory.
.If there is no nearby POI, a message
asking whether to search from an
extended area will be displayed. When
[Yes] is selected, the system starts to
search for POI in a wider area.
.Touch [ i ] on the list screen to display
the detailed information about the POI
that is selected on the touch screen
display.
.Touch [By Distance] to sort the list by
the distance. Touch [New Category] to
select a different POI category.
6-20
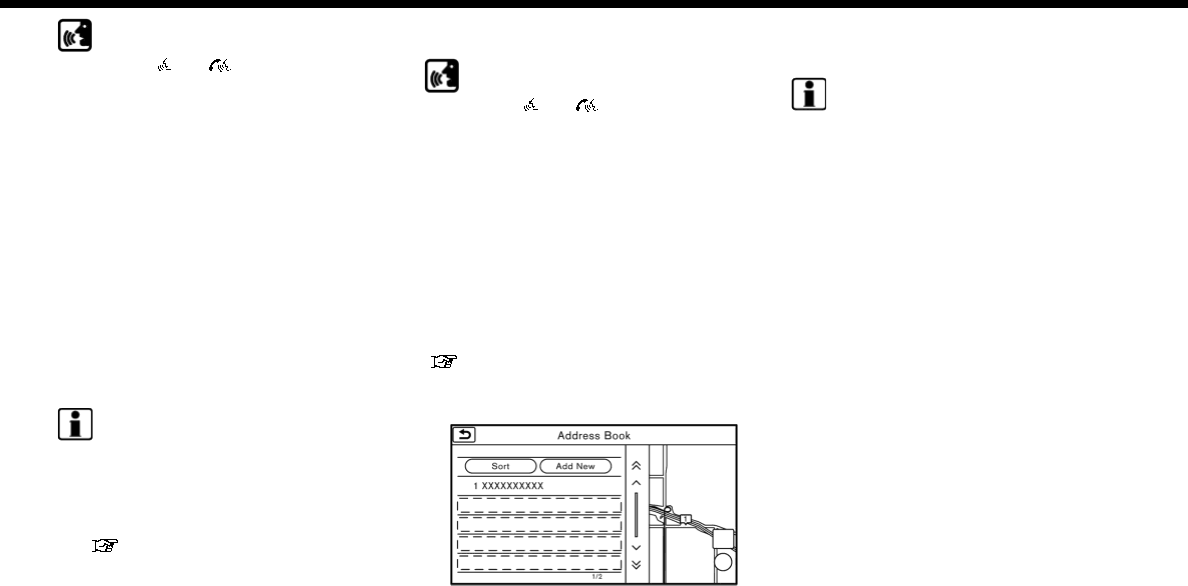
Voice command
1. Push <>/< > located on the
steering wheel.
2. After the tone sounds, speak a com-
mand.
Use the following voice command to
search for Points of Interest from cate-
gory:
“POI Category”
SETTING HOME AS DESTINATION
The home location can be set as the
destination if the home location is stored
in advance. This function is especially
useful when searching for a route to
return to the home location.
1. Touch [Navi] on the Launch Bar.
2. Touch [Home].
INFO:
If the home location is not stored yet,
the system will display a message
asking if you wish to store a home
location. Touch [Yes] to store the
home location.
“Storing home location”
(page 6-50)
3. An entire route to the destination is
displayed. Touch [Start] to start route
guidance.
Voice command
1. Push <>/< > located on the
steering wheel.
2. After the tone sounds, speak a com-
mand.
Use the following voice command to set
home as the destination:
“Go Home”
SEARCHING FROM ADDRESS
BOOK
Locations frequently visited can be stored
in the Address Book and reused to set
destinations.
“Storing location” (page 6-50)
1. Touch [Navi] on the Launch Bar.
2. Touch [Address Book].
3. Touch the preferred location from the
list.
INFO:
.Selecting [Sort] displays a list of
various sort functions.
— [Sorted By Number]:
The Address Book entries are dis-
played in ascending numerical or-
der.
— [Sorted By Name]:
The Address Book entries are dis-
played in alphabetic order.
— [Sorted By Icon]:
By selecting a particular icon, a list
that contains only the Address
Book entries associated with that
icon is displayed.
— [Sorted By Group]:
By selecting a particular group (fa-
mily, friends, leisure, etc.), the se-
lected group is displayed at the top
of the list.
.Touch [Add New] to add a new
location.
4. The selected destination is displayed.
Touch [Start] to start route guidance.
6. Navigation
6-21
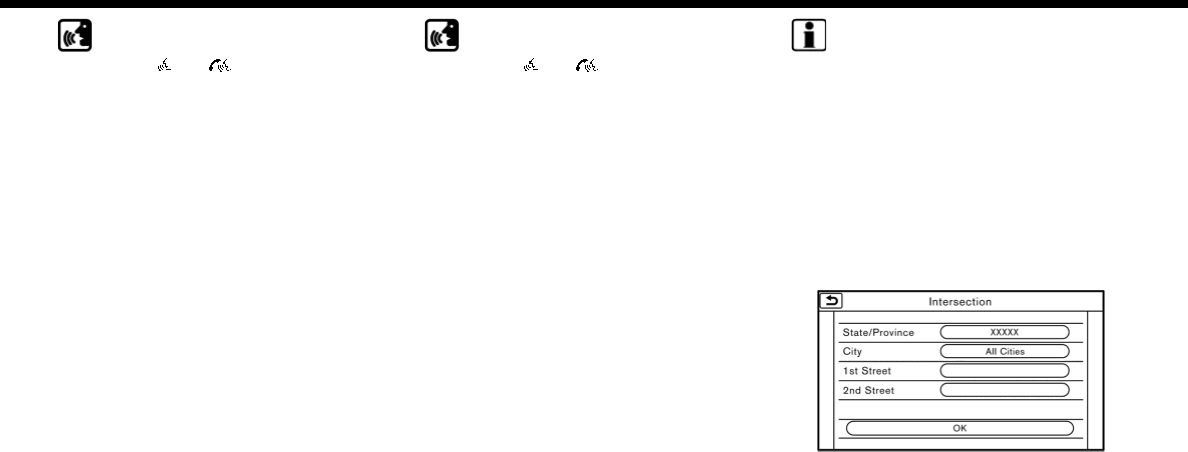
6. Navigation
Voice command
1. Push <>/< > located on the
steering wheel.
2. After the tone sounds, speak a com-
mand.
Use the following voice command to set a
destination from the Address Book:
“Address Book”
SEARCHING FROM PREVIOUS
DESTINATIONS
A previous destination and a previous
start point can be set as the destination.
Up to 100 previous destinations will be
automatically stored. If the number of
previous destinations exceeds 100, the
oldest one is automatically deleted and
the new destination is added.
1. Touch [Navi] on the Launch Bar.
2. Touch [Previous Destinations]. A list
screen is displayed.
3. Touch the previous destination or a
previous start point from the list.
4. Touch [Start] to start route guidance.
Voice command
1. Push <>/< > located on the
steering wheel.
2. After the tone sounds, speak a com-
mand.
Use the following voice commands to
display the previous destinations/start
point list:
“Previous Destinations”
“Previous Start Point”
SEARCHING BY CONNECTING TO
THE INTERNET (if so equipped)
It is possible to find a point of interest by
inputting a keyword and connecting to
the Internet. The searched location can be
set as a destination.
1. Touch [Navi] on the Launch Bar.
2. Touch [Connected Search].
3. Enter the keyword and touch [Search].
The system will connect to the Nissan-
Connect
SM
Services and the search
results will be displayed.
4. Touch the preferred destination from
the list.
5. The entire destination is displayed.
Touch [Start] to start route guidance.
INFO:
Connected Search is a NissanConnect
SM
Services feature. It is necessary to sub-
scribe to NissanConnect
SM
Services in
order to use the feature.
SETTING INTERSECTION
It is possible to set an intersection of any
two streets as the destination and have
the system calculate a route.
1. Touch [Navi] on the Launch Bar.
2. Touch [Intersection]. Intersection
screen is displayed.
3. Input the Intersection.
.Touch [State/Province] to enter the
state or province name if necessary.
.Touch [City] to enter the city name.
.Touch [1st Street] to enter the first
street name. After finishing the
entry, touch [List]. A list screen is
6-22
displayed.
.After first street information is en-
tered, touch [2nd Street] to enter
the second street name. After fin-
ishing the entry, touch [List]. A list
screen is displayed.
4. Enter the state/province, city, and
street of the destination and then
touch [OK]. The route is displayed.
5. The selected destination is displayed
at the center of the map. Touch [Start]
to start route guidance.
Voice command
For U.S. and Canada
1. Push <>/< > located on the
steering wheel.
2. After the tone sounds, speak a com-
mand.
Use the following voice command to set
an intersection as destination:
“Intersection”*
*: This voice command operation is avail-
able only when the language setting is set
to English.
SETTING BY PHONE NUMBER
If the phone number of a facility is known,
it is possible to search for a facility by
entering the phone number.
INFO:
.If the area code of the specified tele-
phone number does not exist in the
map data, the system cannot search
for the location.
.Only the locations included in the
database in the map data can be
searched for by phone number. Resi-
dential phone numbers cannot be
used to search for a location.
1. Touch [Navi] on the Launch Bar.
2. Touch [Phone Number]. The telephone
number input screen is displayed.
3. Enter the telephone number including
the area code. After finishing entry,
touch [OK].
4. The selected destination is displayed.
Touch [Start] after confirming the
location of the displayed destination.
INFO:
If there are more than one location
registered for the phone number, a list
screen is displayed. Touch an item on the
list to select a preferred location.
SETTING CITY CENTER
It is possible to set the center of a
specified city as a destination.
1. Touch [Navi] on the Launch Bar.
2. Touch [City Center]. A character input
screen is displayed.
3. Enter the name of the city and touch
[List]. A list screen is displayed.
INFO:
Touch [Last 5 Cities] to display the last
5 cities recently set as destinations.
4. Touch the preferred destination from
the list.
INFO:
Touch [By Distance] to sort the list by
the nearest distance. Touch [By Name]
to sort the list by the alphabetic order.
5. The selected destination is displayed
on the map. Touch [Start] after con-
firming the location of the displayed
destination.
6. Navigation
6-23
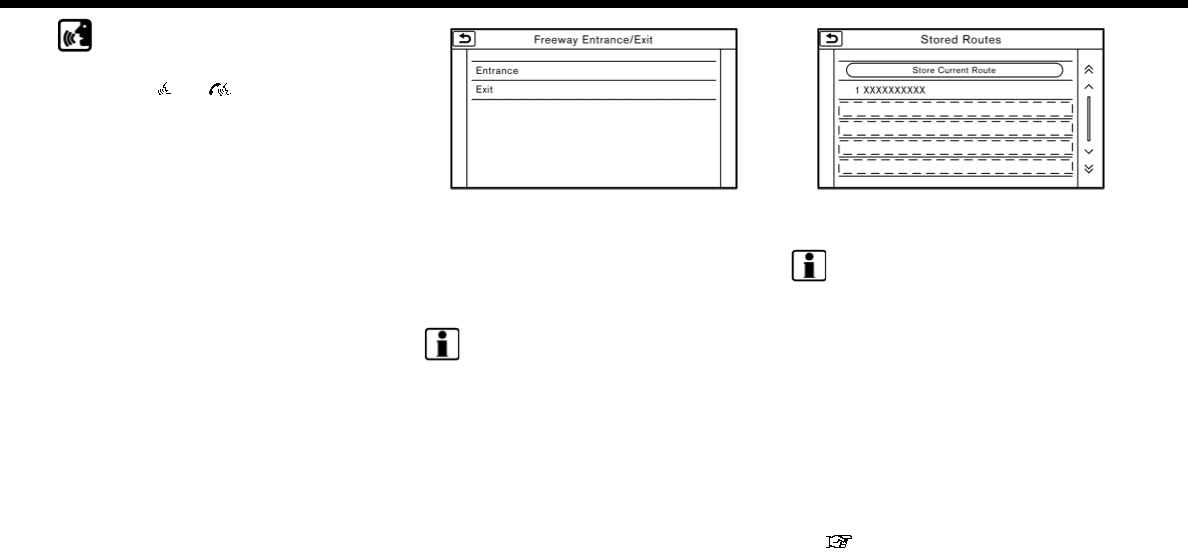
6. Navigation
Voice command
For U.S. and Canada
1. Push <>/< > located on the
steering wheel.
2. After the tone sounds, speak a com-
mand.
Use the following voice command to set
city center as a destination:
“City Center”*
*: This voice command operation is avail-
able only when the language setting is in
English.
SETTING FREEWAY ENTRANCE/
EXIT
It is possible to set the destination to an
entrance or exit of a freeway.
1. Touch [Navi] on the Launch Bar.
2. Touch [Freeway Entrance/Exit] to dis-
play the keyboard input screen.
3. Enter the name of the freeway. After
finishing entry, touch [List].
4. Touch the preferred freeway.
5. Touch [Entrance] or [Exit]. A list screen
is displayed.
6. Touch the preferred destination from
the list. The selected location is dis-
played in the preview on the touch
screen display.
INFO:
Touch [By Distance] to sort the list by
the nearest distance.
7. Touch [Start] to start route guidance.
SETTING FROM STORED ROUTES
It is possible to select a preferred route
from the stored routes.
1. Touch [Navi] on the Launch Bar.
2. Touch [Stored Routes]. A list screen is
displayed.
3. Touch the preferred route from the
list.
4. The entire route is shown on the map.
Touch [Start] to start route guidance.
INFO:
.The stored route only includes loca-
tions (destination and waypoints) and
route calculation conditions, not the
route itself. Therefore, when the desti-
nation is set using a stored route, a
different route may be suggested if
the current vehicle location is different
from the one when the route was
stored.
.To store the current route, touch
[Store Current Route]. A route can be
stored only when it includes one or
more waypoints.
“Storing route” (page 6-51)
6-24
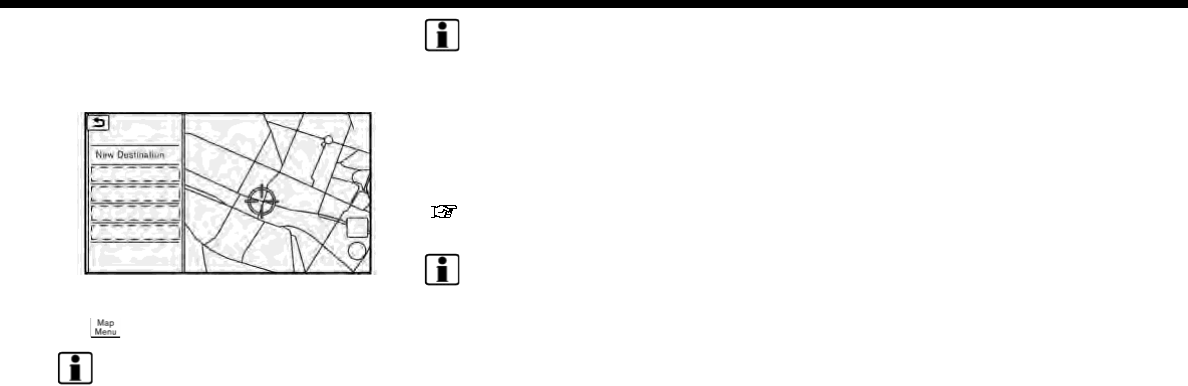
SETTING POINT ON MAP
It is possible to set a location scrolled to
on the map as the destination and have
the system calculate a route.
1. Scroll the map, place the cross pointer
over the preferred location, and touch
[].
INFO:
The point on the blinking road where
the center of the cross pointer is
located can be set as a destination.
2. Touch [New Destination].
3. The entire route is shown on the touch
screen display. Touch [Start] to start
route guidance.
INFO:
If a point on a freeway is set as the
destination, a confirmation message is
displayed.
SETTING WITH NISSANCON-
NECT
SM
SERVICES (if so equipped)
It is possible to set the destination using
the NissanConnect
SM
Services features.
“NissanConnect
SM
Services”
(page 5-7)
INFO:
Use of NissanConnect
SM
Services features
is dependent upon a valid subscription
and the telematics device being in opera-
tive condition, as well as cellular connec-
tivity, navigation map data and GPS
satellite signal reception being available.
Setting from information feeds
If the downloaded NissanConnect
SM
Ser-
vices information feed has location data,
you can set it as a destination. It is also
possible to use NissanConnect
SM
Services
features such as “Destination Download”,
“Send to Car” or “Journey Planner”, etc. to
set a destination.
For details of the services and settings,
refer to NissanConnect
SM
Services web-
site or contact the NissanConnect
SM
Ser-
vices support line.
NissanConnect
SM
Services website:
For U.S.
www.nissanusa.com/connect
For Canada
www.nissan.ca/nissanconnect
(English)
www.nissan.ca/nissanconnect/fr
(French)
NissanConnect
SM
Services support
line:
1-855-426-6628
1. Touch [Info] on the Launch Bar.
2. Touch [NissanConnect Services].
3. Touch [All Information Feeds]. A list
screen is displayed.
4. Touch a preferred folder. A list of
information feeds is displayed.
5. Touch a preferred information feed.
6. Navigation
6-25
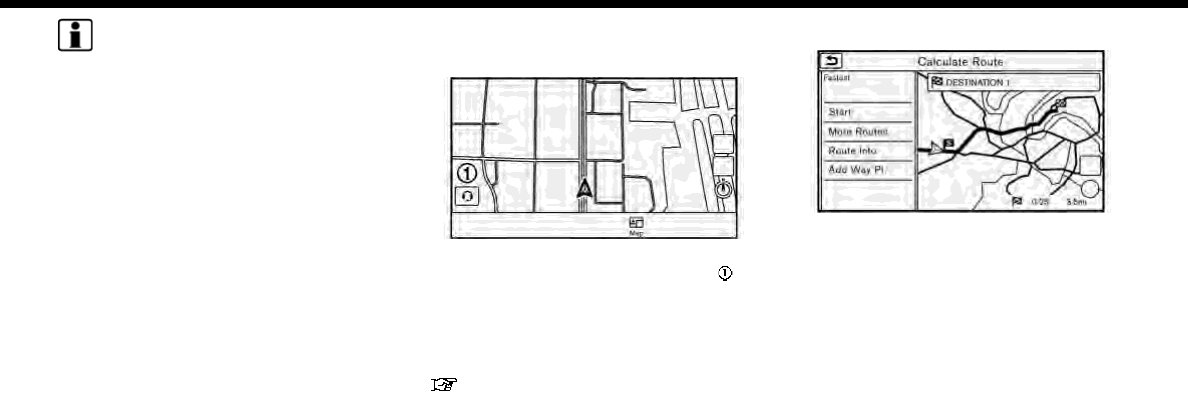
6. Navigation
INFO:
The methods for setting a destination
differ depending on the specific service
(Roadside Assistance Service, Assisted
Search, Destination Download, Connected
Search, etc.) and NissanConnect
SM
Ser-
vices may be updated during ownership.
Please see the NissanConnect
SM
Services
website for the latest features and ser-
vices, as well as the most up-to-date user
guide.
NissanConnect
SM
Services website:
For U.S.
www.nissanusa.com/connect
For Canada
www.nissan.ca/nissanconnect
(English)
www.nissan.ca/nissanconnect/fr
(French)
Searching by using Voice Menu
button on map
It is possible to set a destination by
touching the Voice Menu button on
the map. You can choose from the options
provided by the voice guidance and speak
your choice, or ask the NissanConnect
SM
Services Response Specialists directly to
search for your destination.
“Connecting to Interactive Voice
Menu” (page 5-12)
OPTIONS BEFORE STARTING THE
ROUTE GUIDANCE
Before starting the route guidance, select
menus for route details to modify the
route, preview the turn list, or store the
route.
There are two types of route details menu
that are displayed depending on the
conditions and the methods used to set
the destinations.
Example 1:
.[Start]:
Starts route guidance to the selected
destination.
.[More Routes]:
— [Fastest]
Selects a route that is shortest in
time.
— [Min. FWY]
Selects a route with minimum use
of freeways.
— [Short. Dist.]
Selects a route that is shortest in
distance.
.[Route Info]:
Route Information such as turn list and
scrolled map can be displayed. The
route can also be saved for future use.
6-26
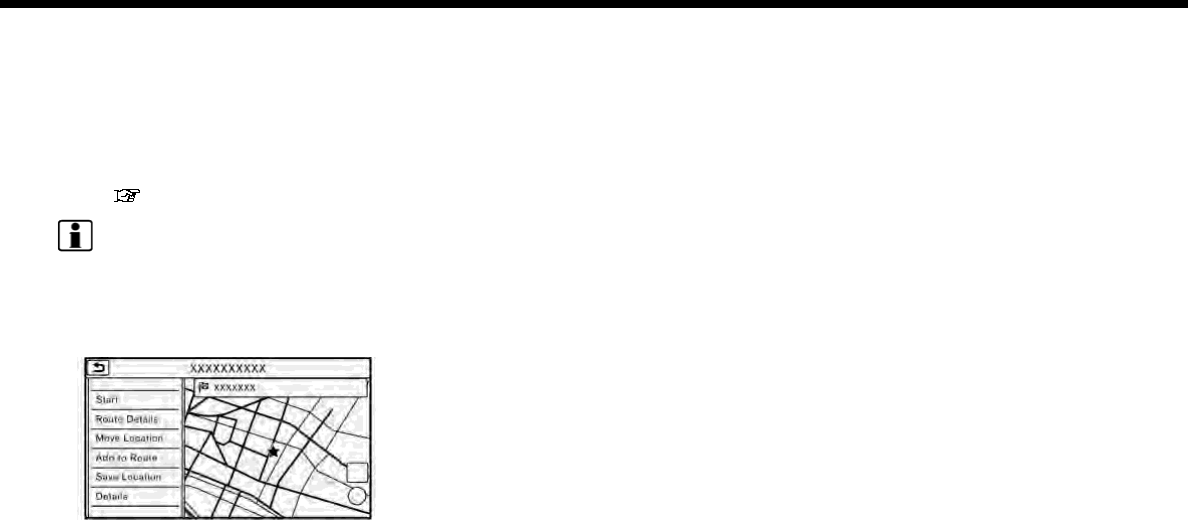
.[Add Way Pt.]:
Route can be edited by adding a
destination or a waypoint.
— If a waypoint is added, three alter-
native routes cannot be selected.
— It is possible to edit or add a
destination or waypoints to the
route that is already set.
“Editing route” (page 6-37)
INFO:
Choosing different route search condi-
tions in [More Routes] may not always
generate results search for different
routes.
Example 2:
.[Start]:
Starts route guidance to the selected
destination.
.[Route Details]:
Displays information of the route and
allows the route to be edited.
The menu shown in Example 1 is
displayed.
.[Move Location]:
Displays a map screen and allows the
location of the destination to be ad-
justed.
.[Add to Route]:
Adds a location to the route previously
set.
.[Save Location]:
Saves the location in the Address
Book.
.[Details]:
Displays detailed information of the
destination. Touch [Show Map] to dis-
play the map around the destination.
Touch [Call] (when available) to make a
phone call to the facility set as a
destination.
6. Navigation
6-27
6. Navigation
ROUTE GUIDANCE
ABOUT ROUTE GUIDANCE
After setting the route, select [Start] to
start the route guidance.
Throughout the route guidance, the sys-
tem navigates you through the guide
points using visual and voice guidance.
WARNING
.The navigation system’s visual and
voice guidance is for reference
purposes only. The contents of
the guidance may be inappropri-
ate depending on the situation.
.Follow all traffic regulations when
driving along the suggested route
(e.g., one-way traffic).
“Route guidance” (page 6-66)
Voice guidance during route gui-
dance
Basics of voice guidance:
Voice guidance announces which direc-
tion to turn when approaching an inter-
section for which a turn is necessary.
INFO:
.There may be some cases in which
voice guidance and actual road con-
ditions do not correspond. This may
occur because of discrepancies be-
tween the actual road and the infor-
mation on the map data, or may also
be due to the vehicle speed.
.In case voice guidance does not cor-
respond to the actual road conditions,
follow the information obtained from
traffic signs or notices on the road.
.Route guidance provided by the navi-
gation system does not take carpool
lane driving into consideration, espe-
cially when carpool lanes are sepa-
rated from other road lanes.
.For U.S. and Canada:
The system will announce street
names when the system language is
set to English. Street names are not
announced when the system is set to
French or Spanish.
.For Mexico:
The system will announce street
names when the system language is
set to Spanish. Street names are not
announced when the system is set to
English or French.
INFO:
.When approaching a guide point (in-
tersection or corner), destination, etc.
during route guidance, voice guidance
announces the remaining distance
and/or turning direction. Push and
hold <MAP> to repeat voice guidance.
.Voice guidance settings can be chan-
ged from [Intersection Guidance Set-
tings].
“Guidance settings” (page 6-42)
6-28
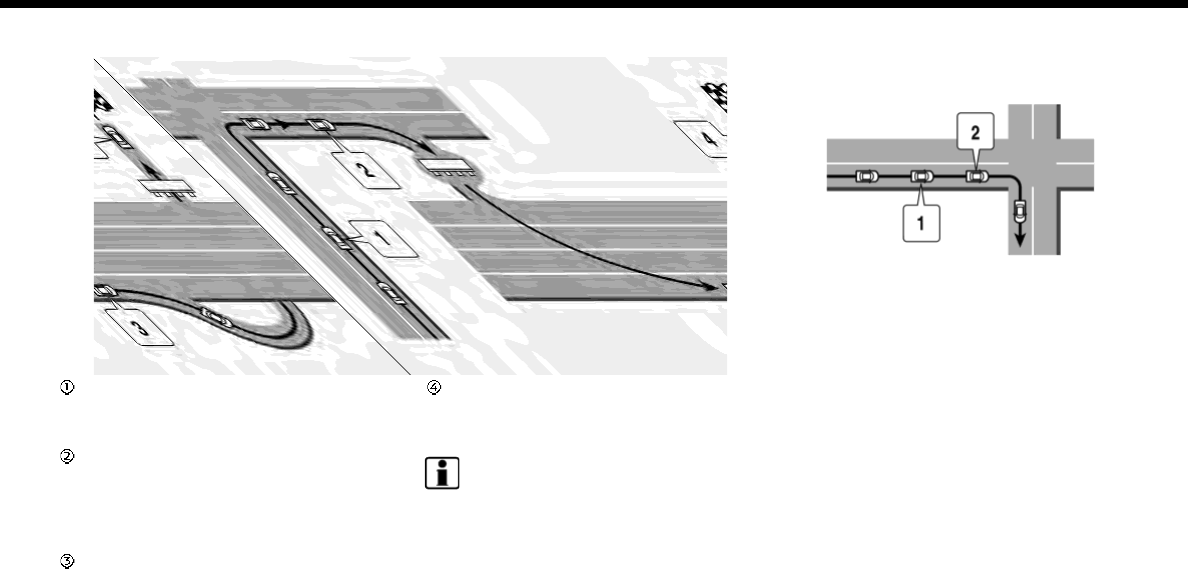
Example of voice guidance:
“In about a quarter mile (400 meters),
right (left) turn.”
“Right (left) turn ahead.”
“In about a quarter mile (400 meters)
freeway entrance on your right onto
(road number and direction).”
“Freeway entrance on your right onto
(road number and direction).”
“In about 1 mile (2 kilometers), exit on
your right.”
“Exit on your right.”
“You have arrived at your destination.”
Directions will differ, depending on the
road type.
INFO:
Distances may vary, depending on the
vehicle speed.
Notification of intersection on ordinary
road:
1. “In about a quarter mile (400 meters),
right (left) turn.”
2. “Right (left) turn ahead.”
6. Navigation
6-29

6. Navigation
Notification of consecutive intersec-
tions on ordinary roads:
When the road has three or more con-
secutive intersections ahead, voice gui-
dance will announce the following.
1. “In about a quarter mile (400 meters),
right (left) turn, then in about a quarter
mile (400 meters) left (right) turn.”
2. “Left (right) turn ahead, then in about a
quarter mile (400 meters) right (left)
turn.”
Notification of freeway entrance:
1. “In about a quarter mile (400 meters)
freeway entrance on your right onto
(road number and direction).”
2. “Freeway entrance on your right onto
(road number and direction).”
6-30
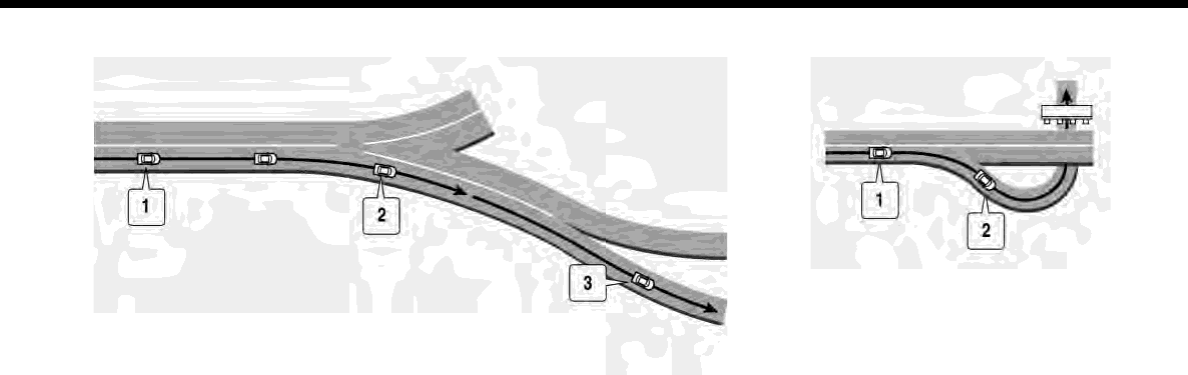
Notification of freeway junction:
1. “In about 1 mile (2 kilometers), keep to
the right (left) onto (road number and
direction), then in about a quarter mile
(400 meters) keep to the right (left).”
2. “Keep to the right (left) onto (road
number and direction), then in about
a quarter mile (400 meters) keep to
the right (left) onto (road number and
direction).”
3. “Keep to the right (left) onto (road
number and direction).”
Notification of freeway exit:
1. “In about 1 mile (2 kilometers), exit on
your right.”
2. “Take the second exit on your right.”
Notification when approaching desti-
nation:
Ordinary road:
When approaching the destination, voice
guidance will announce, “You have arrived
at your destination.” To reach your final
destination, refer to the map screen.
Dark green road:
After passing the last turning point on a
suggested route, voice guidance will an-
nounce, “The route to your destination
includes roads through incomplete map
areas. Voice guidance will not be provided
6. Navigation
6-31
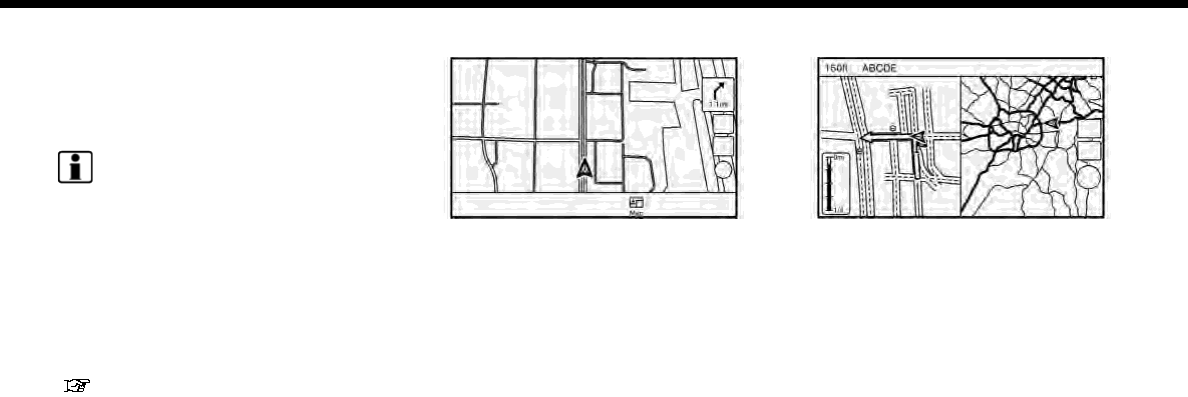
6. Navigation
in these areas.” When approaching the
endpoint of the suggested road, voice
guidance will announce, “Entering the
road with incomplete map data. The route
will be shown in a different color in this
area. Please follow traffic regulations.”
INFO:
Actual voice guidance may vary depend-
ing on road conditions and information
registered in the system.
Route guidance screens
Various guidance screens are displayed
on the touch screen display during route
guidance.
The settings of the guidance screens can
be changed.
“Map view settings” (page 6-9)
Route guidance on map screen:
When route guidance starts, the small
turn arrow and the distance to the next
guide point are displayed in the upper
right corner of the map screen. This arrow
indicates the turning direction at the next
guide point (corner or intersection). When
approaching a guide point, enlarged in-
tersection view is displayed. Also, there
may be cases where next street names
are announced.
Enlarged intersection view:
When approaching a guide point, the
system automatically changes to the split
screen and shows an enlarged view of the
intersection on the left screen. To switch
to the full map screen while the enlarged
intersection view is displayed, push
<MAP>. The distance to the guide point
and the name of the next street to drive
on are displayed on the top of the screen.
6-32
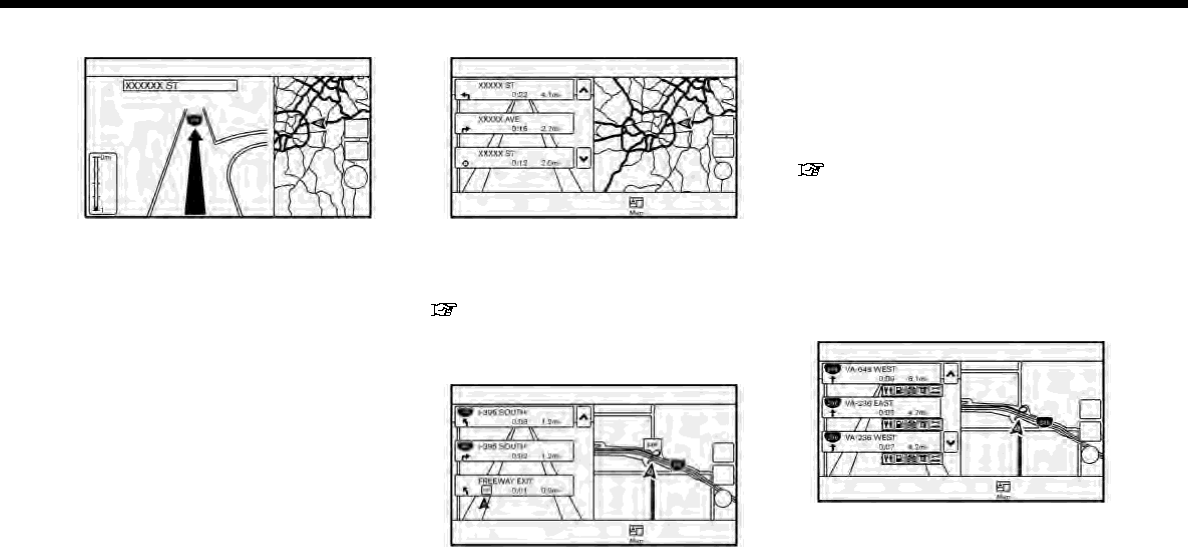
Junction guidance:
While driving on a freeway, when the
vehicle is approximately 1 mile (approxi-
mately 2 km) from a junction, the system
automatically switches to the split screen
and displays an enlarged view of the
junction on the left screen. After the
vehicle passes the junction, the system
automatically returns to the full screen
mode. To switch to the full map screen
while the enlarged junction view is dis-
played, push <MAP>.
Turn list:
When [Turn List] in the view settings menu
is turned on, a turn list can be displayed on
the left side of the screen. To switch to the
full map screen, push <MAP>.
“Map view settings” (page 6-9)
The left screen automatically switches to
an enlarged view of the intersection when
approaching a guide point.
When [Turn List] and [Show all Freeway
Exit on Route] (for U.S. and Canada) are
turned on and the route includes a free-
way or toll road, all exits along the route
and its exit information (for U.S. and
Canada) will be shown in the turn list.
The exit information is shown as icons.
With [Auto. Show Turn List on Freeway]
turned on, the turn list will appear auto-
matically when driving on freeways.
“Map view settings” (page 6-9)
Selecting a waypoint from the exit
information list (for U.S. and Canada):
When exit information is displayed on the
turn list, a waypoint to a facility located
near the freeway exit can be set as a
waypoint. The facility categories that are
not shown with an icon on the turn list
cannot be selected.
1. Touch the exit where the exit informa-
tion icon is displayed. The category list
screen is displayed.
2. Touch the landmark category. A list of
facilities located near the freeway exit
is displayed.
6. Navigation
6-33

6. Navigation
INFO:
The facility categories that are not
shown with an icon cannot be se-
lected.
3. Touch the preferred facility for the
waypoint.
4. The waypoint is set, and the route
search is performed.
“Options before starting the route
guidance” (page 6-26)
5. Touch [Start] to start the route gui-
dance.
ROUTE MENU
WARNING
Always stop the vehicle in a safe
location before modifying the route
conditions. Modifying the route con-
ditions while driving may cause an
accident.
During route guidance, the route condi-
tions can be modified and the route
information can be confirmed. Set route
conditions according to your personal
preference.
Touch [Navi] on the Launch Bar.
Route menu screen is displayed when a
destination is already set.
6-34

Available settings
Setting item Action
[New Destination] Sets the new destination.
“Setting new destination” (page 6-37)
[Cancel Route] Cancels the current route guidance.
[Route Info] [Turn List] Displays the details of the suggested route.
[Simulation] Simulates the route guidance. This function provides a detailed
image of the route with voice guidance.
“Confirming route” (page 6-37)
[Store Route] A calculated route can be stored. A route can be stored only when it
includes at least one waypoint.
[Map Scroll] A map scrolled further will be displayed.
[Edit/Add to Route] A destination or waypoint can be edited to a route that has already
been set.
“Editing route” (page 6-37)
[Settings] [Guidance Settings] [Guidance Voice] Activates or deactivates voice guidance.
[Guidance Volume] Adjust the volume level of voice guidance.
[Traffic Announcement]*
(for U.S. and Canada)
Activates or deactivates the traffic information announcements.
[Route Settings] [Basic Route Type] Set the route search conditions.
“Route Settings” (page 6-44)
[Other Routing Choices]
[Show Destination] [Move Location] Displays a map screen and allows the location of the destination to
be adjusted.
[Nearby POIs] Search for points of interest near the current vehicle location, such
as restaurants and gas stations, etc. The location can be set as a
waypoint.
[Save Location] Save the destination in the Address Book.
6. Navigation
6-35

6. Navigation
Setting item Action
[Recalculate] Manually search for the route again after changing the search
conditions, etc. and have the system calculate a route.
“Recalculating route” (page 6-40)
[Traffic Detour]* (for U.S. and Canada) Set the route search condition to detour traffic jam and traffic
accident.
“Searching for detour route using traffic information (for U.S.
and Canada)” (page 6-40)
[Detour] A detour of a specified distance can be calculated.
“Setting detour route” (page 6-41)
*: A SiriusXM Travel Link or SiriusXM Traffic subscription is necessary to receive SXM information services.
6-36
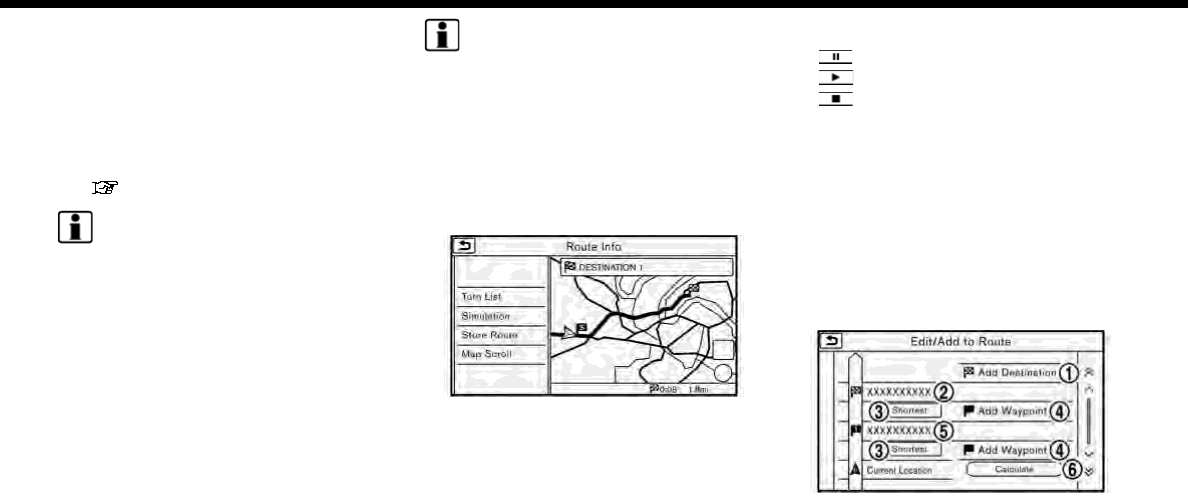
SETTING NEW DESTINATION
When the destination is already set, new
destination can be set.
1. Touch [Navi] on the Launch Bar.
2. Touch [New Destination].
3. Touch the preferred destination
setting method.
“Setting destination” (page 6-14)
INFO:
You can also set a waypoint with this
operation.
CANCELING ROUTE
It is possible to delete a destination and all
waypoints that have already been set.
1. Touch [Navi] on the Launch Bar.
2. Touch [Cancel Route].
3. A confirmation message is displayed.
Touch [Yes] to delete the currently set
destinations and waypoints.
INFO:
The deleted destination and waypoints
cannot be reactivated.
CONFIRMING ROUTE
The route information can be confirmed
and the suggested route simulation can
be performed.
1. Touch [Navi] on the Launch Bar.
2. Touch [Route Info].
3. Touch the preferred item.
Available items
.[Turn List]:
Displays the details of the suggested
route guidance.
.[Simulation]:
Simulate the route guidance. This
function provides a detailed image of
the route with voice guidance.
Touch the following keys for opera-
tion.
: Pauses the simulation.
: Resumes the simulation.
: Ends the simulation.
.[Store Route]:
A calculated route can be stored. A
maximum of 5 routes can be stored.
The stored routes can easily be re-
called for future use.
.[Map Scroll]:
Displays a map screen where the
location of the destination can be
confirmed.
EDITING ROUTE
1. Touch [Navi] on the Launch Bar.
2. Touch [Edit/Add to Route].
3. Edit the following settings and touch
[Calculate].
6. Navigation
6-37
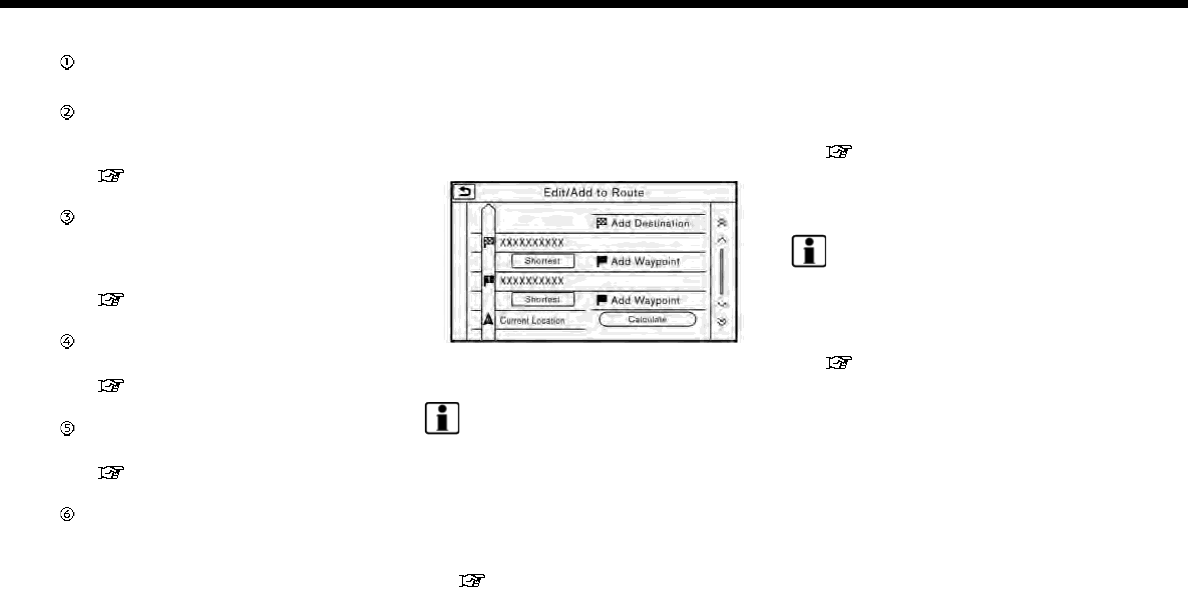
6. Navigation
Available settings
[Add Destination]:
Touch to add a new destination.
Current destination:
Touch to edit or delete the destina-
tion.
“Editing/deleting destination or
waypoint” (page 6-38)
Condition for calculating a route to
the destination/waypoint:
Changes the conditions for route
calculation.
“Changing route calculation con-
ditions” (page 6-39)
[Add Waypoint]:
Touch to add a waypoint.
“Setting destination or waypoint”
(page 6-38)
Current waypoint:
Modifies or deletes the waypoint.
“Editing/deleting destination or
waypoint” (page 6-38)
[Calculate]:
After editing the route, the system
recalculates a route with new condi-
tions.
Setting destination or waypoint
A destination or waypoint can be added to
a route that has already been set. Up to 5
waypoints besides one destination can be
set.
1. Touch [Navi] on the Launch Bar.
2. Touch [Edit/Add to Route].
3. Touch [Add Destination] or [Add Way-
point].
INFO:
If [Add Destination] is selected, the
current destination changes to a way-
point.
4. Set a destination or waypoint. The
method of searching for a destination
or waypoint is the same as the one for
a destination.
“Setting destination” (page 6-14)
5. Touch [Add to Route] to add the
location to the route.
6. The route information with the se-
lected location added to the route is
displayed. Adjust the route calculation
conditions as necessary.
“Changing route calculation con-
ditions” (page 6-39)
7. Touch [Calculate] to confirm the route
change. The route will be recalculated.
INFO:
.The prior route will be deleted auto-
matically.
.Destinations or waypoints can also be
added from the Map Menu.
“Scrolled location map screen”
(page 6-14)
Editing/deleting destination or
waypoint
A destination or waypoint that has al-
ready been set can be modified or deleted.
1. Touch [Navi] on the Launch Bar.
2. Touch [Edit/Add to Route].
3. Touch a destination or waypoint that
is already set.
6-38

4. Touch the item you would like to set.
Available settings
.[Delete]:
A selected destination or waypoint
that has already been set can be
deleted.
.[Change Order]:
The order of a destination and
waypoints that are already set can
be changed.
.[Move Dest.]:
The location of the destination or
waypoint can be adjusted by mov-
ing the cross pointer across the
map on the touch screen display.
5. Touch [Calculate] to apply the change.
INFO:
If the destination is deleted, the final
waypoint of the route becomes the desti-
nation.
Changing route calculation con-
ditions
Each section of the route between way-
points can have different route calcula-
tion conditions.
1. Touch [Navi] on the Launch Bar.
2. Touch [Edit/Add to Route].
3. Touch the route condition shown on
the preferred section of the route to
the destination or waypoint.
4. Touch the preferred condition.
“Route Settings” (page 6-44)
5. The conditions are changed and the
display returns to the edit route
screen.
6. Touch [Calculate] to apply the change.
INFO:
.The recalculated route may not be the
shortest route because the system
prioritizes roads that are easy to drive
on for safety reasons.
Changing order of destination
and waypoints
The order of a destination and waypoints
that are already set can be changed.
1. Touch [Navi] on the Launch Bar.
2. Touch [Edit/Add to Route].
3. Touch a destination or waypoint that
is already set.
4. Touch [Change Order].
5. Touch a preferred destination or way-
point to replace the previously se-
lected destination or waypoint.
6. Navigation
6-39
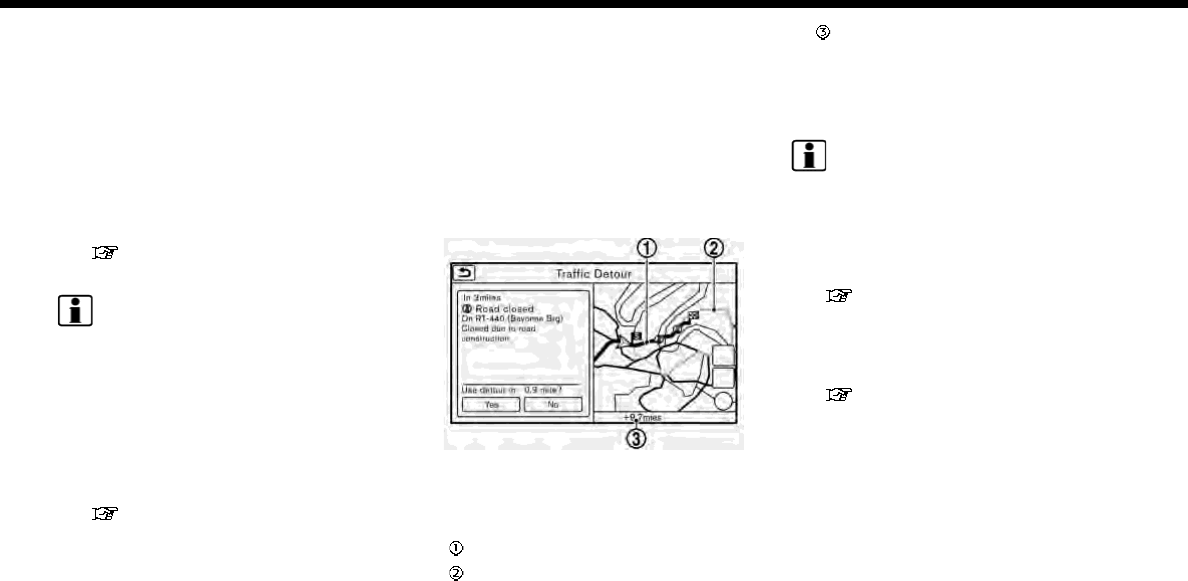
6. Navigation
6. Touch [Calculate] to apply the change.
RECALCULATING ROUTE
A route can be manually searched again
after changing the search conditions, etc.
1. Touch [Navi] on the Launch Bar.
2. Touch [Recalculate]. A message is
displayed and the route is recalcu-
lated.
3. Touch [Start] or conduct other opera-
tions as necessary.
“Options before starting the route
guidance” (page 6-26)
INFO:
.When a waypoint has been set on the
route, the system will search for only
one route, even if route recalculation is
performed.
.When the vehicle deviates from the
suggested route, the route from the
current location to the destination is
automatically searched again by the
Auto Reroute function.
“Route Settings” (page 6-44)
SEARCHING FOR DETOUR ROUTE
USING TRAFFIC INFORMATION (for
U.S. and Canada)
When a serious traffic event occurs on the
route, or if the system finds a faster route,
a detour alert will display automatically. If
the automatic alert is not noticed, a
detour can also be searched for manually.
1. Touch [Navi] on the Launch Bar.
2. Touch [Traffic Detour].
3. When the detour search is successful,
detailed information about the detour
route and the comparison screen of
the two routes are displayed.
Original route (blue)
Detour route (purple)
The change of distance and esti-
mated travel time to destination
when the detour route is taken.
4. To accept the suggested detour route,
touch [Yes].
INFO:
.Without a subscription to SiriusXM
Traffic, it will not be possible to receive
traffic detour information or apply
settings for functions related to traffic
information. A message appears when
a related menu item is selected.
“Notes on SiriusXM Traffic infor-
mation” (page 5-19)
.If no route is set, or [Use Real Time
Traffic Information] is turned off, this
function cannot be operated.
“Route Settings” (page 6-44)
.If a detour route is not selected and no
further action is performed, the detour
route will be automatically canceled.
.The detour suggestion can be re-
trieved even after the message dis-
appears by manually selecting [Traffic
Detour]. The system will then search
for the detour again and will suggest a
detour if one is available at that time.
6-40
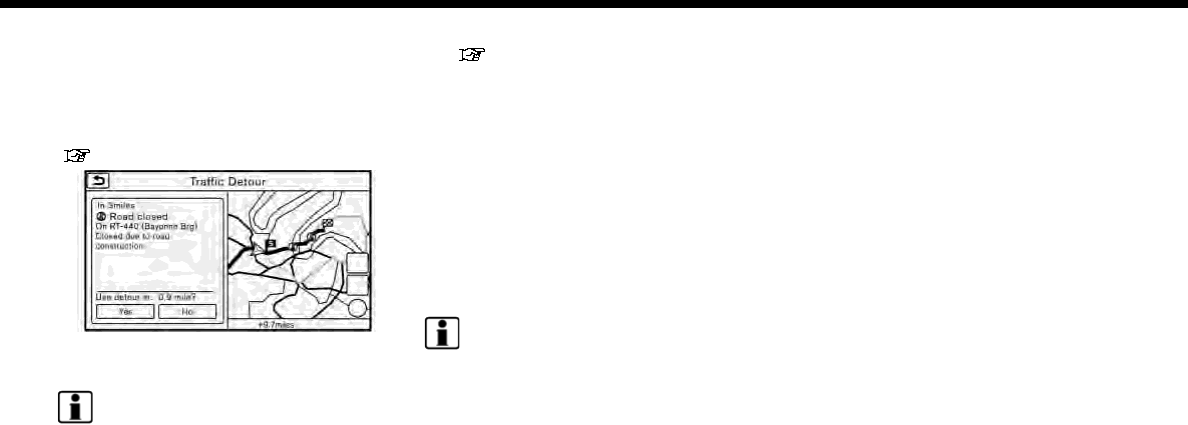
Automatic detour guidance
When [Auto Reroute] and [Use Real Time
Traffic Information] are turned on in the
detailed route settings, a message will be
displayed automatically when the system
finds a detour.
“Route Settings” (page 6-44)
To accept the suggested detour route,
touch [Yes].
INFO:
.If no operation is performed for 1
minute after the message is displayed,
the message disappears. The detour
will not be accepted, and the current
suggested route will remain un-
changed.
.When [Traffic Announcements] is
turned on in the guidance settings,
the system will announce voice gui-
dance at the same time the message
appears on the screen.
“Guidance settings” (page 6-42)
SETTING DETOUR ROUTE
To detour from the suggested route, a
route detouring for a specified distance
can be calculated.
1. Touch [Navi] on the Launch Bar.
2. Touch [Detour].
3. Touch a detour distance select from
1/2 mile (1km), 1 mile (2km), 3 miles
(5km) or 5 miles (10km). After calculat-
ing the detour, the system displays the
detour route on the map.
INFO:
.When the vehicle has deviated from
the suggested route, [Detour] cannot
be selected.
.If the system cannot calculate a de-
tour with the specified conditions the
previous suggested route is displayed.
.If the vehicle is traveling very fast, the
detour route may start from a location
that the vehicle has already passed.
ROUTE GUIDANCE SETTINGS
The route search conditions and route
guidance can be set.
6. Navigation
6-41

6. Navigation
Guidance settings
Various guidance information can be set to be played during route guidance and the route and/or voice guidance can be activated or
deactivated.
1. Touch [Settings] on the Launch Bar.
2. Touch [Navigation] and touch [Guidance Settings].
3. Touch an item you would like to set.
Setting item Action
[Guidance Volume] Adjusts the volume level of voice guidance.
[Guidance Voice] Activates or deactivates voice guidance.
[Traffic Announcement] (for U.S. and Canada) Activates/deactivates the traffic announcement.
When this item is activated, the system provides an announcement of a traffic
information event on the route. The indicator illuminates if traffic announcement is
activated.
[Intersection Guidance
Settings]
[Tones Only] When this item is turned on, a tone will sound at the timing of [At Turing Point], [Near
Guidance] and [Basic Guidance].
[1 Voice Guide] When this item is turned on, a tone will sound at the timing of [At Turning Point] and
[Near Guidance], and the voice guidance will be announced at the timing of [Basic
Guidance].
[2 Voice Guide] When this item is turned on, a tone will sound at the timing of [At Turning Point], and
the voice guidance will be announced at the timing of [Near Guidance] and [Basic
Guidance].
[3 Voice Guide] When this item is turned on, a tone will sound at the timing of [At Turning Point], and
the voice guidance will be announced at the timing of [Near Guidance], [Basic
Guidance] and [Far Guidance].
[Estimated Time] [Destination] Displays
and the travel time to the destination on the map screen.
[Waypoint] Displays and the travel time to the waypoint on the map screen.
6-42

INFO:
.The guidance volume can also be adjusted by turning <VOL/ >,<VOLUME/ > or pushing + or - side of < > on the steering
wheel while voice guidance is being announced.
.A SiriusXM Traffic subscription is necessary to use Traffic Announcement function (for U.S. and Canada).
6. Navigation
6-43
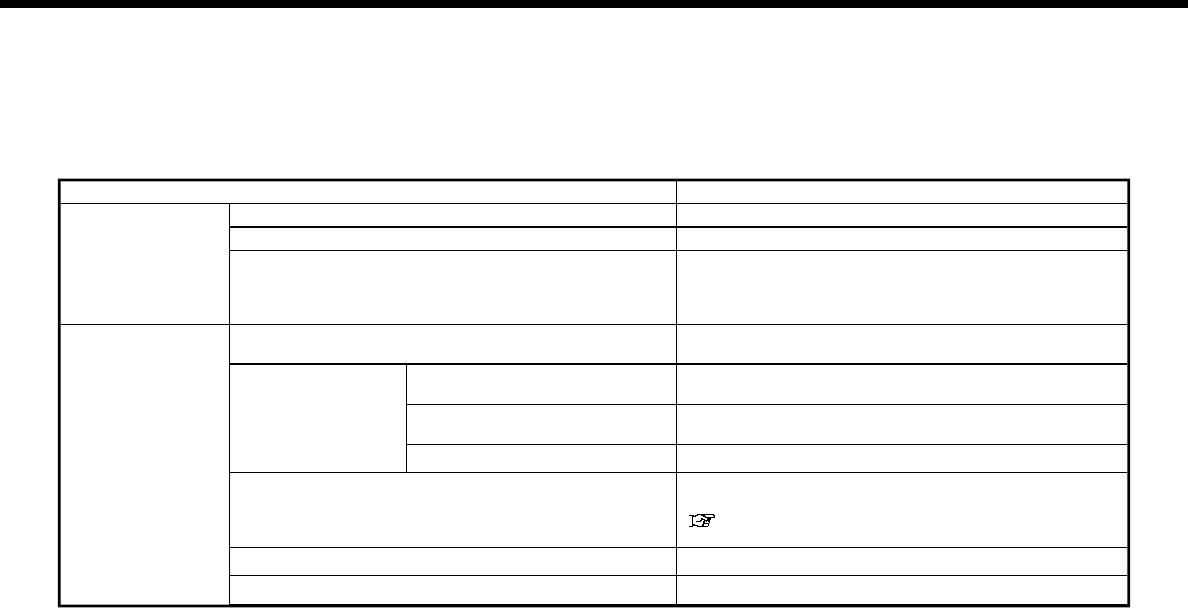
6. Navigation
Route Settings
It is possible to set the conditions of the route search.
1. Touch [Settings] on the Launch Bar.
2. Touch [Navigation] and touch [Route Settings].
3. Touch the item you would like to set.
For U.S. and Canada
Setting Item Action
[Basic Route Type] [Fastest Route] Prioritizes the use of freeways.
[Minimize Freeway] Minimizes the use of freeways.
[Shortest Distance] Prioritizes the shortest route.
The recalculated route may not be the shortest route
because the system prioritizes roads that are easy to drive
on for safety reasons.
[Other Routing
Choices]
[Minimize Toll Roads] Minimizes the use of toll roads.
[Time Restricted Rd] [Use Restriction Info] Calculates route taking time restriction information into
consideration.
[Do Not Use Restriction Info] Calculates route without taking time restriction informa-
tion into consideration.
[Avoid] Calculates route avoiding the use of time restricted roads.
[Use Real Time Traffic Information] Uses the latest traffic information received via the
SiriusXM Traffic broadcast.
“Searching for detour route using traffic information
(for U.S. and Canada)” (page 6-40)
[Use Avoid Area Settings] Enables the avoid area setting.
[Use Ferries] Includes the use of ferries.
6-44

Setting Item Action
[Use Learned Routes] Uses the roads that are most frequently traveled with the
help of self-learning technology.
[Use HOV Lanes] Uses the HOV lanes.
[Auto Reroute] If the vehicle deviates from the suggested route, the
system automatically recalculates a route that leads the
vehicle to the suggested route.
INFO:
.If the vehicle greatly deviates from the suggested route, the system calculates a new route.
.Traffic jam information displayed on the map screen is not statistical traffic information.
.If [Do Not Use Restriction Info] is selected for [Time Restricted Rd] setting, the system calculates a route without any consideration
of the regulations concerning the time or day of the week. Therefore, the suggested route may include a road subject to traffic
regulations concerning the time or day of the week. When driving along the route, always follow all traffic regulations regardless of
whether [Time Restricted Rd] is set to be considered or not.
.Even when [Use Real Time Traffic Information] is turned on, if traffic information has not been provided for the area, a detour may
not always be indicated in a location where a traffic jam occurs.
.The system calculates to reduce the time required for the entire route from the start to the destination. If there are no appropriate
routes, the system may lead to a route where a traffic jam occurs instead of leading to a detour.
.The system may not lead to a detour if traffic closure or a traffic jam occurs far from the present location.
6. Navigation
6-45

6. Navigation
For Mexico
Setting Item Action
[Basic Route Type] [Fastest Route] Prioritizes the use of freeways.
[Minimize Freeway] Minimizes the use of freeways.
[Shortest Distance] Prioritizes the shortest route.
The recalculated route may not be the shortest route
because the system prioritizes roads that are easy to drive
on for safety reasons.
[Other Routing
Choices]
[Minimize Toll Roads] Minimizes the use of toll roads.
[Time Restricted Rd] Turns the time restriction information on/off.
[Use Avoid Area Settings] Enables the avoid area setting.
[Use Ferries] Includes the use of ferries.
[Auto Reroute] If the vehicle deviates from the suggested route, the
system automatically recalculates a route that leads the
vehicle to the suggested route.
INFO:
If the vehicle greatly deviates from the suggested route, the system calculates a new route.
6-46
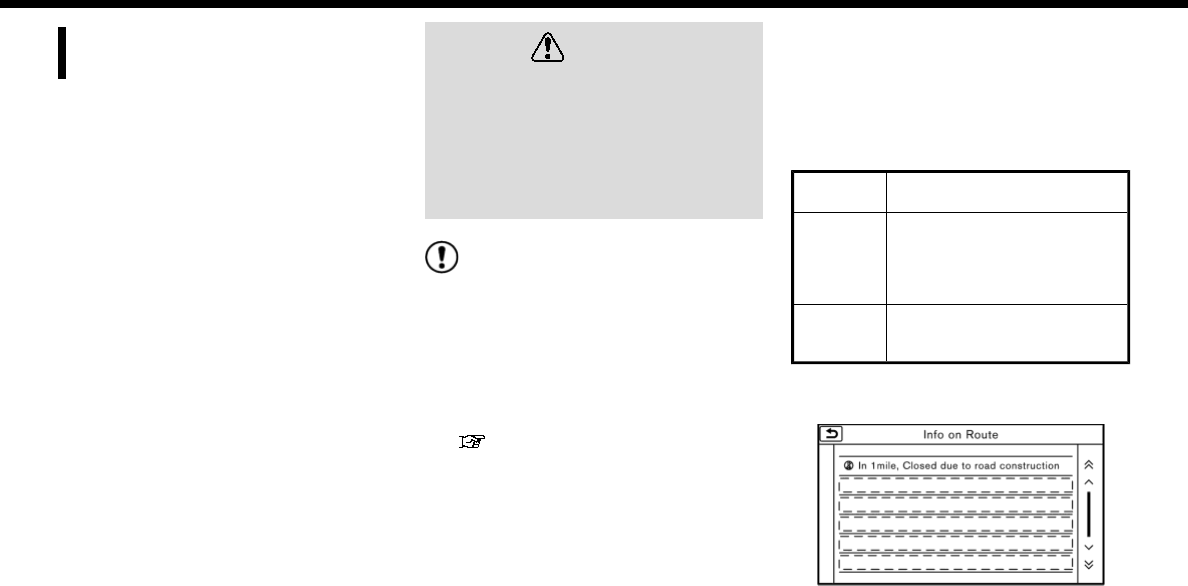
VIEWING TRAFFIC INFORMA-
TION (for U.S. and Canada)
SiriusXM Traffic information is a subscrip-
tion service offered by SiriusXM Satellite
Radio.
This service provides real-time informa-
tion regarding traffic flow, accidents, road
construction and other incidents, where
available.
SiriusXM Traffic combines information
from commercial and public traffic data
providers including government depart-
ments of transportation, police, emer-
gency services, road sensors, cameras
and aircraft reports. The traffic informa-
tion is broadcast to the vehicle by the
SiriusXM satellites. Available traffic infor-
mation on the route the driver selected is
shown on the navigation screen so traffic
conditions between you and the destina-
tion are known. Three types of real-time
traffic information for major roadways are
shown on the navigation system:
* Unscheduled traffic data for example,
accidents and disabled vehicles.
* Scheduled traffic data, for example road
construction and road closures.
* Traffic flow information (rate of speed
data).
WARNING
SiriusXM Traffic information is not a
substitute for attentive driving. Traffic
conditions change constantly and
emergency situations can arise with-
out warning. Relying only on SiriusXM
Traffic information may lead to a
collision and could result in serious
personal injury.
NOTE:
.Flow information is provided only for
roads equipped with traffic sensors
and is not available in all markets
covered by the service. Flow data
may not be available on portions of a
road that is under construction.
.A SiriusXM Traffic subscription is
necessary to view Traffic Info.
“SiriusXM Travel Link (for U.S.
and Canada)” (page 5-18)
VIEWING AVAILABLE TRAFFIC IN-
FORMATION
Viewing traffic events from list
1. Touch [Info] on the Launch Bar.
2. Touch [SXM Traffic]. A list of available
types of information are displayed.
Available
items
Function
[Info on
Route]
Displays a list of traffic infor-
mation found on the route
from the current vehicle loca-
tion to the destination. Avail-
able only when a route is set.
[Nearby
Traffic
Info]
Displays a list of available
traffic information around the
current vehicle location.
3. Touch the preferred information. A list
of available events are displayed.
6. Navigation
6-47
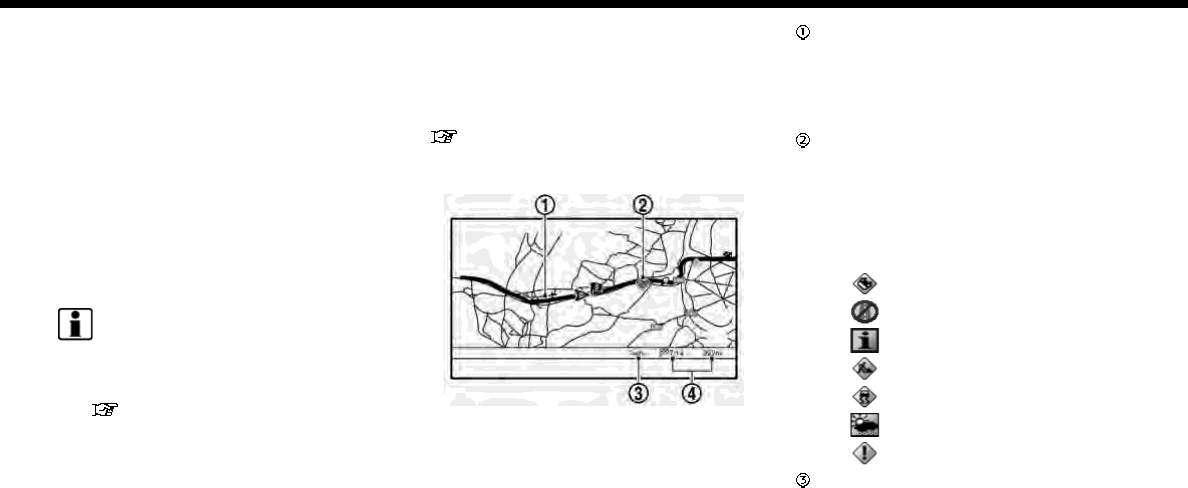
6. Navigation
4. Touch a preferred events from the list
to check the detailed information and
the map.
Displaying urgent traffic informa-
tion
When an urgent event is found around the
current vehicle location, a message pops
up automatically on the touch screen
display with a voice announcement.
The message includes the icon, event
type, event information and the direct
distance from the current location to the
event.
INFO:
.Urgent traffic information is displayed
regardless of whether [Use Traffic Info]
function is on or off.
“Traffic information setting”
(page 6-49)
.When there are multiple urgent events,
the event with the shortest direct
distance from the current location is
displayed.
.If the urgent event is on the recom-
mended route, and if a detour is found,
the detour route notification screen is
displayed when the vehicle ap-
proaches the detour point.
Traffic information on map
With a subscription to SiriusXM Traffic
service, traffic information is displayed
on both 2D map and Birdview™ map
screen.
“Notes on SiriusXM Traffic informa-
tion” (page 5-19)
Screen information
Road conditions
Free Flow: Green arrow
Moderate traffic: Yellow arrow
Heavy traffic: Red arrow
Section affected by serious traffic
event: Purple arrow
Traffic information icon:
If a route is not already set, all of the
traffic information icons on the map
screen are displayed in color. When a
route is already set, the icons on the
route are displayed in color, and the
icons outside the route are displayed
in gray.
: Accident
: Closed road
: Information
: Road work
: Slippery road
: Weather
: Incident
Traffic indicator:
Displays the reception condition of
traffic information transmitted from
the provider.
When reception condition of traffic
information transmitted from the
provider is not detected, the traffic
indicator will be “grayed-out”.
6-48
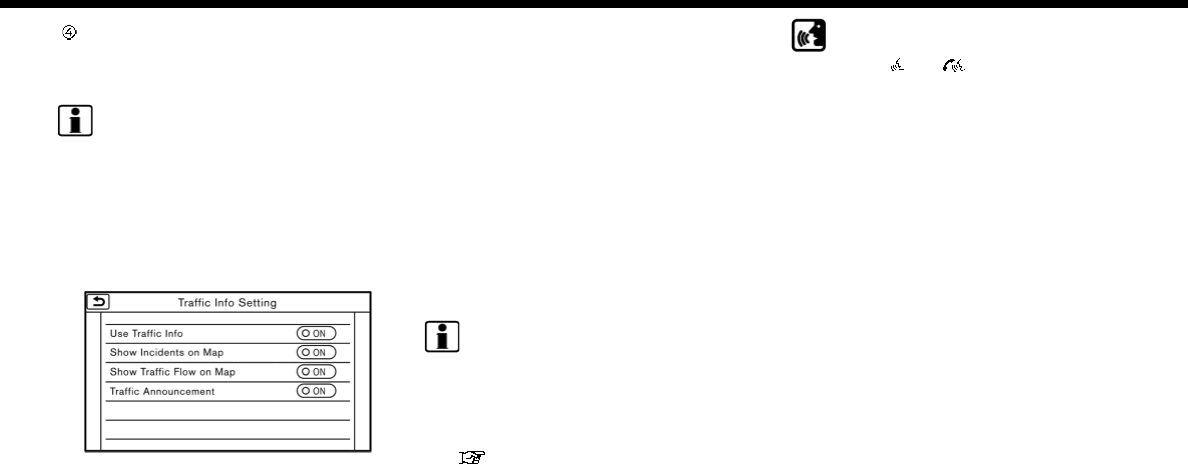
Remaining distance and estimated
time to the destination calculated
with consideration of traffic infor-
mation on route.
INFO:
Traffic icons are displayed in the scale
level of 1/64 miles (25 m) - 5 miles (10 km)
range. Some traffic icons are displayed
only on the map at higher detail levels.
TRAFFIC INFORMATION SETTING
Settings for the traffic information related
functions can be changed.
1. Touch [Settings] on the Launch Bar.
2. Touch [Navigation].
3. Touch [Traffic Info Setting].
4. Touch the preferred setting. The in-
dicator for the selected setting illumi-
nates.
Available setting items
.[Use Traffic Info]:
Enables all traffic information related
functions.
.[Show Incidents on Map]:
Displays the traffic incidents (e.g., ac-
cident) on the map screen.
.[Show Traffic Flow on Map]:
Displays the traffic flow with an arrow
on the map screen.
.[Traffic Announcement]:
Announces the traffic information
event on the route.
INFO:
.Even when [Show Traffic Flow on Map]
and [Show Incidents on Map] are set to
off, the list display of [Info on Route]
and [Nearby Traffic Info] will not be
affected.
“Viewing traffic events from list”
(page 6-47)
.Even when [Traffic Announcement] is
set to off, the route guidance will not
be affected. Also, the announcement
of emergency information and weath-
er information will not be turned off.
Voice command
1. Push <>/< > located on the
steering wheel.
2. After the tone sounds, speak a com-
mand.
Use the following voice command to
turn the traffic information system on/
off:
“Traffic Information”
6. Navigation
6-49
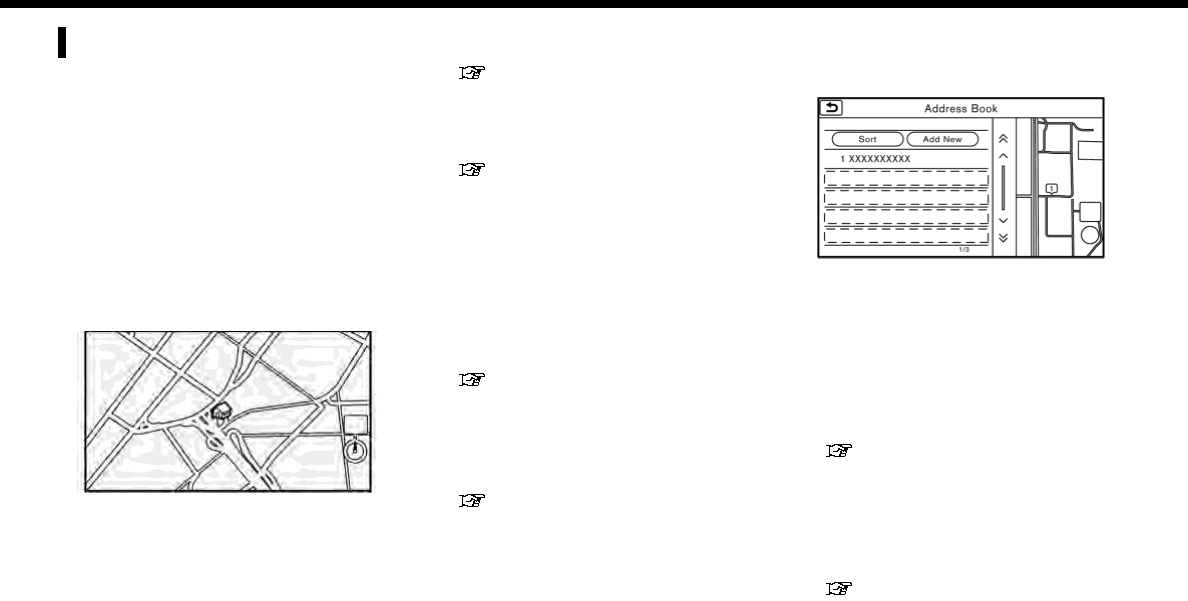
6. Navigation
STORING A LOCATION/ROUTE
STORING LOCATION
Often visited locations can be stored in
the Stored Locations. The stored ad-
dresses can be easily retrieved to set
them as a destination or waypoint. The
Stored Locations can store up to 200
locations.
Storing home location
A home location can be stored in the
system.
This operation is not available when a
destination is set for route guidance.
1. Touch [Navi] on the Launch Bar.
2. Touch [Home].
3. If a home location is not registered, the
system asks if you wish to store it.
Touch [Yes] to continue with the stor-
ing operation.
4. Set the Home location using the same
procedure as setting a destination.
“Setting destination” (page 6-14)
5. The selected location is displayed on
the map screen as a home icon. Edit
the contents of the stored item as
necessary and touch [OK].
“Editing stored home and loca-
tion” (page 6-53)
Other Settings
1. Touch [Settings] on the Launch Bar.
2. Touch [Navigation] and touch [Ad-
dress Book].
3. Touch [Home Location (None)].
4. Touch an appropriate method to set a
location. Refer to the search methods
used for destination setting.
“Setting destination” (page 6-14)
When stored, the location is displayed
at the center of the map on the touch
screen display.
5. Edit the contents of the stored item as
necessary and touch [OK].
“Editing stored home and loca-
tion” (page 6-53)
Storing location by searching
It is possible to store a location by
searching in various ways.
1. Touch [Settings] on the Launch Bar.
2. Touch [Navigation].
3. Touch [Address Book].
4. Touch [Stored Locations].
5. Touch [Add New].
6. Touch an appropriate method to set a
location. Refer to the search methods
used for destination setting.
“Setting destination” (page 6-14)
7. A message is displayed, and the ad-
dress of the location is stored in the
Address Book.
8. Adjust and edit the contents of the
stored item as necessary. Touch [OK]
to confirm.
“Editing stored home and loca-
tion” (page 6-53)
6-50
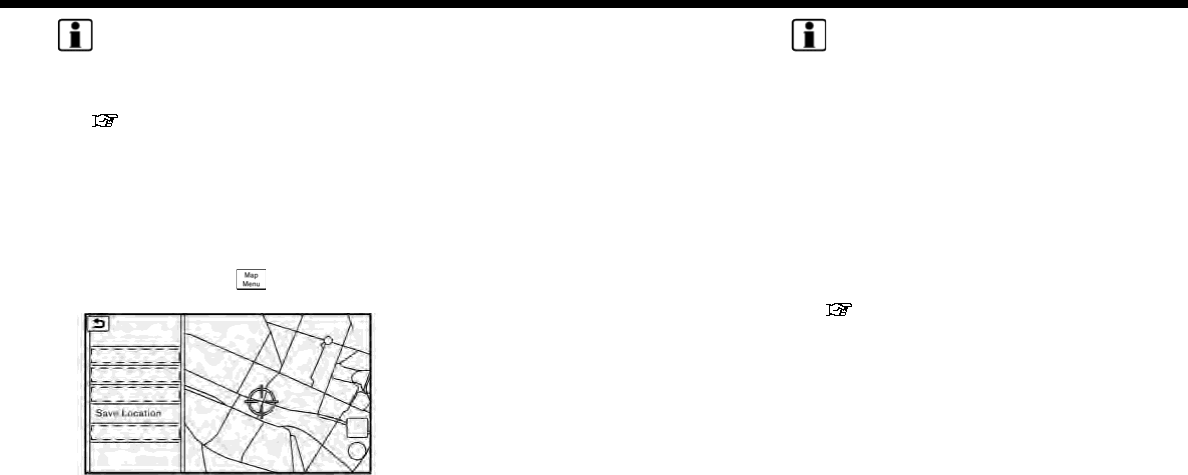
INFO:
.When the location is stored in the
Stored Locations, [Address Book] can
be used to search for the location.
“Searching from address book”
(page 6-21)
.When 200 locations are already stored,
a new location cannot be stored until a
currently stored location is deleted.
Storing location by moving map
1. Move to the preferred location on the
map and touch [ ] on the touch
screen display.
2. Touch [Save Location]. A message is
displayed.
3. The icon representing the stored loca-
tion is displayed on the map. Push
<MAP> to return to the current loca-
tion map screen.
STORING ROUTE
A maximum of 5 calculated routes can be
stored. Stored routes can be easily re-
trieved and set as the suggested route.
If any waypoints are not set on the route,
the route cannot be stored.
1. Touch [Navi] on the Launch Bar.
2. Touch [Route Info].
3. Touch [Store Route]. A confirmation
message is displayed. Select [Yes] to
store the current route.
Other settings
A route can also be stored using the
following procedure.
1. Touch [Settings] on the Launch Bar.
2. Touch [Navigation].
3. Touch [Address Book].
4. Touch [Stored Routes].
5. Touch [Store Current Route]. A con-
firmation message is displayed.
6. Confirm the contents of the message
and touch [Yes]. The current route is
stored.
INFO:
.At least 1 waypoint must be set for the
route to be stored.
.A stored route includes only locations
(destination and waypoints) and route
calculation conditions, not the route
itself.
.The route is stored in the first available
position number in the store current
route list.
.When 5 routes are already stored in
the address book, a new route cannot
be stored until a route is deleted.
“Deleting stored item” (page 6-55)
STORING AVOID AREA
An Avoid Area can be stored. The Avoid
Area is an area that can be excluded from
a route, such as a road that is always
congested. Once Avoid Areas are stored,
the system avoids those areas when
calculating a route. Up to 10 Avoid Areas
can be stored.
1. Touch [Settings] on the Launch Bar.
2. Touch [Navigation].
3. Touch [Address Book].
4. Touch [Avoid Area].
6. Navigation
6-51
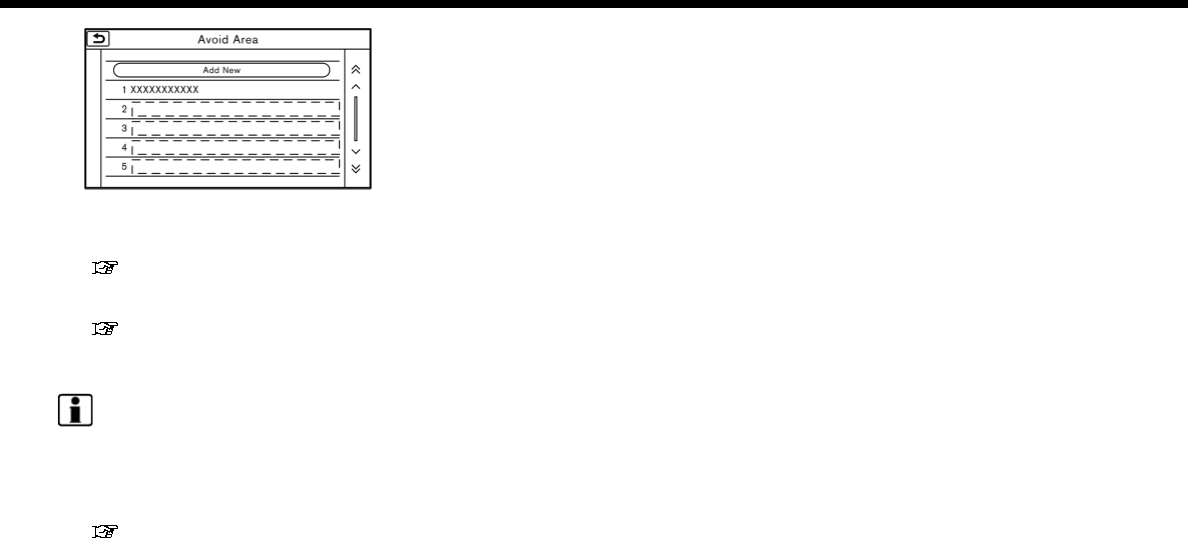
6. Navigation
5. Touch [Add New].
Touch an appropriate method to
search for a location.
“Setting destination” (page 6-14)
6. Adjust the information of the Avoid
Area as necessary.
“Editing avoid area” (page 6-55)
7. Touch [OK] to store the avoid area
information.
INFO:
.A maximum of 10 Avoid Areas can be
stored. When 10 Avoid Areas are al-
ready stored, a new Avoid Area cannot
be stored until a currently stored Avoid
Area is deleted.
“Deleting stored item” (page 6-55)
6-52
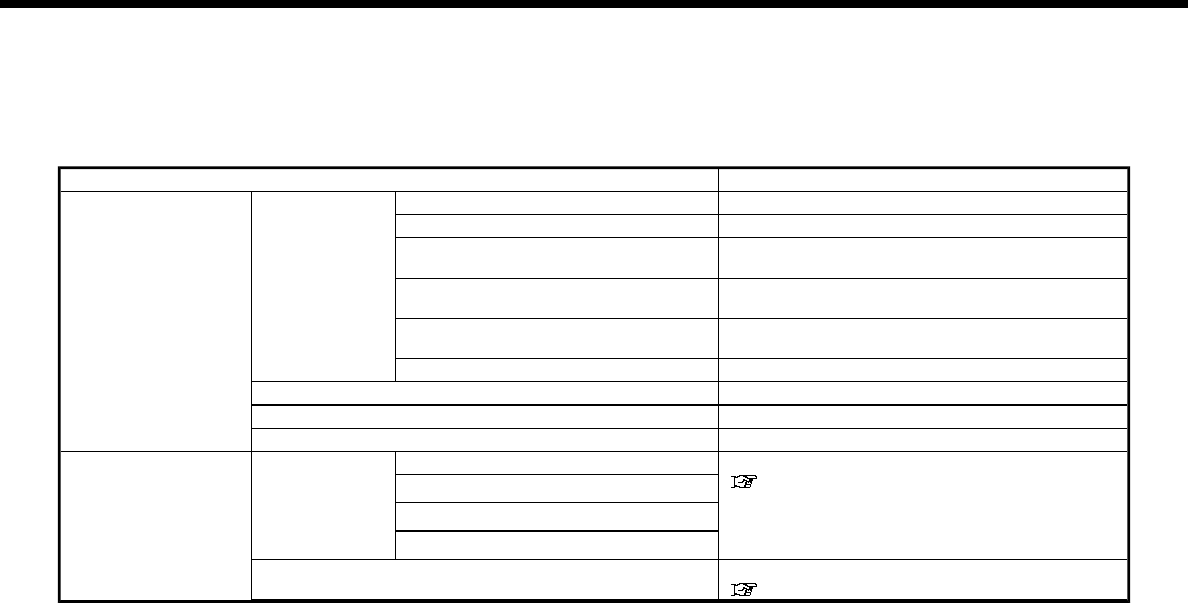
EDITING STORED INFORMATION
Items stored in the system can be edited.
Editing stored home and location
1. Touch [Settings] on the Launch Bar.
2. Touch [Navigation] and touch [Address Book].
Setting item Action
[Home Location]* [Edit] [Show Icon on Map] Displays the home icon on the map.
[Icon] Selects a home icon of a preferred design.
[Sound] Sets the type of the alarm that sounds when the
vehicle approaches home.
[Direction] Sets the alarm to sound when approaching from a
specific direction.
[Distance] Sets the alarm to sound when reaching a specific
distance to home.
[Phone No.] Stores the home telephone number.
[Move Location] Adjusts the stored home location.
[Delete] Deletes the stored home location.
[OK] Confirms and saves the edited home information.
[Stored Locations] [Sort] [Sorted By Number] Sorts the stored locations.
“Searching from address book” (page 6-21)
[Sorted By Name]
[Sorted By Icon]
[Sorted By Group]
[Add New] Adds a new location.
“Storing location by searching” (page 6-50)
6. Navigation
6-53

6. Navigation
Setting item Action
Stored Location
List
[Edit] [Show Icon on Map] Displays the icon of a stored location on the map.
[Name] Registers a name of the entry.
[Voicetag] Registers a voicetag for the entry which allows the
entry to be used with the voice recognition system.
[Icon] Selects an icon for the entry.
[Sound] Sets the type of the alarm that sounds when the
vehicle approaches the location.
[Direction] Sets the alarm to sound when approaching from a
specific direction.
[Distance] Sets the alarm to sound when reaching a specific
distance to the location.
[Phone No.] Registers a phone number of the location.
[Group] Registers a group of the entry.
[Entry Number] Registers an entry number for the location.
[Move Location] Adjusts the stored location information.
[Delete] Deletes the stored location information.
[OK] Confirms and saves the edited stored location
information.
*: When home location has not been stored, [Home Location (None)] is displayed and a home location can be stored from the menu.
6-54

Editing stored route
1. Touch [Settings] on the Launch Bar.
2. Touch [Navigation] and touch [Ad-
dress Book].
3. Touch [Stored Routes].
4. Touch the preferred stored route from
the list.
Setting item Action
[Rename] Changes the stored route
name.
[Replace] Overwrites the stored
tracked route to the cur-
rent tracked route.
[Delete] Deletes the stored route.
[OK] Applies the edited settings.
Editing avoid area
1. Touch [Settings] on the Launch Bar
and touch [Navigation].
2. Touch [Address Book] and then touch
[Avoid Area].
3. Touch a preferred Avoid Area from the
list. Avoid Area editing screen will be
displayed.
Setting item Action
[Rename] Changes the name of an
Avoid Area.
[Move Loca-
tion]
Display the Avoid Area on
the touch screen display,
and adjusts the location of
the Avoid Area.
[Resize Area] Adjusts the range of the
Avoid Area.
[FWY] Sets the route to include or
not include freeways.
On the map, the Avoid Area
will be displayed in green if
it includes a freeway or in
blue if it does not include a
freeway.
[Delete] Delete an Avoid Area.
[OK] Applies the edited setting.
DELETING STORED ITEM
The locations and routes in the Address
Book can be deleted. Two deletion meth-
ods are available: deleting an individual
item and deleting all stored items.
INFO:
.Deleted items cannot be restored.
Before deleting an item, always make
sure that the item is no longer needed.
6. Navigation
6-55

6. Navigation
Deleting stored item individually
1. Touch [Settings] on the Launch Bar.
2. Touch [Navigation] and touch [Address Book].
3. Touch [Delete Stored Items].
Select the preferred item and touch [Yes] to complete the deleting operation.
Step 1 Step2 Action
[Delete Home Location] Deletes home location.
[Delete Ad-
dress Book]
[Delete All] Deletes all stored locations.
[Delete One] Deletes a selected stored location.
[Delete
Stored
Routes]
[Delete All] Deletes all stored routes.
[Delete One] Deletes selected stored routes.
[Delete Avoid
Areas]
[Delete All] Deletes all Avoid Areas.
[Delete One] Deletes a selected Avoid Area.
[Delete Pre-
vious Desti-
nations]
[Delete All Previous Destina-
tions]
Deletes all of the previous destinations.
[Delete Previous Destination] Deletes a selected previous destination.
[Delete Previous Start Point] Deletes a previous start point.
[Delete Learned Routes] (for U.S. and Canada) Deletes all system learned routes.
Deleting individual item on map
1. Align the cross pointer over the pre-
ferred stored location for deletion by
moving on the map, and then touch
[].
2. Touch [Delete].
3. A confirmation message is displayed.
Confirm the contents of the message
and touch [Yes].
The stored item is deleted from the
Address Book.
TRANSFERRING INFORMATION
TO/FROM ADDRESS BOOK
The information of the stored home and
addresses can be exported and imported
using a USB memory device.
“USB (Universal Serial Bus) Connec-
tion Port and AUX (auxiliary) input
jack” (page 2-12)
6-56
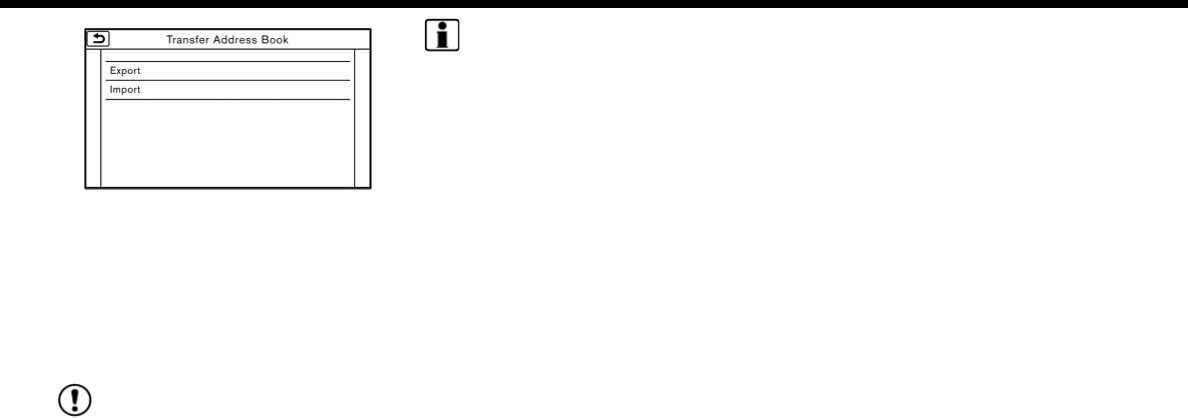
1. Touch [Settings] on the Launch Bar.
2. Touch [Navigation].
3. Touch [Address Book].
4. Touch [Transfer Address Book].
5. Touch [Export] or [Import].
6. Touch [Home Location] or [Stored
Locations].
7. Touch [Download].
NOTE:
Do not remove the USB memory device
until the system completely imports or
exports the data.
INFO:
.If the USB memory device already has
the data for a stored address, a con-
firmation message will be displayed.
Once overwritten, the original data
cannot be recovered.
.A USB memory device can be used to
transfer data but it is not possible to
edit the data using a personal compu-
ter, etc.
.Models with two USB connection
ports:
Either of the two USB connection ports
can be used for information transfer.
6. Navigation
6-57

6. Navigation
NAVIGATION SETTINGS
The navigation system can be customized according to the user’s preference.
Available items may vary depending on models and specifications.
1. Touch [Settings] on the Launch Bar.
2. Touch [Navigation].
3. Touch the item you would like to set.
Available items:
[Address Book]
Stores locations and routes. Stored items can be edited.
“Storing a location/route” (page 6-50)
[Map View]
Sets the display method and direction of the map.
“Map view settings” (page 6-9)
[Map Icons]
Sets the map icons to appear on the map.
“Displaying map icons” (page 6-12)
[Guidance Settings]
Sets the various functions for route guidance.
“Guidance settings” (page 6-42)
[Route Settings]
Changes the routing preferences.
“Route Settings” (page 6-44)
[Traffic Info Setting] (for U.S. and Canada)
Sets the various functions of the SiriusXM Traffic information system.
“Traffic information setting” (page 6-49)
6-58

[Speed Limit Indication on Map] (for U.S. and Canada)
Turns on/off the speed limit display function. When this item is turned on, speed limit indicator will appear on the map screen when
available.
[Others]
Setting item Action
[Audio Display on Map] Turns the audio information display on the map screen on/off.
[Small Step Zoom With Dial] (if so equipped) Sets the free zoom function on/off. When this setting is on, it is possible to adjust the
scale in smaller steps than with normal scale adjustment.
[Map Scrolling Informa-
tion]
[Address Book Icons] Information about the location, on which the center of the cross pointer is placed by
scrolling on the map, can be set to be displayed.
“Displaying map scrolling information” (page 6-12)
[Destination/Waypoint
Icons]
[Show pop-up for POIs]
[Latitude/Longitude Info]
[Customize Nearby POIs] Item 1 - Item 5 Customizes the nearby categories to show the categories that you frequently use.
[Reset] Resets the nearby categories to default.
[Keyboard Type] [QWERTY] The keyboard layout of the character input screens can be selected.
[ABC]
[Tracking Dots Displayed
on Map]
[Show Tracking Dots on
Map]
Turns the route tracking dots display on/off.
[Dist. Between Tracking
Dots]
Select tracking dot interval.
[Delete Track to Current
Location]
Deletes the route tracking dots up to the current location.
6. Navigation
6-59

6. Navigation
Setting item Action
[Adjust Current Location] If the vehicle icon indicating the current vehicle location is not in the correct
position, the location of the vehicle icon on the map screen can be adjusted.
[Delete Stored Items]
Deletes a stored location or route.
“Deleting stored item individually” (page 6-56)
[Delete Previous Destinations]
Deletes all or one of the previous destinations or a previous start point.
“Deleting stored item individually” (page 6-56)
[Reset All Navigation Settings to Default]
This resets various settings (display, volume level, etc.) to the default settings.
6-60
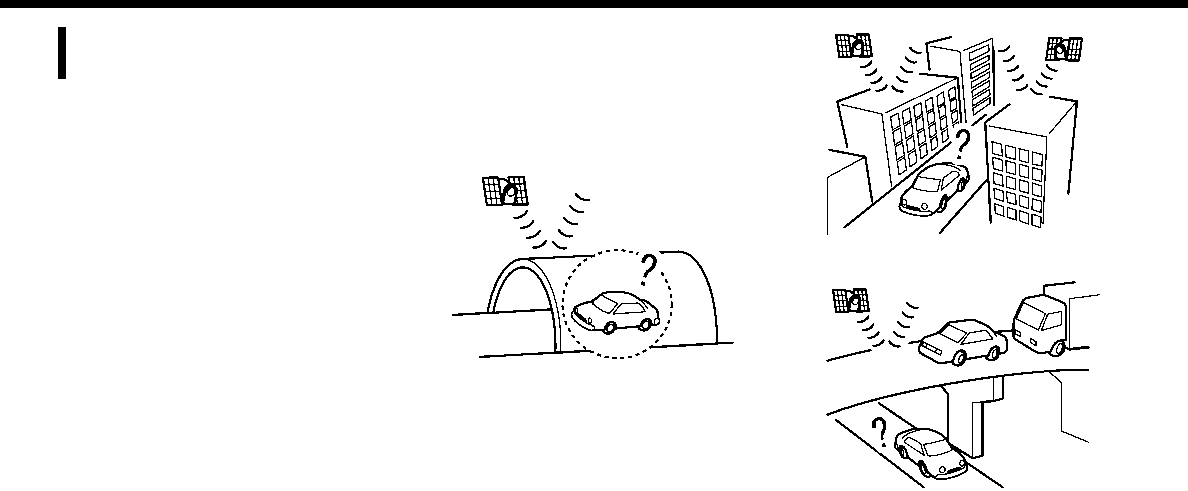
GENERAL INFORMATION FOR
NAVIGATION SYSTEM
CURRENT VEHICLE LOCATION
Display of current vehicle location
This navigation system combines the data
obtained from the vehicle (by gyro sensor)
and from GPS (Global Positioning System)
satellites to calculate the current location
of the vehicle. This position is then dis-
played throughout route guidance to a
destination.
What is GPS (Global Positioning
System)?
GPS is a position detecting system that
uses satellites deployed by the U.S. gov-
ernment. This navigation system receives
radio signals from three or more different
satellites that orbit 13,049 miles (21,000
km) above the earth in space, and detect
the position of the vehicle by utilizing the
principle of triangulation.
Positioning adjustment:
When the system judges that the vehicle
position is not accurate based on vehicle
speed and gyro sensor data calculations,
the system will automatically adjust the
position of the vehicle icon using GPS
signals.
Receiving signals from GPS satellites:
The reception of GPS signals can be weak,
depending on the environment. Vehicles
in the following areas/environments may
not receive GPS signals.
*Inside tunnels or parking garages
*In areas with numerous tall buildings
*Under multi-layered highways
6. Navigation
6-61
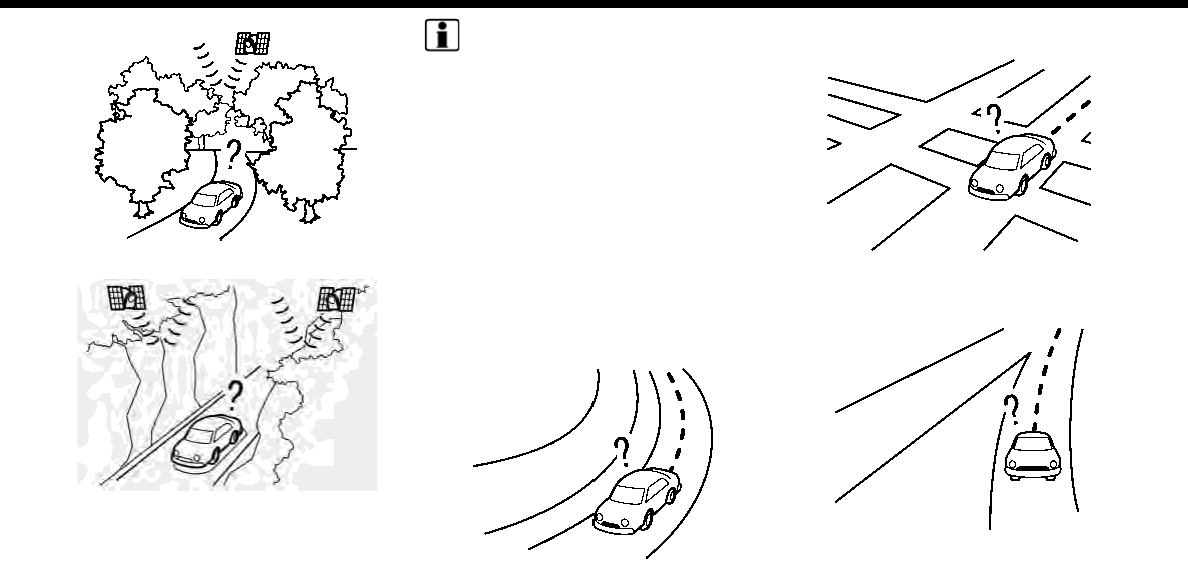
6. Navigation
*Areas with numerous tall trees
*In a canyon
INFO:
The GPS antenna is located on the instru-
ment panel inside the vehicle. Do not
place any objects, especially cellular
phones or transceivers, on the instrument
panel. Because the strength of the GPS
signal is approximately one billionth of
that of TV waves, phones and transceivers
will affect or may totally disrupt the signal.
Incorrect display of vehicle posi-
tion
The following cases may affect the display
accuracy of the vehicle’s position or tra-
veling direction. The accuracy will return
to normal if the driving conditions return
to normal.
*When there is a similar road nearby.
*When the vehicle is traveling in an
area with a grid pattern road system.
*When the vehicle is passing through a
large Y-shaped intersection/junction.
6-62
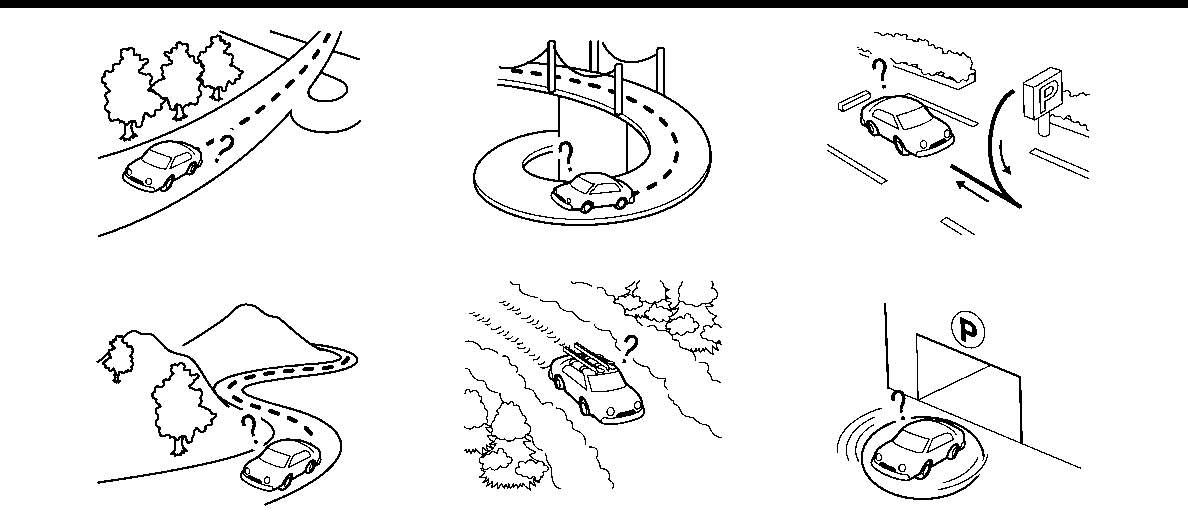
*When the vehicle is traveling on a
continuous, slowly curving road.
*When the vehicle is traveling on a road
with repeating S-shaped curves.
*When the vehicle is on a loop bridge.
*When the vehicle is on a snow-cov-
ered or unpaved road.
*When repeatedly turning left or right,
or driving in zigzags.
*When the vehicle is rotated on a
parking lot turntable while the igni-
tion switch placed in the OFF position.
6. Navigation
6-63
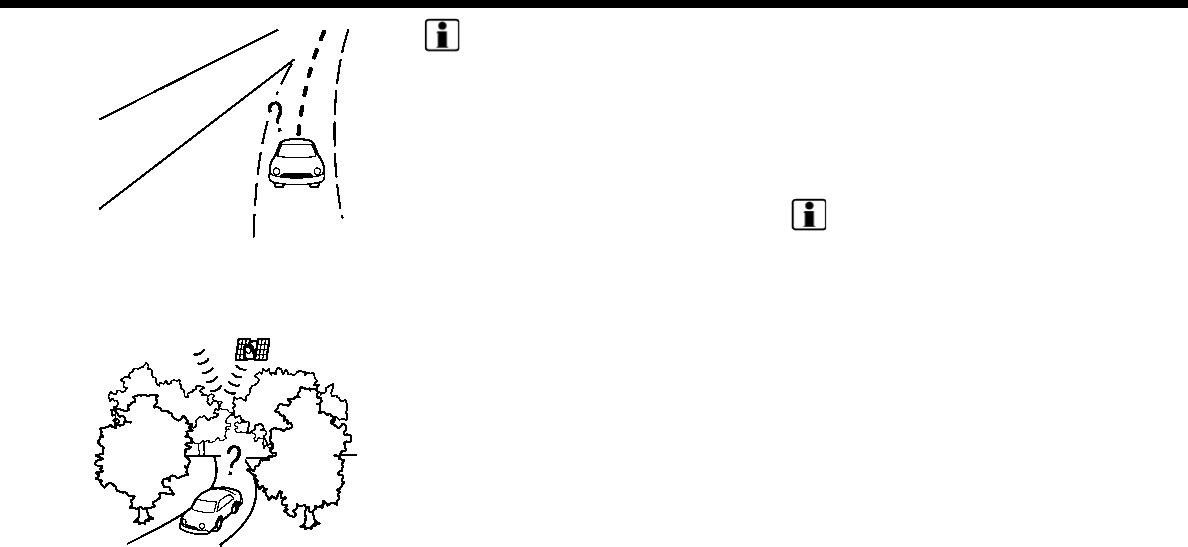
6. Navigation
*When driving on a road not displayed
on the map screen or a road that has
been changed due to additional con-
struction or other reasons.
*When the GPS positioning accuracy is
low.
INFO:
.The vehicle icon may be misaligned
when starting the vehicle just after
starting the engine or the hybrid
system.
.The vehicle icon may also be misa-
ligned if different sized tires or tire
chains are installed.
.The system has a function that auto-
matically corrects the vehicle icon
position when it is misaligned from
the actual position.
.Vehicle position correction by GPS
may not function when the vehicle is
stopped.
.If the vehicle icon position does not
return to normal even after driving for
a while, correct the vehicle icon posi-
tion manually.
Detailed Map Coverage Areas
(MCA) for navigation system
This system is designed to help guiding to
the destination, and it also performs other
functions as outlined in this manual.
However, the system must be used safely
and properly. Information concerning
road conditions, traffic signs and the
availability of services may not always be
up-to-date. The system is not a substitute
for safe, proper and legal driving.
Map data covers select metropolitan
areas.
Map data includes two types of areas:
“Detailed coverage areas” providing all
detailed road data and other areas show-
ing “Main roads only”.
INFO:
Detailed map data is not available in many
areas and is generally limited to select
major metropolitan areas.
When gray/dark green road is
displayed on map
.When you are driving on a road
displayed in gray after the vehicle has
deviated from the suggested route
during route guidance, automatic re-
routing may not start immediately.
.The navigation system does not pro-
vide route guidance for roads dis-
played in dark green. Therefore, if the
destination is set on a road displayed
in dark green, the enlarged map dis-
play will return to the ordinary map
screen at some point on a suggested
route that is near the destination. Also,
voice guidance will stop at some point
6-64

on a suggested route that is near the
destination.
.Places information and street names
near roads displayed in gray may not
be contained in the map data.
ROUTE CALCULATION
.There may be cases where carpool
lanes are included on a suggested
route when the automatic rerouting
function is activated, even if the [Time
Restricted Rd] is set to [Use Restriction
Info] or [Avoid] (for U.S. and Canada).
“Route Settings” (page 6-44)
.The navigation system does not pro-
vide route guidance for roads dis-
played in dark green.
.If the destination is set on a dark green
road, the enlarged map display will
switch to the ordinary map screen at
some point and suggest a route that is
near the destination. The distance and
direction to the endpoint of the sug-
gested route will be displayed in the
lower right corner of the screen. Also,
at this time, voice guidance will an-
nounce, “The route to your destination
includes roads through incomplete
map areas. Voice guidance will not be
provided in these areas.”
When approaching the endpoint of the
suggested route, voice guidance will
announce, “Entering the road with
incomplete map data. Please use the
direction arrow and distance informa-
tion to proceed to your destination.”
To reach the destination, refer to the
map screen. Always follow actual
roads and regulations and drive safely.
.The suggested route may not be the
shortest, nor are other circumstances
such as traffic jams considered.
.Because of the inevitable difference in
road conditions and circumstances
between the time you use this system
and the time the information was
produced for the map data, there
may be discrepancies in roads and
regulations. In such cases, actual road
conditions and regulations take pre-
cedence over map data information.
.During route calculation, the map will
not scroll, however the vehicle icon will
move according to the actual vehicle’s
movement.
.During route calculation, buttons such
as <MAP> and <MENU> will be dis-
abled.
.In some cases, after the calculation is
complete, the calculated route may
not be immediately displayed.
.Waypoints that have been passed will
be disregarded by rerouting calcula-
tion.
.If you scroll the map while the sug-
gested route is being drawn, it may
take more time to finish drawing.
.Route calculation may not be com-
pleted in the following cases.
— If there is no main road within a
range of 1.5 miles (2.5 km) from the
vehicle, a message saying so will
appear on the screen. Try recalcu-
lating when the vehicle is closer to a
main road.
— If there is no main road within a
range of 1.5 miles (2.5 km) from the
destination or waypoint, a message
saying so will appear on the screen.
Try setting the location closer to a
main road.
— If the vehicle is too close to the
destination or if there are no roads
to the destination, a message say-
ing so will appear on the screen.
— If it is impossible to reach the
destination or waypoints because
of traffic regulations, etc.
— If the only route to reach the desti-
nation or waypoints is extremely
6. Navigation
6-65

6. Navigation
complicated.
.The following may occur when the
route is displayed.
— If you calculate a route on a main
road, the starting point of the route
may not exactly match the current
vehicle location.
— The endpoint of the route may not
exactly match the destination.
— If you calculate a route on a main
road, the system may display a
route from another main road. This
may be because the position of the
vehicle icon is not accurate. In this
case, park the vehicle in a safe
location and reset the vehicle icon,
or continue driving to see if the
position of the vehicle icon is auto-
matically adjusted before recalcu-
lating the route.
— There are cases in which the system
shows an indirect route to reach
the destination or waypoints, if you
set them from stored or facility
information. In order to correct this,
you must be careful about the
traffic direction, especially when
lanes with different travel directions
are shown separately, such as inter-
changes and service areas.
— This system makes no distinction
between limited traffic control and
total control (blockage). It may
show an indirect route even if the
road is usable.
— Even if the ferry preference is set to
OFF, a route that uses a ferry line
may be suggested.
ROUTE GUIDANCE
INFO:
.For U.S. and Canada:
The system will announce street
names when the system language is
set to English. Street names are not
announced when the system is set to
French/Spanish.
.For Mexico:
The system will announce street
names when the system language is
set to Spanish. Street names are not
announced when the system is set to
English/French.
Repeating voice guidance
This function is available throughout
route guidance, from the time after the
route calculation is completed until the
vehicle arrives at the destination. Push
and hold the <MAP>. Voice guidance will
be repeated.
INFO:
If <MAP> is pushed and held when the
vehicle is going in the wrong direction,
voice guidance will announce: “Please
make a legal U-turn if possible.”
Notes on voice guidance
.Voice guidance in this system should
be regarded as a supplementary func-
tion. When driving the vehicle, check
the route on the map and follow the
actual roads and traffic regulations.
.Voice guidance is activated only for
intersections with certain conditions.
There may be cases where the vehicle
has to turn, but voice guidance is not
provided.
.Voice guidance contents may vary,
depending on the direction of the turn
and the type of intersection.
6-66

.The voice guidance timing will vary
depending on the situation.
.When the vehicle has deviated from
the suggested route, voice guidance is
not available. The system will not
announce this. Refer to the map and
recalculate the route.
“Recalculating route” (page 6-40)
.Voice guidance may not accurately
correspond with road numbers and
directions at freeway junctions.
.Voice guidance may not accurately
correspond to street names at free-
way exits.
.The displayed street names may
sometimes differ from the actual
names.
.Voice guidance is not available when
the [Guidance Voice] is turned off.
“Volume and Beeps settings”
(page 2-24)
.Voice guidance will start when the
vehicle enters the suggested route.
Refer to the map for directions to the
starting point of the route.
.When approaching a waypoint, voice
guidance will announce, “You have
arrived at waypoint 1 (2, 3, 4,...).” Voice
guidance will switch to the next sec-
tion of the route. When voice guidance
is not available, refer to the map for
directions.
.In some cases, voice guidance ends
before arrival at the destination. Refer
to the destination icon on the map to
reach the destination.
.If the system recognizes on which side
the destination (waypoint) is located,
voice guidance will announce “on the
right/left” after announcing the arrival
at the destination.
.Voice guidance may be partially op-
erational or inoperative due to the
angle of roads at an intersection.
.For U.S. and Canada:
Because freeway lane information is
available only for approximately 7,000
major freeways in North America, it is
not possible to display information for
all junctions and exits.
.Freeway exit information may differ
from the information on the actual exit
signs.
.Because it is not possible to consider
data concerning roads that are sea-
sonally available or unavailable, a
route may be displayed that does not
match the actual traffic restrictions. Be
sure to follow the actual traffic restric-
tions while driving.
.For U.S. and Canada:
Canada and Alaska contain many
roads with incomplete map data. As a
result, when searching for a route, the
route may include roads with incom-
plete data. In regions where road data
is not complete, voice guidance may
stop for long periods of time. Be sure
to follow the actual traffic restrictions
while driving.
MAP DATA
How to handle the Map SD card
An SD card that includes the map data is
inserted. When handling the Map SD card,
please be careful and adhere to the
following instructions:
.An SD card is inserted in the slot. This is
the SDHC card that is exclusively used
for this device. This card includes the
map data. The SDHC card is necessary
to operate the device. Do not remove
this card except when updating the
map data is required.
.Never analyze, modify, delete or for-
mat the map data. Doing so may cause
an improper operation of the device.
6. Navigation
6-67

6. Navigation
.The SDHC card that is exclusively used
for this device does not work properly
if it is inserted in another device.
.The map data cannot be used even if it
is copied to another SDHC card.
.Do not remove the SDHC card contain-
ing map data from the system. Using
the system with the SDHC card con-
taining map data removed will prevent
some functions from operating.
NOTE:
Do not remove the SD card containing
map data that is inserted in the slot.
When this SD card containing map data
is removed the navigation system will
not operate. If the SD card containing
map data is accidentally removed, after
reinserting the SD card containing map
data into the slot, place the ignition
switch in the OFF position and then
place it back in the ON position.
How to order map data updates
For U.S. and Canada
Visit NissanNavigation.com or contact the
NISSAN NAVIGATION SYSTEM HELPDESK
to order updated map data. (See the
contact information on the inside front
cover of this manual.)
For Mexico
To order updated map data, contact a
NISSAN dealer.
About map data (for U.S. and
Canada)
1. This map data has been prepared by
CLARION CO., LTD. (CLARION), under
license from HERE. has added, pro-
cessed and digitized data based on
the digital road map data of HERE. Due
to the production timing of the map
data, some new roads may not be
included in this map data or some of
the names or roads may be different
from those at the time you use this
map data.
2. Traffic control and regulation data
used in this map data may be different
from those at the time you use this
map data due to the data production
timing. When driving your vehicle, fol-
low the actual traffic control signs and
notices on the roads.
3. Reproducing or copying this map soft-
ware is strictly prohibited by law.
Published by Nissan North America, Inc.
© 2012 HERE. All Rights Reserved.
© ZENRIN CO., LTD.2013. All rights re-
served.
Certain business data provided by In-
fogroup © 2012, All Rights Reserved.
WARNING
.This navigation system should not
be used as a substitute for your
own judgement. Any route sug-
gestions made by this navigation
system may never override any
local traffic regulations, your own
judgement, and/or knowledge of
safe driving practices. Disregard
route suggestions by the naviga-
tion system if such suggestions
would: cause you to perform an
hazardous or illegal maneuver,
place you in an hazardous situa-
tion, or route you into an area you
consider unsafe.
.The advice provided by the navi-
gation system is to be regarded
only as a suggestion. There may be
situations where the navigation
system displays the vehicle’s loca-
tion incorrectly, fails to suggest
the shortest course, and/or fails
to direct you to your desired desti-
nation. In such situations, rely on
your own driving judgement, tak-
ing into account current driving
conditions.
6-68

.Do not use the navigation system
to route you to emergency ser-
vices. The database does not con-
tain a complete listing of locations
of emergency service providers
such as police, fire stations, hospi-
tals and clinics. Please use your
judgement and your ability to ask
for directions in these situations.
.As the driver you solely are re-
sponsible for your driving safety.
— In order to avoid traffic acci-
dents, do not operate the sys-
tem while driving.
— In order to avoid traffic acci-
dents, operate the system only
when the vehicle is stopped at a
safe place and the parking brake
is set.
— In order to avoid traffic accidents
or traffic offence, remember that
actual road conditions and traf-
fic regulations take precedence
over the information contained
on the navigation system.
— Accordingly, the Software may
contain inaccurate or incom-
plete information due the pas-
sage of time, changing
circumstances, and due to the
nature of the sources used.
Please observe the actual traffic
circumstances and regulations
at all times while driving.
— In a situation when actual road
conditions and traffic regula-
tions differ from the information
contained on the navigation sys-
tem, then abide by traffic rules.
— The navigation system does not
provide, or account for in any
way, information regarding traf-
fic and road laws; speed restric-
tions; road conditions including
road slope, grade, and/or sur-
face conditions; obstruction in-
formation including bridge and
tunnel height and width, and/or
other prevailing driving and/or
road conditions. Always rely on
your own driving judgment, tak-
ing into account current driving
conditions.
— Minimize the amount of time
spent viewing the screen while
driving.
The marks of companies displayed by this
product to indicate business locations are
the marks of their respective owners. The
use of such marks in this product does not
imply any sponsorship, approval, or en-
dorsement by such companies of this
product.
About map data (for Mexico)
1. This map data has been prepared by
CLARION CO., LTD. (CLARION), under
license from HERE. has added, pro-
cessed and digitized data based on
the digital road map data of HERE. Due
to the production timing of the map
data, some new roads may not be
included in this map data or some of
the names or roads may be different
from those at the time you use this
map data.
2. Traffic control and regulation data
used in this map data may be different
from those at the time you use this
map data due to the data production
timing. When driving your vehicle, fol-
low the actual traffic control signs and
notices on the roads.
3. Reproducing or copying this map soft-
ware is strictly prohibited by law.
Published by Clarion Co., Ltd. Manufac-
tured by ZENRIN CO., LTD.
© 2013 HERE. All Rights Reserved.
© ZENRIN CO., LTD.2013. All rights re-
served.
6. Navigation
6-69

6. Navigation
WARNING
.This navigation system should not
be used as a substitute for your
own judgment. Any route sugges-
tions made by this navigation sys-
tem may never override any local
traffic regulations, your own judg-
ment, and/or knowledge of safe
driving practices. Disregard route
suggestions by the navigation sys-
tem if such suggestions would:
cause you to perform an hazar-
dous or illegal maneuver, place
you in an hazardous situation, or
route you into an area you con-
sider unsafe.
.The advice provided by the navi-
gation system is to be regarded
only as a suggestion(s). There may
be situations where the navigation
system displays the vehicle’s loca-
tion incorrectly, fails to suggest
the shortest course, and/or fails
to direct you to your desired desti-
nation. In such situations, rely on
your own driving judgment, taking
into account current driving con-
ditions.
.Do not use the navigation system
to route you to emergency ser-
vices. The database does not con-
tain a complete listing of locations
of emergency service providers
such as police, fire stations, hospi-
tals and clinics. Please use your
judgment and your ability to ask
for directions in these situations.
.As the driver you solely are re-
sponsible for your driving safety.
— In order to avoid traffic acci-
dents, do not operate the sys-
tem while driving.
— In order to avoid traffic acci-
dents, operate the system only
when the vehicle is stopped at a
safe place and the parking brake
is set.
— In order to avoid traffic accidents
or traffic offence, remember that
actual road conditions and traf-
fic regulations take precedence
over the information contained
on the navigation system.
— Accordingly, the Software may
contain inaccurate or incom-
plete information due the pas-
sage of time, changing
circumstances, and due to the
nature of the sources used.
Please observe the actual traffic
circumstances and regulations
at all times while driving.
— In a situation when actual road
conditions and traffic regula-
tions differ from the information
contained on the navigation sys-
tem, then abide by traffic rules.
— The navigation system does not
provide, or account for in any
way, information regarding traf-
fic and road laws; speed restric-
tions; road conditions including
road slope, grade, and/or sur-
face conditions; obstruction in-
formation including bridge and
tunnel height and width, and/or
other prevailing driving and/or
road conditions. Always rely on
your own driving judgment, tak-
ing into account current driving
conditions.
— Minimize the amount of time
spent viewing the screen while
driving.
6-70

End-user terms (for U.S. and Ca-
nada)
The data (“Data”) is provided for your
personal, internal use only and not for
resale. It is protected by copyright, and is
subject to the following terms and condi-
tions which are agreed to by you, on the
one hand, and CLARION CO., LTD. (“CLAR-
ION”) and its licensors (including their
licensors and suppliers) on the other
hand.
© 2012 HERE. All rights reserved.
This data includes information taken with
permission from Canadian authorities,
including © Her Majesty, © Queen’s Printer
for Ontario, © Canada Post, GeoBase®, ©
Department of Natural Resources Cana-
da. All rights reserved.
HERE holds a non-exclusive license from
the United States Postal Service® to pub-
lish and sell ZIP+4® information.
© United States Postal Service® 2012.
Prices are not established, controlled or
approved by the United States Postal
Service®. The following trademarks and
registrations are owned by the USPS:
United States Postal Service, USPS, and
ZIP+4.
Terms and conditions:
Personal Use Only. You agree to use this
Data together with Nissan Automotive
Products for the solely personal, non-
commercial purposes for which you were
licensed, and not for service bureau, time-
sharing or other similar purposes. Accord-
ingly, but subject to the restrictions set
forth in the following paragraphs, you
agree not to otherwise reproduce, copy,
modify, decompile, disassemble or reverse
engineer any portion of this Data, and may
not transfer or distribute it in any form, for
any purpose, except to the extent per-
mitted by mandatory laws. Multi-disc sets
may only be transferred or sold as a
complete set as provided by CLARION
and not as a subset thereof.
Restrictions.Except where you have been
specifically licensed to do so by CLARION,
and without limiting the preceding para-
graph, you may not (a) use this Data with
any products, systems, or applications
installed or otherwise connected to or in
communication with vehicles, capable of
vehicle navigation, positioning, dispatch,
real time route guidance, fleet manage-
ment or similar applications; or (b) with or
in communication with any positioning
devices or any mobile or wireless-con-
nected electronic or computer devices,
including without limitation cellular
phones, palmtop and handheld compu-
ters, pagers, and personal digital assis-
tants or PDAs.
Warning.The Data may contain inaccu-
rate or incomplete information due to the
passage of time, changing circumstances,
sources used and the nature of collecting
comprehensive geographic data, any of
which may lead to incorrect results.
No Warranty.This Data is provided to you
“as is,” and you agree to use it at your own
risk. CLARION and its licensors (and their
licensors and suppliers) make no guaran-
tees, representations or warranties of any
kind, express or implied, arising by law or
otherwise, including but not limited to,
content, quality, accuracy, completeness,
effectiveness, reliability, fitness for a parti-
cular purpose, usefulness, use or results to
be obtained from this Data, or that the
Data or server will be uninterrupted or
error-free.
Disclaimer of Warranty: CLARION AND ITS
LICENSORS (INCLUDING THEIR LICENSORS
AND SUPPLIERS) DISCLAIM ANY WARRAN-
TIES, EXPRESS OR IMPLIED, OF QUALITY,
PERFORMANCE, MERCHANTABILITY, FIT-
NESS FOR A PARTICULAR PURPOSE OR
NON-INFRINGEMENT. Some States, Terri-
tories and Countries do not allow certain
6. Navigation
6-71

6. Navigation
warranty exclusions, so to that extent the
above exclusion may not apply to you.
Disclaimer of Liability: CLARION AND ITS
LICENSORS (INCLUDING THEIR LICENSORS
AND SUPPLIERS) SHALL NOT BE LIABLE TO
YOU: IN RESPECT OF ANY CLAIM, DEMAND
OR ACTION, IRRESPECTIVE OF THE NAT-
URE OF THE CAUSE OF THE CLAIM, DE-
MAND OR ACTION ALLEGING ANY LOSS,
INJURY OR DAMAGES, DIRECT OR INDIR-
ECT, WHICH MAY RESULT FROM THE USE
OR POSSESSION OF THE INFORMATION;
OR FOR ANY LOSS OF PROFIT, REVENUE,
CONTRACTS OR SAVINGS, OR ANY OTHER
DIRECT, INDIRECT, INCIDENTAL, SPECIAL
OR CONSEQUENTIAL DAMAGES ARISING
OUT OF YOUR USE OF OR INABILITY TO
USE THIS INFORMATION, ANY DEFECT IN
THE INFORMATION, OR THE BREACH OF
THESE TERMS OR CONDITIONS, WHETHER
IN AN ACTION IN CONTRACT OR TORT OR
BASED ON A WARRANTY, EVEN IF CLARION
OR ITS LICENSORS HAVE BEEN ADVISED
OF THE POSSIBILITY OF SUCH DAMAGES.
Some States, Territories and Countries do
not allow certain liability exclusions or
damages limitations, so to that extent
the above may not apply to you.
Export Control. CLARION shall not export
from anywhere any part of the Data or any
direct product thereof except in compli-
ance with, and with all licenses and
approvals required under, applicable ex-
port laws, rules and regulations, including
but not limited to the laws, rules and
regulations administered by the Office of
Foreign Assets Control of the U.S. Depart-
ment of Commerce and the Bureau of
Industry and Security of the U.S. Depart-
ment of Commerce. To the extent that
any such export laws, rules or regulations
prohibit NT from complying with any of its
obligations hereunder to deliver or dis-
tribute Data, such failure shall be excused
and shall not constitute a breach of this
Agreement.
Entire Agreement.These terms and con-
ditions constitute the entire agreement
between CLARION (and its licensors, in-
cluding their licensors and suppliers) and
you pertaining to the subject matter here-
of, and supersedes in their entirety any
and all written or oral agreements pre-
viously existing between us with respect
to such subject matter.
Governing Law. The above terms and
conditions shall be governed by the laws
of the State of Illinois, without giving effect
to (i) its conflict of laws provisions, or (ii)
the United Nations Convention for Con-
tracts for the International Sale of Goods,
which is explicitly excluded. You agree to
submit to the jurisdiction of the State of
Illinois for any and all disputes, claims and
actions arising from or in connection with
the Data provided to you hereunder.
Government End Users. If the Data is
being acquired by or on behalf of the
United States government or any other
entity seeking or applying rights similar to
those customarily claimed by the United
States government, the Data is a “com-
mercial item” as that term is defined at 48
C.F.R. (“FAR”) 2.101, is licensed in accor-
dance with the End-User Terms under
which this Data was provided, and each
copy of the Data delivered or otherwise
furnished shall be marked and embedded
as appropriate with the following “Notice
of Use,” and shall be treated in accordance
with such Notice:
NOTICE OF USE
CONTRACTOR (MANUFACTURER/ SUPPLI-
ER) NAME: HERE
CONTRACTOR (MANUFACTURER/SUPPLI-
ER) ADDRESS:
c/o Nokia 425 West Randolph Street,
Chicago, Illinois 60606
This Data is a commercial item as defined
in FAR 2.101 and is subject to the End-User
Terms under which this Data was pro-
vided.
© 2012 HERE – All rights reserved.
If the Contracting Officer, federal govern-
6-72

ment agency, or any federal official re-
fuses to use the legend provided herein,
the Contracting Officer, federal govern-
ment agency, or any federal official must
notify HERE prior to seeking additional or
alternative rights in the Data
End-user terms (for Mexico)
The data (“Data”) is provided for your
personal, internal use only and not for
resale. It is protected by copyright, and is
subject to the following terms and condi-
tions which are agreed to by you, on the
one hand, and CLARION CO., LTD. (“CLAR-
ION”) and its licensors (including their
licensors and suppliers) on the other
hand.
© 2013 HERE. All rights reserved.
Fuente: INEGI (Instituto Nacional de Esta-
dística y Geografía.)
Terms and conditions:
Personal Use Only. You agree to use this
Data together with Nissan Automotive
Products for the solely personal, noncom-
mercial purposes for which you were
licensed, and not for service bureau, time-
sharing or other similar purposes. Accord-
ingly, but subject to the restrictions set
forth in the following paragraphs, you
agree not to otherwise reproduce, copy,
modify, decompile, disassemble or reverse
engineer any portion of this Data, and may
not transfer or distribute it in any form, for
any purpose, except to the extent per-
mitted by mandatory laws. Multi-disc sets
may only be transferred or sold as a
complete set as provided by CLARION
and not as a subset thereof.
Restrictions. Except where you have been
specifically licensed to do so by CLARION,
and without limiting the preceding para-
graph, you may not (a) use this Data with
any products, systems, or applications
installed or otherwise connected to or in
communication with vehicles, capable of
vehicle navigation, positioning, dispatch,
real time route guidance, fleet manage-
ment or similar applications; or (b) with or
in communication with any positioning
devices or any mobile or wireless-con-
nected electronic or computer devices,
including without limitation cellular
phones, palmtop and handheld compu-
ters, pagers, and personal digital assis-
tants or PDAs.
Warning. The Data may contain inaccu-
rate or incomplete information due to the
passage of time, changing circumstances,
sources used and the nature of collecting
comprehensive geographic data, any of
which may lead to incorrect results.
No Warranty. This Data is provided to you
“as is,” and you agree to use it at your own
risk. CLARION and its licensors (and their
licensors and suppliers) make no guaran-
tees, representations or warranties of any
kind, express or implied, arising by law or
otherwise, including but not limited to,
content, quality, accuracy, completeness,
effectiveness, reliability, fitness for a parti-
cular purpose, usefulness, use or results to
be obtained from this Data, or that the
Data or server will be uninterrupted or
error-free.
Disclaimer of Warranty: CLARION AND ITS
LICENSORS (INCLUDING THEIR LICENSORS
AND SUPPLIERS) DISCLAIM ANY WARRAN-
TIES, EXPRESS OR IMPLIED, OF QUALITY,
PERFORMANCE, MERCHANTABILITY, FIT-
NESS FOR A PARTICULAR PURPOSE OR
NON-INFRINGEMENT. Some States, Terri-
tories and Countries do not allow certain
6. Navigation
6-73

6. Navigation
warranty exclusions, so to that extent the
above exclusion may not apply to you.
Disclaimer of Liability: CLARION AND ITS
LICENSORS (INCLUDING THEIR LICENSORS
AND SUPPLIERS) SHALL NOT BE LIABLE TO
YOU: IN RESPECT OF ANY CLAIM, DEMAND
OR ACTION, IRRESPECTIVE OF THE NAT-
URE OF THE CAUSE OF THE CLAIM, DE-
MAND OR ACTION ALLEGING ANY LOSS,
INJURY OR DAMAGES, DIRECT OR INDIR-
ECT, WHICH MAY RESULT FROM THE USE
OR POSSESSION OF THE INFORMATION;
OR FOR ANY LOSS OF PROFIT, REVENUE,
CONTRACTS OR SAVINGS, OR ANY OTHER
DIRECT, INDIRECT, INCIDENTAL, SPECIAL
OR CONSEQUENTIAL DAMAGES ARISING
OUT OF YOUR USE OF OR INABILITY TO
USE THIS INFORMATION, ANY DEFECT IN
THE INFORMATION, OR THE BREACH OF
THESE TERMS OR CONDITIONS, WHETHER
IN AN ACTION IN CONTRACT OR TORT OR
BASED ON A WARRANTY, EVEN IF CLARION
OR ITS LICENSORS HAVE BEEN ADVISED
OF THE POSSIBILITY OF SUCH DAMAGES.
Some States, Territories and Countries do
not allow certain liability exclusions or
damages limitations, so to that extent
the above may not apply to you.
Export Control. CLARION shall not export
from anywhere any part of the Data or any
direct product thereof except in compli-
ance with, and with all licenses and
approvals required under, applicable ex-
port laws, rules and regulations, including
but not limited to the laws, rules and
regulations administered by the Office of
Foreign Assets Control of the U.S. Depart-
ment of Commerce and the Bureau of
Industry and Security of the U.S. Depart-
ment of Commerce. To the extent that
any such export laws, rules or regulations
prohibit NT from complying with any of its
obligations hereunder to deliver or dis-
tribute Data, such failure shall be excused
and shall not constitute a breach of this
Agreement.
Entire Agreement. These terms and con-
ditions constitute the entire agreement
between CLARION (and its licensors, in-
cluding their licensors and suppliers) and
you pertaining to the subject matter here-
of, and supersedes in their entirety any
and all written or oral agreements pre-
viously existing between us with respect
to such subject matter.
Governing Law. The above terms and
conditions shall be governed by the laws
of the State of Illinois, without giving effect
to (i) its conflict of laws, provisions, or (ii)
the United Nations Convention for Con-
tracts for the International Sale of Goods,
which is explicitly excluded. You agree to
submit to the jurisdiction of the State of
Illinois for any and all disputes, claims and
actions arising from or in connection with
the Data provided to you hereunder.
Government End Users. If the Data is
being acquired by or on behalf of the
United States government or any other
entity seeking or applying rights similar to
those customarily claimed by the United
States government, the Data is a “com-
mercial item” as that term is defined at 48
C.F.R. (“FAR”) 2.101, is licensed in accor-
dance with the End-User Terms under
which this Data was provided, and each
copy of the Data delivered or otherwise
furnished shall be marked and embedded
as appropriate with the following “Notice
of Use,” and shall be treated in accordance
with such Notice:
NOTICE OF USE
CONTRACTOR (MANUFACTURER/ SUPPLI-
ER) NAME: HERE
CONTRACTOR (MANUFACTURER/SUPPLI-
ER) ADDRESS:
c/o Nokia 425 West Randolph Street,
Chicago, Illinois 60606
This Data is a commercial item as defined
in FAR 2.101 and is subject to the End-User
Terms under which this Data was pro-
vided.
© 1987-2013 HERE – All rights reserved.
If the Contracting Officer, federal govern-
6-74

ment agency, or any federal official re-
fuses to use the legend provided herein,
the Contracting Officer, federal govern-
ment agency, or any federal official must
notify HERE prior to seeking additional or
alternative rights in the Data.
HOW TO HANDLE THE SD CARD
When handling the SD card, please be
careful and adhere to the following in-
structions:
.Always follow the instructions de-
scribed in this manual and in the
handbook attached to the SD card
when using an SD card in this device.
.Do not handle an SD card with wet
hands. Doing so may cause electric
shock or a malfunction.
.Do not allow hands or metal objects to
contact the terminal area of SD cards.
.Do not place SD cards on the instru-
ment panel, on any place with direct
sunlight or in moist circumstances.
Doing so may damage or deform the
SD card.
.Do not use any conventional cleaner,
benzine, thinner or antistatic spray.
.Do not use SD cards in any place
where static electricity or electric noise
adversely affects SD cards. This may
cause data corruption or data loss.
.SD card optimization must not be
performed.
.Always place the SD card in its storage
case when not in use.
.If an SD card is disposed of when it is
not used, it is recommended not only
to delete the stored data but also to
physically break the card.
6. Navigation
6-75

6. Navigation
MEMO
6-76

7 Voice recognition
Voice recognition .......................................................................... 7-2
Using Voice Recognition System ............................... 7-2
Before starting ......................................................................... 7-2
Giving voice commands ................................................. 7-2
Voice recognition settings ........................................ 7-23
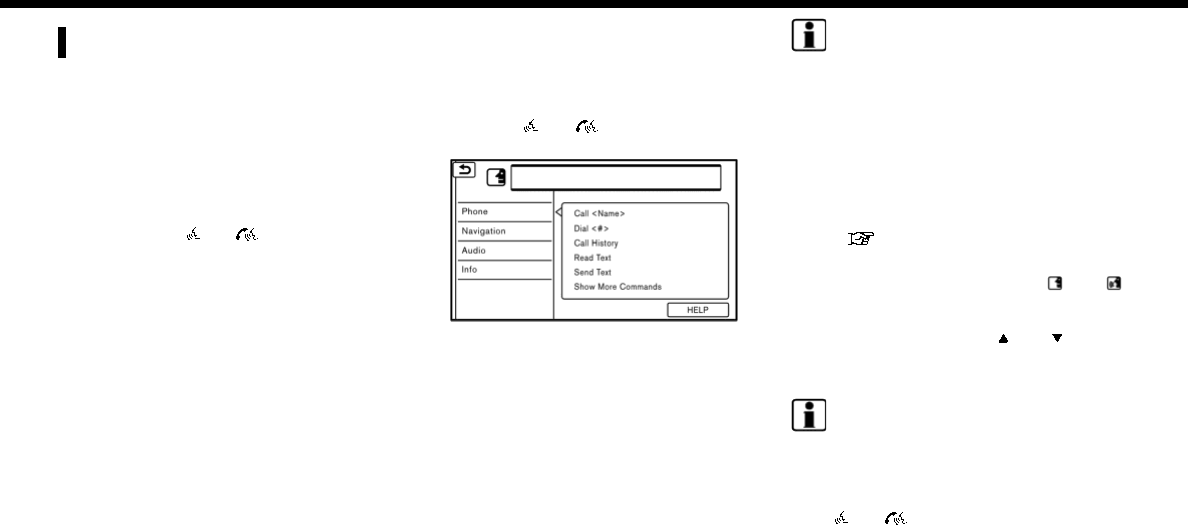
7. Voice recognition
VOICE RECOGNITION
USING VOICE RECOGNITION SYS-
TEM
Initialization
When the ignition switch is in the ON or
ACC position, Voice Recognition is initia-
lized. When the initialization is complete,
the system is ready to accept voice
commands. If <>/< > on the steering
wheel is pushed before the initialization
completes, the display will show a mes-
sage to wait until the system is ready.
BEFORE STARTING
To get the best recognition performance
from Voice Recognition, observe the fol-
lowing items.
.The interior of the vehicle should be as
quiet as possible. Close the windows
to eliminate the surrounding noises
(traffic noise, vibration sounds, etc.),
which may prevent the system from
correctly recognizing the voice com-
mands.
.Wait until the tone sounds before
speaking a command.
.Speak in a natural conversational
voice without pausing between words.
.The system cannot recognize voice
commands spoken from passenger
seats.
GIVING VOICE COMMANDS
1. Push < >/< > located on the
steering wheel.
2. A list of commands appears on the
screen, and the system provides the
voice menu prompt.
Available category commands are dis-
played on the left side of the screen.
Speak or touch a category command
from the category command list.
INFO:
.Some of the commands for each
category are shown on the right
side of the screen and they can also
be spoken without selecting a ca-
tegory.
.After executing the category com-
mand, only the commands related
to the selected category can be
recognized.
“Command list” (page 7-6)
3. After the tone sounds and the icon on
the screen changes from to ,
speak a command. You can also select
a command by directly touching the
screen or by tilting <>/< > up or
down and pushing <OK>/<ENTER> on
the steering wheel.
INFO:
The Voice Recognition system will
pause its operation when no com-
mand is given after three prompts. To
resume the operation, push
<>/< > on the steering wheel.
4. Continue to follow the voice menu
prompts and speak the voice com-
mands after the tone sounds until the
preferred operation is executed.
7-2

INFO:
To cancel a voice command, push and
hold <>/< > on the steering wheel or
<BACK> on the control panel.
Operating tips
.Speak a command after the tone.
.If the command is not recognized, the
system will prompt you to speak the
command again. Repeat the com-
mand in a clear voice.
.Touch [ ] on the touch screen or
push <>/< > on the steering
wheel to return to the previous screen.
.To exit the Voice Recognition system,
push and hold <>/< > on the
steering wheel.
.To adjust the volume of the system
feedback, push + or - side of <>on
the steering wheel or turn the <VOL/
>or <VOLUME/ > while the sys-
tem is making an announcement.
The volume setting is also available
from [Guidance Volume] in the [Set-
tings] menu on the Launch Bar.
“Volume and Beeps settings”
(page 2-24)
.When setting a destination for route
guidance with some search methods,
such as POI, Intersection or City Center
search, the search area is automati-
cally set to the state/province where
your vehicle is located. Change state/
province to change the search area to
another state/province if necessary.
Voice Prompt Interrupt:
In most cases, you can interrupt the voice
feedback to speak the next command by
pushing the <>/< > on the steering
wheel. After interrupting the system, wait
for a tone before speaking your com-
mand.
One Shot Call:
To use the system faster when making a
call, you may speak the second level
command skipping speaking the first level
command. For example, push
<>/< > and say “Redial” after the
tone without first saying “Phone”.
How to see voice command
screen
1. Push < >/< > to display the first
screen of the voice command list.
2. Speak a command or select an item on
the voice command list. The Second
screen is displayed.
3. Speak a command or select an item on
the voice command list. The command
is executed or the next screen for
further command is displayed.
4. Follow the prompts to complete the
commands.
Voice command screens:
First screen
Shows a list of available categories.
Speak a category command or touch
7. Voice recognition
7-3
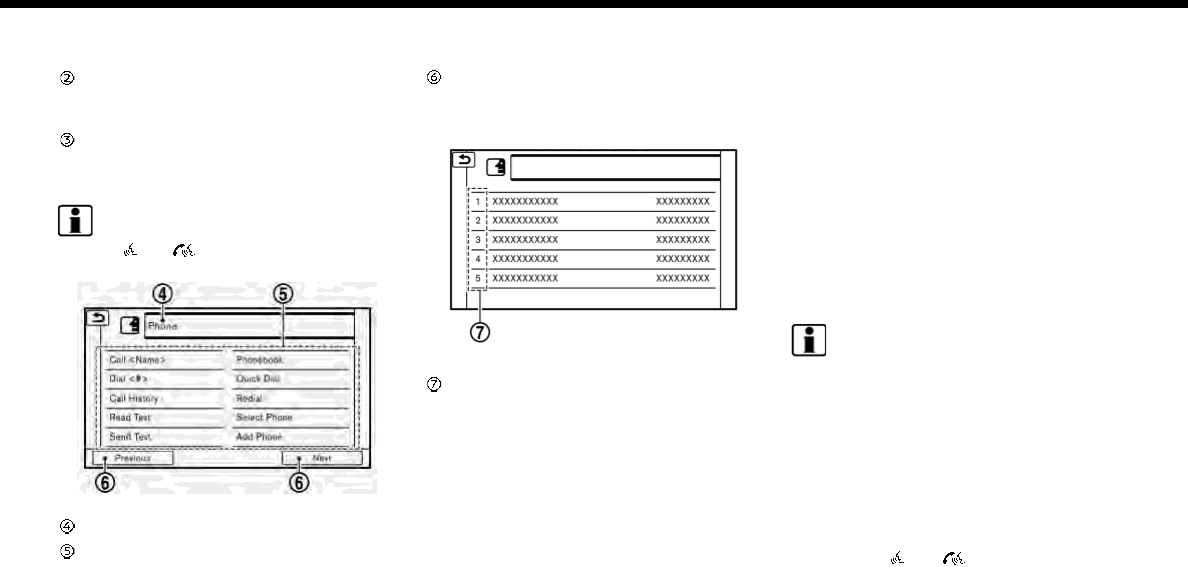
7. Voice recognition
the key of the corresponding cate-
gory.
Shows a list of available commands
for the selected category. Speak a
preferred command.
Touch [HELP] or say “Help” to hear
help announcements on how to use
the system.
INFO:
Push <>/< > to stop the help an-
nouncements.
Second screen
Previously selected command.
Command list
You can speak a command from the
list or touch the corresponding key.
Preferred words can be spoken for
the part of the command enclosed in
<>.
[Previous]/[Next]
Say as a command or touch to go to
the previous/next screen.
List screen
Speak a number from 1 to 5 or touch
an item on the list screen to select the
item.
How to speak numbers
The Voice Recognition system requires
the user to speak numbers in a certain
way when giving voice commands.
General rule:
500, 800 and 900 can be pronounced as
“five hundred”, “eight hundred” and “nine
hundred” respectively.
For other numbers, only single digits 0
(zero) to 9 can be used. (For example, for
the number “600”, speaking “six zero zero”
can be recognized by the system, but “six
hundred” cannot.)
Example:
1-800-662-6200
“One eight hundred six six two six two zero
zero”
INFO:
For the best recognition, speak “zero” for
the number “0”, and “oh” for the letter “o”.
Voice command examples
As examples, some additional basic op-
erations that can be performed by voice
commands are described here.
Example 1 Placing call by speaking a
phone number:
1. Push <>/< > located on the
steering wheel.
7-4
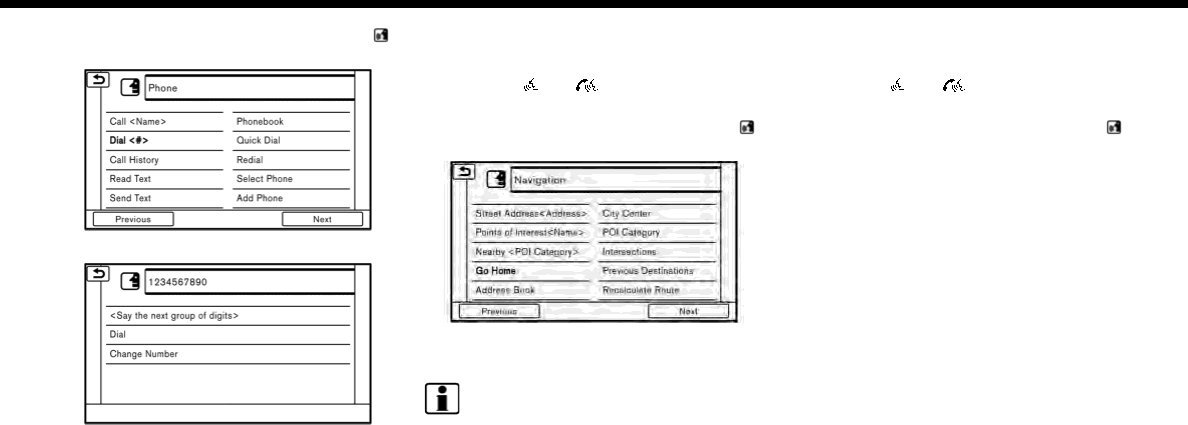
2. Wait for the indicator to change to .
Speak “Phone”.
3. Speak “Dial <phone number>”.
4. The phone number recognized by the
system is displayed on the screen. If
the number is correct, say “Dial”.
5. The system will make a phone call to
the spoken phone number.
Example 2 Setting home as a destina-
tion:
1. Push <>/< > located on the
steering wheel.
2. Wait for the indicator change to .
Speak “Navigation”.
3. Speak “Go Home”. The navigation sys-
tem will set home as a destination.
INFO:
.Location of home must be registered
to the Address Book prior to using this
command.
.The step of speaking “Navigation” can
be omitted.
Example 3 Displaying folders in the USB
device:
1. Push <>/< > located on the
steering wheel.
2. Wait for the indicator change to .
Speak “Audio”.
3. Speak “USB Show Folders”. The folders
in the connected USB device will
appear on the touch screen display.
7. Voice recognition
7-5

7. Voice recognition
Command list
To use the Voice Recognition function, you can speak commands in the order of 1st command, 2nd command and 3rd command. You
can also operate the system by directly speaking the 2nd or 3rd command.
Variable numbers or words such as names can be applied in the < > when speaking a command.
Some navigation commands are only for English.
General Command
Command Action
Show More Commands Display other commands of the same category.
Go Back Corrects the last recognition result to return to the previous screen.
Exit Cancels Voice Recognition.
Help Announces how to use voice guidance.
Next Skip to the next page.
Previous Skip to the previous page.
General phone command
The following commands can be used during a phone Voice Recognition session.
Command Action
Dial The system makes a call to the spoken phone number.
Change Number Change a spoken phone number.
7-6

Phone Command
1st Command 2nd Command 3rd Command 4th Command Action
Phone Phonebook <phonebook name> Makes a call to a contact that is stored in the mobile phone. You can
select the type from [Mobile], [Home], [Office], [Main] or [Other].
<phonebook name> <type>
Call History Incoming Calls Displays an Incoming Call list.
Outgoing Calls Displays an Outgoing Call list.
Missed Calls Displays a Missed Call list.
Dial <#> Dial Makes a call to a spoken phone number.
Change Number Change a spoken phone number.
International
Call
<phone number> Makes an international call by allowing more than 11 digits to be
spoken.
You may need to include the international call prefixes and country
codes.
Redial Makes a call to the last outgoing phone number.
Add Phone Use this command to connect a compatible Bluetooth® device to
system. Follow the on-screen instructions to complete the pairing
process from your handset.
Select Phone <1-5> Use this command to select a phone from a list of the registered
devices.
Quick Dial <quick dial name> Makes a call to a contact that is stored in the Quick Dial.
<1-5>
Call <name> Makes a call to a contact that is stored in the Quick Dial or phonebook.
Call <phonebook name> Makes a call to a contact that is stored in the mobile phone.
<phonebook name> <type> Makes a call to a contact that is stored in the mobile phone. You can
select type from [Mobile], [Home], [Office], [Main] or [Other].
7. Voice recognition
7-7
7. Voice recognition
1st Command 2nd Command 3rd Command 4th Command Action
Send Text <phonebook name> You can select a text message from a list and send it to a contact name.
<phonebook name> <type> You can select a text message from a list and send it to a contact name.
You can select a type from [Mobile], [Home], [Office], [Main] or [Other].
Incoming Calls A list of spoken call history is displayed. Select a contact to whom you
wish to send the text message.
Outgoing Calls
Missed Calls
Enter Number Enter a phone number to which you wish to send the text message.
Say “Pick Message” to confirm the phone number and select a text
message.
<quick dial name> A phone number registered in the quick dial can be selected as a
recipient.
Read Text <1 - 5> Play You can listen to recent text messages received. Reads out a text
message. Select from the list of current received messages.
Reply Reply to a received message.
Call Call the sender of the message.
Operating tips for phone command operation:
.After the command “Call”, a name registered in the phonebook can be spoken for recognition, while a phone number can be
spoken after the command “Dial”. Names from the phonebook cannot be spoken after the command “Dial”.
.Names in the phonebook can be recognized when only a first name is spoken or when spoken in the order of first name and then
the last name. The system does not recognize the commands when only a last name is spoken or if the phonebook name was
pronounced with last name first and then the first name.
.The system has the function to read the text messages out loud, but misreading may occur in some cases.
.Even if nicknames such as “Mom” or “Dad” are registered in the cellular phone, the voice recognition system recognizes only names.
To have the system recognize the nicknames, register the entries in the [Quick Dial] from the Phone menu.
“Quick Dial” (page 4-12)
7-8
General navigation command
The following commands can be used during the Navigation voice recognition session.
Command Action
Select City Search a destination from the specified city.
Change State Change the state to search.
Calculate Route Calculate a route.
Adjust Location Fine-tune the destination.
Add as waypoint The selected location will be added to the route as a waypoint.
Change Address (English only) Change State After the street address is specified, change state, city, street, or house
number.
Change City
Change Street
Change House Number
Navigation Command (for U.S. and Canada)
1st Command 2nd Command 3rd Command Action
Navigation Street Address (Eng-
lish only)
<Full Address> Used to search for a street address.
Select State Select the state to search.
Street Address <Full Address> (English only) Used to search for a street address.
Points of Interest (English only) Speak a POI name to search for as a destination.
Points of Interest <POI name> (English only) Used to search for the POI within a specified state, province or city.
Follow the prompts to enter the place name.
Points of Interest
(English only)
<POI name> Used to search for the POI within a specified state or city. Follow the
prompts to enter the place name.
7. Voice recognition
7-9

7. Voice recognition
1st Command 2nd Command 3rd Command Action
Nearby <1 - 5> When a route is set, options of [Near Current Location], [Along Route]
and [Near Destination] will be displayed. Select an item to search for the
POI of the selected category in the preferred area.
POI Category
Nearby <POI Cate-
gory>
<1 - 5> Say “Nearby” followed by a POI category name such as Gas station,
Restaurant or Parking. You can say any category name that appears
when using manual controls. The system will always search for nearby
matches regardless of the current state location.
Go Home Sets a route to your home location.
Previous Destina-
tions
<1 - 5> Sets a route to a previously entered destination.
Address Book <Stored location
name>
<1-5>
Sets a route to a location stored in the Stored location.
City Center (English
only)
<City name> Sets a route to a city center.
Intersection (English
only)
<Street name> Sets a route to an intersection. To specify a city to narrow down the
search, select [Select City].
Recalculate Route Fastest Sets the route search condition to find the fastest route.
Sets the route search condition to find the route that is the most energy
saving.
Shortest distance Sets the route search condition to find the route that is the shortest in
distance.
Minimize Freeway Sets the route search condition to find a route with a minimal use of
freeways.
Traffic Detour Sets the route search condition to detour traffic jam and traffic
accident.
Distance Detour Sets a detour according to the distance selected from the list.
7-10

1st Command 2nd Command 3rd Command Action
Previous Start Point Sets a route with the previous starting point as a destination.
Cancel Route Cancels route and deletes the destination/waypoints.
Zoom In Zooms in the map scale by 1 step.
Zoom In <1-13> Increases the magnification of the map by the number of steps
specified.
Zoom Out Zooms out the map scale by 1 step.
Zoom Out <1-13> Decreases the magnification of the map by the number of steps
specified.
Zoom Streets Change to the street map.
North Up Sets the 2D full map to North Up.
Heading Up Sets the 2D full map to Heading Up.
Full Map Displays a full map.
Split Map Displays a split map.
2D Map Change the current map to a 2D Heading Up map.
3D Map Change the current map to a 3D map.
Repeat Voice Guidance Speaks the current navigation guidance.
Voice Guidance ON Turns the navigation guidance on.
Voice Guidance OFF Turns the navigation guidance off.
Show POI Icons Select a category of POI the icon you wish to display on map. Selected
POI icons will be displayed on the map screen.
Remove POI Icons Select a category of the POI icon you wish to delete from the map.
Selected POI icons will be deleted from the map screen.
7. Voice recognition
7-11
7. Voice recognition
1st Command 2nd Command 3rd Command Action
Route Information Display the route information.
Where am I? Displays the information of the current position.
Navigation Command (for Mexico)
1st Command 2nd Command 3rd Command Action
Navigation Nearby <1 - 5> When a route is set, options of [Near Current Location], [Along Route],
and [Near Destination] will be displayed. Select an item to search for
the POI of the selected category in the preferred area.
POI Category
Nearby <POI Cate-
gory>
<1 - 5> Say “Nearby” followed by a POI category name such as Gas station,
Restaurant, or Parking. You can say any category name that appears
when using manual controls. The system will always search for nearby
matches regardless of the current state location.
Go Home Sets a route to your home location.
Previous Destinations <1 - 5> Sets a route to a previously entered destination.
Address Book <Stored location
name>
<1-5>
Sets a route to a location stored in the Stored location.
Recalculate Route Fastest Sets the route search condition to find the fastest route.
Sets the route search condition to find the route that is the most
energy saving.
Shortest distance Sets the route search condition to find the route that is the shortest in
distance.
Minimize Freeway Sets the route search condition to find a route with a minimal use of
freeways.
Distance Detour Sets a detour according to the distance selected from the list.
7-12

1st Command 2nd Command 3rd Command Action
Previous Start Point Sets a route with the previous starting point as a destination.
Cancel Route Cancels route and deletes the destination/waypoints.
Zoom In Zooms in the map scale by 1 step.
Zoom In <1-13> Increases the magnification of the map by the number of steps
specified.
Zoom Out Zooms out the map scale by 1 step.
Zoom Out <1-13> Decreases the magnification of the map by the number of steps
specified.
Zoom Streets Change to the street map.
North Up Sets the 2D full map to North Up.
Heading Up Sets the 2D full map to Heading Up.
Full Map Displays a full map.
Split Map Displays a split map.
2D Map Change the current map to a 2D Heading Up map.
3D Map Change the current map to a 3D map.
Repeat Voice Guidance Speaks the current navigation guidance.
Voice Guidance ON Turns the navigation guidance on.
Voice Guidance OFF Turns the navigation guidance off.
Show POI Icons Select the category of the POI icon you wish to display on map.
Selected POI icons will be displayed on the map screen.
Remove POI Icons Select the category of the POI icon you wish to delete from the map.
Selected POI icons will be deleted from the map screen.
7. Voice recognition
7-13

7. Voice recognition
1st Command 2nd Command 3rd Command Action
Route Information Display the route information.
Where am I? Displays the information of the current position.
Operating tips for navigation command operation:
.Depending on the area where the vehicle is located (such as in Puerto Rico, Guam, etc.), the system may not recognize the general
navigation commands.
.Points Of Interest (for U.S. and Canada):
— The POI commands searches for Points of Interest registered in the navigation system.
— When searching for POI, the search is conducted within the current state/province or the state/province specified by “Change
State” command. To change the state/province, speak “Change State” after the prompt and then after the next prompt, speak
the name of the state/province for which you wish to conduct the POI search. The state/province will be reset to the current
state each time the voice recognition session is restarted.
— The following POI main categories cannot be used for “Points of Interest” search with voice command operations while all
registered categories can be recognized for “Nearby” search:
Others, Repair, Rental Car Agency, Parking, Police Station, Administration, ATM, Other Leisure, Bars & Clubs, Other Dealers,
Motorcycle Dealership, Medical Offices, Post Office, Auto Parts, Banquets & Food Delivery, Carwash, Copying, Day Care, Fire
Station, Laundry & Cleaners, Office Supply, Other Services, Other Shopping, Package Delivery
.Street Address (for U.S. and Canada):
— Alphabet letters cannot be included when speaking a house number. When a specified house number cannot be found, a
location representing the address will be displayed.
— Speak in a natural conversational speed without pausing between words for better recognition.
— When the system recognizes the command incorrectly, correct the search conditions using commands such as “Change State”,
“Change City”, “Change Street” or “Change House Number”.
7-14

Audio Command (for U.S. and Canada)
1st Command 2nd Command 3rd Command Action
Audio Play AM Turns to the AM band, selecting the last played station.
FM Turns to the FM band, selecting the last played station.
SXM Turns to the SiriusXM Satellite Radio band, selecting the channel last
played.
CD Turns on the CD, selecting the last played mode.
USB Turns on the USB, selecting the last played mode.
iPod Turns on the iPod, selecting the last played mode.
Bluetooth Audio Turns on the Bluetooth® Audio, selecting the last played mode.
AUX Turns on the AUX audio, selecting the last played mode.
Play AM Turns to the AM band, selecting the last played station.
Play FM Turns to the FM band, selecting the last played station.
Play SXM Turns to the SiriusXM Satellite Radio band, selecting the channel last
played.
Play CD Turns on the CD, selecting the last played mode.
Play USB Turns on the USB, selecting the last played mode.
Play iPod Turns on the iPod, selecting the last played mode.
Play Bluetooth Audio Turns on the Bluetooth® Audio, selecting the last played mode.
Play AUX Turns on the AUX audio, selecting the last played mode.
AM Turns to the AM band, selecting the last played station.
FM Turns to the FM band, selecting the last played station.
7. Voice recognition
7-15

7. Voice recognition
1st Command 2nd Command 3rd Command Action
SXM Turns to the SiriusXM Satellite Radio band, selecting the channel last
played.
CD Turns on the CD, selecting the last played mode.
USB Turns on the USB, selecting the last played mode.
iPod Turns on the iPod, selecting the last played mode.
Bluetooth Audio Turns on the Bluetooth® Audio, selecting the last played mode.
AUX Turns on the AUX audio, selecting the last played mode.
AM <am frequency> Turns to the AM band, selecting the station of the preferred frequency.
AM Preset <1-6> Plays the spoken AM preset station.
FM <fm frequency> Turns to the FM band, selecting the station of the preferred frequency.
FM Preset <1-12> Plays the spoken FM preset station.
SXM <Channel number> Turns to the SiriusXM Satellite Radio band, selecting the channel
number.
SXM <Channel name> Turns to the SiriusXM Satellite Radio band, selecting the channel
name.
SXM Preset <1-18> Plays the spoken SXM preset channel.
USB Show Folders Displays folders in the USB memory device.
USB Play Folder <folder name> Plays songs in the selected folder in the USB memory device.
USB Play File <file name> Plays songs in the selected file in the USB memory device.
iPod Play Artist <artist name> Turns on the iPod, selecting the artist.
iPod Play Album <album name> Turns on the iPod, selecting the album.
7-16

1st Command 2nd Command 3rd Command Action
iPod Play Song <song name> Turns on the iPod, selecting the track. You can speak the commands
successively.
iPod Play Playlist <playlist name> Turns on the iPod, playing the playlist that you spoke.
iPod Show Artists Displays a list of Artist names stored in the iPod.
iPod Show Albums Displays a list of Albums in the iPod.
iPod Show Songs Displays a list of songs in the iPod.
iPod Play Artist <ar-
tist name>
<1-5> Turns on the iPod, selecting the artist.
iPod Play Album <al-
bum name>
<1-5> Turns on the iPod, selecting the album.
iPod Play Song <song
name>
<1-5> Turns on the iPod, selecting the track. You can speak the commands
successively.
iPod Play Playlist
<playlist name>
<1-5> Turns on the iPod, playing the playlist that you spoke.
iPod Play All Songs Plays all songs in the iPod.
Play Artist <artist name>
Plays the songs of the corresponding song list in the iPod.
Play Album <album name>
Play Song <song name>
Play Playlist <playlist name>
INFO:
A SiriusXM Travel Link or SiriusXM Traffic subscription is necessary to receive SiriusXM information services.
“SiriusXM Travel Link (for U.S. and Canada)” (page 5-18)
7. Voice recognition
7-17

7. Voice recognition
Audio Command (for Mexico)
1st Command 2nd Command 3rd Command Action
Audio Play AM Turns to the AM band, selecting the last played station.
FM Turns to the FM band, selecting the last played station.
CD Turns on the CD, selecting the last played mode.
USB Turns on the USB, selecting the last played mode.
iPod Turns on the iPod, selecting the last played mode.
Bluetooth Audio Turns on the Bluetooth® Audio, selecting the last played mode.
AUX Turns on the AUX audio, selecting the last played mode.
Play AM Turns to the AM band, selecting the last played station.
Play FM Turns to the FM band, selecting the last played station.
Play CD Turns on the CD, selecting the last played mode.
Play USB Turns on the USB, selecting the last played mode.
Play iPod Turns on the iPod, selecting the last played mode.
Play Bluetooth Audio Turns on the Bluetooth® Audio, selecting the last played mode.
Play AUX Turns on the AUX audio, selecting the last played mode.
AM Turns to the AM band, selecting the last played station.
FM Turns to the FM band, selecting the last played station.
CD Turns on the CD, selecting the last played mode.
USB Turns on the USB, selecting the last played mode.
iPod Turns on the iPod, selecting the last played mode.
7-18

1st Command 2nd Command 3rd Command Action
Bluetooth Audio Turns on the Bluetooth® Audio, selecting the last played mode.
AUX Turns on the AUX audio, selecting the last played mode.
AM <am frequency> Turns to the AM band, selecting the station of the preferred
frequency.
AM Preset <1-6> Plays the spoken AM preset station.
FM <fm frequency> Turns to the FM band, selecting the station of the preferred
frequency.
FM Preset <1-12> Plays the spoken FM preset station.
USB Show Folders Displays folders in the USB memory device.
USB Play Folder <folder name> Plays songs in the selected folder in the USB memory device.
USB Play File <file name> Plays songs in the selected file in the USB memory device.
iPod Play Artist <artist name> Turns on the iPod, selecting the artist.
iPod Play Album <album name> Turns on the iPod, selecting the album.
iPod Play Song <song name> Turns on the iPod, selecting the track. You can speak the commands
successively.
iPod Play Playlist <playlist name> Turns on the iPod, playing the playlist that you spoke.
iPod Show Artists Displays a list of Artist names stored in the iPod.
iPod Show Albums Displays a list of Albums in the iPod.
iPod Show Songs Displays a list of songs in the iPod.
iPod Play Artist <ar-
tist name>
<1-5> Turns on the iPod, selecting the artist.
iPod Play Album <al-
bum name>
<1-5> Turns on the iPod, selecting the album.
7. Voice recognition
7-19

7. Voice recognition
1st Command 2nd Command 3rd Command Action
iPod Play Song <song
name>
<1-5> Turns on the iPod, selecting the track. You can speak the commands
successively.
iPod Play Playlist
<playlist name>
<1-5> Turns on the iPod, playing the playlist that you spoke.
iPod Play All Songs Plays all songs in the iPod.
Play Artist <artist name>
Plays the songs of the corresponding song list in the iPod.
Play Album <album name>
Play Song <song name>
Play Playlist <playlist name>
Operating tips for audio command operation:
.An audio device connected via Bluetooth® cannot be operated with the Voice Recognition system. Source change is only available
for Bluetooth® streaming Audio.
.The Voice Recognition system may not function when the song information is too long (artist names, album titles, song titles and
play lists, etc.).
.The SiriusXM function will not operate without a subscription to SiriusXM Satellite Radio (for U.S. and Canada).
.When playing USB files with the voice recognition system, do not pronounce the extension attached to the file name (such as “.
mp3”).
.Song titles registered in ID3 tags cannot be pronounced for voice recognition operation.
.Models with two USB connection ports:
If two USB devices are connected at the same time, voice operation will only be available for use with one registered and selected
device. When selecting “YES” in the pop-up screen that displays after a new USB audio device is connected, the USB audio device is
registered in the voice recognition system and is selected automatically. One iPod and one USB device can be registered in the
system. If a USB audio device is newly registered, old data is overwritten. It may take a few moments to register an audio device. If
you want to enable voice operation for music stored in a previously registered audio device, select the device you want to use in
advance. Even when a device has been previously registered, simply connecting the device will not result in it being selected
7-20

automatically.
“Voice recognition settings” (page 7-23)
Information Command (for U.S. and Canada)
1st Command 2nd Command Action
Information Where am I? Displays information of the current position.
SXM Weather Map Displays the SiriusXM Weather map.
SXM Current Weather Displays the nearby weather (current weather).
SXM Weather Forecast Displays the weather forecast.
SXM Fuel Prices Displays fuel prices.
SXM Movie Listings Displays SiriusXM Movie Listings.
SXM Stocks Displays SiriusXM stock information.
SXM Sports Scores Displays sports scores.
SXM Traffic Turns the traffic information system on or off.
Favorite Feeds (if so equipped) Plays Favorite Feeds.
All Information Feeds (if so equipped) Plays Information Feeds.
Voice Menu (if so equipped) Connects NissanConnect
SM
Services center.
Energy Flow (model with hybrid system) Displays Energy Flow.
INFO:
A SiriusXM Travel Link or SiriusXM Traffic subscription is necessary to receive SiriusXM information services.
“SiriusXM Travel Link (for U.S. and Canada)” (page 5-18)
7. Voice recognition
7-21

7. Voice recognition
Information Command (for Mexico)
1st Command 2nd Command Action
Information Where am I? Displays information of the current position.
7-22

VOICE RECOGNITION SETTINGS
The voice recognition settings can be
changed.
1. Touch [Setting] on the Launch Bar.
2. Touch [Voice Recognition].
3. Touch the item you would like to set.
Available settings
.[Minimize Voice Feedback]:
Turns the minimize voice feedback
function on/off. When this item is
turned on, short and minimized voice
feedback will be provided.
.[Audio device setting]:
Select an audio device to be operated
via the Voice Recognition system from
the audio devices connected to the
USB connection ports. A device with an
indicator light illuminated can be op-
erated with the Voice Recognition
system.
7. Voice recognition
7-23

7. Voice recognition
MEMO
7-24

8 Troubleshooting guide
Customer assistance ................................................................. 8-2
System unit........................................................................................ 8-3
Liquid crystal display ........................................................... 8-3
Audio system ................................................................................... 8-5
HD Radio technology (for U.S.) ..................................... 8-5
Compact Disc (CD) player ................................................ 8-7
iPod player ................................................................................... 8-9
USB memory device .......................................................... 8-11
Bluetooth® streaming audio ...................................... 8-12
Bluetooth® Hands-Free Phone System .................... 8-14
NissanConnect
SM
Services (if so equipped).......... 8-17
Apple CarPlay ............................................................................... 8-18
Android Auto ................................................................................ 8-19
Navigation....................................................................................... 8-21
Basic operations................................................................ 8-21
Vehicle icon ........................................................................... 8-22
Route calculation and visual guidance ........... 8-24
Voice guidance ................................................................... 8-27
Traffic information (for U.S. and Canada) ...... 8-28
Voice recognition ...................................................................... 8-29

8. Troubleshooting guide
CUSTOMER ASSISTANCE
For U.S. and Canada
For assistance or to order updated map
data, contact the NISSAN NAVIGATION
SYSTEM HELPDESK. For other assistance
or inquiries, contact NISSAN Consumer
Affairs Department. See the contact in-
formation on the inside front cover of this
manual.
For Mexico
For assistance or inquiries about Nissan-
Connect
SM
with Navigation, or to order
updated map data for the navigation
system, contact a NISSAN dealer.
8-2

SYSTEM UNIT
LIQUID CRYSTAL DISPLAY
Symptom Possible cause Possible solution
The screen is too dark. The cabin temperature is too low. Wait until the cabin temperature becomes
moderate.
Screen brightness is set to the maximum
darkness.
Adjust the brightness setting of the screen.
“Display settings” (page 2-24)
The screen is too bright. Screen brightness is set to the maximum
brightness.
Adjust the brightness setting of the screen.
“Display settings” (page 2-24)
A small black spot or a small bright spot
appears on the screen.
This is a typical phenomenon for liquid crystal
displays.
This is not a malfunction.
A dot or stripe pattern appears on the screen. Electromagnetic waves that are generated
from neon billboards, high voltage electric
power cables, ham radios or other radio
devices equipped to other vehicles may
adversely affect the screen.
This is not a malfunction.
Image lag appears on the screen. This is a typical phenomenon for liquid crystal
displays.
This is not a malfunction.
Image motion displayed on the screen is slow. The cabin temperature is less than 50°F
(10°C).
Wait until the cabin temperature rises to
within 50°F (10°C) and 122°F (50°C).
When looking at the screen from an angle, the
screen lightens or darkens.
This is a typical phenomenon for liquid crystal
displays.
Adjust the brightness setting of the screen.
“Display settings” (page 2-24)
8. Troubleshooting guide
8-3

8. Troubleshooting guide
Symptom Possible cause Possible solution
The screen turns blue or an error message is
displayed on the touch screen display.
A system malfunction has occurred. It is recommended you contact a NISSAN
dealer for an inspection.
The SD card is not inserted into the slot
correctly.
If the SD card containing map data is acci-
dentally removed, after reinserting the SD
card containing map data into the slot, place
the ignition switch in the OFF position and
then place back in the ON position again.
Navigation system related functions cannot
be operated.
The SD card is not inserted into the slot. Insert the appropriate SD card.
8-4

AUDIO SYSTEM
HD RADIO TECHNOLOGY (for U.S.)
Sound
Symptom Possible cause Possible solution
Delay in digital audio on HD Radio broadcasts. The radio acquires an analog station first and
blends to an digital signal.
This is not a malfunction.
Audio skips, stutters, or echoes. The radio station has not properly aligned the
digital and analog audio.
Verify correct operation on another station.
Report any station with poor performance.
Volume changing up/down. The radio station has not properly aligned
digital and analog audio level.
Verify correct operation on another station
and check www.hdradio.com for stations in
the area. Report any station with poor
performance.
Sound fading in and out. The transition between analog and digital is
taking place (blending).
Verify transition performance on several sta-
tions in the area. Report any stations with
poor alignment.
Excessive blending (Transition between ana-
log and digital).
The receiver is located near the edge of the
digital coverage area.
Refer to hdradio.com to verify radio stations
in your coverage area.
Digital audio not better than analog audio. Audio processing on the digital audio at a
station can potentially decrease the digital
audio sound quality.
Verify correct operation on another station.
Report any station with poor performance.
8. Troubleshooting guide
8-5

8. Troubleshooting guide
Functional
Symptom Possible cause Possible solution
Keep losing my local stations. The digital coverage is slightly less than the
analog signal coverage.
Verify correct operation on another station.
This is expected behavior.
Shadowing (urban/terrain) can cause re-
duced digital coverage.
Verify correct operation on another station.
Some data fields are blank. Text information is sent at the broadcaster’s
discretion.
Verify correct operation on another station.
Report station issues.
Text information is truncated / appears to be
more available.
The display is limited to a fixed number of
characters and more data is being sent than
can be shown.
This is an intended behavior.
AM reception changes at night. AM stations are required by the government
(FCC) to lower their power at night.
This is not a malfunction.
8-6

COMPACT DISC (CD) PLAYER
Symptom Possible cause Possible solution
Music cannot be played back. The disc is inserted upside down. Insert a CD with the label side facing up.
Moisture condensation occurs inside the unit. Wait until the moisture evaporates (approxi-
mately 1 hour).
The cabin temperature is too high. Wait until the cabin temperature becomes
moderate.
The disc is scratched or dirty. A disc is not
always playable if it is scratched.
Wipe off any dirt from the disc.
Depending on the condition in which they are
stored, discs may become unreadable due to
deterioration (for example, keeping the discs
in the passenger compartment, etc.).
Change the disc with a deterioration-free
disc. Do not use a deteriorated disc. The label
surface of the disc may crack or chip, and the
layer of the label surface may eventually peel
off.
The compressed audio files cannot be played
back.
If both music CD files (CD-DA data) and
compressed audio files (MP3 data, etc.) are
mixed on one disc, the audio compression
files cannot be played back.
Prepare a disc that includes compressed
audio files only.
The files are not named using characters that
are compliant with the specifications.
Use the character codes and the number of
characters that are compliant with the spe-
cifications for folder names and file names. In
addition, always use “.MP3”, “.WMA”, “.mp3” or “.
wma” for file extensions.
It takes a long time before the music starts
playing.
The disc contains a large amount of data. Some time may be required to check the files.
It is recommended that unnecessary folders
or any files other than compressed audio files
should not be recorded in a disc.
The sound quality is poor. The disc is dirty. Wipe off any dirt from the disc.
8. Troubleshooting guide
8-7

8. Troubleshooting guide
Symptom Possible cause Possible solution
No sounds are played though the CD play
time is displayed.
The system plays back the first track of the
mix mode disc. (Mix mode is a format in which
data except music is recorded on the first
track and music data is recorded on one
other than the first track in a session.)
Play back music data that are recorded on
one other than the first track.
Music cuts off or skips. The combination of writing software and
hardware might not match; or the writing
speed, writing depth, writing width, etc. might
not match the specifications.
Create a disc using different writing speed
settings, etc.
The system skips the selected track and
moves to the next track.
A non-MP3/WMA file is given an extension of “.
MP3”, “.WMA”, “.mp3” or “.wma”.
Prepare MP3/WMA files.
The system plays back a file that is prohibited
due to copyright protection.
Prepare playable files.
The tracks do not play back in the desired
order.
The folder locations in the disc are changed
by the writing software while the files are
written in the disc.
Check the settings of the writing software,
and create a new disc.
The CD cannot be ejected. The ignition switch is not placed in the ACC or
ON position.
Place the ignition switch in the ACC or ON
position.
8-8

iPod PLAYER
Symptom Possible cause Possible solution
The system does not recognize an iPod. A connector cable is not correctly connected,
or the iPod does not correctly operate.
Connect the connector cable again. If the
system does not recognize the iPod after
performing this procedure above, reset the
iPod.
The iPod that is to be connected is not
compatible with the system.
Check the iPod model and firmware versions
available for the system.
A USB extension cable is not correctly con-
nected.
Do not use a USB extension cable.
The cable is rapidly connected to or discon-
nected from the USB connection port.
Slowly connect or disconnect the USB cable.
An iPod cannot be operated. The iPod is connected to the in-vehicle audio
system while headsets, etc. are connected to
the iPod.
Remove all equipment from the iPod after
disconnecting the iPod from the system, and
then connect it to the system again.
The iPod is not operating normally. Disconnect the iPod from the in-vehicle audio
system, and then connect it to the system
again.
The system plays back an album/file that
includes a particular album art.
Disconnect the iPod from the in-vehicle audio
system, and then reset the iPod. Disable the
album art, and then connect the iPod to the
system.
“iPod Menu” (page 3-31)
An iPod does not respond. There are too many files in a category. Decrease the number of files in a category
(less than 65500 files).
The shuffle function is turned on. Turn off the shuffle function if many files are
stored on the iPod.
Music cannot be played back. A connector is not connected to the iPod. Firmly connect the connector to the iPod.
Playback cuts out. The sound cuts due to vibration resulting
from an unstable location of the iPod.
Place the iPod on a stable location where it
does not roll over.
8. Troubleshooting guide
8-9

8. Troubleshooting guide
Symptom Possible cause Possible solution
Distorted sound occurs. The EQ (equalizer) function of the iPod is
turned on.
Turn off the EQ (equalizer) function on your
iPod.
Battery charge of an iPod takes longer. Battery charge of the iPod may take longer
while an iPod is playing back.
If the iPod needs to be charged, it is recom-
mended to stop playing the music.
Battery charge of an iPod is unavailable. The cable that is connected to the iPod may
be damaged or improperly connected.
Check the cable currently in use.
Functions cannot be operated using an iPod
that is connected to the in-vehicle audio
system. -
The operation of an iPod must be performed
using the in-vehicle audio system after the
iPod is connected to the system.
Sound skips. Surrounding circumstances (noise, etc.) may
cause the sound to skip.
This does not indicate a malfunction.
A USB extension cable is used. Do not use a USB extension cable.
8-10

USB MEMORY DEVICE
Symptom Possible cause Possible solution
The system does not recognize a USB device. A USB extension cable is used. Do not use a USB extension cable.
A USB hub is used. Do not use a USB hub.
A USB device is rapidly connected to or
disconnected from the USB connection port.
Slowly connect or disconnect the USB device.
8. Troubleshooting guide
8-11

8. Troubleshooting guide
BLUETOOTH® STREAMING AUDIO
Symptom Possible cause Possible solution
Registration cannot be performed. The Bluetooth® audio device is not compa-
tible with the in-vehicle audio system.
Check the Bluetooth® audio device Owner’s
Manual.
Bluetooth® is disabled on device. Check that the Bluetooth® function is enabled
on device.
The PIN code is incorrect. Check the PIN code for the Bluetooth® audio
device that is to be registered.
Check that the PIN code for the Bluetooth®
audio device is consistent with that for the in-
vehicle audio system.
Another Bluetooth® device is used in the
vehicle.
Turn off the other Bluetooth® device until the
registration is completed.
Music cannot be played back. The Bluetooth® audio device is not compa-
tible with the in-vehicle audio system.
Check the Bluetooth® audio device Owner’s
Manual.
The system is not set to the Bluetooth® audio
mode.
Push <AUDIO> to select the Bluetooth® audio
mode.
A Bluetooth® adapter is turned off. Turn on a Bluetooth® adapter when it is used
for a Bluetooth® audio device.
Playback stops. The Bluetooth® audio device is not compa-
tible with the in-vehicle audio system.
Visit www.nissanusa.com/bluetooth/ to
check Bluetooth® audio device compatibility.
A cellular call is active. This is not a malfunction.
Sound may cut out when a Bluetooth® audio
device is operated.
Push <AUDIO> to select the Bluetooth® audio
mode, and then operate a function on the
touch screen display of the in-vehicle system
instead of conducting the operation on the
Bluetooth® audio device.
8-12

Symptom Possible cause Possible solution
Audio operation cannot be performed. A Bluetooth® audio device that does not
support audio operations is in use.
Visit www.nissanusa.com/bluetooth/ to
check Bluetooth® audio device compatibility.
An error occurs when connecting to a Blue-
tooth® audio profile.
Turn the power source of the Bluetooth®
audio player off and on, and then resume
connection with the system.
8. Troubleshooting guide
8-13

8. Troubleshooting guide
BLUETOOTH® HANDS-FREE PHONE SYSTEM
Symptom Possible cause Possible solution
A cellular phone cannot be registered. The cellular phone is not compatible with the
in-vehicle hands-free phone system.
Use a cellular phone compatible with the system.
Visit www.nissanusa.com/bluetooth/ to check
compatibility.
Registration of the cellular phone has been
performed incorrectly.
Check the registration procedure, and then regis-
ter the cellular phone again.
A cellular phone cannot be connected or
is disconnected after the registration is
completed.
The Bluetooth® setting of the in-vehicle
hands-free phone system is turned off.
Turn on the Bluetooth® setting of the system.
The Bluetooth® setting of the cellular phone
is turned off.
Turn on the Bluetooth® setting of the cellular
phone.
The remaining battery level of the cellular
phone is low.
Charge the battery of the cellular phone.
The wireless Bluetooth® connection may be
disrupted depending on the location of the
cellular phone.
Do not place the cellular phone in an area
surrounded by metal or far away from the in-
vehicle hands-free phone system. Do not place the
cellular phone close to the seats or your body.
Registration of the cellular phone is not
completed.
Perform registration of the cellular phone.
A call to a particular phone number fails. If the system tries to make a call several times
to the same phone number (for example: the
party does not respond to the call, the party is
out of the service area, or the call is aban-
doned before the party responds), the system
may reject a request to make a call to the
phone number.
Turn off the cellular phone and turn it on again to
reset the connection.
8-14

Symptom Possible cause Possible solution
The system does not recognize the
connection of a cellular phone. The
system does not receive or make a call.
The cellular phone is not compatible with the
in-vehicle hands-free phone system.
Use a cellular phone compatible with the system.
Visit www.nissanusa.com/bluetooth/ to check
compatibility.
The cellular phone is not connected. Check the registration procedure, and then regis-
ter the cellular phone again.
The phone operation is limited by the func-
tions (such as dial lock, etc.) of the registered
cellular phone.
Remove any settings that are limiting use of the
cellular phone, and then perform registration
again.
The other party cannot hear your voice.
The other party can hear your voice, but
it cracks or cuts out.
Mute function is enabled. Verify mute function is disabled.
The cellular phone is not connected. Check the registration procedure, and then regis-
ter the cellular phone again.
The fan speed of the heater/air conditioner is
too fast.
Decrease the fan speed of the heater/air condi-
tioner.
The ambient noise level is excessive. (For
example: heavy rain, construction sites, inside
a tunnel, oncoming vehicles, etc.)
Close the windows to shut out ambient noise.
The noise generated by driving the vehicle is
too loud.
Reduce the vehicle speed.
The incoming or outgoing voice level is too
loud.
Adjust the incoming or outgoing voice level
properly.
The voice is cut out or noise is heard
during a call.
The wireless Bluetooth® connection may be
disrupted depending on the location of the
cellular phone.
Do not place the cellular phone in an area
surrounded by metal or far away from the in-
vehicle hands-free phone system. Do not place a
cellular phone close to the seats or your body.
When a cellular phone is operated to
make a call, the hands-free function
becomes unavailable.
Some models of a cellular phone do not
switch to the hands-free mode when they are
operated to make a call.
This is not a malfunction. Make a call again using
the hands-free function.
8. Troubleshooting guide
8-15

8. Troubleshooting guide
Symptom Possible cause Possible solution
The other party’s voice cannot be heard.
There is no ring tone.
The volume level is set to the minimum. Adjust the volume level.
A cellular phone is not connected. Check the registration procedure, and then regis-
ter the cellular phone again.
Each volume level (ring tone, incoming
voice or outgoing voice) is different.
Each volume level is not adjusted properly. Adjust each volume level properly.
The antenna display is different between
the navigation screen and a cellular
phone screen. Making or receiving a call
is unavailable even though the antenna
display shows that it is possible to do so.
The antenna display varies depending on the
model of cellular phone.
This does not indicate a malfunction. The antenna
display and remaining battery level shown on the
navigation screen may be different from those
shown on the cellular phone screen. Use them as a
reference.
A voice cannot be heard clearly when
using a cellular phone behind tall build-
ings.
Some structures such as tall buildings, etc.
may cause irregular reflection of radio waves
or completely shut out radio waves that are
used for cellular phones.
Move to a place without tall buildings.
Noise is heard when using a cellular
phone under/near areas of elevated
railroads, high voltage electric power
cables, traffic signals, neon billboards,
etc.
Electromagnetic waves that are generated
from radio devices may adversely affect the
cellular phone.
This is not a malfunction.
Noise is heard in the sound from the
audio system while using a cellular
phone.
Radio waves that are generated from a
cellular phone may adversely affect the
sound from the audio system.
This is not a malfunction.
Sound skips or stutters. The cellular phone may have turned on the
wireless LAN (Wi-Fi).
Turn off the wireless LAN (Wi-Fi).
Phonebook cannot be downloaded. An error occurred during the phone pairing
process.
Please delete the Bluetooth® pairing information
from both the mobile phone and vehicle system
before registering it again.
Phone does not support phonebook down-
load function.
Visit www.nissanusa.com/bluetooth/ to check
compatibility.
8-16

NISSANCONNECT
SM
SERVICES
(if so equipped)
Symptom Possible cause Possible solution
The system cannot con-
nect to the NissanCon-
nect
SM
Services Data
Center.
A subscription for the NissanCon-
nect
SM
Services has not been estab-
lished.
Sign up for a subscription to the NissanConnect
SM
Services. For details
about subscriptions, contact the NissanConnect
SM
Services support line
at 1-855-426-6628.
The communication line is busy. Try again after a short period of time.
The vehicle is in a location where it is
difficult to receive radio waves.
When the vehicle moves to an area where radio waves can be
transmitted sufficiently, communication will be restored. When the icon
on the display shows that the vehicle is inside the communication area,
the system can be used.
TCU (Telematics Control Unit) is not
turned on.
If the icon does not show that the vehicle is inside the communication
area despite the fact that the vehicle is in that location, contact the
NissanConnect
SM
Services support line at 1-855-426-6628.
Radio wave reception is not sufficient
for TCU (Telematics Control Unit)
operation.
When the vehicle moves to an area where radio waves can be
transmitted sufficiently, communication will be restored. When the icon
on the display shows that the vehicle is inside the communication area,
the system can be used.
Some of the items that are
displayed on the menu
screen cannot be selected.
The vehicle is being driven and some
menu items are disabled.
Stop the vehicle in a safe location and apply the parking brake before
operating the menu screen items.
Some parts of the screen
are not displayed.
The vehicle is being driven and some
menu items are disabled.
Operate the system after stopping the vehicle in a safe location and
applying the parking brake.
The system does not an-
nounce information.
The volume level is set to the mini-
mum.
Adjust the volume level by operating the <VOL/
>or <VOLUME/ >
located on the control panel or <>on the steering wheel switch while
the system is announcing information.
8. Troubleshooting guide
8-17
8. Troubleshooting guide
Apple CarPlay
Symptom Cause and Countermeasure
Cannot start Apple CarPlay though it is tethered to the
vehicle.
The USB cable is not connected to the USB connection port. Properly connect the
USB cable to the USB connection port.
For models with two USB connection ports, the USB cable must be connected to
the USB connection port 1 for Apple CarPlay operation.
“USB (Universal Serial Bus) Connection Port and AUX (auxiliary) input jack”
(page 2-12)
Apple CarPlay setting is not active on your iPhone. Turn on “CarPlay” on your
iPhone.
Device is not compatible with Apple CarPlay. Check compatibility requirements.
Apple CarPlay performance decreases. For example,
slow connectivity or slow application functionality.
or
An error message appears when trying to access
features of Apple CarPlay. A blank screen appears when
trying to access maps.
Confirm you have a compatible iPhone, a cellular connection and an active data
plan.
Use Apple Lightning cable to connect your phone to the USB connection port.
Phone’s performance or cellular connection. Disconnect and reconnect your
phone.
Phone’s performance or cellular connection. Close all apps and restart them.
Phone’s performance or cellular connection. Cycle phone power off/on to restart.
Cannot access Siri using the switch on the steering
wheel.
The USB cable may not be properly connected. Disconnect and reconnect the USB
cable.
Siri setting is not enabled on the phone. Turn on “Siri” on your phone.
Check that you are pushing and holding <
>/< > instead of just pushing the
switch to initiate Siri operation.
8-18
Android Auto
Symptom Cause and Countermeasure
Cannot start Android Auto though it is connected to the
vehicle.
The USB cable is not connected to the USB connection port. Properly connect the
USB cable to the USB connection port.
For models with two USB connection ports, the USB cable must be connected to
the USB connection port 1 for Android Auto operation.
“USB (Universal Serial Bus) Connection Port and AUX (auxiliary) input jack”
(page 2-12)
Always Start Android Auto setting is not active on your in-vehicle system. Turn on
[Always Start Android Auto] on your in-vehicle system.
“Android Auto settings” (page 5-25)
Touch [Smartphone Connection] or [Android Auto] on the MENU screen to activate
Android Auto.
“How to view and operate HOME MENU screen” (page 2-19)
The connected device is not compatible with Android Auto. Check the compat-
ibility requirements.
Your Android phone may not be recognized if its battery is low. Charge your
Android phone then try again.
Android Auto performance decreases. For example, slow
connectivity or slow application functionality.
or
An error message appears when trying to access
features of Android Auto. A blank screen appears when
trying to access maps.
Confirm you have a compatible Android phone, a cellular connection and an active
data plan.
Use the Android phone OEM cable to connect your phone to the USB connection
port.
Phone’s performance or cellular connection. Disconnect and reconnect your
phone.
Phone’s performance or cellular connection. Close all apps and restart them.
Phone’s performance or cellular connection. Cycle phone power off/on to restart.
8. Troubleshooting guide
8-19

8. Troubleshooting guide
Cannot start voice operation using the switch on the
steering wheel.
The USB cable may not be properly connected. Disconnect and reconnect the USB
cable.
To use the voice operation function while driving, turn on the "While driving"
setting on your Android phone.
Check that you are pushing and holding <>/< > instead of just pushing the
switch to voice operation.
8-20

NAVIGATION
BASIC OPERATIONS
Symptom Possible cause Possible solution
No image is displayed. The brightness is at the lowest setting. Adjust the brightness of the display.
“Display settings” (page 2-24)
The display is turned off. Push <>to turn on the display.
The volume of the voice guidance is too high
or too low.
The volume is not set correctly, or the voice
guidance setting is turned off.
Adjust the volume of the voice guidance or
turn on the voice guidance setting.
“Volume and Beeps settings” (page 2-24)
No voice guidance is available. Voice guidance is not provided for certain
streets (roads displayed in gray).
This is not a malfunction.
No map is displayed on the screen. A screen other than a map screen is dis-
played.
Touch [Map] on the Launch Bar or push
<MAP>.
The screen is too dim. The movement is slow. The temperature in the interior of the vehicle
is low.
Wait until the interior of the vehicle has
warmed up.
Some pixels in the display are darker or
brighter than others.
This condition is an inherent characteristic of
liquid crystal displays.
This is not a malfunction.
Some menu items cannot be selected. Some menu items become unavailable while
the vehicle is driven.
Park the vehicle in a safe location, and then
operate the navigation system.
8. Troubleshooting guide
8-21

8. Troubleshooting guide
VEHICLE ICON
Symptom Possible cause Possible solution
Names of roads and locations differ
between 2D view and Birdview™.
This is because the quantity of the displayed informa-
tion is reduced so that the screen does not become too
cluttered. There is also a chance that names of the
roads or locations may be displayed multiple times, and
the names appearing on the screen may be different
because of a processing procedure.
This is not a malfunction.
The location of the vehicle icon is
misaligned from the actual position.
The vehicle was transported after the ignition switch
was placed in the OFF position, for example, by a ferry or
car transporter.
Drive the vehicle for a period of time on a
road where GPS signals can be received.
The position and direction of the vehicle icon may be
incorrect depending on the driving environments and
the levels of positioning accuracy of the navigation
system.
This is not a malfunction. Drive the vehicle
for a period of time to automatically
correct the position and direction of the
vehicle icon.
“Current vehicle location” (page 6-61)
Driving with tire chains or tires that have been replaced
may result in an incorrect vehicle location display due to
miscalculation by the speed sensor.
Drive the vehicle for a period of time (at
approximately 19 MPH (30 km/h) for about
30 minutes) to automatically correct the
vehicle icon position.
If this does not correct the vehicle icon
position, it is recommended you contact a
NISSAN dealer.
The map data has a mistake or is incomplete (the
vehicle icon position is always misaligned in the same
area).
Updated road information will be included
in the next version of the map data.
When the vehicle is traveling on a new
road, the vehicle icon is located on
another road nearby.
Because the new road is not stored in the map data, the
system automatically places the vehicle icon on the
nearest road available.
Updated road information will be included
in the next version of the map data.
“How to order map data updates”
(page 6-68)
8-22

Symptom Possible cause Possible solution
The screen does not switch to the
night screen even after turning on the
headlights.
The daytime screen was set the last time the headlights
were turned on.
Set the screen to the night screen mode
using <>when turning on the head-
lights.
“Display settings” (page 2-24)
The map does not scroll even when
the vehicle is moving.
The current location map screen is not displayed. Touch [Map] on the Launch Bar or push
<MAP>.
The vehicle icon is not displayed. The current location map screen is not displayed. Touch [Map] on the Launch Bar or push
<MAP>.
8. Troubleshooting guide
8-23

8. Troubleshooting guide
ROUTE CALCULATION AND VISUAL GUIDANCE
Symptom Possible cause Possible solution
Waypoints are not included in
the auto reroute calculation.
Waypoints that have been already passed are not included
in the auto reroute calculation.
To go to that waypoint again, edit the route.
Route information is not dis-
played.
Route calculation has not yet been performed. Set the destination and perform route calcu-
lation.
The vehicle is not on the suggested route. Drive on the suggested route.
Route guidance is turned off. Turn on route guidance.
Route information is not provided for certain types of
roads (roads displayed in dark green).
This is not a malfunction.
The auto reroute calculation (or
detour calculation) suggests the
same route as the one pre-
viously suggested.
Route calculations took priority conditions into consid-
eration, but the same route was calculated.
This is not a malfunction.
A waypoint cannot be added. Five waypoints are already set on the route, including ones
that the vehicle has already passed.
A maximum of 5 waypoints can be set on the
route. To go to 6 or more waypoints, perform
route calculations multiple times as neces-
sary.
8-24

Symptom Possible cause Possible solution
The suggested route is not dis-
played.
Roads near the destination cannot be calculated. Reset the destination to a main or ordinary
road, and recalculate the route.
The starting point and destination are too close. Set a more distant destination.
The starting point and destination are too far away. Divide the trip by selecting one or two
intermediate destinations, and perform route
calculations multiple times.
There are time restricted roads (by the day of the week, by
time) near the current vehicle location or destination.
Select [Do Not Use Restriction Info] in the
[Time Restricted Rd] setting (for U.S. and
Canada).
“Route Settings” (page 6-44)
Turn off the [Time Restricted Rd] setting (for
Mexico).
“Route Settings” (page 6-44)
A part of the route is not dis-
played.
The suggested route includes narrow streets (roads
displayed in gray).
This is not a malfunction.
The part of the route that the
vehicle has already passed is
deleted.
A route is managed by sections between waypoints. If the
vehicle passed the first waypoint, the section between the
starting point and the waypoint is deleted (it may not be
deleted depending on the area).
This is not a malfunction.
An indirect route is suggested. If there are restrictions (such as one-way streets) on roads
close to the starting point or destination, the system may
suggest an indirect route.
Adjust the location of the starting point or
destination.
The system may suggest an indirect route because route
calculation does not take into consideration some areas
such as narrow streets (gray roads).
Reset the destination to a main or ordinary
road, and recalculate the route.
The landmark information does
not correspond to the actual
information.
This may be caused by insufficient or incorrect map data. Updated information will be included in the
next version of the map data.
“How to order map data updates”
(page 6-68)
8. Troubleshooting guide
8-25

8. Troubleshooting guide
Symptom Possible cause Possible solution
The suggested route does not
exactly connect to the starting
point, waypoints or destination.
There is no data for route calculation closer to these
locations.
Set the starting point, waypoints and desti-
nation on a main road, and perform route
calculation.
8-26

VOICE GUIDANCE
Symptom Possible cause Possible solution
Voice guidance is not available. Voice guidance is only available at certain intersections
marked with . In some cases, voice guidance is not
available even when the vehicle makes a turn.
This is not a malfunction.
The vehicle has deviated from the suggested route. Go back to the suggested route or
request route calculation again.
Voice guidance is turned off. Turn on voice guidance.
Route guidance is turned off. Turn on route guidance.
The guidance content does not
correspond to the actual road con-
ditions.
The content of voice guidance may vary, depending on the
types of intersections at which turns are made.
Follow all traffic rules and regulations.
8. Troubleshooting guide
8-27
8. Troubleshooting guide
TRAFFIC INFORMATION (for U.S.
and Canada)
Symptom Possible cause Possible solution
Traffic information is not displayed. Traffic information is not turned on. Turn on the traffic information.
The vehicle is in an area where traffic information
is not available.
Scroll to an area where traffic information is
available.
The subscription to SiriusXM Traffic is incomplete,
or the subscription to SiriusXM Traffic has expired.
Check the subscription status of SiriusXM Traffic.
“Notes on SiriusXM Traffic information”
(page 5-19)
The map scale is set at a level where the display of
icons is impossible.
Check that the map scale is set at a level in which
the display of icons is possible.
“Traffic information on map” (page 6-48)
With the automatic detour route
turned on, no detour route is set to
avoid congested areas.
There is no faster route compared to the current
route, based on the road network and the traffic
information.
The automatic detour search is not intended for
avoiding traffic jams. It searches for the fastest
route taking conditions such as traffic jams into
consideration. Follow the current route.
“Notes on SiriusXM Traffic information”
(page 5-19)
The route does not avoid a road
section with traffic information
stating that it is closed due to road
construction.
The navigation system is designed not to avoid
this event because the actual period of closure
may differ from the declared roadwork period.
Observe the actual road conditions and follow the
instructions on the road for a detour when
necessary. If the road is closed, use the detour
function and set the detour distance to avoid the
road section that is closed.
8-28

VOICE RECOGNITION
Symptom Possible cause Possible solution
The system does not operate or fails to
interpret the command correctly.
The interior of the vehicle is too noisy. Close the windows or have the other occu-
pants be quiet.
The fan speed of the heater/air conditioner is
too fast.
Decrease the fan speed of the heater/air
conditioner.
The noise generated by driving the vehicle is
too loud.
Reduce the vehicle speed.
The voice command is spoken in a low voice. Speak the command in a louder voice.
The timing of speaking a command is too
early.
Speak the command after confirming the
following: a voice guidance is announced, a
tone sounds, and an icon on the screen
changes from gray to orange.
The command is spoken too slowly. Speak in a natural voice without pausing
between words.
The system prompts to repeat a command. Pronunciation is unclear. Speak clearly.
The command is spoken too late after the
tone.
Speak the command within 5 seconds after
confirming the following: a voice guidance is
announced, a tone sounds, and an icon on
the screen changes from gray to orange.
An improper command is spoken. Speak the command or a number that is
displayed on the screen.
Speak a command that is shown in the
command list.
The system does not correctly recognize a
number spoken.
Too many numbers are spoken at once. Place a pause between the appropriate digits
for correct recognition by the system. When
speaking a telephone number, place a pause
between area codes, dial codes, etc.
8. Troubleshooting guide
8-29

8. Troubleshooting guide
Symptom Possible cause Possible solution
USB memory device cannot be operated with
voice commands.
Depending on the device, iPhone or iPod may
be recognized as a USB memory device.
This is not malfunction
More than one audio device is connected to
USB connection port.
Only one audio device can be operated with
the voice recognition system even when
multiple numbers of devices are connected.
Select an audio source to operate with the
voice recognition system.
“Voice recognition settings” (page 7-23)
The USB/iPod operation screen is grayed out. The audio device is not connected. Connect an audio device to the system.
An audio source to be operated with the
voice recognition system has not been se-
lected.
Select an audio source to be operated with
the voice recognition system.
“Voice recognition settings” (page 7-23)
An error message is displayed when trying to
select a track and operate USB/iPod.
The track information is being processed for
registration by the system.
Song information will be loaded into the
system when a new audio device is registered
for the first time or when the song informa-
tion in the pre-registered device has been
changed. Please wait for the loading to
complete which may take a few minutes to up
to an hour.
Exceeding number of songs are stored in the
connected audio device than it can hold.
Decrease the number of songs stored in the
audio device.
No song is stored in the audio device. Store songs in the connected audio device.
Storing songs with information such as artist
name, album name, song name, playlist, etc.,
will make voice recognition song search
available.
The system does not correctly recognize a
Point of Interest (POI) name spoken.
There are some rare cases where a POI
search is unavailable by speaking the facility
name but the location can be found on the
map.
This is not a malfunction. Consider using an
alternate search method, like street address.
8-30

Symptom Possible cause Possible solution
The system does not correctly recognize a
Point of Interest (POI) name spoken.
Partial or alias name is spoken. For best results, speak the full name.
8. Troubleshooting guide
8-31

8. Troubleshooting guide
MEMO
8-32

Number
2D map...................................................................... 6-4
A
About route guidance................................. 6-28
Adjusting settings........................................... 2-18
Android Auto...................................................... 5-23
Apple CarPlay..................................................... 5-20
Audio main buttons....................... 3-10, 3-12
Audio operation precautions ................... 3-2
Audio operations............................................. 3-14
AUX (auxiliary) input jack........................... 2-12
Auxiliary (AUX) devices................................ 3-35
B
Birdview™ (3D) map......................................... 6-5
Bluetooth® Hands-Free
Phone System....................................................... 4-2
Bluetooth® setting......................................... 4-13
Bluetooth® streaming audio...... 3-9, 3-32
Building graphics............................................... 6-6
C
Canceling Route .............................................. 6-37
CD/USB memory device care
and cleaning....................................................... 3-38
Changing map..................................................... 6-8
Changing order of destination
and waypoints................................................... 6-39
Changing scale of map................................. 6-7
Clock settings.................................................... 2-25
Command list ....................................................... 7-6
Compact Disc (CD) player............. 3-4, 3-21
Compatibility...................................................... 5-23
Compressed Audio
Files (MP3/WMA/AAC) .................................... 3-7
Confirming route............................................. 6-37
Connecting Bluetooth®
audio device........................................................ 2-26
Connecting Bluetooth® device............. 2-26
Connecting Bluetooth®
Hands-free Phone............................................. 4-4
Connecting cellular phone...................... 2-26
Connecting to Interactive
Voice Menu.......................................................... 5-12
Control buttons and touch
screen display....................................................... 2-2
Control panel............................................. 2-2, 2-4
Current location map screen................ 6-13
Current vehicle location............................ 6-61
Customer assistance...................................... 8-2
D
Deleting stored item..................................... 6-55
Destination setting menu........................ 6-14
Display Commander..................................... 2-11
Display settings................................................ 2-24
Displaying current vehicle location..... 6-3
Displaying urgent
traffic information.......................................... 6-48
During a call........................................................... 4-5
E
Editing route....................................................... 6-37
Editing stored information...................... 6-53
Emergency support...................................... 5-15
F
Finding address................................................ 6-17
Finding nearby place ................................... 6-18
Finding points of interest......................... 6-19
Functions disabled while driving........ 2-22
G
Giving voice commands............................... 7-2
H
Hands-free text
messaging assistant....................................... 4-6
Index
9-1

Index
How to handle the Map SD card......... 6-67
How to handle the SD card..................... 6-75
How to see voice command screen.... 7-3
I
Information feeds........................................... 5-14
Information menu............................................. 5-2
iPod player............................................................ 3-28
L
Laser product ....................................................... 1-5
Launch Bar........................................................... 2-14
Liquid crystal display....................................... 2-6
M
Making a call.......................................................... 4-4
Map data................................................................ 6-67
Map Menu screen........................................... 6-13
Map operation...................................................... 6-3
Map types................................................................ 6-3
Map view settings.............................................. 6-9
Moving map........................................................... 6-6
N
Navigation settings....................................... 6-58
NissanConnect
SM
Services.......................... 5-7
NissanConnect
SM
Services settings.............................................. 5-17
Notes on SiriusXM
Traffic information......................................... 5-19
Number input screen................................... 2-19
O
One Shot Call........................................................ 7-3
Operating with voice.................................... 5-25
Options before starting the
route guidance................................................. 6-26
P
Phone.......................................................................... 4-4
Phone selection................................................... 4-4
Phone settings.................................................. 4-10
Phonebook........................................................... 4-12
Q
Quick Dial.............................................................. 4-12
R
Radio............................................................. 3-2, 3-15
Recalculating route....................................... 6-40
Receiving a call.................................................... 4-5
Route calculation............................................ 6-65
Route guidance................................. 6-28, 6-66
Route guidance settings........................... 6-41
Route menu......................................................... 6-34
S
Safety information................................. 1-3, 6-3
Scrolled location map screen................ 6-14
Searching for detour route using
traffic information.......................................... 6-40
Searching from address book.............. 6-21
Searching from
previous destinations.................................. 6-22
Setting at information on map............ 6-12
Setting by phone number........................ 6-23
Setting city center.......................................... 6-23
Setting detour route .................................... 6-41
Setting freeway entrance/exit............. 6-24
Setting from stored routes..................... 6-24
Setting home as destination................. 6-21
Setting intersection....................................... 6-22
Setting new destination............................ 6-37
Setting point on map.................................. 6-25
Setting with
NissanConnect
SM
Services....................... 6-25
Settings menu................................................... 2-23
Siri .............................................................................. 5-21
9-2

SiriusXM Travel Link...................................... 5-18
Specifying region ............................................ 6-17
Split screen............................................................. 6-8
Starting system................................................ 2-14
Start-up screen................................................ 2-14
Steering wheel controls
for audio.................................................. 3-13, 3-14
Storing a location/route........................... 6-50
Storing avoid area.......................................... 6-51
Storing home location................................ 6-50
Storing location................................................ 6-50
Storing route...................................................... 6-51
Subscription to
NissanConnect
SM
Services.......................... 5-7
System settings................................................ 2-23
T
Text message settings............................... 4-10
Touch panel........................................................ 2-16
Trademarks............................................................ 1-4
Traffic information on map .................... 6-48
Traffic information setting...................... 6-49
Transferring information to/from
address book..................................................... 6-56
Turn list................................................................... 6-33
U
USB (Universal Serial Bus)
connection port(s).............................. 2-12, 3-5
USB memory device player..................... 3-24
V
Viewing SiriusXM Travel Link................. 5-18
Viewing traffic events from list............ 6-47
Viewing traffic information..................... 6-47
Voice Prompt Interrupt................................. 7-3
Voice recognition............................................... 7-2
Voice recognition settings....................... 7-23
Volume settings............................................... 2-24
Index
9-3

Index
MEMO
9-4

For your safety, read carefully and keep in this vehicle.
2018 NISSANCONNECT®NCGNJ-N
NCGNJ-N
Printing : June 2018
Publication No.:
Printed in the U.S.A.
N18E NCGNJU1
2018 NISSANCONNECT®
OWNER’S MANUAL
MAXIMA MURANO
ALTIMA
