Installation Directions
308717-Installationsheet 1 308717-InstallationSheet_1 308717-InstallationSheet_1 B5 unilog cesco-content
2016-10-06
: Pdf 580463-Installationsheet 1 580463-InstallationSheet_1 B5 unilog
Open the PDF directly: View PDF ![]() .
.
Page Count: 44

INSTALLATION AND
CONFIGURATION DTM
COLLECTION
CONVENTIONAL INTERFACE
PROCESS AUTOMATION
MANUAL

With regard to the supply of products, the current issue of the following document is
applicable: The General Terms of Delivery for Products and Services of the Electrical
Industry, published by the Central Association of the Electrical Industry (Zentralverband
Elektrotechnik und Elektroindustrie (ZVEI) e.V.) in its most recent version as well as the
supplementary clause: "Expanded reservation of proprietorship"
Installation and Configuration DTM Collection Conventional Interface

Installation and Configuration DTM Collection Conventional Interface
Contents
3
2012-11
1 Introduction . . . . . . . . . . . . . . . . . . . . . . . . . . . . . . . . . . . . . . . . . . . . . . . . . . . 4
1.1 Used Symbols . . . . . . . . . . . . . . . . . . . . . . . . . . . . . . . . . . . . . . . . . . . . . . . 4
2 Product Description. . . . . . . . . . . . . . . . . . . . . . . . . . . . . . . . . . . . . . . . . . . . . 5
3 Prerequisites . . . . . . . . . . . . . . . . . . . . . . . . . . . . . . . . . . . . . . . . . . . . . . . . . . 6
4 Installation . . . . . . . . . . . . . . . . . . . . . . . . . . . . . . . . . . . . . . . . . . . . . . . . . . . . 8
4.1 Microsoft®.Net 2.0 Framework. . . . . . . . . . . . . . . . . . . . . . . . . . . . . . . . . . 8
4.2 FDT Framework Program PACTwareTM . . . . . . . . . . . . . . . . . . . . . . . . . . 10
4.3 DTM Collection Conventional Interface. . . . . . . . . . . . . . . . . . . . . . . . . . 13
4.3.1 Device DTMs . . . . . . . . . . . . . . . . . . . . . . . . . . . . . . . . . . . . . . . . . . . . . 14
4.3.2 Communication DTMs . . . . . . . . . . . . . . . . . . . . . . . . . . . . . . . . . . . . . 18
4.4 Connection between Device and PC . . . . . . . . . . . . . . . . . . . . . . . . . . . . 20
5 Configuration . . . . . . . . . . . . . . . . . . . . . . . . . . . . . . . . . . . . . . . . . . . . . . . . . 22
5.1 Updating the Device Catalog . . . . . . . . . . . . . . . . . . . . . . . . . . . . . . . . . . 22
5.2 Starting and Saving a Project . . . . . . . . . . . . . . . . . . . . . . . . . . . . . . . . . . 25
5.3 Configuring the Communication DTM . . . . . . . . . . . . . . . . . . . . . . . . . . . 26
5.4 Configuring the Device DTM. . . . . . . . . . . . . . . . . . . . . . . . . . . . . . . . . . . 32
6 Additional Information on PACTwareTM. . . . . . . . . . . . . . . . . . . . . . . . . . . . 41
7 Index . . . . . . . . . . . . . . . . . . . . . . . . . . . . . . . . . . . . . . . . . . . . . . . . . . . . . . . . 43
2012-11
4
Installation and Configuration DTM Collection Conventional Interface
Introduction
1Introduction
This manual guides you through the installation steps necessary to install the software
components of the DTM Collection Conventional Interface.
The following software components must be installed:
■Microsoft®.Net 2.0 Framework
■FDT framework program PACTwareTM 4.X
■DTM Collection Conventional Interface
1.1 Used Symbols
This document contains information that you must read to avoid property damage.
Safety-relevant Symbols
Informative Symbols
Action
This symbol indicates a paragraph with instructions.
Note!
If one of the software components is already installed on your system, you do not need to
reinstall it.
Caution!
This symbol indicates a warning about a possible fault.
In case of ignoring the devices and any connected facilities or systems may be interrupted or
fail completely.
Note!
This symbol brings important information to your attention.

Installation and Configuration DTM Collection Conventional Interface
Product Description
2012-11
5
2 Product Description
FDT Concept
The FDT concept (FDT — Field Device Tool) created a standard that can be used to integrate
devices in various user interfaces (framework applications such as PACTwareTM). The FDT
concept enables open and continuous device operation from the control level to the field,
regardless of the bus systems used. PACTwareTM is based on the FDT concept. This concept
specifies the data exchange between the device-specific driver and the framework application.
Every communicating device has a device-specific driver (DTM — Device Type Manager) that
is integrated in the framework application.
PACTwareTM
PACTwareTM is a manufacturer-independent operating software for devices. In the past, it was
often necessary to use multiple manufacturer-specific programs in order to be able to operate
different devices. PACTwareTM enables you to operate any number of devices with just this
software. To operate devices, PACTwareTM uses a standardized interface between the
PACTwareTM framework program and the individual software modules. This interface is called
FDT. The software modules for device operation are called DTMs.
Device and Communication DTM
The DTM contains all the data and functions of a device. Every DTM contains its own user
interface optimized for the device. The device and communication DTMs can be integrated in
any FDT framework program, such as PACTwareTM.
The DTM offers almost no restriction with regard to display and user guidance. This means that
all available device functions can be operated according to the user's needs. Operation is
supported by graphics. The DTM technology enables consistent operation of a device in all
FDT systems.
Essentially, there are two different types of DTM:
■Device DTMs
Device DTMs are DTMs for configuring devices such as transmitter power supply units,
signal converters, and trip amplifiers.
■Communication DTMs
Communication DTMs are required for communication with a device via a point to point
connection or via any network structures. The communication DTMs are available for
various interfaces, such as an RS 232 interface or USB interface. PACTwareTM contains a
communication DTM.

2012-11
6
Installation and Configuration DTM Collection Conventional Interface
Prerequisites
3Prerequisites
The following prerequisites must be fulfilled for the installation and configuration of the DTM
Collection Conventional Interface:
Hardware prerequisites
■IBM® PC or compatible PC
■Intel/AMD processor min. 500 MHz
■Working memory: min. 256 MB
■Hard disk space: min. 200 MB
■Graphic resolution 1024 x 768
Software prerequisites
■Operating system: Microsoft® Windows XP, Windows Vista, or Windows 7
■Internet Browser: Microsoft® Internet Explorer 4.0 or higher
■Unpacked software components for installation
•Microsoft
®.Net 2.0 Framework
• FDT framework program PACTwareTM 4.X
• DTM Collection Conventional Interface
Where to find the required software components:
Downloading Microsoft® .NET 2.0 Framework from the Internet
1. In the Internet browser, enter www.pepperl-fuchs.de.
2. In the search field, enter the product name of the software component: Microsoft .NET.
> The results list is displayed.
3. In the Product section, click the Microsoft .NET link.
> The Internet browser displays the product page.
4. In the Software section, click the Microsoft(R) .NET connection software link.
5. Load the software to your PC.
6. Unzip the ZIP file.
7. Save the data to a temporary folder of your choice on your PC.
Note!
For installation with Windows XP, Windows Vista, or Windows 7, administrator rights are
required.
Tip
Alternatively, the Microsoft ® .NET framework package and service packs are available for
download from www.microsoft.com/download.

Installation and Configuration DTM Collection Conventional Interface
Prerequisites
2012-11
7
Downloading the FDT Framework Program PACTwareTM 4.X from the Internet
1. In the Internet browser, enter www.pepperl-fuchs.de.
2. In the search field, enter the product name of the software component: PACTware 4.X.
> The results list is displayed.
3. In the Product section, click the PACTware 4. X link.
> The Internet browser displays the product page.
4. In the Software section, click the PACTware 4.X link.
5. Load the software to your PC.
6. Unzip the ZIP file.
7. Save the data to a temporary folder of your choice on your PC.
Downloading DTM Collection Conventional Interface from the Internet
1. In the Internet browser, enter www.pepperl-fuchs.de.
2. In the search field, enter the product name of the software component:
Conventional Interface DTM.
> The results list is displayed.
3. In the Product section, click the Conventional Interface DTM link.
> The Internet browser displays the product page.
4. In the Software section, click the DTM Collection Conventional Interface link.
5. Load the software to your PC.
6. Unzip the ZIP file.
7. Save the data to a temporary folder of your choice on your PC.
2012-11
8
Installation and Configuration DTM Collection Conventional Interface
Installation
4Installation
4.1 Microsoft®.Net 2.0 Framework
As a .NET application, PACTwareTM requires Microsoft®.Net 2.0 Framework to run.
The .NET application can only be run if the version of Microsoft®.Net. Framework with which
the application was developed is installed.
Checking the Microsoft® .Net Framework Version
Check which Microsoft® .Net Framework version is installed on your PC.
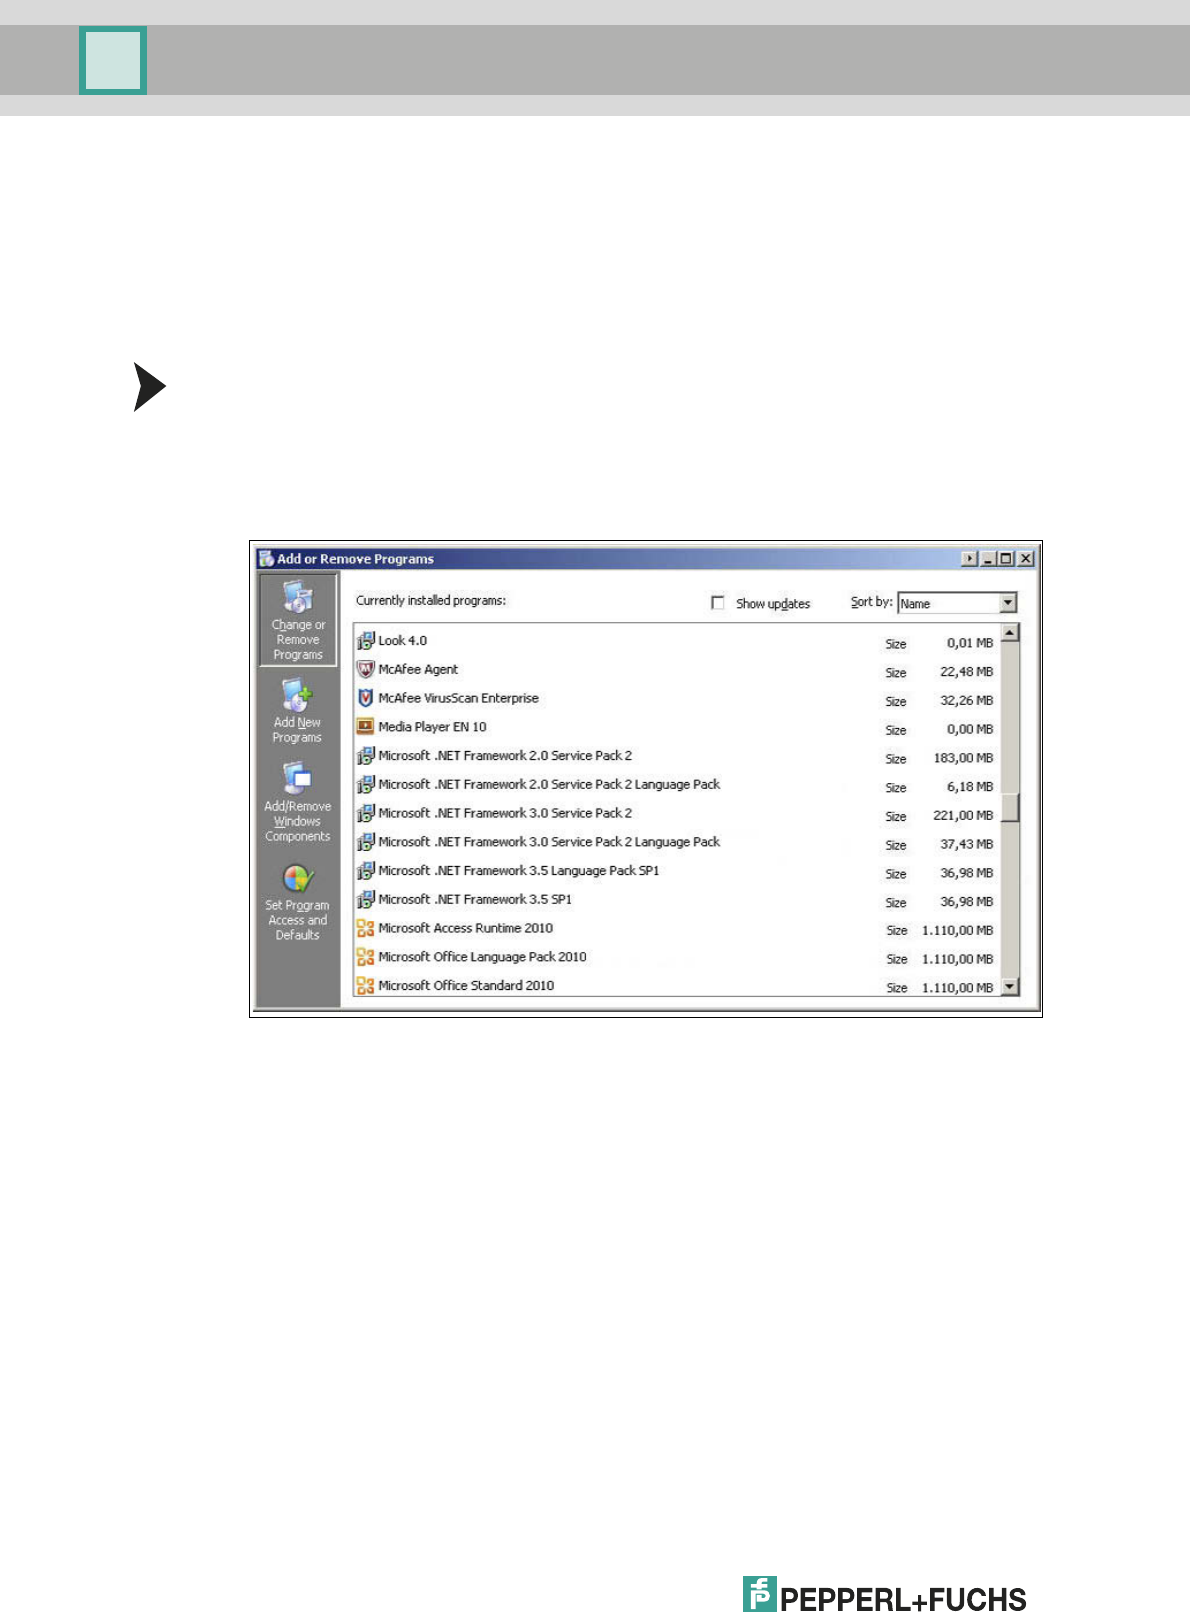
1. Open the system control on your PC.
2. Open the overview of installed programs by double-clicking Software.
> The overview of installed programs is displayed.
3. If Microsoft®.Net. Framework 1.0 or 1.1 is installed, you will need to install
Microsoft®.Net 2.0 Framework. Install Microsoft® .Net 2.0 Framework as described in the
next section.
4. If Microsoft®.Net. Framework 3.0 or 3.5 is installed, you do not need to install
Microsoft®.Net 2.0 Framework. These software versions are backward-compatible with
version 2.0.
5. If Microsoft®.Net. Framework 4.0 or higher is installed, you will need to install
Microsoft®.Net 2.0 Framework. Microsoft®.Net. Framework 4.0 is not backward-
compatible with version 2.0. Install Microsoft® .Net 2.0 Framework as described in the
next section.
Installation and Configuration DTM Collection Conventional Interface
Installation
2012-11
9
Installing Microsoft®.Net 2.0 Framework
1. Load Microsoft® .Net 2.0 Framework to your PC. See chapter 3.
2. Unzip the ZIP file.
3. Save the data to a temporary folder of your choice on your PC.
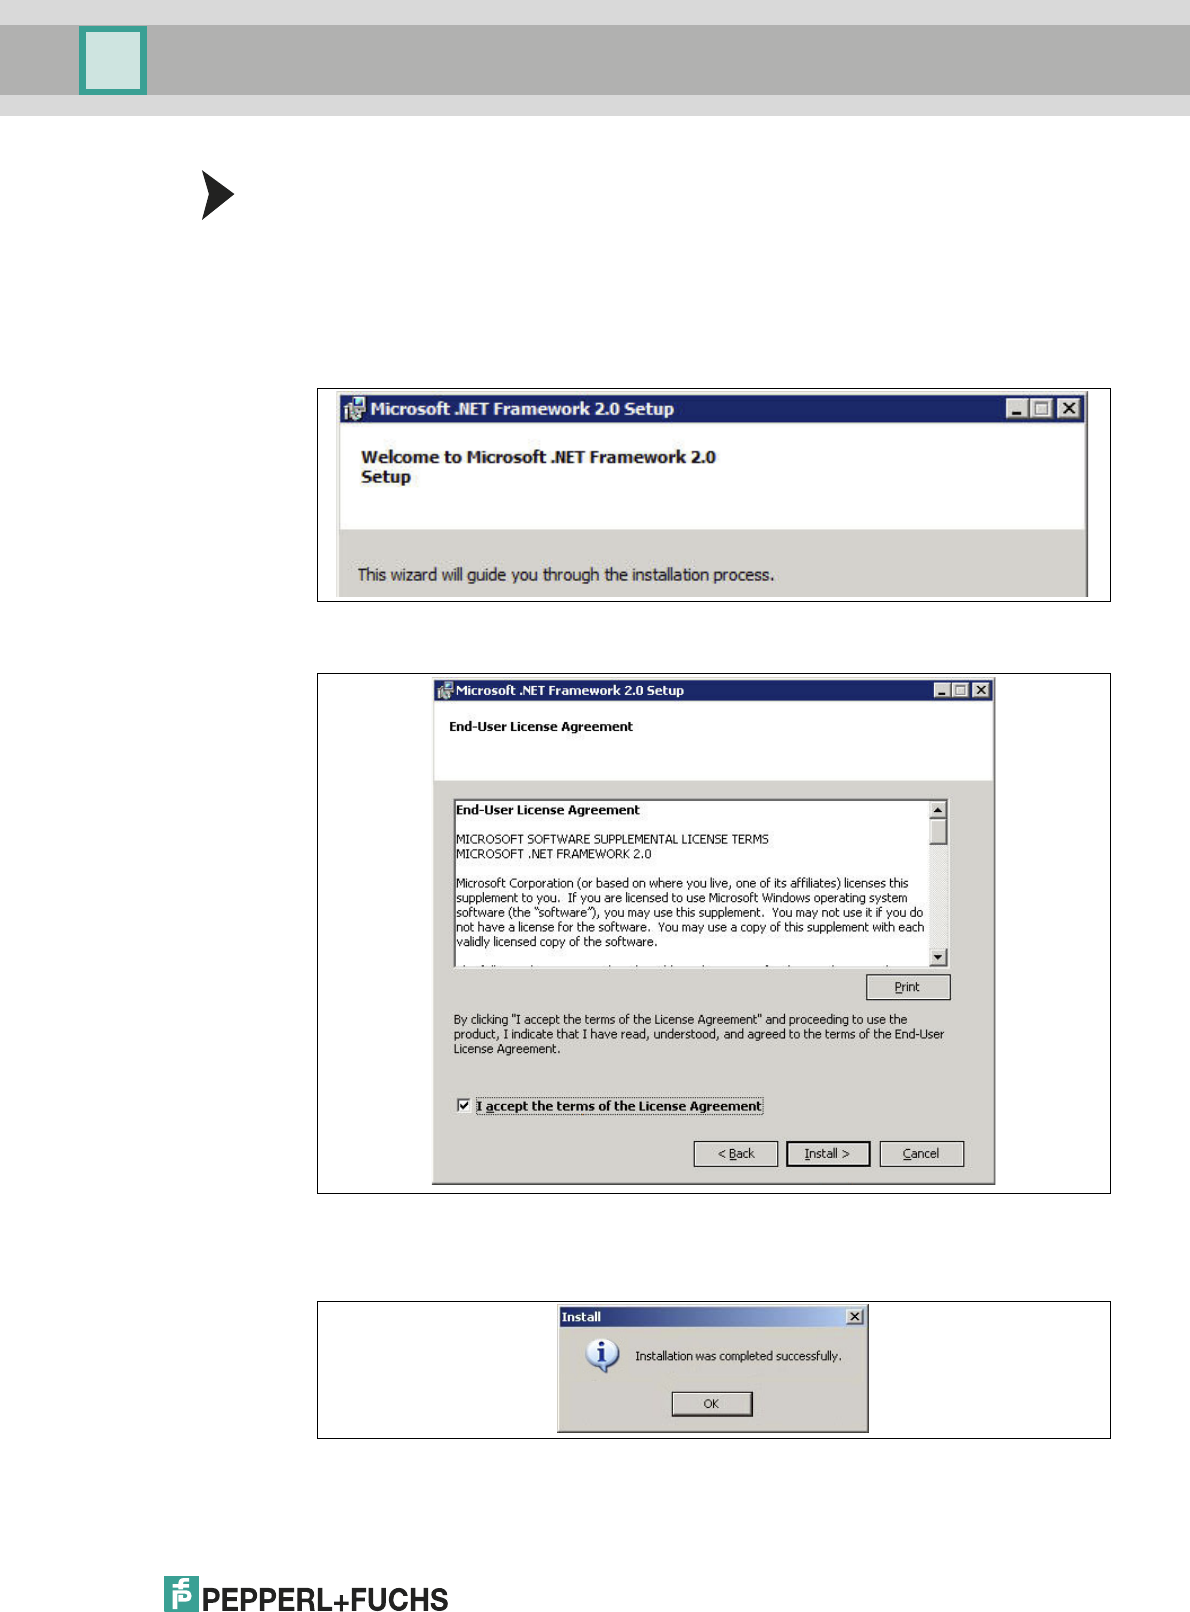
4. Start the installation by double-clicking the install.exe file.
> The installation wizard is displayed.
5. Follow the installation instructions and confirm the installation steps.
> The window with the license terms is displayed.
6. Agree to the End User License Agreement and confirm your entry with Install.
7. Follow the installation instructions and confirm the installation steps.
> The installation completion window is displayed.
8. Confirm the end of the installation with OK.
> The Microsoft®.Net 2.0 Framework software is installed.
2012-11
10
Installation and Configuration DTM Collection Conventional Interface
Installation
4.2 FDT Framework Program PACTwareTM
To w o rk , t h e DT M always requires an FDT framework program such as PACTwareTM. The
installation sequence of the DTM and the respective FDT framework program is not defined.
We recommend the following installation sequence:
1. Installation of the FDT framework program PACTwareTM
2. Installation of DTM Collection Conventional Interface
Installing the FDT Framework Program PACTwareTM
1. Load the FDT framework program PACTwareTM to your PC. See chapter 3.
2. Unzip the ZIP file.
3. Save the data to a temporary folder of your choice on your PC.
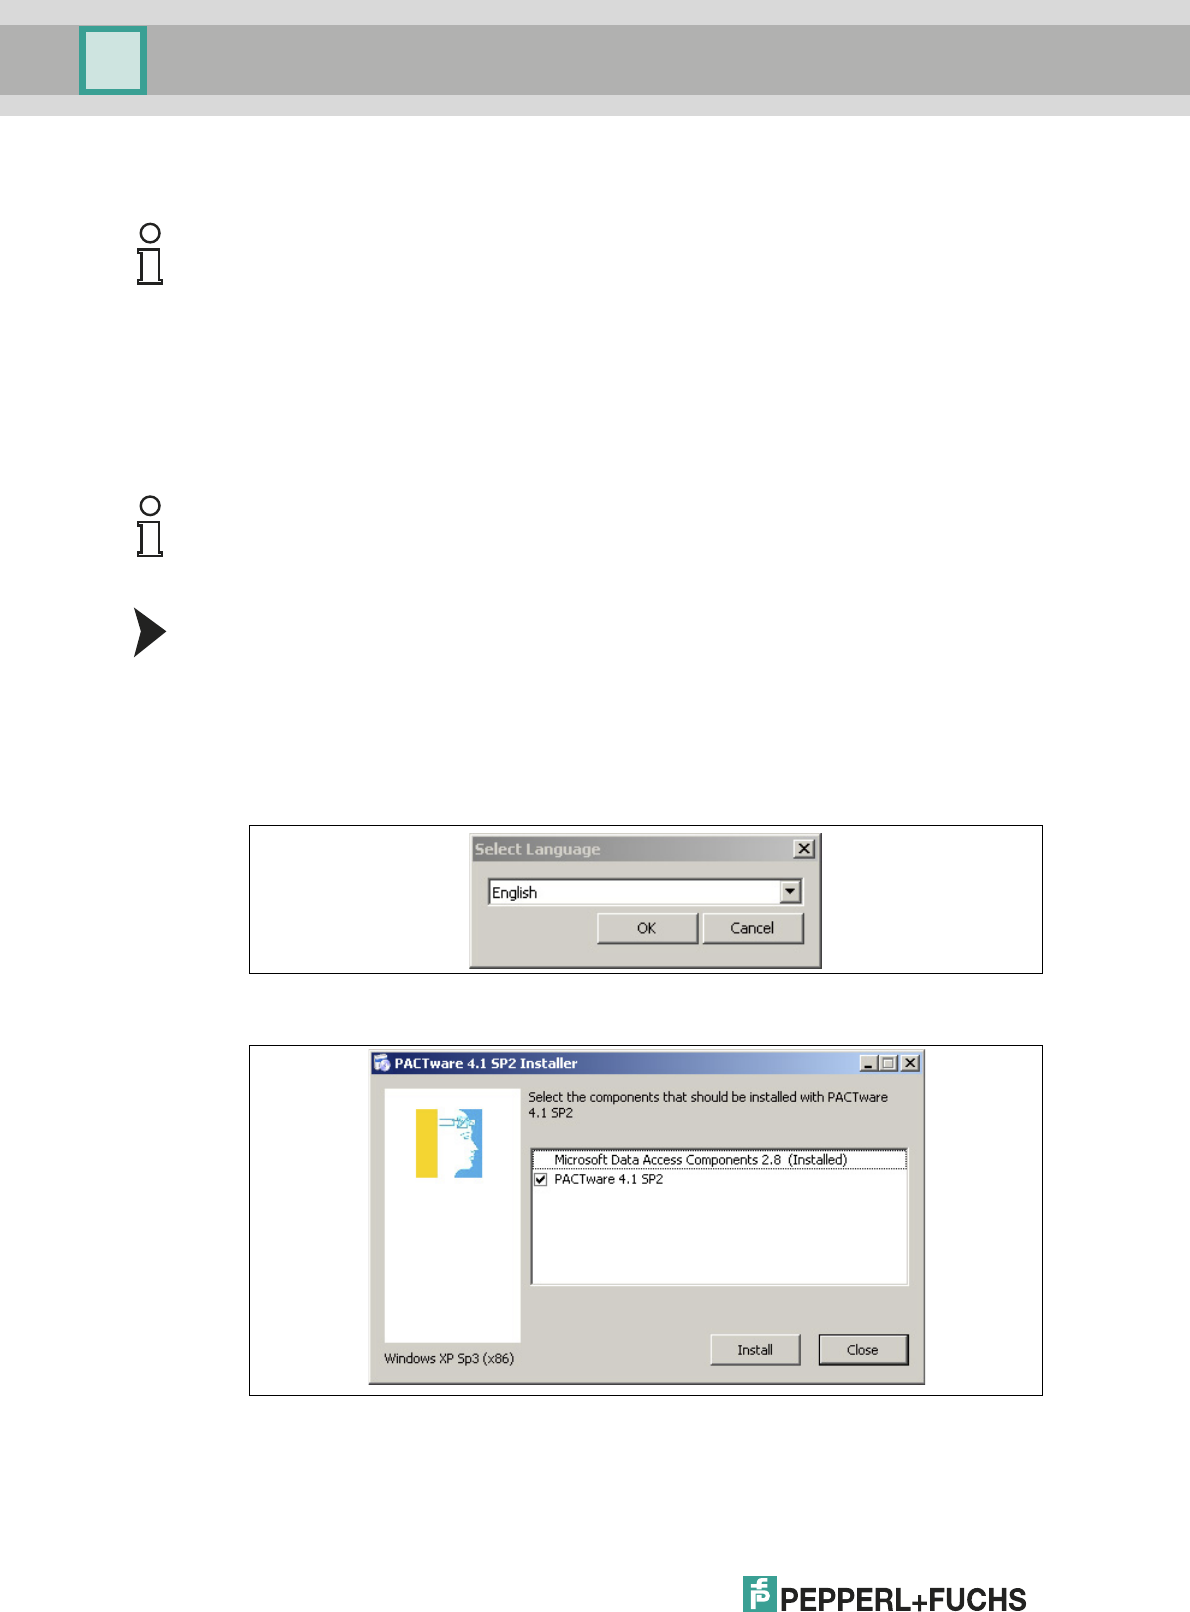
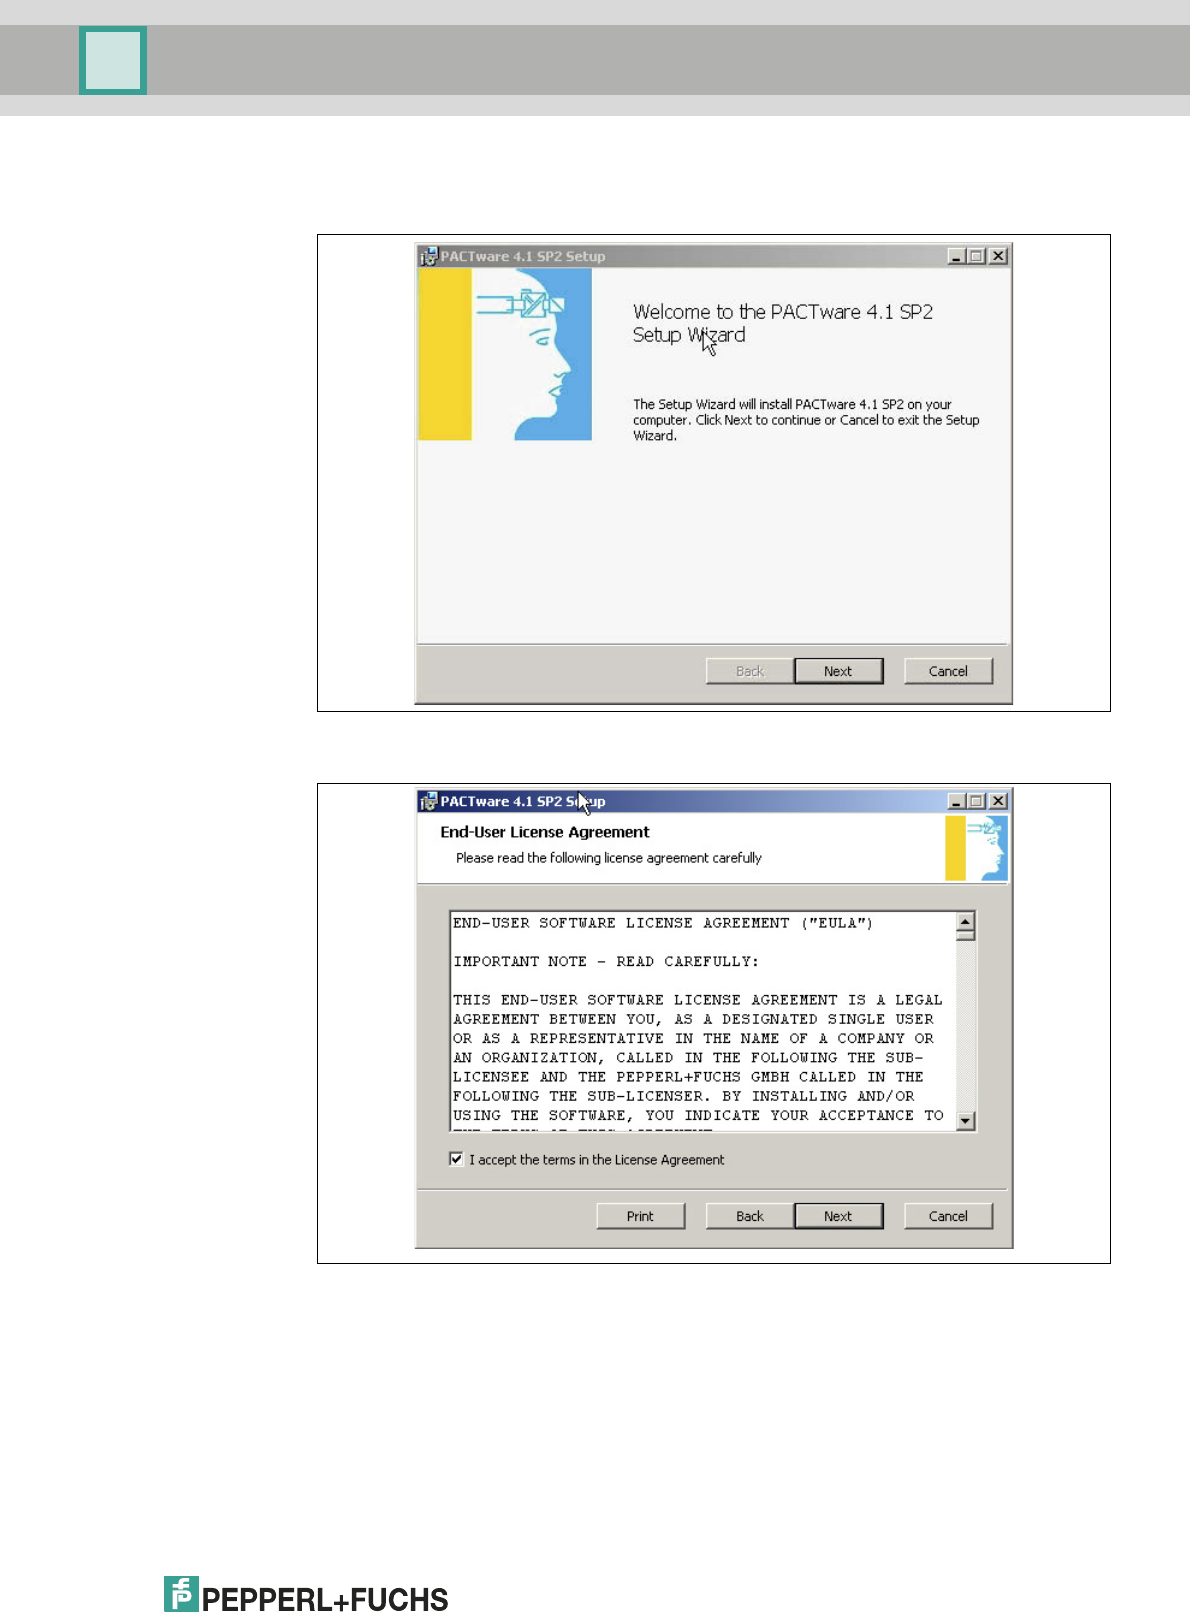
4. Start the installation by double-clicking the Setup.exe file.
> The Select Language window is displayed.
5. In the drop-down list, select the installation language and confirm your selection with OK.
> The list of available software is displayed.
Note!
You do not have to uninstall older PACTwareTM versions. Additional information on the
PACTwareTM versions can be found at the end of the manual. See chapter 6.
Note!
If you select the reverse order, you must update the DTM device catalog before you edit a
project. See chapter 5.1.
Installation and Configuration DTM Collection Conventional Interface
Installation
2012-11
11
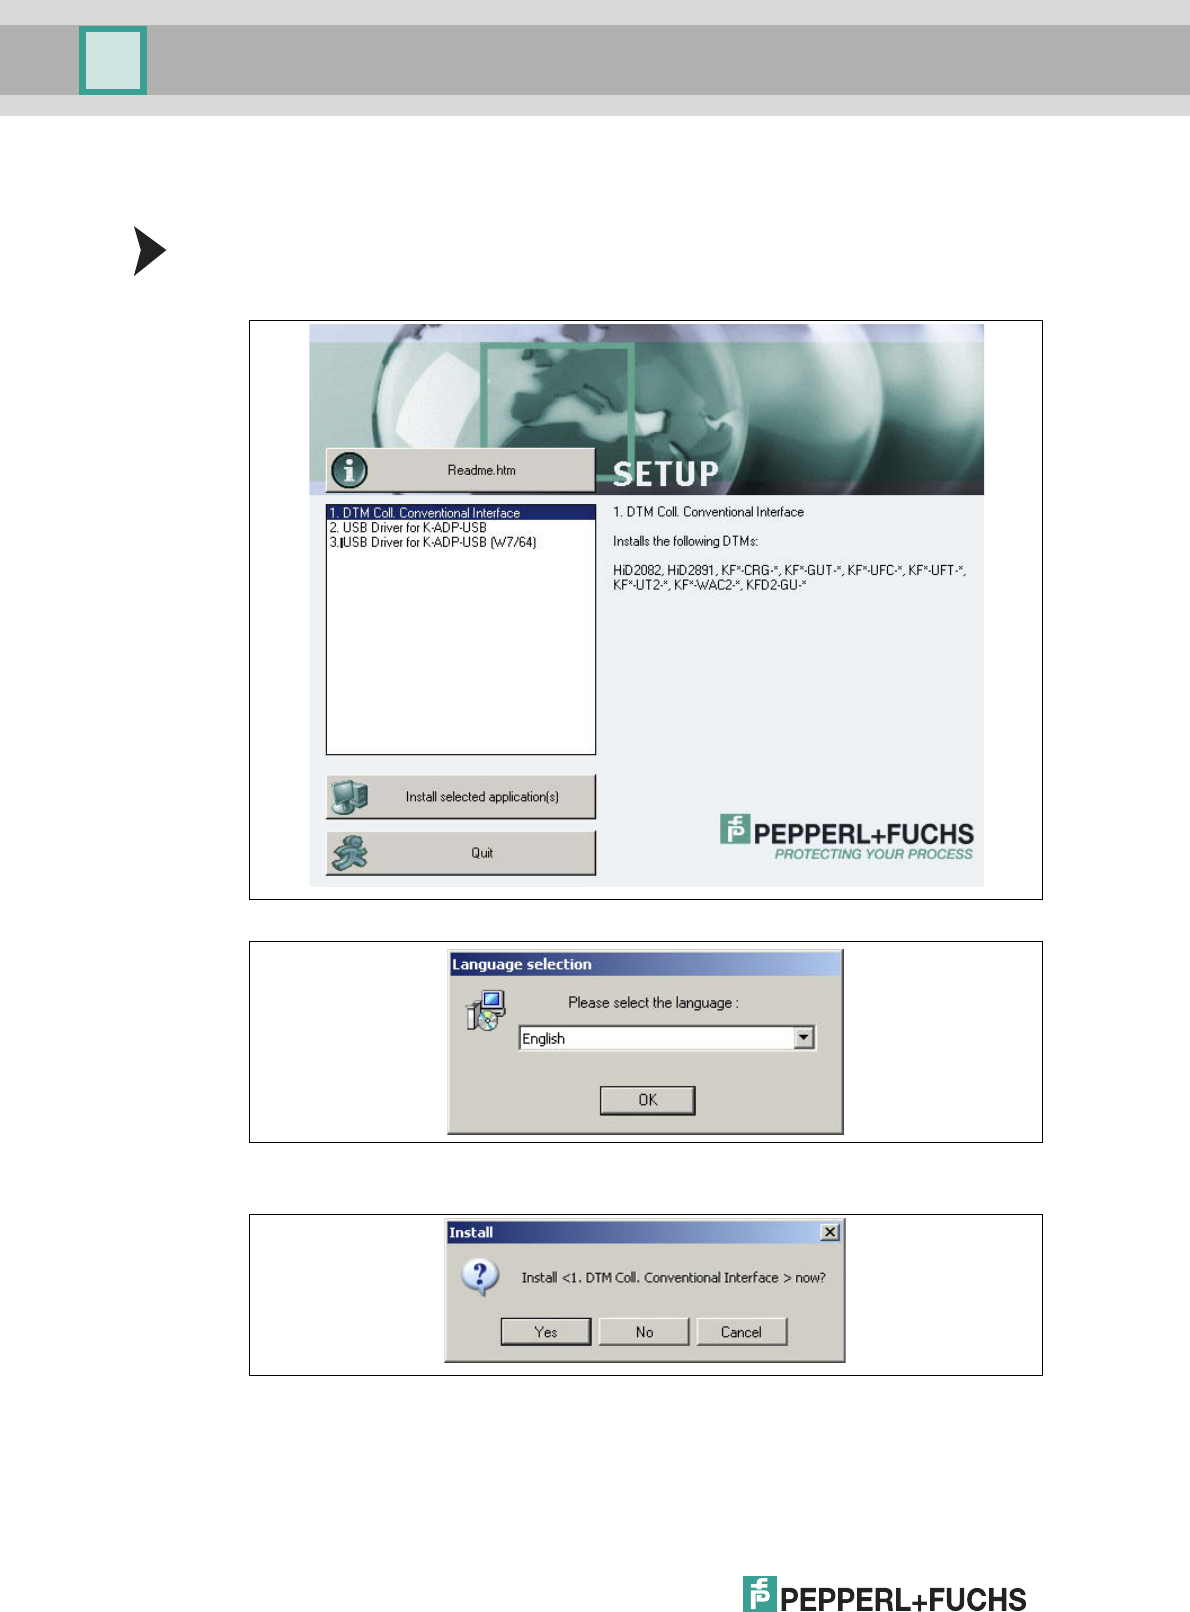
6. Select PACTware 4.X and confirm your selection with Install.
> The installation wizard is displayed.
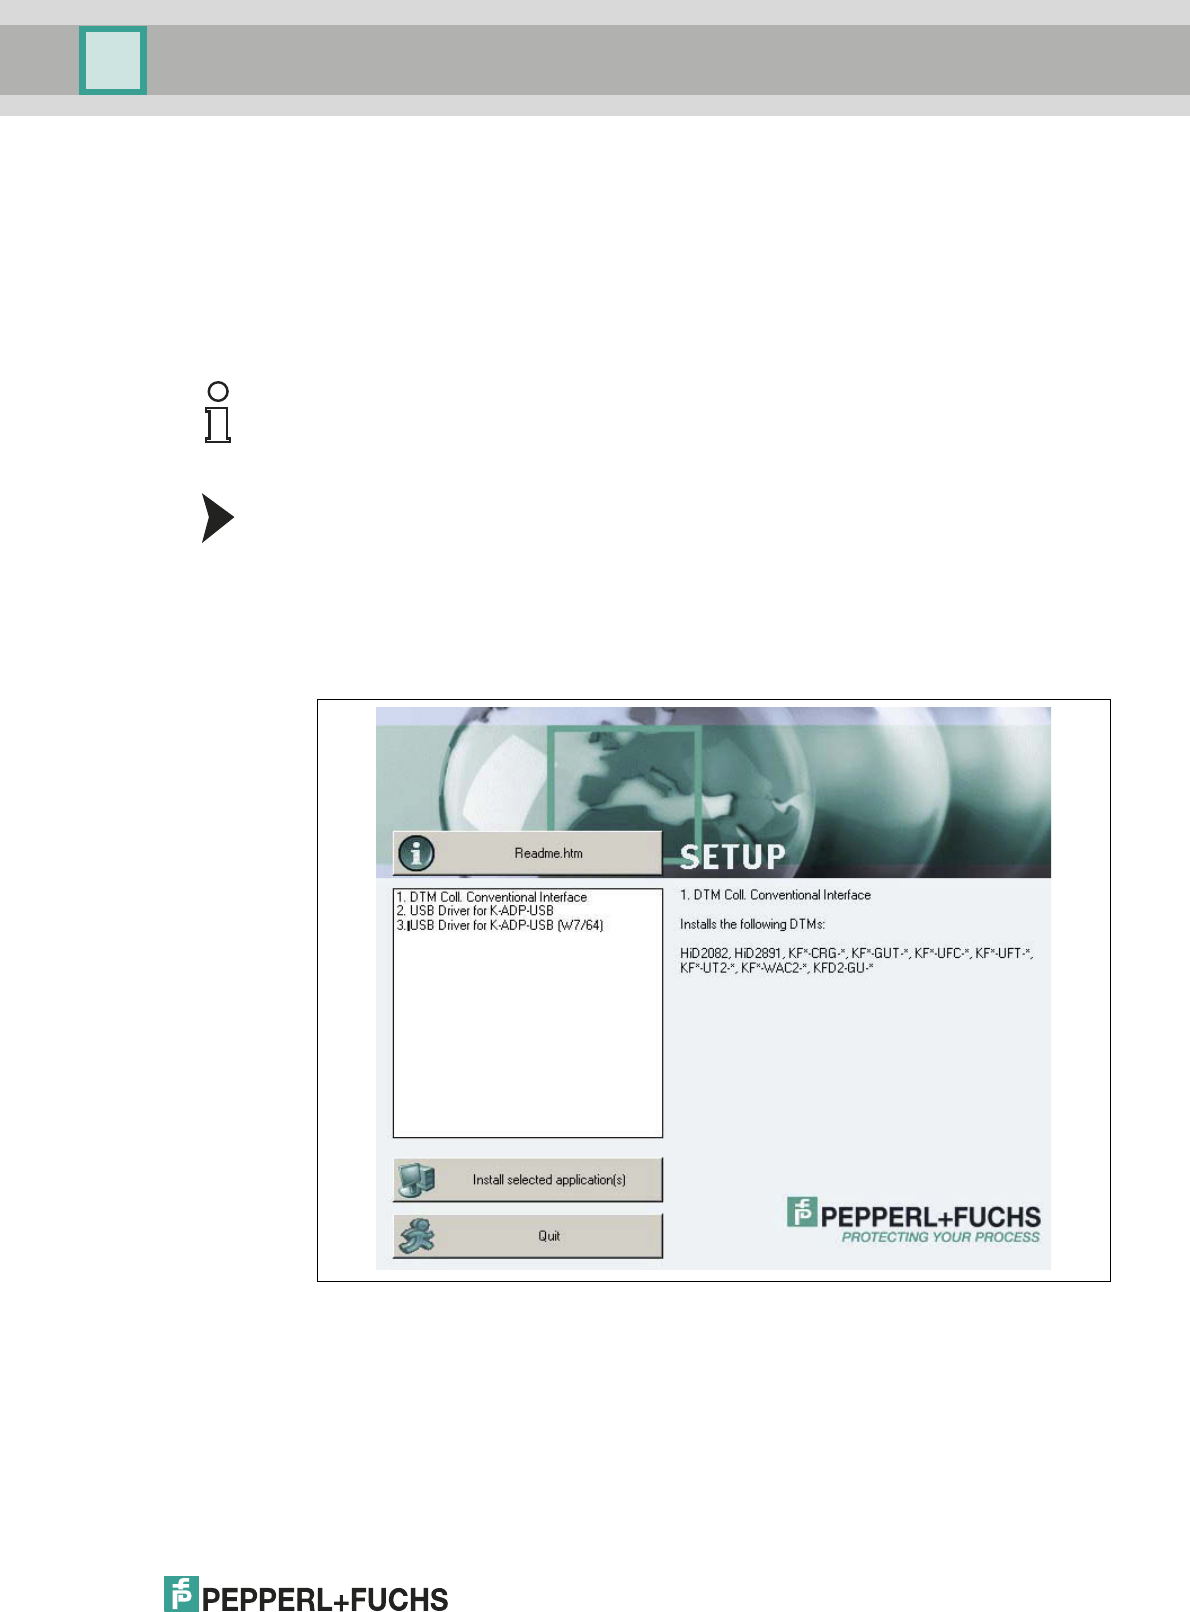
7. Follow the installation instructions and confirm the installation steps.
> The window with the license terms is displayed.
8. Agree to the End User License Agreement and confirm your entry with Next.

2012-11
12
Installation and Configuration DTM Collection Conventional Interface
Installation
9. Follow the installation instructions and confirm the installation steps.
> The installation completion window is displayed.
10. Confirm the end of the installation with OK.
> The FDT framework program PACTwareTM software is installed.
Installation and Configuration DTM Collection Conventional Interface
Installation
2012-11
13
4.3 DTM Collection Conventional Interface
To w o rk , t h e DT M always requires an FDT framework program such as PACTwareTM. The
installation sequence of the DTM and the respective FDT framework program is not defined.
We recommend the following installation sequence:
1. Installation of the FDT framework program PACTwareTM
2. Installation of DTM Collection Conventional Interface
Installing DTM Collection Conventional Interface
1. Load the DTM Collection Conventional Interface to your PC. See chapter 3.
2. Unzip the ZIP file.
3. Save the data to a temporary folder of your choice on your PC.
4. Start the installation by double-clicking the autorun.exe file.
> The list of available software is displayed.
Note!
If you select the reverse order, you must update the DTM device catalog before you edit a
project. See chapter 5.1.
2012-11
14
Installation and Configuration DTM Collection Conventional Interface
Installation
4.3.1 Device DTMs
Installing Device DTMs
1. Select DTM Coll. Conventional Interface and confirm your selection with Install
selected application(s).
> The Language Selection window is displayed.
2. In the drop-down list, select the installation language and confirm your selection with OK.
> The Install window is displayed.
Installation and Configuration DTM Collection Conventional Interface
Installation
2012-11
15
3. Click Ye s to confirm the installation start.
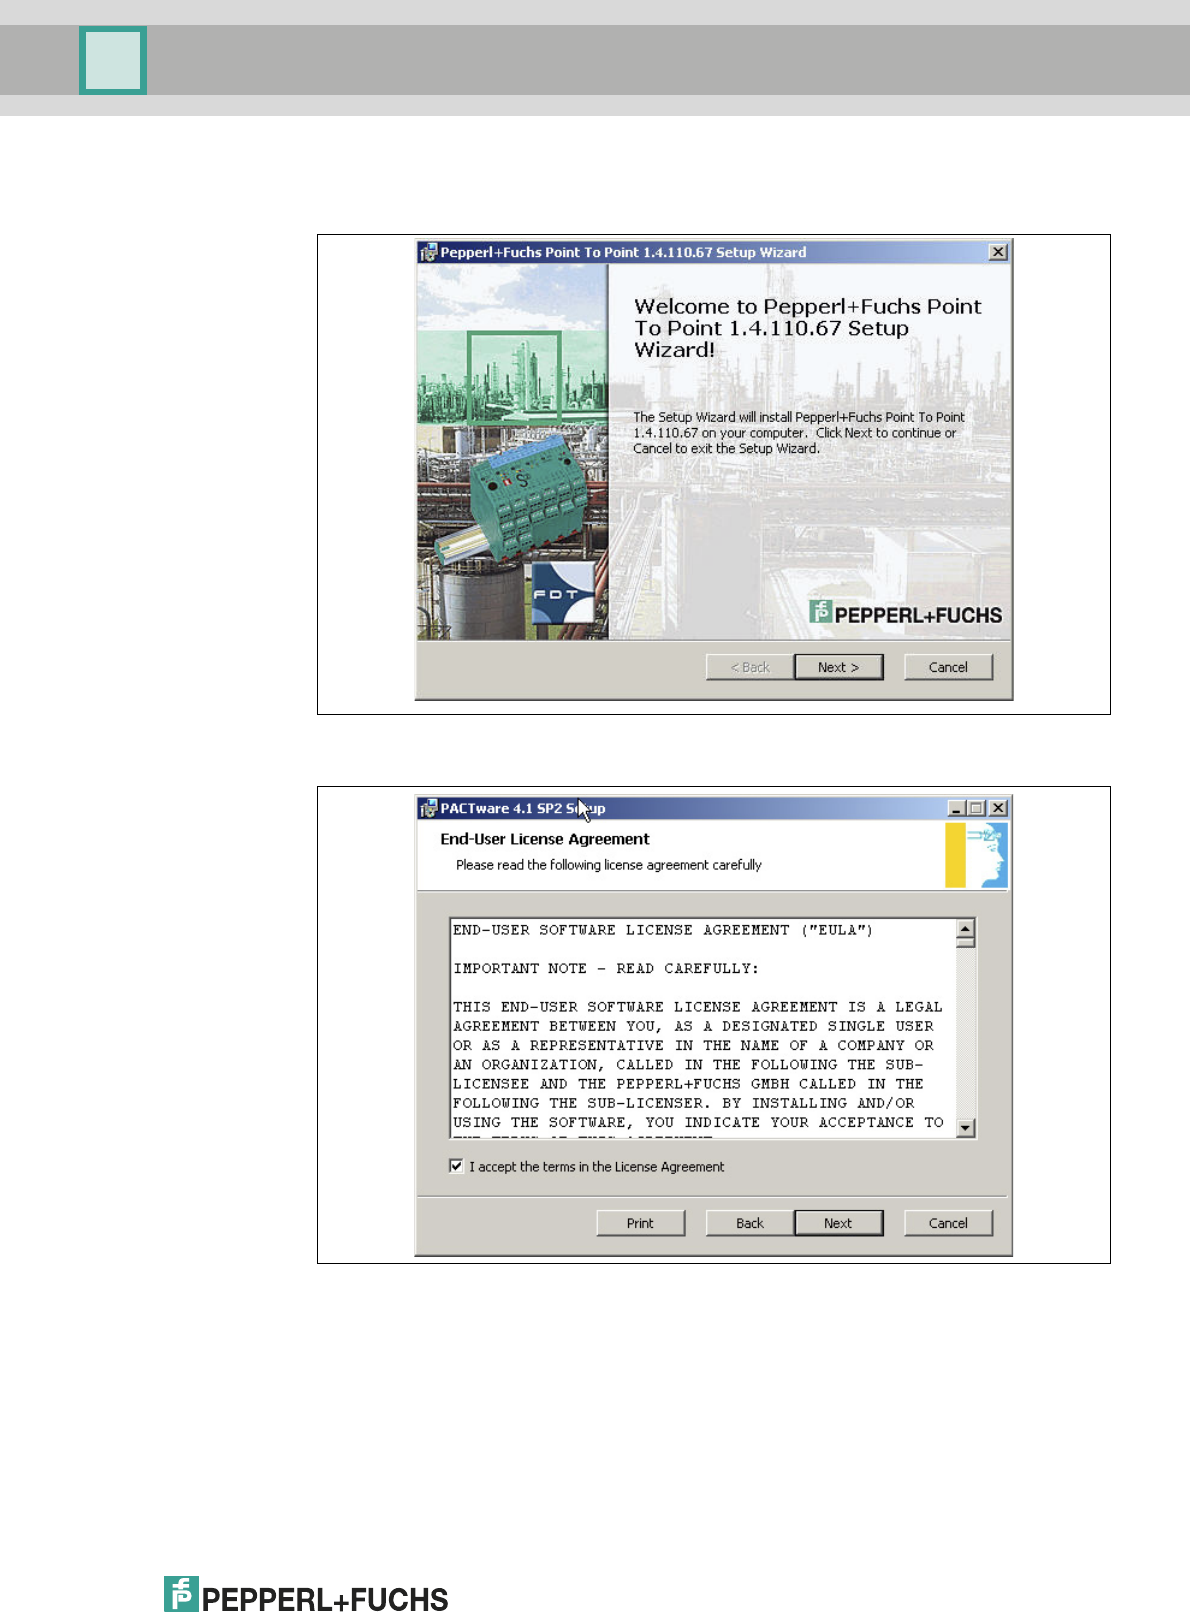
> The installation wizard is displayed.
4. Follow the installation instructions and confirm the installation steps.
> The window with the license terms is displayed.
2012-11
16
Installation and Configuration DTM Collection Conventional Interface
Installation
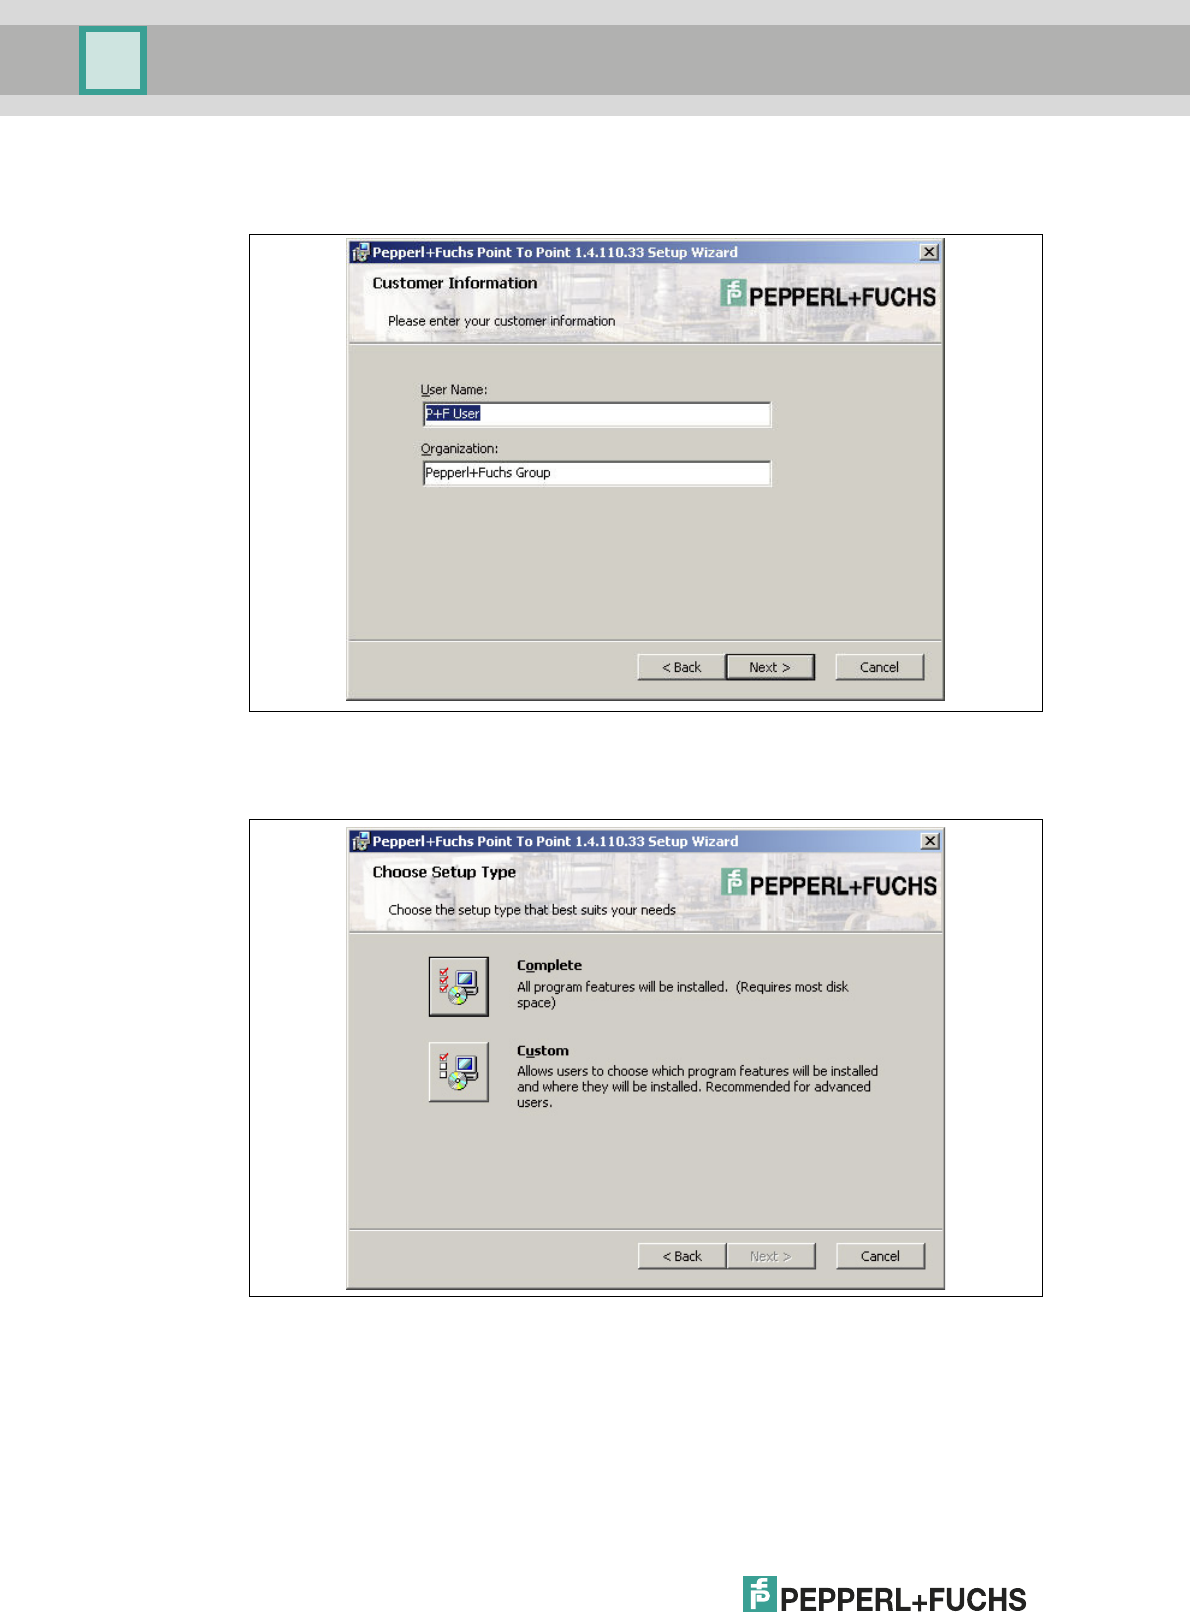
5. Agree to the End User License Agreement and confirm your entry with Next.
> The Customer Information window is displayed.
6. Enter the required texts in the User Name and Organization fields.
7. Confirm your entry with Next.
> The window for selecting the type of setup is displayed.
Installation and Configuration DTM Collection Conventional Interface
Installation
2012-11
17
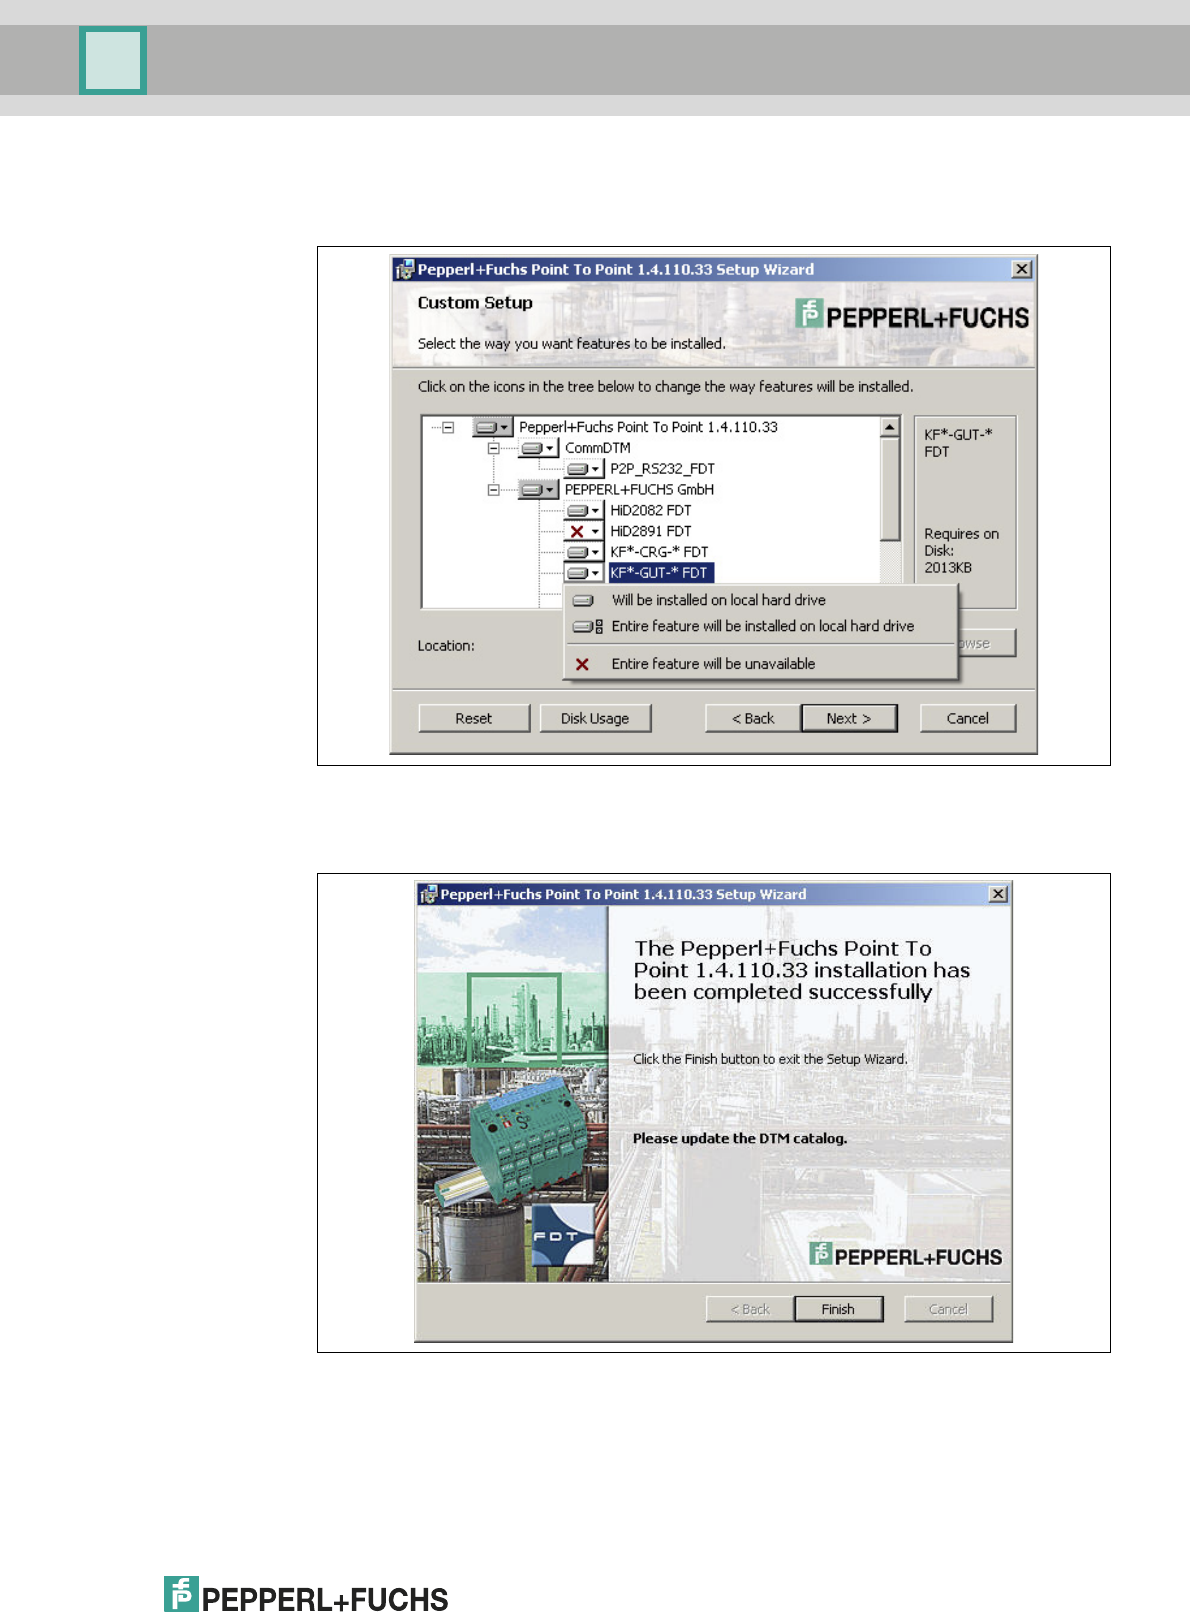
8. Select the required setup type.
The Complete option installs all DTMs available in the package.
The Custom option allows individual DTMs to be selected.
9. Confirm your selection with Next.
10. Follow the installation instructions and confirm the installation steps.
> The installation completion window is displayed.
11. Confirm the end of the installation with Finish.
> The device DTMs are installed.
2012-11
18
Installation and Configuration DTM Collection Conventional Interface
Installation
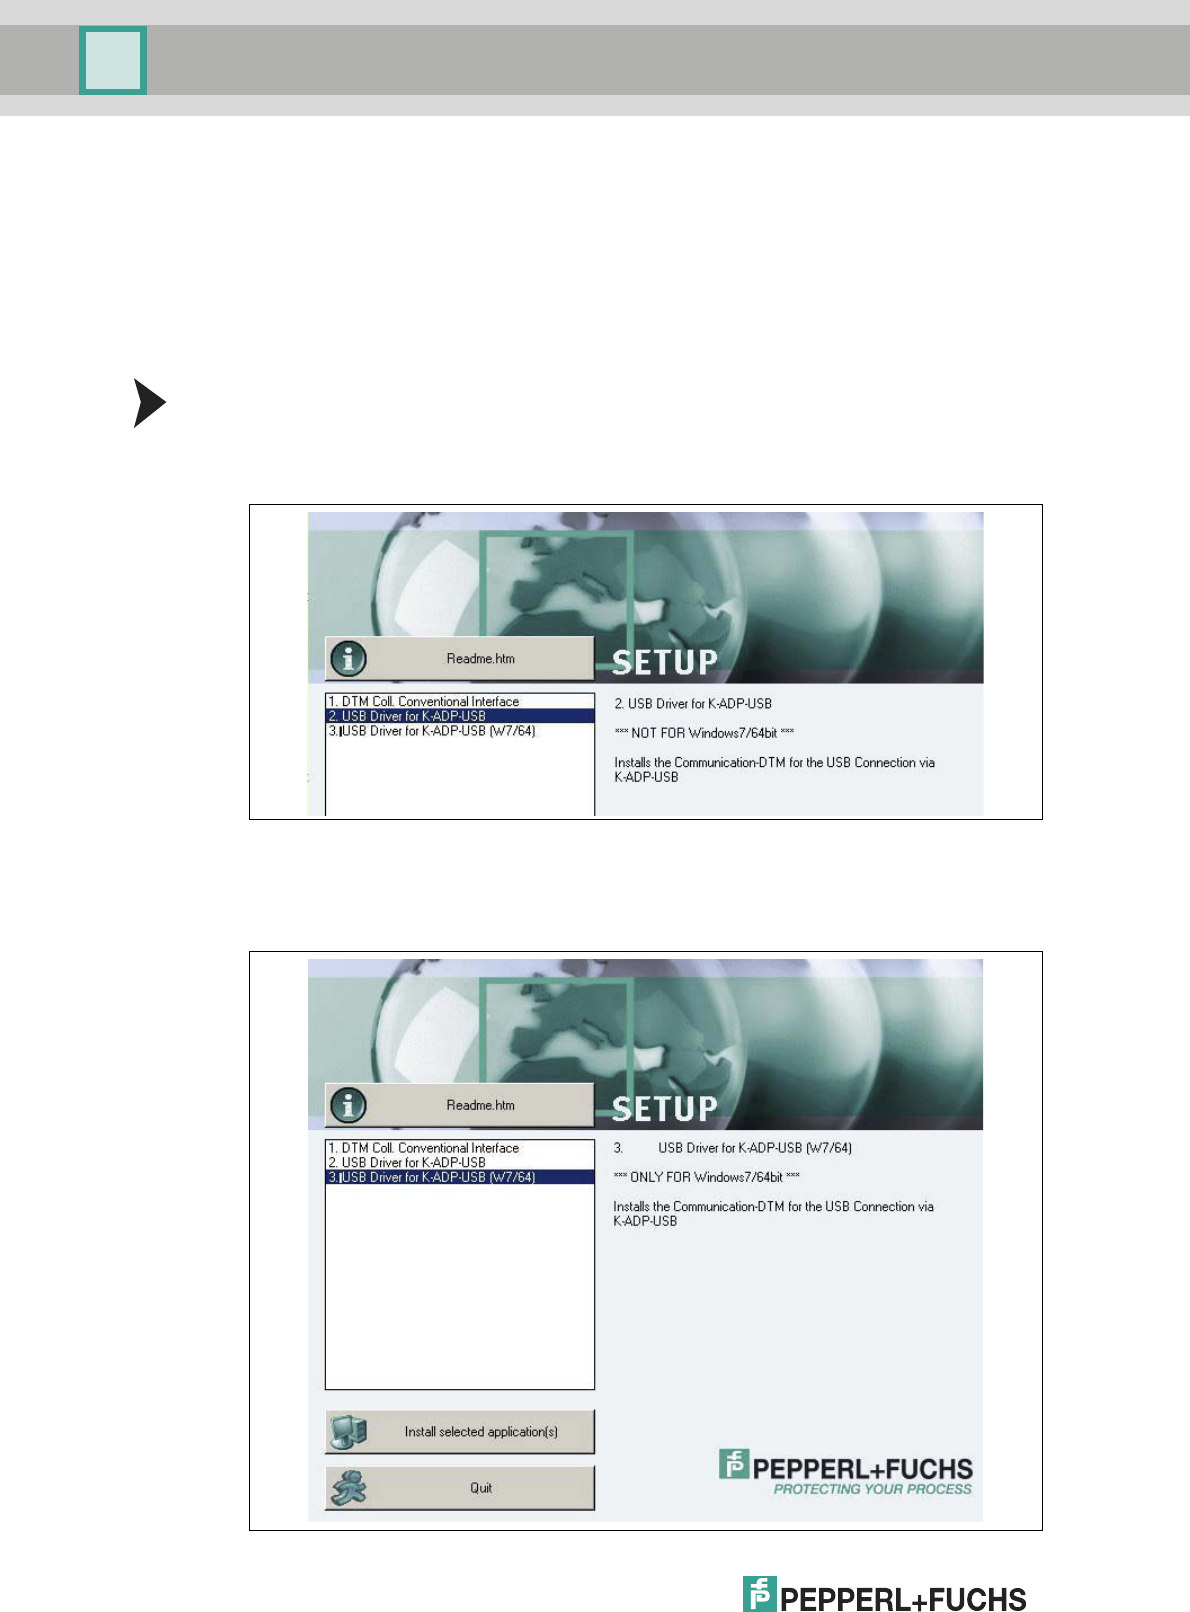
4.3.2 Communication DTMs
Two communication DTMs are available, depending on the Windows operating system:
■Microsoft® Windows XP, Windows Vista, and Windows 7/32 Bit operating systems:
USB Driver for K-ADP-USB
■Microsoft® Windows 7/64 Bit operating system:
USB Driver for K-ADP-USB (W7/64)
Installing Communication DTMs
1. Select the appropriate communication DTM for your operating system.
2. Select USB Driver for K-ADP-USB and confirm your selection with Install selected
application(s).
or
Select USB Driver for K-ADP-USB (W7/64) and confirm your selection with Install
selected application(s).
Installation and Configuration DTM Collection Conventional Interface
Installation
2012-11
19
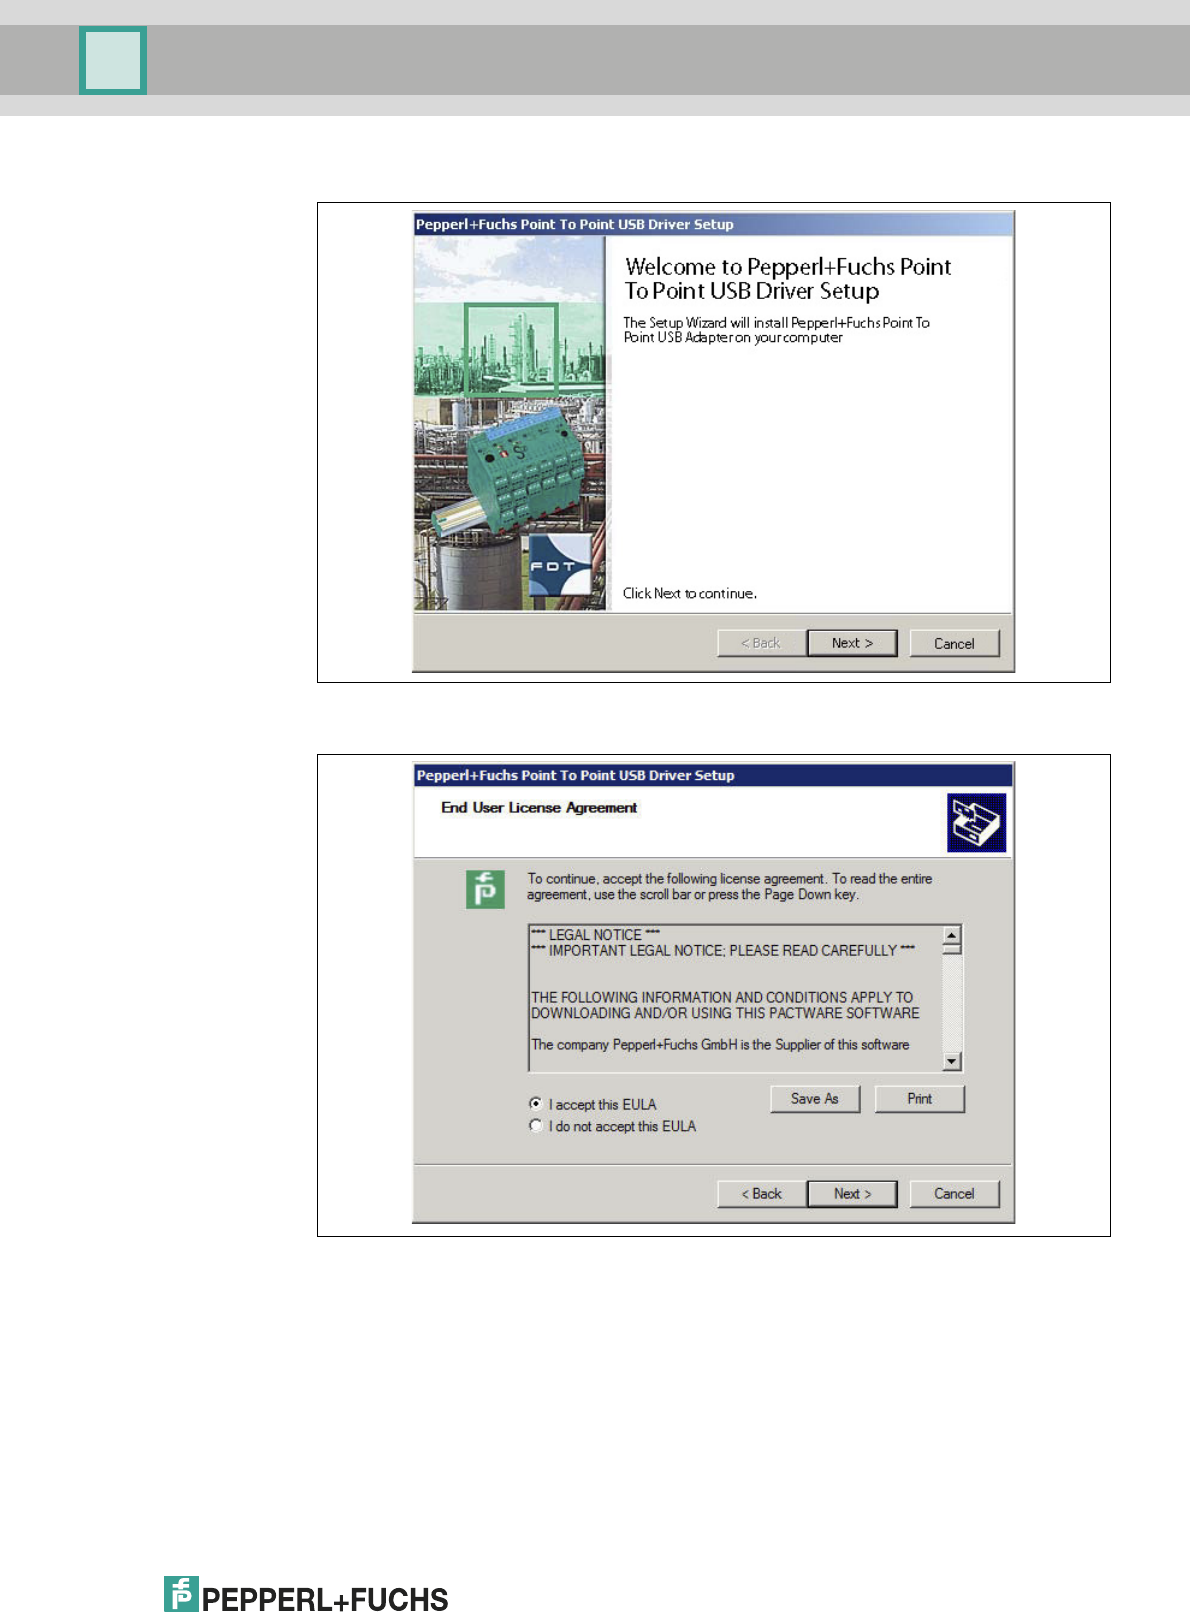
> The installation wizard is displayed.
3. Follow the installation instructions and confirm the installation steps.
> The window with the license terms is displayed.
4. Agree to the End User License Agreement and confirm your entry with Next.
2012-11
20
Installation and Configuration DTM Collection Conventional Interface
Installation
5. Follow the installation instructions and confirm the installation steps.
> The installation completion window is displayed.
6. Confirm the end of the installation with Finish.
> The communication DTM is installed.
4.4 Connection between Device and PC
Before you connect the device to the PC, please note the following:
Note!
In the past, the device programming sockets and the K-ADP1 adapter plugs were
3.55 mm x 18.3 mm. There was no additional adapter cable for the adapter.
■Use this adapter for devices with programming sockets that are 3.55 mm x 18.3 mm.
■If you use this adapter with devices with programming sockets that are 3.5 mm x 14 mm,
the plug protrudes by approximately 3 mm. The function is not impaired.
The newer devices and the K-ADP1 and K-ADP-USB adapters have programming sockets and
plugs that are 3.5 mm x 14 mm. The adapters have an additional adapter cable with plug
dimensions 3.55 mm x 18.3 mm.
■Use these adapters for devices with programming sockets that are 3.5 mm x 14 mm.
■If you are using these adapters with devices with programming sockets that are
3.55 mm x 18.3 mm, insert the additional adapter cable.
Installation and Configuration DTM Collection Conventional Interface
Installation
2012-11
21
Connecting the Device to the PC via the 9-Pin Serial Interface
1. Mount the device as described in the system description.
2. Connect the device to the power supply as described in the system description.
3. Connect the device to the PC via the adapter with serial interface K-ADP1.
- Connection on the device: front programming socket
- Connection on the PC: 9-pin serial interface
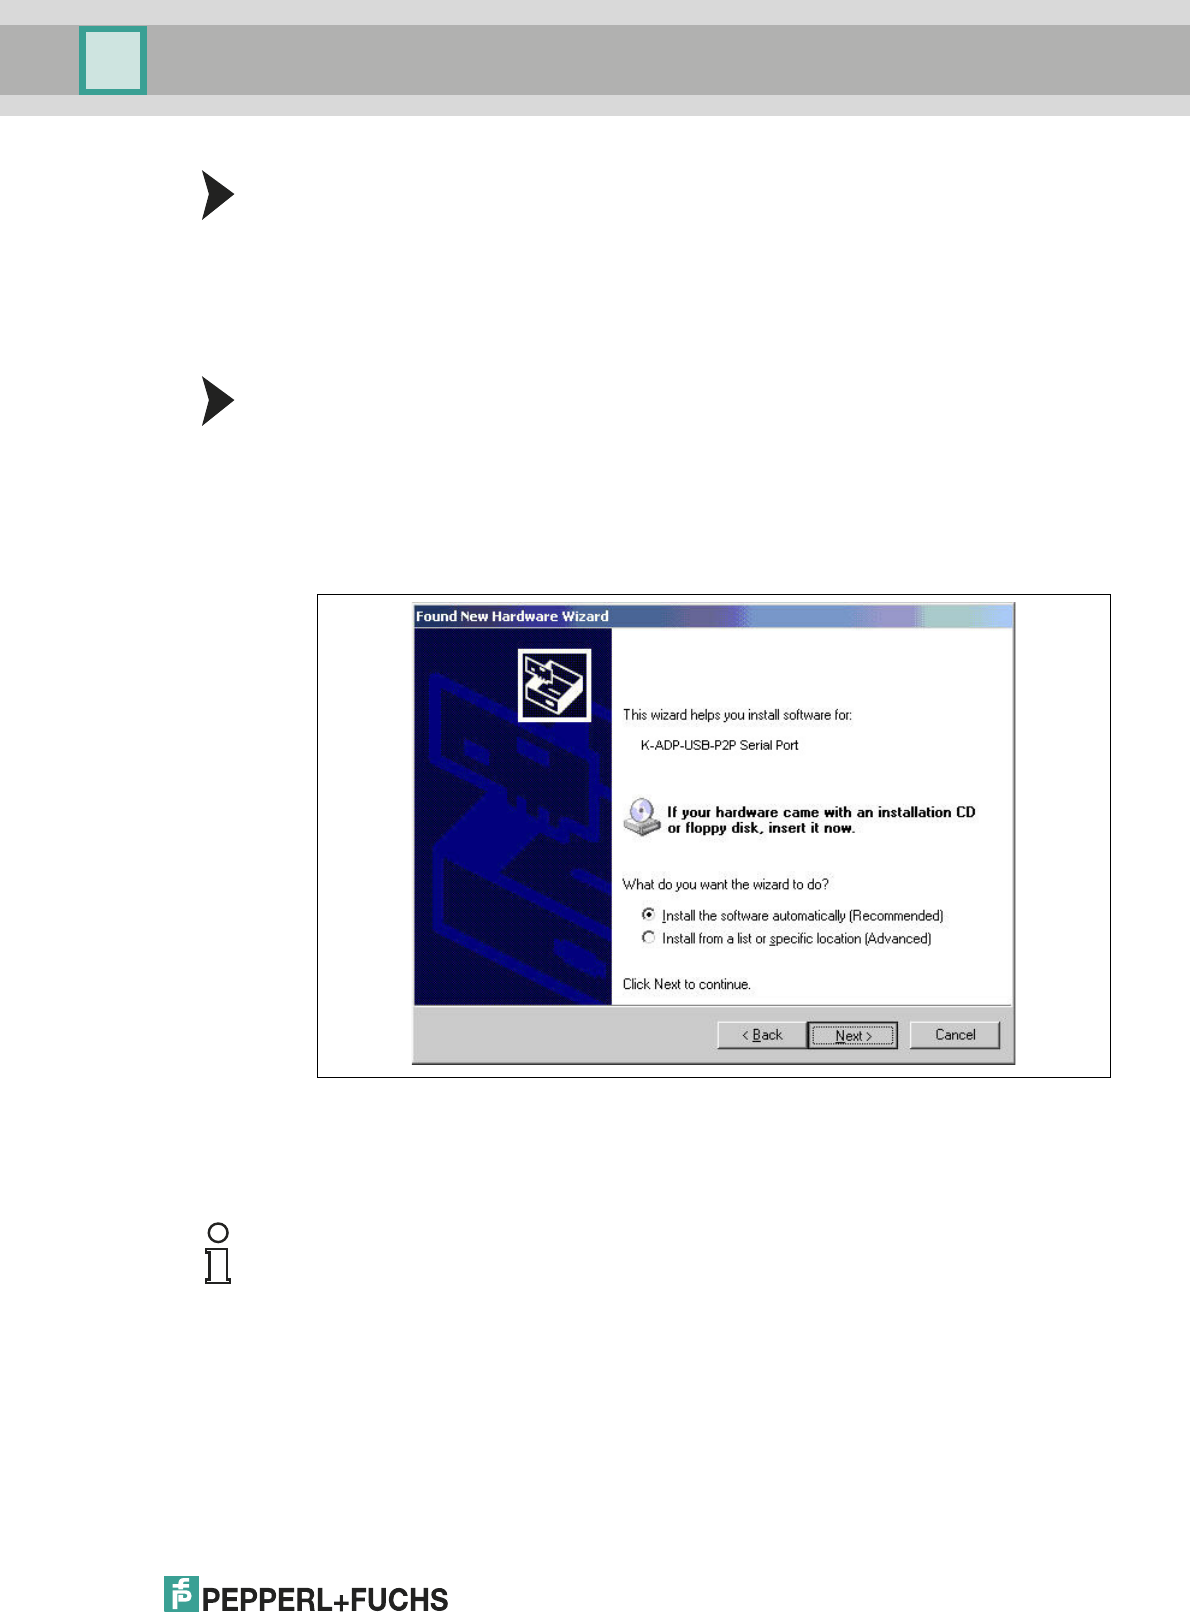
Connecting the Device to the PC via the USB Interface
1. Mount the device as described in the system description.
2. Connect the device to the power supply as described in the system description.
3. Connect the device to the PC via the adapter with USB interface K-ADP-USB.
- Connection on the device: front programming socket
- Connection on the PC: USB interface
> The hardware wizard is displayed. Read the note.
4. Follow the installation instructions and confirm the installation steps.
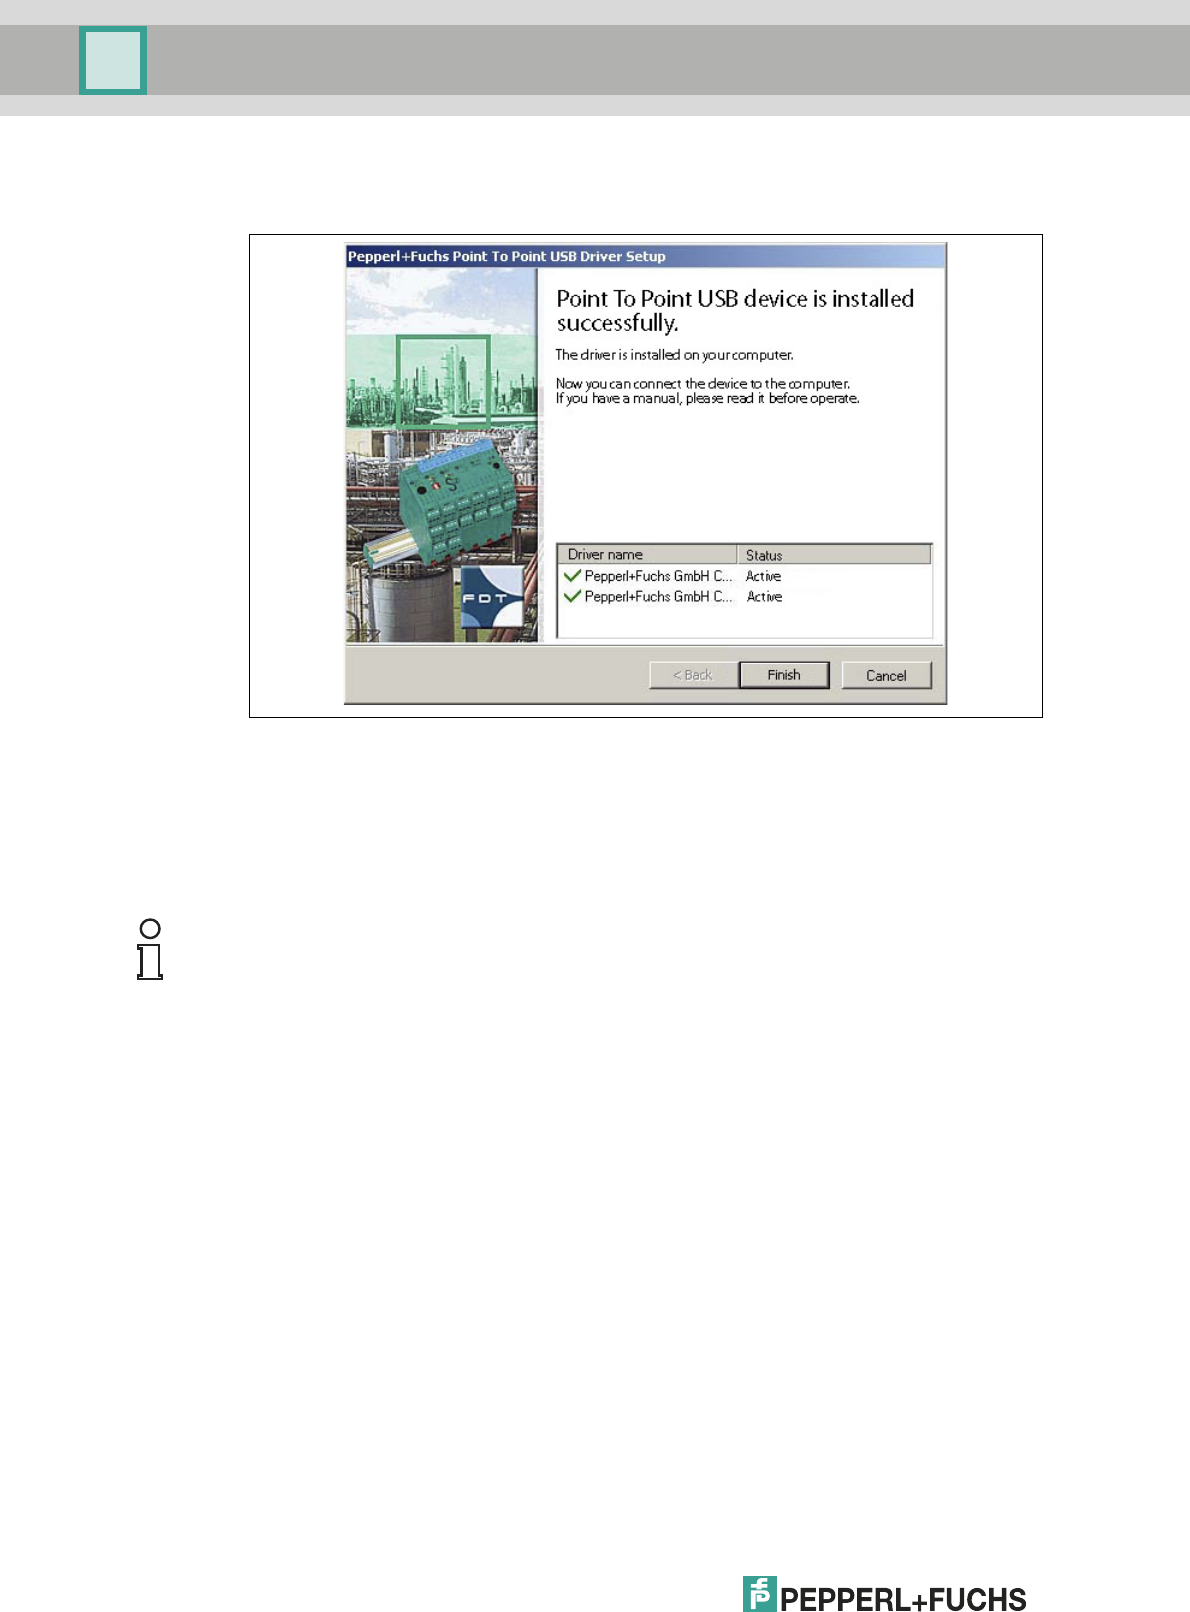
> The installation completion window is displayed.
5. Confirm the end of the installation with Finish.
> The interface driver is installed.
Note!
The hardware wizard is displayed only on initial installation or for an update.
2012-11
22
Installation and Configuration DTM Collection Conventional Interface
Configuration
5 Configuration
5.1 Updating the Device Catalog
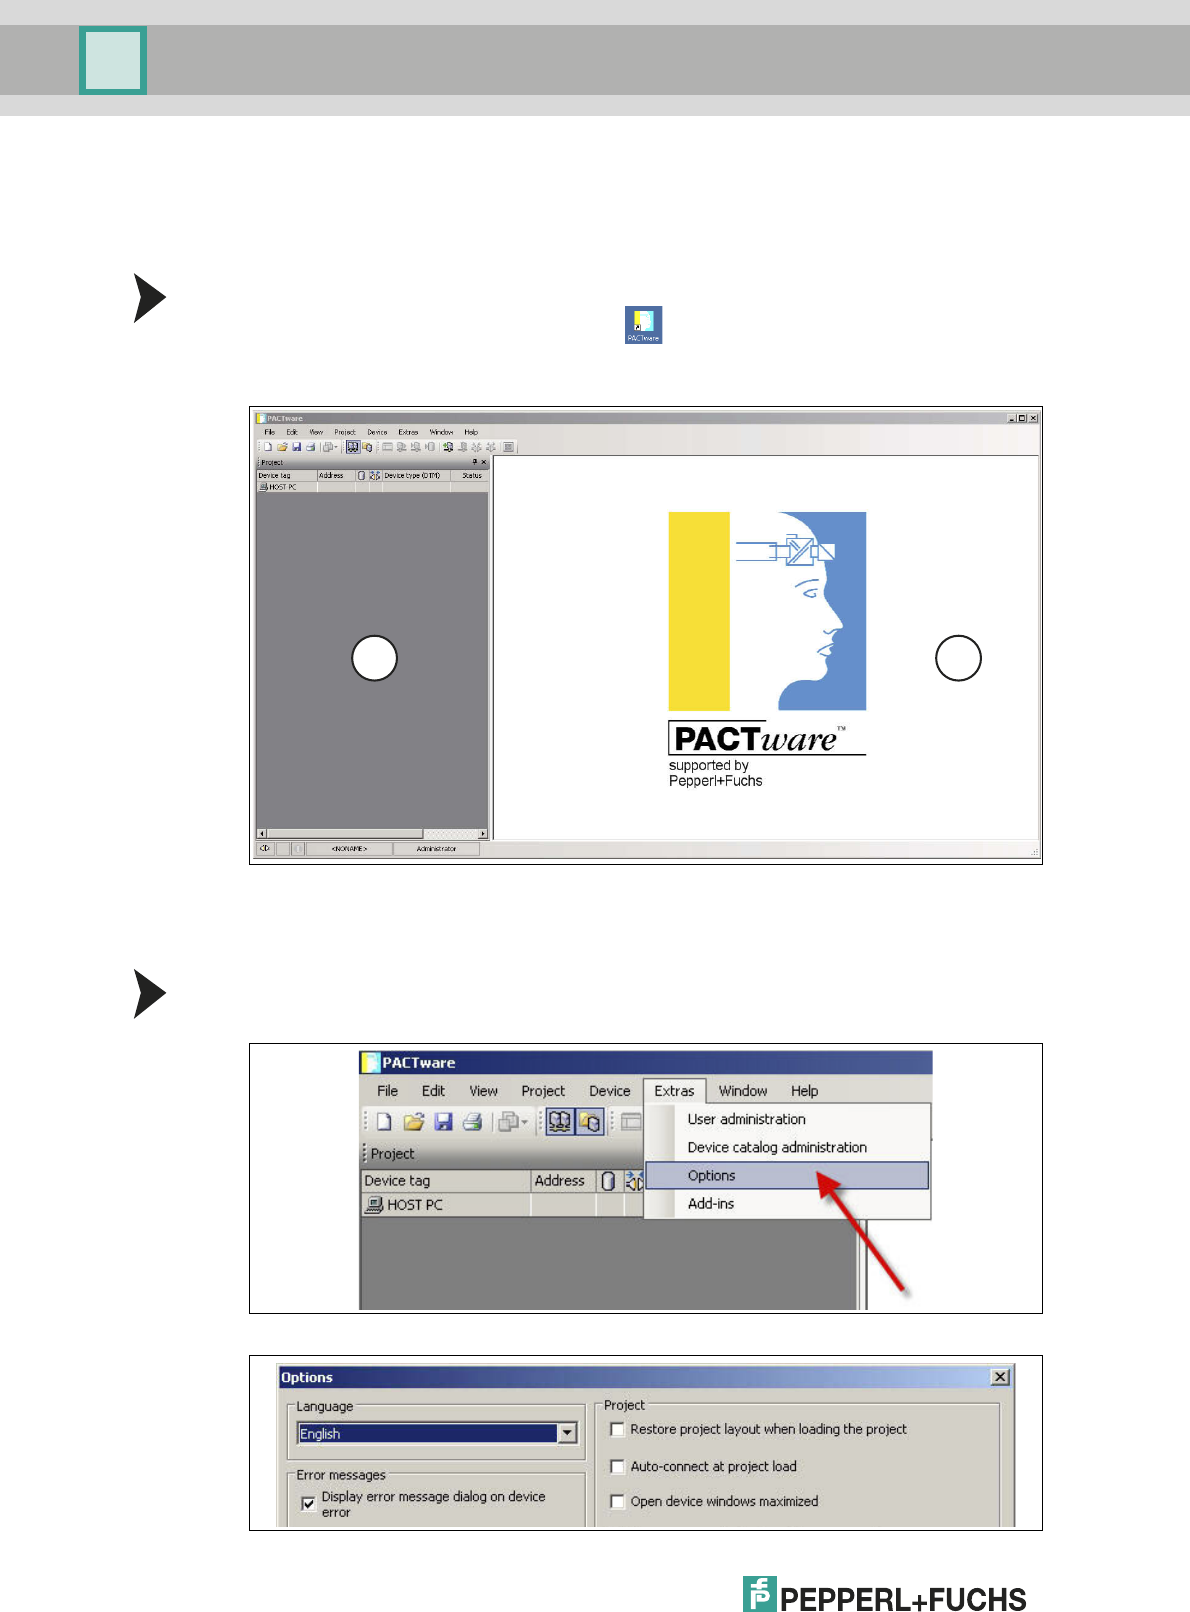
Starting the Program
Start PACTwareTM by double-clicking the icon .
>The PACTware
TM main window is displayed.
Changing the Language
1. Change the language using the menu Extras > Options.
> The Options window is displayed.
1Project range
2Operating range
1 2
Installation and Configuration DTM Collection Conventional Interface
Configuration
2012-11
23
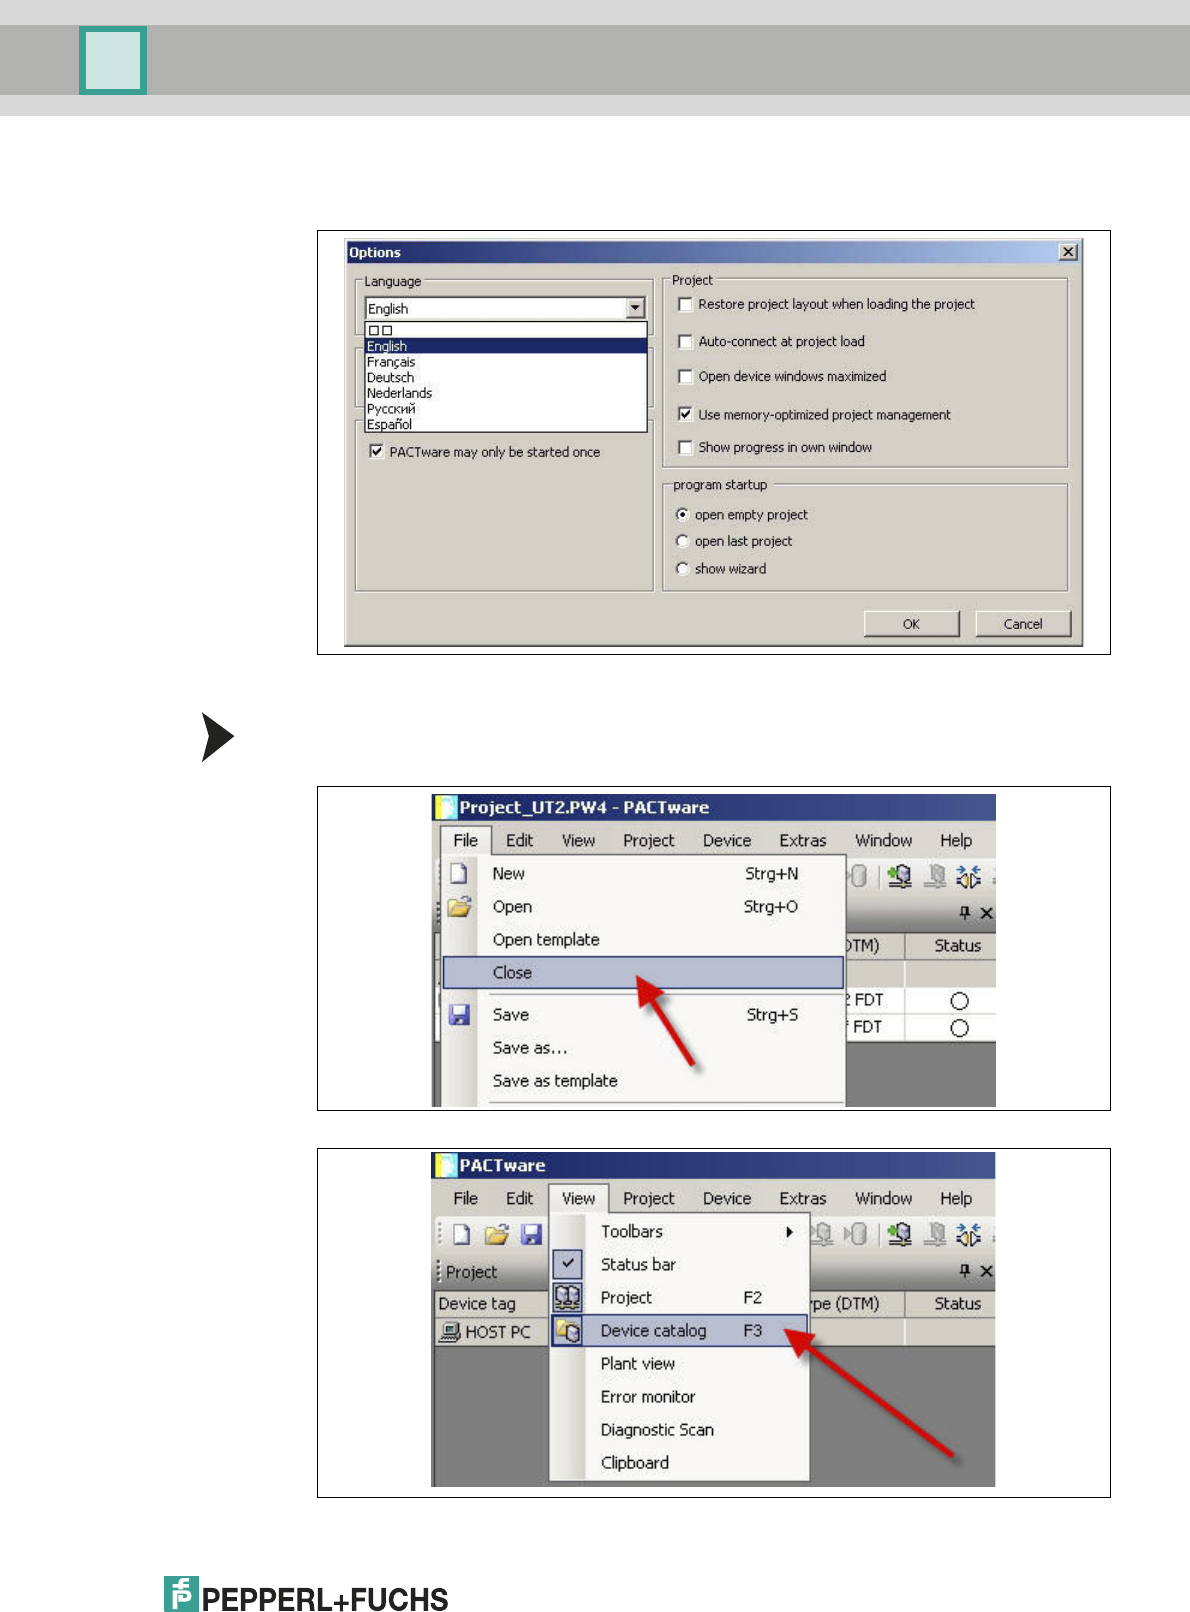
2. Open the Language drop-down list.
3. Select the required language in the drop-down list.
4. Confirm your selection with OK.
Updating the device catalog
1. Close all open projects using the menu File > Close.
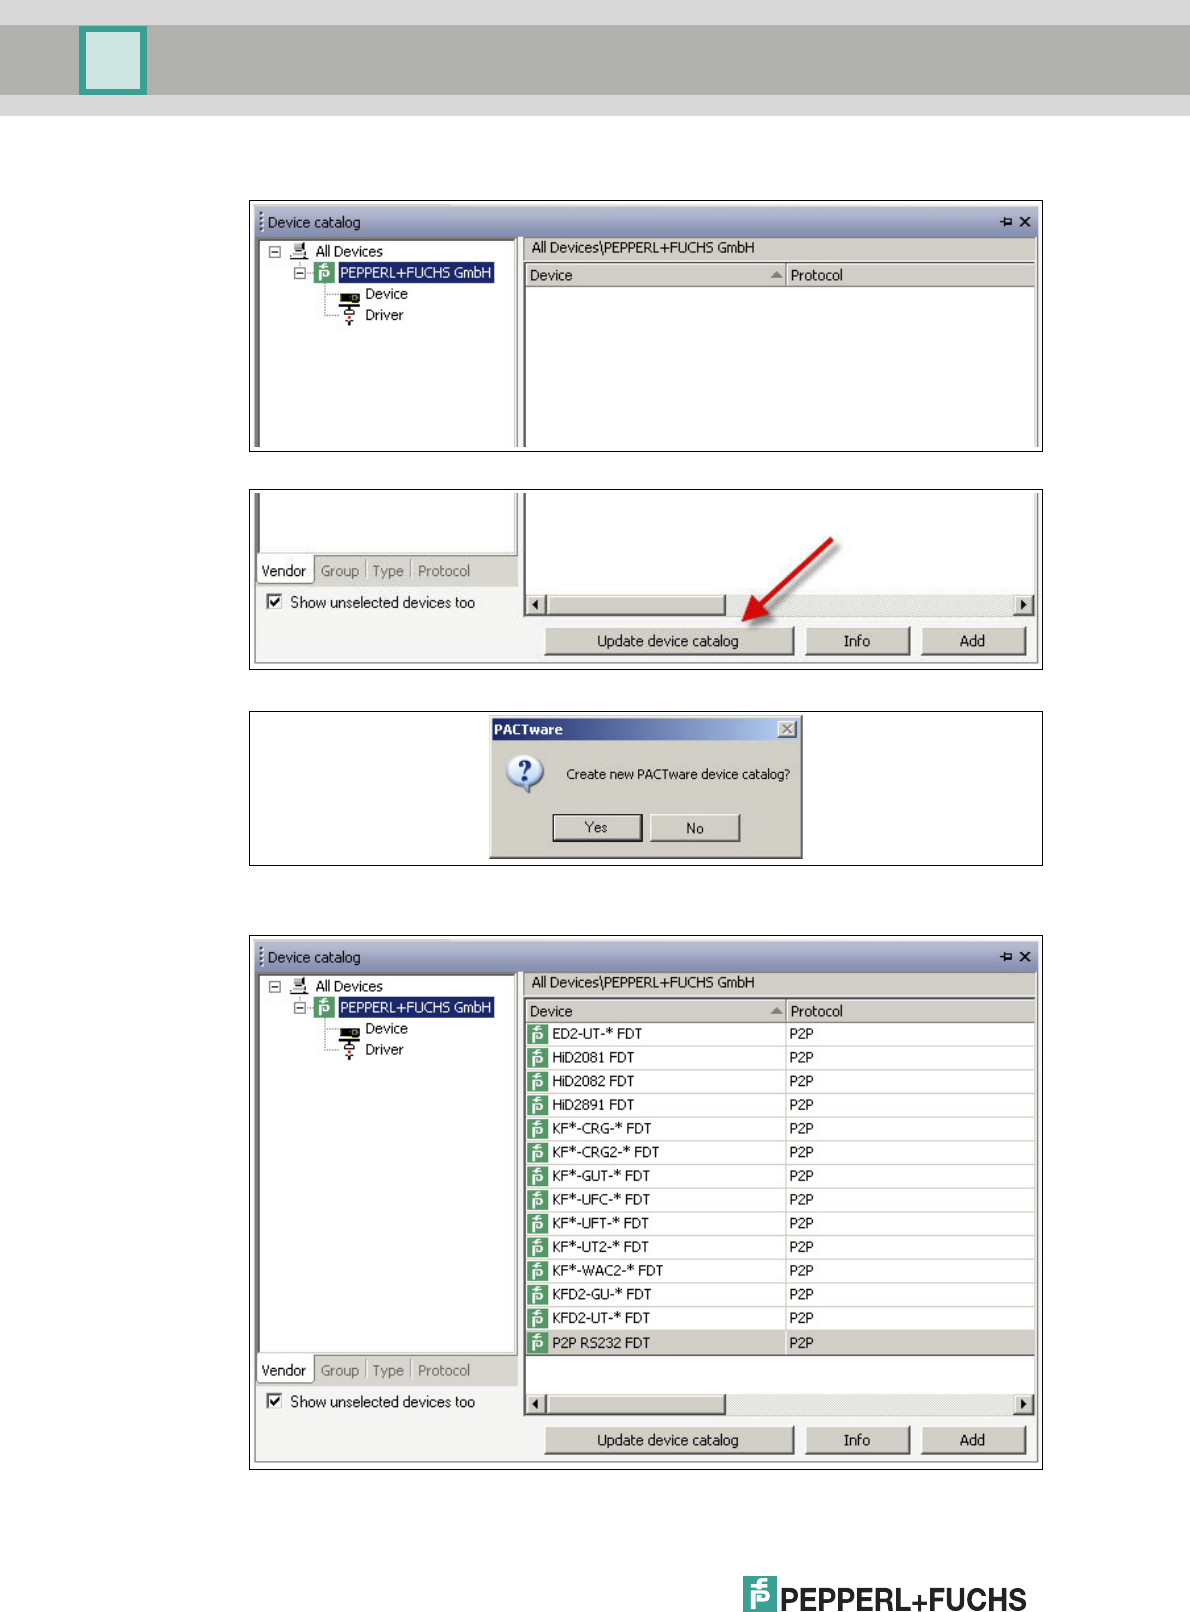
2. Open the device catalog using the menu View > Device catalog.
2012-11
24
Installation and Configuration DTM Collection Conventional Interface
Configuration
> The device catalog is displayed.
3. Update the device catalog using the Update device catalog button.
> The query window is displayed.
4. Click Ye s to confirm the prompt.
> The updated device catalog is displayed.
Installation and Configuration DTM Collection Conventional Interface
Configuration
2012-11
25
5.2 Starting and Saving a Project
Starting a Project
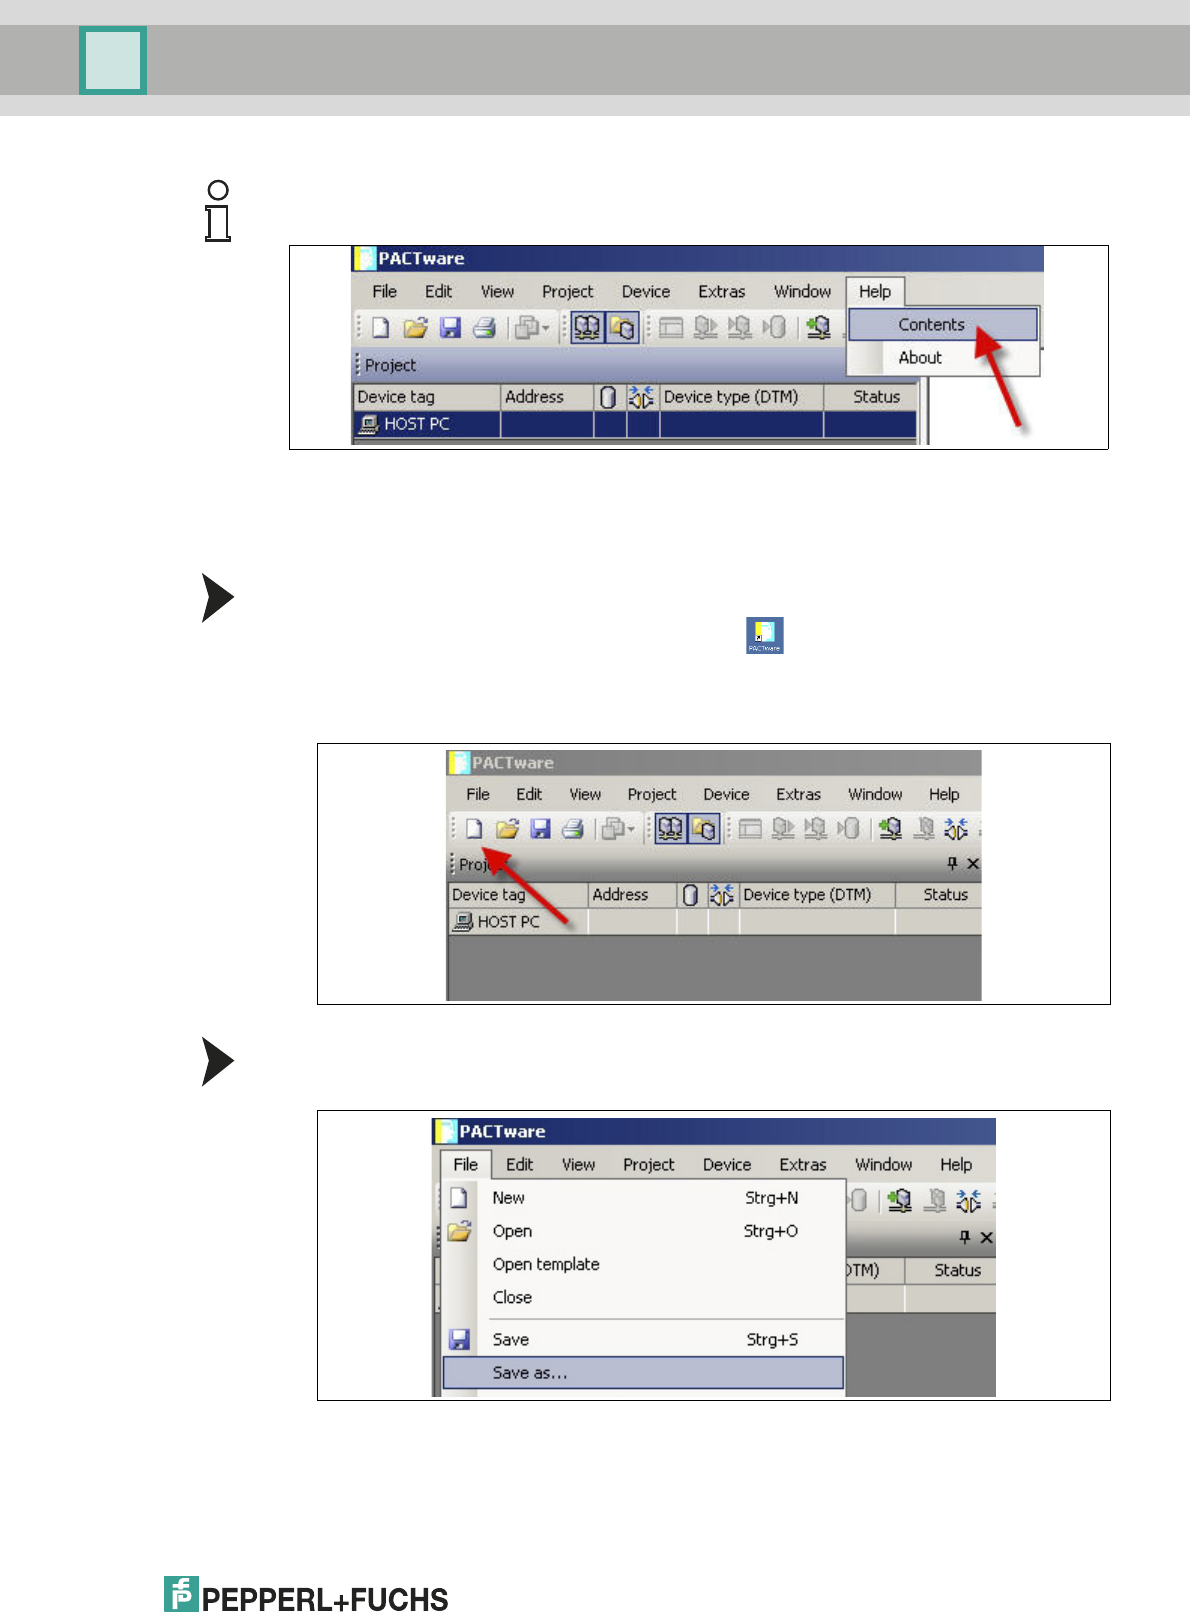
1. Start PACTwareTM by double-clicking the icon .
>The PACTware
TM main window is displayed.
2. Start a new project via Create new project.
Saving a Project
1. Save the project using the menu File > Save as.
Note!
For more information on operating PACTwareTM, see the online help.

2012-11
26
Installation and Configuration DTM Collection Conventional Interface
Configuration
2. Enter a project name and confirm the entry with Save.
> The project name is displayed.
Note!
For more information on operating PACTwareTM, see the online help.
Installation and Configuration DTM Collection Conventional Interface
Configuration
2012-11
27
5.3 Configuring the Communication DTM
The device is connected to the PC via the 9-pin serial interface or the USB interface.
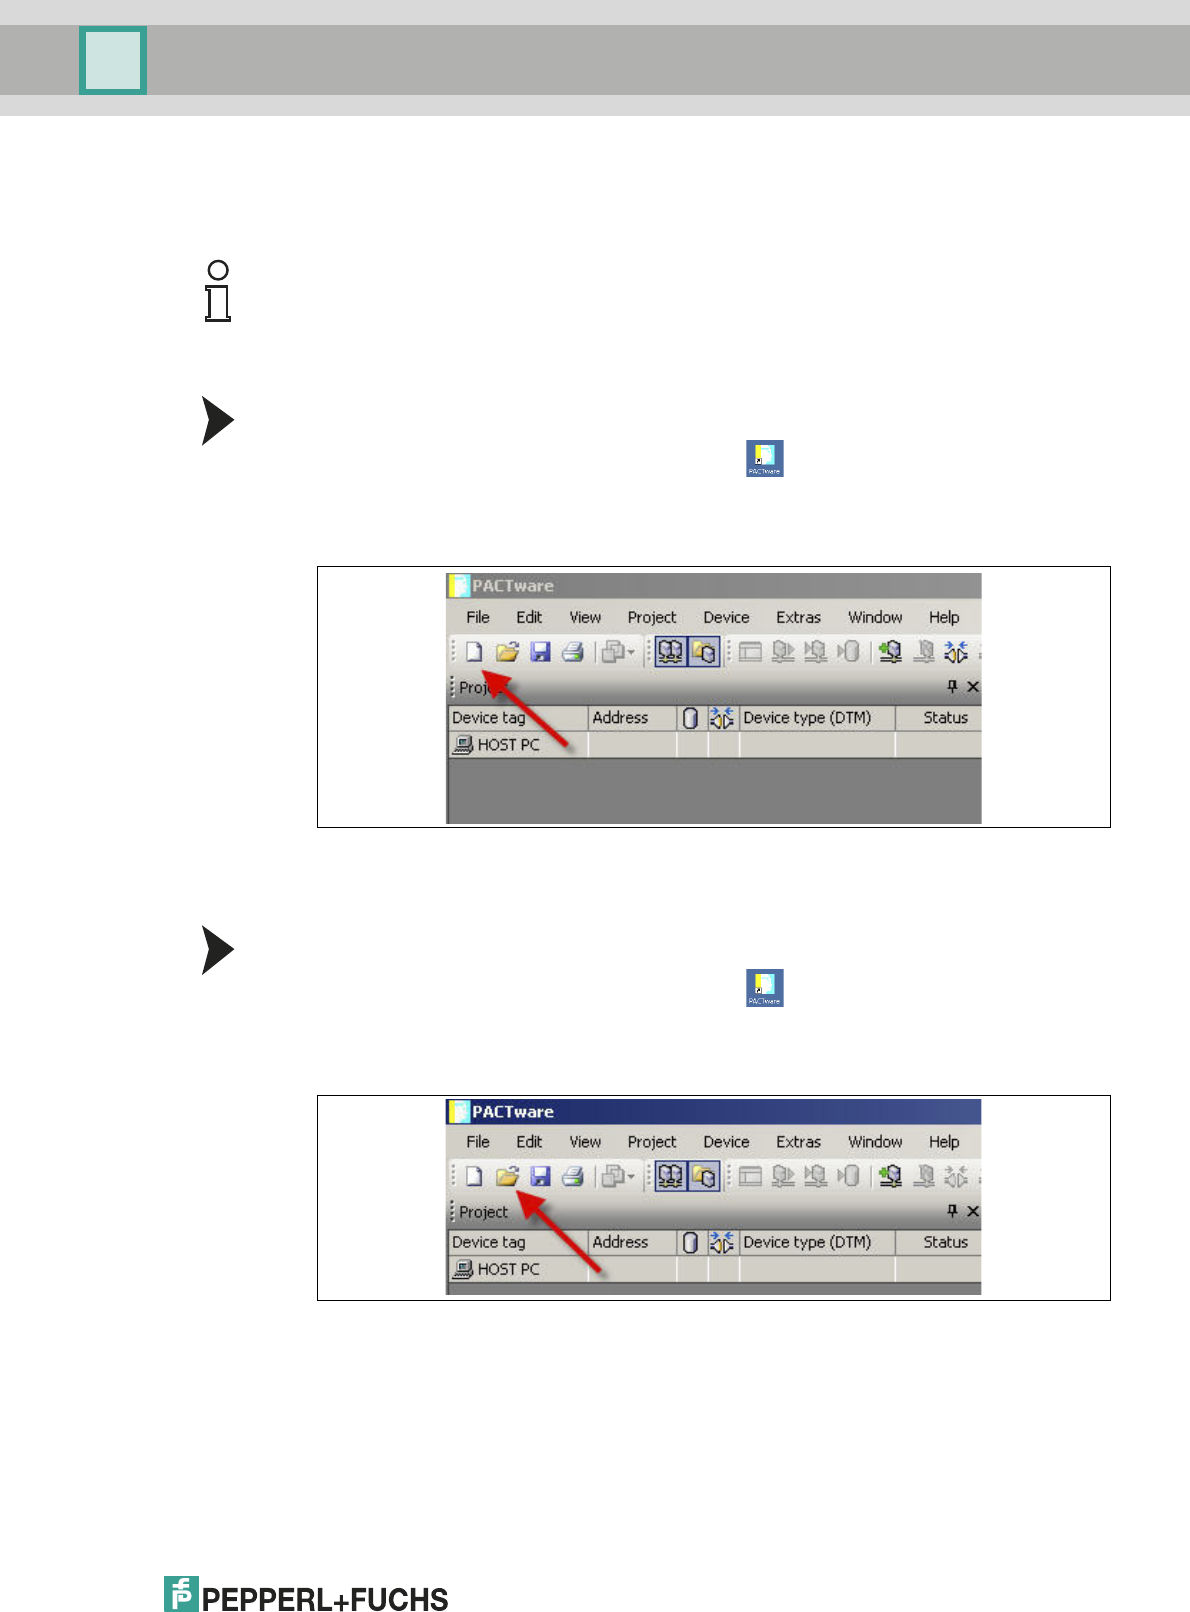
Starting a Project
1. Start PACTwareTM by double-clicking the icon .
>The PACTware
TM main window is displayed.
2. Start a new project via Create new project.
or
Opening a Project
1. Start PACTwareTM by double-clicking the icon .
>The PACTware
TM main window is displayed.
2. Open an existing project with Open project.
Note!
The communication DTM P2P RS232 FDT is required for both connection versions via the
9-pin serial interface and the USB interface. You cannot configure the device DTMs until you
have configured the communication DTM.
2012-11
28
Installation and Configuration DTM Collection Conventional Interface
Configuration
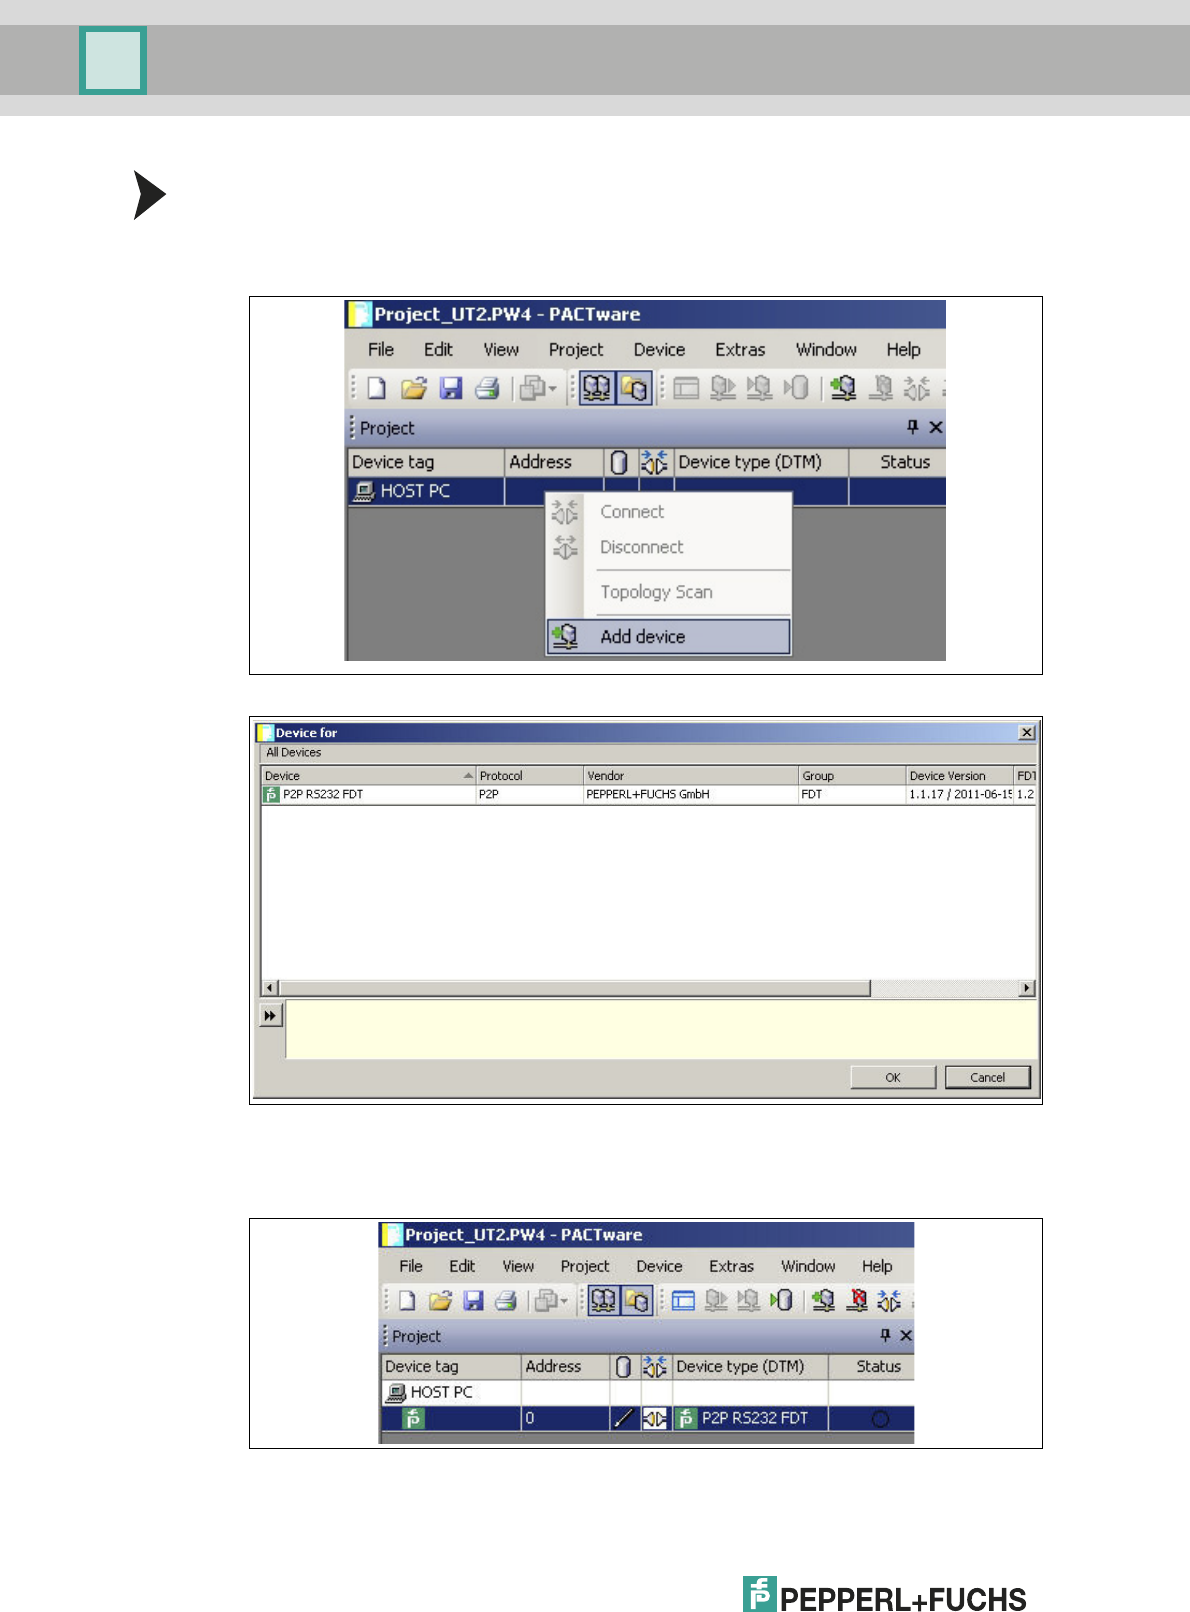
Adding a Communication DTM to the Project
1. In the project window, select HOST PC and then use the right mouse button to open the
context menu.
2. Select Add device.
> The list of communication DTMs is displayed.
3. Select the communication DTM P2P RS232 FDT and confirm your selection with OK. The
communication DTM P2P RS232 FDT is required for both connection versions — via the
9-pin serial interface and the USB interface.
> The communication DTM is included in the project tree.

Installation and Configuration DTM Collection Conventional Interface
Configuration
2012-11
29
Configuring the Communication DTM
1. Where necessary, disconnect the PC from the communication DTM. See the
"Disconnecting the Communication DTM and PC" section in this chapter.
2. In the project window, select P2P RS232 FDT and then use the right mouse button to
open the context menu.
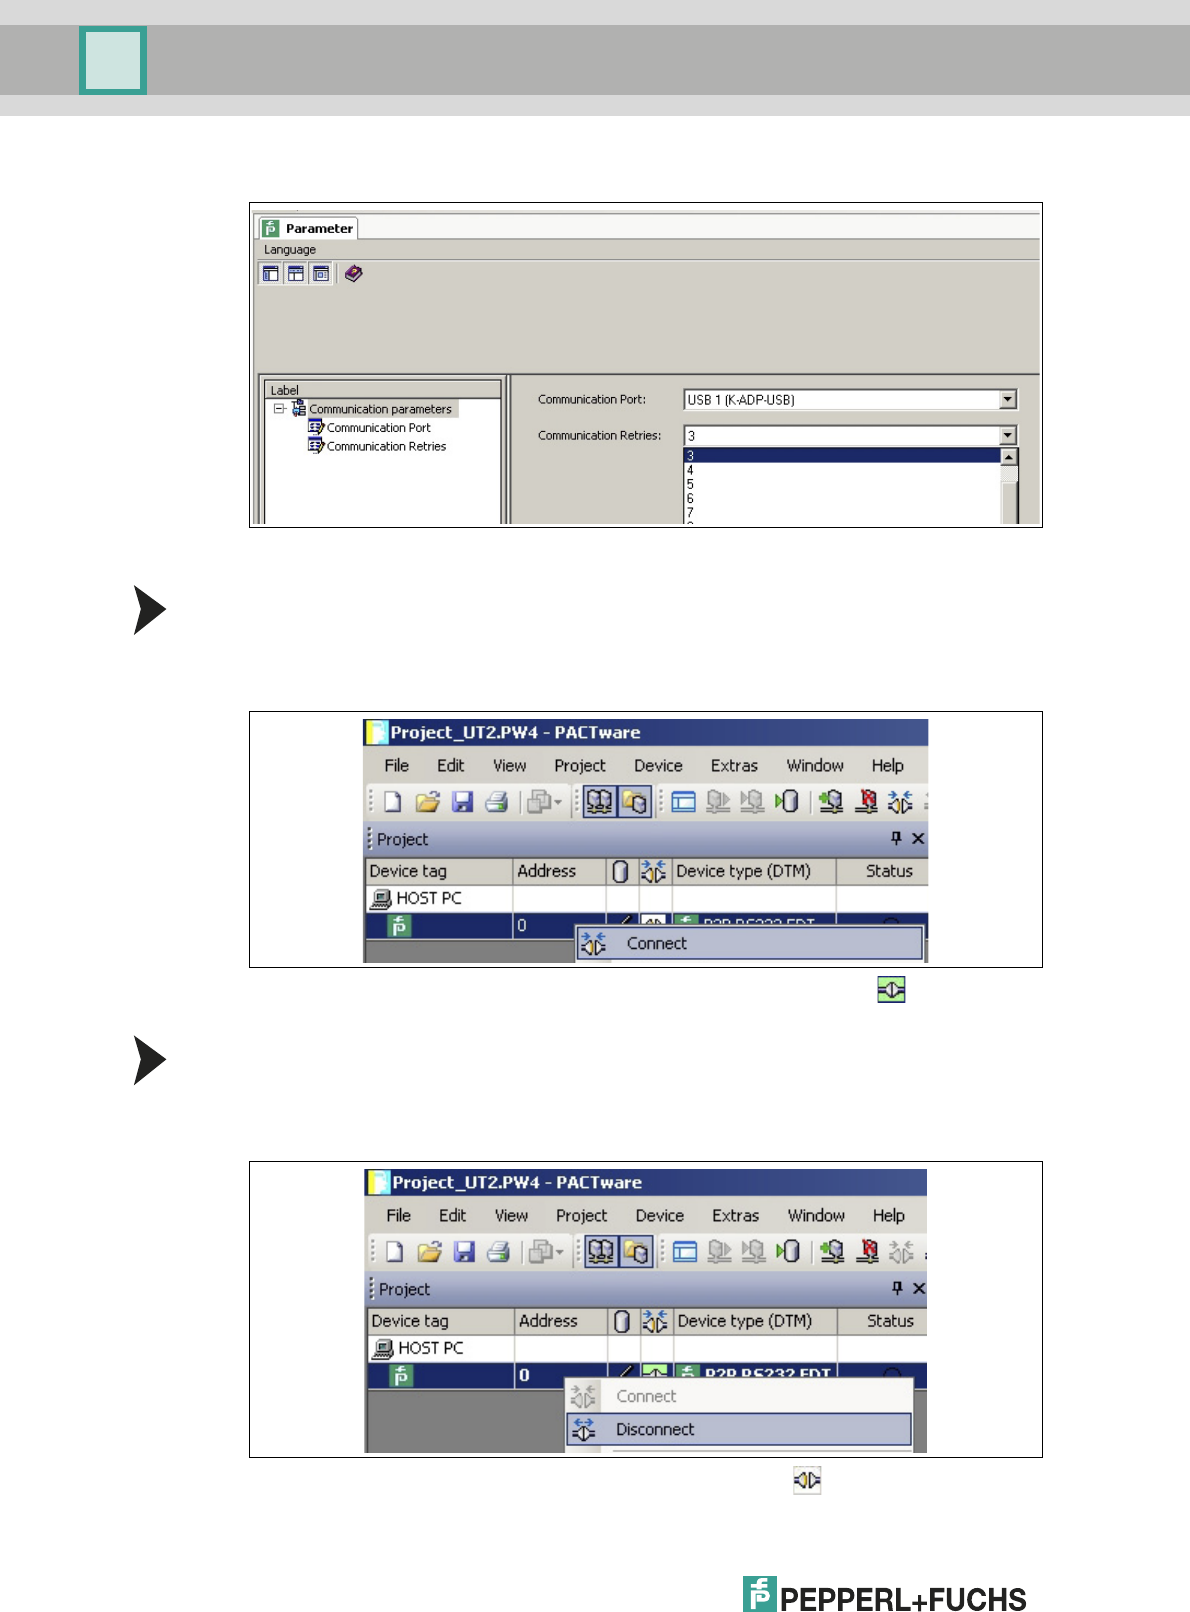
3. Choose Parameter.
> The Parameter window is displayed.
4. From the Communication Port drop-down list, select the desired parameter. You can
select communication port USB 1 (K-ADP-USB) only if the K-ADP-USB adapter was
connected before you started to configure the communication DTM. See chapter 4.4.
2012-11
30
Installation and Configuration DTM Collection Conventional Interface
Configuration
5. From the Communication Retries drop-down list, select the desired parameter.
> The communication DTM is configured.
Establishing the Connection between the Communication DTM and PC
1. In the project window, select P2P RS232 FDT and then use the right mouse button to open
the context menu.
2. Choose Connect.
> The connection is established. The connection status is displayed:
Disconnecting the Communication DTM from the PC
1. In the project window, select P2P RS232 FDT and then use the right mouse button to open
the context menu.
2. Choose Disconnect.
> The connection is disconnected. The status is displayed:
Installation and Configuration DTM Collection Conventional Interface
Configuration
2012-11
31
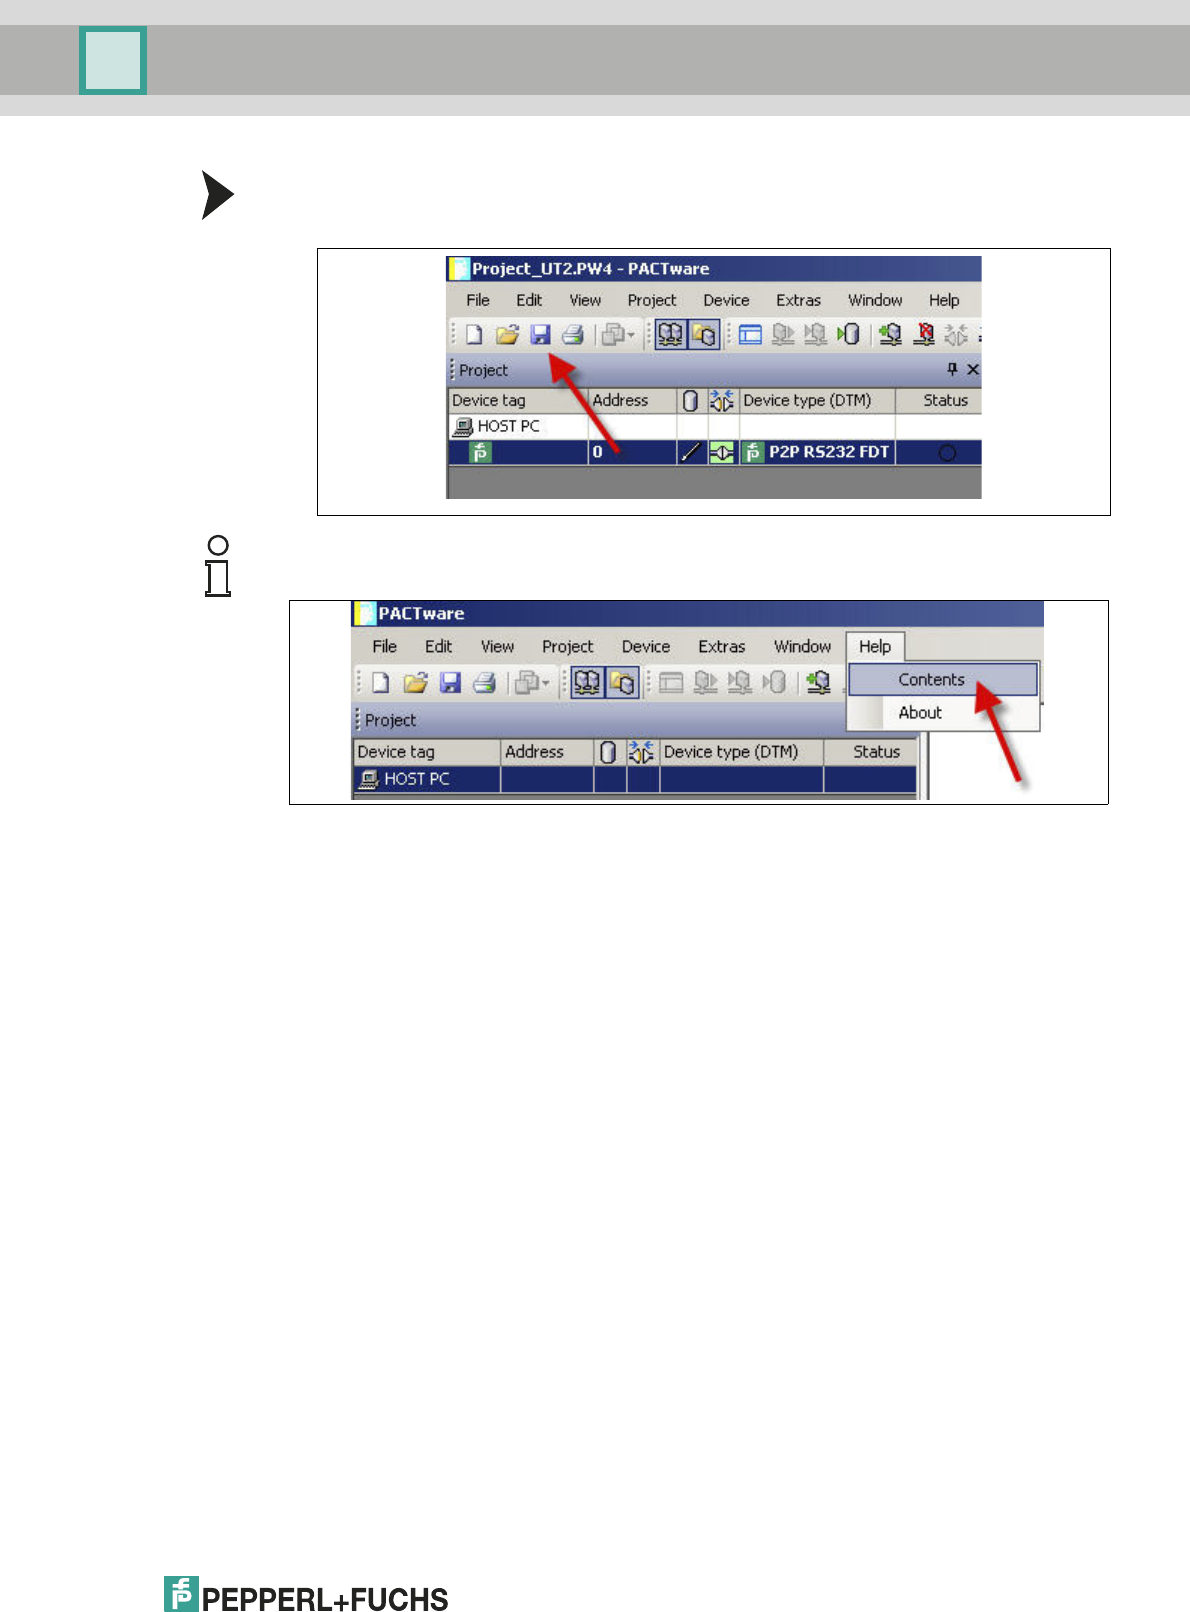
Saving a Project
Save the project with Save project.
Note!
For more information on operating PACTwareTM, see the online help.
2012-11
32
Installation and Configuration DTM Collection Conventional Interface
Configuration
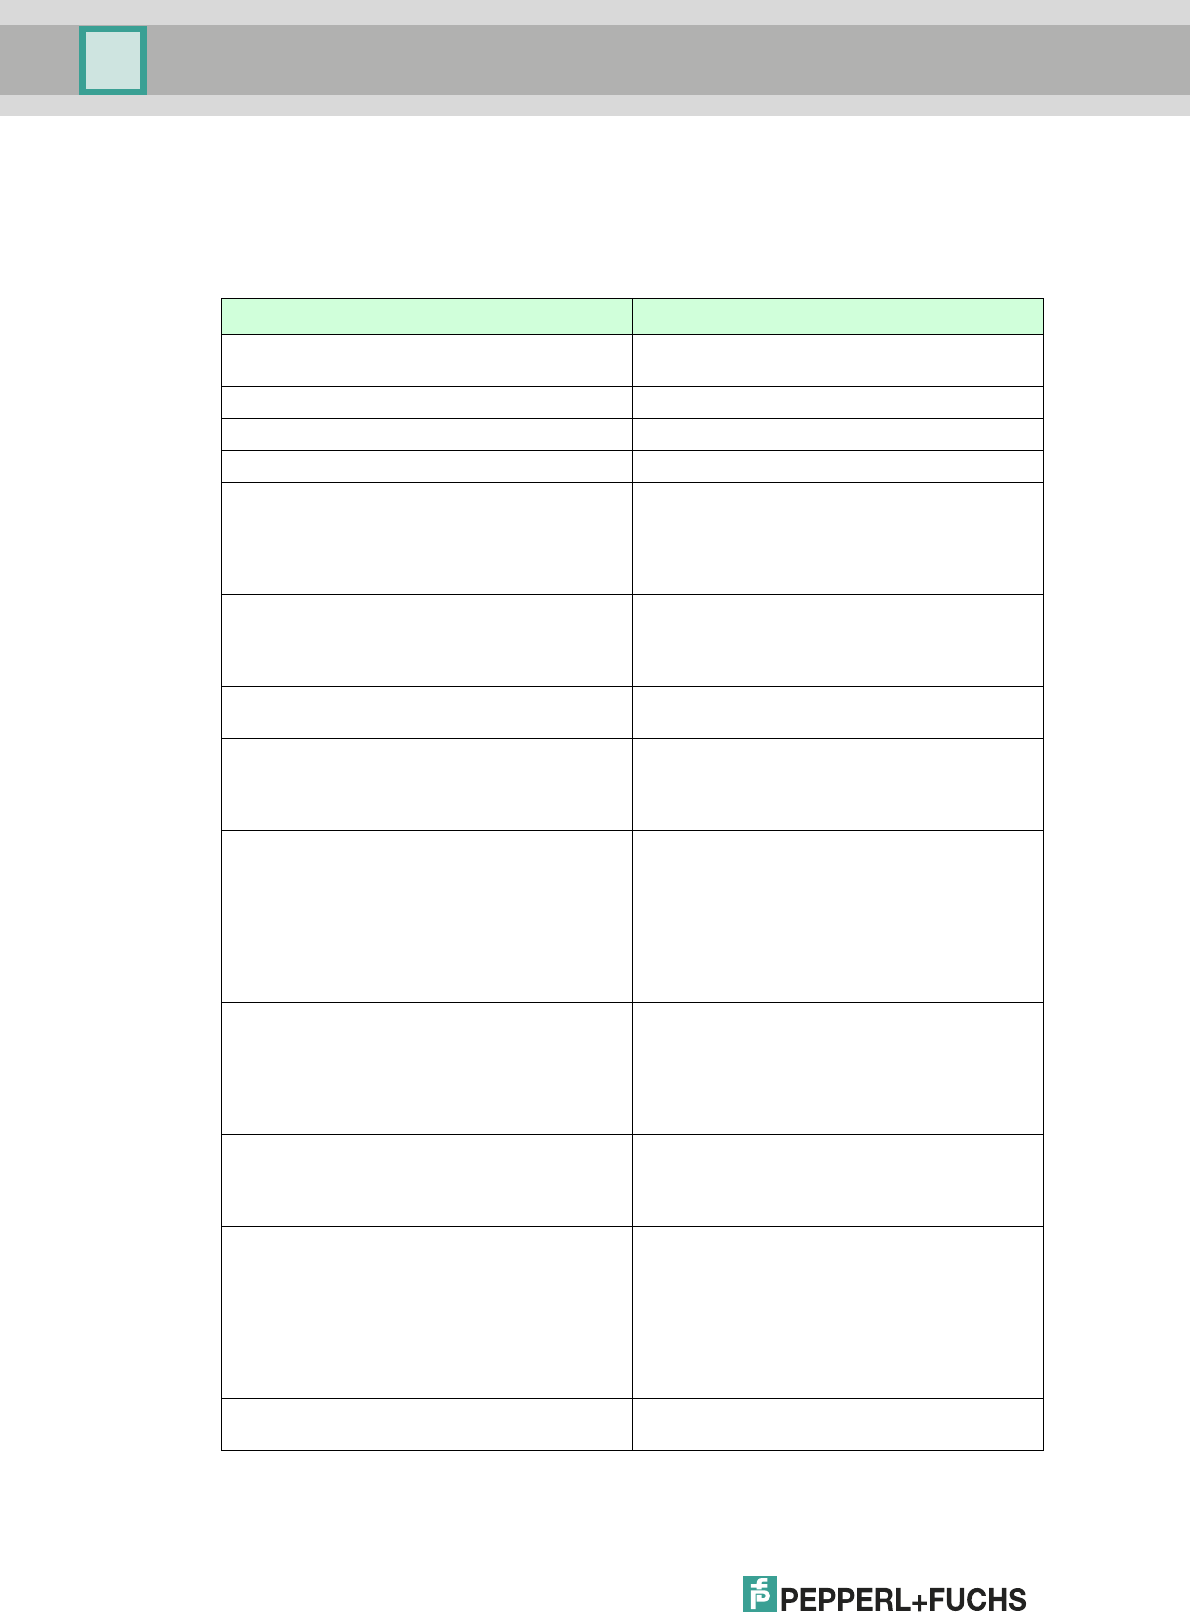
5.4 Configuring the Device DTM
Various device DTMs are available for the devices. Select the appropriate device DTM for your
device from the device list. You can configure the device only if you have selected the correct
device DTM.
Device Device DTM
ED2-UT-Ex2
ED2-UT-Ex2-2
ED2-UT-* FDT
HiD2081 HiD2081 FDT
HiD2082 HiD2082 FDT
HiD2891 HiD2891 FDT
KFD2-CRG-1.D
KFD2-CRG-Ex1.D
KFU8-CRG-1.D
KFU8-CRG-Ex1
KFU8-CRG-Ex1.D
KF*-CRG-* FDT
KFD2-CRG2-1.D
KFD2-CRG2-Ex1.D
KFU8-CRG2-1.D
KFU8-CRG2-Ex1.D
KF*-CRG2-* FDT
KFD2-GU-1
KFD2-GU-Ex1
KFD2-GU-* FDT
KFD2-GUT-1.D
KFD2-GUT-Ex1.D
KFU8-GUT-1.D
KFU8-GUT-Ex1.D
KF*-GUT-* FDT
KFD2-UFC-1
KFD2-UFC-1.D
KFD2-UFC-Ex1
KFD2-UFC-Ex1.D
KFU8-UFC-1
KFU8-UFC-1.D
KFU8-UFC-Ex1
KFU8-UFC-Ex1.D
KF*-UFC-* FDT
KFD2-UFT-2.D
KFD2-UFT-Ex2
KFD2-UFT-Ex2.D
KFU8-UFT-2.D
KFU8-UFT-Ex2
KFU8-UFT-Ex2.D
KF*-UFT-* FDT
KFD2-UT-1
KFD2-UT-1-1
KFD2-UT-Ex1
KFD2-UT-Ex1-1
KFD2-UT-* FDT
KFD2-UT2-1
KFD2-UT2-1-1
KFD2-UT2-2
KFD2-UT2-2-1
KFD2-UT2-Ex1
KFD2-UT2-Ex1-1
KFD2-UT2-Ex2
KFD2-UT2-Ex2-1
KF*-UT2-* FDT
KFD2-WAC2-1.D
KFD2-WAC2-Ex1.D
KF*-WAC2-* FDT
Ta b l e 5 . 1
Installation and Configuration DTM Collection Conventional Interface
Configuration
2012-11
33
The configuration of the device is shown using the configuration of the KFD2-UT2-Ex2
temperature converter as an example.
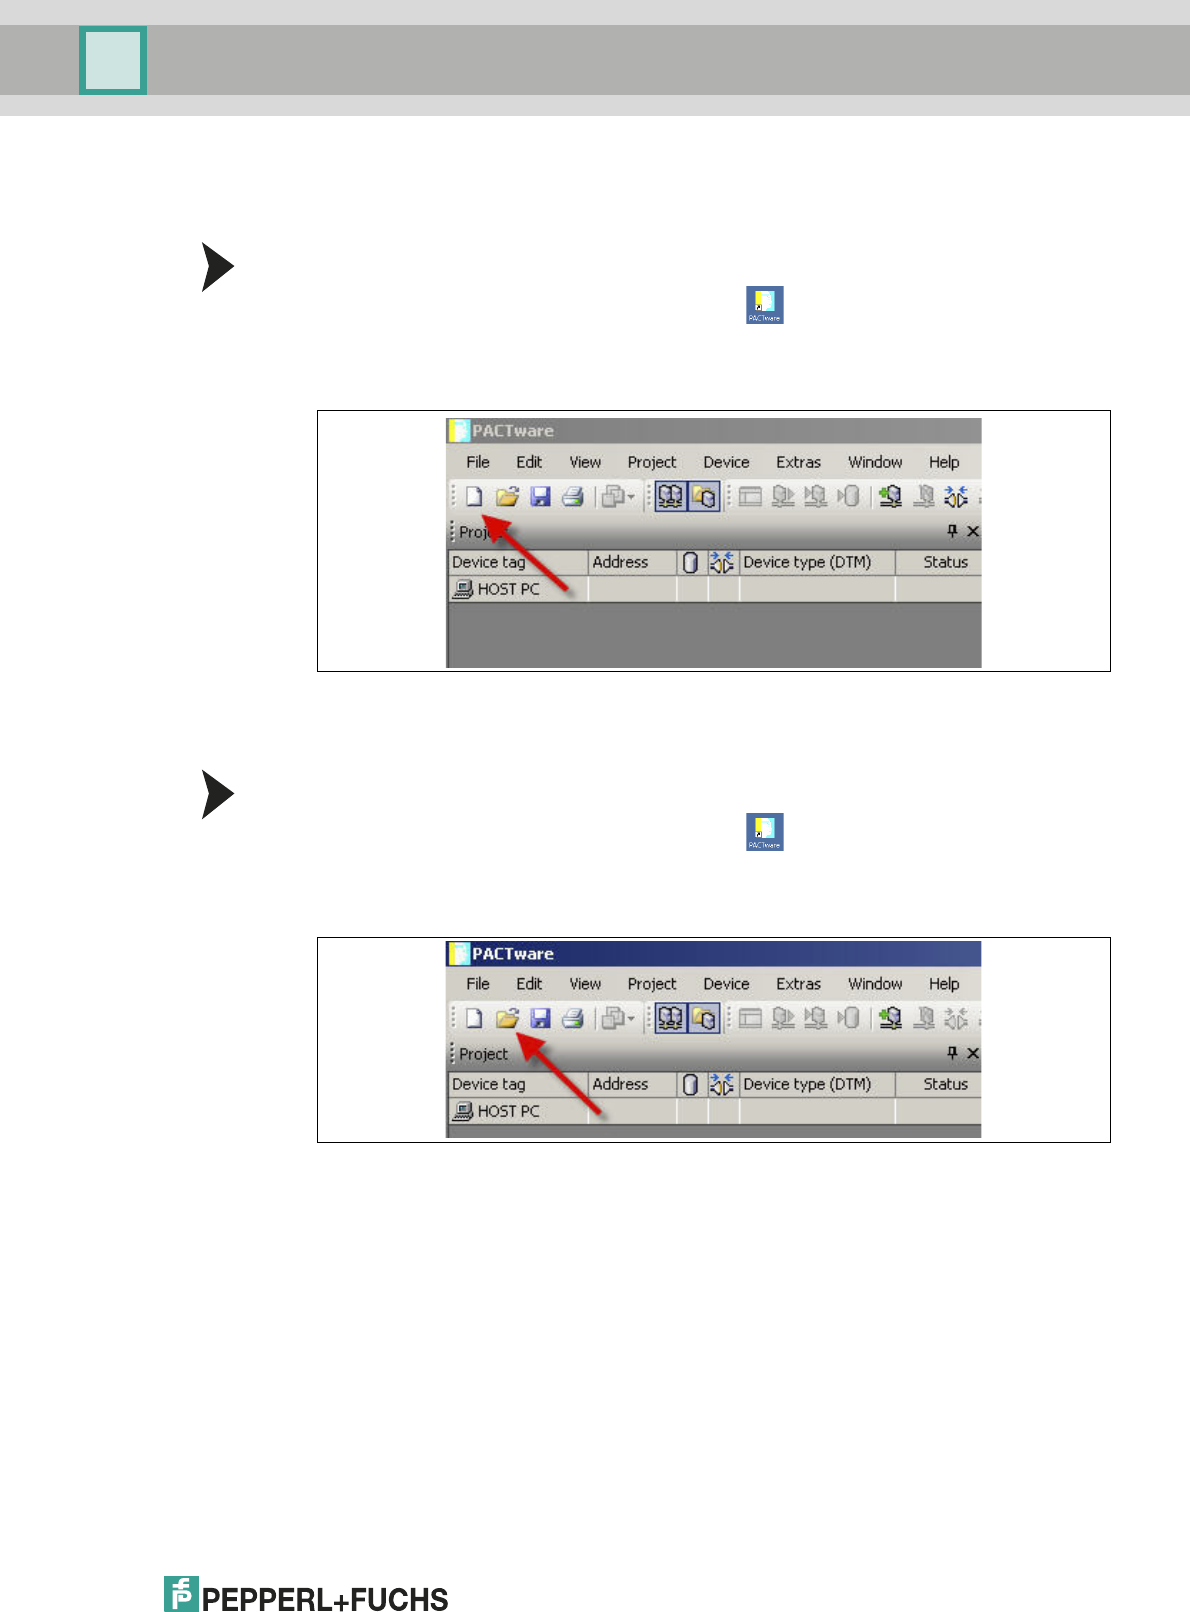
Starting a Project
1. Start PACTwareTM by double-clicking the icon .
>The PACTware
TM main window is displayed.
2. Start a new project via Create new project.
or
Opening a Project
1. Start PACTwareTM by double-clicking the icon .
>The PACTware
TM main window is displayed.
2. Open an existing project with Open project.
2012-11
34
Installation and Configuration DTM Collection Conventional Interface
Configuration
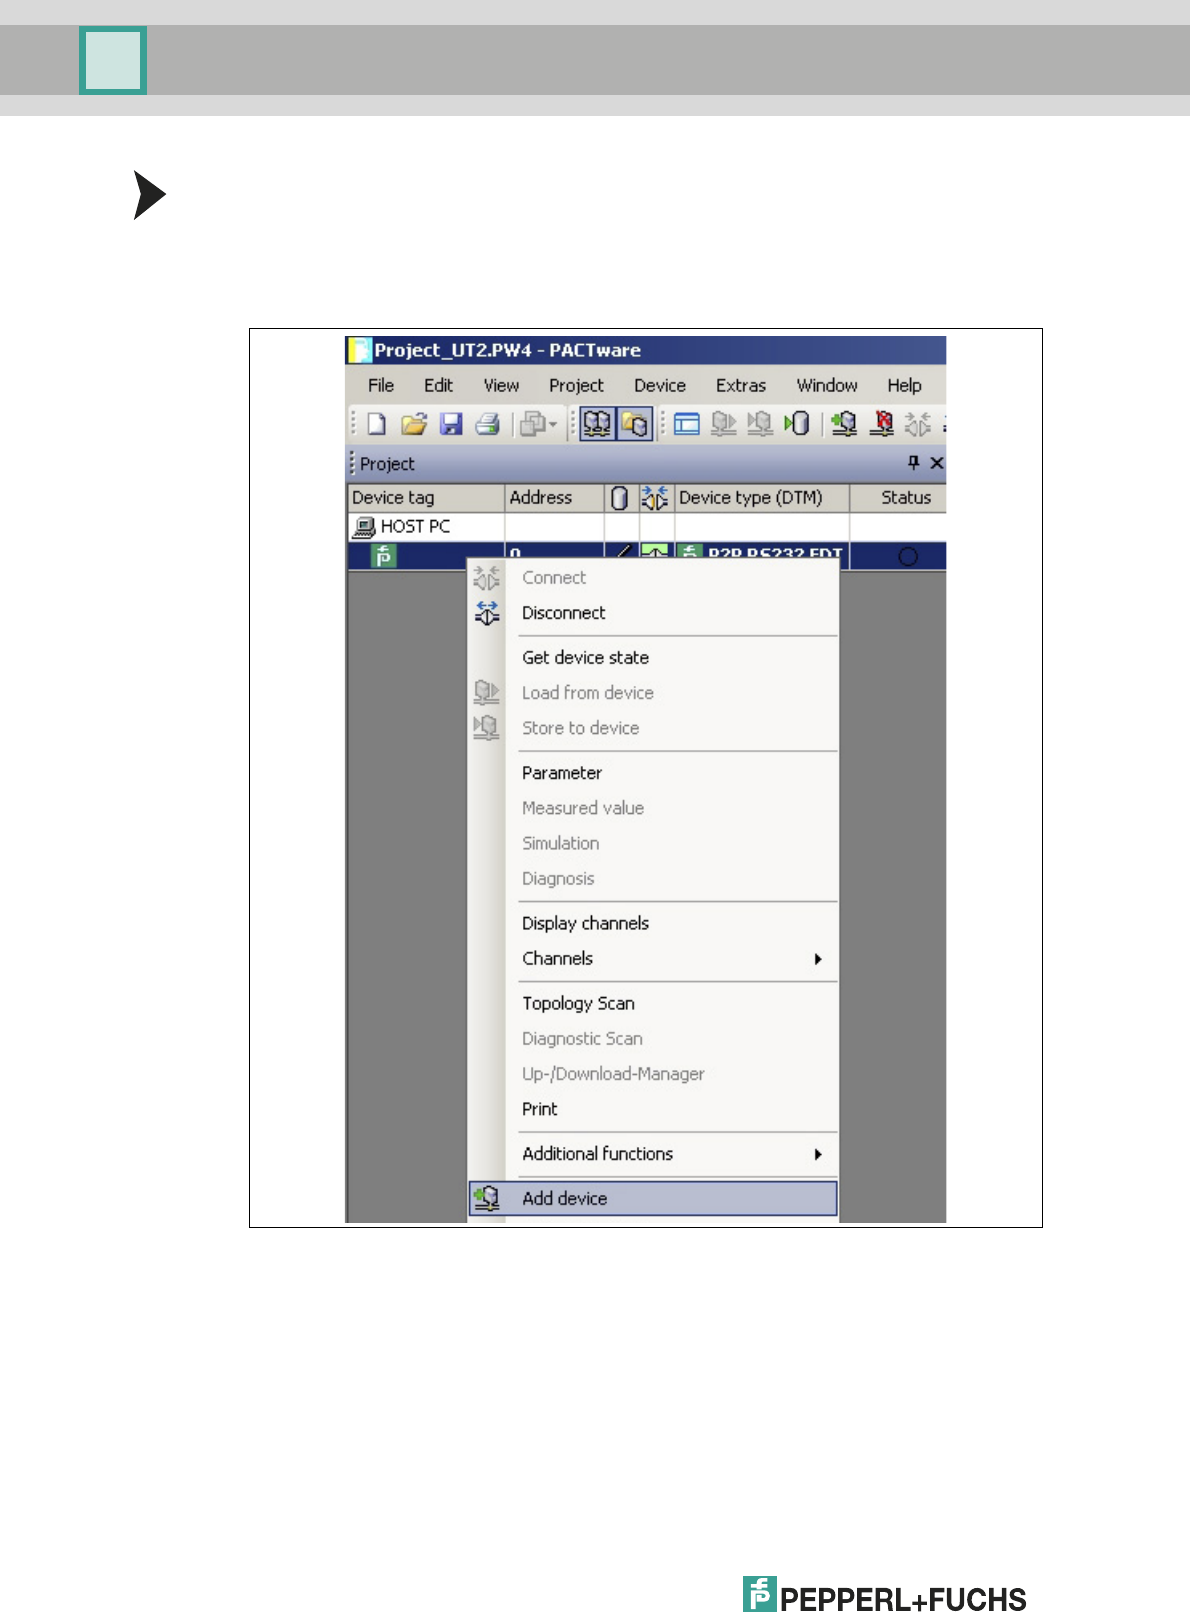
Adding a Device to the Project
1. Add a communication DTM to your project. See chapter 5.3.
2. In the project window, select P2P RSD232 FDT and then use the right mouse button to
open the context menu.
3. Select Add device.

Installation and Configuration DTM Collection Conventional Interface
Configuration
2012-11
35
> The list of device DTMs is displayed.
4. Select the required device DTM and confirm your selection with OK.
Example: KF*-UT2-*FDT.
> The device DTM is included in the project tree.
Establishing the Connection between the Device and PC
1. In the project window, select KF*-UT2-*FDT and then use the right mouse button to open
the context menu.
2. Choose Connect.
> The connection is established. The connection status is displayed:
2012-11
36
Installation and Configuration DTM Collection Conventional Interface
Configuration
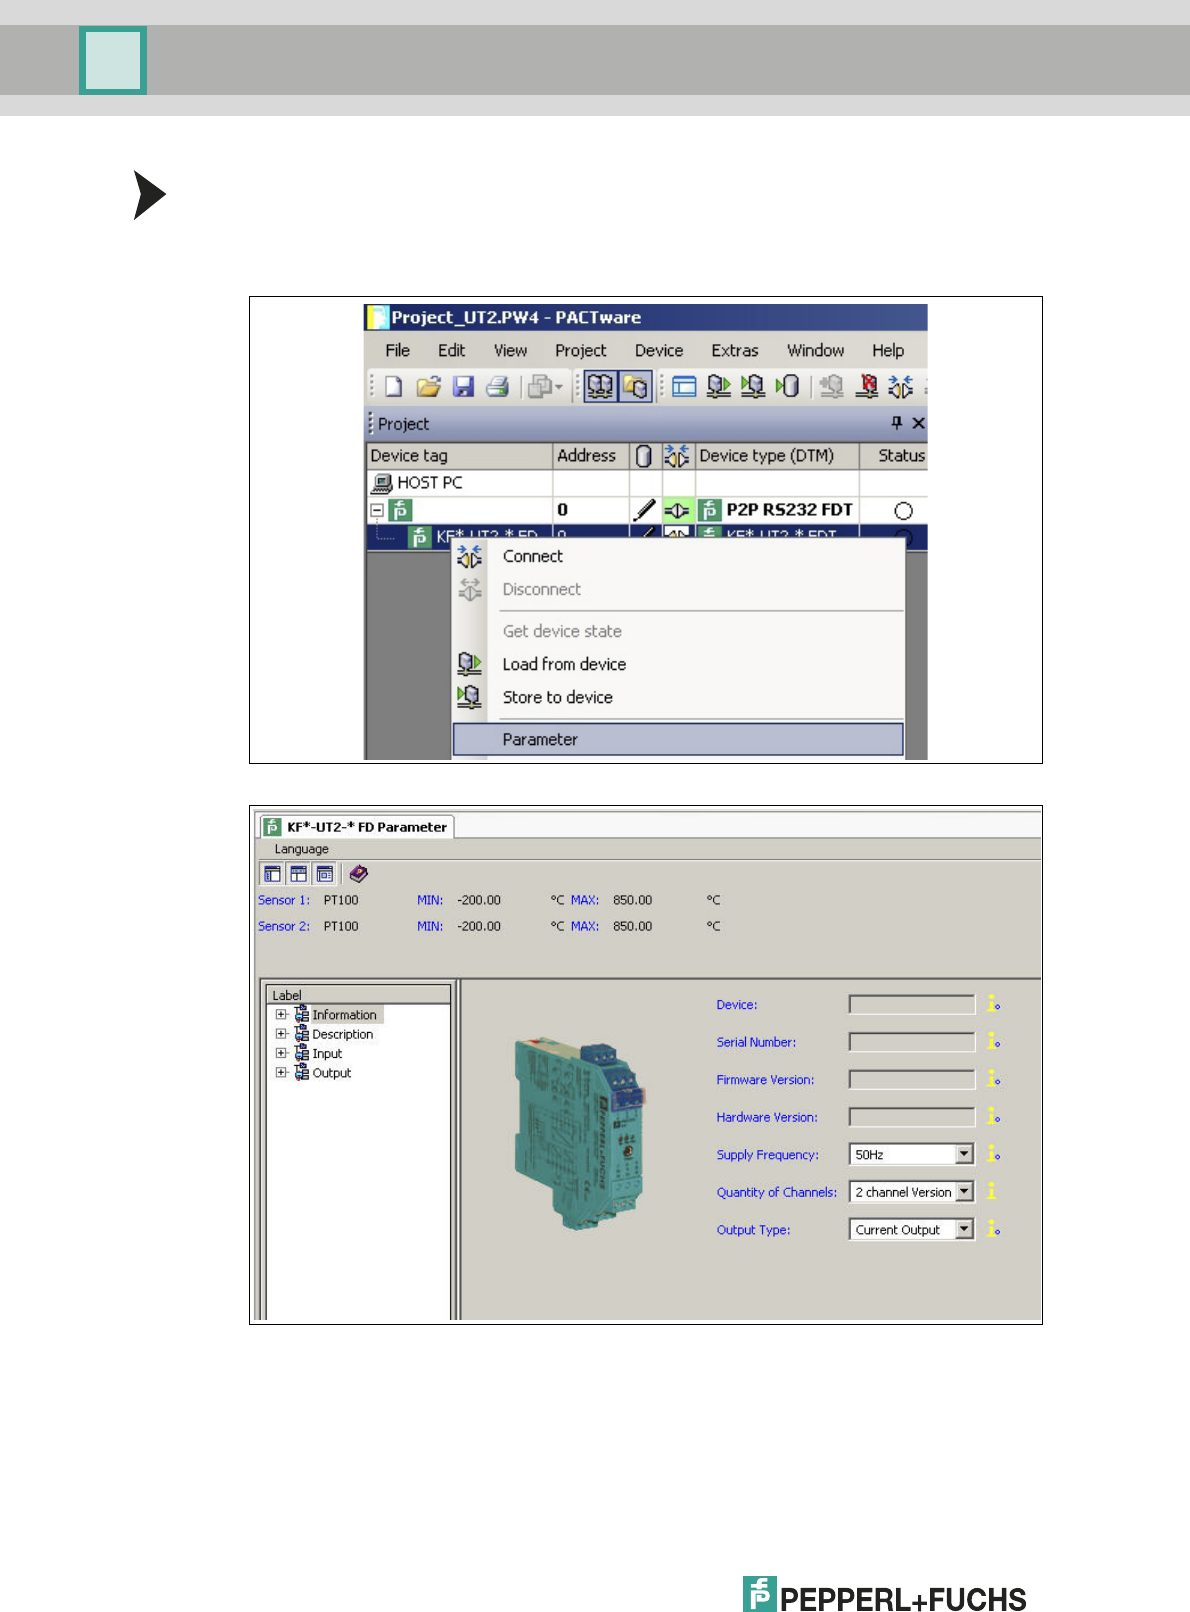
Configuring the Device
1. In the project window, select KF*-UT2-*FDT and then use the right mouse button to open
the context menu.
2. Choose Parameter.
> The Parameter window is displayed.
Installation and Configuration DTM Collection Conventional Interface
Configuration
2012-11
37
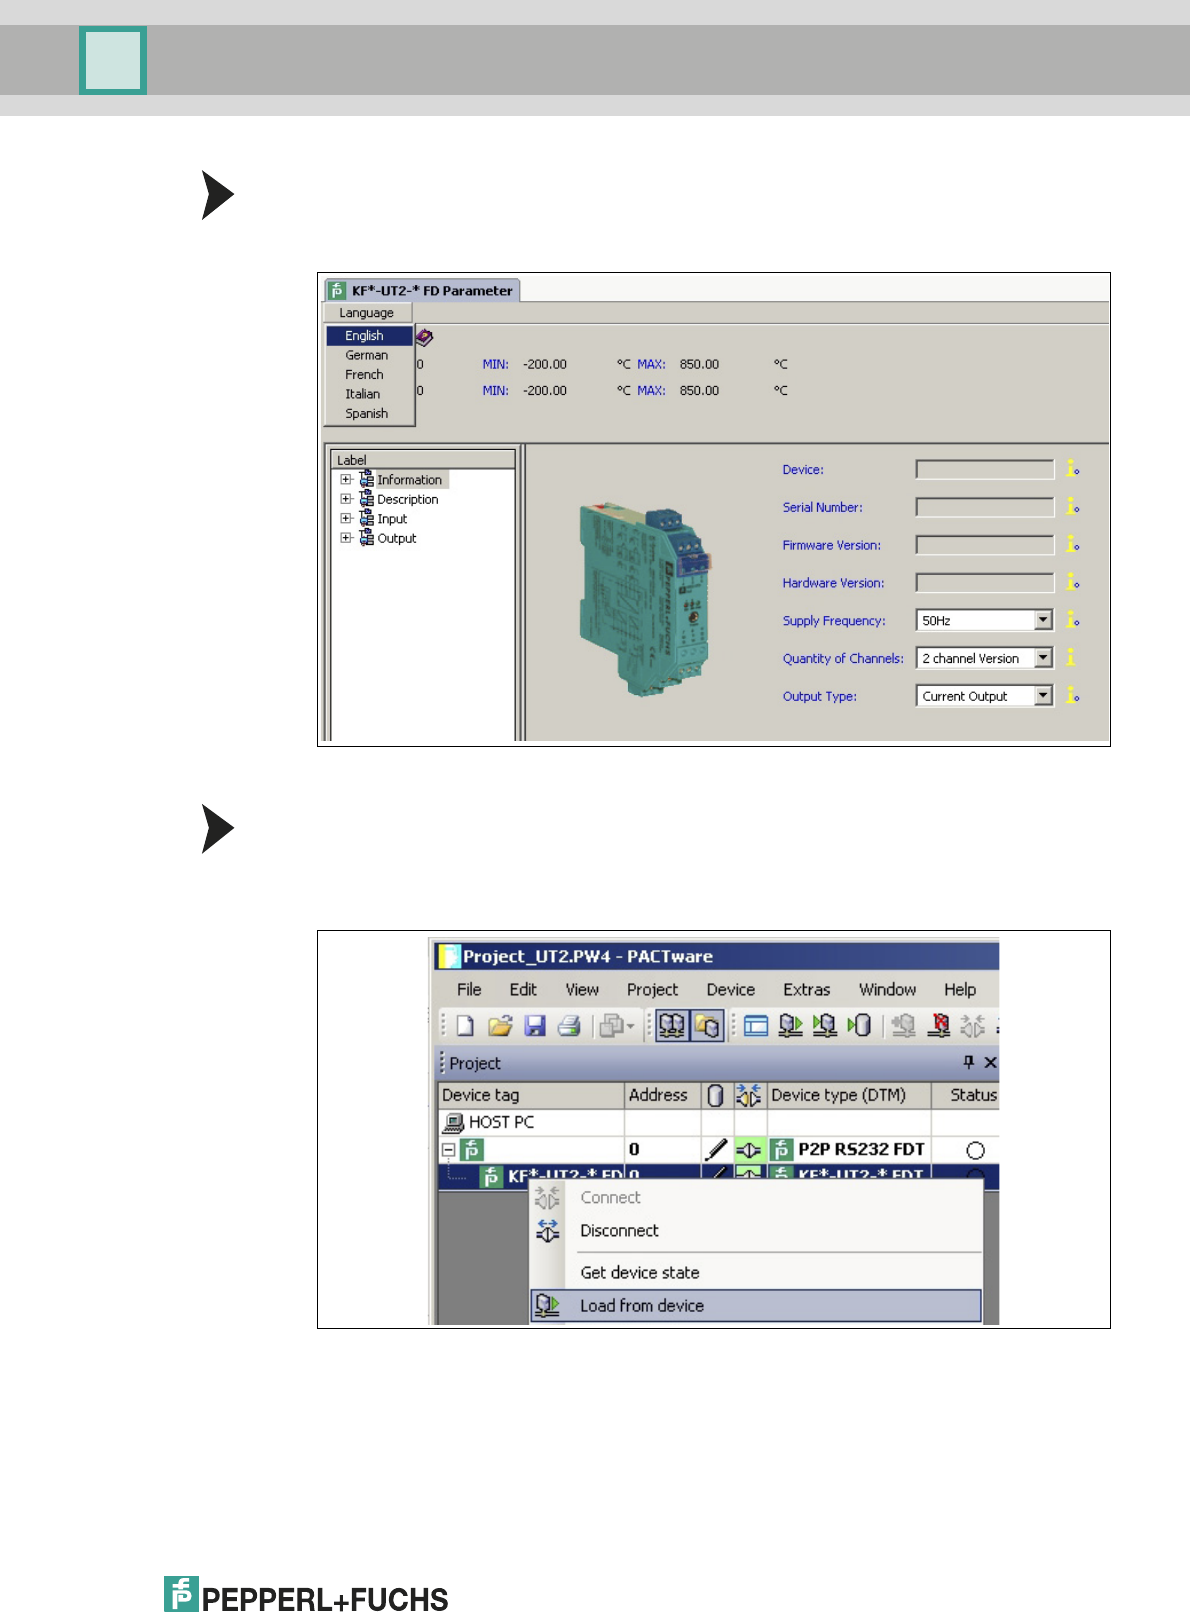
Changing the Language for Parameter Window
1. Change the language using the menu Language in the Parameter window.
2. Select the required parameter language in the drop-down list.
> The Language for Parameter window is changed.
Loading Device Data from the Device
1. In the project window, select KF*-UT2-*FDT and then use the right mouse button to open
the context menu.
2. To transfer device data from the device to the PC, choose Load from device.

2012-11
38
Installation and Configuration DTM Collection Conventional Interface
Configuration
> The device data is displayed.
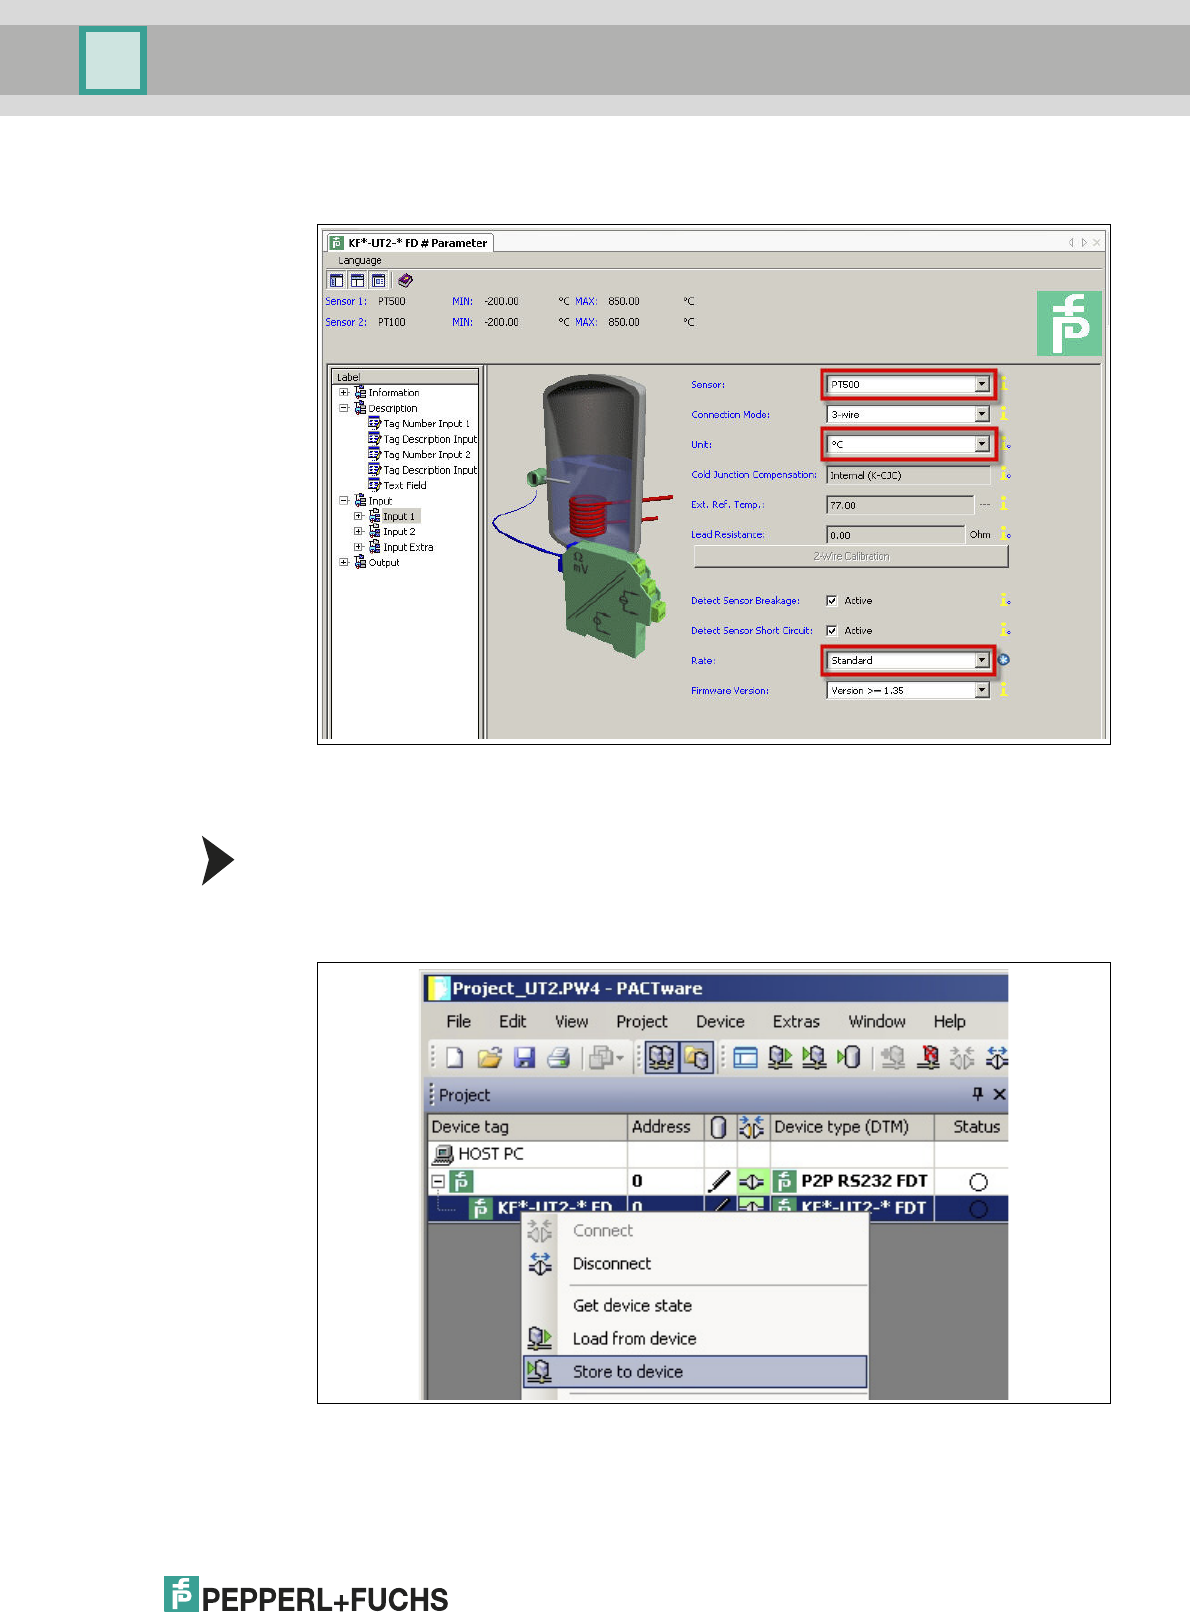
Editing Device Data
1. In the project tree, choose the entry that you want to edit. Example: Input 1.
> The device data for Input 1 is displayed.
Installation and Configuration DTM Collection Conventional Interface
Configuration
2012-11
39
2. Edit the device data. For more information about editing the device data, see the
KFD2-UT2-(Ex)*(-1) Temperature Converter Manual.
3. Select the required parameter from the drop-down list.
4. Confirm your selection with Return.
Storing Device Data on the Device
1. In the project window, select KF*-UT2-*FDT and then use the right mouse button to open
the context menu.
2. To transfer device data from the PC to the device, choose Store to device.
> The device is now configured.

2012-11
40
Installation and Configuration DTM Collection Conventional Interface
Configuration
Disconnecting Devices from PCs
1. In the project window, select KF*-UT2-*FDT and then use the right mouse button to open
the context menu.
2. Choose Disconnect.
> The connection is disconnected. The status is displayed:
3. Disconnect the device from the PC by removing the adapter cable from the device or PC.
Saving a Project
Save the project with Save project.
Note!
For more information on operating PACTwareTM, see the online help.
Installation and Configuration DTM Collection Conventional Interface
Additional Information on PACTware
2012-11
41
6 Additional Information on PACTwareTM
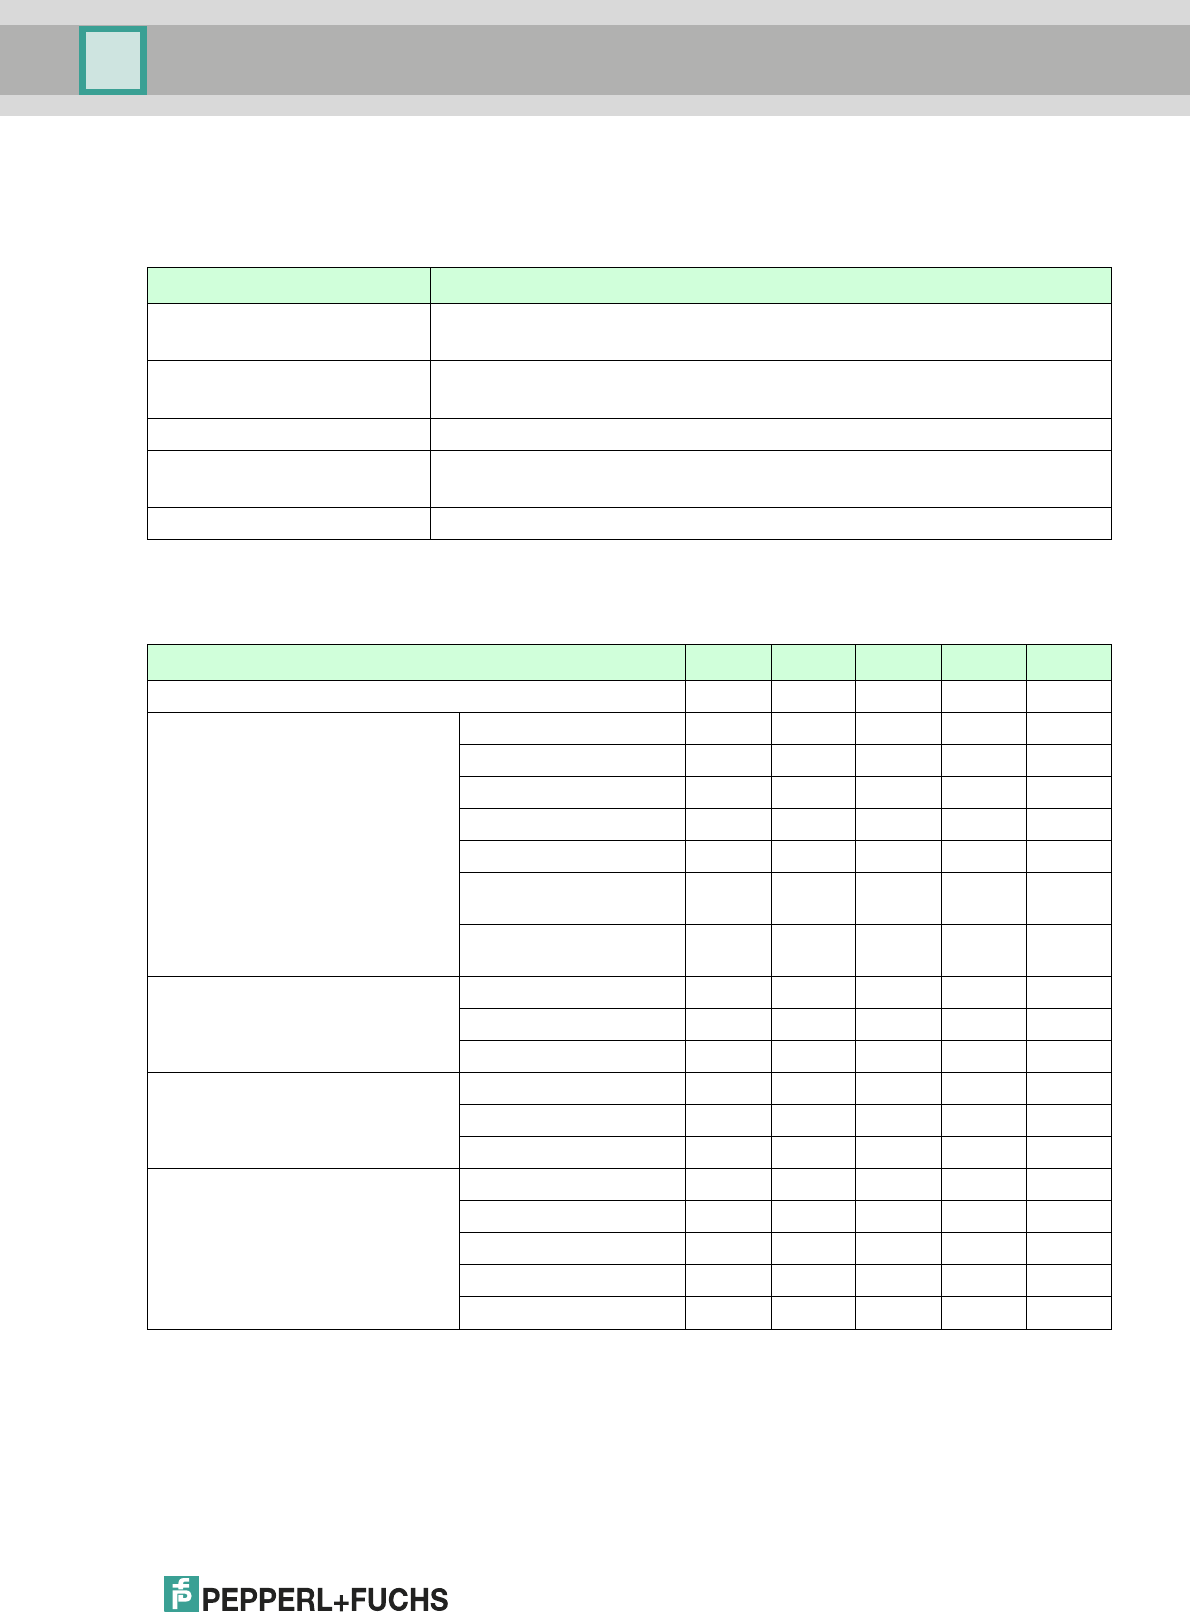
Release Information
Compatibility of PACTwareTM with Other Software Components
PACTwa reTM version Description
PACTware 2.4, Service Pack 4 Latest version for Microsoft® Windows 98 operating system
Frozen status, no further support, replaced by version 3.0
PACTware 3.0, Service Pack 5 Latest version for Microsoft® Windows NT 4.0 operating system
Frozen status, no further support, replaced by version 3.5
PACTwa re 3. 5 Frozen status, no further support, replaced by version 3.6
PACTware 3.6, Service Pack 1 For Microsoft® Windows Vista operating system
Frozen status, no further support, replaced by version 4.0
PACTware 4.1, Service Pack 2 Current version
Ta b l e 6 . 1
PACTwa reTM version PW 2.4 PW 3.0 PW 3.5 PW3.6 PW 4.1
Release 2002 2004 2007 2008 2010
Microsoft® operating system Windows 98 X
Windows NT 4.0 X X X
Windows 2000 X X X X
Windows XP X X X X X
Windows Vista X X
Windows 7
32 Bit and 64 Bit
X
Windows Server 2008
32 Bit and 64 Bit
X
Interface IDL X X
FDT 1.2 X X X X X
FDT 1.2.1 X X X
Microsoft® technology COM X
.Net 1.1 XXX
.Net 2.0 X
Possible parallel operation PW 2.4 XXX
PW 3.0 X X X X
PW 3.5 X X – X
PW 3.6 X X – X
PW 4.1 X X X X
Ta b l e 6 . 2
2012-11
42
Installation and Configuration DTM Collection Conventional Interface
Additional Information on PACTware
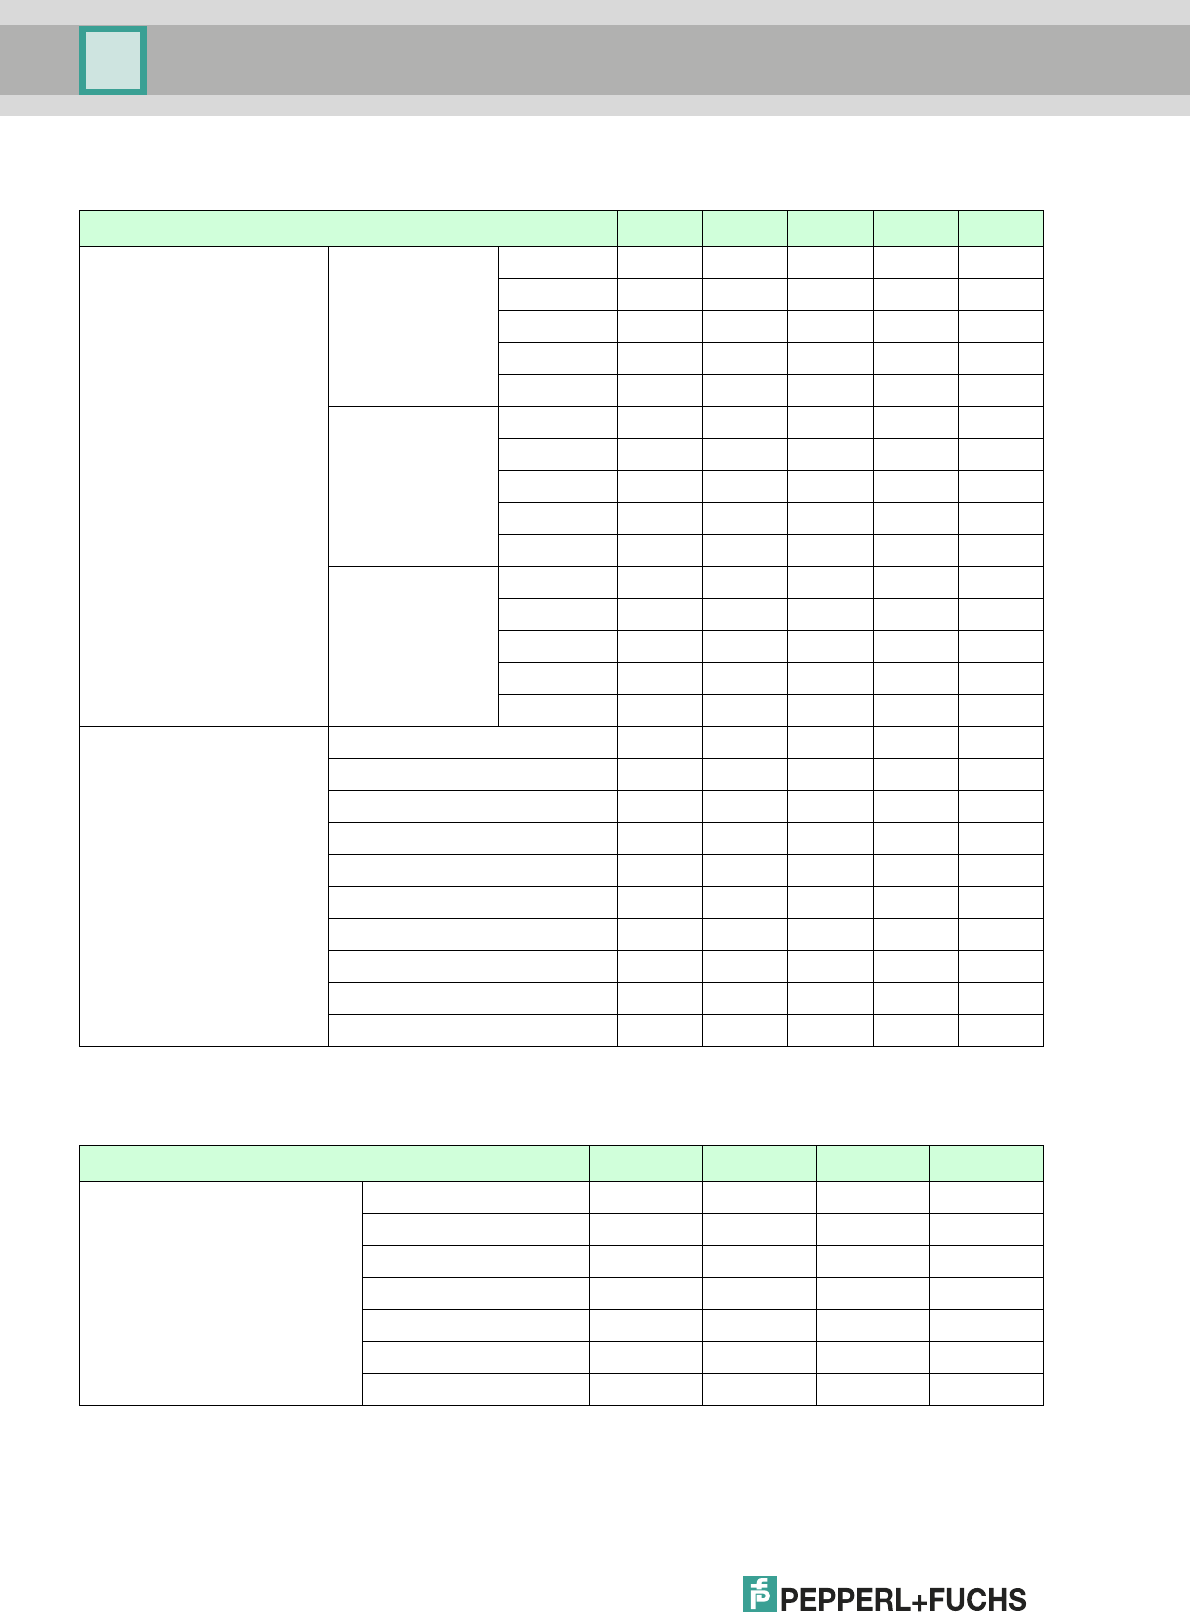
Compatibility of PACTwareTM Functions
Supported Languages
PACTwa reTM version PW 2.4 PW 3.0 PW 3.5 PW3.6 PW 4.1
Project and password
compatibility
Saving a project PW 2.4 X
PW 3.0 X
PW 3.5 X
PW 3.6 X
PW 4.1 X
Loading a project PW 2.4 X X X X X
PW 3.0 X X X X
PW 3.5 X X X
PW3.6 X X
PW 4.1 X
Keep passwords PW 2.4 X X X X X
PW 3.0 X X X X
PW 3.5 X X X
PW 3.6 X X
PW 4.1 X
Loading a project Ta b s X X X
HART scan addin X X X X
Debug monitor X X X
Profile X X X
TCI (X) X
Plant view X X X
Diagnostic scan (NE107) X
Upload and download manager X X
Topology scan X
Project wizard X
Ta b l e 6 . 3
PACTwa reTM version PW 3.0 PW 3.5 PW3.6 PW 4.1
Application languages Ge r m a n X X X X
English X X X X
French X X X X
Spain X X X X
Russian X X X X
Chinese X
Dutch X
Ta b l e 6 . 4

Installation and Configuration DTM Collection Conventional Interface
Index
2012-11
43
Prerequisites
Downloading DTM Collection Conventional Interface from the Internet . . . . . . . . . 7
Downloading the FDT Framework Program PACTwareTM 4.X from the Internet . . . 7
Downloading Microsoft® .NET 2.0 Framework from the Internet . . . . . . . . . . . . . . . 6
Installation
Checking the Microsoft® .Net Framework Version . . . . . . . . . . . . . . . . . . . . . . . . . . 8
Connecting the Device to the PC via the 9-Pin Serial Interface . . . . . . . . . . . . . . . 21
Connecting the Device to the PC via the USB Interface . . . . . . . . . . . . . . . . . . . . . 21
Installing Communication DTMs . . . . . . . . . . . . . . . . . . . . . . . . . . . . . . . . . . . . . . . . 18
Installing Device DTMs . . . . . . . . . . . . . . . . . . . . . . . . . . . . . . . . . . . . . . . . . . . . . . . 14
Installing DTM Collection Conventional Interface . . . . . . . . . . . . . . . . . . . . . . . . . . 13
Installing the FDT Framework Program PACTwareTM . . . . . . . . . . . . . . . . . . . . . . . 10
Installing Microsoft®.Net 2.0 Framework. . . . . . . . . . . . . . . . . . . . . . . . . . . . . . . . . . 9
Configuration
Adding a Communication DTM to the Project . . . . . . . . . . . . . . . . . . . . . . . . . . . . . 28
Adding a Device to the Project . . . . . . . . . . . . . . . . . . . . . . . . . . . . . . . . . . . . . . . . . 34
Changing the Language . . . . . . . . . . . . . . . . . . . . . . . . . . . . . . . . . . . . . . . . . . .22, 37
Configuring the Communication DTM . . . . . . . . . . . . . . . . . . . . . . . . . . . . . . . . . . . 29
Configuring the Device . . . . . . . . . . . . . . . . . . . . . . . . . . . . . . . . . . . . . . . . . . . . . . . 36
Disconnecting the Communication DTM from the PC. . . . . . . . . . . . . . . . . . . . . . . 30
Disconnecting Devices from PCs . . . . . . . . . . . . . . . . . . . . . . . . . . . . . . . . . . . . . . . 40
Editing Device Data . . . . . . . . . . . . . . . . . . . . . . . . . . . . . . . . . . . . . . . . . . . . . . . . . . 38
Establishing the Connection between the Communication DTM and PC . . . . . . . 30
Establishing the Connection between the Device and PC . . . . . . . . . . . . . . . . . . . 35
Loading Device Data from the Device . . . . . . . . . . . . . . . . . . . . . . . . . . . . . . . . . . . 37
Opening a Project . . . . . . . . . . . . . . . . . . . . . . . . . . . . . . . . . . . . . . . . . . . . . . . .27, 33
Saving a Project . . . . . . . . . . . . . . . . . . . . . . . . . . . . . . . . . . . . . . . . . . . . . . .25, 31, 40
Storing Device Data on the Device . . . . . . . . . . . . . . . . . . . . . . . . . . . . . . . . . . . . . . 39
Starting the Program . . . . . . . . . . . . . . . . . . . . . . . . . . . . . . . . . . . . . . . . . . . . . . . . . 22
Starting a Project . . . . . . . . . . . . . . . . . . . . . . . . . . . . . . . . . . . . . . . . . . . . . .25, 25, 33
Updating the device catalog . . . . . . . . . . . . . . . . . . . . . . . . . . . . . . . . . . . . . . . . . . . 23

Subject to modifications
Copyright PEPPERL+FUCHS • Printed in Germany
www.pepperl-fuchs.com
Worldwide Headquarters
Pepperl+Fuchs GmbH
68307 Mannheim · Germany
Tel. +49 621 776-0
E-mail: info@de.pepperl-fuchs.com
For the Pepperl+Fuchs representative
closest to you check www.pepperl-fuchs.com/contact
PROCESS AUTOMATION –
PROTECTING YOUR PROCESS
TDOCT-1599BENG
11/2012
